Embed Size (px)
Citation preview

PBSI — Positive Business Solutions, Inc.“The Commercial Systems Specialists”
Tag Lot / CertificationRev. 6.1
TABLE OF CONTENTS
OVERVIEW . . . . . . . . . . . . . . . . . . . . . . . . . . . . . . . . . . . . . . . . . . . . . . . . . . . . . . . . . . . . . . . . . . . . . . . . . . . . 1LOCATION TAG ITEMS . . . . . . . . . . . . . . . . . . . . . . . . . . . . . . . . . . . . . . . . . . . . . . . . . . . . . . . . . . . . . . 1NON-DIMENSION TAG ITEMS . . . . . . . . . . . . . . . . . . . . . . . . . . . . . . . . . . . . . . . . . . . . . . . . . . . . . . . . 1VOLATILE DIMENSION TAG ITEMS . . . . . . . . . . . . . . . . . . . . . . . . . . . . . . . . . . . . . . . . . . . . . . . . . . . . 2
INITIAL INSTALLATION . . . . . . . . . . . . . . . . . . . . . . . . . . . . . . . . . . . . . . . . . . . . . . . . . . . . . . . . . . . . . . . . . . . 2
FILE MODIFICATIONS WITHIN OTHER MODULES . . . . . . . . . . . . . . . . . . . . . . . . . . . . . . . . . . . . . . . . . . . . 3ITEM FILE MAINTENANCE . . . . . . . . . . . . . . . . . . . . . . . . . . . . . . . . . . . . . . . . . . . . . . . . . . . . . . . . . . . 3
LIST OPTION . . . . . . . . . . . . . . . . . . . . . . . . . . . . . . . . . . . . . . . . . . . . . . . . . . . . . . . . . . . . . . . . . . . . 4SUPPORT FILES . . . . . . . . . . . . . . . . . . . . . . . . . . . . . . . . . . . . . . . . . . . . . . . . . . . . . . . . . . . . . . . . . . . 5
WAREHOUSE . . . . . . . . . . . . . . . . . . . . . . . . . . . . . . . . . . . . . . . . . . . . . . . . . . . . . . . . . . . . . . . . . . . . 5WAREHOUSE LOCATION . . . . . . . . . . . . . . . . . . . . . . . . . . . . . . . . . . . . . . . . . . . . . . . . . . . . . . . . . . 6PRODUCT LINE . . . . . . . . . . . . . . . . . . . . . . . . . . . . . . . . . . . . . . . . . . . . . . . . . . . . . . . . . . . . . . . . . . 6ALLOCATION FILE MAINTENANCE . . . . . . . . . . . . . . . . . . . . . . . . . . . . . . . . . . . . . . . . . . . . . . . . . . 6
CONTROL FILE—SCREEN 2 . . . . . . . . . . . . . . . . . . . . . . . . . . . . . . . . . . . . . . . . . . . . . . . . . . . . . . . . . . 7CONTROL FILE—SCREEN 6 . . . . . . . . . . . . . . . . . . . . . . . . . . . . . . . . . . . . . . . . . . . . . . . . . . . . . . . . . . 9MFG CONTROL FILE—SCREEN 3 . . . . . . . . . . . . . . . . . . . . . . . . . . . . . . . . . . . . . . . . . . . . . . . . . . . . 10
TAG/LOT FILES (INITIAL INSTALLATION) . . . . . . . . . . . . . . . . . . . . . . . . . . . . . . . . . . . . . . . . . . . . . . . . . . . 11
PROCESS FLOW OVERVIEW . . . . . . . . . . . . . . . . . . . . . . . . . . . . . . . . . . . . . . . . . . . . . . . . . . . . . . . . . . . . 11
TAG/LOT SCREENS WITHIN OTHER MODULES . . . . . . . . . . . . . . . . . . . . . . . . . . . . . . . . . . . . . . . . . . . . . 11ORDER ENTRY—SALES ORDERS . . . . . . . . . . . . . . . . . . . . . . . . . . . . . . . . . . . . . . . . . . . . . . . . . . . . 11ORDER ENTRY—SHIP AND/OR BACK ORDER . . . . . . . . . . . . . . . . . . . . . . . . . . . . . . . . . . . . . . . . . 12P. O. RECEIPTS . . . . . . . . . . . . . . . . . . . . . . . . . . . . . . . . . . . . . . . . . . . . . . . . . . . . . . . . . . . . . . . . . . . 12WORK ORDERS—ADD, CHANGE, OR DELETE . . . . . . . . . . . . . . . . . . . . . . . . . . . . . . . . . . . . . . . . . 14WORK ORDERS—RECEIVE OR CLOSE . . . . . . . . . . . . . . . . . . . . . . . . . . . . . . . . . . . . . . . . . . . . . . . 15ITEM INQUIRY FOR TAG ITEMS . . . . . . . . . . . . . . . . . . . . . . . . . . . . . . . . . . . . . . . . . . . . . . . . . . . . . . 17TAG SPLIT . . . . . . . . . . . . . . . . . . . . . . . . . . . . . . . . . . . . . . . . . . . . . . . . . . . . . . . . . . . . . . . . . . . . . . . 18
TAG LOT / CERTIFICATIONS . . . . . . . . . . . . . . . . . . . . . . . . . . . . . . . . . . . . . . . . . . . . . . . . . . . . . . . . . . . . . 22TAG MAINTENANCE . . . . . . . . . . . . . . . . . . . . . . . . . . . . . . . . . . . . . . . . . . . . . . . . . . . . . . . . . . . . . . . 22SHAPE MAINTENANCE . . . . . . . . . . . . . . . . . . . . . . . . . . . . . . . . . . . . . . . . . . . . . . . . . . . . . . . . . . . . . 26LABEL PRINTER CONTROL . . . . . . . . . . . . . . . . . . . . . . . . . . . . . . . . . . . . . . . . . . . . . . . . . . . . . . . . . 28ALLOCATED TAGS REPORT . . . . . . . . . . . . . . . . . . . . . . . . . . . . . . . . . . . . . . . . . . . . . . . . . . . . . . . . 28SELECT/ALLOCATE SHAPED TAGS . . . . . . . . . . . . . . . . . . . . . . . . . . . . . . . . . . . . . . . . . . . . . . . . . . 29SELECT/ALLOCATE NON-SHAPED TAGS . . . . . . . . . . . . . . . . . . . . . . . . . . . . . . . . . . . . . . . . . . . . . . 31SELECT/ALLOCATE LOCATION TAGS . . . . . . . . . . . . . . . . . . . . . . . . . . . . . . . . . . . . . . . . . . . . . . . . 32LOCATION INQUIRY . . . . . . . . . . . . . . . . . . . . . . . . . . . . . . . . . . . . . . . . . . . . . . . . . . . . . . . . . . . . . . . 33TAG HISTORY INQUIRY . . . . . . . . . . . . . . . . . . . . . . . . . . . . . . . . . . . . . . . . . . . . . . . . . . . . . . . . . . . . 33AUTO ALLOCATE SALES AND WORK ORDERS . . . . . . . . . . . . . . . . . . . . . . . . . . . . . . . . . . . . . . . . . 34ORDER PULLS . . . . . . . . . . . . . . . . . . . . . . . . . . . . . . . . . . . . . . . . . . . . . . . . . . . . . . . . . . . . . . . . . . . . 34

CERTIFICATION SYSTEM . . . . . . . . . . . . . . . . . . . . . . . . . . . . . . . . . . . . . . . . . . . . . . . . . . . . . . . . . . . . . . . 35THE PROCESS . . . . . . . . . . . . . . . . . . . . . . . . . . . . . . . . . . . . . . . . . . . . . . . . . . . . . . . . . . . . . . . . . . . . 35CERT FORM MAINTENANCE . . . . . . . . . . . . . . . . . . . . . . . . . . . . . . . . . . . . . . . . . . . . . . . . . . . . . . . . 37
ADDING A CERTIFICATION FORM . . . . . . . . . . . . . . . . . . . . . . . . . . . . . . . . . . . . . . . . . . . . . . . . . . 37ADDING A NEW SECTION TO A FORM . . . . . . . . . . . . . . . . . . . . . . . . . . . . . . . . . . . . . . . . . . . . . . 38CHANGING A CERTIFICATION FORM . . . . . . . . . . . . . . . . . . . . . . . . . . . . . . . . . . . . . . . . . . . . . . . 38DELETING A CERTIFICATION FORM/SECTION OR SEQUENCE . . . . . . . . . . . . . . . . . . . . . . . . . 39
FORM DELETE . . . . . . . . . . . . . . . . . . . . . . . . . . . . . . . . . . . . . . . . . . . . . . . . . . . . . . . . . . . 39SECTION DELETE . . . . . . . . . . . . . . . . . . . . . . . . . . . . . . . . . . . . . . . . . . . . . . . . . . . . . . . . 40CURRENT SEQUENCE . . . . . . . . . . . . . . . . . . . . . . . . . . . . . . . . . . . . . . . . . . . . . . . . . . . . . 40
FINDING A CERTIFICATION FORM . . . . . . . . . . . . . . . . . . . . . . . . . . . . . . . . . . . . . . . . . . . . . . . . . 40CERT LAYOUT MAINTENANCE . . . . . . . . . . . . . . . . . . . . . . . . . . . . . . . . . . . . . . . . . . . . . . . . . . . . . . 41
RESERVED WORDS . . . . . . . . . . . . . . . . . . . . . . . . . . . . . . . . . . . . . . . . . . . . . . . . . . . . . . . . . . . . . 41FINDING A FORM . . . . . . . . . . . . . . . . . . . . . . . . . . . . . . . . . . . . . . . . . . . . . . . . . . . . . . . . . . . . . . . . 42ADDING A FORM . . . . . . . . . . . . . . . . . . . . . . . . . . . . . . . . . . . . . . . . . . . . . . . . . . . . . . . . . . . . . . . . 43DELETING A FORM . . . . . . . . . . . . . . . . . . . . . . . . . . . . . . . . . . . . . . . . . . . . . . . . . . . . . . . . . . . . . . 43LIST . . . . . . . . . . . . . . . . . . . . . . . . . . . . . . . . . . . . . . . . . . . . . . . . . . . . . . . . . . . . . . . . . . . . . . . . . . . 43
CERT DATA ENTRY . . . . . . . . . . . . . . . . . . . . . . . . . . . . . . . . . . . . . . . . . . . . . . . . . . . . . . . . . . . . . . . . 44ADDING DATA TO A CERTIFICATION FORM . . . . . . . . . . . . . . . . . . . . . . . . . . . . . . . . . . . . . . . . . 44ADDING DATA TO A SECTION . . . . . . . . . . . . . . . . . . . . . . . . . . . . . . . . . . . . . . . . . . . . . . . . . . . . . 46CHANGING A CERTIFICATION NUMBER AND/OR DATA . . . . . . . . . . . . . . . . . . . . . . . . . . . . . . . . 46DELETING A CERTIFICATION DATA ENTRY . . . . . . . . . . . . . . . . . . . . . . . . . . . . . . . . . . . . . . . . . 47
CERT DELETE . . . . . . . . . . . . . . . . . . . . . . . . . . . . . . . . . . . . . . . . . . . . . . . . . . . . . . . . . . . . 47SECTION DELETE . . . . . . . . . . . . . . . . . . . . . . . . . . . . . . . . . . . . . . . . . . . . . . . . . . . . . . . . 47
FINDING A CERTIFICATION DATA ENTRY . . . . . . . . . . . . . . . . . . . . . . . . . . . . . . . . . . . . . . . . . . . 48MANUAL CERT MERGE . . . . . . . . . . . . . . . . . . . . . . . . . . . . . . . . . . . . . . . . . . . . . . . . . . . . . . . . . . . . . 48BATCH CERT PRINT . . . . . . . . . . . . . . . . . . . . . . . . . . . . . . . . . . . . . . . . . . . . . . . . . . . . . . . . . . . . . . . 48CERT PRINT . . . . . . . . . . . . . . . . . . . . . . . . . . . . . . . . . . . . . . . . . . . . . . . . . . . . . . . . . . . . . . . . . . . . . . 49CERT PRINT BY SALES ORDER . . . . . . . . . . . . . . . . . . . . . . . . . . . . . . . . . . . . . . . . . . . . . . . . . . . . . . 49

Profit Manager Tag / Lot Control System
Rev 6.1–Tag / Lot Control System Page 1
TAG / LOT CONTROL SYSTEM
OVERVIEW
The tracking capabilities of the Tag/Lot Control System satisfy the requirements of material tracking. Tag/LotControl provides a method of tracking items back to their original (mother) product. Profit Manager’s Tag/LotControl System tags, tracks and identifies items that were produced from a particular batch, and in the caseof volatile dimension items, tags, tracks, and identifies items that were modified but still retain their originalshape. Tag/Lot Control also tags and tracks items by location (where the tag identifier is the location).Location Tag is included in the Profit Manager standard program. Non-dimensional and dimension tags are aseparate module that integrates with standard Profit Manager.
LOCATION TAG ITEMS
Items tagged by location are ‘like’ items stored in multiple locations (multiple warehouses or multiple areaswithin a warehouse (bins)). Location tagged items do not have a physical tag attached to them. Their taginformation is the same as their location information. These items are identified in the Inventory Item MasterFile as L-Location items. The basic function of a location item is to keep track of where the item is and aidsinventory, warehouse, and bin control.
Illustration:A distributor receives 500 identical doors from their supplier. The doors arereceived into inventory and stored in different locations in the same warehouse.To identify were the doors are located in a warehouse and how many, the doorsare identified within Profit Manager with a location tag. For instance, 250 doorsare identified as Warehouse 1, Location: Storage1. The other 250 doors arealso tagged as Warehouse 1, but with Location: Storage2.
When an order is processed for location tagged items, the items can beallocated from one or more locations. For instance, if Warehouse 1, Location:Storage 1 has 3 doors in stock and Warehouse 1, Location: Storage2 has 50doors in stock and an order is processed for 15 doors, 3 can be allocated fromStorage1 and 12 allocated from Storage 2.
NON-DIMENSION TAG ITEMS
A non-dimension (non-shape) tag item is an item that originated from a particular production batch (in themetal industry also referred to as a ‘Heat’) and is tagged by the peculiar characteristics (idiosyncrasies) ofthat batch with lot or heat number traceability. Non-shaped tag items include location tracking and areidentified in the Inventory Item Master File as T-Tag items. Tagged items may require a certification attachedto them. Usually a physical tag is attached to the item however a tag item can be assigned in the systemwithout actually having a physical tag.
Illustration:A jet engine turbine blade originates from melted iron ore and other ingredientsthat are shaped into bars at a steel mill and shipped to a blade manufacturer.The blade manufacturer shapes the iron bars into turbine blades and sendsthem to a jet engine producer who then builds an engine using the blades.Down the line, if a problem occurs where the blades are at fault or suspect,investigators will want to know the history of the blades (the original productionand other applied processes).

Profit Manager Tag / Lot Control System
Rev 6.1–Tag / Lot Control System Page 2
The Process Steps:
Ø The steel mill keeps a record of the exact chemical makeup of the originalprocessed iron ore (referred to in the steel industry as a 'melt' or 'heat'). Whenthe processed product ships, it is accompanied by a Certification Form that liststhe composition of the metal and other physical characteristics.
Ù When the metal is received by the blade manufacturer, every piece of metalis tagged with the heat number from the mill. This heat number stays with themetal (no matter how it is processed) until it ships to the next customer.
Ú A certification form is issued with the original product from the mill. Thiscertification remains with the product from beginning to end. In our example,the certification is included with the tag for every engine that uses blades madefrom the original iron ore batch.
VOLATILE DIMENSION TAG ITEMS
Volatile dimension items (shape) are items that can be modified in the course of production but still retain theoriginal shape and are assigned an identical item number within the system. This level of tracking not onlyassigns a specific tag number to an item but also allows assigning up to four variable dimensions. This isuseful for tracking the size and shape of a remaining quantity of material after some is used duringproduction. These items are identified in the Inventory Item Master File as T-tagged and require a shapecode and dimension information.
Illustration:A metals service center stocks steel bars that are 1/8th of an inch thick by 2inches wide and 40 feet long. A customer places an order for 10 of these butwants them cut to 25 feet long.
It's very cumbersome to have an item number assigned to every possiblelength of bar that can be ordered. This is where a tag system becomes theanswer.
In this example, when each of the ten 40 foot bars are cut to 25 feet, the resultis ten 15 foot bars returned to stock. If the next order is for twenty 12 foot bars,since all the lengths are referenced by the same item number, the second ordercan be satisfied by selecting the ten 15 foot bars and cutting the remaining barsout of the 40 foot stock.
What about the remaining ten bars that are now 3 foot bars? These can bescrapped, or tagged as remnants and returned to stock. Tag/Lot provides anefficient way to use odd sizes from inventory as quickly as possible.
INITIAL INSTALLATION
The Tag / Lot Menu is accessed from Profit Manager’s Main Menu. In addition to Tag/Lot’s new screens andfiles, some master and support file modifications are necessary for implementation.
FILE MODIFICATIONS WITHIN OTHER MODULES TAG/LOT FILES (required for initial setup)• Item File Maintenance • Shape File Maintenance (not used in• Warehouse File Maintenance Location tags).• Warehouse Location File Maintenance• Product Line• Control File and MFG Control File• P.O. Receipts• Work Order–Add, Change, or Receive

Profit Manager Tag / Lot Control System
Rev 6.1–Tag / Lot Control System Page 3
FIMFM INVENTORY MASTER FILE (FIM) SCREEN 1
1-ITEM __________________ 18-PURCHASE FACTOR: ________ 2-DESC: ______________________________ QSIP 19-LEAD TIME (DAYS): ____ 3-DESC: ______________________________ ____ 20-ITEM TAX FLAG: _ 4-DESC: ______________________________ ____ 21-VENDOR #: _________ 5-PRODUCT LINE: ___ 22-VENDOR ITEM: __________________ 6-PRICE 1: __________ 23-AVG MTL COST: __________ 7-PRICE 2: __________ 24-STD MTL COST: __________ 8-PRICE 3: __________ 25-CURRENT COST: __________ 9-PRICE 4: __________ 26-COST DIVISOR: ____10-PRICE 5: __________ 27-CLASS(MAKE BUY FINISHED TOTAL):_
11-PRICE 6: __________ 28-SERIAL/LOC/TAG/NONE (S/L/T/N):_12-PRICE DIVISOR: ____ 29-HAZARDOUS MATERIAL (Y/N):_
13-STOCK UNITS PER CASE: ____ 30-CERT REQUIRED (Y/N):_14-STOCK UNIT OF MEASURE: __ 31-SOQF: __________15-PURCHASE UNIT OF MEASURE: __ 32-__________________16-WT/STOCK UNIT OF MEASURE: _________17-RECEIVE TO INSPECTION...: _COMMENTS: 33-____________________________________________________________ 34-____________________________________________________________
FILE MODIFICATIONS WITHIN OTHER MODULES
ITEM FILE MAINTENANCE
Inventory Control, Order Entry, Bill of Materials, Routing, and Purchasing share the Item Master File.Changes to this file include a modification to the serial number option and the addition of a certificationoption.
SYSTEM ACTION YOUR ACTION
1. The Inventory Master File Menu displays. Enter A to add a new item or F to find anexisting item.
2. If add is selected, the system prompts ITEM. Enter the item's field information. Note: The data entered in field 4-DESCappends to the order line description when ashaped tag item is entered on an order.
At the Serial/Loc/Tag/None (S/L/T/N) field, enterL to set this item as a location tagged item orenter T to set this item as a tagged item.
If find is selected, the system prompts ITEMand displays the item information.
For a find, first enter C-CHANGE then enter Lor T.
3. If T is entered, the system opens a windowand prompts for shape options.
Note: If any other value is entered, the pop-up window is bypassed.
Enter a shape code if the item is a volatiledimension item (this code must exist in theshape code file) or press Enter to leave blankand skip to the Default Tag Label field if theitem is non-dimensional.
Note: If you don't know the shape code, enter a?. The system opens a window of shape codesfrom the shape code file.Note: Enter A to add a shape to the Shape file.

Profit Manager Tag / Lot Control System
Rev 6.1–Tag / Lot Control System Page 4
4. If a shape code is entered, the systemprompts STD WEIGHT.
Defaults from the Shape Code file or enter astandard weight for the item.
5. Next the system prompts DEVALUE SIZE. Not used for Phase 1 of Tag/Lot. Press Enter.
6. Now the system prompts DEVALUE COST. Not used for Phase 1 of Tag/Lot. Press Enter.
7. The system prompts DEFAULT TAG LABEL. Enter up to 6 alphanumeric characters for aunique tag label.
8. The cursor returns to the Item MaintenanceFile, the system asks HAZARDOUSMATERIAL (Y/N).
If this item is hazardous material, enter Y. EnterN if the item is not hazardous.
9. If yes is entered, the system opens a windowand prompts HAZ. MATL. COMMENTCODE.
Enter a hazardous material comment code.
10. The system prompts REPORTABLE QTY(LB)
Enter the quantity (in pounds) that is reportablehazardous material.
11. Next the system prompts PLACARDINDICATOR CODE.
Enter the 1 character placard indicator code forthis hazardous material item.
12. After the hazardous material option, thesystem asks CERT REQUIRED (Y/N).
If this item requires a certification, enter Y (mustexists in the Certs file). Enter N if no certificationis needed. Note: Location tagged items do notrequire CERTS.
13. If yes is entered, the system opens awindow and prompts for a CERT FORMNAME.
Enter the certification form name (must existon the Certification Form File).
ITEM FILE MAINTENANCE—LIST OPTION
Select L-LIST to produce the Item Masterfile Report. One of the user defined sort selections for this listing isSerial/Loc/Tag/None.
CUSTOMER FILE
NOTE: A certification will only print with a shipment if both the customer and the item sold are marked as ‘Y’for certification required.
35 CERT PRINT REQ:Y=This customer requires certifications to ship with productN=This customer does not require certifications to ship with product.
29-HAZARDOUS MATERIAL (Y/N): Y HAZ. MATL. COMMENT CODE: REPORTABLE QTY (LB): .000 PLACARD INDICATOR CODE:
Profit Manager Tag / Lot Control System
Rev 6.1–Tag / Lot Control System Page 5
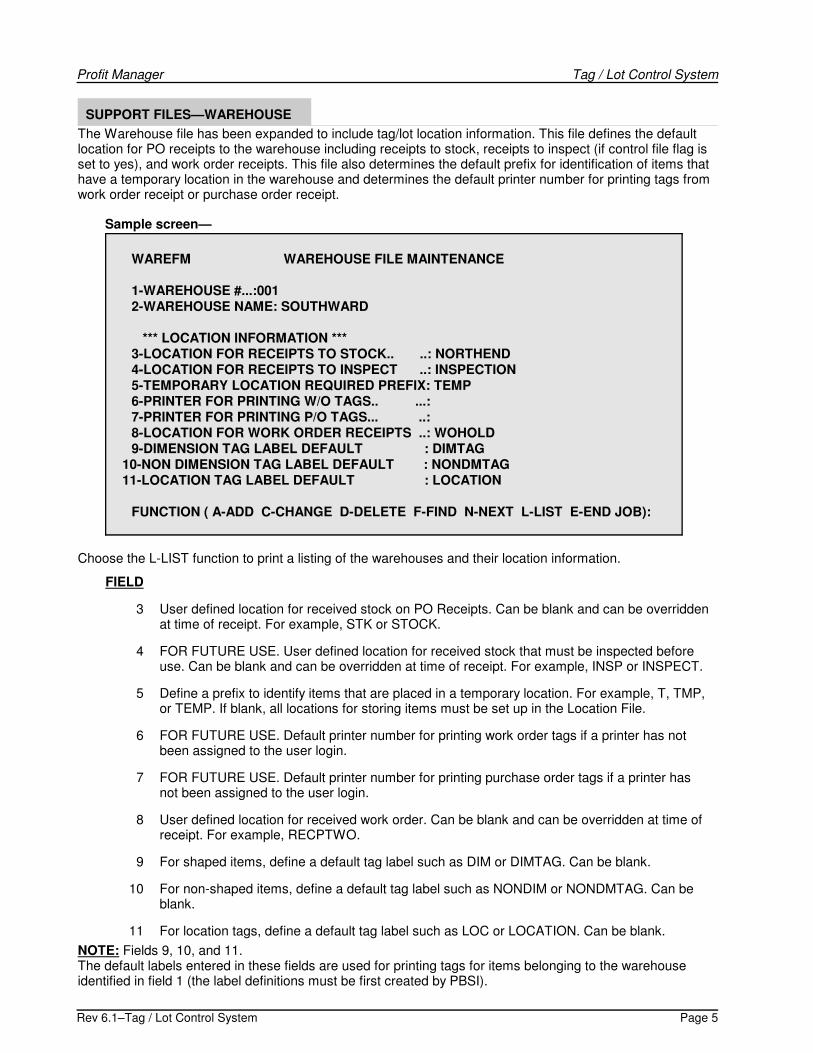
SUPPORT FILES—WAREHOUSE
The Warehouse file has been expanded to include tag/lot location information. This file defines the defaultlocation for PO receipts to the warehouse including receipts to stock, receipts to inspect (if control file flag isset to yes), and work order receipts. This file also determines the default prefix for identification of items thathave a temporary location in the warehouse and determines the default printer number for printing tags fromwork order receipt or purchase order receipt.
Choose the L-LIST function to print a listing of the warehouses and their location information.
FIELD
3 User defined location for received stock on PO Receipts. Can be blank and can be overriddenat time of receipt. For example, STK or STOCK.
4 FOR FUTURE USE. User defined location for received stock that must be inspected beforeuse. Can be blank and can be overridden at time of receipt. For example, INSP or INSPECT.
5 Define a prefix to identify items that are placed in a temporary location. For example, T, TMP,or TEMP. If blank, all locations for storing items must be set up in the Location File.
6 FOR FUTURE USE. Default printer number for printing work order tags if a printer has notbeen assigned to the user login.
7 FOR FUTURE USE. Default printer number for printing purchase order tags if a printer hasnot been assigned to the user login.
8 User defined location for received work order. Can be blank and can be overridden at time ofreceipt. For example, RECPTWO.
9 For shaped items, define a default tag label such as DIM or DIMTAG. Can be blank.
10 For non-shaped items, define a default tag label such as NONDIM or NONDMTAG. Can beblank.
11 For location tags, define a default tag label such as LOC or LOCATION. Can be blank.
NOTE: Fields 9, 10, and 11.The default labels entered in these fields are used for printing tags for items belonging to the warehouseidentified in field 1 (the label definitions must be first created by PBSI).
WAREFM WAREHOUSE FILE MAINTENANCE
1-WAREHOUSE #...:0012-WAREHOUSE NAME: SOUTHWARD
*** LOCATION INFORMATION ***3-LOCATION FOR RECEIPTS TO STOCK.. ..: NORTHEND4-LOCATION FOR RECEIPTS TO INSPECT ..: INSPECTION5-TEMPORARY LOCATION REQUIRED PREFIX: TEMP6-PRINTER FOR PRINTING W/O TAGS.. ...: 7-PRINTER FOR PRINTING P/O TAGS... ..: 8-LOCATION FOR WORK ORDER RECEIPTS ..: WOHOLD9-DIMENSION TAG LABEL DEFAULT : DIMTAG
10-NON DIMENSION TAG LABEL DEFAULT : NONDMTAG 11-LOCATION TAG LABEL DEFAULT : LOCATION
FUNCTION ( A-ADD C-CHANGE D-DELETE F-FIND N-NEXT L-LIST E-END JOB):
Sample screen—

Profit Manager Tag / Lot Control System
Rev 6.1–Tag / Lot Control System Page 6
ITMALCFM ITEM ALLOCATION FILE MAINTENANCE
1-WAREHOUSE#...: 999 NAME:2-ITEM NUMBER..: XXXXXXXXXXXXXXXXXX DESC:
3-ALLOCATION TYPE (A)LWAYS (F)IRST (B)EST : X 4-ALLOCATION LOCATIONS....................:XXXXXXXXXX
SUPPORT FILES—WAREHOUSE LOCATION
This file maintains a list of locations within a warehouse (the warehouse must exist in the SupportFile–Warehouse file).
To find a location, enter F-FIND.Enter a warehouse number (the warehousedescription displays).
At the LOCATION NAME prompt, press Enterthen select (N)ext. The system displays thewarehouse location.
ALLOCATIONS prompt:: Enter (Y)es, (N)o, or leave blank (same as yes). This field is used by the autoallocate program to bypass certain locations when allocating items if this field is set to no. Note: The manualallocation programs allow allocating to any location regardless of the status of this field.
Another method to find a location is to list thecontents of the file.Enter L-LIST.The system asks OUTPUT TO PRINTER ORTERMINAL? (P/T)Enter P to print the listing to a printer.Enter T to display the listing on the screen.
SUPPORT FILES—PRODUCT LINE
A new field, Drop-Ship, is analternative inventory account.
Another new field in theProduct Line file, WRITEOFF, is used to handlescrap. Enter the G/L accountnumber for scrap. Caution: Ifthe Inventory Write-off field isblank, G/L will be out ofbalance (call CustomerSupport for assistance).
SUPPORT FILES—ALLOCATION FILE MAINTENANCE
Used for automatic allocation of itemsfrom negative quantities. Allows userto enter rules for the auto-allocateprograms to use when determiningwhich locations to allocate from.
DISFM15 PRODUCT LINE FILE MAINTENANCE
1) PRODUCT LINE: 999
2) DESCRIPTION: XXXXXXXXXXXXXXXXXXXXXXXXXXXXXX
*** GENERAL LEDGER ACCOUNTS ***
3) REVENUE : 999999999
*** INVENTORY *** *** COGS ****
MATERIAL 4) 999999999 5) 999999999
LABOR 6) 999999999 7) 999999999
BURDEN 8) 999999999 9) 999999999
OUTSIDE 10) 999999999 11) 999999999
DROP SHIP 12) 999999999
WRITE-OFF 13) 999999999
******************************** WARRANTY INFO********************************
14) OUR WARRANTY EXPIRES(DAYS): 9999 15) MFG WARRANTY EXPIRES(DAYS): 9999
WALCFM LOCATION FILE MAINTENANCE
1 WAREHOUSE # : 1 CINCINNATI 2 LOCATION NAME: EAST END 3 ALLOCATIONS :
FUNCTION (A-ADD D-DELETE F-FIND N-NEXT L-LIST E-END JOB):
WALCFM LOCATIONS FILE LIST PAGE 1
WAREHOUSE NUM LOCATION ALLOCATE
CINCINNATI 1 EAST END Y 1 NORTH END Y 1 W100 N 1 W101 N 1 WEST END YHAMILTON 2 CENTER Y 2 EAST SIDE Y 2 WEST SIDE YPRESS 'CR' TO CONTINUE, 'R' TO RESTART, OR 'E' TO END.

Profit Manager Tag / Lot Control System
Rev 6.1–Tag / Lot Control System Page 7
CONTROL FILE—SCREEN 2
NOTE: When the inventorymaster indicates an item as T-tag or L-location and this controlfile is set to allocate at S/O addor print (A or P), the allocationshows what has been ‘tagallocated’. If this control file is setto N, the allocations shown arefrom the actual order entryquantities. The Inventory StatusReport and MRP always show the order entry quantity not thetag allocated quantity.
SYSTEM ACTION YOUR ACTION
1. The Control File Menu, screen 2 displays. Enter C to change a field.
2. The system prompts ENTER FIELD# TOCHANGE OR 'U' TO UPDATE.
Enter 17-AUTO NUMBER TAGS.
3. The cursor positions in the AUTO NUMBERTAGS field.
Enter Y to have the system automatically assigntag numbers or enter N for no auto assignedtags (the user will manually assign the tagnumber). Up to 18 numeric characters. Note:We recommend beginning your tag numbers at1000.
4. The system prompts NEXT TAG NUMBER. If auto assign is set to yes, this field shows thenext consecutive tag number the system willuse. If auto assign is set to no, this field must bezero.
Note: If AUTO NUMBER TAGS is set to yes, donot make changes to the number that appearsin the NEXT TAG NUMBER field.
5. Next the system prompts MFG/MILLPROMPT.
This field can be defined by the user. Theinformation entered will appear as a prompt onthe Tag Master File Maintenance screen. Enter'MILL #' for the prompt or enter a prompt of yourchoice.
6. The system prompts LOT# / HEAT#PROMPT.
This prompt can also be defined by the user andalso appears on the Tag Master FileMaintenance screen. Enter LOT# or HEAT# ora prompt of your choice. 10 characters.
7. Now the system prompts COIL # PROMPT. This prompt also appears on the Tag MasterFile Maintenance screen and can be defined bythe user. Enter COIL # or a prompt of yourchoice. 10 characters.
8. The next prompt is TAG/SERIAL/ITEMPROMPT.
The information entered here will appear on thecertification print form. Press Enter to leaveblank.
LOT/LOCATION SETUP INFORMATION: LOT/LOC-AUTOMATIC/PROMPT/NEVER: 17-AUTO NUMBER TAGS......: Y 23-ALLOC TAG S/O ADD..: P (A/P/N) 18-NEXT TAG NUMBER..... ..: 755 24-ALLOC TAG S/O PRINT: A (A/N) 19-MFG/MILL PROMPT.... ...: MILL # 25-ALLOC TAG S/O SHIP: A (A/P/N) 20-LOT#/HEAT# PROMPT.... .: HEAT #: 26-CREATE TAG P/O ADD.: A (A/P/N) 21-COIL # PROMPT...... ...: COIL 27-CREATE TAG P/O RCPT: A (A/P) 22-TAG/SERIAL/ITEM PROMPT: TAG 28-CREATE TAG W/O RCPT: A (A/P)
29-SEARCH ASKS (Y/N)..: Y30-SEARCH PROMPT......: SEARCH

Profit Manager Tag / Lot Control System
Rev 6.1–Tag / Lot Control System Page 8
The next set of Control File flags, LOT/LOC-AUTOMATIC/PROMPT/NEVER, are set tocontrol allocations, creation of tags, and searching for tags.
A = automatic; P = prompt; N = never
9. The system prompts ALLOC TAG S/O ADD. Enter A to have the system automaticallyallocate tagged items when the order is entered.Enter P to have the system prompt for itemallocation during sales order entry. Enter N tobypass allocation during order entry.
10. The system prompts ALLOC TAG S/OPRINT.
Enter A to have the system automaticallyallocate tagged items when the order is printed.Enter N to bypass allocation during order entryprint.
11. Next the system prompts ALLOC TAG S/OSHIP.
Enter A to have the system automaticallyallocate tagged items when the order isshipped. Enter P to have the system prompt foritem allocation during shipping. Enter N tobypass allocation during shipping.
12. The system prompts CREATE TAG P/OADD.
Enter A to have the system automatically createtags when the purchase order is created. EnterP to have the system prompt for tag creationduring purchase order create. Enter N to bypasscreating tags during purchase order entry.
13. Next the system prompts CREATE TAGP/O RCPT.
Create a tag during purchase order receipt.Enter either A or P.
14. At the next field, the system promptsCREATE TAG W/O RCPT.
Create a tag during work order receipt. Entereither A or P.
15. Now the system asks SEARCH ASKS (Y/N). Enter Y if you want search capabilities in theTag Master File and Allocation screens. Enter Nif search is not needed.
16. If yes is entered, the system promptsSEARCH PROMPT.
Enter the characters that will display on the TagMaster File and Allocation screens for thesearch field title (for example, use the wordSEARCH or FIND).
SYSTEM ACTION YOUR ACTION
1. The Control File Menu, screen 6 displays. Enter C to change a field.
2. The system prompts ENTER FIELD# TOCHANGE OR 'U' TO UPDATE.
Enter 1-1st COMP ON TAG SELECT.
3. The cursor positions in the 1st COMP ONTAG SELECT field.
Note: COMP = component
Enter Y to pass the first level component on theBill of Materials before swapping to the tagselect window in Order Entry. In other words,have the system select the first component onthe bill. Enter N to have the system look for theparent item first.

Profit Manager Tag / Lot Control System
Rev 6.1–Tag / Lot Control System Page 9
CONTROLFM CONTROL FILE MAINTENANCE SCREEN 6
ORDER ENTRY (CONTINUED) 1-1ST COMP ON TAG SELECT: N 2-DROP SHIP WAREHOUSE #: 2 3-COST OVERRIDE (ZERO COST LINES, DROP SHIP, BOTH, NEVER) (ZDBN): Z 4-PRINT XREF ITEMS AS COMMENTS?(Y/N): Y 5-BACKORDER % LIMIT: 0 6-EDI CUSTOMER TO TAKE SALES ORDER FROM: 0 7-NEXT PO REQUISITION NUMER: 0 8-ALWAYS CREATE PO REQUISITION: 9-HIDE UNIT OF MEASURE ON SALES ORDER AND INVOICE (Y/N): N10-PRINT SHIP-TO PHONE/FAX/BOTH/NONE ON SO AND INV(P/F/B/N):11-INCLUDE ALL AVAILABLE TAGS ON PULL SHEET (Y/N):12-PRINT PRICES ON PACKING SLIP (Y/N/P): (YES/NO/PROMPT)13-PRINT ALLOCATIONS ON PACKING SLIP (Y/N0:14-PRINT PACKING SLIP ON FORM(Y/N): 15-PRINT SHIPPED ITEMS ONLY ON P/S (Y/N): SALES ANALYSIS INFORMATION:16-S/A COGS?(Y/N): Y 17-LAST S/A MONTH: 12 18-TRACK SHIP-TO CUST#?: Y
SPECIAL ADD-ON PACKAGES:19-POSTAL BAR CODES?(Y/N): N 20-COMMERCIAL BAR CODES..: N (U/2/3/E/I/1/N)
C-CHANGE P-PREV PG L-LIST S-SCREEN E-END :
CONTROL FILE—SCREEN 6
SYSTEM ACTION YOUR ACTION
1. The Control File Menu, screen 6 displays. Enter C to change a field.
2. The system prompts ENTER FIELD# TOCHANGE OR 'U' TO UPDATE.
Enter 1-!st COMP ON TAG SELECT.
3. The cursor positions in the 1st COMP ONTAG SELECT field.
Enter Y to have the system automatically pull upthe first component on the bill of materials toselect from. Enter N to have the system look forthe parent item instead.
SYSTEM ACTION YOUR ACTION
1. Select field 5-BACKORDER % LIMIT. Enter the percentage that a shipment can overor under and still ship with no backorder.
Used for tag and location controlled items. Forexample, if this field is set to 20% then a lineitem that is over or under 20% of the orderedamount will ship with no back order created,even if the total shipped amount is less thanthe ordered amount.
Note: If a work order is attached to a sales order, the amount completed on the work order will allocate tothe sales order for shipment up to the percent allowed for overage.
2. Select field 13-PRINT ALLOCATIONS ONPACKING SLIP? Y/N
Enter Y if printing packing slips at order shippingtime and you want to include the tag informationof the items shipped (Heat#, Coil, etc.).Otherwise, enter N.

Profit Manager Tag / Lot Control System
Rev 6.1–Tag / Lot Control System Page 10
MFG102 MFGCONTROL MAINTENANCE SCREEN 3
WORK ORDER SYSTEM ROLL UP OPTIONS 1-AUTO WORK ORDER #?: Y 15-PRESERVE INCREMENTAL IF NOROUTER:Y 2-NEXT WORK ORDER #: 001017 16-ROLL UP PHANTOM INCREMENTALCOSTS:N 3-MAX QTY/WO PAGE : 0 17-PROMPT/SINGLE/MULTI-LEVELROLLUPS:M 4-PRINT SINGLE COPY IF WO QTY IS >: 0 18-BOM REFERENCE PRINT ON PICK(Y/N):Y 5-AUTO PICK ISSUES UPON RECEIPT: Y 6-DEFAULT LAST OPERATION TO 999 (AUTO RECEIVE WORK ORDER QTY):
FEATURE AND OPTIONS TAG/LOT-AUTOMATIC/PROMPT/NEVER: 7-(O)NE OR (M)ANY BOM OPTIONS: O 19-ALLOC TAG W/O PRINT: (A/N) 8-COPY/BUILD/NO ROUTER: B 20-SELECT TAG W/O PICK: (A/P) 9-NEW PAGE FOR EACH OPTION: Y 21-CREATE TAG W/O REL.: (A/P/N)10-AVOID PROMPT TO UPD COST & PRICE: Y11-PROMPT FOR OPTION QTY (Y/N): N12-W/O EXCEPTIONS UNIQUE/GENERIC/NONE: N13-ROUTER OPR# CAUSING UNIQUE ITEM#: 014-COMPONENT PRICE APPEND/LIST/SPL: A
MFG CONTROL FILE—SCREEN 3
A-Automatic;P-Prompt, N-Never
5-AUTO PICK ISSUES UPONRECEIPT
Used forbackflushing.
6-DEFAULT LAST OPERATION TO999
Enter Y to default the last router operation to 999 (which will allowauto work order receipt. Enter N to not default the last operation.
19-ALLOC TAG W/O PRINT Not used in Phase 1 of Tag/Lot. In the next phase, if A is entered, thesystem automatically allocates the tag during work order print. If N isentered, the system will not allocate a tag during work order print.
20-SELECT TAG W/O PICK If A is entered, the system automatically selects the item tag duringwork order pick list. If P is entered, the system prompts for a tagduring work order pick list for adjustments or changes.
21-CREATE TAG W/O REL If A is entered the system automatically creates an item tag duringwork order receipt. If P is entered, the system prompts for tag creationduring work order receipt. Enter N to never prompt or automaticallycreate a tag during work order receipt.

Profit Manager Tag / Lot Control System
Rev 6.1–Tag / Lot Control System Page 11
ORDER ENTRY—SALES ORDER1. Enter sales order2. Print sales order3. Ship order4. Print invoice5. Run day-end
DIS105 SALES ORDER ENTRY
COMMENTS
TYPE ORDER # SHIP-TO SOLD-TO AUTH
185 5 5 ...........................
ALLEN PRODUCTS CO. ...........................
1343 MAIN ST. P.O.#
P.O. BOX 2224 1-SP CHGS: CODE:
HAMILTON OH 45211 SPECIAL CHARGE DESCR.....
2-ENTRY DATE: 71699 4-TERMS: 1 6-CUST CLASS : 10 8-TERR : 10 10-PRICE: 1
3-PROM DATE : 80299 5-WHSE : 1 7-SALESPERSON: 101 9-DISCNT: 1 11-TX CD: 0
DS DUE
LN______________________________________________________________________ MMDDY
| 1-ITEM: 304CL 304 STAINLESS COIL |
| MIN MAX WIDTH WEIGHT: |
| 2- .0000 .0000 .0000 0 12.000 PER LF |
| |
| 3-QUANTITY: 4-PIECES: 5-PRICED 6-PRICE: EXT PRICE: |
| 10 0 PER LB 1.500 15.00 |
| |
| # TO CHANGE T-TAG SEARCH A-ACCEPT SIZES E-END NO SIZES: |
TAG/LOT FILES (INITIAL INSTALLATION)
Along with changes to existing control, support, and item files, you must also set up the Shape Maintenancefile (refer to the documentation for Tag/Lot Certification, Shape Maintenance section).
PROCESS FLOW OVERVIEW
TAG/LOT SCREENS WITHIN OTHER MODULES
ORDER ENTRY—SALES ORDERS
If the Control File flag, ALLOC TAG S/O ADD, is set to A-Automatic, the system automatically allocates thetagged item. If this flag is set to P (prompt), the tagged item must be manually allocated.
Line Item—Shaped Tag Item. When a tagged item is entered as a line item, if the item is a shaped tag item,the system opens the allocation window for the tag information (entering a '0' (zero) in the quantity field willalso open the tag window). Enter the allocation information or select a function. For field 2 through 5, the fieldtitles default from the Shape file. For field 6, the price defaults from the Item file. The system calculates theEXT PRICE. NOTE: To search for an item number, enter a '?' in the item field.
FUNCTIONS:
# TO CHANGE Enter the line number to change. Enter the new information.
SHAPED TAG ITEMS ONLY
WORK ORDER or EWOS1. Tag Split2. Labor Entry3. Receive Work Order4. Run day-end5. Close work order6. Move closed WO to History

Profit Manager Tag / Lot Control System
Rev 6.1–Tag / Lot Control System Page 12
PUR102 P.O. RECEIPTS
PO#: 108 RLS#: 0 PO CODE: WHSE: 1SOURCE CODE: R VENDOR #: 987 WILL-SON FURNITURE COMPANY DUE QTY QTY QTY BALLN# PART # DATE UM COST DUE REC REJ DUE+---------------------------------------------------------------------------+| TAG CREATE ||PO NUMBER: 108 QTY DUE: 5 || REMAINING: 5 || TAG#: 1212 QTY: 999999999 || LOCATION: STOCK ||COMMENT 1: XXXXXXXXXXXXXXXXXXXXXXXXXXXXXXXXXXXXXXXXXXXXXXXXX ||COMMENT 2: XXXXXXXXXXXXXXXXXXXXXXXXXXXXXXXXXXXXXXXXXXXXXXXXX || : : : : SEARCH || 999.9999 999.9999 999.9999 999.9999 XXXXXXXX ||HEAT# XXXXXXXXXXXXXXXXXX ||BUNDLE# XXXXXXXXXXXXXXXXXX ||MILL 9999999999 || QC FLAG: XXX E-TO END A-TO ADJUST || X |+--------------------------------------------------------------------------+ENTER R-RECEIVE ALL, LINE# FOR PARTIAL, OR E:1
T-TAG SEARCH Enter T to open the Select/Allocate Shaped Tag screen. This screen shows thesizes on-hand and available for allocation (refer to the Tag Lot menu option,Select/Allocate Shaped Tags, for detailed field information).
A-ACCEPT SIZES Enter A to accept the entered size values.
E-END NO SIZES Enter E to end with no sizes.
Line Item—Non-Shaped Tag Item. The system displays the Select/Allocate Non-Shape Tags screen (referto the Tag Lot menu option, Select/Allocate Non-Shape Tags for detailed field information).
Line Item—Location Tag Item. The system displays the Select/Allocate Location Tags screen (refer to theTag Lot menu option, Select/Allocate Location Tags for detailed field information). Note: If the line item has atag using a temporary location, the item must be moved to a permanent warehouse location before it can beauto-allocated.
NOTE: If the Interfaces from Order Entry Control File flag, Work Orders, is set to yes, when a line item isentered the system opens the Automatic Work Order Transaction screen where the user can chose whetherto add a work order for the item.Q.: If the auto allocation is used for Sales Orders and Work Orders, and the item entered only has a partialquantity of stock-on-hand to fill the order, will the system pull the partial quantity tag and ship it?A.: Yes, the system will use up the partial tag and back order the remaining quantity. The Auto AllocationsException Report will show an exception for the sales order and provide the reason (in this case is PartiallyAllocated). The Allocated Tag Report will show the quantity allocated for the tag being used. In this case, theentire quantity of the tag. The Order Pull will show the full quantity needed and the partial quantity on the tag.The invoice will print correctly and only invoice for the shipped quantity then back order the remainder.
ORDER ENTRY—SHIP AND/OR BACK ORDER
–When shipping a location controlled item always ship a partial shipment.–After entering a sales order for a tag/lot item, if a work order is auto-created by the sales order and the workorder receipt was for the exact weight shipped, the sales order can be shipped without specifically allocatinga tag number (the tag number was allocated to the sales order by receiving the auto-created work order).
P. O. RECEIPTS
If the flag, CREATE TAG P/O RCPT, in the Control File is set to P (prompt), when a tagged item is received,the system opens the TAG CREATE window, gathers and displays the default information from the Controlfile, Item file, and Support files.
Note: During Tag Create if the CERTREQUIRED flag in the Item Masterfor this item is yes, a Heat# isrequired even if there is already aHEAT# present (press Enter toaccept the number).

Profit Manager Tag / Lot Control System
Rev 6.1–Tag / Lot Control System Page 13
Note: To receive a PO short for a tag item, enter E. The system displays the P.O. Receipts screen. Pressthe backslash key to go to the QTY REC field.
SYSTEM ACTION YOUR ACTION
1. The system prompts for a TAG# if thetagged item is a location item or the ControlFile is not set for AUTO NUMBER TAGS.
Press Enter to accept the default or enter adifferent tag# (the tag# and location are thesame for location tags. If the tag# is changedthe location also changes).
2. The system prompts QTY. Enter the quantity received.
ADJUSTMENTS: Adjustments can be made during PO Receipts or Work Order Receive.Once the quantity is received from the purchase order, you can enter ‘A’ to open an adjustment window toadjust the quantity for work orders or once the quantity is received from the work order, you can removereceived material. Adjustments are allowed up to the available quantity on a tag.

Profit Manager Tag / Lot Control System
Rev 6.1–Tag / Lot Control System Page 14
PUR102 P.O. RECEIPTS
+-----------------------------TAGADJUSTMENTS-------------------------------+ | P/O: 108 REL: 0 LIN: 1 ITEM: NOSHAPE | |TYPE: DESC: NON SHAPED TAGGED ITEM | | | |LN TAG NUMBER LOCATION ON HAND RECEIVED AVAILABL ADJUSTED | | 1 1023 STOCK 1 1 1 0 | | | | | | QTY RECIEVED: 1 TOTAL ADJUSTED ARE: 0 | | | |(N-NEXT P-PREV M-MORE E-END(AND ADJUST) LN# OR TAG#): | +---------------------------------------------------------------------------+
ENTER R-RECEIVE ALL, LINE# FOR PARTIAL, OR E:1
The adjustment window shows every tag received from the purchase order or work order, its location, thecurrent on hand quantity of the tag, the quantity received from the work order, the quantity currentlyavailable on the tag, and the quantity to be adjusted on this tag (always a negative number).
FUNCTIONS: (N-NEXT P-PREV M-MORE E-END (AND ADJUST) LN# OR TAG#:N-go to the next pageP-go to the previous pageM-displays another function line: B-BACK A-ALLOCATIONS X-END (NO ADJUST).
B-BACK functions: B-return to the previous function screen A-displays an allocation function line E-ends without making any adjustments.
E-end and process the adjustmentLN# or TAG#-enter a line number or tag number to adjust.
3. If the shape file for the item being received isset to track pieces, the system promptPIECES.
Enter the number of pieces received.
4. The system prompts LOCATION anddisplays the default location for this item.
Press Enter to accept the default or enter adifferent location (must exist on the WarehouseLocation file or be a valid temporary location).
5. The system prompts COMMENT 1. Enter comment information up to 65alphanumeric characters or press Enter to leaveblank.

Profit Manager Tag / Lot Control System
Rev 6.1–Tag / Lot Control System Page 15
6. Next the system prompts COMMENT 2. Enter comment information up to 65alphanumeric characters or press Enter to leaveblank.
7. If the item is a tagged volatile dimension(shape) item, the system prompts for the dimensions (the prompts for these fieldsdefault from the Shape file).
The system calculates the on-hand quantitybased off the entered dimensions.
Enter the dimension values (can not be blank).
Note: If the item is a tagged location or non-shaped item, the system skips the dimensionfields.
8. The system prompts SEARCH.Note: If the tagged item is a location item, thecursor skips the SEARCH field.
Enter the criteria to use for searching this itemor press Enter to leave blank.
9. Next the system prompts for information inthe three user defined fields (the prompts forthese fields default from the Control File).
Enter the information for these fields or pressEnter to leave blank.
Note: If the tagged item is a location item, thecursor skips the User Defined fields.
10. The system prompts QC FLAG. Press Enter to accept the default (INS) or entera quality control flag (any value in this fieldindicates available items (AVAIL field) equalzero because they are held for inspection. Torelease and make the quantity available, go toTag Maintenance and clear the QC Flag field.
11. If the quantity received is partial, the systemasks QTY/PIECES REMAINING. ACCEPTOR RETRY (A/R). If the quantity received isall, the system asks ACCEPT OR RETRY(A/R).
Enter A to accept the partial or all shipment (thesystem adds a record to the tag master file andthe tag history file; if the item is a location tag,the system will try to find an existing tag andmerge the two). Enter R to re-enter the quantity.
NOTE: If the AUTO NUMBER TAGS flag inthe Control file is set to Y, the systemdisplays AUTO TAG NUMBER ADDED:xxxxxxx (for shape and non-shape tags).For location tags, the tag number is thesame as the location.
12. The system prompts E-END. Enter E to close and return to the receivescreen.
WORK ORDERS—ADD, CHANGE, OR DELETE
Note: Skip if WO is auto created from Sales Order Entry. When adding or changing a work order, if the itemnumber is a tagged item number, the system opens a window for the tag information (shape items only).Lines 2 through 5 default from the Shape file. Line 6 defaults from the Item file and the EXT PRICE iscalculated by the system.

Profit Manager Tag / Lot Control System
Rev 6.1–Tag / Lot Control System Page 16
WORK ORDER #....: 112233 STATUS: #RELEASES: 999ITEM NUMBER.....: BL0125WEB BELT .0125 WEB FINISHWAREHOUSE.......: 1 CINCINNATIDUE DATE........: 08/03/01RELEASE DATE....: 08/02/01QUANTITY DUE....: 1 BUILT: SCRAPPED:MASTER W.O. #...: XXXXXX STATUS:SALES ORDER #...: 999999CUSTOMER #......: 999999ES+---------------------------------------------------------------------+EX| 1-ITEM: BL0125WEB BELT .0125 WEB FINISH |W.| WIDTH LENGTH WEIGHT: | | 2- .000 .00 0 0 .400 PER SF | | | | 3-QUANTITY: 4-PIECES: 5-PRICED 6-PRICE: EXT PRICE: | | 1 0 PER | | | | | +---------------------------------------------------------------------+FUNCTION (A-ADD F-FIND E-END): A
FUNCTIONS:
# TO CHANGE Enter the line number to change. Enter the new information.
T-TAG SEARCH Enter T to open the Select/Allocate Shaped Tag screen. This screen shows thesizes on-hand and available for allocation (refer to the Tag Lot menu option,Select/Allocate Shaped Tags, for detailed field information).
A-ACCEPT SIZES Enter A to accept the entered size values.
E-END NO SIZES Enter E to end with no sizes.
WORK ORDERS—RECEIVE OR CLOSE
When a work order is received that contains a tagged item, the system opens the tag create window. Whenreceiving a work order for a shaped tag item, the system automatically changes tags added for a work orderduring tag split moving from work in process inventory to finished goods inventory.
WORK ORDER STATUS TRANSACTION ENTRY WRK105
TRANSACTION TYPE (R-RECEIVE C-CLOSE E-END): R
W/O # PART # WH DUE DTE RLS DTE QTY DUE QTY BLT QTY SCRP STAT025201 304CLP 1 80599 80399 1190 0 0 R+-----------------------------------------------------------------------------| TAG CREATE ITEM: xxxxxxxx xxxxxxxxxxxxxxxxxxx ||WO NUMBER: 025201 QTY DUE: 1190 || REMAINING: 1190 || TAG#: AUTO QTY: 999999999 || LOCATION: B102 ||COMMENT 1: XXXXXXXXXXXXXXXXXXXXXXXXXXXXXXXXXXXXXXXXXXXXXXXXXXXXXXXXXXXXXXXXX ||COMMENT 2: XXXXXXXXXXXXXXXXXXXXXXXXXXXXXXXXXXXXXXXXXXXXXXXXXXXXXXXXXXXXXXXXX || MIN: MAX: WIDTH: : SEARCH || 9999.999 9999.999 999.9999 999.9999 XXXXXXXX ||HEAT# : XXXXXXXXXXXXXXXXXX ||COIL XXXXXXXXXXXXXXXXXX ||MILL # 9999999999 || QC FLAG: XXX E-TO END A- TO ADJUST ||IS WORK ORDER BEING RECEIVED COMPLETE (Y/N/E)? |

Profit Manager Tag / Lot Control System
Rev 6.1–Tag / Lot Control System Page 17
PICK LIST ISSUES WRK700
+------------------------------------------------------------------------------+
|W/O: 001014 ITEM: 6230 REQD: 2 WHS: 1 |
| |
| AVAILABLE THIS PICK PREV PICKS ALLOC |
| TAG LOCATION QTY PCS QTY PCS QTY PCS QTY |
|1 1003 A101 245 0 0 0 |
|2 1004 A101 236 0 0 0 |
|3 1005 B102 255 0 0 0 |
|4 1006 GIN 215 0 0 0 |
|5 1007 GIN 265 0 0 0 |
|6 1008 C101 258 0 0 0 |
|7 1009 C101 665 0 0 0 |
|8 1010 A101 254 0 0 0 |
|9 1011 A101 365 0 0 0 |
| |
| TOTALS: 10183 |
| |
|FUNC (A-ALLOCATE R-REQD N-NEXT P-PREV E-END PICK-LN# OR TAG):
SYSTEM ACTION YOUR ACTION
1. The system asks IS WORK ORDER BEINGRECEIVED COMPLETE (Y/N/E)?
Enter Yes if this work order is complete (ifcomplete, all work order allocation records arezeroed and remaining tags are inactivated). Ifthe work order is not complete, enter No. EnterE to end, close the window, and place thecursor in the quantity scrap field.
2. The system prompts QTY. Enter the completed quantity.
If you need to adjust the quantity, refer to theprevious page under PO Receipts, Adjustments.
3. If the MFG Control File flag, AUTO PICKISSUES UPON RECEIPT, is set to yes, backflush of tagged items is permitted.
The shipping pick screen displays.
All tags with allocations for this work order and item will show first, followed by all tags for this item with aquantity available.
AVAILABLE QTY Full amount available. After allocation, tag on hand less tag allocated plus thisallocation.
AVAILABLE PCS Same calculation as qty only shows for piece parts.
THIS PICK QTY Quantity picked in this pick only.
THIS PICK PCS Used for piece parts
PREV QTY Total picked to date on this work order and tag
PICKS PCS Used for piece parts
ALLOC QTY Quantity allocated to this work order for this tag
FUNCTIONS:

Profit Manager Tag / Lot Control System
Rev 6.1–Tag / Lot Control System Page 18
WH: 1 ITEM: COLD ROLL COLD DRAWN ROD
ORDER #: LN: 0 QTY REQ: 0 SEARCH..: ALLOC:
LN RECTDT TAG SEARCH LOCATION ONHAND AVAIL ITEM COMM1
1 9/13/01 1007 GE B103 53 53 COLD R COMM
2 9/13/01 1011 G101 25 25 COLD R
3 9/13/01 1013 A102 25 25 COLD R
4 9/17/01 1016 A102 503 503 COLD R
5 9/17/01 1017 A102 4505 4505 COLD R
6 9/17/01 1018 TEMP 505 505 COLD R
7 9/18/01 1026 GE G101 50 50 COLD R
8 9/18/01 1033 B103 500 500 COLD R
-------------------------------------------------------------------------------
TAG: XXXXXXXXXXXXXXXXXX AVAIL:
QTY: 9999999 DUE: MMDDYY COMMENT: XXXXXXXXXXXXXXXXXXXXXXXXXXXXXXXXXXX
FUNC (F-FIND C-CHANGE S-SWAP N-NEXT A-ALLOC R-CERT V-RESV Z-ZERO E-END JOB):
Example of T-TAG SEARCH
IC140 INVENTORY INQUIRY
ITEM # - COLD ROLL COLD DRAWN ROD
PRICES: 1: .300 2: .000 3: .000
4: .000 5: .000 6: .000
LEAD TIME- 14 DAYS COST: .200
AVG ON TO BE
WH USAGE SOH ALLOC ORDER INSPECTED AVAIL BIN
1 CINCINNATI 0 6166 0 36093 0 6166
6166 0 36093 0 6166 TOTALS
<CR>-NEW SEARCH, P-PEGGING REPORT, T-TAG SEARCH T
A-ALLOCATE Displays the tag select and allocation screen; when finished returns to this screen.
R-REQD Checks that there is sufficient parts allocated to meet the required quantity. If not, awarning displays and the operator is prompted to pick. If sufficient parts exists,components are picked from the top tag down until the required quantity is satisifed.
E-END End the program and pass this pick quantities back to the work order.
PICK-LN# OR TAG Enter a line number or an existing tag number. Enter the quantity for this pick(followed by pieces picked if appropriate). If the entered tag number is not found,the system assumes a line number was entered and moves the cursor to the THISQTY field of that line number.
NOTE:- When entering part quantities with pieces, the system asks if you want to calculate either the piece count orthe quantity. For a piece count, enter a zero for quantity and a number for the piece count. The system willask whether to calculate the quantity. For items stored by weight, but counted by pieces, this can be veryuseful.-This program allows entry of negative amounts for work orders making it easy to adjust the picks on a workorder if it was picked incorrectly.
ITEM INQUIRY FOR TAG ITEMS

Profit Manager Tag / Lot Control System
Rev 6.1–Tag / Lot Control System Page 19
TAG: XXXXXXXXXXXXXXXXXX ITEM: BEG/REM QTY: /
WHS: SIZE: BEG/REM PCS: /
BEG/REM SIZ: /
# WRKORD ALC-QTY ALC-PCS ALC-SIZE LOCATION COMMENT
SALES ORDR CUST ITEM SIZE 1 SIZE 2 SIZE 3 SIZE 4
X XXXXXX 9999999 9999999 999.9999 XXXXXXXXXX XXXXXXXXXXXXXXXXXXXXXXXXXXXXXXXX
99999999 99999999 99999999 99999999
X XXXXXX 9999999 9999999 999.9999 XXXXXXXXXX XXXXXXXXXXXXXXXXXXXXXXXXXXXXXXXX
99999999 99999999 99999999 99999999
X XXXXXX 9999999 9999999 999.9999 XXXXXXXXXX XXXXXXXXXXXXXXXXXXXXXXXXXXXXXXXX
99999999 99999999 99999999 99999999
X XXXXXX 9999999 9999999 999.9999 XXXXXXXXXX XXXXXXXXXXXXXXXXXXXXXXXXXXXXXXXX
99999999 99999999 99999999 99999999
X XXXXXX 9999999 9999999 999.9999 XXXXXXXXXX XXXXXXXXXXXXXXXXXXXXXXXXXXXXXXXX
99999999 99999999 99999999 99999999
X XXXXXX 9999999 9999999 999.9999 XXXXXXXXXX XXXXXXXXXXXXXXXXXXXXXXXXXXXXXXXX
99999999 99999999 99999999 99999999
X XXXXXX 9999999 9999999 999.9999 XXXXXXXXXX XXXXXXXXXXXXXXXXXXXXXXXXXXXXXXXX
99999999 99999999 99999999 99999999
X XXXXXX 9999999 9999999 999.9999 XXXXXXXXXX XXXXXXXXXXXXXXXXXXXXXXXXXXXXXXXX
FUNC (F-FIND A-ADD C-CHG D-DEL B-BEGIN QTY N-NEXT P-PREV M-MORE)
FUNC (S-SWAP H-HIDE R-RECOVER T-ALLOCATE U-UPDATE I-INDX L-LIST E-END):
TAG SPLIT
This option appears on the Work Order and Extended Work Order main menus.
Select Tag Split for shape tags that are to be cut (Tag Split takes care of pick list issues for shaped tags).Once a tag number is entered, the system retrieves and displays the tag information along with any WOallocations that exist for that tag. Tag Split picks up a tag and returns multiple tags to inventory (takes theparent item and makes multiple child items). For tags made to fill a work order, the system designates theseas work in process inventory. Tags added as side or remnant tags are returned to finished good inventory.
FUNCTION: FIND A TAG
The F-FIND function must be selected before selecting any of the other functions.
SYSTEM ACTION YOUR ACTION
1. The Tag/Lot Menu displays. Enter 11 TAG SPLIT
2. The tag split screen displays. Enter F-FIND.
3. The system prompts TAG: ?xxxxxxxxxx. Enter a tag number or press Enter to locate atag number.
4. If a tag number is entered:
The system displays all allocations againstthe tag with the FUNC (function) line.
Enter a function.
If enter is pressed:
The system displays the shape allocationscreen and prompts FUNC line.
Enter F-FIND.
comment size

Profit Manager Tag / Lot Control System
Rev 6.1–Tag / Lot Control System Page 20
5. The system prompts WH. Enter a warehouse number.
6. The system prompts ITEM. Enter an item number.
7. The system displays the SHAPE CODE andthe item DESCRIPTION and prompts forsizes.
Enter the item's sizes.
8. The system prompts SEARCH. Enter the search criteria or press Enter to skipthis field.
9. The system displays the on-hand andavailable sizes for this item with theFUNCTION prompts.
Enter A-ACCEPT.
10. The system prompts ENTER TAG'S LINENUMBER OR 'E' TO EXIT.
Enter a line number or E to end.
11. If a line number is entered, the systemreturns to the Tag split screen and assignsa tag number.
Enter a function.
FUNCTION: ADD A LINE
SYSTEM ACTION YOUR ACTION
1. The Tag split screen displays. Enter A-ADD.
2. The system positions the cursor in the firstopen line and prompts #.
Enter a roll code (valid codes are A through Z).
3. The system prompts WRKORD. Enter a work order number, or SIDE, SCRAP,REM (for remnant), or WASTE.
4. Next the system prompts ALC-QTY or ALCPCS.
Enter quantity and/or pieces for the item, pressEnter.
5. Now the system prompts ALC-SIZE. Size is controlled by the setup for the item,press Enter.
6. The system prompts LOCATION. Press Enter to accept the default or enter alocation.
7. Finally, the system prompts COMMENTS. Enter a comment up to 32 characters.
FUNCTION: CHANGE THE BEGINNING QUANTITY
SYSTEM ACTION YOUR ACTION
1. The Tag split screen displays. Enter B-BEG QTY
2. The system prompts ENTER THE NEWBEGINNING QUANTITY. The cursor is at thetop of the page in field BEG/REM QTY.
Enter the new number of the beginning quantityfor this item and press Enter.

Profit Manager Tag / Lot Control System
Rev 6.1–Tag / Lot Control System Page 21
3. The cursor returns to the function line. Enter the next function.
FUNCTION: CHANGE A LINE
SYSTEM ACTION YOUR ACTION
1. The Tag split screen displays. Enter C-CHANGE.
2. The system prompts ENTER THE LINENUMBER OR 'E' TO EXIT.
Enter the line number to change or E to end.
3. The system prompts #. Enter a different value for this field or pressEnter until the cursor positions in the field tochange.
FUNCTION: DELETE A LINE
SYSTEM ACTION YOUR ACTION
1. The Tag split screen displays. Enter D-DELETE.
2. The system prompts ENTER THE LINENUMBER OR 'E' TO EXIT.
Enter the line number to delete or E to end.
FUNCTION: T-ALLOCATE A LINE
SYSTEM ACTION YOUR ACTION
1. The Tag Split screen displays with the FUNCline.
Enter T-ALLOCATE.
2. The system prompts ENTER THE LINENUMBER OR 'E' TO EXIT.
Enter the line number to allocate or E to end.
3. The system displays the allocation screenwith FUNCTION (F-FIND O-ORDER A-ALLOC U-UNALLOC C-CHANGE N-NEXT R-RESVNS E-END).
Enter a function. Refer to the allocation sectionof the SELECT/ALLOCATE SHAPED TAGS documentation.
FUNCTION: U-UPDATE THE TAG
SYSTEM ACTION YOUR ACTION
1. The Tag split screen displays withFUNCTION: (A-ALLOCATE U-UPDATE T-PRE-PRINT TAGS CR-NO FUNCTION).
Enter U-UPDATE.
2. The system prompts ENTER THE SCRAPITEM CODE if all of the shaped item has notbeen allocated.
Enter the scrap item code.

Profit Manager Tag / Lot Control System
Rev 6.1–Tag / Lot Control System Page 22
3. The system opens the window Tag splitSUMMARY and asks OK TO PROCEED?(Y/N).
Enter a Y to accept the displayed values andupdate the tag or enter N to return to the Tagsplit screen and choose another function.
4. If yes is entered, the system opens anotherwindow and prompts ENTER TAG NUMBERFOR LINE x.
Enter the tag number.
The system verifies that all work orders have been released (pick records exist). If all work orders arereleased, the system compares the weight of the parent tag with the combined weights of the allocated (child)tags. If less quantity is being produced than consumed the program appropriates the remainder to scrap. Ifmore quantity is produced than consumed, the program asks whether to continue.
Allocation records, for each work order involved, are moved from the parent tag to the child tags. Pickrecords are created for the parent material on each work order, and the allocated quantities are reduced bythe amount of the pick. When the operation is complete, there will be work order allocations against thecreated child tags. The child tags and associated allocation and work order records will have the same itemnumber.
The system will: 1) Create tag records and tag history records for the work order and remnant items, 2) Create tag history records for scrap, 3) Update the pick records for the work order items with the producedquantity plus scrap (if the parent tag item number does not match any pick record then a new pick record iscreated), and 4) Consume the parent tag and create a history record.
ADDITIONAL FUNCTIONS
B-BEGIN QTY Enter a new beginning quantity when returning the balance quantity to stockinstead of scraps or remnants.
N-NEXT Go to the next page, if available.
P-PREV Go to the previous page, if more than one page is available.
S-SWAP Changes the screen view. Sales order, customer, item (this is the final finishedgoods item to be made), and sizes display on the screen.
H-HIDE Hide lines
R-RECOVER Refresh the screen
I-INDX Re-sorts the rolls by the roll code.
L-LIST Produces a printout of the currently displayed tag information.
E-END Exit the screen
TAG: 838 ITEM: 304CLP BEG/REM QTY: 4080/ 2980WHS: 1 SIZE: .040 .050 24.0000 BEG/REM PCS: / BEG/REM SIZ: 24.0000/ 23.9000 # WRKORD ALC-QTY ALC-PCS ALC-SIZE LOCATION COMMENT +-------------------------------------------------+ 1 A 021801 | | | TAG SPLIT SUMMARY | 2 B SIDE | | | WEIGHT TO TAGS.............: 1100 | X XXXXXX 999| WEIGHT TO APPORTIONED REMS.: 0 |XXXXXXXXXXXXXX | WEIGHT TO APPORTIONED SCRAP: 2980 | X XXXXXX 999| WEIGHT TO WASTE SCRAP......: 0 |XXXXXXXXXXXXXX | WEIGHT TO INV. WRITEOFF....: 0 | X XXXXXX 999| SCRAP ITEM CODE : SCRAP |XXXXXXXXXXXXXX | OK TO PROCEED? (Y/N) |
FUNCTION (A-ALLOCATE U-UPDATE T-PRE-PRINT TAGS CR-NO FUNCTION):U

Profit Manager Tag / Lot Control System
Rev 6.1–Tag / Lot Control System Page 23
TAG LOT / CERTIFICATIONS
1. TAG MAINTENANCE
This option is a also part of standard Profit Manager for use with Location Control items.
TAG LOT / CERTIFICATIONS
TAG/LOT FUNCTIONS CERTIFICATION FUNCTIONS
FILE MAINTENANCE FILE MAINTENANCE 1. TAG MAINTENANCE 12. CERT FORM MAINTENANCE 2. SHAPE MAINTENANCE 13. CERT LAYOUT MAINTENANCE 3. LABEL PRINTER CONTROL
DATA ENTRY INQUIRY/SELECTION 14. CERT DATA ENTRY 4. ALLOCATED TAGS REPORT 15. MANUAL CERT MERGE 5. SELECT/ALLOCATE SHAPED TAGS 16. BATCH CERT PRINT 6. SELECT/ALLOCATE NON-SHAPE TAGS 17. CERT PRINT 7. SELECT/ALLOCATE LOCATION TAGS 18. CERT PRINT BY SALES ORDER 8. LOCATION INQUIRY 9. TAG HISTORY INQUIRY
10. AUTO ALLOCATE SALES AND WORK ORDERS11. ORDER PULLS
SELECTION ('0' TO END): 0
TAG MASTER FILE MAINTENANCE
1-WHSE..: 1 CINCINNATI 2-ITEM #: 304SH 304 STAINLESS SHEET TAG #.: 755 4-PARENT TAG: 5-LOC...: W102 6-QC FLAG...:-------ORIGINAL RECEIPT INFO-------------- ---------STOCKING INFO--------- 7-PO/WO..: REL: 0 LN: 0 15-ON ORDER.: 0 DUE:10-VENDOR.: 0 16-ON HAND..: 4995 PCS: 998211-QTY REC: 5000 ON: 62799 18-RESERVED.: 120 PCS: 18212-#PIECES: 10000 QTY/PIECE: .500 AVAILABLE: 4875 PCS: 9800
MIN MAX WIDTH LENGTH 24-SEARCH20-CURRENT...: .060 .070 48.0000 48.000025-HEAT #:...: A123 26-COIL......:27-MILL #....: 0
28-COMMENT 1: HANDLE WITH CARE29-COMMENT 2: CALL FOR ADDITIONAL INFORMATION
FUNCTION ( A-ADD C-CHANGE D-DELETE F-FIND N-NEXT M-MORE E-END JOB):

Profit Manager Tag / Lot Control System
Rev 6.1–Tag / Lot Control System Page 24
FUNCTION: ADDING A TAG
SYSTEM ACTION YOUR ACTION
1. The system displays the Tag Master FileMaintenance screen with FUNCTION (A-ADD C-CHANGE D-DELETE F-FIND N-NEXT M-MORE E-END JOB).
Note: Select M-MORE after selecting FIND orCHANGE to display another FUNCTION line.
Enter A-ADD.
2. The system prompts WHSE. Enter a warehouse number (must exist in theWarehouse file). The warehouse descriptiondisplays.
3. The system prompts ITEM #. Enter the item number (must exist in the ItemInventory file). The item description displays.
4. Next the system prompts PARENT TAG. Enter this item's parent tag number (must existin the Tag file) or press Enter to leave blank.
5. The next field is LOC. Enter the location name (where the item isstored in the warehouse; must exist on theWarehouse Location file).
6. Now the system prompts QC FLAG. Enter characters in this field only if the item is aquality control issue and you want to set thequantity as not available or press Enter to leaveblank to make the item available.
7. In the ORIGINAL RECEIPT INFO section,the system prompts PO/WO.
Note: If it's a PO, precede with a 'P'. If it's aWO, precede with a 'W'.
The system skips this field if the item is alocation item.
Enter either the original purchase order numberor the work order number, the release number,and the line number for this tag. Press Enter toleave blank.
8. The system prompts for the VENDOR.
Note:• The vendor # can be a warehouse #.• The vendor # and name are auto filled if a PO# or WO# is entered.• The system skips this field if the item is a location item.
Enter the vendor number (must exist in theVendor File Maintenance file) or press Enter toleave blank.
9. Next the system prompts for QTY REC andON.
Enter the quantity originally received from thePO or WO on this tag and the date received(defaults to today's date) or press Enter to leaveblank.
10. If the Shape file for this item indicates 'trackpieces', the system prompts # PIECES andQTY/PIECE (these fields are skipped if theShape file indicates to not track pieces).
Enter the number of pieces. The system autodisplays the QTY/PIECE.

Profit Manager Tag / Lot Control System
Rev 6.1–Tag / Lot Control System Page 25
11. In the STOCKING INFO section, the systemprompts ON ORDER and DUE.
Not available at this time.
12. Next the system prompts ON HAND. The system defaults the on hand amount; canbe overridden.
13. The system prompts RESERVED. Enter the allocated total. The system calculatesthe AVAILABLE total. This field is always zero ifa value is entered in the QC Flag field.
14. If the item is a volatile dimension item, thesystem prompts CURRENT.
Note: The system does not prompt for thisfield if the item is a location or non-shapeditem.
Enter the size of the item before allocations.
Note: The information for this field is taken fromthe Shape File.
15. The system prompts SEARCH. Enter the search criteria for this tag or pressEnter to leave blank.
16. The system prompts HEAT #.
Note: The system does not prompt for thisfield if the item is a location item.
This prompt is defined in the Control file. Enterthe number.
17. Next the system prompts COIL.
Note: The system does not prompt for thisfield if the item is a location item.
This prompt is defined in the Control file. Enterthe number.
18. The system prompts MILL # (if the item hasa PO# the mill# will be the vendor#).
Note: The system does not prompt for thisfield if the item is a location item.
This prompt is defined in the Control file. Enterthe number.
19. Now the system prompts COMMENT1 andCOMMENT 2.
Enter a comment up to 65 characters for eachcomment or press Enter to leave blank.Comments do not print–for inquiry only.
FUNCTION: CHANGING A TAG
SYSTEM ACTION YOUR ACTION
1. The system displays the Tag Master FileMaintenance screen.
Enter C-CHANGE.
2. The system prompts TAG#. Enter the number of the tag to change (If youare entering a Location Tag that has multipleitems in the same location, a box displays toselect the desired item number).
3. The system prompts ENTER FIELD# TOCHANGE, 'U' TO UPDATE OR 'E' TO EXIT.
Enter the number of the field to change or U toupdate the file. Enter E to end and exit withoutupdating the file.

Profit Manager Tag / Lot Control System
Rev 6.1–Tag / Lot Control System Page 26
FUNCTION: DELETING A TAG
SYSTEM ACTION YOUR ACTION
1. The system displays the Tag Master FileMaintenance screen.
Enter D-DELETE.
2. The system prompts TAG#. Enter the tag number to delete.
NOTE: If you don't know the tag number, entera question mark in the Tag# field. The systemopens the allocation window where you canenter F-FIND to locate the tag number bywarehouse and item number.
3. The system prompts OKAY TO DELETE(Y/N)?
Enter Y to delete the tag.Enter N to cancel the deletion.
FUNCTION: FINDING A TAG
SYSTEM ACTION YOUR ACTION
1. The system displays the Tag Master FileMaintenance screen.
Enter F-FIND.
2. The system prompts TAG#. Enter the tag number to find.
NOTE: If you don't know the tag number, entera question mark in the Tag# field. The systemopens an allocation window where you canenter F-FIND to locate the tag number bywarehouse and item number.
3. The system displays the tag. At the bottom ofthe screen the system also displays anotherfunction line: FUNCTION (M-MOVE R-CERT P-PARENT T-TAG PRINT CR-NOFUNCTION).
Enter M, R, P, to T.M-move quantity from one location to another.R - print certification.P - find parent.T - print tag.
4. If M-MOVE is entered, the system promptsENTER THE QUANTITY TO MOVE.
Enter the quantity in the QTY REC field.
5. Next the system prompts ENTER THELOCATION TO MOVE TO.
Enter the new location name in the LOC field.
6. The system creates a new tag and displaysTAG xxx HAS BEEN ADDED at the bottomof the screen and adjusts the ON-HAND totalfor this item.
Select another function or press Enter to returnto the previous FUNCTION line.
7. If R-CERT is entered, the system promptsENTER PRINTER NUMBER 1 TO x.
Note: Not all tags will have a certification. Thesystem flashes NO CERT FOUND FORTHIS TAG.
Enter the number of the printer you are using.The system flashes CERT FORM PRINTINGand returns to the Tag Master File screen.

Profit Manager Tag / Lot Control System
Rev 6.1–Tag / Lot Control System Page 27
8. If P-PARENT is entered, the system displaysthe parent tag information with theFUNCTION line.
2. SHAPE MAINTENANCE
This option is used only with tagged shape items. Note: The Shape file must be set up before entering tagitems in the Item File Maintenance file. Only volatile dimension items have a shape code.
FUNCTION: ADDING A NEW SHAPE CODE
SYSTEM ACTION YOUR ACTION
1. The Tag/Lot Menu displays. Enter 2-SHAPE FILE MAINTENANCE
2. The Shape File Maintenance screen displays. Enter A-ADD.
3. The system prompts SHAPE CODE. Enter a 2 character alphanumeric shape code.
4. The system prompts for a DESCRIPTION. Enter up to 12 alphanumeric characters thatwill identify the shape.
5. The cursor positions in the SIZE SETUPsection and prompts for SIZE1.
Enter up to 8 alphanumeric characters (thiswill appear as a prompt title on the TAGCREATE screen). For example sizes might bethickness, diameter, length, etc.
6. The cursor moves to the ASK field. Enter Y to display the information entered instep 5 above as a field on the Tag Createscreen. Enter N to suppress the informationfrom appearing on the Tag Create screen.
SHAPEFM SHAPE FILE MAINTENANCE
1- SHAPE CODE: CL 2- DESCRIPTION: COIL
*** SIZE SETUP *** PROMPT ASK WGHT FORMAT FACTOR SUFFIX 3- SIZE1.: MIN Y 8.4 .000 9- SIZE2.: MAX Y 8.4 .00015- SIZE3.: WIDTH Y 8.4 .00021- SIZE4.: N .0 .000
27- ALLOCATE BY DIMENSION (0/1/2/3/4): 328- TREAT SIZE AS A MAX DIMENSION....: 229- STD WEIGHT UNIT OF MEASURE.......: LF30- TRACK PIECES (Y/N) ..............: N31- O/E DEFAULT QTY (1/2) ...........: 132- DEFAULT PRICE UNIT ..............: LB33- TAG PRINT FORM ..................:34- CALC ON HAND AND DON'T ADJUST . .:
FUNCTION ( A-ADD C-CHANGE D-DELETE F-FIND N-NEXT P-PREV E-END JOB):

Profit Manager Tag / Lot Control System
Rev 6.1–Tag / Lot Control System Page 28
7. Next the cursor moves to the WGHT field. Does the size have an impact on the weight?Enter Y to have the system include size 1 in the nominal calculations. If no calculation is needed,enter N. Note: Calculations are based on theinformation entered in the Item file.
8. The cursor positions in the FORMAT field. Enter the number of decimal places for thequantity field of this item. Valid entries are: 1-8 before the decimal followed by 1-4 after thedecimal. For example, 8.2.
9. Next is the FACTOR field. Enter up to 5 whole numbers and 3 decimalplaces. This field is used for calculating the unitof measure between two sizes. For example, ifsize 1 is length by feet but you need to knowinches, the factor is 12 (12 inches in a foot).
10. The cursor moves to the SUFFIX field. Not used for Phase 1 of Tag/Lot. This fielddefines the kind of dimension (inches, feet,etc.).
NOTE: Follow the steps for SIZE 1 to enter the information for SIZE 2, SIZE 3, and SIZE 4,as needed.
11. The system prompts ALLOCATE BYDIMENSION (0/1/2/3/4).
Enter 0 (zero) to allocate by piece (default).Enter 1 to allocate by size 1.Enter 2 to allocate by size 2.For allocation by size 3, enter 3.Allocation by size 4, enter 4.
12. Next the system prompts TREAT SIZE ASMAX DIMENSION.
Enter a size number (1, 2, 3, or 4) to use as themaximum dimension or enter 0 (zero) for nomaximum dimension.
13. The system prompts STD WEIGHT UNITOF MEASURE.
Enter LI – linear inchLF – linear footCF – cubic footSI – square inchSF – square footField can be blank.
14. The system prompts TRACK PIECES (Y/N) Enter Y to track pieces created from the volatiledimension items (shape). Enter N for notracking.
15. Now the system prompts O/E DEFAULTQTY (1 / 2)
Enter 1 to have the default quantity display inthe quantity field (by pounds) in the OrderEntry–Sales Order screen. Enter 2 to have thedefault quantity display in the pieces field.
16. In the next field, the system promptsDEFAULT PRICE UNIT.
Enter LB – poundPC – piecesLT – lot pricingLF – linear footLI – linear inchSF – square footSI – square inchCW – hundred weight (or 100 lbs)
Field cannot be blank.

Profit Manager Tag / Lot Control System
Rev 6.1–Tag / Lot Control System Page 29
17. The system prompts TAG PRINT FORM. Enter the name of the tag layout to print; up to10 characters.
18. The last prompt is CALC ON HAND ANDDON'T ADJUST.
Enter Y to have the system calculate a new on-hand quantity for the tag but not adjust G/Lduring PO Receipt. Enter N (or leave blank) toskip the calculation.
3. LABEL PRINTER CONTROL
This option is a also part of standard Profit Manager for use with Location Control items. The Label PrinterControl tells the system based on the user login which printer to use for this login and the programs this logincan access. There is also an Intermec Printer Control file that PBSI sets up during the initial installation ofTag/Lot. If you need additions or changes to this file, contact Customer Support.
1-USER NAME User name is based on the login name.
2-PROGRAM NAME Enter a specific program name or ALL.
3-PRINTER DEVICENAME
Press Enter for the default device name (this field will contain a device namesuch as /dev/ttyb07 that is set up by PBSI) or enter a device name (labels areprinted on Intermec printers only).
FUNCTION LINE Valid functions are: A-add (add a new user); F-find (find an existing user; oncethe user is found the functions: A-Add, C-Chg; D-Del, F-Find, N-Next, P-Prev, L-List, and E-End become active); L-List (print a list of users); E-End (end theprogram).
4. ALLOCATED TAGS REPORT
This option is a also part of standard Profit Manager for use with Location Control items. Selecting this optionproduces a listing of required tags and allocated tags sorted by due date and sales order/work order numberwithin items. Required tags are grouped and printed together at the beginning of the list. Allocated tags printlast. The system reads through open sales orders and open work orders (without associated sales orders) forall unallocated tagged items to produce the required list and all allocated tagged items to produce theallocated list.
TGALLOCRPT - Lists allocations by due date and SO/WO time date
ENTER S FOR SCREEN DISPLAY OR P FOR PRINTER. S
ENTER WAREHOUSE NUMBER TO BE REPORTED. 1
INCLUDE FULLY-ALLOCATED FINISHED ITEMS IN REPORT (Y/N) ? Y
PLEASE ENTER DESIRED CUT-OFF DUE DATE, BY MMDDYY. OR, HIT <ENTER> TO ENTER TODAY'S DATE AS YOUR CHOICE.
IS mmddyy YOUR DESIRED CUT-OFF DATE (Y/N) ? Y
LABLPTRFM LABEL PRINTER CONTROL FILE MAINTENANCE
1-USER NAME : XXXXXX
2-PROGRAM NAME OR 'ALL' : XXXXXXXXXXXXXXXXXXXX
3-PRINTER DEVICE NAME : XXXXXXXXXXXX
FUNCTION ( A-ADD F-FIND L-LIST E-END):

Profit Manager Tag / Lot Control System
Rev 6.1–Tag / Lot Control System Page 30
WH: 1 ITEM: 304CLF SHAPE: BC MIN MAX WIDTH
DESCRIPTION: 304 COIL FINISHED .0000 .0000 .0000
QTY REQ: 9999999 PIECES:9999999 SEARCH..: XXXXXXXX SEL:
PRICE...: 9999.99 MRG: 999.99%
LN MIN MAX WIDTH ON-HAND AVAIL AVL PCS ITEM COST/U PIW
1 .0580 .0680 6.0000 195 195 304CLF 30.13 32
2 .0580 .0720 48.0000 960 0 304CLF 30.13 20
3 .0580 .0730 6.0000 220 0 304CLF 30.13 37
4 .0600 .0700 .0003 520 520 304CLF 30.13 *33
FUNCTION ( F-FIND C-CHANGE S-SWAP N-NEXT M-MARGIN A-ALLOC R-CERT E-END JOB):
FUNCTION 'N' FOR MORE SELECTIONS
The report includes: • Item number and description• Tag number (allocated tags only)• Item location (allocated tags only)• Due date• Sales order and/or work order number• Quantity and/or pieces• Size 1 through 4
5. SELECT/ALLOCATE SHAPED TAGS
This option is used only with tagged shape items.The Select/Allocate screen shows sizes on-hand and available for the requested item.
pounds perinch width
FUNCTIONS:
F-FIND To find (search), enter the warehouse and item number. Press Enter to theSEARCH field. Enter the search string (the search prompt is defined in the ControlFile).The MIN, MAX, WIDTH, (all user defined field titles), are referred to as 'smartfields' that will limit the search to within the values entered in these fields.
C-CHANGE After finding an item, enter C-CHANGE. The system prompts ENTER LINE# TOCHANGE OR 'E' TO EXIT. Enter a line number. The system displays the TagMaster File Maintenance screen (refer to this screen's documentation for detailedinformation).
S-SWAP After finding an item, enter S-SWAP to change the screen view for more detail.
M-MARGIN After finding an item, enter M-MARGIN to change the price field. The systemcalculates and displays the new margin.
A-ALLOC Enter A-ALLOC to open the item allocation screen (see the Allocation Screendocumentation for details). To allocate, you must first find the order either in salesorder or work order.
R-CERT After finding an item, enter R-CERT. The system prompts ENTER TAG LINENUMBER OR E TO EXIT. Enter a line number. The system displays theCERTIFICATION DATA ENTRY screen (the item inventory file must be set to yesfor certification).
E-END If ending from Order Entry, returns and displays the previous screen. If endingfrom the Tag/Lot main menu, exits and returns to the main menu.

Profit Manager Tag / Lot Control System
Rev 6.1–Tag / Lot Control System Page 31
TAG: 933 SIZES: .040 .060 [ 24.0000] .0000WHS: 1 ITEM #: 304CL 304 STAINLESS COILCOMMENT:
LN ORDER LIN CUST W/O QTY PIECES SIZE DUE COMMENT ON HAND-> 3000 24.0000 1 286- 1 ALLEN 5 1.0000 081199 TEST
REMAINING: 2995 23.0000-------------------------------------------------------------------------------ORD:286 LN: 1 QTY: 5 PC: 0 MIN MAX WIDTH304 STAINLESS COIL .040 .060 24.0000-------------------------------------------------------------------------------REQUIRED.: QTY: 5 PC: SIZE: 1.0000 DUE: 81199COMMENT..: TESTFUNCTION ( F-FIND O-ORDER A-ALLOC U-UNALLOC C-CHANGE N-NEXT R-RESVNS E-END):A
Allocation Screen–
FUNCTIONS:
F-FIND Enter the tag number that you want to change or allocate to.
O-ORDER Enter O-ORDER to find an existing order. Enter the order number and linenumber. The system will search the allocation file to find and display the tag andorder information.
A-ALLOC Select this function to allocate the order to a tag. The system prompts for quantity,pieces, size, due date, and a comment. The system checks that sufficient productexist for the allocation and issues a warning if it does not. Otherwise, the systemadds the allocation record for the displayed tag number, and updates the tagmaster record.
U-UNALLOC Enter 'U' to delete an allocation for an order. Enter a line number. The systemretrieves the allocation record associated with the line and requests confirmation. If confirmed, the allocation record is deleted and the tag master is updated.
C-CHANGE The system prompts ENTER LINE# TO CHANGE OR 'E' TO EXIT. Enter a linenumber and enter changes to the order for the tagged item.
N-NEXT Display the next record.
R-RESVNS After finding an order or work order, enter R-RESVNS. The reservations windowopens. The system determines whether a tag or an order is available. If available,the system prompts ‘O’ for order and ‘T’ for tag except for non-shape or locationtags in which case the system prompts for a line number (seeRESERVERATIONS SCREEN documentation for details).
E-END Returns and displays the previous screen.

Profit Manager Tag / Lot Control System
Rev 6.1–Tag / Lot Control System Page 32
Reservations window—
FUNCTIONS:N-NEXT PAGE Enter N to go to the next page, if applicable.
E-EXIT Enter E-exit to return to the allocation screen.
O-Order T-Tag For shape tags, enter either O for order or T for tag.
LN# For non-shape or location tags, enter a line number to reserve the requiredquantity for this tag.
6. SELECT/ALLOCATE NON-SHAPED TAGS
This option is used only with tagged (T) items.
FUNCTIONS:
F-FIND After entering F-FIND, enter the warehouse number and item. Press Enter throughthe ALLOC field.
C-CHANGE After finding an item, enter C-CHANGE. The system prompts ENTER LINE# TOCHANGE OR 'E' TO EXIT. Enter a line number. The system displays the TagMaster File Maintenance screen (refer to this screen's documentation for detailedinformation).
TAG: 930 SIZES: .040 .060 [ .0000] .0000WHS: 1 ITEM #: 304CL 304 STAINLESS COIL
+-------------------------------RESERVATIONS---------------------------------+L|ORDER: 283 LINE: 1 W/O: | | 304 COIL PRE-SLIT | | | |LN TAG QTY PIECES SIZE COMMENT | | 1 933 4 1.0000 TEST |R| |-| |O| |3|FUNCTION (N-NEXT PAGE E-EXIT LN#) ? |-| |R+----------------------------------------------------------------------------+COMMENT..: XXXXXXXXXXXXXXXXXXXXXXXXXXXXXXXXXXXFUNCTION ( F-FIND O-ORDER A-ALLOC U-UNALLOC C-CHANGE N-NEXT R-RESVNS E-END):R
WH: 1 ITEM: BLOB TAGGED NON SHAPE ITEMORDER #: XXXXXX LN: 0 QTY REQ: 0 SEARCH..: XXXXXXXX ALLOC:
LN RECTDT TAG SEARCH LOCATION ONHAND AVAIL ITEM COMM1 1 4/23/99 282 ABCDEFGH South End 5 5 BLOB THIS 2 4/23/99 287 South End 5 0 BLOB 3 4/23/99 299 South End 10 0 BLOB 4 4/26/99 415 South End 1 0 BLOB 5 4/26/99 73 GE East End 200 170 BLOB------------------------------------------------------------------------------TAG: XXXXXXXXXXXXXXXXXX AVAIL:QTY: 9999999 DUE: MMDDYY COMMENT: XXXXXXXXXXXXXXXXXXXXXXXXXXXXXXXXXXX
FUNCTION ( F-FIND C-CHANGE S-SWAP N-NEXT A-ALLOC R-CERT V-RESV E-END JOB):FUNCTION 'N' FOR MORE SELECTIONS

Profit Manager Tag / Lot Control System
Rev 6.1–Tag / Lot Control System Page 33
S-SWAP After finding an item, enter S-SWAP to change the screen view. The AVAIL, ITEM,and COMM1 fields move to the left revealing more of the comment line.
A-ALLOC After finding an item, enter A-ALLOC to change the item allocation.
Note: The Order # field must contain either an order number or a work ordernumber for this function.
Enter the line number to change. The system prompts for QTY, DUE, andCOMMENT.
R-CERT After finding an item, enter R-CERT. The system prompts ENTER TAG LINENUMBER OR E TO EXIT. Enter a line number. The system displays theCERTIFICATION DATA ENTRY screen.
V-RESV After finding an item, enter V-RESV to see all reservations for the item.
Note: The Order # field must contain either an order number or a work ordernumber for this function.
The system opens the RESERVATIONS window where you can see the tags and quantities reserved for this item.
7. SELECT/ALLOCATE LOCATION TAGS
This option is a also part of standard Profit Manager for use with Location Control items.
FUNCTIONS:
F-FIND After entering F-FIND, enter the warehouse number and item. Press Enter throughthe ALLOC field.
C-CHANGE After finding an item, enter C-CHANGE. The system prompts ENTER LINE# TOCHANGE OR 'E' TO EXIT. Enter a line number. The system displays the TagMaster File Maintenance screen (refer to this screen's documentation for detailedinformation).
S-SWAP After finding an item, enter S-SWAP to view the second comment line.
A-ALLOC After finding an item, enter A-ALLOC to change the item allocation.Note: The Order # field must contain either an order number or a work ordernumber for this function.
Enter the line number to change. The system prompts for QTY, DUE, andCOMMENT.
WH: 1 ITEM: DOOR METAL DOORORDER #: 193 LN: 1 QTY REQ: 10 SEARCH..: XXXXXXXX ALLOC: 5 DOOR METAL DOORLN LOCATION SEARCH ONHAND AVAIL ITEM COMMENT 1 1 EAST END 926 774 DOOR 2 NORTH END FOREIGN 5 - 10 DOOR 3 WEST END 100 78 DOOR
-------------------------------------------------------------------------LOC: EAST END METAL DOOR AVAIL: 779QTY: 5 DUE: 80299 COMMENT: CHANGED ALLOCATION
FUNCTION ( F-FIND C-CHANGE S-SWAP N-NEXT A-ALLOC R-RESV Z-ZERO E-END JOB)

Profit Manager Tag / Lot Control System
Rev 6.1–Tag / Lot Control System Page 34
PAGE: 1 +CHILDREN TAG HISTORY INQUIRY XHISTORY * BOTHENTER TAG: 1025 RECEIVED CURRENTLN LV TAG ITEM LOC QTY PCS QTY PCS 1 1 x1025 BL0125WEB A101 5 5a
Example of find by tag #
R-RESV After finding an item, enter R-RESV to set up a reservation for the item.
Note: The Order # field must contain either an order number or a work ordernumber for this function.
The system opens the RESERVATIONS window where you can see the quantitiesreserved for this item.
Z-ZERO Show tag even if the on-hand is zero.
8. LOCATION INQUIRY
This option is a also part of standard Profit Manager for use with Location Control items. This option providesa method to view inventory by warehouse and location. After entering F-Find, enter a warehouse (the systemdefaults to the ‘home’ warehouse of the user file) and the location (the warehouse and warehouse locationmust exist in the Support Files, Warehouse and Warehouse Location). The program finds all active ‘T’, andall active and non-zero ‘L’ocation tags at that location. The display shows the first twelve characters of the tagnumber, item and description (first 13 characters), on-hand quantity, on-hand pieces, allocated quantity, andallocated pieces on each line.
Available functions are:F-Find: Get another location.N-Next and P-Previous: Displays the next or previous screenful of data for this location.LINE#: Swaps to the Tag Maintenance program in view mode only.S-SWAP: Displays alternate screen layout with full tag number, first ten characters of the item number, full
item description, the on-hand quantity and allocated quantity. Selecting S-SWAP again takes theuser back to the original screen.
9. TAG HISTORY INQUIRY
This option is a also part of standard Profit Manager for use with Location Control items. The purpose of theTag History Inquiry option is to determine what happened to a tag (its history), where it was used or shipped,where it originated, and which tags are associated with a specific purchase order or work order.
Find tag history by T-tag number, P-purchase order number, W-work order number, A-user defined prompt(heat/lot number), or B-user defined prompt (roll number).
TAG HISTORY INQUIRY RECEIVED CURRENTLN LV TAG LOC QTY PCS QTY PCS
FIND BY: (T-TAG P-PO W-WO A-HEAT/LOT# B-ROLL# E-END):

Profit Manager Tag / Lot Control System
Rev 6.1–Tag / Lot Control System Page 35
Tags that have history are shown with an ‘x’ to the left of the tag number.Tags that have both children and history are shown with an ‘*’ to the left of the tag number.Tags which are inactive show no location or current quantities.Tags that have allocations against them show an ‘A’ to the right the current quantity.The LV (level) field displays the relationship of a tag to its original parent tag.
When a tag, PO, WO, Heat, or Roll number is entered, the system searches the Tag File Maintenance file forthe respective number, displays a line for each found tag, and the functions: T-TAGFM (select a line numberto go to the Tag File Maintenance screen), H-HIST (history displays from most recent to oldest; select a linenumber to go to history screen and select history detail), and L-LIST (to print All History, limit the report toShipping history, or No history for this heat (A/S/N)). If All History or No History is selected, the report showsintermediate tags (inactive tags with no shipping history). If Shipping History is selected, the report does notshows intermediate tags.
10. AUTO ALLOCATE SALES AND WORK ORDERS
This option is a also part of standard Profit Manager for use with Location Control items. This optionproduces the Auto Allocations Exception Report. The system prompts to auto allocate by sales orders orwork orders.
S - If allocating by sales order the allocate options are: Allocate by a range of due date, by territory, byaccount, by all orders, by individual orders, by freight code, or by list of orders.
W - If allocating by work order the allocate options are: Allocate by unprinted, all, list, or range of pick lists, byaccount, warehouse, or release date range.
Note: This option looks at the allocate flag in the Warehouse Location file to determine which warehouselocations to allocate from.
11. ORDER PULLS
This option is a also part of standard Profit Manager for use with Location Control items. Select this option toprint the order pulls by list of orders, all unprinted order pulls, or by due date range, territory, account orwarehouse. Printed Order Pulls can be used in place of the sales order for internal use. Items must beallocated before printing order pulls.
Order pulls print on the same form as sales orders and invoices or can be printed on plain paper. The title,ORDER PULLS, prints in the upper right corner Transaction Type field. The system allows reprinting of orderpulls and indicates the reprint as ‘REPRINT PULLS’ in the Transaction Type field.
CONTROL FILES:If the CONTROLTG file flag, INCLUDE AVAILABLE TAGS ON PULL SHEET, is set to yes, all available(unallocated) tags show on the pull sheet below each item description (allocated tags for this item also print).If set to no, only allocated tags print.
If the CONTROLPRT file flag, PRINT PRICES ON PACKING LIST, is set to yes (or when prompted duringorder entry the operator enters Y), the price and sales order margin percent print on the order pulls.

Profit Manager Certification
Rev 6.1–Certification Page 36
CERTIFICATION SYSTEM
Certification (also referred to by some suppliers as Certs, Mill Test, and Material Test Reports (MTR)) is ameans of quality control for the chemical and physical properties of an item, particularly steel-based items.Customers frequently require certification of the items they incorporate into their products—all the way backto the original raw materials from which it was made. The stored analysis of an item can print when shipmentis made and sent with the shipment for verification of quality.
Profit Manager's Certification module divides certifications into two types:Ø Certifications received with items from suppliers (master certifications).Ù Certifications developed in Profit Manager (internal certifications).
Within Profit Manager, a flag in the Item Master file indicates whether an item requires an internalcertification. If certification is required, a certification form must be associated with an item.
The Profit Manager Certification system allows recording, creating, and printing an almost unlimited numberof certification formats. The system maintains three major data files. They are:
Certification FormsThe Certification Forms file contains a set of records (templates) for each type of certification and isaccessed through the Certification Form Maintenance option.
Certification DataThe Certification Data file contains a record for each material certification entered into the system.These records hold the data values (chemical, physical, etc.) for the particular material. The records areaccessed by a unique combination of Heat/Lot Number and/or Tag/Item/Serial Number.
Certification LayoutThe Certification Layout file contains a set of records that specify the placement of certificationinformation for printing a certification document. The layout is free-form. It is accessed through theCertification Layout Maintenance option and must coincide with an existing Certification Form.
THE PROCESS— Ø Create templates (Cert Form Maintenance). Templates contain permanent information (e.g.: labeled fields,minimum/maximum values, reserved words, and other information) that is used throughout the certificationprocess.Ù Enter the data (Cert Data Entry). The data is changeable and consist of Heat/Lot and/or Tag/Item number,reserved words, freeform text, and numeric variables based on the minimum/maximum values set in the CertForm Maintenance program (template).Ú Create certification layouts (Cert Layout Maintenance). The layouts tell the system how to pull theinformation from the template and data files and builds the print file.Û Print the certification report (Cert Print). Enter the Heat/Lot and/or Tag/Item numbers entered in data entryand print.

Profit Manager Certification
Rev 6.1–Certification Page 37
NOTES:
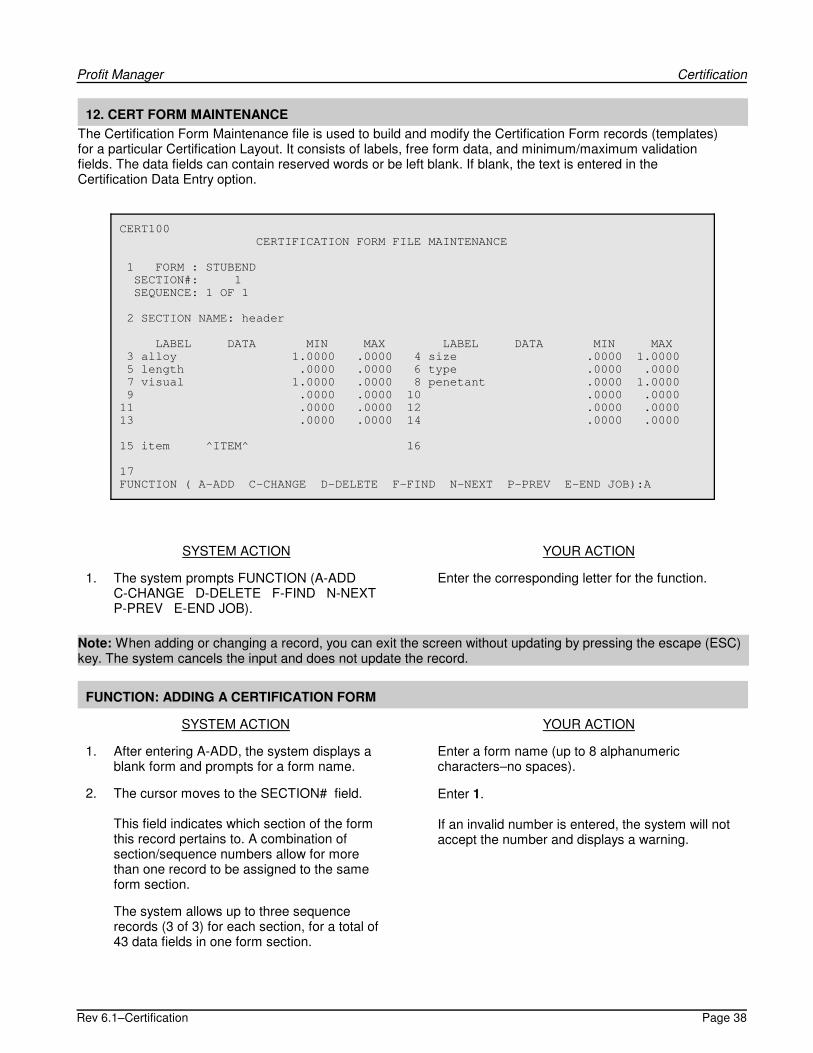
Profit Manager Certification
Rev 6.1–Certification Page 38
12. CERT FORM MAINTENANCE
The Certification Form Maintenance file is used to build and modify the Certification Form records (templates)for a particular Certification Layout. It consists of labels, free form data, and minimum/maximum validationfields. The data fields can contain reserved words or be left blank. If blank, the text is entered in theCertification Data Entry option.
SYSTEM ACTION YOUR ACTION
1. The system prompts FUNCTION (A-ADD C-CHANGE D-DELETE F-FIND N-NEXT P-PREV E-END JOB).
Enter the corresponding letter for the function.
Note: When adding or changing a record, you can exit the screen without updating by pressing the escape (ESC)key. The system cancels the input and does not update the record.
FUNCTION: ADDING A CERTIFICATION FORM
SYSTEM ACTION YOUR ACTION
1. After entering A-ADD, the system displays ablank form and prompts for a form name.
Enter a form name (up to 8 alphanumericcharacters–no spaces).
2. The cursor moves to the SECTION# field.
This field indicates which section of the formthis record pertains to. A combination ofsection/sequence numbers allow for morethan one record to be assigned to the sameform section.
Enter 1.
If an invalid number is entered, the system will notaccept the number and displays a warning.
The system allows up to three sequencerecords (3 of 3) for each section, for a total of43 data fields in one form section.
CERT100
CERTIFICATION FORM FILE MAINTENANCE
1 FORM : STUBEND
SECTION#: 1
SEQUENCE: 1 OF 1
2 SECTION NAME: header
LABEL DATA MIN MAX LABEL DATA MIN MAX
3 alloy 1.0000 .0000 4 size .0000 1.0000
5 length .0000 .0000 6 type .0000 .0000
7 visual 1.0000 .0000 8 penetant .0000 1.0000
9 .0000 .0000 10 .0000 .0000
11 .0000 .0000 12 .0000 .0000
13 .0000 .0000 14 .0000 .0000
15 item ^ITEM^ 16
17
FUNCTION ( A-ADD C-CHANGE D-DELETE F-FIND N-NEXT P-PREV E-END JOB):A

Profit Manager Certification
Rev 6.1–Certification Page 39
Note: About sequence records: Sequence records only apply to the Certification Form (template) records. Inthe Data Entry option, sequencing is not needed because the system displays up to three sequences on onedata entry screen.
3. When a section number is entered, thesystem inputs a sequence number (x of x) andprompts for the SECTION NAME.
Enter a section name (up to 20 alphanumericcharacters).
4. The cursor positions in the LABEL field. Enter a label name (up to 8 alphanumericcharacters). The label name will appear on thetarget certification form.
5. The cursor positions in the DATA field. Press Enter to leave blank (in a future release,reserved words will be available).
6. The cursor moves to the MIN field. Enter the minimum amount for the label (2 wholenumbers and 4 decimals) or leave blank.
7. Next the cursor moves to the MAX field.
Note: The maximum quantity must be equalto or greater than the minimum quantityunless blank.
Enter the maximum amount for the label (2 wholenumbers and 4 decimals) or leave blank.
8. Continue entering LABEL and DATAinformation as needed.
Note: Fields 15 (20 alphanumeric characters),16 (20 alphanumeric characters), and 17 (65alphanumeric characters) provide additionalspace for label and data field information anddo not require minimum and maximumquantities.
Field 17 is restricted to sequence 1 of asection only.
To exit, enter . (period) and press Enter.
9. The system asks INPUT NEXT SEQUENCE?(Y/N)
Enter Y to enter another sequence for this form.
Enter N to return to the function line.
FUNCTION: ADDING A NEW SECTION TO A FORM
SYSTEM ACTION YOUR ACTION
1. Follow the same procedure as ADDING ACERTIFICATION FORM except:
Ø Enter an existing form nameÙ Enter a section number that does not alreadyexists for this form.
FUNCTION: CHANGING A CERTIFICATION FORM
!!Note: Do not modify cert forms that already have data records.
SYSTEM ACTION YOUR ACTION
1. The system displays the Certification FormFile Maintenance screen.
Enter C to make a change to an existing form.

Profit Manager Certification
Rev 6.1–Certification Page 40
2. The cursor positions in the FORM field. Enter the name of the form to change.
3. Next the cursor moves to the SECTION #field.
Enter the section # to change.
4. The cursor moves to the first position of theSEQUENCE field.
Enter the beginning number of the sequence range.
5. The system prompts ENTER FIELD# TOCHANGE OR 'U' TO UPDATE.
Enter a field number (if you don't want to makechanges to the form, enter U to update and exitwithout any changes).
6. The cursor positions in the field to change. Enter the required changes. Enter . (period) andpress Enter to return to the function line.
Note:Ø If changing the form name, the system warns 'FORM NAME WILL BE CHANGED FOR ALL SECTIONSAND SEQUENCES! OK (Y/N). Ù Field 17 can only be changed for sequence 1 of 1.
7. The system again prompts ENTER FIELD#TO CHANGE OR 'U' TO UPDATE.
Enter U to update the file with your changes.
8. The system asks OK TO UPDATE THISRECORD AS SHOWN? (Y/N).
Verify the changes. If correct, enter Y. If not, enterN to cancel the changes.
FUNCTION: DELETING A CERTIFICATION FORM/SECTION OR SEQUENCE
SYSTEM ACTION YOUR ACTION
1. The system displays the Certification FormFile Maintenance screen.
Enter D to display a second function line.
2. The system prompts FUNCTION (DELETE F-FORM S-SECTION C-CURRENTSEQUENCE CR-NO ACTION).
To delete the entire form, enter F.To select a section to delete, enter S.To delete the current sequence, enter C.Press Enter for no action and cancel the deletion.
FUNCTION: F–FORM DELETE
SYSTEM ACTION YOUR ACTION
1. When 'F' is entered to delete the entire form,the system prompts for the FORM name.
Enter the name of the form to delete.
2. The cursor positions in the SECTION # field. Enter the section number.
3. The cursor moves to the SEQUENCE field. Enter the beginning sequence number to delete.
4. The system asks DELETE ALL SECTIONSAND SEQUENCES FOR THIS FORM? (Y/N)
Enter Y to delete the form.Enter N to cancel the deletion.
5. If 'Y' is entered, the system displays RECORDDELETED. If 'N' is entered, the systemdisplays RECORD NOT DELETED and thecursor returns to the function line.

Profit Manager Certification
Rev 6.1–Certification Page 41
FUNCTION: S–SECTION DELETE
SYSTEM ACTION YOUR ACTION
1. When 'S' is entered to delete a section of theform, the system prompts for the FORMname.
Enter the name of the form to delete.
2. The cursor positions in the SECTION # field. Enter the section number to delete.
3. The cursor moves to the SEQUENCE field. Enter the beginning sequence number to delete.
4. The system asks DELETE ALL SEQUENCESIN THIS SECTION? (Y/N)
Enter Y to delete all sections and sequences.Enter N to cancel the deletion.
5. If 'Y' is entered, the system displays RECORDDELETED. If 'N' is entered, the systemdisplays RECORD NOT DELETED and thecursor returns to the function line.
FUNCTION: C–CURRENT SEQUENCE
Note: When deleting sequences, delete the last sequence first (e.g.: Delete sequence 3 of 3 before deletingsequence 2 of 3).
SYSTEM ACTION YOUR ACTION
1. When 'C' is entered to delete the currentsequence, the system prompts for the FORMname.
Enter the name of the form to delete.
2. The cursor positions in the SECTION # field. Enter the section number to delete.
3. The cursor moves to the SEQUENCE field. Enter the beginning sequence number to delete.
4. The system asks OKAY TO DELETE? (Y/N) Enter Y to delete the displayed sequence.Enter N to cancel the deletion.
5. If 'Y' is entered, the system displays RECORDDELETED. If 'N' is entered, the systemdisplays RECORD NOT DELETED and thecursor returns to the function line.
FUNCTION: FINDING A CERTIFICATION FORM
SYSTEM ACTION YOUR ACTION
1. The system displays the Certification FormFile Maintenance screen.
Enter F to find a form.
2. The cursor positions in the FORM field. Enter the name of the form you are looking for.
3. The cursor positions in the SECTION # field. Enter the section number.
4. If the form is found, the system displays thefirst section and sequence range. If the formis not found, the system displays NOTFOUND and displays the next form in the file.

Profit Manager Certification
Rev 6.1–Certification Page 42
Press N-NEXT to display the next sequenceor next section for the displayed form. Thesystem prompts NEW SECTION. If anothersection or sequence does not exist for thisform, the system displays the next form in thefile and prompts NEW CERT FORM.
Press P-PREVIOUS to display prior forms.
FUNCTION: E-END. Exits the certification form screen and displays the Certification Menu.
13. CERT LAYOUT MAINTENANCE
The certification layout is free-form style where the user inputs fields (headings, section headings, labels, etc.) andreserved words to produce the certification print file. Enter reserved words in uppercase between carats: ^xxxx^. Enter user defined labels between tildes: ~xxxx~ (the label must exist on the Cert Form template). Be sure toleave enough room for reserved words and user defined labels to expand.
RESERVED WORDS: Begin and end each reserved word with a carat (^).
Reserved Words Definition Reserved Words Definition
^DATE^ System Date ^KEY2^ Tag/Item #
^TIME^ System Time ^CERTNO^ Certification #
^KEY1^ Heat/Lot # ^END^ Exit
^ITEM^ Item number
²²²² linenumbers
free-form text÷÷÷÷
²²²² reserved words-systemdefined
²²²² user defined labels betweenthe tildes

Profit Manager Certification
Rev 6.1–Certification Page 43
The following reserved words are only accessible when Cert Batch Print is run or when printing Certs directly fromshipping.
ReservedWords
Definition ReservedWords
Definition
^SONUM^ Sales Order ^SOLINE^ Sales Line
^CUSTNM^ Customer name from CustomerMaster file
^CUSTPO^ Customer PO from Order Header record
^IDESC^ Item description from Order Linerecord
^PROMDT^ Promise date from Order Header orOrder Line override due date
^PCQTY^ If PC part then PCs from OrderLine record else display 1
^SHTONAME^
Ship-to Name ^BLTONAME^
Bill-to Name
^SHTOADR1^ First line of ship-to address ^BLTOADR1^ First line of bill-to address
^SHTOADR2^ Second line of ship-to address ^BLTOADR2^ Second line of bill-to address
^SHTOADR3^ Third line of ship-to address ^BLTOADR3^ Third line of bill-to address
^SHTOADR4^ Fourth line of ship-to address ^BLTOADR4^ Fourth line of bill-to address
^SHTOADR5^ Fifth line of ship-to address ^BLTOADR5^ Fifth line of bill-to address
SYSTEM ACTION YOUR ACTION
1. The Certification Menu displays. Enter 12 to display the Certification LayoutMaintenance screen.
2. The system prompts FUNCTION: 1-FIND AFORM 2-ADD A FORM 3-DELETE AFORM 4-LIST E-END
Enter the corresponding number for the function orE to exit and return to the Certification Menu.
3. If 2-ADD A FORM is selected, the systemprompts ENTER CERT FORM.
Enter a name for this cert.
4. The system prompts SAME AS CERT? If you want to copy an existing cert to this new cert,enter the name of the cert you want to copy. Youcan then edit the cert.
FUNCTION: FINDING A FORM
SYSTEM ACTION YOUR ACTION
1. The system displays the Certification LayoutMaintenance screen.
Enter 1 to find an existing form.
2. The system prompts ENTER CERT FORMNAME.
Enter an existing form name.
Note: The form name must exist in the CertificationForms and Data files.
3. The system displays the CERT FORM nameat the top of the screen, displays the layout,and prompts 1-CHANGE A LINE 2-ADD ALINE 3-DELETE A LINE 0-DISPLAY MORE
Enter the corresponding number for function.
4. If 1-CHANGE A LINE is entered, the systemprompts ENTER LINE #.
Enter the number of the line you wish to change.

Profit Manager Certification
Rev 6.1–Certification Page 44
5. The system displays the line number at thebottom of the screen.
Enter the changes for this line.
6. If 2-ADD A LINE is entered, the systemprompts ENTER LINE #.
Enter the number of the line to add.
7. The system displays LINE: at the bottom ofthe screen.
Enter the information for this new line.
8. If 3-DELETE A LINE is entered, the systemprompts ENTER LINE #.
Enter the number of the line to delete.
9. The system prompts OKAY TO DELETE xx Y/N
Enter Y to delete the line. Enter N to cancel thedelete and return the cursor to the function line.
FUNCTION: 0-DISPLAY MORE. The system only displays 20 lines of the layout on one screen. Enter 0 toscroll down to the next screen.
FUNCTION: ADDING A FORM
SYSTEM ACTION YOUR ACTION
1. The system displays the Certification LayoutMaintenance screen.
Enter 2 to add a new form.
2. The system prompts ENTER CERT FORM. Enter a name for the certification form.
Note: The layout form name must exist on thecertification form and data files.
3. The system displays the first line number.
....Note: Line numbers increment by 10.
Enter the information for the first line or press Enterfor a blank line.
Note: The line information can include free-formtext, reserved words (reserved words begin andend with a carat (^)) and also labels from thecertification forms file (labels begin and end with atilde (~)).
4. The system displays the next line. Continue entering information. On the last blankline, enter ^END^ to exit and return to the functionline.
FUNCTION: DELETING A FORM
SYSTEM ACTION YOUR ACTION
1. The system displays the Certification LayoutMaintenance screen.
Enter 3 to delete a new form.
2. The system prompts ENTER CERT LAYOUTTO DELETE.
Enter the form name to delete.

Profit Manager Certification
Rev 6.1–Certification Page 45
3. The system prompts OKAY TO DELETELAYOUT 'xxxxxxxxx' Y/N
Enter Y to delete the layout. Enter N to cancel thedelete and return to the function line.
The system displays RECORD DELETED whenyes is entered and RECORD NOT DELETED whenno is entered.
FUNCTION: LIST
SYSTEM ACTION YOUR ACTION
1. The system displays the Certification LayoutMaintenance screen.
Enter 4 to produce a listing.
2. The system prompts ENTER CERT FORMOR 'LIST' TO PRINT CERT FORM NAMES.
To print all line of the layout exactly as entered,enter a certification form name.
To print a list of layout file names, enter the wordLIST.
3. The system prompts ENTER PRINTERNUMBER 1 TO X.
Enter the number of the printer you are using.
FUNCTION: E-END. Exits the certification layout maintenance screen and displays the Certification Menu.
14. CERT DATA ENTRY
The Certification Data Entry program is used to enter data for specific heat and/or tag certifications.
SYSTEM ACTION YOUR ACTION
1. The Certification Menu displays. Enter 13 to display the Certification Data Entryscreen.
2. The system prompts FUNCTION (A-ADD C-CHANGE D-DELETE F-FIND N-NEXT P-PREV E-END JOB).
Enter the corresponding letter for the function.

Profit Manager Certification
Rev 6.1–Certification Page 46
FUNCTION: ADDING DATA TO A CERTIFICATION FORM
1. After entering A-ADD, the system displays ablank form and prompts for a HEAT/LOTname.
Enter a heat/lot name (up to 18 alphanumericcharacters) or press Enter to leave blank.
2. The cursor moves to the TAG/ITEM field. Enter a tag/item name (up to 18 alphanumericcharacters) or press Enter to leave blank.
Note: Either the heat/lot field or the tag/item field must contain data. The system prompts HEAT AND/OR TAGMUST BE ENTERED if both are blank.
3. The system displays the FORM NAME andpositions the cursor in the SECTION # field.
Enter an existing form name (a form that has beenset up in Cert Form Maintenance).
4. Next the cursor is in the SECTION # field. Enter the section number to display—or—PressEnter to display the first available section—or Entera question mark (?) to open a window and enter thecorresponding number of the section to add.
• The section name displays to the right of thesection number.
• The section number must exist in the CertificationForm file.
5. The system searches for a matching recordbased on the entered heat/tag information.
• If a matching record is not found, the cursorpositions in the CERT NO. field.
• If a matching record is found, the systemdisplays RECORD ALREADY EXISTS andreturns the cursor to the function line.
Enter the certification number (up to 18alphanumeric characters).
6. The system automatically displays the labels from the Certification Form record andpositions the cursor in the first data field thathas a label and requires input (data fields withreserved words do not require input).
Note: Blank labels on the template CertificationForm are also blank on the Certification DataEntry form and do not require input.
Enter the data information for each field.
Note:Ø For fields 2-37 (if minimum/maximum are set upin the form file) the system checks the min/maxvalues from the Certification Form record. If a valueexists, the system displays at the bottom of theform:RANGE: xx.xxxx – xx.xxxx
• If no min/max are found, then the data enteredcan be alphanumeric.

Profit Manager Certification
Rev 6.1–Certification Page 47
• If both a minimum and a maximum quantity arefound, the data entered must be numeric, andequal to or greater than the minimum and equalto or less than the maximum.
• If only a minimum or only a maximum is found,then the data must be numeric and the min/maxvalue is used as a lower or upper limit.
• If the entered numeric data is out-of-range forthe minimum or maximum, the system issues awarning.
7. If a form has additional sections on file in theCertification Form record, the system promptsADD ANOTHER SECTION TO THIS CERT?(Y/N)
Enter Y to add a section. Enter N to cancel andreturn to the function line.
8. When Y is entered, the cursor positions in theSECTION# field.
Enter the section number to display—or—Press Enter to display the first available section—orEnter a question mark (?) to open a window andenter the corresponding number of the section toadd.
9. The cursor positions in the CERT NO. field. Enter the certification number (up to 18alphanumeric characters) and proceed withentering the data for this cert.
FUNCTION: ADDING DATA TO A SECTION
SYSTEM ACTION YOUR ACTION
1. The system displays the Certification DataEntry screen.
Enter A to add data.
2. The cursor positions in the HEAT/LOT field. Enter the Heat/Lot information or press Enter ifblank.
3. Next the cursor moves to the TAG/ITEM# field. Enter the Tag/Item # to change or press Enter ifblank.
4. The system displays the FORM NAME of theexisting certification and positions the cursor inthe SECTION # field.
Enter the section number to display—or—Press Enter to display the first available section—orEnter a question mark (?) to open a window andenter the corresponding number of the section toadd.
5. The cursor moves to the CERT NO. field. Enter the certification number.
6. The system automatically displays the labels from the Certification Form record andpositions the cursor in the first data field thathas a label and requires input (data fields withreserved words do not require input).
Enter the data information for each field. Press .(period) and Enter to return to the function line.

Profit Manager Certification
Rev 6.1–Certification Page 48
FUNCTION: CHANGING A CERTIFICATION NUMBER AND/OR DATA
SYSTEM ACTION YOUR ACTION
1. The system displays the Certification DataEntry screen.
Enter C to make a change to the CERT NO. ordata fields.
2. The cursor positions in the HEAT/LOT field. Enter the Heat/Lot information or press Enter ifblank.
3. Next the cursor moves to the TAG/ITEM# field. Enter the Tag/Item # to change or press Enter ifblank.
4. The system displays the FORM NAME andpositions the cursor in the SECTION # field.
Enter the section number to display—or—Press Enter to display the first available section—orEnter a question mark (?) to open a window andenter the corresponding number of the section toadd.
5. The system prompts ENTER FIELD# TOCHANGE OR 'U' TO UPDATE.
Note: Data fields that contain reserved wordscannot be changed.
Enter a field number (if you don't want to makechanges to the form, enter U to update and exitwithout any changes).
6. The cursor positions in the field to change. Enter the required changes. Enter . (period) andpress Enter to return to the function line.
7. The system again prompts ENTER FIELD# TOCHANGE OR 'U' TO UPDATE.
Enter U to update the file with your changes.
8. The system asks OK TO UPDATE THISRECORD AS SHOWN? (Y/N).
Verify the changes. If correct, enter Y. If not, enterN to cancel the changes.
FUNCTION: DELETING A CERTIFICATION DATA ENTRY
SYSTEM ACTION YOUR ACTION
1. The system displays the Certification DataEntry screen.
Enter D to display a second function line.
2. The system prompts DELETE FUNCTION (C-CERT S-SECTION CR-NO ACTION).
To delete the entire data entry form, enter CTo select a section to delete, enter S.Press Enter for no action and cancel the deletion.
FUNCTION: C–CERT DELETE
SYSTEM ACTION YOUR ACTION
1. When 'C' is entered to delete a cert, the cursorpositions in the HEAT/LOT field.
Enter the Heat/Lot information or press Enter ifblank.
2. The cursor moves to the TAG/ITEM# field. Enter the Tag/Item # to change or press Enter ifblank.
3. The system prompts DELETE ALL SECTIONSFOR THIS CERT!? (Y/N)
Enter Y to delete the entire cert.Enter N to cancel the deletion and return to thefunction line.

Profit Manager Certification
Rev 6.1–Certification Page 49
4. If 'Y' is entered, the system displays RECORDDELETED. If 'N' is entered, the systemdisplays RECORDS NOT DELETED and thecursor returns to the function line.
FUNCTION: S–SECTION DELETE
SYSTEM ACTION YOUR ACTION
1. When 'S' is entered to delete a section, thecursor positions in the HEAT/LOT field.
Enter the Heat/Lot information or press Enter ifblank.
2. The cursor moves to the TAG/ITEM# field. Enter the Tag/Item # to change or press Enter ifblank.
3. The system displays the FORM NAME andpositions the cursor in the SECTION # field.
Enter the section number to delete or press Enterto display the first available section.
4. The system prompts OKAY TO DELETE THISSECTION? (Y/N)
Enter Y to delete the displayed section. Enter N tocancel the deletion and return to the function line.
5. If 'Y' is entered, the system displays RECORDDELETED. If 'N' is entered, the systemdisplays RECORD NOT DELETED and thecursor returns to the function line.
FUNCTION: FINDING A CERTIFICATION DATA ENTRY
SYSTEM ACTION YOUR ACTION
1. The system displays the Certification DataEntry screen.
Enter F to find a form.
2. The cursor positions in the HEAT/LOT field. Enter the Heat/Lot information or press Enter ifblank.
3. The cursor moves to the TAG/ITEM# field. Enter the Tag/Item # to change or press Enter ifblank.
4. The system displays the FORM NAME andpositions the cursor in the SECTION # field.
Enter the section number or press Enter to displaythe first available section.
5. If the form is found, the system displays it tothe screen. If the form is not found, the systemdisplays NOT FOUND and displays the nextform in the file.
Press N-NEXT to display the next section for thedisplayed form. The system prompts NEWSECTION. If another section does not exist for thisform, the system displays the next form in the fileand prompts NEW CERT FORM.
Press P-PREVIOUS to display prior forms.
FUNCTION: E-END. Exits the certification data entry screen and displays the Certification Menu.
15. MANUAL CERT MERGE

Profit Manager Certification
Rev 6.1–Certification Page 50
This option requires assistance from PBSI, call for Customer Support.
16. BATCH CERT PRINT
Processes the CERTPRINT file. If two certs exist for the same Heat Number only one of the certs will print. Allowsfor recovery printing of certifications by entering the tag number of the last certification that printed. Certs print onlyfor items that are shipped.
17. CERT PRINT
SYSTEM ACTION YOUR ACTION
1. The system displays the Certification Menu. Enter 16 to print.
2. The system displays the user defined label setup in the Control File, screen 2, for theHEAT/LOT NUMBER.
<ESC> TO END displays at the bottom of thescreen. Press the escape (ESC) to exit andend the print request.
Enter the Heat/Lot number of the certification formto print.
3. The system displays the user defined label setup in the Control File, screen 2, for the TAG/SERIAL/ITEM NUMBER.
Enter the Tag/Serial/Item Number of thecertification form to print. Press Enter to leaveblank.
4. The system searches for the cert form file andthe Heat/Lot# .If found, prompts CERT FORMPRINTING. If the certification form is not found,the system warns CERT KEY NOT ON FILE.
Enter another combination of heat/lot andtag/serial/item number to print another certificationform.
<ESC> TO END displays at the bottom of thescreen. Press the ESC key to exit. The systemdisplays CERT PRINT PROGRAM ENDING.
5. The system displays the Printing CertificationsForm screen and prompts ENTER PRINTERNUMBER 1 TO X.
Enter the number of the printer you are using.
ORDER ENTRY—SHIP AND/OR BACK-ORDER AN ORDERCertifications can be printed from order entry ship if the customer record field, CERT PRINT REQ, indicates yes
Sample Cert Printout—

Rev 6.1–Certification Page 51
and valid cert data records exist for the line item allocation tag/heat combination. If two Certs exist for the sameHEAT number only one of them will print.
Once S-SHIP is entered, and the choices for printing a packing list and/or bill of lading are entered, the systemprompts CERT TO PRINT indicating that there is a certification form to print for this order. The system prompts fora printer number and sends the cert information to the printer.
18. CERT PRINT BY SALES ORDER
Verify the requested cert is valid for the sales order it will print on. Enter a sales order number. If two Certs exist forthe same HEAT number only one of them will print. Certs print for shipped items only.
NOTES: