Embed Size (px)
Citation preview
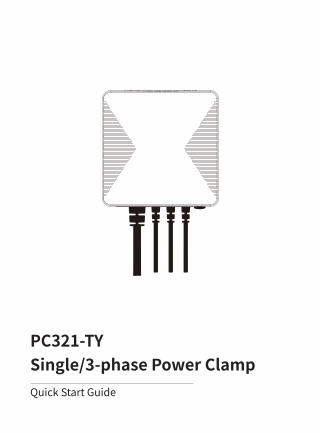
PC321-TY Single/3-phase Power ClampQuick Start Guide
2
Safety HandlingWARNING: Failure to follow these safety notices could result in fire, electric shock, other injuries, or damage to the Power Clamp and other property. Read all the safety notices below before using the Power Clamp.
• Avoid high humidity or extreme temperatures.• Avoid long exposure to direct sunlight or strong ultraviolet light. • Do not drop or expose the unit to intense vibration.• Do not disassemble or try to repair the unit on your own.• Do not expose the unit or its accessories to flammable liquids, gases or other explosives.
3
Technical SpecificationsWireless Connectivity
Wi-Fi • 802.11 B/G/N20/N40
RF Characteristics• Operating frequency: 2.4GHz• Internal Antenna
Physical SpecificationsOperating Voltage • 100~240 Vac 50/60 Hz
Calibrated Metering Accuracy• ≤ 100W ( Within ±2W ) • >100W ( Within ±2% )
CT Provided• CT 80A (default)• CT 120A/200A/300A(optional)
Operating environment• Temperature: -20 ℃ ~ +55 ℃• Humidity: ≤ 90% non-condensing
Dimension • 86(L) x 86(W) x 37(H) mm
4
Welcome1
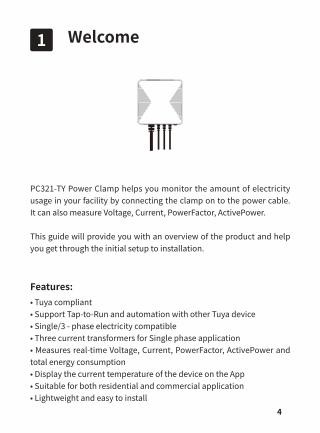
PC321-TY Power Clamp helps you monitor the amount of electricity usage in your facility by connecting the clamp on to the power cable. It can also measure Voltage, Current, PowerFactor, ActivePower.
This guide will provide you with an overview of the product and help you get through the initial setup to installation.
• Tuya compliant• Support Tap-to-Run and automation with other Tuya device• Single/3 - phase electricity compatible• Three current transformers for Single phase application• Measures real-time Voltage, Current, PowerFactor, ActivePower and total energy consumption• Display the current temperature of the device on the App• Suitable for both residential and commercial application• Lightweight and easy to install
Features:
5
2
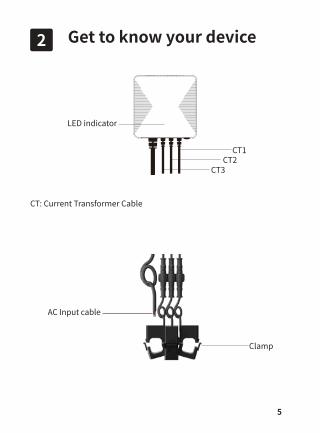
CT: Current Transformer Cable
Get to know your device
LED indicator
AC Input cable
CT3
Clamp
CT2CT1

6
Reset Button• Reset. Press and hold the reset button for 5 seconds until the LED indicator flashes 3 times quikly to restore the power clamp to default factory settings (energy data will be cleared). And it will get into EZ mode for 3 minutes.
Reset Button
LED indicatorThe LED status gives the following information of the power clamp:LED Status What it means
Green LED Rapidly blink: EZ pair modeSlowly blink: AP pair mode
Green LED solid on Device has connected with router.No light Device can not connect with router.
• EZ pair mode (Default): Quick pair devices. You can set all devices to this mode, and then add devices in batches on your phone.
• AP pair mode: If you would like to pair one specific device during many devices. Please refer to FAQ1 to configure network in this mode.

7
3 InstallaionImportant safety information! • The power clamp must be installed and serviced only by a qualified electrical personnel.• Do not touch the terminals of the device during testing.• Turn off all the power supply for this equipment before installing.• Make sure that the power supply is off before connecting or disconnecting it to an auxiliary device.• Always use a properly rated voltage sensing device to confirm power is off.• Replace all devices, doors and covers before applying power to the equipment.Failure to follow these instructions will result in death or serious injury.
Get started:Please make sure the main power in your facility is off before installing. Follow the schematics below as an example to wire the Power Clamp for different phase.
N
Red/L1Green/L2Brown/L3White/N
PC321
Load1
L1 N
Load2
L2 N
Load3
L3 NL1/AL2/BL3/C
L3/C
L2/B
L1/A
CircuitBreaker
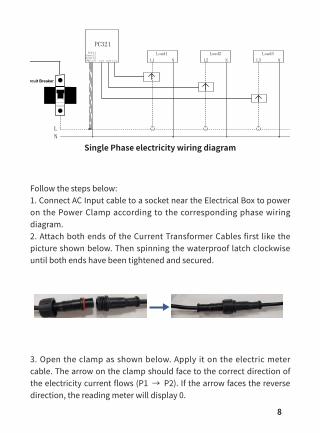
3 Phase electricity wiring diagram
8
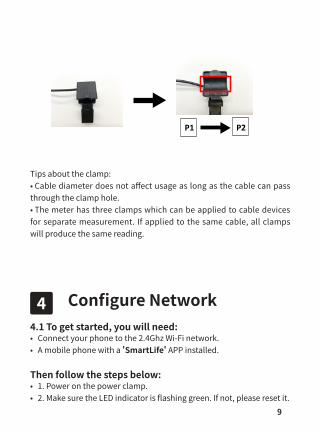
3. Open the clamp as shown below. Apply it on the electric meter cable. The arrow on the clamp should face to the correct direction of the electricity current flows (P1 → P2). If the arrow faces the reverse direction, the reading meter will display 0.
Follow the steps below:1. Connect AC Input cable to a socket near the Electrical Box to power on the Power Clamp according to the corresponding phase wiring diagram.2. Attach both ends of the Current Transformer Cables first like the picture shown below. Then spinning the waterproof latch clockwise until both ends have been tightened and secured.
Single Phase electricity wiring diagram
LN
Red/L1Green/L2Brown/L3White/N
PC321
Load1
L1 N
Load2
L2 N
Load3
L3 NL1/AL2/BL3/C
Circuit Breaker
9
P2P1
Tips about the clamp:• Cable diameter does not affect usage as long as the cable can pass through the clamp hole. • The meter has three clamps which can be applied to cable devices for separate measurement. If applied to the same cable, all clamps will produce the same reading.
4 Configure Network4.1 To get started, you will need:• Connect your phone to the 2.4Ghz Wi-Fi network.• A mobile phone with a 'SmartLife' APP installed.
Then follow the steps below: • 1. Power on the power clamp. • 2. Make sure the LED indicator is flashing green. If not, please reset it.
10
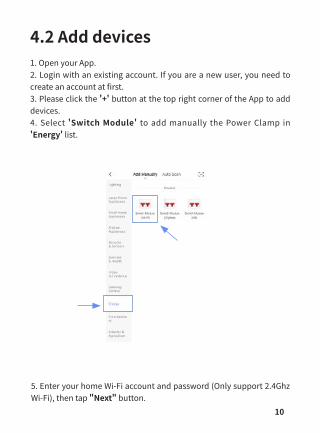
1. Open your App.2. Login with an existing account. If you are a new user, you need to create an account at first.3. Please click the '+' button at the top right corner of the App to add devices.4. Select 'Switch Module' to add manually the Power Clamp in 'Energy' list.
4.2 Add devices
5. Enter your home Wi-Fi account and password (Only support 2.4Ghz Wi-Fi), then tap "Next" button.

11
6. Place the router, mobile phone and Power Clamp as close as possible to wait for connection. Confirm the green indicator on your device is rapidly blink, then tap 'Next'.
7. After the connection succeeds, you can rename the it and click "Done" to complete. (If failed, please refer to FAQ3 to troubleshoot)
12
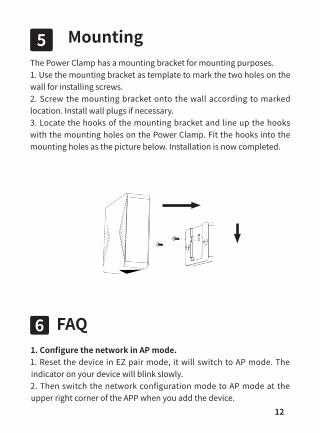
5 MountingThe Power Clamp has a mounting bracket for mounting purposes.1. Use the mounting bracket as template to mark the two holes on the wall for installing screws.2. Screw the mounting bracket onto the wall according to marked location. Install wall plugs if necessary.3. Locate the hooks of the mounting bracket and line up the hooks with the mounting holes on the Power Clamp. Fit the hooks into the mounting holes as the picture below. Installation is now completed.
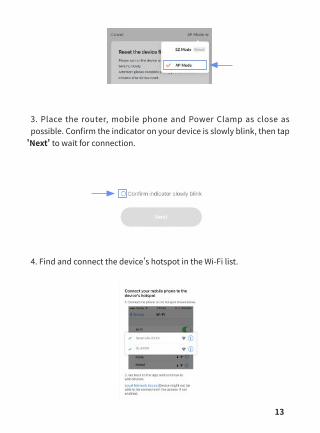
6 FAQ1. Configure the network in AP mode.1. Reset the device in EZ pair mode, it will switch to AP mode. The indicator on your device will blink slowly.2. Then switch the network configuration mode to AP mode at the upper right corner of the APP when you add the device.
13
3. Place the router, mobile phone and Power Clamp as close as possible. Confirm the indicator on your device is slowly blink, then tap
'Next' to wait for connection.
4. Find and connect the device's hotspot in the Wi-Fi list.
14
5. After the connection succeeds, you can rename it and click 'Done' to complete the configuration. (If failed, please refer to FAQ3 to troubleshoot)
2. How to identify the Power Clamp is powered on?1. You can press the reset button once, if the LED indicator flashes red 3 times, which means the device is powered on.
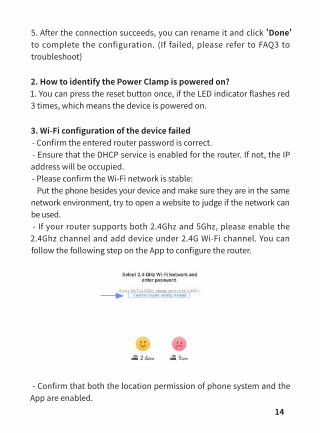
3. Wi-Fi configuration of the device failed - Confirm the entered router password is correct. - Ensure that the DHCP service is enabled for the router. If not, the IP address will be occupied. - Please confirm the Wi-Fi network is stable: Put the phone besides your device and make sure they are in the same network environment, try to open a website to judge if the network can be used. - If your router supports both 2.4Ghz and 5Ghz, please enable the 2.4Ghz channel and add device under 2.4G Wi-Fi channel. You can follow the following step on the App to configure the router.
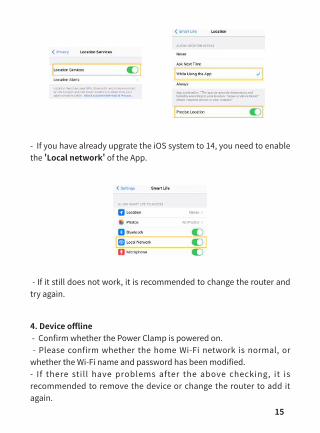
- Confirm that both the location permission of phone system and the App are enabled.
15
- If it still does not work, it is recommended to change the router and try again.
- If you have already upgrate the iOS system to 14, you need to enable the 'Local network' of the App.
4. Device offline - Confirm whether the Power Clamp is powered on. - Please confirm whether the home Wi-Fi network is normal, or whether the Wi-Fi name and password has been modified.- If there still have problems after the above checking, it is recommended to remove the device or change the router to add it again.