Embed Size (px)
Citation preview
Rev C
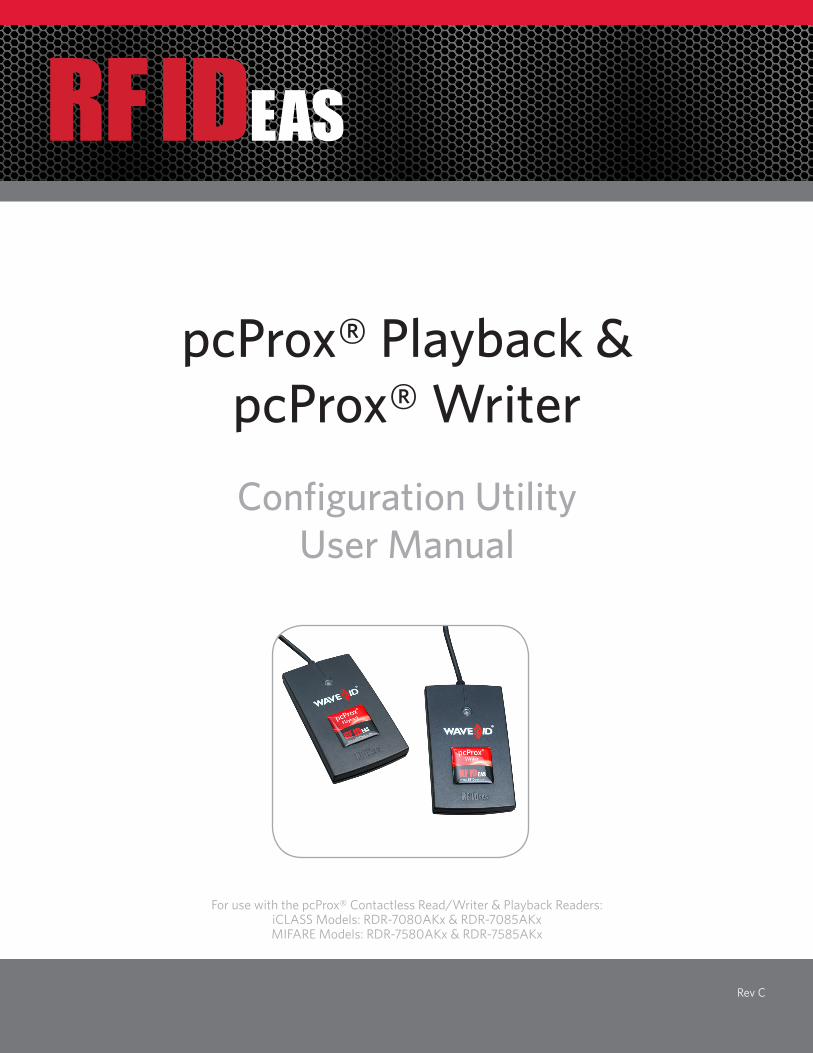
pcProx® Playback & pcProx® Writer
Configuration UtilityUser Manual
For use with the pcProx® Contactless Read/Writer & Playback Readers:iCLASS Models: RDR-7080AKx & RDR-7085AKxMIFARE Models: RDR-7580AKx & RDR-7585AKx

Thank You!Congratulations on the purchase of your pcProx® Playback and/or pcProx® Writer device(s). RF IDeas hopes you enjoy using the readers as much as we enjoyed creating and developing them. Configuration is easy, so you will be able to quickly take advantage of a more secure environment in your business, school, or organization.
Please call our Sales department if you have any questions or are interested in our OEM and Independent Developer’s programs.
We look forward to your comments and suggestions for our product line! Please go to www.RFIDeas.com and follow the Support a Learning Center link for more details about our product line.
We are always discovering new applications for our product line(s). There are several software developer’s licensing our technology so the solution you are looking for may already be developed.
Thank you,The RF IDeas Staff
Need Assistance?
Ph: 847.870.1723 Fx: 847.483.1129 E: [email protected] [email protected]
2
3
Contents
2 Thank You!
4 Chapter 1: The Basics 4 Wireless Identification Overview5 ID Card Reader System5 pcProx Output Formats 6 Credential Form Factors7 Card Compatibility7 Reader Configuration Purposes
8 Chapter 2:Hardware 8 What’s In Your Part Number? 9 Interface (Connectors)10 USB Readers and Wiegand Converters 10 RS-232 Readers and Converters10 Minimum System Requirements11 Reader Set-Up Basics11 LED Beeper
12 Chapter 3: Software12 pcProx Card Manager Overview13 pcProx Card Manager Utility 14 Connect Tab 16 pcProx Writer for Log-On Tab 29 pcProx Writer for Swipe Cards Tab 30 pcProx Playback Tab 36 About Tab 38 File Menu 39 Auto-Run Operation
42 Chapter 4: Increasing Security42 Security Overview
44 Chapter 5: Card Management44 iCLASS45 MIFARE
51 Chapter 6: Auto-Locking the Workstation
53 Chapter 7: Tips & Troubleshooting53 Troubleshooting53 Before You Call Technical Support53 Talking to the Technician
56 Index 57 Other Products and Accessories
4
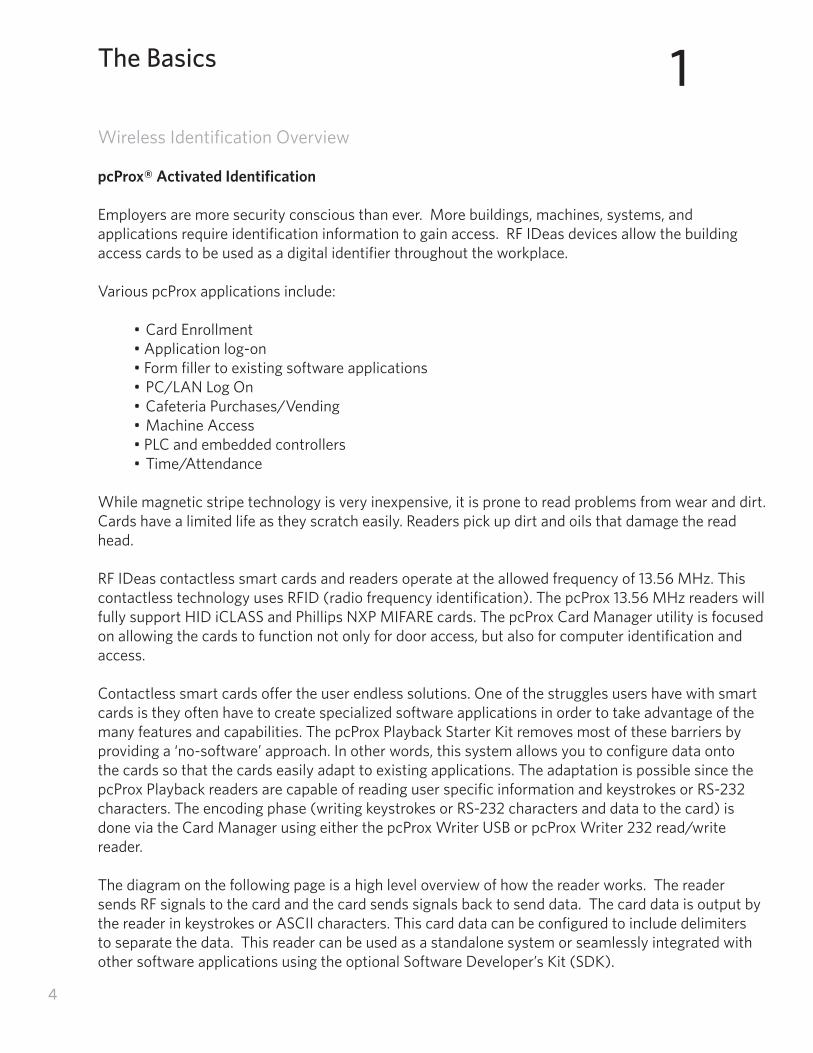
Wireless Identification Overview
pcProx® Activated Identification
Employers are more security conscious than ever. More buildings, machines, systems, and applications require identification information to gain access. RF IDeas devices allow the building access cards to be used as a digital identifier throughout the workplace.
Various pcProx applications include:
• Card Enrollment• Application log-on• Form filler to existing software applications• PC/LAN Log On• Cafeteria Purchases/Vending• Machine Access• PLC and embedded controllers• Time/Attendance
While magnetic stripe technology is very inexpensive, it is prone to read problems from wear and dirt.Cards have a limited life as they scratch easily. Readers pick up dirt and oils that damage the readhead.
RF IDeas contactless smart cards and readers operate at the allowed frequency of 13.56 MHz. Thiscontactless technology uses RFID (radio frequency identification). The pcProx 13.56 MHz readers will fully support HID iCLASS and Phillips NXP MIFARE cards. The pcProx Card Manager utility is focused on allowing the cards to function not only for door access, but also for computer identification and access.
Contactless smart cards offer the user endless solutions. One of the struggles users have with smartcards is they often have to create specialized software applications in order to take advantage of themany features and capabilities. The pcProx Playback Starter Kit removes most of these barriers by providing a ‘no-software’ approach. In other words, this system allows you to configure data onto the cards so that the cards easily adapt to existing applications. The adaptation is possible since the pcProx Playback readers are capable of reading user specific information and keystrokes or RS-232 characters. The encoding phase (writing keystrokes or RS-232 characters and data to the card) is done via the Card Manager using either the pcProx Writer USB or pcProx Writer 232 read/write reader.
The diagram on the following page is a high level overview of how the reader works. The reader sends RF signals to the card and the card sends signals back to send data. The card data is output by the reader in keystrokes or ASCII characters. This card data can be configured to include delimiters to separate the data. This reader can be used as a standalone system or seamlessly integrated with other software applications using the optional Software Developer’s Kit (SDK).
1The Basics
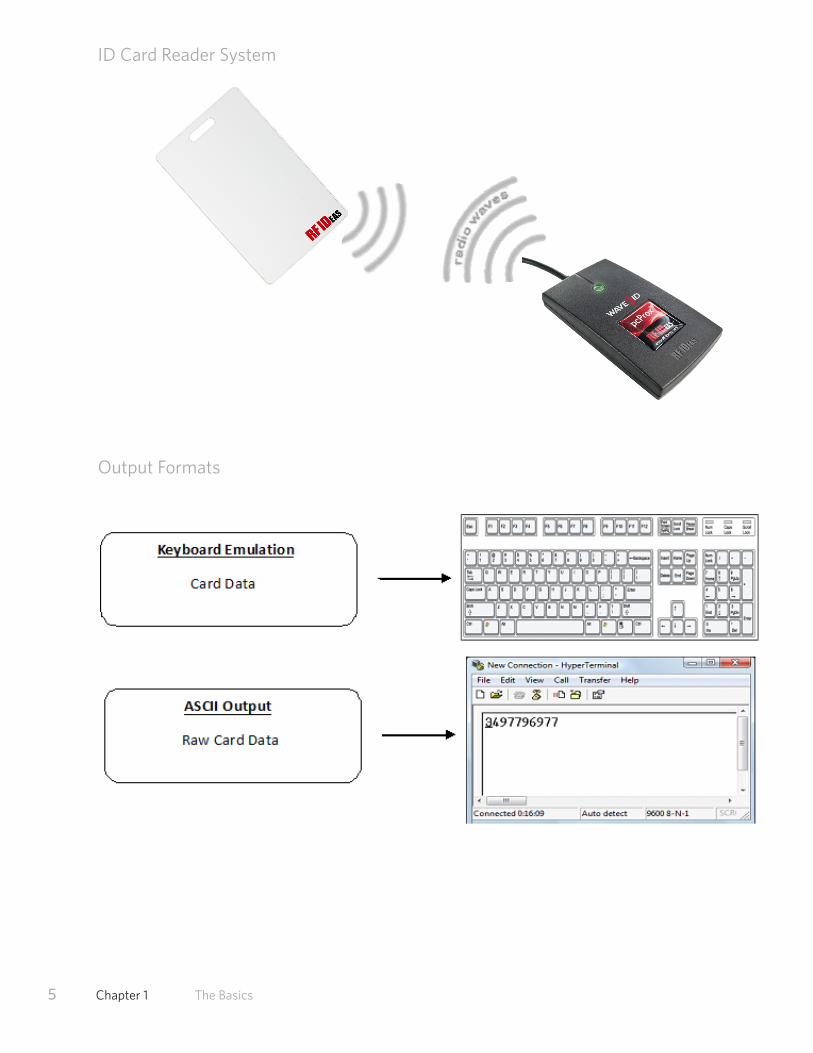
ID Card Reader System
Output Formats
5 Chapter 1 The Basics
6 Chapter 1 The Basics
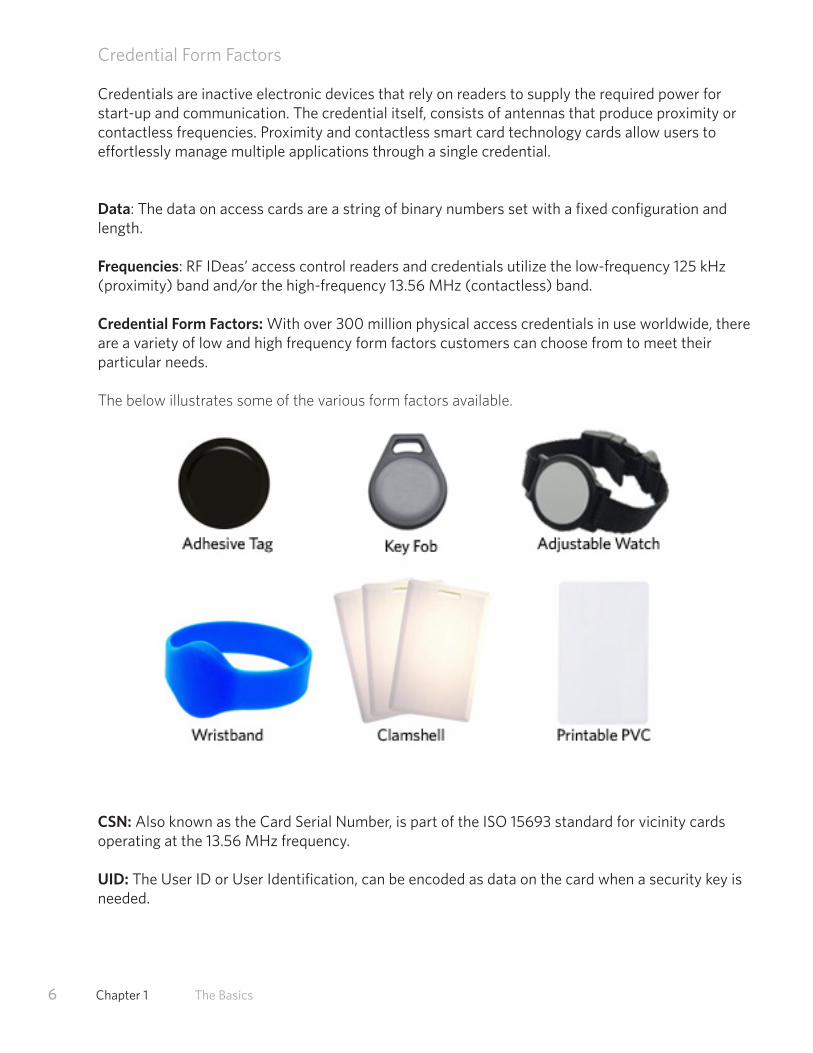
Credential Form Factors
Credentials are inactive electronic devices that rely on readers to supply the required power for start-up and communication. The credential itself, consists of antennas that produce proximity or contactless frequencies. Proximity and contactless smart card technology cards allow users to effortlessly manage multiple applications through a single credential.
Data: The data on access cards are a string of binary numbers set with a fixed configuration and length.
Frequencies: RF IDeas’ access control readers and credentials utilize the low-frequency 125 kHz (proximity) band and/or the high-frequency 13.56 MHz (contactless) band.
Credential Form Factors: With over 300 million physical access credentials in use worldwide, there are a variety of low and high frequency form factors customers can choose from to meet their particular needs.
The below illustrates some of the various form factors available.
CSN: Also known as the Card Serial Number, is part of the ISO 15693 standard for vicinity cards operating at the 13.56 MHz frequency.
UID: The User ID or User Identification, can be encoded as data on the card when a security key is needed.
7 Chapter 1 The Basics
Card Compatibility
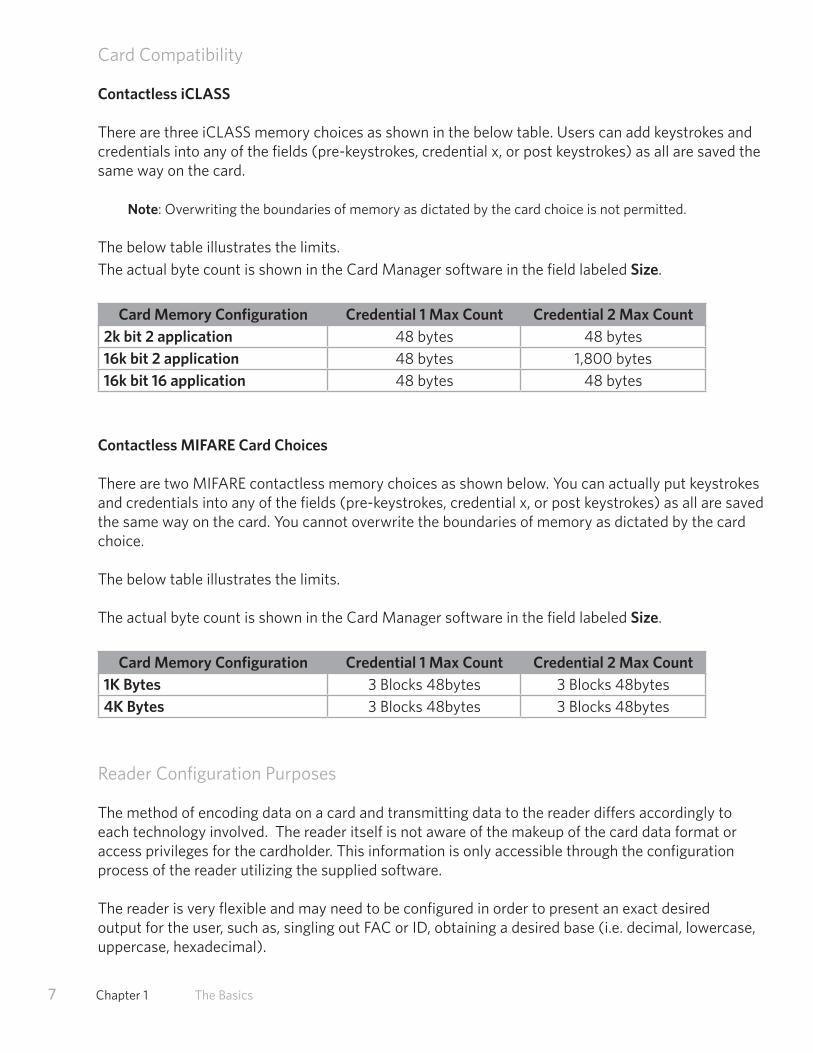
Contactless iCLASS
There are three iCLASS memory choices as shown in the below table. Users can add keystrokes andcredentials into any of the fields (pre-keystrokes, credential x, or post keystrokes) as all are saved thesame way on the card.
Note: Overwriting the boundaries of memory as dictated by the card choice is not permitted.
The below table illustrates the limits. The actual byte count is shown in the Card Manager software in the field labeled Size.
Card Memory Configuration Credential 1 Max Count Credential 2 Max Count2k bit 2 application 48 bytes 48 bytes16k bit 2 application 48 bytes 1,800 bytes16k bit 16 application 48 bytes 48 bytes
Contactless MIFARE Card Choices
There are two MIFARE contactless memory choices as shown below. You can actually put keystrokes and credentials into any of the fields (pre-keystrokes, credential x, or post keystrokes) as all are saved the same way on the card. You cannot overwrite the boundaries of memory as dictated by the card choice.
The below table illustrates the limits.
The actual byte count is shown in the Card Manager software in the field labeled Size.
Card Memory Configuration Credential 1 Max Count Credential 2 Max Count1K Bytes 3 Blocks 48bytes 3 Blocks 48bytes4K Bytes 3 Blocks 48bytes 3 Blocks 48bytes
Reader Configuration Purposes
The method of encoding data on a card and transmitting data to the reader differs accordingly to each technology involved. The reader itself is not aware of the makeup of the card data format or access privileges for the cardholder. This information is only accessible through the configuration process of the reader utilizing the supplied software.
The reader is very flexible and may need to be configured in order to present an exact desired output for the user, such as, singling out FAC or ID, obtaining a desired base (i.e. decimal, lowercase, uppercase, hexadecimal).
8
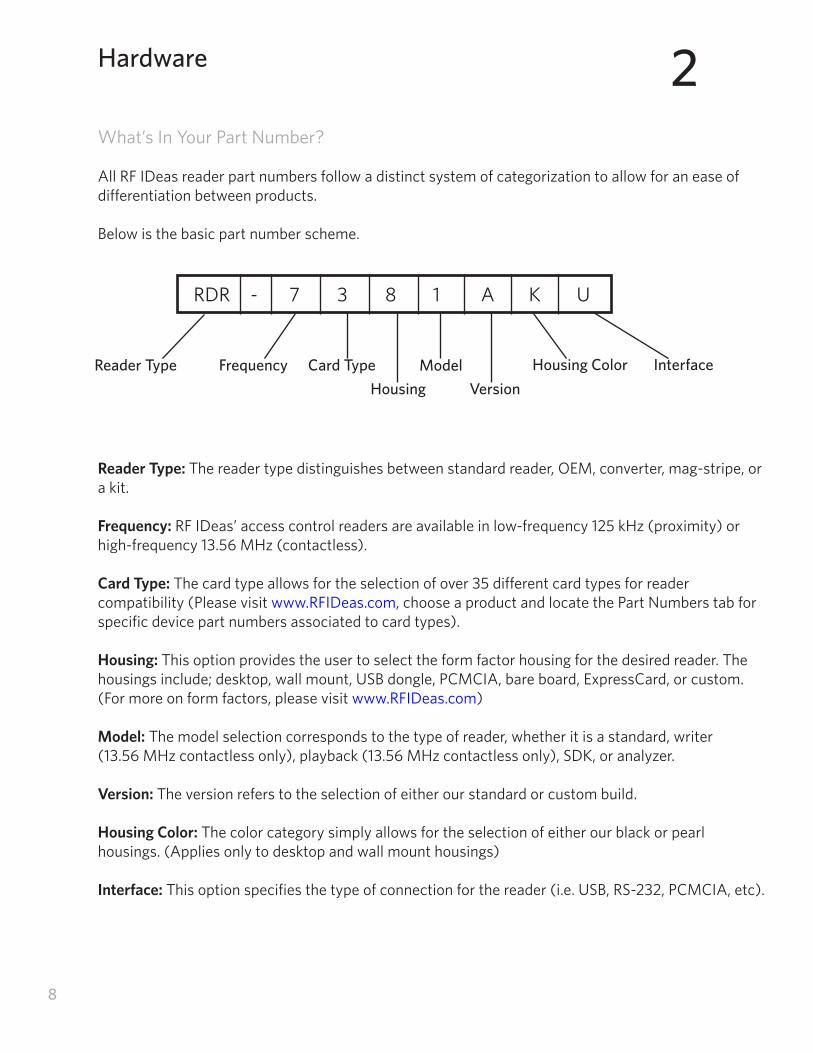
What’s In Your Part Number?
All RF IDeas reader part numbers follow a distinct system of categorization to allow for an ease of differentiation between products.
Below is the basic part number scheme.
RDR - 7 3 8 1 A K U
Reader Type: The reader type distinguishes between standard reader, OEM, converter, mag-stripe, or a kit.
Frequency: RF IDeas’ access control readers are available in low-frequency 125 kHz (proximity) or high-frequency 13.56 MHz (contactless).
Card Type: The card type allows for the selection of over 35 different card types for reader compatibility (Please visit www.RFIDeas.com, choose a product and locate the Part Numbers tab for specific device part numbers associated to card types).
Housing: This option provides the user to select the form factor housing for the desired reader. The housings include; desktop, wall mount, USB dongle, PCMCIA, bare board, ExpressCard, or custom. (For more on form factors, please visit www.RFIDeas.com)
Model: The model selection corresponds to the type of reader, whether it is a standard, writer (13.56 MHz contactless only), playback (13.56 MHz contactless only), SDK, or analyzer.
Version: The version refers to the selection of either our standard or custom build.
Housing Color: The color category simply allows for the selection of either our black or pearl housings. (Applies only to desktop and wall mount housings)
Interface: This option specifies the type of connection for the reader (i.e. USB, RS-232, PCMCIA, etc).
2Hardware
Reader Type Frequency Card Type
Housing
Model
Version
Housing Color Interface
9 Chapter 2 Hardware
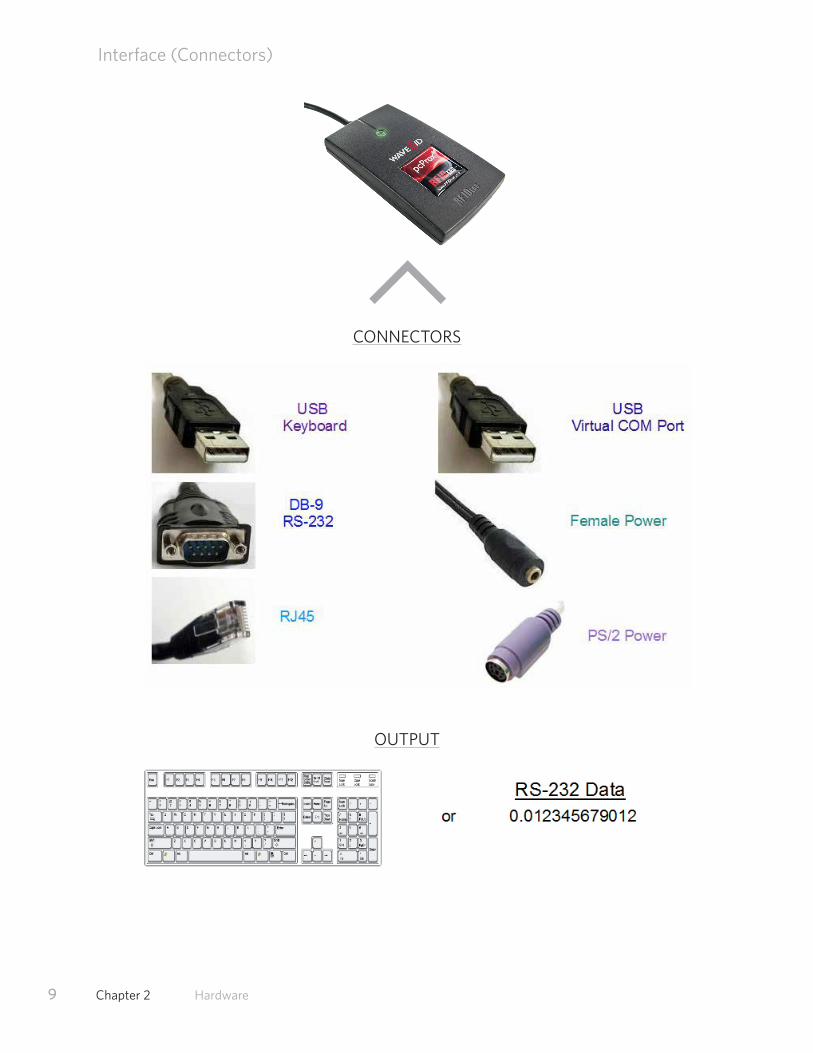
Interface (Connectors)
OUTPUT
CONNECTORST
10 Chapter 2 Hardware
USB Readers and Wiegand Converters
The pcProx USB keystroke device operates in two primary modes:
• USB keyboard. It reads the card data and sends it as keystrokes as if the user typed the ID data on a keyboard.
• Under the application programmer interface (API) defined in the pcProx SDK. When it reads card data, the active application receives the entire card data.
RS-232 Readers and Converters
The RS-232, Ethernet, or virtual COM port device operates in two primary modes:
1. ASCII output device. In this mode the user card data is read and sent as a decimal or hexadecimal number in ASCII characters.
2. API defined in the pcProx SDK. The device attaches to a computer serial port. When it reads card data, the active application receives the entire card data.
Once the configuration settings are correctly configured and written to flash memory, the device can immediately be deployed.
Minimum System Requirements
Minimum System RequirementsHARDWARE Pentium class PCMEMORY 32 MB RAMDISK 25 MB hard disk spaceI/O 1 available RS-232 or USB PortOPERATING SYSTEM Any operating system that supports a USB keyboard including
Microsoft Windows 2000®, XP®, Vista®, 7®, Server 2003®, Server 2008®, Linux. Can be used for keystroke applications.
Note: The software does not perform any data validation checking. The data must be known before it is read to verify its validity.
11 Chapter 2 Hardware
Reader Set-Up Basics
Plug the connector into the workstation’s (or available on any peripheral) open RS-232 or USB plug.
Place the device next to the monitor, beside the workstation, or where appropriate. The workstation should detect new hardware for USB connections. Verify the workstation recognizes this connection using Device Manager.
Verify the correct COM port for RS-232 DB9 connections using ‘Device Manager.’
When the software is installed, it should recognize these connections in order to configure the appropriate device. Once the device is configured and written to its flash memory, these settings will not have to be configured again.
LED Beeper
The desktop, USB dongle, wall mount, and bare board (OEM) model readers are all equipped with a light up LED on the front cover. The LED is configurable through the utility software (See LED and Beeper functions in the Software section) to allow the device to produce a beep upon light up of the LED when a credential is detected by the reader.
pcProx Card Manager Overview
pcProx Writer and Card Manager
The pcProx Card Manager, together with the pcProx Writer, allows you to store multiple user-centric data into different locations in the contactless smart card. You can write both user data and keystrokes (pcProx Playback USB), RS-232 ASCII characters (pcProx Playback 232), or Wiegand numeric data (pcProx Playback Wiegand) onto the card.
The keystrokes are useful in helping to launch applications and/or directing the user-centric data into the correct fields on the screen.
The RS-232 ASCII characters are useful for serial port driven solutions such as truck scales,time and attendance terminals, PLCs and other serial port devices requiring user-centric data.
The Wiegand numeric data is useful for security panel and other devices accepting Wiegand data.
pcProx Playback and Card Manager
The pcProx Playback reader is configurable using the pcProx Card Manager utility and is used for reading the card and deliver data. The pcProx Playback (USB/RS-232) reader can be configured to read specific locations on the card as well as provide keystrokes or ASCII characters surrounding the user-centric data. The pcProx Playback Wiegand must be pre-configured at the factory.
pcProx Playback USBThe pcProx Playback USB reader installs as a plug-n-play device and requires no drivers or software to be deployed. This is beneficial since there is no need to develop software, distribute or test software, modify or replace existing back end systems. Users will simply “write” the data required, as well as any keystrokes, into the contactless smart card, add additional keystroke delimiters into the pcProx Playback USB reader, and the solution is ready to deploy.
pcProx Playback RS-232The pcProx Playback RS-232 reader installs as a standard serial port device and requires no drivers orsoftware to be deployed. The output is delivered using COM port parameters at: 9600, n,8,1. There is no need to develop software, distribute or test software, modify or replace existing back end systems. Users will simply “write” the data required plus any RS-232 characters into the contactless smart card, add other additional characters, such as delimiters, into the pcProx Playback RS-232 reader, and the solution is ready to deploy.
pcProx Playback WiegandThe pcProx Playback Wiegand reader installs as a Wiegand output device and requires no drivers orsoftware to be deployed. The output is delivered using output lines Data 0/ Data 1 and the Wiegandprotocol. There is no need to develop software, distribute or test software, modify or replace existing
12
3Software
back end systems. Users will simply “write” the numeric data into the contactless smart card and the solution is ready to deploy.
The pcProx Card Manager allows users to:
1. Organize user data into specific card memory locations. (See section labeled ‘Card Organization Forms’)
2. Decide if keystrokes or ASCII characters should be stored within the card, or stored within the pcProx Playback reader.
3. Write user data (credential, swipe card, or other identification information) along with any keystrokes or ASCII characters, to individual locations on a contactless card (when using the pcProx Writer).
4. Configure the pcProx Playback reader to use existing data (if your contactless cards have ASCII data that has been previously written) to output as desired.
5. Configure the pcProx Playback reader to access a desired location on a card.
Note: If you have multiple applications, you will need to create individual pcProx Playback files (*.PLB) describing each of these locations (called Card Context). The Playback files are used to dynamically reconfigure the pcProx Playback reader to retrieve another application credential or identification set from the contactless smart card. To do this, you can use the ‘Auto-Run’ mode as command-line options and shortcuts such as: C:\Program Files\RF IDeas, Inc\RFID1356i\pcProxCardman.exe” magstripe.plb.
6. Create hot keys or batch files that can be used to launch the dynamic configuration together with the associated application.
The pcProx Playback reader is configured to retrieve the data at various locations within the card. It istherefore possible to write many different identification and security access requirements within the card. The reader can be configured to retrieve a specific section off the card. Since the Playback reader may be configured as needed (see ‘Auto-Run Operation’ section), you can use your card for multiple purposes at a desktop.
pcProx Card Manager Utility
Install the pcProx Card Manager by running the pcProxCardMgr.exe setup program. This will install the pcProx Card Manager software along with the necessary components as required by Windows. This application is supported under Windows 2000 and XP. Once installed, use the Windows “Start – All Programs” to locate and run the pcProx Card Manager Software application.
13 Chapter 3 Software
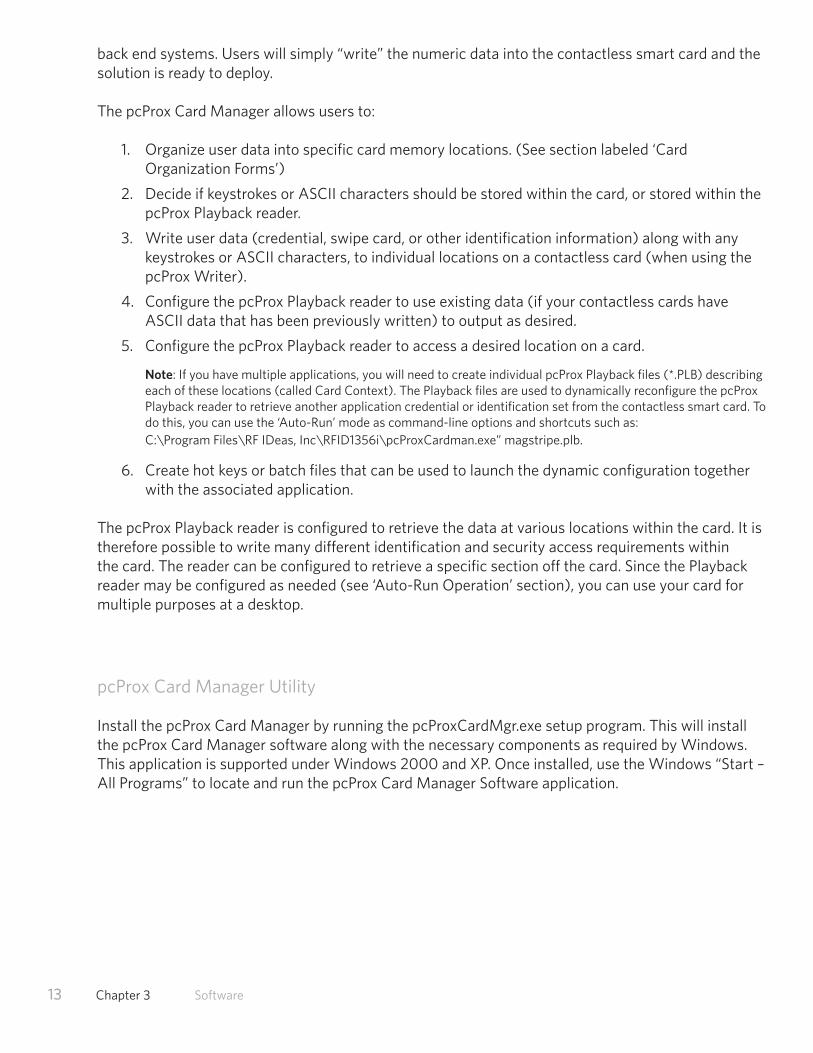
Connect Tab
The connect section is used to perform the initial connection between either RF IDeas’ pcProx Writer, or one of HID’s wall mount read/write RS-232 readers such as the RW400, and the pcProx Card Manager software. It is also used to describe the type of data you will be writing to the card: USB keystrokes or RS-232 /Wiegand characters. You may have the pcProx Playback USB reader attached to another USB port at the same time but no connection to the pcProx Playback reader is established under the Connect check boxes on this screen.
Connect pcProx Writer USB or RS-232
First, attach the pcProx Writer to your PCs (RS-232 or USB) port. The pcProx Writer’s LED should be red.
Next, if using the RDR-7080AKU iCLASS compatible Writer, place either a 2k BDG-2000 or any of the 16k bit iCLASS (BDG-2001 or BDG-2002) cards on the top of the reader. If using the RDR-7580AKU MIFARE compatible Writer, place either a 1k or 4k MIFARE contactless card on the top of the reader.
Note: It is important to lay the card completely across the face of the pcProx Writer during the encoding operation. Placing the card on an angle may inhibit the writing operation.
The Card Manager will automatically detect either the USB or RS-232 pcProx Writer reader by simplyselecting the ‘Connect to pcProx Writer USB or RS-232’ checkbox.
Connect HID RS-232 Read/Write Reader
First, attach the HID read/write reader to your PC’s RS-232 port and make sure the power adaptor isattached and the LED is red.
Next, place either a 2k BDG-2000 or any of the 16k bit iCLASS (BDG-2001 or BDG-2002) cards on the top of the reader.
For either method of connection made, the LED will light green for approximately 2 seconds and than go back to red. This is normal. If you remove the iCLASS card for 2-3 seconds, and replace it, the LEDwill return to green for 2 seconds.
14 Chapter 3 Software
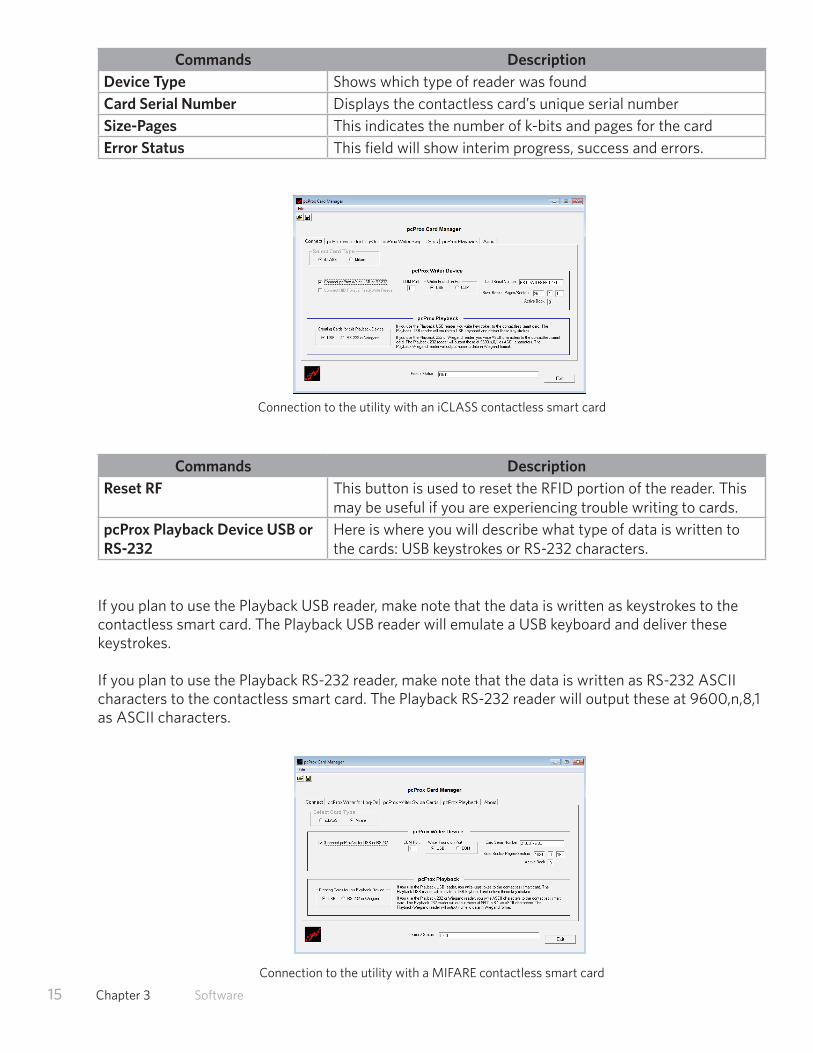
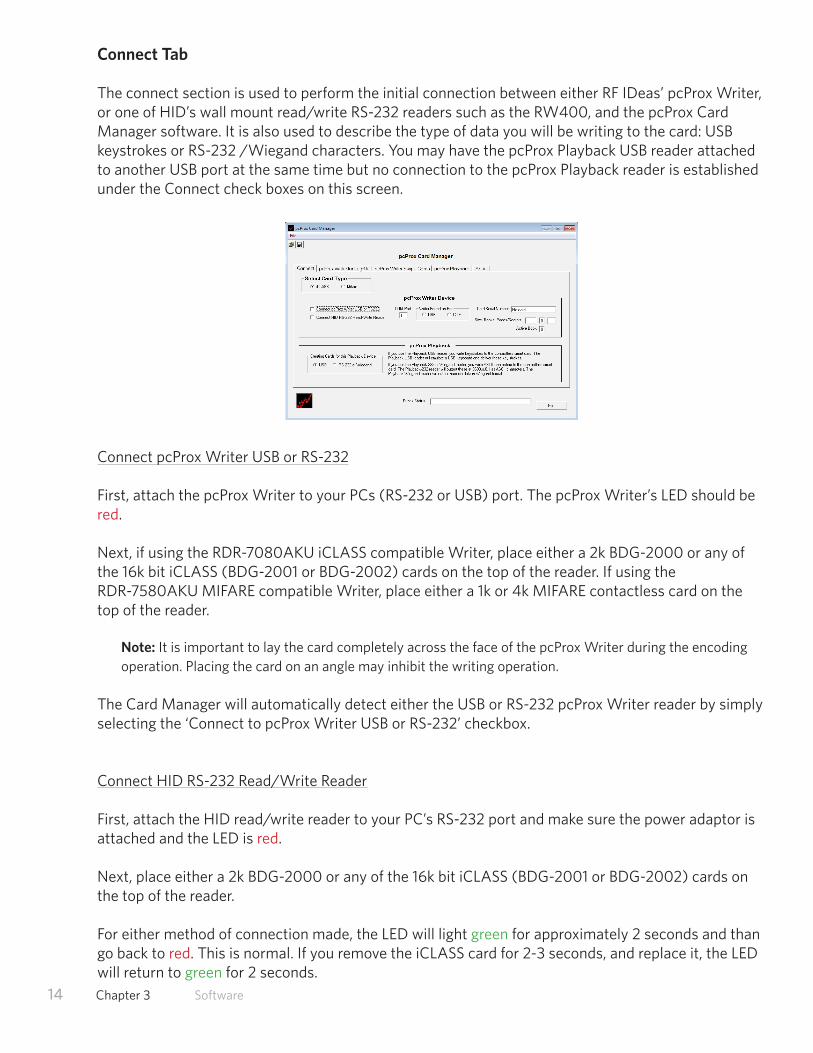
Commands DescriptionDevice Type Shows which type of reader was foundCard Serial Number Displays the contactless card’s unique serial numberSize-Pages This indicates the number of k-bits and pages for the cardError Status This field will show interim progress, success and errors.
Connection to the utility with an iCLASS contactless smart card
Commands DescriptionReset RF This button is used to reset the RFID portion of the reader. This
may be useful if you are experiencing trouble writing to cards.pcProx Playback Device USB or RS-232
Here is where you will describe what type of data is written to the cards: USB keystrokes or RS-232 characters.
If you plan to use the Playback USB reader, make note that the data is written as keystrokes to the contactless smart card. The Playback USB reader will emulate a USB keyboard and deliver these keystrokes.
If you plan to use the Playback RS-232 reader, make note that the data is written as RS-232 ASCII characters to the contactless smart card. The Playback RS-232 reader will output these at 9600,n,8,1 as ASCII characters.
Connection to the utility with a MIFARE contactless smart card
15 Chapter 3 Software
16 Chapter 3 Software
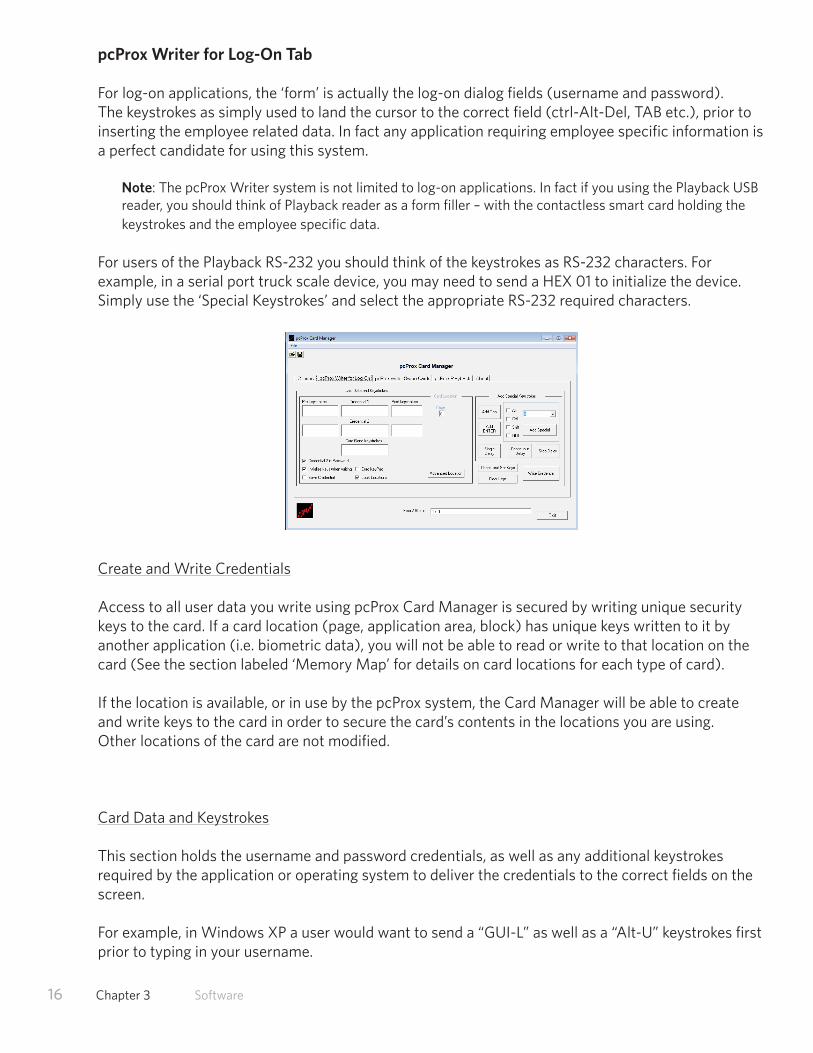
pcProx Writer for Log-On Tab
For log-on applications, the ‘form’ is actually the log-on dialog fields (username and password). The keystrokes as simply used to land the cursor to the correct field (ctrl-Alt-Del, TAB etc.), prior to inserting the employee related data. In fact any application requiring employee specific information is a perfect candidate for using this system.
Note: The pcProx Writer system is not limited to log-on applications. In fact if you using the Playback USB reader, you should think of Playback reader as a form filler – with the contactless smart card holding the keystrokes and the employee specific data.
For users of the Playback RS-232 you should think of the keystrokes as RS-232 characters. For example, in a serial port truck scale device, you may need to send a HEX 01 to initialize the device. Simply use the ‘Special Keystrokes’ and select the appropriate RS-232 required characters.
Create and Write Credentials
Access to all user data you write using pcProx Card Manager is secured by writing unique security keys to the card. If a card location (page, application area, block) has unique keys written to it by another application (i.e. biometric data), you will not be able to read or write to that location on the card (See the section labeled ‘Memory Map’ for details on card locations for each type of card).
If the location is available, or in use by the pcProx system, the Card Manager will be able to create and write keys to the card in order to secure the card’s contents in the locations you are using.Other locations of the card are not modified.
Card Data and Keystrokes
This section holds the username and password credentials, as well as any additional keystrokes required by the application or operating system to deliver the credentials to the correct fields on the screen.
For example, in Windows XP a user would want to send a “GUI-L” as well as a “Alt-U” keystrokes first prior to typing in your username.

The “GUI-L” keystroke sequence (the windows key + ‘L’), cause the PC to go into a locked state. This sequence is done first to prevent someone from trying to send your username and password sequence of keystrokes into another application, such as MS Word (for viewing and stealing). If the user is already in a logged off or locked stated, these keystrokes are simply discarded. If your PC is logged-on, the first thing that happens is to lock the machine – eliminating viewing possibilities.
The keystroke sequence, “Alt-U”, places the cursor into the username field at logon. The “Alt-U” is a ‘Special Keystroke’ that is inserted using unique key codes as defined by the USB keyboardspecification.
Note: To insert the correct key codes for special keystrokes, use the ‘Add Special Keystrokes’ section. It is possible to put keystrokes and user data into any of the Credential and keystrokes fields.
Commands DescriptionPre-Keystrokes This field holds the keystrokes that are to be sent prior to the
user’s ‘Credential 1’. In the context of a typical log-on application, ‘Credential 1’ is commonly known as the Username. The ‘Pre-Keystrokes’ would be the sequence of keystrokes required to bring up the log-on dialog box. This sequence of keystrokes can be different for each application and operating system. For example Windows 2000 is Ctrl-Alt-Del, while the home edition of Windows XP uses the keystroke sequence Alt-U (to position the cursor into the Username field).
Credential 1 For a log-on application, this field is commonly known as the Username.
Post Keystrokes This field holds the keystrokes that are to be sent after the user’s ‘Credential 1’ is delivered. In the context of a typical log-on application, the cursor must be positioned into the password field by using a TAB keystroke.
Credential 2 For a log-on application, this field is commonly known as the Password.
Advanced Location
Location for Data on iCLASS Card: Page - Appl Area - BlockDepending on the contactless part number, your card will have a different number of pages and size (see Memory Map section). This area is automatically entered for you, however if you need to modify and place the data into different locations, you may modify these values. Be cautious not to overwrite blocks of data when modifying these values. As you add or remove keystrokes the starting block location for each Credential may change if a boundary is reached.
Location for Data on MIFARE Card: SectorFor MIFARE cards, each of the Credentials is allocated a complete Sector. A Sector consists of 3 blocks of 16 bytes – for a total of 48 bytes. We do not allow for writing in Sector ‘0’ or the to the last Sector located on the card. Each keystroke requires 2 bytes, and each block holds up to 8 bytes – 4 keystrokes. Each Credential or Card Gone field requires a 2 byte termination character.
To test a card, simply reconfigure the Playback reader and test the card.17 Chapter 3 Software
18 Chapter 3 Software
iCLASS Find Free PageAfter pressing the Advanced Location button, this feature button is visible. The Find Free Page button performs a lookup for contactless cards with more than 1 page (16kbit /16 Appl Area), such as the BDG-2002. This will perform a search of all pages to find which ones are not secured with unique keys. The list will appear in the adjacent pull down box.
Note: pcProx secured pages will not show up as free.
MIFARE Find Free SectorThis will provide a drop down list of all available Sectors on the card being read.
Note: sectors already being used by pcProx Card Manager will show up as unavailable.
Card Gone Keystrokes
The Card Gone field holds the keystrokes to be delivered when the card is removed from the pcProx Playback reader. A typical Card Gone keystroke sequence would be to lock a workstation. Under Windows XP this is done by holding down ‘GUI’ (Windows key) and pressing ‘L’.
Note: This feature should be used with caution since it implies the user is being asked to leave their card on the reader. Since the contactless card often carries security information, it is dangerous to ask employees to leave a card on the reader since they are likely to forget the card. It therefore leaves open a security flaw since another user can easily obtain a card and impersonate the user. A much safer alternative is to use the RF IDeas pcProx Sonar (visit www.RFIDeas.com for more information on the Sonar)
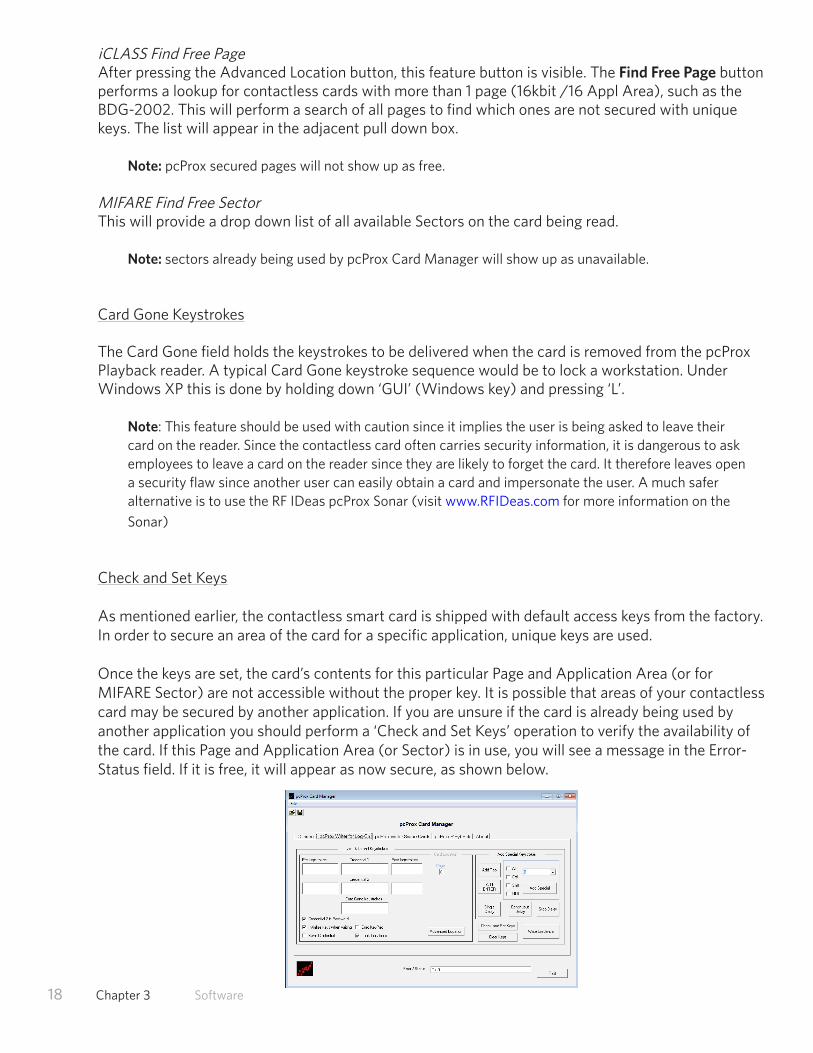
Check and Set Keys
As mentioned earlier, the contactless smart card is shipped with default access keys from the factory. In order to secure an area of the card for a specific application, unique keys are used.
Once the keys are set, the card’s contents for this particular Page and Application Area (or for MIFARE Sector) are not accessible without the proper key. It is possible that areas of your contactless card may be secured by another application. If you are unsure if the card is already being used by another application you should perform a ‘Check and Set Keys’ operation to verify the availability of the card. If this Page and Application Area (or Sector) is in use, you will see a message in the Error-Status field. If it is free, it will appear as now secure, as shown below.
19 Chapter 3 Software
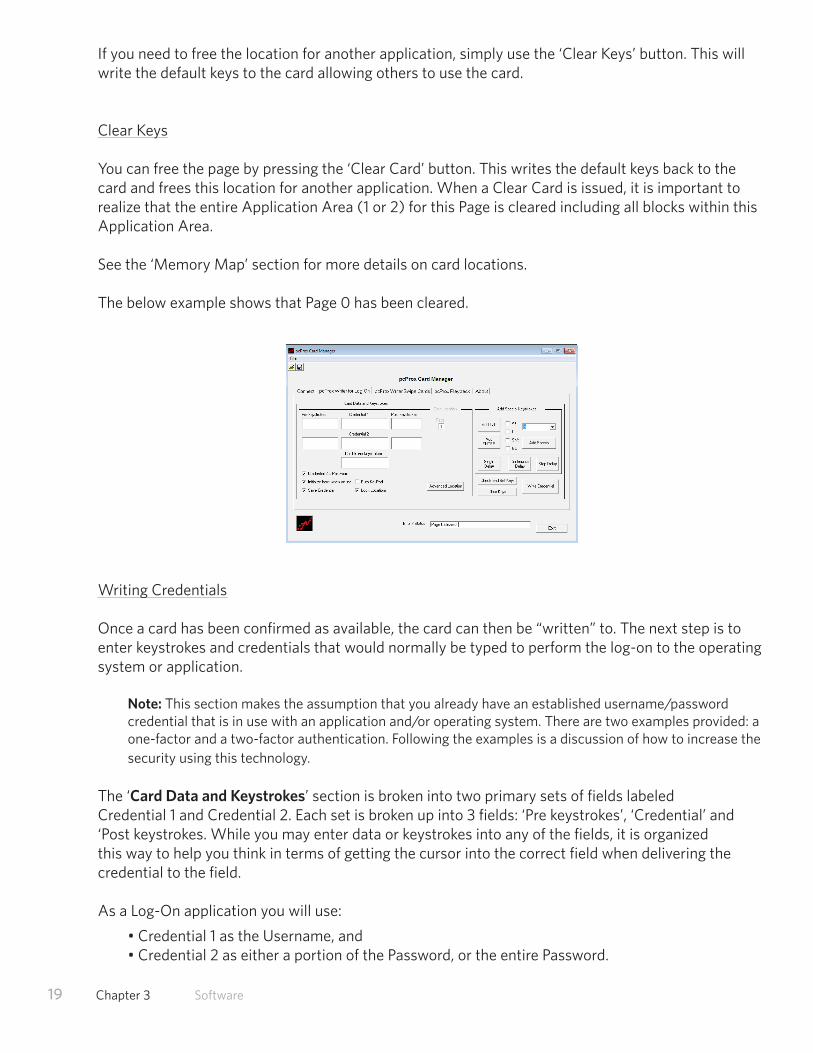
If you need to free the location for another application, simply use the ‘Clear Keys’ button. This will write the default keys to the card allowing others to use the card.
Clear Keys
You can free the page by pressing the ‘Clear Card’ button. This writes the default keys back to the card and frees this location for another application. When a Clear Card is issued, it is important to realize that the entire Application Area (1 or 2) for this Page is cleared including all blocks within this Application Area.
See the ‘Memory Map’ section for more details on card locations.
The below example shows that Page 0 has been cleared.
Writing Credentials
Once a card has been confirmed as available, the card can then be “written” to. The next step is to enter keystrokes and credentials that would normally be typed to perform the log-on to the operating system or application.
Note: This section makes the assumption that you already have an established username/password credential that is in use with an application and/or operating system. There are two examples provided: a one-factor and a two-factor authentication. Following the examples is a discussion of how to increase the security using this technology.
The ‘Card Data and Keystrokes’ section is broken into two primary sets of fields labeledCredential 1 and Credential 2. Each set is broken up into 3 fields: ‘Pre keystrokes’, ‘Credential’ and ‘Post keystrokes. While you may enter data or keystrokes into any of the fields, it is organized this way to help you think in terms of getting the cursor into the correct field when delivering the credential to the field.
As a Log-On application you will use:
• Credential 1 as the Username, and• Credential 2 as either a portion of the Password, or the entire Password.
20 Chapter 3 Software
By placing a portion of the Password into the field, and requiring the end user to fill in the balance of the Password, you have created a two-factor authentication system (something you have – i.e. the card, and something you know – i.e. the balance of the password). This has the benefit of protectingagainst lost/stolen badges. That being said, there is nothing that would stop you from putting the entire set of data into either (but not both) fields.
Once you have defined the keystrokes and credentials necessary, you are ready to perform a ‘WriteCredential’ operation.
The default setup for the log-on credential allocates room on the card for 16 character usernames,passwords, as well as a couple of pre and post keystrokes for each credentials. The 16 characters are the Microsoft Windows limitation for user credentials. Should you need to override the defaults to expand or reduce this, you may do so by unlocking the ‘Lock Locations’ and pressing the ‘Advanced Location’.
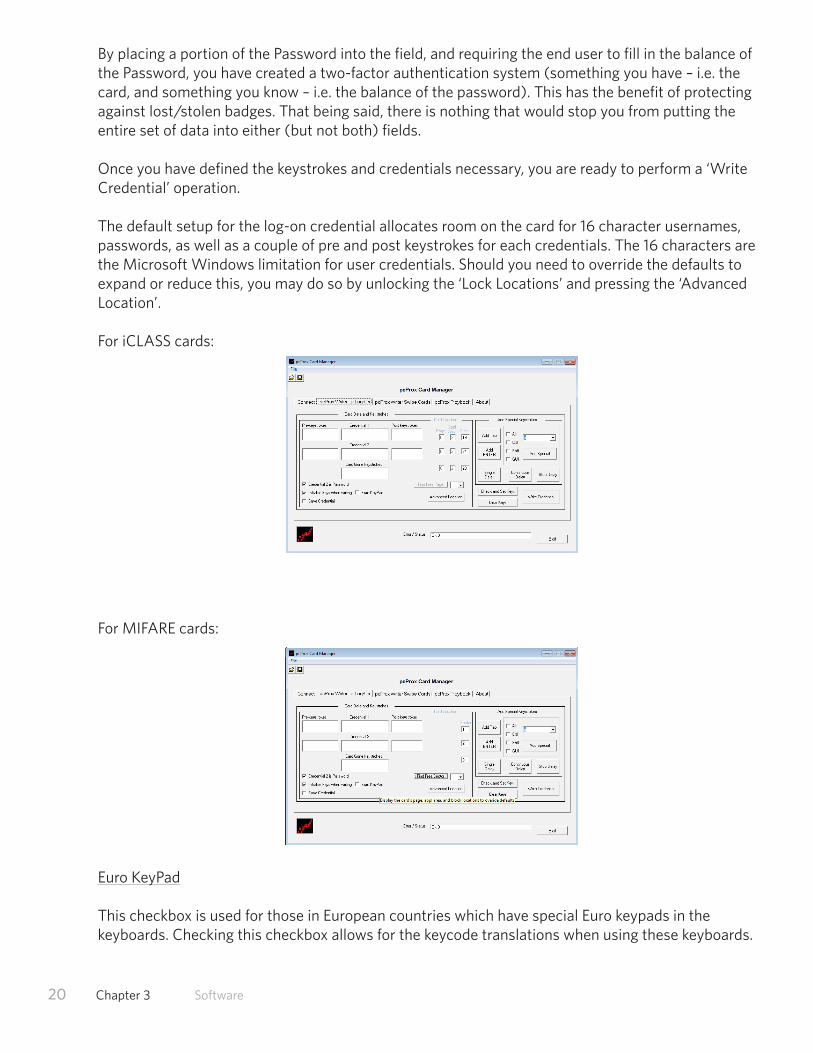
For iCLASS cards:
For MIFARE cards:
Euro KeyPad
This checkbox is used for those in European countries which have special Euro keypads in thekeyboards. Checking this checkbox allows for the keycode translations when using these keyboards.
21 Chapter 3 Software
Lock Locations
This checkbox is used to lock down the block locations for the ‘Credential 1’, ‘Credential 2’, and ‘CardGone Keystrokes’. This is useful to maintain a consistent location for each of the credentials whenmaking several cards that will be used by the same pcProx Playback reader. Unlocking this will causethe locations for each credential field to change depending on its length and actual number of keystroke required.
Note: This is not available for MIFARE since each credential uses an entire Sector.
Delays
There may be times when a delay is required before the keystrokes are sent. There are three types ofdelays possible:
Single DelayPressing this button will allow you to insert a single delay (.01-16 seconds) before continuing with the keystrokes.
Continuous DelayPressing this button will allow you to insert a continuous delay (.01-16 seconds) that will be inserted after the next keystroke character, and each of the remaining keystrokes for the current ‘Credential’ or ‘Card Gone’ sequence.
Stop DelayDiscontinues the ‘Continuous Delay’ prior to the end of the ‘Credential’ or ‘Card Gone’ field beingreached.
Other Features:Speeding the Playback Output
The Playback is designed to wait 2-3 seconds after issuing Credential 2 keystrokes, before being able to turn the LED red and accepting the next card. If you need to creating faster card sequencing, you can eliminate this delay by placing all pre-, post-keystrokes and credentials (1 and 2) into the Credential 1 fields. This will not change the behavior in Windows since the entire keystroke sequence is played out.
Auto-Locking on 2nd Card Presentation
The Playback is designed to hold keystrokes that may be played back as pre- or post- keystrokessurrounding the credentials. It is possible to add a pre-keystroke in front of Credential 1 which can beused to auto-lock the workstation. For example, enter a GUI+L (Windows key is GUI) as the prekeystroke for Credential 1. If you quickly present the card and pull it away, only this keystroke sequence is played and the workstation is locked.
Note: Please see the Playback Advanced Section of this User’s Manual for additional details.
22 Chapter 3 Software
Example A: One-Factor Authentication
The examples provided here apply to both iCLASS and MIFARE cards/readers.
A user who needs to log-on to Windows XP: The Username is Admin, and the Password is UserPassword.
This user typically types (in terms of keystrokes):
GUI-L (first lock the machine to prevent viewing of the credentials if the PC is unlocked)Alt-U (gets the cursor into the Username field)Admin{TAB} (key labeled ‘Tab’ on keyboard)UserPassword{ENTER} (key labeled ‘Enter’ on keyboard)
The concept is to get the 1st three lines into Credential 1, and the last two lines onto Credential 2.
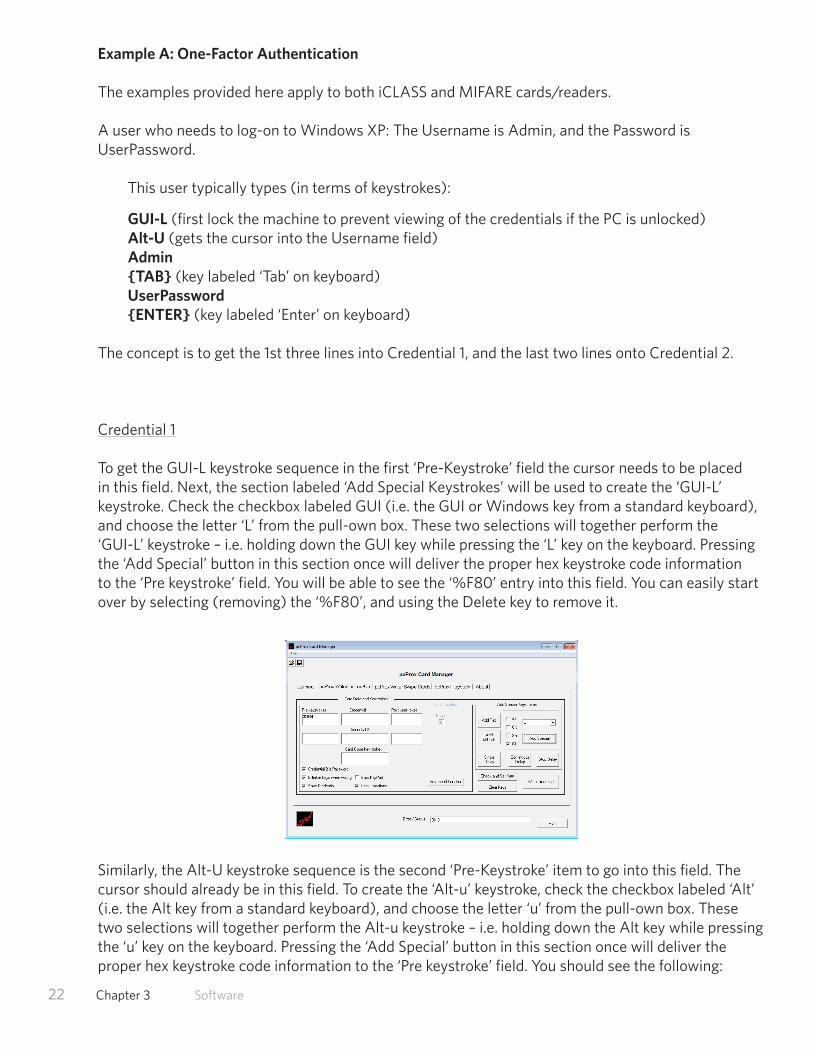
Credential 1
To get the GUI-L keystroke sequence in the first ‘Pre-Keystroke’ field the cursor needs to be placed in this field. Next, the section labeled ‘Add Special Keystrokes’ will be used to create the ‘GUI-L’ keystroke. Check the checkbox labeled GUI (i.e. the GUI or Windows key from a standard keyboard), and choose the letter ‘L’ from the pull-own box. These two selections will together perform the ‘GUI-L’ keystroke – i.e. holding down the GUI key while pressing the ‘L’ key on the keyboard. Pressing the ‘Add Special’ button in this section once will deliver the proper hex keystroke code information to the ‘Pre keystroke’ field. You will be able to see the ‘%F80’ entry into this field. You can easily start over by selecting (removing) the ‘%F80’, and using the Delete key to remove it.
Similarly, the Alt-U keystroke sequence is the second ‘Pre-Keystroke’ item to go into this field. Thecursor should already be in this field. To create the ‘Alt-u’ keystroke, check the checkbox labeled ‘Alt’ (i.e. the Alt key from a standard keyboard), and choose the letter ‘u’ from the pull-own box. These two selections will together perform the Alt-u keystroke – i.e. holding down the Alt key while pressing the ‘u’ key on the keyboard. Pressing the ‘Add Special’ button in this section once will deliver the proper hex keystroke code information to the ‘Pre keystroke’ field. You should see the following:
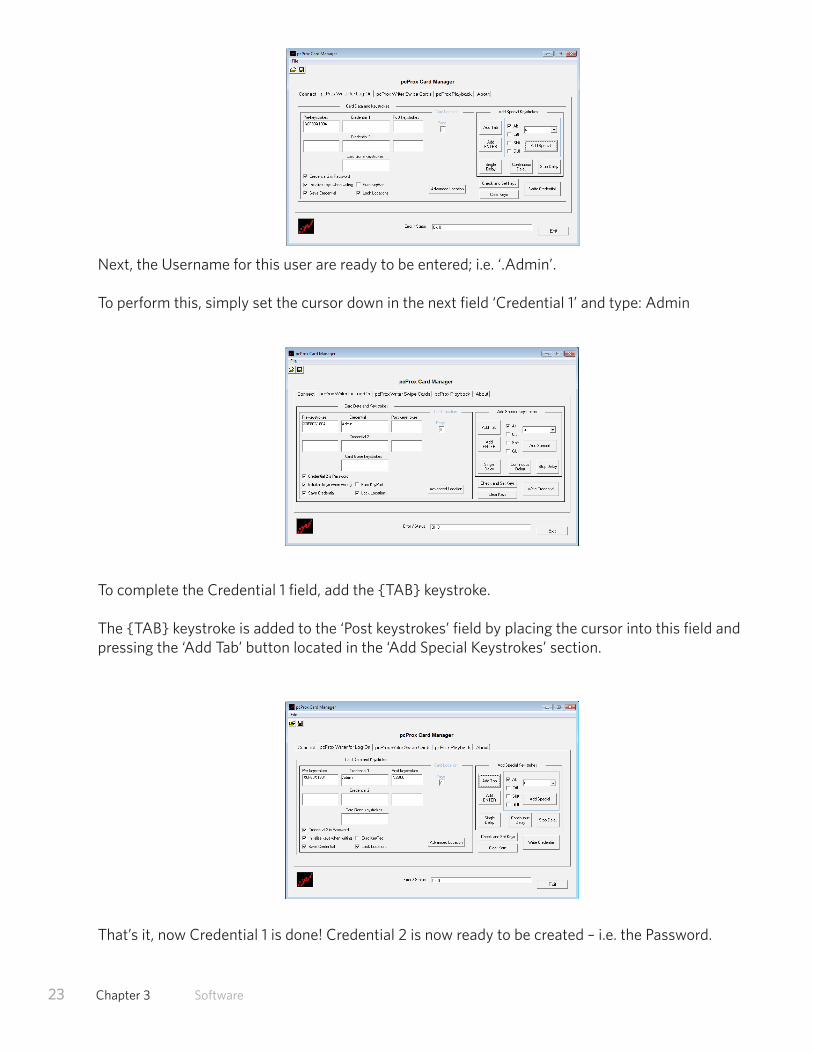
Next, the Username for this user are ready to be entered; i.e. ‘.Admin’.
To perform this, simply set the cursor down in the next field ‘Credential 1’ and type: Admin
To complete the Credential 1 field, add the {TAB} keystroke.
The {TAB} keystroke is added to the ‘Post keystrokes’ field by placing the cursor into this field andpressing the ‘Add Tab’ button located in the ‘Add Special Keystrokes’ section.
That’s it, now Credential 1 is done! Credential 2 is now ready to be created – i.e. the Password.
23 Chapter 3 Software
24 Chapter 3 Software
Credential 2
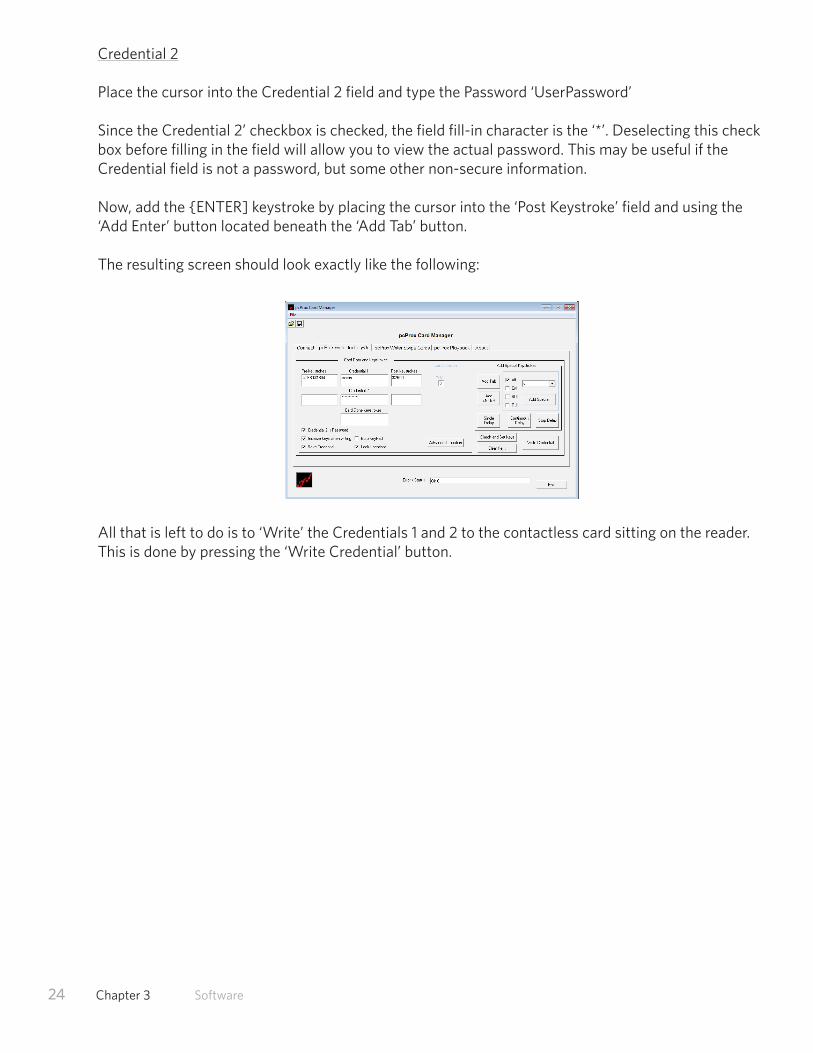
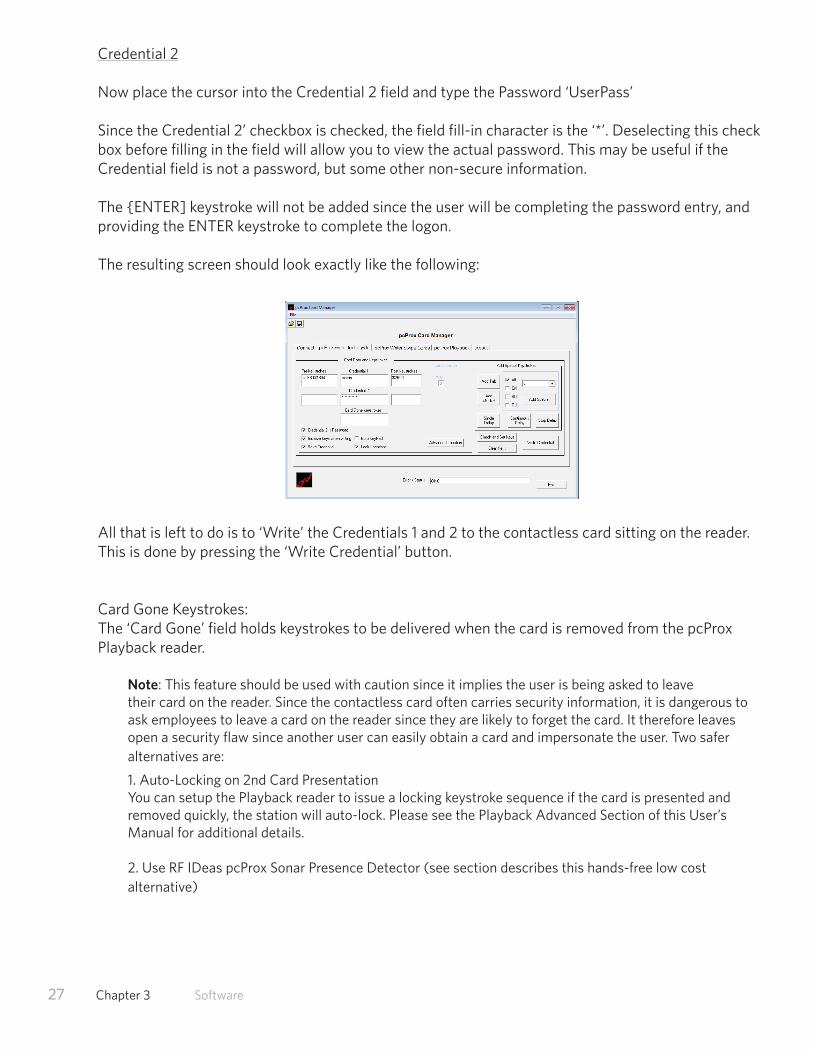
Place the cursor into the Credential 2 field and type the Password ‘UserPassword’
Since the Credential 2’ checkbox is checked, the field fill-in character is the ‘*’. Deselecting this checkbox before filling in the field will allow you to view the actual password. This may be useful if theCredential field is not a password, but some other non-secure information.
Now, add the {ENTER] keystroke by placing the cursor into the ‘Post Keystroke’ field and using the ‘Add Enter’ button located beneath the ‘Add Tab’ button.
The resulting screen should look exactly like the following:
All that is left to do is to ‘Write’ the Credentials 1 and 2 to the contactless card sitting on the reader. This is done by pressing the ‘Write Credential’ button.

25 Chapter 3 Software
Example B: Two-Factor Authentication
The below example applies to a User who needs to log-on to Windows XP.
A user who needs to log-on to Windows XP: The Username is Admin, and the Password is UserPassword.
This user typically types (in terms of keystrokes):
GUI-L (first lock the machine to prevent viewing of the credentials if the PC is unlocked)Alt-U (gets the cursor into the Username field)Admin{TAB} (key labeled ‘Tab’ on keyboard)UserPass
The concept is to get the 1st three lines onto Credential 1, and the last two lines onto Credential 2.
Credential 1
To get the GUI-L keystroke sequence in the first ‘Pre-Keystroke’ field we have to first place our cursor in this field. Next, we will need to use the right-hand section of the section labeled ‘Add Special Keystrokes’. To create the ‘GUI-L’ keystroke you need to check the checkbox labeled GUI (i.e. the GUI (or Windows) key from a standard keyboard), and choose the letter ‘L’ from the pull-own box. These two selections will together perform the ‘GUI-L’ keystroke – i.e. holding down the GUI key whilepressing the ‘L’ key on the keyboard. Pressing the ‘Add Special’ button in this section once will deliverthe proper hex keystroke code information to the ‘Pre keystroke’ field. You will be able to see the ‘%F80’ entry into this field. You can easily start over by (removing) selecting the ‘%F80’, and using the Delete key to remove it.
Similarly, the Alt-U keystroke sequence is the second ‘Pre-Keystroke’ item to go into this field. Thecursor should already be in this field. To create the ‘Alt-u’ keystroke, check the checkbox labeled ‘Alt’ (i.e. the Alt key from a standard keyboard), and choose the letter ‘u’ from the pull-own box. These two selections will together perform the Alt-u keystroke – i.e. holding down the Alt key while pressing the ‘u’ key on the keyboard. Pressing the ‘Add Special’ button in this section once will deliver the proper hex keystroke code information to the ‘Pre keystroke’ field. You should see the following:
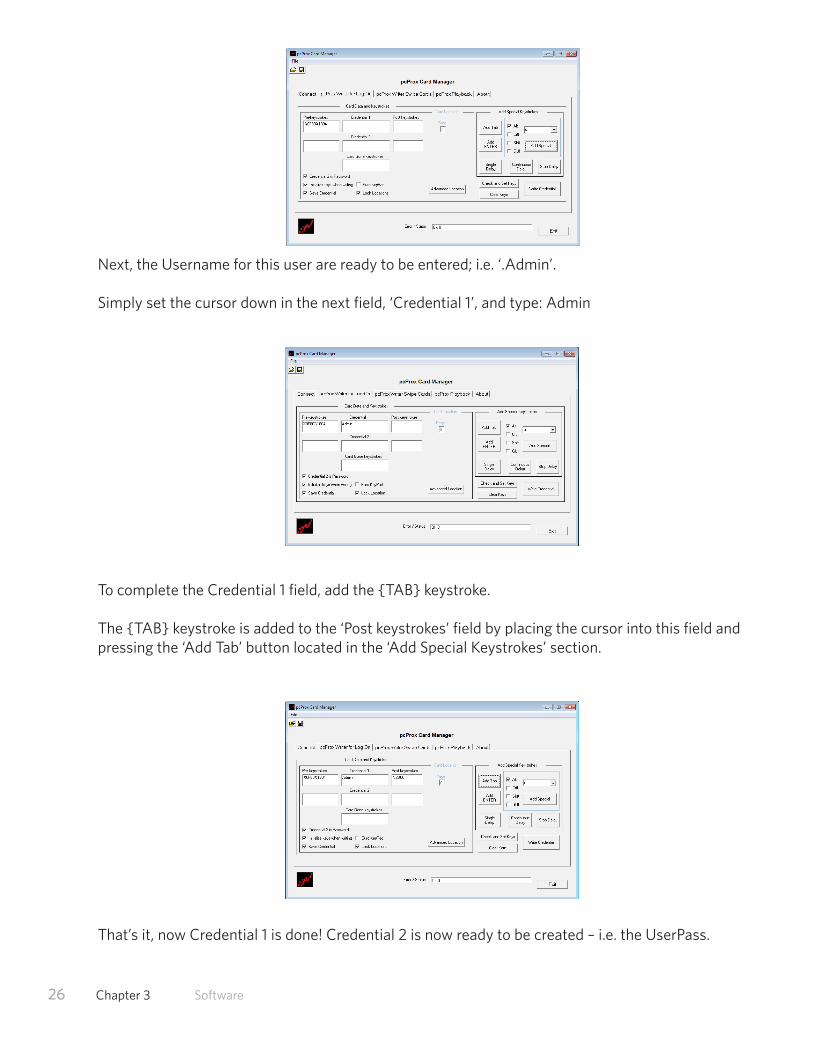
Next, the Username for this user are ready to be entered; i.e. ‘.Admin’.
Simply set the cursor down in the next field, ‘Credential 1’, and type: Admin
To complete the Credential 1 field, add the {TAB} keystroke.
The {TAB} keystroke is added to the ‘Post keystrokes’ field by placing the cursor into this field andpressing the ‘Add Tab’ button located in the ‘Add Special Keystrokes’ section.
That’s it, now Credential 1 is done! Credential 2 is now ready to be created – i.e. the UserPass.
26 Chapter 3 Software
27 Chapter 3 Software
Credential 2
Now place the cursor into the Credential 2 field and type the Password ‘UserPass’
Since the Credential 2’ checkbox is checked, the field fill-in character is the ‘*’. Deselecting this checkbox before filling in the field will allow you to view the actual password. This may be useful if theCredential field is not a password, but some other non-secure information.
The {ENTER] keystroke will not be added since the user will be completing the password entry, and providing the ENTER keystroke to complete the logon.
The resulting screen should look exactly like the following:
All that is left to do is to ‘Write’ the Credentials 1 and 2 to the contactless card sitting on the reader. This is done by pressing the ‘Write Credential’ button.
Card Gone Keystrokes:The ‘Card Gone’ field holds keystrokes to be delivered when the card is removed from the pcProx Playback reader.
Note: This feature should be used with caution since it implies the user is being asked to leavetheir card on the reader. Since the contactless card often carries security information, it is dangerous to ask employees to leave a card on the reader since they are likely to forget the card. It therefore leaves open a security flaw since another user can easily obtain a card and impersonate the user. Two safer alternatives are:
1. Auto-Locking on 2nd Card PresentationYou can setup the Playback reader to issue a locking keystroke sequence if the card is presented and removed quickly, the station will auto-lock. Please see the Playback Advanced Section of this User’s Manual for additional details.
2. Use RF IDeas pcProx Sonar Presence Detector (see section describes this hands-free low cost alternative)
28 Chapter 3 Software
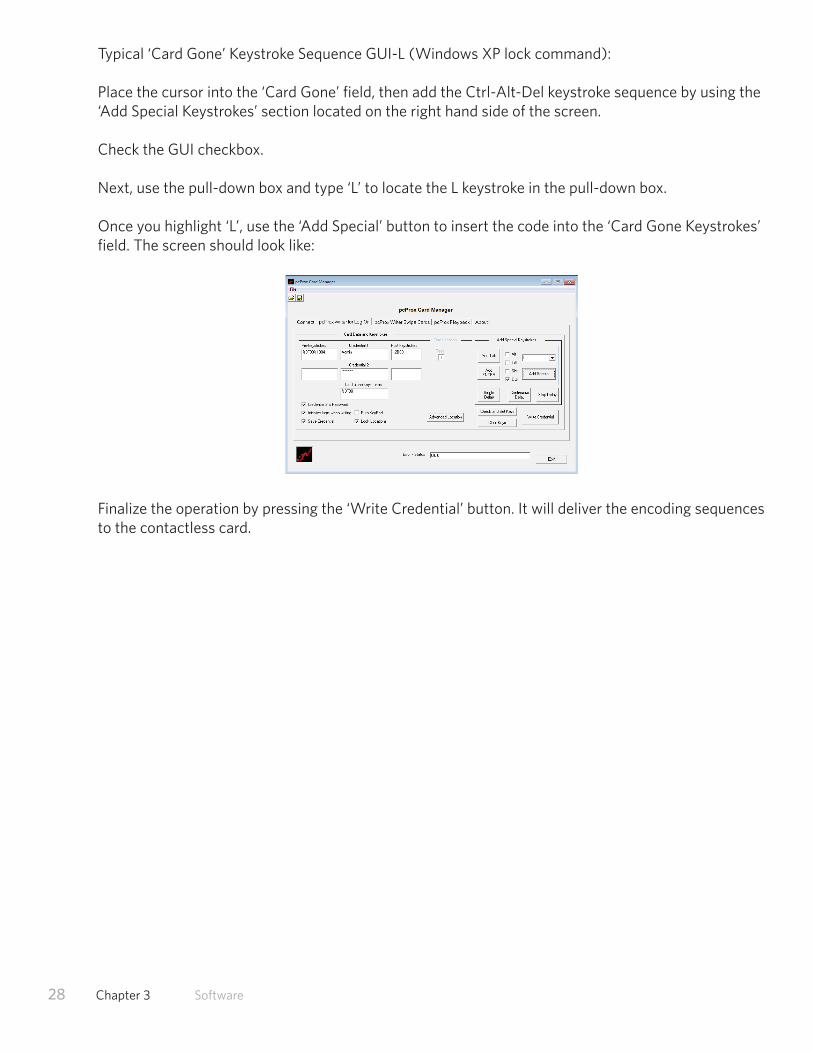
Typical ‘Card Gone’ Keystroke Sequence GUI-L (Windows XP lock command):
Place the cursor into the ‘Card Gone’ field, then add the Ctrl-Alt-Del keystroke sequence by using the ‘Add Special Keystrokes’ section located on the right hand side of the screen.
Check the GUI checkbox.
Next, use the pull-down box and type ‘L’ to locate the L keystroke in the pull-down box.
Once you highlight ‘L’, use the ‘Add Special’ button to insert the code into the ‘Card Gone Keystrokes’ field. The screen should look like:
Finalize the operation by pressing the ‘Write Credential’ button. It will deliver the encoding sequences to the contactless card.
29 Chapter 3 Software
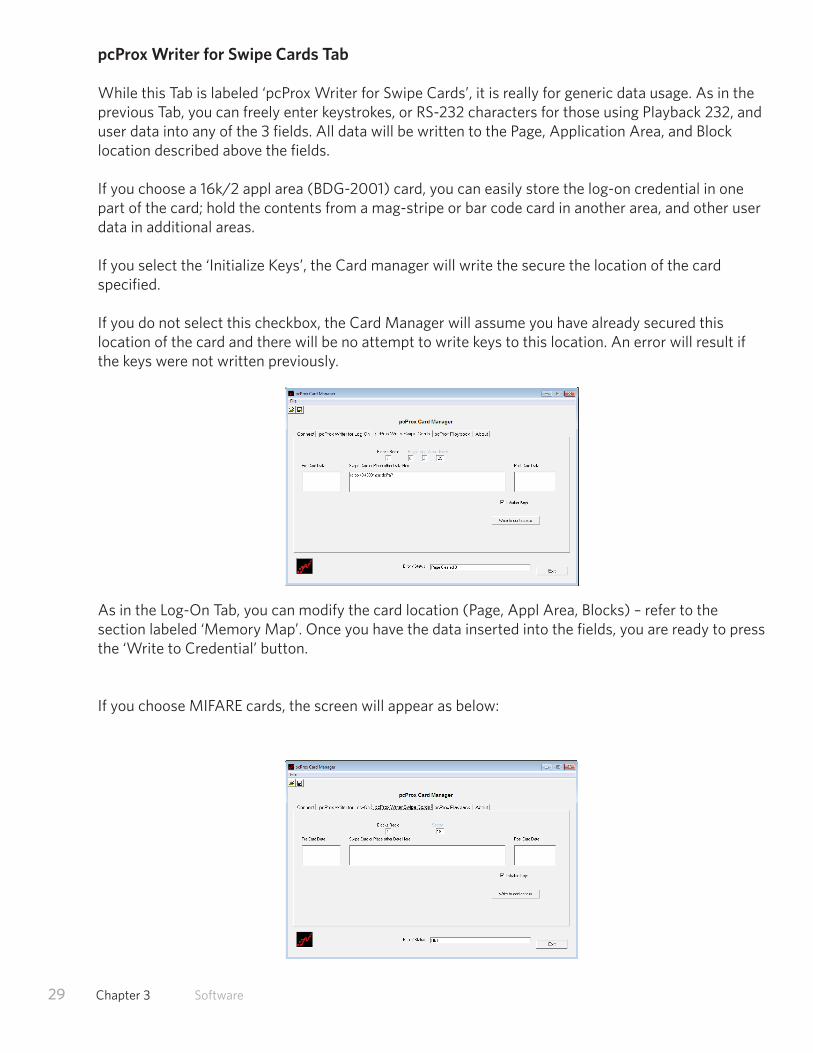
pcProx Writer for Swipe Cards Tab
While this Tab is labeled ‘pcProx Writer for Swipe Cards’, it is really for generic data usage. As in theprevious Tab, you can freely enter keystrokes, or RS-232 characters for those using Playback 232, anduser data into any of the 3 fields. All data will be written to the Page, Application Area, and Blocklocation described above the fields.
If you choose a 16k/2 appl area (BDG-2001) card, you can easily store the log-on credential in one part of the card; hold the contents from a mag-stripe or bar code card in another area, and other user data in additional areas.
If you select the ‘Initialize Keys’, the Card manager will write the secure the location of the cardspecified.
If you do not select this checkbox, the Card Manager will assume you have already secured this location of the card and there will be no attempt to write keys to this location. An error will result if the keys were not written previously.
As in the Log-On Tab, you can modify the card location (Page, Appl Area, Blocks) – refer to the section labeled ‘Memory Map’. Once you have the data inserted into the fields, you are ready to press the ‘Write to Credential’ button.
If you choose MIFARE cards, the screen will appear as below:
30 Chapter 3 Software
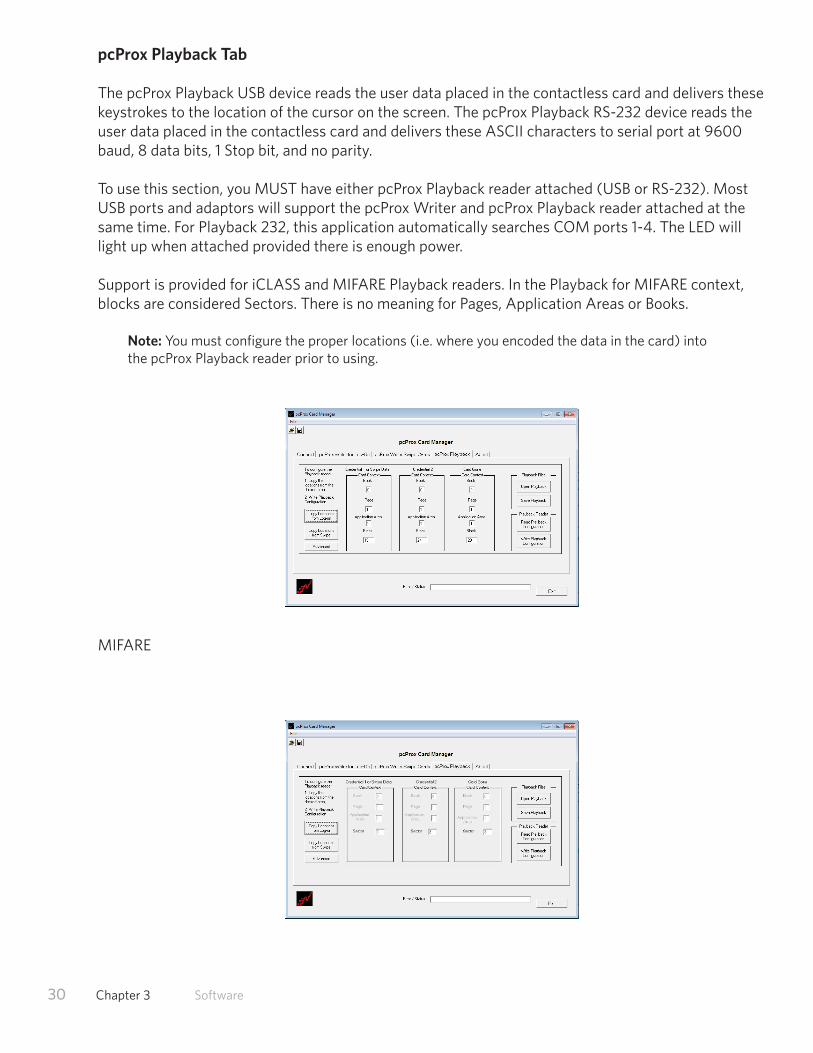
pcProx Playback Tab
The pcProx Playback USB device reads the user data placed in the contactless card and delivers these keystrokes to the location of the cursor on the screen. The pcProx Playback RS-232 device reads the user data placed in the contactless card and delivers these ASCII characters to serial port at 9600 baud, 8 data bits, 1 Stop bit, and no parity.
To use this section, you MUST have either pcProx Playback reader attached (USB or RS-232). MostUSB ports and adaptors will support the pcProx Writer and pcProx Playback reader attached at the same time. For Playback 232, this application automatically searches COM ports 1-4. The LED will light up when attached provided there is enough power.
Support is provided for iCLASS and MIFARE Playback readers. In the Playback for MIFARE context, blocks are considered Sectors. There is no meaning for Pages, Application Areas or Books.
Note: You must configure the proper locations (i.e. where you encoded the data in the card) intothe pcProx Playback reader prior to using.
MIFARE
To be able to use the pcProx Playback reader, it must be configured. There are two ways to configurethe pcProx Playback reader:
1. First, select one of the ‘Copy Locations’ buttons to obtain the correct card locations and fill in the fields (Page, Appl Area, and Blocks) on the pcProx Playback Tab screen. Next use the button‘Write Playback Configuration’ to transfer these locations to the attached Playback reader. OR
2. First, select one of the ‘Copy Locations’ buttons to obtain the correct card locations and fill thefields (Page, Appl Area, and Blocks) on the pcProx Playback Tab screen. Next, use the button‘Save Playback’ to create and save a Playback file on your PC. This file is then used as acommand line option to auto-configure the reader on-the-fly. See section labeled ‘Auto-RunOperation’ below.
The choices are described in detail below.
The pcProx Playback tab provides this functionality. The following are descriptions of the various buttons in this tab:
Card Context: Credential 1, 2 and Card Gone
pcProx Writer for Log-on Users: The three sets of Card Context are used to tell the Playback readerwhere to find the Credentials 1 and 2, and the Card Gone keystrokes.
Note: The Book field is a future option not available yet.
The card location (Page, Application Area, and Sector/Block fields) must be the same for the set of the Credential and Card Gone fields in the pcProx Writer for Log-on Tab and for the locations shown in the respective fields on this screen. The easiest way to make sure the fields are the same is to use the ‘Copy Locations from Log-on’ button (described below).
Once you have the all fields filled in with the correct choices, you can:
1. Use the ‘Save Playback’ button to save the contents as a file for later retrieval or for Auto-Runusage.
2. Use the ‘Write Playback Configuration’ button to write this configuration information into thePlayback reader. After pressing this button, your Playback reader is now properly configured toread this area of the card.
pcProx Writer for Swipe Users: The first Card Context is used to tell the pcProx Playback reader where to find the swipe (or other type) user data.
Note: The Book field is a future option not available yet.
31 Chapter 3 Software
Copy Locations from Log-onThis button will copy all the card locations from the pcProx Writer for the Log-On Tab directly to the correct fields. After this operation, the reader is ready to be configured with these settings.
Copy Locations from SwipeThis button will copy all the card locations from the pcProx for Swipe Card Tab directly to the correctfields. After this operation, the reader is ready to be configured with these settings.
AdvancedThis button will allow the user to configure more advanced features within the Playback reader. Mostusers will not need to modify these parameters.
Open PlaybackThis reads the specified Playback (PLB) file and loads all the Card Context fields.
Save PlaybackThis saves all the Card Context fields to the specified Playback (PLB) file.
Read Playback ConfigurationThis reads the attached pcProx Playback reader configuration and fills in all the Card Context fields.
Write Playback ConfigurationThis writes all the Card Context fields to the attached pcProx Playback reader.
32 Chapter 3 Software
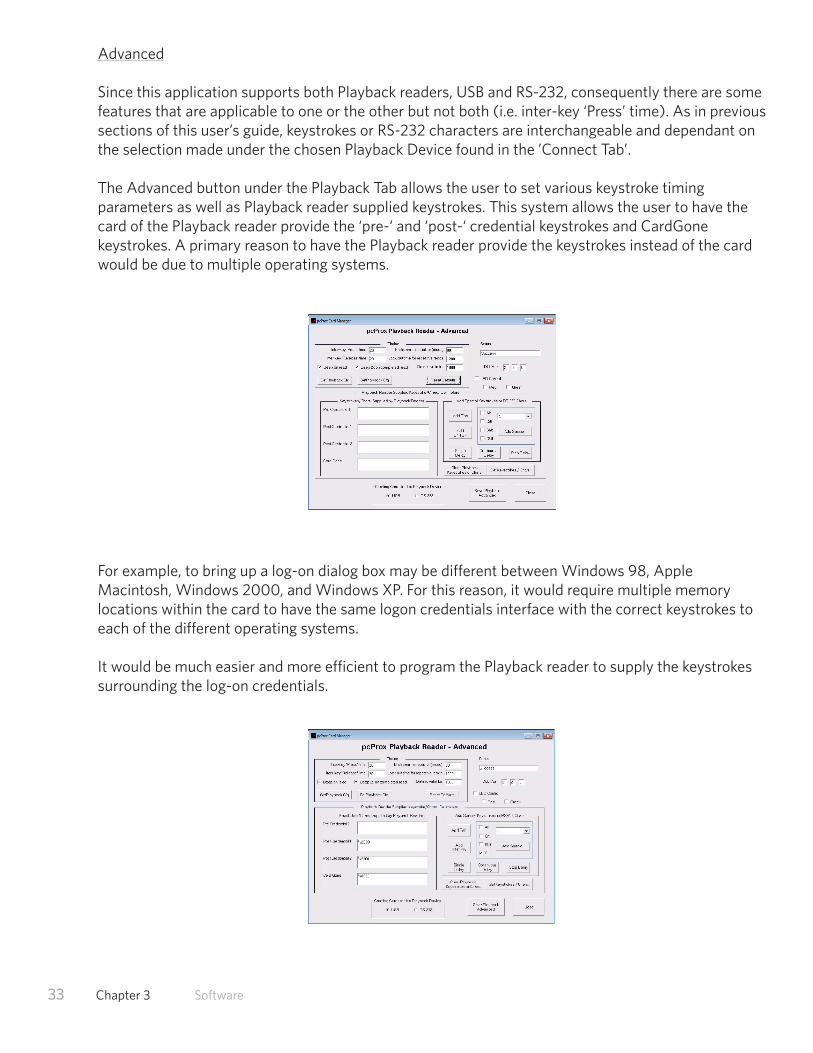
Advanced
Since this application supports both Playback readers, USB and RS-232, consequently there are somefeatures that are applicable to one or the other but not both (i.e. inter-key ‘Press’ time). As in previoussections of this user’s guide, keystrokes or RS-232 characters are interchangeable and dependant onthe selection made under the chosen Playback Device found in the ’Connect Tab’.
The Advanced button under the Playback Tab allows the user to set various keystroke timingparameters as well as Playback reader supplied keystrokes. This system allows the user to have the card of the Playback reader provide the ‘pre-‘ and ‘post-‘ credential keystrokes and CardGonekeystrokes. A primary reason to have the Playback reader provide the keystrokes instead of the cardwould be due to multiple operating systems.
For example, to bring up a log-on dialog box may be different between Windows 98, Apple Macintosh, Windows 2000, and Windows XP. For this reason, it would require multiple memory locations within the card to have the same logon credentials interface with the correct keystrokes to each of the different operating systems.
It would be much easier and more efficient to program the Playback reader to supply the keystrokessurrounding the log-on credentials.
33 Chapter 3 Software
Since the Playback USB reader installs and appears as a USB keyboard to the operating system, manyof the same keyboard parameters appear in the pcProx Playback reader.
All times are in msecs (i.e. 1000 msecs = 1 second)
Inter-Key ‘Press’ and ‘Release’ time: Are in msecs and refer to the time each keystroke is helddown and released.
Bitstream Timeout: This is the delay time used before the card is read.
Lock-out Time for repetitive reads: This is the time used to wait before another card is read.
Data valid for: This is the time the last card’s contents are valid for (msecs)
Reset Defaults: All values are set to factory defaults
Beep on Read: Beepers sounds when a supported contactless card is presented.
Note: This beep does not indicate it is programmed correctly, or configured to the correct page of memory within the card.
Beep 2x on Completed Read: This checkbox is only valid if Beep on Read (above) is checked.Once the programmed Playback data is completely read from the card, the reader will beeptwice. This signals the user that the card may be pulled away from the reader.
Playback Reader Supplied Keystrokes/ Chars. DelimitersThe keystrokes (or RS-232 characters) are handled the same way as in the Writing Credential sectiondescribed above.
Pre Credential 1This field holds the keystrokes you need to have sent prior to the user’s ‘Credential 1’. In the context ofa typically log-on application, ‘Credential1’ is commonly known as the Username. In this context the Pre-Keystrokes would be the sequence of keystrokes required to bring up the log-on dialog box. Thissequence of keystrokes can be different for each application and operating system. For exampleWindows 2000 is Ctrl-Alt-Del, while the home edition of Windows XP is Alt-U (gets the cursor into the user field).
Using Pre Credential 1 for Auto-Locking on 2nd Card PresentationIt is possible to use this field to allow an employee to present their card and quickly pull thisaway for the purpose of locking the station. To use tis 2nd tap of the card concept, you simplyinsert a auto-locking keystroke sequence into this field. For example, enter a GUI+L (Windowskey is GUI) as the pre-keystroke for Credential 1. If you quickly present the card and pull it away,only this keystroke sequence is played and the workstation is locked.
Post Credential 1This field holds the keystrokes you need to have sent after the user’s ‘Credential 1’ is delivered. In thecontext of a typically log-on application, you need to get the cursor into the password field by using aTAB keystroke.
34 Chapter 3 Software
Post Credential 2This field holds the keystrokes you need to have sent after the user’s ‘Credential 2’ is delivered. In thecontext of a typically log-on application, you need to get the cursor into the password field by using aTAB keystroke.
Card Gone KeystrokesThe Card Gone field holds keystrokes you would like to be delivered when the card is removed from the pcProx Playback reader. A typical Card Gone keystroke sequence would be to lock a workstation. Under Windows XP this is done by holding down ‘Ctrl-Alt’ and pressing ‘Del’, then pressing ‘K’. Example B below will show how, using the Special Keystrokes section, this is placed into the Card Gone field.
Clear Playback KeystrokesThis clears all keystroke held by the Playback reader.
Get Playback KeystrokesThis button cause the application to re-read the Playback reader and retrieve the keystrokes.
Save Playback AdvancedThis saves all parameters on the Advanced screen to the attached Playback reader.
35 Chapter 3 Software
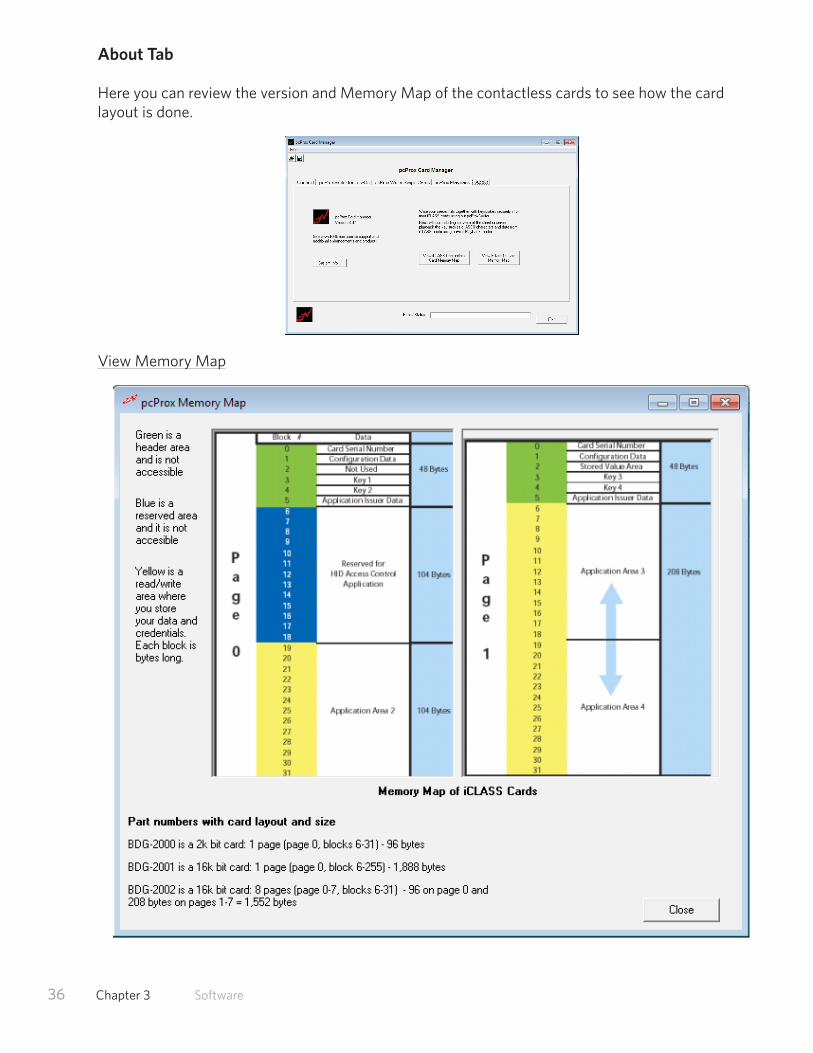
About Tab
Here you can review the version and Memory Map of the contactless cards to see how the card layout is done.
View Memory Map
36 Chapter 3 Software
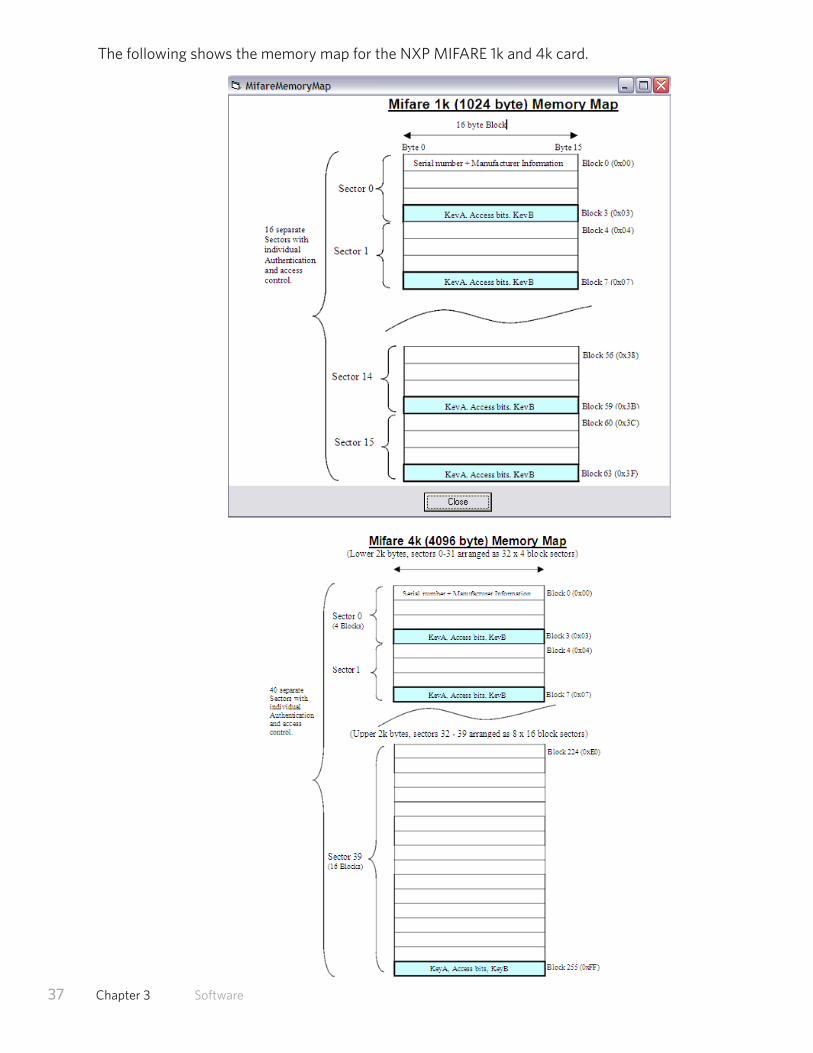
The following shows the memory map for the NXP MIFARE 1k and 4k card.
37 Chapter 3 Software
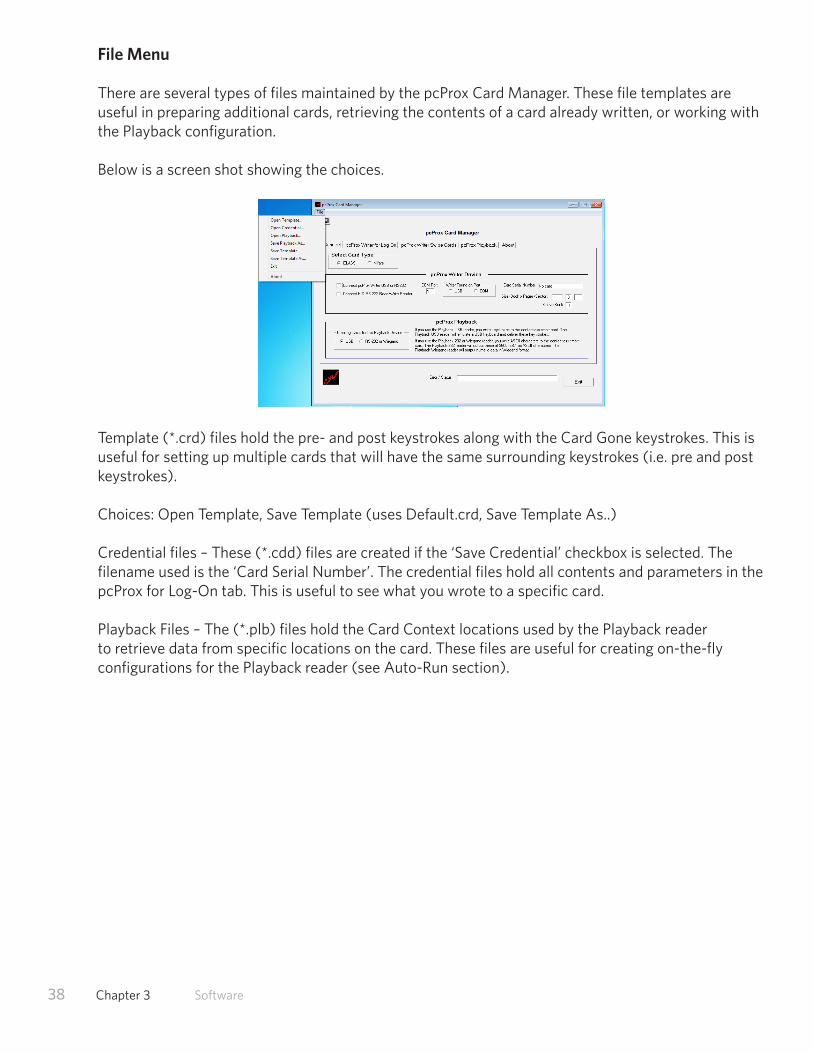
File Menu
There are several types of files maintained by the pcProx Card Manager. These file templates are useful in preparing additional cards, retrieving the contents of a card already written, or working with the Playback configuration.
Below is a screen shot showing the choices.
Template (*.crd) files hold the pre- and post keystrokes along with the Card Gone keystrokes. This isuseful for setting up multiple cards that will have the same surrounding keystrokes (i.e. pre and postkeystrokes).
Choices: Open Template, Save Template (uses Default.crd, Save Template As..)
Credential files – These (*.cdd) files are created if the ‘Save Credential’ checkbox is selected. Thefilename used is the ‘Card Serial Number’. The credential files hold all contents and parameters in thepcProx for Log-On tab. This is useful to see what you wrote to a specific card.
Playback Files – The (*.plb) files hold the Card Context locations used by the Playback reader to retrieve data from specific locations on the card. These files are useful for creating on-the-fly configurations for the Playback reader (see Auto-Run section).
38 Chapter 3 Software
Auto-Run Operation
OverviewThere are two auto-run operating modes available. One for dynamically configuring the pcProx Playback reader and the other for writing to cards and another for.
The Playback reader can be dynamically configured to read various card locations.
The card writing a batch of cards from a database can be automated by spawning an executable program with a command line optional file that contains the data needed to be written to the card.
Playback Auto-Run
In the Playback Auto-Run mode, the user specifies a configuration file (ex. Default.plb) using a “shortcut properties” link as defined in the Windows environment. This is useful when you need a method to automatically re-configure any of the device’s features, such as the distance or keystrokes.
First, the user makes all desired pcProx Playback configuration settings (see pcProx Playback Tab).
Second, once the settings are defined, the user creates a (.PLB) by using the ‘Save Playback As’selection under the File menu system, or the Save Playback button located in the pcProx Playback tab.
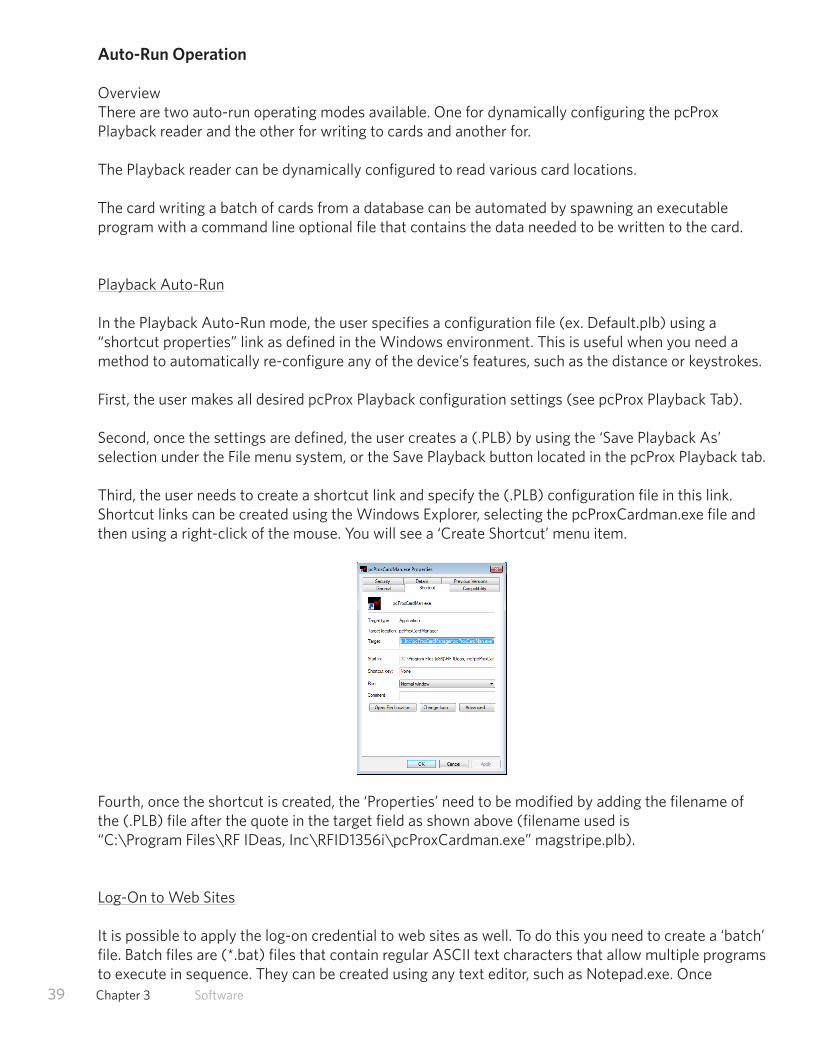
Third, the user needs to create a shortcut link and specify the (.PLB) configuration file in this link.Shortcut links can be created using the Windows Explorer, selecting the pcProxCardman.exe file andthen using a right-click of the mouse. You will see a ‘Create Shortcut’ menu item.
Fourth, once the shortcut is created, the ‘Properties’ need to be modified by adding the filename of the (.PLB) file after the quote in the target field as shown above (filename used is“C:\Program Files\RF IDeas, Inc\RFID1356i\pcProxCardman.exe” magstripe.plb).
Log-On to Web Sites
It is possible to apply the log-on credential to web sites as well. To do this you need to create a ‘batch’file. Batch files are (*.bat) files that contain regular ASCII text characters that allow multiple programs to execute in sequence. They can be created using any text editor, such as Notepad.exe. Once
39 Chapter 3 Software
created, the shortcut property (see Auto-run example) can be used and/or the shortcut can be tied to a hotkey.
The following is an example that will configure the Playback reader prior to running a website using Microsoft Internet explorer:
The files test.bat and default.plb are both placed in c:\.
C:\Test.bat contents look like:
“C:\Program Files\RF IDeas, Inc\pcProx Writer\pcProxCardman.exe” default.plb“C:\Program Files\Internet Explorer\iexplore.exe” http://www.rfideasstore.com/
This batch file will first configure the Playback reader with the file Default.plb, then load and run Explorer and go to the web site: http://www.rfideasstore.com/
Card Writing Auto-Run
In a similar fashion, the pcProxCardMan.exe application is used with a command line file option toperform the writing.
For example: “C:\Program Files\RF IDeas, Inc\RFID1356i\pcProxCardman.exe” JohnSmit.CDD)would write the JohnSmit.CDD file to the card placed on the pcProx Writer.
Below is a complete description of the file contents. Each field must be in ASCII TEXT format, and be on it own line in the file.
Line# Description1. Pre-Keystrokes (for Credential 1)2. Credential 13. Post-Keystrokes (for Credential 1)4. Pre-Keystrokes (for Credential 1)5. Credential 16. Post-Keystrokes (for Credential 1)7. CardGone Keystrokes8. Page for Credential 19. Page for Credential 210. Page Card gone11. ApplArea for Credential 112. ApplArea for Credential 213. ApplArea Card gone14. StartBlock for Credential 115. StartBlock for Credential 216. StartBlock Card gone
You can leave lines in the file empty (i.e. place a blank line) for fields which require no entry. All linesshould be enclosed in quotes “ ”. In all cases, the file must have 16 lines of text.
40 Chapter 3 Software

Here is an example of the file: writing test as credential 1, and 12345678 as credential 2. This is written to Page 1, Application Area 1, blocks 19 and 21.:
“”“test”“”“”“12345678”“”“”“1”“1”“1”“1”“1”“1”“19”“21”“23”
41 Chapter 3 Software
Security Overview
Preventing Sharing Passwords, Viewing the Username and/or Password
For those concerned about a person being able to view their own credentials, or finding a badge andviewing another’s credentials there is an easy solution. In the pre-keystrokes section of Credential 1, before all other ‘pre-keystrokes’, add the necessary keystrokes which lock the PC. For example under Windows XP, GUI+L is used to issue the locking command.
If the station is already locked, these keystrokes are ignored.If the station is not locked, this initial set of keystrokes will lock the PC before any other keystrokes are sent.
Security Due to Lost/Stolen CardsIf there is concern for logon impersonation as a result of a lost or stolen contactless token, you may set up the usage as a two-factor authentication system.
A two-factor authentication system is made up of1. Something you have (the token), and2. Something you know (a PIN)
The card may be encoded to allow operation under either a one- or two-factor authentication system.
One-FactorIn a one-factor system, the user simply waves the contactless token. Therefore the token may beconfigured to add TAB keystrokes between the username and password data as well as an ENTERkeystroke behind the data. This was illustrated in example A.
Two-FactorIn a two-factor system, only a portion of the password is encoded into the token. The user is required to enter the balance of the password (the PIN) after the token data is inserted into the field. The user then completes the entry with the ENTER keystroke. This was illustrated in example B.
The two-factor approach is especially useful when using a policy that insists on password construction rules or periodic changing of passwords
Password Change RulesThe issues the administrator will face include:
Automatic Change Password: To increase security several companies have adopted a policythat requires users to change password every xx number of days. To keep this policy in place,
42
4Increasing Security
43 Chapter 4 Increasing Security
you will need to have user’s password include both the data in the token as well as a usersupplied PIN. The PIN is the portion that the user will change periodically.Complex Passwords: To keep this policy in place, you will need to have users passwordinclude both the token data as well as a user supplied PIN. In this case, the token data maycontain any alpha and upper/lower case letter constraints will be handled in the user suppliedPIN portion of the password.
More difficult passwords can be constructed using password characters created using keypad created keystrokes such as: “ALT 002”. To perform this you must use the numbers from the keypad. The keypad numbers are available from the pull-down special keys combo box – these are indicated as KP_0 through KP_9. Here is what these special keystroke characters may look like in a typical wordprocessor such as MS Word or NotePad: ☻☻☻☻☻ or ☻☺• ♦☻•☺♦.
Single Sign-OnIf you would like to log-on to several applications, i.e. single sign-on, here is an approach which maywork for you.
ID Password PINXP Log-On Admin UserPas swordApplication 1 Admin UserPas app1
Application 2 Admin UserPas app2
44
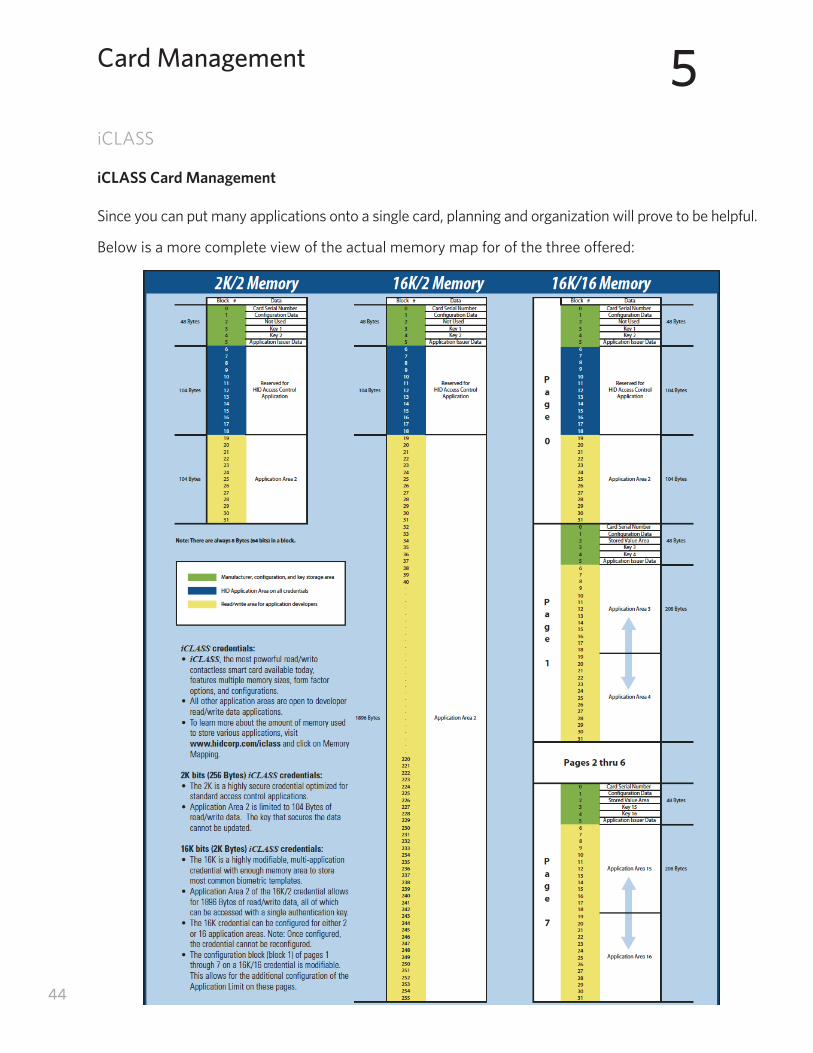
iCLASS
iCLASS Card Management
Since you can put many applications onto a single card, planning and organization will prove to be helpful.
Below is a more complete view of the actual memory map for of the three offered:
5Card Management
MIFARE
MIFARE Card Management
MIFARE is a contactless smart card technology owned by Philips. The MIFARE technology is based onISO 14443A operating at the 13.56 MHz frequency. MIFARE is a proven, reliable, and robust technology for contactless smart card with 250 million cards in the field. It is an open architecture platform that guarantees compatibility with current and future products. MIFARE has an established customer base with the broadest offering of suppliers providing multiple sources for cards and readers.
MIFARE Technical Specification
The MIFARE standard card is a 1K byte (8192 bits) with 16 sectors. The memory map of the sector is as follows: each sector has 64 bytes (512 bits); within each sector, there are 4 blocks. A block has 16 bytes (128 bit) of memory. Sector 0 is reserved for the MIFARE Application Directory commonly refers to as MAD. For this reason, the pcProx Card Manager does not allow selecting Sector ‘0’. The MAD defines the common data structures for card application directory entries; allowing terminal to identify the right card and the right memory within the card without the need to perform a comprehensive search through all of the card’s sectors until the appropriate application is found. The MAD uses Application Identifiers (AID) pointing to the specific sector in which the data is stored and identifies the registered card application for that sector. For multiple applications on a single MIFARE card, there can be multiple AIDs programmed Sector 0x0 and 0x1 to identify all registered card applications. The AID is a unique 16-bit number that is assigned by Philips to the participating registered companies. RF IDeas leaves this up to the end user to register.
Each MIFARE card contains an integrated chip with a unique permanent identification (UID) burned-in during the manufacturing process. The UID is often referred to as the Card Serial Number (CSN); for MIFARE, it is a 32-bit randomly generated serial number. The card serial number is not encrypted and resides in Sector 0, Block 0 and cannot be overwritten. In each sector including the MAD, there is a set of 48-bit encryption keys: Key A (read) and Key B (write). The keys are used to protect the programmed data from being read or overwritten without authorization. Since each sector has its own pair of keys, the card can be used to store information from multiple vendors for separate applications and protecting their specific sector(s) with their respective keys.
Security
The MIFARE technology uses the three pass mutual authentication according to ISO 9798-2 to ensure the security of the card and reader data exchange. The three pass mutual authentication is used to authenticate the card and the data stored on the card. The three pass sequence encrypts thecommunication and the transfer of card data between the card and the reader.
The pcProx Card Manager establishes its own security keys. If you require to establish your own keys,another version of the pcProx Card Manager is available – please contact technical support.
45 Chapter 5 Card Management
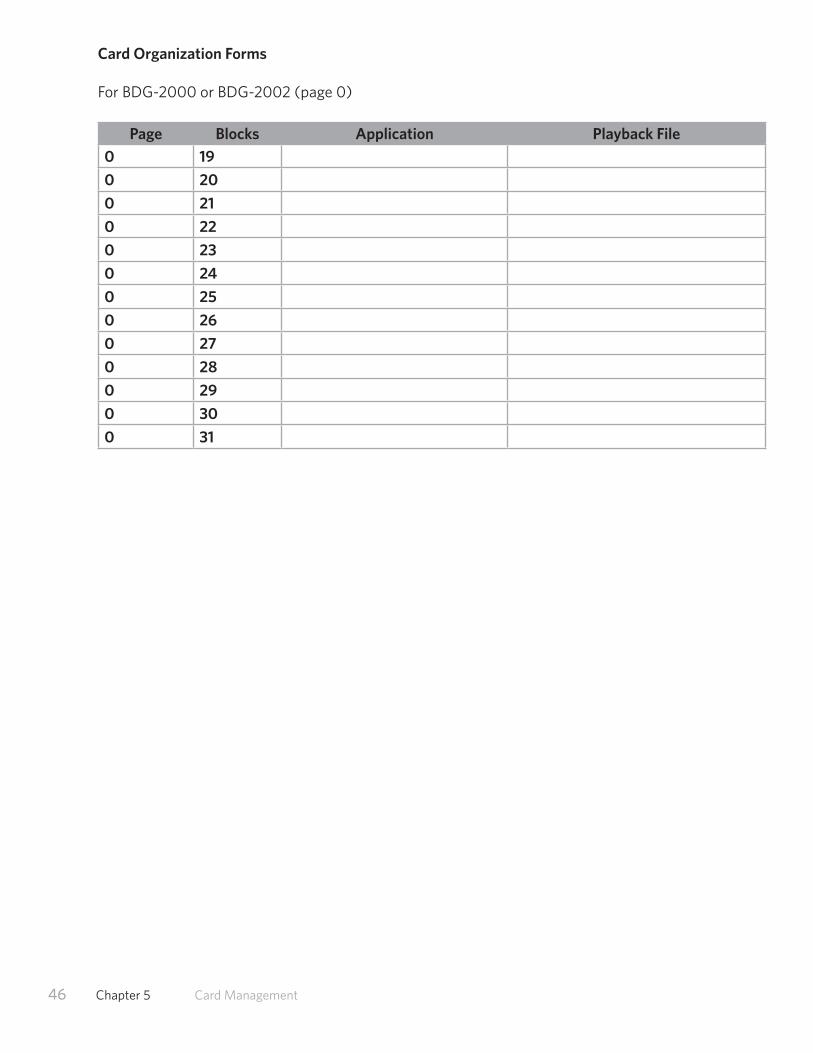
Card Organization Forms
For BDG-2000 or BDG-2002 (page 0)
Page Blocks Application Playback File0 19
0 20
0 21
0 22
0 23
0 24
0 25
0 26
0 27
0 28
0 29
0 30
0 31
46 Chapter 5 Card Management
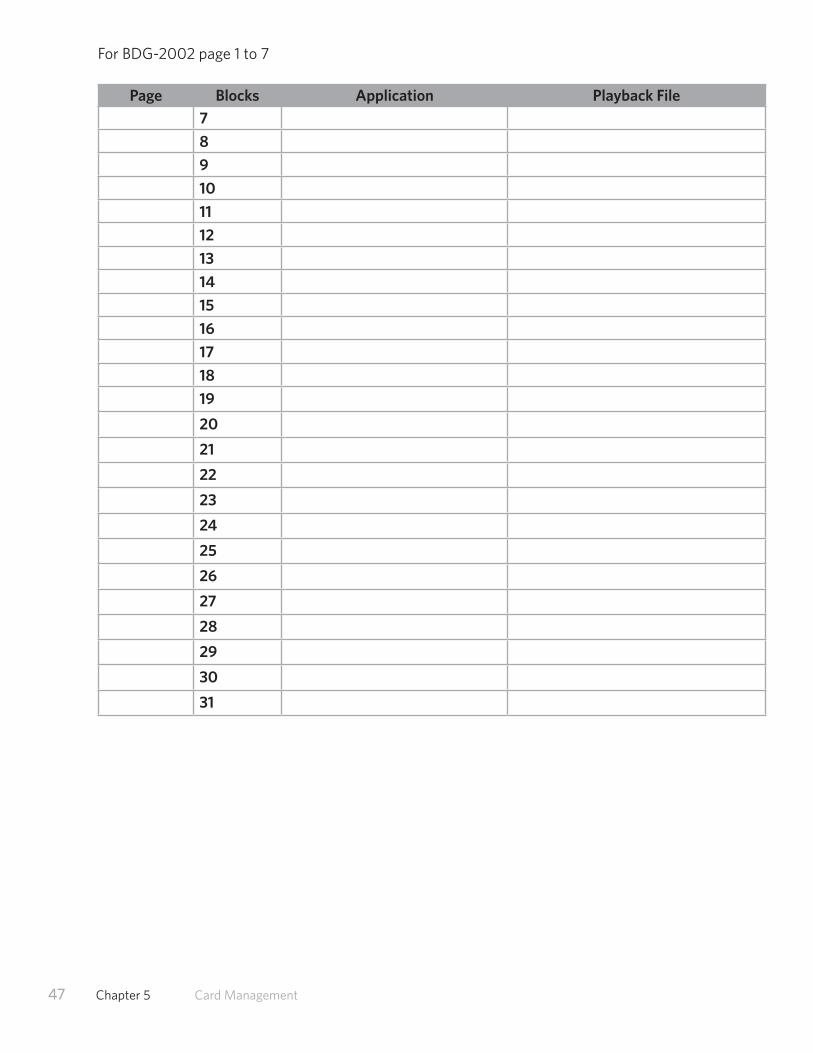
For BDG-2002 page 1 to 7
Page Blocks Application Playback File7
8
9
10
11
12
13
14
15
16
17
18
19
20
21
22
23
24
25
26
27
28
29
30
31
47 Chapter 5 Card Management
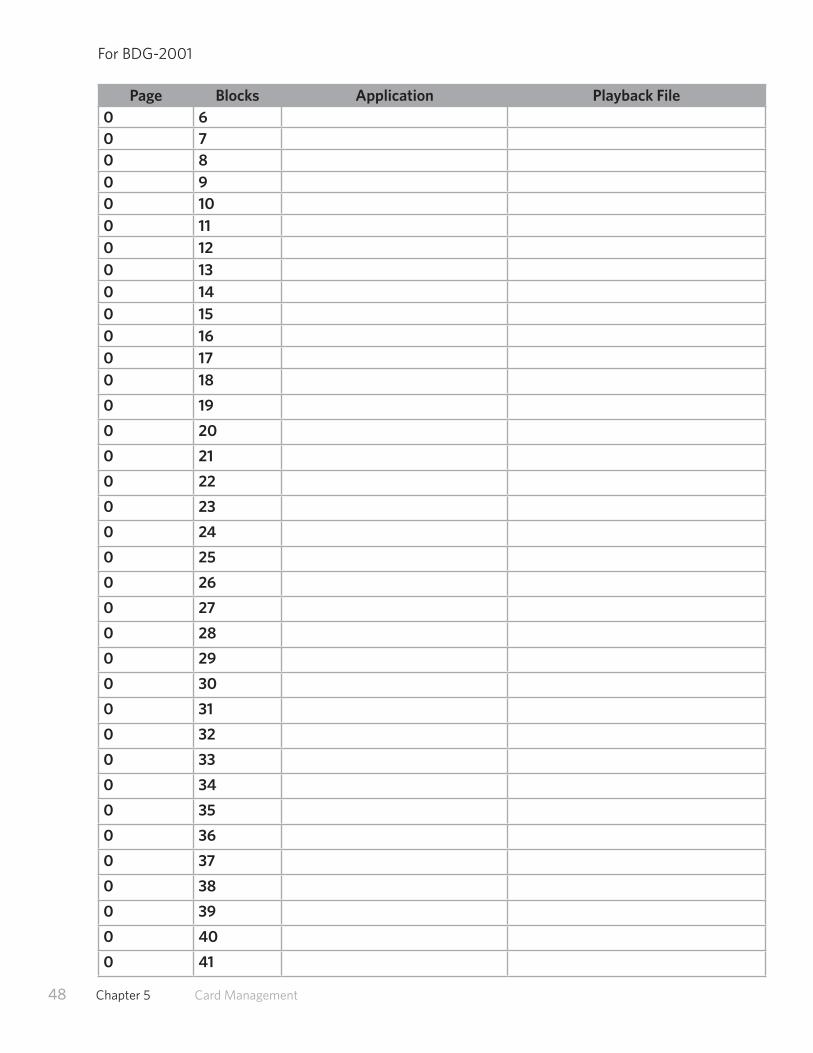
For BDG-2001
Page Blocks Application Playback File0 60 70 80 90 100 110 120 130 140 150 160 170 18
0 19
0 20
0 21
0 22
0 23
0 24
0 25
0 26
0 27
0 28
0 29
0 30
0 31
0 32
0 33
0 34
0 35
0 36
0 37
0 38
0 39
0 40
0 41
48 Chapter 5 Card Management
49 Chapter 5 Card Management
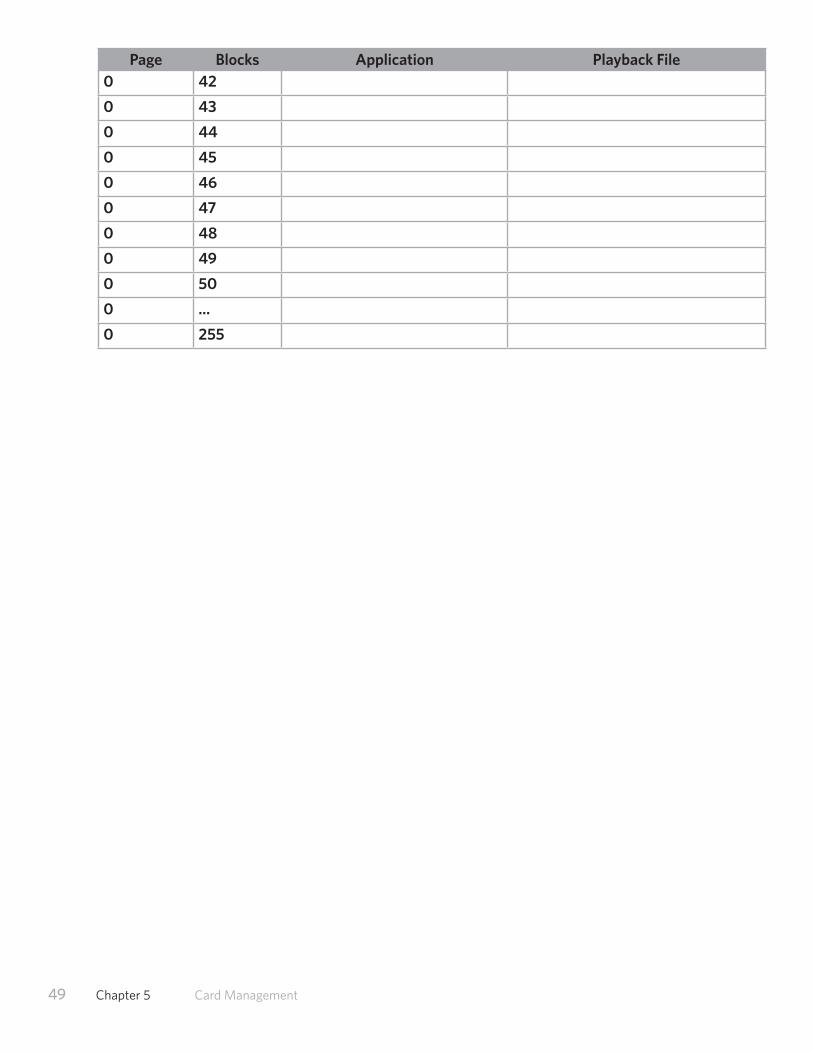
Page Blocks Application Playback File0 42
0 43
0 44
0 45
0 46
0 47
0 48
0 49
0 50
0 ...
0 255

50 Chapter 5 Card Management
For MIFARE 1k
Sector Application Playback File01
2
3
4
5
6
7
8
9
10
11
12
13
14
15
51
To increase security when the user steps away, you can use a screen saver, but this could be a problem since:
1. Timing issues- Too Short - It can be problematic because if a user becomes pre-occupied with something else, without leaving the station, the computer will lock. Users grow tired of this since it can cause them to enter their password more than necessary.
2. Timing issues- Too Long - If set too long, there is no security, someone can come up within a minute or two of you leaving and jump onto the open system.
To improve the security, the best solution is to use the pcProx Sonar. This is a presence detector thatusually mounts to the top lip of the monitor. It sends either the walk-up or walk-away keystrokes every time the user steps into or out of the perimeter zone.
What is Sonar Proximity Detection?This is an ultra-sonic proximity detector functioning as a USB keyboard. The primary purpose is fordetecting users stepping away from an un-locked (log-in active) computer terminal they have, andissuing keystrokes to lock or log-off the session to the computer.
Now when you walk away from your system, you will benefit from a hands-free means of locking yourcomputer.
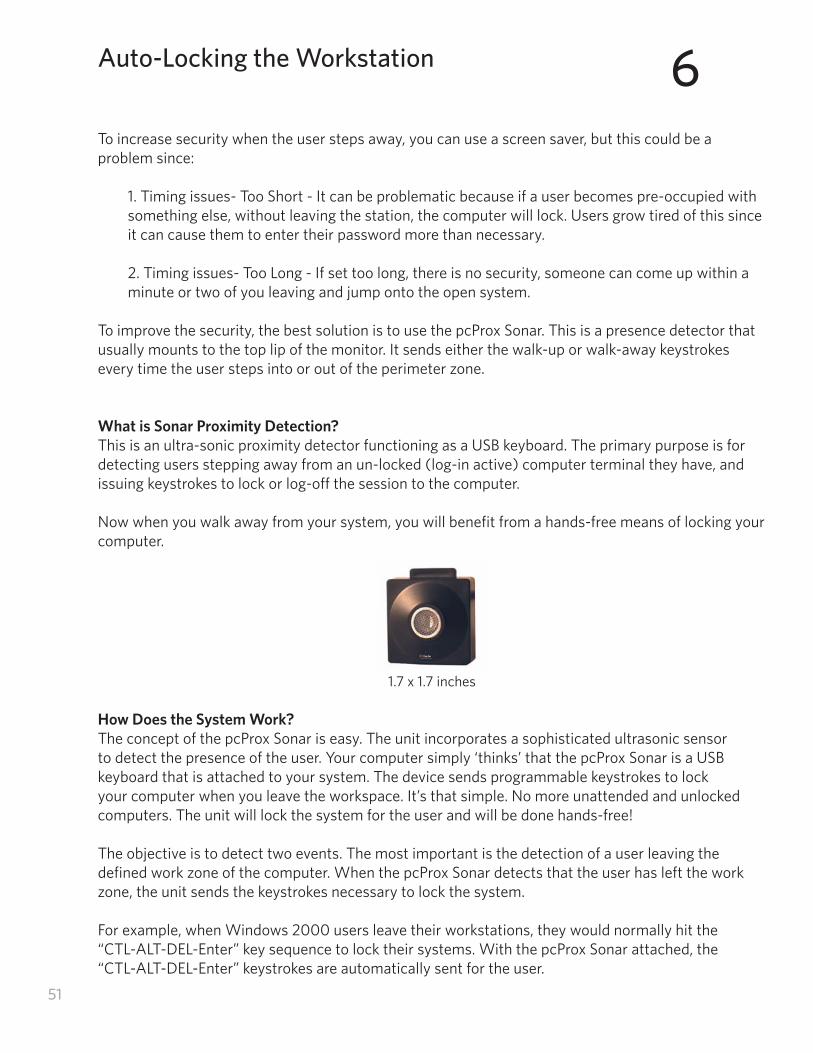
1.7 x 1.7 inches
How Does the System Work?The concept of the pcProx Sonar is easy. The unit incorporates a sophisticated ultrasonic sensor to detect the presence of the user. Your computer simply ‘thinks’ that the pcProx Sonar is a USB keyboard that is attached to your system. The device sends programmable keystrokes to lock your computer when you leave the workspace. It’s that simple. No more unattended and unlocked computers. The unit will lock the system for the user and will be done hands-free!
The objective is to detect two events. The most important is the detection of a user leaving the defined work zone of the computer. When the pcProx Sonar detects that the user has left the work zone, the unit sends the keystrokes necessary to lock the system.
For example, when Windows 2000 users leave their workstations, they would normally hit the “CTL-ALT-DEL-Enter” key sequence to lock their systems. With the pcProx Sonar attached, the “CTL-ALT-DEL-Enter” keystrokes are automatically sent for the user.
6Auto-Locking the Workstation
52 Chapter 6 Auto-Locking the Workstation
The second event is when you return to your work zone. The pcProx Sonar can now detect this event and send some preparatory keystrokes for you.
For example, on return to their computer, Windows 2000 users must hit the “CTL-ALT-DEL” key sequence to prepare the computer for the password entry. Again, with the pcProx Sonar attached, it will now send those keystrokes for you.
Who Can Benefit Using the System?Any company, institution, or hospital using passwords, biometrics or any form of computer accesscontrol that needs to secure stations without reliance on users of cumbersome time-outs.
53
Troubleshooting
If your system is not working it could be for one of the following reasons:
No USB Device Attached
1. Check to be sure the pcProx Writer (RDR-7080, BSE-RFID1356i-U or BSE-RFID1356i-232) orpcProx Playback (PN: RDR-7075, RDR-7185) unit is plugged into the USB port. When the PC ison and no card is being read, you will see the LED is red. A valid contactless card will cause theLED to turn green for 1-2 seconds.
2. Verify you have the correct model and the software configuration screen agrees with the reader attached.
3. If trouble continues, unplug the pcProx unit, use the Control Panel’s Add/Remove Hardware toremove ‘General USB Device’, and reboot the PC. When your system is started, re-attach thereader and the OS should re-install the Windows driver automatically.
Before You Call Technical Support
Please make sure you’ve identified your reader model and credential type being used. Have this information ready so that your call will be routed to the correct specialist.
For Assistance:
Ph: 847.870.1723 E: [email protected]
Talking To The Technician Provide the reader model and credential type being used to the Technical Support Specialist. Explain your problem to the specialist. Be prepared to provide the following information:
- Error messages displayed on the computer - What you were doing when the problem occurred - What steps you have taken to resolve the problem, including results from each steps
Listen and follow the steps provided by the specialist. Let the specialist know what happens when you perform the steps.
7Tips & Troubleshooting
END-USER LICENSE AGREEMENTLICENSE AGREEMENTEnd-User License Agreement for RF IDeas™ SOFTWARE and HARDWARE - RF IDeas’ pcProx®, Proximity Activated Readers, Software Developer’s Kit, and Proximity Reader DLLs, and Protocol(s). IMPORTANT-READ CAREFULLY: This End-User License Agreement (“EULA”) is a legal agreement between you (either an individual or a single entity) and the manufacturer RF IDeas (“Manufacturer”) with which you acquired the RF IDeas software and hardware product(s) identified above (“PRODUCT”). The PRODUCT includes the RF IDeas reader, computer software, the associated media, any printed materials, and any “on line” or electronic documentation. By installing, copying or otherwise using the PRODUCT, you agree to be bound by the terms of this EULA. The SOFTWARE PORTION OF THE PRODUCT includes the computer software, the associated media, any printed materials, and any “on line” or electronic documentation. By installing, copying or otherwise using the PRODUCT, you agree to be bound by the terms of this EULA. If you do not agree to the terms of this EULA, RF IDeas is unwilling to license the PRODUCT to you. In such event, you may not use or copy the SOFTWARE PORTION OF THE PRODUCT, and you should promptly contact the vendor you obtained this PRODUCT from for instructions on return of the unused product(s) for a refund. The products described in this publication are intended for consumer applications. RF IDeas assumes no liability for the performance of product. RF IDeas products are not suitable for use in life-support applications, biological hazard applications, nuclear control applications, or radioactive areas. None of these products or components, software or hardware, are intended for applications that provide life support or any critical function necessary for the support of protection of life, property or business interests. The user assumes responsibility for the use of any of these products in any such application. RF IDeas shall not be liable for losses due to failure of any of these products, or components of these products, beyond the RF IDeas commercial warranty, limited to the original purchase price. SOFTWARE PRODUCT LICENSE The PRODUCT is protected by copyright laws and international copyright treaties, as well as other intellectual property laws and treaties. The SOFTWARE PORTION OF THE PRODUCT is licensed, not sold. 1. GRANT OF LICENSE. This EULA grants you the following rights: *Software. You may install and use one copy of the SOFTWARE PORTION OF THE PRODUCT on the COMPUTER. *Network Services. If the SOFTWARE PORTION OF THE PRODUCT includes functionality that enables the COMPUTER to act as a network server, any number of computers or workstations may access or otherwise utilize the basic network services of that server. The basic network services are more fully described in the printed materials accompanying the SOFTWARE PORTION OF THE PRODUCT. *Storage/Network Use. You may also store or install a copy of the computer SOFTWARE PORTION OF THE PRODUCT on the COMPUTER to allow your other computers to use the SOFTWARE PORTION OF THE PRODUCT over an internal network, and distribute the SOFTWARE PORTION OF THE PRODUCT to your other computers over an internal network.1.1 General License Grant RF IDeas grants to an individual, a personal, nonexclusive license to make and use copies of the SOFTWARE PRODUCT for the sole purposes of designing, developing, and testing your software product(s) that are designed to operate in conjunction with any RF IDeas designed proximity reader product. You may install copies of the SOFTWARE PRODUCT on an unlimited number of computers provided that you are the only individual using the SOFTWARE PRODUCT. If you are an entity, RF IDeas grants the right to designate one individual within your organization to have the sole right to use the SOFTWARE PRODUCT in the manner provided above.1.2 Documentation. This EULA grants an individual, a personal, nonexclusive license to make and use an unlimited number of copies of any documentation, provided that such copies shall be used only for personal purposes and are not to be republished or distributed (either in hard copy or electronic form) beyond the user’s premises and with the following exception: you may use documentation identified in the SOFTWARE PRODUCT as the file format specification for RF IDeas’ proximity readers solely in connection with your development of software product(s) or an integrated work or product suite whose components include one or more general purpose software products. 1.3 Storage/Network Use. You may also store or install a copy of the SOFTWARE PRODUCT on a storage device, such as a network server, used only to install or run the SOFTWARE PRODUCT on computers used by a licensed end user in accordance with Section 1.1. A single license for the SOFTWARE PRODUCT may not be shared or used concurrently by other end users. 1.4 Sample Code. RF IDeas grants you the right to use and modify the source code version of those portions of the SOFTWARE PRODUCT identified as “Samples in the SOFTWARE PRODUCT (“Sample Code”) for the sole purposes to design, develop, and test your software product(s), and to reproduce and distribute the Sample Code, along with any modifications thereof, only in object code form.2. DESCRIPTION OF OTHER RIGHTS AND LIMITATIONS.*Limitations on Reverse Engineering, Decompilation and Disassembly. You may not reverse engineer, decompile, or disassemble the PRODUCT, except and only to the extent that such activity is expressly permitted by applicable law notwithstanding this limitation*You may not reproduce or otherwise emulate, in whole or in part, any form the protocol(s) defined within this PRODUCT for usewithout a RF IDeas PRODUCT Redistributable Code. If you are authorized and choose to redistribute Sample Code (“Redistributables”) as described in Section 1.4, you agree to: (a) distribute the Redistributables in object code only in conjunction with and as a part of a software application product developed by you using the PRODUCT accompanying this EULA that adds significant and primary functionality to the SOFTWARE PRODUCT (“Licensed Product”); (b) not use RF IDeas’ name, logo, or trademarks to market the Licensed Product; (c) include a valid copyright notice on the Licensed Product; (d) indemnify, hold harmless, and defend RF IDeas from and against any claims or lawsuits, including attorney’s fees, that arise or result from the use or distribution of the Licensed Product; (e) otherwise comply with the terms of this EULA; and (g) agree that RF IDeas reserves all rights not expressly granted. You also agree not to permit further distribution of the Redistributables by your end users except: (1) you may permit further redistribution of the Redistributables by your distributors to your end-user customers if your distributors only distribute the Redistributables in conjunction with, and as part of, the Licensed Product and you and your distributors comply with all other terms of this EULA; and (2) in the manner described in Section 1.4.*Separation of Components. The PRODUCT is licensed as a single product. Its component parts may not be separated for use on more than one computer.*Single COMPUTER. The PRODUCT is licensed with the COMPUTER as a single integrated product. The PRODUCT may only be used with the COMPUTER. *Rental. You may not rent or lease the PRODUCT without permission from RF IDeas*Software Transfer. You may permanently transfer all of your rights under this EULA only as part of a sale or transfer of the COMPUTER,provided you retain no copies, you transfer all of the PRODUCT (including all component parts, the media and printed materials, any upgrades, this EULA and, if applicable, the Certificate(s) of Authenticity), AND the recipient agrees to the terms of this EULA. If thePRODUCT is an upgrade, any transfer must include all prior versions of the PRODUCT.*Termination. Without prejudice to any other rights, RF IDeas may terminate this EULA if you fail to comply with the terms and conditionsof this EULA. In such event, you must destroy all copies of the SOFTWARE PORTION OF THE PRODUCT and all of its component parts.
54
nn
3. UPGRADES. If the SOFTWARE PORTION OF THE PRODUCT is an upgrade from another product, whether from RF IDeas or another supplier, you may use or transfer the PRODUCT only in conjunction with that upgraded product, unless you destroy the upgraded product. If the SOFTWARE PORTION OF THE PRODUCT is an upgrade of a RF IDeas product, you now may use that upgraded product only in accordance with this EULA. If the SOFTWARE PORTION OF THE PRODUCT is an upgrade of a component of a package of software programs which you licensed as a single product, the SOFTWARE PORTION OF THE PRODUCT may be used and transferred only as part of that single product package and may not be separated for use on more than one computer.4. OEM COPYRIGHT. All title and copyrights in and to the PRODUCT (including but not limited to images, photographs, animations, video, audio, music, text and “applets,” incorporated into the PRODUCT), the accompanying printed materials, and any copies of the SOFTWARE PORTION OF THE PRODUCT, are owned by RF IDeas or its suppliers. The PRODUCT and SOFTWARE PORTION OF THE PRODUCT is protected by copyright laws and international treaty provisions. You may not copy the printed materials accompanying the PRODUCT.5. DUAL-MEDIA SOFTWARE. You may receive the SOFTWARE PORTION OF THE PRODUCT in more than one medium. Regardless of the type or size of medium you receive, you may use only one medium that is appropriate for your single computer. You may not use or install the other medium on another computer. You may not loan, rent, lease, or otherwise transfer the other medium to another user, except as part of the permanent transfer (as provided above) of the SOFTWARE PORTION OF THE PRODUCT. 6. OEM PRODUCT SUPPORT. Product support for the product is not provided by RF IDeas or its subsidiaries. For product support, please refer to the OEM supplies support number provided in the documentation. Should you have any questions concerning the EULA, or if you desire to contact OEM for any other reason, please refer to the address provided in the documentation provided.FOR THE LIMITED WARRANTIES AND SPECIAL PROVISIONS PERTAINING TO YOUR PARTICULAR JURISDICTION, PLEASE REFER TO YOUR WARRANTY BOOKLET INCLUDED WITH THIS PACKAGE OR PROVIDED WITH THE SOFTWARE PRODUCT PRINTED MATERIALS. Limited Warranty: RF IDeas warrants to the original buyer of this product, that the hardware and related disk(s) are free of defects in material and workmanship for a period of one year from date of purchase from RF IDeas or from an authorized RF IDeas dealer. Should the RF IDeas products fail to be in good working order at any time during the one-year period, RF IDeas will, at its option, repair or replace the product at no additional charge, provided that the product has not been abused, misused, repaired or modified. This warranty shall be limited to repair or replacement and in no event shall RF IDeas be liable for any loss of profit or any commercial or other damages, including but not limited to special, incidental, consequential or other similar claims. No dealer, distributor, company, or person has been authorized to change or add to the terms of this agreement, and RF IDeas will not be bound by any representation to the contrary. RF IDeas SPECIFICALLY DISCLAIMS ALL OTHER WARRANTIES, EXPRESSED OR IMPLIED, INCLUDING BUT NOT LIMITED TO IMPLIED WARRANTIES OF MERCHANTABILITY AND FITNESS OF PURPOSE. Since some states do not allow such exclusion of limitation of incidental or consequential damages for consumer products, check the statute of the state in which your business resides. This warranty gives you the specific legal rights in addition to any rights that you have under the laws of the state in which your business resides or operates. Returns: RF IDeas products which require Limited Warranty service during the warranty period shall be delivered to the nearest authorized dealer or sent directly to RF IDeas at the address below with proof of purchase and a Return Materials Authorization (RMA) Number provided by RF IDeas Technical Support Dept. Replacement parts or complete boards become the property of RF IDeas If the returned board or unit is sent by mail, the purchaser agrees to pre-pay the shipping charges and insure the board or unit or assume the risk of loss or damage which may occur in transit. The purchaser is expected to employ a container equivalent to the original packaging. Copyright: Copyright by RF IDeas 2011. All rights reserved. Reproduction or distribution of this document in whole or in part or in any form is prohibited without express written permission from RF IDeas.Trademarks: All RF IDeas products are trademarks of RF IDeas. All other product names or names are trademarks or registered trademarks of their respective holders.Applicable Patents: RF IDeas pcProx Plus card readers supporting HID formats retain US Patent No. 5,952,935 and U.S. Patent No. 7,439,862.Disclaimer: This Reference Guide is printed in the U.S.A. Any resemblance mentioned in the Reference Guide to persons living or dead, or to actual corporations or products is purely coincidental. RF IDeas believes that the information contained in this manual is correct. However, RF IDeas does not assume any responsibility for the accuracy of the content of this User Manual, nor for any patent infringements or other rights of third parties. RF IDeas reserves the right to make any modifications in either product or the manual without giving prior written notification.
FCC Compliance StatementFCC ID: M9MPCPROXHUSB100 (HID USB model) FCC ID: M9MBUPCPROXH100 (HID RS-232 model)FCC ID: M9MPCPROXM101 (Indala model) FCC ID: M9MBUPCPROXA100 (AWID) FCC ID: M9MRDR6X8X (Kantech, Indala, Casi-Rusco) FCC ID: M9MPCPROXP100 (Pyramid)FCC ID: M9MPCPROXC101 (Casi-Rusco model) FCC ID: M9MRDR7P71 (FIPS 201 13.56MHz)FCC ID: M9MRFID1856I100 (MIFARE/iCLASS models) FCC ID: M9MRDR7L81 (Legic 13.56MHz)FCC ID: M9MRDR7081 (iCLASS Module based) FCC ID: M9MRDR7580 (iCLASS MIFARE and Other 13.56MHz)FCC ID: M9MRDR7581 (iCLASS MIFARE and Other 13.56MHz) FCC ID: M9MRDR7081AKF (iCLASS MIFARE and Other 13.56MHz)FCC ID: M9MRDR7081AKE (iCLASS MIFARE and Other 13.56MHz) FCC ID: M9MRDR75DX (iCLASS MIFARE and Other 13.56MHz)FCC ID: M9MRDR8XX8U (Plus combo model) FCC ID: M9MRDR758X (iCLASS MIFARE and Other 13.56 MHz)FCC ID: M9MRDR8058X (Multi-protocol Combo model) FCC ID: M9M8058XCCL (Multi-protocol and Contact model)FCC ID: M9M758XCCL (MIFARE and Contact model) FCC ID: M9M7580CCL (MIFARE and Contact model)FCC ID: M9MRDR80081 (Plus SIO Combo Model) FCC ID: M9MRDR70EX (13.56MHz Express Model)FCC ID: M9MRFID1356i100 (13.56 MHz Playback & Writer)
“Pursuant to FCC 15.21 of the FCC rules, changes not expressly approved by RF IDeas might cause harmful interference and void the FCC authorization to operate this product.
Note: This device complies with Part 15 of the FCC Rules and Industry Canada license-exempt RSS standard(s). Operation is subject to the following two conditions: (1) This device may not cause harmful interference, and (2) this device must accept any interference received, including interference that may cause undesired operation. This product complies with FCC OET Bulletin 65 radiation exposure limits set forth for an uncontrolled environment.
The reader may not recognize value cards in the presence of high RF fields. If the current reading is erratic, the user shall take the following step: Move the equipment from any known transmitters nearby. For more information contact Tech Support at 866.439.4884.
55
Inde
xIndex
56
AAdvanced 33ASCII 4, 10, 12, 15, 30Auto-Locking Card Presentation 21, 27, 34Auto-Run 31, 39, 40
BBDG-2000 14, 46-47BDG-2001 14, 29, 48-49BDG-2002 14, 46
CCard Gone Keystrokes 18, 21, 27-28, 33, 38Check and Set Keys 18Clear Keys 19COM 11-12, 30
DDelays 21
EEuro Key Pad 20
FFAC 7Find Free Page 18
IiCLASS 7, 14-15, 17-18, 20, 22, 30, 36, 44
LLED 11, 14, 21, 30 Lock Locations 21Log-On 16-17, 19, 29
MMemory Map 16, 19, 29, 36MIFARE 7, 14-15, 17-18, 20-22, 29-30, 36-37, 45, 50
OOne-Factor Authentication 22, 42
PPart Numbers 8 pcProx Sonar 51
RRS-232 12, 14-16, 33
SSingle Sign-On 43Software Developers Kit (SDK) 4, 10 Special Keystrokes 16-17, 25 Speeding Playback Output 21
TTwo-Factor Authentication 25, 42
WWiegand 12 Writing Credentials 19
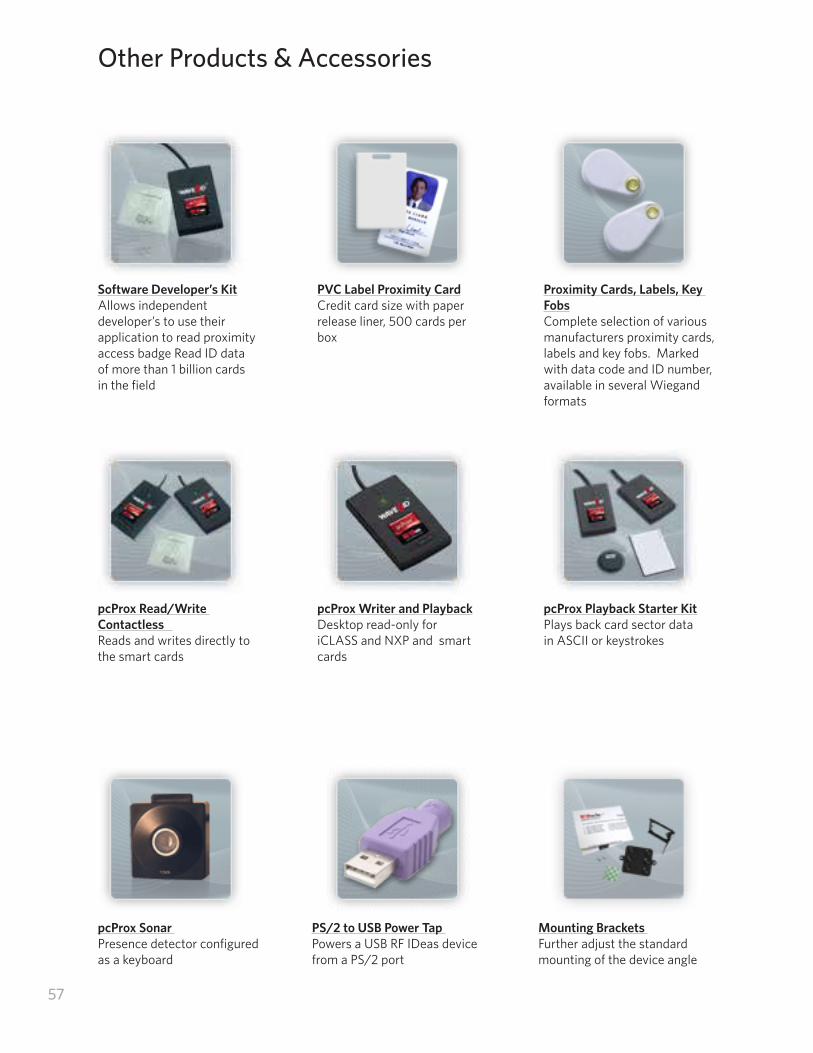
57
Other Products & Accessories
Software Developer’s KitAllows independent developer’s to use their application to read proximity access badge Read ID data of more than 1 billion cards in the field
PVC Label Proximity CardCredit card size with paper release liner, 500 cards per box
Proximity Cards, Labels, Key FobsComplete selection of various manufacturers proximity cards, labels and key fobs. Marked with data code and ID number, available in several Wiegand formats
pcProx Read/Write Contactless Reads and writes directly to the smart cards
pcProx Writer and PlaybackDesktop read-only for iCLASS and NXP and smart cards
pcProx Playback Starter KitPlays back card sector data in ASCII or keystrokes
pcProx Sonar Presence detector configured as a keyboard
PS/2 to USB Power Tap Powers a USB RF IDeas device from a PS/2 port
Mounting Brackets Further adjust the standard mounting of the device angle

70
RF IDeas Inc.© 2013 RF IDeas. All rights reserved.
Specifications subject to change without notice.
Windows, Macintosh, Solaris, Sun Ray and Linux are trademarks of their respective companies. All other trademarks, service marks and product or service names are property of their respective owners.
Mention of third-party products is for informational purposes only and constitutes neither an endorsement nor a recommendation. RF IDeas assumes no responsibility with regard to the performance or use of these products. All understandings, agreements, or warranties, if any, take place directly between the vendors and the prospective users.
Please feel free to call, e-mail or visit our web site for a full list of applications, products, configuration options, supported cards and form factor specifications. Our web site includes application videos, support materials, case studies anddetailed information about our product line.
Every effort has been made to ensure that the information in this manual is accurate. RF IDeas is not responsible for printing or clerical errors.