Embed Size (px)
Citation preview

PDC WORKFLOW TRAINING DOCUMENT
MAY 17, 2019 NORTHEASTERN UNIVERSITY
Contents What’s the Payroll Distribution Change (PDC) system ................................................................................. 3
Improved Features ........................................................................................................................................ 3
How to log into the system? ......................................................................................................................... 4
Step 1: Visit the web link for the PDC request page ................................................................................. 4
Step 2: Enter your credentials .................................................................................................................. 4
Step 3: Successfully sign in to view Home Screen .................................................................................... 5
How to create a new Payroll Distribution Change (PDC) Request? .............................................................. 6
Step 1: Click on the New PDC Request button.......................................................................................... 6
Step 2: Enter General Information of requestor ....................................................................................... 6
Step 3: Review Current Earnings Distribution .......................................................................................... 7
Step 4: Modify the Earnings Distribution .................................................................................................. 7
Step 5: Select the Approver(s) .................................................................................................................. 8
Step 6: Submit Request ............................................................................................................................. 8
How to Approve/Reject the Payroll Distribution Change (PDC) Request? ................................................... 9
Step 1: Open Request from the Task List section ..................................................................................... 9
Step 2: Approve/Reject the request with relevant comments ................................................................. 9
How to Resubmit a Rejected Request? ....................................................................................................... 10
Step 1: Open Request from the Task List section ................................................................................... 10
Step 2: Review the Rejection comments made by Approver ................................................................. 10
Step 3: Make changes to the Request and Resubmit ............................................................................. 10
How to Track the Payroll Distribution Change (PDC) Request? .................................................................. 11
Step 1: Select any Request you want to track ........................................................................................ 11
Step 2: View status of Request ............................................................................................................... 11
Step 3: View additional details of Request ............................................................................................. 11
Points to Remember ................................................................................................................................... 12
What’s the Payroll Distribution Change (PDC) system The purpose of this document is to be a reference manual providing detailed information to support the process of creating, approving/rejecting, and viewing the payroll distribution change requests.
Improved Features The following improvements are implemented in the new version of the PDC system:
1. Auto populate position number for the Employee selected 2. Only valid and active indexes can be part of the request 3. Index and Account description are displayed for the account and the index used in the request 4. List of reasons to select for when a request is raised 5. Enter comments to justifying if the Change From date is less than the request date 6. Allow multiple approvers for a request 7. Allow HR to mark the request as complete 8. Receive notifications on various activities in the system 9. Dashboard for requestors to view visibility on the request status 10. Reports for HR users on various parameters

How to log into the system?
Walkthrough
Step 1: Visit the web link for the PDC request page a. Use the following link to view the PDC request landing page.
https://k2forms.northeastern.edu/Runtime/Runtime/Form/PDC+-+My+Requests/?
Note: The system is best compatible for use on the latest Firefox, Chrome, Edge or Safari browsers. The system is not responsive on mobile / tablet screens.
Step 2: Enter your credentials a. Log in to the system using [email protected] as shown in the screenshot below,
and click on the Next button:
Step 1: Visit the web link for the PDC request page Step 2: Enter your credentials Step 3: Successfully sign in to view Home Screen
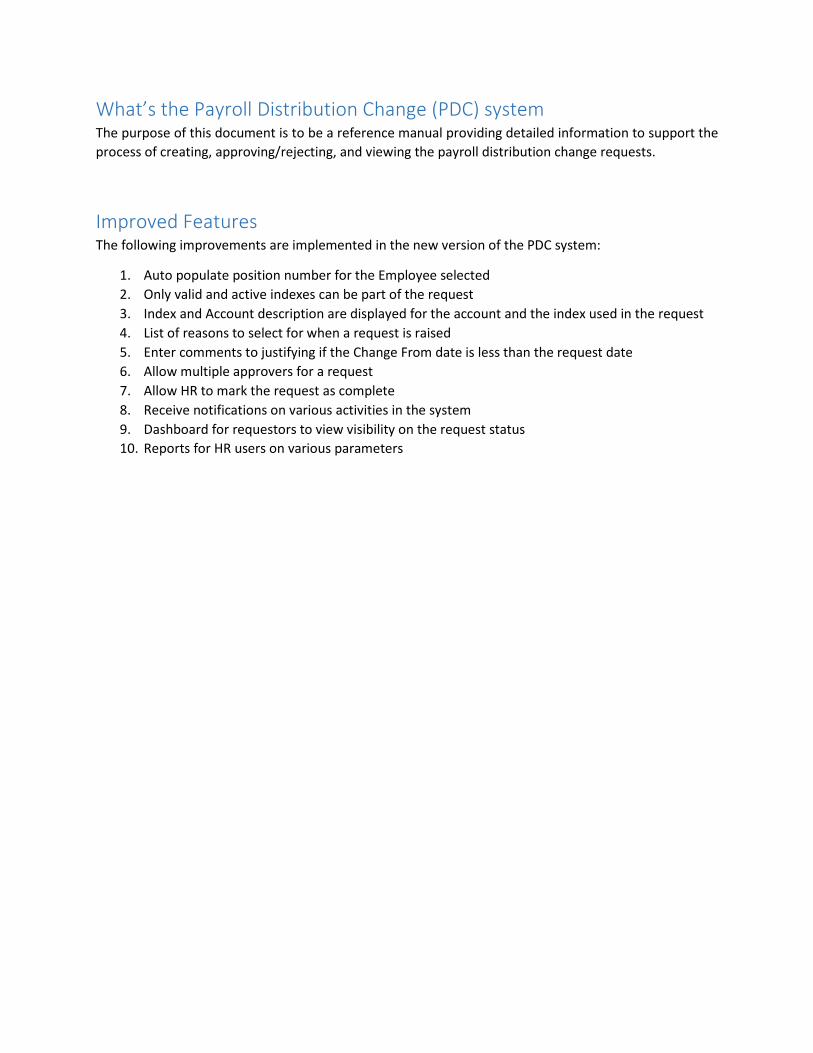
b. You will be redirected to the Northeastern University Organizational Account sign in page, enter your credentials and click on the Sign in button.
Step 3: Successfully sign in to view Home Screen c. Once you are logged in you will be redirected to the Home screen of the Payroll Distribution
Change system.

How to create a new Payroll Distribution Change (PDC) Request?
Walkthrough
Step 1: Click on the New PDC Request button a. Once logged in, click on the New PDC Request button on the Home screen.
Step 2: Enter General Information of requestor In the General Information section, enter the following details:
a. Full Name: This is the Employee name field for whom you are raising a request. i. Enter the last name and hit enter.
ii. Or click on the magnifier icon to search in the Search dialog box. iii. The Position field will be auto filled after selecting the employee. If the employee
list is populated, select the position number from the prepopulated list. b. Change From Date: Set the date from when the change should be applied using the
Change From Date field. If the from date selected is a past date, the requestor will have to enter a comment in the Late Change Comment field mandatorily.
c. Request Reason: Select the reason for creating the request using the Request Reason picklist. If the Other option is selected, the requestor will have to enter a comment in the Request Reason Other field mandatorily.
Step 1: Click on the New PDC Request button Step 2: Enter General Information of requestor Step 3: Review Current Earnings Distribution Step 4: Modify the Earnings Distribution Step 5: Select the Approver(s) Step 6: Submit Request
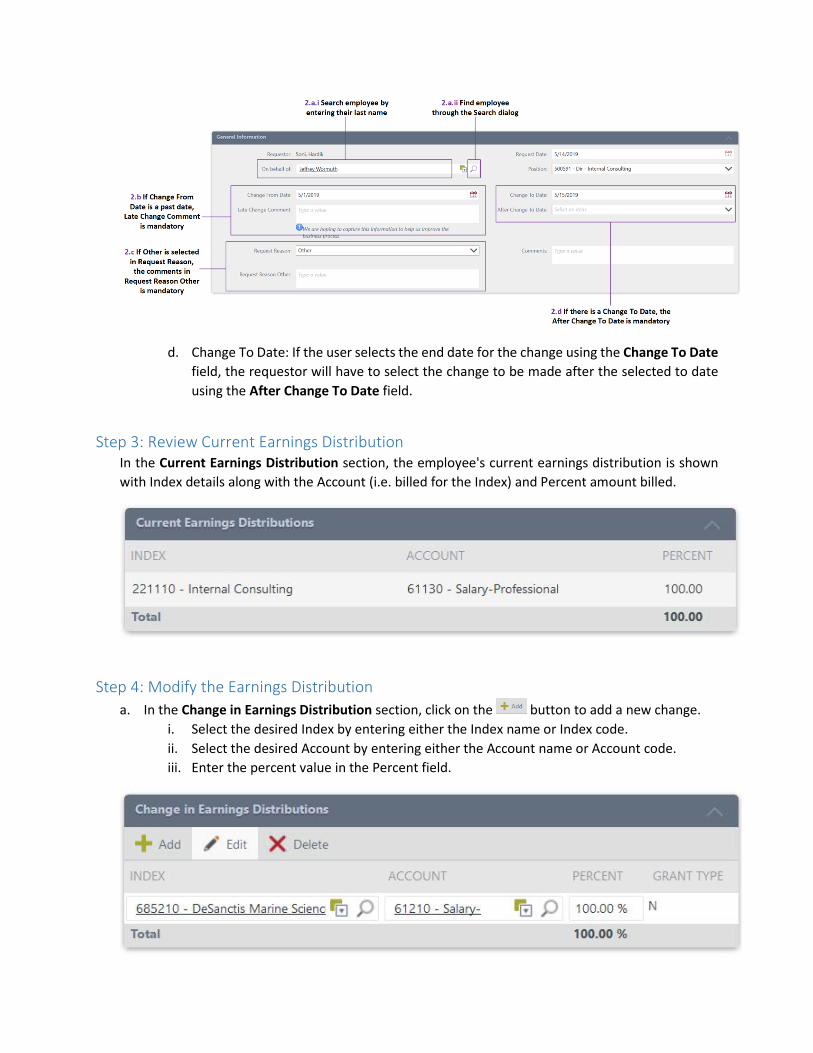
d. Change To Date: If the user selects the end date for the change using the Change To Date field, the requestor will have to select the change to be made after the selected to date using the After Change To Date field.
Step 3: Review Current Earnings Distribution In the Current Earnings Distribution section, the employee's current earnings distribution is shown with Index details along with the Account (i.e. billed for the Index) and Percent amount billed.
Step 4: Modify the Earnings Distribution
a. In the Change in Earnings Distribution section, click on the button to add a new change. i. Select the desired Index by entering either the Index name or Index code. ii. Select the desired Account by entering either the Account name or Account code. iii. Enter the percent value in the Percent field.

b. Select the individual split line item and click on the button to edit the individual line item. c. Select the individual split line item and click on the button to delete the individual line item.
Step 5: Select the Approver(s)
a. In the Request Approvers section, click on the button to add an approver to the list. i. For each of the approvers, search by entering the approver name in the Approver Name
section.
b. Select the individual split line item and click on the button to edit an approver. c. Select the individual split line item and click on the button to delete an approver.
Step 6: Submit Request
a. Skim through the entire form and click on the Submit button in the bottom-right corner to submit the request.
b. Click on the Exit button to cancel the PDC creation process.

How to Approve/Reject the Payroll Distribution Change (PDC) Request?
Walkthrough
Step 1: Open Request from the Task List section a. Double-click on the request in the Task List section on the Home screen to view the list of the
request waiting for your approval.
b. Alternatively, single-click on the arrow located on the right side of the line item to pull up a menu and select Open Form to view the request waiting for approval.
Step 2: Approve/Reject the request with relevant comments a. Click on the Approve or Reject buttons in the bottom right to approve / reject the request. b. Comments in the Approval / Rejection Comment field are mandatory when you reject a request. c. Click on the Exit button to cancel the PDC Approval / Rejection process.
Note: This section is for Approvers (users who were added as approvers by the requestors) and Research Compliance, and HR team
Step 1: Open Request from the Task List section Step 2: Approve/Reject the request with relevant comments
How to Resubmit a Rejected Request?
Walkthrough
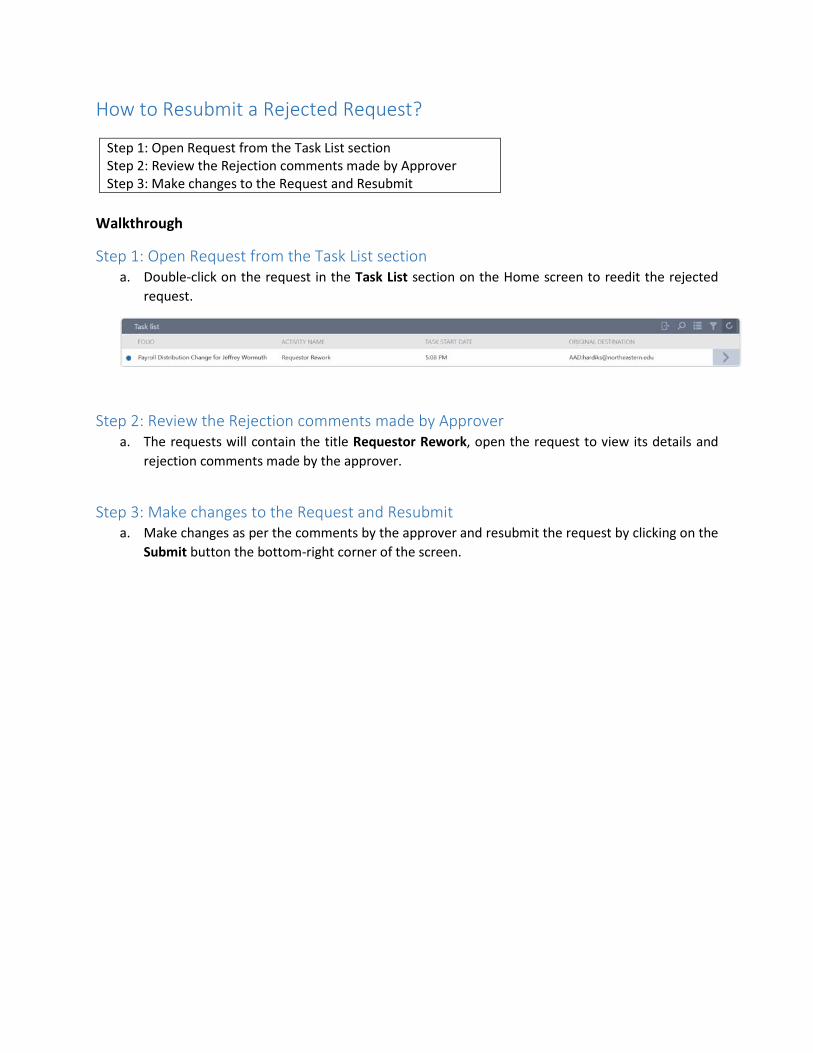
Step 1: Open Request from the Task List section a. Double-click on the request in the Task List section on the Home screen to reedit the rejected
request.
Step 2: Review the Rejection comments made by Approver a. The requests will contain the title Requestor Rework, open the request to view its details and
rejection comments made by the approver.
Step 3: Make changes to the Request and Resubmit a. Make changes as per the comments by the approver and resubmit the request by clicking on the
Submit button the bottom-right corner of the screen.
Step 1: Open Request from the Task List section Step 2: Review the Rejection comments made by Approver Step 3: Make changes to the Request and Resubmit

How to Track the Payroll Distribution Change (PDC) Request?
Walkthrough
Step 1: Select any Request you want to track a. The following section on the home screen will showcase all the requests that you have raised
b. You could do a search by selecting any of the parameters listed in the Quick Search field (Request #, Requestor, On Behalf Of (Employee Name), Change From date, Change To date, Status, Late Change (Yes/No), Position Title).
Step 2: View status of Request a. Single click on any of the request from the previous step would showcase the approval history for
that particular request in the Approver History section. b. The raised request will have to undergo the following reviews before it is approved:
i. Approver Review – The form must be approved by the Approver(s) selected while raising the PDC request.
ii. Research Compliance – For Research related transfers, the PDC request form undergoes an additional review by the Research Compliance Team.
iii. HR Processing – This is the final step before your PDC request can be approved.
Step 3: View additional details of Request a. Double click on any of the requests to view its details. b. Click on the Export to Excel button to export the displayed list into an Excel file.
Step 1: Select any Request you want to track Step 2: View Status of the Request Step 3: View additional details of Request

Points to Remember
a. The fields highlighted with a Red line on the left border (as shown below) are the mandatory fields.
b. All the validations on the fields are highlighted in red as shown below when you try to submit the request.
c. For various actions in the event the following person are notified:
Email Recipient Event
Requestor 1. When a request is submitted 2. When the request is rejected 3. When the request is processed by the HR
Approver 1. When a request is submitted by the requestor and your name is added as one of the approvers
Research Compliance 1. When the request is approved by the intended approvers and is now awaiting Research Compliance approval.
HR 1. When the request is approved by the Research Compliance team and is awaiting for the HR to Approve or Reject the request.


![Mifare Application Programming Guide - Giga Tms Inc Products/13.56MHz/Mifare...4 Select Card: Select an individual card for operation by [Select] command. The operation can be made](https://img.pdfslide.net/doc/110x75/5e683709b1c6071fc247607b/mifare-application-programming-guide-giga-tms-products1356mhzmifare-4-select.jpg)