Embed Size (px)
Citation preview

ABC
PLOP and PLOP DSVersion 5.0
PDF Linearization, Optimization, Protection and Digital Signature

Copyright © 1997–2015 PDFlib GmbH. All rights reserved.
PDFlib GmbHFranziska-Bilek-Weg 9, 80339 München, Germanywww.pdflib.comphone +49 • 89 • 452 33 84-0fax +49 • 89 • 452 33 84-99
If you have questions check the PDFlib mailing list and archive atgroups.yahoo.com/neo/groups/pdflib/info
Licensing contact: [email protected] for commercial PDFlib licensees: [email protected] (please include your license number)
This publication and the information herein is furnished as is, is subject to change without notice, and should not be construed as a commitment by PDFlib GmbH. PDFlib GmbH assumes no responsibility or lia-bility for any errors or inaccuracies, makes no warranty of any kind (express, implied or statutory) with re-spect to this publication, and expressly disclaims any and all warranties of merchantability, fitness for par-ticular purposes and noninfringement of third party rights.
PDFlib and the PDFlib logo are registered trademarks of PDFlib GmbH. PDFlib licensees are granted the right to use the PDFlib name and logo in their product documentation. However, this is not required.
Adobe, Acrobat, PostScript, and XMP are trademarks of Adobe Systems Inc. AIX, IBM, OS/390, WebSphere, iSeries, and zSeries are trademarks of International Business Machines Corporation. ActiveX, Microsoft, OpenType, and Windows are trademarks of Microsoft Corporation. Apple, Macintosh and TrueType are trademarks of Apple Computer, Inc. Unicode and the Unicode logo are trademarks of Unicode, Inc. Unix is a trademark of The Open Group. Java and Solaris are trademarks of Sun Microsystems, Inc. HKS is a regis-tered trademark of the HKS brand association: Hostmann-Steinberg, K+E Printing Inks, Schmincke. Other company product and service names may be trademarks or service marks of others.
PDFlib PLOP and PLOP DS contain modified parts of the following third-party software:Zlib compression library, Copyright © 1995-2002 Jean-loup Gailly and Mark AdlerCryptographic software written by Eric Young, Copyright © 1995-1998 Eric Young ([email protected])Software developed by the OpenSSL Project for use in the OpenSSL Toolkit. (www.openssl.org)Expat XML parser, Copyright © 1998, 1999, 2000 Thai Open Source Software Center LtdICU International Components for Unicode, Copyright © 1995-2009 International Business Machines Cor-poration and othersLibcurl multiprotocol file transfer library, Copyright © 1996-2014, Daniel Stenberg ([email protected])
PDFlib PLOP and PLOP DS contain the RSA Security, Inc. MD5 message digest algorithm.

Contents 3
Contents0 First Steps with PLOP and PLOP DS 7
0.1 Installing the Software 7
0.2 Applying the PLOP/PLOP DS License Key 8
0.3 Roadmap to Documentation and Samples 11
0.4 Overview of PLOP and PLOP DS 12
1 PLOP Features 15
1.1 Encryption, Decryption, and Permissions 15
1.2 Web-Optimized (Linearized) PDF 16
1.3 Optimization (Size Reduction) 17
1.4 Repair Mode for Damaged PDF 18
1.5 Query Document Information with pCOS 19
1.6 Inserting and Reading Document Info Entries 20
1.7 Inserting, Extracting, or Removing XMP Metadata 21
1.8 PLOP Processing Details 23
2 PLOP DS Features (Digital Signatures) 27
2.1 Signature Features in PLOP DS 27
2.2 Preparations for PLOP DS Evaluation 29
2.3 Signing Documents with PLOP DS 29
2.4 Certification Signatures 30
2.5 Time-Stamps 30
2.6 LTV-enabled Signatures 30
2.7 PAdES Signatures 31
2.8 Visualize Digital Signatures 31
2.9 Query Signature Properties 32
3 PLOP and PLOP DS Command-line Tool 33
3.1 PLOP and PLOP DS Command-line Options 33
3.2 PLOP and PLOP DS Command-line Examples 37
4 PLOP and PLOP DS Library Language Bindings 39
4.1 C Binding 39
4.2 C++ Binding 42
4.3 COM Binding 45
4.4 Java Binding 46

4 Contents
4.5 .NET Binding 48
4.6 Objective-C Binding 49
4.7 Perl Binding 51
4.8 PHP Binding 52
4.9 Python Binding 54
4.10 Ruby Binding 55
5 PDF Encryption and Decryption 57
5.1 PDF Encryption Features 57
5.2 PDF Encryption with PLOP 61
5.3 Securing PDF Documents on the Command Line 64
6 Digital Signatures with PLOP DS 67
6.1 Introduction 676.1.1 Signature Concepts 676.1.2 Signatures in Acrobat and PDF 68
6.2 Cryptographic Engines in PLOP DS 726.2.1 Overview 726.2.2 Built-in Engine 736.2.3 PKCS#11 Engine for Smartcards and other cryptographic Tokens 736.2.4 MSCAPI Engine on Windows 756.2.5 Signature and Hash Algorithms 76
6.3 PDF Aspects of Signatures 786.3.1 Visualizing Signatures with a Graphic or Logo 786.3.2 PDF/A, PDF/UA, PDF/X and PDF/VT Conformance 806.3.3 Document Security Store (DSS) 826.3.4 Signatures and incremental PDF Updates 826.3.5 Certification Signatures 84
6.4 Certificate Revocation Information 866.4.1 Online Certificate Status Protocol (OCSP) 866.4.2 Certificate Revocation Lists (CRLs) 886.4.3 OCSP or CRL? 90
6.5 Time-Stamps 916.5.1 Configuration 916.5.2 Time-Stamped Signatures 926.5.3 Document-Level Time-Stamp Signatures 936.5.4 Unsupported TSAs 94
6.6 Long-Term Validation (LTV) 966.6.1 LTV Concept and Acrobat Support 966.6.2 LTV-enabled Signatures with PLOP DS 97
6.7 The CAdES and PAdES Signature Standards 1006.7.1 CMS and CAdES Signatures 1006.7.2 PAdES Signatures with PLOP DS 102
Contents 5
7 PLOP and PLOP DS Library API Reference 103
7.1 Option Lists 103
7.2 General Functions 105
7.3 Input Functions 108
7.4 Output Functions 111
7.5 Digital Signature Function 116
7.6 Exception Handling 125
7.7 Option Handling 127
7.8 pCOS Functions 130
7.9 Unicode Conversion Function 133
A Combining PDFlib with PLOP DS 135
B PLOP Library Quick Reference 136
C Revision History 137
Index 139

0.1 Installing the Software 7
0 First Steps with PLOP and PLOP DS
0.1 Installing the SoftwarePLOP and PLOP DS are delivered as a combined installer package for Windows systems, and as a combined compressed archive for all other supported operating systems. The installer and the archive contain the PLOP/PLOP DS command-line tool and the PLOP/ PLOP DS library, plus documentation and examples. After installing or unpacking the package the following steps are recommended:
> An introduction of PLOP and PLOP DS features is available in Chapter 1, »PLOP Fea-tures«, page 15.
> Users of the PLOP/PLOP DS command-line tool can use the executable right away. The available options are discussed in Section 3.1, »PLOP and PLOP DS Command-line Options«, page 33, and are also displayed when you execute the PLOP command-line tool without any options.
> Users of the PLOP/PLOP DS library/component should read one of the sections in Chapter 4, »PLOP and PLOP DS Library Language Bindings«, page 39, corresponding to their environment of choice, and review the installed examples. On Windows the PLOP and PLOP DS programming examples are accessible via the Start menu (for COM and .NET) or in the installation directory (for other language bindings).
If you obtained a commercial PLOP or PLOP DS license you must apply your license key according to the next page.
Restrictions of the evaluation version. The PLOP/PLOP DS command-line tool and li-brary can be used as fully functional evaluation versions even without a commercial li-cense. Unlicensed versions of PLOP or PLOP DS must not be used for production purpos-es, but only for evaluating the product. Deploying the software in a production environment requires a valid license.
Unless a valid license key is applied, PLOP includes the text unlicensed in the output document’s metadata and inserts an extra front page at the beginning of the document. In order to facilitate testing, no front page is created if one or both of the following con-ditions are true:
> Encryption with the fixed password strings demo or DEMO (options userpassword and masterpassword).
> Applying a signature with a digital ID where the subject name (also called common name, or CN) contains demo or DEMO; suitable digital IDs for testing are included in the PLOP DS package.
In some situations insertion of the front page may result in PDF output which no longer conforms to PDF/A, PDF/UA, PDF/VT or PDF/X even if the input conforms to one of these standards. The non-conformance is specific to the front page and is no longer an issue once a valid license key is applied.
pCOS functions are restricted to small documents (less than 10 pages and less than 1 MB) in evaluation mode.
For each document handle retrieved from p.open_document( ), only a single call to p.create_document( ) call is allowed in evaluation mode.
8 Chapter 0: First Steps with PLOP and PLOP DS
0.2 Applying the PLOP/PLOP DS License KeyUsing PLOP/PLOP DS for production purposes requires a valid license key. Once you purchased a license you must apply your license key in order to get rid of the extra front page and enable the use of arbitrary passwords. There are several methods for applying the license key; choose one of the methods detailed below.
If the frontpage option for PLOP_set_option( ) is false, an exception is thrown instead of creating the front page when no valid license key could be found.
Note PLOP/PLOP DS license keys are platform-dependent, and can only be used on the platform for which they have been purchased. While a PLOP DS license key activates all features of PLOP, a PLOP license key does not activate the signature features which are only available in PLOP DS.
Windows installer. Windows users can enter the license key when they install PLOP/PLOP DS using the supplied installer. This is the recommended method on Windows. If you do not have write access to the registry or cannot use the installer refer to one of the alternate methods below.
Applying a license key with an API call at runtime. Add a line to your script or pro-gram which sets the license key at runtime. The license parameter must be set immedi-ately after instantiating the PLOP object (i.e., after PLOP_new( ) or equivalent call). The exact syntax depends on your programming language:
> In COM/VBScript:
oPLOP.set_option "license=...your license key..."
> In C++, Java, .NET/C#, Python and Ruby:
p.set_option("license=...your license key...")
> In C:
PLOP_set_option(p, "license=...your license key...");
> In Perl and PHP:
$p->set_option("license=...your license key...")
Working with a license file. As an alternative to supplying the license key with a run-time call, you can enter the license key in a text file according to the following format (you can use the license file template licensekeys.txt which is contained in all PLOP distri-butions). Lines beginning with a ’#’ character contain comments and will be ignored; the second line contains version information for the license file itself:
# Licensing information for PDFlib GmbH productsPDFlib license file 1.0PLOP 5.0 ...your license key...
The license file may contain license keys for multiple PDFlib GmbH products on sepa-rate lines. It may also contain license keys for multiple platforms so that the same li-cense file can be shared among platforms. License files can be configured in the follow-ing ways:
> A file called licensekeys.txt will be searched in all default locations (see »Default file search paths«, page 9).
0.2 Applying the PLOP/PLOP DS License Key 9
> You can specify the licensefile parameter with the set_option( ) API function:
p.set_option("licensefile={/path/to/licensekeys.txt}");
> Use the --plopopt option of the PLOP command-line tool and supply the licensefile op-tion with the name of a license file:
plop --plopopt "licensefile /path/to/your/licensekeys.txt" ...
If the path name contains space characters you must enclose the path with braces:
plop --plopopt "licensefile {/path/to/your/license file.txt}" ...
> You can set an environment (shell) variable which points to a license file. On Win-dows use the system control panel and choose System, Advanced, Environment Variables.; on Unix apply a command similar to the following:
export PDFLIBLICENSEFILE=/path/to/licensekeys.txt
License keys in the registry. On Windows you can also enter the name of the license file in the following registry key:
HKLM\SOFTWARE\PDFlib\PDFLIBLICENSEFILE
As another alternative you can enter the license key directly in one of the following reg-istry keys:
HKLM\SOFTWARE\PDFlib\PLOP5\licenseHKLM\SOFTWARE\PDFlib\PLOP5\5.0\license
The MSI installer writes the license key to the last of these entries.
Note Be careful when manually accessing the registry on 64-bit Windows systems: as usual, 64-bit PLOP binaries work with the 64-bit view of the Windows registry, while 32-bit PDFlib binaries running on a 64-bit system work with the 32-bit view of the registry. If you must add registry keys for a 32-bit product manually, make sure to use the 32-bit version of the regedit tool. It can be invoked as follows from the Start dialog:
%systemroot%\syswow64\regedit
Default file search paths. On Unix, Linux and OS X systems some directories will be searched for files by default even without specifying any path and directory names. The following directories will be searched:
<rootpath>/PDFlib/PLOP/5.0/resource/cmap<rootpath>/PDFlib/PLOP/5.0/resource/codelist<rootpath>/PDFlib/PLOP/5.0/resource/glyphlst<rootpath>/PDFlib/PLOP/5.0/resource/fonts<rootpath>/PDFlib/PLOP/5.0/resource/icc<rootpath>/PDFlib/PLOP/5.0<rootpath>/PDFlib/PLOP<rootpath>/PDFlib
On Unix, Linux, and OS X <roothpath> will first be replaced with /usr/local and then with the HOME directory.
Default file names for license files. By default, the following file name will be searched for in the default search path directories:
licensekeys.txt
This feature can be used to work with a license file without setting any environment variable or runtime option.
Licensing options. Different licensing options are available for PLOP use on one or more servers, and for redistributing PLOP with your own products. We also offer sup-port and source code contracts. Please contact us if you are interested in obtaining a commercial PLOP license or have any questions:
PDFlib GmbH, Licensing DepartmentFranziska-Bilek-Weg 9, 80339 München, Germanywww.pdflib.comphone +49 • 89 • 452 33 84-0fax +49 • 89 • 452 33 84-99Licensing contact: [email protected] for PDFlib licensees: [email protected]
0.3 Roadmap to Documentation and Samples 11
0.3 Roadmap to Documentation and SamplesMini samples for PLOP. The PLOP distribution contains simple programming exam-ples for all supported language bindings. These demonstrate basic PLOP library pro-gramming tasks:
> The encrypt sample encrypts an unencrypted PDF document with user and master password.
> The dumper sample uses the pCOS interface to collect general properties, informa-tion about the encryption and signature status of a document as well as document information and XMP metadata.
> The insertxmp sample reads XMP metadata from a file, and inserts the XMP in a PDF document. Sample XMP files are supplied for testing.
Mini samples for PLOP DS. The following mini samples are for use with PLOP DS:> The sign sample shows how to apply a digital signature to an existing PDF document.> The multisign sample shows how to apply digital signature to multiple PDF docu-
ments and demonstrates session handling for PKCS#11 tokens.> The hellosign shows how to dynamically create a document with PDFlib in memory
and pass it to PLOP DS, which then applies a digital signature to it. Note that this ex-ample requires the PDFlib product which is not included in the PLOP package. Free evaluation packages for PDFlib are available from our Web site, however.
The signature samples are prepared to use demo digital IDs which are also included in the package. The password for the digital ID files (e.g. demorsa2048.p12) is demo.
Sample calls of the PLOP command-line tool. The PLOP command-line tool supports various options. They are documented in the following sections which also contain sample calls of the PLOP command-line tool:
> Chapter 1, »PLOP Features«, page 15> Chapter 2, »PLOP DS Features (Digital Signatures)«, page 27> Section 3.1, »PLOP and PLOP DS Command-line Options«, page 33
and Section 3.2, »PLOP and PLOP DS Command-line Examples«, page 37.
pCOS Cookbook. The pCOS Cookbook is a collection of code fragments for the pCOS in-terface which is integrated in PLOP and PLOP DS. It is available at the following URL:www.pdflib.com/pcos-cookbook.
Details of the pCOS interface are documented in the pCOS Path Reference which is included in the PLOP package.
12 Chapter 0: First Steps with PLOP and PLOP DS
0.4 Overview of PLOP and PLOP DSPLOP is available in two flavors: the PLOP base product and the extended version PLOP DS with support for digital signatures.
PLOP features. PLOP supports the following kinds of PDF processing:> Protection: encrypt a PDF document with a user or master password (or both); re-
move PDF encryption if you know the document’s master password; add or remove permission settings (e.g., printing or text extraction not allowed) if you know the document’s master password.
> Linearize PDF documents for enhanced viewer experience when retrieving PDF files from a Web server (see below).
> Optimize the size of PDF documents by reducing redundant objects.> Repair damaged PDF documents.> Use the integrated pCOS interface to query information about the document’s secu-
rity status (encrypted with user or master password), permission settings, document metadata, and many other properties.
> Insert and retrieve predefined or custom document information entries.> Insert and retrieve XMP metadata.
PLOP DS features. PLOP DS offers all features of PLOP, plus the ability to apply digital signatures to PDF documents. The signatures support time-stamping, long-term valida-tion and PAdES signatures. Section 2.1, »Signature Features in PLOP DS«, page 27, pro-vides a summary of digital signature features in PLOP DS.
Advantages. PDFlib PLOP and PLOP DS offer the following advantages:> All PLOP and PLOP DS operations are aware of the PDF/A, PDF/UA, PDF/VT and PDF/X
standards: if the input conforms to one of these standards, the output is guaranteed to conform to the same standard if possible. If this is not possible (e.g. encryption was requested for PDF/A input) the operation will either be rejected or the standard identification removed.
> PLOP is a standalone tool which does not require any third-party software for read-ing, encrypting, signing, or writing PDF.
> PLOP can technically and legally be deployed on a server, is fully thread-safe, and has been checked for memory leaks. PLOP has been engineered for heavy server usage, and can be used in Web server environments, for high-volume batch processing, etc.
> PLOP is available on many platforms and for several programming environments.> For added flexibility, PLOP is available both as a command-line tool and a program-
ming library (component) for various development languages.
PLOP/PLOP DS command-line tool or library? PLOP/PLOP DS is available both as a pro-gramming library (component) for various development languages, and as a command-line tool for batch operations. Both offer the same feature set, but are suitable for differ-ent deployment tasks. Here are some guidelines for choosing among the library and the command-line tool:
> The command-line PLOP/PLOP DS tool is suited for batch processing PDF documents. It doesn’t require any programming, but offers powerful command-line options which can be used to integrate it into complex workflows. The PLOP/PLOP DS com-

0.4 Overview of PLOP and PLOP DS 13
mand-line tool can also be called from environments which do not support the use of the library.
> The PLOP/PLOP DS programming library integrates well into a variety of common development environments, such as .NET, Java (including servlets), PHP, and plain C or C++ application development.
The PLOP/PLOP DS license covers both the command-line tool and the library.

1.1 Encryption, Decryption, and Permissions 15
1 PLOP FeaturesNote PLOP DS features for digital signatures are presented in Chapter 2, »PLOP DS Features (Digital
Signatures)«, page 27.
1.1 Encryption, Decryption, and PermissionsEncrypting and decrypting PDF documents as well as permission restrictions are cov-ered in detail in Chapter 5, »PDF Encryption and Decryption«, page 57. In the current sec-tion we provide a summary and some initial examples.
Querying security settings. With the pCOS programming interface you can query vari-ous security settings of a PDF document. The required function calls and parameters can be seen in the dumper mini sample, which is included in all PLOP packages. The cor-responding option for the PLOP command-line tool is --info (see Section 1.5, »Query Document Information with pCOS«, page 19, for an example).
Encrypting documents with PLOP. You can encrypt documents by specifying the user-password or masterpassword option (or both) for PLOP_create_document( ). Note that a user password always requires a master password, but not vice versa. Sample code for encrypting PDF documents can be seen in the encrypt sample which is included in all PLOP packages. The equivalent options for the PLOP command-line tool are --user and --master.
Example: encrypt a file with user password demo and master password DEMO:
plop --user demo --master DEMO --outfile encrypted.pdf input.pdf
Specify permission restrictions with PLOP. You can specify the permission restrictions in the permissions option for PLOP_create_document( ) which supports various keywords (see Table 5.3, page 62). The equivalent option for the PLOP command-line tool is --permissions. Note that permission restrictions always require a master password.
Example: encrypt a document with the master password DEMO, and disallow print-ing the document and copying contents:
plop --master DEMO --permissions "noprint nocopy" --outfile encrypted.pdf input.pdf
Decrypting documents with PLOP. You can decrypt documents by specifying the ap-propriate user or master password in the password option for PLOP_create_document( ). The equivalent option for the PLOP command-line tool is --password.
Example: decrypt a single file with the master password DEMO. All access restrictions which may have been applied to the input document will be removed (since the output is unencrypted):
plop --password DEMO --outfile decrypted.pdf encrypted.pdf
More encryption and decryption examples can be found in Section 5.3, »Securing PDF Documents on the Command Line«, page 64.

16 Chapter 1: PLOP Features
1.2 Web-Optimized (Linearized) PDFPLOP can apply a process called linearization to PDF documents. The resulting property is called Fast Web View in Acrobat. Linearization reorganizes the objects within a PDF file and adds supplemental information which can be used for faster access.
While non-linearized PDFs must be fully transferred to the client, a Web server can transfer linearized PDF documents one page at a time using a process called byte-serving. It allows Acrobat (running as a browser plugin) to retrieve individual parts of a PDF document separately. The result is that the first page of the document will be pre-sented to the user without having to wait for the full document to download from the server. This provides enhanced user experience.
Note that the Web server streams PDF data to the browser, not PLOP. Instead, PLOP prepares the PDF files for byteserving. All of the following requirements must be met in order to take advantage of byteserving PDFs:
> The PDF document must be linearized, which can be achieved with PLOP. Lineariza-tion can be applied along with encryption or decryption in a single run. In Acrobat you can check whether a file is linearized by looking at its document properties (»Fast Web View: yes«).
> The user must use Acrobat as a Browser plugin, and have page-at-a-time download enabled in the PDF viewer (Acrobat X/XI: Edit, Preferences, Internet, Allow fast web view). This is enabled by default.
The larger a PDF file (measured in pages or MB), the more it will benefit from lineariza-tion when delivered over the Web.
Linearization and encryption/decryption can be applied in combination. However, in order to linearize a protected file you must provide the proper master password (see Table 5.2).
Linearizing small files. Since linearization aims at improving the Web-based display of large PDF documents it doesn’t make much sense for single-page documents (although this is possible). However, due to a bug in Acrobat small linearized documents are not always treated as linearized. For example, Acrobat X/XI regards all documents which are smaller than 4KB as non-linearized.
Linearizing PDF documents with PLOP. You can enable the linearization step with the linearize option for PLOP_create_document( ).
The equivalent option for the PLOP command-line tool is --webopt. Example: linear-ize all PDF documents in a directory (assuming these do not require any password), and copy the resulting files to the target directory output. Verbosity level 2 prints the names of all input and output files as they are processed:
plop --verbose 2 --webopt --targetdir output *.pdf
1.3 Optimization (Size Reduction) 17
1.3 Optimization (Size Reduction)While processing PDF documents PLOP can apply file optimization in addition to other operations:
> PLOP detects multiple instances of identical data, and removes all instances but one. This is mostly relevant for fonts and images, but may affect other data types as well, e.g. ICC profiles or even complete pages with identical content. An embedded font or image is removed if another font or image contains the exact same data; all referenc-es to the removed data are replaced with references to the remaining instance of the font or image. For example, if a document has been assembled from several PDFs containing parts of a document and all of these parts contain the same embedded font, the resulting combined PDF may carry excess font data. PLOP reduces the re-dundant font data and keeps only one instance of the font.
> Unused objects are removed from the PDF file in a process known as garbage col-lection. In some cases (when the Save menu item in Acrobat has been used, as op-posed to Save As...) Acrobat appends changes to a file while retaining the previous state of the document. PLOP removes all objects related to older versions of the docu-ment.
PLOP never applies any optimization which would result in loss of information (e.g. un-embedding fonts, downsampling images). All relevant information for viewing or print-ing the document in the exact same quality of the input is retained in the output.
Since only a small fraction of today’s PDF documents suffers from redundant objects the optimization step is disabled by default.
Optimizing PDF documents with PLOP. You can enable the optimization step with the optimize=all option for PLOP_create_document( ) or the --outputopt option of the PLOP command-line tool
Example: optimize a document with the PLOP command-line tool:
plop --outputopt optimize=all --outfile optimized.pdf input.pdf
Removing XMP metadata with PLOP. Some applications create PDF output with large amounts of XMP metadata which are not required in all situations. There are extreme cases where XMP metadata accounts for the vast majority of the total PDF file size. In these cases you can remove unwanted XMP document metadata with PLOP as follows:
plop --inputopt xmppolicy=remove --outfile output.pdf input.pdf
This may substantially reduce the PDF file size at the expense of detailed metadata.
18 Chapter 1: PLOP Features
1.4 Repair Mode for Damaged PDFPLOP implements a repair mode for damaged PDF so that even certain kinds of dam-aged documents can be processed. However, in rare cases a damaged PDF document may be rejected if PLOP is unable to repair it.
Repairing PDF documents with PLOP. The repair mode is activated automatically when PLOP encounters damaged input. However, using the repair=force option of PLOP_open_document( ) you can enforce the repair mode even if no problems occurred when opening the document. The equivalent option for the PLOP command-line tool is --inputopt repair=force. You can disable the repair mode with repair=none.
Example: force reconstruction of a document with the PLOP command-line tool:
plop --inputopt repair=force --outfile repaired.pdf damaged.pdf
Invalid XMP metadata. PLOP repairs certain kinds of problems in XMP metadata. How-ever, some problems cannot be repaired. For example XML parsing errors caused by XMP metadata always imply that the XMP is unusable. PLOP provides the xmppolicy op-tion for controlling the processing behavior when invalid XMP is encountered. See »Dealing with invalid XMP metadata«, page 22, for more details.
1.5 Query Document Information with pCOS 19
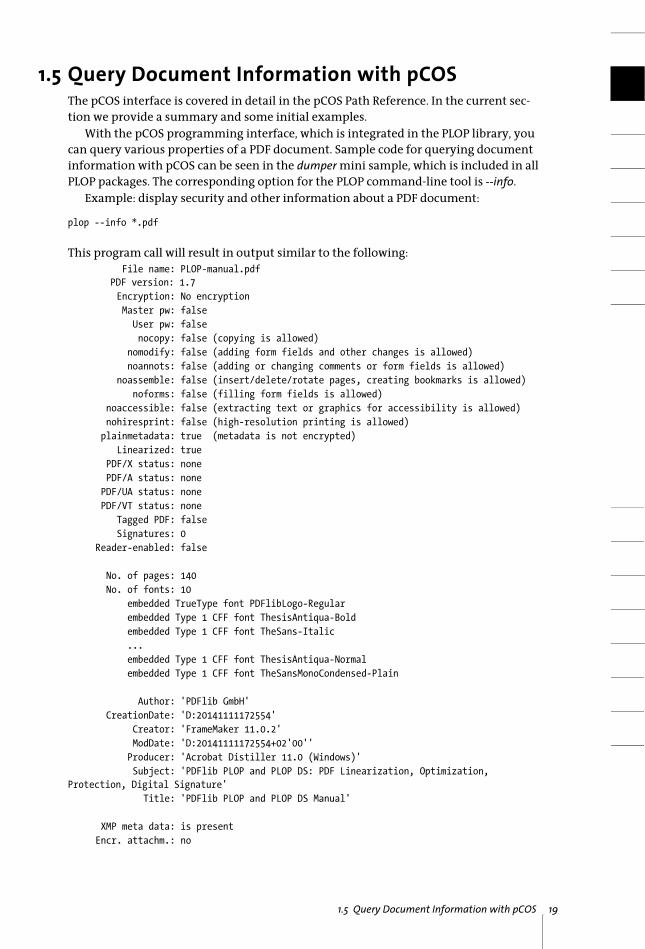
1.5 Query Document Information with pCOSThe pCOS interface is covered in detail in the pCOS Path Reference. In the current sec-tion we provide a summary and some initial examples.
With the pCOS programming interface, which is integrated in the PLOP library, you can query various properties of a PDF document. Sample code for querying document information with pCOS can be seen in the dumper mini sample, which is included in all PLOP packages. The corresponding option for the PLOP command-line tool is --info.
Example: display security and other information about a PDF document:
plop --info *.pdf
This program call will result in output similar to the following:File name: PLOP-manual.pdf
PDF version: 1.7 Encryption: No encryption Master pw: false User pw: false nocopy: false (copying is allowed) nomodify: false (adding form fields and other changes is allowed) noannots: false (adding or changing comments or form fields is allowed) noassemble: false (insert/delete/rotate pages, creating bookmarks is allowed) noforms: false (filling form fields is allowed) noaccessible: false (extracting text or graphics for accessibility is allowed) nohiresprint: false (high-resolution printing is allowed) plainmetadata: true (metadata is not encrypted) Linearized: true PDF/X status: none PDF/A status: none PDF/UA status: none PDF/VT status: none Tagged PDF: false Signatures: 0 Reader-enabled: false
No. of pages: 140 No. of fonts: 10 embedded TrueType font PDFlibLogo-Regular embedded Type 1 CFF font ThesisAntiqua-Bold embedded Type 1 CFF font TheSans-Italic
... embedded Type 1 CFF font ThesisAntiqua-Normal embedded Type 1 CFF font TheSansMonoCondensed-Plain
Author: 'PDFlib GmbH' CreationDate: 'D:20141111172554' Creator: 'FrameMaker 11.0.2' ModDate: 'D:20141111172554+02'00'' Producer: 'Acrobat Distiller 11.0 (Windows)' Subject: 'PDFlib PLOP and PLOP DS: PDF Linearization, Optimization,
Protection, Digital Signature' Title: 'PDFlib PLOP and PLOP DS Manual'
XMP meta data: is present Encr. attachm.: no

20 Chapter 1: PLOP Features
1.6 Inserting and Reading Document Info EntriesPDF supports two kinds of document metadata which contain general information about a document: document info entries and XMP metadata.
Document info entries are keys with associated strings that hold some unstructured information. The predefined info keys Subject, Title, Author, and Keywords are commonly used, but arbitrary custom keys can be defined for specific purposes. Document infor-mation entries are considered the old and simple kind of PDF metadata.
With PLOP you can add new document information entries or replace the values of existing info entries. Both predefined or custom entries can be set. If the input docu-ment contains XMP document metadata, all predefined info entries will automatically be synchronized to the XMP metadata in order to keep the metadata consistent.
Inserting document info entries with PLOP. You can set document info entries with the docinfo option for PLOP_create_document( ).
Example: specify the predefined document info entry Subject and the custom info entry Department; note the braces around Product Manual to protect the space character:
docinfo={Department Techdoc Subject {Product Manual}}
This option can be supplied to the PLOP command-line tool via the --outputopt option as follows:
plop --outputopt "docinfo={Department Techdoc Subject {Product Manual}}" --outfile output.pdf input.pdf
Reading document info entries with PLOP. With the pCOS programming interface, which is integrated in the PLOP library, you can read document information entries (keys and values) from a PDF document. The required function calls and parameters can be seen in the dumper mini sample, which is included in all PLOP packages.
The corresponding option for the PLOP command-line tool is --info (see Section 1.5, »Query Document Information with pCOS«, page 19, for an example).
Document info entries in PDF/A. Keep in mind that the PDF/A standard mandates spe-cial handling for document info entries:
> PDF/A-1: the standard document info entries Title, Author, Subject, Keywords, Creator, Producer, CreationDate, ModDate must be synchronized in the document XMP meta-data. PLOP automatically provides this synchronization.
> PDF/A-2/3: document information entries may be present, but must be ignored by PDF/A-conforming readers. If they are present, they should be synchronized with document XMP which is done automatically by PLOP as in the PDF/A-1 case.
1.7 Inserting, Extracting, or Removing XMP Metadata 21
1.7 Inserting, Extracting, or Removing XMP MetadataXMP (Extensible Metadata Platform) is an XML framework with many predefined proper-ties. However, as the name implies, XMP can be extended to satisfy specific require-ments using custom extension schemas. XMP is much more powerful than document information entries, and is required in PDF/A and various other standards. Many indus-try groups have published standards based on XMP for various vertical applications, e.g. digital imaging or prepress data exchange.
You can find more detailed information on XMP as well as links to other resources at www.pdflib.com/knowledge-base/xmp-metadata.
With PLOP you can insert XMP metadata in PDF documents, or extract XMP from PDF. Inserted XMP is validated to make sure that valid output can be created. If the in-put document conforms to the PDF/A standard, the user-supplied XMP must conform to the XMP rules set forth in PDF/A. Again, these rules (including XMP extension sche-ma validation) are checked by PLOP to make sure that PDF/A input plus user-supplied XMP will result in conforming PDF/A output.
XMP insertion with PLOP can be used in the following and many other situations (the names of sample XMP files in the PLOP distribution are provided in parenthesis):
> Add XMP metadata to PDF/A documents, including support for XMP extension sche-mas as defined in the PDF/A standard (machine_pdfa1.xmp).
> Add XMP metadata describing the scan process for digitized legacy documents (engineering.xmp).
> Add XMP metadata according to the Ghent Workgroup (GWG) Ad Ticket scheme, (gwg_ad_ticket.xmp). For more details see www.gwg.org/download/job-tickets/
> Add company-specific XMP metadata (acme.xmp).
Inserting XMP metadata with PLOP. In order to insert metadata you must create a file which contains valid XMP metadata in UTF-8 format. You can insert XMP with the metadata option for PLOP_create_document( ), which supports several suboptions. Sam-ple code for inserting XMP in PDF documents is available in the insertxmp mini sample, which is included in all PLOP packages.
Example: insert XMP metadata from a file called gwg_ad_ticket.xmp, where the XMP is validated against the XMP 2004 standard:
plop --outputopt "metadata={filename=gwg_ad_ticket.xmp validate=xmp2004}" --outfile output.pdf input.pdf
Extracting XMP metadata with PLOP. With the pCOS programming interface, which is integrated in the PLOP library, you can extract XMP metadata from a PDF document. The required function calls and parameters can be seen in the dumper mini sample, which is included in all PLOP packages. Note that the sample code in the dumper sample does not actually print the XMP metadata, but simply reports the size of the XMP found in the document.
The PLOP command-line tool can not be used for extracting XMP metadata. We offer a powerful pCOS command-line tool for extracting information from PDF.
22 Chapter 1: PLOP Features
Removing XMP metadata with PLOP. In some situations you may want to remove XMP metadata, e.g. because it no longer matches the actual documents. This can be achieved with PLOP as follows:
plop --inputopt xmppolicy=remove --outfile output.pdf input.pdf
Dealing with invalid XMP metadata. PDF documents sometime contain invalid XMP metadata which is either invalid on the XML level or the XMP/RDF level. PLOP will by de-fault reject such documents and stop processing. In order to provide more fine-grain control for such input documents the xmppolicy option for PLOP_open_document( ) can be used to distinguish the following cases:
> xmppolicy=rejectinvalid: by default, invalid XMP prevents PLOP from generating PDF output.
> xmppolicy=ignoreinvalid: ignore invalid XMP and include the text of the XML parsing error message in the generated output XMP as a debugging aid. Note that no PDF/A or PDF/X-3/4/5 output can be created with this option.
> xmppolicy=remove: remove input XMP. This may be useful to delete unwanted meta-data.
For example, if you don’t want invalid XMP metadata to disrupt batch processing of documents you can ignore problems caused by invalid XMP in the input document:
plop --inputopt "xmppolicy=ignoreinvalid" --outfile output.pdf input.pdf

1.8 PLOP Processing Details 23
1.8 PLOP Processing DetailsAcceptable input documents. PLOP accepts the following PDF flavors:
> PDF 1.6 (Acrobat 7) and all older versions> PDF 1.7 (Acrobat 8), technically identical to ISO 32000-1> PDF 1.7 Adobe extension level 3 (Acrobat 9)> PDF 1.7 Adobe extension level 8 (Acrobat X and XI)> PDF 2.0 according to ISO 32000-2 (currently in draft)
Depending on the desired operation a password may be required for encrypted docu-ments. PLOP attempts to repair various kinds of damaged PDF documents.
PDF version. The PDF version number of the generated output document is never low-er than the PDF version number of the input document, but it may be forced to a higher number as detailed below. PLOP uses the PDF version of the input document, modified according to the following rules:
> In PDF/A-1 and PDF/X mode the PDF version is kept unchanged; in PDF/A-2/3 mode PDF 1.7 is generated.
> Otherwise the PDF output version is at least PDF 1.6.> Encryption (option masterpassword) increases the PDF version to PDF 1.7ext3 for en-
cryption algorithm 4 and to PDF 1.7ext8 for encryption algorithm 11.> Some signature features increase the PDF version to PDF 1.7ext8 (see Table 6.1).
Standard conformance. PLOP processing conforms to several PDF standards. If the in-put conforms to one of the following standards, the output generated by PLOP is guar-anteed to conform to the same standard:
> PDF/A-1/2/3: all flavors> PDF/X-3/4/5 and PDF/VT-1/2: all flavors> PDF/UA-1
Note that some PLOP operations (most importantly encryption) are not compatible with certain standards. In this situation the sacrifice option can be used to set priorities (see below).
Sacrificing certain properties of the input PDF. Conflicts can arise between several PDF document properties and certain PLOP actions. For example, PDF/A documents are not allowed to use encryption. What should PLOP do when encryption is requested for a PDF/A document? By default PLOP refuses the operation and throws an exception. How-ever, you can use the option sacrifice for PLOP_create_document( ) or the --outputopt op-tion of the PLOP command-line tool to give the requested action priority over the input property. In the example above, the PDF/A conformance entry is removed from the doc-ument to allow encryption.
There are several combinations of input document properties and requested actions. In all of these combinations you can use the sacrifice option to allow an operation by sacrificing a particular document property (see Table 7.5, for details):
> PDF/A: PLOP applies digital signatures in a PDF/A-conforming manner: input docu-ments which conform to the PDF/A-1, PDF/A-2 or PDF/A-3 standard are guaranteed to produce PDF/A-conforming signed output. However, encryption is not allowed for PDF/A documents since the standard prohibits any encryption. You can sacrifice PDF/A conformance with the sacrifice={pdfa} option, though. PDF pages used for sig-
24 Chapter 1: PLOP Features
nature visualization must also conform to PDF/A (see Section 6.3.1, »Visualizing Sig-natures with a Graphic or Logo«, page 78).
> PDF/X: PDF/X-1a/3/4/5 don’t allow encryption or visible signature fields on the page. In these situations PLOP raises an exception, but you can sacrifice PDF/X confor-mance with the sacrifice={pdfx} option. Signature visualization is not supported in PDF/X mode.
> PDF/UA: most PLOP operations automatically conform to PDF/UA-1 with the excep-tion of permissions=noaccessible. You can sacrifice PDF/UA conformance with the sacrifice={pdfua} option. Signature visualization is not supported in PDF/UA mode.
> PLOP cannot apply signatures if the document contains non-signature form fields without appearances (e.g. form fields created with PDFlib 7/8/9), and therefore issues an error for this kind of input. The reason is that Acrobat builds the missing appear-ance streams for form fields which instantly invalidate the signature. You can sacri-fice existing form fields in this situation with the option sacrifice={fields} in PLOP_create_document( ) or the --outputopt option of the PLOP command-line tool.
> If an unencrypted document contains encrypted file attachments for which the password is not available, processing stops by default. You can sacrifice encrypted file attachments with the option sacrifice={encryptedattachments} in PLOP_create_document( ) or the --outputopt option of the PLOP command-line tool. Encrypted file attachments for which the password is not available are removed with this option.
Properties of the input document which are generally lost. The following properties of the input document are lost after applying any PLOP operation:
> If the input document is linearized, the linearization is lost by default. In order to linearize the output, supply the linearize option to PLOP_create_document( ) or the --linearize option to the PLOP command-line tool. Note that linearization cannot be combined with digital signatures.
> Reader-enabled documents: processing Reader-enabled PDF documents with PLOP results in output which is not Reader-enabled. Since Reader-enabled documents can only be created with Adobe software there is no workaround.
Temporary disk space requirements. PLOP reads an input PDF document and writes an output PDF. The output document requires roughly the same amount of disk space as the input document (unless PLOP’s optimizing step removes redundant information). In many cases no additional disk space is required. However, PLOP/PLOP DS require ad-ditional temporary disk space for its operation if linearization or digital signatures are enabled.
Temporary files are created in the current directory by default, but this can be changed with the tempdirname option of PLOP_create_document( ). The disk space for temporary data roughly equals the size of the input file. If linearization is requested in combination with in-core PDF generation (i.e., no output file name supplied), PLOP re-quires temporary disk space with roughly two times the size of the input.
Large PDF Documents. Although most users won’t see any need for PDF documents in the range of Gigabytes, some enterprise applications must create or process documents containing a large number of, say, invoices or statements. While PLOP itself does not im-pose any limits on the size of the generated documents, there are several restrictions mandated by the PDF Reference and some PDF standards:
1.8 PLOP Processing Details 25
> 2 GB file size limit: PDF/A and other standards limit the file size to 2 GB. If a docu-ment gets larger than this limit, PLOP throws an exception when creating PDF/A, PDF/X-4 or PDF/X-5 output. Otherwise documents beyond 2 GB can be created.
> 10 GB file size limit: classical cross-reference tables in PDF documents are limited to 10 decimal digits and therefore 1010-1 bytes, which equates to roughly 9.3 GB. Howev-er, using compressed object streams this limit can be exceeded. While compressed object streams reduce the overall file size anyway, the compressed cross-reference streams which are part of the objectstreams implementation are no longer subject to the 10-decimal-digits limit, and therefore allow creation of PDF documents beyond 10 GB.
> Number of objects: while the object count in a document is not limited by PDF in general, the PDF/A, PDF/X-4 and PDF/X-5 standards limit the number of indirect ob-jects in a document to 8.388.607. If a document requires objects beyond this limit, PLOP throws an exception when creating PDF/A, PDF/X-4 or PDF/X-5 output. In other modes documents with more objects can always be created. This check can be dis-abled with the option limitcheck=false.
What you can’t do with PLOP. Please be aware of the following restrictions:> PLOP is not a cracker tool – it cannot be used to gain access to protected documents
without knowing the appropriate user or master password because this would vio-late the document author’s intentions.
> You cannot process dynamic XFA forms since these are not genuine PDF documents but rather XML forms packaged inside a thin PDF layer.


2.1 Signature Features in PLOP DS 27
2 PLOP DS Features (Digital Signatures)
Note The ability to digitally sign PDF documents is only available in PLOP DS, but not in the PLOP base product.
Digital signatures for PDF documents are covered in detail in Chapter 6, »Digital Signa-tures with PLOP DS«, page 67. In the current chapter we provide a summary and initial examples which may serve as a starting point.
2.1 Signature Features in PLOP DSPDF Signature Aspects.
> Create signatures in existing PDF signature fields or generate new fields which hold the signature. The signatures can be invisible or visible at a particular location on the page.
> Visualize digital signatures by importing a logo, scan of a handwritten signature or other representation as PDF page.
> Create PDF certification (author) signatures which allow document changes such as form-filling without breaking the signature.
> Validation information can be stored directly in the signature according to ISO 32000-1 or in a Document Security Store (DSS) as specified in ISO 32000-2 and PAdES part 4.
> Signatures can be applied in an incremental PDF update section to preserve existing signatures and document structure, or by rewriting the document structure which allows optimization and encryption.
PDF Versions and Standards. PLOP DS supports all relevant PDF versions and stan-dards:
> PLOP DS processes all PDF versions up to Acrobat XI, i.e. PDF 1.7 (ISO 32000-1) up to extension level 8. PLOP DS can also process documents according to the forthcoming standard PDF 2.0 (ISO 32000-2).
> PLOP DS is aware of the PDF/A-1/2/3 (ISO 19005) archiving standards: if the input doc-ument conforms to PDF/A, the output document is guaranteed to conform as well. PLOP DS fully supports XMP extension schemas as required by PDF/A. The ability to insert PDF/A-conforming XMP metadata in PDF documents is an important advan-tage of PLOP DS.
> Similarly, PLOP DS is aware of the PDF/X-1a/3/4/5 (ISO 15930) print production stan-dards, PDF/VT-1/2 (ISO 16612-2) for transactional printing and PDF/UA-1 (ISO 14289) for accessible PDF.
Signature standards.> Standard PDF signatures according to ISO 32000-1 and the forthcoming ISO 32000-2> Signatures for Long-Term Validation (LTV) according to Acrobat XI> PAdES (PDF Advanced Electronic Signatures) according to ETSI TS 102 778 part 2, 3 and
4 and CAdES (ETSI TS 101 733), including PAdES conformance levels PAdES-B (Basic),
28 Chapter 2: PLOP DS Features (Digital Signatures)
PAdES-T (Trusted Time), PAdES-LT (Long Term), and PAdES-LTA (Long Term with Ar-chive time-stamps) per ETSI TS 103 172. PAdES-BES (Basic Electronic Signature) and PAdES-EPES (Explicit Policy-based Electronic Signature) according to PAdES part 3 are both supported.
Cryptographic Signature Details.> Signatures according to the RSA and DSA algorithms as well as the Elliptic Curve Dig-
ital Signature Algorithm (ECDSA) based on Elliptic Curve Cryptography. The elliptic curves recommended by NIST are supported as well as Brainpool and other curves.
> Strong signature and hash functions according to NSA’s Suite B Cryptography.> Embed the full certificate chain in the generated signatures, which means that signa-
tures with certificates from a CA (Certification Authority) on the Adobe Approved Trust List (AATL) can be validated in Acrobat and Adobe Reader without any configu-ration on the client side.
> Embed Online Certificate Status Protocol responses (OCSP according to RFC 2560 and RFC 6960) and Certificate Revocation Lists (CRL according to RFC 3280) as revocation information for Long-Term Validation (LTV).
Time-stamping.> Retrieve a time-stamp from a trusted Time-Stamp Authority (TSA) according to RFC
3161 and embed it in the generated signature. TSA details can be read from AATL cer-tificates to create time-stamps without any configuration.
> Create document-level time-stamp signatures according to ISO 32000-2 and PAdES part 4. A document-level time-stamp assures the state of a document without apply-ing a personal signature.
> Support for the time-stamp policy parameter and all common time-stamp hash functions.
Signature Engines. PLOP DS supports multiple cryptographic engines, i.e. components for generating digital signatures:
> The built-in engine implements the required cryptographic functions directly in PLOP DS without any external dependencies. The built-in engine supports software-based digital IDs in the common PKCS#12 and PFX formats.
> PLOP DS can attach cryptographic tokens via the standard PKCS#11 interface. This way digital IDs on smartcards, USB sticks, and other secure devices can be used for signing. This includes devices with an integrated keyboard for secure PIN input.
> On Windows PLOP DS can leverage the cryptographic infrastructure provided by Windows via the Microsoft Cryptographic API (MS CAPI). Digital IDs from the Win-dows certificate store can be used for signing, including software-based digital IDs and secure hardware tokens. Note that not all signature features are available with the MSCAPI engine, e.g. LTV.
What you can’t do with PLOP DS. Please be aware of the following restrictions:> You cannot Reader-enable PDF documents (e.g. allow annotation creation in Adobe
Reader) with PLOP DS because this requires a specific Adobe signature.> You cannot sign static or dynamic XFA forms.
2.2 Preparations for PLOP DS Evaluation 29
2.2 Preparations for PLOP DS EvaluationInstall PDFlib Demo CA certificate in Acrobat. The following step is not required for creating digital signatures with PLOP DS. However, if you are evaluating PLOP DS with the sample certificates provided in the packages it is recommended to configure Acro-bat as detailed below. This is not required if you work with certificates from a commer-cial CA which is installed in Acrobat’s list of trusted certificates (see »Trusted root certif-icates in Acrobat«, page 70)
The sample certificates which are included in the PLOP DS package have been issued and signed by the PDFlib Demo CA. If you make the self-signed root certificate of this CA available to Acrobat, the generated signatures are accepted as fully valid in Acrobat. Pro-ceed as follows for installing the PDFlib Demo CA certificate in Acrobat XI:
> Click Edit, Preferences, General..., Signatures, Identities & Trusted Certificates, More..., Trusted Certificates, Import, Browse...
> Browse to bind/data/PDFlibDemoCA.crt (part of the PLOP installation) and click Import, Ok.
> Now the entry PDFlib GmbH Demo CA is visible in the list of trusted certificates. Select this entry, click on Edit Trust, and activate the buttons Use this certificate as a trusted root and Certified documents, and click Ok.
Import demo digital IDs in Windows. In order to test the MSCAPI-based signature en-gine of PLOP DS on Windows you must make available digital IDs in the Windows certif-icate store. In order to import the demo digital IDs double-click on the corresponding .p12 file to launch the certificate import wizard, and follow its instructions.
2.3 Signing Documents with PLOP DSApplying a signature requires a digital ID, which may be available as a file, in the Win-dows certificate store, or on a cryptographic token (e.g. a smartcard or USB stick). While the former requires a password for accessing the digital ID, the Windows certificate store is usually protected by the Windows login and does not require any password. Cryptographic tokens are often protected by a PIN which must be supplied either by the signing software or directly on the token’s integrated keyboard.
You can prepare a digital signature with PLOP_prepare_signature( ) which supports several options, and then apply it with PLOP_create_document( ). Sample code for signing PDF documents is available in the sign and multisign mini samples which are included in all PLOP packages. The equivalent option for the PLOP command-line tool is --signopt.
Basic signature option list examples. Create an invisible signature for a PDF document using a digital ID from the file demorsa2048.p12. The password demo for the digital ID is contained in the file pw.txt:
plop --signopt "digitalid={filename=demorsa2048.p12} passwordfile=pw.txt" --outfile signed.pdf input.pdf
(Windows only) Create an invisible signature for a PDF document using a certificate from the Windows Certificate Store (from the default store My). This assumes that the digital ID is protected by your Windows login so that no password must be supplied:

30 Chapter 2: PLOP DS Features (Digital Signatures)
plop --signopt "engine=mscapi digitalid={store=My subject={PDFlib Demo PLOP User 2048}}" --outfile signed.pdf input.pdf
(Only platforms with PKCS#11 support) Create an invisible signature for a PDF docu-ment using a digital ID from a cryptographic token. The PKCS#11 interface for the token is implemented in the library cryptoki.dll which must be provided by the smartcard sup-plier. The password for the digital ID is contained in the file pw.txt:
plop --signopt "engine=pkcs#11 digitalid={filename=cryptoki.dll} passwordfile=pw.txt" --outfile signed.pdf input.pdf
More details are available in Section 6.2, »Cryptographic Engines in PLOP DS«, page 72.
2.4 Certification SignaturesA certification or author signature certifies the state of the document as the author cre-ated it while at the same time allowing certain changes without breaking the certifica-tion. The certification option specifies the changes which can be applied to the certified document without breaking the signature, e.g. form-filling allowed:
plop --signopt "digitalid={filename=demorsa2048.p12} passwordfile=pw.txt certification=formfilling" --outfile certified.pdf input.pdf
2.5 Time-StampsIn order to add a time-stamp to a signature you need the URL of a Time-Stamp Authori-ty (TSA) and must supply it to the timestamp option:
plop --signopt "digitalid={filename=demorsa2048.p12} passwordfile=pw.txt timestamp={source={url={http://timestamp.acme.com/tsa-noauth/tsa}}}" --outfile signed.pdf input.pdf
Similarly, a document-level time-stamp can be applied with the doctimestamp option:
plop --signopt "doctimestamp={source={url={http://timestamp.acme.com/tsa-noauth/tsa}}}" --outfile signed.pdf input.pdf
More details are available in Section 6.5, »Time-Stamps«, page 91.
2.6 LTV-enabled SignaturesSupport for long-term validation (LTV) requires that all certificates in the chain are available, and that certificate revocation information can be obtained online or from a disk file when the signature is created. This requires suitable OCSP or CRL servers to be provided by the PKI. In many cases (especially AATL certificates) the necessary network information can be read from the signing certificate. Otherwise you must provide suit-able network resources via the ocsp and/or crl/crlfile/crldir options. In order to provide ac-cess to the whole certificate chain you must supply the option rootcertfile with the name of a PEM file containing the root CA certificate.
2.7 PAdES Signatures 31
LTV-enabled signatures generally require online PKI resources (CRL or OCSP) for the certificates in use, which are not available for the PLOP demo certificates. As a work-around you can use the CRL file PDFlibDemoCA.crl which is provided in the distribution (this CRL has a very long expiration date which would not be acceptable in a production environment). The corresponding command-line call for creating LTV-enabled signa-tures looks as follows:
plop --signopt "digitalid={filename=demorsa2048.p12} password=demo ltv=full crlfile=PDFlibDemoCA.crl rootcertfile=PDFlibDemoCA.pem" --outfile ltv-signed.pdf input.pdf
For the next example we assume that the required OCSP or CRL retrieval information is present in the signing certificate, which is typically the case for commercial certificates. Under these conditions you can supply the option ltv=full to make sure that an LTV-en-abled signature is created:
plop --signopt "digitalid={filename=signer.p12} passwordfile=pw.txt ltv=full rootcertfile=RootCA.pem" --outfile ltv-signed.pdf input.pdf
Note that this may not be sufficient depending on the details of the involved PKI. In particular, revocation information must also be available for the OCSP/CRL signer and the time-stamp authority.
2.7 PAdES SignaturesThe PAdES family of signature standards improves PDF signatures and ensures that EU requirements are met. Various signature options can be used to create signatures ac-cording to different PAdES flavors. For example, the following command-line creates a basic signature according to PAdES part 3 (PAdES-B):
plop --signopt "digitalid={filename=demorsa2048.p12} passwordfile=pw.txt sigtype=cades" --outfile signed.pdf input.pdf
The following command-line creates a signature according to PAdES part 3 with explicit policy identifier (PAdES-EPES):
plop --signopt "digitalid={filename=demorsa2048.p12} passwordfile=pw.txt sigtype=cades policy={oid=2.16.276.1.89.1.1.1.1.3 commitmenttype=origin}" --outfile signed.pdf input.pdf
More details are available in Section 6.7, »The CAdES and PAdES Signature Standards«, page 100.
2.8 Visualize Digital SignaturesA digital signature can be visualized, e.g. by a company logo or the scan of a handwrit-ten signature. The visual representation must be supplied as a PDF document which will be placed in the signature form field. If the input document does not yet contain a signature field suitable field coordinates must be supplied. The following command-line places the visualization document signing_man.pdf in the field rectangle:
32 Chapter 2: PLOP DS Features (Digital Signatures)
plop --signopt "digitalid={filename=demorsa2048.p12} passwordfile=pw.txt field={name=Signature1 rect={10 10 adapt adapt}}" --visdoc signing_man.pdf --outfile signed.pdf input.pdf
More details are available in Section 6.3.1, »Visualizing Signatures with a Graphic or Lo-go«, page 78.
2.9 Query Signature PropertiesWith the pCOS programming interface which is integrated in PLOP DS you can query signature settings of a PDF document. The pCOS Cookbook topic interactive_elements/signatures demonstrates how to query signature types and details. Sample code for que-rying document information with pCOS can be seen in the dumper mini sample, which is included in all PLOP packages. The corresponding option for the PLOP command-line tool is --info (see Section 1.5, »Query Document Information with pCOS«, page 19):
plop --info *.pdf
This program call creates output similar to the following:
File name: hellosign.pdf PDF version: 1.7 Encryption: No encryption
...Tagged PDF: falseSignatures: 1
signature field 'Signature1': invisible approval signature, CAdESReader-enabled: false
3.1 PLOP and PLOP DS Command-line Options 33
3 PLOP and PLOP DS Command-line Tool
3.1 PLOP and PLOP DS Command-line OptionsThe combined command-line tool for PLOP and PLOP DS allows you to encrypt, decrypt, optimize, repair, and sign one or more PDF documents without the need for any pro-gramming. In addition, it can be used to query the status of PDF documents. The PLOP program can be controlled via a number of command-line options. It is called as follows for one or more input PDF files (items in square brackets are optional):
plop --helpplop [ <general options> ] --info [ --outfile <filename> ] <filename> ...plop [ <general options> ] <transform options> --outfile <filename> <filename>plop [ <general options> ] <transform options> --targetdir <pathname> <filename>...
The PLOP command-line tool is built on top of the PLOP library. By default PLOP repairs input documents which are found to be damaged. You can supply library options using the --inputopt, --outputopt, and --plopopt options according to the option tables in Chap-ter 7, »PLOP and PLOP DS Library API Reference«, page 103. Table 3.1 lists all PLOP com-mand-line options.
Table 3.1 PLOP command-line options
option parameters function
-- End the list of options; this is useful in case file names start with a - charac-ter.
@filename1 Specify a response file with options; for a syntax description see »Response files«, page 35. Response files will only be recognized before the -- option and before the first filename, and can not be used to replace the parameter for another option.
--help, -?(or no option)
Display help with a summary of available options.
--info, -i Display status information for the input file; no PDF output is produced.
--inputopt <option list> Additional option list for PLOP_open_document( ) (see Table 7.3, page 109)
--master2, -m <password> Output master password; missing option means no password
--noreplace, -n If the output file already exists, it will not be overwritten and an exception will be thrown. Default: existing output files will be overwritten.
--outfile, -o <filename> (Requires exactly one input document except with --info; one of --outfile and --targetdir must be supplied) Output file name; input and output file name must be different.
--outputopt <option list> Additional option list for PLOP_create_document( ) (see Table 7.5, page 112)
--password2, -p <password> User or master password for input document(s). This password is used for all input documents. Documents which require different passwords must be processed in separate program calls.

34 Chapter 3: PLOP and PLOP DS Command-line Tool
Constructing PLOP command lines. The following rules must be obeyed for construct-ing PLOP command lines:
> Input files will be searched in all directories specified as searchpath.> Short forms are available for some options, and can be mixed with long options.
--permissions2 <permissions> (Requires --master) The access permission list for the output document. It contains any number of the noprint, nomodify, nocopy, noannots, noassemble, noforms, noaccessible, nohiresprint, and plainmetadata keywords (see Table 5.3, page 62). In addition, the following keyword can be used (default: no permission restrictions):keep Keep the permission settings of the input document. This setting
can be amended by additional keywords in order to modify the permission settings of the input PDF, e.g. keep noprint.
--plopopt <option list> Additional option list for PLOP_set_option( ) (see Table 7.11, page 127). This can be used to pass the license or licensefile options.
--recsize, -R <blocksize> (MVS only) The record size of the output file. Default: 0 (unblocked)
--searchpath, -s1 <path> Name of a directory where files will be searched. The path must not start with a minus character »-« (prepend ./ if required). Default: current directo-ry
--signopt, -S <option list> (Only available in PLOP DS) Option list for PLOP_prepare_signature( ) for digi-tally signing documents (see Table 7.7, page 117).
--targetdir, -t <dirname> (One of --outfile and --targetdir must be supplied) Output directory name; the directory must already exist.
--tempdirname <dirname> Name of a directory where temporary files needed for PLOP’s internal pro-cessing will be created. If empty, PLOP will generate temporary files in the current directory. Default: empty
--tempfilename, -T <filename> (MVS only) Full file name for a temporary file for PLOP’s internal processing. If empty, PLOP will generate a unique temporary file name. The user is respon-sible for deleting the temporary file when PLOP finished. Default: empty
--user, -u2 <password> (Requires --master) Output user password; missing option means no pass-word
--verbose, -v 0, 1, 2, 3 Verbosity level (default: 1):0 no output1 only error messages2 add file names and API function name in error messages3 detailed reporting
--visdoc <filename> (Only with --signopt) Name of the PDF file from which a page will be used for visualizing the digital signature.
--visdocopt <option list> (Only with --visdoc) Options for PLOP_open_document( ) (see Table 7.3, page 109) which are used to open the signature visualization document
--webopt, -w Linearize the PDF output for Web delivery, also known as Web optimization. Default: no linearization
1. This option can be supplied more than once.2. This option is used for all input files.
Table 3.1 PLOP command-line options
option parameters function
3.1 PLOP and PLOP DS Command-line Options 35
> Long options can be abbreviated provided the abbreviation is unique (e.g. --plop in-stead of --plopopt).
> If an option is supplied more than once only the last instance will be taken into ac-count. However, this rule does not hold for options which are marked as repeatable in Table 3.1.
> Depending on the encryption status of the input file, a user or master password may be required for processing. This must be supplied with the --password option. PLOP will check whether this password is sufficient for the requested action (see Table 5.2), and will throw an exception if it isn’t.
PLOP checks the full command line before processing any file. If an option syntax error is encountered in the options anywhere on the command line, no files will be processed at all. If a particular file cannot be processed (e.g. because the required password is miss-ing), an error message will be created, and PLOP will continue processing the remaining files.
File names. File names which contain blank characters require some special handling when used with command-line tools like PLOP. In order to process a file name with blank characters you should enclose the complete file name with double quote " charac-ters. Wildcards can be used according to standard practice. For example, *.pdf denotes all files in a given directory which have a .pdf file name suffix. Note that on some systems case is significant, while on others it isn’t (i.e., *.pdf may be different from *.PDF). Also note that on Windows systems wildcards do not work for file names containing blank characters. Wildcards will be evaluated in the current directory, not any searchpath di-rectory.
On Windows all file name options accept Unicode strings, e.g. as a result of dragging files from the Explorer to a command prompt window.
Response files. In addition to options supplied directly on the command-line, options can also be supplied in a response file. The contents of a response file will be inserted in the command-line at the location where the @filename option was found.
A response file is a simple text file with options and parameters. It must adhere to the following syntax rules:
> Option values must be separated with whitespace, i.e. space, linefeed, return, or tab.> Values which contain whitespace must be enclosed with double quotation marks: "> Double quotation marks at the beginning and end of a value will be omitted.> A double quotation mark must be masked with a backslash to use it literally: \"> A backslash character must be masked with another backslash to use it literally: \\
Response files can be nested, i.e. @filename can be used in another response file.Response files may contain Unicode strings for file name and password arguments.
Response files can be encoded in UTF-8, EBCDIC-UTF-8, or UTF-16 format and must start with the corresponding BOM. If no BOM is found, the contents of the response file will be interpreted in EBCDIC on zSeries, and in ISO 8859-1 (Latin-1) on all other systems.
Exit codes. The PLOP command-line tool returns with an exit code which can be used to check whether or not the requested operations could be successfully carried out:
> Exit code 0: all command-line options and input files could be successfully and fully processed.
> Exit code 1: one or more file processing errors occurred, but processing continued.

36 Chapter 3: PLOP and PLOP DS Command-line Tool
> Exit code 2: some error was found in the command-line options. Processing stopped at the particular bad option, and no documents have been processed.

3.2 PLOP and PLOP DS Command-line Examples 37
3.2 PLOP and PLOP DS Command-line ExamplesThe following examples demonstrate some useful combinations of PLOP command-line options. All samples are shown in two variations; the first uses the long format of all options, while the second uses the equivalent short option format. More examples are available in the following sections:
> Chapter 1, »PLOP Features«, page 15 (various sections)> Section 5.3, »Securing PDF Documents on the Command Line«, page 64> Section 6.2.2, »Built-in Engine«, page 73.
Display security and other information about all PDF files in the current directory:
plop --info *.pdfplop -i *.pdf
Linearize all PDF documents in a directory (assuming these do not require any pass-word), and copy the resulting files to the target directory output. Verbosity level 2 prints the names of all input and output files as they are processed:
plop --verbose 2 --webopt --targetdir output *.pdfplop -v 2 -w -t output *.pdf
Encrypt all files in the current directory with the same user password demo and master password DEMO, and place the resulting files in the target directory output:
plop --targetdir output --user demo --master DEMO *.pdfplop -t output -u demo -m DEMO *.pdf
Create an invisible signature for a PDF document, using a digital ID from the file demorsa2048.p12. The password for the digital ID is contained in the file pw.txt:
plop --signopt "digitalid={filename=demorsa2048.p12} passwordfile=pw.txt" --outfile signed.pdf input.pdf
plop -S "digitalid={filename=demorsa2048.p12} passwordfile=pw.txt" -o signed.pdf input.pdf
Create a signature, using an existing PDF with a hand-written signature to visualize the signature:
plop --signopt "digitalid={filename=demorsa2048.p12} passwordfile=pw.txt field={rect={100 100 300 adapt}}" --visdoc signature.pdf --outfile signed.pdf input.pdf


4.1 C Binding 39
4 PLOP and PLOP DS Library Language BindingsIn this chapter we discuss language-specific aspects of the PLOP/PLOP DS library.
4.1 C BindingPLOP is written in C with some C++ modules. In order to use the C binding you can use a static or shared library (DLL/SO), and you need the central PLOP include file ploplib.h for inclusion in your client source modules. Alternatively, ploplibdl.h can be used for dy-namically loading the PLOP DLL at runtime (see next section for details).
Note Applications which use the PLOP binding for C must be linked with a C++ compiler since the li-brary includes some parts which are implemented in C++. Using a C linker may result in unre-solved externals unless the application is explicitly linked against the required C++ support li-braries.
Error handling. The PLOP API provides a mechanism for acting upon exceptions thrown by the library in order to compensate for the lack of native exception handling in the C language. Using the PLOP_TRY( ) and PLOP_CATCH( ) macros client code can be set up such that a dedicated piece of code is invoked for error handling and cleanup when an exception occurs. These macros set up two code sections: the try clause with code which may throw an exception, and the catch clause with code which acts upon an ex-ception. If any of the API functions called in the try block throws an exception, program execution will continue at the first statement of the catch block immediately. The fol-lowing rules must be obeyed in PLOP client code:
> PLOP_TRY( ) and PLOP_CATCH( ) must always be paired.> PLOP_new( ) will never throw an exception; since a try block can only be started with
a valid PLOP object handle, PLOP_new( ) must be called outside of any try block.> PLOP_delete( ) will never throw an exception, and therefore can safely be called out-
side of any try block. It can also be called in a catch clause.> Special care must be taken about variables that are used in both the try and catch
blocks. Since the compiler doesn’t know about the transfer of control from one block to the other, it might produce inappropriate code (e.g., register variable optimiza-tions) in this situation.Fortunately, there is a simple rule to avoid this kind of problem: Variables used in both the try and catch blocks must be declared volatile. Using the volatile keyword sig-nals to the compiler that it must not apply dangerous optimizations to the variable.
> If a try block is left (e.g., with a return statement, thus bypassing the invocation of the corresponding PLOP_CATCH( )), the PLOP_EXIT_TRY( ) macro must be called before the return statement to inform the exception machinery.
> As in all PLOP language bindings document processing must stop when an exception was thrown.
The following code fragment demonstrates these rules with the typical idiom for deal-ing with PLOP exceptions in client code (full samples can be found in the PLOP package):

40 Chapter 4: PLOP and PLOP DS Library Language Bindings
if ((plop = PLOP_new()) == (PLOP *) 0){
printf("out of memory\n");return(2);
}PLOP_TRY(plop){
/* statements that directly or indirectly call API functions */}PLOP_CATCH(plop){
printf("Error %d in %s() on page %d: %s\n",PLOP_get_errnum(plop), PLOP_get_apiname(plop),
pageno, PLOP_get_errmsg(plop));}PLOP_delete(plop);
Unicode handling for name strings. The C language does not natively support Uni-code. Some string parameters for API functions may be declared as name strings. These are handled depending on the length parameter and the existence of a BOM at the be-ginning of the string. In C, if the length parameter is different from 0 the string will be interpreted as UTF-16. If the length parameter is 0 the string will be interpreted as UTF-8 if it starts with a UTF-8 BOM, or as EBCDIC UTF-8 if it starts with an EBCDIC UTF-8 BOM, or as host encoding if no BOM is found (or ebcdic on all EBCDIC-based platforms).
Unicode handling for option lists. Strings within option lists require special attention since they cannot be expressed as Unicode strings in UTF-16 format, but only as byte ar-rays. For this reason UTF-8 is used for Unicode options. By looking for a BOM at the be-ginning of an option PLOP decides how to interpret it. The BOM will be used to deter-mine the format of the string. More precisely, interpreting a string option works as follows:
> If the option starts with a UTF-8 BOM (\xEF\xBB\xBF) it will interpreted as UTF-8.> If the option starts with an EBCDIC UTF-8 BOM (\x57\x8B\xAB) it will be interpreted as
EBCDIC UTF-8.> If no BOM is found, the string will be treated as winansi (or ebcdic on EBCDIC-based
platforms).
Note The PLOP_convert_to_unicode( ) utility function can be used to create UTF-8 strings from UTF-16 strings, which is useful for creating option lists with Unicode values.
Using PLOP as a DLL loaded at runtime. While most clients will use PLOP as a statically bound library or a dynamic library which is bound at link time, you can also load the DLL at runtime and dynamically fetch pointers to all API functions. This is especially useful to load the DLL only on demand. PLOP supports a special mechanism to facilitate this dynamic usage. It works according to the following rules:
> Include ploplibdl.h instead of ploplib.h.> Use PLOP_new_dl( ) and PLOP_delete_dl( ) instead of PLOP_new( ) and PLOP_delete( ).> Use PLOP_TRY_DL( ) and PLOP_CATCH_DL( ) instead of PLOP_TRY( ) and PLOP_CATCH( ).> Use function pointers for all other PLOP calls.> Compile the auxiliary module ploplibdl.c and link your application against the result-
ing object file.

4.1 C Binding 41
The dynamic loading mechanism is demonstrated in the encryptdl.c sample.
Note Loading the DLL at runtime is supported on selected platforms only.
42 Chapter 4: PLOP and PLOP DS Library Language Bindings
4.2 C++ BindingNote For .NET applications written in C++ we recommend to access the PLOP .NET DLL directly in-
stead of via the C++ binding (except for cross-platform applications which should use the C++ binding). The PLOP distribution contains C++ sample code for use with .NET CLI which demon-strates this combination.
In addition to the ploplib.h C header file, an object-oriented wrapper for C++ is supplied for PLOP clients. It requires the plop.hpp header file, which in turn includes ploplib.h. Since plop.hpp contains a template-based implementation no corresponding plop.cpp module is required. Using the C++ object wrapper replaces the functional approach with API functions and PLOP_ prefixes in all PLOP function names with a more object-orient-ed approach.
String handling in C++. PLOP 4.1 introduced a new Unicode-capable C++ binding. The new template-based approach supports the following usage patterns with respect to string handling:
> Strings of the C++ standard library type std::wstring are used as basic string type. They can hold Unicode characters encoded as UTF-16 or UTF-32. This is the default be-havior since PLOP 4.1 and the recommended approach for new applications unless custom data types (see next item) offer a significant advantage over wstrings.
> Custom (user-defined) data types for string handling can be used as long as the cus-tom data type is an instantiation of the basic_string class template and can be con-verted to and from Unicode via user-supplied converter methods.
> Plain C++ strings can be used for compatibility with existing C++ applications which have been developed against PLOP 4.0 or earlier versions. This compatibility variant is only meant for existing applications (see below for notes on source code compati-bility).
The new interface assumes that all strings passed to and received from PLOP methods are native wstrings. Depending on the size of the wchar_t data type, wstrings are assumed to contain Unicode strings encoded as UTF-16 (2-byte characters) or UTF-32 (4-byte char-acters). Literal strings in the source code must be prefixed with L to designate wide strings. Unicode characters in literals can be created with the \u and \U syntax. Al-though this syntax is part of standard ISO C++, some compilers don’t support it. In this case literal Unicode characters must be created with hex characters.
Note On EBCDIC-based systems the formatting of option list strings for the wstring-based interface requires additional conversions to avoid a mixture of EBCDIC and UTF-16 wstrings in option lists. Convenience code for this conversion and instructions are available in the auxiliary mod-ule utf16num_ebcdic.hpp.
Adjusting applications to the new C++ binding. Existing C++ applications which have been developed against PLOP 4.0 or earlier versions can be adjusted as follows:
> Since the PLOP C++ class now lives in the pdflib namespace the class name must be qualified. In order to avoid the pdflib::PLOP construct client applications should add the following before using PLOP methods:
using namespace pdflib;

4.2 C++ Binding 43
> Switch the application’s string handling to wstrings. This includes data from external sources. However, string literals in the source code (including option lists) must also be adjusted by prepending the L prefix, e.g.
const wstring docoptlist = L"password=foo";
> Suitable wstring-capable methods (wcerr etc.) must be used to process PLOP error messages and exception strings (get_errmsg( ) method in the PLOP and PLOP::Exception classes).
> The plop.cpp module is no longer required for the PLOP C++ binding. Although the PLOP distribution contains a dummy implementation of this module, it should be removed from the build process for PLOP applications.
Full source code compatibility with legacy applications. The new C++ binding has been designed with application-level source code compatibility mind, but client applications must be recompiled. The following aids are available to achieve full source code com-patibility for legacy applications:
> Disable the wstring-based interface as follows before including plop.hpp:
#define PLOPCPP_PLOP_WSTRING 0
> Disable the pdflib namespace as follows before including plop.hpp:
#define PLOPCPP_USE_PDFLIB_NAMESPACE 0
Error handling in C++. PLOP API functions will throw a C++ exception in case of an er-ror. These exceptions must be caught in the client code by using C++ try/catch clauses. In order to provide extended error information the PLOP class provides a public PLOP::Exception class which exposes methods for retrieving the detailed error message, the exception number, and the name of the PLOP API function which threw the excep-tion.
Native C++ exceptions thrown by PLOP routines will behave as expected. The follow-ing code fragment will catch exceptions thrown by PLOP:
try {...some PLOP instructions...
} catch (PLOP::Exception &ex) {wcerr << L"Error " << ex.get_errnum()<< L" in " << ex.get_apiname()<< L"(): " << ex.get_errmsg() << endl;
}
ed approach.
Using PLOP as a DLL loaded at runtime. Similar to the C language binding the C++ binding allows you to dynamically attach PLOP to your application at runtime (see »Us-ing PLOP as a DLL loaded at runtime«, page 40). Dynamic loading can be enabled as fol-lows when compiling the application module which includes plop.hpp:
#define PLOPCPP_DL 1
In addition you must compile the auxiliary module ploplibdl.c and link your application against the resulting object file. Since the details of dynamic loading are hidden in the

44 Chapter 4: PLOP and PLOP DS Library Language Bindings
PLOP object it does not affect the C++ API: all method calls look the same regardless of whether or not dynamic loading is enabled.
Note Loading the DLL at runtime is supported on selected platforms only.
4.3 COM Binding 45
4.3 COM BindingInstalling the PLOP Edition for COM. Install PLOP/PLOP DS with the supplied Windows Installer. The installer will make appropriate registry entries, and register the PLOP component with Windows so that it can be used from any COM-compatible program.
Exception Handling in COM. The PLOP/PLOP DS component implements standard COM exception behavior, and will throw a COM exception with an explanatory mes-sage. PLOP users can use standard programming means to catch the exception and react on it.
Using the PLOP COM Edition with .NET. As an alternative to PLOP.NET (see Section 4.5, ».NET Binding«, page 48) the COM edition of PLOP can also be used with .NET. First, you must create a .NET assembly from the PLOP COM edition using the tlbimp.exe utility:
tlbimp plop_com.dll /namespace:plop_com /out:Interop.plop_com.dll
You can use this assembly within your .NET application. If you add a reference to plop_com.dll from within Visual Studio .NET an assembly will be created automatically.
The following code fragment shows how to use the PLOP COM edition with VB.NET:
Imports plop_com ...Dim p As plop_com.IPDF ...p = New PLOP() ...buf = p.get_buffer()
The following code fragment shows how to use the PLOP COM edition with C#:
using plop_com; ...static plop_com.IPDF p; ...p = New PLOP(); ...buf = (byte[])p.get_buffer();
The rest of your code works as with the .NET version of PLOP. Please note that in C# you have to cast the result of get_buffer( ) since there is no automatic conversion from the VARIANT data type returned by the COM object here.

46 Chapter 4: PLOP and PLOP DS Library Language Bindings
4.4 Java BindingInstalling the PLOP Edition for Java. PLOP/PLOP DS has been implemented as a native C library which attaches to Java via the JNI (Java Native Interface). Obviously, for devel-oping Java applications you will need the JDK which includes support for the JNI. For the PLOP binding to work, the Java VM must have access to the PLOP Java wrapper li-brary and the PLOP Java package.
The PLOP Java package. In order to maintain a consistent look-and-feel for the Java de-veloper, PLOP is organized as a Java package with the following package name:
com.pdflib.plop
This package is available in the plop.jar file and contains a single class called plop. Last-minute comments on using PLOP in various Java development environments may be found in the readme.txt file.
In order to supply this package to your application, you must add plop.jar to your CLASSPATH environment variable, add the option -classpath plop.jar in your calls to the Java compiler and runtime, or perform equivalent steps in your Java IDE. You can con-figure the Java VM to search for native libraries in a given directory by setting the java.library.path property to the name of the directory, e.g.
java -Djava.library.path=. encrypt
You can check the value of this property as follows:
System.out.println(System.getProperty("java.library.path"));
In addition, the following platform-dependent steps must be performed:> Unix: The library libplop_java.so must be placed in one of the default locations for
shared libraries, or in an appropriately configured directory.> OS X: The library libplop_java.jnilib must be placed in one of the default locations for
shared libraries, or in an appropriately configured directory.> Windows: The library plop_java.dll must be placed in the Windows system directory,
or a directory which is listed in the PATH environment variable.
PLOP servlets and Java application servers. PLOP/PLOP DS is perfectly suited for serv-er-side Java applications, especially servlets. When using PLOP with a specific servlet en-gine the following configuration issues must be observed:
> The directory where the servlet engine looks for native libraries varies among ven-dors. Common candidate locations are system directories, directories specific to the underlying Java VM, and local directories of the servlet engine. Please check the doc-umentation supplied by the vendor of your servlet engine.
> Servlets are often loaded by a special class loader which may be restricted, or use a dedicated classpath. For some servlet engines it is required to define a special engine classpath to make sure that the PLOP package will be found.
Examples for using PLOP within servlets are contained in the PLOP distribution.
4.4 Java Binding 47
Exception Handling in Java. All PLOP/PLOP DS methods will throw an exception of type PLOPException in case of an error. PLOP users can use standard Java language fea-tures to catch the exception and react on it:
try {plop plop;/* ... PLOP statements ... */
} catch (PLOPException e) {System.err.println("encrypt: PLOP Exception occurred:");System.err.println(e.get_apiname() +": " + e.get_errmsg());
} finally {/* delete the PLOP object */if (plop != null) plop.delete();
}
48 Chapter 4: PLOP and PLOP DS Library Language Bindings
4.5 .NET BindingNote Detailed information about the various flavors and options for using PLOP with the .NET
Framework can be found in the PDFlib-in-.NET-HowTo.pdf document which is contained in the distribution packages and also available on the PDFlib Web site.
The .NET edition of PLOP supports all relevant .NET concepts. In technical terms, the PLOP.NET edition is a C++ class (with a managed wrapper for the unmanaged PLOP core library) which runs under control of the .NET framework. It is packaged as a static as-sembly with a strong name. The PLOP assembly (PLOP_dotnet.dll) contains the actual li-brary plus meta information.
Installing the PLOP Edition for .NET. Install PLOP with the supplied Windows MSI In-staller. The PLOP.NET MSI installer will install the PLOP assembly plus auxiliary data files, documentation and samples on the machine interactively. The installer will also register PLOP so that it can easily be referenced on the .NET tab in the Add Reference dia-log box of Visual Studio .NET.
Error Handling in .NET. PLOP.NET supports .NET exceptions, and will throw an excep-tion with a detailed error message when a runtime problem occurs. The client is respon-sible for catching such an exception and properly reacting on it. Otherwise the .NET framework will catch the exception and usually terminate the application.
In order to convey exception-related information PLOP defines its own exception class PLOP_dotnet.PLOPException with the members get_errnum, get_errmsg, and get_apiname.
Using PLOP with C++ and CLI. .NET applications written in C++ (based on the Common Language Infrastructure CLI) can directly access the PLOP.NET DLL without using the PLOP C++ binding. The source code must reference PLOP as follows:
using namespace PLOP_dotnet;
4.6 Objective-C Binding 49
4.6 Objective-C BindingAlthough the C and C++ language bindings can be used with Objective-C1, a genuine lan-guage binding for Objective-C is also available. The PLOP framework is available in the following flavors:
> PLOP for use on OS X> PLOP_ios for use on iOS
Both frameworks contain language bindings for C, C++, and Objective-C.
Installing the PLOP Edition for Objective-C on OS X. In order to use PLOP in your appli-cation you must copy PLOP.framework or PLOP.framework to the directory /Library/Frame-works. Installing the PLOP framework in a different location is possible, but requires use of Apple’s install_name_tool which is not described here. The PLOP_objc.h header file with PLOP method declarations must be imported in the application source code:
#import "PLOP/PLOP_objc.h"
or
#import "PLOP_ios/PLOP_objc.h"
Parameter naming conventions. For PLOP method calls you must supply parameters according to the following conventions:
> The value of the first parameter is provided directly after the method name, separat-ed by a colon character.
> For each subsequent parameter the parameter’s name and its value (again separated from each other by a colon character) must be provided. The parameter names can be found in Chapter 7, »PLOP and PLOP DS Library API Reference«, page 103, and in PLOP_objc.h.
For example, the following line in the API description:
int open_page(int doc, int pagenumber, String optlist)int open_document(wstring filename, wstring optlist)
corresponds to the following Objective-C method:
- (NSInteger) open_document: (NSString *) filename optlist: (NSString *) optlist;
This means your application must make a call similar to the following:
doc = [plop open_document:filename optlist:pageoptlist];
XCode Code Sense for code completion can be used with the PLOP framework.
Error handling in Objective-C. The Objective-C binding translates PLOP errors to native Objective-C exceptions. In case of a runtime problem PLOP throws a native Objective-C exception of the class PLOPException. These exceptions can be handled with the usual try/catch mechanism:
1. See developer.apple.com/library/mac/documentation/Cocoa/Conceptual/ProgrammingWithObjectiveC/Introduction/Introduction.html
50 Chapter 4: PLOP and PLOP DS Library Language Bindings
@try { ...some PLOP instructions...
}@catch (PLOPException *ex) {
NSString * errorMessage =[NSString stringWithFormat:@"PLOP error %d in '%@': %@",[ex get_errnum], [ex get_apiname], [ex get_errmsg]];
NSAlert *alert = [[NSAlert alloc] init];[alert setMessageText: errorMessage];[alert runModal];[alert release];
}@catch (NSException *ex) {
NSAlert *alert = [[NSAlert alloc] init];[alert setMessageText: [ex reason]];[alert runModal];[alert release];
}@finally {
[plop release];}
In addition to the get_errmsg method you can also use the reason field of the exception object to retrieve the error message.
4.7 Perl Binding 51
4.7 Perl BindingThe PLOP wrapper for Perl consists of a C wrapper and two Perl package modules, one for providing a Perl equivalent for each PLOP API function and another one for the PLOP object. The C module is used to build a shared library which the Perl interpreter loads at runtime, with some help from the package file. Perl scripts refer to the shared library module via a use statement.
Installing the PLOP Edition for Perl. The Perl extension mechanism loads shared librar-ies at runtime through the DynaLoader module. The Perl executable must have been compiled with support for shared libraries (this is true for the majority of Perl configu-rations).
For the PLOP binding to work, the Perl interpreter must access the PLOP Perl wrapper and the modules plop_pl.pm and PDFlib/PLOP.pm. In addition to the platform-specific methods described below you can add a directory to Perl’s @INC module search path us-ing the -I command line option:
perl -I/path/to/plop encrypt.pl
Unix. Perl will search plop_pl.so (on OS X: plop_pl.bundle), plop_pl.pm and PDFlib/PLOP.pm in the current directory, or the directory printed by the following Perl com-mand:
perl -e 'use Config; print $Config{sitearchexp};'
Perl will also search the subdirectory auto/plop_pl. Typical output of the above com-mand looks like
/usr/lib/perl5/site_perl/5.16/i686-linux
Windows. The DLL plop_pl.dll and the modules plop_pl.pm and PDFlib/PLOP.pm will be searched in the current directory, or the directory printed by the following Perl com-mand:
perl -e "use Config; print $Config{sitearchexp};"
Typical output of the above command looks like
C:\Program Files\Perl5.16\site\lib
Exception Handling in Perl. When a PLOP exception occurs, a Perl exception is thrown. It can be caught and acted upon using an eval sequence:
eval {...some PLOP instructions...
};die "Exception caught: $@" if $@;
52 Chapter 4: PLOP and PLOP DS Library Language Bindings
4.8 PHP BindingNote Detailed information about the various flavors and options for using PLOP with PHP can be
found in the PDFlib-in-.NET-HowTo.pdf document which is contained in the distribution pack-ages and also available on the PDFlib Web site. Although it is mainly targeted at using PDFlib with PHP the discussion applies equally to using PLOP with PHP.
Installing the PLOP Edition for PHP. PLOP/PLOP DS is implemented as a C library which can dynamically be attached to PHP. PLOP supports several versions of PHP. Depending on the version of PHP you use you must choose the appropriate PLOP library from the unpacked PLOP archive.
You must configure PHP so that it knows about the external PLOP library. You have two choices:
> Add one of the following lines in php.ini:
extension=plop_php.so ; for Unix and OS Xextension=plop_php.dll ; for Windows
PHP will search the library in the directory specified in the extension_dir variable in php.ini on Unix, and additionally in the standard system directories on Windows. You can test which version of the PHP PLOP binding you have installed with the fol-lowing one-line PHP script:
<?phpinfo()?>
This will display a long info page about your current PHP configuration. On this page check the section titled plop. If this section contains the phrase
PDFlib PLOP (PDF Linearization, Optimization, Protection and Digital Signature) => enabled
(plus the PLOP version number) you successfully installed PLOP for PHP.> Load PLOP at runtime with one of the following lines at the start of your script:
dl("plop_php.so"); # for Unix and OS Xdl("plop_php.dll"); # for Windows
File name handling in PHP. Unqualified file names (without any path component) and relative file names for PDF, image, font and other disk files are handled differently in Unix and Windows versions of PHP:
> PHP on Unix systems will find files without any path component in the directory where the script is located.
> PHP on Windows will find files without any path component only in the directory where the PHP DLL is located.
Exception handling in PHP. Since PHP supports structured exception handling, PLOP exceptions will be propagated as PHP exceptions. You can use the standard try/catch technique to deal with PLOP exceptions:
try {
...some PLOP instructions...
} catch (PLOPException $e) {print "PLOP exception occurred:\n";
4.8 PHP Binding 53
print "[" . $e->get_errnum() . "] " . $e->get_apiname() . ": " $e->get_errmsg() . "\n";
}catch (Exception $e) {
print $e;}
Developing with Eclipse and Zend Studio. The PHP Development Tools (PDT)1 support PHP development with Eclipse and Zend Studio. PDT can be configured to support con-text-sensitive help with the steps outlined below.
Add PLOP to the Eclipse preferences so that it will be known to all PHP projects:> Select Window, Preferences, PHP, PHP Libraries, New... to launch a wizard.> In User library name enter PLOP, click Add External folder... and select the folder
bind\php\Eclipse PDT.
In an existing or new PHP project you can add a reference to the PLOP library as follows:> In the PHP Explorer right-click on the PHP project and select Include Path, Configure
Include Path...> Go to the Libraries tab, click Add Library..., and select User Library, PLOP.
After these steps you can explore the list of PLOP methods under the PHP Include Path/PLOP/PLOP node in the PHP Explorer view. When writing new PHP code Eclipse will assist with code completion and context-sensitive help for all PDFlib methods.
1. See www.eclipse.org/pdt
4.9 Python BindingInstalling the PLOP edition for Python. The Python extension mechanism works by loading shared libraries at runtime. For the PLOP binding to work, the Python interpret-er must have access to the PLOP Python wrapper which will be searched in the directo-ries listed in the PYTHONPATH environment variable. The name of Python wrapper de-pends on the platform:
> Unix and OS X: plop_py.so> Windows: plop_py.pyd
Error Handling in Python. The Python binding installs a special error handler which translates PLOP errors to native Python exceptions. The Python exceptions can be dealt with by the usual try/catch technique:
try:...some PLOP instructions...
except PLOPException:print 'PLOP Exception caught!'
4.10 Ruby Binding 55
4.10 Ruby BindingInstalling the PLOP Ruby edition. The Ruby1 extension mechanism works by loading a shared library at runtime. For the PLOP binding to work, the Ruby interpreter must have access to the PLOP extension library for Ruby. This library (on Windows and Unix: PLOP.so; on OS X: PLOP.bundle) will usually be installed in the site_ruby branch of the local ruby installation directory, i.e. in a directory with a name similar to the following:
/usr/local/lib/ruby/site_ruby/<version>/
However, Ruby will search other directories for extensions as well. In order to retrieve a list of these directories you can use the following ruby call:
ruby -e "puts $:"
This list usually includes the current directory, so for testing purposes you can simply place the PDFlib extension library and the scripts in the same directory.
Data types. Parameters must be passed to the PLOP API according to the data types listed in Table 4.1.
Error Handling in Ruby. The Ruby binding installs an error handler which translates PLOP exceptions to native Ruby exceptions. The Ruby exceptions can be dealt with by the usual rescue technique:
begin...some PLOP instructions...
rescue PLOPException => peprint "PLOP exception occurred in encrypt sample:\n"print "[" + pe.get_errnum.to_s + "] " + pe.get_apiname + ": " + pe.get_errmsg + "\n"
end
1. See www.ruby-lang.org/en
Table 4.1 Data types in the Ruby binding
API data type data types in the Ruby binding
string data type string
binary data type string

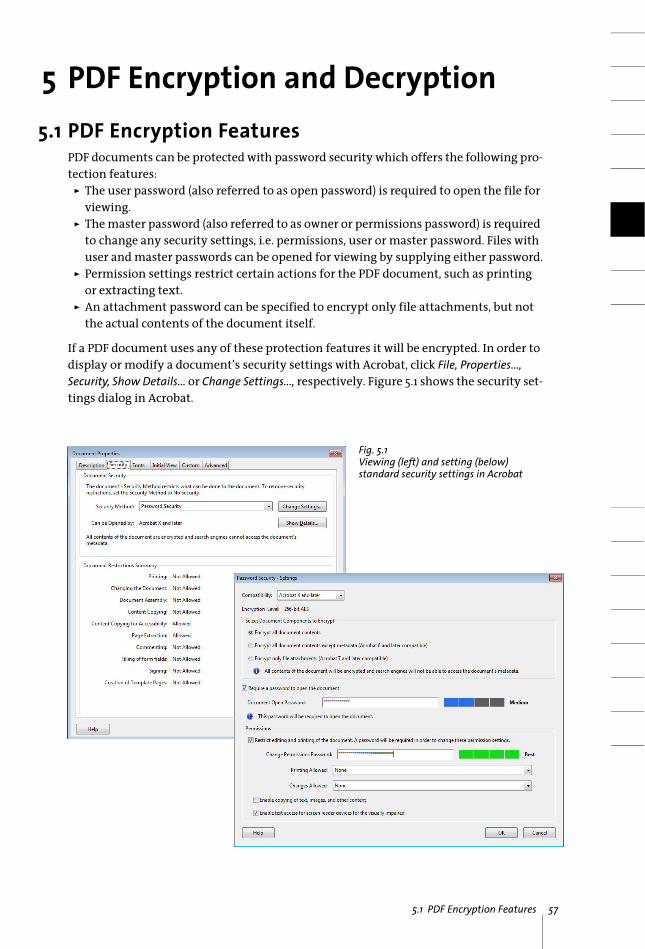
5.1 PDF Encryption Features 57
5 PDF Encryption and Decryption5.1 PDF Encryption Features
PDF documents can be protected with password security which offers the following pro-tection features:
> The user password (also referred to as open password) is required to open the file for viewing.
> The master password (also referred to as owner or permissions password) is required to change any security settings, i.e. permissions, user or master password. Files with user and master passwords can be opened for viewing by supplying either password.
> Permission settings restrict certain actions for the PDF document, such as printing or extracting text.
> An attachment password can be specified to encrypt only file attachments, but not the actual contents of the document itself.
If a PDF document uses any of these protection features it will be encrypted. In order to display or modify a document’s security settings with Acrobat, click File, Properties..., Security, Show Details... or Change Settings..., respectively. Figure 5.1 shows the security set-tings dialog in Acrobat.
Fig. 5.1Viewing (left) and setting (below) standard security settings in Acrobat
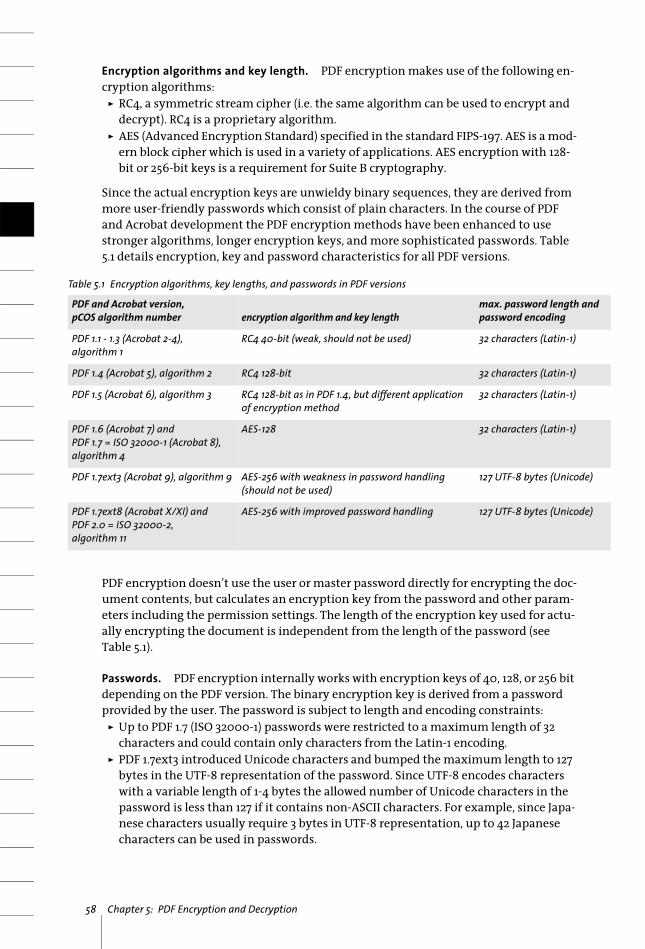
58 Chapter 5: PDF Encryption and Decryption
Encryption algorithms and key length. PDF encryption makes use of the following en-cryption algorithms:
> RC4, a symmetric stream cipher (i.e. the same algorithm can be used to encrypt and decrypt). RC4 is a proprietary algorithm.
> AES (Advanced Encryption Standard) specified in the standard FIPS-197. AES is a mod-ern block cipher which is used in a variety of applications. AES encryption with 128-bit or 256-bit keys is a requirement for Suite B cryptography.
Since the actual encryption keys are unwieldy binary sequences, they are derived from more user-friendly passwords which consist of plain characters. In the course of PDF and Acrobat development the PDF encryption methods have been enhanced to use stronger algorithms, longer encryption keys, and more sophisticated passwords. Table 5.1 details encryption, key and password characteristics for all PDF versions.
PDF encryption doesn’t use the user or master password directly for encrypting the doc-ument contents, but calculates an encryption key from the password and other param-eters including the permission settings. The length of the encryption key used for actu-ally encrypting the document is independent from the length of the password (see Table 5.1).
Passwords. PDF encryption internally works with encryption keys of 40, 128, or 256 bit depending on the PDF version. The binary encryption key is derived from a password provided by the user. The password is subject to length and encoding constraints:
> Up to PDF 1.7 (ISO 32000-1) passwords were restricted to a maximum length of 32 characters and could contain only characters from the Latin-1 encoding.
> PDF 1.7ext3 introduced Unicode characters and bumped the maximum length to 127 bytes in the UTF-8 representation of the password. Since UTF-8 encodes characters with a variable length of 1-4 bytes the allowed number of Unicode characters in the password is less than 127 if it contains non-ASCII characters. For example, since Japa-nese characters usually require 3 bytes in UTF-8 representation, up to 42 Japanese characters can be used in passwords.
Table 5.1 Encryption algorithms, key lengths, and passwords in PDF versions
PDF and Acrobat version,pCOS algorithm number encryption algorithm and key length
max. password length andpassword encoding
PDF 1.1 - 1.3 (Acrobat 2-4), algorithm 1
RC4 40-bit (weak, should not be used) 32 characters (Latin-1)
PDF 1.4 (Acrobat 5), algorithm 2 RC4 128-bit 32 characters (Latin-1)
PDF 1.5 (Acrobat 6), algorithm 3 RC4 128-bit as in PDF 1.4, but different application of encryption method
32 characters (Latin-1)
PDF 1.6 (Acrobat 7) andPDF 1.7 = ISO 32000-1 (Acrobat 8),algorithm 4
AES-128 32 characters (Latin-1)
PDF 1.7ext3 (Acrobat 9), algorithm 9 AES-256 with weakness in password handling (should not be used)
127 UTF-8 bytes (Unicode)
PDF 1.7ext8 (Acrobat X/XI) andPDF 2.0 = ISO 32000-2,algorithm 11
AES-256 with improved password handling 127 UTF-8 bytes (Unicode)

5.1 PDF Encryption Features 59
In order to avoid ambiguities, Unicode passwords are normalized by a process called SASLprep (specified in RFC 4013 based on Stringprep in RFC 3454). This process elimi-nates non-text characters and normalizes certain character classes (e.g. non-ASCII space characters are mapped to the ASCII space character U+0020). The password is normal-ized to Unicode normalization form KC, and special bidirectional processing is applied to avoid ambiguities which may otherwise arise if right-to-left and left-to-right charac-ters are mixed in a password.
The strength of PDF encryption is not only determined by the length of the encryp-tion key, but also by the length and quality of the password. It is widely known that names, plain words, etc. should not be used as passwords since these can easily be guessed or systematically tried using a so-called dictionary attack. Surveys have shown that a significant number of passwords are chosen to be the spouse’s or pet’s name, the user’s birthday, the children’s nickname etc., and can therefore easily be guessed.
Permission settings. PDF can encode various restrictions on document operations which can be granted or denied individually (some settings depend on others, though):
> Printing: If printing is not allowed, the print button in Acrobat will be disabled. Acro-bat supports a distinction between high-resolution and low-resolution printing. Low-resolution printing generates a bitmapped image of the page which is suitable only for personal use, but prevents high-quality reproduction and re-distilling. Note that bitmap printing not only results in low output quality, but will also consider-ably slow down the printing process.
> General Editing: If this is disabled, any document modification is prohibited. Content extraction and printing are allowed.
> Content Copying and Extraction: If this is disabled, selecting document contents and copying it to the clipboard for repurposing the contents is prohibited. The accessibil-ity interface also is disabled. If you need to search such documents with Acrobat you must select the Certified Plugins Only preference in Acrobat.
> Authoring Comments and Form Fields: If this is disabled, adding, modifying, or deleting comments and form fields is prohibited. Form field filling is allowed.
> Form Field Fill-in or Signing: If this is enabled, users can sign and fill in forms, but not create form fields.
> Content Accessibility Enabled: Allow accessibility software (such as a screenreader) to use the document contents. This setting is declared as deprecated in PDF 2.0; content extraction for accessibility purposes is based on the Content Copying and Extraction setting.
> Document Assembly: If this is disabled, inserting, deleting or rotating pages, or creat-ing bookmarks and thumbnails is prohibited.
Specifying access restrictions for a document, such as printing prohibited will disable the respective function in Acrobat. However, this not necessarily holds true for third-party PDF viewers or other software. It is up to the developer of PDF tools whether or not ac-cess permissions will be honored. Indeed, several PDF tools are known to ignore permis-sion settings altogether; commercially available PDF cracking tools can be used to dis-able all access restrictions. This has nothing to do with cracking the encryption; there is simply no way that a PDF file can make sure it won’t be printed while it still remains viewable. This is described as follows in ISO 32000-1:
60 Chapter 5: PDF Encryption and Decryption
»Once the document has been opened and decrypted successfully, a conforming reader technically has access to the entire contents of the document. There is nothing inherent in PDF encryption that enforces the document permissions specified in the encryption dictionary.«
Encrypted document components. By default, PDF encryption always covers all com-ponents of a document. However, there are use cases where it is desirable to encrypt only some components of the document, but not others:
> PDF 1.5 (Acrobat 6) introduced a feature called plaintext metadata. With this feature encrypted documents can contain unencrypted document XMP metadata. This is for the benefit of search engines which can retrieve document metadata even from en-crypted documents.
> Since PDF 1.6 (Acrobat 7) file attachments can be encrypted even in otherwise unpro-tected documents. This way an unprotected document can be used as a container for confidential attachments.
Security recommendations. The following should be avoided because the resulting en-cryption is weak and could be cracked:
> Passwords consisting of 1-6 characters should be avoided since they are susceptible to attacks which try all possible passwords (brute-force attack against the password).
> Passwords should not resemble a plain text word since the password would be sus-ceptible to attacks which try all plaintext words (dictionary attack). Passwords should contain non-alphabetic characters. Don’t use your spouse’s or pet’s name, birthday, or other items which are easy to determine.
> The weak RC4 algorithm and AES-256 according to PDF 1.7ext3 (Acrobat 9) should be avoided because it contains a weakness in the password checking algorithm which facilitates brute-force attacks against the password. For this reason Acrobat X/XI and PLOP never use Acrobat 9 encryption for protecting new documents (only for de-crypting existing documents).
In summary, AES-256 according to PDF 1.7ext8/PDF 2.0 or AES-128 according to PDF 1.6/1.7 should be used, depending on whether or not Acrobat X/XI is available. Passwords should be longer than 6 characters and should contain non-alphabetic characters.
Protecting PDFs on the Web. When PDFs are served over the Web users can always pro-duce a local copy of the document with their browser. There is no way for a PDF docu-ment to prevent users from saving a local copy.
5.2 PDF Encryption with PLOP 61
5.2 PDF Encryption with PLOPPLOP applies or removes Acrobat standard security features to or from PDF files. PLOP can apply user and master passwords, and set access permissions to prevent printing the document with Acrobat, extracting text, modifying the document, etc. In order to decrypt a document the appropriate master password is required.
Encryption algorithm and key length. The encryption details for protecting a docu-ment depend on the PDF version of the input document and the encryption option of PLOP_create_document( ).
PLOP never uses the weak RC4 encryption algorithm. AES-256 according to PDF 1.7ext3 (Acrobat 9) contains a weakness in the password checking algorithm which facil-itates brute-force attacks against the password. For this reason Acrobat X/XI and PLOP never use Acrobat 9 encryption for encrypting (only for decrypting existing docu-ments).
By default PLOP creates PDF 1.6 or above. Other features, especially digital signatures may further increase the PDF output version. In this case the increased version number is used as basis instead of the original PDF version. The detailed process of selecting an encryption algorithm is as follows:
> PDF 1.7ext3 input and older or encryption=algo4 is supplied: the PDF version is in-creased to PDF 1.6 if required and AES-128 encryption according to Acrobat 7/8 (pCOS algorithm 4) is used. Passwords may contain only Latin-1 characters and are truncat-ed to 32 characters.
> PDF 1.7ext8 and PDF 2.0 input or encryption=algo11 is supplied: the PDF version is in-creased to PDF 1.7ext8 if required and AES-256 encryption according to Acrobat X/XI (pCOS algorithm 11) is used. Passwords may contain Unicode characters and are trun-cated to 127 UTF-8 bytes.
Required passwords for various PLOP operations. In order to strictly obey the author’s intentions as reflected by a PDF document’s permission settings, not all operations on encrypted documents may be allowed. PLOP acts according to the following rules:
> Querying the encryption status with the pCOS pseudo object encrypt/algorithm etc. is always possible, regardless of any password.
> Querying document properties with the pCOS interface is governed by the pCOS mode. For example, XMP document metadata, document info fields, bookmarks, and annotation contents can be retrieved without the master password if the document does not require a user password (or only the user password has been supplied). The pCOS Path Reference discusses this in more detail.
> Changing or removing the user password, master password, or permission settings requires the master password.
> Linearizing, optimizing, repairing, or signing an encrypted document (see Section 1.2, »Web-Optimized (Linearized) PDF«, page 16) requires the master password.
Table 5.2 summarizes the requirements for all operations.
Setting passwords with PLOP. In the PLOP library API and the PLOP command-line op-tions we refer to the original PDF document as the input document, and the encrypted or decrypted result as the output document (although both may end up with the same file name). If the input document is protected, PLOP requires either the user or master password depending on the desired operation according to Table 5.2. If the input docu-
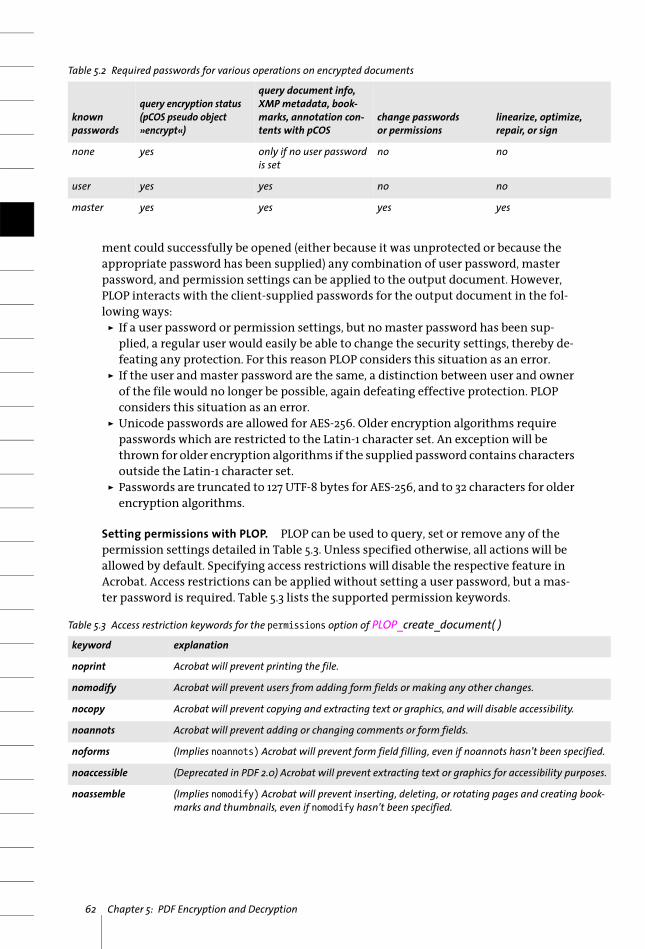
62 Chapter 5: PDF Encryption and Decryption
ment could successfully be opened (either because it was unprotected or because the appropriate password has been supplied) any combination of user password, master password, and permission settings can be applied to the output document. However, PLOP interacts with the client-supplied passwords for the output document in the fol-lowing ways:
> If a user password or permission settings, but no master password has been sup-plied, a regular user would easily be able to change the security settings, thereby de-feating any protection. For this reason PLOP considers this situation as an error.
> If the user and master password are the same, a distinction between user and owner of the file would no longer be possible, again defeating effective protection. PLOP considers this situation as an error.
> Unicode passwords are allowed for AES-256. Older encryption algorithms require passwords which are restricted to the Latin-1 character set. An exception will be thrown for older encryption algorithms if the supplied password contains characters outside the Latin-1 character set.
> Passwords are truncated to 127 UTF-8 bytes for AES-256, and to 32 characters for older encryption algorithms.
Setting permissions with PLOP. PLOP can be used to query, set or remove any of the permission settings detailed in Table 5.3. Unless specified otherwise, all actions will be allowed by default. Specifying access restrictions will disable the respective feature in Acrobat. Access restrictions can be applied without setting a user password, but a mas-ter password is required. Table 5.3 lists the supported permission keywords.
Table 5.2 Required passwords for various operations on encrypted documents
knownpasswords
query encryption status (pCOS pseudo object »encrypt«)
query document info, XMP metadata, book-marks, annotation con-tents with pCOS
change passwordsor permissions
linearize, optimize, repair, or sign
none yes only if no user password is set
no no
user yes yes no no
master yes yes yes yes
Table 5.3 Access restriction keywords for the permissions option of PLOP_create_document( )keyword explanation
noprint Acrobat will prevent printing the file.
nomodify Acrobat will prevent users from adding form fields or making any other changes.
nocopy Acrobat will prevent copying and extracting text or graphics, and will disable accessibility.
noannots Acrobat will prevent adding or changing comments or form fields.
noforms (Implies noannots) Acrobat will prevent form field filling, even if noannots hasn’t been specified.
noaccessible (Deprecated in PDF 2.0) Acrobat will prevent extracting text or graphics for accessibility purposes.
noassemble (Implies nomodify) Acrobat will prevent inserting, deleting, or rotating pages and creating book-marks and thumbnails, even if nomodify hasn’t been specified.
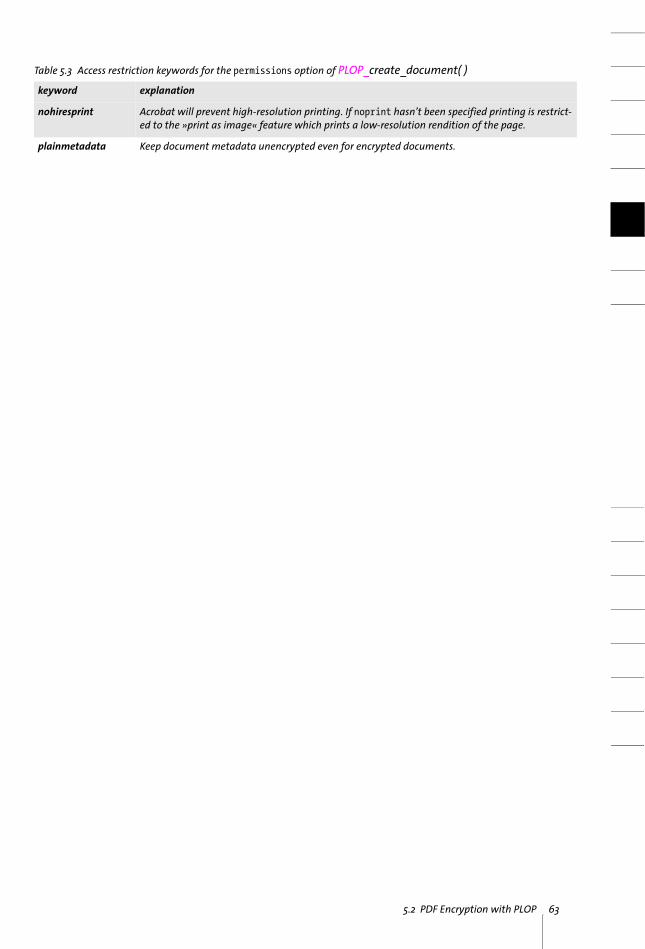
5.2 PDF Encryption with PLOP 63
nohiresprint Acrobat will prevent high-resolution printing. If noprint hasn’t been specified printing is restrict-ed to the »print as image« feature which prints a low-resolution rendition of the page.
plainmetadata Keep document metadata unencrypted even for encrypted documents.
Table 5.3 Access restriction keywords for the permissions option of PLOP_create_document( )keyword explanation
64 Chapter 5: PDF Encryption and Decryption
5.3 Securing PDF Documents on the Command LineYou can encrypt documents by specifying the userpassword or masterpassword option (or both) for PLOP_create_document( ). Note that a user password always requires a master password, but not vice versa. Full sample code for securing PDF documents and remov-ing security with the PLOP library can be seen in the encrypt and decrypt programming samples, which are included in all PLOP packages. The equivalent options for the PLOP command-line tool are --user and --master.
Permission restrictions can be specified with the permissions option for PLOP_create_document( ); the equivalent option for the command-line tool is --permissions.
Note On Windows passwords on the command line may contain Unicode characters outside the Latin-1 character set.
Encryption examples. The sample command-line calls below are shown with long command-line options; see Section 3.1, »PLOP and PLOP DS Command-line Options«, page 33, for abbreviated command-line options.
Encrypt a file with user password demo and master password DEMO:
plop --user demo --master DEMO --outfile encrypted.pdf input.pdf
Encrypt all files in the current directory with the same user password demo and master password DEMO, and place the resulting files in the target directory output:
plop --targetdir output --user demo --master DEMO *.pdf
Passwords which contain space characters must be enclosed in braces (to follow option list syntax) and with straight quote characters (to follow shell syntax) as in the follow-ing example: encrypt a document with the master password two words:
plop --master "{two words}" --outfile encrypted.pdf input.pdf
Decryption examples. Decrypt a single file with the master password DEMO. All access restrictions which may have been applied to the input document will be removed (since the output is unencrypted):
plop --password DEMO --outfile decrypted.pdf encrypted.pdf
Re-encrypt with stronger crypto. PLOP can be used to apply stronger encryption to documents which are encrypted with short keys or weak passwords. You must supply the old and the new password. PLOP uses strong AES encryption by default. The follow-ing example assumes that the input is encrypted with the master password old, and the output will be AES-encrypted with the master password DEMO. The new password can even be the same as the old password. Of course you should only use really strong pass-words (see »Security recommendations«, page 60), not short ones as in this example:
plop --password old --master DEMO --outputfile strong.pdf weak.pdf
Permission settings. Apply the master password DEMO and the permission settings noprint, nocopy, and noannots to all files in a directory, and copy the resulting files to the target directory output. AES encryption is applied regardless of the encryption used in

5.3 Securing PDF Documents on the Command Line 65
the input documents. Verbosity level 2 prints the names of all input and output files as they are processed:
plop --verbose 2 --master DEMO --permissions "noprint nocopy noannots" --targetdir output *.pdf
Remove all permission restrictions from a file, and copy the result to a different output file with the same master password. This requires the master password for the input document:
plop --password DEMO --master DEMO --outfile unrestricted.pdf protected.pdf
Re-encrypt a document (e.g. to replace weak encryption with strong AES encryption or weak passwords with better ones), and clone the permission settings of the input docu-ment. Copy the result to a different output file. This requires the master password for the input document:
plop --password DEMO --master LONGPASSWORD --permissions keep --outfile unrestricted.pdf protected.pdf


6.1 Introduction 67
6 Digital Signatures with PLOP DSNote The ability to digitally sign PDF documents is only available in PDFlib PLOP DS, but not in the
PLOP base product.
6.1 Introduction6.1.1 Signature Concepts
Explaining the details of digital signatures is beyond the scope of this manual. Howev-er, we will mention some important components which play a role for digitally signing PDF documents with PLOP DS. These components collectively form a Public Key Infra-structure (PKI).
Digital signatures are based on Public Key Cryptography, also called asymmetric en-cryption. It works with a private key which is only available to the person who signs a document, and a public key which is available to everyone so that they can validate the signatures.
Certificates. Public keys are generally distributed in a so-called certificate file which contains the signer’s public key and his name and contact details. In order to avoid forged certificates this information package is again signed by a trusted third party which issues a certificate to a person or other entity, such as an enterprise or a server. Such trusted third parties are called Certificate Authority (CA) or Trust Center (TC). The CA’s own certificate is called the root certificate. It is usually published on the CA’s web site for everyone to download it. Certificates are generally stored in X.509 format.
Certificate chain. A signing certificate issued by a CA is considered trustworthy if the issuing CA or the higher-up CA which issued the intermediate CA’s certificate is consid-ered trustworthy. The list of certificates which are linked by signing the respective next certificate from the root CA down to the end-user certificate which is actually used to sign a document is referred to as the certificate chain. The top-level CA certificate in the chain is called the root certificate. In order for a signature to be regarded as valid all cer-tificates in the chain must be valid.
Digital IDs. It is important to distinguish certificates from a package containing both the certificate and the corresponding private key, which is called a digital ID. While cer-tificates can freely be distributed to everyone, digital IDs must be carefully protected since they contain confidential information (the private key). Accessing the private key in a digital ID in order to apply a digital signature usually requires a password or pass-phrase. A common storage format for digital IDs is PKCS#12 (also called PFX on Win-dows). Note that certificates and digital IDs are not always clearly distinguished: it is common to talk about signing a document with a certificate when it would be more accu-rate to call it signing with a digital ID.
Certificate revocation checking. Certificates are valid for a certain period of time. They are no longer valid as soon as their expiration date has passed, or if they have explicitly been revoked by the CA. Revoking a certificate may be necessary because the certificate holder has left the associated organization or the private key has been compromised.
68 Chapter 6: Digital Signatures with PLOP DS
Certificate checking usually involves an online query using a protocol called OCSP (Online Certificate Status Protocol) or certificate revocation lists (CRLs). More details about both methods can be found in »OCSP overview«, page 86, and »CRL overview«, page 88.
Time-stamping. Time-stamps apply a digital signatures to the representation of a par-ticular point in time, where the time may be obtained from a trusted and accurate time source. Time-stamps can be integrated into a regular signature to ensure that the signa-ture (and the signed document) existed before a certain point in time. Time-stamps can also be applied separately to PDF documents. See Section 6.5.1, »Configuration«, page 91, for more information about time-stamping servers and protocol details.
Sources of digital IDs. There are various sources where you can obtain a digital ID. Many IDs are intended for signing e-mail; these e-mail IDs can also be used in PLOP DS for signing PDF documents. Your choice of source for a digital ID depends on the num-ber of required IDs (e.g. one per employee or only one corporate ID) and the desired de-gree of control:
> Obtain a digital ID from one of the public CAs which issue commercial or free IDs. In order to facilitate signature validation with Acrobat it is recommended to create sig-natures with a digital ID from a CA which is installed as trusted root in Acrobat (see »Trusted root certificates in Acrobat«, page 70).
> For large organizations: Build your own private CA so that you can create digital IDs yourself. There are various software packages available for building a CA. Examples include the free OpenSSL software (see www.openssl.org), the keytool application which is part of Java, and the Certificate Services which are part of the Microsoft Win-dows Server operating system.
> For testing purposes or exchange within a controlled or small user group: Create a digital ID from a self-signed certificate. You can create self-signed certificates in Acrobat as follows:Acrobat XI: Edit, Preferences, General, Signatures, Identities & Trusted Certificates, More..., Add ID, A new digital ID I want to create nowAcrobat X: Tools, Sign&Certify, More Sign & Certify, Security Settings, Digital IDs, Add ID, A new digital ID I want to create now;In the next step you can specify a PKCS#12 disk file or the Windows certificate store as target. Both methods are supported in PLOP DS.
6.1.2 Signatures in Acrobat and PDFPDF supports different kinds of digital signatures which are discussed below. Signatures are implemented as form fields in PDF. PDF signatures always relate to the whole docu-ment (as opposed to single pages) and are available in two flavors:
> Invisible signatures do not occupy any space on the page. They can be viewed in Acrobat by bringing up the Signatures pane (Acrobat X/XI: View, Show/Hide..., Naviga-tion Panes, Signatures...).
> Visible signatures use a rectangular form field which is located somewhere on a page in the document. You can specify the page number, field name and field coordinates.
Additional properties can be specified for both types of signatures, e.g. location, reason for signing, and contact information.
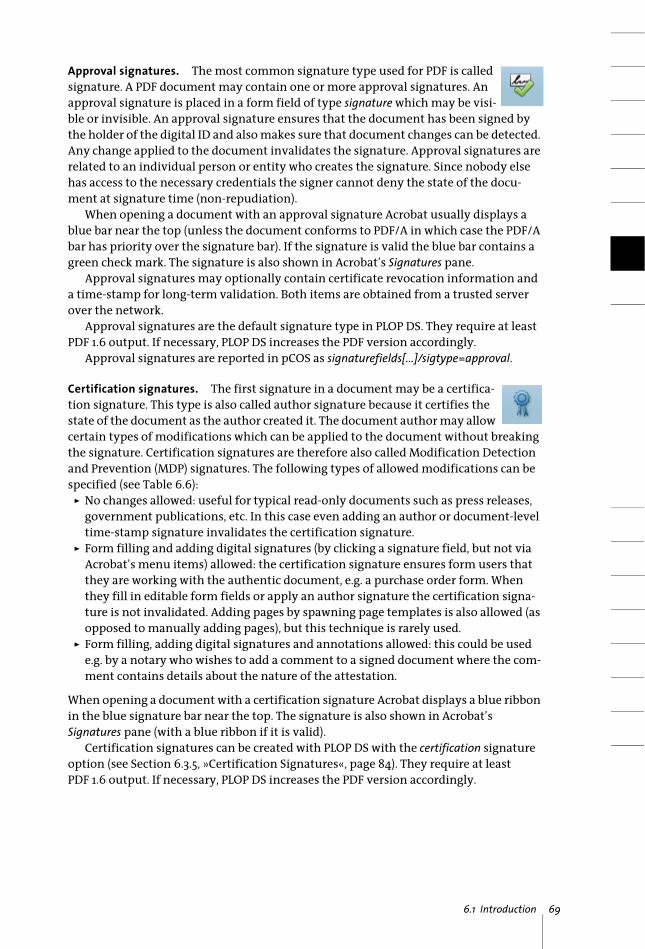
6.1 Introduction 69
Approval signatures. The most common signature type used for PDF is called signature. A PDF document may contain one or more approval signatures. An approval signature is placed in a form field of type signature which may be visi-ble or invisible. An approval signature ensures that the document has been signed by the holder of the digital ID and also makes sure that document changes can be detected. Any change applied to the document invalidates the signature. Approval signatures are related to an individual person or entity who creates the signature. Since nobody else has access to the necessary credentials the signer cannot deny the state of the docu-ment at signature time (non-repudiation).
When opening a document with an approval signature Acrobat usually displays a blue bar near the top (unless the document conforms to PDF/A in which case the PDF/A bar has priority over the signature bar). If the signature is valid the blue bar contains a green check mark. The signature is also shown in Acrobat’s Signatures pane.
Approval signatures may optionally contain certificate revocation information and a time-stamp for long-term validation. Both items are obtained from a trusted server over the network.
Approval signatures are the default signature type in PLOP DS. They require at least PDF 1.6 output. If necessary, PLOP DS increases the PDF version accordingly.
Approval signatures are reported in pCOS as signaturefields[...]/sigtype=approval.
Certification signatures. The first signature in a document may be a certifica-tion signature. This type is also called author signature because it certifies the state of the document as the author created it. The document author may allow certain types of modifications which can be applied to the document without breaking the signature. Certification signatures are therefore also called Modification Detection and Prevention (MDP) signatures. The following types of allowed modifications can be specified (see Table 6.6):
> No changes allowed: useful for typical read-only documents such as press releases, government publications, etc. In this case even adding an author or document-level time-stamp signature invalidates the certification signature.
> Form filling and adding digital signatures (by clicking a signature field, but not via Acrobat’s menu items) allowed: the certification signature ensures form users that they are working with the authentic document, e.g. a purchase order form. When they fill in editable form fields or apply an author signature the certification signa-ture is not invalidated. Adding pages by spawning page templates is also allowed (as opposed to manually adding pages), but this technique is rarely used.
> Form filling, adding digital signatures and annotations allowed: this could be used e.g. by a notary who wishes to add a comment to a signed document where the com-ment contains details about the nature of the attestation.
When opening a document with a certification signature Acrobat displays a blue ribbon in the blue signature bar near the top. The signature is also shown in Acrobat’s Signatures pane (with a blue ribbon if it is valid).
Certification signatures can be created with PLOP DS with the certification signature option (see Section 6.3.5, »Certification Signatures«, page 84). They require at least PDF 1.6 output. If necessary, PLOP DS increases the PDF version accordingly.

70 Chapter 6: Digital Signatures with PLOP DS
Document-level time-stamp signatures. Time-stamp signatures must not be confused with an embedded time-stamp in an approval or certification signa-ture. A document may contain any number of time-stamp signatures. A time-stamp signature ensures that the document existed at a particular point in time. The time-stamp is obtained from a trusted server over the network and is not related to an individual person or entity who signed the document. Time-stamp signatures play an important role for long-term validation since they can be used to refresh existing signa-tures. Time-stamp signatures are placed in a form field, but they are always invisible.
When opening a document with a time-stamp signature Acrobat displays a green check mark in the blue signature bar near the top. The signature is also shown in the Signatures pane (with a clock-and-stamp icon if it is valid).
Time-stamp signatures can be created with PLOP DS with the doctimestamp signature option (see Section 6.5.3, »Document-Level Time-Stamp Signatures«, page 93). They re-quire at least PDF 1.7ext8 output. If necessary, PLOP DS increases the PDF version accord-ingly.
Usage rights signatures. A document may contain up to two usage rights sig-natures. They can be used to enable certain editing features in Adobe Reader, re-sulting in so-called Reader-enabled PDF documents. Usage rights signatures are not bound to signature form fields and are not shown in Acrobat’s Signatures pane.
Usage rights signatures cannot be created with PLOP DS, but they can queried with the pCOS pseudo object usagerights.
Trusted root certificates in Acrobat. Adobe Reader and Acrobat accept trusted root cer-tificates from the following sources:
> Root certificates from the Adobe Approved Trust List (AATL)1. The AATL contains commercial, institutional and governmental certificate authorities (CAs) from many countries around the world. The corresponding CA certificates are included in Adobe Reader and Acrobat. All certificates which chain to one of the root certificates in the AATL are considered trustworthy. The AATL list is built into Acrobat and Adobe Read-er, and may be expanded over time. An updated list can be downloaded in Acrobat automatically or manually via Edit, Preferences, Trust Manager, Automatic Adobe Approved Trusted Certificates Updates. At the time of writing almost 50 CAs participate in the AATL program.
> Root certificates from Adobe’s older Certified Document Services (CDS)2 program which was introduced in 2005 and is the predecessor of AATL. While AATL certificates are directly treated as a trusted root CA in Acrobat, CDS certificates always chain to the Adobe Root certificate. The following CAs are part of the CDS program: Entrust, GlobalSign, Keynectis, Post.Trust, and Symantec.
> Starting with version 11.0.6, Adobe Reader and Acrobat support downloading trusted root certificates from the European Union Trust List (EUTL) according to ETSI TS 119 6123. This can be controlled via Edit, Preferences, Trust Manager, Automatic European Union Approved Trusted Certificates Updates. Although this feature is not yet function-al, we expect that it can soon be used for adding national trust lists.
1. See helpx.adobe.com/acrobat/kb/approved-trust-list2.html for more information and a list of participating CAs.2. See helpx.adobe.com/acrobat/kb/certified-document-services.html 3. See www.etsi.org/deliver/etsi_ts/119600_119699/119612/01.01.01_60/ts_119612v010101p.pdf
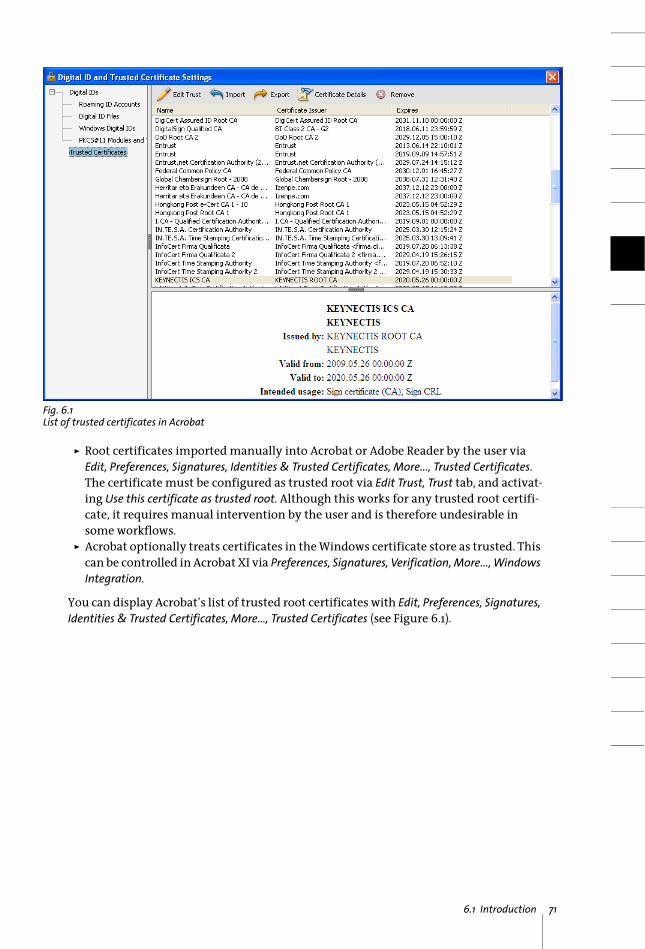
6.1 Introduction 71
> Root certificates imported manually into Acrobat or Adobe Reader by the user via Edit, Preferences, Signatures, Identities & Trusted Certificates, More..., Trusted Certificates. The certificate must be configured as trusted root via Edit Trust, Trust tab, and activat-ing Use this certificate as trusted root. Although this works for any trusted root certifi-cate, it requires manual intervention by the user and is therefore undesirable in some workflows.
> Acrobat optionally treats certificates in the Windows certificate store as trusted. This can be controlled in Acrobat XI via Preferences, Signatures, Verification, More..., Windows Integration.
You can display Acrobat’s list of trusted root certificates with Edit, Preferences, Signatures, Identities & Trusted Certificates, More..., Trusted Certificates (see Figure 6.1).
Fig. 6.1List of trusted certificates in Acrobat
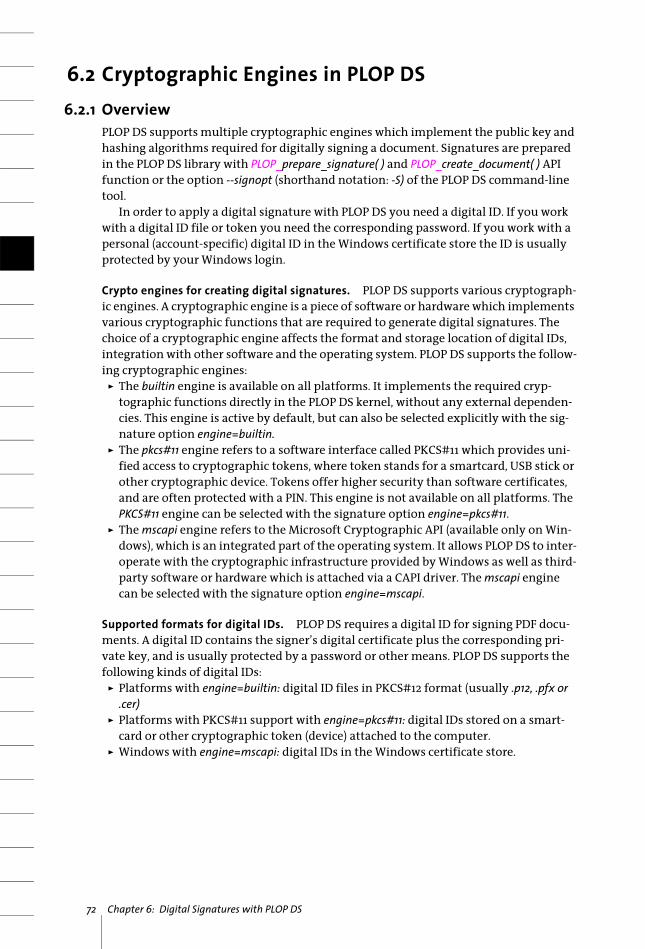
72 Chapter 6: Digital Signatures with PLOP DS
6.2 Cryptographic Engines in PLOP DS6.2.1 Overview
PLOP DS supports multiple cryptographic engines which implement the public key and hashing algorithms required for digitally signing a document. Signatures are prepared in the PLOP DS library with PLOP_prepare_signature( ) and PLOP_create_document( ) API function or the option --signopt (shorthand notation: -S) of the PLOP DS command-line tool.
In order to apply a digital signature with PLOP DS you need a digital ID. If you work with a digital ID file or token you need the corresponding password. If you work with a personal (account-specific) digital ID in the Windows certificate store the ID is usually protected by your Windows login.
Crypto engines for creating digital signatures. PLOP DS supports various cryptograph-ic engines. A cryptographic engine is a piece of software or hardware which implements various cryptographic functions that are required to generate digital signatures. The choice of a cryptographic engine affects the format and storage location of digital IDs, integration with other software and the operating system. PLOP DS supports the follow-ing cryptographic engines:
> The builtin engine is available on all platforms. It implements the required cryp-tographic functions directly in the PLOP DS kernel, without any external dependen-cies. This engine is active by default, but can also be selected explicitly with the sig-nature option engine=builtin.
> The pkcs#11 engine refers to a software interface called PKCS#11 which provides uni-fied access to cryptographic tokens, where token stands for a smartcard, USB stick or other cryptographic device. Tokens offer higher security than software certificates, and are often protected with a PIN. This engine is not available on all platforms. The PKCS#11 engine can be selected with the signature option engine=pkcs#11.
> The mscapi engine refers to the Microsoft Cryptographic API (available only on Win-dows), which is an integrated part of the operating system. It allows PLOP DS to inter-operate with the cryptographic infrastructure provided by Windows as well as third-party software or hardware which is attached via a CAPI driver. The mscapi engine can be selected with the signature option engine=mscapi.
Supported formats for digital IDs. PLOP DS requires a digital ID for signing PDF docu-ments. A digital ID contains the signer’s digital certificate plus the corresponding pri-vate key, and is usually protected by a password or other means. PLOP DS supports the following kinds of digital IDs:
> Platforms with engine=builtin: digital ID files in PKCS#12 format (usually .p12, .pfx or .cer)
> Platforms with PKCS#11 support with engine=pkcs#11: digital IDs stored on a smart-card or other cryptographic token (device) attached to the computer.
> Windows with engine=mscapi: digital IDs in the Windows certificate store.
6.2 Cryptographic Engines in PLOP DS 73
6.2.2 Built-in EngineThe built-in engine is the default engine. It works with file-based certificates and pro-vides full functionality and control.
Unlocking the private key. Digital IDs (more precisely: the private key contained in the digital ID) are generally protected with a password, passphrase, or PIN since they con-tain the confidential private key for creating the digital signature. In order to unlock a digital ID for use with PLOP DS you must provide proper authentication. If you supply the wrong password PLOP DS will throw an exception. The details of unlocking the digi-tal ID depend on the selected cryptographic engine:
You must supply the corresponding password with the password signature option. If you are using the PLOP DS command-line tool it is strongly recommended to supply the password indirectly in an auxiliary file with the passwordfile suboption. If you supply the password directly instead of in a password file other users could possibly read it since the command-line may be visible to other users on a multi-user system.
Option list example. The examples below show how to digitally sign PDF documents with the PLOP DS command-line tool and library. The option list supplied to --signopt can be supplied to the PLOP DS API function PLOP_prepare_signature( ) in order to create a signature from within your own program. Full programming examples for all sup-ported language bindings are contained in the PLOP DS package. The examples use the digital ID file demorsa2048.p12 with the password demo which is included in the distri-bution packages.
Create an invisible signature for a PDF document, using a digital ID from the file demorsa2048.p12. The password for the digital ID is contained in the file pw.txt:
plop --signopt "digitalid={filename=demorsa2048.p12} passwordfile=pw.txt" --outfile signed.pdf input.pdf
6.2.3 PKCS#11 Engine for Smartcards and other cryptographic TokensUsing the PKCS#11 engine in PLOP DS you can use certificates on a smartcard, USB stick or other cryptographic token. Using such a token for signature creation requires a DLL or shared library which implements a token-specific protocol. This PKCS#11 DLL/SO must be provided by the token vendor as part of the corresponding software package. It must be installed on the system and must be made available to PLOP DS. On Windows this means the DLL must either be copied to the Windows system directory, a directory which is included in the PATH environment variable, or the current directory of the ap-plication. Note that a PKCS#11 DLL/SO may depend on other DLLs. In this case all re-quired DLLs supplied by the token vendor must be made available to PLOP DS.
Selecting a private key. A signature token may contain multiple digital IDs, e.g. one for encrypting E-mails and another one for digitally signing documents. If multiple sig-nature certificates are present on the token you must supply one of the suboptions issuer, label, serial or subject of the digitalid option to select the appropriate certificate by one of these criteria. A label can be assigned to a key with the administration software for the token. Issuer, serial number and subject are intrinsic fields of the certificate.
Unlocking the private key on the token. If the cryptographic token allows a passwords or PIN to be submitted by software you must supply the password signature option as

74 Chapter 6: Digital Signatures with PLOP DS
with engine=builtin. If the token requires direct PIN or password entry (e.g. a smartcard reader with attached keyboard) you can omit the password option (or supply an empty string) and must manually type the PIN into the token’s keyboard. Details of password/PIN handling may vary among cryptographic tokens.
PKCS#11 sessions and multi-threading. In order to improve performance of bulk sig-natures, PLOP DS minimizes the number of load/unload operations for the PKCS#11 DLL/SO, and maximizes the duration of each PKCS#11 session. This requires the applica-tion to obey to the following conditions:
> At any time only a single PKCS#11 DLL/SO can be loaded until PLOP_delete( ) has been called for the last PLOP object which used that library. After deleting the last PLOP ob-ject another PKCS#11 DLL/SO can be specified in PLOP_prepare_signature( ). In other words, any number of PKCS#11 slots can be addressed in a multi-threaded manner provided all token slots are served by the same DLL/SO (which usually means the same type of token).
> PLOP_prepare_signature( ) in a particular thread must not access a PKCS#11 slot which is already accessed from another thread.
A new session is created in the first call to PLOP_prepare_signature( ) for a particular slot and maintained until PLOP_prepare_signature( ) is called again in the same thread. For this reason the application should call PLOP_prepare_signature( ) only once for as many output documents as possible. For example, as long as the same PKCS#11 slot is ad-dressed and the token’s restrictions are met (e.g. maximum number of signatures or maximum time for consecutive signatures) no more calls to PLOP_prepare_signature( ) are required.
A full code sample for efficiently applying bulk signatures is available in the multi-sign sample which is part of all PLOP DS packages.
PKCS#11 option list examples. In the following examples we refer to the vendor-specific PKCS#11 DLL as cryptoki.dll. The name of the actual DLL may be different.
Create an invisible signature for a PDF document, using a digital ID from a token ad-dressed via PKCS#11. The PIN for the token is contained in the file pw.txt:
plop --signopt "engine=pkcs#11 digitalid={filename=cryptoki.dll} passwordfile=pw.txt" --outfile signed.pdf input.pdf
Fig. 6.2Smartcard reader with keyboard
6.2 Cryptographic Engines in PLOP DS 75
Create an invisible signature for a PDF document, using a digital ID from a token ad-dressed via PKCS#11. No PIN is supplied in this command; instead, the PIN for the token must be typed into the token’s integrated keyboard:
plop --signopt "engine=pkcs#11 digitalid={filename=cryptoki.dll}" --outfile signed.pdf input.pdf
6.2.4 MSCAPI Engine on WindowsUsing the MSCAPI engine allows you to take advantage of the signature features built into the Windows operating system. Most importantly, you can access digital IDs in the Windows certificate store. On the other hand, the MSCAPI engine is subject to certain re-strictions which don’t affect other cryptographic engines. For example, MSCAPI does not support ECDSA.
Note OSCP and CRL embedding as well as time-stamping are not supported for engine=mscapi. As a result, LTV-enabled signatures can not be created with the MSCAPI engine.
Unlocking the private key. Depending on your certificate settings the digital IDs in the Windows certificate store may be protected by your Windows login, and no additional password is required. If you enabled high security when importing the certificate into the Windows certificate store you are prompted for the password whenever the certifi-cate is used for signing. This is obviously not suited for batch applications.
Option list examples for MSCAPI. The examples below assume that the digital ID for signing is available in the Windows certificate store. In order to achieve this with the PLOP DS demo certificates you must double-click and install the digital ID in the file demorsa2048.p12 in the Windows certificate store.
Create an invisible signature for a PDF document, using a certificate from the Windows Certificate Store (from the default store My and the default store location current_user). This assumes that the digital ID is protected by your Windows login so that no password must be supplied:
plop --signopt "engine=mscapi digitalid={store=My subject={PDFlib Demo PLOP User 2048}}" --outfile signed.pdf input.pdf
Create an invisible signature for a PDF document, using a certificate in the file demorsa2048.p12:
plop --signopt "engine=mscapi digitalid={filename=demorsa2048.p12} passwordfile=pw.txt" --outfile signed.pdf input.pdf
Create an invisible signature and encrypt the document with the master password SECRET for PDF encryption and password demo for accessing the digital ID:
plop --master SECRET --signopt "digitalid={filename=demorsa2048.p12} password={demo}" --outfile signed.pdf input.pdf
76 Chapter 6: Digital Signatures with PLOP DS
Managing the Windows certificate store. The Windows operating system can hold certificates which are organized in several certificate stores. To install a new certificate in PKCS#12 format simply double-click on the certificate file and follow the Certificate Import Wizard. You can try this with the demo certificates in the PLOP DS package, us-ing the password demo.
You can view and organize certificates with the Microsoft Management Console (MMC) as follows:
> Click on Start and type mmc in the box for program names to launch the program.> In the File menu click Add/Remove Snap-in... > In Available Standalone Snap-ins select Certificates and click Add.> In the next dialog select My user account and Finish. Alternatively, use Service account
or Computer account if this is the store location of your certificates.> Click OK.
Now you can browse the installed certificates. Your own certificates are available in the Personal category, which can be addressed in PLOP DS with the following option list (supplied to the --signopt command-line option or as signature option in PLOP_prepare_ signature( )):
engine=mscapi digitalid={store=My subject={PDFlib Demo PLOP User 2048}}
You can view certificate details by double-clicking on a certificate in MMC. In order to export a certificate in PFX format right-click on a certificate in the list and click All Tasks, Export... . This launches the Certificate Export Wizard.
Using the Management Console you can also import a certificate: right-click on a cer-tificate store (e.g. Personal) and select All Tasks, Import... .
6.2.5 Signature and Hash AlgorithmsDigital signatures are characterized by an encryption algorithm and a hash algorithm plus parameters for both.
Encryption algorithm and key length for generating signatures are determined by the digital ID. They are specified when creating the public/private key pair for the digi-tal ID. PLOP DS supports the following signature algorithms:
> RSA with key lengths in the range 1024-4096 (2048-bit or more recommended). RSA is widely used on the Internet and many other application areas.
> DSA with key lengths in the range 1024-4096 (2048-bit or more recommended). DSA is not widely used. Since DSA requires the use of SHA-1 which is no longer considered secure there are security concerns regarding the use of DSA.
> ECDSA (Elliptic Curve Digital Signature Algorithm) is the modern successor of RSA. The strength of ECDSA is determined by a curve which is characterized by parame-ters or more commonly a name. RFC 5480 defines a list of 15 named curves recom-mended by NIST, but only three of these curves are supported in Acrobat XI. These Acrobat-conforming curves are called P-256/P-384/P-521. RFC 5639 defines an addi-tional set of curves called Brainpool curves. Signatures using Brainpool curves can-not be validated with Acrobat, but require dedicated validation software. ECDSA sig-natures with curve P-256 or P-384 are a requirement for Suite B cryptography.
A hash algorithm is used to create a message digest for the signed data. Common hash algorithms are SHA-1 (no longer considered secure) and the stronger algorithms in the SHA-2 family which includes SHA-256, SHA-384 and SHA-512. The hash functions

6.2 Cryptographic Engines in PLOP DS 77
SHA-256 or SHA-384 are a requirement for Suite B cryptography. The hash algorithm used for a signature can be displayed in Acrobat XI as follows:
> open the Signatures pane;> select a signature and select Show Signature Properties... in the Signatures menu.> click Advanced Properties;> the resulting dialog entitled Advanced Signature Properties displays Signature Details
including the hash algorithm.
Table 6.1 lists signature algorithms and corresponding hash functions. The table also lists the minimum required Acrobat version for validating a signature. If you plan to validate PDF signatures with Acrobat you must make sure that the Acrobat version matches the signature characteristics of the digital ID used for signing. Table 6.1 also lists the minimum PDF output version created for each signature algorithm. If the in-put document uses a lower PDF version number PLOP DS increases the PDF version to the one listed in the table.
Table 6.1 Signature algorithms, hash algorithms, PDF output version and required Acrobat versions
signature algorithm
hash algorithm forengine=builtin andengine=mscapi1
1. The hash function for engine=pkcs#11 is provided by the token. Refer to the token vendor’s documentation to determine the hashfunction used by a particular token model.
notes
PDF output version and minimum Acrobat version required for validation2
2. In PDF/A and PDF/X modes the PDF version of the input document remains unchanged.
Approval and certification signatures
RSA up to 4096 bit SHA-256 engine=mscapi: Enhanced Cryp-tographic Provider required
PDF 1.6 / Acrobat 7For sigtype=cades:PDF 1.7ext8 / Acrobat X
DSA up to 4096 bit SHA-1 (required by DSA) engine=mscapi: only up to 1024 bitengine=pkcs#11: not supported
PDF 1.6 / Acrobat 7For sigtype=cades:PDF 1.7ext8 / Acrobat X
ECDSA with NIST curves (RFC 5480) P-256/P-384/P-5213
3. These curves are also known by the names secp256r1 (or prime256v1)/secp384r1/secp521r1
SHA-256, SHA-384 or SHA-512 depending on the strength of the curve
engine=mscapi: not supported PDF 1.7ext8 / Acrobat XI
ECDSA with NIST curves (RFC 5480) other thanP-256/P-384/P-521
SHA-256, SHA-384 or SHA-512 depending on the strength of the curve
engine=mscapi: not supportedrequires conformance=extended
PDF 1.7ext8 / only some curves can be validated with Acrobat XI on Windows
ECDSA with 14 Brain-pool curves (RFC 5639)
SHA-256, SHA-384 or SHA-512 depending on the strength of the curve
engine=mscapi: not supportedrequires conformance=extended
PDF 1.7ext8 / cannot be vali-dated with Acrobat XI
Document-level time-stamps
selected by the TSA SHA-256 by default, but can be changed with doctime-stamp suboption hash
time-stamps are always created with the builtin engine
PDF 1.7ext8 with PAdES part 4 extension/ Acrobat X
OCSP request and response (certificate identification)
selected by the OCSP responder
SHA-1 by default, but can be changed with ocsp subop-tion hash
selected hash algorithm must be supported by the OCSP responder
Acrobat XI and below sup-port only SHA-1 for OCSP
78 Chapter 6: Digital Signatures with PLOP DS
6.3 PDF Aspects of Signatures6.3.1 Visualizing Signatures with a Graphic or Logo
Approval and certification signatures can be represented in the document in the follow-ing ways:
> Invisible signatures don’t have any representation on a page. They are shown in Acrobat’s Signatures pane only.
> Visible signatures may contain arbitrary text or graphics to display the signature vi-sually at a specific location on a page. A page from an existing PDF document can be used to create the signature’s visual appearance. Visual signatures are also shown in the Signatures pane. The document from which this page is taken is called the visual-ization document.
Document-level time-stamp signatures are always created as invisible signatures.
Signature visualization document. The PDF page used for signature visualization may contain a scanned hand-written signature, an official seal or a company logo, a photo of the holder of the signing certificate, or any other visible representation which may be useful to recipients of the signed document.
If the visualization document uses a higher PDF version than the signed input docu-ment, the PDF version of the generated output is adjusted accordingly. PDF 1.7ext3 (Acro-bat 9) and PDF 1.7ext8 (Acrobat X/XI) documents are compatible with PDF 1.7 regarding their use as visualization page.
Note Signature visualization for PDF/A imposes certain conditions on the visualization document (see »PDF/A conformance«, page 80). Visualizing digital signatures is not supported in PDF/UA, PDF/X and PDF/VT modes.
The visualization document must be opened with PLOP_open_document( ). You must supply its document handle to the visdoc suboption of the field option:
field={visdoc=<handle> rect={100 100 300 150}}
Location and size of the signature field. The field signature option controls the repre-sentation of the signature on the page. Location and size of the signature visualization page on the visible page of the signed document can be specified with the rect subop-tion of the field option. The size can be specified explicitly, or implicitly by specifying one corner and one or two of the other dimensions. The missing values are specified with the keyword adapt to calculated automatically to avoid distortion. With the adapt keyword you can attach the visualization page to any corner of the signature rectangle. The resulting rectangle must not exceed the page. The examples below demonstrate various combinations.
> The simplest approach is to prepare the visualization page in the desired target size. In this case you can simply supply the coordinates of the lower left corner of the field and PLOP DS will use the original page dimensions for the signature visualiza-tion:
rect={100 100 adapt adapt}
> Attach to the lower left corner, maintain the width and adapt the height to avoid dis-tortion:
6.3 PDF Aspects of Signatures 79
rect={100 100 300 adapt}
> Attach to the lower left corner, adapt the width and maintain the height to avoid dis-tortion:
rect={100 100 adapt 200}
> Force-fit the page into the rectangle, i.e. maintain both width and height of the rect-angle. If the page and the rectangle have different width/height ratios the visualiza-tion page appears distorted:
rect={100 100 300 200}
In order to calculate a suitable signature field rectangle dynamically depending on the size of the visualization page you can use the pCOS interface to query the page dimen-sions (keep in mind that pCOS page indexes start at 0):
width = plop.pcos_get_number(visdoc, "pages[" + (vispage-1) + "]/width");height = plop.pcos_get_number(visdoc, "pages[" + (vispage-1) + "]/height");
Signing into an existing form field. If the input document already contains a signa-ture field you can use this field for the signature and its visualization. In order to achieve this you can supply the name of the existing field if you know it:
field={name=MyExistingFieldName visdoc=<handle>}
If you don’t know the field name you can instruct PLOP to use an existing signature field as follows:
field={fillexisting visdoc=<handle>}
Even if you sign into an existing field you can modify its position and size with the rect field option. If you create a signature into an existing field and the field uses a visible rectangle on the page you must supply the visdoc option (or make the field invisible with the field option rect={0 0 0 0}).
Placing the visualization page inside the signature field. The visualization page is placed in the signature field and scaled such that it entirely fits into the rectangle while preserving its aspect ratio. This is particularly useful if you want to place the signature in an existing form field and the width/height ratio of the field and the visualization page don’t match.
The position suboption of the field option can be used to specify the placement of the visualization page inside the signature field.
By default, the visualization page is centered horizontally and vertically in the field. This can be changed, e.g. to place the visualization page at the lower left corner of the signature field:
field={name=MyExistingFieldName visdoc=<handle> position={left bottom} }
pCOS. Signature visibility is reported in pCOS as signaturefields[...]/visible=true. The in-formation whether or not a signature field already contains a signature can be queried with signaturefields[...]/sigtype != none.

80 Chapter 6: Digital Signatures with PLOP DS
6.3.2 PDF/A, PDF/UA, PDF/X and PDF/VT ConformanceUnless mentioned otherwise in this manual, all PLOP operations conform to PDF/A, PDF/UA, PDF/VT and PDF/X regulations which means that standard conformance is maintained by PLOP operations. However, there are some exceptions to this rule where PLOP operations are prohibited by a particular standard, e.g. encryption in PDF/A. In such cases you must consider your priorities:
> If you must maintain standard conformance the operation will be rejected by PLOP. This is the default behavior.
> If the operation (e.g. encryption) is more important than standard conformance, you can remove the standard identifier with the sacrifice option.
Specific notes on the relevant standards are provided below.
PDF/A conformance. The PDF/A standard allows CMS- and CAdES-based signatures and recommends to include a timestamp, revocation information, and as much of the cer-tificate chain as is available.
In PDF/A mode, i.e. if the input conforms to PDF/A and the sacrifice option has not been set to pdfa, an imported visualization document must be compatible regarding its PDF/A characteristics:
> The PDF/A level of the visualization document must be compatible (see Table 6.2).> The output intent of the visualization document must be compatible (see Table 6.3).
Tip: a PDF/A-1a visualization document without an output intent (highlighted in red in Table 6.2 and Table 6.3) is compatible with all PDF/A parts, conformance levels, and out-put intent types. The PLOP DS distribution contains a sample visualization file signing_ man_pdfa1a.pdf with these characteristics. It can be used as visualization document for testing with all PDF/A flavors. A PDF/A-1b visualization document without an output in-tent is compatible with the b conformance levels of all PDF/A parts.
If you don’t care about PDF/A conformance you can remove the standard confor-mance entry:
sacrifice={pdfa}
PDF/UA conformance. Signature visualization is not supported in PDF/UA mode. Fur-thermore, PDF/UA requires even invisible signature fields to »be represented in the structure tree in correct reading order«. Since PLOP is unable to determine the proper
Table 6.2 Compatible PDF/A levels of the visualization document for various PDF/A input levels
PDF/A level of the visualization document
PDF/A level of theinput document PDF/A-1a:2005 PDF/A-1b:2005
PDF/A-2a,PDF/A-3a
PDF/A-2b,PDF/A-3b
PDF/A-2u,PDF/A-3u
PDF/A-1a:2005 allowed – – – –
PDF/A-1b:2005 allowed allowed – – –
PDF/A-2a, PDF/A-3a allowed – allowed – –
PDF/A-2b, PDF/A-3b allowed allowed allowed allowed allowed
PDF/A-2u, PDF/A-3u allowed – allowed – allowed
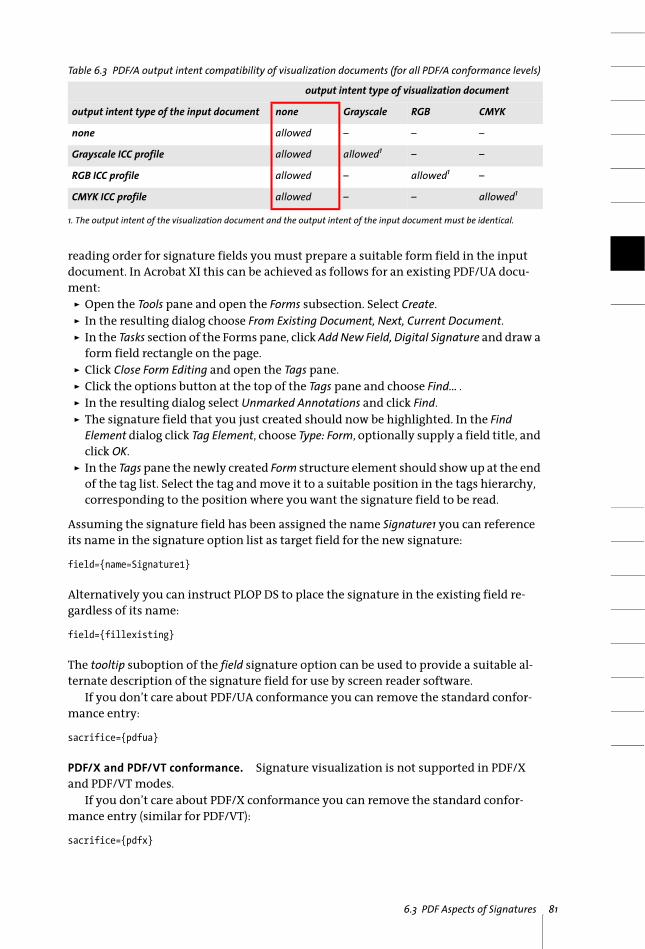
6.3 PDF Aspects of Signatures 81
reading order for signature fields you must prepare a suitable form field in the input document. In Acrobat XI this can be achieved as follows for an existing PDF/UA docu-ment:
> Open the Tools pane and open the Forms subsection. Select Create.> In the resulting dialog choose From Existing Document, Next, Current Document.> In the Tasks section of the Forms pane, click Add New Field, Digital Signature and draw a
form field rectangle on the page.> Click Close Form Editing and open the Tags pane.> Click the options button at the top of the Tags pane and choose Find... .> In the resulting dialog select Unmarked Annotations and click Find.> The signature field that you just created should now be highlighted. In the Find
Element dialog click Tag Element, choose Type: Form, optionally supply a field title, and click OK.
> In the Tags pane the newly created Form structure element should show up at the end of the tag list. Select the tag and move it to a suitable position in the tags hierarchy, corresponding to the position where you want the signature field to be read.
Assuming the signature field has been assigned the name Signature1 you can reference its name in the signature option list as target field for the new signature:
field={name=Signature1}
Alternatively you can instruct PLOP DS to place the signature in the existing field re-gardless of its name:
field={fillexisting}
The tooltip suboption of the field signature option can be used to provide a suitable al-ternate description of the signature field for use by screen reader software.
If you don’t care about PDF/UA conformance you can remove the standard confor-mance entry:
sacrifice={pdfua}
PDF/X and PDF/VT conformance. Signature visualization is not supported in PDF/X and PDF/VT modes.
If you don’t care about PDF/X conformance you can remove the standard confor-mance entry (similar for PDF/VT):
sacrifice={pdfx}
Table 6.3 PDF/A output intent compatibility of visualization documents (for all PDF/A conformance levels)
output intent type of visualization document
output intent type of the input document none Grayscale RGB CMYK
none allowed – – –
Grayscale ICC profile allowed allowed1 – –
RGB ICC profile allowed – allowed1 –
CMYK ICC profile allowed – – allowed1
1. The output intent of the visualization document and the output intent of the input document must be identical.
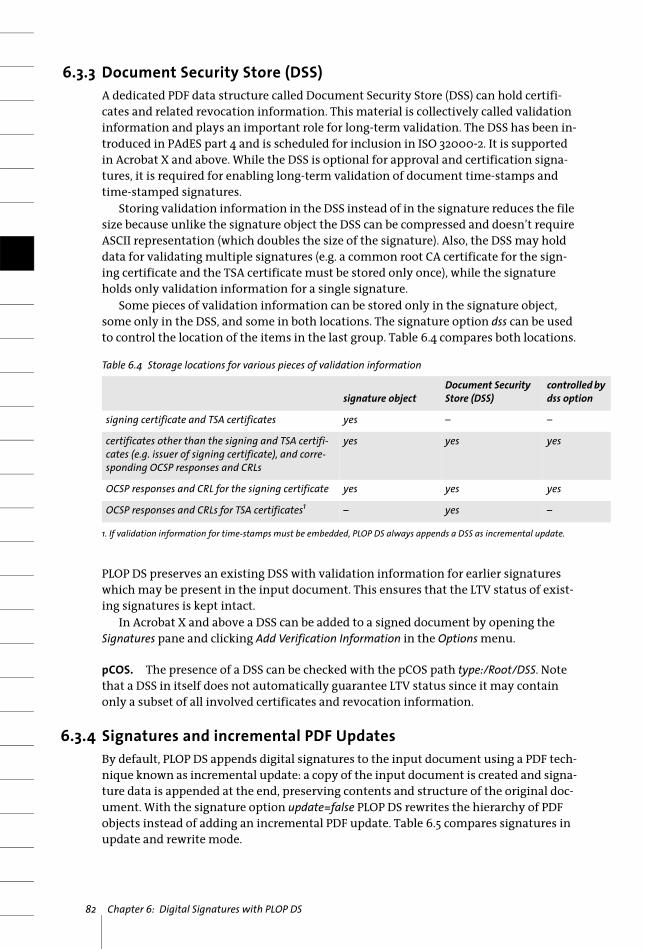
82 Chapter 6: Digital Signatures with PLOP DS
6.3.3 Document Security Store (DSS)A dedicated PDF data structure called Document Security Store (DSS) can hold certifi-cates and related revocation information. This material is collectively called validation information and plays an important role for long-term validation. The DSS has been in-troduced in PAdES part 4 and is scheduled for inclusion in ISO 32000-2. It is supported in Acrobat X and above. While the DSS is optional for approval and certification signa-tures, it is required for enabling long-term validation of document time-stamps and time-stamped signatures.
Storing validation information in the DSS instead of in the signature reduces the file size because unlike the signature object the DSS can be compressed and doesn’t require ASCII representation (which doubles the size of the signature). Also, the DSS may hold data for validating multiple signatures (e.g. a common root CA certificate for the sign-ing certificate and the TSA certificate must be stored only once), while the signature holds only validation information for a single signature.
Some pieces of validation information can be stored only in the signature object, some only in the DSS, and some in both locations. The signature option dss can be used to control the location of the items in the last group. Table 6.4 compares both locations.
PLOP DS preserves an existing DSS with validation information for earlier signatures which may be present in the input document. This ensures that the LTV status of exist-ing signatures is kept intact.
In Acrobat X and above a DSS can be added to a signed document by opening the Signatures pane and clicking Add Verification Information in the Options menu.
pCOS. The presence of a DSS can be checked with the pCOS path type:/Root/DSS. Note that a DSS in itself does not automatically guarantee LTV status since it may contain only a subset of all involved certificates and revocation information.
6.3.4 Signatures and incremental PDF UpdatesBy default, PLOP DS appends digital signatures to the input document using a PDF tech-nique known as incremental update: a copy of the input document is created and signa-ture data is appended at the end, preserving contents and structure of the original doc-ument. With the signature option update=false PLOP DS rewrites the hierarchy of PDF objects instead of adding an incremental PDF update. Table 6.5 compares signatures in update and rewrite mode.
Table 6.4 Storage locations for various pieces of validation information
signature objectDocument Security Store (DSS)
controlled by dss option
signing certificate and TSA certificates yes – –
certificates other than the signing and TSA certifi-cates (e.g. issuer of signing certificate), and corre-sponding OCSP responses and CRLs
yes yes yes
OCSP responses and CRL for the signing certificate yes yes yes
OCSP responses and CRLs for TSA certificates1
1. If validation information for time-stamps must be embedded, PLOP DS always appends a DSS as incremental update.
– yes –
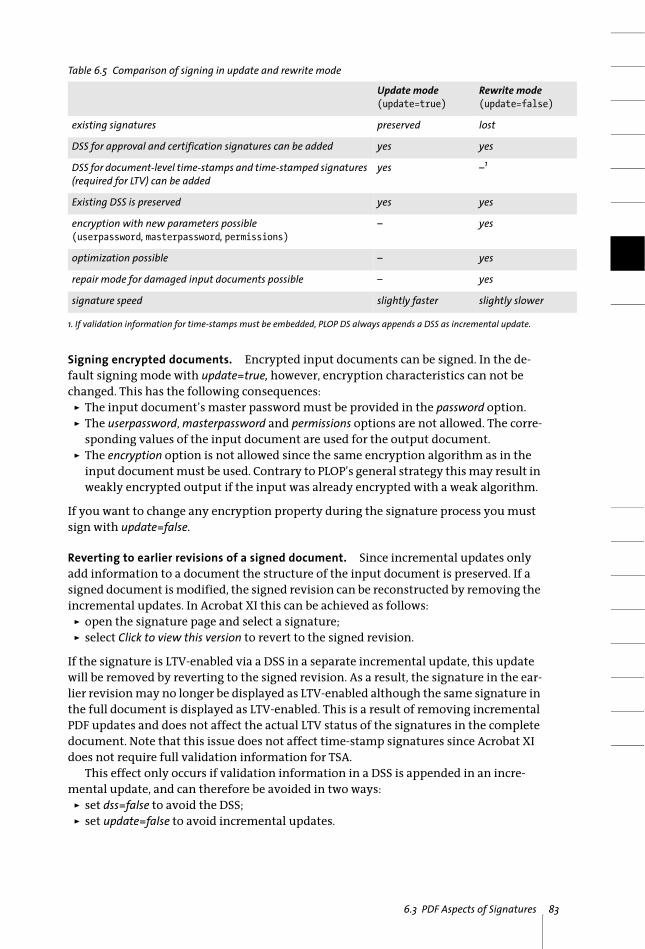
6.3 PDF Aspects of Signatures 83
Signing encrypted documents. Encrypted input documents can be signed. In the de-fault signing mode with update=true, however, encryption characteristics can not be changed. This has the following consequences:
> The input document’s master password must be provided in the password option.> The userpassword, masterpassword and permissions options are not allowed. The corre-
sponding values of the input document are used for the output document.> The encryption option is not allowed since the same encryption algorithm as in the
input document must be used. Contrary to PLOP’s general strategy this may result in weakly encrypted output if the input was already encrypted with a weak algorithm.
If you want to change any encryption property during the signature process you must sign with update=false.
Reverting to earlier revisions of a signed document. Since incremental updates only add information to a document the structure of the input document is preserved. If a signed document is modified, the signed revision can be reconstructed by removing the incremental updates. In Acrobat XI this can be achieved as follows:
> open the signature page and select a signature;> select Click to view this version to revert to the signed revision.
If the signature is LTV-enabled via a DSS in a separate incremental update, this update will be removed by reverting to the signed revision. As a result, the signature in the ear-lier revision may no longer be displayed as LTV-enabled although the same signature in the full document is displayed as LTV-enabled. This is a result of removing incremental PDF updates and does not affect the actual LTV status of the signatures in the complete document. Note that this issue does not affect time-stamp signatures since Acrobat XI does not require full validation information for TSA.
This effect only occurs if validation information in a DSS is appended in an incre-mental update, and can therefore be avoided in two ways:
> set dss=false to avoid the DSS;> set update=false to avoid incremental updates.
Table 6.5 Comparison of signing in update and rewrite mode
Update mode (update=true)
Rewrite mode (update=false)
existing signatures preserved lost
DSS for approval and certification signatures can be added yes yes
DSS for document-level time-stamps and time-stamped signatures (required for LTV) can be added
yes –1
Existing DSS is preserved yes yes
encryption with new parameters possible(userpassword, masterpassword, permissions)
– yes
optimization possible – yes
repair mode for damaged input documents possible – yes
signature speed slightly faster slightly slower
1. If validation information for time-stamps must be embedded, PLOP DS always appends a DSS as incremental update.

84 Chapter 6: Digital Signatures with PLOP DS
Both options don’t affect document-level time-stamps and embedded time-stamps which always require a DSS in an incremental update.
pCOS. The number of document revisions by incremental updates is reported in the pCOS pseudo object revisions. While each signature creates a new revision, revisions may also be created by other changes, e.g. adding a DSS. The number of revisions therefore may be larger than the number of signatures in the document.
6.3.5 Certification SignaturesCertification (author) signatures have been introduced in »Certification signatures«, page 69. When opening a document with a certification signature Acrobat displays a blue ribbon in the blue signature bar near the top and in Acrobat’s Signatures pane (with a blue ribbon if it is valid). Certification signatures specify which kind of changes may be applied to the document without invalidating the signature (see Figure 6.3 and Table 6.6). Certification signatures can be created with PLOP DS with the certification option.
The following signature options create a certification signature such that form fill-ing is allowed without invalidating the signature:
digitalid={filename=demorsa2048.p12} passwordfile=pw.txt certification=formfilling
The preventchanges suboption can be used to disable tools in the Acrobat user interface which would invalidate the signature, e.g. commenting tools. This way the user is not tempted to apply changes which would break the certification signature. When certify-ing documents with Acrobat changes are always prevented. The preventchanges option is set to true by default. If preventchanges=false Acrobat no longer displays the blue certi-fication bar near the top and enables all editing tools. However, unallowed modifica-tions still invalidate the certification signature.
Since a certification signature should always be the first signature in a document it shouldn’t be applied to a document which already contains a signature.
Fig. 6.3 Certification signature with »form filling and signing allowed« in Acrobat
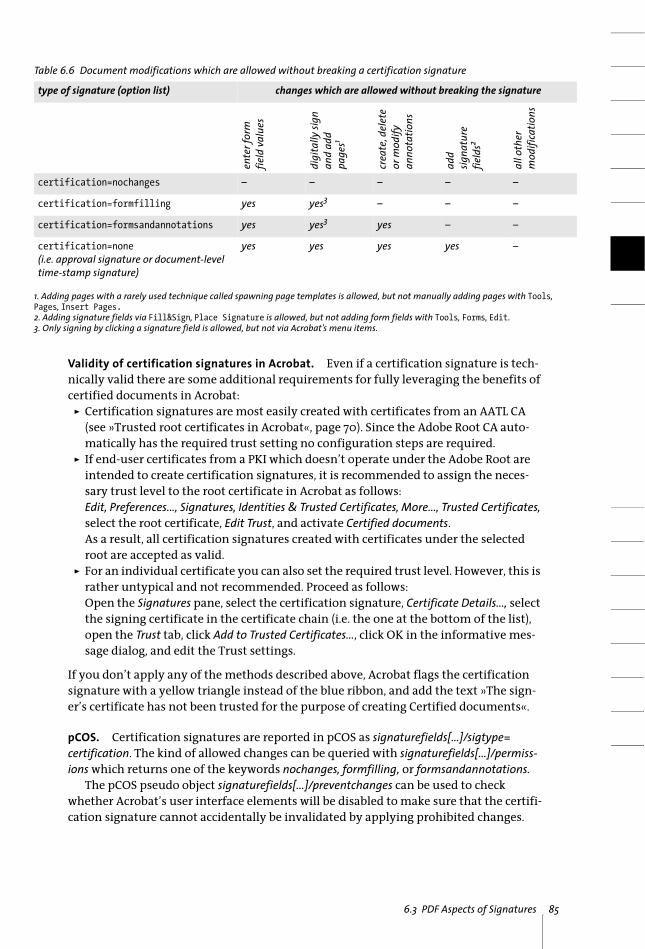
6.3 PDF Aspects of Signatures 85
Validity of certification signatures in Acrobat. Even if a certification signature is tech-nically valid there are some additional requirements for fully leveraging the benefits of certified documents in Acrobat:
> Certification signatures are most easily created with certificates from an AATL CA (see »Trusted root certificates in Acrobat«, page 70). Since the Adobe Root CA auto-matically has the required trust setting no configuration steps are required.
> If end-user certificates from a PKI which doesn’t operate under the Adobe Root are intended to create certification signatures, it is recommended to assign the neces-sary trust level to the root certificate in Acrobat as follows:Edit, Preferences..., Signatures, Identities & Trusted Certificates, More..., Trusted Certificates, select the root certificate, Edit Trust, and activate Certified documents.As a result, all certification signatures created with certificates under the selected root are accepted as valid.
> For an individual certificate you can also set the required trust level. However, this is rather untypical and not recommended. Proceed as follows:Open the Signatures pane, select the certification signature, Certificate Details..., select the signing certificate in the certificate chain (i.e. the one at the bottom of the list), open the Trust tab, click Add to Trusted Certificates..., click OK in the informative mes-sage dialog, and edit the Trust settings.
If you don’t apply any of the methods described above, Acrobat flags the certification signature with a yellow triangle instead of the blue ribbon, and add the text »The sign-er’s certificate has not been trusted for the purpose of creating Certified documents«.
pCOS. Certification signatures are reported in pCOS as signaturefields[...]/sigtype= certification. The kind of allowed changes can be queried with signaturefields[...]/permiss-ions which returns one of the keywords nochanges, formfilling, or formsandannotations.
The pCOS pseudo object signaturefields[...]/preventchanges can be used to check whether Acrobat’s user interface elements will be disabled to make sure that the certifi-cation signature cannot accidentally be invalidated by applying prohibited changes.
Table 6.6 Document modifications which are allowed without breaking a certification signature
type of signature (option list) changes which are allowed without breaking the signature
ente
r for
mfie
ld v
alue
s
digi
tally
sign
and
add
page
s1
crea
te, d
elet
eor
mod
ifyan
nota
tions
add
signa
ture
field
s2
all o
ther
mod
ifica
tions
certification=nochanges – – – – –
certification=formfilling yes yes3 – – –
certification=formsandannotations yes yes3 yes – –
certification=none(i.e. approval signature or document-level time-stamp signature)
yes yes yes yes –
1. Adding pages with a rarely used technique called spawning page templates is allowed, but not manually adding pages with Tools,Pages, Insert Pages.2. Adding signature fields via Fill&Sign, Place Signature is allowed, but not adding form fields with Tools, Forms, Edit.3. Only signing by clicking a signature field is allowed, but not via Acrobat’s menu items.
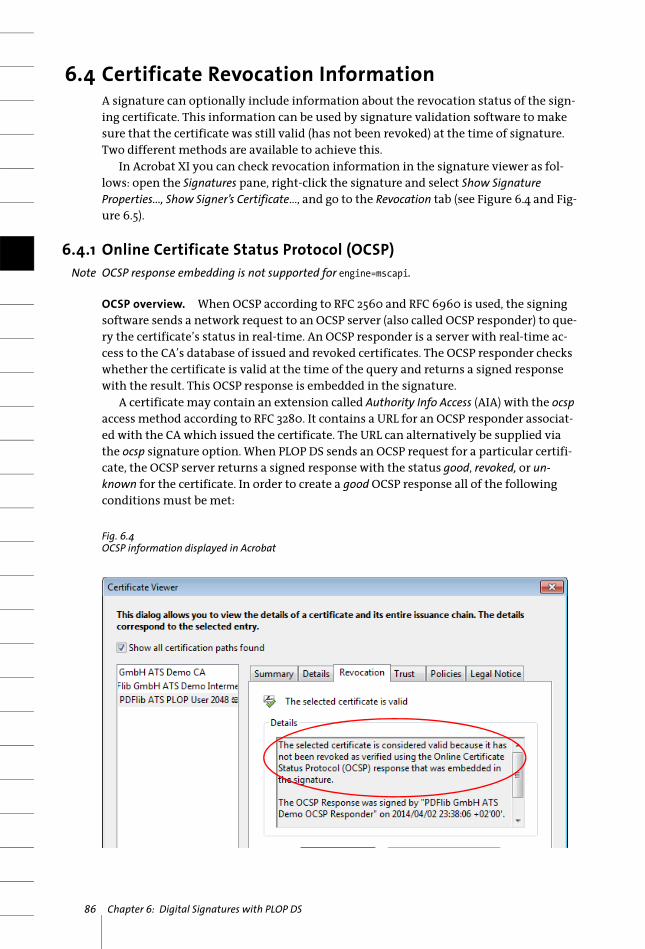
86 Chapter 6: Digital Signatures with PLOP DS
6.4 Certificate Revocation InformationA signature can optionally include information about the revocation status of the sign-ing certificate. This information can be used by signature validation software to make sure that the certificate was still valid (has not been revoked) at the time of signature. Two different methods are available to achieve this.
In Acrobat XI you can check revocation information in the signature viewer as fol-lows: open the Signatures pane, right-click the signature and select Show Signature Properties..., Show Signer’s Certificate..., and go to the Revocation tab (see Figure 6.4 and Fig-ure 6.5).
6.4.1 Online Certificate Status Protocol (OCSP)Note OCSP response embedding is not supported for engine=mscapi.
OCSP overview. When OCSP according to RFC 2560 and RFC 6960 is used, the signing software sends a network request to an OCSP server (also called OCSP responder) to que-ry the certificate’s status in real-time. An OCSP responder is a server with real-time ac-cess to the CA’s database of issued and revoked certificates. The OCSP responder checks whether the certificate is valid at the time of the query and returns a signed response with the result. This OCSP response is embedded in the signature.
A certificate may contain an extension called Authority Info Access (AIA) with the ocsp access method according to RFC 3280. It contains a URL for an OCSP responder associat-ed with the CA which issued the certificate. The URL can alternatively be supplied via the ocsp signature option. When PLOP DS sends an OCSP request for a particular certifi-cate, the OCSP server returns a signed response with the status good, revoked, or un-known for the certificate. In order to create a good OCSP response all of the following conditions must be met:
Fig. 6.4OCSP information displayed in Acrobat

6.4 Certificate Revocation Information 87
> An AIA extension with the ocsp access method must be present in the digital ID or the source suboption of the ocsp signature option must be supplied.
> The OCSP responder can be reached over the network at the specified URL and sends a response within the period specified in the timeout suboption of the source subop-tion of the ocsp signature option.
> The OCSP response contains the status good which requires that the certificate has been issued by the CA which is served by the OCSP responder, is valid (i.e. has not reached the end of its validity period) and has not been revoked.
If the OCSP response is good, PLOP DS embeds the response in the generated signature. Otherwise the unusable response is either ignored or no signature is created, depending on the critical suboption. By default PLOP DS uses the OCSP responder’s URL in the AIA extension if present in the signer’s digital ID and silently ignores situations without any good OCSP response. However, if OCSP response embedding is explicitly requested with the ocsp option a good response is required for generating a signature unless the critical option has been set to false.
OCSP configuration. Depending on the PKI in use you must consider the following configuration issues for OCSP responses:
> If no AIA extension is present in the certificate, you must supply an OCSP responder with the source suboption of the ocsp option.
> A valid certificate for the issuer of the signer’s certificate is required for creating the OCSP request. It is often included in the signer’s digital ID; otherwise it must be sup-plied separately with one the rootcertdir/rootcertfile/certfile signature options.
> Since the OCSP responder may require authentication for successful network com-munication several authentication options are supported for OCSP requests.
> The nonce feature of OCSP prevents replay attacks, but at the same time thwarts caching and therefore reduces performance. Depending on the configuration of the OCSP responder you may have to use the nonce option. If you get a message similar to the following the OCSP responder doesn’t support the nonce feature. In this situa-tion you can supply the option nonce=false to suppress the nonce feature:
OCSP response from URL 'http://ocsp.acme.com' for certificate 'CN = PDFlib GmbH...'does not contain nonce although it was requested
> The hash suboption of the ocsp option can be used to select a suitable hash function which is used in the OCSP request and response to identify the certificate. However, Acrobat XI can only deal with OCSP responses which use the SHA-1 hash function, and cannot use OCSP responses with other hash functions for signature validation. The suboption hash=sha1 of the ocsp option ensures that Acrobat correctly deter-mines the revocation status.
Revocation checking for the OCSP responder. The OCSP responder’s signing certificate must be valid at the time of creating the OCSP response. In order to avoid a recursive problem (the OCSP responder’s certificate would require another OCSP response) it is recommended to include the id-pkix-ocsp-nocheck extension according to RFC 2560 in the OCSP responder’s certificate. This is true for almost all commercial OCSP respond-ers. Alternatively, this certificate may contain the CRL distribution point (CRLdp) exten-sion.
88 Chapter 6: Digital Signatures with PLOP DS
OCSP option list examples. In the examples below only the part of the option list which is relevant for OCSP response embedding is shown. Other signature options must be added as appropriate.Try OCSP response embedding with the URL present in the signer’s digital ID and fail with an error if no AIA extension with the ocsp access method is available in the digital ID:
ocsp={source={}}
or equivalently
ocsp={}
Request OCSP response embedding using the AIA extension if possible, but silently ig-nore any error:
ocsp={source={} critical=false}
or equivalently
ocsp={critical=false}
Don’t embed an OCSP response even if the AIA extension is present in the digital ID:
ocsp=none
Explicitly provide the URL and a timeout of one second for the OCSP responder, overrid-ing an entry in the AIA extension which may be present in the digital ID:
ocsp={source={url={http://ocsp.acme.com/} timeout=1000} }
Ensure that unsuccessful OCSP attempts prevent the signing process and disable the nonce feature for OCSP responders which don’t support it:
ocsp={critical nonce=false}
6.4.2 Certificate Revocation Lists (CRLs)Note CRL embedding is not supported for engine=mscapi.
CRL overview. When CRLs according to RFC 3280 are used, the CA periodically (e.g. once per day) creates a signed list of certificates which haven’t yet expired but have been re-voked. This list is made available to the signature software and embedded in the signa-ture. The list can be retrieved via the network or can be stored locally. CRLs have a specif-ic lifetime (e.g. one day) and must be refreshed before the end of their lifetime. Since CRLs may cover any number of revoked certificates they are typically much larger than an OCSP response (up to several megabytes), and their size is not known in advance. Since the full CRL is embedded in the PDF output this kind of revocation information bloats the signed PDF documents. PLOP DS can obtain CRLs from several sources:
> A certificate may contain an extension called CRL distribution points (CRLdp). It con-tains one or more network URLs of CRL resources. PLOP DS tries all entries in the CRLdp extension until it can retrieve a CRL. If a usable CRL was found it is embedded in the signature or a Document Security Store (DSS) (see Section 6.3.3, »Document Se-curity Store (DSS)«, page 82). The CRLdp extension is evaluated for each certificate for
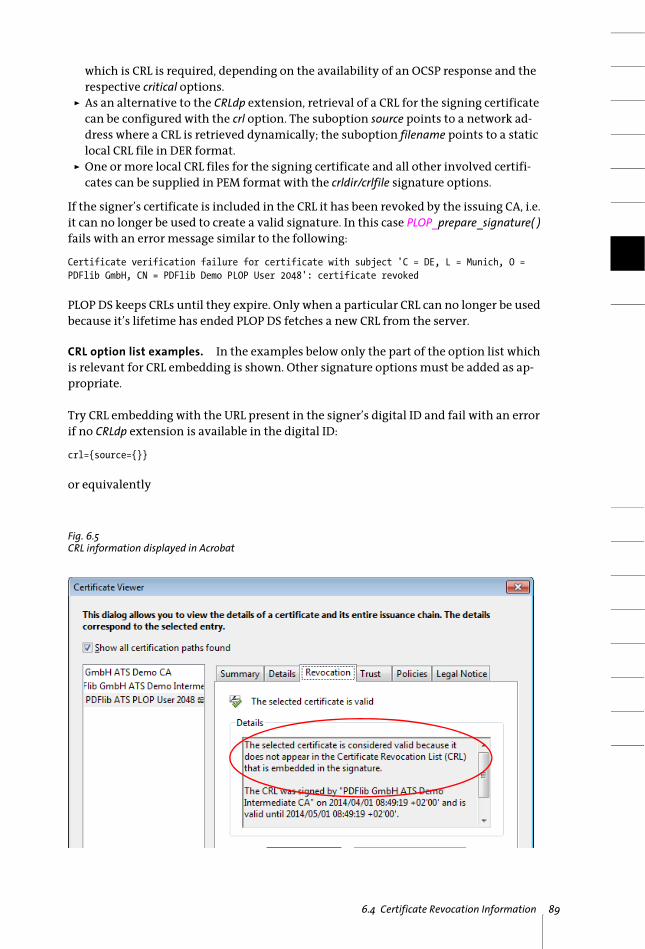
6.4 Certificate Revocation Information 89
which is CRL is required, depending on the availability of an OCSP response and the respective critical options.
> As an alternative to the CRLdp extension, retrieval of a CRL for the signing certificate can be configured with the crl option. The suboption source points to a network ad-dress where a CRL is retrieved dynamically; the suboption filename points to a static local CRL file in DER format.
> One or more local CRL files for the signing certificate and all other involved certifi-cates can be supplied in PEM format with the crldir/crlfile signature options.
If the signer’s certificate is included in the CRL it has been revoked by the issuing CA, i.e. it can no longer be used to create a valid signature. In this case PLOP_prepare_signature( ) fails with an error message similar to the following:
Certificate verification failure for certificate with subject 'C = DE, L = Munich, O = PDFlib GmbH, CN = PDFlib Demo PLOP User 2048': certificate revoked
PLOP DS keeps CRLs until they expire. Only when a particular CRL can no longer be used because it’s lifetime has ended PLOP DS fetches a new CRL from the server.
CRL option list examples. In the examples below only the part of the option list which is relevant for CRL embedding is shown. Other signature options must be added as ap-propriate.
Try CRL embedding with the URL present in the signer’s digital ID and fail with an error if no CRLdp extension is available in the digital ID:
crl={source={}}
or equivalently
Fig. 6.5CRL information displayed in Acrobat
90 Chapter 6: Digital Signatures with PLOP DS
crl={}
Request CRL embedding using the CRLdp extension if possible, but silently ignore errors:
crl={source={} critical=false}
or equivalently
crl={critical=false}
Don’t try to retrieve a CRL for the signing certificate or any other certificate even if the CRLdp extension is present in the digital ID. This makes sense if online retrieval is doomed to fail anyway, e.g. because the signing computer is offline:
crl=none
Explicitly provide the URL and a timeout of one second for the CRL server, overriding an entry in the CRLdp extension which may be present in the digital ID:
crl={source={url={http://crl.acme.com/} timeout=1000} }
Provide a CRL contained in a local disk file:
crlfile={certs.pem}
6.4.3 OCSP or CRL?The following factors are relevant for selecting the most suitable method of including revocation information:
> OCSP provides real-time certificate status information. Since an OCSP response cov-ers only a single certificate it has a predictable size of only a few kilobytes. On the other hand, OCSP always requires a network connection to the OCSP responder.
> The advantage of CRLs over OCSP is that they can be stored locally and therefore net-work overhead can be avoided. The disadvantage is that a locally stored CRL may be-come stale unless it is renewed frequently (i.e. published and fetched).
> Since CA certificates rarely need to be revoked, CRLs for CAs are typically much smaller than CRLs for end-user certificates.
> Some legislations or private signature policies may require or prohibit one of both methods.
By default, PLOP DS only embeds a CRL in the signature if no valid good OCSP response is available, but this behavior can be modified with the ocsp and crl options and the critical suboption.
Use the following option list to ensure that revocation information is always embed-ded, where a CRL will only be retrieved if OCSP doesn’t provide a good response:
ocsp={critical=false source={url={http://ocsp.acme.com/}}} crl={critical=true source={url={ http://crl.acme.com/}}}
Keep in mind that the ocsp and crl options control only revocation information embed-ding for the signing certificate, but not for any CA or TSA certificates which may be in-volved.
6.5 Time-Stamps 91
6.5 Time-Stamps6.5.1 Configuration
A digital signature may include date and time information obtained from a trusted time server, also called Time-Stamp Authority (TSA). Unlike the time taken from the signing computer (which can easily be manipulated), a time-stamp obtained from a trusted server provides a signed and reliable source for the time of signature. PLOP DS supports time-stamping according to RFC 3161. Since the time-stamping request in-cludes a hash of the generated signature, the time-stamp confirms that the signature has been created at a particular time. The time-stamp is embedded in the generated PDF signature.
Depending on the selected TSA you must consider the following configuration is-sues for creating time-stamps:
> The most important information is the network address where the TSA can be reached. It can be supplied with the url suboption of the source suboption. Alterna-tively it can be taken from the signer’s digital ID (see »Time-stamp extension in digi-tal ID«, page 92).
> In order to trust the TSA the CA which issued the TSA certificate must be trusted. The TSA’s CA certificate must be handled the same way as other CA certificates when val-idating a signature; see »Configuring intermediate CA certificate(s)«, page 97, for de-tails. This is especially important for creating LTV-enabled signatures. If you work with a TSA under one of the AATL hierarchies (see »Trusted root certificates in Acro-bat«, page 70) the issuer or chain of issuers of the TSA certificate is known to Acrobat as a trusted root. However, it may be necessary to supply the TSA CA certificate in the certfile option.
> The TSA may require the client to use a particular hash algorithm when requesting the time-stamp. By default, PLOP DS uses the SHA-256 algorithm which works with all modern TSAs. Other hash functions can be supplied with the hash suboption.
> While some TSAs are freely accessible, some TSAs require user name and password to restrict access. Unauthorized access results in a message similar to the following:
Network response from URL 'https://timestamp.acme.com/tsa' has bad status code 401('Unauthorized'))
Authentication parameters can be supplied as part of the URL or with the suboptions username/password of the source network suboption.
> If the TSA requires SSL access (i.e. https) the server’s SSL root certificate must be sup-plied with the sslcertdir/sslcertfile options. Otherwise you will run into a message sim-ilar to the following:
Document time-stamp request to 'https://timestamp.acme.com/tsa' failed('Peer certificate cannot be authenticated with given CA certificates')
As an alternative to providing the required server certificate you can skip the server certificate check with the option sslverifypeer=false, provided you are aware of the se-curity implications of doing so.
> Some TSAs require an explicit policy OID (object identifier) which can be supplied with the policy suboption. The applicable value of the OID must be arranged with the TSA. The policy OID is displayed in Acrobat’s Signature Properties dialog, Advanced Properties... .

92 Chapter 6: Digital Signatures with PLOP DS
6.5.2 Time-Stamped SignaturesNote Time-stamped signatures are not supported for engine=mscapi.
Approval and certification signatures may optionally contain an embedded time-stamp. Time-stamped signatures are supported in Acrobat 7 and above.
Time-stamp extension in digital ID. A digital ID may contain the TimeStamp extension which contains the URL of a time-stamp authority to facilitate signing with embedded time-stamps without the need for supplying TSA details. The TimeStamp extension has been specified by Adobe for use by its partner CAs and is typically included in certifi-cates issued by AATL (Adobe Approved Trust List) providers (see »Trusted root certificates in Acrobat«, page 70).
If the TimeStamp extension is present and contains a URL which does not require au-thentication, PLOP DS attempts to access the specified TSA for creating a time-stamp. In this situation it is not necessary to supply the url suboption for creating a time-stamp. In order to use a TSA which requires authentication, however, you must specify the full TSA details explicitly in an option list (see examples below), even if the TSA is specified in the TimeStamp extension.
Time-stamping option list examples. In the examples below only the part of the op-tion list which is relevant for including a time-stamp is shown. Other signature options must be added as appropriate.
Stamp the signature with a time-stamp obtained from the TSA at the specified URL us-ing the default hash algorithm SHA-256:
timestamp={source={url={http://timestamp.acme.com/tsa}}}
Stamp the signature with a time-stamp where the TSA requires user name and pass-word to obtain a time-stamp:
timestamp={source={url={http://timestamp.acme.com/tsa} username=demo password=demo}}
Fig. 6.6Time-stamped signature in Acrobat

6.5 Time-Stamps 93
Stamp the signature with a time-stamp where the TSA requires digest authentication:
timestamp={source={url={http://timestamp.acme.com/tsa} httpauthentication=digest username=demo password=demo }}
If the TSA must be accessed via SSL you must supply the server’s SSL certificate with the options sslcertdir/sslcertfile. If the server’s SSL certificate is not available you can skip server authentication with the sslverifypeer option, provided you are aware of the securi-ty implications of doing so:
timestamp={source={url={https://timestamp.acme.com/tsa}} sslverifypeer=false}
Attempt to embed a time-stamp with the URL present in the signer’s digital ID and fail with an error if no TimeStamp extension is available in the digital ID:
timestamp={source={}}
or equivalently
timestamp={}
Don’t embed a time-stamp even if the TimeStamp extension is present in the digital ID:
timestamp=none
6.5.3 Document-Level Time-Stamp SignaturesDocument-level time-stamps have been introduced in PAdES part 4 and are scheduled for inclusion in ISO 32000-2. Document-level time-stamps are supported in Acrobat X and above.
Time-stamped signature vs. document-level time-stamp. Similar to a time-stamped signature a document-level time-stamp provides status information related to a partic-ular point in time. However, in the first case the time-stamp is an attribute of the main
Fig. 6.7Document-level time-stamp in Acrobat

94 Chapter 6: Digital Signatures with PLOP DS
signature, while a document-level time-stamp is a valid signature of its own. It does not require any digital ID since no signing person or entity is involved. Instead, document-level time-stamps are created via a network request to a Time-Stamp Authority (TSA). Document-level time-stamps ensures that a particular document has been in existence at the time designated in the time-stamp.
Note Document-level time-stamp signatures are not supported for engine=mscapi.
Document-level time-stampings option list examples. In the examples below the full signature option list for creating a document time-stamp is shown. Since no signing certificate is required no other signature options are required.
Add a document-level time-stamp obtained from the TSA at the specified URL using the default hash algorithm SHA-256:
doctimestamp={source={url={http://timestamp.acme.com/tsa}}}
Add a document-level time-stamp from a TSA which requires user name and password:
doctimestamp={source={url={http://timestamp.acme.com/tsa}} username=demo password=demo}
Add a document-level time-stamp from a TSA which requires digest authentication:
doctimestamp={source={url={http://timestamp.acme.com/tsa} httpauthentication=digest username=demo password=demo}}
pCOS. Document-level time-stamp signatures are reported in pCOS as signature-fields[...]/sigtype=doctimestamp.
6.5.4 Unsupported TSAsIn the situations described below a TSA cannot be used for signing PDF documents with PLOP DS.
Newer time-stamping protocol. PDF supports the time-stamping protocol according to RFC 3161, but not the newer RFC 5816. This newer protocol is based on RFC 5035 which introduces ESSCertIDv2 and SigningCertificateV2. Such TSAs cannot be used for signing PDF documents. PLOP DS issues the following error message:
Signature verification of time-stamp failed: ess signing certificate error
Attribute certificates. Attribute certificates are not supported in PLOP DS. If a TSA uses them PLOP DS issues the following error message:
Time-stamp authority 'http://adobe-tsa.entrust.net/TSS/HttpTspServer'uses unsupported protocol ('wrong tag')
A particular application of attribute certificates is for a TSA’s Time Auditing Certificate (TAC). Some TSA products use the new CMS syntax according to RFC 2630 for encoding the TAC which is not supported in PLOP DS. However, they can be configured to encode the TAC with alternative methods such as putting the TAC in a signed attribute accord-ing to RFC 3126.
6.5 Time-Stamps 95
Missing »critical« flag in key usage extension. The time-stamping protocol RFC 3161 requires that the TSA certificate includes an Extended Key Usage field extension with the value time-stamping, where this extension must be marked as critical. If this extension is present in the TSA certificate, but not marked as critical, Acrobat rejects the signature as invalid.
PLOP DS rejects time-stamps produced with such a TSA certificate with the following error message:
Signature verification of time-stamp failed: certificate verify error:Verify error:unsupported certificate purpose
Trying to use a TSA certificate which doesn’t have the »critical« flag set for the Extended Key Usage field to create a document time-stamp with Acrobat results in the following error message:
Error encountered while signing:Certificate is not valid for the usage
Using such a TSA to create a certification or approval signature with an embedded time-stamp with Acrobat succeeds, but upon validation the time-stamp in the resulting sig-nature is rejected with the following message:
The signature includes an embedded timestamp but it is invalid
Authenticode Time-stamp servers. Authenticode is a Microsoft time-stamping proto-col which had its main use for code-signing. Since Authenticode is based on the older RFC 2985/PKCS#9 instead of RFC 3161 it is not supported in PDF and PLOP DS.
PLOP DS rejects time-stamps produced with an Authenticode TSA with an error mes-sage similar to the following:
Unexpected content type 'text/html;charset=ISO-8859-1' in reply to time-stamp request toURL 'http://timestamp.entrust.net/TSS/AuthenticodeTS'(expected content type 'application/timestamp-reply')
or
Unexpected content type 'application/timestamp-query' in reply to time-stamp request to URL 'http://timestamp.verisign.com/scripts/timstamp.dll'(expected content type 'application/timestamp-reply')
Trying to use an Authenticode TSA with Acrobat results in the following error message:
Error encountered while signing:Error encountered while BER decoding
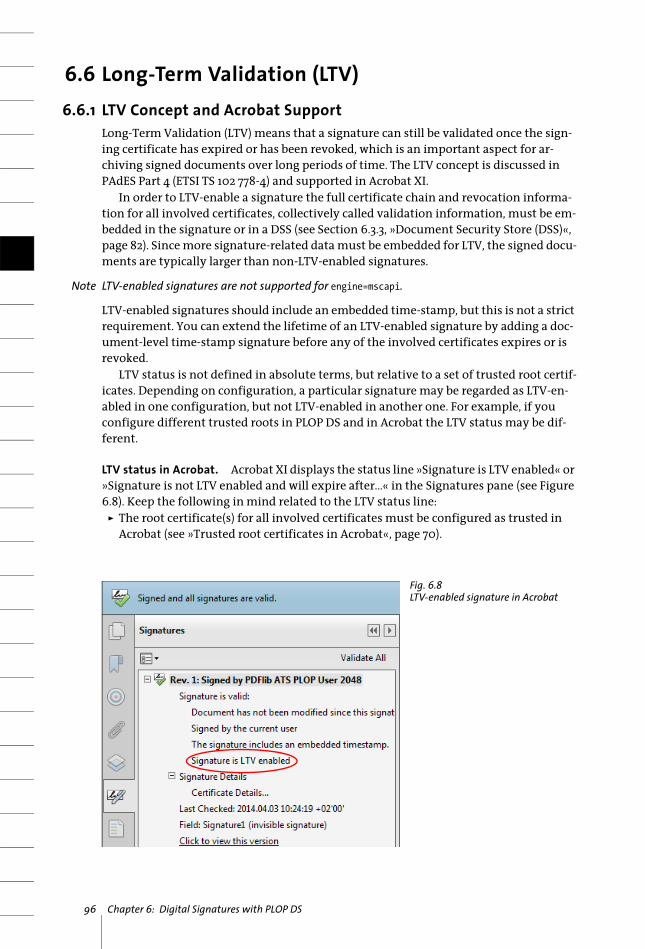
96 Chapter 6: Digital Signatures with PLOP DS
6.6 Long-Term Validation (LTV)6.6.1 LTV Concept and Acrobat Support
Long-Term Validation (LTV) means that a signature can still be validated once the sign-ing certificate has expired or has been revoked, which is an important aspect for ar-chiving signed documents over long periods of time. The LTV concept is discussed in PAdES Part 4 (ETSI TS 102 778-4) and supported in Acrobat XI.
In order to LTV-enable a signature the full certificate chain and revocation informa-tion for all involved certificates, collectively called validation information, must be em-bedded in the signature or in a DSS (see Section 6.3.3, »Document Security Store (DSS)«, page 82). Since more signature-related data must be embedded for LTV, the signed docu-ments are typically larger than non-LTV-enabled signatures.
Note LTV-enabled signatures are not supported for engine=mscapi.
LTV-enabled signatures should include an embedded time-stamp, but this is not a strict requirement. You can extend the lifetime of an LTV-enabled signature by adding a doc-ument-level time-stamp signature before any of the involved certificates expires or is revoked.
LTV status is not defined in absolute terms, but relative to a set of trusted root certif-icates. Depending on configuration, a particular signature may be regarded as LTV-en-abled in one configuration, but not LTV-enabled in another one. For example, if you configure different trusted roots in PLOP DS and in Acrobat the LTV status may be dif-ferent.
LTV status in Acrobat. Acrobat XI displays the status line »Signature is LTV enabled« or »Signature is not LTV enabled and will expire after...« in the Signatures pane (see Figure 6.8). Keep the following in mind related to the LTV status line:
> The root certificate(s) for all involved certificates must be configured as trusted in Acrobat (see »Trusted root certificates in Acrobat«, page 70).
Fig. 6.8LTV-enabled signature in Acrobat
6.6 Long-Term Validation (LTV) 97
> Any valid signature can be forced to display as LTV-enabled in Acrobat by adding the immediate signing CA certificates to the trusted root store. This may cause confu-sion regarding the LTV status if the configuration is not taken into account. It also implies that signatures created with a self-signed certificate are treated as LTV-en-abled if the certificate is added to the trusted root certificates.
> Acrobat XI does not insist on an embedded time-stamp to achieve LTV status. If a time-stamp is embedded, Acrobat does not require validation information for the TSA certificate. PLOP DS is stricter and also requires full validation information for the TSA certificate.
> Acrobat XI supports only the SHA-1 hash function for OCSP responses (see »OCSP configuration«, page 87). As a result, Acrobat XI may not display the LTV status cor-rectly if another hash function is used although full validation information is actu-ally available.
> The following setting must not be activated in Acrobat since otherwise the LTV sta-tus is not shown: Preferences, Signatures, Verification, More..., Verification Time, Verify Signatures Using: Current time.
> The LTV status may get lost by reverting to an earlier revision; see »Reverting to ear-lier revisions of a signed document«, page 83, for details.
6.6.2 LTV-enabled Signatures with PLOP DSIf the following option is supplied, PLOP DS creates an LTV-enabled signature provided all validation information. Otherwise an error is issued and no signature is created:
ltv=full
This option alone does not ensure LTV-enabled signatures, but only checks that all re-quirements are met. If a certificate is missing or validation information could not be ob-tained, PLOP DS issues an error message. It it therefore important to thoroughly analyze all error messages.
The default setting ltv=try means that all available revocation information is embed-ded in the signed document, but the signature call does not fail if the information is not sufficient for achieving LTV status.
Configuring trust root certificate(s) for all chains. In order to fully validate all invol-ved certificates PLOP DS needs trust anchors for all certificates. The exact number de-pends on details of the PKI configuration. Trusted root certificates must be supplied with the rootcertdir or rootcertfile option. This involves at least the certificate of the root CA at the top of the chain for the signing certificate. Other root certificates, e.g. for the TSA, may be required unless a single root CA is at the top of all involved certificate chains.
Configuring intermediate CA certificate(s). The remaining certificate chain (i.e. all in-termediate CAs between the root and the signing certificate or other involved certifi-cates) must be available so that PLOP DS can embed it in the signature. CA certificates for the signing certificate as well as other involved certificates such as an OCSP respond-er certificate or TSA certificate are searched in the following locations:
> CA certificates can be supplied with the certfile option.> (Not for engine=mscapi) CA certificates for the signing certificate can be included in
the PKCS#12 file which contains the signer’s digital ID.

98 Chapter 6: Digital Signatures with PLOP DS
> (Only for engine=mscapi) CA certificates are searched in the Windows certificate store.
> A certificate may contain the Authority Info Access (AIA) extension with the caIssuers (Certification Authority Issuer) access method according to RFC 3280. This extension contains one or more URLs where the certificate of the CA which issued the signing certificate and possibly intermediate CA certificates can be retrieved. The protocols http, https, and ftp are supported.
A certificate may specify the LDAP protocol in the AIA extension which is not currently supported in PLOP DS. In this situation you can use an LDAP browser1 to retrieve the CA certificate manually via LDAP and supply it to the options mentioned above. This is fea-sible since it must be done only once for a signing certificate.
Which CA certificates do I have to configure? The detailed requirements for achieving LTV status depend on the PKI configuration. In many cases the following steps are suffi-cient:
> Certificates issued by many commercial CAs include the AIA extension with the caIssuers access method. This means that PLOP DS can automatically retrieve the chain of CA certificates for the signing certificate. Only the root CA certificate must be supplied with the rootcertdir or rootcertfile option.If the AIA extension with the caIssuers access method is not present in the signing certificate you can usually download the required root certificate(s) from the CA’s Web site.
> Certificates of TSAs and OCSP responders are retrieved automatically. If these certifi-cates or any intermediate certificates have been issued by another root CA than the signing certificate, the root certificate must be supplied with the rootcertdir or root-certfile option.
> CRLs are often signed by the same CA which issued the certificate that is being que-ried. However, if the CRL has been signed by another CA the corresponding CA certif-icate must be supplied with the certfile option since it cannot be retrieved automati-cally. If the certificate used for signing a CRL has been issued by another root CA than the signing certificate (e.g. the CRL for a TSA which is based in another PKI), the root certificate must be supplied with the rootcertdir or rootcertfile options.
With validate=full or ltv=full PLOP DS emits an error »unable to get local issuer certificate« if a required CA certificate is missing. In this case you must supply the missing certifi-cate in one of the options rootcertdir, rootcertfile, or certfile. The following message:
Certificate verification failure for certificate with subject '...':self signed certificate in certificate chain
typically occurs if you supplied a trusted self-signed certificate in the certfile option in-stead of the rootcertfile or rootcertdir option.
Revocation information for the signing certificate. Revocation information for the signing certificate must be supplied by one of the following means:
> OCSP via the AIA extension in the signer’s certificate or the ocsp option.> CRL via the CRLdp extension in the signer’s certificate or the crl option. Existing CRLs
can be supplied with the crldir and crlfile options.
1. For example the free Softerra LDAP Browser which is available from www.ldapbrowser.com/
6.6 Long-Term Validation (LTV) 99
The critical suboption of the ocsp and crl options can be used to make sure that a signa-ture is only created if OCSP or CRL information for the signing certificate could be ob-tained successfully. See Section 6.4, »Certificate Revocation Information«, page 86, for details.
Revocation information for other involved certificates. Revocation information for the certificates of all CAs in the certificate chain as well as for the certificates of all CAs used for signing CRLs and OCSP responses must also be available, with the following ex-ceptions which don’t require revocation information:
> root CA certificates supplied to the rootcertdir or rootcertfile options;> an OCSP responder’s certificate if it includes the id-pkix-ocsp-nocheck extension
(which is commonly the case).
Revocation information for certificates other than the signing certificate can be provid-ed by one of the following means:
> OCSP via the AIA extension in the certificate.> CRL via the CRLdp extension in the certificate. Existing CRLs can be supplied with the
crldir and crlfile options.
LTV option list examples. Let’s assume that the PKI is set up as follows:> the signer’s digital ID contains the chain of CA certificates in the PKCS#12 file, or each
certificate except the root certificate contains an AIA extension with caIssuers access method;
> the signer’s digital ID and all CA certificates in the chain except the root certificate contain an AIA extension with the ocsp access method or CRLdp extension;
> the OCSP responder’s certificate contains the id-pkix-ocsp-nocheck extension.
In this situation only the rootcertfile option is required (in addition to options for deal-ing with the digital ID) to achieve LTV status. The option ltv=full can be used to ensure that violations of LTV requirements are detected and no signature is created if LTV sta-tus cannot be achieved:
digitalid={filename=demorsa2048.p12} passwordfile=pw.txt ltv=full rootcertfile=root1.pem
In order to embed a time-stamp, revocation information for the TSA certificate must also be available to achieve LTV status. Ideally, the TSA certificate also contains the AIA extension with ocsp access method or CRLdp extension and is rooted in the same CA as the signing certificate. In this case no more specific options are required to achieve LTV status:
digitalid={filename=demorsa2048.p12} passwordfile=pw.txt ltv=full rootcertfile=root1.pem timestamp={source={url={http://timestamp.acme.com/tsa}}}
However, if the TSA is based on a different root CA you must also supply the TSA root in the rootcertfile option (the file root1+2.pem is assumed to contain both required root cer-tificates in PEM format):
digitalid={filename=demorsa2048.p12} passwordfile=pw.txt ltv=full rootcertfile=root1+2.pem timestamp={source={url={http://timestamp.acme.com/tsa}}}
100 Chapter 6: Digital Signatures with PLOP DS
6.7 The CAdES and PAdES Signature Standards6.7.1 CMS and CAdES Signatures
The European Telecommunications Standards Institute (ETSI)1 issued a number of digi-tal signature standards in an attempt to foster adoption and implementation of the Eu-ropean directive on digital signatures and to harmonize digital signatures among EU member countries. The ETSI standards are quite influential also in other parts of the world. For example, they are supported in Acrobat X and above, are referenced in the PDF 2.0 standard ISO 32000-2 and have been incorporated in various RFCs.
CMS and CAdES signatures. For a long time PDF signatures were based on CMS (Cryp-tographic Message Syntax). CMS is based on the older PKCS#7 version 1.5 format. It is specified in RFC 5652 and widely used on the Internet. CMS signatures in PDF use adbe.pkcs7.detached or some older deprecated subfilter entry in the signature dictionary. CMS signatures can be created and validated with all Acrobat versions.
CAdES (CMS Advanced Electronic Signatures) is specified in ETSI TS 101 733 (technically equivalent to RFC 5126) and adds some features to CMS. Most importantly, it protects against a threat scenario called certificate substitution by including a reference to the signing certificate in the signature (using the signing-certificate-v2 attribute). CAdES sig-natures in PDF require the ETSI.CAdES.detached subfilter in the PDF signature dictionary. CAdES signature creation and validation is supported in Acrobat X and above.
pCOS. CAdES signatures are reported in pCOS as signaturefields[...]/cades=true.
PAdES signatures. PAdES (PDF Advanced Electronic Signatures) is specified in ETSI TS 102 778. It applies CAdES to PDF by adding options and constraints to PDF signatures as defined in PDF 1.7 (ISO 32000-1). PAdES also specifies additional PDF data structures which are scheduled for inclusion in PDF 2.0 (ISO 32000-2). PAdES consists of several parts (those parts which are not relevant here are omitted below).
> PAdES Part 2 is specified in ETSI TS 102 778-2. It is also called PAdES-CMS as it is based on CMS and conforms to ISO 32000-1 while forbidding some of its optional features.
> PAdES Part 3 is specified in ETSI TS 102 778-3. It is based on CAdES and defines the two flavors BES (Basic Electronic Signature) and EPES (Explicit Policy-based Electronic Signa-ture). EPES extends BES by adding a policy identifier and an optional commitment type indication to the signature. The policy attribute specifies the signature policy under which the signature is created. The commitment-type attribute can be used as an alternative to the Reason entry in the signature dictionary. CAdES defines a series of generic commitment types such as proof of origin, proof of receipt, or proof of approval.
> PAdES Part 4 is specified in ETSI TS 102 778-4 and provides the means for long-term validation, discussed in more detail in Section 6.6, »Long-Term Validation (LTV)«, page 96. Part 4 introduces document-level time-stamps and the DSS (see Section 6.3.3, »Document Security Store (DSS)«, page 82). The concepts defined in PAdES part 4 can be applied to PAdES part 2 and part 3 signatures.
1. ETSI standards are freely available from www.etsi.org/standards

6.7 The CAdES and PAdES Signature Standards 101
PAdES conformance levels. In order to meet the requirements of different workflow and archival scenarios, several flavors of PAdES signatures have been defined. The fol-lowing PAdES conformance levels are specified in ETSI TS 103 172, where each level is built on top of the preceding level:
> PAdES-B (Basic) is the building block of PAdES signatures. Level B is believed to con-form to the Commission Decision 2011/130/EU. It supports signatures with or with-out signature policy identifier, i.e. EPES and BES.
> PAdES-T (Trusted time for signature existence) adds a time-stamp to PAdES-B to prove that the signature existed at a certain date and time.
> PAdES-LT (Long Term) adds validation information to PAdES-T to ensure long-term validation.
> PAdES-LTA (Long Term with Archive time-stamps) adds a document-level time-stamp to PAdES-LT to ensure availability and integrity of the validation material.
CAdES and PAdES support in Acrobat. By default Acrobat signatures conform to PAdES part 2 (CMS). Acrobat X and XI can create PAdES part 3 BES signatures if configured for CAdES as follows:
> Acrobat XI: Edit, Preferences, Signatures, Creation & Appearance, More..., Default Signing Format: CAdES-Equivalent
> Acrobat X: Edit, Preferences, Security, Advanced Preferences..., Creation, Default Signature Signing Format: CAdES-Equivalent.
Since there is no support for policy identifiers, PAdES part 3 EPES cannot be created with Acrobat XI. However, both BES and EPES can be validated with Acrobat.
PAdES part 4 is supported in Acrobat X and Acrobat XI with the following features:> Acrobat XI: Long-Term Validation status information, see »LTV status in Acrobat«,
page 96, for details;> Acrobat X and XI: LTV-enabling a signature by opening the Signatures pane and click-
ing Add Verification Information in the Options menu.> Acrobat X and XI: document-level time-stamps.
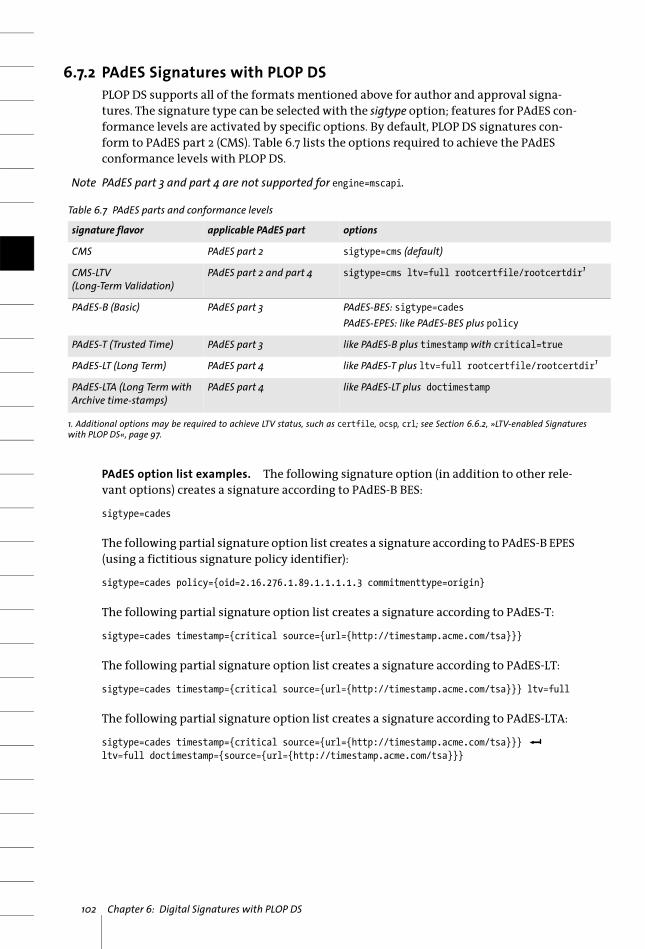
102 Chapter 6: Digital Signatures with PLOP DS
6.7.2 PAdES Signatures with PLOP DSPLOP DS supports all of the formats mentioned above for author and approval signa-tures. The signature type can be selected with the sigtype option; features for PAdES con-formance levels are activated by specific options. By default, PLOP DS signatures con-form to PAdES part 2 (CMS). Table 6.7 lists the options required to achieve the PAdES conformance levels with PLOP DS.
Note PAdES part 3 and part 4 are not supported for engine=mscapi.
PAdES option list examples. The following signature option (in addition to other rele-vant options) creates a signature according to PAdES-B BES:
sigtype=cades
The following partial signature option list creates a signature according to PAdES-B EPES (using a fictitious signature policy identifier):
sigtype=cades policy={oid=2.16.276.1.89.1.1.1.1.3 commitmenttype=origin}
The following partial signature option list creates a signature according to PAdES-T:
sigtype=cades timestamp={critical source={url={http://timestamp.acme.com/tsa}}}
The following partial signature option list creates a signature according to PAdES-LT:
sigtype=cades timestamp={critical source={url={http://timestamp.acme.com/tsa}}} ltv=full
The following partial signature option list creates a signature according to PAdES-LTA:
sigtype=cades timestamp={critical source={url={http://timestamp.acme.com/tsa}}} ltv=full doctimestamp={source={url={http://timestamp.acme.com/tsa}}}
Table 6.7 PAdES parts and conformance levels
signature flavor applicable PAdES part options
CMS PAdES part 2 sigtype=cms (default)
CMS-LTV(Long-Term Validation)
PAdES part 2 and part 4 sigtype=cms ltv=full rootcertfile/rootcertdir1
1. Additional options may be required to achieve LTV status, such as certfile, ocsp, crl; see Section 6.6.2, »LTV-enabled Signatureswith PLOP DS«, page 97.
PAdES-B (Basic) PAdES part 3 PAdES-BES: sigtype=cadesPAdES-EPES: like PAdES-BES plus policy
PAdES-T (Trusted Time) PAdES part 3 like PAdES-B plus timestamp with critical=true
PAdES-LT (Long Term) PAdES part 4 like PAdES-T plus ltv=full rootcertfile/rootcertdir1
PAdES-LTA (Long Term with Archive time-stamps)
PAdES part 4 like PAdES-LT plus doctimestamp
7.1 Option Lists 103
7 PLOP and PLOP DS Library API Reference
7.1 Option ListsOption lists are a powerful yet easy method to control PLOP operations. Instead of re-quiring a multitude of function parameters, many API methods support option lists, or optlists for short. These are strings which may contain an arbitrary number of options. Optlists support various data types and composite data like arrays. In most languages optlists can easily be constructed by concatenating the required keywords and values. C programmers may want to use the sprintf( ) function in order to construct optlists. An optlist is a string containing one or more pairs of the form
name value(s)
Names and values, as well as multiple name/value pairs can be separated by arbitrary whitespace characters (space, tab, carriage return, newline). The value may consist of a list of multiple values. You can also use an equal sign ’=’ between name and value:
name=value
Simple values. Simple values may use any of the following data types:> Boolean: true or false; if the value of a boolean option is omitted, the value true is as-
sumed. As a shorthand notation noname can be used instead of name false.> String: strings containing whitespace or ’=’ characters must be bracketed with { and }.
An empty string can be constructed with { }. The characters {, }, and \ must be preced-ed by an additional \ character if they are supposed to be part of the string.
> Text strings are a special kind of string for certain options. While most options of type string accept only ASCII values, text strings may also carry Unicode values be-yond ASCII. In Unicode-aware language bindings you can simply supply arbitrary Unicode values for such options. In non-Unicode-aware language bindings the user must prepend a UTF-8 BOM to text strings if the string is to be interpreted as UTF-8. If no UTF-8 BOM is present, text strings will be interpreted in auto encoding, i.e. the current code page on Windows, ebcdic on zSeries, and iso8859-1 on Unix and OS X.
> Keyword: one of a predefined list of fixed keywords> Float and integer: decimal floating point or integer numbers; point and comma can
be used as decimal separators.> Handle: several internal object handles, e.g., document or page handles. Technically
these are integer values.
Depending on the type and interpretation of an option additional restrictions may ap-ply. For example, integer or float options may be restricted to a certain range of values; handles must be valid for the corresponding type of object, etc. Conditions for options are documented in their respective function descriptions. Some examples for simple values (the first line shows a string containing a blank character):
password={secret string}linearize=true
104 Chapter 7: PLOP and PLOP DS Library API Reference
List values. List values consist of multiple values, which may be simple values or list values in turn. Lists are bracketed with { and }. Example for a list value:
permissions={ noprint nocopy }
Note The backslash \ character requires special handling in many programming languages
Rectangle. A rectangle is a list of four float values specifying the x and y coordinates of the lower left and upper right corners of a rectangle. The coordinates are interpreted in the default PDF coordinate system, i.e. origin in the lower left corner of the page and point as unit. Example:
rect={ 100 100 200 150}
The adapt keyword can be used for automatic size calculations, see Section 6.3.1, »Visual-izing Signatures with a Graphic or Logo«, page 78.
7.2 General Functions 105
7.2 General Functions
C PLOP * PLOP_new(void)
Create a new PLOP context.
Returns A handle to the new context, or NULL if not enough memory is available. The context must be supplied to all other API functions.
Bindings Not available in object-oriented language bindings where it will be called automatically when a new PLOP object is created.
Java void delete( )C# void Dispose( )
C void PLOP_delete(PLOP *plop)
Delete a PLOP context and release all its internal resources.
Details All open documents in the context are closed automatically. It is good programming practice, however, to close documents explicitly with PLOP_close_document( ) when they are no longer needed.
Bindings In C this function must not be called within a PLOP_TRY( )/PLOP_CATCH( ) clause.
In Java this method will be called by the finalizer method of PLOP. However, it is strongly recommended to explicitly call delete( ) for proper cleanup. The same holds true when an exception occurred.
In Perl, PHP and COM this function will be called automatically when the PLOP object is destroyed.
In .NET Dispose( ) should be called at the end of processing to clean up unmanaged re-sources.
C++ void create_pvf(wstring filename, const void *data, size_t size, wstring optlist)C# Java void create_pvf(String filename, byte[ ] data, String optlist)
Perl PHP create_pvf(string filename, string data, string optlist)VB Sub create_pvf(filename As String, data, optlist As String)
C void PLOP_create_pvf(PLOP *plop,const char *filename, int len, const void *data, size_t size, const char *optlist)
Create a named virtual read-only file from data provided in memory.
filename (Name string) The name of the virtual file. This is an arbitrary string which can later be used to refer to the virtual file in other PLOP calls.
len (C language binding only) Length of filename (in bytes) for UTF-16 strings. If len=0 a null-terminated string must be provided.
data A reference to the data for the virtual file. In COM this is a variant of byte con-taining the data comprising the virtual file. In C and C++ this is a pointer to a memory location. In Java this is a byte array. In Perl and PHP this is a string.
106 Chapter 7: PLOP and PLOP DS Library API Reference
size (C and C++ only) The length in bytes of the memory block containing the data.
optlist An option list according to Table 7.1. The following option can be used: copy.
Details This function may be useful for repeatedly used digital IDs or XMP metadata. The virtu-al file name can be supplied to any API function which uses input files. Some of these functions may set a lock on the virtual file until the data is no longer needed. Virtual files will be kept in memory until they are deleted explicitly with PLOP_delete_pvf( ), or automatically in PLOP_delete( ).
Each PLOP object will maintain its own set of PVF files. Virtual files cannot be shared among different PLOP objects. Multiple threads working with separate PLOP objects do not need to synchronize PVF use. If filename refers to an existing virtual file an excep-tion will be thrown. This function does not check whether filename is already in use for a regular disk file.
Unless the copy option has been supplied, the caller must not modify or free (delete) the supplied data before a corresponding successful call to PLOP_delete_pvf( ). Not obey-ing to this rule will most likely result in a crash.
C++ int delete_pvf(wstring filename)C# Java int delete_pvf(String filename)
Perl PHP int delete_pvf(string filename)VB Function delete_pvf(filename As String) As Long
C int PLOP_delete_pvf(PLOP *plop, const char *filename, int len)
Delete a named virtual file and free its data structures (but not the contents).
filename (Name string) The name of the virtual file as supplied to PLOP_create_pvf( ).
len (C language binding only) Length of filename (in bytes) for UTF-16 strings. If len=0 a null-terminated string must be provided.
Returns -1 (in PHP: 0) if the corresponding virtual file exists but is locked, and 1 otherwise.
Details If the file isn’t locked, PLOP will immediately delete the data structures associated with filename. If filename does not refer to a valid virtual file this function will silently do nothing. After successfully calling this function filename may be reused. All virtual files will automatically be deleted in PLOP_delete( ).
The detailed semantics depend on whether or not the copy option has been supplied to the corresponding call to PLOP_create_pvf( ): If the copy option has been supplied, both the administrative data structures for the file and the actual file contents (data) will be freed; otherwise, the contents will not be freed, since the client is supposed to do so.
Table 7.1 Options for PLOP_create_pvf( )
option description
copy (Boolean) PLOP will immediately create an internal copy of the supplied data. In this case the caller may dispose of the supplied data immediately after this call. The copy option will automatically be set to true in the COM, .NET, and Java bindings (default for other bindings: false). In other language bindings the data will not be copied unless the copy option is supplied.
7.2 General Functions 107
C++ double info_pvf(wstring filename, wstring keyword)C# Java double info_pvf(String filename, String keyword)
Perl PHP float info_pvf(string filename, string keyword)VB Function info_pvf(filename As String, keyword As String) As Double
C double PLOP_info_pvf(PDF *p, const char *filename, int len, const char *keyword)
Query properties of a virtual file or the PDFlib Virtual File system (PVF).
filename (Name string) The name of the virtual file. The filename may be empty if keyword=filecount.
len (C language binding only) Length of filename (in bytes) for UTF-16 strings. If len=0 a null-terminated string must be provided.
keyword A keyword according to Table 7.5.
Details This function returns various properties of a virtual file or the PDFlib Virtual File sys-tem (PVF). The property is specified by keyword.
Table 7.2 Keywords for PLOP_info_pvf( )
option description
filecount Total number of files in the PDFlib Virtual File system maintained for the current PLOP object. The filename parameter will be ignored.
exists 1 if the file exists in the PDFlib Virtual File system (and has not been deleted), otherwise 0
size (Only for existing virtual files) Size of the specified virtual file in bytes.
iscopy (Only for existing virtual files) 1 if the copy option was supplied when the specified virtual file was creat-ed, otherwise 0
lockcount (Only for existing virtual files) Number of locks for the specified virtual file set internally be PLOP func-tions. The file can only be deleted if the lock count is 0.

108 Chapter 7: PLOP and PLOP DS Library API Reference
7.3 Input Functions
C++ int open_document(wstring filename, wstring optlist)C# Java int open_document(String filename, String optlist)
Perl PHP int open_document(string filename, string optlist)VB Function open_document(filename As String, optlist As String) As Long
C int PLOP_open_document(PLOP *plop, const char *filename, int len, const char *optlist)
Open a PDF document (which may be protected) for processing.
filename The full path name of the PDF file to be opened. The file will be searched by means of the SearchPath resource.
In non-Unicode language bindings the file name is converted to UTF-8 according to the filenamehandling option (unless filenamehandling=unicode or the supplied file name starts with a UTF-8 BOM). If len is different from 0 (C language binding only) the file name is converted from UTF-16 to UTF-8 regardless of the option filenamehandling. An error occurs if the file name cannot be converted or if the file name does not constitute valid UTF-8 or UTF-16.
On Windows it is OK to use UNC paths or mapped network drives as long as you have the necessary permissions (which may not be the case when running in ASP).
len (C language binding only) Length of filename (in bytes) for UTF-16 strings. If len=0 a null-terminated string must be provided.
optlist An option list (see Section 7.1, »Option Lists«, page 103) according to Table 7.3.
Returns -1 (in PHP: 0) on error, and a document handle otherwise. After an error it is recom-mended to call PLOP_get_errmsg( ) to find out more details about the error.
Details The document handle can be used for the following purposes:> use as input document for further processing with PLOP_create_document( );> provide a page as signature appearance (signature option field and suboption visdoc);> query document information with pCOS.
If the document is encrypted its user or master password must be supplied in the password option unless the requiredmode option has been specified.

7.3 Input Functions 109
Table 7.3 Options for PLOP_open_document*( )
option description
inmemory (Boolean; only for PLOP_open_document( )) If true, PLOP loads the complete file into memory and pro-cess it from there. This can result in a tremendous performance gain on some systems (especially MVS) at the expense of memory usage. If false, individual parts of the document will be read from disk as need-ed. Default: false
password (String; required for encrypted documents except with requiredmode) The user or master password for the document. As detailed in Table 5.2, page 62, the document’s user password, master password, or no password may be required depending on which operation is applied to the document. On EBCDIC plat-forms the password is expected in ebcdic encoding or EBCDIC-UTF-8. If update=true the same password is used as master password for the generated output document.
repair (Keyword; forced to none for update=true) Specifies how to treat damaged PDF input documents. Re-pairing a document takes more time than normal parsing, but may allow processing of certain damaged PDFs. Note that some documents may be damaged beyond repair (default: auto):force Unconditionally try to repair the document, regardless of whether or not it has problems.auto Repair the document only if problems are detected while opening the PDF.none No attempt will be made at repairing the document. If there are problems in the PDF the
function call will fail.
requiredmode (Keyword) The minimum pcos mode (minimum/restricted/full) which is acceptable when opening the document. The call fails if the resulting pCOS mode would be lower than the required mode. If the call succeeds it is guaranteed that the resulting pCOS mode is at least the one specified in this option. However, it may be higher; e.g. requiredmode=minimum for an unencrypted document will result in full mode. Default: full
shrug (Boolean) Access restrictions are ignored (i.e. PDF processing is allowed) in the following situation: the document is encrypted with a master password, but only the user password (if any) has been supplied. When permissions are ignored, the pCOS pseudo object shrug is set to true. Default: false
xmppolicy (Keyword) Control treatment of invalid document-level XMP in the input document. Invalid XMP implies that no standard identifier can be found, e.g. PDF/A documents will not be treated as such. Supported keywords (default: rejectinvalid):rejectinvalid
Throw an exception for invalid XMP which includes the XML parser error message, and stop processing.
ignoreinvalid(Implies sacrifice={pdfa pdfua pdfvt pdfx}) Treat invalid XMP as if there was no XMP present. Output XMP will be generated based on document info entries; it will also include an XML parsing error message in the <pdfx:invalid_source_XMP_exception> element.
remove Unconditionally ignore input XMP, regardless of its validity. The output XMP is generated from scratch. This may be useful to delete unwanted metadata. However, standard identifiers (e.g. for PDF/A) are still read from the input XMP and copied to the output.
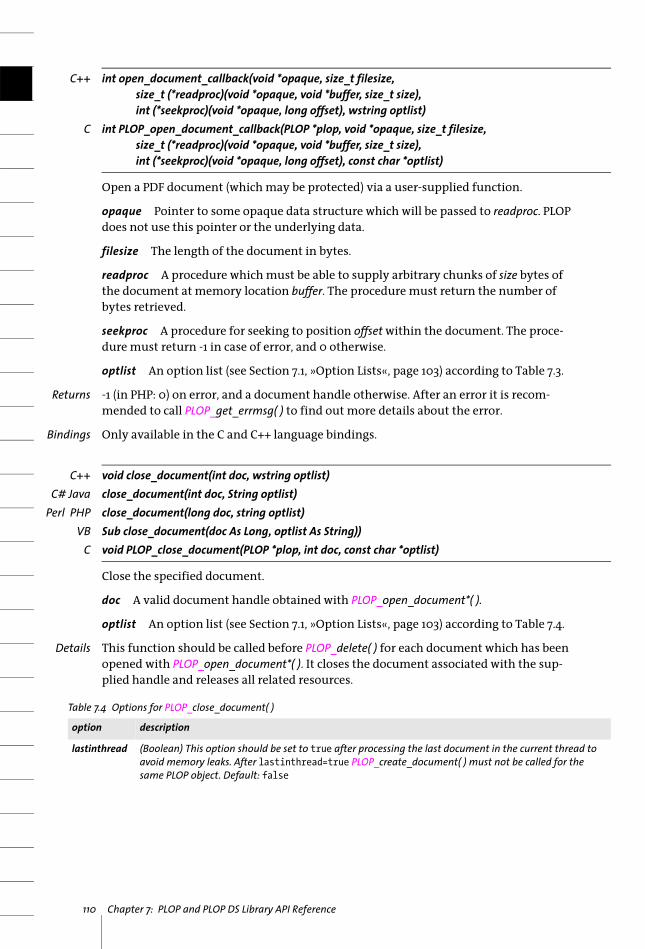
110 Chapter 7: PLOP and PLOP DS Library API Reference
C++ int open_document_callback(void *opaque, size_t filesize,size_t (*readproc)(void *opaque, void *buffer, size_t size),int (*seekproc)(void *opaque, long offset), wstring optlist)
C int PLOP_open_document_callback(PLOP *plop, void *opaque, size_t filesize,size_t (*readproc)(void *opaque, void *buffer, size_t size),int (*seekproc)(void *opaque, long offset), const char *optlist)
Open a PDF document (which may be protected) via a user-supplied function.
opaque Pointer to some opaque data structure which will be passed to readproc. PLOP does not use this pointer or the underlying data.
filesize The length of the document in bytes.
readproc A procedure which must be able to supply arbitrary chunks of size bytes of the document at memory location buffer. The procedure must return the number of bytes retrieved.
seekproc A procedure for seeking to position offset within the document. The proce-dure must return -1 in case of error, and 0 otherwise.
optlist An option list (see Section 7.1, »Option Lists«, page 103) according to Table 7.3.
Returns -1 (in PHP: 0) on error, and a document handle otherwise. After an error it is recom-mended to call PLOP_get_errmsg( ) to find out more details about the error.
Bindings Only available in the C and C++ language bindings.
C++ void close_document(int doc, wstring optlist)C# Java close_document(int doc, String optlist)
Perl PHP close_document(long doc, string optlist)VB Sub close_document(doc As Long, optlist As String))
C void PLOP_close_document(PLOP *plop, int doc, const char *optlist)
Close the specified document.
doc A valid document handle obtained with PLOP_open_document*( ).
optlist An option list (see Section 7.1, »Option Lists«, page 103) according to Table 7.4.
Details This function should be called before PLOP_delete( ) for each document which has been opened with PLOP_open_document*( ). It closes the document associated with the sup-plied handle and releases all related resources.
Table 7.4 Options for PLOP_close_document( )
option description
lastinthread (Boolean) This option should be set to true after processing the last document in the current thread to avoid memory leaks. After lastinthread=true PLOP_create_document( ) must not be called for the same PLOP object. Default: false

7.4 Output Functions 111
7.4 Output Functions
C++ int create_document(wstring filename, wstring optlist)C# Java int create_document(String filename, String optlist)
Perl PHP int create_document(string filename, string optlist)VB Function create_document(filename As String, optlist As String) As Long
C int PLOP_create_document(PLOP *plop, const char *filename, int len, const char *optlist)
Create a PDF output document in memory or on disk file.
filename (Name string, but Unicode file names are only supported on Windows) The name of the generated output file, which should be different from the input file name supplied to PLOP_open_document( ). If this is an empty string the output is generated in memory, and can later be fetched with PLOP_get_buffer( ).
In non-Unicode language bindings file names with len=0 are interpreted in the cur-rent system codepage unless they are preceded by a UTF-8 BOM, in which case they are interpreted as UTF-8 or EBCDIC-UTF-8.
len (C language binding only) Length of filename (in bytes) for UTF-16 strings. If len=0 a null-terminated string must be provided.
optlist An option list (see Section 7.1, »Option Lists«, page 103) according to Table 7.5.
Returns -1 (in PHP: 0) on error, and a document handle otherwise. After an error it is recom-mended to call PLOP_get_errmsg( ) to find out more details about the error.
When a digital signature is created the function call fails in the following cases:> a timestamp cannot be obtained and the critical option is set;> the signature chain is revalidated and a certificate has expired or has been revoked
in the meantime;> a visualization document is supplied which doesn’t fit on the page;> the input document is damaged and the signature is created in update mode.
Details Before calling this function PLOP_open_document*( ) must have been called. The docu-ment to be processed is supplied in the input option. See Section 5.2, »PDF Encryption with PLOP«, page 61, for conditions which are enforced for the user and master pass-words.
PLOP_create_document( ) may revalidate the signature chain, e.g. because an OCSP re-sponse expired since it has been requested.

112 Chapter 7: PLOP and PLOP DS Library API Reference
Table 7.5 Options for PLOP_create_document( )
option description
docinfo (List of pairs of text strings) Set document info entries for the output document. If the document contains document XMP metadata, standard document info entries are mirrored in the XMP. Each pair in the op-tion list contains the name of an entry and its value. The following predefined and custom keys can be supplied (default: document info entries are copied from the input document):Subject Subject of the documentTitle Title of the documentAuthor Author of the documentKeywords Keywords describing the contents of the documentTrapped Indicates whether trapping has been applied to the document. Allowed values are True,
False, and Unknown. For PDF/X input Unknown is only allowed if sacrifice includes pdfx or pdfvt.
any name other than Creator, CreationDate, Producer, ModDate, GTS_PDFXVersion, GTS_PDFXConfor-mance, ISO_PDFEVersionUser-defined field name (must not contain any space character). PLOP supports an arbitrary number of fields. A custom field name should be supplied only once.
encryption (Keyword; only relevant if masterpassword is supplied; not allowed if update=true) Encryption algo-rithm to be used for the output document. Supported keywords (default: algo11 for PDF 1.7ext8 input and above, otherwise algo4):algo4 Encrypt with AES-128 according to Acrobat 7/8, i.e. pCOS algorithm 4; this increases the
output PDF version to PDF 1.6 if required. Passwords may contain only Latin-1 characters and are truncated to 32 characters.
algo11 Encrypt with AES-256 according to Acrobat X/XI, i.e. pCOS algorithm 11; this increases the output PDF version to PDF 1.7ext8 if required. Passwords may contain Unicode characters and are truncated to 127 UTF-8 bytes.
input (Document handle obtained with PLOP_open_document*( ); required) Input document to be processed
limitcheck If true, the limit for the number of indirect PDF objects (8.388.607) is enforced in PDF/A-1/2/3 and PDF/X-4/5 modes. Default: true
linearize (Boolean; cannot be combined with signature creation or metadata) If true, the output document will be linearized. On MVS systems this option cannot be combined with in-memory generation (i.e. empty filename parameter). Default: false
master-password1
(String; not allowed if update=true) Master password for the document. If it is empty no master pass-word is applied. Default: empty
metadata (Option list; can not be combined with linearize) Supply XMP metadata for the document. PDF/A and PDF/X identification entries are not allowed in the supplied XMP. Supported suboptions:filename (Name string; required) The name of a file containing well-formed XMP metadata in UTF-8
format.validate (Keyword) The supplied XMP metadata will be validated according to the keyword (note that
PLOP does not validate the XMP metadata in the input document):none No validationxmp2004 Validation according to the XMP 2004 specificationxmp2005 Validation according to the XMP 2005 specificationpdfa1 Like xmp2004, plus testing for predefined properties and schemas, and extension
schema validation according to PDF/A-1pdfa2 Like xmp2005, plus testing for predefined properties and schemas, and extension
schema validation according to PDF/A-2 and PDF/A-3 (both standards have identi-cal metadata requirements)
Default: pdfa1 if the input conforms to PDF/A-1 and the sacrifice option does not include pdfa; pdfa2 if the input conforms to PDF/A-2 or PDF/A-3 and the sacrifice option does not include pdfa; otherwise none
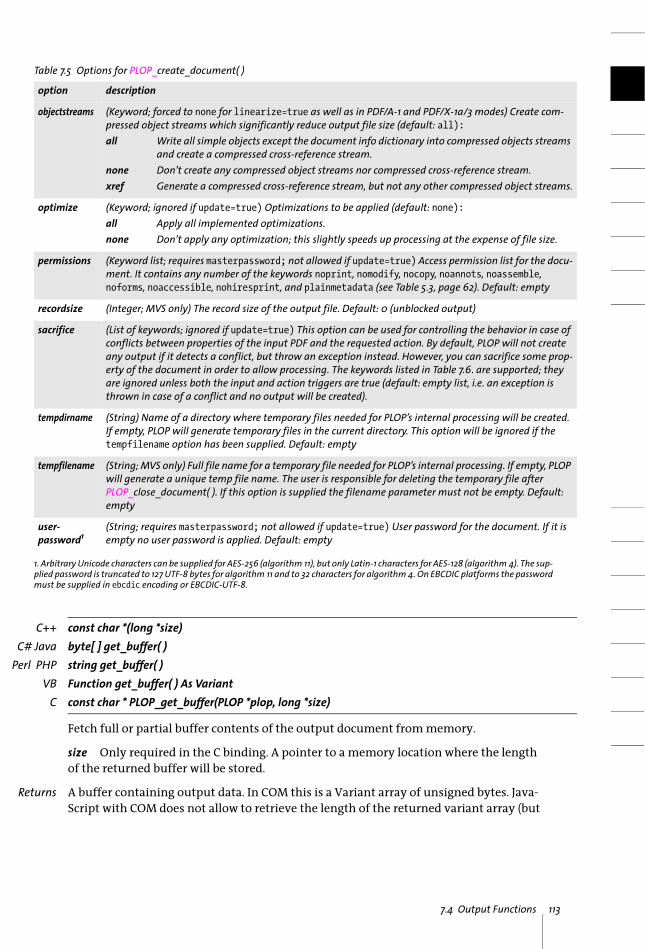
7.4 Output Functions 113
C++ const char *(long *size)C# Java byte[ ] get_buffer( )
Perl PHP string get_buffer( )VB Function get_buffer( ) As Variant
C const char * PLOP_get_buffer(PLOP *plop, long *size)
Fetch full or partial buffer contents of the output document from memory.
size Only required in the C binding. A pointer to a memory location where the length of the returned buffer will be stored.
Returns A buffer containing output data. In COM this is a Variant array of unsigned bytes. Java-Script with COM does not allow to retrieve the length of the returned variant array (but
objectstreams (Keyword; forced to none for linearize=true as well as in PDF/A-1 and PDF/X-1a/3 modes) Create com-pressed object streams which significantly reduce output file size (default: all):all Write all simple objects except the document info dictionary into compressed objects streams
and create a compressed cross-reference stream.none Don’t create any compressed object streams nor compressed cross-reference stream.xref Generate a compressed cross-reference stream, but not any other compressed object streams.
optimize (Keyword; ignored if update=true) Optimizations to be applied (default: none):all Apply all implemented optimizations.none Don’t apply any optimization; this slightly speeds up processing at the expense of file size.
permissions (Keyword list; requires masterpassword; not allowed if update=true) Access permission list for the docu-ment. It contains any number of the keywords noprint, nomodify, nocopy, noannots, noassemble, noforms, noaccessible, nohiresprint, and plainmetadata (see Table 5.3, page 62). Default: empty
recordsize (Integer; MVS only) The record size of the output file. Default: 0 (unblocked output)
sacrifice (List of keywords; ignored if update=true) This option can be used for controlling the behavior in case of conflicts between properties of the input PDF and the requested action. By default, PLOP will not create any output if it detects a conflict, but throw an exception instead. However, you can sacrifice some prop-erty of the document in order to allow processing. The keywords listed in Table 7.6. are supported; they are ignored unless both the input and action triggers are true (default: empty list, i.e. an exception is thrown in case of a conflict and no output will be created).
tempdirname (String) Name of a directory where temporary files needed for PLOP’s internal processing will be created. If empty, PLOP will generate temporary files in the current directory. This option will be ignored if the tempfilename option has been supplied. Default: empty
tempfilename (String; MVS only) Full file name for a temporary file needed for PLOP’s internal processing. If empty, PLOP will generate a unique temp file name. The user is responsible for deleting the temporary file after PLOP_close_document( ). If this option is supplied the filename parameter must not be empty. Default: empty
user-password1
(String; requires masterpassword; not allowed if update=true) User password for the document. If it is empty no user password is applied. Default: empty
1. Arbitrary Unicode characters can be supplied for AES-256 (algorithm 11), but only Latin-1 characters for AES-128 (algorithm 4). The sup-plied password is truncated to 127 UTF-8 bytes for algorithm 11 and to 32 characters for algorithm 4. On EBCDIC platforms the passwordmust be supplied in ebcdic encoding or EBCDIC-UTF-8.
Table 7.5 Options for PLOP_create_document( )
option description
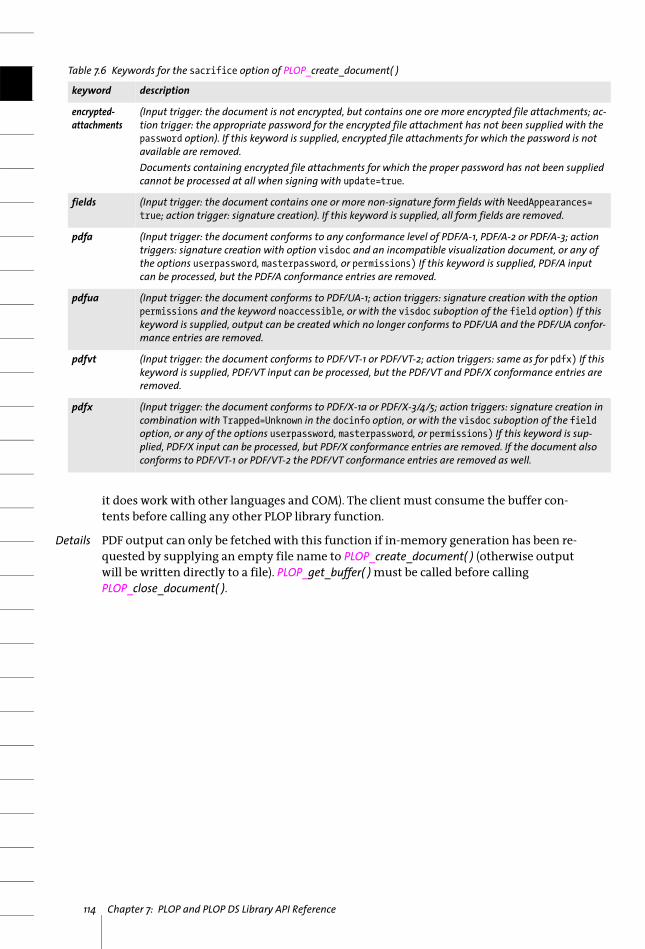
114 Chapter 7: PLOP and PLOP DS Library API Reference
it does work with other languages and COM). The client must consume the buffer con-tents before calling any other PLOP library function.
Details PDF output can only be fetched with this function if in-memory generation has been re-quested by supplying an empty file name to PLOP_create_document( ) (otherwise output will be written directly to a file). PLOP_get_buffer( ) must be called before calling PLOP_close_document( ).
Table 7.6 Keywords for the sacrifice option of PLOP_create_document( )
keyword description
encrypted-attachments
(Input trigger: the document is not encrypted, but contains one ore more encrypted file attachments; ac-tion trigger: the appropriate password for the encrypted file attachment has not been supplied with the password option). If this keyword is supplied, encrypted file attachments for which the password is not available are removed.Documents containing encrypted file attachments for which the proper password has not been supplied cannot be processed at all when signing with update=true.
fields (Input trigger: the document contains one or more non-signature form fields with NeedAppearances= true; action trigger: signature creation). If this keyword is supplied, all form fields are removed.
pdfa (Input trigger: the document conforms to any conformance level of PDF/A-1, PDF/A-2 or PDF/A-3; action triggers: signature creation with option visdoc and an incompatible visualization document, or any of the options userpassword, masterpassword, or permissions) If this keyword is supplied, PDF/A input can be processed, but the PDF/A conformance entries are removed.
pdfua (Input trigger: the document conforms to PDF/UA-1; action triggers: signature creation with the option permissions and the keyword noaccessible, or with the visdoc suboption of the field option) If this keyword is supplied, output can be created which no longer conforms to PDF/UA and the PDF/UA confor-mance entries are removed.
pdfvt (Input trigger: the document conforms to PDF/VT-1 or PDF/VT-2; action triggers: same as for pdfx) If this keyword is supplied, PDF/VT input can be processed, but the PDF/VT and PDF/X conformance entries are removed.
pdfx (Input trigger: the document conforms to PDF/X-1a or PDF/X-3/4/5; action triggers: signature creation in combination with Trapped=Unknown in the docinfo option, or with the visdoc suboption of the field option, or any of the options userpassword, masterpassword, or permissions) If this keyword is sup-plied, PDF/X input can be processed, but PDF/X conformance entries are removed. If the document also conforms to PDF/VT-1 or PDF/VT-2 the PDF/VT conformance entries are removed as well.

7.5 Digital Signature Function 115
7.5 Digital Signature FunctionNote Digital signature functionality is only available in the product PLOP DS.
C++ int prepare_signature(wstring optlist)C# Java int prepare_signature(String optlist)
Perl PHP int prepare_signature(string optlist)VB Function prepare_signature(optlist As String)
C int PLOP_prepare_signature(PLOP *plop, const char *optlist)
Set one or more global options for PLOP.
optlist An option list specifying signature options according to Table 7.7:> Options for the signing certificate (digital ID): digitalid, password, passwordfile> Options for providing information about the signature context:
contactinfo, location, policy, reason> Options for time-stamping: doctimestamp, timestamp> Option for signature visualization: field> Options for providing validation information:
certfile, crl, crldir, crlfile, ocsp, rootcertdir, rootcertfile, validate> Options for certification signatures: certification, preventchanges> Options for controlling details of signature creation:
conformance, engine, ltv, signature, sigtype> Option for controlling signature details: dss, update
Returns -1 (in PHP: 0) on error, and 1 otherwise. After an error it is recommended to call PLOP_get_errmsg( ) to find out more details about the error. The function call may fail for the following reasons:
> signer’s certificate cannot be found or private key cannot be accessed, e.g. because of a wrong password or PIN;
> validation fails, e.g. no valid OCSP response or CRL could be retrieved and the corre-sponding critical flag is set;
> the requirements for ltv=full or validate=full cannot be fulfilled.
After a failed call to PLOP_prepare_ signature( ) it is recommended to avoid another call with the same options since this may disable a PKCS#11 token, e.g. if a wrong password/PIN was supplied too often.
Details Signature options prepared with this function can be used to create an arbitrary num-ber of signatures with PLOP_create_document( ). The supplied signature options will be used for all signatures created with PLOP_create_document( ) until PLOP_prepare_ signature( ) is called again (with other signature options or the option nosignature).
The signature preparation option list may be processed again at unpredictable times before a signature is created. In particular, if a CRL or OCSP response is found to be out-dated after a number of signatures has been created, the signature options are pro-cessed again to refresh certificate revocation information.
Certificate formats. Some options accept certificates in the text-based PEM format. On EBCDIC platforms PEM certificates must be encoded in EBCDIC.

116 Chapter 7: PLOP and PLOP DS Library API Reference
Naming convention for certificate and CRL files. Some options require hash values as file names for certificate or CRL files. These hashed file names can be created with OpenSSL 1.0.0 or above (but not earlier versions which use a different naming conven-tion). OpenSSL includes the c_rehash utility to create the hashed links for all certificates in a directory; the OpenSSL commands openssl x509 -hash and openssl crl -hash create the hash for a single certificate or CRL. If you need to create hashed file names manually you can do so according to the following rules:
> use the DER-encoded form of the subject field of a certificate or the DER-encoded form of the issuer field of a CRL and take the SHA-1 hash;
> consider the first four bytes of the generated hash value and use the corresponding initial 8 hexadecimal digits as basis for the filename;
> append a "." (period) character and the decimal number 0 (zero). If there is a conflict within the hash values, increase the number and use it instead of zero.
Syntax for object identifiers (OIDs). Some options require OIDs, e.g. suboption policy of the signature option timestamp. OIDs consist of series of numbers where the num-bers are separated by whitespace or period characters ».«.
Table 7.7 Options for PLOP_prepare_signature( )
option description
certfile (String; not for engine=mscapi) Name of a file which contains one or more intermediate CA certificates in PEM format which may be required for validating embedding the full certificate chain.
certification (Keyword) Create a certification (author) signature with the specified certification level. Values other than none create a certification signature and should only be used for the first signature in a document (default: none):none Regular approval signature: document is not certified.nochanges Certification signature: any change breaks the signature.formfilling Certification signature: form filling and signing (by clicking a signature field, but not via
Acrobat’s menu items) are allowed. Adding pages by spawning page templates is also allowed (as opposed to manually adding pages), but this technique is rarely used. Other changes break the signature.
formsandannotationsCertification signature: form filling, signing and page adding as well as commenting (i.e. annotation creation, deletion, and modification) are allowed; other changes break the signature.
conformance (Keyword) Conformance of the generated signature. Supported keywords (default: acrobat):acrobat The signature can be validated with Acrobat (for required Acrobat versions see Table 6.1, page
77). If the signing certificate uses features which are not supported in Acrobat the function call fails.
extended Accept the signing certificate even if it uses one of the features below. It may not be possible to validate the signature with Acrobat:Elliptic curve signature with one of the Brainpool curves (RFC 5639)Elliptic curve signature with one of the NIST-15 curves (RFC 5480) except P-256/P-384/P-521
contactinfo (Text string; only relevant for digitalid) Information provided by the signer to enable a recipient to con-tact the signer to verify the signature (e.g. a phone number). However, this is not recommended as a scal-able solution for establishing trust. Acrobat 8/9/X display the contact information in the Signature Properties dialog in the Signer tab. Acrobat XI does not display the contact information.
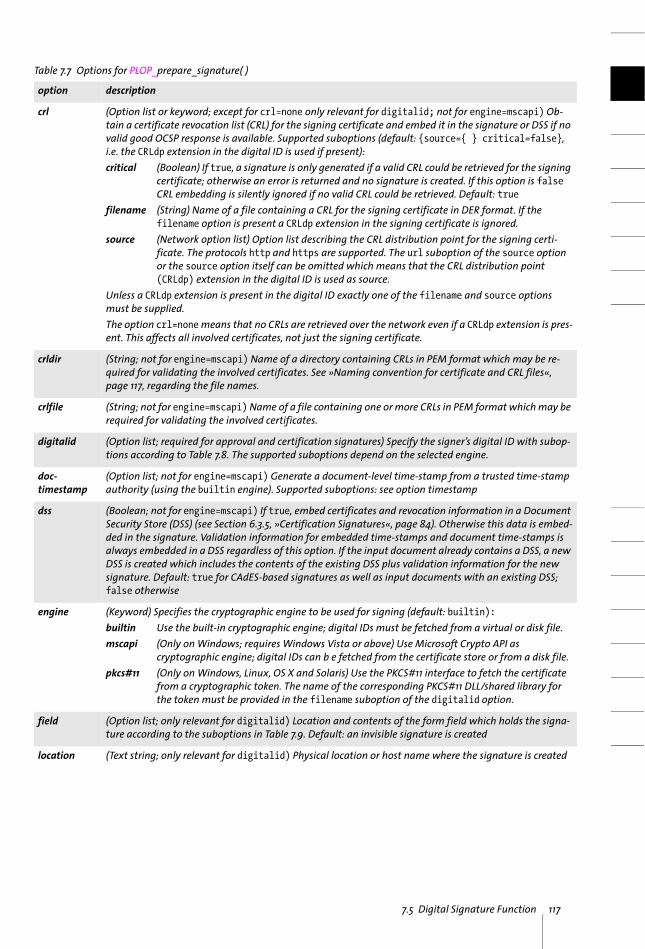
7.5 Digital Signature Function 117
crl (Option list or keyword; except for crl=none only relevant for digitalid; not for engine=mscapi) Ob-tain a certificate revocation list (CRL) for the signing certificate and embed it in the signature or DSS if no valid good OCSP response is available. Supported suboptions (default: {source={ } critical=false}, i.e. the CRLdp extension in the digital ID is used if present):critical (Boolean) If true, a signature is only generated if a valid CRL could be retrieved for the signing
certificate; otherwise an error is returned and no signature is created. If this option is false CRL embedding is silently ignored if no valid CRL could be retrieved. Default: true
filename (String) Name of a file containing a CRL for the signing certificate in DER format. If the filename option is present a CRLdp extension in the signing certificate is ignored.
source (Network option list) Option list describing the CRL distribution point for the signing certi-ficate. The protocols http and https are supported. The url suboption of the source option or the source option itself can be omitted which means that the CRL distribution point (CRLdp) extension in the digital ID is used as source.
Unless a CRLdp extension is present in the digital ID exactly one of the filename and source options must be supplied.The option crl=none means that no CRLs are retrieved over the network even if a CRLdp extension is pres-ent. This affects all involved certificates, not just the signing certificate.
crldir (String; not for engine=mscapi) Name of a directory containing CRLs in PEM format which may be re-quired for validating the involved certificates. See »Naming convention for certificate and CRL files«, page 117, regarding the file names.
crlfile (String; not for engine=mscapi) Name of a file containing one or more CRLs in PEM format which may be required for validating the involved certificates.
digitalid (Option list; required for approval and certification signatures) Specify the signer’s digital ID with subop-tions according to Table 7.8. The supported suboptions depend on the selected engine.
doc-timestamp
(Option list; not for engine=mscapi) Generate a document-level time-stamp from a trusted time-stamp authority (using the builtin engine). Supported suboptions: see option timestamp
dss (Boolean; not for engine=mscapi) If true, embed certificates and revocation information in a Document Security Store (DSS) (see Section 6.3.5, »Certification Signatures«, page 84). Otherwise this data is embed-ded in the signature. Validation information for embedded time-stamps and document time-stamps is always embedded in a DSS regardless of this option. If the input document already contains a DSS, a new DSS is created which includes the contents of the existing DSS plus validation information for the new signature. Default: true for CAdES-based signatures as well as input documents with an existing DSS; false otherwise
engine (Keyword) Specifies the cryptographic engine to be used for signing (default: builtin):builtin Use the built-in cryptographic engine; digital IDs must be fetched from a virtual or disk file.mscapi (Only on Windows; requires Windows Vista or above) Use Microsoft Crypto API as
cryptographic engine; digital IDs can b e fetched from the certificate store or from a disk file.pkcs#11 (Only on Windows, Linux, OS X and Solaris) Use the PKCS#11 interface to fetch the certificate
from a cryptographic token. The name of the corresponding PKCS#11 DLL/shared library for the token must be provided in the filename suboption of the digitalid option.
field (Option list; only relevant for digitalid) Location and contents of the form field which holds the signa-ture according to the suboptions in Table 7.9. Default: an invisible signature is created
location (Text string; only relevant for digitalid) Physical location or host name where the signature is created
Table 7.7 Options for PLOP_prepare_signature( )
option description
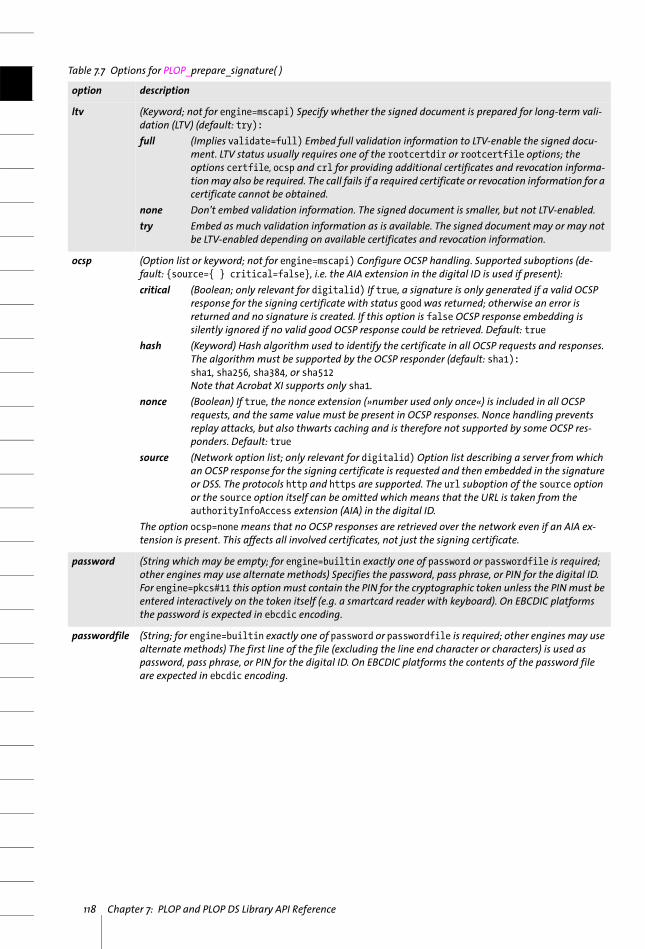
118 Chapter 7: PLOP and PLOP DS Library API Reference
ltv (Keyword; not for engine=mscapi) Specify whether the signed document is prepared for long-term vali-dation (LTV) (default: try):full (Implies validate=full) Embed full validation information to LTV-enable the signed docu-
ment. LTV status usually requires one of the rootcertdir or rootcertfile options; the options certfile, ocsp and crl for providing additional certificates and revocation informa-tion may also be required. The call fails if a required certificate or revocation information for a certificate cannot be obtained.
none Don’t embed validation information. The signed document is smaller, but not LTV-enabled.try Embed as much validation information as is available. The signed document may or may not
be LTV-enabled depending on available certificates and revocation information.
ocsp (Option list or keyword; not for engine=mscapi) Configure OCSP handling. Supported suboptions (de-fault: {source={ } critical=false}, i.e. the AIA extension in the digital ID is used if present):critical (Boolean; only relevant for digitalid) If true, a signature is only generated if a valid OCSP
response for the signing certificate with status good was returned; otherwise an error is returned and no signature is created. If this option is false OCSP response embedding is silently ignored if no valid good OCSP response could be retrieved. Default: true
hash (Keyword) Hash algorithm used to identify the certificate in all OCSP requests and responses. The algorithm must be supported by the OCSP responder (default: sha1):sha1, sha256, sha384, or sha512Note that Acrobat XI supports only sha1.
nonce (Boolean) If true, the nonce extension (»number used only once«) is included in all OCSP requests, and the same value must be present in OCSP responses. Nonce handling prevents replay attacks, but also thwarts caching and is therefore not supported by some OCSP res-ponders. Default: true
source (Network option list; only relevant for digitalid) Option list describing a server from which an OCSP response for the signing certificate is requested and then embedded in the signature or DSS. The protocols http and https are supported. The url suboption of the source option or the source option itself can be omitted which means that the URL is taken from the authorityInfoAccess extension (AIA) in the digital ID.
The option ocsp=none means that no OCSP responses are retrieved over the network even if an AIA ex-tension is present. This affects all involved certificates, not just the signing certificate.
password (String which may be empty; for engine=builtin exactly one of password or passwordfile is required; other engines may use alternate methods) Specifies the password, pass phrase, or PIN for the digital ID. For engine=pkcs#11 this option must contain the PIN for the cryptographic token unless the PIN must be entered interactively on the token itself (e.g. a smartcard reader with keyboard). On EBCDIC platforms the password is expected in ebcdic encoding.
passwordfile (String; for engine=builtin exactly one of password or passwordfile is required; other engines may use alternate methods) The first line of the file (excluding the line end character or characters) is used as password, pass phrase, or PIN for the digital ID. On EBCDIC platforms the contents of the password file are expected in ebcdic encoding.
Table 7.7 Options for PLOP_prepare_signature( )
option description

7.5 Digital Signature Function 119
policy (Option list; only for sigtype=cades; not allowed if reason is specified; required for PAdES-EPES) Signa-ture policy which shall be used to validate the signature. Supported suboptions:commitmenttype
(Keyword) Type of commitment associated with the signature within the scope of the specified policy. Supported keywords (default: none):approval The signer has approved the content of the message.creation The signer has created the message (but not necessarily approved, nor sent it).delivery The trusted service provider providing that indication has delivered a message in a
local store accessible to the recipient of the message.none No commitment type is included in the signatureorigin The signer recognizes to have created, approved, and sent the message.receipt The signer recognizes to have received the content of the message.sender The entity providing that indication has sent the message (but not necessarily cre-
ated it).notice (Text string) Human-readable text description of the signature policyoid (String; required) Object ID of the signature policyuri (String) URI of the signature policy
prevent-changes
(Boolean; only if certification is different from none) If true, the changes which are prohibited with the certification option (i.e. those changes which would invalidate the certification signature) are pre-vented in Acrobat, i.e. the respective user interface elements are disabled. Default: true
reason (Text string; only relevant for digitalid; not allowed with policy) Reason for signing the document
rootcertdir (String; not for engine=mscapi) Name of a directory which contains trusted root CA certificates in PEM format which may be required for validating the certificate chain. See »Naming convention for certificate and CRL files«, page 117, for file name conventions.
rootcertfile (String; not for engine=mscapi) Name of a file which contains one or more trusted root CA certificates in PEM format which may be required for validating the certificate chain. For security reasons the file is not searched in the searchpath.
signature (Boolean) If false no signature is created. This may be useful to switch between signing and other pro-cessing even if a prior call to PLOP_prepare_signature( ) supplied signature options. Default: true
sigtype (Keyword; only relevant for digitalid; not for engine=mscapi) Signature type (default: cms):cms CMS-based signature according to ISO 32000-1 and PAdES part 2 (ETSI TS 102 778-2)cades CAdES-based signature according to CAdES (ETSI TS 101 733) and RFC 5126. This is a require-
ment for PAdES part 3 and part 4.
Table 7.7 Options for PLOP_prepare_signature( )
option description
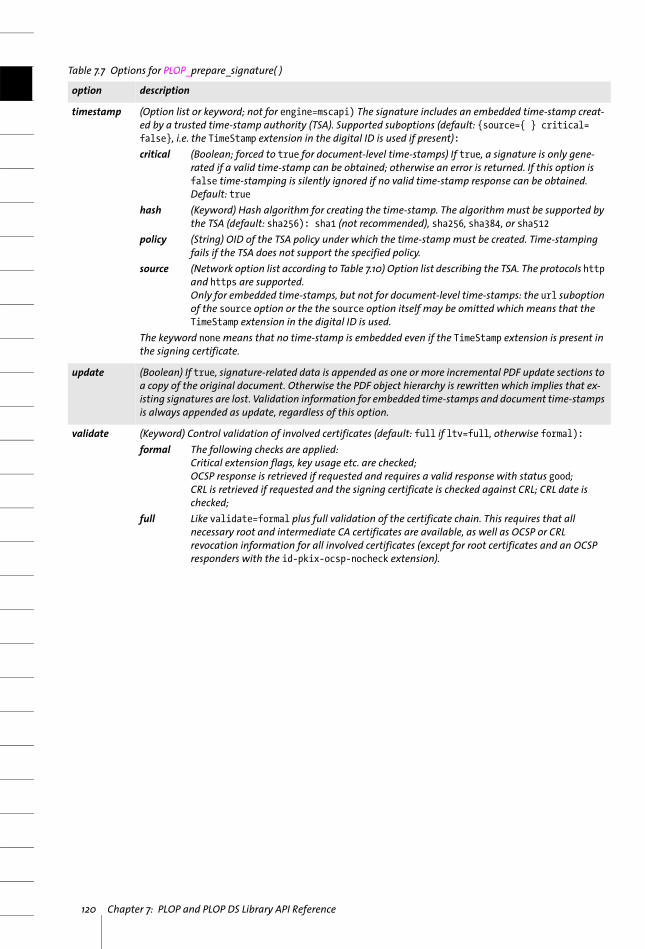
120 Chapter 7: PLOP and PLOP DS Library API Reference
timestamp (Option list or keyword; not for engine=mscapi) The signature includes an embedded time-stamp creat-ed by a trusted time-stamp authority (TSA). Supported suboptions (default: {source={ } critical= false}, i.e. the TimeStamp extension in the digital ID is used if present):critical (Boolean; forced to true for document-level time-stamps) If true, a signature is only gene-
rated if a valid time-stamp can be obtained; otherwise an error is returned. If this option is false time-stamping is silently ignored if no valid time-stamp response can be obtained. Default: true
hash (Keyword) Hash algorithm for creating the time-stamp. The algorithm must be supported by the TSA (default: sha256): sha1 (not recommended), sha256, sha384, or sha512
policy (String) OID of the TSA policy under which the time-stamp must be created. Time-stamping fails if the TSA does not support the specified policy.
source (Network option list according to Table 7.10) Option list describing the TSA. The protocols http and https are supported.Only for embedded time-stamps, but not for document-level time-stamps: the url suboption of the source option or the the source option itself may be omitted which means that the TimeStamp extension in the digital ID is used.
The keyword none means that no time-stamp is embedded even if the TimeStamp extension is present in the signing certificate.
update (Boolean) If true, signature-related data is appended as one or more incremental PDF update sections to a copy of the original document. Otherwise the PDF object hierarchy is rewritten which implies that ex-isting signatures are lost. Validation information for embedded time-stamps and document time-stamps is always appended as update, regardless of this option.
validate (Keyword) Control validation of involved certificates (default: full if ltv=full, otherwise formal):formal The following checks are applied:
Critical extension flags, key usage etc. are checked;OCSP response is retrieved if requested and requires a valid response with status good;CRL is retrieved if requested and the signing certificate is checked against CRL; CRL date is checked;
full Like validate=formal plus full validation of the certificate chain. This requires that all necessary root and intermediate CA certificates are available, as well as OCSP or CRL revocation information for all involved certificates (except for root certificates and an OCSP responders with the id-pkix-ocsp-nocheck extension).
Table 7.7 Options for PLOP_prepare_signature( )
option description

7.5 Digital Signature Function 121
Table 7.8 Suboptions of the digitalid option of PLOP_prepare_signature( )
option description
Suboption for engine=builtin:
filename (String; required) Name of a disk-based or virtual digital ID file in PKCS#12 format.
Suboptions for engine=pkcs#11:
filename (String; required) Name of the PKCS#11 DLL/shared library for the cryptographic token, e.g. a smartcard. This must be a disk-based file, not a PVF file. Example: cryptoki.dll
issuer (String) Select a digital ID where the »issuer« field (PKCS#11 attribute CKA_ISSUER) matches the supplied query. See option subject below for a description of the query format.
label (String) Select a digital ID where the user-friendly label of the digital ID (PKCS#11 attribute CKA_ LABEL) matches the supplied value.
serial (String) Select a digital ID where the serial number (PKCS#11 attribute CKA_SERIAL_NUMBER) matches the supplied value. The serial number must be provided as a decimal string or hexadecimal string (pre-fixed with 0x).
slotid (Positive integer) Number of the slot that interfaces with the token. This can be used to directly address a slot if multiple slots are available.
subject (String) Select a digital ID where the »subject« field (PKCS#11 attribute CKA_ SUBJECT) matches the sup-plied query. The query must be in the format /type0=value0/type1=value1/type2=...; characters may be escaped by \ (backslash). The order of attributes is significant. If the token contains more than one dig-ital ID the options issuer, label, and subject can be used for certificate selection.Example: subject={/C=DE/L=Munich/O=PDFlib GmbH/CN=PDFlib Demo PLOP User 2048}
threadsafe (Boolean) If true, the PKCS#11 library must support thread-safe operation and is initialized in thread-safe mode. If the PKCS#11 library doesn’t support thread-safe operation the call fails. If false, the PKCS#11 li-brary is initialized in single-threaded mode which is only allowed for single-threaded applications. De-fault: true
Suboptions for engine=mscapi:
filename (String; one of filename or store is required) Name of a disk-based or virtual digital ID file in PKCS#12 format.
storelocation (Keyword) Location of the certificate store (default: current_user):current_service, current_user, current_user_group_policy, local_machine, local_machine_enterprise, local_machine_group_policy, services, usersThe following store locations can be opened remotely by prefixing the store name (option store) with the computer name (separated by a backslash character):local_machine, local_machine_group_policy, services, users.
subject (String; required if store is specified) Search a digital ID where the »subject« entry contains the supplied string. It usually holds the »common name« (CN) entry of the digital ID.
store (String; one of filename or store is required) Name of the certificate store, e.g. My, Root, Trust. If storelocation=services or storelocation=users the store name must be prefixed with the service or user name (separated by a backslash character). Default: My
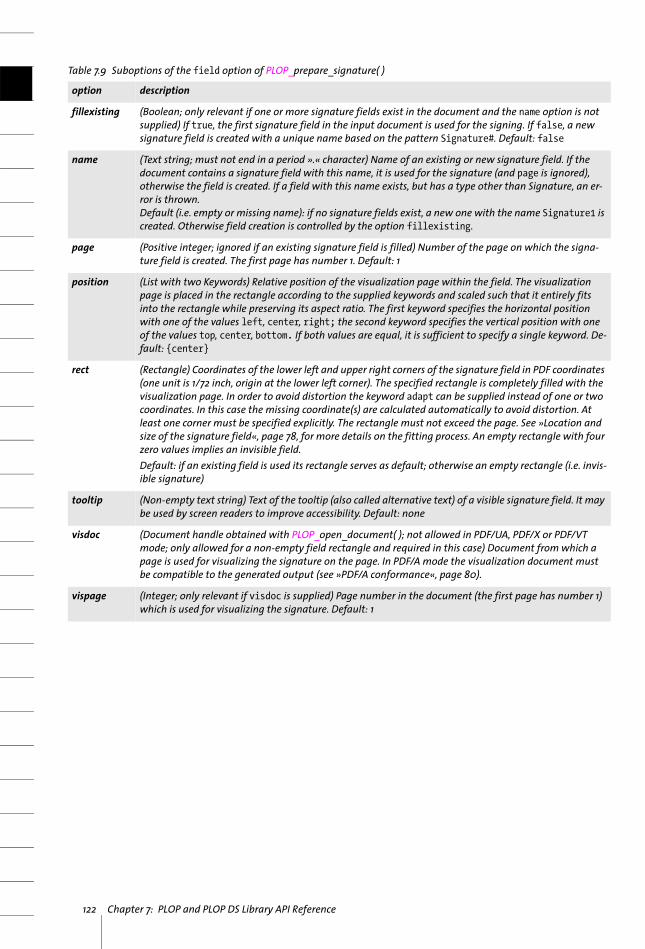
122 Chapter 7: PLOP and PLOP DS Library API Reference
Table 7.9 Suboptions of the field option of PLOP_prepare_signature( )
option description
fillexisting (Boolean; only relevant if one or more signature fields exist in the document and the name option is not supplied) If true, the first signature field in the input document is used for the signing. If false, a new signature field is created with a unique name based on the pattern Signature#. Default: false
name (Text string; must not end in a period ».« character) Name of an existing or new signature field. If the document contains a signature field with this name, it is used for the signature (and page is ignored), otherwise the field is created. If a field with this name exists, but has a type other than Signature, an er-ror is thrown.Default (i.e. empty or missing name): if no signature fields exist, a new one with the name Signature1 is created. Otherwise field creation is controlled by the option fillexisting.
page (Positive integer; ignored if an existing signature field is filled) Number of the page on which the signa-ture field is created. The first page has number 1. Default: 1
position (List with two Keywords) Relative position of the visualization page within the field. The visualization page is placed in the rectangle according to the supplied keywords and scaled such that it entirely fits into the rectangle while preserving its aspect ratio. The first keyword specifies the horizontal position with one of the values left, center, right; the second keyword specifies the vertical position with one of the values top, center, bottom. If both values are equal, it is sufficient to specify a single keyword. De-fault: {center}
rect (Rectangle) Coordinates of the lower left and upper right corners of the signature field in PDF coordinates (one unit is 1/72 inch, origin at the lower left corner). The specified rectangle is completely filled with the visualization page. In order to avoid distortion the keyword adapt can be supplied instead of one or two coordinates. In this case the missing coordinate(s) are calculated automatically to avoid distortion. At least one corner must be specified explicitly. The rectangle must not exceed the page. See »Location and size of the signature field«, page 78, for more details on the fitting process. An empty rectangle with four zero values implies an invisible field.Default: if an existing field is used its rectangle serves as default; otherwise an empty rectangle (i.e. invis-ible signature)
tooltip (Non-empty text string) Text of the tooltip (also called alternative text) of a visible signature field. It may be used by screen readers to improve accessibility. Default: none
visdoc (Document handle obtained with PLOP_open_document( ); not allowed in PDF/UA, PDF/X or PDF/VT mode; only allowed for a non-empty field rectangle and required in this case) Document from which a page is used for visualizing the signature on the page. In PDF/A mode the visualization document must be compatible to the generated output (see »PDF/A conformance«, page 80).
vispage (Integer; only relevant if visdoc is supplied) Page number in the document (the first page has number 1) which is used for visualizing the signature. Default: 1
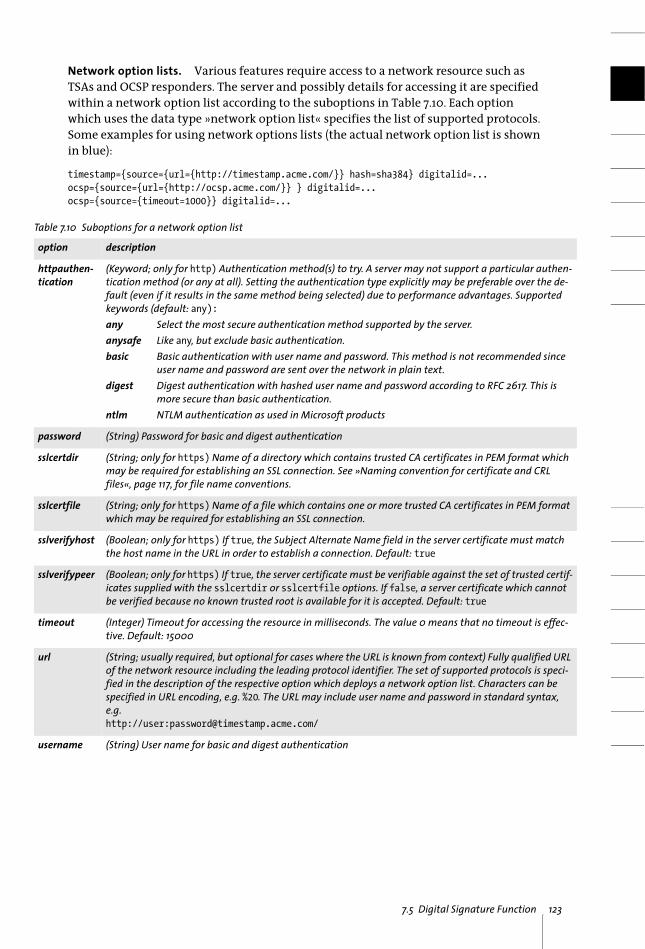
7.5 Digital Signature Function 123
Network option lists. Various features require access to a network resource such as TSAs and OCSP responders. The server and possibly details for accessing it are specified within a network option list according to the suboptions in Table 7.10. Each option which uses the data type »network option list« specifies the list of supported protocols. Some examples for using network options lists (the actual network option list is shown in blue):
timestamp={source={url={http://timestamp.acme.com/}} hash=sha384} digitalid=...ocsp={source={url={http://ocsp.acme.com/}} } digitalid=...ocsp={source={timeout=1000}} digitalid=...
Table 7.10 Suboptions for a network option list
option description
httpauthen-tication
(Keyword; only for http) Authentication method(s) to try. A server may not support a particular authen-tication method (or any at all). Setting the authentication type explicitly may be preferable over the de-fault (even if it results in the same method being selected) due to performance advantages. Supported keywords (default: any):any Select the most secure authentication method supported by the server.anysafe Like any, but exclude basic authentication.basic Basic authentication with user name and password. This method is not recommended since
user name and password are sent over the network in plain text.digest Digest authentication with hashed user name and password according to RFC 2617. This is
more secure than basic authentication.ntlm NTLM authentication as used in Microsoft products
password (String) Password for basic and digest authentication
sslcertdir (String; only for https) Name of a directory which contains trusted CA certificates in PEM format which may be required for establishing an SSL connection. See »Naming convention for certificate and CRL files«, page 117, for file name conventions.
sslcertfile (String; only for https) Name of a file which contains one or more trusted CA certificates in PEM format which may be required for establishing an SSL connection.
sslverifyhost (Boolean; only for https) If true, the Subject Alternate Name field in the server certificate must match the host name in the URL in order to establish a connection. Default: true
sslverifypeer (Boolean; only for https) If true, the server certificate must be verifiable against the set of trusted certif-icates supplied with the sslcertdir or sslcertfile options. If false, a server certificate which cannot be verified because no known trusted root is available for it is accepted. Default: true
timeout (Integer) Timeout for accessing the resource in milliseconds. The value 0 means that no timeout is effec-tive. Default: 15000
url (String; usually required, but optional for cases where the URL is known from context) Fully qualified URL of the network resource including the leading protocol identifier. The set of supported protocols is speci-fied in the description of the respective option which deploys a network option list. Characters can be specified in URL encoding, e.g. %20. The URL may include user name and password in standard syntax, e.g.http://user:[email protected]/
username (String) User name for basic and digest authentication
124 Chapter 7: PLOP and PLOP DS Library API Reference
7.6 Exception HandlingPLOP supplies auxiliary methods for handling library exceptions in the C language. Oth-er PLOP language bindings use the native exception handling system of the respective language, such as try/catch clauses. The language wrappers pack information about ex-ception number, description, and API function name into the generated exception ob-ject. In the Java language binding these items can be retrieved selectively.
When a PLOP exception occurred, no other PLOP function except PLOP_delete( ) may be called with the corresponding PLOP object.
The PLOP language bindings for Java and .NET define a separate PLOPException object which offers several members to access detailed error information.
C++ int get_errnum( )C# Java int get_errnum( )
Perl PHP int get_errnum( )VB Function get_errnum( ) As Long
C int PLOP_get_errnum(PLOP *plop)
Get the number of the last thrown exception, or the reason of a failed function call.
Returns The exception’s error number.
Bindings In .NET this method is also available as Errnum in the PLOPException object.In Java this method is also available as get_errnum( ) in the PLOPException object.
C++ wstring get_errmsg( )C# Java String get_errmsg( )
Perl PHP string get_errmsg( )VB Function get_errmsg( ) As String
C const char *PLOP_get_errmsg(PLOP *plop)
Get the descriptive text of the last thrown exception, or the reason of a failed function call.
Returns A string describing the error, or an empty string if the last API call didn’t cause any error.
Bindings In .NET this method is also available as Errmsg in the PLOPException object.In Java this method is also available as getMessage( ) in the PLOPException object.
C++ wstring get_apiname( )C# Java String get_apiname( )
Perl PHP string get_apiname( )VB Function get_apiname( ) As String
C const char *PLOP_get_apiname(PLOP *plop)
Get the name of the API function which threw the last exception or failed.
Returns The name of a PLOP API function.
7.6 Exception Handling 125
Bindings In .NET this method is also available as Apiname in the PLOPException object.In Java this method is also available as get_apiname( ) in the PLOPException object.
C PLOP_TRY(PLOP *plop)
Set up an exception handling frame; must always be paired with PLOP_CATCH( ).
Details See »Error handling«, page 39.
C PLOP_CATCH(PLOP *plop)
Catch an exception; must always be paired with PLOP_TRY( ).
Details See »Error handling«, page 39.
C PLOP_EXIT_TRY(PLOP *plop)
Inform the exception machinery that a PLOP_TRY( ) will be left without entering the cor-responding PLOP_CATCH( ) clause.
Details See »Error handling«, page 39.
C PLOP_RETHROW(PLOP *plop)
Re-throw an exception to another handler.
Details See »Error handling«, page 39.
126 Chapter 7: PLOP and PLOP DS Library API Reference
7.7 Option Handling
C++ void set_option(wstring optlist)C# Java void set_option(String optlist)
Perl PHP set_option(string optlist)VB Sub set_option(optlist As String)
C void PLOP_set_option(PLOP *plop, const char *optlist)
Set one or more global options for PLOP.
optlist An option list specifying global options according to Table 7.11. If an option is provided more than once the last instance overrides all previous ones. In order to sup-ply multiple values for a single option (e.g. searchpath) supply all values in a list argu-ment to this option.
Details Multiple calls to this function can be used to accumulate values for those options marked in Table 7.11. For unmarked options the new value overrides the old one.
Table 7.11 Global options for PLOP_set_option( )
option description
filename-handling
(Keyword) Indicates the encoding of file names. File names supplied as function parameters without UTF-8 BOM in non-Unicode aware language bindings are interpreted according to this option to guard against characters which would be illegal in the file system and to create a Unicode version of the file name. An error occurs if the file name contains characters outside the specified encoding. Default: unicode on Windows and OS X, otherwise honorlang:ascii 7-bit ASCIIbasicebcdic Basic EBCDIC according to code page 1047, but only Unicode values <= U+007Ebasicebcdic_37
Basic EBCDIC according to code page 0037, but only Unicode values <= U+007Ehonorlang The environment variables LC_ALL, LC_CTYPE and LANG are interpreted. The codeset specified
in LANG is applied to file names if it is available.legacy Use auto encoding (i.e. the current system encoding) to interpret the file name and interpret
the LANG variable if the honorlang parameter is set.unicode Unicode encoding in (EBCDIC-) UTF-8 formatall names of 8-bit and CJK encodings
Any (internal or user-defined) encoding recognized by PLOP
license (String) Set the license key. It must be set before the first call to PLOP_open_document*( ).
licensefile (String) Set the name of a file containing the license key(s). The license file can be set only once before the first call to PLOP_open_document*( ). Alternatively, the name of the license file can be supplied in an en-vironment variable called PDFLIBLICENSEFILE or (on Windows) via the registry.
frontpage (Boolean) If false, an exception is thrown if no valid license key was found; if true, a front page is creat-ed in evaluation mode according to Section 0.1, »Installing the Software«, page 7. This option must be set before the first call to PLOP_open_document*( ). It doesn’t have any effect if a valid license key was found. Default: true
logging1 (Option list; unsupported) An option list specifying logging output according to Table 7.12. Alternatively, logging options can be supplied in an environment variable called PLOPLOGGING or on Windows via the registry. An empty option list will enable logging with the options set in previous calls. If the environment variable is set logging will start immediately after the first call to PLOP_new( ).
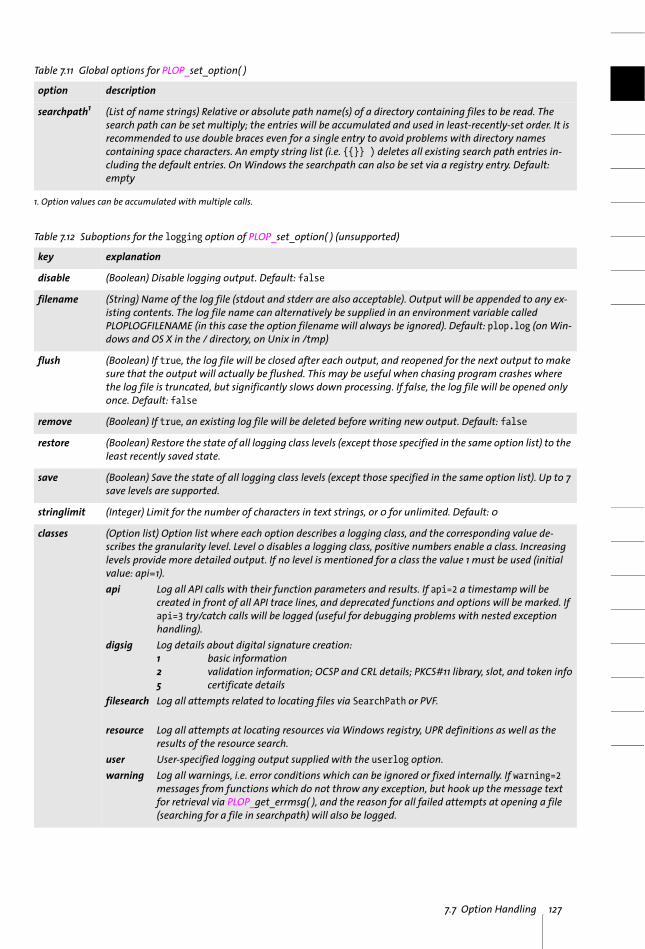
7.7 Option Handling 127
searchpath1 (List of name strings) Relative or absolute path name(s) of a directory containing files to be read. The search path can be set multiply; the entries will be accumulated and used in least-recently-set order. It is recommended to use double braces even for a single entry to avoid problems with directory names containing space characters. An empty string list (i.e. {{}} ) deletes all existing search path entries in-cluding the default entries. On Windows the searchpath can also be set via a registry entry. Default: empty
1. Option values can be accumulated with multiple calls.
Table 7.12 Suboptions for the logging option of PLOP_set_option( ) (unsupported)
key explanation
disable (Boolean) Disable logging output. Default: false
filename (String) Name of the log file (stdout and stderr are also acceptable). Output will be appended to any ex-isting contents. The log file name can alternatively be supplied in an environment variable called PLOPLOGFILENAME (in this case the option filename will always be ignored). Default: plop.log (on Win-dows and OS X in the / directory, on Unix in /tmp)
flush (Boolean) If true, the log file will be closed after each output, and reopened for the next output to make sure that the output will actually be flushed. This may be useful when chasing program crashes where the log file is truncated, but significantly slows down processing. If false, the log file will be opened only once. Default: false
remove (Boolean) If true, an existing log file will be deleted before writing new output. Default: false
restore (Boolean) Restore the state of all logging class levels (except those specified in the same option list) to the least recently saved state.
save (Boolean) Save the state of all logging class levels (except those specified in the same option list). Up to 7 save levels are supported.
stringlimit (Integer) Limit for the number of characters in text strings, or 0 for unlimited. Default: 0
classes (Option list) Option list where each option describes a logging class, and the corresponding value de-scribes the granularity level. Level 0 disables a logging class, positive numbers enable a class. Increasing levels provide more detailed output. If no level is mentioned for a class the value 1 must be used (initial value: api=1).api Log all API calls with their function parameters and results. If api=2 a timestamp will be
created in front of all API trace lines, and deprecated functions and options will be marked. If api=3 try/catch calls will be logged (useful for debugging problems with nested exception handling).
digsig Log details about digital signature creation:1 basic information2 validation information; OCSP and CRL details; PKCS#11 library, slot, and token info5 certificate details
filesearch Log all attempts related to locating files via SearchPath or PVF.
resource Log all attempts at locating resources via Windows registry, UPR definitions as well as the results of the resource search.
user User-specified logging output supplied with the userlog option.warning Log all warnings, i.e. error conditions which can be ignored or fixed internally. If warning=2
messages from functions which do not throw any exception, but hook up the message text for retrieval via PLOP_get_errmsg( ), and the reason for all failed attempts at opening a file (searching for a file in searchpath) will also be logged.
Table 7.11 Global options for PLOP_set_option( )
option description
128 Chapter 7: PLOP and PLOP DS Library API Reference
7.8 pCOS FunctionsThe full pCOS syntax for retrieving object data from a PDF is supported; see the pCOS Path Reference for a detailed description.
C++ double pcos_get_number(int doc, wstring path)C# Java double pcos_get_number(int doc, String path)
Perl PHP double pcos_get_number(long doc, string path)VB Function pcos_get_number(doc as Long, path As String) As Double
C double PLOP_pcos_get_number(PLOP *plop, int doc, const char *path, ...)
Get the value of a pCOS path with type number or boolean.
doc A valid document handle obtained with PLOP_open_document*( ).
path A full pCOS path for a numerical or boolean object.
Additional parameters (C language binding only) A variable number of additional pa-rameters can be supplied if the key parameter contains corresponding placeholders (%s for strings or %d for integers; use %% for a single percent sign). Using these parameters will save you from explicitly formatting complex paths containing variable numerical or string values. The client is responsible for making sure that the number and type of the placeholders matches the supplied additional parameters.
Returns The numerical value of the object identified by the pCOS path. For Boolean values 1 will be returned if they are true, and 0 otherwise.
C++ string pcos_(int doc, wstring path)C# Java String pcos_get_string(int doc, String path)
Perl PHP string pcos_get_string(long doc, string path)VB Function pcos_get_string(doc as Long, path As String) As String
C const char *PLOP_pcos_get_string(PLOP *plop, int doc, const char *path, ...)
Get the value of a pCOS path with type name, number, string, or boolean.
doc A valid document handle obtained with PLOP_open_document*( ).
path A full pCOS path for a string, name, or boolean object.
Additional parameters (C language binding only) A variable number of additional pa-rameters can be supplied if the key parameter contains corresponding placeholders (%s for strings or %d for integers; use %% for a single percent sign). Using these parameters will save you from explicitly formatting complex paths containing variable numerical or string values. The client is responsible for making sure that the number and type of the placeholders matches the supplied additional parameters.
Returns A string with the value of the object identified by the pCOS path. For Boolean values the strings true or false will be returned.
Details This function raises an exception if pCOS does not run in full mode and the type of the object is string. However, the objects /Info/* (document info keys) can also be retrieved in restricted pCOS mode if nocopy=false or plainmetadata=true, and bookmarks[...]/Title as
7.8 pCOS Functions 129
well as all paths starting with pages[...]/annots[...]/ can be retrieved in restricted pCOS mode if nocopy=false.
This function assumes that strings retrieved from the PDF document are text strings. String objects which contain binary data should be retrieved with PLOP_pcos_get_ stream( ) instead which does not modify the data in any way.
Bindings C language binding: The string will be returned in UTF-8 format without BOM. The re-turned strings will be stored in a ring buffer with up to 10 entries. If more than 10 strings are queried, buffers will be reused, which means that clients must copy the strings if they want to access more than 10 strings in parallel. For example, up to 10 calls to this function can be used as parameters for a printf( ) statement since the return strings are guaranteed to be independent if no more than 10 strings are used at the same time.
C++ language binding: The string will be returned as wstring in the default wstring con-figuration of the C++ wrapper. In string compatibility mode on zSeries the result will be returned in EBCDIC-UTF-8 without BOM.
Java and .NET: the result will be provided as Unicode string. If no more text is available a null object will be returned.
Perl, PHP, Python and Ruby language bindings: the result will be provided as UTF-8 string. If no more text is available a null object will be returned.
C++ const unsigned char *pcos_get_stream(int doc, int *length, string optlist, wstring path)C# Java byte[ ] pcos_get_stream(int doc, String optlist, String path)
Perl PHP string pcos_get_stream(long doc, string optlist, string path)VB Function pcos_get_stream(doc as Long, optlist As String, path As String)
C const unsigned char *PLOP_pcos_get_stream(PLOP *plop, int doc, int *length, const char *optlist,const char *path, ...)
Get the contents of a pCOS path with type stream, fstream, or string.
doc A valid document handle obtained with PLOP_open_document*( ).
length (C and C++ language bindings only) A pointer to a variable which will receive the length of the returned stream data in bytes.
optlist An option list specifying stream retrieval options according to Table 7.13.
path A full pCOS path for a stream or string object.
Additional parameters (C language binding only) A variable number of additional pa-rameters can be supplied if the key parameter contains corresponding placeholders (%s for strings or %d for integers; use %% for a single percent sign). Using these parameters will save you from explicitly formatting complex paths containing variable numerical or string values. The client is responsible for making sure that the number and type of the placeholders matches the supplied additional parameters.
Returns The unencrypted data contained in the stream or string. The returned data will be emp-ty (in C and C++: NULL) if the stream or string is empty, or if the contents of encrypted attachments in an unencrypted document are queried and the attachment password has not been supplied.
130 Chapter 7: PLOP and PLOP DS Library API Reference
If the object has type stream, all filters will be removed from the stream contents (i.e. the actual raw data will be returned). If the object has type fstream or string the data will be delivered exactly as found in the PDF file, with the exception of ASCII85 and ASCII-Hex filters which will be removed.
Details This function will throw an exception if pCOS does not run in full mode. As an excep-tion, the object /Root/Metadata can also be retrieved in restricted pCOS mode if nocopy=false or plainmetadata=true. An exception will also be thrown if path does not point to an object of type stream, fstream, or string.
Despite its name this function can also be used to retrieve objects of type string. Un-like PLOP_pcos_get_string( ), which treats the object as a text string, this function will not modify the returned data in any way. Binary string data is rarely used in PDF, and can-not be reliably detected automatically. The user is therefore responsible for selecting the appropriate function for retrieving string objects as binary data or text.
Bindings COM: Most client programs will use the Variant type to hold the stream contents. Java-Script with COM does not allow to retrieve the length of the returned variant array (but it does work with other languages and COM).
C and C++ language bindings: The returned data buffer can be used until the next call to this function.
This function can be used to retrieve embedded font data from a PDF. Users are reminded of the fact that fonts are subject to the respective font vendor’s license agreement, and must not be reused without the explicit permission of the respective intellectual property owners. Please contact your font vendor to discuss the relevant license agreement.
Table 7.13 Options for PLOP_pcos_get_stream( )
option description
convert (Keyword; will be ignored for streams which are compressed with unsupported filters) Controls whether or not the string or stream contents will be converted (default: none):none Treat the contents as binary data without any conversion.unicode Treat the contents as textual data (i.e. exactly as in PLOP_pcos_get_string( )), and normalize it
to Unicode. In non-Unicode-aware language bindings this means the data will be converted to UTF-8 format without BOM.This option is required for the data type »text stream« in PDF which is rarely used (e.g. it can be used for JavaScript, although the majority of JavaScripts is contained in string objects, not stream objects).
7.9 Unicode Conversion Function 131
7.9 Unicode Conversion Function
C++ string convert_to_unicode(wstring inputformat, string input, wstring optlist)C# Java string convert_to_unicode(string inputformat, byte[ ] input, string optlist)
Perl PHP string convert_to_unicode(string inputformat, string input, string optlist)VB Function convert_to_unicode(inputformat as String, input, optlist as String) As String
C const char *PLOP_convert_to_unicode(PLOP *p,const char *inputformat, const char *input, int inputlen, int *outputlen, const char *optlist)
Convert a string in an arbitrary encoding to a Unicode string in various formats.
inputformat Unicode text format or encoding name specifying interpretation of the input string:
> Unicode text formats: utf8, ebcdicutf8, utf16, utf16le, utf16be, utf32> All internally known 8-bit encodings, encodings available on the host system, and
the CJK encodings cp932, cp936, cp949, cp950> The keyword auto specifies the following behavior: if the input string contains a
UTF-8 or UTF-16 BOM it will be used to determine the appropriate format, otherwise the current system codepage will be assumed.
input String (COM: Variant) to be converted to Unicode.
inputlen (C language binding only) Length of the input string in bytes. If inputlen = 0 a null-terminated string must be provided.
outputlen (C language binding only) C-style pointer to a memory location where the length of the returned string (in bytes) will be stored.
optlist An option list specifying options for input interpretation and Unicode conver-sion:
> Input filter options according to Table 7.14: charref, escapesequence> Unicode conversion options according to Table 7.14:
bom, errorpolicy, inflate, outputformat
Returns A Unicode string created from the input string according to the specified parameters and options. If the input string does not conform to the specified input format (e.g. in-valid UTF-8 string) an empty output string will be returned if errorpolicy=return, and an exception will be thrown if errorpolicy=exception.
Details This function may be useful for general Unicode string conversion. It is provided for the benefit of users working in environments which do not provide suitable Unicode con-verters.
Scope any
Bindings C binding: the returned strings will be stored in a ring buffer with up to 10 entries. If more than 10 strings are converted, the buffers will be reused, which means that clients must copy the strings if they want to access more than 10 strings in parallel. For exam-ple, up to 10 calls to this function can be used as parameters for a printf( ) statement since the return strings are guaranteed to be independent if no more than 10 strings are used at the same time.

132 Chapter 7: PLOP and PLOP DS Library API Reference
Table 7.14 Options for PLOP_convert_to_unicode( )
option description
bom (Keyword; will be ignored for outputformat=utf32) Policy for adding a byte order mark (BOM) to the output string. Supported keywords (default: none):add Add a BOM.keep Add a BOM if the input string has a BOM.none Don’t add a BOM.optimize Add a BOM except if outputformat=utf8 or ebcdicutf8 and the output string contains only
characters in the range < U+007F.
charref (Boolean) If true, enable substitution of numeric and character entity references and glyph name refer-ences. Default: false
errorpolicy (Keyword) Behavior in case of conversion errors (default: exception):return The replacement character will be used if a character reference cannot be resolved. An empty
string will be returned in case of conversion errors.exception An exception will be thrown in case of conversion errors.
escape-sequence
(Boolean) If true, enable substitution of escape sequences in strings. Default: false
inflate (Boolean; only for inputformat=utf8; will be ignored if outputformat=utf8) If true, an invalid UTF-8 input string will not trigger an exception, but rather an inflated byte string in the specified output for-mat will be generated. This may be useful for debugging. Default: false
output-format
(Keyword) Unicode text format of the generated string: utf8, ebcdicutf8, utf16, utf16le, utf16be, utf32. An empty string is equivalent to utf16. Default: utf16Unicode-aware language bindings: the output format will be forced to utf16.C++ language binding: only the following output formats are allowed: utf8, utf16, utf32.
A Combining PDFlib with PLOP DS 135
A Combining PDFlib with PLOP DSPLOP DS has been designed for easy interoperability with PDFlib for dynamically gener-ating and signing PDF documents. In this chapter we discuss how you can combine both products. Although it is possible to use the PLOP command-line tool to post-process documents generated with PDFlib, it is usually more efficient to use the PLOP DS library to do so unless you are dealing with very large documents.
File-Based Combination. The file-based method is recommended if you deal with very large PDF documents, or if you need to reduce the total memory requirements of the PDFlib/PLOP DS combination. Simply generate a PDF file on disk with appropriate PDFlib routines, and process the generated document with PLOP_open_document( ).
Create documents in memory and digitally sign. The memory-based method is faster, but requires more memory. The following process is recommended for dynamic PDF generation and signature in Web applications unless you deal with very large docu-ments:
> Instead of generating a PDF file on disk with PDFlib, use in-core PDF generation by supplying an empty file name to PDF_begin_document( ).
> Fetch the contents of the buffer containing the generated PDF data by calling PDF_get_buffer( ) after PDF_end_document( ).
> Create a virtual file in PLOP based on the PDF data in memory by calling PLOP_create_pvf( ).
> Pass the name of the PVF file to PLOP DS using PLOP_open_document( ).
The hellosign programming sample which is included in all PLOP packages demon-strates how to use PDFlib for dynamically creating a PDF document and passing it to PLOP in memory for applying a digital signature.
Note Since PDFlib 7/8/9 doesn’t create appearance streams for form fields you can only use PLOP DS to sign PDFlib-generated documents containing non-signature form fields if you remove the fields with the sacrifice option.
Dynamically create signature visualization documents. You can also use PDFlib to dy-namically create a document which is used for signature visualization (see Section 6.3.1, »Visualizing Signatures with a Graphic or Logo«, page 78). This is useful if you need to include varying text or image components in the visualization document, e.g. the cur-rent date/time. The basic structure of dynamicsign is very similar to the hellosign sample.
The dynamicsign programming sample demonstrates how to use PDFlib for dynami-cally creating a PDF visualization document and pass it to PLOP in memory for use in the signature creation process.
136 Chapter B: PLOP Library Quick Reference
B PLOP Library Quick ReferenceThe following tables contain an overview of all PLOP API functions. The prefix (C) de-notes C prototypes of functions which are not available in the Java language binding.
General Functions
Document Input and Output
Error Handling
Option Handling
pCOS Functions
Unicode Conversion Function
Function prototype page(C) PLOP * PLOP_new(void) 105void delete( ) 105void create_pvf(String filename, byte[ ] data, String optlist) 105int delete_pvf(String filename) 106double info_pvf(String filename, String keyword) 106
Function prototype pageint open_document(String filename, String optlist) 108(C) int PLOP_open_document_callback(PLOP *plop, void *opaque, size_t filesize, size_t (*readproc)(void *opaque, void *buffer, size_t size), int (*seekproc)(void *opaque, long offset), const char *optlist) 110int create_document(String filename, String optlist) 111close_document(int doc, String optlist) 110byte[ ] get_buffer( ) 114int prepare_signature(String optlist) 116
Function prototype pageint get_errnum( ) 125String get_errmsg( ) 125String get_apiname( ) 125
Function prototype pagevoid set_option(String optlist) 127
Function prototype pagedouble pcos_get_number(int doc, String path) 130String pcos_get_string(int doc, String path) 130byte[ ] pcos_get_stream(int doc, String optlist, String path) 131
Function prototype pagestring convert_to_unicode(string inputformat, byte[ ] input, string optlist) 133
C Revision History 137
C Revision History
Revision history of this manual
Date Changes
December 04, 2014 > Changes for PLOP 5.0 and PLOP DS 5.0
September 09, 2014 > Changes for PLOP 5.0 and PLOP DS 5.0 Beta 1
March 13, 2014 > Changes for PLOP 5.0 and PLOP DS 5.0 Alpha 2
January 30, 2014 > Changes for PLOP 5.0 and PLOP DS 5.0 Alpha 1
March 04, 2011 > Major overhaul for PLOP 4.1 and PLOP DS 4.1
December 05, 2008 > Updates for XMP, PVF, and PKCS#11 (smartcard) support in PLOP 4.0 and PLOP DS 4.0
July 15, 2007 > Updates for PLOP 3.0 and PLOP DS 3.0
September 27, 2004 > Updates for PLOP 2.1
December 01, 2003 > Updated for new major release PLOP 2.0
November 23, 2002 > Added a description of the Perl binding for PSP
November 7, 2002 > Added a section on the use of PSP with ILE-RPG
October 22, 2002 > Minor changes for PSP 1.0.1
September 17, 2002 > First edition for PSP 1.0.0

Index 139
Index
AAd Ticket scheme 21Adobe Approved Trust List (AATL) 70AES encryption algorithm 58approval signatures 69attachment password 57attribute certificates 94Authenticode time-stamping 95author signatures 84Authority Info Access (AIA) 86, 98
BBES (Basic Electronic Signature) 100Brainpool curves for ECDSA 77bulk signatures 74byteserving 16
CC binding 39C++ and .NET 48C++ binding 42CAdES (CMS Advanced Electronic Signatures) 100,
120certificate chain 67certificate organization in Windows 76certificate revocation checking 67certificate revocation list (CRL) 88certificates 67certification signatures 69, 84Certified Document Services (CDS) 70CLI 42CMS (Cryptographic Message Syntax) 100COM binding 45commercial license 10commitment type indication 100critical flag in TSA certificate 95CRL distribution point (CRLdp) 88cryptographic engines 72cryptographic tokens 72, 73
Ddamaged input PDFs 18DER format 89dictionary attack 59digital IDs 67digital signatures 23, 67document info entries 20Document Security Store (DSS) 83, 88, 100, 118
document-level time-stamp 70, 93DSA signature 77
EECDSA (elliptic curve) signature 77electronic signatures: see digital signaturesencrypted file attachments 24, 60encryption algorithm for digital signatures 76EPES (Explicit Policy-based Electronic Signature)
100ETSI (European Telecommunications Standards
Institute) standards 100ETSI TS 101 733 (CAdES) 100ETSI TS 102 778 (PAdES) 100ETSI TS 103 172 (PAdES conformance levels) 101European Union Trust List (EUTL) 70evaluation version 7exception handling 125
in C 39exit codes 36
Ffile attachments, encrypted 60font optimization 17form fields in the input document 24
Ggarbage collection 17Ghent Workgroup (GWG) 21
Hhash function for digital signatures 77
Iid-pkix-ocsp-nocheck 87incremental PDF update 82installing PLOP/PLOP DS 7invalid XMP metadata 22
JJava binding 46
Kkey lengths for digital signatures 76
140 Index
Llarge PDF Documents 24LDAP 98license key 8linearized PDF 16long-term validation (LTV) 96, 100
Mmaster password 57message digest for digital signatures 77Microsoft Cryptographic API (MSCAPI) 72, 75Modification Detection and Prevention signature
(MDP) 69multi-threading for PKCS#11 74
N.NET binding 48noaccessible 62noannots 62noassemble 62no-check extension (OCSP) 87nocopy 62noforms 62nohiresprint 63nomodify 62noprint 62
OObjective-C binding 49OCSP (Online Certificate Status Protocol) 86OCSP no-check extension 87optimization 17optimized PDF 16option lists 103owner password 57
PPAdES (PDF Advanced Electronic Signatures) 100,
120conformance levels 101PAdES-B, PAdES-T, PAdES-LT, PAdES-LTA 101parts 100
page-at-a-time download 16password file for digital IDs 73passwords 57, 58
for digital IDs 73Unicode 58
pCOSAPI functions 130Cookbook 11
PDF update 82PDF version of the generated output 23PDF/A 23
and signatures 80and XMP metadata 21
PDF/UA 23, 78PDF/VT 23, 78PDF/X 23, 24, 78PDFlib and PLOP/PLOP DS 135PEM format 89Perl binding 51permission settings 59permissions password 57PFX format 72PHP binding 52PKCS#11 72, 73PKCS#12 72PKCS#7 100plainmetadata 63PLOP and PLOP DS command-line tool
examples 37exit codes 36features 15, 27options 33
PLOP and PLOP DS libraryAPI reference 103features 15, 27quick reference 136
PLOP_CATCH( ) 126PLOP_close_document( ) 110PLOP_convert_to_unicode( ) 133PLOP_create_document( ) 111PLOP_create_pvf( ) 105PLOP_delete_pvf( ) 106PLOP_delete( ) 105PLOP_EXIT_TRY( ) 39, 126PLOP_get_apiname( ) 125PLOP_get_buffer( ) 114PLOP_get_errmsg( ) 125PLOP_get_errnum( ) 125PLOP_info_pvf() 107PLOP_new( ) 105PLOP_open_document_callback( ) 110PLOP_open_document( ) 108PLOP_pcos_get_number( ) 130PLOP_pcos_get_stream( ) 131PLOP_pcos_get_string( ) 130PLOP_prepare_signature( ) 116PLOP_RETHROW( ) 126PLOP_set_option( ) 127PLOP_TRY( ) 126policy identifier 100Python binding 54
RRC4 encryption algorithm 58Reader-enabled PDF 24rectangles in option lists 104repair mode for damaged PDFs 18response file 35RFC 2560 (OCSP) 86RFC 2630 (CMS syntax) 94RFC 3126 (signed attributes) 95
RFC 3161 (time-stamping) 91RFC 3280
(Authority Info Access for caIssuers) 98(Authority Info Access for OCSP) 86(CRL) 88
RFC 5035 (SigningCertificateV2) 94RFC 5126 (CAdES) 100RFC 5480 (ECDSA with NIST curves) 77RFC 5639 (ECDSA with Brainpool curves) 77RFC 5652 (CMS) 100RFC 5816 (time-stamping) 94RFC 6960 (OCSP) 86RPG binding 55RSA signature 77Ruby binding 55
Ssacrificing properties of the input document 23session handling for PKCS#11 74SHA-256 message digest 77signature types in PDF 68signatures: see digital signaturesSigningCertificateV2 94smartcards 72, 73stream optimization 17Suite B Cryptography
digital signature algorithms 76encryption 58hash functions 77
Ttemporary disk space requirements 24time-stamp (document-level) 70, 93Time-Stamp Authority (TSA) 91TimeStamp extension 92time-stamped signature 92time-stamping 68
UUnicode passwords 58unused objects 17update 82usage rights signatures 70user password 57
Vvisualizing digital signatures 78
Wweb-optimized PDF 16
XXMP metadata 20, 21
invalid 22plaintext 60
ABC
PDFlib GmbHFranziska-Bilek-Weg 980339 München, Germanywww.pdflib.comphone +49 • 89 • 452 33 84-0fax +49 • 89 • 452 33 84-99
If you have questions check the PDFlib mailing listand archive at groups.yahoo.com/neo/groups/pdflib/info
Licensing [email protected]
[email protected] (please include your license number)