Embed Size (px)
Citation preview

Photoshop Plug-in
User Guide

Zaxwerks Inc.
5724 Camellia Ave.Temple City, CA 91780(626) 309-9102 phone(626) 309-9142 faxhttp://www.zaxwerks.comhttp://www.digitalanarchy.com
Sales: [email protected] Support: [email protected] can also fill out a help request form at:http://www.digitalanarchy.com/support/form.php
© 1996 - 2009 Zaxwerks Inc. All rights reserved.
This manual, as well as the software described in it, is furnished under license and may only be used or copied in accordance with the terms of such license. The information in this manual is furnished for informational use only, is subject to change without notice, and does not represent product specifications or commitment on the part of Zaxwerks. Zaxwerks assumes no responsibility or liability for any error or inaccuracies that may appear in this document.
The Zaxwerks Invigorator for Photoshop is a trademark of Zaxwerks Inc. Illustrator and Photoshop are trademarks of Adobe Systems Inc. Windows, Windows Vista, and Windows XP are registered trademarks of Microsoft, Inc. Tiger and Leopard are registered trademarks of Apple Inc. All other product names or trademarks are the property of their respective owners.

Table Of Contents
System Requirements Mac & Windows Requirements . . . . . . . . . . . . . . . . . . 6
Install 3D Invigorator for Photoshop Zaxwerks Software License Agreement . . . . . . . . . . 7 Install Location . . . . . . . . . . . . . . . . . . . . . . . . . . . . . . . . . 7 Multiple Installations . . . . . . . . . . . . . . . . . . . . . . . . . . . 7
Project Setup Coverting a Layer into a Smart Filter . . . . . . . . . . . . . 8 Applying 3D Invigorator to a Smart Filter . . . . . . . . 8 Re-edit Contents of 3D Invigorator . . . . . . . . . . . . . . 8 Applying 3D Invigorator to a Layer . . . . . . . . . . . . . . 8 Using the “Last Filter” Command . . . . . . . . . . . . . . . . 8
Authorize the Software Filling in the Authorization Code . . . . . . . . . . . . . . . . 9 Run the Program as a Demo . . . . . . . . . . . . . . . . . . . . . 9 Create 3D Objects Using the Object Menu . . . . . . . . . . . . . . . . . . . . . . . . 10 Create 3D Text . . . . . . . . . . . . . . . . . . . . . . . . . . . . . . . . . 10 Choosing a Font . . . . . . . . . . . . . . . . . . . . . . . . . . . 10 Customizing Text Properties . . . . . . . . . . . . . . . 10 Text Input Box . . . . . . . . . . . . . . . . . . . . . . . . . . . . . 10 Expanding the Text Field . . . . . . . . . . . . . . . . . . . 10 Create 3D Primitives . . . . . . . . . . . . . . . . . . . . . . . . . . . 11 Open Illustrator File . . . . . . . . . . . . . . . . . . . . . . . . . . . . 11 Selecting an Illustrator File . . . . . . . . . . . . . . . . . 11 Open By Layers . . . . . . . . . . . . . . . . . . . . . . . . . . . . 11 Use Illustrator Colors . . . . . . . . . . . . . . . . . . . . . . 11 Dismantle Incoming Groups . . . . . . . . . . . . . . . 11 Save Without “Use Compression” . . . . . . . . . . . 11
Interface Customizing the Workspaces . . . . . . . . . . . . . . . . . . . 12 Saving the Current Workspace . . . . . . . . . . . . . 12 Assigning a Workspace Button . . . . . . . . . . . . . 12 Deleting a Workspace . . . . . . . . . . . . . . . . . . . . . 12 Switching Between Workspaces . . . . . . . . . . . . 12 Renaming a Workspace Button . . . . . . . . . . . . . 12 Menu Options Adjusting Panels . . . . . . . . . . . . . . . . . . . . . . . . . . . . . . . 13 Panels Menu . . . . . . . . . . . . . . . . . . . . . . . . . . . . . . 13 Opening and Closing Panels . . . . . . . . . . . 13 Closing a Panel Tab . . . . . . . . . . . . . . . . . . . . . . . . 13 Dragging a Panel to a Tab . . . . . . . . . . . . . . . . . . 13 Resizing a Panel . . . . . . . . . . . . . . . . . . . . . . . . . . . 13 Creating a Panel at a Location . . . . . . . . . . . . . . 13 File Menu . . . . . . . . . . . . . . . . . . . . . . . . . . . . . . . . . . . . . . 14 New Scene . . . . . . . . . . . . . . . . . . . . . . . . . . . . . . . . 14 Open Scene . . . . . . . . . . . . . . . . . . . . . . . . . . . . . . . 14 Merge Scene . . . . . . . . . . . . . . . . . . . . . . . . . . . . . . 14 Save Scene As . . . . . . . . . . . . . . . . . . . . . . . . . . . . . 14 Edit Menu . . . . . . . . . . . . . . . . . . . . . . . . . . . . . . . . . . . . . 14 Undo . . . . . . . . . . . . . . . . . . . . . . . . . . . . . . . . . . . . . 14 Delete . . . . . . . . . . . . . . . . . . . . . . . . . . . . . . . . . . . . 14 Clear Objects . . . . . . . . . . . . . . . . . . . . . . . . . . . . . . 14 Clear Scene . . . . . . . . . . . . . . . . . . . . . . . . . . . . . . . 14 Select All . . . . . . . . . . . . . . . . . . . . . . . . . . . . . . . . . . 14 Deselect All . . . . . . . . . . . . . . . . . . . . . . . . . . . . . . . 14 Help and Preferences . . . . . . . . . . . . . . . . . . . . . . . . . . 15 Duplication Offset . . . . . . . . . . . . . . . . . . . . . . . . . 15 Default Hard Shading . . . . . . . . . . . . . . . . . . . . . . 15 Number of Undos . . . . . . . . . . . . . . . . . . . . . . . . . 15 Restore Preferences . . . . . . . . . . . . . . . . . . . . . . . 15 Restore Files . . . . . . . . . . . . . . . . . . . . . . . . . . . . . . . 15 Help Menu . . . . . . . . . . . . . . . . . . . . . . . . . . . . . . . . 15

3D Preview Window Camera Mode . . . . . . . . . . . . . . . . . . . . . . . . . . . . . . . . . 16 Light Mode . . . . . . . . . . . . . . . . . . . . . . . . . . . . . . . . . . . . 16 Object Mode . . . . . . . . . . . . . . . . . . . . . . . . . . . . . . . . . . 16 Tumble Tool . . . . . . . . . . . . . . . . . . . . . . . . . . . . . . . 16 Roll Tool . . . . . . . . . . . . . . . . . . . . . . . . . . . . . . . . . . 16 Tracking Tool . . . . . . . . . . . . . . . . . . . . . . . . . . . . . . 16 Dolly Tool . . . . . . . . . . . . . . . . . . . . . . . . . . . . . . . . . 16 Scale Tool . . . . . . . . . . . . . . . . . . . . . . . . . . . . . . . . . 16 Selection Tool . . . . . . . . . . . . . . . . . . . . . . . . . . . . . 16 Zoom Tool . . . . . . . . . . . . . . . . . . . . . . . . . . . . . . . . 16 Drag Using Object Axes . . . . . . . . . . . . . . . . . . . . . . . . 16 Offline Camera . . . . . . . . . . . . . . . . . . . . . . . . . . . . . . . . 17 Display Setting . . . . . . . . . . . . . . . . . . . . . . . . . . . . . . . . 17 Background Color . . . . . . . . . . . . . . . . . . . . . . . . . . . . . 17 Background Image . . . . . . . . . . . . . . . . . . . . . . . . . . . . 17 Render Preview . . . . . . . . . . . . . . . . . . . . . . . . . . . . . . . . 17 Views Menu . . . . . . . . . . . . . . . . . . . . . . . . . . . . . . . . . . . 17 Camera Menu . . . . . . . . . . . . . . . . . . . . . . . . . . . . . . . . . 17 Grids Menu . . . . . . . . . . . . . . . . . . . . . . . . . . . . . . . . . . . . 17 Objects Panel Object List . . . . . . . . . . . . . . . . . . . . . . . . . . . . . . . . . . . . . 18 Make Invisible . . . . . . . . . . . . . . . . . . . . . . . . . . . . . . . . . 18 Clear Objects . . . . . . . . . . . . . . . . . . . . . . . . . . . . . . . . . . 18 Reset Button . . . . . . . . . . . . . . . . . . . . . . . . . . . . . . . . . . 18 Delete Button . . . . . . . . . . . . . . . . . . . . . . . . . . . . . . . . . 18 Clear Scene Button . . . . . . . . . . . . . . . . . . . . . . . . . . . . 18 Move To Center Button . . . . . . . . . . . . . . . . . . . . . . . . . 18 Duplicate Button . . . . . . . . . . . . . . . . . . . . . . . . . . . . . . 18 Edit Text Button . . . . . . . . . . . . . . . . . . . . . . . . . . . . . . . . 18 Depth Slider . . . . . . . . . . . . . . . . . . . . . . . . . . . . . . . . . . . 18 SpikeBuster . . . . . . . . . . . . . . . . . . . . . . . . . . . . . . . . . . . . 18 Faces . . . . . . . . . . . . . . . . . . . . . . . . . . . . . . . . . . . . . . . . . . 18 Bevels . . . . . . . . . . . . . . . . . . . . . . . . . . . . . . . . . . . . . . . . 18 Edges . . . . . . . . . . . . . . . . . . . . . . . . . . . . . . . . . . . . . . . . . 18
Material Swatches Panel Duplicate Selected Materials . . . . . . . . . . . . . . . . . . . 19 Select All Unused . . . . . . . . . . . . . . . . . . . . . . . . . . . . . . 19 Delete Selected Materials . . . . . . . . . . . . . . . . . . . . . . 19 Clear Bin . . . . . . . . . . . . . . . . . . . . . . . . . . . . . . . . . . . . . . 19 Missing Texture Map . . . . . . . . . . . . . . . . . . . . . . . . . . . 19 Applying Materials to Objects . . . . . . . . . . . . . . . . . . 19 Reset Material Swatches . . . . . . . . . . . . . . . . . . . . . . . 19 Material Editor Panel New Material . . . . . . . . . . . . . . . . . . . . . . . . . . . . . . . . . . 20 Duplicate Material . . . . . . . . . . . . . . . . . . . . . . . . . . . . . 20 Save Material to Bin . . . . . . . . . . . . . . . . . . . . . . . . . . . . 20 Clear Map . . . . . . . . . . . . . . . . . . . . . . . . . . . . . . . . . . . . . 20 Material Color . . . . . . . . . . . . . . . . . . . . . . . . . . . . . . . . . 20 Material Color Sampler . . . . . . . . . . . . . . . . . . . . . . . . . 20 Highlight Texture Map . . . . . . . . . . . . . . . . . . . . . . . . . 20 Bump Map . . . . . . . . . . . . . . . . . . . . . . . . . . . . . . . . . . . . 20 Transparency Map . . . . . . . . . . . . . . . . . . . . . . . . . . . . . 20 Reflectivity . . . . . . . . . . . . . . . . . . . . . . . . . . . . . . . . . . . . 20 Standard Color . . . . . . . . . . . . . . . . . . . . . . . . . . . . . . . . 20 Absolute Color . . . . . . . . . . . . . . . . . . . . . . . . . . . . . . . . 20 Cartoon Color . . . . . . . . . . . . . . . . . . . . . . . . . . . . . . . . . 20 Wireframe . . . . . . . . . . . . . . . . . . . . . . . . . . . . . . . . . . . . . 20 Hidden Line . . . . . . . . . . . . . . . . . . . . . . . . . . . . . . . . . . . 20 Matte Color . . . . . . . . . . . . . . . . . . . . . . . . . . . . . . . . . . . . 20 Shadow Catcher . . . . . . . . . . . . . . . . . . . . . . . . . . . . . . . 20 JPEG, Photoshop, TARGA Files . . . . . . . . . . . . . . . . . . 20
Object Style Swatches Panel Save Object Style . . . . . . . . . . . . . . . . . . . . . . . . . . . . . 21 Apply Object Style . . . . . . . . . . . . . . . . . . . . . . . . . . . . . 21 Unlink Object Style . . . . . . . . . . . . . . . . . . . . . . . . . . . . 21 Remove Object Style . . . . . . . . . . . . . . . . . . . . . . . . . . . 21

Duplicate Object Style. . . . . . . . . . . . . . . . . . . . . . . . . . 21 Select All Unused . . . . . . . . . . . . . . . . . . . . . . . . . . . . . . 21 Delete Selected Object Styles . . . . . . . . . . . . . . . . . . 21 Show Names and Notes . . . . . . . . . . . . . . . . . . . . . . . . 21 Clear Bin . . . . . . . . . . . . . . . . . . . . . . . . . . . . . . . . . . . . . . 21 Arranging the Bin . . . . . . . . . . . . . . . . . . . . . . . . . . . . . . 21 Resaving an Object Style to the Bin . . . . . . . . . . . . . 21 Material Palette and Profile Viewer Panel Applying Materials to the Edges . . . . . . . . . . . . . . . . 22 Camera Manipulation Tool . . . . . . . . . . . . . . . . . . . . . 22 Split Tool . . . . . . . . . . . . . . . . . . . . . . . . . . . . . . . . . . . . . . 22 Repositioning a Split . . . . . . . . . . . . . . . . . . . . . . . . . . . 22 Material Palette Chip . . . . . . . . . . . . . . . . . . . . . . . . . . . 22 Assigning Materials to a Split . . . . . . . . . . . . . . . . . . . 22 Turn Splits On/Off . . . . . . . . . . . . . . . . . . . . . . . . . . . . . 22
Light Editor Panel Editing Lights . . . . . . . . . . . . . . . . . . . . . . . . . . . . . . . . . . 23 Save Light to Bin . . . . . . . . . . . . . . . . . . . . . . . . . . . . . . . 23 Shadow Casting . . . . . . . . . . . . . . . . . . . . . . . . . . . . . . . 23 Disable All Shadows . . . . . . . . . . . . . . . . . . . . . . . . . . . 23 Turn On This Light . . . . . . . . . . . . . . . . . . . . . . . . . . . . . 23 Light Color . . . . . . . . . . . . . . . . . . . . . . . . . . . . . . . . . . . . 23 Light Intensity . . . . . . . . . . . . . . . . . . . . . . . . . . . . . . . . . 23 Adjusting the Light Position . . . . . . . . . . . . . . . . . . . . 23
Light Swatches and Lighting Style Swatches Panel Apply Swatch to Light . . . . . . . . . . . . . . . . . . . . . . . . . 24 Duplicate Light Swatch . . . . . . . . . . . . . . . . . . . . . . . . 24 Delete Selected Swatches . . . . . . . . . . . . . . . . . . . . . . 24 Clear Bin . . . . . . . . . . . . . . . . . . . . . . . . . . . . . . . . . . . . . . 24 Save Lighting Style . . . . . . . . . . . . . . . . . . . . . . . . . . . . 24 Apply Lighting Style . . . . . . . . . . . . . . . . . . . . . . . . . . . 24 Duplicate Lighting Style . . . . . . . . . . . . . . . . . . . . . . . 24 Delete Selected Lighting Styles . . . . . . . . . . . . . . . . 24
Output Panel AntiAliasing Menu . . . . . . . . . . . . . . . . . . . . . . . . . . . . . 25 AntiAliasing Chart . . . . . . . . . . . . . . . . . . . . . . . . . . . . . 25
Setting up target areas for 3D Invigorator Setting up a Non-editable Target Area . . . . . . . . . . 26 Making a Selection . . . . . . . . . . . . . . . . . . . . . . . . 26 Applying 3D Invigorator . . . . . . . . . . . . . . . . . . . 26 Rendering out the Objects . . . . . . . . . . . . . . . . . 26 Setting up a Live Target Area . . . . . . . . . . . . . . . . . . . 27 Selecting the Marquee Tool . . . . . . . . . . . . . . . . 27 Setting up the Selection Area . . . . . . . . . . . . . . 27 Saving the Selection . . . . . . . . . . . . . . . . . . . . . . . 27 Creating a Smart Filter Layer . . . . . . . . . . . . . . . 28 Setting up 3D Invigorator . . . . . . . . . . . . . . . . . . 28 Loading the Saved Selection . . . . . . . . . . . . . . . 29 Load Selection Window . . . . . . . . . . . . . . . . 29 Re-edit 3D Invigorator . . . . . . . . . . . . . . . . . 29 Using a Custom Selection Shape . . . . . . . . . . . 30 Create the Custom Selection . . . . . . . . . . 30 Applying 3D Invigorator . . . . . . . . . . . . . . . 30 Smart Filter Mask . . . . . . . . . . . . . . . . . . . . . . 30

System Requirements
To run this program, your system must be able to run Adobe Photoshop CS2 or above. The following requirements are the minimum system specifications to run the program.
Macintosh
• PowerPC G4, G5 processor, or the Intel Mac.
• Mac OS X (10.3.9, 10.4.11, 10.5.6 or later).
• 1 GB of RAM.
• 52 MB of available hard-disk space to install the application, in addition to the hard disk space required to install Adobe Photoshop.
• 1024x768 monitor resolution
• Adobe Photoshop CS2
Windows
• Pentium 4 or above.
• Windows XP or Windows Vista.
• 1 GB of RAM.
• 52 MB of available hard-disk space to install the application, in addition to the hard disk space required to install Adobe Photoshop.
• 1024x768 monitor resolution
• Adobe Photoshop CS2
System Requirements 6
While 3D Invigorator works with Adobe Photoshop CS2, it is recommended that you use version CS3 or above. Photoshop CS3 and above support smart filters which enable you to create live, re-editable scenes.

Install 3D Invigorator for Photoshop
To install 3D Invigorator, insert your installation disc, or unzip the file you downloaded and double-click on the installation icon. Click the “Accept” checkbox, and press the Install button.
Installation 7
Check the accept checkbox before continuing with the installation.
Click Change Location to customize where you want to installthe program.
To do multiple installations, click the “Do Another” button. Otherwise, click the “Quit” button.
Find the install icon from your installation disc or your download file.

Project Setup
3D Invigorator can be applied to regular layers, or Smart Filter layers. 3D Invigorator applied to Smart Filter layers will save your3D scene so you can do further editing at a later time. 3D Invigorator applied to regular layers will directly apply the graphics onto the layer. If you apply 3D Invigorator again, the new graphics will draw on top of your existing work. See the section called “Setting Up Target Area” for more information.
Project Setup 8
Click Convert for Smart Filters to change layers into Smart Filters.
Use the Filter> Zaxwerks > 3D Invigorator command to create a new instance of Invigorator. If you apply 3D Invigorator from the “Last Filter” command, you will create a duplicate of your previous 3D Invigorator graphic.
Double click the 3D Invigorator Filter to enter the 3D Invigorator interface and make changes to your work.
You can apply 3D Invigorator directly to your background layer, but you won’t be able to edit it later.
Apply 3D Invigorator to a Smart Filter layer. This feature works in Photoshop CS3 and above.

Authorize the Software
The first time you run the plug-in, you will need to authorize the software. Enter your name, your organization, and the authorization code. Be sure to include the dashes when entering the authorization code. Once you finish entering the authorization code, click the OK button and the 3D Invigorator interface will launch.
Authorization 9
Fill in the information, and click the OK button.
Click the Demo button to run the program as a trial.
The authorization code will follow this example format: ICPS40-A1234-B1234-C1234.

Create 3D Objects
Use the Object Menu to quickly create 3D Objects.
This is a quick overview of how to create 3D Objects. Let’s begin with creating 3D Text. The first time you apply 3D Invigorator, you will see a start up menu to create objects. Select Create 3D Text to customize your own 3D Text.
Creating 3D Objects 10
You can also use the shortcut command to open up the 3D Text window from your workspace.
Type your text message in the text input box.
Choose a font from the fonts installed on your system. Type 1 and True Type fonts are supported.
Press the OK button when you are finished editing the 3D text.
Customize your text properties.
Drag the edge to increase or decrease the text field.
Select Create 3D Text from the start up menu.

Create 3D Primitives and Objects from Adobe Illustrator Files.
Using the Object menu, you can easily create 3D objects based on text, primitives, and vector outlines.
Creating 3D Objects 11
Create a 3D Object from Illustrator paths.
Create spheres, cubes, cylinders, pyramids, cones and planes.
Select an Illustrator file to create a 3D object.
Open each Illustrator layer as a separate 3D object.
Separates grouped objects into individual pieces.
When saving your Illustrator file for 3D Invigorator, make sure to save without using compression.
This will apply the Illustrator fill color to the object, and the stroke color to the edges. If you want to use gradients, save the gradient as a JPEG, and apply it as a texture map.

Interface
Customize your own workspaces for improved workflow.
The 3D Invigorator interface allows you to design different workspaces for different needs, and quickly switch from one workspace to the other.
Interface 12
Save your current workspace, assign your workspace to a workspace button, or delete a saved workspace.
Click to quickly switch from one workspace to another. Hold down the shift key and click to clear the button. Hold down the shift key and click a button to rename the workspace button.

Adjusting Panels
Resize, position, open and close panels to customize your workspace.
Interface 13
Click on the panel’s name and drag it to a new location. Once you see a yellow box around the tab, let go of the mouse to drop the panel.
Drag panels beside other panel spaces. When you see a yellow line beside the panel, let go of the mouse to drop the panel at that location.
Use the Panels menu to open and close menus.
Click the small box to close the panel.
Drag the horizontal or vertical edges of panels to resize them.

Menu Options
The top menus allow you to do simple file organization such as saving and loading scenes, undo, create objects, open and close panels, and also get help.
Interface 14
Use merge scene to combine your current scene with a saved scene.
Select Clear Objects to clear all objects from the project. Clear Scene will remove everything including camera views.
Click to quickly create 3D objects.

Help and Preferences
Use the Help menu to get program shortcuts, and use the Preferences menu to set up 3D Invigorator.
Interface 15
Duplication offset determines where your objects are placed once duplicated.
Sets the number of Undos.
Restore panels, window positions, and workspace settings.
Restore materials, object style swatches, and lighting swatches.
Sets the object faceting angle. A low value will create a lot of facets in your curve while a high value will create a smooth curve.
Use the Help menu to learn shortcut commands.

3D Preview Panel - Tools
Select Camera, Light, or Object mode, then use the tools to set up your scene.
Interface 16
Enable the “Drag Using Object Axes” checkbox to move your object along its own axes as opposed to the current camera view.
Rotate around your camera, lights or your objects.
Roll your camera or your objects.
Move your camera or your objects side to side or up and down.
Dolly in or out on your camera or your objects.
Scale your objects bigger or smaller.
Select your objects. Double click on the tool to select all objects.
Click to zoom in. Hold down the “option” (“alt” on Windows) key and click to zoom out.
Camera mode. Switch to Camera mode to move the camera around.
Light mode. Switch to Light mode to change the lighting.
Object mode. Switch to Object mode to move the objects around.

Interface 17
3D Preview Panel - Displays
Set up your scene with different preview settings, background settings, camera positions, and more.
Offline Camera allows you to explore the scene without moving your camera.
Click to select between Wireframe, Solid, and Texture displays.
Click to select a background color.
Click to turn on/off the background image.
Click to render the current camera view at Best quality.
Select a camera preset position from the pull down menu.
Select a camera lens preset from the pull down menu.
Enable and disable Floor Grids, Title Safety, Action Safety and other grid options.

Objects Panel
Customize the shape of the 3D objects that you create with the objects panel.
Interface 18
The object list contains all objects in the scene. Use the list to select objects.
Use the commands to clear, reset, delete or duplicate the selected objects.
Click the Edit Text button to retype the letters. You can also double click on the text in the preview window.
Reveal the Info parameter to change an object’s position and rotation. Expand the Object Smoothness to change the Preview and Final smoothness.
Set the depth of the object with the depth setting. If your objects contain sharp spikes, adjust the SpikeBuster to remove the spikes.
Show or hide the different paths of an object.
Select a bevel for your object and make letters thicker or thinner.
Customize the bevels next to holes by applying different bevel, profiles, materials, and scale.
Click a disclosure triangle to reveal or hide the parameters.

Material Swatches Panel
A material swatch contains colors, texture maps and rendering styles. Objects that are using a material swatch are linked so that if you have multiple objects using the same material swatch, updating one material will update all the objects. To edit or create additional material swatches, use the material editor panel.
Interface 19
Use the swatch commands to duplicate, and delete materials. If you use the Clear Bin command, you will erase all your swatches.
Drag material balls onto objects in the 3D preview window to apply the material. To re-organize the bin, drag the material balls around in the bin in the order that you prefer. To edit a material preset, drag and drop the material into the Material Editor.
A material ball that has a question mark on it means it is missing a texture map. To fix this, load the swatch into the material editor, then click on the missing texture map to replace it or you can choose to delete the swatch.
To reset your swatches, go to the Help menu and open the Preferences window. In the User Preferences, click the Restore button to restore all material swatches back to default.

Material Editor Panel
Edit the details of a material to give it character. Assign texture maps, bump maps, and reflectivity maps for realism, or apply color settings like cartoon color to give it a fun look. Double click a material swatch to load it into the editor. Materials applied to an object are copied into the Material Palette. To edit a material applied on an object, double click the material from the Material Palette.
Interface 20
Select a jpeg, photoshop, or targa (.jpg, .psd, .tga) file to use as a texture map.
Use the material commands to create, save, duplicate, and delete materials. When editing a material preset, duplicate the material first to avoid losing the original.
Select a material type to change the rendering style.
Preview material ball. You can drag this ball onto your objects, or into the material bin to save it as a swatch. To edit a material preset, drag and drop it onto this spot.
Apply texture, bump, transparency, and reflectivity maps by clicking on the image thumbnail.

Object Style Swatches Panel
An object style contains all the settings of an object. All the materials, edge profiles, depth settings, etc, are saved as a style so you can quickly apply an existing style to your objects, or save your own object styles for future projects.
Interface 21
Use the swatch command menu to access commands such as Save, Apply and Unlink. Unlink Object Style will unlink objects using the same object style so you can apply changes to one object without affecting all linked objects. Show Names and Notes changes the display to a list view where you can add notes about Object Styles, such as what project they were used in.
To apply an Object Style drag a swatch onto your objects in the 3D preview window. Hold down Option (Alt) when you apply an Object Style to several objects to create a link. When objects are linked, any changes made to one object will result in a change to all linked objects. Editing a linked Object Style will result in the Object Style in the bin to be edited. To re-organize the bin, drag the material swatches around in the bin in the order that you prefer.
If you deleted an Object Style, you can recreate the swatch as long as you have an object in the scene that is using that Object Style. Select the object from the scene, and use the Save Object Style command. You can even load up old projects to save the Object Style, and use as a preset for new projects.

Material Palette and Profile Viewer Panel
With the material palette and the profile viewer, you can assign different materials to individual parts of your object.
Interface 22
Drag and drop material swatches into the palette to apply more than one material to an object. You can add more materials to the empty palette docks.
This number represents the material palette swatch being used on this part of the object.
The edge indicator shows where the front, back, side, and hole edges of the object are. Similar to being above the object looking down at it.
Click on the edge to create splits to assign different materials to different parts of an edge. You can also split an edge so the holes are colored with one material while the outside edges are using another material.
Using the split tool, click on an edge to create a split. Drag the split (red arrow) to change the size of the split.
The camera manipulation tools for the Profile Viewer canvas.
Hides or shows splits.
You can use the Profile Viewer if your selection is a 3D text object or an Illustrator File object. If you are using a 3D primitive, this panel becomes inactive.

Light Editor Panel
Lighting is set up by creating multiple lights that illuminate from different angles. You can set up the light colors, angles and intensity. Each light can be saved as a light swatch.
Interface 23
Select a light to edit. Lights that are not turned on are italicized. Lights appearing in bold have shadows turned on.
Save your current light as a light swatch.
Enable shadows to be cast. You must have another object positioned nearby to catch the shadow.
Disable all shadows from all the lights.
Adjust how bright or dim the light is.
Drag the arrow around the sphere to adjust the direction of the light.
Click on the color box to change the color of the light.

Light Swatches and Lighting Style Swatches Panel
When you apply a light swatch, it will apply it to the current light. However, when you apply a lighting style swatch, it affects the whole “mood” by changing all the lights at once. If you save a lighting style, it saves all the lights into one style.
Interface 24
Use the apply command to apply the light swatch to the currently selected light.
Double click the lighting style to apply the swatch to the scene.
Double click a light swatch to apply the swatch to the currently selected light.
Use the swatch commands to save, apply, duplicate, or delete the selected light style.
Output Panel
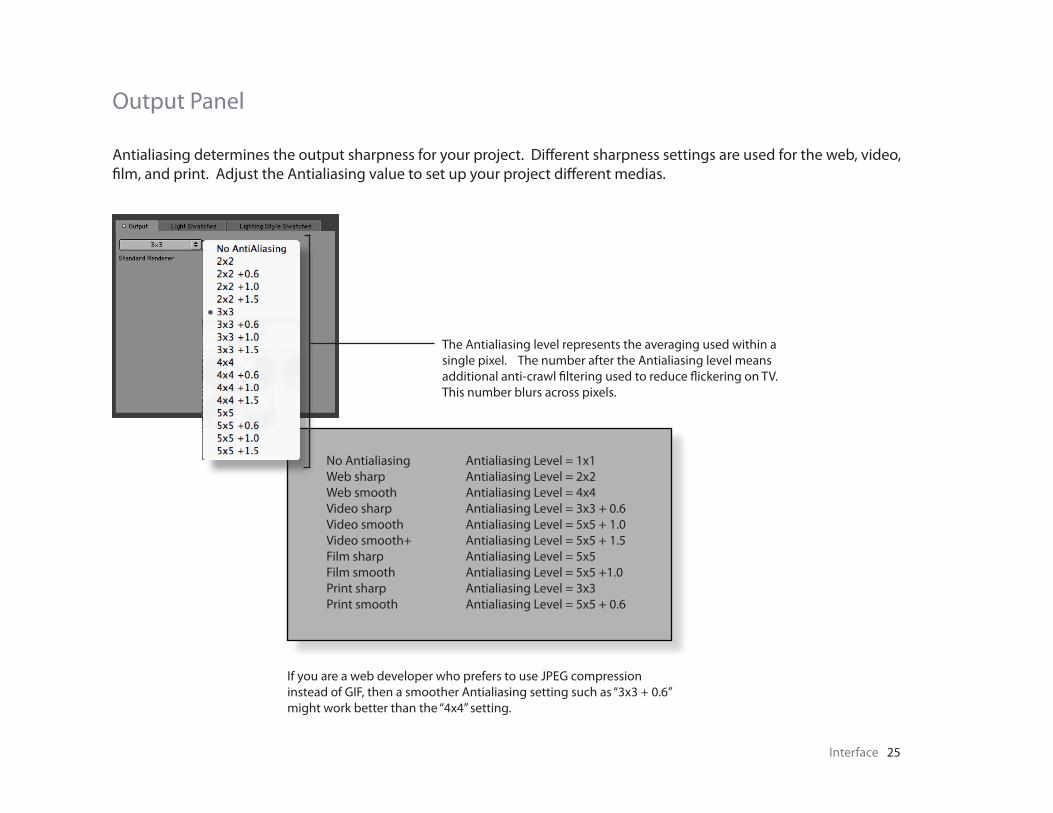
Antialiasing determines the output sharpness for your project. Different sharpness settings are used for the web, video, film, and print. Adjust the Antialiasing value to set up your project different medias.
Interface 25
The Antialiasing level represents the averaging used within a single pixel. The number after the Antialiasing level means additional anti-crawl filtering used to reduce flickering on TV. This number blurs across pixels.
No AntialiasingWeb sharpWeb smoothVideo sharpVideo smoothVideo smooth+Film sharpFilm smoothPrint sharpPrint smooth
Antialiasing Level = 1x1Antialiasing Level = 2x2Antialiasing Level = 4x4Antialiasing Level = 3x3 + 0.6Antialiasing Level = 5x5 + 1.0Antialiasing Level = 5x5 + 1.5Antialiasing Level = 5x5Antialiasing Level = 5x5 +1.0Antialiasing Level = 3x3Antialiasing Level = 5x5 + 0.6
If you are a web developer who prefers to use JPEG compression instead of GIF, then a smoother Antialiasing setting such as “3x3 + 0.6” might work better than the “4x4” setting.

Setting up target areas for 3D Invigorator
Two ways for you to set up your Photoshop projects
To set up a non-editable target area, make a selection and apply 3D Invigorator to that selection. When you are finished with the 3D Invigorator scene, it will be rendered into your selection area.
Target Areas 26
Make a selection in your Photoshop workspace.
Create your objects in 3D Invigorator, click OK, and your objects will be rendered out in your selection area.
Apply 3D Invigorator to your selection.
If you apply the 3D Invigorator to a Smart Object or Smart Filter layer, the 3D Invigorator will be applied on the whole layer regardless of your selection. The next example up will show you how to create live target areas.

Setting up a live target area
Create a document to add a 3D Invigorator graphic to. Use the Rectangular Marquee tool to define the area where you want the graphic to end up, and save the selection.
Target Areas 27
Select the Rectangular Marquee Tool.
Use the Rectangular Marquee Tool to create a selection area.
Enter a selection name and press OK to save the selection.

Set up the Smart Filter Layer
Convert the layer into a Smart Filter layer. Then apply 3D Invigorator to the Smart Filter Layer. Create your 3D objects in the 3D Invigorator, and click the OK button.
Target Areas 28
Your layer setup should look similar to this.
Apply 3D Invigorator on your Smart Filter Layer. The 3D Invigorator interface will open up. Create your 3D scene, and click the OK button.
Convert the layer into a Smart Filter layer.

Double click the 3D Invigorator filter to re-launch the Invigorator interface.
Re-edit your content
Load the saved selection, then double click on the 3D Invigorator filter to open the 3D Invigorator interface. After you make any changes in the 3D Invigorator, press the OK button to update the graphic into your target area.
Target Areas 29
Select the saved selection and press OK to load the selection.
Use a custom selection shape
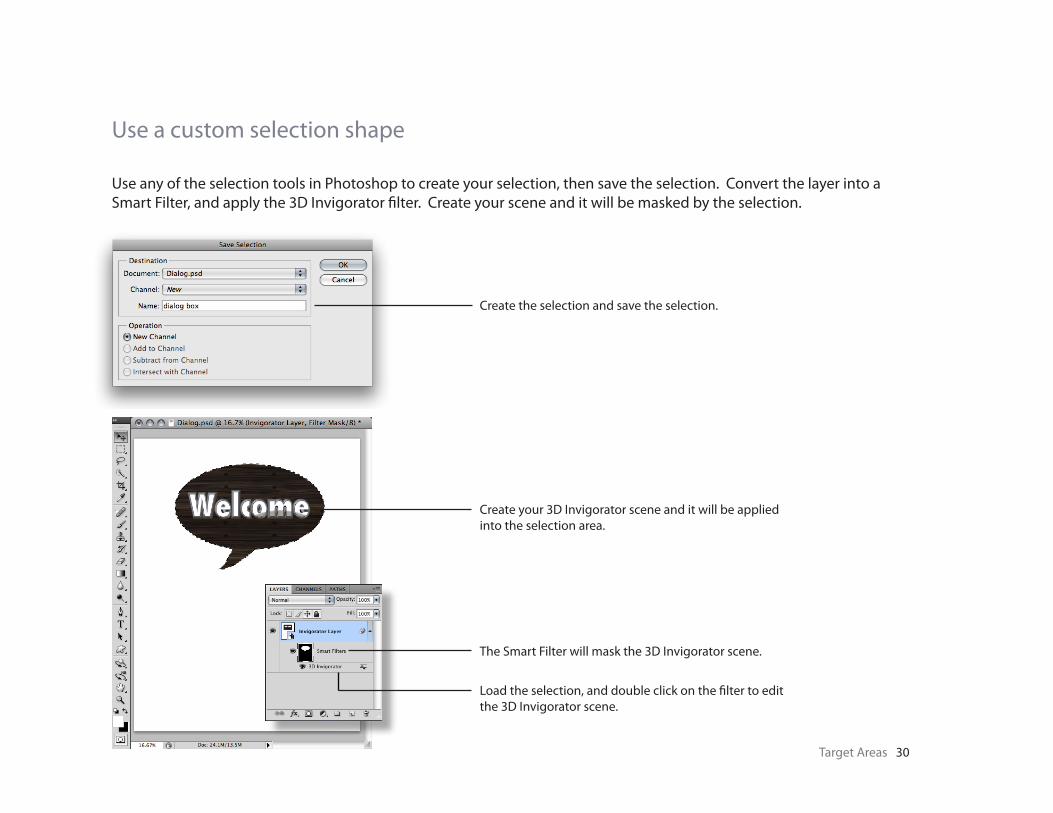
Use any of the selection tools in Photoshop to create your selection, then save the selection. Convert the layer into a Smart Filter, and apply the 3D Invigorator filter. Create your scene and it will be masked by the selection.
Target Areas 30
Create the selection and save the selection.
Create your 3D Invigorator scene and it will be applied into the selection area.
The Smart Filter will mask the 3D Invigorator scene.
Load the selection, and double click on the filter to edit the 3D Invigorator scene.