Embed Size (px)
Citation preview

Additives & InstrumentsA member of
Measure what you see.
Pencil Hardness TesterBleistift-HärteprüferDurezza alla matita
Manual
Betriebsanleitung
Istruzioni d´uso
Instrukcja obsługi

Eng
lish
Deu
tsch
Ital
iano
Po
lski
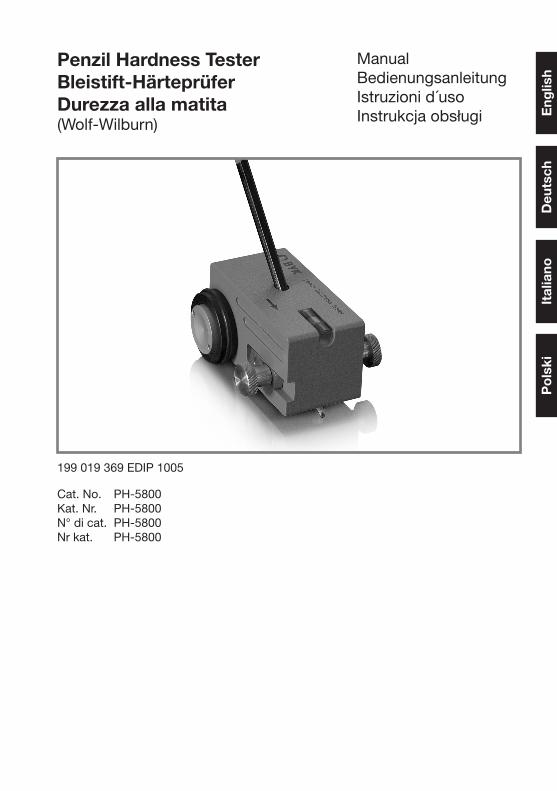
Penzil Hardness TesterBleistift-HärteprüferDurezza alla matita(Wolf-Wilburn)
ManualBedienungsanleitungIstruzioni d´usoInstrukcja obsługi
Cat. No. PH-5800Kat. Nr. PH-5800N° di cat. PH-5800Nr kat. PH-5800
199 019 369 EDIP 1005

Eng
lish
Deu
tsch
Fran
çais
BYK-Gardner GmbHLausitzer Str. 8D-82538 GeretsriedGermanyTel. 0-800-gardner (0-800-4273637) +49-8171-3493-0Fax +49-8171-3493-140
BYK - Gardner USA9104 Guilford RoadColumbia, MD 21046USAPhone 800-343-7721 301-483-6500Fax 800-394-8215 301-483-6555
www.byk.com/instruments
3
Sprachenverzeichnis
English............................................................................................................4
Deutsch..........................................................................................................8
Italiano..........................................................................................................12
Polski............................................................................................................16
Sprachenverzeichnis
4
Pencil.Hardness.Tester.(Wolf.Wilburn)
1.0.Introduction
This instrument offers an easy to use method for the determination of film hardness for a coating applied to a flat substrate, by means of drawing pencil leads of known hardness at a constant applied mass across the coated surface.
2.0.Specifications
The Pencil Tester complies with the requirements of ISO 15184, ECCA-T4 /1. In order to achieve consistent results it is recommended that the test be conducted in accordance with the stated test methods.
3.0.Preparation.for.Test
The following instruction will provide the user with a working knowledge of how to conduct the test. These notes should be read in conjunction with the stated test methods in order to obtain meaningful results that can be used for comparative purposes.
3.1 Select a pencil from the range, remove approximately 5 to 6 mm of wood from the point using the special Pencil Sharpener, being careful to leave an undisturbed, unmarked, smooth cylinder of pencil lead.
3.2 The tip of the pencil shall be squared by holding the pencil in a vertical position and moving the pencil back and forth over the abrasive paper, whilst maintaining an angle of 90°. Continue until a flat, smooth, circular cross-section is obtained, free from chips or nicks in the edges.
3.3 Repeat procedure 3.1 & 3.2 each time a pencil is used.
3.4 Place the coated panel to be tested on a level, firm horizontal surface.
5
3.5 Place the Pencil Tester Body on end, onto a firm horizontal surface (arrow pointing downwards.
3.6 Slowly slide (care should be taken not to chip the pencil edges) the prepared pencil into the hole adjacent to the arrow until it rests on the same firm horizontal surface as the pencil tester body. Turn the pencil clamping knob clockwise to lock the pencil in position. Carefully lift the pencil tester off the surface, ensure pencil is set firm and is free from damage to edges. Check the bubble level to confirm the pencil has been properly positioned.
Important:.always ensure the position of the pencil is the same, thereby applying the consistent mass to the coating under test.
Place the pencil tip gently onto the scales and read the applied mass, value to be 750 (+10/-10) grams. If the mass is outside of the specification, move the slide weight forward to increase the mass or back to decrease the mass.
3.7 Carefully place the prepared pencil tester, wheels first onto the surface to be tested, gently bring the pencil tip into contact with the coated surface to be tested, ensure no chipping occurs.
3.8 Immediately after the tip of the pencil rests on the coated surface, place thumb and forefinger on the pencil tester, centre portion of each wheel, push the instrument in the direction of the arrow for a suggested distance of 7mm.
3.9 Inspect the coating after a specified period of time with the naked eye check for marking of the surface.
3.10 If no marking has occurred, repeat the test (3.1 to 3.8) on a new portion of undisturbed
6
coating, moving up the hardness grade scale until marking occurs over the test distance. If marking has occurred repeat the test (3.1 to the 3.8) down the hardness scale until marking no longer occurs.
3.11 Carry out the test in duplicate, if the results differ by more than one pencil unit.
Note:.The hardness of the hardest pencil that does not mark the coating is the so-called pencil hardness. Further definition of pencil hardness is stated in the test method standards.
4.0.Limitations
This test method is applicable to smooth surfaces, it is not considered suitable for textured or rough surfaces.
5.0.Routine.Maintenance
5.1 Ensure the Pencil Tester body is free from damage, dents, paint chips etc. as this may effect the applied mass.
5.2 The rubber rings on the wheels are clean and free to rotate.
5.3 The instrument and pencils are stored in the case supplied when not in use. Always replace any pencils with the same reference type and manufacturer. (pencils from different manufacturers may produce different results).
5.4 Ensure the special pencil sharpener supplied is always used, check the blade for sharpness.
5.5 Replace the abrasive paper 400 grit when required.
6.0.Calibration
6.1 The Pencil Tester may be checked for the correct applied mass by preparing the instrument as defined (6.2 to 6.6)
Note:.The instrument is correctly set at the factory, no further adjustment can be made.
7
6.2 Set the wheels of the instrument on a firm horizontal surface in direct a precise alignment with the measuring pan of precision scales.
6.3 Place the pencil tip gently onto the scales and read the applied mass, check the value to be within 750 (+10/-10) grams.
7.0.Packing.List,.Cat..No..PH-5800
- Pencil Tester, Body
- 1 Set of Pencils (20 ), 9 B to 9 H
- Special Pencil Sharpener
- Abrasive Paper, 400 grade grit
8
Bleistift-Härteprüfer.(Wolf-Wilburn)
1.0.Systembeschreibung
Das Bleistiftverfahren ist eine einfache und schnelle Methode zur Prüfung der Oberflächenhärte von Beschichtungen. Bleistifte unterschiedlicher Härtegrade werden unter einem Winkel von 45° über die Oberfläche geschoben.
2.0.Normen
Das Bleistifthärteverfahren entspricht den Normen ISO 15184, ECCA-T4. Es wird empfohlen, die Prüfungen genau nach der jeweils zitierten Norm durchzuführen.
3.0.Durchführung.der.Prüfung
Die folgende Anweisung ersetzt nicht die in den Normen beschriebenen Verfahren. Sie ist für die Vorbereitung, Handhabung und Prüfung als Leitfaden zu betrachten.
3.1 Wählen Sie einen Bleistift mittlerer Härte, spitzen Sie ihn mit dem Anspitzer an, bis ein 5-6 mm langer glatter Grafitstift freigelegt ist.
3.2 Schleifen Sie den Grafitstift auf Schleifpapier Nr. 400 scharfkantig plan, wobei Sie den Bleistift senkrecht (90° Winkel) halten.
3.3 Bereiten Sie alle Bleistifte gemäß 3.1 und 3.2 vor.
3.4 Legen Sie die zu prüfende Probe auf einen ebenen, waagerechten Untergrund.
3.5 Stellen Sie die Bleistiftprüfvorrichtung so auf eine waagerechte Unterlage, dass der Pfeil nach unten zeigt. Lösen Sie die Schraube (Drehknopf), bis Sie einen Bleistift einführen können.
3.6 Schieben Sie langsam, ohne den Grafitstift zu beschädigen, einen Bleistift mit z.B. mittlerer Härte so weit in die Bohrung, bis die Spitze die
9
Unterlage berührt. Drehen Sie die Schraube (Drehknopf) so weit im Uhrzeigersinn, bis der Bleistift fixiert ist.
Achtung:.Die Schraube nur leicht anziehen, sonst wird der Bleistift beschädigt ! Wenn der Bleistift durch mehrmaliges Anspitzen an Masse verloren hat, sollte das komplette Prüfgerät mit Bleistift, wie unter 6.0 beschrieben, auf sein Prüfgewicht über-prüft werden. Das Prüfgewicht muß 750 (+10/-10) Gramm betragen.
3.7 Setzen Sie vorsichtig die vorbereitete Prüfvorrichtung mit den Rädern zuerst auf die zu prüfende Oberfläche. Achten Sie auf die Bleistiftspitze!
3.8 Sofort nach dem Aufsetzen greifen Sie mit Zeigefinger und Daumen in die Felgen der Räder. Schieben Sie die Bleistiftvorrichtung in Pfeilrichtung mindestens 7 mm über die Oberfläche.
3.9 Kontrollieren Sie die Oberfläche auf Beschädigungen. Achtung:.Bitte beachten Sie bei der Prüfung, dass Sie das Schreiben auf der Beschichtung nicht mit dem Eindringen (Beschädigung) verwechsen!
3.10 Wenn keine Beschädigung aufgetreten ist, wiederholen Sie den Test (3.1 bis 3.8) auf einem neuen Teil der zu prüfenden Oberfläche. Die geeignete Bleistifthärte muss empirisch ermittelt werden.
3.11 Wiederholen Sie die Prüfung so lange, bis Sie die richtige Härteskala ermittelt haben.
Achtung:.Die Härte des härtesten Bleistiftes, der nicht die Oberfläche beschädigt hat, ist die sogenannte Bleistifthärte. Weitere Definitionen entnehmen Sie bitte den Normen.
10
4.0.Grenzen.der.Testmethode
Diese Testmethode ist nur bei glatten Oberflächen anwendbar. Strukturierte und rauhe Oberflächen sind nicht geeignet.
5.0.Wartung
5.1 Stellen Sie sicher, dass Farbreste, Holzspäne und Bleistiftreste das Gewicht nicht verändern.
5.2 Prüfen Sie, dass die Gummiringe sauber sind und die Räder sich frei drehen lassen.
5.3 Nach Gebrauch immer die Bleistifte aus der Prüfvorrichtung nehmen und im Behälter aufbewahren. Achten Sie auf gleiche Härtegrade und auf den gleichen Hersteller (Bleistifte verschiedener Hersteller können unterschiedliche Resultate ergeben).
5.4 Benutzen Sie immer den mitgelieferten Anspitzer.
5.5 Falls Schleifpapier ausgetauscht werden muss, achten Sie auf die Körnung 400.
6.0.Kalibrierung
6.1 Überprüfung des Prüfgewichtes. Auf einer Waage wird mit eingebautem Bleistift das Prüfgewicht an der Bleistiftspitze ermittelt. Eine Justage ist nicht möglich.
6.2 Stellen Sie die Räder des Instrumentes auf eine feste waagerechte Fläche, die exakt am Waagetisch einer Präzisionswaage ausgerichtet ist.
6.3 Setzen Sie die Bleistiftspitze vorsichtig auf den Waagentisch und lesen Sie das Prüfgewicht ab. Das Gewicht muß 750 (+10/-10) Gramm betragen.
11
7.0.Lieferumfang,.Kat.-Nr..PH-5800
- Bleistift-Härteprüfer
- 1 Satz Bleistifte (20 Stück von 9 B bis 9 H)
- Schleifpapier, Korn 400
- Anspitzer
- Koffer
12
Strumento.distruttivo.per.la.misurazione.della.durezza..superficiale.secondo.metodo.Wolf-Wilburn
1.0.Introduzione
Questo metodo offre un metodo facile da utilizzare per la determinazione della durezza del film delle vernici applicate su superfici piane; attraverso lo sfregamento di matite a durezza nota, unitamente all’applicazione di peso costante, sulla superfice verniciata.
2.0.Normative
Lo strumento per la determinazione della Durezza alla Matita è conforme alle norme ISO 15184, ECCA-T4 /1. Allo scopo di ottenere risultati accettabili si raccomanda di eseguire i test secondo i metodi descritti nei test.
3.0.Esecuzione.del..test
Le seguenti istruzioni forniranno all’esegutore della prova le necessarie conoscienze per condurre il test. Queste note dovrebbero essere lette unitamente ai medodi dei test descriiti nelle normative in modo da ottenere risultati significativi che possono essere utilizzati a fini comparativi.
3.1 Selezionare una matita fra quelle disponibili, rimuovere 5 o 6 mm ca. di legno dalla punta utilizzando il temperino in dotazione, facendo attenzione che la mina della matita risulti liscia e libera dai residui di legno.
3.2 La punta della matita deve essere squadrata posizionando la matita verticalmente alla carta abrasiva e muovendola avanti e indietro, facendo attenzione di mantenere un angolo di 90°. Continuare fino ad ottenere una sezione circolare perfettamente piana, liscia e priva di scheggiature e/o intaccature ai bordi.
3.3 Ripetere le procedure 3.1 e 3.2 ogni volta che la matita viene utilizzata.
13
3.4 Posizionare il pannello verniciato su una superficie orizzontale piana e rigida.
3.5 Posizionare il corpo dello strumento su una superficie orizzontale piana e rigida in modo che la freccia dipinta sul corpo dello strumento stesso sia rivolta verso il basso.
3.6 Inserire lentamente la matita preparata in precedenza nella fessura adiacente alla freccia dipinta sul corpo dello strumento (avendo cura di non rovinare la punta) fino a toccare lo stesso piano su cui è appoggiato lo strumento stesso. Ruotare la manopola del morsetto per bloccare la matita nella posizione raggiunta. Sollevare accuratamente lo strumento dalla superficie ed assicurarsi che la matita sia fissata accuratamente e che i bordi della punta non siano danneggiati.
Importante:.assicurarsi che la posizione della matita sia sempre la stessa; così da applicare una massa consistente alla vernice in esame.
Posizionare delicatamente la punta della matita su una bilancia e verificare il peso peso applicato, il valore deve essere di 750 (+10/-10) grammi.
3.7 Appoggiare quindi lo strumento così predisposto sul provino da testare; appoggiare prima le ruote e successivamente mettere a contatto la punta della matita alla superficie verniciata in modo da non creare nessuna scheggiatura del film.
3.8 Immediatamente dopo aver appoggiato la matita alla superficie da testare, impugnate lo strumento con pollice ed indice (nella zona centrale di ciascuna ruota) e spingere lo strumento nella direzione segnata dalla freccia per la distanza consigliata di 7 mm.
3.9 Ispezionare la superficie ad occhio nudo alla ricerca della traccia lasciata dalla matita.
14
3.10 Se non si scorge nessuna traccia, ripetere il test (da 3.1 a 3.8) su una nuova posizione, sostituendo di volta in volta la matita con una di durezza superiore, fino a procurare la traccia desiderata. Se al contrario, la superficie è stata segnata, ripetere il test (da 3.1 a3.8) sostituendo di volta in volta la matita con una di durezza inferiore, fino a che la matita selezionata non segni più la superficie del film.
3.11 Duplicare il test, se il risultato delle singole prove differisce per più di un’unità di matita.
Nota:.La “durezza matita” viene definita indicando il grado di durezza della matita più dura che non segna la vernice testata. Ulteriori definizioni di “durezza Matita” sono riportate nei metodi di test delle normative.
4.0.Limitazioni
Questo metodo è applicabile a superfici lisce, non è ritenuto adatto per superfici strutturate o corrugate.
5.0.Manutenzione
5.1 Assicurarsi che il corpo dello strumento non sia danneggiato, privo di ammaccature, macchie di vernice, ecc. così che risulti sempre del peso appropriato.
5.2 I gommini montati sulle ruote devono essere pulitie liberi di girare.
5.3 Quando non viene utilizzato, lo strumento e le matite devono essere conservati nella valigetta in dotazione. Se necessario sostituire le matite, rimpiazzarle con matite dello stesso grado e dello stesso produttore (matite di altri produttori, potrebbero fornire risultati diversi).
5.4 Assicurarsi che lo speciale temperino fornito sia sempre utilizzabile, controllare la lama del temperino.
15
5.5 Sostituire la carta abrasiva (grado 400) quando necessario.
6.0.Calibrazione
6.1 Per verificare il peso applicato alla punta della matita, approntare lo strumento come indicato (da 6.2 a 6.3). Nota:.Lo strumento è settato correttamente dal produttore; non sono necessarie ulteriori correzioni.
6.2 Posizionare le ruote dello strumento su una superficie orizzontale, perfettamente allineata al piatto della bilancia di precisione.
6.3 Appoggiare delicatamente la punta della matita sul piatto della bilancia e verificare il peso applicato, verificare che il valore sia compreso tra 750 (+10/-10) grammi.
7.0.Dotazione.strumento,.N°.di.cat..PH-5800
- Carrello
- 1 set di matite (20), da 9B a 9H
- Temperino
- Carta abrasiva, grado 400
16
Tester.twardosci.metoda.olówkowa.Wolf’a-Wilburn’a
1.0.Informacje.ogólne.–.wstep.
Przyrzad ten oferuje prosta metode oznaczania twardosci powloki, nalozonej na plaskie podloze, przy uzyciu olówków róznego stopnia twardosci, przesuwanych po powloce ruchem ciaglym pod katem 45 stopni.
2.0.Specyfikacje.
Tester olówkowy spelnia wymagania norm ISO 15184 oraz ECCA-T4. W celu otrzymania porównywalnych wyników zaleca sie wykonywanie testu zgodnie z wyzej wymienionymi normami.
3.0.Przygotowanie.badania.
Nastepujacy instruktaz wyposaza uzytkownika w praktyczne wiadomosci o sposobie przeprowadzenia testu. Nalezy je stosowac wraz z informacjami zawartymi w odnosnych normach. Pozwoli to na uzyskanie waznych i porównywalnych wyników.
3.1 Wybierz olówek z zestawu a nastepnie usun ok. 5 - 6 mm drewna z jednego z jego konców przy pomocy zalaczonej temperówki, zwracajac uwage by nie uszkodzic odslonietego grafitowego walca.
3.2 Koncówke grafitu nalezy uformowac na plasko i koliscie, bez elementów drewnianej obsadki oraz uszkodzen, scierajac ja prostopadle na papierze sciernym nr 400.
3.3 Powtórz procedure 3.1. i 3.2. po kazdym uzyciu olówka.
3.4 Ustaw próbke na plaskiej, równej powierzchni poziomej.
3.5 Ustaw wózek na plaskiej poziomej powierzchni strzalka w dól. Odkrec srube tak dalece, by mozna bylo wprowadzic olówek.
17
3.6 Ostroznie wprowadz olówek w otwór obok strzalki az do zetkniecia sie grafitu z powierzchnia podloza. Teraz zablokuj pozycje olówka dokrecajac srube.
3.7 Podnies tester z podloza i sprawdz, czy grafit nie jest uszkodzony a olówek prawidlowo zamocowany.
Uwaga: Nie dokrecac sruby zbyt mocno! Pozycja olówka powinna BYC za kazdym razem identyczna, zapewniajac staly (Powtarzalny) docisk grafitu do powloki testowanej. Jesli przez wielokrotne temperowanie olówek stracil znacznie na wadze, nalezy upewnic sie, ze waga wózka wraz z olówkiem wynosi 750 +5/-15 g.
3.8 Ostroznie ustaw tak przygotowany wózek na powloce do testowania najpierw kolami a potem koncówka grafitowa. Natychmiast potem uchwyc felgi wózka pomiedzy kciuk a duzy palec dloni i przejedz odleglosc 7 mm (zalecana dlugosc drogi) w kierunku strzalki.
3.9 Dokonaj ogladu powierzchni nieuzbrojonym okiem po okreslonym czasie, zwracajac uwage na zarysowania powierzchni.
3.10 Jesli nie nastapilo zarysowanie powierzchni, nalezy powtórzyc test (3.1 do 3.9) na nowym wycinku próbki olówkiem twardszym od aktualnego, az do uzyskania zarysowania. Jesli zarysowanie nastapilo, nalezy powtórzyc test az do twardosci olówka nie dajacej sladu zarysowania na próbce.
3.11 Powtórzyc testy, jesli wyniki róznia sie bardziej niz dwie wartosci twardosci olówkowych.
Uaga: Twardosc olówka, który wlasnie nie uszkadza powloki próbki okreslana jest jako tzw. Twardosc olówkowa. Inne definicje twardosci olówkowej mozna odnalezc w odpowiednich normach.
18
4.0.Ograniczenia.
Powyzsza metoda badania stosuje sie do powierzchni gladkich. Nie jest ona zalecana do powierzchni silnie fakturowanych i szorstkich.
5.0.Konserwacja.
5.1 Sprawdzic, czy wózek jest czysty i nieobciazony (wplyw na nacisk).
5.2 Sprawdzic, czy „opony” kólek i kólka sa w dobrym stanie (czyste, nieuszkodzone, swobodnie obracajace sie).
5.3 Przyrzad i olówki przechowywane sa w ich oryginalnej walizeczce. Wymieniac olówki zawsze partiami i od tego samego producenta. Olówki od róznych producentów moga dawac rózne wyniki.
5. Uzywac zawsze temperówki dostarczonej oryginalnie w zestawie. Sprawdzic stan ostrza.
5.5 Wymienic lub uzupelnic papier scierny nr 400.
6.0.Kalibracja.
6.1 Przyrzad moze byc kontrolowany ze wzgledu na mase wózka (nacisk) jak opisano to w pkt. 6.2. do 6.3.
Uwaga: Przyrzad jest ustawiony fabrycznie i nie ma mozliwosci justacji.
6.2 Ustawic wózek odpowiednio na wadze.
6.3 Odczytac nacisk grafitu, który powinien wynosic 750 +5/-15 gram.
7.0.Zakres.dostawy,.Nr.kat..PH-5800.
- wózek testera olówkowego - zestaw olówków (20 szt.) od 9B do 9H - temperówka specjalna - papier scierny nr 400.

19

20


199 019 369 EDIP 1005