Embed Size (px)
Citation preview
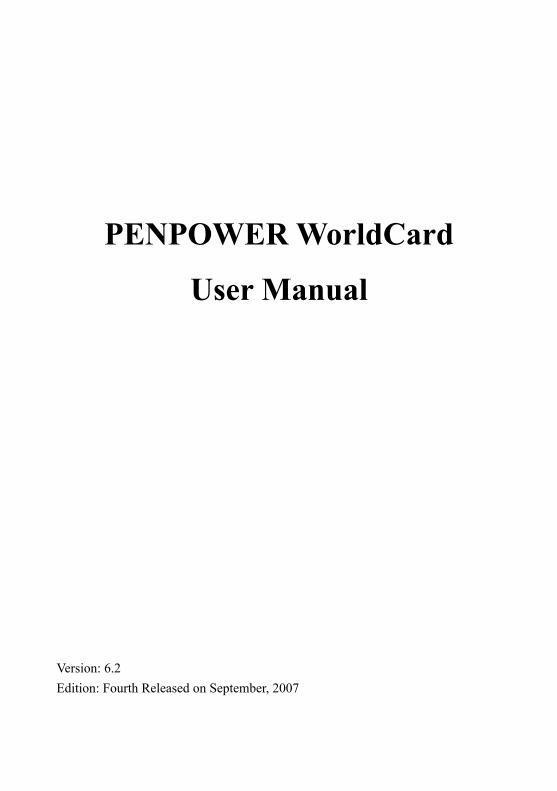
PENPOWER WorldCard
User Manual
Version: 6.2Edition: Fourth Released on September, 2007
Penpower Technology Ltd.
Software User License AgreementYou are licensed to legally use this software program (“the Software”) by Penpower
Technology Ltd (“Penpower”) under this license agreement (“The Agreement”). If you do not agree with any of the provisions in this Agreement, please do not install, copy or use the Software. By using the Software, you are deemed to fully understand and accept the provi-sions of this Agreement.
1. Intellectual PropertyAll intellectual property rights in the Software, together with all information and docu-ments included in the packaging for the Software (including but not limited to copy-rights), are property of Penpower, and are protected by relevant laws and regulations.
2. License to UseYou are authorized to use the Software on one (1) single computer only. You may not use the Software on any other machines other than the said single computer.
3. Authority to CopyThe Software and all documents included with the Software, and copyright thereof, are property of Penpower. You are licensed to make one (1) copy of the Software for your personal backup purposes. All other acts of copying are strictly prohibited.
You may not sell, lease, dissemble, reverse engineer, copy, translate, adapt or derive the Software, or obtain the source code of the Software by any other means. You may not use the Software for any purposes other than those permitted under this Agreement.
4. Business UsersIf you need to install or use the Software on more than one (1) computer, please contact Penpower or our local distributor to purchase a license for the additional use.
5. LiabilityYou agree to indemnify Penpower against all losses, costs, debts, settlement payments or other expenses (including but not limited to attorneys fees) arising from your breach of this Agreement, and you agree to compensate Penpower for all of the abovementioned damages.
6. No WarrantyEffectiveness of a packaged software in handling information is closely related to its soft-ware and hardware environment. The Software is published following careful develop-ment and product testing by Penpower, but Penpower is not able to conduct tests based on all possible combinations of software and hardware environment. Therefore, Penpower is unable to promise nor warrant that there will be absolutely no risk of loss or damage of
information, or any other kind of loss, during installation and/or execution of the Soft-ware. You must be fully aware of your risks in using the Software.
Penpower will provide you with the Software and support services in respect of the Soft-ware to the maximum extent permitted by law. However, Penpower does not warrant that the Software and information included in the package of the Software contain no defects or errors. Penpower is not liable for any indirect, special or incidental loss arising from the Software, including but not limited to loss of profits, damage to business reputation, cessation of work, hardware malfunction or damage, or any other commercial damage or loss arising from commercial use of the Software.
7. Limitation of Liability and DamagesThe maximum amount of compensation payable by Penpower, in respect of any damage incurred by you for any reason under this Agreement, is limited to the amount you have already paid to Penpower in respect of the Software.
Under no circumstances will Penpower be held liable for the possibility of loss, notwith-standing Penpower may be aware of the possibility of such loss.
8. Prohibition Against SublicenseYou are prohibited to assign the license in respect of the Software granted to you under this Agreement, or to grant a sublicense to another person.
9. JurisdictionWith regards to any disputes arising from this Agreement, Penpower and you agree that the court having jurisdiction over the business location of Penpower will be the court in the first instance.
10. MiscellaneousIn the event that any provision of this Agreement is found to be invalid at law, such invalidity will not affect the validity of any other provisions, or the legal enforceability of such other provisions.
In the event that the Software cannot be executed under conditions of normal use, due to any damage to the original disk/s, Penpower will replace the disk/s free of charge.
ContentsChapter 1 Product Introduction............................................................................1-1
Chapter 2 Getting Started.....................................................................................2-12.1 System Requirements..............................................................................................2-1
2.2 Installing Penpower WorldCard.............................................................................2-1
2.2.1 Software and Driver Installation............................................................................2-1
2.2.2 Connecting Hardware.............................................................................................2-3
2.3 Preparation for Card Scan.......................................................................................2-4
2.3.1 Calibration.............................................................................................................2-4
2.3.2 Start-up Wizard....................................................................................................2-4
Chapter 3 Overview..............................................................................................3-13.1 User Interface..........................................................................................................3-1
3.1.1 Menu Bar...............................................................................................................3-2
3.1.2 Alphabet............................................................................................................3-2
3.2 Scanning Wizard....................................................................................................3-3
3.2.1 Scanning Business Cards......................................................................................3-3
3.2.2 Batch Scanning....................................................................................................3-4
3.3 Scan Bussiness Card Directly................................................................................3-4 3.4 Viewing Contacts..................................................................................................3-5
3.4.1 List Mode View........................................................................................................3-5
3.4.2 Label Mode View.....................................................................................................3-6
3.4.1 Image Mode View........................................................................................................3-7
3.4.2 Dual Mode View..................................................................................................3-8
Chapter 4 Editing Cards...................................................................................4-14.1 Editing Window Overview............................................................................................4-1
4.2 Verifying Contacts..........................................................................................................4-1
4.3 Editing Contacsts.....................................................................................................4-2
4.3.1 Recognizing Partial Content of a Card Entry.................................................4-3
4.3.2 Adjusting Separation Rate.................................................................................4-3
4.3.3 Deframing Function...........................................................................................4-4
4.3.4 Fine Rotate...........................................................................................................4-4
4.3.5 Rotating Card ......................................................................................................4-5

4.3.6 Rescanning Card.................................................................................................4-5
4.3.7 Recognize Again............................................................................................4-6
4.3.8 Front and Back Business Card Image Exchange...............................................4-6
4.4 Viewing Cards.......................................................................................................4-7
4.4.1 Saving Card Image.................................................................................................4-7 4.4.2 Deleting Card Image............................................................................................4-7
Chapter 5 Managing Business Cards..........................................................................5-15.1 Categorizing Cards...................................................................................................5-1
5.1.1 Categorizing from Management Page...................................................................5-1
5.1.2 Categorizing from Editing Page............................................................................5-2
5.1.3 Sending Email by Category................................................................................5-2
5.2 Merging and Separating Cards................................................................................5-3
5.3 Adding New Cards....................................................................................................5-4
5.3.1 Adding an Empty Card......................................................................................5-4
5.3.2 Adding the Same Company Card...............................................................................5-4
5.4 Adding Cards from Other Resources......................................................................5-5
5.4.1 Photo File...............................................................................................................5-5
5.4.2 Twain Scanner........................................................................................................5-5
5.5 Searching Contacts....................................................................................................5-7
5.5.1 Text Search............................................................................................................5-7
5.5.2 Advanced Search...................................................................................................5-8
5.5.3 Finding Duplicate Data............................................................................5-9
5.6 Safeguarding your Contacts..................................................................................5-10
5.6.1 Save ....................................................................................................................5-10
5.6.2 Save As...............................................................................................................5-10
5.6.3 File Encryption..................................................................................................5-10
5.7 Printing Cards......................................................................................................5-12
5.7.1 Printing Preview.................................................................................................5-12
5.7.2 Editing Print Templates.....................................................................................5-13
5.8 Exchanging Contacts...........................................................................................5-14
5.8.1 Export..............................................................................................................5-14
5.8.2 Import..............................................................................................................5-17
5.8.3 Synchronize....................................................................................................5-19
5.9 Settings.....................................................................................................5-21
5.9.1 Export Option....................................................................................................5-21
5.9.2 Sync Option........................................................................................................5-22
5.9.3 Field Display......................................................................................................5-23
5.9.4 User Define Field..............................................................................................5-23
5.9.5 Scan Option.......................................................................................................5-24
5.9.6 Revising the Results of Chinese Card Recognition..................................5-24
5.10 WorldCard Portable Disk..........................................................................5-25
5.10.1 Saving Card Data to a Portable Disk .............................................................5-25
5.10.2 Card Data Management for Portable Disk.....................................................5-26
Chapter 6 Scan Manager........................................................................................6-16.1 Scanning Contacts.........................................................................................................6-1
6.2 Scan business cards ..................................................................................................6-2
6.2.1 Scan and Edit business cards.............................................................................6-2
6.2.2 View business card image..................................................................................6-4
Chapter 7 WorldCard duet 2.......................................................................................7-17.1 Introduction................................................................................................................7-1
7.1.1 Hardware Introduction.........................................................................................7-1
7.2 Installation................................................................................................................7-2
7.3 Connecting Hardware.............................................................................................7-2
7.4 Using Hardware......................................................................................................7-3
7.5 Capturing Business Cards.......................................................................................7-4
7.6 Capture Option......................................................................................................7-10
FAQ

Chapter 1 Product Introduction 1-1
Chapter 1 Product Introduction
The PENPOWER WorldCard provides you with a total business card management solu-tion by integrating card recognition, management, transmission, and printing functions in a single digitized unit. So you can find your business cards at anytime and anywhere when you need them.
* Easy Card ReaderScanning or snapping your business cards has never been quicker or easier.
* Organizing Business Card After scanning or snapping your business cards, WorldCard Manager Software allows you to organize, sort, search, add and delete. Also, you can easily edit and add comments to any business card.
* Advanced SearchFull text search to find your contacts easily and conveniently.
* Support 16 languagesRecognize business cards in 16 different languages: English, French, German, Italian, Spanish, Dutch, Swedish, Norwegian, Russian, Polish, Turkish, Hungarian, Traditional Chinese, Simplified Chinese, Japanese and Korean.
* Multiple Categories and Sub-categoriesOrganize card information into categories and sub-categories in anyway you want.
* Print TemplatesWorldCard provides various print templates. You can also easily create your own tem-plates and print contact information in different formats.
* Recognize contact from other resourceRecognize business card image files taken by digital cameras or advanced mobile phones. It can also work with the flatbed scanner.
* Data ExchangeExport/Import/Sync contacts to/from/with Outlook, Outlook Express, Lotus Notes, Palm, Windows Mobile, ACT!, Goldmine, Salesforce and other PIM software.
Note: Vista version has not provided export/import/sync function for Pocket PC and Goldmine.

1-� WorldCard
* UnicodeUnicode design makes it possible to display various languages of business cards at the same time.
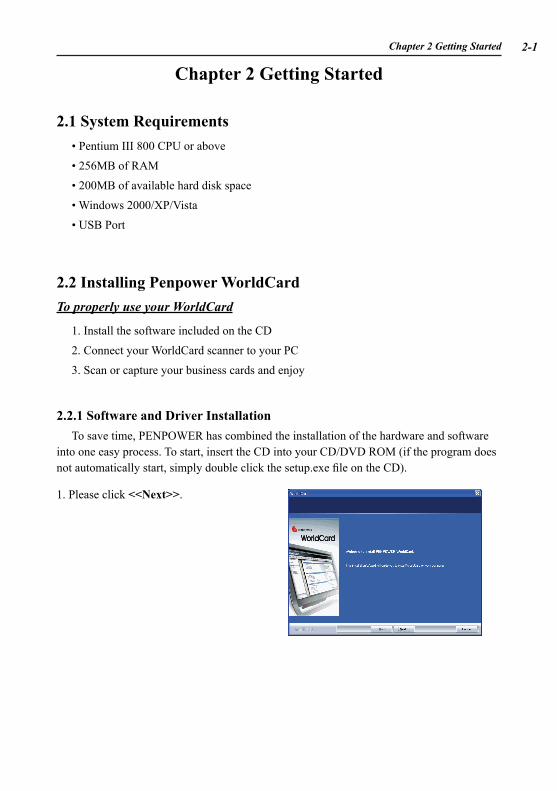
Chapter 2 Getting Started 2-�
1. Please click <<Next>>.
Chapter 2 Getting Started
2.1 System Requirements• Pentium III 800 CPU or above
• 256MB of RAM
• 200MB of available hard disk space
• Windows 2000/XP/Vista
• USB Port
2.2 Installing Penpower WorldCardTo properly use your WorldCard
1. Install the software included on the CD
2. Connect your WorldCard scanner to your PC
3. Scan or capture your business cards and enjoy
2.2.1 Software and Driver InstallationTo save time, PENPOWER has combined the installation of the hardware and software
into one easy process. To start, insert the CD into your CD/DVD ROM (if the program does not automatically start, simply double click the setup.exe file on the CD).
2-2 WorldCard
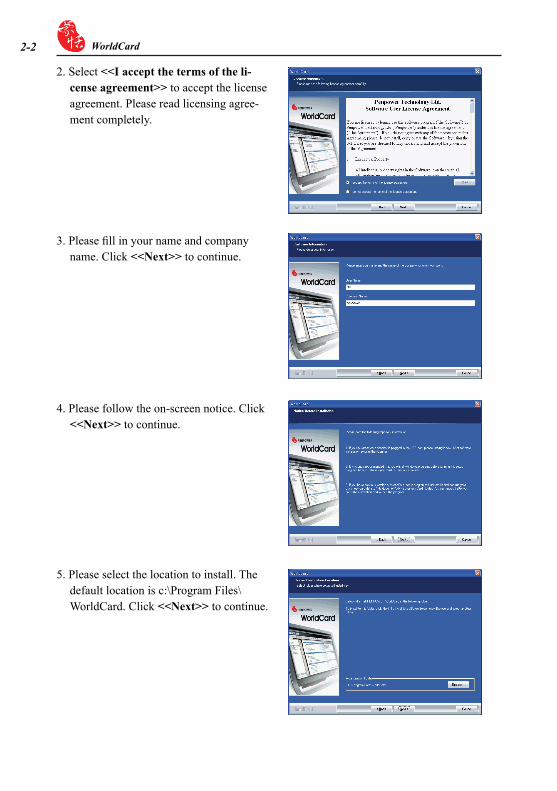
3. Please fill in your name and company name. Click <<Next>> to continue.
2. Select <<I accept the terms of the li-cense agreement>> to accept the license agreement. Please read licensing agree-ment completely.
4. Please follow the on-screen notice. Click <<Next>> to continue.
5. Please select the location to install. The default location is c:\Program Files\WorldCard. Click <<Next>> to continue.
Chapter 2 Getting Started 2-�
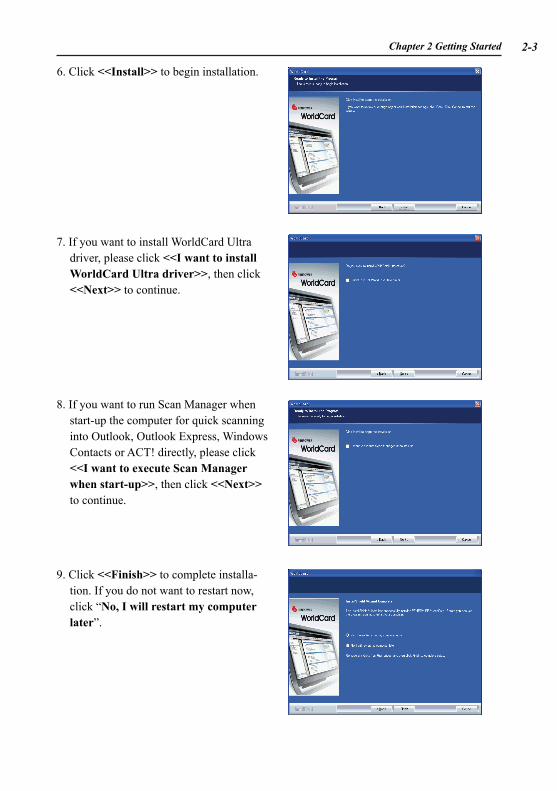
6. Click <<Install>> to begin installation.
9. Click <<Finish>> to complete installa-tion. If you do not want to restart now, click “No, I will restart my computer later”.
7. If you want to install WorldCard Ultra driver, please click <<I want to install WorldCard Ultra driver>>, then click <<Next>> to continue.
8. If you want to run Scan Manager when start-up the computer for quick scanning into Outlook, Outlook Express, Windows Contacts or ACT! directly, please click <<I want to execute Scan Manager when start-up>>, then click <<Next>> to continue.
2-� WorldCard
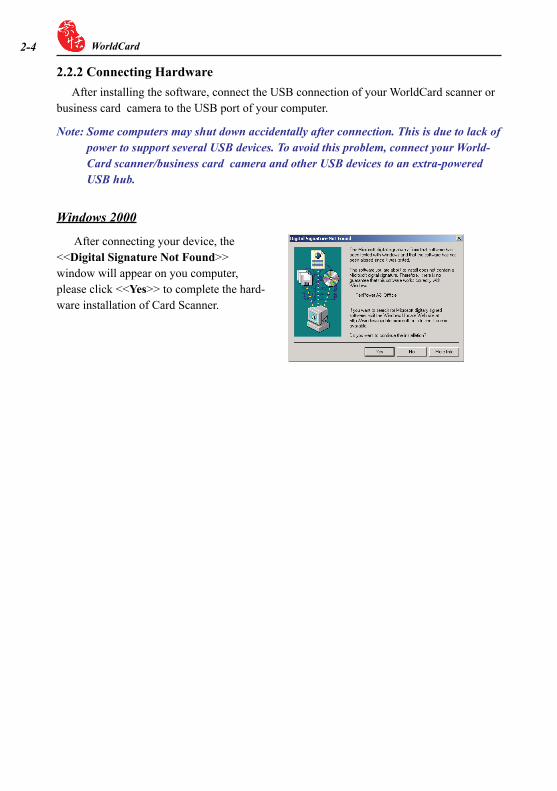
Windows 2000
After connecting your device, the <<Digital Signature Not Found>> window will appear on you computer, please click <<Yes>> to complete the hard-ware installation of Card Scanner.
2.2.2 Connecting HardwareAfter installing the software, connect the USB connection of your WorldCard scanner or
business card camera to the USB port of your computer.
Note: Some computers may shut down accidentally after connection. This is due to lack of power to support several USB devices. To avoid this problem, connect your World-Card scanner/business card camera and other USB devices to an extra-powered USB hub.
Chapter 2 Getting Started 2-�
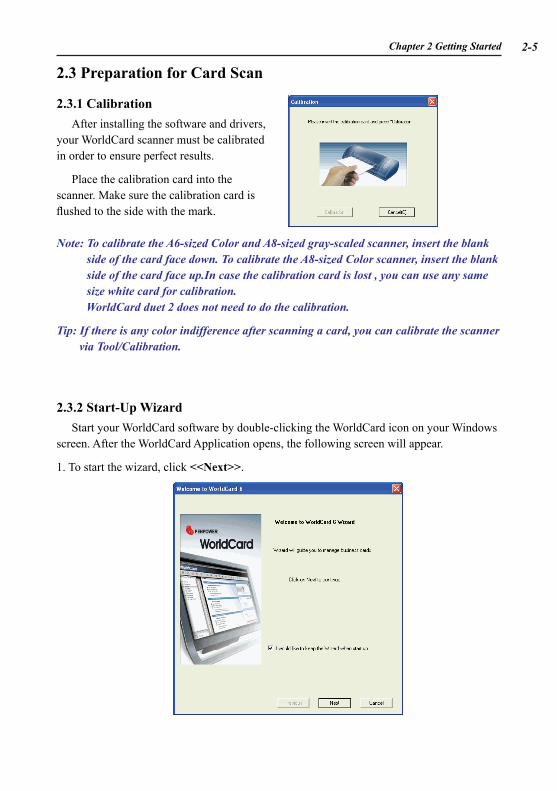
2.3 Preparation for Card Scan
2.3.1 CalibrationAfter installing the software and drivers,
your WorldCard scanner must be calibrated in order to ensure perfect results.
Place the calibration card into the scanner. Make sure the calibration card is flushed to the side with the mark.
Note: To calibrate the A6-sized Color and A8-sized gray-scaled scanner, insert the blank side of the card face down. To calibrate the A8-sized Color scanner, insert the blank side of the card face up.In case the calibration card is lost , you can use any same size white card for calibration.
WorldCard duet 2 does not need to do the calibration.
Tip: If there is any color indifference after scanning a card, you can calibrate the scanner via Tool/Calibration.
2.3.2 Start-Up WizardStart your WorldCard software by double-clicking the WorldCard icon on your Windows
screen. After the WorldCard Application opens, the following screen will appear.
1. To start the wizard, click <<Next>>.
2-� WorldCard
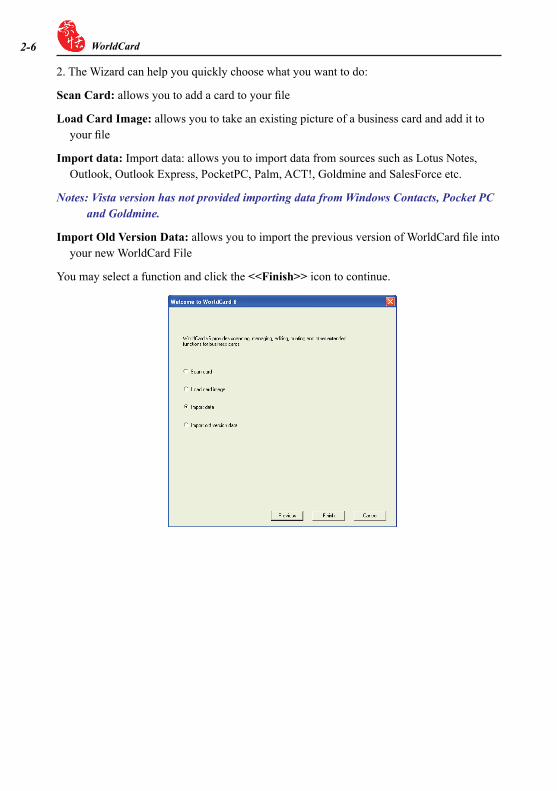
2. The Wizard can help you quickly choose what you want to do:
Scan Card: allows you to add a card to your file
Load Card Image: allows you to take an existing picture of a business card and add it to your file
Import data: Import data: allows you to import data from sources such as Lotus Notes, Outlook, Outlook Express, PocketPC, Palm, ACT!, Goldmine and SalesForce etc.
Notes: Vista version has not provided importing data from Windows Contacts, Pocket PC and Goldmine.
Import Old Version Data: allows you to import the previous version of WorldCard file into your new WorldCard File
You may select a function and click the <<Finish>> icon to continue.
Chapter 3 Overview 3-�
Chapter 3 Overview
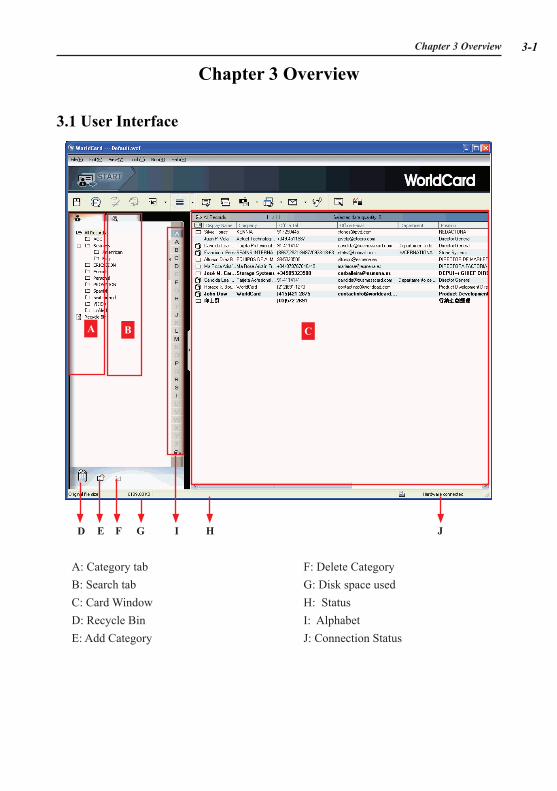
3.1 User Interface
A: Category tabB: Search tabC: Card WindowD: Recycle BinE: Add Category
D E F G
A
H J
CB
I
F: Delete CategoryG: Disk space usedH: StatusI: AlphabetJ: Connection Status
3-� WorldCard
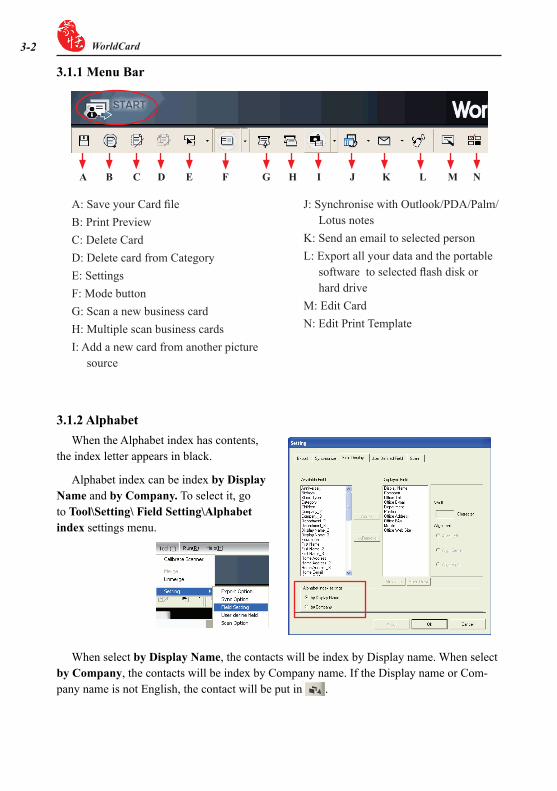
3.1.1 Menu Bar
A: Save your Card file B: Print PreviewC: Delete Card D: Delete card from CategoryE: Settings F: Mode buttonG: Scan a new business card H: Multiple scan business cardsI: Add a new card from another picture
source
A L M NIHGFEDCB J K
J: Synchronise with Outlook/PDA/Palm/Lotus notes
K: Send an email to selected personL: Export all your data and the portable
software to selected flash disk or hard drive
M: Edit Card N: Edit Print Template
When select by Display Name, the contacts will be index by Display name. When select by Company, the contacts will be index by Company name. If the Display name or Com-pany name is not English, the contact will be put in .
3.1.2 Alphabet When the Alphabet index has contents,
the index letter appears in black.
Alphabet index can be index by Display Name and by Company. To select it, go to Tool\Setting\ Field Setting\Alphabet index settings menu.

Chapter 3 Overview 3-3
3.2 Scanning Wizard
3.2.1 Scanning Business CardsTo scan business cards, select Scan . The wizard will open:
1. Select if the card is single or double sided.
2. Select the language of the card, if the card is double-sided select the language of the both sides.
3. Insert the card into your WorldCard Scanner, placing the card flush with the edge with the symbol. Once inserted, the Scanner status frame should say Ready.
4. In the Scanner Panel frame:
- Select Auto Scanning, if you want the scan to automatically start when the paper is inserted.
- Select Auto Recognition after scanning, if you want the card information to be automatically added to your file. If you want to see the scanned card image before recognition, do not select this. If you select Double-side, you can click Skip back side to scan front side only.
- Select Editing business card after scanning, the edit window will be open when closing Scan Wizard.
5. After you recognize the card, the information will automatically go into the Unfiled category.
Note: To scan business card, face up and insert the business card to A6-sized and A8-sized color business card scanner. Face down and insert the business card to A8-sized gray-scale business card scanner. A6-sized business card scanner has two hardware buttons. The one on the top is for scanning pictures via TWAIN interface, another
3-� WorldCard
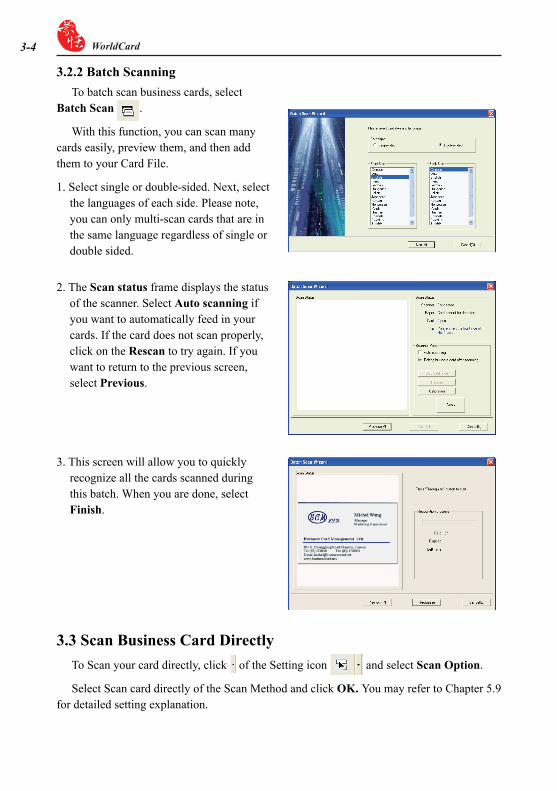
3.2.2 Batch ScanningTo batch scan business cards, select
Batch Scan .
With this function, you can scan many cards easily, preview them, and then add them to your Card File.
1. Select single or double-sided. Next, select the languages of each side. Please note, you can only multi-scan cards that are in the same language regardless of single or double sided.
3. This screen will allow you to quickly recognize all the cards scanned during this batch. When you are done, select Finish.
2. The Scan status frame displays the status of the scanner. Select Auto scanning if you want to automatically feed in your cards. If the card does not scan properly, click on the Rescan to try again. If you want to return to the previous screen, select Previous.
3.3 Scan Business Card DirectlyTo Scan your card directly, click of the Setting icon and select Scan Option.
Select Scan card directly of the Scan Method and click OK. You may refer to Chapter 5.9 for detailed setting explanation.
Chapter 3 Overview 3-�
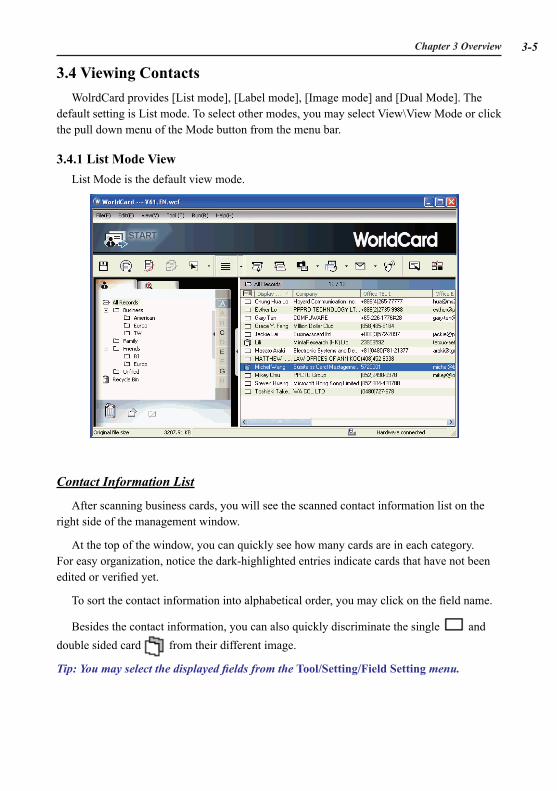
3.4 Viewing ContactsWolrdCard provides [List mode], [Label mode], [Image mode] and [Dual Mode]. The
default setting is List mode. To select other modes, you may select View\View Mode or click the pull down menu of the Mode button from the menu bar.
3.4.1 List Mode ViewList Mode is the default view mode.
Contact Information List
After scanning business cards, you will see the scanned contact information list on the right side of the management window.
At the top of the window, you can quickly see how many cards are in each category. For easy organization, notice the dark-highlighted entries indicate cards that have not been edited or verified yet.
To sort the contact information into alphabetical order, you may click on the field name.
Besides the contact information, you can also quickly discriminate the single and double sided card from their different image.
Tip: You may select the displayed fields from the Tool/Setting/Field Setting menu.
3-6 WorldCard
Category tab
You can manage your business cards by storing them in category groups. The Category tab is on the left side of the management window. You can find All Records category and Unfiled category as the default. WorldCard allows you to add as many user specified catego-ries and sub-categories to manage your business cards as you chose.
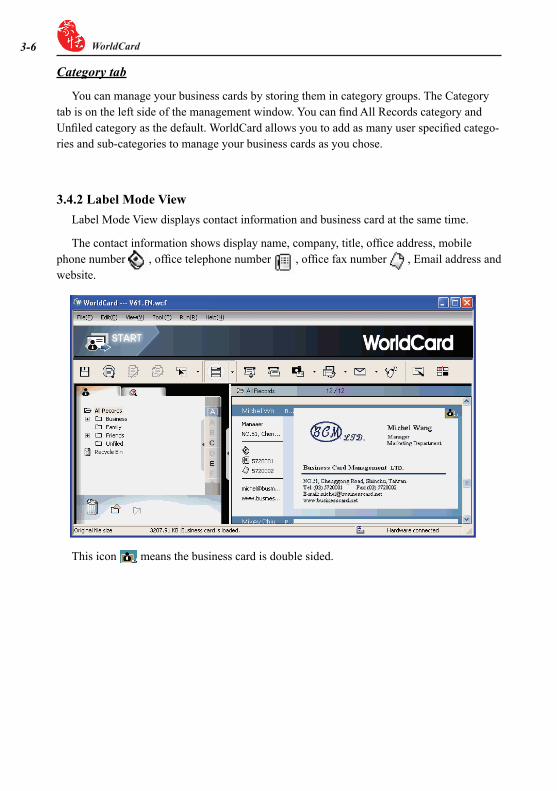
3.4.2 Label Mode ViewLabel Mode View displays contact information and business card at the same time.
The contact information shows display name, company, title, office address, mobile phone number , office telephone number , office fax number , Email address and website.
This icon means the business card is double sided.
Chapter 3 Overview 3-�
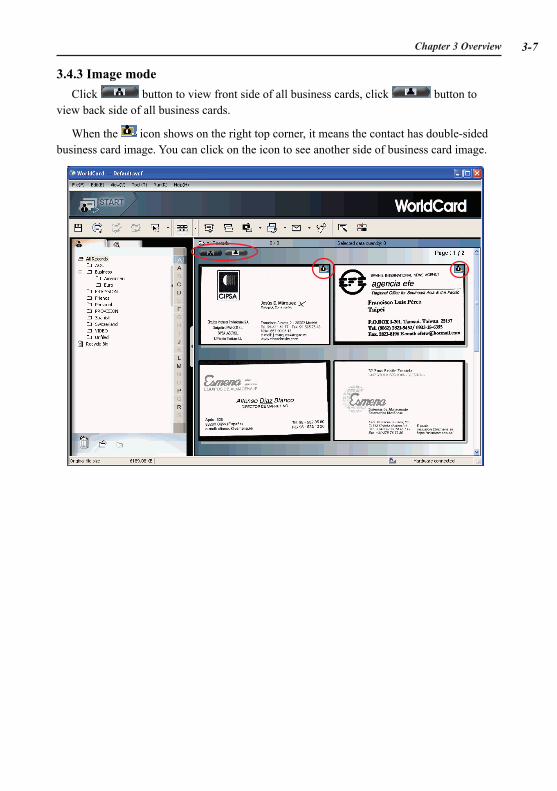
3.4.3 Image modeClick button to view front side of all business cards, click button to
view back side of all business cards.
When the icon shows on the right top corner, it means the contact has double-sided business card image. You can click on the icon to see another side of business card image.
3-8 WorldCard
Tip: WorldCard provides you to drag-and-drop business card image from view mode (ex-cept List Mode) to other applications such as Microsoft office Word, Excel etc.
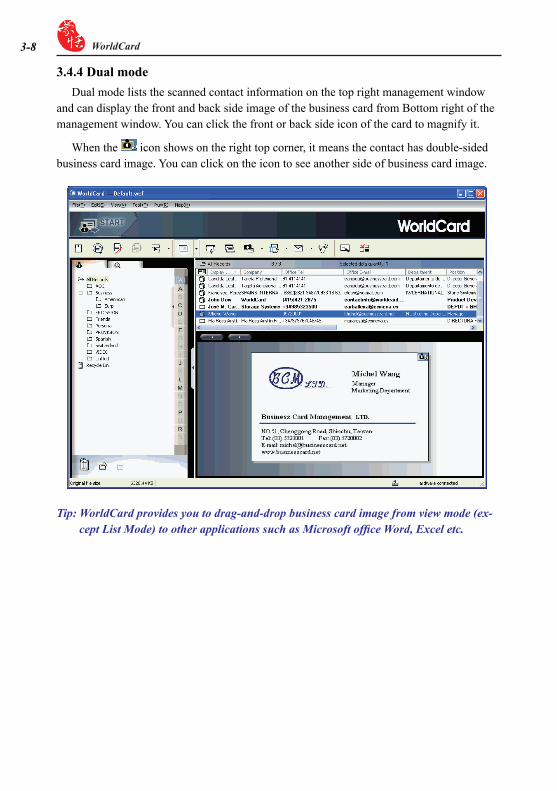
3.4.4 Dual modeDual mode lists the scanned contact information on the top right management window
and can display the front and back side image of the business card from Bottom right of the management window. You can click the front or back side icon of the card to magnify it.
When the icon shows on the right top corner, it means the contact has double-sided business card image. You can click on the icon to see another side of business card image.
Chapter 4 Editing Cards 4-�
Chapter 4 Editing Cards
4.1 Editing Window Overview
The WorldCard Editing window allows you to edit the information of individual busi-ness cards.
To select the WorldCard Editing window, simply double click on any card record in the list menu of the WorldCard Management page. Or, you may click the Edit Selected Record icon to the WorldCard Editing window and edit the selected records.
You may click a record and press on Ctrl or Shift key of your keyboard, and then click another record for multiple selection.
4.2 Verifying Contacts
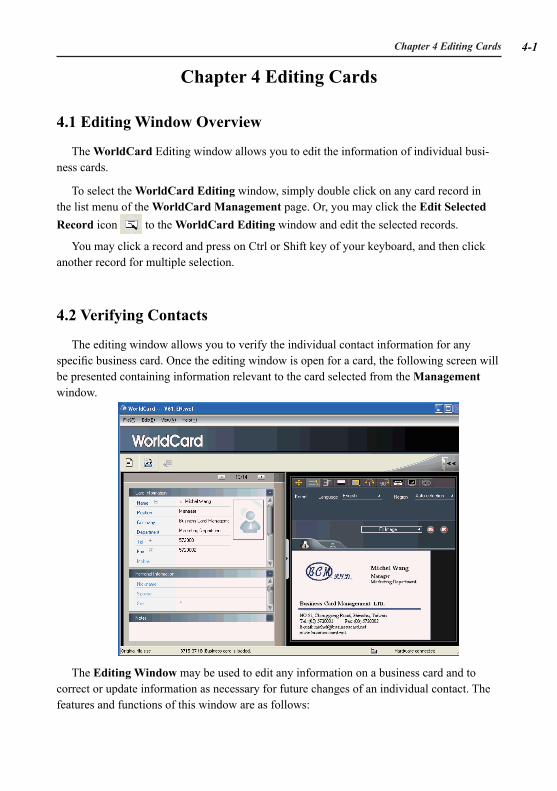
The editing window allows you to verify the individual contact information for any specific business card. Once the editing window is open for a card, the following screen will be presented containing information relevant to the card selected from the Management window.
The Editing Window may be used to edit any information on a business card and to correct or update information as necessary for future changes of an individual contact. The features and functions of this window are as follows:
4-� WorldCard
4.3 Editing Contacts
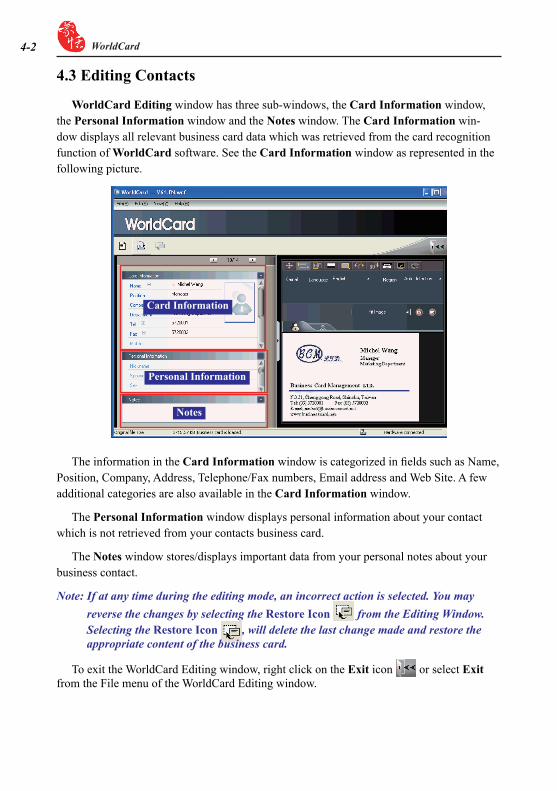
WorldCard Editing window has three sub-windows, the Card Information window, the Personal Information window and the Notes window. The Card Information win-dow displays all relevant business card data which was retrieved from the card recognition function of WorldCard software. See the Card Information window as represented in the following picture.
The information in the Card Information window is categorized in fields such as Name, Position, Company, Address, Telephone/Fax numbers, Email address and Web Site. A few additional categories are also available in the Card Information window.
The Personal Information window displays personal information about your contact which is not retrieved from your contacts business card.
The Notes window stores/displays important data from your personal notes about your business contact.
Note: If at any time during the editing mode, an incorrect action is selected. You may reverse the changes by selecting the Restore Icon from the Editing Window. Selecting the Restore Icon , will delete the last change made and restore the appropriate content of the business card.
To exit the WorldCard Editing window, right click on the Exit icon or select Exit from the File menu of the WorldCard Editing window.
Card Information
Personal Information
Notes
Chapter 4 Editing Cards 4-�
After selecting the area, a pop up window will open. This allows you to select the appro-priate category for the information which has been highlighted.
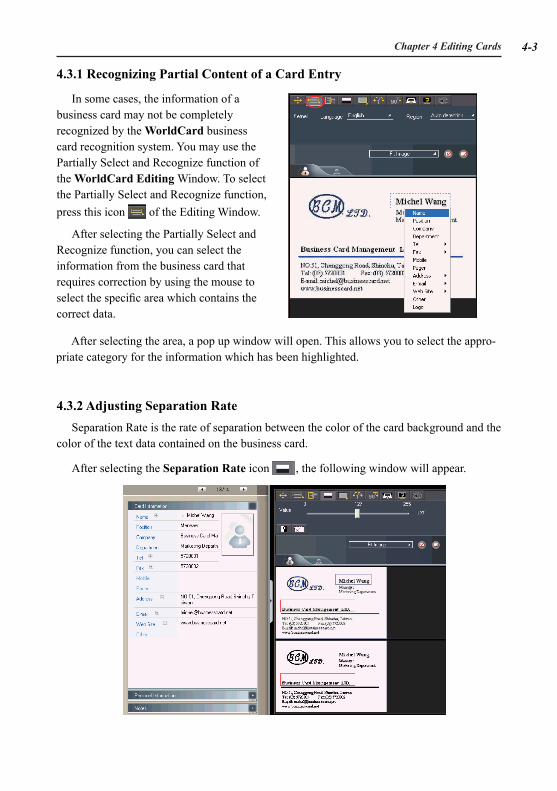
4.3.1 Recognizing Partial Content of a Card Entry
4.3.2 Adjusting Separation RateSeparation Rate is the rate of separation between the color of the card background and the
color of the text data contained on the business card.
After selecting the Separation Rate icon , the following window will appear.
In some cases, the information of a business card may not be completely recognized by the WorldCard business card recognition system. You may use the Partially Select and Recognize function of the WorldCard Editing Window. To select the Partially Select and Recognize function, press this icon of the Editing Window.
After selecting the Partially Select and Recognize function, you can select the information from the business card that requires correction by using the mouse to select the specific area which contains the correct data.
4-4 WorldCard
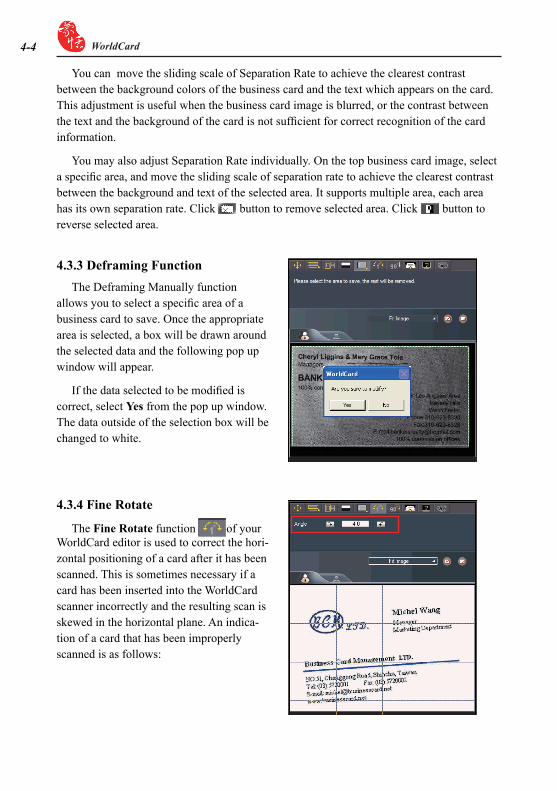
4.3.3 Deframing FunctionThe Deframing Manually function
allows you to select a specific area of a business card to save. Once the appropriate area is selected, a box will be drawn around the selected data and the following pop up window will appear.
If the data selected to be modified is correct, select Yes from the pop up window. The data outside of the selection box will be changed to white.
4.3.4 Fine Rotate
The Fine Rotate function of your WorldCard editor is used to correct the hori-zontal positioning of a card after it has been scanned. This is sometimes necessary if a card has been inserted into the WorldCard scanner incorrectly and the resulting scan is skewed in the horizontal plane. An indica-tion of a card that has been improperly scanned is as follows:
You can move the sliding scale of Separation Rate to achieve the clearest contrast between the background colors of the business card and the text which appears on the card. This adjustment is useful when the business card image is blurred, or the contrast between the text and the background of the card is not sufficient for correct recognition of the card information.
You may also adjust Separation Rate individually. On the top business card image, select a specific area, and move the sliding scale of separation rate to achieve the clearest contrast between the background and text of the selected area. It supports multiple area, each area has its own separation rate. Click button to remove selected area. Click button to reverse selected area.
Chapter 4 Editing Cards 4-�
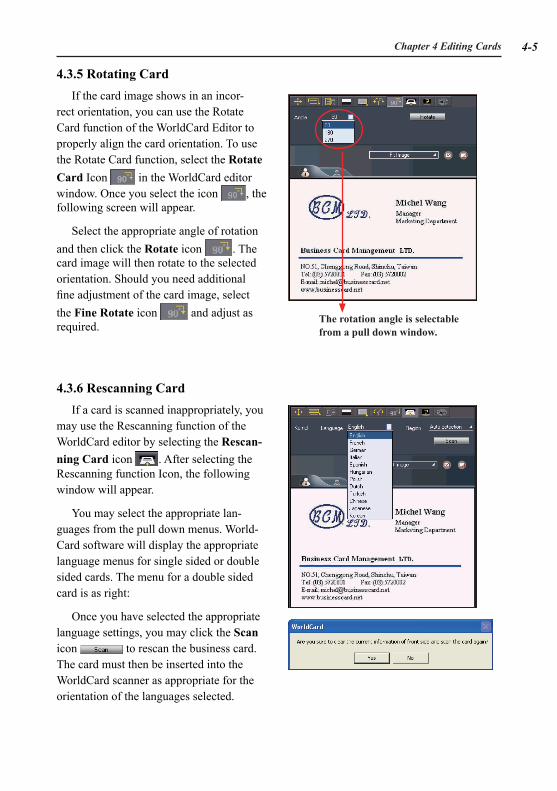
4.3.5 Rotating Card If the card image shows in an incor-
rect orientation, you can use the Rotate Card function of the WorldCard Editor to properly align the card orientation. To use the Rotate Card function, select the Rotate Card Icon in the WorldCard editor window. Once you select the icon , the following screen will appear.
Select the appropriate angle of rotation and then click the Rotate icon . The card image will then rotate to the selected orientation. Should you need additional fine adjustment of the card image, select the Fine Rotate icon and adjust as required.
The rotation angle is selectable from a pull down window.
4.3.6 Rescanning CardIf a card is scanned inappropriately, you
may use the Rescanning function of the WorldCard editor by selecting the Rescan-ning Card icon . After selecting the Rescanning function Icon, the following window will appear.
You may select the appropriate lan-guages from the pull down menus. World-Card software will display the appropriate language menus for single sided or double sided cards. The menu for a double sided card is as right:
Once you have selected the appropriate language settings, you may click the Scan icon to rescan the business card. The card must then be inserted into the WorldCard scanner as appropriate for the orientation of the languages selected.
4-� WorldCard
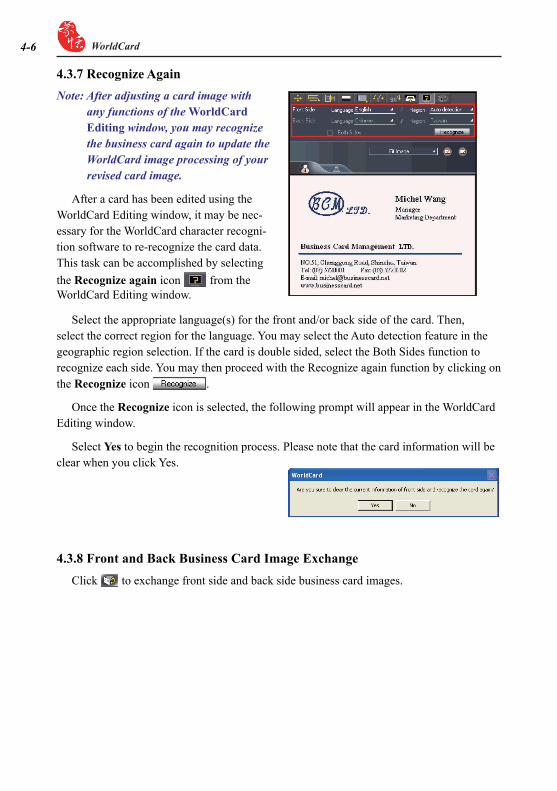
4.3.7 Recognize AgainNote: After adjusting a card image with
any functions of the WorldCard Editing window, you may recognize the business card again to update the WorldCard image processing of your revised card image.
After a card has been edited using the WorldCard Editing window, it may be nec-essary for the WorldCard character recogni-tion software to re-recognize the card data. This task can be accomplished by selecting the Recognize again icon from the WorldCard Editing window.
Select the appropriate language(s) for the front and/or back side of the card. Then, select the correct region for the language. You may select the Auto detection feature in the geographic region selection. If the card is double sided, select the Both Sides function to recognize each side. You may then proceed with the Recognize again function by clicking on the Recognize icon .
Once the Recognize icon is selected, the following prompt will appear in the WorldCard Editing window.
Select Yes to begin the recognition process. Please note that the card information will be clear when you click Yes.
4.3.8 Front and Back Business Card Image ExchangeClick to exchange front side and back side business card images.
Chapter 4 Editing Cards 4-�
4.4 Viewing Cards
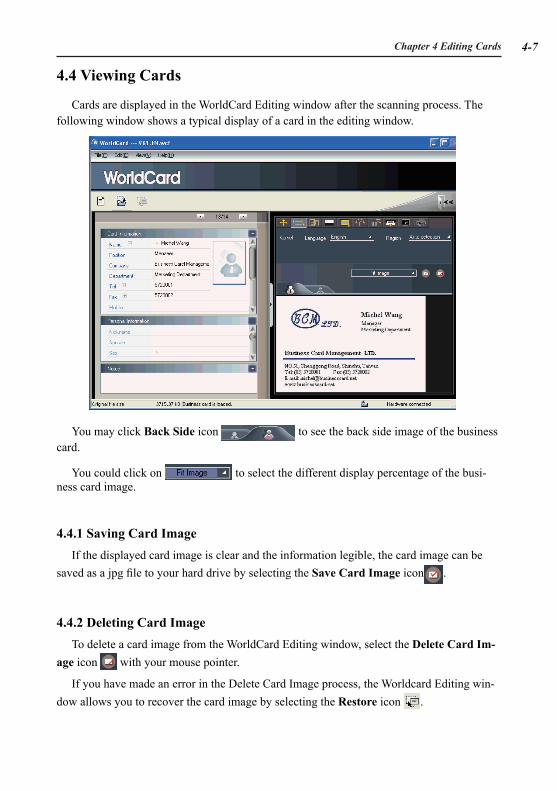
Cards are displayed in the WorldCard Editing window after the scanning process. The following window shows a typical display of a card in the editing window.
You may click Back Side icon to see the back side image of the business card.
You could click on to select the different display percentage of the busi-ness card image.
4.4.1 Saving Card ImageIf the displayed card image is clear and the information legible, the card image can be
saved as a jpg file to your hard drive by selecting the Save Card Image icon .
4.4.2 Deleting Card ImageTo delete a card image from the WorldCard Editing window, select the Delete Card Im-
age icon with your mouse pointer.
If you have made an error in the Delete Card Image process, the Worldcard Editing win-dow allows you to recover the card image by selecting the Restore icon .

4-� WorldCard
Chapter 5 Managing Business Cards 5-�
Chapter 5 Managing Business Cards
The management functions of your WorldCard allow you to categorize contacts, send e-mail by contact or group functions, add new cards to a group, import cards from other sources, search cards by various data fields, file encryption features to protect your card database, printing cards, exporting database to other applications and synchronization with other software applications.
5.1 Categorizing CardsThe WorldCard software allows you to manage your business cards by storing them in
the category groups. After installing your WorldCard software, you will find two default cat-egories on the management page, the All Records category and Unfiled category. You may add as many user specified categories and sub-categories to manage your business cards as you chose.
5.1.1 Categorizing from Management Page
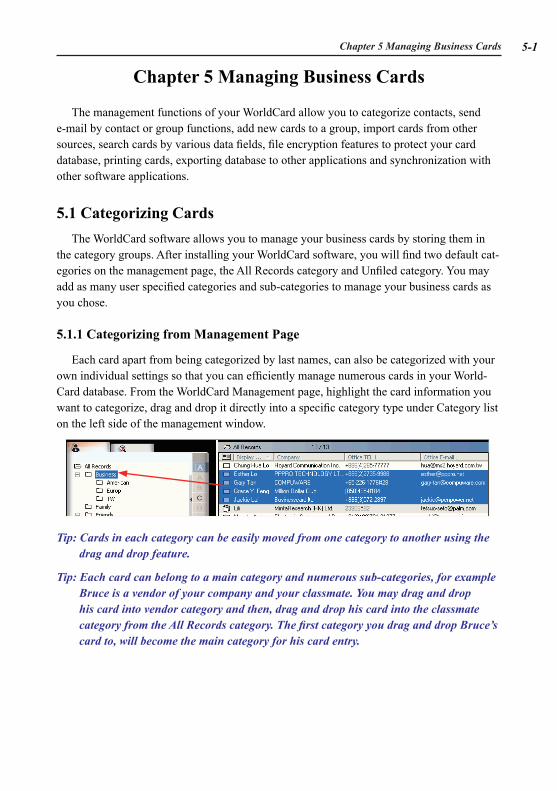
Each card apart from being categorized by last names, can also be categorized with your own individual settings so that you can efficiently manage numerous cards in your World-Card database. From the WorldCard Management page, highlight the card information you want to categorize, drag and drop it directly into a specific category type under Category list on the left side of the management window.
Tip: Cards in each category can be easily moved from one category to another using the drag and drop feature.
Tip: Each card can belong to a main category and numerous sub-categories, for example Bruce is a vendor of your company and your classmate. You may drag and drop his card into vendor category and then, drag and drop his card into the classmate category from the All Records category. The first category you drag and drop Bruce’s card to, will become the main category for his card entry.
5-� WorldCard
5.1.2 Categorizing from Editing Page
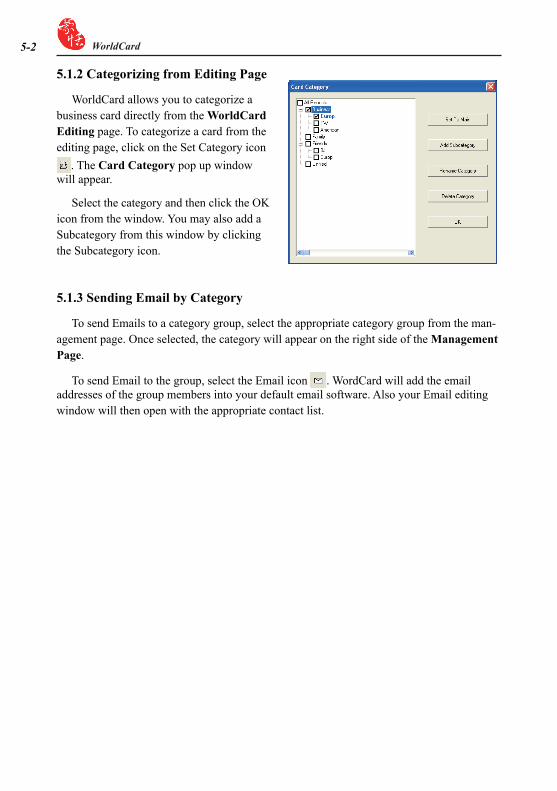
WorldCard allows you to categorize a business card directly from the WorldCard Editing page. To categorize a card from the editing page, click on the Set Category icon
. The Card Category pop up window will appear.
Select the category and then click the OK icon from the window. You may also add a Subcategory from this window by clicking the Subcategory icon.
5.1.3 Sending Email by Category
To send Emails to a category group, select the appropriate category group from the man-agement page. Once selected, the category will appear on the right side of the Management Page.
To send Email to the group, select the Email icon . WordCard will add the email addresses of the group members into your default email software. Also your Email editing window will then open with the appropriate contact list.
Chapter 5 Managing Business Cards 5-�
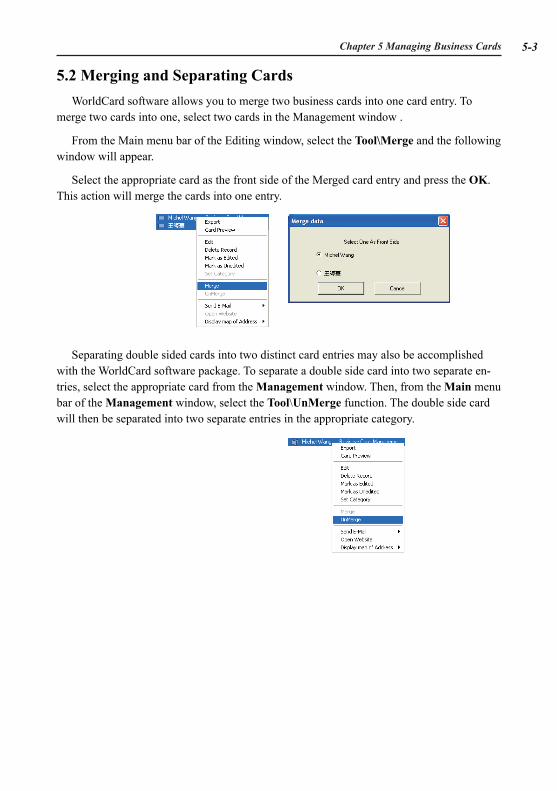
5.2 Merging and Separating CardsWorldCard software allows you to merge two business cards into one card entry. To
merge two cards into one, select two cards in the Management window .
From the Main menu bar of the Editing window, select the Tool\Merge and the following window will appear.
Select the appropriate card as the front side of the Merged card entry and press the OK. This action will merge the cards into one entry.
Separating double sided cards into two distinct card entries may also be accomplished with the WorldCard software package. To separate a double side card into two separate en-tries, select the appropriate card from the Management window. Then, from the Main menu bar of the Management window, select the Tool\UnMerge function. The double side card will then be separated into two separate entries in the appropriate category.
5-� WorldCard
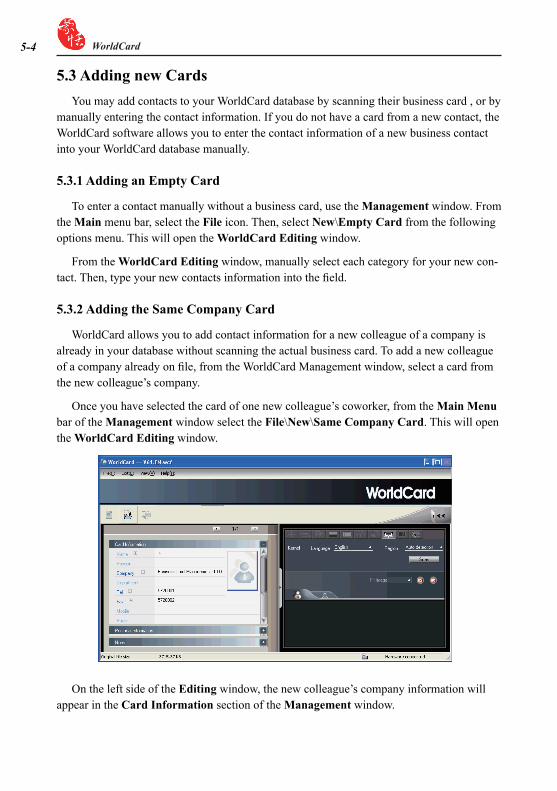
On the left side of the Editing window, the new colleague’s company information will appear in the Card Information section of the Management window.
5.3 Adding new CardsYou may add contacts to your WorldCard database by scanning their business card , or by
manually entering the contact information. If you do not have a card from a new contact, the WorldCard software allows you to enter the contact information of a new business contact into your WorldCard database manually.
5.3.1 Adding an Empty Card
To enter a contact manually without a business card, use the Management window. From the Main menu bar, select the File icon. Then, select New\Empty Card from the following options menu. This will open the WorldCard Editing window.
From the WorldCard Editing window, manually select each category for your new con-tact. Then, type your new contacts information into the field.
5.3.2 Adding the Same Company Card
WorldCard allows you to add contact information for a new colleague of a company is already in your database without scanning the actual business card. To add a new colleague of a company already on file, from the WorldCard Management window, select a card from the new colleague’s company.
Once you have selected the card of one new colleague’s coworker, from the Main Menu bar of the Management window select the File\New\Same Company Card. This will open the WorldCard Editing window.
Chapter 5 Managing Business Cards 5-5
5.4 Adding Cards from Other ResourcesThe WorldCard Business Card Scanner and other WorldCard recognition products are
equipped with a card scanner or camera which are used to capture a card image. However, you may use other hardware resources in conjunction with your WorldCard software to process card images.
5.4.1 Photo File
WorldCard can process a business card entry from a photo image in either a bmp format of a jpg format. To use this option of your WorldCard software, you must have a picture image of the card on an accessible medium which your computer can access directly, as well as connecting the camera or scanner. To select an alternative image source from the Image Source icon . From the pull down menu, select the appropriate image source, (Photo File or Twain Scanner).
5.4.2 Twain Scanner
Card entries may also be accomplished through any twain scanner hardware resources. If your scanner is connected, WorldCard software will recognize it and add the scanner to the resource list. You may select the Twain Scanner option from the Image Source icon’s
pull down menu.
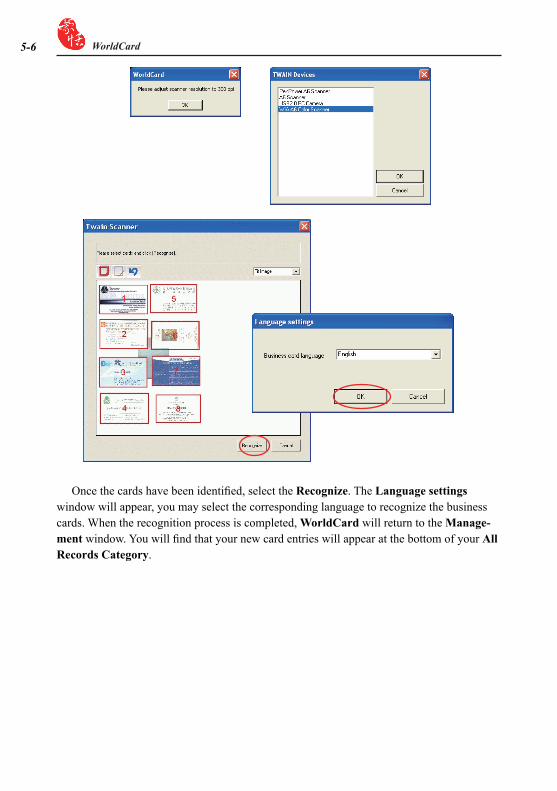
Ensure that the resolution for your scanner is set to at least 300dpi.
Tip: You may scan up to 8 cards at one time with an A4 size flatbed scanner. Place the card on the bed of your scanner with some separation between the card edges to clearly distinguish each individual card. You may also put an A�-size white paper to cover the business cards for recognizing regions of business cards properly.
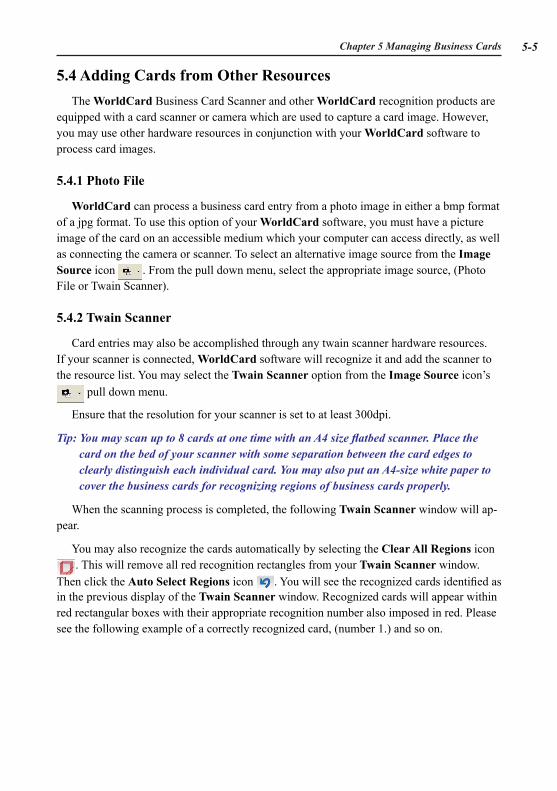
When the scanning process is completed, the following Twain Scanner window will ap-pear.
You may also recognize the cards automatically by selecting the Clear All Regions icon . This will remove all red recognition rectangles from your Twain Scanner window.
Then click the Auto Select Regions icon . You will see the recognized cards identified as in the previous display of the Twain Scanner window. Recognized cards will appear within red rectangular boxes with their appropriate recognition number also imposed in red. Please see the following example of a correctly recognized card, (number 1.) and so on.
5-� WorldCard
Once the cards have been identified, select the Recognize. The Language settings window will appear, you may select the corresponding language to recognize the business cards. When the recognition process is completed, WorldCard will return to the Manage-ment window. You will find that your new card entries will appear at the bottom of your All Records Category.
Chapter 5 Managing Business Cards 5-�
5.5 Searching ContactsWith the WorldCard management software, you can quickly and efficiently find your
contacts with the WorldCard Search functions.
5.5.1 Text Search
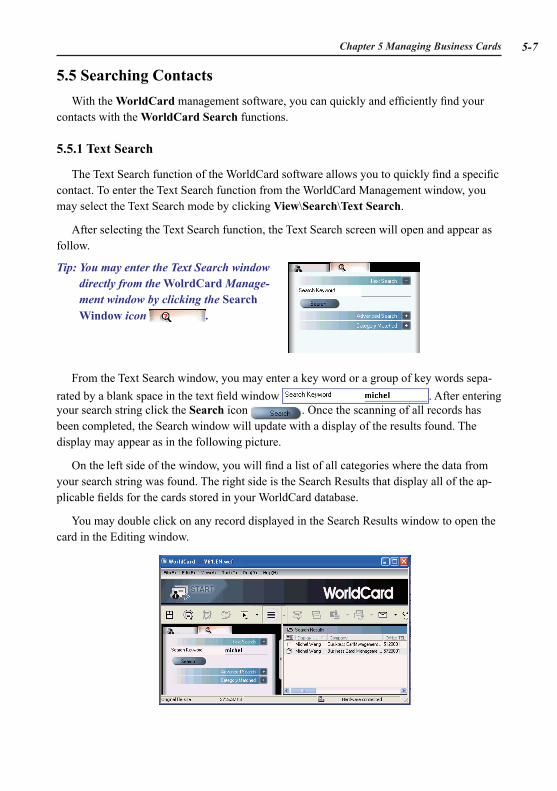
The Text Search function of the WorldCard software allows you to quickly find a specific contact. To enter the Text Search function from the WorldCard Management window, you may select the Text Search mode by clicking View\Search\Text Search.
After selecting the Text Search function, the Text Search screen will open and appear as follow.
From the Text Search window, you may enter a key word or a group of key words sepa-rated by a blank space in the text field window . After entering your search string click the Search icon . Once the scanning of all records has been completed, the Search window will update with a display of the results found. The display may appear as in the following picture.
On the left side of the window, you will find a list of all categories where the data from your search string was found. The right side is the Search Results that display all of the ap-plicable fields for the cards stored in your WorldCard database.
You may double click on any record displayed in the Search Results window to open the card in the Editing window.
Tip: You may enter the Text Search window directly from the WolrdCard Manage-ment window by clicking the Search Window icon .
5-� WorldCard
5.5.2 Advanced Search
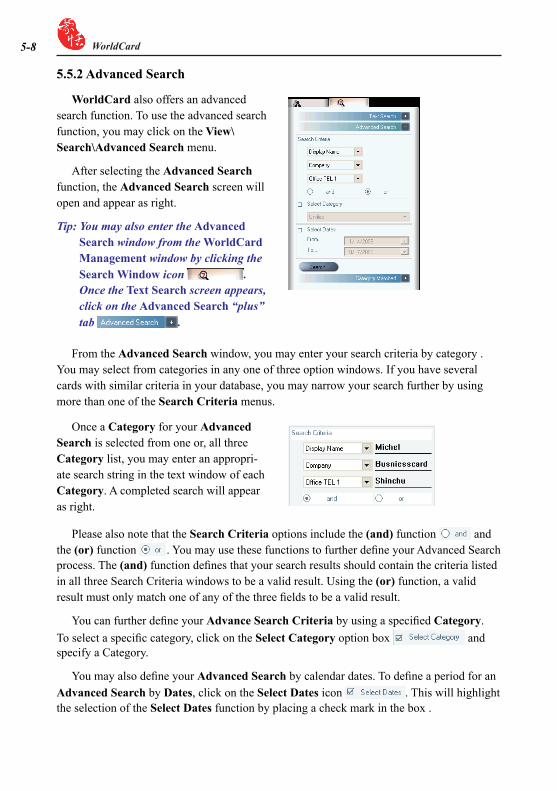
WorldCard also offers an advanced search function. To use the advanced search function, you may click on the View\Search\Advanced Search menu.
After selecting the Advanced Search function, the Advanced Search screen will open and appear as right.
Tip: You may also enter the Advanced Search window from the WorldCard Management window by clicking the Search Window icon . Once the Text Search screen appears, click on the Advanced Search “plus” tab .
From the Advanced Search window, you may enter your search criteria by category . You may select from categories in any one of three option windows. If you have several cards with similar criteria in your database, you may narrow your search further by using more than one of the Search Criteria menus.
Please also note that the Search Criteria options include the (and) function and the (or) function . You may use these functions to further define your Advanced Search process. The (and) function defines that your search results should contain the criteria listed in all three Search Criteria windows to be a valid result. Using the (or) function, a valid result must only match one of any of the three fields to be a valid result.
You can further define your Advance Search Criteria by using a specified Category. To select a specific category, click on the Select Category option box and specify a Category.
You may also define your Advanced Search by calendar dates. To define a period for an Advanced Search by Dates, click on the Select Dates icon . This will highlight the selection of the Select Dates function by placing a check mark in the box .
Once a Category for your Advanced Search is selected from one or, all three Category list, you may enter an appropri-ate search string in the text window of each Category. A completed search will appear as right.
Chapter 5 Managing Business Cards 5-�
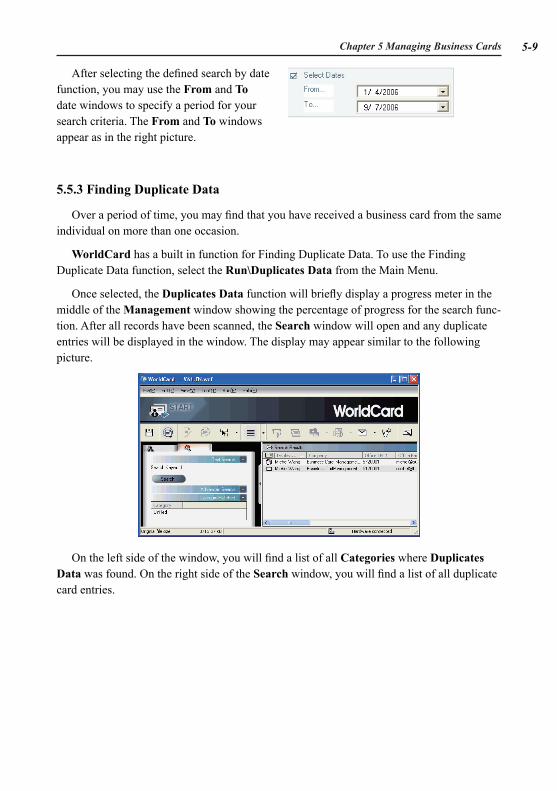
5.5.3 Finding Duplicate Data
Over a period of time, you may find that you have received a business card from the same individual on more than one occasion.
WorldCard has a built in function for Finding Duplicate Data. To use the Finding Duplicate Data function, select the Run\Duplicates Data from the Main Menu.
Once selected, the Duplicates Data function will briefly display a progress meter in the middle of the Management window showing the percentage of progress for the search func-tion. After all records have been scanned, the Search window will open and any duplicate entries will be displayed in the window. The display may appear similar to the following picture.
After selecting the defined search by date function, you may use the From and To date windows to specify a period for your search criteria. The From and To windows appear as in the right picture.
On the left side of the window, you will find a list of all Categories where Duplicates Data was found. On the right side of the Search window, you will find a list of all duplicate card entries.
5-�0 WorldCard
5.6 Safeguarding Your ContactsInformation is a valuable resource to any business. WorldCard recognizes the intangible
value of your business card contacts and has built in features to help you safeguard that data.
5.6.1 Save
WorldCard is a business card database management system. It will automatically save all changes when exit the system. You may manually save your card database from the File\Save of the Main Menu.
You may also Save your database by selecting the Save icon from the WorldCard Management page.
5.6.2 Save As
The WorldCard Save As function allows you to save your database file to a specified di-rectory for use as a back up file. To use the Save As function of WorldCard, from the File\ Save As of the main menu.
WorldCard database files are stored in the (*.wcf) format. No other format options are available. Once you have named your file accordingly, select the Save to complete this operation.
5.6.3 File Encryption
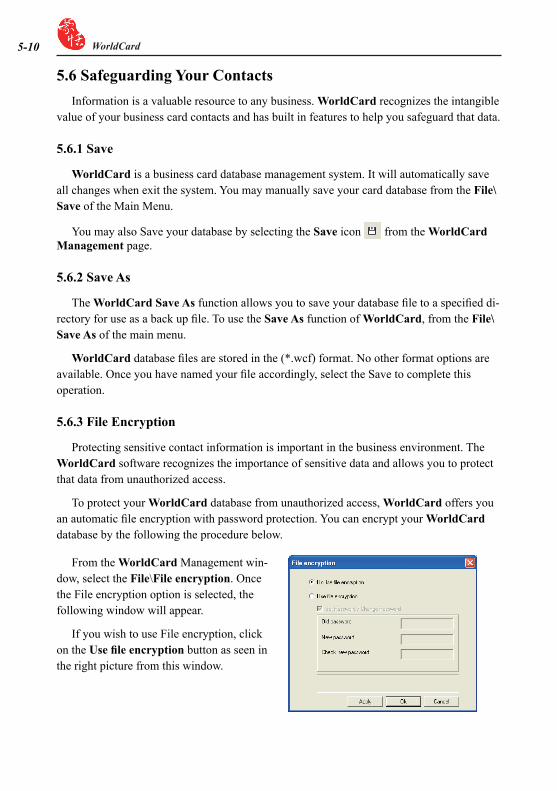
Protecting sensitive contact information is important in the business environment. The WorldCard software recognizes the importance of sensitive data and allows you to protect that data from unauthorized access.
To protect your WorldCard database from unauthorized access, WorldCard offers you an automatic file encryption with password protection. You can encrypt your WorldCard database by the following the procedure below.
From the WorldCard Management win-dow, select the File\File encryption. Once the File encryption option is selected, the following window will appear.
If you wish to use File encryption, click on the Use file encryption button as seen in the right picture from this window.
Chapter 5 Managing Business Cards 5-��
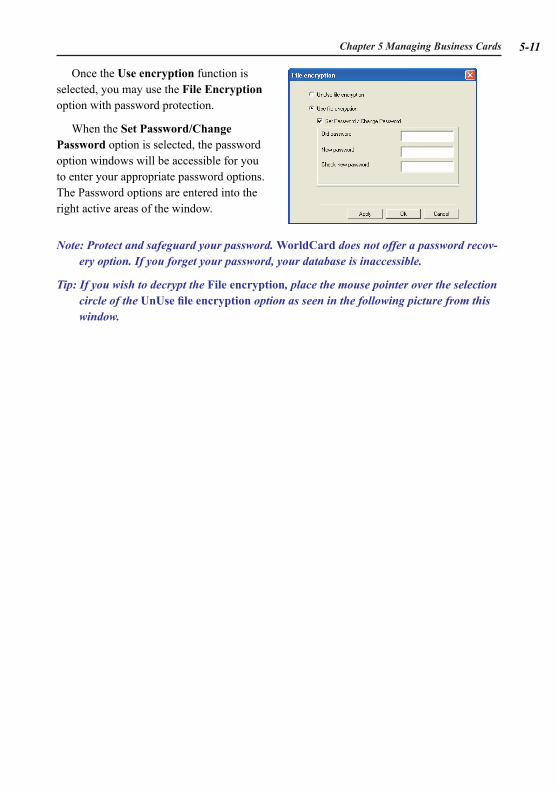
Once the Use encryption function is selected, you may use the File Encryption option with password protection.
When the Set Password/Change Password option is selected, the password option windows will be accessible for you to enter your appropriate password options. The Password options are entered into the right active areas of the window.
Note: Protect and safeguard your password. WorldCard does not offer a password recov-ery option. If you forget your password, your database is inaccessible.
Tip: If you wish to decrypt the File encryption, place the mouse pointer over the selection circle of the UnUse file encryption option as seen in the following picture from this window.
5-�� WorldCard
5.7 Printing CardsWorldCard software allows you to print card information into several usable formats.
An overview of the WorldCard printing functions will be presented in this chapter.
5.7.1 Printing Preview
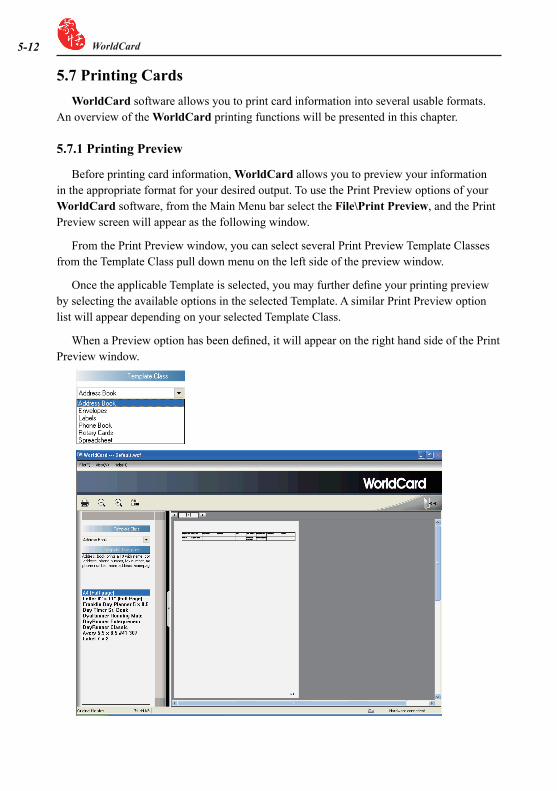
Before printing card information, WorldCard allows you to preview your information in the appropriate format for your desired output. To use the Print Preview options of your WorldCard software, from the Main Menu bar select the File\Print Preview, and the Print Preview screen will appear as the following window.
From the Print Preview window, you can select several Print Preview Template Classes from the Template Class pull down menu on the left side of the preview window.
Once the applicable Template is selected, you may further define your printing preview by selecting the available options in the selected Template. A similar Print Preview option list will appear depending on your selected Template Class.
When a Preview option has been defined, it will appear on the right hand side of the Print Preview window.
Chapter 5 Managing Business Cards 5-��
5.7.2 Editing Print Templates
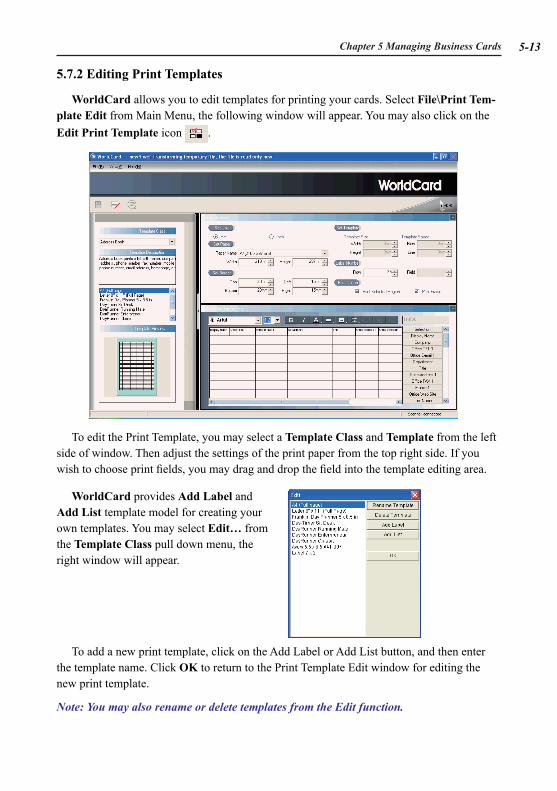
WorldCard allows you to edit templates for printing your cards. Select File\Print Tem-plate Edit from Main Menu, the following window will appear. You may also click on the Edit Print Template icon .
To edit the Print Template, you may select a Template Class and Template from the left side of window. Then adjust the settings of the print paper from the top right side. If you wish to choose print fields, you may drag and drop the field into the template editing area.
To add a new print template, click on the Add Label or Add List button, and then enter the template name. Click OK to return to the Print Template Edit window for editing the new print template.
Note: You may also rename or delete templates from the Edit function.
WorldCard provides Add Label and Add List template model for creating your own templates. You may select Edit… from the Template Class pull down menu, the right window will appear.
5-�� WorldCard
5.8 Exchanging ContactsWorldCard software allows you to exchange valuable contact information with other ap-
plications through the use of the Import, Export and Synchronize functions.
5.8.1 Export
To select export fields, you may refer to 5.9.1 Export Option for detailed explanation.
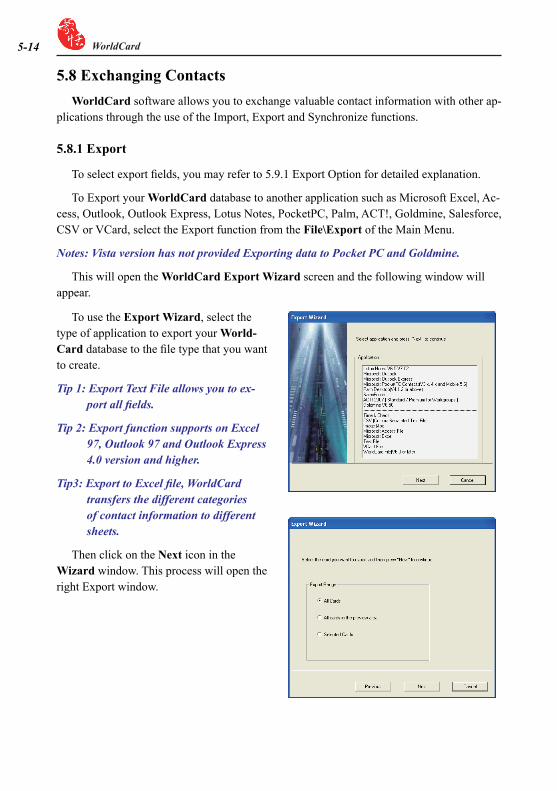
To Export your WorldCard database to another application such as Microsoft Excel, Ac-cess, Outlook, Outlook Express, Lotus Notes, PocketPC, Palm, ACT!, Goldmine, Salesforce, CSV or VCard, select the Export function from the File\Export of the Main Menu.
Notes: Vista version has not provided Exporting data to Pocket PC and Goldmine.
This will open the WorldCard Export Wizard screen and the following window will appear.
To use the Export Wizard, select the type of application to export your World-Card database to the file type that you want to create.
Tip �: Export Text File allows you to ex-port all fields.
Tip �: Export function supports on Excel ��, Outlook �� and Outlook Express �.0 version and higher.
Tip3: Export to Excel file, WorldCard transfers the different categories of contact information to different sheets.
Then click on the Next icon in the Wizard window. This process will open the right Export window.
Chapter 5 Managing Business Cards 5-�5
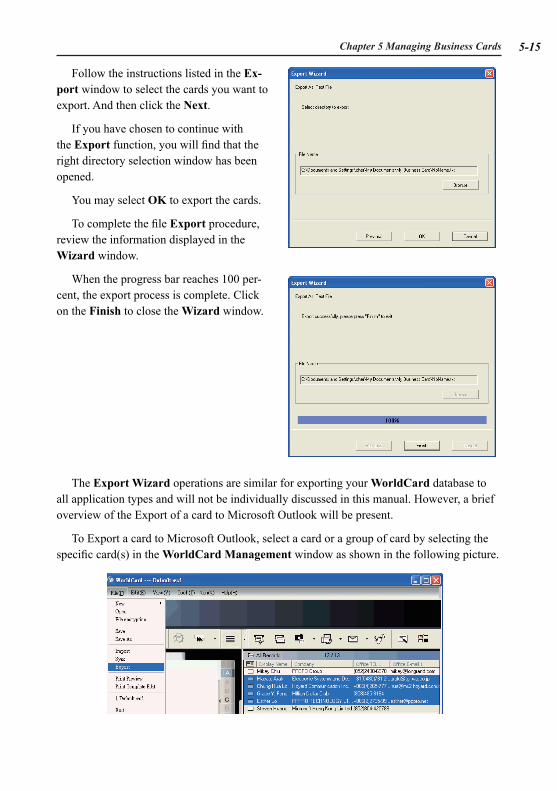
Follow the instructions listed in the Ex-port window to select the cards you want to export. And then click the Next.
If you have chosen to continue with the Export function, you will find that the right directory selection window has been opened.
You may select OK to export the cards.
To complete the file Export procedure, review the information displayed in the Wizard window.
When the progress bar reaches 100 per-cent, the export process is complete. Click on the Finish to close the Wizard window.
The Export Wizard operations are similar for exporting your WorldCard database to all application types and will not be individually discussed in this manual. However, a brief overview of the Export of a card to Microsoft Outlook will be present.
To Export a card to Microsoft Outlook, select a card or a group of card by selecting the specific card(s) in the WorldCard Management window as shown in the following picture.
5-�� WorldCard
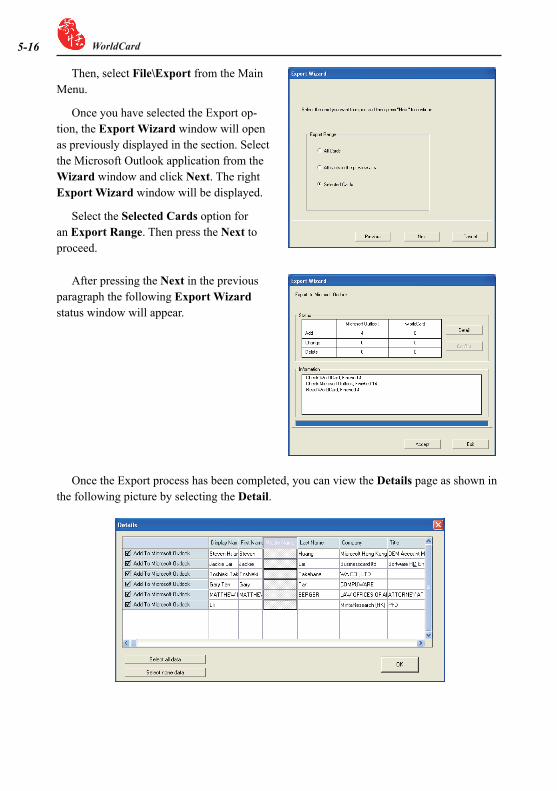
Then, select File\Export from the Main Menu.
Once you have selected the Export op-tion, the Export Wizard window will open as previously displayed in the section. Select the Microsoft Outlook application from the Wizard window and click Next. The right Export Wizard window will be displayed.
Select the Selected Cards option for an Export Range. Then press the Next to proceed.
After pressing the Next in the previous paragraph the following Export Wizard status window will appear.
Once the Export process has been completed, you can view the Details page as shown in the following picture by selecting the Detail.
Chapter 5 Managing Business Cards 5-��
From the Details window, you can select to export all details of each card or none. To close the Details window and proceed, click the OK. This will return you to the Export Wizard status window as seen previously in this section.
To complete the Export process, click on the Accept. You may see a suspicious script warning window at this time. Choose the continue option from the warning window to proceed. Your WorldCard Export Wizard will now display the completed Status and In-formation of the exported cards being processed.. To complete the Export Wizard, click on the Finish. This will close the Export Wizard and return to the WorldCard Management page.
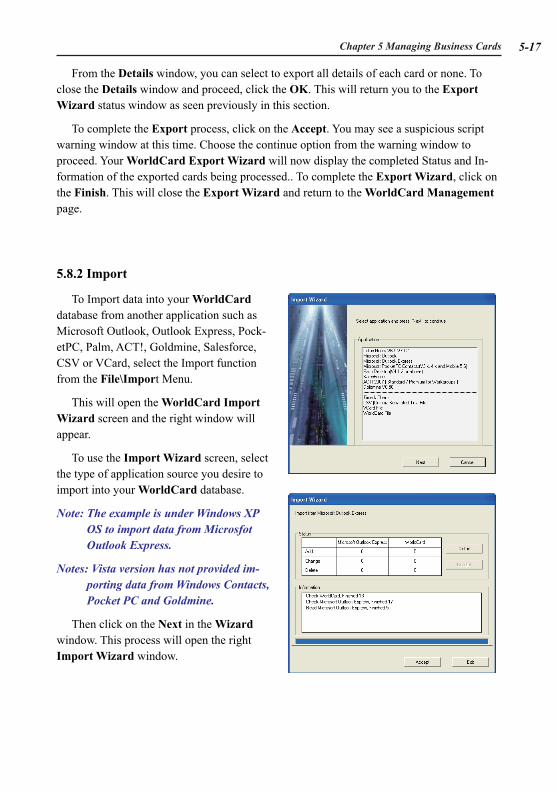
5.8.2 Import
To Import data into your WorldCard database from another application such as Microsoft Outlook, Outlook Express, Pock-etPC, Palm, ACT!, Goldmine, Salesforce, CSV or VCard, select the Import function from the File\Import Menu.
This will open the WorldCard Import Wizard screen and the right window will appear.
To use the Import Wizard screen, select the type of application source you desire to import into your WorldCard database.
Note: The example is under Windows XP OS to import data from Microsfot Outlook Express.
Notes: Vista version has not provided im-porting data from Windows Contacts, Pocket PC and Goldmine.
Then click on the Next in the Wizard window. This process will open the right Import Wizard window.
5-�� WorldCard
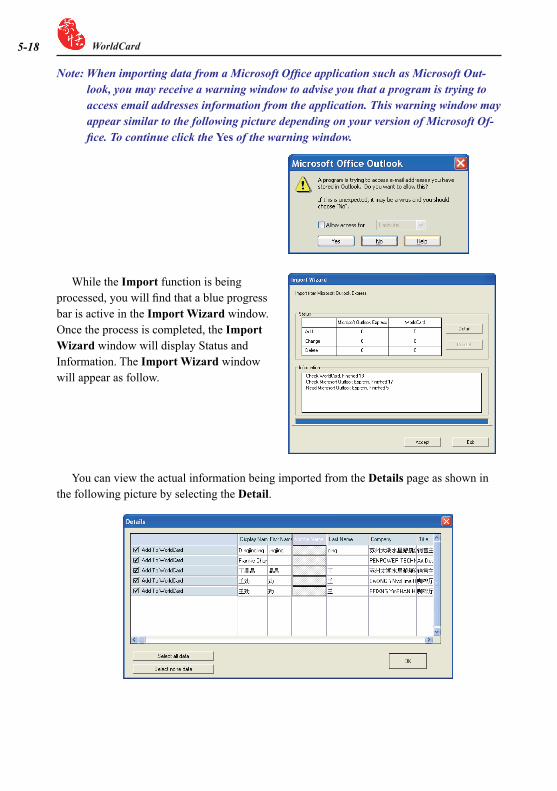
Note: When importing data from a Microsoft Office application such as Microsoft Out-look, you may receive a warning window to advise you that a program is trying to access email addresses information from the application. This warning window may appear similar to the following picture depending on your version of Microsoft Of-fice. To continue click the Yes of the warning window.
While the Import function is being processed, you will find that a blue progress bar is active in the Import Wizard window. Once the process is completed, the Import Wizard window will display Status and Information. The Import Wizard window will appear as follow.
You can view the actual information being imported from the Details page as shown in the following picture by selecting the Detail.

Chapter 5 Managing Business Cards 5-��
From the Details window, you can select to import all details of each card or none. To close the Details window and proceed, click the OK.
To complete the Import process, click the Accept. The Import Wizard window will up-date the Status and Information fields for the data accepted. When the update is completed, click the Finish to close the Import Wizard. You will find that your imported records have been added to the bottom of the cards listed in All Records category.
5.8.3 Synchronize
The WorldCard Synchronize function allows you to synchronize the data between WorldCard and other applications such as Microsoft Outlook Express, Microsoft Outlook, Lotus Notes, PocketPC Contacts, Palm Desktop, ACT!, Goldmine and Salesforce.
Notes: Vista version has not provided synchronizing data with Windows Contacts, Pocket PC and Goldmine.
To use the Synchronize function, select File\Sync from the Main Menu. When the Sync has been selected, the Sync Wizard window will appear.
Select the application that you desire to synchronize with your WorldCard database by clicking on the Next. The Sync Wizard Status and Information window will open. At the same time WorldCard will begin to synchronize with the selected application.
While the Sync function is being processed, you will find that a blue progress bar is ac-tive in the Sync Wizard window. Once the process is completed, the Sync Wizard window will display Status and Information data about the records you have synchronize.
In the Satus window you can see that there is a difference between the Database of Microsoft Outlook and the database of WorldCard. And the Information window shows all actions that have been completed at this point.
5-�0 WorldCard
From the Detail window, you may use the Select all data icon to select all actions in the list as acceptable changes.
For this item, the Sync function would DELETE the entry from Microsoft Outlook.Or, you may use the Select none data icon to de-select all items in the list. After reviewing the Detail list, you may close the Detail window by clicking on the OK.
To Accept the actions required to synchronize the two databases, click on the Accept. The Sync Wizard will display the updated Status and Information windows. To close the window and complete the Sync process, click on the Finish.
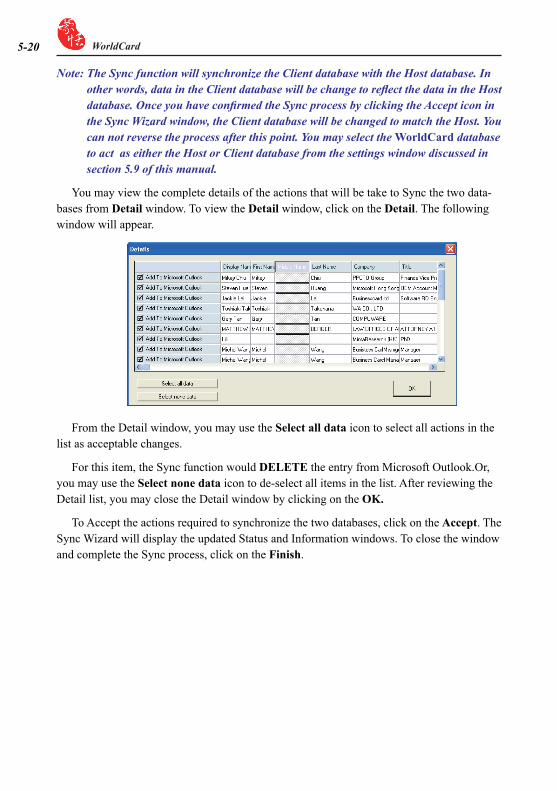
Note: The Sync function will synchronize the Client database with the Host database. In other words, data in the Client database will be change to reflect the data in the Host database. Once you have confirmed the Sync process by clicking the Accept icon in the Sync Wizard window, the Client database will be changed to match the Host. You can not reverse the process after this point. You may select the WorldCard database to act as either the Host or Client database from the settings window discussed in section 5.� of this manual.
You may view the complete details of the actions that will be take to Sync the two data-bases from Detail window. To view the Detail window, click on the Detail. The following window will appear.

Chapter 5 Managing Business Cards 5-��
5.9 SettingsWorldCard has many selectable Setting options to allow you to configure the operational
functions of Export, Synchronize, Field Display, User Define Field and Scan options. To set your WorldCard options, use the procedures outlined in this chapter.
Open the Setting window from Tool\Setting of the Main Menu. Alternatively, you may open the Settings window from the bar.
5.9.1 Export Option
To use the Setting option page to con-figure the Export options, open the Setting page as described in the preceding section of this chapter.
The Setting Export option page will open with ALL options selected as a default configuration. The right side fields will be export to Excel, Access and CSV file. To add another field, select a field from the left side and click [->] button. Click [>>] button to export all fields. Each field can be set the count of export for exporting up to 10 fields of the same name field.
Select Split address field to export ad-dress detail in different fields.
Once the modifications are completed, click on the OK to accept the changes and close the window.
5-�� WorldCard
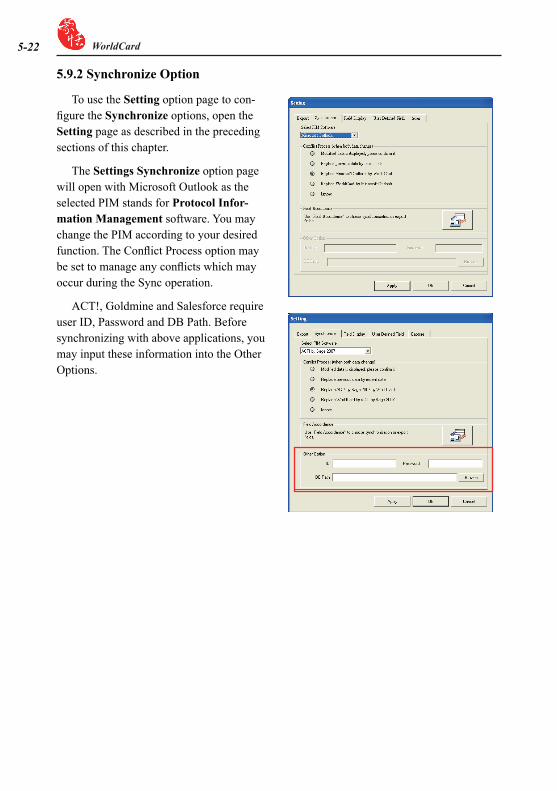
5.9.2 Synchronize Option
To use the Setting option page to con-figure the Synchronize options, open the Setting page as described in the preceding sections of this chapter.
The Settings Synchronize option page will open with Microsoft Outlook as the selected PIM stands for Protocol Infor-mation Management software. You may change the PIM according to your desired function. The Conflict Process option may be set to manage any conflicts which may occur during the Sync operation.
ACT!, Goldmine and Salesforce require user ID, Password and DB Path. Before synchronizing with above applications, you may input these information into the Other Options.
Chapter 5 Managing Business Cards 5-��
5.9.3 Field Display
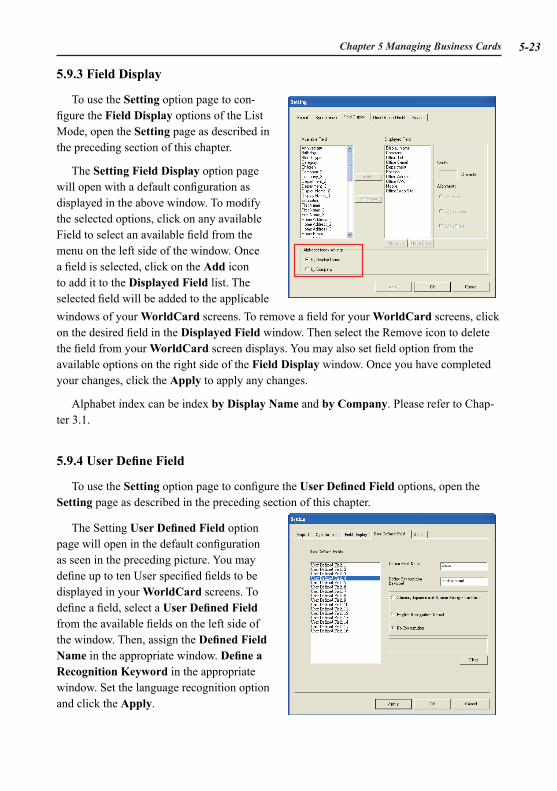
To use the Setting option page to con-figure the Field Display options of the List Mode, open the Setting page as described in the preceding section of this chapter.
The Setting Field Display option page will open with a default configuration as displayed in the above window. To modify the selected options, click on any available Field to select an available field from the menu on the left side of the window. Once a field is selected, click on the Add icon to add it to the Displayed Field list. The selected field will be added to the applicable windows of your WorldCard screens. To remove a field for your WorldCard screens, click on the desired field in the Displayed Field window. Then select the Remove icon to delete the field from your WorldCard screen displays. You may also set field option from the available options on the right side of the Field Display window. Once you have completed your changes, click the Apply to apply any changes.
Alphabet index can be index by Display Name and by Company. Please refer to Chap-ter 3.1.
5.9.4 User Define Field
To use the Setting option page to configure the User Defined Field options, open the Setting page as described in the preceding section of this chapter.
The Setting User Defined Field option page will open in the default configuration as seen in the preceding picture. You may define up to ten User specified fields to be displayed in your WorldCard screens. To define a field, select a User Defined Field from the available fields on the left side of the window. Then, assign the Defined Field Name in the appropriate window. Define a Recognition Keyword in the appropriate window. Set the language recognition option and click the Apply.
5-�� WorldCard
5.9.5 Scan Option
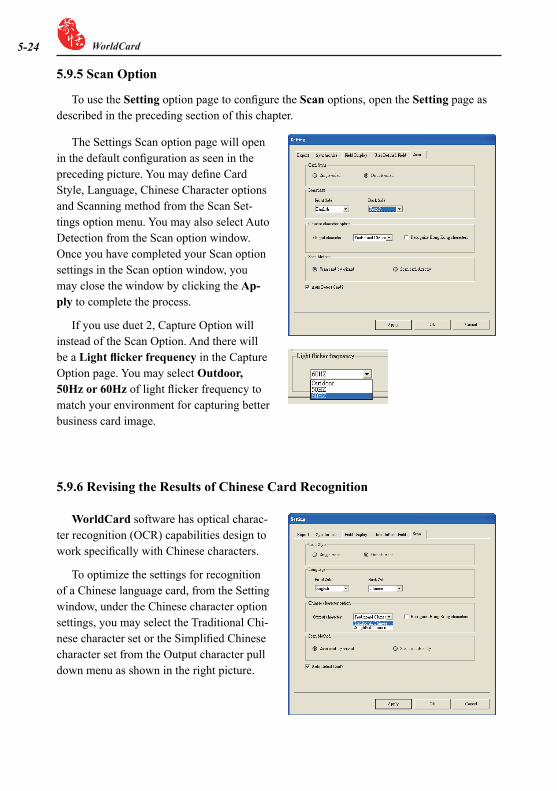
To use the Setting option page to configure the Scan options, open the Setting page as described in the preceding section of this chapter.
The Settings Scan option page will open in the default configuration as seen in the preceding picture. You may define Card Style, Language, Chinese Character options and Scanning method from the Scan Set-tings option menu. You may also select Auto Detection from the Scan option window. Once you have completed your Scan option settings in the Scan option window, you may close the window by clicking the Ap-ply to complete the process.
If you use duet 2, Capture Option will instead of the Scan Option. And there will be a Light flicker frequency in the Capture Option page. You may select Outdoor, 50Hz or 60Hz of light flicker frequency to match your environment for capturing better business card image.
WorldCard software has optical charac-ter recognition (OCR) capabilities design to work specifically with Chinese characters.
To optimize the settings for recognition of a Chinese language card, from the Setting window, under the Chinese character option settings, you may select the Traditional Chi-nese character set or the Simplified Chinese character set from the Output character pull down menu as shown in the right picture.
5.9.6 Revising the Results of Chinese Card Recognition
Chapter 5 Managing Business Cards 5-�5
5.10 WorldCard Portable DiskWith PenPower WorldCard, you have a new traveling companion and all the flexibility
you need for a successful business trip. You can quickly store your WorldCard Portable software and database on any USB flash disk and access them from the USB port of any available computer.
5.10.1 Saving Card Data to a Portable Disk
Note: WorldCard does not come with a flash disk. Flash disk must be purchased sepa-rately.
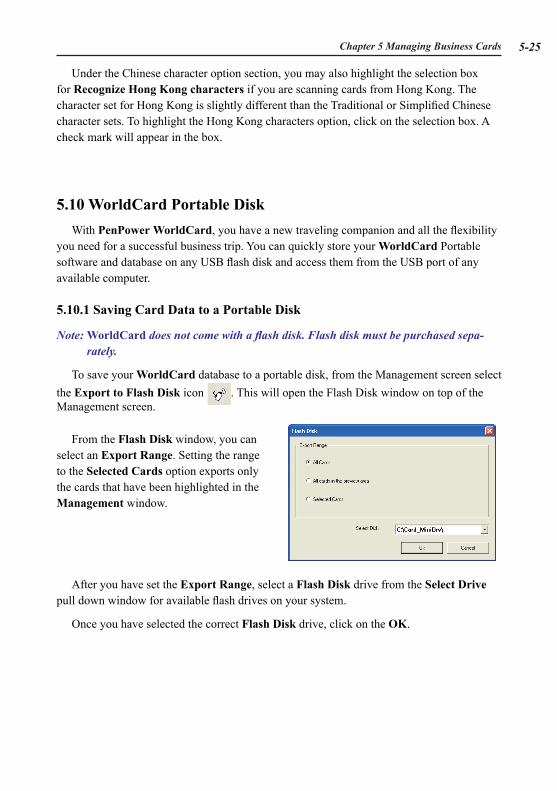
To save your WorldCard database to a portable disk, from the Management screen select the Export to Flash Disk icon . This will open the Flash Disk window on top of the Management screen.
From the Flash Disk window, you can select an Export Range. Setting the range to the Selected Cards option exports only the cards that have been highlighted in the Management window.
After you have set the Export Range, select a Flash Disk drive from the Select Drive pull down window for available flash drives on your system.
Once you have selected the correct Flash Disk drive, click on the OK.
Under the Chinese character option section, you may also highlight the selection box for Recognize Hong Kong characters if you are scanning cards from Hong Kong. The character set for Hong Kong is slightly different than the Traditional or Simplified Chinese character sets. To highlight the Hong Kong characters option, click on the selection box. A check mark will appear in the box.
5-�� WorldCard
5.10.2 Card Data Management for Portable Disk
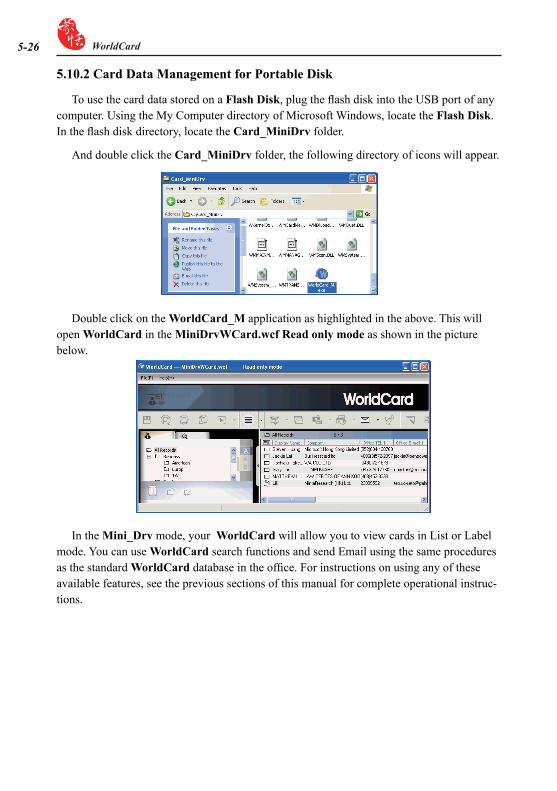
To use the card data stored on a Flash Disk, plug the flash disk into the USB port of any computer. Using the My Computer directory of Microsoft Windows, locate the Flash Disk. In the flash disk directory, locate the Card_MiniDrv folder.
And double click the Card_MiniDrv folder, the following directory of icons will appear.
Double click on the WorldCard_M application as highlighted in the above. This will open WorldCard in the MiniDrvWCard.wcf Read only mode as shown in the picture below.
In the Mini_Drv mode, your WorldCard will allow you to view cards in List or Label mode. You can use WorldCard search functions and send Email using the same procedures as the standard WorldCard database in the office. For instructions on using any of these available features, see the previous sections of this manual for complete operational instruc-tions.
Chapter 6 Scan Manager 6-�
Chapter 6 Scan Manager
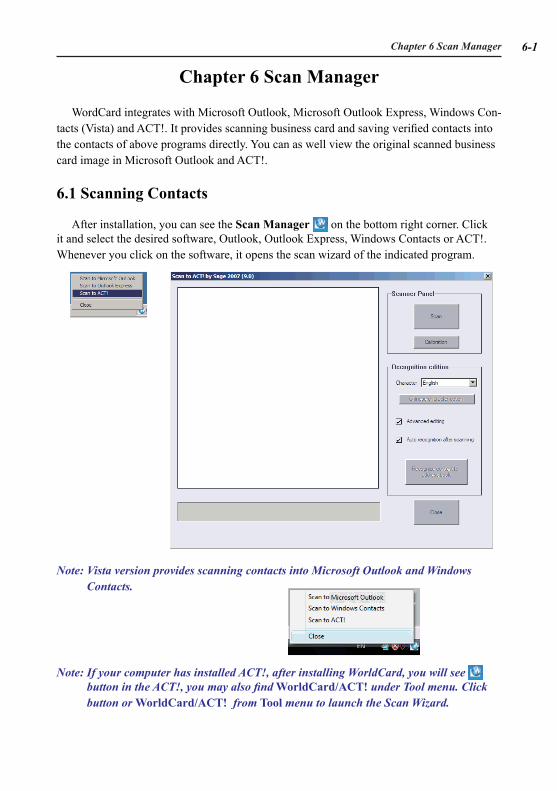
WordCard integrates with Microsoft Outlook, Microsoft Outlook Express, Windows Con-tacts (Vista) and ACT!. It provides scanning business card and saving verified contacts into the contacts of above programs directly. You can as well view the original scanned business card image in Microsoft Outlook and ACT!.
6.1 Scanning Contacts
After installation, you can see the Scan Manager on the bottom right corner. Click it and select the desired software, Outlook, Outlook Express, Windows Contacts or ACT!. Whenever you click on the software, it opens the scan wizard of the indicated program.
Note: Vista version provides scanning contacts into Microsoft Outlook and Windows Contacts.
Note: If your computer has installed ACT!, after installing WorldCard, you will see button in the ACT!, you may also find WorldCard/ACT! under Tool menu. Click button or WorldCard/ACT! from Tool menu to launch the Scan Wizard.
6-� WorldCard
6.2 Scan business cards
6.2.1 Scan and Edit business cards1. Insert a business card and click [Scan] button to scan it.
Tip: System will require you to calibrate the scanner when you use the scanner at the first time. Whenever there is color indifference after scanning the card, you can calibrate the scanner by clicking Calibration.
2. Editing Recognition:
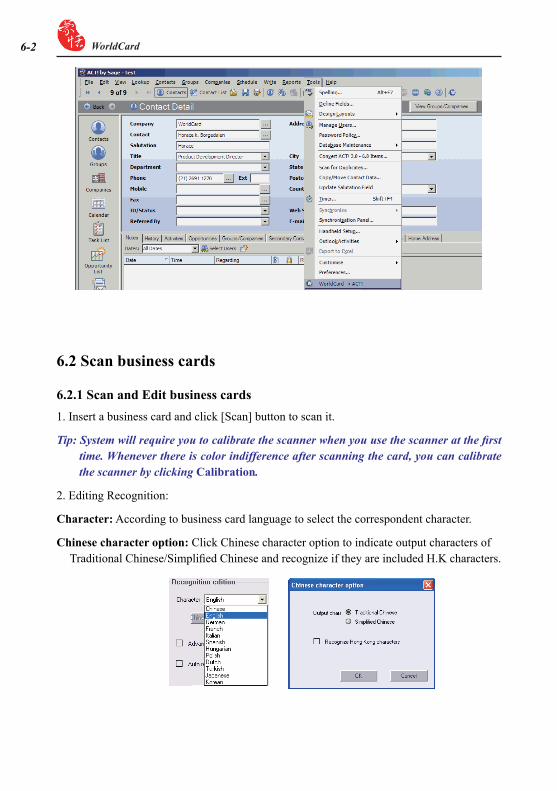
Character: According to business card language to select the correspondent character.
Chinese character option: Click Chinese character option to indicate output characters of Traditional Chinese/Simplified Chinese and recognize if they are included H.K characters.
Chapter 6 Scan Manager 6-�
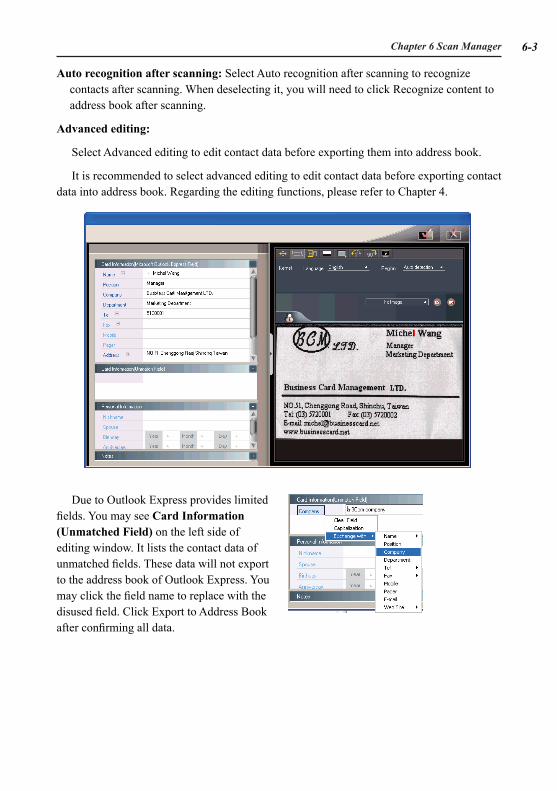
Auto recognition after scanning: Select Auto recognition after scanning to recognize contacts after scanning. When deselecting it, you will need to click Recognize content to address book after scanning.
Advanced editing:
Select Advanced editing to edit contact data before exporting them into address book.
It is recommended to select advanced editing to edit contact data before exporting contact data into address book. Regarding the editing functions, please refer to Chapter 4.
Due to Outlook Express provides limited fields. You may see Card Information (Unmatched Field) on the left side of editing window. It lists the contact data of unmatched fields. These data will not export to the address book of Outlook Express. You may click the field name to replace with the disused field. Click Export to Address Book after confirming all data.
6-� WorldCard
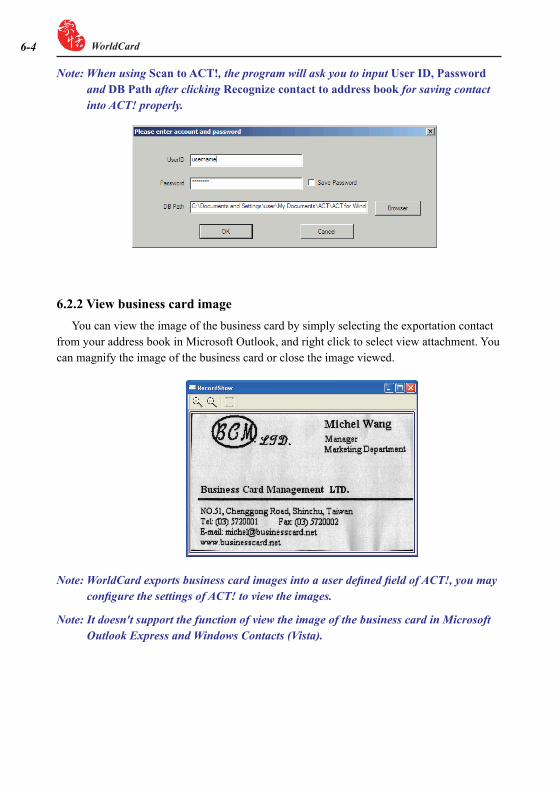
6.2.2 View business card imageYou can view the image of the business card by simply selecting the exportation contact
from your address book in Microsoft Outlook, and right click to select view attachment. You can magnify the image of the business card or close the image viewed.
Note: WorldCard exports business card images into a user defined field of ACT!, you may configure the settings of ACT! to view the images.
Note: It doesn't support the function of view the image of the business card in Microsoft Outlook Express and Windows Contacts (Vista).
Note: When using Scan to ACT!, the program will ask you to input User ID, Password and DB Path after clicking Recognize contact to address book for saving contact into ACT! properly.
Chapter 7 WorldCard duet 2 7-�
Chapter 7 WorldCard duet 2
7.1 Introduction
WorldCard duet 2 is a business card camera , as well as a webcam. It has dual functions. First, it can take pictures of business cards. Second, it can serve as a webcam for confer-ences. WorldCard duet 2 is a new system that breaks through the traditional scanning. It takes a shoot of the business card, and converts the image to your computer in a digital form. This innovative procedure allows you to differentiate and manage business card materials in a convenient and efficient manner.
Note: The Penpower WorldCard duet 2 package includes the full version of WorldCard card management software on the CD in the duet 2 package, the duet 2 Capture Camera, camera mount, a USB cable to connect the duet 2 camera to your com-puter and the WorldCard installation manual.
7.1.1 Hardware Introduction
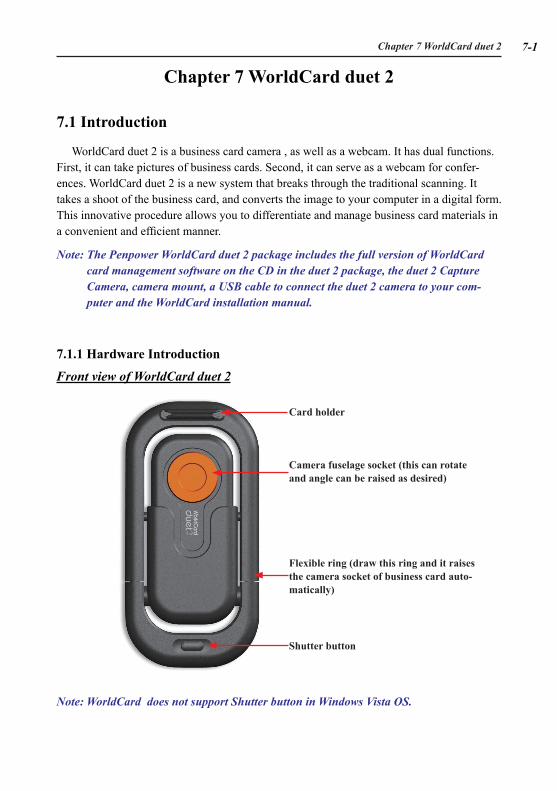
Front view of WorldCard duet 2
Card holder
Camera fuselage socket (this can rotate and angle can be raised as desired)
Flexible ring (draw this ring and it raises the camera socket of business card auto-matically)
Shutter button
Note: WorldCard does not support Shutter button in Windows Vista OS.
7-2 WorldCard
7.2 Installation
The procedure to install Penpower WorldCard software package for is the same as the installation procedure for any other WorldCard package. The software installation for World-Card has been presented in previous sections of this manual. As a brief introduction to the package, please refer to chapter 2 for the software installation procedure.
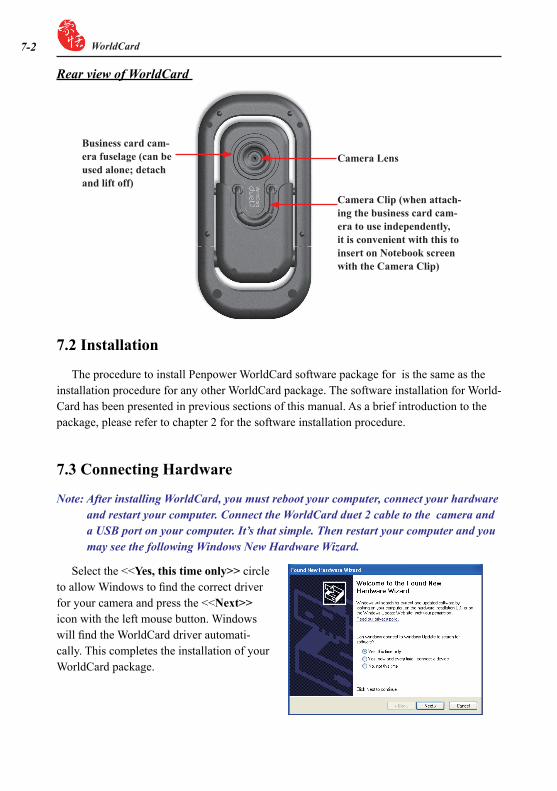
Rear view of WorldCard
Business card cam-era fuselage (can be used alone; detach and lift off)
Camera Lens
Camera Clip (when attach-ing the business card cam-era to use independently, it is convenient with this to insert on Notebook screen with the Camera Clip)
7.3 Connecting Hardware
Note: After installing WorldCard, you must reboot your computer, connect your hardware and restart your computer. Connect the WorldCard duet 2 cable to the camera and a USB port on your computer. It’s that simple. Then restart your computer and you may see the following Windows New Hardware Wizard.
Select the <<Yes, this time only>> circle to allow Windows to find the correct driver for your camera and press the <<Next>> icon with the left mouse button. Windows will find the WorldCard driver automati-cally. This completes the installation of your WorldCard package.
Chapter 7 WorldCard duet 2 7-�
7.4 Using Hardware
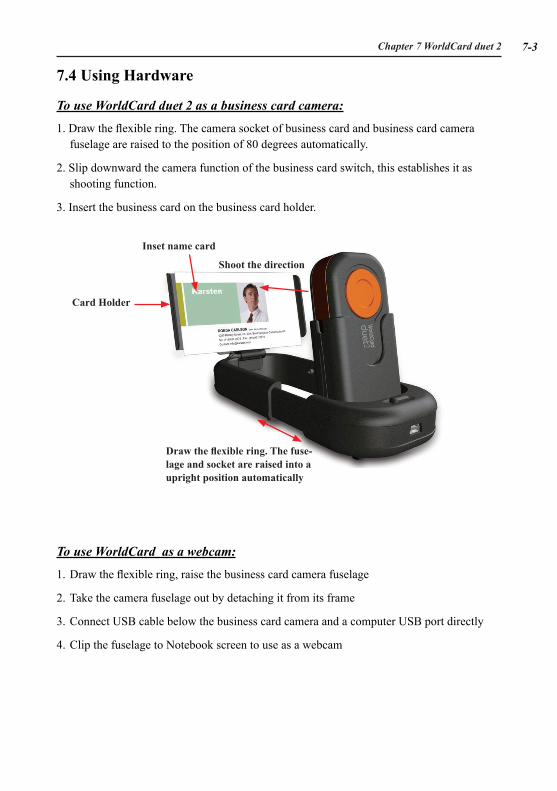
To use WorldCard duet 2 as a business card camera:
1. Draw the flexible ring. The camera socket of business card and business card camera fuselage are raised to the position of 80 degrees automatically.
2. Slip downward the camera function of the business card switch, this establishes it as shooting function.
3. Insert the business card on the business card holder.
To use WorldCard as a webcam:
1. Draw the flexible ring, raise the business card camera fuselage
2. Take the camera fuselage out by detaching it from its frame
3. Connect USB cable below the business card camera and a computer USB port directly
4. Clip the fuselage to Notebook screen to use as a webcam
Shoot the direction
Inset name card
Draw the flexible ring. The fuse-lage and socket are raised into a upright position automatically
Card Holder
7-� WorldCard
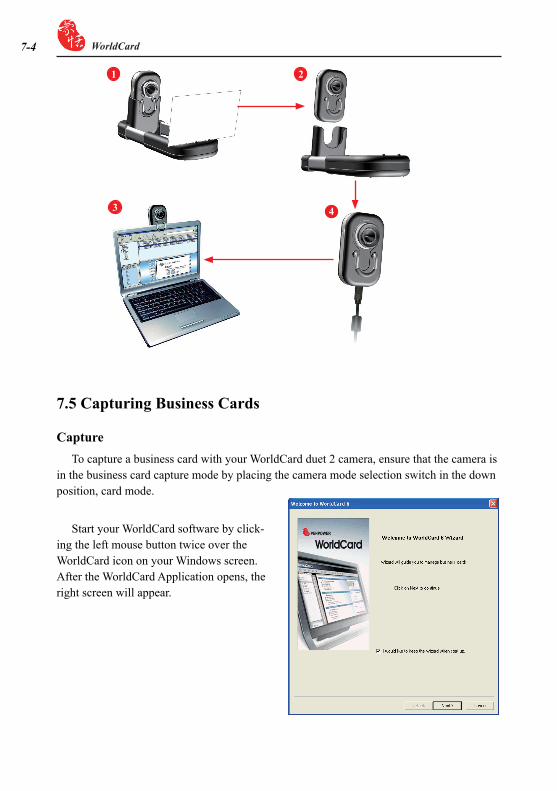
1 2
3 4
7.5 Capturing Business Cards
CaptureTo capture a business card with your WorldCard duet 2 camera, ensure that the camera is
in the business card capture mode by placing the camera mode selection switch in the down position, card mode.
Start your WorldCard software by click-ing the left mouse button twice over the WorldCard icon on your Windows screen. After the WorldCard Application opens, the right screen will appear.
Chapter 7 WorldCard duet 2 7-�
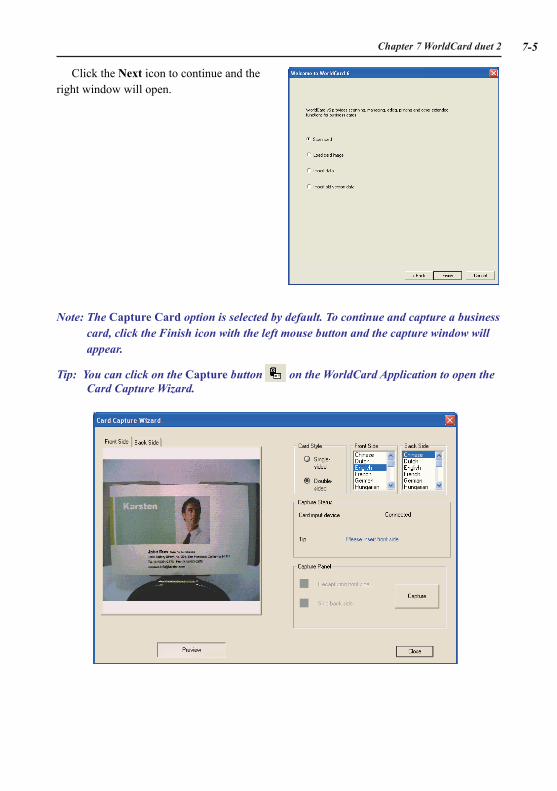
Note: The Capture Card option is selected by default. To continue and capture a business card, click the Finish icon with the left mouse button and the capture window will appear.
Tip: You can click on the Capture button on the WorldCard Application to open the Card Capture Wizard.
Click the Next icon to continue and the right window will open.
7-� WorldCard
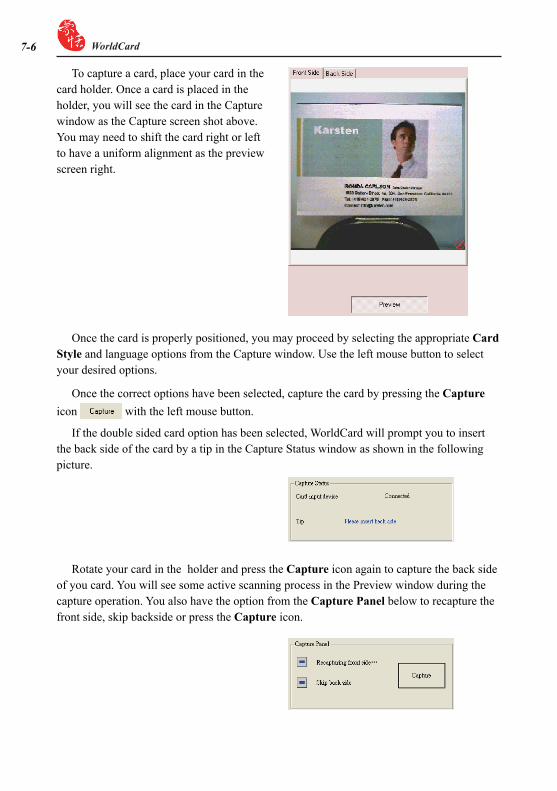
To capture a card, place your card in the card holder. Once a card is placed in the holder, you will see the card in the Capture window as the Capture screen shot above. You may need to shift the card right or left to have a uniform alignment as the preview screen right.
Rotate your card in the holder and press the Capture icon again to capture the back side of you card. You will see some active scanning process in the Preview window during the capture operation. You also have the option from the Capture Panel below to recapture the front side, skip backside or press the Capture icon.
Once the card is properly positioned, you may proceed by selecting the appropriate Card Style and language options from the Capture window. Use the left mouse button to select your desired options.
Once the correct options have been selected, capture the card by pressing the Capture icon with the left mouse button.
If the double sided card option has been selected, WorldCard will prompt you to insert the back side of the card by a tip in the Capture Status window as shown in the following picture.
Chapter 7 WorldCard duet 2 7-7
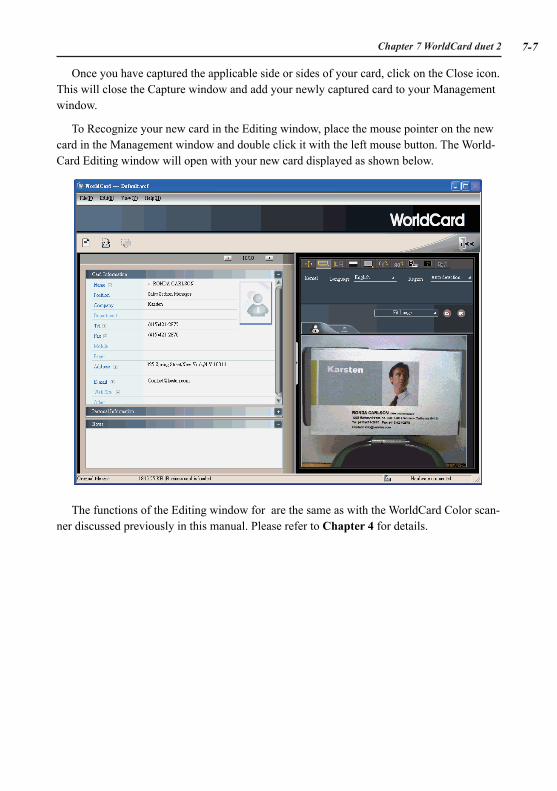
The functions of the Editing window for are the same as with the WorldCard Color scan-ner discussed previously in this manual. Please refer to Chapter 4 for details.
Once you have captured the applicable side or sides of your card, click on the Close icon. This will close the Capture window and add your newly captured card to your Management window.
To Recognize your new card in the Editing window, place the mouse pointer on the new card in the Management window and double click it with the left mouse button. The World-Card Editing window will open with your new card displayed as shown below.
7-� WorldCard
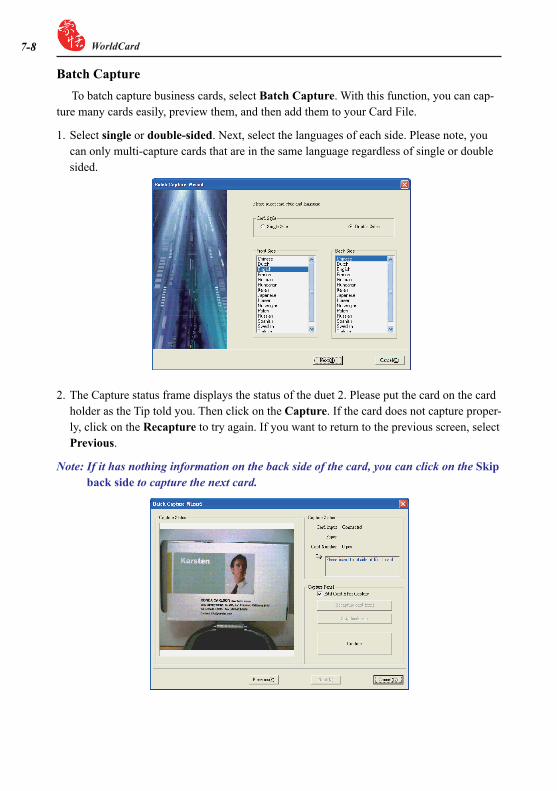
Batch CaptureTo batch capture business cards, select Batch Capture. With this function, you can cap-
ture many cards easily, preview them, and then add them to your Card File.
1. Select single or double-sided. Next, select the languages of each side. Please note, you can only multi-capture cards that are in the same language regardless of single or double sided.
2. The Capture status frame displays the status of the duet 2. Please put the card on the card holder as the Tip told you. Then click on the Capture. If the card does not capture proper-ly, click on the Recapture to try again. If you want to return to the previous screen, select Previous.
Note: If it has nothing information on the back side of the card, you can click on the Skip back side to capture the next card.
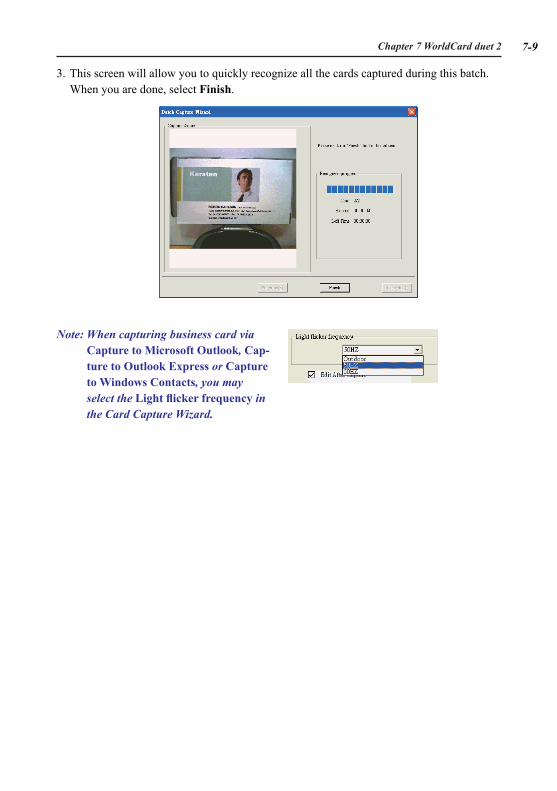
Chapter 7 WorldCard duet 2 7-�
3. This screen will allow you to quickly recognize all the cards captured during this batch. When you are done, select Finish.
Note: When capturing business card via Capture to Microsoft Outlook, Cap-ture to Outlook Express or Capture to Windows Contacts, you may select the Light flicker frequency in the Card Capture Wizard.
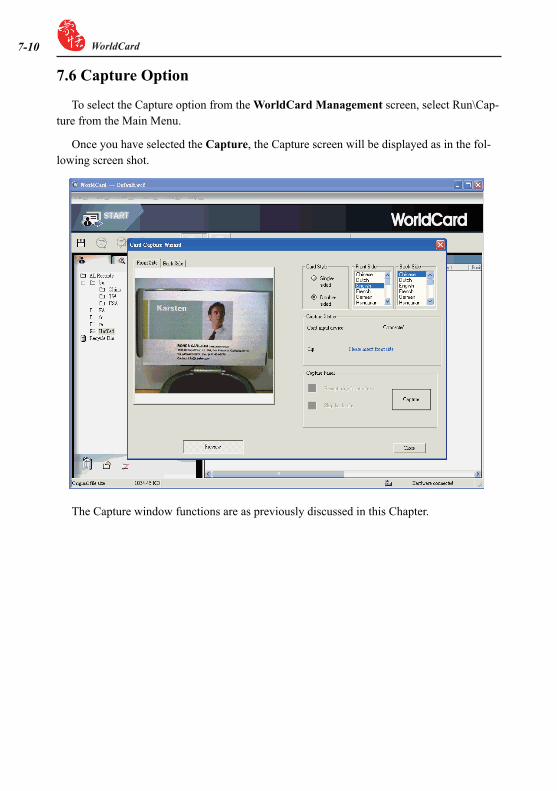
7-�0 WorldCard
7.6 Capture Option
To select the Capture option from the WorldCard Management screen, select Run\Cap-ture from the Main Menu.
Once you have selected the Capture, the Capture screen will be displayed as in the fol-lowing screen shot.
The Capture window functions are as previously discussed in this Chapter.
FAQ
FAQ
Q: How can I convert the files in earlier version to v6.X format?A: WorldCard v6.x can convert your v5.x version files and import them in v6.x format (for
v3.0, v4.0 CRD format, support is not available at this moment). Please go to [Files] \ [Import] \ [Penpower WorldCard files] to convert the files to v6.x format. You can also use [Start-Up Wizard] to accomplish this task.
Q: Why are there N dark lines on the scanned pictures of business cards, or all scanned pictures turnout blank?
A: Before the first use of WorldCard, the system will ask you to complete “Calibration”. If the problem still exists during usage, please choose [Tool] \ [Calibrate the scanner] to proceed with calibration. You can also use [Calibrate the scanner] in the scan wizard for calibration.
Q: How to backup business card files?A: You can use [Files] \ [Export] \ [WorldCard files v6.0 above] to backup files.
Q: How to protect my business card files from being opened by other persons without my permission?
A: [Files] \ [File encryption] provides the function for encrypting files. Other persons have to key in your predefined password to open the encrypted files.
Q: How to combine two pieces of business card data into one?A: Please use “Ctrl” and left click on mouse to select two single-sided business card picture
files or the image-less data of the card. Then select [Combine] by right clicking on mouse, and set either one to be the front side of the data combined.
Q: How to separate a single picture file with data including the business card informa-tion of front and rear sides into two separate data files?
A: Select the data including the business card information of front and rear sides, and right click on mouse to select [UnMerge].
Q: How to add the signature information in e-mails to the business card files?A: Please highlight the signature or business card information in e-mails or Word files. Then
drag it directly to the WorldCard program and finish.
WorldCard
WorldCard duet 2 FAQ
Q: Why does it still indicate, on the bottom right of the WorldCard software, that WorldCard duet 2 is not connected after connecting with WorldCard duet 2?
A: Please check if the main body and the base are properly connected.
Q: I have taken a picture of a business card the size of a normal business card. But why can I not see the entire card?
A: Please check if the opened flexible ring has been pulled by the arrow pointer.
Q: Is there any absolute relation between the angle of the business card posted and the outcome of recognition?
A: Yes, the best angle is to set the angle between the card and the lens in parallel. Thus the best result of recognition will be achieved.
Q: I use a desk light to directly illuminate business cards for shooting in a dark place. Will the image of the business cards be sharper?
A: WorldCard duet 2 will automatically balance exposure, brightness and contrast. Direct lighting from a desk light will cause a contrary result. The best way is to have the shoot-ing environment evenly lighted, such as to position the desk light about 40cm above WorldCard duet 2 and wait to shoot after the completion of automatic balance.
Q: How to take pictures of vertical business cards in portrait orientation?A: Please put the business cards in horizontal orientation same as normal business cards.
The system will automatically reorient and recognize the information on the cards after shooting.
Penpower WorldCard User ManualManufacturer: Penpower Technology Ltd.
Version: 6.2
Release: Fourth released on September, 2007


![Welcome [static.highspeedbackbone.net]static.highspeedbackbone.net/pdf/benq-fp222wb-manual.pdfHave Disk button, insert the BenQ LCD Monitor CD-ROM and select the appropriate monitor](https://img.pdfslide.net/doc/110x75/5aab515c7f8b9a9c2e8bc275/welcome-disk-button-insert-the-benq-lcd-monitor-cd-rom-and-select-the-appropriate.jpg)


![WorldCard User Manualpenpowerinc.us/download/WorldCard/WorldCard_v8_ENG.pdf1-4 WorldCard 1-5 1.2 Launch WorldCard Execute [Start/All Programs/WorldCard/WorldCard v8] or just click](https://img.pdfslide.net/doc/110x75/5b00e71b7f8b9a0c028d727a/worldcard-user-worldcard-1-5-12-launch-worldcard-execute-startall-programsworldcardworldcard.jpg)


![Welcome [static.highspeedbackbone.net]static.highspeedbackbone.net/pdf/Motorola-A780-Manual.pdfWelcome Welcome to the world ... chosen the Motorola A780 GSM wireless phone. Note: Your](https://img.pdfslide.net/doc/110x75/5ac343ff7f8b9a333d8be718/welcome-welcome-to-the-world-chosen-the-motorola-a780-gsm-wireless-phone.jpg)