Embed Size (px)
Citation preview
PeopleSoft EnterpriseHRMS and Campus Solutions9.0 Feature Pack March 2011Installation Guide
March 2011

PeopleSoft EnterpriseHRMS and Campus Solutions 9.0 Feature Pack March 2011 Installation GuideSKU ihrcs90install_030411_ihrcs90
Copyright © 2011, Oracle and/or its affiliates. All rights reserved.
Trademark NoticeOracle is a registered trademark of Oracle Corporation and/or its affiliates. Other namesmay be trademarks of theirrespective owners.
License Restrictions Warranty/Consequential Damages DisclaimerThis software and related documentation are provided under a license agreement containing restrictions on use anddisclosure and are protected by intellectual property laws. Except as expressly permitted in your license agreementor allowed by law, youmay not use, copy, reproduce, translate, broadcast, modify, license, transmit, distribute,exhibit, perform, publish or display any part, in any form, or by anymeans. Reverse engineering, disassembly, ordecompilation of this software, unless required by law for interoperability, is prohibited.
Warranty DisclaimerThe information contained herein is subject to change without notice and is not warranted to be error-free. If you findany errors, please report them to us in writing.
Restricted Rights NoticeIf this software or related documentation is delivered to the U.S. Government or anyone licensing it on behalf of theU.S. Government, the following notice is applicable:
U.S. GOVERNMENT RIGHTS
Programs, software, databases, and related documentation and technical data delivered to U.S. Government customersare “commercial computer software” or “commercial technical data” pursuant to the applicable Federal AcquisitionRegulation and agency-specific supplemental regulations. As such, the use, duplication, disclosure, modification, andadaptation shall be subject to the restrictions and license terms set forth in the applicable Government contract, and,to the extent applicable by the terms of the Government contract, the additional rights set forth in FAR 52.227-19,Commercial Computer Software License (December 2007). Oracle USA, Inc., 500 Oracle Parkway, Redwood City,CA 94065.
Hazardous Applications NoticeThis software is developed for general use in a variety of informationmanagement applications. It is not developedor intended for use in any inherently dangerous applications, including applications whichmay create a riskof personal injury. If you use this software in dangerous applications, then you shall be responsible to take allappropriate fail-safe, backup, redundancy and other measures to ensure the safe use of this software. OracleCorporation and its affiliates disclaim any liability for any damages caused by use of this software in dangerousapplications.
Third Party Content, Products, and Services Disclaimer

This software and documentationmay provide access to or information on content, products and services from thirdparties. Oracle Corporation and its affiliates are not responsible for and expressly disclaim all warranties of any kindwith respect to third party content, products and services. Oracle Corporation and its affiliates will not be responsiblefor any loss, costs, or damages incurred due to your access to or use of third party content, products or services.

Contents
PrefaceAbout This Documentation... . . . . . . . . . . .. . . . . . . . . . . . . . . . . . . . . . . . . . . . . . . . . .. . . . . . . . . . . . . . . . . . . . . . . . . . . . . . . . . ixInstalling the PeopleSoft HRMS and PeopleSoft Campus Solutions Applications.. . . . . . . . . . . . . . . . . . . . . . . . . . . . ix
Chapter 1Installing PeopleSoft Enterprise HRMS 9.0 Applications.... . . . . . . . . . . .. . . . . . . . . . . . . . . . . . . . . . . . . . . . . 1Preparing for the PeopleSoft HRMS Installation.. . . . . . . . . . . . . . . . . . . . . . . . . . . . . . . . . . . . . . . . . . . . . . . . . . . . . . . . . . . . . . . . . . 1
Verifying the Enterprise PeopleTools Version.. . . . . . . . . . . . . . . . . . . . . . . . . . . . . . . . . . . . . . . . . . . . . . . . . . . . . . . . . .. . . . . . . . 2Verifying the Demo Database Size.. . . . . . . . . . . . . . . . . . . . . . . . . . . . . . . . . . . . . . . . . . . . . . . . . . . . . . . . . . . . . . . . . . . . . .. . . . . . . . 2Running the HRINSSYS.DMS Script. . . . . . . . . . . . . . . . . . . . . . . . . . . . . . . . . . . . . . . . . . . . . . . . . . . . . . . . . . . . . . . . . . . .. . . . . . . . 2Running the HC9MAINTLOG_I.DMS Script. . . . . . . . . . . . . . . . . . . . . . . . . . . . . . . . . . . . . . . . . . . . . . . . . . . . . . . . . . . .. . . . . . . . 3Verifying the EDM Pool Size.. . . . . . . . . . . . . . . . . . . . . . . . . . . . . . . . . . . . . . . . . . . . . . . . . . . . . . . . . . . . . . . . . . . . . . . . . . . . .. . . . . . . . 3Re-Ordering the Steps in Enterprise PeopleTools Installation for DB2 z/OS Only. . . . . . . . . . . . . . . . .. . . . . . . . 3Reviewing PeopleSoft Campus Solutions COBOL on DB2 z/OS.. . . . . . . . . . . . . . . . . . . . . . . . . . . . . . . . . . .. . . . . . . . 3
Installing PeopleSoft HRMS for the U.S. Federal Government. . . . . . . . . . . . . . . . . . . . . . . . . . . . . . . . . . . . . . . . . . . . . . . . . . 4Installing PeopleSoft HRMS for Education and Government.. . . . . . . . . . . . . . . . . . . . . . . . . . . . . . . . . . . . . . . . . . . . . . . . . . . . 5Installing PeopleSoft HRMS for Military Customers. . . . . . . . . . . . . . . . . . . . . . . . . . . . . . . . . . . . . . . . . . . . . . . . . . . . . . . . . . . . . . . 6Installing PeopleSoft HRMS for Japan.. . . . . . . . . . . . . . . . . . . . . . . . . . . . . . . . . . . . . . . . . . . . . . . . . . . . . . . . . . . . . . . . . . . . . . . . . . . . . 8
Using Global Search.. . . . . . . . . . . . . . . . . . . . . . . . . . . . . . . . . . . . . . . . . . . . . . . . . . . . . . . . . . . . . . . . . . . . . . . . . . . . . . . . . . . . . .. . . . . . . . 9Configuring Phone and FAX Number Fields. . . . . . . . . . . . . . . . . . . . . . . . . . . . . . . . . . . . . . . . . . . . . . . . . . . . . . . . . . . .. . . . . . . . 9Printing Japanese Characters on SQR Reports.. . . . . . . . . . . . . . . . . . . . . . . . . . . . . . . . . . . . . . . . . . . . . . . . . . . . . . .. . . . . . . . 9
Installing PeopleSoft HRMS for Switzerland.. . . . . . . . . . . . . . . . . . . . . . . . . . . . . . . . . . . . . . . . . . . . . . . . . . . . . . . . . . . . . . . . . . . . . . .10Installing PeopleSoft Time and Labor.. . . . . . . . . . . . . . . . . . . . . . . . . . . . . . . . . . . . . . . . . . . . . . . . . . . . . . . . . . . . . . . . . . . . . . . . . . . . . . .10
Creating Time Zone Offsets.. . . . . . . . . . . . . . . . . . . . . . . . . . . . . . . . . . . . . . . . . . . . . . . . . . . . . . . . . . . . . . . . . . . . . . . . . . . . . .. . . . . . . .10Installing PeopleSoft Absence Management and PeopleSoft Global Payroll Core.. . . . . . . . . . . . . . . . . . . . . . . . . . .11
Verifying Installation Settings for PeopleSoft Absence Management.. . . . . . . . . . . . . . . . . . . . . . . . . . . . . . .. . . . . . . .11Updating Process and Job Definitions for PeopleSoft Packager.. . . . . . . . . . . . . . . . . . . . . . . . . . . . . . . . . . . .. . . . . . . .12
Installing PeopleSoft HRMS Portal Pack.. . . . . . . . . . . . . . . . . . . . . . . . . . . . . . . . . . . . . . . . . . . . . . . . . . . . . . . . . . . . . . . . . . . . . . . . . . .13Installing PeopleSoft Talent Acquisition Manager.. . . . . . . . . . . . . . . . . . . . . . . . . . . . . . . . . . . . . . . . . . . . . . . . . . . . . . . . . . . . . . . . .14Installing PeopleSoft Global Payroll Country Extensions.. . . . . . . . . . . . . . . . . . . . . . . . . . . . . . . . . . . . . . . . . . . . . . . . . . . . . . . .15
Understanding the PeopleSoft Global Payroll Country Extensions Installation. . . . . . . . . . . . . . . . . . . .. . . . . . . .15Updating Installation Indicators.. . . . . . . . . . . . . . . . . . . . . . . . . . . . . . . . . . . . . . . . . . . . . . . . . . . . . . . . . . . . . . . . . . . . . . . . . .. . . . . . . .15Running the GPCESYS.DMS Script to Update Stored Installation Indicators. . . . . . . . . . . . . . . . . . . . . .. . . . . . . .16Running the GPCERATE_EXP.DMS / GPCERATE_IMP.DMS Scripts to Copy HR Rate Codes.. . . . . . . .16
Copyright © 2011, Oracle and/or its affiliates. All rights reserved. v
Contents
Installing PeopleSoft ePay Payslips for PeopleSoft Global Payroll. . . . . . . . . . . . . . . . . . . . . . . . . . . . . . . . . . . . . . . . . . . . . .17Understanding the PeopleSoft ePay Payslips Installation. . . . . . . . . . . . . . . . . . . . . . . . . . . . . . . . . . . . . . . . . . . .. . . . . . . .17Installing the PeopleSoft ePay Payslips Functionality. . . . . . . . . . . . . . . . . . . . . . . . . . . . . . . . . . . . . . . . . . . . . . . . .. . . . . . . .17Installing Process Schedulers on MVS Platforms.. . . . . . . . . . . . . . . . . . . . . . . . . . . . . . . . . . . . . . . . . . . . . . . . . . . . .. . . . . . . .19Modifying the JVM Configuration to Increase Heap Size.. . . . . . . . . . . . . . . . . . . . . . . . . . . . . . . . . . . . . . . . . . . . .. . . . . . . .19
Installing PeopleSoft HR Spain and PeopleSoft Global Payroll Germany/Switzerland PDF FormFiles.. . . . . . . . . . . . . . . . . . . . . . . . . . . . . . . . . . . . . . . . . . . . . . . . . . . . . . . . . . . . . . . . . . . . . . . . . . . . . . . . . . . . . . . . . . . . . . . . . . . . . . . . . . . . . . . . . . . . .20Installing PeopleSoft Directory Interface.. . . . . . . . . . . . . . . . . . . . . . . . . . . . . . . . . . . . . . . . . . . . . . . . . . . . . . . . . . . . . . . . . . . . . . . . . . .21
Prerequisites.. . . . . . . . . . . . . . . . . . . . . . . . . . . . . . . . . . . . . . . . . . . . . . . . . . . . . . . . . . . . . . . . . . . . . . . . . . . . . . . . . . . . . . . . . . . . . . .. . . . . . . .21Verifying the Installation Options for PeopleSoft Directory Interface.. . . . . . . . . . . . . . . . . . . . . . . . . . . . . . . .. . . . . . . .22Backing up the Directory Server and Database.. . . . . . . . . . . . . . . . . . . . . . . . . . . . . . . . . . . . . . . . . . . . . . . . . . . . . . .. . . . . . . .22Running PeopleSoft Data Mover Scripts.. . . . . . . . . . . . . . . . . . . . . . . . . . . . . . . . . . . . . . . . . . . . . . . . . . . . . . . . . . . . . . .. . . . . . . .22
Installing PeopleSoft Payroll Interface for ADP Connection.. . . . . . . . . . . . . . . . . . . . . . . . . . . . . . . . . . . . . . . . . . . . . . . . . . . . .22Verifying the Installation Options for PeopleSoft Payroll Interface for ADP Connection. . . . . . . . . .. . . . . . . .23Running the PeopleSoft Payroll ADP Connection Installation Script. . . . . . . . . . . . . . . . . . . . . . . . . . . . . . . .. . . . . . . .23
Installing PeopleSoft Pay/Bill Management.. . . . . . . . . . . . . . . . . . . . . . . . . . . . . . . . . . . . . . . . . . . . . . . . . . . . . . . . . . . . . . . . . . . . . . . .24Installing Service Handlers.. . . . . . . . . . . . . . . . . . . . . . . . . . . . . . . . . . . . . . . . . . . . . . . . . . . . . . . . . . . . . . . . . . . . . . . . . . . . . . . . . . . . . . . . . . .24Installing Configurable Matrices and Metadata.. . . . . . . . . . . . . . . . . . . . . . . . . . . . . . . . . . . . . . . . . . . . . . . . . . . . . . . . . . . . . . . . . . . .26Installing PeopleSoft Human Resources for French Public Sector. . . . . . . . . . . . . . . . . . . . . . . . . . . . . . . . . . . . . . . . . . . . . .26
Chapter 2Installing PeopleSoft Campus Solutions 9.0 Applications... . . . . . . . . . . . . . . . . . . . . . . . . . . . . . . . . . . . . . . .29Setting Up Equation Engine Security. . . . . . . . . . . . . . . . . . . . . . . . . . . . . . . . . . . . . . . . . . . . . . . . . . . . . . . . . . . . . . . . . . . . . . . . . . . . . . . .29Transferring and Compiling Additional Component COBOL for PeopleSoft Student Administration. . . . . . . . .29
Using Additional Component COBOL for PeopleSoft Student Administration.. . . . . . . . . . . . . . . . . . . . .. . . . . . . .30Compiling Additional Component COBOL on Microsoft Windows NT/2000.. . . . . . . . . . . . . . . . . . . . . . .. . . . . . . .31Compiling Additional Component COBOL on UNIX.. . . . . . . . . . . . . . . . . . . . . . . . . . . . . . . . . . . . . . . . . . . . . . . . . .. . . . . . . .32
Installing Database Audit Triggers for PeopleSoft Student Records.. . . . . . . . . . . . . . . . . . . . . . . . . . . . . . . . . . . . . . . . . . . .33Understanding Database Audit Triggers.. . . . . . . . . . . . . . . . . . . . . . . . . . . . . . . . . . . . . . . . . . . . . . . . . . . . . . . . . . . . . . . .. . . . . . . .33Using Audit Triggers... . . . . . . . . . . . . . . . . . . . . . . . . . . . . . . . . . . . . . . . . . . . . . . . . . . . . . . . . . . . . . . . . . . . . . . . . . . . . . . . . . . . . .. . . . . . . .33Installing the Audit Triggers. . . . . . . . . . . . . . . . . . . . . . . . . . . . . . . . . . . . . . . . . . . . . . . . . . . . . . . . . . . . . . . . . . . . . . . . . . . . . . .. . . . . . . .33
Adjusting PeopleTools EDI Manager for Financial Aid Processes.. . . . . . . . . . . . . . . . . . . . . . . . . . . . . . . . . . . . . . . . . . . . . .34Updating the ECOUTMAP.SQC File.. . . . . . . . . . . . . . . . . . . . . . . . . . . . . . . . . . . . . . . . . . . . . . . . . . . . . . . . . . . . . . . . . . . .. . . . . . . .34Modifying the ECIN0001.SQR File.. . . . . . . . . . . . . . . . . . . . . . . . . . . . . . . . . . . . . . . . . . . . . . . . . . . . . . . . . . . . . . . . . . . . . .. . . . . . . .35
Using CPU Space for PeopleSoft Academic Advising.. . . . . . . . . . . . . . . . . . . . . . . . . . . . . . . . . . . . . . . . . . . . . . . . . . . . . . . . . . . .36Running the SFA_ECQUEUE_TABLES_RESET Script. . . . . . . . . . . . . . . . . . . . . . . . . . . . . . . . . . . . . . . . . . . . . . . . . . . . . . . . . . .36Configuring Your PeopleBooks Documentation Website.. . . . . . . . . . . . . . . . . . . . . . . . . . . . . . . . . . . . . . . . . . . . . . . . . . . . . . . . .36Using the User Profiles Management Result Table.. . . . . . . . . . . . . . . . . . . . . . . . . . . . . . . . . . . . . . . . . . . . . . . . . . . . . . . . . . . . . . .37
Understanding the Audience for this Information.. . . . . . . . . . . . . . . . . . . . . . . . . . . . . . . . . . . . . . . . . . . . . . . . . . . . . .. . . . . . . .37
vi Copyright © 2011, Oracle and/or its affiliates. All rights reserved.
Contents
Using the User Profiles Management Clean Up Pages.. . . . . . . . . . . . . . . . . . . . . . . . . . . . . . . . . . . . . . . . . . . . . .. . . . . . . .37Installing PeopleSoft Student Administration Integration Pack.. . . . . . . . . . . . . . . . . . . . . . . . . . . . . . . . . . . . . . . . . . . . . . . . . .40
Setting Up Installation Options.. . . . . . . . . . . . . . . . . . . . . . . . . . . . . . . . . . . . . . . . . . . . . . . . . . . . . . . . . . . . . . . . . . . . . . . . . . .. . . . . . . .40Installing Additional Database Changes Using PeopleSoft Data Mover. . . . . . . . . . . . . . . . . . . . . . . . . . . .. . . . . . . .41Running Conversion Programs Using PeopleSoft Application Engine. . . . . . . . . . . . . . . . . . . . . . . . . . . . . .. . . . . . . .41Activating PeopleSoft Student Administration Integration Pack Service Operations. . . . . . . . . . . . . .. . . . . . . .42Activating PeopleSoft Student Administration Integration Pack Service Routings.. . . . . . . . . . . . . . . .. . . . . . . .46Activating PeopleSoft Student Administration Integration Pack Queues.. . . . . . . . . . . . . . . . . . . . . . . . . . .. . . . . . . .49
Installing PeopleSoft Contributor Relations.. . . . . . . . . . . . . . . . . . . . . . . . . . . . . . . . . . . . . . . . . . . . . . . . . . . . . . . . . . . . . . . . . . . . . . . .49
Index ... . . . . . . . . . . . . . . . . . . . . . . . . . . . . . . . . . . . . . . . . . . . . . . .. . . . . . . . . . . . . . . . . . . . . . . . . . . . . . . . . . . . . . . . . . . . . . . . . . . . . . . . . . .51
Copyright © 2011, Oracle and/or its affiliates. All rights reserved. vii

Contents
viii Copyright © 2011, Oracle and/or its affiliates. All rights reserved.
About This Documentation
Installing the PeopleSoft HRMS and PeopleSoftCampus Solutions Applications
This document provides supplemental installation instructions for Oracle’s PeopleSoft Enterprise HumanResources Management Solutions (HRMS) and Oracle’s PeopleSoft Enterprise Campus Solutions (CS)applications.
This document supplements the PeopleSoft Enterprise PeopleTools installation guide for your databaseplatform.
Copyright © 2011, Oracle and/or its affiliates. All rights reserved. ix

Preface
x Copyright © 2011, Oracle and/or its affiliates. All rights reserved.
CHAPTER 1
Installing PeopleSoft Enterprise HRMS9.0 Applications
This chapter discusses:
• Preparing for the PeopleSoft HRMS Installation
• Installing PeopleSoft HRMS for the U.S. Federal Government
• Installing PeopleSoft HRMS for Education and Government
• Installing PeopleSoft HRMS for Military Customers
• Installing PeopleSoft HRMS for Japan
• Installing PeopleSoft HRMS for Switzerland
• Installing PeopleSoft Time and Labor
• Installing PeopleSoft Absence Management and PeopleSoft Global Payroll Core
• Installing PeopleSoft HRMS Portal Pack
• Installing PeopleSoft Talent Acquisition Manager
• Installing PeopleSoft Global Payroll Country Extensions
• Installing PeopleSoft ePay Payslips for PeopleSoft Global Payroll
• Installing PeopleSoft HR Spain and PeopleSoft Global Payroll Germany/Switzerland PDF Form Files
• Installing PeopleSoft Directory Interface
• Installing PeopleSoft Payroll Interface for ADP Connection
• Installing PeopleSoft Pay/Bill Management
• Installing Service Handlers
• Installing Configurable Matrices and Metadata
• Installing PeopleSoft Human Resources for French Public Sector
This chapter provides pre-installation considerations, and installation notes and instructions specific to PeopleSoftHRMS applications. Installation notes are tips about a specific issue in a product, whereas installation instructionsare step-by-step instructions on how to install a PeopleSoft HRMS product.
Preparing for the PeopleSoft HRMS InstallationThis section discusses:
Copyright © 2011, Oracle and/or its affiliates. All rights reserved. 1
Installing PeopleSoft Enterprise HRMS 9.0 Applications Chapter 1
• Verifying the Enterprise PeopleTools Version
• Verifying the Demo Database Size
• Running the HRINSSYS.DMS Script
• Running the HC9MAINTLOG_I.DMS Script
• Verifying the EDM Pool Size
• Re-Ordering the Steps in Enterprise PeopleTools Installation for DB2 z/OS Only
• Reviewing PeopleSoft Campus Solutions COBOL on DB2 z/OS
Verifying the Enterprise PeopleTools VersionAll new installs of PeopleSoft HRCS 9.0 require Enterprise PeopleTools 8.50.03 or higher. For upgradecustomers, please check the Upgrade Home Page for the Enterprise PeopleTools requirements for yourspecific upgrade path.
Important! This document is not a stand-alone installation guide. It does not contain Enterprise PeopleToolsinstallation instructions. When installing PeopleSoft HRMS, be sure to use both the Enterprise PeopleToolsInstallation Guide for your database platform and these supplemental PeopleSoft HRMS installationinstructions. The Enterprise PeopleTools Installation Guide is available on My Oracle Support
See Enterprise PeopleTools 8.50 Installation for your database platform, available on My Oracle Support.
Verifying the Demo Database SizeThe following table lists the approximate PeopleSoft HRMS 9.0 Demo database size for each RDBMSplatform.
RDBMS Platform Approximate Database SizeOracle ANSI/Unicode 19.7 GBDB2/UNIX—ANSI 19.7 GBDB2/UNIX—Unicode 36 GBDB2 z/OS Non-Unicode 18.7 GBDB2 z/OS Unicode 20.9 GBSybase ANSI 18 GBInformix 9.2 GBMicrosoft SQL Server 4.9 GBMicrosoft SQL Server—Unicode 5.4 GB
Running the HRINSSYS.DMS ScriptUse PeopleSoft Data Mover to run this script against the PeopleSoft HRMS SYS database only. You can findthe HRINSSYS.DMS script in <PS_HOME>\scripts. You then need to log off all clients, shut down andrestart all application servers after running this script.
2 Copyright © 2011, Oracle and/or its affiliates. All rights reserved.

Chapter 1 Installing PeopleSoft Enterprise HRMS 9.0 Applications
Running the HC9MAINTLOG_I.DMS ScriptRun this script using PeopleSoft Data Mover against the PeopleSoft HRMS and Campus Solutionsdatabase being installed. This script loads PeopleSoft HRCS 9.0 Multi-Lingual update IDs to thePS_MAINTENANCE_LOG table. The HC9MAINTLOG_I.DMS script is located in <PS_HOME>\scripts.You do not need to log off all clients and shut down all application servers after running this script.
Verifying the EDM Pool SizeThe PeopleSoft installation procedure places all of the tables for the product that you are installing intomultiple physical DB2 for z/OS databases using a shared tablespace methodology. The DB2 subsystem shouldhave a minimum EDM pool size of 6 MB for PeopleSoft HRMS.
Re-Ordering the Steps in Enterprise PeopleToolsInstallation for DB2 z/OS OnlyFor DB2/zOS - PeopleSoft HRMS 9.0, the order of steps performed in the "Creating a Database" chapter of theEnterprise PeopleTools installation guide changes if you are installing a demo database.
See Enterprise PeopleTools 8.50 Installation for DB2 UDB z/OS, "Creating a Database."
Before performing the task “Running PeopleSoft Data Mover Import Scripts,” the <DBNAME>dbo.dms scriptneeds to be edited. Edit the script <DBNAME>dbo.dms and create two different DMS scripts from the original.
Note. This modification is necessary because the PeopleSoft HRMS Demo database has some duplicatedata definitions and indexes that need to be created before loading the Demo database so that duplicatescan be avoided.
1. Search for the key word hcengl.log in <DBNAME>dbo.dms.2. Cut the portion of the script from the line that contains hcengl.log to the end of script and paste it into
a different script called <DBNAME>dbo_2.dms.3. Save the original <DBNAME>dbo.dms script after removing the portion of script from the line that has the
key word hcengl.log to the end of the script.4. At this stage, make sure that the original <DBNAME>dbo.dms script contains only the import from
hcengs.db and that <DBNAME>dbo_2.dms contains the rest of the import and updates.5. Run the <DBNAME>dbo.dms script in bootstrap mode.
Perform this step by following the instructions in the task “Running PeopleSoft Data Mover ImportScripts”.
See Enterprise PeopleTools 8.50 Installation for your database platform, “Creating a Database,” availableon My Oracle Support.
6. Run the step to create indexes by following the instructions in the task “Creating Indexes.”7. Run the <DBNAME>dbo_2.dms script by following the instructions in the task “Running PeopleSoft
Data Mover Import Scripts.”
Reviewing PeopleSoft Campus Solutions COBOL on DB2 z/OSPeopleSoft Campus Solutions 9.0 is no longer supported on the IBM z/OS platform. The COBOL programsin the following list are for the PeopleSoft Campus Solutions product, and will not compile successfullyfor customers running DB2 on the z/OS platform.
Copyright © 2011, Oracle and/or its affiliates. All rights reserved. 3

Installing PeopleSoft Enterprise HRMS 9.0 Applications Chapter 1
• FAPINAS0• FAPINAS1• FAPINAS5• FAPINAS6• FAPINAS7• FAPINAS8• FAPINAS9• IMPLUS04• IMPLUS05• IMPLUS06• IMPLUS07• IMPLUS08• IMPLUS09• IMPLUS10
DB2 z/OS customers should do one of the following:
• Comment out the JCL compile steps for these programs in the JCLLIB(PSCOB*) PDS members prior toCOBOL compile execution.
• Take no action and simply ignore the COBOL compile errors for the previously listed programs.
Task 1-1: Installing PeopleSoft HRMS for theU.S. Federal Government
This section describes the system data set up process that users of PeopleSoft HRMS for the U.S. FederalGovernment should run to ensure proper installation of Federal functionality.
To install Federal functionality in a PeopleSoft HRMS Database:
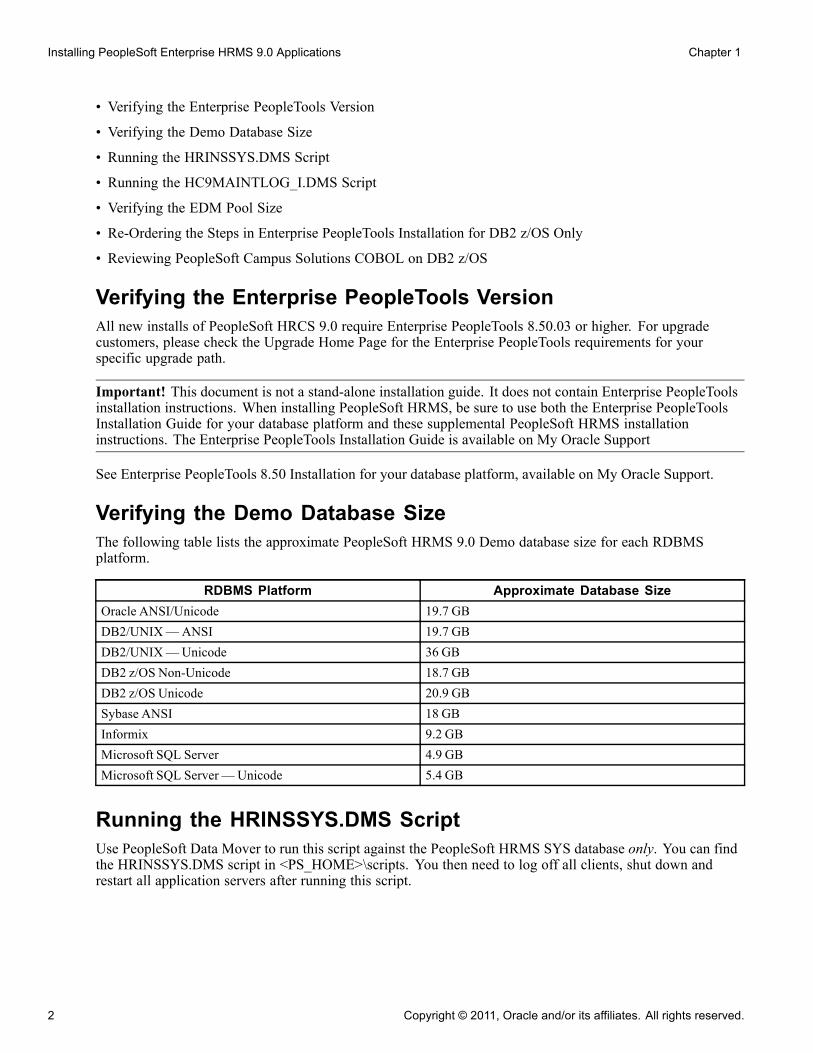
1. Select Set Up HRMS, Product Related, Workforce Administration, Workforce Data USF, DataFederalization.
2. Click the Federalize System Data button to load the contents of the core tables that are to contain FederalData.
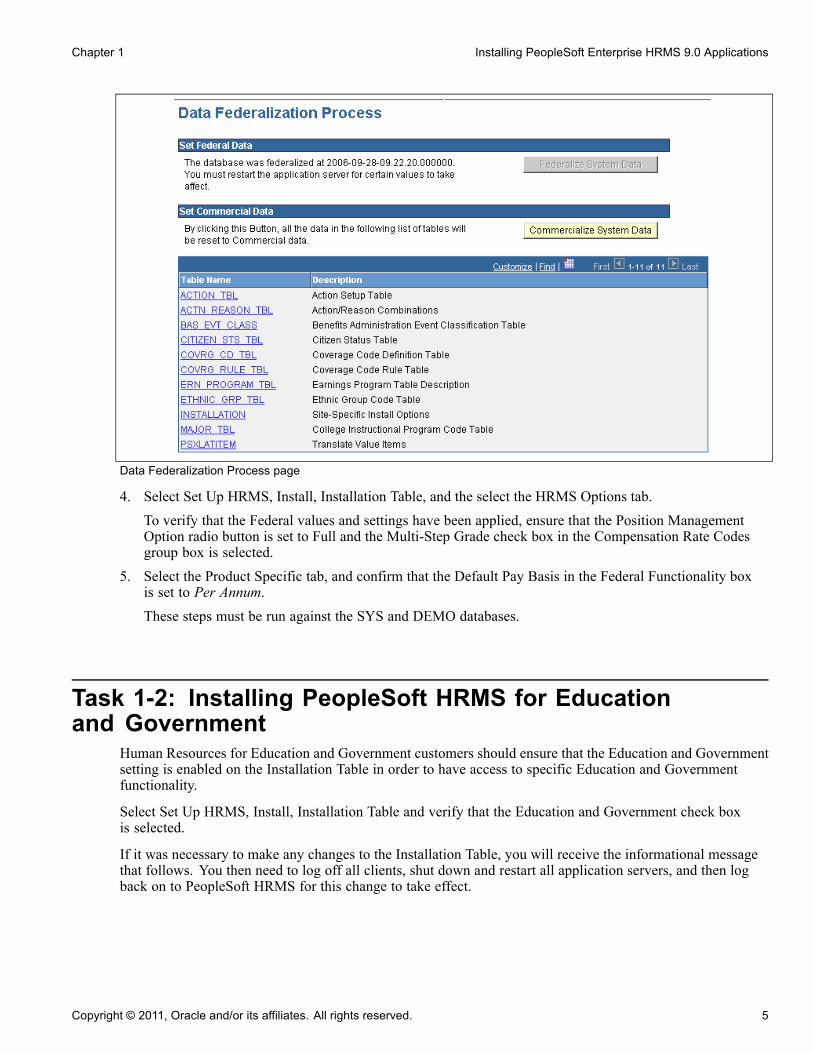
3. Since running the Federalization process induces changes to the Installation Table, you will receive theinformational message that follows.You then need to log off all clients, shut down and restart all application servers, and then log back on toPeopleSoft HRMS for this change to take effect.
4 Copyright © 2011, Oracle and/or its affiliates. All rights reserved.
Chapter 1 Installing PeopleSoft Enterprise HRMS 9.0 Applications
Data Federalization Process page
4. Select Set Up HRMS, Install, Installation Table, and the select the HRMS Options tab.To verify that the Federal values and settings have been applied, ensure that the Position ManagementOption radio button is set to Full and the Multi-Step Grade check box in the Compensation Rate Codesgroup box is selected.
5. Select the Product Specific tab, and confirm that the Default Pay Basis in the Federal Functionality boxis set to Per Annum.These steps must be run against the SYS and DEMO databases.
Task 1-2: Installing PeopleSoft HRMS for Educationand Government
Human Resources for Education and Government customers should ensure that the Education and Governmentsetting is enabled on the Installation Table in order to have access to specific Education and Governmentfunctionality.
Select Set Up HRMS, Install, Installation Table and verify that the Education and Government check boxis selected.
If it was necessary to make any changes to the Installation Table, you will receive the informational messagethat follows. You then need to log off all clients, shut down and restart all application servers, and then logback on to PeopleSoft HRMS for this change to take effect.
Copyright © 2011, Oracle and/or its affiliates. All rights reserved. 5
Installing PeopleSoft Enterprise HRMS 9.0 Applications Chapter 1
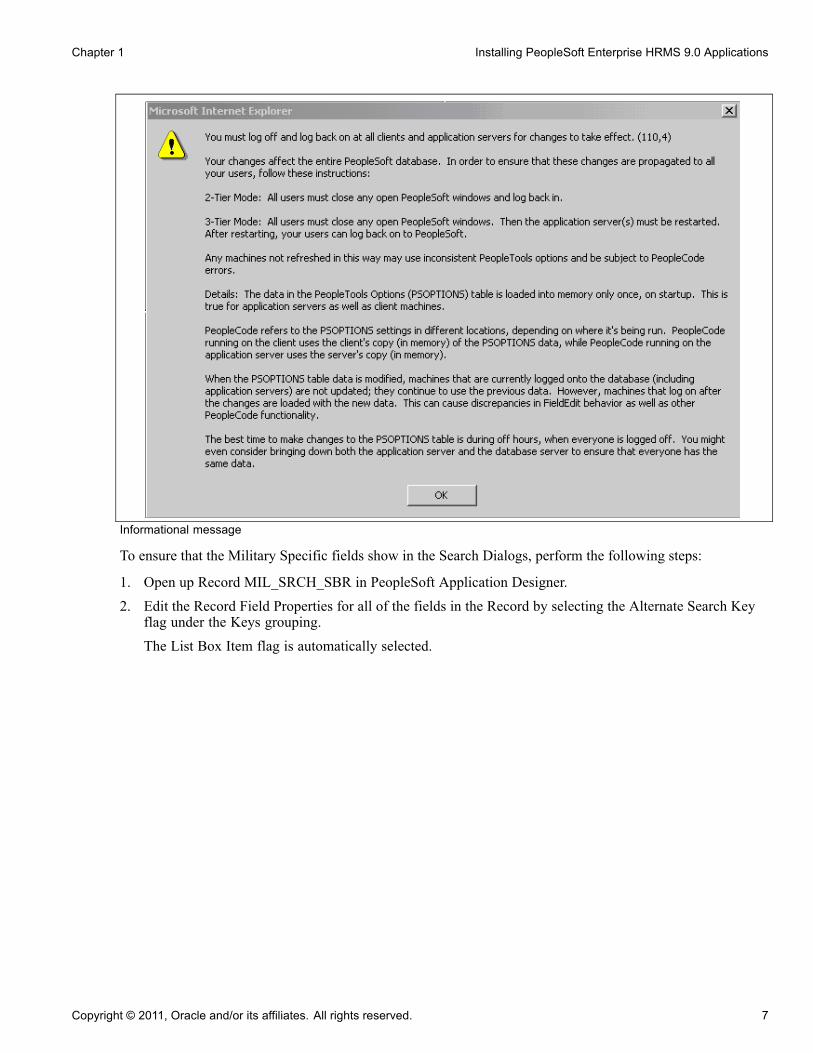
Informational message
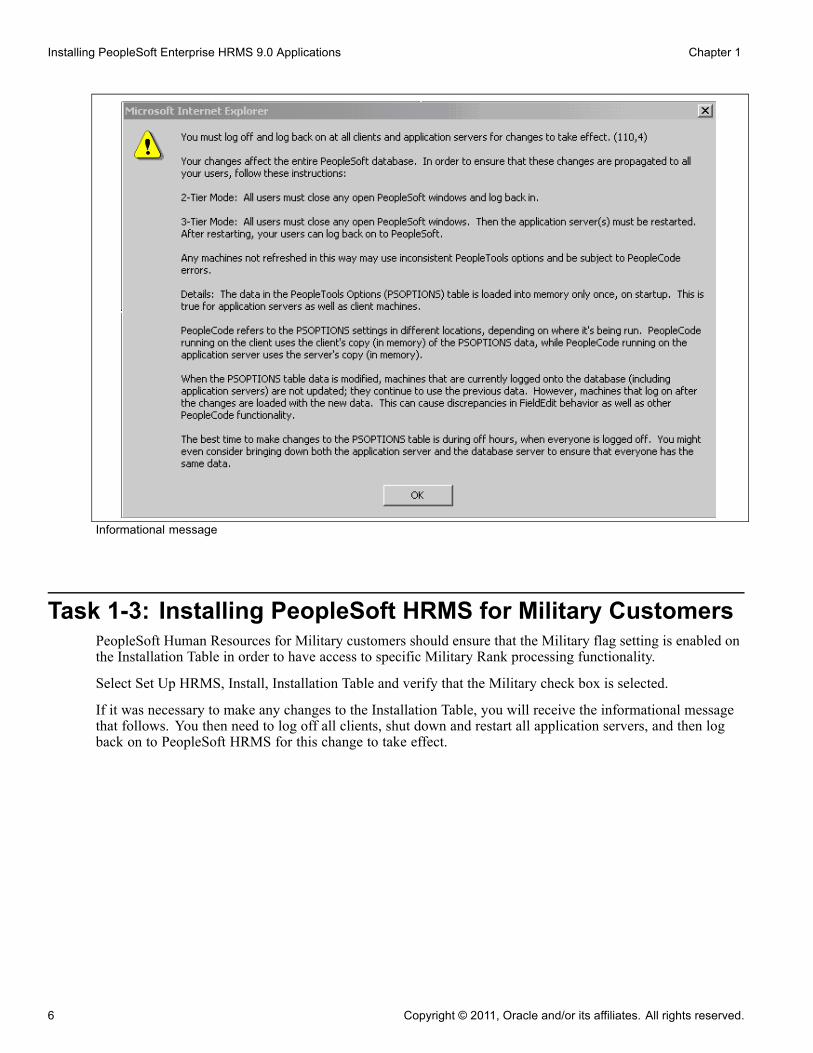
Task 1-3: Installing PeopleSoft HRMS for Military CustomersPeopleSoft Human Resources for Military customers should ensure that the Military flag setting is enabled onthe Installation Table in order to have access to specific Military Rank processing functionality.
Select Set Up HRMS, Install, Installation Table and verify that the Military check box is selected.
If it was necessary to make any changes to the Installation Table, you will receive the informational messagethat follows. You then need to log off all clients, shut down and restart all application servers, and then logback on to PeopleSoft HRMS for this change to take effect.
6 Copyright © 2011, Oracle and/or its affiliates. All rights reserved.
Chapter 1 Installing PeopleSoft Enterprise HRMS 9.0 Applications
Informational message
To ensure that the Military Specific fields show in the Search Dialogs, perform the following steps:
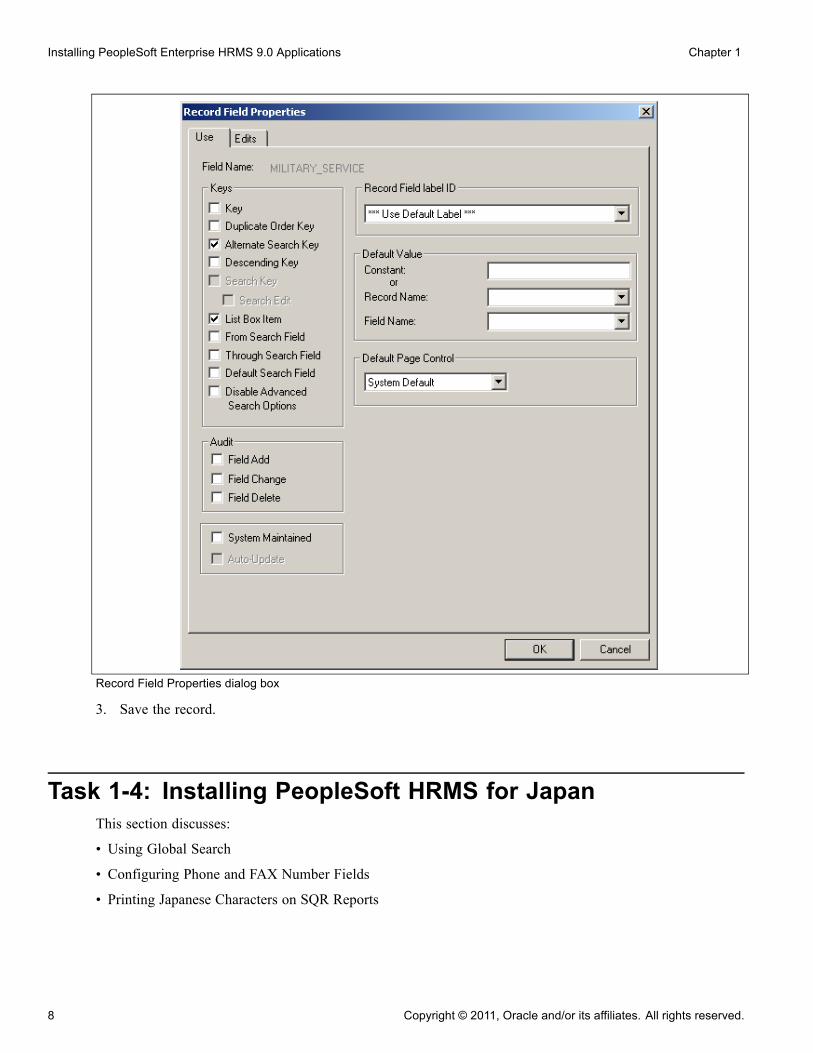
1. Open up Record MIL_SRCH_SBR in PeopleSoft Application Designer.2. Edit the Record Field Properties for all of the fields in the Record by selecting the Alternate Search Key
flag under the Keys grouping.The List Box Item flag is automatically selected.
Copyright © 2011, Oracle and/or its affiliates. All rights reserved. 7
Installing PeopleSoft Enterprise HRMS 9.0 Applications Chapter 1
Record Field Properties dialog box
3. Save the record.
Task 1-4: Installing PeopleSoft HRMS for JapanThis section discusses:
• Using Global Search
• Configuring Phone and FAX Number Fields
• Printing Japanese Characters on SQR Reports
8 Copyright © 2011, Oracle and/or its affiliates. All rights reserved.
Chapter 1 Installing PeopleSoft Enterprise HRMS 9.0 Applications
Task 1-4-1: Using Global SearchIf you want the ability to search by Other ID in the delivered search views, perform the following steps:
1. Open the subrecord SCRTY_FLD_SBR and double-click the field OTHER_ID_JPN.2. Select the Alternate Search check box.3. Save the record.
Task 1-4-2: Configuring Phone and FAX Number FieldsPhone and fax number fields are custom format fields. If you enter a phone number without any hyphenationlike 9256944023, the system automatically reformats the number into the proper format like “925/694-4023.”This works in the US.
In Japan, however, a ten-digit phone number may be formatted in several ways such as 03-1234-5670,045-123-4567, 0567-21-1234, and so on. Thus, PeopleSoft’s standard custom format feature does not workfor Japanese phone numbers.
To solve this issue, if you are a Japanese customer, you can modify the definition of the phone number fieldjust as an ordinary string field so that the data is stored as you entered it without any automatic formatting. Youcan enter the phone numbers with parentheses or dashes as you like, such as 03(4567)1234 or 03-4567-1234.
1. In PeopleSoft Application Designer, open the following fields:• FAX• HOME_PHONE• PHONE• PHONE1• PHONE2• POSITION_PHONE• PROXY_PHONE• PT_CTI_PHONENUMBER• WORK_PHONE
2. For each field, in the Field Format group box, change the Format Type drop-down list from Custom toUppercase.
3. Save the field.
Task 1-4-3: Printing Japanese Characters on SQR ReportsTo print Japanese characters on SQR reports, the following changes need to be made.
In setenv.sqc, uncomment this line:
Print Specific Language -#define PRINT_JAPANESE
Additional changes to configuration files may also be needed depending on the settings on your operatingsystem. For more information, see the section PeopleSoft SQR Globalization in the Global TechnologyPeopleBook.
Copyright © 2011, Oracle and/or its affiliates. All rights reserved. 9
Installing PeopleSoft Enterprise HRMS 9.0 Applications Chapter 1
See Enterprise PeopleTools 8.50 PeopleBook: Global Technology, “Using Global Reporting and Data AnalysisTools,” for your database platform.
Task 1-5: Installing PeopleSoft HRMS for SwitzerlandThis section describes how to install Swiss address validation.
To import Swiss address data:
1. Sign on with PeopleSoft Data Mover to the 9.0 application database.2. Open the PeopleSoft Data Mover script <PS_HOME>\scripts\CHE_ADDR.DMS.
Note. If you are using a Unicode database, use the CHE_ADDR_DBCS.DMS file instead of theCHE_ADDR.DMS file. This imports the Swiss address data in a form that can be used with thedouble-byte character set.
3. Run this script against the 9.0 application database.
4. Close PeopleSoft Data Mover.
Note. The accented characters in the address data are only visible on databases that support either Unicodeor the European character set.
Task 1-6: Installing PeopleSoft Time and LaborThis section discusses:
• Creating Time Zone Offsets
This section discusses the installation of PeopleSoft Time and Labor and the creation of time zone offsets.
Task 1-6-1: Creating Time Zone OffsetsEnterprise PeopleTools stores time/date information in only one time zone—the "Base Time Zone"—that youselect at the time of installation and should never change. The base time zone may be set to the time zone ofthe company’s headquarters or perhaps to Greenwich Mean Time (GMT)—also known as UTC (CoordinatedUniversal Time).
When employees enter the hours they have worked in PeopleSoft Time and Labor, they report time accordingto the local time zone and Enterprise PeopleTools stores the information in the base time zone. The TimeAdministration process then converts the base time back to the local time for rules processing.
To do this, the system needs to know the time zone “offsets”, or the differences between the local time andbase time. The following procedure explains how to select the base time zone and create time zone offsets.
To select the Base Time Zone and create time zone offsets:
1. Select PeopleTools, Utilities, Administration, PeopleTools Options.
2. In the Base Time Zone field on the PeopleTools Options page, browse and select the time zone in whichyou want all reported time to be stored.
10 Copyright © 2011, Oracle and/or its affiliates. All rights reserved.
Chapter 1 Installing PeopleSoft Enterprise HRMS 9.0 Applications
3. Select PeopleTools, Utilities, International, Time Zones.4. Change the default settings on the Time Zone Data page and Daylight Savings page, if applicable.
The Time Zone Data page and Daylight Savings page display the default time zone settings deliveredwith Enterprise PeopleTools. You can change the settings on these pages if you need to customize theinformation for your organization.
5. Create time zone offsets using the Time Zone Data page. Click the Generate Query Offsets button on theTime Zone Data page to populate the time zone offsets table with values that represent the differencesbetween the local and base time zones.
6. Enter the Start and End dates for the offset generation.• Specify Start Date: Determine 5 years prior to current date and use year begin date as Start Date.• Specify End Date: Determine 5 years in the future, from current date and use year end date as End Date.
Task 1-7: Installing PeopleSoft Absence Managementand PeopleSoft Global Payroll Core
This section discusses:
• Verifying Installation Settings for PeopleSoft Absence Management
• Updating Process and Job Definitions for PeopleSoft Packager
Task 1-7-1: Verifying Installation Settings for PeopleSoftAbsence ManagementPeopleSoft Absence Management customers who are licensed for PeopleSoft Payroll for North America orPeopleSoft Payroll Interface should ensure that Global Payroll Core is disabled on the Installation Table inorder to have access to specific PeopleSoft Absence Management functionality.
PeopleSoft Absence Management customers licensed for PeopleSoft Global Payroll Core, a CountryExtension, or who are planning on using PeopleSoft Absence Management as a stand alone product, need toensure that Global Payroll Core is enabled on the Installation Table.
This step must be run against both the SYS database and the DMO database.
• Select Set Up HRMS, Install, Installation Table and verify that the Global Payroll Core check box is notselected if you are using PeopleSoft Payroll for North America or PeopleSoft Payroll Interface.
• Select Set Up HRMS, Install, Installation Table and verify that the Global Payroll Core check box isselected if you are using PeopleSoft Global Payroll Core, a Country Extension or you are planning onusing PeopleSoft Absence Management as a stand-alone product.
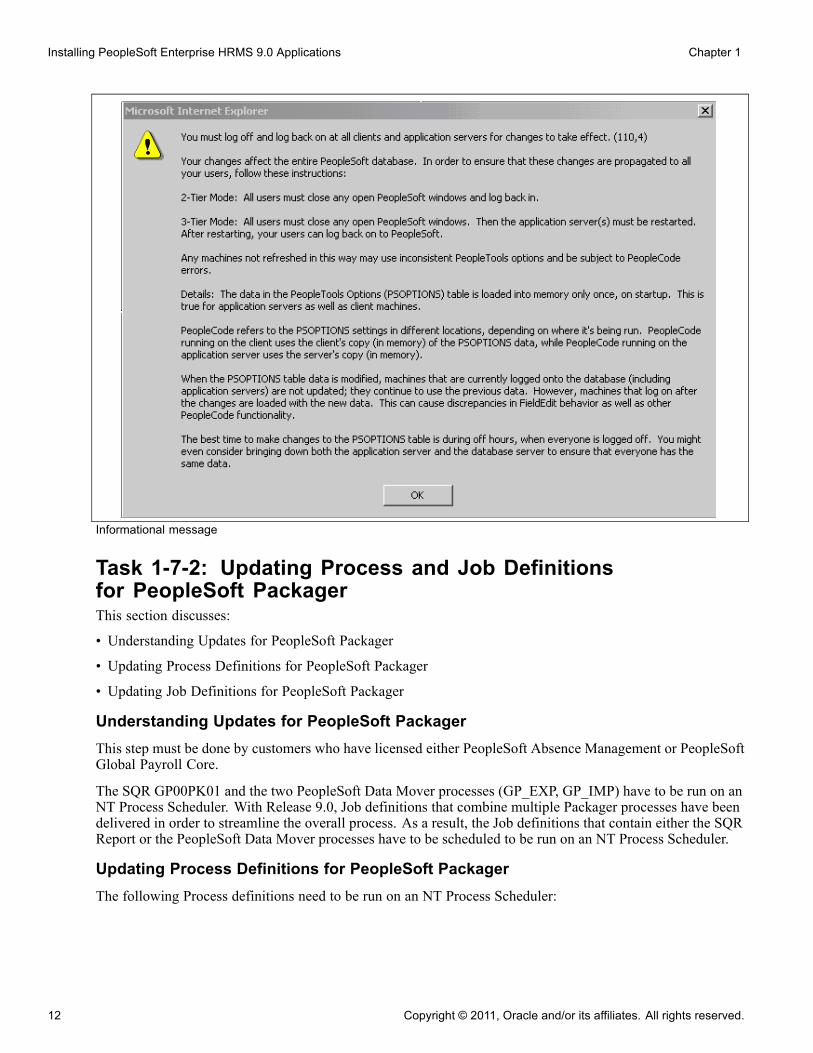
If any change is needed in the Installation Table, you will receive the informational message that follows.You then need to log off all clients, shut down and restart all application servers, and then log back on toPeopleSoft HRMS for this change to take effect.
Copyright © 2011, Oracle and/or its affiliates. All rights reserved. 11
Installing PeopleSoft Enterprise HRMS 9.0 Applications Chapter 1
Informational message
Task 1-7-2: Updating Process and Job Definitionsfor PeopleSoft PackagerThis section discusses:
• Understanding Updates for PeopleSoft Packager
• Updating Process Definitions for PeopleSoft Packager
• Updating Job Definitions for PeopleSoft Packager
Understanding Updates for PeopleSoft PackagerThis step must be done by customers who have licensed either PeopleSoft Absence Management or PeopleSoftGlobal Payroll Core.
The SQR GP00PK01 and the two PeopleSoft Data Mover processes (GP_EXP, GP_IMP) have to be run on anNT Process Scheduler. With Release 9.0, Job definitions that combine multiple Packager processes have beendelivered in order to streamline the overall process. As a result, the Job definitions that contain either the SQRReport or the PeopleSoft Data Mover processes have to be scheduled to be run on an NT Process Scheduler.
Updating Process Definitions for PeopleSoft PackagerThe following Process definitions need to be run on an NT Process Scheduler:
12 Copyright © 2011, Oracle and/or its affiliates. All rights reserved.
Chapter 1 Installing PeopleSoft Enterprise HRMS 9.0 Applications
Process Type Process NameSQR Report GP00PK01Data Mover GP_EXP
Data Mover GP_IMP
To update the previously listed Process Definitions:
1. Access the Processes component by selecting PeopleTools, Process Scheduler, Processes.2. Click the Advanced Search link on the Search page.3. Open the component for each of the process types and process names in the previously provided list.4. Select the Process Definition Options tab.5. Select the value of the NT Process Scheduler set up at your installation in the Server Name field.
Updating Job Definitions for PeopleSoft PackagerThe following job definitions need to run on an NT Process Scheduler:
• GPCMPRPT — Rules Package Compare Report• GPCMPRU — Compare & Upgrade with Report• GPCRSCTE — Create Package & Scripts & Export• GPEXP — Export Rule Packages• GPICMP — Import Rule Package & Compare• GPICMPRU — Import & Compare & Upgrade with Report• GPICMPU — Import & Compare & Upgrade• GPIMP — Import Rule Packages• GPSCTE — Create Scripts & Export Package
To update the previously listed Job Definitions:
1. Access the Jobs component by selecting PeopleTools, Process Scheduler, Jobs.2. Open the component for each of the previously listed jobs.3. Select the Job Definition Options tab.
The Server Name field contains the value PSNT.4. Select the value of the NT Process Scheduler set up at your installation in the ’Server Name field.
Task 1-8: Installing PeopleSoft HRMS Portal PackThis section describes how to grant access to the homepage personalization.
In order to add, remove, or change the layout of the homepage, the homepage personalization security accessmust be granted to all non-guest users.
To add the Portal User Role to the user IDs:
Copyright © 2011, Oracle and/or its affiliates. All rights reserved. 13
Installing PeopleSoft Enterprise HRMS 9.0 Applications Chapter 1
1. With PeopleSoft Data Mover sign in to the 9.0 application database.2. Open the PeopleSoft Data Mover script <PS_HOME>\scripts\portal_add_role.dms.3. Run this script against the 9.0 application database.4. Close PeopleSoft Data Mover.
Note. The PAPP_USER role should be granted to all new user IDs for access to the homepage personalization.After running this script, the role PAPP_USER should be manually removed from any GUEST User ID, sincethe GUEST user should not be personalizing the common homepage.
Task 1-9: Installing PeopleSoft Talent Acquisition ManagerThis section describes the installation steps for the Resume Processing feature in PeopleSoft Talent AcquisitionManager.
To install Resume Processing functionality:
Note. Verify prerequisites for Resume Processing. Resume Processing (RP) 9.0 requires a working PeopleSoftHRCS 9.0 Database, Application Server, Process Scheduler, and PeopleSoft Pure Internet Architecture (PIA)Web Server. Detailed instructions for installing these components can be found in the appropriate EnterprisePeopleTools installation guide for your database platform.
See Enterprise PeopleTools 8.50 Installation for your database platform, available on My Oracle Support.
1. Configure the Local Gateway.a. Select PeopleTools, Integration Broker, Configuration, Gateways.b. Click the Search button and select the Default Local Gateway.c. In the URL field enter the following:http://<PIA_Webserver>:<Port Number>/PSIGW/PeopleSoftListeningConnector<PIA_Webserver> refers to the machine name of the web server hosting the gateway. This is usually thesame machine that is used to run PeopleSoft PIA (for example, http://psftweb01.peoplesoft.com:8080/PSIGW/PeopleSoftListeningConnector). The gateway uses the PeopleSoft listening connector toreceive messages from an integration engine node or a remote gateway.
d. Click the Load Gateway Connectors button.An informational message appears.
e. Click OK.f. Click Save.
2. Synchronize counters with your data.a. Select Set Up HRMS, Install, Product and Country Specific, Recruiting Installation and then selectthe Last Assigned Ids tab.
b. Click the Fix Counters button near the bottom of the page.c. Click the Save button.
14 Copyright © 2011, Oracle and/or its affiliates. All rights reserved.
Chapter 1 Installing PeopleSoft Enterprise HRMS 9.0 Applications
Task 1-10: Installing PeopleSoft Global PayrollCountry Extensions
This section discusses:
• Understanding the PeopleSoft Global Payroll Country Extensions Installation
• Updating Installation Indicators
• Running the GPCESYS.DMS Script to Update Stored Installation Indicators
• Running the GPCERATE_EXP.DMS / GPCERATE_IMP.DMS Scripts to Copy HR Rate Codes
Understanding the PeopleSoft Global Payroll CountryExtensions InstallationThis section describes the additional installation steps required to install PeopleSoft Global Payroll CountryExtensions.
Note. You only need to complete this section if you are installing one or more PeopleSoft Global PayrollCountry Extensions.
The following abbreviations and terms are used in this section:
Abbreviation Global Payroll TermsCE Country ExtensionGP Global PayrollHRDMO PeopleSoft HRMS Demo databaseHRSYS PeopleSoft HRMS System database
The objects, rules, and data for the PeopleSoft Global Payroll Country Extensions are delivered as part of theHRSYS and HRDMO databases. These additional steps walk you through additional installation actions thatare required for PeopleSoft Country Extensions.
Task 1-10-1: Updating Installation IndicatorsOracle recommends that you update the PeopleSoft Global Payroll Country Extension indicators on theInstallation page on both your HRSYS and HRDMO databases so that only the PeopleSoft Country Extensionsthat you licensed are turned on.
1. Select Set Up HRMS, Install, Installation Table.2. On the Products page, select the Installed GP Countries link at the bottom to see a list of Countries.3. Clear the check boxes for all of the Country Extensions that you have not licensed (so the only check
boxes remaining selected should be for those PeopleSoft Country Extensions that you licensed).
Note. This is important as these indicators are used later in this task to identify if additional updates shouldbe made (as they are conditional based on which PeopleSoft Country Extensions you licensed).
Copyright © 2011, Oracle and/or its affiliates. All rights reserved. 15
Installing PeopleSoft Enterprise HRMS 9.0 Applications Chapter 1
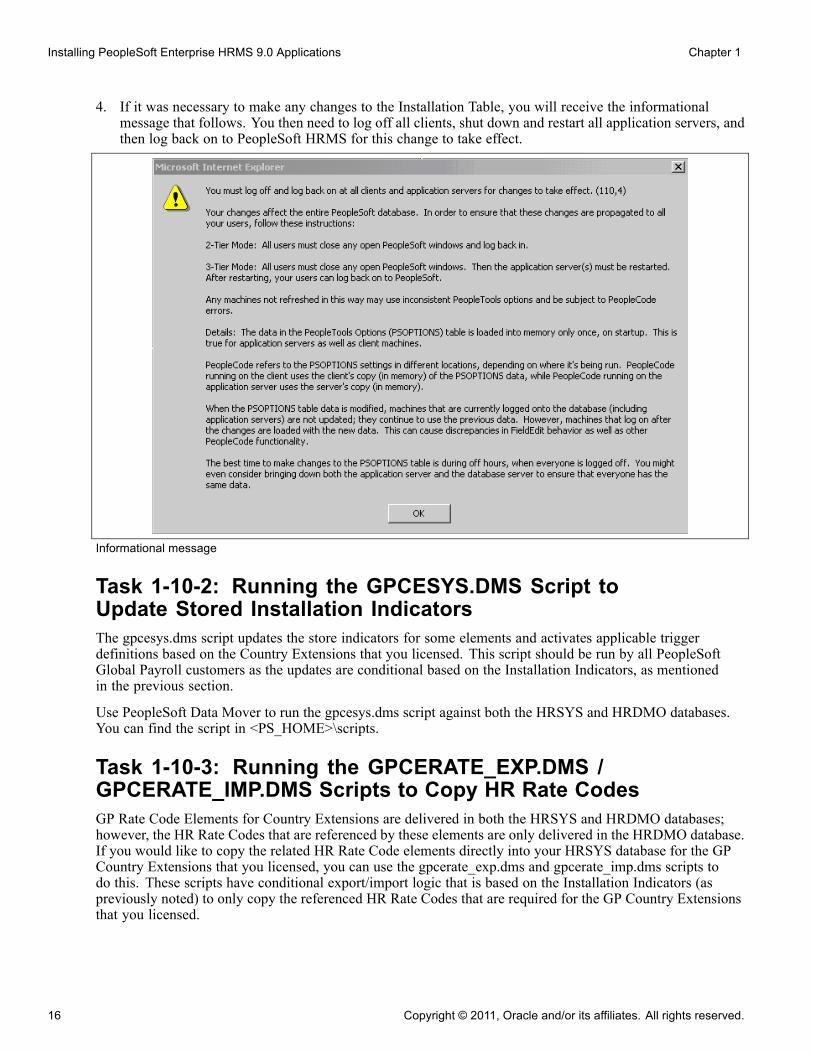
4. If it was necessary to make any changes to the Installation Table, you will receive the informationalmessage that follows. You then need to log off all clients, shut down and restart all application servers, andthen log back on to PeopleSoft HRMS for this change to take effect.
Informational message
Task 1-10-2: Running the GPCESYS.DMS Script toUpdate Stored Installation IndicatorsThe gpcesys.dms script updates the store indicators for some elements and activates applicable triggerdefinitions based on the Country Extensions that you licensed. This script should be run by all PeopleSoftGlobal Payroll customers as the updates are conditional based on the Installation Indicators, as mentionedin the previous section.
Use PeopleSoft Data Mover to run the gpcesys.dms script against both the HRSYS and HRDMO databases.You can find the script in <PS_HOME>\scripts.
Task 1-10-3: Running the GPCERATE_EXP.DMS /GPCERATE_IMP.DMS Scripts to Copy HR Rate CodesGP Rate Code Elements for Country Extensions are delivered in both the HRSYS and HRDMO databases;however, the HR Rate Codes that are referenced by these elements are only delivered in the HRDMO database.If you would like to copy the related HR Rate Code elements directly into your HRSYS database for the GPCountry Extensions that you licensed, you can use the gpcerate_exp.dms and gpcerate_imp.dms scripts todo this. These scripts have conditional export/import logic that is based on the Installation Indicators (aspreviously noted) to only copy the referenced HR Rate Codes that are required for the GP Country Extensionsthat you licensed.
16 Copyright © 2011, Oracle and/or its affiliates. All rights reserved.
Chapter 1 Installing PeopleSoft Enterprise HRMS 9.0 Applications
After you install both the HRSYS and HRDMO databases, use PeopleSoft Data Mover to run thegpcerate_exp.dms script (which can be found in your <PS_HOME>\scripts directory) against your HRDMOdatabase. You then use PeopleSoft Data Mover in bootstrap mode to run the gpcerate_imp.dms script(which can be found in your <PS_HOME>\scripts directory) against your HRSYS database (using the datfile that was just generated).
Note. DB2 z/OS customers: Follow the instructions in the script gpcerate_imp.dms to alter it to workproperly in your environment
Note. If you only want to copy HR Rate Codes for a subset of the Country Extensions that you licensed, youshould modify the gpcerate_exp.dms script before you run and comment out the export logic for the licensedCountry Extensions that you do not want to copy (by default, only those for your licensed Country Extensionsare exported, based on your Installation Indicators).
Task 1-11: Installing PeopleSoft ePay Payslips forPeopleSoft Global Payroll
This section discusses:
• Understanding the PeopleSoft ePay Payslips Installation
• Installing the PeopleSoft ePay Payslips Functionality
• Installing Process Schedulers on MVS Platforms
• Modifying the JVM Configuration to Increase Heap Size
Understanding the PeopleSoft ePay Payslips InstallationThis section describes the installation steps for PeopleSoft ePay Payslips (for PeopleSoft Global Payroll).
Note. The PeopleSoft Payslips process may throw a java.lang.OutOfMemoryError exception when the numberof payees in a single payslip print run gets above 4,000. If this occurs, the amount of memory allocated tojava can be increased.
See Modifying JVM Configuration to Increase Heap Size.
Task 1-11-1: Installing the PeopleSoft ePay PayslipsFunctionalityTo install PeopleSoft ePay Payslips for PeopleSoft Global Payroll:
Note. PeopleSoft ePay Payslips for PeopleSoft Global Payroll has a dependence on a working FTPserver. In the following example, the user ID and password used for logging onto the FTP session isPSLPUSER/PSLPUSER.
1. To confirm the jar installation, verify that the following two jar files are installed in your<PS_HOME>\class directory:• Itext-1.02b.jar
Copyright © 2011, Oracle and/or its affiliates. All rights reserved. 17
Installing PeopleSoft Enterprise HRMS 9.0 Applications Chapter 1
• com.peoplesoft.hmcr.exceptions.jar2. Update URL IDs in the PeopleSoft software to point to the FTP site.
The URL ID is pointing to a virtual directory on the ftp site. You may create this virtual directory“PAYSLIPS” in the ftp root, however the PeopleSoft ePay process creates this folder if it did not existpreviously. You may choose to create a directory by any name or structure (you are not limited to using“PAYSLIPS”). If you create a different directory, you must ensure that you reference this directoryin the URL ID.a. Select PeopleTools, Utilities, Administration, URLs.b. Select the following URL Identifier:GP_SS_PSLP_FTP
c. Update this URL with your ftp payslip URL; for example:ftp://PSLPUSER:PSLPUSER@COMPUTERNAME/PAYSLIPS/
3. Check the URL setting in Self Service Payslip Options.a. Select Set Up HRMS, Product Related, ePay, Self Service Payslip Options.b. Search for the Global Payroll Country that you are installing PeopleSoft ePay Payslips for and ensurethat the URL setting is the URL Identifier from the prior step.
Important! You may create your own URL ID and update this URL instead of using GP_SS_PSLP_FTP.If you create your own URL ID you must update the Self Service Payslip Options to point to your newURL ID. See PeopleSoft Enterprise ePay 9.0 PeopleBook, “Managing Pay Information for PeopleSoftEnterprise Global Payroll” for more information regarding Payslip Options.
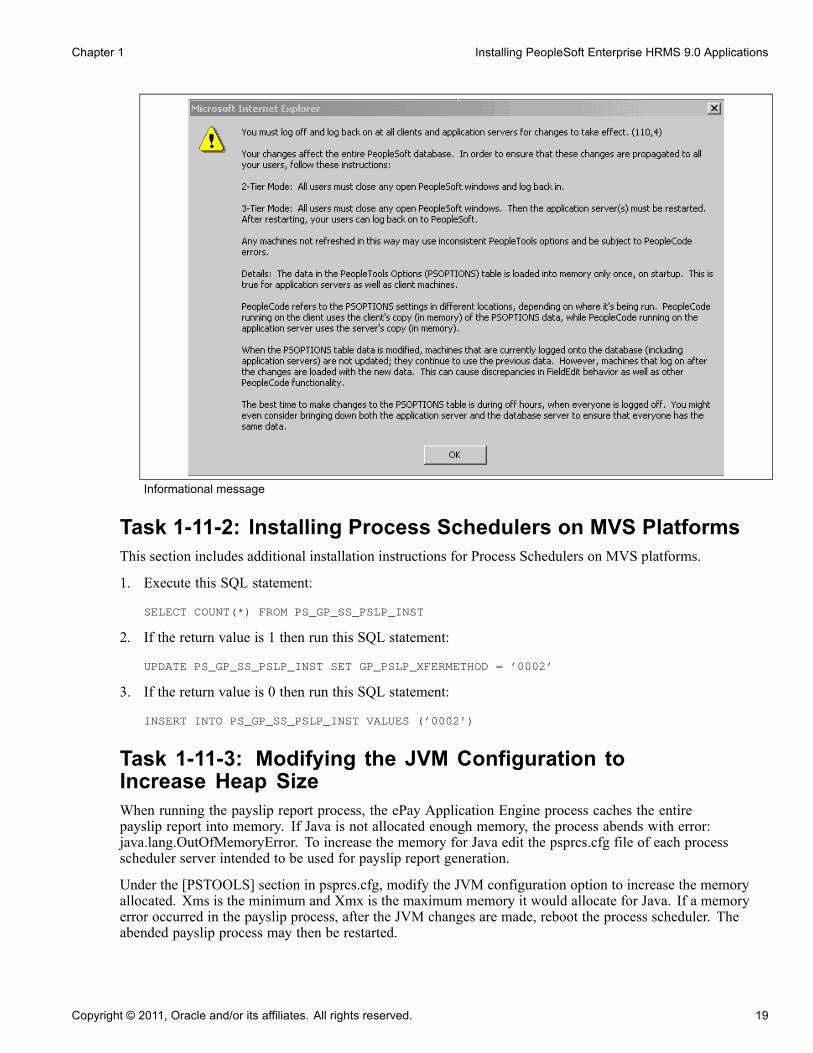
4. Check PeopleSoft Installation Table Settings.a. Select Set Up HRMS, Install, Installation Table.b. Select the ePay check box on the main Installation Table tab (Products).c. If it was necessary to make any changes to the Installation Table, you will receive the informationalmessage that follows. You then need to log off all clients, shut down and restart all application servers,and then log back on to PeopleSoft HRMS for this change to take effect.
18 Copyright © 2011, Oracle and/or its affiliates. All rights reserved.
Chapter 1 Installing PeopleSoft Enterprise HRMS 9.0 Applications
Informational message
Task 1-11-2: Installing Process Schedulers on MVS PlatformsThis section includes additional installation instructions for Process Schedulers on MVS platforms.
1. Execute this SQL statement:
SELECT COUNT(*) FROM PS_GP_SS_PSLP_INST
2. If the return value is 1 then run this SQL statement:
UPDATE PS_GP_SS_PSLP_INST SET GP_PSLP_XFERMETHOD = ’0002’
3. If the return value is 0 then run this SQL statement:
INSERT INTO PS_GP_SS_PSLP_INST VALUES (’0002’)
Task 1-11-3: Modifying the JVM Configuration toIncrease Heap SizeWhen running the payslip report process, the ePay Application Engine process caches the entirepayslip report into memory. If Java is not allocated enough memory, the process abends with error:java.lang.OutOfMemoryError. To increase the memory for Java edit the psprcs.cfg file of each processscheduler server intended to be used for payslip report generation.
Under the [PSTOOLS] section in psprcs.cfg, modify the JVM configuration option to increase the memoryallocated. Xms is the minimum and Xmx is the maximum memory it would allocate for Java. If a memoryerror occurred in the payslip process, after the JVM changes are made, reboot the process scheduler. Theabended payslip process may then be restarted.
Copyright © 2011, Oracle and/or its affiliates. All rights reserved. 19
Installing PeopleSoft Enterprise HRMS 9.0 Applications Chapter 1
Example of the modified JVM configuration:
[PSTOOLS]
;=========================================================================
; General settings for PSTOOLS
;=========================================================================
;To pass java options to the jvm loaded via JNI, uncomment JavaVM Options=
;and set it equal to the list of parameters you would like to use.
;The options need to be a blank space separated list of valid java options.
;Consult your JRE vendor for valid java options.
;For example, JavaVM Options=-Xmx256m -Xms128m
JavaVM Options=-Xmx512m -Xms32m
Task 1-12: Installing PeopleSoft HR Spain and PeopleSoftGlobal Payroll Germany/Switzerland PDF Form Files
This section describes how to load the PDF Form Files used in the PeopleSoft HR Spain and PeopleSoftGlobal Payroll Germany and Switzerland products. You only need to complete this task if you have licensedthose products.
Before beginning this procedure, copy the files *.pdf from the PeopleSoft SQR directory to your local harddrive
1. Select the appropriate command for the products that you installed:• For PeopleSoft Global Payroll Switzerland, select Set Up HRMS, Product Related, Global Payroll andAbsence Mgmt, Reports, Form Definition CHE.
• For PeopleSoft Global Payroll Germany, select Set Up HRMS, Product Related, Global Payroll andAbsence Mgmt, Reports, PDF Form Setup DEU, and then click the Correct History button.
• For PeopleSoft HRMS Spain, select Set Up HRMS, Product Related, Workforce Administration,Workforce Data ESP, PDF Form Definition, and then click the Correct History button.
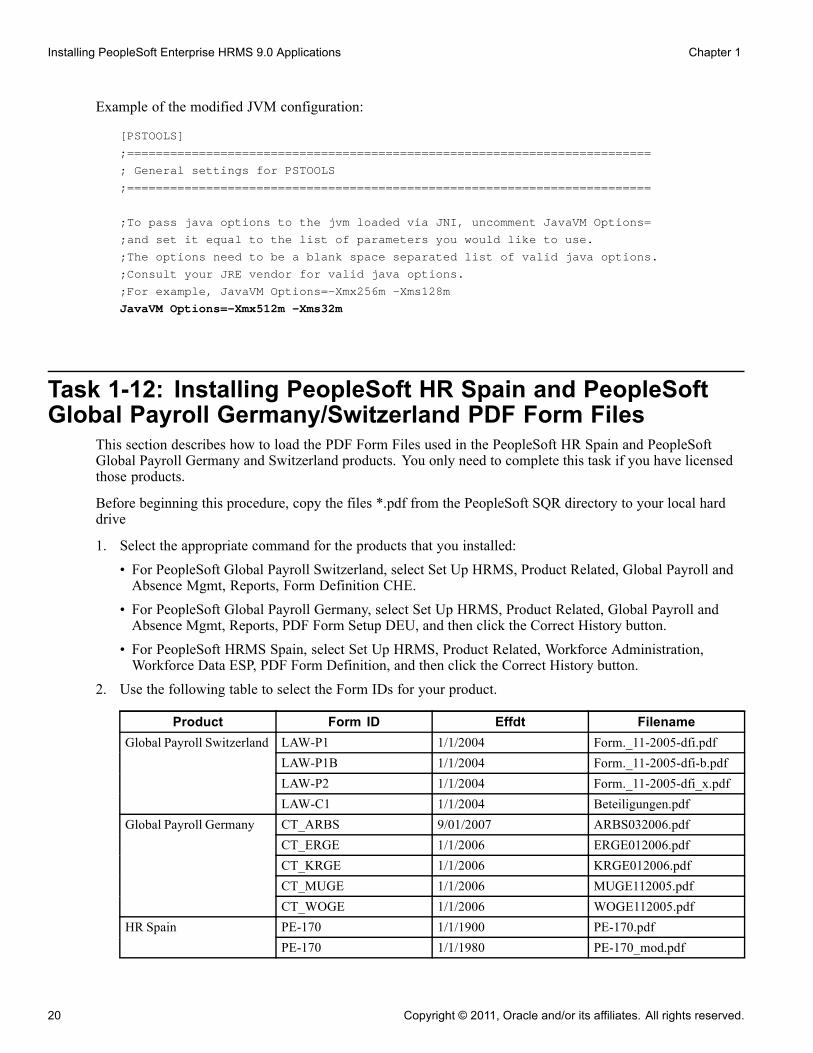
2. Use the following table to select the Form IDs for your product.
Product Form ID Effdt FilenameLAW-P1 1/1/2004 Form._11-2005-dfi.pdfLAW-P1B 1/1/2004 Form._11-2005-dfi-b.pdfLAW-P2 1/1/2004 Form._11-2005-dfi_x.pdf
Global Payroll Switzerland
LAW-C1 1/1/2004 Beteiligungen.pdfCT_ARBS 9/01/2007 ARBS032006.pdfCT_ERGE 1/1/2006 ERGE012006.pdfCT_KRGE 1/1/2006 KRGE012006.pdfCT_MUGE 1/1/2006 MUGE112005.pdf
Global Payroll Germany
CT_WOGE 1/1/2006 WOGE112005.pdfPE-170 1/1/1900 PE-170.pdfHR SpainPE-170 1/1/1980 PE-170_mod.pdf
20 Copyright © 2011, Oracle and/or its affiliates. All rights reserved.
Chapter 1 Installing PeopleSoft Enterprise HRMS 9.0 Applications
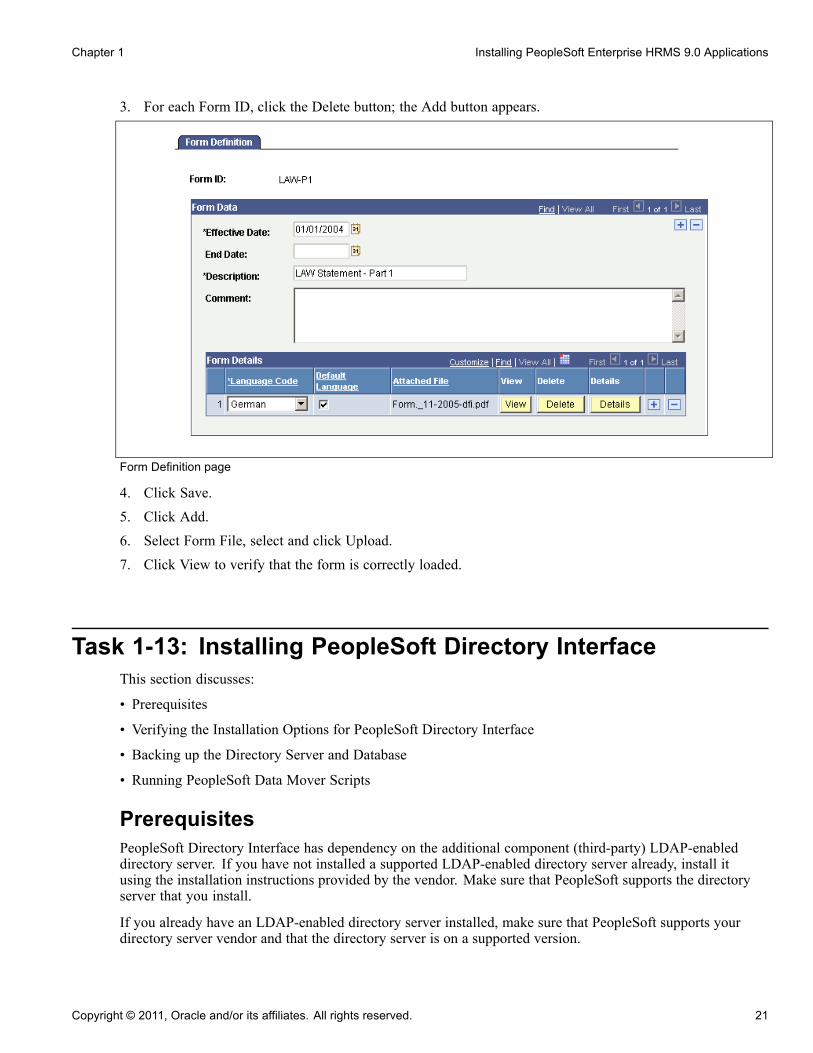
3. For each Form ID, click the Delete button; the Add button appears.
Form Definition page
4. Click Save.5. Click Add.6. Select Form File, select and click Upload.7. Click View to verify that the form is correctly loaded.
Task 1-13: Installing PeopleSoft Directory InterfaceThis section discusses:
• Prerequisites
• Verifying the Installation Options for PeopleSoft Directory Interface
• Backing up the Directory Server and Database
• Running PeopleSoft Data Mover Scripts
PrerequisitesPeopleSoft Directory Interface has dependency on the additional component (third-party) LDAP-enableddirectory server. If you have not installed a supported LDAP-enabled directory server already, install itusing the installation instructions provided by the vendor. Make sure that PeopleSoft supports the directoryserver that you install.
If you already have an LDAP-enabled directory server installed, make sure that PeopleSoft supports yourdirectory server vendor and that the directory server is on a supported version.
Copyright © 2011, Oracle and/or its affiliates. All rights reserved. 21
Installing PeopleSoft Enterprise HRMS 9.0 Applications Chapter 1
Note. Novell NDS is no longer bundled with PeopleSoft. For the most current information on the supporteddirectory servers, refer to the Enterprise PeopleTools Hardware and Software Requirements Guide and thePeopleSoft Platforms site on My Oracle Support.
Task 1-13-1: Verifying the Installation Options forPeopleSoft Directory InterfacePeopleSoft Directory Interface customers should ensure that the Directory Interface setting is enabled on theInstallation Table in order to have access to PeopleSoft Directory Interface functionality.
Select Set Up HRMS, Install, Installation Table and verify that the Directory Interface check box is selected.
Task 1-13-2: Backing up the Directory Server and DatabaseBefore proceeding with the installation, back up all servers and databases that you have set up for theinstallation. So that you can recover to this point if necessary, do the following:
• Back up any changes you have made to the database server in setting up your PeopleSoft system.• Back up any changes you have made to your directory server prior to this installation procedure.
Task 1-13-3: Running PeopleSoft Data Mover ScriptsIn this section, you run multiple PeopleSoft Data Mover scripts (DMS scripts) against your database.
The PeopleSoft Directory Interface includes directory schema extensions and sample maps for publishingHuman Resources data to the directory. This step describes how to load the sample maps into your PeopleSoftdatabase using PeopleSoft Data Mover.
In addition to the sample maps, you also run PeopleSoft Data Mover scripts that load messages, publishingrules, and LDAP extensions into your database.
1. Launch PeopleSoft Data Mover on the Install Workstation.2. Select File, Open.3. Navigate to the \scripts directory on the drive containing the Directory Interface codeline installation.
For example, <PS_HOME>\scripts.4. Open and select File, Run Script to run the following PeopleSoft Data Mover scripts for PeopleSoft HRMS:
disehr.dms
dimaphr.dms
Note. PeopleSoft Directory Interface includes directory schema extensions relevant to the Human Resourcesapplication. The extensions add two Object Classes (psftPerson and psftJob) as well as several Attribute Typesto your directory. You are not required to use the HR schema extensions. Nevertheless, the sample maps thatOracle provides assume the HR schema extensions have been applied to the directory.
Task 1-14: Installing PeopleSoft Payroll Interfacefor ADP Connection
This section discusses:
22 Copyright © 2011, Oracle and/or its affiliates. All rights reserved.
Chapter 1 Installing PeopleSoft Enterprise HRMS 9.0 Applications
• Verifying the Installation Options for PeopleSoft Payroll Interface for ADP Connection
• Running the PeopleSoft Payroll ADP Connection Installation Script
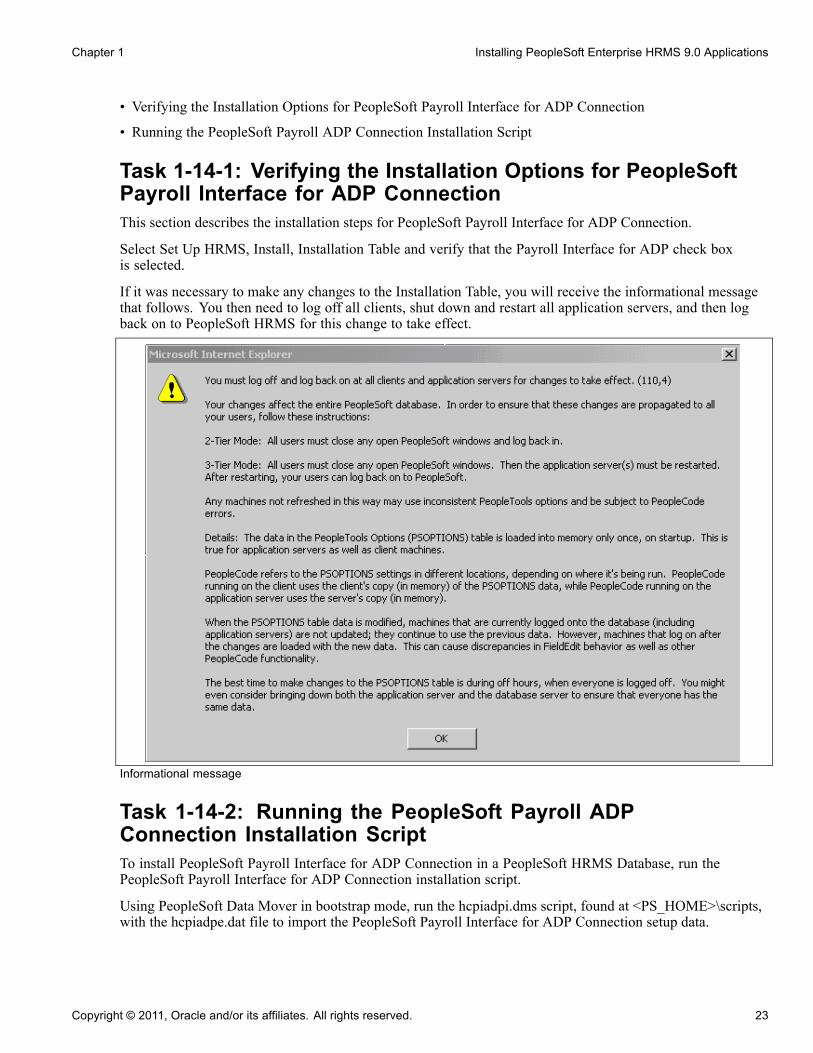
Task 1-14-1: Verifying the Installation Options for PeopleSoftPayroll Interface for ADP ConnectionThis section describes the installation steps for PeopleSoft Payroll Interface for ADP Connection.
Select Set Up HRMS, Install, Installation Table and verify that the Payroll Interface for ADP check boxis selected.
If it was necessary to make any changes to the Installation Table, you will receive the informational messagethat follows. You then need to log off all clients, shut down and restart all application servers, and then logback on to PeopleSoft HRMS for this change to take effect.
Informational message
Task 1-14-2: Running the PeopleSoft Payroll ADPConnection Installation ScriptTo install PeopleSoft Payroll Interface for ADP Connection in a PeopleSoft HRMS Database, run thePeopleSoft Payroll Interface for ADP Connection installation script.
Using PeopleSoft Data Mover in bootstrap mode, run the hcpiadpi.dms script, found at <PS_HOME>\scripts,with the hcpiadpe.dat file to import the PeopleSoft Payroll Interface for ADP Connection setup data.
Copyright © 2011, Oracle and/or its affiliates. All rights reserved. 23
Installing PeopleSoft Enterprise HRMS 9.0 Applications Chapter 1
Note. For DB2 z/OS users: Update the hcpiadpi.dms script before running to set the current sqlid.
Task 1-15: Installing PeopleSoft Pay/Bill ManagementIn this section, you activate Service Operations that are required to integrate with the PeopleSoft FSCM 9.0database. Remember that the PeopleSoft Pay/Bill Management product is only supported on the followingdatabase platforms:
• Oracle• Microsoft SQL Server• DB2 UDB for Linux, UNIX, and Microsoft Windows
Note. For customers on the Oracle platform only: Please run the following statement against the PeopleSoftHRMS 9.0 database using SQL*PLUS before running the following script: ALTER SESSION setNLS_Date_Format = ’YYYY-MM-DD’
1. Using a database query tool (such as iSQL, SQL*Plus, or DB2 Command Window) log on to the targetPeopleSoft HRMS database.
2. Run the following script from the <PS_HOME>/scripts directory:
activate_all_hcm.sql
The script reads a project that is contained in your PeopleSoft HRMS 9.0 database named FO_MESSAGESand based on this, the script activates Service Operations, Routings and Handlers, starts queues, and creates oractivates Full Data Publish Rules.
Task 1-16: Installing Service HandlersSome products have service handlers that need to be activated for the proper working of the database.
See Enterprise PeopleTools 8.50 PeopleBook: PeopleSoft Integration Broker.
This step is not performed by the installer but by the implementation team.
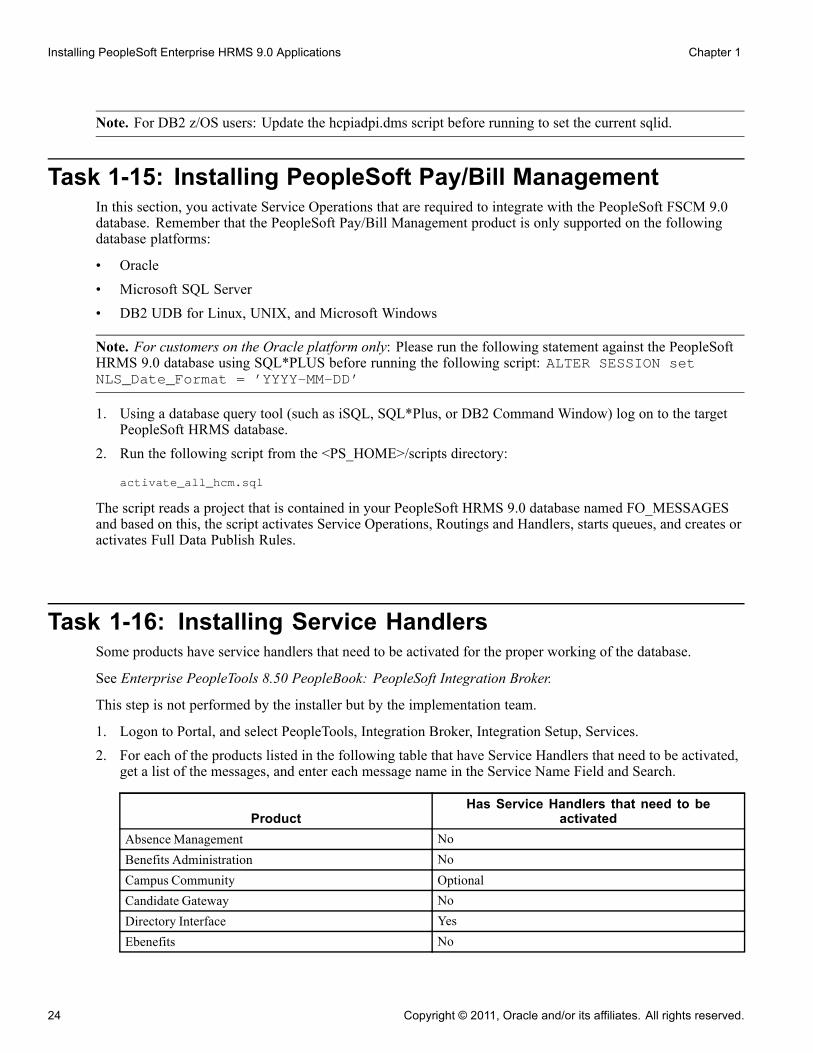
1. Logon to Portal, and select PeopleTools, Integration Broker, Integration Setup, Services.2. For each of the products listed in the following table that have Service Handlers that need to be activated,
get a list of the messages, and enter each message name in the Service Name Field and Search.
ProductHas Service Handlers that need to be
activatedAbsence Management NoBenefits Administration NoCampus Community OptionalCandidate Gateway NoDirectory Interface YesEbenefits No
24 Copyright © 2011, Oracle and/or its affiliates. All rights reserved.
Chapter 1 Installing PeopleSoft Enterprise HRMS 9.0 Applications
ProductHas Service Handlers that need to be
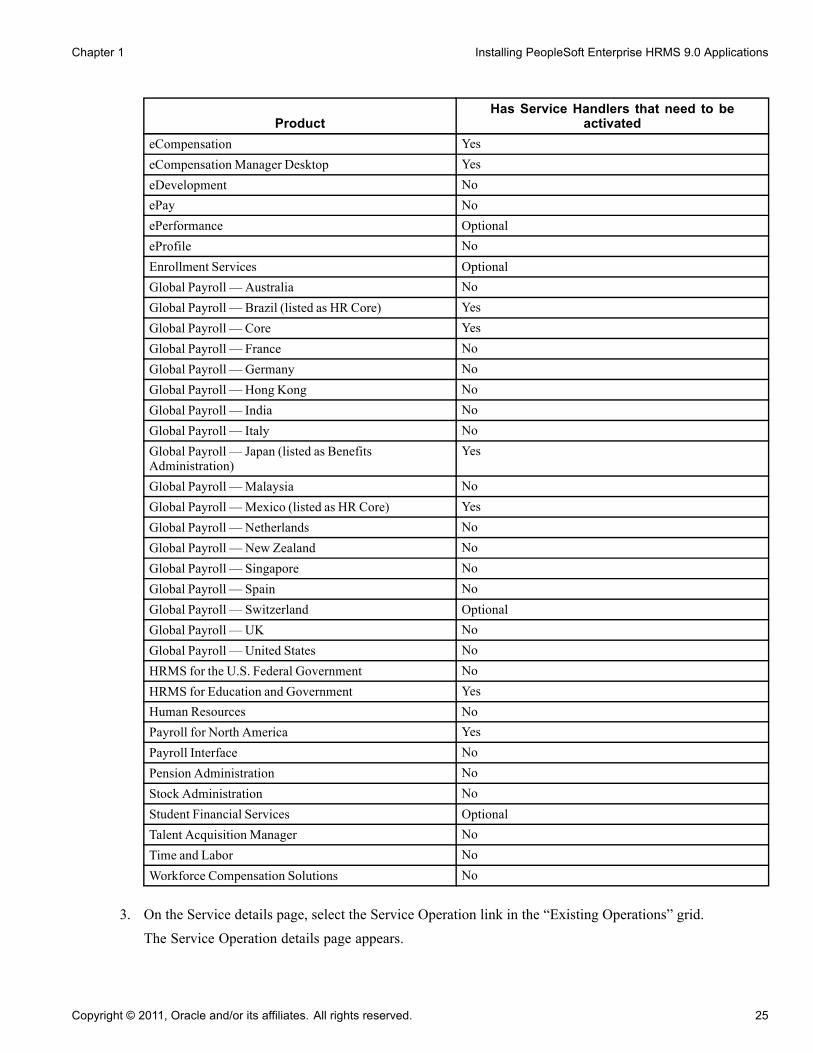
activatedeCompensation YeseCompensation Manager Desktop YeseDevelopment NoePay NoePerformance OptionaleProfile NoEnrollment Services OptionalGlobal Payroll — Australia NoGlobal Payroll — Brazil (listed as HR Core) YesGlobal Payroll — Core YesGlobal Payroll — France NoGlobal Payroll — Germany NoGlobal Payroll — Hong Kong NoGlobal Payroll — India NoGlobal Payroll — Italy NoGlobal Payroll — Japan (listed as BenefitsAdministration)
Yes
Global Payroll —Malaysia NoGlobal Payroll —Mexico (listed as HR Core) YesGlobal Payroll — Netherlands NoGlobal Payroll — New Zealand NoGlobal Payroll — Singapore NoGlobal Payroll — Spain NoGlobal Payroll — Switzerland OptionalGlobal Payroll — UK NoGlobal Payroll — United States NoHRMS for the U.S. Federal Government NoHRMS for Education and Government YesHuman Resources NoPayroll for North America YesPayroll Interface NoPension Administration NoStock Administration NoStudent Financial Services OptionalTalent Acquisition Manager NoTime and Labor NoWorkforce Compensation Solutions No
3. On the Service details page, select the Service Operation link in the “Existing Operations” grid.The Service Operation details page appears.
Copyright © 2011, Oracle and/or its affiliates. All rights reserved. 25

Installing PeopleSoft Enterprise HRMS 9.0 Applications Chapter 1
4. Select the Handlers tab, and ensure the status is Active for the Handlers.
Task 1-17: Installing Configurable Matrices and MetadataConfigurable Matrices are a special type of lookup table that can be designed and populated by theCompensation Administrator. A matrix can be built to capture market pay information, calculate different payrates based on employee data, and set increase criteria to be used in the calculation of group budgets.
Configurable Matrices are dependent on metadata definitions that in turn are dependent on the properinstallation of java classes. Confirm that the following two jar files are installed in the <PSHOME>\classdirectory:
• jdom.jar• com.peoplesoft.hmcr.exceptions.jar
If there is a <PSHOME>\class\OS390 directory, these two files should be there as well.
Task 1-18: Installing PeopleSoft Human Resourcesfor French Public Sector
PeopleSoft Human Resources for French Public Sector customers should ensure that French Public Sectorsetting is enabled on the Installation Table in order to have access to specific PeopleSoft French PublicSector functionality.
1. Select Set Up HRMS, Install, Installation Table, Products, and verify that the Human Resources andFrench Public Sector check-boxes are selected.If they are not already selected, select them.
2. Go to the Country Specific page, select the Installed HR Countries link and verify that France is selected.If it is not selected, select it.
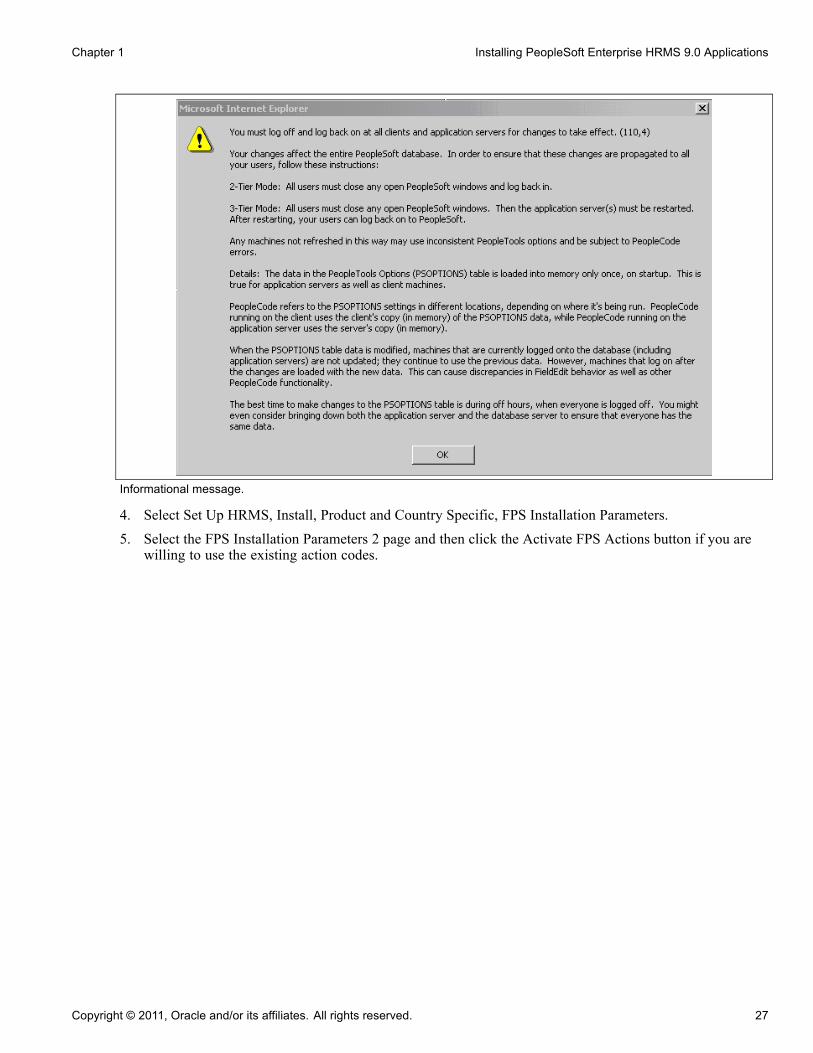
3. If it was necessary to make any changes to the Installation Table, you will receive the message that follows.You then need to log off all clients, shut down and restart all application servers, and then log back on toPeopleSoft HRMS for this change to take effect.
26 Copyright © 2011, Oracle and/or its affiliates. All rights reserved.
Chapter 1 Installing PeopleSoft Enterprise HRMS 9.0 Applications
Informational message.
4. Select Set Up HRMS, Install, Product and Country Specific, FPS Installation Parameters.5. Select the FPS Installation Parameters 2 page and then click the Activate FPS Actions button if you are
willing to use the existing action codes.
Copyright © 2011, Oracle and/or its affiliates. All rights reserved. 27
Installing PeopleSoft Enterprise HRMS 9.0 Applications Chapter 1
28 Copyright © 2011, Oracle and/or its affiliates. All rights reserved.
CHAPTER 2
Installing PeopleSoft Campus Solutions9.0 Applications
This chapter discusses:
• Setting Up Equation Engine Security
• Transferring and Compiling Additional Component COBOL for PeopleSoft Student Administration
• Installing Database Audit Triggers for PeopleSoft Student Records
• Adjusting PeopleTools EDI Manager for Financial Aid Processes
• Using CPU Space for PeopleSoft Academic Advising
• Running the SFA_ECQUEUE_TABLES_RESET Script
• Configuring Your PeopleBooks Documentation Website
• Using the User Profiles Management Result Table
• Installing PeopleSoft Student Administration Integration Pack
• Installing PeopleSoft Contributor Relations
Task 2-1: Setting Up Equation Engine SecurityOracle delivers Equation Security with all public access to all equation objects activated within the authorizedequation components. Your institution may not want to provide this level of access to all of your equationusers. For example, you may want to limit who can read certain tables and views and who can execute certainequation sql objects. Refer to the sections on equation security in the Equation Engine Programmers Guide fordetails on how to limit security access. The Equation Engine Programmers Guide can be found at the end ofthe PeopleSoft Enterprise Campus Solutions 9.0 Application Fundamentals PeopleBook.
Task 2-2: Transferring and Compiling Additional ComponentCOBOL for PeopleSoft Student Administration
This section discusses:
• Using Additional Component COBOL for PeopleSoft Student Administration
• Compiling Additional Component COBOL on Microsoft Windows NT/2000
• Compiling Additional Component COBOL on UNIX
Copyright © 2011, Oracle and/or its affiliates. All rights reserved. 29
Installing PeopleSoft Campus Solutions 9.0 Applications Chapter 2
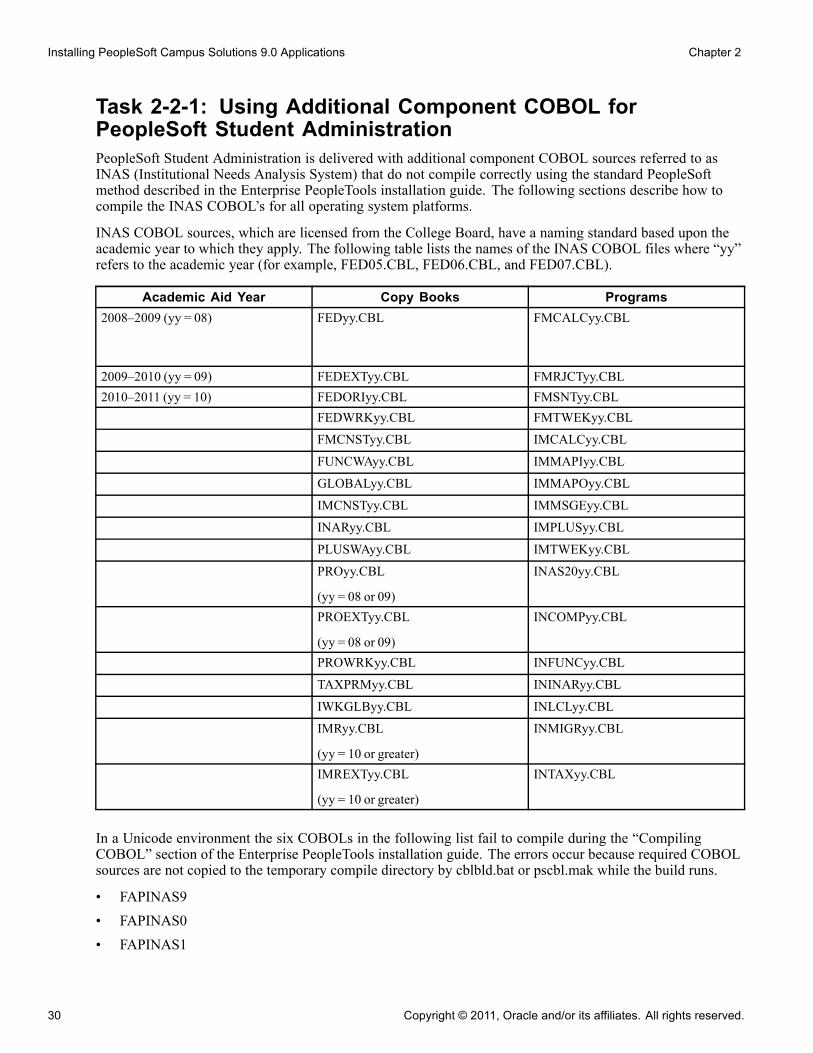
Task 2-2-1: Using Additional Component COBOL forPeopleSoft Student AdministrationPeopleSoft Student Administration is delivered with additional component COBOL sources referred to asINAS (Institutional Needs Analysis System) that do not compile correctly using the standard PeopleSoftmethod described in the Enterprise PeopleTools installation guide. The following sections describe how tocompile the INAS COBOL’s for all operating system platforms.
INAS COBOL sources, which are licensed from the College Board, have a naming standard based upon theacademic year to which they apply. The following table lists the names of the INAS COBOL files where “yy”refers to the academic year (for example, FED05.CBL, FED06.CBL, and FED07.CBL).
Academic Aid Year Copy Books Programs2008–2009 (yy = 08) FEDyy.CBL FMCALCyy.CBL
2009–2010 (yy = 09) FEDEXTyy.CBL FMRJCTyy.CBL2010–2011 (yy = 10) FEDORIyy.CBL FMSNTyy.CBL
FEDWRKyy.CBL FMTWEKyy.CBL
FMCNSTyy.CBL IMCALCyy.CBL
FUNCWAyy.CBL IMMAPIyy.CBL
GLOBALyy.CBL IMMAPOyy.CBL
IMCNSTyy.CBL IMMSGEyy.CBL
INARyy.CBL IMPLUSyy.CBL
PLUSWAyy.CBL IMTWEKyy.CBL
PROyy.CBL
(yy = 08 or 09)
INAS20yy.CBL
PROEXTyy.CBL
(yy = 08 or 09)
INCOMPyy.CBL
PROWRKyy.CBL INFUNCyy.CBL
TAXPRMyy.CBL ININARyy.CBL
IWKGLByy.CBL INLCLyy.CBL
IMRyy.CBL
(yy = 10 or greater)
INMIGRyy.CBL
IMREXTyy.CBL
(yy = 10 or greater)
INTAXyy.CBL
In a Unicode environment the six COBOLs in the following list fail to compile during the “CompilingCOBOL” section of the Enterprise PeopleTools installation guide. The errors occur because required COBOLsources are not copied to the temporary compile directory by cblbld.bat or pscbl.mak while the build runs.
• FAPINAS9• FAPINAS0• FAPINAS1
30 Copyright © 2011, Oracle and/or its affiliates. All rights reserved.
Chapter 2 Installing PeopleSoft Campus Solutions 9.0 Applications
• IMPLUS08• IMPLUS09• IMPLUS10
See Enterprise PeopleTools 8.50 Installation for your database platform, available on My Oracle Support.
On UNIX, the errors can be ignored because pscbl.mak copies all of the COBOLs that successfully compileto PS_HOME/cblbin directory. Also, the errors should go away after Task 2-1 is completed so subsequentrecompiles should be clean. Task 2-1 describes how to successfully compile the remaining files so that allsources are built.
On Microsoft Windows, cblbld.bat stops after the six errors occur and does not copy the compiled COBOLfiles to the PS_HOME\CBLBINU directory. Because of this, the compiled *.exe’s., *.gnt’s, and *.int’s shouldbe manually copied from the compile directory to the PS_HOME\cblbinu directory after cblbld.bat stops.
See Compiling Additional Component COBOL on Microsoft Windows NT/2000.
In an ANSI environment on Microsoft Windows, the COBOL compiling process described in the EnterprisePeopleTools 8.50 Installation Guide removes all compiled COBOLs from PS_HOME\cblbina before copyingthe new files in. This also removes the INAS COBOLs that are created in this task. As a result, you need torepaet Task 2-1 after a PeopleSoft COBOL recompile using cblbld.bat so that the INAS objects are replaced.
Task 2-2-2: Compiling Additional Component COBOLon Microsoft Windows NT/2000Using cblbld.bat, as described in the “Compiling COBOL on Microsoft Windows” chapter of the EnterprisePeopleTools installation guide, only compiles sources with a “P” in the 3rd position of the file name, which isthe PeopleSoft naming standard for COBOL. The INAS COBOL files do not conform to this naming standardso the following instructions should be used to compile the INAS sources.
See Enterprise PeopleTools 8.50 Installation for your database platform, “Compiling COBOL on MicrosoftWindows, available on My Oracle Support.
To compile additional component COBOL on Microsoft Windows NT/2000:
1. Select Start, Run.Enter cmd.exe and click OK.
2. Enter the following command:
SET COBROOT = <Net Express Base directory>
For example:SET COBROOT = C:\psoft\NetExpress\Base
3. Enter the command:
SET PS_HOME = <PS_HOME>
For example:SET PS_HOME = c:\psoft\psenv\HR90DEMO
4. Enter the command:
SET PATH=%PATH%;%PS_HOME%\src\cbl\win32
5. Change directory to the COBOL source directory within PS_HOME, for example:
Copyright © 2011, Oracle and/or its affiliates. All rights reserved. 31
Installing PeopleSoft Campus Solutions 9.0 Applications Chapter 2
CD %PS_HOME%\src\cbl\base
6. Execute the Third-Party INAS compile routine to compile INAS sources for all active academic aid years.
INASUNCV <Compile Drive> <\Compile Directory>
For example:INASUNCV C: \TEMP\COMPILE
This routine should be run using the same run parameters used to run CBLBLD.BAT.
7. Change directory to the temporary COBOL compile directory from step 6.
Compile PeopleSoft Third-Party (additional component) interface programs FAPINAS9.CBL,FAPINAS0.CBL, and FAPINAS1.CBL:
CBLMAKE FAPINAS9
CBLMAKE FAPINAS0
CBLMAKE FAPINAS1
8. If you are in a Unicode environment, you need to manually copy all .GNT, .EXE, and .INT filesfrom the temporary compile directory used by CBLBLD.BAT and INASUNCV.BAT into the%PS_HOME%\CBLBINU directory.The temporary compile directory would be c:\temp\compile if cblbld.bat was run as shown in thefollowing example:
cblbld.bat c: \temp\compile
C:\temp\compile>move * D:\PSOFT\PSENV\HR90DMOU\CBLBINU
Task 2-2-3: Compiling Additional Component COBOL on UNIXUsing pscbl.mak, as described in the “Compiling COBOL on UNIX” chapter of the Enterprise PeopleToolsinstallation guide, only compiles sources with a “P” in the 3rd position of the file name, which is thePeopleSoft naming standard for COBOL. The INAS COBOL files do not conform to this naming standard.Use the following directions to compile the INAS sources.
See Enterprise PeopleTools 8.50 Installation for your database platform, “Compiling COBOL on UNIX,”available on My Oracle Support.
To compile additional component COBOL on UNIX:
1. Set variables using. ./psconfig.sh
2. Change directory to $PS_HOME/setup, and run these commands:a. ./inasbl08.makb. ./inasbl09.makc. ./inasbl10.makd. ./psrun.mak
32 Copyright © 2011, Oracle and/or its affiliates. All rights reserved.

Chapter 2 Installing PeopleSoft Campus Solutions 9.0 Applications
Task 2-3: Installing Database Audit Triggers forPeopleSoft Student Records
This section discusses:
• Understanding Database Audit Triggers
• Using Audit Triggers
• Installing the Audit Triggers
Understanding Database Audit TriggersAn audit mechanism implemented using database triggers is provided for Grade changes, Degree recordchanges, and Security table changes. Pages and components are also being delivered to allow a user to searchand review the audit records.
See AlsoPeopleSoft Enterprise Campus Solutions 9.0 Application Fundamentals PeopleBook
PeopleSoft Enterprise Student Records 9.0 PeopleBook
Task 2-3-1: Using Audit TriggersThese triggers should be created after the data conversion is completed and the legacy data for an institution isloaded into the application tables. Otherwise, the internal load of the legacy data into the system inserts rowsinto the audit tables and the data load process runs slower for tables that have triggers.
Triggers are automatically dropped if the table they are defined on is dropped for any reason. If a table isdropped and then re-created, then the appropriate scripts to create the triggers for that table must be executedagain.
An example of such a scenario would be as follows. Using PeopleSoft Application Designer, a field isadded to one of the tables on which a trigger is defined. The build action generates an alter script which isexecuted using a query tool to change the table at the database level. The alter script drops the original tableand recreates a new one by the same name. This causes the trigger to be dropped. You must then recreatethe trigger for this table. This scenario could occur when an institution makes a modification at their site orapplies a fix provided by Oracle that alters such a table. In the case of a fix, the instructions for the fixcreate a note about recreating the trigger.
These tables and the associated triggers are listed in the next section.
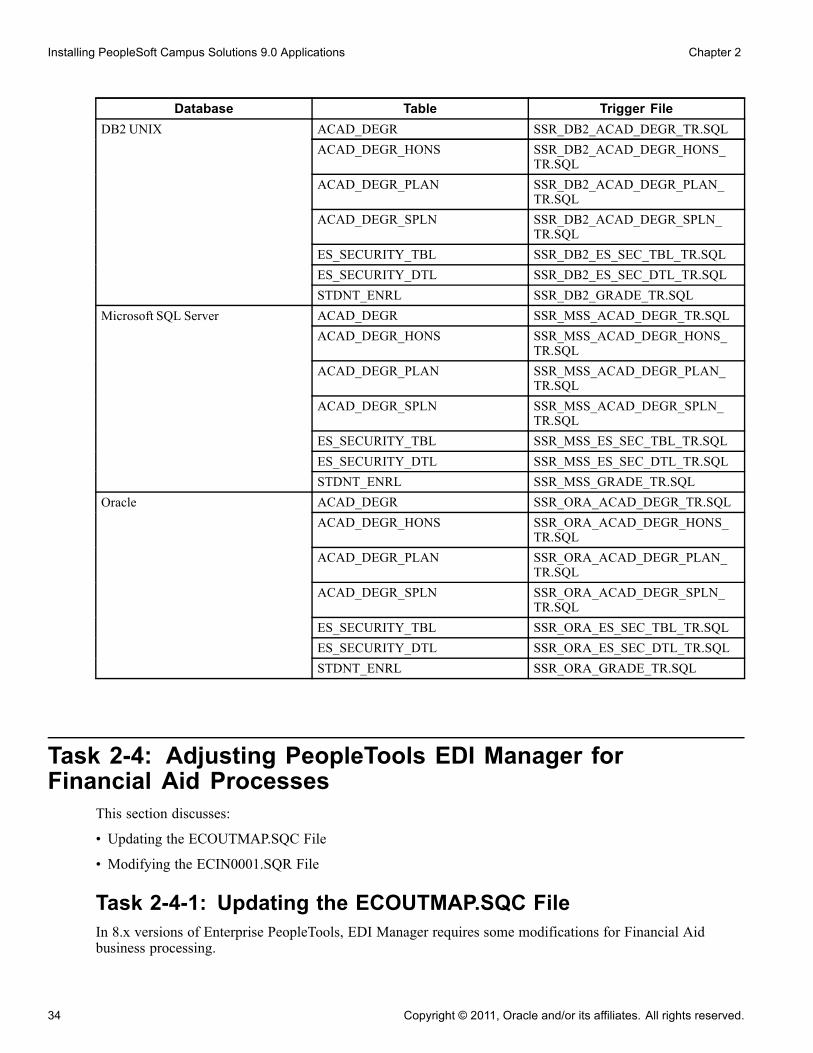
Task 2-3-2: Installing the Audit TriggersBased on your database platform, find the appropriate trigger files under the Scripts folder and create triggersas listed in the table that follows. These are SQL files and should be run against your database using yourquery tool of choice. These trigger files have been tested on these databases using the release level specifiedby Oracle for PeopleSoft release 9.0 and therefore are certified for any database release level that is the sameor higher. If you are running on a database release level prior to the one specified in the table, these triggerfiles may not be applicable. Consult with your database administrator before running these trigger files.
Copyright © 2011, Oracle and/or its affiliates. All rights reserved. 33
Installing PeopleSoft Campus Solutions 9.0 Applications Chapter 2
Database Table Trigger FileACAD_DEGR SSR_DB2_ACAD_DEGR_TR.SQLACAD_DEGR_HONS SSR_DB2_ACAD_DEGR_HONS_
TR.SQLACAD_DEGR_PLAN SSR_DB2_ACAD_DEGR_PLAN_
TR.SQLACAD_DEGR_SPLN SSR_DB2_ACAD_DEGR_SPLN_
TR.SQLES_SECURITY_TBL SSR_DB2_ES_SEC_TBL_TR.SQLES_SECURITY_DTL SSR_DB2_ES_SEC_DTL_TR.SQL
DB2 UNIX
STDNT_ENRL SSR_DB2_GRADE_TR.SQLACAD_DEGR SSR_MSS_ACAD_DEGR_TR.SQLACAD_DEGR_HONS SSR_MSS_ACAD_DEGR_HONS_
TR.SQLACAD_DEGR_PLAN SSR_MSS_ACAD_DEGR_PLAN_
TR.SQLACAD_DEGR_SPLN SSR_MSS_ACAD_DEGR_SPLN_
TR.SQLES_SECURITY_TBL SSR_MSS_ES_SEC_TBL_TR.SQLES_SECURITY_DTL SSR_MSS_ES_SEC_DTL_TR.SQL
Microsoft SQL Server
STDNT_ENRL SSR_MSS_GRADE_TR.SQLACAD_DEGR SSR_ORA_ACAD_DEGR_TR.SQLACAD_DEGR_HONS SSR_ORA_ACAD_DEGR_HONS_
TR.SQLACAD_DEGR_PLAN SSR_ORA_ACAD_DEGR_PLAN_
TR.SQLACAD_DEGR_SPLN SSR_ORA_ACAD_DEGR_SPLN_
TR.SQLES_SECURITY_TBL SSR_ORA_ES_SEC_TBL_TR.SQLES_SECURITY_DTL SSR_ORA_ES_SEC_DTL_TR.SQL
Oracle
STDNT_ENRL SSR_ORA_GRADE_TR.SQL
Task 2-4: Adjusting PeopleTools EDI Manager forFinancial Aid Processes
This section discusses:
• Updating the ECOUTMAP.SQC File
• Modifying the ECIN0001.SQR File
Task 2-4-1: Updating the ECOUTMAP.SQC FileIn 8.x versions of Enterprise PeopleTools, EDI Manager requires some modifications for Financial Aidbusiness processing.
34 Copyright © 2011, Oracle and/or its affiliates. All rights reserved.
Chapter 2 Installing PeopleSoft Campus Solutions 9.0 Applications
Note. This task is only necessary when using the CommonLine™ 4 features. This is not necessary toimplement if your institution uses Direct Lending or Common Record CommonLine processing.
In the following procedure, you use PeopleTools EDI Manager to run a process that updates the baseECOUTMAP.SQC file with the Financial Aid EDI Outbound map definitions. Make sure that the new filereplaces the original file of the same name.
To update the ECOUTMAP.SQC file with Financial Aid EDI Outbound map definitions:
1. Select PeopleTools, EDI Manager on your target database.2. Select Monitor EDI Processing, Prepare Outbound Driver.3. Enter a Run Control ID of FA800. (Add it if you don’t have it).4. Enter the directory path for ECOUTMAP.SQC file, typically <PS_HOME>\SQR.5. Select the Transaction IDs that your institution uses by checking the appropriate “Select” box.
Important! Additional Transaction IDs may appear. It is important that only the files processed byyour Financial Aid office are selected. Consult with your Financial Aid Office staff for the requiredEDI transactions.
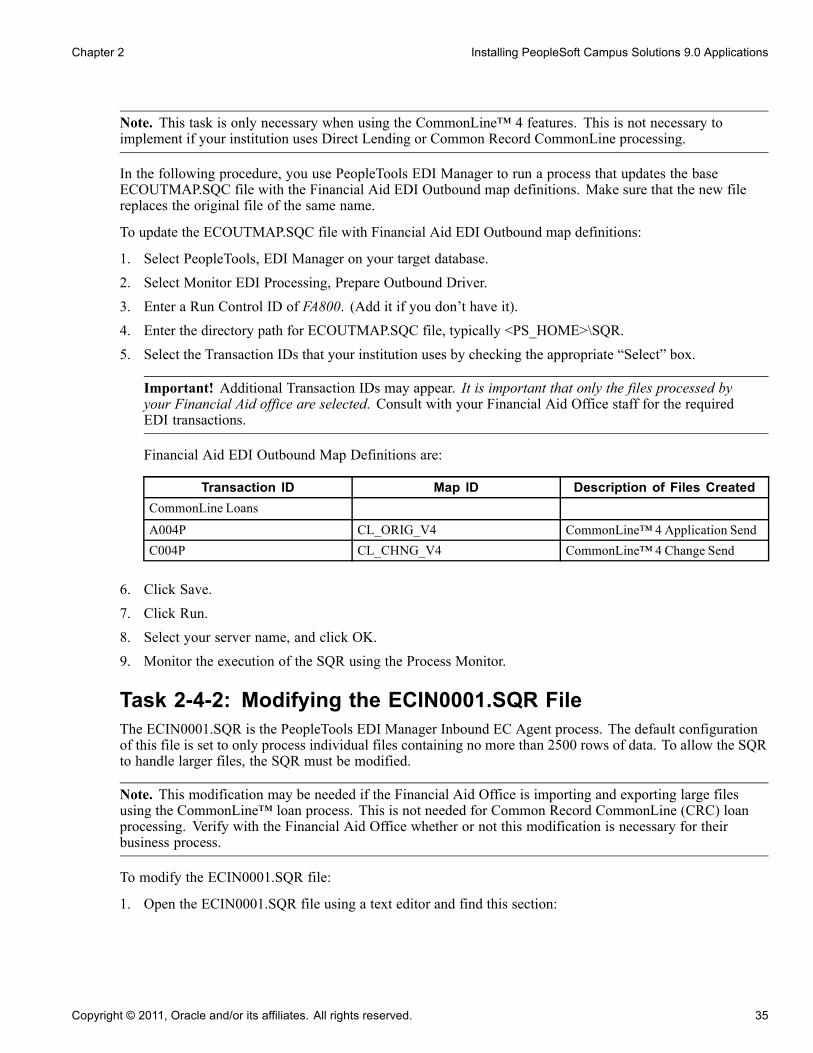
Financial Aid EDI Outbound Map Definitions are:
Transaction ID Map ID Description of Files CreatedCommonLine Loans
A004P CL_ORIG_V4 CommonLine™ 4 Application SendC004P CL_CHNG_V4 CommonLine™ 4 Change Send
6. Click Save.7. Click Run.8. Select your server name, and click OK.9. Monitor the execution of the SQR using the Process Monitor.
Task 2-4-2: Modifying the ECIN0001.SQR FileThe ECIN0001.SQR is the PeopleTools EDI Manager Inbound EC Agent process. The default configurationof this file is set to only process individual files containing no more than 2500 rows of data. To allow the SQRto handle larger files, the SQR must be modified.
Note. This modification may be needed if the Financial Aid Office is importing and exporting large filesusing the CommonLine™ loan process. This is not needed for Common Record CommonLine (CRC) loanprocessing. Verify with the Financial Aid Office whether or not this modification is necessary for theirbusiness process.
To modify the ECIN0001.SQR file:
1. Open the ECIN0001.SQR file using a text editor and find this section:
Copyright © 2011, Oracle and/or its affiliates. All rights reserved. 35
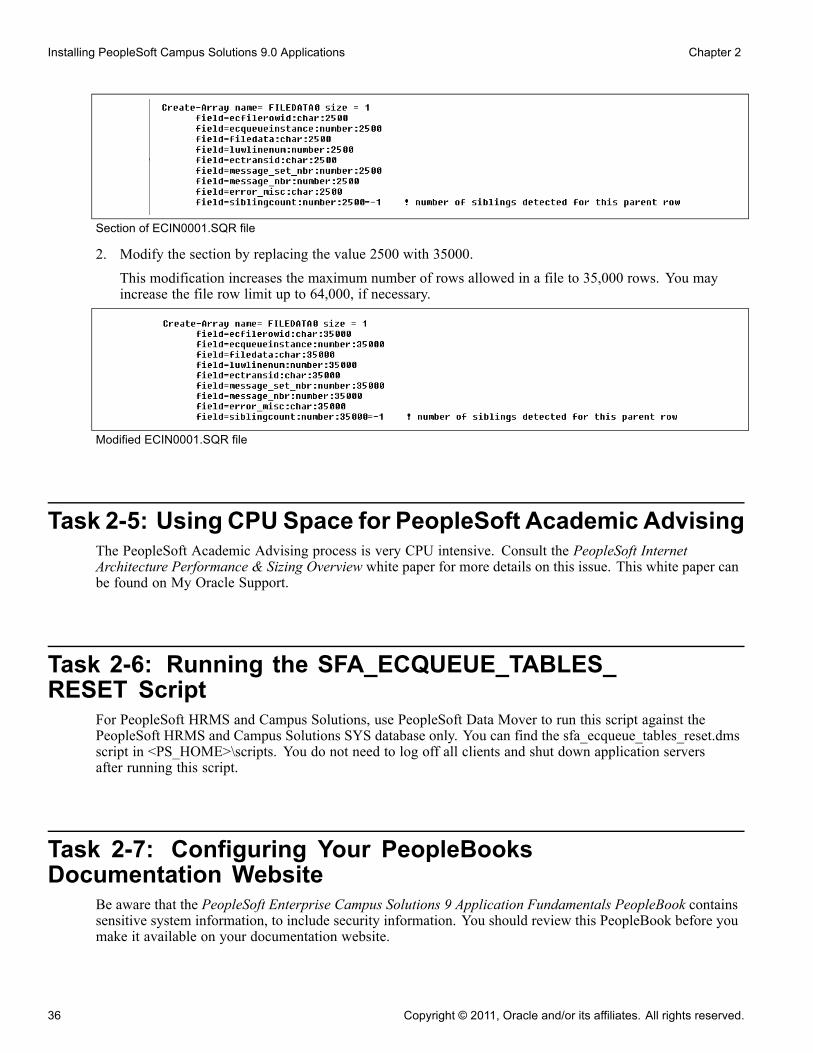
Installing PeopleSoft Campus Solutions 9.0 Applications Chapter 2
Section of ECIN0001.SQR file
2. Modify the section by replacing the value 2500 with 35000.
This modification increases the maximum number of rows allowed in a file to 35,000 rows. You mayincrease the file row limit up to 64,000, if necessary.
Modified ECIN0001.SQR file
Task 2-5: Using CPU Space for PeopleSoft Academic AdvisingThe PeopleSoft Academic Advising process is very CPU intensive. Consult the PeopleSoft InternetArchitecture Performance & Sizing Overview white paper for more details on this issue. This white paper canbe found on My Oracle Support.
Task 2-6: Running the SFA_ECQUEUE_TABLES_RESET Script
For PeopleSoft HRMS and Campus Solutions, use PeopleSoft Data Mover to run this script against thePeopleSoft HRMS and Campus Solutions SYS database only. You can find the sfa_ecqueue_tables_reset.dmsscript in <PS_HOME>\scripts. You do not need to log off all clients and shut down application serversafter running this script.
Task 2-7: Configuring Your PeopleBooksDocumentation Website
Be aware that the PeopleSoft Enterprise Campus Solutions 9 Application Fundamentals PeopleBook containssensitive system information, to include security information. You should review this PeopleBook before youmake it available on your documentation website.
36 Copyright © 2011, Oracle and/or its affiliates. All rights reserved.
Chapter 2 Installing PeopleSoft Campus Solutions 9.0 Applications
Task 2-8: Using the User Profiles Management Result TableThis section discusses:
• Understanding the Audience for this Information
• Using the User Profiles Management Clean Up Pages
Task 2-8-1: Understanding the Audience for this InformationThis section is intended to be available only to the administrator having access to your security tables. Itincludes sensitive security information about user IDs and passwords that are created by the User ProfilesManagement process. The information is included here so that it would not be part of the PeopleBooks.
Warning! The information in this section should not be shared with your users.
The following sections include information on how to manipulate the user IDs and passwords that are createdby the User Profiles Management background process. What is documented here is the clean up process thattakes place after the User Profiles Management process is run.
See PeopleSoft Enterprise Campus Solutions 9.0 Application Fundamentals PeopleBook, "Creating andMaintaining User Profiles."
Task 2-8-2: Using the User Profiles Management Clean Up PagesThis table describes the User Profiles Management process:
Usage Use the User Profile Clean Up Processes page to delete the temporary tablesassociated with the USERPROFILE processes. You also use this page to deletethe result table, which holds user ID and non-encrypted password information.
Object Name MAINT_USRPROF_DATA
Page Name User Profile Clean Up Process.
Navigation Set Up SACR, Security, Secure Student Administration, Process, User ProfilesMgmt - Clean Up.
Copyright © 2011, Oracle and/or its affiliates. All rights reserved. 37
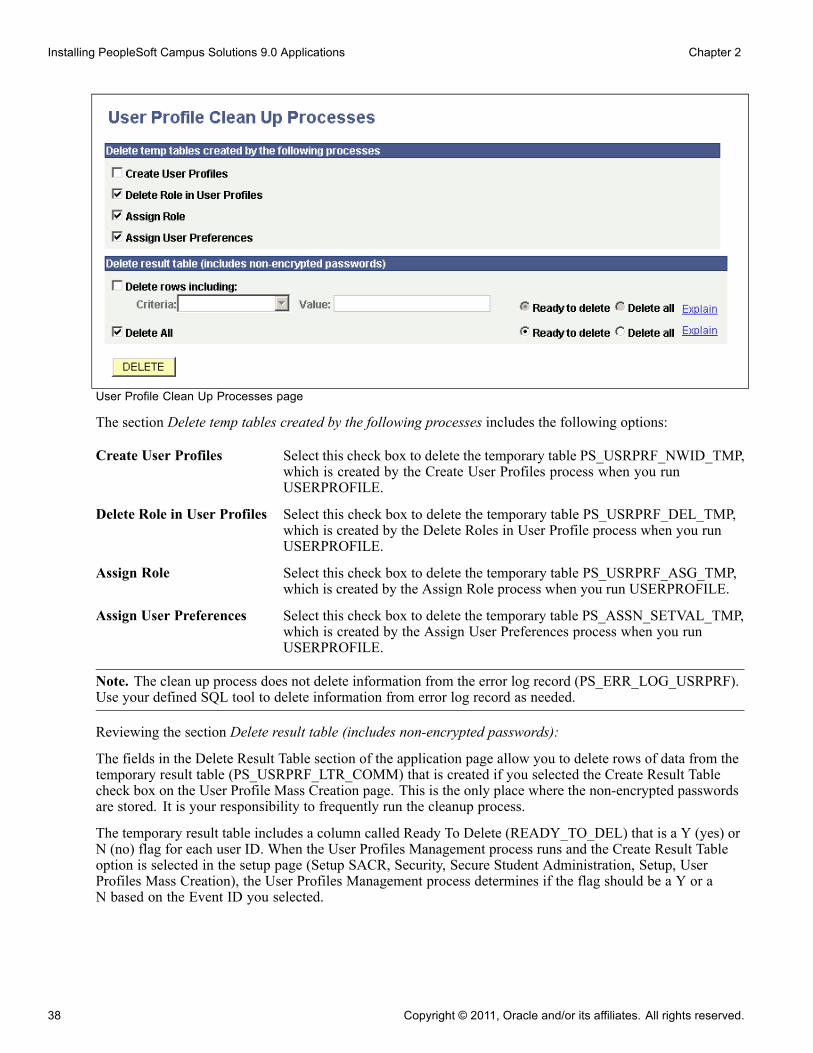
Installing PeopleSoft Campus Solutions 9.0 Applications Chapter 2
User Profile Clean Up Processes page
The section Delete temp tables created by the following processes includes the following options:
Create User Profiles Select this check box to delete the temporary table PS_USRPRF_NWID_TMP,which is created by the Create User Profiles process when you runUSERPROFILE.
Delete Role in User Profiles Select this check box to delete the temporary table PS_USRPRF_DEL_TMP,which is created by the Delete Roles in User Profile process when you runUSERPROFILE.
Assign Role Select this check box to delete the temporary table PS_USRPRF_ASG_TMP,which is created by the Assign Role process when you run USERPROFILE.
Assign User Preferences Select this check box to delete the temporary table PS_ASSN_SETVAL_TMP,which is created by the Assign User Preferences process when you runUSERPROFILE.
Note. The clean up process does not delete information from the error log record (PS_ERR_LOG_USRPRF).Use your defined SQL tool to delete information from error log record as needed.
Reviewing the section Delete result table (includes non-encrypted passwords):
The fields in the Delete Result Table section of the application page allow you to delete rows of data from thetemporary result table (PS_USRPRF_LTR_COMM) that is created if you selected the Create Result Tablecheck box on the User Profile Mass Creation page. This is the only place where the non-encrypted passwordsare stored. It is your responsibility to frequently run the cleanup process.
The temporary result table includes a column called Ready To Delete (READY_TO_DEL) that is a Y (yes) orN (no) flag for each user ID. When the User Profiles Management process runs and the Create Result Tableoption is selected in the setup page (Setup SACR, Security, Secure Student Administration, Setup, UserProfiles Mass Creation), the User Profiles Management process determines if the flag should be a Y or aN based on the Event ID you selected.
38 Copyright © 2011, Oracle and/or its affiliates. All rights reserved.
Chapter 2 Installing PeopleSoft Campus Solutions 9.0 Applications
The User Profiles Management process sets the flag to N (meaning not ready to be deleted) when the Assign3C check box is checked on the User Profile Mass Creation setup page and the Event ID specified includesa letter code set up with the Name SQC equal to CCLTRWOL. This SQC is used by the Letter Generationprocess to extract the user ID and the password and make the information available to add on a communication.Do not delete rows in this table if the Letter Generation process has not been run yet. After the LetterGeneration process is run, the flag changes to Y to indicate that the user ID row is now ready to be deleted.
Note. Only the Letter Generation process can change the Ready to Delete flag.
The section Delete result table (includes non-encrypted passwords) includes the following options:
Delete rows including Select this check box if you want to delete only selected rows in the resulttable. If you select this check box, select a criterion and value to be used.
Criteria Select a criterion to be used to delete specific rows in the result table. You canselect only one of the following criteria.
• ID: Select to delete the row for a particular person with the employee IDthat you select in the Value field.
• Event 3C IDs: Select to delete all rows associated with the event IDthat you select in the Value field.
• Rolename: Select to delete all rows associated with the role that youselect in the Value field.
• User ID: Select to delete the row for a particular person with the user IDthat you select in the Value field.
Value Select the value you want to be used for the criterion that you selected.
Ready to Delete Select this option if you want to delete only those rows where theREADY_TO_DEL field in the temporary result table is set to Yes. Thisoption prevents you from deleting the rows where the Letter Generationprocess has not yet been run.
Delete all (radiobutton/option)
Select this option to delete rows in the temporary result table where theREADY_TO_DEL field is set to Yes or No.
Warning! If you select this option, you may delete rows for which the LetterGeneration process has not run, and you delete the user ID and passwordinformation. There is no way to recover this information unless you reset allthe passwords manually.
Delete All (check box) Select this check box if you want to delete rows in the temporary result tablewithout specifying any criteria. As previously described, you can also select todelete the rows marked as Ready to delete or Delete all.
Warning! If you select Delete All, you may delete rows for which the LetterGeneration process has not run, and you delete the user ID and passwordinformation. There is no way to recover this information unless you reset allthe passwords manually.
Explain Use these links to see the explanation for the selected check box.
Copyright © 2011, Oracle and/or its affiliates. All rights reserved. 39
Installing PeopleSoft Campus Solutions 9.0 Applications Chapter 2
Click the Delete button to delete the selected temp tables and the selected rows in the result table. When youclick Delete, you receive a warning message letting you know that you are about to delete data from thesystem and asking if you want to continue.
Note. The Ready to Delete and Delete all options work in conjunction with the Delete rows including andDelete All check boxes. For example, if you elect to delete certain rows based on a selected criterion andyou select the Delete all option, only the rows selected by the criteria are deleted. Similarly, if you select theDelete All check box and select the Ready to Delete option, only the rows where the READY_TO_DELfield is set to Yes are deleted.
The fields in this area of the application page allow you to delete rows of data from the temporary result table(PS_USRPRF_LTR_COMM) that is created if you selected the Create Result Table check box on the UserProfile Mass Creation page. This is the only place where the non-encrypted passwords are stored. It is yourresponsibility to frequently run the cleanup process.
The temporary result table includes a column called Ready To Delete (READY_TO_DEL) that is a Y (yes) orN (no) flag for each user ID. When the User Profiles Management process runs and the Create Result Tableoption is selected in the setup page (Setup SACR, Security, Secure Student Administration, Setup, UserProfiles Mass Creation), the User Profiles Management process determines if the flag should be a Y or aN based on the Event ID you selected.
The User Profiles Management process sets the flag to N (meaning not ready to be deleted) when the Assign3C check box is checked on the User Profile Mass Creation setup page and the Event ID specified includesa letter code set up with the Name SQC equal to CCLTRWOL. This SQC is used by the Letter Generationprocess to extract the user ID and the password and make the information available to add on a communication.Do not delete rows in this table if the Letter Generation process has not been run yet. Once the LetterGeneration process is run, it changes the flag to Y to indicate the user ID row is now ready to be deleted.
Task 2-9: Installing PeopleSoft Student AdministrationIntegration Pack
This section discusses:
• Setting Up Installation Options
• Installing Additional Database Changes Using PeopleSoft Data Mover
• Running Conversion Programs Using PeopleSoft Application Engine
• Activating PeopleSoft Student Administration Integration Pack Service Operations
• Activating PeopleSoft Student Administration Integration Pack Service Routings
• Activating PeopleSoft Student Administration Integration Pack Queues
Task 2-9-1: Setting Up Installation OptionsOracle recommends that you update the PeopleSoft Student Administration Integration Pack (SAIP) indicatoron the Installation page on both your SYS and DMO databases to ensure that the license for the productis turned on and recognized.
Log in to the PeopleSoft application in a browser and select Set Up HRMS, Install, Installation Table. On theProducts page, select the SA Integration Pack check box.
40 Copyright © 2011, Oracle and/or its affiliates. All rights reserved.
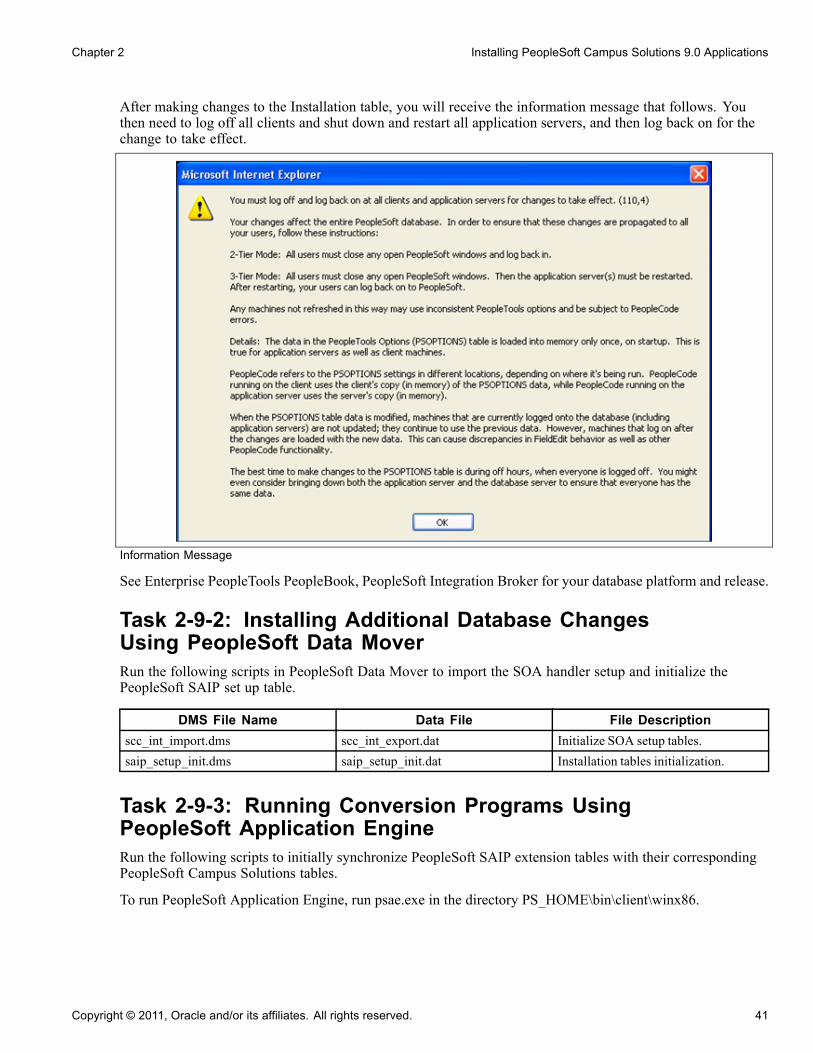
Chapter 2 Installing PeopleSoft Campus Solutions 9.0 Applications
After making changes to the Installation table, you will receive the information message that follows. Youthen need to log off all clients and shut down and restart all application servers, and then log back on for thechange to take effect.
Information Message
See Enterprise PeopleTools PeopleBook, PeopleSoft Integration Broker for your database platform and release.
Task 2-9-2: Installing Additional Database ChangesUsing PeopleSoft Data MoverRun the following scripts in PeopleSoft Data Mover to import the SOA handler setup and initialize thePeopleSoft SAIP set up table.
DMS File Name Data File File Descriptionscc_int_import.dms scc_int_export.dat Initialize SOA setup tables.saip_setup_init.dms saip_setup_init.dat Installation tables initialization.
Task 2-9-3: Running Conversion Programs UsingPeopleSoft Application EngineRun the following scripts to initially synchronize PeopleSoft SAIP extension tables with their correspondingPeopleSoft Campus Solutions tables.
To run PeopleSoft Application Engine, run psae.exe in the directory PS_HOME\bin\client\winx86.
Copyright © 2011, Oracle and/or its affiliates. All rights reserved. 41
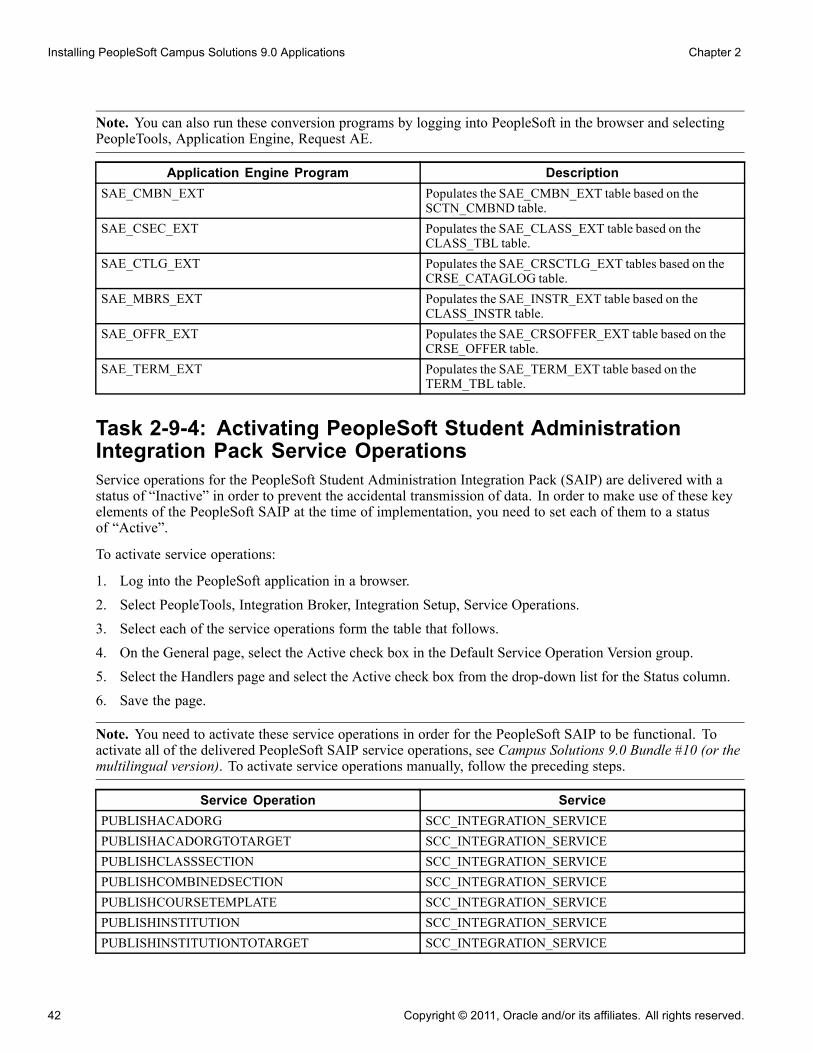
Installing PeopleSoft Campus Solutions 9.0 Applications Chapter 2
Note. You can also run these conversion programs by logging into PeopleSoft in the browser and selectingPeopleTools, Application Engine, Request AE.
Application Engine Program DescriptionSAE_CMBN_EXT Populates the SAE_CMBN_EXT table based on the
SCTN_CMBND table.SAE_CSEC_EXT Populates the SAE_CLASS_EXT table based on the
CLASS_TBL table.SAE_CTLG_EXT Populates the SAE_CRSCTLG_EXT tables based on the
CRSE_CATAGLOG table.SAE_MBRS_EXT Populates the SAE_INSTR_EXT table based on the
CLASS_INSTR table.SAE_OFFR_EXT Populates the SAE_CRSOFFER_EXT table based on the
CRSE_OFFER table.SAE_TERM_EXT Populates the SAE_TERM_EXT table based on the
TERM_TBL table.
Task 2-9-4: Activating PeopleSoft Student AdministrationIntegration Pack Service OperationsService operations for the PeopleSoft Student Administration Integration Pack (SAIP) are delivered with astatus of “Inactive” in order to prevent the accidental transmission of data. In order to make use of these keyelements of the PeopleSoft SAIP at the time of implementation, you need to set each of them to a statusof “Active”.
To activate service operations:
1. Log into the PeopleSoft application in a browser.2. Select PeopleTools, Integration Broker, Integration Setup, Service Operations.3. Select each of the service operations form the table that follows.4. On the General page, select the Active check box in the Default Service Operation Version group.5. Select the Handlers page and select the Active check box from the drop-down list for the Status column.6. Save the page.
Note. You need to activate these service operations in order for the PeopleSoft SAIP to be functional. Toactivate all of the delivered PeopleSoft SAIP service operations, see Campus Solutions 9.0 Bundle #10 (or themultilingual version). To activate service operations manually, follow the preceding steps.
Service Operation ServicePUBLISHACADORG SCC_INTEGRATION_SERVICEPUBLISHACADORGTOTARGET SCC_INTEGRATION_SERVICEPUBLISHCLASSSECTION SCC_INTEGRATION_SERVICEPUBLISHCOMBINEDSECTION SCC_INTEGRATION_SERVICEPUBLISHCOURSETEMPLATE SCC_INTEGRATION_SERVICEPUBLISHINSTITUTION SCC_INTEGRATION_SERVICEPUBLISHINSTITUTIONTOTARGET SCC_INTEGRATION_SERVICE
42 Copyright © 2011, Oracle and/or its affiliates. All rights reserved.
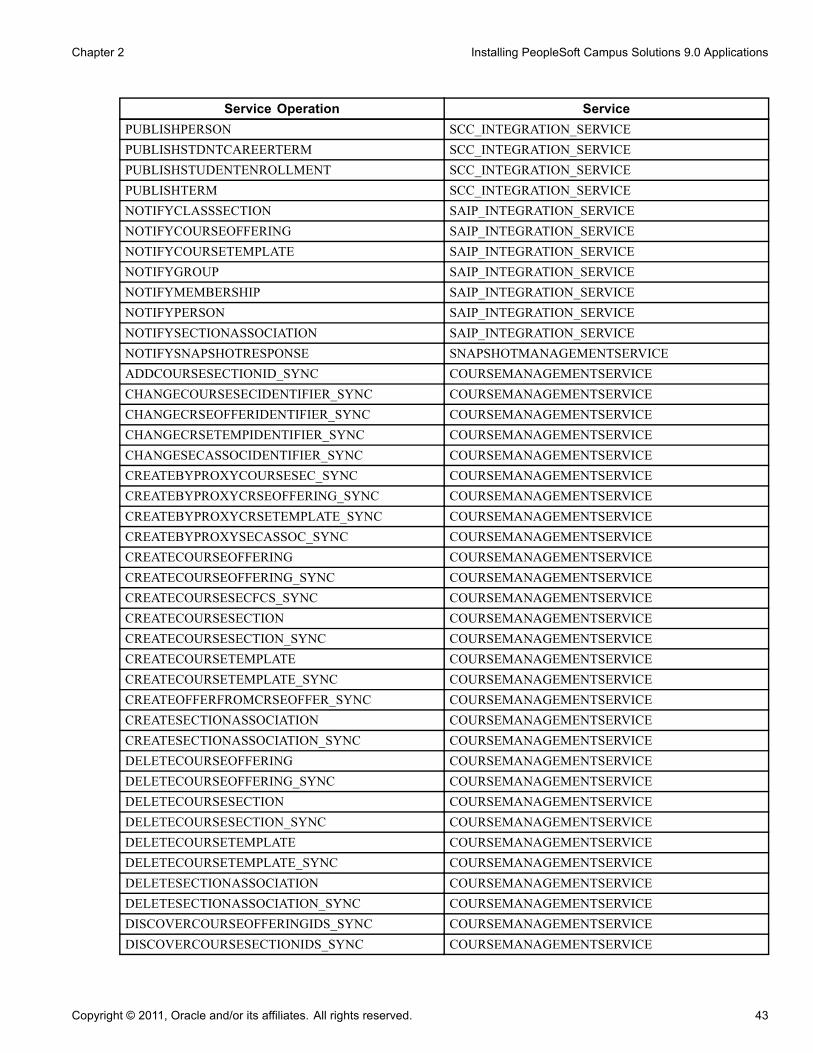
Chapter 2 Installing PeopleSoft Campus Solutions 9.0 Applications
Service Operation ServicePUBLISHPERSON SCC_INTEGRATION_SERVICEPUBLISHSTDNTCAREERTERM SCC_INTEGRATION_SERVICEPUBLISHSTUDENTENROLLMENT SCC_INTEGRATION_SERVICEPUBLISHTERM SCC_INTEGRATION_SERVICENOTIFYCLASSSECTION SAIP_INTEGRATION_SERVICENOTIFYCOURSEOFFERING SAIP_INTEGRATION_SERVICENOTIFYCOURSETEMPLATE SAIP_INTEGRATION_SERVICENOTIFYGROUP SAIP_INTEGRATION_SERVICENOTIFYMEMBERSHIP SAIP_INTEGRATION_SERVICENOTIFYPERSON SAIP_INTEGRATION_SERVICENOTIFYSECTIONASSOCIATION SAIP_INTEGRATION_SERVICENOTIFYSNAPSHOTRESPONSE SNAPSHOTMANAGEMENTSERVICEADDCOURSESECTIONID_SYNC COURSEMANAGEMENTSERVICECHANGECOURSESECIDENTIFIER_SYNC COURSEMANAGEMENTSERVICECHANGECRSEOFFERIDENTIFIER_SYNC COURSEMANAGEMENTSERVICECHANGECRSETEMPIDENTIFIER_SYNC COURSEMANAGEMENTSERVICECHANGESECASSOCIDENTIFIER_SYNC COURSEMANAGEMENTSERVICECREATEBYPROXYCOURSESEC_SYNC COURSEMANAGEMENTSERVICECREATEBYPROXYCRSEOFFERING_SYNC COURSEMANAGEMENTSERVICECREATEBYPROXYCRSETEMPLATE_SYNC COURSEMANAGEMENTSERVICECREATEBYPROXYSECASSOC_SYNC COURSEMANAGEMENTSERVICECREATECOURSEOFFERING COURSEMANAGEMENTSERVICECREATECOURSEOFFERING_SYNC COURSEMANAGEMENTSERVICECREATECOURSESECFCS_SYNC COURSEMANAGEMENTSERVICECREATECOURSESECTION COURSEMANAGEMENTSERVICECREATECOURSESECTION_SYNC COURSEMANAGEMENTSERVICECREATECOURSETEMPLATE COURSEMANAGEMENTSERVICECREATECOURSETEMPLATE_SYNC COURSEMANAGEMENTSERVICECREATEOFFERFROMCRSEOFFER_SYNC COURSEMANAGEMENTSERVICECREATESECTIONASSOCIATION COURSEMANAGEMENTSERVICECREATESECTIONASSOCIATION_SYNC COURSEMANAGEMENTSERVICEDELETECOURSEOFFERING COURSEMANAGEMENTSERVICEDELETECOURSEOFFERING_SYNC COURSEMANAGEMENTSERVICEDELETECOURSESECTION COURSEMANAGEMENTSERVICEDELETECOURSESECTION_SYNC COURSEMANAGEMENTSERVICEDELETECOURSETEMPLATE COURSEMANAGEMENTSERVICEDELETECOURSETEMPLATE_SYNC COURSEMANAGEMENTSERVICEDELETESECTIONASSOCIATION COURSEMANAGEMENTSERVICEDELETESECTIONASSOCIATION_SYNC COURSEMANAGEMENTSERVICEDISCOVERCOURSEOFFERINGIDS_SYNC COURSEMANAGEMENTSERVICEDISCOVERCOURSESECTIONIDS_SYNC COURSEMANAGEMENTSERVICE
Copyright © 2011, Oracle and/or its affiliates. All rights reserved. 43
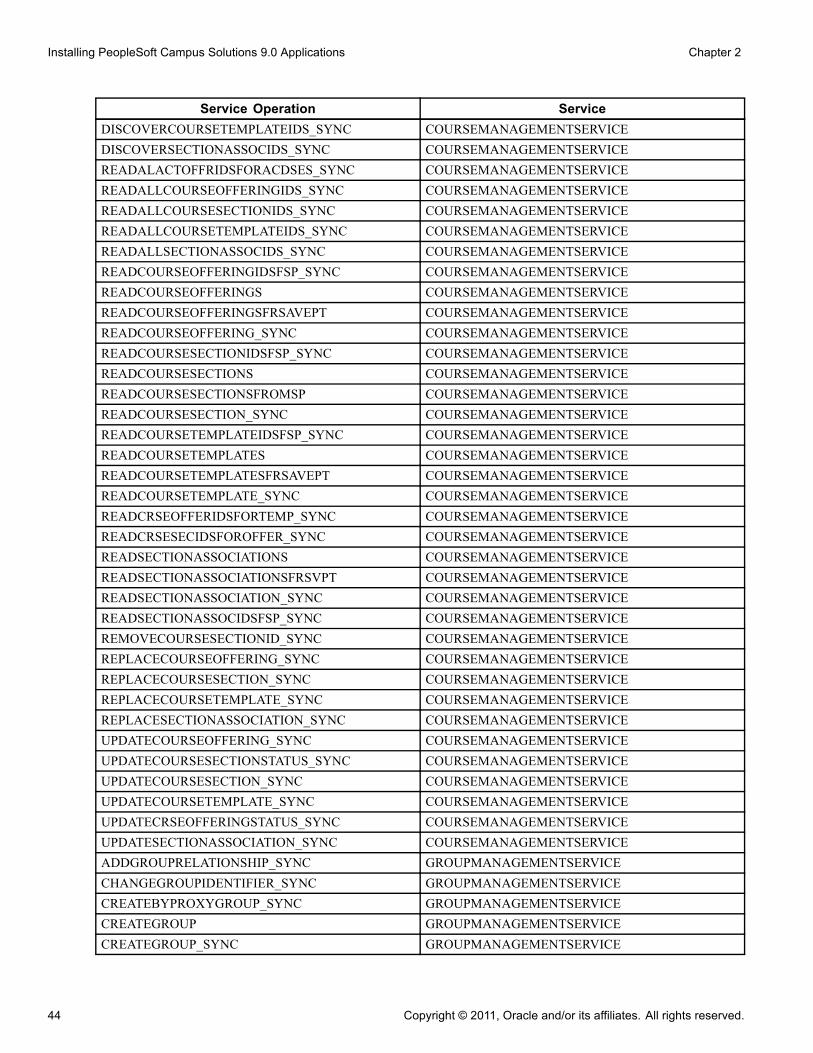
Installing PeopleSoft Campus Solutions 9.0 Applications Chapter 2
Service Operation ServiceDISCOVERCOURSETEMPLATEIDS_SYNC COURSEMANAGEMENTSERVICEDISCOVERSECTIONASSOCIDS_SYNC COURSEMANAGEMENTSERVICEREADALACTOFFRIDSFORACDSES_SYNC COURSEMANAGEMENTSERVICEREADALLCOURSEOFFERINGIDS_SYNC COURSEMANAGEMENTSERVICEREADALLCOURSESECTIONIDS_SYNC COURSEMANAGEMENTSERVICEREADALLCOURSETEMPLATEIDS_SYNC COURSEMANAGEMENTSERVICEREADALLSECTIONASSOCIDS_SYNC COURSEMANAGEMENTSERVICEREADCOURSEOFFERINGIDSFSP_SYNC COURSEMANAGEMENTSERVICEREADCOURSEOFFERINGS COURSEMANAGEMENTSERVICEREADCOURSEOFFERINGSFRSAVEPT COURSEMANAGEMENTSERVICEREADCOURSEOFFERING_SYNC COURSEMANAGEMENTSERVICEREADCOURSESECTIONIDSFSP_SYNC COURSEMANAGEMENTSERVICEREADCOURSESECTIONS COURSEMANAGEMENTSERVICEREADCOURSESECTIONSFROMSP COURSEMANAGEMENTSERVICEREADCOURSESECTION_SYNC COURSEMANAGEMENTSERVICEREADCOURSETEMPLATEIDSFSP_SYNC COURSEMANAGEMENTSERVICEREADCOURSETEMPLATES COURSEMANAGEMENTSERVICEREADCOURSETEMPLATESFRSAVEPT COURSEMANAGEMENTSERVICEREADCOURSETEMPLATE_SYNC COURSEMANAGEMENTSERVICEREADCRSEOFFERIDSFORTEMP_SYNC COURSEMANAGEMENTSERVICEREADCRSESECIDSFOROFFER_SYNC COURSEMANAGEMENTSERVICEREADSECTIONASSOCIATIONS COURSEMANAGEMENTSERVICEREADSECTIONASSOCIATIONSFRSVPT COURSEMANAGEMENTSERVICEREADSECTIONASSOCIATION_SYNC COURSEMANAGEMENTSERVICEREADSECTIONASSOCIDSFSP_SYNC COURSEMANAGEMENTSERVICEREMOVECOURSESECTIONID_SYNC COURSEMANAGEMENTSERVICEREPLACECOURSEOFFERING_SYNC COURSEMANAGEMENTSERVICEREPLACECOURSESECTION_SYNC COURSEMANAGEMENTSERVICEREPLACECOURSETEMPLATE_SYNC COURSEMANAGEMENTSERVICEREPLACESECTIONASSOCIATION_SYNC COURSEMANAGEMENTSERVICEUPDATECOURSEOFFERING_SYNC COURSEMANAGEMENTSERVICEUPDATECOURSESECTIONSTATUS_SYNC COURSEMANAGEMENTSERVICEUPDATECOURSESECTION_SYNC COURSEMANAGEMENTSERVICEUPDATECOURSETEMPLATE_SYNC COURSEMANAGEMENTSERVICEUPDATECRSEOFFERINGSTATUS_SYNC COURSEMANAGEMENTSERVICEUPDATESECTIONASSOCIATION_SYNC COURSEMANAGEMENTSERVICEADDGROUPRELATIONSHIP_SYNC GROUPMANAGEMENTSERVICECHANGEGROUPIDENTIFIER_SYNC GROUPMANAGEMENTSERVICECREATEBYPROXYGROUP_SYNC GROUPMANAGEMENTSERVICECREATEGROUP GROUPMANAGEMENTSERVICECREATEGROUP_SYNC GROUPMANAGEMENTSERVICE
44 Copyright © 2011, Oracle and/or its affiliates. All rights reserved.
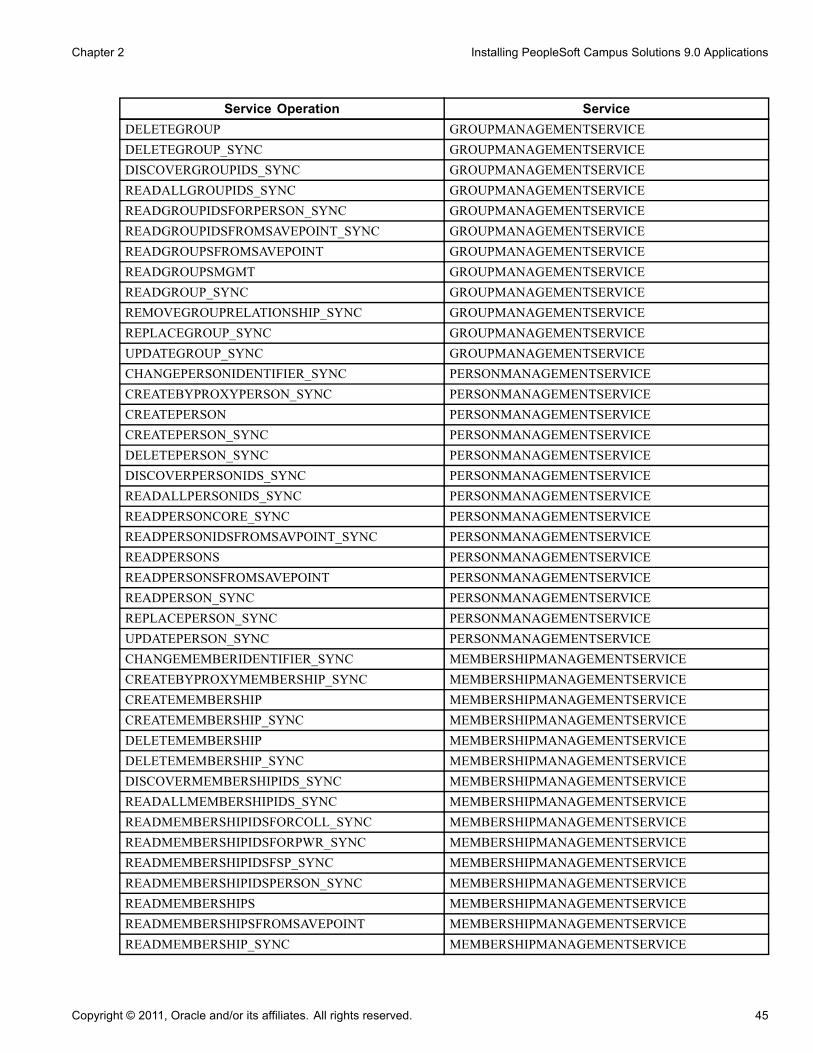
Chapter 2 Installing PeopleSoft Campus Solutions 9.0 Applications
Service Operation ServiceDELETEGROUP GROUPMANAGEMENTSERVICEDELETEGROUP_SYNC GROUPMANAGEMENTSERVICEDISCOVERGROUPIDS_SYNC GROUPMANAGEMENTSERVICEREADALLGROUPIDS_SYNC GROUPMANAGEMENTSERVICEREADGROUPIDSFORPERSON_SYNC GROUPMANAGEMENTSERVICEREADGROUPIDSFROMSAVEPOINT_SYNC GROUPMANAGEMENTSERVICEREADGROUPSFROMSAVEPOINT GROUPMANAGEMENTSERVICEREADGROUPSMGMT GROUPMANAGEMENTSERVICEREADGROUP_SYNC GROUPMANAGEMENTSERVICEREMOVEGROUPRELATIONSHIP_SYNC GROUPMANAGEMENTSERVICEREPLACEGROUP_SYNC GROUPMANAGEMENTSERVICEUPDATEGROUP_SYNC GROUPMANAGEMENTSERVICECHANGEPERSONIDENTIFIER_SYNC PERSONMANAGEMENTSERVICECREATEBYPROXYPERSON_SYNC PERSONMANAGEMENTSERVICECREATEPERSON PERSONMANAGEMENTSERVICECREATEPERSON_SYNC PERSONMANAGEMENTSERVICEDELETEPERSON_SYNC PERSONMANAGEMENTSERVICEDISCOVERPERSONIDS_SYNC PERSONMANAGEMENTSERVICEREADALLPERSONIDS_SYNC PERSONMANAGEMENTSERVICEREADPERSONCORE_SYNC PERSONMANAGEMENTSERVICEREADPERSONIDSFROMSAVPOINT_SYNC PERSONMANAGEMENTSERVICEREADPERSONS PERSONMANAGEMENTSERVICEREADPERSONSFROMSAVEPOINT PERSONMANAGEMENTSERVICEREADPERSON_SYNC PERSONMANAGEMENTSERVICEREPLACEPERSON_SYNC PERSONMANAGEMENTSERVICEUPDATEPERSON_SYNC PERSONMANAGEMENTSERVICECHANGEMEMBERIDENTIFIER_SYNC MEMBERSHIPMANAGEMENTSERVICECREATEBYPROXYMEMBERSHIP_SYNC MEMBERSHIPMANAGEMENTSERVICECREATEMEMBERSHIP MEMBERSHIPMANAGEMENTSERVICECREATEMEMBERSHIP_SYNC MEMBERSHIPMANAGEMENTSERVICEDELETEMEMBERSHIP MEMBERSHIPMANAGEMENTSERVICEDELETEMEMBERSHIP_SYNC MEMBERSHIPMANAGEMENTSERVICEDISCOVERMEMBERSHIPIDS_SYNC MEMBERSHIPMANAGEMENTSERVICEREADALLMEMBERSHIPIDS_SYNC MEMBERSHIPMANAGEMENTSERVICEREADMEMBERSHIPIDSFORCOLL_SYNC MEMBERSHIPMANAGEMENTSERVICEREADMEMBERSHIPIDSFORPWR_SYNC MEMBERSHIPMANAGEMENTSERVICEREADMEMBERSHIPIDSFSP_SYNC MEMBERSHIPMANAGEMENTSERVICEREADMEMBERSHIPIDSPERSON_SYNC MEMBERSHIPMANAGEMENTSERVICEREADMEMBERSHIPS MEMBERSHIPMANAGEMENTSERVICEREADMEMBERSHIPSFROMSAVEPOINT MEMBERSHIPMANAGEMENTSERVICEREADMEMBERSHIP_SYNC MEMBERSHIPMANAGEMENTSERVICE
Copyright © 2011, Oracle and/or its affiliates. All rights reserved. 45
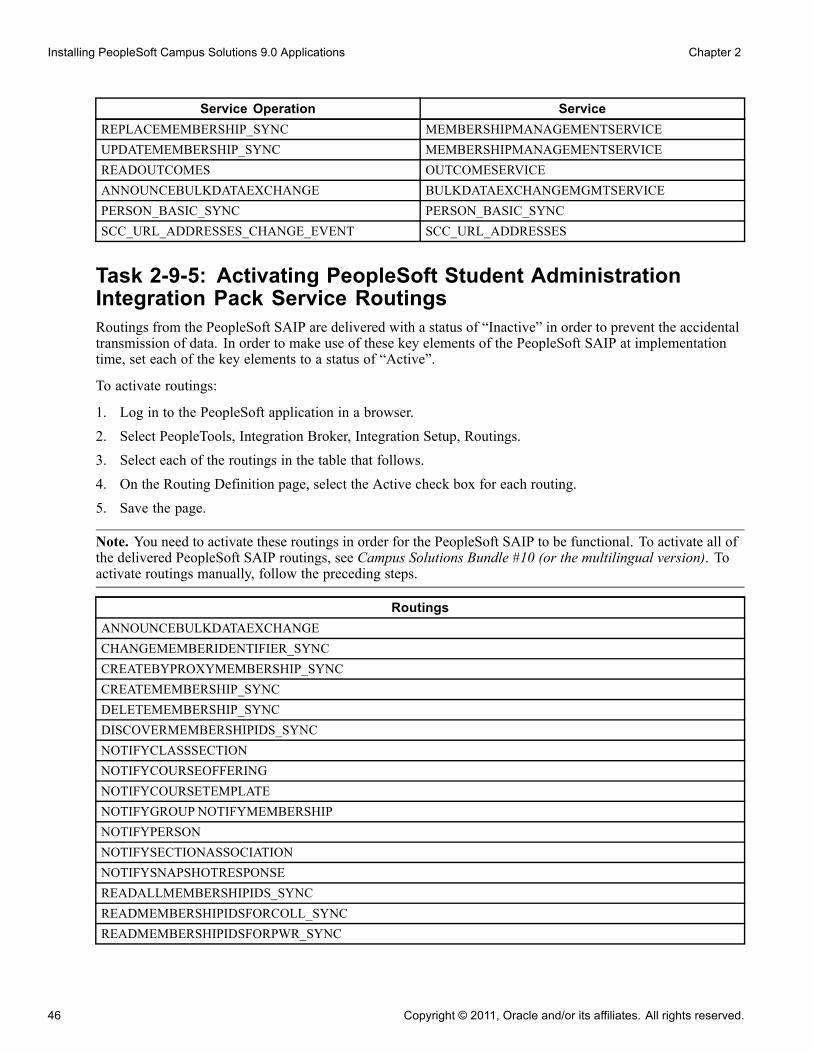
Installing PeopleSoft Campus Solutions 9.0 Applications Chapter 2
Service Operation ServiceREPLACEMEMBERSHIP_SYNC MEMBERSHIPMANAGEMENTSERVICEUPDATEMEMBERSHIP_SYNC MEMBERSHIPMANAGEMENTSERVICEREADOUTCOMES OUTCOMESERVICEANNOUNCEBULKDATAEXCHANGE BULKDATAEXCHANGEMGMTSERVICEPERSON_BASIC_SYNC PERSON_BASIC_SYNCSCC_URL_ADDRESSES_CHANGE_EVENT SCC_URL_ADDRESSES
Task 2-9-5: Activating PeopleSoft Student AdministrationIntegration Pack Service RoutingsRoutings from the PeopleSoft SAIP are delivered with a status of “Inactive” in order to prevent the accidentaltransmission of data. In order to make use of these key elements of the PeopleSoft SAIP at implementationtime, set each of the key elements to a status of “Active”.
To activate routings:
1. Log in to the PeopleSoft application in a browser.2. Select PeopleTools, Integration Broker, Integration Setup, Routings.3. Select each of the routings in the table that follows.4. On the Routing Definition page, select the Active check box for each routing.5. Save the page.
Note. You need to activate these routings in order for the PeopleSoft SAIP to be functional. To activate all ofthe delivered PeopleSoft SAIP routings, see Campus Solutions Bundle #10 (or the multilingual version). Toactivate routings manually, follow the preceding steps.
RoutingsANNOUNCEBULKDATAEXCHANGECHANGEMEMBERIDENTIFIER_SYNCCREATEBYPROXYMEMBERSHIP_SYNCCREATEMEMBERSHIP_SYNCDELETEMEMBERSHIP_SYNCDISCOVERMEMBERSHIPIDS_SYNCNOTIFYCLASSSECTIONNOTIFYCOURSEOFFERINGNOTIFYCOURSETEMPLATENOTIFYGROUP NOTIFYMEMBERSHIPNOTIFYPERSONNOTIFYSECTIONASSOCIATIONNOTIFYSNAPSHOTRESPONSEREADALLMEMBERSHIPIDS_SYNCREADMEMBERSHIPIDSFORCOLL_SYNCREADMEMBERSHIPIDSFORPWR_SYNC
46 Copyright © 2011, Oracle and/or its affiliates. All rights reserved.
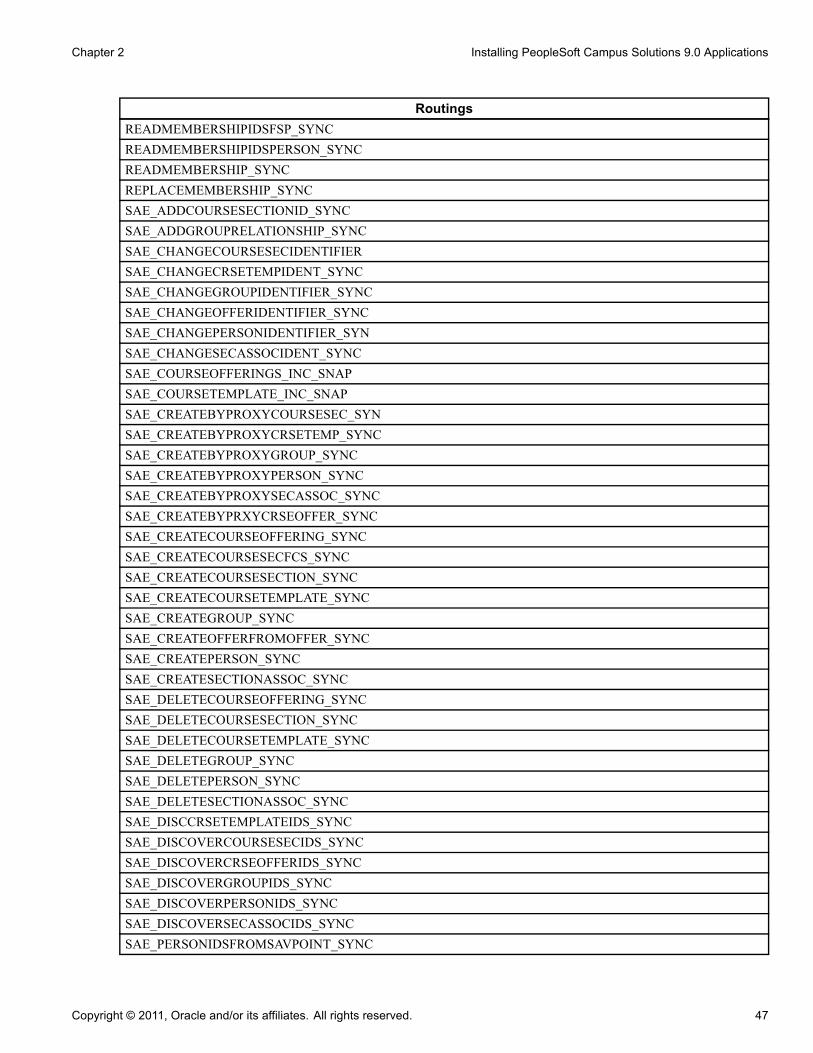
Chapter 2 Installing PeopleSoft Campus Solutions 9.0 Applications
RoutingsREADMEMBERSHIPIDSFSP_SYNCREADMEMBERSHIPIDSPERSON_SYNCREADMEMBERSHIP_SYNCREPLACEMEMBERSHIP_SYNCSAE_ADDCOURSESECTIONID_SYNCSAE_ADDGROUPRELATIONSHIP_SYNCSAE_CHANGECOURSESECIDENTIFIERSAE_CHANGECRSETEMPIDENT_SYNCSAE_CHANGEGROUPIDENTIFIER_SYNCSAE_CHANGEOFFERIDENTIFIER_SYNCSAE_CHANGEPERSONIDENTIFIER_SYNSAE_CHANGESECASSOCIDENT_SYNCSAE_COURSEOFFERINGS_INC_SNAPSAE_COURSETEMPLATE_INC_SNAPSAE_CREATEBYPROXYCOURSESEC_SYNSAE_CREATEBYPROXYCRSETEMP_SYNCSAE_CREATEBYPROXYGROUP_SYNCSAE_CREATEBYPROXYPERSON_SYNCSAE_CREATEBYPROXYSECASSOC_SYNCSAE_CREATEBYPRXYCRSEOFFER_SYNCSAE_CREATECOURSEOFFERING_SYNCSAE_CREATECOURSESECFCS_SYNCSAE_CREATECOURSESECTION_SYNCSAE_CREATECOURSETEMPLATE_SYNCSAE_CREATEGROUP_SYNCSAE_CREATEOFFERFROMOFFER_SYNCSAE_CREATEPERSON_SYNCSAE_CREATESECTIONASSOC_SYNCSAE_DELETECOURSEOFFERING_SYNCSAE_DELETECOURSESECTION_SYNCSAE_DELETECOURSETEMPLATE_SYNCSAE_DELETEGROUP_SYNCSAE_DELETEPERSON_SYNCSAE_DELETESECTIONASSOC_SYNCSAE_DISCCRSETEMPLATEIDS_SYNCSAE_DISCOVERCOURSESECIDS_SYNCSAE_DISCOVERCRSEOFFERIDS_SYNCSAE_DISCOVERGROUPIDS_SYNCSAE_DISCOVERPERSONIDS_SYNCSAE_DISCOVERSECASSOCIDS_SYNCSAE_PERSONIDSFROMSAVPOINT_SYNC
Copyright © 2011, Oracle and/or its affiliates. All rights reserved. 47
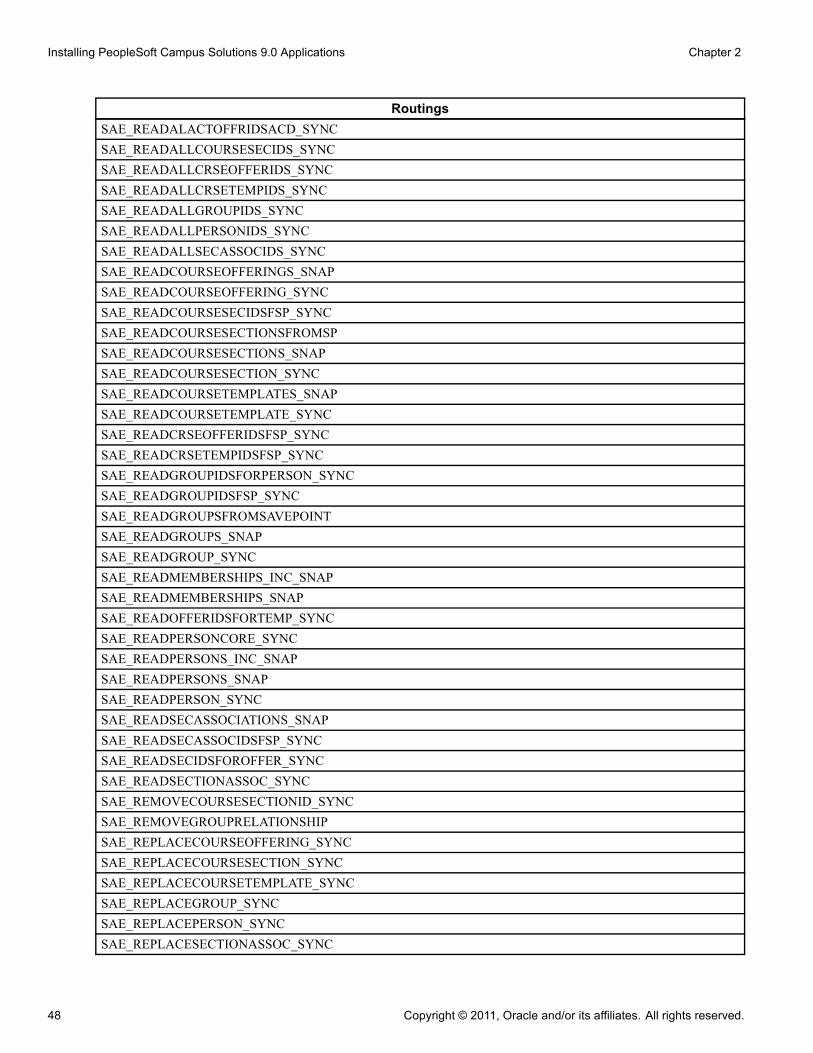
Installing PeopleSoft Campus Solutions 9.0 Applications Chapter 2
RoutingsSAE_READALACTOFFRIDSACD_SYNCSAE_READALLCOURSESECIDS_SYNCSAE_READALLCRSEOFFERIDS_SYNCSAE_READALLCRSETEMPIDS_SYNCSAE_READALLGROUPIDS_SYNCSAE_READALLPERSONIDS_SYNCSAE_READALLSECASSOCIDS_SYNCSAE_READCOURSEOFFERINGS_SNAPSAE_READCOURSEOFFERING_SYNCSAE_READCOURSESECIDSFSP_SYNCSAE_READCOURSESECTIONSFROMSPSAE_READCOURSESECTIONS_SNAPSAE_READCOURSESECTION_SYNCSAE_READCOURSETEMPLATES_SNAPSAE_READCOURSETEMPLATE_SYNCSAE_READCRSEOFFERIDSFSP_SYNCSAE_READCRSETEMPIDSFSP_SYNCSAE_READGROUPIDSFORPERSON_SYNCSAE_READGROUPIDSFSP_SYNCSAE_READGROUPSFROMSAVEPOINTSAE_READGROUPS_SNAPSAE_READGROUP_SYNCSAE_READMEMBERSHIPS_INC_SNAPSAE_READMEMBERSHIPS_SNAPSAE_READOFFERIDSFORTEMP_SYNCSAE_READPERSONCORE_SYNCSAE_READPERSONS_INC_SNAPSAE_READPERSONS_SNAPSAE_READPERSON_SYNCSAE_READSECASSOCIATIONS_SNAPSAE_READSECASSOCIDSFSP_SYNCSAE_READSECIDSFOROFFER_SYNCSAE_READSECTIONASSOC_SYNCSAE_REMOVECOURSESECTIONID_SYNCSAE_REMOVEGROUPRELATIONSHIPSAE_REPLACECOURSEOFFERING_SYNCSAE_REPLACECOURSESECTION_SYNCSAE_REPLACECOURSETEMPLATE_SYNCSAE_REPLACEGROUP_SYNCSAE_REPLACEPERSON_SYNCSAE_REPLACESECTIONASSOC_SYNC
48 Copyright © 2011, Oracle and/or its affiliates. All rights reserved.
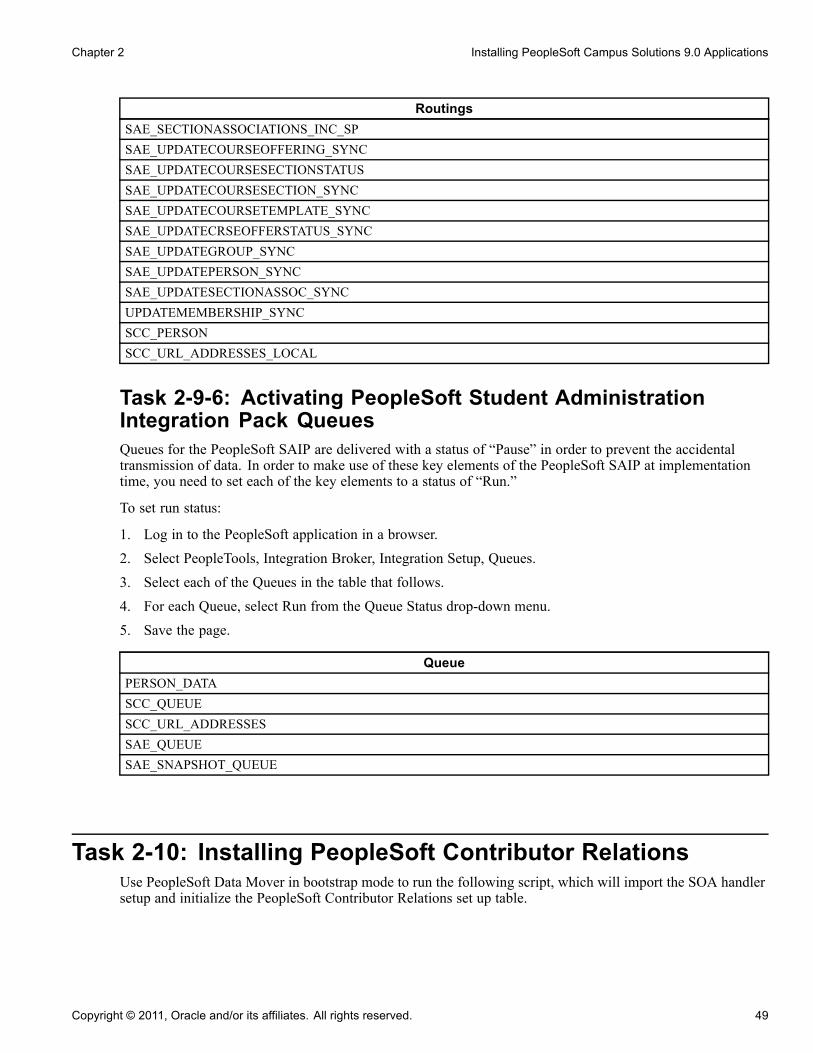
Chapter 2 Installing PeopleSoft Campus Solutions 9.0 Applications
RoutingsSAE_SECTIONASSOCIATIONS_INC_SPSAE_UPDATECOURSEOFFERING_SYNCSAE_UPDATECOURSESECTIONSTATUSSAE_UPDATECOURSESECTION_SYNCSAE_UPDATECOURSETEMPLATE_SYNCSAE_UPDATECRSEOFFERSTATUS_SYNCSAE_UPDATEGROUP_SYNCSAE_UPDATEPERSON_SYNCSAE_UPDATESECTIONASSOC_SYNCUPDATEMEMBERSHIP_SYNCSCC_PERSONSCC_URL_ADDRESSES_LOCAL
Task 2-9-6: Activating PeopleSoft Student AdministrationIntegration Pack QueuesQueues for the PeopleSoft SAIP are delivered with a status of “Pause” in order to prevent the accidentaltransmission of data. In order to make use of these key elements of the PeopleSoft SAIP at implementationtime, you need to set each of the key elements to a status of “Run.”
To set run status:
1. Log in to the PeopleSoft application in a browser.
2. Select PeopleTools, Integration Broker, Integration Setup, Queues.
3. Select each of the Queues in the table that follows.
4. For each Queue, select Run from the Queue Status drop-down menu.
5. Save the page.
QueuePERSON_DATASCC_QUEUESCC_URL_ADDRESSESSAE_QUEUESAE_SNAPSHOT_QUEUE
Task 2-10: Installing PeopleSoft Contributor RelationsUse PeopleSoft Data Mover in bootstrap mode to run the following script, which will import the SOA handlersetup and initialize the PeopleSoft Contributor Relations set up table.
Copyright © 2011, Oracle and/or its affiliates. All rights reserved. 49
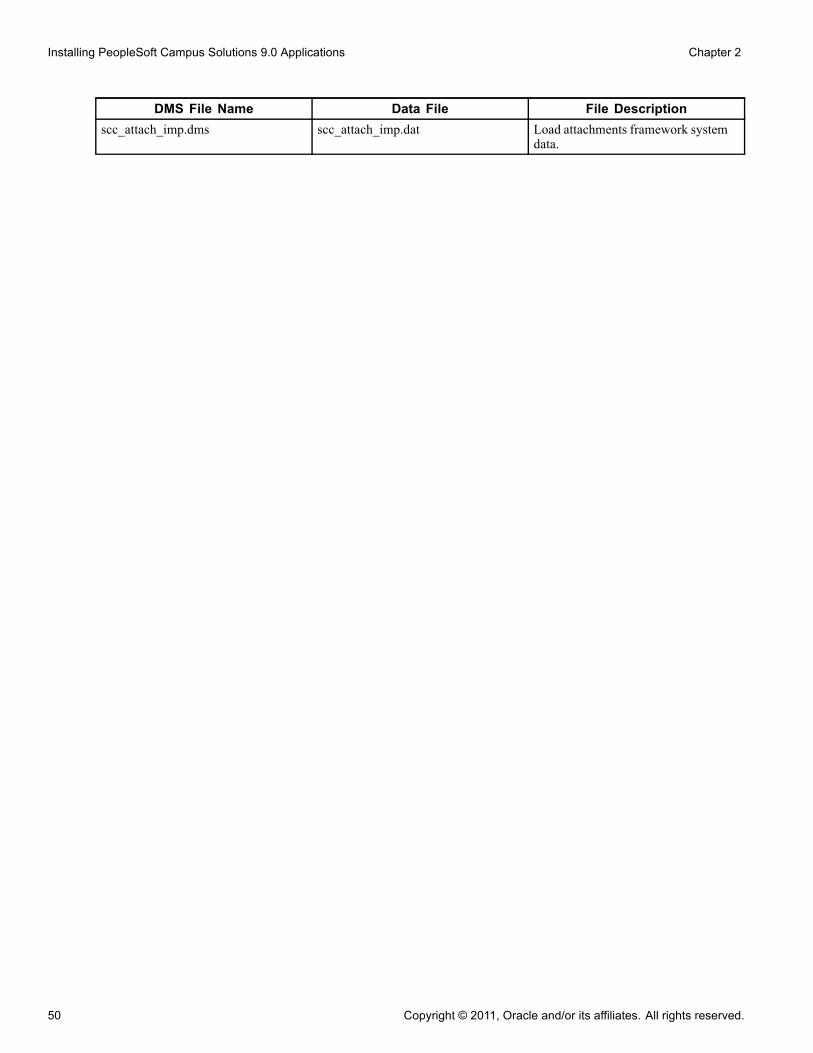
Installing PeopleSoft Campus Solutions 9.0 Applications Chapter 2
DMS File Name Data File File Descriptionscc_attach_imp.dms scc_attach_imp.dat Load attachments framework system
data.
50 Copyright © 2011, Oracle and/or its affiliates. All rights reserved.
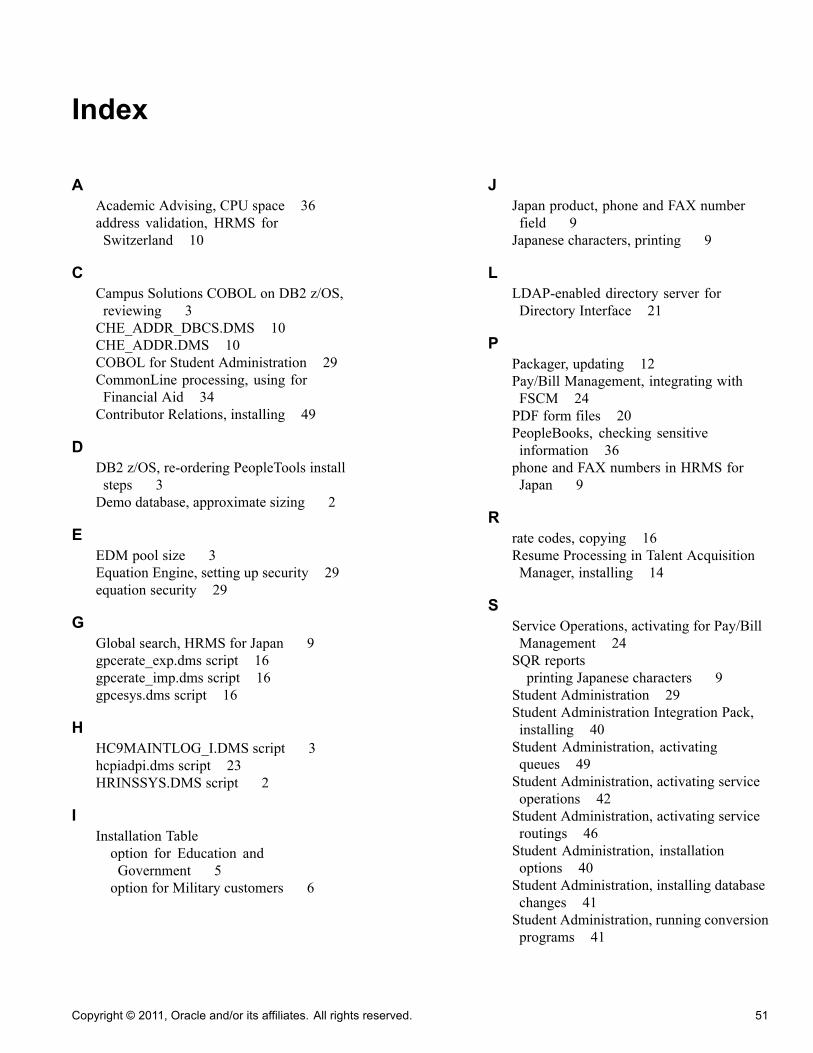
Index
AAcademic Advising, CPU space 36address validation, HRMS forSwitzerland 10
CCampus Solutions COBOL on DB2 z/OS,reviewing 3CHE_ADDR_DBCS.DMS 10CHE_ADDR.DMS 10COBOL for Student Administration 29CommonLine processing, using forFinancial Aid 34Contributor Relations, installing 49
DDB2 z/OS, re-ordering PeopleTools installsteps 3Demo database, approximate sizing 2
EEDM pool size 3Equation Engine, setting up security 29equation security 29
GGlobal search, HRMS for Japan 9gpcerate_exp.dms script 16gpcerate_imp.dms script 16gpcesys.dms script 16
HHC9MAINTLOG_I.DMS script 3hcpiadpi.dms script 23HRINSSYS.DMS script 2
IInstallation Tableoption for Education andGovernment 5option for Military customers 6
JJapan product, phone and FAX numberfield 9Japanese characters, printing 9
LLDAP-enabled directory server forDirectory Interface 21
PPackager, updating 12Pay/Bill Management, integrating withFSCM 24PDF form files 20PeopleBooks, checking sensitiveinformation 36phone and FAX numbers in HRMS forJapan 9
Rrate codes, copying 16Resume Processing in Talent AcquisitionManager, installing 14
SService Operations, activating for Pay/BillManagement 24SQR reportsprinting Japanese characters 9
Student Administration 29Student Administration Integration Pack,installing 40Student Administration, activatingqueues 49Student Administration, activating serviceoperations 42Student Administration, activating serviceroutings 46Student Administration, installationoptions 40Student Administration, installing databasechanges 41Student Administration, running conversionprograms 41
Copyright © 2011, Oracle and/or its affiliates. All rights reserved. 51
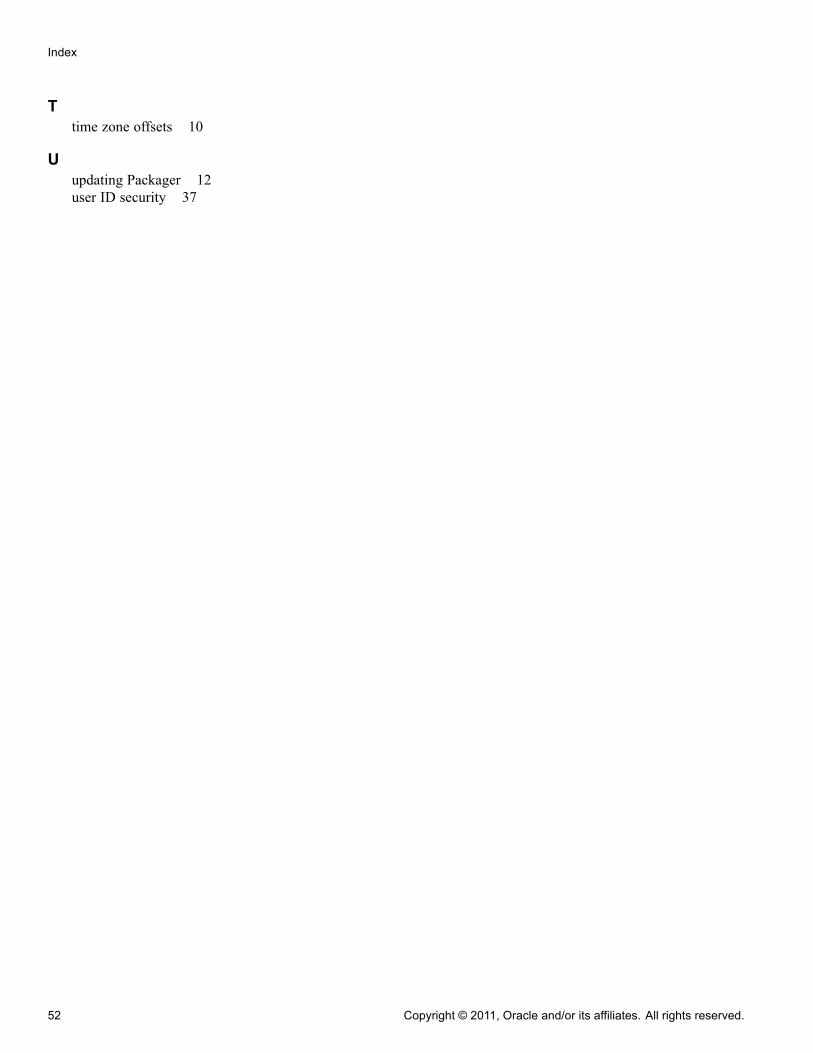
Index
Ttime zone offsets 10
Uupdating Packager 12user ID security 37
52 Copyright © 2011, Oracle and/or its affiliates. All rights reserved.

![[XLS]PeopleSoft HRMS/Payroll Employee Set-Up · Web viewTitle PeopleSoft HRMS/Payroll Employee Set-Up Tables Subject HRMS/Payroll Employee Set-Up Tables for the CORe Oklahoma system](https://img.pdfslide.net/doc/110x75/5aaee4d77f8b9aa8438ca3e0/xlspeoplesoft-hrmspayroll-employee-set-up-viewtitle-peoplesoft-hrmspayroll-employee.jpg)