Embed Size (px)
Citation preview
PeopleSoft Training Using the PeopleSoft P-card System V8.9
Participant Manual
March 2010
-i- March 2010 Privileged and Confidential – For Internal use Only
Table of Contents OBJECTIVES ........................................................................................................................................ 3
OVERVIEW............................................................................................................................................ 3
Business Flow Diagram.................................................................................................................. 4
MODULE 1: P-CARD OVERVIEW....................................................................................................... 5
P-card Process in PeopleSoft ........................................................................................................ 5
Navigating to the P-card Bank Statement ...................................................................................... 6
What can I view? ............................................................................................................................ 6
Locating a Statement ..................................................................................................................... 6
Reviewing the Bank Statement Page............................................................................................ 8 Transaction Tab...................................................................................................................... 8 Billing Tab............................................................................................................................. 10
Personalizing the Bank Statement ............................................................................................... 12 Show All Columns ................................................................................................................ 12 Customize............................................................................................................................. 13
MODULE 2: P-CARD TRANSACTIONS 101..................................................................................... 14
Locating Transactions .................................................................................................................. 14
Valid vs. Recycled Chartfield Status ............................................................................................ 14
Account Distribution ..................................................................................................................... 15
Approving Single Transactions .................................................................................................... 17
MODULE 3: ADVANCED P-CARD FEATURES ............................................................................... 18
Searching for a Specific Transaction .......................................................................................... 18 Distributing to Multiple Transaction………………………………………………………………….. ..20
Splitting Distributions vs. Splitting Transactions……………………………………………………...22
Splitting Distributions…………………………………………………………………………………….23
Splitting Transactions ................................................................................................................... 24
Approving Multiple Transactions .................................................................................................. 28
Adding Comments........................................................................................................................ 30
Locating Comments ..................................................................................................................... 32
Disputing a Charge (Information only) ......................................................................................... 32
MODULE 4: P-CARD REPORTS....................................................................................................... 35
P-card Reports ............................................................................................................................. 35
P-card Queries ............................................................................................................................. 37
MODULE 5: GETTING HELP............................................................................................................. 38
SUMMARY........................................................................................................................................... 40
Using the PS P-CARD System
-3- March 2010 Privileged and Confidential – For Internal use Only
Objectives By the end of this class, you should be able to:
• Locate a P-card Transaction
• Allocate P-Card charges to the appropriate Chartfield strings;
• Split Transactions;
• Approve P-Card transactions;
• Run P-card Reports;
Overview The Procurement Card Allocation and Reallocation process in PeopleSoft includes:
• Receive and review the procurement card bank charges from VISA,
• Assign the accounting distributions (Allocation),
• Approve the charges.
Note: The system will not automatically allocate the charges if you do nothing by the 24th of the month. With the PeopleSoft P-Card system, you are responsible for allocating the charges, as well as reallocating the charges if you need to distribute charges among different Chartfield strings.
Using the PS P-CARD System
-4- March 2010 Privileged and Confidential – For Internal use Only
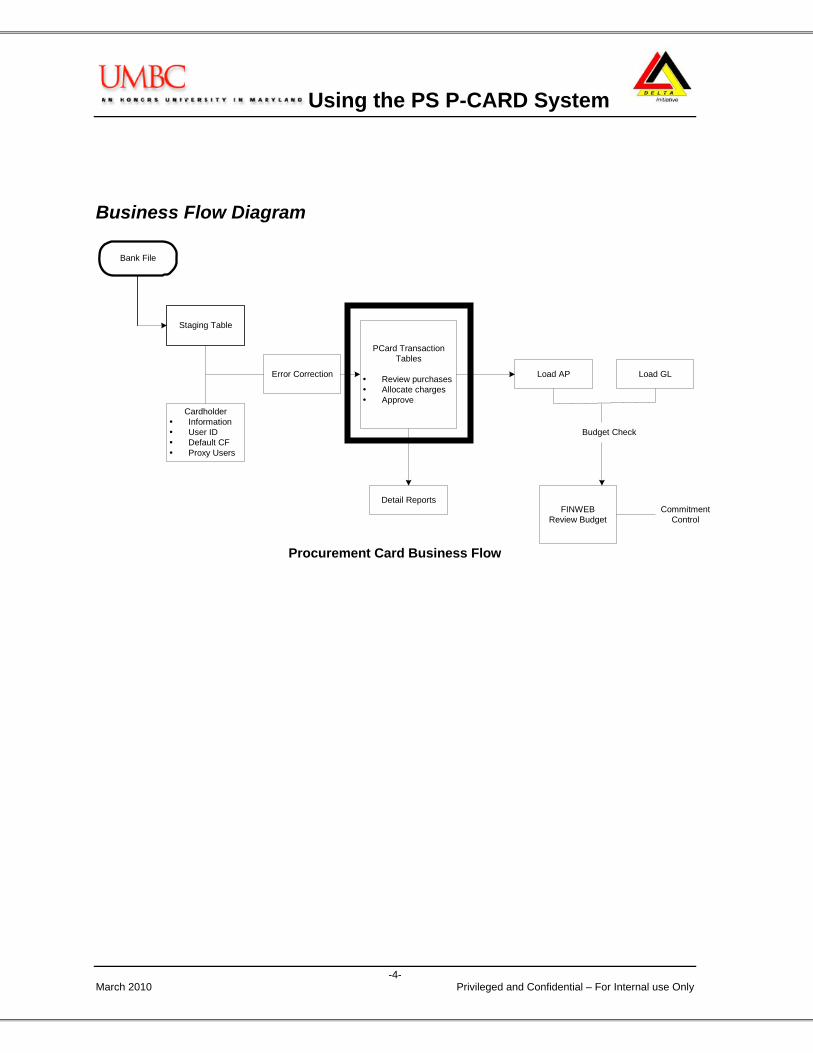
Business Flow Diagram
Bank File
Staging Table
Error Correction
CardholderInformationUser IDDefault CFProxy Users
PCard TransactionTables
Review purchasesAllocate chargesApprove
Detail Reports
Load AP
FINWEBReview Budget
Load GL
Budget Check
CommitmentControl
Procurement Card Business Flow

Using the PS P-CARD System
-5- March 2010 Privileged and Confidential – For Internal use Only
Module 1: P-card Overview By the end of this module, you will be able to:
• Describe the PeopleSoft P-card process • Navigate to the P-card Bank Statement in PeopleSoft • Identify the components of the Bank Statement page • Define the columns on the Bank Statement • Perform the steps to customize the Bank Statement
P-card Process in PeopleSoft The Procurement Department will grant access to the PS P-card system to those employees who have 1) submitted a specialized access form (http://www.umbc.edu/procurement) to Financial Services and 2) submitted a P-card Proxy Authorization Form (http://www.umbc.edu/procurement/) to Procurement. The Bank of America charges are downloaded on a daily basis to UMBC. The charges are loaded into PeopleSoft, and are available to view via the PeopleSoft P-card Bank Statement. Once charges are loaded into PeopleSoft, it is the user’s responsibility to review and approve each transaction before they are sent to the General Ledger. Below is the overall PeopleSoft P-card process.
You can view all procurement card transactions for which you have been granted authority to access on the Bank of America statement page. If you do not have access to the appropriate data, the Procurement Department will make adjustments to the Employee-Profile – Proxy page whenever they receive a completed Procurement Card Maintenance Form (http://www.umbc.edu/procurement) requesting a change. Note: The billing cycle begins on the 26th of the month, and ends on the 25th of the following month. At UMBC, even if you currently do not reallocate expenses, at a minimum, you must
approve the transactions on the Bank Statement page. Since a transaction is not sent to the General Ledger until you approve that transaction, you must change the status of a transaction from Staged to Approved, and select SAVE. The system will not automatically charge the transaction to your department, fund, or project after the 24th of the month.
Using the PS P-CARD System
-6- March 2010 Privileged and Confidential – For Internal use Only
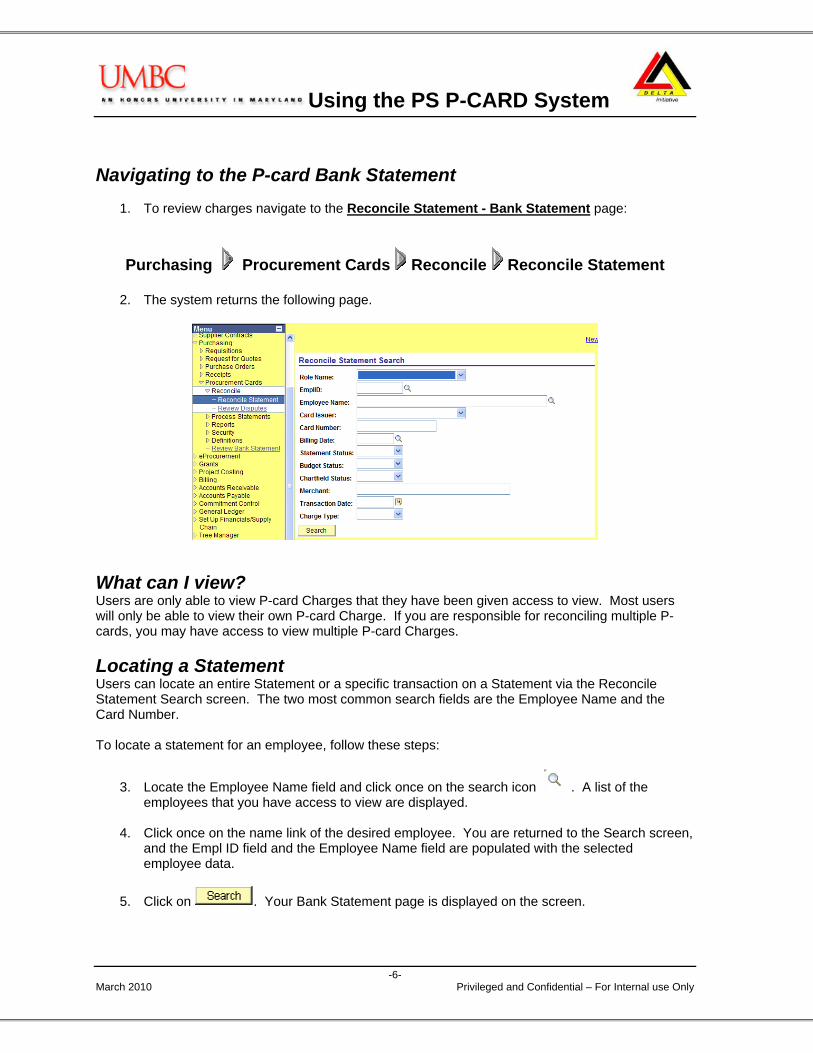
Navigating to the P-card Bank Statement
1. To review charges navigate to the Reconcile Statement - Bank Statement page:
Purchasing Procurement Cards Reconcile Reconcile Statement
2. The system returns the following page.
What can I view? Users are only able to view P-card Charges that they have been given access to view. Most users will only be able to view their own P-card Charge. If you are responsible for reconciling multiple P-cards, you may have access to view multiple P-card Charges.
Locating a Statement Users can locate an entire Statement or a specific transaction on a Statement via the Reconcile Statement Search screen. The two most common search fields are the Employee Name and the Card Number. To locate a statement for an employee, follow these steps:
3. Locate the Employee Name field and click once on the search icon . A list of the employees that you have access to view are displayed.
4. Click once on the name link of the desired employee. You are returned to the Search screen,
and the Empl ID field and the Employee Name field are populated with the selected employee data.
5. Click on . Your Bank Statement page is displayed on the screen.
Using the PS P-CARD System
-7- March 2010 Privileged and Confidential – For Internal use Only
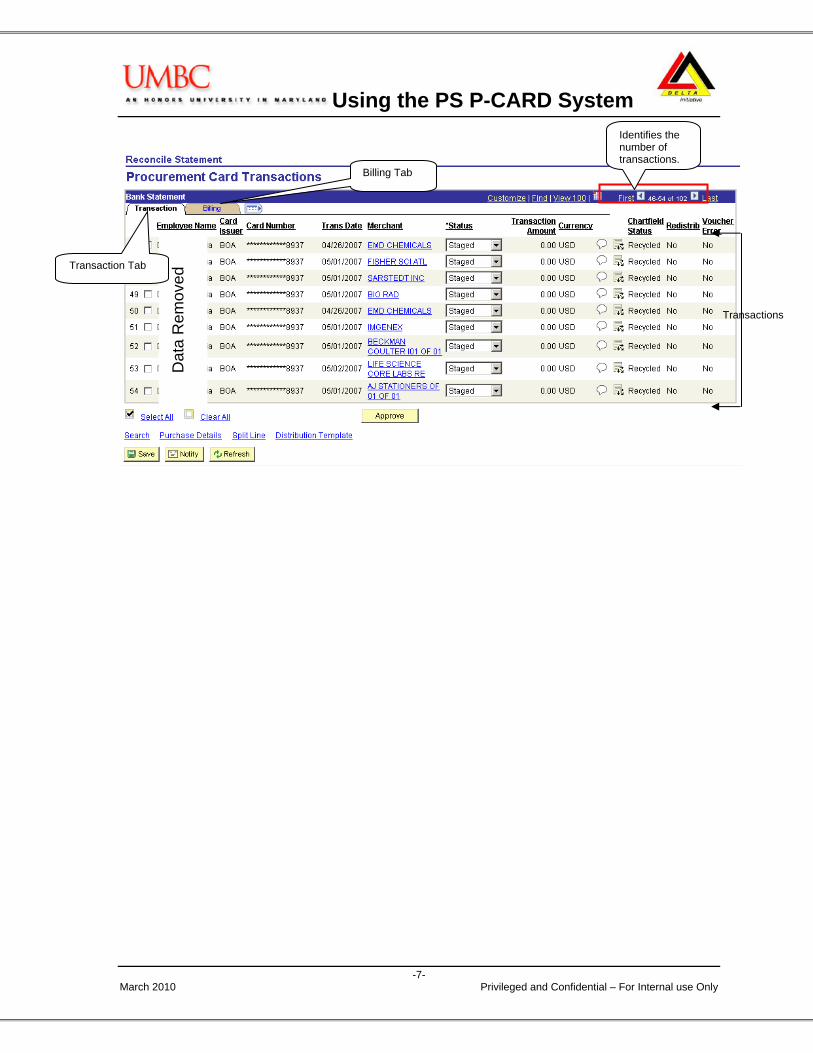
Billing Tab
Transactions
Identifies the number of transactions.
Dat
a R
emov
ed Transaction Tab
Using the PS P-CARD System
-8- March 2010 Privileged and Confidential – For Internal use Only
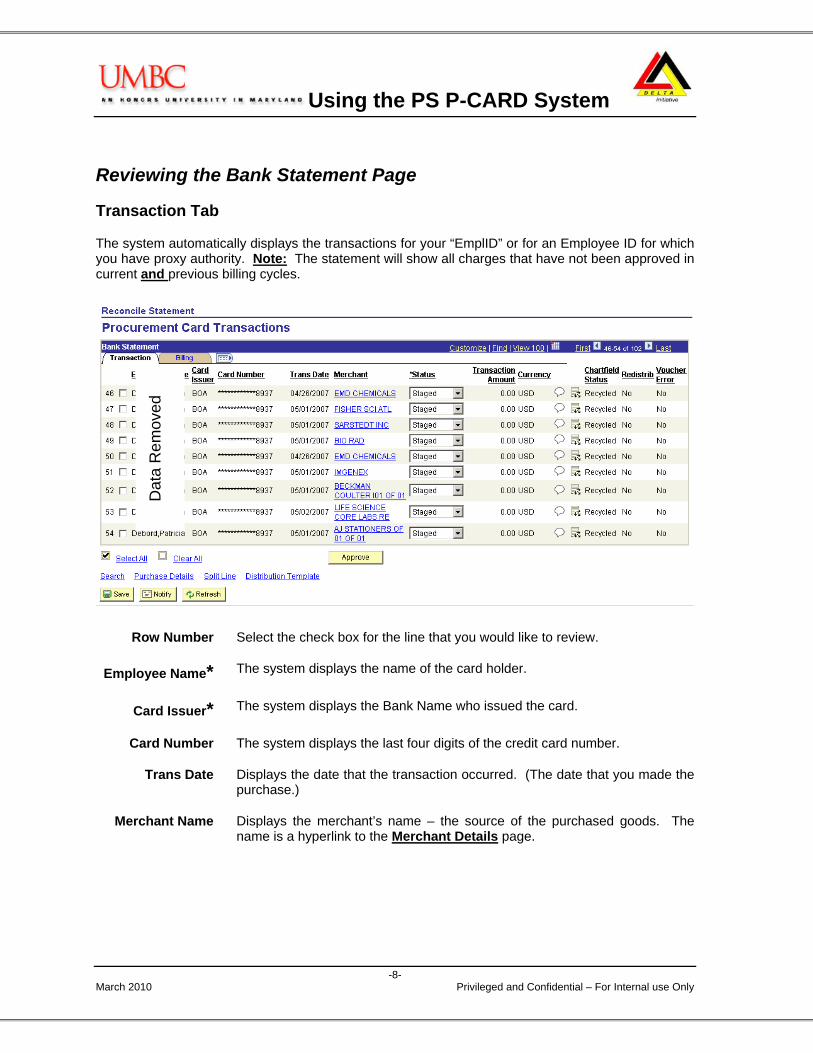
Reviewing the Bank Statement Page
Transaction Tab
The system automatically displays the transactions for your “EmplID” or for an Employee ID for which you have proxy authority. Note: The statement will show all charges that have not been approved in current and previous billing cycles.
Row Number Select the check box for the line that you would like to review.
Employee Name* The system displays the name of the card holder.
Card Issuer* The system displays the Bank Name who issued the card.
Card Number The system displays the last four digits of the credit card number.
Trans Date Displays the date that the transaction occurred. (The date that you made the purchase.)
Merchant Name Displays the merchant’s name – the source of the purchased goods. The name is a hyperlink to the Merchant Details page.
Dat
a R
emov
ed
Using the PS P-CARD System
-9- March 2010 Privileged and Confidential – For Internal use Only
Transaction Tab, continued
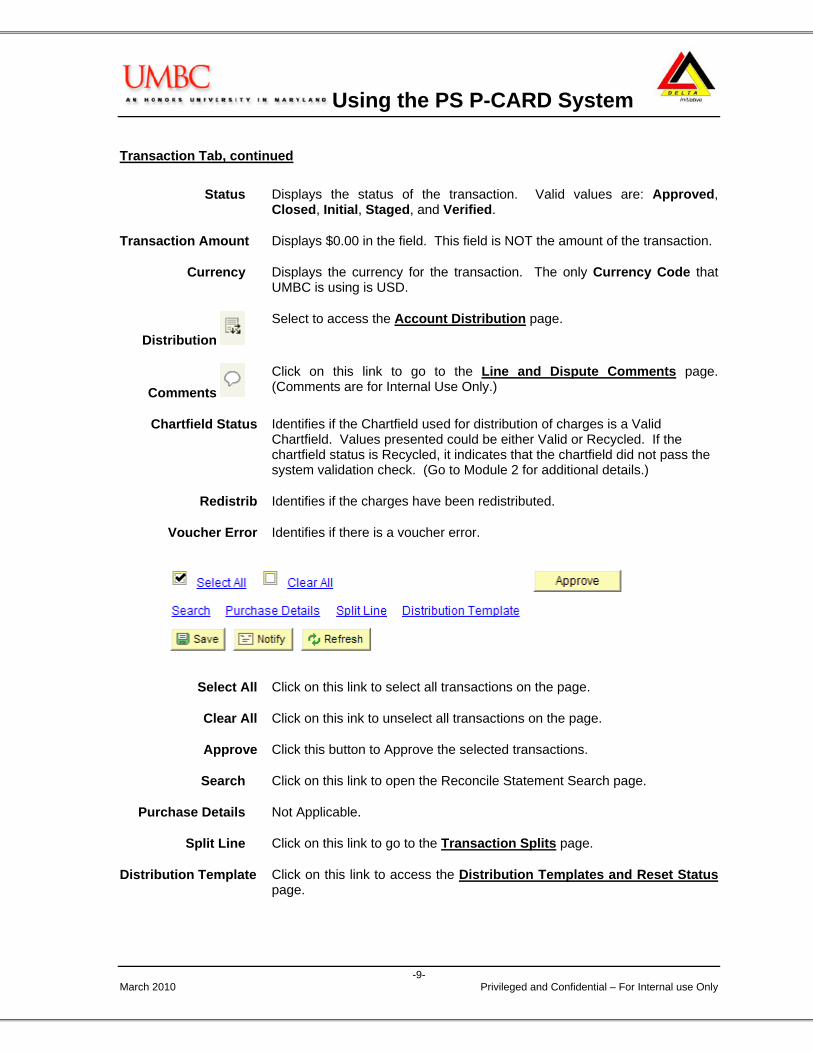
Status Displays the status of the transaction. Valid values are: Approved, Closed, Initial, Staged, and Verified.
Transaction Amount Displays $0.00 in the field. This field is NOT the amount of the transaction.
Currency Displays the currency for the transaction. The only Currency Code that UMBC is using is USD.
Distribution Select to access the Account Distribution page.
Comments Click on this link to go to the Line and Dispute Comments page. (Comments are for Internal Use Only.)
Chartfield Status Identifies if the Chartfield used for distribution of charges is a Valid Chartfield. Values presented could be either Valid or Recycled. If the chartfield status is Recycled, it indicates that the chartfield did not pass the system validation check. (Go to Module 2 for additional details.)
Redistrib Identifies if the charges have been redistributed.
Voucher Error Identifies if there is a voucher error.
Select All Click on this link to select all transactions on the page.
Clear All Click on this ink to unselect all transactions on the page.
Approve Click this button to Approve the selected transactions.
Search Click on this link to open the Reconcile Statement Search page.
Purchase Details Not Applicable.
Split Line Click on this link to go to the Transaction Splits page.
Distribution Template Click on this link to access the Distribution Templates and Reset Status page.
Using the PS P-CARD System
-10- March 2010 Privileged and Confidential – For Internal use Only
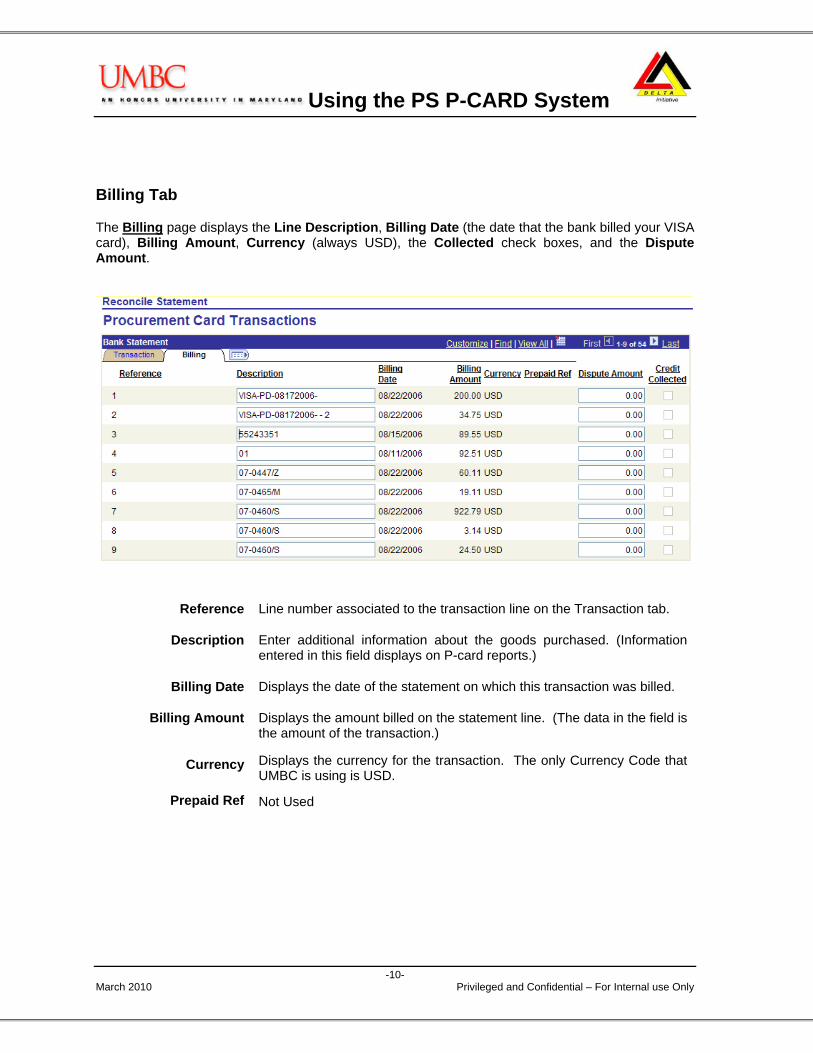
Billing Tab
The Billing page displays the Line Description, Billing Date (the date that the bank billed your VISA card), Billing Amount, Currency (always USD), the Collected check boxes, and the Dispute Amount.
Reference Line number associated to the transaction line on the Transaction tab.
Description Enter additional information about the goods purchased. (Information entered in this field displays on P-card reports.)
Billing Date Displays the date of the statement on which this transaction was billed.
Billing Amount Displays the amount billed on the statement line. (The data in the field is the amount of the transaction.)
Currency Displays the currency for the transaction. The only Currency Code that UMBC is using is USD.
Prepaid Ref Not Used
Using the PS P-CARD System
-11- March 2010 Privileged and Confidential – For Internal use Only
Billing Tab (continued)
Dispute Amount Not Required – this field is for internal use only.
If your records disagree with the billing amount, enter the amount difference in this field. Entering an amount in the Dispute Amount field does not mean that UMBC is not liable for the purchase, but rather acts as a notation that the user reconciling this account must follow up with the merchant or procurement card vendor to settle the disputed amount. If an amount is entered here, the statement line is visible on the Dispute History – Dispute page until it has been marked as collected.
If you dispute an amount, enter the amount in question in this field. Entering this information does not automatically notify Bank of America or the Procurement Department. Cardholders are still required to submit a Bank of America dispute form within 60 days of the charge to Procurement for processing. Note: If a charge is in PS P-card that you do not recognize, you should not approve it if it does not belong to your department. Leave it as “staged” and indicate in PeopleSoft that you are disputing this charge. Submit a dispute form to Procurement when you receive your bank statement. When the charge is credited by the vendor or Bank of America then you should approve both the charge and the credit. The net effect on your chartfield would then be $0.
Using the PS P-CARD System
-12- March 2010 Privileged and Confidential – For Internal use Only
Personalizing the Bank Statement
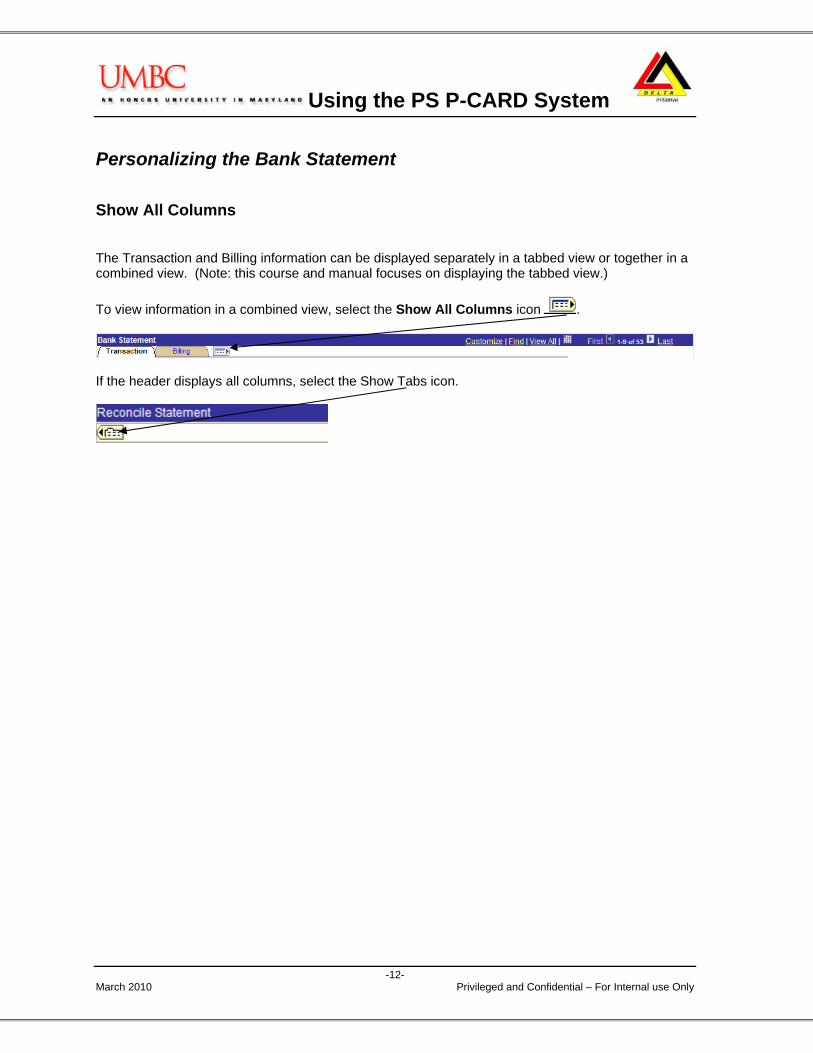
Show All Columns
The Transaction and Billing information can be displayed separately in a tabbed view or together in a combined view. (Note: this course and manual focuses on displaying the tabbed view.) To view information in a combined view, select the Show All Columns icon .
If the header displays all columns, select the Show Tabs icon.
Using the PS P-CARD System
-13- March 2010 Privileged and Confidential – For Internal use Only
Customize
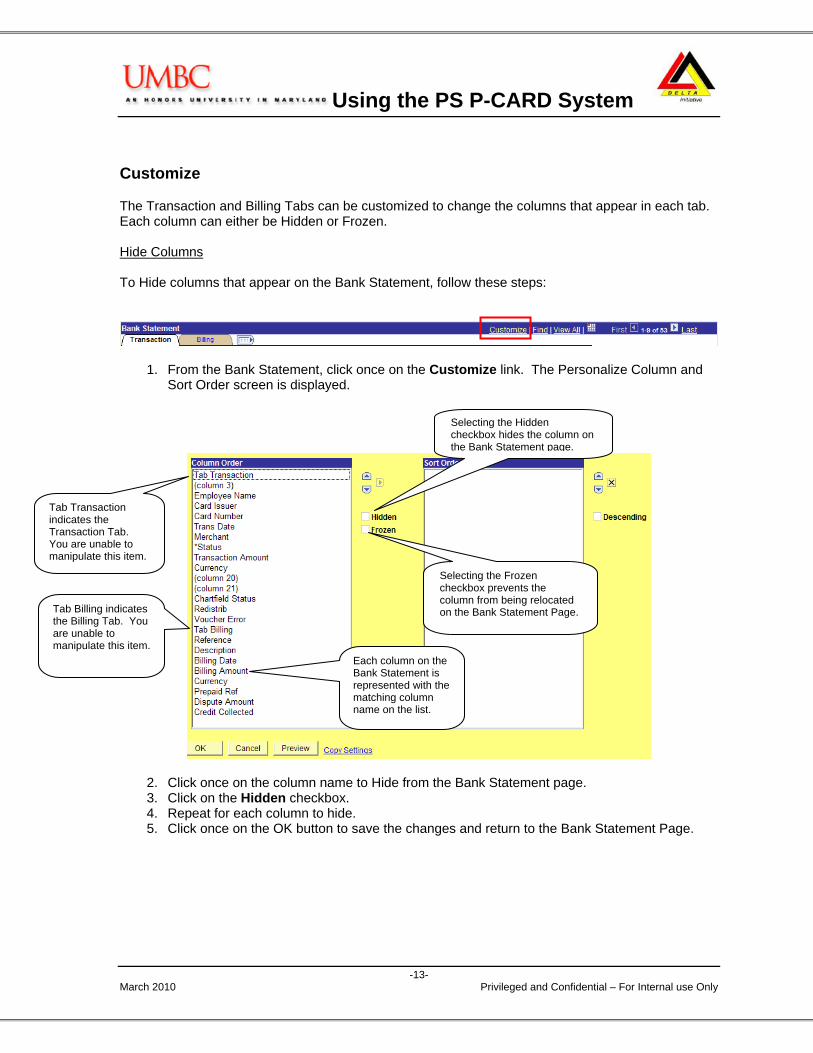
The Transaction and Billing Tabs can be customized to change the columns that appear in each tab. Each column can either be Hidden or Frozen. Hide Columns To Hide columns that appear on the Bank Statement, follow these steps:
1. From the Bank Statement, click once on the Customize link. The Personalize Column and Sort Order screen is displayed.
2. Click once on the column name to Hide from the Bank Statement page. 3. Click on the Hidden checkbox. 4. Repeat for each column to hide. 5. Click once on the OK button to save the changes and return to the Bank Statement Page.
Tab Transaction indicates the Transaction Tab. You are unable to manipulate this item.
Selecting the Hidden checkbox hides the column on the Bank Statement page.
Selecting the Frozen checkbox prevents the column from being relocated on the Bank Statement Page. Tab Billing indicates
the Billing Tab. You are unable to manipulate this item. Each column on the
Bank Statement is represented with the matching column name on the list.
Using the PS P-CARD System
-14- March 2010 Privileged and Confidential – For Internal use Only
Module 2: P-card Transactions 101 By the end of this module, you will be able to:
• Locate a transaction • Describe the difference between a Valid and Recycled Chartfield Status • Review the Chartfield distribution for a transaction • Approve a single transaction
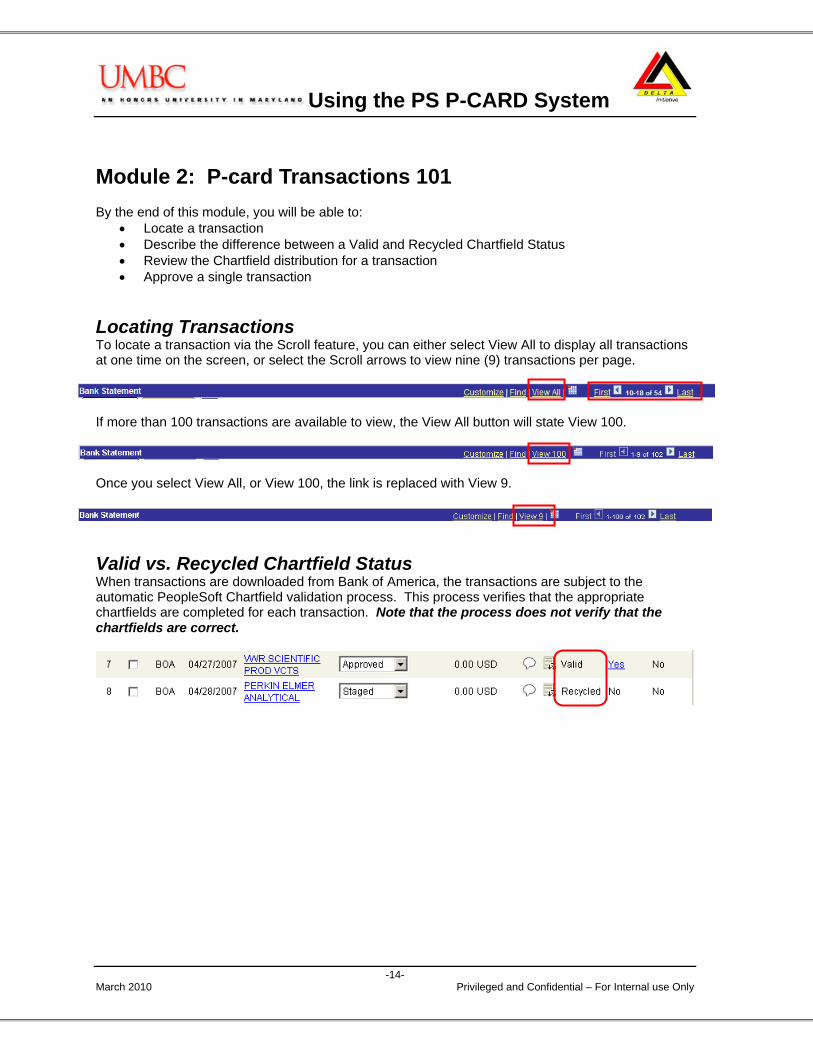
Locating Transactions To locate a transaction via the Scroll feature, you can either select View All to display all transactions at one time on the screen, or select the Scroll arrows to view nine (9) transactions per page.
If more than 100 transactions are available to view, the View All button will state View 100.
Once you select View All, or View 100, the link is replaced with View 9.
Valid vs. Recycled Chartfield Status When transactions are downloaded from Bank of America, the transactions are subject to the automatic PeopleSoft Chartfield validation process. This process verifies that the appropriate chartfields are completed for each transaction. Note that the process does not verify that the chartfields are correct.
Using the PS P-CARD System
-15- March 2010 Privileged and Confidential – For Internal use Only
After the transactions go through the automated PeopleSoft validation process during the download from Bank of America, they are given either a Valid or Recycled Chartfield Status.
• A Valid chartfield status means that the appropriate chartfield fields are completed. • A Recycled chartfield status indicates that the chartfield fields did not pass the validation
process. This typically means that all required chartfield fields are not completed. o Fund Code 1253, the Grant Fund Code, often appears as Recycled.
In order to Approve a transaction, the chartfield status must be Valid. To change a chartfield status from Recycled to Valid, you must modify the account distribution for the transaction.
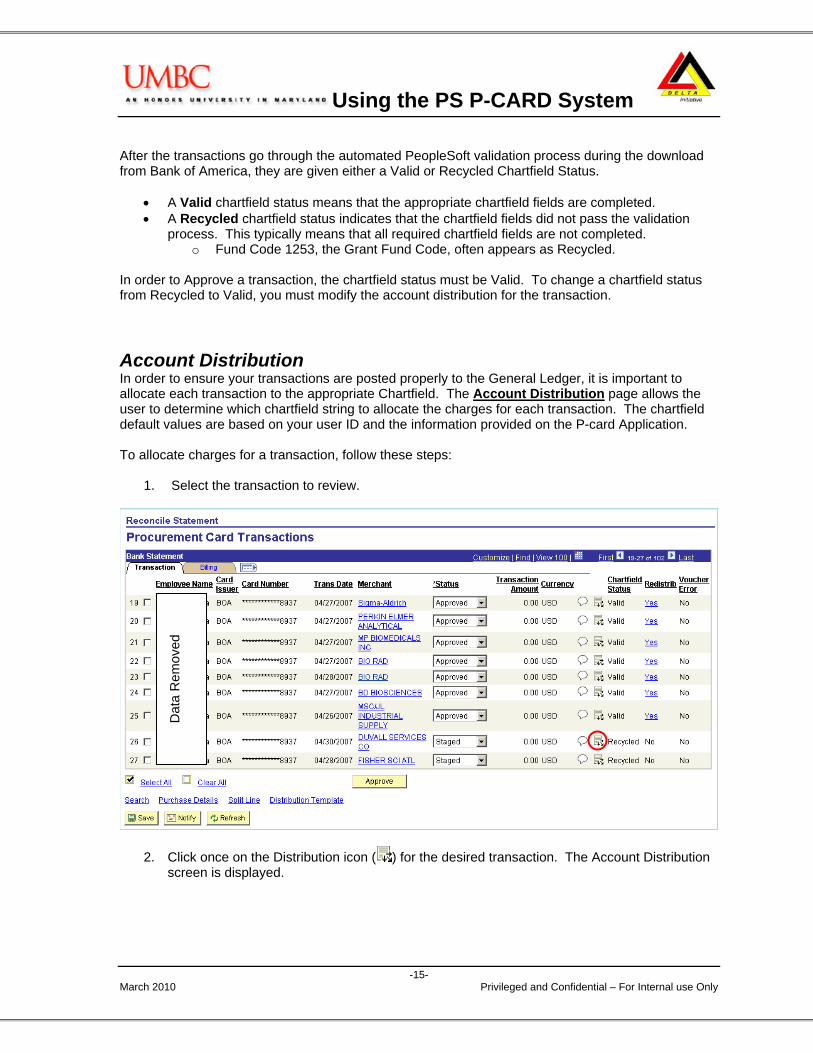
Account Distribution In order to ensure your transactions are posted properly to the General Ledger, it is important to allocate each transaction to the appropriate Chartfield. The Account Distribution page allows the user to determine which chartfield string to allocate the charges for each transaction. The chartfield default values are based on your user ID and the information provided on the P-card Application. To allocate charges for a transaction, follow these steps:
1. Select the transaction to review.
2. Click once on the Distribution icon ( ) for the desired transaction. The Account Distribution screen is displayed.
Dat
a R
emov
ed
Using the PS P-CARD System
-16- March 2010 Privileged and Confidential – For Internal use Only
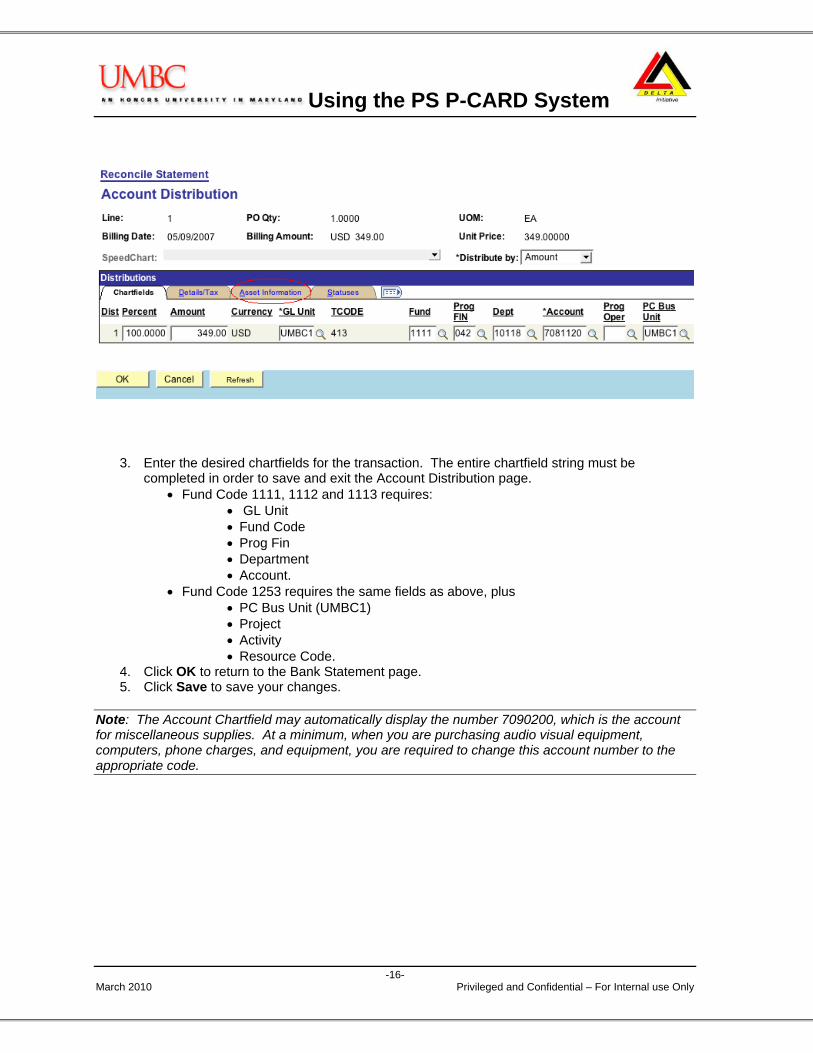
3. Enter the desired chartfields for the transaction. The entire chartfield string must be
completed in order to save and exit the Account Distribution page. • Fund Code 1111, 1112 and 1113 requires:
• GL Unit • Fund Code • Prog Fin • Department • Account.
• Fund Code 1253 requires the same fields as above, plus • PC Bus Unit (UMBC1) • Project • Activity • Resource Code.
4. Click OK to return to the Bank Statement page. 5. Click Save to save your changes.
Note: The Account Chartfield may automatically display the number 7090200, which is the account for miscellaneous supplies. At a minimum, when you are purchasing audio visual equipment, computers, phone charges, and equipment, you are required to change this account number to the appropriate code.
Using the PS P-CARD System
-17- March 2010 Privileged and Confidential – For Internal use Only
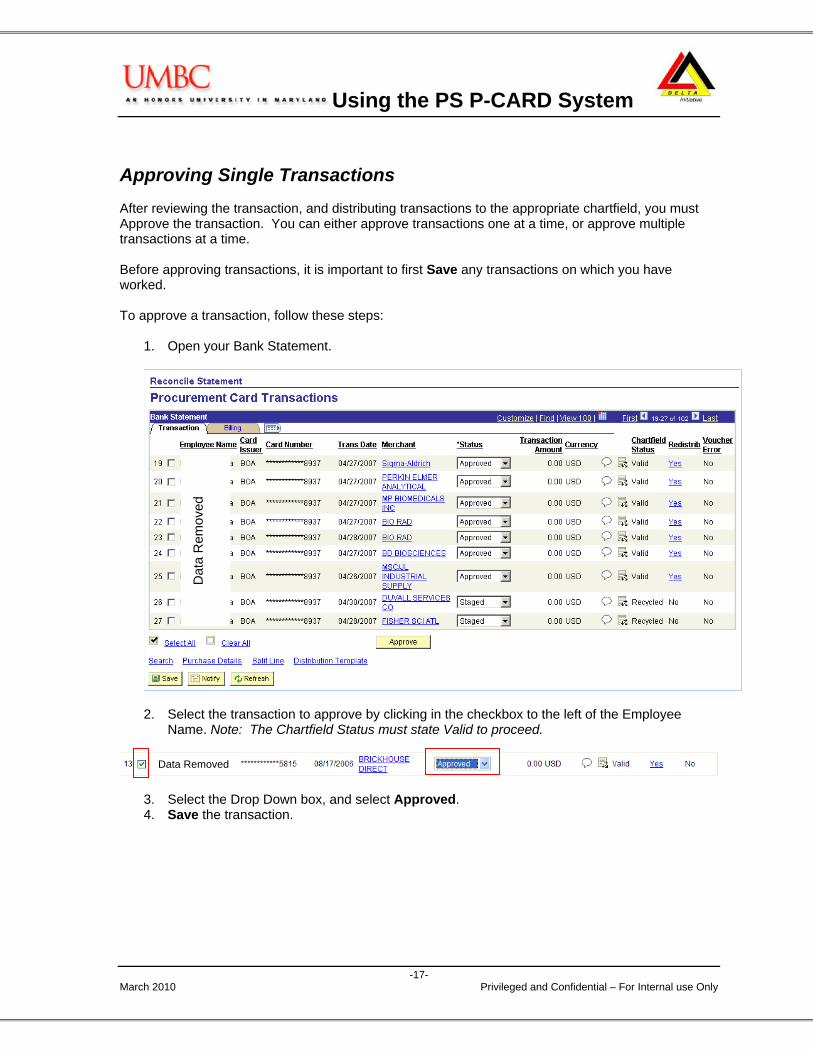
Approving Single Transactions After reviewing the transaction, and distributing transactions to the appropriate chartfield, you must Approve the transaction. You can either approve transactions one at a time, or approve multiple transactions at a time. Before approving transactions, it is important to first Save any transactions on which you have worked. To approve a transaction, follow these steps:
1. Open your Bank Statement.
2. Select the transaction to approve by clicking in the checkbox to the left of the Employee
Name. Note: The Chartfield Status must state Valid to proceed.
3. Select the Drop Down box, and select Approved. 4. Save the transaction.
Data Removed
Dat
a R
emov
ed
Using the PS P-CARD System
-18- March 2010 Privileged and Confidential – For Internal use Only
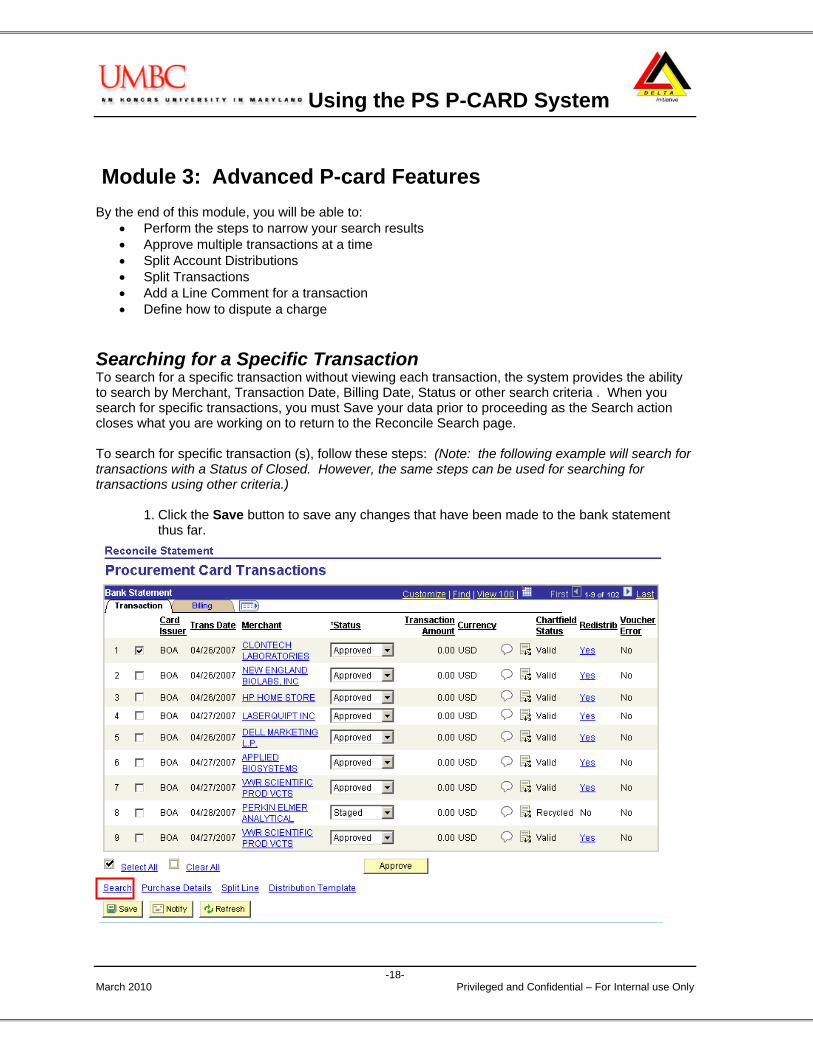
Module 3: Advanced P-card Features By the end of this module, you will be able to:
• Perform the steps to narrow your search results • Approve multiple transactions at a time • Split Account Distributions • Split Transactions • Add a Line Comment for a transaction • Define how to dispute a charge
Searching for a Specific Transaction To search for a specific transaction without viewing each transaction, the system provides the ability to search by Merchant, Transaction Date, Billing Date, Status or other search criteria . When you search for specific transactions, you must Save your data prior to proceeding as the Search action closes what you are working on to return to the Reconcile Search page. To search for specific transaction (s), follow these steps: (Note: the following example will search for transactions with a Status of Closed. However, the same steps can be used for searching for transactions using other criteria.)
1. Click the Save button to save any changes that have been made to the bank statement thus far.
Using the PS P-CARD System
-19- March 2010 Privileged and Confidential – For Internal use Only
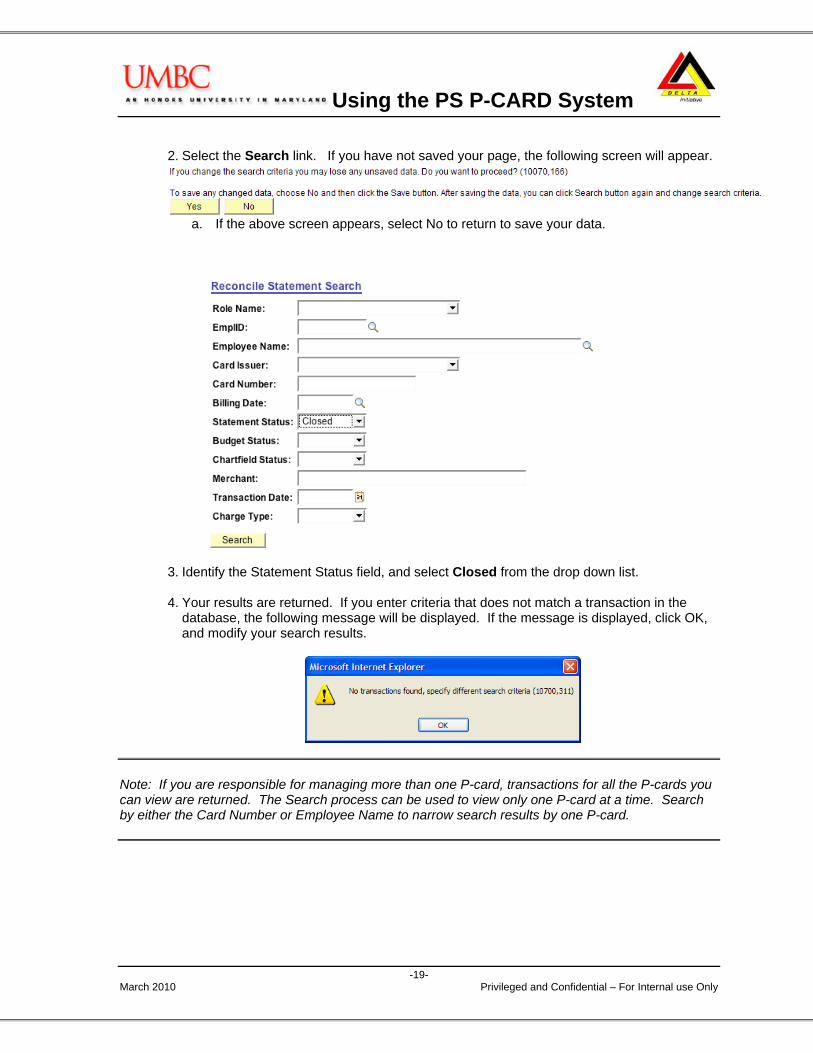
2. Select the Search link. If you have not saved your page, the following screen will appear.
a. If the above screen appears, select No to return to save your data.
3. Identify the Statement Status field, and select Closed from the drop down list. 4. Your results are returned. If you enter criteria that does not match a transaction in the
database, the following message will be displayed. If the message is displayed, click OK, and modify your search results.
Note: If you are responsible for managing more than one P-card, transactions for all the P-cards you can view are returned. The Search process can be used to view only one P-card at a time. Search by either the Card Number or Employee Name to narrow search results by one P-card.
Using the PS P-CARD System
-20- March 2010 Privileged and Confidential – For Internal use Only
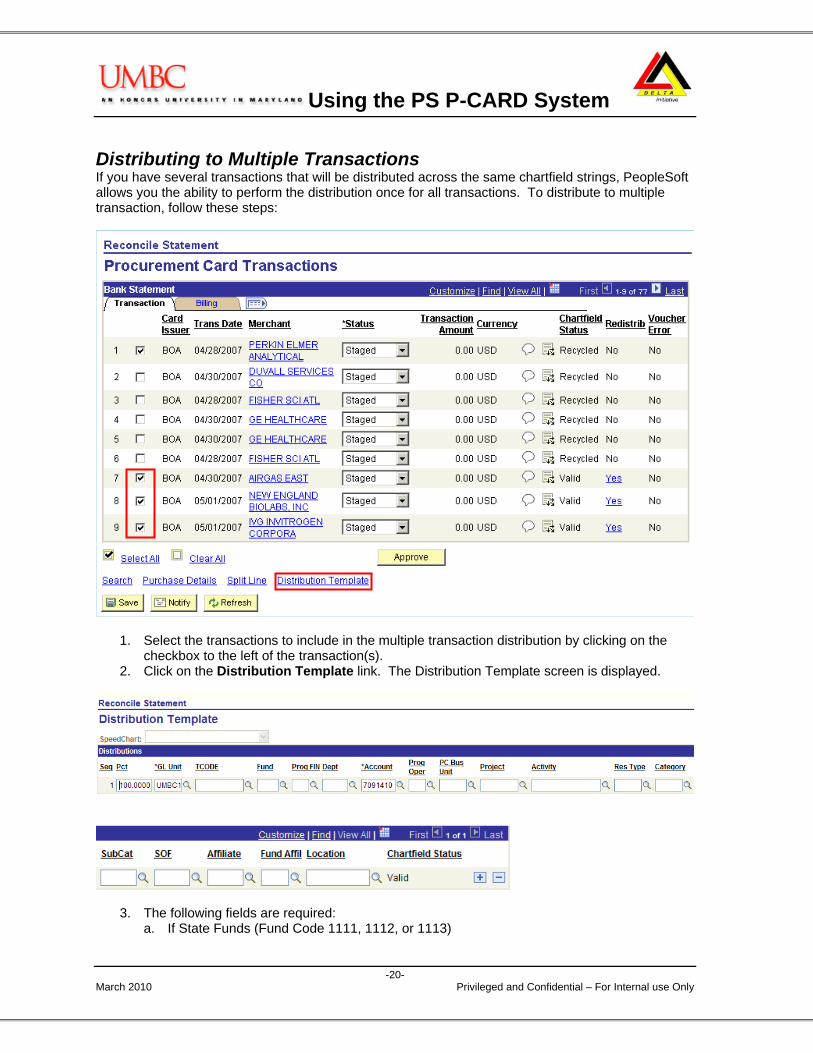
Distributing to Multiple Transactions If you have several transactions that will be distributed across the same chartfield strings, PeopleSoft allows you the ability to perform the distribution once for all transactions. To distribute to multiple transaction, follow these steps:
1. Select the transactions to include in the multiple transaction distribution by clicking on the checkbox to the left of the transaction(s).
2. Click on the Distribution Template link. The Distribution Template screen is displayed.
3. The following fields are required: a. If State Funds (Fund Code 1111, 1112, or 1113)
Using the PS P-CARD System
-21- March 2010 Privileged and Confidential – For Internal use Only
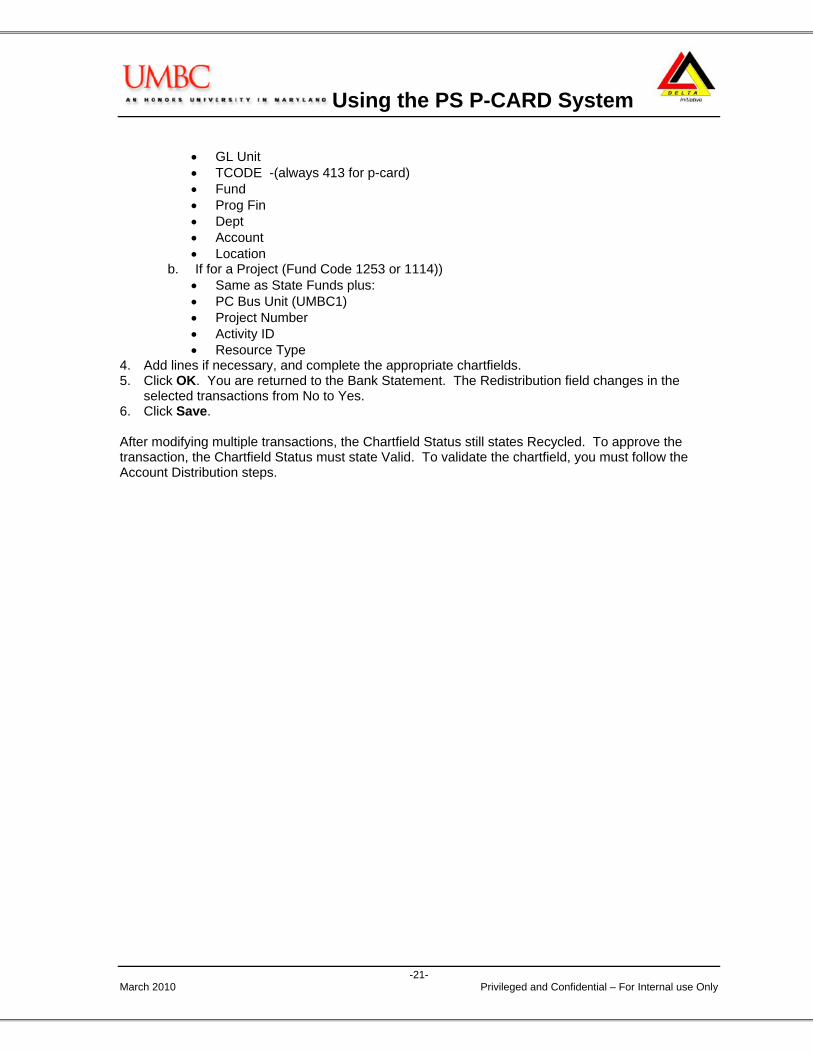
• GL Unit • TCODE -(always 413 for p-card) • Fund • Prog Fin • Dept • Account • Location
b. If for a Project (Fund Code 1253 or 1114)) • Same as State Funds plus: • PC Bus Unit (UMBC1) • Project Number • Activity ID • Resource Type
4. Add lines if necessary, and complete the appropriate chartfields. 5. Click OK. You are returned to the Bank Statement. The Redistribution field changes in the
selected transactions from No to Yes. 6. Click Save. After modifying multiple transactions, the Chartfield Status still states Recycled. To approve the transaction, the Chartfield Status must state Valid. To validate the chartfield, you must follow the Account Distribution steps.
Using the PS P-CARD System
-22- March 2010 Privileged and Confidential – For Internal use Only
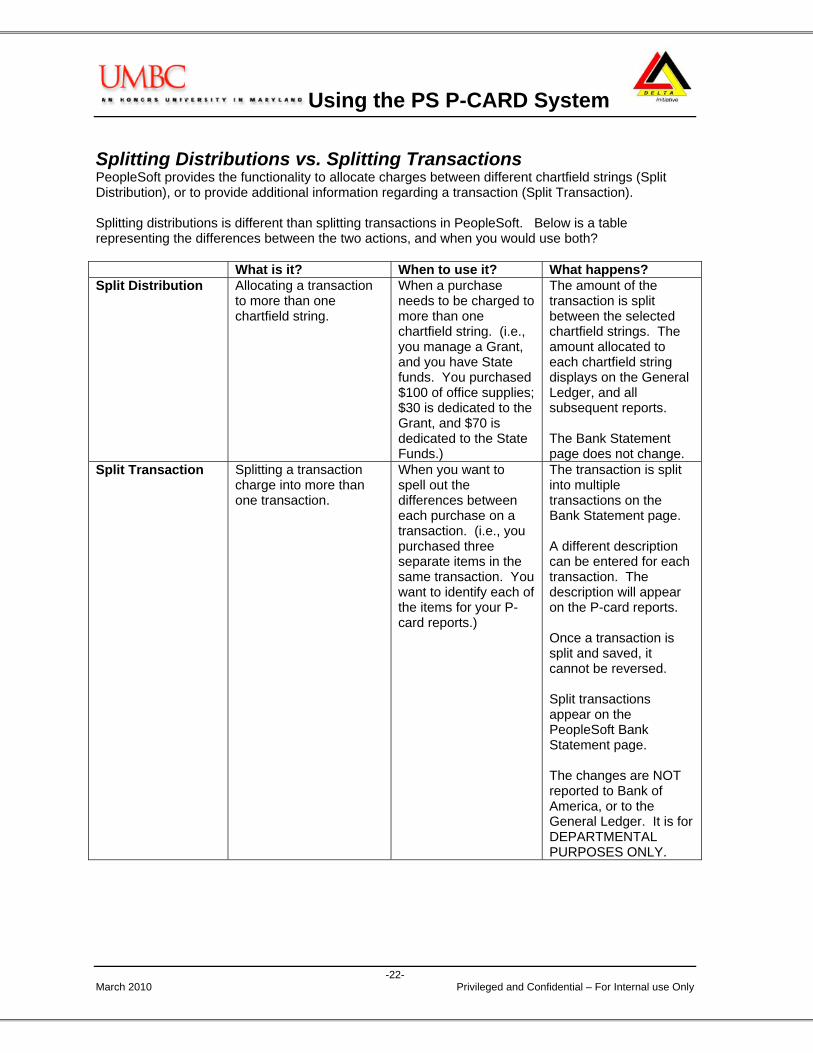
Splitting Distributions vs. Splitting Transactions PeopleSoft provides the functionality to allocate charges between different chartfield strings (Split Distribution), or to provide additional information regarding a transaction (Split Transaction). Splitting distributions is different than splitting transactions in PeopleSoft. Below is a table representing the differences between the two actions, and when you would use both? What is it? When to use it? What happens? Split Distribution Allocating a transaction
to more than one chartfield string.
When a purchase needs to be charged to more than one chartfield string. (i.e., you manage a Grant, and you have State funds. You purchased $100 of office supplies; $30 is dedicated to the Grant, and $70 is dedicated to the State Funds.)
The amount of the transaction is split between the selected chartfield strings. The amount allocated to each chartfield string displays on the General Ledger, and all subsequent reports. The Bank Statement page does not change.
Split Transaction Splitting a transaction charge into more than one transaction.
When you want to spell out the differences between each purchase on a transaction. (i.e., you purchased three separate items in the same transaction. You want to identify each of the items for your P-card reports.)
The transaction is split into multiple transactions on the Bank Statement page. A different description can be entered for each transaction. The description will appear on the P-card reports. Once a transaction is split and saved, it cannot be reversed. Split transactions appear on the PeopleSoft Bank Statement page. The changes are NOT reported to Bank of America, or to the General Ledger. It is for DEPARTMENTAL PURPOSES ONLY.
Using the PS P-CARD System
-23- March 2010 Privileged and Confidential – For Internal use Only
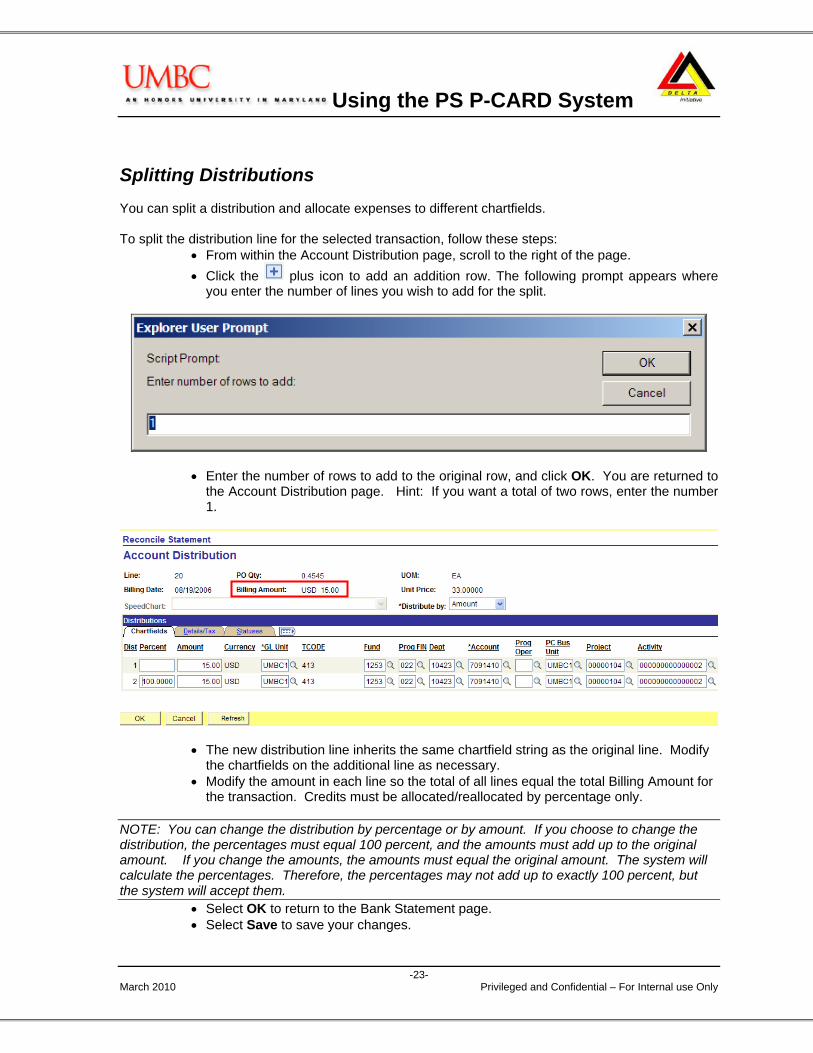
Splitting Distributions You can split a distribution and allocate expenses to different chartfields. To split the distribution line for the selected transaction, follow these steps:
• From within the Account Distribution page, scroll to the right of the page. • Click the plus icon to add an addition row. The following prompt appears where
you enter the number of lines you wish to add for the split.
• Enter the number of rows to add to the original row, and click OK. You are returned to the Account Distribution page. Hint: If you want a total of two rows, enter the number 1.
• The new distribution line inherits the same chartfield string as the original line. Modify the chartfields on the additional line as necessary.
• Modify the amount in each line so the total of all lines equal the total Billing Amount for the transaction. Credits must be allocated/reallocated by percentage only.
NOTE: You can change the distribution by percentage or by amount. If you choose to change the distribution, the percentages must equal 100 percent, and the amounts must add up to the original amount. If you change the amounts, the amounts must equal the original amount. The system will calculate the percentages. Therefore, the percentages may not add up to exactly 100 percent, but the system will accept them.
• Select OK to return to the Bank Statement page. • Select Save to save your changes.
Using the PS P-CARD System
-24- March 2010 Privileged and Confidential – For Internal use Only
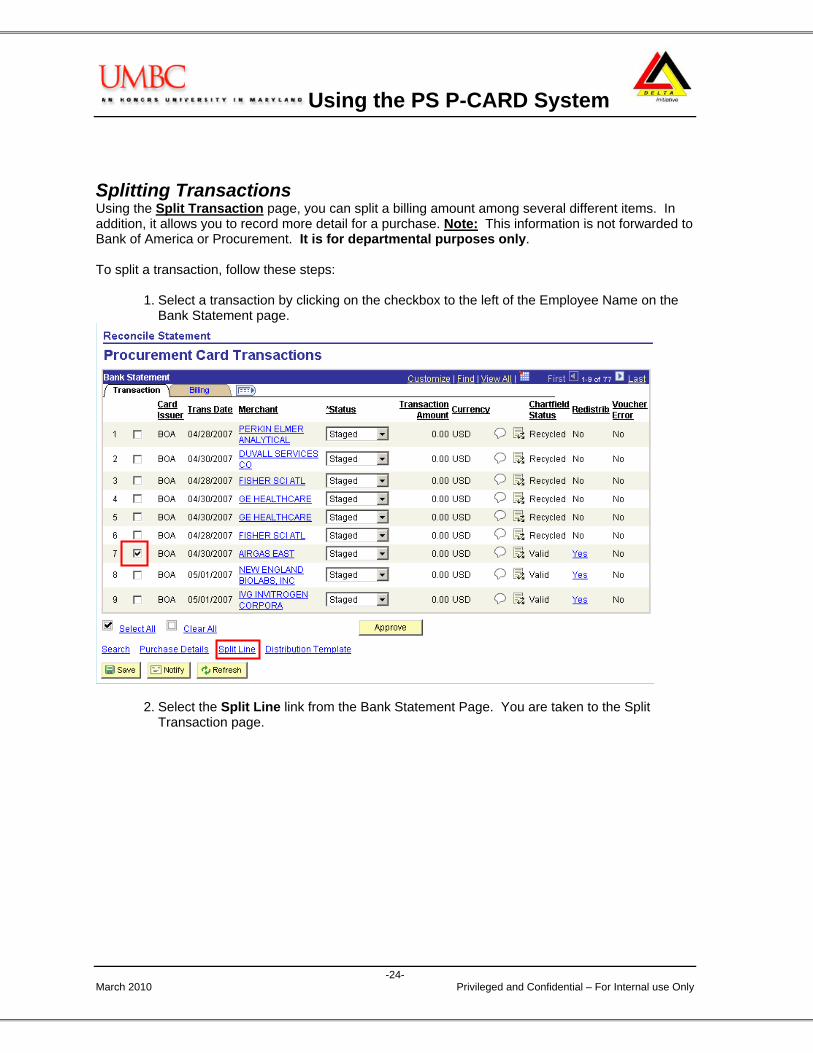
Splitting Transactions Using the Split Transaction page, you can split a billing amount among several different items. In addition, it allows you to record more detail for a purchase. Note: This information is not forwarded to Bank of America or Procurement. It is for departmental purposes only. To split a transaction, follow these steps:
1. Select a transaction by clicking on the checkbox to the left of the Employee Name on the Bank Statement page.
2. Select the Split Line link from the Bank Statement Page. You are taken to the Split Transaction page.
Using the PS P-CARD System
-25- March 2010 Privileged and Confidential – For Internal use Only
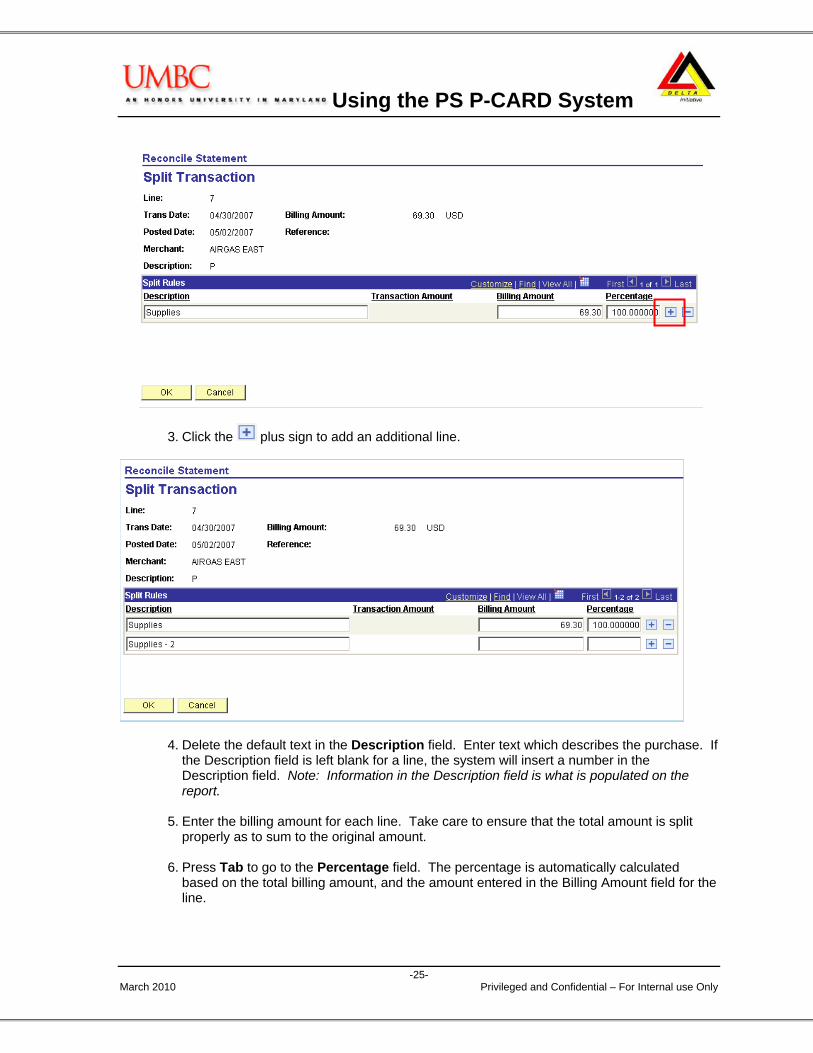
3. Click the plus sign to add an additional line.
4. Delete the default text in the Description field. Enter text which describes the purchase. If the Description field is left blank for a line, the system will insert a number in the Description field. Note: Information in the Description field is what is populated on the report.
5. Enter the billing amount for each line. Take care to ensure that the total amount is split
properly as to sum to the original amount. 6. Press Tab to go to the Percentage field. The percentage is automatically calculated
based on the total billing amount, and the amount entered in the Billing Amount field for the line.
Using the PS P-CARD System
-26- March 2010 Privileged and Confidential – For Internal use Only
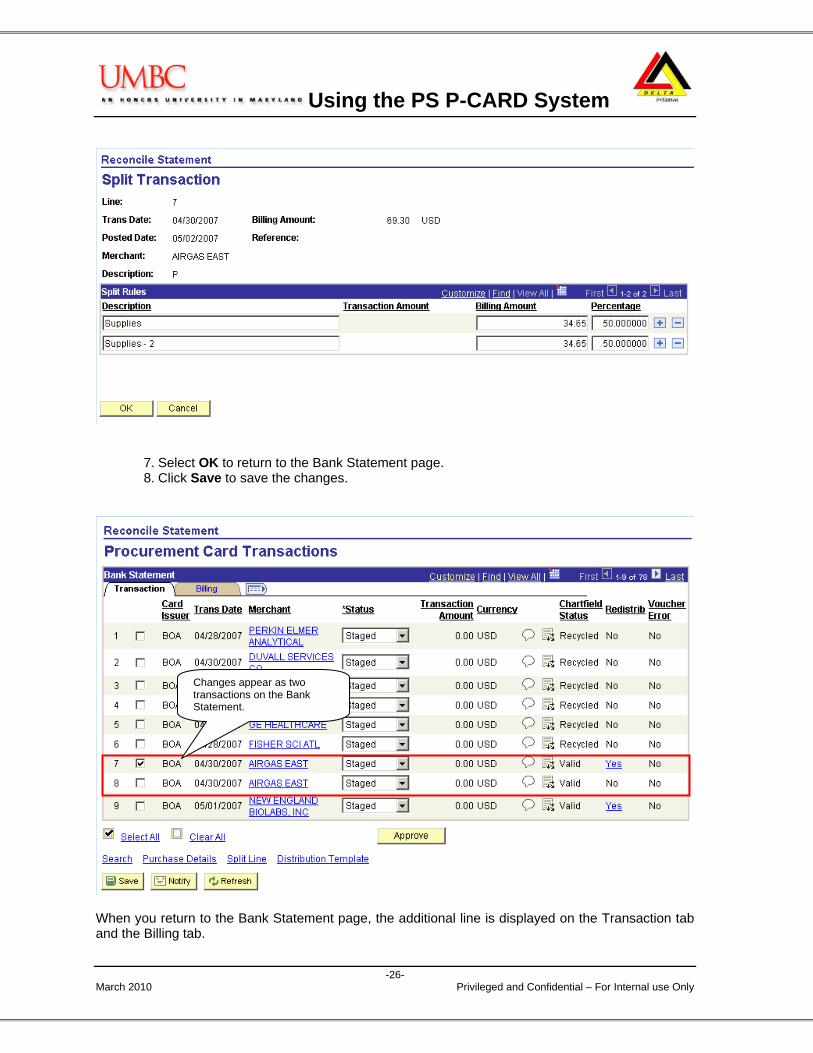
7. Select OK to return to the Bank Statement page. 8. Click Save to save the changes.
When you return to the Bank Statement page, the additional line is displayed on the Transaction tab and the Billing tab.
Changes appear as two transactions on the Bank Statement.
Using the PS P-CARD System
-27- March 2010 Privileged and Confidential – For Internal use Only
The newly created lines will inherit the same accounting distribution as the original line. If the distributions need to be changed or split, you will need to click the Sel check box beside the line and then click the Distribution link.
NOTE: When you split a line, the information does not change the distribution of the charges. Splitting a line is for your own records only; the information does not affect the UMBC ledgers or your VISA charges and payments. NOTE: Splitting a transaction will add a new line for each split line on both the Transaction Tab and the Billing Tab. When approving transactions after splitting lines, it is recommended to select the View All Columns icon ( ) in order to view the details for each line prior to approving it.
NOTE: If you split the line AFTER you reallocate the accounting distribution, the new lines will inherit the reallocation Chartfields.
Using the PS P-CARD System
March 2010 -28- Privileged and Confidential – For Internal use Only
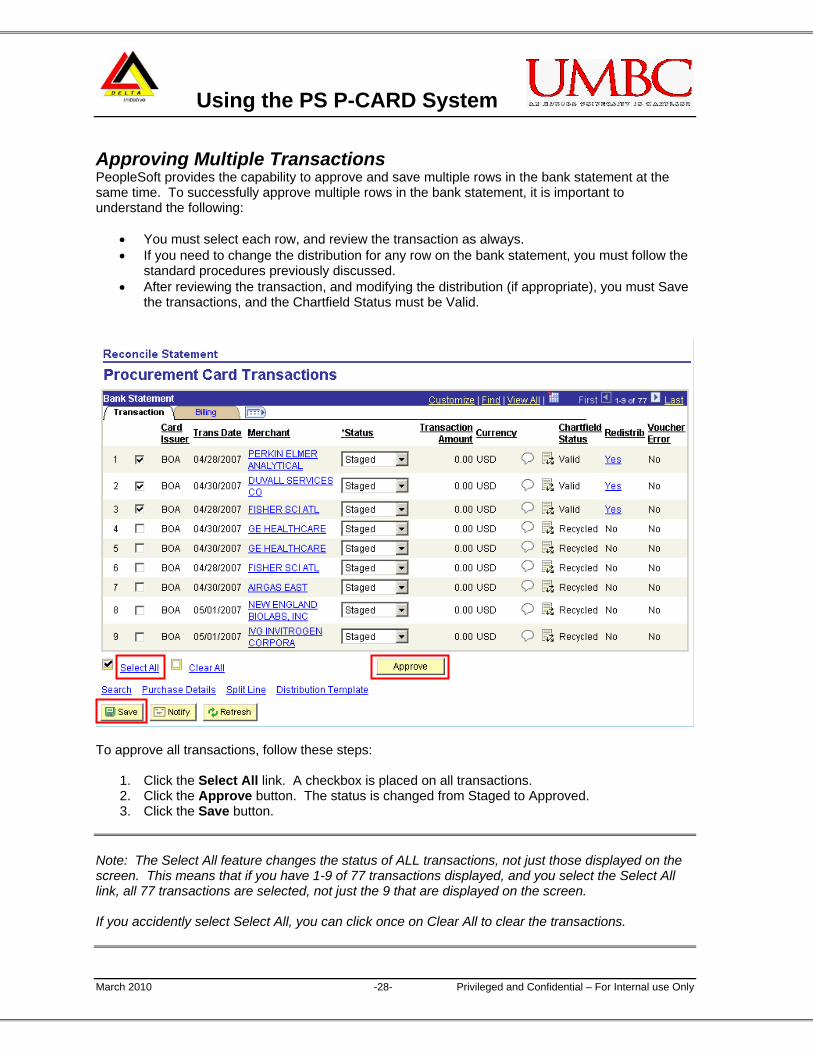
Approving Multiple Transactions PeopleSoft provides the capability to approve and save multiple rows in the bank statement at the same time. To successfully approve multiple rows in the bank statement, it is important to understand the following:
• You must select each row, and review the transaction as always. • If you need to change the distribution for any row on the bank statement, you must follow the
standard procedures previously discussed. • After reviewing the transaction, and modifying the distribution (if appropriate), you must Save
the transactions, and the Chartfield Status must be Valid.
To approve all transactions, follow these steps:
1. Click the Select All link. A checkbox is placed on all transactions. 2. Click the Approve button. The status is changed from Staged to Approved. 3. Click the Save button.
Note: The Select All feature changes the status of ALL transactions, not just those displayed on the screen. This means that if you have 1-9 of 77 transactions displayed, and you select the Select All link, all 77 transactions are selected, not just the 9 that are displayed on the screen. If you accidently select Select All, you can click once on Clear All to clear the transactions.
Using the PS P-CARD System
March 2010 -29- Privileged and Confidential – For Internal use Only
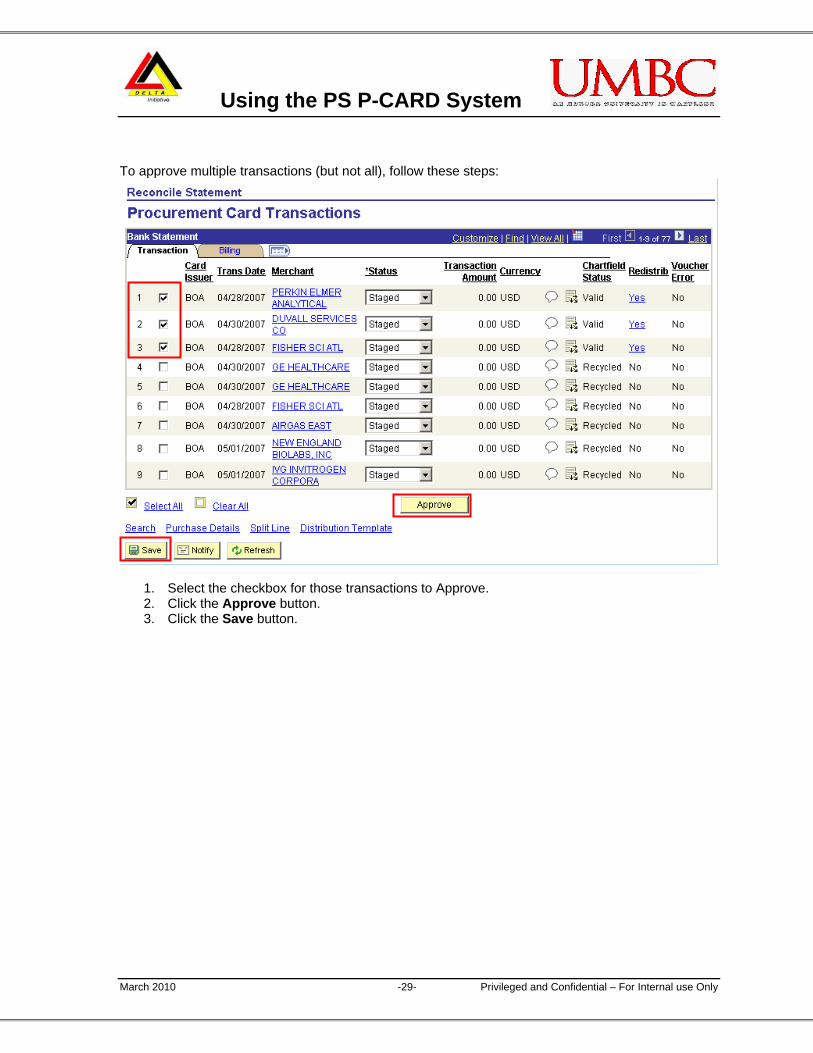
To approve multiple transactions (but not all), follow these steps:
1. Select the checkbox for those transactions to Approve. 2. Click the Approve button. 3. Click the Save button.
Using the PS P-CARD System
March 2010 -30- Privileged and Confidential – For Internal use Only
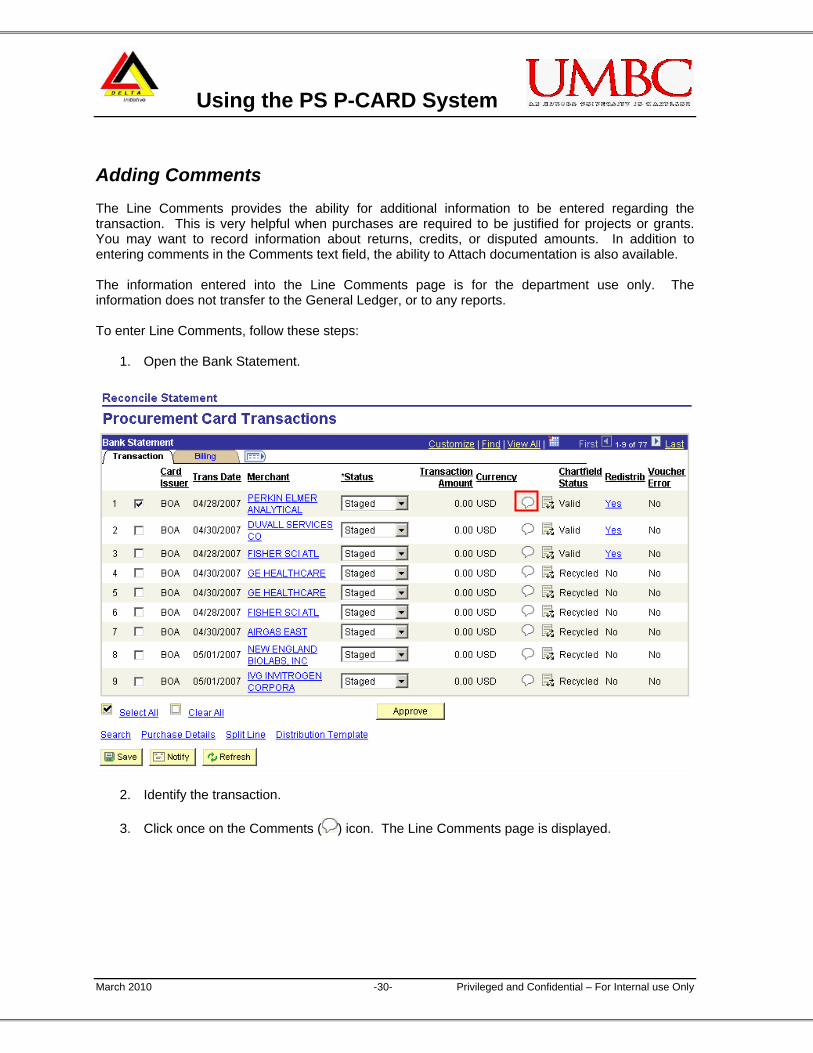
Adding Comments The Line Comments provides the ability for additional information to be entered regarding the transaction. This is very helpful when purchases are required to be justified for projects or grants. You may want to record information about returns, credits, or disputed amounts. In addition to entering comments in the Comments text field, the ability to Attach documentation is also available. The information entered into the Line Comments page is for the department use only. The information does not transfer to the General Ledger, or to any reports. To enter Line Comments, follow these steps:
1. Open the Bank Statement.
2. Identify the transaction.
3. Click once on the Comments ( ) icon. The Line Comments page is displayed.
Using the PS P-CARD System
March 2010 -31- Privileged and Confidential – For Internal use Only
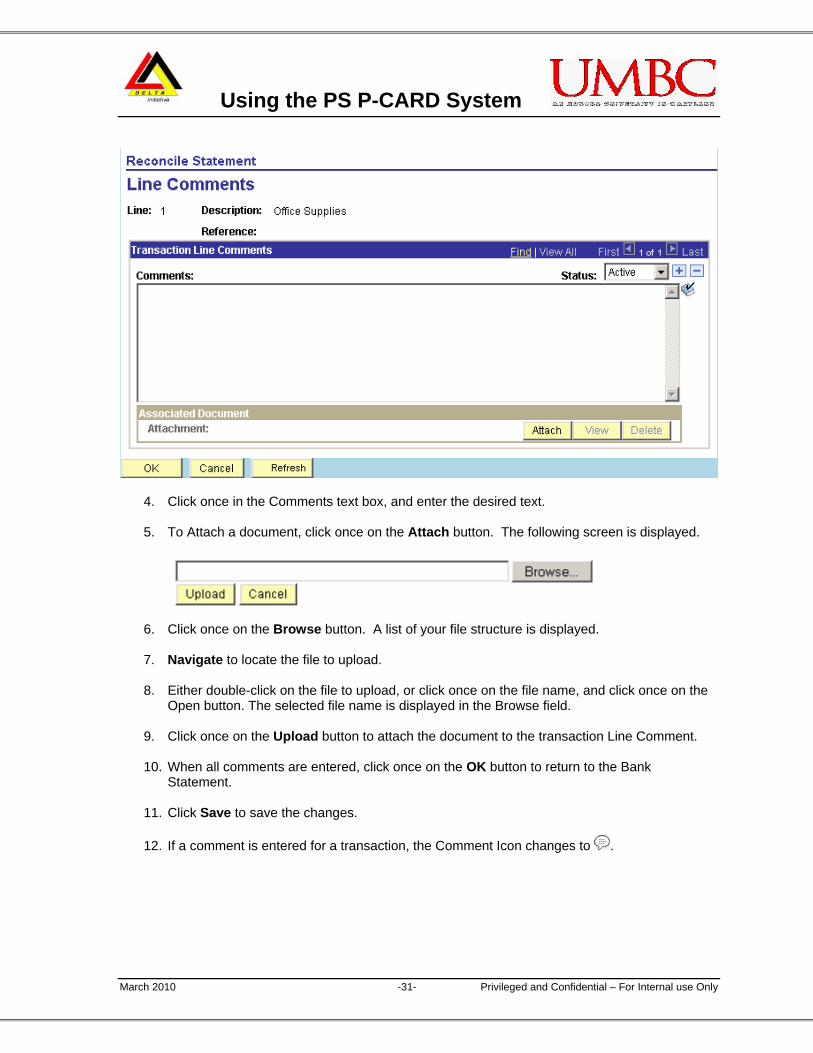
4. Click once in the Comments text box, and enter the desired text. 5. To Attach a document, click once on the Attach button. The following screen is displayed.
6. Click once on the Browse button. A list of your file structure is displayed. 7. Navigate to locate the file to upload.
8. Either double-click on the file to upload, or click once on the file name, and click once on the
Open button. The selected file name is displayed in the Browse field.
9. Click once on the Upload button to attach the document to the transaction Line Comment.
10. When all comments are entered, click once on the OK button to return to the Bank Statement.
11. Click Save to save the changes.
12. If a comment is entered for a transaction, the Comment Icon changes to .
Using the PS P-CARD System
March 2010 -32- Privileged and Confidential – For Internal use Only
Locating Comments Once a transaction is approved, and validated by Procurement, the transaction is no longer on the Bank Statement. This does not mean that the transaction is not available to view. You can view old transactions by performing a Search on Closed transactions. To perform a search on Closed transactions, follow the steps in the Searching for a Specific Transaction section of the manual. When prompted on the search screen, select the Statement Status of Closed. You can further narrow the search by date, or other criteria if desired. Transactions with comments can be identified by the Comment icon with text lines inside ( ). Click once on the comment icon to open the comments. Please note, that you should not make any changes after the transaction has been approved.
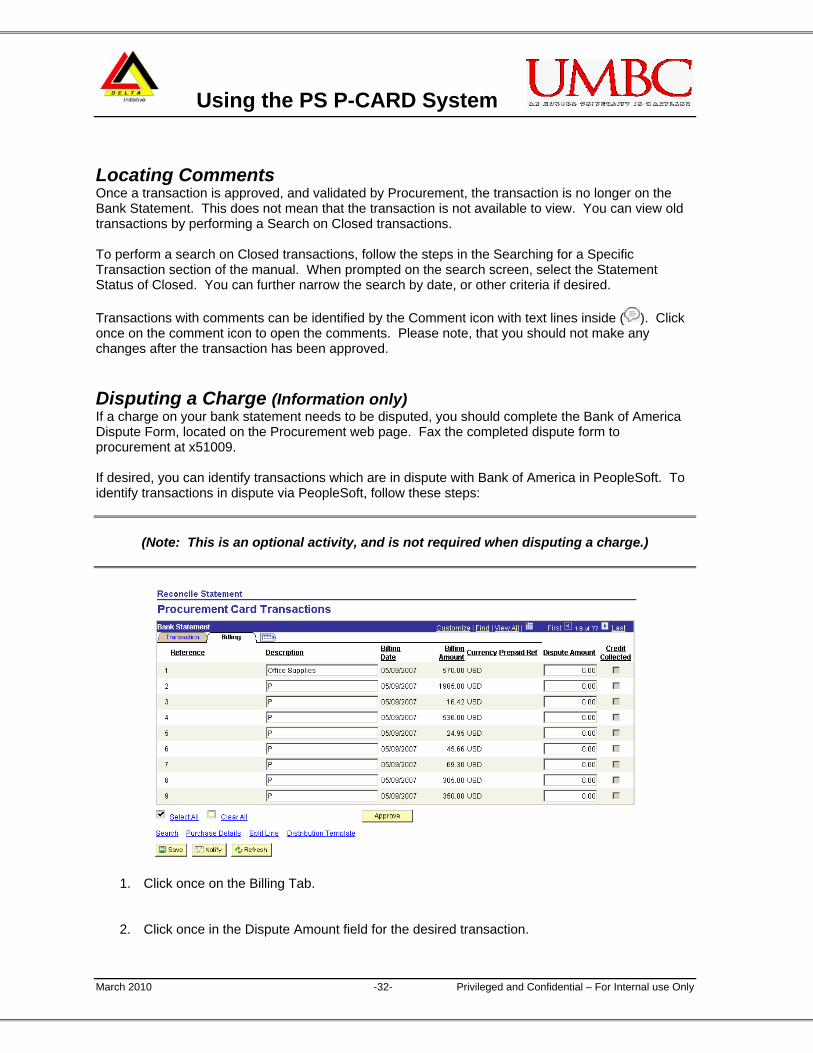
Disputing a Charge (Information only) If a charge on your bank statement needs to be disputed, you should complete the Bank of America Dispute Form, located on the Procurement web page. Fax the completed dispute form to procurement at x51009. If desired, you can identify transactions which are in dispute with Bank of America in PeopleSoft. To identify transactions in dispute via PeopleSoft, follow these steps:
(Note: This is an optional activity, and is not required when disputing a charge.)
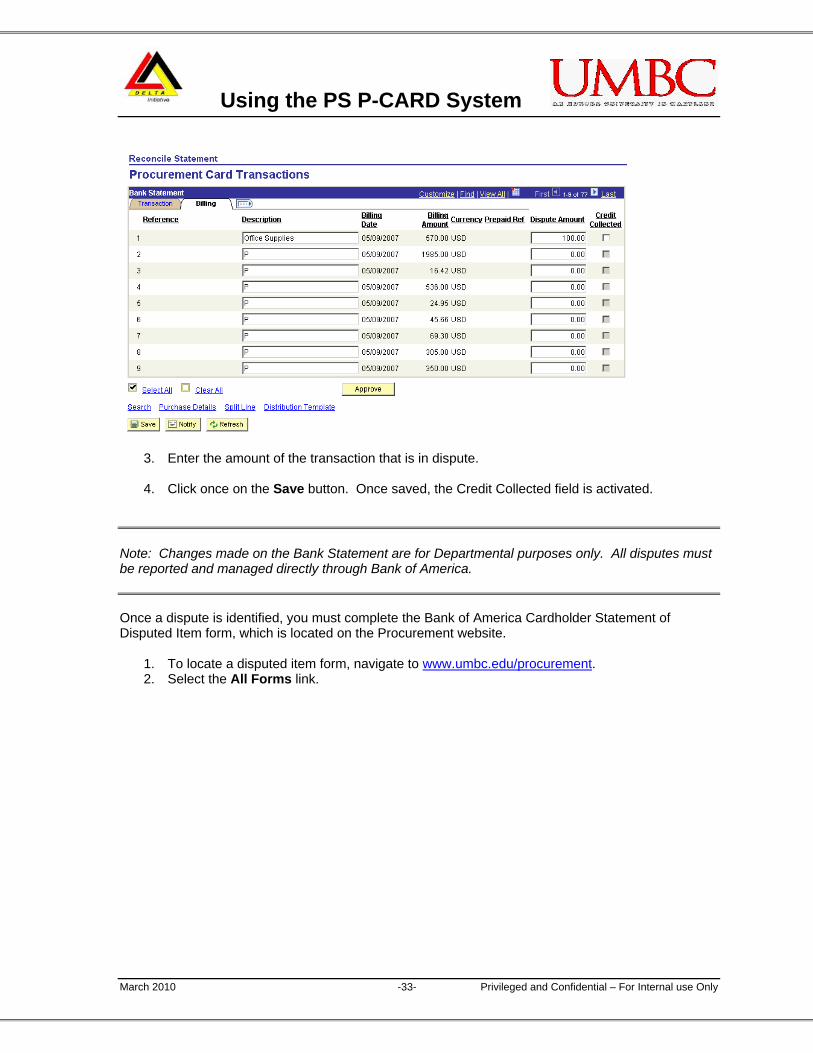
1. Click once on the Billing Tab.
2. Click once in the Dispute Amount field for the desired transaction.
Using the PS P-CARD System
March 2010 -33- Privileged and Confidential – For Internal use Only
3. Enter the amount of the transaction that is in dispute.
4. Click once on the Save button. Once saved, the Credit Collected field is activated.
Note: Changes made on the Bank Statement are for Departmental purposes only. All disputes must be reported and managed directly through Bank of America. Once a dispute is identified, you must complete the Bank of America Cardholder Statement of Disputed Item form, which is located on the Procurement website.
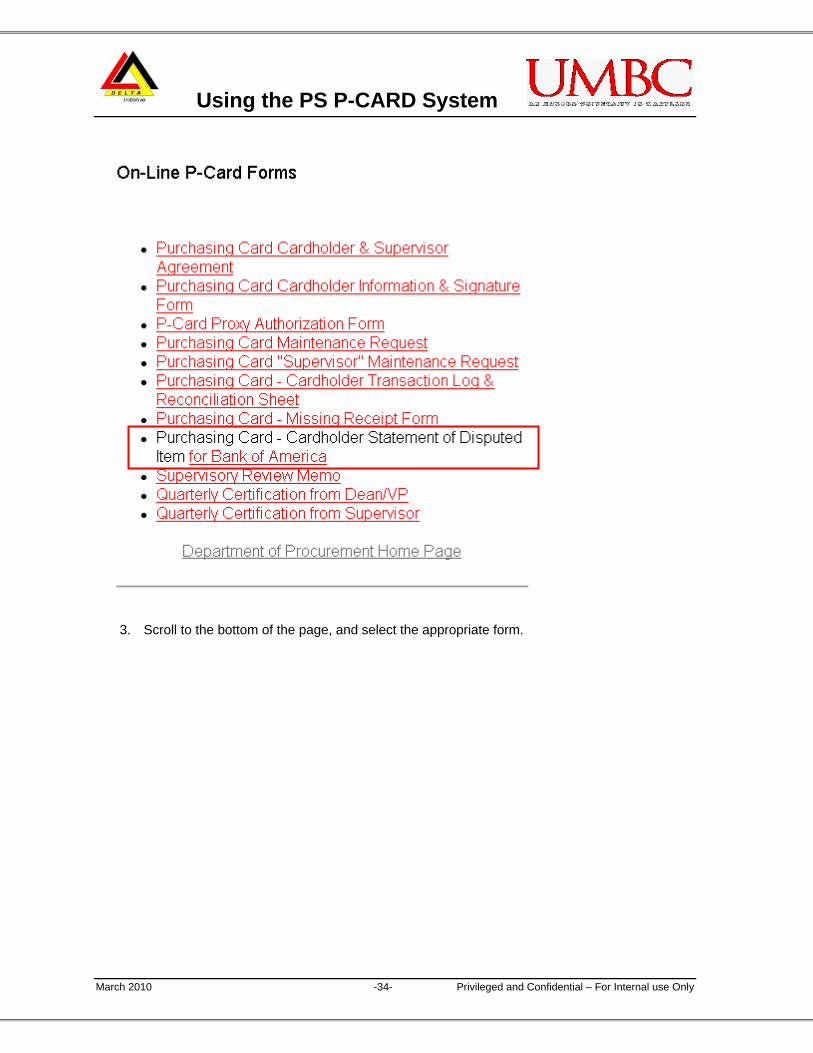
1. To locate a disputed item form, navigate to www.umbc.edu/procurement. 2. Select the All Forms link.
Using the PS P-CARD System
March 2010 -34- Privileged and Confidential – For Internal use Only
3. Scroll to the bottom of the page, and select the appropriate form.
Using the PS P-CARD System
March 2010 -35- Privileged and Confidential – For Internal use Only
Module 4: P-card Reports By the end of this module, you should be able to:
• Navigate to P-card Reports • Perform the steps to run each P-card Report • Identify the P-card Queries
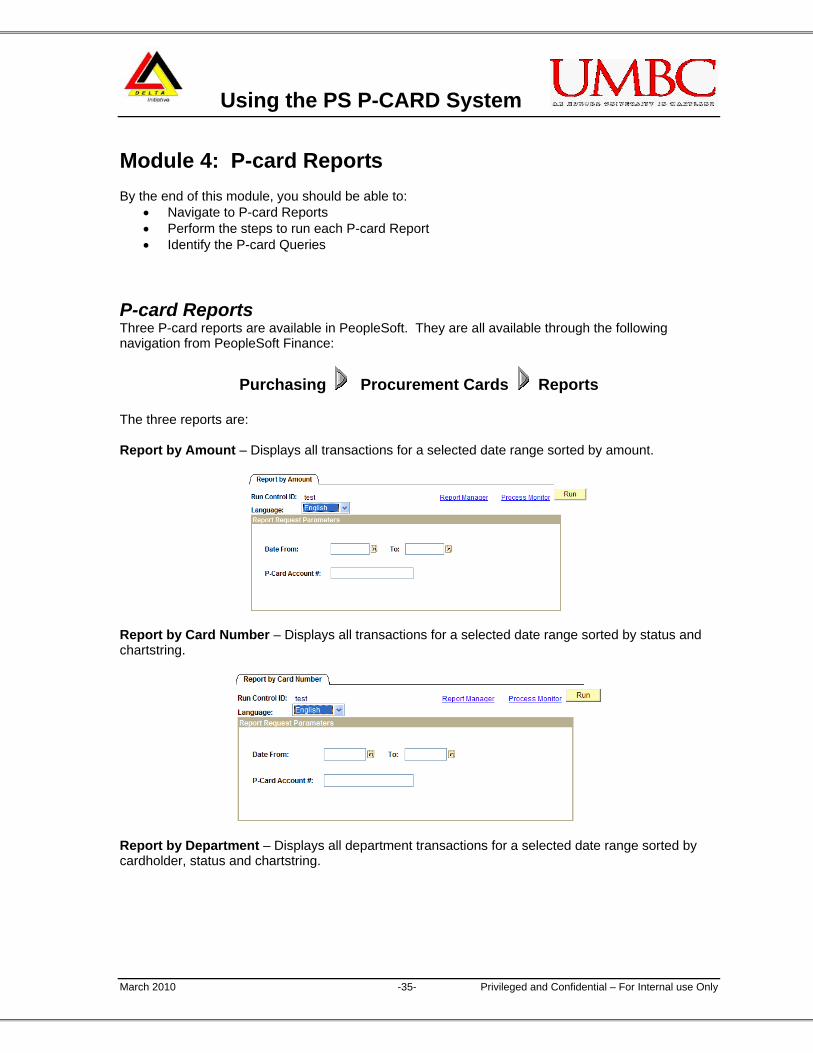
P-card Reports Three P-card reports are available in PeopleSoft. They are all available through the following navigation from PeopleSoft Finance:
Purchasing Procurement Cards Reports The three reports are: Report by Amount – Displays all transactions for a selected date range sorted by amount.
Report by Card Number – Displays all transactions for a selected date range sorted by status and chartstring.
Report by Department – Displays all department transactions for a selected date range sorted by cardholder, status and chartstring.

Using the PS P-CARD System
March 2010 -36- Privileged and Confidential – For Internal use Only
The steps for running the reports include:
1. Open the desired report.
2. Select an existing Run Control ID, or create a new Run Control ID for the desired report. Do not use your 16 digit card number as the Run Control ID. This Run Control ID is a semi-public field within PeopleSoft. Please create a Run Control ID using the name and/or last five digits of the P-card. (See the screen captures above for specific criteria required for each report.)
3. Enter the desired date range and other criteria for the desired report.
4. Select .
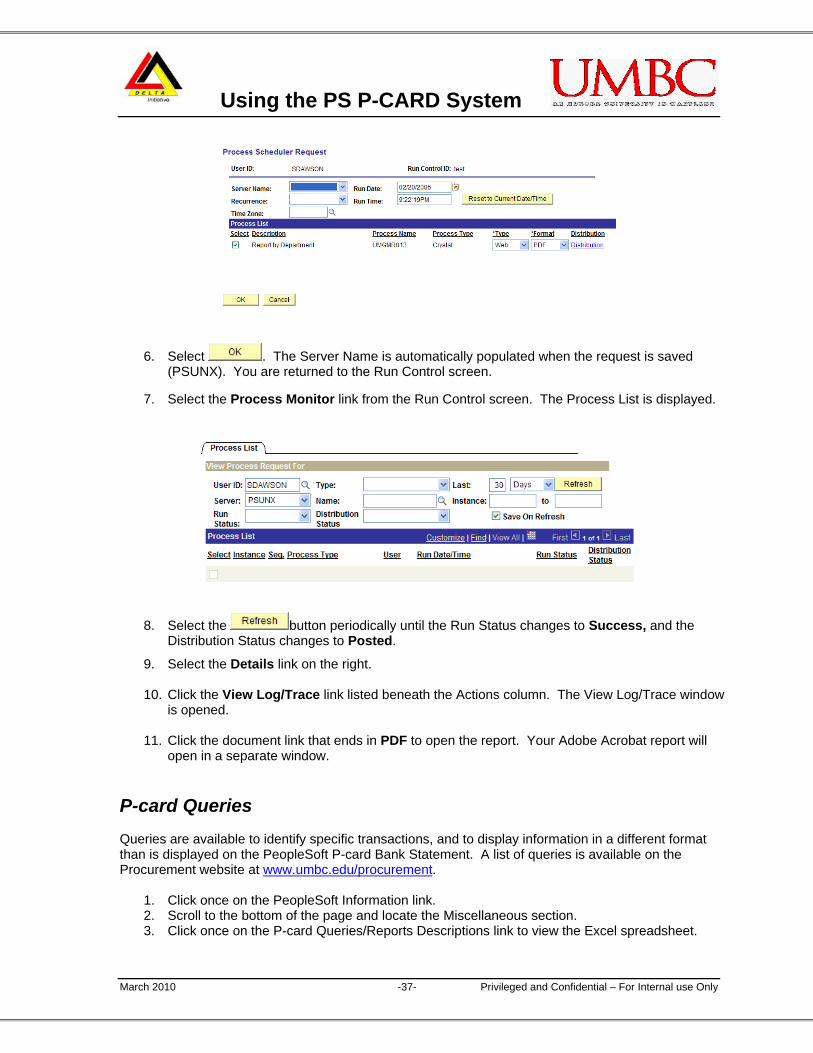
5. Select . The Process Scheduler Request screen is displayed.
Using the PS P-CARD System
March 2010 -37- Privileged and Confidential – For Internal use Only
6. Select . The Server Name is automatically populated when the request is saved (PSUNX). You are returned to the Run Control screen.
7. Select the Process Monitor link from the Run Control screen. The Process List is displayed.
8. Select the button periodically until the Run Status changes to Success, and the Distribution Status changes to Posted.
9. Select the Details link on the right. 10. Click the View Log/Trace link listed beneath the Actions column. The View Log/Trace window
is opened.
11. Click the document link that ends in PDF to open the report. Your Adobe Acrobat report will open in a separate window.
P-card Queries Queries are available to identify specific transactions, and to display information in a different format than is displayed on the PeopleSoft P-card Bank Statement. A list of queries is available on the Procurement website at www.umbc.edu/procurement.
1. Click once on the PeopleSoft Information link. 2. Scroll to the bottom of the page and locate the Miscellaneous section. 3. Click once on the P-card Queries/Reports Descriptions link to view the Excel spreadsheet.
Using the PS P-CARD System
March 2010 -38- Privileged and Confidential – For Internal use Only
Module 5: Getting Help By the end of this module, you will be able to:
• Navigate the Procurement website • Use the PeopleSoft KnowledgeBase
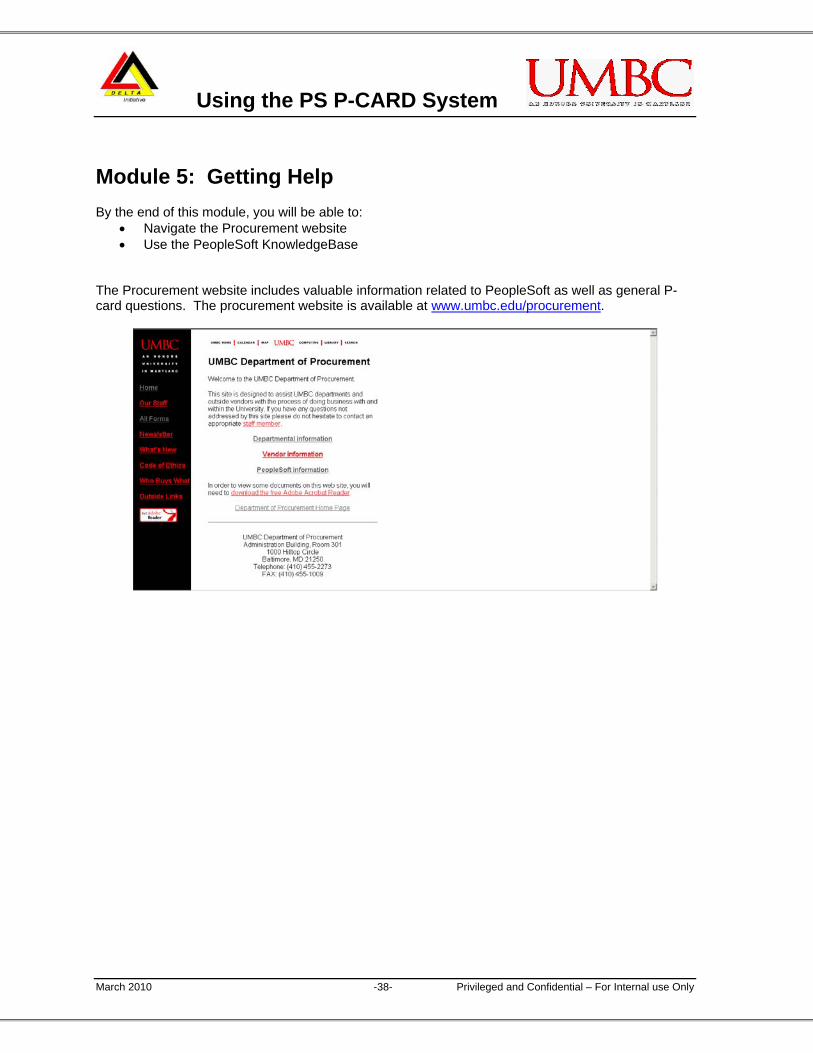
The Procurement website includes valuable information related to PeopleSoft as well as general P-card questions. The procurement website is available at www.umbc.edu/procurement.
Using the PS P-CARD System
March 2010 -39- Privileged and Confidential – For Internal use Only
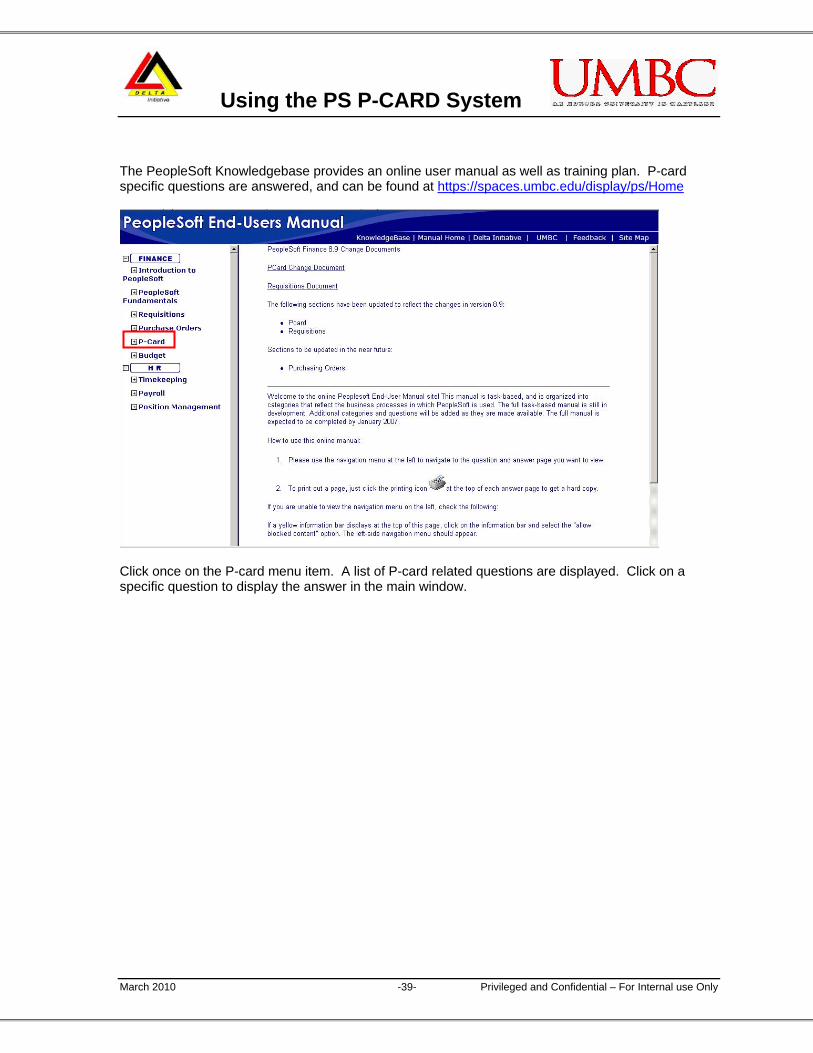
The PeopleSoft Knowledgebase provides an online user manual as well as training plan. P-card specific questions are answered, and can be found at https://spaces.umbc.edu/display/ps/Home
Click once on the P-card menu item. A list of P-card related questions are displayed. Click on a specific question to display the answer in the main window.

Using the PS P-CARD System
March 2010 -40- Privileged and Confidential – For Internal use Only
Summary • PeopleSoft P-card bank statement is updated daily.
• Since a transaction is not sent to the General Ledger until you approve that transaction, you must change the status of a transaction from Staged to Approved. The system will not automatically charge the transaction to your department, fund, or project after the 24th of the month.
• When splitting a line, the information does not change the distribution of the charges. Splitting a line is for your own records only; the information does not affect the UMBC ledgers or your VISA charges and payments.
• The Account Distribution page’s Chartfield default values are based on your user ID.
IMPORTANT: REMEMBER TO HIT THE “SAVE” BUTTON AFTER COMPLETING EACH TRANSACTION.
Using the PS P-CARD System
March 2010 -41- Privileged and Confidential – For Internal use Only
NOTES