Embed Size (px)
Citation preview
W W W . T A R O X . C O M | W W W . T A R O X U S | W W W . T A R O X B R A K E S . D E
PERFORMANCE BRAKES
FITTING GUIDE
D F I 2 0 1 6 / 0 4
0468 Tarox Fitting guide 12pp April 16 V2.indd 1 03/08/2016 10:05

W W W . T A R O X . C O M | W W W . T A R O X U S | W W W . T A R O X B R A K E S . D E
I N T R O D U C T I O N
Thank you for purchasing TAROX performance discs, we take pride and care when manufacturing this pair of discs and make all efforts to deliver an excellent product.
These fitting instructions are intended to make sure that you will enjoy the TAROX experience to the full. They DO NOT replace the vehicle manufacturer handbook / workshop manual. It is strongly advised that the fitting of safety critical components such as brakes, be carried out only by fully trained and qualified persons.
It is assumed that the operations starts with the car safely raised and supported in a safe and appropriate environment and the wheel removed.
Grazie per avere acquistato dischi TAROX high performance. L’eccellenza di questo prodotto è frutto della grande cura e del tempo che dedichiamo a progetto e costruzione.
Queste istruzioni di montaggio vi permetteranno sfruttare a pieno le potenzialità del prodotto acquistato. Le nostre indicazioni NON VANNO MAI comunque a sostituire il libretto di istruzioni e il manuale d’officina del costruttore del veicolo. Raccomandiamo vivamente che il montaggio di elementi fondamentali per la sicurezza come i freni venga sempre effettuato da persone qualificate e capaci.
Vi esortiamo inoltre a rispettare tutte le norme di sicurezza nel sollevamento della vettura e nella rimozione delle ruote, prima di iniziare a lavorare sui freni.
Vielen Dank, dass Sie sich für Tarox Performance-Bremsscheiben entschieden haben!
Diese Einbauhinweise sind dazu gedacht sicher zu gehen, dass Sie die Vorzüge unserer Hochleistungsbremsscheiben im Vollen und Ganzen nutzen können. Sie ersetzen ausdrücklich NICHT die Fahrzeugherstellervorgaben! Wir empfehlen dringend, sicherheitskritische Arbeiten an der Bremsanlage nur durch geschultes Fachpersonal durchführen zu lassen!
Zuerst empfehlen wir, dass sich das Fahrzeug mit demontierten Rädern und bereits angehoben und gesichert auf einer Hebebühne befindet.
0468 Tarox Fitting guide 12pp April 16 V2.indd 2 03/08/2016 10:05
1
F I T T I N G / M O N TA G G I O / E I N B A U
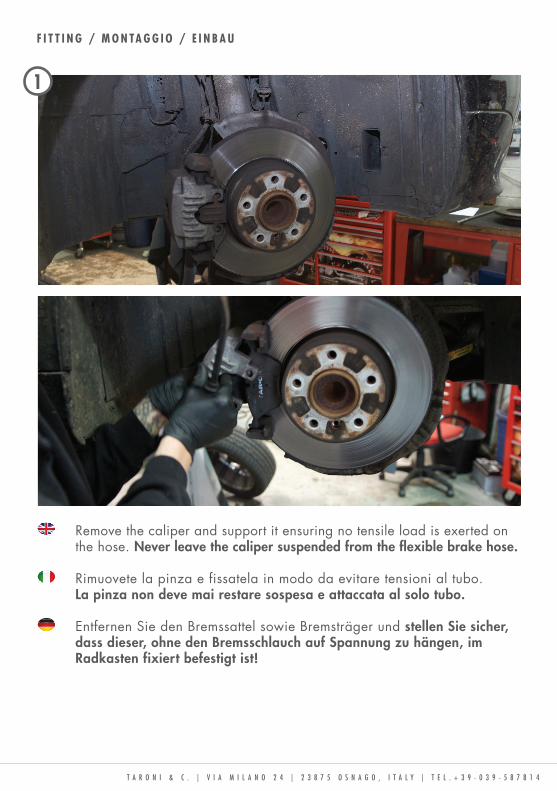
Remove the caliper and support it ensuring no tensile load is exerted on the hose. Never leave the caliper suspended from the flexible brake hose.
Rimuovete la pinza e fissatela in modo da evitare tensioni al tubo. La pinza non deve mai restare sospesa e attaccata al solo tubo.
Entfernen Sie den Bremssattel sowie Bremsträger und stellen Sie sicher, dass dieser, ohne den Bremsschlauch auf Spannung zu hängen, im Radkasten fixiert befestigt ist!
0468 Tarox Fitting guide 12pp April 16 V2.indd 3 03/08/2016 10:05
2
F I T T I N G / M O N TA G G I O / E I N B A U
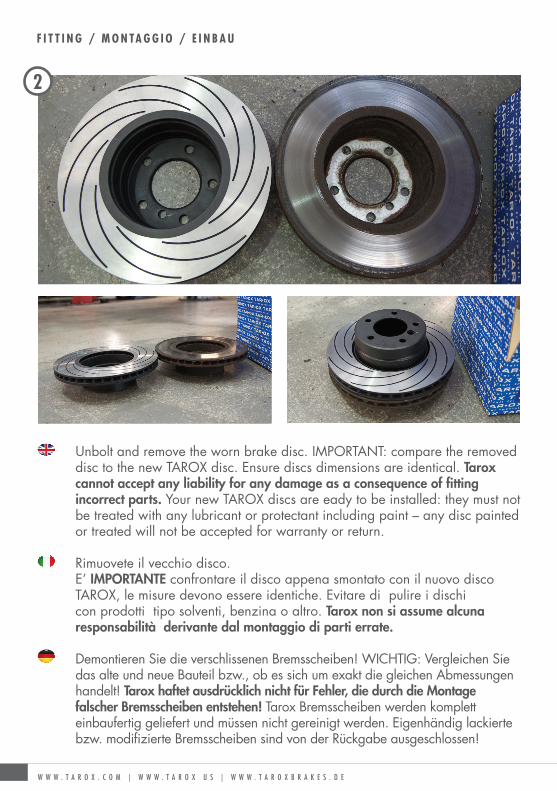
Unbolt and remove the worn brake disc. IMPORTANT: compare the removed disc to the new TAROX disc. Ensure discs dimensions are identical. Tarox cannot accept any liability for any damage as a consequence of fitting incorrect parts. Your new TAROX discs are eady to be installed: they must not be treated with any lubricant or protectant including paint – any disc painted or treated will not be accepted for warranty or return.
Rimuovete il vecchio disco. E’ IMPORTANTE confrontare il disco appena smontato con il nuovo disco TAROX, le misure devono essere identiche. Evitare di pulire i dischi con prodotti tipo solventi, benzina o altro. Tarox non si assume alcuna responsabilità derivante dal montaggio di parti errate.
Demontieren Sie die verschlissenen Bremsscheiben! WICHTIG: Vergleichen Sie das alte und neue Bauteil bzw., ob es sich um exakt die gleichen Abmessungen handelt! Tarox haftet ausdrücklich nicht für Fehler, die durch die Montage falscher Bremsscheiben entstehen! Tarox Bremsscheiben werden komplett einbaufertig geliefert und müssen nicht gereinigt werden. Eigenhändig lackierte bzw. modifizierte Bremsscheiben sind von der Rückgabe ausgeschlossen!
W W W . T A R O X . C O M | W W W . T A R O X U S | W W W . T A R O X B R A K E S . D E
0468 Tarox Fitting guide 12pp April 16 V2.indd 4 03/08/2016 10:05

3
F I T T I N G / M O N TA G G I O / E I N B A U
Remove any corrosion and dirt from the mounting surface on the hub using abrasive paper or a wire brush. A ‘metal bright’ finish is essential.
Prima di iniziare l’installazione del disco, è essenziale pulire accuratamente le superfici di contatto mozzo/disco utilizzando carta abrasiva o una spazzola metallica: non devono rimanere tracce di detriti o ossidazione.
Entfernen Sie die Korrosionspartikel und den Dreck von der Radnabe. Verwenden Sie hierzu Schmirgelpapier, Drahtbürste oder Bohrmaschinenschleifteller: eine metallisch glatte Oberfläche der Radnabe ist essentiell!
1 2
3 4
0468 Tarox Fitting guide 12pp April 16 V2.indd 5 03/08/2016 10:05

4
F I T T I N G / M O N TA G G I O / E I N B A U
Offer up the brake disc and check that it mounts squarely to the hub. If necessary, further clean the mounting faces to ensure perfect fitment.
Assicuratevi di avere ottenuto un perfetto accoppiamento disco/mozzo. Se necessario, pulite ulteriormente le parti di contatto disco/mozzo.
Setzen Sie die neuen Scheiben an und überprüfen Sie mit einer Prüfarmatur, ob der Rundlauf gegeben ist. Falls nicht, entfernen Sie die Scheibe und säubern Sie die Radnabe erneut. Ggfs. die Bremsscheibe versetzt zum 1. Vorgang montieren!
W W W . T A R O X . C O M | W W W . T A R O X U S | W W W . T A R O X B R A K E S . D E
0468 Tarox Fitting guide 12pp April 16 V2.indd 6 03/08/2016 10:05

5
F I T T I N G / M O N TA G G I O / E I N B A U
Secure the new disc to the hub referencing the torque setting documented within the vehicle handbook / workshop manual.
Fissate il disco al mozzo rispettando i valori di coppia di serraggio prescritti dal costruttore del veicolo.
Befestigen Sie die neuen Scheiben mittels Schraube - sofern vorgesehen- gemäß Herstellervorgaben.
F 2 0 0 0
G 8 8
S P O R T J A P A N
Observe the following images for correct disc orientation:
Osservate queste immagini per il corretto orientamento del disco.
Beachten Sie hierbei bitte folgende Angaben zur korrekten Laufrichtung der Bremsscheiben:
0468 Tarox Fitting guide 12pp April 16 V2.indd 7 03/08/2016 10:05
6
F I T T I N G / M O N TA G G I O / E I N B A U
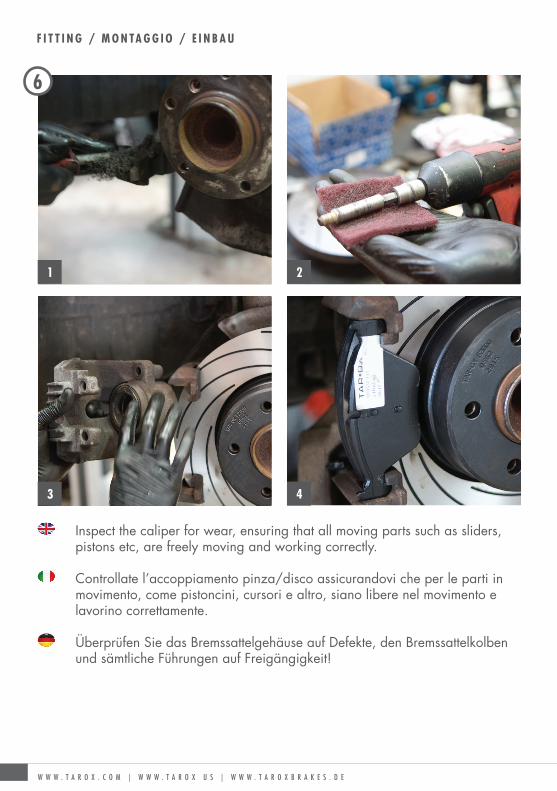
Inspect the caliper for wear, ensuring that all moving parts such as sliders, pistons etc, are freely moving and working correctly.
Controllate l’accoppiamento pinza/disco assicurandovi che per le parti in movimento, come pistoncini, cursori e altro, siano libere nel movimento e lavorino correttamente.
Überprüfen Sie das Bremssattelgehäuse auf Defekte, den Bremssattelkolben und sämtliche Führungen auf Freigängigkeit!
W W W . T A R O X . C O M | W W W . T A R O X U S | W W W . T A R O X B R A K E S . D E
1 2
3 4
0468 Tarox Fitting guide 12pp April 16 V2.indd 8 03/08/2016 10:05

F I T T I N G / M O N TA G G I O / E I N B A U
Refit the caliper and tighten the bolts in-line with the manufacturers torque settings. When replacing brake pads, it is essential no modifications are made to the braking material – i.e. tapering, or to the pad backing plate. Tarox do not recommend the use of copper grease when installing pads as it is corrosive to alloy components. A non metallic high temperature lubricant should be used if required. f the brake hose had been disconnected, reconnect and bleed the brakes.
Rimontate la pinza rispettando i valori di coppia di serraggio delle viti prescritti dal costruttore del veicolo. Se si sostituiscono anche le pastiglie evitare assolutamente di smussarne gli angoli o di cospargerle di pasta di rame. Se avevate scollegato il tubo dei freni, procedete sempre a uno spurgo dell’impianto frenante.
Montieren Sie Bremsträger und Bremssattel unter Berücksichtigung der Drehmomentvorgaben des Herstellers! Sofern auch die Bremsschläuche gewechselt wurden, entlüften Sie die Bremse! Beim Wechsel der Bremsbeläge ist darauf zu achten, dass das Belagmaterial sauber auf der Reibfläche der Bremsscheibe trägt. Bitte die Belagkanten nicht anphasen, um eine volle Abdeckung der Bremsscheibe zu gewährleisten. Statt korrosiver Kupferpaste empfehlen wir die Verwendung einer nicht metallischen Antiquietschpaste. Nach dem Wechsel der Bremsschläuche vergessen Sie nicht, das System neu zu entlüften!
7
8Before moving the car pump the brakes to reposition the pads and ensure even contact.
Prima di spostare l’auto, assicuratevi che si stato ristabilito il contatto disco/pastiglia freno.
Bevor Sie das Fahrzeug bewegen, bedienen Sie einmalig das Bremspedal, um die Bremsbeläge korrekt anzulegen!
0468 Tarox Fitting guide 12pp April 16 V2.indd 9 03/08/2016 10:05

A D D I T I O N A L I N F O R M AT I O N / I N F O R M A Z I O N I U T I L I / W E I T E R E I N F O R M AT I O N E N
Run Out
Thorough cleaning of the hub is essential as it ensures the disc has a flat surface to mount to. The mounting surface must be clean, free from rust and burrs. It is essential to achieve a bright metal finish before securing the disc to the hub. If the surface is uneven the disc will not spin true. Any lateral movement of the disc is known as ‘Run out’ and is the cause of brake vibration / judder. Excessive run out leads to uneven wear which you will eventually (approximately 3000 - 4000km) notice as a vibration through the pedal. You may think at this point your discs are warped from overheating – this is seldom the case. Improper mounting causes uneven wear around the diameter of the disc causing variances in the discs actual thickness which progressively increases run out during normal use.
Oscillazione radiale
Un’accurata pulizia del mozzo è fondamentale per ottenere un perfetto montaggio del disco ed evitare il rischio dell’oscillazione radiale. Le superfici di contatto mozzo/campana del disco debbono risultare prive di ruggine o bave . Se la campana del disco poggia su una superficie irregolare si determina un’oscillazione del disco stesso rispetto al suo raggio. In questa situazione, nel giro di 3000/4000 km, si manifesteranno delle vibrazioni sul pedale del freno, ciò è dovuto al fatto che il disco ha subito una variazione di spessore sul suo diametro esterno. La causa non è il surriscaldamento del disco ma il suo errato montaggio.
Leerlaufen
Das Reinigen der Radnabe ist entscheidend, dass die neuen Bremsscheiben perfekt anliegen. Eine metallisch glatte Oberfläche der Radnabe ist essentiell! Verwenden Sie keine Kuper- oder andere Feststoffpasten zur Konservierung. Benebeln Sie die Radnabe stattdessen mit einem Sprühöl, das sich
durch Anpressen der Scheibe gleichmäßig auf der Nabe verteilt. Auf der Radnabe falsch montierte Bremsscheiben führen klassischerweise nach einer Laufleistung von 3000-4000km zu Bremsenrubbeln. Eine falsche Montage führt ab dem 1. Kilometer zu einem unrunden Lauf der Scheiben, das folglich o. g. Bremsrubbeln - spürbar durch Lenkradvibrationen- oder Pulsieren im Bremspedal merkbar ist. Es handelt sich hierbei ausdrücklich NICHT um einen Material- sondern Einbaufehler!
Bedding-in
All TAROX discs are hand finished to ensure the braking surface is perfectly flat to the tightest tolerances in the industry. Correct bed-in ensures that the discs will work efficiently and maximises performance and disc longevity.
For the first 500km force can be placed on the brake pedal but only at average speed and for short durations. Unless there is an emergency, breaking hard to a dead stop must be avoided where possible. Between 500 - 600km you should monitor the brake discs surface. Once correctly bedded-in there will be a uniform contact patch across the whole surface of the discs.
Putting excess heat into the brakes through unnecessarily prolonged application of the brake pedal must be avoided at all times.
If at any part you feel there may be a problem during or after the bedding-in procedure, contact your dealer.
Rodaggio
Tutti i dischi Tarox sono sottoposti a rettifica di precisione manuale, in modo tale che la superficie frenante sia perfettamente planare con tolleranze estremamente ridotte. Per massimizzare le performance e la longevità del disco è essenziale però effettuare il rodaggio in modo corretto.
W W W . T A R O X . C O M | W W W . T A R O X U S | W W W . T A R O X B R A K E S . D E
0468 Tarox Fitting guide 12pp April 16 V2.indd 10 03/08/2016 10:05
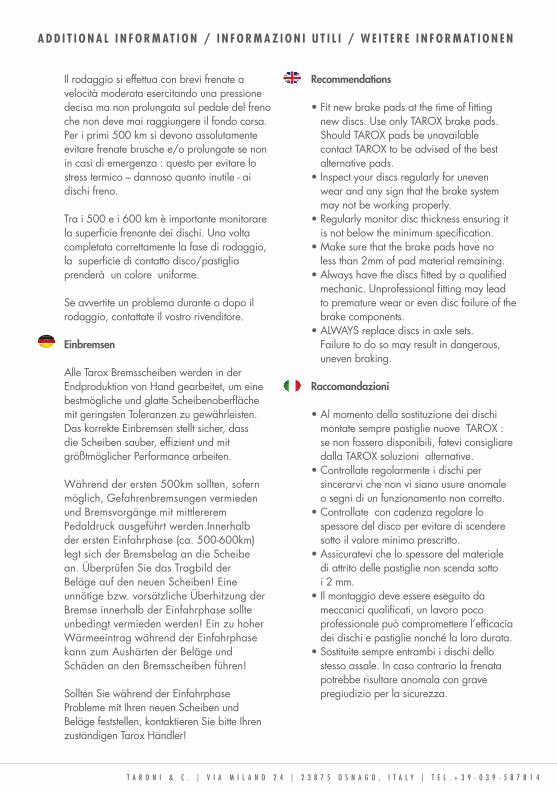
Il rodaggio si effettua con brevi frenate a velocità moderata esercitando una pressione decisa ma non prolungata sul pedale del freno che non deve mai raggiungere il fondo corsa.Per i primi 500 km si devono assolutamente evitare frenate brusche e/o prolungate se non in casi di emergenza : questo per evitare lo stress termico – dannoso quanto inutile - ai dischi freno.
Tra i 500 e i 600 km è importante monitorare la superficie frenante dei dischi. Una volta completata correttamente la fase di rodaggio, la superficie di contatto disco/pastiglia prenderà un colore uniforme.
Se avvertite un problema durante o dopo il rodaggio, contattate il vostro rivenditore.
Einbremsen
Alle Tarox Bremsscheiben werden in der Endproduktion von Hand gearbeitet, um eine bestmögliche und glatte Scheibenoberfläche mit geringsten Toleranzen zu gewährleisten. Das korrekte Einbremsen stellt sicher, dass die Scheiben sauber, effizient und mit größtmöglicher Performance arbeiten.
Während der ersten 500km sollten, sofern möglich, Gefahrenbremsungen vermieden und Bremsvorgänge mit mittlererem Pedaldruck ausgeführt werden.Innerhalb der ersten Einfahrphase (ca. 500-600km) legt sich der Bremsbelag an die Scheibe an. Überprüfen Sie das Tragbild der Beläge auf den neuen Scheiben! Eine unnötige bzw. vorsätzliche Überhitzung der Bremse innerhalb der Einfahrphase sollte unbedingt vermieden werden! Ein zu hoher Wärmeeintrag während der Einfahrphase kann zum Aushärten der Beläge und Schäden an den Bremsscheiben führen!
Sollten Sie während der Einfahrphase Probleme mit Ihren neuen Scheiben und Beläge feststellen, kontaktieren Sie bitte Ihren zuständigen Tarox Händler!
Recommendations
•Fitnewbrakepadsatthetimeoffitting new discs. Use only TAROX brake pads. Should TAROX pads be unavailable contact TAROX to be advised of the best alternative pads. •Inspectyourdiscsregularlyforuneven wear and any sign that the brake system may not be working properly.•Regularlymonitordiscthicknessensuringit is not below the minimum specification. •Makesurethatthebrakepadshaveno less than 2mm of pad material remaining.•Alwayshavethediscsfittedbyaqualified mechanic. Unprofessional fitting may lead to premature wear or even disc failure of the brake components.•ALWAYSreplacediscsinaxlesets. Failure to do so may result in dangerous, uneven braking.
Raccomandazioni
•Almomentodellasostituzionedeidischi montate sempre pastiglie nuove TAROX : se non fossero disponibili, fatevi consigliare dalla TAROX soluzioni alternative.•Controllateregolarmenteidischiper sincerarvi che non vi siano usure anomale o segni di un funzionamento non corretto. •Controllateconcadenzaregolarelo spessore del disco per evitare di scendere sotto il valore minimo prescritto.•Assicuratevichelospessoredelmateriale di attrito delle pastiglie non scenda sotto i 2 mm.•Ilmontaggiodeveessereeseguitoda meccanici qualificati, un lavoro poco professionale può compromettere l’efficacia dei dischi e pastiglie nonché la loro durata.•Sostituitesempreentrambiidischidello stesso assale. In caso contrario la frenata potrebbe risultare anomala con grave pregiudizio per la sicurezza.
A D D I T I O N A L I N F O R M AT I O N / I N F O R M A Z I O N I U T I L I / W E I T E R E I N F O R M AT I O N E N
0468 Tarox Fitting guide 12pp April 16 V2.indd 11 03/08/2016 10:05
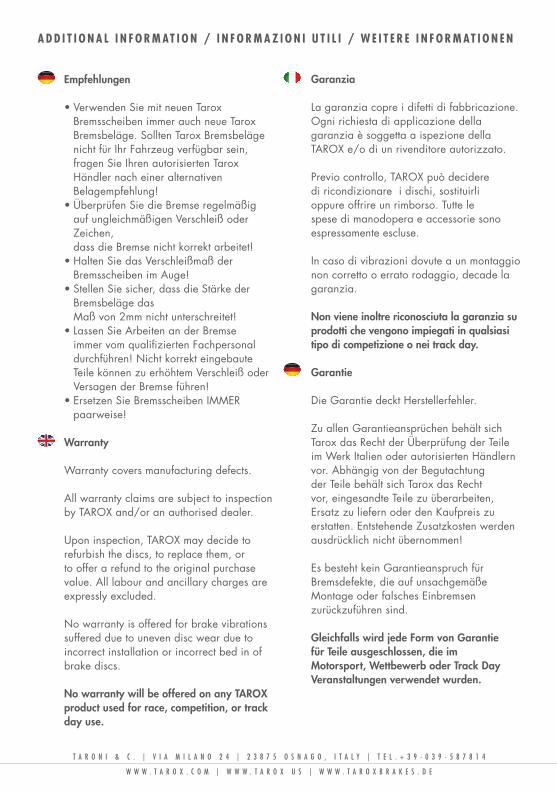
Empfehlungen
•VerwendenSiemitneuenTarox Bremsscheiben immer auch neue Tarox Bremsbeläge. Sollten Tarox Bremsbeläge nicht für Ihr Fahrzeug verfügbar sein, fragen Sie Ihren autorisierten Tarox Händler nach einer alternativen Belagempfehlung!•ÜberprüfenSiedieBremseregelmäßig auf ungleichmäßigen Verschleiß oder Zeichen, dass die Bremse nicht korrekt arbeitet!•HaltenSiedasVerschleißmaßder Bremsscheiben im Auge!•StellenSiesicher,dassdieStärkeder Bremsbeläge das Maß von 2mm nicht unterschreitet!•LassenSieArbeitenanderBremse immer vom qualifizierten Fachpersonal durchführen! Nicht korrekt eingebaute Teile können zu erhöhtem Verschleiß oder Versagen der Bremse führen!•ErsetzenSieBremsscheibenIMMER paarweise!
Warranty
Warranty covers manufacturing defects.
All warranty claims are subject to inspection by TAROX and/or an authorised dealer.
Upon inspection, TAROX may decide to refurbish the discs, to replace them, or to offer a refund to the original purchase value. All labour and ancillary charges are expressly excluded.
No warranty is offered for brake vibrations suffered due to uneven disc wear due to incorrect installation or incorrect bed in of brake discs.
No warranty will be offered on any TAROX product used for race, competition, or track day use.
Garanzia
La garanzia copre i difetti di fabbricazione. Ogni richiesta di applicazione della garanzia è soggetta a ispezione della TAROX e/o di un rivenditore autorizzato.
Previo controllo, TAROX può decidere di ricondizionare i dischi, sostituirli oppure offrire un rimborso. Tutte le spese di manodopera e accessorie sono espressamente escluse.
In caso di vibrazioni dovute a un montaggio non corretto o errato rodaggio, decade la garanzia.
Non viene inoltre riconosciuta la garanzia su prodotti che vengono impiegati in qualsiasi tipo di competizione o nei track day.
Garantie
Die Garantie deckt Herstellerfehler.
Zu allen Garantieansprüchen behält sich Tarox das Recht der Überprüfung der Teile im Werk Italien oder autorisierten Händlern vor. Abhängig von der Begutachtung der Teile behält sich Tarox das Recht vor, eingesandte Teile zu überarbeiten, Ersatz zu liefern oder den Kaufpreis zu erstatten. Entstehende Zusatzkosten werden ausdrücklich nicht übernommen!
Es besteht kein Garantieanspruch für Bremsdefekte, die auf unsachgemäße Montage oder falsches Einbremsen zurückzuführen sind.
Gleichfalls wird jede Form von Garantie für Teile ausgeschlossen, die im Motorsport, Wettbewerb oder Track Day Veranstaltungen verwendet wurden.
A D D I T I O N A L I N F O R M AT I O N / I N F O R M A Z I O N I U T I L I / W E I T E R E I N F O R M AT I O N E N
W W W . T A R O X . C O M | W W W . T A R O X U S | W W W . T A R O X B R A K E S . D E
0468 Tarox Fitting guide 12pp April 16 V2.indd 12 03/08/2016 10:05
5
F I T T I N G / M O N TA G G I O / E I N B A U
Secure the new disc to the hub referencing the torque setting documented within the vehicle handbook / workshop manual.
Fissate il disco al mozzo rispettando i valori di coppia di serraggio prescritti dal costruttore del veicolo.
Befestigen Sie die neuen Scheiben mittels Schraube - sofern vorgesehen- gemäß Herstellervorgaben.
F 2 0 0 0
G 8 8
S P O R T J A P A N
Observe the following images for correct disc orientation:
Osservate queste immagini per il corretto orientamento del disco.
Beachten Sie hierbei bitte folgende Angaben zur korrekten Laufrichtung der Bremsscheiben:
0468 Tarox Fitting guide 12pp April 16 V2.indd 7 03/08/2016 10:05


![Firma Elettroniche eSAW - irealtors.it · Regole tecniche in materia di generazione, apposizione e verifica delle firme elettroniche avanzate, qualificate e digitali. [06] D.Lgs](https://img.pdfslide.net/doc/110x75/5c680ae809d3f2034d8ce5bd/firma-elettroniche-esaw-regole-tecniche-in-materia-di-generazione-apposizione.jpg)