Embed Size (px)
Citation preview

Innovative 3D Cell Culture Tools for Life Sciences
PerfusionPal Starter System INSTRUCTIONS
PerfusionPal: U.S. PATENT NO. 9,701,938
SeedEZ: U.S. PATENT NO. 9,334,473
PerfusionPal AND SeedEZ ARE TRADEMARKS OF LENA BIOSCIENCES, INC.
FOR IN VITRO RESEARCH USE ONLY. NOT FOR USE IN DIAGNOSTIC OR THERAPEUTIC PROCEDURES. NOT FOR USE IN ANIMALS OR HUMANS.
©2018 LENA BIOSCIENCES. ALL RIGHTS RESERVED.

PerfusionPalTM Starter System Instructions Innovative 3D Cell Culture Tools for Life Sciences www.lenabio.com
h
PerfusionPalTM Starter System Product Instructions | 1
MATERIALS NEEDED AND NOT PROVIDED
Sterile forceps, and a larger Petri dish or a multiwell plate
A small stand or step-stool INSTRUCTIONS
All steps should be carried out in a cell culture hood using proper sterile techniques.
1. Place the pump onto a stand or step-stool outside of the hood.
2. Put the remaining package contents into the hood.
3. Open the pouch with tubing. Attach one end of the tubing to the luer fitting on the tray tube. Attach the other end of the tubing to the luer fitting on the syringe provided with the package.
4. Place the syringe into a syringe pump (See Loading a Syringe).
5. Prime the system:
a. Add 50 mL of blood substitute to the tray.
b. Place multiwell insert into tray and cover with lid.
c. Set the syringe pump to withdraw a volume of 20 mL at a flow rate of 1 mL/min (See Priming PerfusionPal).
d. Without disconnecting any tubing, remove the syringe from the pump, point it upwards and tap on syringe to dislodge any small bubbles.
e. With the syringe still pointed upwards, slowly press the plunger and ensure that all accumulated air is passed through the tubing and released into the tray. There should be no bubbles present in the syringe or in the tubing at this point.
f. Continue to press the plunger to the 5 mL mark. If the plunger is already past this point, place the syringe back into the syringe pump and set the pump to withdraw at 1 mL/min until it reaches the 5 mL mark.
6. Place the syringe back into the syringe pump.
7. Add 750 µL medium into each well.
8. Seed cells into SeedEZ scaffolds using the desired method (See Seeding cells).
9. Place scaffolds into wells (See Placement of 3D cultures into the insert).
10. Carefully place PerfusionPal into the incubator. Keep it horizontal during transfer from the hood to incubator. Slide the steel sheath on the tubing into position between the incubator door and gasket to prevent crushing of the tubing.
11. Put the pump on the stand outside the incubator at the same or lower level than is that of the PerfusionPal in the incubator to prevent degassing of the blood substitute.
12. Set the desired continuous flow rate for cyclic infusion/ withdrawal with a target volume of 10 mL. For example, 0.028 mL/min infusion and 0.028 mL/min withdrawal results in two complete cycles (2x up and 2x down), or 16 culture volume exchanges per day. (See Perfusing with PerfusionPal; see Table of flow rates; see Feeding cells for media exchange protocol).
PerfusionPalTM Starter System Instructions Innovative 3D Cell Culture Tools for Life Sciences www.lenabio.com
h
PerfusionPalTM Starter System Product Instructions | 2
NOTES
Avoid manual withdrawal of the blood substitute (pulling of the syringe plunger) to prevent air bubble formation. Since the blood substitute is viscous, small bubbles will occasionally form in the tubing or syringe. This is normal and does not affect the performance of PerfusionPal™.
After priming, the 5 mL of blood substitute in the syringe acts as a buffer for bubbles. Although rare, in a long-term culture, a bubble in the syringe may grow large enough to enter the tubing during infusion. Should this occur, disconnect the syringe from the tubing, point it upwards, purge the air, and reconnect. Doing this should not introduce bacterial contamination as the blood substitute contains no nutrients to support their growth.
To prevent accidental spills, place PerfusionPal into a glass staining/fixing dish (without the lid). Since the glass dish is heavy, it is easy to keep PerfusionPal leveled during transport to and from the incubator for feedings. You may also secure the tube by taping it to the side of the glass dish.
Blood substitute does not evaporate and can be reused. After a perfusion study, carefully collect the liquid and ensure there is no medium floating on top. Sterile filter using a 0.2 µm PES bottle-top filter and reuse.
DO NOT dispose of blood substitute in the sink or in biohazard waste that will be incinerated. Blood substitute residue should be removed with a Kimwipe and disposed of in the regular trash, if possible.
SEEDING CELLS
SeedEZ scaffolds are versatile and compatible with various cell culture coatings, extracellular matrices
and hydrogels to ensure optimal environment for cells.
Method 1 – Uncoated SeedEZ
Using sterile forceps, transfer SeedEZ scaffolds to a multiwell plate or petri dish. Deliver 75 µL of cell
suspension using a micropipette. Allow few minutes for cells to settle and proceed to Step 8.
Method 2 – Pre-coated SeedEZ
SeedEZ scaffolds can be coated (e.g. Poly-D-Lysine, Collagen etc.) prior to addition of cells. To coat the
scaffolds, use standard protocols for flat disposables like Petri dishes and multiwell plates.
Coating the scaffolds:
Transfer SeedEZ scaffolds to a multiwell plate or a large petri dish using sterile forceps.
Deliver 75 µL or more coating liquid. It should be enough volume to completely wet the scaffold
using a micropipette.
Incubate as necessary.
PerfusionPalTM Starter System Instructions Innovative 3D Cell Culture Tools for Life Sciences www.lenabio.com
h
PerfusionPalTM Starter System Product Instructions | 3
After incubation, aspirate the coating liquid from the scaffold. The scaffold will turn white when
dry. This drying step should be repeated after any rinses that are performed.
Cell seeding:
Deliver 75 µL of cell suspension using a micropipette.
Allow 5 minutes (or longer) for cells to settle and adhere.
Proceed to Step 8.
Method 3 – Seeding in a hydrogel
SeedEZ scaffolds (either uncoated or coated) can be seeded with cells in a hydrogel. The following
example is for Matrigel®. Using forceps, transfer SeedEZ scaffolds to the top surface of the wells of a
96-well plate. The small contact area between the scaffold and the top of the wells of a 96-well plate
will prevent Matrigel from sticking and allow easy transfer of scaffolds after seeding. Deliver 75 - 100
µL of cell suspension in hydrogel using a micropipette (depending on the viscosity of the hydrogel,
more volume may be required to completely wet the scaffold). Leave 96-well plate without the lid and
place into a larger, sterile, lidded glass staining/fixing dish. Incubate according to hydrogel’s protocol
(for Matrigel®, we recommend incubating for 10 minutes at 37 °C). Proceed to Step 8.
Method 4 – Dipping into cell suspension
Instead of using a micropipette with any of the previous methods, SeedEZ scaffolds can be directly
dipped into a cell suspension (in medium or hydrogel) until the scaffold completely wets. We
recommend this method for those hydrogels that are difficult to dispense using a micropipette. To
prevent hydrogel from sticking to the surface of the dish during incubation, place the scaffolds onto a
96-well plate as described in Method 3. Proceed to Step 8.
PLACEMENT OF 3D CULTURES INTO THE INSERT
Using forceps, carefully transfer seeded scaffolds to PerfusionPal wells by lowering scaffold onto the surface of the medium at a slight angle, allowing air to escape as the scaffold is lowered.
Seat the scaffolds by either:
A. Using the included seating insert: Set it on top of the scaffolds in the multiwell insert and gently press downward. Gently lift to remove and verify that the scaffolds are seated properly. If a scaffold is not seated properly, use forceps to pick it up, lay it on the medium, and use the seating insert again.
B. Without using the seating insert: Use forceps or a pipet tip and gently press down the edges of each scaffold to ensure that it is resting on the seat.
Cover PerfusionPal plate with the lid.
PerfusionPalTM Starter System Instructions Innovative 3D Cell Culture Tools for Life Sciences www.lenabio.com
h
PerfusionPalTM Starter System Product Instructions | 4
FEEDING CELLS
Removal of PerfusionPal from the incubator for feeding should be done near the end of an up-stroke, i.e. at the end of infusion when the medium level in the wells is at its highest position (fully infused), to prevent medium from exiting the bottom of the wells due to tilting. (See Table of Flow Rates to aid in planning). If this happens, it will not affect the function of the system, but medium may need to be added to the well to correct the volume.
When changing medium, exchange half the media from the well (375 µL) to ensure that cultures are always submerged.
For long-term studies, account for evaporative losses of the media in your incubator by adding more media to wells during media exchanges. For example, remove 375 µL and add 500 µL at 1 week. These values are for guidance only. The actual values will depend on humidity control in your incubator. Please ensure that the water pan in your incubator is filled with deionized water during perfusion.

PerfusionPalTM Starter System Instructions Innovative 3D Cell Culture Tools for Life Sciences www.lenabio.com
h
PerfusionPalTM Starter System Product Instructions | 5
LOADING A SYRINGE
Step numbers correspond to numbers in diagrams on the left
1. The infusion safety collar is already in the proper position.
2. While pressing in the block release button (see 6 for block release button location), slide the pusher block all the way to the left.
3. Loosen the screw knobs for the flange retaining bracket and adjust the bracket such that the flange of the syringe barrel will fit in between. Do not tighten the bracket, yet.
4. Pull up on the spring-loaded syringe clamp and place the syringe in one of the channels of the holder block. Ensure that the flange of the syringe barrel is flush against the edge of the holder block. Slowly lower the syringe clamp to secure the syringe in place.
5. Loosen the bracket clamp knob for the plunger retaining bracket and adjust the gap such that the plunger cap of the syringe may fit.
6. Press the block release button and slide the pusher block to the right until it is flush against the syringe plunger. The plunger cap for the syringe should fit in the gap between the bracket and the pusher block.
7. Tighten the bracket clamp knob for the plunger retaining bracket to secure the syringe plunger in place.
8. Move the flange retaining bracket flush against the flange of the syringe barrel and tighten the bracket clamp knobs to secure the syringe barrel flange in place.
PerfusionPalTM Starter System Instructions Innovative 3D Cell Culture Tools for Life Sciences www.lenabio.com
h
PerfusionPalTM Starter System Product Instructions | 6
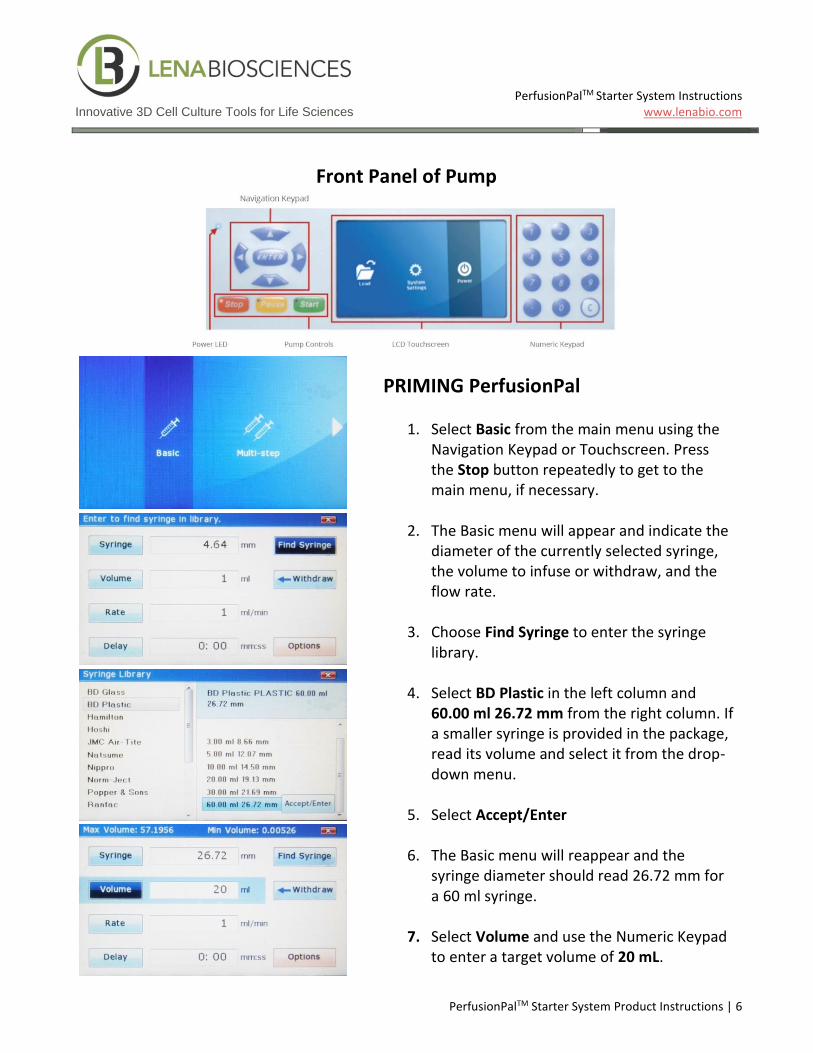
Front Panel of Pump
PRIMING PerfusionPal
1. Select Basic from the main menu using the Navigation Keypad or Touchscreen. Press the Stop button repeatedly to get to the main menu, if necessary.
2. The Basic menu will appear and indicate the diameter of the currently selected syringe, the volume to infuse or withdraw, and the flow rate.
3. Choose Find Syringe to enter the syringe
library.
4. Select BD Plastic in the left column and 60.00 ml 26.72 mm from the right column. If a smaller syringe is provided in the package, read its volume and select it from the drop-down menu.
5. Select Accept/Enter
6. The Basic menu will reappear and the
syringe diameter should read 26.72 mm for a 60 ml syringe.
7. Select Volume and use the Numeric Keypad
to enter a target volume of 20 mL.

PerfusionPalTM Starter System Instructions Innovative 3D Cell Culture Tools for Life Sciences www.lenabio.com
h
PerfusionPalTM Starter System Product Instructions | 7
System Running
8. The button to the right of the volume should
read Withdraw. If it reads Infusion, select it to toggle it to Withdraw.
9. Select Rate and use the Numeric Keypad to
enter a flow rate of 1 ml/min.
10. The display should read exactly as shown on the left.
11. Press Start on the Pump Controls to begin priming the system.
12. The screen shown on the left should appear, indicating how much liquid has been withdrawn and the elapsed time.
PERFUSING WITH PerfusionPal
1. Select Multi-step from the main menu using the Navigation Keypad or Touchscreen. Press the Stop button repeatedly to get to the main menu, if necessary.
2. The Multi-step menu will appear and indicate the diameter of the currently selected syringe, the number of times to loop all steps, and the total number of steps.
3. The diameter of the syringe should be 26.72 mm for a 60 ml syringe. If it not, enter the syringe library as before and choose BD Plastic and 60.00 ml 26.72 mm and select Accept/Enter.
4. Select Loop All and set the desired number of loops. If continuous flow is desired, use the Numeric Keypad to enter “00” to set the number of loops to infinity as shown.

PerfusionPalTM Starter System Instructions Innovative 3D Cell Culture Tools for Life Sciences www.lenabio.com
h
PerfusionPalTM Starter System Product Instructions | 8
Settings for Step 1
Settings for Step 2
System Running
5. Select Step 1 and the menu for Step 1 of the
loop will appear.
6. Select Volume and use the Numeric Keypad to set a target volume of 10 mL.
7. The button to the right of the volume should read Withdraw. If it reads Infusion, select it to toggle it to Withdraw.
8. Select Rate 1 and use the Numeric Keypad to enter a flow rate of 0.028 ml/min.
9. Selecting Rate 2 will automatically set it to the same rate as Rate 1. This will result in a constant flow rate.
10. Select Step 2 and input the same settings for Volume (10 mL) and Rate (0.028 ml/min).
11. The button to the right of the volume should read Infusion. If it reads Withdraw, select it to toggle it to Infusion.
12. Press Start on the Pump Controls to begin perfusion.
13. The screen shown on the left should appear, indicating the status of the flow of liquid (including direction), elapsed time, and the count of the number of loops completed.
14. When changing medium, use Pause on the Pump Controls so that the perfusion will continue from the same point.

PerfusionPalTM Starter System Instructions Innovative 3D Cell Culture Tools for Life Sciences www.lenabio.com
h
PerfusionPalTM Starter System Product Instructions | 9
TABLE OF FLOW RATES
Flow Rate (mL/min) Time to complete one
step (withdrawal or infusion) (hrs)
Time to complete two complete cycles* (hrs)
0.028 5.95 23.8
0.029 5.75 23.0
0.031 5.38 21.5
0.033 5.05 20.2
0.035 4.76 19.0
0.037 4.50 18.0
0.039 4.27 17.1
0.041 4.07 16.3
* 1 complete perfusion cycle = 1 withdrawal + 1 infusion Two complete perfusion cycles (two withdrawals and two infusions)
correspond to 16 culture volume exchanges per day