Embed Size (px)
Citation preview
Peugeot 306Roller Bearing Wishbone Bush KitInstallation Guidelines
The scope of this document is, as the name suggests, installation guidelines, and not a complete instruction manual. The context of this document and the terminology used with in assumes a reasonable level of mechanical knowledge and competence.
I can under no circumstances take responsibility for your actions and the consequences that arise from them as a result of fitting the Roller Bearing Wishbone bush kit. I can also take no responsibility for the mechanical failure of this product, or related suspension components, or any other form of loss that arises from your fitting of the Roller Bearing Wishbone Kit.
I recommend obtaining a Haynes Manual for the Peugeot 306 if you have limited mechanical knowledge or ability; this will offer good general guidance.
Removal of Wishbones and existing Wishbone Bushes
1. Remove the existing wishbones from the car. This process is described in the Haynes Manual, and also in the FAQ Forum on www.306gti6.com
2. Remove the existing bushes from the wishbones. This will be the hardest bit. Burn them out, cut them out, press them out, air chisel them out, do whatever you have to do. This process is described in the Haynes Manual, and also in the FAQ Forum on_www.306gti6.com
Installation
Part Identification Diagram
Please refer to diagrams on the following pages for identifying parts and terminology.
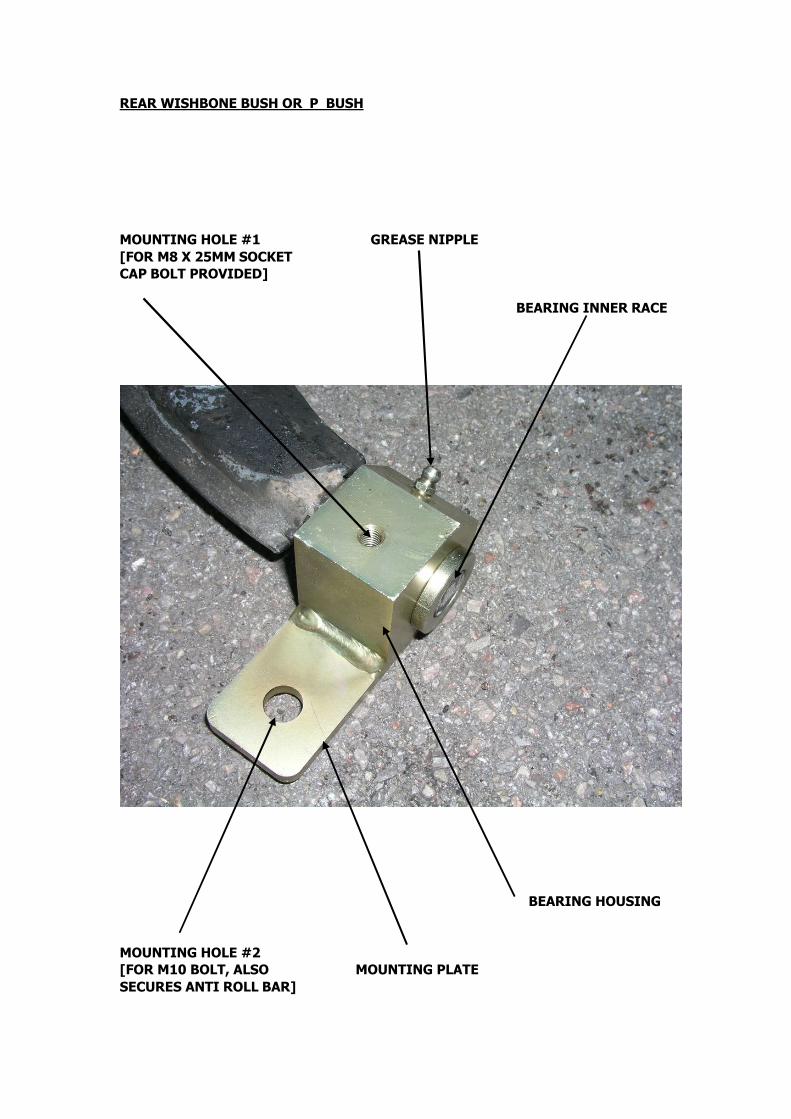
REAR WISHBONE BUSH OR ‘P’ BUSH
MOUNTING HOLE #1 GREASE NIPPLE[FOR M8 X 25MM SOCKETCAP BOLT PROVIDED]
BEARING INNER RACE
BEARING HOUSING
MOUNTING HOLE #2[FOR M10 BOLT, ALSO MOUNTING PLATESECURES ANTI ROLL BAR]
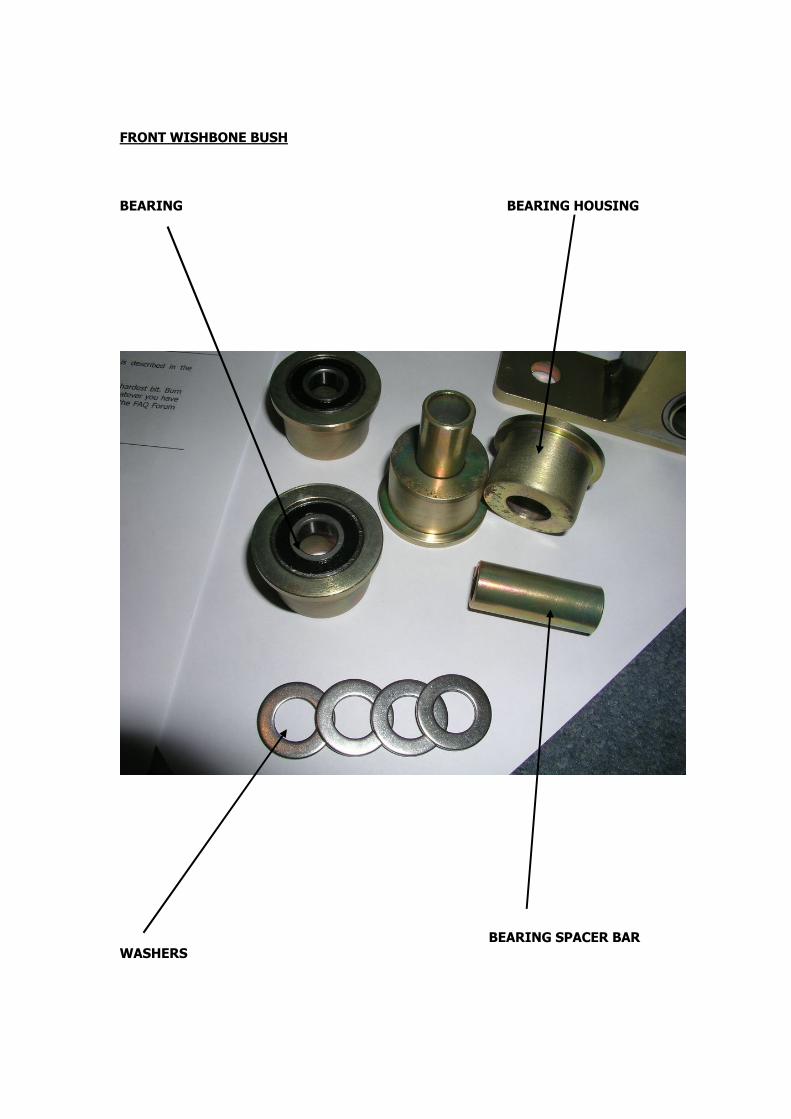
FRONT WISHBONE BUSH
BEARING BEARING HOUSING
BEARING SPACER BARWASHERS
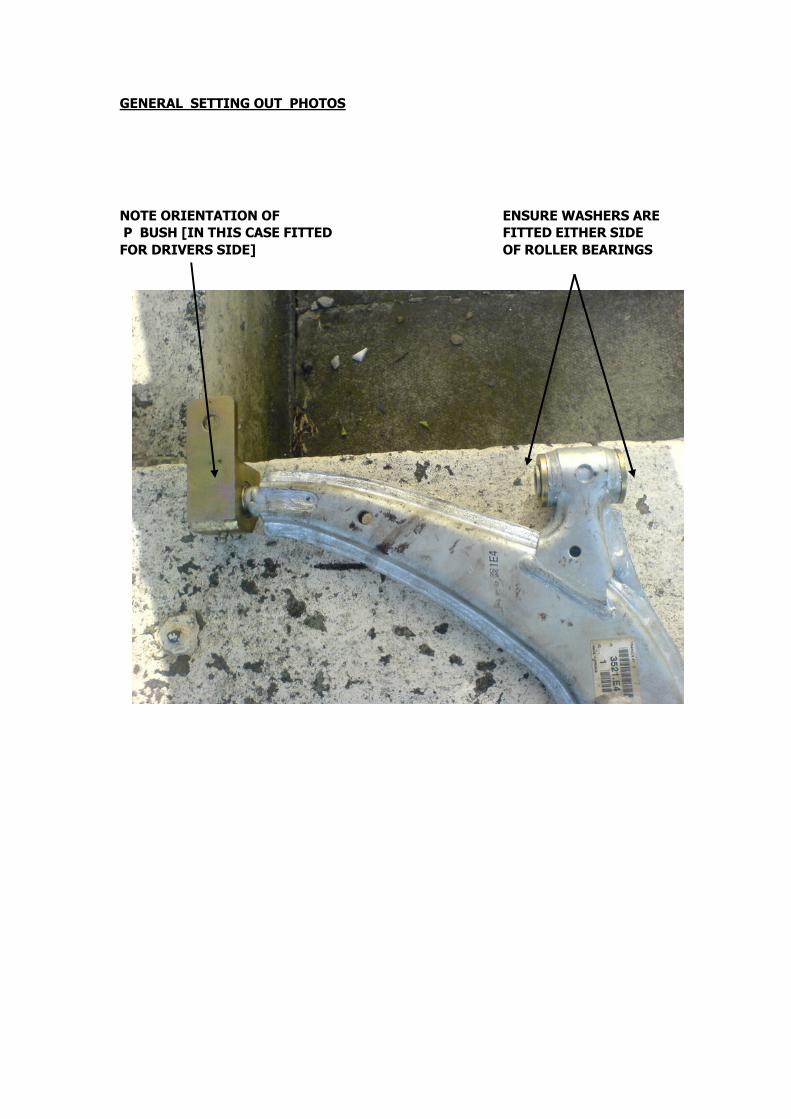
GENERAL ‘SETTING OUT’ PHOTOS
NOTE ORIENTATION OF ENSURE WASHERS ARE‘P’ BUSH [IN THIS CASE FITTED FITTED EITHER SIDEFOR DRIVERS SIDE] OF ROLLER BEARINGS
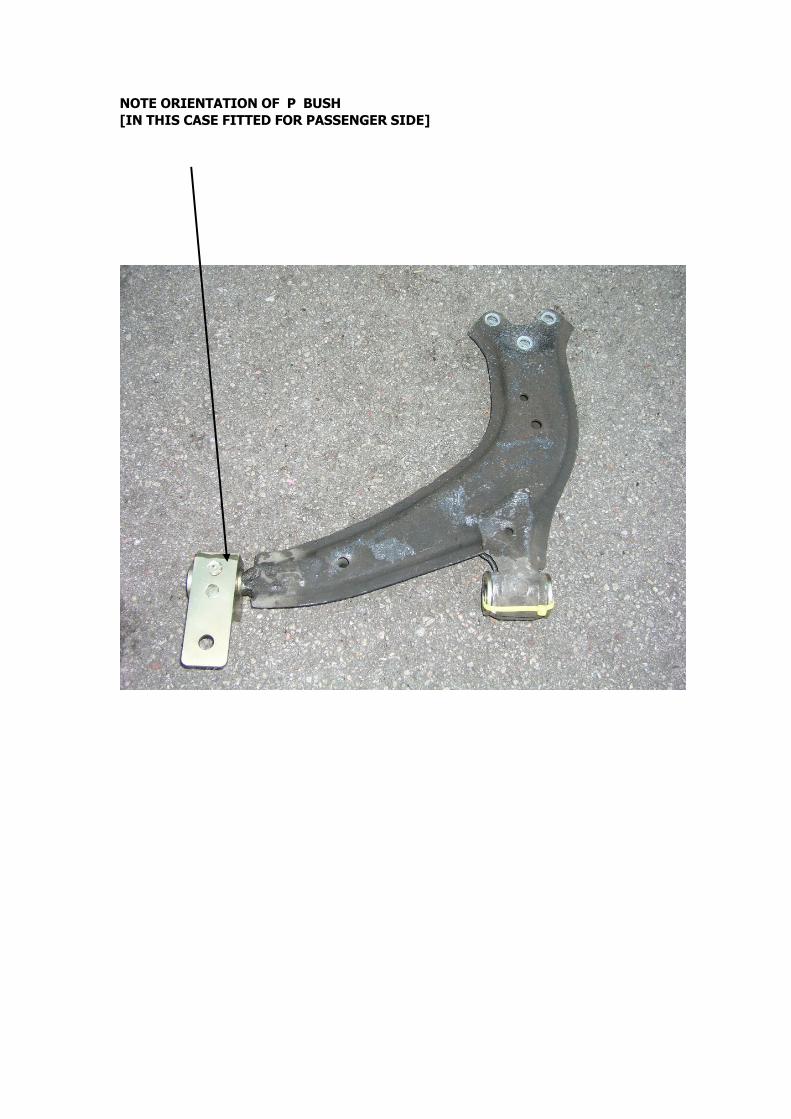
NOTE ORIENTATION OF ‘P’ BUSH[IN THIS CASE FITTED FOR PASSENGER SIDE]
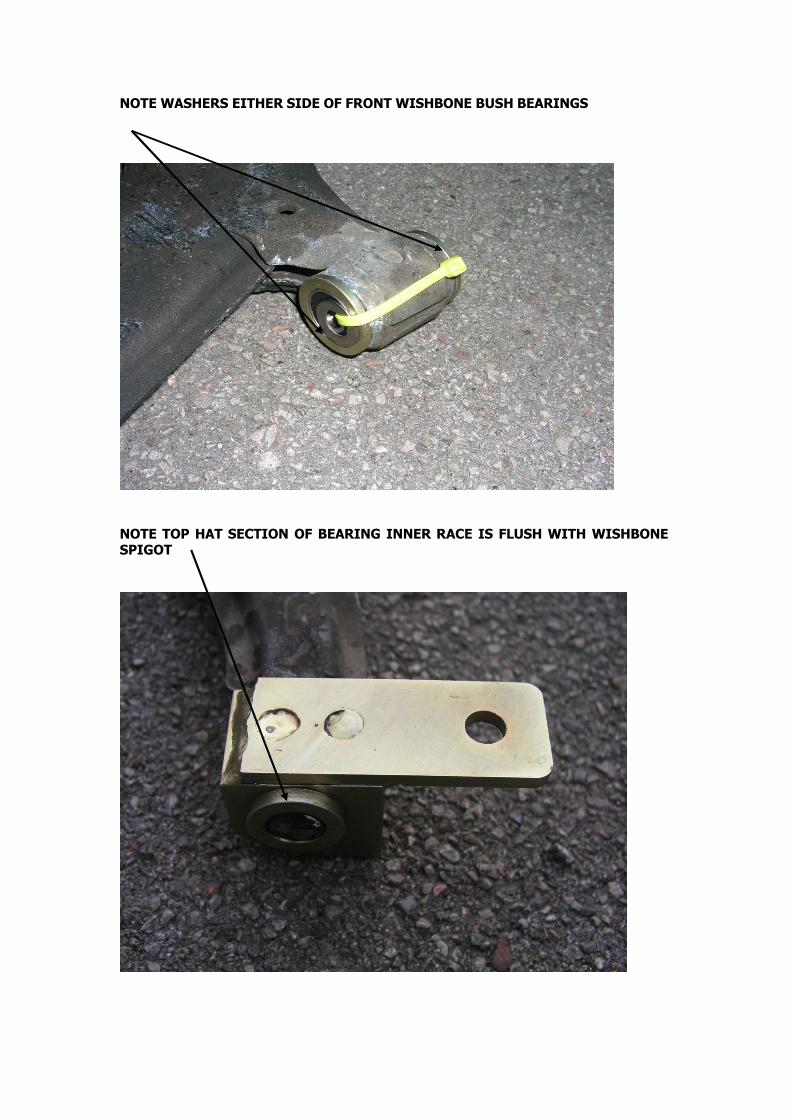
NOTE WASHERS EITHER SIDE OF FRONT WISHBONE BUSH BEARINGS
NOTE TOP HAT SECTION OF BEARING INNER RACE IS FLUSH WITH WISHBONE SPIGOT
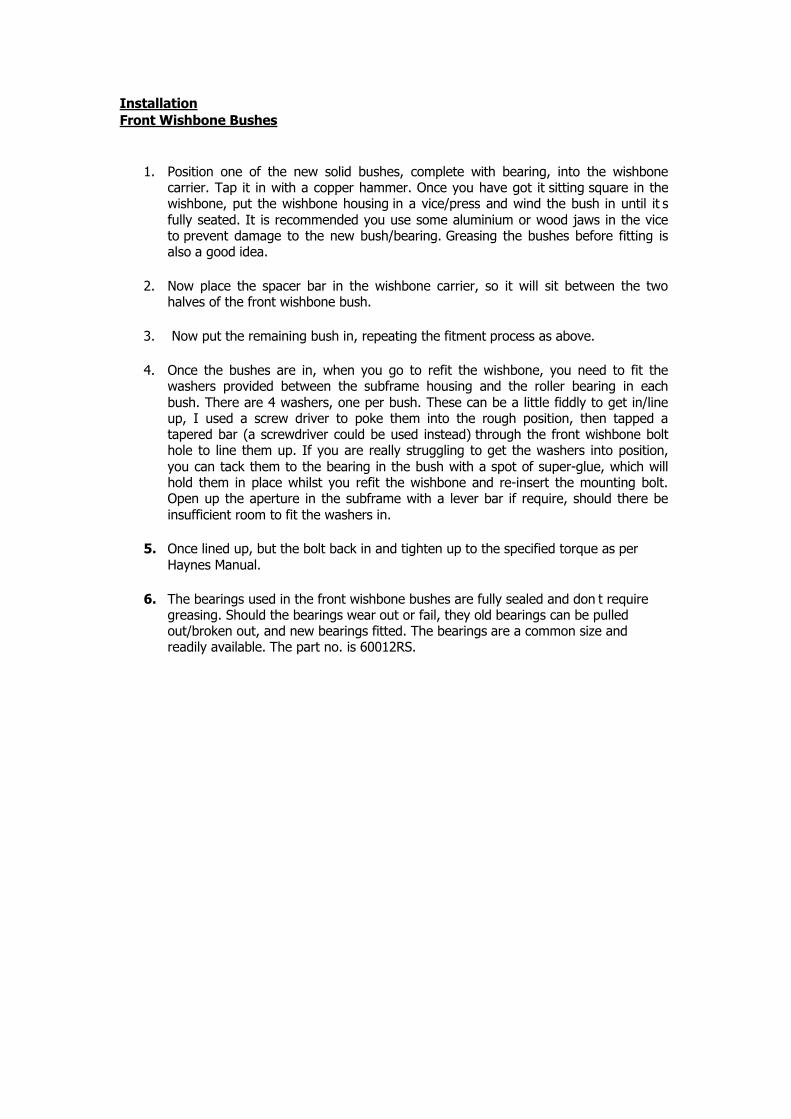
InstallationFront Wishbone Bushes
1. Position one of the new solid bushes, complete with bearing, into the wishbone carrier. Tap it in with a copper hammer. Once you have got it sitting square in the wishbone, put the wishbone housing in a vice/press and wind the bush in until it’s fully seated. It is recommended you use some aluminium or wood jaws in the vice to prevent damage to the new bush/bearing. Greasing the bushes before fitting is also a good idea.
2. Now place the spacer bar in the wishbone carrier, so it will sit between the two halves of the front wishbone bush.
3. Now put the remaining bush in, repeating the fitment process as above.
4. Once the bushes are in, when you go to refit the wishbone, you need to fit the washers provided between the subframe housing and the roller bearing in each bush. There are 4 washers, one per bush. These can be a little fiddly to get in/line up, I used a screw driver to poke them into the rough position, then tapped a tapered bar (a screwdriver could be used instead) through the front wishbone bolt hole to line them up. If you are really struggling to get the washers into position, you can tack them to the bearing in the bush with a spot of super-glue, which will hold them in place whilst you refit the wishbone and re-insert the mounting bolt. Open up the aperture in the subframe with a lever bar if require, should there be insufficient room to fit the washers in.
5. Once lined up, but the bolt back in and tighten up to the specified torque as per Haynes Manual.
6. The bearings used in the front wishbone bushes are fully sealed and don’t require greasing. Should the bearings wear out or fail, they old bearings can be pulled out/broken out, and new bearings fitted. The bearings are a common size and readily available. The part no. is 60012RS.
Rear Wishbone or 'P' Bushes
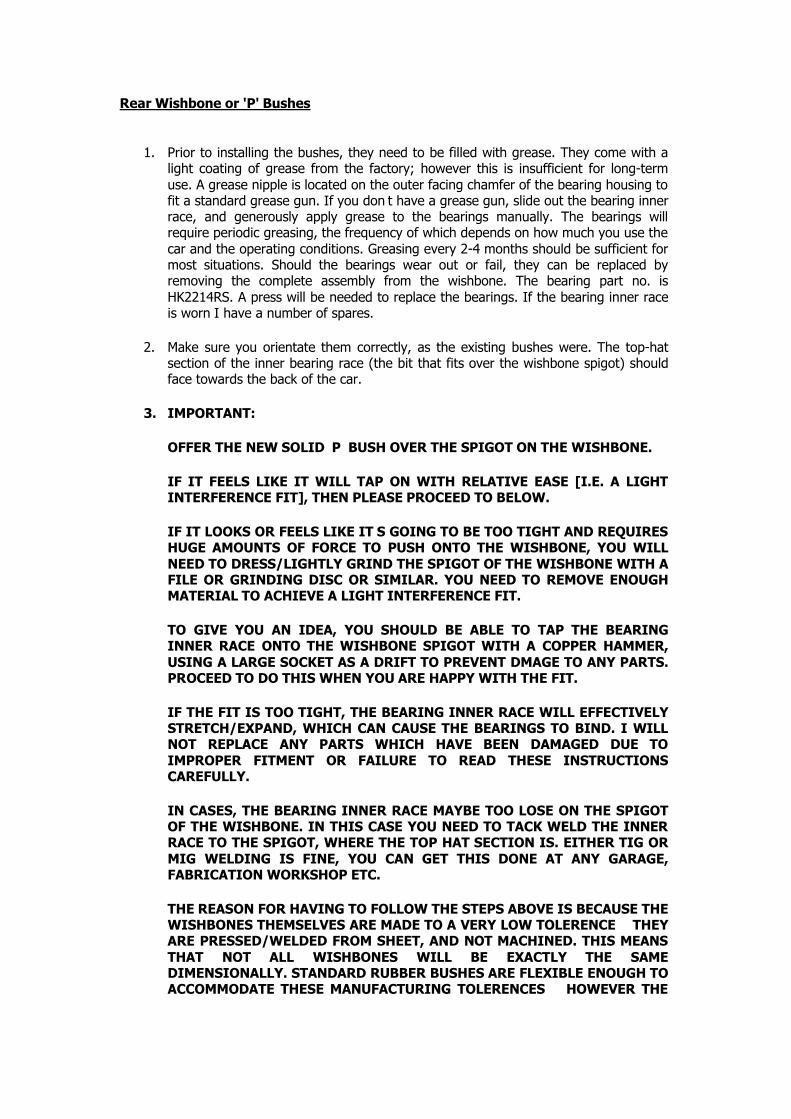
1. Prior to installing the bushes, they need to be filled with grease. They come with a light coating of grease from the factory; however this is insufficient for long-term use. A grease nipple is located on the outer facing chamfer of the bearing housing to fit a standard grease gun. If you don’t have a grease gun, slide out the bearing inner race, and generously apply grease to the bearings manually. The bearings will require periodic greasing, the frequency of which depends on how much you use the car and the operating conditions. Greasing every 2-4 months should be sufficient for most situations. Should the bearings wear out or fail, they can be replaced by removing the complete assembly from the wishbone. The bearing part no. is HK2214RS. A press will be needed to replace the bearings. If the bearing inner raceis worn I have a number of spares.
2. Make sure you orientate them correctly, as the existing bushes were. The top-hat section of the inner bearing race (the bit that fits over the wishbone spigot) should face towards the back of the car.
3. IMPORTANT:
OFFER THE NEW SOLID ‘P’ BUSH OVER THE SPIGOT ON THE WISHBONE.
IF IT FEELS LIKE IT WILL TAP ON WITH RELATIVE EASE [I.E. A LIGHT INTERFERENCE FIT], THEN PLEASE PROCEED TO BELOW.
IF IT LOOKS OR FEELS LIKE IT’S GOING TO BE TOO TIGHT AND REQUIRES HUGE AMOUNTS OF FORCE TO PUSH ONTO THE WISHBONE, YOU WILL NEED TO DRESS/LIGHTLY GRIND THE SPIGOT OF THE WISHBONE WITH A FILE OR GRINDING DISC OR SIMILAR. YOU NEED TO REMOVE ENOUGH MATERIAL TO ACHIEVE A LIGHT INTERFERENCE FIT.
TO GIVE YOU AN IDEA, YOU SHOULD BE ABLE TO TAP THE BEARING INNER RACE ONTO THE WISHBONE SPIGOT WITH A COPPER HAMMER, USING A LARGE SOCKET AS A DRIFT TO PREVENT DMAGE TO ANY PARTS.PROCEED TO DO THIS WHEN YOU ARE HAPPY WITH THE FIT.
IF THE FIT IS TOO TIGHT, THE BEARING INNER RACE WILL EFFECTIVELY STRETCH/EXPAND, WHICH CAN CAUSE THE BEARINGS TO BIND. I WILL NOT REPLACE ANY PARTS WHICH HAVE BEEN DAMAGED DUE TO IMPROPER FITMENT OR FAILURE TO READ THESE INSTRUCTIONS CAREFULLY.
IN CASES, THE BEARING INNER RACE MAYBE TOO LOSE ON THE SPIGOT OF THE WISHBONE. IN THIS CASE YOU NEED TO TACK WELD THE INNER RACE TO THE SPIGOT, WHERE THE TOP HAT SECTION IS. EITHER TIG OR MIG WELDING IS FINE, YOU CAN GET THIS DONE AT ANY GARAGE, FABRICATION WORKSHOP ETC.
THE REASON FOR HAVING TO FOLLOW THE STEPS ABOVE IS BECAUSE THE WISHBONES THEMSELVES ARE MADE TO A VERY LOW TOLERENCE – THEY ARE PRESSED/WELDED FROM SHEET, AND NOT MACHINED. THIS MEANS THAT NOT ALL WISHBONES WILL BE EXACTLY THE SAME DIMENSIONALLY. STANDARD RUBBER BUSHES ARE FLEXIBLE ENOUGH TO ACCOMMODATE THESE MANUFACTURING TOLERENCES – HOWEVER THE

SOLID BUSHES, BEING SOLID, ARE NOT AS FLEXIBLE AND THIS NEEDS TO BE CONSIDERED DURING THE FITTING PROCESS. THIS IS NOTHING TO DO WITH THE MANUFACTURING OF THE SOLID BUSHES – THESE ARE PRECISION ENGINEERED TO MUCH FINER TOLERENCES THAN THE WISHBONES THEMSELVES!
4. Once the solid ‘P’ bushes are on, refit the wishbone as per the Haynes Manual. Visually check the alignment of bolt holes etc, and if required, remove the wishbone and make any necessary adjustments to the location of the bearing inner Race on the wishbone spigot. The bolts should be tightened as follows:
5. When everything is in position, tighten up the front wishbone bush mounting bolt to the specified torque as per the Haynes Manual.
6. Insert the small bolt in to the rear ‘P’ bush bearing housing, but just do it finger tight. Use the longer M8 Allen head bolts provided for this – not the bolts you removed along with your old rubber bushes. These will provided better clamp load than the original bolts which are fairly short.
7. Now put the big bolt through (16mm head). This bolt also goes through the ARB bush retaining plate. Tighten this up to the specified torque as per Haynes Manual.
8. Once this is all done, you can tighten up the small bolt to the specified torque. Do not over tighten!
9. Road test – observe for any new noises and knocking etc. When satisfied all is well, recheck the torque on all mounting bolts.
10. Re-grease the ‘P’ bushes periodically as suggested earlier in this document.
Should you require any further information, or require spare parts, please contact me at:


![Wishbone Series by Coachingyouthfootball[1]](https://img.pdfslide.net/doc/110x75/5525c56f550346ca3b8b460f/wishbone-series-by-coachingyouthfootball1.jpg)