Embed Size (px)
Citation preview
Operating Instructions
Commercial DishwasherPG 8080i
To prevent accidents and machine damage,read these instructions before installation or use.
en - US
M.-Nr. 09 501 392

2

Contents
3
Guide to the manual .............................................................................................. 6
Proper use.............................................................................................................. 7
Important safety instructions ............................................................................... 8
Product description............................................................................................. 14Machine overview.................................................................................................. 14Control panel ......................................................................................................... 15
Caring for the environment ................................................................................ 16Energy-saving washing ......................................................................................... 17
Commissioning .................................................................................................... 18Opening the door .................................................................................................. 18Closing the door.................................................................................................... 18Child safety lock.................................................................................................... 18Display functions................................................................................................... 19Standard settings .................................................................................................. 20Before using the machine for the first time, you will need: ................................... 21Filling the salt compartment.................................................................................. 21Salt indicator ......................................................................................................... 23Rinse aid................................................................................................................ 23Adding rinse aid .................................................................................................... 24Rinse aid indicator................................................................................................. 24
Loading the dishwasher...................................................................................... 25Preparing the load ................................................................................................. 25Tips........................................................................................................................ 25Typical load for 10 place settings with cutlery basket .......................................... 27Typical load for 13 place settings with cutlery basket .......................................... 28Upper basket......................................................................................................... 29
Hinged spikes................................................................................................... 29Cup rack ........................................................................................................... 29XXL cup rack .................................................................................................... 30Glass rail ........................................................................................................... 30Adjusting the height of the glass rail: ............................................................... 30Adjusting the upper basket .............................................................................. 31
Lower basket......................................................................................................... 32Glass rack......................................................................................................... 33Hinged spikes................................................................................................... 33
Cutlery basket ....................................................................................................... 34Cutlery insert for the cutlery basket ...................................................................... 34
Optional accessories .......................................................................................... 35
Contents
4
Operation.............................................................................................................. 36Detergent............................................................................................................... 36Adding detergent................................................................................................... 37Switching on the appliance ................................................................................... 38Selecting a program .............................................................................................. 38Starting a program ................................................................................................ 38Time display .......................................................................................................... 39Standby ................................................................................................................. 39End of program...................................................................................................... 40Switching off.......................................................................................................... 40Unloading the dishwasher..................................................................................... 40Interrupting a program........................................................................................... 41Changing a program.............................................................................................. 41
Additional functions ............................................................................................ 42Additional drying ................................................................................................... 42Delay Start............................................................................................................. 42
Program chart...................................................................................................... 44
Settings menu...................................................................................................... 46Settings menu for changing standard settings ..................................................... 46Open the Settings menu ....................................................................................... 46Language ........................................................................................................... 46Water hardness ..................................................................................................... 47Rinse aid................................................................................................................ 48AutoOpen .............................................................................................................. 48Optimize Standby.................................................................................................. 49Refill indicators ...................................................................................................... 50Brightness ............................................................................................................. 50Contrast................................................................................................................. 50Filter check ............................................................................................................ 50Detergent quantity................................................................................................. 51Venting DOS.......................................................................................................... 51High-temperature final rinse .................................................................................. 52Water plus ............................................................................................................. 52Program selection ................................................................................................. 52Showroom program............................................................................................... 52Factory default setting........................................................................................... 53To close the Settings menu................................................................................... 53
Cleaning and care ............................................................................................... 54Maintenance.......................................................................................................... 54Cleaning the wash chamber.................................................................................. 54
Contents
5
Cleaning the door and the door seal..................................................................... 55Cleaning the front of the dishwasher .................................................................... 55Filter system .......................................................................................................... 56Cleaning the filters................................................................................................. 56Cleaning the spray arms........................................................................................ 58
Frequently asked questions ............................................................................... 59Technical problems ............................................................................................... 59Faults with water intake or drainage...................................................................... 61General problems with the dishwasher ................................................................. 62Noises.................................................................................................................... 64Poor cleaning results ............................................................................................. 65
Frequently asked questions ............................................................................... 67Cleaning the water intake...................................................................................... 67Recommendation .................................................................................................. 67To clean the filter: .................................................................................................. 67Cleaning the drain pump and non-return valve..................................................... 68
Miele Service ....................................................................................................... 69PC Update............................................................................................................. 69
Electrical connection .......................................................................................... 70
Plumbing .............................................................................................................. 72The Miele WaterProof System............................................................................... 72Water intake .......................................................................................................... 72Connection to the drainage system ...................................................................... 74
Technical details .................................................................................................. 75
Sound emission tests.......................................................................................... 76Setup for sound emission tests............................................................................. 76

Guide to the manual
6
Warnings
Information which is important for safety is highlightedby a thickly framed box with a warning symbol. This alertsyou to a potential risk of personal injury or propertydamage.Read these warning notes carefully and follow anyprocedural instructions and operating prompts.
Notices
Notes contain information that requires particular attention.They are highlighted by a thickly framed box.
Additional information and comments
Additional information and comments are marked by a boxwith thin line.They are not necessarily critical to the operation of thedishwasher.
Operating steps
Additional instructions on how to operate the dishwasher aredescribed step-by-step in a logical sequence.Each new step is marked by a black square bullet point.
Example: Select the desired setting and press the center button toconfirm.
DisplayIn this manual, information that is shown in the dishwasherdisplay appears in a special font similar to the display text.
Example:
When the message End or AutoOpen appears in thedisplay ....

Proper use
7
This dishwasher complies with current safety requirements. Inappropriate usecan, however, lead to personal injury and damage to property.To avoid the risk of accidents and damage to the dishwasher, please read theseinstructions carefully before using it for the first time. They contain importantinformation on its safety, installation, use and maintenance. Keep theseinstructions in a safe place and pass them on to any future owner.
Proper use
This dishwasher with its short program running times andpowerful cleaning performance is intended for commercial use inoffices, lunch rooms, clubhouses, workshops, daycare centers,schools, large kitchens and similar professional environments.
This dishwasher is not intended for continuous use.
This commercial dishwasher is not suitable for the cleaning ofmedical products or devices.
This appliance is designed exclusively for use as a "dishwasher"for cleaning cookware, glassware and cutlery only, as described inthese instructions. Alterations or conversions to the dishwasher, orusing it for purposes other than those for which it is designed, arenot permitted and could be dangerous. Miele cannot be held liable for damage caused by improper orincorrect use or operation.
This commercial dishwasher is intended only for stationary indooruse.
The special inserts are to be used for their specific purpose only.
Persons who lack physical, sensory or mental abilities, orexperience with the appliance should not use it without supervisionor instruction by a responsible person.
Important safety instructions
8
Proper installation
Do not install the commercial dishwasher in areas at risk ofexplosion or freezing.
To ensure the stability of undercounter commercial dishwashers,they must only be installed beneath a continuous countertop that isbolted to the adjacent cabinetry.
In order to reduce the risk of damage from condensation, thefurniture in the area around the commercial dishwasher should bedesigned for commercial use.
Technical safety
The commercial dishwasher must only be installed,commissioned, repaired and then maintained by the Miele ServiceDepartment or an authorized Miele Service dealer. Installation, repairand other work by unqualified persons could be dangerous andMiele will not be held liable.
This commercial dishwasher must only be operated byappropriately trained personnel. They must be instructed and trainedregularly.
Before using the commercial dishwasher, check it for anyexternally visible damage. Under no circumstances should you use itif it has been damaged. It could be dangerous.
In the event of a damaged or leaking commercial dishwasher, turnit off immediately and contact Miele or an authorized Miele Servicedealer.
Faulty components may only be replaced by genuine Mieleoriginal parts. Only when these parts are fitted can Miele guaranteethe safety standards of the appliance.
Important safety instructions
9
The electrical safety of this commercial dishwasher can only beguaranteed when it is connected to a correctly installed groundingconductor system. If in any doubt, please have the electricalinstallation tested by a qualified electrician. Miele cannot be heldliable for the consequences for the lack or interruption of agrounding conductor (e.g. electric shock).
Be sure to follow the installation instructions in this manual and inthe installation diagram.
Ensure that the connection data on the data plate (voltage,frequency, and fuse rating) match those of your electrical supply.
There must be no electrical sockets behind the commercialdishwasher since the depth of the installation niche may be too smalland there is a danger of overheating if the dishwasher is pushed upagainst a plug (see the "Electrical connection" chapter for moreinformation).
Do not connect the dishwasher to the electrical supply by amultiple outlet box or an extension cable since they do not guaranteethe required safety of the appliance (e.g. danger of overheating).
Do not open the commercial dishwasher casing under anycircumstances. Tampering with electrical connections orcomponents and mechanical parts is highly dangerous to the userand can cause operational faults.
The commercial dishwasher must not be used if the connectingcable is damaged. If the cable is damaged, it must be replaced witha special connecting cable available from Miele. For safety reasons,this may only be performed by the Miele Service Department or anauthorized Miele Service dealer.
Before maintenance, disconnect the commercial dishwasher fromthe electrical supply.
The plastic housing of the water connection contains electricalcomponents. It must not be dipped in water.

Important safety instructions
10
There are live wires in the water intake hose. Do not shorten thewater intake hose, even if it is too long.
The built-in waterproof system offers reliable protection againstwater damage if the following conditions are met:
– proper installation
– proper maintenance of the dishwasher or exchange of parts incase of visible damage
– closing of the water valve during longer absences (for examplevacation)
The waterproof system will work even if the dishwasher is turned off.However, the commercial dishwasher must remain connected to theelectrical supply.
Important safety instructions
11
Correct use
This commercial dishwasher is designed for operation with waterand detergents suitable for use in commercial dishwashers only.Organic solvents and flammable liquid agents must not be used.This could cause an explosion, property damage due to thedestruction of rubber or plastic, and the resulting leakage of liquids.
Use detergents formulated for use in commercial dishwashers.Using unsuitable detergents could damage the dishes and thecommercial dishwasher itself.
Do not sit or lean on the opened door. This could cause thecommercial dishwasher to tip or become damaged.
After any plumbing work on the water supply, to the dishwasherwill need to be vented. If this is not done, components can bedamaged.
Please be aware that the dishwasher may be operating at hightemperatures. If the door is opened, there is a danger of burning orscalding. Dishes, cutlery, baskets, and inserts must be allowed tocool down before they are unloaded. Any water remaining incontainers could still be very hot. Empty them into the wash cabinetbefore taking them out.
The water in the wash cabinet is NOT safe to drink!
The pretreatment of items (for example with dishwashing liquidand other detergents), but also some types of soiling and somedetergents, can cause a build-up of foam in the wash cabinet. Foamcan have an adverse effect on the cleaning result.
Foam escaping from the wash chamber can cause damage to thedishwasher. If foam escapes, the program must be cancelledimmediately and the machine must be disconnected from theelectrical supply.
Important safety instructions
12
When using detergents and specialized products, it is essentialthat the manufacturer's instructions are followed. Detergents mustonly be used for the purpose they are designed for and in thesituation specified, to avoid material damage and serious chemicalreactions (e.g. oxyhydrogen explosion).
Do not inhale or ingest powder detergent. Dishwasher detergentscontain irritant or corrosive ingredients which can cause burning inthe nose, mouth and throat if swallowed, or inhibit breathing. Seekmedical attention immediately if detergent has been swallowed orinhaled.
Miele cannot be held liable for any effect chemical detergents mayhave on the material of the items being cleaned. Observe thedetergent manufacturer's instructions with regard to storageconditions, use, and dosage.
To avoid material damage and corrosion, do not allow any acidsor solutions containing chloride to get into the wash cabinet.Similarly avoid any materials with a corrosive effect.
Do not wash items soiled with ash, sand, wax, lubricants, or paintin the dishwasher. These substances could damage the dishwasher.
Do not hose down the dishwasher or its direct vicinity to clean it,e.g. with a water hose or high-pressure cleaner.
Ensure that the stainless steel outer casing of the appliance doesnot come into contact with solutions or steam containing acid toavoid any corrosion damage.
Be careful when sorting items with sharp pointed ends andpositioning them in the dishwasher so that you do not hurt yourselfor create a danger for others. Cutlery should be placed in baskets insuch a way that no injuries can occur.
Remove any coarse food deposits from the items being cleanedbefore loading them in the dishwasher.
Important safety instructions
13
Children in the vicinity
Supervise children when they are anywhere near this dishwasher.Do not let them play with it. There is a danger that children may lockthemselves in the dishwasher.
Keep children away from chemical agents. These contain irritantand corrosive ingredients which can cause burning in the mouth,nose and throat if swallowed, or inhibit breathing. Keep childrenaway from the dishwasher when the door is open. There could stillbe residual chemical agent in the cabinet. Seek medical adviceimmediately if a child has swallowed or inhaled chemical agent.
Accessories
Accessories may only be fitted if approved by Miele. If other partsare used, any warranty and product liability claims shall be void.
Miele cannot be held liable for damage caused by failure tocomply with these safety instructions and warnings.
SAVE THESE INSTRUCTIONS
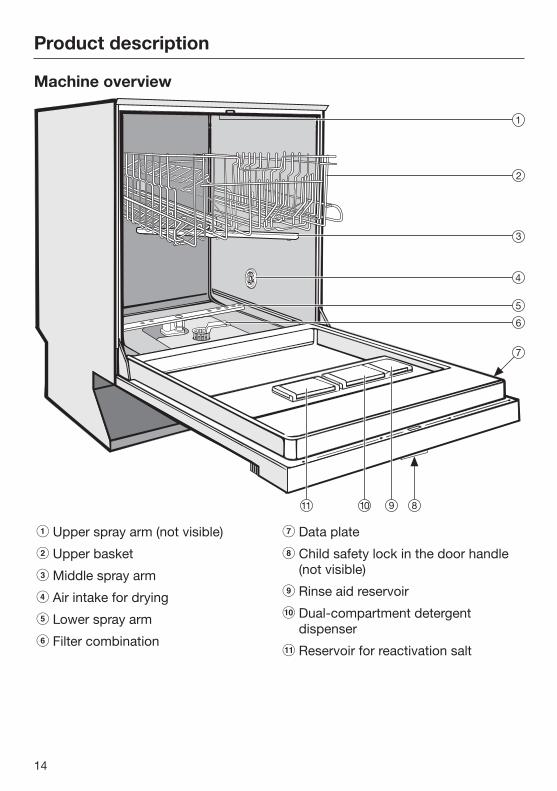
Product description
14
Machine overview
a Upper spray arm (not visible)
b Upper basket
c Middle spray arm
d Air intake for drying
e Lower spray arm
f Filter combination
g Data plate
h Child safety lock in the door handle(not visible)
i Rinse aid reservoir
j Dual-compartment detergentdispenser
k Reservoir for reactivation salt

Product description
15
Control panel
a Program selection
b Display
c Start/Start button with indicator light
d Additional Programs button withindicator light
e Delay Start button with indicatorlight
f Extra Drying button + withindicator light
g Program Selection button
h On/Off button

Caring for the environment
16
Disposal of the packingmaterialThe cardboard box and packingmaterials protect the appliance duringshipping. They have been designed tobe biodegradable and recyclable.
Ensure that any plastic wrappings,bags, etc. are disposed of safely andkept out of the reach of children.Danger of suffocation!
Disposal of your old applianceElectrical and electronic appliancescontain valuable materials. They alsocontain certain substances, compoundsand components which were essentialfor the proper functioning and safe useof the equipment. Handling thesematerials improperly by disposing ofthem in your household waste can beharmful to your health and theenvironment. Therefore, please do notdispose of your old appliance withregular household waste and followlocal regulations on proper disposal.
Consult with local authorities, dealers orMiele in order to dispose of and recycleelectrical and electronic appliances.Miele assumes no responsibility fordeleting any personal data left on theappliance being disposed. Pleaseensure that your old appliance is keptaway from children until removal.Observe safety requirements forappliances that may tip over or pose anentrapment hazard.
Caring for the environment
17
Energy-saving washingThis dishwasher is exceptionallyeconomical in its use of water andelectricity. You can make the most ofyour machine by following these tips:
You may connect the dishwasher to ahot water supply. This is particularlysuitable with energy-saving waterheating sources such as solar energysystems. If the hot water system iselectrically heated and if loadsconsist primarily of glassware, werecommend connecting the machineto the cold water supply.
For most economical dishwashing,make full use of the baskets withoutoverloading the dishwasher.
Choose a program that best suits thedegree of soiling and the type ofdishes being washed.
Select the Normal program forenergy-saving dishwashing. Thisprogram is the most efficient in termsof its combined energy and waterconsumption at cleaning normallysoiled tableware.
Follow the detergent manufacturer'srecommendations on detergentdosage.
When using powder detergent youcan use 1/3 less detergent if basketsare only half full.

Commissioning
18
Opening the door
At the end of programs with a dryingphase (see "Program overview"), thedoor will open automatically a little inorder to help the drying process. This function can be deactivated ifpreferred (see "Settings, AutoOpen").
To open the door, reach under therecessed handle and pull.
If the door is opened during operation,all functions are automaticallyinterrupted.
Keep the area around the doorfree of obstructions.
Closing the door Insert the baskets.
Then lift the door upwards and pushuntil it clicks into position.
Do not put your hand inside thedoor as it is closing.Risk of injury!
Child safety lockUse the safety lock to prevent childrenfrom opening the dishwasher door.
To lock the door, push the slideunderneath the door grip to the right.
To unlock the door, push the slide tothe left.

Commissioning
19
Display functionsGeneral information
The following functions can be selectedor set with the display:
– The program
– The delay start time
– The settings
The following appears in the displaywhile a program is running:
– The program stage
– The estimated time left for theprogram to run
– Any relevant fault messages andinformation
To save energy, the dishwasher willswitch to Standby mode within a fewminutes if no program is running andno button is pressed. After severalmore minutes it switches offcompletely (see "Operating thedishwasher, Standby").To turn the dishwasher back on, pressthe button.
Settings menu
The "Settings" menu is used to adaptthe electronic module of the dishwasherto changing requirements.You access the "Settings" menu bypressing a specific combination ofbuttons. See the "Settings menu" chapter formore information.
In the Settings menu, the normalfunctions of the buttons underneath thedisplay are not active, allowing you toselect and confirm menu options withthese buttons.
The left and right arrows in the displayindicate that additional selections areavailable. You can use the arrowbuttons underneath the display, asappropriate, to select these furtheroptions.
Use the center button underneath thedisplay to confirm messages or settingsand to switch to the next menu orsubmenu.
A check will appear beside theoption which is currently selected.

Commissioning
20
Standard settings Switch the dishwasher on with the
button.
If the dishwasher is being turned on forthe first time, the welcome screen willappear.
Language
The display will change automatically tothe screen for setting the language.
See "Guide to the appliance, Display"for more information about the displayand controls.
Select the desired language andpress the center button to confirm.
A check will appear next to thelanguage that has been set.
Water hardness
The display changes to the screen forsetting the water hardness.
– The dishwasher must beprogrammed to match exactly thehardness of your water.
– Your local water supplier can tell youthe water hardness level in your area.
– Where the water hardness fluctuates,e.g. between 18 - 26 gr/gal (17 - 25 °d - German scale), alwaysprogram the dishwasher to the highervalue (26 gr/gal or 25 °d in thisexample).
It is useful to know your water hardnessso that you can provide the servicetechnician with this information in theevent of any service calls.
Enter the water hardness below:
____________ gr/gal (°d)
The dishwasher is programmed at thefactory for a water hardness level of15 °gr/gal (15 d - German scale).
Select the water hardness level foryour water supply and confirm withthe center button.
See "Settings menu, Water hardness"for more information.
The following two messages Refillrinse aid and Refill salt may thenappear in the display.Press any button to confirm them. Thedisplay will change to show the mainmenu.

Commissioning
21
Before using the machine forthe first time, you will need:– Approx. 2.2 lbs (1 kg) of dishwasher
salt
– approx. 110 ml rinse aid,
– Dishwasher detergent, see"Operation".
Every dishwasher is tested at thefactory. There will be residual water inthe machine from this test. It is not anindication that it has been usedpreviously.
Filling the salt compartmentIn order to achieve good cleaningresults, the dishwasher needs tooperate with soft water. Hard waterresults in a build-up of calcium depositson tableware and in the dishwasher.Water with a hardness level higher than0.7 mmol/l (4 gr/gal (4 °d - Germanscale)) needs to be softened. This takesplace automatically in the integratedwater softener. The water softenerassembly in the dishwasher is suitablefor a water hardness level of up to6.5 mmol/l (38 gr/gal (36°d - Germanscale)).
See "Settings menu, Water hardness"for more information.
If the water in your area is very softand constantly lower than 0.7 mmol/l(4 gr/gal (4 °d - German scale)), youdo not need to add dishwasher salt.The dishwasher must, however, stillbe programmed for the waterhardness level in your area.
Do not fill the salt compartmentwith dishwasher detergent (includingliquid detergent).Dishwasher detergent will damagethe softener assembly.
Only use special coarse-graineddishwasher salt for reactivation, orpure evaporated salt.Miele Professional offers appropriateproducts.Other types of salt may containinsoluble components which cancause the water softener tomalfunction.

Commissioning
22
When adding salt, only open the doorhalf way to avoid spills.
Press the button on the lid of the saltcompartment in the direction of thearrow until the flap springs open.
Open the funnel.
Do not pour any water into the saltcompartment!
Add salt only until the reservoir is full.The salt reservoir holds approx. 2.2lbs (1 kg) of salt, depending on thetype of salt used.
Do not add any more than 2.2 lbs(1 kg) of salt.
If there is water present in thecompartment, it may be forced out bythe added salt.
Clean any excess salt from aroundthe reservoir opening, and then closethe flap.
Run the "Pre-rinse" programimmediately without a load in order toremove any traces of salt from thechamber.
Commissioning
23
Salt indicator Fill the salt reservoir with dishwasher
salt for reactivation when Refill saltappears in the display.
Press the center button to confirm.
The salt refill indicator will go out.
After the salt reservoir has been filled,the salt indicator may still appear in thedisplay if the salt concentration has notyet reached the correct level. If this isthe case, confirm again with the centerbutton.
The salt indicator is deactivated if thedishwasher is set to a water hardnessbelow 4 gr/gal (4 °dH - German scale).
Run the "Pre-rinse" or "Short"program immediately without a loadin order to remove any traces of saltfrom the chamber.
Rinse aidRinse aid is needed to prevent spottingon dishes and glassware. The rinse aid is filled in the reservoirand the set amount will beautomatically dosed.
Fill the reservoir with rinse aidonly. Do not fill it with liquid dishsoap or cleaning agent.This would damage the rinse aidreservoir.
Suitable products are available fromMiele Professional.
Alternatively household vinegar with amax. 5 % acid content or liquid citricacid with a max. 10 % acid content canbe used. The resulting rinsing anddrying quality will not, however, be asgood as when rinse aid is used.
Do not use vinegar with a higheracid content (e.g. vinegar essence25 % acid).This would damage the dishwasher.
Commissioning
24
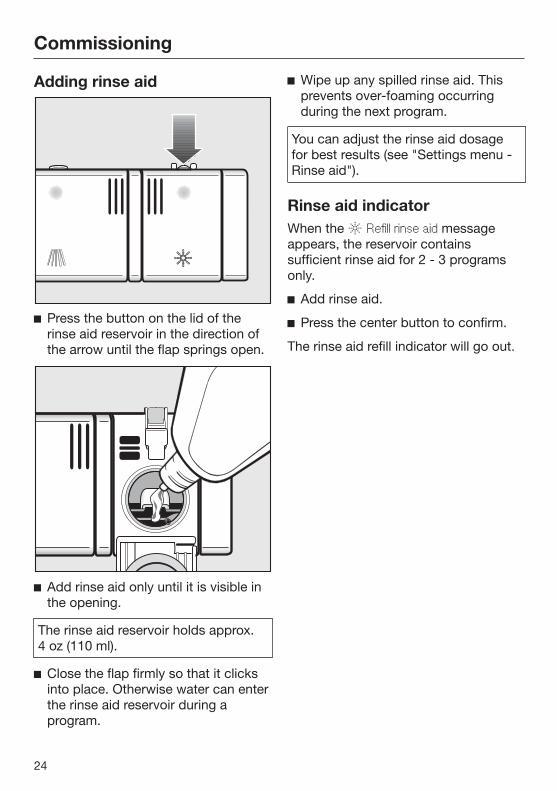
Adding rinse aid
Press the button on the lid of therinse aid reservoir in the direction ofthe arrow until the flap springs open.
Add rinse aid only until it is visible inthe opening.
The rinse aid reservoir holds approx.4 oz (110 ml).
Close the flap firmly so that it clicksinto place. Otherwise water can enterthe rinse aid reservoir during aprogram.
Wipe up any spilled rinse aid. Thisprevents over-foaming occurringduring the next program.
You can adjust the rinse aid dosagefor best results (see "Settings menu -Rinse aid").
Rinse aid indicatorWhen the Refill rinse aid messageappears, the reservoir containssufficient rinse aid for 2 - 3 programsonly.
Add rinse aid.
Press the center button to confirm.
The rinse aid refill indicator will go out.

Loading the dishwasher
25
Preparing the loadRemove coarse food residues from thedishware.
There is no need to rinse items underrunning water!
Tips
Ensure that no acid or solventresidues, especially hydrochloricacid or chlorides, get inside themachine.
Do not wash items soiled withash, sand, wax, grease or paint inthe dishwasher.These substances will damage thedishwasher.
Dishware can be loaded anywhere inthe baskets, but the following notesshould be observed:
Load the dishware so that water canaccess all surfaces. This ensures thatthe items will be properly cleaned.
Load plates symmetrically in theupper and lower baskets with theconcave surfaces facing the center ofthe basket (as shown on the followingpages).
Do not place dishes or cutlery insideother pieces. They will cover oneanother.
Load the dishware so that water canaccess all surfaces. This ensures thatthe items will be properly cleaned.
Make sure that all items are securelypositioned.
Hollow items such as cups, glassesand pans, etc. should be placedupside down in the baskets.
Tall and narrow hollow items shouldbe placed in the center of the basketif possible to ensure better watercoverage.
Concave items such as mugs orbowls should be placed at an angleso that the water can run off.
The spray arms must not be blockedby items which are too tall or hangthrough the baskets. When in doubt,test for free movement by manuallyrotating the spray arms.
Small items can fall through theholders in the baskets. Small itemsshould therefore be placed in thecutlery basket or cutlery tray(depending on model).
Some foods may contain naturaldyes, e.g. carrots, tomatoes orketchup. Plastic items in thedishwasher may discolor if largequantities of these foods find theirway into the dishwasher on thedishes. The stability of plastic itemsis not affected by this discoloration.

Loading the dishwasher
26
Items not suitable for dishwashers:
– Wooden cutlery and cookware oritems with wooden parts: these maydiscolor and fade. The glue used inthese items is not dishwasher-proofand wooden handles may comeloose after being washed in adishwasher.
– Craft items, antiques, valuable vasesand decorative glassware: such itemsare not suitable for dishwashers.
– Plastic items which are not heatresistant: the high temperatures inthe dishwasher may cause them tomelt or lose shape.
– Copper, brass, tin and aluminumitems: these may discolor or becomematt.
– Colors painted over a glaze: thesemay fade after a number of washes.
– Delicate glassware and glasswarecontaining lead crystal: clouding mayoccur over time.
We recommend
– When purchasing new cookware andcutlery, make sure they aredishwasher-proof.
– Clouding may occur on glasses afterfrequent washing. If delicateglassware is washed in thedishwasher ensure that only a specialglass-care program with very lowtemperatures (see program chart) isselected and that suitable detergentis used. This will reduce the risk ofclouding.
Please note:
Silver and aluminum which has beenin contact with foods containing sulfurcan discolor.
Aluminum components (e.g.grease filters) must not be cleanedwith caustic alkaline commercial orindustrial cleaning agents.These may damage the material, orin extreme cases, there is a risk of asevere explosive chemical reaction(such as an explosive oxyhydrogengas reaction).

Loading the dishwasher
27
Typical load for 10 placesettings with cutlery basket
Upper basket
Cutlery basket
Lower basket
Loading the dishwasher
28
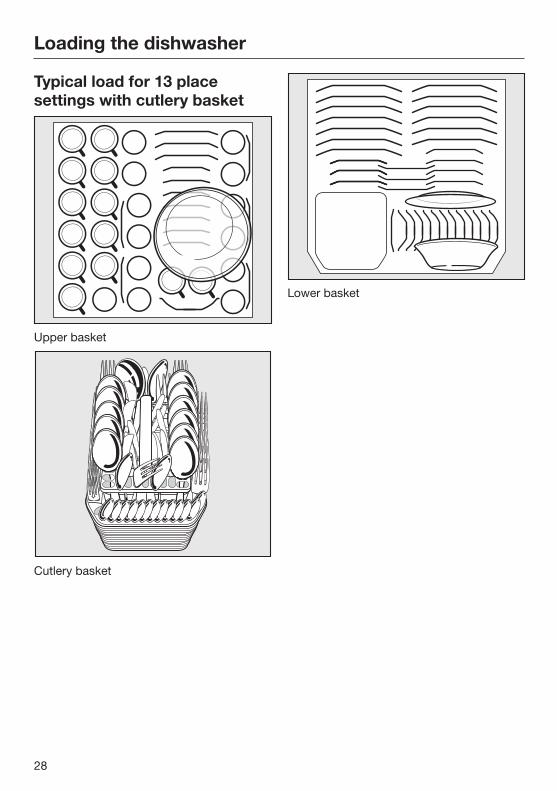
Typical load for 13 placesettings with cutlery basket
Upper basket
Cutlery basket
Lower basket
Loading the dishwasher
29
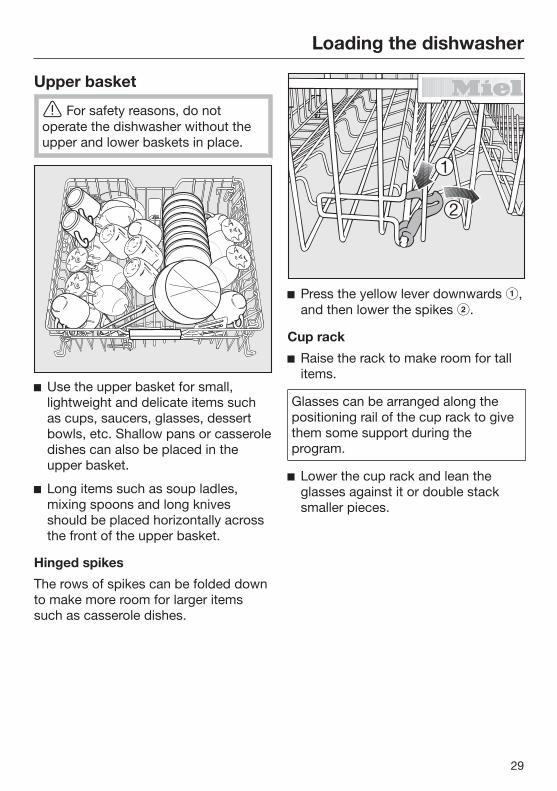
Upper basket
For safety reasons, do notoperate the dishwasher without theupper and lower baskets in place.
Use the upper basket for small,lightweight and delicate items suchas cups, saucers, glasses, dessertbowls, etc. Shallow pans or casseroledishes can also be placed in theupper basket.
Long items such as soup ladles,mixing spoons and long knivesshould be placed horizontally acrossthe front of the upper basket.
Hinged spikes
The rows of spikes can be folded downto make more room for larger itemssuch as casserole dishes.
Press the yellow lever downwards ,and then lower the spikes .
Cup rack
Raise the rack to make room for tallitems.
Glasses can be arranged along thepositioning rail of the cup rack to givethem some support during theprogram.
Lower the cup rack and lean theglasses against it or double stacksmaller pieces.

Loading the dishwasher
30
XXL cup rack
The cup rack can be set at two differentwidths so that it can also accommodatelarge cups.
Pull the cup rack upwards and click itback into position at the requiredwidth.
Glass rail
This rail is designed to hold tall glassesand stemware securely.
Lower the rail and lean tall glassesagainst it.
Adjusting the height of the glass rail:
You can set the glassware rail at twodifferent heights.
Pull the rail upwards and click it backinto position at the required height.
Use the lower position for small glassesand tumblers.
Use the higher position for tall glassesand glasses with stems.
Loading the dishwasher
31
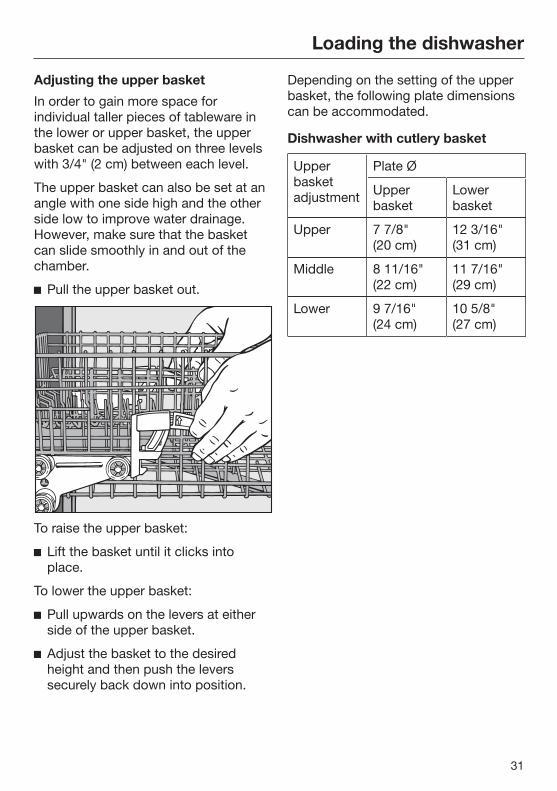
Adjusting the upper basket
In order to gain more space forindividual taller pieces of tableware inthe lower or upper basket, the upperbasket can be adjusted on three levelswith 3/4" (2 cm) between each level.
The upper basket can also be set at anangle with one side high and the otherside low to improve water drainage.However, make sure that the basketcan slide smoothly in and out of thechamber.
Pull the upper basket out.
To raise the upper basket:
Lift the basket until it clicks intoplace.
To lower the upper basket:
Pull upwards on the levers at eitherside of the upper basket.
Adjust the basket to the desiredheight and then push the leverssecurely back down into position.
Depending on the setting of the upperbasket, the following plate dimensionscan be accommodated.
Dishwasher with cutlery basket
Upperbasketadjustment
Plate Ø
Upperbasket
Lowerbasket
Upper 7 7/8" (20 cm)
12 3/16" (31 cm)
Middle 8 11/16" (22 cm)
11 7/16" (29 cm)
Lower 9 7/16" (24 cm)
10 5/8" (27 cm)
Loading the dishwasher
32
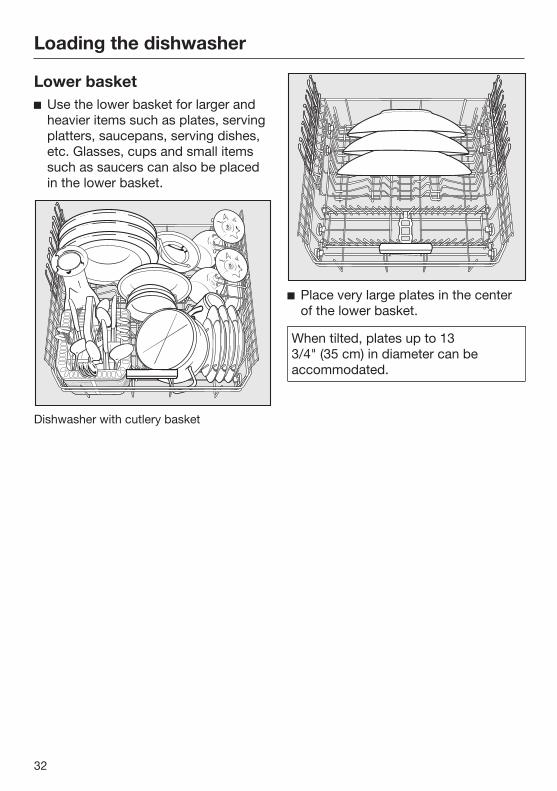
Lower basket Use the lower basket for larger and
heavier items such as plates, servingplatters, saucepans, serving dishes,etc. Glasses, cups and small itemssuch as saucers can also be placedin the lower basket.
Dishwasher with cutlery basket
Place very large plates in the centerof the lower basket.
When tilted, plates up to 133/4" (35 cm) in diameter can beaccommodated.

Loading the dishwasher
33
Glass rack
The glass holder can be raised tomake more room for tall items.
Stemware, e.g. wine glasses orchampagne flutes, can be leanedagainst the glass rack or suspendedfrom it.
The height of the glass rack isadjustable.
Slide the glass rack to the desiredheight until the catches click intoplace at the top.
Hinged spikes
The spikes at the front are used forwashing plates, soup bowls, platters,dessert bowls, and saucers.
The spikes can be lowered to makemore room for large items, e.g. pots,pans and dishes.
Press the yellow lever downwards ,and then lower the spikes .
Loading the dishwasher
34
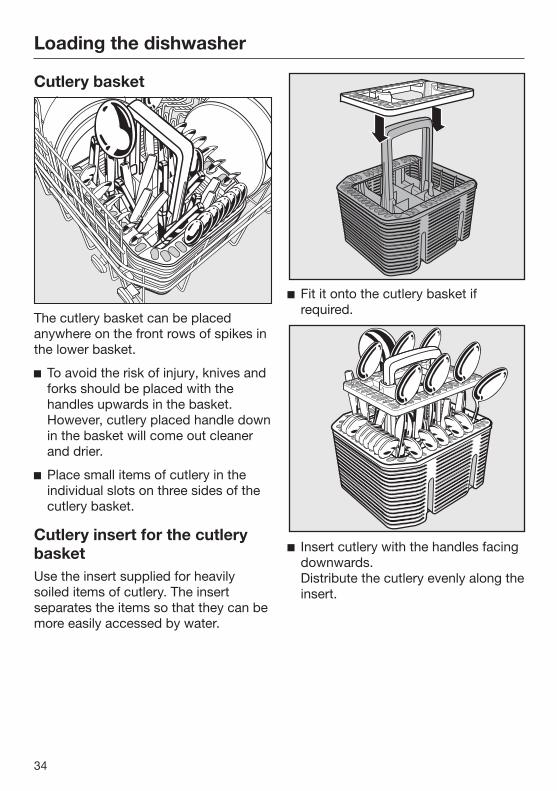
Cutlery basket
The cutlery basket can be placedanywhere on the front rows of spikes inthe lower basket.
To avoid the risk of injury, knives andforks should be placed with thehandles upwards in the basket.However, cutlery placed handle downin the basket will come out cleanerand drier.
Place small items of cutlery in theindividual slots on three sides of thecutlery basket.
Cutlery insert for the cutlerybasketUse the insert supplied for heavilysoiled items of cutlery. The insertseparates the items so that they can bemore easily accessed by water.
Fit it onto the cutlery basket ifrequired.
Insert cutlery with the handles facingdownwards. Distribute the cutlery evenly along theinsert.
Optional accessories
35
Making better use of the dishwasherOptional accessories for this dishwasher are available from Miele.
If you would like to … you will need to order …
... wash a Miele Cappuccinatore … a Cappuccinatore insert for theupper basket
...wash additional cutlery ... a cutlery basket for the lower basket
...wash long-stemmed glassware ...a glass rail for the lower basket
Operation
36
Detergent
Powder detergents
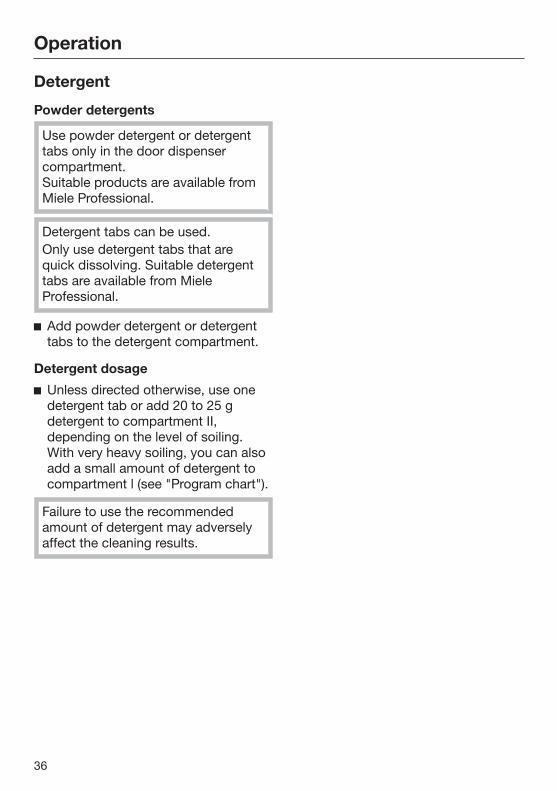
Use powder detergent or detergenttabs only in the door dispensercompartment.Suitable products are available fromMiele Professional.
Detergent tabs can be used.Only use detergent tabs that arequick dissolving. Suitable detergenttabs are available from MieleProfessional.
Add powder detergent or detergenttabs to the detergent compartment.
Detergent dosage
Unless directed otherwise, use onedetergent tab or add 20 to 25 gdetergent to compartment II,depending on the level of soiling.With very heavy soiling, you can alsoadd a small amount of detergent tocompartment l (see "Program chart").
Failure to use the recommendedamount of detergent may adverselyaffect the cleaning results.
Operation
37
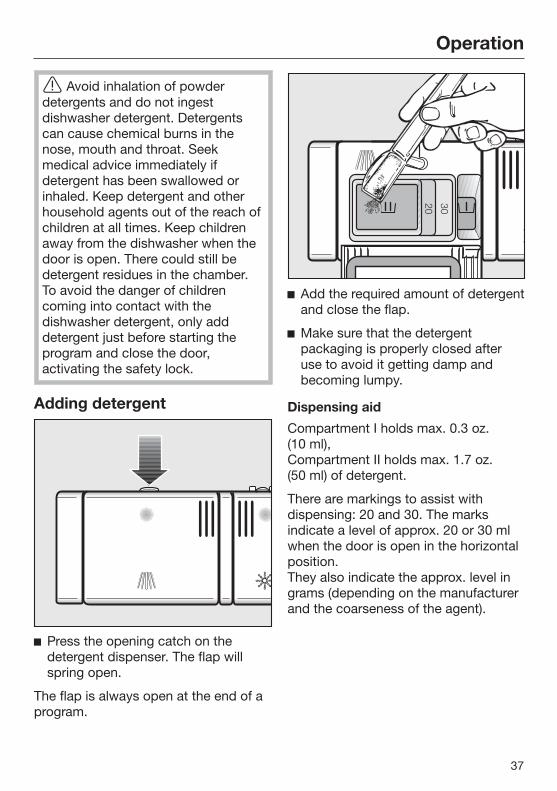
Avoid inhalation of powderdetergents and do not ingestdishwasher detergent. Detergentscan cause chemical burns in thenose, mouth and throat. Seekmedical advice immediately ifdetergent has been swallowed orinhaled. Keep detergent and otherhousehold agents out of the reach ofchildren at all times. Keep childrenaway from the dishwasher when thedoor is open. There could still bedetergent residues in the chamber.To avoid the danger of childrencoming into contact with thedishwasher detergent, only adddetergent just before starting theprogram and close the door,activating the safety lock.
Adding detergent
Press the opening catch on thedetergent dispenser. The flap willspring open.
The flap is always open at the end of aprogram.
Add the required amount of detergentand close the flap.
Make sure that the detergentpackaging is properly closed afteruse to avoid it getting damp andbecoming lumpy.
Dispensing aid
Compartment I holds max. 0.3 oz.(10 ml), Compartment II holds max. 1.7 oz.(50 ml) of detergent.
There are markings to assist withdispensing: 20 and 30. The marksindicate a level of approx. 20 or 30 mlwhen the door is open in the horizontalposition.They also indicate the approx. level ingrams (depending on the manufacturerand the coarseness of the agent).

Operation
38
Switching on the appliance Turn on the water supply if it is turned
off.
Make sure the spray arms are notobstructed.
Close the door.
Switch the dishwasher on with the button.
The factory-set Normal program willappear in the display and the matchingindicator light will come on.After a short while, the estimatedprogram duration for the selectedprogram will appear in the display.
You can also change the setting to theprogram you last used (see "Settingsmenu, Program selection").
Selecting a programChoose your program according to thetype of load and how dirty it is.
The different programs and their usesare described in the Program chartlater on in this booklet.
Select the program required with the button.
The indicator light for the selectedprogram comes on and the indicatorlight of the Start/Stop button flashes.
When the indicator light next to the symbol lights up, you can select furtherprograms using the > button. Thefurther programs are shown in thedisplay between the alternatingprogram names and duration.
You can now select additionalfunctions (see "Additional functions").
Starting a program Press the Start/Stop button.
The program starts.
If any additional functions are selected,the appropriate indicator lights will alsolight up.
A program should only be cancelledin the first few minutes, if at all.Important program stages (e.g.reactivating the water softener) couldotherwise be omitted.
Operation
39
Time displayBefore the program starts, the displayshows the duration of the selectedprogram in hours and minutes. Theremaining runtime is displayed duringthe program.
Each program phase is indicated by asymbol:
Pre-rinse Main wash Interim rinse Final rinse Drying Finished
The displayed program duration mayvary with the same program. It isinfluenced by, among other things, thetemperature of the incoming water, thereactivation process of the watersoftener and the amount of dishes.
When a program is selected for the firsttime, the display shows an averageprogram duration for warm water.
The program duration changes if theelectrical connection is changed.
StandbyTo save energy, the dishwasher willswitch to Standby mode a few minutesafter the last time a button has beenpressed or a few minutes after the endof the program. The display and theindicator lights will go out and only theStart/Stop indicator will flash slowly.
Press any button to switch thedisplay back on.
If the dishwasher is not switched off atthe end of the program, it will switch offcompletely after a few minutes inStandby mode (see "Settings menu,Optimize standby").
The dishwasher will not switch toStandby mode while a program isrunning, if salt or rinse aid needs tobe replenished or there is a fault.
You can switch off the refill indicatorsto replenish salt and rinse aid so thatthe dishwasher will go into Standbydespite a lack of salt or rinse aid (see"Settings menu, Refill display").You cannot switch off faultmessages.
Operation
40
End of programThe program has finished when Endor AutoOpen appears in the display andthe door has opened slightly (ifapplicable).
If "Extra Drying" was selected andAutoOpen is active, the drying fan willrun for a few minutes after theprogram has ended.
Open the door completely to re-engage the door closing mechanism.
You can now empty the dishwasher.
If you have deactivated theautomatic door opening function (see"Settings menu, AutoOpen"), butwould still like to open the door atthe end of the program, then makesure that you open the door fully.Otherwise steam from thedishwasher could damage the edgeof the counter because the fan is nolonger running.
Switching offAt the end of a program:
Turn the dishwasher off with the button.
The dishwasher will continue to useelectricity until it is switched off withthe button.
Tip: If the dishwasher is not going to beused for a longer period of time, e.g.,while on vacation, the water supplyshould be turned off.
Unloading the dishwasherDishes tend to break and chip moreeasily when they are hot. Allow thedishes to cool until they are coolenough to handle before unloadingthem.
The dishes will cool much faster if youopen the door when the program hasended.
Unload the lower basket first, then theupper basket and then the cutlery tray(depending on model).This will prevent water from the upperbasket and cutlery tray from drippingonto dishes in the lower basket.

Operation
41
Interrupting a programA program is interrupted as soon as thedoor is opened. If the door is closed again, the programwill continue from the point it was atbefore the door was opened.
Water in the dishwasher may behot. Danger of scalding.Only open the door if absolutelynecessary and exercise extremecaution when doing so. Beforeclosing the door again, leave it ajarfor approx. 20 seconds. This willenable the temperature in the washchamber to settle. Then raise thedoor up and push until the catchengages.
Changing a program
If the detergent dispenser flap hasalready opened, powder detergentmust be added for the new programunless liquid detergent is beingdispensed.
If a program has already started andyou wish to change it, proceed asfollows:
Press the Start/Stop button for atleast one second.
The program will be canceled.
Select the program you want, andthen start it.
Additional functions
42
Additional dryingFor better drying results and to reducethe amount of steam that escapeswhen the door is opened, the "ExtraDrying" function extends the fanruntime at the end of the program. Thisfunction is not available for all programs(see "Program chart").
When Extra Drying is selected, theprogram duration will increase byapprox. 20-30 minutes, depending onthe program.
Switch the dishwasher on with the button.
The Start/Stop indicator light will flash.
Select a program.
Press the button.
The "" indicator light will come on ifthis function is available for the selectedprogram. Otherwise Option not possibleappears in the display.
Press the Start/Stop button to startthe program.
Delay StartThe start time of a program can bedelayed, e.g. to benefit from cheaperelectricity tariffs at night. A start timedelay of between 30 minutes and24 hours can be selected. The starttime delay is set in 30 minute steps.
When using the delay start function,make sure that the detergentcompartment is dry before addingdetergent. Wipe dry with a cloth ifnecessary.If the compartment is wet, cleaningagent can become lumpy and stickto the dispenser, with the result thatit is not fully dispensed.
Turn the dishwasher on using the button.
The Start/Stop indicator light will flash.
Select the program you require (see"Operation, Selecting a program").
Press the button.
The last start time delay will appear inthe display. The "Delay start" indicatorlight comes on.
Set the required time using the button.
If you keep the delay start buttonpressed in, the time will increaseautomatically up to 24:00 h. To start at30 minutes again, press the buttontwice.
Additional functions
43
Press the Start/Stop button.
The "Start/Stop" indicator light willcome on.
If you do not press the "Start/Stop"button within a few seconds after youhave set the delay start time, theprogram duration will appear in thedisplay again. You will have to set thedelay start time again.
The time starts counting down inminutes until the program start time.
At the end of the delay period, theprogram selected begins automatically.The time left for a program to run thenshows in the display, the "Delay start"indicator light goes out and the "Start/Stop" indicator light comes on.
To prevent children coming intocontact with detergent:Do not fill the detergent dispenseruntil just before starting theprogram, i.e. before pressing theStart/Stop button, and activate thesafety lock.
Starting a program before the delaystart time has elapsed:
A program can be started before thedelay start time has elapsed. Just dothe following:
Press the Start/Stop button for atleast one second.
The "Delay start" indicator light will goout and the "Start/Stop" indicator lightwill flash.
Press the Start/Stop button again.
The program starts. The "Start/Stop"indicator light lights up.

Program chart
44
Program Application Detergent
The following dosages are based onMiele cleaning agents.
Please follow manufacturer'sinstructions on dosage.
Compartment I 1)
Compartment II 1)
ProSpeed
For fresh, non-sticky food residues. 20 - 25 g or 1 tab
Universal
For normal, slightly dried food residues. 20 - 25 g or 1 tab
Pots & Pans
For burnt-on, stubborn, dried-on food deposits
containing starch or protein 1)
.
10 g 20 - 25 g or 1 tab
China &Crystal
Special glassware program. 20 - 25 g or 1 tab
Sanitize
Special hygiene program for items that need to behygienically clean
20 - 25 g or 1 tab
PlasticsSpecial plastics program 20 - 25 g
or 1 tab
Glass norinse aid
Special program for beer glasses. (Instead ofbeing left to dry in the machine at the end of theprogram, beer glasses are taken out and dried byhand).
20 - 25 g or 1 tab
NormalProgram for completely washing a full load ofnormally soiled dishware.Energy-saving program with a long running time.
20 - 25 g or 1 tab
Rinse & HoldTo rinse heavily soiled items, e.g. for initialremoval of soil or to prevent residues drying on todishes when a complete program does not yetneed to be run.
1) see "Operation - Detergent"

Program chart
45
Program cycle
Pre-rinse Clean Interimrinse I
Interimrinse II2)
Finalrinse
Drying Additionaldrying
Auto-Open
Waterplus
X150°F(65°C)1 min
X
10 s
(X) X150°F
(65°C) 3)
30 s
(X) 4) (X)
X150°F(65°C)10 min
X
3 min
(X) X150°F
(65°C) 3)
1.5 min
(X) (X) (X)
X
8 min
X165°F(75°C)10 min
X
3 min
(X) X150°F
(65°C) 3)
1.5 min
(X) (X) (X)
X120°F(50°C)1 min
X
3 min
(X) X120°F(50°C)1 min
(X) (X) (X)
X
8 min
X122°F(50°C)10 min
X
3 min
(X) X179.6°F(82°C)
15 s
X
30 min
(X) (X)
X
10 min
X120°F(50°C)1 min
X
5 min
X140°F(60°C)
30 s
X
45 min
(X)
X120°F(50°C)1 min
X
3 min
X
- 5)
1 min
X118.4°F(48°C)47 min
X125.6°F(52°C)5 min
X
45 min
(X)
XCold8 min
X = sections included in a program (X) = optional sections which can be selected (see "Additional functions")2) Interim rinse II must be programmed by a Miele service technician.3) Optional temperature increase to 165°F (75°C).4) No AutoOpen at the end of the program because of the short running time.5) Without rinse aid and with cold water.

Settings menu
46
Settings menu for changingstandard settings
Open the Settings menu If the dishwasher is switched on,
switch it off with the button.
Press and hold the Start/Stop buttonpressed in.
Switch the dishwasher on with the button and hold the Start/Stop button pressed in for at least4 more seconds.
The first option of the Settings menuwill appear in the display and all theindicator lights will come on.
See "Guide to the appliance, Display"for more information about the displayand controls.
Select the menu option you wish tochange.
Submenu options which have alreadybeen set are marked with a check .
Language The display can be set to appear in oneof several different languages.
You can change the language in thedisplay via the Language submenu.
Select the desired language andpress the center button to confirm.
The flag after the word Language acts as a guide if a language whichyou do not understand has alreadybeen set.If this the case, keep selecting themenu option which has a flag after ituntil you reach the Language submenu.

Settings menu
47
Water hardnessYour dishwasher is fitted with a watersoftener assembly. The dishwashermust be programmed for the waterhardness in your household connection.
– The dishwasher must beprogrammed to match exactly thehardness of your water.
– Your local water supplier can tell youthe water hardness level in your area.
– Where the water hardness fluctuates,e.g. between 18 - 26 gr/gal (17 - 25 °d - German scale), alwaysprogram the dishwasher to the highervalue (26 gr/gal or 25 °d in thisexample).
Select the hardness of your waterand press the center button toconfirm.
A check will appear beside the waterhardness which has been set.
°d gr/gal Display
1 1 1
2 2 2
3 3 3
4 4 4
5 5 5
6 6 6
7 7 7
8 8 8
9 9 9
10 10 10
11 11 11
12 12 12
13 13 13
14 14 14
15 15 15
16 16 16
17 17 17
18 18 18
19 19 19
20 20 20
21 21 21
22 22 22
23 23 23
24 25 24
25 26 25
26 27 26
27 28 27
28 29 28
29 30 29
30 31 30
31 32 31
32 33 32
33 34 33
34 35 34
35 36 35
36 37 36
Settings menu
48
Rinse aidFor best results, the rinse aid dosagecan be adjusted.The dosage can be set betweenapprox. 0-6 ml.The factory setting is 3 ml of rinse aid.
If spots appear on dishware andglassware:
– Increase the rinse aid dosage.
If clouding or smearing appears ondishware and glassware:
– Decrease the rinse aid dosage.
Select the desired amount of rinse aidand press the center button toconfirm.
AutoOpenTo improve drying, the doorautomatically opens a little at the end ofa program, except for Pre-rinse,ProSpeed and Glass no rinse aid (seeProgram guide).
With the Universal, Intensive andGlasses program, AutoOpen can onlybe activated by selecting Extra Drying(see "Additional functions, Extradrying").With the Normal program the dooropens during the drying phase.
This function can be deactivated ifwished.
Select the desired setting and pressthe center button to confirm.
If you have deactivated theautomatic door opening function butwould still like to open the door atthe end of the program, make surethat you open the door fully.Otherwise steam from thedishwasher could damage the edgeof the counter because the fan is nolonger running.

Settings menu
49
Optimize StandbyTo save energy, the dishwasher willswitch to Standby mode a few minutesafter the last time a button has beenpressed or a few minutes after the endof the program. The display andindicator lights will go out and only theStart/Stop indicator light will flashslowly.If the dishwasher is not turned off at theend of the program, it will switch offcompletely after a few minutes inStandby mode.
Optimize Standby can be switched off ifyou prefer. If you do this, the displayand indicator lights will not go out andthe duration before the dishwasherswitches off automatically increases toapprox. 6 hours.Doing this will increase energyconsumption.
Select the desired setting and pressthe center button to confirm.
The dishwasher will not switch toStandby mode while a program isrunning, if salt or rinse aid needs tobe replenished or there is a fault.
Settings menu
50
Refill indicators
You can switch off the refill indicatorsto replenish salt and rinse aid so thatthe dishwasher will go into Standbydespite a lack of salt or rinse aid.You cannot switch off faultmessages.
If you want the dishwasher to switch toStandby mode in spite of the refillindicators, you can switch bothindicator lights off.
Select the desired setting and pressthe center button to confirm.
BrightnessThere are seven different displaybrightness settings.
Select the level of brightness youwant and press the center button toconfirm.
ContrastThere are seven different displaycontrast settings.
Select the contrast you want, andpress the center button to confirm.
Filter checkYou can adjust the interval at which themessage to remind you to check thefilters appears. You can set an interval between 30 and60 program cycles.
The "Check filters" message is set atthe factory to appear after every 50program cycles.
This function can be deactivated ifwished.
Select the desired setting and pressthe center button to confirm.
Settings menu
51
Detergent quantity
This function only becomes visiblewhen External DOS is activated.
When using liquid dispensing via anexternal dispensing module, you candispense the detergent according to thedetergent manufacturer's instructions inmilliliters or as a percentage.
– Value in ml30 ml is set as standard. Thedispensed quantity can be modifiedbetween 10 and 100 ml in 2 ml steps.
– Value in %0.50 % is set as standard. Thedispensed quantity can be modifiedbetween 0.17 and 1.67 % in 0.03 -0.04 % steps.
Setting the dosage:
Set the dosage according to thedetergent manufacturer'srecommendations.
The dishwasher uses approx. 6.5 l ofwater for the main wash cycle.
Example:The detergent manufacturerrecommends 4 ml (or 0.07 %) ofdetergent per liter of water.6.5 l x 4 ml/l = 26 ml.(6.5 l x 0.07 %/l = 0.455 %)
Select the desired amount ofdetergent or dosage concentrationand press the center button toconfirm.
Venting DOSThe DOS system will not dispensereliably if there is air in the system.
The DOS system must be vented:
– it is being used for the first time,
– if the liquid cleaning agent reservoirwas not refilled in time and the DOSsystem was emptied,
– if the detergent canister wasreplaced,
To ensure that the dispensingsystem functions properly, prior toventing make sure that the detergentcontainer is full enough and that thedispensing lances are firmly attachedto the containers.
Select Start venting and press thecenter button to confirm.
The venting process begins. Theremaining time appears in the display.
The "Pre-rinse" program is offereddirectly after the venting process isfinished. Start the program in order todilute and drain any detergent thatescaped into the wash chamber.
Settings menu
52
High-temperature final rinseFor better drying, the rinse temperaturecan be increased for individualprograms. This function is not availablefor all programs (see "Program chart").
Select the desired setting and pressthe center button to confirm.
Water plusWhen Water plus is selected, morewater will be used for the wash cycle.This function is not available for allprograms (see "Program chart").
Select the desired setting and pressthe center button to confirm.
Program selectionYou can chose whether to preset theNormal program or the last selectedprogram when the dishwasher isswitched on.
Select the desired setting and pressthe center button to confirm.
Showroom program
For demonstration purposes only!
The dishwasher is equipped withvarious demo programs for showroomuse.
– Demo with sound:This program activates the circulationpump to demonstrate the sound ofthe dishwasher.
– Demo AutoOpen:The door will open automatically.
To switch Demo mode on
Select the desired option.
Select On and press the center buttonto confirm.
Close the Settings menu.
Press the Start/Stop button. Thedemo mode is activated.
To switch Demo mode off
Demo mode ends automatically afterone cycle.

Settings menu
53
Factory default settingIf any settings have been changed fromthe factory default, you can reset themback to the factory default settings. An activated external dispensingmodule and its respective amount ofdetergent or dosage concentration willnot be reset.
Select Reset and press the centerbutton to confirm.
To close the Settings menuYou can exit the Settings menu usingClose menu.
Select Close menu and press thecenter button to confirm.
The last selected program will appearbriefly in the display and theappropriate indicator light will come on.After a short while, the estimatedprogram duration will be displayed.
Cleaning and care
54
MaintenanceIn order to increase the dishwasher'sservice life, the machine should beserved by an authorized Miele servicetechnician after every 750 hours ofoperation or at least once a year.
This service work covers the followingpoints:
– Electrical safety check
– Door mechanism and door seal
– Screw connectors and connections inthe wash cabinet
– Water intake and drainage
– Internal and external dispensingsystems
– Spray arms
– Filter combination
– Collecting basin with drain pump andnon-return valve
– All baskets and inserts
As part of the service package, thefollowing functional checks areperformed:
– Test run of a program cycle
– Thermoelectric measurement
– Leak test
– Check of all safety-relevantmeasuring systems (indication offault status)
– Safety features check
All surfaces of this appliance aresusceptible to scratching.Contact with unsuitable cleaningagents can alter or discolor allsurfaces.
Cleaning the wash chamberThe wash chamber is largely self-cleaning, provided that the correctamount of detergent is always used.
If, despite this, lime scale or greasedeposits accumulate in the chamber,these can be removed with aproprietary dishwasher cleaner(available from Miele).
Washing at low temperatures can allowgerms and odors to build up inside theappliance. To prevent this, run anintensive program with detergent afterapprox. 20 program cycles with lowtemperatures.
Cleaning and care
55
Cleaning the door and the doorseal Wipe the door seals regularly with a
damp cloth to remove food deposits.
When the dishwasher is beingloaded, food and drink residues maydrip onto the sides of the dishwasherdoor. These surfaces are outside thewash chamber and are not accessedby water from the spray arms. Anysoiling should be wiped off thesesurfaces before the door is closed.
Cleaning the front of thedishwasher
Remove any soiling immediately.If soiling remains longer, the surfacescan become discolored or changed.
Clean the front with a clean spongeand a solution of hot water and liquiddish soap. After cleaning, dry with asoft cloth.A clean, damp microfiber clothwithout cleaning agent can also beused.
To avoid damaging thesurfaces of the machine, donot use:– cleaning agents containing soda,
ammonia, acids or chlorides,
– lime scale removers,
– abrasive cleaning products, such asscouring powder, scouring liquid, orpumice stones,
– solvent-based cleaning agents,
– stainless steel cleaners;
– dishwasher cleaners;
– oven sprays;
– glass cleaner;
– hard, abrasive sponges and brushes,such as pot scrubbers,
– eraser sponges,
– sharp metal scrapers,
– steam cleaning appliances.
Cleaning and care
56
Filter systemThe filter combination in the base of thewash chamber prevents food frombeing redeposited on dishes. It alsoprotects the circulation pump fromdamage caused by foreign objects.
This dishwasher must not beused without all the filters in place!
Collection of coarse soil may cause thefilters to clog. The level of soiling andtime it takes before the filters needcleaning will vary depending on use.
The message Check filters will appear inthe display after every 50 programcycles (factory default setting).
You can turn off the filter check or setthe interval for this message to appearbetween 30 to 60 program cycles (see"Settings menu, Check filter").
Check the filter combination.
Clean it if necessary.
Confirm the message with the centerbutton.
The last selected program will appearbriefly in the display and theappropriate indicator light will come on.After a short while, the estimatedprogram duration will be displayed.
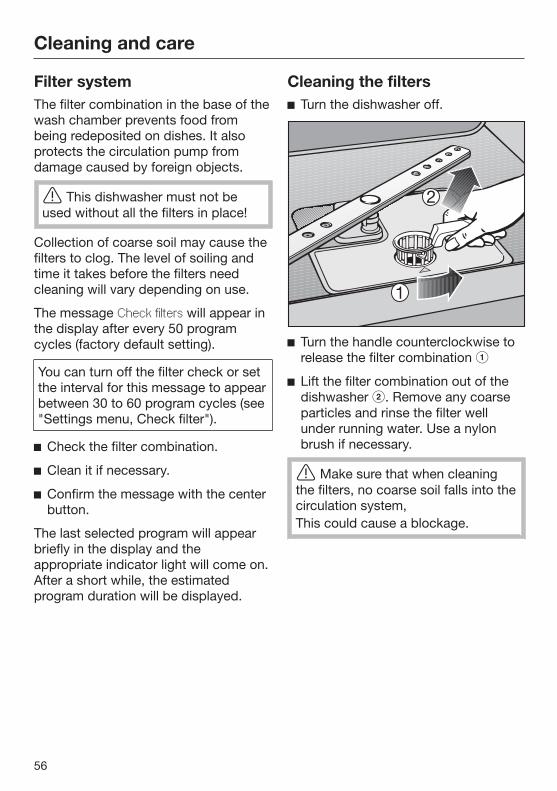
Cleaning the filters Turn the dishwasher off.
Turn the handle counterclockwise torelease the filter combination
Lift the filter combination out of thedishwasher . Remove any coarseparticles and rinse the filter wellunder running water. Use a nylonbrush if necessary.
Make sure that when cleaningthe filters, no coarse soil falls into thecirculation system,This could cause a blockage.

Cleaning and care
57
To clean the inside of the filter, the flapmust be opened:
Press catches together in thedirection of the arrows as shown, andopen the filter .
Rinse all of the filters under runningwater.
Then close the flap so that the catchengages.
Replace the filter combination so thatit lies flat in the base of the washchamber.
Then turn the handle clockwise untilboth arrows point towards eachother. This will lock the filtercombination in place.
When you are fitting the filtercombination, take care that it issecured in position correctly.Otherwise, coarse soil could get intothe circulation system and cause ablockage.
Cleaning and care
58
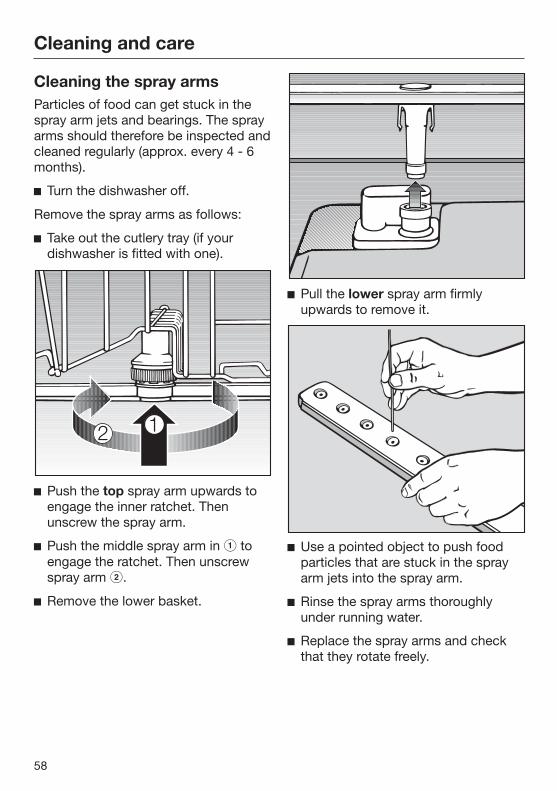
Cleaning the spray armsParticles of food can get stuck in thespray arm jets and bearings. The sprayarms should therefore be inspected andcleaned regularly (approx. every 4 - 6months).
Turn the dishwasher off.
Remove the spray arms as follows:
Take out the cutlery tray (if yourdishwasher is fitted with one).
Push the top spray arm upwards toengage the inner ratchet. Thenunscrew the spray arm.
Push the middle spray arm in toengage the ratchet. Then unscrewspray arm .
Remove the lower basket.
Pull the lower spray arm firmlyupwards to remove it.
Use a pointed object to push foodparticles that are stuck in the sprayarm jets into the spray arm.
Rinse the spray arms thoroughlyunder running water.
Replace the spray arms and checkthat they rotate freely.
Frequently asked questions
59
With the help of the following guide, minor faults in the performance of theappliance, some of which may result from incorrect operation, can be correctedwithout contacting the Service Department.
Repairs must only be carried out by a Miele technician or a Miele-authorized service agent in accordance with local and national safetyregulations. Unauthorized or incorrect repairs and other work by unqualifiedpersons could be dangerous.
Technical problems
Problem Possible cause and solution
The display remainsdark and the "Start/Stop" light does notflash after thedishwasher was turnedon using the button.
The dishwasher is not plugged in. Insert the plug.
The circuit breaker was tripped. Activate the fuse
(see data plate for minimum fuse rating).
The dishwasher stopsduring a program.
The circuit breaker has tripped. Reset the circuit breaker (see data plate for the
correct fuse rating). If the circuit breaker trips again, contact Miele
Customer Service.
Power outage duringoperation
If a temporary power outage occurs during aprogram sequence, no measures are required.The program which was running continues withoutinterruption.If the temperature in the wash chamber drops belowthe minimum value required for the program blockduring the power outage, the program block isrepeated.In case of a power outage of ≥ 20 hours, the entireprogram is repeated.
One of the followingfault messages isdisplayed:
Before remedying the fault: Turn the dishwasher off using the button.
Frequently asked questions
60
Problem Possible cause and solution
Fault FXX There may be a technical fault.After several seconds: Turn the dishwasher back on. Select the desired program. Press the Start/Stop button.
If the fault message is displayed again, there hasbeen a malfunction. Contact Miele Service.
Waterproof The Waterproof system was activated. Close the water supply valve. Contact Miele Service.
Frequently asked questions
61
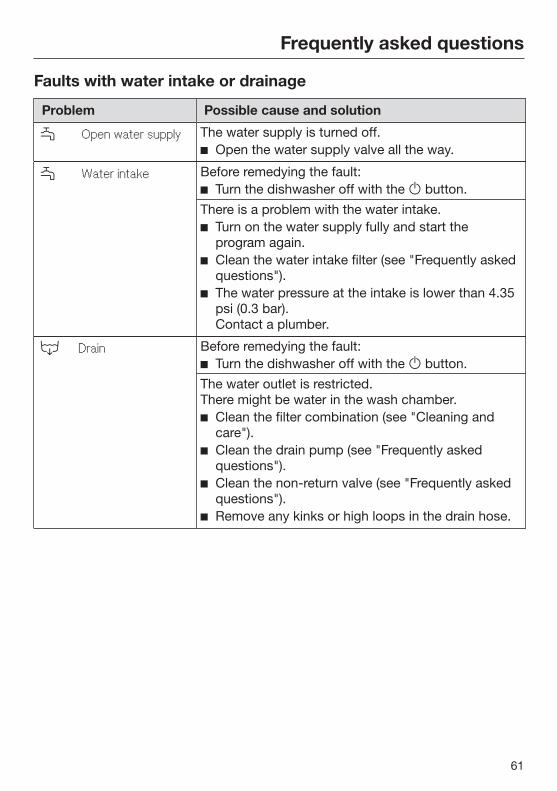
Faults with water intake or drainage
Problem Possible cause and solution
Open water supply The water supply is turned off. Open the water supply valve all the way.
Water intake Before remedying the fault: Turn the dishwasher off with the button.
There is a problem with the water intake. Turn on the water supply fully and start the
program again. Clean the water intake filter (see "Frequently asked
questions"). The water pressure at the intake is lower than 4.35
psi (0.3 bar). Contact a plumber.
Drain Before remedying the fault: Turn the dishwasher off with the button.
The water outlet is restricted. There might be water in the wash chamber. Clean the filter combination (see "Cleaning and
care"). Clean the drain pump (see "Frequently asked
questions"). Clean the non-return valve (see "Frequently asked
questions"). Remove any kinks or high loops in the drain hose.

Frequently asked questions
62
General problems with the dishwasher
Problem Possible cause and solution
The indicator lights andthe display are dark.Only the "Start/Stop"indicator light flashesslowly.
The indicators and the display switch offautomatically to save energy (Standby mode). Press the button. Standby comes to an end.
The following faultmessage appears in thedisplay: Salt container lid
The salt reservoir cover is not properly closed. Close the salt reservoir cover.
If the salt reservoir cover opened during a program: Switch the dishwasher off and then on again with
the button. Start the program again.
The following faultmessage appears in thedisplay during aprogram: Spray arm blocked
The middle spray arm is blocked by individual dishes. Open the dishwasher door and rearrange the items
which are obstructing the spray arm.The spray arm jets of the middle arm are clogged. Turn the dishwasher off with the button.
Then: Clean the spray arm (see "Cleaning and care").
Detergent residue is leftin the detergentcompartment at the endof a program.
The detergent compartment was still damp whendetergent was added. Make sure the compartment is dry before adding
detergent.
The detergentdispenser flap cannotbe closed.
Detergent residue is blocking the latch. Remove the detergent residue.
The inside of the doorand/or the interior wallsare wet after a programhas finished.
This is not a fault. It is caused by the drying system.The moisture will dissipate after a short while.
Frequently asked questions
63
Problem Possible cause and solution
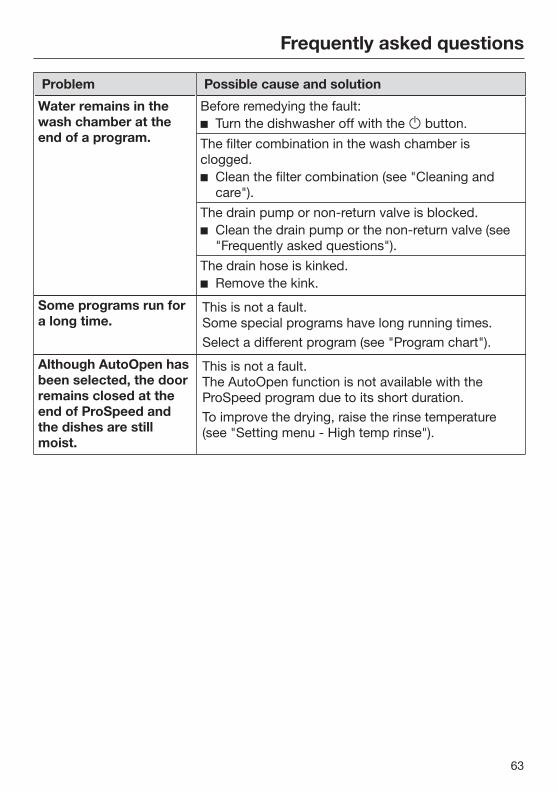
Water remains in thewash chamber at theend of a program.
Before remedying the fault: Turn the dishwasher off with the button.
The filter combination in the wash chamber isclogged. Clean the filter combination (see "Cleaning and
care").The drain pump or non-return valve is blocked. Clean the drain pump or the non-return valve (see
"Frequently asked questions").The drain hose is kinked. Remove the kink.
Some programs run fora long time.
This is not a fault.Some special programs have long running times.Select a different program (see "Program chart").
Although AutoOpen hasbeen selected, the doorremains closed at theend of ProSpeed andthe dishes are stillmoist.
This is not a fault.The AutoOpen function is not available with theProSpeed program due to its short duration.To improve the drying, raise the rinse temperature(see "Setting menu - High temp rinse").
Frequently asked questions
64
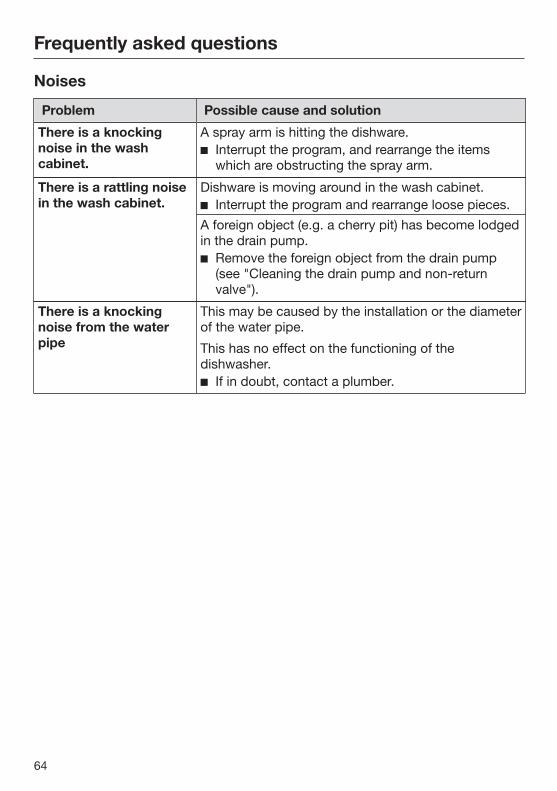
Noises
Problem Possible cause and solution
There is a knockingnoise in the washcabinet.
A spray arm is hitting the dishware. Interrupt the program, and rearrange the items
which are obstructing the spray arm.
There is a rattling noisein the wash cabinet.
Dishware is moving around in the wash cabinet. Interrupt the program and rearrange loose pieces.
A foreign object (e.g. a cherry pit) has become lodgedin the drain pump. Remove the foreign object from the drain pump
(see "Cleaning the drain pump and non-returnvalve").
There is a knockingnoise from the waterpipe
This may be caused by the installation or the diameterof the water pipe.
This has no effect on the functioning of thedishwasher. If in doubt, contact a plumber.
Frequently asked questions
65
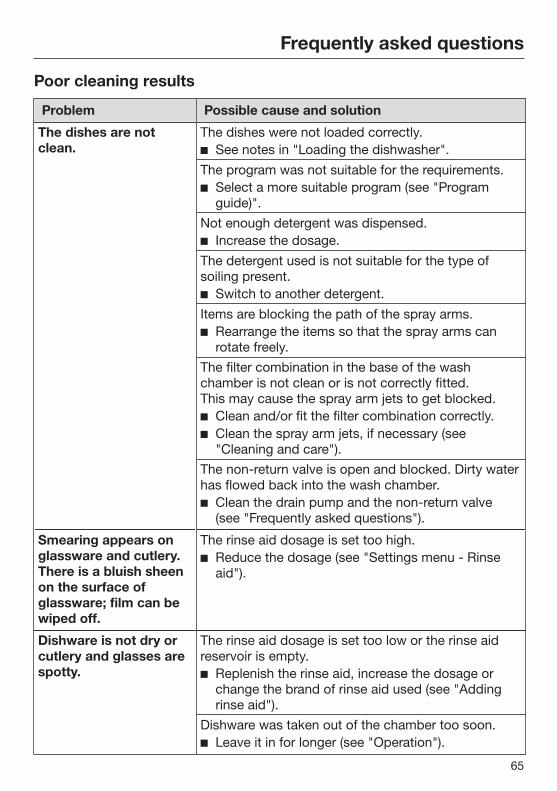
Poor cleaning results
Problem Possible cause and solution
The dishes are notclean.
The dishes were not loaded correctly. See notes in "Loading the dishwasher".
The program was not suitable for the requirements. Select a more suitable program (see "Program
guide)".Not enough detergent was dispensed. Increase the dosage.
The detergent used is not suitable for the type ofsoiling present. Switch to another detergent.
Items are blocking the path of the spray arms. Rearrange the items so that the spray arms can
rotate freely.The filter combination in the base of the washchamber is not clean or is not correctly fitted. This may cause the spray arm jets to get blocked. Clean and/or fit the filter combination correctly. Clean the spray arm jets, if necessary (see
"Cleaning and care").The non-return valve is open and blocked. Dirty waterhas flowed back into the wash chamber. Clean the drain pump and the non-return valve
(see "Frequently asked questions").
Smearing appears onglassware and cutlery.There is a bluish sheenon the surface ofglassware; film can bewiped off.
The rinse aid dosage is set too high. Reduce the dosage (see "Settings menu - Rinse
aid").
Dishware is not dry orcutlery and glasses arespotty.
The rinse aid dosage is set too low or the rinse aidreservoir is empty. Replenish the rinse aid, increase the dosage or
change the brand of rinse aid used (see "Addingrinse aid").
Dishware was taken out of the chamber too soon. Leave it in for longer (see "Operation").
Frequently asked questions
66
Problem Possible cause and solution
White residue is visibleon the dishware.Clouding occurs onglassware and cutlery;the deposit can bewiped off.
The rinse aid dosage is too low. Increase the dosage (see "Settings menu, Rinse
aid").The salt reservoir is empty. Fill the reactivation salt reservoir (see "Filling the
salt reservoir").The softener assembly is programmed too low for thewater hardness level. Program the softener assembly to the correct
value (see "Settings, Water hardness").
Glasses have abrownish-bluediscoloration; thedeposit cannot bewiped off.
Detergent deposits. Switch to another detergent right away.
Glasses are dull anddiscolored; the depositcannot be wiped off.
The glassware is not dishwasher-safe. The surfacesare affected. Purchase glassware which is dishwasher-safe.
Tea or lipstick stainshave not beencompletely removed.
The wash temperature of the selected program wastoo low. Select a program with a higher wash temperature.
The bleaching effect of the detergent is too low. Switch to another detergent.
Plastic parts arediscolored.
Natural dyes e.g. from carrots, tomatoes or ketchupmay be the cause. The amount of detergent used orits bleaching effect was not sufficient to deal withnatural dyes. Use more detergent (see "Operation, Adding
detergent").
Discolored plastic items will not regain their originalcolor.
There are rust stains onthe cutlery.
A program was not run after reactivation salt wasadded. Traces of salt entered the wash cycle. Always run the "Rinse & Hold" program without a
wash load after refilling salt.The affected items are not corrosion resistant. Purchase cutlery which is dishwasher-proof.
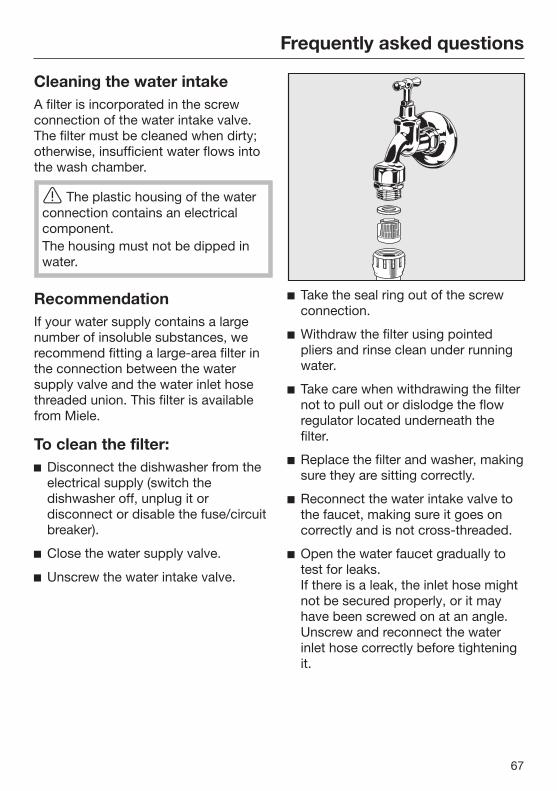
Frequently asked questions
67
Cleaning the water intakeA filter is incorporated in the screwconnection of the water intake valve.The filter must be cleaned when dirty;otherwise, insufficient water flows intothe wash chamber.
The plastic housing of the waterconnection contains an electricalcomponent.The housing must not be dipped inwater.
RecommendationIf your water supply contains a largenumber of insoluble substances, werecommend fitting a large-area filter inthe connection between the watersupply valve and the water inlet hosethreaded union. This filter is availablefrom Miele.
To clean the filter: Disconnect the dishwasher from the
electrical supply (switch thedishwasher off, unplug it ordisconnect or disable the fuse/circuitbreaker).
Close the water supply valve.
Unscrew the water intake valve.
Take the seal ring out of the screwconnection.
Withdraw the filter using pointedpliers and rinse clean under runningwater.
Take care when withdrawing the filternot to pull out or dislodge the flowregulator located underneath thefilter.
Replace the filter and washer, makingsure they are sitting correctly.
Reconnect the water intake valve tothe faucet, making sure it goes oncorrectly and is not cross-threaded.
Open the water faucet gradually totest for leaks. If there is a leak, the inlet hose mightnot be secured properly, or it mayhave been screwed on at an angle. Unscrew and reconnect the waterinlet hose correctly before tighteningit.
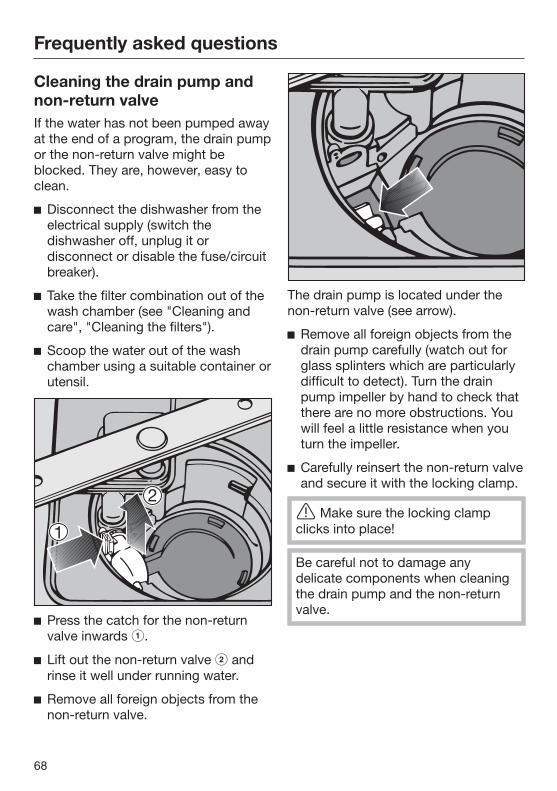
Frequently asked questions
68
Cleaning the drain pump andnon-return valveIf the water has not been pumped awayat the end of a program, the drain pumpor the non-return valve might beblocked. They are, however, easy toclean.
Disconnect the dishwasher from theelectrical supply (switch thedishwasher off, unplug it ordisconnect or disable the fuse/circuitbreaker).
Take the filter combination out of thewash chamber (see "Cleaning andcare", "Cleaning the filters").
Scoop the water out of the washchamber using a suitable container orutensil.
Press the catch for the non-returnvalve inwards .
Lift out the non-return valve andrinse it well under running water.
Remove all foreign objects from thenon-return valve.
The drain pump is located under thenon-return valve (see arrow).
Remove all foreign objects from thedrain pump carefully (watch out forglass splinters which are particularlydifficult to detect). Turn the drainpump impeller by hand to check thatthere are no more obstructions. Youwill feel a little resistance when youturn the impeller.
Carefully reinsert the non-return valveand secure it with the locking clamp.
Make sure the locking clampclicks into place!
Be careful not to damage anydelicate components when cleaningthe drain pump and the non-returnvalve.

Miele Service
69
RepairsIn the event of any faults that youcannot remedy yourself, please contact:
– the Miele Service Department, or
– your Miele dealer or
– a qualified specialist.
When contacting Miele, you will needthe model and serial number of yourdishwasher.
These can be found on the data platealong the right edge of the open door.
PC Update
The Program Correction (PC) allows atechnician to update the dishwasher tomake use of new technology.
These updates can only be performedby a Miele Service Technician.

Electrical connection
70
Electrical connection
All work on the electricalconnection must be carried out byMiele, a Miele-authorized technicianor a qualified electrician.
– The electrical installation must be incompliance with national and localcodes.
– The dishwasher can be plugged intoan electrical outlet (the outlet must beaccessible after installation). This willthen make it easier to perform anelectrical safety check, e.g. duringrepair or service work.
– If the dishwasher is permanentlywired to the electricity supply, a mainswitch capable of disconnecting thedishwasher at all poles must beinstalled. This switch must have acontact gap of at least 3 mm andalso be lockable in the Off position.
– For increased safety, it isrecommended to protect themachine with a suitable ground faultcircuit interrupter with a trip current of30 mA.
– If necessary, equipotential bondingmust be carried out.
– The power cord may only bereplaced with an original Miele part.
– For technical data, see the data plateor the attached wiring diagram!
The dishwasher must only be operatedwith the voltage, frequency and fuserating shown on the data plate.
This appliance can be converted to adifferent type of power supply inaccordance with the conversiondiagram and wiring diagram supplied.
The data plates are located at the backof the dishwasher and along the rightedge of the open door.
The wiring diagram is supplied withthe dishwasher.
The conversion diagram is attached tothe base panel behind the plastic basecover.
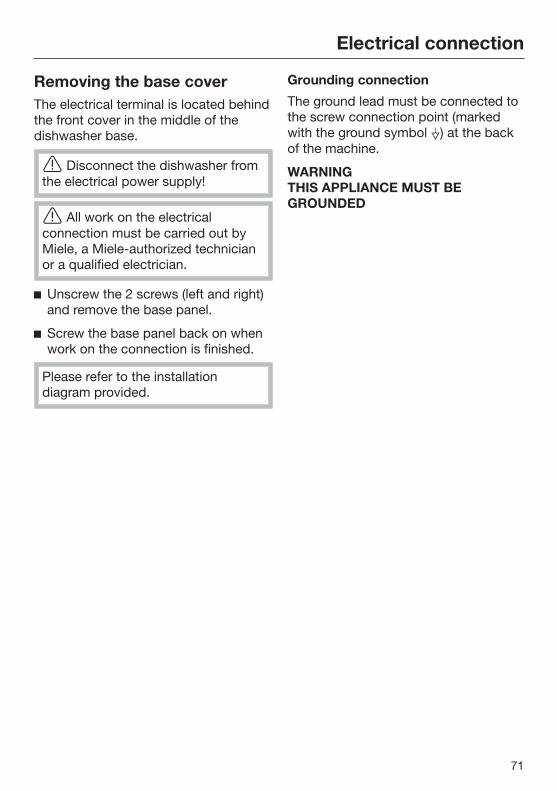
Electrical connection
71
Removing the base coverThe electrical terminal is located behindthe front cover in the middle of thedishwasher base.
Disconnect the dishwasher fromthe electrical power supply!
All work on the electricalconnection must be carried out byMiele, a Miele-authorized technicianor a qualified electrician.
Unscrew the 2 screws (left and right)and remove the base panel.
Screw the base panel back on whenwork on the connection is finished.
Please refer to the installationdiagram provided.
Grounding connection
The ground lead must be connected tothe screw connection point (markedwith the ground symbol ) at the backof the machine.
WARNINGTHIS APPLIANCE MUST BEGROUNDED

Plumbing
72
The Miele WaterProof SystemProvided your dishwasher has beeninstalled correctly, the Miele Waterproofsystem will provide protection againstwater damage throughout its lifetime.
Water intake
The water in the dishwasher isNOT safe to drink!
– The dishwasher's connection to thewater supply system must be incompliance with local codes.
– The water quality should satisfy localdrinking water requirements.A high iron content can lead toexternal rust deposits on the washload and the dishwasher itself.A chloride concentration greater than100 mg/l in the process watersignificantly increases the risk ofcorrosion for the wash load.
– In certain regions (e.g. mountainousareas), the typical water compositioncan cause precipitates to form, whichin turn requires the use of softenedwater for the dishwasher.
– A device for preventing the returnflow of water is not necessary, as thisdishwasher conforms to theapplicable standards for theprotection of drinking water.
– Water pressure: Must be between4.35 - 145 psi (0.3 - 10 bar). If the water pressure is lower thanthis, the fault message Water intakewill appear in the display (see"Frequently asked questions"). If the water pressure is too high, apressure reducer valve must be fitted.
– A shut-off valve with a 3/4 inch malethread must be provided on site. Itshould be easily accessible so thatthe water supply can be turned offwhen the dishwasher is not in use.
– The intake hose is an approx.59" (1.5 m) long DN 10 pressure hosewith a 3/4" screw connection. A59" (1.5 m) flexible metal hose (testpressure: 140 bar) is available as anextension. Do not remove the filterand flow regulator from the screwconnection.
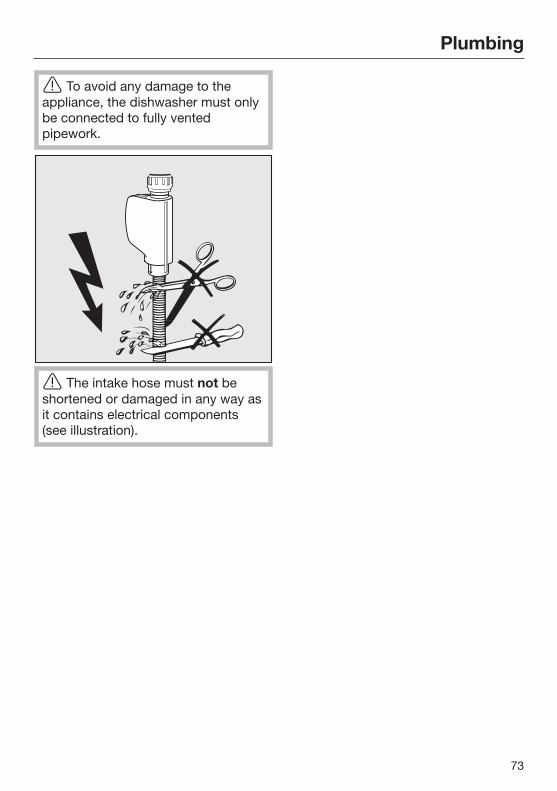
Plumbing
73
To avoid any damage to theappliance, the dishwasher must onlybe connected to fully ventedpipework.
The intake hose must not beshortened or damaged in any way asit contains electrical components(see illustration).
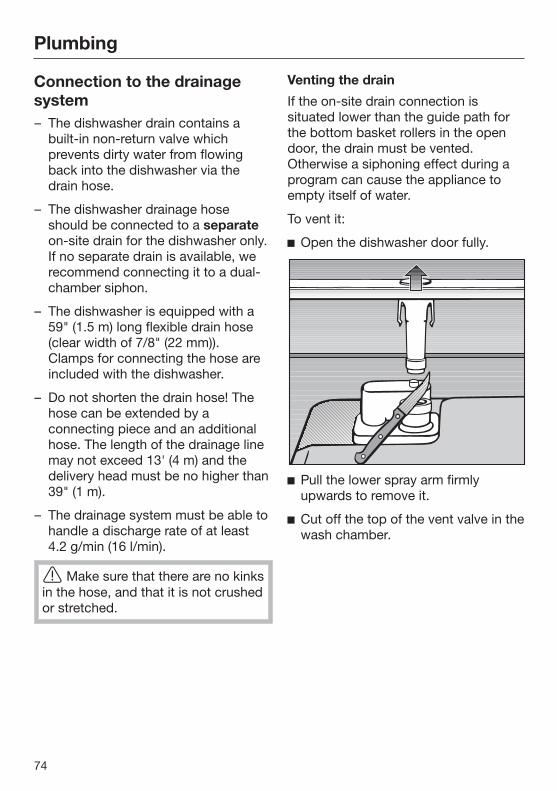
Plumbing
74
Connection to the drainagesystem– The dishwasher drain contains a
built-in non-return valve whichprevents dirty water from flowingback into the dishwasher via thedrain hose.
– The dishwasher drainage hoseshould be connected to a separateon-site drain for the dishwasher only.If no separate drain is available, werecommend connecting it to a dual-chamber siphon.
– The dishwasher is equipped with a59" (1.5 m) long flexible drain hose(clear width of 7/8" (22 mm)). Clamps for connecting the hose areincluded with the dishwasher.
– Do not shorten the drain hose! Thehose can be extended by aconnecting piece and an additionalhose. The length of the drainage linemay not exceed 13' (4 m) and thedelivery head must be no higher than39" (1 m).
– The drainage system must be able tohandle a discharge rate of at least4.2 g/min (16 l/min).
Make sure that there are no kinksin the hose, and that it is not crushedor stretched.
Venting the drain
If the on-site drain connection issituated lower than the guide path forthe bottom basket rollers in the opendoor, the drain must be vented.Otherwise a siphoning effect during aprogram can cause the appliance toempty itself of water.
To vent it:
Open the dishwasher door fully.
Pull the lower spray arm firmlyupwards to remove it.
Cut off the top of the vent valve in thewash chamber.

Technical details
75
Commercial Dishwashermodel
PG 8080i
Height 32 1/10" (805 mm)(adjustable + 2 9/16" (65 mm))
Installation height 32 1/10" (805 mm)(adjustable + 2 9/16" (65 mm))
Width 23 9/16" (59.8 cm)
Installation width 23 5/8" (600 mm)
Depth 22 7/16" (570 mm)
Weight 125 lb (56.5 kg)
VoltageConnected loadFuse rating
See data plate
Water pressure (supply pressure) 4.35 - 145 psi (30 - 1,000 kPa)
Cold or hot water supply max. 140°F (60°C)
Water hardness 37.5 gr/gal (36°d)
Drain pump height 3' 3 3/8" (1 m)
Drain hose length 13' 1 1/2" (4 m)
Power cable length 5' 7" (1.7 m)
Capacity 13 place settings
Noise emission valuesSound power in LwASound pressure in LpA
49 dB (A)38 dB (A)
Manufacturer's address Miele & Cie. KG, Carl-Miele-Straße 29,33332 Gütersloh, Germany

Sound emission tests
76
Setup for sound emission testsTest standard IEC 60704-2-3
The dishwasher needs to be set up according to the following information:
Install the dishwasher into an analyzing unit.
Secure the front panel.

Sound emission tests
77
aaaaaaaaaaaaaaaaaa Push the provided fleece strips (depending on model) under the toe-kick until it
is flush with the appliance feet Push the toe-kick into place in such a way that it is flush with the door front .


Please have the model and serial numberof your machine available whencontacting Technical Service.
U.S.A.Miele, Inc.
National Headquarters9 Independence WayPrinceton, NJ 08540Phone:Fax:www.miele-pro.com
Technical Service & Support800-991-9380800-220-1348
Phone:Fax:
800-991-9380609-419-4241
2017-02-27 M.-Nr. 09 501 392 / 00