Embed Size (px)
Citation preview
PROF. PAUL C. KING RA
New York City College of Technology
Spring 2011
Learning Community - 1200 & 1290 - 04 Building Development Stages
Copyright © 2010 Paul C. King
Phase 3 Stage 2: ADDING THE STAIRS
Overview: We will add three stairs to the lab building.
second level slab to the atrium space and two additional internal egress stairs
will run from the first level up to the roof.
Create Atrium Stair: Start by creating the Atrium Stair
Extend Floor Slab: Working on Level
below. To make it easier to work hide the categories for walls and windows.
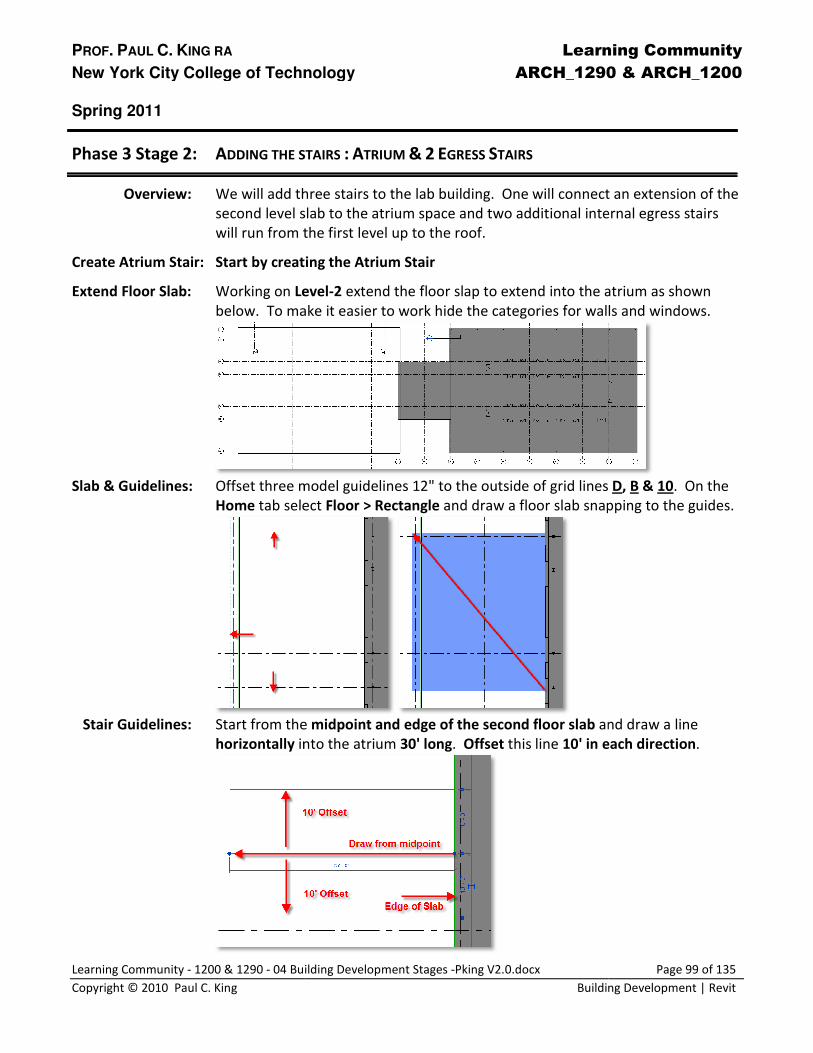
Slab & Guidelines: Offset three model
Home tab select
Stair Guidelines: Start from the
horizontally into the atrium
Learning Community
New York City College of Technology ARCH_1290 & ARCH_1200
04 Building Development Stages -Pking V2.0.docx
Building Development | Revit
DDING THE STAIRS : ATRIUM & 2 EGRESS STAIRS
We will add three stairs to the lab building. One will connect an extension of the
second level slab to the atrium space and two additional internal egress stairs
the first level up to the roof.
Start by creating the Atrium Stair
Level-2 extend the floor slap to extend into the atrium as shown
below. To make it easier to work hide the categories for walls and windows.
three model guidelines 12" to the outside of grid lines
tab select Floor > Rectangle and draw a floor slab snapping to the guides.
from the midpoint and edge of the second floor slab and draw a line
nto the atrium 30' long. Offset this line 10' in each direction
Learning Community
ARCH_1290 & ARCH_1200
Page 99 of 135
Building Development | Revit
One will connect an extension of the
second level slab to the atrium space and two additional internal egress stairs
extend the floor slap to extend into the atrium as shown
below. To make it easier to work hide the categories for walls and windows.
D, B & 10. On the
and draw a floor slab snapping to the guides.
and draw a line
10' in each direction.
PROF. PAUL C. KING RA
New York City College of Technology
Spring 2011
Learning Community - 1200 & 1290 - 04 Building Development Stages
Copyright © 2010 Paul C. King
Draw the Stair: On the home tab under the "
Stair Properties
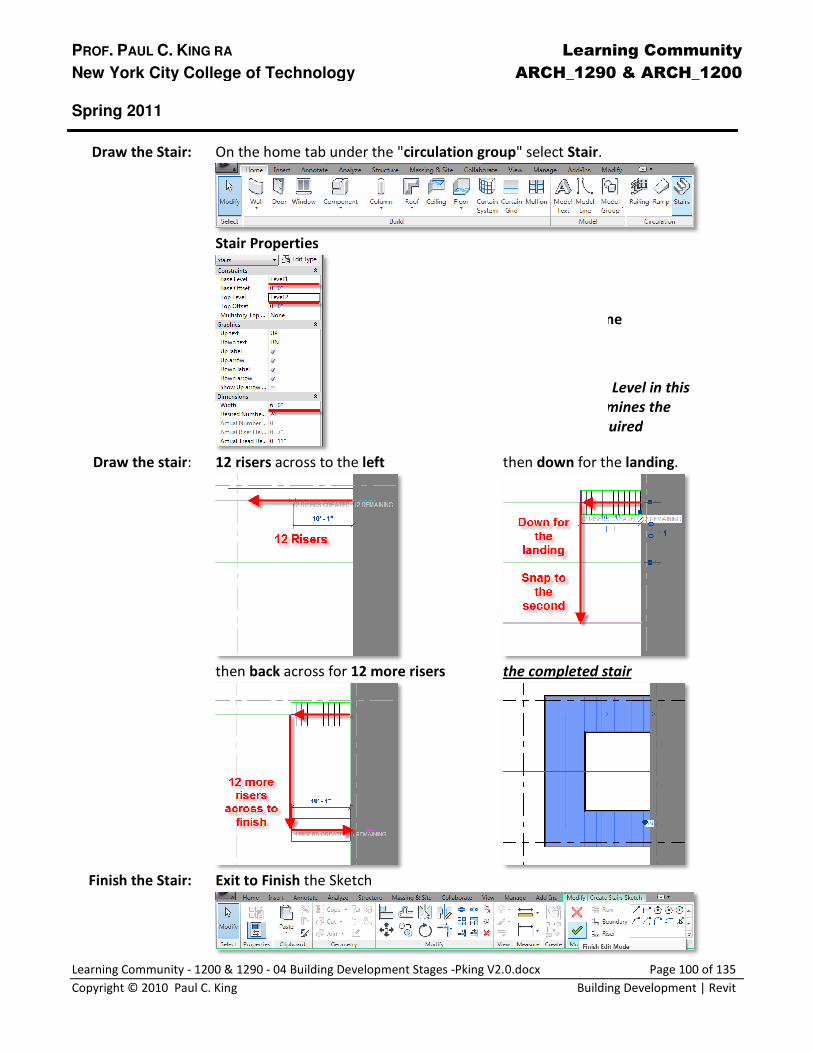
Draw the stair: 12 risers across
then back across for
Finish the Stair: Exit to Finish the Sketch
Learning Community
New York City College of Technology ARCH_1290 & ARCH_1200
04 Building Development Stages -Pking V2.0.docx
Building Development | Revit
On the home tab under the "circulation group" select Stair.
Stair Properties
across to the left then down for the
across for 12 more risers the completed stair
the Sketch
Set the Stair Properties:
Base Level = Level 1
Top Level = Level 2
Multistory Top Level = None
Stair width = 6'-0"
Note:
The distance from Base Level to Top Level in this
case from Level 1 to Level 2 determines the
number of risers and runs required
Learning Community
ARCH_1290 & ARCH_1200
Page 100 of 135
Building Development | Revit
the landing.
the completed stair
Multistory Top Level = None
The distance from Base Level to Top Level in this
case from Level 1 to Level 2 determines the
of risers and runs required

PROF. PAUL C. KING RA
New York City College of Technology
Spring 2011
Learning Community - 1200 & 1290 - 04 Building Development Stages
Copyright © 2010 Paul C. King
Edit the Stair: Select the Stair and select "
Draw an Arc using "
Select the three points
Delete the original
Before
Learning Community
New York City College of Technology ARCH_1290 & ARCH_1200
04 Building Development Stages -Pking V2.0.docx
Building Development | Revit
Select the Stair and select "Edit Path".
Draw an Arc using "Start-End-Radius"
three points as shown and then modify the Radius to 20'
the original Straight Line Finish the Sketch to see the
and After images of the stair
Learning Community
ARCH_1290 & ARCH_1200
Page 101 of 135
Building Development | Revit
Radius to 20'-0"
to see the updated stair
and After images of the stair

PROF. PAUL C. KING RA
New York City College of Technology
Spring 2011
Learning Community - 1200 & 1290 - 04 Building Development Stages
Copyright © 2010 Paul C. King
Create Egress Stair: Create the first of two egress stairs
Create a Shaft: Create a shaft that penetr
Level-2, offset the two grid lines
beams. Offset thes
Set Properties: On the Home
Draw Rectangle: Draw a rectangle
Learning Community
New York City College of Technology ARCH_1290 & ARCH_1200
04 Building Development Stages -Pking V2.0.docx
Building Development | Revit
Create the first of two egress stairs
Create a shaft that penetrates the floor slabs to prepare for the stair.
ffset the two grid lines 7 and A at 12" to allow for clearance from the
Offset these new lines 8'-9" and 15-6" to create guidelines for the shaft.
Tab under "Openings" select Shaft.
Draw a rectangle to match the guidelines and then exit to save
Set Shaft Opening as follows:
Base Offset
Base Constraint
Top Constraint
Learning Community
ARCH_1290 & ARCH_1200
Page 102 of 135
Building Development | Revit
for the stair. Working on
w for clearance from the
to create guidelines for the shaft.
save the sketch.
Set Shaft Opening as follows:
= -1'-0"
Base Constraint = Level 2
Top Constraint = Up to Roof
PROF. PAUL C. KING RA
New York City College of Technology
Spring 2011
Learning Community - 1200 & 1290 - 04 Building Development Stages
Copyright © 2010 Paul C. King
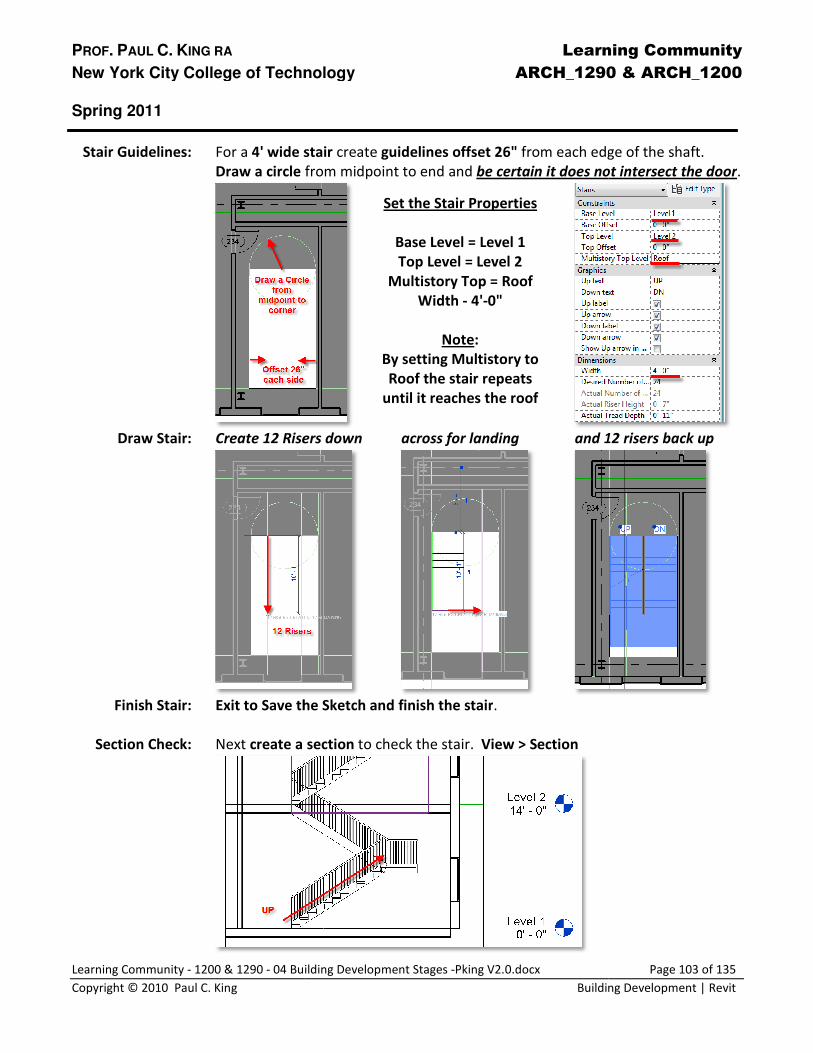
Stair Guidelines: For a 4' wide stair
Draw a circle
Draw Stair: Create 12 Risers down
Finish Stair: Exit to Save the Sketch and finish the stair
Section Check: Next create a section
Learning Community
New York City College of Technology ARCH_1290 & ARCH_1200
04 Building Development Stages -Pking V2.0.docx
Building Development | Revit
4' wide stair create guidelines offset 26" from each edge of the shaft.
from midpoint to end and be certain it does not intersect the door
Create 12 Risers down across for landing and 12 risers back up
Exit to Save the Sketch and finish the stair.
a section to check the stair. View > Section
Set the Stair Properties
Base Level = Level 1
Top Level = Level 2
Multistory Top = Roof
Width - 4'-0"
Note:
By setting Multistory to
Roof the stair repeats
until it reaches the roof
Learning Community
ARCH_1290 & ARCH_1200
Page 103 of 135
Building Development | Revit
edge of the shaft.
be certain it does not intersect the door.
and 12 risers back up
PROF. PAUL C. KING RA
New York City College of Technology
Spring 2011
Learning Community - 1200 & 1290 - 04 Building Development Stages
Copyright © 2010 Paul C. King
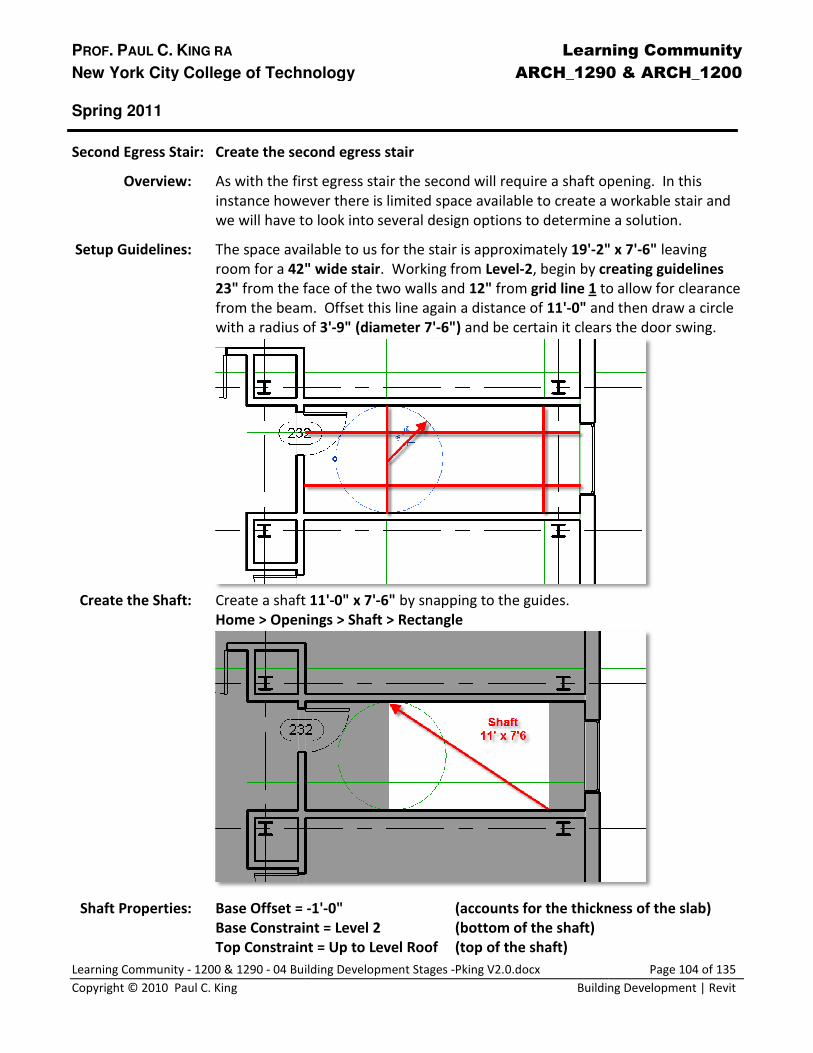
Second Egress Stair: Create the second egress stair
Overview: As with the first egress stair the second will require a shaft opening. In this
instance however there is limited space available to create a workable stair and
we will have to look into several design options to determine a solution.
Setup Guidelines: The space available to us for the stair is approximately
room for a 42" wide
23" from the face of the two walls and
from the beam.
with a radius of
Create the Shaft: Create a shaft
Home > Openings > Shaft > Rectangle
Shaft Properties: Base Offset =
Base Constraint = Level 2
Top Constraint
Learning Community
New York City College of Technology ARCH_1290 & ARCH_1200
04 Building Development Stages -Pking V2.0.docx
Building Development | Revit
Create the second egress stair
As with the first egress stair the second will require a shaft opening. In this
instance however there is limited space available to create a workable stair and
we will have to look into several design options to determine a solution.
The space available to us for the stair is approximately 19'-2" x 7'
42" wide stair. Working from Level-2, begin by creating guidelines
from the face of the two walls and 12" from grid line 1 to allow for clearance
from the beam. Offset this line again a distance of 11'-0" and then draw a circle
with a radius of 3'-9" (diameter 7'-6") and be certain it clears the door swing.
Create a shaft 11'-0" x 7'-6" by snapping to the guides.
Home > Openings > Shaft > Rectangle
Base Offset = -1'-0" (accounts for the thickness of the slab)
Base Constraint = Level 2 (bottom of the shaft)
Top Constraint = Up to Level Roof (top of the shaft)
Learning Community
ARCH_1290 & ARCH_1200
Page 104 of 135
Building Development | Revit
As with the first egress stair the second will require a shaft opening. In this
instance however there is limited space available to create a workable stair and
we will have to look into several design options to determine a solution.
2" x 7'-6" leaving
creating guidelines
to allow for clearance
and then draw a circle
and be certain it clears the door swing.
(accounts for the thickness of the slab)
PROF. PAUL C. KING RA
New York City College of Technology
Spring 2011
Learning Community - 1200 & 1290 - 04 Building Development Stages
Copyright © 2010 Paul C. King
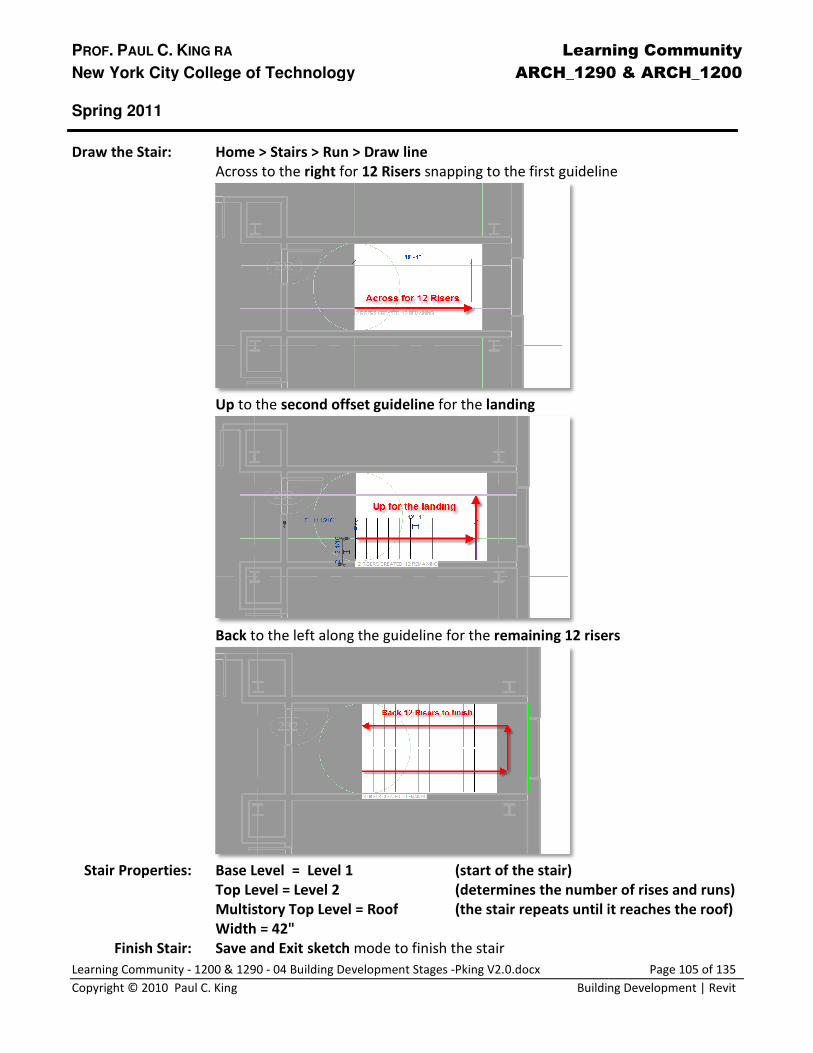
Draw the Stair: Home > Stairs > Run > Draw line
Across to the
Up to the second offset guideline
Back to the left
Stair Properties: Base Level =
Top Level = Level 2
Multistory Top Level = Roof
Width = 42"
Finish Stair: Save and Exit sketch
Learning Community
New York City College of Technology ARCH_1290 & ARCH_1200
04 Building Development Stages -Pking V2.0.docx
Building Development | Revit
Home > Stairs > Run > Draw line
Across to the right for 12 Risers snapping to the first guideline
second offset guideline for the landing
to the left along the guideline for the remaining 12 risers
Level 1 (start of the stair)
Top Level = Level 2 (determines the number of rises and runs)
Multistory Top Level = Roof (the stair repeats until it reaches the roof)
and Exit sketch mode to finish the stair
Learning Community
ARCH_1290 & ARCH_1200
Page 105 of 135
Building Development | Revit
snapping to the first guideline
risers
(determines the number of rises and runs)
(the stair repeats until it reaches the roof)
PROF. PAUL C. KING RA
New York City College of Technology
Spring 2011
Learning Community - 1200 & 1290 - 04 Building Development Stages
Copyright © 2010 Paul C. King
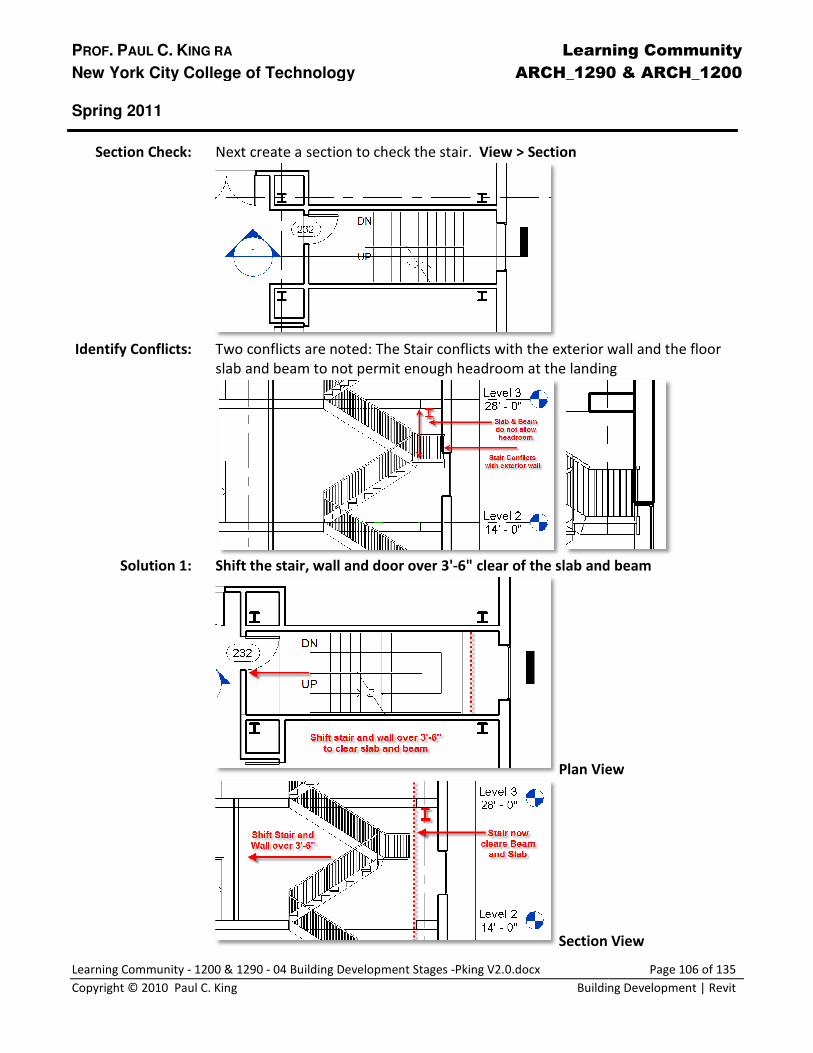
Section Check: Next create a section to check the stair.
Identify Conflicts: Two conflicts are noted: The Stair conflicts with the exterior wall and the floor
slab and beam to not permit enough
Solution 1: Shift the stair, wall and door over 3'
Learning Community
New York City College of Technology ARCH_1290 & ARCH_1200
04 Building Development Stages -Pking V2.0.docx
Building Development | Revit
a section to check the stair. View > Section
Two conflicts are noted: The Stair conflicts with the exterior wall and the floor
slab and beam to not permit enough headroom at the landing
Shift the stair, wall and door over 3'-6" clear of the slab and beam
Plan View
Section View
Learning Community
ARCH_1290 & ARCH_1200
Page 106 of 135
Building Development | Revit
Two conflicts are noted: The Stair conflicts with the exterior wall and the floor
headroom at the landing
6" clear of the slab and beam
Plan View
Section View

PROF. PAUL C. KING RA
New York City College of Technology
Spring 2011
Learning Community - 1200 & 1290 - 04 Building Development Stages
Copyright © 2010 Paul C. King
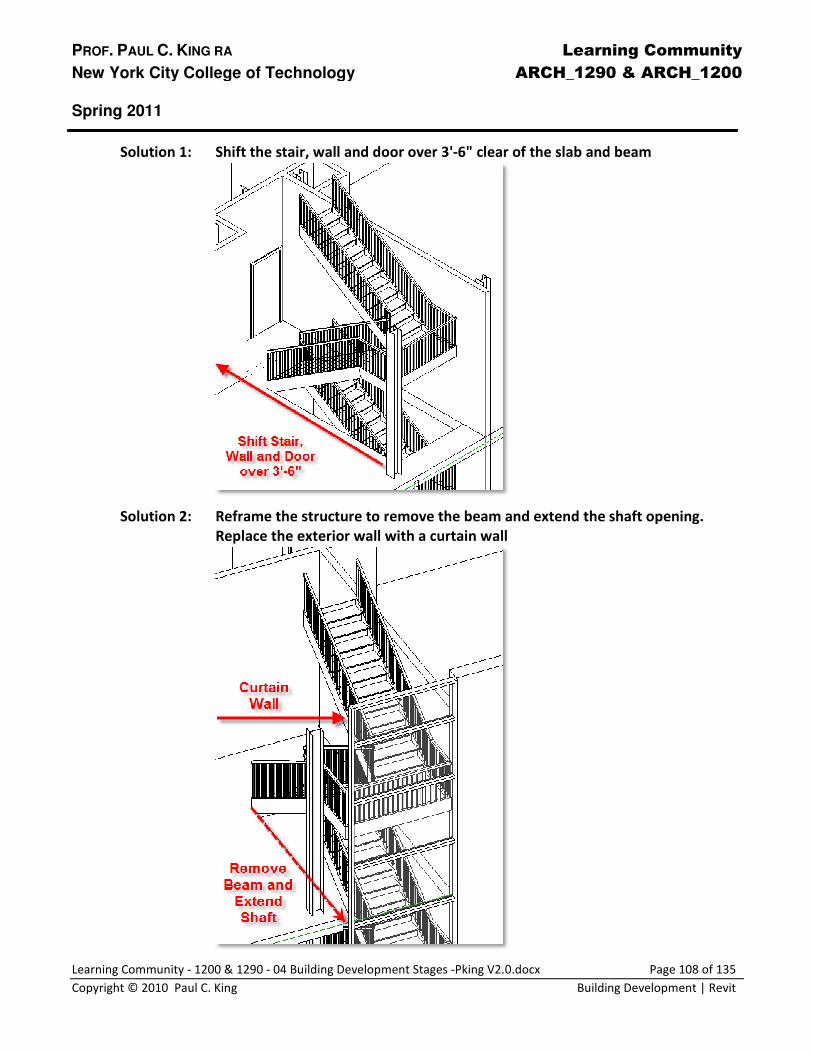
Solution 2: Reframe the structure to remove the beam and extend the shaft opening.
Change the exterior
The problem is resolved without moving the stair
Note: Often the resolution of an issue can be taken as a design opportunity.
In this instance a curtain wall has been added which will create additional
interest to the exterior facade.
Learning Community
New York City College of Technology ARCH_1290 & ARCH_1200
04 Building Development Stages -Pking V2.0.docx
Building Development | Revit
Reframe the structure to remove the beam and extend the shaft opening.
exterior wall to a thinner curtain wall to clear the stair
The problem is resolved without moving the stair
Often the resolution of an issue can be taken as a design opportunity.
In this instance a curtain wall has been added which will create additional
est to the exterior facade.
Learning Community
ARCH_1290 & ARCH_1200
Page 107 of 135
Building Development | Revit
Reframe the structure to remove the beam and extend the shaft opening.
to clear the stair
Often the resolution of an issue can be taken as a design opportunity.
In this instance a curtain wall has been added which will create additional
PROF. PAUL C. KING RA
New York City College of Technology
Spring 2011
Learning Community - 1200 & 1290 - 04 Building Development Stages
Copyright © 2010 Paul C. King
Solution 1: Shift the stair, wall and door over 3'
Solution 2: Reframe the structure to remove the beam and extend the shaft opening.
Replace the exterior wall with a curtain wall
Learning Community
New York City College of Technology ARCH_1290 & ARCH_1200
04 Building Development Stages -Pking V2.0.docx
Building Development | Revit
Shift the stair, wall and door over 3'-6" clear of the slab and beam
Reframe the structure to remove the beam and extend the shaft opening.
Replace the exterior wall with a curtain wall
Learning Community
ARCH_1290 & ARCH_1200
Page 108 of 135
Building Development | Revit
6" clear of the slab and beam
Reframe the structure to remove the beam and extend the shaft opening.