Embed Size (px)
Citation preview

PHILIPS CD-ROM Drive
User’s Manual
PCA84CD/PCA104CD
Table of ContentsChapter 1 INTRODUCTION....................................................................1
1.1 Features .................................................................................................1
1.2 Package Contents...................................................................................2
1.3 System Requirements ............................................................................2
Chapter 2 INSTALLING YOUR DRIVE ................................................3
2.1 Installing the CD-ROM Drive ...............................................................3
2.2 Letting Your System Recognize the Drive ............................................5
2.2.1 If You Are a DOS or Windows 3.1 User....................................52.2.2 If You Are a Windows 95 User..................................................6
2.2.3 If You Are an OS/2 Warp User ..................................................9
Chapter 3 USING YOUR CD-ROM DRIVE.........................................13
3.1 Drive Applications...............................................................................13
3.2 Manually Controlling the Drive...........................................................13
Appendix A A MASTER OR A SLAVE DEVICE? .................................15
A.1 IDE Connections .................................................................................15
A.2 Setting Master and Slave Jumpers .......................................................18
Appendix B SPECIFICATIONS................................................................19
i
Copyrights And Liabilities
Copyright � 1996 by Philips Electronics N.V. Allrights reserved. No part of this publication may bereproduced or transmitted in any form by any meansfor any purpose without the prior written permissionof Philips Electronics N.V.
The information in this manual is subject to changewithout notice and does not represent any commitmenton the part of Philips Electronics N.V. PhilipsElectronics N.V. also specifically disclaims anyimplied warranties of merchantability or fitness forany particular purpose.
The software described in this document may be copiedand used by one intended user only, unless otherwisestated, and the copying should be solely for thepurpose of backup.
In the event the product this manual supports is notfree from defects, the purchaser’s sole remedy shallbe repair or replacement within the warranty period.By acceptance of this product, you hereby assume allliability consequent to your use or misuse of it.Philips Electronics N.V. assumes no liability forincidental, special or consequential damage of anykind. Under no circumstances will PhilipsElectronics N.V. be liable for any expenses, lostprofits, lost savings, damage to or replacement ofequipment and property, costs of recovering,reprogramming, or reproducing any data stored in orused with this product.
Philips and the Philips logo are registered trademarksof Philips Electronics N.V. All other company names

ii
and product names are trademarks and registeredtrademarks of their respective owners.
Printed inTaiwan

iii
FCC Notice (USA)
This equipment has been tested and found to complywith the limits for a Class B digital device, pursuantto Part 15 of FCC Rules. These limits are designed toprovide reasonable protection against harmfulinterference in a residential installation. Thisequipment generates, uses, and can radiate radiofrequency energy and, if not installed and used inaccordance with the instructions, may cause harmfulinterference to radio communications. However, thereis no guarantee that interference will not occur in aparticular installation. If this equipment does causeharmful interference to radio or television reception,which can be determined by turning the equipment offand on, the user is encouraged to try to correct theinterference by one or more of the following measures:
1. Reorient or relocate the receiving antenna.
2. Increase the separation between the equipmentand receiver.
3. Connect the equipment into an outlet on acircuit different from that to which thereceiver is connected.
4. Consult the dealer or an experiencedradio/television technician for help.
Notice 1:
The changes or modifications not expressly approved bythe party responsible for compliance could void theuser's authority to operate the equipment.
Notice 2:
Shielded interface cables must be used in order tocomply with the emission limits.

iv
Notice 3:
This product complies with the requirements set out inthe Council Directive on the Approximation of the Lawsof the Member States relating ElectromagneticCompatibility (89/336/EEC). For the evaluationregarding the electromagnetic compatibility, thefollowing standards were applied:
EN 50 082-1, IEC 801-2, IEC 801-3, IEC 801-4
EN 50 081-1, EN 55 022
CDC Regulatory Statement(Canada)
This digital apparatus does not exceed Class B limitsfor radio noise emissions from digital apparatus setout in the Radio Interference Regulations of theCanadian Department of Communications.
Le présent appareil numérique n'émet pas de bruitsradio-électriques dépassant les limites applicablesaux appareils numériques de la classe B prescritesdans le Réglement sur le brouillage radioélectriqueédicté par le ministère des Communications du Canada.
D.N.S.F1. RegulatoryStatement
Class 1 laser product
(EN 60825: 1991)
or
Luokan 1 laserlaite
v
Klass 1 laser apparat
(EN 60825: 1991)
Additional remarks:
VAROITUS - Laitteen käyttäminen muulla kuin tässäkäyttöohjeessa mainitulla tavalla saattaa altistaakäyttäjän turyallisuusluokan 1 ylittävällenäkymättömälle lasersäteilylle.
Varning - Om apparaten används pä annat sätt än idenna bruksanvisning specificerats, kan användarenutsättas för osynlig lasersträlning, som överskridergränsen för laserkläss 1.
According to EN 60825 sub-clause 6, regarding actionsto be taken against dangerous radiation includingcopies of all warning labels and information about thelaser components and radiation data such aswavelength, output power and pluse times.
vi
Important Safety Notice
1. Follow all warnings and instructions marked on theproduct.
2. Danger: Invisible laser radiation when open. Avoiddirect exposure to beam.
3. Unplug this product from the wall outlet beforecleaning. Do not use liquid cleaners or aerosolcleaners. Use a damp cloth for cleaning.
4. Slots and openings in the cabinet and the back orbottom are provided for ventilation. To protect itfrom overheating, these openings must not beblocked or covered. This product should never beplaced near or over a radiator or heat register, orin a built-in installation unless properventilation is provided.
5. This product should be operated from the type ofpower indicated on the marking label. If you arenot sure of the type of power available, consultyour dealer or local power company.
6. Never push objects of any kind into this productthrough cabinet slots as they may touch dangerousvoltage points or short cut parts that could resultin a fire or electric shock. Never spill liquid ofany kind on the product.
Belangrijkeveiligheidsvoorschriften
1. Let op alle waarschuwingen en instructies die ophet product staan vermeld.
vii
2. GEVAAR: Bij het demonteren van dit produkt kunt uworden blootgesteld aan onzichtbare laserstraling.Vermijd directe blootstelling aan laserstraling.
3. Trek de stekker van de PC uit het stopcontactvoordat u dit produkt schoonmaakt. Gebruik geenvloeibaar reinigingsmiddel of spuitbussen. Gebruikvoor het schoonmaken alleen een vochtige doek.
4. De sleuven en openingen in de kast van het produktdienen voor de ventilatie. Om te voorkomen dat hetprodukt oververhit raakt, mogen deze sleuven enopeningen nooit worden geblokkeerd of bedekt.Bovendien mag u dit produkt nooit in de buurt vaneen radiator of een kachel plaatsen, u mag hemalleen inbouwen als er voor voldoende ventilatie isgezorgd.
5. U mag dit apparaat alleen aansluiten op een voedingvan het type dat op het label staat vermeld. Neemcontact op met uw leverancier of het plaatselijkelektriciteitsbedrijf voor meer informatie.
6. Steek nooit voorwerpen of iets anders in ditprodukt via de ventilatiesleuven of de openingen,deze voorwerpen kunnen onder spanning komen testaan of kortsluiting veroorzaken en op die manierbrand veroorzaken of een elektrische schok. Laatnooit enige vloeistof op of in het apparaat lopen.
Avis important en matière desécurité
1. Veuillez observer les avertissements et suivre lesinstructions indiquées sur le produit.
viii
2. Danger : Cet appareil émet des radiations laserinvisibles lorsqu'il est ouvert. Veillez à évitertoute exposition directe aux rayons laser.
3. Débranchez votre ordinateur avant de procéder aunettoyage de l'appareil. N'utilisez pas de produitliquide ou d'aérosol de nettoyage. Utilisez plutôtun chiffon propre et humide.
4. Les fentes et les ouvertures situées sur le capotde l'appareil sont destinées à assurer laventilation de ses circuits. Pour protégerl'appareil de toute surchauffe, il convient de nepas obturer ou couvrir ces fentes et cesouvertures. En outre, il convient de ne jamaisplacer cet appareil sur ou à proximité d'unradiateur ou d'un accumulateur de chaleur, ouencore dans une installation intégrée, à moinsqu'une ventilation adéquate soit assurée.
5. Ce produit ne doit fonctionner qu'avec le typed'alimentation indiqué sur l'étiquette de repérage.Veuillez consulter votre revendeur ou la société dedistribution électrique locale pour connaître letype d'alimentation disponible dans votre région.
6. Veillez à ne jamais enfoncer d'objets de quelquesorte que ce soit dans les fentes ou les ouverturesde ce produit. Ces objets peuvent en effet entreren contact avec des parties dangereuses à hautetension ou provoquer des coupe-circuits qui, à leurtour, peuvent entraîner un incendie ou uneélectrocution. Veillez également à ne jamais verserde liquide d'aucune sorte dans l'appareil.
Wichtiger Sicherheitshinweis
1. Befolgen Sie alle auf dem Produkt vorhandenenWarnungen und Anweisungen.
ix
2. Gefahr: Im geöffneten Zustand kann unsichtbareLaserstrahlung entweichen. Vermeiden Sie dendirekten Kontakt mit Laserstrahlen.
3. Ziehen Sie den Netzstecker Ihres PC aus derSteckdose, bevor Sie dieses Produkt reinigen.Verwenden Sie keine flüssigen Reinigungsmittel oderReinigungssprays. Reinigen Sie das Produkt, fallsnotwendig, mit einem feuchten Tuch.
4. Die Schlitze und Öffnungen am Gehäuse des Produktesdienen zur Lüftung. Um das Produkt vor Überhitzungzu schützen, dürfen die Schlitze und Öffnungennicht blockiert oder verdeckt werden. Zusätzlichsollten Sie dieses Produkt niemals in der Näheeiner Heizquelle stellen oder in eine Anlageintegrieren, außer wenn ausreichende Lüftunggewährleistet ist.
5. Dieses Produkt sollte mit der auf dem Etikettangegebenen Netzspannung betrieben werden. FragenSie Ihren Händler oder Ihr lokalesStromversorgungsunternehmen, welche Netzspannungverfügbar ist.
6. Stecken Sie niemals Gegenstände durch die Schlitzeund Öffnungen in das Produkt, da diese Gegenständeunter gefährlicher Spannung stehende Bereicheberühren oder Teile kurzschließen und somit Brandoder elektrischen Schlag verursachen können.Verschütten Sie keine Flüssigkeiten auf demProdukt.
x
Precauzioni Importanti
1. Seguire tutte le istruzioni e precauzioni indicatesul prodotto.
2. Pericolo! Quando l’unità è aperta, c’è unaradiazione laser invisibile. Evitare l’esposizioneai raggi laser.
3. Disinserire la spina del PC dalla presa di correnteprima di effettuare operazioni di pulizia sulprodotto. Quando lo si vuole pulire, non bisognaimpiegare detergenti liquidi né spray, ma soltantoun panno umido.
4. Le fessure e aperture presenti sull’unitàpermettono la ventilazione necessaria a proteggerlada surriscaldamento; pertanto queste non devonoessere bloccate né coperte. Inoltre, questoprodotto non dovrebbe essere mai posto vicino osopra termosifoni o altre fonti di calore e neppureincorporato in altri contenitori a meno che non siprovveda ad una opportuna ventilazione.
5. Questo prodotto dovrebbe esser fatto funzionare conl’alimentazione elettrica indicatasull’etichetta.Consultare il proprio rivenditore ola società elettrica locale per conoscere i tipi dialimentazione disponbili.
6. Mai introdurre o spingere oggetti di qualsiasi tipoattraverso le fessure e le aperture poichépotrebbero entrare in contatto con zone a voltaggiopericoloso oppure con parti di circuito che possonoprovocare incendi o scosse elettriche. Nonrovesciare mai liquidi di alcun tipo sul prodotto.
xi
Importante Advertencia deSeguridad
1. Tenga en cuenta todas las advertencias einstrucciones marcadas en el producto.
2. Peligro: Radiación láser invisible al estarabierto. Evite quedar expuesto directamente a rayosláser.
3. Desenchufe su PC de la toma de corriente antes delimpiar este producto. No use detergentes líquidoso detergentes en pulverizadores. Para limpiar,sírvase de un trapo húmedo.
4. Las ranuras y aperturas en la cubierta del productoson aptas para la ventilación. Para prevenir queel producto se sobrecaliente, estas ranuras yaperturas no deben ser bloqueadas o tapadas.Además, este producto no se deberá colocar cerca deo encima de un radiador o una calefacción, o en unainstalación incorporada, a no ser que venga con unaventilación apropiada.
5. Este producto tendrá que funcionar con el tipo dealimentación que se indica en la marca de fábrica.Recurra a su distribuidor local o compañíaeléctrica para enterarse de los tipos dealimentación disponibles.
6. No introduzca nunca ningún objeto a través de lasranuras y aperturas del producto, dado que estosproductos podrán tocar áreas de voltaje peligrosasy provocar cortocicuitos o choques eléctricos. Noderrame ningún tipo de líquido sobre el producto.

1 1
Congratulations! You have just made a very importantupgrade for your PC. With your new Philips 8X or 10XCD-ROM drive, you can now take advantage of the vasthost of multimedia software available today at ahigher performance than ever. Whether you areinterested in the Encyclopedia Britanica, educationalgames, using your computer as a digital music studioor composing a business presentation with sound,graphics and animation, your new CD-ROM drive will bethe tool to efficiently and effectively get all thatinformation into your computer.
1.1 FeaturesThis CD-ROM drive has the following key features:
� IDE/ATAPI interface
� Access time at 170 ms
� Data transfer rate at 1,400 KB/sec for PCA84CD and1,500 KB/sec for PCA104CD
� Built in 128 KB buffer
� Special design to ensure maximum readability oflow-quality CDs
� Motorized tray for loading and unloading CDs
� Fits into a standard 5.25 inch half-height PC diskdrive bay
� Automatic power-saving feature
� Compatibility with the following disc formats:Audio-CD, Video-CD, CD-ROM/XA, CD-i/FMV (CD-imovies), Karaoke-CD, CD Extra (CD+), I-trax CD andPhoto-CD (both single and multi-session)
INTRODUCTION 1
PHILIPS CD-ROM D RIVE USER’ S MANUAL
12
� Front-panel Stop/Eject, audio Play/Skip trackcontrol
� Compatibility with Windows 3.1, Windows 95 and OS/2
Note: The use of the IDE/ATAPI interface means that youcan use your PC’s existing IDE interface to setup the drive without the need for an additionalCD-ROM interface card.
1.2 Package ContentsYour complete CD-ROM package contains the followingitems:
� CD-ROM drive
� Audio cable
� IDE cable
� software diskette
� Four screws
� This user‘s manual
1.3 System Requirements� IBM PC or compatible, with 80286 CPU or higher (a
80386 or higher is recommended)
� 3.5” floppy drive
� One empty 5.25” horizontally oriented disk bay
� One free IDE interface connector
� MS-DOS 6.0 or later, Windows 3.1 or higher, or OS/2Warp 3.0 or above
Please read this manual thoroughly before installingor using your new CD-ROM drive.

1 3
2 3
This chapter guides you through the installation ofyour new CD-ROM drive. To install the drive, your PCmust have a free IDE interface connector, or you mustbuy an IDE controller card from a computer retailer.(An Enhanced IDE controller card is required if yourPC already has a one-port IDE controller). SeeAppendix A for a brief introduction to IDEconnections.
2.1 Installing the CD-ROM DriveHere’s how to install your CD-ROM drive:
1. Turn off your PC and remove its casing.
2. Adjust the Master/Slave jumpers on the back of theCD-ROM drive as necessary. (The factory defaultof the slave mode normally should not be changed.See Appendix A .)
3. Remove the 5.25” drive’s drive guard as instructedby your PC manual.
4. Slide the CD-ROM drive into the drive bay.
INSTALLING YOURDRIVE 2

PHILIPS CD-ROM D RIVE USER’ S MANUAL
24
Figure 2-1 Inserting the CD-ROM Drive
5. Plug a free power connector inside your PC into the�� socket on the back of the CD-ROM drive.
401 5V G G 12V
AUDIO IDE DC
ABCDE
ABCDE
Audio Cable IDE Cable Power Cable
RED
RED
Figure 2-2 Back Panel Connections
6. Plug a free IDE connector inside your PC into thedrive’s ��� socket. The cable’s colored edge mustbe aligned with the Pin 1 position.
I NSTALLING YOUR DRIVE
2 5
Note: If you have a sound card that has an IDE port,you can either connect the CD-ROM drive toyour PC or to the sound card. You must thendisable the unused secondary IDE port. SeeAppendix A for what a secondary IDE port isand refer to your sound card, PC or IDEcontroller manual for the instructions ondisabling the unused secondary IDE port.
7. If you have a sound card with a 4-pin CD-ROM audioconnector, use the supplied audio cable to connectit to the drive’s “ �����” connector.
8. ( Optional connection for advanced users only ) Usean audio cable with two 2-pin Molex connectors toconnect to the drive’s “ �� ��” connector an audiooutput device that accepts digital audio input.The “ �� ��” digital output connector providespurer sound output than the “ �����” analog outputconnector.
9. Secure the drive with the supplied four screws.
10. Replace your PC's casing and reconnect the powersupply.
This completes the hardware installation.
2.2 Letting Your System Recognizethe Drive
For your system to recognize the new CD-ROM drive, youneed an appropriate driver to act as the system’s “eyeopener.” In normal cases, either Windows 95 or OS/2Warp should have no problem recognizing the drive withthe OS’s built-in standard IDE CD-ROM driver. To usethe drive in DOS and Windows 3.1, however, you need toinstall the supplied device driver.
PHILIPS CD-ROM D RIVE USER’ S MANUAL
26
2.2.1 If You Are a DOS or Windows 3.xUser
Perform the following steps:
1. Boot your computer.
2. Identify the directory that contains the file����� �� �.
Note: MSCDEX.EXE comes with DOS 6.0 and above. ForDOS 6.x, the file is typically located inyour DOS directory. For DOS installed withWindows 95, it is typically located in yourWindows 95 directory’s COMMAND sub-directory.You can locate this file by using the FileManager’s Search command in Windows 3.x orthe Start menu’s Find command in Windows 95.If the file is missing, contact your DOS orWindows 95 distributor for a copy of it.
3. Insert the Installation diskette into a 3.5” floppydrive.
4. Read through the README.TXT file on the diskette ifyou are an advanced user and are consideringchanging the CD-ROM drive’s configuration.
5. Under DOS, change to the drive where the disketteis inserted and type ������� �������.
Note: You must change to that drive before typingthe “INSTALL” command. Simply typingA:\INSTALL or B:\INSTALL will not properlyinstall the driver.
6. Change the default destination disk ( ���) anddirectory ( �����) if necessary and press the ������
button.
7. Change the name of the directory containing the����� �� � file if necessary and press the �� button.
I NSTALLING YOUR DRIVE
2 7
8. Change the drive configuration if necessary andpress the ���� �� button. The default settingsnormally do not need to be changed.
9. Press the �� button at the two subsequentlyappearing information boxes.
10. Reboot your computer.
If everything is okay, you can start using your CD-ROM drive right away. Otherwise, make sure thatyour CD-ROM drive has been correctly set as amaster device or a slave device (see Appendix A forinstructions). If this still does not solve theproblem, contact your Philips distributor orrepresentative.
2.2.2 If You Are a Windows 95 User
Perform the following steps:
1. Install Windows 95, if it is not already installed.
2. Boot your computer. Windows 95 automaticallystarts.
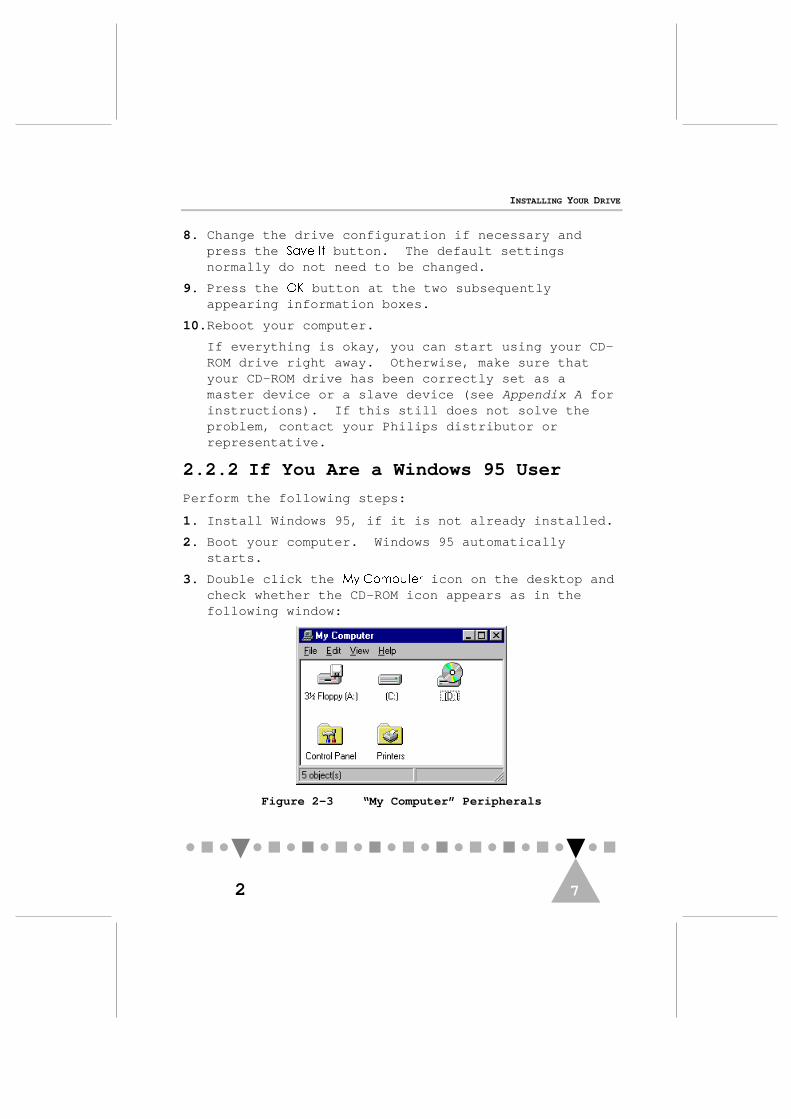
3. Double click the �� �������� icon on the desktop andcheck whether the CD-ROM icon appears as in thefollowing window:
Figure 2-3 “My Computer” Peripherals

PHILIPS CD-ROM D RIVE USER’ S MANUAL
28
4. Double click the �� ���! "� �! folder in the samewindow. The �� ���! "� �! folder contents aredisplayed:
Figure 2-4 The “Control Panel” Folder Contents
5. Double click the ��#��� icon. The ��#��� "������$�#
folder appears:

I NSTALLING YOUR DRIVE
2 9
Figure 2-5 The “System Properties” Folder
6. Click the ���$�� �� �%�� tab and check whether theCD-ROM drive is listed.
If the CD-ROM icon is listed in both Step 3 andthis step, you can stop here. Windows 95 hassuccessfully recognized your new CD-ROM drive.Otherwise, proceed with Steps 7 and 8.
7. Go to the DOS prompt and install the supplieddevice driver by following the instructions givenin Section 2.2.1.
8. Restart Windows 95 and repeat Step 3.
This time the CD-ROM icon should appear in ��
��������’s peripheral icon display (but not in theDevice Manager’s listing for reasons beyond thismanual’s purposes).

PHILIPS CD-ROM D RIVE USER’ S MANUAL
210
Note: If you need to but cannot access the CD-ROM drivein one of the several available DOS modes, followthe instructions in Section 2.2.1 and install thesupplied device driver under that DOS mode.
Why couldn’t I install Windows 95 withits CD disc? Is my CD-ROM defective?
No. Your CD-ROM probably had nothingto do with that problem.
If you were making an upgrade fromWindows 3.1 to Windows 95, you mighthave forgotten to complete the stepslisted in Section 2.2.1 beforeperforming the upgrade. Remember,without the CD-ROM driver, Windows 3.1has no way to recognize your CD-ROMdrive.
If you were installing Windows 95 fromscratch, the standard IDE CD-ROM drivercontained in the Windows 95installation package might not beworking properly with your IDEcontroller. Try the diskette version.
2.2.3 If You Are an OS/2 Warp User
Perform the following steps:
1. Install OS/2 Warp, or skip to Step 3 if you alreadyhave it installed.
I NSTALLING YOUR DRIVE
2 11
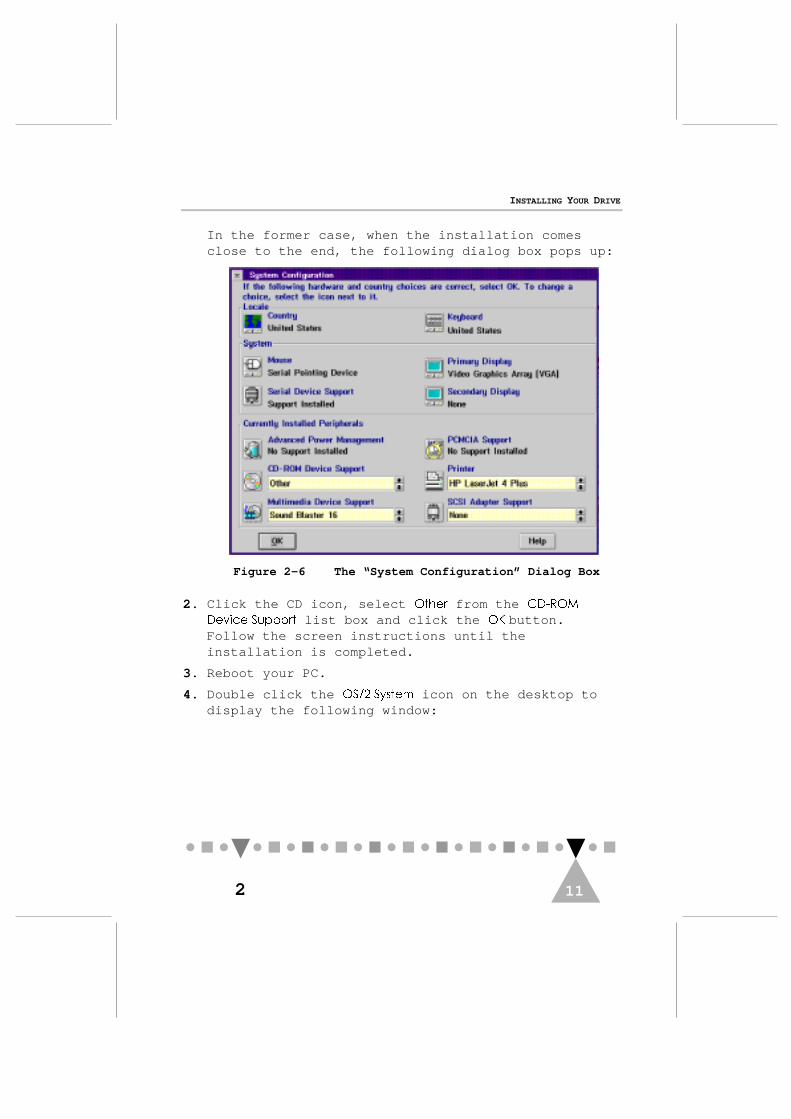
In the former case, when the installation comesclose to the end, the following dialog box pops up:
Figure 2-6 The “System Configuration” Dialog Box
2. Click the CD icon, select ��&�� from the ��'���
���$�� ������� list box and click the �� button.Follow the screen instructions until theinstallation is completed.
3. Reboot your PC.
4. Double click the ��() ��#��� icon on the desktop todisplay the following window:

PHILIPS CD-ROM D RIVE USER’ S MANUAL
212
Figure 2-7 The “OS/2 System - Icon View” Window
5. Double click the ��$��# icon and check whether the CD-ROM icon ( ��$�� �) appears as in the following listof available drives:
Figure 2-8 The “Drives - Icon View” Window
6. If it is listed, you can stop here. OS/2 Warp hassuccessfully recognized your new CD-ROM drive.Otherwise, proceed with the remaining steps.
7. Close the window and double click the ����� *
"�����# icon in the ��() ��#��� ' ��� +$�, window (seeFigure 2-7). The following window appears:
Figure 2-9 The “Command Prompts - Icon View” Window
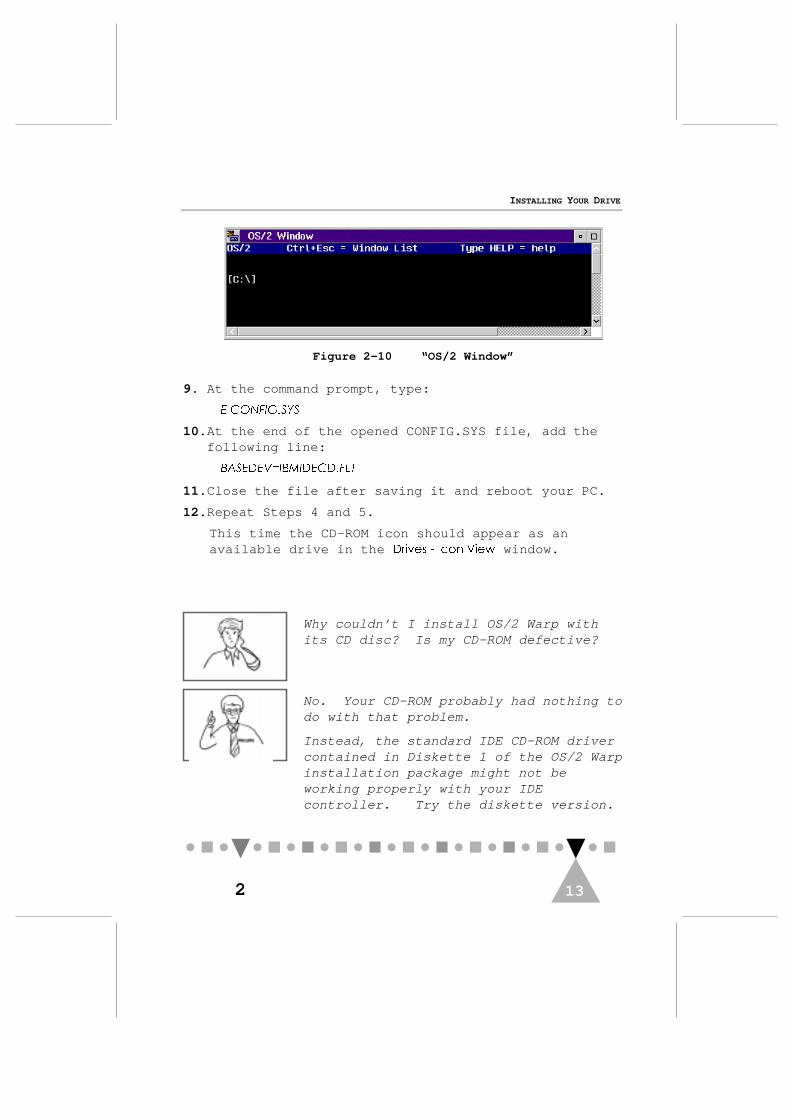
8. Double click the ��() -$ *�, icon. An OS/2 windowappears:
I NSTALLING YOUR DRIVE
2 13
Figure 2-10 “OS/2 Window”
9. At the command prompt, type:
� ���� ���
10. At the end of the opened CONFIG.SYS file, add thefollowing line:
��������������� ���
11. Close the file after saving it and reboot your PC.
12. Repeat Steps 4 and 5.
This time the CD-ROM icon should appear as anavailable drive in the ��$��# ' ��� +$�, window.
Why couldn’t I install OS/2 Warp withits CD disc? Is my CD-ROM defective?
No. Your CD-ROM probably had nothing todo with that problem.
Instead, the standard IDE CD-ROM drivercontained in Diskette 1 of the OS/2 Warpinstallation package might not beworking properly with your IDEcontroller. Try the diskette version.
PHILIPS CD-ROM D RIVE USER’ S MANUAL
214
This page is intentionally left blank.

3 13
3.1 Drive Applications
There are two main ways in which you will use your newCD-ROM drive. The first way is as a typical diskdrive (albeit read-only). Here, data such as programfiles, databases, sound clips, video images, etc. isread from the CD into your PC's CPU. The other way isas a CD player. You can use your CD-ROM drive tolisten to music CDs.
3.2 Manually Controlling the Drive
Most of the time, you will use application software tocontrol the CD-ROM drive. However, there are timesmanually controlling the drive can be more direct andeven necessary. Figure 3-1 shows the drive’s frontpanel components for manually controlling the drive:
1
2 3 4 5 6
Figure 3-1 The Front Panel Look
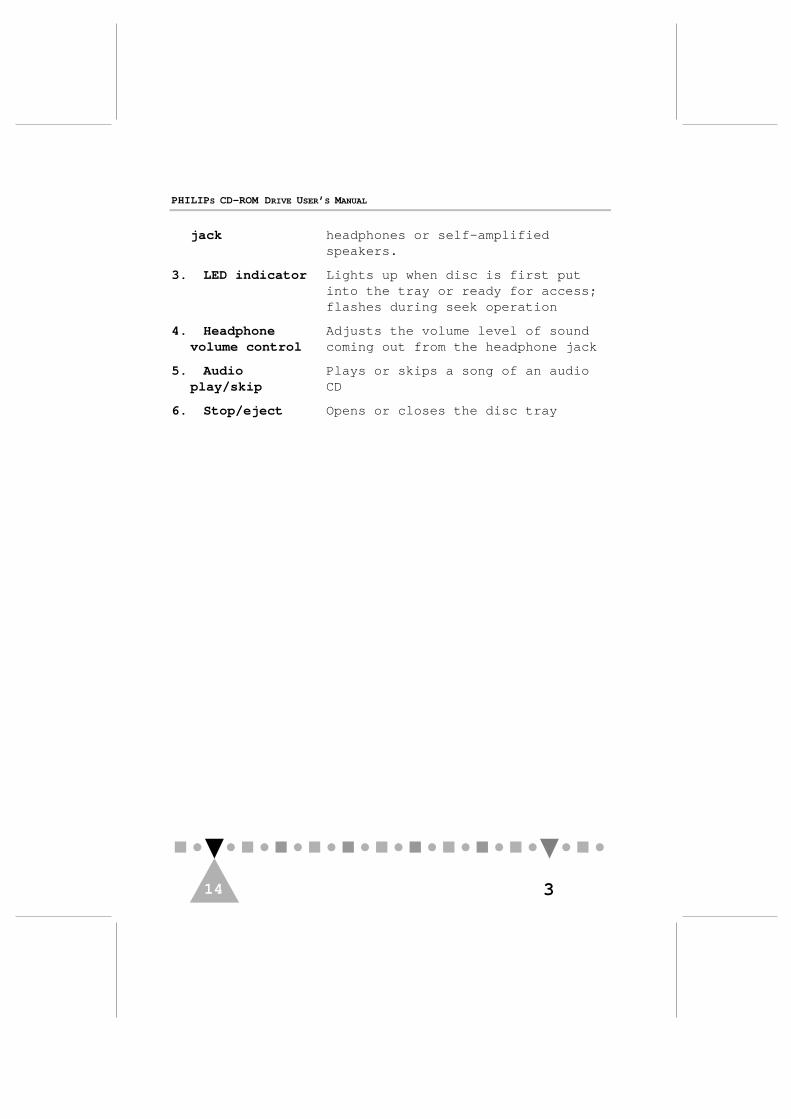
1. Disc tray Opens or closes for disc loadingand removal
2. Headphone For optional connection to
USING YOUR CD-ROMDRIVE 3
PHILIP S CD-ROM DRIVE USER’ S MANUAL
314
jack headphones or self-amplifiedspeakers.
3. LED indicator Lights up when disc is first putinto the tray or ready for access;flashes during seek operation
4. Headphonevolume control
Adjusts the volume level of soundcoming out from the headphone jack
5. Audioplay/skip
Plays or skips a song of an audioCD
6. Stop/eject Opens or closes the disc tray

15A 15
Before sliding your CD-ROM drive into the 5.25” drivebay, you have to decide whether the drive is going tobe a master or slave device by adjusting the �� and ��
jumpers on its back. This appendix presents somebasic concepts of IDE connections to help you make thedecision and describes the way to set the jumpers.
A.1 IDE ConnectionsWhen you open your PC box, most likely you will see awide ribbon cable with two 40-pin connectors stemmingfrom a connector seat on the mother board; each of theconnectors may or may not have been connected to aperipheral device. Such a cable is called an IDEcable and the connector seat an IDE port, Thefunctionality of the cable and port is determined byan “IDE controller”, either built-in on yourmotherboard or in the form of an add-on card. Thiswhole set of things acts as a data bridge between yourCPU and devices that are designed for use with the IDEstandards.
Red
IDE Cable
Floppy Cable
Primary Port
Figure A-1 IDE Port and Cable on Motherboard
A MASTER OR A SLAVEDEVICE? A

PHILIPS CD-ROM D RIVE USER’ S MANUAL
18 A16
A MASTER OR A SLAVE DEVICE
17A 17
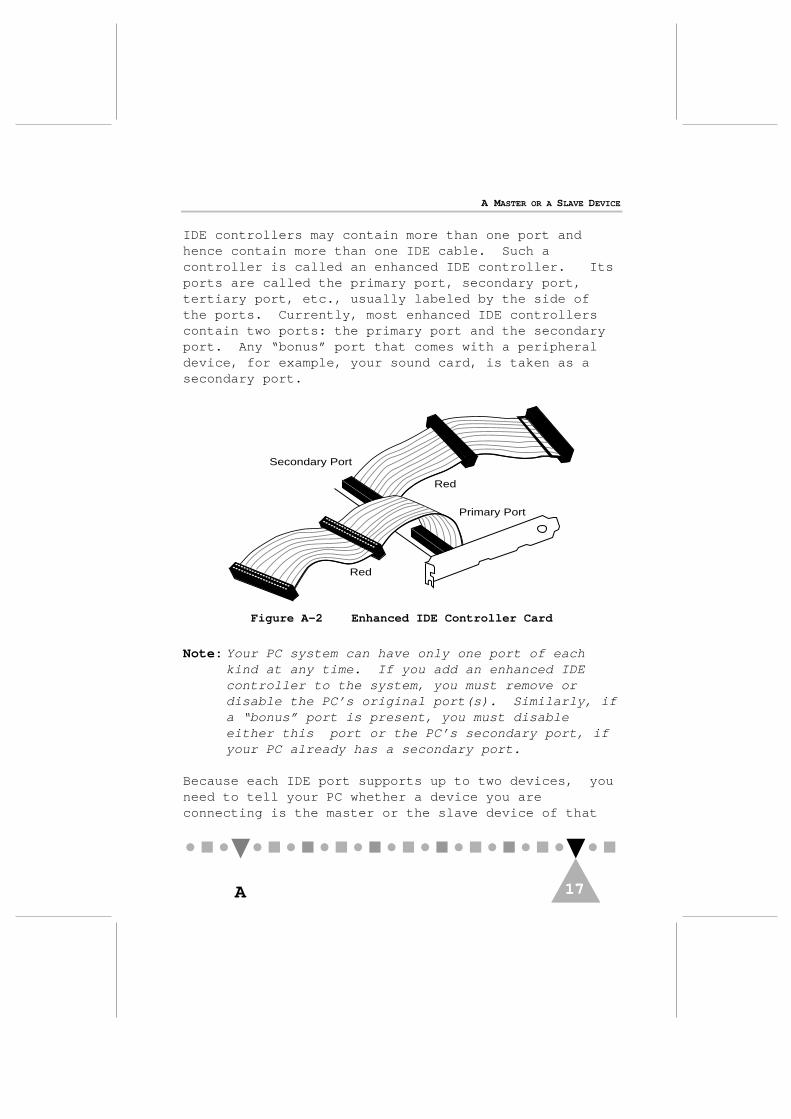
IDE controllers may contain more than one port andhence contain more than one IDE cable. Such acontroller is called an enhanced IDE controller. Itsports are called the primary port, secondary port,tertiary port, etc., usually labeled by the side ofthe ports. Currently, most enhanced IDE controllerscontain two ports: the primary port and the secondaryport. Any “bonus” port that comes with a peripheraldevice, for example, your sound card, is taken as asecondary port.
Red
Red
Secondary Port
Primary Port
Figure A-2 Enhanced IDE Controller Card
Note: Your PC system can have only one port of eachkind at any time. If you add an enhanced IDEcontroller to the system, you must remove ordisable the PC’s original port(s). Similarly, ifa “bonus” port is present, you must disableeither this port or the PC’s secondary port, ifyour PC already has a secondary port.
Because each IDE port supports up to two devices, youneed to tell your PC whether a device you areconnecting is the master or the slave device of that
PHILIPS CD-ROM D RIVE USER’ S MANUAL
18 A18
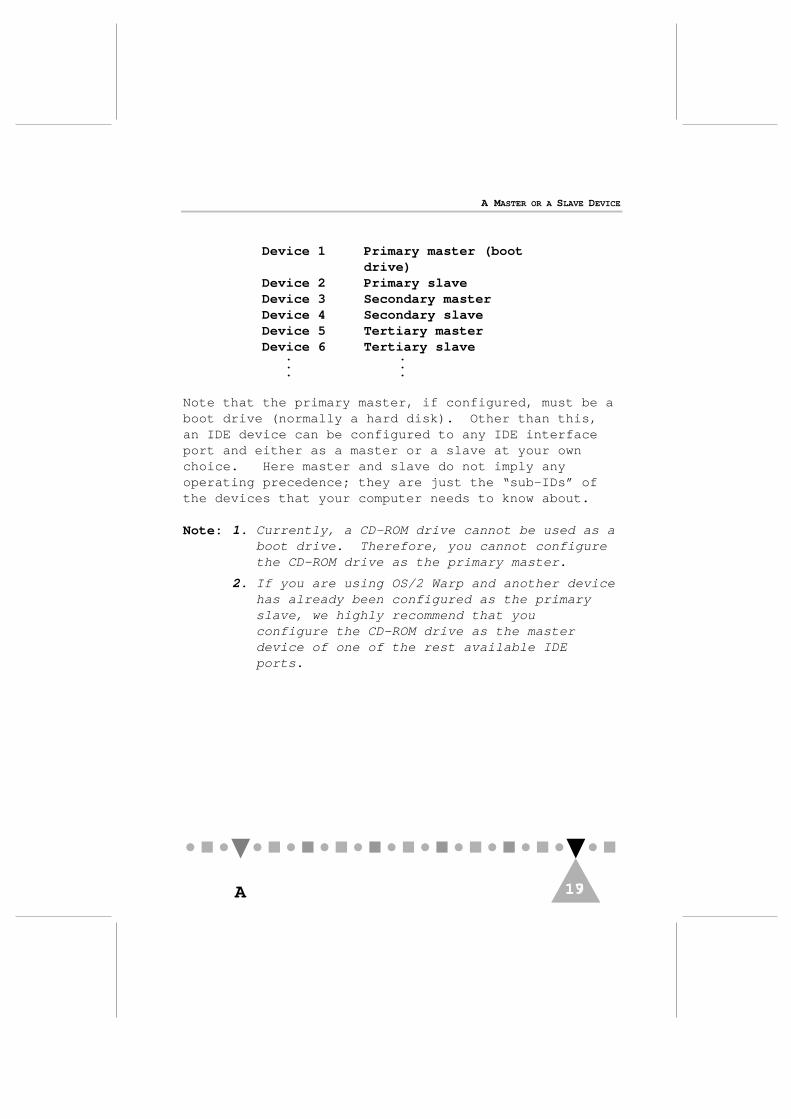
port. As a result, if you have more than one IDEdevice, their assignments may look similar to thefollowing:
A MASTER OR A SLAVE DEVICE
17A 19
Device 1 Primary master (bootdrive)
Device 2 Primary slaveDevice 3 Secondary masterDevice 4 Secondary slaveDevice 5 Tertiary masterDevice 6 Tertiary slave
. .
. .
. .
Note that the primary master, if configured, must be aboot drive (normally a hard disk). Other than this,an IDE device can be configured to any IDE interfaceport and either as a master or a slave at your ownchoice. Here master and slave do not imply anyoperating precedence; they are just the “sub-IDs” ofthe devices that your computer needs to know about.
Note: 1. Currently, a CD-ROM drive cannot be used as aboot drive. Therefore, you cannot configurethe CD-ROM drive as the primary master.
2. If you are using OS/2 Warp and another devicehas already been configured as the primaryslave, we highly recommend that youconfigure the CD-ROM drive as the masterdevice of one of the rest available IDEports.
PHILIPS CD-ROM D RIVE USER’ S MANUAL
18 A20
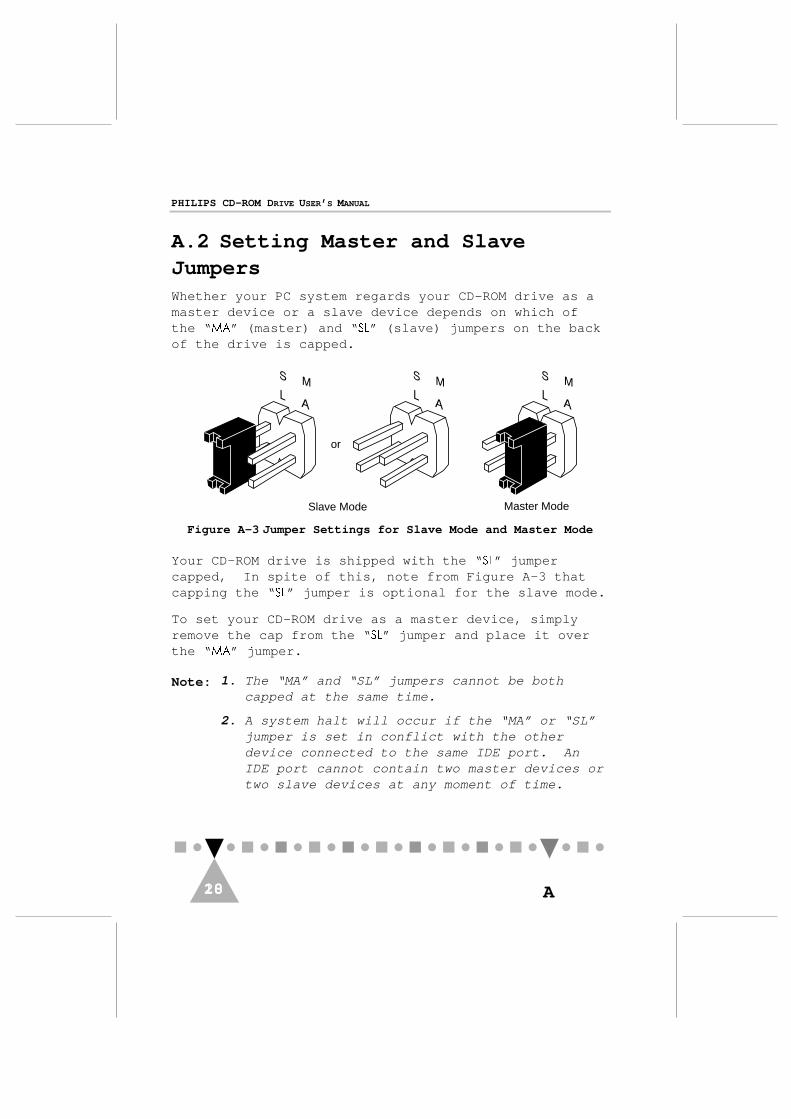
A.2 Setting Master and SlaveJumpersWhether your PC system regards your CD-ROM drive as amaster device or a slave device depends on which ofthe “ ��” (master) and “ ��” (slave) jumpers on the backof the drive is capped.
or
Slave Mode Master Mode
Figure A-3 Jumper Settings for Slave Mode and Master Mode
Your CD-ROM drive is shipped with the “ ��” jumpercapped, In spite of this, note from Figure A-3 thatcapping the “ ��” jumper is optional for the slave mode.
To set your CD-ROM drive as a master device, simplyremove the cap from the “ ��” jumper and place it overthe “ ��” jumper.
Note: 1. The “MA” and “SL” jumpers cannot be bothcapped at the same time.
2. A system halt will occur if the “MA” or “SL”jumper is set in conflict with the otherdevice connected to the same IDE port. AnIDE port cannot contain two master devices ortwo slave devices at any moment of time.

A MASTER OR A SLAVE DEVICE
17A 21
B 19
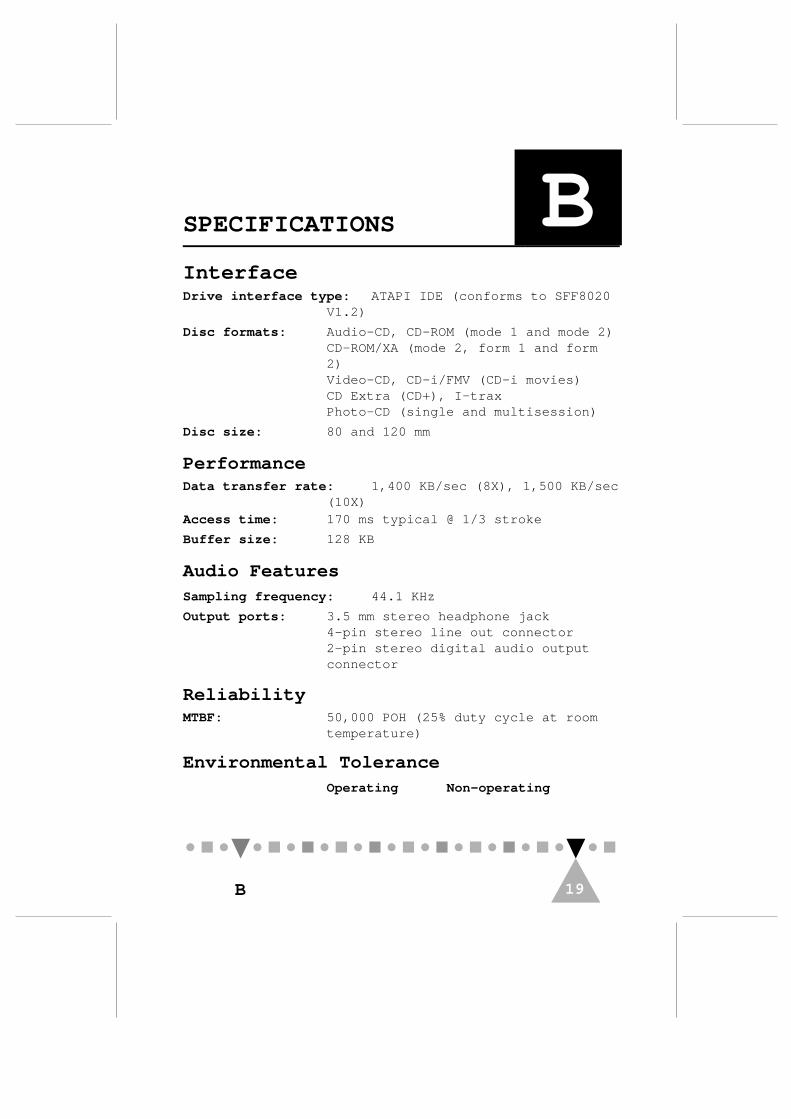
InterfaceDrive interface type: ATAPI IDE (conforms to SFF8020
V1.2)
Disc formats: Audio-CD, CD-ROM (mode 1 and mode 2)CD-ROM/XA (mode 2, form 1 and form2)Video-CD, CD-i/FMV (CD-i movies)CD Extra (CD+), I-traxPhoto-CD (single and multisession)
Disc size: 80 and 120 mm
PerformanceData transfer rate: 1,400 KB/sec (8X), 1,500 KB/sec
(10X)Access time: 170 ms typical @ 1/3 stroke
Buffer size: 128 KB
Audio FeaturesSampling frequency: 44.1 KHz
Output ports: 3.5 mm stereo headphone jack4-pin stereo line out connector2-pin stereo digital audio outputconnector
ReliabilityMTBF: 50,000 POH (25% duty cycle at room
temperature)
Environmental ToleranceOperating Non-operating
SPECIFICATIONS B
PHILIPS CD-ROM D RIVE USER’ S MANUAL
B20
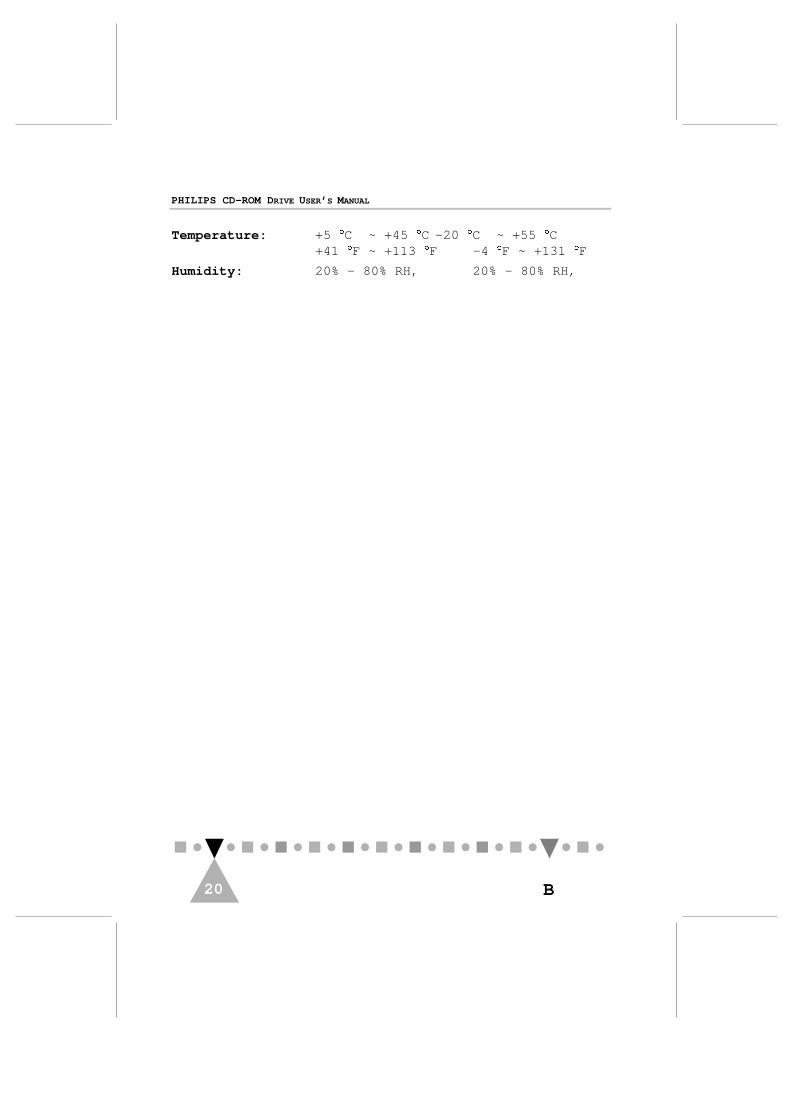
Temperature: +5 �C ~ +45 �C -20 �C ~ +55 �C+41 �F ~ +113 �F -4 �F ~ +131 �F
Humidity: 20% - 80% RH, 20% - 80% RH,

21
Physical CharacteristicsDimensions: 149 x 42 x 196.5 mm (W x H x D)
typical
Weight: 0.85 Kg
Front panel: Stop/Eject buttonAudio Play/Skip buttonRotary volume control knobDisc Ready/Data Seek LED indicatorHeadphone jack
Rear Panel: Power supply connectorIDE interface connectorMaster/Slave configuration jumpersAudio line outputDigital audio output