Embed Size (px)
Citation preview
1
PHOTOGRAPHY GUIDEVersion 1.0 – March 2017This document is subject to periodic revision.Please check www.leeds.ac.uk/commsto make sure you have the most recent copy.
02
INTRODUCTION 3
SECTION ONE: Identity management 4–7 and achieving the best imagesBefore you start 5Achieving the best images 6
SECTION TWO: Planning and organisation 8–9
SECTION THREE: Capturing images 10–22Introduction to photographing people 11Multiple locations 12Storyboards 13Positioning 14Shooting for different formats 16Taking a step back 17Group shots – extreme shapes 19Art direction – people and props 20Art direction – attention to detail 21Campus 22
SECTION 4: Image selection 23–26 Pre-production and selection 24Dos and don’ts 25Image cropping 26
SECTION FIVE: Format, size 27–32 and technical specifications Websites using the University’s web toolkit approach 28Websites in the University’s web toolkit 29Print 31Display advertising 32
SECTION SIX: Applications 33–34How one shoot can be used across 34 multiple applications – example
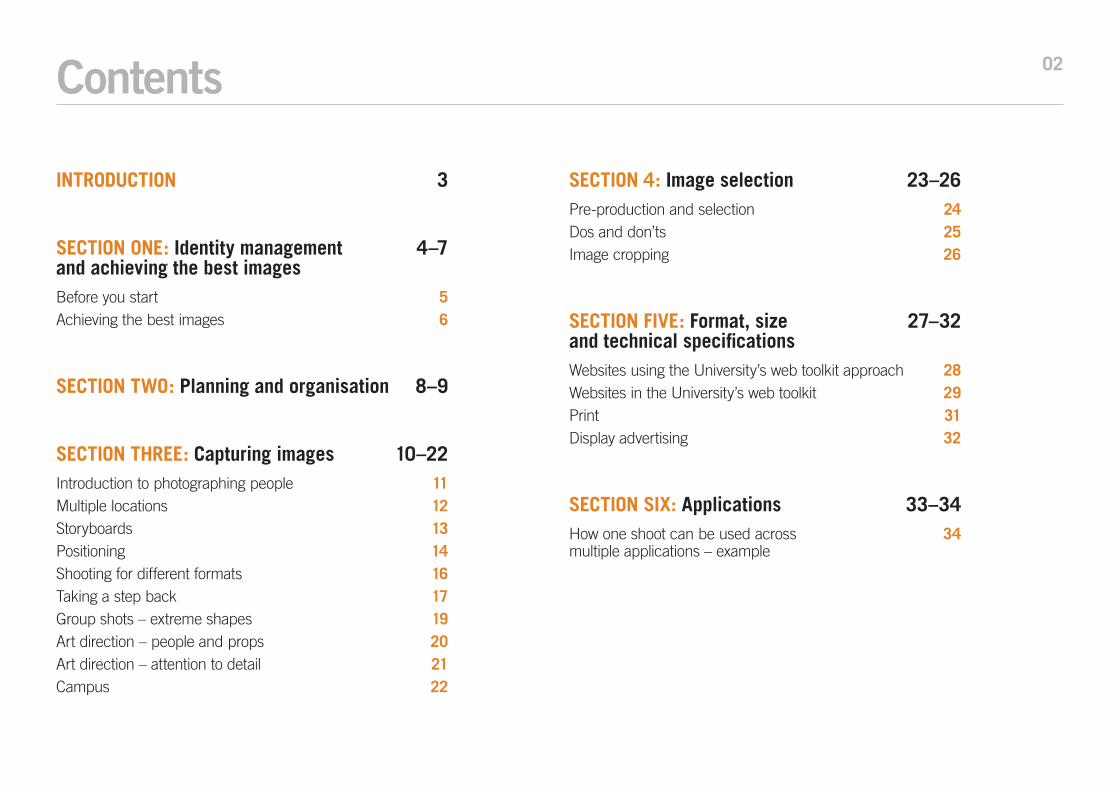
Contents

03Photography guide
This guide is for you if you’re:• a member of staff, commissioning photography• a photographer, taking photos for the University.
It covers the whole process, from writing the brief and planning the photoshoot, to image selection and post-production work.
In advance of the photoshoot, use this guidance to understand:• the different image formats and sizes the
University uses – for print, web and in display advertising
• the importance of space in many of our images• any permission you need to get.
It also offers a host of practical photoshoot and photography tips to help you get the images you want.
Tell us what you thinkWe welcome your feedback. Please let us know if anything in the guide is unclear or if you can’t find the information you need – email Claire Andrews [email protected]
Introduction
04SECTION ONE
IDENTITY MANAGEMENT AND ACHIEVING THE BEST IMAGES

05
Managing the University’s identity
We manage the University’s visual identity so that it is clear, cohesive and recognisable. Images are a key part of our identity management. They help to express the organisation and communicate our messages and our style. In using images we aim to project some important messages about the University, reflecting our:• heritage• gravitas• vibrance• academic excellence • internationalism• inclusiveness • cutting-edge research and teaching.
Read the identity management guidelines: comms.leeds.ac.uk/design-and-print
The University uses a combination of in-house and external suppliers to provide stills photography. We also have a large library of images available.
If you need advice on photography, email Claire Andrews: [email protected] or the Communications Production team [email protected]
Before commissioning new photography
Before you start, talk through your requirements with Communications or your faculty marketing manager because there may be suitable existing photos or plans to commission similar work.
Check the University image library for existing commissioned photography. As a member of staff, you have access to the image library automatically. You log on with your regular University of Leeds username and password. imagelibrary.leeds.ac.uk
If you have a query about the image library, contact Matt Clark [email protected]
Before you startVisual identity, University image library and finding a photographer
Choose a photographer and organise payment
You must, by law, use one of our approved photography suppliers or in-house photographer, unless the work is being done outside of the UK. These suppliers were selected through a rigorous process and in line with University purchasing policies. Find the current list of photographers at comms.leeds.ac.uk/photography
In-house photography is available through Tony Glossop. He can be commissioned by contacting the Print and Copy Bureau (PCB) pcb.leeds.ac.uk/photography
Use these photography guidelines to brief your supplier and to help you plan and organise the photoshoot.
Permission and release forms
When using pictures of people who can be recognised you must have their permission on a signed image consent form. You can download an image consent form from comms.leeds.ac.uk/photography
Storing and sharing final images
When your photography is finished, save your images and share them with University colleagues by putting the selected high-resolution images supplied by your photographer on the image library. You can do this via your faculty or departmental marketing team or the digital communications team.
Contact Matt Clark for further details [email protected]
06
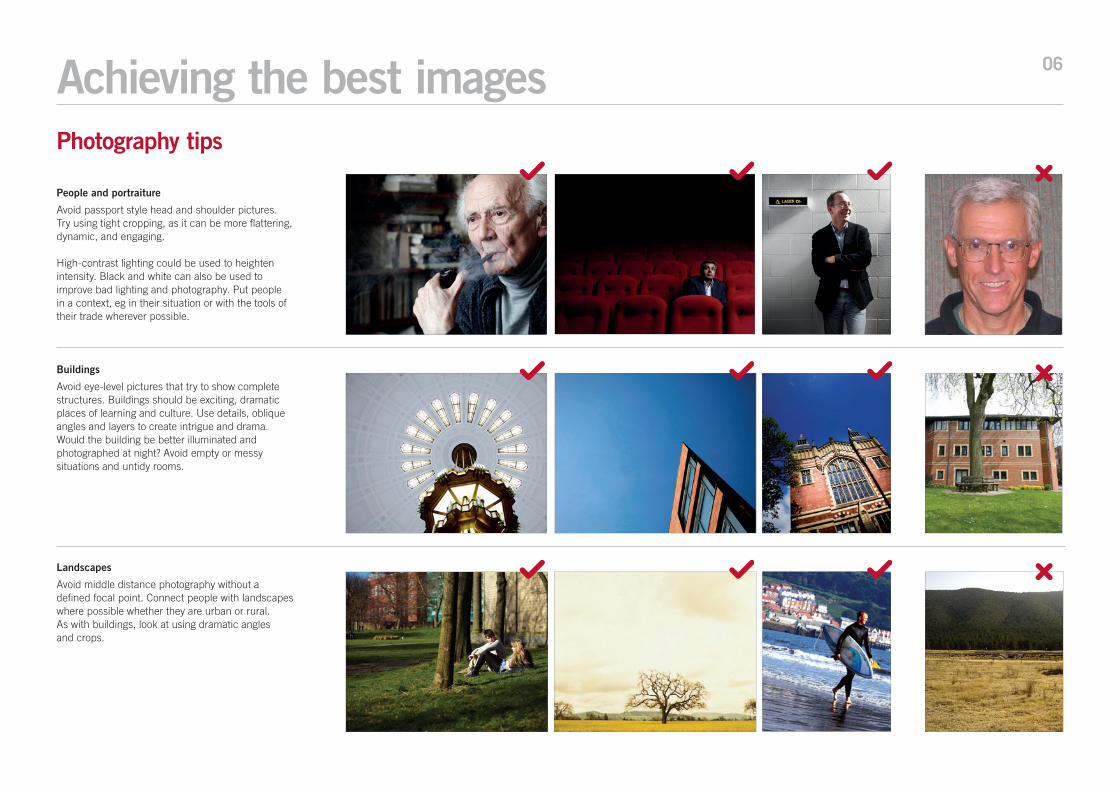
People and portraiture
Avoid passport style head and shoulder pictures. Try using tight cropping, as it can be more flattering, dynamic, and engaging.
High-contrast lighting could be used to heighten intensity. Black and white can also be used to improve bad lighting and photography. Put people in a context, eg in their situation or with the tools of their trade wherever possible.
Buildings
Avoid eye-level pictures that try to show complete structures. Buildings should be exciting, dramatic places of learning and culture. Use details, oblique angles and layers to create intrigue and drama. Would the building be better illuminated and photographed at night? Avoid empty or messy situations and untidy rooms.
Landscapes
Avoid middle distance photography without a defined focal point. Connect people with landscapes where possible whether they are urban or rural. As with buildings, look at using dramatic angles and crops.
Achieving the best imagesPhotography tips
07
Teaching and learning
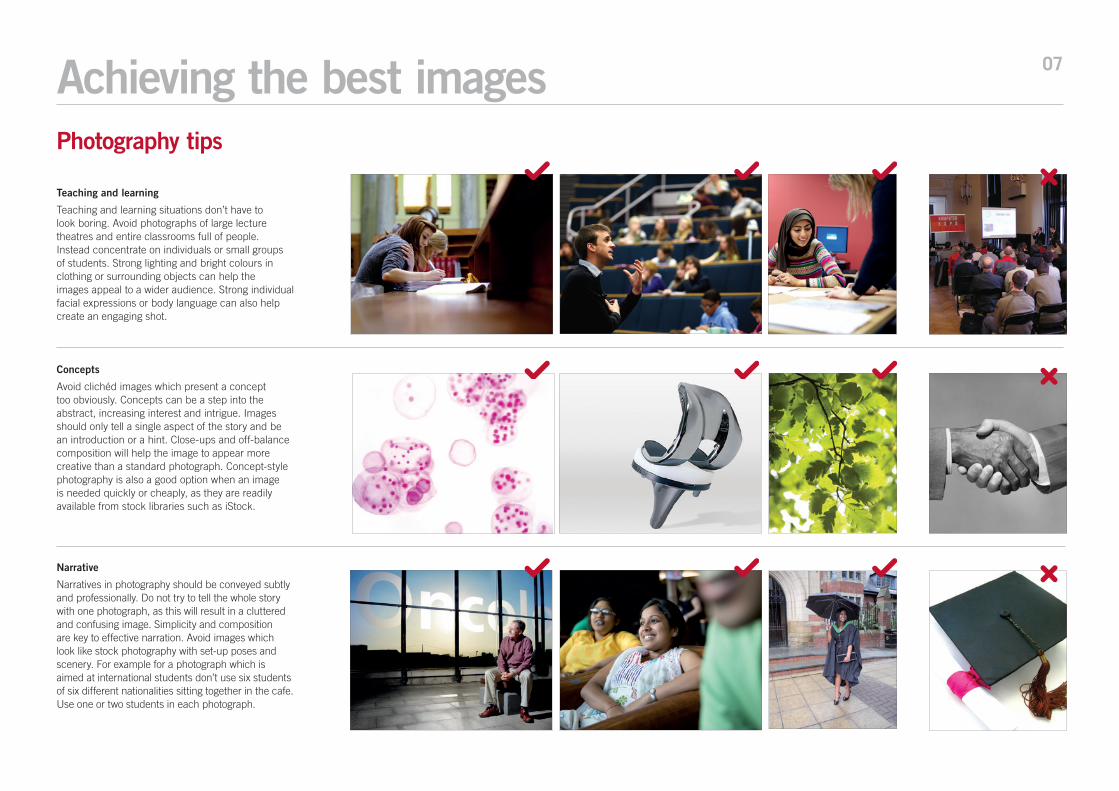
Teaching and learning situations don’t have to look boring. Avoid photographs of large lecture theatres and entire classrooms full of people. Instead concentrate on individuals or small groups of students. Strong lighting and bright colours in clothing or surrounding objects can help theimages appeal to a wider audience. Strong individual facial expressions or body language can also help create an engaging shot.
Concepts
Avoid clichéd images which present a concept too obviously. Concepts can be a step into the abstract, increasing interest and intrigue. Images should only tell a single aspect of the story and be an introduction or a hint. Close-ups and off-balance composition will help the image to appear more creative than a standard photograph. Concept-style photography is also a good option when an image is needed quickly or cheaply, as they are readily available from stock libraries such as iStock.
Narrative
Narratives in photography should be conveyed subtly and professionally. Do not try to tell the whole story with one photograph, as this will result in a cluttered and confusing image. Simplicity and composition are key to effective narration. Avoid images which look like stock photography with set-up poses and scenery. For example for a photograph which is aimed at international students don’t use six students of six different nationalities sitting together in the cafe. Use one or two students in each photograph.
Achieving the best imagesPhotography tips
08SECTION TWO
PLANNING AND ORGANISATION
09
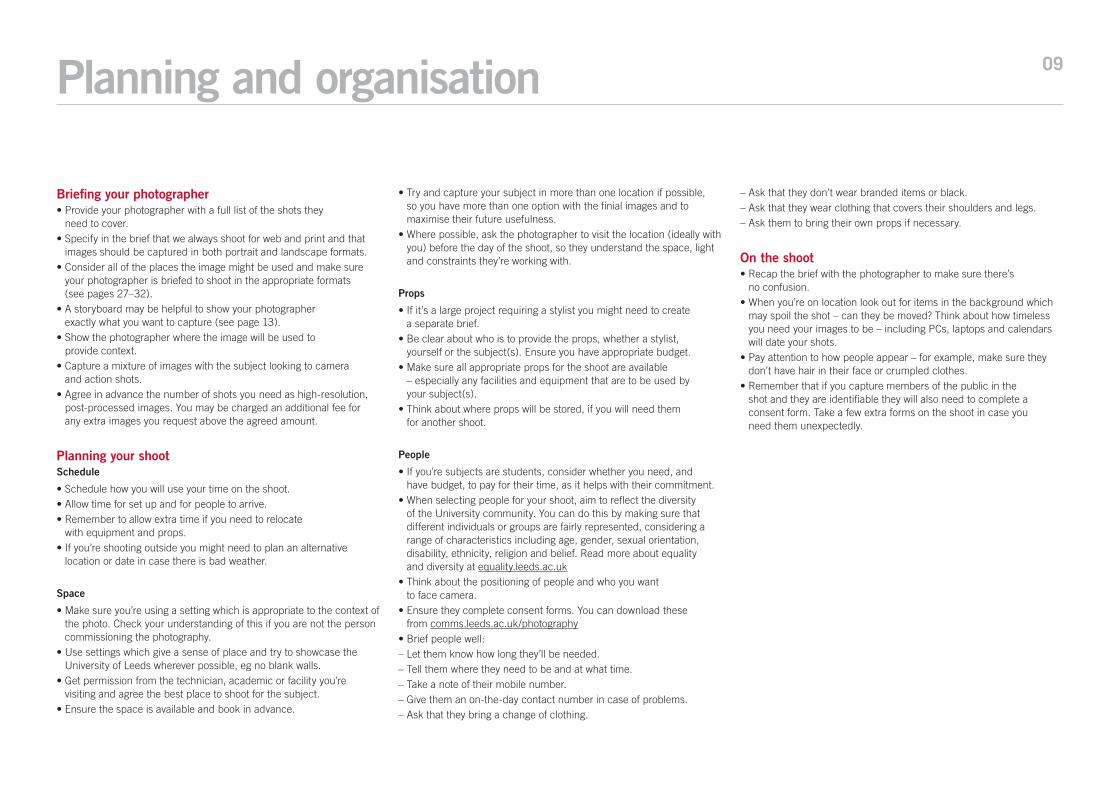
Briefing your photographer• Provide your photographer with a full list of the shots they
need to cover.• Specify in the brief that we always shoot for web and print and that
images should be captured in both portrait and landscape formats.• Consider all of the places the image might be used and make sure
your photographer is briefed to shoot in the appropriate formats (see pages 27–32).
• A storyboard may be helpful to show your photographer exactly what you want to capture (see page 13).
• Show the photographer where the image will be used to provide context.
• Capture a mixture of images with the subject looking to camera and action shots.
• Agree in advance the number of shots you need as high-resolution, post-processed images. You may be charged an additional fee for any extra images you request above the agreed amount.
Planning your shootSchedule
• Schedule how you will use your time on the shoot.• Allow time for set up and for people to arrive.• Remember to allow extra time if you need to relocate
with equipment and props.• If you’re shooting outside you might need to plan an alternative
location or date in case there is bad weather.
Space
• Make sure you’re using a setting which is appropriate to the context of the photo. Check your understanding of this if you are not the person commissioning the photography.
• Use settings which give a sense of place and try to showcase the University of Leeds wherever possible, eg no blank walls.
• Get permission from the technician, academic or facility you’re visiting and agree the best place to shoot for the subject.
• Ensure the space is available and book in advance.
• Try and capture your subject in more than one location if possible, so you have more than one option with the finial images and to maximise their future usefulness.
• Where possible, ask the photographer to visit the location (ideally with you) before the day of the shoot, so they understand the space, light and constraints they’re working with.
Props
• If it’s a large project requiring a stylist you might need to create a separate brief.
• Be clear about who is to provide the props, whether a stylist, yourself or the subject(s). Ensure you have appropriate budget.
• Make sure all appropriate props for the shoot are available – especially any facilities and equipment that are to be used by your subject(s).
• Think about where props will be stored, if you will need them for another shoot.
People
• If you’re subjects are students, consider whether you need, and have budget, to pay for their time, as it helps with their commitment.
• When selecting people for your shoot, aim to reflect the diversity of the University community. You can do this by making sure that different individuals or groups are fairly represented, considering a range of characteristics including age, gender, sexual orientation, disability, ethnicity, religion and belief. Read more about equality and diversity at equality.leeds.ac.uk
• Think about the positioning of people and who you want to face camera.
• Ensure they complete consent forms. You can download these from comms.leeds.ac.uk/photography
• Brief people well: – Let them know how long they’ll be needed.– Tell them where they need to be and at what time.– Take a note of their mobile number.– Give them an on-the-day contact number in case of problems.– Ask that they bring a change of clothing.
– Ask that they don’t wear branded items or black.– Ask that they wear clothing that covers their shoulders and legs.– Ask them to bring their own props if necessary.
On the shoot• Recap the brief with the photographer to make sure there’s
no confusion.• When you’re on location look out for items in the background which
may spoil the shot – can they be moved? Think about how timeless you need your images to be – including PCs, laptops and calendars will date your shots.
• Pay attention to how people appear – for example, make sure they don’t have hair in their face or crumpled clothes.
• Remember that if you capture members of the public in the shot and they are identifiable they will also need to complete a consent form. Take a few extra forms on the shoot in case you need them unexpectedly.
Planning and organisation
10SECTION THREE
CAPTURING IMAGES
11
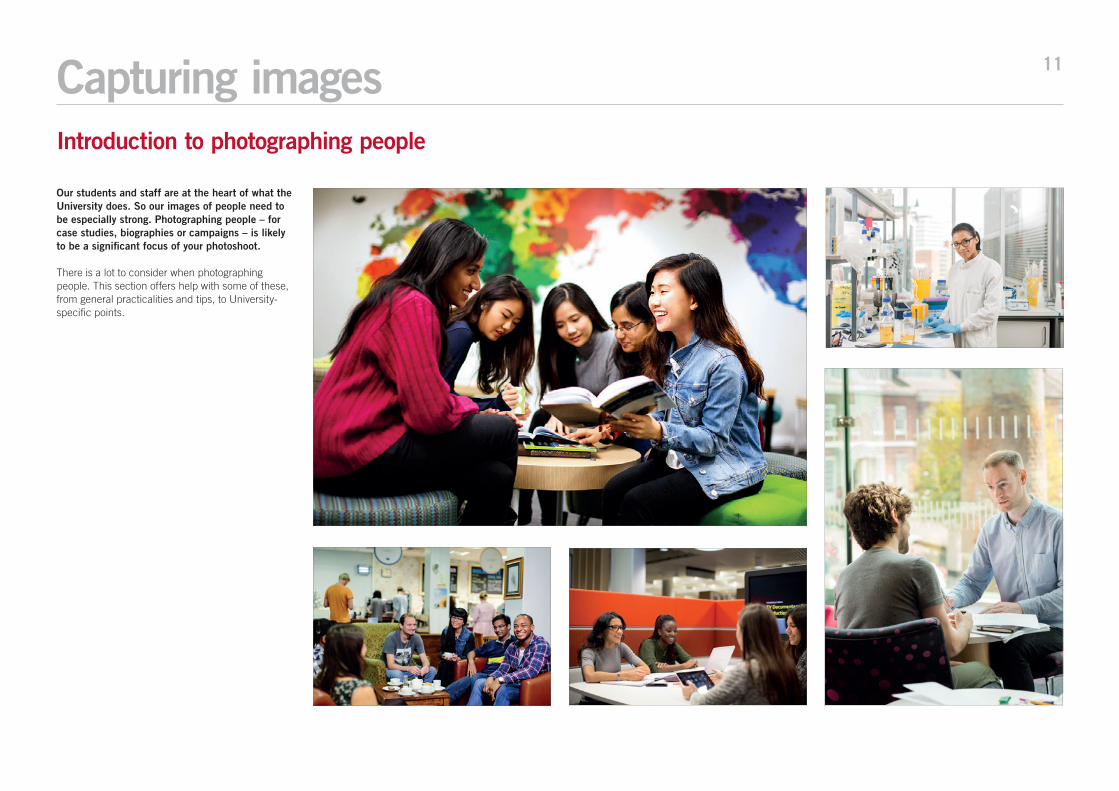
Our students and staff are at the heart of what the University does. So our images of people need to be especially strong. Photographing people – for case studies, biographies or campaigns – is likely to be a significant focus of your photoshoot.
There is a lot to consider when photographing people. This section offers help with some of these, from general practicalities and tips, to University-specific points.
Introduction to photographing people
Capturing images
12
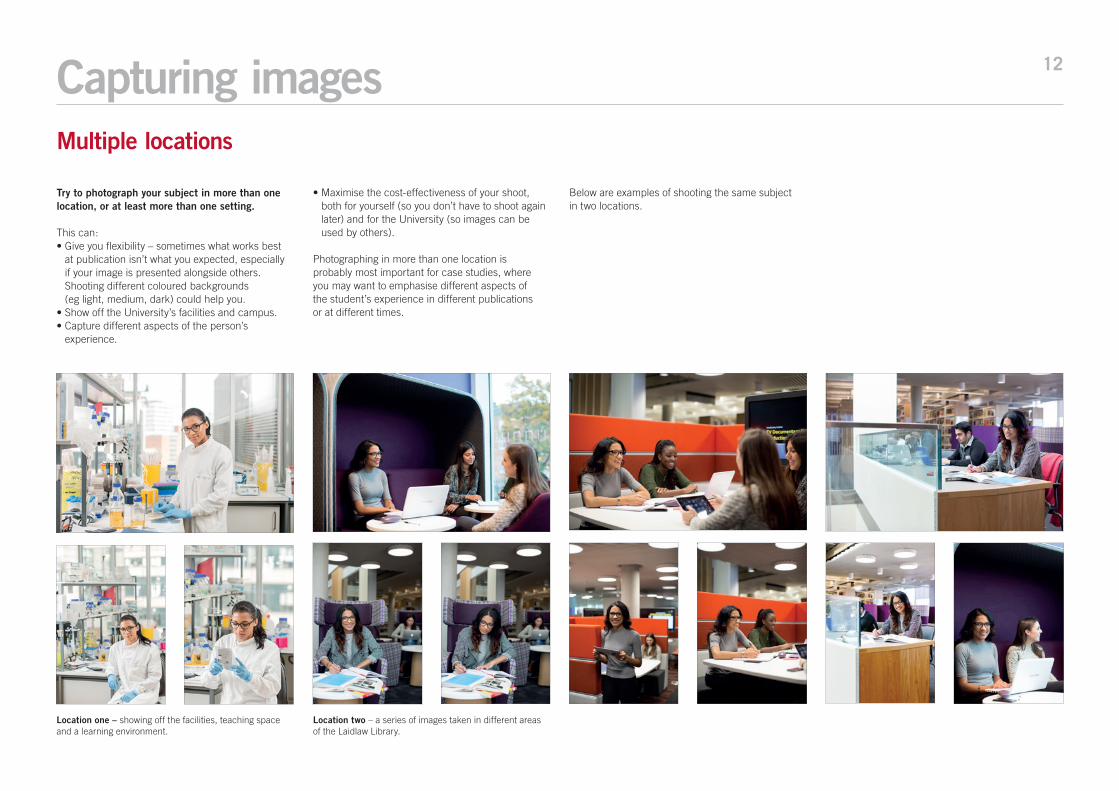
Try to photograph your subject in more than one location, or at least more than one setting.
This can:• Give you flexibility – sometimes what works best
at publication isn’t what you expected, especially if your image is presented alongside others. Shooting different coloured backgrounds (eg light, medium, dark) could help you.
• Show off the University’s facilities and campus.• Capture different aspects of the person’s
experience.
• Maximise the cost-effectiveness of your shoot, both for yourself (so you don’t have to shoot again later) and for the University (so images can be used by others).
Photographing in more than one location is probably most important for case studies, where you may want to emphasise different aspects of the student’s experience in different publications or at different times.
Below are examples of shooting the same subject in two locations.
Location one – showing off the facilities, teaching space and a learning environment.
Location two – a series of images taken in different areas of the Laidlaw Library.
Multiple locations
Capturing images
13
Content/gutter
Image
UGP – Case study story board
13 ■ UNIVERSITY OF LEEDS UNDERGRADUATE PROSPECTUS 2017 ■ YOUR LEEDS Be inspired www.leeds.ac.uk ■ 13 Subject:
Contact details:
Date:
Location:
Notes:
420mm approx
297mm approx
420mm approx
297mm approx
UGP – Case study story board
Subject:
Contact details:
Date:
Location:
Notes:
13 ■ UNIVERSITY OF LEEDS UNDERGRADUATE PROSPECTUS 2017 ■ YOUR LEEDS Be inspired www.leeds.ac.uk ■ 13
Content/gutter
Image
NamePictured in xxxxxx
Lorem ipsum dolor sit amet, consectetur adipiscing elit. Curabitur vel erat non neque tempor lobortis eget sed lectus. Nam tristique placerat nisi, vitae laoreet risus rhoncus efficitur. Ut eget aliquam lorem. Maecenas fermentum arcu erat, vel accumsan urna auctor varius. Nullam lacinia eros quis arcu cursus consectetur. Suspendisse nec ex ut nulla vestibulum convallis eu non velit. .
Storyboards
Capturing images
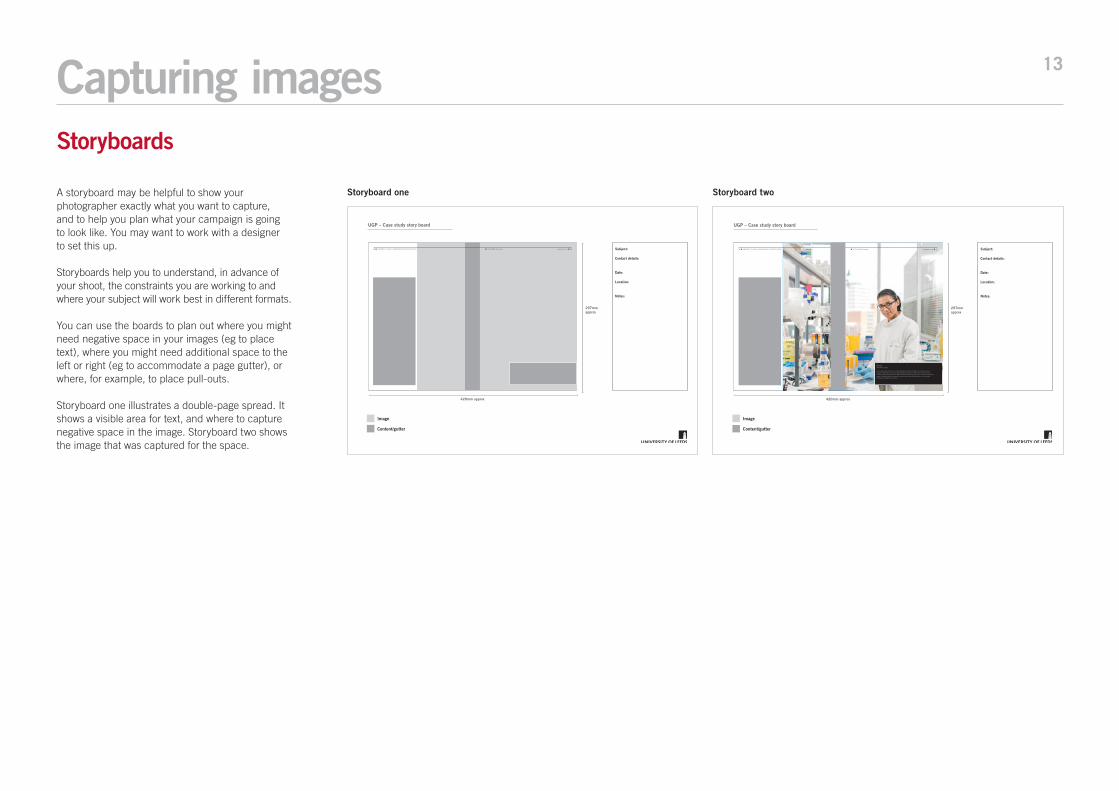
A storyboard may be helpful to show your photographer exactly what you want to capture, and to help you plan what your campaign is going to look like. You may want to work with a designer to set this up.
Storyboards help you to understand, in advance of your shoot, the constraints you are working to and where your subject will work best in different formats.
You can use the boards to plan out where you might need negative space in your images (eg to place text), where you might need additional space to the left or right (eg to accommodate a page gutter), or where, for example, to place pull-outs.
Storyboard one illustrates a double-page spread. It shows a visible area for text, and where to capture negative space in the image. Storyboard two shows the image that was captured for the space.
Storyboard one Storyboard two
14
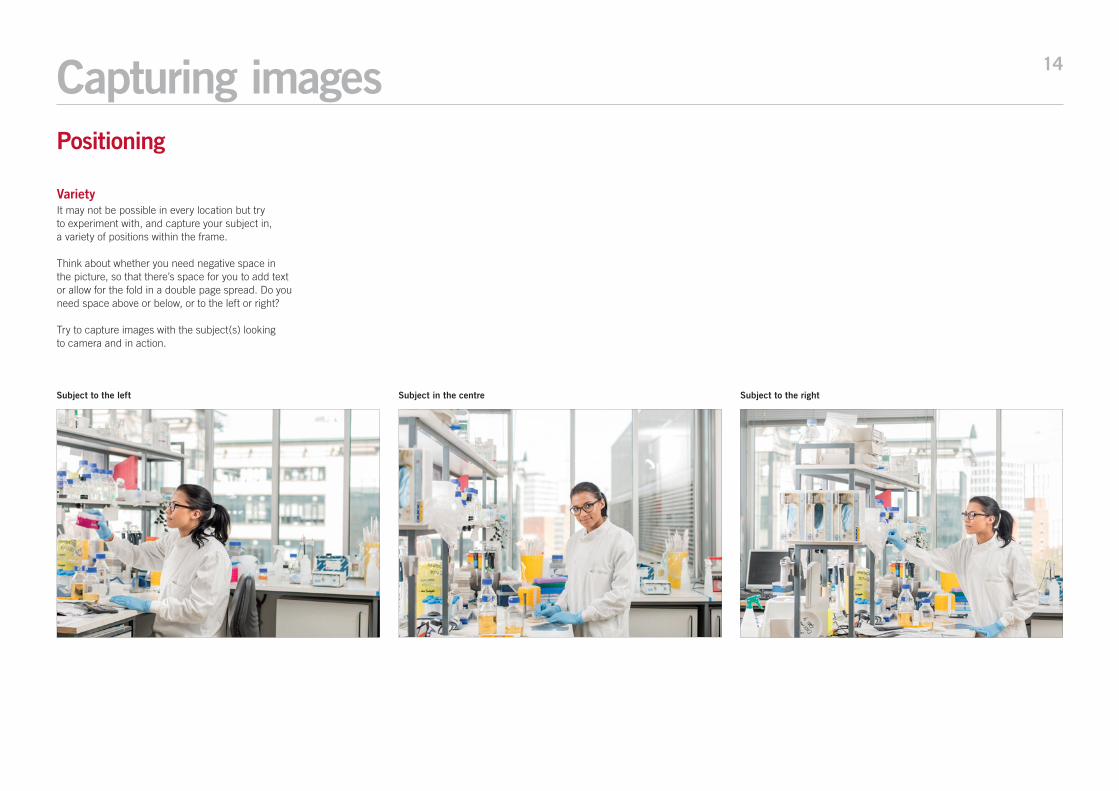
Subject to the left Subject in the centre Subject to the right
VarietyIt may not be possible in every location but try to experiment with, and capture your subject in, a variety of positions within the frame.
Think about whether you need negative space in the picture, so that there’s space for you to add text or allow for the fold in a double page spread. Do you need space above or below, or to the left or right?
Try to capture images with the subject(s) looking to camera and in action.
Capturing imagesPositioning
15Capturing images
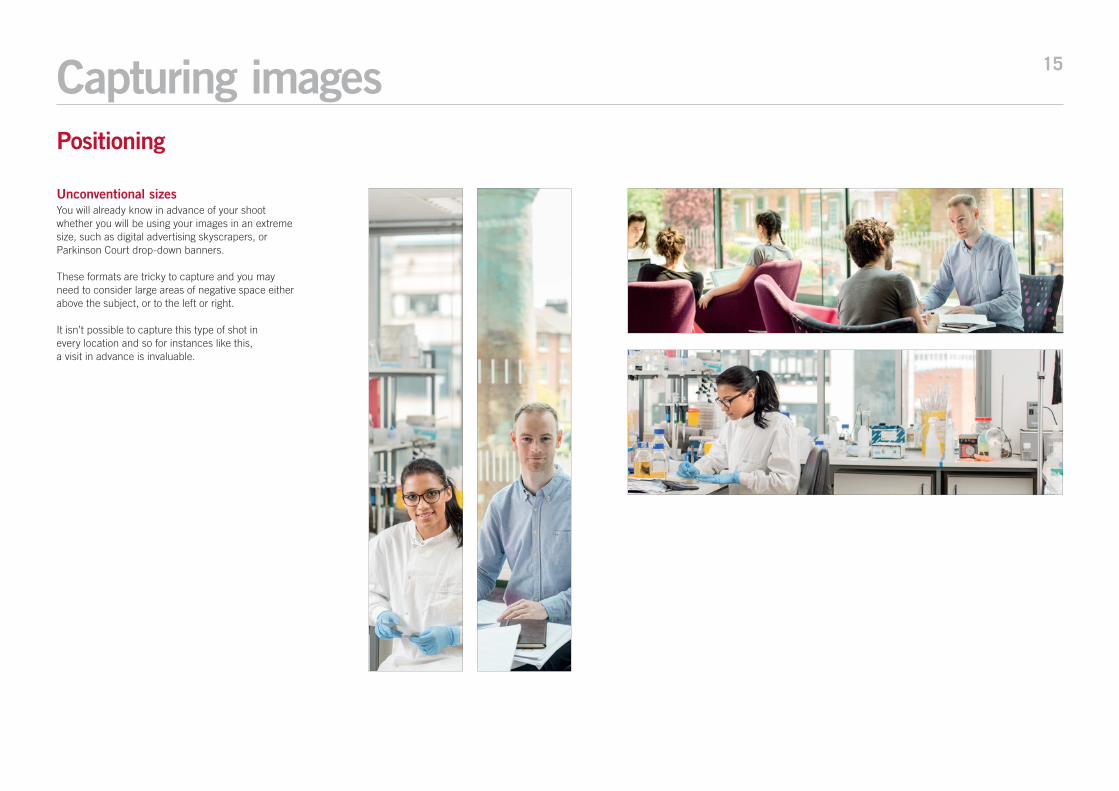
Unconventional sizesYou will already know in advance of your shoot whether you will be using your images in an extreme size, such as digital advertising skyscrapers, or Parkinson Court drop-down banners.
These formats are tricky to capture and you may need to consider large areas of negative space either above the subject, or to the left or right.
It isn’t possible to capture this type of shot in every location and so for instances like this, a visit in advance is invaluable.
Positioning
16
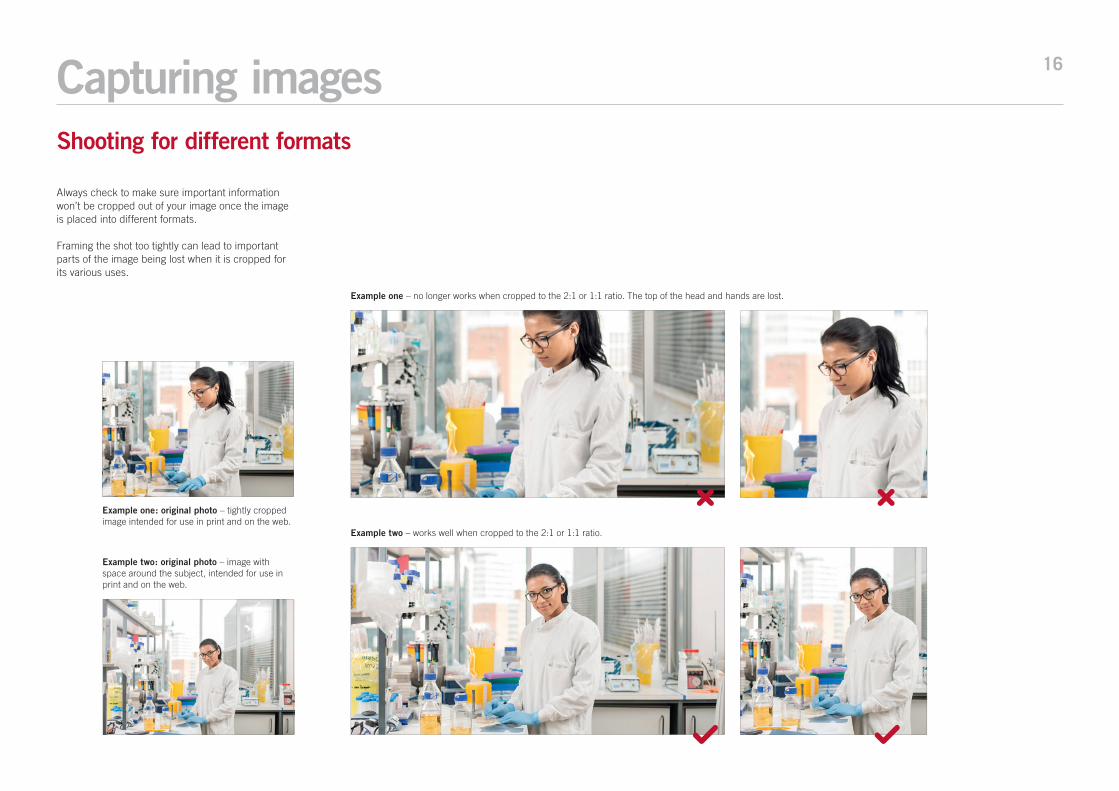
Always check to make sure important information won’t be cropped out of your image once the image is placed into different formats.
Framing the shot too tightly can lead to important parts of the image being lost when it is cropped for its various uses.
Shooting for different formats
Example one: original photo – tightly cropped image intended for use in print and on the web.
Example one – no longer works when cropped to the 2:1 or 1:1 ratio. The top of the head and hands are lost.
Capturing images
Example two: original photo – image with space around the subject, intended for use in print and on the web.
Example two – works well when cropped to the 2:1 or 1:1 ratio.
17
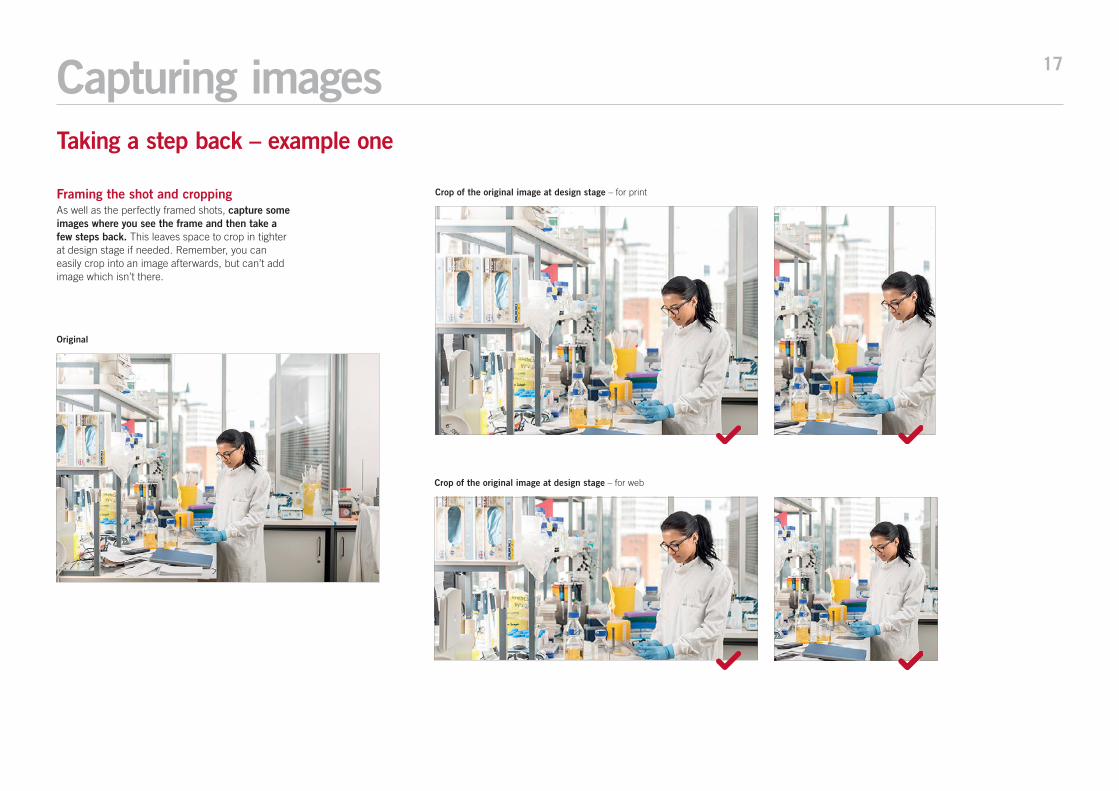
Framing the shot and cropping As well as the perfectly framed shots, capture some images where you see the frame and then take a few steps back. This leaves space to crop in tighter at design stage if needed. Remember, you can easily crop into an image afterwards, but can’t add image which isn’t there.
Original
Crop of the original image at design stage – for print
Crop of the original image at design stage – for web
Taking a step back – example one
Capturing images
18
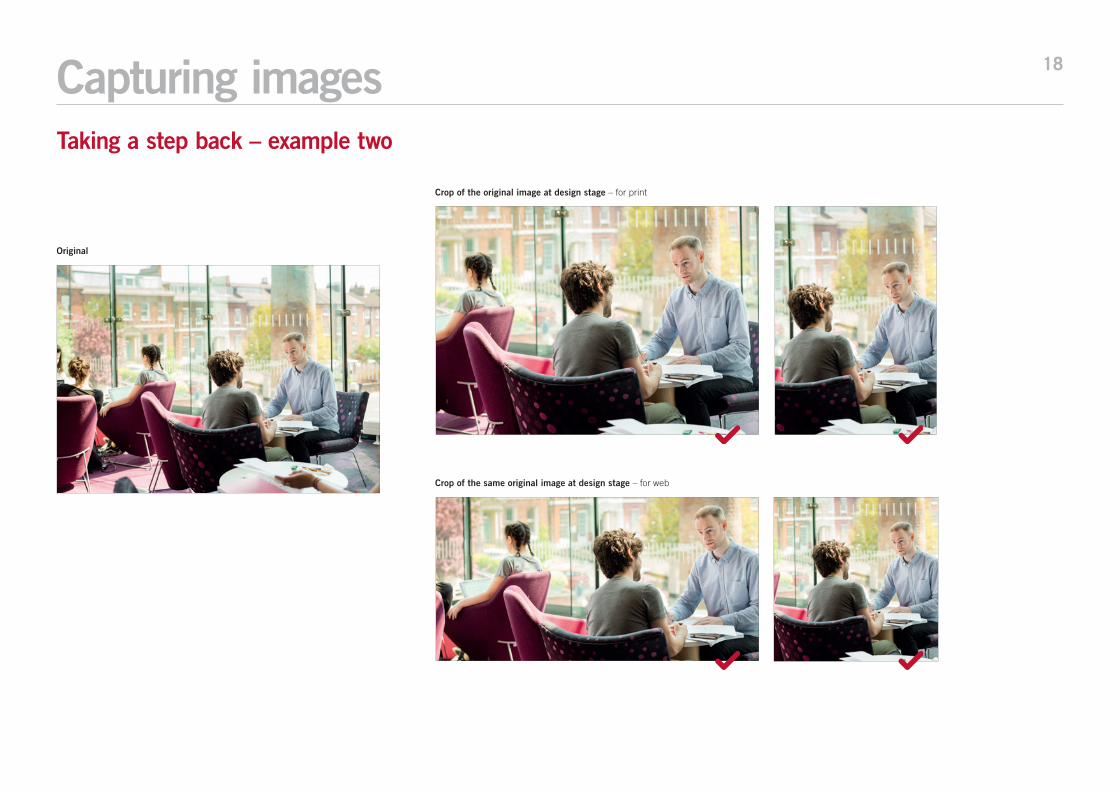
Taking a step back – example two
Capturing images
Original
Crop of the original image at design stage – for print
Crop of the same original image at design stage – for web
19
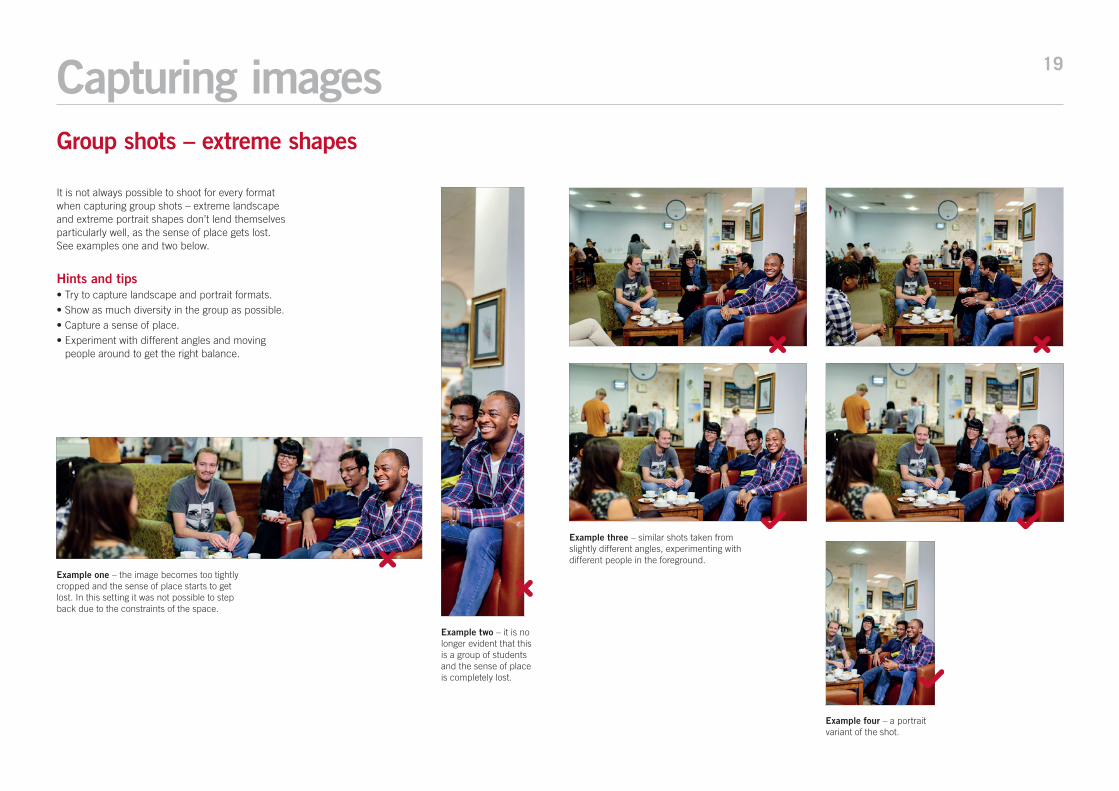
It is not always possible to shoot for every format when capturing group shots – extreme landscape and extreme portrait shapes don’t lend themselves particularly well, as the sense of place gets lost. See examples one and two below.
Hints and tips• Try to capture landscape and portrait formats. • Show as much diversity in the group as possible.• Capture a sense of place.• Experiment with different angles and moving
people around to get the right balance.
Example one – the image becomes too tightly cropped and the sense of place starts to get lost. In this setting it was not possible to step back due to the constraints of the space.
Example two – it is no longer evident that this is a group of students and the sense of place is completely lost.
Example three – similar shots taken from slightly different angles, experimenting with different people in the foreground.
Example four – a portrait variant of the shot.
Capturing imagesGroup shots – extreme shapes
20
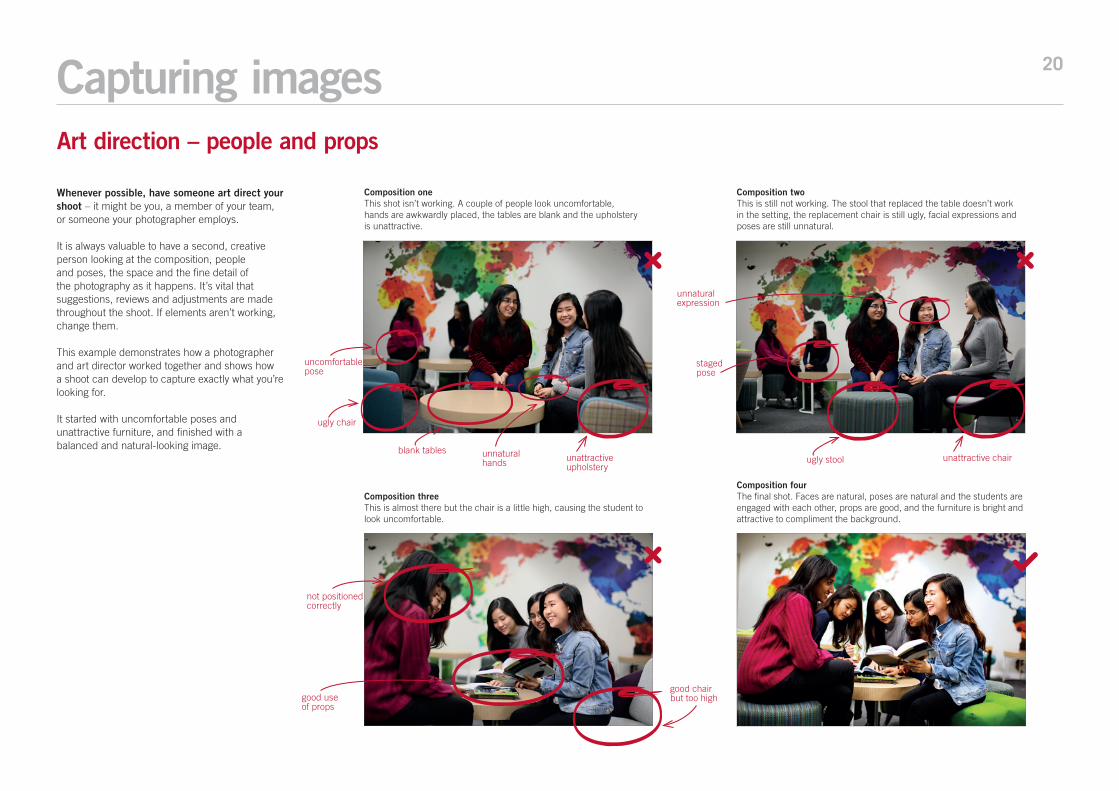
Art direction – people and props
Capturing images
Composition oneThis shot isn’t working. A couple of people look uncomfortable, hands are awkwardly placed, the tables are blank and the upholstery is unattractive.
Composition twoThis is still not working. The stool that replaced the table doesn’t work in the setting, the replacement chair is still ugly, facial expressions and poses are still unnatural.
Composition fourThe final shot. Faces are natural, poses are natural and the students are engaged with each other, props are good, and the furniture is bright and attractive to compliment the background.
Composition threeThis is almost there but the chair is a little high, causing the student to look uncomfortable.
Whenever possible, have someone art direct your shoot – it might be you, a member of your team, or someone your photographer employs.
It is always valuable to have a second, creative person looking at the composition, people and poses, the space and the fine detail of the photography as it happens. It’s vital that suggestions, reviews and adjustments are made throughout the shoot. If elements aren’t working, change them.
This example demonstrates how a photographer and art director worked together and shows how a shoot can develop to capture exactly what you’re looking for.
It started with uncomfortable poses and unattractive furniture, and finished with a balanced and natural-looking image.
uncomfortable pose
not positioned correctly
staged pose
ugly chair
good use of props
blank tablesunattractive upholstery
good chair but too high
unattractive chairugly stoolunnatural hands
unnatural expression
21
Art direction – attention to detail
Capturing images
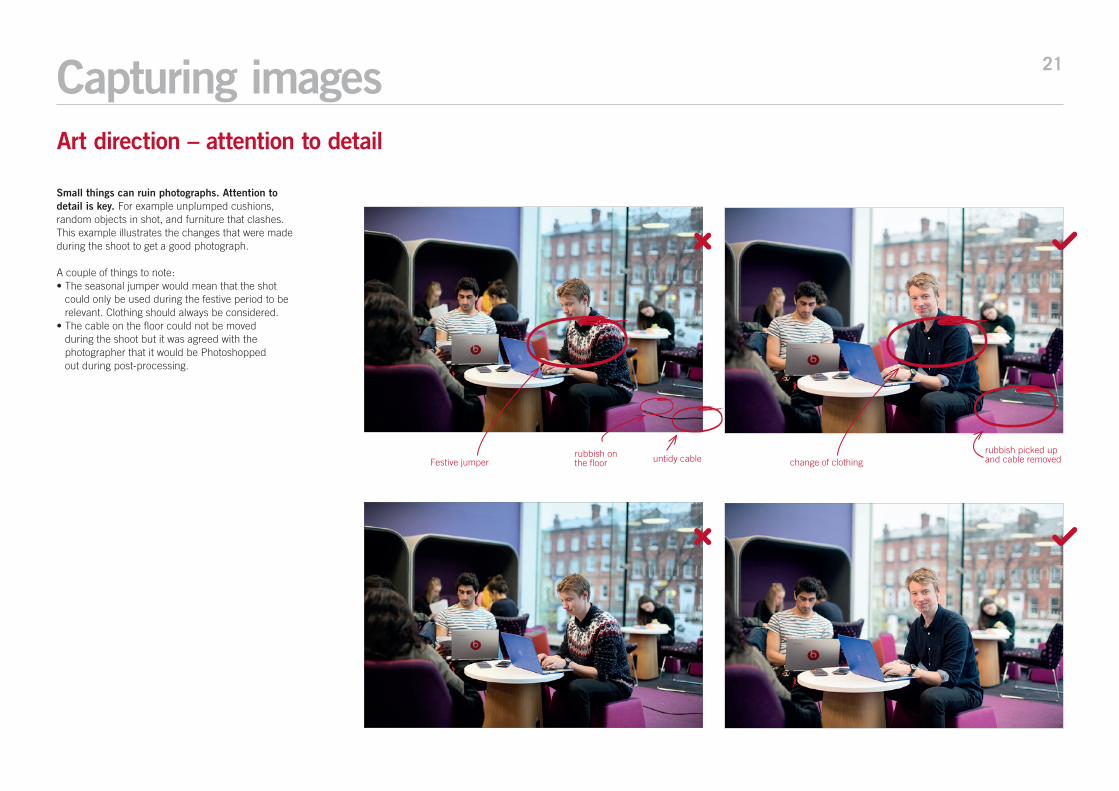
Small things can ruin photographs. Attention to detail is key. For example unplumped cushions, random objects in shot, and furniture that clashes.This example illustrates the changes that were made during the shoot to get a good photograph.
A couple of things to note:• The seasonal jumper would mean that the shot
could only be used during the festive period to be relevant. Clothing should always be considered.
• The cable on the floor could not be moved during the shoot but it was agreed with the photographer that it would be Photoshopped out during post-processing.
Festive jumper change of clothinguntidy cablerubbish on the floor
rubbish picked up and cable removed
22
Campus
Capturing images
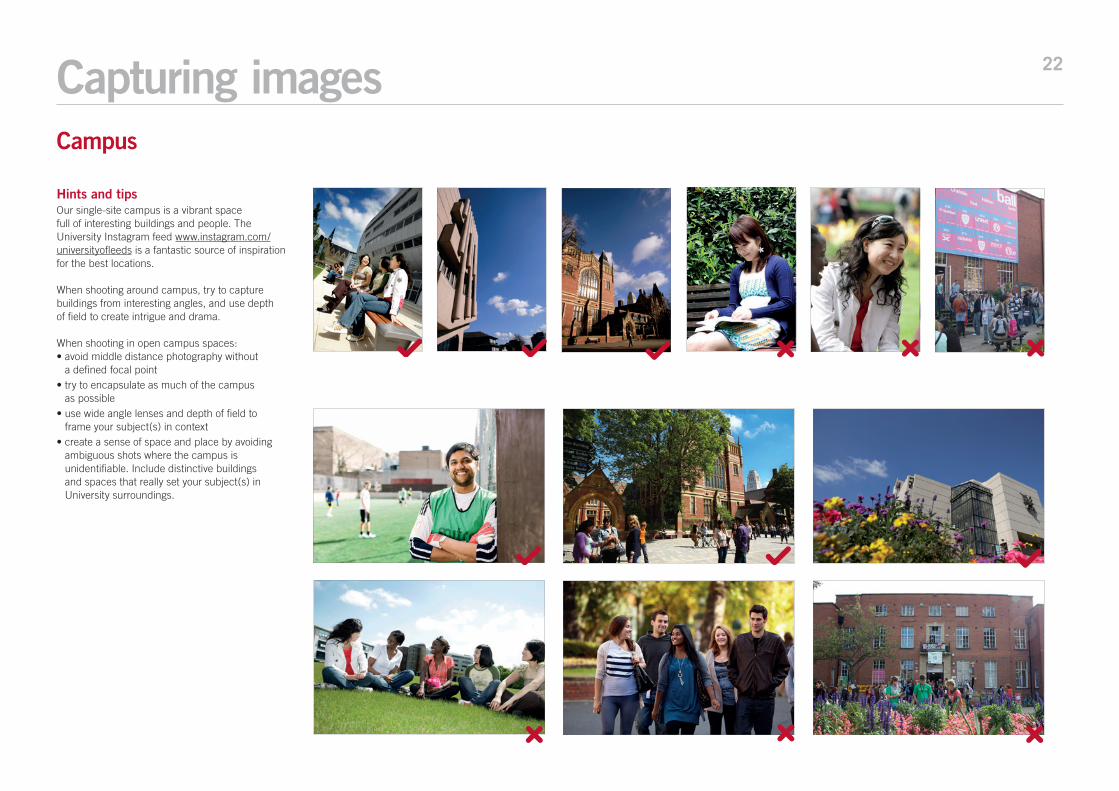
Hints and tipsOur single-site campus is a vibrant space full of interesting buildings and people. The University Instagram feed www.instagram.com/universityofleeds is a fantastic source of inspiration for the best locations.
When shooting around campus, try to capture buildings from interesting angles, and use depth of field to create intrigue and drama.
When shooting in open campus spaces:• avoid middle distance photography without
a defined focal point• try to encapsulate as much of the campus
as possible• use wide angle lenses and depth of field to
frame your subject(s) in context • create a sense of space and place by avoiding
ambiguous shots where the campus is unidentifiable. Include distinctive buildings and spaces that really set your subject(s) in University surroundings.

23SECTION FOUR
IMAGE SELECTION
24Image selectionPre-production and selection
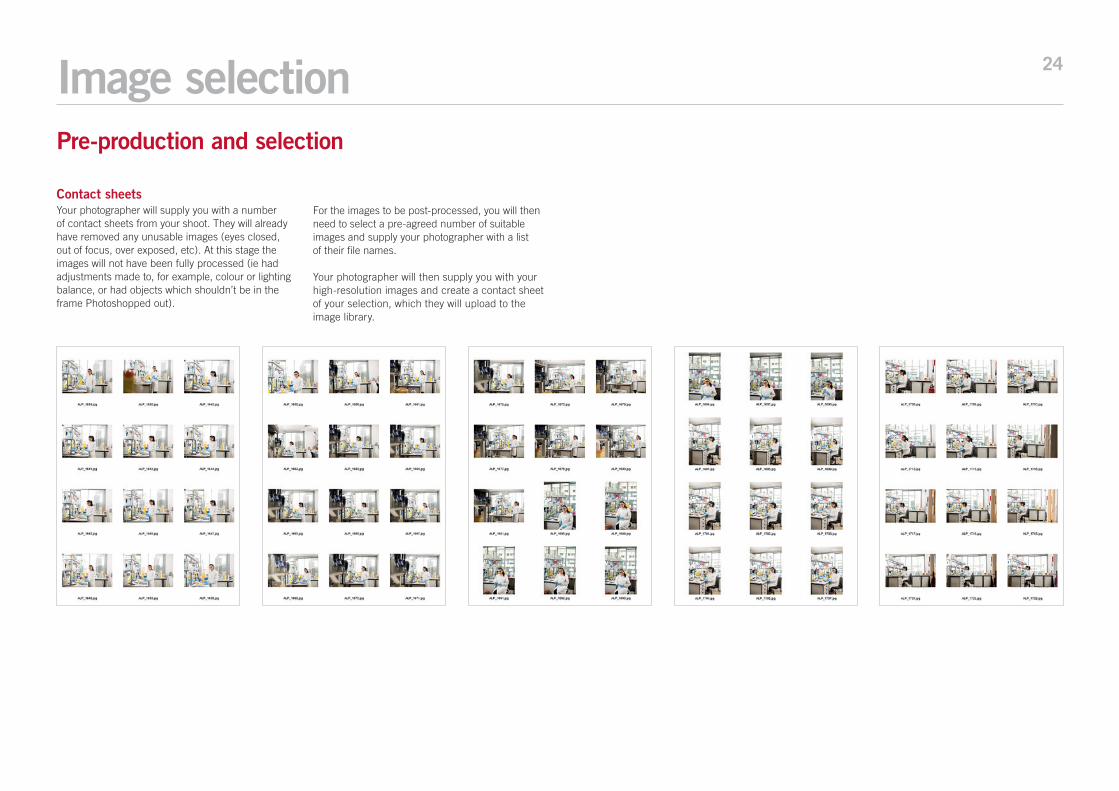
Contact sheetsYour photographer will supply you with a number of contact sheets from your shoot. They will already have removed any unusable images (eyes closed, out of focus, over exposed, etc). At this stage the images will not have been fully processed (ie had adjustments made to, for example, colour or lighting balance, or had objects which shouldn’t be in the frame Photoshopped out).
For the images to be post-processed, you will then need to select a pre-agreed number of suitable images and supply your photographer with a list of their file names.
Your photographer will then supply you with your high-resolution images and create a contact sheet of your selection, which they will upload to the image library.
25Image selection
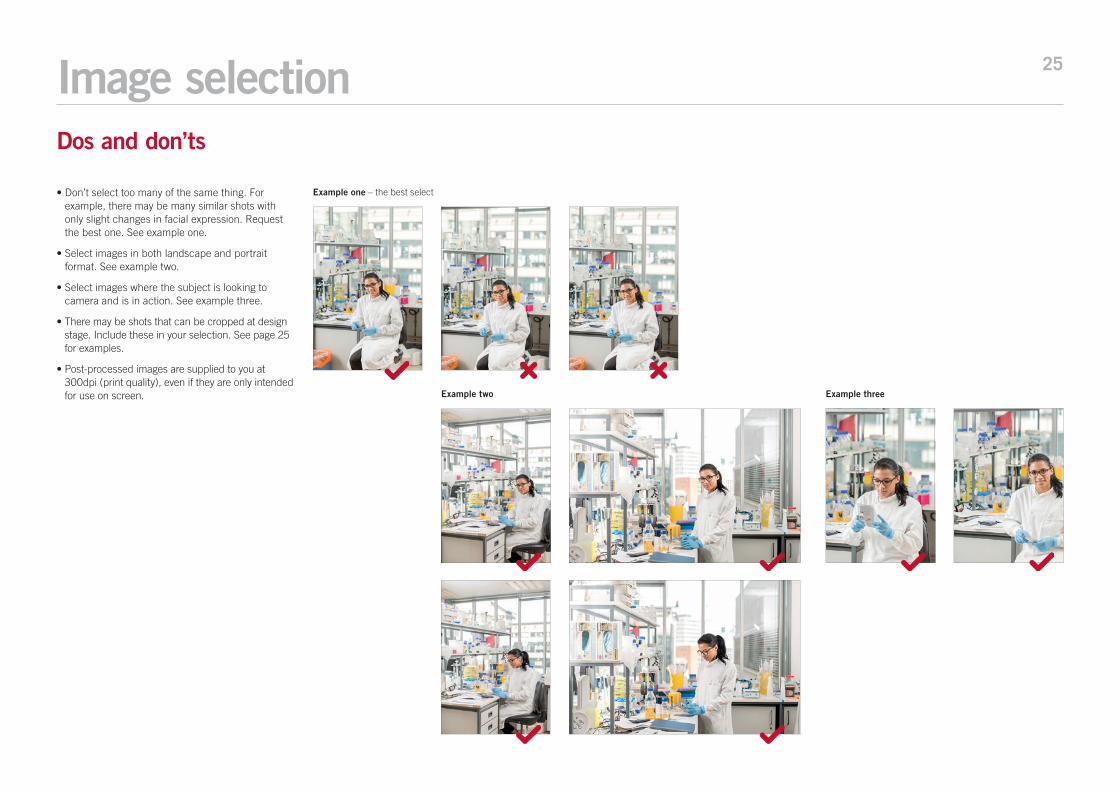
• Don’t select too many of the same thing. For example, there may be many similar shots with only slight changes in facial expression. Request the best one. See example one.
• Select images in both landscape and portrait format. See example two.
• Select images where the subject is looking to camera and is in action. See example three.
• There may be shots that can be cropped at design stage. Include these in your selection. See page 25 for examples.
• Post-processed images are supplied to you at 300dpi (print quality), even if they are only intended for use on screen.
Dos and don’ts
Example one – the best select
Example two Example three
26
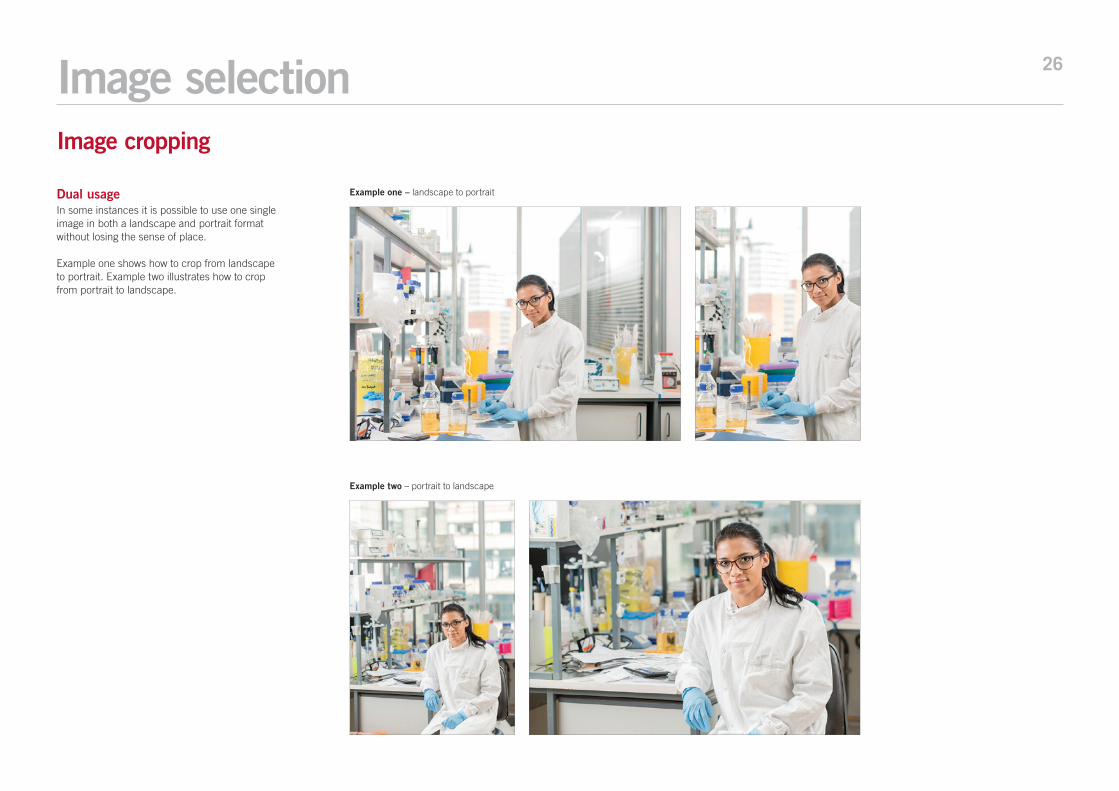
Dual usageIn some instances it is possible to use one single image in both a landscape and portrait format without losing the sense of place.
Example one shows how to crop from landscape to portrait. Example two illustrates how to crop from portrait to landscape.
Image selectionImage cropping
Example one – landscape to portrait
Example two – portrait to landscape
27SECTION FIVE
FORMAT, SIZE AND TECHNICAL SPECIFICATIONS
28
Colour and optimisationAll images should be:• 72ppi (pixels per inch)• RGB colour format• Fully optimised using ‘save for web’ in
Photoshop or an image optimisation tool such as: http://optimizilla.com
For more about general use of imagery on the web, read the web toolkit.toolkit.leeds.ac.uk
Formats and sizes
2:1 1:1
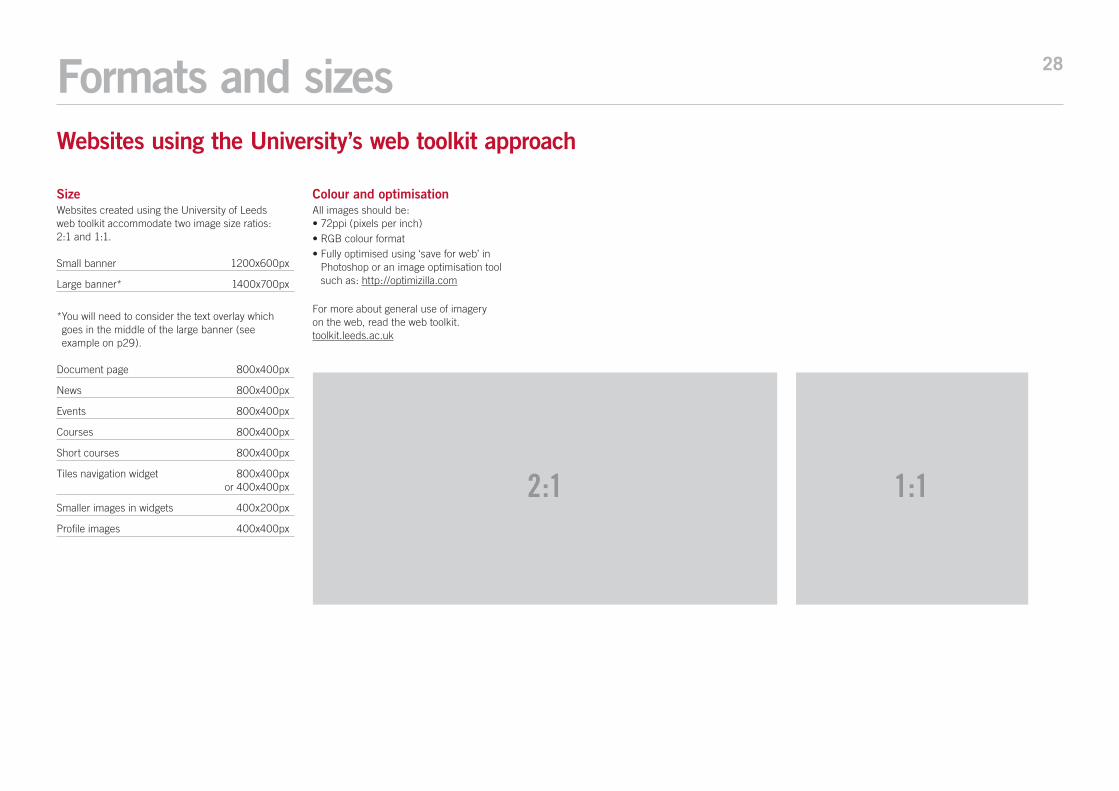
SizeWebsites created using the University of Leeds web toolkit accommodate two image size ratios: 2:1 and 1:1.
Small banner 1200x600px
Large banner* 1400x700px
* You will need to consider the text overlay which goes in the middle of the large banner (see example on p29).
Document page 800x400px
News 800x400px
Events 800x400px
Courses 800x400px
Short courses 800x400px
Tiles navigation widget 800x400px or 400x400px
Smaller images in widgets 400x200px
Profile images 400x400px
Websites using the University’s web toolkit approach
29Formats and sizes
Small banner Profile
1:12:1
Large banner
2:1
Widget
2:1 2:1 2:1
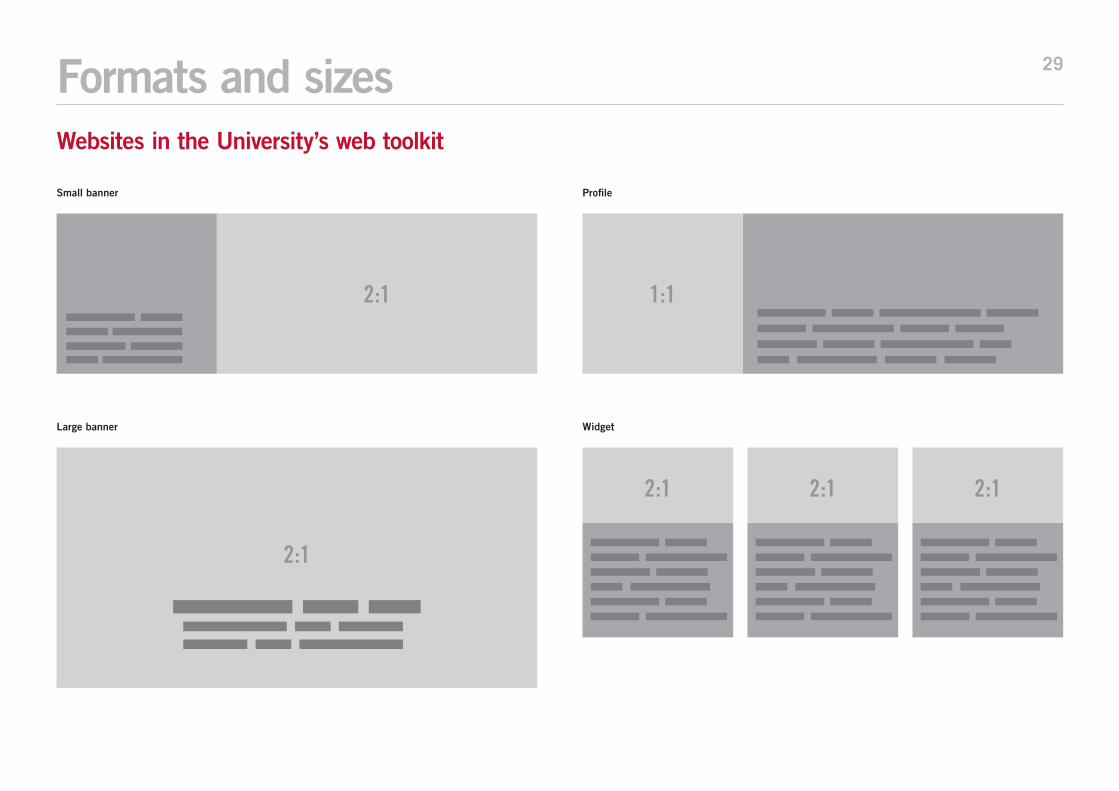
Websites in the University’s web toolkit
30Formats and sizes
Tiles navigation widget
1:1
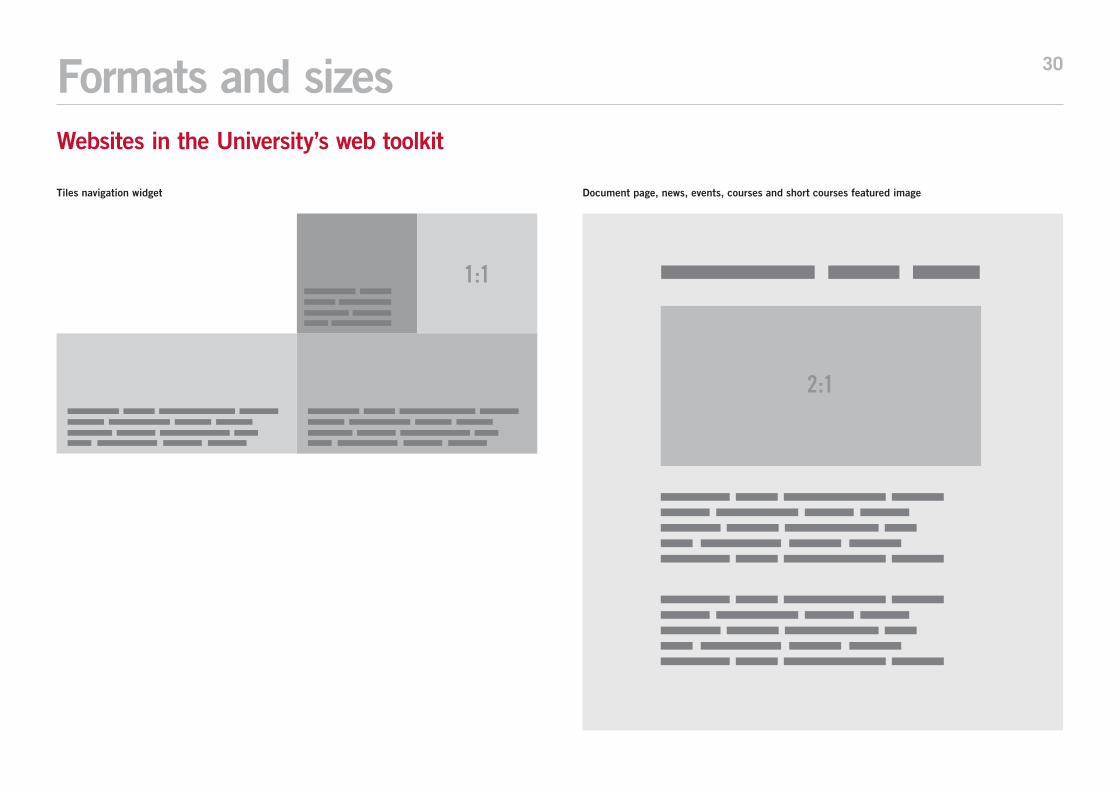
Document page, news, events, courses and short courses featured image
2:1
Websites in the University’s web toolkit
31
HEADER HERE
HEADER HERE
TITLE HERE
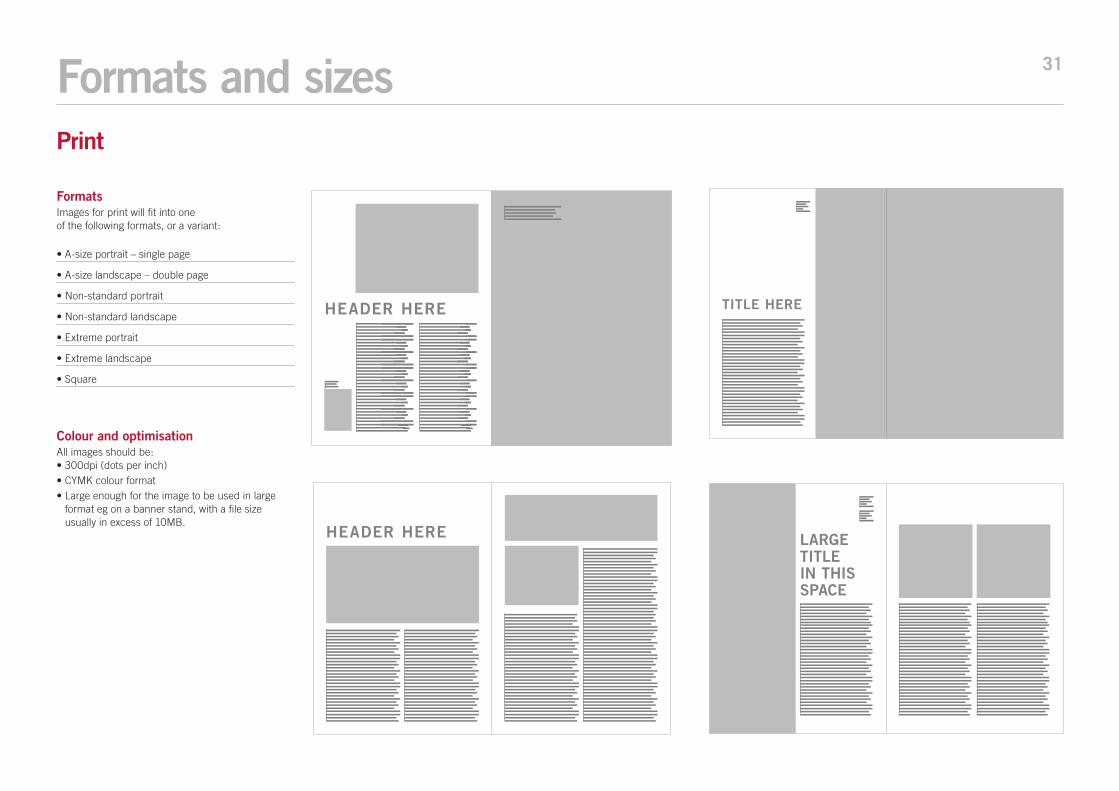
FormatsImages for print will fit into one of the following formats, or a variant:
• A-size portrait – single page
• A-size landscape – double page
• Non-standard portrait
• Non-standard landscape
• Extreme portrait
• Extreme landscape
• Square
Colour and optimisationAll images should be:• 300dpi (dots per inch)• CYMK colour format• Large enough for the image to be used in large
format eg on a banner stand, with a file size usually in excess of 10MB.
Formats and sizes
LARGE TITLE IN THIS SPACE
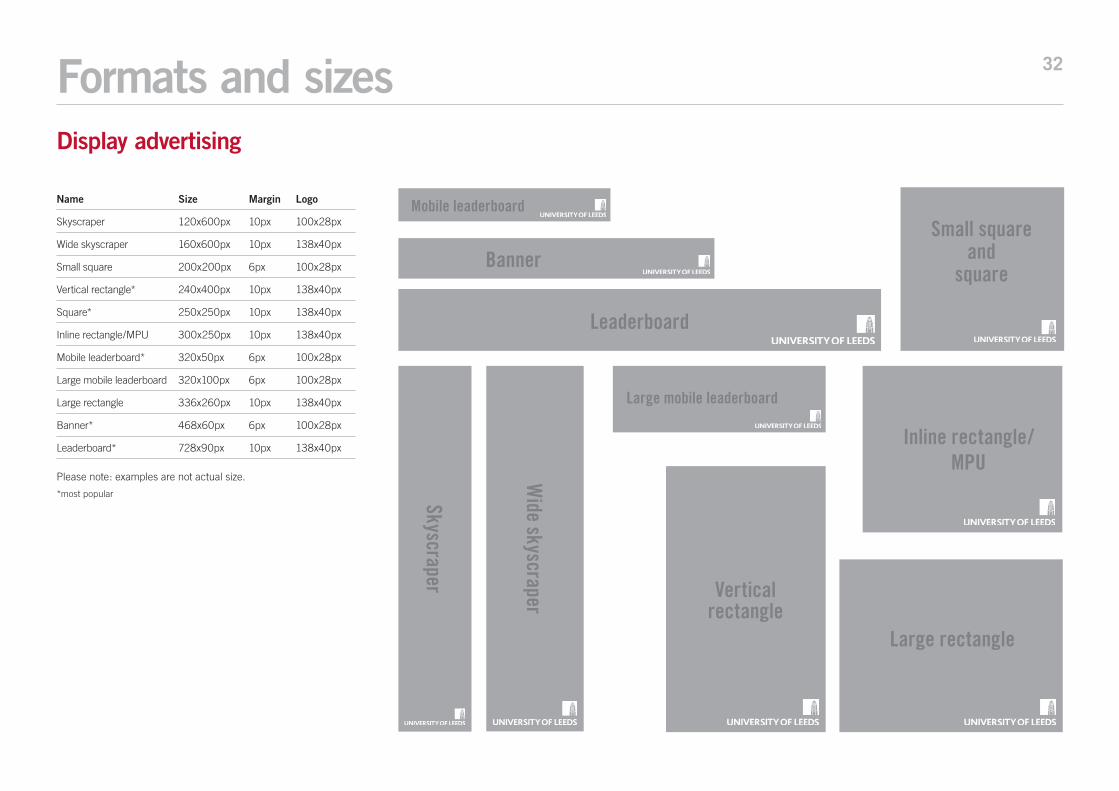
32Formats and sizesDisplay advertising
Small square and
squareBanner
Leaderboard
Inline rectangle/MPU
Mobile leaderboard
Large rectangle
Skyscraper
Wide skyscraper Vertical
rectangle
Please note: examples are not actual size.
*most popular
Large mobile leaderboard
Name Size Margin Logo
Skyscraper 120x600px 10px 100x28px
Wide skyscraper 160x600px 10px 138x40px
Small square 200x200px 6px 100x28px
Vertical rectangle* 240x400px 10px 138x40px
Square* 250x250px 10px 138x40px
Inline rectangle/MPU 300x250px 10px 138x40px
Mobile leaderboard* 320x50px 6px 100x28px
Large mobile leaderboard 320x100px 6px 100x28px
Large rectangle 336x260px 10px 138x40px
Banner* 468x60px 6px 100x28px
Leaderboard* 728x90px 10px 138x40px
33SECTION SIX
APPLICATIONS
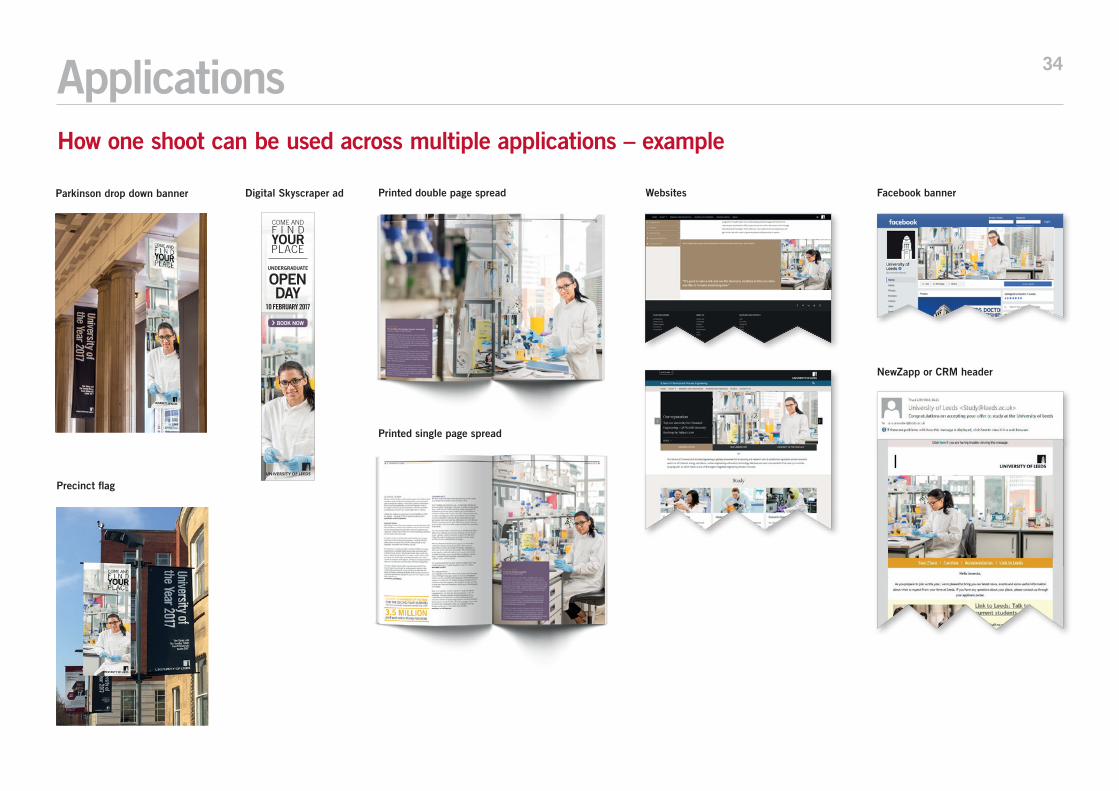
34
Websites
Applications
Printed double page spread
Printed single page spread
How one shoot can be used across multiple applications – example
Facebook bannerParkinson drop down banner
NewZapp or CRM header
Digital Skyscraper ad
10 FEBRUARY 2017
BOOK NOW
UNDERGRADUATE
OPEN DAY
Precinct flag