Embed Size (px)
Citation preview

Physical Property Measurement System
Vibrating Sample Magnetometer (VSM) Option User’s Manual
Part Number 1096-100, A3

Quantum Design 6325 Lusk Boulevard San Diego, CA 92121 USA Technical support (858) 481-4400 (800) 289-6996 Fax (858) 481-7410 Fourth edition of manual completed January 2008.
Trademarks All product and company names appearing in this manual are trademarks or registered trademarks of their respective holders.
U.S. Patents 4,791,788 Method for Obtaining Improved Temperature Regulation When Using Liquid Helium Cooling 4,848,093 Apparatus and Method for Regulating Temperature in a Cryogenic Test Chamber 5,053,834 High Symmetry DC Squid System 5,110, 034 Superconducting Bonds for Thin Film Devices 5,139,192 Superconducting Bonds for Thin Film Devices 5,311,125 Magnetic Property Characterization System Employing a Single Sensing Coil Arrangement to Measure AC
Susceptibility and DC Moment of a Sample (patent licensed from Lakeshore) 5,319,307 Geometrically and Electrically Balanced DC Squid System Having a Pair of Intersecting Slits 5,647,228 Apparatus and Method for Regulating Temperature in Cryogenic Test Chamber
Foreign Patents U.K. 9713380.5 Apparatus and Method for Regulating Temperature in Cryogenic Test Chamber Canada 2,089,181 High Symmetry DC Squid System Japan 2,533,428 High Symmetry DC Squid System

Quantum Design PPMS VSM Option User’s Manual, Rev. A3 iii January 2008
Safety Instructions
No operator-serviceable parts are inside. Refer servicing to qualified personnel.
For continued protection against fire hazard, replace fuses only with same type and rating of fuses for selected line voltage.
Observe the following safety guidelines when you use your system:
○ To avoid damaging the system, verify that the system power requirements match the alternating current (AC) power available at your location. If the system has not been configured for the correct power available at your location, contact your local service representative before you proceed with the system installation.
○ To prevent electrical shock, verify that the equipment is properly grounded with three-wire grounded plugs.
○ To prevent electrical shock, unplug the system before you install it, adjust it, or service it.
○ Do not spill food or liquids on the system or its cables.
○ Refer to the section titled “Safety Precautions” before you install or operate this system. Direct contact with cryogenic liquids, materials recently removed from cryogenic liquids, or exposure to the boil-off gas, can freeze skin or eyes almost instantly, causing serious injuries similar to frostbite or burns.
○ Wear protective gear, including clothing, insulated gloves, and safety eye protection, when you handle cryogenic liquids.
○ Transfer liquid helium only in areas that have adequate ventilation and a supply of fresh air. Helium gas can displace the air in a confined space or room, resulting in asphyxiation, dizziness, unconsciousness, or death.
○ Keep this system away from radiators and heat sources. Provide adequate ventilation to allow for cooling around the cabinet and computer equipment.
○ Refer to the manuals for the supplied computer and monitor for additional safety warnings and notices before you operate the system.
Regulatory Information ○ This apparatus has been tested to the requirements of the EMC Directive 89/336/EEC.
○ This apparatus is defined as ISM Group 1, Class A and B equipment per EN 50011:1991 (industrial and light industrial environment limits of radio frequency emission).
○ This apparatus has been tested to the requirement of the Low Voltage Directive 73/23/EEC.
○ See the EU Declaration of Conformity for additional regulatory information regarding your PPMS.


Quantum Design PPMS VSM Option User’s Manual, Rev. A3 v January 2008
C O N T E N T S
Table of Contents
PREFACE Contents and Conventions ................................................................................................. xvii P.1 Introduction............................................................................................................................... xvii P.2 Scope of the Manual ................................................................................................................. xvii P.3 Contents of the Manual ............................................................................................................. xvii P.4 Conventions in the Manual ...................................................................................................... xviii
CHAPTER 1 Introduction to the VSM Option........................................................................................ 1-1 1.1 Introduction................................................................................................................................ 1-1 1.2 Overview of the VSM Option.................................................................................................... 1-1
1.2.1 What It Measures .............................................................................................................. 1-1 1.2.2 Notable Features of the VSM System............................................................................... 1-1
1.3 Theory of Operation................................................................................................................... 1-2 1.4 Safety Precautions...................................................................................................................... 1-4
1.4.1 Magnets............................................................................................................................. 1-4 1.4.2 Cryogens ........................................................................................................................... 1-5 1.4.3 Electricity.......................................................................................................................... 1-6 1.4.4 Lifting and Handling......................................................................................................... 1-6
1.5 Contacting Quantum Design...................................................................................................... 1-7
CHAPTER 2 Installing and Removing the VSM Option ........................................................................ 2-1 2.1 Introduction................................................................................................................................ 2-1 2.2 Initial Installation of the Hardware and Software ...................................................................... 2-1
2.2.1 Install the Modular Control System and CAN Network Adapter ..................................... 2-3 2.2.2 Insert the Control Modules (4101-150 and 4101-100) ..................................................... 2-4 2.2.3 Prepare the PPMS for Option Installation ........................................................................ 2-4 2.2.4 Install the Coilset Puck ..................................................................................................... 2-6 2.2.5 Insert the Sample Tube ..................................................................................................... 2-7 2.2.6 Mount the VSM Linear Motor Transport ......................................................................... 2-8 2.2.7 Complete the System Connections ................................................................................. 2-10 2.2.8 Install the VSM Software ............................................................................................... 2-10 2.2.9 Configure the VSM System............................................................................................ 2-12

Contents Table of Contents
vi PPMS VSM Option User’s Manual, Rev. A3 Quantum Design January 2008
2.3 Reconfiguring the PPMS for the VSM Option ........................................................................ 2-14 2.3.1 Prepare for Re-installation.............................................................................................. 2-14 2.3.2 Install the VSM Coilset Puck and Insert the Sample Tube............................................. 2-16 2.3.3 Install the VSM Linear Motor Transport........................................................................ 2-16 2.3.4 Connect the System ........................................................................................................ 2-17 2.3.5 Activate the VSM Option ............................................................................................... 2-17 2.3.6 Configure the VSM System............................................................................................ 2-18
2.4 Removing the VSM Option ..................................................................................................... 2-19 2.4.1 Prepare for Removal ....................................................................................................... 2-19 2.4.2 Deactivate the VSM Option............................................................................................ 2-22 2.4.3 Remove the VSM Linear Motor Transport..................................................................... 2-23 2.4.4 Remove the VSM Sample Tube and Coilset Puck ......................................................... 2-23
CHAPTER 3 Sample Preparation and Mounting.................................................................................... 3-1 3.1 Introduction................................................................................................................................ 3-1 3.2 Sample Properties ...................................................................................................................... 3-1
3.2.1 Size and Shape.................................................................................................................. 3-1 3.2.2 Errors from Radial Offset of Sample................................................................................ 3-2 3.2.3 Size of Magnetic Moment ................................................................................................ 3-3
3.3 Mounting Samples ..................................................................................................................... 3-3 3.3.1 Sample Holder Construction............................................................................................. 3-3 3.3.2 Accurate Sample Location................................................................................................ 3-4 3.3.3 Sample Holder Variations................................................................................................. 3-4
CHAPTER 4 Taking VSM Measurements ............................................................................................... 4-1 4.1 Introduction................................................................................................................................ 4-1 4.2 Overview of VSM Measurements ............................................................................................. 4-1
4.2.1 Sample Centering.............................................................................................................. 4-1 4.2.1.1 The Touchdown Operation..................................................................................... 4-2 4.2.1.2 Scheduling Touchdown Operations ....................................................................... 4-2
4.2.2 VSM Measurement Process: Synchronous Detection ...................................................... 4-3 4.2.3 Immediate Mode and Sequence Mode.............................................................................. 4-3
4.3 Installing a Sample..................................................................................................................... 4-4 4.3.1 Attach a Sample and Measure the Sample Offset............................................................. 4-4 4.3.2 Activate the VSM Option and Control Center.................................................................. 4-5 4.3.3 Install the Sample ............................................................................................................. 4-6
4.4 Taking Immediate-Mode VSM Measurements ....................................................................... 4-12 4.4.1 Measure Command and VSM Measurement Dialog ...................................................... 4-12 4.4.2 Setting Up a Measurement.............................................................................................. 4-13
4.4.2.1 Settings Tab.......................................................................................................... 4-13 4.4.2.2 Centering Tab....................................................................................................... 4-14 4.4.2.3 Advanced Tab ...................................................................................................... 4-15
4.4.3 Starting/Stopping/Pausing a Measurement..................................................................... 4-16 4.5 Removing a Sample ................................................................................................................. 4-17

Contents Table of Contents
Quantum Design PPMS VSM Option User’s Manual, Rev. A3 vii January 2008
CHAPTER 5 VSM Hardware.................................................................................................................... 5-1 5.1 Introduction................................................................................................................................ 5-1 5.2 VSM Hardware Components ..................................................................................................... 5-1
5.2.1 Linear Transport ............................................................................................................... 5-1 5.2.2 Storage Case for Linear Motor Transport ......................................................................... 5-3 5.2.3 Coilset Puck ...................................................................................................................... 5-3 5.2.4 Sample Tube ..................................................................................................................... 5-5 5.2.5 Sample Rod....................................................................................................................... 5-6
5.3 VSM Option User’s Kit ............................................................................................................. 5-7 5.4 Sample-Mounting Station .......................................................................................................... 5-8 5.5 VSM Electronics ........................................................................................................................ 5-9
5.5.1 Preamp Cable Assembly ................................................................................................... 5-9 5.5.2 Motor Drive Cable ............................................................................................................ 5-9 5.5.3 VSM–Motor Sync Cable .................................................................................................. 5-9 5.5.4 Model CM-A (VSM Motor Module).............................................................................. 5-10 5.5.5 Model CM-B (VSM Detection Module)......................................................................... 5-10 5.5.6 Model 1000 (Modular Control System).......................................................................... 5-11 5.5.7 CAN Computer Interface Kit.......................................................................................... 5-11
CHAPTER 6 VSM Software ...................................................................................................................... 6-1 6.1 Introduction................................................................................................................................ 6-1 6.2 Overview of the VSM Software................................................................................................. 6-1 6.3 MultiVu Software Application................................................................................................... 6-2
6.3.1 MultiVu Basics ................................................................................................................. 6-2 6.3.2 VSM Commands in MultiVu............................................................................................ 6-3
6.3.2.1 Activating the VSM Option and the Control Center .............................................. 6-3 6.3.2.2 Deactivating the VSM Option ................................................................................ 6-4
6.4 VSM Dropdown Menus ............................................................................................................. 6-5 6.4.1 View.................................................................................................................................. 6-5 6.4.2 Sample .............................................................................................................................. 6-5 6.4.3 Measure............................................................................................................................. 6-6
6.5 VSM Control Center .................................................................................................................. 6-8 6.5.1 VSM Control Center: Components................................................................................... 6-8
6.5.1.1 Tabs ........................................................................................................................ 6-8 6.5.1.2 Buttons.................................................................................................................... 6-8 6.5.1.3 VSM Status Area.................................................................................................... 6-8
6.5.2 VSM Control Center: Tabs ............................................................................................... 6-9 6.5.2.1 Install Tab............................................................................................................. 6-10 6.5.2.2 Data File Tab ........................................................................................................ 6-10 6.5.2.3 Sample Tab........................................................................................................... 6-12 6.5.2.4 Advanced Tab....................................................................................................... 6-12

Contents Table of Contents
viii PPMS VSM Option User’s Manual, Rev. A3 Quantum Design January 2008
6.5.3 VSM Control Center: "Measure" Button........................................................................ 6-13 6.5.3.1 "VSM Measurement" Dialog: Buttons................................................................. 6-13 6.5.3.2 "VSM Measurement" Dialog: Last Measurement................................................ 6-13 6.5.3.3 "VSM Measurement" Dialog: Settings Tab ......................................................... 6-13 6.5.3.4 "VSM Measurement" Dialog: Centering Tab ...................................................... 6-14 6.5.3.5 "VSM Measurement" Dialog: Advanced Tab...................................................... 6-15
6.6 Overview of Sequence-Mode Commands ............................................................................... 6-17 6.6.1 Opening and Creating Sequence Files ............................................................................ 6-17 6.6.2 Using the Sequence Editor and Commands Bar ............................................................. 6-18 6.6.3 Inserting Sequence Commands....................................................................................... 6-19
6.7 Sequence-Mode VSM "Adv. Measure" Command ................................................................. 6-19 6.7.1 Sequence-Mode "VSM Measurement" Dialog............................................................... 6-19
6.7.1.1 Sequence-Mode "VSM Measurement" Dialog: Settings Tab .............................. 6-20 6.7.1.2 Sequence-Mode "VSM Measurement" Dialog: Centering Tab ........................... 6-20 6.7.1.3 Sequence-Mode "VSM Measurement" Dialog: Advanced Tab ........................... 6-20
6.7.2 Summary: Setting up a Sequence-Mode VSM "Adv. Measure" Command................... 6-21 6.8 Sequence-Mode VSM "Center Sample" Command ................................................................ 6-21 6.9 Sequence-Mode VSM “Moment vs. Field” Command ........................................................... 6-22
6.9.1 Sequence-Mode VSM "Moment Versus Field" Dialog.................................................. 6-22 6.9.2 Sequence-Mode VSM "Moment versus Field" Dialog: Setup Tab ............................... 6-23
6.9.2.1 Field Sequence Settings ....................................................................................... 6-23 6.9.2.2 Field Control Settings........................................................................................... 6-23 6.9.2.3 Data Acquisition Settings..................................................................................... 6-24 6.9.2.4 Approximate Fields .............................................................................................. 6-25 6.9.2.5 Estimated.............................................................................................................. 6-26
6.9.3 Sequence-Mode VSM "Moment versus Field" Dialog: Advanced Tab ......................... 6-26 6.9.3.1 Centering Settings ................................................................................................ 6-26 6.9.3.2 Ranging Settings .................................................................................................. 6-26 6.9.3.3 PPMS Data Logging Settings............................................................................... 6-26 6.9.3.4 Advanced Settings................................................................................................ 6-26 6.9.3.5 Excitation Parameters........................................................................................... 6-27
6.10 Sequence Mode VSM "Moment vs. Temp." Command.......................................................... 6-27 6.10.1 Sequence-Mode VSM "Moment versus Temperature" Dialog ...................................... 6-27 6.10.2 Sequence-Mode VSM "Moment versus Temperature" Dialog: Setup Tab .................... 6-28
6.10.2.1 Temperature Control Settings .............................................................................. 6-28 6.10.2.2 Data Acquisition Settings..................................................................................... 6-29 6.10.2.3 Approx. Temperatures.......................................................................................... 6-31 6.10.2.4 Estimated.............................................................................................................. 6-31
6.10.3 Sequence-Mode VSM "Moment versus Temperature" Dialog: Advanced Tab ............. 6-31 6.10.3.1 Centering Settings ................................................................................................ 6-31 6.10.3.2 Ranging Settings .................................................................................................. 6-31 6.10.3.3 PPMS Data Logging Settings............................................................................... 6-31 6.10.3.4 Advanced Settings................................................................................................ 6-31 6.10.3.5 Excitation Parameters........................................................................................... 6-32

Contents Table of Contents
Quantum Design PPMS VSM Option User’s Manual, Rev. A3 ix January 2008
CHAPTER 7 VSM Architecture and Data Storage................................................................................. 7-1 7.1 Introduction................................................................................................................................ 7-1 7.2 Architecture................................................................................................................................ 7-1
7.2.1 System File Structure........................................................................................................ 7-1 7.2.2 Software and Hardware Communications ........................................................................ 7-1 7.2.3 Software and Hardware Status.......................................................................................... 7-2
7.2.3.1 VSM Log................................................................................................................ 7-2 7.2.3.2 Error Count............................................................................................................. 7-3
7.3 VSM Data Files.......................................................................................................................... 7-3 7.3.1 Data File Headers.............................................................................................................. 7-3 7.3.2 Views of the Data ............................................................................................................. 7-4 7.3.3 Fields in VSM Data Files.................................................................................................. 7-5 7.3.4 Creating a VSM Measurement Data File.......................................................................... 7-6 7.3.5 Adding a Comment to a VSM Measurement Data File .................................................... 7-7
7.3.5.1 Append Immediately .............................................................................................. 7-7 7.3.5.2 Append in the Future .............................................................................................. 7-7
7.3.6 Changing VSM Data Files during a Sequence Run.......................................................... 7-8
APPENDIX A Model CM-A VSM Motor Module.................................................................................... A-1 A.1 Introduction............................................................................................................................... A-1 A.2 Functional Overview................................................................................................................. A-1
A.2.1. Functional Block Diagram............................................................................................... A-2 A.2.2. Specifications................................................................................................................... A-3
A.3 Model CM-A VSM Motor Module: Front Panel ...................................................................... A-3 A.3.1. Indicator LEDs................................................................................................................. A-3 A.3.2. Connectors and Pinout Tables ......................................................................................... A-4
A.3.2.1 JA-1: Servo Connector .......................................................................................... A-4 A.3.2.2 JA-2: Stepper Connector ....................................................................................... A-5 A.3.2.3 JA-3: Motor Sync Connector................................................................................. A-5 A.3.2.4 JA-4: Aux Connector............................................................................................. A-6 A.3.2.5 JA-5: Monitor BNC............................................................................................... A-6
A.4 Model CM-A VSM Motor Module: Rear Panel ....................................................................... A-7 A.4.1. Address Selector .............................................................................................................. A-7 A.4.2 Single Guide Hole............................................................................................................ A-7 A.4.3 QD CAN Connector......................................................................................................... A-8
APPENDIX B Model CM-B VSM Detection Module................................................................................B-1 B.1 Introduction............................................................................................................................... B-1 B.2 Functional Overview................................................................................................................. B-1
B.2.1 Functional Block Diagram............................................................................................... B-2 B.2.2 Specifications................................................................................................................... B-3

Contents Table of Contents
x PPMS VSM Option User’s Manual, Rev. A3 Quantum Design January 2008
B.3 Model CM-B Detection Module: Front Panel ...........................................................................B-3 B.3.1 Indicator LEDs .................................................................................................................B-3 B.3.2 Connectors and Pinout Tables ..........................................................................................B-4
B.3.2.1 JB-1: Motor Sync Connector..................................................................................B-4 B.3.2.2 JB-2: Monitor BNC................................................................................................B-4 B.3.2.3 JB-3: Preamp Connector ........................................................................................B-5
B.4 Model CM-B Detection Module: Rear Panel ............................................................................B-6 B.4.1 Address Selector.....................................................................................................B-6 B.4.2 Guide Holes............................................................................................................B-6 B.4.3 QD CAN Connector ...............................................................................................B-7
GLOSSARY......................................................................................................................... G-1
INDEX........................................................................................................................ INDEX-1
Figures..................................................................................................................................... xi
Tables ......................................................................................................................................xv

Contents Table of Figures
Quantum Design PPMS VSM Option User’s Manual, Rev. A3 xi January 2008
Figures Figure 1-1. Operating principle for the PPMS VSM option........................................................ 1-3 Figure 2-1. System components for PPMS VSM option............................................................. 2-3 Figure 2-2. Temperature-System dialog box ............................................................................... 2-5 Figure 2-3. Field dialog box ........................................................................................................ 2-5 Figure 2-4. Chamber dialog box .................................................................................................. 2-6 Figure 2-5. Coilset puck (4096-204), with arrows to
coilset serial number and mounting ring ............................................................ 2-6 Figure 2-6. Installing the VSM coilset puck with the puck-insertion tool................................... 2-6 Figure 2-7. VSM sample-tube assembly (4096-301)................................................................... 2-7 Figure 2-8. Inserting the VSM sample tube into the sample chamber......................................... 2-7 Figure 2-9. Front and rear views of the VSM linear motor transport (4096-400).. ..................... 2-8 Figure 2-10. Installing the VSM linear motor transport on the top flange of the PPMS............... 2-9 Figure 2-11. VSM option connections on a 9-T PPMS............................................................... 2-10 Figure 2-12. PPMS MultiVu menu bar and Utilities dropdown menu with Activate Option selected................................................ 2-11 Figure 2-13. Activating the VSM option with the Option Manager dialog box.......................... 2-11 Figure 2-14. VSM Control Center (VSM SIM) and VSM Log window ..................................... 2-12 Figure 2-15. PPMS MultiVu menu bar and Measure dropdown menu for VSM option............. 2-12 Figure 2-16. Configure VSM System dialog, page 1................................................................... 2-13 Figure 2-17. Configure VSM System dialog, page 2: Testing calibration file ............................ 2-13 Figure 2-18. Warming the system to 300 K with the Temperature-System dialog box .............. 2-14 Figure 2-19. Setting the field to zero (0) with the Field dialog box ............................................ 2-15 Figure 2-20. Venting the chamber with the Chamber dialog box................................................ 2-15 Figure 2-21. VSM Control Center (VSM SIM) and the Install tab ............................................. 2-18 Figure 2-22. VSM Install/Remove Sample Wizard dialog, page 1: Open Chamber ................... 2-20 Figure 2-23A. VSM Install/Remove Sample Wizard dialog, page 2: Preparing the sample chamber.......................................................................... 2-20 Figure 2-23B. VSM Install/Remove Sample Wizard dialog, page 2: Install or remove sample.... 2-21 Figure 2-24. VSM Ppmsmvu popup dialog with shutdown instructions..................................... 2-21 Figure 2-25A. VSM Install/Remove Sample dialog, page 3: Moving the transport into the shutdown position ............................................. 2-22 Figure 2-25B. VSM Install/Remove Sample dialog, page 3: Transport shutdown ........................ 2-22 Figure 3-1. Trough-shaped sample holder (4096-378) ................................................................ 3-3 Figure 3-2. Paddle-shaped sample holder (4096-372)................................................................. 3-4

Contents Table of Figures
xii PPMS VSM Option User’s Manual, Rev. A3 Quantum Design January 2008
Figure 4-1. The touchdown centering operation.......................................................................... 4-2 Figure 4-2. Reading the position of the sample from the sample-mounting station.................... 4-4 Figure 4-3. Activating the VSM option with the Option Manager dialog box............................ 4-5 Figure 4-4. Main MultiVu window and main window of the VSM Control Center (VSM Log window has been minimized) .......................................................... 4-5 Figure 4-5. The VSM Install/Remove Sample Wizard dialog (VSM Install wizard for short), page 1: Open chamber........................................................................................ 4-6 Figure 4-6. The VSM Install wizard, page 1: Install or remove sample...................................... 4-6 Figure 4-7. The VSM Install wizard, page 2: Selecting the standard (low-temperature) VSM option .......................................................................... 4-7 Figure 4-8. The VSM Install wizard: Cover the VSM head with the standard cap..................... 4-7 Figure 4-9A. The VSM Install wizard, page 3: Designating an output data file ............................ 4-8 Figure 4-9B. Using the VSM Select Data File dialog to open or create an output data file .......... 4-8 Figure 4-9C. Confirming creation of new data file ........................................................................ 4-8 Figure 4-9D. Creating a title for the data file ................................................................................. 4-9 Figure 4-9E. Describing sample properties.................................................................................... 4-9 Figure 4-9F. The VSM Install wizard, page 3: Output data file name and sample properties ...... 4-9 Figure 4-10A. The VSM Install wizard, page 4: Entering sample holder coordinates................... 4-10 Figure 4-10B. Confirming sample offset: Accept or reject scanned value .................................... 4-10 Figure 4-10C. The VSM Install wizard, page 4: Sample offset graphed ....................................... 4-10 Figure 4-11. The VSM Install wizard, page 5: Reporting sample-offset position....................... 4-11 Figure 4-12. The VSM Install wizard, page 5: Performing a touchdown ................................... 4-11 Figure 4-13. The VSM Install wizard, page 5: Finishing sample installation ............................. 4-11 Figure 4-14. Installation completed after standard purge ............................................................ 4-11 Figure 4-15A. Appearance of the Install tab when an extended purge has been initiated.............. 4-12 Figure 4-15B. Appearance of the Install tab after completion of an extended purge..................... 4-12 Figure 4-16. VSM Measurement dialog: Settings tab ................................................................. 4-13 Figure 4-17. VSM Measurement dialog: Centering tab .............................................................. 4-14 Figure 4-18. VSM Measurement dialog: Advanced tab .............................................................. 4-15 Figure 4-19. Designating additional measurement data to be collected ...................................... 4-16 Figure 4-20. The VSM Install wizard, page 1: Initial instructions .............................................. 4-17 Figure 4-21A. The VSM Install wizard, page 1: Chamber preparation ......................................... 4-17 Figure 4-21B. The VSM Install wizard, page 1: Shutdown transport or install sample ................ 4-18 Figure 4-22. Ppmsmvu popup dialog with shutdown instructions .............................................. 4-18 Figure 4-23. The VSM Install wizard, page 2: End wizard or install sample.............................. 4-19 Figure 5-1. VSM linear motor transport (4096-400) ................................................................... 5-2 Figure 5-2. Storage case (4096-150) for the linear motor transport. ........................................... 5-3 Figure 5-3. Coilset puck (4096-204) ........................................................................................... 5-4 Figure 5-4. The internal dimensions of a standard coilset puck. ................................................. 5-4 Figure 5-5. VSM sample tube (4096-301)................................................................................... 5-6 Figure 5-6. VSM sample rod (4096-352) .................................................................................... 5-6 Figure 5-7. VSM Option User's Kit (4096-100).......................................................................... 5-8 Figure 5-8. Sample-mounting station (4096-110) ....................................................................... 5-8 Figure 5-9. Preamp cable assembly (3096-300) .......................................................................... 5-9 Figure 5-10. Motor drive cable (3096-200)................................................................................... 5-9 Figure 5-11. VSM—Motor sync cable (3096-400) ....................................................................... 5-9 Figure 5-12. Model CM-A VSM motor module (4101-100)....................................................... 5-10 Figure 5-13. Model CM-B VSM detection module (4101-150).................................................. 5-10 Figure 5-14. Model 1000 modular control system (4100-001) ................................................... 5-11

Contents Table of Figures
Quantum Design PPMS VSM Option User’s Manual, Rev. A3 xiii January 2008
Figure 6-1. The MultiVu software application window and the View >> Status Bar dropdown menu ................................................................. 6-2 Figure 6-2. The MultiVu Status Bar and the Sequence, Temperature, Field, and Chamber sections ........................................................ 6-2 Figure 6-3. Using the MultiVu dropdown Utilities menu and Option Manager to activate the VSM Option................................................................................ 6-3 Figure 6-4. The MultiVu window and the VSM Control Center (VSM SIM), including the Install tab, the VSM Status area, and the MultiVu Status bar ...... 6-4 Figure 6-5. The MultiVu window and the View dropdown menu, showing VSM immediate-mode commands....................................................... 6-5 Figure 6-6. The MultiVu window and the Sample dropdown menu, showing VSM immediate-mode commands....................................................... 6-5 Figure 6-7. The MultiVu window, the Sample dropdown menu, and the VSM Install/Remove Sample Wizard.................................................... 6-6 Figure 6-8. The Specify Sample Location dialog that opens from the dropdown menu when you select Sample >> VSM Manual Locate ............................................. 6-6 Figure 6-9. VSM immediate-mode commands in the context of the MultiVu window and the Measure dropdown menu ...................................................................... 6-7 Figure 6-10. The immediate-mode VSM Center Sample popup ................................................... 6-7 Figure 6-11. The immediate-mode VSM Datafile Comment popup ............................................. 6-7 Figure 6-12. The VSM Control Center dialog ............................................................................... 6-8 Figure 6-13. Install tab in the VSM Control Center .................................................................... 6-10 Figure 6-14. Data File tab in the VSM Control Center................................................................ 6-10 Figure 6-15. Designating an output data file ............................................................................... 6-11 Figure 6-16. Recording sample properties................................................................................... 6-11 Figure 6-17. Sample tab in the VSM Control Center .................................................................. 6-12 Figure 6-18. Advanced tab in the VSM Control Center .............................................................. 6-12 Figure 6-19. VSM Measurement dialog and the Settings tab...................................................... 6-13 Figure 6-20. Centering tab in the VSM Measurement dialog...................................................... 6-14 Figure 6-21. Advanced tab in the VSM Measurement dialog ..................................................... 6-15 Figure 6-22. PPMS data-logging dialog for selecting additional
types of data to be collected ............................................................................. 6-16 Figure 6-23. Opening a sequence file by using the MultiVu dropdown File menu..................... 6-17 Figure 6-24. The MultiVu window, the Sequence Editor, and the
Sequence Commands bar ................................................................................. 6-18 Figure 6-25. VSM sequence-mode Measurement dialog: Settings tab........................................ 6-20 Figure 6-26. VSM sequence-mode Measurement dialog: Centering tab..................................... 6-20 Figure 6-27. VSM sequence-mode Measurement dialog: Advanced tab .................................... 6-20 Figure 6-28. Sequence-mode VSM Center Sample command: VSM Center Sample Sequence popup.............................................................. 6-21 Figure 6-29. Setup tab of the sequence-mode VSM Moment versus Field dialog ...................... 6-22 Figure 6-30. Advanced tab of the sequence-mode VSM Moment versus Field dialog ............... 6-22 Figure 6-31. Field Sequence section of the VSM Moment vs Field Setup tab: Start-End Quadrant de-selected ........................................................................ 6-23 Figure 6-32. Field Sequence section of VSM Moment vs Field Setup tab: Start-End Quadrant selected ............................................................................. 6-23 Figure 6-33. Field Control section of VSM Moment versus Field dialog ................................... 6-23

Contents Table of Figures
xiv PPMS VSM Option User’s Manual, Rev. A3 Quantum Design January 2008
Figure 6-34. Data Acquisition: Data spacing selection ............................................................... 6-24 Figure 6-35. Data Acquisition: Number of Fields and Field Increment ...................................... 6-25 Figure 6-36. Data Acquisition: Keep and Approximate Fields settings ...................................... 6-25 Figure 6-37. Advanced Settings–Advanced tab: Require sweep and so on ................................ 6-26 Figure 6-38. Setup tab of the sequence-mode VSM Moment versus Temperature dialog.......... 6-28 Figure 6-39. Advanced tab of the sequence-mode VSM Moment versus Temperature dialog... 6-28 Figure 6-40. Temperature Control section of the sequence-mode VSM Moment versus Temperature dialog ....................................................... 6-28 Figure 6-41. Data Acquisition section of the sequence-mode VSM Moment versus Temperature dialog ....................................................... 6-29 Figure 6-42. Data Acquisition section: Keep and so on .............................................................. 6-30 Figure 6-43. Advanced Settings section: Require sweep and so on ............................................ 6-31 Figure 7-1. Example of a VSM Log ............................................................................................ 7-2 Figure 7-2. Opening the VSM Log window................................................................................ 7-2 Figure 7-3. The Error Count popup ............................................................................................. 7-3 Figure 7-4. A Raw Data view of a VSM data file ....................................................................... 7-3 Figure 7-5. Example of a Table view of a VSM data file............................................................ 7-4 Figure 7-6. Data File tab of the VSM Control Center ................................................................. 7-6 Figure 7-7. VSM Select Data File dialog .................................................................................... 7-6 Figure 7-8. Entering sample properties for a new data file ......................................................... 7-6 Figure 7-9. Examining sample properties with the Sample tab................................................... 7-6 Figure 7-10. Dialog for appending a comment to a file, now or in the future............................... 7-7 Figure 7-11. Using the sequence editor and the Sequence Commands bar ................................... 7-7 Figure 7-12. Select a Sequence File dialog ................................................................................... 7-8 Figure 7-13. Command dialog for changing the data file during a sequence measurement.......... 7-9 Figure A-1. Model CM-A VSM motor module (4101-100)........................................................ A-2 Figure A-2. Abridged functional block diagram of Model CM-A VSM motor-module specifications ................................................................... A-2 Figure A-3. JA-1: Servo connector for the Model CM-A VSM motor module .......................... A-4 Figure A-4. JA-3: Motor sync connector for the Model CM-A VSM motor module ................. A-5 Figure A-5. JA-4: Aux connector for the Model CM-A VSM motor module ............................ A-6 Figure A-6. Rear panel of the Model CM-A VSM motor module .............................................. A-7 Figure A-7. Quantum Design CAN connector for the Model CM-A VSM motor module......... A-8 Figure B-1. Model CM-B VSM detection module (4101-150)....................................................B-2 Figure B-2. Abridged functional block diagram of the Model CM-B VSM detection module ...B-2 Figure B-3. JB-1: Motor sync connector for the Model CM-B VSM detection module .............B-4 Figure B-4. JB-3: Preamp connector for the Model CM-B VSM detection module....................B-5 Figure B-5. Rear panel of the Model CM-B VSM detection module ..........................................B-6 Figure B-6. QD CAN connector on the rear of the Model CM-B VSM detection module .........B-7

Contents Table of Tables
Quantum Design PPMS VSM Option User’s Manual, Rev. A3 xv January 2008
Tables Table 2-1. PPMS VSM system components .............................................................................. 2-2 Table 3-1. Calculated ratio of the reported moment to the true moment for different size cylindrical samples and different amplitudes. .................................................... 3-2 Table 3-2. Calculated ratio of the reported moment to the true moment of cylindrical samples for different radial offsets from the coilset centerline. ... 3-3 Table 5-1. Sample Connection with User Bridge Cable Connected .......................................... 5-5 Table 6-1. VSM warning and error messages ............................................................................ 6-9 Table 7-1. Software files required to operate the VSM option .................................................. 7-2 Table 7-2. Definitions of column headers for VSM data files (*.dat files) ................................ 7-5 Table A-1. Electrical specifications for Model CM-A VSM motor module.............................. A-3 Table A-2. LED guide for Model CM-A VSM motor module .................................................. A-3 Table A-3. JA-1: Servo connector for the Model CM-A VSM motor module .......................... A-4 Table A-4. JA-3: Motor sync connector for the Model CM-A VSM motor module ................. A-5 Table A-5. JA-4: Aux connector for the Model CM-A VSM motor module............................. A-6 Table A-6. QD CAN connector on the rear of the Model CM-A VSM motor module.............. A-8 Table B-1. Electrical specifications for the Model CM-B VSM detection module ................... B-3 Table B-2. LED guide for the Model CM-B VSM detection module........................................ B-3 Table B-3. JB-1: Motor sync connections for the Model CM-B VSM detection module ......... B-4 Table B-4. JB-3: Preamp connector for the Model CM-B VSM detection module................... B-5 Table B-5. QD CAN connector on the rear of the Model CM-B VSM detection module......... B-7


Quantum Design PPMS VSM Option User’s Manual, Rev. A3 xvii January 2008
P R E F A C E
Contents and Conventions
P.1 Introduction This preface contains the following information:
○ Section P.2 provides an overview of the scope of the manual.
○ Section P.4 shows the conventions that appear in the manual.
○ Section P.3 outlines the contents of the manual.
P.2 Scope of the Manual This manual contains background about the PPMS Vibrating Sample Magnetometer (VSM) option, as well as instructions for using the VSM software and hardware and performing sensitive measurements when the VSM is installed in the PPMS unit.
P.3 Contents of the Manual o Chapter 1 provides an overview of the VSM option and the theory of operation.
o Chapter 2 describes VSM installation and removal procedures and gives contact information for Quantum Design service representatives.
o Chapter 3 covers sample materials and how to mount them for measurement with the VSM.
o Chapter 4 summarizes the VSM measurement process and guides you through an immediate-mode measurement with the VSM option.
o Chapter 5 describes the hardware and electrical components of the VSM option as well as the VSM User's Kit.
o Chapter 6 describes the VSM application software and the use of immediate-mode and sequence-mode commands to take measurements.

Section P.4 Preface Conventions in the Manual Contents and Conventions
xviii PPMS VSM Option User’s Manual, Rev. A3 Quantum Design January 2008
o Appendix A provides a functional description of the Model CM-A VSM motor module, including diagrams and electrical specifications.
o Appendix B provides a functional description of the Model CM-B VSM detection module, including diagrams and electrical specifications.
o Glossary presents the terms typically used in the VSM manual.
o Index is a guide to information organized by key terms and phrases.
P.4 Conventions in the Manual File menu Bold text identifies the names of menus, dialogs, options, buttons, and panels
used in the PPMS MultiVu and VSM software.
File >> Open The >> symbol indicates that you select multiple, nested software options.
.dat The Courier font indicates file and directory names and computer code.
Important Text is set off in this manner to signal essential information that is directly related to the completion of a task.
Note Text is set off in this manner to signal supplementary information about the current task; the information may primarily apply in special circumstances.
C A U T I O N !
Text is set off in this manner to signal conditions that could result in loss of information or damage to equipment.
W A R N I N G !
Text is set off in this manner to signal conditions that could result in bodily harm or loss of life.
W A R N I N G !
Text is set off in this manner to signal electrical hazards that could result in bodily harm or loss of life.

Quantum Design PPMS VSM Option User’s Manual, Rev. A3 1-1 January 2008
C H A P T E R 1
Introduction to the VSM Option
1.1 Introduction This chapter contains the following information:
○ Section 1.2 presents an overview of the VSM option.
○ Section 1.4 outlines major safety considerations for working with the PPMS system.
○ Section 1.3 discusses the VSM theory of operation.
○ Section 1.5 contains information on how to contact your Quantum Design service representative.
1.2 Overview of the VSM Option
1.2.1 What It Measures The Quantum Design Vibrating Sample Magnetometer (VSM) option for the Physical Property Measurement System (PPMS) is a fast and sensitive DC magnetometer.
The basic measurement is accomplished by oscillating the sample near a detection (pickup) coil and synchronously detecting the voltage induced. By using a compact gradiometer pickup coil configuration, a relatively large oscillation amplitude (1–3 mm peak) and a frequency of 40 Hz, the system is able to resolve magnetization changes of less than 10-6 emu at a data rate of 1 Hz.
The VSM option for the PPMS consists primarily of a VSM linear motor transport (head) for vibrating the sample, a coilset puck for detection, electronics for driving the linear motor transport and detecting the response from the pickup coils, and a copy of the MultiVu software application for automation and control.
1.2.2 Notable Features of the VSM System The Quantum Design PPMS VSM linear motor transport uses a uniquely designed linear motor to vibrate the sample. Unlike other vibrating sample magnetometers that use a short-throw resonant voice-coil design, you will find that the PPMS VSM linear motor is designed to operate at 40 Hz,

Section 1.3 Chapter 1 Theory of Operation Introduction to the VSM Option
1-2 PPMS VSM Option User’s Manual, Rev. A3 Quantum Design January 2008
with rapid slewing possible over about 6.5 cm of travel. The large range of motion enables the PPMS VSM system to perform rapid, completely automated centering operations—you will not need to perform manual adjustments to center the sample.
The sensitivity of the VSM coils is not significantly affected by large magnetic fields, so the PPMS VSM can perform sensitive measurements up to the maximum field available from your PPMS magnet.
The VSM detection coil is inserted into the PPMS sample chamber by using the standard PPMS sample interface design. This procedure will make it easy to reconfigure the VSM option with alternate pickup coil designs in the future. You will find that you can change the pickup coil configuration as easily as you can change a puck.
You will find it easy to activate and deactivate the VSM option on your PPMS, just like the other PPMS options. The modularity of the design enables you to perform successive types of measurement with little additional effort. For example, you could follow state-of-the-art VSM measurements with heat-capacity measurements by inserting a different puck or probe.
The PPMS VSM is the first new measurement option from Quantum Design to use the next generation electronics architecture based on the CANopen networking protocol. The VSM option includes the Model 1000 modular control system, which is the heart of the new architecture. Plug-in modules, including the Model CM-A VSM motor module and the Model CM-B VSM detection module, provide option-specific functionality. This new modular architecture offers very high reliability as well as the ability to be expanded when you add options in the future.
1.3 Theory of Operation The basic principle of operation for a vibrating sample magnetometer is that a changing magnetic flux will induce a voltage in a pickup coil. The time-dependent induced voltage is given by the following equation:
⎟⎠⎞
⎜⎝⎛⎟⎠⎞
⎜⎝⎛ Φ
=
Φ=
dt
dz
dz
ddt
dcoilV
(1.1)
In equation (1.1), Φ is the magnetic flux enclosed by the pickup coil, z is the vertical position of the sample with respect to the coil, and t is time. For a sinusoidally oscillating sample position, the voltage is based on the following equation:
)2sin(2 ftfCmAcoilV ππ= (1.2)
In equation (1.2), C is a coupling constant, m is the DC magnetic moment of the sample, A is the amplitude of oscillation, and f is the frequency of oscillation.
The acquisition of magnetic moment measurements involves measuring the coefficient of the sinusoidal voltage response from the detection coil. Figure 1-1 illustrates how this is done with the PPMS VSM option.

Chapter 1 Section 1.3 Introduction to the VSM Option Theory of Operation
Quantum Design PPMS VSM Option User’s Manual, Rev. A3 1-3 January 2008
Figure 1-1. Operating principle for the PPMS VSM option
The sample is attached to the end of a sample rod that is driven sinusoidally. The center of oscillation is positioned at the vertical center of a gradiometer pickup coil. The precise position and amplitude of oscillation is controlled from the VSM motor module using an optical linear encoder signal readback from the VSM linear motor transport. The voltage induced in the pickup coil is amplified and lock-in detected in the VSM detection module. The VSM detection module uses the position encoder signal as a reference for the synchronous detection. This encoder signal is obtained from the VSM motor module, which interprets the raw encoder signals from the VSM linear motor transport. The VSM detection module detects the in-phase and quadrature-phase signals from the encoder and from the amplified voltage from the pickup coil. These signals are averaged and sent over the CAN bus to the VSM application running on the PC.
Chapter 5 describes the hardware components of the Quantum Design PPMS VSM option in more detail.
Section 1.4 Chapter 1 Safety Precautions Introduction to the VSM Option
1-4 PPMS VSM Option User’s Manual, Rev. A3 Quantum Design January 2008
1.4 Safety Precautions
W A R N I N G ! The VSM option is used in conjunction with the Physical Property Measurement System (PPMS), so you should be aware of the safety considerations for both pieces of equipment. PPMS-related safety precautions include those for the use of superconducting magnets and for the use of cryogenic liquids, as is reviewed below and in the Physical Property Measurement System: Hardware Manual.
Above all, Quantum Design and its staff ask that you use standard safe laboratory procedures.
Use common sense.
Pay attention to the system’s state and your surroundings.
If the behavior of the system appears abnormal, something may be wrong with it. Investigate, and if necessary, take appropriate action.
Supervise inexperienced users and train them in general electrical safety procedures.
The VSM and PPMS have safety features to prevent accidents from causing injury or serious equipment damage. If you use the equipment in a manner that is not specified by Quantum Design, the protection afforded by the equipment may be impaired.
1.4.1 Magnets
W A R N I N G ! Any person who wears a pacemaker, electrical medical device, or metallic implant must stay at least 5 m (16.5 ft.)1 from the PPMS dewar. In addition, personnel should keep all ferromagnetic objects at least 5 m (16.5 ft.) from the PPMS dewar. Verify that all magnetic fields are at zero (0) before you handle the VSM linear motor transport in any way.
The following precautions should be followed to ensure the safety of personnel who work with or around a PPMS with a superconducting magnet. This material is covered in more depth in Chapter 1 of the Physical Property Measurement System: Hardware Manual.
Verify that any person who has a metallic implant or is wearing a pacemaker or electrical or mechanical medical device stays at least 5 m (16.5 ft.) from the PPMS dewar. Large magnetic fields are dangerous to anyone who has a metallic implant or is wearing a pacemaker or other electrical or mechanical medical device.
1 At the current time (August 2004), 5 m should be a large enough distance to protect wearers of metallic implants or medical devices from most magnetic fields produced by Quantum Design magnets. However, the safe distance from newer magnets (in development) could be greater. Hence, personnel who work with and around the superconducting magnets should review thoroughly documentation for new equipment.

Chapter 1 Section 1.4 Introduction to the VSM Option Safety Precautions
Quantum Design PPMS VSM Option User’s Manual, Rev. A3 1-5 January 2008
Important: The automated control system can turn on the magnet while the system is unattended. Furthermore, the three-dimensional magnetic field of the PPMS will penetrate nearby walls, the ceiling, and the floor. Therefore, your safety considerations should include such adjacent spaces.
Keep all iron, nickel, and other ferromagnetic objects at least 5 m (16.5 ft.) from the PPMS dewar. Large magnets, such as the PPMS superconducting magnets, can attract iron and other ferromagnetic materials with great force. The observable effects of magnetic fields are listed in Chapter 1 of the Physical Property Measurement System: Hardware Manual.
Never attempt to install, remove, or handle the VSM linear motor transport (4096-400) when there is a field set in the PPMS or in any other nearby equipment. In addition, the VSM linear motor transport must be secured when it is stored within 5 m (16.5 ft.) of the PPMS or any other large field source. The VSM linear motor transport contains nearly 9 kg of iron, which presents a considerable hazard in a large magnetic field such as that produced by the PPMS or other laboratory equipment such as an NMR magnet.
1.4.2 Cryogens
W A R N I N G !
Always wear protective clothing and ensure that the room has good ventilation when you work with cryogenic materials such as liquid helium and liquid nitrogen. These precautions will protect you against cryogenic material hazards: (1) they can expand explosively when exposed to room temperature; (2) they can cause serious burns.
Always wear protective clothing, including thermal gloves, eye protection, and covered shoes, when you work with liquid helium, liquid nitrogen, or other cryogens. Avoid loose clothing or loose fitting gloves that could collect cryogenic liquids next to the skin. The extreme cold of liquid and gaseous cryogens can cause serious burns and has the potential to cause loss of limbs.
Work with cryogenic materials in well-ventilated areas only. In the event a helium container ruptures or there is a helium spill, vent the room immediately and evacuate all personnel. In a poorly ventilated area, helium can displace the air, leading to asphyxiation. Because helium rises, well-vented rooms with high ceilings generally provide the safest setting for working with helium.

Section 1.4 Chapter 1 Safety Precautions Introduction to the VSM Option
1-6 PPMS VSM Option User’s Manual, Rev. A3 Quantum Design January 2008
1.4.3 Electricity
W A R N I N G !
The VSM and the PPMS are powered by nominal voltages that range from 100 V to 240 V AC. These voltages are potentially lethal, so you should exercise appropriate care before opening any of the electronics units, including turning off the equipment and disconnecting it from its power source.
Turn off and unplug all electronic equipment before removing any equipment covers.
Keep electrical cords in good working condition and replace frayed and damaged cords.
Keep liquids away from the workstations.
1.4.4 Lifting and Handling The VSM linear motor transport (4096-400) should be handled with care, as it is very heavy (about 10 kg or 22 lb) and could cause crushing injuries.

Chapter 1 Section 1.5 Introduction to the VSM Option Contacting Quantum Design
Quantum Design PPMS VSM Option User’s Manual, Rev. A3 1-7 January 2008
1.5 Contacting Quantum Design If you have trouble with your VSM or your PPMS, please contact your local Quantum Design service representative for assistance. Your service representative will ask you to describe the problem, the circumstances involved, and the recent history of your system.
United States
Quantum Design World Headquarters 6325 Lusk Boulevard San Diego, CA 92121
Tel: 1-858-481-4400 1-800-289-6996 Fax: 1-858-481-7410
Email: [email protected] Web: http://www.qdusa.com
Service for Canada, Mexico, the United States, and other countries not listed below
Europe L.O.T.—Gmbh & Co KG Im Tiefen See 58 D-64293 Darmstadt, Germany
Tel: 49-6151-880631 Fax: 49-6151-896667
Email: [email protected] Web: http://www.lot-oriel.com
Service for Austria, Belgium, Crete, Croatia, Czech Republic, Denmark, England, Finland, France, Germany, Greece, Hungary, Ireland, Israel, Italy, Luxembourg, Netherlands, Norway, Poland, Portugal, Russia, Slovakia, Slovenia, Spain, Sweden, Switzerland, Turkey, and Yugoslavia
Japan Quantum Design Japan Sanpo Ikebukuro Building Annex 4-32-8 Ikebukuro Toshima-ku, Tokyo 171-0014, Japan
Tel: 81-3-5954-8570 Fax: 81-3-5954-6570
Email: [email protected] Web: http://www.qd-japan.com
Service for Japan
Section 1.5 Chapter 2 Contacting Quantum Design Installing and Removing the VSM Option
1-8 PPMS VSM Option User’s Manual, Rev. A3 Quantum Design January 2008
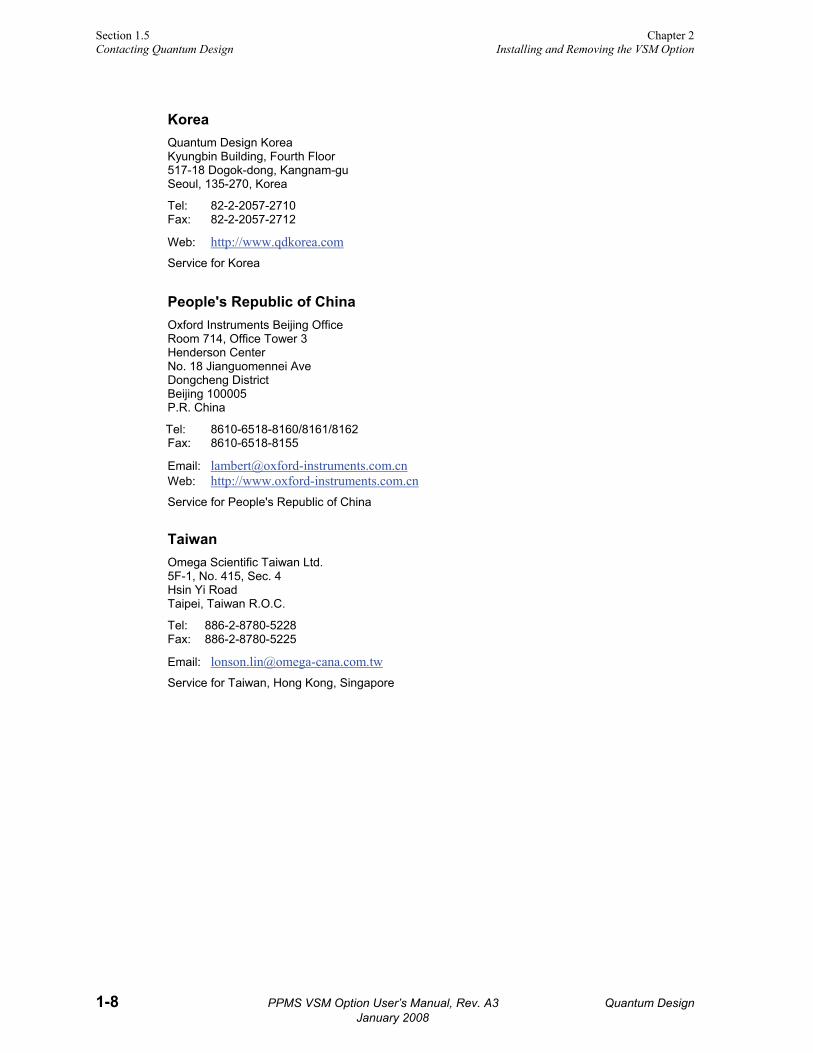
Korea Quantum Design Korea Kyungbin Building, Fourth Floor 517-18 Dogok-dong, Kangnam-gu Seoul, 135-270, Korea
Tel: 82-2-2057-2710 Fax: 82-2-2057-2712
Web: http://www.qdkorea.com
Service for Korea
People's Republic of China Oxford Instruments Beijing Office Room 714, Office Tower 3 Henderson Center No. 18 Jianguomennei Ave Dongcheng District Beijing 100005 P.R. China
Tel: 8610-6518-8160/8161/8162 Fax: 8610-6518-8155
Email: [email protected] Web: http://www.oxford-instruments.com.cn Service for People's Republic of China Taiwan Omega Scientific Taiwan Ltd. 5F-1, No. 415, Sec. 4 Hsin Yi Road Taipei, Taiwan R.O.C.
Tel: 886-2-8780-5228 Fax: 886-2-8780-5225
Email: [email protected]
Service for Taiwan, Hong Kong, Singapore

Quantum Design PPMS VSM Option User’s Manual, Rev. A3 2-1 January 2008
C H A P T E R 2
Installing and Removing the VSM Option
2.1 Introduction This chapter contains the following information: ○ Section 2.2 lists the components of
theVSM option and describes the procedures you will use for the initial installation on the PPMS.
○ Section 2.4 describes the procedures you will use to deactivate and remove the VSM option so that you can use a different measurement option.
○ Section 2.3 describes the procedures you will use to reconfigure your PPMS for the VSM option after it has been configured for non-VSM options.
2.2 Initial Installation of the Hardware and Software This section describes the procedures you will use for the initial installation of the Quantum Design Vibrating Sample Magnetometer (VSM). These procedures apply only to the first time you set up and use the VSM option. To re-install the VSM option after it has been deactivated and a different measurement option (e.g., the Heat Capacity option) has been used, you will use the procedures in Section 2.3, "Reconfiguring the PPMS for the VSM Option."
Important: Parts of the initial installation may have been performed at the factory if the VSM option was purchased as part of a new PPMS system.
Table 2-1 lists the components of the Quantum Design VSM option. Verify that you have received all the components before you start the installation process.

Section 2.2 Chapter 2 Initial Installation of the Hardware and Software Installing and Removing the VSM Option
2-2 PPMS VSM Option User’s Manual, Rev. A3 Quantum Design January 2008
Table 2-1. PPMS VSM system components
COMPONENT PART NUMBER
ILLUSTRATION
Linear Motor Transport (sometimes referred to as the "Head" or the "VSM Transport")
4096-400 Figures 2-1, 2-9, 5-1
Extender tube flange (sometimes referred to as the "Bottom Weldment Flange") and O-rings
4096-418 and VON2-030
Figures 2-9, 5-1
Storage Case 4096-150 Figure 5-2
Coilset Assembly** 4096-204 Figures 2-1, 2-5–2-6, 5-3–5-4
Sample Tube 4096-301 Figures 2-1, 2-7–2-8, 5-5
Two Sample Rods 4096-352 Figures 2-1, 5-6
Five Sample Holders (paddle-shaped) 4096-392 Figure 3-2
Five Sample Holders (trough-shaped) 4096-391 Figure 3-1
Preamp Cable Assembly 3096-300 Figures 2-1, 2-11, 5-9
Motor Drive Cable 3096-200 Figures 2-1, 2-11, 5-10
VSM–Motor Sync Cable*** 3096-400 Figures 2-1, 2-11, 5-11
Model CM-A Motor Module*** 4101-100 Figures 2-1, 2-11, 5-12
Model CM-B VSM Module*** 4101-150 Figures 2-1, 2-11, 5-13
Model 1000 Modular Control System 4100-001 Figures 2-1, 5-14
CAN Network Adapter Kit 4100-100
CAN PCI card* PCI 165A
CAN cable 3100-024
VSM Option User's Kit 4096-100 Figure 5-7
VSM/MultiVu Application Software Version 1.0 or newer
*This item might be pre-installed. **This item is shipped in the VSM Option User's Kit. ***This item might be pre-installed in the Model 1000.
Installation Process
In the event that you are performing a complete initial installation (i.e., no components were installed at the factory), the process includes the following phases: ○ installing and verifying the modular control system, CAN network adapter, and CAN
driver software ○ inserting the control modules ○ warming the sample chamber, setting the magnetic field to zero, and venting the sample
chamber ○ installing the VSM coilset puck ○ inserting the VSM sample tube
Chapter 2 Section 2.2 Installing and Removing the VSM Option Initial Installation of the Hardware and Software
Quantum Design PPMS VSM Option User’s Manual, Rev. A3 2-3 January 2008
○ mounting the linear motor transport ○ completing the electrical connections ○ installing the MultiVu software application and the VSM software ○ activating the VSM option ○ configuring the coilset
The complete initial installation of the VSM option should take no longer than an hour.
In the event that you are performing a partial installation only, check the instructions for each phase to be sure that you understand critical aspects of the process.
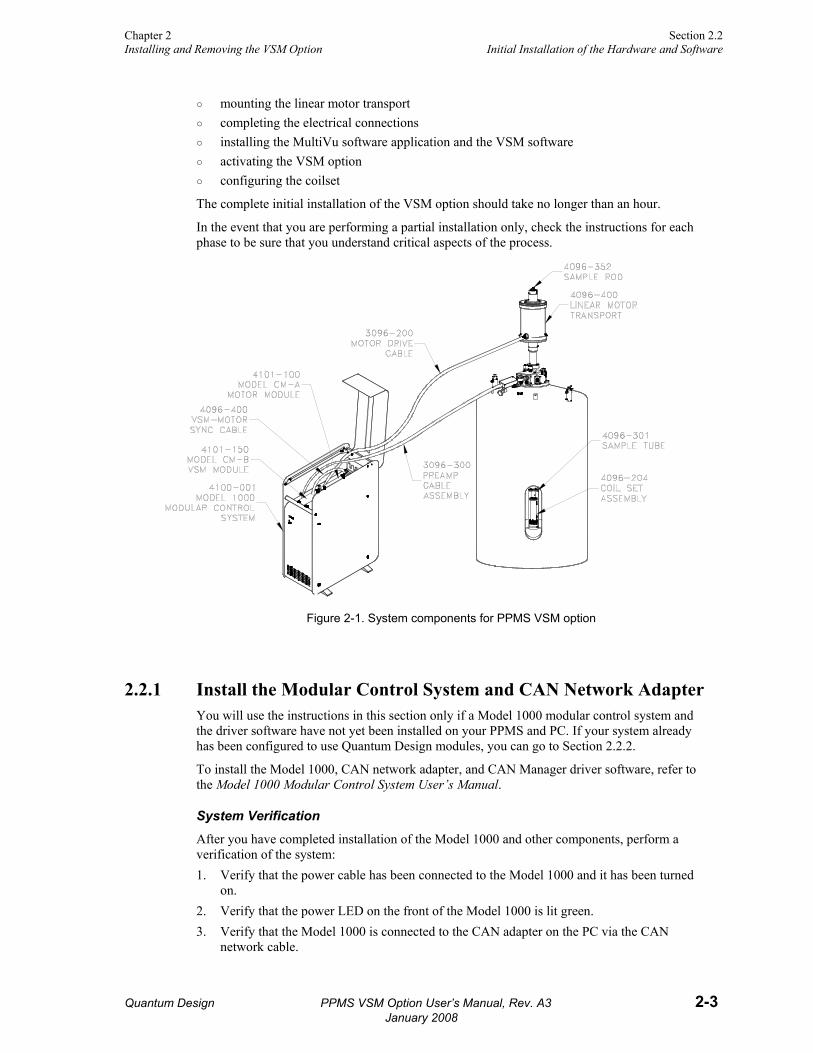
Figure 2-1. System components for PPMS VSM option
2.2.1 Install the Modular Control System and CAN Network Adapter You will use the instructions in this section only if a Model 1000 modular control system and the driver software have not yet been installed on your PPMS and PC. If your system already has been configured to use Quantum Design modules, you can go to Section 2.2.2.
To install the Model 1000, CAN network adapter, and CAN Manager driver software, refer to the Model 1000 Modular Control System User’s Manual.
System Verification
After you have completed installation of the Model 1000 and other components, perform a verification of the system: 1. Verify that the power cable has been connected to the Model 1000 and it has been turned
on. 2. Verify that the power LED on the front of the Model 1000 is lit green. 3. Verify that the Model 1000 is connected to the CAN adapter on the PC via the CAN
network cable.

Section 2.2 Chapter 2 Initial Installation of the Hardware and Software Installing and Removing the VSM Option
2-4 PPMS VSM Option User’s Manual, Rev. A3 Quantum Design January 2008
2.2.2 Insert the Control Modules (4101-150 and 4101-100) You will use the instructions in this section only if the Model CM-B (4101-150) and the Model CM-A (4101-100) control modules have not been installed in the Model 1000 already (e.g., installed at the factory). If the modules were installed at the factory, you can go to Section 2.2.3.
Refer to the instructions and cautions in the Model 1000 Modular Control System User’s Manual before proceeding with the module installation. 1. Turn off the power to the Model 1000 and disconnect the power cord. 2. Open the lid on the Model 1000. 3. Remove the cover plate for two module bays, one from the front row and one from the
back row, as shown in Figure 1-6 of the Model 1000 Modular Control System User’s Manual. The back-row bay will be used for the Model CM-A motor-control module. Important: The back-row bays are designed for modules that have high power requirements, such as the motor-control module.
4. Carefully insert the modules into the module bays: • Carefully slide the Model CM-B VSM detection module (4101-150) into the bay in
the front row until it is firmly seated. • Gently tighten the securing screw only until it is finger tight. The faceplate of the
module should be flush with the surrounding plates. • Carefully slide the Model CM-A motor-control module (4101-100) into the back-row
bay. • Gently tighten the securing screw only until it is finger tight. The faceplate of the
module should be flush with the surrounding plates. 4. Connect the VSM–motor-module sync cable (3096-400) between the two modules as
shown in Figures 2-1 and 2-11. 5. Reconnect the power cord and turn on the power to the Model 1000. 6. Verify that both the PWR and COP (CANopen Protocol) indicator LEDs on both modules
are green (they might be red when the power is first turned on, but they will turn green shortly). See Appendix A and Appendix B for further information on the LEDs.
2.2.3 Prepare the PPMS for Option Installation To prepare the PPMS system for installation of the VSM option, you will use the PPMS MultiVu application to warm the PPMS sample chamber to 300K, set the magnetic field to zero (0) Oe, and vent the sample chamber. Then, you will remove any sample puck or option that is currently installed in the chamber. When you do this, be sure to remove the standard centering ring from the chamber opening (the VSM has a custom-designed centering ring). 1. Set the PPMS system temperature to 300 K:
• Open the Temperature-System dialog box (select Instrument >> Temperature) and specify a set point of 300 K, as shown in Figure 2-2.
• Click on the Set button. • Leave the dialog box open so that you can monitor the temperature until it reaches at
least 290 K (do not continue with installation until the temperature reaches at least 290 K).
2. In the Temperature dialog box, click on the Close button.

Chapter 2 Section 2.2 Installing and Removing the VSM Option Initial Installation of the Hardware and Software
Quantum Design PPMS VSM Option User’s Manual, Rev. A3 2-5 January 2008
Figure 2-2. Temperature-System dialog box
3. Open the Field dialog box (Figure 2-3) to set the field to zero (0) Oe. • Select Instrument >> Field. • In the Field dialog box, specify a
Set Point of zero (0) Oe. • Click on the Set button. • Leave the dialog box open so that
you can monitor the field until it is within 1000 Oe of zero (do not continue until the field is within 1000 Oe of zero [0]).
4. In the Field dialog box, click on the Close button.
Figure 2-3. Field dialog box
W A R N I N G !
Verify that there are no nearby sources of magnetic field (e.g., NMR or other laboratory magnets) before attempting to install or remove the linear motor transport, as explained in Section 1.4.1.
5. Open the Chamber dialog box (Figure 2-4) to vent the PPMS sample chamber:
• Select Instrument >> Chamber. • Click on the Vent Cont. button. • Click on the Close button.

Section 2.2 Chapter 2 Initial Installation of the Hardware and Software Installing and Removing the VSM Option
2-6 PPMS VSM Option User’s Manual, Rev. A3 Quantum Design January 2008
6. Remove any sample puck or PPMS option that is installed in the sample chamber. Refer to the Physical Property Measurement System: Hardware Manual for instructions on removing a sample puck. Refer to the appropriate PPMS option manual to remove an option.
7. Remove the standard centering ring (or any other hardware that is present) from the top flange of the PPMS.
Figure 2-4. Chamber dialog box
2.2.4 Install the Coilset Puck The coilset puck contains the VSM detection coils and a thermometer for monitoring the sample temperature. You will insert the coilset puck into the sample chamber by using the standard PPMS puck-insertion tool1 and the same procedures that are used to insert other types of pucks (see the Physical Property Measurement System: Hardware Manual for more information). Install the puck before you insert the sample tube. 1. On the PPMS, verify that all items have been removed from the sample-chamber opening,
including the standard centering ring. 2. Locate the serial number of the detection coilset puck (4096-204), as shown in Figure 2-5.
This serial number will be used to identify the calibration data for the coilset in a later step. 3. Insert the coilset into the PPMS sample chamber by using the puck-insertion tool, as
illustrated in Figure 2-6.
Figure 2-5. Coilset puck (4096-204), with arrows to coilset serial number and to mounting ring for attaching the puck-insertion tool
Figure 2-6. Installing the VSM coilset puck
with the puck-insertion tool.
1 The puck-insertion tool is also referred to as the puck-extraction tool, the sample-holder tool, and the sample-insertion (sample-extraction) tool, depending on context.

Chapter 2 Section 2.2 Installing and Removing the VSM Option Initial Installation of the Hardware and Software
Quantum Design PPMS VSM Option User’s Manual, Rev. A3 2-7 January 2008
2.2.5 Insert the Sample Tube The sample tube contains low-friction bearing sleeves to center the sample rod in the bore of the coilset. Figure 2-7 shows the sample-tube assembly, where you can see that the top of the sample tube assembly includes an integrated centering ring and a stabilizer post. When the sample tube has been inserted into the sample chamber, the stabilizer post will extend into both the sample chamber and the extender tube flange on the VSM linear motor transport, as is shown in Figure 2-10. The primary functions of the post are to act as a guide when the transport is installed and to keep the transport on the PPMS. See Chapter 5 for more information on the sample tube.
Figure 2-7. VSM sample-tube assembly (4096-301)
Figure 2-8. Inserting the VSM sample
tube into the sample chamber
Use the steps below to install the sample-tube assembly. 1. Verify that the standard centering ring has been removed from the top of the PPMS. (A
VSM-specific centering-ring assembly has been integrated into the VSM sample-tube assembly.) Important: You cannot use a standard centering ring between the VSM linear motor transport and the PPMS. As a safety mechanism, the VSM system cannot be installed on the PPMS without the VSM-specific components, such as the VSM sample-tube assembly with its integrated centering-ring and stabilizer post.
2. Examine the O-ring on the sample-tube centering ring for dust or dirt. If it is dirty, clean it and lightly grease it with silicon vacuum grease.
3. Using Figure 2-8 as a guide, carefully lower the sample tube assembly (4096-301) into the PPMS sample chamber until the VSM centering ring seats onto the top flange of the PPMS.

Section 2.2 Chapter 2 Initial Installation of the Hardware and Software Installing and Removing the VSM Option
2-8 PPMS VSM Option User’s Manual, Rev. A3 Quantum Design January 2008
2.2.6 Mount the VSM Linear Motor Transport
W A R N I N G ! Verify that there are no nearby sources of magnetic field (e.g., NMR or other laboratory magnets) before attempting to install or remove the linear motor transport, as explained in Section 1.4.1.
The VSM linear motor transport (Figure 2-9) moves the sample. You will mount the linear motor transport directly on top of the PPMS sample-chamber opening after you have inserted the sample tube into the sample chamber. Before you install the linear motor transport, you must remove the shipping plug and install the extender-tube-flange assembly. See Chapter 5 for more information on the linear motor transport and its operations.
Figure 2-9. Front and rear views of the VSM linear motor transport (4096-400). The rear view (right) shows the transport with the shipping plug installed; in the front view (left), the shipping
plug has been replaced by the extender tube flange.
C A U T I O N ! ♦ Quantum Design recommends that you have another person help you install the VSM
linear motor transport—it is fragile, bulky, and moderately heavy (about 10 kg or 22 lb).
♦ Always use the VSM-specific parts (e.g., the centering rings) to ensure that the equipment operates safely and properly.
♦ Always use the flange clamp (Figure 2-10) to hold the linear motor transport onto the stabilizer post.

Chapter 2 Section 2.2 Installing and Removing the VSM Option Initial Installation of the Hardware and Software
Quantum Design PPMS VSM Option User’s Manual, Rev. A3 2-9 January 2008
1. Prepare the extender tube flange: • Locate the extender tube flange and the flange O-ring (part number VON2-030). • Wipe the neck of the flange with a lint-free cloth (e.g., Kimwipe) to remove any dust
or dirt. • Place the O-ring into the neck of the extender tube flange. Firmly press on the O-ring
to assure it is completely seated. • Wipe the O-ring and lightly grease it with silicon vacuum grease. • Place the extender tube flange on a clean piece of paper or lint-free cloth until it can
be installed. 2. Remove the VSM linear motor transport and its stand from the storage case and place them
on a stable work surface, keeping the motor in a vertical position. 3. Remove the shipping plug from the bottom of the motor (see Figure 2-9). 4. Verify that the O-ring of the extender tube flange is still in place and its exposed surface is
clean. If it is dusty or dirty, clean it and lightly grease it with silicon vacuum grease. 5. Screw the extender tube flange onto the bottom of the motor until it is tightly attached,
using Figure 2-9 for an example. Hand tighten the tube only. 6. Remove the VSM linear motor transport from the stand, keeping it upright. For example,
you can support the weight of the linear motor transport by gripping it with one hand on the top tube and the other hand on the extender tube flange.
7. Place the VSM linear motor transport onto the top flange of the PPMS by orienting the electrical connector to the rear of the dewar (the same direction as the other PPMS cables). The linear motor transport should slide over the stabilizer post at the top of the VSM sample-tube assembly (4096-301). Figure 2-10 shows where the stabilizer post emerges from the PPMS sample chamber, the correct orientation of the linear motor transport, and other relevant parts of the equipment.
8. Verify that the integrated VSM centering ring is sandwiched snugly between the top flange of the PPMS and the linear motor transport.
9. Attach the flange clamp to the flange. Always use the flange clamp to hold the linear motor transport onto the stabilizer post.
Figure 2-10. Installing the VSM linear motor transport on the top flange of the PPMS

Section 2.2 Chapter 2 Initial Installation of the Hardware and Software Installing and Removing the VSM Option
2-10 PPMS VSM Option User’s Manual, Rev. A3 Quantum Design January 2008
2.2.7 Complete the System Connections Using Figure 2-11 for guidance, complete the electrical connections for the VSM option. After you have attached the connectors, verify that the connections are firm.
Figure 2-11. VSM option connections on a 9-T PPMS
2.2.8 Install the VSM Software Use the following instructions to install the MultiVu and VSM software applications on your PC (see the Physical Property Measurement System: MultiVu Application User's Manual for more information on MultiVu). If you purchased the VSM option as part of a new PPMS system, you can go to Step 3 below, "Verify that the VSM software is properly installed . . ." See Chapter 6 for more information on the VSM application.
1. Install the most recent version of the PPMS MultiVu software (Version 1.3.0 or later) if it is not already installed.
2. Install the VSM software by starting the VSM software setup wizard and following the instructions.
3. Verify that the VSM software is properly installed by activating it from within MultiVu: a. Start the PPMS MultiVu application program. b. Go to the Utilities menu on the main MultiVu menu bar (at the top of the application
window). c. Select Utilities >> Activate Option (Figure 2-12).
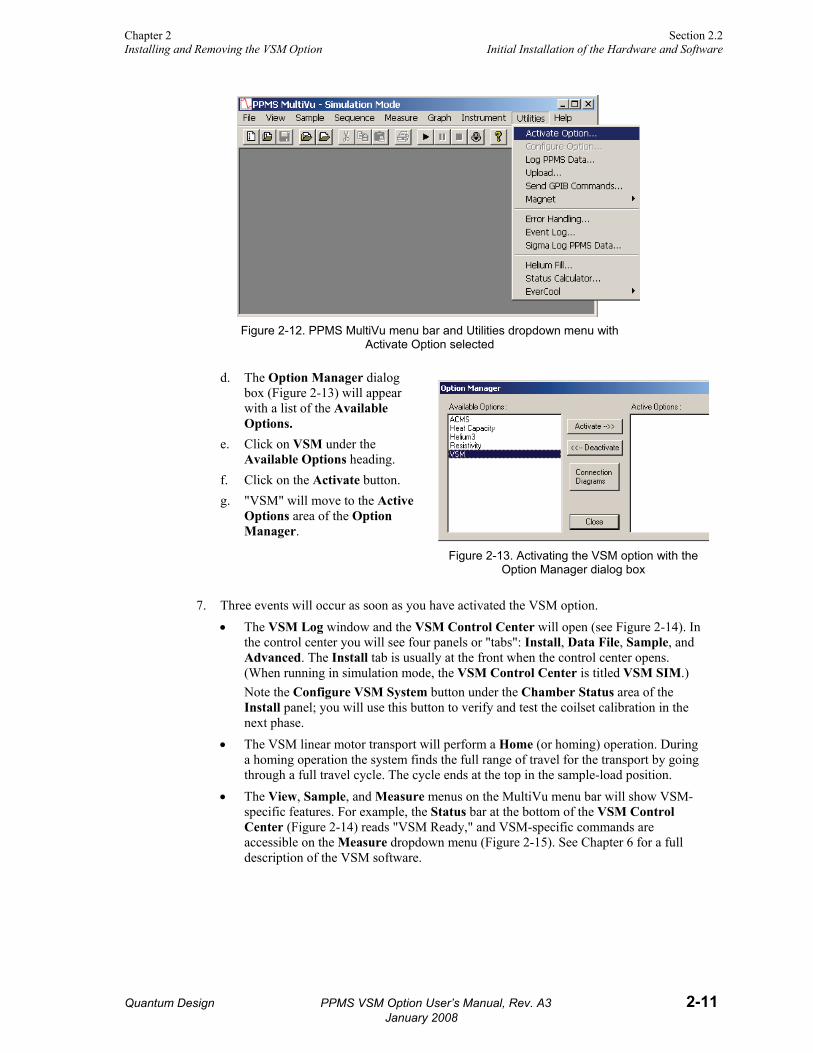
Chapter 2 Section 2.2 Installing and Removing the VSM Option Initial Installation of the Hardware and Software
Quantum Design PPMS VSM Option User’s Manual, Rev. A3 2-11 January 2008
Figure 2-12. PPMS MultiVu menu bar and Utilities dropdown menu with
Activate Option selected
d. The Option Manager dialog box (Figure 2-13) will appear with a list of the Available Options.
e. Click on VSM under the Available Options heading.
f. Click on the Activate button. g. "VSM" will move to the Active
Options area of the Option Manager.
Figure 2-13. Activating the VSM option with the Option Manager dialog box
7. Three events will occur as soon as you have activated the VSM option. • The VSM Log window and the VSM Control Center will open (see Figure 2-14). In
the control center you will see four panels or "tabs": Install, Data File, Sample, and Advanced. The Install tab is usually at the front when the control center opens. (When running in simulation mode, the VSM Control Center is titled VSM SIM.) Note the Configure VSM System button under the Chamber Status area of the Install panel; you will use this button to verify and test the coilset calibration in the next phase.
• The VSM linear motor transport will perform a Home (or homing) operation. During a homing operation the system finds the full range of travel for the transport by going through a full travel cycle. The cycle ends at the top in the sample-load position.
• The View, Sample, and Measure menus on the MultiVu menu bar will show VSM-specific features. For example, the Status bar at the bottom of the VSM Control Center (Figure 2-14) reads "VSM Ready," and VSM-specific commands are accessible on the Measure dropdown menu (Figure 2-15). See Chapter 6 for a full description of the VSM software.

Section 2.2 Chapter 2 Initial Installation of the Hardware and Software Installing and Removing the VSM Option
2-12 PPMS VSM Option User’s Manual, Rev. A3 Quantum Design January 2008
Figure 2-14. VSM Control Center (VSM SIM) and VSM Log window
Figure 2-15. PPMS MultiVu menu bar and Measure dropdown menu
for VSM option
4. Next, you will verify the serial number on the detection coilset puck and test the coilset thermometer and system calibration.
2.2.9 Configure the VSM System The serial number of the detection coilset puck identifies the calibration file that is used to calibrate the coilset. You must verify that the serial number on the puck, which you obtained in Section 2.2.4, matches the standard calibration file referenced in the software. You will use the Configure VSM System dialogs to specify the puck serial number and test the VSM hardware. 1. Locate the puck serial number that you obtained in Section 2.2.4. 2. Click on the Configure VSM System button, which is located on the right-hand side of
the Install tab (Figure 2-14). 3. Page 1 of the Configure VSM System dialog will open (Figure 2-16). Note the text box
where you will enter the serial number of the standard VSM calibration file and the View Diagram button at the top right-hand side of the dialog. (Clicking on the View Diagram button will display the same diagram that is shown in Figure 2-11.)

Chapter 2 Section 2.2 Installing and Removing the VSM Option Initial Installation of the Hardware and Software
Quantum Design PPMS VSM Option User’s Manual, Rev. A3 2-13 January 2008
Figure 2-16. Configure VSM System dialog, page 1
4. Verify that the number in the text box matches the serial number of your detection coilset puck. If no number is displayed (as above), enter the serial number of your detection coilset puck in the text box.
5. Click on the Next >> button at the bottom of the dialog box. Page 2 of the Configure VSM System dialog (Figure 2-17) will open, showing the results of system tests to verify system operations.
Figure 2-17. Configure VSM System dialog, page 2: Testing calibration file
6. When the report in the VSM System Test Results area is complete and no errors are reported, click on the Finish button. The Configure VSM System dialog will close and you will be back at the VSM Control Center and the Install tab.
7. If you have completely followed the VSM hardware and software setup steps, the PPMS is now ready for you to mount a sample, install it in the PPMS, and perform VSM measurements, as is explained in Chapters 3 and 4. First, please review Section 1.4, "Safety Precautions," for important information.

Section 2.3 Chapter 2 Reconfiguring the PPMS for the VSM Option Installing and Removing the VSM Option
2-14 PPMS VSM Option User’s Manual, Rev. A3 Quantum Design January 2008
2.3 Reconfiguring the PPMS for the VSM Option You will use the procedures in this section whenever you re-install the VSM option. For example, if you have been using the Heat Capacity option with the PPMS, you would use the Section 2.3 procedures to reconfigure the PPMS to perform VSM measurements. Many of the procedures used in initial installation are also used in re-installation of the VSM option, but some procedures apply only to initial installation or to re-installation.
The following subsections describe the reconfiguration and re-installation process in detail. You should follow the steps closely the first time that you re-install the VSM option. After you are more familiar with the necessary procedures, the outline below may provide you with sufficient information for many of the steps.
Summary of VSM Reconfiguration Procedures 1. Warm up the system, set the field to zero, vent the chamber, and remove any existing items
(e.g., puck, probe, standard-centering ring) from the sample chamber (see Figures 2-18–2-20).
2. Install the VSM coilset puck and the VSM sample tube (see Figures 2-5–2-8). 3. Install the VSM linear motor transport (see Figures 2-9–2-10). 4. Connect the VSM motor drive cable (3096-200) to the VSM linear motor transport (see
Figure 2-11). 5. Connect the VSM preamp cable (3096-300) to the gray Lemo connector on the probe head
(see Figure 2-11). 6. Activate the VSM application from within MultiVu (see Figures 2-12–2-14). 7. Configure the VSM System (see Figure 2-14 and Figures 2-16–2-17).
2.3.1 Prepare for Re-installation To prepare the PPMS system for re-installation of the VSM option, you will use the PPMS MultiVu application to warm the system to 300 K, set the magnetic field to zero (0) Oe, and vent the sample chamber. Then, after you have removed any sample puck or option that is currently installed in the chamber, you will remove the centering ring from the top of the PPMS.
1. Set the PPMS system temperature to 300 K: • Open the Temperature-System
dialog box (select Instrument >> Temperature) and specify a set point of 300 K, as shown in Figure 2-18.
• Click on the Set button. • Leave the dialog box open so
that you can monitor the temperature until it reaches at least 290 K (do not continue with installation until the temperature reaches at least 290 K).
2. In the Temperature-System dialog box, click on the Close button.
Figure 2-18. Warming the system to 300 K with the Temperature-System dialog box

Chapter 2 Section 2.3 Installing and Removing the VSM Option Reconfiguring the PPMS for the VSM Option
Quantum Design PPMS VSM Option User’s Manual, Rev. A3 2-15 January 2008
3. Open the Field dialog box (Figure 2-19) to set the field to zero (0) Oe. • Select Instrument >> Field. • In the Field dialog box, specify a
Set Point of zero (0) Oe. • Click on the Set button. • Leave the dialog box open so that
you can monitor the field until it is within 1000 Oe of zero (do not continue until the field is within 1000 Oe of zero [0]).
4. In the Field dialog box, click on the Close button.
Figure 2-19. Setting the field to zero (0) with the
Field dialog box
W A R N I N G !
Verify that there are no nearby sources of magnetic field (e.g., NMR or other laboratory magnets) before attempting to install or remove the linear motor transport, as explained in Section 1.4.1.
5. Open the Chamber dialog box (Figure
2-20) to vent the PPMS sample chamber: • Select Instrument >> Chamber. • Click on the Vent Cont. button. • Click on the Close button.
6. Remove any sample puck or PPMS option that is installed in the sample chamber. Refer to the Physical Property Measurement System: Hardware Manual for instructions on removing a sample puck. Refer to the appropriate PPMS option manual to remove an option.
Figure 2-20. Venting the chamber with the
Chamber dialog box
7. Remove the standard centering ring (or any other hardware that is present) from the top flange of the PPMS.
Section 2.3 Chapter 2 Reconfiguring the PPMS for the VSM Option Installing and Removing the VSM Option
2-16 PPMS VSM Option User’s Manual, Rev. A3 Quantum Design January 2008
2.3.2 Install the VSM Coilset Puck and Insert the Sample Tube 1. Locate the serial number of the detection coilset puck (4096-204), as shown in Figure 2-5.
This serial number will be used to identify the calibration data for the coilset in a later step. 2. Using the illustrations in Figures 2-5–2-8 for guidance, install the puck and sample tube.
• Insert the coilset into the PPMS sample chamber using the puck-insertion2 tool. Refer to the Physical Property Measurement System: Hardware Manual for a detailed description of puck insertion and extraction.
• Verify that the standard centering ring has been removed from the top of the PPMS. (The VSM option has an integrated sample tube and centering-ring assembly.)
• On the VSM sample tube, examine the O-ring on the centering ring for dirt and dust. If the ring is dirty, clean it with a lint-free cloth (e.g., Kimwipe) and lightly grease it with silicon vacuum grease.
• Carefully lower the VSM sample tube (4096-301) into the PPMS sample chamber until the centering ring seats onto the top-flange of the PPMS.
2.3.3 Install the VSM Linear Motor Transport
C A U T I O N !
Quantum Design recommends that you have another person help you install the VSM linear motor transport, which is fragile, bulky, and moderately heavy (about 10 kg or 22 lb).
1. Remove the VSM linear motor transport and its stand from the storage case and place them
on a stable work surface, keeping the motor in a vertical position. 2. Verify that the bottom surface of the extender tube flange is clean. If it is dusty or dirty, clean
it with a lint-free cloth (e.g., Kimwipe). 3. Remove the VSM linear motor transport from the stand, keeping it upright. For example, you
can support the weight of the linear motor transport by gripping it with one hand on the top tube and the other hand on the extender tube flange.
4. Place the VSM linear motor transport onto the top flange of the PPMS by orienting the electrical connector to the rear of the dewar (the same direction as the other PPMS cables). The linear motor transport should slide over the stabilizer post at the top of the VSM sample-tube assembly (4096-301). Figure 2-10 shows where the stabilizer post emerges from the PPMS sample chamber, the correct orientation of the linear motor transport, and other relevant parts of the equipment.
5. Verify that the integrated VSM centering ring is sandwiched snugly between the top flange of the PPMS and the linear motor transport.
6. Attach the flange clamp to the flange. Always use the flange clamp to hold the linear motor transport onto the post.
2 See Footnote 1.

Chapter 2 Section 2.3 Installing and Removing the VSM Option Reconfiguring the PPMS for the VSM Option
Quantum Design PPMS VSM Option User’s Manual, Rev. A3 2-17 January 2008
C A U T I O N !
In order to install the VSM option on the PPMS, you must use the VSM-specific components, such as the VSM sample-tube assembly with its integrated centering ring and stabilizer post. This design is for your safety.
7. Place the cap on the linear motor transport and purge and seal the PPMS sample chamber by
using the Instrument >> Chamber dialog box (see Section 2.3.1 and Figure 2-20).
2.3.4 Connect the System Complete the electrical connections for the VSM option, using Figure 2-11 for guidance. After you have screwed in the connectors, verify that the connections are firm.
2.3.5 Activate the VSM Option After installing the VSM option, you must activate it by using the MultiVu application software. First, you must deactivate any other measurement option, as the PPMS can operate only one measurement option at a time. 1. Start the PPMS MultiVu application if it is not already running. 2. Open the Option Manager dialog box (select Utilities >> Activate Option), as shown in
Figures 2-12 and 2-13. 3. Deactivate any currently active option:
• Click on the name of the active option. • Click on the Deactivate button. The active option will move over to the Available
Options list. 4. Activate the VSM option:
• Click on VSM (in the Available Options list). • Click on the Activate button. The VSM option will be moved to the Active Options list.
The VSM Control Center will open as soon as you have activated the VSM option. When the control center opens, it shows four tabs or dialog panels, with the Install tab in the front, as shown in Figure 2-21. (When running in simulation mode, the VSM Control Center is titled VSM SIM.) Chapter 6 contains a detailed description of the VSM Control Center.

Section 2.3 Chapter 2 Reconfiguring the PPMS for the VSM Option Installing and Removing the VSM Option
2-18 PPMS VSM Option User’s Manual, Rev. A3 Quantum Design January 2008
Figure 2-21. VSM Control Center (VSM SIM) and the Install tab
Next, you will verify the serial number on the detection coilset puck.
2.3.6 Configure the VSM System The serial number of the detection coilset puck identifies the calibration file that is used to calibrate the coilset. You must verify that the serial number on the puck (Step 1 of Section 2.3.2.) matches the standard calibration file referenced in the software. You will use the Configure VSM System dialogs to specify the puck serial number and test the VSM hardware. 1. Locate the serial number that you obtained in Section 2.3.2. 2. Click on the Configure VSM System button, which is located on the right side of the Install
tab (Figure 2-21). 3. Page 1 of the Configure VSM System dialog will open (Figure 2-16). Note the text box for
the serial number of the calibration file and the View Diagram button at the top right-hand side of the dialog. (When you click on the View Diagram button, it opens a page that displays Figure 2-11.)
4. Verify that the number in the text box matches the number of your detection coilset puck or, if no number is displayed, enter the serial number of your detection coilset puck in the text box.
5. Click on the Next >> button, which opens page 2 of the Configure VSM System dialog (Figure 2-17). This dialog shows the results of system tests to verify system operations.
6. When the report in the VSM System Test Results area is complete and no errors are shown, click on the Finish button. The Configure VSM System dialog will close and you will be back at the VSM Control Center and the Install tab.
7. The PPMS and the VSM option are now ready for you to complete the measurement preparations, beginning with mounting the sample, as explained in Chapter 4. First, please review the material on system safety in Section 1.4.

Chapter 2 Section 2.4 Installing and Removing the VSM Option Removing the VSM Option
Quantum Design PPMS VSM Option User’s Manual, Rev. A3 2-19 January 2008
2.4 Removing the VSM Option
You do not need to remove the VSM linear motor transport and its associated hardware from the PPMS while the system is idle. However, if you intend to use the PPMS for other types of measurements (e.g., Heat Capacity, Thermal Transport), you must first remove the VSM option.
As summarized below, you will use the VSM Install/Remove Sample Wizard to prepare the system so that you can remove the linear motor transport, sample tube, and coilset puck. These procedures are essentially the reverse of the installation procedure.
Summary of VSM Removal Procedures 1. Prepare for removal of the VSM transport and hardware:
a. Set the field to zero. b. Use the VSM Install/Remove Sample Wizard to warm the sample chamber to 300 K,
vent the chamber, and move the transport to the load position. c. Remove the sample rod. d. Shut down the linear motor transport.
2. Deactivate the VSM software application. 3. Remove the linear motor transport and place it in the storage case. 4. Remove the sample tube and the coilset puck.
2.4.1 Prepare for Removal 1. If necessary, activate the VSM software from MultiVu (select Utilities >> Activate Option
>> VSM) as explained in Section 2.3.5. 2. If the field is not zero, set it to zero by using the Field dialog box (Figure 2-19):
• Select Instrument >> Field. • In the Field dialog box, specify a set point of zero (0) Oe. • Click on the Set button. • Leave the dialog box open so that you can monitor the field until it is within 1000 Oe of
zero (do not continue until the field is within 1000 Oe of zero). • In the Field dialog box, click on the Close button.
W A R N I N G ! Verify that there are no nearby sources of magnetic field (e.g., NMR or other laboratory magnets) before attempting to install or remove the linear motor transport, as explained in Section 1.4.1.

Section 2.4 Chapter 2 Removing the VSM Option Installing and Removing the VSM Option
2-20 PPMS VSM Option User’s Manual, Rev. A3 Quantum Design January 2008
3. Use the VSM Install/Remove Sample Wizard to prepare the system for the remainder of the procedures (removing the sample rod, shutting down the linear motor transport, and removing the sample tube and coilset puck). • To start the wizard, click on the Install/Remove Sample button in the left side of the
VSM Control Center, just below the Chamber Status area (see Figure 2-21). • The Install/Remove Sample button opens the first page of the VSM Install/Remove
Sample Wizard dialog (Figure 2-22). This page has a Chamber Status area, an Instructions area, and buttons to Open Chamber, Skip >> (to the next step), and Cancel the operation.
Figure 2-22. VSM Install/Remove Sample Wizard dialog, page 1: Open Chamber
4. To start the removal process, click on the Open Chamber button at the bottom of the Instructions area. The system software will automatically bring the chamber to room temperature, vent the chamber, and move the transport into the loading position. The instructions area and button labels will reflect the process, as shown in Figure 2-23A.
Figure 2-23A. VSM Install/Remove Sample Wizard dialog, page 2: Preparing
the sample chamber
5. When the instructions area indicates that the process is complete and the system is prepared for the next step (install a new sample or remove a sample, Figure 2-23B), verify that there are no nearby sources of magnetic field.
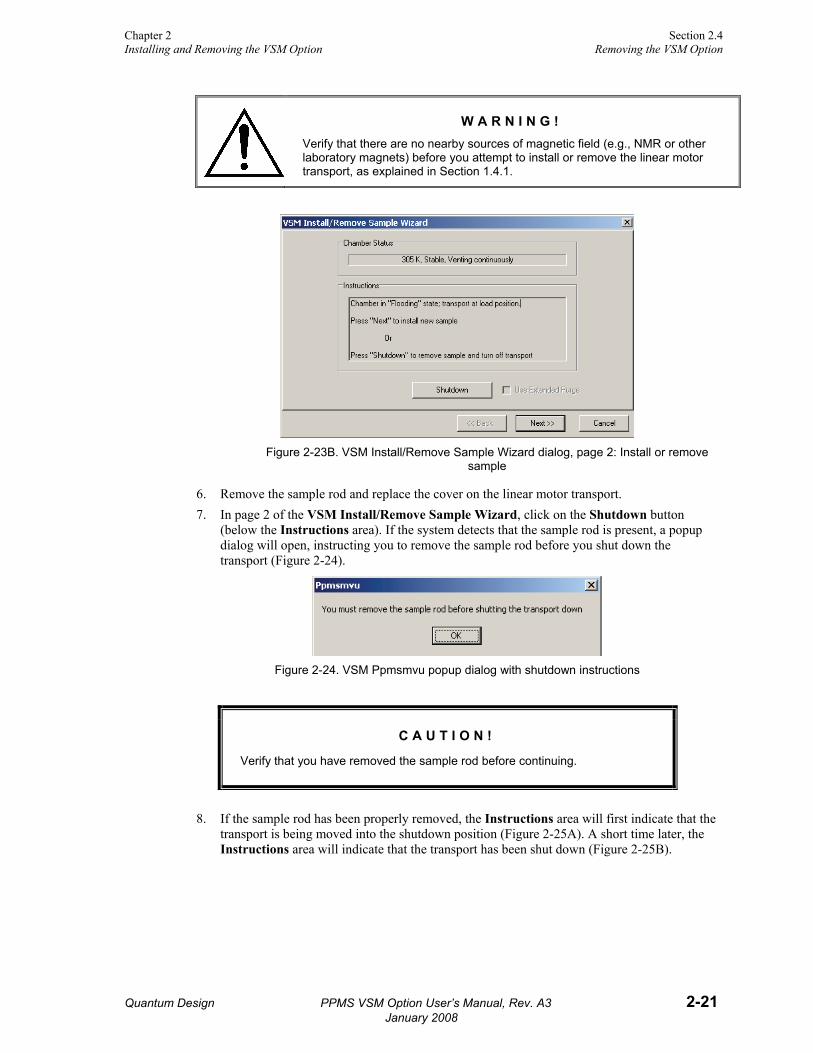
Chapter 2 Section 2.4 Installing and Removing the VSM Option Removing the VSM Option
Quantum Design PPMS VSM Option User’s Manual, Rev. A3 2-21 January 2008
W A R N I N G ! Verify that there are no nearby sources of magnetic field (e.g., NMR or other laboratory magnets) before you attempt to install or remove the linear motor transport, as explained in Section 1.4.1.
Figure 2-23B. VSM Install/Remove Sample Wizard dialog, page 2: Install or remove
sample
6. Remove the sample rod and replace the cover on the linear motor transport. 7. In page 2 of the VSM Install/Remove Sample Wizard, click on the Shutdown button
(below the Instructions area). If the system detects that the sample rod is present, a popup dialog will open, instructing you to remove the sample rod before you shut down the transport (Figure 2-24).
Figure 2-24. VSM Ppmsmvu popup dialog with shutdown instructions
C A U T I O N !
Verify that you have removed the sample rod before continuing.
8. If the sample rod has been properly removed, the Instructions area will first indicate that the
transport is being moved into the shutdown position (Figure 2-25A). A short time later, the Instructions area will indicate that the transport has been shut down (Figure 2-25B).
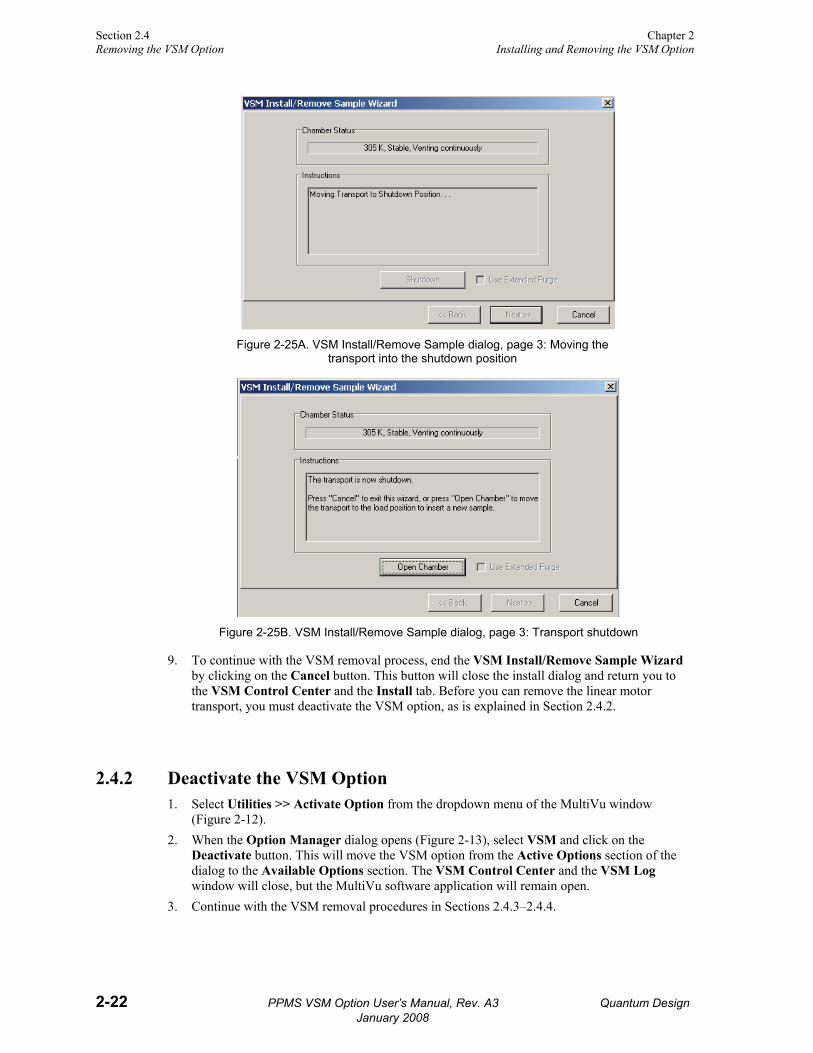
Section 2.4 Chapter 2 Removing the VSM Option Installing and Removing the VSM Option
2-22 PPMS VSM Option User’s Manual, Rev. A3 Quantum Design January 2008
Figure 2-25A. VSM Install/Remove Sample dialog, page 3: Moving the
transport into the shutdown position
Figure 2-25B. VSM Install/Remove Sample dialog, page 3: Transport shutdown
9. To continue with the VSM removal process, end the VSM Install/Remove Sample Wizard by clicking on the Cancel button. This button will close the install dialog and return you to the VSM Control Center and the Install tab. Before you can remove the linear motor transport, you must deactivate the VSM option, as is explained in Section 2.4.2.
2.4.2 Deactivate the VSM Option 1. Select Utilities >> Activate Option from the dropdown menu of the MultiVu window
(Figure 2-12). 2. When the Option Manager dialog opens (Figure 2-13), select VSM and click on the
Deactivate button. This will move the VSM option from the Active Options section of the dialog to the Available Options section. The VSM Control Center and the VSM Log window will close, but the MultiVu software application will remain open.
3. Continue with the VSM removal procedures in Sections 2.4.3–2.4.4.

Chapter 2 Section 2.4 Installing and Removing the VSM Option Removing the VSM Option
Quantum Design PPMS VSM Option User’s Manual, Rev. A3 2-23 January 2008
2.4.3 Remove the VSM Linear Motor Transport
C A U T I O N !
Quantum Design recommends that you have another person help you remove the VSM linear motor transport, which is fragile, bulky, and moderately heavy (about 10 kg or 22 lb).
1. Unplug the electrical connector from the back of the VSM linear motor transport. (You can
leave the other end of the cable connected to the Model 1000 modular control system.) Important: Never attempt to move the linear motor transport when it has a cable connected to it.
2. Remove the flange clamp from the top flange of the PPMS (see Figure 2-10). 3. Slowly lift the linear motor transport until it has cleared the stabilizer post (see Figure 2-10). 4. Place the linear motor transport back in the storage case (4096-150).
W A R N I N G ! Store the VSM linear motor transport in a secure location to prevent it from being attracted to magnetic fields in the laboratory, including those produced by the PPMS, as explained in Section 1.4.1.
2.4.4 Remove the VSM Sample Tube and Coilset Puck 1. Remove the VSM sample tube (4096-301) from the PPMS sample chamber. 2. Remove the VSM coilset puck (4096-204) from the sample chamber by using the puck-
extraction tool.3 Refer to the Physical Property Measurement System: Hardware Manual for a detailed description of puck insertion and extraction.
3. Unplug the VSM preamp cable (3096-300) from the probe head and set it aside. You do not need to disconnect the other end of the cable from the Model 1000.
4. Return the blank flange to the top of the probe head or install another of the Quantum Design measurement options.
5. When the sample chamber has been closed, you can purge and seal it by using the Chamber dialog box (Figure 2-20). • Select Instrument >> Chamber. • In the Chamber dialog box, click on the Purge/Seal button.
6. The base PPMS measurement system is now ready for you to install a different option.
3 See Footnote 1.


Quantum Design PPMS VSM Option User’s Manual, Rev. A3 3-1 January 2008
C H A P T E R 3
Sample Preparation and Mounting
3.1 Introduction This chapter contains the following information: ○ Section 3.2 discusses constraints on the
samples that can be measured with the PPMS VSM option.
○ Section 3.3 explains how to mount samples for measurement with the PPMS VSM option.
3.2 Sample Properties The quality of your VSM measurement results will be affected by the dimensions and shape of the sample and the size of its magnetic moment.
3.2.1 Size and Shape The geometry of the detection coils in the PPMS VSM constrains the dimensions of samples that can be measured. Figure 5-4 gives the dimensions of a standard coilset puck. In order for the sample and sample holder to fit into the detection coils, their diameter must be less than 6.35 mm (0.25 inches). Furthermore, accurate results require samples that have a small vertical size compared to the baseline dimension of the detection coils. For the standard coilset puck, this baseline is 7.11 mm (0.280 inches). In practice, a cylindrical sample in the shape of the included Palladium standard sample is close to ideal.
Table 3-1 shows the calculated effect of the sample length and diameter on the reported sample moment. The entries in the table were calculated for a vertically oriented cylindrical sample of length L and diameter D. Each entry corresponds to the ratio of the reported moment to the true moment. For example, for a sample of length L = 5.0 mm and diameter D = 2.0 mm measured with a peak amplitude A = 2.0 mm, the software will report a numerical result for the moment that is 0.9476 times the answer obtained for a pointlike sample of the same total moment. Note that while the values in Table 3-1 have been normalized to 1.0000 for a pointlike sample, the PPMS VSM system is calibrated with an approximately spherical sample of diameter 2 mm (closely approximated by a cylinder of L = 2 mm, D = 2 mm) at a peak amplitude A = 1.0 mm.

Section 3.2 Chapter 3 Sample Properties Sample Preparation and Mounting
3-2 PPMS VSM Option User’s Manual, Rev. A3 Quantum Design January 2008
Table 3-1. Calculated ratio of the reported moment to the true moment for different size cylindrical samples and different amplitudes.
SAMPLE DIMENSIONS PEAK AMPLITUDE OF SAMPLE OSCILLATION
Length L (mm)
Diameter D (mm) 0.5 mm 1.0 mm 2.0 mm
0 0 1.0000 1.0000 1.0000 0 1 1.0003 1.0005 1.0014 0 2 1.0007 1.0017 1.0053 0 3 1.0005 1.0026 1.0109 1 0 0.9996 0.9993 0.9981 1 1 0.9999 0.9999 0.9996 1 2 1.0007 1.0013 1.0037 1 3 1.0010 1.0028 1.0097 2 0 0.9978 0.9966 0.9921 2 1 0.9985 0.9975 0.9937 2 2 1.0002 0.9999 0.9986 2 3 1.0020 1.0029 1.0059 3 0 0.9933 0.9906 0.9808 3 1 0.9944 0.9920 0.9828 3 2 0.9976 0.9958 0.9887 3 3 1.0020 1.0013 0.9980 5 0 0.9662 0.9597 0.9367 5 1 0.9687 0.9622 0.9394 5 2 0.9759 0.9698 0.9476 5 3 0.9877 0.9820 0.9613 10 0 0.6961 0.6889 0.6647 10 1 0.6988 0.6914 0.6669 10 2 0.7070 0.6993 0.6737 10 3 0.7213 0.7130 0.6854
Table 3-1 only addresses pointlike and cylindrical samples, but you can obtain similar results when you measure samples with other shapes. In such cases, use Table 3-1 as a rough guide to approximate the expected errors. Again, detection-coil sensitivity for the included Palladium standard sample (4096-390) is not necessarily the same as detection-coil sensitivity for samples with shapes and/or sizes that differ from the included Palladium standard sample. The VSM measurement software will not correct for such differences.
3.2.2 Errors from Radial Offset of Sample You also should consider the radial centering of the sample in the coilset when the absolute accuracy of VSM measurement results is important.
Table 3-2 shows the calculated effect of radial offset for cylindrical samples of different sizes, using oscillation amplitudes of 1 mm and 2 mm. Note that when the centering error is only 1 mm there could be as much as 1% error in the repeated moment.

Chapter 3 Section 3.3 Sample Preparation and Mounting Mounting Samples
Quantum Design PPMS VSM Option User’s Manual, Rev. A3 3-3 January 2008
Table 3-2. Calculated ratio of the reported moment to the true moment of cylindrical samples for different radial offsets from the coilset centerline.
PEAK AMPLITUDE
SAMPLE DIMENSIONS SAMPLE RADIAL OFFSET
A (mm) L (mm) D (mm) 0 mm 0.5 mm 1.0 mm 1.5 mm 2.0 mm
1.0 1.0 1.0 1.000 1.001 1.003 1.003 0.997 1.0 2.0 2.0 1.000 1.001 1.003 1.005 1.000 1.0 3.0 3.0 1.001 1.003 1.006 1.009 1.006 2.0 1.0 1.0 1.000 1.002 1.010 1.020 1.028 2.0 2.0 2.0 0.999 1.002 1.010 1.020 1.030 2.0 3.0 3.0 0.998 1.001 1.010 1.023 1.035
3.2.3 Size of Magnetic Moment The magnetic moment of your samples should be larger than about 10-6 emu to be detected in the VSM.
3.3 Mounting Samples
3.3.1 Sample Holder Construction Most sample holders are constructed of materials with magnetic moments that are much larger than the minimum detectable moment. The key to successful measurements is making the sample holder relatively uniform. Figure 3-1 shows the geometry of the trough-shaped sample holder included in the VSM Option User's Kit. As you can see, the cross-section is shaped like a “C” to hold the sample. In addition, the cross-section shows that the sample holder is uniform in the region where the sample is mounted. As a result, small vertical displacements of the sample holder will not create a signal. However, if the ends of the sample holder move sufficiently close to the detection coils, the imbalance will create a detected signal.
MOUNT SAMPLE HERE
THREAD: 10-32
Figure 3-1. Trough-shaped sample holder (4096-391)

Section 3.3 Chapter 3 Mounting Samples Sample Preparation and Mounting
3-4 PPMS VSM Option User’s Manual, Rev. A3 Quantum Design January 2008
3.3.2 Accurate Sample Location The PPMS VSM system uses a touchdown technique for automatic centering of the sample in the detection coils. This technique is described in detail in Chapter 4. To optimize the touchdown, take special care with two steps in your preparations:
○ Verify that the sample is mounted on the sample holder at 35 mm from the bottom of the sample holder. Quantum Design has provided you with a special sample-mounting fixture (see Figures 4-2 and 5-8) for locating the sample.
○ Verify that the end of the sample holder has a very well defined contact surface for performing the touchdown operation.
Quantum Design recommends that you locate the sample at an offset of 35 mm. The height of the coilset is about 40 mm, so the offset of 35 mm places the end of the sample holder 5 mm above the puck surface. This location is far enough from the end of the sample holder so that end effects are minimal, yet it safely allows up to 4 mm oscillation amplitude of the sample rod. In addition, use of this location exposes the sample to minimal variations in applied magnetic field, because the sample is only moved 5 mm during a touchdown operation.
3.3.3 Sample Holder Variations You can also use the paddle-shaped sample holder shown in Figure 3-2. A set is included in the VSM Option User's Kit. For this approach, you can glue a sample to the side of the paddle, or you can use a long piece of clear plastic heat-shrink tubing to hold the sample. In either case, it is important to minimize cross-sectional variation along the length of the holder. For example, with the heat-shrink tubing, you should verify that the tubing is free of cuts or kinks, which could appear as a signal, and that the tubing extends the full length of the beam.
MOUNT SAMPLE HERE
THREAD: 10-32
Figure 3-2. Paddle-shaped sample holder (4096-392)

Quantum Design PPMS VSM Option User’s Manual, Rev. A3 4-1 January 2008
C H A P T E R 4
Taking VSM Measurements
4.1 Introduction This chapter contains the following information:
○ Section 4.2 summarizes the measurement process when you use the Quantum Design VSM option.
○ Section 4.4 describes how to take immediate-mode measurements with the VSM option.
○ Section 4.3 describes how to install samples for taking VSM measurements.
○ Section 4.5 describes how to remove a sample from the VSM.
4.2 Overview of VSM Measurements A VSM measurement consists of a sequence of centering operations followed by the oscillation of the sample and synchronous detection of the voltage induced in the coilset by the magnetized sample.
In preparation for the measurement, you will use the automated VSM Install/Remove Sample Wizard to install the sample. After that, the VSM application software completely automates the next steps, which include centering the sample, setting measurement parameters, and setting up measurement command files as well as operations that are more advanced.
The measurement process and use of the software are explained in the following subsections.
Important: Before you attempt to begin the measurement process, verify that the VSM option and the application software have been installed (Chapter 2) and the sample has been mounted on the sample holder (Chapter 3).
4.2.1 Sample Centering Accurate VSM measurements require that the system oscillate the sample in the center of the coil pair (see Figure 5-3), and that the centering position be kept stable to within about 0.1 mm at the center of the pickup coils. The 0.1 mm stability is maintained by periodic “touchdown” operations that adjust for changes in the sample position.1
1For example, during a measurement the temperature of the PPMS sample chamber changes. With the sample chamber and the sample rod being affected by different thermal expansions, the sample shifts with respect to the coilset. In addition, magnetic fields from the PPMS 16-T magnet can deflect the motor assembly that is suspended inside the linear motor

Section 4.2 Chapter 4 Overview of VSM Measurements Taking VSM Measurements
4-2 PPMS VSM Option User’s Manual, Rev. A3 Quantum Design January 2008
4.2.1.1 THE TOUCHDOWN OPERATION
Automatic sample centering is accomplished with the touchdown operation. To perform a touchdown operation, the linear motor transport lowers the sample rod until the end of the sample holder touches the puck surface (see Figure 4-1). At this point, the software knows the precise offset between the coilset and the sample, based on the dimensions of the coilset and the location of the sample on the sample holder. The linear motor transport then moves the center of the sample to the center of the coilset to continue measuring according to the following relation:
Measure location = (touchdown) + (coilset height) – (sample offset),
where coilset height ("H" in Figure 5-4) is constant for a given puck.
Figure 4-1. The touchdown centering operation
4.2.1.2 SCHEDULING TOUCHDOWN OPERATIONS
The software usually performs touchdown operations automatically, based on how rapidly the temperature and field are changing. The system does not collect VSM data during the brief time (about 20 s) it takes to perform a touchdown operation. In the event you want to control when the touchdown operation and its “downtime” occur, you can disable automatic centering and perform the centering operations manually. You can construct sequence files to pre-program centering operations, which Quantum Design staff recommend, or you can issue immediate-mode commands during the measurement by using the MultiVu menus.
Sequence files give you control over when touchdowns occur and they allow you to run a measurement without attending to the process. The software application runs sequence files, which contain sequences of commands that explicitly perform touchdowns (see Chapter 6). Sequence commands are the preferred method for controlling the timing of touchdowns, because they help you ensure the accuracy of your measurements.2
Immediate-mode commands allow you to center the sample at will by periodically selecting Measure >> VSM Center Sample on the main MultiVu dropdown menu bar while the VSM measurement is in progress.
transport, which further displaces the sample. Such effects can produce a displacement that exceeds the required centering accuracy of 0.1 mm. 2 Refer to the Physical Properties Measurement System: PPMS MultiVu Application User’s Manual for more information on sequence commands and command files.

Chapter 4 Section 4.2 Taking VSM Measurements Overview of VSM Measurements
Quantum Design PPMS VSM Option User’s Manual, Rev. A3 4-3 January 2008
C A U T I O N !
Failure to perform frequent enough centering operations will lower the accuracy of measurements.
Automatic centering is a key quality-control mechanism in the software. When automatic centering has been disabled, the software cannot know how far the sample has drifted from the center of the pickup coils unless a touchdown is performed.
4.2.2 VSM Measurement Process: Synchronous Detection To perform VSM measurements, the Model CM-A VSM motor module is programmed to oscillate the sample at the center of the coilset at a predetermined frequency and amplitude. The voltage induced in the coilset is then amplified by the preamp and detected by the Model CM-B VSM detection module. The VSM detection module also reads the real-time sample position from the motor module.
The VSM detection module uses both the position and voltage signals to generate a complete and independent magnetization measurement every cycle of oscillation. In principle, a 40-Hz oscillation frequency can produce a 40-Hz data rate from the module. These data are averaged over an amount of time that you specify. For example, if you specify an averaging time of 1 second and the oscillation frequency is 40 Hz, the detection module would average the 40 readings per second into one reading per second.
To obtain an accurate measurement of the magnetic moment, the VSM software application uses calibration data from calibration files on the PC and from ROMs in the modules. The calibration data includes corrections for preamplifier gain errors, phase-shift errors, and the geometry of the coilset puck.
4.2.3 Immediate Mode and Sequence Mode VSM measurement commands, including starting, stopping, and centering, can be carried out in immediate mode or sequence mode. Immediate mode corresponds to commands that you issue directly from the VSM Control Center (Figure 4-4) and from the PPMS MultiVu Measure menu (Figure 6-9), for example, by clicking on buttons in dialog boxes. Sequence mode corresponds to commands that are executed from within a running sequence file. These commands are inserted into the sequence file by using the MultiVu Sequence Editor, as explained in Chapter 6 and in the Physical Properties Measurement System: PPMS MultiVu Application User’s Manual.
While immediate mode provides you with an interactive approach to measurements, sequence commands allow you to set up the system so that it will perform complex data-acquisition activities like magnetic hysteresis loops, temperature sweeps, and programmed touchdowns, consistently and without your attention. If you disable automatic centering, Quantum Design staff strongly recommend that you use a sequence to perform your measurements, including frequent touchdowns.
Important: Data from any measurement type or mode will be saved only if you have designated (selected or created) a VSM data file (see Sections 4.3.3, 6.5.2.2, and 7.3.4 for more about designating data files).

Section 4.3 Chapter 4 Installing a Sample Taking VSM Measurements
4-4 PPMS VSM Option User’s Manual, Rev. A3 Quantum Design January 2008
4.3 Installing a Sample This section takes you through the process of installing a sample into the VSM sample chamber, starting with a description of how the sample is attached to the holder and how the sample offset is measured.
You will be aided in sample installation by the VSM Control Center (Figure 4-4), which opens in the main MultiVu window as soon as you activate the VSM option. (When operating in simulation mode, the title of the VSM Control Center is VSM SIM.) The VSM Control Center organizes VSM-specific operations via automated programs (wizards) and four main panels or "tabs": the Install tab, the Data File tab, the Sample tab, and the Advanced tab. This introduction focuses on an installation method that uses the Install tab and the VSM Install/Remove Sample Wizard. Chapter 6 describes the VSM software application, including the VSM Control Center, in more detail.
4.3.1 Attach a Sample and Measure the Sample Offset 1. Attach the sample to the sample holder using the techniques discussed in Chapter 3. The
target line at 35 mm is the recommended mounting location, but the actual sample position can be 1 or 2 mm from this line.
2. Use the sample-mounting station to measure the distance from the center of the sample to the bottom of the sample holder, reading the position from the scale as demonstrated in Figure 4-2. This distance is called the sample offset. Measure the sample position to an accuracy of 0.5 mm. Important: It is important to read the actual position of the sample, not the target position. Accuracy is also important; you should carefully measure the sample position to an accuracy of 0.5 mm.
Figure 4-2. Reading the position of the sample from the sample-mounting
station
3. Remove the sample holder (with the mounted sample) from the mounting station and screw it onto the end of the sample rod.

Chapter 4 Section 4.3 Taking VSM Measurements Installing a Sample
Quantum Design PPMS VSM Option User’s Manual, Rev. A3 4-5 January 2008
4.3.2 Activate the VSM Option and Control Center Important: Do not use these instructions to re-install3 the VSM option. Instead, follow the instructions in Section 2.3 ("Reconfiguring the PPMS for the VSM Option") to reconfigure the PPMS for the VSM option and to reactivate the VSM software.
1. To start the VSM application and open the VSM Control Center, select Utilities >> Activate Option in the MultiVu window (Figure 4-3). When the Option Manager window opens, select VSM and click on the Activate button.
Figure 4-3. Activating the VSM option with the Option Manager dialog box
2. The Activate button opens the VSM Control Center (Figure 4-4) and VSM Log window (hidden in Figure 4-4; see Figures 2-14 and 7-1).
At this time, the system also will perform a Home operation to determine the full range of travel for the sample transport by touching down and then going to the load position. If a sample already has been installed when you activate the option (e.g., you left your sample installed when you turned off the system), the system performs a Touchdown operation.
Figure 4-4. Main MultiVu window and main window of the VSM Control
Center (VSM Log window has been minimized)
3. In the VSM Control Center, note the Install/Remove Sample button, which is located below the Chamber Status area, and the Measure button, which is located above the Status area. You will use these command buttons for the sample installation, centering, and measurement procedures that follow.
3 In other words, you used the PPMS to take measurements with some other option (e.g., Heat Capacity option) after you first installed and used the VSM option.
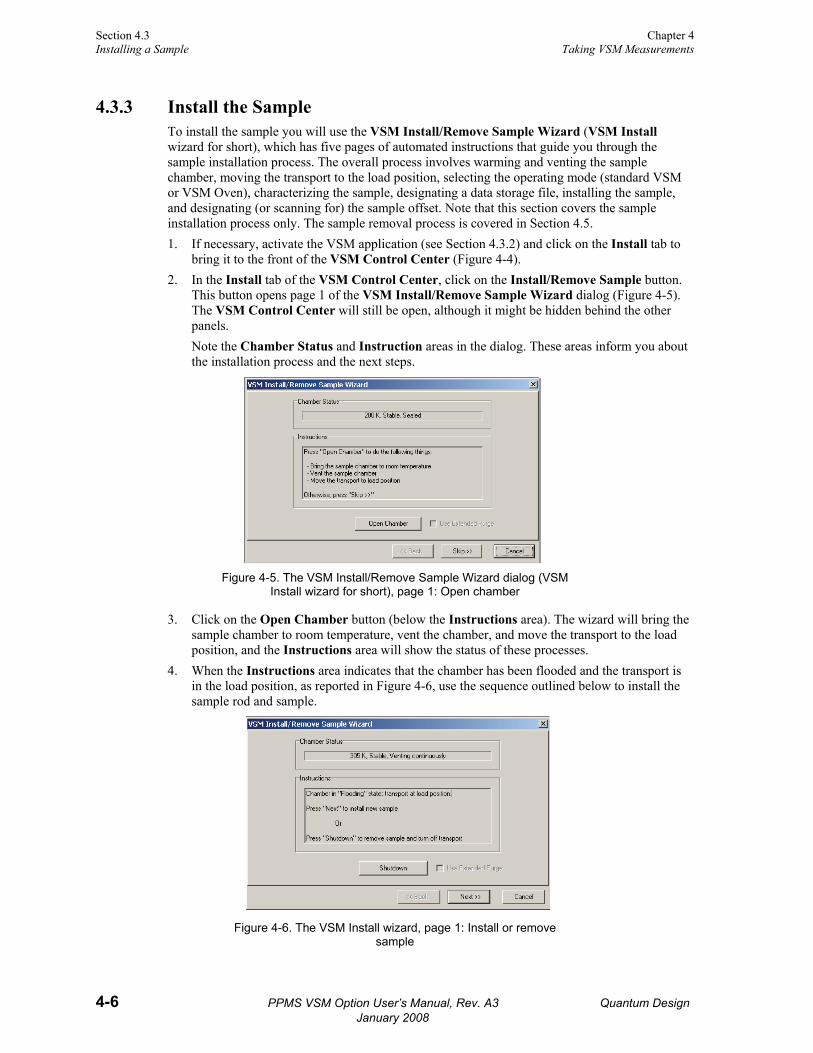
Section 4.3 Chapter 4 Installing a Sample Taking VSM Measurements
4-6 PPMS VSM Option User’s Manual, Rev. A3 Quantum Design January 2008
4.3.3 Install the Sample To install the sample you will use the VSM Install/Remove Sample Wizard (VSM Install wizard for short), which has five pages of automated instructions that guide you through the sample installation process. The overall process involves warming and venting the sample chamber, moving the transport to the load position, selecting the operating mode (standard VSM or VSM Oven), characterizing the sample, designating a data storage file, installing the sample, and designating (or scanning for) the sample offset. Note that this section covers the sample installation process only. The sample removal process is covered in Section 4.5. 1. If necessary, activate the VSM application (see Section 4.3.2) and click on the Install tab to
bring it to the front of the VSM Control Center (Figure 4-4). 2. In the Install tab of the VSM Control Center, click on the Install/Remove Sample button.
This button opens page 1 of the VSM Install/Remove Sample Wizard dialog (Figure 4-5). The VSM Control Center will still be open, although it might be hidden behind the other panels. Note the Chamber Status and Instruction areas in the dialog. These areas inform you about the installation process and the next steps.
Figure 4-5. The VSM Install/Remove Sample Wizard dialog (VSM
Install wizard for short), page 1: Open chamber
3. Click on the Open Chamber button (below the Instructions area). The wizard will bring the sample chamber to room temperature, vent the chamber, and move the transport to the load position, and the Instructions area will show the status of these processes.
4. When the Instructions area indicates that the chamber has been flooded and the transport is in the load position, as reported in Figure 4-6, use the sequence outlined below to install the sample rod and sample.
Figure 4-6. The VSM Install wizard, page 1: Install or remove
sample

Chapter 4 Section 4.3 Taking VSM Measurements Installing a Sample
Quantum Design PPMS VSM Option User’s Manual, Rev. A3 4-7 January 2008
• If you have not already measured your sample offset position, use the sample-mounting station to obtain the sample offset from the end of the sample holder (see Section 4.3.1).
• Attach the sample holder to the sample rod. • Remove the cap from the top of the VSM linear motor transport. • Insert the sample rod with the attached sample holder into the sample access port until
the magnetic lock at the top of the sample rod engages the magnetic lock ring in the linear motor transport. Verify that the magnetic lock has engaged the magnetic lock ring. Important: The sample will be subject to vertical magnetic fields of up to approximately 200 gauss when it passes through the head. If this is unacceptable for your samples, please contact Customer Service at Quantum Design.
5. Click on the Next >> button at the bottom of the VSM Install wizard. This will open page 2 of the VSM Install wizard (Figure 4-7), in which you designate the type of measurement (standard VSM or VSM Oven) you will be taking. Important: If you have installed both the standard (low temperature) VSM option and the VSM Oven option, you can come back to this page and change your selection at any point during the VSM Install wizard. However, if you want to change the operating mode after the VSM Install wizard has ended, you must restart the wizard from the beginning.
Figure 4-7. The VSM Install wizard, page 2: Selecting the standard
(low-temperature) VSM option
6. Click on the radio button next to Standard VSM Option and then click on the Next >> button at the bottom of the window.
7. If you have installed the VSM Oven option, new instructions will appear (Figure 4-8), directing you to remove the oven access port from the linear motor transport and replace it with the standard cap. When you have replaced the oven access port with the standard cap, click on the Next >> button.
Figure 4-8. The VSM Install wizard: Cover the VSM head with the
standard cap
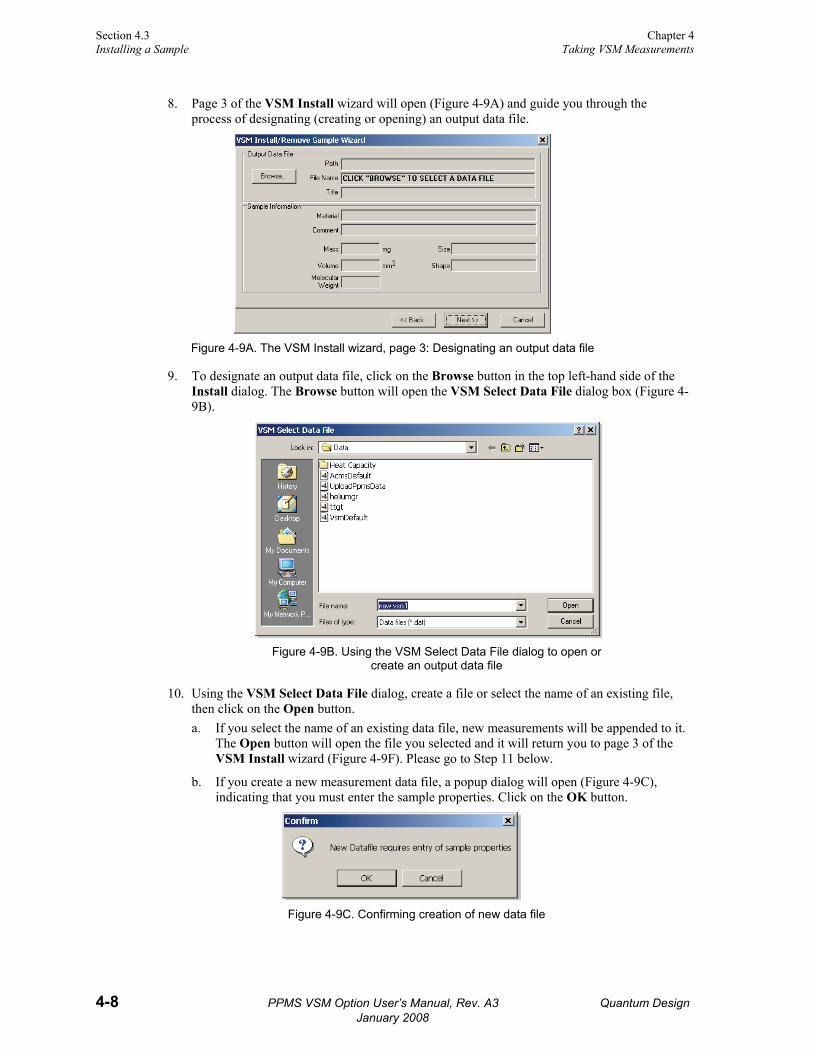
Section 4.3 Chapter 4 Installing a Sample Taking VSM Measurements
4-8 PPMS VSM Option User’s Manual, Rev. A3 Quantum Design January 2008
8. Page 3 of the VSM Install wizard will open (Figure 4-9A) and guide you through the process of designating (creating or opening) an output data file.
Figure 4-9A. The VSM Install wizard, page 3: Designating an output data file
9. To designate an output data file, click on the Browse button in the top left-hand side of the Install dialog. The Browse button will open the VSM Select Data File dialog box (Figure 4-9B).
Figure 4-9B. Using the VSM Select Data File dialog to open or
create an output data file
10. Using the VSM Select Data File dialog, create a file or select the name of an existing file, then click on the Open button. a. If you select the name of an existing data file, new measurements will be appended to it.
The Open button will open the file you selected and it will return you to page 3 of the VSM Install wizard (Figure 4-9F). Please go to Step 11 below.
b. If you create a new measurement data file, a popup dialog will open (Figure 4-9C), indicating that you must enter the sample properties. Click on the OK button.
Figure 4-9C. Confirming creation of new data file

Chapter 4 Section 4.3 Taking VSM Measurements Installing a Sample
Quantum Design PPMS VSM Option User’s Manual, Rev. A3 4-9 January 2008
• The OK button will open the VSM Datafile Title dialog (Figure 4-9D) so that you can provide a title for the graph view of the data. Note that this is optional.
• Enter the title you want displayed at the top of a plot or graph and click on the OK button.
Figure 4-9D. Creating a title for the data file
• The VSM Sample Properties dialog (Figure 4-9E) will open so that you can describe the sample for your records (also optional).
Figure 4-9E. Describing sample properties
• When you have completed your description, click on the OK button. You will be returned to page 3 of the VSM Install wizard (Figure 4-9F).
Figure 4-9F. The VSM Install wizard, page 3: Output
data file name and sample properties
11. Page 3 of VSM Install wizard will now display any optional information that you entered in the VSM Sample Properties dialog. If you designated a pre-existing file as the data output file, the dialog will display the sample information from that file.
12. Click on the Next >> button at the bottom of the dialog. Page 4 of the VSM Install wizard will open (Figure 4-10A), in which you can scan for the sample offset or enter your measurement of the sample-offset position (the value you obtained by using the sample-mounting station shown in Figure 4-2).

Section 4.3 Chapter 4 Installing a Sample Taking VSM Measurements
4-10 PPMS VSM Option User’s Manual, Rev. A3 Quantum Design January 2008
Figure 4-10A. The VSM Install wizard, page 4: Entering sample holder coordinates
13. Click on the Scan for Sample Offset button (right-hand side of the dialog in Figure 4-10A). The graph will reflect the progress of the scan.
14. When the system has completed the scan, a popup dialog will appear (Figure 4-10B) so that you can accept or reject the scanned value. a. To accept the value, click on the OK
button. The popup dialog will close and the dialog with the Sample Offset graph will reappear (Figure 4-10C).
Figure 4-10B. Confirming sample offset:
Accept or reject scanned value
Figure 4-10C. The VSM Install wizard, page 4: Sample offset
graphed
b. To ignore the value, click on the Cancel button. The popup dialog will close and the dialog with the Sample Offset graph will reappear, but the Offset text box will show the previous sample offset. You can now perform another scan, manually enter the sample offset, or click on the Next >> button to use the previous sample offset.
15. Click on the Next >> button at the bottom of the dialog (Figure 4-10C). This button opens page 5 of the VSM Install wizard (Figure 4-11), which reports the sample-offset position and related instructions.

Chapter 4 Section 4.3 Taking VSM Measurements Installing a Sample
Quantum Design PPMS VSM Option User’s Manual, Rev. A3 4-11 January 2008
Figure 4-11. The VSM Install wizard, page 5: Reporting sample-offset position
Note the "Use Extended Purge" checkbox that has appeared next to the Close Chamber button. Quantum Design staff strongly recommend that you use this option under the following circumstances: you will perform low-temperature measurements (< 270 K) and the VSM hardware has been exposed to air for an extended time. Under all other circumstances, the standard PPMS purge routine is sufficient, and it is more expedient than the extended purge.
16. Place the cap on the linear motor transport and click on the Close Chamber button (just below the Instructions area of Figure 4-11). • The text in the Instructions area will indicate that a touchdown is being performed
(Figure 4-12) and it will report on the process as it takes place. • When the touchdown has been completed, the Instructions area will say "Sample
Installation complete" and "Press 'Finish'," as shown in Figure 4-13.
Figure 4-12. The VSM Install wizard, page 5: Performing
a touchdown
17. Click on the Finish button at the bottom of the dialog (Figure 4-13). This button returns you to the Install tab of the VSM Control Center (Figure 4-14), which will display the system temperature and other status information.
Note: If you chose the extended purge option in Step 16, the Instructions area will reflect that process (Figure 4-15A) until the purge has been completed. Then the dialog shown in Figure 4-15B will appear.
Figure 4-13. The VSM Install wizard, page 5:
Finishing sample installation
Figure 4-14. Installation completed after
standard purge
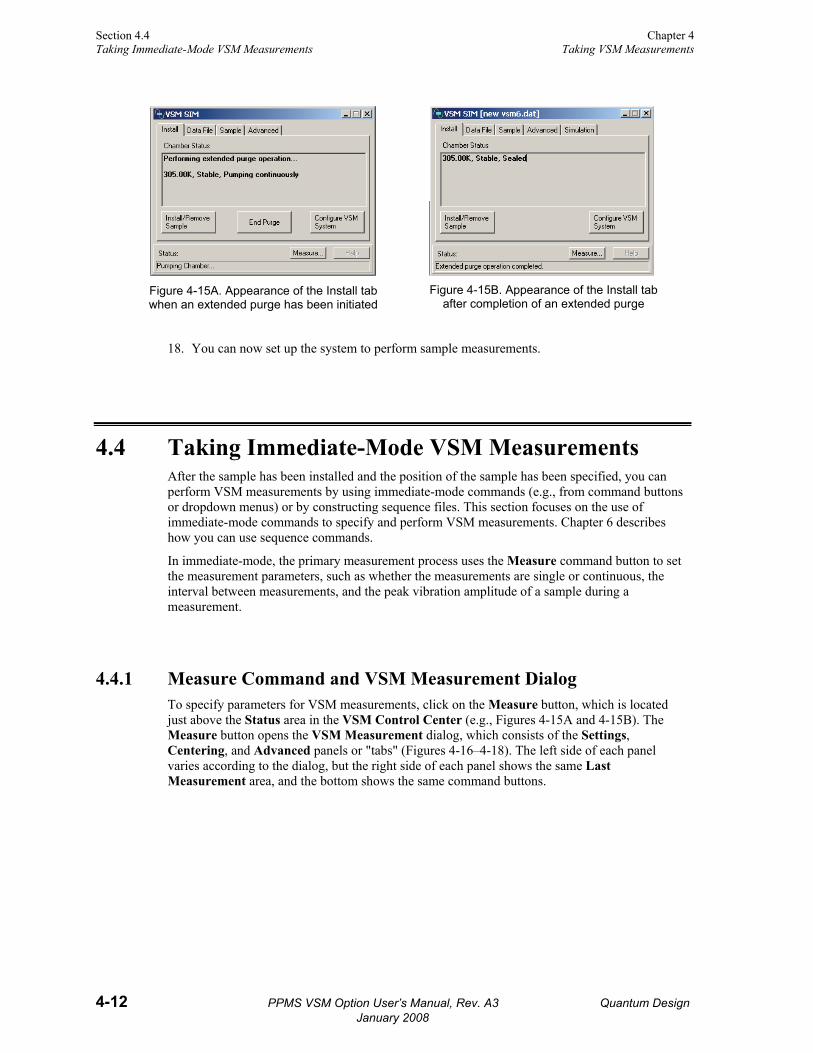
Section 4.4 Chapter 4 Taking Immediate-Mode VSM Measurements Taking VSM Measurements
4-12 PPMS VSM Option User’s Manual, Rev. A3 Quantum Design January 2008
Figure 4-15A. Appearance of the Install tab when an extended purge has been initiated
Figure 4-15B. Appearance of the Install tab
after completion of an extended purge
18. You can now set up the system to perform sample measurements.
4.4 Taking Immediate-Mode VSM Measurements After the sample has been installed and the position of the sample has been specified, you can perform VSM measurements by using immediate-mode commands (e.g., from command buttons or dropdown menus) or by constructing sequence files. This section focuses on the use of immediate-mode commands to specify and perform VSM measurements. Chapter 6 describes how you can use sequence commands.
In immediate-mode, the primary measurement process uses the Measure command button to set the measurement parameters, such as whether the measurements are single or continuous, the interval between measurements, and the peak vibration amplitude of a sample during a measurement.
4.4.1 Measure Command and VSM Measurement Dialog To specify parameters for VSM measurements, click on the Measure button, which is located just above the Status area in the VSM Control Center (e.g., Figures 4-15A and 4-15B). The Measure button opens the VSM Measurement dialog, which consists of the Settings, Centering, and Advanced panels or "tabs" (Figures 4-16–4-18). The left side of each panel varies according to the dialog, but the right side of each panel shows the same Last Measurement area, and the bottom shows the same command buttons.

Chapter 4 Section 4.4 Taking VSM Measurements Taking Immediate-Mode VSM Measurements
Quantum Design PPMS VSM Option User’s Manual, Rev. A3 4-13 January 2008
"Last Measurement" Area The right side of each panel consists of the Last Measurement area, which displays the most recent measurement results. The displayed data are also written to the open data file along with the data items that are defined in Chapter 7, Table 7-2.
○ Temperature represents the average temperature during the measurement, in Kelvin.
○ Field represents the average field, in oersted.
○ Moment represents the average of the moment over the averaging time, in emu.
○ Moment Std. Error represents the error on the mean, that is, the error bar on the reported moment.
Figure 4-16. VSM Measurement dialog: Settings tab
Command Buttons The Start (Stop), Pause (Resume), Close, and Help command buttons are arranged across the bottom of all VSM Measurement panels. The Start and Pause buttons toggle (change) from Start to Stop and from Pause to Resume according to the process you initiated most recently. The Close button closes the VSM Measurement dialog, but it does not stop the measurements. The Start and Pause buttons are explained in Section 4.4.3.
4.4.2 Setting Up a Measurement You will set the main parameters for the VSM measurement by using the Measure Type and Measurement Parameters subsections of the Settings tab (Figure 4-16).
4.4.2.1 SETTINGS TAB 1. In the top left side of the Settings tab, the Measure Type subsection has radio buttons to
select Continuous Measuring or a Single Measurement. Both measures are defined by the parameters that you set by using the Measurement Parameters subsection. • Continuous Measuring takes measurements lasting "Averaging Time." If "Logging
Interval" is less than Averaging Time, a new measurement will occur every Averaging Time number of seconds. Otherwise, a new measurement will occur every Logging Interval number of seconds. If you select Continuous Measuring, the system will take measurements until you click on the Stop or Pause button.
• Single Measurement takes one measurement lasting Averaging Time.
2. The Measurement Parameters subsection (below the Measure Type subsection) contains text boxes in which you enter the Duration and Interval of the measurements. • Averaging Time is defined as the averaging time (in seconds) that you want the system
to use for each measurement it writes to the data file. The averaging time can be as small as 2 cycles (0.05 sec for 40 Hz), but Quantum Design staff recommend that you use values from 1 second to 10 seconds. The system will round the entered value to the nearest cycle period. For example, if the VSM frequency is 40.2 Hz and you request an

Section 4.4 Chapter 4 Taking Immediate-Mode VSM Measurements Taking VSM Measurements
4-14 PPMS VSM Option User’s Manual, Rev. A3 Quantum Design January 2008
averaging time of 1 second, the system will use an internal averaging time of 0.995 second (40 whole cycles divided by 40.2 Hz).
• Logging Interval is defined as the amount of time that elapses between recorded measurements (in seconds). If Logging Interval is set to less than Averaging Time, then one data point will be displayed and written to the data file every Averaging Time number of seconds. That is, all the data will be saved.
The next sections describe the settings in the Centering and Advanced tabs. The default values are likely to fit many of your measurement needs, but you can adjust them whenever you need additional control.
4.4.2.2 CENTERING TAB Use the settings on this panel to enable or disable automatic centering operations and to set the parameters for touchdown centering. 1. To enable or disable automatic centering,
click in the appropriate radio button in the Centering panel (Figure 4-17). Quantum Design staff strongly recommend that you enable automatic centering by selecting Do Touchdown Centering at Intervals.4 See Section 4.2.1.2 for more about touchdown operations.
Important: If you select No Automatic Centering, you must determine when touchdowns are needed and you must perform them.5 The Do Touchdown Centering at Intervals command assures measurement accuracy by informing the software about the location of the sample.
Figure 4-17. VSM Measurement dialog:
Centering tab
2. Use the definitions below to determine how you set the Centering parameters. You do not need to set the parameters if you disable automatic touchdowns (by selecting No Automatic Centering).
Delta Time is the maximum allowed time interval, in minutes, between touchdown operations. For example, if it is set to 5 minutes and no manual or automatic centering operations have been performed within the past 5 minutes, the system will automatically trigger a touchdown operation.Use a value of zero (0) if the amount of elapsed time should never trigger a touchdown.
• Delta Field is the maximum allowed field change, in oersted, between touchdown operations. For example, if this is set to 10000 Oe and the field has changed by more than 10000 Oe without any manual or automatic centering operations, the system will automatically trigger a touchdown operation. Use a value of zero (0) if the amount of field change should never trigger a touchdown.
• Delta Temperature is the maximum allowed temperature change, in degrees Kelvin, between touchdown operations. For example, if this is set to 20 K and the temperature has changed by more than 20 K without any manual or automatic centering operations, the system will automatically trigger a touchdown operation. Use a value of zero (0) if the amount of temperature change should never trigger a touchdown.
4You might occasionally find that you prefer to disable automatic touchdowns. If so, please review Section 4.2.1.2. 5 You can do this periodically by selecting Measure >> VSM Center Sample from the main MultiVu dropdown menu, or by inserting the Center Sample sequence command into a sequence file that is run during the measurements, as explained in Chapter 6.

Chapter 4 Section 4.4 Taking VSM Measurements Taking Immediate-Mode VSM Measurements
Quantum Design PPMS VSM Option User’s Manual, Rev. A3 4-15 January 2008
4.4.2.3 ADVANCED TAB
The Advanced tab of the VSM Measurement dialog (Figure 4-18) contains settings that you can typically ignore, as there are default values. However, the Excitation Parameters, Ranging, and PPMS Data Logging options offer additional control over your measurements, as explained below. Chapter 6 explains these settings in greater detail.
1. You can use the Excitation Parameters section to set the Peak Amplitude. Oscillation Frequency is set to 40 Hz. Note that the Max. Accel. and Max. Moment readings will change in accordance with the settings used for Peak Amplitude.
Important: Before you attempt to change the Peak Amplitude setting, please read about it in Section 6.5 .
Figure 4-18. VSM Measurement dialog: Advanced tab
• Peak Amplitude specifies the peak vibration amplitude (i.e., one-half the peak-to-peak amplitude) of the sample during a measurement (in mm). Typically, Peak Amplitude is set to 2 mm.
• Frequency specifies the frequency at which the VSM oscillates the sample. The system uses an oscillation Frequency of 40 Hz.
• Max. Accel. is computed from Frequency (40 Hz) and the value that you entered for Peak Amplitude. It is the maximum calculated acceleration during a cycle.
• Max. Moment is computed from Frequency (40 Hz) and the value that you entered for Peak Amplitude. It is the maximum measurable moment.
2. The Ranging setting refers to the way the system chooses the gain of the amplifiers in the VSM module during a measurement. The preamplifiers in the VSM module can change the gain ranges by factors of ten, depending on the size of the signal that is induced in the pickup coils. You can change this setting from Sticky Autorange in the rare case when you need more control. • Sticky Autorange (recommended): The system automatically increases the gain by a
factor of 10 if the current peak signal drops below 2% of the current range. The system automatically decreases the gain by a factor of 10 if the current peak signal exceeds 50% of the current range.
• Always Autorange: The system automatically increases the gain by a factor of 10 if the current peak signal drops below 9%. The system automatically decreases the gain by a factor of 10 if the current peak signal exceeds 100%. In some cases, the Always Autorange setting might improve the signal-to-noise ratio. However, it could also lead an increased number of range changes and a corresponding drop in data throughput.
• Fixed Range: The system always uses the specified gain range.

Section 4.4 Chapter 4 Taking Immediate-Mode VSM Measurements Taking VSM Measurements
4-16 PPMS VSM Option User’s Manual, Rev. A3 Quantum Design January 2008
3. The PPMS Data Logging section has links to a dialog for designating supplemental measurement data (the typical items in a data file are shown in Table 7-2). • Click on the Select Data button. The PPMS dialog (Figure 4-19) will open, showing
additional PPMS system data items that can be saved. • For any type of data you would like added to the current file, select the accompanying
check box. • When you are finished, click on the OK button.
Figure 4-19. Designating additional measurement data to be
collected by using the PPMS dialog
4.4.3 Starting/Stopping/Pausing a Measurement 1. To start the VSM measurement process, click on the Start (Stop) button at the bottom of the
current panel of the VSM Measurement dialog. The right panel of the dialog box will display VSM measurement results as they are acquired (see Figure 4-18). The displayed data are also written to the open data file along with the data items that are defined in Chapter 7, Table 7-2.
2. To stop sending new readings to the dialog box and the data file, click on the Pause (Resume) toggle button next to the Start (Stop) button. Although the system does not save or update readings during a Pause, it will continue oscillating the sample and executing any automatic touchdown operations that were scheduled.
3. To restart the data output after a pause, click on the Resume (Pause) button. 4. To stop data output and sample oscillation, click on the Stop (Start) button.

Chapter 4 Section 4.5 Taking VSM Measurements Removing a Sample
Quantum Design PPMS VSM Option User’s Manual, Rev. A3 4-17 January 2008
4.5 Removing a Sample You will use the VSM Install/Remove Sample Wizard to remove the sample and sample rod. The process is the same as that for installing a sample, through Step 3 (see Section 4.3.3). If you will temporarily stop taking measurements (e.g., a week or more), you can remove the sample rod, cover the linear motor transport, shut down the transport, and end the VSM Install wizard.
Important: If you want to stop taking VSM measurements and start taking measurements with a non-VSM option, you will need to remove the VSM-related hardware and "reconfigure" the PPMS by using the procedures that are outlined in Section 2.4. The reconfiguration process requires steps that are not needed for the basic sample-removal process outlined here. 1. Start the VSM Install/Remove Sample Wizard (VSM Install wizard for short): In the
Install tab of the VSM Control Center (e.g., Figure 4-4), click on the Install/Remove Sample button.
2. When page 1 of the VSM Install wizard opens (Figure 4-20), click on the Open Chamber button underneath the Instructions area. The wizard will warm the sample chamber to 305 K, vent the chamber, and move the transport to the load (or unload) position.
Figure 4-20. The VSM Install wizard, page 1: Initial instructions
3. The instructions area and button labels will reflect the process, as shown in Figures 4-21A and 4-21B.
Figure 4-21A. The VSM Install wizard, page 1: Chamber preparation

Section 4.5 Chapter 4 Removing a Sample Taking VSM Measurements
4-18 PPMS VSM Option User’s Manual, Rev. A3 Quantum Design January 2008
Figure 4-21B. The VSM Install wizard, page 1: Shutdown transport or
install sample
4. When the instructions are complete and indicate that the system has been prepared for the next step (remove a sample rod or install a sample rod), remove the sample rod and replace the cover on the linear motor transport.
C A U T I O N !
Verify that you have removed the sample rod before continuing.
5. Click on the Shutdown button. If the system detects the presence of the sample rod, a popup
dialog will open (Figure 4-22), instructing you to remove the sample rod before you shut down the transport. Verify that you have removed the sample rod and click on the OK button.
Figure 4-22. Ppmsmvu popup dialog with shutdown
instructions
6. The OK button will return you to page 2 of the VSM Install wizard dialog, where the Instructions area will first indicate that the transport is being moved into the shutdown position. A short time later, the Instructions area will indicate that the transport has been shut down (Figure 4-23).

Chapter 4 Section 4.5 Taking VSM Measurements Removing a Sample
Quantum Design PPMS VSM Option User’s Manual, Rev. A3 4-19 January 2008
Figure 4-23. The VSM Install wizard, page 2: End wizard or install sample
7. To end the VSM Install wizard and stop taking measurements for a period, click on the Cancel button.
8. The VSM Install wizard will close and you will be returned to the VSM Control Center and the Install tab.


Quantum Design PPMS VSM Option User’s Manual, Rev. A3 5-1 January 2008
C H A P T E R 5
VSM Hardware
5.1 Introduction This chapter contains the following information: ○ Section 5.2 describes each of the basic
hardware components that make up the VSM option.
○ Section 5.4 describes the sample-mounting station and its use.
○ Section 5.3 describes the contents of the VSM User's Kit.
○ Section 5.5 describes the electrical components of the VSM option.
5.2 VSM Hardware Components This section describes each of the basic hardware components that make up the VSM system. For instructions about installing the various components, please refer to Chapter 2.
5.2.1 Linear Transport The VSM linear transport (4096-400) is the motor that moves the sample. The linear motor transport and many of its component parts are illustrated in Figure 5-1. You will mount the linear motor transport directly on top of the PPMS sample-chamber opening after you have inserted the sample tube into the sample chamber.
The sample rod is inserted into the sample chamber through an access port on top of the VSM linear motor transport. The sample chamber is sealed (for storage and during operations) by a cap and an O-ring seal. An electrical connector at the rear of the linear motor transport provides the Model CM-A with electrical access to the drive coil, position encoder, and linear-motor-transport calibration ROM via the motor drive cable (3096-200).
The sample rod is held in place in the VSM linear motor transport by a magnetic-locking mechanism consisting of small magnets in the top of the rod; the magnets stick to a thin steel ring at the top of the armature.
A spring-suspension mechanism inside the linear motor transport isolates the vertical motion of the motor from the housing during vibration. The resonant frequency of the spring-suspension mechanism is about 5 Hz. You can verify whether the suspension mechanism is functioning

Section 5.2 Chapter 5 VSM Hardware Components VSM Hardware
5-2 PPMS VSM Option User’s Manual, Rev. A3 Quantum Design January 2008
correctly by gently tapping the top of the sample rod at the sample access port during sample loading. A mechanism that is working correctly will oscillate for at least 5 seconds.
The transport is shipped from the factory with the shipping plug installed to prevent oscillation of the motor suspension mechanism. Before using the equipment, you must remove the shipping plug and install the extender tube flange.
A window in the front side of the linear motor transport (opposite the electrical connector) displays the location of the armature (the moving section of the motor transport). When you are installing or removing samples, you will be able to see an indicator pin at the top of the window: The indicator pin will be at the top of the window when the system is in the “load” position. The indicator pin will be at the bottom of the window, which is the "shutdown" position, only when the sample rod has been removed and the linear motor transport has been shut down. During VSM operations, the indicator pin will vibrate rapidly (1–4 mm peak-to-peak amplitude at 40 Hz) between the load and shutdown positions.
Important: The sample will be subject to vertical magnetic fields of up to approximately 200 gauss when it passes through the head. If this is unacceptable for your samples, please contact Quantum Design.
C A U T I O N ! ♦ The indicator pin should be at the bottom of the window when the linear motor transport
has been shut down. If it is NOT, it indicates that the sample rod has been inadvertently left in the sample chamber.
♦ Never attempt to remove the linear motor transport from the PPMS while the sample rod is still installed.
Figure 5-1. VSM linear motor transport (4096-400)

Chapter 5 Section 5.2 VSM Hardware VSM Hardware Components
Quantum Design PPMS VSM Option User’s Manual, Rev. A3 5-3 January 2008
5.2.2 Storage Case for Linear Motor Transport Because the linear motor transport is both heavy and delicate, Quantum Design has furnished you with a specially designed storage case to protect it during transport and storage. When the linear motor transport is not being used, it should be stored in this case. You can keep the case on a shelf or in a cabinet, so long as it is on a stable base and is stored upright as shown in Figure 5-2.
C A U T I O N !
Because the storage case has a high center of gravity, it is critical that you place it on a very stable base such as the floor.
Figure 5-2. Storage case (4096-150) for the linear motor transport.
5.2.3 Coilset Puck The coilset puck contains the VSM detection coils and a thermometer for monitoring the sample temperature. You will insert the coilset puck into the sample chamber by using the PPMS sample insertion tool (also called the puck insertion/extraction tool) and the same procedures used to insert other types of pucks (see the Physical Property Measurement System: Hardware Manual for information on puck insertion and extraction). You must install the puck before you insert the sample tube.

Section 5.2 Chapter 5 VSM Hardware Components VSM Hardware
5-4 PPMS VSM Option User’s Manual, Rev. A3 Quantum Design January 2008
The electrical connector at the bottom of the coilset puck has a serial number (see Figure 5-3). As explained in Sections 2.2.4 and 2.2.9, you will use these serial numbers to verify the numbers contained in the application software. The system uses the serial numbers to identify the puck calibration information.
The VSM option is flexible enough to accommodate different detection-coil configurations—all you will need to do is change the coilset puck. However, for most uses, the standard coilset puck provides the best trade-off between sensitivity and accuracy.
The dimensions of the standard coilset puck are shown schematically in Figure 5-4. The center of the gradiometer pick-up coils is located 40.1 mm (1.58 in) above the location corresponding to the puck surface. This position corresponds to the center position of PPMS high-field systems (14-T or greater) and the high homogeneity region of lower field magnets (e.g., 7-T, 9-T).
After repeated insertions of the VSM puck, the contact fingers at the base of the coilset (above the serial number in Figure 5-3) might bend inwards, which would loosen the fit of the coilset in the bottom of the PPMS sample chamber. When this happens, you should make the coilset fit snugly again by using the puck adjustment tool, as described in the Physical Property Measurement System: Hardware Manual.
Figure 5-3. Coilset puck (4096-204)
Figure 5-4. The internal dimensions of a standard coilset puck are as follows: Bore diameter (B) = 6.33 mm; coil thickness (T) = 1.78 mm; coil spacing (S) = 7.11 mm; coil inner diameter (ID) = 7.73 mm; coil outer diameter (OD) = 13.7 mm; height above puck surface (H) = 40.1 mm.

Chapter 5 Section 5.2 VSM Hardware VSM Hardware Components
Quantum Design PPMS VSM Option User’s Manual, Rev. A3 5-5 January 2008
Table 5-1. Sample Connection with User Bridge Cable Connected. sample puck probe head
SAMPLE PUCK
GRAY LEMO CONNECTOR AT PROBE HEAD
JB-3 PREAMP ON CM-B VSM MODULE
FUNCTION
3 3 5 Thermometer Current + 4 4 18 Thermometer Current – 5 5 6 Thermometer Voltage + 6 6 19 Thermometer Voltage –
11 11 10 Channel 1 Input + 12 12 23 Channel 1 Input – 13 13 12 Channel 2 Input + 14 14 25 Channel 2 Input –
5.2.4 Sample Tube You will insert the sample tube (Figure 5-5) into the sample chamber after you have installed the coilset puck. The sample tube provides low-friction guide sleeves for the sample rod. The top of the sample tube consists of an integrated O-ring attached to a stabilizer post. The stabilizer post provides a rigid, bayonet-style mount that prevents the linear motor transport from tipping over. Part of the post extends into the sample chamber and part extends into the extender tube flange on the bottom of the linear motor transport, as shown in Figure 2-10.
C A U T I O N !
You should always use the flange clamp to hold the linear motor transport onto the post, even though the stabilizer post helps prevent the linear motor transport from tipping over.
JB-3: Preamp connector on Model CM-B VSM detection module
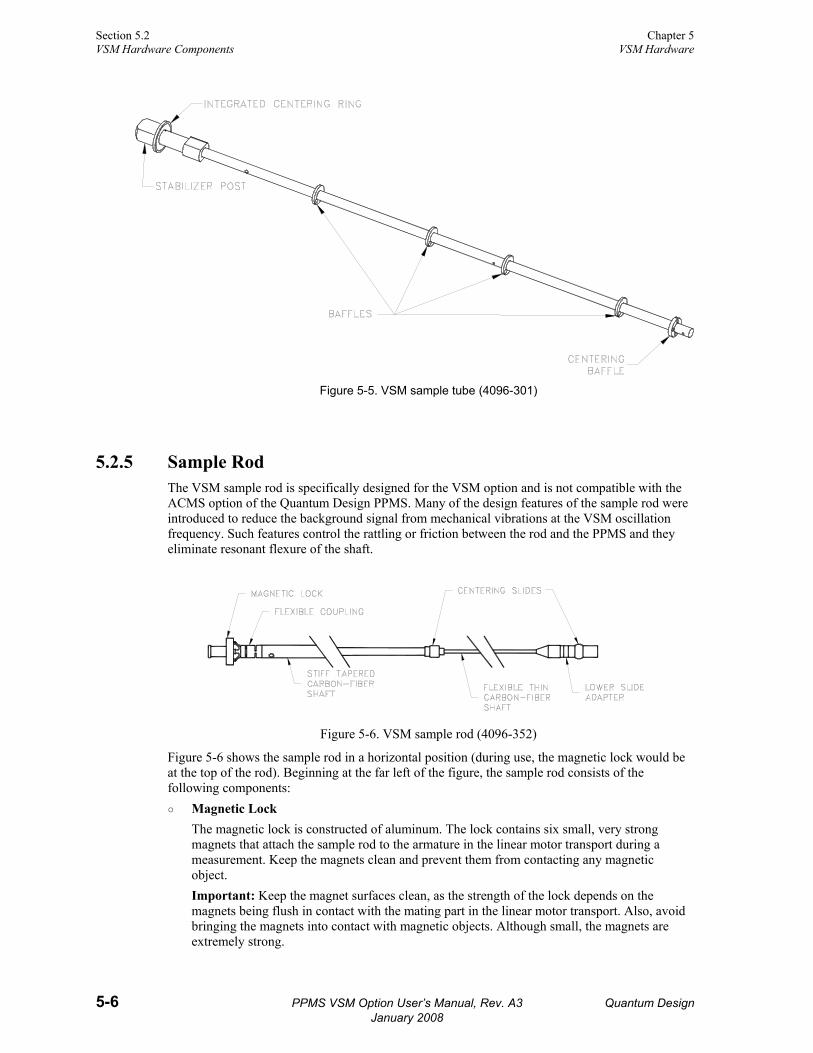
Section 5.2 Chapter 5 VSM Hardware Components VSM Hardware
5-6 PPMS VSM Option User’s Manual, Rev. A3 Quantum Design January 2008
Figure 5-5. VSM sample tube (4096-301)
5.2.5 Sample Rod The VSM sample rod is specifically designed for the VSM option and is not compatible with the ACMS option of the Quantum Design PPMS. Many of the design features of the sample rod were introduced to reduce the background signal from mechanical vibrations at the VSM oscillation frequency. Such features control the rattling or friction between the rod and the PPMS and they eliminate resonant flexure of the shaft.
Figure 5-6. VSM sample rod (4096-352)
Figure 5-6 shows the sample rod in a horizontal position (during use, the magnetic lock would be at the top of the rod). Beginning at the far left of the figure, the sample rod consists of the following components: ○ Magnetic Lock
The magnetic lock is constructed of aluminum. The lock contains six small, very strong magnets that attach the sample rod to the armature in the linear motor transport during a measurement. Keep the magnets clean and prevent them from contacting any magnetic object. Important: Keep the magnet surfaces clean, as the strength of the lock depends on the magnets being flush in contact with the mating part in the linear motor transport. Also, avoid bringing the magnets into contact with magnetic objects. Although small, the magnets are extremely strong.

Chapter 5 Section 5.3 VSM Hardware VSM Option User’s Kit
Quantum Design PPMS VSM Option User’s Manual, Rev. A3 5-7 January 2008
○ Flexible Coupling
The flexible coupling is made of Delrin and relieves excess transverse bending stress and mechanical coupling that might arise in the rigid shaft from slight non-axial alignment.
○ Stiff Tapered Shaft The stiff tapered shaft is the main shaft of the sample rod. It is made from wound carbon-fiber composite that is lightweight and stiff.
○ Centering Slides The centering slides slide through precision guide tubes within the sample tube and are precisely fitted to prevent rattling. These slides are integrated into the shaft and the lower slide adapter and are designed to be low friction and to have a long life, so long as you keep them clean and smooth. Important: The centering slides must be kept clean and smooth.
○ Flexible Thin Shaft The flexible thin shaft is carbon fiber and forms a flexible coupling between the two centering slides. It is designed to relieve excess contact force between the centering slides and the guide tubes.
○ Lower Slide Adapter The lower slide adapter is made of bearing-grade plastic. The upper end of this adapter has the lower centering slide integrated into it. The lower end of the slide adapter is designed to mate with a threaded sample holder that you screw onto the bottom of the sample rod (not shown in this figure).
5.3 VSM Option User’s Kit The VSM Option User's Kit contains miscellaneous hardware and supplies that you will use to mount samples and to verify the operation of the VSM. The convenient portable toolbox (see Figure 5-7) helps organize the items.
The kit includes the following contents: ○ Sample-Mounting Station
The sample-mounting station is used to mount samples at the correct location in the sample holder. For more information about mounting samples, see Figure 5-8 and Section 3.3.
○ Sample Holders Sample holders are used to hold samples (see Figure 5-8); the holders screw onto the bottom of the VSM sample rod. Quantum Design has provided five paddle-shaped sample holders and five trough-shaped sample holders.
○ Calibration Sample
The palladium calibration sample is used to calibrate the VSM option and to verify its accuracy.
○ Coilset Assembly
The VSM coilset assembly is shipped as part of the VSM Option User's Kit.

Section 5.4 Chapter 5 Sample-Mounting Station VSM Hardware
5-8 PPMS VSM Option User’s Manual, Rev. A3 Quantum Design January 2008
Figure 5-7. VSM Option User's Kit (4096-100)
5.4 Sample-Mounting Station The sample-mounting station (4096-110) is used to precisely locate and measure (within 0.5 mm) the sample offset, which is the distance between the sample and the bottom of the sample holder (see Figure 5-8).
Figure 5-8. Sample-mounting station (4096-110)
The VSM measurement algorithm requires an accurate measurement of this distance so that it can perform touchdown operations (See Chapters 1 and 4 for more details about touchdown operations).

Chapter 5 Section 5.5 VSM Hardware VSM Electronics
Quantum Design PPMS VSM Option User’s Manual, Rev. A3 5-9 January 2008
5.5 VSM Electronics
5.5.1 Preamp Cable Assembly Figure 5-9 shows the preamp cable assembly (3096-300), which is the electrical connection between the coilset puck and the “PREAMP” port (JB-3) on the Model CM-B detection module. Integrated into the cable are dual 40-gain preamplifiers for up to two independent detection coils. The preamp end of the cable is plugged into the gray connector at the PPMS probe head.
Figure 5-9. Preamp cable assembly (3096-300)
5.5.2 Motor Drive Cable Figure 5-10 shows the VSM motor drive cable (3096-200), which connects the back of the linear motor transport to the “SERVO” port (JA-1) on the Model CM-A (motor module). The drive cable provides drive-coil power to the linear motor transport, position-encoder read-back to the module, and serial communication between the linear motor transport and the module for diagnostic and configuration purposes.
Figure 5-10. Motor drive cable (3096-200)
5.5.3 VSM–Motor Sync Cable Figure 5-11 shows the VSM–Motor sync cable (3096-400), which connects the “SYNC” port (JA-3) on the Model CM-A (motor module) to the “SYNC” port (JB-1) on the Model CM-B (VSM detection module). The cable provides high-speed position-encoder data to the VSM module so that it can perform synchronous detection.
Figure 5-11. VSM–Motor sync cable (3096-400)

Section 5.5 Chapter 5 VSM Electronics VSM Hardware
Quantum Design PPMS VSM Option User’s Manual, Rev. A3 5-10 January 2008
5.5.4 Model CM-A (VSM Motor Module) Figure 5-12 shows the Model CM-A VSM motor module (4101-100), which provides all the power and logic that are necessary to drive the VSM linear motor transport. All configuration and control of this module is through the VSM application software on the computer (PC) via the CAN-bus connector on the back panel of the module.
See Appendix A for a detailed description of the functions of this module.
Figure 5-12. Model CM-A VSM motor module (4101-100)
5.5.5 Model CM-B (VSM Detection Module) Figure 5-13 shows the Model CM-B (4101-150), which performs the synchronous detection (or “lock-in”) operation for the VSM option. The reference position signal comes from the Model CM-A VSM motor module via the VSM–motor sync cable; the induced voltage signal from the coilset puck comes via the preamp cable assembly. All configuration and control of this module is handled through the VSM application software on the computer (PC) via the CAN-bus connector on the back panel of the module.
See Appendix B for a detailed description of the functions of this module.
Figure 5-13. Model CM-B VSM detection module (4101-150)
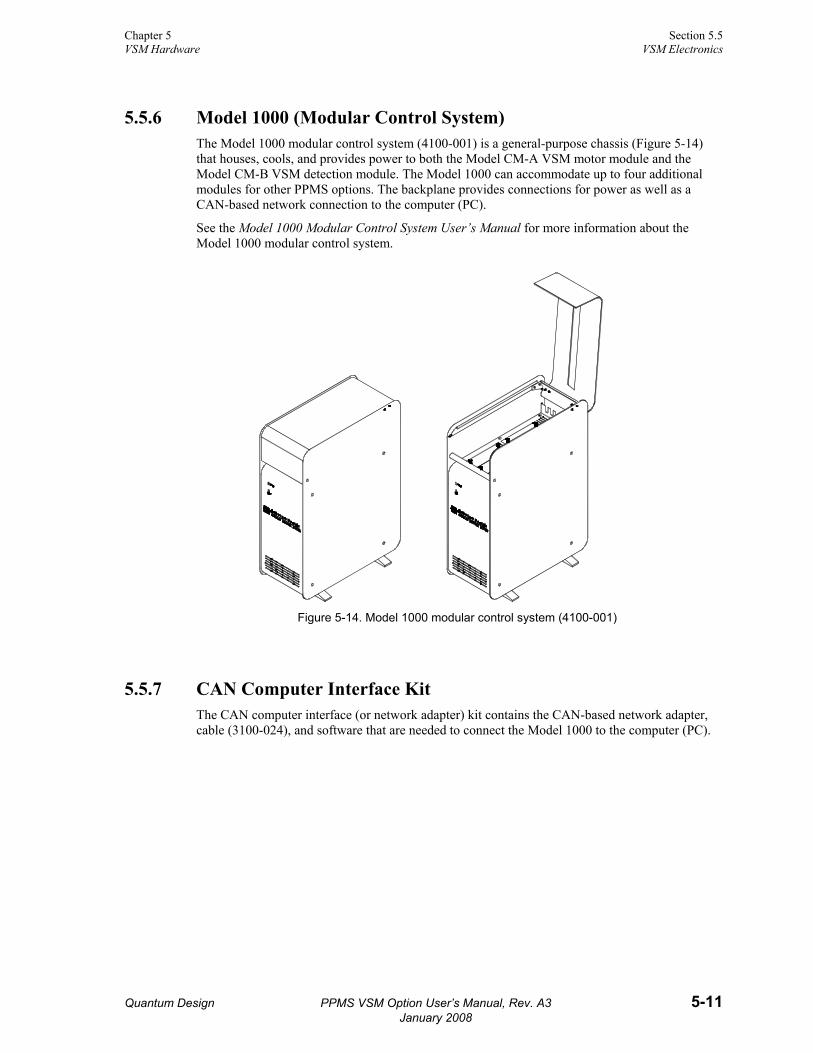
Chapter 5 Section 5.5 VSM Hardware VSM Electronics
Quantum Design PPMS VSM Option User’s Manual, Rev. A3 5-11 January 2008
5.5.6 Model 1000 (Modular Control System) The Model 1000 modular control system (4100-001) is a general-purpose chassis (Figure 5-14) that houses, cools, and provides power to both the Model CM-A VSM motor module and the Model CM-B VSM detection module. The Model 1000 can accommodate up to four additional modules for other PPMS options. The backplane provides connections for power as well as a CAN-based network connection to the computer (PC).
See the Model 1000 Modular Control System User’s Manual for more information about the Model 1000 modular control system.
Figure 5-14. Model 1000 modular control system (4100-001)
5.5.7 CAN Computer Interface Kit The CAN computer interface (or network adapter) kit contains the CAN-based network adapter, cable (3100-024), and software that are needed to connect the Model 1000 to the computer (PC).


Quantum Design PPMS VSM Option User’s Manual, Rev. A3 6-1 January 2008
C H A P T E R 6
VSM Software
6.1 Introduction This chapter contains the following information:
○ Section 6.2 introduces the software used to control the VSM option.
○ Section 6.7 explains use of the VSM sequence-mode Adv. Measure command.
○ Section 6.3 describes the MultiVu window and how to access the VSM commands. ○ Section 6.8 explains use of the VSM
sequence-mode Center Sample command. ○ Section 6.4 describes the VSM-specific
dialogs and menu items in the MultiVu dropdown menus.
○ Section 6.9 explains use of the VSM sequence-mode Moment vs. Field command.
○ Section 6.5 describes the VSM Control Center and its components.
○ Section 6.10 explains use of the VSM sequence-mode Moment vs. Temp command.
○ Section 6.6 briefly describes sequence-mode commands, the construction of sequence files, and VSM-specific sequence commands.
6.2 Overview of the VSM Software All VSM measurements are accomplished using the VSM software application. The application runs as an option within the windows-based PPMS MultiVu application, so VSM operations benefit from MultiVu functionality, including real-time graphing and automated measurements. For example, by embedding commands in a PPMS MultiVu sequence file, you can set up the VSM system to take multiple temperature-dependent magnetization measurements at different fields, followed by hysteresis loops at specific fields. When you use a sequence file, the system can perform these procedures without your intervention.

Section 6.3 Chapter 6 MultiVu Software Application VSM Software
6-2 PPMS VSM Option User’s Manual, Rev. A3 Quantum Design January 2008
DC magnetization measurements performed by the VSM system are defined by user-specified measurement parameters. The measurement parameters are usually grouped into basic settings and advanced settings to distinguish commonly specified parameters from those that are required under special circumstances. Measurement results and other relevant data reported by the VSM motor module, VSM detection module, and Model 6000 PPMS controller are stored in VSM measurement data files.
6.3 MultiVu Software Application The MultiVu software application is the interface to the Quantum Design Physical Property Measurement System (PPMS) and to the different options that can be installed on the PPMS. Option-specific commands, such as those for VSM operations, are added to the menus when you "activate" the option by using the dropdown Utilities menu, as explained in Section 6.3.2.1.
6.3.1 MultiVu Basics As shown in Figure 6-1, the top of the MultiVu window has a series of dropdown menus and a tool bar. At the bottom of the MultiVu window, a Status bar summarizes the general status of the PPMS and any active option. You can show or hide the Status bar by selecting the appropriate option (Minimum, Maximum, or None) from the dropdown View menu at the top of the MultiVu window (View >> Status Bar).
Dropdown Menus Tool Bar
Status Bars
Figure 6-1. The MultiVu software application window and the View >> Status Bar dropdown menu
Starting from the left, the Status bar panels (Figure 6-2) display information about a running sequence file, the sample temperature, the strength of the magnetic field, and the status of the sample chamber. If you place your mouse pointer on a panel and click on it, the related dialog box will open so that you can initiate changes. These dialog boxes are the same ones that open through the dropdown menus at the top of the MultiVu window.
Sequence Status Temperature Field Chamber
Figure 6-2. The MultiVu Status Bar and the Sequence, Temperature, Field, and Chamber sections

Chapter 6 Section 6.3 VSM Software MultiVu Software Application
Quantum Design PPMS VSM Option User’s Manual, Rev. A3 6-3 January 2008
For example, if you click on the Temperature panel, the Temperature-System dialog box will open so that you can change the temperature set point and the mode and rate of change. This dialog box is the same one that opens when you select Instrument >> Temperature from the MultiVu dropdown menus.
The Status bar also displays color-coded warning and error messages to alert you to possible problems with any of those components. See the Physical Properties Measurement System: PPMS MultiVu Application User’s Manual for detailed information about the error messages and the MultiVu application.
6.3.2 VSM Commands in MultiVu The VSM-specific commands and dialogs appear in the MultiVu software application after you install the VSM option (see Chapter 2) and activate the VSM application (see Section 6.3.2.1 and Figure 6-3).
The VSM software application includes immediate-mode and sequence-mode measurement commands. You can access and initiate immediate-mode commands by using the dropdown menus in the MultiVu window or by using tabs, dialogs, and buttons in the VSM Control Center, as explained in Section 6.5.
Sequence-mode commands are, essentially, encapsulated versions of immediate-mode commands. For example, as explained in Section 6.6, there are sequence-mode versions of the immediate-mode VSM Measure and VSM Center Sample commands. However, unlike immediate-mode commands, sequence-mode commands are accessed through the Sequence Editor. Once you have inserted sequence commands into a MultiVu sequence file, they are automatically carried out (executed) when the sequence is run. The VSM sequence commands can be combined with other (non-VSM) sequence commands and looping constructs.
A general introduction to sequence commands and the construction of VSM measurement sequences is presented in Section 6.6, and Sections 6.7–6.10 explain the VSM-specific sequence-mode commands. Refer to the Physical Properties Measurement System: PPMS MultiVu Application User’s Manual for more detailed information about sequence commands.
6.3.2.1 ACTIVATING THE VSM OPTION AND THE CONTROL CENTER 1. To activate the VSM application and open the VSM Control Center, select Utilities >>
Activate Option from the dropdown menu of the MultiVu window (Figure 6-3).
Figure 6-3. Using the MultiVu dropdown Utilities menu and Option Manager to
activate the VSM Option

Section 6.3 Chapter 6 MultiVu Software Application VSM Software
6-4 PPMS VSM Option User’s Manual, Rev. A3 Quantum Design January 2008
2. When the Option Manager dialog opens, select VSM and click on the Activate button. This will move the VSM option from the Available Options section of the dialog to the Active Options section. The VSM Control Center and the VSM Log window will open concurrently. When running in simulation mode, the VSM Control Center is titled VSM SIM (see Figure 6-4).
Figure 6-4. The MultiVu window and the VSM Control Center (VSM SIM),
including the Install tab, the VSM Status area, and the MultiVu Status bar. Note that the VSM Log window has been minimized.
6.3.2.2 DEACTIVATING THE VSM OPTION
When you want to use a non-VSM option (e.g., the Heat Capacity option), you will need to shut down the VSM, deactivate the VSM software, and remove the VSM linear motor transport (see Chapter 2, Section 2.4). As a rule of thumb, you also should deactivate the VSM when you will not be using it for an extended period (e.g., a week or more).1 The general removal sequence is outlined below, including the instructions for deactivating the VSM option. Important: If you only need to deactivate the VSM application (i.e., you will not be removing the VSM option), follow the procedures in Step 2 only. You do not need to deactivate the VSM when the system will be idle for brief periods (less than a week). 1. First, prepare the system for deactivation according to the procedures in Chapter 2, Section
2.4.1, "Prepare for Removal." 2. Deactivate the VSM option (Section 2.4.2):
• Select Utilities >> Activate Option from the dropdown menu of the MultiVu window (Figure 6-3).
• When the Option Manager dialog opens, select VSM and click on the Deactivate button. The VSM option will move from the Active Options section of the dialog to the Available Options section. The VSM Control Center and the VSM Log window will close, but the MultiVu software application will remain open.
3. Continue with the VSM removal procedures that are presented in Sections 2.4.3–2.4.4. When they have been completed, the base PPMS measurement system will be ready for you to install a different option.
1 In this type of situation, you also could put the PPMS in Shutdown (standby) mode, which helps conserve helium while allowing the Model 6000 to monitor the system.

Chapter 6 Section 6.4 VSM Software VSM Dropdown Menus
Quantum Design PPMS VSM Option User’s Manual, Rev. A3 6-5 January 2008
6.4 VSM Dropdown Menus VSM-specific actions, dialogs, and commands are incorporated into the View, Sample, and Measure dropdown menus in the MultiVu window after you have activated the option. The other dropdown menus in the MultiVu window contain menu items that are common to all Quantum Design systems and are explained in the Physical Properties Measurement System: PPMS MultiVu Application User’s Manual.
6.4.1 View You can use the View dropdown menu at the top of the MultiVu window (Figure 6-5) to open VSM-specific dialogs as well as to perform general actions, such as opening and closing the MultiVu Status Bar, the Sequence Control bar at the side of the window, or the tool bar. ○ To view the VSM Log, select VSM Status Log (see Section 7.2.3.1). ○ To view the current errors, select VSM Error Count (see Section 7.2.3.2).
Figure 6-5. The MultiVu window and the View dropdown menu showing VSM
immediate-mode commands
6.4.2 Sample You can use the Sample dropdown menu at the top of the MultiVu window (Figure 6-6) to install and remove samples and to center the sample manually.
Figure 6-6. The MultiVu window and the Sample dropdown menu showing VSM
immediate-mode commands
Important: The Sample dropdown menu contains two "install" selections: Install... and VSM Install/Remove ... You should always select VSM Install/Remove... when using the VSM. The Install... selection applies to the base PPMS system and is not appropriate for the VSM option. ○ To install a sample, designate an output data file, and center the sample, select Sample >>
VSM Install/Remove. This selection opens the VSM Install/Remove Sample Wizard (Figure 6-7), which also organizes the installation (and removal) process when you use the VSM Control Center (Section 6.5, Figure 6-12) to install a sample.

Section 6.4 Chapter 6 VSM Dropdown Menus VSM Software
6-6 PPMS VSM Option User’s Manual, Rev. A3 Quantum Design January 2008
Figure 6-7. The MultiVu window, the Sample dropdown menu with VSM immediate-mode
commands, and the VSM Install/Remove Sample Wizard
○ To provide the software with the location of the sample, select Sample >> VSM Manual Locate. The Specify Sample Location dialog will open (Figure 6-8) so that you can enter the sample offset or perform an automatic scan. This dialog also appears when you use the VSM Install/Remove Sample Wizard to install a sample (Section 4.3.3).
Figure 6-8. The Specify Sample Location dialog that opens from the dropdown menu when you select Sample >> VSM Manual Locate
6.4.3 Measure If a sample has been installed in the VSM, you can use the Measure dropdown menu at the top of the MultiVu window (Figure 6-9) to open immediate-mode VSM measurement dialogs (e.g., for setting up and taking measurements, for centering the sample, and for adding a comment to an output data file). In the event you attempt to use commands in the Measure dropdown menu but you have not installed a sample, a popup message will open, directing you to first install a sample.
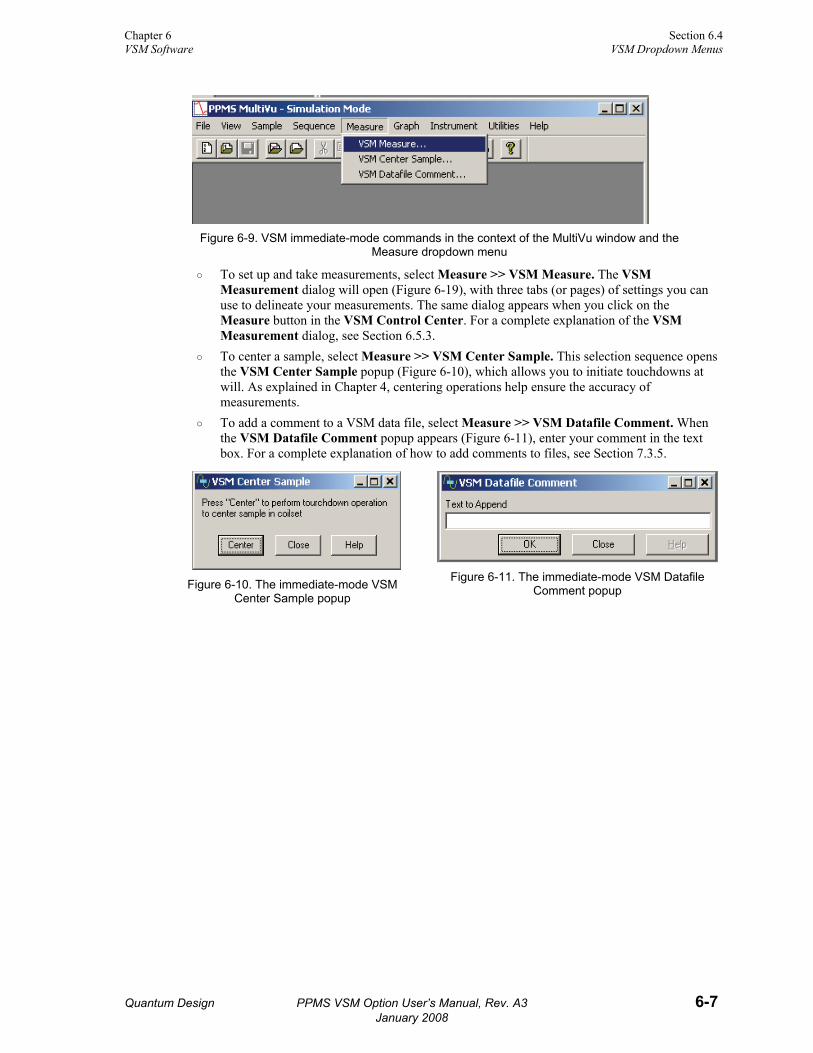
Chapter 6 Section 6.4 VSM Software VSM Dropdown Menus
Quantum Design PPMS VSM Option User’s Manual, Rev. A3 6-7 January 2008
Figure 6-9. VSM immediate-mode commands in the context of the MultiVu window and the
Measure dropdown menu
○ To set up and take measurements, select Measure >> VSM Measure. The VSM Measurement dialog will open (Figure 6-19), with three tabs (or pages) of settings you can use to delineate your measurements. The same dialog appears when you click on the Measure button in the VSM Control Center. For a complete explanation of the VSM Measurement dialog, see Section 6.5.3.
○ To center a sample, select Measure >> VSM Center Sample. This selection sequence opens the VSM Center Sample popup (Figure 6-10), which allows you to initiate touchdowns at will. As explained in Chapter 4, centering operations help ensure the accuracy of measurements.
○ To add a comment to a VSM data file, select Measure >> VSM Datafile Comment. When the VSM Datafile Comment popup appears (Figure 6-11), enter your comment in the text box. For a complete explanation of how to add comments to files, see Section 7.3.5.
Figure 6-10. The immediate-mode VSM
Center Sample popup
Figure 6-11. The immediate-mode VSM Datafile
Comment popup

Section 6.5 Chapter 6 VSM Control Center VSM Software
6-8 PPMS VSM Option User’s Manual, Rev. A3 Quantum Design January 2008
6.5 VSM Control Center The VSM Control Center opens within the MultiVu window as soon as you activate the VSM option and application software. Figure 6-12 shows the VSM Control Center and the commands, dialogs, tabs, buttons, and software prompts that organize measurement-related activities, making it easy for you to perform basic operations (e.g., create data files, install samples, and set up and initiate immediate-mode measurements).
6.5.1 VSM Control Center: Components
6.5.1.1 TABS
The VSM Control Center contains four panels (or tabs) that offer options for setting up your measurements: Install (Section 6.5.2.1), Data File (Section 6.5.2.2), Sample (Section 6.5.2.3), and Advanced (Section 6.5.2.4).
Figure 6-12. The VSM Control Center dialog box
6.5.1.2 BUTTONS
Below the tabs, a separate area contains the Measure and Help buttons.
The Measure button is used to open the dialogs for setting immediate-mode VSM measurement parameters (see Section 6.5.3). You will always see the Measure button in this area of the VSM Control Center, so you can use it to set up measurements at any time.
6.5.1.3 VSM STATUS AREA
The state of the current VSM process is summarized in the VSM Status area or bar, which is located just below the Measure button. This area will show information about the VSM option that has been selected, the progress of an ongoing measurement, and the results of the last measurement. The VSM Status bar appears under every tab in the VSM Control Center. Each VSM status message is logged to the VSM Log file (see Section 7.2.3.1).

Chapter 6 Section 6.5 VSM Software VSM Control Center
Quantum Design PPMS VSM Option User’s Manual, Rev. A3 6-9 January 2008
Note: The VSM Status area is separate and different from the MultiVu Status bar, which is at the bottom of the MultiVu window. You can see the difference between the two status areas in Figure 6-4.
Warning and Error Messages
The VSM Status bar also displays color-coded warning and error messages to alert you to the possibility of a problem with any components of the system. Table 6-1 summarizes the characteristics of warning and error messages.
Table 6-1. VSM warning and error messages
MESSAGE TYPE
BACKGROUND COLOR
IMPORTANCE MEANING EFFECT ON MEASUREMENT
Warning Yellow High Minor hardware or software problem
Can affect data quality
Error Red Critical Serious hardware or software problem
Data will be faulty
Recovering from an Error Message
Most warning and error messages are recoverable, meaning that the equipment automatically takes action to continue running. In some cases, recovery from an error might require that you restart the system.
If the error message states that you should deactivate the VSM application and exit PPMS MultiVu, use the following sequence to gracefully end the programs and shut off the equipment (if circumstances permit). 1. Deactivate the VSM application by using the MultiVu Utilities dropdown menu, as
explained in Section 6.3.2.2, Step 2 (in this situation, you do not need to remove the VSM linear motor transport, sample rod, etc.).
2. Exit the PPMS MultiVu program by using the MultiVu File dropdown menu (Figure 6-23). 3. Recycle the power on the Model 1000 Modular Control System (turn it off, wait 10 seconds,
then turn it back on). 4. Start MultiVu. 5. Reactivate the VSM option by selecting Utilities >> Activate Option from the MultiVu
dropdown menus (see Section 6.3.2.1).
Important: Even though the system can recover from an error, some of your data might be lost.
C A U T I O N ! In the event that you lose data, you should investigate the cause of the problem before using the system again.
6.5.2 VSM Control Center: Tabs Each of the separate panels (or tabs) of the VSM Control Center organizes various related operations. For example, the Install tab organizes operations related to loading and unloading a sample, such as moving the motor to its top position, venting and purging the sample chamber, and performing touchdown operations.
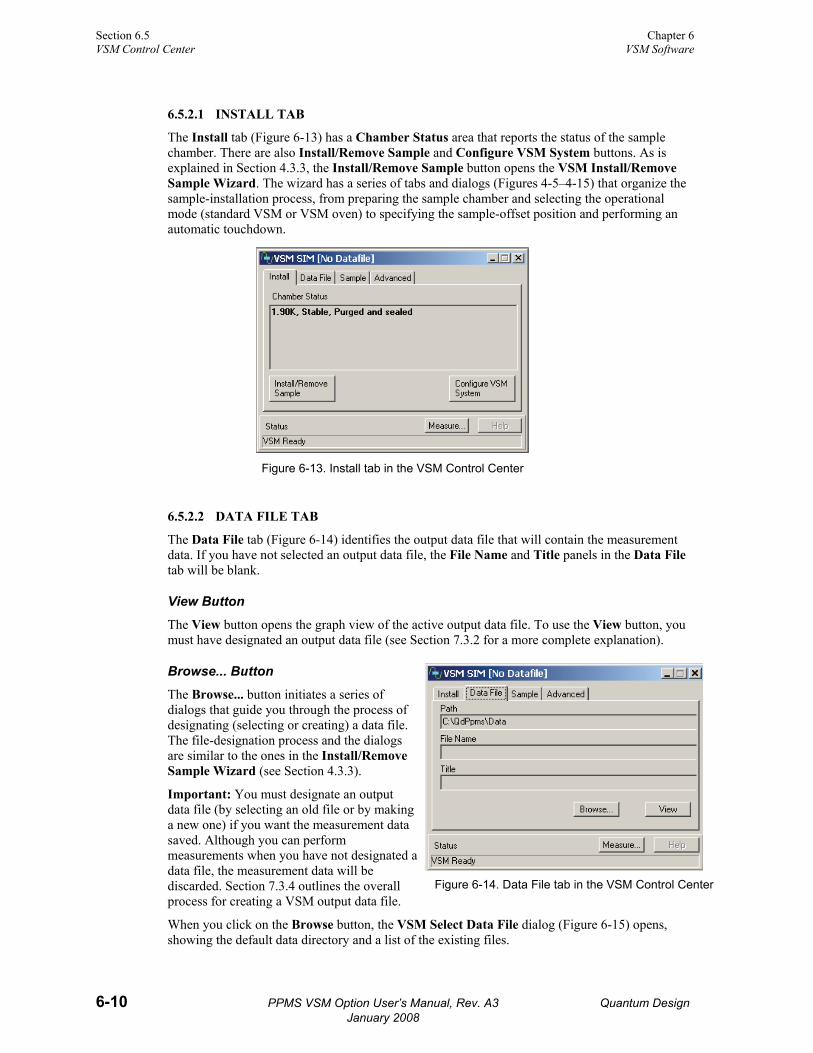
Section 6.5 Chapter 6 VSM Control Center VSM Software
6-10 PPMS VSM Option User’s Manual, Rev. A3 Quantum Design January 2008
6.5.2.1 INSTALL TAB
The Install tab (Figure 6-13) has a Chamber Status area that reports the status of the sample chamber. There are also Install/Remove Sample and Configure VSM System buttons. As is explained in Section 4.3.3, the Install/Remove Sample button opens the VSM Install/Remove Sample Wizard. The wizard has a series of tabs and dialogs (Figures 4-5–4-15) that organize the sample-installation process, from preparing the sample chamber and selecting the operational mode (standard VSM or VSM oven) to specifying the sample-offset position and performing an automatic touchdown.
Figure 6-13. Install tab in the VSM Control Center
6.5.2.2 DATA FILE TAB
The Data File tab (Figure 6-14) identifies the output data file that will contain the measurement data. If you have not selected an output data file, the File Name and Title panels in the Data File tab will be blank.
View Button
The View button opens the graph view of the active output data file. To use the View button, you must have designated an output data file (see Section 7.3.2 for a more complete explanation).
Browse... Button
The Browse... button initiates a series of dialogs that guide you through the process of designating (selecting or creating) a data file. The file-designation process and the dialogs are similar to the ones in the Install/Remove Sample Wizard (see Section 4.3.3).
Important: You must designate an output data file (by selecting an old file or by making a new one) if you want the measurement data saved. Although you can perform measurements when you have not designated a data file, the measurement data will be discarded. Section 7.3.4 outlines the overall process for creating a VSM output data file.
Figure 6-14. Data File tab in the VSM Control Center
When you click on the Browse button, the VSM Select Data File dialog (Figure 6-15) opens, showing the default data directory and a list of the existing files.

Chapter 6 Section 6.5 VSM Software VSM Control Center
Quantum Design PPMS VSM Option User’s Manual, Rev. A3 6-11 January 2008
Figure 6-15. Designating an output data file
○ To select an existing output data file, place your cursor on the file name and click on the Open button. When measurements are taken, the new data will be appended to the existing file. Important: If you select an existing file that has the wrong type of format (for example, a data file for a different PPMS measurement option), you will receive an error message.
○ To create a new output data file, enter the new file name in the File name text box and click on the Open button. The software will prompt you to specify the title of the data file, which will be used for the graph of the data. It will then open the VSM Sample Properties dialog (Figure 6-16). The VSM Sample Properties dialog is for your notes about the sample. The sample property information is optional, as there are no fixed sample properties and the VSM software does not use the sample properties for any computations. Sample property information is stored in the header of the measurement data file, so you can specify it only when the data file is created, and you cannot use the MultiVu or VSM software to change it after the file has been created. You can view the sample information in an active output file by clicking on the Sample tab of the VSM Control Center (Section 6.5.2.3).
Figure 6-16. Recording sample properties

Section 6.5 Chapter 6 VSM Control Center VSM Software
6-12 PPMS VSM Option User’s Manual, Rev. A3 Quantum Design January 2008
6.5.2.3 SAMPLE TAB
The Sample tab (Figure 6-17) is a read-only status display that shows the sample properties (e.g., material, comments, mass, and volume) for the active output data file. The information in the Sample tab originates from your entries in the VSM Sample Properties dialog, which are stored in the header of the output data file. If you select a pre-existing file to which you want data appended and bring the Sample tab forward, the information in the Sample dialog will reflect the entries in the header of the pre-existing file.
Figure 6-17. Sample tab in the VSM Control Center
6.5.2.4 ADVANCED TAB
The Advanced tab (Figure 6-18) organizes support for troubleshooting, for example, checking calibrations and troubleshooting system performance. Hence, you will use the options on the Advanced tab only if you are an experienced VSM operator. ○ The Units of Measure options allow you to record in emu or in A-m2 (ampere meters
squared). By default, the measures are recorded as emu. ○ The Motor Friction Scan button moves the VSM linear motor transport through the full
range of motion. The system plots the motor force (as current) as a function of position for both lifting the sample and lowering the sample. A difference between these two curves indicates friction due to ice or other obstructions.
Figure 6-18. Advanced tab in the VSM Control Center

Chapter 6 Section 6.5 VSM Software VSM Control Center
Quantum Design PPMS VSM Option User’s Manual, Rev. A3 6-13 January 2008
6.5.3 VSM Control Center: "Measure" Button The Measure button in the VSM Control Center opens the VSM Measurement dialog box (Figure 6-19), which organizes immediate-mode measurement settings and initiates measurements. The dialog has a section showing the measurements, three tabs (Settings, Centering, and Advanced), and three buttons (Start (Stop), Pause (Resume), and Close).
6.5.3.1 "VSM MEASUREMENT" DIALOG: BUTTONS ○ The Start (Stop) toggle button starts and stops the measurement process, but it does not
close the dialog. ○ The Pause (Resume) toggle button only stops the system from performing measurements, as
the system continues to oscillate the sample and execute any scheduled automatic touchdown operations. To restart the data output after a Pause, click on the Resume (Pause) toggle button.
○ The Close button closes the VSM Measurement dialog, but it does not stop the measurement.
6.5.3.2 "VSM MEASUREMENT" DIALOG: LAST MEASUREMENT
The VSM Measurement dialog is divided into two main areas: On the left side are the tabs with the measurement settings. On the right side is a Last Measurement area that displays the most recent Temperature, Field, Moment, and Moment Std. Error data, which are written to the open data file. ○ Temperature represents the average
temperature during the measurement, in Kelvin. ○ Field represents the average field, in oersted. ○ Moment represents the average of the moment
over the averaging time, in emu. ○ Moment Std. Error represents the error on the
mean, that is, the error bar on the reported moment. Figure 6-19. VSM Measurement dialog and
the Settings tab
6.5.3.3 "VSM MEASUREMENT" DIALOG: SETTINGS TAB
The Settings tab (Figure 6-19) is divided into options for Measure Type and Measurement Parameters.
Measure Type After you click in the radio button to select the type of measurement to be made, the data will be defined by your settings in the Measurement Parameters section.
○ The Single Measurement option takes one measurement of the specified "Averaging Time."
○ Continuous Measuring takes measurements that last "Averaging Time." If the "Logging Interval" value is less than "Averaging Time," a new measurement occurs every "Averaging Time" seconds. Otherwise, a new measurement occurs every "Logging Interval" seconds. Once started, Continuous Measuring takes measurements until you click on the Stop (Start) toggle button.
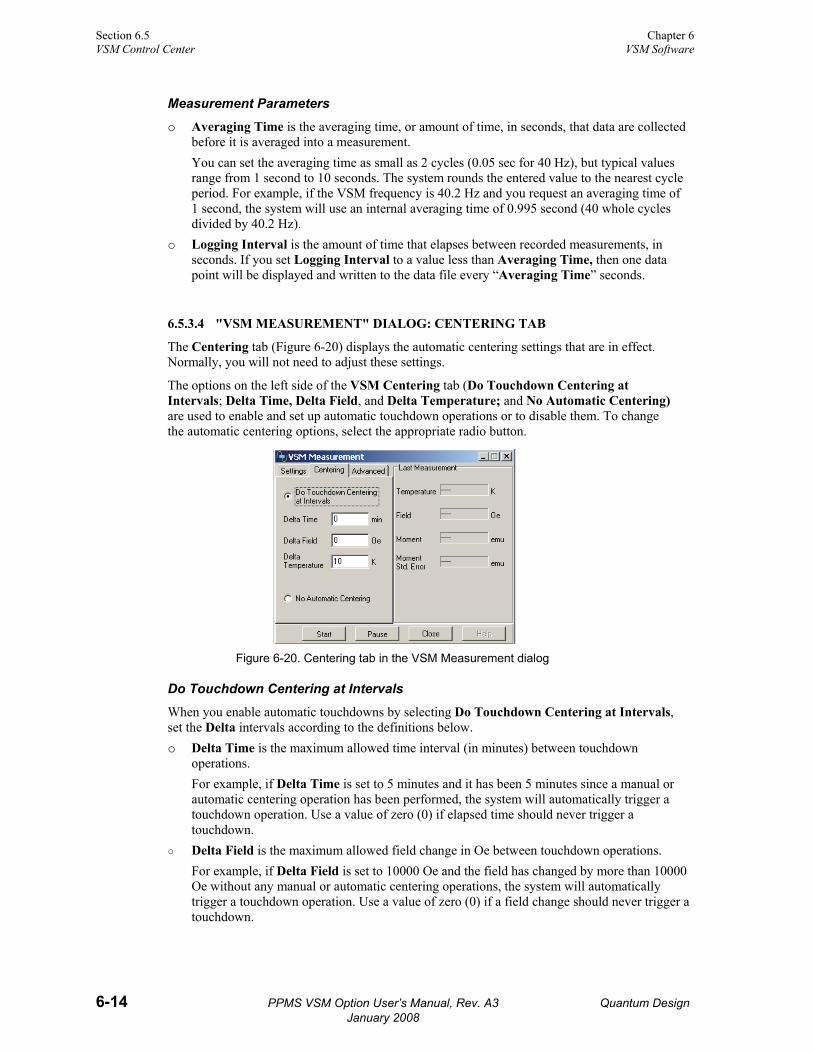
Section 6.5 Chapter 6 VSM Control Center VSM Software
6-14 PPMS VSM Option User’s Manual, Rev. A3 Quantum Design January 2008
Measurement Parameters
o Averaging Time is the averaging time, or amount of time, in seconds, that data are collected before it is averaged into a measurement. You can set the averaging time as small as 2 cycles (0.05 sec for 40 Hz), but typical values range from 1 second to 10 seconds. The system rounds the entered value to the nearest cycle period. For example, if the VSM frequency is 40.2 Hz and you request an averaging time of 1 second, the system will use an internal averaging time of 0.995 second (40 whole cycles divided by 40.2 Hz).
o Logging Interval is the amount of time that elapses between recorded measurements, in seconds. If you set Logging Interval to a value less than Averaging Time, then one data point will be displayed and written to the data file every “Averaging Time” seconds.
6.5.3.4 "VSM MEASUREMENT" DIALOG: CENTERING TAB
The Centering tab (Figure 6-20) displays the automatic centering settings that are in effect. Normally, you will not need to adjust these settings.
The options on the left side of the VSM Centering tab (Do Touchdown Centering at Intervals; Delta Time, Delta Field, and Delta Temperature; and No Automatic Centering) are used to enable and set up automatic touchdown operations or to disable them. To change the automatic centering options, select the appropriate radio button.
Figure 6-20. Centering tab in the VSM Measurement dialog
Do Touchdown Centering at Intervals
When you enable automatic touchdowns by selecting Do Touchdown Centering at Intervals, set the Delta intervals according to the definitions below. o Delta Time is the maximum allowed time interval (in minutes) between touchdown
operations. For example, if Delta Time is set to 5 minutes and it has been 5 minutes since a manual or automatic centering operation has been performed, the system will automatically trigger a touchdown operation. Use a value of zero (0) if elapsed time should never trigger a touchdown.
○ Delta Field is the maximum allowed field change in Oe between touchdown operations. For example, if Delta Field is set to 10000 Oe and the field has changed by more than 10000 Oe without any manual or automatic centering operations, the system will automatically trigger a touchdown operation. Use a value of zero (0) if a field change should never trigger a touchdown.

Chapter 6 Section 6.5 VSM Software VSM Control Center
Quantum Design PPMS VSM Option User’s Manual, Rev. A3 6-15 January 2008
○ Delta Temperature is the maximum allowed temperature change (in Kelvin) between touchdown operations.
For example, if Delta Temperature is set to 20 K and the temperature has changed by more than 20 K without any manual or automatic centering operations, the system will automatically trigger a touchdown operation. Use a value of zero (0) if a temperature change should never trigger a touchdown.
No Automatic Centering
When you select No Automatic Centering, you disable automatic touchdown operations—the system will never automatically trigger a touchdown centering operation.
Important: When automatic centering has been disabled, you are responsible for performing centering operations. You can do this periodically by selecting Measure >> VSM Center Sample from the MultiVu dropdown menu bar, which will open the VSM Center Sample popup (Figure 6-10). As an alternative, you can insert the Center Sample sequence command into a sequence file that is run during the measurements, as explained in Section 6.8.
6.5.3.5 "VSM MEASUREMENT" DIALOG: ADVANCED TAB
The Advanced tab of the VSM Measurement dialog (Figure 6-21) contains settings for Excitation Parameters, Ranging, and PPMS Data Logging.
Excitation Parameters o The default setting of the Peak
Amplitude option (Excitation Parameters section) is suitable for most situations, so you can generally leave it alone. However, it offers additional control over your measurements. You do not set the Max. Accel. and Max. Moment values, because they change in accordance with the Peak Amplitude setting. Yet, these two values help you assess whether the amplitude setting is suitable for your sample and its characteristics. Figure 6-21. Advanced tab in the VSM
Measurement dialog
o The Peak Amplitude is typically set to 2 mm; it specifies the peak vibration amplitude (i.e., one-half the peak-to-peak amplitude) of the sample during a measurement. Up to about 2 mm, the signal-to-noise ratio increases linearly with amplitude; after that, it increases more slowly. You might need amplitudes of 1 mm or less when you want to minimize the forces applied to the sample (e.g., for fragile samples or samples of a powder) or when the sample signal is very large. At small amplitudes (less than 0.5 mm), the accuracy of the measurement will be reduced due to the limited resolution of the position encoder in the linear motor transport. Important: Quantum Design staff recommend that you limit the maximum Peak Amplitude to 3 mm, because the motor module could overheat at greater amplitudes. By limiting the maximum Peak Amplitude to 3 mm, you also ensure that the sample holder clears the puck surface. For example, taking into account that the detection coils are 40 mm above the puck surface and using a sample offset of 35 mm, the use of a Peak Amplitude of 5 mm or greater would cause the sample holder to touch the puck surface, which could dislodge the sample or the sample rod.

Section 6.5 Chapter 6 VSM Control Center VSM Software
6-16 PPMS VSM Option User’s Manual, Rev. A3 Quantum Design January 2008
o The Frequency is 40 Hz; it specifies the frequency with which the VSM oscillates the sample.
o Max. Accel. is computed from Frequency (40 Hz) and the Peak Amplitude entry; it represents the maximum acceleration the sample will experience during a measurement in units of meter per second squared. Important: Do not proceed with a measurement if your sample cannot tolerate accelerations of this magnitude. To reduce the acceleration, reduce the amplitude.
o Max. Moment is computed from Frequency (40 Hz) and the Peak Amplitude entry; it represents the maximum sample moment that can be measured using these settings. Important: Do not proceed with a measurement if the magnetic moment of your sample is larger than the calculated Max. Moment, as the system will not be able to complete the measurement. Larger moments can be measured by using relatively small values for amplitude.
Ranging
The Ranging setting refers to the way the system chooses the gain of the amplifiers in the VSM module during a measurement; the optimal setting is typically Sticky Autorange. The preamplifiers in the VSM module can change the gain ranges by factors of 10, depending on the size of the signal that is induced in the pickup coils. In the rare case when you need more control than is offered by Sticky Autorange, you can change the Ranging setting.
o Sticky Autorange (recommended): The system automatically increases the gain by a factor of 10 if the current peak signal drops below 2% of the current range. The system automatically decreases the gain by a factor of 10 if the current peak signal exceeds 50% of the current range.
o Always Autorange: The system automatically increases the gain by a factor of 10 if the current peak signal drops below 9% of the current range. The system automatically decreases the gain by a factor of 10 if the current peak signal exceeds 100%. In some cases, the "Always Autorange" setting might improve the signal-to-noise ratio. However, this setting could also lead to an increase in the number of range changes and a corresponding drop in data throughput.
o Fixed Range: The system always uses the specified gain range.
PPMS Data Logging
In the PPMS Data Logging area of the VSM Control Center Advanced tab, the Select … button opens the PPMS dialog (Figure 6-22), which lists additional PPMS system data items that you can choose to add to the current data file. These items are in addition to the VSM data items that are typically included, which are summarized in Table 7-2.
Figure 6-22. PPMS data-logging dialog for selecting additional types of data to be collected

Chapter 6 Section 6.6 VSM Software Overview of Sequence-Mode Commands
Quantum Design PPMS VSM Option User’s Manual, Rev. A3 6-17 January 2008
6.6 Overview of Sequence-Mode Commands VSM sequence-mode commands are, essentially, encapsulated versions of VSM immediate-mode measurement commands. VSM Adv. Measure, Center Sample, Moment vs. Field, and Moment vs. Temp. sequence commands can be combined with non-VSM sequence commands and looping constructs. (The latter are explained in the Physical Properties Measurement System: PPMS MultiVu Application User's Manual.) The VSM sequence-mode commands have interactive dialogs that help you specify your measurements, and these dialogs are similar to the ones used to set up the immediate-mode measurements.
Important: Except for the general discussions, this section pertains only to VSM-specific sequence commands. However, your sequence files can include any other non-VSM sequence commands that are relevant.
Using VSM-specific sequence commands to take VSM measurements involves the following steps:
o Install the sample by using the VSM Install/Remove Sample Wizard, which you access from the dropdown menu or the VSM Control Center. During the installation process, you should designate an output data file. (You can do this at any time before you run the sequence file, but you will get an error message if the file is not open when you attempt to run the sequence file.)
o Designate (open or create) a sequence file. o Add VSM measurement commands to the sequence file (if necessary) and save it. o Run the sequence file.
6.6.1 Opening and Creating Sequence Files To open an existing sequence file, select File >> Open >> Sequence on the MultiVu dropdown menu bar (Figure 6-23). The Select a Sequence File dialog will open, showing the available files.
Figure 6-23. Opening a sequence file by using the MultiVu dropdown File menu

Section 6.6 Chapter 6 Overview of Sequence-Mode Commands VSM Software
6-18 PPMS VSM Option User’s Manual, Rev. A3 Quantum Design January 2008
○ When you have selected and opened a file, it will open in the Sequence Editor, which is shown in Figure 6-24 as Sequence1.
○ The Sequence Commands bar (shown at the right side of Figure 6-24) should open at the same time as the sequence file. If it does not, select View >> Sequence Command Bar2 from the MultiVu dropdown menus.
To create a new file containing sequence-mode commands, select File >> New Sequence on the MultiVu dropdown menu bar.3 The Sequence Editor dialog and the Sequence Commands bar will open concurrently, as is shown in Figure 6-24.
Figure 6-24. The MultiVu window, the Sequence Editor, and the Sequence Commands bar
6.6.2 Using the Sequence Editor and Sequence Commands Bar Sequence files are constructed by inserting commands from the Sequence Commands bar into the file in the Sequence Editor "window." The Sequence Commands bar and Sequence Editor are shown in Figure 6-24.
The Sequence Commands bar contains three major command groups: System, Advanced, and Measurement. The VSM-specific measurement commands (Adv. Measure, Center Sample, Datafile Comment, Moment vs. Field, Moment vs. Temp., and New Datafile) are in the VSM subgroup within the main Measurement Commands group. To see the commands in any group, expand it by clicking on the plus sign (+) next to the group heading. To close a command group, click on the minus (–) sign next to the group heading.
Important: The VSM option must be activated before the VSM sequence commands will appear in the Sequence Commands bar.
2 This command does not appear in the dropdown View menu until you have activated the Sequence Editor. 3 You can also click on the New Sequence File button on the MultiVu toolbar.
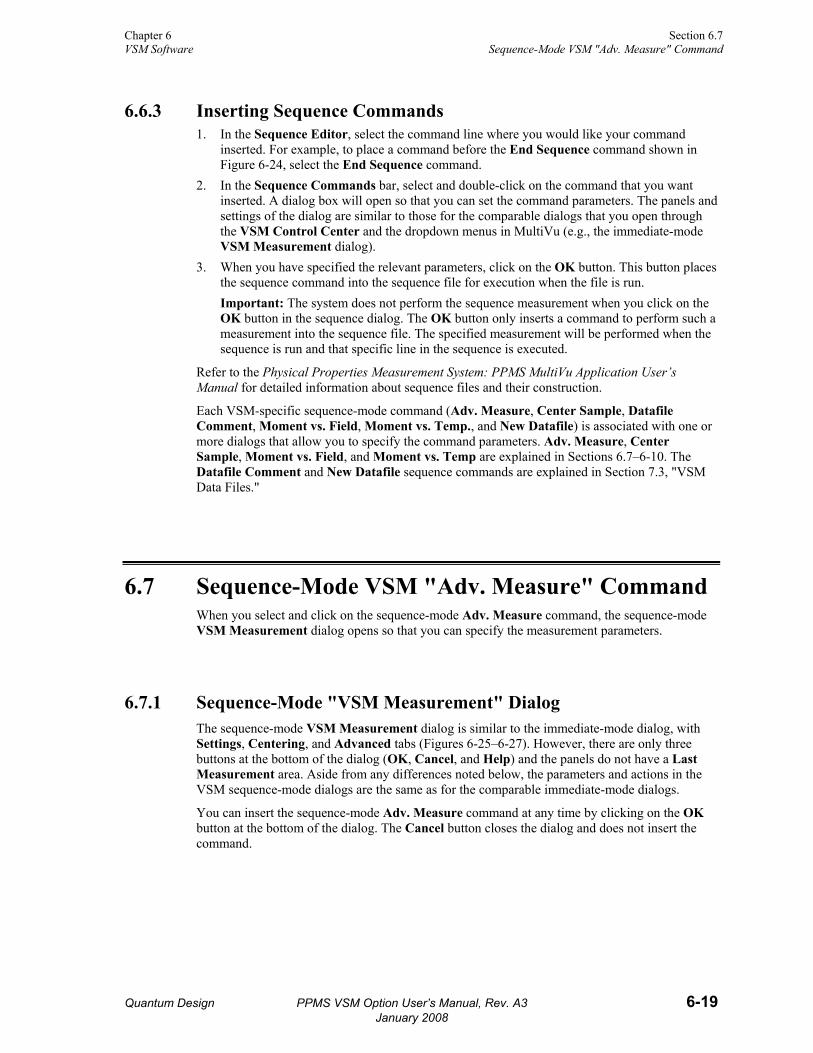
Chapter 6 Section 6.7 VSM Software Sequence-Mode VSM "Adv. Measure" Command
Quantum Design PPMS VSM Option User’s Manual, Rev. A3 6-19 January 2008
6.6.3 Inserting Sequence Commands 1. In the Sequence Editor, select the command line where you would like your command
inserted. For example, to place a command before the End Sequence command shown in Figure 6-24, select the End Sequence command.
2. In the Sequence Commands bar, select and double-click on the command that you want inserted. A dialog box will open so that you can set the command parameters. The panels and settings of the dialog are similar to those for the comparable dialogs that you open through the VSM Control Center and the dropdown menus in MultiVu (e.g., the immediate-mode VSM Measurement dialog).
3. When you have specified the relevant parameters, click on the OK button. This button places the sequence command into the sequence file for execution when the file is run. Important: The system does not perform the sequence measurement when you click on the OK button in the sequence dialog. The OK button only inserts a command to perform such a measurement into the sequence file. The specified measurement will be performed when the sequence is run and that specific line in the sequence is executed.
Refer to the Physical Properties Measurement System: PPMS MultiVu Application User’s Manual for detailed information about sequence files and their construction.
Each VSM-specific sequence-mode command (Adv. Measure, Center Sample, Datafile Comment, Moment vs. Field, Moment vs. Temp., and New Datafile) is associated with one or more dialogs that allow you to specify the command parameters. Adv. Measure, Center Sample, Moment vs. Field, and Moment vs. Temp are explained in Sections 6.7–6-10. The Datafile Comment and New Datafile sequence commands are explained in Section 7.3, "VSM Data Files."
6.7 Sequence-Mode VSM "Adv. Measure" Command When you select and click on the sequence-mode Adv. Measure command, the sequence-mode VSM Measurement dialog opens so that you can specify the measurement parameters.
6.7.1 Sequence-Mode "VSM Measurement" Dialog The sequence-mode VSM Measurement dialog is similar to the immediate-mode dialog, with Settings, Centering, and Advanced tabs (Figures 6-25–6-27). However, there are only three buttons at the bottom of the dialog (OK, Cancel, and Help) and the panels do not have a Last Measurement area. Aside from any differences noted below, the parameters and actions in the VSM sequence-mode dialogs are the same as for the comparable immediate-mode dialogs.
You can insert the sequence-mode Adv. Measure command at any time by clicking on the OK button at the bottom of the dialog. The Cancel button closes the dialog and does not insert the command.

Section 6.7 Chapter 6 Sequence-Mode VSM "Adv. Measure" Command VSM Software
6-20 PPMS VSM Option User’s Manual, Rev. A3 Quantum Design January 2008
Figure 6-25. VSM sequence-mode Measurement dialog: Settings tab
Figure 6-26. VSM sequence-mode Measurement dialog: Centering tab
Figure 6-27. VSM sequence-mode Measurement dialog: Advanced tab
6.7.1.1 SEQUENCE-MODE "VSM MEASUREMENT" DIALOG: SETTINGS TAB
This Settings tab (Figure 6-25) allows you to specify the action to be taken, which is different from the immediate-mode VSM Measurement–Settings panel. Thus, the Action subsection and its Start/Reconfigure and Stop radio buttons are new. o When the Start/Reconfigure sequence command is executed, it initiates a VSM measurement
with the parameters that are specified in the Settings, Centering, and Advanced tabs of the VSM Measurement dialog, unless a VSM measurement is already running. In the latter case, the Start/Reconfigure command will reconfigure the VSM measurement with the specified parameters and continue measurements.
o When the Stop sequence command is executed, it halts data output and stops the oscillation of the sample.
This tab also has basic measurement parameters and options (Measure Type, Averaging Time, and Logging Interval) that are defined the same as they are in the immediate-mode VSM Measurement dialogs (Section 6.5.3.3).
6.7.1.2 SEQUENCE-MODE "VSM MEASUREMENT" DIALOG: CENTERING TAB
This Centering tab (Figure 6-26) is the same as the immediate-mode Centering panel, and the options are defined the same as they are in the immediate-mode panel (see Section 6.5.3.4).
6.7.1.3 SEQUENCE-MODE "VSM MEASUREMENT" DIALOG: ADVANCED TAB
This Advanced tab (Figure 6-27) is the same as the immediate-mode Advanced panel, and the options are defined the same as they are in the immediate-mode panel (see Section 6.5.3.5).
Important: Please read about the Peak Amplitude setting in Section 6.5.3.5 before you attempt to change it from the default.

Chapter 6 Section 6.8 VSM Software Sequence-Mode VSM "Center Sample" Command
Quantum Design PPMS VSM Option User’s Manual, Rev. A3 6-21 January 2008
6.7.2 Summary: Setting up a Sequence-Mode VSM "Adv. Measure" Command Complete the following steps to set up a VSM measurement in sequence mode: 1. Install a sample and designate an output data file. 2. Designate (create or open) a sequence command file and start the sequence-mode VSM
Measurement dialog. (In the Sequence Commands bar, open the Measurement and VSM command groups and double-click on Adv. Measure).
3. Set the basic parameters for your measurements in the Settings tab of the VSM Measurement dialog.
4. Use the Centering and Advanced tabs to make any desired changes to the automatic centering (enabled or disabled) option or settings and to the Excitation Parameters, Ranging, and PPMS Data Logging settings. These measurement options are defined the same as they are in the immediate-mode dialogs.
5. When you have completed the measurement specifications, click on the OK button at the bottom of the VSM Measurement dialog. This will place the sequence command and its settings into the sequence file.
6.8 Sequence-Mode VSM "Center Sample" Command If you choose not to use automatic centering, you will need to perform centering operations by using the dropdown menu or by inserting centering operations into a sequence file. As explained in Chapter 4, centering operations help ensure the accuracy of measurements, keeping the centering position stable to within about 0.1 mm at the center of the pickup coils by informing the system about sample position shifts with respect to the coilset.
To insert a centering operation into a sequence file, click on the Center Sample sequence command in the Sequence Commands bar. This opens the VSM Center Sample Sequence dialog shown in Figure 6-28.
When the sequence file is run and the program encounters the Center Sample sequence command, it temporarily halts the current VSM Adv. Measure command. During the pause, the program performs a centering operation and adjusts the center of oscillation for the measurement. Then it resumes the measure command, continuing from the point where it stopped. This operation takes about 20 seconds.
Figure 6-28. Sequence-mode VSM Center Sample command: VSM Center Sample Sequence popup
The Center Sample sequence command is invaluable when you have disabled automatic centering (by selecting No Automatic Centering), but it is also useful when automatic centering has been enabled. In the latter case, you can place the Center Sample command in your sequence just before measurements that you would like to have performed without the interruption of a touchdown operation. The measurement is still subject to the other parameters (e.g., Averaging Time and Logging Interval) that you have set, but by explicitly executing the Center Sample command, you reset the beginning of the interval.

Section 6.9 Chapter 6 Sequence-Mode VSM “Moment vs. Field” Command VSM Software
6-22 PPMS VSM Option User’s Manual, Rev. A3 Quantum Design January 2008
6.9 Sequence-Mode VSM “Moment vs. Field” Command The sequence-mode VSM Moment vs. Field command facilitates using sequences to make common VSM measurements such as hysteresis loops. This command allows you to rapidly set the VSM to take data while sweeping the field in a variety of different patterns, and it gives you the ability to control the spacing of the data points (e.g., uniform spacing in Log (Field)), 1/Field, etc.) so that it is easy to plot the data. When you click on the sequence-mode Moment vs. Field command in the Sequence Commands bar, it opens the sequence-mode VSM Moment versus Field dialog shown in Figure 6-29.
6.9.1 Sequence-Mode VSM "Moment versus Field" Dialog The VSM Moment versus Field dialog has two tabs, Setup (Figure 6-29) and Advanced (Figure 6-30), with options for setting measurement parameters. As is explained below, the tabs provide several unique functions as well as some of the same functions found in the sequence-mode Scan Field and VSM Adv. Measure commands.
You can insert the Moment vs. Field command at any time by clicking on the OK button at the bottom of the dialog. The Cancel button closes the dialog and does not insert the command or save any changes you have made to the dialog.
Figure 6-29. Setup tab of the sequence-mode
VSM Moment versus Field dialog
Figure 6-30. Advanced tab of the sequence-mode
VSM Moment versus Field dialog

Chapter 6 Section 6.9 VSM Software Sequence-Mode VSM “Moment vs. Field” Command
Quantum Design PPMS VSM Option User’s Manual, Rev. A3 6-23 January 2008
6.9.2 Sequence-Mode VSM "Moment versus Field" Dialog: Setup Tab The Setup tab (Figure 6-29) organizes the parameters relevant to a field-sweep or hysteresis measurement. Options in the Field Sequence, Field Control, and Data Acquisition subsections of the tab allow you to control the settings. A scroll bar at the right side automatically displays Approximate Fields. The subsections and their settings are explained below.
6.9.2.1 FIELD SEQUENCE SETTINGS
Use the options in the Field Sequence section (Figures 6-31 and 6-32) to set the amplitude and order of the field changes during the Moment vs. Field measurement.
Figure 6-31. Field Sequence section of the VSM Moment
vs Field Setup tab: Start-End Quadrant de-selected
Figure 6-32. Field Sequence section of the VSM
Moment vs Field Setup tab: Start-End Quadrant selected
○ Hmax defines the maximum field used in the measurement.
○ Ho defines a starting or ending field used in the measurement. By default, Ho is the starting point of the measurement, but you also can use Hmax or Hmin as the starting point.
○ Hmin defines the minimum field used in the measurement.
Note: Uniform spacing is referenced between Hmax and Hmin. This can affect whether Ho is used in the measurement, as is explained below in the Data Acquisition subsection.
○ Select Start/End Quadrant (Figures 6-31 and 6-32) allows you to use your mouse to set the starting and ending fields of the measurement. To set the starting and ending quadrants (the area between the field set points), place your mouse pointer in the diagram, left-click the field for the start of the measurement, drag the pointer to the end field, and release the left button. The selected quadrants will be highlighted and included in the measurement.
6.9.2.2 FIELD CONTROL SETTINGS
Use the settings in the Field Control section (Figure 6-33) of the Setup tab to control how the magnetic field changes between the field set points.
Sweep Rate
The Sweep Rate value sets the rate at which the field changes when the magnet is ramping up or down. The Physical Property Measurement System: Hardware Manual has more information about the Sweep Rate setting.
Figure 6-33. Field Control section of the VSM Moment versus Field dialog
Driven at each field
The Driven at each field radio button sets the magnet to stabilize the field in Driven mode at each field shown in the Approximate Fields list (Figures 6-29 and 6-36).

Section 6.9 Chapter 6 Sequence-Mode VSM “Moment vs. Field” Command VSM Software
6-24 PPMS VSM Option User’s Manual, Rev. A3 Quantum Design January 2008
Persistent at each field
The Persistent at each field radio button sets the magnet to stabilize the field in Persistent mode at each field shown in the Approximate Fields list (Figures 6-29 and 6-36).
Sweep
The Sweep radio button sets the magnet to continuously change the field without pause during the measurement. When this setting is used, the VSM will collect data at each field shown in the Approximate Fields list.
End Mode
The End Mode dropdown menu bar allows you to set the state (Persistent or Driven) that the magnet will be in after the measurement has ended. For more information about End Mode, see Chapter 6 of the PPMS MultiVu Application User’s Manual.
C A U T I O N ! Monitor the system closely when it is in Driven mode. Use of Driven mode significantly increases heat flow into the dewar and the helium boil-off rate, so there is an increased risk of a magnet quench.
6.9.2.3 DATA ACQUISITION SETTINGS
Use the Data Acquisition section (Figure 6-34) to set the basic parameters of the moment versus field measurements.
"Data Spacing"
The "Data Spacing" dropdown menu bar at the top of the section provides the following options: ○ Continuous Measuring sets the VSM to take data in
Continuous Measuring mode (refer to Section 6.5.3.3 for more information on Continuous Measuring). When you are not using Continuous Measuring, you must define when the VSM will take data by designating the field increment between measurements, as is explained below in Number of Fields Min to Max and Field Increment.
○ Uniform Spacing in Field sets the VSM to uniformly space data collection with respect to the magnitude of the magnetic field.
Figure 6-34. Data Acquisition:
Data spacing selection
○ Uniform Spacing in Field^2 sets the VSM to uniformly space data collection with respect to the square of the magnitude of the magnetic field.
○ Uniform Spacing in Field^1/2 sets the VSM to uniformly space data collection with respect to the square root of the magnitude of the magnetic field.
○ Uniform Spacing in 1/Field sets the VSM to uniformly space data collection with respect to the inverse of the magnitude of the magnetic field.
○ Uniform Spacing in Log (Field) sets the VSM to uniformly space data collection with respect to the logarithm of the magnitude of the magnetic field.

Chapter 6 Section 6.9 VSM Software Sequence-Mode VSM “Moment vs. Field” Command
Quantum Design PPMS VSM Option User’s Manual, Rev. A3 6-25 January 2008
Averaging Time
The Averaging Time text box (Figure 6-35) allows you to set the length of time the VSM will collect data before it is averaged into a measurement. See Section 6.5.3.3 for more information about Averaging Time.
Number of Fields Min to Max and Field Increment
When you are not using Continuous Measuring, you must define the spacing between the fields with one of these options (Figure 6-35). Note that when you select one of these settings, you must enter a number in the associated text box before you will be able to take measurements.
Figure 6-35. Data Acquisition:
Number of Fields and Field Increment
○ To set the number of times the VSM will measure between your selected Hmax and Hmin, click on the button next to Number of Fields Min to Max. The value you enter into the text box next to Number of Fields Min to Max sets the number of data points the VSM will take between Hmax to Hmin (including Hmax and Hmin), spaced uniformly in the manner you have selected.
○ To directly set the increment in magnetic field between VSM data points, click on the button next to Field Increment. If you select the Field Increment radio button, you must enter a number in the associated text box. If you set a step size that does not fit evenly with your selected Hmax and Hmin, the program will adjust the increment size slightly to include Hmax and Hmin.
Note: Because uniform spacing is referenced between Hmax and Hmin, the field you enter for Ho might not be used in the measurement if the combination of uniform spacing and number of fields does not line up evenly with Ho. If this occurs, Ho will only be included as a data point if it is selected as the starting or ending field (or both) of the measurement.
Repetitions at each Field
The value entered for Repetitions at each Field (Figure 6-36) is the number of data points the VSM will take at each of the fields shown in the Approximate Fields list. This option has no effect if you have selected the Sweep or Continuous Measuring mode.
Keep
The Keep dropdown menu bar (Figure 6-36) is only available when you have selected Continuous Measurement, which can generate large volumes of data. Use the Keep options to choose a percentage of VSM data points that will be written to the data file. See the Estimated explanation below for more on this issue.
6.9.2.4 APPROXIMATE FIELDS
Figure 6-36. Data Acquisition: Keep and Approximate Fields settings
The Approximate Fields list (Figure 6-36) displays, in sequence, a close estimate of the fields where the VSM will take data points, based on all your selections in the Field Sequence, Field Control, and Data Acquisition sections of the Setup tab.

Section 6.9 Chapter 6 Sequence-Mode VSM “Moment vs. Field” Command VSM Software
6-26 PPMS VSM Option User’s Manual, Rev. A3 Quantum Design January 2008
6.9.2.5 ESTIMATED
The Estimated area (Figure 6-36) displays the estimated amount of time (in hours and minutes) that will be needed to complete the measurement as well as the estimated number of lines in the output data file. The estimated number of lines in the output data file is also the total number of data points generated by your measurement.
6.9.3 Sequence-Mode VSM "Moment versus Field" Dialog: Advanced Tab The Advanced tab (Figure 6-30) organizes the settings for measurement details (e.g., the VSM measurement parameters and the field-approach mode) and has options that control how the VSM takes measurement data. Experienced users will notice that the Centering, Ranging, PPMS Data Logging, and Excitation Parameters subsections of this tab are identical in form and function to sections of the VSM Measurement dialog.
6.9.3.1 CENTERING SETTINGS
Use the Centering section of the Advanced tab to set the conditions for the VSM to perform touchdown operations. For more information on Centering, see Section 6.5.3.4.
6.9.3.2 RANGING SETTINGS
Use the Ranging section of the Advanced tab to set the way the system chooses the gain of the amplifiers in the VSM module during measurement. For more information on Ranging, see Section 6.5.3.5.
6.9.3.3 PPMS DATA LOGGING SETTINGS
The Select… button in the PPMS Data Logging section opens the PPMS dialog (Figure 6-22) so that you can select additional system information to be sent to the output data file. For more information on PPMS Data Logging, see Section 6.5.3.5.
6.9.3.4 ADVANCED SETTINGS
The Advanced Settings subsection (Figure 6-37) contains settings that are rarely needed, but they can provide extra control over your measurements.
Require Sweep Mode for Continuous Acquisition
When you set Data Acquisition to Continuous Measurement (Section 6.9.2.3), the system automatically uses Sweep Mode and the check box next to Require Sweep Mode For Continuous Acquisition will be selected.
Figure 6-37. Advanced Settings–Advanced tab: Require sweep, Wait Time, and Approach Mode
settings
Although you can clear the check box and select the Driven at each field or Persistent at each field mode during continuous measurements, be aware that these modes might increase the noise and introduce artifacts into your data.

Chapter 6 Section 6.10 VSM Software Sequence Mode VSM "Moment vs. Temp." Command
Quantum Design PPMS VSM Option User’s Manual, Rev. A3 6-27 January 2008
Note: If you measure continuously while the power supply stabilizes the magnetic field at each set point, the noise level might increase temporarily, introducing artifacts into the VSM data until the system can achieve field stability.
Wait Time At Each Step
The Wait Time At Each Step text box is used to set the additional time (in seconds) that you want the system to wait at each field set point. This wait time is in addition to the amount of time it takes for the required VSM measurements and it is added before the VSM performs the measurements. The Wait Time At Each Step setting has no effect if you have selected Sweep or Continuous Measuring modes.
Approach Mode
The Approach Mode dropdown menu bar lets you choose between Linear, No O’Shoot, and Oscillate field-approach modes for each of the magnetic field set points in your measurement. For more information on Approach Mode, see Chapter 6 of the PPMS MultiVu Application User’s Manual. We recommend Linear mode when your Data Acquisition setting is Continuous Measuring.
Restore Defaults
The Restore Defaults button resets everything in the dialog to the default settings.
6.9.3.5 EXCITATION PARAMETERS
Use the options in the Excitation Parameters subsection (Figure 6-37) to set the drive variables for the VSM linear motor transport. For more information on these options, see Section 6.5.3.5.
6.10 Sequence Mode VSM "Moment vs. Temp." Command The VSM sequence-mode Moment vs. Temp. command is designed to make these types of measurements easy to set up and execute in a sequence. You can use the Moment vs. Temp. command to rapidly set the VSM to take data while sweeping temperature in a variety of different patterns. You also can control when data is taken with respect to temperature increment (e.g., uniform spacing in Log (Field) or 1/Field), which facilitates plotting the data. When you click on the sequence-mode Moment vs. Temp. command in the Sequence Commands bar, the sequence-mode VSM Moment versus Temperature dialog opens (Figures 6-38 and 6-39).
6.10.1 Sequence-Mode VSM "Moment versus Temperature" Dialog The VSM Moment versus Temperature dialog has two tabs, Setup (Figure 6-38) and Advanced (Figure 6-39). Use the Setup tab to set the parameters for a variable temperature measurement. Use the Advanced tab to control other aspects of the measurement, such as the temperature-approach mode.
As is explained below, the tabs have several unique functions as well as some of the same functions found in the sequence-mode Scan Temperature and VSM Adv. Measure commands.

Section 6.10 Chapter 6 Sequence Mode VSM "Moment vs. Temp." Command VSM Software
6-28 PPMS VSM Option User’s Manual, Rev. A3 Quantum Design January 2008
You can insert the Moment vs. Temp. command at any time by clicking on the OK button at the bottom of the dialog box. The Cancel button closes the dialog and does not insert the command.
Figure 6-38. Setup tab of the sequence-mode VSM
Moment versus Temperature dialog
Figure 6-39. Advanced tab of the sequence-mode
VSM Moment versus Temperature dialog
6.10.2 Sequence-Mode VSM "Moment versus Temperature" Dialog: Setup Tab The Setup tab (Figure 6-38) has subsections for Temperature Control and Data Acquisition. A scroll bar at the right side automatically displays Approx. Temperatures that are based on the other settings. The subsections and their settings are explained below.
6.10.2.1 TEMPERATURE CONTROL SETTINGS
Use the options in the Temperature Control subsection (Figure 6-40) of the Moment versus Temperature dialog box to set the general parameters of a moment versus temperature measurement.
Figure 6-40. Temperature Control section of the sequence-mode VSM Moment versus
Temperature dialog

Chapter 6 Section 6.10 VSM Software Sequence Mode VSM "Moment vs. Temp." Command
Quantum Design PPMS VSM Option User’s Manual, Rev. A3 6-29 January 2008
Start and End
The Start value sets the temperature, in degrees Kelvin, at which the measurement will start during a temperature sweep. The initial temperature can be larger or smaller than the final temperature, so you can collect data while the sample is being warmed or cooled.
The End value sets the temperature, in degrees Kelvin, at which the moment versus temperature measurement will end.
Sweep Rate
The Sweep Rate value sets the rate at which the temperature changes, in degrees Kelvin per minute, during a measurement. The Moment vs. Temp. sequence command interprets the Sweep Rate as a magnitude and uses the Start and End temperatures to determine the sign of the temperature-sweep rate.
Note: If you choose to stabilize the temperature during measurements, the Sweep Rate will become the rate of temperature change between temperature set points instead of the overall rate of temperature change.
Stabilize at each Temperature and Sweep Continuously
The Stabilize at each Temperature and Sweep Continuously options provide two modes for sweeping temperature. When you select Stabilize at each Temperature, the system waits for the temperature to stabilize at each of the set points listed in the Approx. Temperatures window before it begins to take data. When you select Sweep Continuously, the system changes temperature at the Sweep Rate setting while the VSM takes data, and it does not pause at the set points listed in the Approx. Temperatures window.
6.10.2.2 DATA ACQUISITION SETTINGS
Use the options in the Data Acquisition subsection of the dialog box to set the basic parameters of the moment versus temperature measurement.
"Data Spacing"
The "Data Spacing" dropdown menu bar at the top of the section provides the following options:○ Continuous Measuring (Figures 6-38
and 6-42) sets the VSM to take data in Continuous Measuring mode (refer to Section 6.5.3.3 for more information on Continuous Measuring). When you are not using Continuous Measuring, you must define the temperature change between measurements, as is explained below in Number of Temperatures and Temperature Increment.
Figure 6-41. Data Acquisition section of the
sequence-mode VSM Moment versus Temperature dialog
○ Uniform Spacing in Temperature (Figure 6-41) sets the VSM to take data at uniform temperature intervals.
○ Uniform Spacing in Temperature^2 sets the VSM to take data at uniform temperature intervals with respect to the square of the temperature.
○ Uniform Spacing in Temperature^1/2 sets the VSM to take data at uniform temperature intervals with respect to the square root of the temperature.

Section 6.10 Chapter 6 Sequence Mode VSM "Moment vs. Temp." Command VSM Software
6-30 PPMS VSM Option User’s Manual, Rev. A3 Quantum Design January 2008
○ Uniform Spacing in 1/ Temperature sets the VSM to take data at uniform temperature intervals with respect to the inverse of the temperature.
○ Uniform Spacing in Log (Temperature) sets the VSM to take data at uniform temperature intervals with respect to the logarithm of the temperature.
Averaging Time
The Averaging Time value (Figures 6-41 and 6-42) sets the length of time the VSM collects data before it is averaged into a measurement. Section 6.5.3.3 has more information about Averaging Time.
Number of Temperatures and Temperature Increment
When you select a uniform temperature spacing instead of Continuous Measuring, you must define the spacing between the temperatures with the Number of Temperatures or Temperature Increment options (Figure 6-41). ○ The Number of Temperatures value sets the number of temperature set points at which
VSM data will be taken. This number of temperature set points will be distributed uniformly over your defined temperature range in the manner you have selected. If you select the Number of Temperatures radio button, you must enter a number in the associated text box.
○ The Temperature Increment value sets the temperature increment, in degrees Kelvin, between VSM measurements. If you select the Temperature Increment radio button, you must enter a number in the associated text box.
Note: If you set a step size that does not fit evenly with your selected Start and End temperatures, the program will adjust the increment size slightly to include the Start and End temperatures.
Repetitions at each Temperature
The Repetitions at each Temperature value (Figure 6-42) sets the number of data points the VSM will take at each of the temperatures shown in the Approx. Temperatures list. This value will have no effect if you have also selected the Sweep or Continuous Measuring modes.
Keep
The Keep dropdown menu bar (see Figure 6-42) is available when you have selected the Continuous Measurement option, which can generate large volumes of data. Use the Keep options to choose the percentage of data points that will be written to the data file. See the Estimated explanation below for more on the issue of file size.
Figure 6-42. Data Acquisition section: Keep,
Approximate Temperature, and Estimated settings
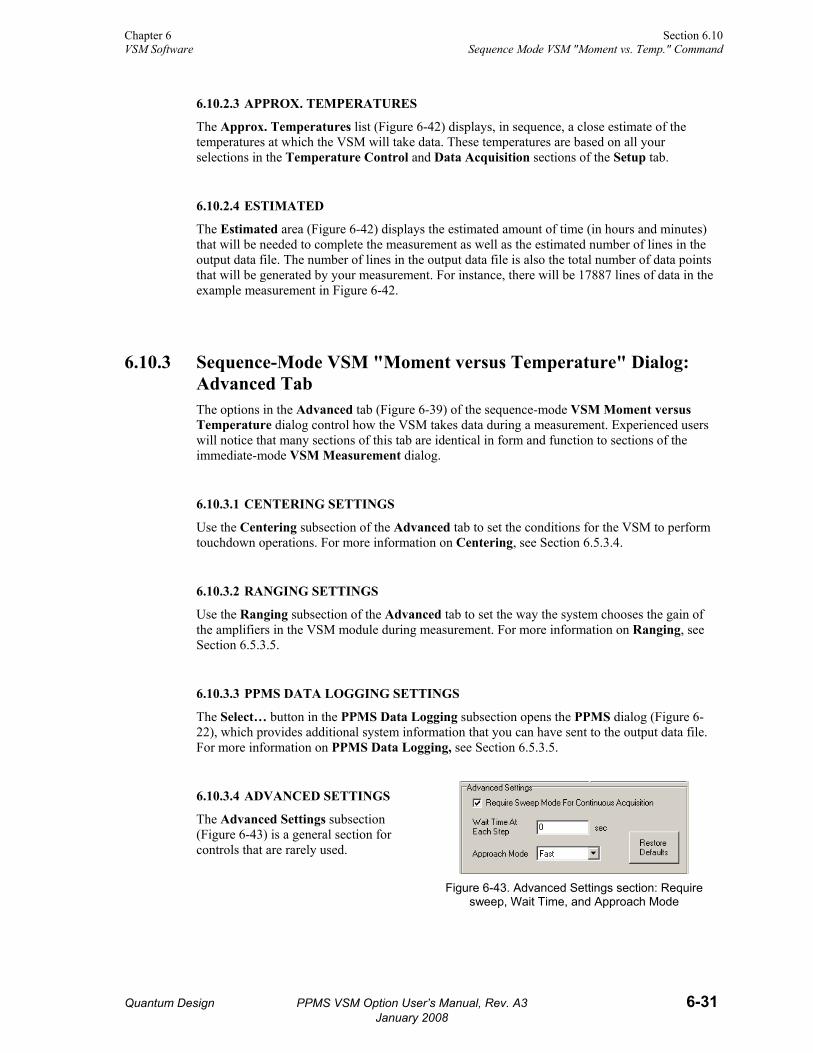
Chapter 6 Section 6.10 VSM Software Sequence Mode VSM "Moment vs. Temp." Command
Quantum Design PPMS VSM Option User’s Manual, Rev. A3 6-31 January 2008
6.10.2.3 APPROX. TEMPERATURES
The Approx. Temperatures list (Figure 6-42) displays, in sequence, a close estimate of the temperatures at which the VSM will take data. These temperatures are based on all your selections in the Temperature Control and Data Acquisition sections of the Setup tab.
6.10.2.4 ESTIMATED
The Estimated area (Figure 6-42) displays the estimated amount of time (in hours and minutes) that will be needed to complete the measurement as well as the estimated number of lines in the output data file. The number of lines in the output data file is also the total number of data points that will be generated by your measurement. For instance, there will be 17887 lines of data in the example measurement in Figure 6-42.
6.10.3 Sequence-Mode VSM "Moment versus Temperature" Dialog: Advanced Tab The options in the Advanced tab (Figure 6-39) of the sequence-mode VSM Moment versus Temperature dialog control how the VSM takes data during a measurement. Experienced users will notice that many sections of this tab are identical in form and function to sections of the immediate-mode VSM Measurement dialog.
6.10.3.1 CENTERING SETTINGS
Use the Centering subsection of the Advanced tab to set the conditions for the VSM to perform touchdown operations. For more information on Centering, see Section 6.5.3.4.
6.10.3.2 RANGING SETTINGS
Use the Ranging subsection of the Advanced tab to set the way the system chooses the gain of the amplifiers in the VSM module during measurement. For more information on Ranging, see Section 6.5.3.5.
6.10.3.3 PPMS DATA LOGGING SETTINGS
The Select… button in the PPMS Data Logging subsection opens the PPMS dialog (Figure 6-22), which provides additional system information that you can have sent to the output data file. For more information on PPMS Data Logging, see Section 6.5.3.5.
6.10.3.4 ADVANCED SETTINGS
The Advanced Settings subsection (Figure 6-43) is a general section for controls that are rarely used.
Figure 6-43. Advanced Settings section: Require
sweep, Wait Time, and Approach Mode

Section 6.10 Chapter 6 Sequence Mode VSM "Moment vs. Temp." Command VSM Software
6-32 PPMS VSM Option User’s Manual, Rev. A3 Quantum Design January 2008
Require Sweep Mode For Continuous Acquisition
The system will automatically activate the Require Sweep Mode For Continuous Acquisition option when Continuous Measurement data acquisition has been selected.
Note: You can uncheck the box and use the Stabilize at each Temperature mode while you perform continuous measurements. However, be aware that if you measure continuously while the controller is stabilizing the temperature, the amount of noise in the VSM data might increase.
Wait Time At Each Step
The Wait Time At Each Step value sets the additional time (in seconds) that the system waits at each of the temperature set points. This wait time is in addition to the amount of time it takes to do the required VSM measurements; it is added before the VSM performs the measurements. This setting has no effect if you have selected Sweep or Continuous Measuring modes.
Approach Mode
The Approach Mode dropdown menu bar lets you choose between Fast and No O’Shoot temperature-approach modes for each of the temperature set points in your measurement. For more information on the Approach Mode, see the PPMS MultiVu Application User’s Manual.
Restore Defaults
The Restore Defaults button resets everything in the dialog to the default settings.
6.10.3.5 EXCITATION PARAMETERS
Use the options in the Excitation Parameters subsection to set the drive variables for the VSM linear motor transport. For more information on Excitation Parameters, see Section 6.5.3.5.

Quantum Design PPMS VSM Option User’s Manual, Rev. A3 7-1 January 2008
C H A P T E R 7
VSM Architecture and Data Files
7.1 Introduction This chapter contains the following information:
○ Section 7.2 describes the software architecture, including the system file structure as well as communications and status.
○ Section 7.3 describes the fields in VSM data files and how to create data files and add comments.
7.2 Architecture
7.2.1 System File Structure Table 7-1 shows the locations of the key VSM application files. The program VsmMultiVu.dll is launched when the option is activated. Default program parameters are read from the vsm.ini file and calibration data are read from files in the calibration directory. Status messages that appear in the VSM Control Center are logged to VSMLog.txt in plain text format. Temporary graph data are stored in files named ScanData.dat and ScanFriction.dat.
7.2.2 Software and Hardware Communications The VSM application software communicates with a number of software and hardware entities. The VSM option acquires low-level data and controls the motor by communicating with the motor module and VSM detection module through the CANComm.dll. PpmsComm.dll communicates with the Model 6000 over the GPIB cable to perform chamber operations, such as setting temperatures and fields. An OLE interface communicates with MultiVu when the VSM option receives sequence commands.
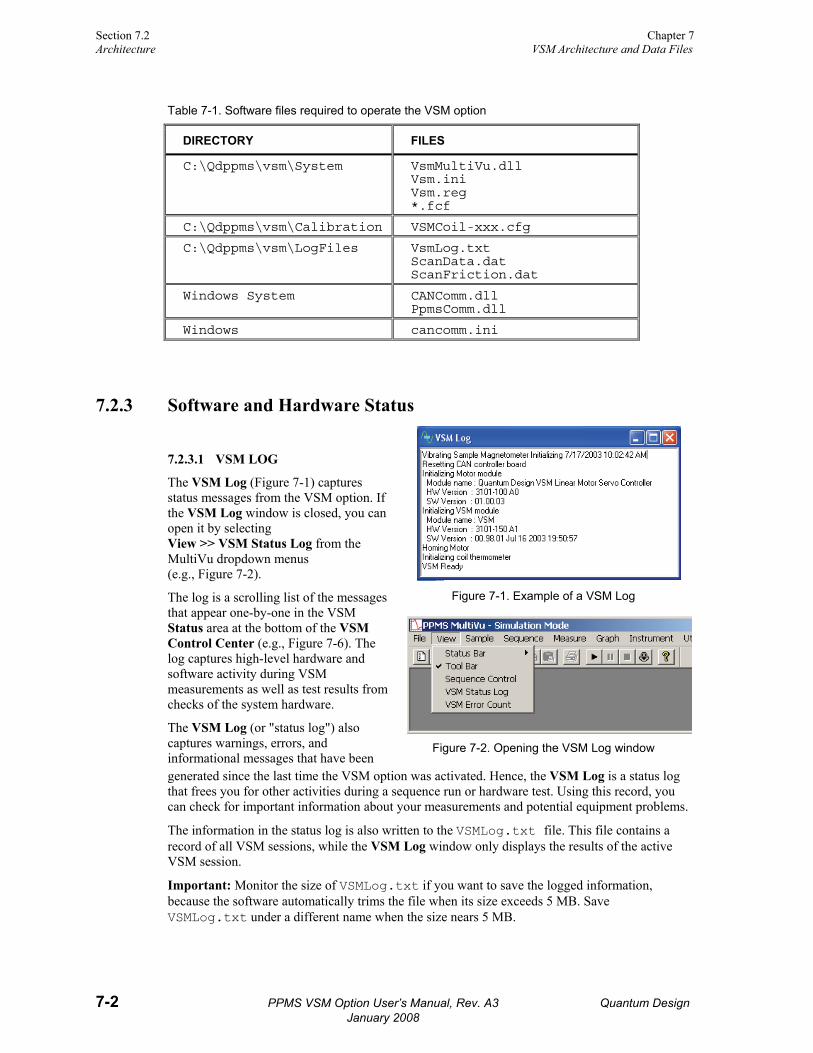
Section 7.2 Chapter 7 Architecture VSM Architecture and Data Files
7-2 PPMS VSM Option User’s Manual, Rev. A3 Quantum Design January 2008
Table 7-1. Software files required to operate the VSM option
DIRECTORY FILES
C:\Qdppms\vsm\System VsmMultiVu.dll Vsm.ini Vsm.reg *.fcf
C:\Qdppms\vsm\Calibration VSMCoil-xxx.cfg
C:\Qdppms\vsm\LogFiles VsmLog.txt ScanData.dat ScanFriction.dat
Windows System CANComm.dll PpmsComm.dll
Windows cancomm.ini
7.2.3 Software and Hardware Status
7.2.3.1 VSM LOG
The VSM Log (Figure 7-1) captures status messages from the VSM option. If the VSM Log window is closed, you can open it by selecting View >> VSM Status Log from the MultiVu dropdown menus (e.g., Figure 7-2).
The log is a scrolling list of the messages that appear one-by-one in the VSM Status area at the bottom of the VSM Control Center (e.g., Figure 7-6). The log captures high-level hardware and software activity during VSM measurements as well as test results from checks of the system hardware.
The VSM Log (or "status log") also captures warnings, errors, and informational messages that have been
Figure 7-1. Example of a VSM Log
Figure 7-2. Opening the VSM Log window
generated since the last time the VSM option was activated. Hence, the VSM Log is a status log that frees you for other activities during a sequence run or hardware test. Using this record, you can check for important information about your measurements and potential equipment problems.
The information in the status log is also written to the VSMLog.txt file. This file contains a record of all VSM sessions, while the VSM Log window only displays the results of the active VSM session.
Important: Monitor the size of VSMLog.txt if you want to save the logged information, because the software automatically trims the file when its size exceeds 5 MB. Save VSMLog.txt under a different name when the size nears 5 MB.

Chapter 7 Section 7.3 VSM Architecture and Data Files VSM Data Files
Quantum Design PPMS VSM Option User’s Manual, Rev. A3 7-3 Jnauary 2008
7.2.3.2 ERROR COUNT
The Error Count popup (Figure 7-3) captures error messages from the VSM option. To see the Error Count, select View >> VSM Error Count from the dropdown menus at the top of the MultiVu window.
Figure 7-3. The Error Count popup
7.3 VSM Data Files Data files have a .dat file extension. To save VSM measurement data, you must "designate" and open a measurement data file before you start the measurement. You designate data files by creating a new one or selecting a pre-existing one, as is explained in Section 7.3.4.
Important: To save or graph measurement data, you must explicitly designate a data file before you begin to collect data. In the event you do not designate a data file, the measurement data will be lost.1
7.3.1 Data File Headers The header of a data file (e.g., Figure 7-4) contains information such as the title of the data set and the sample properties. You have the opportunity to include this information when you create the file—this is the only time you can add this information to the data-file header. Instead, after a file has been created, you can append comments (see Section 7.3.5).
Figure 7-4. A Raw Data view of a VSM data file
1 Contact Customer Service at Quantum Design in the event you would like further information about data recovery and storage techniques.

Section 7.3 Chapter 7 VSM Data Files VSM Architecture and Data Files
7-4 PPMS VSM Option User’s Manual, Rev. A3 Quantum Design January 2008
7.3.2 Views of the Data You can view the data in an open file in several formats: Figure 7-4 shows a Raw Data view and Figure 7-5 shows a Table view. To access a data view, open a data file and select View >> Raw Data or View >> Table from the dropdown menus at the top of the MultiVu window.
Note: The data-format menu items (e.g., Raw Data, Table) do not appear in the View menu until you have opened a data file, as is demonstrated by Figure 7-2.
For more information on viewing data files, see the Physical Property Measurement System: PPMS MultiVu Application User’s Manual.
Figure 7-5. Example of a Table view of a VSM data file

Chapter 7 Section 7.3 VSM Architecture and Data Files VSM Data Files
Quantum Design PPMS VSM Option User’s Manual, Rev. A3 7-5 Jnauary 2008
7.3.3 Fields in VSM Data Files Table 7-2 defines the fields in a VSM data file, and Section 7.3.4 explains how to create VSM measurement data files.
Table 7-2. Definitions of column headers for VSM data files (*.dat files), shown in the order they appear.
COLUMN HEADER/TERM
DEFINITION
Comment user-specified comment; added by using the Datafile Comment command Time stamp (sec) PPMS time stamp Temperature (K) average temperature (T) of the sample during measurements. The sample
temperature is measured by the coil thermometer. Magnetic field (Oe) average magnetic field during measurement Moment (uu) average magnetic moment of the sample during measurement; uu = user units
= emu or A-m2 M. std err (uu) standard error (i.e., the error of the mean) for the measurement Transport action 1 = measurement
2 = auto-touchdown 3 = manual touchdown
Averaging time (sec) (number of cycles per measurement)/frequency (as calculated) Frequency (Hz) frequency of sample oscillation Peak amplitude (mm) peak amplitude (A) of oscillation, such that position z(t) = Asinωt Center position (mm) average position of the transport over the measurement Coil signal' (mV) uses known phasors for preamp and board to back out the actual voltage signal
registered at the coilset in phase with the sample motion; does not correct for the image effect
Coil signal'' (mV) quadrature component of above quantity Range (mV) VSM board range setting M. quad. signal (uu) quadrature component of “Moment (uu)” field M. raw’ (emu) moment with no image effect correction applied M. raw’’ (emu) quadrature component of above quantity Min. temperature (K) minimum temperature reading of the coil thermometer for this measurement Max. temperature (K) maximum temperature reading of the coil thermometer for this measurement Min. field (Oe) minimum field reading of the coil thermometer for this measurement Max. field (Oe) maximum field reading of the coil thermometer for this measurement Mass (grams) mass of transport as obtained from DC component of motor force Motor lag (deg) phase lag between motor drive current and motion Pressure (torr) pressure in sample chamber VSM status (code) status codes unique to the VSM module Motor status (code) status codes unique to the motor module Measure status (code) error condition codes of varying severity. Zero indicates no errors. PPMS status (code) PPMS standard data starts here System temp. (K) PPMS block temperature System field (Oe) currently the same as the "Magnetic Field (Oe)" column

Section 7.3 Chapter 7 VSM Data Files VSM Architecture and Data Files
7-6 PPMS VSM Option User’s Manual, Rev. A3 Quantum Design January 2008
7.3.4 Creating a VSM Measurement Data File There are several ways to create output data files with the MultiVu and VSM software applications. As is explained in Steps 8–11 of Section 4.3.3, "Install the Sample," you will be prompted to designate (create or select) an output data file whenever you install a sample. You can also use the Data File tab in the main window of the VSM Control Center to designate output data files, as is summarized below (see Chapter 6, Section 6.5, for more information on the Data File tab and creating data files). 1. In the VSM Control Center, click on the Data File tab to bring it forward (Figure 7-6).
Figure 7-6. Data File tab of the VSM Control Center
Figure 7-7. VSM Select Data File dialog
2. In the Data File tab, click on the Browse button to open the VSM Select Data File dialog (Figure 7-7).
3. Using the VSM Select Data File dialog, create ("a") or select ("b") a file: a. If you create a new output data file, the VSM Sample Properties dialog (Figure 7-8)
will open so that you can specify the properties and characteristics of the sample. Any information that you enter in this dialog will be displayed in the Sample tab (Figure 7-9) of the VSM Control Center as well as in the data-file header. The sample property information is optional and only for your convenience—VSM measurements do not require fixed sample properties, and the VSM software does not use the sample properties that you specify.
Figure 7-8. Entering sample properties for a
new data file
Figure 7-9. Examining sample properties with
the Sample tab
When you have finished with the VSM Sample Properties dialog, click on the OK button. This button will return you to the Data File tab, which now will display the Path, File Name, and Title for the new file.
b. If you select a pre-existing output data file, the Data File tab will re-open, displaying the Path, File Name, and Title for that file. New measurement data will be appended to this file.

Chapter 7 Section 7.3 VSM Architecture and Data Files VSM Data Files
Quantum Design PPMS VSM Option User’s Manual, Rev. A3 7-7 Jnauary 2008
7.3.5 Adding a Comment to a VSM Measurement Data File You can append a comment to a VSM measurement data file. For example, you can record information about the experiment (e.g., changes in operations) or anything else that might be helpful to those who read the data file. These comments can be appended immediately or they can be included in a sequence so that they are appended to the data file when the sequence is run. Important: A comment is a character string of unlimited length. Do not use quotation marks (") in comments.
7.3.5.1 APPEND IMMEDIATELY
To append a comment to the data file immediately, select Measure >> VSM Datafile Comment from the MultiVu dropdown menu. A small pop-up dialog, VSM Datafile Comment (Figure 7-10), will open. Enter your comment in the text box and click on the OK button.
Figure 7-10. Dialog for appending a comment to a
file, now or in the future
Important: A comment is a character string of unlimited length. Do not use quotation marks (") in comments.
7.3.5.2 APPEND IN THE FUTURE
To append a comment to the data file at the time when a sequence is executed, use the sequence commands. 1. In the MultiVu dropdown menus, select File >> New Sequence (to create a new sequence
file) or File >> Open (to open and edit an existing sequence file).
Both commands open the sequence editor and the Sequence Commands bar. Figure 7-11 shows the sequence editor with a new file and the Sequence Commands bar.
2. In the Sequence Commands bar, click on the plus sign (+) next to the Measurement Commands group. The group name will expand into a list of commands and the VSM commands subgroup.
Figure 7-11. Using the sequence editor and the Sequence Commands bar
3. Click on the plus sign (+) next to the VSM subgroup to expand it. 4. Select and double-click on the Datafile Comment sequence command. This command opens
the same VSM Datafile Comment popup dialog box (Figure 7-10) that opens when you select Measure >> VSM Datafile Comment from the MultiVu dropdown menu.
5. In the comment area, enter your comment and click on the OK button. The comment will appear in the sequence editor, but it will not be added to the output data file until you "Run" the sequence file.
Important: A comment is a character string of unlimited length. Do not use quotation marks (") in comments.
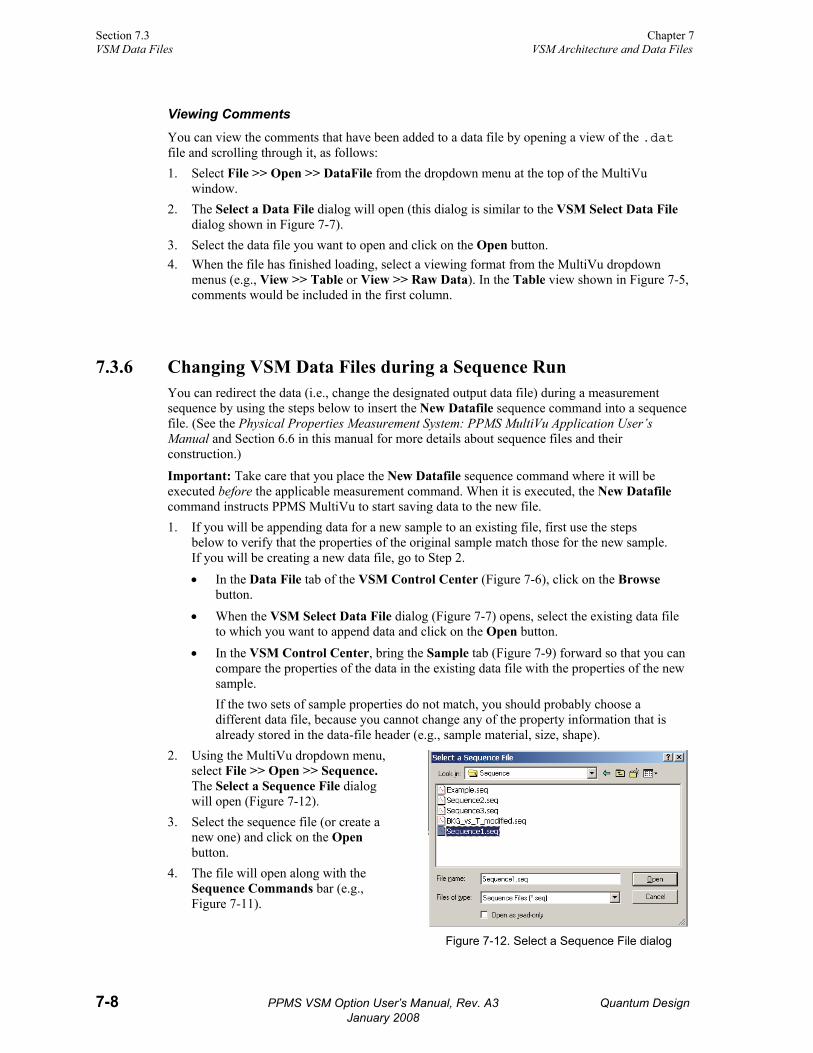
Section 7.3 Chapter 7 VSM Data Files VSM Architecture and Data Files
7-8 PPMS VSM Option User’s Manual, Rev. A3 Quantum Design January 2008
Viewing Comments
You can view the comments that have been added to a data file by opening a view of the .dat file and scrolling through it, as follows: 1. Select File >> Open >> DataFile from the dropdown menu at the top of the MultiVu
window. 2. The Select a Data File dialog will open (this dialog is similar to the VSM Select Data File
dialog shown in Figure 7-7). 3. Select the data file you want to open and click on the Open button. 4. When the file has finished loading, select a viewing format from the MultiVu dropdown
menus (e.g., View >> Table or View >> Raw Data). In the Table view shown in Figure 7-5, comments would be included in the first column.
7.3.6 Changing VSM Data Files during a Sequence Run You can redirect the data (i.e., change the designated output data file) during a measurement sequence by using the steps below to insert the New Datafile sequence command into a sequence file. (See the Physical Properties Measurement System: PPMS MultiVu Application User’s Manual and Section 6.6 in this manual for more details about sequence files and their construction.)
Important: Take care that you place the New Datafile sequence command where it will be executed before the applicable measurement command. When it is executed, the New Datafile command instructs PPMS MultiVu to start saving data to the new file. 1. If you will be appending data for a new sample to an existing file, first use the steps
below to verify that the properties of the original sample match those for the new sample. If you will be creating a new data file, go to Step 2. • In the Data File tab of the VSM Control Center (Figure 7-6), click on the Browse
button. • When the VSM Select Data File dialog (Figure 7-7) opens, select the existing data file
to which you want to append data and click on the Open button. • In the VSM Control Center, bring the Sample tab (Figure 7-9) forward so that you can
compare the properties of the data in the existing data file with the properties of the new sample. If the two sets of sample properties do not match, you should probably choose a different data file, because you cannot change any of the property information that is already stored in the data-file header (e.g., sample material, size, shape).
2. Using the MultiVu dropdown menu, select File >> Open >> Sequence. The Select a Sequence File dialog will open (Figure 7-12).
3. Select the sequence file (or create a new one) and click on the Open button.
4. The file will open along with the Sequence Commands bar (e.g., Figure 7-11).
Figure 7-12. Select a Sequence File dialog

Chapter 7 Section 7.3 VSM Architecture and Data Files VSM Data Files
Quantum Design PPMS VSM Option User’s Manual, Rev. A3 7-9 Jnauary 2008
5. Place your cursor in the sequence file where you want the New Datafile command inserted. 6. In the Sequence Commands bar, select and double-click on the New Datafile sequence
command (Measurement Commands >> VSM >> New Datafile). The New Datafile command will open the VSM Change Datafile dialog (Figure 7-13), which operates in a way similar to the immediate-mode commands found in the Data File tab of the VSM Control Center (see Section 6.5). The VSM Change Datafile dialog has text boxes and buttons that allow you to designate the File Action (Create New File/Version or Append to File), the file name, and a title for the graph data.
Figure 7-13. Command dialog for changing the data file during a sequence measurement
Note: The VSM Change Datafile dialog does not allow you to designate sample properties. If you designate a new file, it will "inherit" the properties of a .dat file specified by the VSM Control Center.
7. In the File Action area of the VSM Change Datafile dialog, use the radio buttons to specify where data will be sent (to a new file or appended to an existing one).
8. Use the Browse... button to designate (select or create) a measurement data file (see Section 7.3.4 for instructions).
9. When you have completed your specifications, click on the OK button. 10. The VSM Change Datafile dialog box will close and the New Datafile command will be
inserted into the sequence file.


Quantum Design PPMS VSM Option User’s Manual, Rev. A3 A-1 January 2008
A P P E N D I X A
Model CM-A VSM Motor Module
A.1 Introduction This appendix contains the following information: ○ Section A.2 provides a functional overview
of the Model CM-A VSM motor module, including a block diagram and electrical specifications.
○ Section A.4 describes the back panel and relevant components of the Model CM-A VSM motor module.
○ Section A.3 describes the front panel and relevant components of the Model CM-A VSM motor module.
A.2 Functional Overview The Model CM-A (4101-100) is a servomotor controller module that was designed with the specific needs of the VSM head in mind. Figure A-1 shows the module and the front panel.
The principle function of this module is to provide closed-loop servo control to a linear motor equipped with a position encoder output. A programmed wave table allows the module to drive the motor sinusoidally at 40 Hz. The servo loop is closed digitally at about 2000 Hz using a 16-bit current source and the read-back from the position encoder. For use with other synchronous detection hardware, including the Model CM-B VSM detection module, the real-time encoder position is output digitally, using a high-speed serial port, and as a voltage through a BNC connector. Other features include in-system programmable on-board flash memory for program storage and a serial ROM for calibration and other configuration data.
The module is designed to plug into the Model 1000 modular control system or an equivalent host chassis that can provide power and the required CAN network signals that communicate with the module.

Section A.2 Appendix A Functional Overview Model CM-A VSM Motor Module
A-2 PPMS VSM Option User’s Manual, Rev. A3 Quantum Design January 2008
Figure A-1. Model CM-A VSM motor module (4101-100)
A.2.1 Functional Block Diagram
Figure A-2. Abridged functional block diagram of Model CM-A VSM motor-module specifications

Appendix A Section A.3 Model CM-A VSM Motor Module Model CM-A VSM Motor Module: Front Panel
Quantum Design PPMS VSM Option User’s Manual, Rev. A3 A-3 January 2008
A.2.2 Specifications
Table A-1. Electrical specifications for Model CM-A VSM motor module
Drive Current Limit 3 A
Drive Voltage Compliance Limit 20 V peak
Encoder Range 32-bit
Supply Voltage ±24 V DC
A.3 Model CM-A VSM Motor Module: Front Panel
A.3.1 Indicator LEDs The front panel of the Model CM-A VSM motor module has two LEDs in the top left, as shown in Figure A-1. The PWR LED indicates the power-on status of the module. The COP (CANopen Protocol) LED indicates the status of the CAN network controller. Table A-2 outlines the LED states and provides solutions in the event of a problem.
Important: The error information in Table A-2 refers to situations that persist for longer than about 15 seconds. Typically, when the module is powered on, the LEDs may briefly flash red before they turn green. This is a normal part of the startup or reset sequence.
Table A-2. LED guide for Model CM-A VSM motor module
LED COLOR STATUS MEANING AND/OR SOLUTION
PWR Green On The processor is running with no errors (normal).
Red Flashing Errors were encountered during the self-test. The flashing sequence can be used to determine the cause of the failure.
COP Green On CAN status is operational (normal).
Flashing CAN status is pre-operational. Verify that cable is connected to PC.
Red On or flashing
Error on the CAN bus. Contact Quantum Design for assistance.
If you are unable to achieve operation with both LEDs green, please contact Quantum Design for assistance.

Section A.3 Appendix A Model CM-A VSM Motor Module: Front Panel Model CM-A VSM Motor Module
A-4 PPMS VSM Option User’s Manual, Rev. A3 Quantum Design January 2008
A.3.2 Connectors and Pinout Tables
A.3.2.1 JA-1: SERVO CONNECTOR
This connector is used to provide the current drive to the motor and read back the position information from the encoder. This connector also supports serial communication to logic associated with the motor (e.g., serial ROM for storing calibration or configuration information about the motor).
Figure A-3. JA-1: Servo connector for the Model CM-A VSM
motor module
Table A-3. JA-1: Servo connector for the Model CM-A VSM motor module
PIN FUNCTION
1 Motor -
2 +5 V
3 Encoder Input A+
4 Encoder Input B+
5 Unused Encoder Input Z+
6 n.c.
7 n.c.
8 Motor Max Limit Switch
9 Motor Min Limit Switch
10 Motor +
11 Ground
12 Encoder Input A–
13 Encoder Input B-
14 Unused Encoder Input Z–
15 n.c.
16 n.c.
17 Motor Max Limit Switch Rtn
18 Motor Min Limit Switch Rtn
19 Serial Com Data Out
20 Serial Com Data Input
21 Serial Com Clock
22 Serial Com Select 1
23 Serial Com Select 2
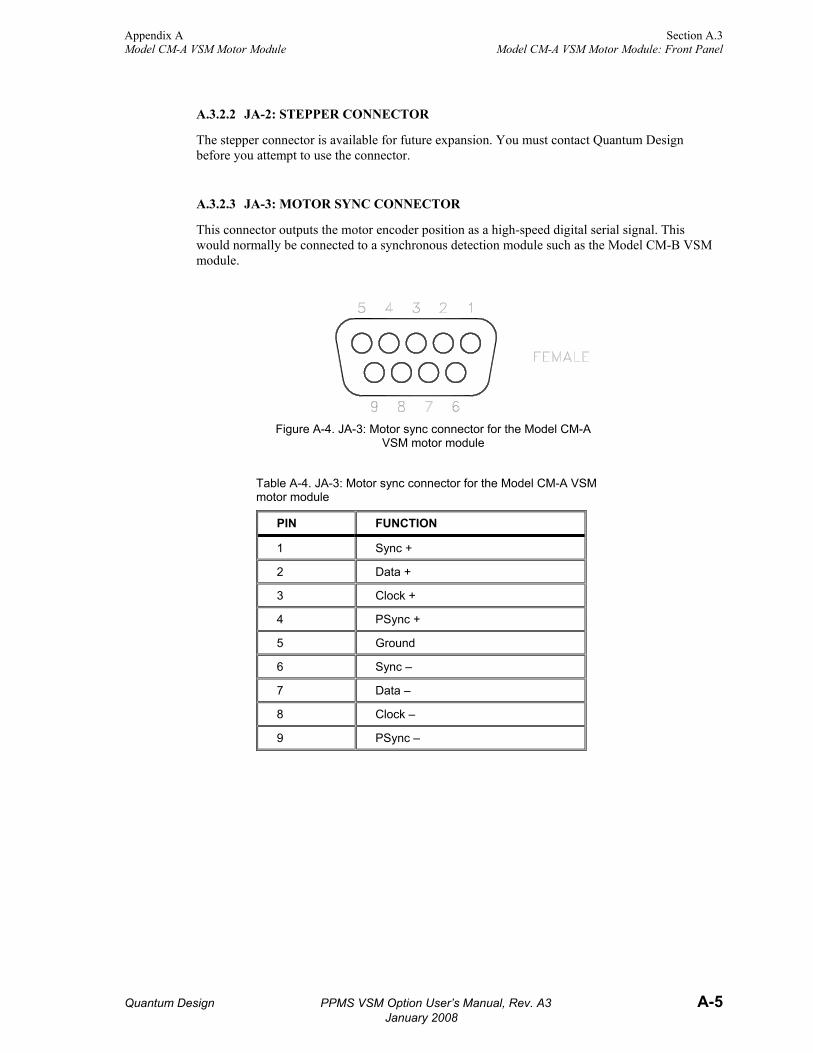
Appendix A Section A.3 Model CM-A VSM Motor Module Model CM-A VSM Motor Module: Front Panel
Quantum Design PPMS VSM Option User’s Manual, Rev. A3 A-5 January 2008
A.3.2.2 JA-2: STEPPER CONNECTOR
The stepper connector is available for future expansion. You must contact Quantum Design before you attempt to use the connector.
A.3.2.3 JA-3: MOTOR SYNC CONNECTOR
This connector outputs the motor encoder position as a high-speed digital serial signal. This would normally be connected to a synchronous detection module such as the Model CM-B VSM module.
Figure A-4. JA-3: Motor sync connector for the Model CM-A
VSM motor module
Table A-4. JA-3: Motor sync connector for the Model CM-A VSM motor module
PIN FUNCTION
1 Sync +
2 Data +
3 Clock +
4 PSync +
5 Ground
6 Sync –
7 Data –
8 Clock –
9 PSync –
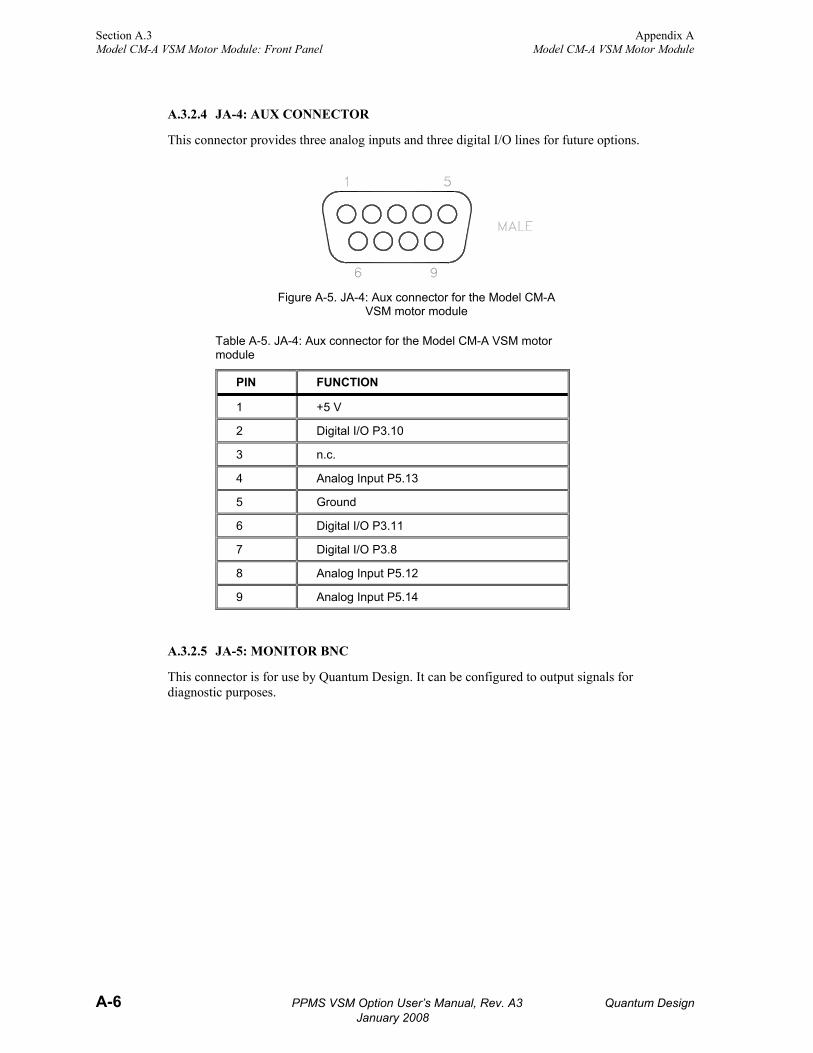
Section A.3 Appendix A Model CM-A VSM Motor Module: Front Panel Model CM-A VSM Motor Module
A-6 PPMS VSM Option User’s Manual, Rev. A3 Quantum Design January 2008
A.3.2.4 JA-4: AUX CONNECTOR
This connector provides three analog inputs and three digital I/O lines for future options.
Figure A-5. JA-4: Aux connector for the Model CM-A
VSM motor module
Table A-5. JA-4: Aux connector for the Model CM-A VSM motor module
PIN FUNCTION
1 +5 V
2 Digital I/O P3.10
3 n.c.
4 Analog Input P5.13
5 Ground
6 Digital I/O P3.11
7 Digital I/O P3.8
8 Analog Input P5.12
9 Analog Input P5.14
A.3.2.5 JA-5: MONITOR BNC
This connector is for use by Quantum Design. It can be configured to output signals for diagnostic purposes.

Appendix B Section A.4 Model CM-B VSM Detection Module Model CM-A VSM Motor Module: Rear Panel
Quantum Design PPMS VSM Option User’s Manual, Rev. A3 A-7 January 2008
A.4 Model CM-A VSM Motor Module: Rear Panel The rear panel of the module contains an address selector, a single-guide hole, and the CAN connector through which the module sends and receives network data and receives power.
A.4.1 Address Selector Each module on the CAN bus must have a unique 5-bit binary address. The selector on the back panel is used to set the four least significant bits, and an internal jumper sets the most significant bit. If the selector is set to zero (0), the module uses its default address. For a Model CM-A VSM motor module, the default address is 10 (or equivalently, “A” on the selector).
A.4.2 Single Guide Hole The single guide hole is used to align the connector with one of the back-row (high-power) receptacles on the Model 1000 modular control system.
Figure A-6. Rear panel of the Model CM-A VSM motor module

Section A.4 Appendix B Model CM-A VSM Motor Module: Rear Panel Model CM-B VSM Detection Module
A-8 PPMS VSM Option User’s Manual, Rev. A3 Quantum Design January 2008
A.4.3 QD CAN Connector The QD CAN connector is the main communication connection for controlling the module. The CAN network signals (CAN High, CAN Low) are connected to all other CAN modules on the bus and to the PC. Power (±24 volts), reset, and sync signals are also provided to the module though this connector.
Figure A-7. Quantum Design CAN connector for the Model
CM-A VSM motor module
Table A-6. QD CAN connector on the rear of the Model CM-A VSM motor module
PIN FUNCTION
1 –24 V
2 CAN Low
3 Power Return (24V)
4 Sync Low
5 Line Sync
6 System Ground
7 CAN High
8 Sync High / Reset
9 +24 V DC

Quantum Design PPMS VSM Option User’s Manual, Rev. A3 B-1 January 2008
A P P E N D I X B
Model CM-B VSM Detection Module
B.1 Introduction This appendix contains the following information: ○ Section B.2 provides a functional
overview of the Model CM-B VSM detection module, including a block diagram and electrical specifications.
○ Section B.4 describes the back panel and relevant components of the Model CM-B VSM detection module.
○ Section B.3 describes the front panel and relevant components of the Model CM-B VSM detection module.
B.2 Functional Overview The Model CM-B (4101-150) is a synchronous detection module that performs the real-time signal processing for the VSM option. The module and its front panel are shown in Figure B-1.
The principle function of this module is to detect the in-phase and quadrature-phase components of one or two input signals (e.g., pickup coils), as well as a digital reference from, say, a position encoder. The detection is done by multiplying each of the signals by both a sine function and a cosine function. These sine components are computed once per cycle and can be output at this rate, or they can be averaged for multiple cycles with statistics calculated for the ensemble of measurements. Other features include a thermometer bridge circuit for temperature measurements, two programmable gain amplifiers, in-system programmable on-board flash memory for program storage, and a serial ROM for calibration and other configuration data.
The module is designed to plug into the Model 1000 modular control system or an equivalent host chassis that can provide power and the required CAN network signals to communicate with the module.

Section B.2 Appendix B Functional Overview Model CM-B VSM Detection Module
B-2 PPMS VSM Option User’s Manual, Rev. A3 Quantum Design January 2008
Figure B-1. Model CM-B VSM detection module (4101-150)
B.2.1 Functional Block Diagram
Figure B-2. Abridged functional block diagram of the Model CM-B VSM detection module

Appendix B Section B.3 Model CM-B VSM Detection Module Model CM-B Detection Module: Front Panel
Quantum Design PPMS VSM Option User’s Manual, Rev. A3 B-3 January 2008
B.2.2 Specifications
Table B-1. Electrical specifications for the Model CM-B VSM detection module
Input Ranges (from preamp) 5 V, 0.5 V, 50 mV, 5 mV
Thermometer Current Ranges ±0.02 mA, ±0.5 mA
Thermometer Voltage Range ±10 mV
Thermometer Sample Rate 14 Hz
Thermometer Resistance Range 20 to 200,000 ohms
Supply Voltage ±24 V DC
B.3 Model CM-B Detection Module: Front Panel
B.3.1 Indicator LEDs The front panel of the Model CM-B detection module has two LEDs in the top left, as shown in Figure B-1. The PWR LED indicates the power-on status of the module. The COP (CANopen Protocol) LED indicates the status of the CAN network controller. Table B-2 outlines the LED states and provides solutions in the event of a problem.
Important: The error information in Table B-2 refers to situations that persist for longer than about 15 seconds. Typically, when the module is powered on, the LEDs briefly flash red before they turn green. This is a normal part of the startup or reset sequence.
Table B-2. LED guide for the Model CM-B VSM detection module
LED COLOR STATUS MEANING AND/OR SOLUTION
PWR Green On The processor is running with no errors (normal)
Red Flashing Errors were encountered during the self-test. The flashing sequence can be used to determine the cause of the failure.
COP Green On CAN status is operational (normal)
Flashing CAN status is pre-operational. Verify that cable is connected to PC.
Red On or flashing
Error on the CAN bus. Contact Quantum Design for assistance.
If you are unable to achieve operation with both LEDs green, please contact Quantum Design for assistance.

Section B.3 Appendix B Model CM-B Detection Module: Front Panel Model CM-B VSM Detection Module
B-4 PPMS VSM Option User’s Manual, Rev. A3 Quantum Design January 2008
B.3.2 Connectors and Pinout Tables
B.3.2.1 JB-1: MOTOR SYNC CONNECTOR
This connector reads the motor encoder position from the Model CM-A VSM motor module as a high-speed digital serial signal.
Figure B-3. JB-1: Motor sync connector for the Model CM-B
VSM detection module
Table B-3. JB-1: Motor sync connections for the Model CM-B VSM detection module
PIN FUNCTION
1 Sync +
2 Data +
3 Clock +
4 PSync +
5 Ground
6 Sync –
7 Data –
8 Clock –
9 PSync –
B.3.2.2 JB-2: MONITOR BNC
This connector outputs the amplified pickup coil signal.

Appendix B Section B.3 Model CM-B VSM Detection Module Model CM-B Detection Module: Front Panel
Quantum Design PPMS VSM Option User’s Manual, Rev. A3 B-5 January 2008
B.3.2.3 JB-3: PREAMP CONNECTOR
This connector is the main connection to the preamplifiers and coilset puck. It contains two analog inputs for the synchronous detection, current and voltage for a thermometer, power for the preamp, and serial communications to the serial ROM in the preamp box for storing calibration or configuration information.
Figure B-4. JB-3: Preamp connector for the Model CM-B VSM
detection module
Table B-4. JB-3: Preamp connector for the Model CM-B VSM detection module
PIN FUNCTION
3 Serial Com Select
4 Serial Com Data MOSI
5 Thermometer Current +
6 Thermometer Voltage +
9 +15 V
10 Channel 1 Input +
11 +5 V
12 Channel 2 Input +
13 Signal Ground
16 Serial Com Clock
17 Serial Com Data MISO
18 Thermometer Current –
19 Thermometer Voltage –
22 –15 V
23 Channel 1 Input –
25 Channel 2 Input –

Section B.4 Appendix B Model CM-B Detection Module: Rear Panel Model CM-B VSM Detection Module
B-6 PPMS VSM Option User’s Manual, Rev. A3 Quantum Design January 2008
B.4 Model CM-B Detection Module: Rear Panel The rear panel of the Model CM-B VSM detection module contains an address selector, two guide holes, and the CAN connector through which the module sends and receives network data and receives power.
B.4.1 Address Selector Each module on the CAN bus must have a unique 5-bit binary address. The selector on the back panel is used to set the four least significant bits, while an internal jumper sets the most significant bit. If the selector is set to “0,” the module uses its default address. For a Model CM-B VSM detection module, the default address is 8.
B.4.2 Guide Holes The two guide holes are used to align the connector with either a low-power receptacle or a high-power receptacle on the Model 1000 modular control system.
Figure B-5. Rear panel of the Model CM-B VSM detection module
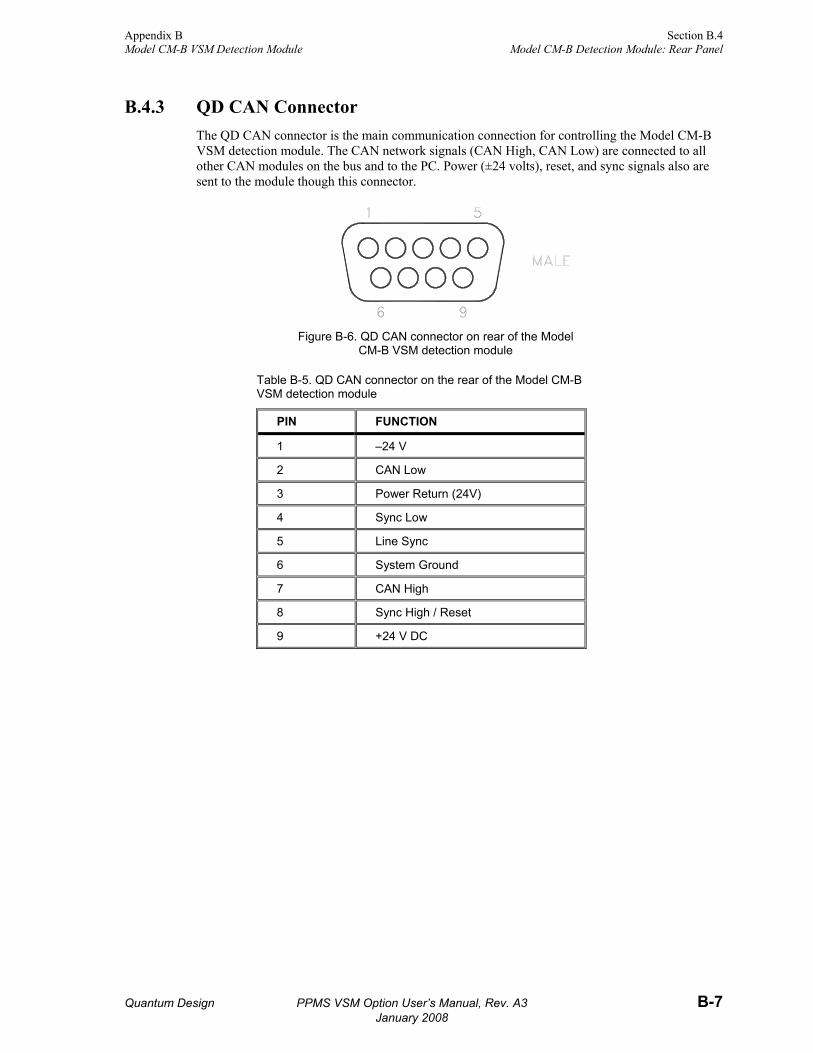
Appendix B Section B.4 Model CM-B VSM Detection Module Model CM-B Detection Module: Rear Panel
Quantum Design PPMS VSM Option User’s Manual, Rev. A3 B-7 January 2008
B.4.3 QD CAN Connector The QD CAN connector is the main communication connection for controlling the Model CM-B VSM detection module. The CAN network signals (CAN High, CAN Low) are connected to all other CAN modules on the bus and to the PC. Power (±24 volts), reset, and sync signals also are sent to the module though this connector.
Figure B-6. QD CAN connector on rear of the Model
CM-B VSM detection module
Table B-5. QD CAN connector on the rear of the Model CM-B VSM detection module
PIN FUNCTION
1 –24 V
2 CAN Low
3 Power Return (24V)
4 Sync Low
5 Line Sync
6 System Ground
7 CAN High
8 Sync High / Reset
9 +24 V DC


Quantum Design PPMS VSM Option User’s Manual, Rev. A3 G-1 January 2008
G l o s s a r y
STANDARD TERM QD PART NUMBER
DEFINITION
Armature The moving section of the linear motor, inside the head.
Auto-scheduled centering
An automated operating mode, with the software carrying out centering operations after a certain amount of time has expired or the temperature or field has changed by a prescribed amount.
Bottom weldment flange Another name for the extender tube flange.
Cable slots The “comb-like” structure at the rear of the Model 1000, designed to hold the exiting cables.
Calibration sample 4096-390 Palladium sample mounted in trough-shaped sample holder, proved in VSM User's Kit.
CAN computer interface kit
4100-100 CAN interface card, cabling, and software for PC communications with Model 1000.
Cap 4096-429 The cap that covers the sample access port
Centering operation This is the act of performing either a touchdown operation to measure touchdown position (TP) or a centering scan to measure center position (CP).
Centering scan The act of oscillating the sample while scanning it slowly through the coilset. The voltage versus position data is then fit to the expected theoretical response curve to determine the location of the sample. The result is a center position (CP), which is the alternative to performing a touchdown operation.
Centering slides Bearing-grade plastic washers on sample rod.
Coilset puck 4096-204 Puck containing one or two pickup coils arranged in any configuration for performing VSM measurements.
Contact fingers Springy fingers at the bottom of the puck.
Cover plate Blank cover for empty module bays.
Dead reckoning A centering technique that is not based on a formal measurement; one simply enters a target position for the motor and vibrates the sample about that point.
Drive coil Coil on the armature inside the head that drives the vibrating motion.
Extender tube flange 4096-418 The portion of the head that sticks down from its body and has an NW40 O-ring flange at the bottom.

Glossary
G-2 PPMS VSM Option User’s Manual, Rev. A3 Quantum Design January 2008
STANDARD TERM QD PART NUMBER
DEFINITION
Firmware Software and data stored in flash memory in a QD module. Firmware controls the operation of the module and the interface to the PC. Firmware is retained even when the system is turned off. Firmware can only be changed by using a QD utility to download updates.
Flange clamp NW40 plastic clamp.
Flexible coupling 4096-366 Located below magnetic lock.
Guide pin The alignment pin located at the back of the module bays. These pins help align the CAN connector. They also prevent a high-power module from being plugged into a low-power slot.
Head 4096-400 The linear transport motor used with the VSM.
High-power bay A module bay with a single guide pin, designed to accommodate a QD module that dissipates up to 50 W. Three of these slots are located on the back row of the Model 1000. High-power bays have more airflow than low-power bays.
Indicator pin Attached to the armature. The location of the indicator pin shows the vertical position of the armature in the window at the front of the linear motor transport.
Load position When the indicator pin is at top of the window (at the front of the linear motor transport), the user has access to the magnetic lock.
Lower slide adapter 4096-368 Lower end of sample rod, threaded to attach sample holder.
Low-power bay A module bay with two guide pins, designed to accommodate a QD module that dissipates up to 20 W. Three of these slots are located on the front row of the Model 1000. High-power bays have more airflow than low-power bays.
Magnetic lock 4096-358 Located at upper end of sample rod, uses magnets to adhere sample rod to transport.
Magnetic-lock ring Thin steel ring at the top of the armature that holds the sample rod magnetically.
Manual centering User-initiated touchdown operation.
“Model 1000” or “modular control system” or “module tower”
Control center for CAN modules.
“Model CM-A” or “Motor module”
4101-100 The VSM motor module.
“Model CM-B” or "VSM module”
4101-150 The VSM detection module.
Module bay The slot in the Model 1000 modular control system where a QD module is inserted.

Glossary
Quantum Design PPMS VSM Option User’s Manual, Rev. A3 G-3 January 2008
STANDARD TERM QD PART NUMBER
DEFINITION
Motor drive cable 3096-200 Carries drive currents and encoder read-back for linear motor in head.
“Motor module” or “Model CM-A”
4101-100 The VSM motor module.
Pickup coils The counter-wound detection coils in the coilset puck.
Position The value in mm as read from the motor position encoder. The term “position” always refers to this absolute scale. The zero of the encoder is set only during a reset of the hardware (e.g., in the “Setup and Configure Magnetometer Wizard”) and remains persistent throughout multiple samples and runs.
Position encoder Optical encoder in the head that reads-out the vertical position of the armature.
Preamp cable assembly 3096-300 Carries signals from detection coilset(s).
Puck-insertion (puck-extraction) tool
Tool used to lower the puck into the sample tube of the PPMS. This tool is also referred to as the sample-holder tool or the sample-insertion (sample-extraction) tool, depending on context.
Puck surface See Figure 5-4. This is the surface that is “touched” by the end of the sample holder during a touchdown operation.
QD module A CAN module, e.g., Model CM-A VSM motor module and Model CM-B VSM detection module.
Sample-access port Opening in the top of the head where the sample rod is inserted.
Sample holder The sample is mounted to this part, which screws into the lower slide adapter.
Sample-holder tool Used to insert and remove samples from the PPMS sample chamber. Depending on context, this item also might be referred to as the puck-insertion (puck-extraction) tool or the sample insertion (sample-extraction) tool.
Sample-insertion (sample-extraction) tool
Used to insert and remove samples from PPMS sample chamber. Depending on context, this item also might be referred to as the puck-insertion (puck-extraction) tool or the sample-holder tool.
Sample-mounting station 4096-110 Fixture used for mounting and measuring sample position in sample holder.
Sample rod 4096-352 The VSM sample rod. The term does not necessarily include the sample holder, which screws on the end of the rod.
Sample tube 4096-301
Shipping plug Plug inserted into the bottom of the head during shipping; it prevents oscillation of the suspension during shipment.

Glossary
G-4 PPMS VSM Option User’s Manual, Rev. A3 Quantum Design January 2008
STANDARD TERM QD PART NUMBER
DEFINITION
Shutdown position When the indicator pin is at the bottom of the window (at the front of the head), it indicates that the power is off and no sample rod is installed.
Stabilizer post Stinger at the top of the sample tube.
Standard coilset 4096-204 The coilset with the specific dimensions listed in Section 5.2.3.
Stiff tapered shaft Main shaft of VSM sample rod (see Chapter 5).
Storage case 4096-150 The box for storing the head.
Synchronous detection The operation performed by the VSM module when acquiring signal data from the pickup coils.
Touchdown operation The act of slowly lowering the motor position until there is no more levitation force, indicating that the bottom of the sample holder is resting on the puck surface. A tiny dithering amplitude (e.g., 0.05 mm) is used during this process to avoid stiction. The result is a touchdown position (TP).
Touchdown position This is the position (motor encoder value) of zero levitation force as measured by the touchdown operation.
User’s kit, VSM Option 4096-100 Box of miscellaneous VSM-related hardware and supplies.
VSM application The VSM software running in MultiVu.
VSM Control Center The main form presented by the VSM application containing Install, Data File, Sample, and Advanced tabs.
“VSM head” or “head” 4096-400 The VSM linear motor transport.
”VSM module” or “Model CM-B”
4101-150 The VSM detection module.
VSM–Motor sync cable 3096-400 Cable connecting "SYNC" ports of the Model CM-A ( motor module) and Model CM-B (VSM detection module).
”VSM Transport” The VSM linear motor transport.
"Window" The window at the front of the head where the position of the armature can be seen.
Windows tool tray Usually, the lower right corner of the computer screen in the same area where the system time is displayed.

Quantum Design PPMS VSM Option User’s Manual, Rev. A3 Index-1 January 2008
I n d e x
A
Activate Option 2-10–2-11, 2-17, 4-5, 6-3–6-4 Adv. Measure .................................. 6-19–6-21 alignment pin, See module bays Amplitude, Peak .................... 4-15, 6-15–6-16 armature, See VSM linear motor transport
(head) Autorange .............................. 4-15, 6-15–6-16 Averaging Time ...........4-13–4-14, 6-13–6-14, 6-25, 6-30
B
bottom weldment flange, See extender tube flange
C
cables ............2-2–2-4, 2-10, 5-8–5-9, G-1–G-3 connection diagram......................... 2-3, 2-10 preamp assembly..............2-2–2-3, 2-10, 5-8 slots..........................................................G-1 motor drive cable.......2-2–2-3, 2-10, 5-9, G-2 VSM–Motor Sync Cable....2-2–2-4, 2-10, 5-9
calibration (standard) sample............... 3-1, 5-7 CAN computer interface kit ................ 2-2, 5-11 CAN network adapter kit, See CAN computer
interface kit CAUTION ....... 2-8, 2-16–2-17, 2-21, 2-23, 4-3, 4-18, 5-2–5-3, 5-5, 6-9 center position, See centering operation Center Sample ......................... 6-7, 6-15, 6-21 centering operation..............4-1–4-3, 4-14, 6-7, 6-14, 6-20–6-21, G-1
center position...........................................5-4 centering scan..........................................G-1 scheduling touchdowns.............................4-2 sample location ...................3-4, 4-1–4-4, 5-8 touchdown operation............... 4-1–4-2, 4-14, 6-8, 6-14–6-15, G-4 touchdown position ..................................G-4
Centering parameters ............ 4-14, 6-14–6-15 centering scan, See centering operation Chamber dialog .................2-5–2-6, 2-15, 2-23
coilset puck .....2-2, 2-6, 2-12–2-13, 2-16, 2-18, 3-1, 4-2–4-3, 5-3–5-4, G-1
contact fingers ..........................................5-4 detection coils .... 1-2, 2-6, 5-3, 5-8, 6-15, G-3 installing..................................2-6, 2-14–2-16 pickup coils ........................ 1-1, 4-1, 4-3, G-3 removing .............................. 2-14–2-16, 2-23 standard coilset..................................3-1, 5-4
comments appending............................................7-7 definition ..............................................7-7
Configure VSM System dialog.......2-12–2-13, 2-18 contact fingers, See coilset puck contact information................................1-7–1-8 control center, See VSM Control Center cover plate, See module bays
D
data files.......................4-3, 4-8–4-9, 4-16, 6-8, 6-10–6-11, 7-3–7-9
changing ............................................7-8–7-9 creating ....................4-8–4-9, 6-10–6-11, 7-6 description ................................................7-3 fields .........................................................7-5 sequence ..................................6-17, 7-8–7-9
Deactivate Option ......................2-22, 6-3–6-4 definition
comments............................................7-7 data file fields ......................................7-5 glossary ...................................... G-1–G-4
detection coils, See coilset puck detection module, See Model CM-B VSM
detection module dialog
Chamber ..................................2-5–2-6, 2-15 Configure VSM System ..... 2-12–2-13, 2-18 Field ................................................2-5, 2-15 Install/Remove Sample Wizard..2-19–2-22, 4-6–4-12, 4-17–4-19, 6-6
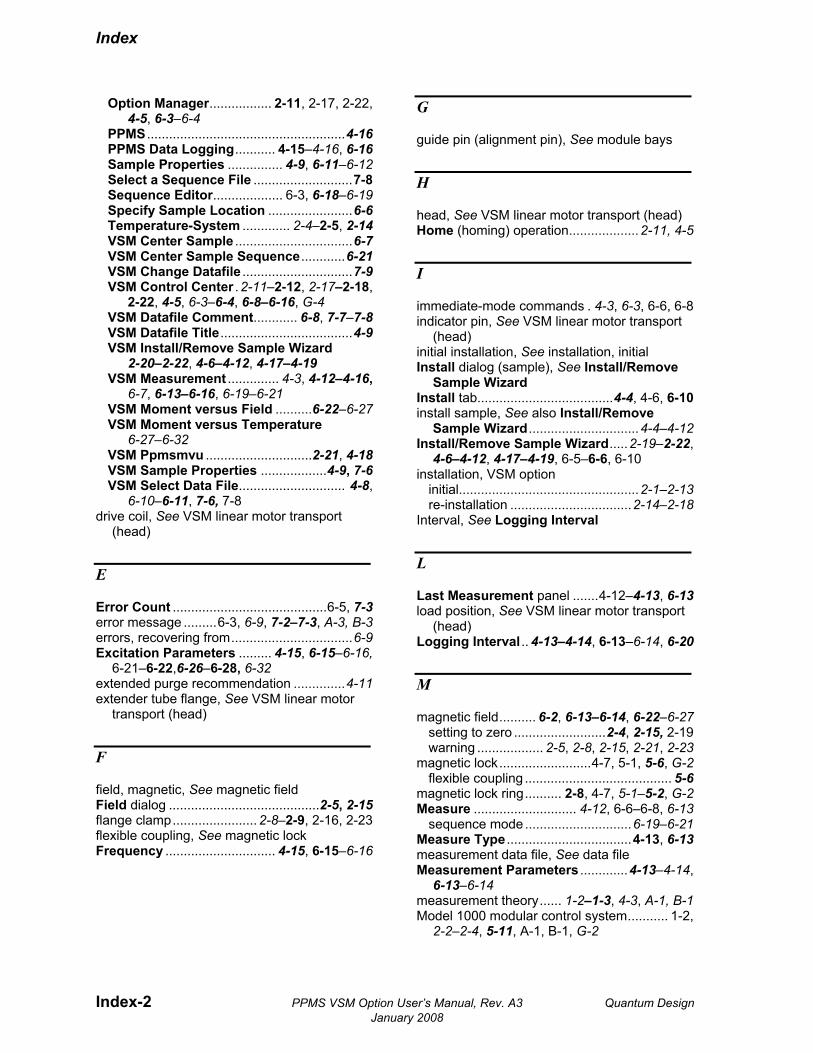
Index
Index-2 PPMS VSM Option User’s Manual, Rev. A3 Quantum Design January 2008
Option Manager................. 2-11, 2-17, 2-22, 4-5, 6-3–6-4 PPMS ......................................................4-16 PPMS Data Logging........... 4-15–4-16, 6-16 Sample Properties ............... 4-9, 6-11–6-12 Select a Sequence File ...........................7-8 Sequence Editor................... 6-3, 6-18–6-19 Specify Sample Location .......................6-6 Temperature-System ............. 2-4–2-5, 2-14 VSM Center Sample ................................6-7 VSM Center Sample Sequence............6-21 VSM Change Datafile ..............................7-9 VSM Control Center .2-11–2-12, 2-17–2-18, 2-22, 4-5, 6-3–6-4, 6-8–6-16, G-4 VSM Datafile Comment............ 6-8, 7-7–7-8 VSM Datafile Title....................................4-9 VSM Install/Remove Sample Wizard 2-20–2-22, 4-6–4-12, 4-17–4-19 VSM Measurement .............. 4-3, 4-12–4-16, 6-7, 6-13–6-16, 6-19–6-21 VSM Moment versus Field ..........6-22–6-27 VSM Moment versus Temperature 6-27–6-32 VSM Ppmsmvu .............................2-21, 4-18 VSM Sample Properties ..................4-9, 7-6 VSM Select Data File............................. 4-8, 6-10–6-11, 7-6, 7-8
drive coil, See VSM linear motor transport (head)
E
Error Count ..........................................6-5, 7-3 error message .........6-3, 6-9, 7-2–7-3, A-3, B-3 errors, recovering from.................................6-9 Excitation Parameters ......... 4-15, 6-15–6-16, 6-21–6-22,6-26–6-28, 6-32 extended purge recommendation ..............4-11 extender tube flange, See VSM linear motor
transport (head)
F
field, magnetic, See magnetic field Field dialog .........................................2-5, 2-15 flange clamp.......................2-8–2-9, 2-16, 2-23 flexible coupling, See magnetic lock Frequency .............................. 4-15, 6-15–6-16
G
guide pin (alignment pin), See module bays
H
head, See VSM linear motor transport (head) Home (homing) operation...................2-11, 4-5
I
immediate-mode commands . 4-3, 6-3, 6-6, 6-8 indicator pin, See VSM linear motor transport
(head) initial installation, See installation, initial Install dialog (sample), See Install/Remove
Sample Wizard Install tab.....................................4-4, 4-6, 6-10 install sample, See also Install/Remove
Sample Wizard ..............................4-4–4-12 Install/Remove Sample Wizard.....2-19–2-22, 4-6–4-12, 4-17–4-19, 6-5–6-6, 6-10 installation, VSM option
initial.................................................2-1–2-13 re-installation .................................2-14–2-18
Interval, See Logging Interval
L
Last Measurement panel .......4-12–4-13, 6-13 load position, See VSM linear motor transport
(head) Logging Interval .. 4-13–4-14, 6-13–6-14, 6-20
M
magnetic field.......... 6-2, 6-13–6-14, 6-22–6-27 setting to zero .........................2-4, 2-15, 2-19 warning .................. 2-5, 2-8, 2-15, 2-21, 2-23
magnetic lock.........................4-7, 5-1, 5-6, G-2 flexible coupling ........................................ 5-6
magnetic lock ring.......... 2-8, 4-7, 5-1–5-2, G-2 Measure ............................ 4-12, 6-6–6-8, 6-13
sequence mode .............................6-19–6-21 Measure Type ..................................4-13, 6-13 measurement data file, See data file Measurement Parameters .............4-13–4-14, 6-13–6-14 measurement theory...... 1-2–1-3, 4-3, A-1, B-1 Model 1000 modular control system........... 1-2, 2-2–2-4, 5-11, A-1, B-1, G-2

Index
Quantum Design PPMS VSM Option User’s Manual, Rev. A3 Index-3 January 2008
Model CM-A ...................1-2–1-3, 2-2, 2-4, 4-3, 5-1, 5-9–5-11, A-1–A-8, G-2 Model CM-B ..................1-2–1-3, 2-2, 2-4, 4-3, 5-8–5-11, A-1, B-1–B-7, G-3–G-4 module bays, See also Model 1000 modular
control system..................................2-4, G-2 alignment pin............................................G-2 cover plate.........................................2-4, G-1 guide pins.................................................G-2
moment, magnetic........1-2, 3-1–3-3, 4-3, 4-13, 4-15, 6-13, 6-15–6-16, 6-18, 6-22–6-32 Moment versus Field...................... 6-22–6-27 Moment versus Temperature ........ 6-27–6-32 motor module, See Model CM-A VSM motor
module motor, linear, See VSM linear motor transport
(head) mounting samples ......................... 3-3–3-4, 4-4 MultiVu software................2-10–2-12, 4-2–4-5, 6-1–6-3, 6-5–6-7, 6-9
O
offset, sample, See sample offset operating principles, See measurement theory optical linear encoder, See VSM linear motor,
position encoder Option Manager .............2-11, 2-17, 2-22, 4-5, 6-3–6-4
P
Pause (Resume) toggle button ................4-13, 4-16, 6-13 Peak Amplitude ..................... 4-15, 6-15, 6-20 pickup coils, See coilset puck position encoder (optical encoder), See VSM
linear motor, position enconder PPMS Data Logging ....4-15–4-16, 6-15–6-16, 6-21, 6-26, 6-31 PPMS dialog..................................... 4-16, 6-16 Ppmsmvu dialog.............................. 2-21, 4-18 preamp cable assembly, See cables puck, See coilset puck puck insertion (extraction) tool .... 2-6, 2-16, 5-3
Q
QD module, See module name, e.g., Model CM-A VSM motor module
R
Ranging setting ............ 4-15, 6-15–6-16, 6-21, 6-26, 6-31 Reconfigure radio button, See
Start/Reconfigure radio button reconfiguring the PPMS for the VSM 2-14–2-18 removing a sample............................4-17–4-19 removing the VSM option... 2-19–2-23, 6-4, 6-8 Resume, See Pause (Resume) toggle button
S
safety.....................................................1-4–1-6 sample access port ............... 2-8, 4-7, 5-2, G-3
cap ............2-8, 2-17, 4-7, 4-11, 5-1–5-2, G-1 sample centering, See centering operation sample holder .........2-2, 3-1, 3-3–3-4, 4-2, 4-4, 4-7, 5-7–5-8, G-3 sample insertion (extraction) tool..........2-6, 5-3 sample installation .......................4-4, 4-6, 4-12
Use Extended Purge check box ...........4-11 target line ..................................................4-4
sample length, calculated effect on reported sample moment ................................3-1–3-2
sample location, See centering operation sample mounting, See mounting samples sample offset.....4-2, 4-4, 4-6–4-7, 4-9, 5-8, 6-6 sample position, See centering operation,
sample location sample properties
size and shape...................................3-1–3-2 magnetic moment ..............................3-1–3-3 recording....................4-8–4-9, 6-11, 7-6, 7-9
Sample Properties dialog. 4-9, 6-11–6-12, 7-6 sample rod ..........1-3, 2-2, 2-7, 2-19–2-21, 4-4, 4-6–4-7, 4-17–4-18, 5-1–5-2, 5-5–5-7, G-3 sample shape........................................3-1–3-3 sample size ...........................................3-1–3-2 sample tube ............2-2–2-3, 2-6–2-8, 5-5, G-3 sample-mounting station.......................4-4, 5-7 scheduling touchdowns, See centering
operation Select a Sequence File dialog ..........6-17, 7-8 Select Start-End Quadrant ......................6-23

Index
Index-4 PPMS VSM Option User’s Manual, Rev. A3 Quantum Design January 2008
sequence commands (VSM) 4-2, 6-3, 6-17–6-32, 7-7–7-9
inserting ..................................................6-19 Adv. Measure................................6-19–6-21 Center Sample.......................................6-21 Datafile Comment ...................................7-7 Moment vs. Field..........................6-22–6-27 Moment vs. Temp.........................6-27–6-32 New Datafile......................................7-8–7-9 Sequence Commands bar ..........6-18–6-19, 6-21, 7-7
Sequence Editor...................... 6-3, 6-18–6-19 sequence-mode ................. 4-3, 6-3, 6-17–6-32 serial number, puck
location...............................................2-6, 5-4 using............................2-12–2-13, 2-16, 2-18
Settings tab ..........4-12–4-13, 6-13, 6-19–6-20 shipping plug ................................. 2-8–2-9, 5-2 Shutdown ............................... 2-21–2-22, 4-18 Specify Sample Location dialog................6-6 stabilizer post ....................... 2-7–2-9, 2-23, 5-5
and safety ........................................2-7, 2-17 standard coilset, See coilset puck Start (End) temperature ...................6-29–6-30 Start/Reconfigure radio button.................6-20 Start (Stop) toggle button...... 4-13, 4-16, 6-13 Status ..........................................................7-2 Stop radio button .......................................6-20 synchronous detection ................. 1-3, 4-1, 4-3, 5-9–5-10, A-1, B-1
T
target line, See sample installation Temperature-System dialog...............2-4–2-5, 2-14, 6-3 Temperature panel, MultiVu ................6-2–6-3 theory of operation, See measurement theory touchdown... 3-4, 4-1–4-3, 4-5, 4-11, 4-14, 5-8, 6-14–6-15, 6-21, 6-26, 6-31, G-3 touchdown operation, See centering operation touchdown position, See centering operation transport (head), See VSM linear transport
motor
V
VSM Center Sample Sequence dialog ....6-21 VSM Change Datafile dialog................7-8–7-9 VSM Control Center ....2-11–2-12, 2-17–2-18, 2-22, 4-3–4-6, 6-3–6-4, 6-8–6-16, G-4 VSM Datafile Comment.... 6-7, 6-18–6-19, 7-7 VSM detection module, See Model CM-B
VSM head, See VSM linear motor transport VSM linear motor transport (head) ......1-1, 1-3, 2-2, 2-7–2-10, 2-16–2-17, 2-23, 4-2, 4-11,
4-17–4-18, 5-1–5-3, G-3 armature ....................................5-1–5-2, G-1
drive coil ..................................... 5-1, G-1 indicator pin ....................................... 5-2, G-2 load position........................2-8, 2-11, 4-5–4-6 shutdown position ...........2-21–2-22, 4-18, 5-2
Home (homing) operation ...............2-11, 4-5 position encoder (optical encoder) ...1-3, 5-1, 6-15, A-1, B-1, G-3 extender tube flange......... 2-7–2-9, 2-16, 5-2 mounting on PPMS......... 2-8–2-9, 2-16–2-17 window...................................................... 5-2
VSM Log............................ 2-11–2-12, 6-4, 7-2 VSM Measurement (seq. mode) .....6-19–6-21
Start/Reconfigure ................................. 6-20 Stop........................................................ 6-20
VSM measurements .. 4-1–4-3, 4-12–4-16, 6-1, 6-6–6-7, 6-13–6-17, 6-20–6-22, 6-24
successful................................................. 3-3 VSM Module, See Model CM-B VSM
detection module VSM motor module, See Model CM-A VSM
motor module VSM option ...........................................1-1–1-3
initial installation ..............................2-1–2-13 re-installing ....................................2-14–2-18 removing........................................2-19–2-23
VSM Ppmsmvu dialog .....................2-21, 4-18 VSM Sample Properties dialog................ 6-11 VSM software application ... 2-10, 4-1, 4-3–4-6, 5-9–5-10, 6-1, 6-3–6-6, G-4 VSM Transport, See VSM linear motor
transport (head) VSM Select Data File dialog4-8, 6-10–6-11, 7-6 VSM–Motor Sync cable, See cables
W
WARNING, safety........ 1-4–1-6, 2-5, 2-8, 2-15, 2-19, 2-21, 2-23 warning and error messages, equipment 6-3, 6-9, 7-2, A-3, B-3