Embed Size (px)
Citation preview
Pianocorder Control Plug-in
for WINAMP 3
User Manual
Mark Fontana <[email protected]>
Last updated 9/12/2016

1
2
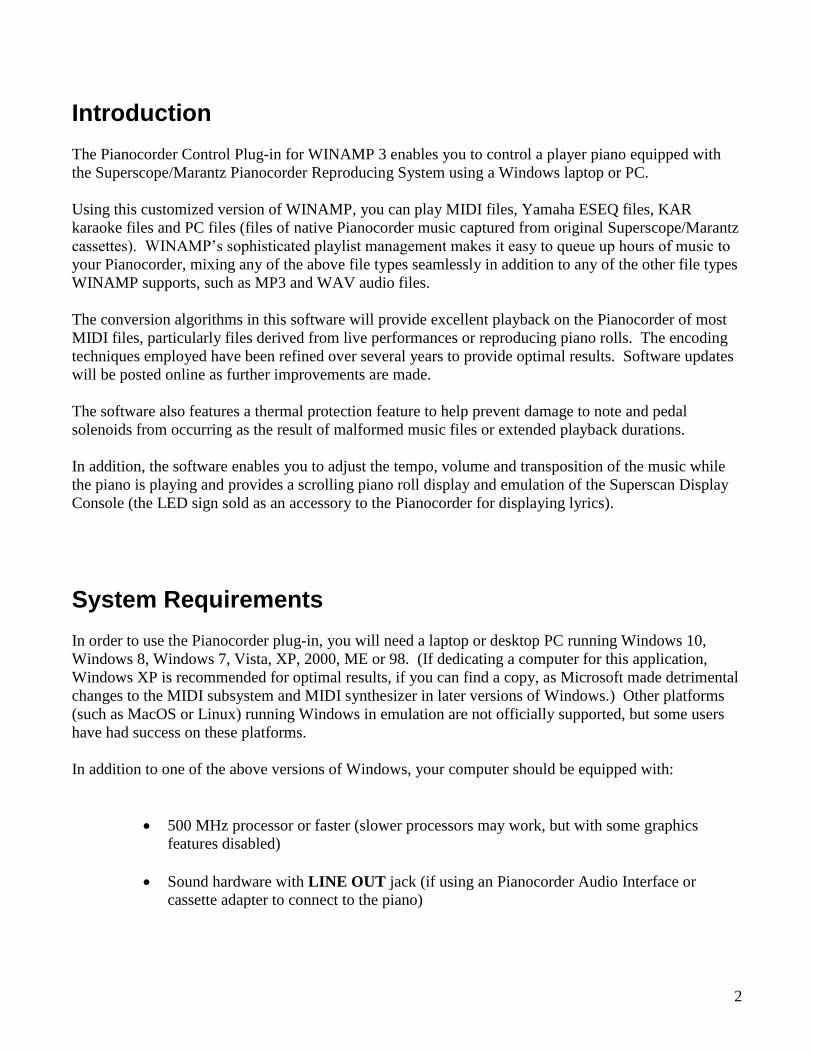
Introduction
The Pianocorder Control Plug-in for WINAMP 3 enables you to control a player piano equipped with
the Superscope/Marantz Pianocorder Reproducing System using a Windows laptop or PC.
Using this customized version of WINAMP, you can play MIDI files, Yamaha ESEQ files, KAR
karaoke files and PC files (files of native Pianocorder music captured from original Superscope/Marantz
cassettes). WINAMP’s sophisticated playlist management makes it easy to queue up hours of music to
your Pianocorder, mixing any of the above file types seamlessly in addition to any of the other file types
WINAMP supports, such as MP3 and WAV audio files.
The conversion algorithms in this software will provide excellent playback on the Pianocorder of most
MIDI files, particularly files derived from live performances or reproducing piano rolls. The encoding
techniques employed have been refined over several years to provide optimal results. Software updates
will be posted online as further improvements are made.
The software also features a thermal protection feature to help prevent damage to note and pedal
solenoids from occurring as the result of malformed music files or extended playback durations.
In addition, the software enables you to adjust the tempo, volume and transposition of the music while
the piano is playing and provides a scrolling piano roll display and emulation of the Superscan Display
Console (the LED sign sold as an accessory to the Pianocorder for displaying lyrics).
System Requirements
In order to use the Pianocorder plug-in, you will need a laptop or desktop PC running Windows 10,
Windows 8, Windows 7, Vista, XP, 2000, ME or 98. (If dedicating a computer for this application,
Windows XP is recommended for optimal results, if you can find a copy, as Microsoft made detrimental
changes to the MIDI subsystem and MIDI synthesizer in later versions of Windows.) Other platforms
(such as MacOS or Linux) running Windows in emulation are not officially supported, but some users
have had success on these platforms.
In addition to one of the above versions of Windows, your computer should be equipped with:
500 MHz processor or faster (slower processors may work, but with some graphics
features disabled)
Sound hardware with LINE OUT jack (if using an Pianocorder Audio Interface or
cassette adapter to connect to the piano)
3
Getting Started
Please carefully follow the steps below to set up the Pianocorder Control Plug-in for WINAMP.
1. Download the Software
If you haven’t already, download WINAMP 3.0D and the Utility Files package from the web site where
you obtained this manual:
http://www.pianocorder.info/winamp_plugin/
Go to the Download section of the page and retrieve each of the files to a known location on your
computer by right-clicking on each file and selecting “Save Target As…” or “Save Link As”.
Please note that two separate “setup.exe” style installers are provided on this page. The first installs
WINAMP 3.0D complete with the Pianocorder plug-in pre-configured. The other installs only the
Pianocorder plug-in (for updating a system on which you’ve already installed the full version).
You are likely doing a fresh installation, so use the full WINAMP 3.0D installer. It will have a name
similar to winamp_3.0D_pianocorder_1.29_setup.exe
If you happen to have a later version of WINAMP (such as version 5.x) already installed on your
computer, it is recommended that you remove it before installing WINAMP 3. To uninstall a previous
version of WINAMP, use Windows' Programs and Features interface in the Control Panel (known as
Add/Remove Programs in versions of Windows earlier than Vista).
Please note that the WINAMP software and its creator, Nullsoft, have been defunct since 2013. Do not
attempt to use other WINAMP installers that you might find elsewhere on the Internet. They are
unlikely to work and may be contaminated with malware.
2. Install WINAMP 3.0D
The next step in setting up your computer for Pianocorder control is to install WINAMP 3.0D.
To install WINAMP, close all open applications and then double-click on
winamp_3.0D_pianocorder_1.29_setup.exe (the version number may vary). Follow the prompts as
shown on the following pages to complete the installation.
4
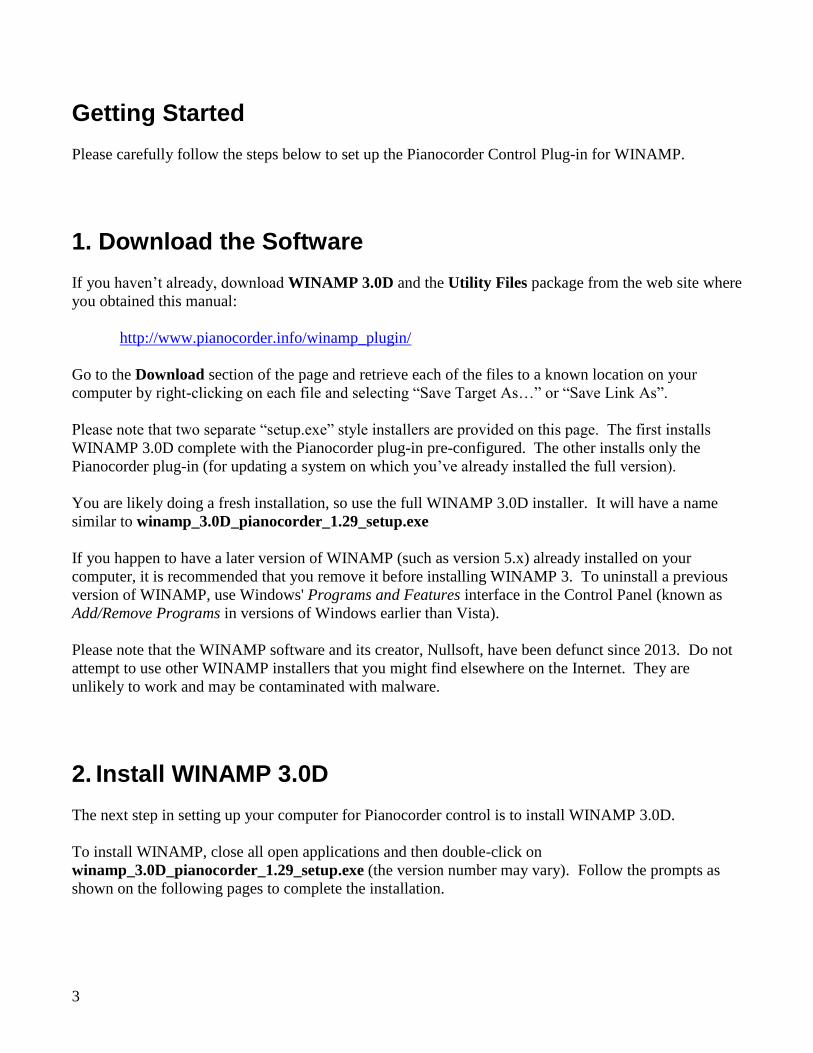
Click Next to continue.
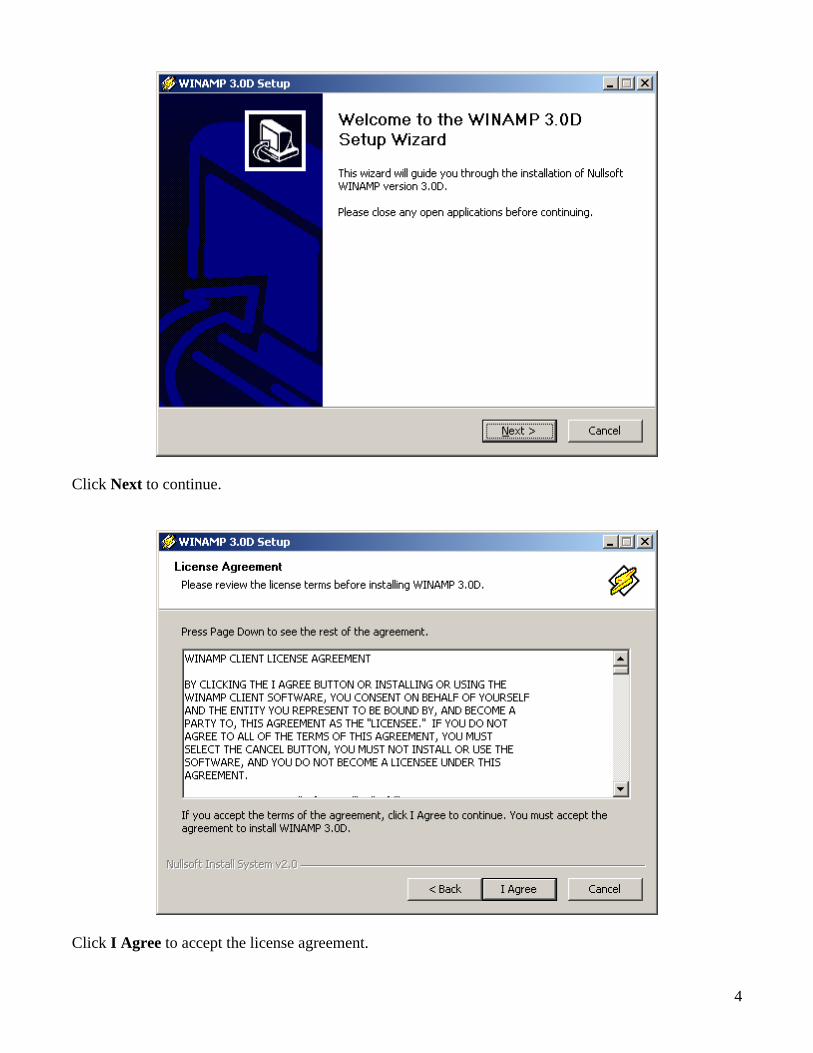
Click I Agree to accept the license agreement.
5
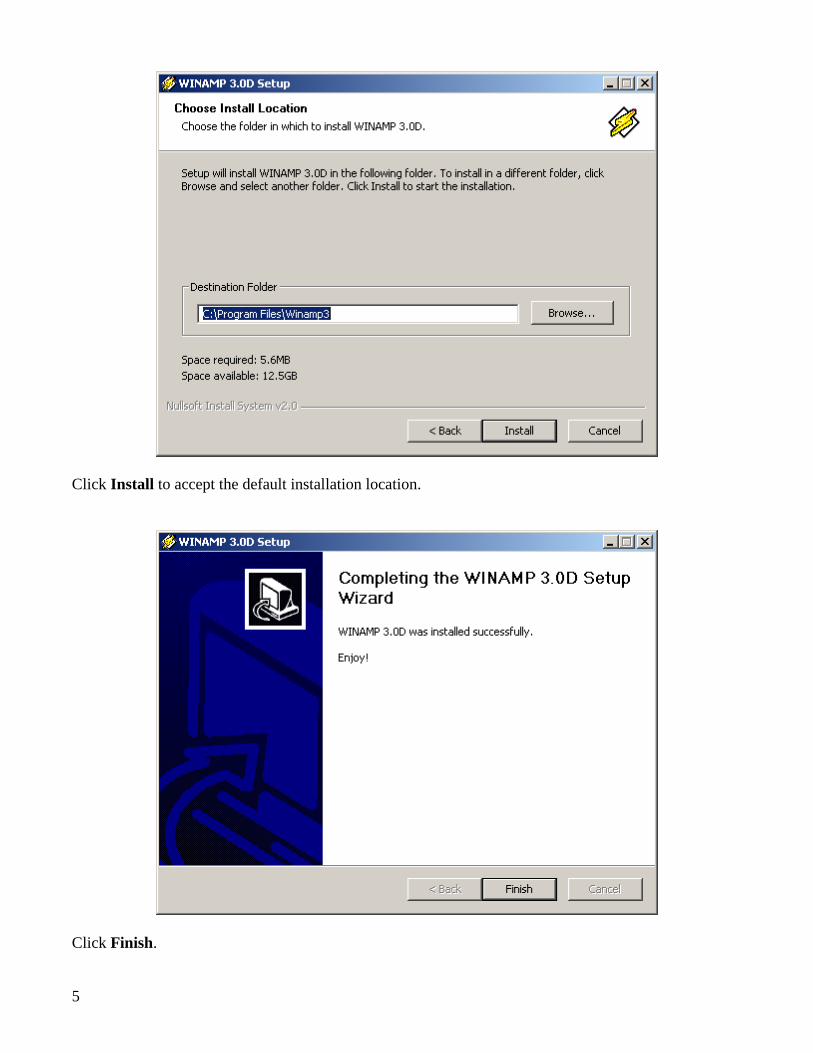
Click Install to accept the default installation location.
Click Finish.
6
Introduction to the WINAMP 3.0 User Interface
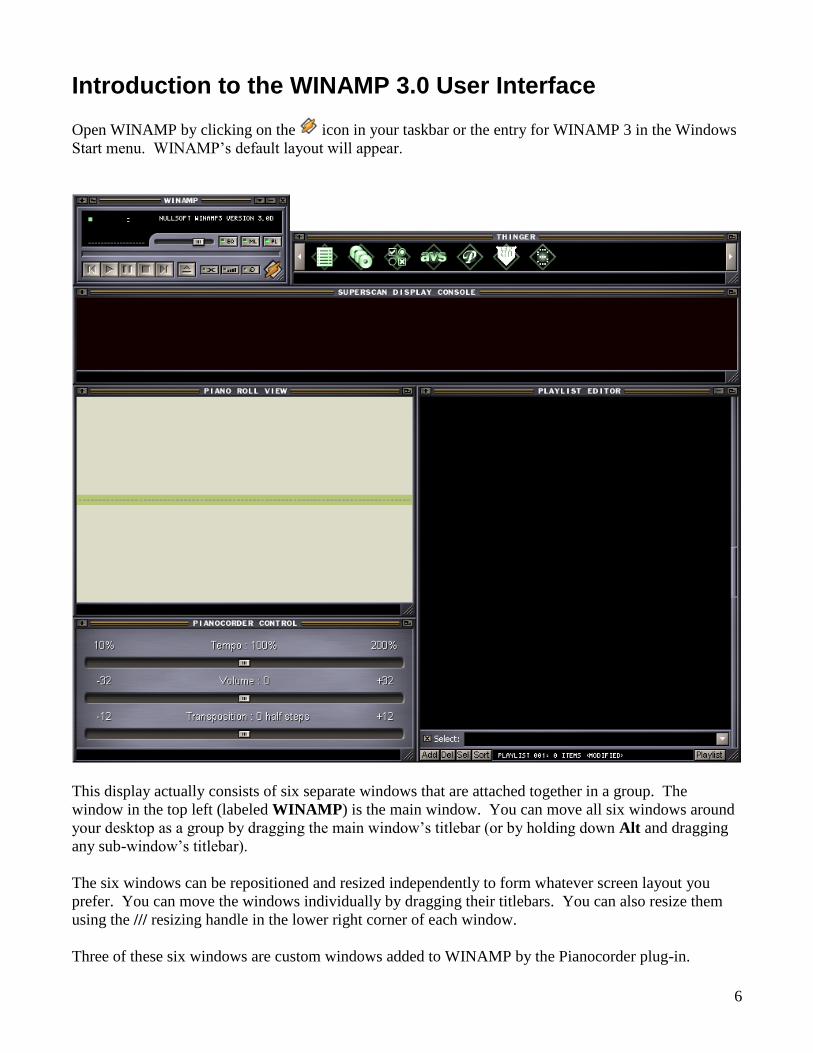
Open WINAMP by clicking on the icon in your taskbar or the entry for WINAMP 3 in the Windows
Start menu. WINAMP’s default layout will appear.
This display actually consists of six separate windows that are attached together in a group. The
window in the top left (labeled WINAMP) is the main window. You can move all six windows around
your desktop as a group by dragging the main window’s titlebar (or by holding down Alt and dragging
any sub-window’s titlebar).
The six windows can be repositioned and resized independently to form whatever screen layout you
prefer. You can move the windows individually by dragging their titlebars. You can also resize them
using the /// resizing handle in the lower right corner of each window.
Three of these six windows are custom windows added to WINAMP by the Pianocorder plug-in.
7
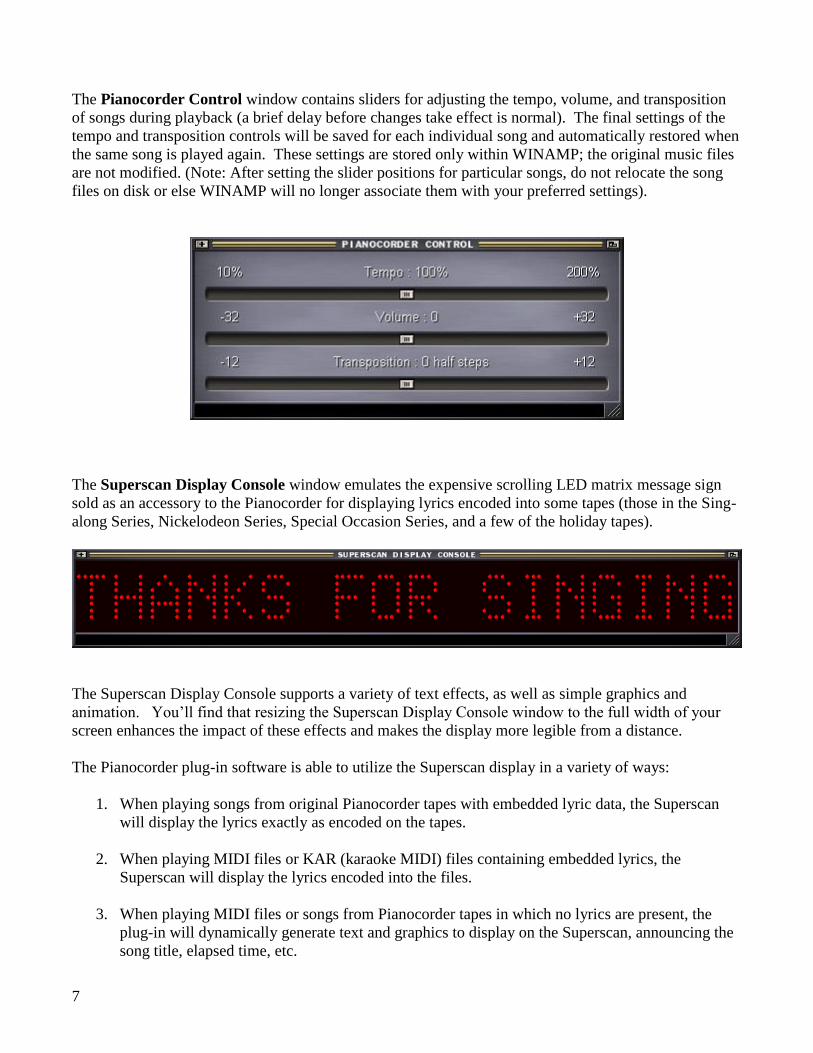
The Pianocorder Control window contains sliders for adjusting the tempo, volume, and transposition
of songs during playback (a brief delay before changes take effect is normal). The final settings of the
tempo and transposition controls will be saved for each individual song and automatically restored when
the same song is played again. These settings are stored only within WINAMP; the original music files
are not modified. (Note: After setting the slider positions for particular songs, do not relocate the song
files on disk or else WINAMP will no longer associate them with your preferred settings).
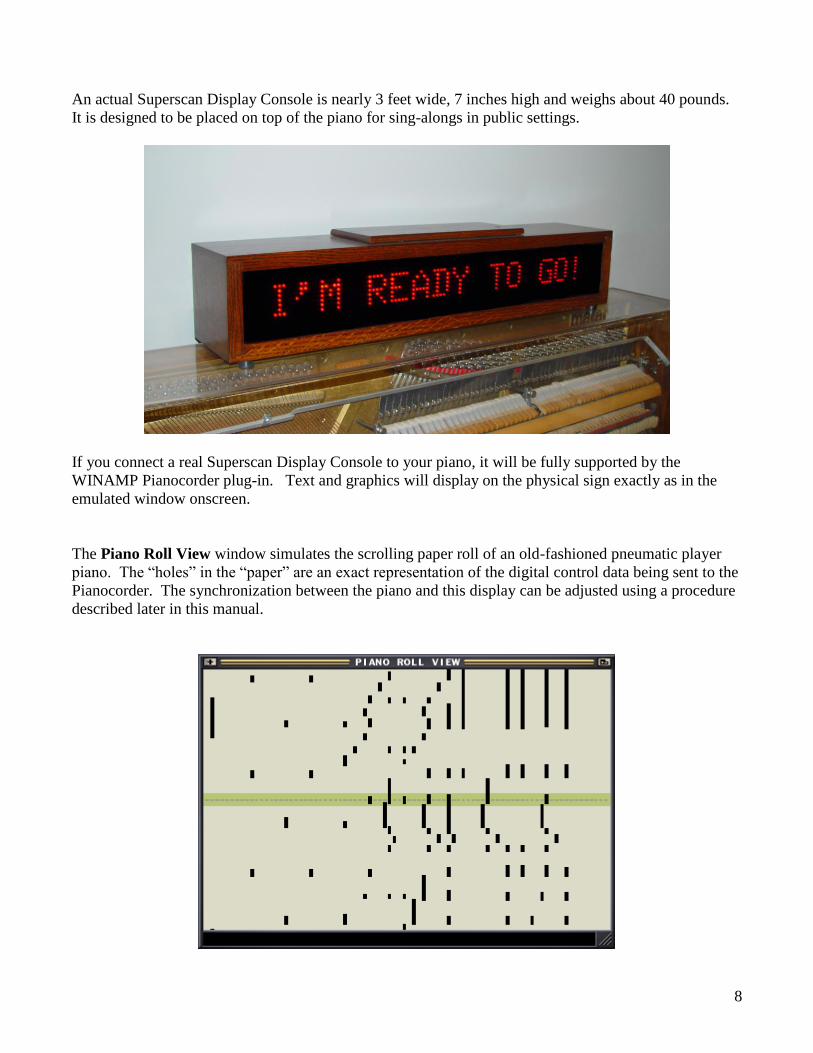
The Superscan Display Console window emulates the expensive scrolling LED matrix message sign
sold as an accessory to the Pianocorder for displaying lyrics encoded into some tapes (those in the Sing-
along Series, Nickelodeon Series, Special Occasion Series, and a few of the holiday tapes).
The Superscan Display Console supports a variety of text effects, as well as simple graphics and
animation. You’ll find that resizing the Superscan Display Console window to the full width of your
screen enhances the impact of these effects and makes the display more legible from a distance.
The Pianocorder plug-in software is able to utilize the Superscan display in a variety of ways:
1. When playing songs from original Pianocorder tapes with embedded lyric data, the Superscan
will display the lyrics exactly as encoded on the tapes.
2. When playing MIDI files or KAR (karaoke MIDI) files containing embedded lyrics, the
Superscan will display the lyrics encoded into the files.
3. When playing MIDI files or songs from Pianocorder tapes in which no lyrics are present, the
plug-in will dynamically generate text and graphics to display on the Superscan, announcing the
song title, elapsed time, etc.
8
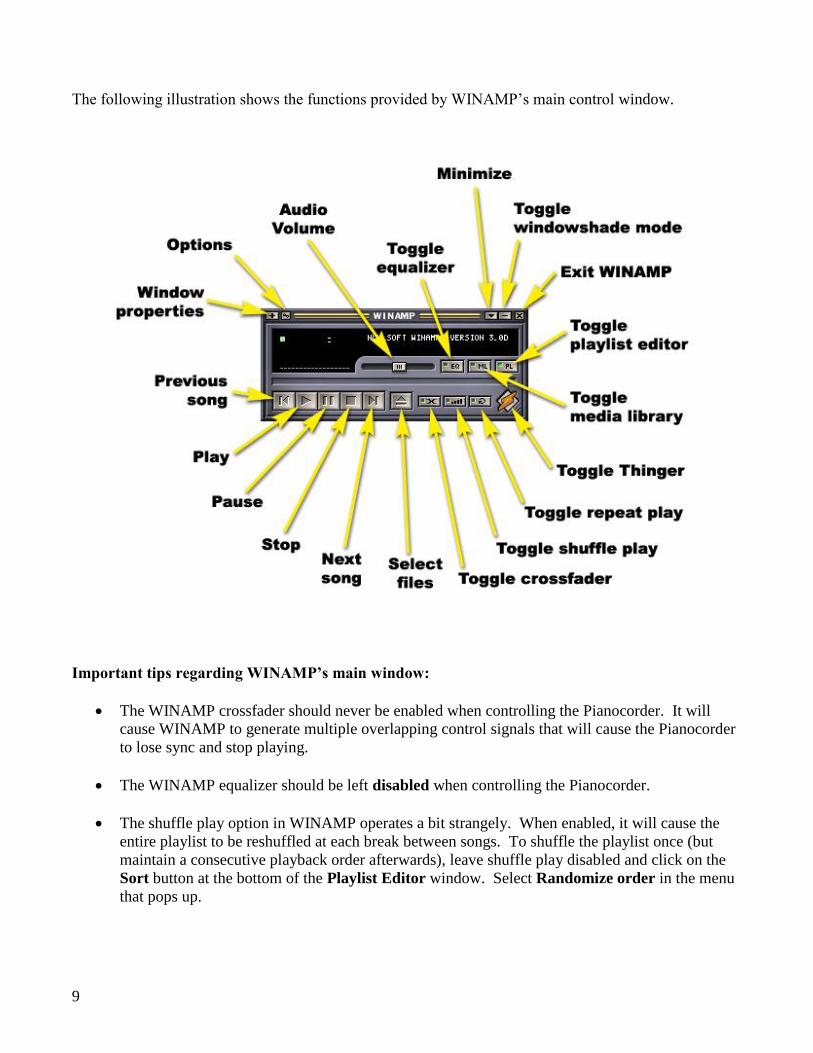
An actual Superscan Display Console is nearly 3 feet wide, 7 inches high and weighs about 40 pounds.
It is designed to be placed on top of the piano for sing-alongs in public settings.
If you connect a real Superscan Display Console to your piano, it will be fully supported by the
WINAMP Pianocorder plug-in. Text and graphics will display on the physical sign exactly as in the
emulated window onscreen.
The Piano Roll View window simulates the scrolling paper roll of an old-fashioned pneumatic player
piano. The “holes” in the “paper” are an exact representation of the digital control data being sent to the
Pianocorder. The synchronization between the piano and this display can be adjusted using a procedure
described later in this manual.
9
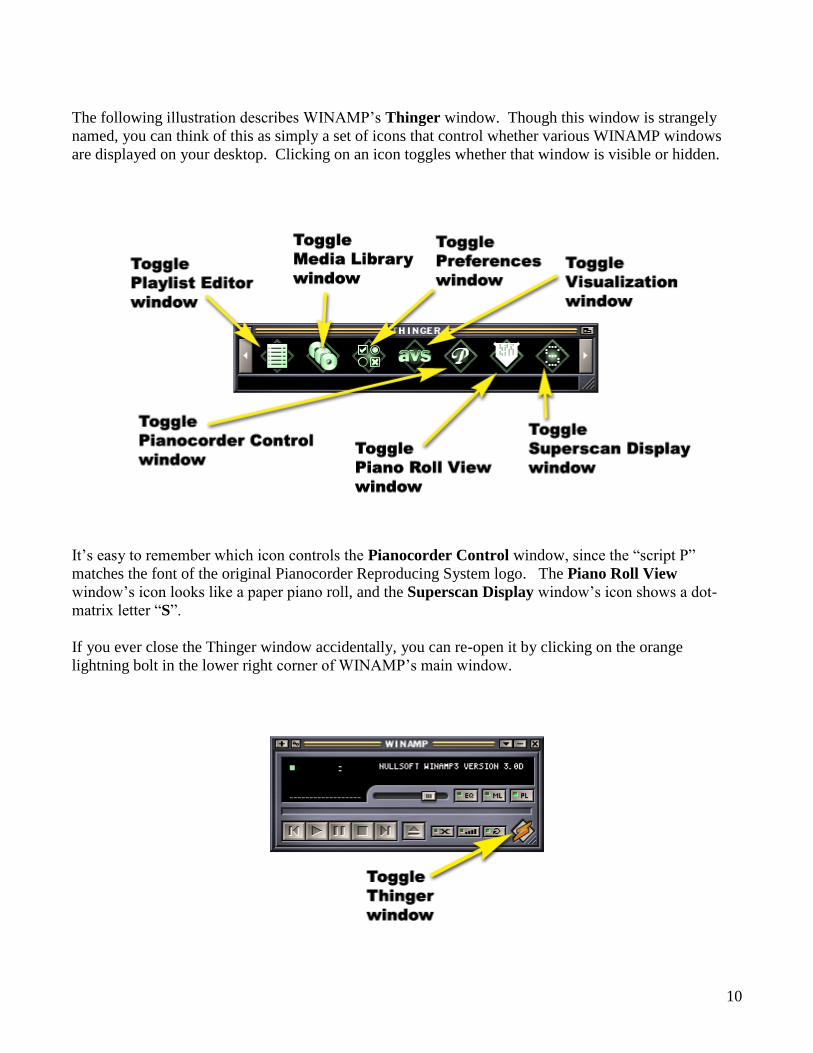
The following illustration shows the functions provided by WINAMP’s main control window.
Important tips regarding WINAMP’s main window:
The WINAMP crossfader should never be enabled when controlling the Pianocorder. It will
cause WINAMP to generate multiple overlapping control signals that will cause the Pianocorder
to lose sync and stop playing.
The WINAMP equalizer should be left disabled when controlling the Pianocorder.
The shuffle play option in WINAMP operates a bit strangely. When enabled, it will cause the
entire playlist to be reshuffled at each break between songs. To shuffle the playlist once (but
maintain a consecutive playback order afterwards), leave shuffle play disabled and click on the
Sort button at the bottom of the Playlist Editor window. Select Randomize order in the menu
that pops up.
10
The following illustration describes WINAMP’s Thinger window. Though this window is strangely
named, you can think of this as simply a set of icons that control whether various WINAMP windows
are displayed on your desktop. Clicking on an icon toggles whether that window is visible or hidden.
It’s easy to remember which icon controls the Pianocorder Control window, since the “script P”
matches the font of the original Pianocorder Reproducing System logo. The Piano Roll View
window’s icon looks like a paper piano roll, and the Superscan Display window’s icon shows a dot-
matrix letter “S”.
If you ever close the Thinger window accidentally, you can re-open it by clicking on the orange
lightning bolt in the lower right corner of WINAMP’s main window.
11
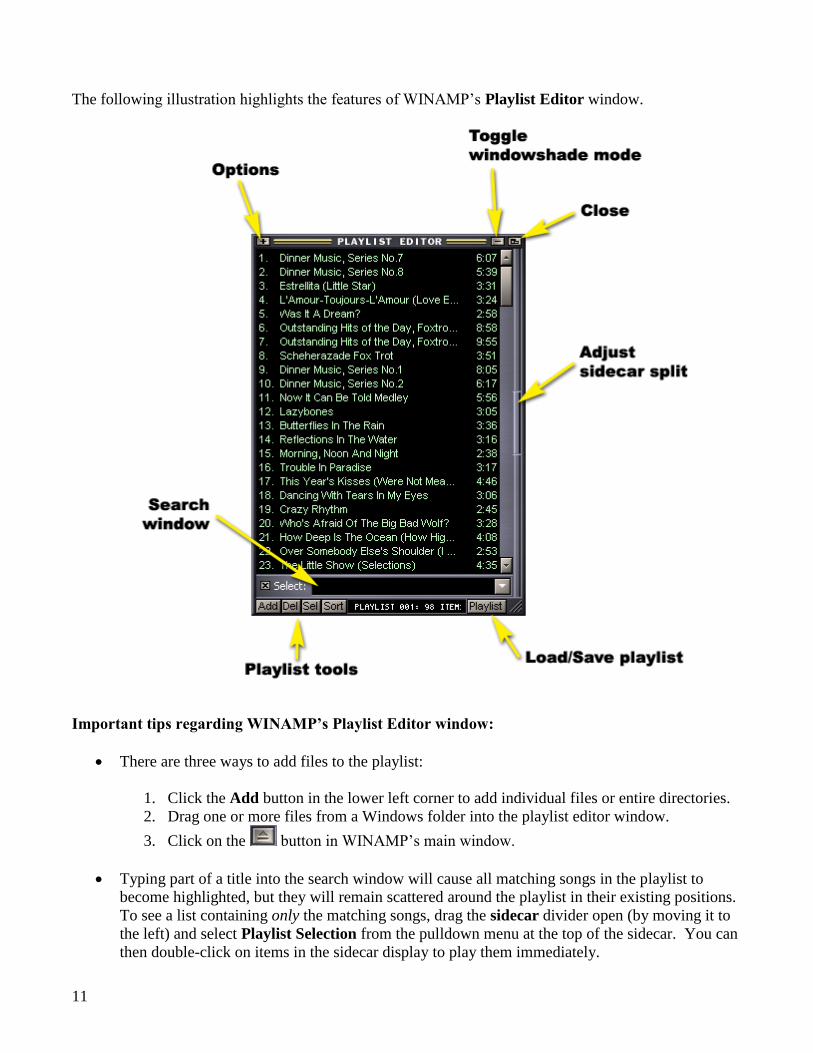
The following illustration highlights the features of WINAMP’s Playlist Editor window.
Important tips regarding WINAMP’s Playlist Editor window:
There are three ways to add files to the playlist:
1. Click the Add button in the lower left corner to add individual files or entire directories.
2. Drag one or more files from a Windows folder into the playlist editor window.
3. Click on the button in WINAMP’s main window.
Typing part of a title into the search window will cause all matching songs in the playlist to
become highlighted, but they will remain scattered around the playlist in their existing positions.
To see a list containing only the matching songs, drag the sidecar divider open (by moving it to
the left) and select Playlist Selection from the pulldown menu at the top of the sidecar. You can
then double-click on items in the sidecar display to play them immediately.
12
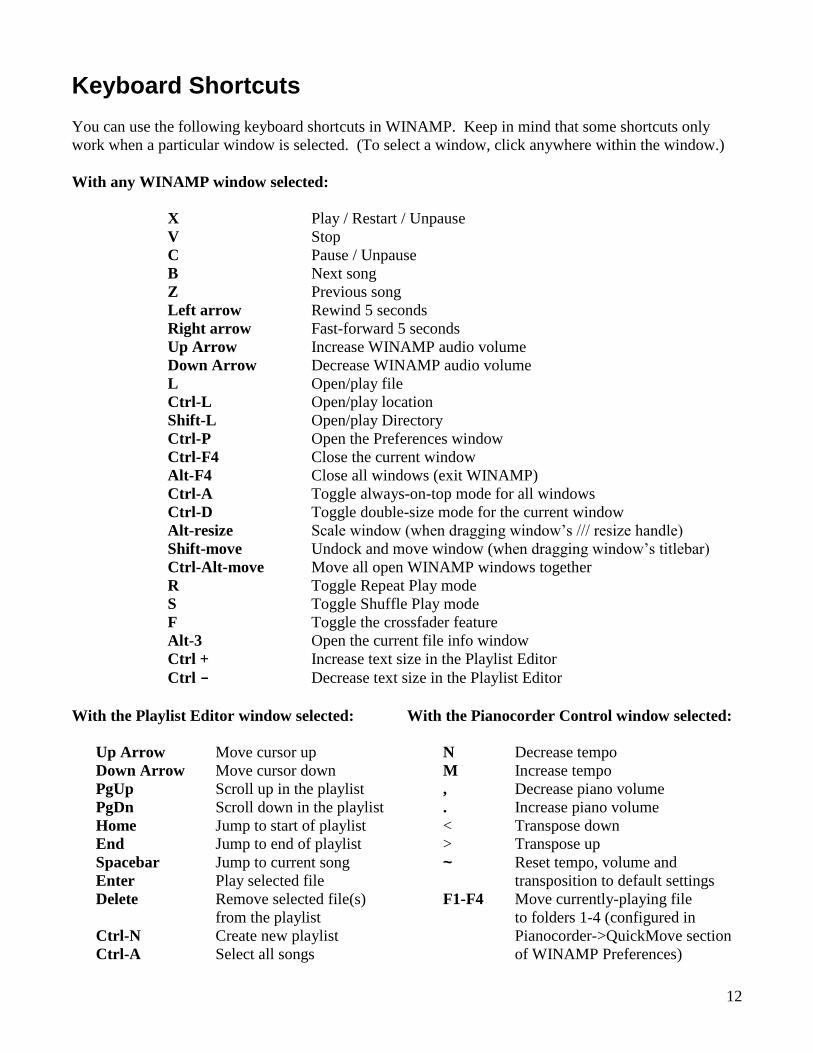
Keyboard Shortcuts
You can use the following keyboard shortcuts in WINAMP. Keep in mind that some shortcuts only
work when a particular window is selected. (To select a window, click anywhere within the window.)
With any WINAMP window selected:
X Play / Restart / Unpause
V Stop
C Pause / Unpause
B Next song
Z Previous song
Left arrow Rewind 5 seconds
Right arrow Fast-forward 5 seconds
Up Arrow Increase WINAMP audio volume
Down Arrow Decrease WINAMP audio volume
L Open/play file
Ctrl-L Open/play location
Shift-L Open/play Directory
Ctrl-P Open the Preferences window
Ctrl-F4 Close the current window
Alt-F4 Close all windows (exit WINAMP)
Ctrl-A Toggle always-on-top mode for all windows
Ctrl-D Toggle double-size mode for the current window
Alt-resize Scale window (when dragging window’s /// resize handle)
Shift-move Undock and move window (when dragging window’s titlebar)
Ctrl-Alt-move Move all open WINAMP windows together
R Toggle Repeat Play mode
S Toggle Shuffle Play mode
F Toggle the crossfader feature
Alt-3 Open the current file info window
Ctrl + Increase text size in the Playlist Editor
Ctrl - Decrease text size in the Playlist Editor
With the Playlist Editor window selected: With the Pianocorder Control window selected:
Up Arrow Move cursor up N Decrease tempo
Down Arrow Move cursor down M Increase tempo
PgUp Scroll up in the playlist , Decrease piano volume
PgDn Scroll down in the playlist . Increase piano volume
Home Jump to start of playlist < Transpose down
End Jump to end of playlist > Transpose up
Spacebar Jump to current song ~ Reset tempo, volume and
Enter Play selected file transposition to default settings
Delete Remove selected file(s) F1-F4 Move currently-playing file
from the playlist to folders 1-4 (configured in
Ctrl-N Create new playlist Pianocorder->QuickMove section
Ctrl-A Select all songs of WINAMP Preferences)
13
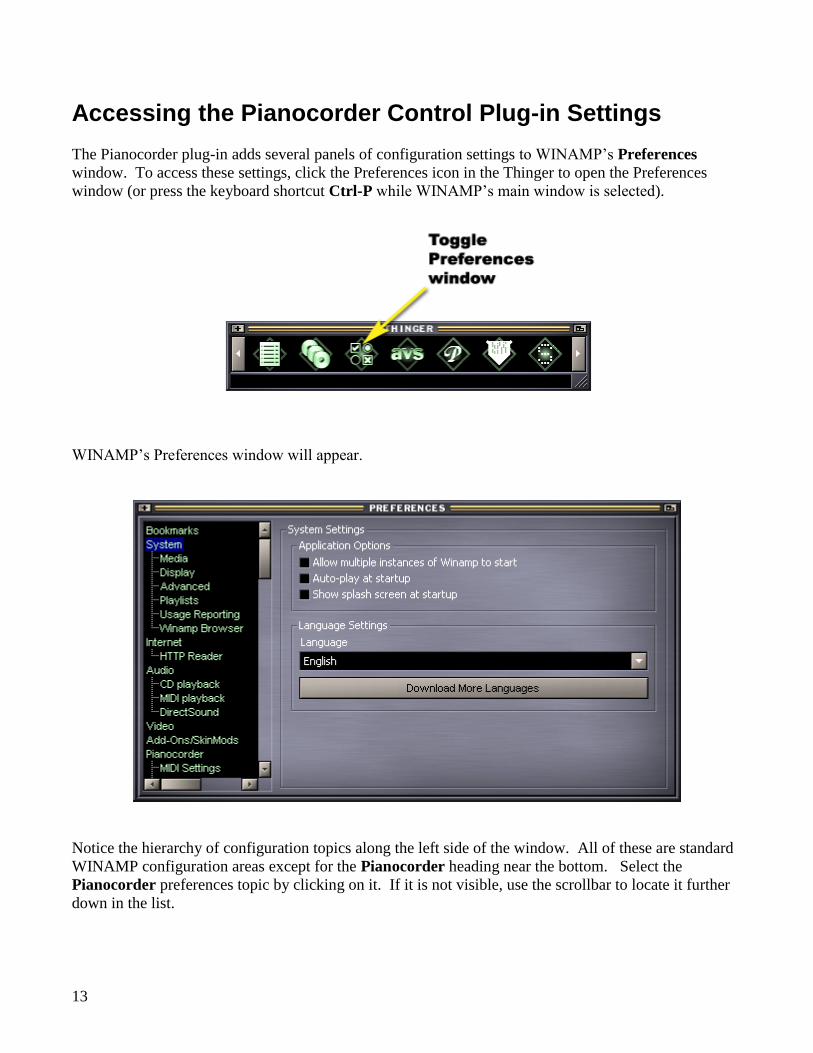
Accessing the Pianocorder Control Plug-in Settings
The Pianocorder plug-in adds several panels of configuration settings to WINAMP’s Preferences
window. To access these settings, click the Preferences icon in the Thinger to open the Preferences
window (or press the keyboard shortcut Ctrl-P while WINAMP’s main window is selected).
WINAMP’s Preferences window will appear.
Notice the hierarchy of configuration topics along the left side of the window. All of these are standard
WINAMP configuration areas except for the Pianocorder heading near the bottom. Select the
Pianocorder preferences topic by clicking on it. If it is not visible, use the scrollbar to locate it further
down in the list.
14
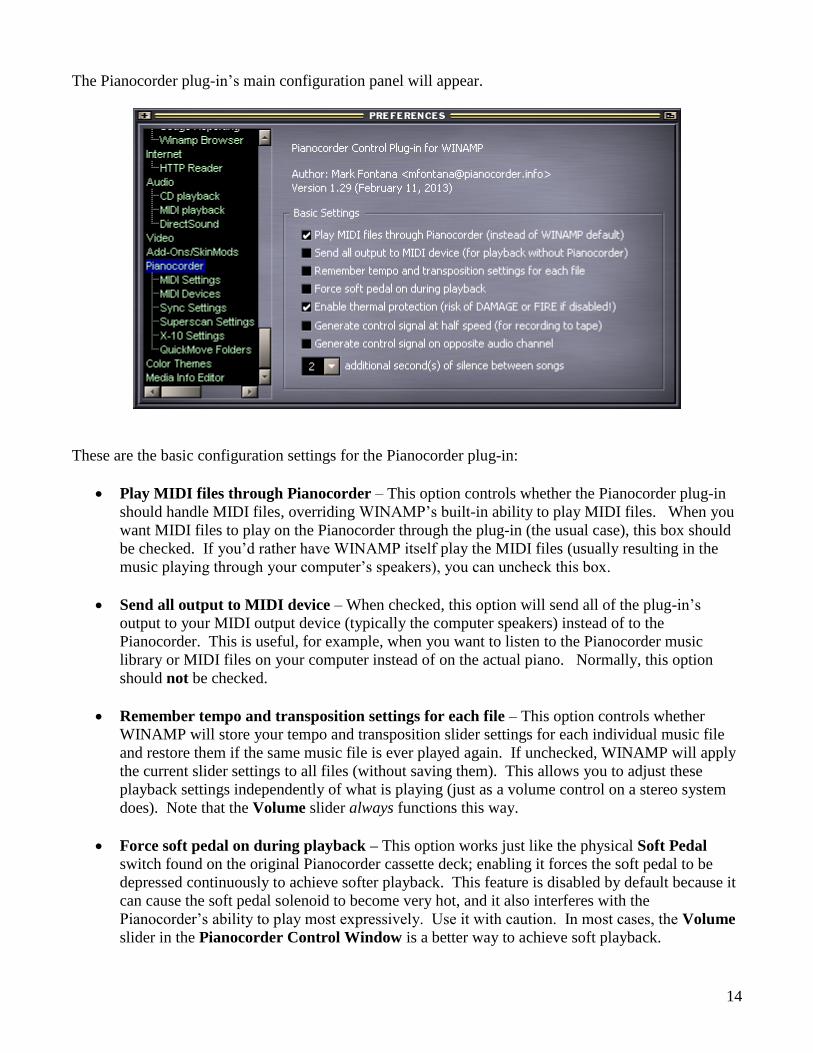
The Pianocorder plug-in’s main configuration panel will appear.
These are the basic configuration settings for the Pianocorder plug-in:
Play MIDI files through Pianocorder – This option controls whether the Pianocorder plug-in
should handle MIDI files, overriding WINAMP’s built-in ability to play MIDI files. When you
want MIDI files to play on the Pianocorder through the plug-in (the usual case), this box should
be checked. If you’d rather have WINAMP itself play the MIDI files (usually resulting in the
music playing through your computer’s speakers), you can uncheck this box.
Send all output to MIDI device – When checked, this option will send all of the plug-in’s
output to your MIDI output device (typically the computer speakers) instead of to the
Pianocorder. This is useful, for example, when you want to listen to the Pianocorder music
library or MIDI files on your computer instead of on the actual piano. Normally, this option
should not be checked.
Remember tempo and transposition settings for each file – This option controls whether
WINAMP will store your tempo and transposition slider settings for each individual music file
and restore them if the same music file is ever played again. If unchecked, WINAMP will apply
the current slider settings to all files (without saving them). This allows you to adjust these
playback settings independently of what is playing (just as a volume control on a stereo system
does). Note that the Volume slider always functions this way.
Force soft pedal on during playback – This option works just like the physical Soft Pedal
switch found on the original Pianocorder cassette deck; enabling it forces the soft pedal to be
depressed continuously to achieve softer playback. This feature is disabled by default because it
can cause the soft pedal solenoid to become very hot, and it also interferes with the
Pianocorder’s ability to play most expressively. Use it with caution. In most cases, the Volume
slider in the Pianocorder Control Window is a better way to achieve soft playback.
15
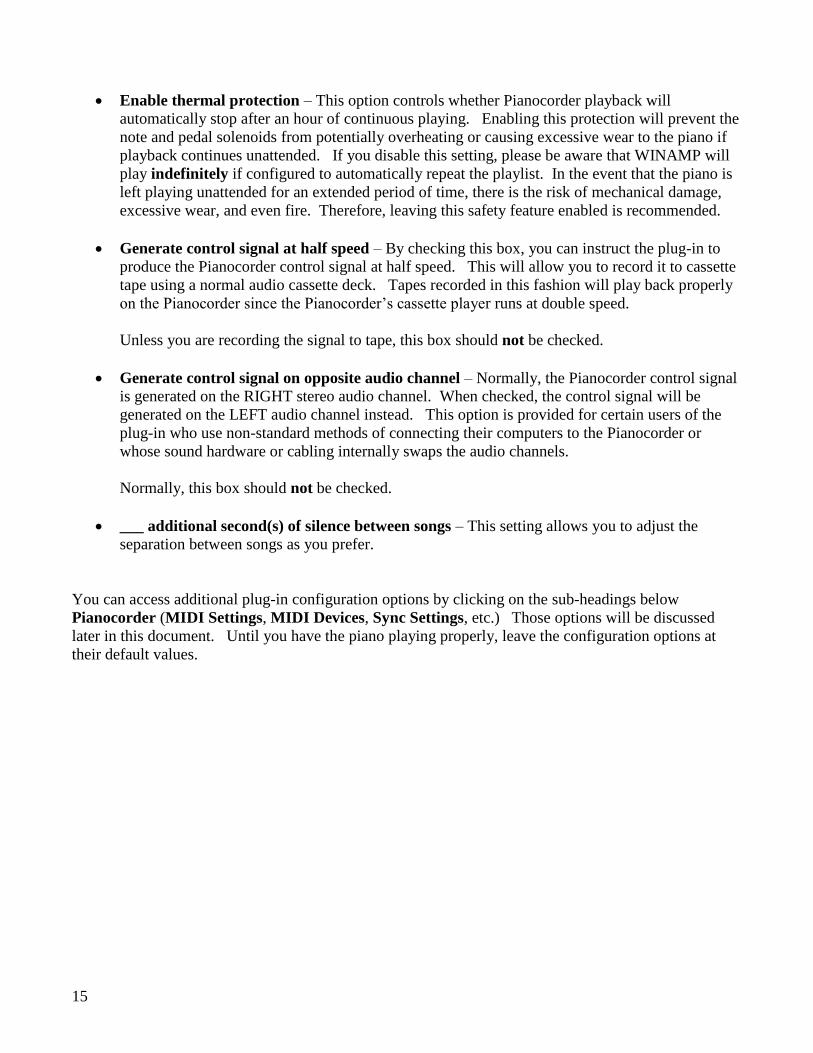
Enable thermal protection – This option controls whether Pianocorder playback will
automatically stop after an hour of continuous playing. Enabling this protection will prevent the
note and pedal solenoids from potentially overheating or causing excessive wear to the piano if
playback continues unattended. If you disable this setting, please be aware that WINAMP will
play indefinitely if configured to automatically repeat the playlist. In the event that the piano is
left playing unattended for an extended period of time, there is the risk of mechanical damage,
excessive wear, and even fire. Therefore, leaving this safety feature enabled is recommended.
Generate control signal at half speed – By checking this box, you can instruct the plug-in to
produce the Pianocorder control signal at half speed. This will allow you to record it to cassette
tape using a normal audio cassette deck. Tapes recorded in this fashion will play back properly
on the Pianocorder since the Pianocorder’s cassette player runs at double speed.
Unless you are recording the signal to tape, this box should not be checked.
Generate control signal on opposite audio channel – Normally, the Pianocorder control signal
is generated on the RIGHT stereo audio channel. When checked, the control signal will be
generated on the LEFT audio channel instead. This option is provided for certain users of the
plug-in who use non-standard methods of connecting their computers to the Pianocorder or
whose sound hardware or cabling internally swaps the audio channels.
Normally, this box should not be checked.
___ additional second(s) of silence between songs – This setting allows you to adjust the
separation between songs as you prefer.
You can access additional plug-in configuration options by clicking on the sub-headings below
Pianocorder (MIDI Settings, MIDI Devices, Sync Settings, etc.) Those options will be discussed
later in this document. Until you have the piano playing properly, leave the configuration options at
their default values.
16
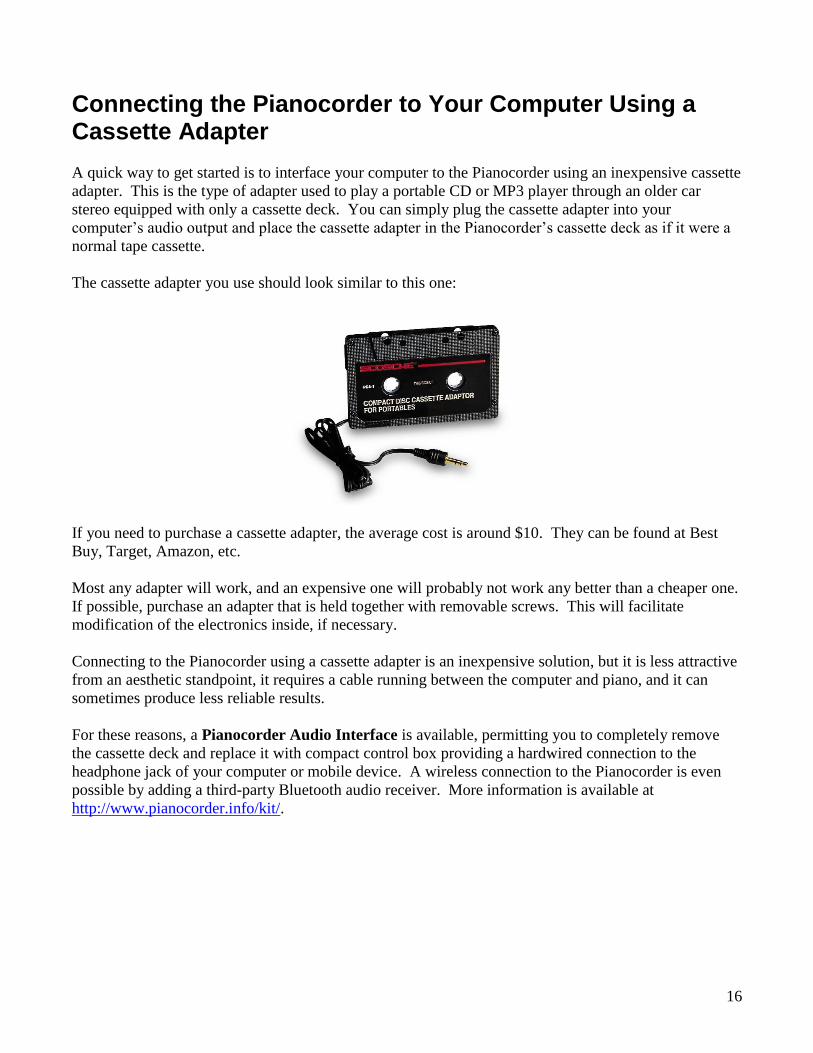
Connecting the Pianocorder to Your Computer Using a Cassette Adapter
A quick way to get started is to interface your computer to the Pianocorder using an inexpensive cassette
adapter. This is the type of adapter used to play a portable CD or MP3 player through an older car
stereo equipped with only a cassette deck. You can simply plug the cassette adapter into your
computer’s audio output and place the cassette adapter in the Pianocorder’s cassette deck as if it were a
normal tape cassette.
The cassette adapter you use should look similar to this one:
If you need to purchase a cassette adapter, the average cost is around $10. They can be found at Best
Buy, Target, Amazon, etc.
Most any adapter will work, and an expensive one will probably not work any better than a cheaper one.
If possible, purchase an adapter that is held together with removable screws. This will facilitate
modification of the electronics inside, if necessary.
Connecting to the Pianocorder using a cassette adapter is an inexpensive solution, but it is less attractive
from an aesthetic standpoint, it requires a cable running between the computer and piano, and it can
sometimes produce less reliable results.
For these reasons, a Pianocorder Audio Interface is available, permitting you to completely remove
the cassette deck and replace it with compact control box providing a hardwired connection to the
headphone jack of your computer or mobile device. A wireless connection to the Pianocorder is even
possible by adding a third-party Bluetooth audio receiver. More information is available at
http://www.pianocorder.info/kit/.
17
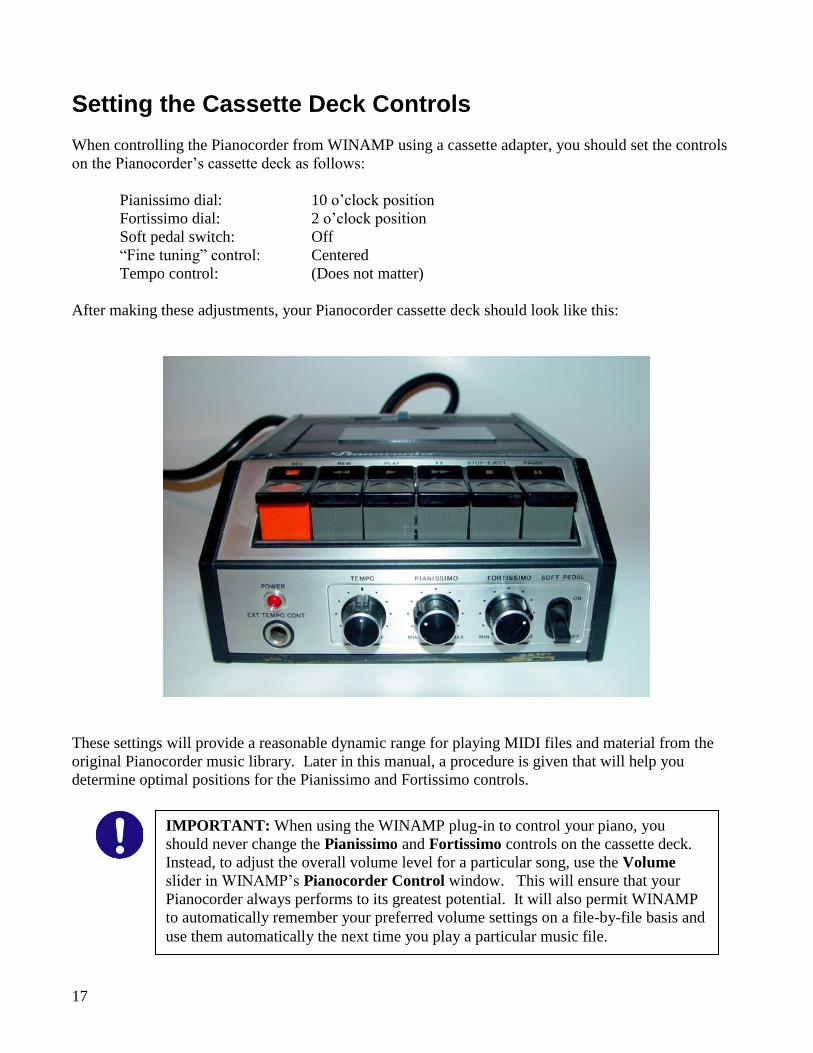
Setting the Cassette Deck Controls
When controlling the Pianocorder from WINAMP using a cassette adapter, you should set the controls
on the Pianocorder’s cassette deck as follows:
Pianissimo dial: 10 o’clock position
Fortissimo dial: 2 o’clock position
Soft pedal switch: Off
“Fine tuning” control: Centered
Tempo control: (Does not matter)
After making these adjustments, your Pianocorder cassette deck should look like this:
These settings will provide a reasonable dynamic range for playing MIDI files and material from the
original Pianocorder music library. Later in this manual, a procedure is given that will help you
determine optimal positions for the Pianissimo and Fortissimo controls.
IMPORTANT: When using the WINAMP plug-in to control your piano, you
should never change the Pianissimo and Fortissimo controls on the cassette deck.
Instead, to adjust the overall volume level for a particular song, use the Volume
slider in WINAMP’s Pianocorder Control window. This will ensure that your
Pianocorder always performs to its greatest potential. It will also permit WINAMP
to automatically remember your preferred volume settings on a file-by-file basis and
use them automatically the next time you play a particular music file.
18
Configuring Optimal Audio Settings in Windows 10/8/7/Vista
(If you have an older version of Windows, skip past this section.)
Follow the steps below to configure the Windows volume and audio settings for optimal results.
1. Find the speaker icon in the taskbar, in the lower right corner of your desktop:
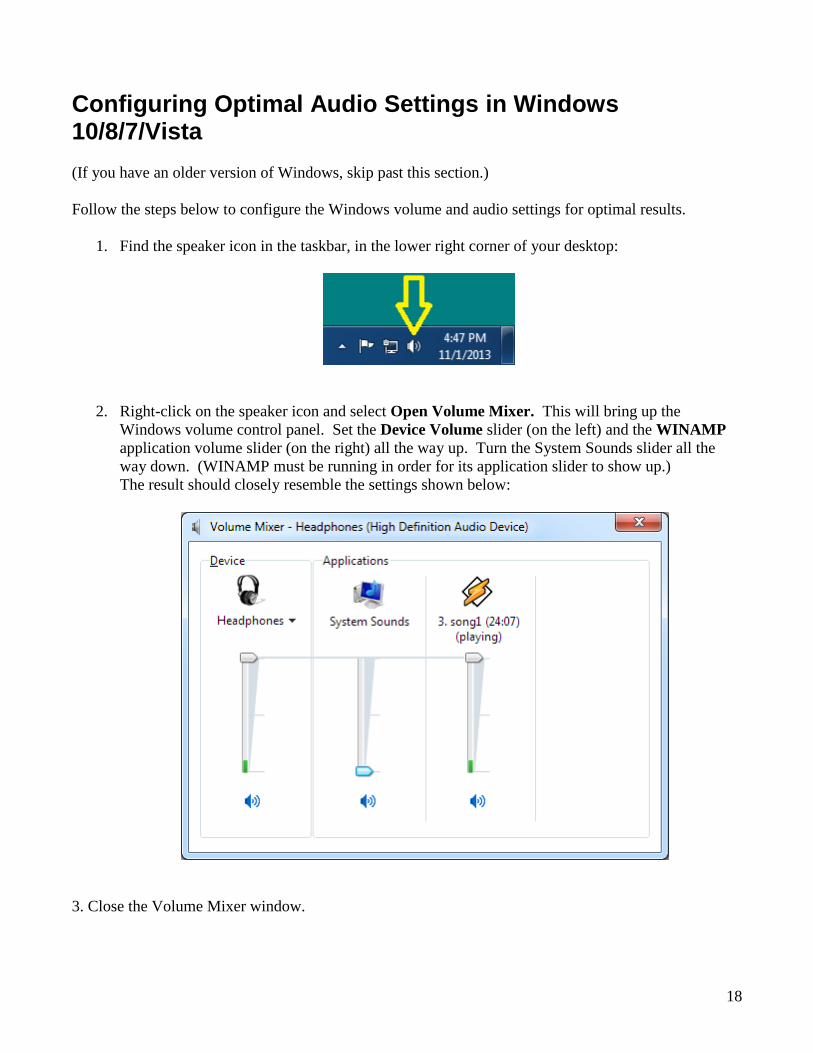
2. Right-click on the speaker icon and select Open Volume Mixer. This will bring up the
Windows volume control panel. Set the Device Volume slider (on the left) and the WINAMP
application volume slider (on the right) all the way up. Turn the System Sounds slider all the
way down. (WINAMP must be running in order for its application slider to show up.)
The result should closely resemble the settings shown below:
3. Close the Volume Mixer window.
19
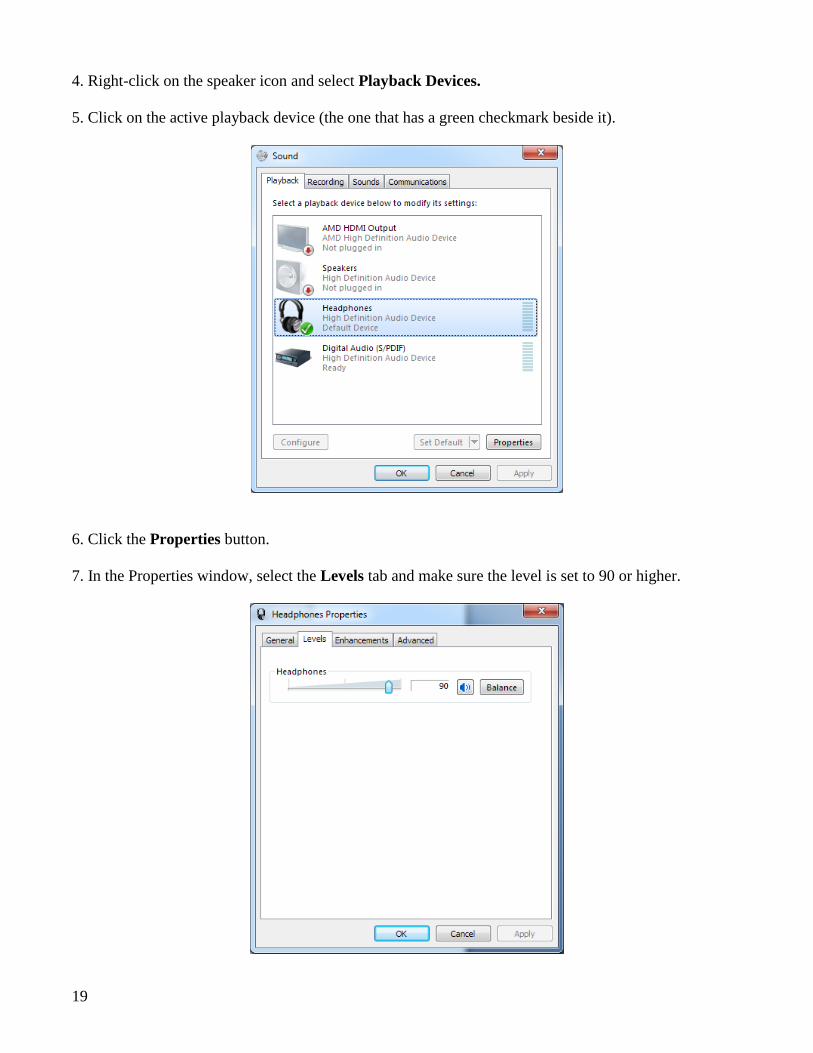
4. Right-click on the speaker icon and select Playback Devices.
5. Click on the active playback device (the one that has a green checkmark beside it).
6. Click the Properties button.
7. In the Properties window, select the Levels tab and make sure the level is set to 90 or higher.
20
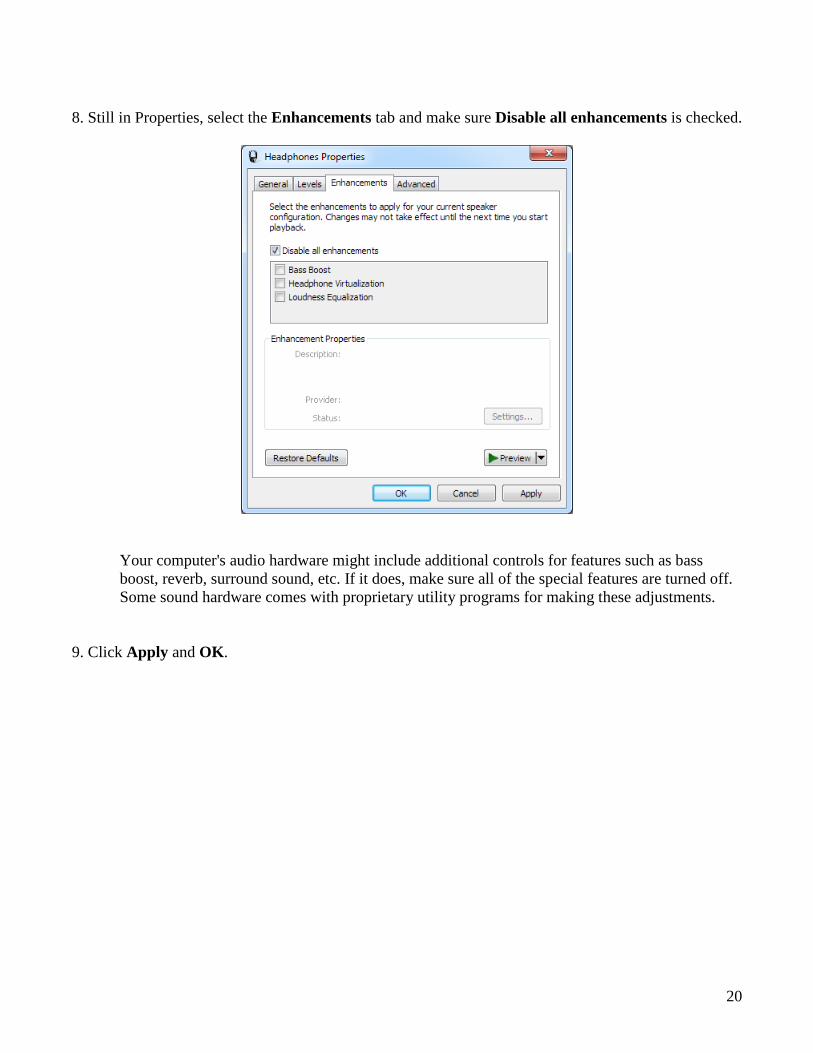
8. Still in Properties, select the Enhancements tab and make sure Disable all enhancements is checked.
Your computer's audio hardware might include additional controls for features such as bass
boost, reverb, surround sound, etc. If it does, make sure all of the special features are turned off.
Some sound hardware comes with proprietary utility programs for making these adjustments.
9. Click Apply and OK.

21
Disabling the Windows System Sounds in Windows 10/8/7/Vista
(If you have an older version of Windows, skip past this section.)
It is a good idea to disable the Windows “system sounds” (those clicks, dings and other sound effects
heard when using various Windows applications) because they will interfere with the Pianocorder
control signal, causing the piano to lose sync or play random notes.
To disable the system sounds:
1. Right-click on the speaker icon on the taskbar
2. Click Sound
3. Select No Sounds for Sound Scheme
4. Click Apply and OK
22
Setting the Windows Volume Levels in Old Versions of Windows (XP, 2000, ME, 98)
Follow the steps below to set the Windows volume levels as recommended for optimal results.
3. Find the speaker icon in the taskbar, in the lower right corner of your desktop:
(If the speaker icon is not present, go to the Windows Control Panel, open the Sounds and
Audio Devices section, and make sure the Show volume control on the taskbar checkbox is
checked, then press Apply and OK.)
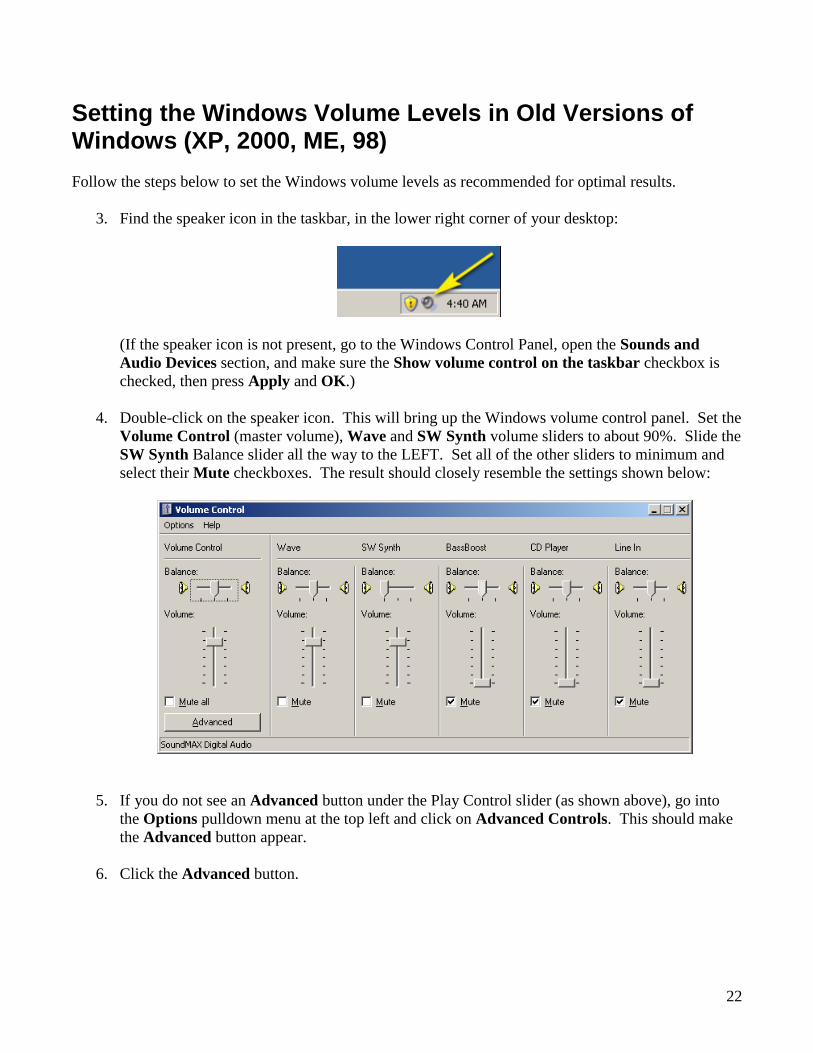
4. Double-click on the speaker icon. This will bring up the Windows volume control panel. Set the
Volume Control (master volume), Wave and SW Synth volume sliders to about 90%. Slide the
SW Synth Balance slider all the way to the LEFT. Set all of the other sliders to minimum and
select their Mute checkboxes. The result should closely resemble the settings shown below:
5. If you do not see an Advanced button under the Play Control slider (as shown above), go into
the Options pulldown menu at the top left and click on Advanced Controls. This should make
the Advanced button appear.
6. Click the Advanced button.
23
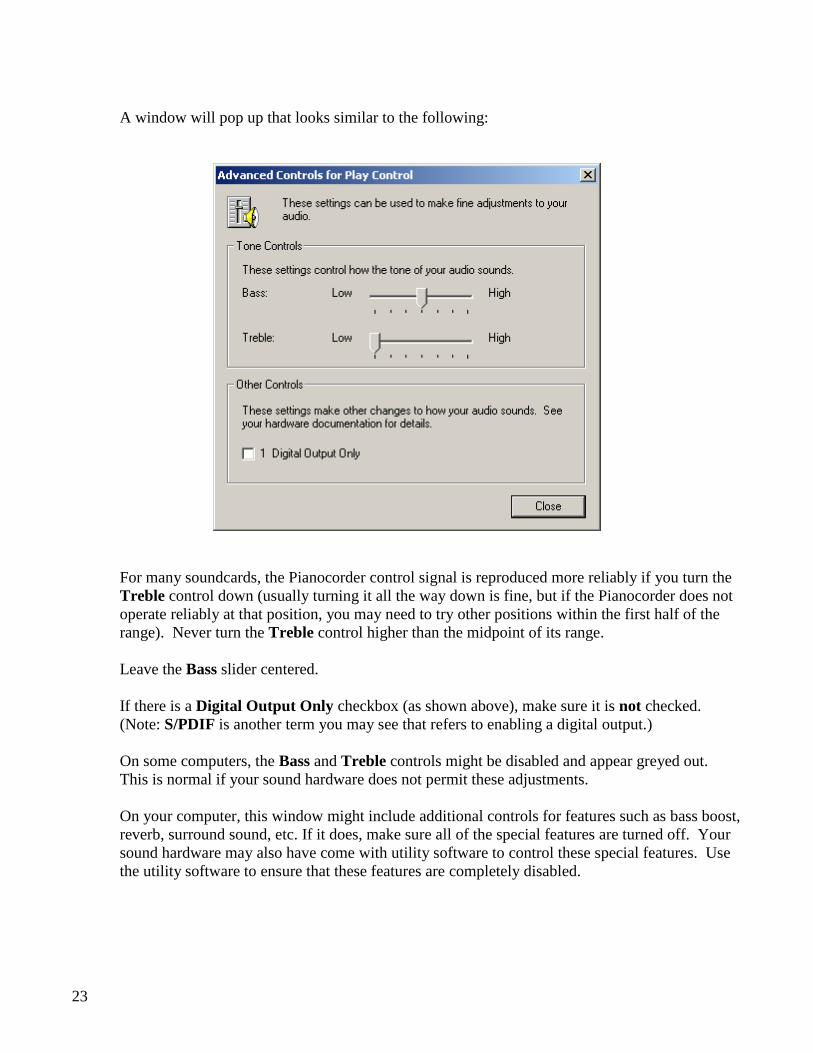
A window will pop up that looks similar to the following:
For many soundcards, the Pianocorder control signal is reproduced more reliably if you turn the
Treble control down (usually turning it all the way down is fine, but if the Pianocorder does not
operate reliably at that position, you may need to try other positions within the first half of the
range). Never turn the Treble control higher than the midpoint of its range.
Leave the Bass slider centered.
If there is a Digital Output Only checkbox (as shown above), make sure it is not checked.
(Note: S/PDIF is another term you may see that refers to enabling a digital output.)
On some computers, the Bass and Treble controls might be disabled and appear greyed out.
This is normal if your sound hardware does not permit these adjustments.
On your computer, this window might include additional controls for features such as bass boost,
reverb, surround sound, etc. If it does, make sure all of the special features are turned off. Your
sound hardware may also have come with utility software to control these special features. Use
the utility software to ensure that these features are completely disabled.
24
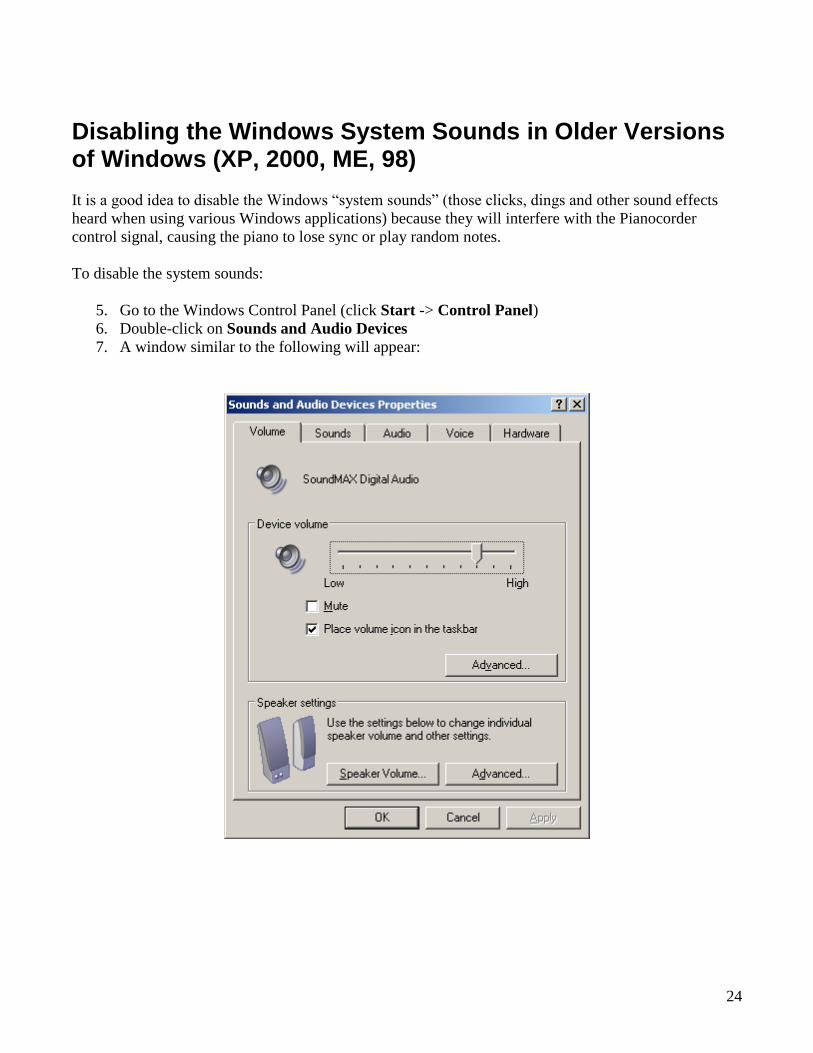
Disabling the Windows System Sounds in Older Versions of Windows (XP, 2000, ME, 98)
It is a good idea to disable the Windows “system sounds” (those clicks, dings and other sound effects
heard when using various Windows applications) because they will interfere with the Pianocorder
control signal, causing the piano to lose sync or play random notes.
To disable the system sounds:
5. Go to the Windows Control Panel (click Start -> Control Panel)
6. Double-click on Sounds and Audio Devices
7. A window similar to the following will appear:
25
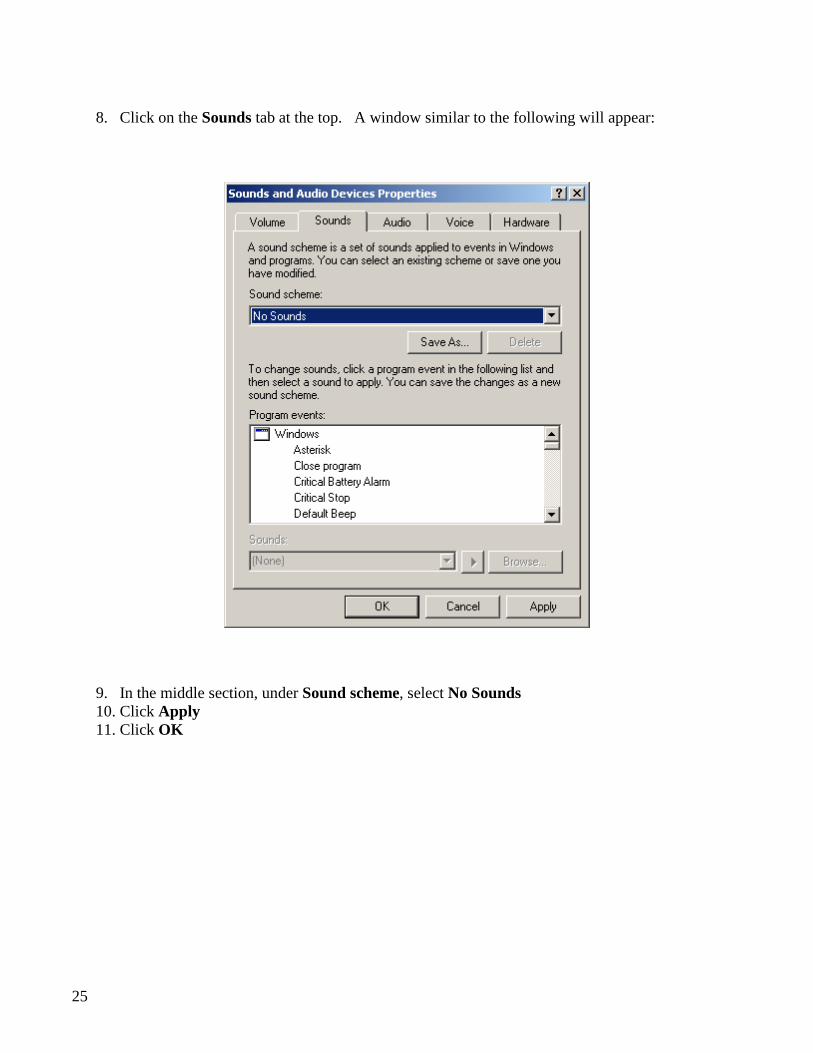
8. Click on the Sounds tab at the top. A window similar to the following will appear:
9. In the middle section, under Sound scheme, select No Sounds
10. Click Apply
11. Click OK
26
Getting Your Pianocorder Locked On to the Control Signal
Now that WINAMP and the Windows volume levels are configured, you are ready to start
experimenting with the piano.
Go into a directory containing some MIDI files. For these initial tests, choose files that have a piano
part as the only instrument. It is strongly recommended that you use files from the Piano Test Files
subdirectory of the Utility Files package, available in the Download section of the Pianocorder plug-in
web page. Select a few files and drag them into the left panel of WINAMP's Playlist Editor window.
Make sure a set of speakers is connected to your computer (if it is not a laptop computer), verify that
they are turned on, and set their volume control (if any) to about 50%.
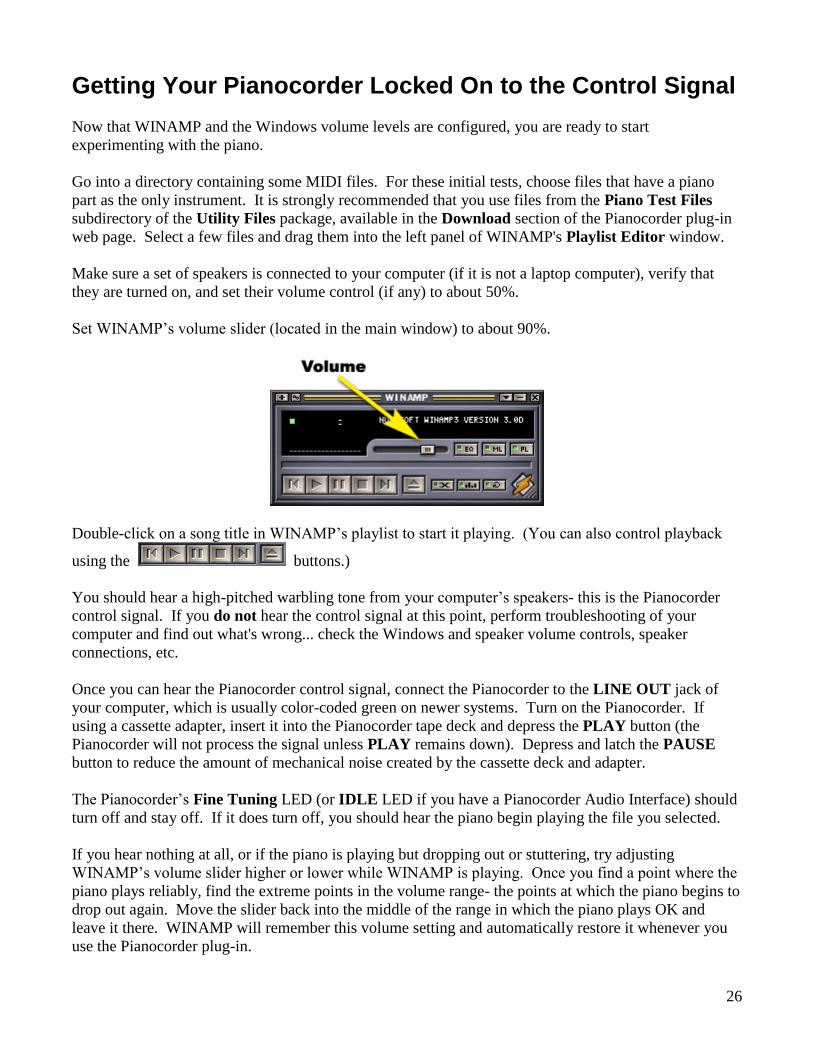
Set WINAMP’s volume slider (located in the main window) to about 90%.
Double-click on a song title in WINAMP’s playlist to start it playing. (You can also control playback
using the buttons.)
You should hear a high-pitched warbling tone from your computer’s speakers- this is the Pianocorder
control signal. If you do not hear the control signal at this point, perform troubleshooting of your
computer and find out what's wrong... check the Windows and speaker volume controls, speaker
connections, etc.
Once you can hear the Pianocorder control signal, connect the Pianocorder to the LINE OUT jack of
your computer, which is usually color-coded green on newer systems. Turn on the Pianocorder. If
using a cassette adapter, insert it into the Pianocorder tape deck and depress the PLAY button (the
Pianocorder will not process the signal unless PLAY remains down). Depress and latch the PAUSE
button to reduce the amount of mechanical noise created by the cassette deck and adapter.
The Pianocorder’s Fine Tuning LED (or IDLE LED if you have a Pianocorder Audio Interface) should
turn off and stay off. If it does turn off, you should hear the piano begin playing the file you selected.
If you hear nothing at all, or if the piano is playing but dropping out or stuttering, try adjusting
WINAMP’s volume slider higher or lower while WINAMP is playing. Once you find a point where the
piano plays reliably, find the extreme points in the volume range- the points at which the piano begins to
drop out again. Move the slider back into the middle of the range in which the piano plays OK and
leave it there. WINAMP will remember this volume setting and automatically restore it whenever you
use the Pianocorder plug-in.
27
If you are still having trouble getting the piano to play (the Fine Tuning LED will not stay off), here are
some things to try, in the approximate order you should try them:
1. Slowly adjust WINAMP’s volume slider
2. Slowly adjust the Fine Tuning control on the Pianocorder cassette deck
3. Try adjusting the Treble control in Windows’s volume control panel, accessed by pressing
the Advanced button in the lower left corner.
4. Verify that any special effects your sound hardware may offer such as bass boost, ambience,
reverb, equalization or surround sound are completely disabled. (You may need to run utility
software provided with the sound hardware to access these settings.)
5. Under Audio->DirectSound in WINAMP’s Preferences window, try increasing the Buffer
Size slightly by moving its slider to the right. (Stop playback while making this change.)
Try not to increase this value by more than 150 ms, if possible.
6. Under Audio->DirectSound in WINAMP’s Preferences window, try enabling the Create
primary buffer checkbox. Make sure the Allow hardware mixing checkbox is always
unchecked. (Stop playback while making this change.)
Try to avoid changing the master volume and “Wave” sliders in Windows’ volume control panel.
Leaving these both at about 75% usually produces the best signal quality.
Whenever you find a slider that seems to make a difference, try to find the start and end of the range in
which the Pianocorder plays properly. Then leave the slider set right in the middle of that range.
One additional thing to check is that sometimes cassette adapters have some small capacitors inside
them to reduce noise. It is sometimes helpful to remove these capacitors. This is rarely necessary, but if
you are having problems getting the piano locked onto the control signal and are comfortable modifying
electronics, you might try it.
If your Pianocorder still will not lock onto the signal properly, email the author for assistance.
Once you have the system working reliably, it is a good idea to make a note of all the slider positions.
This will allow you to easily restore things to working order if one of them gets bumped accidentally.
28
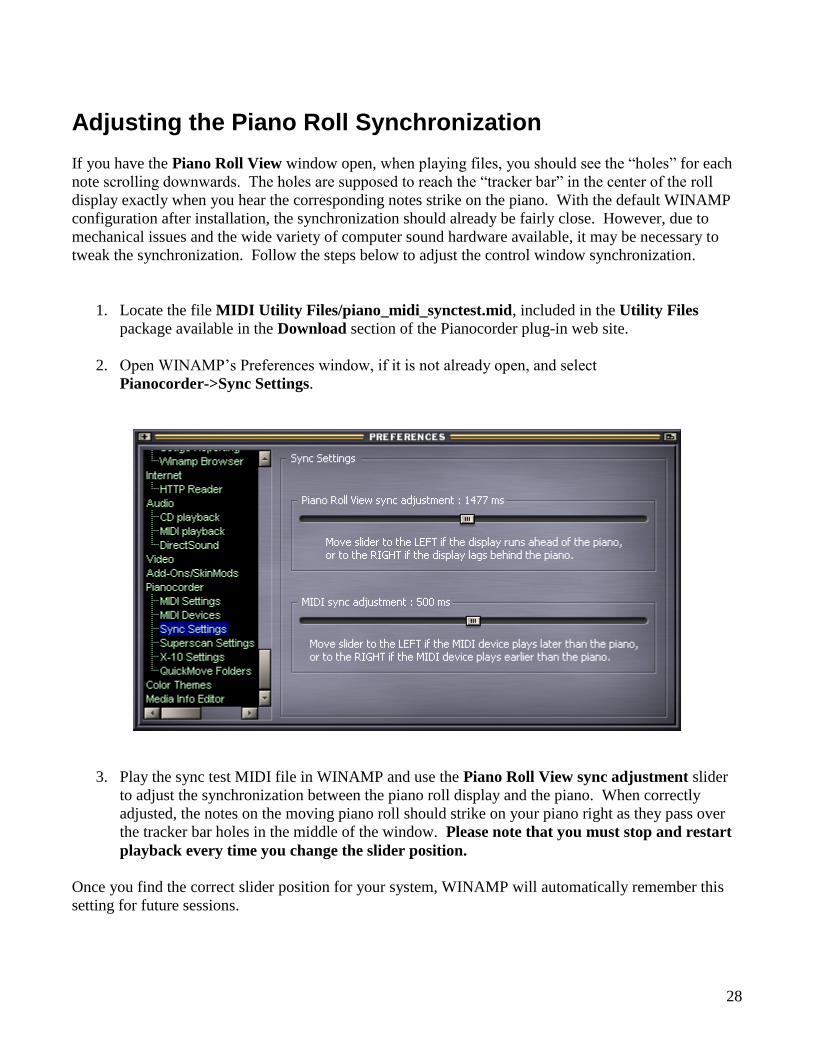
Adjusting the Piano Roll Synchronization
If you have the Piano Roll View window open, when playing files, you should see the “holes” for each
note scrolling downwards. The holes are supposed to reach the “tracker bar” in the center of the roll
display exactly when you hear the corresponding notes strike on the piano. With the default WINAMP
configuration after installation, the synchronization should already be fairly close. However, due to
mechanical issues and the wide variety of computer sound hardware available, it may be necessary to
tweak the synchronization. Follow the steps below to adjust the control window synchronization.
1. Locate the file MIDI Utility Files/piano_midi_synctest.mid, included in the Utility Files
package available in the Download section of the Pianocorder plug-in web site.
2. Open WINAMP’s Preferences window, if it is not already open, and select
Pianocorder->Sync Settings.
3. Play the sync test MIDI file in WINAMP and use the Piano Roll View sync adjustment slider
to adjust the synchronization between the piano roll display and the piano. When correctly
adjusted, the notes on the moving piano roll should strike on your piano right as they pass over
the tracker bar holes in the middle of the window. Please note that you must stop and restart
playback every time you change the slider position.
Once you find the correct slider position for your system, WINAMP will automatically remember this
setting for future sessions.
29
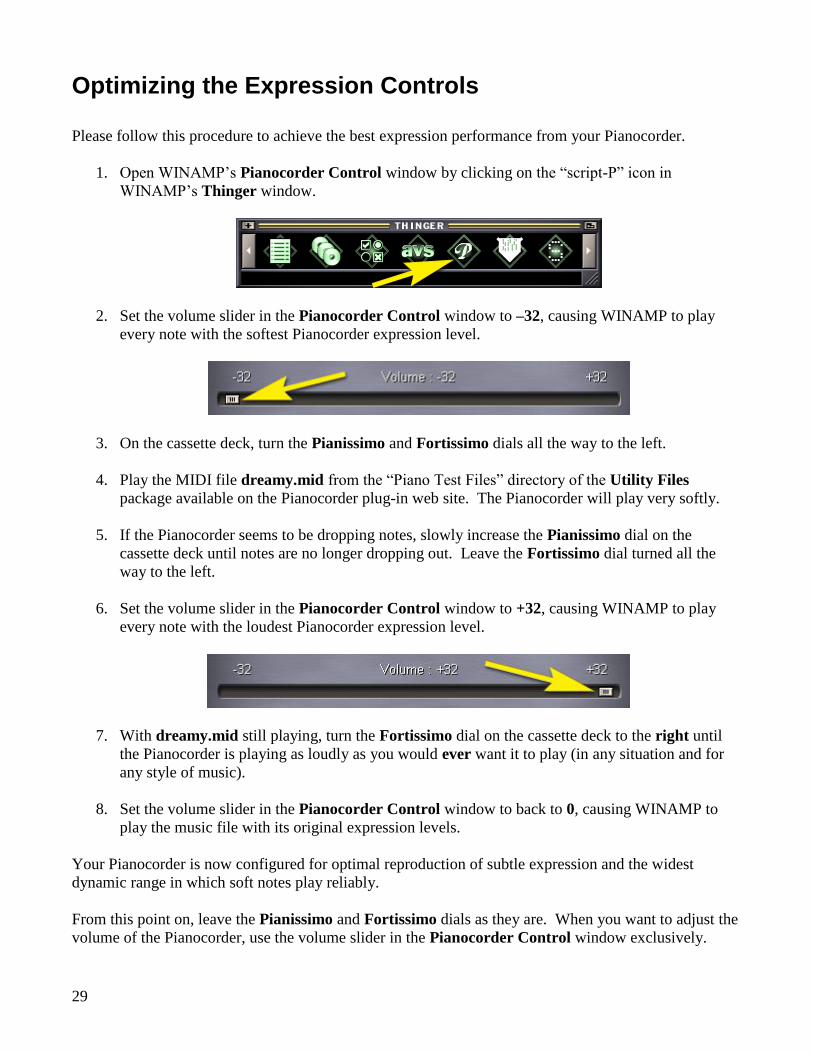
Optimizing the Expression Controls Please follow this procedure to achieve the best expression performance from your Pianocorder.
1. Open WINAMP’s Pianocorder Control window by clicking on the “script-P” icon in
WINAMP’s Thinger window.
2. Set the volume slider in the Pianocorder Control window to –32, causing WINAMP to play
every note with the softest Pianocorder expression level.
3. On the cassette deck, turn the Pianissimo and Fortissimo dials all the way to the left.
4. Play the MIDI file dreamy.mid from the “Piano Test Files” directory of the Utility Files
package available on the Pianocorder plug-in web site. The Pianocorder will play very softly.
5. If the Pianocorder seems to be dropping notes, slowly increase the Pianissimo dial on the
cassette deck until notes are no longer dropping out. Leave the Fortissimo dial turned all the
way to the left.
6. Set the volume slider in the Pianocorder Control window to +32, causing WINAMP to play
every note with the loudest Pianocorder expression level.
7. With dreamy.mid still playing, turn the Fortissimo dial on the cassette deck to the right until
the Pianocorder is playing as loudly as you would ever want it to play (in any situation and for
any style of music).
8. Set the volume slider in the Pianocorder Control window to back to 0, causing WINAMP to
play the music file with its original expression levels.
Your Pianocorder is now configured for optimal reproduction of subtle expression and the widest
dynamic range in which soft notes play reliably.
From this point on, leave the Pianissimo and Fortissimo dials as they are. When you want to adjust the
volume of the Pianocorder, use the volume slider in the Pianocorder Control window exclusively.
30
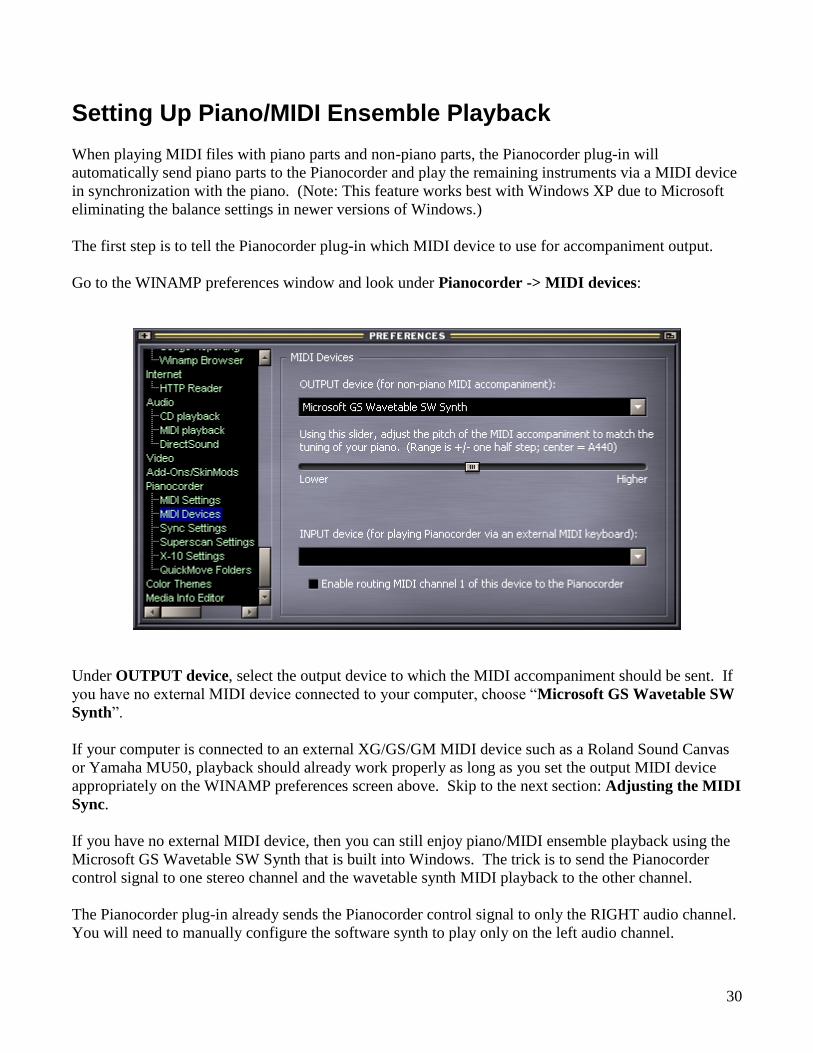
Setting Up Piano/MIDI Ensemble Playback
When playing MIDI files with piano parts and non-piano parts, the Pianocorder plug-in will
automatically send piano parts to the Pianocorder and play the remaining instruments via a MIDI device
in synchronization with the piano. (Note: This feature works best with Windows XP due to Microsoft
eliminating the balance settings in newer versions of Windows.)
The first step is to tell the Pianocorder plug-in which MIDI device to use for accompaniment output.
Go to the WINAMP preferences window and look under Pianocorder -> MIDI devices:
Under OUTPUT device, select the output device to which the MIDI accompaniment should be sent. If
you have no external MIDI device connected to your computer, choose “Microsoft GS Wavetable SW
Synth”.
If your computer is connected to an external XG/GS/GM MIDI device such as a Roland Sound Canvas
or Yamaha MU50, playback should already work properly as long as you set the output MIDI device
appropriately on the WINAMP preferences screen above. Skip to the next section: Adjusting the MIDI
Sync.
If you have no external MIDI device, then you can still enjoy piano/MIDI ensemble playback using the
Microsoft GS Wavetable SW Synth that is built into Windows. The trick is to send the Pianocorder
control signal to one stereo channel and the wavetable synth MIDI playback to the other channel.
The Pianocorder plug-in already sends the Pianocorder control signal to only the RIGHT audio channel.
You will need to manually configure the software synth to play only on the left audio channel.
31
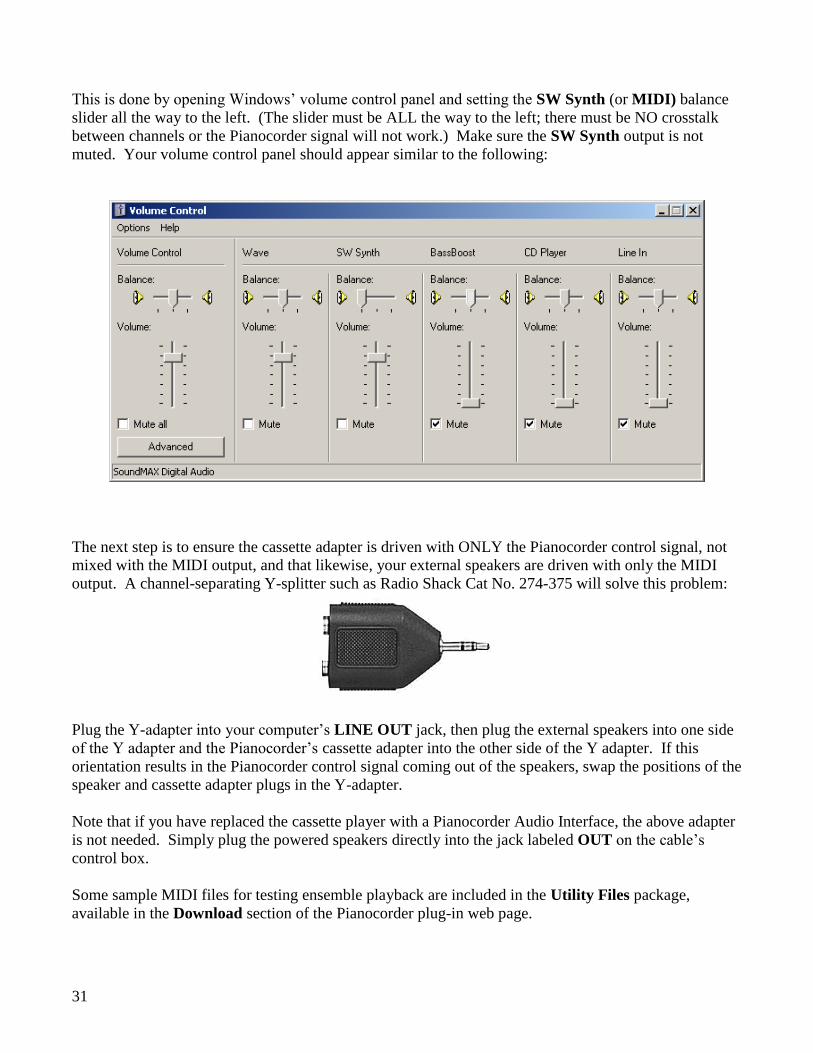
This is done by opening Windows’ volume control panel and setting the SW Synth (or MIDI) balance
slider all the way to the left. (The slider must be ALL the way to the left; there must be NO crosstalk
between channels or the Pianocorder signal will not work.) Make sure the SW Synth output is not
muted. Your volume control panel should appear similar to the following:
The next step is to ensure the cassette adapter is driven with ONLY the Pianocorder control signal, not
mixed with the MIDI output, and that likewise, your external speakers are driven with only the MIDI
output. A channel-separating Y-splitter such as Radio Shack Cat No. 274-375 will solve this problem:
Plug the Y-adapter into your computer’s LINE OUT jack, then plug the external speakers into one side
of the Y adapter and the Pianocorder’s cassette adapter into the other side of the Y adapter. If this
orientation results in the Pianocorder control signal coming out of the speakers, swap the positions of the
speaker and cassette adapter plugs in the Y-adapter.
Note that if you have replaced the cassette player with a Pianocorder Audio Interface, the above adapter
is not needed. Simply plug the powered speakers directly into the jack labeled OUT on the cable’s
control box.
Some sample MIDI files for testing ensemble playback are included in the Utility Files package,
available in the Download section of the Pianocorder plug-in web page.
32
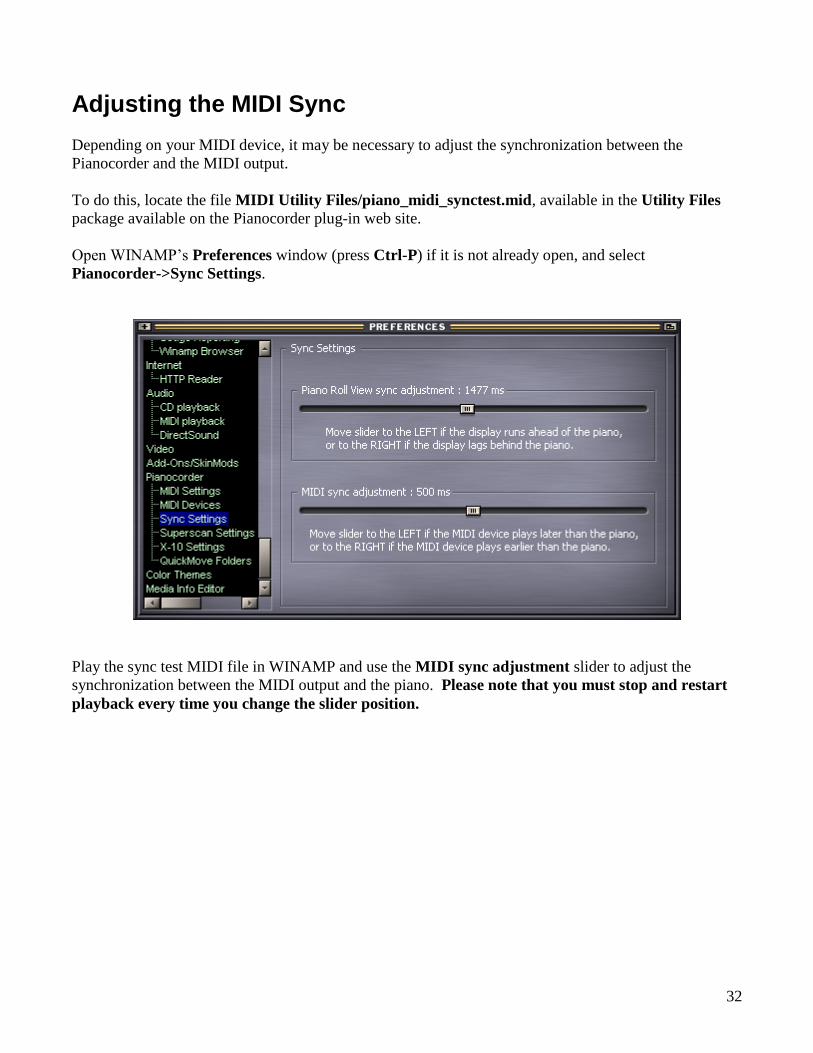
Adjusting the MIDI Sync
Depending on your MIDI device, it may be necessary to adjust the synchronization between the
Pianocorder and the MIDI output.
To do this, locate the file MIDI Utility Files/piano_midi_synctest.mid, available in the Utility Files
package available on the Pianocorder plug-in web site.
Open WINAMP’s Preferences window (press Ctrl-P) if it is not already open, and select
Pianocorder->Sync Settings.
Play the sync test MIDI file in WINAMP and use the MIDI sync adjustment slider to adjust the
synchronization between the MIDI output and the piano. Please note that you must stop and restart
playback every time you change the slider position.
33
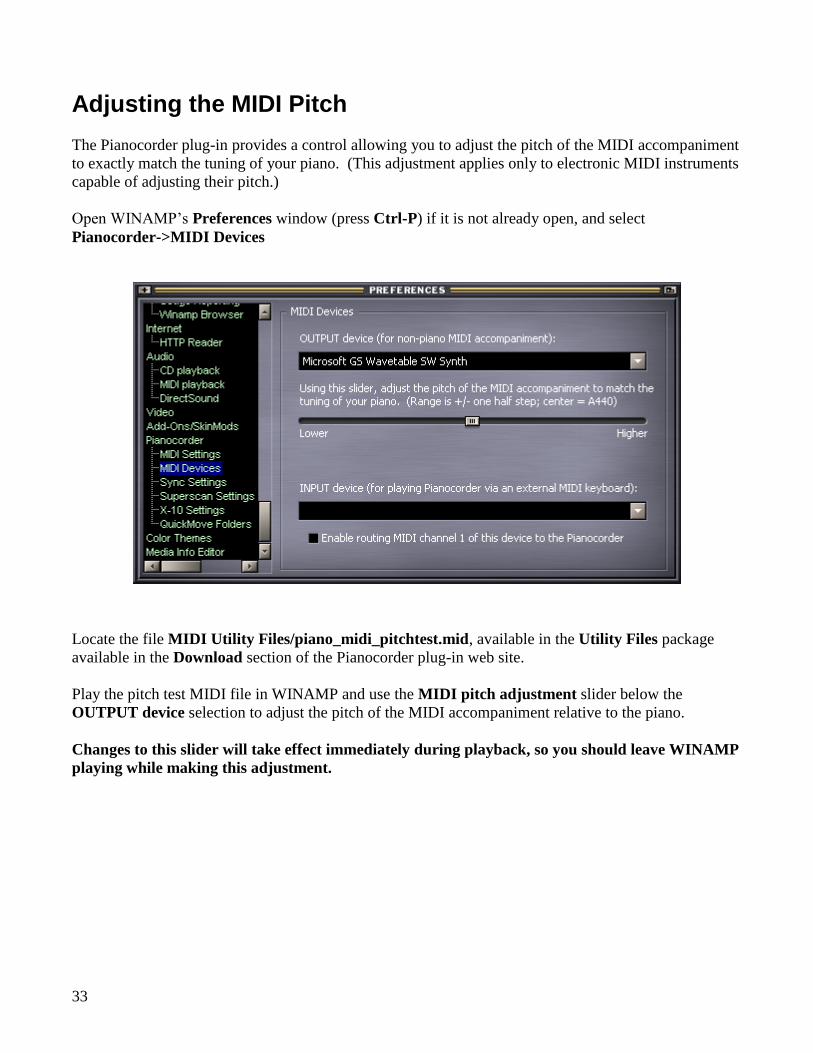
Adjusting the MIDI Pitch
The Pianocorder plug-in provides a control allowing you to adjust the pitch of the MIDI accompaniment
to exactly match the tuning of your piano. (This adjustment applies only to electronic MIDI instruments
capable of adjusting their pitch.)
Open WINAMP’s Preferences window (press Ctrl-P) if it is not already open, and select
Pianocorder->MIDI Devices
Locate the file MIDI Utility Files/piano_midi_pitchtest.mid, available in the Utility Files package
available in the Download section of the Pianocorder plug-in web site.
Play the pitch test MIDI file in WINAMP and use the MIDI pitch adjustment slider below the
OUTPUT device selection to adjust the pitch of the MIDI accompaniment relative to the piano.
Changes to this slider will take effect immediately during playback, so you should leave WINAMP
playing while making this adjustment.
34
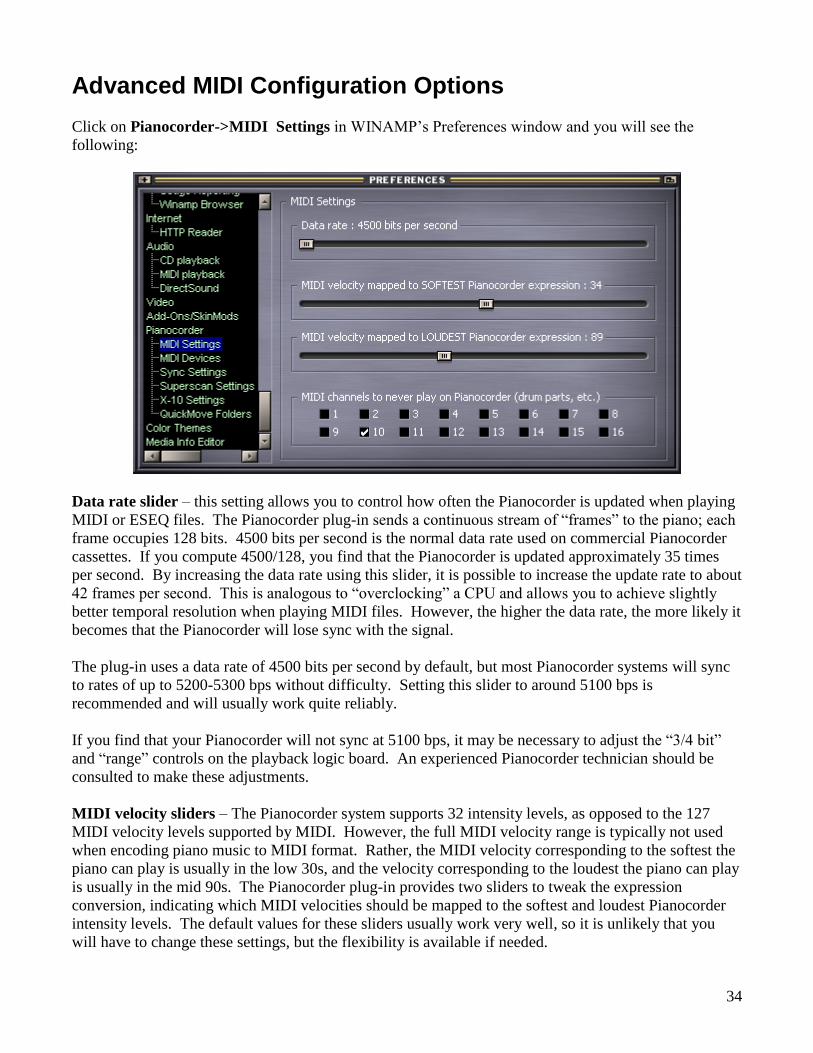
Advanced MIDI Configuration Options
Click on Pianocorder->MIDI Settings in WINAMP’s Preferences window and you will see the
following:
Data rate slider – this setting allows you to control how often the Pianocorder is updated when playing
MIDI or ESEQ files. The Pianocorder plug-in sends a continuous stream of “frames” to the piano; each
frame occupies 128 bits. 4500 bits per second is the normal data rate used on commercial Pianocorder
cassettes. If you compute 4500/128, you find that the Pianocorder is updated approximately 35 times
per second. By increasing the data rate using this slider, it is possible to increase the update rate to about
42 frames per second. This is analogous to “overclocking” a CPU and allows you to achieve slightly
better temporal resolution when playing MIDI files. However, the higher the data rate, the more likely it
becomes that the Pianocorder will lose sync with the signal.
The plug-in uses a data rate of 4500 bits per second by default, but most Pianocorder systems will sync
to rates of up to 5200-5300 bps without difficulty. Setting this slider to around 5100 bps is
recommended and will usually work quite reliably.
If you find that your Pianocorder will not sync at 5100 bps, it may be necessary to adjust the “3/4 bit”
and “range” controls on the playback logic board. An experienced Pianocorder technician should be
consulted to make these adjustments.
MIDI velocity sliders – The Pianocorder system supports 32 intensity levels, as opposed to the 127
MIDI velocity levels supported by MIDI. However, the full MIDI velocity range is typically not used
when encoding piano music to MIDI format. Rather, the MIDI velocity corresponding to the softest the
piano can play is usually in the low 30s, and the velocity corresponding to the loudest the piano can play
is usually in the mid 90s. The Pianocorder plug-in provides two sliders to tweak the expression
conversion, indicating which MIDI velocities should be mapped to the softest and loudest Pianocorder
intensity levels. The default values for these sliders usually work very well, so it is unlikely that you
will have to change these settings, but the flexibility is available if needed.
35
MIDI channels to never play on Pianocorder – Multitimbral MIDI files (files that play drums and
other instruments in addition to a piano part) typically designate one or more MIDI channels as “drum
parts”. For these channels, keyboard notes are mapped to a variety of drum sounds instead of pitches. It
is important that drum parts not be played on the Pianocorder (since garbage notes would be heard).
This setting provides a way to permanently prevent certain MIDI channels from ever being sent to the
piano. In most MIDI files, channel 10 is used for the drum part, and so by default the Pianocorder plug-
in mutes only channel 10. It is usually not necessary to change this setting.
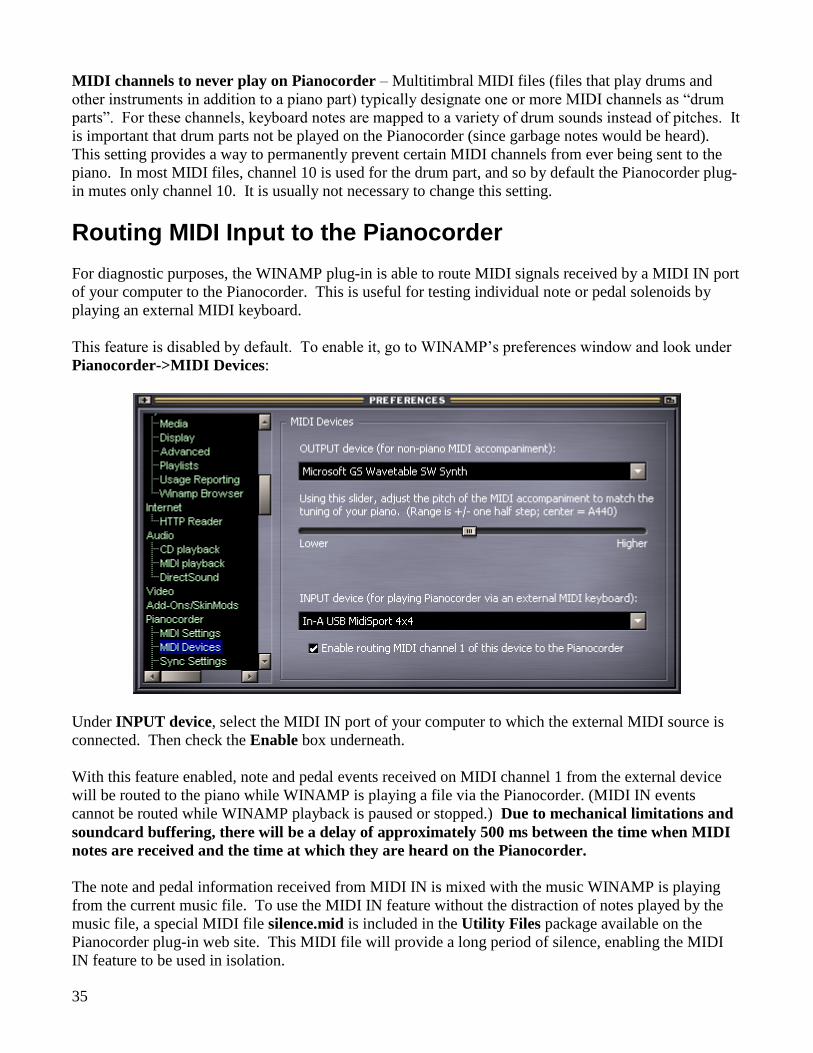
Routing MIDI Input to the Pianocorder
For diagnostic purposes, the WINAMP plug-in is able to route MIDI signals received by a MIDI IN port
of your computer to the Pianocorder. This is useful for testing individual note or pedal solenoids by
playing an external MIDI keyboard.
This feature is disabled by default. To enable it, go to WINAMP’s preferences window and look under
Pianocorder->MIDI Devices:
Under INPUT device, select the MIDI IN port of your computer to which the external MIDI source is
connected. Then check the Enable box underneath.
With this feature enabled, note and pedal events received on MIDI channel 1 from the external device
will be routed to the piano while WINAMP is playing a file via the Pianocorder. (MIDI IN events
cannot be routed while WINAMP playback is paused or stopped.) Due to mechanical limitations and
soundcard buffering, there will be a delay of approximately 500 ms between the time when MIDI
notes are received and the time at which they are heard on the Pianocorder.
The note and pedal information received from MIDI IN is mixed with the music WINAMP is playing
from the current music file. To use the MIDI IN feature without the distraction of notes played by the
music file, a special MIDI file silence.mid is included in the Utility Files package available on the
Pianocorder plug-in web site. This MIDI file will provide a long period of silence, enabling the MIDI
IN feature to be used in isolation.
36
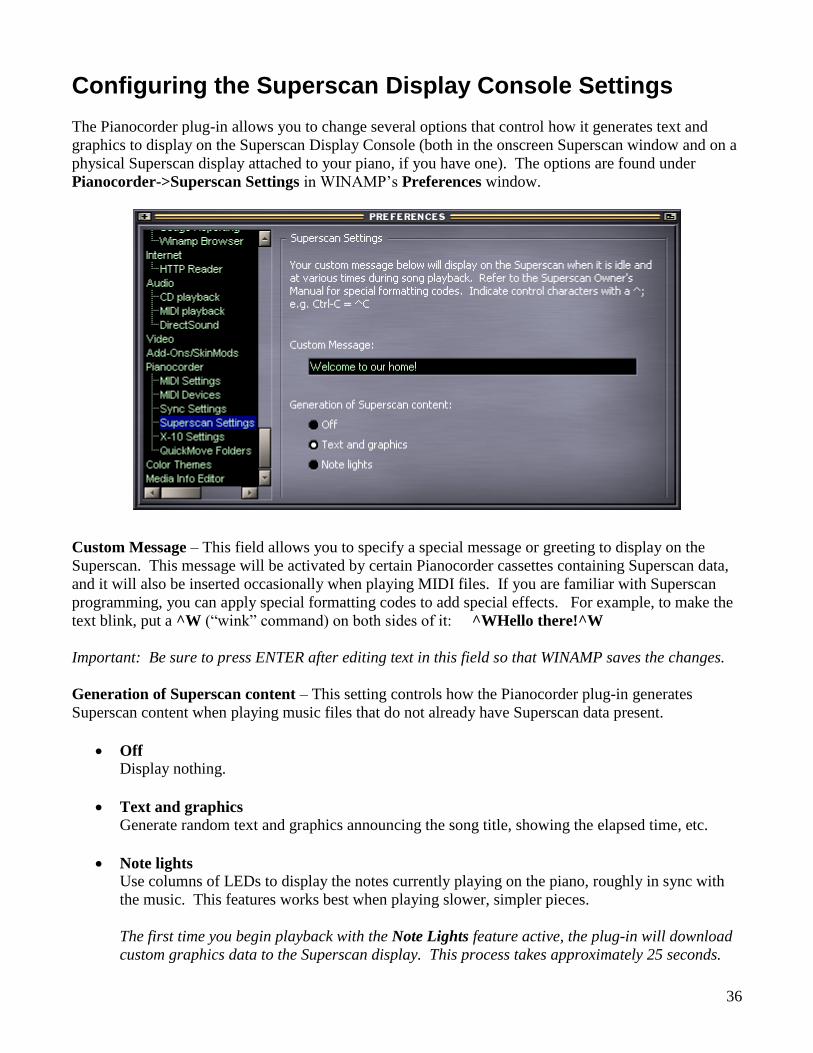
Configuring the Superscan Display Console Settings
The Pianocorder plug-in allows you to change several options that control how it generates text and
graphics to display on the Superscan Display Console (both in the onscreen Superscan window and on a
physical Superscan display attached to your piano, if you have one). The options are found under
Pianocorder->Superscan Settings in WINAMP’s Preferences window.
Custom Message – This field allows you to specify a special message or greeting to display on the
Superscan. This message will be activated by certain Pianocorder cassettes containing Superscan data,
and it will also be inserted occasionally when playing MIDI files. If you are familiar with Superscan
programming, you can apply special formatting codes to add special effects. For example, to make the
text blink, put a ^W (“wink” command) on both sides of it: ^WHello there!^W
Important: Be sure to press ENTER after editing text in this field so that WINAMP saves the changes.
Generation of Superscan content – This setting controls how the Pianocorder plug-in generates
Superscan content when playing music files that do not already have Superscan data present.
Off Display nothing.
Text and graphics Generate random text and graphics announcing the song title, showing the elapsed time, etc.
Note lights
Use columns of LEDs to display the notes currently playing on the piano, roughly in sync with
the music. This features works best when playing slower, simpler pieces.
The first time you begin playback with the Note Lights feature active, the plug-in will download
custom graphics data to the Superscan display. This process takes approximately 25 seconds.
37
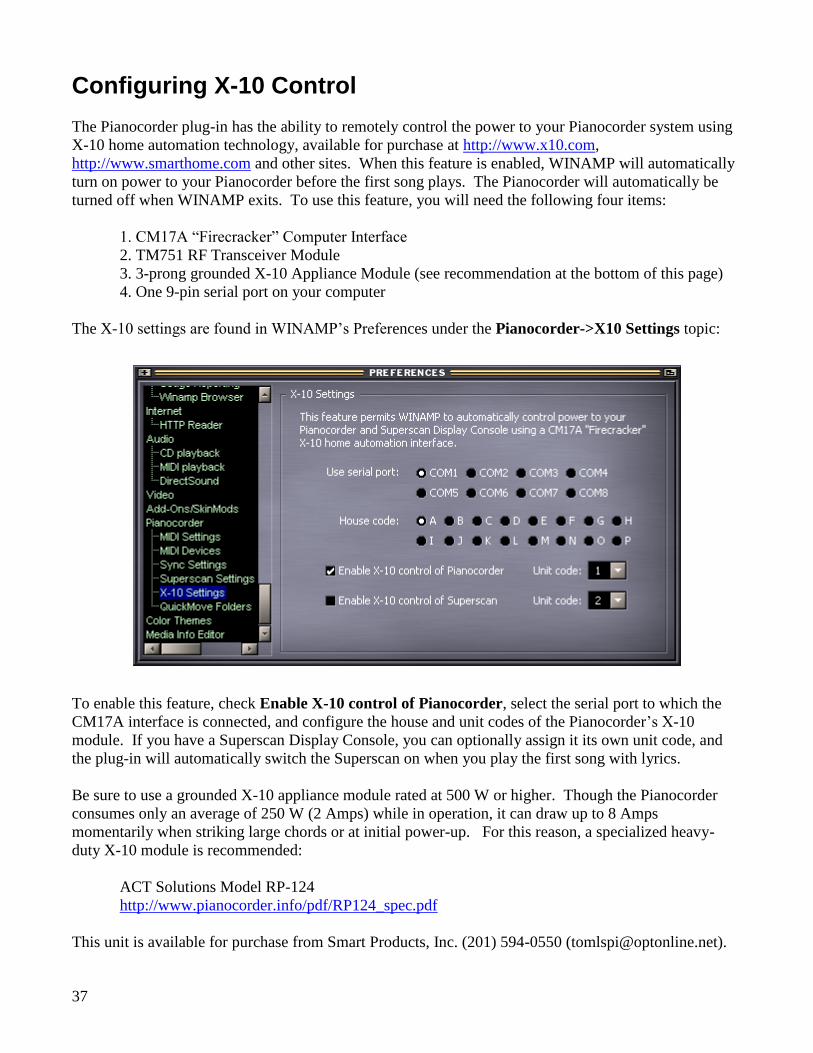
Configuring X-10 Control
The Pianocorder plug-in has the ability to remotely control the power to your Pianocorder system using
X-10 home automation technology, available for purchase at http://www.x10.com,
http://www.smarthome.com and other sites. When this feature is enabled, WINAMP will automatically
turn on power to your Pianocorder before the first song plays. The Pianocorder will automatically be
turned off when WINAMP exits. To use this feature, you will need the following four items:
1. CM17A “Firecracker” Computer Interface
2. TM751 RF Transceiver Module
3. 3-prong grounded X-10 Appliance Module (see recommendation at the bottom of this page)
4. One 9-pin serial port on your computer
The X-10 settings are found in WINAMP’s Preferences under the Pianocorder->X10 Settings topic:
To enable this feature, check Enable X-10 control of Pianocorder, select the serial port to which the
CM17A interface is connected, and configure the house and unit codes of the Pianocorder’s X-10
module. If you have a Superscan Display Console, you can optionally assign it its own unit code, and
the plug-in will automatically switch the Superscan on when you play the first song with lyrics.
Be sure to use a grounded X-10 appliance module rated at 500 W or higher. Though the Pianocorder
consumes only an average of 250 W (2 Amps) while in operation, it can draw up to 8 Amps
momentarily when striking large chords or at initial power-up. For this reason, a specialized heavy-
duty X-10 module is recommended:
ACT Solutions Model RP-124
http://www.pianocorder.info/pdf/RP124_spec.pdf
This unit is available for purchase from Smart Products, Inc. (201) 594-0550 ([email protected]).
38
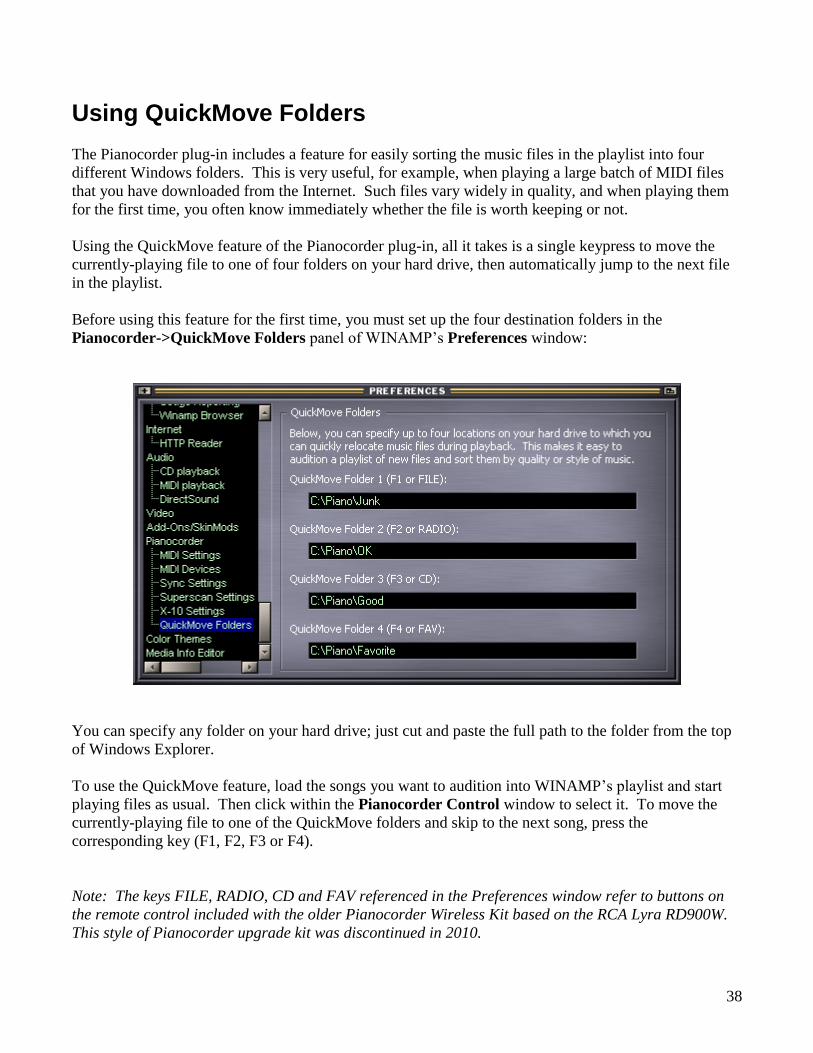
Using QuickMove Folders
The Pianocorder plug-in includes a feature for easily sorting the music files in the playlist into four
different Windows folders. This is very useful, for example, when playing a large batch of MIDI files
that you have downloaded from the Internet. Such files vary widely in quality, and when playing them
for the first time, you often know immediately whether the file is worth keeping or not.
Using the QuickMove feature of the Pianocorder plug-in, all it takes is a single keypress to move the
currently-playing file to one of four folders on your hard drive, then automatically jump to the next file
in the playlist.
Before using this feature for the first time, you must set up the four destination folders in the
Pianocorder->QuickMove Folders panel of WINAMP’s Preferences window:
You can specify any folder on your hard drive; just cut and paste the full path to the folder from the top
of Windows Explorer.
To use the QuickMove feature, load the songs you want to audition into WINAMP’s playlist and start
playing files as usual. Then click within the Pianocorder Control window to select it. To move the
currently-playing file to one of the QuickMove folders and skip to the next song, press the
corresponding key (F1, F2, F3 or F4).
Note: The keys FILE, RADIO, CD and FAV referenced in the Preferences window refer to buttons on
the remote control included with the older Pianocorder Wireless Kit based on the RCA Lyra RD900W.
This style of Pianocorder upgrade kit was discontinued in 2010.

39
Playing Pianocorder Tapes
The Pianocorder plug-in is capable of playing original Superscope/Marantz Pianocorder material that
has been digitally captured from original Pianocorder cassettes into computer files. These files have the
extension “.pc”. You may contact the author at the email address on the first page of this document to
request the corresponding digital files for the Pianocorder cassettes you physically own (proof of
ownership is required). Nearly every tape produced for the Pianocorder is already available in this
format, so it will not usually be necessary to send your tapes for conversion.
Playing Homemade Pianocorder Tapes
If you have made cassette tapes using the recording feature of your Pianocorder system and would like
to convert these recordings to data files that can be used with the WINAMP plug-in, a conversion
service is available for USD $10.00 per cassette tape.
Recording Your Own Pianocorder Cassettes
The WINAMP plug-in is most flexible when used to control the Pianocorder “live” via a direct
connection to your computer. However, by recording the control signal to cassette tape, you can also
use the WINAMP plug-in to create your own tapes for playback on a standalone Pianocorder system.
An important fact to keep in mind is that the Pianocorder’s tape deck plays the tape at twice the speed of
a normal cassette deck. Therefore, WINAMP’s Pianocorder control signal must be slowed to half speed
when making the recording on a conventional, non-Pianocorder cassette deck. That way, the signal will
be reproduced at normal speed when played by the Pianocorder’s faster cassette deck.
To switch to half-speed mode, open WINAMP’s Preferences window (press Ctrl-P) and click on the
Pianocorder preferences topic. Enable the checkbox for Generate soundcard output at half speed.
You must restart playback for this change to take effect.
You can then record the Pianocorder control signal to cassette tape, and the resulting tape should play
properly on the Pianocorder. For best results, disable Dolby noise reduction, use non-metal tape, and set
the record level such that the Pianocorder signal is strong and clear but free of distortion.
To create Pianocorder-encoded MP3 files or CD tracks, a more efficient software solution is available:
MID2PianoCD, available at http://www.kinura.net/mid2pianocd/.
40
Troubleshooting
The piano stutters, repeats notes when it shouldn’t, drops out, etc. This happens when the Pianocorder is not getting a clean control signal. Follow the steps earlier in this
manual in the section Getting Your Pianocorder Locked On To The Control Signal.
The piano roll or Superscan windows stop updating or do not scroll smoothly. These two features are particularly demanding of your computer, and performance can vary, especially
on older computers. Resizing the windows to be smaller may help. These displays may also be erratic
for a short while after you add a large number of new files to the playlist, because WINAMP will
consume a lot of processing resources looking up the titles for all of the new files.
The playlist keeps mixing itself up every time I change songs. You have somehow enabled WINAMP’s playlist shuffling feature. To turn this feature off, click on
the icon in WINAMP’s main window. The tiny little green light in the top left corner of the icon
should be OFF.
After an hour or so, playback stops and a message pops up saying I need to let my Pianocorder cool down. This is a built-in safety feature to protect the Pianocorder from overheating or damaging your piano if
left playing unattended. It can be disabled by unchecking the Enable thermal protection option in the
Pianocorder section of WINAMP’s Preferences window.
The piano has trouble locking on to the control signal when I start playing a MIDI file or when changing songs. The MIDI data rate is probably set too high. Go into WINAMP’s Preferences window under
Pianocorder->MIDI Settings and lower the value of the data rate slider. Playback must be stopped and
restarted for the new slider setting to take effect. If problems persist, your Pianocorder’s playback logic
board may require adjustment. Contact the author or your Pianocorder technician for assistance.
I hear problems in the Pianocorder playback if I do other things with my computer while WINAMP is playing the piano. Make sure you have disabled all of the Windows system sounds (the clicks, dings, etc.) since they will
interfere with the Pianocorder control signal. It is also possible that you have too many applications
open, leaving too little processor or memory for WINAMP to run effectively. Finally, consider closing
the Piano Roll View and Superscan Display Console windows; disabling these will greatly reduce the
level of CPU resources required by WINAMP during playback.
41
Some (or all) of the songs in my WINAMP playlist no longer play. The cursor just rapidly skips over them and moves down to the next song. It is important to keep in mind that a WINAMP playlist is a list of links to files on disk – the music itself
is not stored within the playlist. This is analogous to how links work when you browse websites on the
Internet. Just as web links become invalid if a website owner moves or deletes their web pages, if you
move your music files on disk to another location, their corresponding entries in a WINAMP playlist
become invalid. If WINAMP cannot find the corresponding file for a playlist entry, it just skips over it.
To correct this situation, delete the invalid entries from your playlist, find the files in question on your
hard drive, then re-add the files to the playlist from their new location.
One way that WINAMP users run into this invalid playlist situation is by manually moving their music
files around after creating a playlist. Another scenario involves Windows itself: if you click on MIDI
files listed on a web page, your web browser downloads a temporary copy of the file, stores it in a
temporary area on your hard drive, and then adds it to the WINAMP playlist from that temporary
location. Initially, that playlist entry works correctly. But after a period of time (typically a few days or
weeks), your web browser will automatically delete such temporary files, causing their playlist entries to
become invalid. To prevent this situation, if you find files you like on a web page, remember to save
permanent copies of them in a known, non-temporary folder of your hard drive. To do this, right-click
on each music file link within the web page and select “Save Target As…” Then add the files from this
location to your playlists.
Technical Support
Please be sure you have read the troubleshooting section above.
For general Pianocorder questions (not related to the WINAMP plug-in), visit the Pianocorder Forum at
http://www.voy.com/33099/
For Pianocorder plug-in assistance, send email to Mark Fontana <[email protected]>.