Embed Size (px)
Citation preview

A-CR-CCP-907/PF-001
3-1-1
COMMON TRAINING
PIPE BAND – BASIC MUSICIAN
INSTRUCTIONAL GUIDE
SECTION 1
EO S115.01 – IDENTIFY ELEMENTS OF PITCH
Total Time: 40 min
PREPARATION
PRE-LESSON INSTRUCTIONS
Resources needed for the delivery of this lesson are listed in the lesson specification located in A-CR-CCP-907/PG-001, Pipe Band–Basic Musician Qualification Standard and Plan, Chapter 4. Specific uses for saidresources are identified throughout the instructional guide within the TP for which they are required.
Review the lesson content and become familiar with the material prior to delivering the lesson.
PRE-LESSON ASSIGNMENT
N/A.
APPROACH
An interactive lecture was chosen for this lesson to present elements of pitch.
INTRODUCTION
REVIEW
N/A.
OBJECTIVES
By the end of this lesson the cadet shall have identified the elements of pitch.
IMPORTANCE
It is important for cadets to know the elements of pitch because it allows the cadets to read music which is thefoundation to all practical music training activities.
Teaching Point 1 Describe Staves
Time: 5 min Method: Interactive Lecture
STRUCTURE
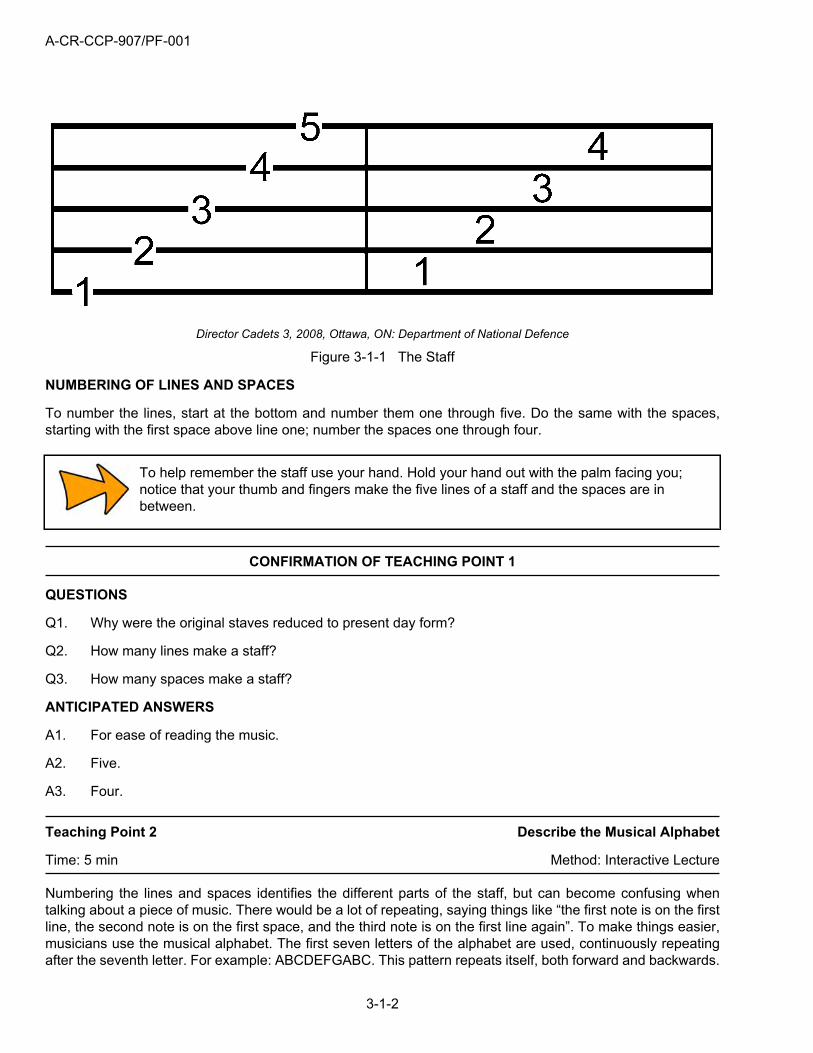
Staves are a set of parallel lines. Originally staves were many, many lines, and were reduced for ease of readingthe music. The system that is used today is a staff made of five lines and four spaces.
A-CR-CCP-907/PF-001
3-1-2
Director Cadets 3, 2008, Ottawa, ON: Department of National Defence
Figure 3-1-1 The Staff
NUMBERING OF LINES AND SPACES
To number the lines, start at the bottom and number them one through five. Do the same with the spaces,starting with the first space above line one; number the spaces one through four.
To help remember the staff use your hand. Hold your hand out with the palm facing you;notice that your thumb and fingers make the five lines of a staff and the spaces are inbetween.
CONFIRMATION OF TEACHING POINT 1
QUESTIONS
Q1. Why were the original staves reduced to present day form?
Q2. How many lines make a staff?
Q3. How many spaces make a staff?
ANTICIPATED ANSWERS
A1. For ease of reading the music.
A2. Five.
A3. Four.
Teaching Point 2 Describe the Musical Alphabet
Time: 5 min Method: Interactive Lecture
Numbering the lines and spaces identifies the different parts of the staff, but can become confusing whentalking about a piece of music. There would be a lot of repeating, saying things like “the first note is on the firstline, the second note is on the first space, and the third note is on the first line again”. To make things easier,musicians use the musical alphabet. The first seven letters of the alphabet are used, continuously repeatingafter the seventh letter. For example: ABCDEFGABC. This pattern repeats itself, both forward and backwards.
A-CR-CCP-907/PF-001
3-1-3
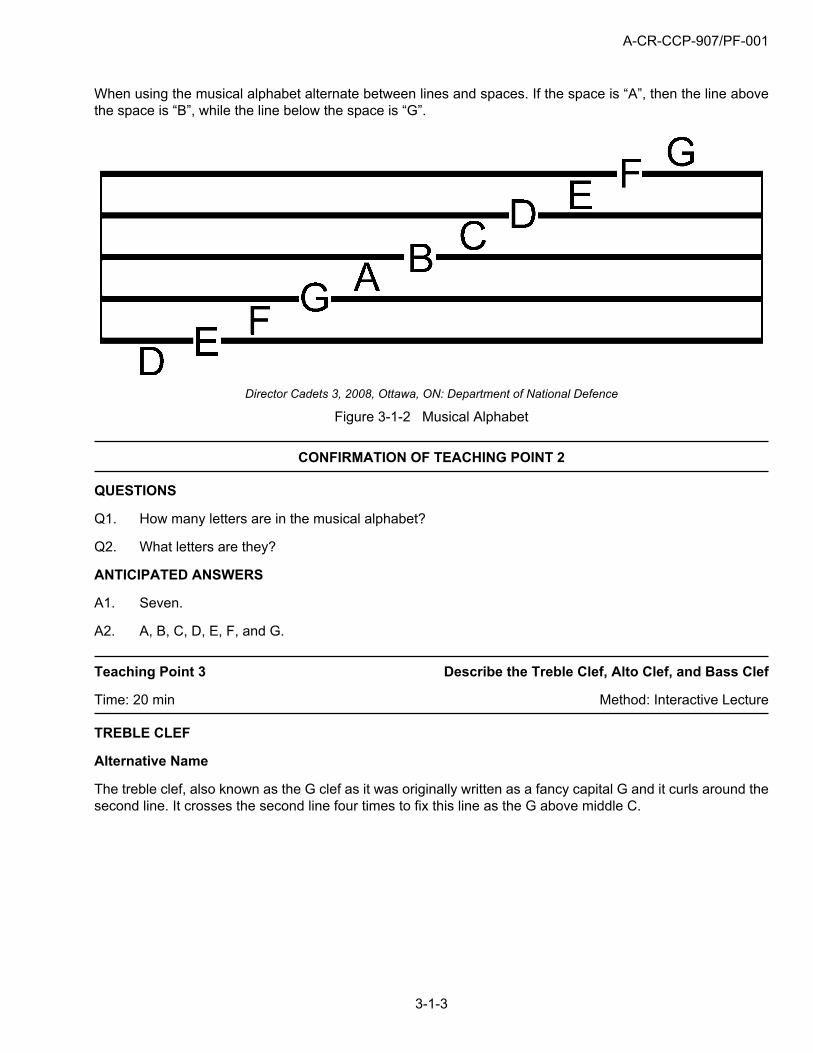
When using the musical alphabet alternate between lines and spaces. If the space is “A”, then the line abovethe space is “B”, while the line below the space is “G”.
Director Cadets 3, 2008, Ottawa, ON: Department of National Defence
Figure 3-1-2 Musical Alphabet
CONFIRMATION OF TEACHING POINT 2
QUESTIONS
Q1. How many letters are in the musical alphabet?
Q2. What letters are they?
ANTICIPATED ANSWERS
A1. Seven.
A2. A, B, C, D, E, F, and G.
Teaching Point 3 Describe the Treble Clef, Alto Clef, and Bass Clef
Time: 20 min Method: Interactive Lecture
TREBLE CLEF
Alternative Name
The treble clef, also known as the G clef as it was originally written as a fancy capital G and it curls around thesecond line. It crosses the second line four times to fix this line as the G above middle C.

A-CR-CCP-907/PF-001
3-1-4
Director Cadets 3, 2008, Ottawa, ON: Department of National Defence
Figure 3-1-3 Treble Clef
Shape and Location on the Staff
The treble clef curls around the second line. The bottom of the body sits on, but not over, the first line, the topof the treble clef extends above top line, and then comes back down with the tail extending below the first line.
Names of Lines and Spaces
As mentioned, the lines and spaces have letter names associated with them. The first line is E, while the firstspace is F. Use the musical alphabet, remembering to go back to A after G, to name the rest of the lines andspaces.
The lines of the treble clef are E, G, B, D, and F. There are sayings that can be used to help remember theorder of the lines in the treble clef. Two of the sayings are “Every Good Boy Deserves Fudge”, and “EmptyGarbage Before Dad Flips”. There are many others that can be used.
A-CR-CCP-907/PF-001
3-1-5
Director Cadets 3, 2008, Ottawa, ON: Department of National Defence
Figure 3-1-4 Treble Clef Lines and Spaces
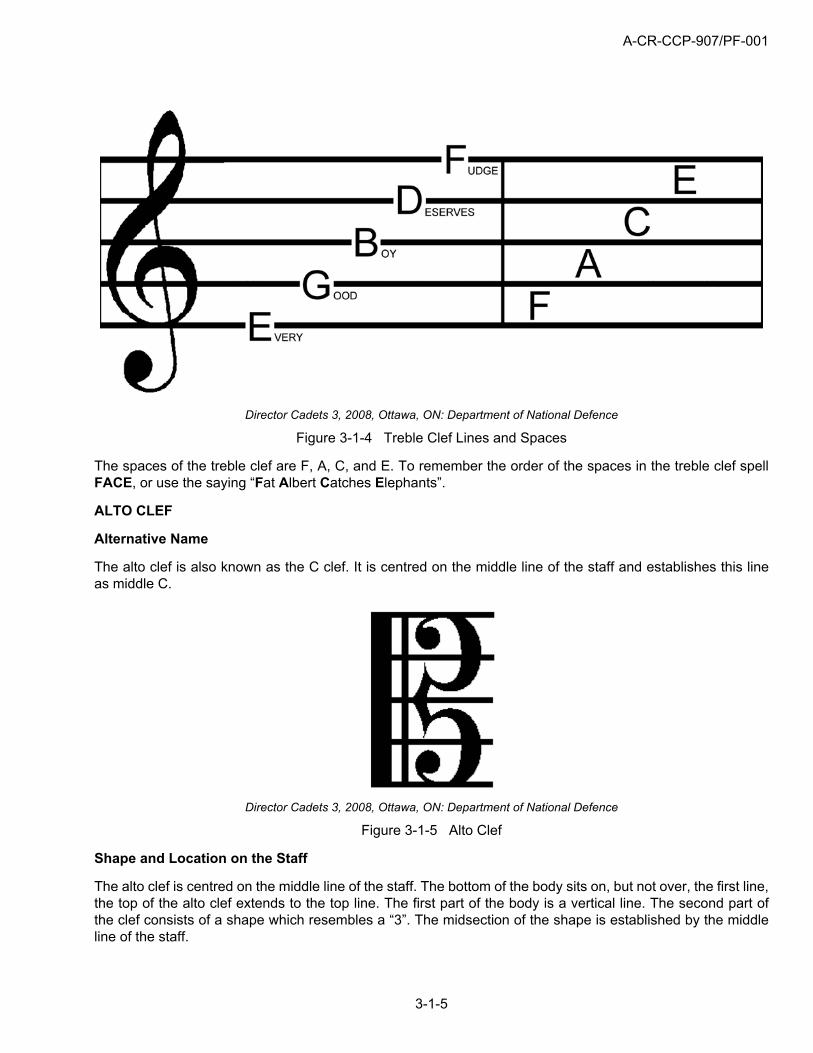
The spaces of the treble clef are F, A, C, and E. To remember the order of the spaces in the treble clef spellFACE, or use the saying “Fat Albert Catches Elephants”.
ALTO CLEF
Alternative Name
The alto clef is also known as the C clef. It is centred on the middle line of the staff and establishes this lineas middle C.
Director Cadets 3, 2008, Ottawa, ON: Department of National Defence
Figure 3-1-5 Alto Clef
Shape and Location on the Staff
The alto clef is centred on the middle line of the staff. The bottom of the body sits on, but not over, the first line,the top of the alto clef extends to the top line. The first part of the body is a vertical line. The second part ofthe clef consists of a shape which resembles a “3”. The midsection of the shape is established by the middleline of the staff.

A-CR-CCP-907/PF-001
3-1-6
Names of Lines and Spaces
Like the treble clef, the lines and spaces have letter names associated with them. The note names, however,are not the same as the treble clef. The first line is F, while the first space is G. Use the musical alphabet,remembering to go back to A after G, to name the rest of the lines and spaces.
Director Cadets 3, 2008, Ottawa, ON: Department of National Defence
Figure 3-1-6 Alto Clef Lines and Spaces
BASS CLEF
Alternative Name
The bass clef is also known as the F clef as it was originally an old form of the letter F. The two dots on eitherside of the fourth line fixes the line as the F below middle C.
Director Cadets 3, 2008, Ottawa, ON: Department of National Defence
Figure 3-1-7 Bass Clef
Shape and Location on the Staff
The bass clef curls around the fourth line. The bass clef looks similar to a backwards “C”. The top touches, butdoes not cross, the fifth line, the bottom extends just below second line. The two dots are directly to the right,one above and one below the fourth line.
Names of Lines and Spaces
Like the treble clef, the lines and spaces have letter names associated with them. The note names however,are not the same as the treble clef. The first line is G, while the first space is A. Use the musical alphabet,remembering to go back to A after G, to name the rest of the lines and spaces.
A-CR-CCP-907/PF-001
3-1-7
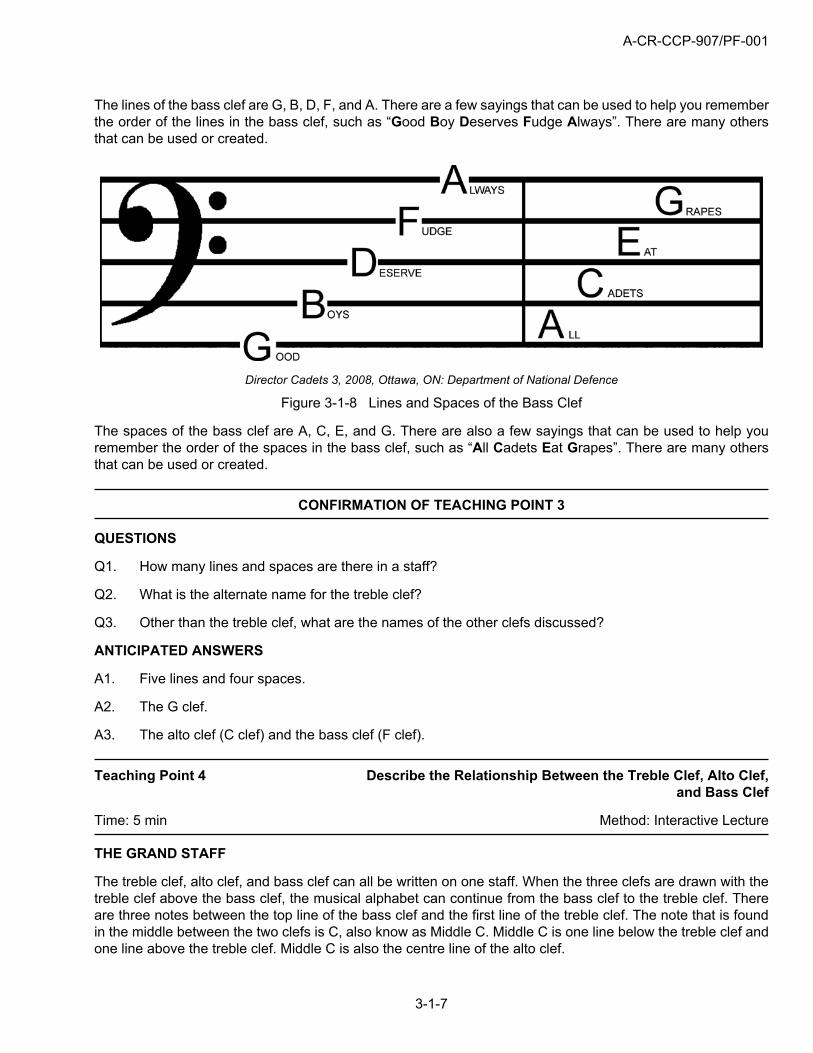
The lines of the bass clef are G, B, D, F, and A. There are a few sayings that can be used to help you rememberthe order of the lines in the bass clef, such as “Good Boy Deserves Fudge Always”. There are many othersthat can be used or created.
Director Cadets 3, 2008, Ottawa, ON: Department of National Defence
Figure 3-1-8 Lines and Spaces of the Bass Clef
The spaces of the bass clef are A, C, E, and G. There are also a few sayings that can be used to help youremember the order of the spaces in the bass clef, such as “All Cadets Eat Grapes”. There are many othersthat can be used or created.
CONFIRMATION OF TEACHING POINT 3
QUESTIONS
Q1. How many lines and spaces are there in a staff?
Q2. What is the alternate name for the treble clef?
Q3. Other than the treble clef, what are the names of the other clefs discussed?
ANTICIPATED ANSWERS
A1. Five lines and four spaces.
A2. The G clef.
A3. The alto clef (C clef) and the bass clef (F clef).
Teaching Point 4 Describe the Relationship Between the Treble Clef, Alto Clef,and Bass Clef
Time: 5 min Method: Interactive Lecture
THE GRAND STAFF
The treble clef, alto clef, and bass clef can all be written on one staff. When the three clefs are drawn with thetreble clef above the bass clef, the musical alphabet can continue from the bass clef to the treble clef. Thereare three notes between the top line of the bass clef and the first line of the treble clef. The note that is foundin the middle between the two clefs is C, also know as Middle C. Middle C is one line below the treble clef andone line above the treble clef. Middle C is also the centre line of the alto clef.

A-CR-CCP-907/PF-001
3-1-8
Director Cadets 3, 2008, Ottawa, ON: Department of National Defence
Figure 3-1-9 Relationship of the Treble, Alto and Bass Clefs
Director Cadets 3, 2008, Ottawa, ON: Department of National Defence
Figure 3-1-10 Grand Staff
Although Middle C does indicate where the alto clef would be placed, when drawing the grand staff, the altoclef is not included. If the treble clef and bass clef are connected by a bracket and a vertical line on the left-hand side, they are referred to as the grand staff.
A-CR-CCP-907/PF-001
3-1-9
LEDGER LINES
Director Cadets 3, 2008, Ottawa, ON: Department of National Defence
Figure 3-1-11 Ledger Lines
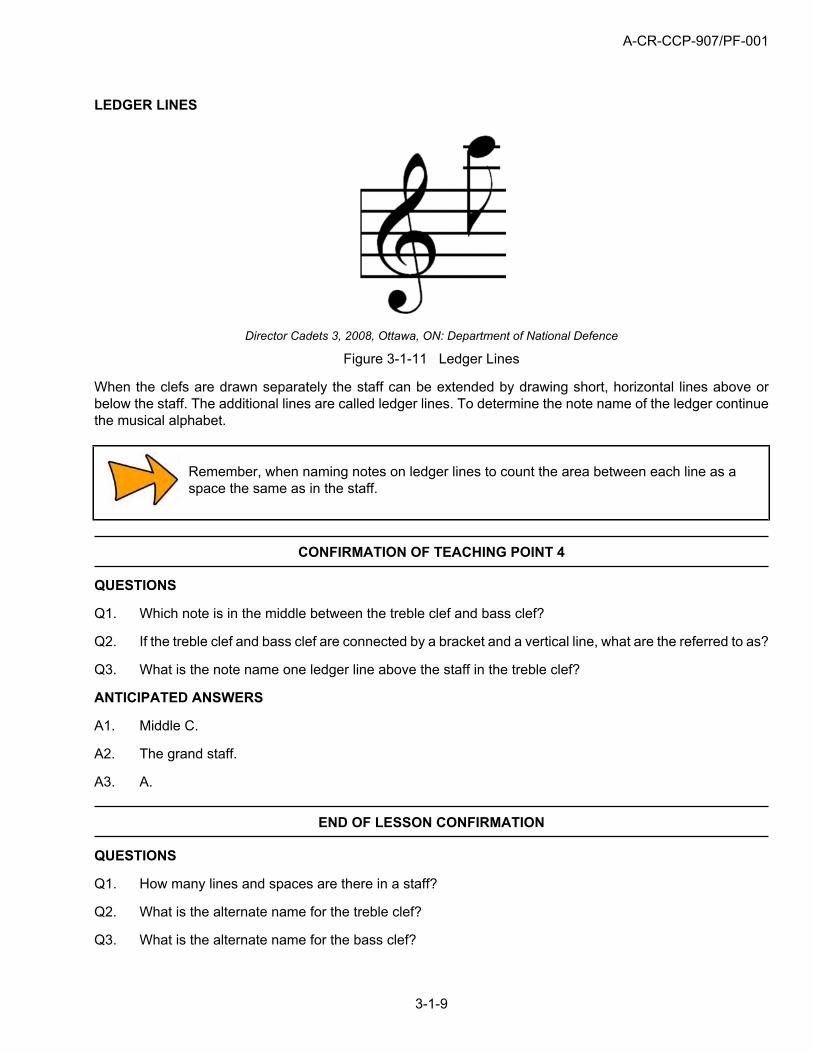
When the clefs are drawn separately the staff can be extended by drawing short, horizontal lines above orbelow the staff. The additional lines are called ledger lines. To determine the note name of the ledger continuethe musical alphabet.
Remember, when naming notes on ledger lines to count the area between each line as aspace the same as in the staff.
CONFIRMATION OF TEACHING POINT 4
QUESTIONS
Q1. Which note is in the middle between the treble clef and bass clef?
Q2. If the treble clef and bass clef are connected by a bracket and a vertical line, what are the referred to as?
Q3. What is the note name one ledger line above the staff in the treble clef?
ANTICIPATED ANSWERS
A1. Middle C.
A2. The grand staff.
A3. A.
END OF LESSON CONFIRMATION
QUESTIONS
Q1. How many lines and spaces are there in a staff?
Q2. What is the alternate name for the treble clef?
Q3. What is the alternate name for the bass clef?

A-CR-CCP-907/PF-001
3-1-10
ANTICIPATED ANSWERS
A1. Five lines and four spaces.
A2. The G clef.
A3. The F clef.
CONCLUSION
HOMEWORK/READING/PRACTICE
N/A.
METHOD OF EVALUATION
This lesson is assessed IAW A-CR-CCP-911/PG-001, Chapter 3, Annex A, Appendix 3.
CLOSING STATEMENT
This lesson is an introduction to musical theory. The information is the basis of the rest of the theory that willbe used in all practical music training activities. The better you understand the information from today’s lesson,the easier it will be for you to read music.
INSTRUCTOR NOTES/REMARKS
N/A.
REFERENCES
C0-257 (ISBN 1-55440-011-2) Wharram B. (2005). Elementary Rudiments of Music. Mississauga, ON:The Frederick Harris Music Co., Limited.
A-CR-CCP-907/PF-001
3-2-1
COMMON TRAINING
PIPE BAND – BASIC MUSICIAN
INSTRUCTIONAL GUIDE
SECTION 2
EO S115.02 – RECOGNIZE RHYTHM
Total Time: 40 min
PREPARATION
PRE-LESSON INSTRUCTIONS
Resources needed for the delivery of this lesson are listed in the lesson specification located in A-CR-CCP-907/PG-001, Chapter 4. Specific uses for said resources are identified throughout the instructional guide withinthe TP for which they are required.
Review the lesson content and become familiar with the material prior to delivering the lesson.
Create cut-outs of notes and rests, to include:
one whole note and whole rest,
two half notes and half rests,
four quarter notes and quarter rests,
eight eighth notes and eighth rests,
sixteen sixteenth notes and sixteenth rests.
PRE-LESSON ASSIGNMENT
N/A.
APPROACH
An interactive lecture was chosen for this lesson to present basic rhythm.
INTRODUCTION
REVIEW
N/A.
OBJECTIVES
By the end of this lesson the cadet shall have recognized simple time signatures, and note and rest values.
A-CR-CCP-907/PF-001
3-2-2
IMPORTANCE
It is important for the cadets to understand rhythm and time signatures because they are the parts of musicthat create the beat. The beat of the music is what gives motion to the music. It helps the cadets know whenthe left foot should be touching the ground when marching and helps when they are dancing.
Teaching Point 1 Describe the Parts of a Note
Time: 5 min Method: Interactive Lecture
PARTS OF A NOTE
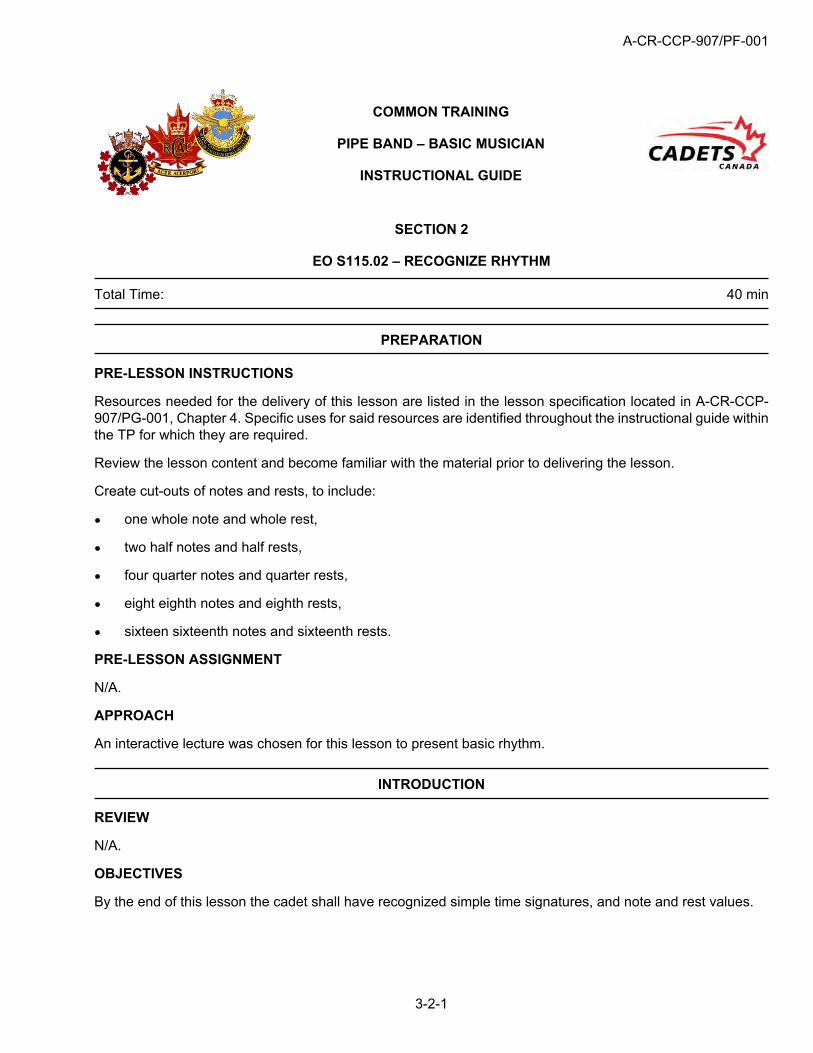
Head
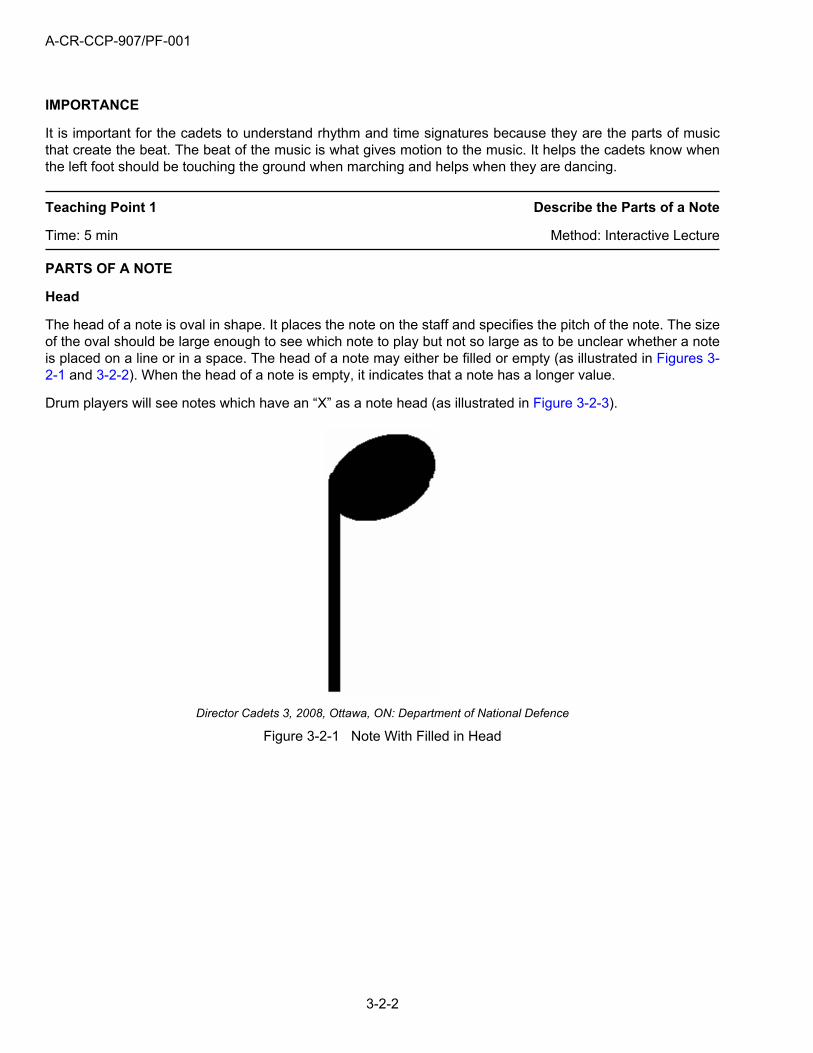
The head of a note is oval in shape. It places the note on the staff and specifies the pitch of the note. The sizeof the oval should be large enough to see which note to play but not so large as to be unclear whether a noteis placed on a line or in a space. The head of a note may either be filled or empty (as illustrated in Figures 3-2-1 and 3-2-2). When the head of a note is empty, it indicates that a note has a longer value.
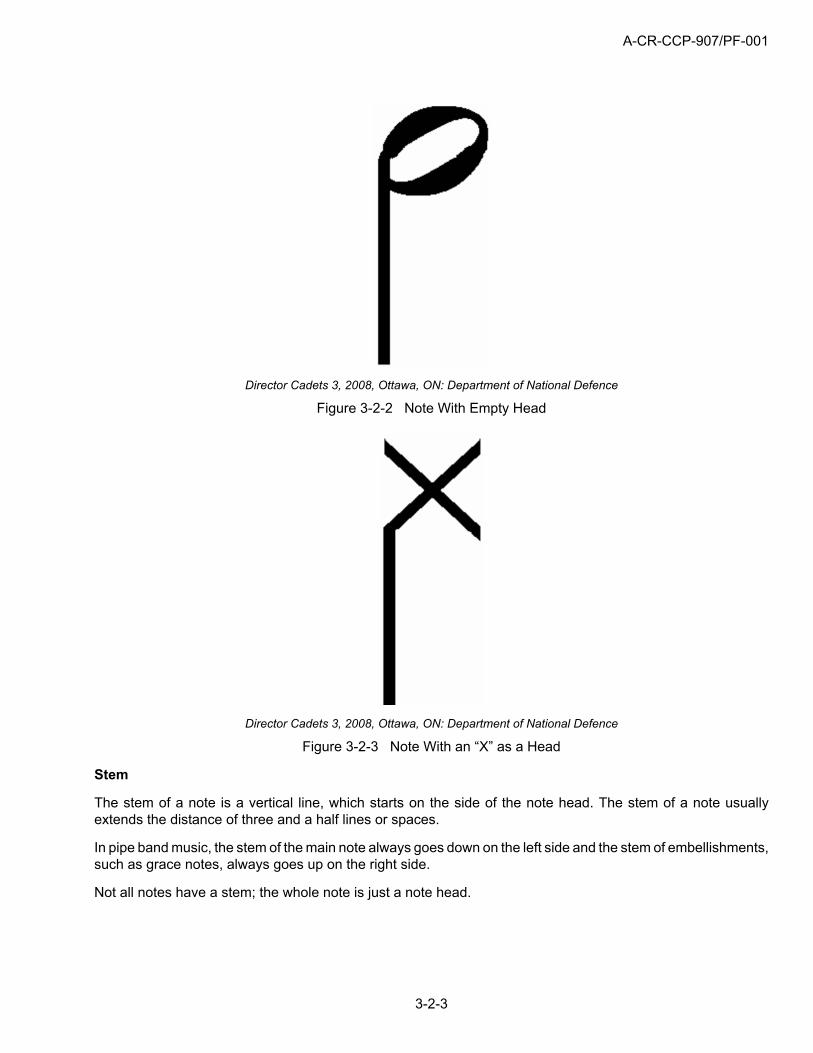
Drum players will see notes which have an “X” as a note head (as illustrated in Figure 3-2-3).
Director Cadets 3, 2008, Ottawa, ON: Department of National Defence
Figure 3-2-1 Note With Filled in Head
A-CR-CCP-907/PF-001
3-2-3
Director Cadets 3, 2008, Ottawa, ON: Department of National Defence
Figure 3-2-2 Note With Empty Head
Director Cadets 3, 2008, Ottawa, ON: Department of National Defence
Figure 3-2-3 Note With an “X” as a Head
Stem
The stem of a note is a vertical line, which starts on the side of the note head. The stem of a note usuallyextends the distance of three and a half lines or spaces.
In pipe band music, the stem of the main note always goes down on the left side and the stem of embellishments,such as grace notes, always goes up on the right side.
Not all notes have a stem; the whole note is just a note head.

A-CR-CCP-907/PF-001
3-2-4
Tail
To help indicate the value of a note, tails are added to the stem. The tail originates on the same side of thestem as the head. It curves out and in toward the head of the note (as illustrated in Figure 3-2-4). A tail looksa lot like a flag on a flag pole when the wind is not blowing.
When two notes with tails are side by side, it is customary to join the tails of the notes together. This processis called beaming. Notes are most commonly beamed in groups of two or four.
Director Cadets 3, 2008, Ottawa, ON: Department of National Defence
Figure 3-2-4 Parts of a Note
CONFIRMATION OF TEACHING POINT 1
QUESTIONS
Q1. Which shapes might the head of the note be?
Q2. How many parts are there in a note?
Q3. What is it called when you join the tails of two notes together?
ANTICIPATED ANSWERS
A1. An oval or an “X”.
A2. Three.
A3. It is called beaming.

A-CR-CCP-907/PF-001
3-2-5
Teaching Point 2 Discuss Note and Rest Values
Time: 20 min Method: Interactive Lecture
The duration of sounds are written as notes of different shapes. The longest note value is the whole note. Eachnote is divided in half to create a new note. There are two half notes in a whole note, two quarter notes in a halfnote, two eighth notes in a quarter note and two sixteenth notes in an eighth note.
Director Cadets 3, 2008, Ottawa, ON: Department of National Defence
Figure 3-2-5 Note Value Tree
Discuss different combinations of note values (eg, eight sixteenth notes in a half note).
Using cut-outs of the notes, create a note value tree on a flip chart. It can be used as aposter for the wall.
ACTIVITY
Time: 10 min
OBJECTIVE
The objective of this activity is for the cadets to identify rest values by constructing a rest value tree.

A-CR-CCP-907/PF-001
3-2-6
RESOURCES
Whiteboard/chalkboard,
Note and rest cut-outs,
Container, and
Note value tree flip chart (from TP 2).
ACTIVITY LAYOUT
N/A.
ACTIVITY INSTRUCTIONS
1. Post note value tree flip chart on the wall.
2. Place note and rest cut-outs in the container.
3. Have each cadet pick a note or rest cut-out from the container and place it under the note of the same value.
4. Repeat until the rest value tree is complete and appears as illustrated in Figure 3-2-6.
“Lesson Tutor”, by E. E. Schneider and J. Mikola, 2008, Elements of Music Notation: NoteValues. Retrieved February 29, 2008, from http://www.lessontutor.com/eesmusic4.html
Figure 3-2-6 Note and Rest Value Tree
SAFETY
N/A.

A-CR-CCP-907/PF-001
3-2-7
CONFIRMATION OF TEACHING POINT 2
QUESTIONS
Q1. How many half notes/rests are in a whole note/rest?
Q2. How many sixteenth notes/rests are in a quarter note/rest?
Q3. How many quarter notes/rests are in a whole note/rest?
ANTICIPATED ANSWERS
A1. Two.
A2. Four.
A3. Four.
Teaching Point 3 Discuss Time Signatures
Time: 10 min Method: Interactive Lecture
TIME SIGNATURES
Time signatures are used to indicate the pulses or beats of a piece of music. Some beats are stronger thanothers. The stronger beat is referred to as an accent beat.
Beats are grouped into twos, threes, or fours. Each group is called a measure, with the first beat of each measurebeing the accent beat. A vertical line is placed on the staff immediately before the strongest accent to show itsposition. The vertical line is called a bar line. A double bar line is used to indicate the end of the piece of music.
Director Cadets 3, 2008, Ottawa, ON: Department of National Defence
Figure 3-2-7 Bar Lines and Measures
Meter (Time). Measuring music as beats with recurring accents.
A-CR-CCP-907/PF-001
3-2-8
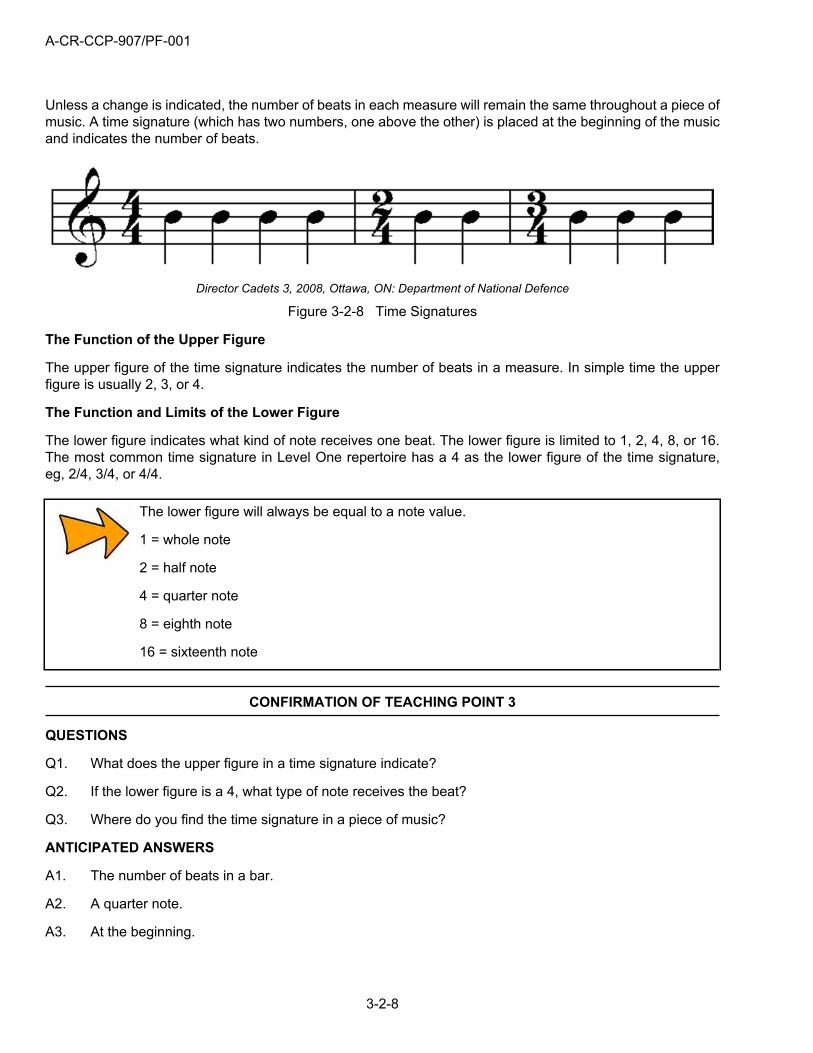
Unless a change is indicated, the number of beats in each measure will remain the same throughout a piece ofmusic. A time signature (which has two numbers, one above the other) is placed at the beginning of the musicand indicates the number of beats.
Director Cadets 3, 2008, Ottawa, ON: Department of National Defence
Figure 3-2-8 Time Signatures
The Function of the Upper Figure
The upper figure of the time signature indicates the number of beats in a measure. In simple time the upperfigure is usually 2, 3, or 4.
The Function and Limits of the Lower Figure
The lower figure indicates what kind of note receives one beat. The lower figure is limited to 1, 2, 4, 8, or 16.The most common time signature in Level One repertoire has a 4 as the lower figure of the time signature,eg, 2/4, 3/4, or 4/4.
The lower figure will always be equal to a note value.
1 = whole note
2 = half note
4 = quarter note
8 = eighth note
16 = sixteenth note
CONFIRMATION OF TEACHING POINT 3
QUESTIONS
Q1. What does the upper figure in a time signature indicate?
Q2. If the lower figure is a 4, what type of note receives the beat?
Q3. Where do you find the time signature in a piece of music?
ANTICIPATED ANSWERS
A1. The number of beats in a bar.
A2. A quarter note.
A3. At the beginning.

A-CR-CCP-907/PF-001
3-2-9
END OF LESSON CONFIRMATION
QUESTIONS
Q1. How many sixteenth notes are in two half notes?
Q2. What does the upper figure of the time signature indicate?
Q3. What are the three parts of a note?
ANTICIPATED ANSWERS
A1. 16.
A2. The number of beats per measure.
A3. The head, the stem, and the tail.
CONCLUSION
HOMEWORK/READING/PRACTICE
N/A.
METHOD OF EVALUATION
This lesson is assessed IAW A-CR-CCP-911/PG-001, Chapter 3, Annex A, Appendix 3.
CLOSING STATEMENT
This lesson is an introduction to rhythms. It is the basis for learning the more difficult rhythms that are usedin music training activities.
INSTRUCTOR NOTES/REMARKS
N/A.
REFERENCES
C0-257 (ISBN 1-55440-011-2) Wharram, B. (2005). Elementary Rudiments of Music. Mississauga, ON:The Frederick Harris Music Co., Limited.

A-CR-CCP-907/PF-001
THIS PAGE INTENTIONALLY LEFT BLANK
3-2-10
A-CR-CCP-907/PF-001
3-3-1
COMMON TRAINING
PIPE BAND – BASIC MUSICIAN
INSTRUCTIONAL GUIDE
SECTION 3
EO S115.03 – DESCRIBE GRACE NOTES AND REPEAT SIGNS
Total Time: 40 min
PREPARATION
PRE-LESSON INSTRUCTIONS
Resources needed for the delivery of this lesson are listed in the lesson specification located in A-CR-CCP-907/PG-001, Chapter 4. Specific uses for said resources are identified throughout the instructional guide withinthe TP for which they are required.
Review the lesson content and become familiar with the material prior to delivering the lesson.
Photocopy examples of Music Proficiency Level Tunes that have grace notes/embellishments which clearlyaccent, embellish and separate notes or phrases. Provide three examples for every group of three cadets.
PRE-LESSON ASSIGNMENT
N/A.
APPROACH
An interactive lecture was chosen for this lesson to present grace notes and repeat signs.
INTRODUCTION
REVIEW
N/A.
OBJECTIVES
By the end of this lesson the cadet shall describe grace notes and repeat signs.
IMPORTANCE
It is important for cadets to understand the purpose of grace notes because they are the primary embellishmentof pipe band music. Repeat signs are also used throughout pipe band music and establish the form of pipeband music. These two concepts are fundamental to pipe band music.

A-CR-CCP-907/PF-001
3-3-2
Teaching Point 1 Describe the Purposes of a Grace Note
Time: 20 min Method: Interactive Lecture
A grace note is a smaller version of a normal note and has the same structure: a head, stem and tails. Gracenotes do not have time of their own; they borrow time from the note following it. There are three purposes ofa grace note: accent, embellish and separate other notes.
Director Cadets 3, 2008, Ottawa, ON: Department of National Defence
Figure 3-3-1 Parts of a Grace Note
ACCENTING
When a grace note is to accent a note, it draws attention to the note which follows it. The grace note must beused to accent because unlike other instruments, there is no way to bring accent to a note without affecting thetone and pitch of the note (eg, a snare drummer can strike the snare head harder or softer to create variance insound). This is a very common use of a grace note. In the following example, the G grace note draws attentionto the C which follows it.
Director Cadets 3, 2008, Ottawa, ON: Department of National Defence
Figure 3-3-2 Example of an Accenting Grace Note

A-CR-CCP-907/PF-001
3-3-3
EMBELLISHING
When a group of grace notes are grouped together, they create embellishment of a note. These embellishmentshave names, such as Doublings, Taorluath, etc. Again, the embellishment grace notes steal time from the notewhich follows them, making that note slightly smaller in duration.
Director Cadets 3, 2008, Ottawa, ON: Department of National Defence
Figure 3-3-3 Example of Embellishing Grace Notes
SEPARATING
Grace notes are also used to separate notes and phrases. While playing the bagpipes, there is no way toarticulate the notes, that is to distinguish one note from another note on the same pitch. It is necessary to usea grace note to articulate where one note value ends and where the next note value begins. Again, the time forthe grace note is stolen from the note which follows it. In the following examples, 32nd note grace notes are usedto distinguish between the repeated F and A pitches. Notice that there is no grace note used when changingfrom the F to the A. Changing the fingering between notes serves as the articulation between the notes.
Director Cadets 3, 2008, Ottawa, ON: Department of National Defence
Figure 3-3-4 Example of Separating Grace Notes
ACTIVITY
Time: 10 min
OBJECTIVE
The objective of this activity is have the cadets examine Music Proficiency Level Tunes and identify purposesof the three types of grace notes.

A-CR-CCP-907/PF-001
3-3-4
RESOURCES
Example Music Proficiency Level Tunes, and
Pencil.
ACTIVITY LAYOUT
N/A.
ACTIVITY INSTRUCTIONS
1. Divide the cadets into groups of three.
2. Distribute three examples of Music Proficiency Level Tunes to each group.
3. Have the cadets circle examples of grace notes being used in each of the three ways and label them.
4. Have each group present their examples to the class by copying the music example onto flip chart paperat the front of the room; discuss and correct as required. Repeat until all groups have presented.
SAFETY
N/A.
CONFIRMATION OF TEACHING POINT 1
QUESTIONS
Q1. What are the three purposes of a grace note?
Q2. Why is a grace note used to accent a note as opposed to blowing harder?
Q3. Where does the time for a grace note come from?
ANTICIPATED ANSWERS
A1. Accent, embellish and separate.
A2. Blowing harder will affect the tone and pitch of the note.
A3. The grace note steals time from the note which follows it.
Teaching Point 2 Describe Repeat Signs
Time: 15 min Method: Interactive Lecture
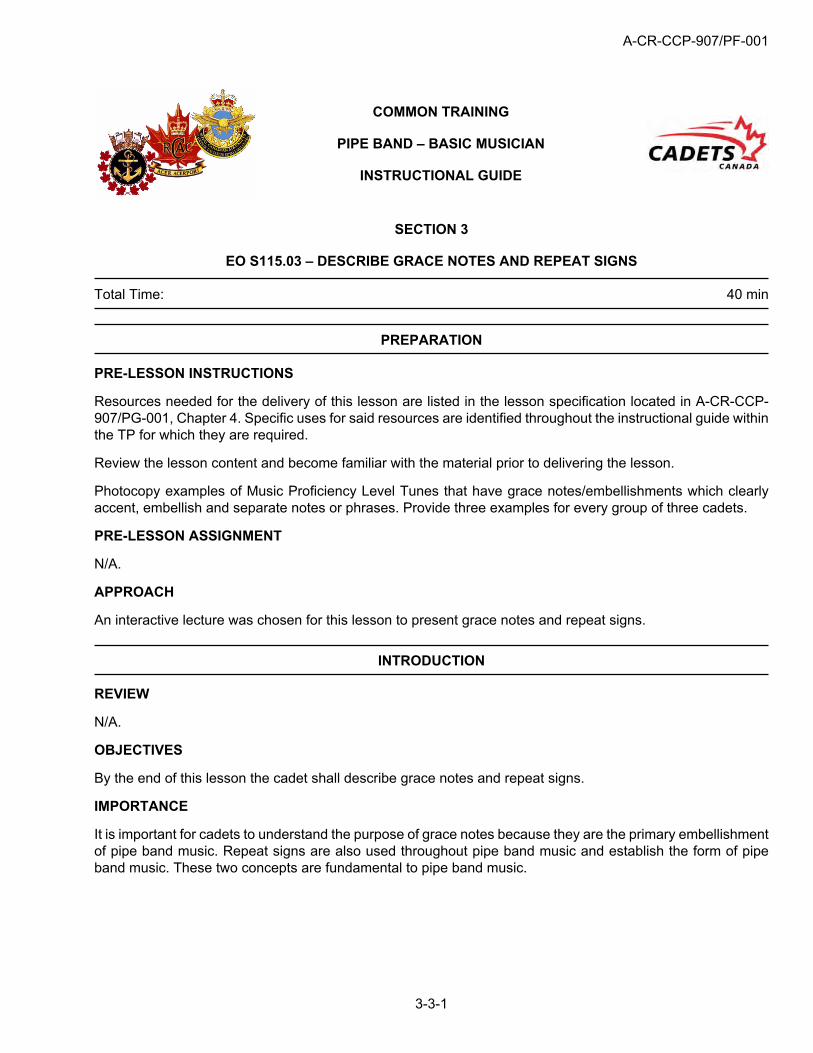
The repeat sign is used when a part of the music needs to be played again. Instead of writing out the music asecond time, the repeat symbol is inserted. The repeat symbol consists of a double bar with two dots beforeit. The two dots are place above and below the middle B line.
A-CR-CCP-907/PF-001
3-3-5
Director Cadets 3, 2008, Ottawa, ON: Department of National Defence
Figure 3-3-5 Repeat Sign
Repeat signs usually occur in pairs. They are placed on either side of the music which is to be repeated. The firstrepeat sign is flipped so that the two dots are after the double bar line. When playing music which is surroundedby repeat signs, play through the music normally, when you reach the second repeat sign return to the firstrepeat sign and play the part again. Music which is in repeat signs is only repeated once, so when playing thepassage the second time, ignore the second repeat sign and continue on in the music.
Director Cadets 3, 2008, Ottawa, ON: Department of National Defence
Figure 3-3-6 Repeated Bars
Sometimes there is only one repeat sign. It will indicate the end of the passage which is to be repeated. If thereis no first repeat sign, the passage is repeated from the beginning.
ACTIVITY
Time: 10 min
OBJECTIVE
The objective of this activity is to have the cadets recognize how repeat signs are used within Music ProficiencyLevel Tunes.
RESOURCES
Example Music Proficiency Level Tunes, and
Pencil.
ACTIVITY LAYOUT
N/A.
ACTIVITY INSTRUCTIONS
1. Divide the cadets into groups of three.
2. Distribute three examples of Music Proficiency Level Tunes to each group.

A-CR-CCP-907/PF-001
3-3-6
3. Have the cadets circle the repeat signs being used and indicate where to repeat to and from in eachexample.
4. Have each group present their examples to the class by copying the music example onto flip chart paperat the front of the room; discuss and correct as required. Repeat until all groups have presented.
SAFETY
N/A.
CONFIRMATION OF TEACHING POINT 2
The cadets’ participation in the activity will serve as the confirmation of this TP.
END OF LESSON CONFIRMATION
The cadets’ participation in the activities will serve as the confirmation of this lesson.
CONCLUSION
HOMEWORK/READING/PRACTICE
N/A.
METHOD OF EVALUATION
This lesson is assessed IAW A-CR-CCP-911/PG-001, Chapter 3, Annex A, Appendix 3.
CLOSING STATEMENT
Grace notes are the primary embellishment of pipe band music. Repeat signs are also used throughout pipeband music and establish the form of pipe band music. These two concepts are fundamental to pipe band music.
INSTRUCTOR NOTES/REMARKS
N/A.
REFERENCES
C0-257 (ISBN 1-55440-011-2) Wharram, B. (2005). Elementary Rudiments of Music. Mississauga, ON:The Frederick Harris Music Co.

A-CR-CCP-907/PF-001
3-4-1
COMMON TRAINING
PIPE BAND – BASIC MUSICIAN
INSTRUCTIONAL GUIDE
SECTION 4
EO S215.01 – DEFINE MUSIC SYMBOLS AND TERMS
Total Time: 40 min
PREPARATION
PRE-LESSON INSTRUCTIONS
Resources needed for the delivery of this lesson are listed in the lesson specification located in A-CR-CCP-907/PG-001, Chapter 4. Specific uses for said resources are identified throughout the instructional guide withinthe TP for which they are required.
Review the lesson content and become familiar with the material prior to delivering the lesson.
PRE-LESSON ASSIGNMENT
N/A.
APPROACH
An interactive lecture was chosen for this lesson to present music symbols and terms.
INTRODUCTION
REVIEW
N/A.
OBJECTIVES
By the end of this lesson the cadet shall define music symbols and terms.
IMPORTANCE
It is important for cadets to be able to define music symbols and terms as they are the language of music.Often, symbols are used to represent words and ideas. It is important for the cadet to be able to understandand apply these symbols in the music they play.
Teaching Point 1 Define an Octave
Time: 10 min Method: Interactive Lecture
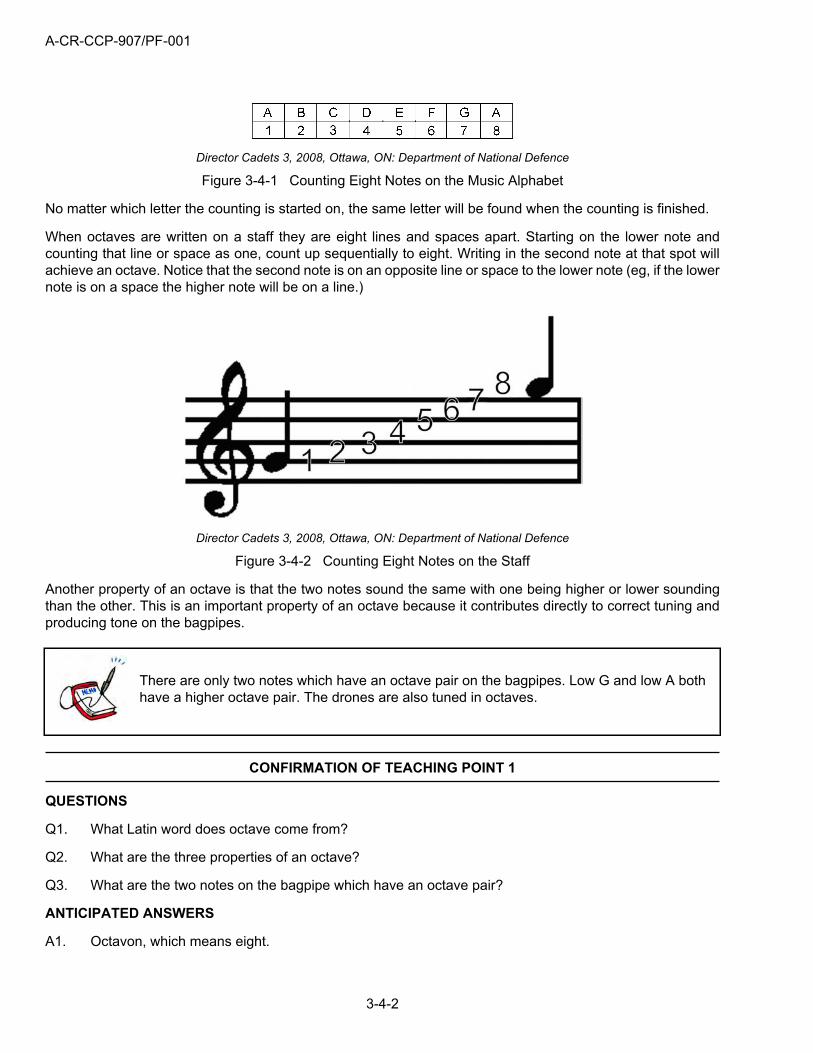
An octave is a measurement of space between two notes. Octave has its origins in the Latin word Octava, whichmeans eight. When two notes are eight letter names apart, they are in octaves. Using the musical alphabet,count eight notes. Remember that the pattern of letters repeats back to A after G.
A-CR-CCP-907/PF-001
3-4-2
Director Cadets 3, 2008, Ottawa, ON: Department of National Defence
Figure 3-4-1 Counting Eight Notes on the Music Alphabet
No matter which letter the counting is started on, the same letter will be found when the counting is finished.
When octaves are written on a staff they are eight lines and spaces apart. Starting on the lower note andcounting that line or space as one, count up sequentially to eight. Writing in the second note at that spot willachieve an octave. Notice that the second note is on an opposite line or space to the lower note (eg, if the lowernote is on a space the higher note will be on a line.)
Director Cadets 3, 2008, Ottawa, ON: Department of National Defence
Figure 3-4-2 Counting Eight Notes on the Staff
Another property of an octave is that the two notes sound the same with one being higher or lower soundingthan the other. This is an important property of an octave because it contributes directly to correct tuning andproducing tone on the bagpipes.
There are only two notes which have an octave pair on the bagpipes. Low G and low A bothhave a higher octave pair. The drones are also tuned in octaves.
CONFIRMATION OF TEACHING POINT 1
QUESTIONS
Q1. What Latin word does octave come from?
Q2. What are the three properties of an octave?
Q3. What are the two notes on the bagpipe which have an octave pair?
ANTICIPATED ANSWERS
A1. Octavon, which means eight.
A-CR-CCP-907/PF-001
3-4-3
A2. Octaves always have the same letter name; on a staff the higher note is always on the opposite line/space as the lower note; the two notes sound the same except one is higher/lower than the other.
A3. Low G and low A.
Teaching Point 2 Define Music Symbols and Terms
Time: 15 min Method: Interactive Lecture
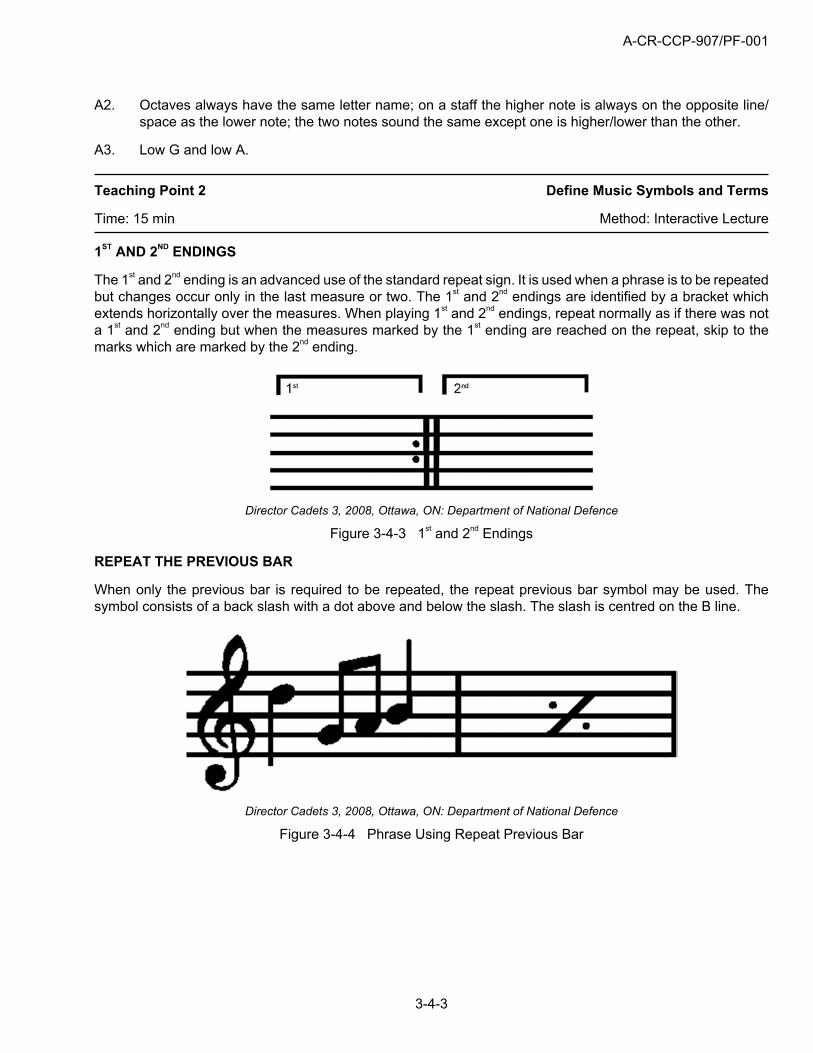
1ST AND 2ND ENDINGS
The 1st and 2nd ending is an advanced use of the standard repeat sign. It is used when a phrase is to be repeatedbut changes occur only in the last measure or two. The 1st and 2nd endings are identified by a bracket whichextends horizontally over the measures. When playing 1st and 2nd endings, repeat normally as if there was nota 1st and 2nd ending but when the measures marked by the 1st ending are reached on the repeat, skip to themarks which are marked by the 2nd ending.
Director Cadets 3, 2008, Ottawa, ON: Department of National Defence
Figure 3-4-3 1st and 2nd Endings
REPEAT THE PREVIOUS BAR
When only the previous bar is required to be repeated, the repeat previous bar symbol may be used. Thesymbol consists of a back slash with a dot above and below the slash. The slash is centred on the B line.
Director Cadets 3, 2008, Ottawa, ON: Department of National Defence
Figure 3-4-4 Phrase Using Repeat Previous Bar

A-CR-CCP-907/PF-001
3-4-4
Director Cadets 3, 2008, Ottawa, ON: Department of National Defence
Figure 3-4-5 Phrase Without Repeat Previous Bar
REPEAT BAR ABOVE
Another type of repeat sign which is used in some older (mainly hand written) music is the repeat bar abovesign. The symbol consists of an inverted chevron with a dot centred under the point.
Director Cadets 3, 2008, Ottawa, ON: Department of National Defence
Figure 3-4-6 Tune Using Repeat Bar Above Sign

A-CR-CCP-907/PF-001
3-4-5
Director Cadets 3, 2008, Ottawa, ON: Department of National Defence
Figure 3-4-7 Tune Without Repeat Bar Above Sign
DAL SEGNO (D.S.)
D.S. means from the sign. When this term is used in a tune it means to play from the sign. The sign looks likea slanted “S” with a percentage sign going through the centre. The sign will be located above the staff at thebeginning of the measure.
Director Cadets 3, 2008, Ottawa, ON: Department of National Defence
Figure 3-4-8 D.S. Sign
DA CAPO (D.C.)
D.C. means from the beginning. When this term is used in a tune it means to return to the beginning of tuneand play the tune again from the beginning.
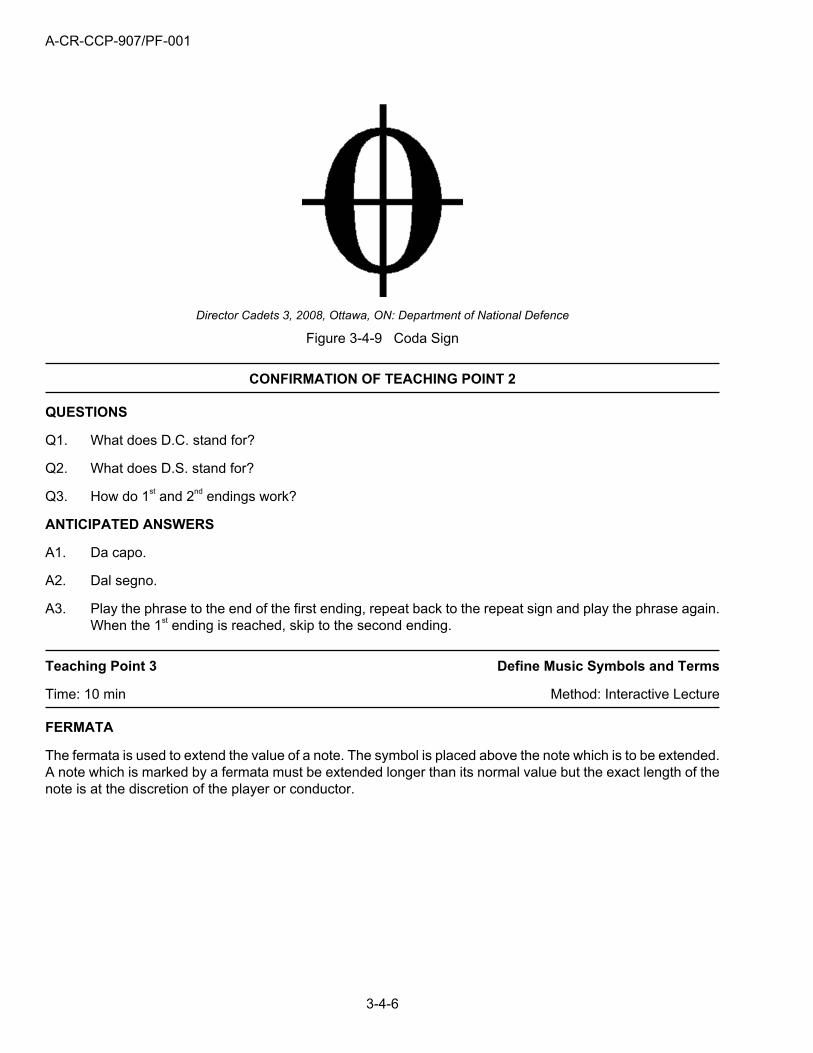
CODA
The coda is an addition to the standard form or design of the music and occurs after the main structure of atune has been completed. The coda is often written below the main body of the tune. The sign for the codalooks like a zero with a vertical and a horizontal line crossing in the middle of it.
A-CR-CCP-907/PF-001
3-4-6
Director Cadets 3, 2008, Ottawa, ON: Department of National Defence
Figure 3-4-9 Coda Sign
CONFIRMATION OF TEACHING POINT 2
QUESTIONS
Q1. What does D.C. stand for?
Q2. What does D.S. stand for?
Q3. How do 1st and 2nd endings work?
ANTICIPATED ANSWERS
A1. Da capo.
A2. Dal segno.
A3. Play the phrase to the end of the first ending, repeat back to the repeat sign and play the phrase again.When the 1st ending is reached, skip to the second ending.
Teaching Point 3 Define Music Symbols and Terms
Time: 10 min Method: Interactive Lecture
FERMATA
The fermata is used to extend the value of a note. The symbol is placed above the note which is to be extended.A note which is marked by a fermata must be extended longer than its normal value but the exact length of thenote is at the discretion of the player or conductor.

A-CR-CCP-907/PF-001
3-4-7
Director Cadets 3, 2008, Ottawa, ON: Department of National Defence
Figure 3-4-10 Fermata
ACCENT
An accent is used to add emphasis to a note. The note becomes strong and feels heavier compared to thesurrounding notes. Bagpipes are not able to accent notes but percussion instruments are able to accent notes.Accents are V-shaped symbols which may lay horizontally or vertically.
Director Cadets 3, 2008, Ottawa, ON: Department of National Defence
Figure 3-4-11 Types of Accents
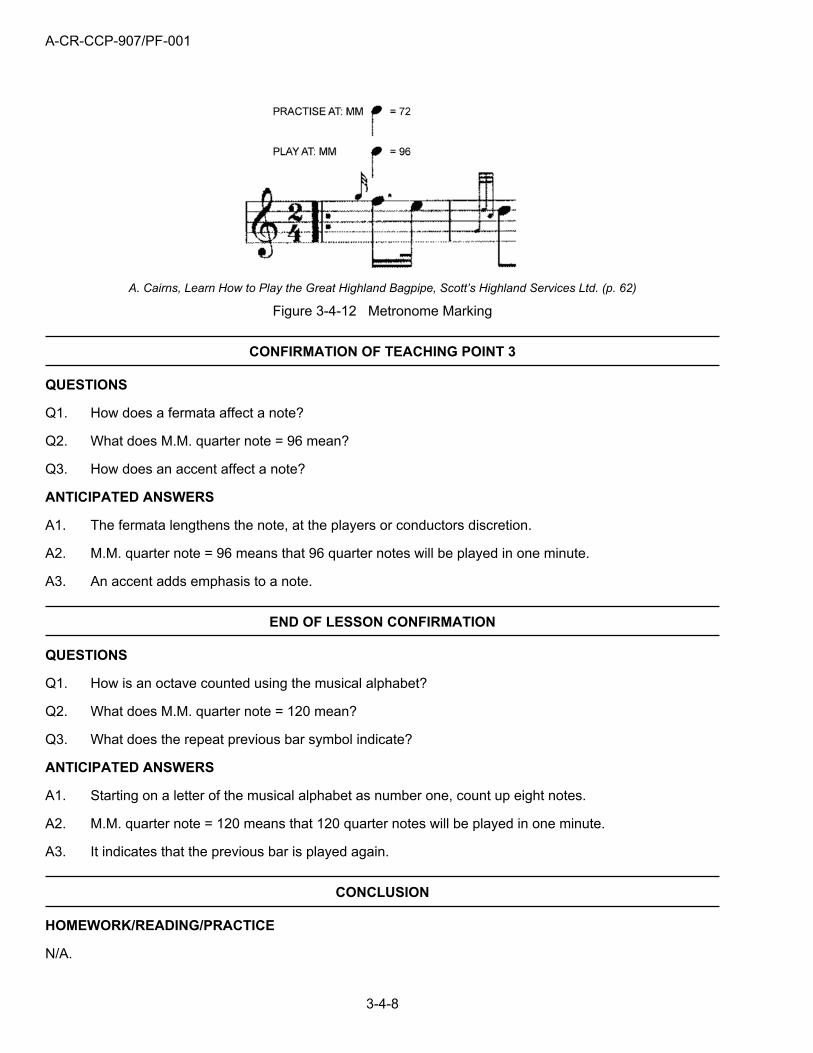
METRONOME MARKING
Metronome markings are used to convey the desired tempo of the music being played. Typically, a metronomemarking consists of a reference rhythmic value and a value of beats per minute. The words “metronomemarking” are usually abbreviated as M.M. A standard metronome marking is quarter note = 120. This wouldindicate that there are 120 quarter notes played every minute, or two beats per second.
A-CR-CCP-907/PF-001
3-4-8
A. Cairns, Learn How to Play the Great Highland Bagpipe, Scott’s Highland Services Ltd. (p. 62)
Figure 3-4-12 Metronome Marking
CONFIRMATION OF TEACHING POINT 3
QUESTIONS
Q1. How does a fermata affect a note?
Q2. What does M.M. quarter note = 96 mean?
Q3. How does an accent affect a note?
ANTICIPATED ANSWERS
A1. The fermata lengthens the note, at the players or conductors discretion.
A2. M.M. quarter note = 96 means that 96 quarter notes will be played in one minute.
A3. An accent adds emphasis to a note.
END OF LESSON CONFIRMATION
QUESTIONS
Q1. How is an octave counted using the musical alphabet?
Q2. What does M.M. quarter note = 120 mean?
Q3. What does the repeat previous bar symbol indicate?
ANTICIPATED ANSWERS
A1. Starting on a letter of the musical alphabet as number one, count up eight notes.
A2. M.M. quarter note = 120 means that 120 quarter notes will be played in one minute.
A3. It indicates that the previous bar is played again.
CONCLUSION
HOMEWORK/READING/PRACTICE
N/A.

A-CR-CCP-907/PF-001
3-4-9
METHOD OF EVALUATION
This lesson is assessed IAW A-CR-CCP-911/PG-001, Chapter 3, Annex C, Appendix 3.
CLOSING STATEMENT
Music symbols and terms are used everywhere in music. It is important to be able to understand and definethem as this will give a greater understanding of how to read and analyze music.
INSTRUCTOR NOTES/REMARKS
N/A.
REFERENCES
C0-257 (ISBN 1-55440-011-2) Wharram, B. (2005). Elementary Rudiments of Music. Mississauga, ON:The Frederick Harris Music Co.

A-CR-CCP-907/PF-001
THIS PAGE INTENTIONALLY LEFT BLANK
3-4-10
A-CR-CCP-907/PF-001
3-5-1
COMMON TRAINING
PIPE BAND – BASIC MUSICIAN
INSTRUCTIONAL GUIDE
SECTION 5
EO S215.02 – RECOGNIZE RHYTHM
Total Time: 40 min
PREPARATION
PRE-LESSON INSTRUCTIONS
Resources needed for the delivery of this lesson are listed in the lesson specification located in A-CR-CCP-907/PG-001, Chapter 4. Specific uses for said resources are identified throughout the instructional guide withinthe TP for which they are required.
Review the lesson content and become familiar with the material prior to delivering the lesson.
PRE-LESSON ASSIGNMENT
N/A.
APPROACH
An interactive lecture was chosen for this lesson to present rhythm.
INTRODUCTION
REVIEW
N/A.
OBJECTIVES
By the end of this lesson the cadet shall recognize rhythm in simple and compound time, using tied and dottednotes, triplets, and introductory notes.
IMPORTANCE
It is important for cadets to be able to recognize rhythm as it is a building block to music. Rhythm is the structurethat gives melody its shape and feel. Understanding these concepts and being able to recognize them in musicshould help make the cadets confident players.

A-CR-CCP-907/PF-001
3-5-2
Teaching Point 1 Describe Introductory Notes and Their Function
Time: 5 min Method: Interactive Lecture
Tunes are divided into smaller pieces called measures. Measures, when combined together, create phrases,or parts of a tune. Sometimes it is necessary to begin a tune or part with a brief lead-in. This is accomplishedby adding a part measure before the first full measure.
Director Cadets 3, 2008, Ottawa, ON: Department of National Defence
Figure 3-5-1 Music Selection Using Introductory Notes
The two notes in the first measure lead in to the first beat of the second bar. These notes are called introductorynotes. However, as they do not have the time value to fill an entire measure, the balance of the time must bemade up in the last measure of the part or tune.
CONFIRMATION OF TEACHING POINT 1
QUESTIONS
Q1. What are introductory notes?
Q2. What is the relationship between the first measure and the last measure when introductory notes areused?
ANTICIPATED ANSWERS
A1. Introductory notes are notes which fall before the first full measure.
A2. The first measure and the last measure, when combined, should contain a full measure worth of time.
Teaching Point 2 Explain Tied and Dotted Notes
Time: 10 min Method: Interactive Lecture
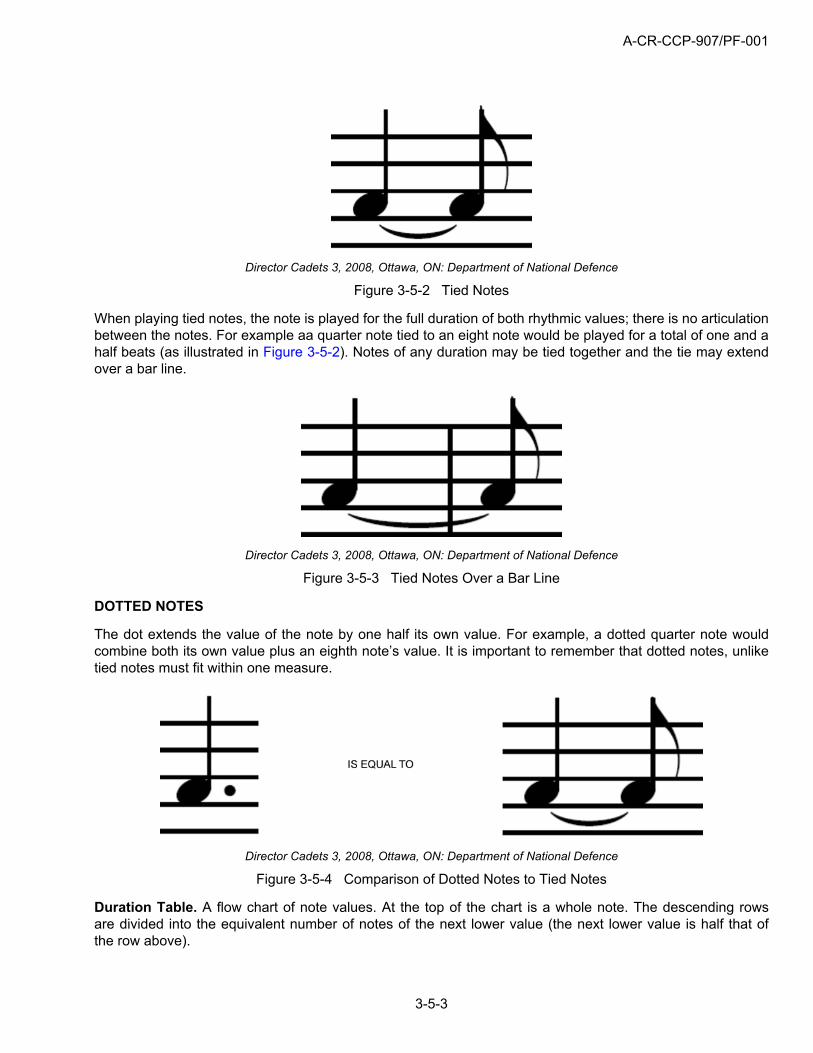
TIED NOTES
Sometimes it is necessary to make a note value longer. When this is desired, two notes may be groupedtogether using a curved line; just like if a rope was too short, another rope might be tied to it to make it longer.The process of joining two notes together is called tying. The notes which are being tied together must be ofthe same pitch.
A-CR-CCP-907/PF-001
3-5-3
Director Cadets 3, 2008, Ottawa, ON: Department of National Defence
Figure 3-5-2 Tied Notes
When playing tied notes, the note is played for the full duration of both rhythmic values; there is no articulationbetween the notes. For example aa quarter note tied to an eight note would be played for a total of one and ahalf beats (as illustrated in Figure 3-5-2). Notes of any duration may be tied together and the tie may extendover a bar line.
Director Cadets 3, 2008, Ottawa, ON: Department of National Defence
Figure 3-5-3 Tied Notes Over a Bar Line
DOTTED NOTES
The dot extends the value of the note by one half its own value. For example, a dotted quarter note wouldcombine both its own value plus an eighth note’s value. It is important to remember that dotted notes, unliketied notes must fit within one measure.
Director Cadets 3, 2008, Ottawa, ON: Department of National Defence
Figure 3-5-4 Comparison of Dotted Notes to Tied Notes
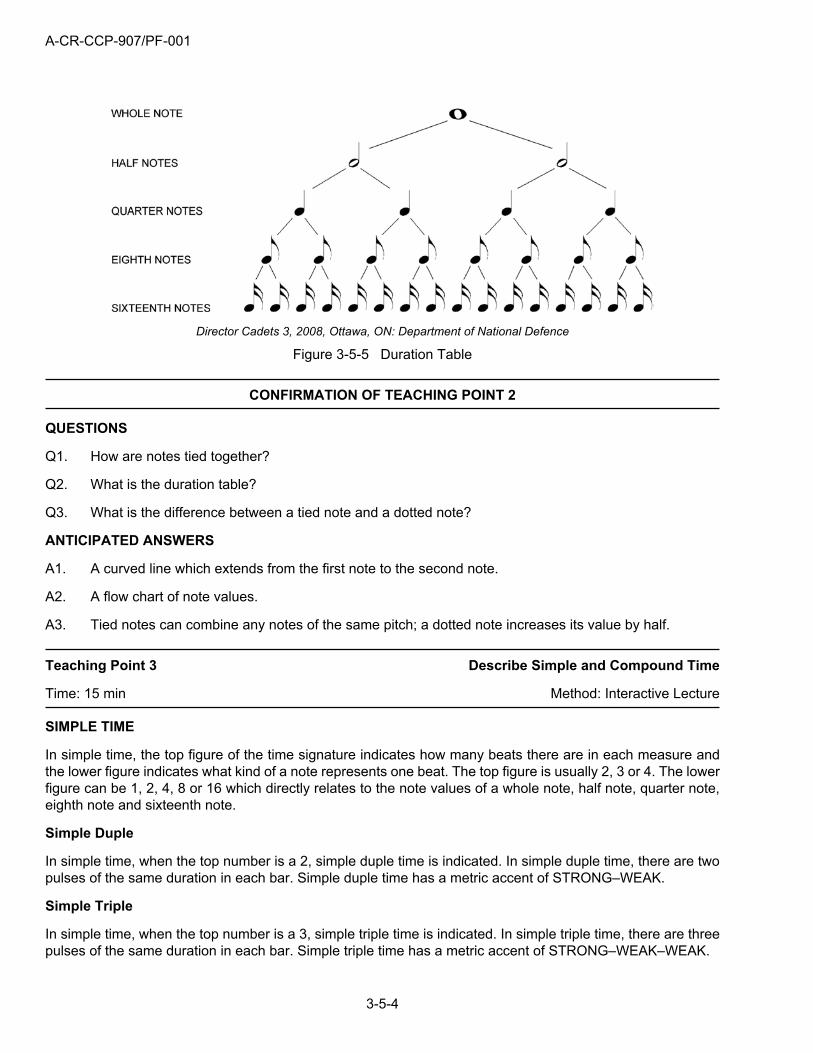
Duration Table. A flow chart of note values. At the top of the chart is a whole note. The descending rowsare divided into the equivalent number of notes of the next lower value (the next lower value is half that ofthe row above).
A-CR-CCP-907/PF-001
3-5-4
Director Cadets 3, 2008, Ottawa, ON: Department of National Defence
Figure 3-5-5 Duration Table
CONFIRMATION OF TEACHING POINT 2
QUESTIONS
Q1. How are notes tied together?
Q2. What is the duration table?
Q3. What is the difference between a tied note and a dotted note?
ANTICIPATED ANSWERS
A1. A curved line which extends from the first note to the second note.
A2. A flow chart of note values.
A3. Tied notes can combine any notes of the same pitch; a dotted note increases its value by half.
Teaching Point 3 Describe Simple and Compound Time
Time: 15 min Method: Interactive Lecture
SIMPLE TIME
In simple time, the top figure of the time signature indicates how many beats there are in each measure andthe lower figure indicates what kind of a note represents one beat. The top figure is usually 2, 3 or 4. The lowerfigure can be 1, 2, 4, 8 or 16 which directly relates to the note values of a whole note, half note, quarter note,eighth note and sixteenth note.
Simple Duple
In simple time, when the top number is a 2, simple duple time is indicated. In simple duple time, there are twopulses of the same duration in each bar. Simple duple time has a metric accent of STRONG–WEAK.
Simple Triple
In simple time, when the top number is a 3, simple triple time is indicated. In simple triple time, there are threepulses of the same duration in each bar. Simple triple time has a metric accent of STRONG–WEAK–WEAK.

A-CR-CCP-907/PF-001
3-5-5
Simple Quadruple
In simple time, when the top number is a 4, simple quadruple time is indicated. In simple quadruple time, thereare four pulses of the same duration in each bar. Simple quadruple time has a metric accent of STRONG–WEAK–MEDIUM–WEAK.
COMPOUND TIME
The difference between simple and compound time is in simple time each beat has a 2-pulse, pendulum-typerhythm and therefore, is either divisible by two or a multiple of two. In compound time, each beat has a 3-pulserhythm (either waltz or pointed); and therefore, is either divisible by three or a multiple of three.
Compound Duple
In compound time, when the top number is a 6, compound duple time is indicated. In compound duple time,there are two dotted pulses of the same duration in each bar. Compound duple time has a metric accent ofSTRONG–WEAK.
Compound Triple
In compound time, when the top number is a 9, compound triple time is indicated. In compound triple time, thereare three pulses of the same duration in each bar. Compound triple time has a metric accent of STRONG–WEAK–WEAK.
Compound Quadruple
In compound time, when the top number is a 12, compound quadruple time is indicated. In compound quadrupletime, there are four pulses of the same duration in each bar. Compound quadruple time has a metric accentof STRONG–WEAK–MEDIUM–WEAK.
CONFIRMATION OF TEACHING POINT 3
QUESTIONS
Q1. In simple time, what numbers may be used on the bottom of a time signature?
Q2. In compound time, what restriction is placed on the top number?
Q3. What are the three metric accents?
ANTICIPATED ANSWERS
A1. 1, 2, 4, 8, 16.
A2. The top number must be divisible by three.
A3. STRONG–WEAK, STRONG–WEAK–WEAK, and STRONG–WEAK–MEDIUM–WEAK.
Teaching Point 4 Explain Triplets
Time: 5 min Method: Interactive Lecture
A triplet is made up of three notes with the same note value. Above the notes there is a bracket and a numberthree which identifies the group as a triplet.

A-CR-CCP-907/PF-001
3-5-6
Director Cadets 3, 2008, Ottawa, ON: Department of National Defence
Figure 3-5-6 Eighth Note Triplet
A triplet is a group of three notes which take place in the time that two notes of the same value would normallyoccur.
Director Cadets 3, 2008, Ottawa, ON: Department of National Defence
Figure 3-5-7 Triplet Comparison
When counting triplets, the word triplet is used. The syllables are split over the three note values such as TRI–PL–ET. When counting a group of triplets, the first syllable may be replaced with the beat on which the tripletoccurs. For example, ONE–PL–ET, TWO–PL–ET, etc.
A triplet is a rhythmic value which is not normally found in a time signature. Due to this, triplets only normallyoccur in simple time signatures. In compound time, every beat has a 3-pulse subdivision so it seems that everybeat is made up of a triplet. Notes in compound time are not written as a triplet.
CONFIRMATION OF TEACHING POINT 4
QUESTIONS
Q1. What is a triplet?
Q2. How is a triplet written?
Q3. Are there triplets in compound time?
ANTICIPATED ANSWERS
A1. A group of three notes of equal value which occur in the space when two notes of the same valuenormally occur.
A-CR-CCP-907/PF-001
3-5-7
A2. Triplets are written with a bracket and a number three written over them.
A3. No.
END OF LESSON CONFIRMATION
QUESTIONS
Q1. What syllable is used for triplets?
Q2. What is the difference between a tied and dotted note?
Q3. What are the three subcategories of simple and compound time signatures?
ANTICIPATED ANSWERS
A1. TRI–PL–ET or ONE–PL–ET, TWO–PL–ET, etc.
A2. Tied notes can combine any notes of the same pitch; a dotted note increases its value by half.
A3. Duple, triple, and quadruple.
CONCLUSION
HOMEWORK/READING/PRACTICE
N/A.
METHOD OF EVALUATION
This lesson is assessed IAW A-CR-CCP-911/PG-001, Chapter 3, Annex A, Appendix 3.
CLOSING STATEMENT
Rhythm gives melody its shape and feel; it is the structure of music. Being able to recognize and apply rhythmassists cadets in becoming better musicians.
INSTRUCTOR NOTES/REMARKS
N/A.
REFERENCES
C0-257 (ISBN 1-55440-011-2) Wharram, B. (2005). Elementary Rudiments of Music. Mississauga, ON:The Frederick Harris Music Co.

A-CR-CCP-908/PF-001
S315.01-1
COMMON TRAINING
PIPE BANDINTERMEDIATE MUSICIAN
INSTRUCTIONAL GUIDE
SECTION 1
EO S315.01 – DEFINE MUSIC SYMBOLS AND TERMS
Total Time: 40 min
PREPARATION
PRE-LESSON INSTRUCTIONS
Resources needed for the delivery of this lesson are listed in the lesson specification located in A-CR-CCP-908/PG-001, Pipe Band–Intermediate Musician Qualification Standard and Plan, Chapter 4. Specific uses for saidresources are identified throughout the instructional guide within the TP for which they are required.
Review the lesson content and become familiar with the material prior to delivering the lesson.
Photocopy the Pipe Band Music Classification Worksheet located at Attachment A for each cadet.
PRE-LESSON ASSIGNMENT
Nil.
APPROACH
An interactive lecture was chosen for this lesson as it is an interactive way to present music symbols, termsand classifications of pipe band music.
INTRODUCTION
REVIEW
Nil.
OBJECTIVES
By the end of this lesson the cadet shall have defined musical symbols and terms.
IMPORTANCE
It is important for cadets to know the meaning of musical terms and symbols to ensure they can play the musicin the manner that the composer intended.
A-CR-CCP-908/PF-001
S315.01-2
Teaching Point 1 Define music symbols and terms.
Time: 20 min Method: Interactive Lecture
When describing the variations in volume, use your voice to demonstrate the differentterms.
Crescendo
The volume at which the music is played is referred to as dynamics. The words that are used for the dynamicsare referred to as musical terms.
While the dynamics are a steady volume, there are musical terms that allow for variations in volume. Theseterms are placed throughout the music to provide effects and to create a smooth transition between dynamics.
Crescendo is when the music gradually becomes louder. Usually there are dynamic markings indicating thevolume at the beginning and the end of the crescendo. If no dynamic markings are indicated, then the increasein volume is one dynamic level.
Figure 1 CrescendoNote. Created by Director Cadets 3, 2009, Ottawa, ON: Department of National Defence.
Decrescendo (Diminuendo)
Decrescendo, or diminuendo, is used when the music gradually becomes softer. Usually there will be dynamicmarkings indicating the volume at the beginning and the end of the crescendo. If no dynamic markings areindicated, then the decrease in volume is one dynamic level.
Figure 2 DecrescendoNote. Created by Director Cadets 3, 2009, Ottawa, ON: Department of National Defence.
Decrescendo and diminuendo both mean to gradually get softer, but diminuendo wasin use before the term crescendo. When crescendo started to be used, the opposite—decrescendo, was introduced. This is why two musical terms have the same definition.
Dynamics are used throughout a piece of music to direct the performer to express the intent of the composer.The dynamics contribute to the "mood" of the music. Think of a scary part of a movie with the music playingvery softly (pianissimo). If that same piece of music was played at a loud volume (forte), then the section ofthe movie would not have the same effect.
Another example of how dynamics affect the music is how it energizes people. It could be played very loud(fortissimo), to get the group motivated. If the same piece of music was played at a soft dynamic (piano), themusic may not have the same effect.

A-CR-CCP-908/PF-001
S315.01-3
Figure 3 Dynamics TableNote. Created by Director Cadets 3, 2009, Ottawa, ON: Department of National Defence.
Mention to the cadets that soft and quiet are the same thing when referring to dynamics.
CONFIRMATION OF TEACHING POINT 1
QUESTIONS:
Q1. The volume at which music is played is referred to as what?
Q2. What is the definition of mezzo forte?
Q3. What is the abbreviation for pianissimo?
ANTICIPATED ANSWERS:
A1. Dynamics.
A2. Moderately loud.
A3. pp.
Teaching Point 2 Explain the classification of pipe band music.
Time: 15 min Method: Interactive Lecture
Traditionally all bagpipe music has been divided into three classes. These three classes of bagpipe music havebeen developed over hundreds of years. Over time an individual class may gain or lose popularity but theyhave all evolved, endured and are still played and enjoyed by millions today.

A-CR-CCP-908/PF-001
S315.01-4
The three classifications of bagpipe music are:
1. ceol beag (little music),
2. ceol meadhonach (middle music), and
3. ceol mor (big music / piobaireachd).
CEOL BEAG (LITTLE MUSIC)
Ceol beag, is a Gaelic term meaning little music. It is within this class of music that many modern tunes (tunescomposed after about 1900) fall. Tunes such as marches, strathspeys, hornpipes and reels are commonlyclassified as ceol beag.
Marches. Marches are a genre of music characterized by a strong regular rhythm. Traditionally, marches werespecifically written for marching troops. They can be written in either slow or quick time in virtually any timesignature.
Strathspeys. Strathspeys are both a type of music as well as a type of dance. Strathspeys are written incommon time (4/4) and usually set to eighth notes.
Hornpipes. Hornpipes are a type of dance and associated music that became popular in the 17th century andhave remained popular until today. Hornpipes are characterized by their bouncy upbeat rhythm and are usuallywritten in 2/4 or 4/4 time.
Reels. Reels are a type of folk dance that are believed to have originated in the 1500s. Most reels are writtenin cut common time () but can also be written in other time signatures.
CEOL MEADHONACH (MIDDLE MUSIC)
Ceol meadhonach, is a Gaelic term meaning middle music. This type of music has evolved over hundreds ofyears. Traditionally, it was the alternative to ceol mor (big music / piobaireachd) which, with its very structuredand sombre melody, did not appeal to many or lend itself to vocals. It is often hard to classify exactly whattunes fall under 'middle music' (due to modern day trends in pipe band composing). As a general rule, mostslow airs, jigs, and folk tunes, as well as music that does not follow the structure of a piobaireachd and has notbeen adapted for marching or dancing, generally fall under this classification.
Slow airs. Slow airs are characterized by their graceful and elegant flow. In many cases, they can be seen asthe piping equivalent to love songs or ballads, as their lyrics usually chronicle a story or event. Bold rhythmicand harmonious melodies are used to create hauntingly emotional and meaningful tunes.
Jigs. Jigs are a type of Irish folk music and dance. Next to reels, jigs are the most popular type of danceoriginating in the British Isles. Jigs are written in compound time, either 6/8, 9/8 or 12/8 time.
CEOL MOR (BIG MUSIC / PIOBAIREACHD)
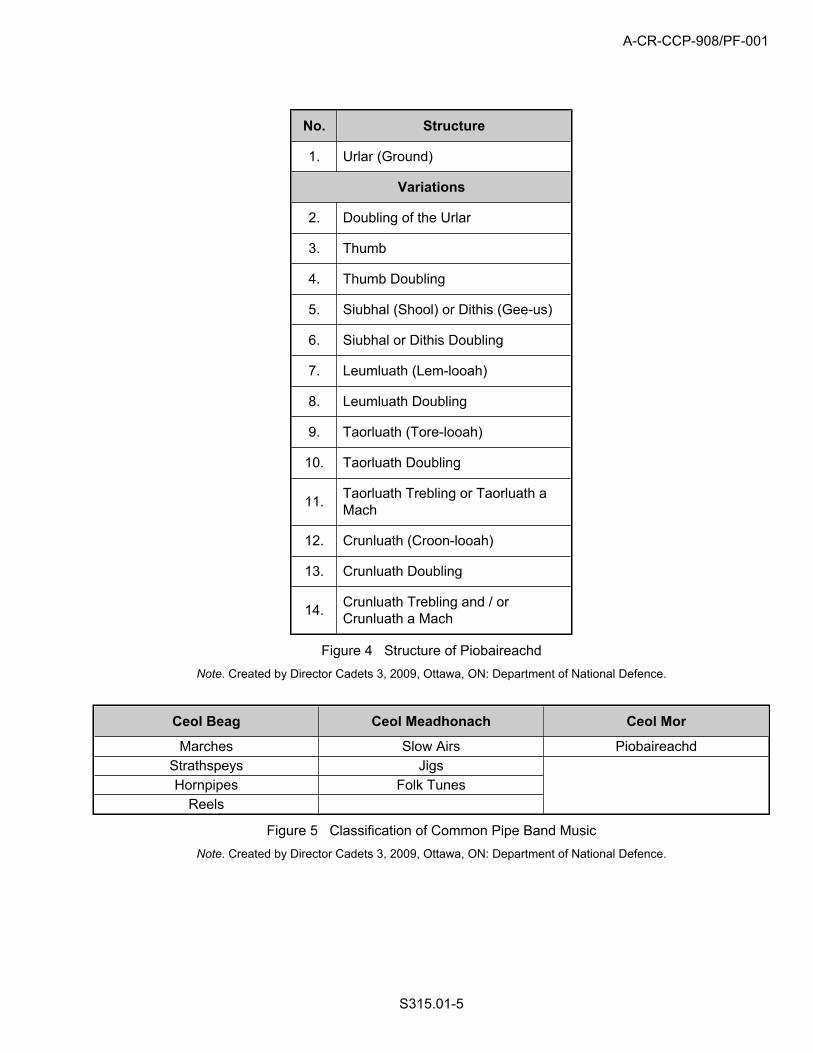
Ceol mor, more commonly known as piobaireachd, is considered to be the classical music of the bagpipe. Likemost forms of classical music, all parts of the piobaireachd are based around a central and evolving theme.In general, piobaireachd is characterized by its slow and haunting melodies which progress from a simplebasic melody (the Urlar) through increasingly technical and complex parts, known as variations. There areapproximately 300 to 400 piobaireachd that have been written to date. Many of the best are believed to havebeen written by members of the MacCrimmon family and their students.
A-CR-CCP-908/PF-001
S315.01-5
No. Structure
1. Urlar (Ground)
Variations
2. Doubling of the Urlar
3. Thumb
4. Thumb Doubling
5. Siubhal (Shool) or Dithis (Gee-us)
6. Siubhal or Dithis Doubling
7. Leumluath (Lem-looah)
8. Leumluath Doubling
9. Taorluath (Tore-looah)
10. Taorluath Doubling
11. Taorluath Trebling or Taorluath aMach
12. Crunluath (Croon-looah)
13. Crunluath Doubling
14. Crunluath Trebling and / orCrunluath a Mach
Figure 4 Structure of PiobaireachdNote. Created by Director Cadets 3, 2009, Ottawa, ON: Department of National Defence.
Ceol Beag Ceol Meadhonach Ceol Mor
Marches Slow Airs PiobaireachdStrathspeys Jigs Hornpipes Folk Tunes
Reels
Figure 5 Classification of Common Pipe Band MusicNote. Created by Director Cadets 3, 2009, Ottawa, ON: Department of National Defence.

A-CR-CCP-908/PF-001
S315.01-6
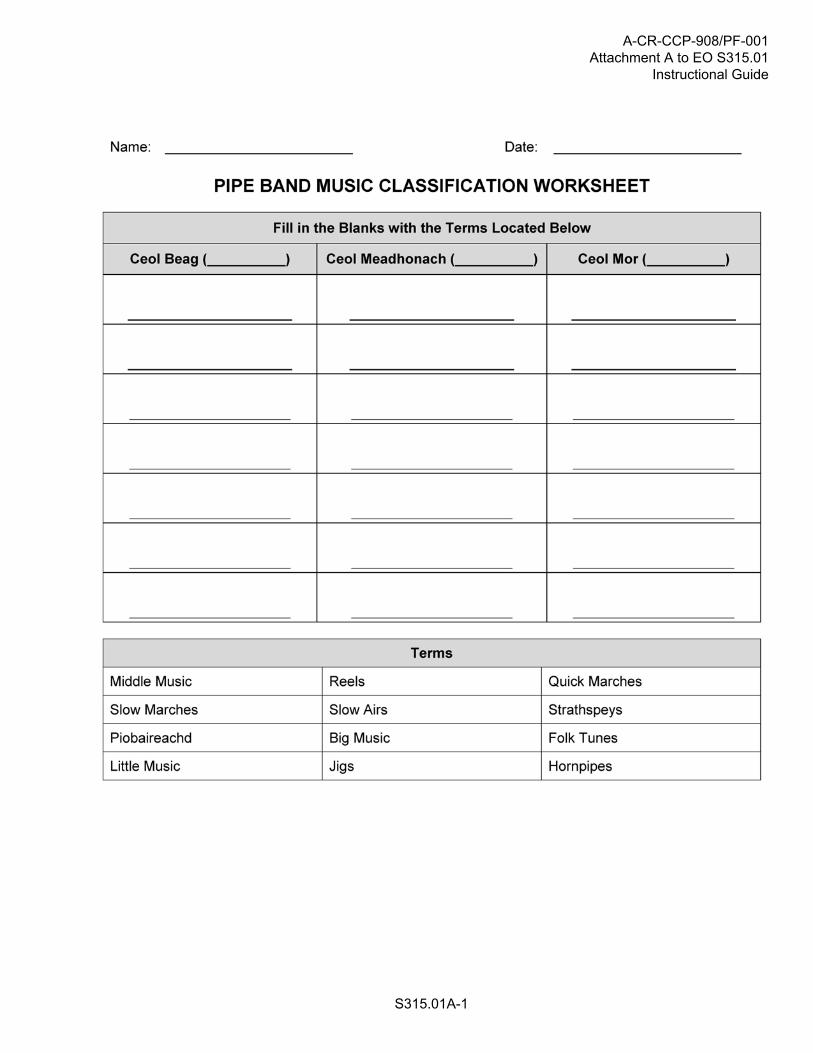
ACTIVITY
Time: 5 min
OBJECTIVE
The objective of this activity is to have the cadets classify pipe band music.
RESOURCES
Pipe Band Classification Worksheet located at Attachment A (one for every cadet), and
Pipe Band Classification Worksheet Answer Key located at Attachment B (for the instructor).
ACTIVITY LAYOUT
Nil.
ACTIVITY INSTRUCTIONS
1. Distribute a copy of the Pipe Band Classification Worksheet to each cadet.
2. Have the cadets fill in the blanks on the worksheet with the terms provided.
3. After five minutes, correct using the Pipe Band Classification Worksheet Answer Key located atAttachment B.
SAFETY
Nil.
CONFIRMATION OF TEACHING POINT 2
The cadets' completion of the Pipe Band Classification Worksheet will serve as the confirmation of this TP.
END OF LESSON CONFIRMATION
QUESTIONS:
Q1. What is the definition of mezzo piano?
Q2. What is the definition of diminuendo?
Q3. What is the first part of a piobaireachd?
ANTICIPATED ANSWERS:
A1. Moderately soft.
A2. Gradually get softer.
A3. The Urlar (ground).
A-CR-CCP-908/PF-001
S315.01-7
CONCLUSION
HOMEWORK / READING / PRACTICE
Nil.
METHOD OF EVALUATION
This lesson is assessed IAW A-CR-CCP-911/PG-001, Canadian Cadet Organizations Pipe Band–MusicProficiency Levels Qualification Standard, Chapter 3, Annex E, Appendix 3.
CLOSING STATEMENT
Music symbols and terms are used everywhere in music. It is important to be able to understand and definethem as this will give a greater understanding of how to read, analyze and classify music.
INSTRUCTOR NOTES / REMARKS
Nil.
REFERENCES
C0-257 ISBN 1-55440-011-2 Wharram, B. (2005). Elementary rudiments of music. Mississauga, ON: TheFrederick Harris Music Co.
C0-277 ISBN 0-9697948-7-8 Cairns, A. (2002). The "how to" manual: Learn to play the great Highland bagpipe.London, ON: Scott's Highland Services Ltd.
C0-282 ISBN 09688371-4-X Chatto, A. (2003). Learn to play the pipe band snare drum. London, ON: Scott'sHighland Services Ltd.
C0-342 ISBN 0-9734718-0-8 Cairns, A. (2004). The "how to" piobaireachd manual and CD. London, ON:Author.
C0-427 Celtic-instruments.com. (2008). The great Highland bagpipes. Retrieved January 29, 2009, from http://www.celtic-instruments.com/pipes/great-highland-bagpipes/index.html.
C0-428 Heineman, P. (2008). Highland bagpipe tutor student manual: Types of tunes. Omaha, NE: OmahaPipe and Drums.
A-CR-CCP-908/PF-001
THIS PAGE INTENTIONALLY LEFT BLANK
S315.01-8
A-CR-CCP-908/PF-001Attachment A to EO S315.01
Instructional Guide
S315.01A-1
A-CR-CCP-908/PF-001Attachment A to EO S315.01Instructional Guide
THIS PAGE INTENTIONALLY LEFT BLANK
S315.01A-2

A-CR-CCP-908/PF-001Attachment B to EO S315.01
Instructional Guide
S315.01B-1

A-CR-CCP-908/PF-001Attachment B to EO S315.01Instructional Guide
THIS PAGE INTENTIONALLY LEFT BLANK
S315.01B-2

A-CR-CCP-908/PF-001
S315.02-1
COMMON TRAINING
PIPE BANDINTERMEDIATE MUSICIAN
INSTRUCTIONAL GUIDE
SECTION 2
EO S315.02 – TRANSCRIBE PIPE BAND MUSIC
Total Time: 80 min
PREPARATION
PRE-LESSON INSTRUCTIONS
Resources needed for the delivery of this lesson are listed in the lesson specification located in A-CR-CCP-908/PG-001, Pipe Band–Intermediate Musician Qualification Standard and Plan, Chapter 4. Specific uses for saidresources are identified throughout the instructional guide within the TP for which they are required.
Review the lesson content and become familiar with the material prior to delivering the lesson.
Photocopy the Transcribe Pipe Band Music Demonstration located at Attachment A on a transparency or drawenough staves to transcribe the sample tune onto a flip chart or chalkboard.
Photocopy the sheet music located at Attachments B, C or D for each cadet according to their instrument.
If desired, any single part of a quick march and / or any single part of a slow march (otherthan that located at Attachments B, C, or D) may be used as long as it is comparable inlength and difficulty.
PRE-LESSON ASSIGNMENT
Nil.
APPROACH
An interactive lecture was chosen for TP 1 to give an overview of how to write music.
A demonstration was chosen for TP 2 as it allows the instructor to explain and demonstrate how to preparemanuscript paper.
A practical activity was chosen for TP 3 as it is an interactive way to allow the cadets to practice transcribingmusic in a fun and challenging setting.
INTRODUCTION
REVIEW
Nil.

A-CR-CCP-908/PF-001
S315.02-2
OBJECTIVES
By the end of this lesson the cadet shall be expected to transcribe one part of a quick march and one partof a slow march.
IMPORTANCE
It is important for cadets to be able to transcribe pipe band music as it is a crucial skill required for developingproficiency in writing music.
A-CR-CCP-908/PF-001
S315.02-3
Teaching Point 1 Discuss how to write music.
Time: 15 min Method: Interactive Lecture
Writing music is a skill that has evolved over hundreds of years. Throughout most of history, music wasconsidered an aural tradition; meaning that it was only passed on by ear, memorized and repeated. Althoughsome ancient societies are now believed to have used different methods of writing music, most of these arerarely seen or even understood today.
The system of writing music based on a staff (lines and spaces) originated around the 11th century. It was atthat time that a monk named Guido d'Arezzo first developed a system of boxes placed on a six-line staff. Eachline of the staff was related to a pitch: Ut, Re, Mi, Fa, So, La (the original bases for the current: Doh, Re, Mi, Fa,So, La, Ti). Over the next five centuries, this system evolved and by the 16th century the five-line staff (which isbased on the grand staff) became the predominant music notation system in the world.
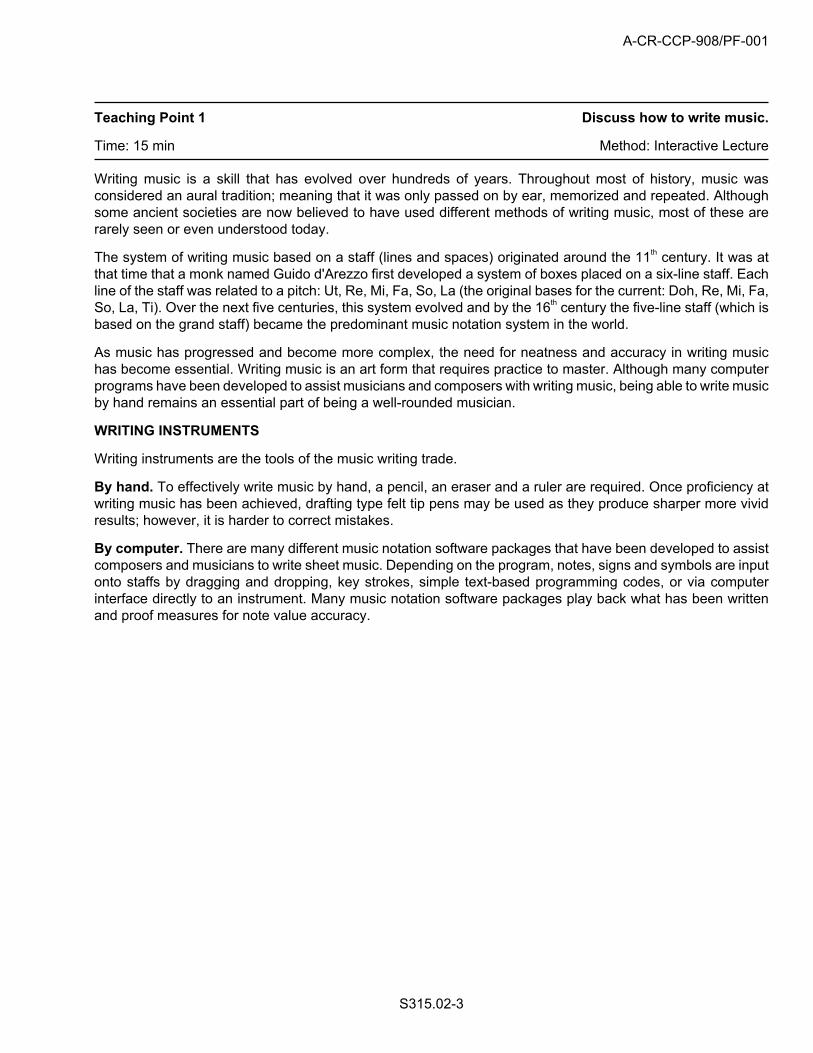
As music has progressed and become more complex, the need for neatness and accuracy in writing musichas become essential. Writing music is an art form that requires practice to master. Although many computerprograms have been developed to assist musicians and composers with writing music, being able to write musicby hand remains an essential part of being a well-rounded musician.
WRITING INSTRUMENTS
Writing instruments are the tools of the music writing trade.
By hand. To effectively write music by hand, a pencil, an eraser and a ruler are required. Once proficiency atwriting music has been achieved, drafting type felt tip pens may be used as they produce sharper more vividresults; however, it is harder to correct mistakes.
By computer. There are many different music notation software packages that have been developed to assistcomposers and musicians to write sheet music. Depending on the program, notes, signs and symbols are inputonto staffs by dragging and dropping, key strokes, simple text-based programming codes, or via computerinterface directly to an instrument. Many music notation software packages play back what has been writtenand proof measures for note value accuracy.
A-CR-CCP-908/PF-001
S315.02-4
Figure 1 Example of Music Notation Software Package (Celtic Pipes)Note. Created by Director Cadets 3, 2009, Ottawa, ON: Department of National Defence.
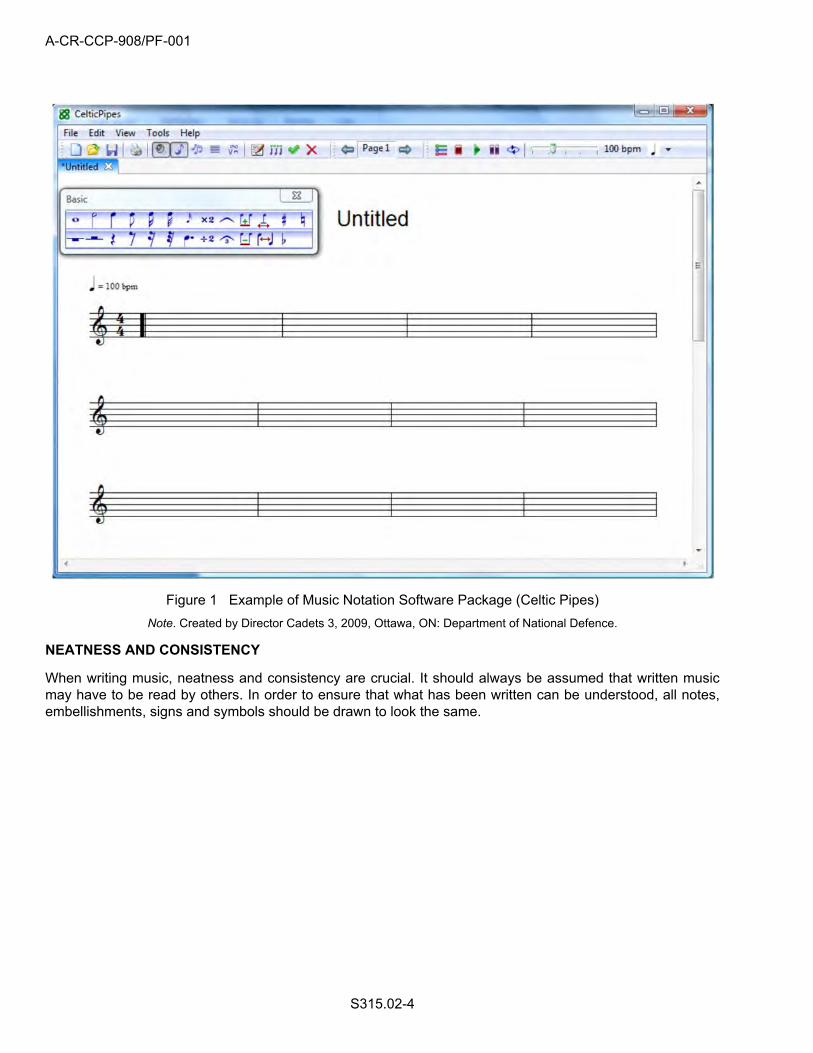
NEATNESS AND CONSISTENCY
When writing music, neatness and consistency are crucial. It should always be assumed that written musicmay have to be read by others. In order to ensure that what has been written can be understood, all notes,embellishments, signs and symbols should be drawn to look the same.
A-CR-CCP-908/PF-001
S315.02-5
One way to ensure consistency when writing music is to lightly draw a horizontal line (aboutone half the height of the staff) above and below the staff. When writing notes with tied tails,the stems should extend to the bottom line. When writing grace notes or embellishmentswith tied tails, the stems should extend above to the top line. For notes with no tails or tailsthat are not tied to another note, the stems should extend down the same height as the staff(eg, if the staff measures 1 cm high, the stem of single notes should extend 1 cm down).
Figure 2 Drawing StemsNote. Created by Director Cadets 3, 2009, Ottawa, ON: Department of National Defence.
LAYOUT OF MEASURES
Each staff should be divided into a maximum of four measures of equal length. However, if the tune / partcontains introductory notes and / or first and second endings, the length of the measures may have to beadjusted to accommodate these.
NOTE SPACING
Notes should be spaced by dividing each measure into sections that equal the number of beats per measure.For example, in 2/4, each measure would be divided into two sections. All notes that equal one beat in durationshould fit in the applicable section. In 2/4, the note that falls on the first beat would be written at the beginning ofthe bar with the note that falls on the second bar being written in the middle of the bar. If there is only one notein the measure, it would be written at the beginning of the measure. This helps the reader to find the beat notes.
Another method to help ensure notes are spaced evenly within the measure is to beginfilling in the notes starting from the end of the measure and working backwards. Once thefirst note has been drawn, subdivide the measure by the number of beats to determinewhere the remaining notes will fall.

A-CR-CCP-908/PF-001
S315.02-6
Figure 3 Example of a Transcribed TuneNote. Created by Director Cadets 3, 2009, Ottawa, ON: Department of National Defence.
CONFIRMATION OF TEACHING POINT 1
QUESTIONS:
Q1. What are the basic instruments required to write music?
Q2. How should each measure be subdivided to ensure better spacing?
Q3. What can help cadets ensure that notes are spaced evenly within a measure?
ANTICIPATED ANSWERS:
A1. A pencil, eraser and a ruler.
A2. By the number of beats.
A3. Begin filling in the notes starting from the end of the measure and working backwards.

A-CR-CCP-908/PF-001
S315.02-7
Teaching Point 2 Demonstrate how to prepare manuscript paper.
Time: 15 min Method: Demonstration
While covering each of the steps, demonstrate each step using the transparency (flip chartor chalkboard)
DETERMINE THE NUMBER OF STAFFS REQUIRED
Based on the number of staffs used in the original tune, allot that many on the manuscript paper.
Figure 4 Determine the Number of Staffs RequiredNote. Created by Director Cadets 3, 2009, Ottawa, ON: Department of National Defence.
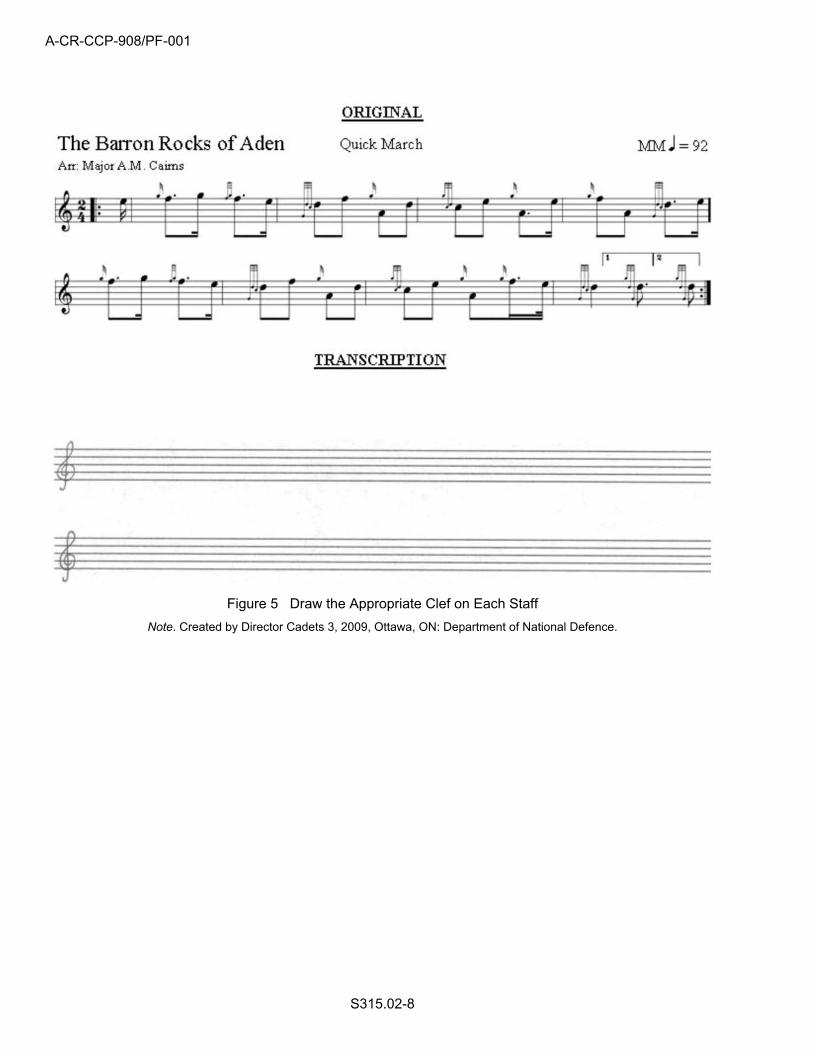
DRAW THE APPROPRIATE CLEF ON EACH STAFF
At the beginning of each staff draw the appropriate clef. Ensure that all clefs are drawn to look the same andtake up the same amount of space on each staff.
A-CR-CCP-908/PF-001
S315.02-8
Figure 5 Draw the Appropriate Clef on Each StaffNote. Created by Director Cadets 3, 2009, Ottawa, ON: Department of National Defence.
A-CR-CCP-908/PF-001
S315.02-9
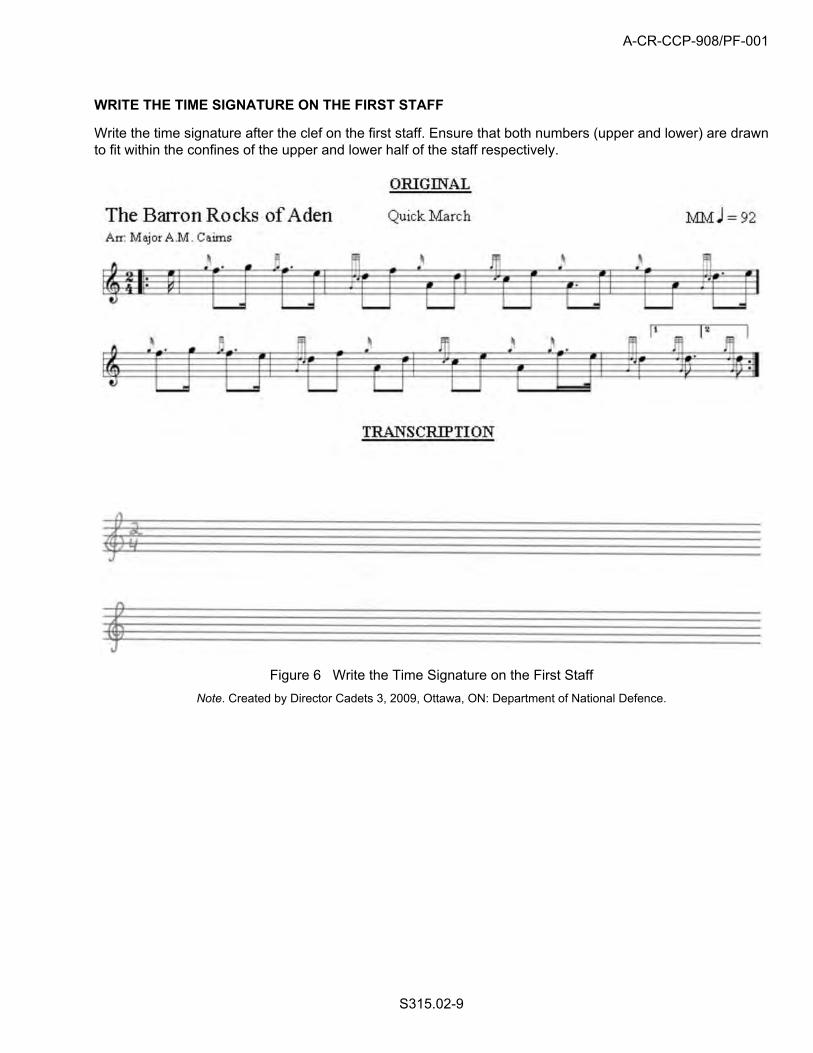
WRITE THE TIME SIGNATURE ON THE FIRST STAFF
Write the time signature after the clef on the first staff. Ensure that both numbers (upper and lower) are drawnto fit within the confines of the upper and lower half of the staff respectively.
Figure 6 Write the Time Signature on the First StaffNote. Created by Director Cadets 3, 2009, Ottawa, ON: Department of National Defence.
A-CR-CCP-908/PF-001
S315.02-10
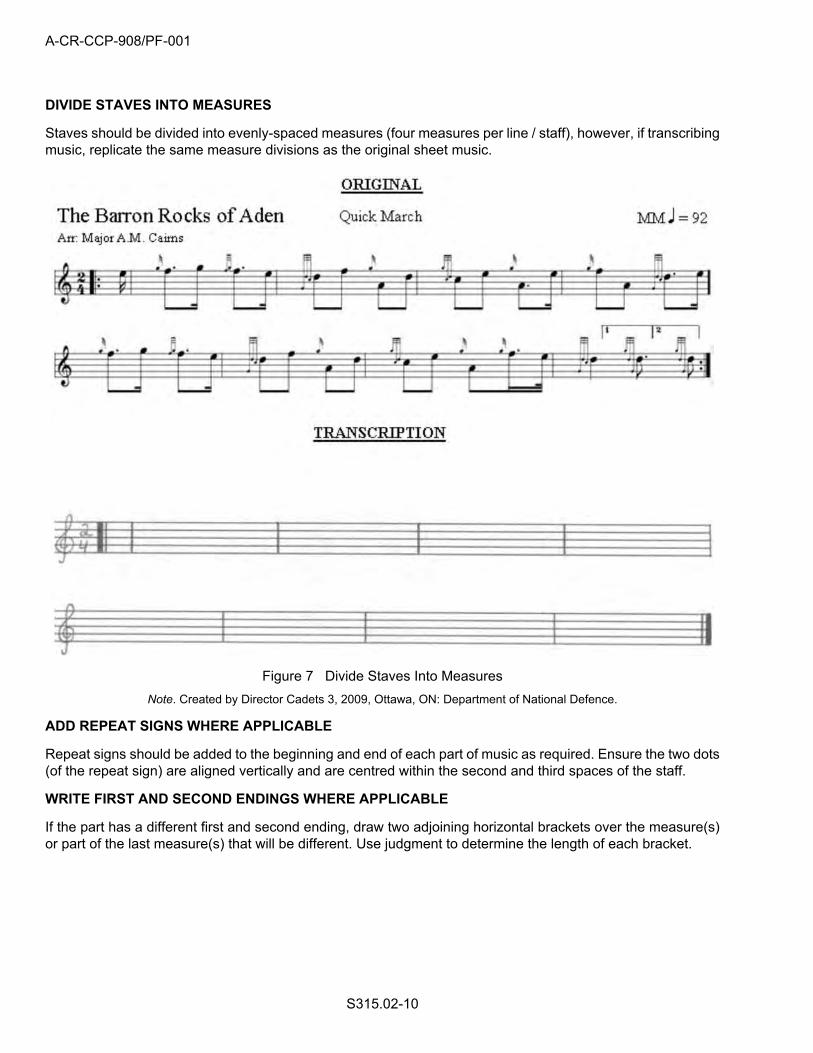
DIVIDE STAVES INTO MEASURES
Staves should be divided into evenly-spaced measures (four measures per line / staff), however, if transcribingmusic, replicate the same measure divisions as the original sheet music.
Figure 7 Divide Staves Into MeasuresNote. Created by Director Cadets 3, 2009, Ottawa, ON: Department of National Defence.
ADD REPEAT SIGNS WHERE APPLICABLE
Repeat signs should be added to the beginning and end of each part of music as required. Ensure the two dots(of the repeat sign) are aligned vertically and are centred within the second and third spaces of the staff.
WRITE FIRST AND SECOND ENDINGS WHERE APPLICABLE
If the part has a different first and second ending, draw two adjoining horizontal brackets over the measure(s)or part of the last measure(s) that will be different. Use judgment to determine the length of each bracket.

A-CR-CCP-908/PF-001
S315.02-11
Figure 8 Add Repeat Signs and First and Second EndingsNote. Created by Director Cadets 3, 2009, Ottawa, ON: Department of National Defence.
WRITE DYNAMIC / TEMPO MARKINGS
Add any dynamic markings to the parts where required, and add the tempo (metronome marking [M.M.]) to theupper right above the top staff. The M.M. takes the form of M.M. quarter, dotted quarter, or half note = numberof beats per minute (eg, M.M. quarter note = 92).
WRITE THE TITLE, COMPOSER / ARRANGER AND TYPE OF TUNE
Write the title, composer / arranger and the type of tune at the top of the manuscript paper. The title shouldbe the dominating text on the page written either bigger and / or bolder than the composer / arranger and thetype of tune.

A-CR-CCP-908/PF-001
S315.02-12
Figure 9 Write in the Dynamic / Tempo Markings, Title, Composer / Arranger and the Type of TuneNote. Created by Director Cadets 3, 2009, Ottawa, ON: Department of National Defence.
CONFIRMATION OF TEACHING POINT 2
QUESTIONS:
Q1. True or False? The time signature is drawn only on the first staff.
Q2. In what form are tempo markings M.M. written?
Q3. What should be the dominating text on the page?
ANTICIPATED ANSWERS:
A1. True.
A2. The M.M. takes the form of M.M. quarter, dotted quarter, or half note = number of beats per minute(eg. M.M. quarter note = 92).
A3. The title should be the dominating text on the page written either bigger and / or bolder than thecomposer / arranger and the type of tune.

A-CR-CCP-908/PF-001
S315.02-13
Teaching Point 3 Conduct an activity where the cadets will transcribe a pieceof pipe band music.
Time: 40 min Method: Practical Activity
ACTIVITY
OBJECTIVE
The objective of this activity is to have the cadets transcribe a piece of pipe band music.
RESOURCES
Sheet music located at Attachments B, C or D,
Manuscript paper, and
Pencil with eraser.
ACTIVITY LAYOUT
Nil.
ACTIVITY INSTRUCTIONS
1. Distribute a copy of the sheet music (according to instrument) and manuscript paper to each cadet.
2. Have the cadets transcribe (copy) the sheet music onto the manuscript paper.
3. Once finished, collect the manuscript paper, review and debrief the cadets on their performance.
SAFETY
Nil.
CONFIRMATION OF TEACHING POINT 3
The cadets' participation in the activity will serve as the confirmation of this TP.
END OF LESSON CONFIRMATION
The cadets' participation in transcribing pipe band music will serve as the confirmation of this lesson.
CONCLUSION
HOMEWORK / READING / PRACTICE
Nil.
METHOD OF EVALUATION
This lesson is assessed IAW A-CR-CCP-911/PG-001, Canadian Cadet Organizations Pipe Band–MusicProficiency Levels Qualification Standard, Chapter 3, Annex E, Appendix 3.

A-CR-CCP-908/PF-001
S315.02-14
CLOSING STATEMENT
It is important for cadets to transcribe pipe band music as it is a crucial skill required for developing proficiencyin writing music.
INSTRUCTOR NOTES / REMARKS
Nil.
REFERENCES
Nil.
A-CR-CCP-908/PF-001Attachment A to EO S315.02
Instructional Guide
S315.02A-1
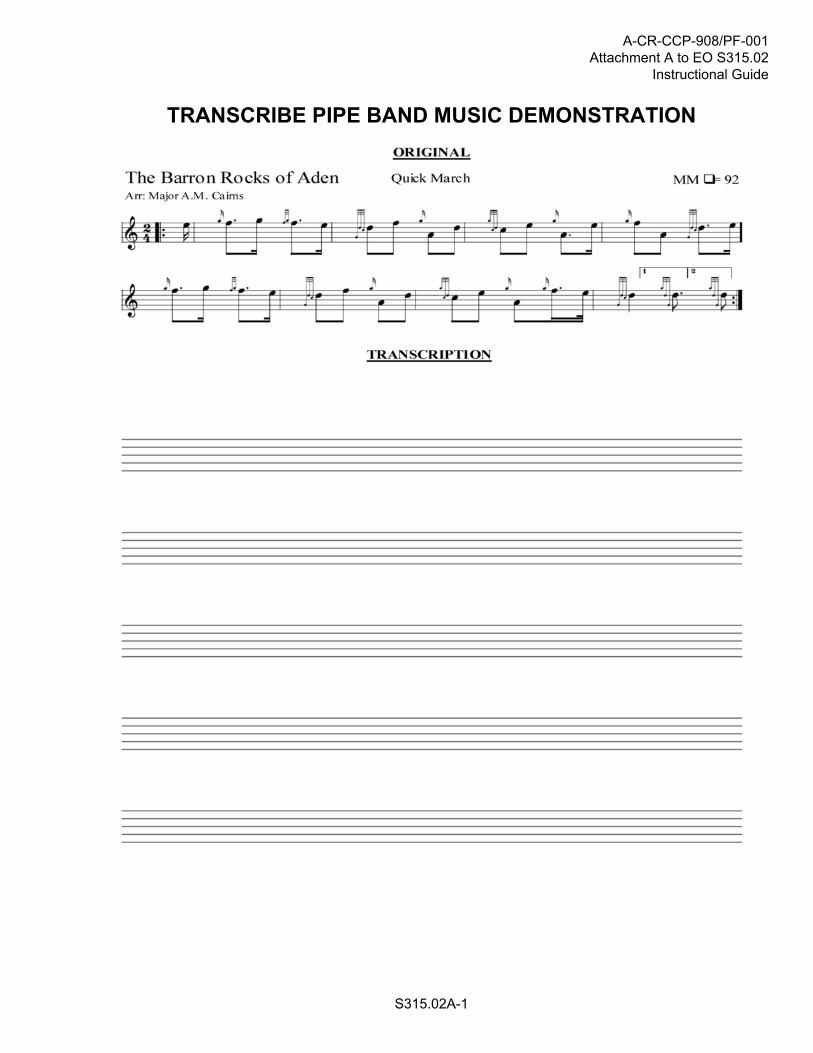
TRANSCRIBE PIPE BAND MUSIC DEMONSTRATION

A-CR-CCP-908/PF-001Attachment A to EO S315.02Instructional Guide
THIS PAGE INTENTIONALLY LEFT BLANK
S315.02A-2
A-CR-CCP-908/PF-001Attachment B to EO S315.02
Instructional Guide
S315.02B-1
Name: Date:
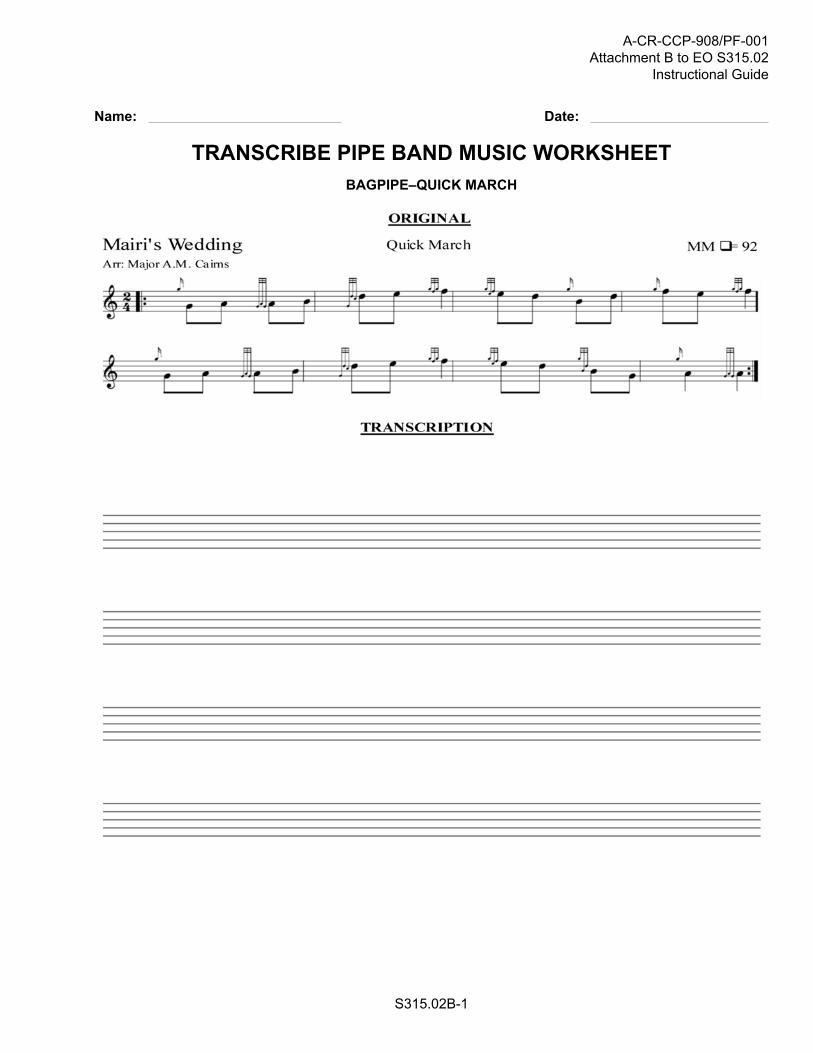
TRANSCRIBE PIPE BAND MUSIC WORKSHEETBAGPIPE–QUICK MARCH

A-CR-CCP-908/PF-001Attachment B to EO S315.02Instructional Guide
S315.02B-2
Name: Date:
TRANSCRIBE PIPE BAND MUSIC WORKSHEETBAGPIPE–SLOW MARCH
A-CR-CCP-908/PF-001Attachment C to EO S315.02
Instructional Guide
S315.02C-1
Name: Date:
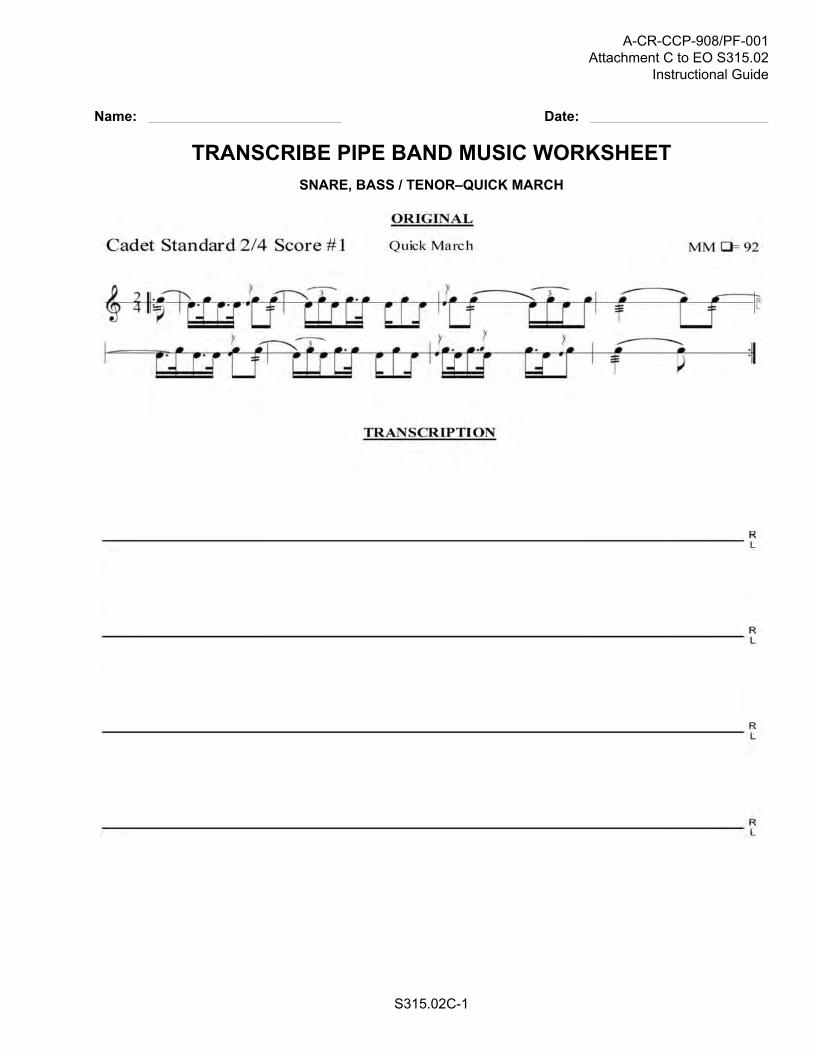
TRANSCRIBE PIPE BAND MUSIC WORKSHEETSNARE, BASS / TENOR–QUICK MARCH
A-CR-CCP-908/PF-001Attachment C to EO S315.02Instructional Guide
S315.02C-2
Name: Date:
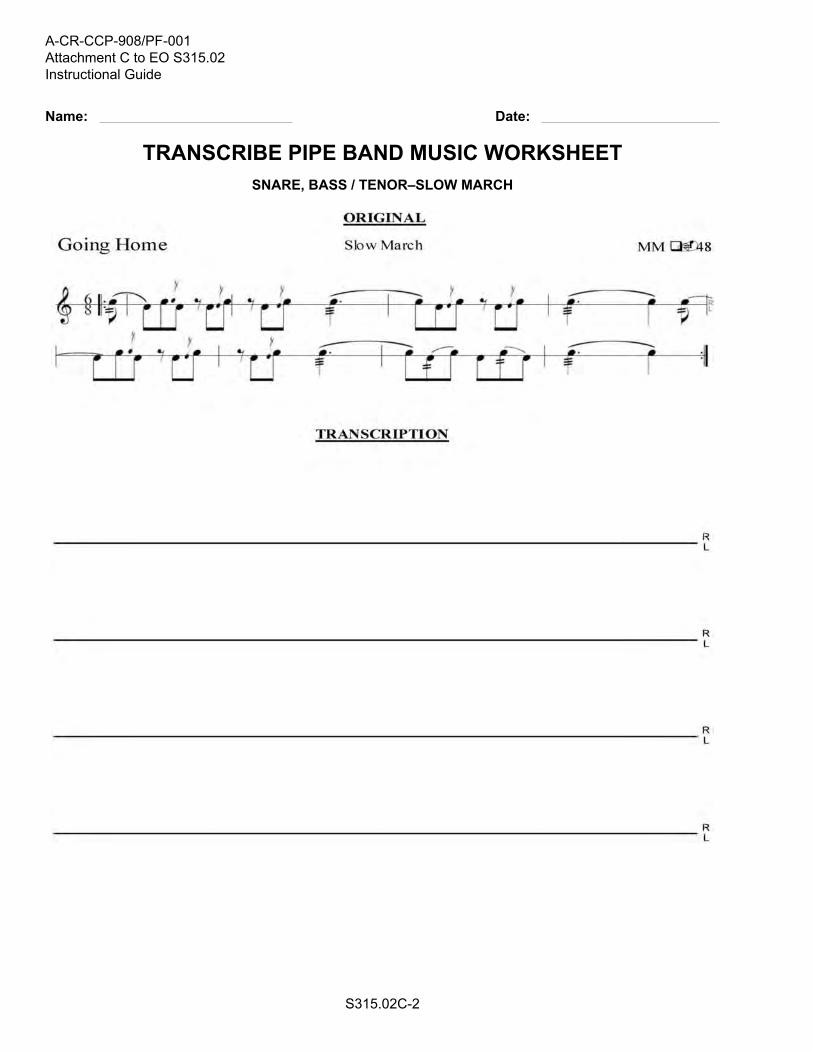
TRANSCRIBE PIPE BAND MUSIC WORKSHEETSNARE, BASS / TENOR–SLOW MARCH
A-CR-CCP-909/PF-001
S415.01-1
COMMON TRAINING
PIPE BANDADVANCED MUSICIAN
INSTRUCTIONAL GUIDE
SECTION 1
EO S415.01 – DEFINE SOUND
Total Time: 40 min
PREPARATION
PRE-LESSON INSTRUCTIONS
Resources needed for the delivery of this lesson are listed in the lesson specification located in A-CR-CCP-909/PG-001, Pipe Band–Advanced Musician Qualification Standard and Plan, Chapter 4. Specific uses for saidresources are identified throughout the instructional guide within the TP for which they are required.
Review the lesson content and become familiar with the material prior to delivering the lesson.
PRE-LESSON ASSIGNMENT
Nil.
APPROACH
An interactive lecture was chosen for this lesson to give an overview of defining sound.
INTRODUCTION
REVIEW
Nil.
OBJECTIVES
By the end of this lesson the cadet shall define sound by identifying the elements and the characteristics ofsound.
IMPORTANCE
It is important for cadets to have a basic understanding of sound as it directly relates to playing, tuning andproducing tone on pipe band instruments.
A-CR-CCP-909/PF-001
S415.01-2
Teaching Point 1 Define the elements of sound.
Time: 20 min Method: Interactive Lecture
Sound is the fundamental basis for music and speech and refers to anything that is heard. It is described as aseries of disturbances in a medium to which the ear is sensitive. Sound is comprised of four distinct elements:the originator, the vibrating body, the medium, and the receptor.
The disturbances send vibrations through the air (the vibrations take the form of a pattern similar to the wavepattern that appears when a pebble is dropped into a pool of water). The vibrations enter the ear where theyare converted into nerve impulses that register in the brain as sound. Sound can only be registered if all fourof the essential elements are present.
THE ORIGINATOR
The originator is the source of energy that sets the vibrating body into motion. This may be a piper forcing airthrough reeds or a drummer striking a drumhead.
THE VIBRATING BODY
The vibrating body, when disturbed or set in motion, sends vibrations through the medium. The vibrating bodycan be anything; however, in the case of pipe band instruments, the blades of the reeds and the drumheadsact as the vibrating bodies. Vibrations are measured in cycles per second or hertz (Hz). This is known as thefrequency of the sound.
THE MEDIUM
The medium is the means through which vibrations are communicated; it may consist of any form of matter.However, the density of the medium affects the quality of the sound and its loudness or volume. For humans,the best medium is air. In the absence of a medium (eg, in a vacuum), sound is not transmitted.
THE RECEPTOR
The receptor converts vibrations from the medium into electrical or nerve impulses. In humans and mostanimals, the receptor is the ear, or more specifically the cochlea. When vibrations (from the medium) enter theear, they are transferred through the ear canal to the cochlea, which converts them into nerve impulses. Thebrain interprets these impulses as sounds. Another example of a receptor is a microphone. Vibrations from themedium disturb the diaphragm, which with a magnet creates electrical impulses.
CONFIRMATION OF TEACHING POINT 1
QUESTIONS:
Q1. What are the four essential elements of sound?
Q2. Name the vibrating bodies involved in the production of sound in a pipe band?
Q3. What are two receptors?
ANTICIPATED ANSWERS:
A1. The originator, the vibrating body, the medium, and the receptor.
A2. The blades of the reeds and the drumheads.
A3. The ear and a microphone.

A-CR-CCP-909/PF-001
S415.01-3
Teaching Point 2 Define the characteristics of sound.
Time: 15 min Method: Interactive Lecture
In addition to the elements of sound, which are required to transmit sounds, every sound can be described bythree characteristics: pitch, volume and quality.
PITCH
Pitch is the height or depth of sound (eg, the difference between an adult’s voice and a child’s).
Pitch is measured by the number of vibrations generated by the vibrating body and is expressed as cycles persecond. The greater the number of cycles per second (Hz), the higher the pitch, and conversely, the lower theHz, the lower the pitch.
In the bagpipe, the reeds send columns of vibrating air through the chanter and the drones. The length of thecolumn the air travels through has a direct influence on its pitch. The longer the column of air, the deeper thesound (eg, the bass drone) and the shorter the column of air, the higher the sound (eg, the tenor drones).
Different sizes of bass and tenor drums also indicate the principle that larger vibrating bodies give lower sounds.
Other vibrating bodies, such as bells, metal tubes, harp strings, etc, indicate the relationship between size andpitch.
VOLUME
The volume of sound, also called amplitude or intensity, is the degree of loudness or softness of a sound. Justas pitch indicates the frequency of sound, the word volume describes the amplitude; the distance between thepeaks and troughs of the wave pattern.
The volume of a sound is measured in decibels. A decibel is a logarithmic measure of amplitude in relationto a given reference. In the case of sound, the reference is based on the auditory threshold at 1 kHz. Theauditory threshold represents the minimum sound level (of a pure tone) the average ear can hear without anyother sounds present.
QUALITY
The quality of sound, also called timbre or colour, is what distinguishes between sounds of the same pitch. Forexample, two different instruments may play at the same pitch, but sound fundamentally different.
When a musical sound, or note, is produced, the quality of the sound is affected by other less evident soundsthat are produced at the same time as the main pitch.
This central or main pitch note is called the fundamental, and the other sounds that occur at the same timeare called harmonics, overtones or partials.
When two different instruments sound alike, it is due to the similarity of their harmonics.
A-CR-CCP-909/PF-001
S415.01-4
CONFIRMATION OF TEACHING POINT 2
QUESTIONS:
Q1. What are the three characteristics of sound?
Q2. What is the pitch of a sound measured in?
Q3. What is the volume of a sound measured in?
ANTICIPATED ANSWERS:
A1. Pitch, volume, and quality.
A2. Cycles per second or hertz (Hz).
A3. Decibels.
END OF LESSON CONFIRMATION
QUESTIONS:
Q1. What are the four essential elements of sound?
Q2. What are two common receptors?
Q3. What does the quality of a sound distinguish?
ANTICIPATED ANSWERS:
A1. The originator, the vibrating body, the medium, and the receptor.
A2. The ear (cochlea) and a microphone.
A3. The quality of sound, also called timbre or colour, distinguishes between sounds of the same pitch.
CONCLUSION
HOMEWORK / READING / PRACTICE
Nil.
METHOD OF EVALUATION
This lesson is assessed IAW A-CR-CCP-911/PG-001, Canadian Cadet Organizations Pipe Band–MusicProficiency Levels Qualification Standard, Chapter 3, Annex G, Appendix 2.
CLOSING STATEMENT
A basic understanding of sound is essential to appreciate the qualities of tone, tuning and musical potentialof pipe band instruments.
INSTRUCTOR NOTES / REMARKS
Nil.
A-CR-CCP-909/PF-001
S415.01-5
REFERENCES
Nil.

A-CR-CCP-909/PF-001
THIS PAGE INTENTIONALLY LEFT BLANK
S415.01-6
A-CR-CCP-909/PF-001
S415.02-1
COMMON TRAINING
PIPE BANDADVANCED MUSICIAN
INSTRUCTIONAL GUIDE
SECTION 2
EO S415.02 – TRANSCRIBE PIPE BAND MUSIC
Total Time: 80 min
PREPARATION
PRE-LESSON INSTRUCTIONS
Resources needed for the delivery of this lesson are listed in the lesson specification located in A-CR-CCP-909/PG-001, Pipe Band–Advanced Musician Qualification Standard and Plan, Chapter 4. Specific uses for saidresources are identified throughout the instructional guide within the TP for which they are required.
Review the lesson content and become familiar with the material prior to delivering the lesson.
Photocopy the Transcribe Pipe Band Music Demonstration located at Attachment A on a transparency or drawenough staves to transcribe the sample tune onto a flip chart or chalkboard.
Photocopy the sheet music located at Attachments B or C for each cadet according to their instrument.
If desired, any two parts of a strathspey and / or any two parts of a reel (other than thatlocated at Attachments B or C) may be used as long as it is comparable in length anddifficulty.
PRE-LESSON ASSIGNMENT
Nil.
APPROACH
An interactive lecture was chosen for TP 1 to give an overview of how to write music.
A demonstration was chosen for TP 2 as it allows the instructor to explain and demonstrate how to preparemanuscript paper.
A practical activity was chosen for TP 3 as it is an interactive way to allow the cadets to practice transcribingmusic in a fun and challenging setting.
INTRODUCTION
REVIEW
Nil.

A-CR-CCP-909/PF-001
S415.02-2
OBJECTIVES
By the end of this lesson the cadet shall have transcribed two parts of a strathspey and two parts of a reel.
IMPORTANCE
It is important for cadets to transcribe pipe band music as it is a crucial skill required for developing proficiencyin writing music.
A-CR-CCP-909/PF-001
S415.02-3
Teaching Point 1 Describe musical writing techniques.
Time: 15 min Method: Interactive Lecture
Writing music is a skill that has evolved over hundreds of years. Throughout most of history, music wasconsidered an aural tradition; meaning that it was only passed on by ear, memorized and repeated. Althoughsome ancient societies are now believed to have used different methods of writing music, most of these arerarely seen or even understood today.
The system of writing music based on a staff (lines and spaces) originated around the 11th century. It was atthat time that a monk named Guido d'Arezzo first developed a system of boxes placed on a six-line staff. Eachline of the staff was related to a pitch: Ut, Re, Mi, Fa, So, La (the original bases for the current: Doh, Re, Mi, Fa,So, La, Ti). Over the next five centuries, this system evolved, and by the 16th century the five-line staff (whichis based on the grand staff) became the predominant music notation system in the world.
As music has progressed and become more complex, the need for neatness and accuracy in writing musichas become essential. Writing music is an art form that requires practice to master. Although many computerprograms have been developed to assist musicians and composers with writing music, being able to write musicby hand remains an essential part of being a well-rounded musician.
WRITING INSTRUMENTS
Writing instruments are the tools of the music writing trade.
By hand. To effectively write music by hand, a pencil, an eraser and a ruler are required. Once proficiency atwriting music has been achieved, drafting type felt tip pens may be used as they produce sharper more vividresults; however, it is harder to correct mistakes.
By computer. There are many different music notation software packages that have been developed to assistcomposers and musicians to write sheet music. Depending on the program, notes, signs and symbols are inputonto staffs by dragging and dropping, key strokes, simple text-based programming codes, or via computerinterface directly to an instrument. Many music notation software packages play back what has been writtenand proof measures for note value accuracy.

A-CR-CCP-909/PF-001
S415.02-4
Figure 1 Example of Music Notation Software Package (Celtic Pipes)Note. Created by Director Cadets 3, 2009, Ottawa, ON: Department of National Defence.
NEATNESS AND CONSISTENCY
When writing music, neatness and consistency are crucial. It should always be assumed that written musicmay have to be read by others. In order to ensure that what has been written can be understood, all notes,embellishments, signs and symbols should be drawn to look the same.
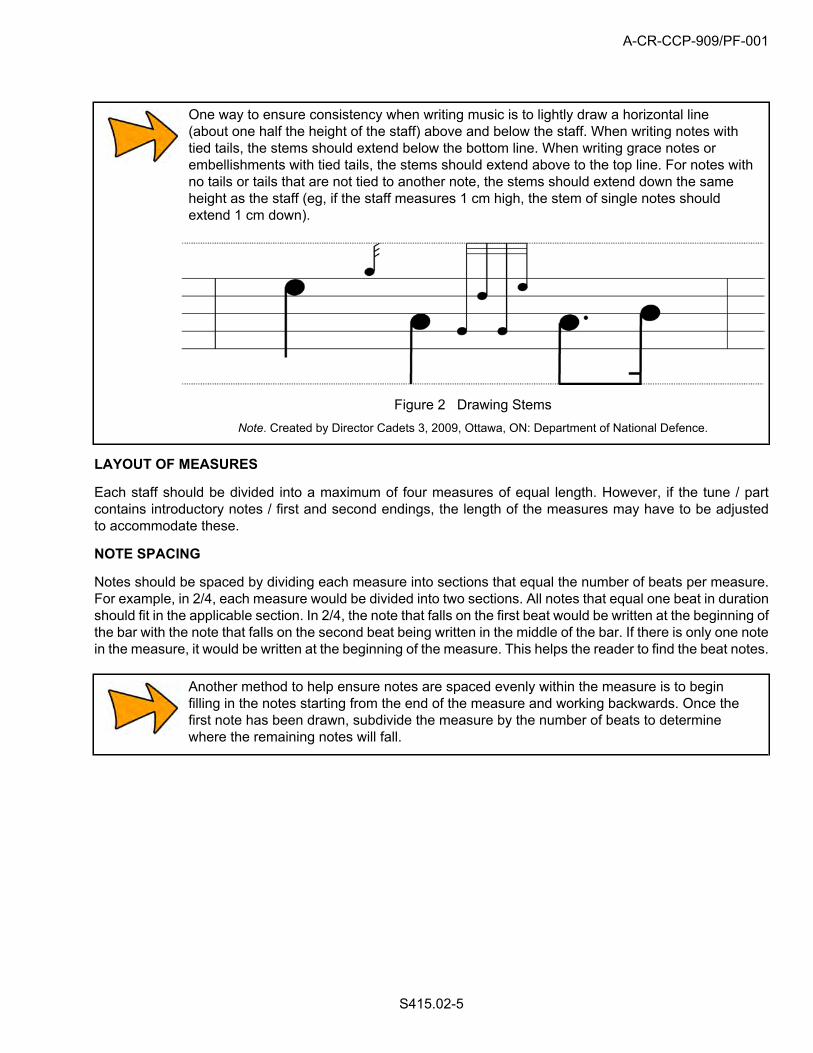
A-CR-CCP-909/PF-001
S415.02-5
One way to ensure consistency when writing music is to lightly draw a horizontal line(about one half the height of the staff) above and below the staff. When writing notes withtied tails, the stems should extend below the bottom line. When writing grace notes orembellishments with tied tails, the stems should extend above to the top line. For notes withno tails or tails that are not tied to another note, the stems should extend down the sameheight as the staff (eg, if the staff measures 1 cm high, the stem of single notes shouldextend 1 cm down).
Figure 2 Drawing StemsNote. Created by Director Cadets 3, 2009, Ottawa, ON: Department of National Defence.
LAYOUT OF MEASURES
Each staff should be divided into a maximum of four measures of equal length. However, if the tune / partcontains introductory notes / first and second endings, the length of the measures may have to be adjustedto accommodate these.
NOTE SPACING
Notes should be spaced by dividing each measure into sections that equal the number of beats per measure.For example, in 2/4, each measure would be divided into two sections. All notes that equal one beat in durationshould fit in the applicable section. In 2/4, the note that falls on the first beat would be written at the beginning ofthe bar with the note that falls on the second beat being written in the middle of the bar. If there is only one notein the measure, it would be written at the beginning of the measure. This helps the reader to find the beat notes.
Another method to help ensure notes are spaced evenly within the measure is to beginfilling in the notes starting from the end of the measure and working backwards. Once thefirst note has been drawn, subdivide the measure by the number of beats to determinewhere the remaining notes will fall.
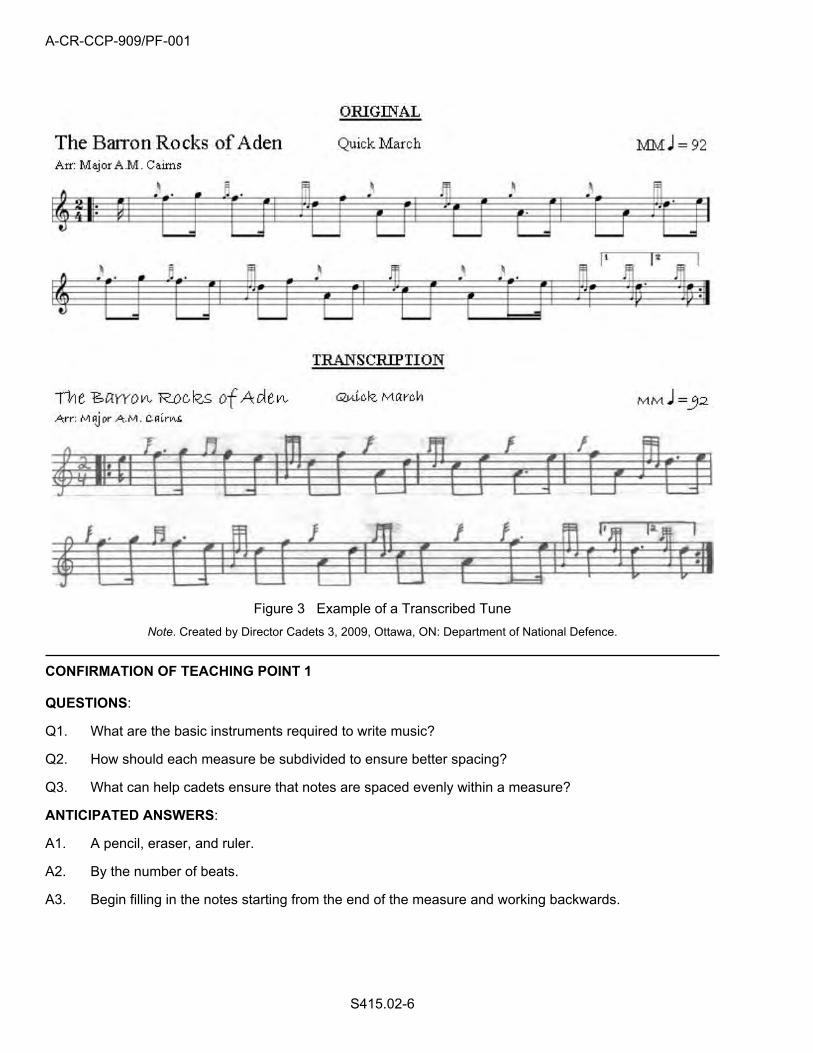
A-CR-CCP-909/PF-001
S415.02-6
Figure 3 Example of a Transcribed TuneNote. Created by Director Cadets 3, 2009, Ottawa, ON: Department of National Defence.
CONFIRMATION OF TEACHING POINT 1
QUESTIONS:
Q1. What are the basic instruments required to write music?
Q2. How should each measure be subdivided to ensure better spacing?
Q3. What can help cadets ensure that notes are spaced evenly within a measure?
ANTICIPATED ANSWERS:
A1. A pencil, eraser, and ruler.
A2. By the number of beats.
A3. Begin filling in the notes starting from the end of the measure and working backwards.
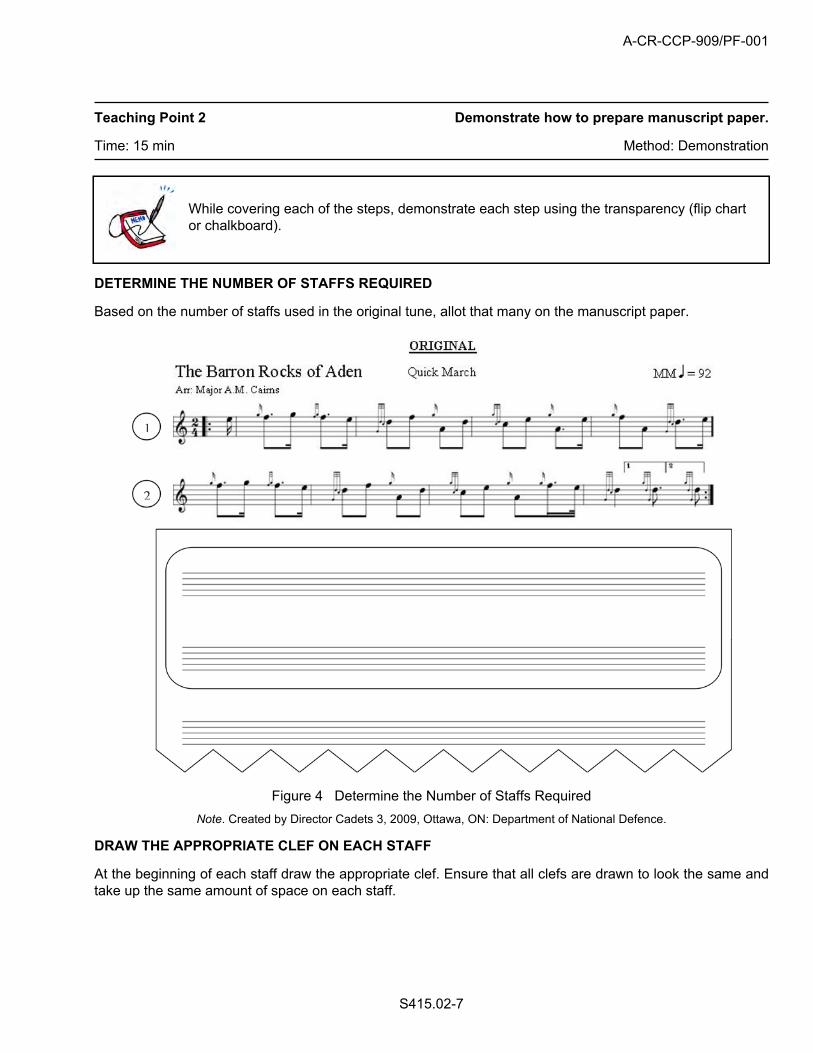
A-CR-CCP-909/PF-001
S415.02-7
Teaching Point 2 Demonstrate how to prepare manuscript paper.
Time: 15 min Method: Demonstration
While covering each of the steps, demonstrate each step using the transparency (flip chartor chalkboard).
DETERMINE THE NUMBER OF STAFFS REQUIRED
Based on the number of staffs used in the original tune, allot that many on the manuscript paper.
Figure 4 Determine the Number of Staffs RequiredNote. Created by Director Cadets 3, 2009, Ottawa, ON: Department of National Defence.
DRAW THE APPROPRIATE CLEF ON EACH STAFF
At the beginning of each staff draw the appropriate clef. Ensure that all clefs are drawn to look the same andtake up the same amount of space on each staff.

A-CR-CCP-909/PF-001
S415.02-8
Figure 5 Draw the Appropriate Clef on Each StaffNote. Created by Director Cadets 3, 2009, Ottawa, ON: Department of National Defence.
WRITE THE TIME SIGNATURE ON THE FIRST STAFF
Write the time signature after the clef on the first staff. Ensure that both numbers (upper and lower) are drawnto fit within the confines of the upper and lower half of the staff respectively.

A-CR-CCP-909/PF-001
S415.02-9
Figure 6 Write the Time Signature on the First StaffNote. Created by Director Cadets 3, 2009, Ottawa, ON: Department of National Defence.
DIVIDE STAVES INTO MEASURES
Staves should be divided into evenly-spaced measures (four measures per line / staff); however, if transcribingmusic, replicate the same measure divisions as the original sheet music.
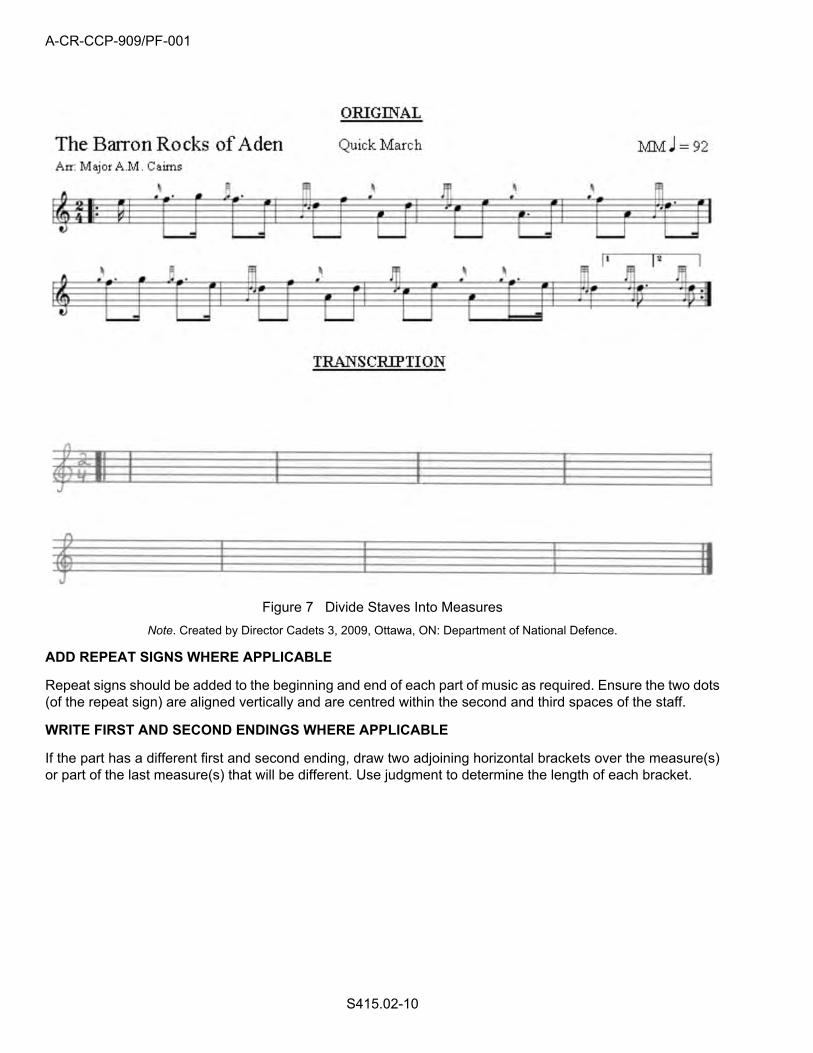
A-CR-CCP-909/PF-001
S415.02-10
Figure 7 Divide Staves Into MeasuresNote. Created by Director Cadets 3, 2009, Ottawa, ON: Department of National Defence.
ADD REPEAT SIGNS WHERE APPLICABLE
Repeat signs should be added to the beginning and end of each part of music as required. Ensure the two dots(of the repeat sign) are aligned vertically and are centred within the second and third spaces of the staff.
WRITE FIRST AND SECOND ENDINGS WHERE APPLICABLE
If the part has a different first and second ending, draw two adjoining horizontal brackets over the measure(s)or part of the last measure(s) that will be different. Use judgment to determine the length of each bracket.
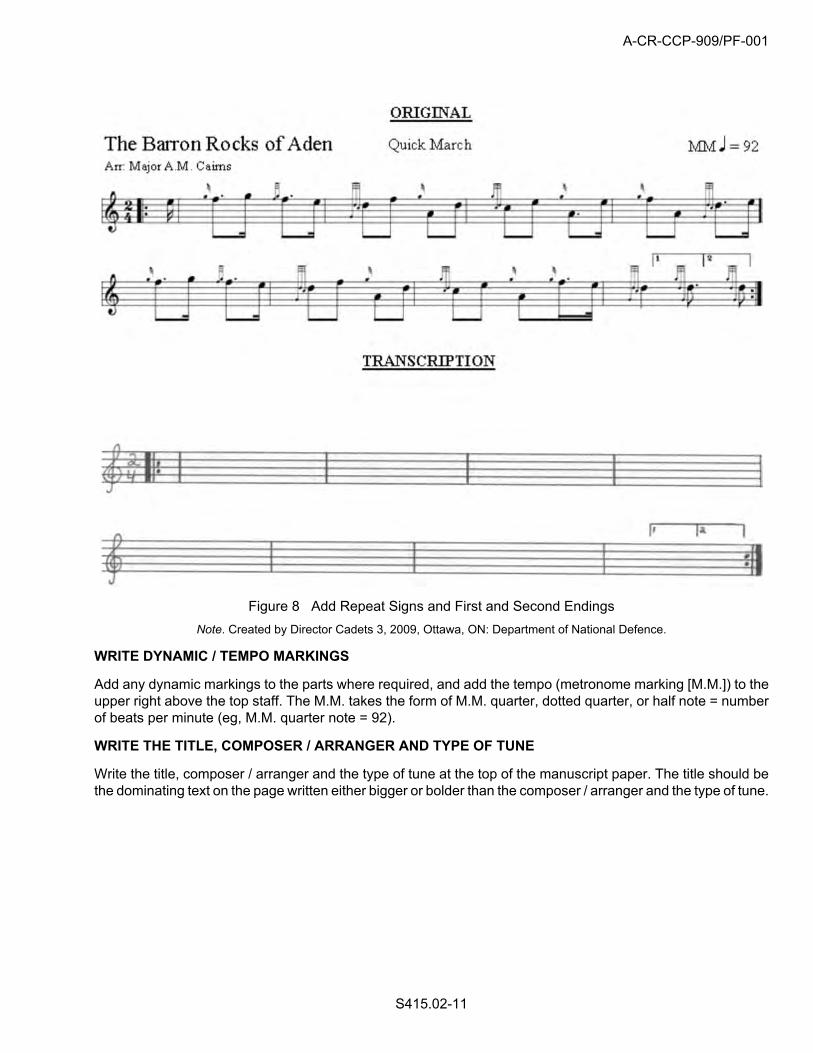
A-CR-CCP-909/PF-001
S415.02-11
Figure 8 Add Repeat Signs and First and Second EndingsNote. Created by Director Cadets 3, 2009, Ottawa, ON: Department of National Defence.
WRITE DYNAMIC / TEMPO MARKINGS
Add any dynamic markings to the parts where required, and add the tempo (metronome marking [M.M.]) to theupper right above the top staff. The M.M. takes the form of M.M. quarter, dotted quarter, or half note = numberof beats per minute (eg, M.M. quarter note = 92).
WRITE THE TITLE, COMPOSER / ARRANGER AND TYPE OF TUNE
Write the title, composer / arranger and the type of tune at the top of the manuscript paper. The title should bethe dominating text on the page written either bigger or bolder than the composer / arranger and the type of tune.

A-CR-CCP-909/PF-001
S415.02-12
Figure 9 Write in the Dynamic / Tempo Markings, Title, Composer / Arranger and the Type of TuneNote. Created by Director Cadets 3, 2009, Ottawa, ON: Department of National Defence.
CONFIRMATION OF TEACHING POINT 2
QUESTIONS:
Q1. True or False? The time signature is drawn only on the first staff.
Q2. In what form are tempo markings M.M. written?
Q3. What should be the dominating text on the page?
ANTICIPATED ANSWERS:
A1. True.
A2. The M.M. takes the form of M.M. quarter, dotted quarter, or half note = number of beats per minute(eg. M.M. quarter note = 92).
A3. The title should be the dominating text on the page written either bigger and / or bolder than thecomposer / arranger and the type of tune.
A-CR-CCP-909/PF-001
S415.02-13
Teaching Point 3 Conduct an activity to have the cadets transcribe a piece ofpipe band music.
Time: 40 min Method: Practical Activity
ACTIVITY
OBJECTIVE
The objective of this activity is to have the cadets transcribe a piece of pipe band music.
RESOURCES
Sheet music located at Attachments B or C,
Manuscript paper, and
Pencil with eraser.
ACTIVITY LAYOUT
Nil.
ACTIVITY INSTRUCTIONS
1. Distribute a copy of the sheet music (according to instrument) and manuscript paper to each cadet.
2. Have the cadets transcribe (copy) the sheet music onto the manuscript paper.
3. Once finished, collect the manuscript paper, review it, and debrief the cadets on their performance.
SAFETY
Nil.
CONFIRMATION OF TEACHING POINT 3
The cadets' participation in the activity will serve as the confirmation of this TP.
END OF LESSON CONFIRMATION
The cadets' participation in transcribing pipe band music will serve as the confirmation of this lesson.
CONCLUSION
HOMEWORK / READING / PRACTICE
Nil.
METHOD OF EVALUATION
This lesson is assessed IAW A-CR-CCP-911/PG-001, Canadian Cadet Organizations Pipe Band–MusicProficiency Levels Qualification Standard, Chapter 3, Annex G, Appendix 3.
A-CR-CCP-909/PF-001
S415.02-14
CLOSING STATEMENT
It is important for cadets to transcribe pipe band music as it is a crucial skill required for developing proficiencyin writing music.
INSTRUCTOR NOTES / REMARKS
Nil.
REFERENCES
Nil.

A-CR-CCP-909/PF-001Attachment A to EO S415.02
Instructional Guide
S415.02A-1
A-CR-CCP-909/PF-001Attachment A to EO S415.02Instructional Guide
THIS PAGE INTENTIONALLY LEFT BLANK
S415.02A-2

A-CR-CCP-909/PF-001Attachment B to EO S415.02
Instructional Guide
S415.02B-1
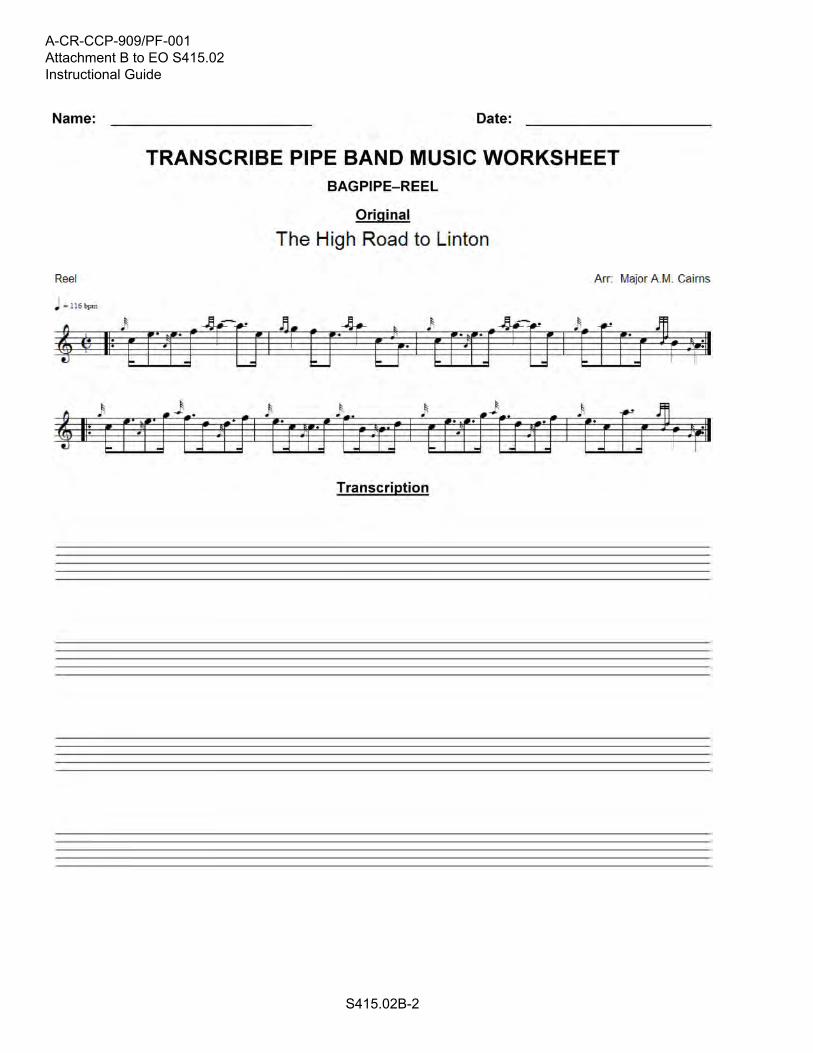
A-CR-CCP-909/PF-001Attachment B to EO S415.02Instructional Guide
S415.02B-2
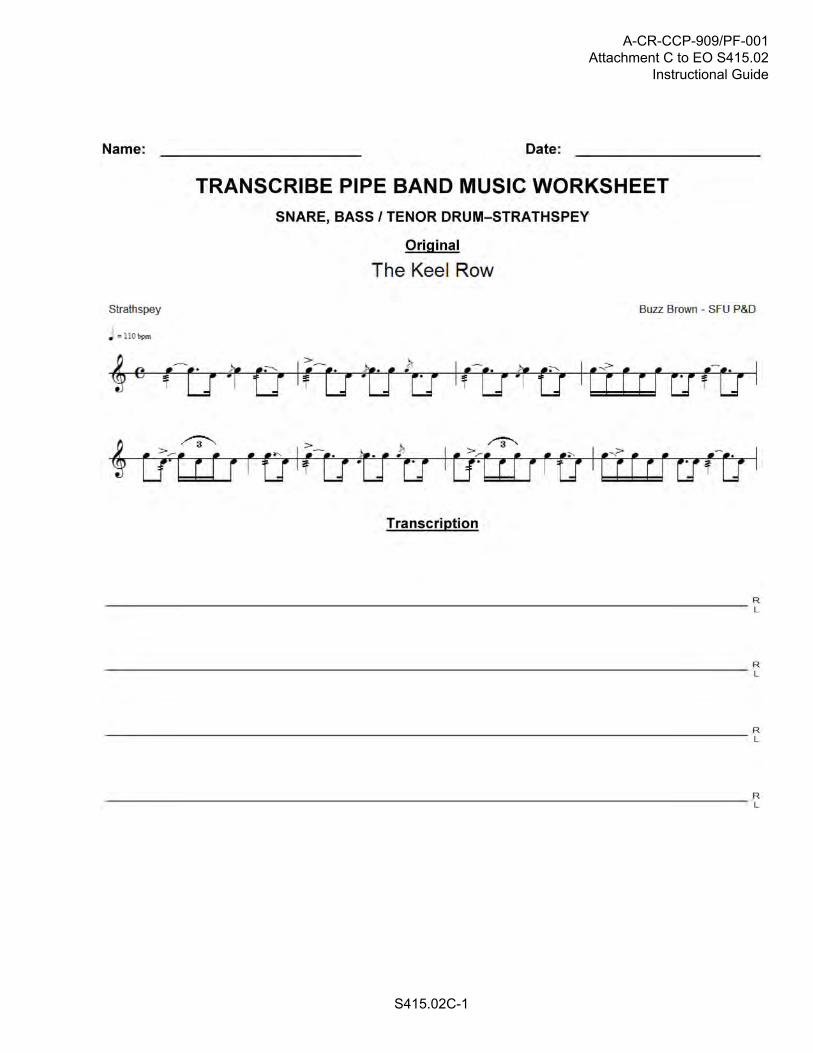
A-CR-CCP-909/PF-001Attachment C to EO S415.02
Instructional Guide
S415.02C-1
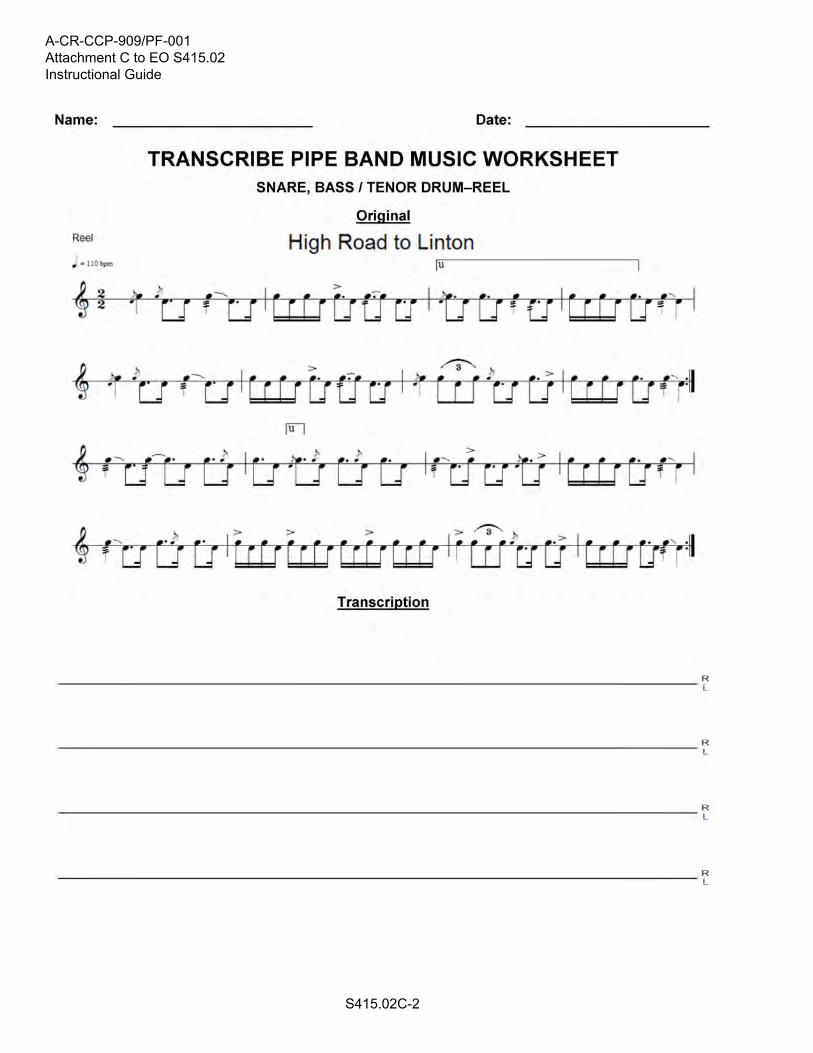
A-CR-CCP-909/PF-001Attachment C to EO S415.02Instructional Guide
S415.02C-2

A-CR-CCP-909/PF-001
S515.01P-1
COMMON TRAINING
PIPE BANDADVANCED MUSICIAN
INSTRUCTIONAL GUIDE
SECTION 3
EO S515.01P – WRITE A HARMONY
Total Time: 80 min
PREPARATION
PRE-LESSON INSTRUCTIONS
Resources needed for the delivery of this lesson are listed in the lesson specification located in A-CR-CCP-909/PG-001, Pipe Band–Advanced Musician Qualification Standard and Plan, Chapter 4. Specific uses for saidresources are identified throughout the instructional guide within the TP for which they are required.
Review the lesson content and become familiar with the material prior to delivering the lesson.
Photocopy the Write a Harmony Demonstration located at Attachment A on a transparency or draw enoughstaves to transcribe the sample tune onto a flip chart or chalkboard.
Photocopy a selection of Music Proficiency Level Three slow or quick marches, one for each cadet.
PRE-LESSON ASSIGNMENT
Nil.
APPROACH
An interactive lecture was chosen for TP 1 to give an overview of intervals and harmony.
A demonstration was chosen for TP 2 as it allows the instructor to explain and demonstrate how to write aharmony for a given tune.
A practical activity was chosen for TP 3 as it is an interactive way to allow the cadets to write a harmony for agiven Music Proficiency Level Three slow or quick march in a fun and challenging setting.
INTRODUCTION
REVIEW
Nil.
OBJECTIVES
By the end of this lesson the cadet shall to have written a harmony for a given Music Proficiency Level Threeslow or quick march.

A-CR-CCP-909/PF-001
S515.01P-2
IMPORTANCE
It is important for cadets to write a harmony as harmonies add to the musicality of tunes and are crowd pleasersduring performances.

A-CR-CCP-909/PF-001
S515.01P-3
There are many styles and practices for writing harmonies for bagpipe music; the followinginformation is meant to serve as a guide and not intended to dictate a specific style ormethod that must be followed.
Teaching Point 1 Define intervals and harmony.
Time: 15 min Method: Interactive Lecture
INTERVALS
Melody and harmony are created by combining notes. The distance between notes is called an interval. Intervalscan either be harmonic—the notes happen at the same time, or melodic—the notes happen one after the other.
Figure 1 Harmonic IntervalNote. Created by Director Cadets 3, 2009, Ottawa, ON: Department of National Defence.
Figure 2 Melodic IntervalNote. Created by Director Cadets 3, 2009, Ottawa, ON: Department of National Defence.
The distance of an interval is measured by counting how many letters of the musical alphabet are used to createthe interval; this includes the starting and ending pitches. Distance can be counted going up—ascending, orgoing down—descending.
Figure 3 Number of Letters From the Musical Alphabet Used in an IntervalNote. Created by Director Cadets 3, 2009, Ottawa, ON: Department of National Defence.
The distance is expressed as a number within a sequence and always as a cardinal number (eg, 2nd, 3rd, 4th).The only exception to this is an interval with a distance of one; it is called a unison. An interval with a distanceof eight is called an octave.

A-CR-CCP-909/PF-001
S515.01P-4
HARMONY
Harmony is the use of complementary pitches or chords that are played simultaneously with the melody. Formany musical instruments, harmony takes the form of a counter melody (the main melody raised or lowereda given interval). Due to the limitation of the bagpipe’s nine-note scale, most bagpipe harmonies are writtenas a counter melody with each note, raised or lowered a 3rd, a 5th or an octave. Harmonies may also involvebeginning or ending the part in unison with the melody and / or alternating between playing the harmony andplaying in unison with the main melody.
3rd 5th
Root Up Down Up DownLow G B DLow A C
Too LowE
B D Low G FC E Low A High G
Too Low
D F B High A Low GE High G C Low AF High A D BHigh G E CHigh A
Too HighF
Too High
D
Figure 4 Bagpipe Scale With IntervalsNote. Created by Director Cadets 3, 2009, Ottawa, ON: Department of National Defence.
Harmonies are only played on the repeat of a part.
CONFIRMATION OF TEACHING POINT 1
Write the two notes in each question on a staff.
QUESTIONS:
Q1. What is the distance between Low G and C?
Q2. What is the distance between Low A and B?
Q3. What is the distance between D and High A?
ANTICIPATED ANSWERS:
A1. The distance is a 4th.
A2. The distance is a 2nd.
A3. The distance is a 5th.

A-CR-CCP-909/PF-001
S515.01P-5
Teaching Point 2 Explain and demonstrate how to develop and write aharmony for a given tune.
Time: 20 min Method: Demonstration
Writing a harmony allows the cadets to use the skills acquired during EO S415.02(Transcribe Pipe Band Music) to neatly and accurately lay out their handwritten music onthe manuscript paper.
While covering each of the steps, demonstrate each step using the transparency (flip chartor chalkboard).
To develop and write a harmony for a given tune:
1. Determine the number of staffs required.
2. Draw the appropriate clef on each staff.
3. Write the time signature on the first staff.
4. Divide the staves into measures.
5. Write dynamic / tempo markings.
6. Write the title, composer / arranger and type of tune.
7. Write the harmony by:
a. writing each note of the melody up or down a 3rd, 5th or an octave; and
b. determining and writing technically appropriate embellishments that complement the harmony andthe melody.
Embellishments chosen should complement the ones used in the melody. For example, ifthe melody contains a doubling, the harmony should have a doubling.
8. With another piper playing the melody, demonstrate the harmony by playing it as written.

A-CR-CCP-909/PF-001
S515.01P-6
Figure 5 The Sky Boat Song With Harmony (6/8 Slow March)Note. Created by Director Cadets 3, 2006, Ottawa, ON: Department of National Defence.
CONFIRMATION OF TEACHING POINT 2
QUESTIONS:
Q1. True or False? The time signature is drawn only on the first staff.
Q2. When writing a harmony, to what interval is a note raised or lowered?
Q3. What should be considered when choosing embellishments?
ANTICIPATED ANSWERS:
A1. True.
A2. An interval is raised a 3rd, 5th or an octave.
A3. Chosen embellishments should complement the ones used in the melody. For example, if the melodycontains a doubling, the harmony should have a doubling.
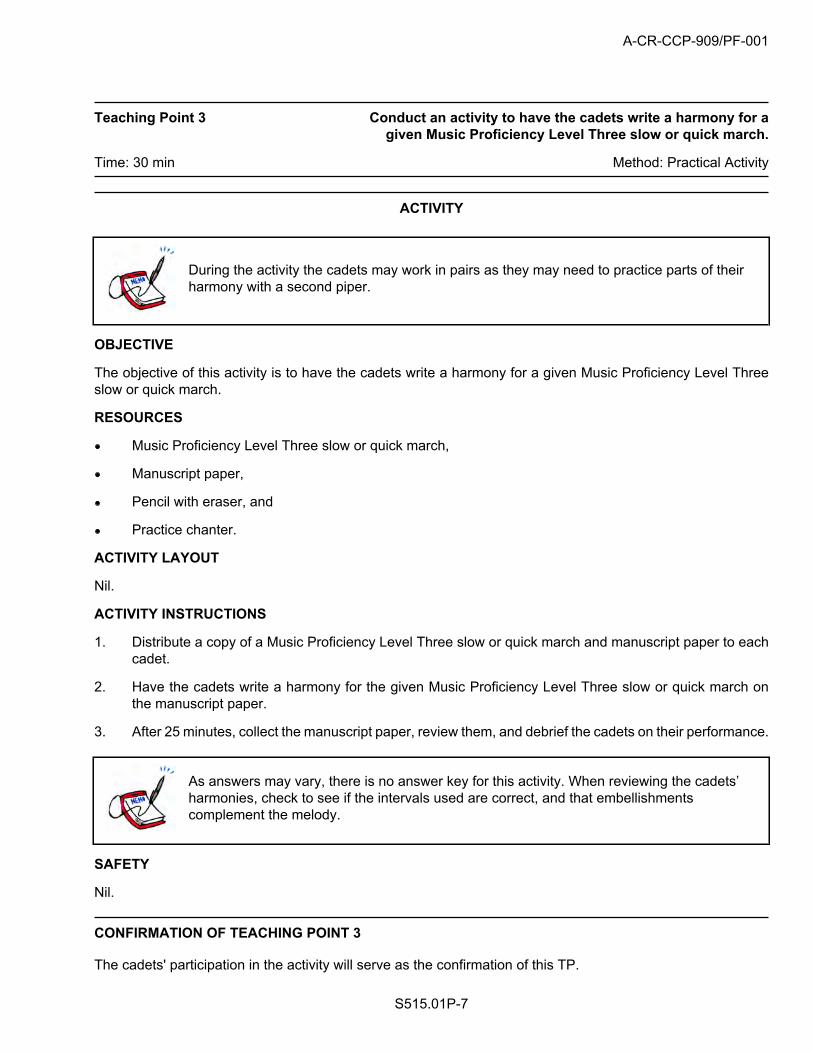
A-CR-CCP-909/PF-001
S515.01P-7
Teaching Point 3 Conduct an activity to have the cadets write a harmony for agiven Music Proficiency Level Three slow or quick march.
Time: 30 min Method: Practical Activity
ACTIVITY
During the activity the cadets may work in pairs as they may need to practice parts of theirharmony with a second piper.
OBJECTIVE
The objective of this activity is to have the cadets write a harmony for a given Music Proficiency Level Threeslow or quick march.
RESOURCES
Music Proficiency Level Three slow or quick march,
Manuscript paper,
Pencil with eraser, and
Practice chanter.
ACTIVITY LAYOUT
Nil.
ACTIVITY INSTRUCTIONS
1. Distribute a copy of a Music Proficiency Level Three slow or quick march and manuscript paper to eachcadet.
2. Have the cadets write a harmony for the given Music Proficiency Level Three slow or quick march onthe manuscript paper.
3. After 25 minutes, collect the manuscript paper, review them, and debrief the cadets on their performance.
As answers may vary, there is no answer key for this activity. When reviewing the cadets’harmonies, check to see if the intervals used are correct, and that embellishmentscomplement the melody.
SAFETY
Nil.
CONFIRMATION OF TEACHING POINT 3
The cadets' participation in the activity will serve as the confirmation of this TP.

A-CR-CCP-909/PF-001
S515.01P-8
END OF LESSON CONFIRMATION
The cadets' participation in writing a harmony will serve as the confirmation of this lesson.
CONCLUSION
HOMEWORK / READING / PRACTICE
Nil.
METHOD OF EVALUATION
This lesson is assessed IAW A-CR-CCP-911/PG-001, Canadian Cadet Organizations Pipe Band–MusicProficiency Levels Qualification Standard, Chapter 3, Annex I, Appendix 3.
CLOSING STATEMENT
It is important to write a harmony as harmonies add to the musicality of tunes and are crowd pleasers duringperformances.
INSTRUCTOR NOTES / REMARKS
Nil.
REFERENCES
C0-257 ISBN 1-55440-011-2 Wharram, B. (2005). Elementary rudiments of music. Mississauga, ON: TheFrederick Harris Music Co.
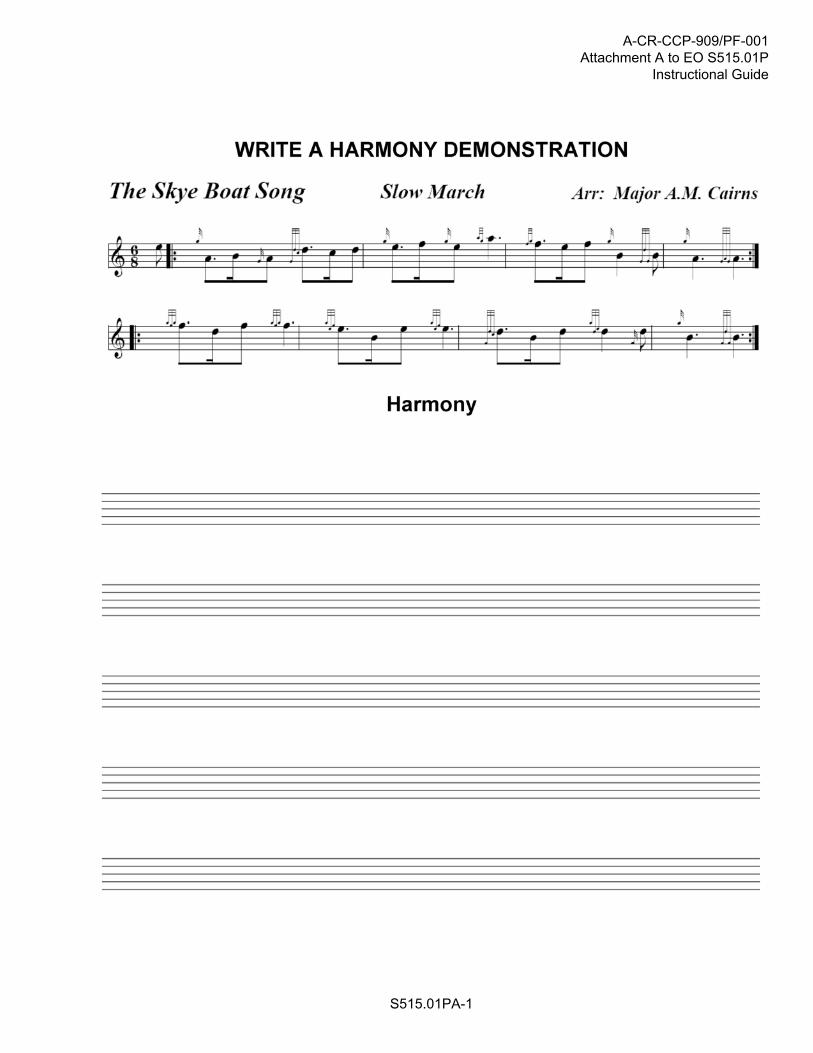
A-CR-CCP-909/PF-001Attachment A to EO S515.01P
Instructional Guide
S515.01PA-1

A-CR-CCP-909/PF-001Attachment A to EO S515.01PInstructional Guide
THIS PAGE INTENTIONALLY LEFT BLANK
S515.01PA-2

A-CR-CCP-909/PF-001
S515.01S-1
COMMON TRAINING
PIPE BANDADVANCED MUSICIAN
INSTRUCTIONAL GUIDE
SECTION 4
EO S515.01S – WRITE A SNARE DRUM SCORE
Total Time: 80 min
PREPARATION
PRE-LESSON INSTRUCTIONS
Resources needed for the delivery of this lesson are listed in the lesson specification located in A-CR-CCP-909/PG-001, Pipe Band–Advanced Musician Qualification Standard and Plan, Chapter 4. Specific uses for saidresources are identified throughout the instructional guide within the TP for which they are required.
Review the lesson content and become familiar with the material prior to delivering the lesson.
Photocopy the Write a Snare Drum Score Worksheet located at Attachment A for each cadet.
PRE-LESSON ASSIGNMENT
Nil.
APPROACH
An interactive lecture was chosen for TP 1 to give an overview of how to develop a rhythmic pattern.
A demonstration was chosen for TP 2 as it allows the instructor to explain and demonstrate how to write asnare drum score for a march in simple time.
A practical activity was chosen for TP 3 as it is an interactive way to allow the cadets to write a two-part snaredrum score for a march in simple time in a fun and challenging setting.
INTRODUCTION
REVIEW
Review questions from EO S415.02 (Transcribe Pipe Band Music).
QUESTIONS:
Q1. True or False? The time signature is drawn only on the first staff.
Q2. In what form are tempo markings M.M. written?
Q3. What should be the dominating text on the page?

A-CR-CCP-909/PF-001
S515.01S-2
ANTICIPATED ANSWERS:
A1. True.
A2. The M.M. takes the form of M.M. quarter, dotted quarter, or half note = number of beats per minute(eg, M.M. quarter note = 92).
A3. The title should be the dominating text on the page written either bigger and / or bolder than thecomposer / arranger and the type of tune.
OBJECTIVES
By the end of this lesson the cadet shall have written a snare drum score for a march in simple time.
IMPORTANCE
It is important for cadets to learn how to write a snare drum score as they add to the dynamics and establishthe tempos and rhythmic feel of the tunes, and are effective crowd pleasers during performances.
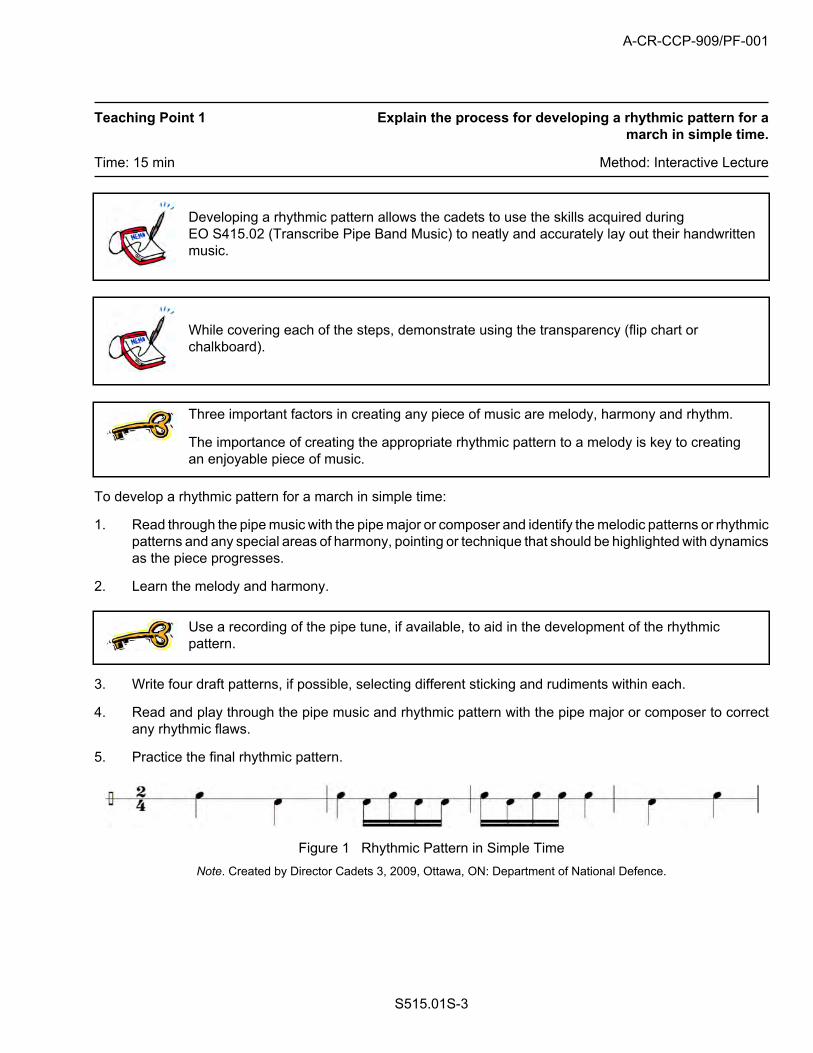
A-CR-CCP-909/PF-001
S515.01S-3
Teaching Point 1 Explain the process for developing a rhythmic pattern for amarch in simple time.
Time: 15 min Method: Interactive Lecture
Developing a rhythmic pattern allows the cadets to use the skills acquired duringEO S415.02 (Transcribe Pipe Band Music) to neatly and accurately lay out their handwrittenmusic.
While covering each of the steps, demonstrate using the transparency (flip chart orchalkboard).
Three important factors in creating any piece of music are melody, harmony and rhythm.
The importance of creating the appropriate rhythmic pattern to a melody is key to creatingan enjoyable piece of music.
To develop a rhythmic pattern for a march in simple time:
1. Read through the pipe music with the pipe major or composer and identify the melodic patterns or rhythmicpatterns and any special areas of harmony, pointing or technique that should be highlighted with dynamicsas the piece progresses.
2. Learn the melody and harmony.
Use a recording of the pipe tune, if available, to aid in the development of the rhythmicpattern.
3. Write four draft patterns, if possible, selecting different sticking and rudiments within each.
4. Read and play through the pipe music and rhythmic pattern with the pipe major or composer to correctany rhythmic flaws.
5. Practice the final rhythmic pattern.
Figure 1 Rhythmic Pattern in Simple TimeNote. Created by Director Cadets 3, 2009, Ottawa, ON: Department of National Defence.

A-CR-CCP-909/PF-001
S515.01S-4
CONFIRMATION OF TEACHING POINT 1
QUESTIONS:
Q1. When developing a rhythmic pattern, who else should be be involved?
Q2. What does the drummer have to learn to write a successful rhythmic pattern?
Q3. What are the three factors in creating a piece of music?
ANTICIPATED ANSWERS:
A1. The pipe major or composer of the pipe tune.
A2. The melody and the harmony.
A3. The three factors are the melody, the harmony and the rhythm.
Teaching Point 2 Explain and demonstrate how to write a snare drum scorefor a march in simple time.
Time: 20 min Method: Demonstration
Writing a drum score allows the cadets to use the skills acquired during EO S415.02(Transcribe Pipe Band Music) to neatly and accurately lay out their handwritten music.
While covering each of the steps, demonstrate using the transparency (flip chart orchalkboard).
When distributing the final drum score, highlight the unisons that are being played by thedrum corps so each individual can practice their part efficiently.
To write a snare drum score for a march in simple time:
1. Determine the number of uni-lines required.
2. Draw the appropriate clef on each uni-line.
3. Write the time signature on the first uni-line.
4. Divide uni-lines into measures.
5. Write dynamic / tempo markings.
6. Write the title, composer / arranger and type of tune.

A-CR-CCP-909/PF-001
S515.01S-5
7. Write the drum score by:
a. writing each note of the score;
b. determining and writing technically appropriate embellishments that complement the rhythm andthe dynamics; and
c. highlighting the unisons to be played by the drum corps.
8. With another drummer playing the unisons, demonstrate the drum score by playing it as written.
9. Coordinate the unisons or "chips" that are to be played by the drum corps.
10. Overlay the bass and tenor beatings and rhythms to add drive, subtle pitch variation and colour to theoverall drum score.
11. Practice the final drum score with pipers or a recording of the pipe music.
Figure 2 Drum Score in Simple TimeNote. Created by Director Cadets 3, 2009, Ottawa, ON: Department of National Defence.
CONFIRMATION OF TEACHING POINT 2
QUESTIONS:
Q1. True or False? The time signature is drawn only on the first uni-line.
Q2. True or False? The clef is drawn only on the first uni-line.
Q3. True or False? The tempo markings are written on the drum score.
ANTICIPATED ANSWERS:
A1. True.
A2. False.
A3. True.

A-CR-CCP-909/PF-001
S515.01S-6
Teaching Point 3 Conduct an activity to have the cadets write a two-part snaredrum score for a march in simple time.
Time: 35 min Method: Practical Activity
ACTIVITY
During the activity the cadets may work in pairs as they may need to practice the drumscore with a second drummer. The first drummer acts as the lead and the second drummerplays the unison parts.
OBJECTIVE
The objective of this activity is to have the cadets write a two-part drum score for a march in simple time.
RESOURCES
Write a Snare Drum Score Worksheet located at Attachment A,
Pencil with eraser,
Drumsticks, and
Practice pad.
ACTIVITY LAYOUT
Nil.
ACTIVITY INSTRUCTIONS
1. Distribute a pencil with eraser and Write a Snare Drum Score Worksheet to each cadet.
2. Have the cadets write a two-part snare drum score for a march in simple time on the worksheet.
3. Once finished, collect and review the worksheets, and debrief the cadets on their performance.
SAFETY
Nil.
CONFIRMATION OF TEACHING POINT 3
The cadets' participation in the activity will serve as the confirmation of this TP.
END OF LESSON CONFIRMATION
The cadets' participation in writing a snare drum score will serve as the confirmation of this lesson.

A-CR-CCP-909/PF-001
S515.01S-7
CONCLUSION
HOMEWORK / READING / PRACTICE
Nil.
METHOD OF EVALUATION
This lesson is assessed IAW A-CR-CCP-911/PG-001, Canadian Cadet Organizations Pipe Band–MusicProficiency Levels Qualification Standard, Chapter 3, Annex I, Appendix 3.
CLOSING STATEMENT
The development of music writing skills is important for a cadet who wants to develop and be a well-roundedmusician. It is important to continue developing this skill as it builds general theory knowledge as well as moredetailed score building.
INSTRUCTOR NOTES / REMARKS
Nil.
REFERENCES
Nil.

A-CR-CCP-909/PF-001
THIS PAGE INTENTIONALLY LEFT BLANK
S515.01S-8
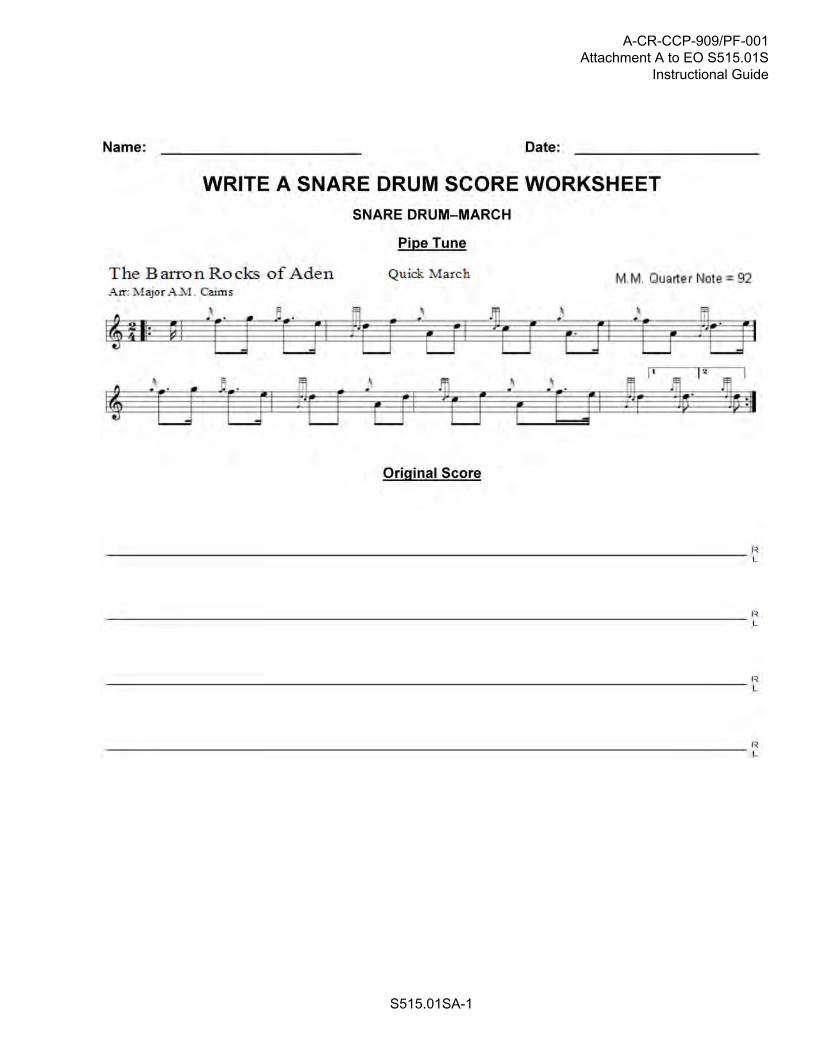
A-CR-CCP-909/PF-001Attachment A to EO S515.01S
Instructional Guide
S515.01SA-1

A-CR-CCP-909/PF-001Attachment A to EO S515.01SInstructional Guide
THIS PAGE INTENTIONALLY LEFT BLANK
S515.01SA-2
A-CR-CCP-909/PF-001
S515.01BT-1
COMMON TRAINING
PIPE BANDADVANCED MUSICIAN
INSTRUCTIONAL GUIDE
SECTION 5
EO S515.01BT – WRITE A FLOURISHING ROUTINE
Total Time: 80 min
PREPARATION
PRE-LESSON INSTRUCTIONS
Resources needed for the delivery of this lesson are listed in the lesson specification located in A-CR-CCP-909/PG-001, Pipe Band–Advanced Musician Qualification Standard and Plan, Chapter 4. Specific uses for saidresources are identified throughout the instructional guide within the TP for which they are required.
Review the lesson content and become familiar with the material prior to delivering the lesson.
Photocopy the Write a Flourishing Routine Worksheet located at Attachment A for each cadet.
PRE-LESSON ASSIGNMENT
Nil.
APPROACH
An interactive lecture was chosen for TP 1 to give an overview of how to develop a rhythmic pattern.
A demonstration was chosen for TP 2 as it allows the instructor to explain and demonstrate how to write a two-part flourishing routine for a march in simple time.
A practical activity was chosen for TP 3 as it is an interactive way to allow the cadets to write a two-partflourishing routine for a march in simple time in a fun and challenging setting.
INTRODUCTION
REVIEW
Review questions from EO S415.02 (Transcribe Pipe Band Music).
QUESTIONS:
Q1. True or False? The time signature is drawn only on the first staff.
Q2. In what form are tempo markings M.M. written?
Q3. What should be the dominating text on the page?
A-CR-CCP-909/PF-001
S515.01BT-2
ANTICIPATED ANSWERS:
A1. True.
A2. The M.M. takes the form of M.M. quarter, dotted quarter, or half note = number of beats per minute(eg, M.M. quarter note = 92).
A3. The title should be the dominating text on the page written either bigger and / or bolder than thecomposer / arranger and the type of tune.
OBJECTIVES
By the end of this lesson the cadet shall have written a flourishing routine for a march in simple time.
IMPORTANCE
It is important for cadets to learn how to write a two-part flourishing routine as they add to the visual dynamics,establish varied pitches and are effective crowd pleasers during performances.
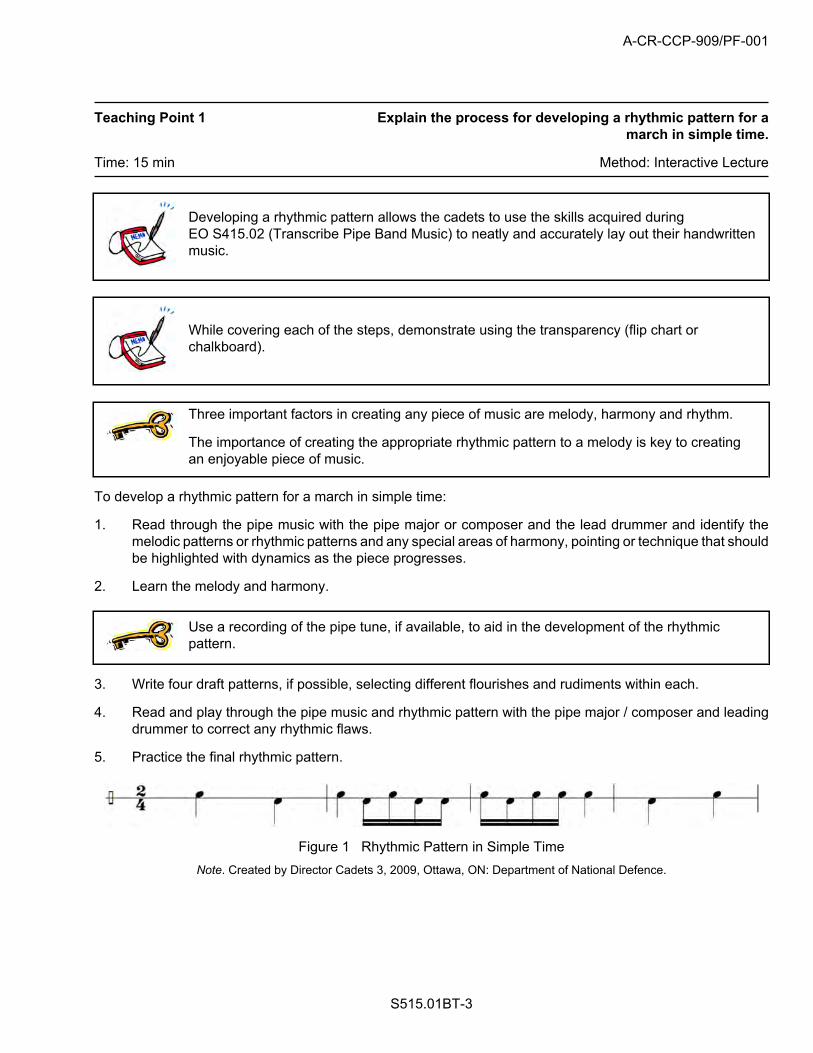
A-CR-CCP-909/PF-001
S515.01BT-3
Teaching Point 1 Explain the process for developing a rhythmic pattern for amarch in simple time.
Time: 15 min Method: Interactive Lecture
Developing a rhythmic pattern allows the cadets to use the skills acquired duringEO S415.02 (Transcribe Pipe Band Music) to neatly and accurately lay out their handwrittenmusic.
While covering each of the steps, demonstrate using the transparency (flip chart orchalkboard).
Three important factors in creating any piece of music are melody, harmony and rhythm.
The importance of creating the appropriate rhythmic pattern to a melody is key to creatingan enjoyable piece of music.
To develop a rhythmic pattern for a march in simple time:
1. Read through the pipe music with the pipe major or composer and the lead drummer and identify themelodic patterns or rhythmic patterns and any special areas of harmony, pointing or technique that shouldbe highlighted with dynamics as the piece progresses.
2. Learn the melody and harmony.
Use a recording of the pipe tune, if available, to aid in the development of the rhythmicpattern.
3. Write four draft patterns, if possible, selecting different flourishes and rudiments within each.
4. Read and play through the pipe music and rhythmic pattern with the pipe major / composer and leadingdrummer to correct any rhythmic flaws.
5. Practice the final rhythmic pattern.
Figure 1 Rhythmic Pattern in Simple TimeNote. Created by Director Cadets 3, 2009, Ottawa, ON: Department of National Defence.
A-CR-CCP-909/PF-001
S515.01BT-4
CONFIRMATION OF TEACHING POINT 1
QUESTIONS:
Q1. What are the three factors in creating a piece of music?
Q2. When developing a rhythmic pattern, who else should be involved?
Q3. What does the drummer have to learn to write a successful rhythmic pattern?
ANTICIPATED ANSWERS:
A1. The three factors are the melody, the harmony and the rhythm.
A2. The pipe major or composer of the pipe tune and the lead drummer.
A3. The melody and the harmony.
Teaching Point 2 Explain and demonstrate how to write a two-part flourishingroutine for a march in simple time.
Time: 20 min Method: Demonstration
Writing a flourishing routine allows the cadets to use the skills acquired during EO S415.02(Transcribe Pipe Band Music) to neatly and accurately lay out their handwritten music.
While covering each of the steps, demonstrate using the transparency (flip chart orchalkboard).
When distributing the final flourishing routine, highlight the rhythms that are played by eachdrummer so each individual can practice their part efficiently.
To write a two-part flourishing routine for a march in simple time:
1. Determine the number of uni-lines required.
2. Draw the appropriate clef on each uni-line.
3. Write the time signature on the first uni-line.
4. Divide uni-lines into measures.
5. Write dynamic / tempo markings and flourishing symbols.
6. Write the title, composer / arranger, and type of tune.

A-CR-CCP-909/PF-001
S515.01BT-5
7. Write the flourishing routine by:
a. writing each note and symbol of the flourishing routine;
b. determining and writing technically appropriate embellishments and appropriate brushingtechniques and tenor drum symbols that complement the rhythm and the dynamics; and
c. highlighting the rhythms to be played by the midsection.
8. Coordinate the brushing techniques and flourishing heights and widths that are to be played by themidsection.
9. Overlay the bass and tenor beatings and rhythms to add drive, subtle pitch variation and colour to theoverall drum score.
10. Practice the final flourishing routine with pipers or a recording of pipe music.
Figure 2 Flourishing Routine in Simple TimeNote. Created by Director Cadets 3, 2009, Ottawa, ON: Department of National Defence.
CONFIRMATION OF TEACHING POINT 2
QUESTIONS:
Q1. True or False? The time signature is drawn only on the first uni-line.
Q2. True or False? The clef is drawn only on the first uni-line.
Q3. Should the final flourishing routine be practiced with the pipe section?

A-CR-CCP-909/PF-001
S515.01BT-6
ANTICIPATED ANSWERS:
A1. True.
A2. False.
A3. Yes, because the final flourishing routine has to be visual and match the melodic line.
Teaching Point 3 Conduct an activity to have the cadets write a two-partflourishing routine for a march in simple time.
Time: 30 min Method: Practical Activity
ACTIVITY
During the activity, the cadets may work in pairs as they may need to practice the flourishingroutine with a second drummer. The first drummer acts as the lead and the seconddrummer follows the same flourishing routine.
OBJECTIVE
The objective of this activity is to have the cadets write a two-part flourishing routine for a march in simple time.
RESOURCES
Write a Flourishing Routine Worksheet located at Attachment A,
Pencil with eraser, and
Tenor drum mallets.
ACTIVITY LAYOUT
Nil.
ACTIVITY INSTRUCTIONS
1. Distribute a copy of a pencil with eraser and Write a Flourishing Routine Worksheet to each cadet.
2. Have the cadets write a two-part flourishing routine for a march in simple time on the worksheet.
3. Once finished, collect and review the worksheets and debrief the cadets on their performance.
SAFETY
Nil.
CONFIRMATION OF TEACHING POINT 3
The cadets' participation in the activity will serve as the confirmation of this TP.
END OF LESSON CONFIRMATION
The cadets' participation in writing a flourishing routine will serve as the confirmation of this lesson.

A-CR-CCP-909/PF-001
S515.01BT-7
CONCLUSION
HOMEWORK / READING / PRACTICE
Nil.
METHOD OF EVALUATION
This lesson is assessed IAW A-CR-CCP-911/PG-001, Canadian Cadet Organizations Pipe Band–MusicProficiency Levels Qualification Standard, Chapter 3, Annex I, Appendix 3.
CLOSING STATEMENT
The development of music writing skills is important for a cadet who wants to develop and be a well-roundedmusician. It is important to continue developing this skill as it builds general theory knowledge as well as moredetailed score building.
INSTRUCTOR NOTES / REMARKS
Nil.
REFERENCES
Nil.

A-CR-CCP-909/PF-001
THIS PAGE INTENTIONALLY LEFT BLANK
S515.01BT-8

A-CR-CCP-909/PF-001Attachment A to EO S515.01BT
Instructional Guide
S515.01BTA-1
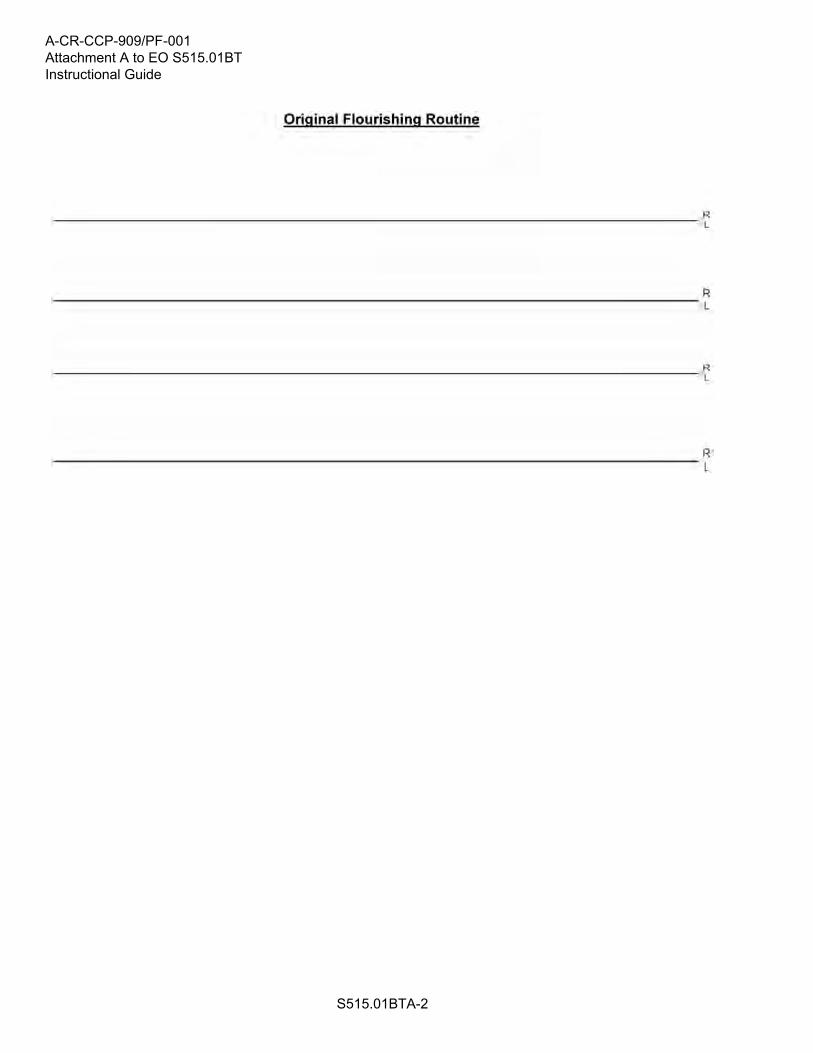
A-CR-CCP-909/PF-001Attachment A to EO S515.01BTInstructional Guide
S515.01BTA-2