Embed Size (px)
Citation preview

REGION FLYERS
PIPER WARRIOR MANEUVER STANDARDIZATION
PRIVATE PILOT – ASEL REV 04.10.2020

Maneuver Standardization – Piper Warrior PPL
2
TABLE OF CONTENTS
Record of Revisions 3 Notes on Maneuvers 4 Slow Flight 5 Power – Off Stall 6 Power – On Stall 7 Steep Turns 8 Emergency Descent 9 Rectangular Course 10 Turns Around a Point 11 S – Turns 12 Short Field Takeoff 13 Short Field Landing 14 Soft Field Takeoff 15 Soft Field Landing 16

Maneuver Standardization – Piper Warrior PPL
3
RECORD OF REVISIONS 09/23/2019 Final Processing – 1st release. 09/24/2019 Changed wording pg. 11 – “field” to “selected point”. 09/27/2019 Added “Keep the Ball Centered” to slow flight. Added “pitch down” on the steep turn transition. 01/23/2020 Added “Set Flaps to 25°” on short field takeoff procedure. 04/10/2020 Steep turns – corrected ACS requirement on airspeed to ± 10 KTS.

Maneuver Standardization – Piper Warrior PPL
4
Notes on Maneuvers
This guide is designed to provide students and instructors a framework for completing each maneuver successfully. This document was derived
from various sources, including the Pilot’s Operating Handbook for the Piper Warrior, the Airplane Flying Handbook, and a collaboration of the
Chief Pilot and Staff CFI’s at Region Flyers. It is designed to allow the student and the instructor to complete each maneuver safely and to the
standard as set forth in the ACS. It is also a handy framework to help students who fly with more than one CFI – everyone should be on the same
page with what’s expected. This eliminates any confusion when flying with different instructors from day to day.
Note that this document sets forth standard operating procedure. SOP’s are not to be confused with technique. This is an important distinction
to note. In this document you will find a specific procedure for each maneuver. Let’s take steep turns for example. The procedure calls for a
certain bank and airspeed. Some instructors prefer to trim the aircraft during the steep turn, while some prefer to simply hold back pressure. This
is individual technique. Students are encouraged to absorb different techniques from different CFI’s, but everyone must adhere to the procedure.
This will ensure the richest educational experience.
This is a read-only document for the time being, but suggestions and proposed changes are always welcome and may be sent to
[email protected] for review.
As always, have fun and fly safe!
Bradley Detert
Chief Flight Instructor, Region Flyers

Maneuver Standardization – Piper Warrior PPL
5
SLOW FLIGHT
1. Perform the “4 C” mental checklist. a. Climb ≥ 1,500’ AGL (Recmd. 3,000’ MSL) b. Clear – Perform clearing turns c. Check Speed – Below VFE (Recmd. 100 kts.) d. Configure – Fuel pump on, 2,400 RPM
2. Select visual point straight ahead for reference. 3. Reduce power to 1,500 RPM. 4. Add full flaps, 1 notch at a time. 5. Slow to 60 kts. 6. Apply power to hold altitude (Approx 2,000 RPM). 7. Keep the BALL CENTERED. 8. Power for Altitude, Pitch for Airspeed. 9. Maneuver as instructed by your CFI or Examiner. Turns, climbs, descents, etc. 10. For turns, do not exceed 10° of bank.
RECOVERY
11. Increase power to cruise 2,400 RPM 12. Pitch down to increase speed. Maintain altitude. 13. Retract flaps slowly. 14. Return to cruise flight.
Airman Certification Standard (ACS)
Altitude Heading Airspeed Bank Angle ± 100 FT. ± 10° +10/-0 KTS ± 10°
Maneuver Standardization – Piper Warrior PPL
6
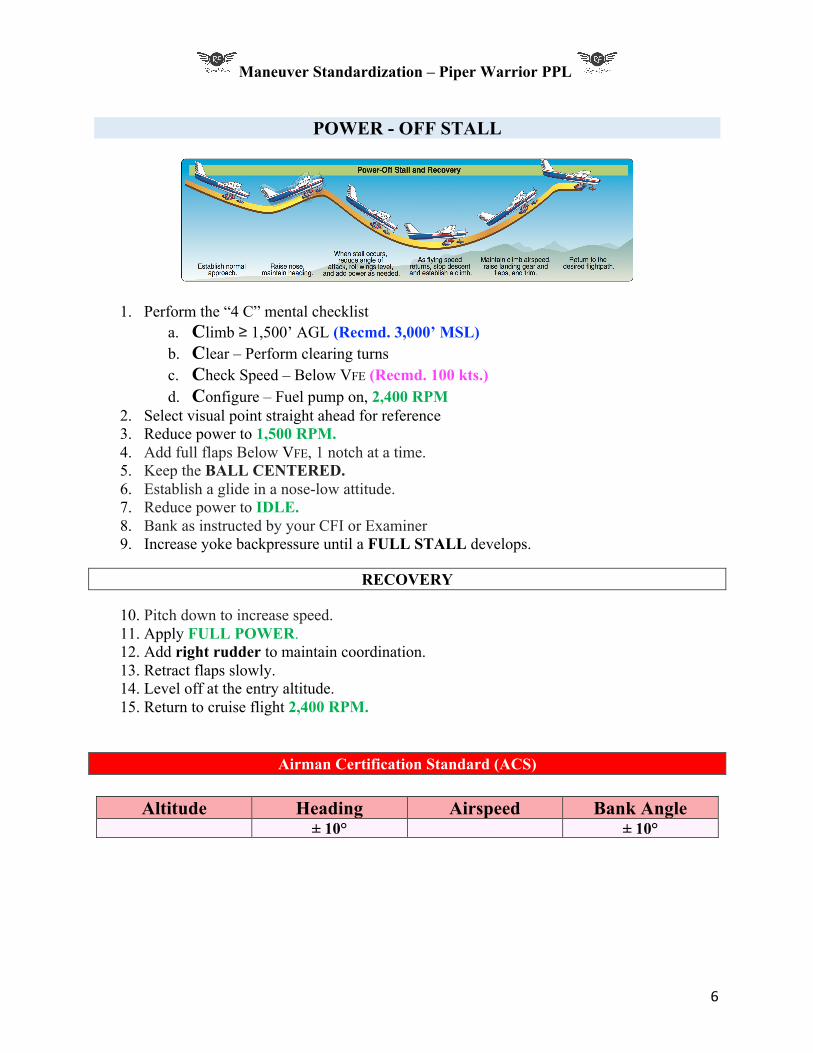
POWER - OFF STALL
1. Perform the “4 C” mental checklist a. Climb ≥ 1,500’ AGL (Recmd. 3,000’ MSL) b. Clear – Perform clearing turns c. Check Speed – Below VFE (Recmd. 100 kts.) d. Configure – Fuel pump on, 2,400 RPM
2. Select visual point straight ahead for reference 3. Reduce power to 1,500 RPM. 4. Add full flaps Below VFE, 1 notch at a time. 5. Keep the BALL CENTERED. 6. Establish a glide in a nose-low attitude. 7. Reduce power to IDLE. 8. Bank as instructed by your CFI or Examiner 9. Increase yoke backpressure until a FULL STALL develops.
RECOVERY
10. Pitch down to increase speed. 11. Apply FULL POWER. 12. Add right rudder to maintain coordination. 13. Retract flaps slowly. 14. Level off at the entry altitude. 15. Return to cruise flight 2,400 RPM.
Airman Certification Standard (ACS)
Altitude Heading Airspeed Bank Angle ± 10° ± 10°

Maneuver Standardization – Piper Warrior PPL
7
POWER - ON STALL
1. Perform the “4 C” mental checklist a. Climb ≥ 1,500’ AGL (Recmd. 3,000’ MSL) b. Clear – Perform clearing turns c. Check Speed – Below VFE (Recmd. 100 kts.) d. Configure – Fuel pump on, 2,400 RPM.
• Set flaps to Clean, 10°, or 25°, as instructed. 2. Select visual point straight ahead for reference 3. Reduce power to 1,500 RPM. 4. Slow to 60 kts. 5. Apply FULL POWER. 6. Keep the BALL CENTERED. 7. Raise the nose to hold 15° PITCH UP.
8. Bank as instructed by your CFI or Examiner. 9. Hold this pitch attitude of 15° PITCH UP until the stall occurs.
RECOVERY
10. Lower the nose to gain airspeed. 11. Maintain current altitude. 12. Return to cruise flight 2,400 RPM.
Airman Certification Standard (ACS)
Altitude Heading Airspeed Bank Angle ± 10° ± 10°

Maneuver Standardization – Piper Warrior PPL
8
STEEP TURNS
1. Perform the “4 C” mental checklist a. Climb ≥ 1,500’ AGL (Recmd. 3,000’ MSL) b. Clear – Perform clearing turns c. Check Speed – Below VA (Recmd. 100 kts.) d. Configure – Clean Config, fuel pump on, 2,400 RPM
2. Select visual point straight ahead for reference 3. Roll into a 45° bank turn to the left. 4. Apply backpressure to the yoke. 5. Apply an additional 100 RPM throttle. 6. Plan to rollout early to end up on your original heading, pointed at the previously selected
visual point. 7. Repeat process to the right. 8. When changing direction of the turn at the 360° point, apply forward elevator pressure to
prevent a gain in altitude.
RECOVERY
9. Reduce power to 2,400 RPM 10. Return to cruise flight
Airman Certification Standard (ACS)
Altitude Heading Airspeed Bank Angle ± 100 FT. ± 10° ± 10 KTS ± 5°

Maneuver Standardization – Piper Warrior PPL
9
EMERGENCY DESCENT
1. Perform the “4 C” mental checklist a. Climb ≥ (Rec. 3,500’ MSL) b. Clear – Perform clearing turns c. Check Speed – Below VA (Rec. 100 kts.) d. Configure – Fuel pump on, 2,400 RPM
2. Reduce power to IDLE. 3. Add full flaps below VFE 103 kts. 4. Enter a 30° bank turn to the left. 5. Pitch the nose down to maintain 95 kts. 6. Establish a favorable emergency landing spot.
RECOVERY
7. Level the wings. 8. Pull the nose up to the horizon. 9. Retract flaps. 10. Return to cruise flight 2,400 RPM.
Airman Certification Standard (ACS)
Level-Off Alt. Heading Airspeed Bank Angle ± 100 FT. + 0 / - 10 KTS
Maneuver Standardization – Piper Warrior PPL
10
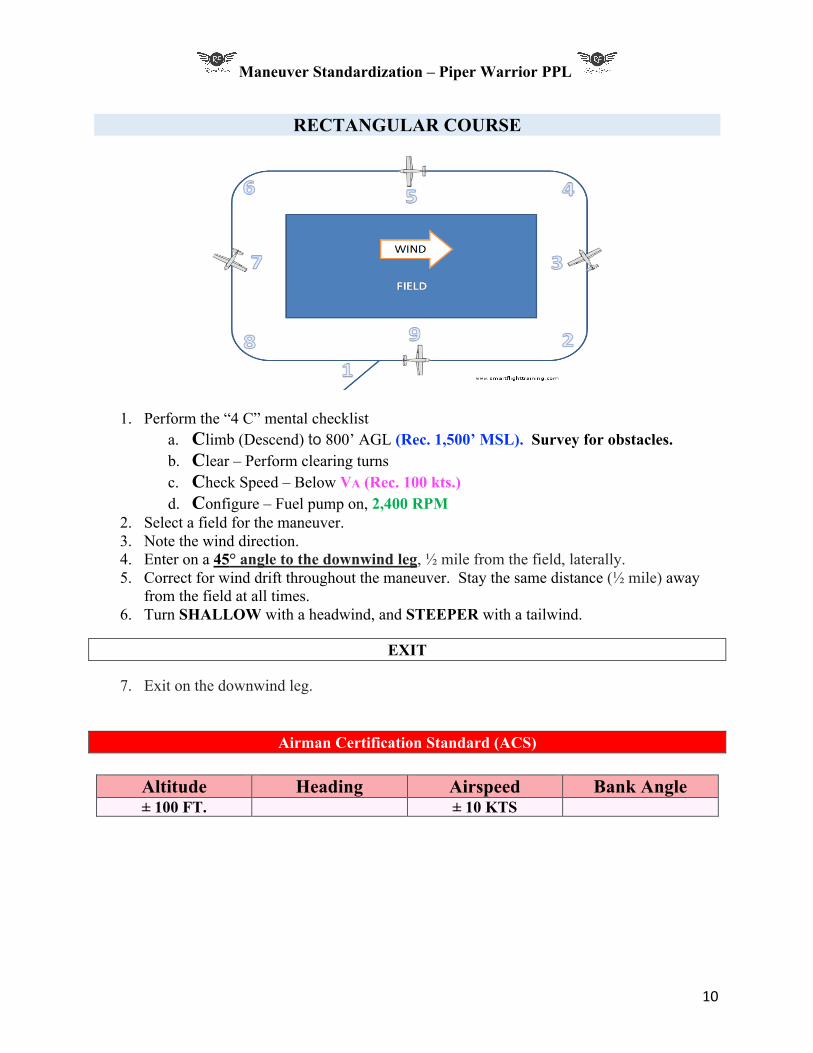
RECTANGULAR COURSE
1. Perform the “4 C” mental checklist a. Climb (Descend) to 800’ AGL (Rec. 1,500’ MSL). Survey for obstacles. b. Clear – Perform clearing turns c. Check Speed – Below VA (Rec. 100 kts.) d. Configure – Fuel pump on, 2,400 RPM
2. Select a field for the maneuver. 3. Note the wind direction. 4. Enter on a 45° angle to the downwind leg, ½ mile from the field, laterally. 5. Correct for wind drift throughout the maneuver. Stay the same distance (½ mile) away
from the field at all times. 6. Turn SHALLOW with a headwind, and STEEPER with a tailwind.
EXIT
7. Exit on the downwind leg.
Airman Certification Standard (ACS)
Altitude Heading Airspeed Bank Angle ± 100 FT. ± 10 KTS

Maneuver Standardization – Piper Warrior PPL
11
TURNS AROUND A POINT
1. Select a point for the maneuver. 2. Note the wind direction. 3. Perform the “4 C” mental checklist
• Climb (Descend) to 800’ AGL (Rec. 1,500’ MSL). Survey for obstacles. • Clear – Perform clearing turns • Check Speed – Below VA (Rec. 100 kts.) • Configure – Fuel pump on, 2,400 RPM
4. Enter the maneuver downwind, ½ mile laterally from your point. 5. Correct for wind drift throughout the maneuver. Stay the same distance (½ mile) away
from the selected point at all times. 6. Turn SHALLOW with a headwind, and STEEPER with a tailwind.
EXIT
7. Exit on the downwind leg.
Airman Certification Standard (ACS)
Altitude Heading Airspeed Bank Angle ± 100 FT. ± 10 KTS

Maneuver Standardization – Piper Warrior PPL
12
S-TURNS
1. Select a point for the maneuver. 2. Note the wind direction. 3. Perform the “4 C” mental checklist
• Climb (Descend) to 800’ AGL (Rec. 1,500’ MSL). Survey for obstacles. • Clear – Perform clearing turns • Check Speed – Below VA (Rec. 100 kts.) • Configure – Fuel pump on, 2,400 RPM
4. Enter the maneuver downwind. 5. Correct for wind drift throughout the maneuver. Stay the same distance (½ mile) away
from the road at the apex of each turn. 6. Turn SHALLOW with a headwind, and STEEPER with a tailwind.
EXIT
7. Exit on the downwind leg.
Airman Certification Standard (ACS)
Altitude Heading Airspeed Bank Angle ± 100 FT. ± 10 KTS

Maneuver Standardization – Piper Warrior PPL
13
SHORT FIELD TAKEOFF
1. Complete the Before Takeoff Checklist. 2. Set flaps to 25°. 3. Use all available runway. 4. Align with the centerline of the runway. 5. Hold FIRM brake pressure. Do not let the airplane roll forward. 6. Apply full power. 7. Note engine gauges.
a. Fuel Pressure Green b. Oil Pressure Green c. RPM > 2,300
8. Release brakes. 9. Accelerate to 52 kts and rotate. 10. Climb at 63 kts until all obstacles are clear. This is a fairly steep climb angle. 11. Climb out at 79 kts once obstacles are clear. 12. At 1,000’ AGL, complete the After Takeoff Checklist.
Airman Certification Standard (ACS)
Altitude Heading Airspeed Bank Angle + 10 / - 5 KTS

Maneuver Standardization – Piper Warrior PPL
14
SHORT FIELD LANDING
1. Complete the Before Landing Checklist. 2. Choose touchdown point. Usually the 1,000 ft. markers.
3. Establish a descent on final approach that will clear an imaginary 50 ft. obstacle on the approach end of the runway.
4. Maintain a stabilized approach with full flaps. 5. Hold 63 kts on final approach, unless a higher airspeed is required due to wind or
turbulence. 6. When landing point is assured, reduce power to IDLE. 7. Land on your desired point. Do not end up short, and do not float more that 200 ft. past
that point. 8. Once on the ground, ensure proper runway tracking and no bouncing. 9. Retract flaps. 10. Maintain nose-up pitch control to allow aerodynamic braking to occur, but do not let the
airplane become airborne again. 11. Apply moderate braking. Do not let the tires skid. 12. Once taxi speed has been attained, exit the runway. 13. Complete the After Landing Checklist.
Airman Certification Standard (ACS)
Altitude Heading Airspeed Bank Angle + 10 / - 5 KTS

Maneuver Standardization – Piper Warrior PPL
15
SOFT FIELD TAKEOFF
1. Complete the Before Takeoff Checklist. 2. Set flaps to 25°. 3. Do not stop the aircraft at any time – keep it rolling so it won’t sink into the snow, mud,
or tall grass. 4. Align with the centerline of the runway. 5. Hold the yoke all the way nose-up. It should almost be in your chest. 6. Apply full power. 7. Note engine gauges.
a. Fuel Pressure Green b. Oil Pressure Green c. RPM > 2,300
8. As the airplane gains speed, the nose will want to come up. Reduce elevator backpressure to prevent a tail strike.
9. We call this “popping the wheelie”. Hold the nose just slightly off the ground for the entire takeoff roll.
10. The airplane will become airborne naturally. Once it does, lower the nose to remain in ground effect.
11. Accelerate to 63 kts if there is an obstacle. Accelerate to 79 kts if there is no obstacle. 12. Once clear of obstacles, retract flaps slowly and climb out normally. 13. At 1,000’ AGL, Complete the After Takeoff Checklist.
Airman Certification Standard (ACS)
Altitude Heading Airspeed Bank Angle + 10 / - 5 KTS

Maneuver Standardization – Piper Warrior PPL
16
SOFT FIELD LANDING
1. Complete the Before Landing Checklist. 2. Survey the landing field for wetness/roughness/obstacles. 3. Choose touchdown point. Paved runway, usually the 1,000 ft. markers. Grass runway, as
instructed.
4. Maintain a stabilized approach with full flaps. 5. Hold 63 kts on final approach, unless a higher airspeed is required due to wind or
turbulence. 6. When landing point is assured, reduce power, but not all the way to idle. Leave some
power in to help cushion the landing. 7. Land on your desired point. Some floating in ground effect is acceptable to ensure a soft
touchdown. 8. Once on the ground, ensure proper runway tracking and no bouncing. 9. Hold back pressure throughout the landing roll to alleviate the weight put on the
nosewheel. As the airspeed decreases you will need to hold additional back pressure. 10. Do NOT apply brakes – the rough surface will slow the airplane down naturally. 11. Once taxi speed has been attained, continue holding full back pressure and exit the
runway. 12. Complete the After Landing Checklist.
Airman Certification Standard (ACS)
Altitude Heading Airspeed Bank Angle
+ 10 / - 5 KTS