Embed Size (px)
Citation preview
1
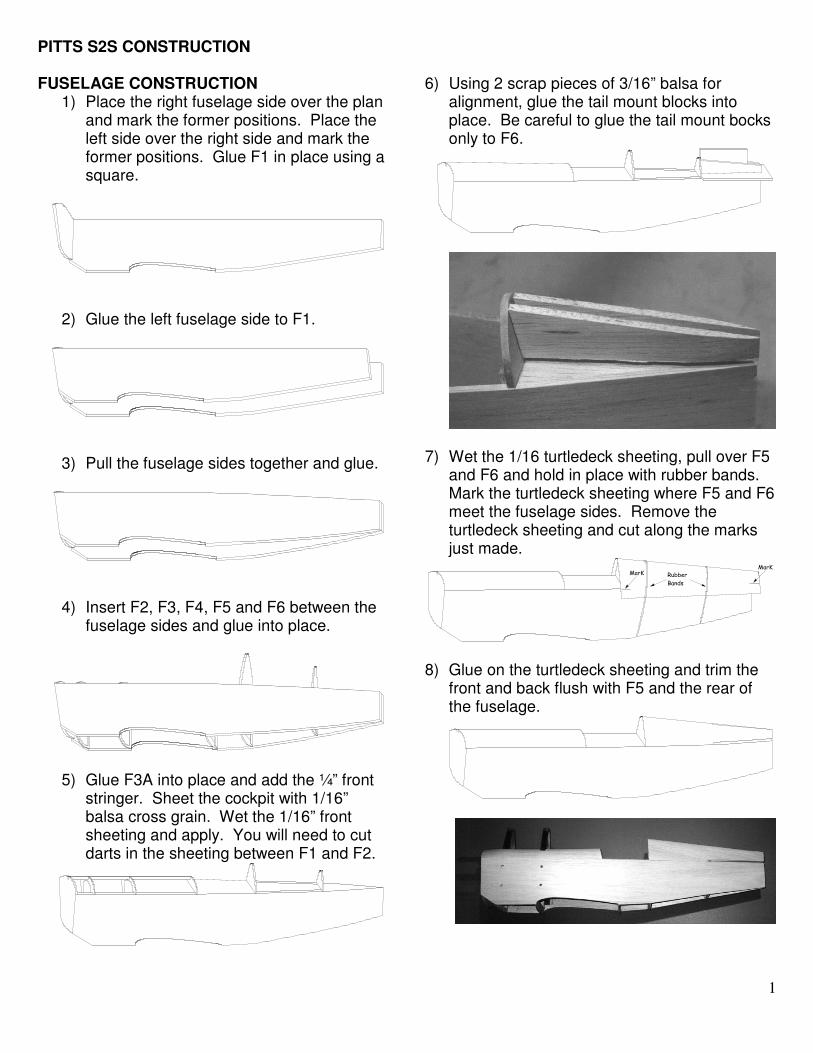
PITTS S2S CONSTRUCTION FUSELAGE CONSTRUCTION
1) Place the right fuselage side over the plan and mark the former positions. Place the left side over the right side and mark the former positions. Glue F1 in place using a square.
2) Glue the left fuselage side to F1.
3) Pull the fuselage sides together and glue.
4) Insert F2, F3, F4, F5 and F6 between the
fuselage sides and glue into place.
5) Glue F3A into place and add the ¼” front stringer. Sheet the cockpit with 1/16” balsa cross grain. Wet the 1/16” front sheeting and apply. You will need to cut darts in the sheeting between F1 and F2.
6) Using 2 scrap pieces of 3/16” balsa for alignment, glue the tail mount blocks into place. Be careful to glue the tail mount bocks only to F6.
7) Wet the 1/16 turtledeck sheeting, pull over F5 and F6 and hold in place with rubber bands. Mark the turtledeck sheeting where F5 and F6 meet the fuselage sides. Remove the turtledeck sheeting and cut along the marks just made.
������
���
��������
8) Glue on the turtledeck sheeting and trim the front and back flush with F5 and the rear of the fuselage.
2
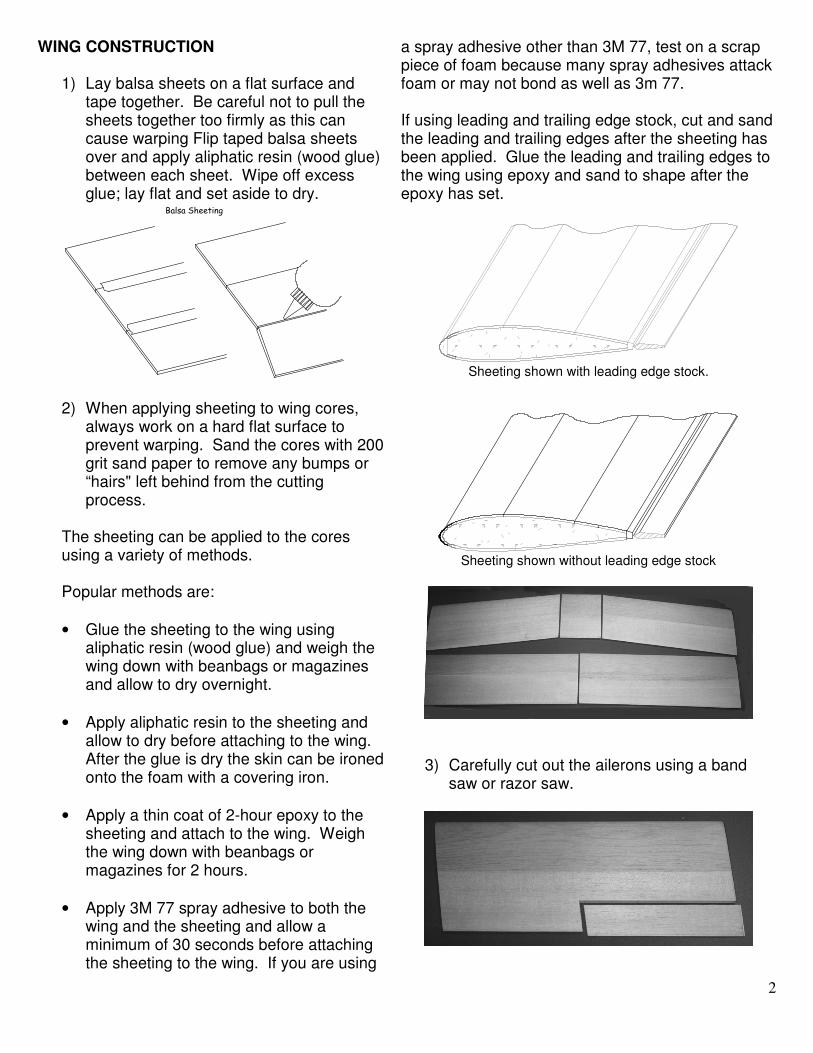
WING CONSTRUCTION 1) Lay balsa sheets on a flat surface and
tape together. Be careful not to pull the sheets together too firmly as this can cause warping Flip taped balsa sheets over and apply aliphatic resin (wood glue) between each sheet. Wipe off excess glue; lay flat and set aside to dry.
�� ����������
2) When applying sheeting to wing cores,
always work on a hard flat surface to prevent warping. Sand the cores with 200 grit sand paper to remove any bumps or “hairs" left behind from the cutting process.
The sheeting can be applied to the cores using a variety of methods. Popular methods are: • Glue the sheeting to the wing using
aliphatic resin (wood glue) and weigh the wing down with beanbags or magazines and allow to dry overnight.
• Apply aliphatic resin to the sheeting and
allow to dry before attaching to the wing. After the glue is dry the skin can be ironed onto the foam with a covering iron.
• Apply a thin coat of 2-hour epoxy to the
sheeting and attach to the wing. Weigh the wing down with beanbags or magazines for 2 hours.
• Apply 3M 77 spray adhesive to both the
wing and the sheeting and allow a minimum of 30 seconds before attaching the sheeting to the wing. If you are using
a spray adhesive other than 3M 77, test on a scrap piece of foam because many spray adhesives attack foam or may not bond as well as 3m 77. If using leading and trailing edge stock, cut and sand the leading and trailing edges after the sheeting has been applied. Glue the leading and trailing edges to the wing using epoxy and sand to shape after the epoxy has set.
Sheeting shown with leading edge stock.
Sheeting shown without leading edge stock
3) Carefully cut out the ailerons using a band saw or razor saw.
3
4) Cut a 2¼” X 2¼” mounting plate from
1/16” ply. Epoxy ¼” X ½” mounting blocks using a servo as a guide. Cut a hole in the wing to allow installation of the servo. Sheet the inside of the hole with 1/32” balsa and glue in ¼” ply mounting blocks.
� ��������������
��������� ����������������������� ��� � �
��!"���������
���#��� �
���������� ���
������ ��� � �
$%�&������'��������% ����
5) Cut slots for the interplane strut mounts using a hobby knife and a straight edge. Epoxy the strut mounts into place. Attach the interplane struts before the epoxy has set to allow proper alignment of the struts. Use cling wrap between the strut and the mount until the epoxy has set to prevent the strut from sticking to the mount.
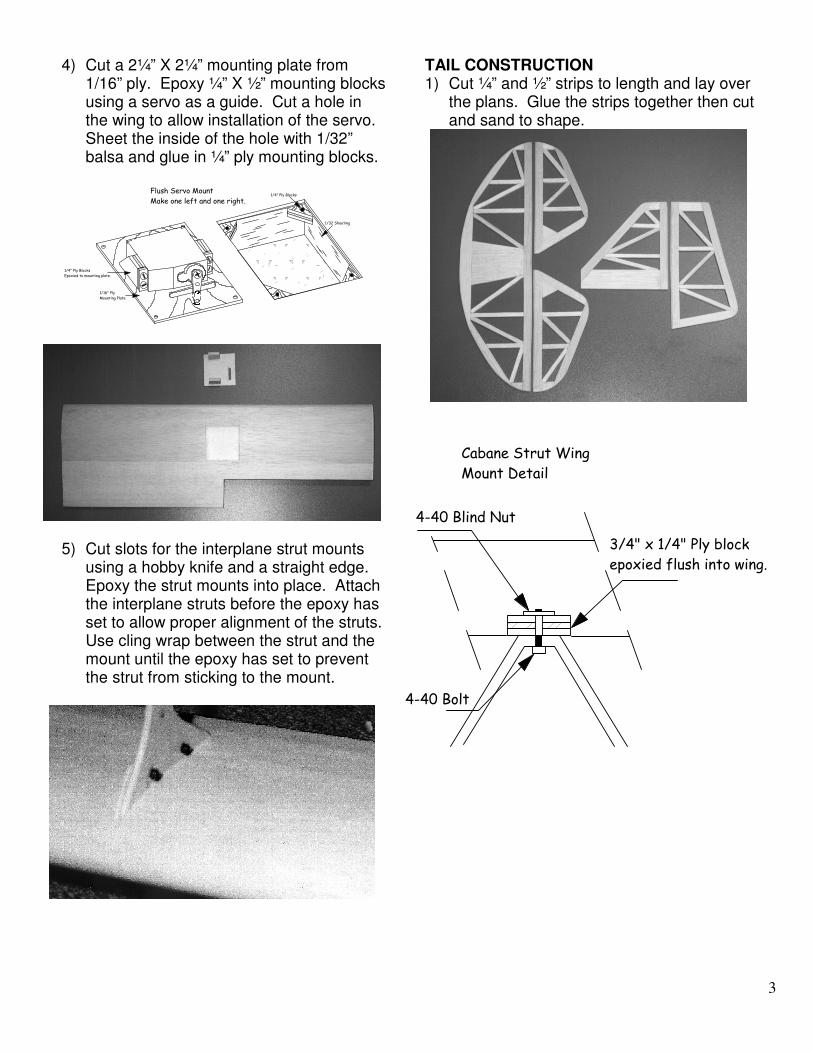
TAIL CONSTRUCTION 1) Cut ¼” and ½” strips to length and lay over
the plans. Glue the strips together then cut and sand to shape.
�(�)�� ���*��
!����&������� ��� � �
�%�&���� ��������+����
,������������-���
������.���� �
�(�)��� �
4
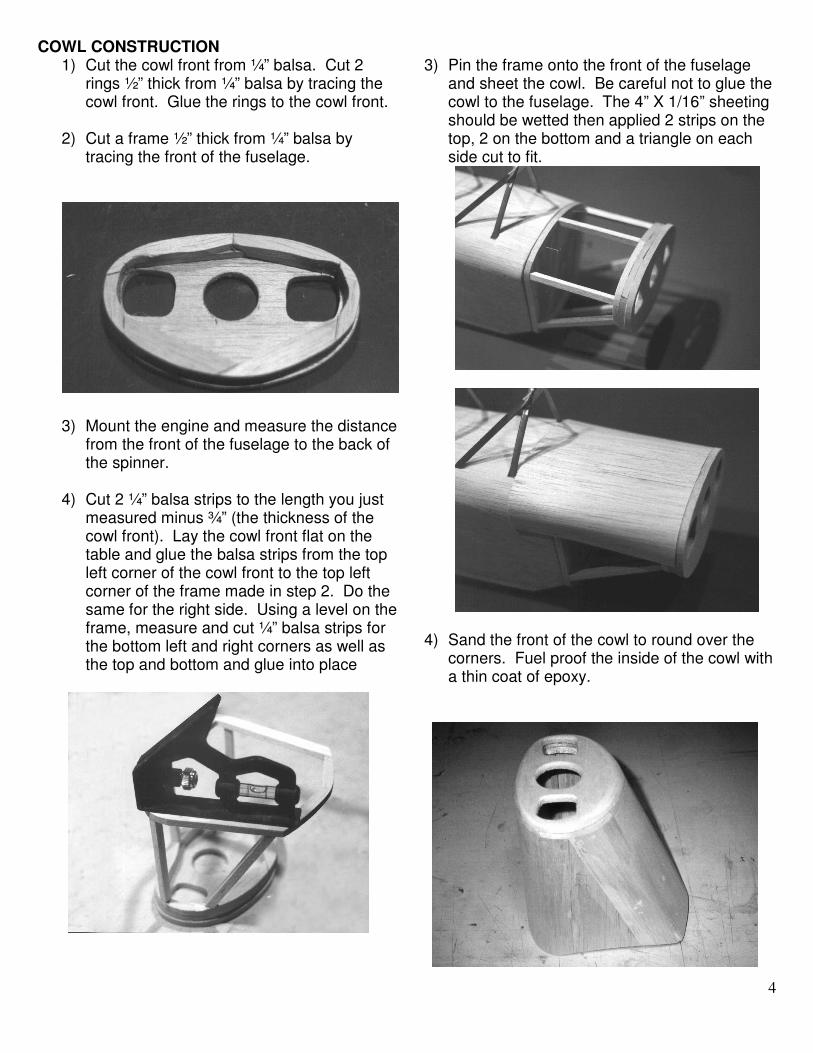
COWL CONSTRUCTION 1) Cut the cowl front from ¼” balsa. Cut 2
rings ½” thick from ¼” balsa by tracing the cowl front. Glue the rings to the cowl front.
2) Cut a frame ½” thick from ¼” balsa by
tracing the front of the fuselage.
3) Mount the engine and measure the distance
from the front of the fuselage to the back of the spinner.
4) Cut 2 ¼” balsa strips to the length you just
measured minus ¾” (the thickness of the cowl front). Lay the cowl front flat on the table and glue the balsa strips from the top left corner of the cowl front to the top left corner of the frame made in step 2. Do the same for the right side. Using a level on the frame, measure and cut ¼” balsa strips for the bottom left and right corners as well as the top and bottom and glue into place
3) Pin the frame onto the front of the fuselage
and sheet the cowl. Be careful not to glue the cowl to the fuselage. The 4” X 1/16” sheeting should be wetted then applied 2 strips on the top, 2 on the bottom and a triangle on each side cut to fit.
4) Sand the front of the cowl to round over the corners. Fuel proof the inside of the cowl with a thin coat of epoxy.
5
WHEEL PANTS
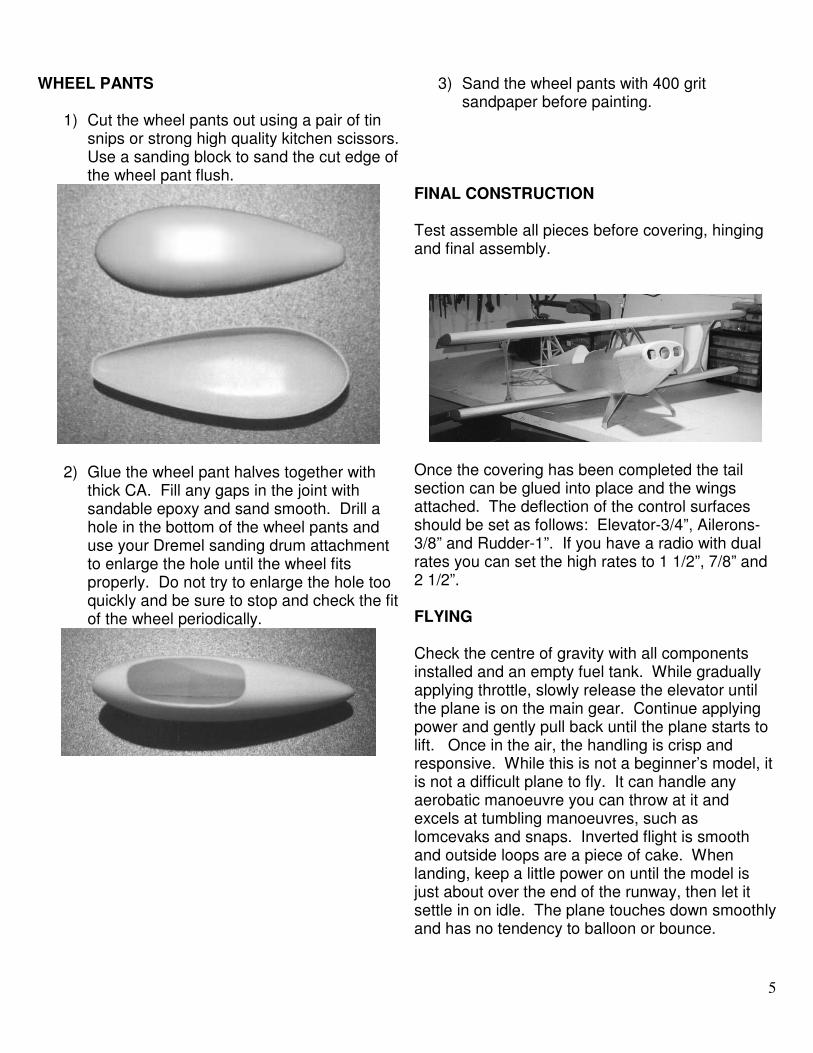
1) Cut the wheel pants out using a pair of tin snips or strong high quality kitchen scissors. Use a sanding block to sand the cut edge of the wheel pant flush.
2) Glue the wheel pant halves together with thick CA. Fill any gaps in the joint with sandable epoxy and sand smooth. Drill a hole in the bottom of the wheel pants and use your Dremel sanding drum attachment to enlarge the hole until the wheel fits properly. Do not try to enlarge the hole too quickly and be sure to stop and check the fit of the wheel periodically.
3) Sand the wheel pants with 400 grit sandpaper before painting.
FINAL CONSTRUCTION Test assemble all pieces before covering, hinging and final assembly.
Once the covering has been completed the tail section can be glued into place and the wings attached. The deflection of the control surfaces should be set as follows: Elevator-3/4”, Ailerons-3/8” and Rudder-1”. If you have a radio with dual rates you can set the high rates to 1 1/2”, 7/8” and 2 1/2”. FLYING Check the centre of gravity with all components installed and an empty fuel tank. While gradually applying throttle, slowly release the elevator until the plane is on the main gear. Continue applying power and gently pull back until the plane starts to lift. Once in the air, the handling is crisp and responsive. While this is not a beginner’s model, it is not a difficult plane to fly. It can handle any aerobatic manoeuvre you can throw at it and excels at tumbling manoeuvres, such as lomcevaks and snaps. Inverted flight is smooth and outside loops are a piece of cake. When landing, keep a little power on until the model is just about over the end of the runway, then let it settle in on idle. The plane touches down smoothly and has no tendency to balloon or bounce.