Embed Size (px)
Citation preview

PKIF OCSP Plug-in for Microsoft Windows
Installation and Configuration
Last updated: May 2010

This page intentionally mostly blank
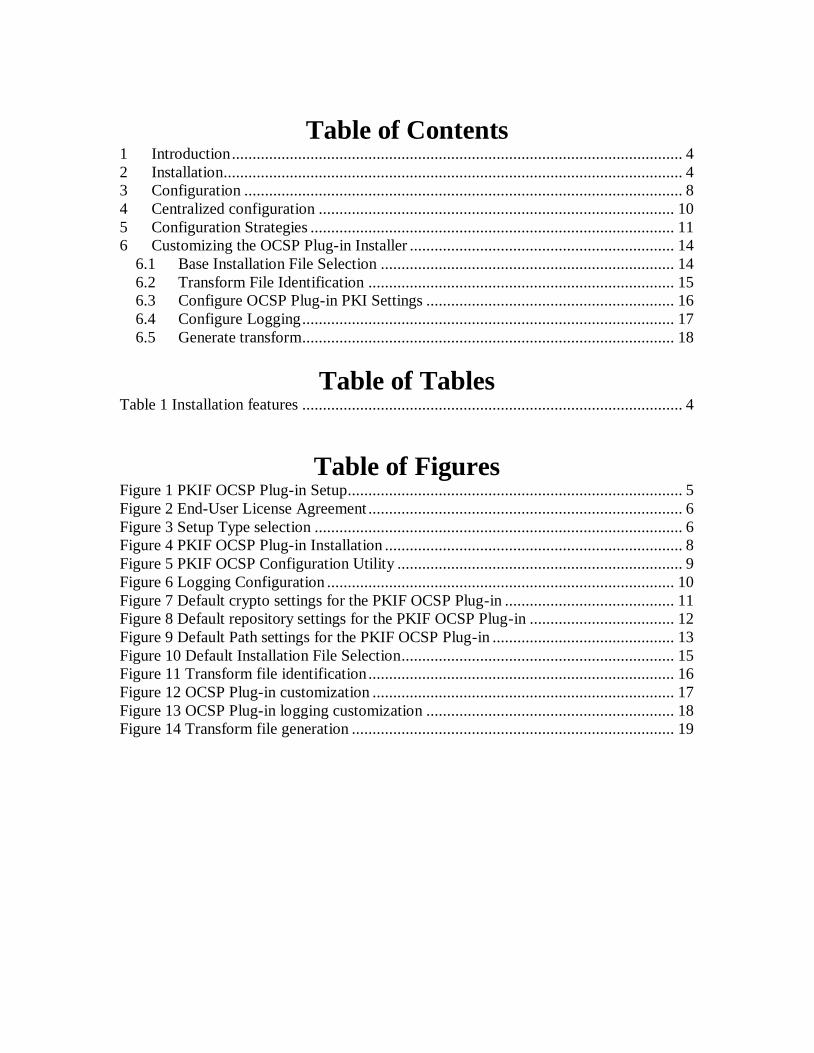
Table of Contents 1 Introduction ............................................................................................................. 4
2 Installation............................................................................................................... 4 3 Configuration .......................................................................................................... 8
4 Centralized configuration ...................................................................................... 10
5 Configuration Strategies ........................................................................................ 11 6 Customizing the OCSP Plug-in Installer ................................................................ 14
6.1 Base Installation File Selection ....................................................................... 14
6.2 Transform File Identification .......................................................................... 15 6.3 Configure OCSP Plug-in PKI Settings ............................................................ 16
6.4 Configure Logging .......................................................................................... 17
6.5 Generate transform.......................................................................................... 18
Table of Tables
Table 1 Installation features ............................................................................................ 4
Table of Figures
Figure 1 PKIF OCSP Plug-in Setup ................................................................................. 5
Figure 2 End-User License Agreement ............................................................................ 6
Figure 3 Setup Type selection ......................................................................................... 6 Figure 4 PKIF OCSP Plug-in Installation ........................................................................ 8
Figure 5 PKIF OCSP Configuration Utility ..................................................................... 9
Figure 6 Logging Configuration .................................................................................... 10
Figure 7 Default crypto settings for the PKIF OCSP Plug-in ......................................... 11 Figure 8 Default repository settings for the PKIF OCSP Plug-in ................................... 12
Figure 9 Default Path settings for the PKIF OCSP Plug-in ............................................ 13
Figure 10 Default Installation File Selection.................................................................. 15 Figure 11 Transform file identification .......................................................................... 16
Figure 12 OCSP Plug-in customization ......................................................................... 17
Figure 13 OCSP Plug-in logging customization ............................................................ 18 Figure 14 Transform file generation .............................................................................. 19
1 Introduction The PKIF OCSP Plug-in for Microsoft Windows is a revocation provider for the
Microsoft Cryptographic API (CAPI). Applications that obtain basic PKI functionality
from CAPI will call the PKIF OCSP Plug-in when validating a certificate. Many
commonly used applications, such as Outlook, Internet Explorer and Infopath, use CAPI
for PKI-related processing. The plug-in is installed using a basic Microsoft Installer
(.msi file). A customization wizard is provided to produce transform files (.mst files) that
can be used to produce installation packages tailored for a specific environment.
2 Installation The PKIF OCSP Plug-in for Microsoft Windows is installed using a standard Windows
installer. The installation package contains two features that may be installed, as
described in the following table.
Table 1 Installation features
Feature Description
PKIF OCSP Plug-in for
Microsoft Windows
Contains the basic components that integrate with
Microsoft CAPI to provide revocation status
determination capabilities. This feature is mandatory.
PKIF OCSP Plug-in
Customization Wizard
Contains a deployment utility that can be used to
create customized installation packages.
The Typical feature set includes PKIF OCSP Plug-in for Microsoft Windows. Other
features may be installed or not installed, as desired. The default installation package
can be customized as described in Section 6.
To begin plug-in installation, double-click the PkifPkifOcspPlugin.msi file. The
following dialog will be displayed. Click the Next button.
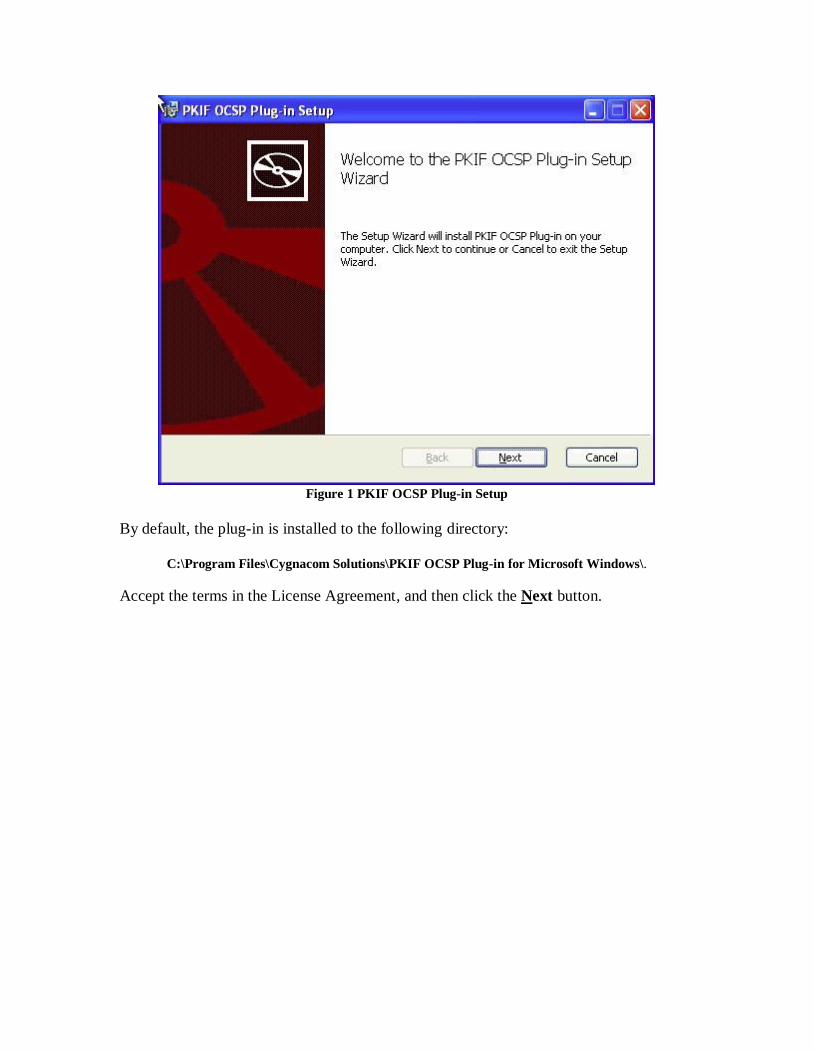
Figure 1 PKIF OCSP Plug-in Setup
By default, the plug-in is installed to the following directory:
C:\Program Files\Cygnacom Solutions\PKIF OCSP Plug-in for Microsoft Windows\.
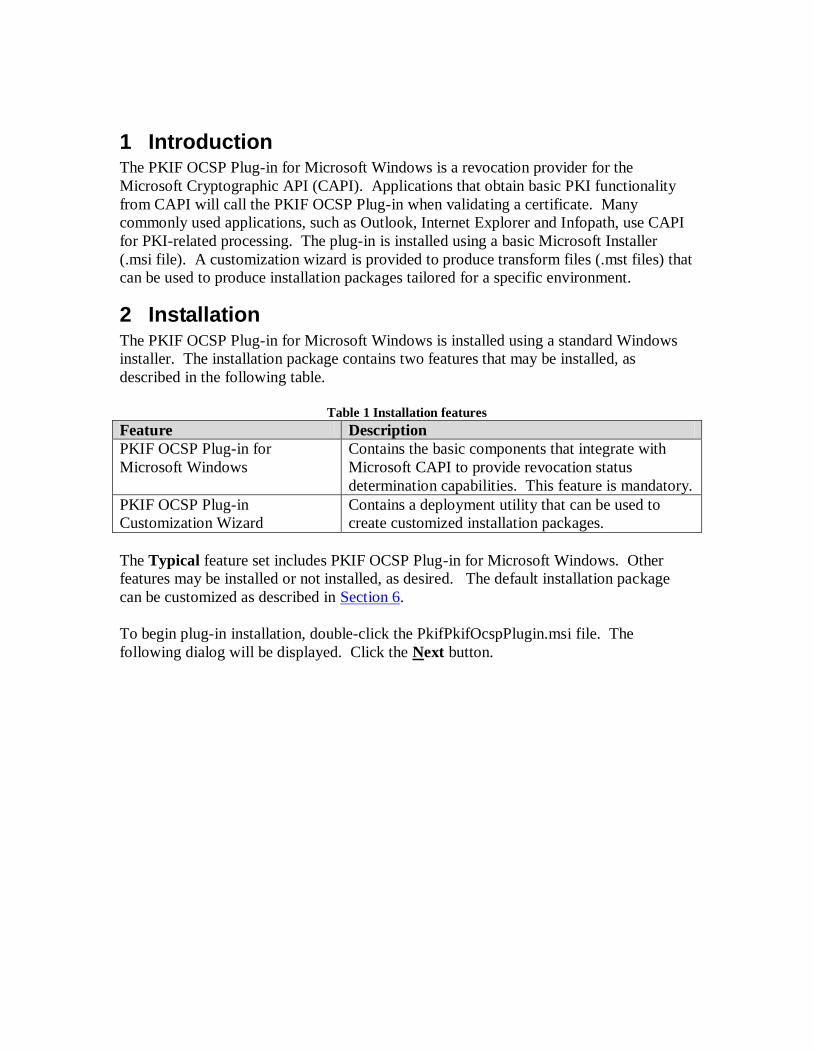
Accept the terms in the License Agreement, and then click the Next button.
Figure 2 End-User License Agreement
Click the Typical button for typical configuration on the third dialog.
Figure 3 Setup Type selection
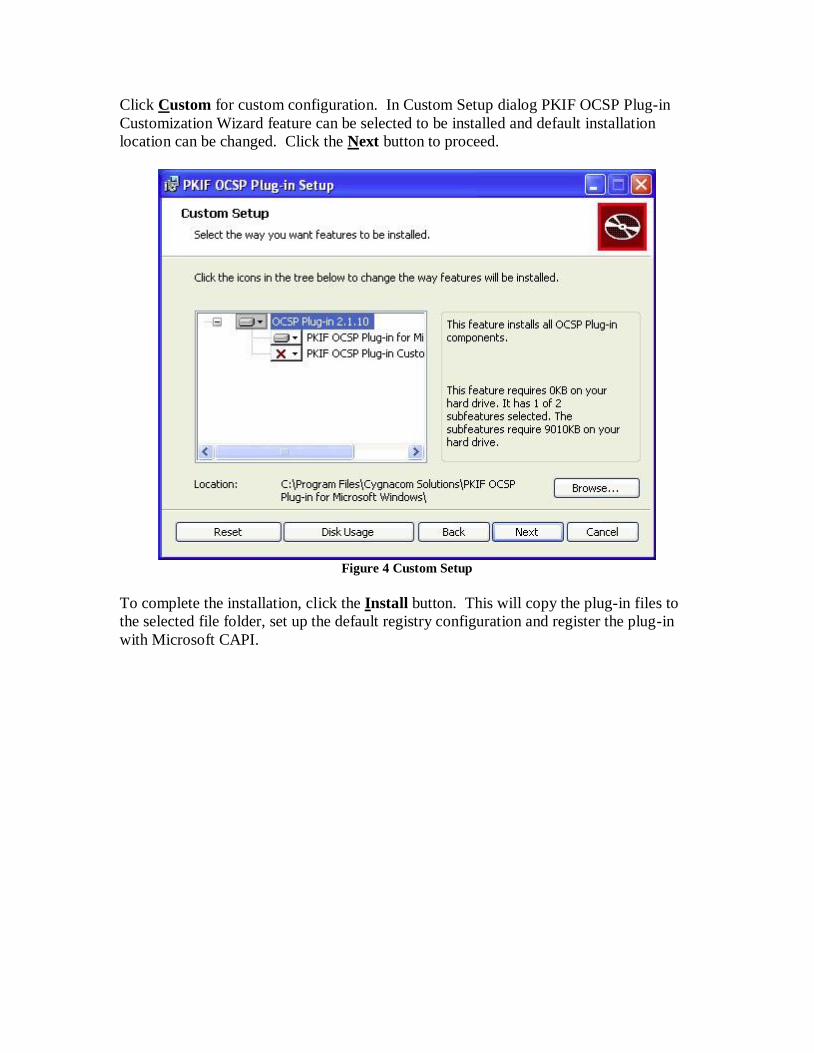
Click Custom for custom configuration. In Custom Setup dialog PKIF OCSP Plug-in
Customization Wizard feature can be selected to be installed and default installation
location can be changed. Click the Next button to proceed.
Figure 4 Custom Setup
To complete the installation, click the Install button. This will copy the plug-in files to
the selected file folder, set up the default registry configuration and register the plug-in
with Microsoft CAPI.
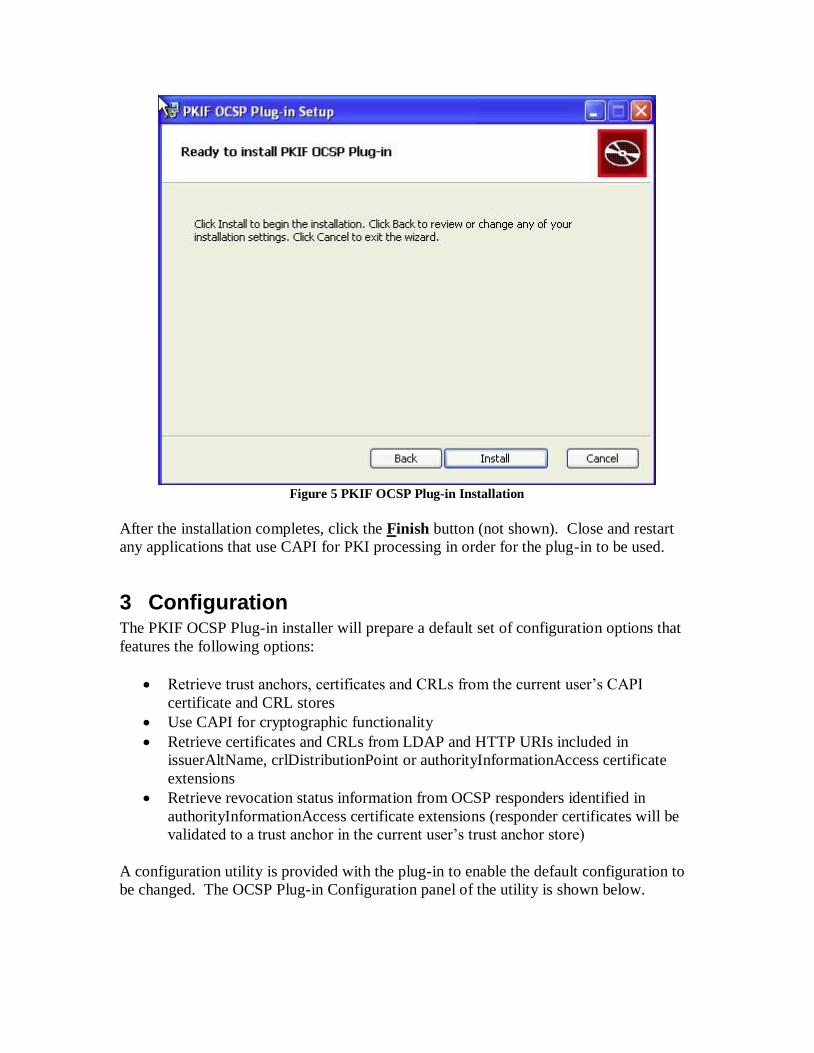
Figure 5 PKIF OCSP Plug-in Installation
After the installation completes, click the Finish button (not shown). Close and restart
any applications that use CAPI for PKI processing in order for the plug-in to be used.
3 Configuration The PKIF OCSP Plug-in installer will prepare a default set of configuration options that
features the following options:
Retrieve trust anchors, certificates and CRLs from the current user’s CAPI
certificate and CRL stores
Use CAPI for cryptographic functionality
Retrieve certificates and CRLs from LDAP and HTTP URIs included in
issuerAltName, crlDistributionPoint or authorityInformationAccess certificate
extensions
Retrieve revocation status information from OCSP responders identified in
authorityInformationAccess certificate extensions (responder certificates will be
validated to a trust anchor in the current user’s trust anchor store)
A configuration utility is provided with the plug-in to enable the default configuration to
be changed. The OCSP Plug-in Configuration panel of the utility is shown below.
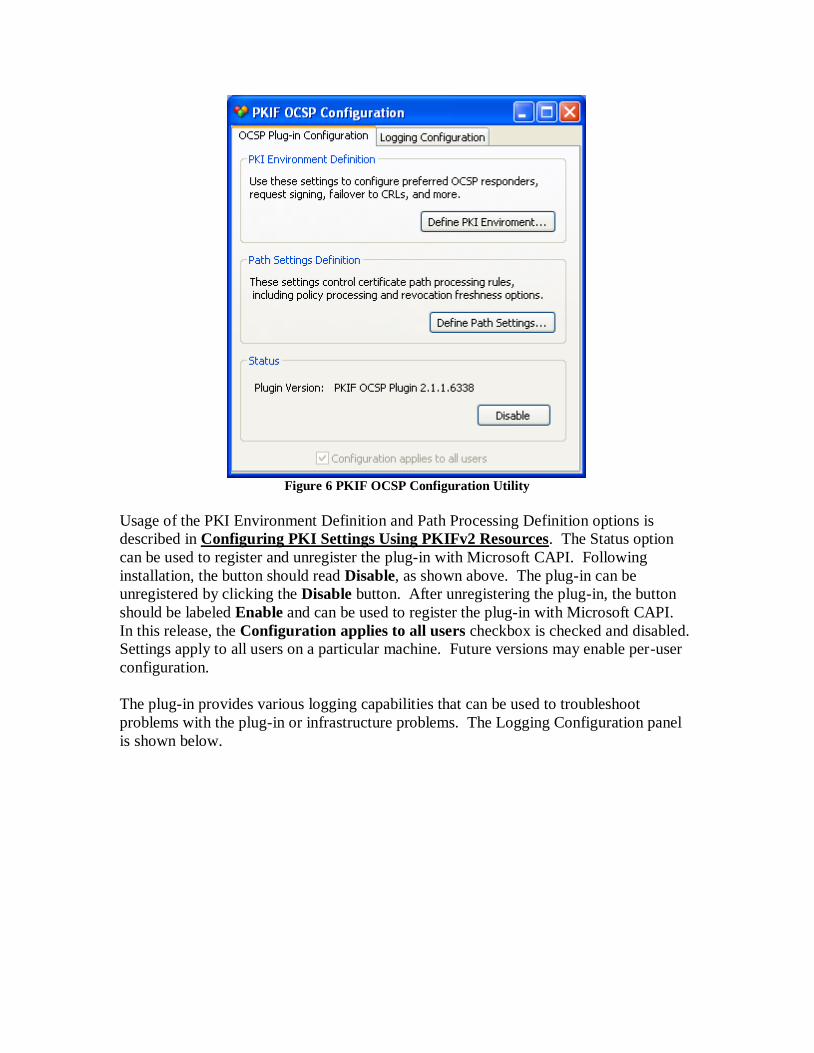
Figure 6 PKIF OCSP Configuration Utility
Usage of the PKI Environment Definition and Path Processing Definition options is
described in Configuring PKI Settings Using PKIFv2 Resources. The Status option
can be used to register and unregister the plug-in with Microsoft CAPI. Following
installation, the button should read Disable, as shown above. The plug-in can be
unregistered by clicking the Disable button. After unregistering the plug-in, the button
should be labeled Enable and can be used to register the plug-in with Microsoft CAPI.
In this release, the Configuration applies to all users checkbox is checked and disabled.
Settings apply to all users on a particular machine. Future versions may enable per-user
configuration.
The plug-in provides various logging capabilities that can be used to troubleshoot
problems with the plug-in or infrastructure problems. The Logging Configuration panel
is shown below.
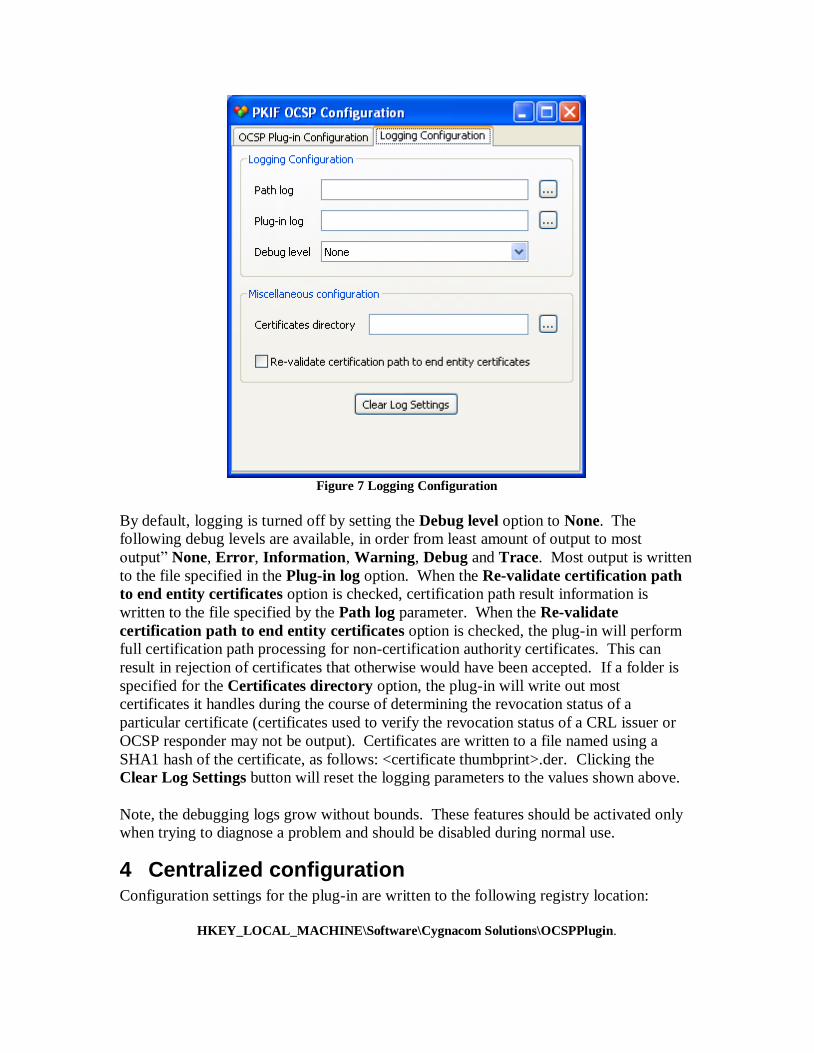
Figure 7 Logging Configuration
By default, logging is turned off by setting the Debug level option to None. The
following debug levels are available, in order from least amount of output to most
output” None, Error, Information, Warning, Debug and Trace. Most output is written
to the file specified in the Plug-in log option. When the Re-validate certification path
to end entity certificates option is checked, certification path result information is
written to the file specified by the Path log parameter. When the Re-validate
certification path to end entity certificates option is checked, the plug-in will perform
full certification path processing for non-certification authority certificates. This can
result in rejection of certificates that otherwise would have been accepted. If a folder is
specified for the Certificates directory option, the plug-in will write out most
certificates it handles during the course of determining the revocation status of a
particular certificate (certificates used to verify the revocation status of a CRL issuer or
OCSP responder may not be output). Certificates are written to a file named using a
SHA1 hash of the certificate, as follows: <certificate thumbprint>.der. Clicking the
Clear Log Settings button will reset the logging parameters to the values shown above.
Note, the debugging logs grow without bounds. These features should be activated only
when trying to diagnose a problem and should be disabled during normal use.
4 Centralized configuration Configuration settings for the plug-in are written to the following registry location:
HKEY_LOCAL_MACHINE\Software\Cygnacom Solutions\OCSPPlugin.
The values under this location can be captured by an administrator and distributed using
an enterprise-wide configuration management tool, such as SMS or Group Policy, or by
creating a custom installation package. The PKIF OCSP Plug-in Configuration utility is
primarily intended for use by administrators in defining settings that will be distributed
across an enterprise. The plug-in will recognize per-user settings that reside in the same
location under HKEY_CURRENT_USER, but the configuration utility cannot be used to
manage these settings.
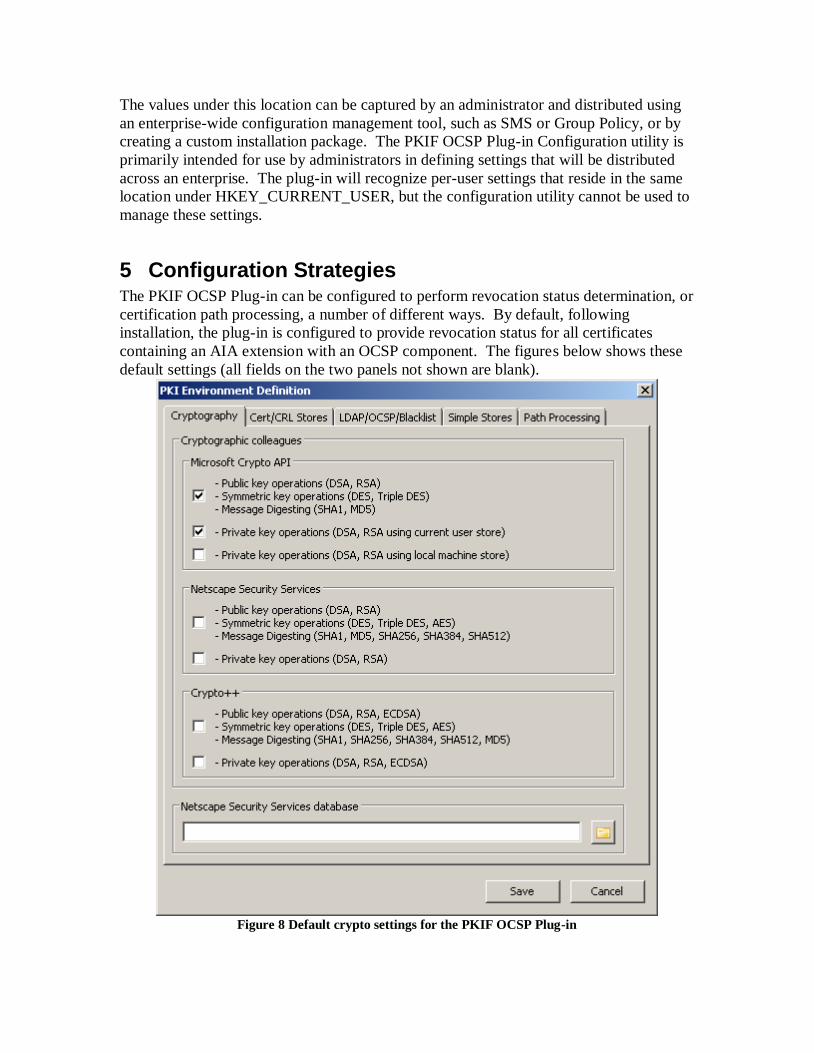
5 Configuration Strategies The PKIF OCSP Plug-in can be configured to perform revocation status determination, or
certification path processing, a number of different ways. By default, following
installation, the plug-in is configured to provide revocation status for all certificates
containing an AIA extension with an OCSP component. The figures below shows these
default settings (all fields on the two panels not shown are blank).
Figure 8 Default crypto settings for the PKIF OCSP Plug-in
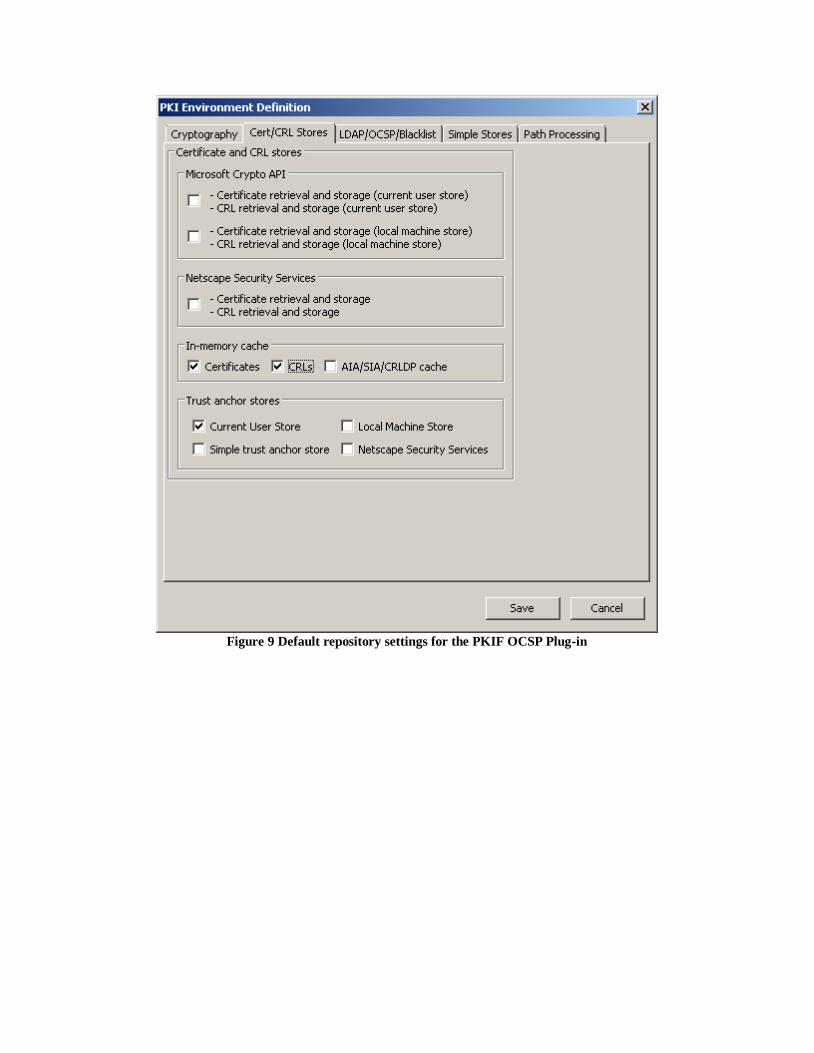
Figure 9 Default repository settings for the PKIF OCSP Plug-in
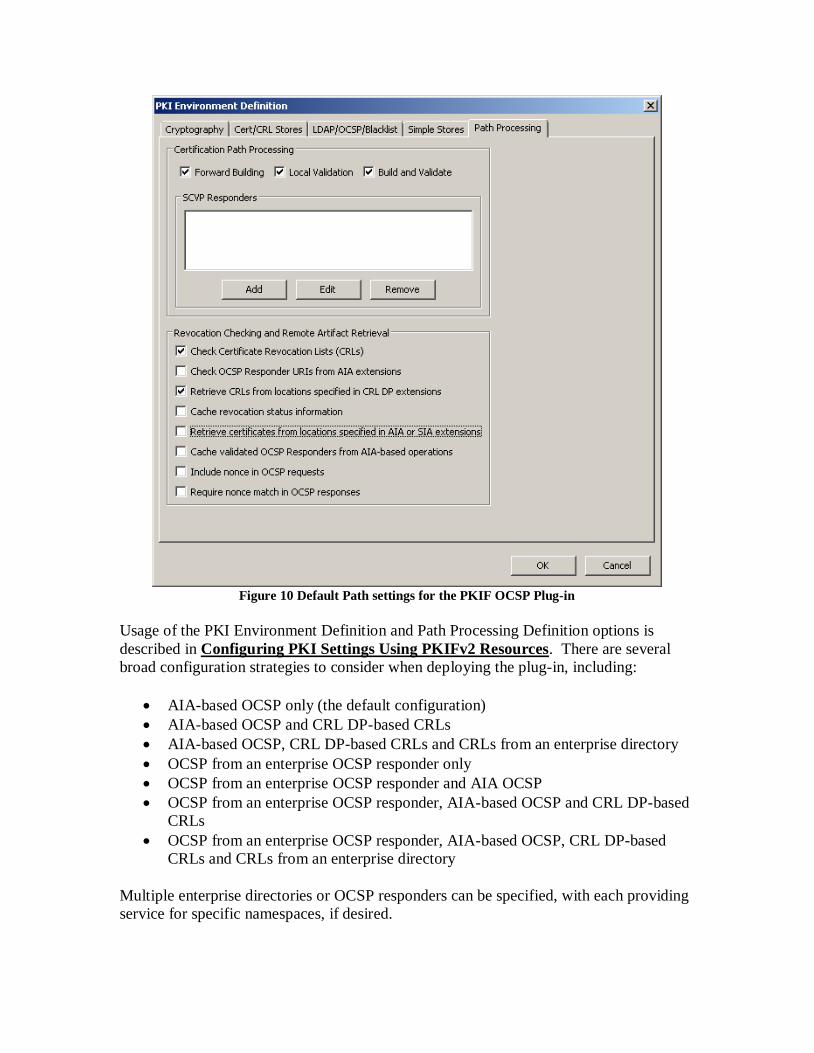
Figure 10 Default Path settings for the PKIF OCSP Plug-in
Usage of the PKI Environment Definition and Path Processing Definition options is
described in Configuring PKI Settings Using PKIFv2 Resources. There are several
broad configuration strategies to consider when deploying the plug-in, including:
AIA-based OCSP only (the default configuration)
AIA-based OCSP and CRL DP-based CRLs
AIA-based OCSP, CRL DP-based CRLs and CRLs from an enterprise directory
OCSP from an enterprise OCSP responder only
OCSP from an enterprise OCSP responder and AIA OCSP
OCSP from an enterprise OCSP responder, AIA-based OCSP and CRL DP-based
CRLs
OCSP from an enterprise OCSP responder, AIA-based OCSP, CRL DP-based
CRLs and CRLs from an enterprise directory
Multiple enterprise directories or OCSP responders can be specified, with each providing
service for specific namespaces, if desired.
6 Customizing the OCSP Plug-in Installer The PKIF OCSP Plug-in is installed using a Microsoft Windows Installer package named
PkifOcspPlugin.msi. This installer performs basic installation activities including
copying files, registration with the host operating system, establishing default
configuration values, preparing shortcuts, etc. In some cases, additional configuration is
required after using the default installation package before using OCSP Plug-in. For
example, in some environments specification of an enterprise OCSP responder may be
required. The OCSP Plug-in Customization Wizard can be used to generate a transform
file that can be applied to the default installer to help avoid the need to perform manual
configuration steps following installation.
The transform file generated by the customization wizard can be installed using the
msiexec shown below:
msiexec /i <full path & filename of installer> TRANSFORMS=<full path & filename of transform>
Alternatively, the transform file can be applied to the base installation package using a
tool like ORCA (http://msdn.microsoft.com/en-us/library/aa370557%28VS.85%29.aspx).
This approach results in a single .msi file that can be distributed and used to install OCSP
Plug-in with the desired customizations.
The following sections describe usage of the customization wizard. Prior to beginning a
customization activity make sure to have collected the information identified below, i.e.,
OCSP responder addresses, LDAP-accessible directory addresses, namespaces for OCSP
responders and LDAP-accessible directories, etc.
6.1 Base Installation File Selection
To launch the customization wizard, double-click the
OcspPluginCustomizationWizard.exe file or select the OcspPluginCustomizationWizard
shortcut from the Start Menu. The panel shown below will be displayed. Browse to the
default PkifOcspPlugin.msi file then click the Next button.
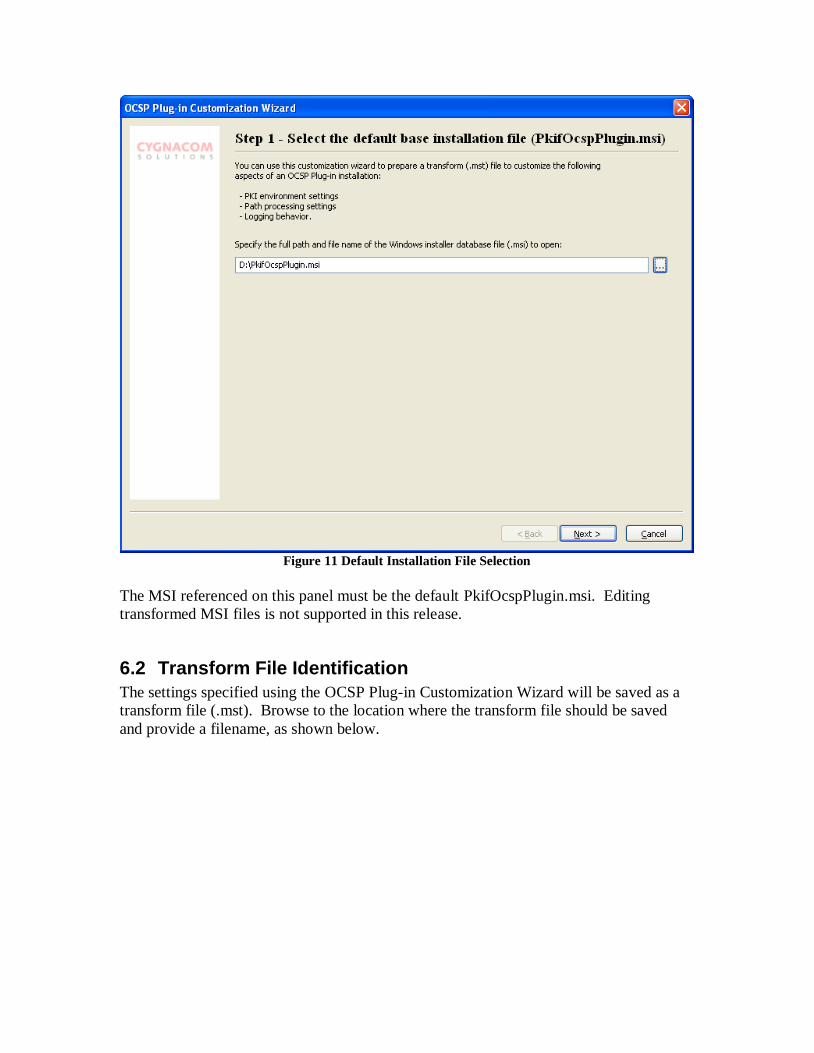
Figure 11 Default Installation File Selection
The MSI referenced on this panel must be the default PkifOcspPlugin.msi. Editing
transformed MSI files is not supported in this release.
6.2 Transform File Identification
The settings specified using the OCSP Plug-in Customization Wizard will be saved as a
transform file (.mst). Browse to the location where the transform file should be saved
and provide a filename, as shown below.
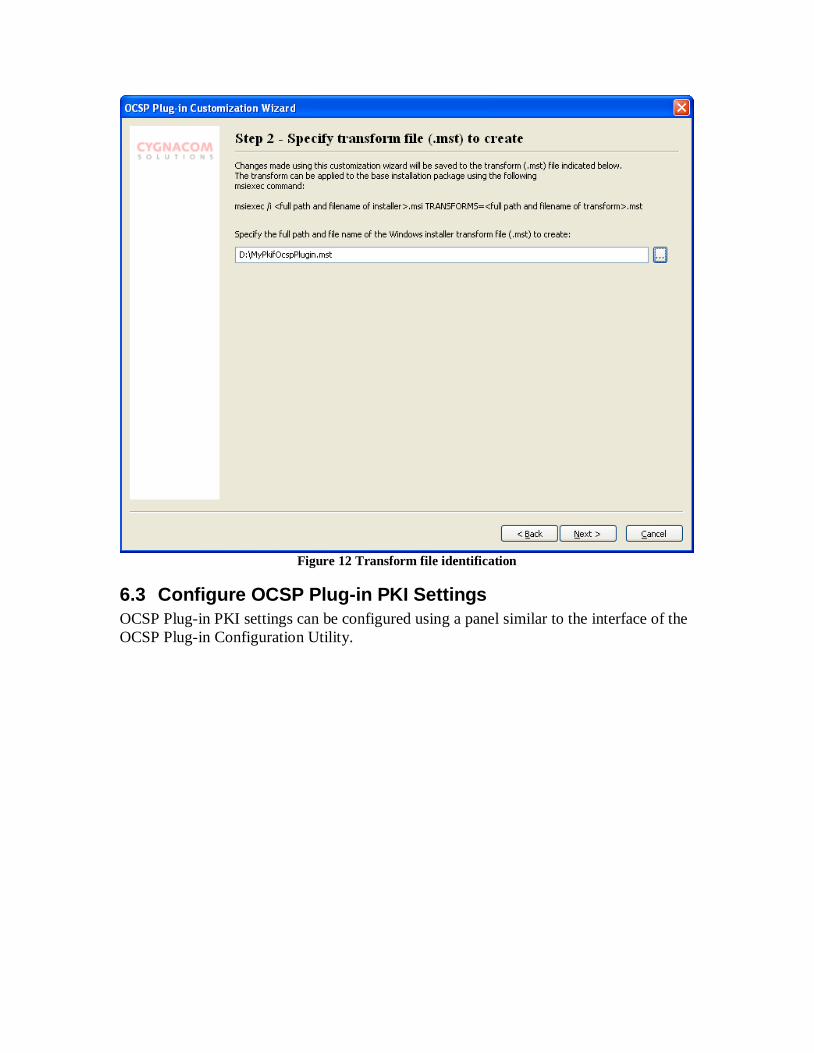
Figure 12 Transform file identification
6.3 Configure OCSP Plug-in PKI Settings
OCSP Plug-in PKI settings can be configured using a panel similar to the interface of the
OCSP Plug-in Configuration Utility.
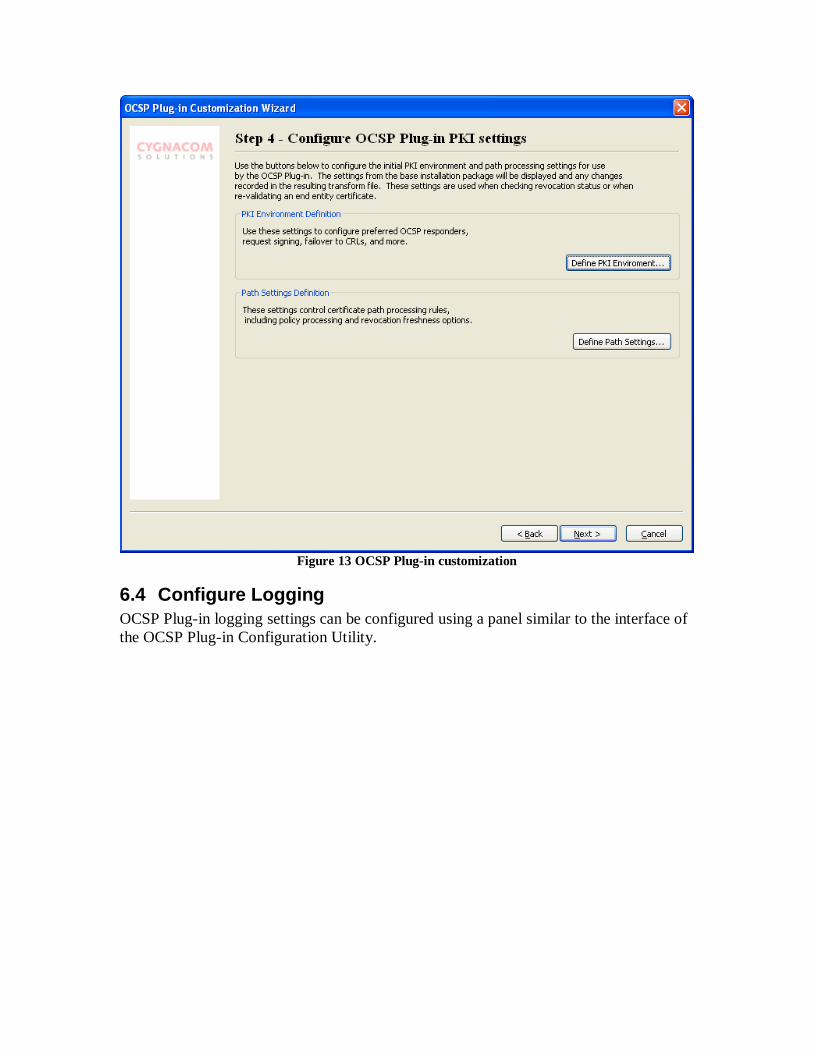
Figure 13 OCSP Plug-in customization
6.4 Configure Logging
OCSP Plug-in logging settings can be configured using a panel similar to the interface of
the OCSP Plug-in Configuration Utility.
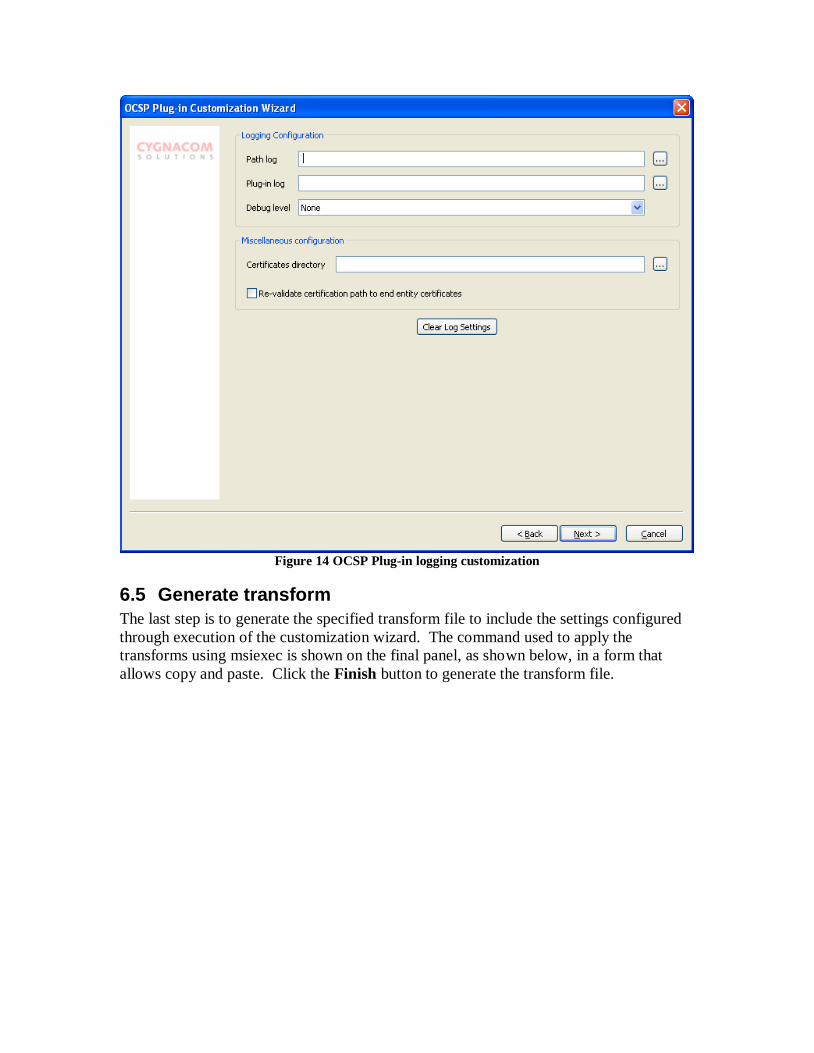
Figure 14 OCSP Plug-in logging customization
6.5 Generate transform
The last step is to generate the specified transform file to include the settings configured
through execution of the customization wizard. The command used to apply the
transforms using msiexec is shown on the final panel, as shown below, in a form that
allows copy and paste. Click the Finish button to generate the transform file.
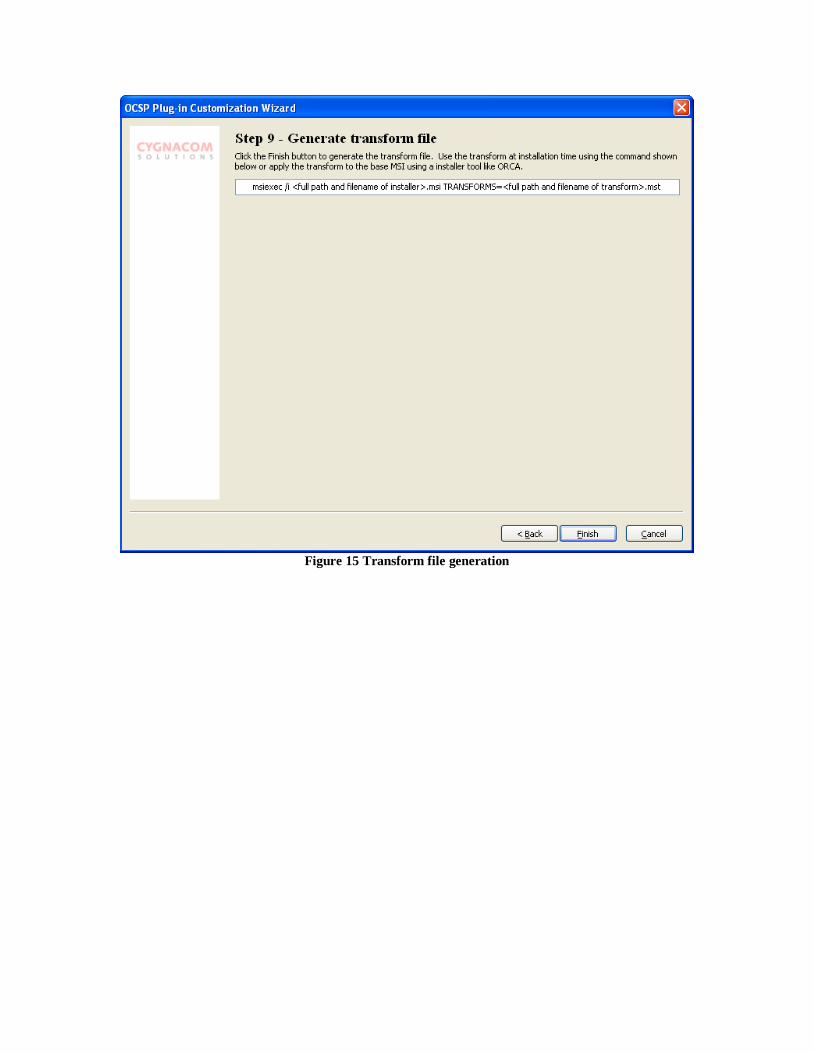
Figure 15 Transform file generation


![[MS-OCSP]: Online Certificate Status Protocol …...The Online Certificate Status Protocol (OCSP) Extensions provide the Microsoft implementation of the Lightweight Online Certificate](https://img.pdfslide.net/doc/110x75/5f0d84e97e708231d43ac2e5/ms-ocsp-online-certificate-status-protocol-the-online-certificate-status.jpg)


![[MS-OCSP]: Online Certificate Status Protocol (OCSP ...download.microsoft.com/download/9/5/E/95EF66AF-9026-4BB0-A41D... · [MS-OCSP]: Online Certificate Status Protocol (OCSP)](https://img.pdfslide.net/doc/110x75/5b8483987f8b9aea498c7a92/ms-ocsp-online-certificate-status-protocol-ocsp-ms-ocsp-online-certificate.jpg)