Embed Size (px)
Citation preview

Diagram A - Parts List
Seam Ripper Kit #PKSR1 Single Blade (small Style A) #PKSR2 Double Blade (large & small Style B) #PKSRNXX Necklace (Style C)#PKSR3 Stilleto (Style A) Kit Features •StyleA-SingleBlade,smallripperwithclip. Reversesintohandleforsafety.•StyleB-DoubleBlade,small&largerippers.•StyleCsinglesmallbladew/magneticnecklacechaincatch.•Sharpbladereversesintohandleforsafety.•8mmtubes
Required Accessories •7mm,PenMandrel•8mmDrillBit#PKPARK-8MM•8mmBarrelTrimmer(usefrom#PKTRIMKIT)•3pc.BushingsSet#PKSRBU(use2ofthe3inthesetforeachstyle)•2partglue,epoxyorInsta-cure(cyanoacrylate).
PSI Woodworking ProductsPKSRXX
Preparing the Blank•Prepareandcutablankof3/4”orlarger,tothelengthofthebrasstube(add1/16”fortrimming)•Drilla8mmholethroughthecenteroftheblank.•Spreadglueoverthetube,insertintoblankwithatwistingmotiontospreadtheglueevenlyinside.•Centerthetubeinsidetheblank.•Whenglueisdry.Trimtheendsoftheblankflushtothetube.
Clip
CapTube style C 2-1/4”
Single Blade - Style - A & C
Large Seam Ripper
Retaining Spring
3-1/8”
Double Blade - Style - B
Single Blade
Necklace
Large & Small Blades
Larger Blade
Smaller Blade
Small Blade
Stored Position
Protective BallSmall Seam Ripper
Small Seam Ripper
Protective Ball
A
C
B
© 2012 PSI Woodworking • Philadelphia, PA 19115 v06/12
Retaining Spring
Retaining Spring
Magnetic Cap
Magnetic Clasp & Chain
Tube
Style A
Style A
Style C
Style C
Tube style A 3-1/8”
Stilleto
Stilleto
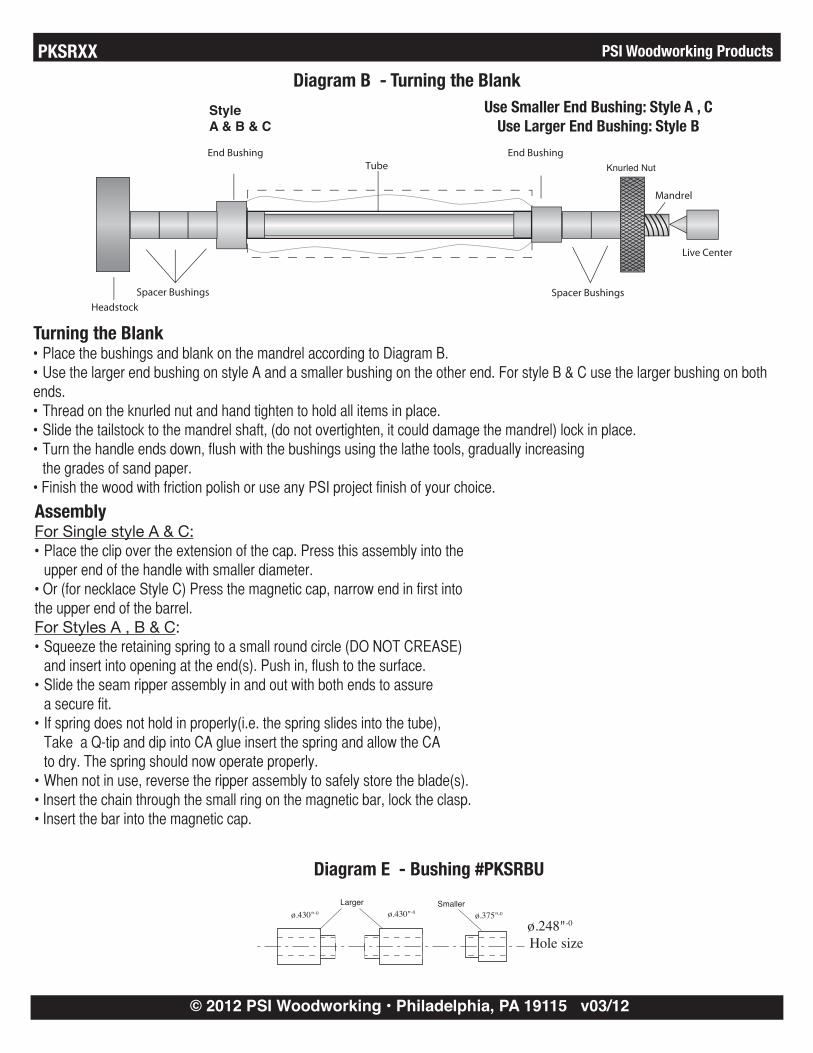
Diagram B - Turning the Blank
PSI Woodworking ProductsPKSRXX
© 2012 PSI Woodworking • Philadelphia, PA 19115 v03/12
HeadstockSpacer Bushings Spacer Bushings
End Bushing(Larger)
End Bushing(Smaller) Lock Nut
Live Center
Mandrel
Tube
Use Smaller End Bushing: Style A , CUse Larger End Bushing: Style B
Turning the Blank•PlacethebushingsandblankonthemandrelaccordingtoDiagramB.•UsethelargerendbushingonstyleAandasmallerbushingontheotherend.ForstyleB&Cusethelargerbushingonbothends.•Threadontheknurlednutandhandtightentoholdallitemsinplace.•Slidethetailstocktothemandrelshaft,(donotovertighten,itcoulddamagethemandrel)lockinplace.•Turnthehandleendsdown,flushwiththebushingsusingthelathetools,graduallyincreasing thegradesofsandpaper.•FinishthewoodwithfrictionpolishoruseanyPSIprojectfinishofyourchoice.
AssemblyFor Single style A & C:•Placetheclipovertheextensionofthecap.Pressthisassemblyintothe upperendofthehandlewithsmallerdiameter.•Or(fornecklaceStyleC)Pressthemagneticcap,narrowendinfirstintotheupperendofthebarrel.For Styles A , B & C:•Squeezetheretainingspringtoasmallroundcircle(DONOTCREASE) andinsertintoopeningattheend(s).Pushin,flushtothesurface.•Slidetheseamripperassemblyinandoutwithbothendstoassure asecurefit.•Ifspringdoesnotholdinproperly(i.e.thespringslidesintothetube), TakeaQ-tipanddipintoCAglueinsertthespringandallowtheCA todry.Thespringshouldnowoperateproperly.•Whennotinuse,reversetheripperassemblytosafelystoretheblade(s).•Insertthechainthroughthesmallringonthemagneticbar,locktheclasp.•Insertthebarintothemagneticcap.
Style A & B & C
Diagram E - Bushing #PKSRBU
ø.430"-0 ø.375"-0ø.430"-0
Larger Smaller
ø.248"-0
Hole size
Knurled Nut

Traduction des instructions de Penn State Industries (PSI) pour les trousses découseurs Seam Ripper Kit Ensemble de découseurs #PKSR1 Single Blade (small Style A) #PKSR2 Double Blade (large & small Style B) #PKSRNXX Necklace (Style C) #PKSR3 Stilleto (Style A)
#PKSR1 Lame simple (petite, style A) #PKSR2 Lame double (grosse et petite, style B) #PKSRNXX Collier (style C) #PKSR3 Poinçon (style A)
Smaller Blade Petite lame Large & Small Blades Grosse lame et petite lame Larger Blade Grosse lame Stilleto Poinçon Single Blade Lame simple Small Blade Petite lame Stored Position Position de rangement Necklace Collier Kit Features Caractéristiques de la trousse • Style A - Single Blade, small ripper with clip. Reverses into handle for safety. • Style B - Double Blade, small & large rippers. • Style C single small blade w/ magnetic necklace chain catch. • Sharp blade reverses into handle for safety. • 8mm tubes
• Style A – Lame simple, petit crochet avec pince. Se rétracte dans le manche par souci de sécurité. • Style B – Lame double, petit crochet et gros crochet. • Style C – Petite lame simple avec chaîne pour le cou à fermoir magnétique. • Le crochet tranchant se rétracte dans le manche par souci de sécurité. • Tubes de 8 mm
Required Accessories Matériel requis • 7mm, Pen Mandrel • Mandrin pour stylo de 7 mm • 8mm Drill Bit #PKPARK-8MM • Mèche de 8 mm no PKPARK-8MM • 8mm Barrel Trimmer (use from #PKTRIMKIT) • Alésoir de 8 mm (utiliser l’alésoir no PKTRIMKIT) • 3 pc. Bushings Set #PKSRBU (use 2 of the 3 in the set for each style)
• Ensemble de bagues (3 pièces) no PKSRBU (utilisez 2 des 3 bagues pour chaque style)
• 2 part glue, epoxy or Insta-cure (cyanoacrylate). • Colle époxy à deux composants ou colle instantanée (cyanoacrylate). Diagram A - Parts List Diagramme A – Liste des pièces Single Blade - Style - A & C Lame simple - Styles A et C Protective Ball Boule protectrice Small Seam Ripper Petit découseur Retaining Spring Ressort de retenue Tube style A 3-1/8” Tube style A 3 1/8 po Clip Pince Tube style C 2-1/4” Tube style C 2,25 po Cap Capuchon Stilleto Poinçon Double Blade - Style - B Lame double – Style B Large Seam Ripper Gros découseur Magnetic Clasp & Chain Fermoir magnétique et chaîne Magnetic Cap Capuchon magnétique 3-1/8” 3 1/8 po Preparing the Blank Préparation du carrelet • Prepare and cut a blank of 3/4” or larger, to the length of the brass tube (add 1/16” for trimming)
• Préparez et coupez un carrelet de 0,75 po ou plus gros de la même longueur que le tube en laiton (laissez 1/16 po de plus pour l’équarrissage).
• Drill an 8mm hole through the center of the blank.
• Percez un trou de 8 mm dans le sens de la longueur au centre du carrelet.
• Spread glue over the tube, insert into blank with a twisting motion to spread the glue evenly inside.
• Enduisez de colle la surface du tube et insérez-le dans le carrelet en tournant pour étendre la colle uniformément à l’intérieur.
• Center the tube inside the blank. • Centrez le tube à l’intérieur du carrelet. • When glue is dry, trim the ends of the blank flush to the tube.
• Lorsque la colle est sèche, équarrissez les bouts du carrelet jusqu’à égalité avec le tube.
Diagram B - Turning the Blank Diagramme B – Tournage du carrelet Style A & B & C Styles A, B et C

Traduction des instructions de Penn State Industries (PSI) pour les trousses découseurs Use Smaller End Bushing: Style A , C Utilisez la petite bague d’extrémité : styles A, C Use Larger End Bushing: Style B Utilisez la grosse bague d’extrémité : style B End Bushing Bague d’extrémité Tube Tube Knurled Nut Écrou moleté Mandrel Mandrin Live Center Pointe vive Spacer Bushings Bagues d’espacement Headstock Poupée fixe Turning the Blank Tournage du carrelet • Place the bushings and blank on the mandrel according to Diagram B.
• Assemblez les bagues et le carrelet sur le mandrin comme l’illustre le diagramme B.
• Use the larger end bushing on style A and a smaller bushing on the other end. For style B & C use the larger bushing on both ends.
• Utilisez la grosse bague d’extrémité pour le style A et une petite bague à l’autre bout. Pour les styles B et C, utilisez une grosse bague à chaque extrémité.
• Thread on the knurled nut and hand tighten to hold all items in place.
• Vissez l’écrou moleté et serrez à la main pour maintenir toutes les pièces en place.
• Slide the tailstock to the mandrel shaft, (do not overtighten, it could damage the mandrel) lock in place.
• Glissez la poupée mobile contre l’arbre du mandrin (ne pas serrer avec trop de force, car cela risque d’endommager le mandrin); verrouillez en position.
• Turn the handle ends down, flush with the bushings using the lathe tools, gradually increasing the grades of sand paper.
• Tournez le carrelet du manche jusqu’à égalité avec les bagues à l’aide des outils du tour à bois; augmentez graduellement le grain du papier sablé.
• Finish the wood with friction polish or use any PSI project finish of your choice.
• Appliquez un agent de polissage par friction ou un agent de finition « Project Finish » de PSI de votre choix.
Assembly Assemblage For Single style A & C: Découseur à lame simple (styles A et C) : • Place the clip over the extension of the cap. Press this assembly into the upper end of the handle with smaller diameter.
• Installez la pince sur la tige du capuchon. Insérez cet assemblage dans l’extrémité supérieure du manche à petit diamètre.
• Or (for necklace Style C) Press the magnetic cap, narrow end in first into the upper end of the barrel.
• Ou (pour le style C à collier), insérez le capuchon magnétique, bout étroit en premier, dans l’extrémité supérieure du barillet.
For Styles A , B & C: Styles A, B et C : • Squeeze the retaining spring to a small round circle (DO NOT CREASE) and insert into opening at the end(s). Push in, flush to the surface.
• Pressez le ressort de retenue de manière à former un petit cercle (NE PAS DISTORDRE) et insérez-le dans l’ouverture à l’extrémité (ou à chaque extrémité). Enfoncez jusqu’à égalité avec la surface.
• Slide the seam ripper assembly in and out with both ends to assure a secure fit.
• Glissez l’assemblage du découseur en un mouvement de va-et-vient à chaque extrémité pour assurer un ajustement sûr.
• If spring does not hold in properly (i.e. the spring slides into the tube), Take a Q-tip and dip into CA glue insert the spring and allow the CA to dry. The spring should now operate properly.
• Si le ressort ne tient pas bien en place (c.-à-d. s’il glisse à l’intérieur du tube), plongez un cure-oreille dans de la colle cyanoacrylate, insérez le ressort et laissez le temps à la colle de sécher. Le ressort devrait maintenant fonctionner correctement.
• When not in use, reverse the ripper assembly to safely store the blade(s).
• Après chaque utilisation, rétractez l’assemblage du découseur pour ranger la lame ou les lames de façon sécuritaire.
• Insert the chain through the small ring on the magnetic bar, lock the clasp.
• Insérez la chaîne dans le petit anneau sur la barrette magnétique, verrouillez le fermoir.
• Insert the bar into the magnetic cap. • Insérez la barrette dans le capuchon magnétique. Diagram E - Bushing #PKSRBU Diagramme E – Bagues no PKSRBU ø.430"-0 ø 0’430 po-0 Larger Grosse Smaller Petite ø.375"-0 ø 0,375 po-0 ø.248"-0 ø 0,248 po-0 Hole size Dimension du trou