Embed Size (px)
Citation preview

The HX711 Load Cell Amplifier is a breakout board that allows you to read weight measurements from
load cells. These readings are sent to the microcontroller board where you can make use of the data for
your desired application.
Use the load cell amplifier with a load sensor to start obtaining measurements.
WARNING:
When using load cells, check the arrow direction, as shown below. This will guide you as to where to
place the load for weight measurements.
PLACE LOAD HERE.
NOT HERE.

HARDWARE CONFIGURATION
Connect the load cell to the load cell amplifier board according to the table below.
Load Cell HX711 Load Cell Amplifier
Black E-
Red E+
Green A-
White A+
Connect the load cell amplifier to the Arduino Board as shown below.
HX711 Load Cell Amplifier Arduino Uno
GND GND
DT 3
SCK 2
VCC 5V
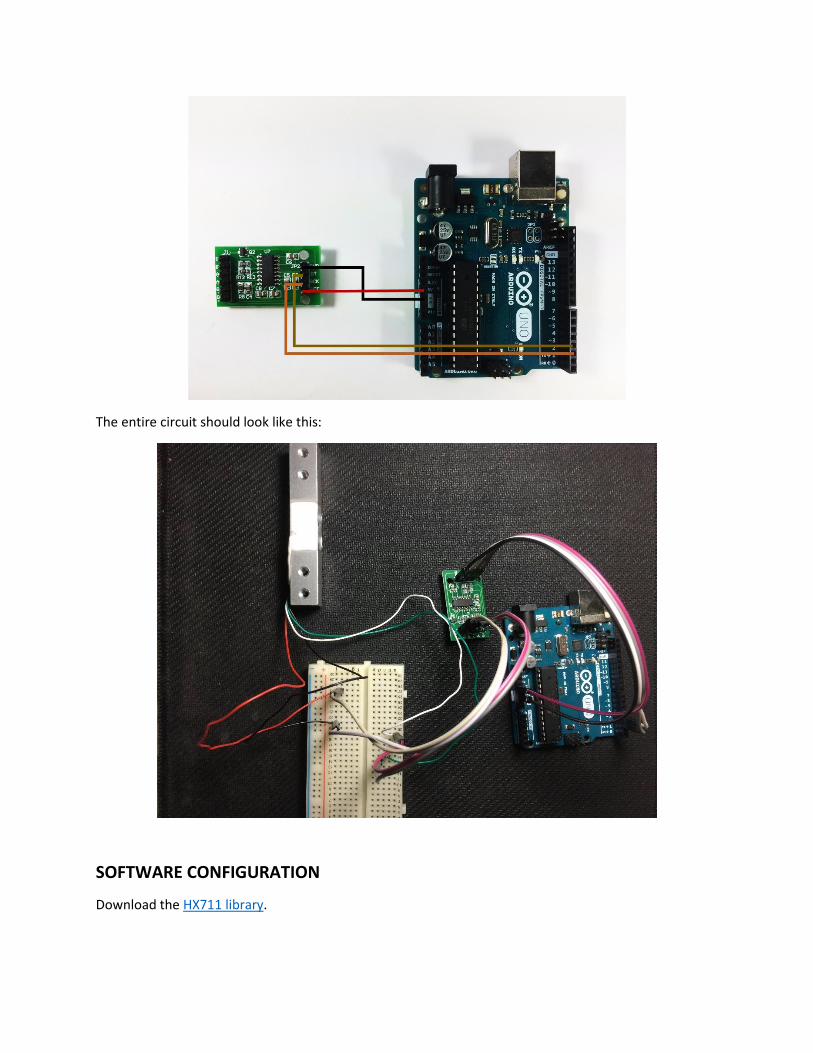
The entire circuit should look like this:
SOFTWARE CONFIGURATION
Download the HX711 library.

Extract the library and copy the library to Documents->Arduino->Libraries. Once done, open Arduino
IDE.
Calibrating the Load Cell Amplifier
Copy the code below:
/*
* circuits4you.com
* 2016 November 25
* Load Cell HX711 Module Interface with Arduino to measure weight in Kgs
Arduino
pin
2 -> HX711 CLK
3 -> DOUT
5V -> VCC
GND -> GND
Most any pin on the Arduino Uno will be compatible with DOUT/CLK.
The HX711 board can be powered from 2.7V to 5V so the Arduino 5V power should be fine.
*/
#include "HX711.h" //You must have this library in your arduino library folder
#define DOUT 3
#define CLK 2
HX711 scale(DOUT, CLK);
//Change this calibration factor as per your load cell once it is found you many need to vary it
in thousands
float calibration_factor = -100540; //-106600 worked for my 40Kg max scale setup
//=============================================================================================
// SETUP
//=============================================================================================
void setup() {
Serial.begin(9600);
Serial.println("HX711 Calibration");
Serial.println("Remove all weight from scale");
Serial.println("After readings begin, place known weight on scale");
Serial.println("Press a,s,d,f to increase calibration factor by 10,100,1000,10000
respectively");
Serial.println("Press z,x,c,v to decrease calibration factor by 10,100,1000,10000
respectively");
Serial.println("Press t for tare");
scale.set_scale();
scale.tare(); //Reset the scale to 0
long zero_factor = scale.read_average(); //Get a baseline reading
Serial.print("Zero factor: "); //This can be used to remove the need to tare the scale. Useful
in permanent scale projects.
Serial.println(zero_factor);
}
//=============================================================================================
// LOOP
//=============================================================================================
void loop() {
scale.set_scale(calibration_factor); //Adjust to this calibration factor
Serial.print("Reading: ");
Serial.print(scale.get_units(), 3);
Serial.print(" kg"); //Change this to kg and re-adjust the calibration factor if you follow SI
units like a sane person
Serial.print(" calibration_factor: ");
Serial.print(calibration_factor);
Serial.println();
if(Serial.available())
{
char temp = Serial.read();
if(temp == '+' || temp == 'a')
calibration_factor += 10;
else if(temp == '-' || temp == 'z')
calibration_factor -= 10;
else if(temp == 's')
calibration_factor += 100;
else if(temp == 'x')
calibration_factor -= 100;
else if(temp == 'd')
calibration_factor += 1000;
else if(temp == 'c')
calibration_factor -= 1000;
else if(temp == 'f')
calibration_factor += 10000;
else if(temp == 'v')
calibration_factor -= 10000;
else if(temp == 't')
scale.tare(); //Reset the scale to zero
}
}
//=============================================================================================
Upload the code to the Arduino Uno. Open Serial Monitor and set baud rate to “9600”, “BOTH NL & CR”.
To calibrate the load cell, place no load on the load cell, and set the reading to 0 kg. To do this, press
a,s,d,f to increase calibration factor and z,x,c,v to decrease it. Below is the table for the increase and
decrease of calibration factor for the letters assigned:
Increase Decrease Calibration Factor
a z 10
s x 100
d c 1000
f v 10000
Once the reading is approximately 0 kg, copy the calibration factor. In the setup above, the calibration
factor was measured at -96650.
Measuring the Weight of a Load
Copy the code below:
/*
* circuits4you.com
* 2016 November 25
* Load Cell HX711 Module Interface with Arduino to measure weight in Kgs
Arduino
pin
2 -> HX711 CLK
3 -> DOUT
5V -> VCC
GND -> GND
Most any pin on the Arduino Uno will be compatible with DOUT/CLK.
The HX711 board can be powered from 2.7V to 5V so the Arduino 5V power should be fine.
*/
#include "HX711.h" //You must have this library in your arduino library folder
#define DOUT 3

#define CLK 2
HX711 scale(DOUT, CLK);
//Change this calibration factor as per your load cell once it is found you many need to vary it
in thousands
float calibration_factor = -96650; //-106600 worked for my 40Kg max scale setup
//=============================================================================================
// SETUP
//=============================================================================================
void setup() {
Serial.begin(9600);
Serial.println("Press T to tare");
scale.set_scale(-96650); //Calibration Factor obtained from first sketch
scale.tare(); //Reset the scale to 0
}
//=============================================================================================
// LOOP
//=============================================================================================
void loop() {
Serial.print("Weight: ");
Serial.print(scale.get_units(), 3); //Up to 3 decimal points
Serial.println(" kg"); //Change this to kg and re-adjust the calibration factor if you follow
lbs
if(Serial.available())
{
char temp = Serial.read();
if(temp == 't' || temp == 'T')
scale.tare(); //Reset the scale to zero
}
}
//=============================================================================================
Change calibration factor to the value you obtained in the previous code. Once done, upload the code,
and open Serial Monitor. The output with no load is shown below:

When a load is added, such as the cellular phone, the output changes.