Embed Size (px)
Citation preview
PLASMA TVOWNER’S MANUAL
Please read this manual carefully before operating your set. Retain it for future reference.Record model number and serial number of the set. See the label attached on the back cover and quote this infor-mation to your dealer when you require service.
Model number :Serial number :
P/NO : 3828VA0468A (RF043B, 126R/Y TX, 026H) c

2 PLASMA TV
Safety Warnings
Safety InstructionsSafety Instructions
Do not place the set in direct sunlight or near heatsources such as heat registers, stove and so on.- This may cause a fire.
Do not use the set in damp place such as a bathroomor any place where it is likely to get wet.- This may cause a fire or could give an electric shock.
Bend antenna cable between inside and outsidebuilding to prevent rain from flowing in.- This may cause water damaged inside the set and could give an
electric shock.
Earth wire should be connected.- If the earth wire is not connected, there is possible a danger of
electric shock caused by the current leakage.- If grounding methods are not possible, a separate circuit break-
er should be employed and installed by a qualified electrician.
- Do not connect ground to telephone wires, lightning rods or gaspipe.
Do not place anything containing liquid on top of theset.- This may cause a fire or could give an electric shock.
Do not insert any object into the exhaust vent.- This may cause a fire or could give an electric shock.
Do not place heavy objects on the set.- This may cause serious injury to a child or adult.
Do not use water while cleaning the set.- This may cause damaged the set or could give an electric
shock.
In case of smoke or strange smell from the set, switchit off ,unplug it from the wall outlet and contact yourdealer or service center .- This may cause a fire or could give an electric shock.
Do not attempt to service the set yourself. Contactyour dealer or service center . - This may cause damaged the set or could give an electric
shock.
During a lightning thunder , unplug the set from thewall outlet and don’t touch an antenna cable. - This may cause damaged the set or could give an electric
shock.
WWARNING
Short-circuitbreaker
Powersupplier
- Use the set at the place lower than the altitude of 6562 feet (2000m) to get the best quality of picture andsound.
Owner’s Manual 3
Safety Warnings
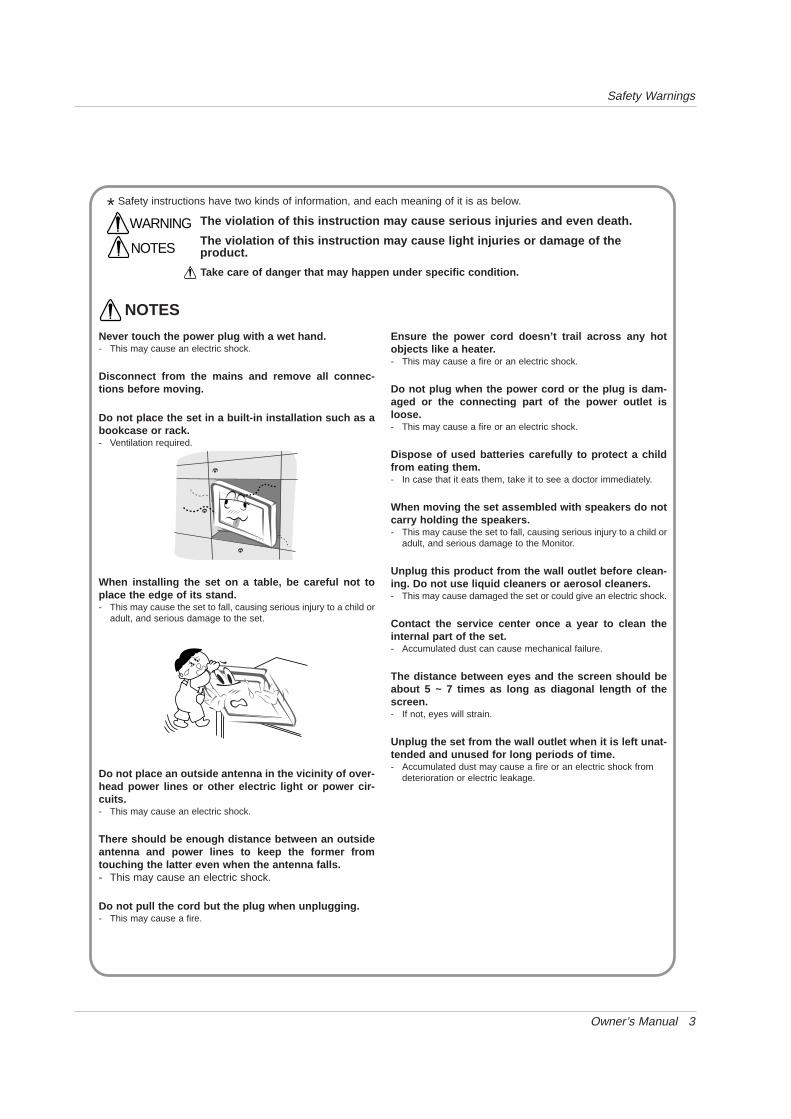
Never touch the power plug with a wet hand.- This may cause an electric shock.
Disconnect from the mains and remove all connec -tions before moving.
Do not place the set in a built-in installation such as abookcase or rack.- Ventilation required.
When installing the set on a table, be careful not toplace the edge of its stand.- This may cause the set to fall, causing serious injury to a child or
adult, and serious damage to the set.
Do not place an outside antenna in the vicinity of over -head power lines or other electric light or power cir -cuits.- This may cause an electric shock.
There should be enough distance between an outsideantenna and power lines to keep the former fromtouching the latter even when the antenna falls. - This may cause an electric shock.
Do not pull the cord but the plug when unplugging.- This may cause a fire.
Ensure the power cord doesn’t trail across any hotobjects like a heater .- This may cause a fire or an electric shock.
Do not plug when the power cord or the plug is dam -aged or the connecting part of the power outlet isloose.- This may cause a fire or an electric shock.
Dispose of used batteries carefully to protect a childfrom eating them.- In case that it eats them, take it to see a doctor immediately.
When moving the set assembled with speakers do notcarry holding the speakers.- This may cause the set to fall, causing serious injury to a child or
adult, and serious damage to the Monitor.
Unplug this product from the wall outlet before clean -ing. Do not use liquid cleaners or aerosol cleaners.- This may cause damaged the set or could give an electric shock.
Contact the service center once a year to clean theinternal part of the set.- Accumulated dust can cause mechanical failure.
The distance between eyes and the screen should beabout 5 ~ 7 times as long as diagonal length of thescreen.- If not, eyes will strain.
Unplug the set from the wall outlet when it is left unat -tended and unused for long periods of time.- Accumulated dust may cause a fire or an electric shock from
deterioration or electric leakage.
NOTES
* Safety instructions have two kinds of information, and each meaning of it is as below.
Take care of danger that may happen under specific condition.
The violation of this instruction may cause serious injuries and even death.
The violation of this instruction may cause light injuries or damage of theproduct.
WARNING
NOTES

4 PLASMA TV
Contents
After reading this manu-al, keep it in the placewhere the user canalways contact easily.
Safety WarningsSafety Instructions . . . . . . . . . . . . . . . . . . . . . . .2~3
IntroductionRemote Control Key Functions . . . . . . . . . . . . . . . .6Location and Function of Controls . . . . . . . . . . .7~8
InstallationExternal Equipment Viewing Setups . . . . . . . . .9~12Displayable Monitor Specification . . . . . . . . . . . . .13Accessories . . . . . . . . . . . . . . . . . . . . . . . . . . . . .14Installation Options . . . . . . . . . . . . . . . . . . . . . . .15
OperationTurning on the Set . . . . . . . . . . . . . . . . . . . . . . . .16On-Screen Menu Language Selection . . . . . . . . .16
Channel Menu Options Auto Programme Tuning . . . . . . . . . . . . . . . . . . .17Manual Programme Tuning . . . . . . . . . . . . . . . . .17Fine Tuning . . . . . . . . . . . . . . . . . . . . . . . . . . . . .18Assigning a Station Name . . . . . . . . . . . . . . . . . .18Booster (option) . . . . . . . . . . . . . . . . . . . . . . . . . .18Programme Edit . . . . . . . . . . . . . . . . . . . . . . . . . .19Favourite Programme . . . . . . . . . . . . . . . . . . . . .19Calling the Programme Table . . . . . . . . . . . . . . . .19
Picture Menu OptionsPSM (Picture Status Memory) . . . . . . . . . . . . . . .20
. . . . . . . . . . . . . . . . . . . . . . . . . . . . . . . . . .20Adjusting Auto Colour Control . . . . . . . . . . . . . . .20Manual Colour Temperature Control (User option) . . . .20sRGB (RGB[PC], DVI[PC] mode only) . . . . . . . . .21Fleshtone . . . . . . . . . . . . . . . . . . . . . . . . . . . . . . .21Manual Picture Control (User option) . . . . . . . . . .21
Sound Menu Options SSM (Sound Status Memory) . . . . . . . . . . . . . . . .22BBE . . . . . . . . . . . . . . . . . . . . . . . . . . . . . . . . . . .22AVL (Auto Volume Leveler) . . . . . . . . . . . . . . . . .22Adjusting Sound Control (User option) . . . . . . . . .22Stereo/Dual Reception . . . . . . . . . . . . . . . . . . . . .23NICAM Reception (option) . . . . . . . . . . . . . . . . . .23
Time Menu OptionsSetting the Clock . . . . . . . . . . . . . . . . . . . . . . . . .24Setting the On/Off Timer . . . . . . . . . . . . . . . . . . .24Auto Sleep . . . . . . . . . . . . . . . . . . . . . . . . . . . . . .24Sleep Timer . . . . . . . . . . . . . . . . . . . . . . . . . . . . .24
Special Menu OptionsChild Lock . . . . . . . . . . . . . . . . . . . . . . . . . . . . . .25ISM (Image Sticking Minimization) Method . . . . . .25Low Power . . . . . . . . . . . . . . . . . . . . . . . . . . . . . .26
Demo . . . . . . . . . . . . . . . . . . . . . . . . . . . . .26Screen Menu Options
Auto adjustment (RGB [PC] mode only) . . . . . . . .27Setting Picture Format . . . . . . . . . . . . . . . . . . . . .27Screen Position . . . . . . . . . . . . . . . . . . . . . . . . . .27Manual Configure (RGB [PC] mode only) . . . . . . .28Selecting Wide VGA/XGA mode (RGB [PC] mode only) . .28Screen Adjustments . . . . . . . . . . . . . . . . . . . . . . .28Cinema . . . . . . . . . . . . . . . . . . . . . . . . . . . . . . . .28Luminance Noise Reduction (option) . . . . . . . . . .29Initializing (Reset to original factory value) . . . . . .29Split Zoom . . . . . . . . . . . . . . . . . . . . . . . . . . . . . .29
PIP (Picture-in-Picture) FeatureWatching PIP . . . . . . . . . . . . . . . . . . . . . . . . . . . .30Programme Selection for Sub Picture . . . . . . . . . .30Selecting an Input Signal Source for the PIP . . . .30Moving the PIP (PIP mode only) . . . . . . . . . . . . .30Picture Size . . . . . . . . . . . . . . . . . . . . . . . . . . . . .30Adjusting PIP Transparency (PIP mode only) . . . .30
Teletext (option)Switch on/off . . . . . . . . . . . . . . . . . . . . . . . . . . . .31SIMPLE Text (option) . . . . . . . . . . . . . . . . . . . . . .31TOP Text (option) . . . . . . . . . . . . . . . . . . . . . . . . .31FASTEXT . . . . . . . . . . . . . . . . . . . . . . . . . . . . . .32Special Teletext Functions . . . . . . . . . . . . . . . . . .32
MiscellaneousExternal Control Device Setup . . . . . . . . . . . .33~38IR Code (NEC Format) . . . . . . . . . . . . . . . . . .39~40Troubleshooting Checklist . . . . . . . . . . . . . . . . . .42Product Specifications . . . . . . . . . . . . . . . . . . . . .43
ContentsContents

Owner’s Manual 5
Introduction
IntroductionIntroduction
What is a Plasma Display ?
If voltage is inputted to gas in glass panels, ultraviolet rays is outputted and fused with a fluorescent substance. At this moment,light is emitted. A Plasma Display is a next generation flat Display using this phenomenon.
160° - Wide angle range of vision
A Plasma Display provides more than 160° angle range of vision so that you can get a picture without distortion from anydirection.
Easy installation
A Plasma Display is much lighter and smaller than other same class products so that you can install the Plasma Displayat the desired place.
Big screen
The screen of a Plasma Display is 42" (or 50") so that you can get vivid experience as if you are in a theater.
Multimedia Plasma Display
A Plasma Display can be connected with a computer so that you can use it as a screen for conference, game, internetand so on.
The explanation about coloured dots may be present on PDP screen
The PDP which is the display device of this product is composed of 0.9 to 2.2 million cells and a few cell defects can occurin the manufacture of the PDP. Several coloured dots visible on the screen would be acceptable, in line with other PDPmanufacturers and would not mean that the PDP is faulty. We hope you will understand that the product which corre-sponds to this standard is regarded as acceptable. It means that it could not be changed or refunded.We promise that we'll do our best to develop our technology to minimize the cell defects.
The explanation about noise of 42" (or 50") PDP
In the same way that a fan is used in a PC to keep the CPU cool, the PDP is equipped with cooling fans to improve thereliability of this product. Therefore, a certain level of noise could occur when the fan is operated. This noise doesn't haveany negative effect on its efficiency and liability and it's also determined to have no difficulty while using this product. Thenoise from the fans is normal in the operation of this product. We hope you will understand that a certain level of noise isacceptable. It means that it is not changeable nor refundable.
TO AVOID BURNING IMAGE INTO THE DISPLAY, DO NOT HAVE A STILL IMAGE ON SCREEN FOR EXTENDED PERIODOF TIME. IMAGE AFTER BURN WILL NOT BE COVERED UNDER WARRANTY ie.Menus, Video games, Borders or LOGOS
WARNINGThis is Class B product. In a domestic environment this product may cause radio interference in whichcase the user may be required to take adequate measures.
WARNINGTO REDUCE THE RISK OF FIRE AND ELECTRIC SHOCK, DO NOT EXPOSE THIS PRODUCT TORAIN OR MOISTURE.
6 PLASMA TV
Introduction
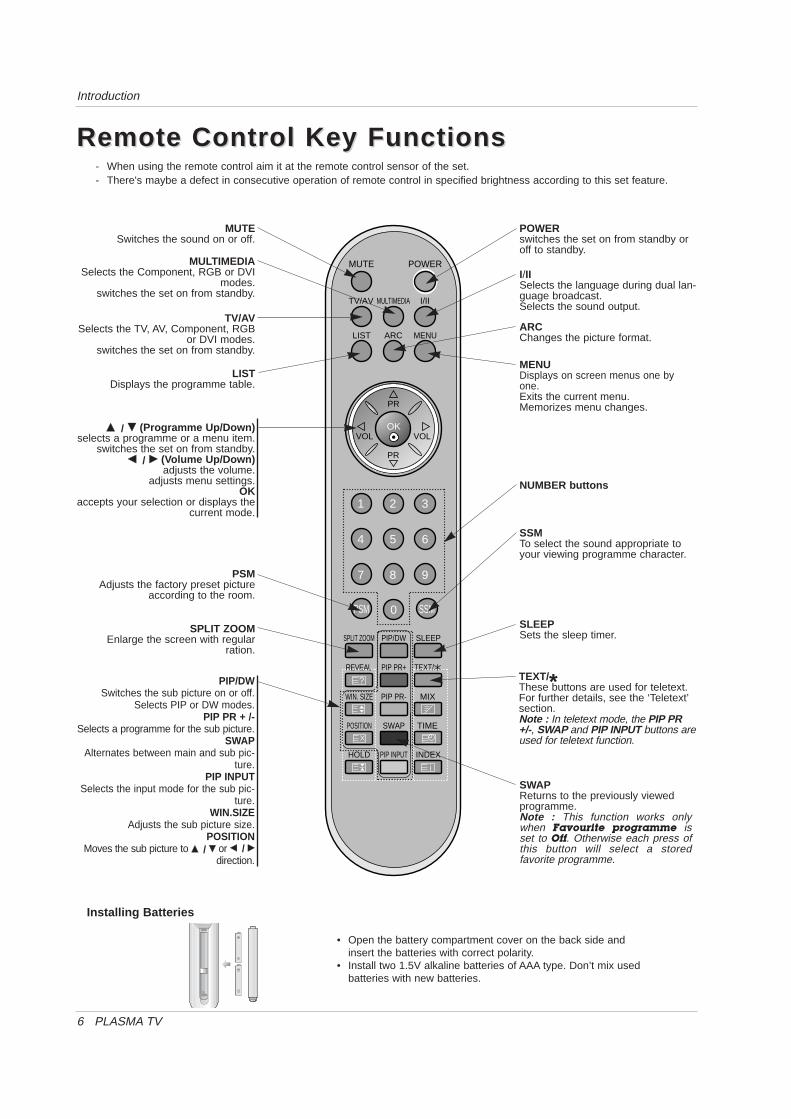
Remote Control Key FunctionsRemote Control Key Functions- When using the remote control aim it at the remote control sensor of the set.- There's maybe a defect in consecutive operation of remote control in specified brightness according to this set feature.
• Open the battery compartment cover on the back side andinsert the batteries with correct polarity.
• Install two 1.5V alkaline batteries of AAA type. Don’t mix usedbatteries with new batteries.
Installing Batteries
POWERMUTE
TV/AV MULTIMEDIA
LIST ARC MENU
PR
PR
VOLOK
1 2 3
4 5 6
7
PSM SSM
8 9
0
VOL
SPLIT ZOOM PIP/DW SLEEP
REVEAL TEXT/PIP PR+
WIN. SIZE MIXPIP PR-
POSITION TIMESWAP
HOLD INDEXPIP INPUT
?
i
I/II
MULTIMEDIASelects the Component, RGB or DVI
modes.switches the set on from standby.
PIP/DWSwitches the sub picture on or off.
Selects PIP or DW modes.PIP PR + /-
Selects a programme for the sub picture.SWAP
Alternates between main and sub pic-ture.
PIP INPUTSelects the input mode for the sub pic-
ture.WIN.SIZE
Adjusts the sub picture size.POSITION
Moves the sub picture to DD / EE or FF / GGdirection.
POWERswitches the set on from standby oroff to standby.
ARC Changes the picture format.
MENUDisplays on screen menus one byone.Exits the current menu.Memorizes menu changes.
SWAPReturns to the previously viewedprogramme.Note : This function works onlywhen Favourite programme isset to Off. Otherwise each press ofthis button will select a storedfavorite programme.
SSMTo select the sound appropriate toyour viewing programme character.
NUMBER buttons
SLEEPSets the sleep timer.
I/IISelects the language during dual lan-guage broadcast.Selects the sound output.
TEXT/*These buttons are used for teletext.For further details, see the ‘Teletext’section.Note : In teletext mode, the PIP PR+/-, SWAP and PIP INPUT buttons areused for teletext function.
LISTDisplays the programme table.
TV/AVSelects the TV, AV, Component, RGB
or DVI modes.switches the set on from standby.
MUTESwitches the sound on or off.
DD / EE (Programme Up/Down)selects a programme or a menu item.
switches the set on from standby.FF / GG (Volume Up/Down)
adjusts the volume.adjusts menu settings.
OKaccepts your selection or displays the
current mode.
PSMAdjusts the factory preset picture
according to the room.
SPLIT ZOOMEnlarge the screen with regular
ration.

Owner’s Manual 7
Introduction
Location and Function of ControlsLocation and Function of Controls
<Front Panel Controls>
ON/OFF
TV/AV MENU VOL PR
TV/AV MENU VOL PR
Main Power Button
Remote Control Sensor
TV/AV ButtonSelects the TV, AV, Component,RGB or DVI modes. If OSD is dis-played, selects menu item.
MENUDisplays on screen menus one by one.Exits the current menu.Memorizes menu changes.
DD / EE (Programme Up/Down)selects a programme or a menu item.
switches the set on from standby.FF / GG (Volume Up/Down)
adjusts the volume.adjusts menu settings.
Power Standby IndicatorIlluminates red in standbymode, Illuminates greenwhen the set is turned on
or
8 PLASMA TV
Introduction
Location and Function of ControlsLocation and Function of Controls
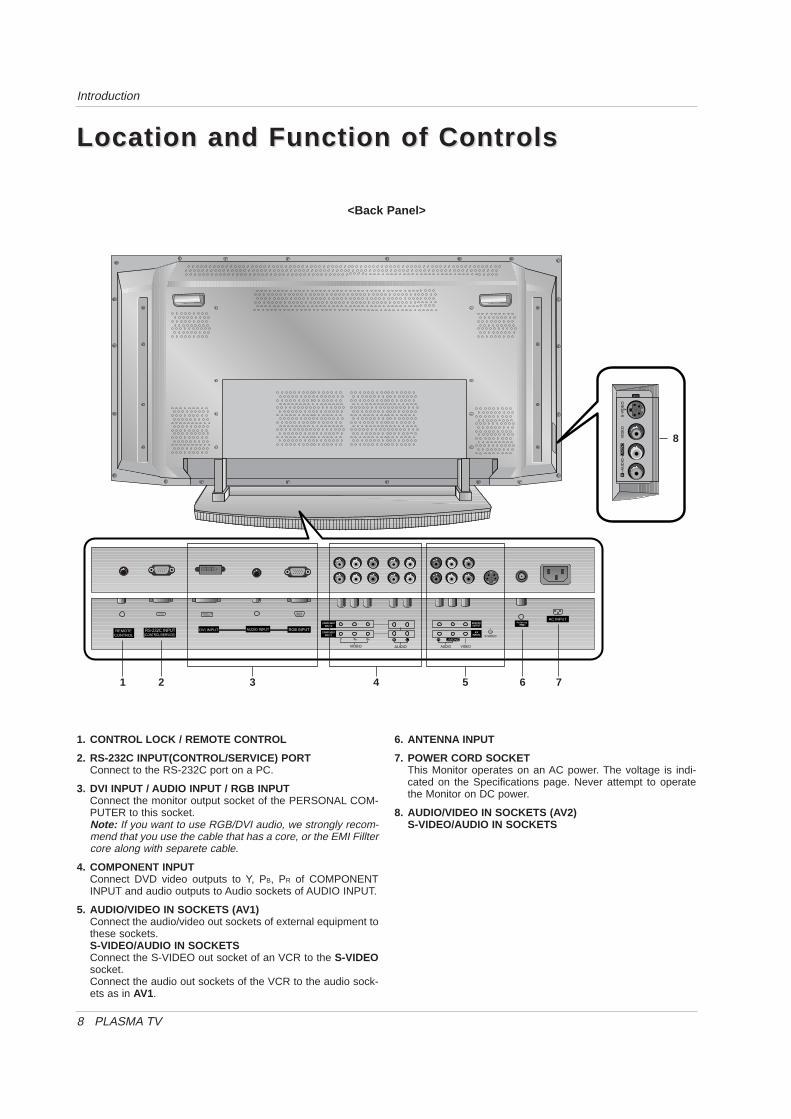
<Back Panel>
RS-232C INPUT(CONTROL/SERVICE)
REMOTECONTROL
DVI INPUT
S-VIDEO
AUDIO VIDEO
MONITOROUTPUT
A/VINPUT1
AUDIO
R L
AntennaAC INPUT
VIDEO
INPUT 2COMPONENT
INPUT 1COMPONENT
AUDIO INPUT RGB INPUT
R L/MOND
S-V
IDE
OV
IDE
OA
UD
IO
AV2
RL/
MO
NO
1. CONTROL LOCK / REMOTE CONTROL
2. RS-232C INPUT(CONTROL/SERVICE) PORTConnect to the RS-232C port on a PC.
3. DVI INPUT / AUDIO INPUT / RGB INPUTConnect the monitor output socket of the PERSONAL COM-PUTER to this socket.Note: If you want to use RGB/DVI audio, we strongly recom-mend that you use the cable that has a core, or the EMI Filltercore along with separete cable.
4. COMPONENT INPUTConnect DVD video outputs to Y, PB, PR of COMPONENTINPUT and audio outputs to Audio sockets of AUDIO INPUT.
5. AUDIO/VIDEO IN SOCKETS (AV1)Connect the audio/video out sockets of external equipment tothese sockets.S-VIDEO/AUDIO IN SOCKETS Connect the S-VIDEO out socket of an VCR to the S-VIDEOsocket. Connect the audio out sockets of the VCR to the audio sock-ets as in AV1.
6. ANTENNA INPUT
7. POWER CORD SOCKETThis Monitor operates on an AC power. The voltage is indi-cated on the Specifications page. Never attempt to operatethe Monitor on DC power.
8. AUDIO/VIDEO IN SOCKETS (AV2)S-VIDEO/AUDIO IN SOCKETS
3 4 5 76
8
1 2

Owner’s Manual 9
Installation
External Equipment VExternal Equipment V iewing Setupsiewing Setups
- Be careful for the bronze wire not to be bended in connecting to antenna input port.
Antenna Connection
INPUT
S-VIDEO
AUDIO VIDEO
MONITOROUTPUT
A/VINPUT1
AUDIO
R LAntenna
AC INPUT
VIDEO
INPUT 2COMPONENT
INPUT 1COMPONENT
AUDIO INPUT RGB INPUT
R L/MOND
Watching VCR- When connecting the Monitor to external equipment, match the colours of connecting ports (Video - yellow, Audio (L) - white,
Audio (R) -red).- Connect the VIDEO INPUT socket (yellow) to the VIDEO INPUT on the set.- If you have a mono VCR, connect the audio cable from the VCR to the AUDIO (L/MONO) input on the set. - If you connect an S-VIDEO VCR to the S-VIDEO input, the picture quality is improved; compared to connecting a regular VCR
to the Video input. - Use the orbiter function to Avoid having a fixed image remain on the screen for a long period of time. Typically a frozen still pic-
ture from a VCR. (Refer to p. 25)If a 4:3 picture format is used; the fixed image may remain visible on the screen.
- To avoid picture noise (interference), leave an adequate distance between the VCR and set.
Watching TV programmes- Turn the set on and select the programme you
want.
Watching VCR1. Use the TV/AV button on the remote control to
select AV1 or AV2.- If both S-VIDEO and VIDEO sockets have been
connected to the S-VHS VCR simultaneously, onlythe S-VIDEO can be received.
2. Insert a video tape into the VCR and press thePLAY button on the VCR.(See VCR owner’s manual)
S-VIDEO
AUDIO VIDEO
MONITOROUTPUT
A/VINPUT1
AUDIO
R L
AntennaAC IN
VIDEO
INPUT 2COMPONENT
INPUT 1COMPONENT
RGB INPUT
R L/MOND
Apartments(connecting to wall antenna socket)
Private house(connecting to wall outdoor antenna)
outdoor antenna
wall antenna socket
VHF antenna
UHF antenna
RF coaxial wire (75 ohms)< Back panel of the set >
< Back panel of the set >
< VCR >

10 PLASMA TV
Installation
External Equipment VExternal Equipment V iewing Setupsiewing SetupsWatching Cable TV- After subscribing for a local cable TV station and installing a converter you can watch cable TV.- For further information of cable TV, contact the local cable TV station.
To watch cable TV
1. Use the TV/AV button on the remote control toselect AV1 or AV2.
2. Tune to cable service provided channels usingthe cable box.
Watching external AV source- When connecting the set to an external source, match the colours of AUDIO/VIDEO input jacks on the set with the output jacks
on the audio/video equipment: Video = yellow, Audio (Left) = white, Audio (Right) = red.
How to use1. Use the TV/AV button on the remote control to
select AV1 or AV2.2. Operate the corresponding external equipment.
See external equipment operating guide.
S-VIDEO
AUDIO VIDEO
MONITOROUTPUT
A/VINPUT1
AUDIO
R L
An
VIDEO
INPUT 2COMPONENT
INPUT 1COMPONENT
AUDIO INPUT RGB INPUT
R L/MOND
R LAUDIO VIDEO
S-VIDEO
AUDIO VIDEO
MONITOROUTPUT
A/VINPUT1
AUDIO
R L
AntennaAC INP
VIDEO
INPUT 2COMPONENT
INPUT 1COMPONENT
RGB INPUT
R L/MOND
< Back panel of the set >
< Cable box >
< Back panel of the set >
Camcorder
Video game set

Owner’s Manual 11
Installation
Watching DVD
How to connectConnect DVD video outputs to Y, PB, PR of COMPO-NENT INPUT and audio outputs to Audio sockets ofAUDIO INPUT.
How to use1. Turn on the DVD player, and insert a DVD.2. Use TV/AV or MULTIMEDIA button on the remote
control to select Component 1 or Component 2.Refer to the DVD player's manual for operatinginstructions.
• Component Input portsYou can get better picture quality if you connectDVD player with component input ports as below.
Component ports of theset
Y PB PR
Video output ports of DVD player
YYYY
PbB-YCbPB
PrR-YCrPR
S-VIDEO
AUDIO VIDEO
MONITOROUTPUT
A/VINPUT1
AUDIO
R L
AntennaAC INPU
VIDEO
INPUT 2COMPONENT
INPUT 1COMPONENT
UT RGB INPUT
R L/MOND
R
R R
R
< Back panel of the set >
< DVD player >
Watching DTV (option)- To watch digitally broadcast programs, purchase and connect a digital set-top box.
How to connect1. Use the monitor’s COMPONENT (Y, PB, PR) INPUT, RGB or DVI
jack for video connections, depending on your set-top box con-nector. Then, make the corresponding audio connections.
How to use1. Turn on the digital set-top box. (Refer to the owner’s manual for
the digital set-top box.) 2. Use TV/AV or MULTIMEDIA on the remote control to select
Component 1, Component 2 or RGB.
RS-232C INPUT(CONTROL/SERVICE)
DVI INPUT
S-VIDEO
AUDIO VIDEO
MONITOROUTPUT
A/VINPUT1
AUDIO
R L
VIDEO
INPUT 2COMPONENT
INPUT 1COMPONENT
AUDIO INPUT RGB INPUT
R L/MOND
(R) AUDIO (L) Y PB RP(R) AUDIO (L) DTV OUTPUT
R
R R
RR
• DTV Input signal
576p(50Hz)
1080i(50Hz)
1152i(50Hz)
ModeTerminal Component
o
o
o
RGB (DTV)
o
o
o
< Back panel of the set >
< Digital Set-top box >
12 PLASMA TV
Installation
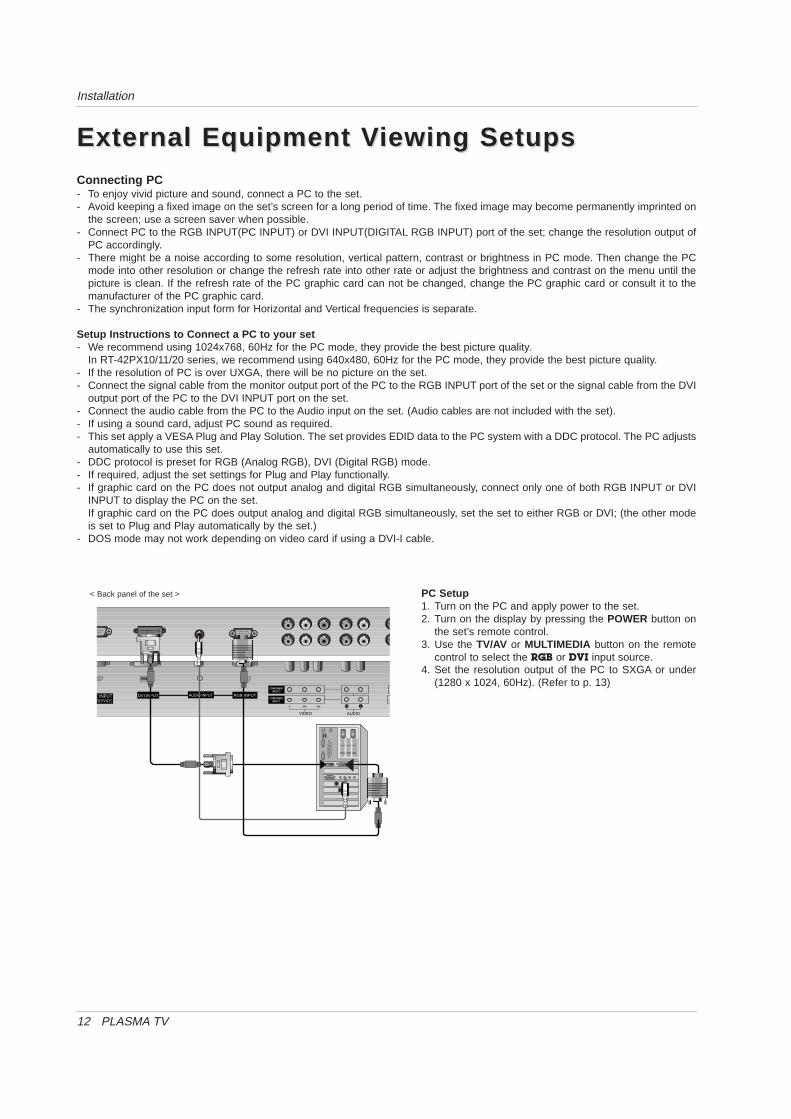
Connecting PC- To enjoy vivid picture and sound, connect a PC to the set.- Avoid keeping a fixed image on the set’s screen for a long period of time. The fixed image may become permanently imprinted on
the screen; use a screen saver when possible.- Connect PC to the RGB INPUT(PC INPUT) or DVI INPUT(DIGITAL RGB INPUT) port of the set; change the resolution output of
PC accordingly.- There might be a noise according to some resolution, vertical pattern, contrast or brightness in PC mode. Then change the PC
mode into other resolution or change the refresh rate into other rate or adjust the brightness and contrast on the menu until thepicture is clean. If the refresh rate of the PC graphic card can not be changed, change the PC graphic card or consult it to themanufacturer of the PC graphic card.
- The synchronization input form for Horizontal and Vertical frequencies is separate.
Setup Instructions to Connect a PC to your set- We recommend using 1024x768, 60Hz for the PC mode, they provide the best picture quality.
In RT-42PX10/11/20 series, we recommend using 640x480, 60Hz for the PC mode, they provide the best picture quality.- If the resolution of PC is over UXGA, there will be no picture on the set.- Connect the signal cable from the monitor output port of the PC to the RGB INPUT port of the set or the signal cable from the DVI
output port of the PC to the DVI INPUT port on the set.- Connect the audio cable from the PC to the Audio input on the set. (Audio cables are not included with the set).- If using a sound card, adjust PC sound as required.- This set apply a VESA Plug and Play Solution. The set provides EDID data to the PC system with a DDC protocol. The PC adjusts
automatically to use this set.- DDC protocol is preset for RGB (Analog RGB), DVI (Digital RGB) mode.- If required, adjust the set settings for Plug and Play functionally.- If graphic card on the PC does not output analog and digital RGB simultaneously, connect only one of both RGB INPUT or DVI
INPUT to display the PC on the set.If graphic card on the PC does output analog and digital RGB simultaneously, set the set to either RGB or DVI; (the other modeis set to Plug and Play automatically by the set.)
- DOS mode may not work depending on video card if using a DVI-I cable.
232C INPUTTROL/SERVICE)
DVI INPUT
AU
AUDIO
R L
VIDEO
INPUT 2COMPONENT
INPUT 1COMPONENT
AUDIO INPUT RGB INPUT
R
PC Setup1. Turn on the PC and apply power to the set.2. Turn on the display by pressing the POWER button on
the set’s remote control.3. Use the TV/AV or MULTIMEDIA button on the remote
control to select the RGB or DVI input source.4. Set the resolution output of the PC to SXGA or under
(1280 x 1024, 60Hz). (Refer to p. 13)
External Equipment VExternal Equipment V iewing Setupsiewing Setups
< Back panel of the set >

Owner’s Manual 13
Installation
Displayable Monitor SpecificationDisplayable Monitor Specification
RGB / DVI mode
Resolution
640x350
720x400
640x480
848x480
800x600
HorizontalFrequency(KHz)
VerticalFrequency(Hz)
852x480
832x624
1024x768
1360x768(XGA)
1366x768(XGA)
1152x864(RGB)
1280x768(XGA)
1152x870 (RGB)
1280x960 (RGB)
1280x1024 (RGB)
70.09
85.08
70.08
85.03
59.94
66.66
72.80
75.00
85.00
60.00
70.00
75.00
60.00
70.00
75.00
56.25
60.31
72.18
75.00
85.06
74.55
60.00
70.06
75.02
85.00
60.00
75.02
60.00
75.02
60.05
70.01
75.00
85.00
75.06
59.992
74.926
84.887
60.02
60.02
31.468
37.861
31.469
37.927
31.469
35.000
37.861
37.500
43.269
31.500
37.799
39.375
31.500
37.799
39.375
35.156
37.879
48.077
46.875
53.674
49.725
48.363
56.476
60.023
68.677
47.700
59.625
47.700
59.625
54.348
63.995
67.500
77.487
68.681
47.693
60.091
68.504
60.023
63.981
RGB / DVI mode
RT-42PX10/11/12X/20 series RT-50PX10/20 series
Resolution
640x350
720x400
640x480
848x480
800x600
HorizontalFrequency(KHz)
VerticalFrequency(Hz)
852x480
832x624
1024x768
1360x768
1366x768
1152x864
1152x870
1280x960
1280x1024
70.09
85.08
70.08
85.03
59.94
66.66
72.80
75.00
85.00
60.00
70.00
75.00
60.00
70.00
75.00
56.25
60.31
72.18
75.00
85.06
74.55
60.00
70.06
75.02
85.00
60.00
75.02
85.00
60.00
75.02
85.00
60.05
70.01
75.00
85.00
75.06
60.02
60.02
31.468
37.861
31.469
37.927
31.469
35.000
37.861
37.500
43.269
31.500
37.799
39.375
31.500
37.799
39.375
35.156
37.879
48.077
46.875
53.674
49.725
48.363
56.476
60.023
68.677
47.700
59.625
68.500
47.700
59.625
69.500
54.348
63.995
67.500
77.487
68.681
60.023
63.981

14 PLASMA TV
Installation
D-sub 15 pin cable (Optional)
AS mark
LG TV
Owner’s Manual
1.5V1.5V
Alkaline batteries
Power Cord
POWERMUTE
TV/AV MULTIMEDIA
LIST ARC MENU
PR
PR
VOLOK
1 2 3
4 5 6
7
PSM SSM
8 9
0
VOL
SPLIT ZOOM PIP/DW SLEEP
REVEAL TEXT/PIP PR+
WIN. SIZE MIXPIP PR-
POSITION TIMESWAP
HOLD INDEXPIP INPUT
?
i
I/II
Remote Control handset
DVI Cable (Optional)
- Optional extras can be changed or modified for quality improvement without any notification new optional extras can beadded.
- Contract your dealer for buying these items.
Optional Extras
AccessoriesAccessories
Tilt wall mounting bracket
404250 40 42 50
Video cables Audio cablesCeiling mounting bracket
40
4250
42
40
- Secure the TV assembly by joinning it to a wall by using the TV/Wall brackets.
Joinning the TV assembly to the wall to protect the set tumbling
• After the set must be mounted on s desk top, install the TV brackets on the TVas shown.Insert the 2 bolts and tighten securely, in the upper holes on the bracket. Install the wall brackets on the wall with 4 bolts*, (not supplied with the product),as shown.Match the height of the TV brackets and the wall brackets. Check to be sure the brackets are tightened securely.
• Secure the TV assembly to the wall with strong strings or wound wire cables,(not supplied with the product), as shown.
2-TV brackets2-Wall brackets
2-TV bracket bolts

Owner’s Manual 15
Installation
Installation OptionsInstallation Options
Desktop Pedestal Installation
• The set can be mounted on a desk as shown above.(For further information, refer to the optional 'DesktopStand Installation and Setup Guide'.)
• Speakers and speaker stands shown are optional, andare shown for example only.
• The set can be installed in different ways such as on a wall, or on a desktop etc.• Install this set only in a location where adequate ventilation is available.• This set is designed so that it can be mounted either horizontally or vertically.
Wall Mount: Horizontal Installation
• The set can be installed on a wall as shown above.(For further information, refer to the optional ‘WallMounting Bracket Installation and Setup Guide’.)
• Speakers are optional, and are shown for illustrationonly.
3cm
10cm
10cm
10cm10cm
To Mount on a W allWall mount minimum allowable clearances for ade-quate ventilation.
To Install on a DesktopPedestal mount minimum allowable clearances foradequate ventilation.
16 PLASMA TV
Operation
TTurning on the Seturning on the Set- When using the remote control, aim it at its sensor on the set.
Turning on the set just after installation
Turning on the set (power cord is still connected)
1. Connect power cord correctly.
2. Press the ON/OFF button on the set. At this moment, the set is switched to standby mode. Press the TV/AV orPR DD / EE button on the set or press the POWER, TV/AV, MULTIMEDIA, PR DD / EE or NUMBER buttons on theremote control and then the set will switch on.
• Press the ON/OFF button on the set to turn the set on.
1. If the set was turned off with the ON/OFF button on the set
2. If the set was turned off with the remote control and the ON/OFF button on the set
• Press the ON/OFF button on the set and then press the TV/AV or PR DD / EE button on the set or press thePOWER, TV/AV, MULTIMEDIA, PR DD / EE or NUMBER button on the remote control to turn the set on.
On-Screen Menu Language SelectionOn-Screen Menu Language Selection- The menus can be shown on the screen in the selected language. First select your language.
1. Press the MENU button and then use DD / EE button to select the SPECIAL menu.
2. Press the GG button and then use DD / EE button to select Language.
3. Press the GG button and then use DD / EE button to select your desired language.From this point on, the on-screen menus will be shown in the language of your choice.
4. Repeatedly press the MENU button to return to normal TV viewing.

Owner’s Manual 17
Operation
Channel Menu OptionsChannel Menu Options
- All stations that can be received are stored by this method. It is recommended that you use auto programme duringinstallation of this set.
1. Press the MENU button and then use DD / EE button to select the STATION menu.2. Press the GG button and then DD / EE button to select Auto programme.3. Press the GG button to select System. Select a TV system with the FF / GG button;
L : SECAM L/L’ (France: SECAM-L models only)BG : PAL B/G, SECAM B/G (Europe / East Europe / Asia / New Zealand / M.East / Africa
/Australia)I : PAL I/II (U.K. / Ireland / Hong Kong / South Africa)DK : PAL D/K, SECAM D/K (East Europe / China / Africa / CIS)M : (USA / Korea / Philippines) (option)
4. Press the EE button to select Storage from. Select the beginning programme numberwith the FF / GG button or NUMBER buttons on the Storage from menu.
5. Press the EE button to select Start.6. Press the GG button to begin auto programming.
All receivable stations are stored.
Note :a. In some models, the station name is stored for stations which broadcast VPS (VideoProgramme Service), PDC (Programme Delivery Control) or TELETEXT data. If no sta-tion name can be assigned to a station, the channel number is assigned and stored asC (V/UHF 01-69) or S (Cable 01-47), followed by a number.b. In Australia, if no station name can be assigned to a station, the channel number isassigned and stored as - - - - - followed by a number see ‘Assigning a station name’ sec-tion to assign the station name.
To stop auto programming, press the MENU button. When auto programming is completed, the Programme edit menu appears on thescreen. See the ‘Programme edit’ section to edit the stored programme.
Auto Programme T uning
Auto programmeManual programmeProgramme editFavourite programme
Prev.
System
Storage from
Start
MENU
BG
2
- Manual programme lets you manually tune and arrange the stations in whatever order you desire. Also you canassign a station name with five characters to each programme number.
1. Press the MENU button and then use DD / EE button to select the STATION menu.2. Press the GG button and then DD / EE button to select Manual Programme.3. Press the GG button to select Storage. Select the desired programme number with the
FF / GG button or NUMBER buttons on the Storage menu.4. Press the EE button to select System. Select a TV system with the FF / GG button;
L : SECAM L/L’ (France: SECAM-L models only)BG : PAL B/G, SECAM B/G (Europe / East Europe / Asia / New Zealand / M.East /Africa / Australia)I : PAL I/II (U.K. / Ireland / Hong Kong / South Africa)DK : PAL D/K, SECAM D/K (East Europe / China / Africa / CIS)M : (USA / Korea / Philippines) (option)
5. Press the EE button to select Band. Press the FF / GG button to select V/UHF or Cableas required.
6. Press the EE button to select Channel. You can select the desired channel number withthe FF / GG button or NUMBER buttons. If possible, select the channel number directlywith the number buttons.
7. Press the EE button to select Search. Press the FF / GG button to commence searching.If a station is found the search will stop.
8. Press the OK button to store it.9. To store another station, repeat steps 3 to 8.
Manual Programme T uning
STATION
PICTURE
SOUND
TIME
SPECIAL
SCREEN
PIP/DW
Auto programme GG
Auto programmeManual programmeProgramme editFavourite programme
Prev.MENU
STATION
PICTURE
SOUND
TIME
SPECIAL
SCREEN
PIP/DW
Manual programme GG
Storage
System
Band
Channel
Fine
Search
Name
Booster
2
BG
1
V/UHF
C 01
Off

1. Repeat the ‘Manual programme tuning’ steps 1 to 2.2. Press the GG button and then DD / EE button to select Fine.3. Press the FF / GG button to fine tune for the best picture and sound.4. Press the OK button.5. Repeatedly press the MENU button to return to normal TV viewing.
The finely tuned programme will be indicated by yellow number during programmeselection.
18 PLASMA TV
Operation
Channel Menu OptionsChannel Menu Options
1. Repeat the ‘Manual programme tuning’ steps 1 to 2.2. Press the GG button and then DD / EE button to select Name.3. Press the GG button to display the Name menu.4. Press the DD button. You can use a blank, +, -, the alphabet A to Z and the numeric 0 to
9. With the EE button you can select in the opposite direction.
5. Select the next position by pressing the GG button and then take your choice of the sec-ond character, and so on.
6. Press the OK button in twice.7. Repeatedly press the MENU button to return to normal TV viewing.
Assigning a Station Name
Fine Tuning
- Normally fine tuning is only necessary if reception is poor.
Auto programmeManual programmeProgramme editFavourite programme
STATION
PICTURE
SOUND
TIME
SPECIAL
SCREEN
PIP/DW
Manual programmeStorage
System
Band
Channel
Fine
Search
Name
Booster
Store
Auto programmeManual programmeProgramme editFavourite programme
STATION
PICTURE
SOUND
TIME
SPECIAL
SCREEN
PIP/DW
Manual programmeStorage
System
Band
Channel
Fine
Search
Name
Booster
Prev.
2
BG
1
V/UHF
C 01
1. Repeat the ‘Manual programme tuning’ steps 1 to 2.2. Press the GG button and then DD / EE button to select Booster.3. Press the FF / GG button to select On or Off.5. Press the OK button.6. Repeatedly press the MENU button to return to normal TV viewing.
Booster (option)
In some models, Booster is an optional function. Only a set with Booster can perform this function.If the reception is poor at the fringe area of TV signal, select Booster to On.
Auto programmeManual programmeProgramme editFavourite programme
STATION
PICTURE
SOUND
TIME
SPECIAL
SCREEN
PIP/DW
Manual programmeStorage
System
Band
Channel
Fine
Search
Name
Booster
Store
2
1
BG
V/UHF
C 01
On
2
BG
1
V/UHF
C 01
Off
Off
FF GG

Owner’s Manual 19
Operation
Displaying programme tablePress the LIST button to display the Programme table menu.The programme table appears on the screen.
• You may find some blue highlighted programmes shown. They have been set up in theprogramme edit mode.
• Some programmes with the channel number shown in the programme table indicatethere is no station name assigned.
Selecting a programme in the programme table Select a programme with the DD / EE or FF / GG button.Then press the OK button.The Plasma Display switches to the chosen programme number.
Paging through a programme tableThere are 10 programme table pages in which contain 100 programmes. Pressing the DD / EE or FF / GG button repeatedly turns the pages.
Press the LIST button to return to normal TV viewing.
Calling the Programme T able
- You can check the programmes stored in the memory by displaying the programme table.
0 - - - - - 5 C 05
1 BLN 2 6 C 07
2 C 01 7 C 55
3 C 04 8 S 27
4 C 05 9 S 29
2 C 01
1. Press the MENU button and then use DD / EE button to select the STATION menu.2. Press the GG button and then DD / EE button to select Programme edit.3. Press the GG button to display the Programme edit menu.
Deleting a programme 1. Select a programme to be deleted with the DD / EE or FF / GG button. 2. Press the RED button twice.
The selected programme is deleted, all the following programmes are shifted up oneposition.
Copying a programme1. Select a programme to be copied with the DD / EE or FF / GG button.2. Press the GREEN button.
All the following programmes are shifted down one position.
Moving a programme1. Select a programme to be moved with the DD / EE or FF / GG button.2. Press the YELLOW button. 3. Move the programme to the desired programme number with the DD / EE or FF / GG button.4. Press the YELLOW button again to release this function.
Skipping a programme number1. Select a programme number to be skipped with the DD / EE or FF / GG button.2. Press the BLUE button. The skipped programme turns to blue.3. Press the BLUE button again to release the skipped programme.
When a programme number is skipped it means that you will be unable to select it usingthe DD / EE button during normal TV viewing. If you want to select the skipped programme,directly enter the programme number with the NUMBER buttons or select it in the pro-gramme edit or table menu.
Programme Edit
- This function enables you to delete or skip the stored programmes. Also you can move some stations to other pro-gramme numbers or copy a blank station data into the selected programme number.
CHANNELProgramme edit
0 - - - - - 5 C 05
1 BLN 2 6 C 07
2 C 01 7 C 55
3 C 04 8 S 27
4 C 05 9 S 29
Delete Copy
Move Skip
Prev.
2 C 01
MENU
1. Press the MENU button and then use DD / EE button to select the STATION menu.2. Press the GG button and then DD / EE button to select Favourite programme.3. Press the GG button and then DD / EE button to select On.4. Press the GG button to display the Favourite programme menu.5. Press the DD / EE button to select -- -----.6. Select a desired programme with the FF / GG button or NUMBER buttons. Any number
under 10 is entered with a numeric ‘0’ (or ‘00’) in front of it, i.e. ‘05’ (or ‘005’) for 5.7. To store another programme, repeat steps 5 to 6.
You can store up to 8 programmes.8. Press the OK button.9, Repeatedly press the MENU button to return to normal TV viewing.
Repeatedly press the SWAP button to select stored favorite programmes.
- This function lets you select your favourite programmes directly.
Favourite Programme
Auto programmeManual programmeProgramme editFavourite programme
STATION
PICTURE
SOUND
TIME
SPECIAL
SCREEN
PIP/DW
Favourite programme
On
Off
Prev.
0 BLN 2
- - - - - - - -
- - - - - - - -
- - - - - - - -
- - - - - - - -
- - - - - - - -
- - - - - - - -
- - - - - - - -
FF GG

20 PLASMA TV
Operation
Picture Menu OptionsPicture Menu Options
1. Press the PSM button
PSM (Picture Status Memory)- This function adjusts the set to the best picture appearance.- When adjusting picture options (contrast, brightness, colour, sharpness and tint (NTSC input only)) manually, PSM
is automatically changed to User.
- You can enjoy the vivid and hi-definition picture with LG’s excellent Digital Reality processor technology.- When selecting picture options (Dynamic, Standard and Mild) in PICTURE menu, XD is automatically changed
to On.
1. Press the MENU button and then use DD / EE button to select the PICTURE menu.
2. Press the GG button and then use DD / EE button to select XD.
3. Press the GG button and then use DD / EE button to select On or Off.
4. Repeatedly press the MENU button to return to normal TV viewing.
• Each press of the PSM button changes the screen display as shown below.
• You can also select Dynamic, Standard, Mild or User in the PICTURE menu. • Picture options Dynamic, Standard and Mild are preset and programmed for good picture quality at
the factory and cannot be changed.
Dynamic Standard Mild User
PSM
CSMFleshtoneContrast 100Brightness 60Colour 50Sharpness 50
Prev.
OnOff
MENU
STATION
PICTURE
SOUND
TIME
SPECIAL
SCREEN
PIP/DW
GG
- To initialize values (reset to default settings), select the Normal option.
1. Press the MENU button and then use DD / EE button to select the PICTURE menu.
2. Press the GG button and then use DD / EE button to select CSM.
3. Press the GG button and then use DD / EE button to select the desired colour tempera-ture.
4. Repeatedly press the MENU button to return to normal TV viewing.
Adjusting Auto Colour Control
PSM
CSMFleshtoneContrast 100Brightness 60Colour 50Sharpness 50
Prev.
Cool
Normal
Warm
User
Red
Green
Blue
MENU
STATION
PICTURE
SOUND
TIME
SPECIAL
SCREEN
PIP/DW
CSM GG
- You can adjust red, green, or blue to any colour temperature you prefer.
1. Press the MENU button and then use DD / EE button to select the PICTURE menu.
2. Press the GG button and then use DD / EE button to select CSM.
3. Press the GG button and then use DD / EE button to select User.
4. Press the GG button and then use FF / GG button to make appropriate adjustments.• The adjustment range of Red, Green and Blue is -30~+30.
5. Repeatedly press the MENU button to return to normal TV viewing.
Manual Colour T emperature Control (User option)
-10
0
10
PSM
CSMFleshtoneContrast 100Brightness 60Colour 50Sharpness 50
Prev.
Cool
Normal
Warm
User
Red
Green
Blue
MENU
STATION
PICTURE
SOUND
TIME
SPECIAL
SCREEN
PIP/DW
CSM GG
-10
0
10
• Each press of DD / EE button changes the screen display as shown below.
Cool Normal Warm User

Owner’s Manual 21
Operation
1. Press the MENU button and then use DD / EE button to select the PICTURE menu.
2. Press the GG button and then use DD / EE button to select sRGB.
3. Press the GG button and then use DD / EE button to select On or Off.
4. Repeatedly press the MENU button to return to normal TV viewing.
sRGB (RGB[PC], DVI[PC] mode only)
1. Press the MENU button and then use DD / EE button to select the PICTURE menu.
2. Press the GG button and then use DD / EE button to select the desired picture option.
3. Press the GG button and then use FF / GG button to make appropriate adjustments.
4. Repeatedly press the MENU button to return to normal TV viewing.
Manual Picture Control (User option)- You can adjust picture contrast, brightness, colour, sharpness and tint (NTSC input only) to the levels you prefer.- In the broadcasting system PAL/SECAM, the picture item Tint doesn’t work.
- Adjust the Fleshtone to select the desired skin colour option.- This function works in the following mode:
TV, AV1, AV2, COMPONENT 480i/480p/576i/576p/720p/1080i.
1. Press the MENU button and then use DD / EE button to select the PICTURE menu.
2. Press the GG button and then use DD / EE button to select Fleshtone.
3. Press the GG button and then use FF / GG button to make appropriate adjustments.
• The adjustment range of Fleshtone is 0 ~ 3.
4. Repeatedly press the MENU button to return to normal TV viewing.
Fleshtone
PSM
CSMFleshtoneContrast 100Brightness 60Colour 50Sharpness 50
Prev.MENU
STATION
PICTURE
SOUND
TIME
SPECIAL
SCREEN
PIP/DW
Contrast 100 GG
PSM
CSMsRGBContrast 100Brightness 60Colour 50
Prev.
OnOff
MENU
STATION
PICTURE
SOUND
TIME
SPECIAL
SCREEN
PIP/DW
sRGB GG
- When the set was connected to external equipment with sRGB function, It’s adjusted a colour difference to displaythe equal image each other.
PSM
CSMFleshtoneContrast 100Brightness 60Colour 50Sharpness 50
Prev.MENU
STATION
PICTURE
SOUND
TIME
SPECIAL
SCREEN
PIP/DW
Fleshtone GG 0

22 PLASMA TV
Operation
Sound Menu OptionsSound Menu Options
1. Press the SSM button.
2. Press the SSM button to select your desired sound.
SSM (Sound Status Memory)
1. Press the MENU button and then use DD / EE button to select the SOUND menu.
2. Press the GG button and then use DD / EE button to select the desired sound item.
3. Press the GG button and then use FF / GG button to make appropriate adjustments.
4. Repeatedly press the MENU button to return to normal TV viewing.
Note : Treble, Bass or BBE aren’t suitable to use SRS TSXT.
Adjusting Sound Control (User option)
- This function lets you enjoy the best sound without any special adjustment because the set automatically selects theappropriate sound option based on the program content.
- When adjusting sound options (treble and bass) manually, SSM is automatically changed to User.
- This feature maintains an equal volume level; even if you change channels.
1. Press the MENU button and then use DD / EE button to select the SOUND menu.
2. Press the GG button and then use DD / EE button to select AVL.
3. Press the GG button and then use DD / EE button to select On or Off.
4. Repeatedly press the MENU button to return to normal TV viewing.
AVL (Auto V olume Leveler)
- BBE High Definition Sound restores clarity and presence for better speech intelligibility and musical realism.
Manufactured under license from BBE Sound, Inc.
1. Press the MENU button and then use DD / EE button to select the SOUND menu.
2. Press the GG button and then use DD / EE button to select BBE.
3. Press the GG button and then use DD / EE button to select On or Off.
4. Repeatedly press the MENU button to return to normal TV viewing.
BBE
• You can also select SRS TSXT, Flat, Music, Movie, Speech or User in the SOUND menu.• The sound SRS TSXT, Flat, Music, Movie and Speech are programmed for good sound reproduction at the factory
and cannot be changed.
SRS TSXT Flat Music Movie Speech User
- is a trademark of SRS Labs, Inc.
- TruSurround XT technology is incorporated under license from SRS Labs, Inc.
R
TTruSurround XTruSurround XT
SSMBBEAVLBalance 0Treble 50Bass 50
Prev.
OnOff
MENU
STATION
PICTURE
SOUND
TIME
SPECIAL
SCREEN
PIP/DW
BBE GG
SSMBBEAVLBalance 0Treble 50Bass 50
Prev.
OnOff
MENU
STATION
PICTURE
SOUND
TIME
SPECIAL
SCREEN
PIP/DW
AVL GG
SSMBBEAVLBalance 0Treble 50Bass 50
Prev.MENU
STATION
PICTURE
SOUND
TIME
SPECIAL
SCREEN
PIP/DW
Treble 50 GG

Owner’s Manual 23
Operation
Stereo / Dual Reception
- When a programme is selected, the sound information for the station appears after the programme number and sta-tion name disappear.
NICAM Reception (option)
- If your Plasma Display is equipped with the PDP Tuner for NICAM reception, the high quality NICAM (NearInstantaneous Companding Audio Multiplex) digital sound can be received.
On Screen DisplayPress the I/II button to received broadcast state.
Mono Sound SelectionIn stereo reception if the stereo signal is weak, you can switch to mono by pressing theI/II button twice. In mono reception the depth of sound is improved. To switch back tostereo, press the I/II button twice again.
Language Selection for Dual Language BroadcastIf a programme received in two languages (dual language), you can switch to DUAL I,DUAL II or DUAL I + II by pressing the I/II button repeatedly.
• DUAL I sends the primary broadcast language to the loudspeakers.• DUAL II sends the secondary broadcast language to the loudspeakers.• DUAL I + II sends a separate language to each loudspeaker.
Sound output can be selected according to the type of received broadcast as follows bypressing the I/II button repeatedly.
• When NICAM mono is received, you can select NICAM MONO or FM MONO.• When NICAM stereo is received, you can select NICAM STEREO or FM MONO. If
the stereo signal is weak, switch to FM mono.• When NICAM dual is received, you can select NICAM DUAL I, NICAM DUAL II,
NICAM DUAL I + II, or MONO. When FM mono is selected the display MONOappears on the screen.
Sound output selectionIn AV, Component, RGB or DVI mode, you can select output sound for the left and rightloudspeakers.Repeatedly press the I/II button to select the sound output.
• L+R : Audio signal from audio L input is sent to left loud-speaker and audio signal fromaudio R input is sent to right loud-speaker.• L+L : Audio signal from audio L input is sent to left and right loud-speakers.• R+R : Audio signal from audio R input is sent to left and right loud-speakers.
BroadcastMonoStereoDual
On screen DisplayMONOSTEREODUAL I

24 PLASMA TV
Operation
TTime Menu Optionsime Menu Options
a.To check the remaining sleep time, press the OK button once.b.To cancel the sleep time, repeatedly press the SLEEP button until the display --- Min appears.c. If you turn the set off after setting the sleep timer, the setting will be erased.
Sleep Timer- Sleep timer turns the set off at the preset time.- Press the SLEEP button to select the number of minutes. The display --- Min will appear on the screen, fol-
lowed by 10, 20, 30, 60, 90, 120, 180 and 240 minutes. The timer begins to count down from the number of minutesselected.
zz
zz
- Timer function operates only if current time has been already set.- Off Timer function overrides on Timer function if they are set to the same time.- The set must be in standby mode for the On Timer to work.
- To cancel Off/On time functionPress the DD / EE button to select Off in step 3.
- Two hours after the set is switched on by the on time function it will automatically switch back to standby modeunless a button has been pressed.
Setting the On/Off T imer
1. Press the MENU button and then use DD / EE button to select the TIME menu.
2. Press the GG button and then use DD / EE button to select Off time or On time.
3. Press the GG button and then use DD / EE button to select On.
4. Press the GG button and then use DD / EE button to adjust the hour.
5. Press the GG button and then use DD / EE button to adjust the minute.
6. Only On time function ; Press the GG button and then use DD / EE button to adjust pro-gramme number or volume level.
7. Repeatedly press the MENU button to return to normal TV viewing.
Auto Sleep
- If there is no input signal, the monitor turn off automatically after 10 minutes.
1. Press the MENU button and then use DD / EE button to select the TIME menu.
2. Press the GG button and then use DD / EE button to select Auto sleep.
3. Press the GG button and then use DD / EE button to select On or Off.
4. Repeatedly press the MENU button to return to normal TV viewing.
Setting the Clock- If current time setting is erased by a power failure, if TV is unplugged or if the set is turned off with the ON/OFF but-
ton on the set, reset the clock.
1. Press the MENU button and then use DD / EE button to select the TIME menu.
2. Press the GG button and then use DD / EE button to select Clock.
3. Press the GG button and then use DD / EE button to adjust the hour.
4. Press the GG button and then use DD / EE button to adjust the minute.
5. Repeatedly press the MENU button to return to normal TV viewing.
ClockOff timeOn timeAuto sleep
Prev.MENU
STATION
PICTURE
SOUND
TIME
SPECIAL
SCREEN
PIP/DW
Clock GG :- - - -
ClockOff timeOn timeAuto sleep
Prev.MENU
STATION
PICTURE
SOUND
TIME
SPECIAL
SCREEN
PIP/DW
On time GG
:12 00
30
1
OnOff
Volume
Programme
ClockOff timeOn timeAuto sleep
Prev.MENU
STATION
PICTURE
SOUND
TIME
SPECIAL
SCREEN
PIP/DW
Auto sleep GG OnOff
Owner’s Manual 25
Operation
Special Menu OptionsSpecial Menu OptionsChild Lock
- The set can be set up so that it can only be used with the remote control.
- This set programmed to remember which option it was last set to event if you turn the set off.- In Child lock ‘On’, if the set is turned off, press the TV/AV, DD / EE button on the set or POWER, TV/AV, MULTI-
MEDIA, DD / EE or NUMBER buttons on the remote control.- With the Child lock On, the display ‘ Child lock on’ appears on the screen if any button on the front panel is
pressed while viewing the set.
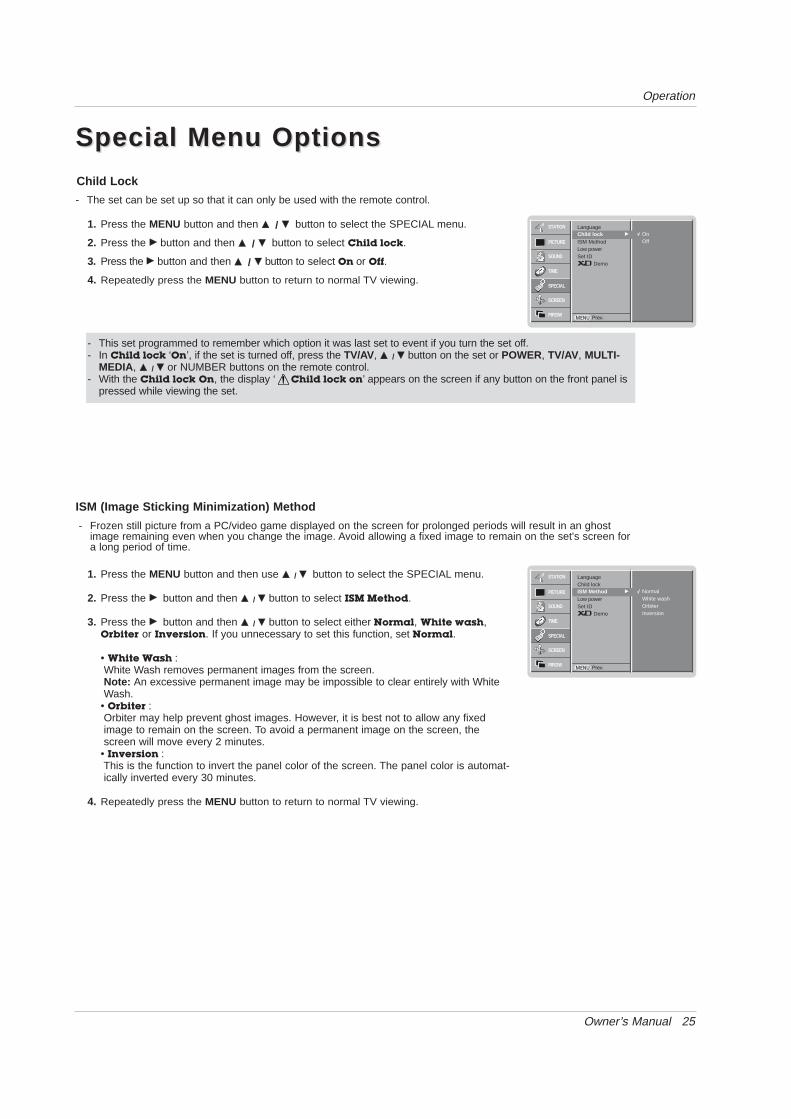
1. Press the MENU button and then DD / EE button to select the SPECIAL menu.
2. Press the GG button and then DD / EE button to select Child lock.
3. Press the GG button and then DD / EE button to select On or Off.
4. Repeatedly press the MENU button to return to normal TV viewing.
ISM (Image Sticking Minimization) Method
- Frozen still picture from a PC/video game displayed on the screen for prolonged periods will result in an ghostimage remaining even when you change the image. Avoid allowing a fixed image to remain on the set's screen fora long period of time.
1. Press the MENU button and then use DD / EE button to select the SPECIAL menu.
2. Press the GG button and then DD / EE button to select ISM Method.
3. Press the GG button and then DD / EE button to select either Normal, White wash,Orbiter or Inversion. If you unnecessary to set this function, set Normal.
• White Wash : White Wash removes permanent images from the screen. Note: An excessive permanent image may be impossible to clear entirely with WhiteWash.
• Orbiter : Orbiter may help prevent ghost images. However, it is best not to allow any fixedimage to remain on the screen. To avoid a permanent image on the screen, thescreen will move every 2 minutes.
• Inversion : This is the function to invert the panel color of the screen. The panel color is automat-ically inverted every 30 minutes.
4. Repeatedly press the MENU button to return to normal TV viewing.
LanguageChild lockISM MethodLow powerSet ID
Demo
Prev.MENU
STATION
PICTURE
SOUND
TIME
SPECIAL
SCREEN
PIP/DW
Child lock GG OnOff
LanguageChild lockISM MethodLow powerSet ID
Demo
Prev.MENU
STATION
PICTURE
SOUND
TIME
SPECIAL
SCREEN
PIP/DW
ISM Method GG NormalWhite washOrbiterInversion

26 PLASMA TV
Operation
- This is the function to reduce the power consumption of the set.
Low Power
1. Press the MENU button and then use DD / EE button to select the SPECIAL menu.
2. Press the GG button and then use DD / EE button to select Low power.
3. Press the GG button and then use DD / EE button to select On or Off.
4. Repeatedly press the MENU button to return to normal TV viewing.
LanguageChild lockISM MethodLow powerSet ID
Demo
Prev.MENU
STATION
PICTURE
SOUND
TIME
SPECIAL
SCREEN
PIP/DW
Low power GG OnOff
Special Menu OptionsSpecial Menu Options
- Use it to see the difference between XD demo on and XD Demo off.
Demo
1. Press the MENU button and then use DD / EE button to select the SPECIAL menu.
2. Press the GG button and then use DD / EE button to select XD Demo.
3. Press the GG button to begin XD Demo.
4. To stop XD Demo, press the MENU button.
LanguageChild lockISM MethodLow powerSet ID
Demo
Prev.MENU
STATION
PICTURE
SOUND
TIME
SPECIAL
SCREEN
PIP/DW
Demo GG To start
Owner’s Manual 27
Operation
Screen Menu OptionsScreen Menu OptionsAuto adjustment (RGB [PC] mode only)
- Automatically adjusts picture position and minimizes image shaking.
- Although the image is still not correct, your set is functioning properly but needs further adjustment.- The Auto config. and the Manual Config. functions don’t need to be run for DVI mode.
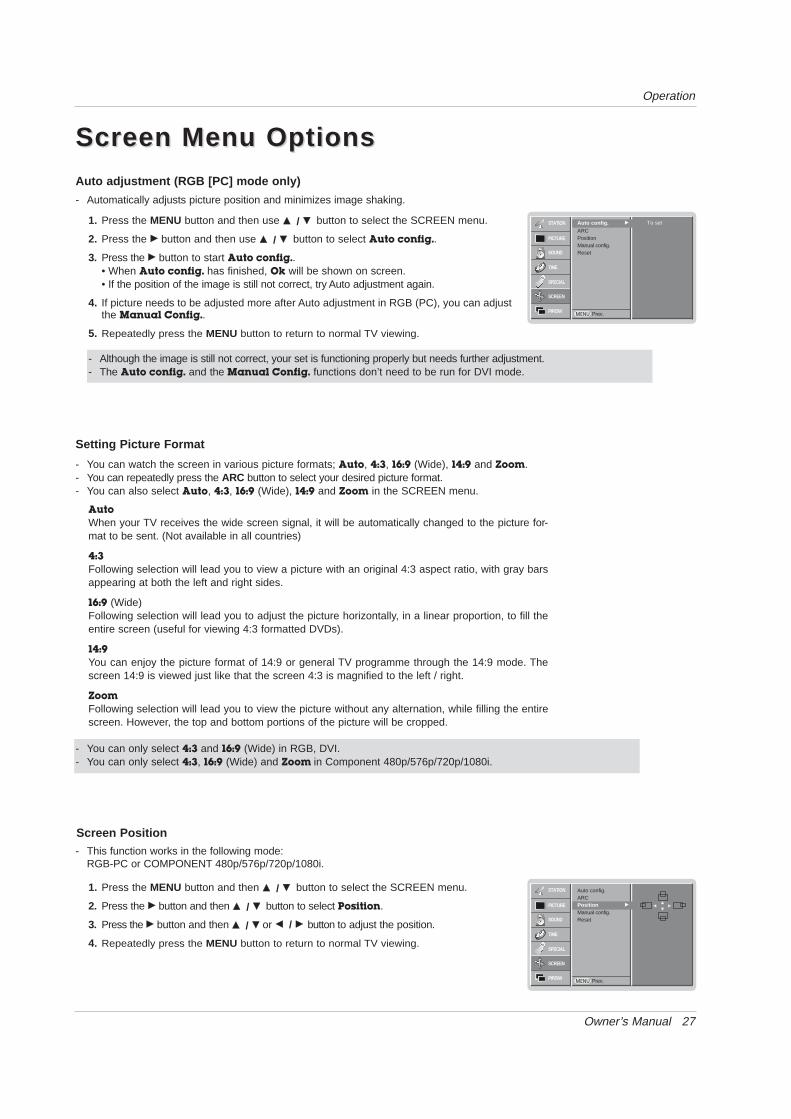
1. Press the MENU button and then use DD / EE button to select the SCREEN menu.
2. Press the GG button and then use DD / EE button to select Auto config..
3. Press the GG button to start Auto config..• When Auto config. has finished, Ok will be shown on screen.• If the position of the image is still not correct, try Auto adjustment again.
4. If picture needs to be adjusted more after Auto adjustment in RGB (PC), you can adjustthe Manual Config..
5. Repeatedly press the MENU button to return to normal TV viewing.
Setting Picture Format
- You can watch the screen in various picture formats; Auto, 4:3, 16:9 (Wide), 14:9 and Zoom.- You can repeatedly press the ARC button to select your desired picture format.- You can also select Auto, 4:3, 16:9 (Wide), 14:9 and Zoom in the SCREEN menu.
- You can only select 4:3 and 16:9 (Wide) in RGB, DVI.- You can only select 4:3, 16:9 (Wide) and Zoom in Component 480p/576p/720p/1080i.
AutoWhen your TV receives the wide screen signal, it will be automatically changed to the picture for-mat to be sent. (Not available in all countries)
4:3Following selection will lead you to view a picture with an original 4:3 aspect ratio, with gray barsappearing at both the left and right sides.
16:9 (Wide)Following selection will lead you to adjust the picture horizontally, in a linear proportion, to fill theentire screen (useful for viewing 4:3 formatted DVDs).
14:9You can enjoy the picture format of 14:9 or general TV programme through the 14:9 mode. Thescreen 14:9 is viewed just like that the screen 4:3 is magnified to the left / right.
ZoomFollowing selection will lead you to view the picture without any alternation, while filling the entirescreen. However, the top and bottom portions of the picture will be cropped.
Auto config.ARCPositionManual config.Reset
Prev.MENU
STATION
PICTURE
SOUND
TIME
SPECIAL
SCREEN
PIP/DW
Auto config. GG To set
Screen Position- This function works in the following mode:
RGB-PC or COMPONENT 480p/576p/720p/1080i.
1. Press the MENU button and then DD / EE button to select the SCREEN menu.
2. Press the GG button and then DD / EE button to select Position.
3. Press the GG button and then DD / EE or FF / GG button to adjust the position.
4. Repeatedly press the MENU button to return to normal TV viewing.
Auto config.ARCPositionManual config.Reset
Prev.MENU
STATION
PICTURE
SOUND
TIME
SPECIAL
SCREEN
PIP/DW
Position GGDD
FF GGEE

28 PLASMA TV
Operation
Screen Menu OptionsScreen Menu OptionsManual Configure (RGB [PC] mode only)
- If the picture isn’t clear after auto adjustment and especially that characters are still trembling, adjust the picturephase manually.
- To correct the screen size, adjust Clock.
1. Press the MENU button and then DD / EE button to select the SCREEN menu.
2. Press the GG button and then DD / EE button to select Manual config..
3. Press the GG button and then DD / EE button to select Phase or Clock.
4. Press the FF / GG button to make appropriate adjustments.
• The adjustment range of Phase is 0 ~ 30.• The adjustment range of Clock is -127 ~ +128.
5. Repeatedly press the MENU button to return to normal TV viewing.
Screen Adjustments
- Use this function to correct jittering or picture instability while viewing a video tape.- This function works in the following mode:
TV, AV1, AV2 or Component 480i/576i.
1. Press the MENU button and then use DD / EE button to select the SCREEN menu.
2. Press the GG button and then use DD / EE button to select Screen adj..
3. Press the GG button and then use DD / EE button to select TV or VCR.• Select the VCR option if watching a VCR. • Select the TV option for other equipment.(Except VCR)
4. Repeatedly press the MENU button to return to normal TV viewing.
Auto config.ARCPositionManual config.Reset
Prev.MENU
STATION
PICTURE
SOUND
TIME
SPECIAL
SCREEN
PIP/DW
Manual config. GG Phase
Clock
0
0
Auto config.ARCPositionManual config.ResetVGA Mode
Prev.MENU
STATION
PICTURE
SOUND
TIME
SPECIAL
SCREEN
PIP/DW
VGA Mode GG
Selecting W ide VGA/XGA mode (RGB[PC] mode only)- To see a normal picture, match the resolution of RGB mode and selection of VGA/XGA mode.- In some models, it’s not available to selection of XGA mode.
1. Press the MENU button and then use DD / EE button to select the SCREEN menu.
2. Press the GG button and then use DD / EE button to select VGA Mode (or XGA Mode).
3. Press the GG button and then use DD / EE button to select the desired VGA/XGA resolution.
4. Repeatedly press the MENU button to return to normal TV viewing.
640x480848x480852x480
Screen adj.ARCCinemaYNRReset
Prev.MENU
STATION
PICTURE
SOUND
TIME
SPECIAL
SCREEN
PIP/DW
Screen adj. GG TVVCR
1. Press the MENU button and then use DD / EE button to select the SCREEN menu.
2. Press the GG button and then use DD / EE button to select Cinema.
3. Press the GG button and then use DD / EE button to select On or Off.
4. Repeatedly press the MENU button to return to normal TV viewing.
Cinema- When you watch the movie, this function adjusts the set to the best picture appearance.- This function works in the following mode:
TV, AV1, AV2 or COMPONENT 480i/576i.
Screen adj.ARCCinemaYNRReset
Prev.MENU
STATION
PICTURE
SOUND
TIME
SPECIAL
SCREEN
PIP/DW
Cinema GG OnOff
Owner’s Manual 29
Operation
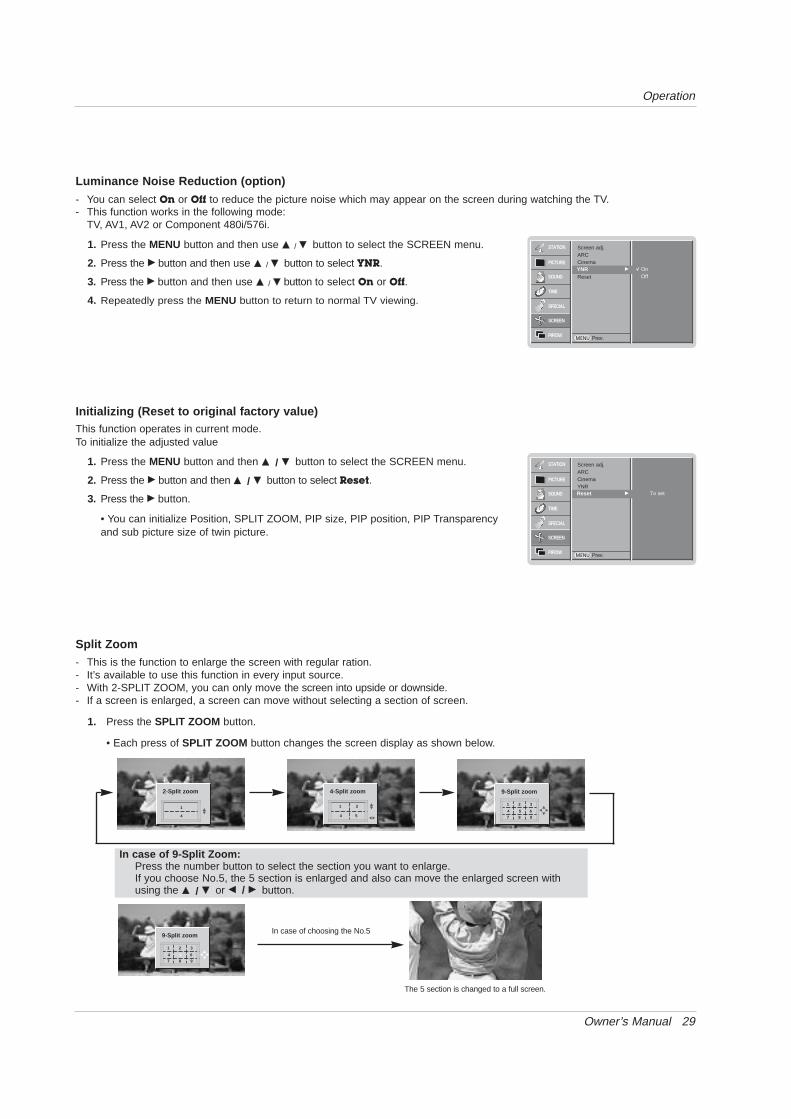
Split Zoom- This is the function to enlarge the screen with regular ration.- It’s available to use this function in every input source.- With 2-SPLIT ZOOM, you can only move the screen into upside or downside.- If a screen is enlarged, a screen can move without selecting a section of screen.
1. Press the SPLIT ZOOM button.
• Each press of SPLIT ZOOM button changes the screen display as shown below.
In case of 9-Split Zoom:Press the number button to select the section you want to enlarge.If you choose No.5, the 5 section is enlarged and also can move the enlarged screen withusing the DD / EE or FF / GG button.
In case of choosing the No.5
The 5 section is changed to a full screen.
9-SPLIT ZOOM
2-Split zoom
1
4
DDEE
4-Split zoom
DDEE
FF GG
1 2
4 5
9-Split zoom
DDFF GGEE
1 2 3
4 5 6
7 8 9
9-Split zoom
DDFF GGEE
1 2 3
4 5 6
7 8 9
Luminance Noise Reduction (option)- You can select On or Off to reduce the picture noise which may appear on the screen during watching the TV.- This function works in the following mode:
TV, AV1, AV2 or Component 480i/576i.
1. Press the MENU button and then use DD / EE button to select the SCREEN menu.
2. Press the GG button and then use DD / EE button to select YNR.
3. Press the GG button and then use DD / EE button to select On or Off.
4. Repeatedly press the MENU button to return to normal TV viewing.
Screen adj.ARCCinemaVGAReset
Prev.MENU
STATION
PICTURE
SOUND
TIME
SPECIAL
SCREEN
PIP/DW
YNR GG OnOff
Screen adj.ARCCinemaYNRReset
Prev.MENU
STATION
PICTURE
SOUND
TIME
SPECIAL
SCREEN
PIP/DW
Reset GG To set
Initializing (Reset to original factory value)This function operates in current mode.To initialize the adjusted value
1. Press the MENU button and then DD / EE button to select the SCREEN menu.
2. Press the GG button and then DD / EE button to select Reset.
3. Press the GG button.
• You can initialize Position, SPLIT ZOOM, PIP size, PIP position, PIP Transparencyand sub picture size of twin picture.

30 PLASMA TV
Operation
Adjusting PIP Transparency (PIP mode only)
1. Press the MENU button and then DD / EE button to select the PIP/DW menu.
2. Press the GG button and then DD / EE button to select PIP Transparency.
3. Press the GG button and then FF / GG button to adjust PIP transparency.• The adjustment range of PIP Transparency is 0 ~ 10.
4. Repeatedly press the MENU button to return to normal TV viewing.
PIPPIP (Picture-in-Picture) Feature(Picture-in-Picture) Feature
Watching PIPPress the PIP/DW button to show the sub picture.
• Each press of PIP/DW button changes the screen display as shown below.
Programme Selection for Sub Picture
Press the PIP PR + /- button to select a programme for the subpicture.
- PIP lets you view 2 different inputs (sources) on your set screen at the same time.- It’s not available to use this function in TELETEXT mode.
Selecting an Input Signal Source for the PIPPress the PIP INPUT button to select the input source for thesub picture.
Picture Size
Press the WIN.SIZE button and then FF / GG button to adjust thesub picture size.
With WIN.SIZE button in DW1, DW2 modes, main and subpicture is adjusted simultaneously. With WIN.SIZE button inPIP mode, sub picture is adjusted.
Win. size
FF GG
Moving the PIP (PIP mode only)Press the POSITION button.
Repeatedly press the DD / EE or FF / GG button until desired posi-tion is achieved. The sub picture moves up/down or left/right.
Win. position
DDFF GG
EE
DW1
DW2
PIP
RGBAV1
10:30
Off
• In RGB, DVI and COMPONENT 480p/576p/720p/1080i formain picture, you can select TV, AV1, AV2 and COMPO-NENT 480i/576i for sub picture.
• In TV, AV1, AV2 and COMPONENT 480i/576i for main pic-ture, you can select TV, AV1, AV2, COMPONENT480i/480p/576i/576p/720p/1080i, RGB and DVI for sub pic-ture.
• You can’t select the same modes for main pictue and subpicture simultaneously. (except TV)

Owner’s Manual 31
Operation
- Teletext (or TOP text) is an optional function, therefore only the set with the teletext system can receive the teletextbroadcast.
- Teletext is a free service broadcast by most TV stations which gives up-to-the-minute information on news, weather,television programmes, share prices and many other topics.
- The teletext decoder of this set can support the SIMPLE, TOP and FASTEXT systems. SIMPLE (standard teletext)consists of a number of pages which are selected by directly entering the corresponding page number. TOP and FAS-TEXT are more modern methods allowing quick and easy selection of teletext information.
Switch on/off
SIMPLE Text (option)
TOP Text (option)
Press the TEXT/* button to switch to teletext.• The initial page or last page appears on the screen.
Two page numbers, TV station name, date and time are displayed on the screen head-line. The first page number indicates your selection, while the second shows the currentpage displayed.
Press the TEXT/* button to switch off teletext.
TTeletext (option)eletext (option)
The user guide displays four fields-red, green, yellow and blue at the bottom of the screen.The yellow field denotes the next group and the blue field indicates the next block.
Block / group / page selection1. With the blue button you can progress from block to block.2. Use the yellow button to proceed to the next group with automatic overflow to the next
block.3. With the green button you can proceed to the next existing page with automatic over-
flow to the next group. (Alternatively the DD button can be used.)4. The red button permits to return to previous selection. (Alternatively the EE button can be
used.)
Direct page selectionCorresponding to the SIMPLE text mode, you can select a page by entering it as a threedigit number using the NUMBER buttons in TOP mode.
Page selection1. Enter the desired page number as a three digit number with the NUMBER buttons. If
during selection you press a wrong number, you must complete the three digit numberand then reenter the correct page number.
2. The DD / EE button can also be used to select the preceding or following page.

32 PLASMA TV
Operation
FASTEXT
Special Teletext Functions
REVEALPress this button to display concealed information, such as solutions of riddles orpuzzles.Press this button again to remove the information from the display.
SIZESelects double height text.Press this button to enlarge the top half of the page.Press this button again to enlarge the bottom half of the page.Press this button again to return to the normal display.
UPDATEDisplays the TV picture on the screen while waiting for the new teletext page. Press this button to view the updated teletext page.
HOLDStops the automatic page change which will occur if a teletext page consists of 2 ormore sub pages. The number of sub pages and the sub page displayed is, usually,shown on the screen below the time. When this button is pressed the stop symbolis displayed at the top left-hand corner of the screen and the automatic pagechange is inhibited.To continue press this button again.
MIXDisplays the teletext pages superimposed on the TV picture.To switch the TV picture off press this button again.
TIMEThis button has two functions:
a) When viewing a TV programme, press this button to display the time at the topright hand corner of the screen. Press this button again to remove the display.b) In teletext mode, press this button to select a sub page number. The sub pagenumber is displayed at the bottom of the screen. To hold or change the sub page,press the RED/ GREEN or DD / EE buttons. Press this button again to exit this func-tion.
The teletext pages are colour coded along the bottom of the screen and are selected bypressing the corresponding coloured button.
Page selection1. Press the button to select the index page.2. You can select the pages which are colour coded along the bottom line with the same
coloured buttons.3. Corresponding to the SIMPLE text mode, you can select a page by entering its three
digit page number with the NUMBER buttons in FASTEXT mode.4. The DD / EE button can also be used to select the preceding or following page.
i
M

Owner’s Manual 33
Miscellaneous
No. Pin name1 No connection2 RXD (Receive data)3 TXD (Transmit data)4 DTR (DTE side ready)5 GND6 DSR (DCE side ready)7 RTS (Ready to send)8 CTS (Clear to send)9 No Connection
1
5
6
9
2354678
RXDTXDGNDDTRDSRRTSCTS
TXDRXDGNDDSRDTRCTSRTS
PC
7-wire configuration(Standard RS-232C cable)
D-Sub 9
3256487
PDP
D-Sub 9
2354678
RXDTXDGNDDTRDSRRTSCTS
TXDRXDGNDDTRDSRRTSCTS
PC
3-wire configuration(Not standard)
D-Sub 9
3254678
PDP
D-Sub 9
External Control Device SetupExternal Control Device Setup- Connect the RS-232C input jack to an external control device (such as a computer or an A/V control system)
and control the set’s functions externally.
How to connect external control equipment
• Connect the serial port of the control device to the RS-232C jack on the Monitor back panel.• RS-232C connection cables are not supplied with the set.• The set remote control and front panel controls (except main power) will not be functional if the Monitor is controlled by a PC
computer or other external device.
Type of connector; D-Sub 9-pin male
RS-232C configurations
REMOTECONTROL
RS-232C INPUT DVI INPUT(CONTROL/SERVICE)
AUDIO INPUT RGB INPUT
< Back panel of the set >

34 PLASMA TV
Miscellaneous
Transmission
* [Command 1] : First command to control PDP set.(j or k)
* [Command 2] : Second command to control PDP set.* [Set ID] : You can adjust the set ID to choose
desired monitor ID number in special menu. See previous page. Adjustment range is 1 ~ 99. When selecting Set ID ‘0’, every connected PDP set is controlled.Set ID is indicated as decimal (1~99) onmenu and as Hexa decimal (0x0~0x63)on transmission/receiving protocol.
* [DATA] : To transmit command data.Transmit ‘FF’ data to read status of command.
* [Cr] : Carriage ReturnASCII code ‘0x0D’
* [ ] : ASCII code ‘space (0x20)’
[Command1][Command2][ ][Set ID][ ][Data][Cr]
OK Acknowledgement
* The Monitor transmits ACK (acknowledgement) based onthis format when receiving normal data. At this time, if thedata is data read mode, it indicates present status data. Ifthe data is data write mode, it returns the data of the PCcomputer.
[Command2][ ][Set ID][ ][OK][Data][x]
Error Acknowledgement
* The Monitor transmits ACK (acknowledgement) based onthis format when receiving abnormal data from non-viable functions or communication errors.
[Command2][ ][Set ID][ ][NG][Data][x]
Transmission / Receiving ProtocolCommand Reference List
* When setting the 25 ~ 33, a menu doesn’t display onscreen.
Data 1: Illegal Code2: not support function3: Wait more time
01. Power k a 0 ~ 102. Input Select k b 0 ~ 603. Aspect Ratio k c 0 ~ 404. Screen Mute k d 0 ~ 105. Volume Mute k e 0 ~ 106. Volume Control k f 0 ~ 6407. Contrast k g 0 ~ 6408. Brightness k h 0 ~ 6409. Colour k i 0 ~ 6410. Tint k j 0 ~ 6411. Sharpness k k 0 ~ 6412. OSD Select k l 0 ~ 113. Remote control lock mode k m 0 ~ 114. PIP/DW k n 0 ~ 315. Split Zoom k p 0 ~ 9916. PIP Position k q 0 ~ 317. Treble k r 0 ~ 6418. Bass k s 0 ~ 6419. Balance k t 0 ~ 6420. Colour Temperature (CSM) k u 0 ~ 321. Red Adjustment k v 0 ~ 3C22. Green Adjustment k w 0 ~ 3C23. Blue Adjustment k $ 0 ~ 3C24. PIP input Source k y 0 ~ 625. Abnormal Status k z 0 ~ a26. ISM Method j p 0 ~ 327. Low Power j q 0 ~ 128. Orbiter Time Setting j r 1 ~ FE29. Orbiter Pixel Setting j s 1 ~ 930. Picture Size Setting for j t 0 ~ 14 (1E or 20)
D/W Mode31. Auto Configure j u 132. Programme selection m a 0 ~ 6333. Programme selection m b 0 ~ 63
for sub picture
COMMAND 1 COMMAND 2 DATA(Hexadecimal)
Set ID
- Use this function to specify a set ID number.- Refer to ‘Real Data Mapping 1’. See page 38.
1. Press the MENU button and then use the DD / EE button to select the SPECIAL menu.
2. Press the GG button and then use DD / EE button to select Set ID.
3. Press the GG button and then use F / G button to adjust Set ID to choose the desiredmonitor ID number.
• The adjustment range of Set ID is 1 ~ 99.
4. Repeatedly press the MENU button to return to normal TV viewing.
• Baud rate : 9600 bps (UART)• Data length : 8 bits• Parity : None* Use a crossed (reverse) cable.
• Stop bit : 1 bit• Communication code : ASCII code
Communication Parameters
LanguageChild lockISM MethodLow powerSet ID
Demo
Prev.MENU
STATION
PICTURE
SOUND
TIME
SPECIAL
SCREEN
PIP/DW
Set ID GG 1

Owner’s Manual 35
Miscellaneous
05. Volume Mute (Command 2 : e)
G To control volume mute on/off.You can also adjust mute using the MUTE button onremote control.
Transmission
Data 0 : Volume mute on (Volume off)1 : Volume mute off (Volume on)
[k][e][ ][Set ID][ ][Data][Cr]
Ack
[e][ ][Set ID][ ][OK][Data][x]
03. Aspect Ratio (Command 2 : c) (Main Picture Size)
G To adjust the screen format. (Main picture format)You can also adjust the screen format using the ARC(Aspect Ratio Control) button on remote control or in theSCREEN menu.
Transmission
Data 0 : Auto1 : Normal screen (4:3) 2 : Wide screen (16:9)3 : Wide screen (14:9)4 : Full screen (Zoom)
[k][c][ ][Set ID][ ][Data][Cr]
Ack
* Using the PC input, you select either 16:9 or 4:3 screenaspect ratio.
[c][ ][Set ID][ ][OK][Data][x]
04. Screen Mute (Command 2 : d)
G To select screen mute on/off.
Transmission
Data 0 : Screen mute off (Picture on)1 : Screen mute on (Picture off)
[k][d][ ][Set ID][ ][Data][Cr]
Ack
[d][ ][Set ID][ ][OK][Data][x]
06. Volume Control (Command 2 : f)
G To adjust volume.You can also adjust volume with the volume buttonson remote control.
Transmission
Data Min : 0 ~ Max : 64* Refer to ‘Real data mapping 1’. See page 38.
[k][f][ ][Set ID][ ][Data][Cr]
Ack
[f][ ][Set ID][ ][OK][Data][x]
07. Contrast (Command 2 : g)G To adjust screen contrast.
You can also adjust contrast in the PICTURE menu.
Transmission
Data Min : 0 ~ Max : 64* Refer to ‘Real data mapping 1’. See page 38.
[k][g][ ][Set ID][ ][Data][Cr]
Ack[g][ ][Set ID][ ][OK][Data][x]
08. Brightness (Command 2 : h)
G To adjust screen brightness.You can also adjust brightness in the PICTURE menu.
Transmission
Data Min : 0 ~ Max : 64* Refer to ‘Real data mapping 1’. See page 38.
[k][h][ ][Set ID][ ][Data][Cr]
Ack
[h][ ][Set ID][ ][OK][Data][x]
02. Input Select (Command 2 : b)
G To select input source for the Monitor. You can also select an input source using the INPUTSELECT button on the Monitor's remote control.
Transmission
Data 0 : TV1 : AV12 : AV23 : Component1
4 : Component25 : RGB6 : DVI
[k][b][ ][Set ID][ ][Data][Cr]
Ack
[b][ ][Set ID][ ][OK][Data][x]
01. Power (Command 2 : a)
G To control Power On/Off of the Monitor.
Transmission
Data 0 : Power Off 1 : Power On
[k][a][ ][Set ID][ ][Data][Cr]
Ack
[a][ ][Set ID][ ][OK][Data][x]
G To show Power On/Off.
Transmission
[k][a][ ][Set ID][ ][FF][Cr]
Ack
* In like manner, if other functions transmit ‘0xFF’ databased on this format, Acknowledgement data feed backpresents status about each function.
[a][ ][Set ID][ ][OK][Data][x]

36 PLASMA TV
Miscellaneous
16. PIP Position (Command 2 : q)
G To select sub picture position for PIP. You can also adjust the sub picture position usingWIN.POSITION button on the remote control or in thePIP/DW menu.
Transmission
Data 0 : Right down on screen1 : Left down on screen2 : Left up on screen3 : Right up on screen
[k][q][ ][Set ID][ ][Data][Cr]
Ack
[q][ ][Set ID][ ][OK][Data][x]
13. Remote control lock mode (Command 2 : m)
G To lock the front panel controls on the monitor and remotecontrol.
Transmission
[k][m][ ][Set ID][ ][Data][Cr]
Ack
Data 0 : Lock off 1 : Lock on
* If you’re not using the remote control, use this mode.When main power is on/off, external control lock isreleased.
[m][ ][Set ID][ ][OK][Data][x]
12. OSD Select (Command 2 : l)
G To select OSD (On Screen Display) on/off when con-trolling remotely.
Transmission
[k][l][ ][Set ID][ ][Data][Cr]
Ack
Data 0 : OSD off 1 : OSD on
[l][ ][Set ID][ ][OK][Data][x]
14. PIP / DW (Command 2 : n)G To control the PIP (Picture In picture)/DW.
You can also control the PIP/DW using the PIP/DW buttonon the remote control or in the PIP/DW menu.
Transmission
Data 0: PIP/DW off1: PIP2: DW13: DW2
[k][n][ ][Set ID][ ][Data][Cr]
Ack
[n][ ][Set ID][ ][OK][Data][x]
15. Split Zoom (Command 2 : p)
G To operate split zoom function and select the split zoomsection number.
Transmission
[k][p][ ][Set ID][ ][Data][Cr]
Ack
Data Min: 0 ~ Max: 99ex. Data 21: Selection 1 of 2 split zoom.
• Refer to ‘Real data mapping 2’.
[p][ ][Set ID][ ][OK][Data][x]
09. Colour (Command 2 : i)G To adjust the screen colour.
You can also adjust colour in the PICTURE menu.
Transmission
Data Min : 0 ~ Max : 64* Refer to ‘Real data mapping 1’. See page 38.
[k][i][ ][Set ID][ ][Data][Cr]
Ack[i][ ][Set ID][ ][OK][Data][x]
10. Tint (Command 2 : j) (option)
G To adjust the screen tint.You can also adjust tint in the PICTURE menu.
Transmission
Data Red : 0 ~ Green : 64* Refer to ‘Real data mapping 1’. See page 38.
[k][j][ ][Set ID][ ][Data][Cr]
Ack
[j][ ][Set ID][ ][OK][Data][x]
G To adjust the screen sharpness.You can also adjust sharpness in the PICTURE menu.
Transmission
11. Sharpness (Command 2 : k)
Data Min : 0 ~ Max : 64* Refer to ‘Real data mapping 1’. See page 38.
[k][k][ ][Set ID][ ][Data][Cr]
Ack
[k][ ][Set ID][ ][OK][Data][x]
* Real data mapping 2
0 : Reset split zoom21: Selection 1 of 2 split zoom24: Selection 4 of 2 split zoom41: Selection 1 of 4 split zoom42: Selection 2 of 4 split zoom44: Selection 4 of 4 split zoom45: Selection 5 of 4 split zoom91: Selection 1 of 9 split zoom
99: Selection 9 of 9 split zoom
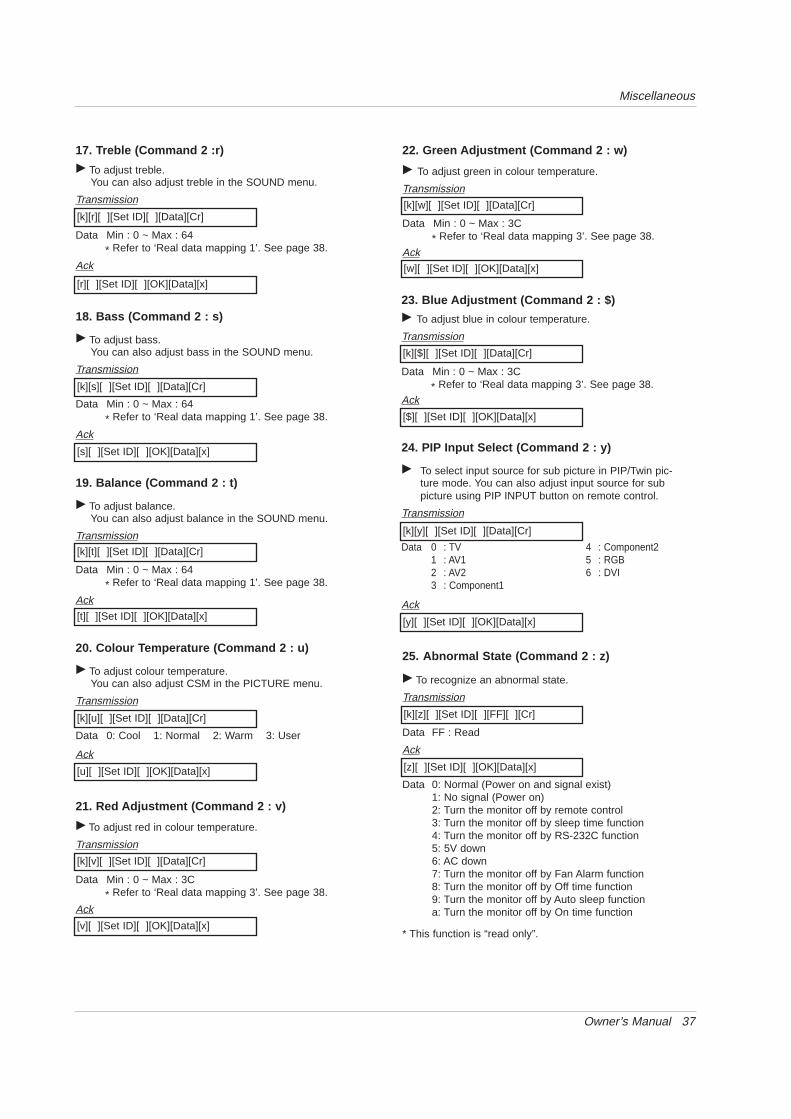
Owner’s Manual 37
Miscellaneous
19. Balance (Command 2 : t)
G To adjust balance.You can also adjust balance in the SOUND menu.
Transmission
Data Min : 0 ~ Max : 64* Refer to ‘Real data mapping 1’. See page 38.
[k][t][ ][Set ID][ ][Data][Cr]
Ack
[t][ ][Set ID][ ][OK][Data][x]
20. Colour T emperature (Command 2 : u)
G To adjust colour temperature.You can also adjust CSM in the PICTURE menu.
Transmission
Data 0: Cool 1: Normal 2: Warm 3: User
[k][u][ ][Set ID][ ][Data][Cr]
Ack
[u][ ][Set ID][ ][OK][Data][x]
21. Red Adjustment (Command 2 : v)
G To adjust red in colour temperature.
Transmission
Data Min : 0 ~ Max : 3C* Refer to ‘Real data mapping 3’. See page 38.
[k][v][ ][Set ID][ ][Data][Cr]
Ack
[v][ ][Set ID][ ][OK][Data][x]
22. Green Adjustment (Command 2 : w)
G To adjust green in colour temperature.
Transmission
Data Min : 0 ~ Max : 3C* Refer to ‘Real data mapping 3’. See page 38.
[k][w][ ][Set ID][ ][Data][Cr]
Ack
[w][ ][Set ID][ ][OK][Data][x]
23. Blue Adjustment (Command 2 : $)
G To adjust blue in colour temperature.
Transmission
Data Min : 0 ~ Max : 3C* Refer to ‘Real data mapping 3’. See page 38.
[k][$][ ][Set ID][ ][Data][Cr]
Ack
[$][ ][Set ID][ ][OK][Data][x]
24. PIP Input Select (Command 2 : y)
G To select input source for sub picture in PIP/Twin pic-ture mode. You can also adjust input source for subpicture using PIP INPUT button on remote control.
Transmission
Data 0 : TV1 : AV12 : AV23 : Component1
4 : Component25 : RGB6 : DVI
[k][y][ ][Set ID][ ][Data][Cr]
Ack
[y][ ][Set ID][ ][OK][Data][x]
18. Bass (Command 2 : s)
G To adjust bass.You can also adjust bass in the SOUND menu.
Transmission
Data Min : 0 ~ Max : 64* Refer to ‘Real data mapping 1’. See page 38.
[k][s][ ][Set ID][ ][Data][Cr]
Ack
[s][ ][Set ID][ ][OK][Data][x]
17. Treble (Command 2 :r)
G To adjust treble.You can also adjust treble in the SOUND menu.
Transmission
Data Min : 0 ~ Max : 64* Refer to ‘Real data mapping 1’. See page 38.
[k][r][ ][Set ID][ ][Data][Cr]
Ack
[r][ ][Set ID][ ][OK][Data][x]
25. Abnormal State (Command 2 : z)
G To recognize an abnormal state.
Transmission
Data FF : Read
Data 0: Normal (Power on and signal exist)1: No signal (Power on)2: Turn the monitor off by remote control3: Turn the monitor off by sleep time function4: Turn the monitor off by RS-232C function5: 5V down6: AC down7: Turn the monitor off by Fan Alarm function8: Turn the monitor off by Off time function9: Turn the monitor off by Auto sleep functiona: Turn the monitor off by On time function
* This function is “read only”.
[k][z][ ][Set ID][ ][FF][ ][Cr]
Ack
[z][ ][Set ID][ ][OK][Data][x]

38 PLASMA TV
Miscellaneous
27. Low Power(Command 1 : j, Command 2 : q)
G To reduce the power consumption of the monitor. Youcan also adjust Low Power in SPECIAL menu.
Transmission
Data 0 : Off1 : On
[j][q][ ][Set ID][ ][Data][ ][Cr]
Ack
[q][ ][Set ID][ ][OK][Data][x]
28. Orbiter T ime Setting(Command 1 : j, Command 2 : r)
G To adjust orbiter operation time term.
Transmission
Data Min: 1 ~ Max: FE* Refer to ‘Real data mapping 1’.
[j][r][ ][Set ID][ ][Data][ ][Cr]
Ack
[r][ ][Set ID][ ][OK][Data][x]
26. ISM Method (Command 1 : j, Command 2 : p)
G To control the ISM method. You can also adjust ISMMethod in SPECIAL menu.
Transmission
Data 0 : Normal Mode1 : White Wash
2 : Orbiter3 : Inversion
[j][p][ ][Set ID][ ][Data][Cr]
Ack
[p][ ][Set ID][ ][OK][Data][x]
29. Orbiter Pixel Setting(Command 1 : j, Command 2 : s)
G To adjust pixel number in orbiter function.
Transmission
Data Min: 1 ~ Max: 9* Refer to ‘Real data mapping 1’.
[j][s][ ][Set ID][ ][Data][Cr]
Ack
[s][ ][Set ID][ ][OK][Data][x]
30. Picture Size Setting for DW Mode(Command 1 : j, Command 2 : t)
G To select the PIP picture format.You can also select the PIP picture format using theWIN.SIZE on the remote control.
Transmission
Data Min: 0 ~ Max: 14 (1E or 20)* Refer to ‘Real data mapping 1’.
[j][t][ ][Set ID][ ][Data][Cr]
Ack
[t][ ][Set ID][ ][OK][Data][x]
31. Auto Configure(Command 1 : j, Command 2 : u)
G To adjust picture position and minimize image shakingautomatically. It works only in RGB (PC) mode.
Transmission
Data 1: To set
[j][u][ ][Set ID][ ][Data][Cr]
Ack
[u][ ][Set ID][ ][OK][Data][x]
32. Programme selection(Command 1 : m, Command 2 : a)
G To select a programme for the main picture.
Transmission
Data Min: 0 ~ Max: 63 (0 ~ C7, 200Pr is on)* Refer to ‘Real data mapping 1’.
[m][a][ ][Set ID][ ][Data][Cr]
Ack
[a][ ][Set ID][ ][OK][Data][x]
33. Programme selection for sub picture(Command 1 : m, Command 2 : b)
G To select a programme for the sub picture.
Transmission
Data Min: 0 ~ Max: 63 (0 ~ C7, 200Pr is on)* Refer to ‘Real data mapping 1’.
[m][b][ ][Set ID][ ][Data][Cr]
Ack
[b][ ][Set ID][ ][OK][Data][x]
* Real data mapping 1
0 : Step 0
A : Step 10 (Set ID 10)
F : Step 15 (Set ID 15)10 : Step 16 (Set ID 16)
64 : Step 100
6E : Step 110
73 : Step 11574 : Step 116
C7 : Step 199
* Real data mapping 3
0 : -301 : -292 : -28
1E : 0
3A : +283B : +293C : +30
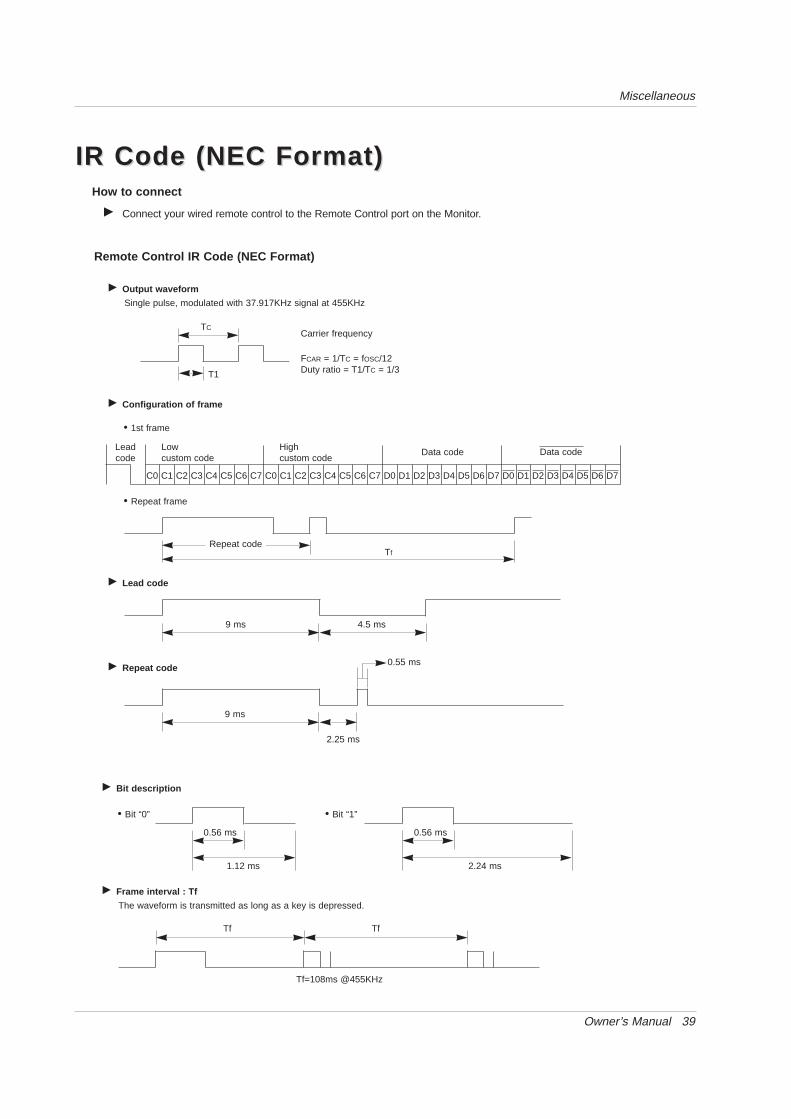
Owner’s Manual 39
Miscellaneous
G Connect your wired remote control to the Remote Control port on the Monitor.
G Output waveform
Single pulse, modulated with 37.917KHz signal at 455KHz
G Configuration of frame
G Repeat code
G Lead code
• 1st frame
Low custom code
Leadcode
High custom code
Data code Data code
TC
Tf
T1
C0
Carrier frequency
FCAR = 1/TC = fOSC/12Duty ratio = T1/TC = 1/3
• Repeat frame
C1 C2 C3 C4 C5 C6 C7 C0 C1 C2 C3 C4 C5 C6 C7 D0 D1 D2 D3 D4 D5 D6 D7 D0 D1 D2 D3 D4 D5 D6 D7
Repeat code
9 ms 4.5 ms
0.55 ms
9 ms
2.25 ms
G Bit description
G Frame interval : Tf
The waveform is transmitted as long as a key is depressed.
• Bit “0”
Tf Tf
Tf=108ms @455KHz
0.56 ms 0.56 ms
1.12 ms
• Bit “1”
2.24 ms
IR Code (NEC Format)IR Code (NEC Format)How to connect
Remote Control IR Code (NEC Format)

40 PLASMA TV
Miscellaneous
Code (Hexa) Function Note
PR+ (D)PR- (E)VOL+ (G)VOL- (F)POWER POWER ONPOWER OFFMUTENumber Key 0Number Key 1Number Key 2Number Key 3Number Key 4Number Key 5Number Key 6Number Key 7Number Key 8Number Key 9TV/AVMULTIMEDIACOMPONENT1COMPONENT2DVIRGBTVAV1AV2I/IISLEEPMENUOK(AA)PSMSSMLISTTEXT/*REVEALMODEMIXTIMEUPDATE / WIN.POSITIONSIZE / WIN.SIZEHOLDINDEXPIP/DWPIP INPUTSWAPPIP PR+PIP PR-SPLIT ZOOMARCARC (4:3)ARC (16:9)ARC (Zoom)
00H01H02H03H08HC4HC5H09H10H11H12H13H14H15H16H17H18H19H0BH98HBFHD4HC6HD5HD6H5AHD0H0AH0EH43H44H4DH52H53H20H2AH22H24H26H62H64H65H70H60H61H63H71H72H7BH79H76H77HAFH
R/C ButtonR/C ButtonR/C ButtonR/C ButtonR/C Button (Power On/Off)Discrete IR Code (Only Power On)Discrete IR Code (Only Power Off)R/C ButtonR/C ButtonR/C ButtonR/C ButtonR/C ButtonR/C ButtonR/C ButtonR/C ButtonR/C ButtonR/C ButtonR/C ButtonR/C ButtonR/C ButtonDiscrete IR Code (Input COMPONENT1 Selection)Discrete IR Code (Input COMPONENT2 Selection)Discrete IR Code (Input DVI Selection)Discrete IR Code (Input RGB Selection)Discrete IR Code (Input TV Selection)Discrete IR Code (Input AV1 Selection)Discrete IR Code (Input AV2 Selection)R/C ButtonR/C ButtonR/C ButtonR/C ButtonR/C ButtonR/C ButtonR/C ButtonR/C ButtonR/C ButtonR/C ButtonR/C ButtonR/C ButtonR/C ButtonR/C ButtonR/C ButtonR/C ButtonR/C ButtonR/C ButtonR/C ButtonR/C ButtonR/C ButtonR/C ButtonR/C ButtonDiscrete IR Code (Only 4:3 mode)Discrete IR Code (Only 16:9 mode)Discrete IR Code (Only Zoom mode)

Owner’s Manual 41
Miscellaneous
NotesNotes

42 PLASMA TV
Miscellaneous
TTroubleshooting Checklistroubleshooting Checklist
No output from one of thespeakers
• Adjust Balance in the SOUND menu. (Refer to p.22)
Unusual sound frominside the set
• A change in ambient humidity or temperature may result in an unusual noiseat the time of switching off or on of the set and does not indicate a fault withthe set.
No picture &No sound
• Check whether the set is turned on.
• Power cord inserted into wall outlet?
• Plug another product’s power cord into the wall outlet where the set’s powercord was plugged in.
No or Poor colouror Poor picture
• Select Colour in the PICTURE menu and press the VOLUME (G) button. (Refer to p.21)
• Keep a certain distance between the set and the VCR.
• Activate any function to restore the brightness of the picture.
(If still picture is on the screen for more than 5 minutes, the screen gets dark.)
The remote control doesn’t work
• Check to see if there is any object between the set and the remote controlcausing obstruction.
• Check to see if the batteries are installed with the correct polarities. (Refer to p.6)
• Check if the remote control handset is set up to correct mode.
• Install new batteries. (Refer to p.6)
Picture OK &No sound
• Press the VOLUME (G) button.
• Sound muted? Press MUTE button.
Picture appears slowly ,after switching on
• This is normal as the image is muted during the startup process of the set.Please contact your service centre, if the picture has not appeared after fiveminutes.
Horizontal/vertical barsor picture shaking
• Check for local interference such as an electrical appliance or power tool.

Owner’s Manual 43
Miscellaneous
Product SpecificationsProduct Specifications
• The specifications shown above may be changed without notice for quality improvement.
MODEL
Width (inches / mm)
Height (inches / mm)
Depth (inches / mm)
Weight (pounds / kg)
Power requirement
Resolution
Colour
Operating Temperature Range
Operating Humidity Range
RT-42PX10/11/H RT-42PX12X/HRT-42PX20/H RT-42PX20/H
48.4 / 1210
27.6 / 701
3.8 / 96
66 / 29.9
AC100-240V, 50/60Hz
852 x 480 (Dot) 1024 x 768 (Dot)
16,770,000 (256 steps of each R, G and B)
32 ~ 104°F (0 ~ 40°C)
Less than 80%
MODEL
Width (inches / mm)
Height (inches / mm)
Depth (inches / mm)
Weight (pounds / kg)
Power requirement
Resolution
Colour
Operating Temperature Range
Operating Humidity Range
RT-50PX10/11/H RT-50PX20/H
55.1 / 1400
32.3 / 821
3.9 / 99
115 / 52.15
AC100-240V, 50/60Hz
1366 x 768 (Dot)
16,770,000 (256 steps of each R, G and B)
32 ~ 104°F (0 ~ 40°C)
Less than 80%