Embed Size (px)
Citation preview
R E F E R E N C E
PLASTER OF PARIS AND OTHER FRACTURE IMMOBILIZATIONSICRC PHYSIOTHERAPY REFERENCE MANUAL

International Committee of the Red Cross19, avenue de la Paix1202 Geneva, SwitzerlandT + 41 22 734 60 01 F + 41 22 733 20 57E-mail: [email protected] icrc.org© ICRC, June 2014

PLASTER OF PARIS AND OTHER FRACTURE IMMOBILIZATIONSICRC PHYSIOTHERAPY REFERENCE MANUAL

Table of contents
Introduction 5
Acknowledgments 6
1. Surgical management 9
2. POP immobilizations 15
3. Bandages and slings 75
4. Traction immobilizations 85
5. References 103
TABLE OF CONTENTS 3

The ICRC’s physical rehabilitation unit has designed a course for physiotherapists in using plaster of Paris (POP) and limb traction.
Physiotherapists who work in ICRC hospital programmes are in charge of making POP casts and take part in the follow-up for the treatments concerned. In conjunction with the surgeons and hospital staff, the physiotherapists usually run the cast room. After surgeons fix tractions, physiotherapists also help, together with the nursing team, to manage the patients under traction and ensure proper setting of the traction.
All these duties and responsibilities, which are not required by international standards, are assigned to ICRC physiotherapists. That is why the ICRC set up a short training course that physiotherapists can take before being sent to an ICRC hospital programme.
The course’s purpose is to give physiotherapists some initial experience in managing POP and limb tractions in a way that will help prepare them for ICRC hospital programmes.
This manual presents the contents of the course and adds a wealth of commentary and advice from physiotherapists and surgeons highly experienced in POP and limb traction.
We hope that the manual will be of use to physiotherapists in carrying out their duties as members of ICRC hospital teams.
ICRC physical rehabilitation sub-unit
Introduction
INTRODUCTION 5

Authors:Daniel Odhiambo NgotaFrançois FriedelEmmanouil Kokkiniotis
The authors would like to thank the following people for their help in editing the text, drawing illustrations and providing photographs:
Anne-Frédérique BonvinPamela Chelagat Emmanouil KokkiniotisKathleen LoadsmanJacob LogilaeHassan NarseddineCatherine MorvanOctavias Ngare Susan NjeriBarbara Rau Anne-Catherine RousselChristoph SchmidCorrie van WijkHarald Veen
Acknowledgments
PATIENT MANAGEMENT GUIDELINES6


Surgical management 1
Table of contents
Objectives 10
1. Fractures 10
2. Immobilizations 11
3. ICRC surgical protocols 12
4. Minimum immobilization period for bones 13
SURGICAL MANAGEMENT 9

Objectives
• Understand the ICRC’s approach to surgical management of war wounds with bone fracture
• Know the objectives and general principles of management of war wounds• Understand the advantages and disadvantages of each immobilization method• Be aware of the average period for immobilization and healing of bones
1 Fractures
The fracture is part of the wound.
In the ICRC manual, War Wounds with Fractures: A Guide to Surgical Management, David I. Rowley, an ICRC orthopaedic surgeon, says:
“It is important to remember that the fracture as seen on the X-ray is only one aspect of the wound complex. The objectives of the management of war wounds involving bone are to:• remove all foreign material, dead tissue and bone fragments (wound excision)• achieve skin cover• achieve bone healing• restore function.”
However well bone continuity is restored, healing follows only if the wound is correctly “debrided” and blood supply restored. Therefore, the first step to recovering function is correct treatment of the whole wound.
Once excision has been carried out the wound will be left open for about five days prior to skin closure. During this phase, bone fragments are maintained in correct alignment with POP slabs or traction methods (initial holding).
Definitive fracture holding will be applied at the time of the second or subsequent operation. Different methods are available for the immobilization of fractures resulting from war trauma:
Conservative• Functional (including bandages & slings)• Plaster• Traction
Surgical*• External fixation
The general condition of the patient is also important, as anaemia and poor nutritional status contribute to delay in healing of the wound.
*Internal fixation devices are not part of the initial management of fractures because of the high risk of complications due to infection and because of the expertise, equipment and level of hygiene required.
PATIENT MANAGEMENT GUIDELINES10
2 Immobilizations
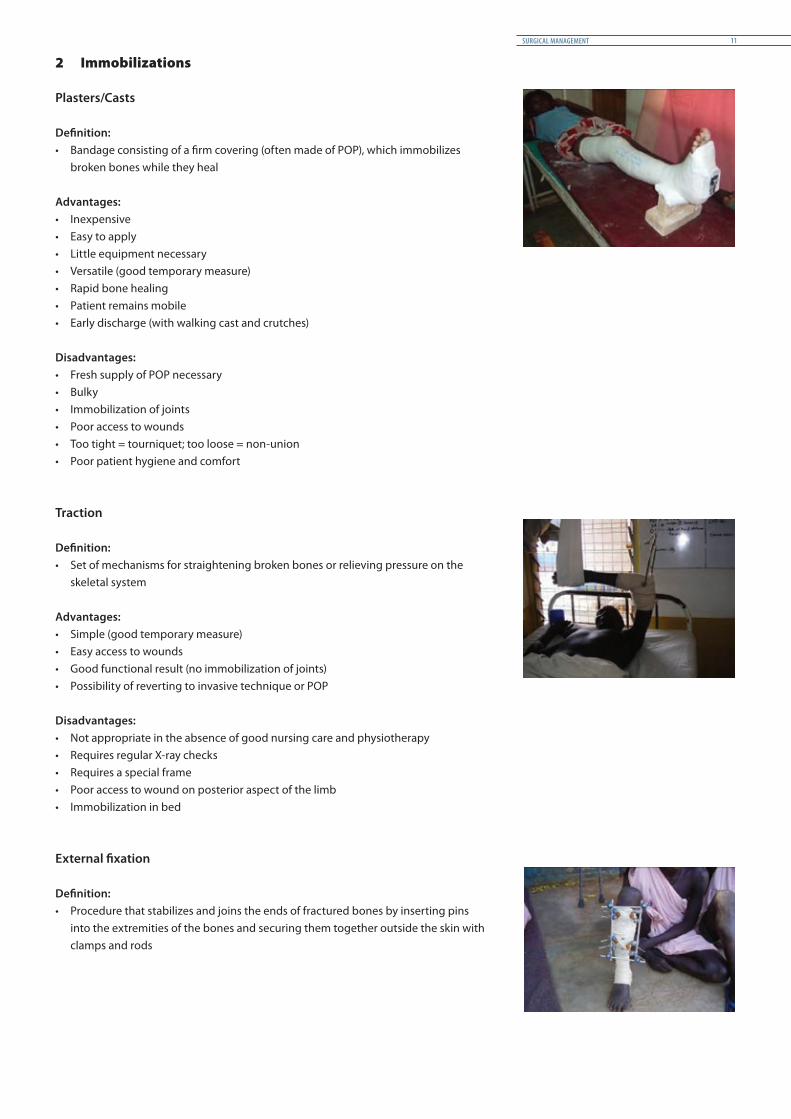
Plasters/Casts
Definition:• Bandage consisting of a firm covering (often made of POP), which immobilizes
broken bones while they heal
Advantages:• Inexpensive• Easy to apply• Little equipment necessary• Versatile (good temporary measure)• Rapid bone healing• Patient remains mobile• Early discharge (with walking cast and crutches)
Disadvantages:• Fresh supply of POP necessary• Bulky• Immobilization of joints• Poor access to wounds• Too tight = tourniquet; too loose = non-union• Poor patient hygiene and comfort
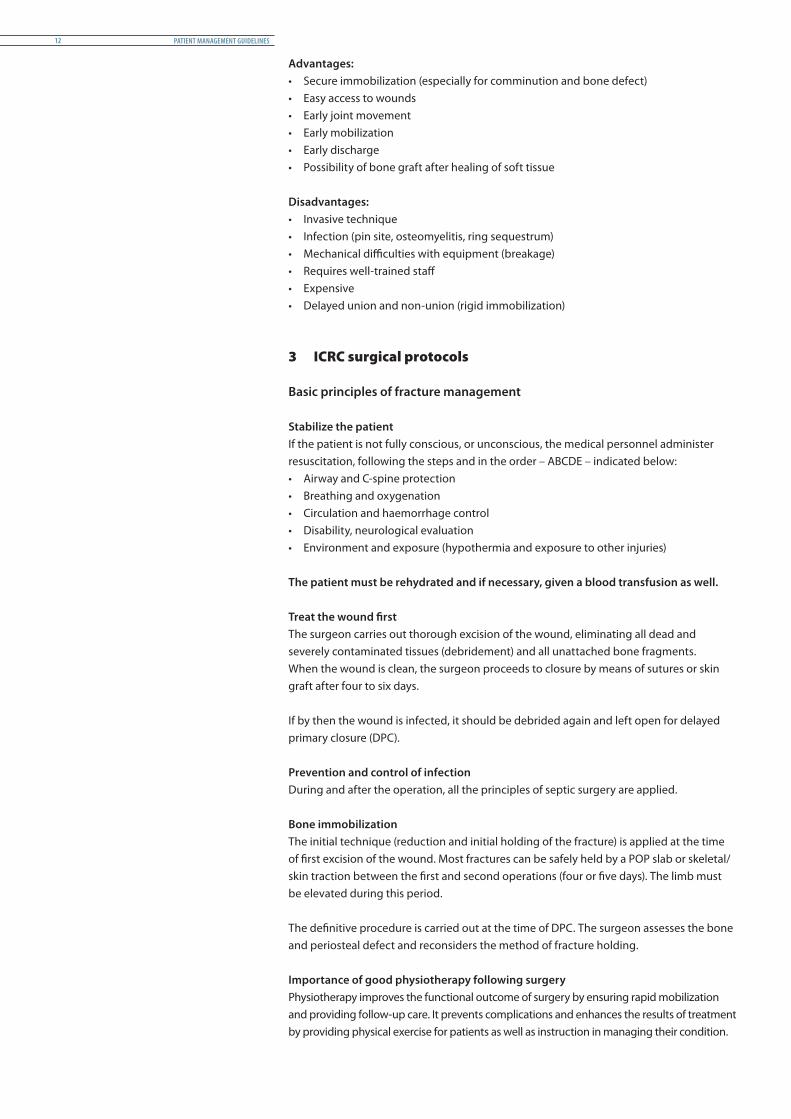
Traction
Definition:• Set of mechanisms for straightening broken bones or relieving pressure on the
skeletal system
Advantages:• Simple (good temporary measure)• Easy access to wounds• Good functional result (no immobilization of joints)• Possibility of reverting to invasive technique or POP
Disadvantages:• Not appropriate in the absence of good nursing care and physiotherapy • Requires regular X-ray checks• Requires a special frame• Poor access to wound on posterior aspect of the limb• Immobilization in bed
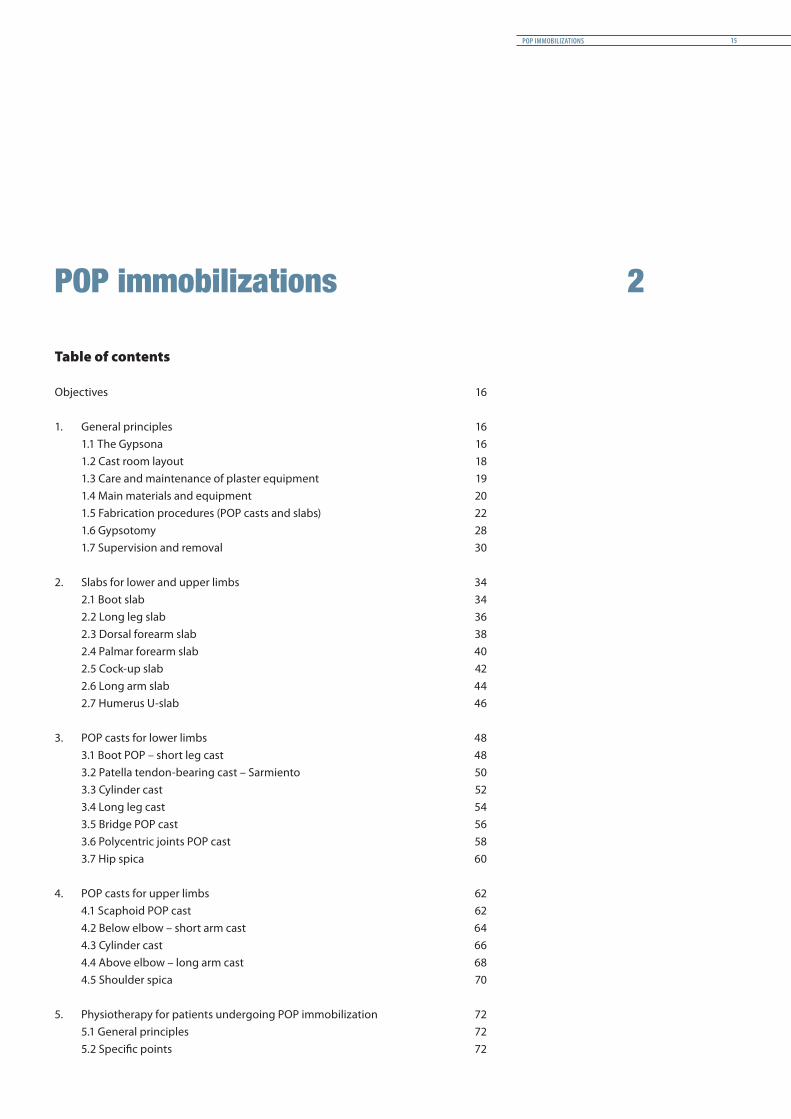
External fixation
Definition:• Procedure that stabilizes and joins the ends of fractured bones by inserting pins
into the extremities of the bones and securing them together outside the skin with clamps and rods
SURGICAL MANAGEMENT 11
Advantages:• Secure immobilization (especially for comminution and bone defect)• Easy access to wounds• Early joint movement• Early mobilization• Early discharge• Possibility of bone graft after healing of soft tissue
Disadvantages:• Invasive technique• Infection (pin site, osteomyelitis, ring sequestrum)• Mechanical difficulties with equipment (breakage)• Requires well-trained staff• Expensive• Delayed union and non-union (rigid immobilization)
3 ICRC surgical protocols
Basic principles of fracture management
Stabilize the patientIf the patient is not fully conscious, or unconscious, the medical personnel administer resuscitation, following the steps and in the order – ABCDE – indicated below:• Airway and C-spine protection• Breathing and oxygenation• Circulation and haemorrhage control• Disability, neurological evaluation• Environment and exposure (hypothermia and exposure to other injuries)
The patient must be rehydrated and if necessary, given a blood transfusion as well.
Treat the wound firstThe surgeon carries out thorough excision of the wound, eliminating all dead and severely contaminated tissues (debridement) and all unattached bone fragments.When the wound is clean, the surgeon proceeds to closure by means of sutures or skin graft after four to six days.
If by then the wound is infected, it should be debrided again and left open for delayed primary closure (DPC).
Prevention and control of infectionDuring and after the operation, all the principles of septic surgery are applied.
Bone immobilizationThe initial technique (reduction and initial holding of the fracture) is applied at the time of first excision of the wound. Most fractures can be safely held by a POP slab or skeletal/skin traction between the first and second operations (four or five days). The limb must be elevated during this period.
The definitive procedure is carried out at the time of DPC. The surgeon assesses the bone and periosteal defect and reconsiders the method of fracture holding.
Importance of good physiotherapy following surgeryPhysiotherapy improves the functional outcome of surgery by ensuring rapid mobilization and providing follow-up care. It prevents complications and enhances the results of treatment by providing physical exercise for patients as well as instruction in managing their condition.
PATIENT MANAGEMENT GUIDELINES12

Objectives of physiotherapy
Before formation of callus• Maintains good bone alignment • Maintains muscle tone• Maintains the joint’s range of motion• Stimulates callus formation with static contractions (before weight bearing)• Improves patient comfortAfter formation of callus• Restores joint mobility• Maintains muscle strength• Restores stability, proprioception/dexterity and appropriate balance• Restores maximum functional status
4 Minimum immobilization period for bones
BONE MOST COMMON IMMOBILIZATION PROTOCOLS WITH NO COMPLICATIONS
AVERAGE CONSOLIDATION PERIOD WITH NO COMPLICATIONS
ADULT CHILD <10 years ADULT CHILD <10 years
Metacarpal 4-6 weeks 2-3 weeks 6 weeks 4-6 weeks
Scaphoid 8-12 weeks 8-10 weeks 15-20 weeks 12 weeks
Carpal 4-6 weeks 2-3 weeks 6 weeks 4-6 weeks
Ulna 4-6 weeks 3-4 weeks 6-8 weeks 4-6 weeks
Radius 4-6 weeks 3-4 weeks 6-8 weeks 4-6 weeks
Humerus 4-6 weeks 3-4 weeks 6-8 weeks 4-6 weeks
Clavicle 4 weeks 2-3 weeks 4 weeks 2-3 weeks
Scapula 4 weeks 2-3 weeks 4 weeks 2-3 weeks
Ribs 4-6 weeks 2-4 weeks 4 weeks 2-3 weeks
Vertebral bones 6-8 weeks 4-6 weeks 12 weeks 6-8 weeks
Pelvic bones 6-8 weeks 4-6 weeks 6-8 weeks 4-6 weeks
Femur 6-8 weeks 4-6 weeks 12 weeks 6-8 weeks
Tibia 6-8 weeks 4-6 weeks 12 weeks 6-8 weeks
Talus 6-8 weeks 4-6 weeks 12 weeks 6-8 weeks
Calcaneus 6-8 weeks 4-6 weeks 12 weeks 6-8 weeks
Phalanges 4-6 weeks 2-3 weeks 6 weeks 4-6 weeks
Note: It takes several months after consolidation for bones to recover their strength.
SURGICAL MANAGEMENT 13

POP immobilizations 2
Table of contents
Objectives 16
1. General principles 16 1.1 The Gypsona 16 1.2 Cast room layout 18 1.3 Care and maintenance of plaster equipment 19 1.4 Main materials and equipment 20 1.5 Fabrication procedures (POP casts and slabs) 22 1.6 Gypsotomy 28 1.7 Supervision and removal 30
2. Slabs for lower and upper limbs 34 2.1 Boot slab 34 2.2 Long leg slab 36 2.3 Dorsal forearm slab 38 2.4 Palmar forearm slab 40 2.5 Cock-up slab 42 2.6 Long arm slab 44 2.7 Humerus U-slab 46
3. POP casts for lower limbs 48 3.1 Boot POP – short leg cast 48 3.2 Patella tendon-bearing cast – Sarmiento 50 3.3 Cylinder cast 52 3.4 Long leg cast 54 3.5 Bridge POP cast 56 3.6 Polycentric joints POP cast 58 3.7 Hip spica 60
4. POP casts for upper limbs 62 4.1 Scaphoid POP cast 62 4.2 Below elbow – short arm cast 64 4.3 Cylinder cast 66 4.4 Above elbow – long arm cast 68 4.5 Shoulder spica 70
5. Physiotherapy for patients undergoing POP immobilization 72 5.1 General principles 72 5.2 Specific points 72
POP IMMOBILIZATIONS 15

Objectives
• Understand the fabrication of different types of POP casts and slabs, their advantages and disadvantages
• Understand the necessary follow-up and possible complications related to the application of circular POP
• Know and master the fabrication procedures of POP casts for lower and upper limbs• Know and master the fabrication procedures of slabs for lower and upper limbs • Be capable of organizing a plaster room and giving instructions regarding the care
and maintenance of the plaster equipment
1 General principles
1.1 The Gypsona
TransformationGypsum when extracted is a calcium sulphate di-hydrate, CaSO4 2 H2O. When crushed and subjected to thermal treatment, it becomes CaSO4 ½ H2O, losing water molecules.On immersion in water it regains the water molecules and again becomes CaSo4 2H2O.
PropertiesDrying time depends on the quantity of water left in the plaster.If there is more water in the plaster, the POP becomes fragile after drying.
Increasing the water temperature shortens the drying time. For long POP, cold water should be used to allow the different layers to dry as one solid cast.
The higher the water temperature, the higher the temperature generated inside the POP.Example:If the water temperature is 24°, the POP temperature increases to 38°.If the water temperature is 38°, the POP temperature increases to 57°.With a water temperature over 50°, the heat produced inside the POP could burn the skin.
PATIENT MANAGEMENT GUIDELINES16

POP powder POP rolls
Types of product
If there are no POP rolls, you can make some with POP powder and cotton bandages.Roll the bandage after spreading a thick layer of plaster powder on it.
POP IMMOBILIZATIONS 17
1.2 Cast room layout
A cast room should be a simple area that offers patients proper privacy and hospital staff comfortable conditions in which to do their work. It requires the following:• A minimum of 12 sq m (to allow freedom of movement around the plaster table or
plaster frame)• Sufficient and efficient ventilation to avoid humidity• Good natural light if possible• A door wide enough for passage of stretchers • Surfaces that are easy to clean (tiling/washable floor and walls are recommended)• A stable and comfortable plaster table• Access to water, with a sink fitted with a filter for plaster particles• System for getting rid of dust• Easy access to all tools and consumables (cupboard or wall containers, mobile plaster
trolley, etc.)
A well-lit room with a stable plaster table in the middle allowing ample working space around it.
Access to water. There should be enough space between the tap and the sink to wash casts, equipment and basins.
The essential mobile plaster trolley. It is rare to have a spica table available.
Wall containers are a good system for providing quick access to POP bandages, Softban and crepe bandages, and for keeping them in good order.
PATIENT MANAGEMENT GUIDELINES18

1.3 Care and maintenance of plaster equipment
General care• Wash all materials with clean water after making POP. Do not use soap, as soap
hardens the plaster• Dry all equipment with a towel or a piece of cloth immediately after washing to avoid
rust, and put all items back in their proper places• To remove plaster from the equipment use a cloth, a soft sponge or a plastic brush
rather than steel wool or a sharp metal tool, as these will make scratches that eventually lead to the formation of rust
• Sharpen blunt scissors with a metal file• Tighten loose screws in all equipment such as scissors and shears• Lubricate moving parts with appropriate oil once a week if the equipment is used
every day
Oscillating plaster saw• Unplug the saw from the electrical socket before maintenance or cleaning• Avoid any contact between electrical parts of the saw and water/humidity• Clean the blade with a damp cloth. Do not put the blade under running water while
the saw is still plugged into an electrical socket• Use air pressure (if available) to blow plaster dust out of the oscillating part of the saw• When changing a blunt blade, make sure the grooves are in the right place and tighten
the bolt• Avoid winding the electrical cable attachment too tightly to prevent strain on the
rubber connector• Do not put the saw on a hard surface while it is oscillating• The saw is to be used only for cutting POP unless it has different blades for other uses
POP IMMOBILIZATIONS 19

1.4 Main materials and equipment
Goniometer Measuring tape Plumb line
POP 20 cm/15 cm/10 cm Softban 15 cm/10 cm Plaster shears
Cast spreader Scissors Cast breaker
Oscillating saw Wooden support Posture cushions
Stockinet 15 cm/10 cm/5 cm Walking heel Plaster scissors
Plaster table Bridge POP splint Polycentric joint
PATIENT MANAGEMENT GUIDELINES20
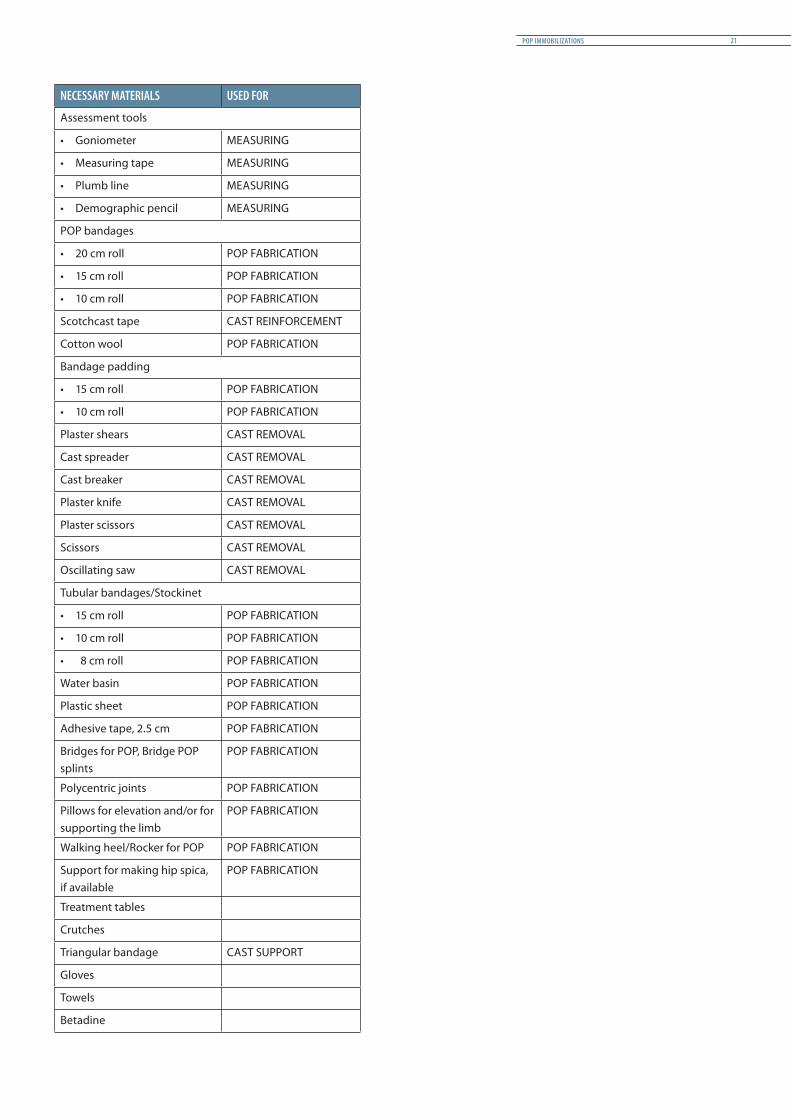
NECESSARY MATERIALS USED FOR
Assessment tools
• Goniometer MEASURING
• Measuring tape MEASURING
• Plumb line MEASURING
• Demographic pencil MEASURING
POP bandages
• 20 cm roll POP FABRICATION
• 15 cm roll POP FABRICATION
• 10 cm roll POP FABRICATION
Scotchcast tape CAST REINFORCEMENT
Cotton wool POP FABRICATION
Bandage padding
• 15 cm roll POP FABRICATION
• 10 cm roll POP FABRICATION
Plaster shears CAST REMOVAL
Cast spreader CAST REMOVAL
Cast breaker CAST REMOVAL
Plaster knife CAST REMOVAL
Plaster scissors CAST REMOVAL
Scissors CAST REMOVAL
Oscillating saw CAST REMOVAL
Tubular bandages/Stockinet
• 15 cm roll POP FABRICATION
• 10 cm roll POP FABRICATION
• 8 cm roll POP FABRICATION
Water basin POP FABRICATION
Plastic sheet POP FABRICATION
Adhesive tape, 2.5 cm POP FABRICATION
Bridges for POP, Bridge POP splints
POP FABRICATION
Polycentric joints POP FABRICATION
Pillows for elevation and/or for supporting the limb
POP FABRICATION
Walking heel/Rocker for POP POP FABRICATION
Support for making hip spica, if available
POP FABRICATION
Treatment tables
Crutches
Triangular bandage CAST SUPPORT
Gloves
Towels
Betadine
POP IMMOBILIZATIONS 21
1.5 Fabrication procedures (POP casts and slabs)
Preparation of the necessary materialsThe required materials should be prepared in advance. Prepare a good number of plaster bandages rather than just a few rolls, as the POP should be made all at once to assure the continuity of its structure.
Position of the patientThe patient should be made comfortable. His/her position can be adjusted with cushions and pillows if required. More than one person may be necessary to support the fractured limb. The therapist should be in a suitable position to work without obstruction or difficulty.
Protect the working surface/areas with plastic sheeting.
In the operating theatre, a physiotherapist may be asked to apply an appropriate POP cast or slab while the patient is under anaesthesia.
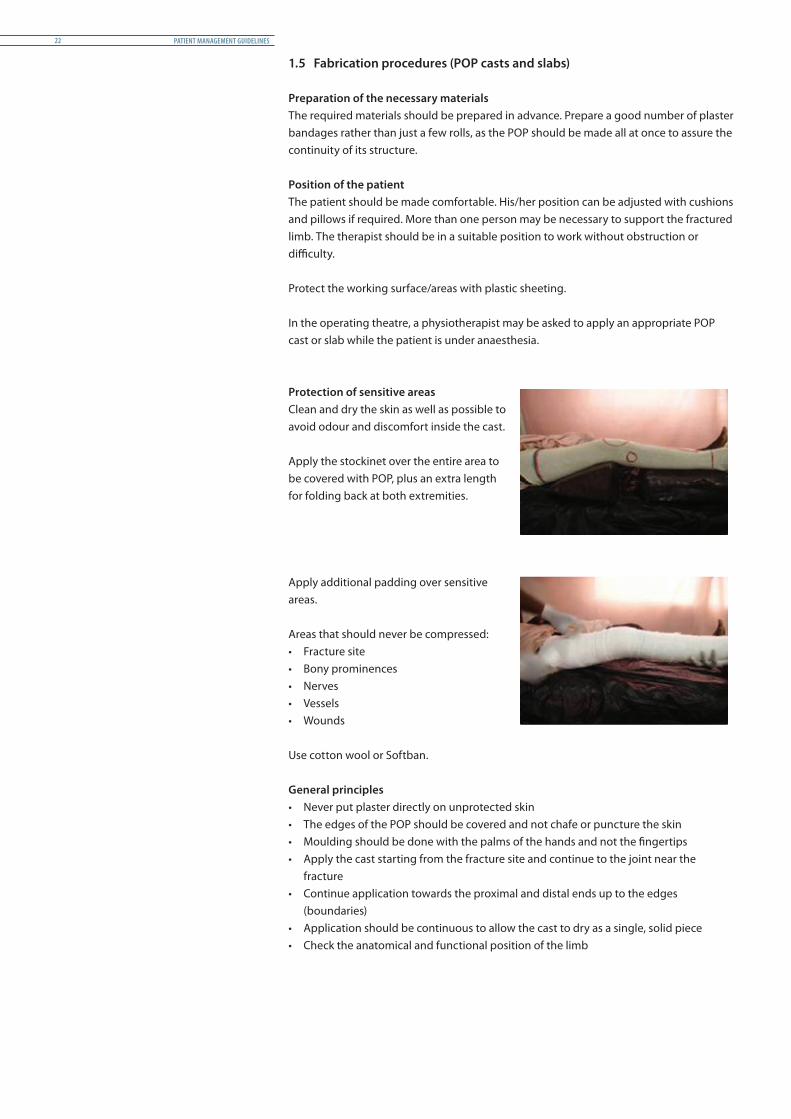
Protection of sensitive areasClean and dry the skin as well as possible to avoid odour and discomfort inside the cast.
Apply the stockinet over the entire area to be covered with POP, plus an extra length for folding back at both extremities.
Apply additional padding over sensitive areas.
Areas that should never be compressed:• Fracture site• Bony prominences• Nerves• Vessels• Wounds
Use cotton wool or Softban.
General principles• Never put plaster directly on unprotected skin• The edges of the POP should be covered and not chafe or puncture the skin• Moulding should be done with the palms of the hands and not the fingertips• Apply the cast starting from the fracture site and continue to the joint near the
fracture• Continue application towards the proximal and distal ends up to the edges
(boundaries)• Application should be continuous to allow the cast to dry as a single, solid piece• Check the anatomical and functional position of the limb
PATIENT MANAGEMENT GUIDELINES22

Detailed procedure for circular POP
Immerse the POP rolls in water until the last air bubble is visible. When a number of rolls are to be used, the next roll may be put into water during application of the preceding one.
Squeeze the excess water from the soaked rolls and apply immediately around the limb.
The POP should be applied smoothly, with uniform tension on the bandage (neither too tight nor too loose).
At each turn, cover 2/3 of the surface area of the preceding layer of POP bandage.
Massage the POP rolls over the leg to spread the wet plaster paste over the pores in the bandage.
Avoid any dents or depressions on the POP cast to minimize localized pressure points on the limb.
Maintain the required angle when applying plaster over a joint, e.g. the ankle, knee or elbow.
Apply POP rolls crossing over the joint three or four times like a figure of eight.
POP IMMOBILIZATIONS 23

In order to give the cast a smooth finish, always leave an extra length of stockinet under the padding, and an extra length of padding under the POP rolls.
Before application of the last layer of POP, fold the end of the stockinet back over the edges and roll the last layer over it. The cotton padding and the stockinet will make a soft rim and protect the skin.
At the end of the application, smooth the finished cast in the direction in which the roll was applied.
Make sure that the POP ends are also smooth.
Write the POP calendar on the cast: date of fracture, date of application of cast, date of removal and date of next visit for an X-ray check-up.
Elevate the limb on a stand or a pillow.
Weight bearing should be avoided before the cast is dry, i.e. approximately 24 – 48 hours.
If needed apply a de-rotation bar to avoid rotation of the limb.
When weight bearing is authorized, apply a rubber walking heel on a flexible metal plate is preferable to a wooden heel, which is less adaptable (adjust the heel as explained in the paragraph titled “Patella tendon-bearing cast”).
PATIENT MANAGEMENT GUIDELINES24
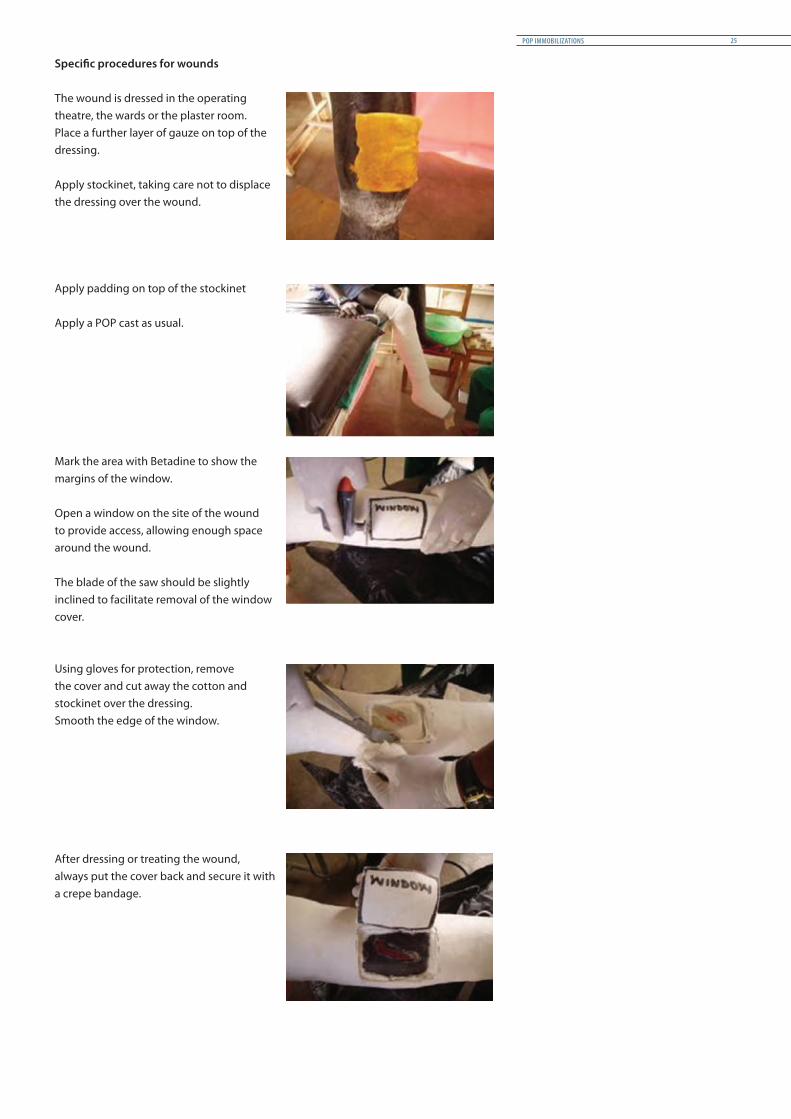
Specific procedures for wounds
The wound is dressed in the operating theatre, the wards or the plaster room. Place a further layer of gauze on top of the dressing.
Apply stockinet, taking care not to displace the dressing over the wound.
Apply padding on top of the stockinet
Apply a POP cast as usual.
Mark the area with Betadine to show the margins of the window.
Open a window on the site of the wound to provide access, allowing enough space around the wound.
The blade of the saw should be slightly inclined to facilitate removal of the window cover.
Using gloves for protection, remove the cover and cut away the cotton and stockinet over the dressing.Smooth the edge of the window.
After dressing or treating the wound, always put the cover back and secure it with a crepe bandage.
POP IMMOBILIZATIONS 25
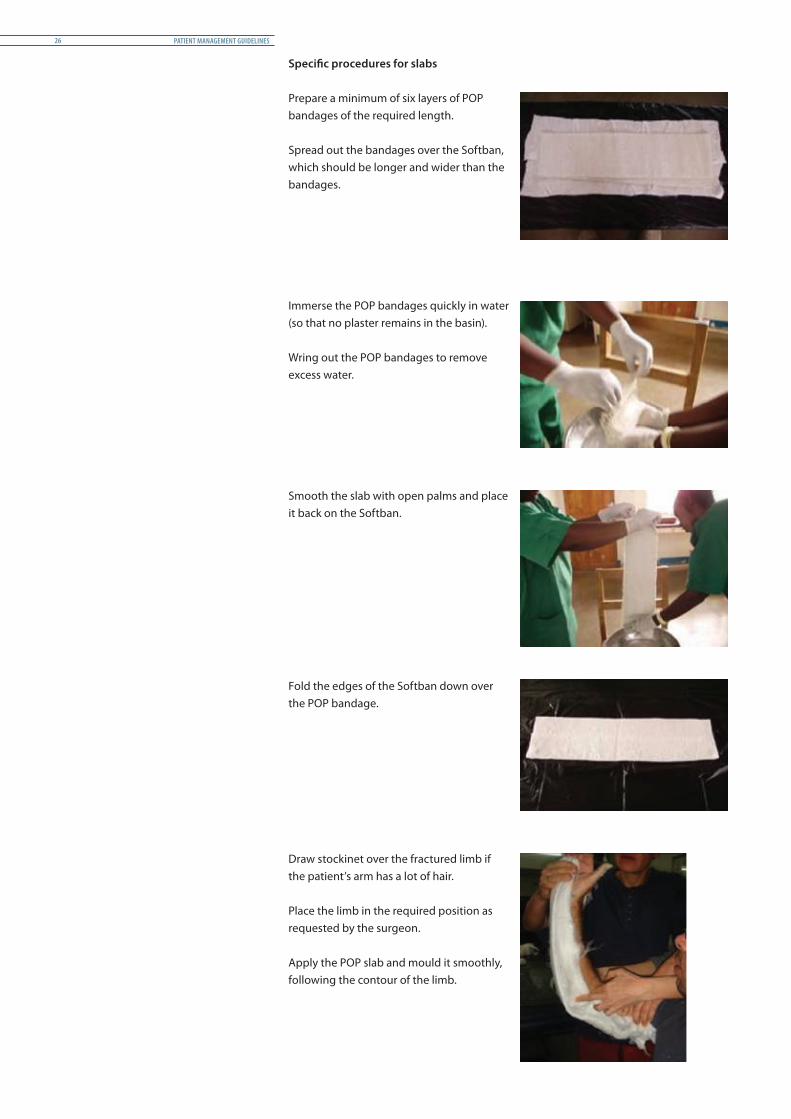
Specific procedures for slabs
Prepare a minimum of six layers of POP bandages of the required length.
Spread out the bandages over the Softban, which should be longer and wider than the bandages.
Immerse the POP bandages quickly in water (so that no plaster remains in the basin).
Wring out the POP bandages to remove excess water.
Smooth the slab with open palms and place it back on the Softban.
Fold the edges of the Softban down over the POP bandage.
Draw stockinet over the fractured limb if the patient’s arm has a lot of hair.
Place the limb in the required position as requested by the surgeon.
Apply the POP slab and mould it smoothly, following the contour of the limb.
PATIENT MANAGEMENT GUIDELINES26
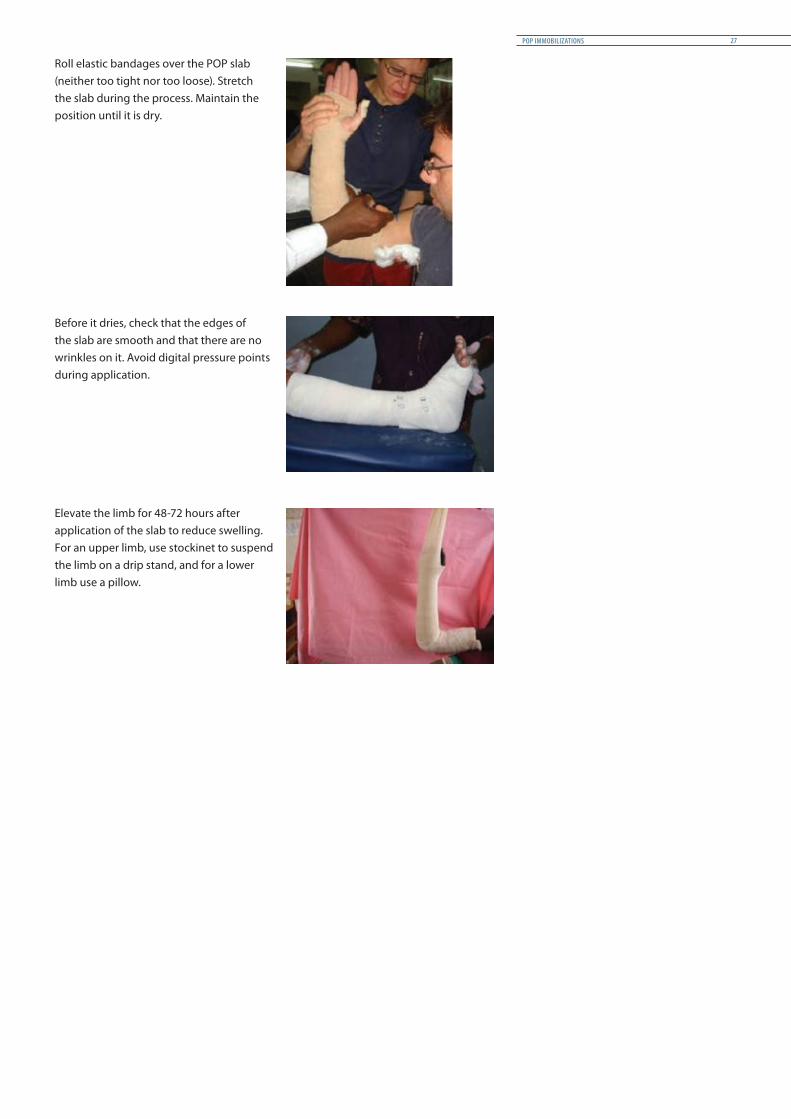
Roll elastic bandages over the POP slab (neither too tight nor too loose). Stretch the slab during the process. Maintain the position until it is dry.
Before it dries, check that the edges of the slab are smooth and that there are no wrinkles on it. Avoid digital pressure points during application.
Elevate the limb for 48-72 hours after application of the slab to reduce swelling. For an upper limb, use stockinet to suspend the limb on a drip stand, and for a lower limb use a pillow.
POP IMMOBILIZATIONS 27

1.6 Gypsotomy
Draw the axis line corresponding to the hallux-patella-ASIS (in red) and the axis of the tibia (in blue). The cut in the plaster should be made at the level of the intersection of the axis of the deformity, not at the fracture level.
Gypsotomy with wedging
Make a circumferential cut around the plaster as if to peel an orange.
Cut out a wedge on the side where the correction is to be made. Carry out the correction carefully. Then insert the piece cut out on the opposite side to fill the gap left by the movement. Take care not to pinch the skin.
Fix with a plaster bandage.Check by X-ray that angulation is correct.
The method proposed avoids the risk of causing pressure at the fracture site, which often leads to skin damage.
PATIENT MANAGEMENT GUIDELINES28

Correction of the rotation
Cut the POP around its entire circumference.
Rotate the distal part in relation to the proximal one.
Fix the correction with a plaster bandage. Make sure of the alignment by checking the position of the foot in relation to the patella.
If possible, check by X-ray.
Fix the two portions of the POP with a POP bandage to maintain correct position of rotation.
Note: A platform under the toes provides more comfort.
POP IMMOBILIZATIONS 29

1.7 Supervision and removal
Final check and supervision
After the application, make sure that the edges are properly trimmed and covered.
The entire POP should be smooth to avoid any dents that could hurt other parts of the body.
Inspect the cast visually for any defects, and check the mobility of all joints above and below.
Write the POP calendar on the cast:• Date of fracture• Date of application of cast• Date of next visit for an X-ray check-up
Mark the POP for any future windows if necessary.Clean the patient properly at the end of the process.Check regularly for any neurovascular problem during the first 24 hours after the application of the cast.
Give the following advice to the patient and his or her family: • Respect drying time before ambulation• POP should not be covered with cloth, varnish, or a blanket until it is dry• The POP must not come in contact with water or any other liquid• Raise or elevate the leg with POP on a pillow to decrease swelling• Perform isometric contraction under the POP against amyotrophy and phlebitis• Mobilize free joints• Never walk on the cast without a rocker or tip
Follow-up and supervision:• Check regularly for 24 hours• Tell the patient to come back
immediately if there is any problem• All POP not tolerated by the patient
should be removed
Clinical supervision• Pain • Lack of sensation• Odour• Cleanliness• Strength• Colour, heat, sensation and mobility of
extremities• Temperature and cardiac pulse
Possible complications:• Skin (pain, burns, sores due to pressure)• Bones (secondary displacement,
osteomyelitis)• Joints (stiffness, osteoporosis)• Muscles (amyotrophy)• Neurovascular complications
(algoneurodystrophy, local compressions, compartment syndrome, thromboembolism)
PATIENT MANAGEMENT GUIDELINES30

Immediate removal of the POP:• If swelling, diffuse pain or lack of sensation occurs, immediately split the POP along
its length.• Should local pain occur, open a window and check the skin. Close the window with
an elastic bandage or POP if there is no wound. The incident should be recorded in writing on the cast.
Removal and bivalving
Place the patient in a comfortable position and support the plastered limb.
Reassure the patient and demonstrate with the blade on your palm that the oscillating saw does not damage the skin.
Support the saw with one hand, the other hand resting on the cast. Ask the patient to tell you if he/she feels heat on the path of the blade.
Cut through the plaster on both sides, constantly checking the depth of the blade during the process.
Always cut with small perpendicular movements. Avoid longitudinal movement of the saw, which could warm up the blade and cut or burn the skin.
Shears can be used to remove POP in the field (as shown in the photograph) if there is no electricity or electric plaster saw.Do not apply pressure on the patient’s skin; incline the shears parallel to the skin.
Separate the two parts of the POP using a cast spreader.
POP IMMOBILIZATIONS 31

Cut out the cotton wool or Softban with a pair of scissors.
Keep the posterior slab in case the fracture is not stable.
Make a smooth edge with POP powder, or place a thin bandage along the slab.
If the fracture is stable with enough callus visible on X-ray, remove the POP.
Inspect the skin and check the physical stability of the fracture site.
Ask the patient to clean the limb.
PATIENT MANAGEMENT GUIDELINES32

POP IMMOBILIZATIONS 33

2 Slabs for lower and upper limbs
2.1 Boot slab
Indication and level of fracture• Primary intention for fresh, stable fractures of malleolus and dislocation of ankle joints• Secondary intention after circular boot cast for fracture of malleolus, dislocation of
ankle joints or tarsal fracture
Edges• Proximal: two fingers below the head of
the fibula• Distal: metacarpophalangeal joint
+/- platform
Position of joints• Ankle in neutral position (except for
some distal fractures of tibia and fibula) • Foot in neutral inversion/eversion
Sensitive areas• Lateral and medial malleolus
Position of patient• Patient lying supine
Ankle at 90°Foot in neutral position
Personnel required• Two persons
Necessary materials
Materials Quantity: Depends on length and size of the leg
Stockinet Ø 20 cm
Padding 1 roll
Plaster bandage 3 Ø 20 cm
Elastic or crepe bandage 2 rolls Ø 15 cm
Crutches To be organized
All quantities are intended for adults
PATIENT MANAGEMENT GUIDELINES34
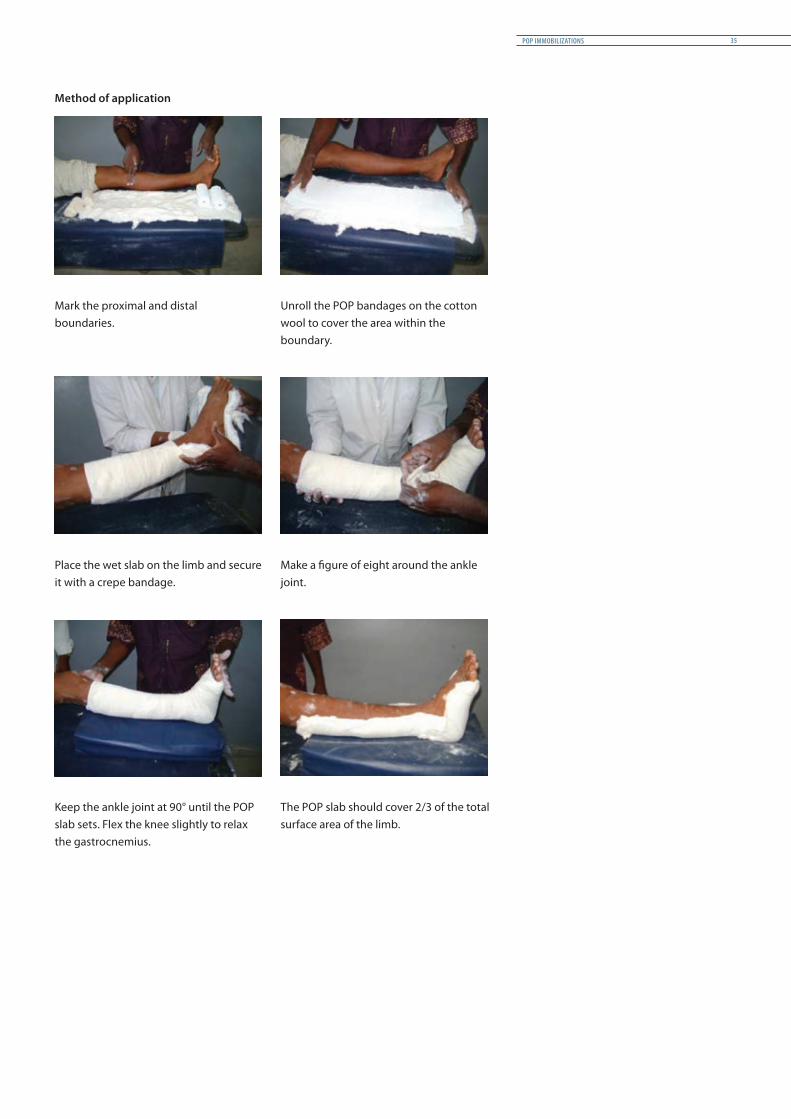
Method of application
Mark the proximal and distal boundaries.
Unroll the POP bandages on the cotton wool to cover the area within the boundary.
Place the wet slab on the limb and secure it with a crepe bandage.
Make a figure of eight around the ankle joint.
Keep the ankle joint at 90° until the POP slab sets. Flex the knee slightly to relax the gastrocnemius.
The POP slab should cover 2/3 of the total surface area of the limb.
POP IMMOBILIZATIONS 35

2.2 Long leg slab
Indication and level of fracture• Primary intention for tibia/fibula fracture – mid-shaft to upper 1/3, dislocated knee
and post ligament reconstruction
Edges• Proximal: four fingers below great
trochanter• Distal: Metatarsophalangeal +/- platform
Position of joints• Knee in 15° flexion• Ankle in neutral position (except for
some distal fractures of tibia and fibula)• Foot in neutral inversion/eversion
Sensitive areas• Lateral and medial malleolus
Position of patient• Patient lying supine
Personnel required• Three persons
Necessary materials
Materials Quantity: Depends on length and size of the leg
Stockinet Ø 20 cm
Padding 2 rolls
Plaster bandage 6 Ø 20 cm
Elastic or crepe bandage 2 rolls Ø 20 cm
Crutches To be organized
All quantities are intended for adults
Knee in 15° flexionAnkle at 90°
Foot in neutral position
PATIENT MANAGEMENT GUIDELINES36

(1)
(2)
Method of application
10-12 layers of POP bandages are prepared, depending on the length of the leg. Do not forget to include the sole of the foot in the measurement.
When the elastic bandage is rolled over the slab, the main difficulty is maintaining the position of the leg. More than two hands are often needed to achieve a good result.
Do not remove the bandage too quickly. The slab should be dry enough to ensure proper rigidity.
When it is dry, the slab can be given cosmetic finishing.
Back slabs are often used in primary intention to stabilize the fracture before a circular POP is applied. A back slab can be converted to circular POP by adding extra cotton padding in front (1) and applying POP rolls over it (2).
POP IMMOBILIZATIONS 37
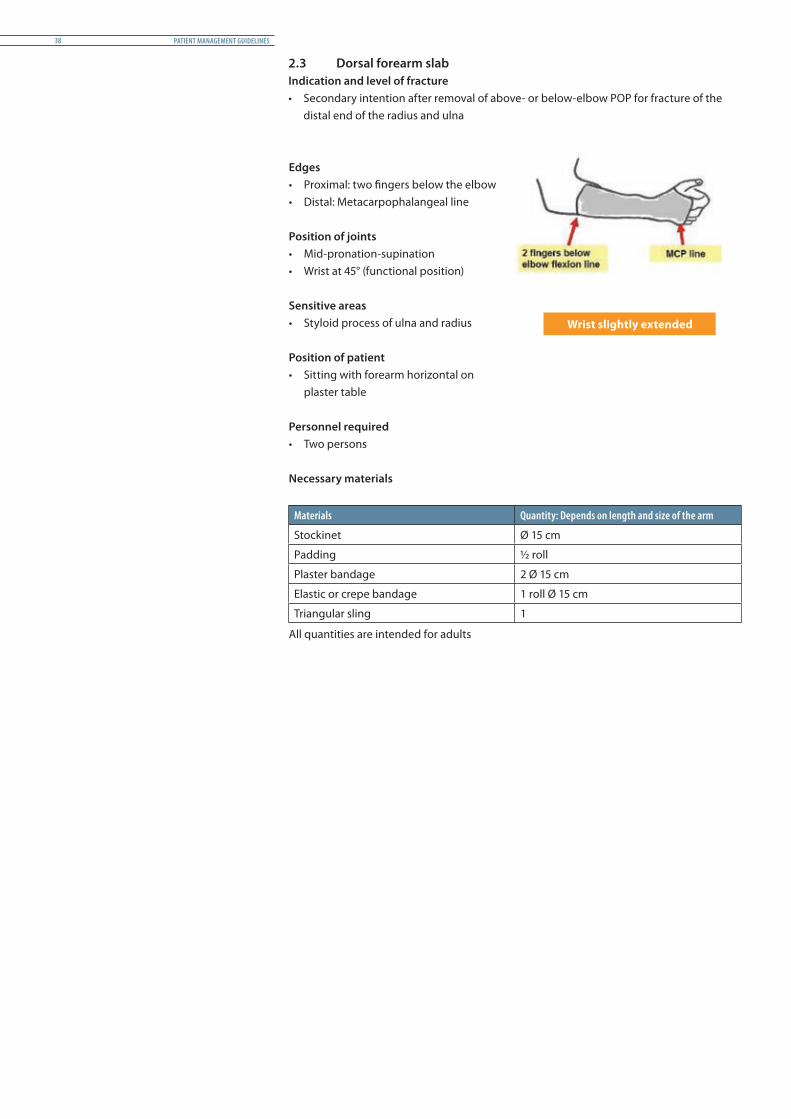
2.3 Dorsal forearm slabIndication and level of fracture• Secondary intention after removal of above- or below-elbow POP for fracture of the
distal end of the radius and ulna
Edges• Proximal: two fingers below the elbow• Distal: Metacarpophalangeal line
Position of joints• Mid-pronation-supination • Wrist at 45° (functional position)
Sensitive areas• Styloid process of ulna and radius
Position of patient• Sitting with forearm horizontal on
plaster table
Personnel required• Two persons
Necessary materials
Materials Quantity: Depends on length and size of the arm
Stockinet Ø 15 cm
Padding ½ roll
Plaster bandage 2 Ø 15 cm
Elastic or crepe bandage 1 roll Ø 15 cm
Triangular sling 1
All quantities are intended for adults
Wrist slightly extended
PATIENT MANAGEMENT GUIDELINES38

Method of application
Indicate the boundary where the slab should reach.
Unroll the POP bandages on the cotton wool to cover the area within the boundary.
Trim the edges of the POP rolls to avoid sharp edges when the slab is dry.
Secure the wet slab on the dorsal aspect of the forearm.
Keep the wrist in 45° extension until the slab sets.
Support the slab and check for sharp edges.
POP IMMOBILIZATIONS 39

2.4 Palmar forearm slab
Indication and level of fracture• Secondary intention after a stable Colles fracture, fracture of the styloid process
Edges• Proximal: two fingers below the elbow• Distal: second flexion line in the hand
Position of joints• Wrist in neutral position
Sensitive areas• Styloid process of ulna and radius
Position of patient• Sitting
Personnel required• Two persons
Necessary materials
Materials Quantity: Depends on length and size of the arm
Stockinet Ø 15 cm
Padding ½ roll
Plaster bandage 1 Ø 15 cm
Elastic or crepe bandage 1 roll Ø 15 cm
Triangular sling To be organized
All quantities are intended for adults
Wrist in neutral position
PATIENT MANAGEMENT GUIDELINES40
Method of application
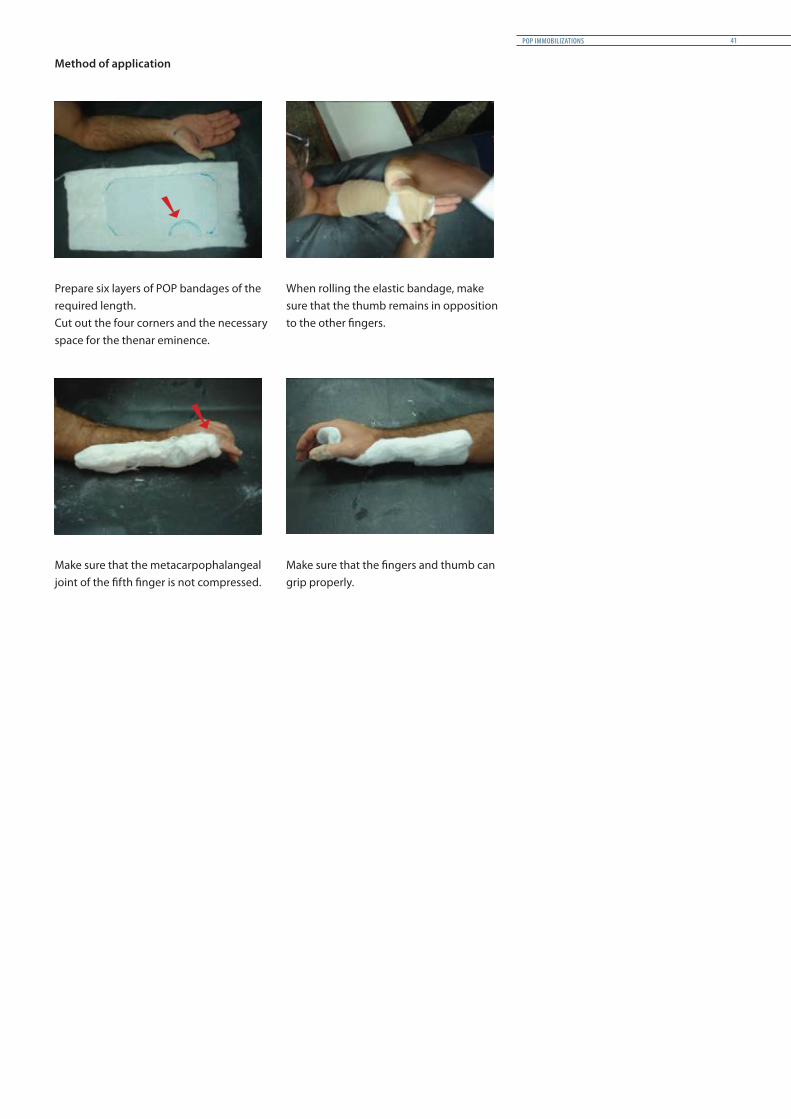
Prepare six layers of POP bandages of the required length.Cut out the four corners and the necessary space for the thenar eminence.
When rolling the elastic bandage, make sure that the thumb remains in opposition to the other fingers.
Make sure that the metacarpophalangeal joint of the fifth finger is not compressed.
Make sure that the fingers and thumb can grip properly.
POP IMMOBILIZATIONS 41
2.5 Cock -up slab
Indication and level of fracture• Fractures of metacarpal bones and wrist drop
Edges• Proximal: two fingers below the elbow• Distal: distal end of fingers
Position of joints• Wrist in 45° extension and metacarpophalangeal in 90° flexion
Sensitive areas• Styloid process of ulna and radius
Position of patient• Sitting
Personnel required• Two persons
Necessary materials
Materials Quantity: Depends on length and size of the arm
Stockinet Ø 15 cm
Padding ½ roll
Plaster bandage 1 Ø 15 cm
Elastic or crepe bandage 1 roll Ø 15 cm
Triangular sling To be organized
All quantities are intended for adults
PATIENT MANAGEMENT GUIDELINES42
Method of application
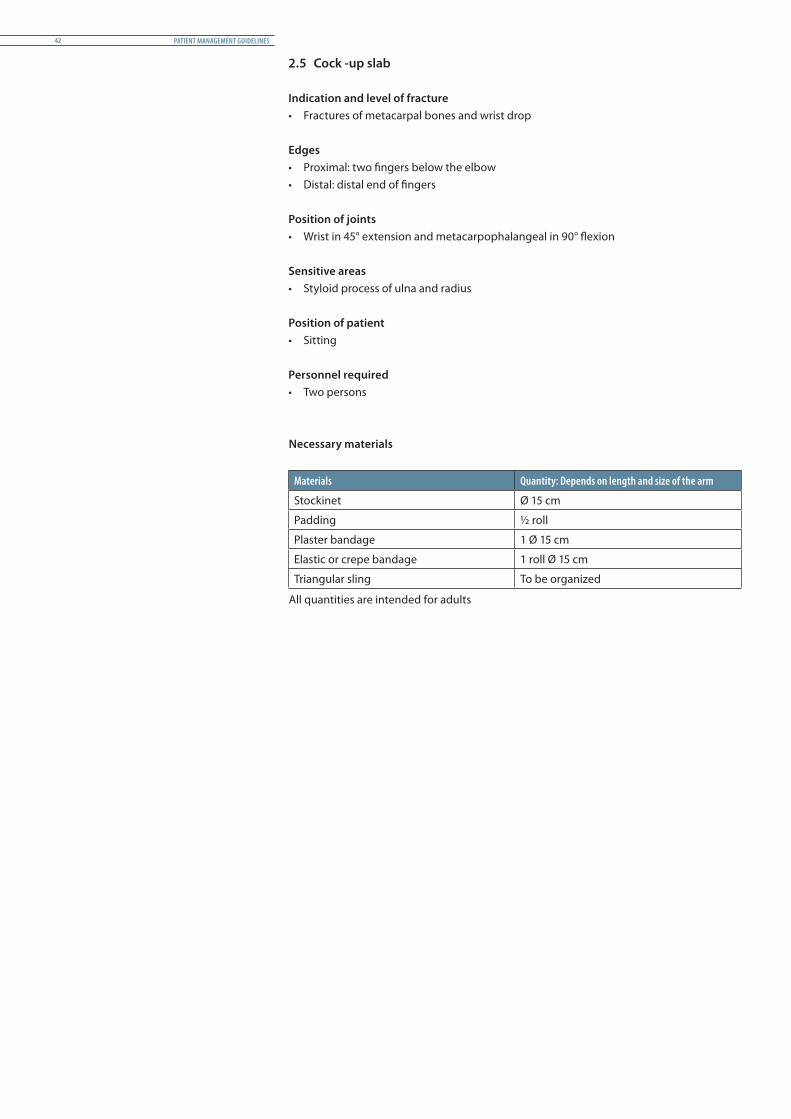
Position of hand: Wrist 45° extension and metacarpophalangeal 90° flexion.
The method for applying the splint is the same as that for the palmar forearm slab.
Palmar view. Lateral and dorsal view.
View of the hand from above.
POP IMMOBILIZATIONS 43
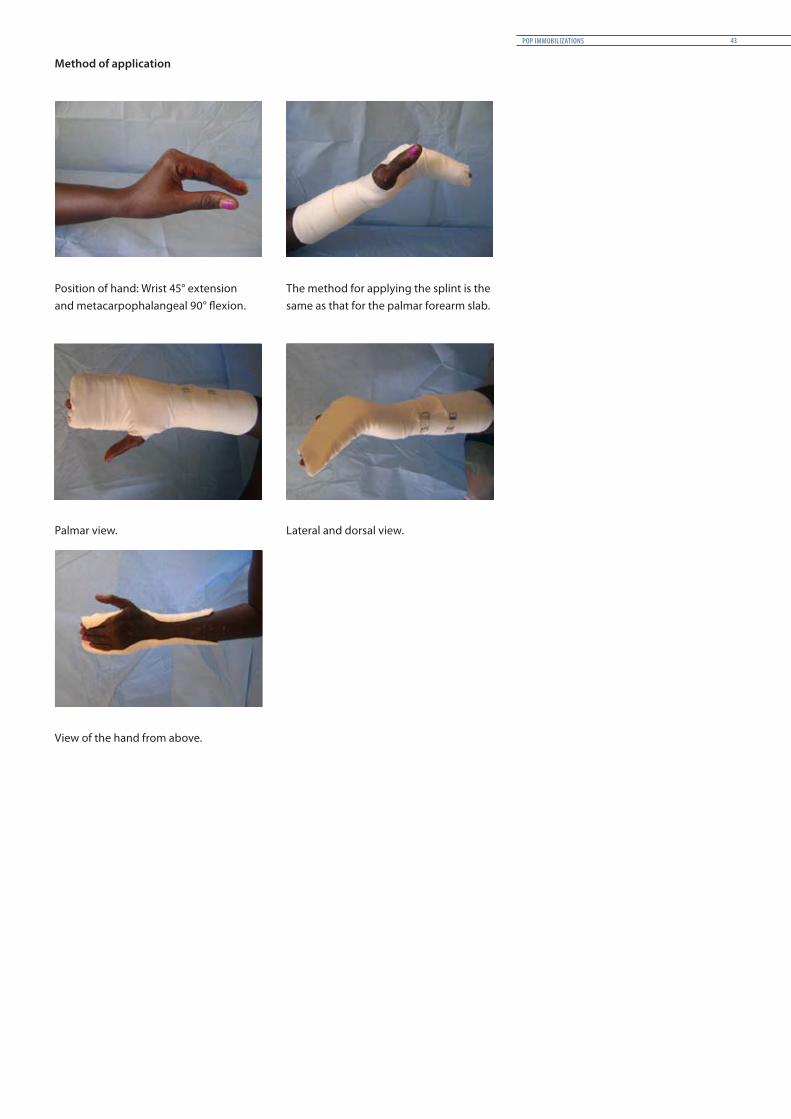
2.6 Long arm slab
Indication and level of fracture• Primary intention for fractures of radius and ulna, supracondylar fracture of the
humerus
Edges• Proximal: below deltoid muscle• Distal: metacarpophalangeal line
Position of joints• Elbow at 90°• Forearm in neutral prono-supination• Wrist: depends on the level of the
fracture. For distal forearm fractures, wrist in flexion (as per the surgeon’s decision); for supracondylar fractures, wrist in extension at 45° (functional position)
Sensitive areas• Condyles of the humerus, olecranon
process, styloid process of radius and ulna
Position of patient• The patient is sitting, or lying down if
reduction is performed in the operating theatre under anaesthesia
Personnel required• Two persons
Necessary materials
Materials Quantity: Depends on length and size of the arm
Stockinet Ø 15 cm
Padding 1 roll
Plaster bandage 3 Ø 15 cm
Elastic or crepe bandage 2 rolls Ø 15 cm1 roll Ø 10 cm
Triangular sling To be organized
All quantities are intended for adults
Elbow in 90° flexionForearm in neutral prono-supinationWrist depending on level of fracture
PATIENT MANAGEMENT GUIDELINES44

Method of application
Six to eight layers of POP bandages of the required length are prepared.
When the POP slab is bent around the elbow special attention must be paid to avoid wrinkles, which can hurt the patient.
After bandaging, maintain the elbow and wrist in the proper position until the slab dries.
Check comfort and position before proceeding to cosmetic finishing.
POP IMMOBILIZATIONS 45
2.7 Humerus U-slab
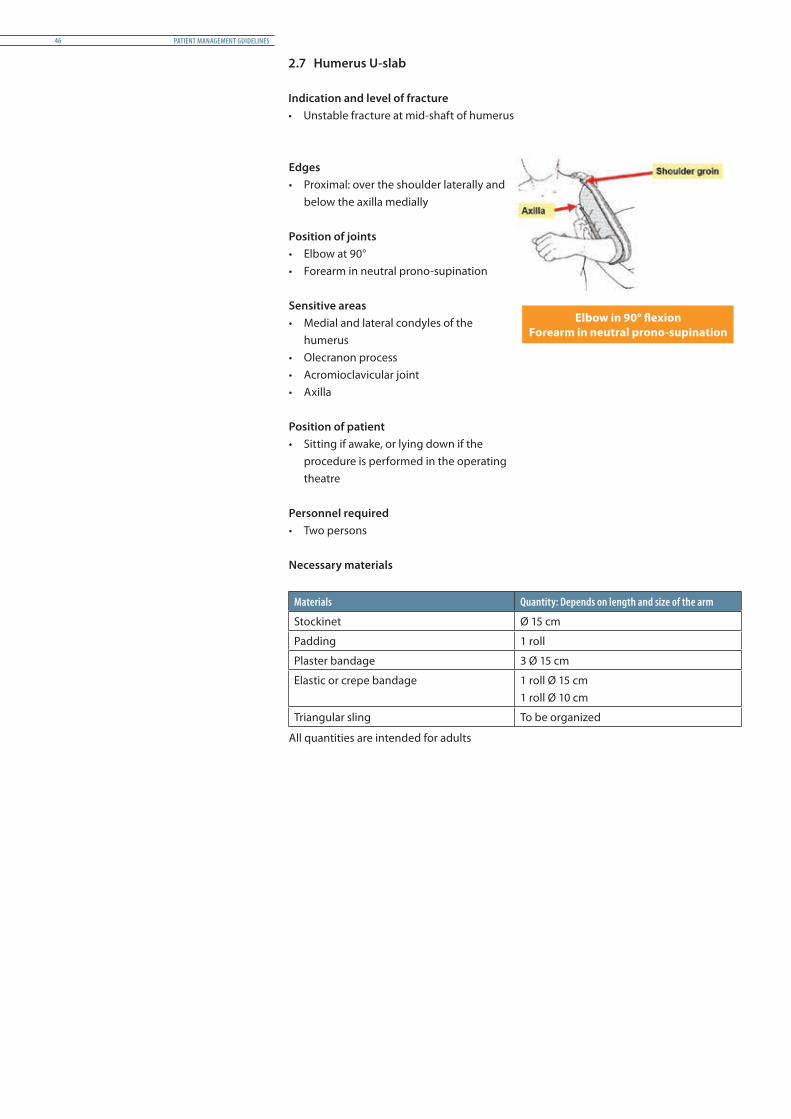
Indication and level of fracture• Unstable fracture at mid-shaft of humerus
Edges• Proximal: over the shoulder laterally and
below the axilla medially
Position of joints• Elbow at 90°• Forearm in neutral prono-supination
Sensitive areas• Medial and lateral condyles of the
humerus• Olecranon process• Acromioclavicular joint• Axilla
Position of patient• Sitting if awake, or lying down if the
procedure is performed in the operating theatre
Personnel required• Two persons
Necessary materials
Materials Quantity: Depends on length and size of the arm
Stockinet Ø 15 cm
Padding 1 roll
Plaster bandage 3 Ø 15 cm
Elastic or crepe bandage 1 roll Ø 15 cm1 roll Ø 10 cm
Triangular sling To be organized
All quantities are intended for adults
Elbow in 90° flexionForearm in neutral prono-supination
PATIENT MANAGEMENT GUIDELINES46
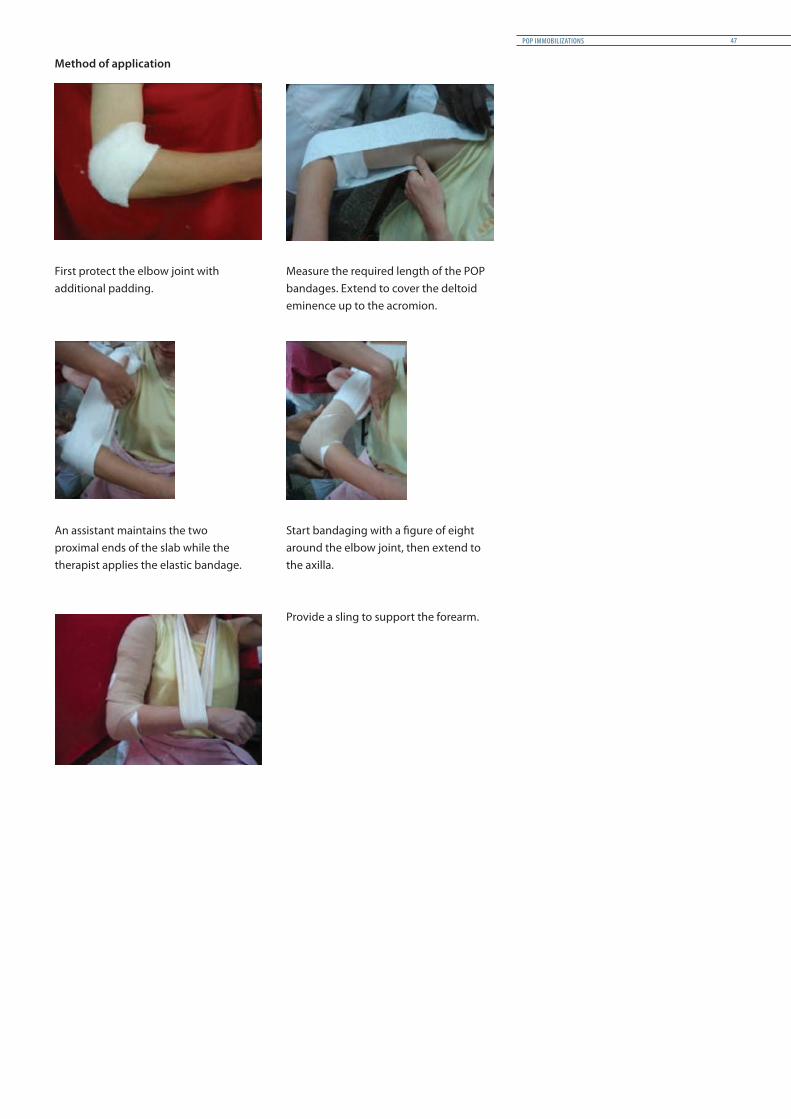
Method of application
First protect the elbow joint with additional padding.
Measure the required length of the POP bandages. Extend to cover the deltoid eminence up to the acromion.
An assistant maintains the two proximal ends of the slab while the therapist applies the elastic bandage.
Start bandaging with a figure of eight around the elbow joint, then extend to the axilla.
Provide a sling to support the forearm.
POP IMMOBILIZATIONS 47

3 POP casts for lower limbs
3.1 Boot POP – short leg cast
Indication and level of fracture• Malleolus (except for unstable bi-malleolus), tarsal and metatarsal
fractures
Edges• Proximal: two fingers below the head
of fibula• Distal: Metatarsophalangeal +
platform (only for metatarsal fracture)
Position of joints• Ankle in neutral position (except for
some distal fractures of tibia and fibula)
• Foot in neutral inversion/eversion
Sensitive areas• Tibial crest, lateral and medial
malleolus
Position of patient• Patient lying prone or supine • Patient sitting on a high stool with
knee at 90° and leg hanging
Personnel required• Two persons
Necessary materials
Materials Quantity: Depends on length and size of the leg
Stockinet Ø 20 cm
Padding 2 rolls
Plaster bandage 1 Ø 20 cm 3 Ø 15 cm 1 Ø 10 cm, in case of walking heel
Scotchcast 2 rolls
Walking heel According to medical instructions
Crutches To be organized
All quantities are intended for adults
Ankle at 90°Foot in neutral positionMould the foot arches
PATIENT MANAGEMENT GUIDELINES48

Method of application
Place additional padding around the ankle joint to avoid pressure on the malleolus.
Reinforce the cast at the ankle by applying POP bandage in a figure of eight crossing over the ankle joint.
Give the cast suitable cosmetic finishing. Respect the boundary and check function: toes free, head of fibula free, and correct ankle joint position (according to displacement of fracture).
POP IMMOBILIZATIONS 49

3.2 Patella tendon-bearing cast – Sarmiento
Indication and level of fracture• Primary intention: stable lower 1/3 tibia fracture • Secondary intention: after removal of long leg POP
Edges• Proximal: at the level of the patella
(anterior, superior border of the patella; posterior, two fingers below the popliteal fossa)
• Distal: Metatarsophalangeal joints or with a platform
Position of joints• Ankle in neutral position• Foot in neutral inversion/eversion
Sensitive areas• Head of fibula, tibial crest, lateral and
medial malleolus
Position of patient• Sitting on a high stool with knee at 90°
and leg hanging
Personnel required• Two persons
Necessary materials
Materials Quantity: Depends on length and size of the leg.
Stockinet Ø 20 cm
Padding 2 rolls
Plaster bandage 1 Ø 20 cm 3 Ø 15 cm 1 Ø 10 cm
Scotchcast 2 rolls
Fibula pad 1
Walking heel 1
Crutches To be organized
All quantities are intended for adults
Ankle at 90°Foot in neutral position
PATIENT MANAGEMENT GUIDELINES50
Method of application
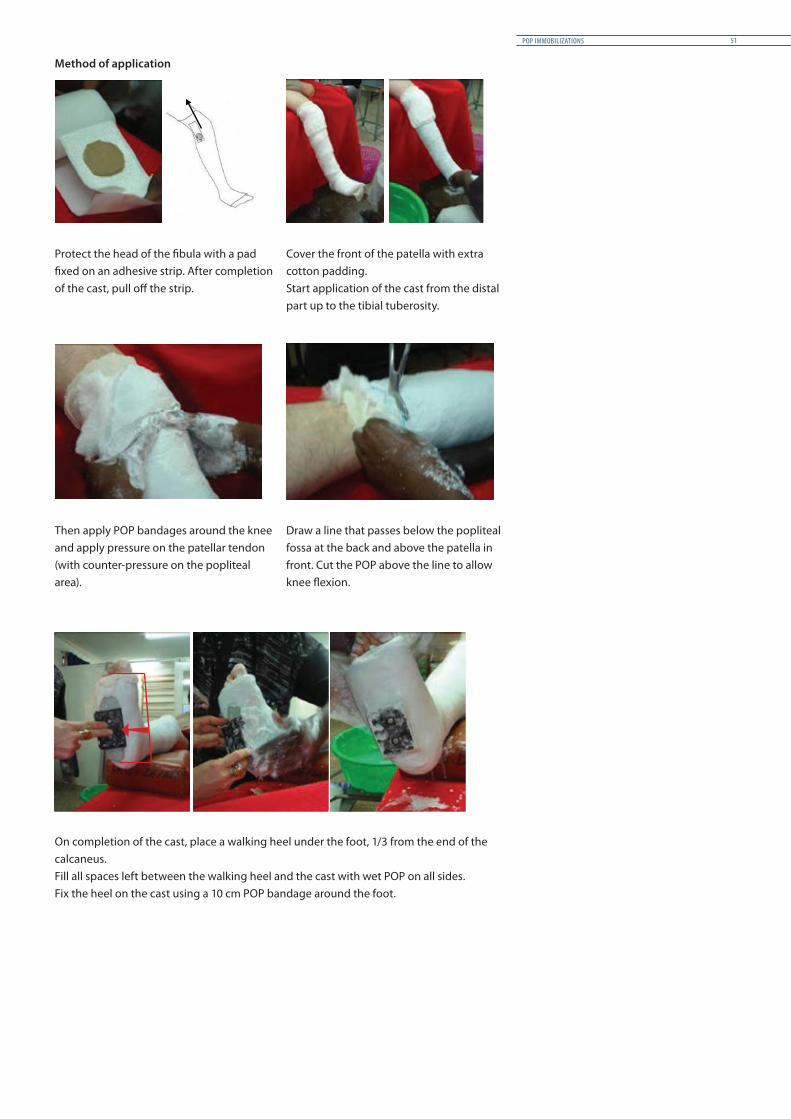
Protect the head of the fibula with a pad fixed on an adhesive strip. After completion of the cast, pull off the strip.
Cover the front of the patella with extra cotton padding.Start application of the cast from the distal part up to the tibial tuberosity.
Then apply POP bandages around the knee and apply pressure on the patellar tendon (with counter-pressure on the popliteal area).
Draw a line that passes below the popliteal fossa at the back and above the patella in front. Cut the POP above the line to allow knee flexion.
On completion of the cast, place a walking heel under the foot, 1/3 from the end of the calcaneus.Fill all spaces left between the walking heel and the cast with wet POP on all sides.Fix the heel on the cast using a 10 cm POP bandage around the foot.
POP IMMOBILIZATIONS 51
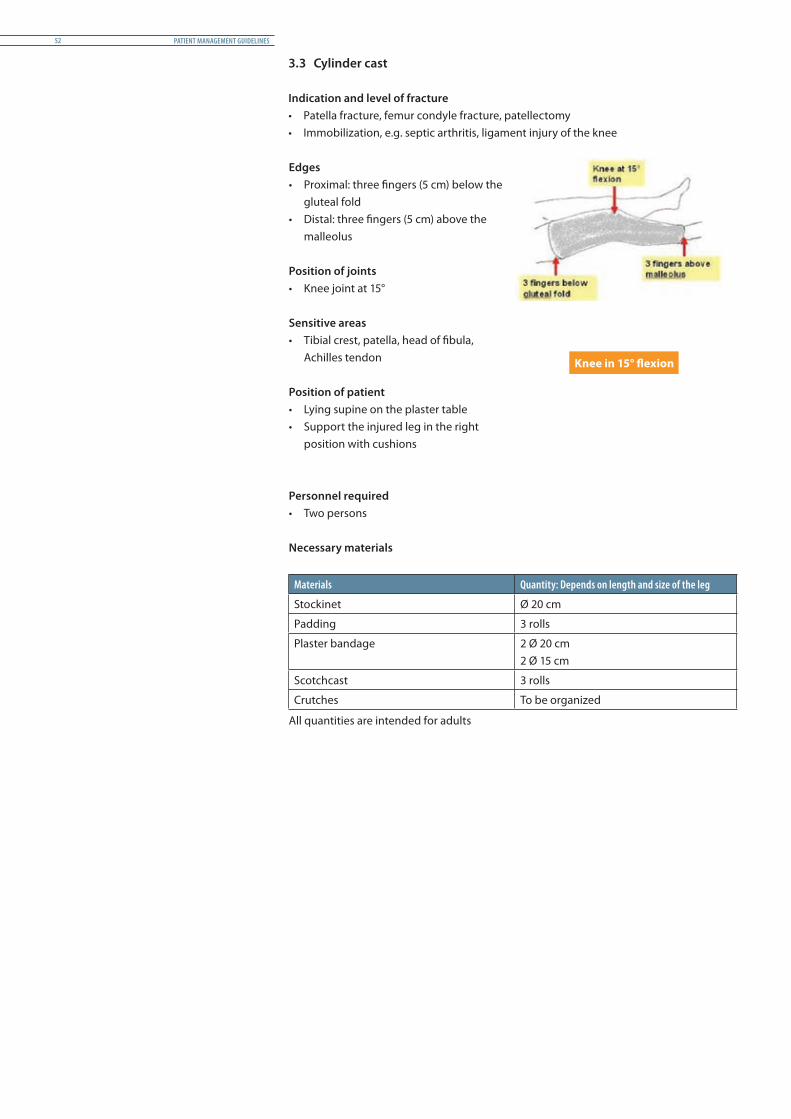
3.3 Cylinder cast
Indication and level of fracture• Patella fracture, femur condyle fracture, patellectomy• Immobilization, e.g. septic arthritis, ligament injury of the knee
Edges• Proximal: three fingers (5 cm) below the
gluteal fold• Distal: three fingers (5 cm) above the
malleolus
Position of joints• Knee joint at 15°
Sensitive areas• Tibial crest, patella, head of fibula,
Achilles tendon
Position of patient• Lying supine on the plaster table• Support the injured leg in the right
position with cushions
Personnel required• Two persons
Necessary materials
Materials Quantity: Depends on length and size of the leg
Stockinet Ø 20 cm
Padding 3 rolls
Plaster bandage 2 Ø 20 cm 2 Ø 15 cm
Scotchcast 3 rolls
Crutches To be organized
All quantities are intended for adults
Knee in 15° flexion
PATIENT MANAGEMENT GUIDELINES52
Method of application
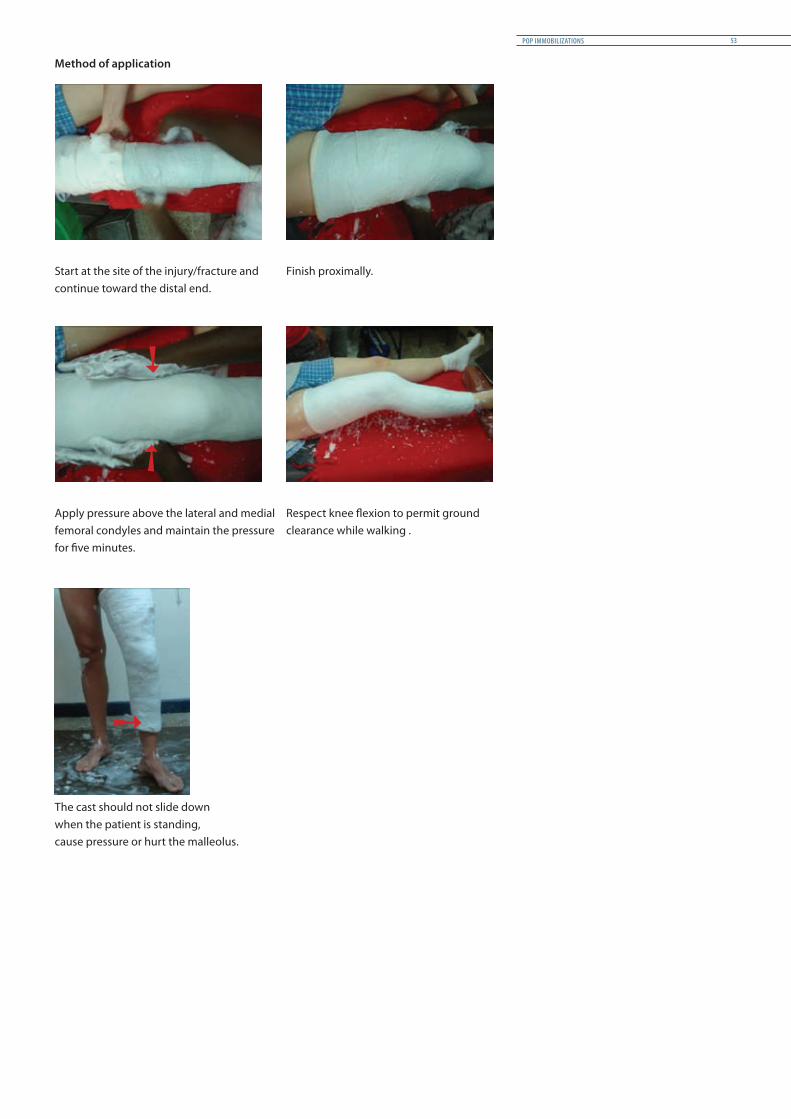
Start at the site of the injury/fracture and continue toward the distal end.
Finish proximally.
Apply pressure above the lateral and medial femoral condyles and maintain the pressure for five minutes.
Respect knee flexion to permit ground clearance while walking .
The cast should not slide down when the patient is standing, cause pressure or hurt the malleolus.
POP IMMOBILIZATIONS 53

3.4 Long leg cast
Indication and level of fracture• Primary intention: all tibia/fibula fractures (except stable distal ones), dislocated knee
and post ligament reconstruction
Edges• Proximal: four fingers below gluteal fold• Distal: Metatarsophalangeal joints
Position of joints• Ankle in neutral position• Foot in neutral inversion/eversion• Knee in 15° flexion
Sensitive areas• Medial and lateral malleolus, head of
fibula, tibial crest, and patella
Position of patient• Lying on the back on the plaster table
Personnel required• Three persons
Necessary materials
Materials Quantity: Depends on length and size of the leg
Stockinet Ø 20 cm
Padding 3 rolls
Plaster bandage 3 Ø 20 cm 4 Ø 15 cm 1 Ø 10 cm, if walking heel used
Scotchcast 4 rolls
Walking heel According to medical instructions
Crutches To be organized
All quantities are intended for adults
Knee in 15° flexionAnkle at 90°
Foot in neutral position
PATIENT MANAGEMENT GUIDELINES54
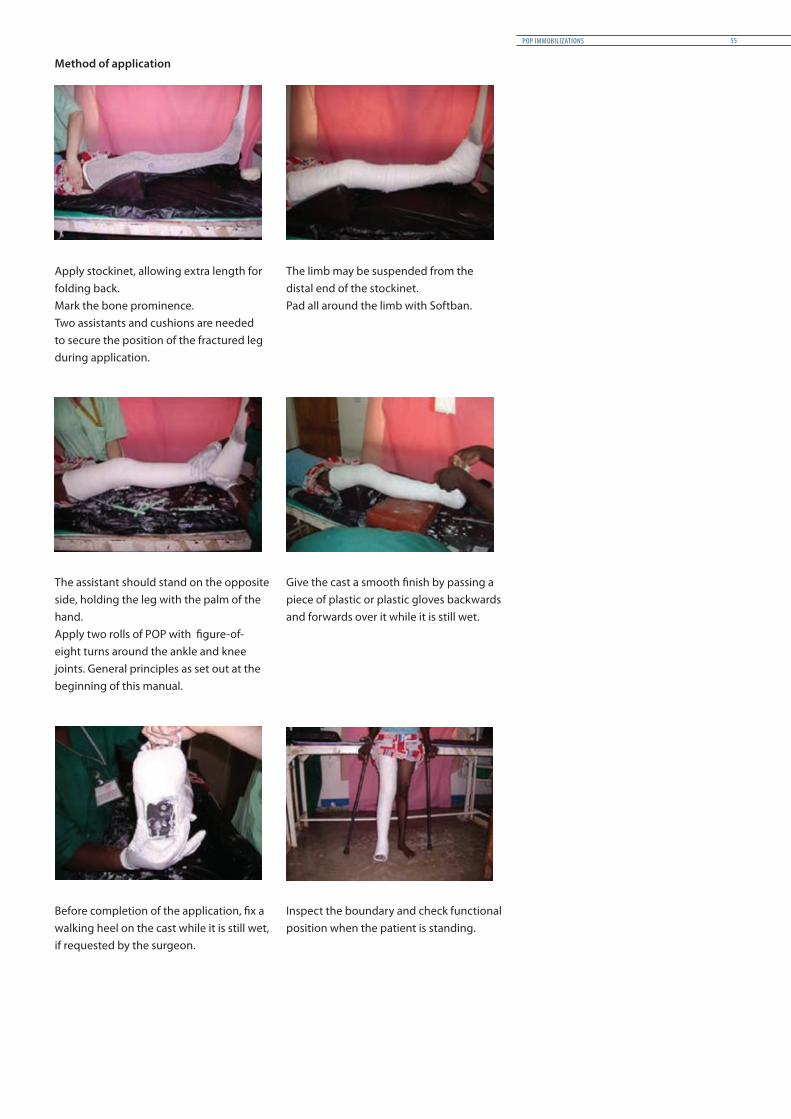
Method of application
Apply stockinet, allowing extra length for folding back.Mark the bone prominence.Two assistants and cushions are needed to secure the position of the fractured leg during application.
The limb may be suspended from the distal end of the stockinet.Pad all around the limb with Softban.
The assistant should stand on the opposite side, holding the leg with the palm of the hand.Apply two rolls of POP with figure-of-eight turns around the ankle and knee joints. General principles as set out at the beginning of this manual.
Give the cast a smooth finish by passing a piece of plastic or plastic gloves backwards and forwards over it while it is still wet.
Before completion of the application, fix a walking heel on the cast while it is still wet, if requested by the surgeon.
Inspect the boundary and check functional position when the patient is standing.
POP IMMOBILIZATIONS 55

3.5 Bridge POP cast
Indication and level of fracture• Distal fracture of femur, tibia/fibula fracture with an open wound• Supracondylar fracture of humerus, radius and ulna fractures with an open wound
Sensitive areas• Depending on the cast• The edges of the POP next to (near) the wound
Necessary materials
Materials Quantity
Plaster bandage 3 Ø 10 cm for fixing of the bridges
Bridges / Bridge POP splints 3
Method of application
Ensure that there is a proper dressing over the wound.Mark the limit of the dressing on the stockinet.
Make two POP casts above and below the fracture/wound.Fold back the edges next to the wound.
PATIENT MANAGEMENT GUIDELINES56

Choose the position of the bridges to allow easy access to the wound and ensure stability and comfort for the patient. Three bridge bars offer more stability but less easy access.
During this process, use plastic sheeting or cloth to protect the bridges from getting wet.
Connect the two parts of the bridge bars using 10 cm plaster bandages, and at the same time finish the edges of the cast next to the wound.
The head bolts of the internal bridge should be facing the cast to avoid hurting the other (sound) leg.
The alignment and rigidity of the POP bridge should be checked at the beginning of weight bearing, and regularly throughout the period of immobilization.
POP IMMOBILIZATIONS 57
3.6 Polycentric joints POP cast
Indication and level of fracture• In secondary intention to free the joint• Articular fracture like tibia plateau fracture (the fitting should be perfect)
Sensitive areas• Depending on the cast• The edges of the POP next to (near) the joint
Necessary materials
Materials Quantity
Plaster bandage 3 Ø 10 cm for fixing the joints
Polycentric joints 1 pair
Method of application
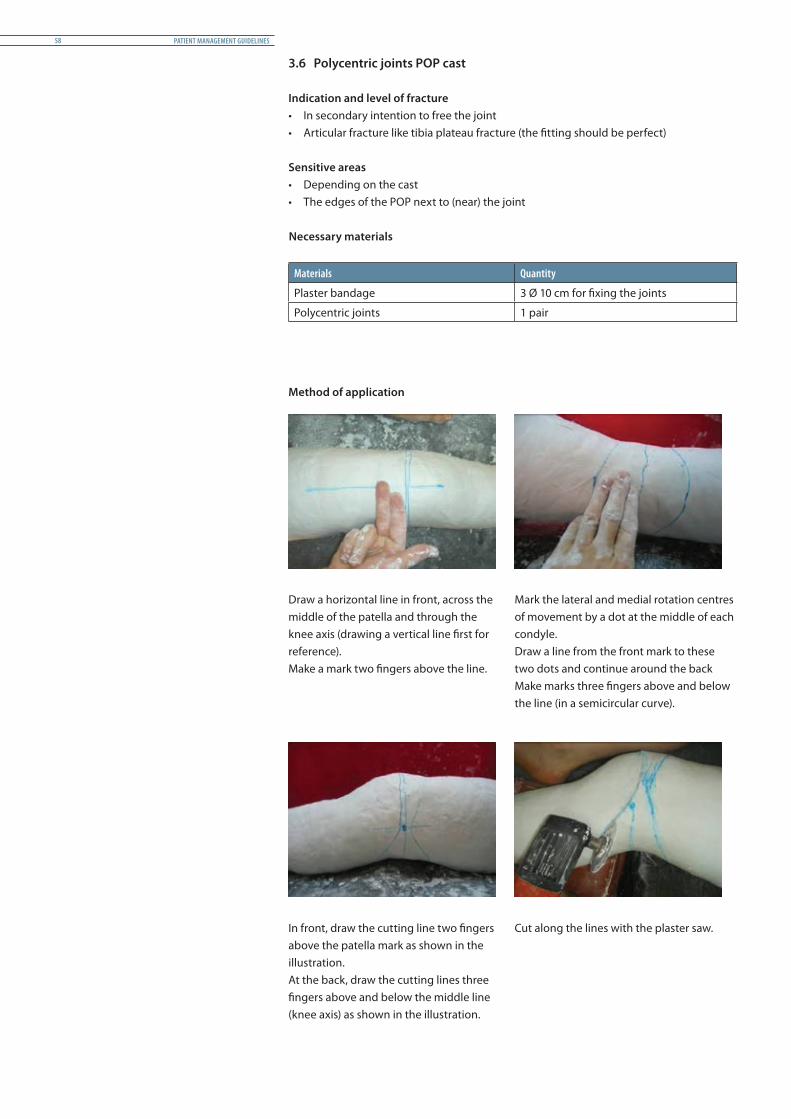
Draw a horizontal line in front, across the middle of the patella and through the knee axis (drawing a vertical line first for reference).Make a mark two fingers above the line.
Mark the lateral and medial rotation centres of movement by a dot at the middle of each condyle.Draw a line from the front mark to these two dots and continue around the backMake marks three fingers above and below the line (in a semicircular curve).
In front, draw the cutting line two fingers above the patella mark as shown in the illustration.At the back, draw the cutting lines three fingers above and below the middle line (knee axis) as shown in the illustration.
Cut along the lines with the plaster saw.
PATIENT MANAGEMENT GUIDELINES58
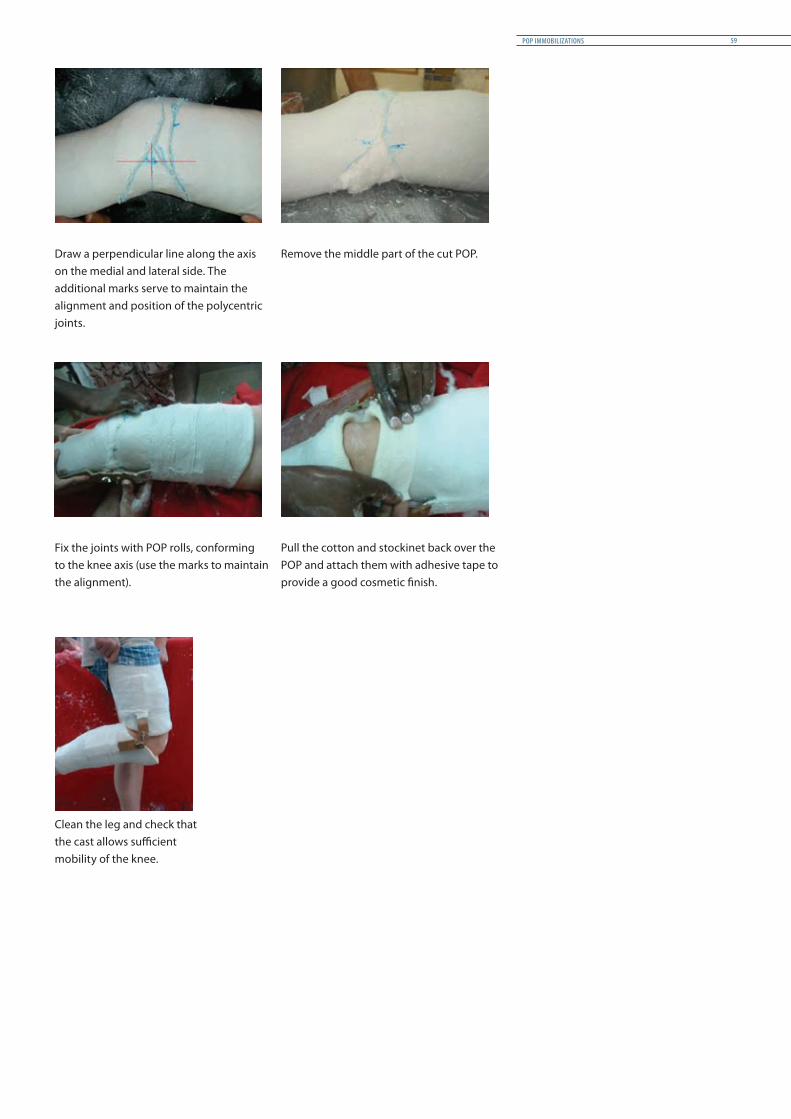
Draw a perpendicular line along the axis on the medial and lateral side. The additional marks serve to maintain the alignment and position of the polycentric joints.
Remove the middle part of the cut POP.
Fix the joints with POP rolls, conforming to the knee axis (use the marks to maintain the alignment).
Pull the cotton and stockinet back over the POP and attach them with adhesive tape to provide a good cosmetic finish.
Clean the leg and check that the cast allows sufficient mobility of the knee.
POP IMMOBILIZATIONS 59
3.7 Hip spica
Hip spica casts are not easy to make. And as they are heavy and warm, having to wear one for weeks can be a burdensome experience for any patient, adult or child. Hip spica casts require a lot of care: to prevent damage to the skin, they have to be cleaned every day and closely tended to. They do however permit the patient to get out of bed and make possible certain daily activities (moving about, using the toilet); but they restrict the patient’s mobility and impose a degree of dependence on others, especially for dressing and washing.
The ICRC does not promote spica casts within its hospital projects, but they should be retained as an option for difficult cases in order to avoid amputations or the removal of the head of the femur when traction and external fixation have failed.
Indication and level of fracture• Fracture of the upper 1/3 of the femur, arthritis and congenital dislocation of the hip• Spica is never prescribed in primary intention except for young children• Avoid spica for elderly patients
Edges• Proximal: lowest ribs, three fingers above
iliac crest • Distal: three fingers above the malleolus Position of joints• Hip in 30° flexion, abduction 10°,
external rotation 10°• Knee in 15° flexion
Sensitive areas • Sacrum, iliac crest, greater trochanter,
head of fibula and tibial crest• Abdomen
Position of patient• Lying on the Hess table, or• Standing, supported by parallel bars and
with the opposite foot on a 2-cm plate
Personnel required• Two persons
Necessary materials
Materials Quantity: Depends on length and size of the leg
Stockinet Ø 20 cm and 90 cm
Padding 3 rolls
Plaster bandage 2 Ø 20 cm 6-8 Ø 15 cm
Hip reinforcements 3
Epigastric pad 1
Scotchcast 4 rolls
Walking heel According to medical instructions
Crutches To be organized
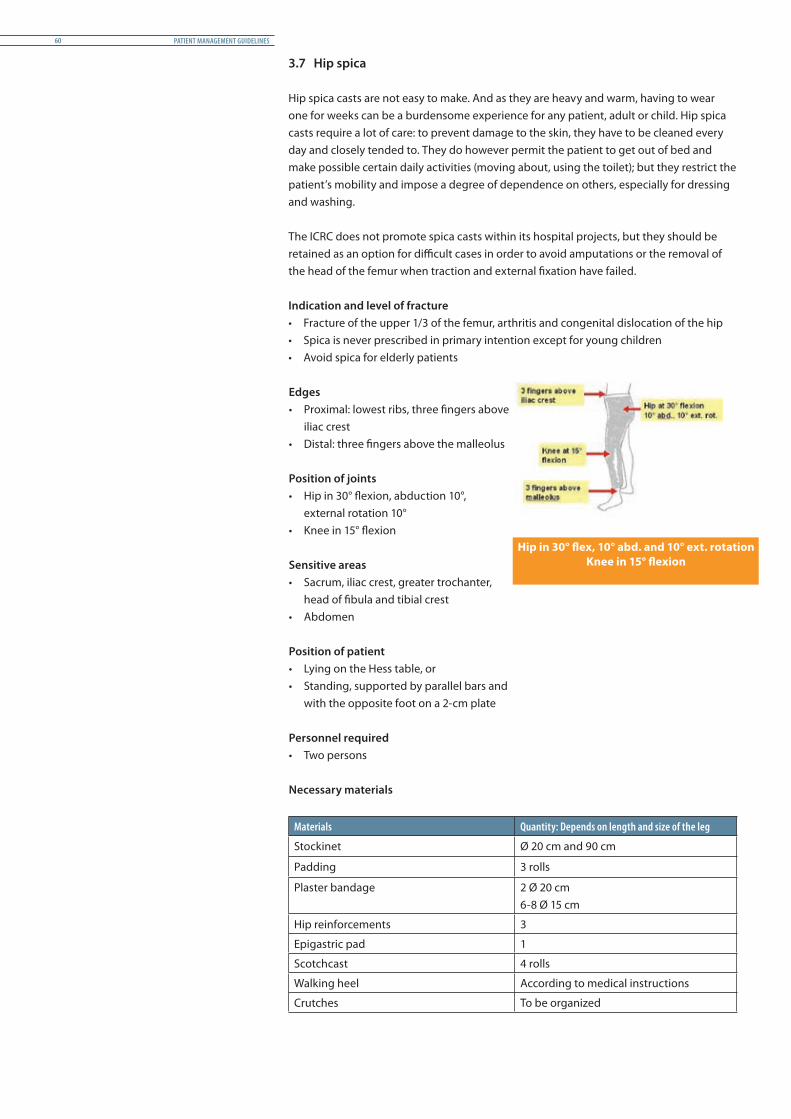
Hip in 30° flex, 10° abd. and 10° ext. rotationKnee in 15° flexion
PATIENT MANAGEMENT GUIDELINES60
Method of application
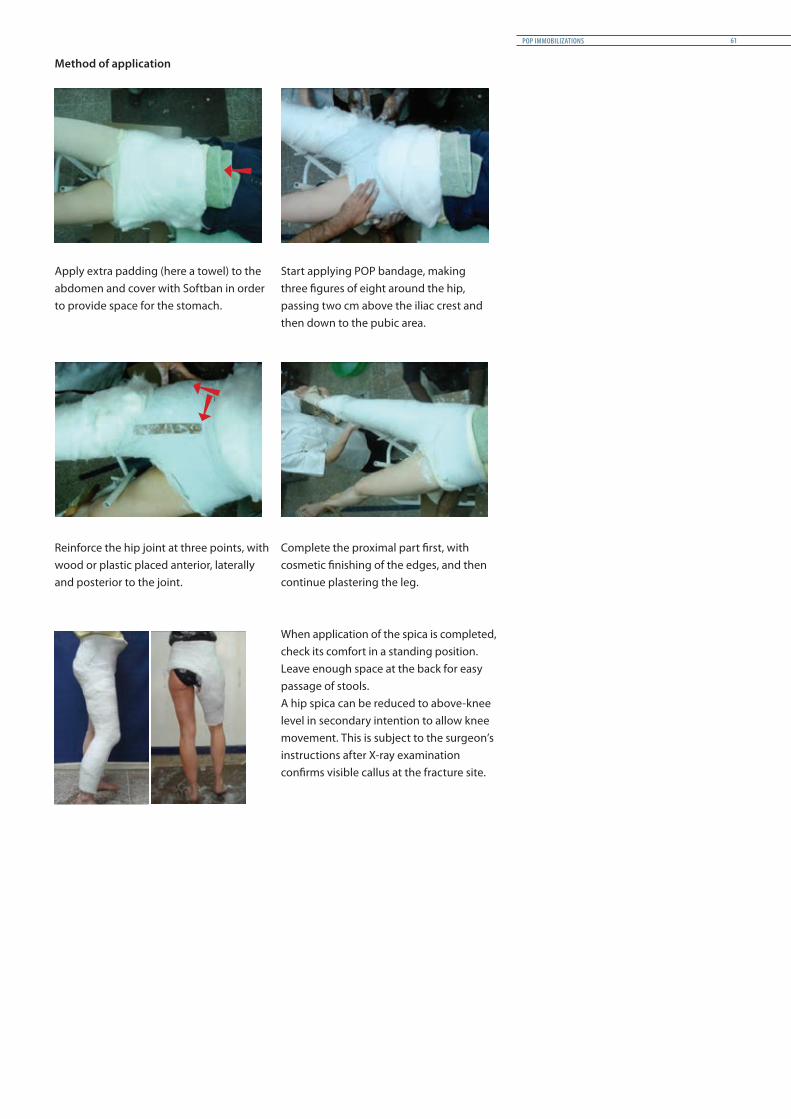
Apply extra padding (here a towel) to the abdomen and cover with Softban in order to provide space for the stomach.
Start applying POP bandage, making three figures of eight around the hip, passing two cm above the iliac crest and then down to the pubic area.
Reinforce the hip joint at three points, with wood or plastic placed anterior, laterally and posterior to the joint.
Complete the proximal part first, with cosmetic finishing of the edges, and then continue plastering the leg.
When application of the spica is completed, check its comfort in a standing position.Leave enough space at the back for easy passage of stools.A hip spica can be reduced to above-knee level in secondary intention to allow knee movement. This is subject to the surgeon’s instructions after X-ray examination confirms visible callus at the fracture site.
POP IMMOBILIZATIONS 61

4 POP casts for upper limbs
4.1 Scaphoid POP cast
Indication and level of fracture• Fracture of the scaphoid
Edges (according to the surgeon’s instructions)
• Proximal: below elbow, or at the deltoid insertion
• Distal: thumb in or distal phalanges out Position of joints• Thumb in opposition to finger• Distal phalanges may allow limited/slight
flexion
Sensitive areas • Styloid process of ulna and radius• First metacarpophalangeal joint Position of patient• Sitting or lying if POP is applied above
the elbow (depending on the surgeon’s instructions)
Personnel required• Two persons
Necessary materials
Materials Quantity: Depends on length and size of the arm
Stockinet Ø 15 cm
Padding 1 roll
Plaster bandage 1 roll Ø 7.5 cm2 rolls Ø 10 cm2 rolls Ø 15 cm
Scotchcast 1 roll Ø 15 cm
Triangular sling 1
All quantities are intended for adults
Elbow at 90°Wrist in slight extension
Thumb in opposition
PATIENT MANAGEMENT GUIDELINES62
Method of application
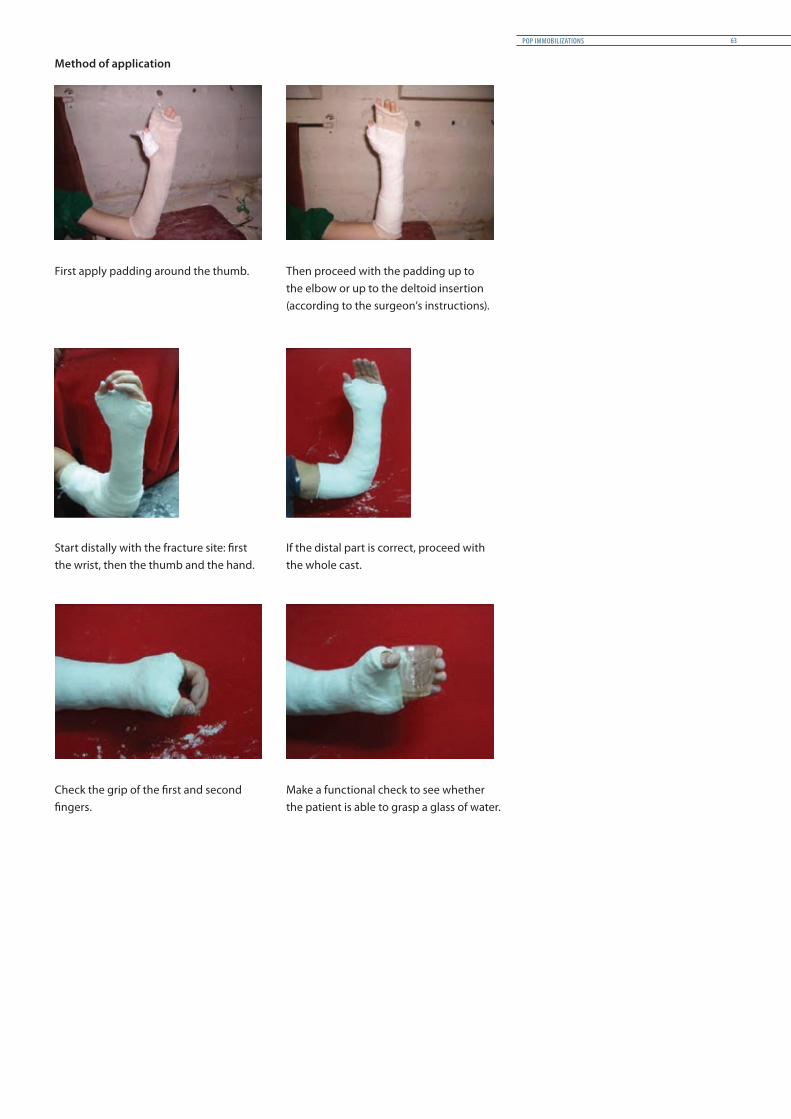
First apply padding around the thumb. Then proceed with the padding up to the elbow or up to the deltoid insertion (according to the surgeon’s instructions).
Start distally with the fracture site: first the wrist, then the thumb and the hand.
If the distal part is correct, proceed with the whole cast.
Check the grip of the first and second fingers.
Make a functional check to see whether the patient is able to grasp a glass of water.
POP IMMOBILIZATIONS 63
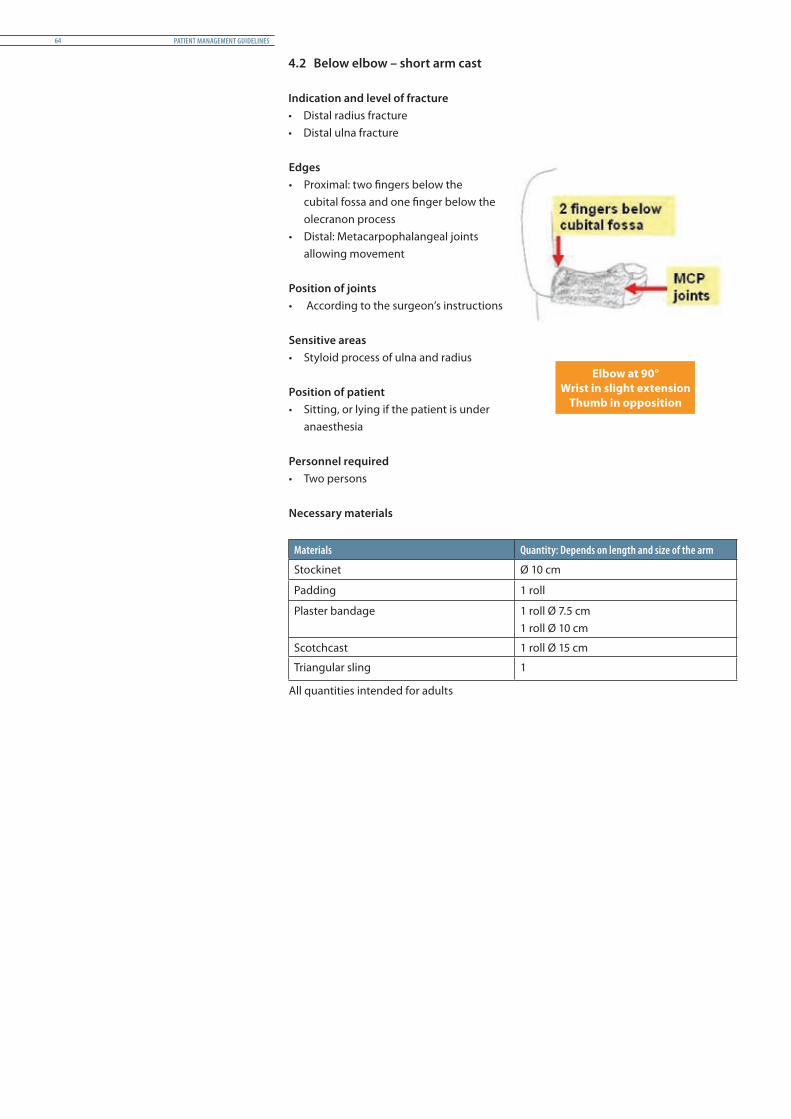
4.2 Below elbow – short arm cast
Indication and level of fracture• Distal radius fracture• Distal ulna fracture
Edges• Proximal: two fingers below the
cubital fossa and one finger below the olecranon process
• Distal: Metacarpophalangeal joints allowing movement
Position of joints• According to the surgeon’s instructions
Sensitive areas • Styloid process of ulna and radius
Position of patient• Sitting, or lying if the patient is under
anaesthesia
Personnel required• Two persons
Necessary materials
Materials Quantity: Depends on length and size of the arm
Stockinet Ø 10 cm
Padding 1 roll
Plaster bandage 1 roll Ø 7.5 cm 1 roll Ø 10 cm
Scotchcast 1 roll Ø 15 cm
Triangular sling 1
All quantities intended for adults
Elbow at 90°Wrist in slight extension
Thumb in opposition
PATIENT MANAGEMENT GUIDELINES64
Method of application
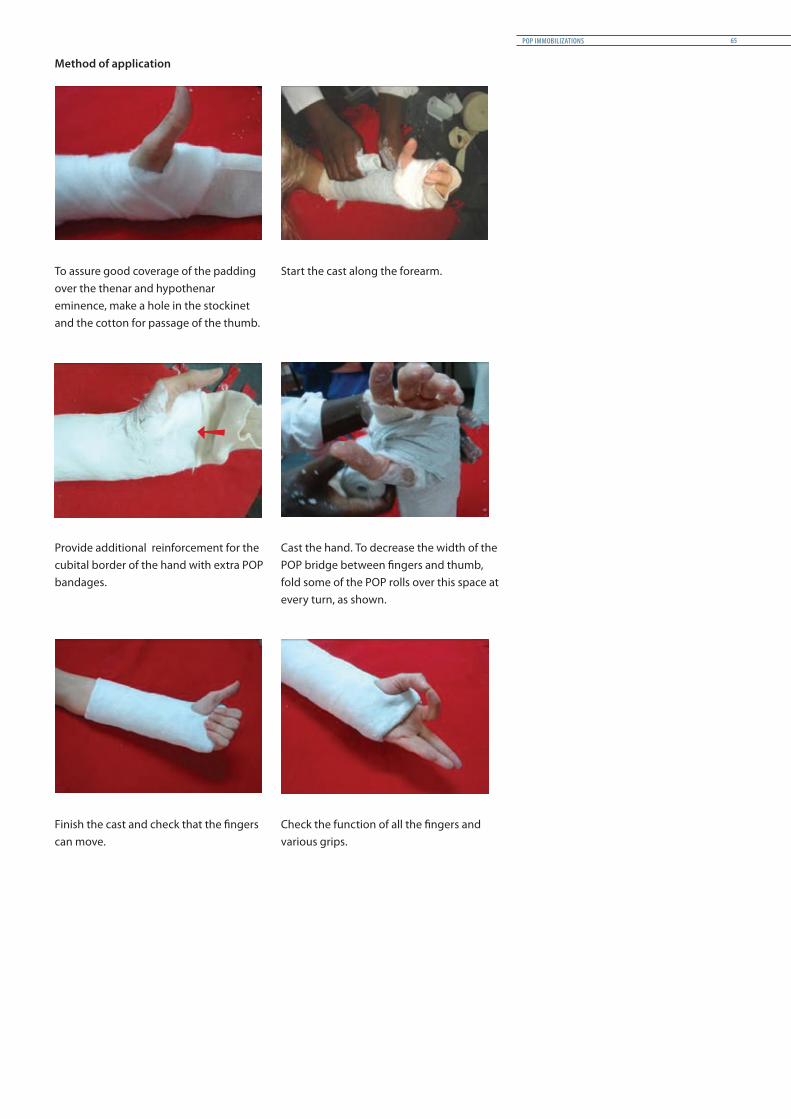
To assure good coverage of the padding over the thenar and hypothenar eminence, make a hole in the stockinet and the cotton for passage of the thumb.
Start the cast along the forearm.
Provide additional reinforcement for the cubital border of the hand with extra POP bandages.
Cast the hand. To decrease the width of the POP bridge between fingers and thumb, fold some of the POP rolls over this space at every turn, as shown.
Finish the cast and check that the fingers can move.
Check the function of all the fingers and various grips.
POP IMMOBILIZATIONS 65
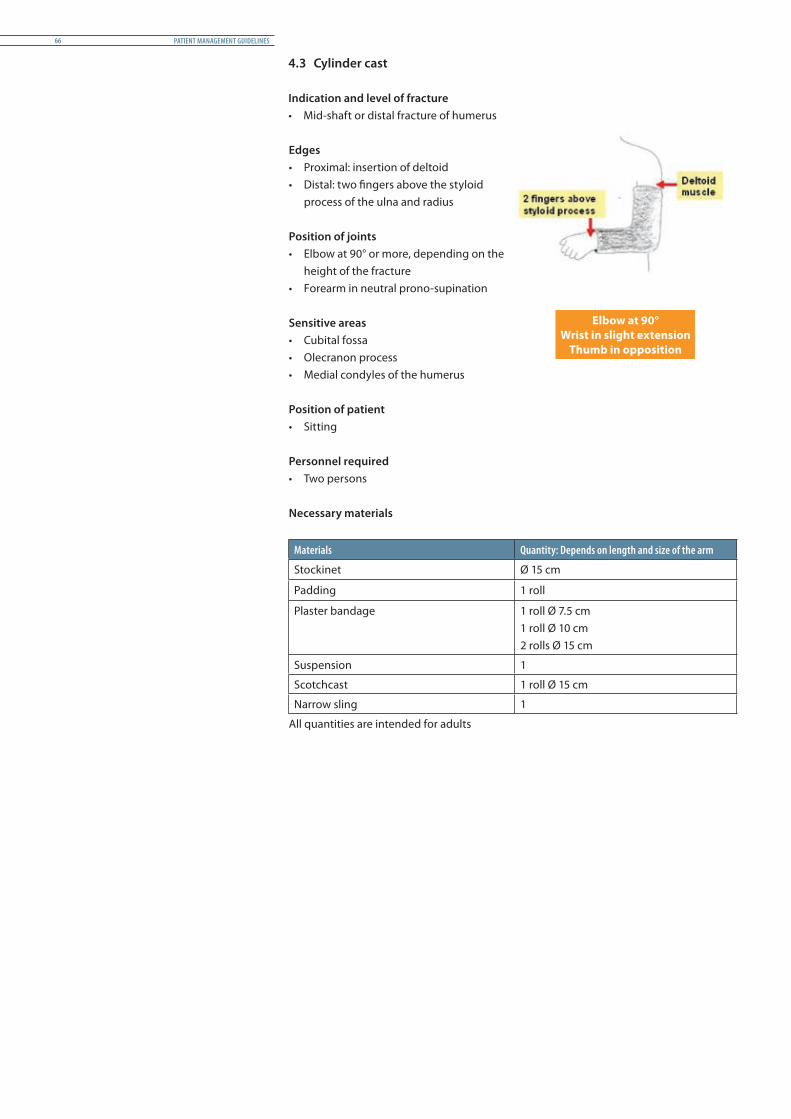
4.3 Cylinder cast
Indication and level of fracture• Mid-shaft or distal fracture of humerus
Edges• Proximal: insertion of deltoid• Distal: two fingers above the styloid
process of the ulna and radius Position of joints• Elbow at 90° or more, depending on the
height of the fracture • Forearm in neutral prono-supination
Sensitive areas • Cubital fossa• Olecranon process• Medial condyles of the humerus
Position of patient• Sitting
Personnel required• Two persons
Necessary materials
Materials Quantity: Depends on length and size of the arm
Stockinet Ø 15 cm
Padding 1 roll
Plaster bandage 1 roll Ø 7.5 cm1 roll Ø 10 cm2 rolls Ø 15 cm
Suspension 1
Scotchcast 1 roll Ø 15 cm
Narrow sling 1
All quantities are intended for adults
Elbow at 90°Wrist in slight extension
Thumb in opposition
PATIENT MANAGEMENT GUIDELINES66

Method of application
Place additional padding over the elbow area to take extra weight.
During casting, apply bilateral pressure on the distal part of the cast to obtain an oval shape which limits prono-supination of the forearm.
The weight of the POP is enough to make the fracture reduction. A sling is compulsory to balance the cast. Check the alignment of the force of traction before discharge.
POP IMMOBILIZATIONS 67

4.4 Above elbow – long arm cast
Indication and level of fracture• Radius fracture• Ulna fracture • Supracondylar humerus fracture
Edges• Proximal: two fingers below axillary
crease or deltoid tuberosity• Distal: Metacarpophalangeal joints
allowing movement of the fingers
Position of joints• Elbow in 90° flexion, according to the
surgeon’s advice• Forearm in neutral prono-supination• Wrist in slight extension
Sensitive areas • Medial and lateral condyles, olecranon
process and cubital fossa• Styloid process of ulna and radius Position of patient• Sitting or lying
Personnel required• Two persons
Necessary materials
Materials Quantity: Depends on length and size of the arm
Stockinet Ø 15 cm
Padding 2 rolls
Plaster bandage 1 roll Ø 7.5 cm2 rolls Ø 10 cm1 roll Ø 15 cm
Scotchcast 1 roll Ø 15 cm
Triangular sling 1
All quantities are intended for adults
Elbow in 90° flexionForearm in neutral prono-supination
Wrist in slight extension
PATIENT MANAGEMENT GUIDELINES68

Method of application
Assistants help to maintain the elbow and hand in the right position.
At the elbow, apply POP bandages in a figure of eight to reinforce the cast in this fragile area.
Finish by casting the hand, taking special care with the thumb space (first interdigital space).
Check the mobility of the fingers and the ability to grip before discharge.
POP IMMOBILIZATIONS 69

4.5 Shoulder spica
Shoulder spica casts are not easy to make. And as they are heavy and warm, having to wear one for weeks can be a burdensome experience for any patient, adult or child. Shoulder spica casts require a lot of care: to prevent damage to the skin, they have to be cleaned every day and closely tended to. They do however permit the patient to get out of bed and make possible certain daily activities (moving about, using the toilet); but they restrict the patient’s mobility and impose a degree of dependence on others, especially for dressing and washing.
The ICRC does not promote spica casts within its hospital projects, but they should be retained as an option for difficult cases in order to avoid amputations or the removal of the head of the humerus when traction and external fixation have failed.
Indication and level of fracture• Very rare and limited indication • Fracture of proximal part of humerus• Repair of rotator cuff
Edges• Proximal: above, along a line passing
from the acromio-clavicular joint of the injured arm to the opposite side, four fingers below the axilla
• Distal: two fingers above the styloid process of radius and ulna
Position of joints• Shoulder in abduction, flexion and
rotation, depending on the surgeon’s decision
• Elbow in 90° flexion• Forearm in complete supination
Sensitive areas • Medial and lateral humeral condyles• Olecranon process and 1/3 distal of ulna• Axilla, ribs, abdomen, spinal column,
scapular spine and breast (for women)
Position of patient• Sitting or half sitting
Personnel required• Two persons
Necessary materials
Materials Quantity: Depends on length and size of the arm
Stockinet Ø 15 cm and 90 cm
Padding 3 rolls
Plaster bandage 1 Ø 10 cm 6 Ø 15 cm 1 Ø 20 cm
Bridge 1
Epigastric pad 1
Scotchcast 1 roll Ø 15 cm
All quantities are intended for adults
Shoulder in abduction, flexion and rotation Elbow in 90° flexion
Forearm in full supination
PATIENT MANAGEMENT GUIDELINES70

Method of application
Prepare two pieces of stockinet for the trunk and for the arm and join them together with tape. Before applying a layer of padding, place an extra piece of cotton wool on the axillary area and a small towel on the stomach, just below the xiphoid process (marked with a blue line on the stockinet).
Start casting the trunk with a brace over the shoulder.
Throughout casting, an assistant should continuously smooth the surface of the POP to avoid wrinkles.
When the trunk plaster is complete, adjust the position of the arm. Then, continue application of the cast.
Support the arm until the diagonal support is fixed in place.
Check the comfort of the cast and possible pressure points along its edges.Ensure that there is enough extra room to allow for stomach expansion.
POP IMMOBILIZATIONS 71

5 Physiotherapy for patients undergoing POP immobilization
5.1 General principles
The aim of exercise is to improve joint range of motion and strengthen muscles. An exercise regimen should get under way as soon as pain subsides or with the provision of pain relief. The emphasis should be on joints above and below the fracture area. For upper-limb fractures, mobility exercises should include all free joints and the shoulder. For lower-limb fractures, exercises help to ensure that the bones can tolerate load and stress. When planning exercises the goals of the treatment and the type of POP cast applied should be kept in mind.
Full rehabilitation begins after POP immobilization is over, but as long as the patient is wearing the cast, the physiotherapist will have to keep the following in mind:
• Supervision of the POP for all possible complications• Patient education regarding hygiene and maintenance• Active exercise, within the patient’s pain limit, of all free joints• Static contractions of muscles under POP• Promotion of global mobility, transfers and ADL with the POP • Patient training in use of mobility aids and management, if necessary• Provision of home exercises before discharge from hospital
5.2 Specific points
Back slabsSlabs are used for primary intervention and not aimed to allow weight bearing. Special attention will be given when patients with lower-limb fracture move out of bed.
Circular POPPatients should exercise against resistance, especially by using the weight of the cast (e.g. raising the leg off the bed). Exercises should become more strenuous gradually, but should stay within the patient’s pain limit.
For lower-limb fractures under circular POP, weight bearing is generally permitted: within the periof of immobilization, it should move gradually from a stage of partial weight bearing, under close medical supervision, to full weight bearing. But two conditions must be followed: a walking heel must be fixed under the POP and the physiotherapist must strictly follow the surgeon’s instructions on the weight that may be borne.
PATIENT MANAGEMENT GUIDELINES72

POP IMMOBILIZATIONS 73

Bandages and slings 3
Table of contents
Objectives 76
1. General principles 76 1.1 Bandage and sling application 76 1.2 Care of bandages and slings 76
2. Bandage methods 77 2.1 Triangular upper-arm sling 77 2.2. Triangular upper-arm sling - 2nd method: High sling immobilization 78 2.3 Collar and cuff sling 79 2.4 Collar and cuff, variations with stockinet 80
2.5 Figure-of-eight sling (clavicle immobilization) 81 2.6 Stockinet shoulder immobilization 82
2.7 Cardboard splint 83
BANDAGES AND SLINGS 75

Objectives
• Understand the use of temporary immobilizations of upper limbs• Know and master the application of bandage and sling immobilizations for upper
limbs• Be capable of advising patients on supervision of bandage and sling immobilizations
1 General principles
1.1 Bandage and sling application
• Bandages and slings are applied to stabilize injuries temporarily and to limit movement of an injured limb
• This type of temporary immobilization should allow the patient to move the limb with a minimum of protection for the injury
• In principle, bandages and slings should stabilize the joints below and the joint above an injury
• An upper-limb bandage should always cover the hand but leave fingers visible so that any discolouration can be detected
• Placing a bandage or a sling directly on a wound should be avoided. Any wound should be dressed and covered before a bandage is applied
1.2 Care of bandages and slings
• Bandages and slings should be kept clean and dry at all times. If it is raining, place a plastic bag over the bandage when the patient is outdoors
• Check a least twice daily for:• finger swelling or discolouration• increase in pain• slippage or change in position of the bandage or sling• signs of discomfort associated with the bandage or sling• wetness or soiling of the bandage or sling
• Advise the patient to come for a consultation immediately if any of these signs are noted
PATIENT MANAGEMENT GUIDELINES76

2 Bandage methods
2.1 Triangular upper-arm sling
Prepare a triangular bandage. Place the patient in a sitting position and ask him/her to assist by supporting the forearm.
Slide the bandage under the axilla with one end over the shoulder and neck.
Tie a knot with the opposite corner on the lateral side of the neck.
Fold the end of the bandage and secure it with a safety pin.
BANDAGES AND SLINGS 77

2.2 Triangular upper-arm sling – 2nd method: High sling immobilization
Place the sling across the chest, one end under the axilla and another over the shoulder.
Knot the ends together, with the hand near the shoulder.
Fold the edge over the elbow. Secure the folded edge with a safety pin.
Posterior view of high arm sling used for hand injuries.
PATIENT MANAGEMENT GUIDELINES78
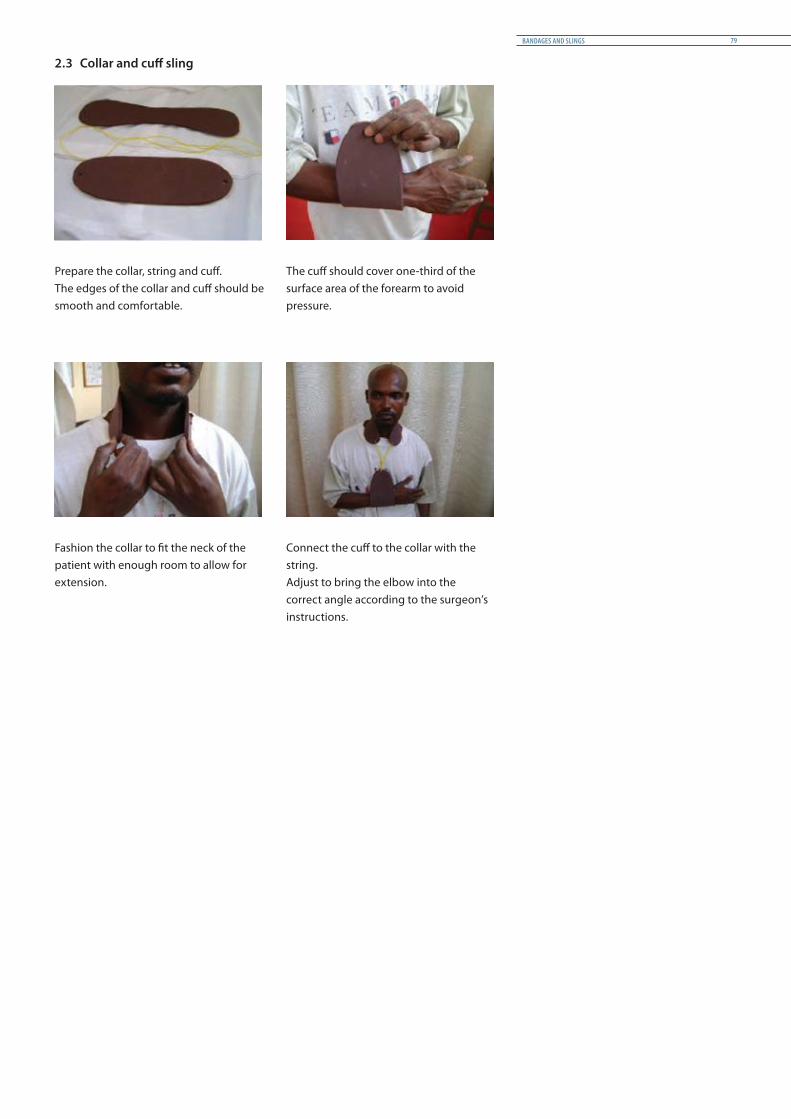
2.3 Collar and cuff sling
Prepare the collar, string and cuff.The edges of the collar and cuff should be smooth and comfortable.
The cuff should cover one-third of the surface area of the forearm to avoid pressure.
Fashion the collar to fit the neck of the patient with enough room to allow for extension.
Connect the cuff to the collar with the string.Adjust to bring the elbow into the correct angle according to the surgeon’s instructions.
BANDAGES AND SLINGS 79
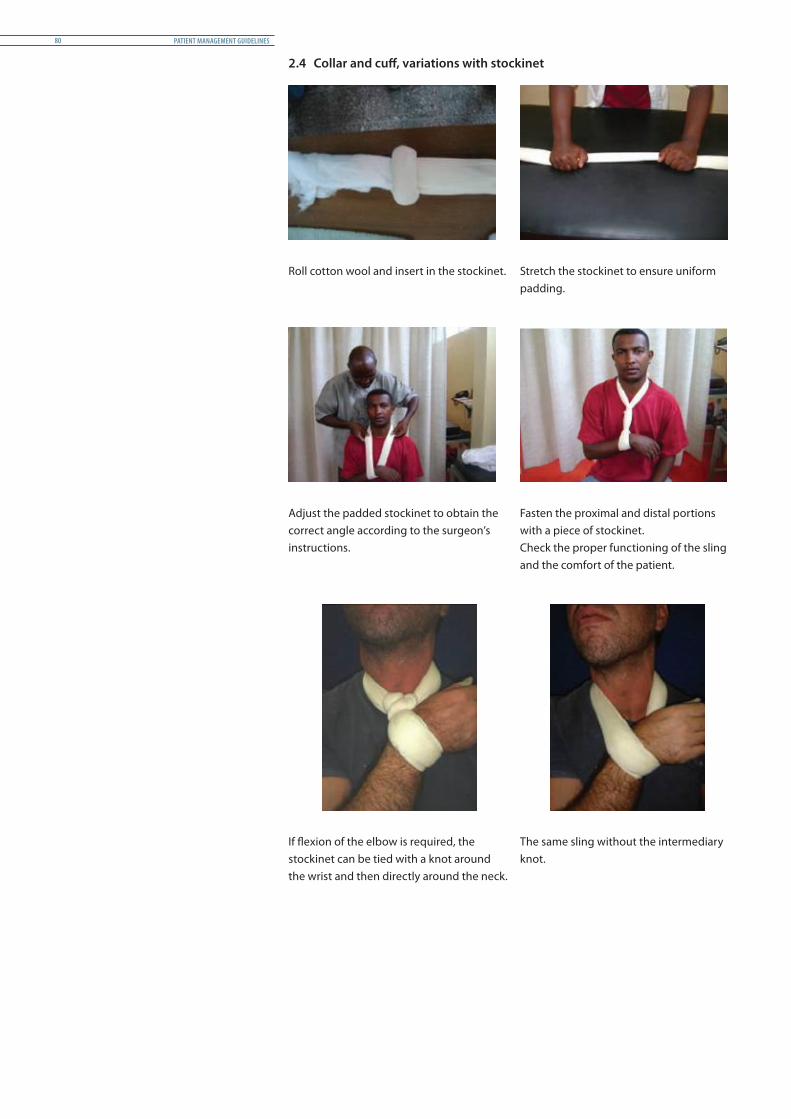
2.4 Collar and cuff, variations with stockinet
Roll cotton wool and insert in the stockinet. Stretch the stockinet to ensure uniform padding.
Adjust the padded stockinet to obtain the correct angle according to the surgeon’s instructions.
Fasten the proximal and distal portions with a piece of stockinet.Check the proper functioning of the sling and the comfort of the patient.
If flexion of the elbow is required, the stockinet can be tied with a knot around the wrist and then directly around the neck.
The same sling without the intermediary knot.
PATIENT MANAGEMENT GUIDELINES80

2.5 Figure-of-eight sling (clavicle immobilization)
Insert cotton padding in the stockinet. Make a ring to the edge of cotton.
Insert the arm in the ring and let the patient place her hands on her head.
Tie the ring at the back.
Let the patient’s arms hang free at her sides. Protect the knots in the back with cotton wool.
BANDAGES AND SLINGS 81

2.6 Stockinet shoulder immobilization
With one piece of stockinet, envelop the injured arm from the wrist to the shoulder.Then, bring the stockinet around the neck and attach it around the wrist, with additional padding.
With the other extremity continue around the trunk.
Attach this end around the arm just above the elbow.Place additional padding in the stockinet.
Posterior view.
PATIENT MANAGEMENT GUIDELINES82

2.7 Cardboard splint
This kind of splint is often placed too low. Make sure that the width of the cardboard is sufficient to ensure good contention at the top.
Draw on a piece of cardboard the surface you need.Mark and cut out the spaces for the elbow and deltoid.
Slide the arm into a piece of stockinet.Place the cardboard over the arm and secure it with tape.
Fold back the two extremities of the stockinet over the cardboard.
Add a sling to maintain the forearm and the elbow in the required flexion position.
BANDAGES AND SLINGS 83


Traction immobilizations 4
Table of contents
Objectives 86
1. General principles 86 1.1 Classification and special features 86 1.2 Main materials and equipment 88 1.3 Preparation and management 89
2. Skeletal traction 91 2.1 Olecranal traction 91 2.2 Femoral traction 92 2.3 Tibial traction 93 2.4 Calcaneal traction 94 2.5 Supervision and follow-up 95 2.6 Removal of skeletal traction 96
3. Skin traction 97 3.1 Skin traction for adults 97 3.2 Gallows (Bryant) traction for children 99 3.3 Removal of skin traction 100
4. Physiotherapy for patients in traction 101
TRACTION IMMOBILIZATIONS 85

Objectives
• Understand the principles of skeletal traction, its installation and its advantages and disadvantages
• Understand the necessary follow-up and possible complications related to the application of skeletal traction
• Be familiar with and master the installation/adaptation/removal of skeletal traction for lower limbs and upper limbs
• Know and master the exercises performed in skeletal traction
1 General principles
1.1 Classification and special features
PurposeTraction is usually applied to the arm and leg and used to treat fractures and dislocations. In ICRC hospital projects they are used to treat all types of fractures (open or closed) of the limbs. Traction serves several purposes:• It aligns the end of a fracture by pulling the limb into a straight position• It ends muscle spasms• It relieves pain
Two main types of traction are commonly used:• Skeletal traction, which is applied directly on the bone, by means of a pin that is
inserted at the end of the bone• Skin traction, which is applied on the skin by means of adhesive tapes and bandages
The application of traction is an exacting technique that requires training and experience, since incorrectly applied traction can cause harm. Positioning the extremity so that the angle of pull brings the end of the fracture together is essential. Weight-and-pulley systems have been developed to provide the appropriate force while keeping bones aligned. The patient’s age, weight, and medical condition are all taken into account when deciding on the type and degree of traction.
Precautions• People with an inflammation of the bone (osteomyelitis) should not undergo skeletal
traction• People who are suffering from a skin disorder (allergy) should not undergo skin
traction. Circulatory disorders or varicose veins can also be aggravated by skin traction
Description
Skeletal tractionTraditionally, the names given to the various types of skeletal traction refer to the site of the pin and not to the broken bone.• Olecranal traction is used for fractures of the humerus• Femoral traction may be used for fractures of the pelvis and hip, but is not common• Tibial traction is used for fractures of the femur• Calcaneal traction is used for fractures of the tibia• Skull traction is used for fractures of the neck vertebrae (not described in this manual)
PATIENT MANAGEMENT GUIDELINES86

Skeletal traction requires an invasive procedure in which pins, screws, or wires are surgically installed in the bone for use in longer-term traction requiring heavy weights. This is the case when the force exerted is more than skin traction can bear, or when skin traction is not appropriate for the body part needing treatment. The weights used in skeletal traction generally range within approximately 10% of body weight.
It is important to place the pins correctly because they may have to stay in place for several months, and are the hardware to which the weights and pulleys are attached. The pins must be clean to avoid infection. Damage may result if the alignment and weights are not carefully calibrated.
Skin tractionSkin traction includes weight traction, which uses lighter weights or counterweights to apply force to fractures or dislocated joints. Skin traction is used when only a little force is required to maintain reduction or employed on a temporary basis (in first or second intention). The weights, typically less than four kg heavy, are attached to the skin by means of tape or straps. Boots could also be used but are not recommended because they are extremely dangerous if they are not applied correctly.
The weights bring together the fractured bone or dislocated joint so that it can heal correctly. The skin has to be checked regularly during the first days because of the risk of allergy.
RisksThe main risks associated with skeletal traction are bone inflammation that may occur in response to the introduction of foreign material into the body. Infection can occur at the pin sites and often require the removal of the pin.
The main risks associated with skin traction are that the traction will be applied incorrectly and cause harm, or that the skin will become irritated.
Both types of traction risk the complications associated with long periods of immobility. These include the development of bed sores, reduced respiratory function, urinary problems, and circulatory problems.
But when correctly applied, traction generally produces very good, if slow, results.
TRACTION IMMOBILIZATIONS 87

1.2 Main materials and equipment for providing counter traction and for preventing the patient from sliding
ICRC Bohler Brown frame Stabilizer S-hook
Flat traction pulley Monkey chain Sand bag
Traction components Skin traction Bed block 6”
PATIENT MANAGEMENT GUIDELINES88

1.3 Preparation and management
General points• Prepare a bed with a board between the mattress and the bed frame• Choose an ICRC Bohler Brown frame that fits the patient’s leg or adjust it accordingly. It
is important that the part that supports the thigh be measured correctly.• Dress the splint with bandage (see illustrations below)• Suspend the limb in traction while the patient is still under anaesthesia• Set the traction according to the surgeon’s instructions• While the fractured limb is being manipulated, maintain the pull with a weight
suspended in traction• Stabilize the splint on the bed and the alignment of the limb accordingly• Position the limb in an anatomical position. For a lower limb, ensure that the proximal
end of the splint is close to the gluteal fold, the leg straight and the foot free• Elevate the foot end of the bed with bed blocks to provide counter-traction• Both skin and skeletal traction require X-rays prior to application. X-rays may be
repeated over the course of treatment to ensure that alignment remains correct and that healing is taking place
It is important that splints be adjustable to patients’ size, especially the part supporting the thigh.
To ensure comfort, dress the splint with a bandage, making figure-of-eight turns followed by circular turns. The slope and the horizontal parts should be dressed separately in order to allow the removal of the horizontal bandage while starting the knee flexion.
Management of weight and direction of traction• Skeletal traction should never exceed 10% of a patient’s body weight, and 7% (1/15) in
case of bilateral fracture. • Weight can be reduced after a few days (under X-ray control) because of the decrease
of muscle tone.• Skin traction weight should be less than or equal to four kg for adults. For children
under three years of age only body weight should be used. Check the alignment according to the medical guidelines.
• The rope should run free on the pulleys and the weight should hang free. A daily check is strongly advised.
• A check-up X-ray is taken 72 hours after application. Increase/decrease/re-alignment of weight is determined by the effect of traction visible on the X-ray. Early mobilization is recommended.
TRACTION IMMOBILIZATIONS 89
Aftercare• Aftercare for skin traction involves making sure the limb stays aligned and caring
for the skin so that it does not become sore and irritated. The patient should also be alert to any swelling or tingling in the limb that would suggest that the limb has been wrapped too tightly.
• The bandage supporting the limb should be checked daily and kept clean and dry.• The patient is encouraged to do breathing exercises and a range of motion exercises
with the unaffected parts of the body to avoid bed rest complications. The patient is also taught how to use a trapeze (an overhead support bar) to shift on and off his or her bedpan, since will not be possible to get up to use the toilet.
• Aftercare for skeletal traction is more complex. The patient is likely to be immobile for an extended period. If this is necessary for preventing infection, the pin sites should be inspected every day and cleaned regularly.
• The frame bandage supporting the limb should be checked daily and kept clean and dry.
Nursing care of the pin• When pins have been inserted particular care must be taken to clean and dress the pin
sites so that infection does not enter the bone through them.• Following normal dressing procedures, the pin and surrounding skin are cleaned with
a normal saline solution.• Exudate is removed and, as per ICRC disinfection policy, a Betadine gauze dressing is
applied around the pins. The dressing enables any exudate to drain rather than collect around the pin, which may lead to infection. Large amounts of exudate, or pus, and obvious instability of the pins must be reported to the nurse in charge and/or surgeon because they are an indication of infection.
Management of traction removal• When the fracture site is clinically stiff or when a good callus is visible on an X-ray,
weight is gradually reduced by one kg per week.• Removal of traction is determined by clinical consolidation (followed by three days of
bed rest). Exercises in bed continue during this period.• A Chinese splint (double slab) is applied for a further four weeks in case of femur
fracture. A brace may be required in cases where the patient cannot come back for follow-up.
PATIENT MANAGEMENT GUIDELINES90

2 Skeletal traction
2.1 Olecranal traction
Indication and level of fracture• Supracondylar fracture of the humerus and displaced intra-condylar fracture of the
humerus
Settings
Position of pin• The pin is inserted through the
olecranon
Position of patient• Patient lying supine, shoulder at 90°,
elbow at 90°• The forearm is supported on a sling
Direction of traction• The suspension is installed on an
overhead beamWeight < 5 kg
Method of applicationPlace a suspension frame over the head of the bed.Mount the pulley system on the frame with a triangular bandage to support the forearm.The shoulder and the elbow are positioned at 90°/90° in relation to the bed.
A traction pin with a stirrup is installed in the operating theatre.The arm is set with the shoulder joint at 90° and the elbow joint at 90°; the forearm and wrist are supported by a sling.
A two kg weight is applied.If necessary, complete the reduction with the surgeon while the patient is still under anaesthesia.
TRACTION IMMOBILIZATIONS 91
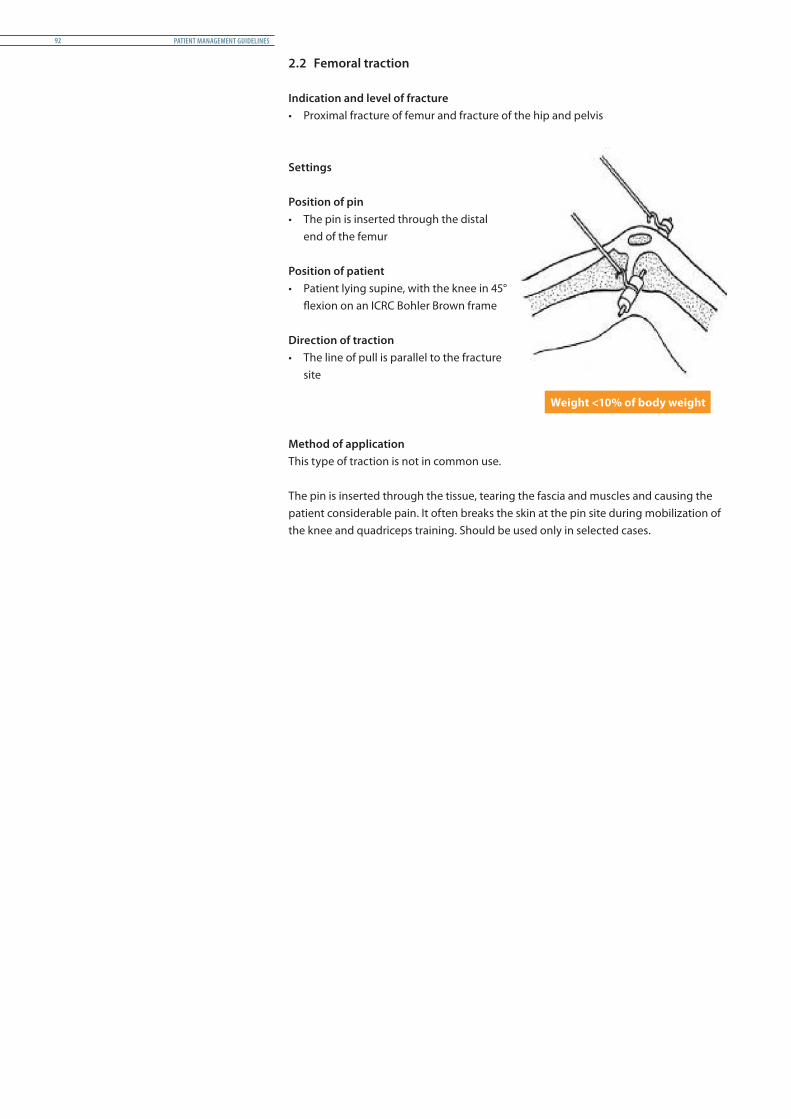
2.2 Femoral traction
Indication and level of fracture• Proximal fracture of femur and fracture of the hip and pelvis
Settings
Position of pin• The pin is inserted through the distal
end of the femur
Position of patient• Patient lying supine, with the knee in 45°
flexion on an ICRC Bohler Brown frame
Direction of traction• The line of pull is parallel to the fracture
site
Weight <10% of body weight
Method of applicationThis type of traction is not in common use.
The pin is inserted through the tissue, tearing the fascia and muscles and causing the patient considerable pain. It often breaks the skin at the pin site during mobilization of the knee and quadriceps training. Should be used only in selected cases.
PATIENT MANAGEMENT GUIDELINES92

2.3 Tibial traction
Indication and level of fracture• Mid shaft femoral fracture and stable fracture of the lower 1/3 of femur
Settings
Position of pin• The pin is inserted two cm below the
tibial tuberosity
Position of patient• Patient lying supine, with the knee in 45°
flexion on an ICRC Bohler Brown frame
Direction of traction• The line of pull is parallel to the femur
Weight <10% of body weight
Method of applicationMid-shaft and proximal fractures: keep the leg in 45° flexion.Abduct the leg by 10° to keep the whole limb in a neutral position.A 90°/90° position may be applicable for a proximal fracture with an open wound.
Set the traction according to the level of the fracture.For distal fractures, lower the plane of pull and increase flexion of the knee to relax the action of the gastrocnemius at insertion point. This will allow reduction of the distal fragment.
TRACTION IMMOBILIZATIONS 93

2.4 Calcaneal traction
Indication and level of fracture• Mid shaft to lower distal 1/3 fracture of the tibia
Settings
Position of pin• The pin is inserted two cm through the
calcaneus
Position of patient• Patient lying supine, with the leg in 45°
flexion on an ICRC Bohler Brown frame
Direction of traction• The line of pull is parallel to the tibia
Weight < 2 kg
Method of applicationThe direction of the pull is parallel to the point of insertion of the pin.Support the foot at the distal end if there is foot drop.
Place a well-padded board between the crepe bandage and the leg.Relieve pressure on the heel using a ring, or loosen the distal bandage.
PATIENT MANAGEMENT GUIDELINES94

2.5 Supervision and follow-up
Checking the pin, the alignment and the pulley system• Check by X-ray that the bone fragments are correctly aligned• Optical judgment is also useful for assessing the suitability of the set-up. The
anatomical boundaries are good references, as are simple tests such as comparison of leg lengths
• Check that the cord or the stirrup is firmly fixed on the pin and that the pin is clear of skin (see illustration below)
• Ensure that the pulley is running freely on the splint and that the rope is in the groove of the pulley
• The weight should not rest on the bed or on the floor
Changing plane and reducing weightThe plane changes when the knee is flexed.Keep the angle of plane low to reduce tension of gastrocnemi muscles.The distal fragment should be pushed upwards.Place a pad at the fracture site to maintain position.Correction is achieved by changing the plane.Reduce the weight when callus is visible on X-ray.
TRACTION IMMOBILIZATIONS 95

2.6 Removal of skeletal traction (usually done by surgeon)
Remove the weight by detaching the rope from the stirrup.Using a screwdriver or pliers, release the screw from the pin and remove the stirrup.
Clean the pin and the pin site with Betadine.Remove any dead tissue around the wound.
If the sharp end of the pin is bent or has developed a ‘hook’ or ‘spike’ during insertion, smooth it out with a pair of pliers. If necessary, use a sharpener file.
Fix a universal handle on the lateral side of the pin and tighten.Stabilize the limb, with an assistant if necessary, and pull the pin from the entry point while turning the universal handle.
Clean the pin sites again after removal of the pin.Apply separate dressings to the two sites.Apply a suitable splint.
PATIENT MANAGEMENT GUIDELINES96

3 Skin traction
3.1 Skin traction for adults
Indication and level of fracture• All limb fractures when force < 4 kg is enough to maintain the reduction • Temporary traction either in first intention before the application of other type of
immobilization or in second intention if pin site is infected
Settings
Position of patient• Patient lying supine
Direction of traction• The line of pull is always parallel to the
bone involved at the fracture site
Weight < 4kg
Method of applicationTraction is applied while the patient is under sedation or, in the case of children, under mild anaesthesia.The limb should be shaved if the patient has a lot of hair, and then washed with mild soap and water. Skin traction may be installed on an ICRC Bohler Brown frame or flat on the bed. In case a ready-made skin traction set is not available, the system can be made on the spot with adhesive bands, a piece of wood and some rope.
Skin traction may be used as a change-of-treatment method.Remove the set from the packet and stretch it to below the level of the fracture.The spreader should be four cm from the foot (the foot must be at 90°).
Remove the plastic film from the sticky side of the traction tape.Spread the tape on the surface of the skin, taking care to avoid wrinkles.Secure it with a crepe bandage, reducing tension on the bandage from the distal towards the proximal part of the leg.
TRACTION IMMOBILIZATIONS 97

Keep the limb on the ICRC Bohler Brown frame.Suspend the weight so as to keep the leg in a straight line.Provide support for the foot support in the event of foot drop.
Flat skin traction is used to maintain position of a fracture in children between the ages of two and twelve to avoid inhibition of growth plate development.A similar type is used for adults after reduction of dislocation.
PATIENT MANAGEMENT GUIDELINES98
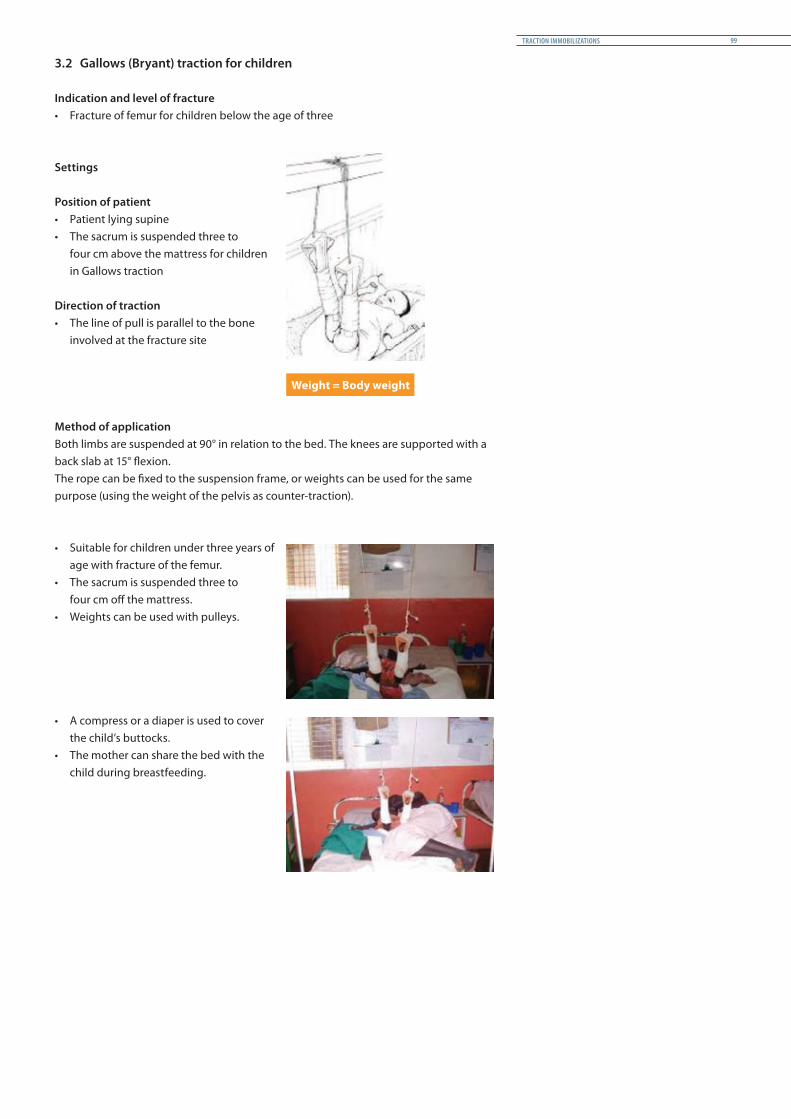
3.2 Gallows (Bryant) traction for children
Indication and level of fracture• Fracture of femur for children below the age of three
Settings
Position of patient• Patient lying supine• The sacrum is suspended three to
four cm above the mattress for children in Gallows traction
Direction of traction• The line of pull is parallel to the bone
involved at the fracture site
Weight = Body weight
Method of applicationBoth limbs are suspended at 90° in relation to the bed. The knees are supported with a back slab at 15° flexion.The rope can be fixed to the suspension frame, or weights can be used for the same purpose (using the weight of the pelvis as counter-traction).
• Suitable for children under three years of age with fracture of the femur.
• The sacrum is suspended three to four cm off the mattress.
• Weights can be used with pulleys.
• A compress or a diaper is used to cover the child’s buttocks.
• The mother can share the bed with the child during breastfeeding.
TRACTION IMMOBILIZATIONS 99
3.3 Removal of skin traction
• Give pain relief if necessary. This is not usually indicated• Release the weight from the traction system• Remove the adhesive tape from the skin• Inspect the skin for any blisters• Apply a suitable splint if needed. Start mobilization during bed rest• If skin traction is used in primary intention only while waiting for swelling to subside,
apply, after removal, the secondary-intention immobilization according to the surgeon’s instructions

4 Physiotherapy for patients in traction
Patients in traction are forced to stay in bed. The primary objective of physiotherapy is therefore to minimize the consequences of the prolonged bed rest and avoid all possible complications during the period of immobilization.
The objective is also to restore to the patient optimum independent functioning in order to prepare for ambulation and limit the time of hospitalization.
Communication with patient • The patient should be informed about the diagnosis, the timeline of the treatment and
the expected outcomes.• The treatment plan should be explained to the patient and his or her agreement
secured. For the treatment to suceed, it is essential that the patient be compliant and motivated.
Assessment• During the acute phase, physiotherapeutic assessment is limited by the need for
immobilization and the patient’s tolerance for pain. The assessment should be short but complete and fully described in the patient’s file.
Prevention of pressure sores • Regular assessment of skin in risky areas • Supervision of hygiene and nutrition • Support with pillows and foam to avoid direct pressure• Massage with oil or powder• After two weeks, the patient should be encouraged to change position by lifting his or
her trunk off the bed
Prevention of respiratory problems • Chest therapy is recommended every day prior to any exercises, starting from the first
day post surgery
Prevention of cramp and joint contracture • Supervised free active movements of unaffected joints (foot, fingers)• Passive mobilization of the patella in all directions• Progressively, and subject to the surgeon’s authorization, the intermediate joint
(elbow, knee) could be mobilized with assistance
Prevention of muscle atrophy • As pain subsides, start active muscle training after the first week post surgery• Static muscular contractions are the preferred muscle-strengthening exercises at the
beginning • Supervised progression of the intensity of the exercises
Use of functional therapeutic exercise• Supervised functional activities for the rest of the body • Sitting position allowed when permitted by the surgeon• Any resistive exercises involving unaffected limbs should be carefully monitored and
should not affect the fracture site (muscle chain)
Resumption of standing, weight bearing and walking with crutches• Traction is removed and the treatment changed if reduction is achieved and the callus
is stable. Treatment could be changed to POP, cylinder POP or back slab• Gradual standing between parallel bars/frame/crutches• Progressive ambulation with gait training from no weight bearing to full weight
bearing • Progressive upper-limb exercises with various grips
TRACTION IMMOBILIZATIONS 101

References 6
Bibliography
1. Nelson Awori et al, Primary Surgery, Vol. 2., Oxford Medical Publications, 1987
2. S Guechtal, Les appareils plâtrés, CHU, Genève, 1990
3. David I. Rowley, War Wounds with Fratures, ICRC, 1996
4. Jenny Hayward-Karlsson, Hospital for War-Wounded, ICRC, 1998
5. Robin M. Coupland, War Wounds of Limbs, ICRC, 1993
6. ICRC Nursing Guidelines, 2007
7. Leonard F. Peltier, A Brief History of Traction, 1968
8. Emmanouil Kokkiniotis, Conservative Management of Fractures During Disasters in Developing Countries: The Use of Tractions, University of Athens, 2012
9. A. Mark Davies, Holger Pettersson, The WHO Manual of Diagnostic Imaging: Radiographic Anatomy and Interpretation of the Musculoskeletal System, WHO, 2002
10. WHO, Surgical Care at the District Hospital, WHO, 2003
Websites- http://www0.sun.ac.za/ortho/webct-ortho/general/trac/trac1.html, access 03/2011- http://www.who.int/hac/techguidance/ tools/Best_practice_guidelines_on_ESC_in_disasters.pdf, πρόσβαση 09/2011- http://www.zimmer.com/web/enUS/pdf /200080500_TractionHandbook.pdf, access 09/2011- http://www.wildernessemergencycare. com/book/splint_femurs.htm 08/2011
REFERENCES 103

MISSIONThe International Committee of the Red Cross (ICRC) is an impartial, neutral and independent organization whose exclusively humanitarian mission is to protect the lives and dignity of victims of armed conflict and other situations of violence and to provide them with assistance. The ICRC also endeavours to prevent suffering by promoting and strengthening humanitarian law and universal humanitarian principles. Established in 1863, the ICRC is at the origin of the Geneva Conventions and the International Red Cross and Red Crescent Movement. It directs and coordinates the international activities conducted by the Movement in armed conflicts and other situations of violence.

4030
_2/0
02 0
6/20
14