Embed Size (px)
Citation preview

Updated April 30, 2021 1
Plastic Bucket Trap Protocol
The plastic bucket trap is a long-lasting insect trap used in conjunction with a lure to monitor or detect various species of moths. The plastic bucket trap is the preferred trap for some moth species since it can catch large numbers of moths without damaging some of their identifying characters. The trap has four parts: 1) lid, 2) lure basket with cap, 3) funnel, and 4) bucket. The trap is available in various color combinations. For PPQ programs, the trap consists of a green lid, yellow funnel, and white bucket. Figure 1 is a photograph of a trap cut in half.
Lid Lure basket Funnel Bucket
Figure 1. Plastic bucket trap cut in half to show its interior.

Plastic Bucket Trap Protocol
Updated April 30, 2021 2
Follow the steps below to prepare the bucket traps for use in the field. 1. Pheromone The synthetic pheromone is embedded in a laminate (a small rubberized square as in Figure 2) or a septum (similar to a pencil eraser as in Figure 3) dispenser. Use gloves when handling lures and unwrap the lure from its packaging. When not in use, the lures should be stored in a freezer not used for food or drinks. Refer to the pheromone MSDS documents for storage and safety information.
If you are using a laminate lure, you may attach the lure to a small paper clip and fold the clip so that the lure does not fall out of the basket (Figures 4 and 5).
Figure 2. Laminate lure. Figure 3. Septum lure.
Figure 4. Laminate lure in paper clip.
Figure 5. Laminate lure in paper clip inside lure basket.

Plastic Bucket Trap Protocol
Updated April 30, 2021 3
If you are using a septum lure, place the septum inside the lure basket (Figure 6). Cover the basket with the lid and insert the basket through the circular opening on the center of the lid (Figure 7). If the cap no longer snaps snuggly into the trap lid opening, secure it with a piece of tape.
Note: To avoid cross-contamination from lure residue, do not reuse lure baskets for different species. Label the lure basket with the name of the moth species. 2. Handle Attach a wire handle to the lid through its two loops, as shown in Figures 8 and 9. A wire handle is usually included with each trap. If a handle is not included or needs to be replaced, make one with a 12-inch long wire. You can also use string, but it does not last as long as the wire.
Figure 6. Septum lure inside lure basket.
Figure 7. Lure basket with cap inserted through center of lid.
Figures 8 and 9. Wire handle attached to trap’s lid.
Plastic Bucket Trap Protocol
Updated April 30, 2021 4
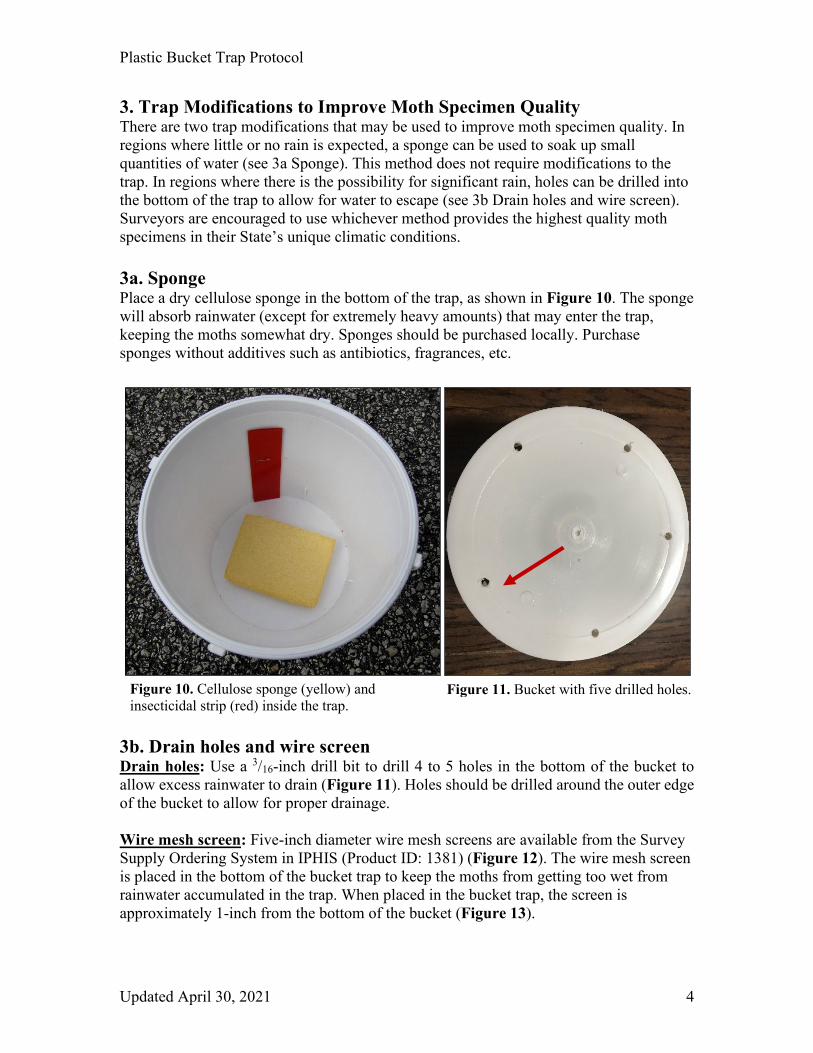
3. Trap Modifications to Improve Moth Specimen Quality There are two trap modifications that may be used to improve moth specimen quality. In regions where little or no rain is expected, a sponge can be used to soak up small quantities of water (see 3a Sponge). This method does not require modifications to the trap. In regions where there is the possibility for significant rain, holes can be drilled into the bottom of the trap to allow for water to escape (see 3b Drain holes and wire screen). Surveyors are encouraged to use whichever method provides the highest quality moth specimens in their State’s unique climatic conditions. 3a. Sponge Place a dry cellulose sponge in the bottom of the trap, as shown in Figure 10. The sponge will absorb rainwater (except for extremely heavy amounts) that may enter the trap, keeping the moths somewhat dry. Sponges should be purchased locally. Purchase sponges without additives such as antibiotics, fragrances, etc.
3b. Drain holes and wire screen Drain holes: Use a 3/16-inch drill bit to drill 4 to 5 holes in the bottom of the bucket to allow excess rainwater to drain (Figure 11). Holes should be drilled around the outer edge of the bucket to allow for proper drainage. Wire mesh screen: Five-inch diameter wire mesh screens are available from the Survey Supply Ordering System in IPHIS (Product ID: 1381) (Figure 12). The wire mesh screen is placed in the bottom of the bucket trap to keep the moths from getting too wet from rainwater accumulated in the trap. When placed in the bucket trap, the screen is approximately 1-inch from the bottom of the bucket (Figure 13).
Figure 10. Cellulose sponge (yellow) and insecticidal strip (red) inside the trap.
Figure 11. Bucket with five drilled holes.

Plastic Bucket Trap Protocol
Updated April 30, 2021 5
Moving or handling the trap may cause the screen to tilt and allow specimens to fall below the screen. To improve the stability of the wire screen mesh use four #8 x ¾ inch machine screws placed equally distance around the trap and 1-inch from the bottom of the plastic bucket (Tip: Use the small tabs on the inside of the bucket as a guide for placing screws 1-inch from bottom) (Figures 14 and 15). The use of screws allows for the easy removal of the wire mesh screen to collect specimens that may fall below (Figure 16).
Figure 12. 5 inch wire mesh screen. Figure 13. Wire mesh screen in bucket.
Figure 14. Machine screws placed equal distance from eachother around the bucket trap.
Figure 15. Machine screws shown one inch from the bottom of the bucket trap.

Plastic Bucket Trap Protocol
Updated April 30, 2021 6
4. Insecticidal Strips Insecticidal strips (Figure 17) are placed in traps so that captured moths are killed quickly. This step is important for preserving specimen quality. The active ingredient in the strips is Dichlorvos, also known as DDVP and Vapona. The strip may be placed in the trap by: 1) attaching it to the side of the trap (as seen in Figure 10) or 2) placing it in the bottom of the trap or on top of the screen (if using the wire mesh screen modification).
Figure 17. Insectidal strip.
Figure 16. Wire mesh screen placed on machine screws inside bucket trap.

Plastic Bucket Trap Protocol
Updated April 30, 2021 7
Note: The strip should be handled with gloves. Refer to the MSDS document for this product for safety information. Store unopened strips in a freezer that is not used for food or drink. The CAPS program has listed a conservative length of effectiveness of 8 weeks for the insecticidal strips. The manufacturers of insecticidal strips list an effectiveness of 12 weeks. Rain, wind, high heat, and large numbers of moths may reduce the potency of the insecticidal strips. Use the 8-week interval as a starting point, but you may change the interval (not to exceed 12 weeks) based on your state’s climate. If you find that moths are badly damaged (indicating they were not killed quickly), you should change the strips more frequently. In very hot and/or humid environments, it may be necessary to use two insecticidal strips, especially if traps are catching large quantities of moths. 5. Label the Trap Attach a rain-proof printed label (Figure 18) or handwrite a note with a water-proof black marker on the bucket trap. It should indicate that the trap belongs to a state or a PPQ program. Include a phone number in case someone has concerns or questions about the trap. 6. Placement of Traps The traps function best when placed in the open, away from foliage, as illustrated in Figure 19. When hung under foliage, the 3-dimensional shape of the pheromone plume (chemical in the air) is disrupted and the effectiveness of the trap is reduced. Hang the traps from places such as greenhouse roofs or in the open using metal rods (see Fig. 19) or other materials.
Figures 18. Label on the trap’s lid. Figure 19. Trap set in open field and away from foliage.

Plastic Bucket Trap Protocol
Updated April 30, 2021 8
7. Trap Servicing In the field, transfer the caught moths to labeled paper sample envelopes and store them in a cooler (Figures 20 and 21). Place them in a freezer overnight to kill any surviving specimens. Prior to screening, specimens can be stored in the freezer or in a cardboard box at room temperature. Note: Do not place samples in airtight containers, like plastic bags. The moths will rot, quickly degrading specimen quality and making identification difficult or impossible.
8. Sample Submission Prior to shipping, screen the samples. Remove any moths vastly different from the target moth and all other arthropods (beetles, flies, spiders). Write the approximate number of moths being submitted on PPQ Form 391. See Specimen Submission Guidance for Lepidoptera for instructions on preparing and submitting samples.
Figure 20. Moths placed in a paper envelope.
Figure 22. Examples of small envelopes for shipping specimens.
Figures 21. Moths stored in a cooler.

Plastic Bucket Trap Protocol
Updated April 30, 2021 9
Tip: The ideal envelopes for shipping samples are 3 ½ x 6 ½ inches and are commonly referred to as “coin envelopes” in office supply stores (Figure 22). Smaller or larger envelopes are acceptable as well. 9. Trap Maintenance and Storage The general recommendation for maintenance of the plastic bucket traps is to wash them occasionally with soap and water to keep them clean, and to store them indoors, or at least protected from sun, rain, and dust. Keep the wire handle and the wire screen in good condition. The traps can be used multiple times and for multiple species since the chemicals degrade quickly in outdoor conditions. These traps usually last more than five years. Acknowledgments This protocol has been designed to aid in the detection of exotic moths of concern by giving instructions on how to use generic plastic bucket traps. Photographs for figures 1-10, 17-19 and 21-22 were taken by J. Brambila; trapping materials were supplied by R. Meagher. These instructions are primarily based on work by R. Meagher.
This aid was originally prepared by Julieta Brambila, Lisa Jackson (USDA APHIS PPQ), and Robert L. Meagher (USDA ARS CMAVE) on April 2010. This aid was revised on October 10, 2014 by Julieta Brambila, Lisa Jackson, Douglas Restom Gaskill, Andrew Derksen (USDA APHIS PPQ), and Robert L. Meagher (USDA ARS SEA). Changes include:
• In the Pheromone section, added an image of the septum lure. Also added images on
how to secure laminate lures into lure baskets with a paper clip. • In the Pheromone section, added instructions on labeling lure baskets to avoid cross-
contamination from lure residue. • In the Trap Modification section, noted that the sponge method may be easier and
more effective than the screen method. • In the Insecticidal strips, changed the recommended number of insecticidal strips to
use in the trap from two to one. • Changed the length of effectiveness of the insecticidal strips from 1 to 4 weeks to 8
weeks as a starting point; encourage states to evaluate what is effective in their climate.
• Added information on differing lengths of effectiveness of the insecticidal strips, depending on climate.
• In the Sample submission section, added two sample submission methods: sending moths in small envelopes or small boxes.
• In the Sample submission section, added images of the small manila envelopes.

Plastic Bucket Trap Protocol
Updated April 30, 2021 10
This aid was revised on April 30, 2021 by Heather Moylett, Todd Gilligan, and Christopher Pierce (USDA APHIS PPQ); and reviewed by Mark Hollister (USDA APHIS PPQ). Changes include: • In Trap Modifications to Improve Moth Specimen Quality section, expanded the
drain holes and wire screen option to include how to stabilize the screen within the trap. Added figures 11-16 to show modification. Photographs taken by Christopher Pierce.
• In Insecticidal Strips section: o Removed insecticidal strip placement option: “stapling it to a string and hung
inside of the trap (if large trap catches are experienced).” The two remaining placement options are simpler and effective for even large sample volumes.
o Simplified “length of efficacy” guidance to improve clarity. • In Trap Servicing section, removed plastic bags as an option for sample storage and
emphasized the use of paper envelopes for sample quality. Added figure 20. Photograph taken by Todd Gilligan.
• In Sample Submission section, replaced written guidance with link to updated sample submission document maintained on the CAPS website.


![Perlu Bantuan ? (Online)€¦ · Ta g s : Bucket Cor, Bucket Cor Murah, Harga Bucket Cor, Rental Bucket Cor, Sewa Bucket Cor [] Terkait Sewa Bar Cutter [… bar-cutter/] Sewa Bar](https://img.pdfslide.net/doc/110x75/6092e5e1719b2225ba12bf39/perlu-bantuan-online-ta-g-s-bucket-cor-bucket-cor-murah-harga-bucket-cor.jpg)