Embed Size (px)
Citation preview

www.novell.com/documentation
User GuidePlateSpin Forge® 3.1
November 19, 2012
Legal Notices
Novell, Inc., makes no representations or warranties with respect to the contents or use of this documentation, and specifically disclaims any express or implied warranties of merchantability or fitness for any particular purpose. Further, Novell, Inc., reserves the right to revise this publication and to make changes to its content, at any time, without obligation to notify any person or entity of such revisions or changes.
Further, Novell, Inc., makes no representations or warranties with respect to any software, and specifically disclaims any express or implied warranties of merchantability or fitness for any particular purpose. Further, Novell, Inc., reserves the right to make changes to any and all parts of Novell software, at any time, without any obligation to notify any person or entity of such changes.
Any products or technical information provided under this Agreement may be subject to U.S. export controls and the trade laws of other countries. You agree to comply with all export control regulations and to obtain any required licenses or classification to export, re-export or import deliverables. You agree not to export or re-export to entities on the current U.S. export exclusion lists or to any embargoed or terrorist countries as specified in the U.S. export laws. You agree to not use deliverables for prohibited nuclear, missile, or chemical biological weaponry end uses. See the Novell International Trade Services Web page (http://www.novell.com/info/exports/) for more information on exporting Novell software. Novell assumes no responsibility for your failure to obtain any necessary export approvals.
Copyright © 2009-2011 Novell, Inc. All rights reserved. No part of this publication may be reproduced, photocopied, stored on a retrieval system, or transmitted without the express written consent of the publisher.
Novell, Inc.1800 South Novell PlaceProvo, UT 84606U.S.A.www.novell.com
Online Documentation: To access the latest online documentation for this and other Novell products, see the Novell Documentation Web page (http://www.novell.com/documentation).
Novell Trademarks
For Novell trademarks, see the Novell Trademark and Service Mark list (http://www.novell.com/company/legal/trademarks/tmlist.html).
Third-Party Materials
All third-party trademarks are the property of their respective owners.
Contents
About This Guide 7
1 Product Overview 9
1.1 About PlateSpin Forge . . . . . . . . . . . . . . . . . . . . . . . . . . . . . . . . . . . . . . . . . . . . . . . . . . . . . . . . . . . . . 91.2 Supported Configurations . . . . . . . . . . . . . . . . . . . . . . . . . . . . . . . . . . . . . . . . . . . . . . . . . . . . . . . . . . 9
1.2.1 Supported Workloads . . . . . . . . . . . . . . . . . . . . . . . . . . . . . . . . . . . . . . . . . . . . . . . . . . . . . . 91.3 Security and Privacy . . . . . . . . . . . . . . . . . . . . . . . . . . . . . . . . . . . . . . . . . . . . . . . . . . . . . . . . . . . . . 10
1.3.1 Security of Workload Data in Transmission. . . . . . . . . . . . . . . . . . . . . . . . . . . . . . . . . . . . . 101.3.2 Security of Credentials. . . . . . . . . . . . . . . . . . . . . . . . . . . . . . . . . . . . . . . . . . . . . . . . . . . . . 111.3.3 User Authorization and Authentication . . . . . . . . . . . . . . . . . . . . . . . . . . . . . . . . . . . . . . . . 11
1.4 Performance. . . . . . . . . . . . . . . . . . . . . . . . . . . . . . . . . . . . . . . . . . . . . . . . . . . . . . . . . . . . . . . . . . . . 111.4.1 About Product Performance Characteristics . . . . . . . . . . . . . . . . . . . . . . . . . . . . . . . . . . . . 111.4.2 Data Compression . . . . . . . . . . . . . . . . . . . . . . . . . . . . . . . . . . . . . . . . . . . . . . . . . . . . . . . . 121.4.3 Bandwidth Throttling . . . . . . . . . . . . . . . . . . . . . . . . . . . . . . . . . . . . . . . . . . . . . . . . . . . . . . 121.4.4 RPO, RTO, and TTO Specifications . . . . . . . . . . . . . . . . . . . . . . . . . . . . . . . . . . . . . . . . . . 12
2 Application Configuration 13
2.1 Product Licensing. . . . . . . . . . . . . . . . . . . . . . . . . . . . . . . . . . . . . . . . . . . . . . . . . . . . . . . . . . . . . . . . 132.1.1 Obtaining a License Activation Code. . . . . . . . . . . . . . . . . . . . . . . . . . . . . . . . . . . . . . . . . . 132.1.2 Online License Activation . . . . . . . . . . . . . . . . . . . . . . . . . . . . . . . . . . . . . . . . . . . . . . . . . . 132.1.3 Offline License Activation . . . . . . . . . . . . . . . . . . . . . . . . . . . . . . . . . . . . . . . . . . . . . . . . . . 14
2.2 Setting Up User Authorization and Authentication . . . . . . . . . . . . . . . . . . . . . . . . . . . . . . . . . . . . . . . 142.2.1 About PlateSpin Forge User Authorization and Authentication . . . . . . . . . . . . . . . . . . . . . . 152.2.2 Managing PlateSpin Forge Access and Permissions . . . . . . . . . . . . . . . . . . . . . . . . . . . . . 162.2.3 Managing PlateSpin Forge Security Groups and Workload Permissions . . . . . . . . . . . . . . 18
2.3 Access and Communication Requirements across your Protection Network . . . . . . . . . . . . . . . . . . 192.3.1 Access and Communication Requirements for Workloads . . . . . . . . . . . . . . . . . . . . . . . . . 192.3.2 Protection Across Public and Private Networks Through NAT . . . . . . . . . . . . . . . . . . . . . . 212.3.3 Optimizing Data Transfer over WAN Connections (File-Based and VSS
Replications) . . . . . . . . . . . . . . . . . . . . . . . . . . . . . . . . . . . . . . . . . . . . . . . . . . . . . . . . . . . . 212.3.4 Imposing Replication Blackout Windows . . . . . . . . . . . . . . . . . . . . . . . . . . . . . . . . . . . . . . . 222.3.5 Configuring the Application to Function Across NAT. . . . . . . . . . . . . . . . . . . . . . . . . . . . . . 22
2.4 Configuring PlateSpin Forge Default Options . . . . . . . . . . . . . . . . . . . . . . . . . . . . . . . . . . . . . . . . . . 232.4.1 Setting Up Automatic E-Mail Notifications of Events and Reports. . . . . . . . . . . . . . . . . . . . 232.4.2 Language Setup for International Versions of PlateSpin Forge. . . . . . . . . . . . . . . . . . . . . . 252.4.3 Configuring the Product Behavior through XML Configuration Parameters . . . . . . . . . . . . 262.4.4 Restarting the PlateSpin Forge Server to Apply System Changes . . . . . . . . . . . . . . . . . . . 26
3 Appliance Setup and Maintenance 27
3.1 Setting up Appliance Networking . . . . . . . . . . . . . . . . . . . . . . . . . . . . . . . . . . . . . . . . . . . . . . . . . . . . 273.1.1 Setting up Appliance Host Networking . . . . . . . . . . . . . . . . . . . . . . . . . . . . . . . . . . . . . . . . 27
3.2 Relocating PlateSpin Forge and Reassigning Its IP Addresses . . . . . . . . . . . . . . . . . . . . . . . . . . . . 283.2.1 Forge Relocation Procedure for Appliance Version 2 . . . . . . . . . . . . . . . . . . . . . . . . . . . . . 283.2.2 Forge Relocation Procedure for Appliance Version 1 . . . . . . . . . . . . . . . . . . . . . . . . . . . . . 32
3.3 Using External Storage Solutions with PlateSpin Forge . . . . . . . . . . . . . . . . . . . . . . . . . . . . . . . . . . 323.3.1 Using Forge with SAN Storage . . . . . . . . . . . . . . . . . . . . . . . . . . . . . . . . . . . . . . . . . . . . . . 333.3.2 Adding a SAN LUN to Forge . . . . . . . . . . . . . . . . . . . . . . . . . . . . . . . . . . . . . . . . . . . . . . . . 34
3.4 PlateSpin Forge Appliance Maintenance . . . . . . . . . . . . . . . . . . . . . . . . . . . . . . . . . . . . . . . . . . . . . . 34
Contents 3
4 Con
3.4.1 Accessing and Working with the Forge Management VM in the Appliance Host . . . . . . . . 343.5 Upgrading PlateSpin Forge . . . . . . . . . . . . . . . . . . . . . . . . . . . . . . . . . . . . . . . . . . . . . . . . . . . . . . . . 38
3.5.1 Before Starting the Upgrade . . . . . . . . . . . . . . . . . . . . . . . . . . . . . . . . . . . . . . . . . . . . . . . . 383.5.2 Summary of Upgrade Tasks . . . . . . . . . . . . . . . . . . . . . . . . . . . . . . . . . . . . . . . . . . . . . . . . 383.5.3 Forge Upgrade Procedure . . . . . . . . . . . . . . . . . . . . . . . . . . . . . . . . . . . . . . . . . . . . . . . . . . 39
3.6 Resetting Forge to Factory Defaults . . . . . . . . . . . . . . . . . . . . . . . . . . . . . . . . . . . . . . . . . . . . . . . . . 40
4 Up and Running 45
4.1 Launching the PlateSpin Forge Web Client . . . . . . . . . . . . . . . . . . . . . . . . . . . . . . . . . . . . . . . . . . . . 454.2 Elements of the PlateSpin Forge Web Client . . . . . . . . . . . . . . . . . . . . . . . . . . . . . . . . . . . . . . . . . . . 46
4.2.1 Navigation Bar . . . . . . . . . . . . . . . . . . . . . . . . . . . . . . . . . . . . . . . . . . . . . . . . . . . . . . . . . . . 474.2.2 Visual Summary Panel . . . . . . . . . . . . . . . . . . . . . . . . . . . . . . . . . . . . . . . . . . . . . . . . . . . . 474.2.3 Tasks and Events Panel . . . . . . . . . . . . . . . . . . . . . . . . . . . . . . . . . . . . . . . . . . . . . . . . . . . 48
4.3 Workloads and Workload Commands . . . . . . . . . . . . . . . . . . . . . . . . . . . . . . . . . . . . . . . . . . . . . . . . 484.3.1 Workload Protection and Recovery Commands . . . . . . . . . . . . . . . . . . . . . . . . . . . . . . . . . 49
4.4 Using Workload Protection Features through the PlateSpin Forge Web Services API . . . . . . . . . . . 504.5 Managing Multiple Instances of PlateSpin Forge. . . . . . . . . . . . . . . . . . . . . . . . . . . . . . . . . . . . . . . . 50
4.5.1 Using the PlateSpin Forge Management Console. . . . . . . . . . . . . . . . . . . . . . . . . . . . . . . . 504.5.2 About PlateSpin Forge Management Console Cards . . . . . . . . . . . . . . . . . . . . . . . . . . . . . 514.5.3 Adding Instances of PlateSpin Forge to the Management Console . . . . . . . . . . . . . . . . . . 524.5.4 Managing Cards on the Management Console . . . . . . . . . . . . . . . . . . . . . . . . . . . . . . . . . . 52
4.6 Generating Workload and Workload Protection Reports . . . . . . . . . . . . . . . . . . . . . . . . . . . . . . . . . . 53
5 Workload Protection 55
5.1 Basic Workflow for Workload Protection and Recovery . . . . . . . . . . . . . . . . . . . . . . . . . . . . . . . . . . . 555.2 Adding a Workload for Protection . . . . . . . . . . . . . . . . . . . . . . . . . . . . . . . . . . . . . . . . . . . . . . . . . . . 565.3 Configuring Protection Details and Preparing the Replication . . . . . . . . . . . . . . . . . . . . . . . . . . . . . . 58
5.3.1 Workload Protection Details . . . . . . . . . . . . . . . . . . . . . . . . . . . . . . . . . . . . . . . . . . . . . . . . 585.4 Starting the Workload Protection . . . . . . . . . . . . . . . . . . . . . . . . . . . . . . . . . . . . . . . . . . . . . . . . . . . . 605.5 Failover . . . . . . . . . . . . . . . . . . . . . . . . . . . . . . . . . . . . . . . . . . . . . . . . . . . . . . . . . . . . . . . . . . . . . . . 61
5.5.1 Failure Detection . . . . . . . . . . . . . . . . . . . . . . . . . . . . . . . . . . . . . . . . . . . . . . . . . . . . . . . . . 615.5.2 Performing a Failover . . . . . . . . . . . . . . . . . . . . . . . . . . . . . . . . . . . . . . . . . . . . . . . . . . . . . 625.5.3 Testing the Recovery Workload and the Failover Functionality. . . . . . . . . . . . . . . . . . . . . . 62
5.6 Failback . . . . . . . . . . . . . . . . . . . . . . . . . . . . . . . . . . . . . . . . . . . . . . . . . . . . . . . . . . . . . . . . . . . . . . . 635.6.1 Automated Failback to a Virtual Machine . . . . . . . . . . . . . . . . . . . . . . . . . . . . . . . . . . . . . . 635.6.2 Semi-Automated Failback to a Physical Machine . . . . . . . . . . . . . . . . . . . . . . . . . . . . . . . . 665.6.3 Semi-Automated Failback to a Virtual Machine. . . . . . . . . . . . . . . . . . . . . . . . . . . . . . . . . . 66
5.7 Advanced Workload Protection Topics . . . . . . . . . . . . . . . . . . . . . . . . . . . . . . . . . . . . . . . . . . . . . . . 665.7.1 Protecting Windows Clusters. . . . . . . . . . . . . . . . . . . . . . . . . . . . . . . . . . . . . . . . . . . . . . . . 675.7.2 Linux Failback to a Paravirtualized VM on Xen-on-SLES . . . . . . . . . . . . . . . . . . . . . . . . . . 67
6 Auxiliary Tools for Working with Physical Machines 71
6.1 Analyzing Workloads with PlateSpin Analyzer (Windows) . . . . . . . . . . . . . . . . . . . . . . . . . . . . . . . . . 716.2 Managing Device Drivers . . . . . . . . . . . . . . . . . . . . . . . . . . . . . . . . . . . . . . . . . . . . . . . . . . . . . . . . . . 72
6.2.1 Packaging Device Drivers for Windows Systems . . . . . . . . . . . . . . . . . . . . . . . . . . . . . . . . 726.2.2 Packaging Device Drivers for Linux Systems . . . . . . . . . . . . . . . . . . . . . . . . . . . . . . . . . . . 736.2.3 Uploading Drivers to the PlateSpin Forge Device Driver Database. . . . . . . . . . . . . . . . . . . 73
7 Essentials of Workload Protection 77
7.1 Guidelines for Workload Credentials . . . . . . . . . . . . . . . . . . . . . . . . . . . . . . . . . . . . . . . . . . . . . . . . . 777.2 Transfer Methods . . . . . . . . . . . . . . . . . . . . . . . . . . . . . . . . . . . . . . . . . . . . . . . . . . . . . . . . . . . . . . . . 787.3 Protection Tiers . . . . . . . . . . . . . . . . . . . . . . . . . . . . . . . . . . . . . . . . . . . . . . . . . . . . . . . . . . . . . . . . . 787.4 Recovery Points . . . . . . . . . . . . . . . . . . . . . . . . . . . . . . . . . . . . . . . . . . . . . . . . . . . . . . . . . . . . . . . . . 79
tents

7.5 Initial Replication Method (Full and Incremental) . . . . . . . . . . . . . . . . . . . . . . . . . . . . . . . . . . . . . . . . 807.6 Service and Daemon Control . . . . . . . . . . . . . . . . . . . . . . . . . . . . . . . . . . . . . . . . . . . . . . . . . . . . . . . 817.7 Using Freeze and Thaw Scripts for Every Replication (Linux) . . . . . . . . . . . . . . . . . . . . . . . . . . . . . . 817.8 Volumes . . . . . . . . . . . . . . . . . . . . . . . . . . . . . . . . . . . . . . . . . . . . . . . . . . . . . . . . . . . . . . . . . . . . . . . 827.9 Networking . . . . . . . . . . . . . . . . . . . . . . . . . . . . . . . . . . . . . . . . . . . . . . . . . . . . . . . . . . . . . . . . . . . . . 847.10 Registering Physical Machines with PlateSpin Forge for Failback. . . . . . . . . . . . . . . . . . . . . . . . . . . 84
7.10.1 Registering Target Physical Machines . . . . . . . . . . . . . . . . . . . . . . . . . . . . . . . . . . . . . . . . 85
8 Troubleshooting 87
8.1 Troubleshooting Workload Inventory (Windows) . . . . . . . . . . . . . . . . . . . . . . . . . . . . . . . . . . . . . . . . 878.1.1 Performing Connectivity Tests. . . . . . . . . . . . . . . . . . . . . . . . . . . . . . . . . . . . . . . . . . . . . . . 888.1.2 Disabling AntiVirus Software . . . . . . . . . . . . . . . . . . . . . . . . . . . . . . . . . . . . . . . . . . . . . . . . 908.1.3 Enabling File/Share Permissions and Access . . . . . . . . . . . . . . . . . . . . . . . . . . . . . . . . . . . 90
8.2 Troubleshooting Workload Inventory (Linux) . . . . . . . . . . . . . . . . . . . . . . . . . . . . . . . . . . . . . . . . . . . 918.3 Troubleshooting Problems during the Prepare Replication Command (Windows) . . . . . . . . . . . . . . 91
8.3.1 Group Policy and User Rights . . . . . . . . . . . . . . . . . . . . . . . . . . . . . . . . . . . . . . . . . . . . . . . 918.4 Troubleshooting Workload Replication . . . . . . . . . . . . . . . . . . . . . . . . . . . . . . . . . . . . . . . . . . . . . . . 928.5 Generating and Viewing Diagnostic Reports . . . . . . . . . . . . . . . . . . . . . . . . . . . . . . . . . . . . . . . . . . . 938.6 Post-Protection Workload Cleanup . . . . . . . . . . . . . . . . . . . . . . . . . . . . . . . . . . . . . . . . . . . . . . . . . . 94
8.6.1 Cleaning Up Windows Workloads . . . . . . . . . . . . . . . . . . . . . . . . . . . . . . . . . . . . . . . . . . . . 948.6.2 Cleaning Up Linux Workloads . . . . . . . . . . . . . . . . . . . . . . . . . . . . . . . . . . . . . . . . . . . . . . . 948.6.3 Removing Workloads. . . . . . . . . . . . . . . . . . . . . . . . . . . . . . . . . . . . . . . . . . . . . . . . . . . . . . 95
Glossary 97
Contents 5

6 PlateSpin Forge 3.1 User Guide
About This Guide
This guide provides information about using PlateSpin Forge.
Chapter 1, “Product Overview,” on page 9 Chapter 4, “Up and Running,” on page 45 Chapter 5, “Workload Protection,” on page 55 Chapter 6, “Auxiliary Tools for Working with Physical Machines,” on page 71 Chapter 7, “Essentials of Workload Protection,” on page 77 Chapter 8, “Troubleshooting,” on page 87 “Glossary” on page 97
Audience
This guide is intended for IT staff, such as data center administrators and operators, who use PlateSpin Forge in their ongoing workload protection projects.
Feedback
We want to hear your comments and suggestions about this manual and the other documentation included with this product. Please use the User Comments feature at the bottom of each page of the online documentation, or submit your comments through the Novell Documentation Feedback site (http://www.novell.com/documentation/feedback.html).
Additional Documentation
This guide is part of the PlateSpin Forge documentation set.
For a complete list of publications supporting this release, visit the PlateSpin Forge 3 Online Documentation Web Site (http://www.novell.com/documentation/platespin_forge_3).
Documentation Updates
The most recent version of this guide can be found at PlateSpin Protect 10 Online Documentation Web Site (http://www.novell.com/documentation/platespin_protect_10).
Additional Resources
We encourage you to use the following additional resources on the Web:
Novell User Forum (http://forums.novell.com): A Web-based community with a variety of discussion topics.
Novell Knowledgebase (http://www.novell.com/support): A collection of in-depth technical articles.
About This Guide 7

Technical Support
Telephone (North America): +1-877-528-3774 (1 87 PlateSpin) Telephone (global): +1-416-203-4799 E-mail: [email protected]
You can also visit the PlateSpin Technical Support Web site (http://www.platespin.com/support).
8 PlateSpin Forge 3.1 User Guide

1 1Product Overview
Section 1.1, “About PlateSpin Forge,” on page 9 Section 1.2, “Supported Configurations,” on page 9 Section 1.3, “Security and Privacy,” on page 10 Section 1.4, “Performance,” on page 11
1.1 About PlateSpin ForgePlateSpin Forge is a consolidated recovery hardware appliance that protects physical and virtual workloads (operating systems, middleware, and data) by using embedded virtualization technology. If there is a production server outage or disaster, workloads can be rapidly powered on within the PlateSpin Forge recovery environment and continue to run as normal until the production environment is restored.
PlateSpin Forge enables you to:
Simultaneously protect multiple workloads (10 to 25, depending on the model) Test the failover workload without interfering with your production environment Quickly recover workloads upon failure Take advantage of existing external storage solutions, such as SANs
With internal, prepackaged storage, Forge has a total storage capacity of 3.5 terabytes, although the capacity is almost unlimited when external storage configurations are used by adding iSCSI or Fibre Channel cards.
1.2 Supported Configurations Section 1.2.1, “Supported Workloads,” on page 9
1.2.1 Supported Workloads
PlateSpin Forge supports both Windows and Linux workloads.
Table 1-1 Supported Windows Workloads
Operating System Remarks
Windows 7 Windows 7 Home Edition is not supported
Windows Server 2008 R2 Including domain controller (DC) systems and Small Business Server (SBS) editions
Product Overview 9

Supported international versions (Windows): French, German, Japanese, Chinese Traditional, and Chinese Simplified
Table 1-2 Supported Linux Workloads
Supported international versions (Linux): All international versions of these Linux systems are supported.
1.3 Security and PrivacyPlateSpin Forge provides several features to help you safeguard your data and increase security.
Section 1.3.1, “Security of Workload Data in Transmission,” on page 10 Section 1.3.2, “Security of Credentials,” on page 11 Section 1.3.3, “User Authorization and Authentication,” on page 11
1.3.1 Security of Workload Data in Transmission
To make the transfer of your workload data more secure, you can configure the workload protection to encrypt the data. When encryption is enabled, data replicated over the network is encrypted by using AES (Advanced Encryption Standard).
You can enable or disable encryption for each workload protection, with encryption being a parameter of workload protection details. See “Workload Protection Details” on page 58.
Windows Server 2008 Including domain controller (DC) systems and Small Business Server (SBS) editions
Windows Vista Business, Enterprise, and Ultimate editions; SP1 and later
Windows Server 2003 Including domain controller (DC) systems and Small Business Server (SBS) editions
Windows XP Professional
Windows Server 2000
Windows clusters
Operating System
Open Enterprise Server 2, SP2 and SP3
Oracle Enterprise Linux (OEL) 5.3, 5.4
SUSE Linux Enterprise Server (SLES) 9, 10, 11
Red Hat Enterprise Linux (RHEL) 4, 5
Operating System Remarks
10 PlateSpin Forge 3.1 User Guide
1.3.2 Security of Credentials
Credentials that you use to access various systems (such as workloads and failback targets) are stored in the PlateSpin Forge database and are therefore covered by the same security safeguards that you have in place for your Forge VM.
In addition, credentials are included within diagnostics, which are accessible to accredited users. You should ensure that workload protection projects are handled by authorized staff.
1.3.3 User Authorization and Authentication
PlateSpin Forge provides a comprehensive and secure user authorization and authentication mechanism based on user roles, and controls application access and operations that users can perform. See Section 2.2, “Setting Up User Authorization and Authentication,” on page 14.
1.4 Performance Section 1.4.1, “About Product Performance Characteristics,” on page 11 Section 1.4.2, “Data Compression,” on page 12 Section 1.4.3, “Bandwidth Throttling,” on page 12 Section 1.4.4, “RPO, RTO, and TTO Specifications,” on page 12
1.4.1 About Product Performance Characteristics
The performance characteristics of your PlateSpin Forge product depend on a number of factors, including:
Hardware and software profiles of your source workloads The specifics of your network bandwidth, configuration, and conditions The number of protected workloads The number of volumes under protection The size of volumes under protection File density (number of files per unit of capacity) on your source workloads’ volumes Source I/O levels (how busy your workloads are) The number of concurrent replications Whether data encryption is enabled or disabled Whether data compression is enabled or disabled
For large-scale workload protection plans, you should perform a test protection of a typical workload, run some replications, and use the result as a benchmark, fine-tuning your metrics regularly throughout the project.
Product Overview 11

1.4.2 Data Compression
If necessary, PlateSpin Forge can compress the workload data before transferring it over the network. This enables you to reduce the overall amount of data transferred during replications.
Compression ratios depend on the type of files on a source workload’s volumes, and might vary from approximately 0.9 (100MB of data compressed to 90 MB) to approximately 0.5 (100MB compressed to 50MB).
NOTE: Data compression utilizes the source workload’s processor power.
Data Compression can be configured per protection or per Protection Tier. See “Protection Tiers” on page 78.
1.4.3 Bandwidth Throttling
PlateSpin Forge enables you to control the amount of available bandwidth consumed by direct source-to-target communication over the course of workload protection; you can specify a throughput rate for each protection schedule. This provides a way to prevent replication traffic from congesting your production network and reduces the overall load of your PlateSpin Forge Server.
Bandwidth throttling is a parameter of a workload protection contact’s Protection Tier. See “Protection Tiers” on page 78.
1.4.4 RPO, RTO, and TTO Specifications
Recovery Point Objective (RPO): Describes the acceptable amount of data loss measured in time. The RPO is determined by the time between incremental replications of a protected workload and is affected by current utilization levels of PlateSpin Forge, the rate and scope of changes on the workload, and your network speed.
Recovery Time Objective (RTO): Describes the time required for a failover operation (bringing a workload replica online to temporarily replace a protected production workload).The RTO for failing a workload over to its virtual replica is affected by the time it takes to configure and execute the failover operation (10 to 45 minutes). See “Failover” on page 61.
Test Time Objective (TTO): Describes the time required for testing disaster recovery with some confidence of service restoration. Use the Test Failover feature to run through different scenarios and generate benchmark data.
Among factors that have an impact on RPO, RTO, and TTO is the number of required concurrent failover operations; a single failed-over workload has more memory and CPU resources than multiple failed-over workloads, which share the resources of their underlying infrastructure.
You should get average failover times for workloads in your environment by doing test failovers at various times, then use them as benchmark data in your overall data recovery plans. See “Generating Workload and Workload Protection Reports” on page 53.
12 PlateSpin Forge 3.1 User Guide

2 2Application Configuration
Section 2.1, “Product Licensing,” on page 13 Section 2.2, “Setting Up User Authorization and Authentication,” on page 14 Section 2.3, “Access and Communication Requirements across your Protection Network,” on
page 19 Section 2.4, “Configuring PlateSpin Forge Default Options,” on page 23
2.1 Product LicensingThis section provides information about activating your PlateSpin Forge software.
Section 2.1.1, “Obtaining a License Activation Code,” on page 13 Section 2.1.2, “Online License Activation,” on page 13 Section 2.1.3, “Offline License Activation,” on page 14
2.1.1 Obtaining a License Activation Code
For product licensing, you must have a license activation code. If you do not have a license activation code, request one through the Novell Customer Center Web site (http://www.novell.com/customercenter/). A license activation code will be e-mailed to you.
The first time you log into PlateSpin Forge, the browser is automatically redirected to the License Activation page. You have two options for activating your product license: Online License Activation or Offline License Activation.
2.1.2 Online License Activation
For online activation, PlateSpin Forge must have Internet access.
NOTE: HTTP proxies might cause failures during online activation. Offline activation is recommended for users in HTTP proxy environments.
1 In the PlateSpin Forge Web Client, click Settings > Licenses > Add License. The License Activation page is displayed.
Application Configuration 13

2 Select Online Activation, specify the e-mail address that you provided when placing your order and the activation code you received, then click Activate.The system obtains the required license over the Internet and activates the product.
2.1.3 Offline License Activation
For offline activation, you obtain a license key over the Internet by using a machine that has Internet access.
NOTE: To obtain a license key, you must have a Novell account. If you are an existing PlateSpin customer and you don’t have a Novell account, you must first create one. Use your existing PlateSpin username (a valid e-mail address registered with PlateSpin) as input for your Novell account username.
1 Click Settings > License, then click Add license. The License Activation page is displayed.2 Select Offline Activation.3 Use your hardware ID to create a license key file at the PlateSpin Product Activation Web Site
(http://www.platespin.com/productactivation/ActivateOrder.aspx). This also requires a user name, password, the e-mail address that you provided when placing your order and the activation code you received.
4 Type the path to the file or browse to its location and click Activate.The License Key file is saved and the product is activated based on this file.
2.2 Setting Up User Authorization and Authentication Section 2.2.1, “About PlateSpin Forge User Authorization and Authentication,” on page 15 Section 2.2.2, “Managing PlateSpin Forge Access and Permissions,” on page 16 Section 2.2.3, “Managing PlateSpin Forge Security Groups and Workload Permissions,” on
page 18
14 PlateSpin Forge 3.1 User Guide

2.2.1 About PlateSpin Forge User Authorization and Authentication
The user authorization and authentication mechanism of PlateSpin Forge is based on user roles, and controls application access and operations that users can perform. The mechanism is based on Integrated Windows Authentication (IWA) and its interaction with Internet Information Services (IIS).
The role-based access mechanism enables you to implement user authorization and authentication in several ways:
Restricting application access to specific users Allowing only specific operations to specific users Granting each user access to specific workloads for performing operations defined by the
assigned role
Every PlateSpin Forge instance has the following set of operating system-level user groups that define related functional roles:
Workload Protection Administrators: Have unlimited access to all features and functions of the application. A local administrator is implicitly part of this group.
Workload Protection Power Users: Have access to a limited subset of system features and functions, sufficient to maintain day-to-day operation.
Workload Protection Operators: Have access to most features and functions of the application, with some limitations such as restrictions in the capability to modify system settings related to licensing and security.
When a user attempts to connect to PlateSpin Forge, the credentials provided through the browser are validated by IIS. If the user is not a member of one of the Workload Protection roles, connection is refused. If the user is a local administrator on the Forge VM, that account is implicitly regarded as a Workload Protection Administrator.
Table 2-1 Workload Protection Roles and Permission Details
Workload Protection Role DetailsAdministrators Power Users Operators
Add Workload Allowed Allowed Denied
Remove Workload Allowed Allowed Denied
Configure Protection Allowed Allowed Denied
Prepare Replication Allowed Allowed Denied
Run (Full) Replication Allowed Allowed Allowed
Run Incremental Allowed Allowed Allowed
Pause/Resume Schedule Allowed Allowed Allowed
Test Failover Allowed Allowed Allowed
Failover Allowed Allowed Allowed
Cancel Failover Allowed Allowed Allowed
Abort Allowed Allowed Allowed
Dismiss (Task) Allowed Allowed Allowed
Application Configuration 15

In addition, PlateSpin Forge software provides a mechanism based on security groups that define which OS-level users should have access to which workloads in the PlateSpin Forge workload inventory.
Setting up a proper role-based access to PlateSpin Forge involves two tasks:
1. Adding OS-level users to the required user groups detailed in Table 2-1.2. Creating application-level security groups that associate these users with specified workloads.
2.2.2 Managing PlateSpin Forge Access and Permissions
“Accessing the PlateSpin Forge Server Administration Interface” on page 16 “Adding PlateSpin Forge Users” on page 17 “Assigning a Workload Protection Role to a PlateSpin Forge User” on page 17 “Changing the PlateSpin Forge Administrator Password” on page 18
Accessing the PlateSpin Forge Server Administration Interface
To access the Web User Interface for Microsoft Windows Server administration:
1 Open a Web browser and go to https://IP_address:8098Replace IP_address with the IP address of the Forge VM.
Your browser connects to the server and displays the default Welcome page.
Settings (All) Allowed Denied Denied
Run Reports/Diagnostics Allowed Allowed Allowed
Failback Allowed Denied Denied
Reprotect Allowed Allowed Denied
Workload Protection Role Details Administrators Power Users Operators
16 PlateSpin Forge 3.1 User Guide

Figure 2-1 Web User Interface for Microsoft Windows Server Administration
Adding PlateSpin Forge Users
Use the procedure in this section to add a new PlateSpin Forge user.
If you want to grant specific role permissions to an existing user on the Forge VM, see “Assigning a Workload Protection Role to a PlateSpin Forge User” on page 17.
1 Access your Forge VM’s Server Administration Web User Interface. See “Accessing the PlateSpin Forge Server Administration Interface” on page 16.
2 Click Users > Local Users.The Local Users on Server page opens.
3 Under Tasks, click New, then type a username, a password, and other optional information. 4 Click OK.
The Local Users on Server page reloads.
You can now assign a workload protection role to the newly created user. See “Assigning a Workload Protection Role to a PlateSpin Forge User” on page 17.
Assigning a Workload Protection Role to a PlateSpin Forge User
Before assigning a role to a user, determine the collection of permissions that best suits that user. See Table 2-1, “Workload Protection Roles and Permission Details,” on page 15.
1 Access your Forge VM’s Server Administration Web User Interface. See “Accessing the PlateSpin Forge Server Administration Interface” on page 16.
2 Click Users > Local Groups.The Local Groups on Server page opens.
3 In the list of groups, select the required workload protection group, then click Properties under Tasks.The corresponding group property page opens.
Application Configuration 17
4 Click Members, select the required user from the list, and then click Add.The selected user is added to the Members list.
5 Click OK.
You can now add this user to a PlateSpin Forge security group and associate a specified collection of workloads. See “Managing PlateSpin Forge Security Groups and Workload Permissions” on page 18.
Changing the PlateSpin Forge Administrator Password
To change the password of the Forge VM’s Administrator account:
1 Access your Forge VM’s Server Administration Web User Interface. See “Accessing the PlateSpin Forge Server Administration Interface” on page 16.
2 Click Set Administrator Password, type the new password, confirm it, then click OK.
2.2.3 Managing PlateSpin Forge Security Groups and Workload Permissions
PlateSpin Forge provides a granular application-level access mechanism that allows specific users to carry out specific workload protection tasks on specified workloads. This is accomplished by setting up security groups.
1 Assign a PlateSpin Forge user a Workload Protection Role whose permissions best suit that role in your organization. See “Assigning a Workload Protection Role to a PlateSpin Forge User” on page 17.
2 Access PlateSpin Forge as an administrator by using the PlateSpin Forge Web Client, then click Settings > Permissions.The Security Groups page opens:
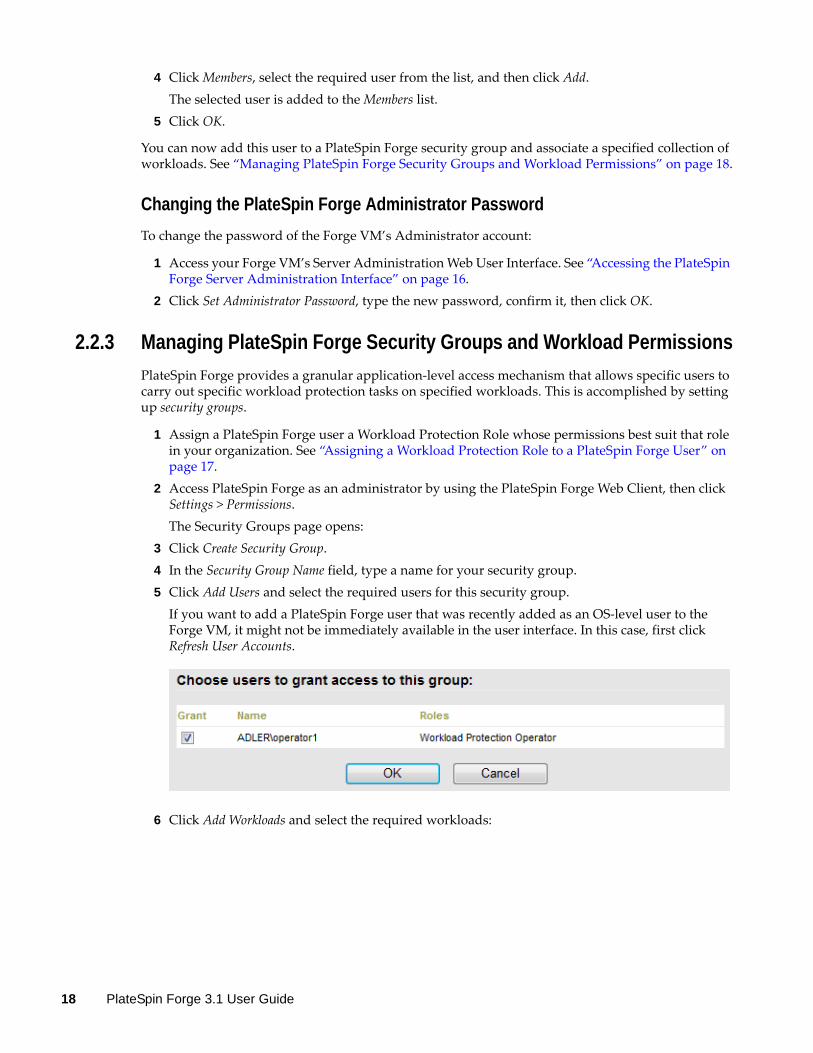
3 Click Create Security Group.4 In the Security Group Name field, type a name for your security group.5 Click Add Users and select the required users for this security group.
If you want to add a PlateSpin Forge user that was recently added as an OS-level user to the Forge VM, it might not be immediately available in the user interface. In this case, first click Refresh User Accounts.
6 Click Add Workloads and select the required workloads:
18 PlateSpin Forge 3.1 User Guide
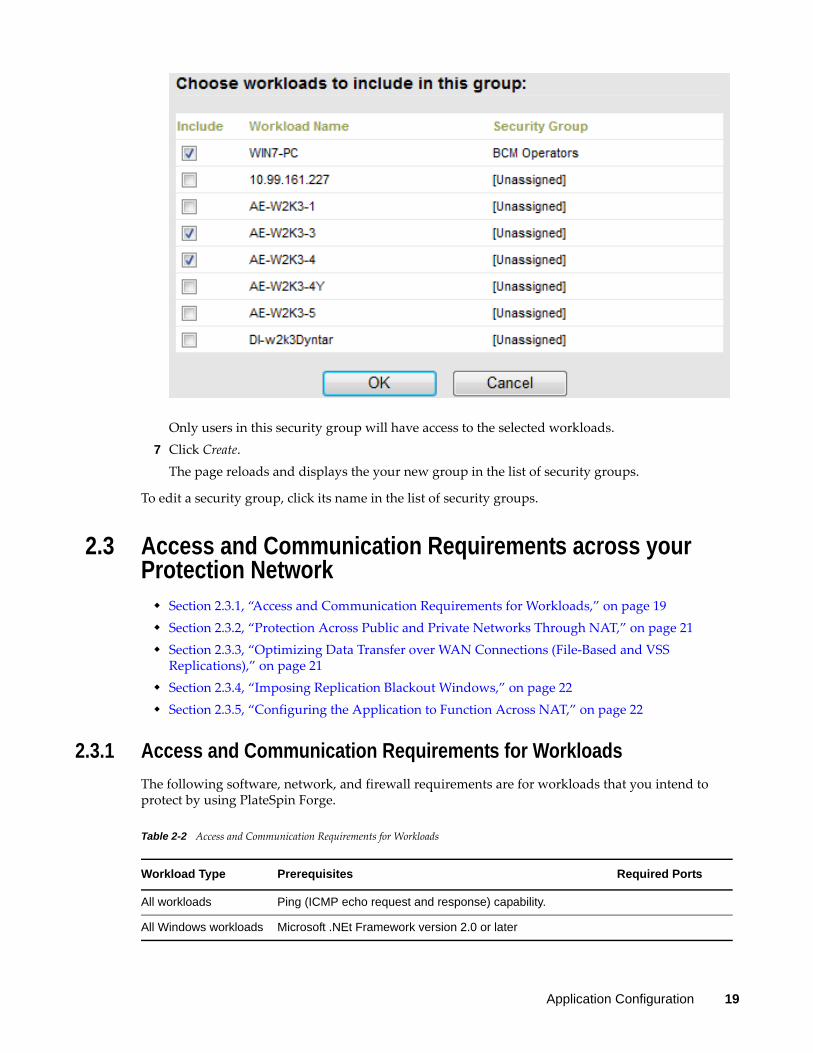
Only users in this security group will have access to the selected workloads.7 Click Create.
The page reloads and displays the your new group in the list of security groups.
To edit a security group, click its name in the list of security groups.
2.3 Access and Communication Requirements across your Protection Network Section 2.3.1, “Access and Communication Requirements for Workloads,” on page 19 Section 2.3.2, “Protection Across Public and Private Networks Through NAT,” on page 21 Section 2.3.3, “Optimizing Data Transfer over WAN Connections (File-Based and VSS
Replications),” on page 21 Section 2.3.4, “Imposing Replication Blackout Windows,” on page 22 Section 2.3.5, “Configuring the Application to Function Across NAT,” on page 22
2.3.1 Access and Communication Requirements for Workloads
The following software, network, and firewall requirements are for workloads that you intend to protect by using PlateSpin Forge.
Table 2-2 Access and Communication Requirements for Workloads
Workload Type Prerequisites Required Ports
All workloads Ping (ICMP echo request and response) capability.
All Windows workloads Microsoft .NEt Framework version 2.0 or later
Application Configuration 19

Windows 7;
Windows Server 2008;
Windows Vista
Built-in Administrator or domain admin account credentials (membership only in the local Administrators group is insufficient). On Vista, the account must be enabled (it is disabled by default).
The Windows Firewall configured with the following Inbound Rules enabled and set to Allow:
File and Printer Sharing (Echo Request - ICMPv4In)
File and Printer Sharing (Echo Request - ICMPv6In)
File and Printer Sharing (NB-Datagram-In)
File and Printer Sharing (NB-Name-In)
File and Printer Sharing (NB-Session-In)
File and Printer Sharing (SMB-In)
File and Printer Sharing (Spooler Service - RPC)
File and Printer Sharing (Spooler Service - RPC-EPMAP)
These firewall settings are configured by using the Windows Firewall with Advanced Security utility (wf.msc). You can achieve the same result by using the basic Windows Firewall utility (firewall.cpl). Select the File and Printer Sharing item in the list of exceptions.
TCP 3725
NetBIOS 137 - 139
SMB (TCP 139, 445 and UDP 137, 138)
TCP 135/445
Windows Server 2000;
Windows XP;
Windows NT 4
Windows Management Instrumentation (WMI) installed
Windows NT Server does not include WMI as part of the default installation. Obtain the WMI Core from the Microsoft Web site. If WMI is not installed, discovery of the workload fails.
WMI (RPC/DCOM) can use TCP ports 135 and 445 as well as random or dynamically assigned ports above 1024. If problems occur during the discovery process, consider temporarily placing the workload in a DMZ or temporarily opening the firewalled ports for the discovery process only.
For additional information, such as guidance in limiting the port range for DCOM and RPC, see the following Microsoft technical articles.
Using DCOM with Firewalls (http://msdn.microsoft.com/en-us/library/ms809327.aspx)
Configuring RPC dynamic port allocation to work with firewalls (http://support.microsoft.com/default.aspx?scid=kb;en-us;154596)
Configuring DCOM to work over a NAT-based firewall (http://support.microsoft.com/kb/248809)
TCP 3725
NetBIOS 137 - 139
SMB (TCP 139, 445 and UDP 137, 138)
TCP 135/445
All Linux workloads Secure Shell (SSH) server TCP 22, 3725
Workload Type Prerequisites Required Ports
20 PlateSpin Forge 3.1 User Guide

2.3.2 Protection Across Public and Private Networks Through NAT
In some cases, a source, a target, or PlateSpin Forge itself, might be located in an internal (private) network behind a network address translator (NAT) device, unable to communicate with its counterpart during protection.
PlateSpin Forge enables you to address this issue, depending on which of the following hosts is located behind the NAT device:
PlateSpin Forge Server: In your server’s web.config configuration file, record the additional IP addresses assigned to that host. See “Configuring the Application to Function Across NAT” on page 22.
Source Workload: Supported for failback only, where you can specify an alternative IP address for the recovery workload in Failback Details (Workload to VM) (page 65).
Failback Target: When you are attempting to register a failback target, specify the public (or external) IP address in the discovery/registration parameters.
2.3.3 Optimizing Data Transfer over WAN Connections (File-Based and VSS Replications)
You can optimize data transfer performance and fine tune it for WAN connections. You do this by modifying configuration parameters that the system reads from *.config files on your Forge VM. For the generic procedure, see “Configuring the Product Behavior through XML Configuration Parameters” on page 26.
Use these settings to optimize data transfers across a WAN. These settings are global and affect all replications using the file-based and VSS replications.
Configuration file: productinternal.config Location: Program Files\PlateSpin Forge Server\Web
NOTE: Local gigabit LAN replication speeds might be negatively impacted if these values are modified.
Table 2-3 lists the configuration parameters with the defaults and with the values recommended for optimum operation in a high-latency WAN environment.
Table 2-3 Default and Optimized Configuration Parameters in productinternal.config
Parameter Default Value Optimized Value
fileTransferThreadcount
Controls the number of TCP connections opened for file-based data transfer.
2 4 to 6
fileTransferMinCompressionLimit
Specifies the packet-level compression threshold in bytes.
0 (disabled) max 65536 (64 KB)
Application Configuration 21

2.3.4 Imposing Replication Blackout Windows
You can impose replication blackout periods to (to suspend scheduled replications during peak utilization hours or to prevent conflicts between VSS-aware Windows applications and the PlateSpin VSS block-level data transfer component). This is done by indicating start times and durations in the configuration file indicated below.
For information on the update procedure, see “Configuring the Product Behavior through XML Configuration Parameters” on page 26.
Configuration file: PlateSpin.Protection.Scheduler.Service.dll.config Location: Program Files\PlateSpin Forge Server\services\PlateSpinService\Plugins Values: This parameter comprises two values:
Workload_Scheduling_Blackout_Window_Start: Defines the time for the start of the suspension. Use the following format:HH:MM:SS (HH 00-23, MM 00-59, SS 00-59)
Workload_Scheduling_Blackout_Window_Length: Defines the duration of the suspension period. Use the following format:HH:MM:SS (HH 00-23, MM 00-59, SS 00-59)
2.3.5 Configuring the Application to Function Across NAT
To enable the PlateSpin Forge application to function across NAT-enabled environments, you must record additional IP addresses of your of your PlateSpin Forge Server in a configuration file that the server reads upon startup.
fileTransferCompressionThreadsCount
Controls the number of threads used for packet-level data compression. This is ignored if compression is disabled. Because the compression is CPU-bound, this setting might have a performance impact.
2 N/A
fileTransferSendReceiveBufferSize
TCP/IP window size setting for file transfer connections. It controls the number of bytes sent without TCP acknowledgement, in bytes.
When the value is set to 0, the default TCP window size is used (8 KB). For custom sizes, specify the size in bytes. Use the following formula to determine the proper value:
((LINK_SPEED(Mbps)/8)*DELAY(sec))*1000*1000
For example, for a 100 Mbps link with 10 ms latency, the proper buffer size would be:
(100/8)*0.01*1000*1000 = 125000 bytes
0 (8192 bytes) max 5242880 (5 MB)
Parameter Default Value Optimized Value
22 PlateSpin Forge 3.1 User Guide

For information on the update procedure, see “Configuring the Product Behavior through XML Configuration Parameters” on page 26.
Configuration file: Web.config Location: Program Files\PlateSpin Forge Server\Web Values: <add key="AlternateServerAddresses" value="" />
Add the additional IP addresses, delimited by a semicolon (;), for example:<add key="AlternateServerAddresses" value="10.99.106.108;10.99.106.109" />
2.4 Configuring PlateSpin Forge Default Options Section 2.4.1, “Setting Up Automatic E-Mail Notifications of Events and Reports,” on page 23 Section 2.4.2, “Language Setup for International Versions of PlateSpin Forge,” on page 25 Section 2.4.3, “Configuring the Product Behavior through XML Configuration Parameters,” on
page 26 Section 2.4.4, “Restarting the PlateSpin Forge Server to Apply System Changes,” on page 26
2.4.1 Setting Up Automatic E-Mail Notifications of Events and Reports
You can configure PlateSpin Forge to automatically send notifications of events and replication reports to specified e-mail addresses. This functionality requires that you first specify a valid SMTP server for PlateSpin Forge to use.
“SMTP Configuration” on page 23 “Setting Up Automatic Event Notifications by E-Mail” on page 24 “Setting Up Automatic Replication Reports by E-Mail” on page 25
SMTP Configuration
Use the PlateSpin Forge Web Client to configure SMTP (Simple Mail Transfer Protocol) settings for the server used to deliver e-mail notifications of events and replication reports.
Figure 2-2 Simple Mail Transfer Protocol Settings
Application Configuration 23
To configure SMTP settings:
1 In your PlateSpin Forge Web Client, click Settings > SMTP.2 Specify an SMTP server Address, an optional Port (the default is 25), and a Reply Address for
receiving e-mail event and progress notifications.3 Type a Username and Password, then confirm the password.4 Click Save.
Setting Up Automatic Event Notifications by E-Mail
1 Set up an SMTP server for PlateSpin Forge to use. See SMTP Configuration.2 In your PlateSpin Forge Web Client, click Settings > Email > Notification Settings.3 Select the Enable Notifications option.4 Click Edit Recipients, type the required e-mail addresses separated by commas, then click OK.5 Click Save.
To delete listed e-mail addresses, click Delete next to the address that you want to remove.
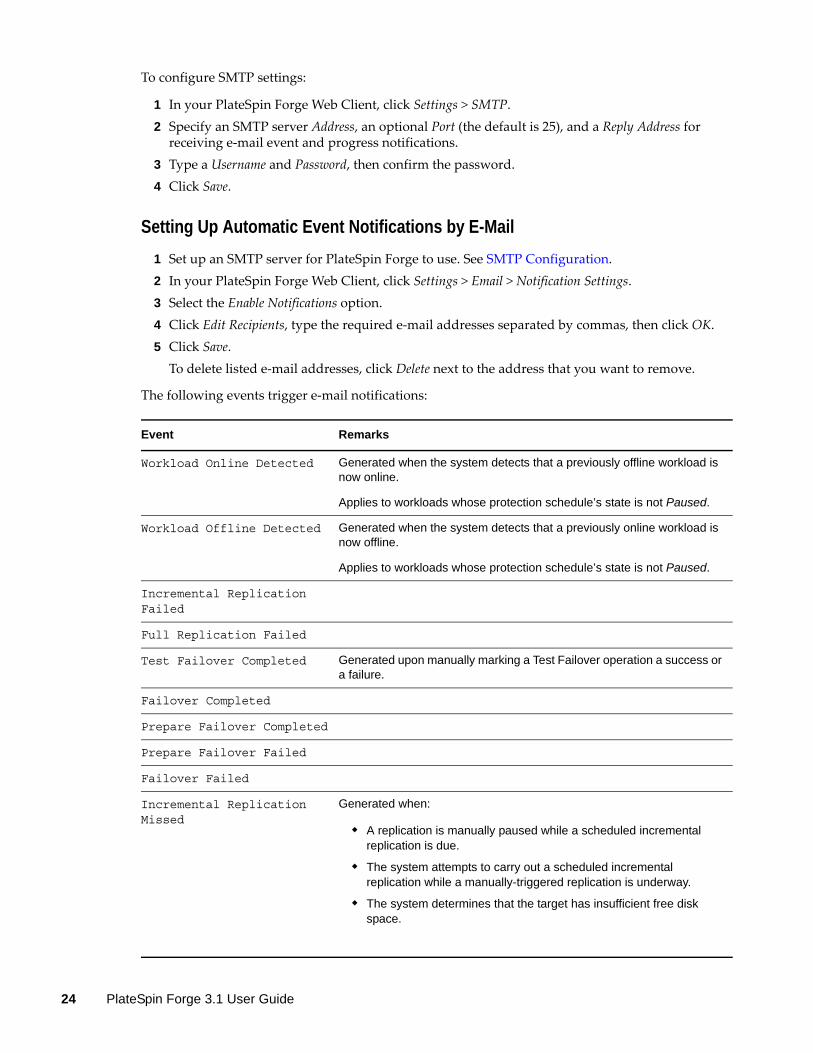
The following events trigger e-mail notifications:
Event Remarks
Workload Online Detected Generated when the system detects that a previously offline workload is now online.
Applies to workloads whose protection schedule’s state is not Paused.
Workload Offline Detected Generated when the system detects that a previously online workload is now offline.
Applies to workloads whose protection schedule’s state is not Paused.
Incremental Replication Failed
Full Replication Failed
Test Failover Completed Generated upon manually marking a Test Failover operation a success or a failure.
Failover Completed
Prepare Failover Completed
Prepare Failover Failed
Failover Failed
Incremental Replication Missed
Generated when:
A replication is manually paused while a scheduled incremental replication is due.
The system attempts to carry out a scheduled incremental replication while a manually-triggered replication is underway.
The system determines that the target has insufficient free disk space.
24 PlateSpin Forge 3.1 User Guide

Setting Up Automatic Replication Reports by E-Mail
To set up PlateSpin Forge to automatically send out replication reports by e-mail, follow these steps:
1 Set up an SMTP server for PlateSpin Forge to use. See SMTP Configuration.2 In your PlateSpin Forge Web Client, click Settings > Email > Replication Reports Settings.3 Select the Enable Replication Reports option.4 In the Report Recurrence section, click Configure and specify the required recurrence pattern for
the reports.5 In the Recipients section, click Edit Recipients, type the required e-mail addresses separated by
commas, then click OK.6 (Optional) In the Protect Access URL section, specify a non-default URL for your PlateSpin Forge
Server (for example, when your Forge VM has more than one NIC or if is located behind a NAT server). This URL impacts the title of the report and the functionality of accessing relevant content on the server through hyperlinks within e-mailed reports.
7 Click Save.
For information on other types of reports that you can generate and view on demand, see “Generating Workload and Workload Protection Reports” on page 53.
2.4.2 Language Setup for International Versions of PlateSpin Forge
PlateSpin Forge provides National Language Support (NLS) for Chinese Simplified, Chinese Traditional, French, German, and Japanese.
To use the PlateSpin Forge Web Client and integrated help in one of these languages, the corresponding language must be added in your Web browser and moved to the top of the order of preference:
1 Access the Lanuguages setting in your Web browser: Internet Explorer: Click Tools > Internet Options > General tab > Languages. Firefox: Click Tools > Options > Content tab > Languages.
2 Add the required language and move it up the top of the list.3 Save the settings, then start the client application by connecting to your PlateSpin Forge Server.
See “Launching the PlateSpin Forge Web Client” on page 45.
NOTE: (For users of Chinese Traditional and Chinese Simplified versions) Attempting to connect to the PlateSpin Forge Server with a browser that does not have a specific version of Chinese added might result in Web server errors. For correct operation, use your browser’s configuration settings to add a specific Chinese language (for example, Chinese [zh-cn] or Chinese [zh-tw]). Do not use the culture-neutral Chinese [zh] language.
The language of a small portion of system messages generated by the PlateSpin Forge Server depends on the operating system interface language selected in your Forge VM:
1 Access your Forge VM.
Full Replication Missed Similar to the Incremental Replication Missed event above.
Event Remarks
Application Configuration 25

See Section 3.4.1, “Accessing and Working with the Forge Management VM in the Appliance Host,” on page 34.
2 Start the Regional and Language Options applet (click Start > Run, type intl.cpl, and press Enter), then click the Languages (Windows Server 2003) or Keybords and Languages (Windows Server 2008) tab, as applicable.
3 If it is not already installed, install the required language pack. You might need access to your OS installation media.
4 Select the required language as the interface language of the operating system. When you are prompted, log out or restart the system.
2.4.3 Configuring the Product Behavior through XML Configuration Parameters
Some aspects of your PlateSpin Forge ServerPlateSpin Forge Server’s behavior are controlled by configuration parameters that are read from *.config files on your Forge VM.
Under normal circumstances you should not need to modify these settings unless you are advised to do so by PlateSpin Support. This section provides a number of common use cases along with information on the required procedure.
Use the following procedure for changing and applying any *.config parameters:
1 On your Forge VM, go to the indicated directory.2 Use a text editor to open the *.config file.3 Locate the required parameter in the *.config file and change its value, which is enclosed in
quotation marks (""). Do not remove the quotation marks. Use acceptable values indicated in this section or as advised by PlateSpin Support.
4 Save and close the *.config file.5 Restart the PlateSpin Forge Server. See “Restarting the PlateSpin Forge Server to Apply System
Changes” on page 26.
The following topics provide information on commonly used configuration files and values that affect the behavior of your PlateSpin Forge Server.
2.4.4 Restarting the PlateSpin Forge Server to Apply System Changes
1 Go to the PlateSpin Forge Server’s bin\RestartPlateSpinServer subdirectory.See Section 3.4.1, “Accessing and Working with the Forge Management VM in the Appliance Host,” on page 34.
2 Double-click the RestartPlateSpinServer.exe executable.A command prompt window opens, requesting confirmation.
3 Confirm by typing Y and pressing Enter.
26 PlateSpin Forge 3.1 User Guide

3 3Appliance Setup and Maintenance
This section provides information about appliance setup and maintenance tasks that you might need to complete on a regular basis.
Section 3.1, “Setting up Appliance Networking,” on page 27 Section 3.2, “Relocating PlateSpin Forge and Reassigning Its IP Addresses,” on page 28 Section 3.3, “Using External Storage Solutions with PlateSpin Forge,” on page 32 Section 3.4, “PlateSpin Forge Appliance Maintenance,” on page 34 Section 3.5, “Upgrading PlateSpin Forge,” on page 38 Section 3.6, “Resetting Forge to Factory Defaults,” on page 40
3.1 Setting up Appliance NetworkingThis section provides information about customizing the networking settings of your appliance host.
Section 3.1.1, “Setting up Appliance Host Networking,” on page 27
3.1.1 Setting up Appliance Host Networking
Your PlateSpin Forge appliance has six physical network interfaces configured for external access:
External Test Network: To isolate network traffic when testing a failover workload with the Test Failover feature.
Internal Test Network: For testing a failover workload in complete isolation from the production network.
Replication Network: To provide the system with networking designated for ongoing traffic between your production workload and its replica in the Management VM.
Production Network: For real-life business continuity networking when performing a failover or a failback.
Management Network: The Forge Management VM network. Appliance Host Network: Hypervisor management network. This network is unavailable for
selection in the PlateSpin Forge Web Client.
By default, PlateSpin Forge ships with all 6 physical network interfaces mapped to one vSwitch in the hypervisor. You can customize the mapping to better suit your environment. For example, you can protect a workload that has two NICs, one of which is used for production connectivity, and the other strictly for replications. For additional information, see KB Article 7921062 (http://www.novell.com/support/viewContent.do?externalId=7921062).
Appliance Setup and Maintenance 27
In addition, to further fine-tune the control of your network traffic, consider assigning a different VLAN ID to each of these individual port groups. This ensures that your production network is not interfered with by traffic from workload protection and recovery operations. See KB Article 21057 (http://www.novell.com/support/viewContent.do?externalId=7921057).
3.2 Relocating PlateSpin Forge and Reassigning Its IP AddressesRelocating your PlateSpin Forge appliance involves changing the IP addresses of its components to reflect the new environment. These are the IP addresses you specified during the initial setup of the appliance (see your Forge Getting Started Guide).
The procedure varies depending on the appliance version (1 or 2). For information on how to determine the appliance version of your unit, see “Determining your Unit’s Appliance Version” in your Forge Getting Started Guide.
Section 3.2.1, “Forge Relocation Procedure for Appliance Version 2,” on page 28 Section 3.2.2, “Forge Relocation Procedure for Appliance Version 1,” on page 32
3.2.1 Forge Relocation Procedure for Appliance Version 2
Before starting the relocation procedure:
1 Pause all replication schedules, ensuring that at least one incremental has run for each workload:1a In your PlateSpin Forge Web Client, select all workloads, click Pause, then click Execute.1b Ensure that the status Paused is displayed for all the workloads.
The spesifics of the relocation process vary depending on whether the new IP address of the appliance at the target site is known (scenario 1) or unknown (scnario 2).
“Scenario 1 - Relocating Forge (New IP Address Known)” on page 28 “Scenario 2 - Relocating Forge (New IP Address Unknown)” on page 30
Scenario 1 - Relocating Forge (New IP Address Known)
1 Pause all replications. See Step 1a and Step 1b above.2 Launch the Forge Appliance Configuration Console (ACC): open a browser and go to http://
<Forge_IP_address>:10000.3 Log in using the forgeuser account and click Configure Host.4 Enter the new network parameters and click Apply.5 In the confirmation popup window, ensure that the new settings are correct, deselect the Verify
network settings before saving, then click Continue.
28 PlateSpin Forge 3.1 User Guide

6 Wait for the configuration process to complete and for the browser window to display the Configuration Successful popup window.
NOTE: The link in the popup window for the new ACC address will not work until you now physically disconnect your appliance and connect it to the new subnet.
7 Shut down the appliance:7a Shut down the Forge Management VM. See “Starting and Shutting Down the Forge
Management VM” on page 36.7b Shut down the Appliance Host:
7b1 At the Forge Console, switch to the ESX Server console by pressing Alt-F2.7b2 Log in as the superuser (user root with the associated password).7b3 Type the following command and press Enter:
shutdown -h now
7c Power the appliance down.
Appliance Setup and Maintenance 29

8 Disconnect your appliance, move it to the new site, attach it to the new subnet, and power it on.The new IP address should now be valid.
9 Launch the ACC and log in using the forgeuser account, click Configure Forge VM, specify the required parameters, then click Apply.
10 Verify that the setting are correct, click Continue, and wait for the process to complete.
NOTE: If you configured the Forge VM to use DHCP, do the following after the relocation: 1. Determine the Forge VM’s new IP address (use the VMware client program to access the Forge VM and look it up in the VM’s Windows interface. See “Launching the VMware Client and Accessing the Forge Management VM” on page 35).
2. Use the new IP address to launch the PlateSpin Forge Web Client and refresh the container (click Settings > Containers > then click ).
11 Resume the paused replications.
Scenario 2 - Relocating Forge (New IP Address Unknown)
1 Pause all replications. See Step 1 on page 28.2 Shut down the appliance:
2a Shut down the Forge Management VM. See “Starting and Shutting Down the Forge Management VM” on page 36.
2b Shut down the Appliance Host:2b1 At the Forge Console, switch to the ESX Server console by pressing Alt-F2.2b2 Log in as the superuser (user root with the associated password).2b3 Type the following command and press Enter:
shutdown -h now
2c Power the appliance off.3 Disconnect your appliance, move it, attach to the new network, then power it on.4 Set up a computer (notebook computer recommended) so that it is able to communicate with
Forge at its current IP address (the IP address at the old site), then connect it to the appliance. See Appliance v2 Configuration Procedure Using the Forge ACC (http://www.novell.com/documentation/platespin_forge_3/getstart/data/bk2otgs.html#bwkc1x9) in your Getting Started Guide.
5 Launch the Forge Appliance Configuration Console (ACC): open a browser and go to http://<Forge_IP_address>:10000.
6 Log in using the forgeuser account and click Configure Host.7 Enter the new network parameters and click Apply.8 In the confirmation popup window, ensure that the new settings are correct, deselect the Verify
network settings before saving, then click Continue.
30 PlateSpin Forge 3.1 User Guide

9 Wait for the configuration process to complete and for the browser window to display the Configuration Successful popup window.
NOTE: The link in the popup window for the new ACC address will not work until you now physically disconnect your appliance and connect it to the new subnet.
10 Disconnect the computer from the appliance and connect the appliance to the new subnet.The new IP address should now be valid.
11 Launch the ACC and log in using the forgeuser account, click Configure Forge VM, specify the required parameters, then click Apply.
12 Verify that the setting are correct, click Continue, and wait for the process to complete.
NOTE: If you configured the Forge VM to use DHCP, do the following after the relocation: 1. Determine the Forge VM’s new IP address (use the VMware client program to access the Forge VM and look it up in the VM’s Windows interface. See “Launching the VMware Client and Accessing the Forge Management VM” on page 35).
Appliance Setup and Maintenance 31

2. Use the new IP address to launch the PlateSpin Forge Web Client and refresh the container (click Settings > Containers > then click ).
13 Resume the paused replications.
3.2.2 Forge Relocation Procedure for Appliance Version 1
1 Pause all replication schedules, ensuring that at least one incremental has run for each workload:1a In your PlateSpin Forge Web Client, select all workloads, click Pause, then click Execute.1b Ensure that the status Paused is displayed for all the workloads.
2 Shut down the Forge Management VM. See “Starting and Shutting Down the Forge Management VM” on page 36.
3 Shut down the Appliance Host:3a At the Forge Console, switch to the ESX Server console by pressing Alt-F2 (to switch back to
the Forge Console, press Alt-F1).3b Log in as the superuser (root and the associated password).3c Type the following command and press Enter:
shutdown -h now
3d Power the appliance off.4 Move the appliance to the new location, set up the hardware, make the required cable
connections, then power the appliance on.5 Update the appliance network configuration:
5a At the Forge console, log in as the superuser (root and the associated password).5b Update the IP address, Netmask, and Gateway IP address settings for the appliance host as
required. You can use DHCP, but only if a static IP lease is enabled. For multiple appliance environments, assign unique hostnames to the appliances to avoid hostname conflicts.
5c Update the IP address, Netmask, Gateway IP address and domain affiliation settings for the Forge Management VM as required.
5d Select OK, review the updates, then select OK again.6 Update the network settings for the paused replications; in your PlateSpin Forge Web Client, do
the following for each paused workload:6a Access the Replication Settings section in the paused workload’s protection details.6b Update the Replication Network value to reflect the network change.6c Save the settings.
7 Resume replications: in your PlateSpin Forge Web Client, select all workloads, click Resume Schedule, then click Execute.
3.3 Using External Storage Solutions with PlateSpin ForgeThe following sections contain information to help you with the setup and configuration of external storage for PlateSpin Forge.
Section 3.3.1, “Using Forge with SAN Storage,” on page 33 Section 3.3.2, “Adding a SAN LUN to Forge,” on page 34
32 PlateSpin Forge 3.1 User Guide

3.3.1 Using Forge with SAN Storage
PlateSpin Forge supports existing external storage solutions, such as Storage Area Network (SAN) implementations. Both Fibre Channel and iSCSI solutions are supported. SAN support for Fibre Channel and iSCSI HBAs allows a Forge appliance to be connected to a SAN array. You can then use SAN-array LUNs (Logical Units) to store workload data. Using Forge with a SAN improves flexibility, efficiency, and reliability.
Each SAN product has its own nuances and differences that do not migrate from one hardware manufacturer to the next. This is especially true when considering how these products connect and interact with the Forge Management VM. As such, specific configuration steps for each possible environment and context are beyond the scope of this guide.
The best place to find this type of information is from your hardware vendor or your SAN product sales representative. Many hardware vendors have support guides available describing these tasks in detail. You can find a wealth of information at the following sites:
The VMware Documentation Web site (http://www.vmware.com/support/pubs/).
The Fibre Channel SAN Configuration Guide discusses the use of ESX Server with Fibre Channel storage area networks.
The iSCSI SAN Configuration Guide discusses the use of ESX Server with iSCSI storage area networks.
The VMware I/O Compatibility Guide lists the currently approved HBAs, HBA drivers, and driver versions.
The VMware Storage/SAN Compatibility Guide lists currently approved storage arrays. The VMware Release Notes give information about known issues and workarounds. The VMware Knowledge Bases have information on common issues and workarounds.
The following vendors provide storage products that have all been tested by VMware:
3PAR (http://www.3par.com) Bull (http://www.bull.com) (FC only) Compellent (http://www.compellent.com) Dell (http://www.dell.com) EMC (http://www.emc.com) EqualLogic (http://www.equallogic.com) (iSCSI only) Fujitsu (http://www.fujitsu.com) and Fujitsu Siemens (http://www.fujitsu-siemens.com) HP (http://www.hp.com) Hitachi (http://www.hitachi.com) and Hitachi Data Systems (http://www.hds.com) (FC only) IBM (http://www.ibm.com) NEC (http://www.nec.com) (FC only) Network Appliance (NetApp) (http://www.netapp.com) Nihon Unisys (http://www.unisys.com) (FC only) Pillar Data (http://www.pillardata.com) (FC only) Sun Microsystems (http://www.sun.com) Xiotech (http://www.xiotech.com) (FC only)
You can also learn more about iSCSI by visiting the Storage Networking Industry Association Web site at http://www.snia.org/tech_activities/ip_storage/iscsi/.
Appliance Setup and Maintenance 33

3.3.2 Adding a SAN LUN to Forge
PlateSpin Forge supports the use of Storage Area Network (SAN) storage, but before Forge can access an existing SAN, a SAN Logical Unit (LUN) needs to be added to Forge’s ESX.
1 Set up and configure your SAN system.2 Access the appliance host (see “Downloading the VMware Client Program” on page 35).3 In the VMware client interface, click the root (top-level) node in the Inventory panel, then click
the Configuration tab.4 Click the Add Storage hyperlink in the upper right.5 In the Add Storage Wizard, click Next until you are prompted to specify datastore information.6 Specify a datastore name and click Next in the subsequent wizard pages. When the wizard
finishes, click Finish.7 Click Storage under Hardware to see the Forge datastores. The newly added SAN LUN should
appear in the window.8 Quit the VMware client program.
In the PlateSpin Forge Web Client, the new datastore doesn’t appear until the next replication runs and the Application Host is refreshed. You can force a refresh by selecting Settings > Containers and clicking near the appliance hostname.
3.4 PlateSpin Forge Appliance MaintenanceTopics in this section provide information about tasks that deal with PlateSpin Forge appliance maintenance.
Section 3.4.1, “Accessing and Working with the Forge Management VM in the Appliance Host,” on page 34
3.4.1 Accessing and Working with the Forge Management VM in the Appliance Host
Occasionally you might need to access the Forge Management VM and perform maintenance tasks as described here or when you are advised to do so by PlateSpin Support.
Use the VMware client software to access the Forge Management VM, including its OS interface and VM settings.
NOTE: The VMware client software differs between ESX version 3.5 (Forge appliance version 1 systems) and ESX version 4.1 (Forge appliance version 2 systems.
ESX 3.5 requires the VMware Virtual Infrastructure Client (VIC) ESX 4.1 requires the VMware vSphere Client
For convenience and ease of reference, these programs are sometimes referred to as VMware Client. In addition, the terms Virtual Infrastructure Client (VIC) and vSphere Client might be used interchangeably.
“Downloading the VMware Client Program” on page 35 “Launching the VMware Client and Accessing the Forge Management VM” on page 35
34 PlateSpin Forge 3.1 User Guide

“Starting and Shutting Down the Forge Management VM” on page 36 “Managing Forge Snapshots on the Appliance Host” on page 37 “Manually Importing VMs into the Appliance Host’s Datastore” on page 37 “Guidelines for Applying Security Updates to the PlateSpin Forge Management VM” on page 38
Downloading the VMware Client Program
Download the client software from the appliance host and install it on a Windows workstation external to PlateSpin Forge.
1 Download the client software: (Conditional: for Forge appliance version 2 with VMware ESX 4.1) Download the VMware
vSphere Client) program (http://vsphereclient.vmware.com/vsphereclient/3/4/5/0/4/3/VMware-viclient-all-4.1.0-345043.exe).OR
(Conditional: for Forge appliance version 1 with VMwre ESX 3.5) Open a Web browser and go to the home page of the appliance host (VMware ESX), using the appliance host’s IP address. Ignore the warning related to the security certificate. On the VMWare ESX Server’s Welcome page, click the Download Virtual Infrastructure Client hyperlink, and dowload the installation program.
2 Launch the downloaded installation program and follow the instructions to install the software.
Launching the VMware Client and Accessing the Forge Management VM
1 Clicking Start > Programs > VMWare > VMware vSphere | Virtual InfrastrucureClient.The VMware client login window is displayed.
2 Specify your root-level credentials and log in, ignoring any certificate warnings.The VMware client program opens.
Appliance Setup and Maintenance 35

3 In the inventory panel at the left, locate and select the PlateSpin Forge Management VM item. At the top of the right panel, click the Console tab.The Client’s console area displays the Forge Management VM’s Windows interface.
Use the console to work with the Management VM the same way as you would work with Windows on a physical machine.
To unlock the Management VM, click inside the console and press Ctrl+Alt+Insert.
To release the cursor for working outside the VMware client program, press Ctrl+Alt.
Starting and Shutting Down the Forge Management VM
Occasionally you might need to shut down and then restart the Forge Management VM, such as when you relocate the appliance.
1 Use the VMware Client to access the Forge Management VM host. See “Downloading the VMware Client Program” on page 35.
2 Use the standard Windows procedure to shut down the VM (Start > Shut Down).
36 PlateSpin Forge 3.1 User Guide
To restart the Management VM:
1 In the inventory panel at the left, right-click the PlateSpin Forge Management VM item and select Power on.
Managing Forge Snapshots on the Appliance Host
Occasionally you might need to take a point-in-time snapshot of your management VM, such as when you upgrade Forge software or when carry out troubleshooting tasks. You might also need to remove snapshots (recovery points) to free storage space.
1 Use the VMware Client to access the appliance host. See “Downloading the VMware Client Program” on page 35.
2 In the inventory panel at the left, right-click the PlateSpin Forge Management VM item and select Snapshot > Take Snapshot.
3 Type a name and a description for the snapshot, then click OK.
To revert the management VM to a previous state:
1 In the inventory panel at the left, right-click the PlateSpin Forge Management VM item and select Snapshot > Snapshot Manager.
2 In the tree representation of the VM states, select a snapshot, then click Go to.
To remove snapshots that represent recovery points:
1 In the inventory panel at the left, right-click the PlateSpin Forge Management VM item and select Snapshot > Snapshot Manager.
2 In the tree representation of the VM states, select a snapshot, then click Remove.
Manually Importing VMs into the Appliance Host’s Datastore
Use this procedure to manually import a VM into the appliance host’s datastore. You might want to consider this option when you want your recovery workload to be created differentially (see “Initial Replication Method (Full and Incremental)” on page 80).
1 At the production site, create a VM (ESX 3.5 and later) from your production workload (for example, by using PlateSpin Migrate) and copy the VM files from the ESX host’s datastore to portable media, such as a portable hard drive or a USB flash drive. Use the Datastore Browser of the client software to browse and locate the files.
2 At the disaster recovery site, attach the media to a workstation that has network access to Forge and has the VMware client program installed. See “Downloading the VMware Client Program” on page 35.
3 Use the VMware Client’s Datastore Browser to access the Forge datastore (Storage1) and upload the VM files from the temporary media. Use the uploaded VM to register it with the appliance host (right-click > Add to Inventory).
4 Refresh the PlateSpin Forge inventory (in the PlateSpin Forge Web Client, click Settings > Containers, then click adjacent to the appliance host).
Appliance Setup and Maintenance 37
Guidelines for Applying Security Updates to the PlateSpin Forge Management VM
This section provides general guidelines for applying security patches to the Forge Management VM.
1 During a maintenance window, access the Forge Management VM by using the VMware VMware client program. See “Downloading the VMware Client Program” on page 35.
2 From within the Forge Management VM’s Windows interface, check for security updates from Microsoft.
3 Use the PlateSpin Forge Web Client to put PlateSpin Forge into maintenance mode by pausing all replication schedules and ensuring that any incomplete replications are complete.
4 Take a snapshot of the Forge Management VM. See “Managing Forge Snapshots on the Appliance Host” on page 37.
5 Download and install the required security patches. When the installation finishes, reboot the Forge Management VM.
6 Use the PlateSpin Forge Web Client to resume replications paused in Step 3 and verify that replications are working properly.
7 Remove the snapshot of the Forge Management VM that you took in Step 4. See “Managing Forge Snapshots on the Appliance Host” on page 37.
3.5 Upgrading PlateSpin ForgeYou can upgrade your Forge software from versions 2.5, 3.0, and 3.0.2.
The rest of this section provides information about upgrading your PlateSpin Forge appliance.
Section 3.5.1, “Before Starting the Upgrade,” on page 38 Section 3.5.2, “Summary of Upgrade Tasks,” on page 38 Section 3.5.3, “Forge Upgrade Procedure,” on page 39
3.5.1 Before Starting the Upgrade
Before starting the upgrade, make sure that you have the following prerequisites:
The Forge setup installation executable. IP addresses and appropriate credentials for:
The Forge appliance (used for the Forge Web Client Interface and the Forge Management VM)
The Forge Appliance Host (VMware ESX server)
The VMware client program. See “Downloading the VMware Client Program” on page 35.
3.5.2 Summary of Upgrade Tasks
To upgrade your Forge appliance, you need to perform the following tasks in order:
1. Ensure that no replications are currently running or are scheduled to run during the upgrade.2. Save the current state of the management VM by taking a snapshot.
38 PlateSpin Forge 3.1 User Guide

3. Update the Forge Management VM with the latest Microsoft .NET Framework software and any security patches.
4. Copy and run the required setup executable locally within the Forge Management VM.5. Verify proper operation of the appliance after the upgrade.
3.5.3 Forge Upgrade Procedure
This phase involves pausing all scheduled replications of protected workloads and waiting for running replications to complete.
1 Use the PlateSpin Forge Web Client to pause all scheduled replications. Wait for any replications that are underway to complete. Ensure that the replication status of protected workloads is idle in the Replication Status column.See “Launching the PlateSpin Forge Web Client” on page 45.
2 Power off the Forge Management VM. See “Starting and Shutting Down the Forge Management VM” on page 36.
3 Back up the Forge Management VM by creating a snapshot. See “Managing Forge Snapshots on the Appliance Host” on page 37.
4 For Forge 1.x appliances, disable Independent mode for VM Hard Disk 2:4a In the Inventory panel at the left, right-click the Forge Management VM and select Edit
Settings.The Virtual Machine Properties window is displayed.
4b On the Hardware tab, click Hard Disk 2.4c At the right, deselect the Independent check box.
5 Power on the Forge Management VM, access it with the VMware client program, and do the following:5a Install the latest Microsoft .NET Framework software. Forge 3 requires Microsoft .NET
Framework 3.5, SP1 (http://www.microsoft.com/downloads/details.aspx?FamilyId=AB99342F-5D1A-413D-8319-81DA479AB0D7).
5b Update Windows, applying any available security updates.5c Reboot the Forge Management VM.
6 Run the Forge setup installation executable within the Forge Management VM and follow the on-screen instructions.
NOTE: In some situations, the installation program might fail to automatically re-import data that it exports during the upgrade process. If this happens, use the PlateSpin.ImportExport.exe utility to recover this data from your server host’s \Documents and Settings\<user_profile>\Application Data\PlateSpin directory. See KB Article 7921084 (http://www.novell.com/support/viewContent.do?externalId=7921084).
7 Use the PlateSpin Forge Web Client to resume all paused replications.8 Use the VMware client program to remove the snapshot created in Step 3.
IMPORTANT: Drivers that were uploaded to the PlateSpin Forge driver database for failback are not preserved. Any such drivers need to be uploaded again after the upgrade.
Appliance Setup and Maintenance 39

3.6 Resetting Forge to Factory DefaultsThis section provides information on resetting your Forge 3.1, Appliance Version 2 unit to its factory default state.
Depending on your Forge model, this process might take 20 to 45 minutes or longer.
1 Disconnect all external/remote/shared storage systems from Forge (iSCSI, FiberChannel, NFS).2 Disconnect all network cables from Forge.
WARNING: If you are performing a factory reset on multiple Forge appliances connected to the same physical switch, skipping this step might cause IP address conflicts and result in failure.
3 Reboot the appliance host:3a Log in to the hypervisor (VMware ESX) either directly or by using DRAC.3b Press Alt-F1 to open the ESX console.
3c Log in with your root-level credentials.3d Type reboot and press Enter:
40 PlateSpin Forge 3.1 User Guide
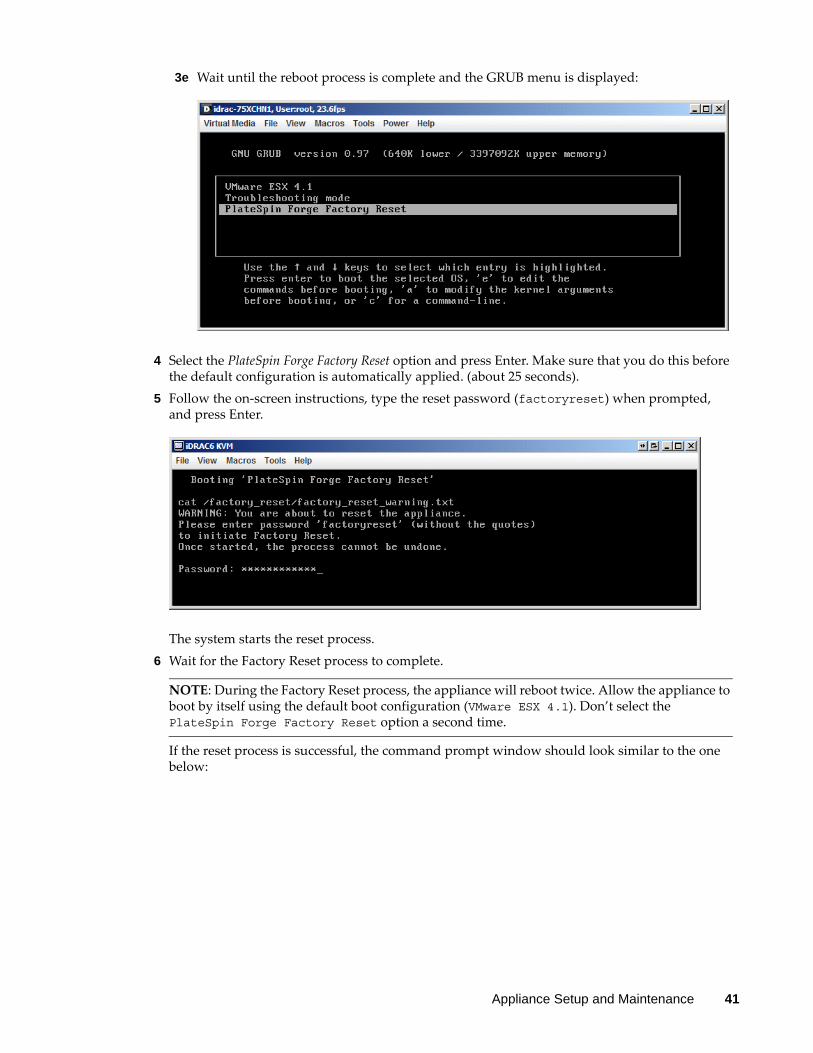
3e Wait until the reboot process is complete and the GRUB menu is displayed:
4 Select the PlateSpin Forge Factory Reset option and press Enter. Make sure that you do this before the default configuration is automatically applied. (about 25 seconds).
5 Follow the on-screen instructions, type the reset password (factoryreset) when prompted, and press Enter.
The system starts the reset process.6 Wait for the Factory Reset process to complete.
NOTE: During the Factory Reset process, the appliance will reboot twice. Allow the appliance to boot by itself using the default boot configuration (VMware ESX 4.1). Don’t select the PlateSpin Forge Factory Reset option a second time.
If the reset process is successful, the command prompt window should look similar to the one below:
Appliance Setup and Maintenance 41

If the reset process is unsuccessful, the screen might look like the following:
In case of failure:
Call PlateSpin Support and be prepared to provide the log files. Log files required for troubleshooting the reset process are: /var/log/forge/forge-recovery.log
/var/log/forge/INSTALL_LOG.log
/var/log/weasel.log
The contents of these log files should also be available through the Forge Appliance Configuration Console (ACC) interface.
42 PlateSpin Forge 3.1 User Guide

Consider rebuilding Forge using a Field Rebuild Kit that you can obtain from PlateSpin Support.
Appliance Setup and Maintenance 43

44 PlateSpin Forge 3.1 User Guide

4 4Up and Running
This section provides information about the essential features of PlateSpin Forge and its interface.
Section 4.1, “Launching the PlateSpin Forge Web Client,” on page 45 Section 4.2, “Elements of the PlateSpin Forge Web Client,” on page 46 Section 4.3, “Workloads and Workload Commands,” on page 48 Section 4.4, “Using Workload Protection Features through the PlateSpin Forge Web Services
API,” on page 50 Section 4.5, “Managing Multiple Instances of PlateSpin Forge,” on page 50 Section 4.6, “Generating Workload and Workload Protection Reports,” on page 53
4.1 Launching the PlateSpin Forge Web ClientMost of your interaction with PlateSpin Forge takes place through the browser-based PlateSpin Forge Web Client.
The supported browsers are:
Microsoft Internet Explorer 7 and later Mozilla Firefox (on Windows) 3.6 and later
JavaScript (Active Scripting) must be enabled in your browser:
Internet Explorer: Click Tools > Internet Options > Security > Internet zone > Custom level, then select the Enable option for the Active Scripting feature.
Firefox: Click Tools > Options > Content, then select the Enable JavaScript option.
To use the PlateSpin Forge Web Client and integrated help in one of the supported languages, see Section 2.4.2, “Language Setup for International Versions of PlateSpin Forge,” on page 25.
To launch the PlateSpin Forge Web Client:
1 Open a Web browser and go to:http://<hostname | IP_address>/ForgeReplace <hostname | IP_address> with the hostname or the IP address of your Forge VM.If is enabled, use https in the URL.
Up and Running 45

4.2 Elements of the PlateSpin Forge Web ClientThe default interface of the PlateSpin Forge Web Client is the Dashboard page, which contains elements for navigating to different functional areas of the interface and carrying out workload protection and recovery operations.
Figure 4-1 The Default Dashboard Page of the PlateSpin Forge Web Client
The Dashboard page consists of the following elements:
Navigation bar: Found on most pages of the PlateSpin Forge Web Client. Visual Summary panel: Provides a high-level view of the overall state of the PlateSpin Forge
workload inventory, Tasks and Events panel: Provides information about events and tasks requiring user attention. Latest News panel: Provides information on product and related updates through RSS. To
subscribe to the PlateSpin Forge news feed, click RSS.
The following topics provide more details:
Section 4.2.1, “Navigation Bar,” on page 47 Section 4.2.2, “Visual Summary Panel,” on page 47 Section 4.2.3, “Tasks and Events Panel,” on page 48
46 PlateSpin Forge 3.1 User Guide

4.2.1 Navigation Bar
The Navigation bar provides the following links:
Dashboard: Displays the default Dashboard page. Workloads: Displays the Workloads page. See “Workloads and Workload Commands” on
page 48. Tasks: Displays the Tasks page, which lists items requiring user intervention. Reports: Displays the Reports page. See “Generating Workload and Workload Protection
Reports” on page 53. Settings: Displays the Settings page, which provides access to the following configuration
options: Protection Tiers: See “Protection Tiers” on page 78. Permissions: See “Setting Up User Authorization and Authentication” on page 14. Email/SMTP: See “Setting Up Automatic E-Mail Notifications of Events and Reports” on
page 23. Licenses/License Designations: See “Product Licensing” on page 13.
4.2.2 Visual Summary Panel
The Visual Summary panel provides a high-level view of all licensed workloads and the amount of available storage on the appliance.
Inventoried workloads are represented by three categories:
Protected: Indicates the number of workloads under active protection. Failed: Indicates the number of protected workloads that the system has rendered as failed
according to that workload’s Protection Tier. Underprotected: Indicates the number of protected workloads that require user attention.
The area in the center of the left panel represents a graphical summary of the Workloads page. It uses the following dot icons to represent workloads in different states:
Table 4-1 Dot Icon Workload Representation
The icons are shown in alphabetical order according to workload name. Mouse over a dot icon to display the workload name, or click the icon to display the corresponding Workload Details page.
Storage provides information about storage space available to PlateSpin Forge.
Unprotected Underprotected
Unprotected – Error Failed
Protected Expired
Unused
Up and Running 47

4.2.3 Tasks and Events Panel
The Tasks and Events panel shows the most recent Tasks, the most recent Past Events, and the next Upcoming Events.
Events are logged whenever something relevant to the system or to the workload occurs. For example, an event could be the addition of a new protected workload, the replication of a workload starting or failing, or the detection of the failure of a protected workload. Some events generate automatic notifications by e-mail if SMTP is configured. See “Setting Up Automatic E-Mail Notifications of Events and Reports” on page 23.
Tasks are special commands that are tied to events that require user intervention. For example, upon completion of a Test Failover command, the system generates an event associated with two tasks: Mark Test as Success and Mark Test as Failure. Clicking either task results in the Test Failover operation being canceled and a corresponding event being written in the history. Another example is the FullReplicationFailed event, which is shown coupled with a StartFull task. You can view a complete list of current tasks on the Tasks tab.
In the Tasks and Events panel on the dashboard, each category shows a maximum of three entries. To see all tasks or to see past and upcoming events, click View All in the appropriate section.
4.3 Workloads and Workload CommandsThe Workloads page displays a table with a row for each inventoried workload. Click a workload name to display a Workload Details page for viewing or editing configurations relevant to the workload and its state.
Figure 4-2 The Workloads Page
NOTE: All time stamps reflect the time zone of the Forge VM. This might be different from the time zone of the protected workload or the time zone of the host on which you are running the PlateSpin Forge Web Client. A display of the server date and time appears at the bottom right of the client window.
48 PlateSpin Forge 3.1 User Guide

4.3.1 Workload Protection and Recovery Commands
Commands reflect the workflow of workload protection and recovery. To perform a command for a workload, select the corresponding check box at the left. Applicable commands depend on the current state of a workload.
Figure 4-3 Workload Commands
The following table summarizes workload commands along with their functional descriptions.
Table 4-2 Workload Protection and Recovery Commands
Workload Command Description
Configure Starts the workload protection configuration with parameters applicable to an inventoried workload.
Prepare Replication Installs required data transfer software on the source and creates a failover VM in preparation of workload replication.
Run Replication Starts replicating the source workload and according to specified parameters.
Run Incremental Performs an individual transfer of changed data from the source to the target outside the workload protection schedule.
Pause Schedule Suspends the protection and pauses data transfers from the protected workload.
Resume Schedule Resumes the protection according to saved protection settings.
Test Failover Brings the recovery workload online in an isolated environment within the container for testing purposes.
Prepare for Failover Boots the recovery workload in preparation for a failover operation.
Run Failover Boots and configures the recovery workload, which takes over the business services of a failed workload.
Cancel Failover Aborts the failover process.
Failback / Deploy Following a failover operation, fails the recovery workload back to its original infrastructure or to a new infrastructure (virtual or physical).
Remove Workload Removes a workload from the inventory.
Up and Running 49

4.4 Using Workload Protection Features through the PlateSpin Forge Web Services APIYou can use workload protection functionality programmatically, through the protection.webservices API from within your applications. You can use any programming or scripting language that supports Web services.
http://<hostname | IP_address>/protection.webservices
Replace <hostname | IP_address> with the hostname or the IP address of your Forge VM.
To script common workload protection operations, use the referenced samples written in Python as guidance. A Microsoft Silverlight application, along with its source code, is also provided for reference purposes.
4.5 Managing Multiple Instances of PlateSpin ForgePlateSpin Forge includes a Web-based client application, the PlateSpin ForgeManagement Console, that provides centralized access to multiple instances of PlateSpin Forge.
In a data center with more than one instance of PlateSpin Forge, you can designate one of the instances as the manager and run the management console from there. Other instances are added under the Manager, providing a single point of control and interaction.
Section 4.5.1, “Using the PlateSpin Forge Management Console,” on page 50 Section 4.5.2, “About PlateSpin Forge Management Console Cards,” on page 51 Section 4.5.3, “Adding Instances of PlateSpin Forge to the Management Console,” on page 52 Section 4.5.4, “Managing Cards on the Management Console,” on page 52
4.5.1 Using the PlateSpin Forge Management Console
1 Open a Web browser on a machine that has access to your PlateSpin Forge instances and navigate to the following URL:http://<IP_address | hostname>/consoleReplace <IP_address | hostname> with either the IP address or the hostname of the Forge VM that is designated as the Manager.
2 Log in with your username and password.The console’s default Dashboard page is displayed.
50 PlateSpin Forge 3.1 User Guide

Figure 4-4 The Management Console’s Default Dashboard Page
4.5.2 About PlateSpin Forge Management Console Cards
Individual instances of PlateSpin Forge, when added to the Management Console, are represented by cards.
Figure 4-5 PlateSpin Forge Instance Card
A card displays basic information about the specific instance of PlateSpin Forge, such as:
IP address/hostname Location Version number Workload count Workload status Storage capacity Remaining free space
Up and Running 51

Hyperlinks on each card allow you to navigate to that particular instance’s Workloads, Reports, Settings, and Tasks pages. There are also hyperlinks that allow you to edit a card’s configuration or remove a card from the display.
4.5.3 Adding Instances of PlateSpin Forge to the Management Console
Adding a PlateSpin Forge instance to the Management Console results in a new card on the Management Console’s dashboard.
NOTE: When you log in to the Management Console on a PlateSpin Forge instance, that instance is not automatically added to the console. It must be manually added.
To add a PlateSpin Forge instance to the console:
1 On the console’s main dashboard, click Add.The Add/Edit page is displayed.
2 Specify the URL of the Forge VM. Both HTTP and HTTPS protocols are supported.3 (Optional) Enable the Use Management Console Credentials check box to use the same credentials
as those used by the console. When it is selected, the console automatically populates the Domain\Username field.
4 In the Domain\Username field, type a domain name and a username valid for the PlateSpin Forge instance that you are adding. In the Password field, type the corresponding password.
5 (Optional) Specify a descriptive or identifying Display Name (15 characters max), a Location (20 characters max), and any Notes you might require (400 characters max).
6 Click Add/Save.A new card is added to the dashboard.
4.5.4 Managing Cards on the Management Console
You can modify the details of a PlateSpin Forge card on the Management Console.
1 Click the Edit hyperlink on the card that you want to edit.The console’s Add/Edit page is displayed.
2 Make any desired changes, then click Add/Save.The updated console dashboard is displayed.
To remove a PlateSpin Forge card from the Management Console:
1 Click the Remove hyperlink on the card you want to remove. A confirmation prompt is displayed.
2 Click OK.The individual appliance card is removed from the dashboard.
52 PlateSpin Forge 3.1 User Guide

4.6 Generating Workload and Workload Protection ReportsPlateSpin Forge enables you to generate reports that provide analytical insight into your workload protection schedules over time.
The following report types are supported:
Workload Protection: Reports replication events for all workloads over a selectable time window.
Replication History: Reports replication type, size, time, and transfer speed per selectable workload over a selectable time window.
Replication Window: Reports the dynamics of full and incremental replications that can be summarized by Average, Most Recent, Sum, and Peak perspectives.
Current Protection Status: Reports Target RPO, Actual RPO, Actual TTO, Actual RTO, Last Test Failover, Last Replication, and Test Age statistics.
Events: Reports system events for all workloads over a selectable time window. Scheduled Events: Reports only upcoming workload protection events.
Figure 4-6 Options for a Replication History Report
To generate a report:
1 In your PlateSpin Forge Web Client, click Reports.A list of the report types is displayed.
2 Click the name of the required report type.
Up and Running 53

54 PlateSpin Forge 3.1 User Guide

5 5Workload Protection
PlateSpin Forge creates a replica of your production workload and regularly updates that replica based on a schedule that you define.
The replica, or the failover workload, is a virtual machine in the VM container of PlateSpin Forge that takes over the business function of your production workload in case of a disruption at the production site.
Section 5.1, “Basic Workflow for Workload Protection and Recovery,” on page 55 Section 5.2, “Adding a Workload for Protection,” on page 56 Section 5.3, “Configuring Protection Details and Preparing the Replication,” on page 58 Section 5.4, “Starting the Workload Protection,” on page 60 Section 5.5, “Failover,” on page 61 Section 5.6, “Failback,” on page 63 Section 5.7, “Advanced Workload Protection Topics,” on page 66
5.1 Basic Workflow for Workload Protection and RecoveryPlateSpin Forge defines the following workflow for workload protection and recovery:
1 Preparatory step:1a Make sure that PlateSpin Forge supports your workload.
See “Supported Configurations” on page 9.1b Make sure that your workloads meet access and network prerequisites.
See “Access and Communication Requirements across your Protection Network” on page 19.
1c (Linux only) (Conditional) If you plan to protect a supported Linux workload that has a non-
standard, customized, or newer kernel, rebuild the PlateSpin blkwatch module, which is required for block-level data replication. See KB Article 7005873 (http://www.novell.com/support/viewContent.do?externalId=7005873).
(Recommended) Prepare LVM snapshots for block-level data transfer. Ensure that each volume group has sufficient free space for LVM snapshots (at least 10 % of the sum of all partitions).See KB Article 7005872 (http://www.novell.com/support/viewContent.do?externalId=7005872).
Workload Protection 55

(Optional) Determine and prepare any custom scripts that you want to execute on your source workload upon each replication. See “Using Freeze and Thaw Scripts for Every Replication (Linux)” on page 81.
2 Add a workload. See “Adding a Workload for Protection” on page 56.
3 Configure protection details and prepare the replication. See “Configuring Protection Details and Preparing the Replication” on page 58.
4 Start the workload protection schedule. See “Starting the Workload Protection” on page 60.
5 (Optional) Manually run an incremental.6 (Optional) Test the failover functionality.
See Testing the Recovery Workload and the Failover Functionality.7 Perform a failover.
See “Failover” on page 61.8 Perform a failback.
See “Failback” on page 63.9 (Optional) Reprotect a workload after failback.
Except for Steps 1, 8, and 9, these are represented by workload commands on the Workloads page. See “Workloads and Workload Commands” on page 48.
A Reprotect command becomes available following a successful Failback operation.
5.2 Adding a Workload for Protection1 Follow the required preparatory steps.
See Step 1 in “Basic Workflow for Workload Protection and Recovery” on page 55.2 On the Dashboard or Workloads page, click Add Workload.
The PlateSpin Forge Web Client displays the Add Workload page.
56 PlateSpin Forge 3.1 User Guide
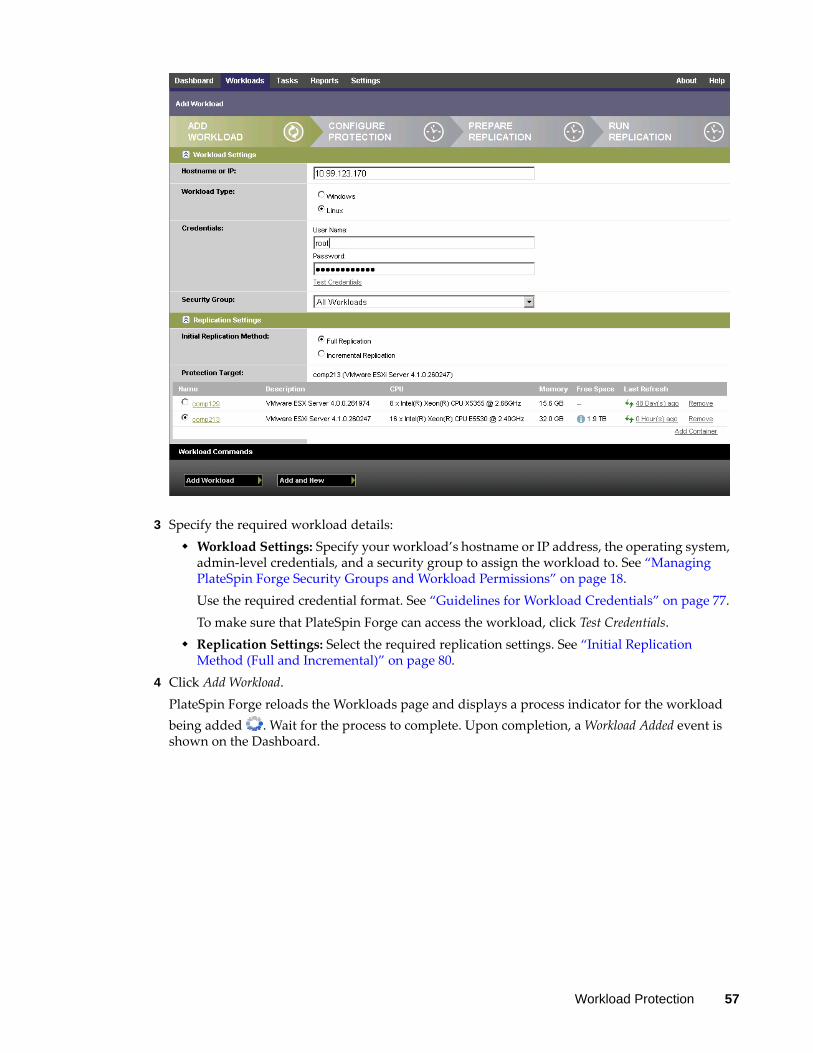
3 Specify the required workload details: Workload Settings: Specify your workload’s hostname or IP address, the operating system,
admin-level credentials, and a security group to assign the workload to. See “Managing PlateSpin Forge Security Groups and Workload Permissions” on page 18.Use the required credential format. See “Guidelines for Workload Credentials” on page 77. To make sure that PlateSpin Forge can access the workload, click Test Credentials.
Replication Settings: Select the required replication settings. See “Initial Replication Method (Full and Incremental)” on page 80.
4 Click Add Workload.PlateSpin Forge reloads the Workloads page and displays a process indicator for the workload being added . Wait for the process to complete. Upon completion, a Workload Added event is shown on the Dashboard.
Workload Protection 57
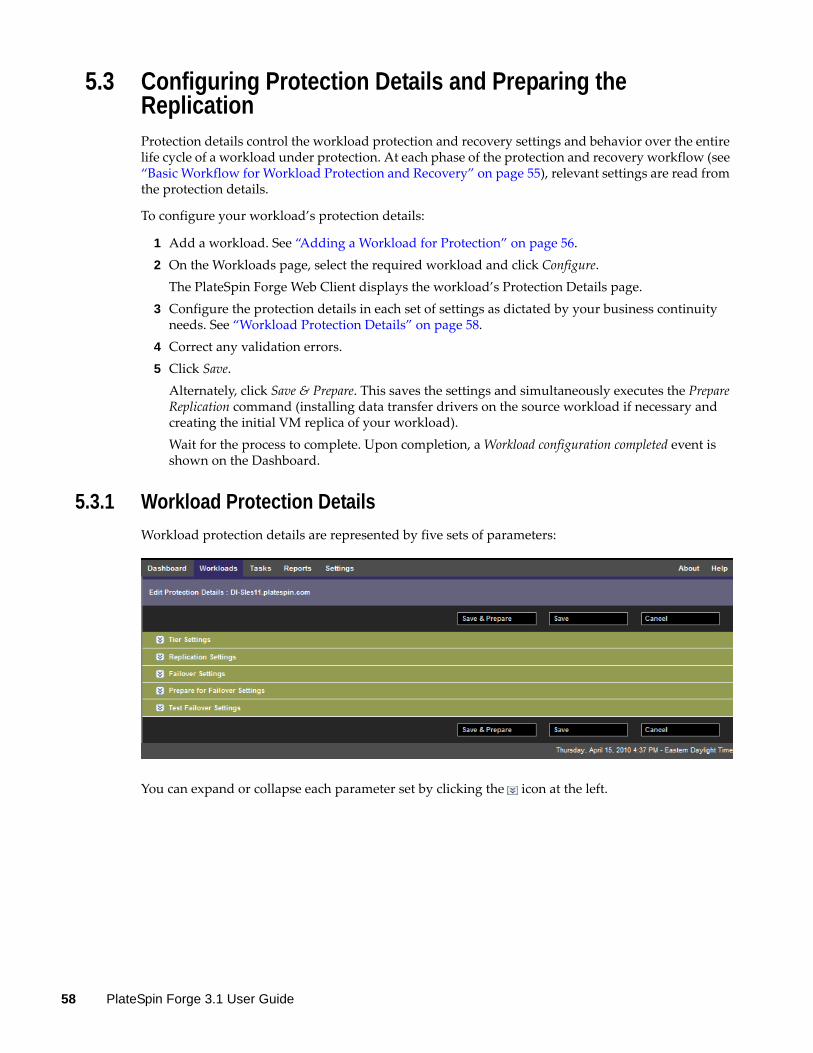
5.3 Configuring Protection Details and Preparing the ReplicationProtection details control the workload protection and recovery settings and behavior over the entire life cycle of a workload under protection. At each phase of the protection and recovery workflow (see “Basic Workflow for Workload Protection and Recovery” on page 55), relevant settings are read from the protection details.
To configure your workload’s protection details:
1 Add a workload. See “Adding a Workload for Protection” on page 56.2 On the Workloads page, select the required workload and click Configure.
The PlateSpin Forge Web Client displays the workload’s Protection Details page.3 Configure the protection details in each set of settings as dictated by your business continuity
needs. See “Workload Protection Details” on page 58.4 Correct any validation errors.5 Click Save.
Alternately, click Save & Prepare. This saves the settings and simultaneously executes the Prepare Replication command (installing data transfer drivers on the source workload if necessary and creating the initial VM replica of your workload). Wait for the process to complete. Upon completion, a Workload configuration completed event is shown on the Dashboard.
5.3.1 Workload Protection Details
Workload protection details are represented by five sets of parameters:
You can expand or collapse each parameter set by clicking the icon at the left.
58 PlateSpin Forge 3.1 User Guide

The following are the details of the five parameter sets:
Table 5-1 Workload Protection Details
Parameter Set (Settings) Details
Tier Indicates the Protection Tier that the current protection uses. See “Protection Tiers” on page 78.
Replication Transfer Encryption: To enable encryption, select the Encrypt Data Transfer option. See “Security and Privacy” on page 10.
Transfer Method: (Windows) Enables you to select a data transfer mechanism and security through encryption. See “Transfer Methods” on page 78.
Source Credentials: Required for accessing the workload. See “Guidelines for Workload Credentials” on page 77.
Number of CPUs: Enables you to specify the required number of vCPUs assigned to the recovery workload.
Replication Network: Enables you to separate replication traffic based on virtual networks defined on your appliance host. See “Networking” on page 84.
Recovery Point Datastore: Enables you to select a datastore associated with your appliance host for storing Recovery Points. See “Recovery Points” on page 79.
Protected Volumes: Use these options to select volumes for protection and to assign their replicas to specific datastores on your appliance host. You can also select for protection:
Linux worloads: logical volumes and volume groups
OES 2 workloads: EVMS volumes
See “Volumes” on page 82.
Thin Disk option: Enables the thin-provisioned virtual disk feature, whereby a virtual disk appears to the VM to have a set size, but only consumes the amount of disk space that is required by that disk.
Services/Daemons to Stop During Replication: Enables you to select Windows services or Linux Daemons that are automatically stopped during the replication. See “Service and Daemon Control” on page 81.
Failover VM Memory: Enables you to specify the amount of memory allocated to the failover VM.
Hostname and Domain/Workgroup affiliation: Use these options to control the identity and domain/workgroup affiliation of the failover workload when it is live. For domain affiliation, domain admin credentials are required.
Network Connections: Use these options to control the LAN settings of the failover workload. See “Networking” on page 84.
Service/Daemon States to Change: Enables you to control the startup state of specific application services (Windows) or daemons (Linux). See “Service and Daemon Control” on page 81.
Prepare for Failover
Enables you to control the temporary network settings of the failover workload during the optional Prepare for Failover operation. See “Networking” on page 84.
Workload Protection 59

5.4 Starting the Workload ProtectionWorkload protection is started by the Run Replication command:
You can execute the Run Replication command after:
Adding a workload. Configuring the workload’s protection details. Preparing the initial replication.
When you are ready to proceed:
1 On the Workloads page, select the required workload, then click Run Replication.2 Click Execute.
PlateSpin Forge starts the execution and displays a process indicator for the Copy data step .
NOTE: After a protection contact is established:
Changing the size of a volume that is under block-level protection invalidates the protection. The appropriate procedure is to 1. remove the contract, 2. resize the volumes as required. 3. re-establish the protection.
Any significant modification of the protected workload requires that the protection be re-established. Examples include adding volumes or network cards to the workload under protection.
Test Failover VM Memory: Enables you to assign the required RAM to the temporary workload.
Hostname: Enables you to assign a hostname to the temporary workload.
Domain/Workgroup: Enables you to affiliate the temporary workload with a domain or a workgroup. For domain affiliation, domain admin credentials are required.
Network Connections: Controls the LAN settings of the temporary workload. See “Networking” on page 84.
Service/Daemon States to Change: Enables you to control the startup state of specific application services (Windows) or daemons (Linux). See “Service and Daemon Control” on page 81.
Parameter Set (Settings) Details
60 PlateSpin Forge 3.1 User Guide
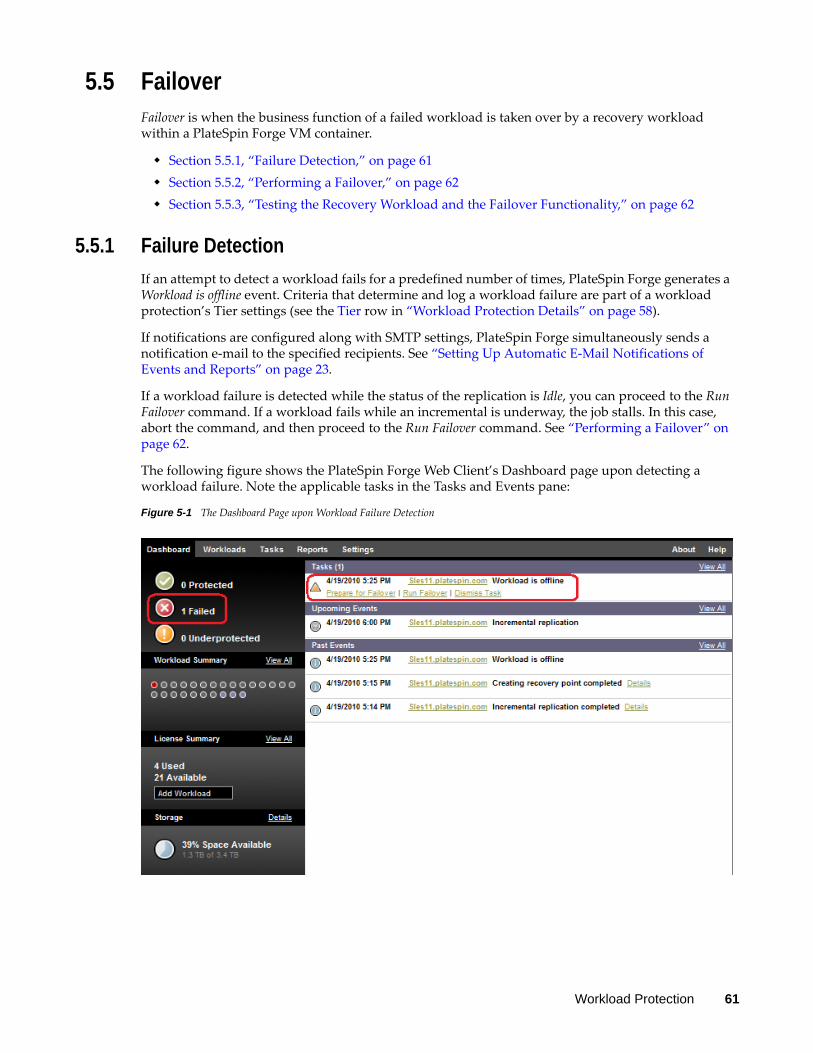
5.5 FailoverFailover is when the business function of a failed workload is taken over by a recovery workload within a PlateSpin Forge VM container.
Section 5.5.1, “Failure Detection,” on page 61 Section 5.5.2, “Performing a Failover,” on page 62 Section 5.5.3, “Testing the Recovery Workload and the Failover Functionality,” on page 62
5.5.1 Failure Detection
If an attempt to detect a workload fails for a predefined number of times, PlateSpin Forge generates a Workload is offline event. Criteria that determine and log a workload failure are part of a workload protection’s Tier settings (see the Tier row in “Workload Protection Details” on page 58).
If notifications are configured along with SMTP settings, PlateSpin Forge simultaneously sends a notification e-mail to the specified recipients. See “Setting Up Automatic E-Mail Notifications of Events and Reports” on page 23.
If a workload failure is detected while the status of the replication is Idle, you can proceed to the Run Failover command. If a workload fails while an incremental is underway, the job stalls. In this case, abort the command, and then proceed to the Run Failover command. See “Performing a Failover” on page 62.
The following figure shows the PlateSpin Forge Web Client’s Dashboard page upon detecting a workload failure. Note the applicable tasks in the Tasks and Events pane:
Figure 5-1 The Dashboard Page upon Workload Failure Detection
Workload Protection 61

5.5.2 Performing a Failover
Failover settings, including the recovery workload’s network identity and LAN settings, are saved together with the workload’s protection details at configuration time. See the Failover row in “Workload Protection Details” on page 58.
You can use the following methods to perform a failover:
Selecting the required workload on the Workloads page and clicking Run Failover. You can use the optional Prepare for Failover command for applying your saved failover settings to the recovery workload and booting it in advance of a full failover. Consider a separate Prepare for Failover operation to make sure that your production workload has indeed failed. This saves time when running a full Failover command.
Clicking the appropriate command hyperlink of the Workload is offline event in the Tasks and Events pane. See Figure 5-1.
Manually booting the recovery workload by using the VMware vSphere Client. When using this method, use the vSphere Client’s Snapshot Manager to select a snapshot (a recovery point).See “Managing Forge Snapshots on the Appliance Host” on page 37.
NOTE: When performing a failover manually, the system applies failover settings as saved upon the workload’s replication.
Use one of these methods to start the failover process and select a recovery point to apply to the recovery workload (see “Recovery Points” on page 79). Click Execute and monitor the progress. Upon completion, the replication status of the workload should indicate Live.
For testing the recovery workload or testing the failover process as part of a planned disaster recovery exercise, see “Testing the Recovery Workload and the Failover Functionality” on page 62.
5.5.3 Testing the Recovery Workload and the Failover Functionality
PlateSpin Forge provides you with the capability to test the failover functionality and the integrity of the recovery workload. This is done by using the Test Failover command, which boots the recovery workload in a restricted network environment for testing.
When you execute the command, PlateSpin Forge applies the Test Failover Settings, as saved in the workload protection details, to the recovery workload (see the Test Failover row in “Workload Protection Details” on page 58.
1 Define an appropriate time window for testing and make sure that there are no replications underway. The replication status of the workload must be Idle.
2 On the Workloads page, select the required workload, click Test Failover, select a recovery point (see “Recovery Points” on page 79), and the click Execute.Upon completion, PlateSpin Forge generates a corresponding event and a task with a set of applicable commands:
62 PlateSpin Forge 3.1 User Guide

3 Verify the integrity and business functionality of the recovery workload. Use the VMware vSphere Client to access the recovery workload in the appliance host.See “Downloading the VMware Client Program” on page 35.
4 Mark the test as a failure or a success. Use the corresponding commands in the task (Mark Test Failure, Mark Test Success). The selected action is saved in the history of events associated with the workload. Dismiss Task discards the task and the event.Upon completion of the Mark Test Failure or Mark Test Success tasks, PlateSpin Forge discards temporary settings that were applied to the recovery workload, and the protection returns to its pre-test state.
5.6 FailbackA Failback operation is the next logical step after a failover; it transfers the failover workload to its original infrastructure or, if necessary, a new one.
Failback methods differ according to the target infrastructure type and the degree of automation of the failback process:
Automated Failback to a Virtual Machine: Supported for VMware ESX platforms. Semi-Automated Failback to a Physical Machine: Supported for all physical machines. Semi-Automated Failback to a Virtual Machine: Supported for Xen on SLES and Microsoft
Hyper-V platforms.
The following topics provide more information:
Section 5.6.1, “Automated Failback to a Virtual Machine,” on page 63 Section 5.6.2, “Semi-Automated Failback to a Physical Machine,” on page 66 Section 5.6.3, “Semi-Automated Failback to a Virtual Machine,” on page 66
5.6.1 Automated Failback to a Virtual Machine
The following containers are supported as automated failback targets:
Platform Notes
VMware DRS Cluster in vSphere 4.1
The DRS configuration must be either Partially Automated or Fully Automated (it must not be set to Manual)
The Cluster can use ESX 4.1, ESXi 4.1, or both
VMware ESX 3.5, 4.0, 4.1, 4.1 Update 1
VMware ESXi 3.5, 4.0, 4.1, 4.1 Update 1
All ESXi versions must have a paid license; protection is unsupported with these systems if they are operating with a free license.
Workload Protection 63

Use these steps to do an automated failback of a failover workload to a target VMware container.
1 Following a failover, select the workload on the Workloads page and click Failback / Deploy.2 Specify the following sets of parameters:
Workload Settings: Specify the recovery workload’s hostname or IP address and provide admin-level credentials. Use the required credential format (see “Guidelines for Workload Credentials” on page 77.
Failback Target Settings: Specify the the following parameters: Replication Method: Select the scope of data replication. If you select Incremental, you
must prepare a target. See “Initial Replication Method (Full and Incremental)” on page 80.
Target Type: Select Virtual Target. If you don’t yet have a failback container, click Add Container and inventory a supported VM host using root-level credentials.
3 Click Save and Prepare and monitor the progress on the Command Details screen.Upon successful completion, PlateSpin Forge loads the Ready for Failback screen, prompting you to specify the details of the failback operation.
4 Configure the failback details. See “Failback Details (Workload to VM)” on page 65.5 Click Save and Failback and monitor the progress on the Command Details page. See Figure 5-2.
PlateSpin Forge executes the command. If you selected Reprotect after Failback in the Post-Failback parameter set, a Reprotect command is shown in the PlateSpin Forge Web Client.
Figure 5-2 Failback Command Details
64 PlateSpin Forge 3.1 User Guide

Failback Details (Workload to VM)
Failback details are represented by three sets of parameters that you configure when you are performing a workload failback operation to a virtual machine.
Table 5-2 Failback Details (VM)
Parameter Set (Settings) Details
Failback Transfer Method: (Windows) Enables you to select a data transfer mechanism and security through encryption. See “Transfer Methods” on page 78.
Failback Network: Enables you to direct failback traffic over a dedicated network based on virtual networks defined on your appliance host. See “Networking” on page 84.
VM Datastore: Enables you to select a datastore associated with your failback container for the target workload.
Volumes to Copy: Enables you to select the volumes for re-creating on the target and assigning to a specific datastore.
Services/Daemons to stop: Enables you to select Windows services or Linux daemons that are automatically stopped during the failback. See “Service and Daemon Control” on page 81.
Alternative Address for Source: Accepts input of an additional IP address for the source workload if applicable. See “Protection Across Public and Private Networks Through NAT” on page 21.
Workload Number of CPUs: Enables you to specify the required number of vCPUs assigned to the target workload.
VM Memory: Enables you to assign the required RAM to the target workload .
Hostname, Domain/Workgroup: Use these options to control the identity and domain/workgroup affiliation of the target workload. For domain affiliation, domain admin credentials are required.
Network Connections: Use these options to specify the network mapping of the target workload based on the virtual networks of the underlying VM container.
Service States to Change: Enables you to control the startup state of specific application services (Windows) or daemons (Linux). See “Service and Daemon Control” on page 81.
Post-Failback Reprotect Workload: Use this option if you plan to re-create the protection contract for the target workload after deployment. This maintains a continuous event history for the workload and auto-assigns/designates a workload license.
Reprotect after Failback: Select this option if you intend to re-create a protection contract for the target workload.
No reprotect: Select this option if you don’t intend to re-create a protection contract for the target workload.
Workload Protection 65

5.6.2 Semi-Automated Failback to a Physical Machine
Use these steps to fail a workload back to a physical machine after a failover. The physical machine might be either the original infrastructure or a new one.
1 Register the required physical machine with your PlateSpin Forge Server. See “Registering Physical Machines with PlateSpin Forge for Failback” on page 84.
2 (Optional: Windows platforms) Run the PS Analyzer tool to determine whether any drivers are missing. See “Analyzing Workloads with PlateSpin Analyzer (Windows)” on page 71.
3 If the PS Analyzer reports missing or incompatible drivers, upload the required drivers to the PlateSpin Forge device driver database. See “Managing Device Drivers” on page 72.
4 Following a failover, select the workload on the Workloads page and click Failback / Deploy.5 Specify the following sets of parameters:
Workload Settings: Specify the recovery workload’s hostname or IP address and provide admin-level credentials. Use the required credential format (see “Guidelines for Workload Credentials” on page 77.
Failback Target Settings: Specify the following parameters: Replication Method: Select the scope of data replication.
See “Initial Replication Method (Full and Incremental)” on page 80. Target Type: Select the Physical Target option and then select the physical machine you
registered in Step 1.6 Click Save and Prepare and monitor the progress on the Command Details screen.
Upon successful completion, PlateSpin Forge loads the Ready for Failback screen, prompting you to specify the details of the failback operation.
7 Configure the failback details, then click Save and Failback.Monitor the progress on the Command Details screen.
5.6.3 Semi-Automated Failback to a Virtual Machine
This failback type follows a process similar to the Semi-Automated Failback to a Physical Machine for a VM target other than a natively-supported VMware container. During this process, you direct the system to regard a VM target as a physical machine.
A semi-automated failback to a VM is supported for the following target VM platforms:
Xen on SLES 10, 11 Microsoft Hyper-V
5.7 Advanced Workload Protection Topics Section 5.7.1, “Protecting Windows Clusters,” on page 67 Section 5.7.2, “Linux Failback to a Paravirtualized VM on Xen-on-SLES,” on page 67
66 PlateSpin Forge 3.1 User Guide

5.7.1 Protecting Windows Clusters
PlateSpin Forge supports the protection of a Microsoft Windows cluster’s business services. The supported clustering technologies are:
Windows 2003 Server-based Windows Cluster Server (Single-Quorum Device Cluster model) Windows 2008 Server-based Microsoft Failover Cluster (Node and Disk Majority and No Majority:
Disk Only models)
Protection of a cluster is achieved through incremental replications of changes on the active node streamed to a virtual single-node cluster, which you can use while troubleshooting the source infrastructure.
The scope of support for cluster migrations in the current release is subject to the following conditions:
When you perform an Add Workload operation, you must identify the active node—the node that currently owns the quorum resource of the cluster—identified by the cluster’s IP address (virtual IP address). Specifying the IP address of an individual node results in that node being inventoried as a regular, cluster-unaware Windows workload.
A cluster’s quorum resource must be collocated with the cluster’s resource group (service) being protected.
If a node failover occurs between incremental replications of a protected cluster, PlateSpin Forge generates a protection event. If the new active node’s profile is similar to the failed active node, the protection schedule continues; otherwise, the command fails. The profiles of cluster nodes are considered similar if:
They have the same number of volumes Each volume is exactly the same size on each node They have an identical number of network connections
To protect a Windows cluster, follow the normal workload protection workflow (see “Basic Workflow for Workload Protection and Recovery” on page 55).
On failback, PlateSpin Forge provides validation that helps you ensure that shared volume layouts are preserved on the target. Make sure you map the volumes correctly.
5.7.2 Linux Failback to a Paravirtualized VM on Xen-on-SLES
You can do a failback to a paravirtualized VM on Xen-on-SLES (version 10 only). This is done indirectly, through a two-stage process. The paravirtualized VM needs to be transformed into a fully virtualized VM first and later transformed back. A utility (xmps), included in your PlateSpin boot ISO image, is used to transform the VM.
The procedure varies slightly, depending on whether the target is a new or an existing paravirtualized VM.
“Linux Failback to a New Paravirtualized VM” on page 68 “Linux Failback to an Existing Paravirtualized VM” on page 70
Workload Protection 67

Linux Failback to a New Paravirtualized VM
1 Copy the PlateSpin Linux boot ISO to the target Xen/SLES server. See Table 7-2, “ISO Boot Images for Target Physical Machines,” on page 84.
2 Start the Virtual Machine manager and create a fully virtualized VM:2a Select the I need to install an operating system option.2b Choose a suitable size for the disk image (the disk size should be equal to or bigger than
that of the source machine).2c Select the boot ISO as the installation source.
The VM boots into the PlateSpin OS environment, used in failback to physical machine settings.
3 Complete the failback procedure. See “Semi-Automated Failback to a Physical Machine” on page 66.Upon completion, the VM should be fully functional as a fully virtualized machine.
4 Reboot the VM, making sure that it still boots into the PlateSpin OS environment.
5 At the boot: prompt, type switch and press Enter.This reconfigures the operating system to be bootable as a paravirtualized machine. Upon completion, the output should look similar to the one shown below:
68 PlateSpin Forge 3.1 User Guide

Note the bootloader arguments in the final segment of the output:
Please apply the following data as bootloader_args forswitching Xen fully-virt machine to Para-virt machine: '-entry=xvda1:/vmlinuz-2.6.16.60-0.54.5-xen, /initrd-2.6.16.60-0.54.5-xen'
These are used by the xmps utility to set up the location of the kernel and the initrd image, from which the paravirtualized machine boots from.
6 Power off the virtual machine:[DB]$ poweroff
7 Login to the XEN/SLES server as root and mount the PlateSpin Linux boot ISO (the command example assumes that the ISO has been copied under the /root directory):
# mkdir /mnt/ps# mount -o loop /root/linuxfailback.iso /mnt/ps
8 Run the xmps utility to create a paravirtualized VM based on the configuration of the fully virtualized VM:
# /mnt/ps/tools/xmps --pv --vm_name=SLES10-FV --new_vm_name=SLES10-PV --bootloader_args="--entry=xvda1:/vmlinuz-2.6.16.60-0.54.5-xen, /initrd-2.6.16.60-0.54.5-xen"
The utility takes as input: The name of the fully virtualized VM on which the configuration of the paravirtualized
machine will be based (SLES10-FV) The name of the virtual machine to create (SLES10-PV) The paravirtualized machine's bootloader arguments "--bootloader_args" (shown at
Step 5)If a VM with the same name as the one passed as new_vm_name already exists, the xmps utility fails.The newly created paravirtualized VM (SLES10-PV) should now be available in the Virtual Machine Manager, ready to be turned on. The corresponding fully virtualized machine is retired and will fail to boot. This VM can be deleted safely (only the VM configuration will be removed).
Workload Protection 69

9 Unmount the PlateSpin Linux boot ISO:
# umount /mnt/ps
Linux Failback to an Existing Paravirtualized VM
1 Copy the PlateSpin Linux boot ISO to the target Xen/SLES server. See Table 7-2, “ISO Boot Images for Target Physical Machines,” on page 84.
2 Log in to the XEN/SLES server as root and mount the PlateSpin Linux boot ISO:
# mkdir /mnt/ps# mount -o loop /root/linuxfailback.iso /mnt/ps
3 Run the xmps utility to create a fully virtualized VM based on the configuration of the paravirtualized VM (the intended failback target):
# /mnt/ps/tools/xmps --fv --vm_name=SLES10-PV --new_vm_name=SLES10-FV --bootiso=/root/linuxfailback.iso
The utility takes as input: The name of the existing paravirtualized machine (SLES10-PV), which is the intended
failback target The name of the temporary fully virtualized machine (SLES10-FV) to be created for the two-
stage failback operation The full path of the boot ISO (assuming that the ISO file is located uner /root: /root/
booxofxx2p.iso)If a VM with the same name as the one passed as new_vm_name already exists, the xmps utility fails.The newly created fully virtualized machine (SLES10-FV) should now be available in the Virtual Machine Manager.
4 Turn on the newly created fully virtualized machine (SLES10-FV).The VM boots into the PlateSpin OS environment, used in failback to physical machine settings.
5 Complete the failback procedure. See “Semi-Automated Failback to a Physical Machine” on page 66.
6 Reboot the VM, run switch, and reconfigure the workload as described in “Linux Failback to a New Paravirtualized VM” on page 68 (from Step 4 to Step 9 only).
70 PlateSpin Forge 3.1 User Guide

6 6Auxiliary Tools for Working with Physical Machines
Your PlateSpin Forge distribution includes tools for use when working with physical machines as failback targets.
Section 6.1, “Analyzing Workloads with PlateSpin Analyzer (Windows),” on page 71 Section 6.2, “Managing Device Drivers,” on page 72
6.1 Analyzing Workloads with PlateSpin Analyzer (Windows)Before running a workload failback or operation to a physical machine, use the PlateSpin Analyzer to identify potential driver problems and correct them beforehand.
NOTE: PlateSpin Analyzer currently supports only Windows workloads.
1 On your Forge VM, start the Analyzer.Client.exe program, located in the following directory:Program Files\PlateSpin Forge Server\PlateSpin Analyzer
2 Make sure that the network selection is Default, then select the required machine in the All Machines drop-down list.
3 (Optional) To reduce the analysis time, limit the scope of machines to a specific language.4 Click Analyze.
Depending on the number of inventoried workloads you select, the analysis might take a few seconds to several minutes.
Analyzed servers are listed in the left pane. Select a server to view test results in the right pane. Test results can be any combination of the following:
Table 6-1 Status Messages in PlateSpin Analyzer Test Results
The Summary tab provides a listing of the number of machines analyzed and not checked, as well as those that passed the test, failed the test, or were assigned a warning status.
The Test Results tab provides the following information:
Result Description
Passed The machine passed the PlateSpin Analyzer tests.
Warning One or more tests returned warnings for the machine, indicating potential migration issues. Click the hostname to see the details.
Failed One or more tests failed for this machine. Click the hostname to see the details and obtain more information.
Auxiliary Tools for Working with Physical Machines 71

Table 6-2 PlateSpin Analyzer Test Results Tab
The Properties tab provides detailed information about a selected machine.
6.2 Managing Device DriversPlateSpin Forge ships with a library of device drivers and automatically installs the appropriate ones on target workloads. To determine if the required drivers are available, use the PlateSpin Analyzer utility. See “Analyzing Workloads with PlateSpin Analyzer (Windows)” on page 71.
If PlateSpin Analyzer encounters missing or incompatible drivers, or if you require specific drivers for a target infrastructure, you might need to add (upload) drivers to the PlateSpin Forge driver database.
Section 6.2.1, “Packaging Device Drivers for Windows Systems,” on page 72 Section 6.2.2, “Packaging Device Drivers for Linux Systems,” on page 73 Section 6.2.3, “Uploading Drivers to the PlateSpin Forge Device Driver Database,” on page 73
6.2.1 Packaging Device Drivers for Windows Systems
To package your Windows device drivers for uploading to the PlateSpin Forge driver database:
1 Prepare all interdependent driver files (*.sys, *.inf, *.dll, etc.) for your target infrastructure and device. If you have obtained manufacturer-specific drivers as a .zip archive or an executable, extract them first.
2 Save the driver files in separate folders, with one folder per device.
The drivers are now ready for upload. See “Uploading Drivers to the PlateSpin Forge Device Driver Database” on page 73.
NOTE: For problem-free operation of your protection job and the target workload, upload only digitally signed drivers for:
All 64-bit Windows systems 32-bit versions of Windows Vista and Windows Server 2008, and Windows 7 systems
Section Details
System Test Validates that the machine fulfills minimum hardware and operating system requirements.
Hardware Support Checks the workload for hardware compatibility.
Target Hardware Support Checks hardware compatibility for use as a target physical machine.
Software Test Checks for applications that must be shut down for Live Transfer, and databases that should be shut down during Live Transfer to guarantee transactional integrity.
Incompatible Application Test Verifies that applications known to interfere with the migration process are not installed on the system. These applications are stored in the Incompatible Application Database. To add, delete or edit entries in this database, select Incompatible Application from the Tools menu.
72 PlateSpin Forge 3.1 User Guide

6.2.2 Packaging Device Drivers for Linux Systems
To package your Linux device drivers for uploading to the PlateSpin Forge driver database, you can use a custom utility included in your Linux Take Control ISO boot image. See Table 7-2, “ISO Boot Images for Target Physical Machines,” on page 84.
1 On a Linux workstation, create a directory for your device driver files. All the drivers in the directory must be for the same kernel and architecture.
2 Download the boot image and mount it.For example, assuming that the ISO has been copied under the /root directory, issue these commands:
# mkdir /mnt/ps# mount -o loop /root/linuxfailback.iso /mnt/ps
3 From the /tools subdirectory of the mounted ISO image, copy the packageModules.tar.gz archive into a another working directory and extract it.For example, with the .gz file is inside your current working directory, issue this command:
tar -xvzf packageModules.tar.gz
4 Enter the working directory and execute the following command:./PackageModules.sh –d <path_to_driver_dir> -o <package name>
Replace <path_to_driver_dir> with the actual path to the directory where you saved you driver files, and <package name> with the actual package name, using the following format: Drivername-driverversion-dist-kernelversion-arch.pkg
For example, bnx2x-1.48.107-RHEL4-2.6.9-11.EL-i686.pkg
The package is now ready for uploading. See “Uploading Drivers to the PlateSpin Forge Device Driver Database” on page 73.
6.2.3 Uploading Drivers to the PlateSpin Forge Device Driver Database
Use the PlateSpin Driver Manager to upload device drivers to the driver database.
NOTE: On upload, PlateSpin Forge does not validate drivers against selected operating system types or their bit specifications; make sure that you only upload drivers that are appropriate for your target infrastructure.
“Device Driver Upload Procedure (Windows)” on page 73 “Device Driver Upload Procedure (Linux)” on page 74
Device Driver Upload Procedure (Windows)
1 Obtain and prepare the required device drivers. See Packaging Device Drivers for Windows Systems.
2 On your Forge VM, under Program Files\PlateSpin Forge Server\DriverManager, start the DriverManager.exe program and select the Windows Drivers tab.
Auxiliary Tools for Working with Physical Machines 73
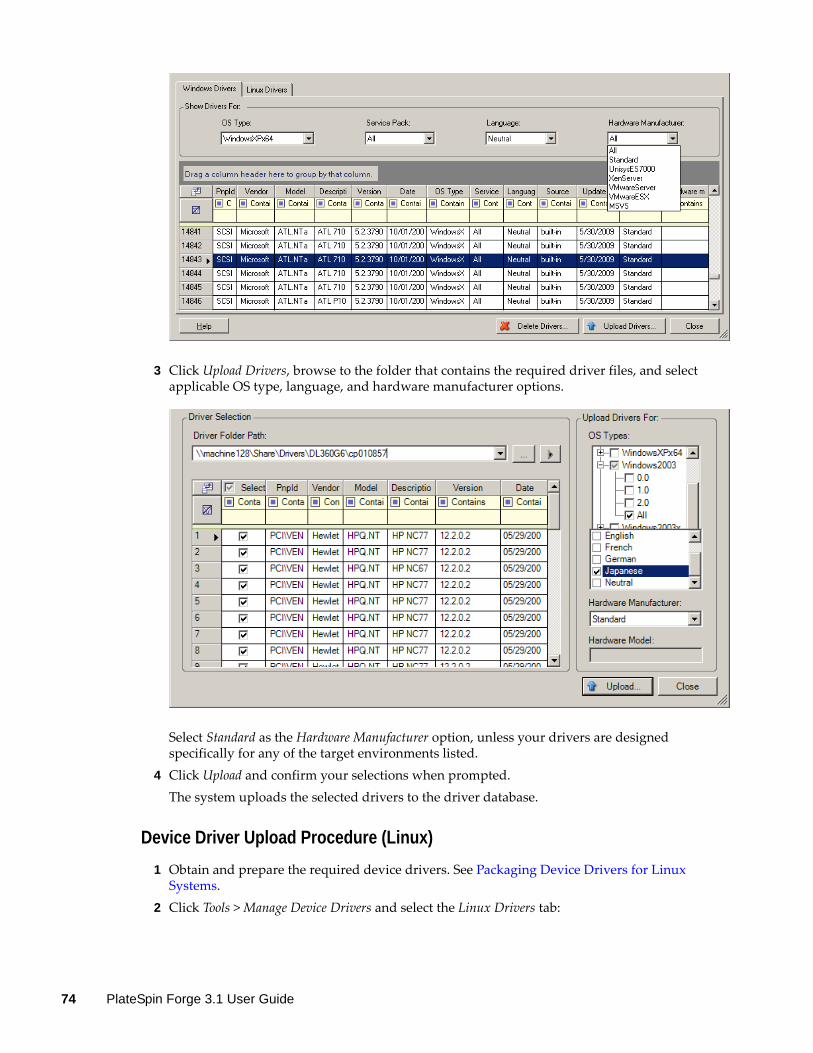
3 Click Upload Drivers, browse to the folder that contains the required driver files, and select applicable OS type, language, and hardware manufacturer options.
Select Standard as the Hardware Manufacturer option, unless your drivers are designed specifically for any of the target environments listed.
4 Click Upload and confirm your selections when prompted.The system uploads the selected drivers to the driver database.
Device Driver Upload Procedure (Linux)
1 Obtain and prepare the required device drivers. See Packaging Device Drivers for Linux Systems.
2 Click Tools > Manage Device Drivers and select the Linux Drivers tab:
74 PlateSpin Forge 3.1 User Guide

3 Click Upload Drivers, browse to the folder that contains the required driver package (*.pkg), and click Upload All Drivers.The system uploads the selected drivers to the driver database.
Auxiliary Tools for Working with Physical Machines 75

76 PlateSpin Forge 3.1 User Guide
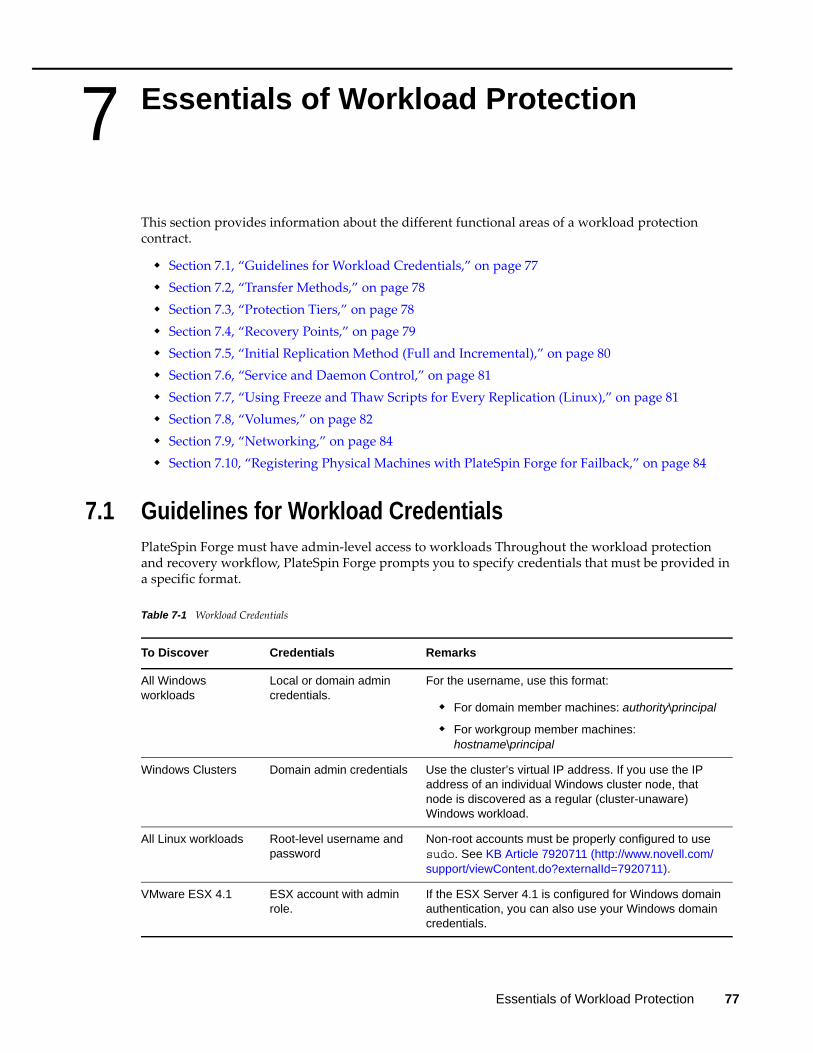
7 7Essentials of Workload Protection
This section provides information about the different functional areas of a workload protection contract.
Section 7.1, “Guidelines for Workload Credentials,” on page 77 Section 7.2, “Transfer Methods,” on page 78 Section 7.3, “Protection Tiers,” on page 78 Section 7.4, “Recovery Points,” on page 79 Section 7.5, “Initial Replication Method (Full and Incremental),” on page 80 Section 7.6, “Service and Daemon Control,” on page 81 Section 7.7, “Using Freeze and Thaw Scripts for Every Replication (Linux),” on page 81 Section 7.8, “Volumes,” on page 82 Section 7.9, “Networking,” on page 84 Section 7.10, “Registering Physical Machines with PlateSpin Forge for Failback,” on page 84
7.1 Guidelines for Workload CredentialsPlateSpin Forge must have admin-level access to workloads Throughout the workload protection and recovery workflow, PlateSpin Forge prompts you to specify credentials that must be provided in a specific format.
Table 7-1 Workload Credentials
To Discover Credentials Remarks
All Windows workloads
Local or domain admin credentials.
For the username, use this format:
For domain member machines: authority\principal
For workgroup member machines: hostname\principal
Windows Clusters Domain admin credentials Use the cluster’s virtual IP address. If you use the IP address of an individual Windows cluster node, that node is discovered as a regular (cluster-unaware) Windows workload.
All Linux workloads Root-level username and password
Non-root accounts must be properly configured to use sudo. See KB Article 7920711 (http://www.novell.com/support/viewContent.do?externalId=7920711).
VMware ESX 4.1 ESX account with admin role.
If the ESX Server 4.1 is configured for Windows domain authentication, you can also use your Windows domain credentials.
Essentials of Workload Protection 77

7.2 Transfer MethodsA transfer method describes the way data is replicated from a source to a target. PlateSpin Forge provides different data transfer capabilities, which depend on the protected workload’s operating system:
Block-level: Data is replicated at a volume’s block level. For this transfer method, PlateSpin Forge uses a driver to monitor changes on the source workload. Windows systems: For Windows systems, PlateSpin Forge uses a block-based component
that leverages the Microsoft Volume Snapshot Service (VSS) with applications and services that support VSS. The automatic installation of the block-based component requires a reboot of the source workload (no reboot is required when you are protecting Windows clusters with block-level data transfer). When you are configuring workload protection details, you can select the timing of the component’s installation. Similarly, when removing a workload, uninstallation of the block-based component requires a reboot.
Linux systems: For block-level transfer of Linux systems, PlateSpin Forge uses a block-level data transfer component that leverages LVM snapshots if available (this is the default and recommended option). See KB Article 7005872 (http://www.novell.com/support/viewContent.do?externalId=7005872).The Linux block-based component included in your PlateSpin Forge distribution is precompiled for the standard, non-debug kernels of the supported Linux distributions. If you have a non-standard, customized, or newer kernel, you can rebuild the block-based component for your specific kernel. See KB Article 7005873 (http://www.novell.com/support/viewContent.do?externalId=7005873).Deployment or removal of the component is transparent, has no continuity impact, and requires no intervention.
File-level: Data is replicated on a file-by-file basis (Windows only). Supported with or without VSS.
To make the transfer of workload data more secure, PlateSpin Forge enables you to encrypt data replication. When encryption is enabled, over-the-network data transfer from the source to the target is encrypted by using AES (Advanced Encryption Standard) or 3DES if FIPS-compliant encryption is enabled.
NOTE: Data encryption has a performance impact and might significantly slow down the data transfer.
7.3 Protection TiersA Protection Tier is a customizable collection of workload protection parameters that define the following:
The frequency and recurrence pattern of replications Whether and how to apply data compression Whether to throttle available bandwidth to a specified throughput rate during data transfer Criteria for the system to consider a workload as failed
A Protection Tier is an integral part of every workload protection contract. During the configuration stage of a workload protection contract, you can select one of several built-in Protection Tiers and customize its attributes as required by that specific protection contract.
78 PlateSpin Forge 3.1 User Guide

You can also create custom Protection Tiers in advance:
1 In your PlateSpin Forge Web Client, click Settings > Protection Tiers > Create Protection Tier.2 Specify the parameters for the new Protection Tier:
7.4 Recovery PointsA recovery point is a point-in-time snapshot of a workload . It allows a replicated workload to be restored to a specific state.
For each protected workload, you can keep up to 32 recovery points.
Recovery points that accumulate over time might cause your PlateSpin Forge storage to run out of space.
To remove recovery points from your appliance, see “Managing Forge Snapshots on the Appliance Host” on page 37.
Name Type the name you want to use for the tier.
Incremental Recurrence Specify the frequency of incremental replications and the incremental recurrence pattern. You can type directly in the Start of recurrence field, or click the calendar icon to select a date. Select None as the Recurrence Pattern to never use incremental replication.
Full Recurrence Specify the frequency of full replications and the full recurrence pattern.
Blackout Window Use these settings to force a replication blackout (for suspending scheduled replications during peak utilization hours or to prevent conflicts between VSS-aware software and the PlateSpin VSS block-level data transfer component).
To specify a blackout window, click Edit, then seleca blackout recurrence pattern (daily, weekly, etc.), and the blackout period’s start and end times.
Note: At the start of a blackout window, the system aborts any replications that have not finished.
Compression Level These settings control whether and how workload data is compressed before transmission. See “Data Compression” on page 12.
Select one of the available options. Fast consumes the least CPU resources on the source but yields a lower compression ratio, Maximum consumes the most, but yields a higher compression ratio. Optimal, the middle ground, is the recommended option.
Bandwidth Throttling These settings control bandwidth throttling. See “Bandwidth Throttling” on page 12.
To throttle replications to a specified rate, specify the required throughput value in Mbps and indicate the time pattern.
Recovery Points to Keep Specify the number of recovery points to keep for workloads that use this Protection Tier. See “Recovery Points” on page 79. A 0 value disables this feature.
Workload Failure Specify the number of workload detection attempts before it is considered failed.
Workload Detection Specify the time interval (in seconds) between workload detection attempts.
Essentials of Workload Protection 79

7.5 Initial Replication Method (Full and Incremental)In workload protection and failback operations, the Initial Replication parameter determines the scope of data transferred from a source to a target.
Full: A full volume transfer takes place from a production workload to its replica (the recovery workload), or from a failover workload to its original virtual or physical infrastructure.
Incremental: Only differences are transferred from a selected operation’s source to its target, provided that they have a similar operating system and volume profile. During protection: The production workload is compared with an existing VM in the
appliance host. The existing VM might be one of the following: A previously-protected workload's recovery VM (when a Remove Workload command’s
Delete VM option is deselected). A VM that is manually imported into the appliance host, such as a workload VM
physically moved on portable media from the production site to a remote recovery site (for VMware ESX 3.5 and later only).See “Manually Importing VMs into the Appliance Host’s Datastore” on page 37.
During failback to a virtual machine: The failover workload is compared with an existing VM in a failback container.
During failback to a physical machine: The failover workload is compared with a workload on the target physical machine, if the physical machine is registered with PlateSpin Forge (see “Semi-Automated Failback to a Physical Machine” on page 66).
During workload protection and failback to a VM host, selecting Incremental as the initial replication method requires that you browse, locate, and prepare the target VM for synchronization with the selected operation’s source.
1 Proceed with the required workload command, such as Add Workload or Failback.2 For the Initial Replication Method option, select Incremental Replication.3 Click Prepare Workload.
The PlateSpin Forge Web Client displays the Prepare for Incremental Replication page.
4 Select the required container, the virtual machine, and the inventory network to use for communicating with the VM.
5 Click Prepare.Wait for the process to complete and for the user interface to return to the original command, then select the prepared workload.
80 PlateSpin Forge 3.1 User Guide

NOTE: (Block-level data replications only) An initial incremental replication takes significantly longer than subsequent replications. This is because the system must compare the volumes on the source and the target block by block. Subsequent replications rely on data already polled by the block-based component while it is monitoring a source.
7.6 Service and Daemon ControlPlateSpin Forge enables you to control services and daemons:
Source service/daemon control: During data transfer, you can automatically stop Windows services or Linux daemons that are running on your source workload. This ensures that the source workload is transferred to the recovery workload in a more consistent state than if you leave them running.
For example, for Windows workloads, consider stopping antivirus software services or services of third-party VSS-aware backup software.
For additional control of Linux sources during replication, consider the capability to run custom scripts on your Linux workloads during each replication. See “Using Freeze and Thaw Scripts for Every Replication (Linux)” on page 81.
Target startup sate/run level control: You can select the startup state (Windows) or the run level (Linux) of services/daemons on the target workload. When you perform a Failover or Test Failover operation, you can specify which services or daemons you want to be running or stopped when the failover workload has gone live.Common services that you might want to assign a disabled startup state are vendor-specific services that are tied to their underlying physical infrastructure and are not required in a virtual machine.
7.7 Using Freeze and Thaw Scripts for Every Replication (Linux)For Linux systems, PlateSpin Forge provides you with the capability to automatically execute custom scripts, freeze and thaw, that complement the automatic daemon control feature. freeze is executed at the beginning of a replication, and thaw is executed at the end of a replication.
Consider using this capability to complement the automated daemon control feature provided through the user interface (see “Source service/daemon control:” on page 81. For example, you might want to use this feature to temporarily freeze certain daemons instead of shutting them down during replications.
To implement the feature, use the following procedure before setting up your Linux workload protection:
1 Create the following files: platespin.freeze.sh: A shell script to execute at the beginning of the replication platespin.thaw.sh: A shell script to execute at the end of the replication platespin.conf: A text file defining any required arguments, along with a timeout value.
The required syntax for the contents of the platespin.conf file is:[ServiceControl]
FreezeArguments=<arguments>
Essentials of Workload Protection 81

ThawArguments=<arguments>
TimeOut=<timeout>
Replace <arguments> with the required command arguments, separated by a space, and <timeout> with a timeout value in seconds. If a value is not specified, the default timeout is used (60 seconds).
2 Save the scripts, along with the .conf file, on your Linux source workload, in the following directory:/etc/platespin
7.8 VolumesUpon adding a workload for protection, PlateSpin Forge inventories your source workload’s storage media and automatically sets up options in the PlateSpin Forge Web Client for you to specify the volumes you require for protection.
PlateSpin Forge supports several types of storage, including Windows dynamic disks, LVM, RAID, and SAN.
For Linux workloads, PlateSpin Forge provides the following additional features:
Non-volume storage that is associated with the source workload is recreated and assigned to the recovery workload.
The layout of volume groups and logical volumes is preserved so that you can re-create it during failback.
(OES 2 workloads) EVMS layouts of source workloads are preserved and re-created in the appliance host. NSS pools are copied from the source to the recovery VM.
The following figures shows the Replication Settings parameter set for a Linux workload with multiple volumes and two logical volumes in a volume group.
82 PlateSpin Forge 3.1 User Guide

Figure 7-1 Volumes, Logical Volumes, and Volume Groups of a Protected Linux Workload
The following figure shows volume protection options of an OES 2 workload with options indicating that the EVMS layout should be preserved and re-created for the recovery workload:
Figure 7-2 Replication Settings, Volume-Related Options (OES 2 Workload)
Essentials of Workload Protection 83

7.9 NetworkingPlateSpin Forge enables you to control your recovery workload’s network identity and LAN settings to prevent replication traffic from interfering with your main LAN or WAN traffic.
You can specify distinct networking settings in your workload protection details for use at different stages of the workload protection and recovery workflow:
Replication: (Replication parameter set) For separating regular replication traffic from your production traffic.
Failover: (Failover parameter set) For the recovery workload to become part of your production network when it goes live.
Prepare for Failover: (Prepare for Failover network parameter) For network settings during the optional Prepare for Failover stage.
Test Failover: (Test Failover parameter set) For network settings to apply to the recovery workload during a Test Failover stage.
7.10 Registering Physical Machines with PlateSpin Forge for FailbackIf the required target infrastructure for a failback operation is a physical machine, you must register it with PlateSpin Forge.
The registration of a physical machine is carried out by booting the target physical machine with the appropriate PlateSpin boot ISO image.
To use a boot ISO image, download it from the PlateSpin Forge area of Novell Downloads (http://download.novell.com/Download?buildid=_FwrAvn0s-8~). Use the image appropriate to your target machine:
Table 7-2 ISO Boot Images for Target Physical Machines
Filename Remarks
WindowsFailback.zip
(contains WindowsFailback.iso)
Windows
LinuxFailback.zip
(contains LinuxFailback.iso)
Linux systems
WindowsFailback-Cisco.zip
(contains WindowsFailback-Cisco.iso)
Windows systems on Cisco hardware
WindowsFailback-Dell.zip
(contains WindowsFailback-Dell.iso)
Windows systems on Dell hardware
WindowsFailback-Fujitsu.zip
(contains WindowsFailback-Fujitsu.iso)
Windows systems on Fujitsu hardware
84 PlateSpin Forge 3.1 User Guide

After downloading the required file, unzip and save the extracted ISO file.
Section 7.10.1, “Registering Target Physical Machines,” on page 85
7.10.1 Registering Target Physical Machines
1 Burn the appropriate image on a CD or save it to media from which your target can boot.2 Ensure that the network switch port connected to the target is set to Auto Full Duplex.
Because the Windows version of the boot CD image supports only Auto Negotiate Full Duplex, this ensures that there are no conflicts in the duplex settings.
3 Use the boot CD to boot the target physical machine, then wait for the command prompt window to open.(Windows only) Wait for the REGISTERMACHINE and Recovery Console command boxes to open. Use the REGISTERMACHINE command box. For information on the Recovery Console utility, see “Using the Recovery Tool Command Line Utility (Windows)” on page 85.
4 (Linux only) For 64-bit systems, at the initial boot prompt, type the following: ps64 (for systems with up to 512 MB RAM) ps64_512m (for systems with more than 512 MB RAM)
5 Press Enter.6 When you are prompted, enter the following URL:
http://<hostname | IP_address>/platespinforge
Replace <hostname | IP_address> with the hostname or the IP address of your Forge VM.7 Provide your admin-level credentials for the Forge VM, specifying an authority. For the user
account, use this format:domain\username or hostname\usernameAvailable network cards are detected and displayed by their MAC addresses.
8 If DHCP is available on the NIC to be used, press Enter to continue. If DHCP is not available, select the required NIC to configure with a static IP address.
9 Enter a hostname for the physical machine or press the Enter key to accept the default values.10 Enter Yes if you have enabled ; otherwise, enter No.
After a few moments, the physical machine should be available in the failback settings of the PlateSpin Forge Web Client.
Using the Recovery Tool Command Line Utility (Windows)
The Recovery Console command line utility enables you to dynamically inject Windows device drivers into the target physical machine without restarting the entire physical target registration process.
The utility is loaded in a secondary command box upon the initial attempt to boot from the Windows boot image (see Step 3 on page 85).
To use the Recovery Tool, enter its command name, RECOVERYTOOL, followed by an applicable parameter, in the Recovery Console window.
Essentials of Workload Protection 85
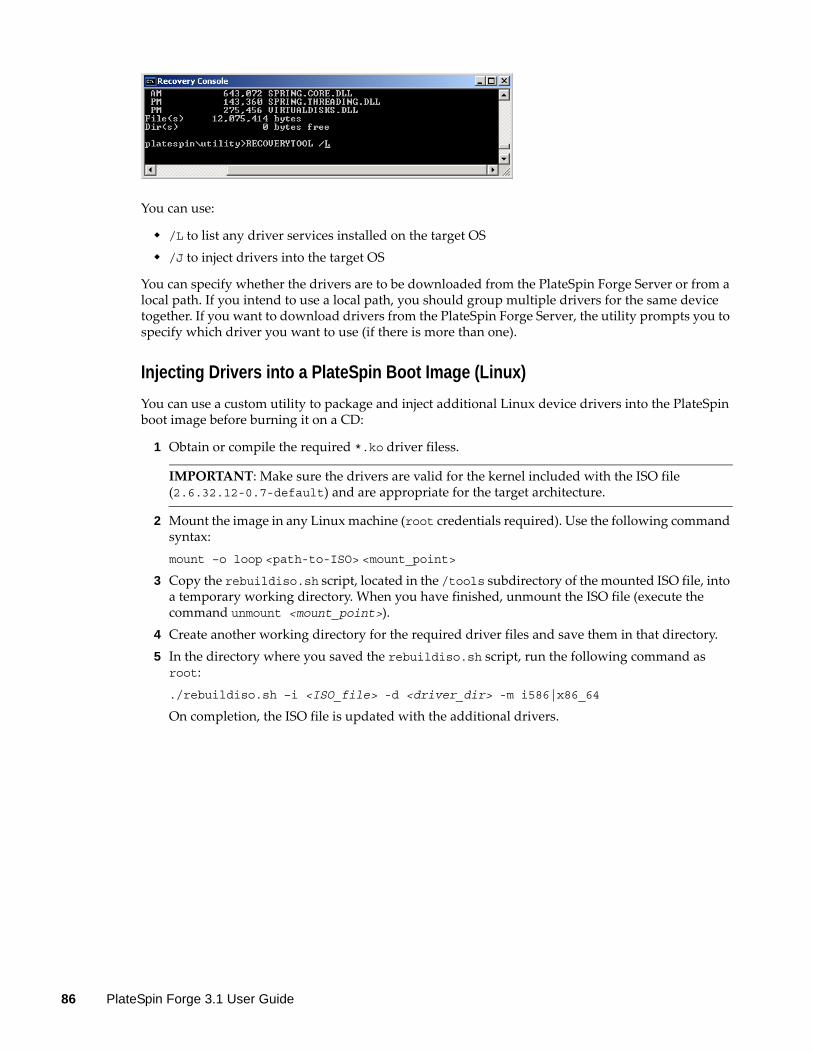
You can use:
/L to list any driver services installed on the target OS /J to inject drivers into the target OS
You can specify whether the drivers are to be downloaded from the PlateSpin Forge Server or from a local path. If you intend to use a local path, you should group multiple drivers for the same device together. If you want to download drivers from the PlateSpin Forge Server, the utility prompts you to specify which driver you want to use (if there is more than one).
Injecting Drivers into a PlateSpin Boot Image (Linux)
You can use a custom utility to package and inject additional Linux device drivers into the PlateSpin boot image before burning it on a CD:
1 Obtain or compile the required *.ko driver filess.
IMPORTANT: Make sure the drivers are valid for the kernel included with the ISO file (2.6.32.12-0.7-default) and are appropriate for the target architecture.
2 Mount the image in any Linux machine (root credentials required). Use the following command syntax:mount –o loop <path-to-ISO> <mount_point>
3 Copy the rebuildiso.sh script, located in the /tools subdirectory of the mounted ISO file, into a temporary working directory. When you have finished, unmount the ISO file (execute the command unmount <mount_point>).
4 Create another working directory for the required driver files and save them in that directory.5 In the directory where you saved the rebuildiso.sh script, run the following command as
root:./rebuildiso.sh –i <ISO_file> -d <driver_dir> -m i586|x86_64
On completion, the ISO file is updated with the additional drivers.
86 PlateSpin Forge 3.1 User Guide
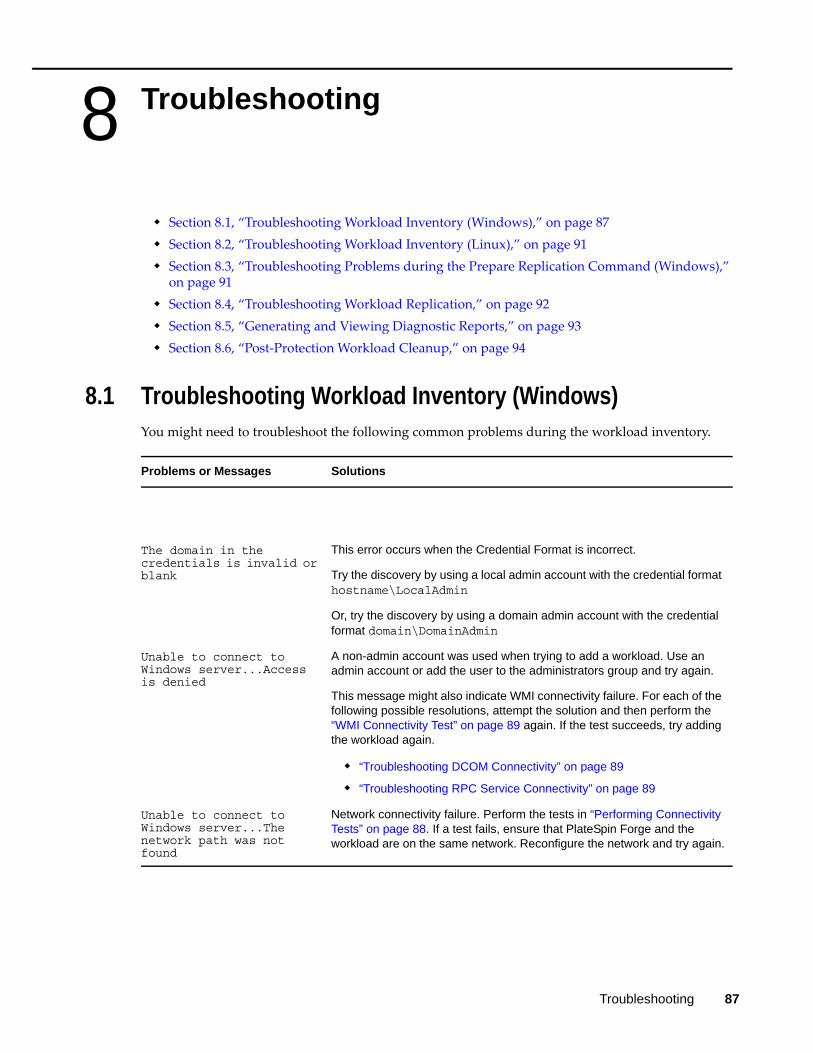
8 8Troubleshooting
Section 8.1, “Troubleshooting Workload Inventory (Windows),” on page 87 Section 8.2, “Troubleshooting Workload Inventory (Linux),” on page 91 Section 8.3, “Troubleshooting Problems during the Prepare Replication Command (Windows),”
on page 91 Section 8.4, “Troubleshooting Workload Replication,” on page 92 Section 8.5, “Generating and Viewing Diagnostic Reports,” on page 93 Section 8.6, “Post-Protection Workload Cleanup,” on page 94
8.1 Troubleshooting Workload Inventory (Windows)You might need to troubleshoot the following common problems during the workload inventory.
Problems or Messages Solutions
The domain in the credentials is invalid or blank
This error occurs when the Credential Format is incorrect.
Try the discovery by using a local admin account with the credential format hostname\LocalAdmin
Or, try the discovery by using a domain admin account with the credential format domain\DomainAdmin
Unable to connect to Windows server...Access is denied
A non-admin account was used when trying to add a workload. Use an admin account or add the user to the administrators group and try again.
This message might also indicate WMI connectivity failure. For each of the following possible resolutions, attempt the solution and then perform the “WMI Connectivity Test” on page 89 again. If the test succeeds, try adding the workload again.
“Troubleshooting DCOM Connectivity” on page 89
“Troubleshooting RPC Service Connectivity” on page 89
Unable to connect to Windows server...The network path was not found
Network connectivity failure. Perform the tests in “Performing Connectivity Tests” on page 88. If a test fails, ensure that PlateSpin Forge and the workload are on the same network. Reconfigure the network and try again.
Troubleshooting 87

8.1.1 Performing Connectivity Tests
“Network Connectivity Test” on page 88 “WMI Connectivity Test” on page 89 “Troubleshooting DCOM Connectivity” on page 89 “Troubleshooting RPC Service Connectivity” on page 89
Network Connectivity Test
Perform this basic network connectivity test to determine whether PlateSpin Forge can communicate with the workload that you are trying to protect.
1 Go to your Forge VM.See “Downloading the VMware Client Program” on page 35.
2 Open a command prompt and ping your workload:
ping workload_ip
“Discover Server Details {hostname}” FailedProgress: 0%Status: NotStarted
This error can occur for several reasons and each has a unique solution:
For environments using a local proxy with authentication, bypass the proxy or add the proper permissions. See KB Article 7920339 (http://www.novell.com/support/viewContent.do?externalId=7920339) for more details.
If local or domain policies restrict required permissions, follow the steps outlined in KB Article 7920862 (http://www.novell.com/support/viewContent.do?externalId=7920862).
Workload Discovery fails with error message
Could not find file output.xml
or
Network path not found
or (upon attempting to discover a Windows cluster)
Inventory failed to discover. Inventory result returned nothing.
There are several possible reasons for the Could not find file output.xml error:
Antivirus software on the source could be interfering with the discovery. Disable the antivirus software to determine whether or not it is the cause of the problem. See “Disabling AntiVirus Software” on page 90.
File and Printer Sharing for Microsoft Networks might not be enabled. Enable it under the Network Interface Card properties.
The C$ and/or Admin$ shares on the source might not be accessible. Ensure that PlateSpin Forge can access those shares. See “Enabling File/Share Permissions and Access” on page 90.
Change the flag ForceMachineDiscoveryUsingService to true in the web.config file in the \Program Files\PlateSpin Portability Suite Server\Web folder.
The Server or the Workstation service might not be running. If this is the case, enable them and set the startup mode to automatic.
The Windows remote registry service is disabled. Start the service and set the startup type to automatic.
Problems or Messages Solutions
88 PlateSpin Forge 3.1 User Guide

WMI Connectivity Test
1 Go to your Forge VM.See “Downloading the VMware Client Program” on page 35“Downloading the VMware Client Program” on page 35.
2 Click Start > Run, type Wbemtest and press Enter.3 Click Connect.4 In the Namespace, type the name of the workload you are trying to discover with \root\cimv2
appended to it. For example, if the hostname is win2k, type:\\win2k\root\cimv2
5 Enter the appropriate credentials, using either the hostname\LocalAdmin or domain\DomainAdmin format.
6 Click Connect to test the WMI connection. If an error message is returned, a WMI connection cannot be established between PlateSpin Forge and your workload.
Troubleshooting DCOM Connectivity
1 Log into the workload that you want to protect.2 Click Start > Run.3 Type dcomcnfg and press Enter.4 Check connectivity:
On a Windows NT/2000 server machine, the DCOM Configuration dialog box is displayed. Click the Default Properties tab and ensure that Enable Distributed COM on this computer is selected.
For Windows Server 2003, the Component Services window is displayed. In the Computers folder of the console tree of the Component Services administrative tool, right-click the computer that you want to check for DCOM connectivity, then click Properties. Click the Default Properties tab and ensure that Enable Distributed COM on this computer is selected.
5 If DCOM was not enabled, enable it and either reboot the server or restart the Windows Management Instrumentation Service. Then try adding the workload again.
Troubleshooting RPC Service Connectivity
There are three potential blockages for the RPC service:
The Windows Service A Windows firewall A hardware firewall
For the Windows Service, ensure that the RPC service is running on the workload. To access the services panel, run services.msc from a command prompt. For a Windows firewall, add an RPC exception. For hardware firewalls, you can try the following strategies:
Putting PlateSpin Forge and the workload on the same side of the firewall Opening up specific ports between PlateSpin Forge and the workload (See “Access and
Communication Requirements across your Protection Network” on page 19.
Troubleshooting 89

8.1.2 Disabling AntiVirus Software
Antivirus software might occasionally block some of the PlateSpin Forge functionality related to WMI and Remote Registry.In order to ensure that workload inventory is successful, it might be necessary to first disable the antivirus service on a workload. In addition, antivirus software might occasionally lock access to certain files, allowing access only to certain processes or executables. This might occasionally obstruct file-based data replication. In this case, when you configure the workload protection, you can select services to disable, such as services installed and used by antivirus software. These services are only disabled for the duration of the file transfer, and are restarted when the process completes. This is not necessary during block-level data replication.
8.1.3 Enabling File/Share Permissions and Access
To successfully protect a workload, PlateSpin Forge needs to successfully deploy and install the OFX Controller and, if you require block-level replication, a dedicated block-based component. Upon deployment of these components to a workload, as well as during the Add Workload process, PlateSpin Forge uses the workload’s administrative shares. PlateSpin Forge needs administrative access to the shares, using either a local administrator account or a domain admin account for this to work.
To ensure that the Administrative shares are enabled:
1 Right-click My Computer on the desktop and select Manage.2 Expand System Tools > Shared Folders > Shares3 In the Shared Folders directory, you should see C$ and Admin$, among other shares.
After confirming that the shares are enabled, ensure that they are accessible from within the Forge VM:
1 Go to your Forge VM.See “Downloading the VMware Client Program” on page 35.
2 Click Start > Run, type \\<server_host>\C$, then click OK.3 If you are prompted, use the same credentials as those you will use to add the workload to the
PlateSpin Forge workload inventory.The directory is opened and you should be able to browse and modify its contents.
4 Repeat the process for all shares with the exception of the IPC$ share.Windows uses the IPC$ share for credential validation and authentication purposes. It is not mapped to a folder or file on the workload, so the test always fails; however, the share should still be visible.
PlateSpin Forge does not modify the existing content of the volume; however, it creates its own directory, to which it requires access and permissions.
90 PlateSpin Forge 3.1 User Guide

8.2 Troubleshooting Workload Inventory (Linux)
8.3 Troubleshooting Problems during the Prepare Replication Command (Windows)
8.3.1 Group Policy and User Rights
You can refresh the policy immediately by using gpudate /force (for Windows 2003/XP) or secedit /refreshpolicy machine_policy /enforce (for Windows 2000). Because of the way that PlateSpin Forge interacts with the source workload’s operating system, it requires the administrator account that is used to add a workload to have certain user rights on the source machine. In most instances, these settings are defaults of group policy; however, if the environment has been locked down, the following user rights assignments might have been removed:
Bypass Traverse Checking Replace Process Level Token Act as part of the Operating System
In order to verify that these Group Policy settings have been set, you can run gpresult /v from the command line on the source machine, or alternately RSOP.msc. If the policy has not been set, or has been disabled, it can be enabled through either the Local Security Policy of the machine or through any of the Domain Group Policies being applied to the machine.
Problems or Messages Solutions
Unable to connect neither to the SSH server running on <IP_address> nor to VMware Virtual Infrastructure web-services at <ip_address>/sdk
This message has a number of possible causes:
The workload is unreachable.
The workload does not have SSH running.
The firewall is on and the required ports have not been opened.
The workload’s specific operating system is not supported.
For network and access requirements for a workload, see “Access and Communication Requirements across your Protection Network” on page 19.
Access denied This authentication problem indicates either an invalid username or password. For information on proper workload access credentials, see “Guidelines for Workload Credentials” on page 77.
Problems or Messages Solutions
Authentication error when verifying the controller connection while setting up the controller on the source.
The account used to add a workload needs to be allowed by this policy. See “Group Policy and User Rights” on page 91.
Failure to determine whether .NET Framework is installed (with exception The trust relationship between this workstation and the primarydomain failed).
Check whether the Remote Registry service on the source is enabled and started. See also “Troubleshooting Workload Inventory (Windows)” on page 87.
Troubleshooting 91

8.4 Troubleshooting Workload Replication
Problems or Messages Solutions
Workload issue requires user intervention
Recoverable error during replication either during Scheduling Taking Snapshot of Virtual Machine or Scheduling Reverting Virtual Machine to Snapshot before Starting.
This problem occurs when the server is under load and the process is taking longer than expected.
The solution is to wait until the replication is complete.
All workloads go into recoverable errors because you are out of disk space.
Verify the free space. If more space is required, remove a workload.
Slow network speeds under 1 MB. Confirm that the source machine’s network interface card’s duplex setting is on and the switch it is connected to has a matching setting. That is, if the switch is set to auto, the source can’t be set to 100 MB.
Slow network speeds over 1 MB. Measure the latency by running the following command from the source workload:
ping ip–t (replace ip with the IP address of your Forge VM).
Allow it to run for 50 iterations and the average indicates the latency.
Also see “Optimizing Data Transfer over WAN Connections (File-Based and VSS Replications)” on page 21.
The file transfer cannot begin - port 3725 is already in use
or
3725 unable to connect
Ensure that the port is open and listening:
Run netstat -ano on the workload.
Check the firewall.
Retry the replication.
Controller connection not established
Replication fails at the Take Control of Virtual Machine step.
This error occurs when the replication networking information is invalid. Either the DHCP server is not available or the replication virtual network is not routable to the Forge VM.
Change the replication IP to a static IP or enable the DHCP server.
Ensure that the virtual network selected for replication is routable to the Forge VM.
92 PlateSpin Forge 3.1 User Guide

8.5 Generating and Viewing Diagnostic ReportsIn the PlateSpin Forge Web Client, after you have executed a command, you can generate detailed diagnostic reports about the command’s details.
1 Click Command Details, then click the Generate Diagnostics link.
After a few moments, the page refreshes and displays a View link above the Generated Diagnostics link.
2 Click View. A new page opens with comprehensive diagnostic information about the current command.
3 Save the diagnostics page and have it ready if you need to contact technical support.
Replication job does not start (stuck at 0%) This error can occur for different reasons and each has a unique solution:
For environments using a local proxy with authentication, bypass the proxy or add proper permissions to resolve this problem. See KB Article 20339 (http://www.novell.com/support/viewContent.do?externalId=7920339) for more details.
If local or domain policies restrict required permissions, follow the steps outlined in KB Article 7920862 (http://www.novell.com/support/viewContent.do?externalId=7920862).
This is a common issue when Forge VM is affiliated with a domain and the domain policies are applied with restrictions. See “Group Policy and User Rights” on page 91.
Problems or Messages Solutions
Troubleshooting 93
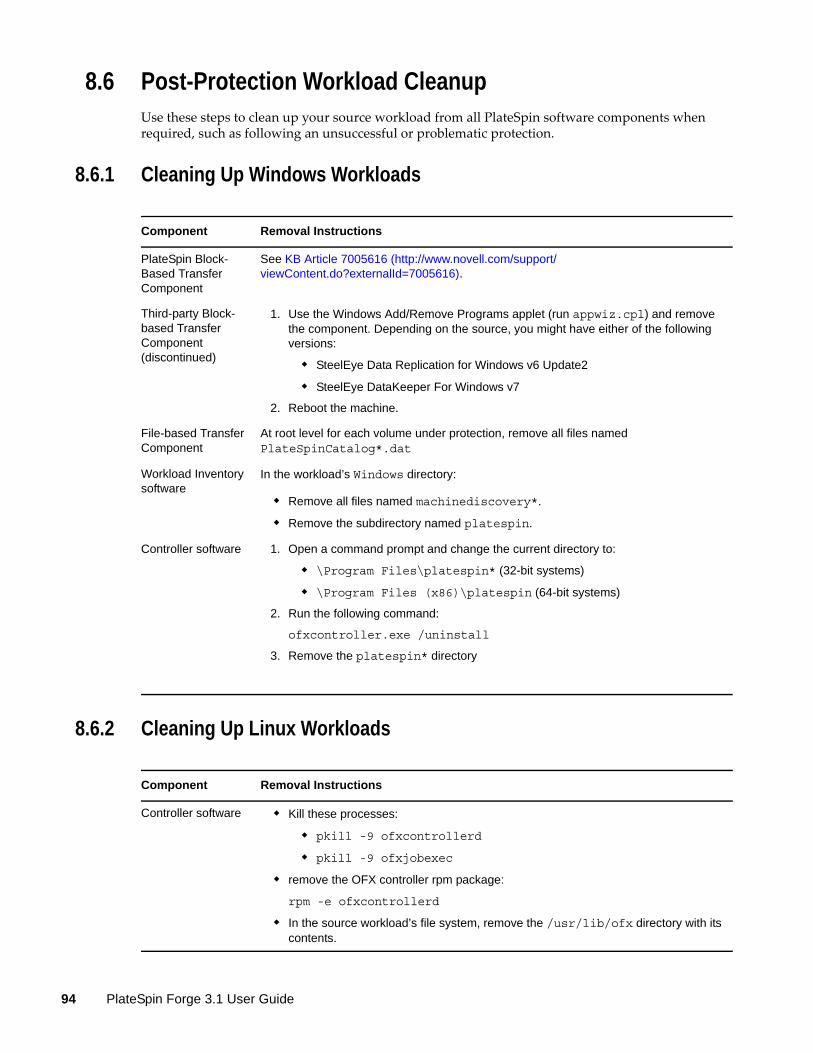
8.6 Post-Protection Workload CleanupUse these steps to clean up your source workload from all PlateSpin software components when required, such as following an unsuccessful or problematic protection.
8.6.1 Cleaning Up Windows Workloads
8.6.2 Cleaning Up Linux Workloads
Component Removal Instructions
PlateSpin Block-Based Transfer Component
See KB Article 7005616 (http://www.novell.com/support/viewContent.do?externalId=7005616).
Third-party Block-based Transfer Component (discontinued)
1. Use the Windows Add/Remove Programs applet (run appwiz.cpl) and remove the component. Depending on the source, you might have either of the following versions:
SteelEye Data Replication for Windows v6 Update2
SteelEye DataKeeper For Windows v7
2. Reboot the machine.
File-based Transfer Component
At root level for each volume under protection, remove all files named PlateSpinCatalog*.dat
Workload Inventory software
In the workload’s Windows directory:
Remove all files named machinediscovery*.
Remove the subdirectory named platespin.
Controller software 1. Open a command prompt and change the current directory to:
\Program Files\platespin* (32-bit systems)
\Program Files (x86)\platespin (64-bit systems)
2. Run the following command:
ofxcontroller.exe /uninstall
3. Remove the platespin* directory
Component Removal Instructions
Controller software Kill these processes:
pkill -9 ofxcontrollerd
pkill -9 ofxjobexec
remove the OFX controller rpm package:
rpm -e ofxcontrollerd
In the source workload’s file system, remove the /usr/lib/ofx directory with its contents.
94 PlateSpin Forge 3.1 User Guide

8.6.3 Removing Workloads
In some circumstances you might need to remove a workload from the PlateSpin Forge inventory and re-add it later.
1 On the Workloads page, select the workload that you want to remove, then click Remove Workload. (Conditional) For Windows workloads previously protected through block-level replication, the PlateSpin Forge Web Client prompts you to indicate whether you also want to remove the Block-Based Components. You can make the following selections: Do not remove components: The components will not be removed. Remove components but do not restart workload: The components will be removed.
However, a reboot of the workload will be required to complete the uninstallation process. Remove components and restart workload: The components will be removed, and the
workload will be automatically rebooted. Make sure you carry out this operation during scheduled downtime.
Block-level data transfer software
1. Check if the driver is active:
lsmod | grep blkwatch
If the driver is still loaded in memory, the result should contain a line, similar to the following:
blkwatch_7616 70924 0
2. (Conditional) If the driver is still loaded, remove it from memory:
rmmod blkwatch_7616
3. Remove the driver from the boot sequence:
blkconfig -u
4. Remove the driver files by deleting the following directory with its contents:
/lib/modules/[Kernel_Version]/Platespin
5. Delete the following file:
/etc/blkwatch.conf
LVM snapshots 1. In the Jobs view, generate a Job Report for the failed job, then note the name of the snapshot.
2. Remove the snapshot device by using the following command:
lvremove snapshot_name
Bitmap files For each volume under protection, at the root of the volume, remove the corresponding .blocks_bitmap file.
Tools On the source workload, under /sbin, remove the following files:
bmaputil
blkconfig
Component Removal Instructions
Troubleshooting 95

2 On the Command Confirmation page, click Confirm to execute the command. Wait for the process to complete.
96 PlateSpin Forge 3.1 User Guide

Glossary
appliance host. See container.
container. The VM host that contains the recovery workload (a protected workload’s bootable virtual replica).
Event. A PlateSpin Forge Server message that contains information about important steps throughout the workload protection lifecycle.
failback. Restoration of the business function of a failed workload in its original environment when the business function of a temporary recovery workload within PlateSpin Forge is no longer required.
failover. Taking over the business function of a failed workload by a recovery workload within a PlateSpin Forge VM container.
incremental. 1. (noun) An individual scheduled transfer or manual transfer of differences between a protected workload and its replica (the recovery workload).
2. (adjective) Describes the scope of replication (1), in which the initial replica of a workload is created differentially, based on differences between the workload and its prepared counterpart.
management VM. The management virtual machine containing the PlateSpin Forge software.
Prepare for Failover. A PlateSpin Forge operation that boots the recovery workload in preparation of a full Failover operation.
Protection Tier. A customizable collection of workload protection parameters that define the frequency of replications and criteria for the system to consider a workload as failed.
recovery point. A point-in-time snapshot, allowing a replicated workload to be restored to a previous state.
recovery point objective (RPO). Tolerable data loss measured in time and defined by a configurable interval between incremental replications of a protected workload .
recovery time objective (RTO). A measure of a workload’s tolerable downtime defined by the time a failover operation takes to complete.
recovery workload. A protected workload’s bootable virtual replica.
replication. 1. The creation of an initial base copy of a workload (initial replication).
2. Any transfer of changed data from a protected workload to its replica in the container.
replication schedule. The schedule that is set up to control the frequency and scope of replications.
Reprotect. A PlateSpin Forge command that reestablishes a protection contract for a workload following the failover and failback operations.
source. A workload or its infrastructure that is the starting point of a PlateSpin Forge operation. For example, upon initial protection of a workload, the source is your production workload. In a failback operation, it is the recovery workload in the container.
See also target.
Glossary 97

target. A workload or its infrastructure that is the outcome of a PlateSpin Forge command. For example, upon initial protection of a workload, the target is the recovery workload in the container. In a failback operation, it is either your production workload’s original infrastructure or any supported container that has been inventoried by PlateSpin Forge.
See also source.
Test Failover. A PlateSpin Forge operation that boots a recovery workload in an isolated networking environment for testing the functionality of the failover and verifying the integrity of the recovery workload.
test time objective (TTO). A measure of the ease with which a disaster recovery plan can be tested. It is similar to RTO, but includes the time needed for a user to test the recovery workload.
workload. The basic object of protection in a data store. An operating system, along with its middleware and data, decoupled from the underlying physical or virtual infrastructure.
98 PlateSpin Forge 3.1 User Guide