Embed Size (px)
Citation preview
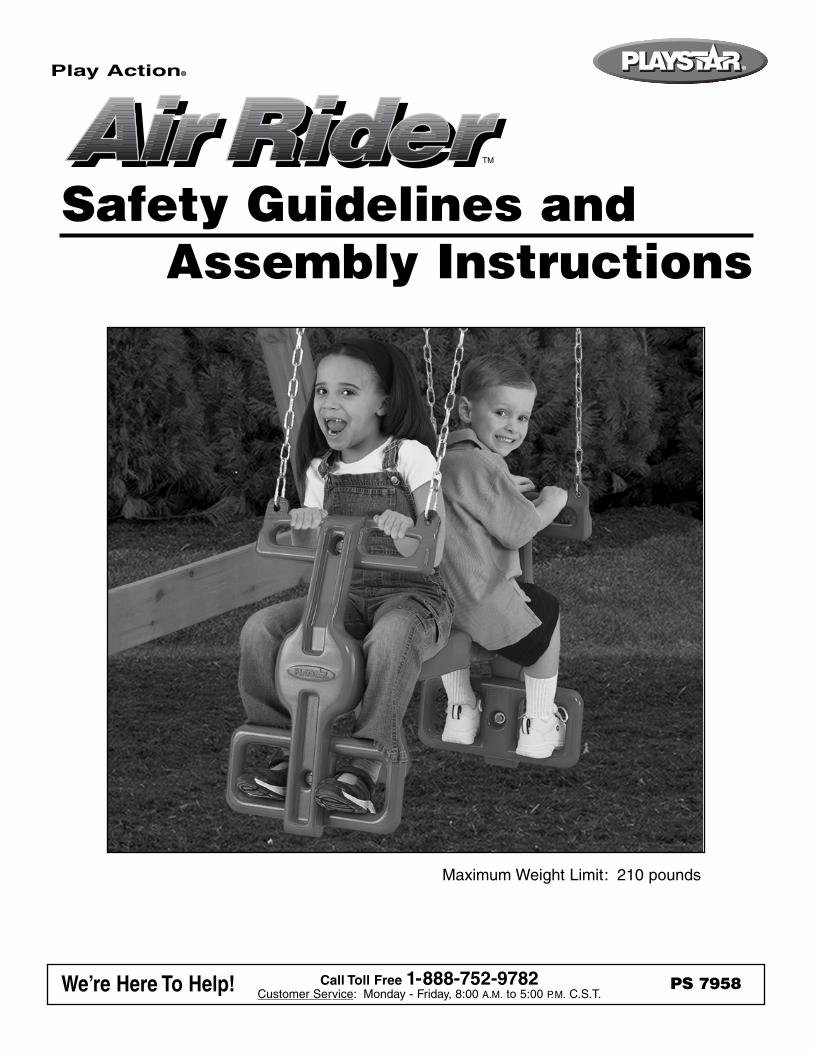
Safety Guidelines and Assembly Instructions
AAiir rRRiiddeerr
PS 7958Call Toll Free 1-888-752-9782Customer Service: Monday - Friday, 8:00 A.M. to 5:00 P.M. C.S.T.We’re Here To Help!
Play Action®
Maximum Weight Limit: 210 pounds
TM
The American Society for Testing and Materials (ASTM) provides thefollowing consumer information for your Home Playground Equipment
• This product is intended for single-family residential use only, by children ages two to ten and a maximum weight of 105 pounds. Any recommendation over 10 years of age or 105 pounds exceeds the upper limits specified in the American Society for Testing and Materials(ASTM) Home Playground Safety Standard. In order for PlayStar to comply with the ASTMStandard, we cannot recommend anyone above these limits.
• It is a misuse of this product when installed or used in places of public assembly such as schools or parks.
• Construction requires at least two adults capable of heavy lifting.• Thoroughly read all safety instructions before beginning.• Children must remain clear of construction site until this product is properly installed and
ready for use.• Save these instructions in the event the manufacturer has to be contacted.
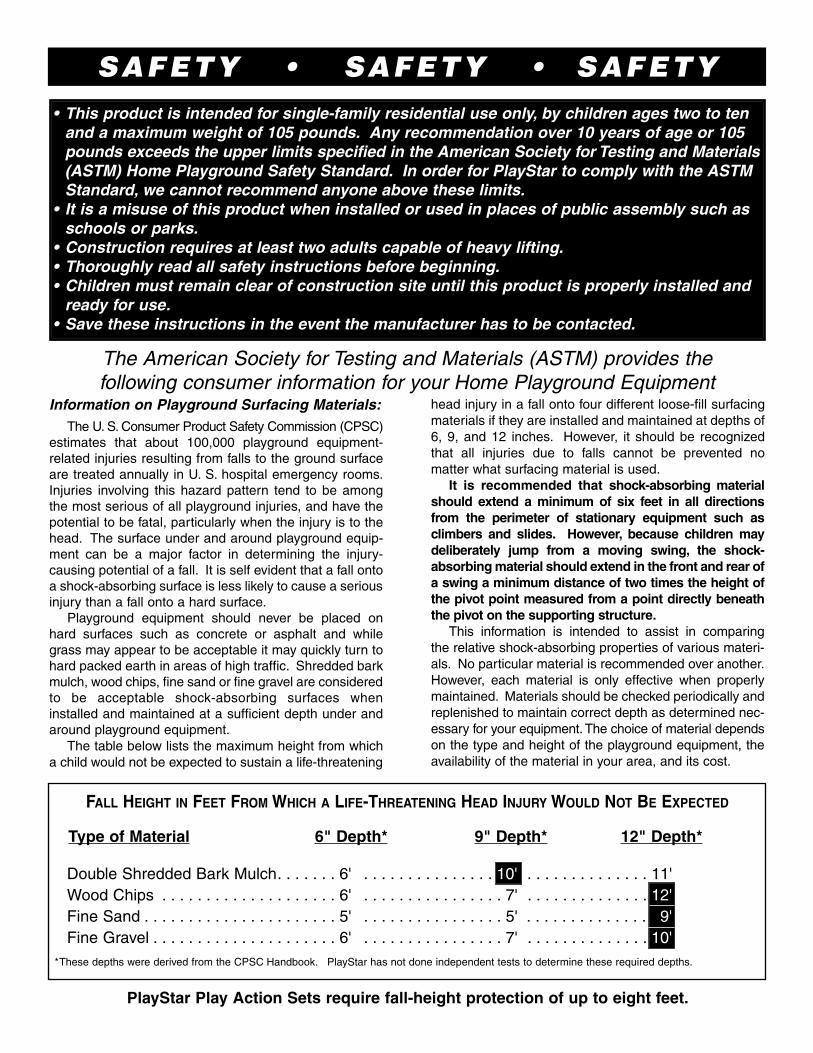
FALL HEIGHT IN FEET FROM WHICH A LIFE-THREATENING HEAD INJURY WOULD NOT BE EXPECTED
Type of Material 6" Depth* 9" Depth* 12" Depth*
Double Shredded Bark Mulch. . . . . . . 6' . . . . . . . . . . . . . . . 10' . . . . . . . . . . . . . . 11'Wood Chips . . . . . . . . . . . . . . . . . . . . 6' . . . . . . . . . . . . . . . . 7' . . . . . . . . . . . . . . 12'Fine Sand . . . . . . . . . . . . . . . . . . . . . . 5' . . . . . . . . . . . . . . . . 5' . . . . . . . . . . . . . . 9'Fine Gravel . . . . . . . . . . . . . . . . . . . . . 6' . . . . . . . . . . . . . . . . 7' . . . . . . . . . . . . . . 10'
*These depths were derived from the CPSC Handbook. PlayStar has not done independent tests to determine these required depths.
PlayStar Play Action Sets require fall-height protection of up to eight feet.
SAFETY • SAFETY • SAFETY
Information on Playground Surfacing Materials:The U. S. Consumer Product Safety Commission (CPSC)
estimates that about 100,000 playground equipment-related injuries resulting from falls to the ground surfaceare treated annually in U. S. hospital emergency rooms.Injuries involving this hazard pattern tend to be amongthe most serious of all playground injuries, and have thepotential to be fatal, particularly when the injury is to thehead. The surface under and around playground equip-ment can be a major factor in determining the injury-causing potential of a fall. It is self evident that a fall ontoa shock-absorbing surface is less likely to cause a seriousinjury than a fall onto a hard surface.
Playground equipment should never be placed onhard surfaces such as concrete or asphalt and whilegrass may appear to be acceptable it may quickly turn tohard packed earth in areas of high traffic. Shredded barkmulch, wood chips, fine sand or fine gravel are consideredto be acceptable shock-absorbing surfaces wheninstalled and maintained at a sufficient depth under andaround playground equipment.
The table below lists the maximum height from whicha child would not be expected to sustain a life-threatening
head injury in a fall onto four different loose-fill surfacingmaterials if they are installed and maintained at depths of6, 9, and 12 inches. However, it should be recognizedthat all injuries due to falls cannot be prevented nomatter what surfacing material is used.
It is recommended that shock-absorbing materialshould extend a minimum of six feet in all directionsfrom the perimeter of stationary equipment such asclimbers and slides. However, because children maydeliberately jump from a moving swing, the shock-absorbing material should extend in the front and rear ofa swing a minimum distance of two times the height ofthe pivot point measured from a point directly beneaththe pivot on the supporting structure.
This information is intended to assist in comparingthe relative shock-absorbing properties of various materi-als. No particular material is recommended over another.However, each material is only effective when properlymaintained. Materials should be checked periodically andreplenished to maintain correct depth as determined nec-essary for your equipment. The choice of material dependson the type and height of the playground equipment, theavailability of the material in your area, and its cost.

SAFETY • SAFETY • SAFETY
INSTALLATION:1. Follow the assembly instructions provided, do not alter
its design in any way.
2. Place the Play Action Set on level ground, not less than 6' (1.8m) from any structure or obstruction such as a fence, garage, house, overhanging branches, laundry lines or electrical wires. If the area where you will be installing your Play Action Set is not level, you must make it level.
3. Do not install the Play Action Set over concrete, asphalt, packed earth or any other hard surface. Afall onto a hard surface can result in serious injury to the equipment user.
4. Play Action Sets must be anchored to the ground.Follow the anchoring instructions provided with your building kit. If soil conditions permit stakes to be pulled out easily, such as in sandy soil conditions, cementing is required.
5. Tighten all bolts securely to the intended member then cut off all protruding threaded ends of bolts with a hacksaw flush to the end of the nut and remove sharp edges with a metal file.
6. Once the Play Action Set is completely assembledand before children are allowed to play on it, proper shock-absorbing surfacing material must be installed.
OPERATION: Observing and following statementsand warnings reduces the likelihood of serious or fatal injury.
1. On-site adult supervision is recommended for children of all ages.
2. No more than two children should be allowed onthis accessory at one time, with a maximum weight of105 pounds for each child.
3. WARNING: You must teach children the following:A. Not to walk close to, in front of, behind, or
between moving items.B. Not to twist swing chains or ropes or loop them
over the top support bar since this may reduce the strength of the chain or rope.
C. Avoid swinging empty seats.D. To Sit in the center of the swings with their full
weight on the seats.E. Not to use the equipment in a manner other than
intended.F. Not to get off equipment while it is in motion.
G. Not to climb when equipment is wet.H. Not to attach items to the playground equipment
that are not specifically designed for use with the equipment such as, but not limited to, jump ropes, clothesline, pet leashes, cables and chain as they may cause a strangulation hazard.
J. Remove helmets before using play equipment as the helmet may become entrapped in an enclosed opening and cause a strangulation hazard.
4. Verify that suspended climbing ropes are secured at both ends and that they cannot be looped back on themselves. (A rope that is not taut enough may causea strangulation hazard.)
5. Dress children appropriately. Provide well fitting shoes.Avoid ponchos, scarves, and other loose-fitting clothingwhich is potentially hazardous while using equipment.
6. Verify that all suspended swinging components haveat least 8" clearance between the lowest point of component and top of shock-absorbing surfacing material.
WARNING: Lawn swings are designed for use by childrentwo years of age and older. Use by children under theage of two can result in entrapment between the seat andback area. NEVER place children in a rearward facingposition or with legs between the seat and backrestbecause the child’s body may pass through the openingcausing entrapment of the child’s head.
MAINTENANCE:
1. Check all nuts and bolts, twice monthly, during the usage season for tightness and tighten as required.It is particularly important that this procedure befollowed at the beginning of each season.
2. Remove plastic swing seats and take indoors, or do not use when the temperature drops below 0˚ F.
3. Oil all metallic moving parts monthly during the usageperiod.
4. Check all hardware and equipment for sharp edges twice monthly during usage season and replace whennecessary. It is especially important to do this at the beginning of each new season.
5. Check all ropes for signs of deterioration such asloosening or fraying twice monthly during usage seasonand tighten or replace when necessary. It is especiallyimportant to do this at the beginning of each new season.
6. Check swing seats and chains monthly during usage season. Replacement should be made if there isevidence of deterioration.
7. If any of these conditions exist, call 1-888-752-9782 forordering information.
8. Clean plastic components with warm water and a mild detergent such as dish soap.
DISPOSAL:1. When the Play Action Set is to be retired from service,
disassemble and dispose of in such a way that no unreasonable hazards will exist. Follow your localdisposal requirements.
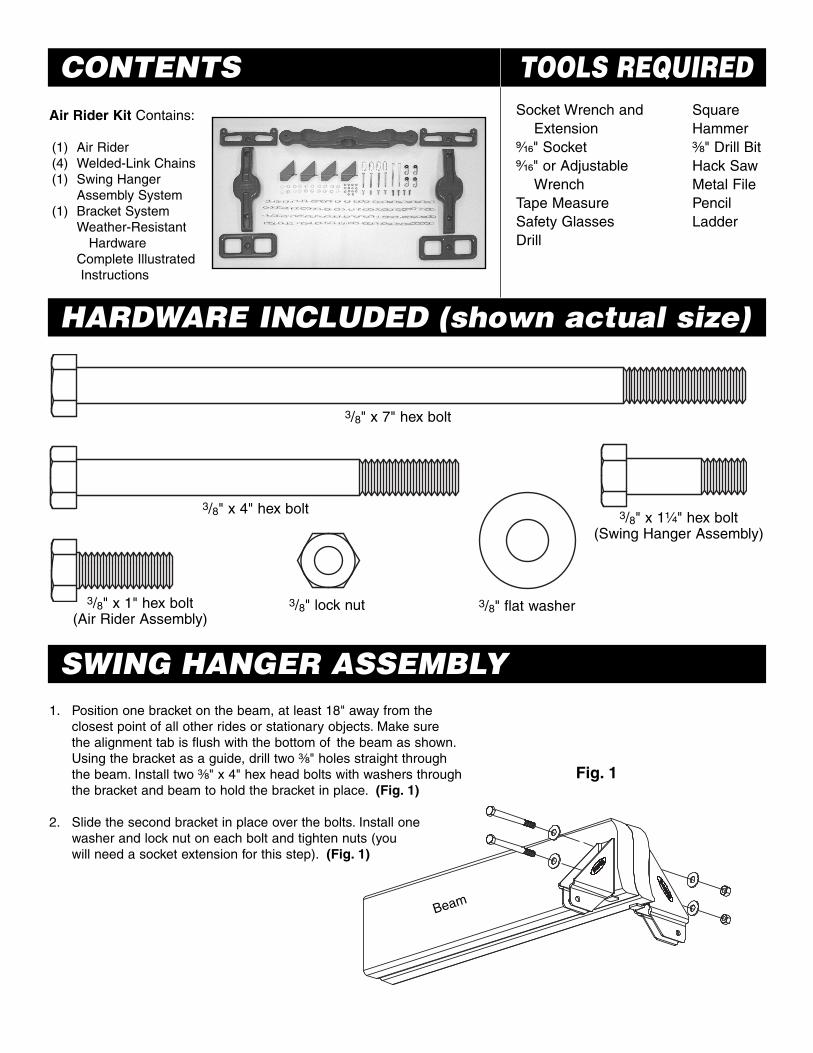
(1) Air Rider(4) Welded-Link Chains(1) Swing Hanger
Assembly System(1) Bracket System
Weather-Resistant Hardware
Complete IllustratedInstructions
CONTENTS TOOLS REQUIRED
HARDWARE INCLUDED (shown actual size)
3/8" x 7" hex bolt
3/8" flat washer
Socket Wrench andExtension
⁹⁄₁₆" Socket⁹⁄₁₆" or Adjustable
Wrench Tape MeasureSafety GlassesDrill
Air Rider Kit Contains:
SWING HANGER ASSEMBLY1. Position one bracket on the beam, at least 18" away from the
closest point of all other rides or stationary objects. Make sure the alignment tab is flush with the bottom of the beam as shown.Using the bracket as a guide, drill two ³⁄₈" holes straight through the beam. Install two ³⁄₈" x 4" hex head bolts with washers throughthe bracket and beam to hold the bracket in place. (Fig. 1)
2. Slide the second bracket in place over the bolts. Install onewasher and lock nut on each bolt and tighten nuts (youwill need a socket extension for this step). (Fig. 1)
Fig. 1
3/8" x 4" hex bolt 3/8" x 1¹⁄₄" hex bolt(Swing Hanger Assembly)
3/8" x 1" hex bolt(Air Rider Assembly)
3/8" lock nut
Beam
SquareHammer³⁄₈" Drill BitHack SawMetal FilePencilLadder
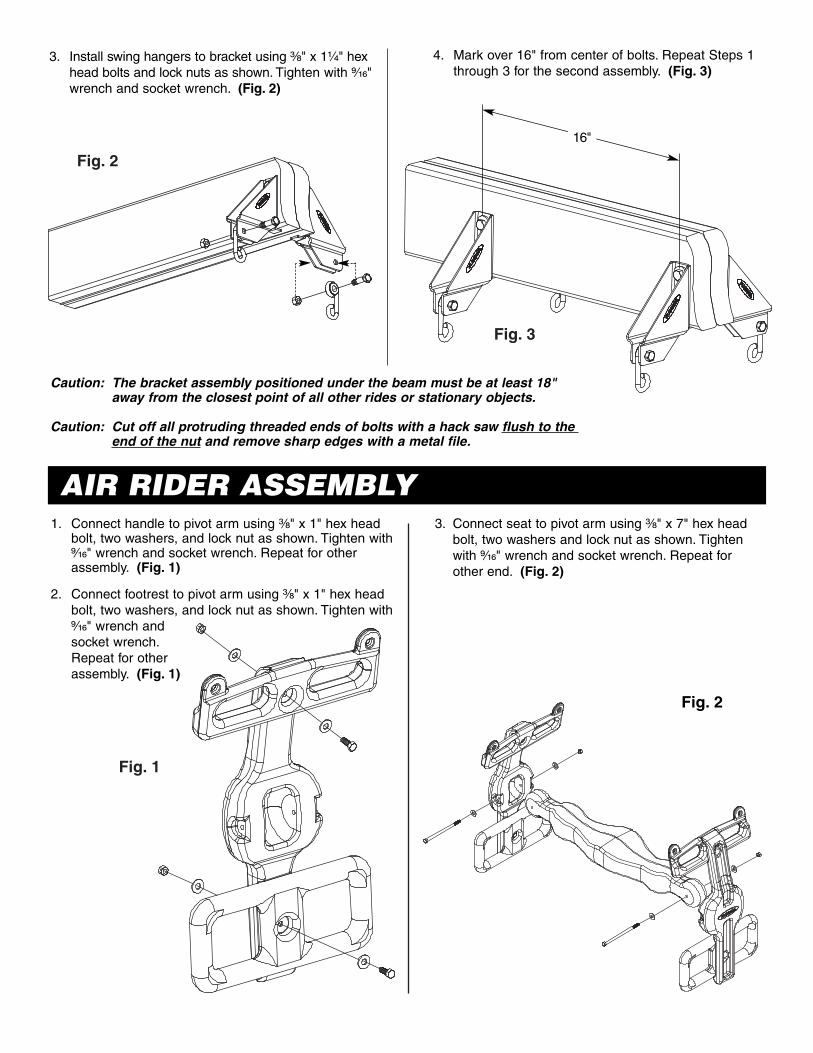
4. Mark over 16" from center of bolts. Repeat Steps 1 through 3 for the second assembly. (Fig. 3)
Fig. 2
Fig. 1
Fig. 2
Fig. 3
AIR RIDER ASSEMBLY
3. Install swing hangers to bracket using ³⁄₈" x 1¹⁄₄" hex head bolts and lock nuts as shown. Tighten with ⁹⁄₁₆"wrench and socket wrench. (Fig. 2)
Caution: The bracket assembly positioned under the beam must be at least 18" away from the closest point of all other rides or stationary objects.
Caution: Cut off all protruding threaded ends of bolts with a hack saw flush to the end of the nut and remove sharp edges with a metal file.
1. Connect handle to pivot arm using ³⁄₈" x 1" hex headbolt, two washers, and lock nut as shown. Tighten with⁹⁄₁₆" wrench and socket wrench. Repeat for other assembly. (Fig. 1)
2. Connect footrest to pivot arm using ³⁄₈" x 1" hex headbolt, two washers, and lock nut as shown. Tighten with⁹⁄₁₆" wrench andsocket wrench.Repeat for otherassembly. (Fig. 1)
3. Connect seat to pivot arm using ³⁄₈" x 7" hex head bolt, two washers and lock nut as shown. Tighten with ⁹⁄₁₆" wrench and socket wrench. Repeat for other end. (Fig. 2)
Fig. 2
16"
Thank You for choosing PlayStar’s Play Action Air Rider. Because it is our intention tomake this a positive family experience, we have taken great care in preparing this product.Should you have any questions, or if we can assist you in any way, please call our friendlyCustomer Service Department for immediate action.
Ask for Customer Service.
We Will Gladly Help!
Printed in U.S.A.LT 6414
© 2004, PlayStar, Inc. Reproduction of this document in part or whole is prohibited without the permission of PlayStar, Inc.
PlayStar, Incorporated, Janesville, WI 53547
Please call us Toll Free at 1-888-PLAYSTAR(752-9782)
Monday through Friday, 8:00 A.M. to 5:00 P.M. C.S.T.
Do not return to the store.
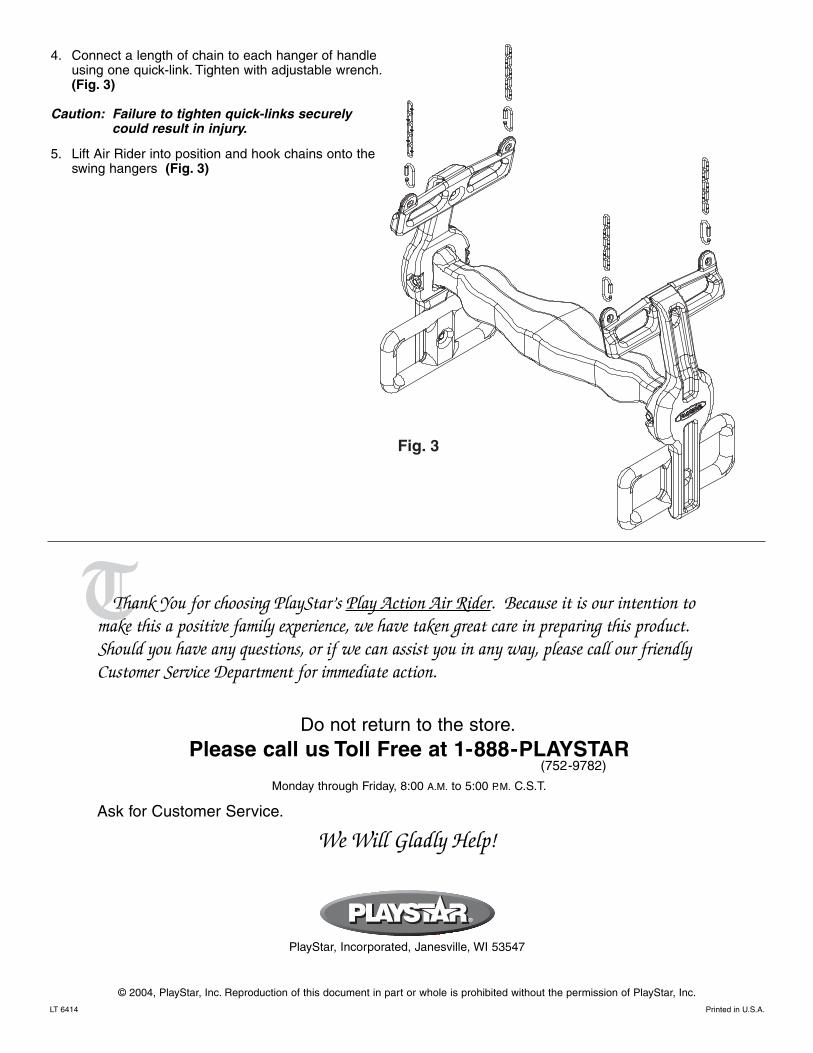
4. Connect a length of chain to each hanger of handle using one quick-link. Tighten with adjustable wrench.(Fig. 3)
Caution: Failure to tighten quick-links securelycould result in injury.
5. Lift Air Rider into position and hook chains onto the swing hangers (Fig. 3)
Fig. 3