Embed Size (px)
Citation preview
Please read before using
Names and Basic Functions
Simple Instructions Quick Start Guide
List of Items That Can Be Input Using Handwriting Recognition
Score Editing Basics
Entering Musical Expressions
Entering Chord Names (In-App Purchase)
Entering Grace Notes
Entering Drum Notation
Playback music from the score
Advanced Editing
Score Settings
Entering Memos onto the Score
Export Score
App Settings
Adding Features With In-App Purchases
FAQ
©2014 - 2017 KAWAI Musical Instruments Mfg. Co., Ltd.

Please read before using Please refer to the Quick Start Guide when using for the first time.
A Help button located in the top right corner of the display is also provided. Tap this button to find how to use the app and detailed information on its features.
Tap the button in the upper left corner of the Help page for the latest support information. (This launches Safari and opens the support page.)
Please note the following when using Touch Notation:
Before using the app, check the "List of Items That Can Be Input Using Handwriting Recognition" for information and animations about how to enter items into the score.
All data created with the "Touch Notation" app will be lost when the app is deleted from the device.
©2014 - 2017 KAWAI Musical Instruments Mfg. Co., Ltd.
Names and Basic Functions
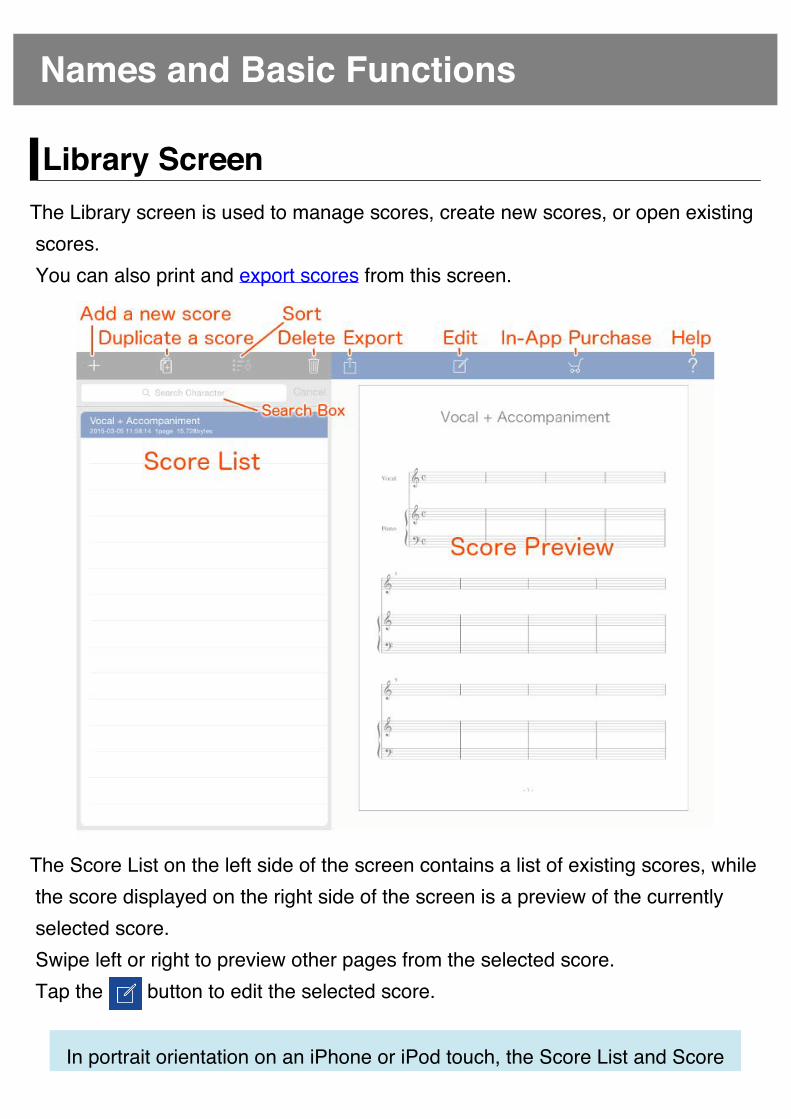
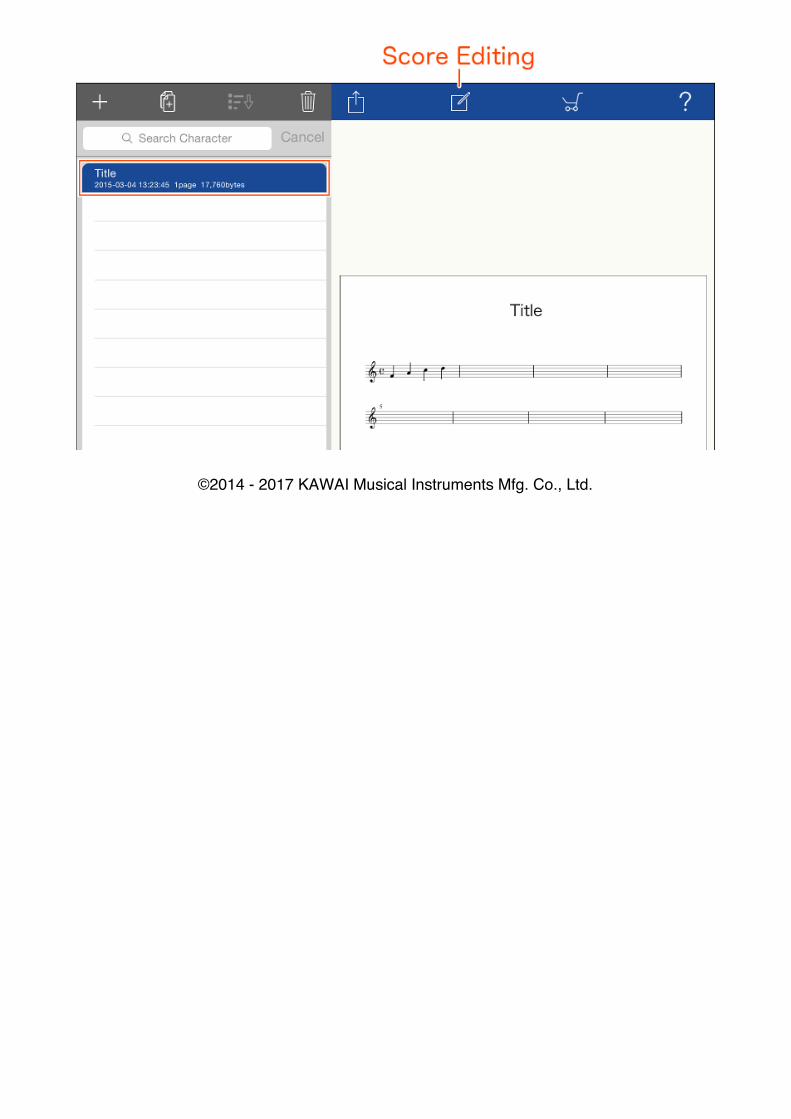
Library ScreenThe Library screen is used to manage scores, create new scores, or open existing scores. You can also print and export scores from this screen.
The Score List on the left side of the screen contains a list of existing scores, while the score displayed on the right side of the screen is a preview of the currently selected score. Swipe left or right to preview other pages from the selected score. Tap the button to edit the selected score.
In portrait orientation on an iPhone or iPod touch, the Score List and Score
Preview are arranged one above the other.
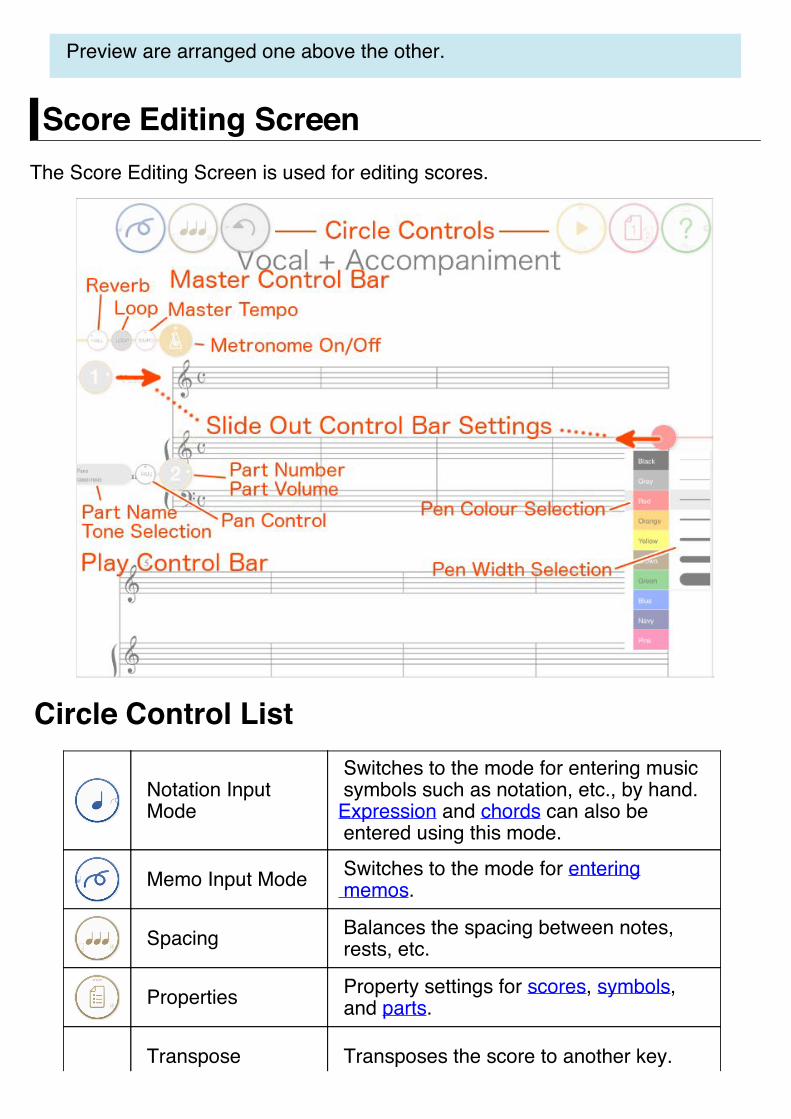
Score Editing ScreenThe Score Editing Screen is used for editing scores.
Circle Control List
Notation Input Mode
Switches to the mode for entering music symbols such as notation, etc., by hand.Expression and chords can also be entered using this mode.
Memo Input Mode Switches to the mode for entering memos.
Spacing Balances the spacing between notes, rests, etc.
Properties Property settings for scores, symbols, and parts.
Transpose Transposes the score to another key.
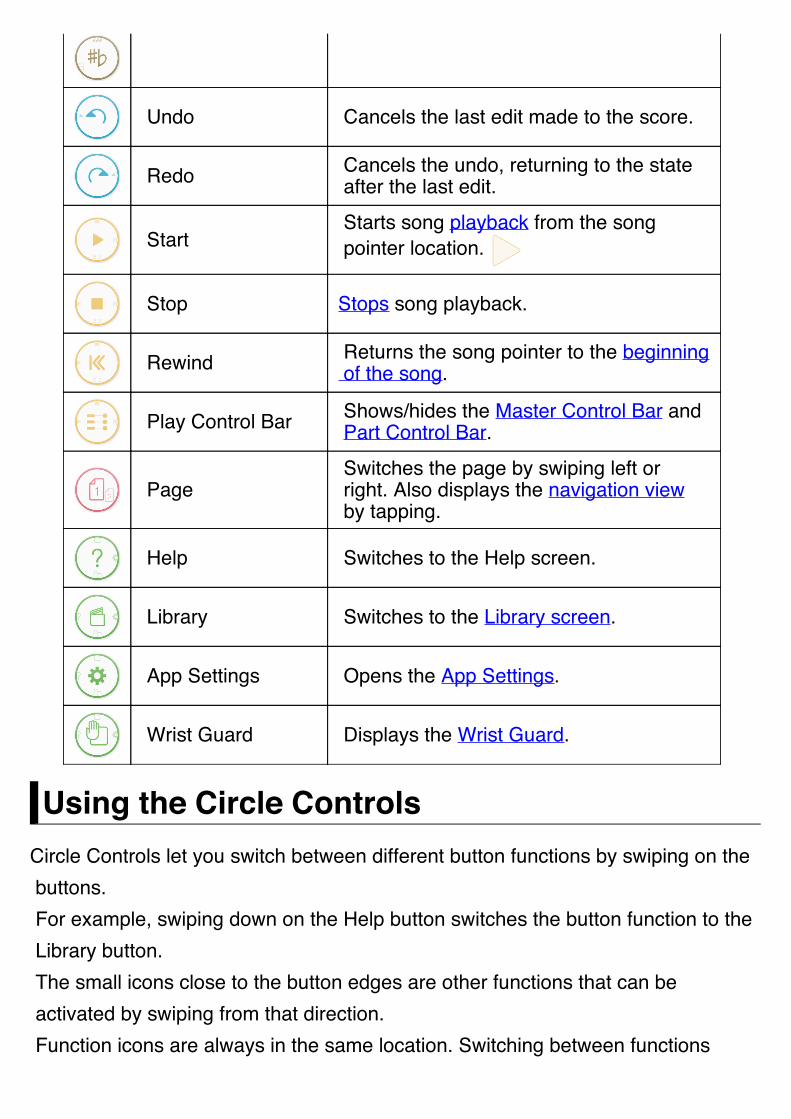
Undo Cancels the last edit made to the score.
Redo Cancels the undo, returning to the state after the last edit.
Start Starts song playback from the song pointer location.
Stop Stops song playback.
Rewind Returns the song pointer to the beginning of the song.
Play Control Bar Shows/hides the Master Control Bar and Part Control Bar.
Page Switches the page by swiping left or right. Also displays the navigation view by tapping.
Help Switches to the Help screen.
Library Switches to the Library screen.
App Settings Opens the App Settings.
Wrist Guard Displays the Wrist Guard.
Using the Circle ControlsCircle Controls let you switch between different button functions by swiping on the buttons. For example, swiping down on the Help button switches the button function to the Library button. The small icons close to the button edges are other functions that can be activated by swiping from that direction. Function icons are always in the same location. Switching between functions
becomes quicker once you know their positions.
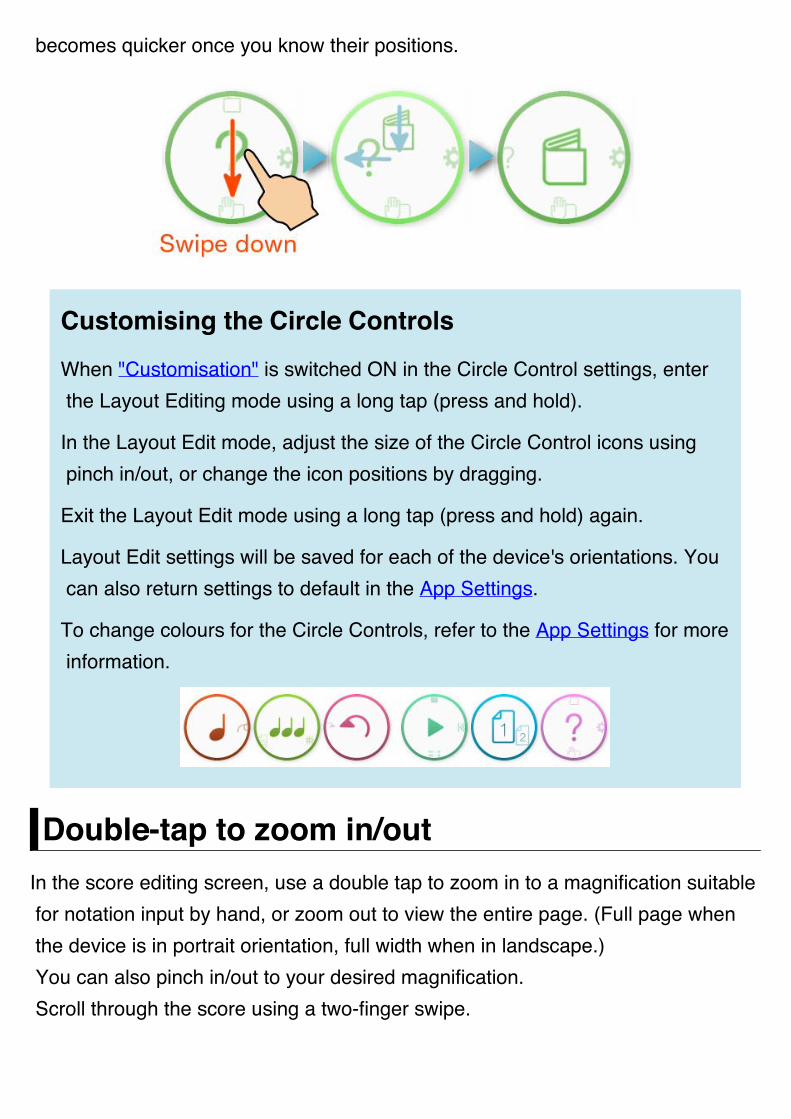
Customising the Circle Controls
When "Customisation" is switched ON in the Circle Control settings, enter the Layout Editing mode using a long tap (press and hold).
In the Layout Edit mode, adjust the size of the Circle Control icons using pinch in/out, or change the icon positions by dragging.
Exit the Layout Edit mode using a long tap (press and hold) again.
Layout Edit settings will be saved for each of the device's orientations. You can also return settings to default in the App Settings.
To change colours for the Circle Controls, refer to the App Settings for more information.
Double-tap to zoom in/outIn the score editing screen, use a double tap to zoom in to a magnification suitable for notation input by hand, or zoom out to view the entire page. (Full page when the device is in portrait orientation, full width when in landscape.) You can also pinch in/out to your desired magnification. Scroll through the score using a two-finger swipe.
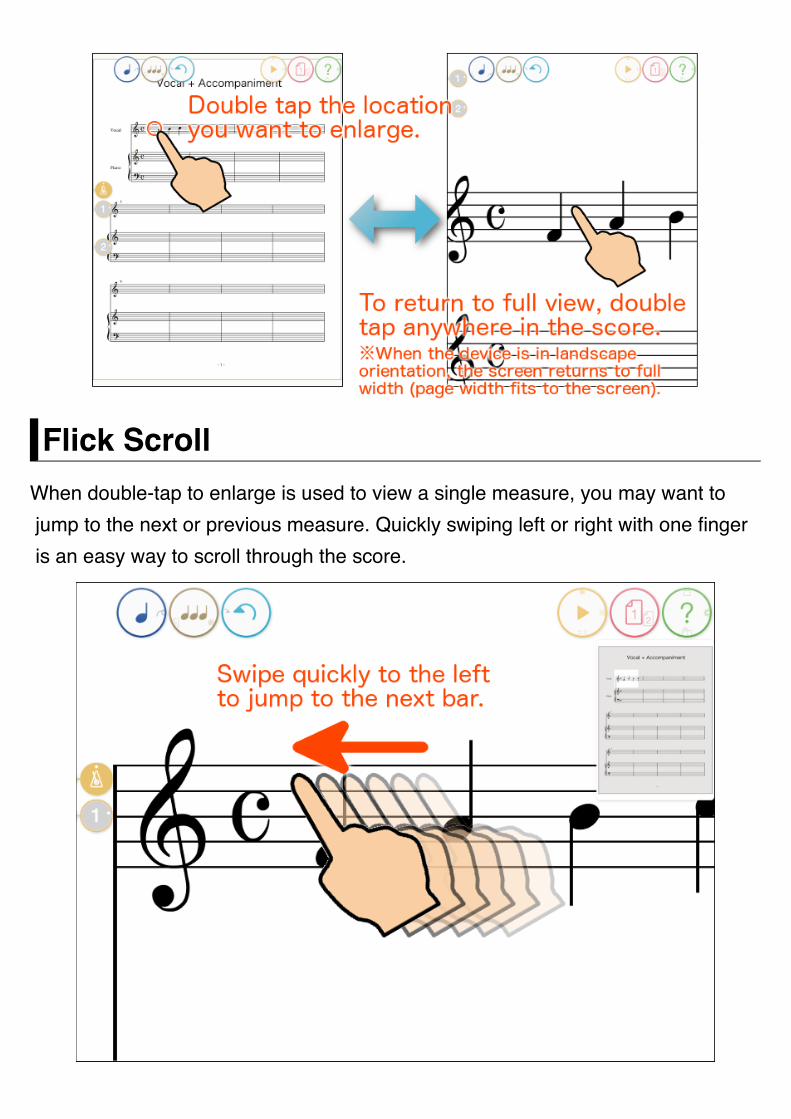
Flick ScrollWhen double-tap to enlarge is used to view a single measure, you may want to jump to the next or previous measure. Quickly swiping left or right with one finger is an easy way to scroll through the score.
If the score is fit to width, swiping left or right will switch pages.
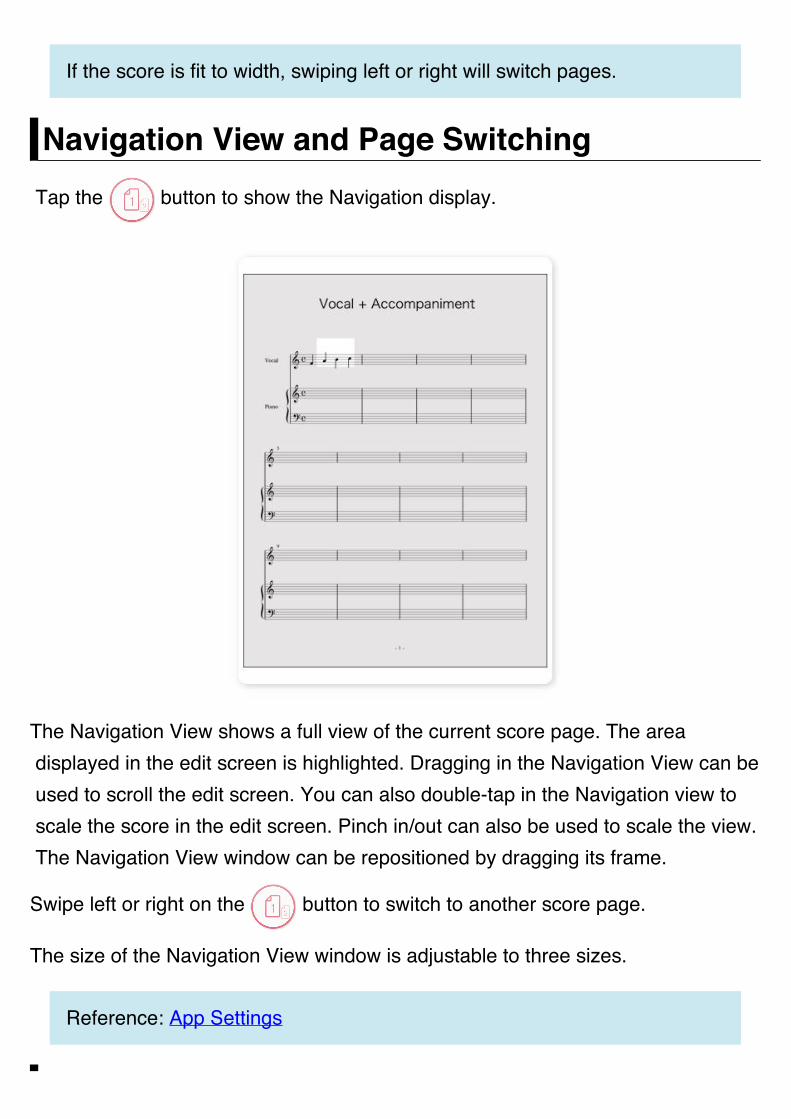
Navigation View and Page Switching Tap the button to show the Navigation display.
The Navigation View shows a full view of the current score page. The area displayed in the edit screen is highlighted. Dragging in the Navigation View can be used to scroll the edit screen. You can also double-tap in the Navigation view to scale the score in the edit screen. Pinch in/out can also be used to scale the view. The Navigation View window can be repositioned by dragging its frame.
Swipe left or right on the button to switch to another score page.
The size of the Navigation View window is adjustable to three sizes.
Reference: App Settings
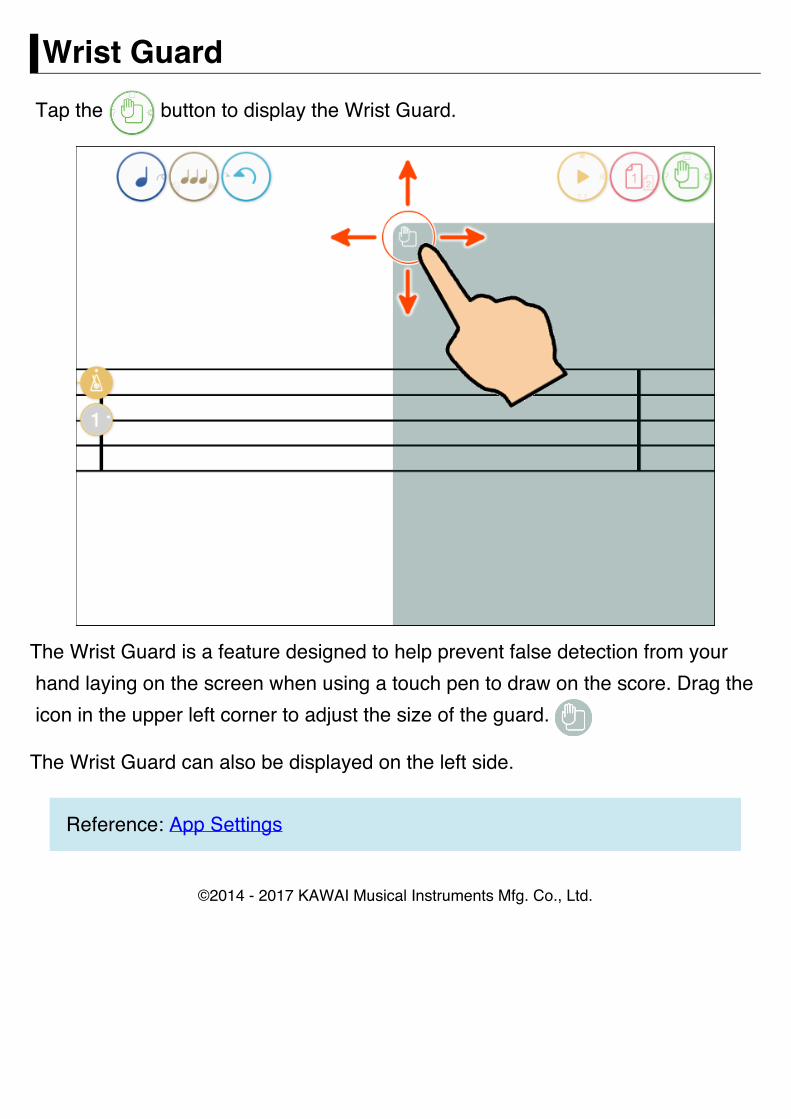
Wrist Guard Tap the button to display the Wrist Guard.
The Wrist Guard is a feature designed to help prevent false detection from your hand laying on the screen when using a touch pen to draw on the score. Drag the icon in the upper left corner to adjust the size of the guard.
The Wrist Guard can also be displayed on the left side.
Reference: App Settings
©2014 - 2017 KAWAI Musical Instruments Mfg. Co., Ltd.
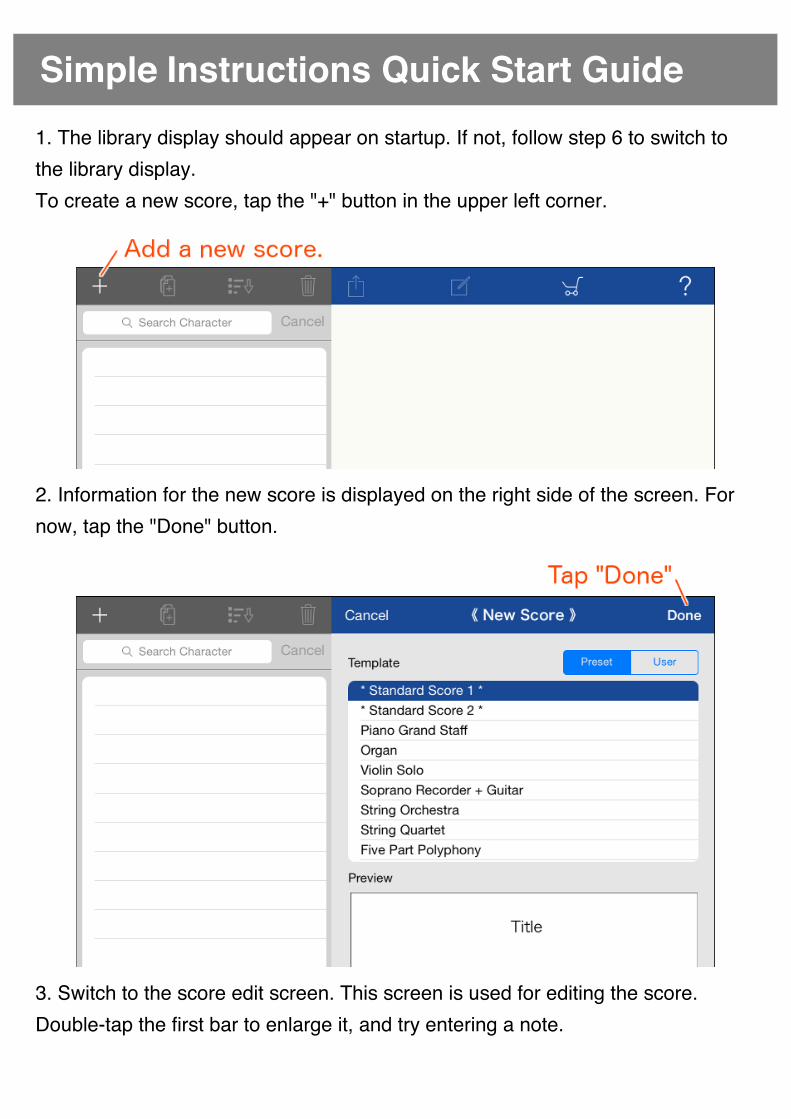
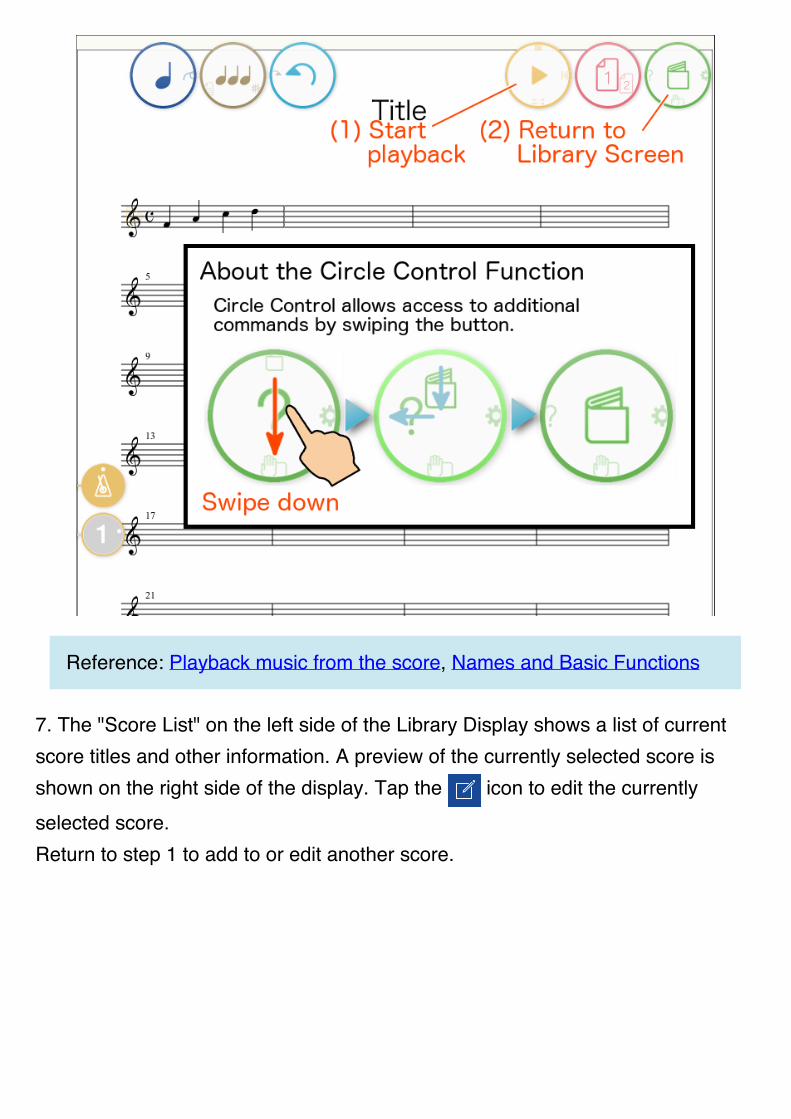
Simple Instructions Quick Start Guide 1. The library display should appear on startup. If not, follow step 6 to switch to the library display. To create a new score, tap the "+" button in the upper left corner.
2. Information for the new score is displayed on the right side of the screen. For now, tap the "Done" button.
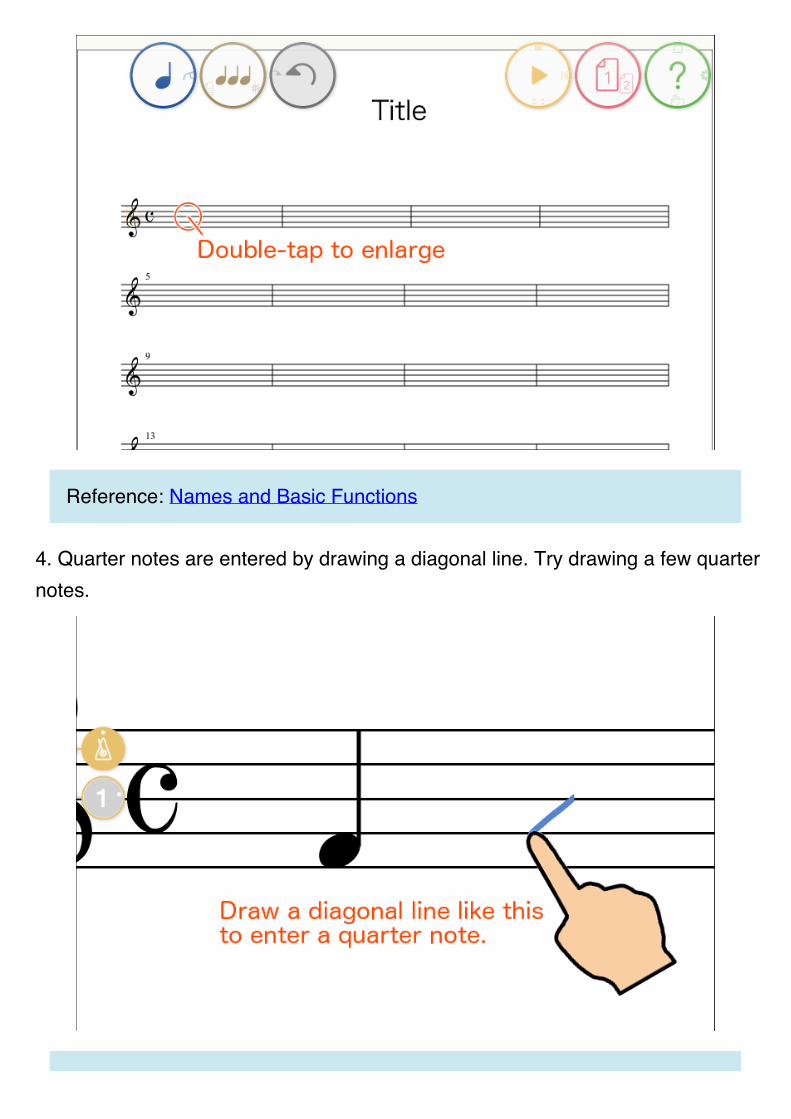
3. Switch to the score edit screen. This screen is used for editing the score. Double-tap the first bar to enlarge it, and try entering a note.
Reference: Names and Basic Functions
4. Quarter notes are entered by drawing a diagonal line. Try drawing a few quarter notes.

Reference: "List of Items That Can Be Input Using Handwriting Recognition"
5. Tap the Undo button to cancel the entry.
6. Double tap the screen to return to the full view. (1) Listen to what you wrote by
tapping the button. (2) Tap the button to return to the library screen.
Reference: Playback music from the score, Names and Basic Functions
7. The "Score List" on the left side of the Library Display shows a list of current score titles and other information. A preview of the currently selected score is shown on the right side of the display. Tap the icon to edit the currently selected score. Return to step 1 to add to or edit another score.
©2014 - 2017 KAWAI Musical Instruments Mfg. Co., Ltd.
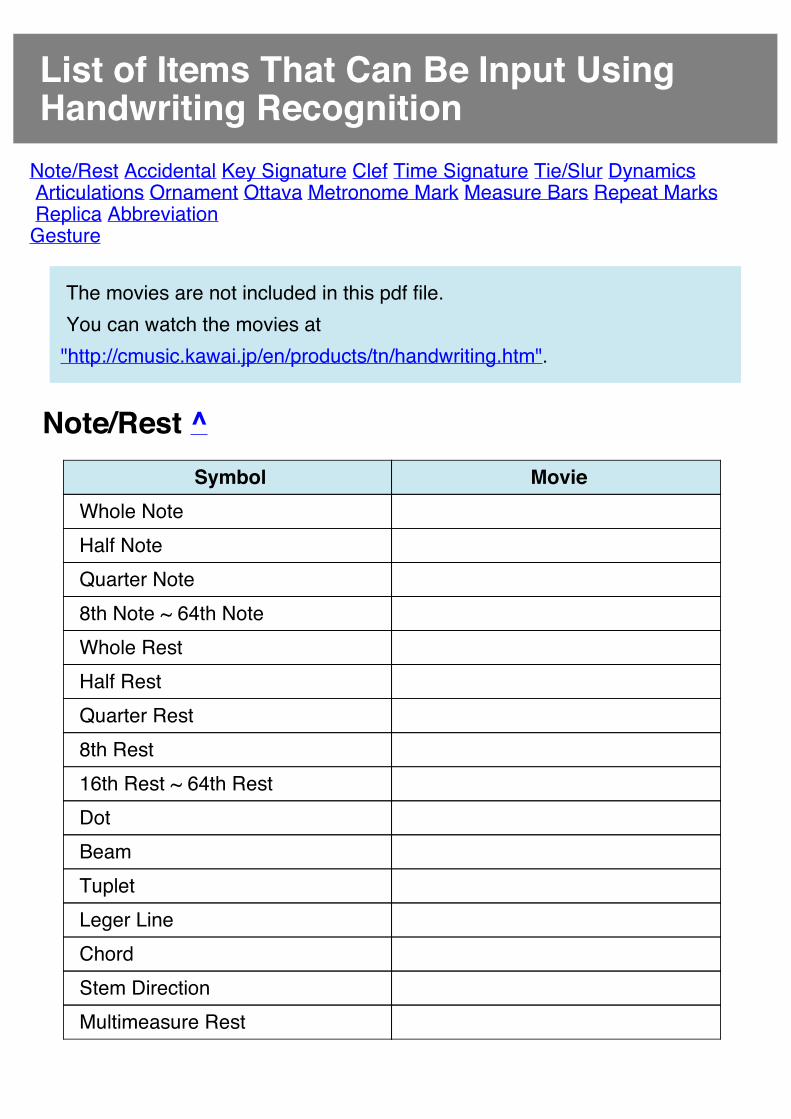
List of Items That Can Be Input Using Handwriting RecognitionNote/Rest Accidental Key Signature Clef Time Signature Tie/Slur Dynamics Articulations Ornament Ottava Metronome Mark Measure Bars Repeat Marks Replica Abbreviation Gesture
The movies are not included in this pdf file. You can watch the movies at"http://cmusic.kawai.jp/en/products/tn/handwriting.htm".
Note/Rest ^ Symbol Movie
Whole Note Half Note Quarter Note 8th Note ~ 64th Note Whole Rest Half Rest Quarter Rest 8th Rest 16th Rest ~ 64th Rest Dot Beam Tuplet Leger Line Chord Stem Direction Multimeasure Rest
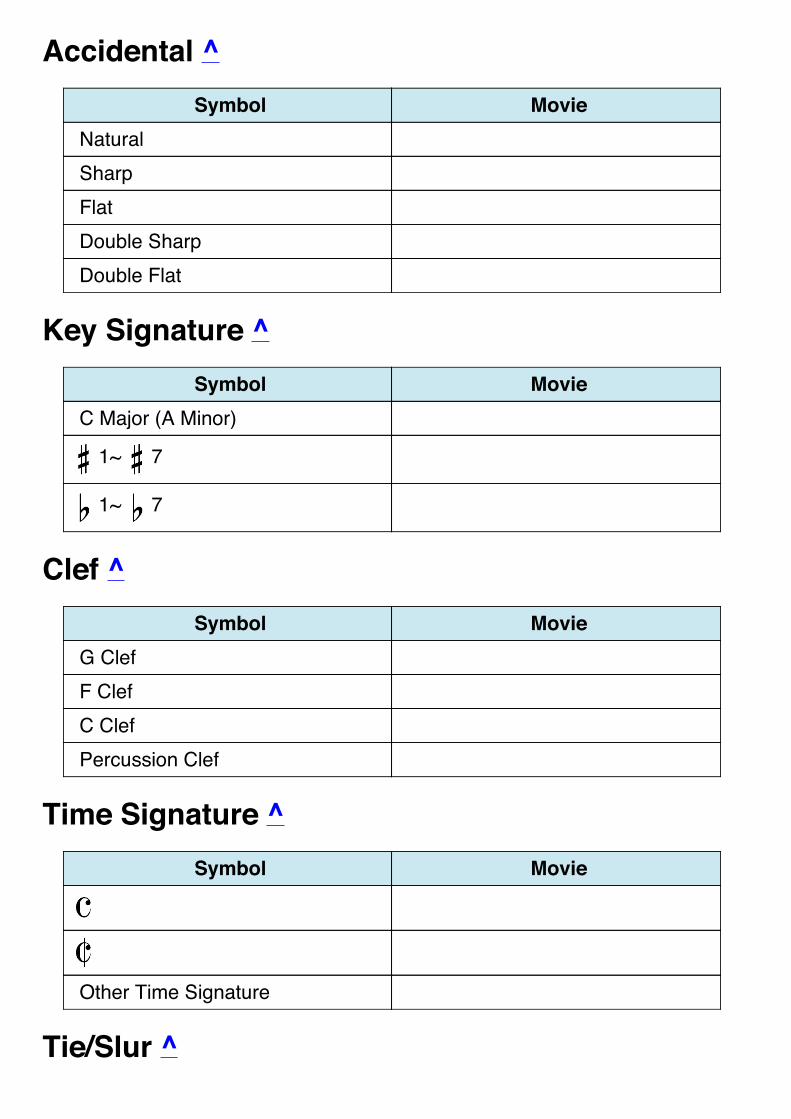
Accidental ^ Symbol Movie
Natural Sharp Flat Double Sharp Double Flat
Key Signature ^ Symbol Movie
C Major (A Minor)
1~ 7
1~ 7
Clef ^ Symbol Movie
G Clef F Clef C Clef Percussion Clef
Time Signature ^ Symbol Movie
Other Time Signature
Tie/Slur ^
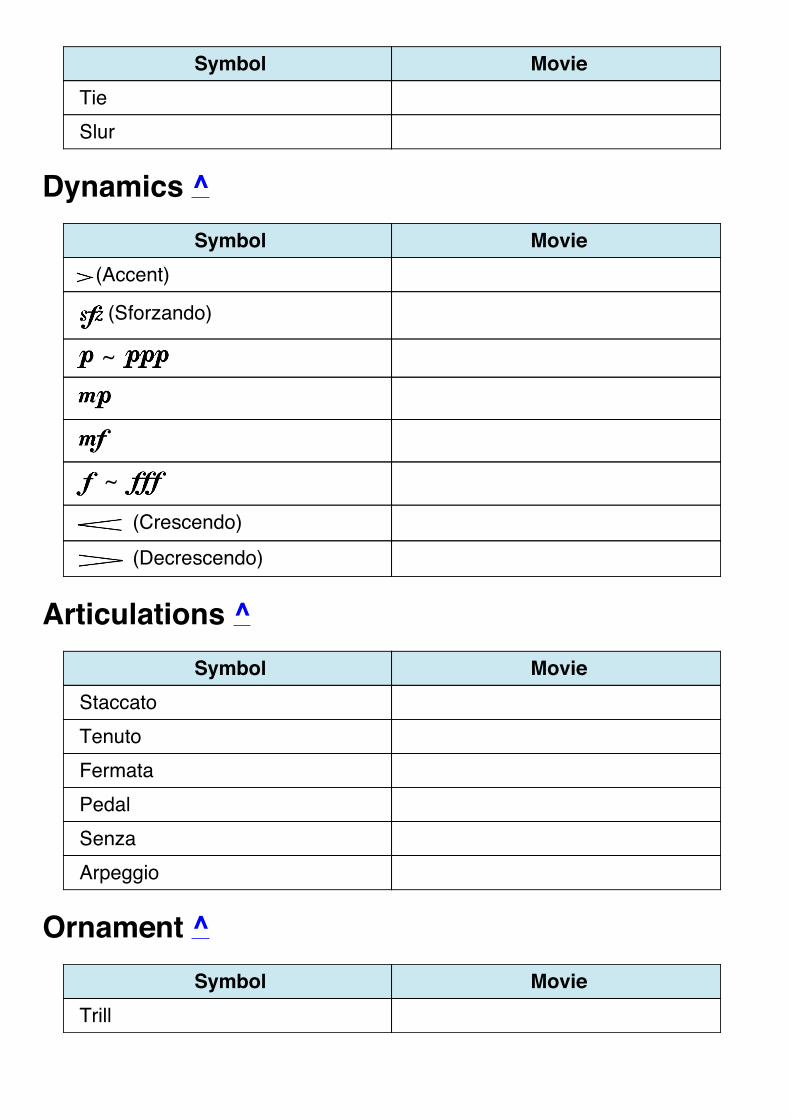
Symbol Movie Tie Slur
Dynamics ^ Symbol Movie
(Accent)
(Sforzando)
~
~
(Crescendo) (Decrescendo)
Articulations ^ Symbol Movie
Staccato Tenuto Fermata Pedal Senza Arpeggio
Ornament ^ Symbol Movie
Trill
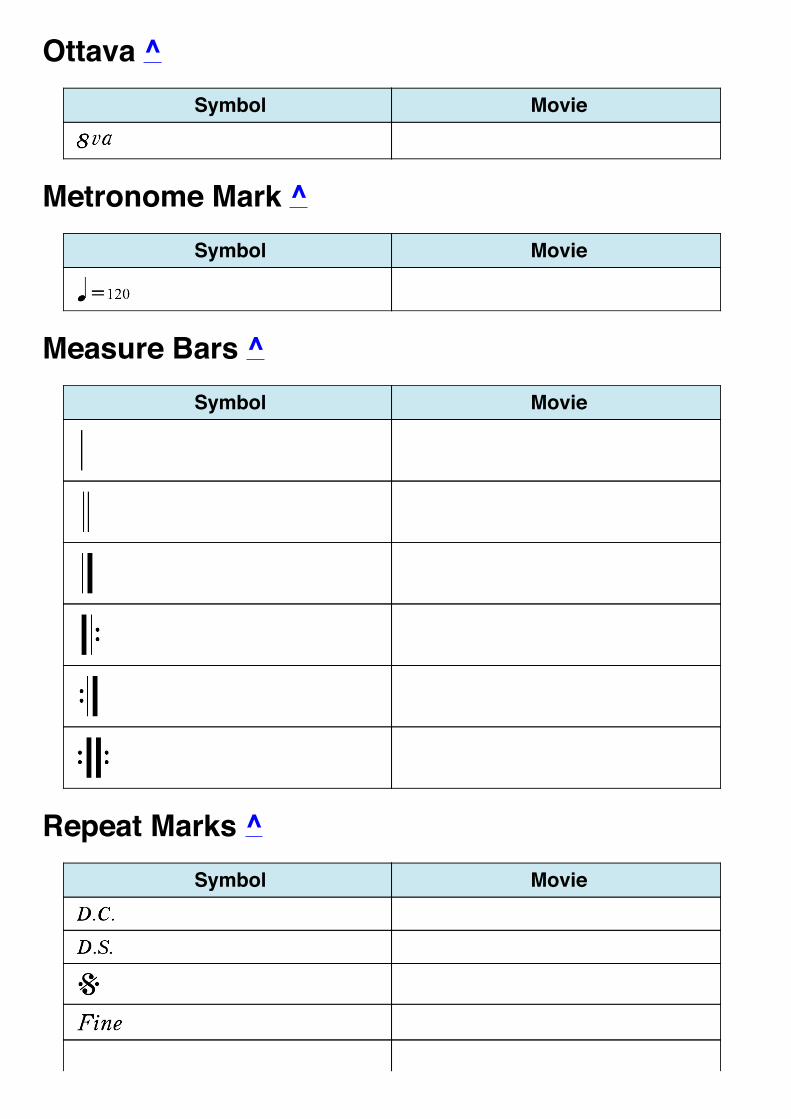
Ottava ^ Symbol Movie
Metronome Mark ^ Symbol Movie
Measure Bars ^ Symbol Movie
Repeat Marks ^ Symbol Movie
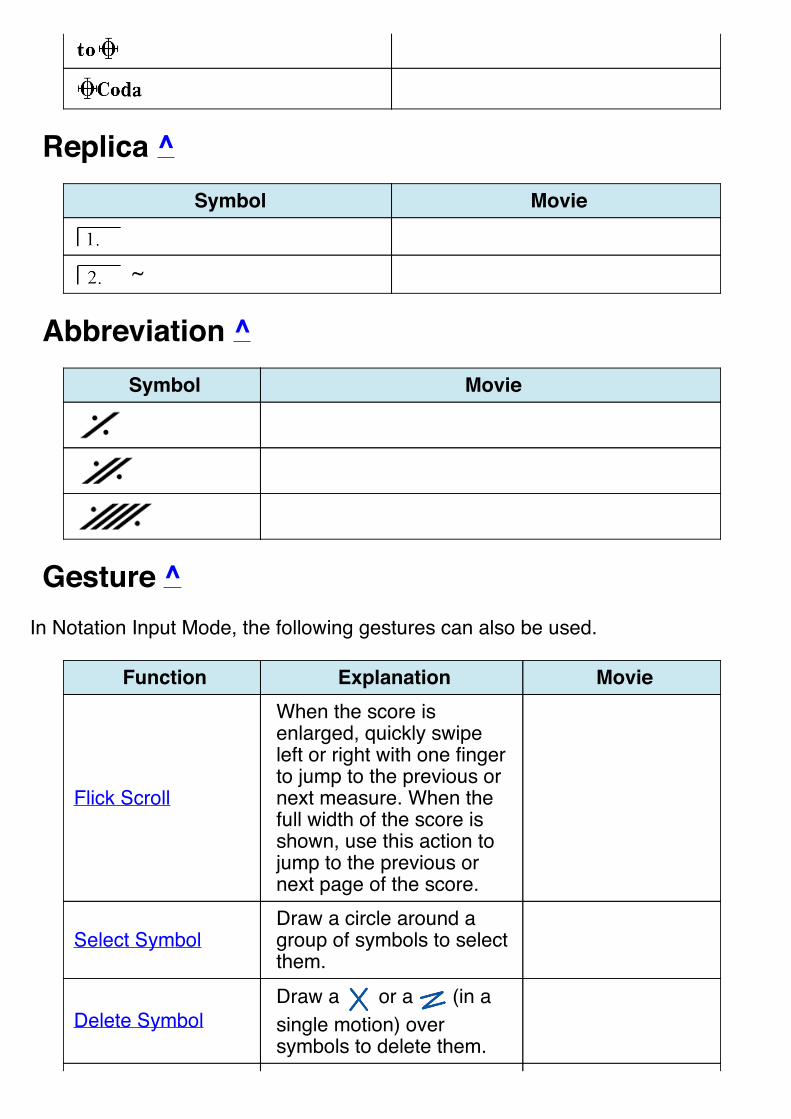
Replica ^ Symbol Movie
~
Abbreviation ^ Symbol Movie
Gesture ^In Notation Input Mode, the following gestures can also be used.
Function Explanation Movie
Flick Scroll
When the score is enlarged, quickly swipe left or right with one finger to jump to the previous or next measure. When the full width of the score is shown, use this action to jump to the previous or next page of the score.
Select Symbol Draw a circle around a group of symbols to select them.
Delete Symbol Draw a or a (in a single motion) over symbols to delete them.
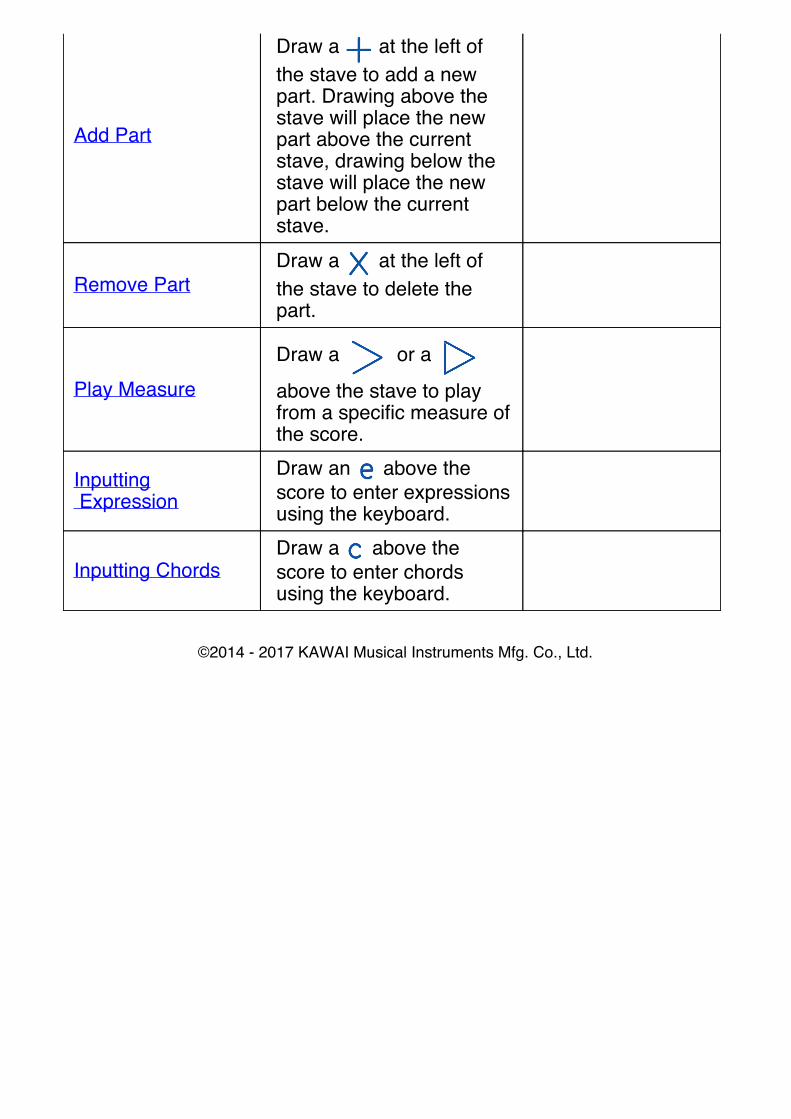
Add Part
Draw a at the left of the stave to add a new part. Drawing above the stave will place the new part above the current stave, drawing below the stave will place the new part below the current stave.
Remove Part Draw a at the left of the stave to delete the part.
Play Measure Draw a or a
above the stave to play from a specific measure of the score.
Inputting Expression
Draw an above the score to enter expressions using the keyboard.
Inputting Chords Draw a above the score to enter chords using the keyboard.
©2014 - 2017 KAWAI Musical Instruments Mfg. Co., Ltd.
Score Editing Basics
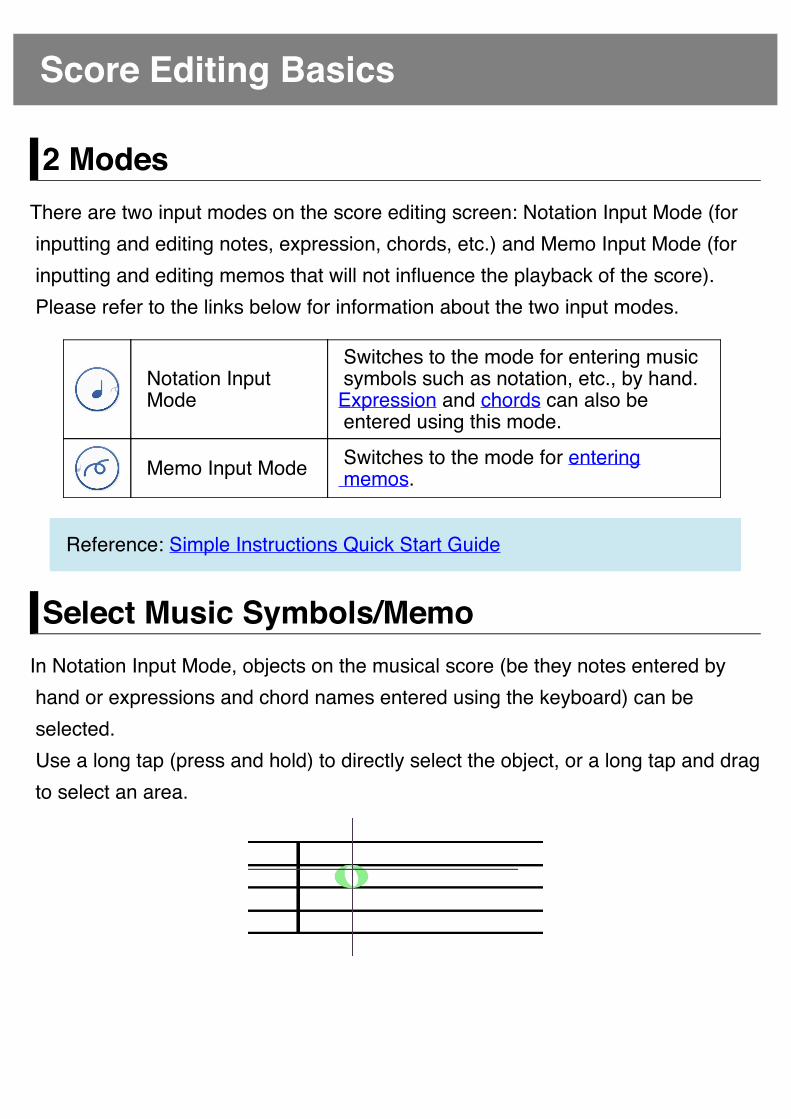
2 ModesThere are two input modes on the score editing screen: Notation Input Mode (for inputting and editing notes, expression, chords, etc.) and Memo Input Mode (for inputting and editing memos that will not influence the playback of the score). Please refer to the links below for information about the two input modes.
Notation Input Mode
Switches to the mode for entering music symbols such as notation, etc., by hand.Expression and chords can also be entered using this mode.
Memo Input Mode Switches to the mode for entering memos.
Reference: Simple Instructions Quick Start Guide
Select Music Symbols/MemoIn Notation Input Mode, objects on the musical score (be they notes entered by hand or expressions and chord names entered using the keyboard) can be selected. Use a long tap (press and hold) to directly select the object, or a long tap and drag to select an area.

Drag the green coloured notes to move them.
In Notation Input Mode, you can also draw a circle around objects to select them.
Memos can be selected in the Memo Input Mode. As used in the Notation Input Mode, you can use a long tap (press and hold) to directly select the memo object, or a long tap away from the memo then drag to select an area.
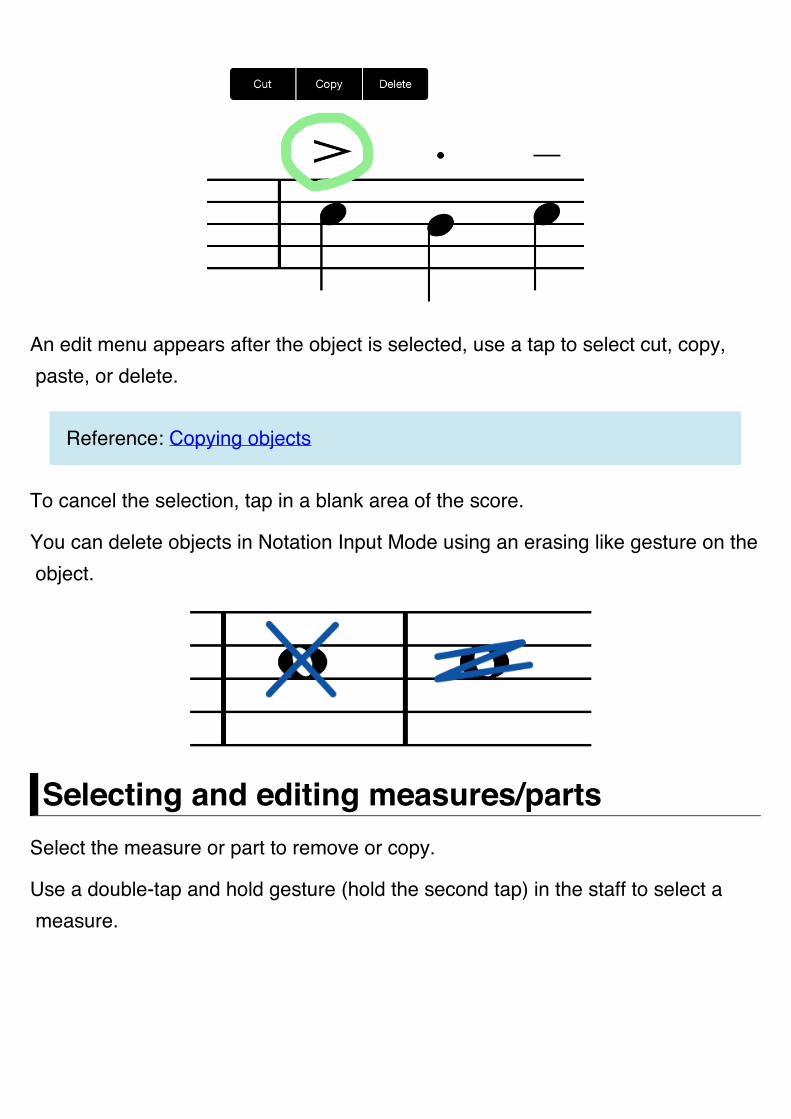
An edit menu appears after the object is selected, use a tap to select cut, copy, paste, or delete.
Reference: Copying objects
To cancel the selection, tap in a blank area of the score.
You can delete objects in Notation Input Mode using an erasing like gesture on the object.
Selecting and editing measures/partsSelect the measure or part to remove or copy.
Use a double-tap and hold gesture (hold the second tap) in the staff to select a measure.
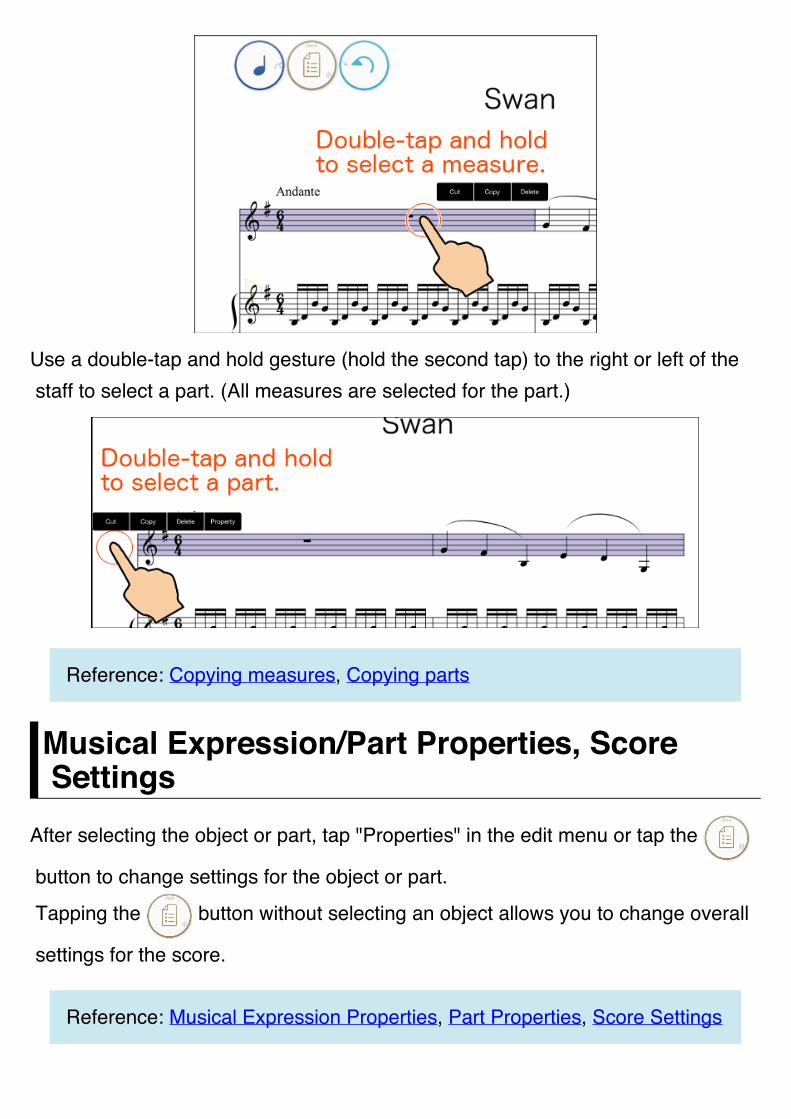
Use a double-tap and hold gesture (hold the second tap) to the right or left of the staff to select a part. (All measures are selected for the part.)
Reference: Copying measures, Copying parts
Musical Expression/Part Properties, Score Settings
After selecting the object or part, tap "Properties" in the edit menu or tap the
button to change settings for the object or part.
Tapping the button without selecting an object allows you to change overall
settings for the score.
Reference: Musical Expression Properties, Part Properties, Score Settings

©2014 - 2017 KAWAI Musical Instruments Mfg. Co., Ltd.
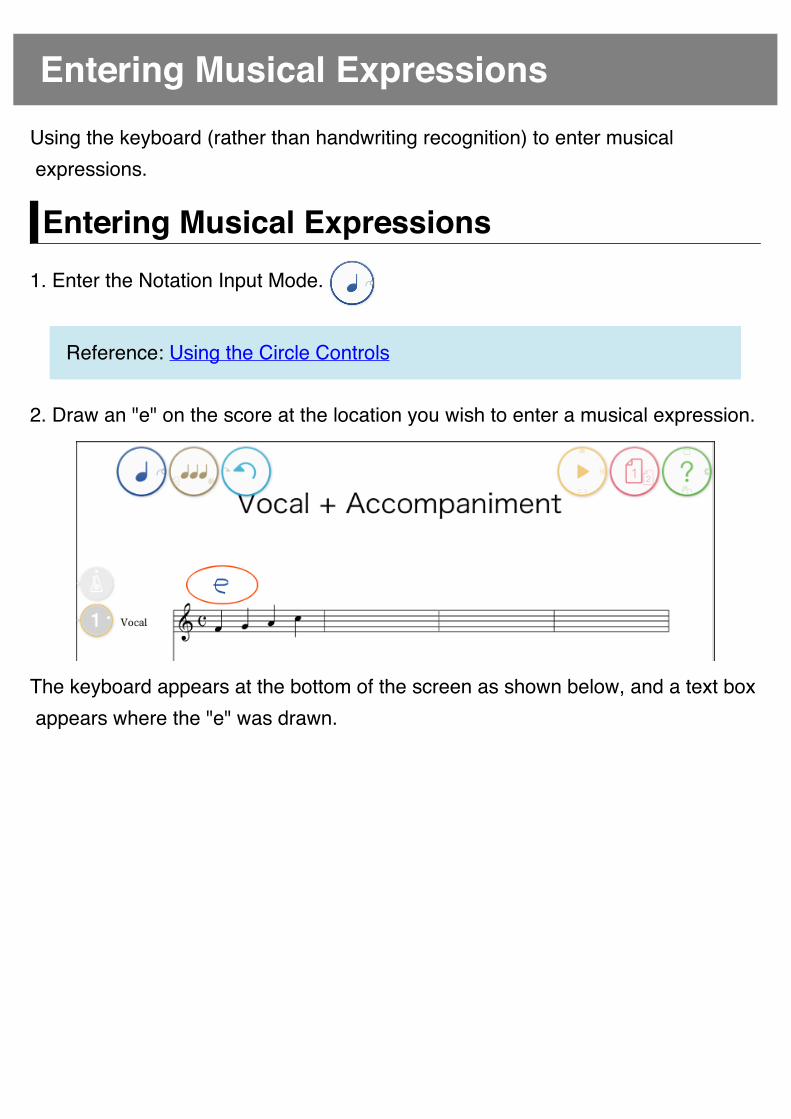
Entering Musical ExpressionsUsing the keyboard (rather than handwriting recognition) to enter musical expressions.
Entering Musical Expressions1. Enter the Notation Input Mode.
Reference: Using the Circle Controls
2. Draw an "e" on the score at the location you wish to enter a musical expression.
The keyboard appears at the bottom of the screen as shown below, and a text box appears where the "e" was drawn.
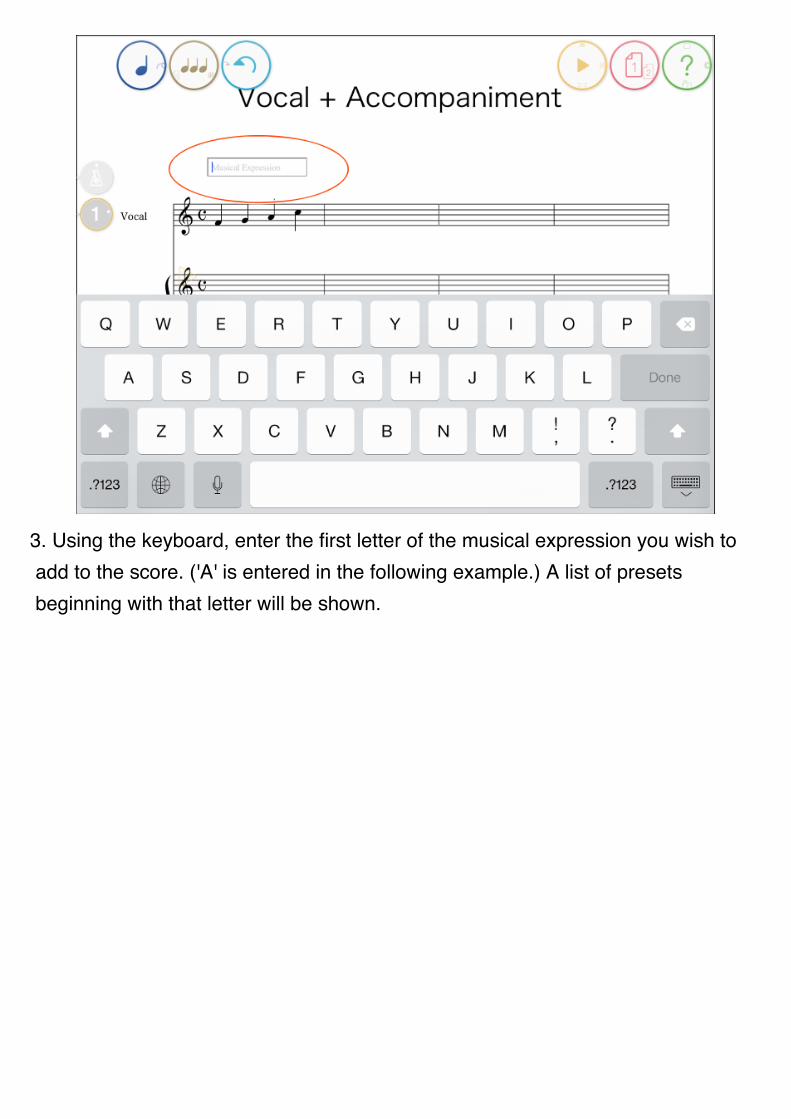
3. Using the keyboard, enter the first letter of the musical expression you wish to add to the score. ('A' is entered in the following example.) A list of presets beginning with that letter will be shown.
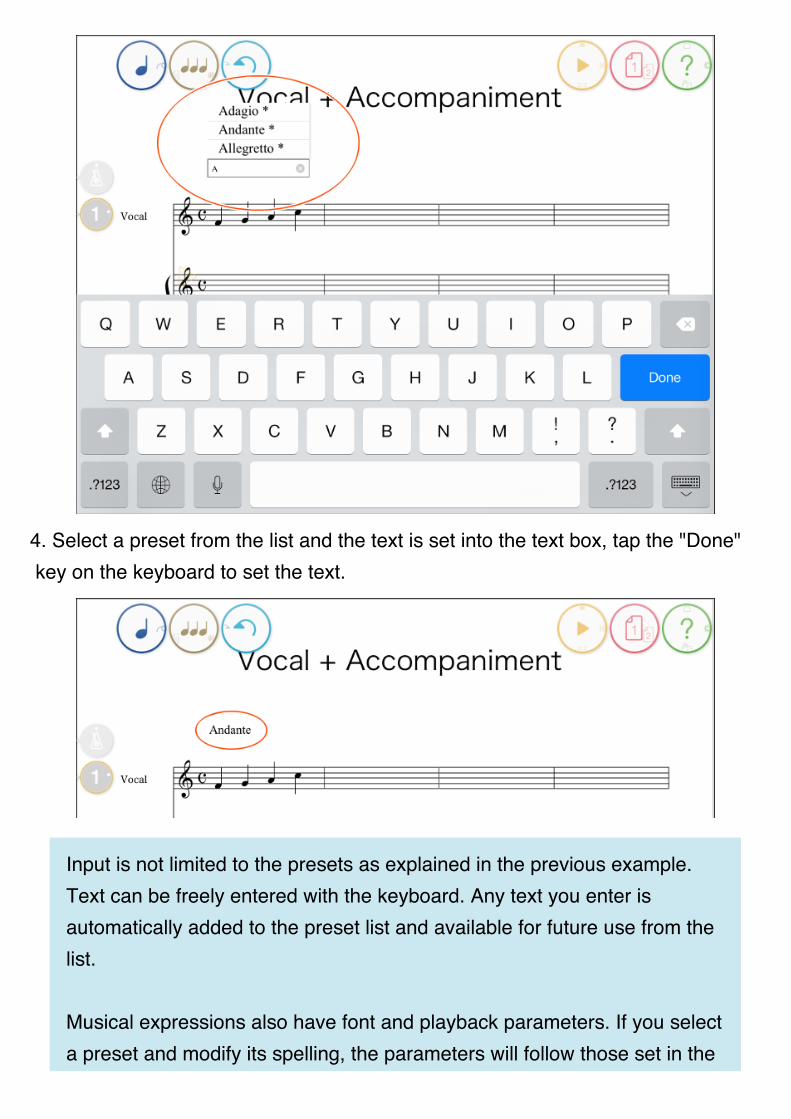
4. Select a preset from the list and the text is set into the text box, tap the "Done" key on the keyboard to set the text.
Input is not limited to the presets as explained in the previous example. Text can be freely entered with the keyboard. Any text you enter is automatically added to the preset list and available for future use from the list.
Musical expressions also have font and playback parameters. If you select a preset and modify its spelling, the parameters will follow those set in the
original preset. If you enter a phrase not available in the preset, its parameters are set to the default value (it will not affect playback). Parameters for the new musical expression can be set in its properties. When setting parameters, parameters are linked to the preset so you do not need to enter the parameters at the time of input. However, parameters for presets marked with an asterisk (*) in the list that are originally provided with Touch Notation cannot be changed. Reference: Property settings for symbols
©2014 - 2017 KAWAI Musical Instruments Mfg. Co., Ltd.
Entering Chord Names (In-App Purchase)
Chord Name Input is enabled with an in-app purchase. To purchase this input method, select the icon from the Library Screen, then select the Chord Name & Automatic Accompaniment feature.
The Chord Name Input process is explained below.
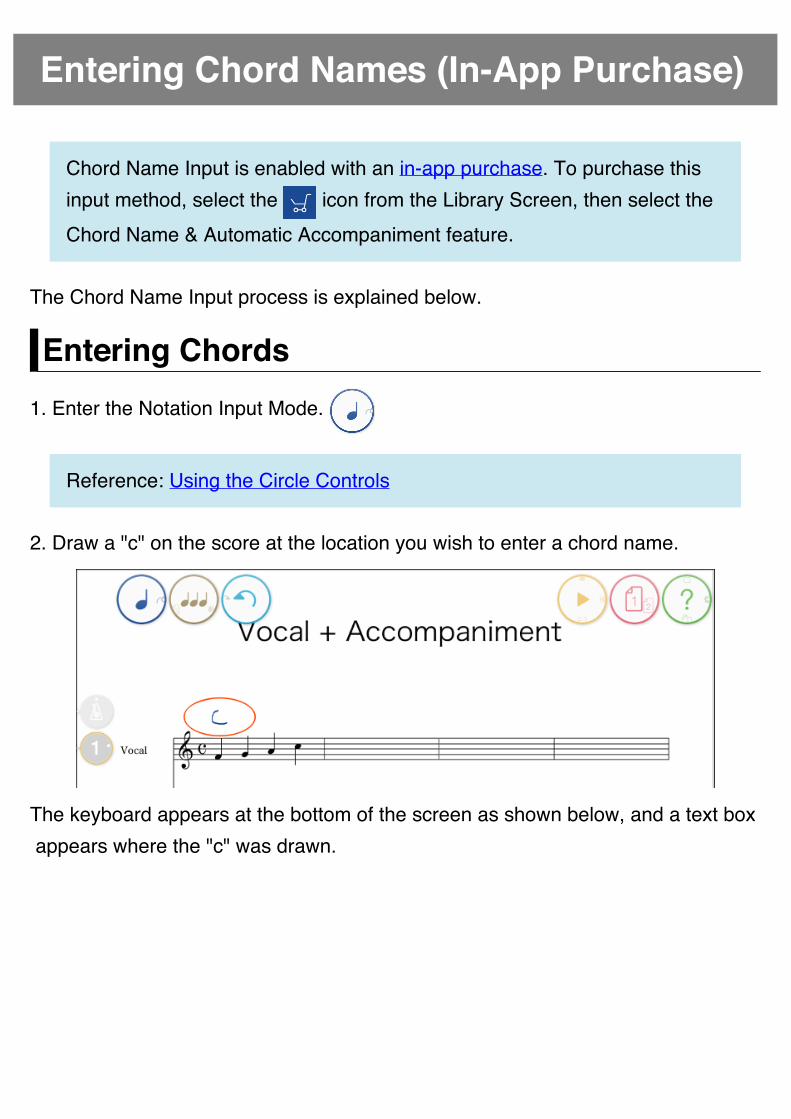
Entering Chords1. Enter the Notation Input Mode.
Reference: Using the Circle Controls
2. Draw a "c" on the score at the location you wish to enter a chord name.
The keyboard appears at the bottom of the screen as shown below, and a text box appears where the "c" was drawn.
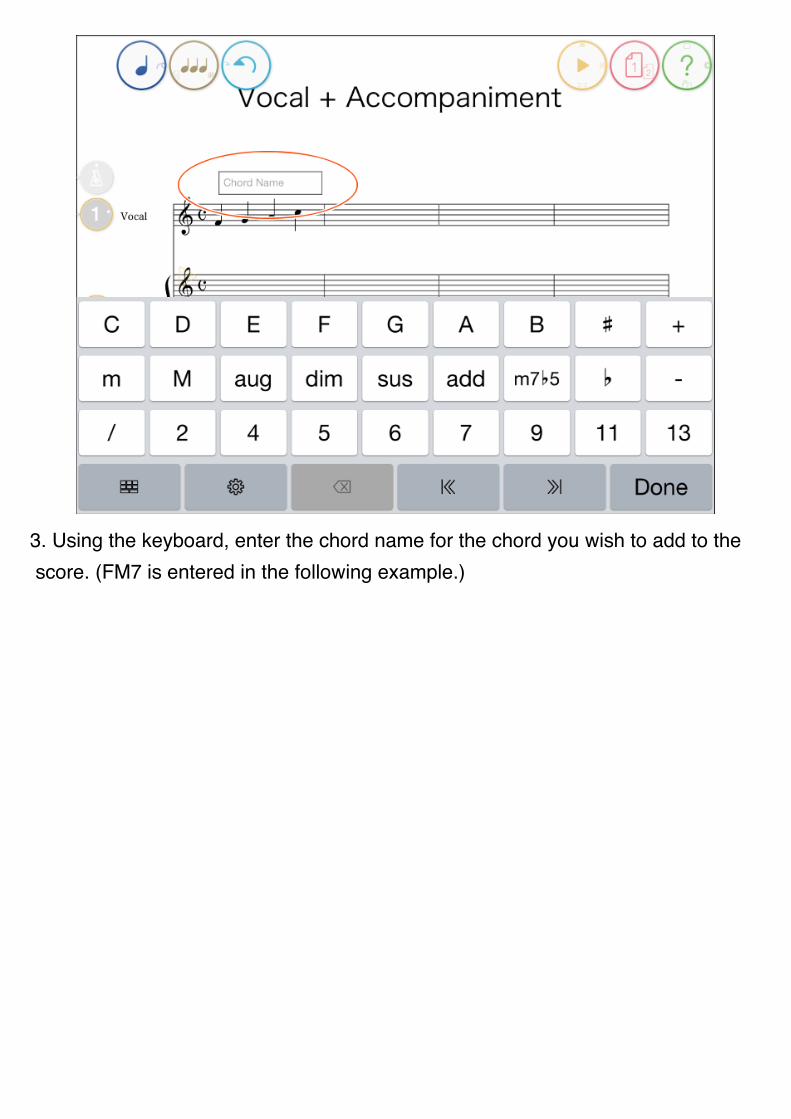
3. Using the keyboard, enter the chord name for the chord you wish to add to the score. (FM7 is entered in the following example.)
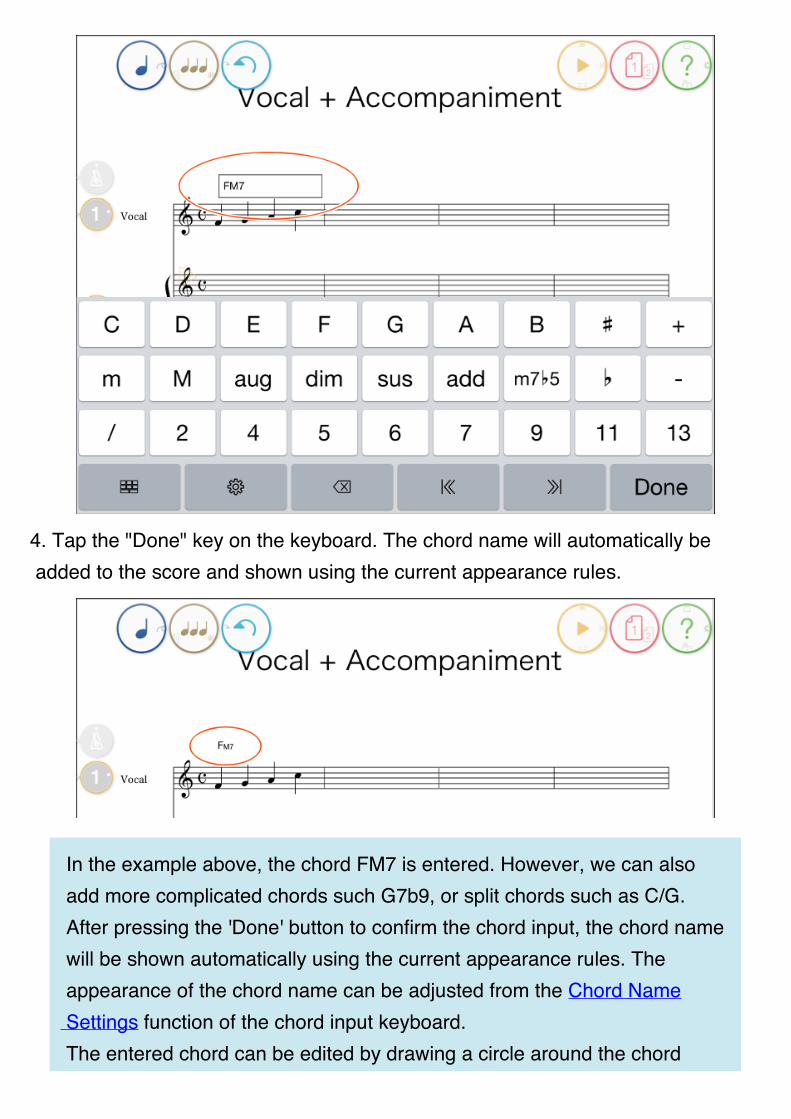
4. Tap the "Done" key on the keyboard. The chord name will automatically be added to the score and shown using the current appearance rules.
In the example above, the chord FM7 is entered. However, we can also add more complicated chords such G7b9, or split chords such as C/G. After pressing the 'Done' button to confirm the chord input, the chord name will be shown automatically using the current appearance rules. The appearance of the chord name can be adjusted from the Chord Name Settings function of the chord input keyboard. The entered chord can be edited by drawing a circle around the chord
name and tapping the 'Edit' button.
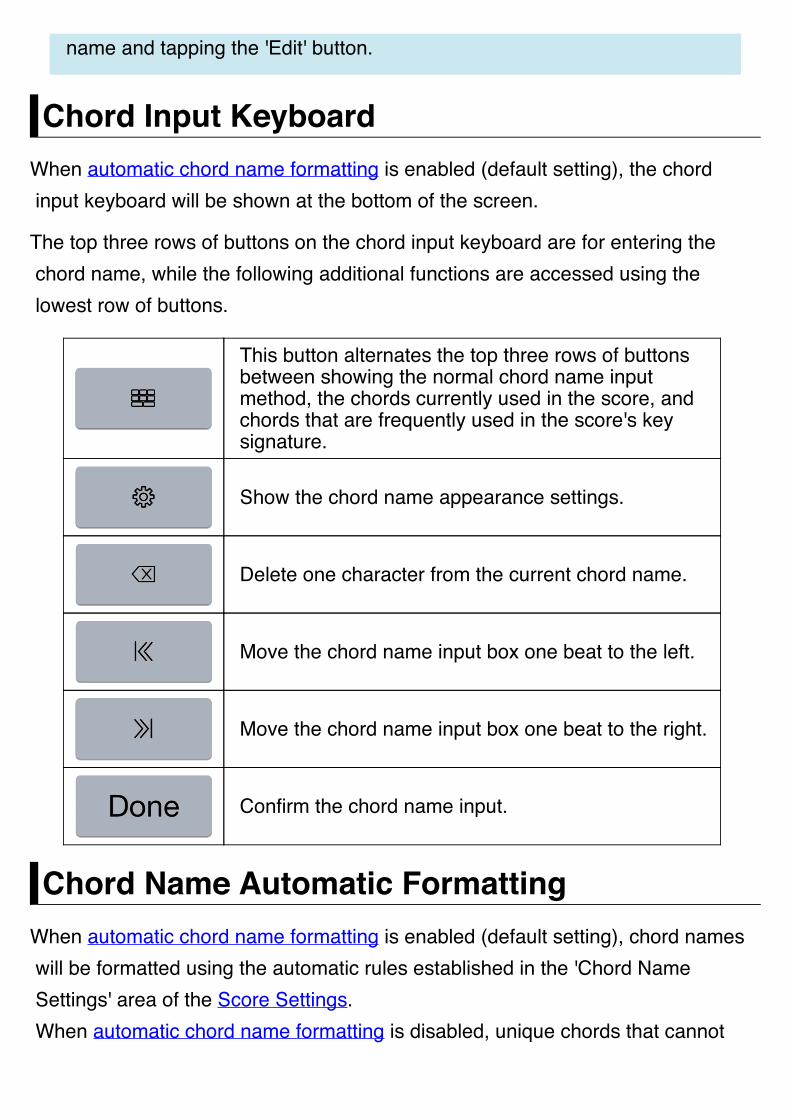
Chord Input KeyboardWhen automatic chord name formatting is enabled (default setting), the chord input keyboard will be shown at the bottom of the screen.
The top three rows of buttons on the chord input keyboard are for entering the chord name, while the following additional functions are accessed using the lowest row of buttons.
This button alternates the top three rows of buttons between showing the normal chord name input method, the chords currently used in the score, and chords that are frequently used in the score's key signature.
Show the chord name appearance settings.
Delete one character from the current chord name.
Move the chord name input box one beat to the left.
Move the chord name input box one beat to the right.
Confirm the chord name input.
Chord Name Automatic FormattingWhen automatic chord name formatting is enabled (default setting), chord names will be formatted using the automatic rules established in the 'Chord Name Settings' area of the Score Settings. When automatic chord name formatting is disabled, unique chords that cannot
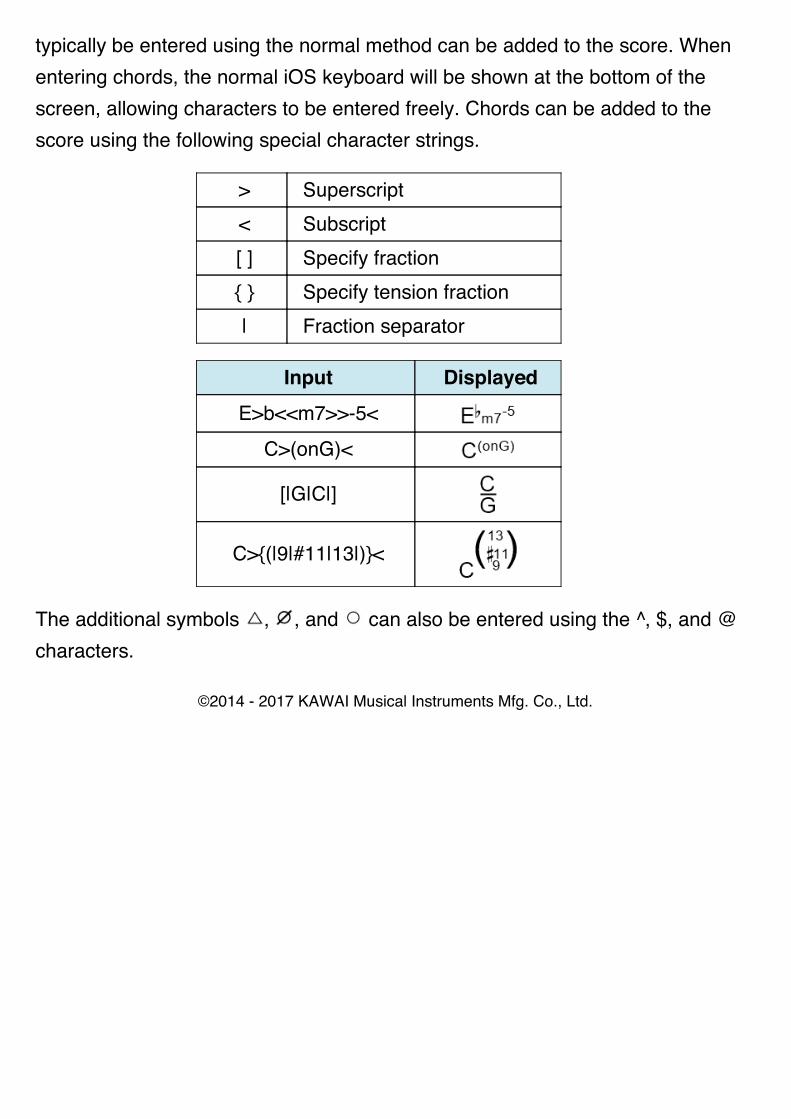
typically be entered using the normal method can be added to the score. When entering chords, the normal iOS keyboard will be shown at the bottom of the screen, allowing characters to be entered freely. Chords can be added to the score using the following special character strings.
> Superscript < Subscript [ ] Specify fraction { } Specify tension fraction | Fraction separator
Input Displayed E>b<<m7>>-5<
C>(onG)<
[|G|C|]
C>{(|9|#11|13|)}<
The additional symbols , , and can also be entered using the ^, $, and @ characters.
©2014 - 2017 KAWAI Musical Instruments Mfg. Co., Ltd.
Entering Grace NotesTo add grace notes, first enter them as regular notes, then select those notes and change them to grace notes.
Add grace notes1. Enter the Notation Input Mode.
Reference: Using the Circle Controls
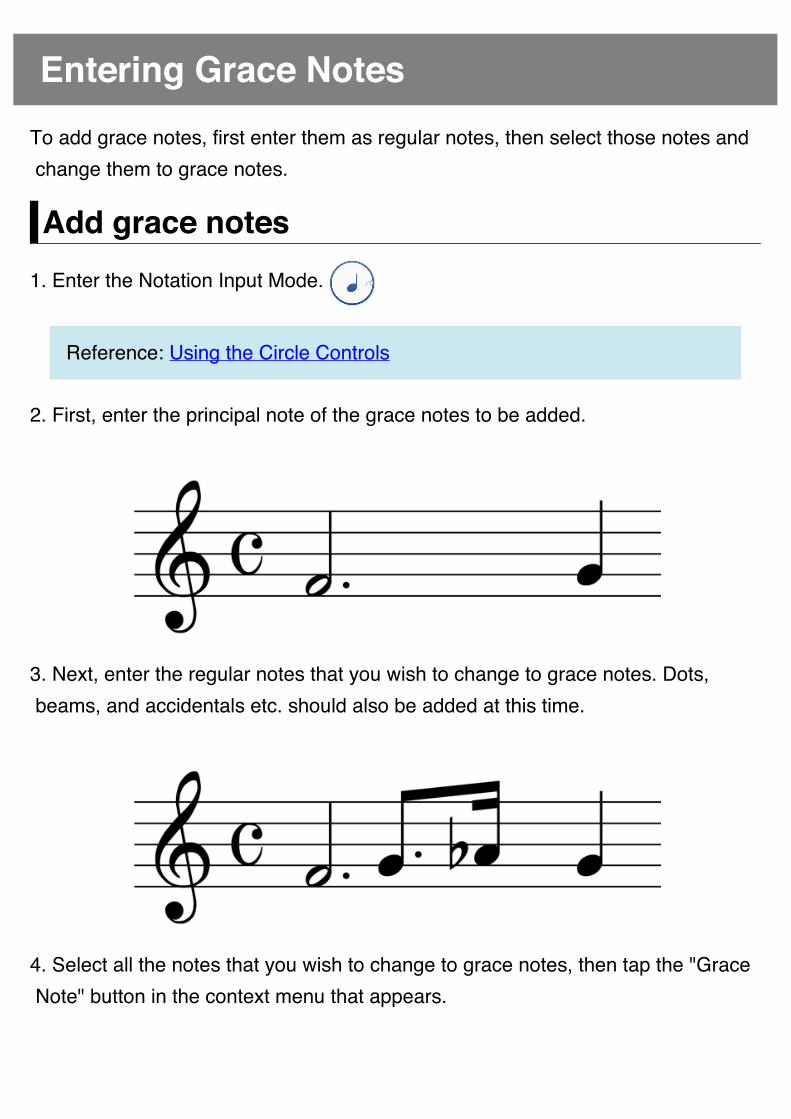
2. First, enter the principal note of the grace notes to be added.
3. Next, enter the regular notes that you wish to change to grace notes. Dots, beams, and accidentals etc. should also be added at this time.
4. Select all the notes that you wish to change to grace notes, then tap the "Grace Note" button in the context menu that appears.
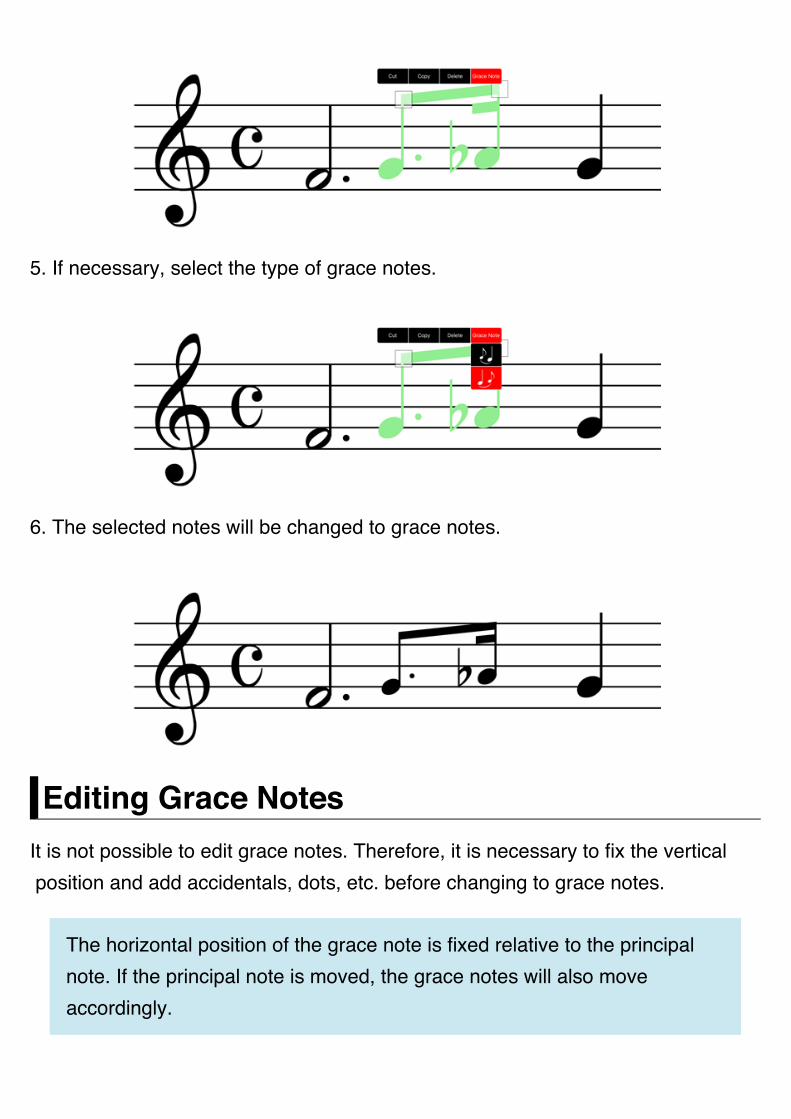
5. If necessary, select the type of grace notes.
6. The selected notes will be changed to grace notes.
Editing Grace NotesIt is not possible to edit grace notes. Therefore, it is necessary to fix the vertical position and add accidentals, dots, etc. before changing to grace notes.
The horizontal position of the grace note is fixed relative to the principal note. If the principal note is moved, the grace notes will also move accordingly.

©2014 - 2017 KAWAI Musical Instruments Mfg. Co., Ltd.
Entering Drum NotationIn addition to single staff and grand staff, it is also possible to specify a drum staff for entering drum notation.There are a number of methods to select a drum staff, as explained below.
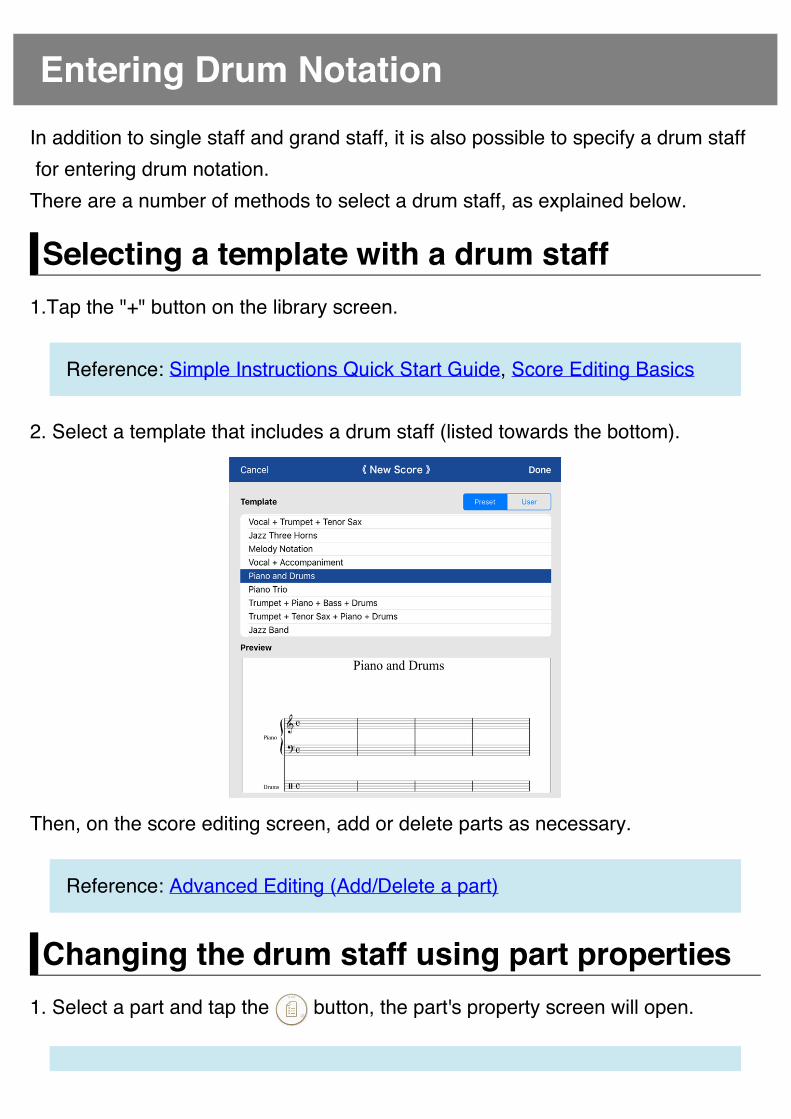
Selecting a template with a drum staff1.Tap the "+" button on the library screen.
Reference: Simple Instructions Quick Start Guide, Score Editing Basics
2. Select a template that includes a drum staff (listed towards the bottom).
Then, on the score editing screen, add or delete parts as necessary.
Reference: Advanced Editing (Add/Delete a part)
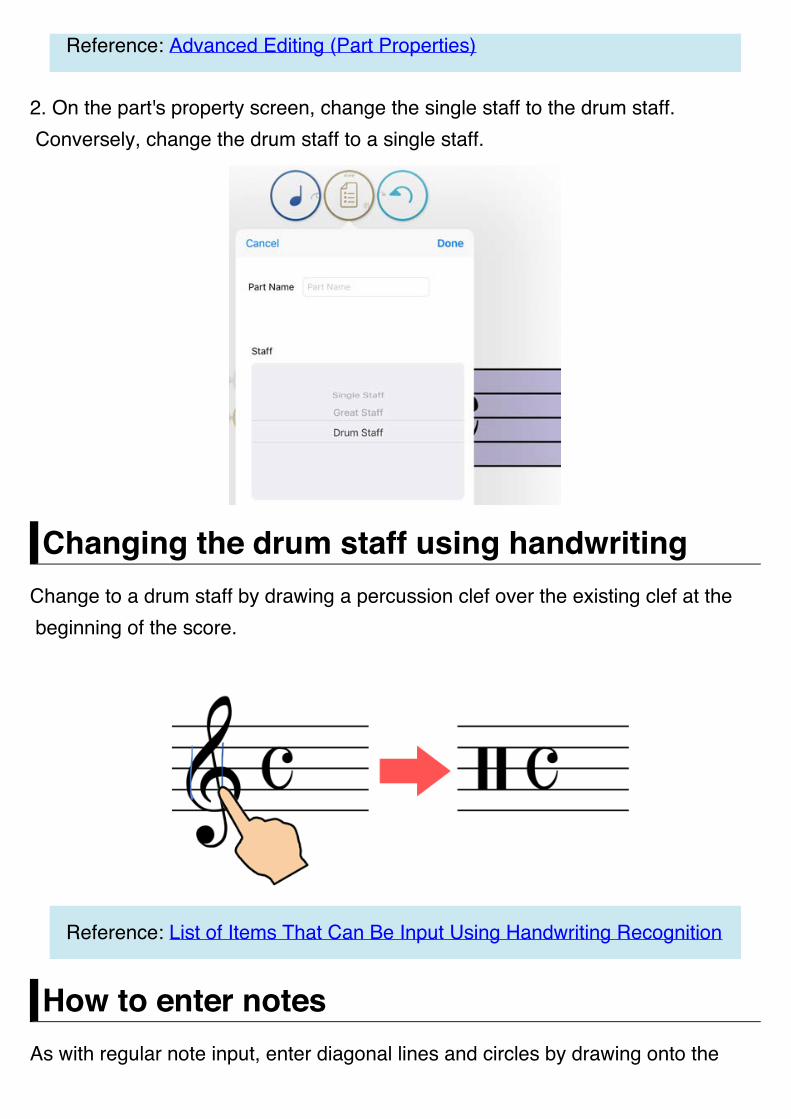
Changing the drum staff using part properties1. Select a part and tap the button, the part's property screen will open.
Reference: Advanced Editing (Part Properties)
2. On the part's property screen, change the single staff to the drum staff. Conversely, change the drum staff to a single staff.
Changing the drum staff using handwritingChange to a drum staff by drawing a percussion clef over the existing clef at the beginning of the score.
Reference: List of Items That Can Be Input Using Handwriting Recognition
How to enter notesAs with regular note input, enter diagonal lines and circles by drawing onto the
staff.
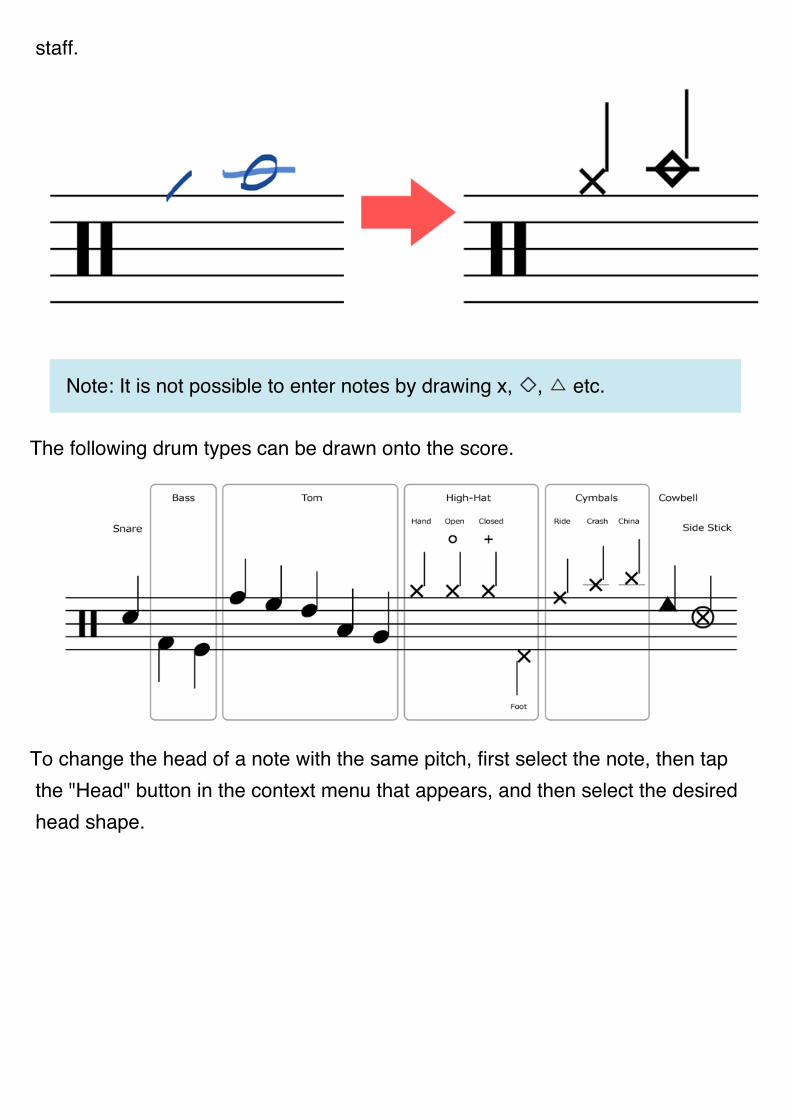
Note: It is not possible to enter notes by drawing x, , etc.
The following drum types can be drawn onto the score.
To change the head of a note with the same pitch, first select the note, then tap the "Head" button in the context menu that appears, and then select the desired head shape.
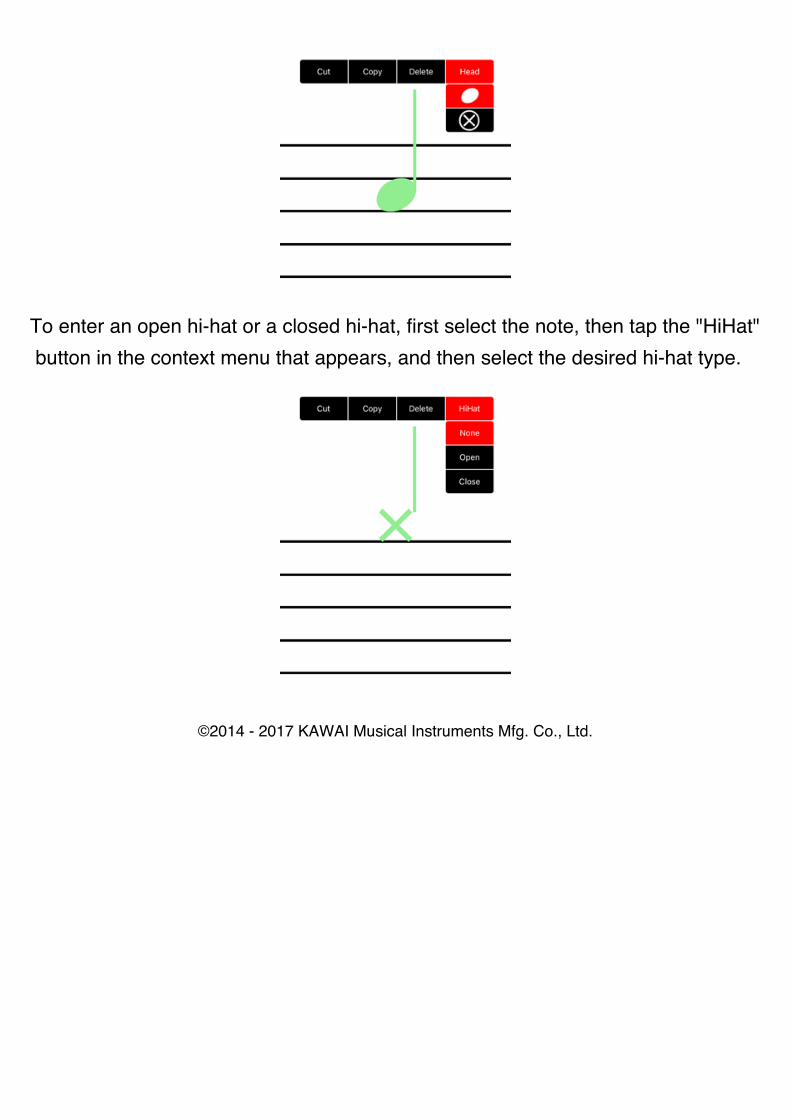
To enter an open hi-hat or a closed hi-hat, first select the note, then tap the "HiHat" button in the context menu that appears, and then select the desired hi-hat type.
©2014 - 2017 KAWAI Musical Instruments Mfg. Co., Ltd.
Playback music from the score
Playback with the Circle ControlTap the button to start playback from the song pointer position.
To stop playback, tap the button. The song pointer remains in the measure
that was playing when playback is stopped. Tap the button to start playback
from that measure.
Tap the button to return the song pointer to the beginning of the song. The
score also scrolls back to the beginning.
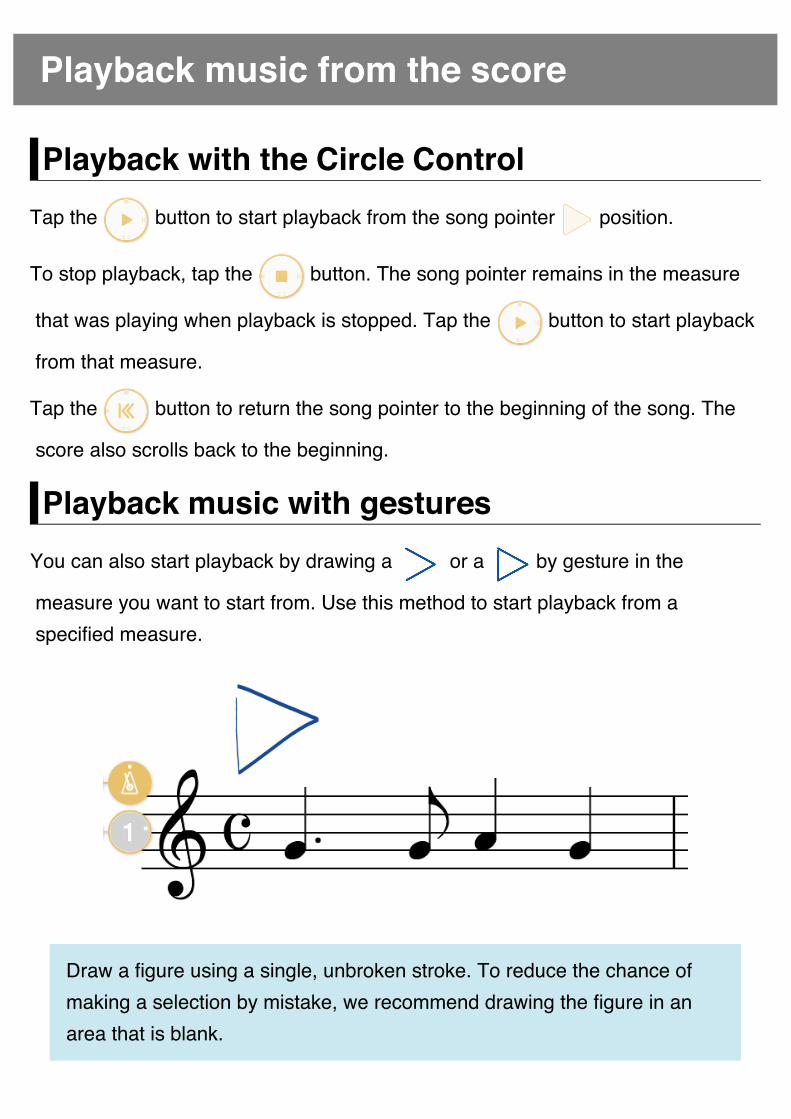
Playback music with gesturesYou can also start playback by drawing a or a by gesture in the
measure you want to start from. Use this method to start playback from a specified measure.
Draw a figure using a single, unbroken stroke. To reduce the chance of making a selection by mistake, we recommend drawing the figure in an area that is blank.
If all measures in the line fit within the display, then playback will operate the same
as with the button, playing to the end of the song. If the score is magnified
so that all measures are not visible, then only one measure is played. The score does not auto-scroll so this is a convenient way to confirm what you entered.
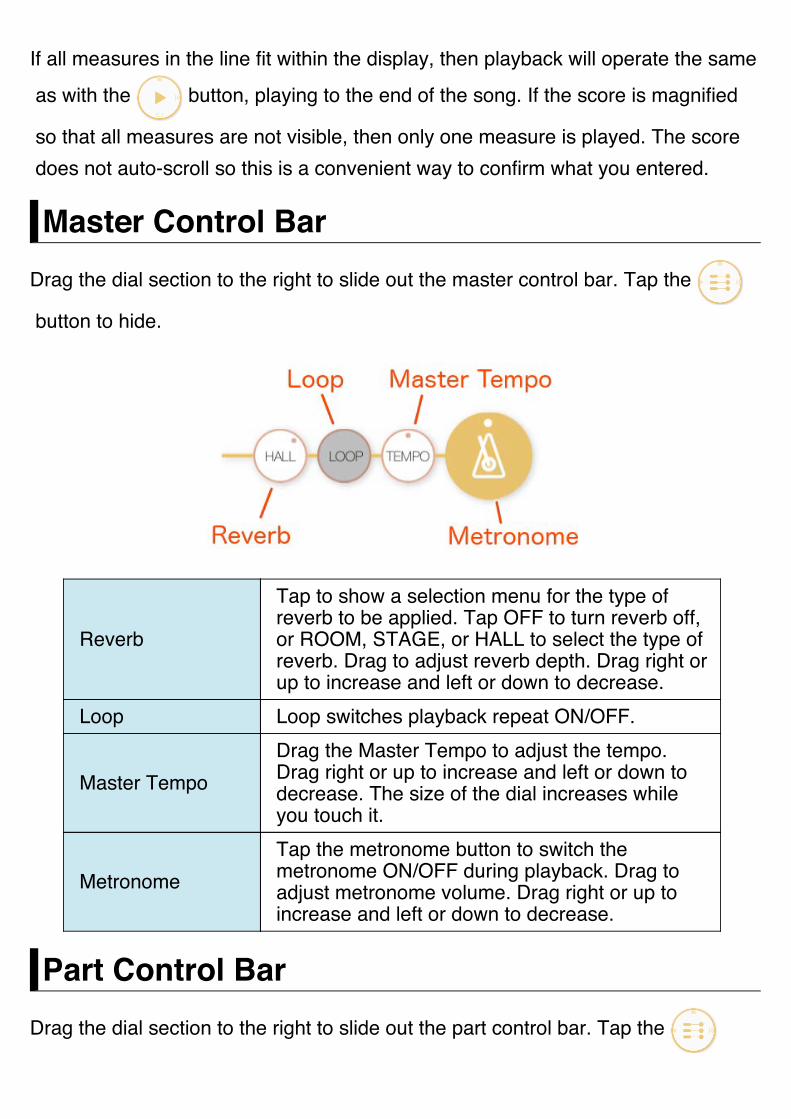
Master Control BarDrag the dial section to the right to slide out the master control bar. Tap the
button to hide.
Reverb
Tap to show a selection menu for the type of reverb to be applied. Tap OFF to turn reverb off, or ROOM, STAGE, or HALL to select the type of reverb. Drag to adjust reverb depth. Drag right or up to increase and left or down to decrease.
Loop Loop switches playback repeat ON/OFF.
Master Tempo Drag the Master Tempo to adjust the tempo. Drag right or up to increase and left or down to decrease. The size of the dial increases while you touch it.
Metronome Tap the metronome button to switch the metronome ON/OFF during playback. Drag to adjust metronome volume. Drag right or up to increase and left or down to decrease.
Part Control BarDrag the dial section to the right to slide out the part control bar. Tap the
button to hide.
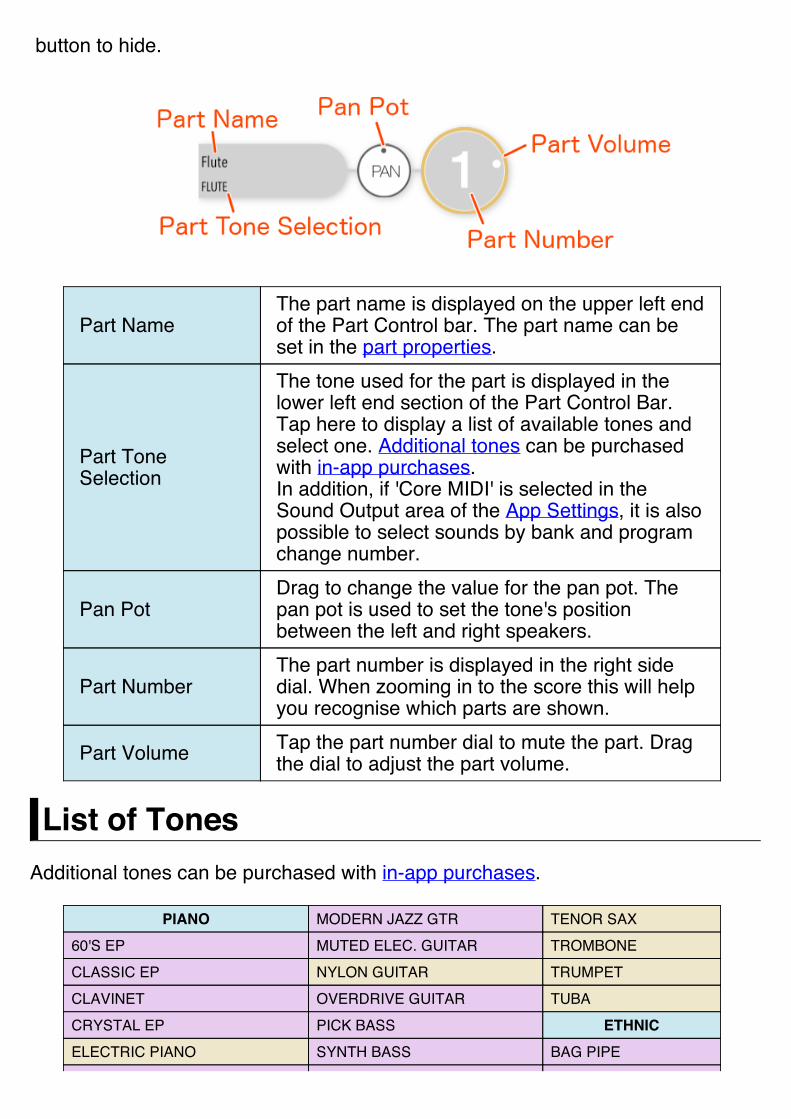
Part Name The part name is displayed on the upper left end of the Part Control bar. The part name can be set in the part properties.
Part Tone Selection
The tone used for the part is displayed in the lower left end section of the Part Control Bar. Tap here to display a list of available tones and select one. Additional tones can be purchased with in-app purchases. In addition, if 'Core MIDI' is selected in the Sound Output area of the App Settings, it is also possible to select sounds by bank and program change number.
Pan Pot Drag to change the value for the pan pot. The pan pot is used to set the tone's position between the left and right speakers.
Part Number The part number is displayed in the right side dial. When zooming in to the score this will help you recognise which parts are shown.
Part Volume Tap the part number dial to mute the part. Drag the dial to adjust the part volume.
List of TonesAdditional tones can be purchased with in-app purchases.
PIANO MODERN JAZZ GTR TENOR SAX60'S EP MUTED ELEC. GUITAR TROMBONECLASSIC EP NYLON GUITAR TRUMPETCLAVINET OVERDRIVE GUITAR TUBACRYSTAL EP PICK BASS ETHNICELECTRIC PIANO SYNTH BASS BAG PIPE

EP LEGEND SYNTH BASS B BIWAGRAND PIANO GUITAR/BASS2 DOBROHONKY TONK PIANO 12 STRINGS GUITAR DULCIMERMELLOW GRAND PIANO BALALAIKA FIDDLEMODERN EP BANJO FIDDLE SLIDENEW AGE EP CLAVI BASS HARMONICANEW AGE PIANO CUTTING GUITAR HICHIRIKINEW AGE PIANO B CUTTING GUITAR B KOKYUPIANO OCTAVES DISTORTION GUITAR KOTOROCK PIANO ELECTRIC GUITAR B NOKANSTUDIO GRAND PIANO EXP GUITAR PAN FLUTESYNTH CLAVI FOLK GUITAR SHAKUHACHITOY PIANO JAZZ GUITAR B SHAMISEN
ORGAN/DRAWBAR MANDOLIN SHO60'S ORGAN POLY SYNTH BASS SITARACCORDION SLAP BASS TAISHO KOTOBE 3 SLAP BASS B BELL/MALLETBE NICE UKULELE BELL LYRABLUES HARP STRINGS BELLSCHURCH ORGAN BEAUTIFUL STRINGS CELESTAELECTRONIC ORGAN CELLO GLOCKENSPIELFRENCH ACCORDION CLASSICAL CELLO HANDBELLSFULL ORGAN CLASSICAL VIOLIN KALIMBAFULL PIPES CONTRABASS MARIMBAHARPSICHORD HARP MUSIC BOXJAZZ ORGAN HARP B MUSIC BOX BJAZZER OCTAVE STRINGS SOFT MARIMBAJAZZY HARMONICA PIZZICATO STRINGS STEEL DRUMSKENBAN HARMONICA STRING ENSEMBLE STEEL DRUMS BODD MAN STRING ENSEMBLE B SYNTH MALLETPERCUSSIVE ORGAN STRINGS & BELL TIMPANIVOICE CELESTE 8 STRINGS AND BRASS TUBULAR BELLSWAH HARMONICA STRINGS SFORZANDO VIBRAPHONE
SYNTH/PAD SYNTH STRINGS XYLOPHONEBIG SAW SYNTH STRINGS B VOCAL/OTHERSCLASSIC SYNTH SYNTH STRINGS C 50'S DOOCLASSIC SYNTH B VIOLA 50'S HEYEURO HIT VIOLIN 50'S LAFULL ORCHESTRA WARM STRINGS 50'S OOH
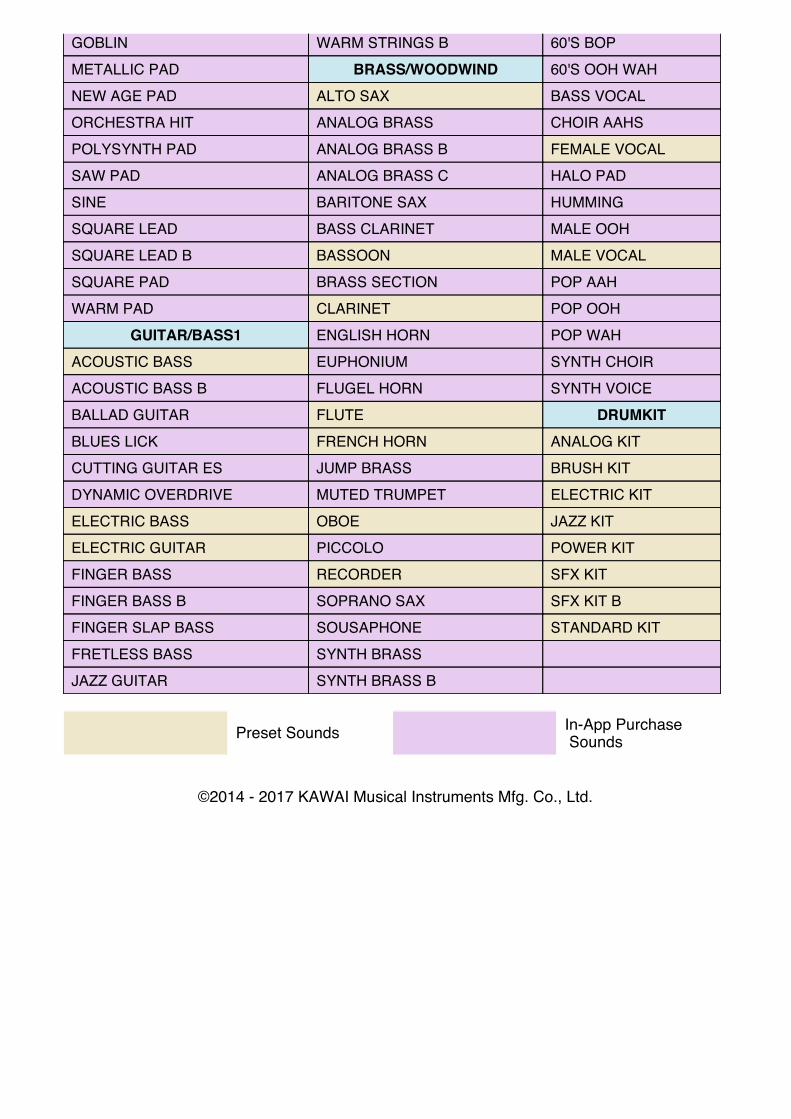
GOBLIN WARM STRINGS B 60'S BOPMETALLIC PAD BRASS/WOODWIND 60'S OOH WAHNEW AGE PAD ALTO SAX BASS VOCALORCHESTRA HIT ANALOG BRASS CHOIR AAHSPOLYSYNTH PAD ANALOG BRASS B FEMALE VOCALSAW PAD ANALOG BRASS C HALO PADSINE BARITONE SAX HUMMINGSQUARE LEAD BASS CLARINET MALE OOHSQUARE LEAD B BASSOON MALE VOCALSQUARE PAD BRASS SECTION POP AAHWARM PAD CLARINET POP OOH
GUITAR/BASS1 ENGLISH HORN POP WAHACOUSTIC BASS EUPHONIUM SYNTH CHOIRACOUSTIC BASS B FLUGEL HORN SYNTH VOICEBALLAD GUITAR FLUTE DRUMKITBLUES LICK FRENCH HORN ANALOG KITCUTTING GUITAR ES JUMP BRASS BRUSH KITDYNAMIC OVERDRIVE MUTED TRUMPET ELECTRIC KITELECTRIC BASS OBOE JAZZ KITELECTRIC GUITAR PICCOLO POWER KITFINGER BASS RECORDER SFX KITFINGER BASS B SOPRANO SAX SFX KIT BFINGER SLAP BASS SOUSAPHONE STANDARD KITFRETLESS BASS SYNTH BRASSJAZZ GUITAR SYNTH BRASS B
Preset Sounds In-App Purchase Sounds
©2014 - 2017 KAWAI Musical Instruments Mfg. Co., Ltd.

Advanced Editing
Editing Symbols with Start and End PointsStart and end points for symbols such as ties, slurs, and crescendos can be moved by dragging.
1. Select a symbol that uses two points. The symbol turns green when selected and appears at the start and end points.
2. Drag the to move.
Use this procedure to create two-point symbols that extend into the next line.
Copying notes/symbols1. Follow the Selecting Music Symbols/Memo instructions to select a note.
2. After selecting the note/symbol, tap the 'Copy' button from the edit menu that appears.
3. Next tap the 'Paste' button.
4. A 'Touch the area of the score to Paste.' message will appear on the screen. Touch the desired area of the score to paste the copied notes/symbols into this area/measure.
In addition to 'Copy', it is also possible to 'Cut' and 'Delete' from the edit menu. When selecting 'Cut', the selected symbol will be removed and the 'Paste' button will appear. When selecting 'Delete', the selected symbol will
be removed, however the 'Paste' button will not appear. To paste the same symbol multiple times, long tap an area of the screen to show the 'Paste' button, then follow the instructions above to paste the copied symbol onto the desired area of the score.
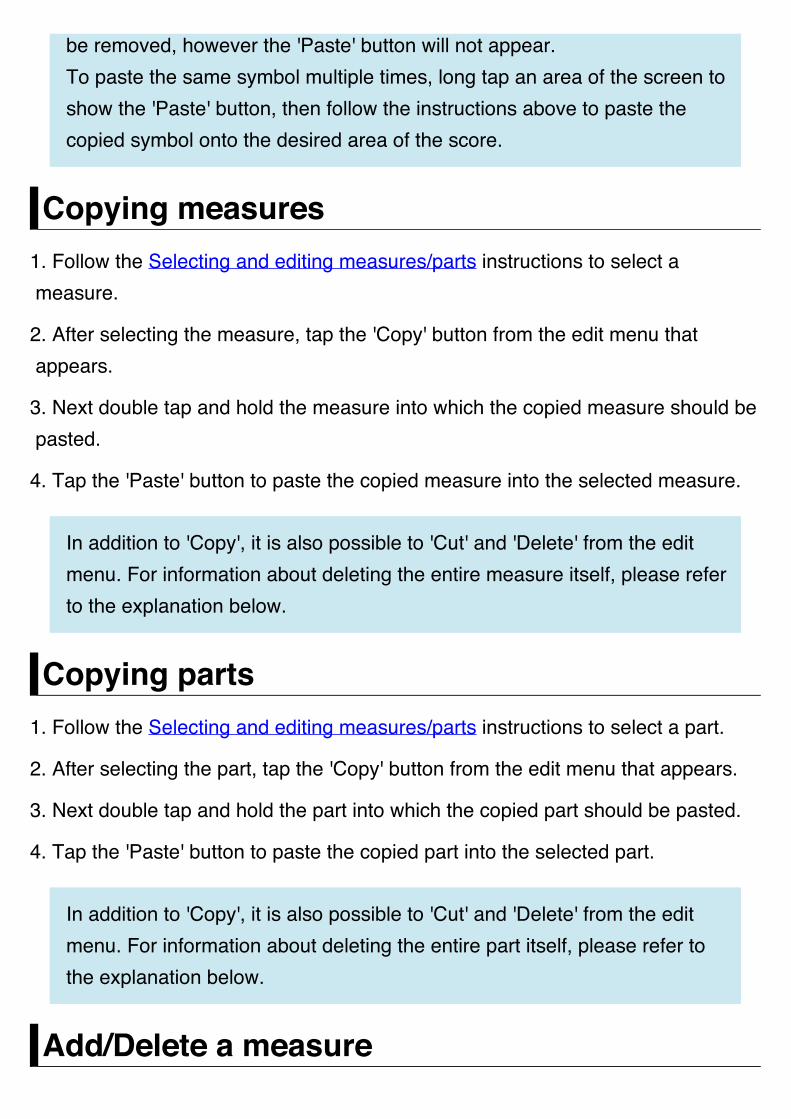
Copying measures1. Follow the Selecting and editing measures/parts instructions to select a measure.
2. After selecting the measure, tap the 'Copy' button from the edit menu that appears.
3. Next double tap and hold the measure into which the copied measure should be pasted.
4. Tap the 'Paste' button to paste the copied measure into the selected measure.
In addition to 'Copy', it is also possible to 'Cut' and 'Delete' from the edit menu. For information about deleting the entire measure itself, please refer to the explanation below.
Copying parts1. Follow the Selecting and editing measures/parts instructions to select a part.
2. After selecting the part, tap the 'Copy' button from the edit menu that appears.
3. Next double tap and hold the part into which the copied part should be pasted.
4. Tap the 'Paste' button to paste the copied part into the selected part.
In addition to 'Copy', it is also possible to 'Cut' and 'Delete' from the edit menu. For information about deleting the entire part itself, please refer to the explanation below.
Add/Delete a measure
Rather than deleting individual notes/symbols in a measure, it may be necessary to delete the entire measure itself. Alternatively, it may be necessary to add (insert) a new measure. On these occasions, the Delete Measure Bar and Add Measure Bar functions can be used.
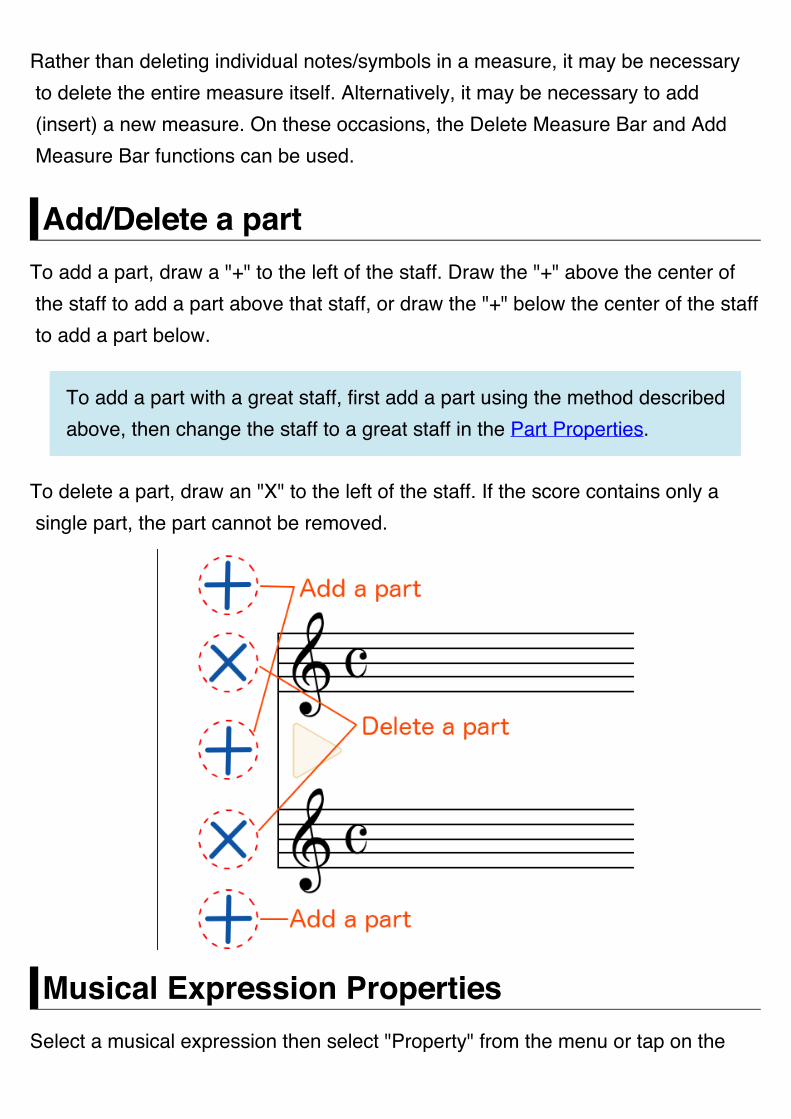
Add/Delete a partTo add a part, draw a "+" to the left of the staff. Draw the "+" above the center of the staff to add a part above that staff, or draw the "+" below the center of the staff to add a part below.
To add a part with a great staff, first add a part using the method described above, then change the staff to a great staff in the Part Properties.
To delete a part, draw an "X" to the left of the staff. If the score contains only a single part, the part cannot be removed.
Musical Expression PropertiesSelect a musical expression then select "Property" from the menu or tap on the
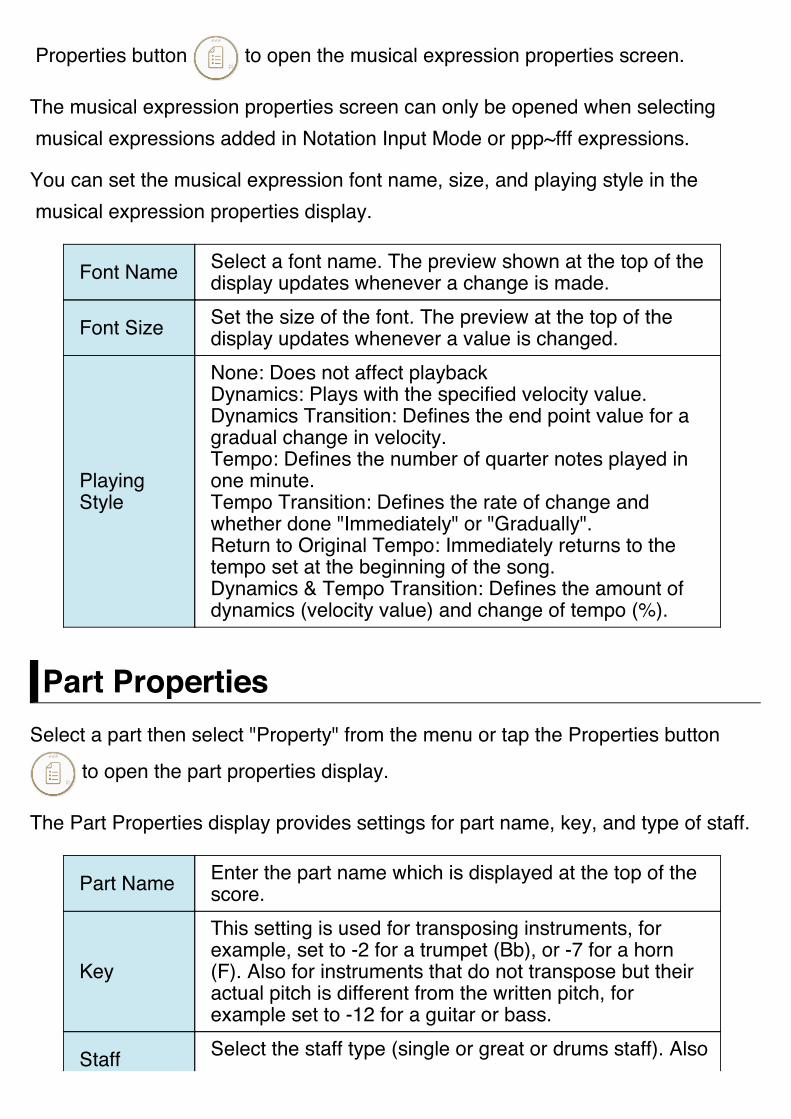
Properties button to open the musical expression properties screen.
The musical expression properties screen can only be opened when selecting musical expressions added in Notation Input Mode or ppp~fff expressions.
You can set the musical expression font name, size, and playing style in the musical expression properties display.
Font Name Select a font name. The preview shown at the top of the display updates whenever a change is made.
Font Size Set the size of the font. The preview at the top of the display updates whenever a value is changed.
Playing Style
None: Does not affect playback Dynamics: Plays with the specified velocity value. Dynamics Transition: Defines the end point value for a gradual change in velocity. Tempo: Defines the number of quarter notes played in one minute. Tempo Transition: Defines the rate of change and whether done "Immediately" or "Gradually". Return to Original Tempo: Immediately returns to the tempo set at the beginning of the song. Dynamics & Tempo Transition: Defines the amount of dynamics (velocity value) and change of tempo (%).
Part PropertiesSelect a part then select "Property" from the menu or tap the Properties button
to open the part properties display.
The Part Properties display provides settings for part name, key, and type of staff.
Part Name Enter the part name which is displayed at the top of the score.
Key
This setting is used for transposing instruments, for example, set to -2 for a trumpet (Bb), or -7 for a horn (F). Also for instruments that do not transpose but their actual pitch is different from the written pitch, for example set to -12 for a guitar or bass.
Staff Select the staff type (single or great or drums staff). Also
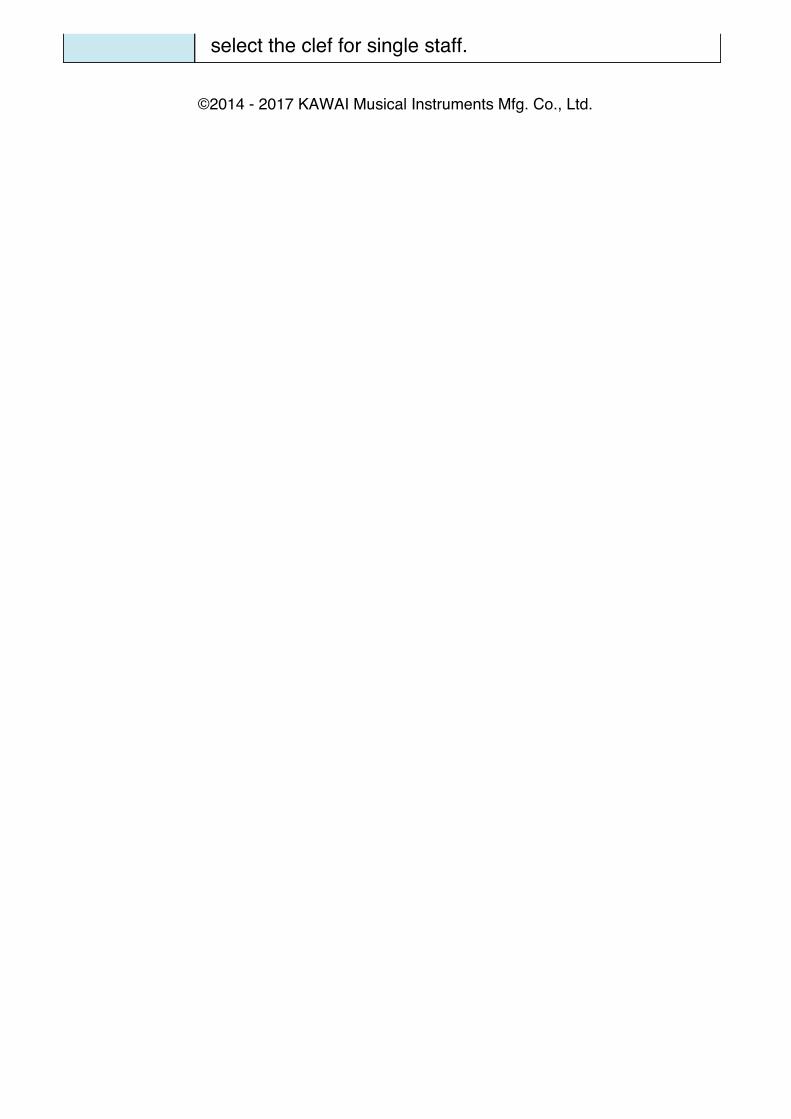
select the clef for single staff.
©2014 - 2017 KAWAI Musical Instruments Mfg. Co., Ltd.
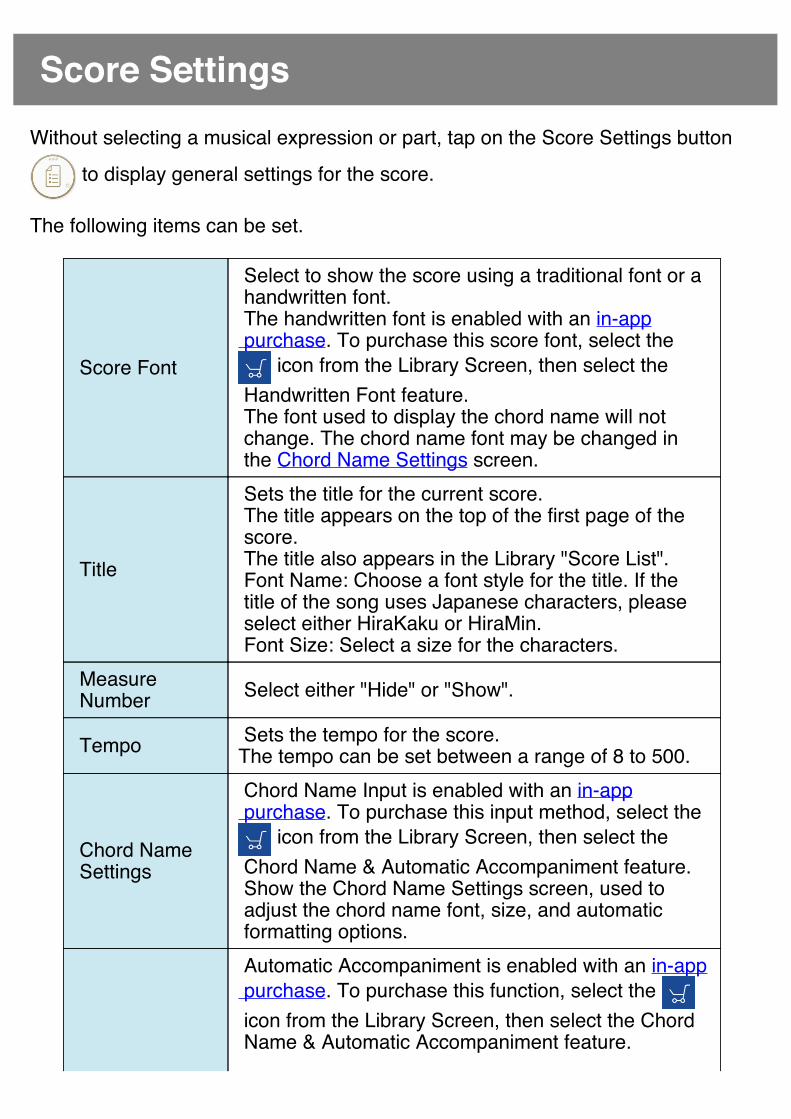
Score SettingsWithout selecting a musical expression or part, tap on the Score Settings button
to display general settings for the score.
The following items can be set.
Score Font
Select to show the score using a traditional font or a handwritten font. The handwritten font is enabled with an in-app purchase. To purchase this score font, select the
icon from the Library Screen, then select the Handwritten Font feature. The font used to display the chord name will not change. The chord name font may be changed in the Chord Name Settings screen.
Title
Sets the title for the current score. The title appears on the top of the first page of the score. The title also appears in the Library "Score List". Font Name: Choose a font style for the title. If the title of the song uses Japanese characters, please select either HiraKaku or HiraMin. Font Size: Select a size for the characters.
Measure Number Select either "Hide" or "Show".
Tempo Sets the tempo for the score.The tempo can be set between a range of 8 to 500.
Chord Name Settings
Chord Name Input is enabled with an in-app purchase. To purchase this input method, select the
icon from the Library Screen, then select the Chord Name & Automatic Accompaniment feature. Show the Chord Name Settings screen, used to adjust the chord name font, size, and automatic formatting options. Automatic Accompaniment is enabled with an in-app purchase. To purchase this function, select the icon from the Library Screen, then select the Chord Name & Automatic Accompaniment feature.
Automatic Accompaniment
Select the style used for the automatic accompaniment. This feature will be disabled by default. Tap the [No Style] button to select the preferred accompaniment style from a list of 101 styles. Each style features four variations that change automatically whenever repeat or double bar etc. marks are used in the score. The volume of the automatic accompaniment can be set from 0 to 127.
* Automatic Accompaniment will not be output using Core MIDI. If the application's Output Sound Source setting is set to Core MIDI, the automatic accompaniment cannot be adjusted.
Paper size Select the desired paper size to be used for the printed score.
Reference: Musical Expression Properties, Part Properties
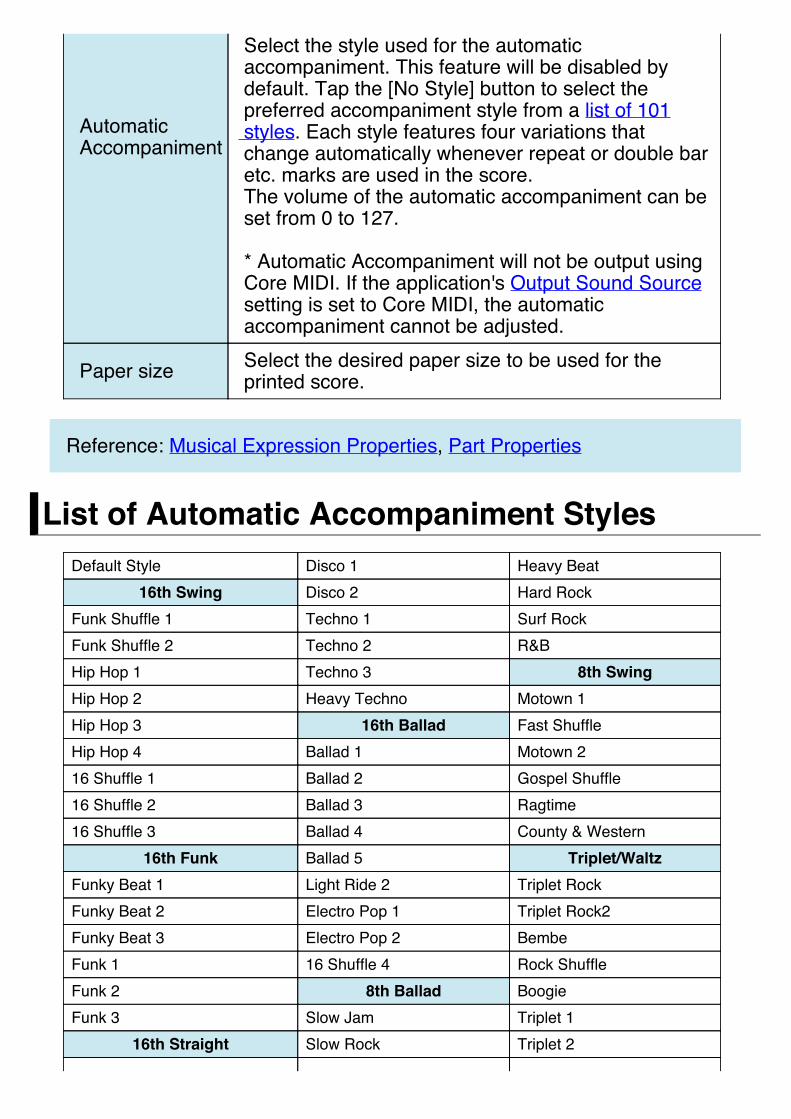
List of Automatic Accompaniment StylesDefault Style Disco 1 Heavy Beat
16th Swing Disco 2 Hard RockFunk Shuffle 1 Techno 1 Surf RockFunk Shuffle 2 Techno 2 R&BHip Hop 1 Techno 3 8th SwingHip Hop 2 Heavy Techno Motown 1Hip Hop 3 16th Ballad Fast ShuffleHip Hop 4 Ballad 1 Motown 216 Shuffle 1 Ballad 2 Gospel Shuffle16 Shuffle 2 Ballad 3 Ragtime16 Shuffle 3 Ballad 4 County & Western
16th Funk Ballad 5 Triplet/WaltzFunky Beat 1 Light Ride 2 Triplet RockFunky Beat 2 Electro Pop 1 Triplet Rock2Funky Beat 3 Electro Pop 2 BembeFunk 1 16 Shuffle 4 Rock ShuffleFunk 2 8th Ballad BoogieFunk 3 Slow Jam Triplet 1
16th Straight Slow Rock Triplet 2
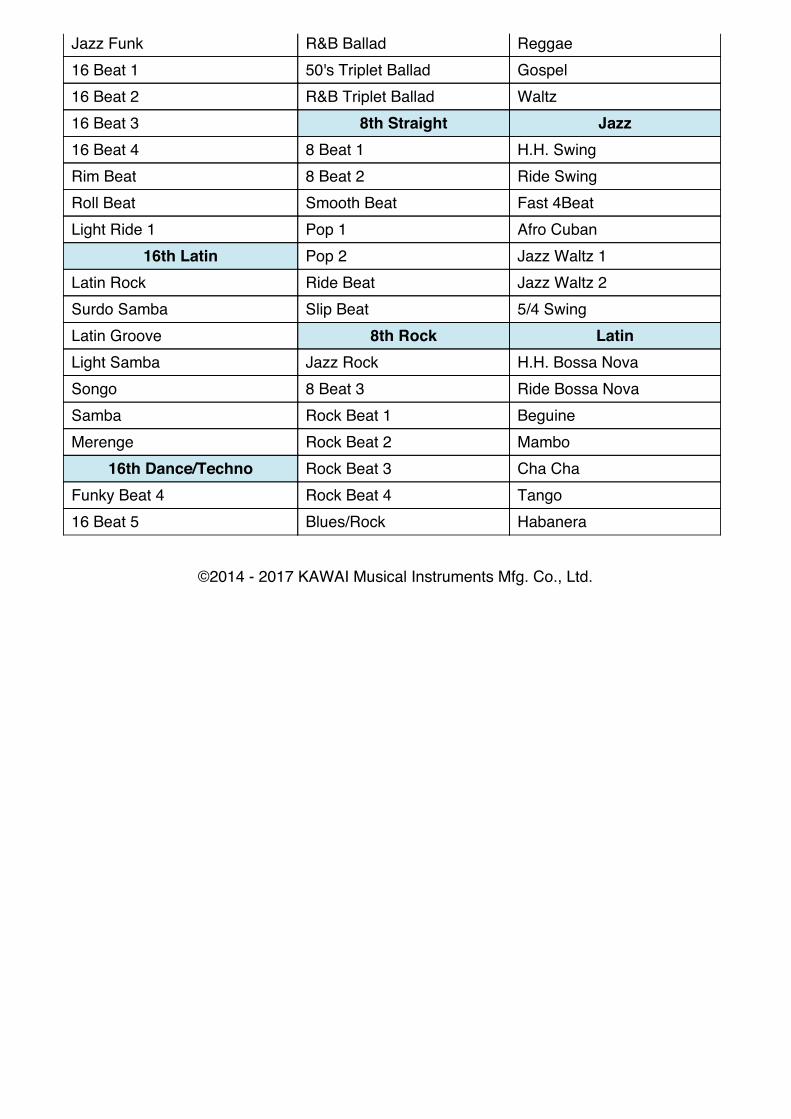
Jazz Funk R&B Ballad Reggae16 Beat 1 50's Triplet Ballad Gospel16 Beat 2 R&B Triplet Ballad Waltz16 Beat 3 8th Straight Jazz16 Beat 4 8 Beat 1 H.H. SwingRim Beat 8 Beat 2 Ride SwingRoll Beat Smooth Beat Fast 4BeatLight Ride 1 Pop 1 Afro Cuban
16th Latin Pop 2 Jazz Waltz 1Latin Rock Ride Beat Jazz Waltz 2Surdo Samba Slip Beat 5/4 SwingLatin Groove 8th Rock LatinLight Samba Jazz Rock H.H. Bossa NovaSongo 8 Beat 3 Ride Bossa NovaSamba Rock Beat 1 BeguineMerenge Rock Beat 2 Mambo
16th Dance/Techno Rock Beat 3 Cha ChaFunky Beat 4 Rock Beat 4 Tango16 Beat 5 Blues/Rock Habanera
©2014 - 2017 KAWAI Musical Instruments Mfg. Co., Ltd.
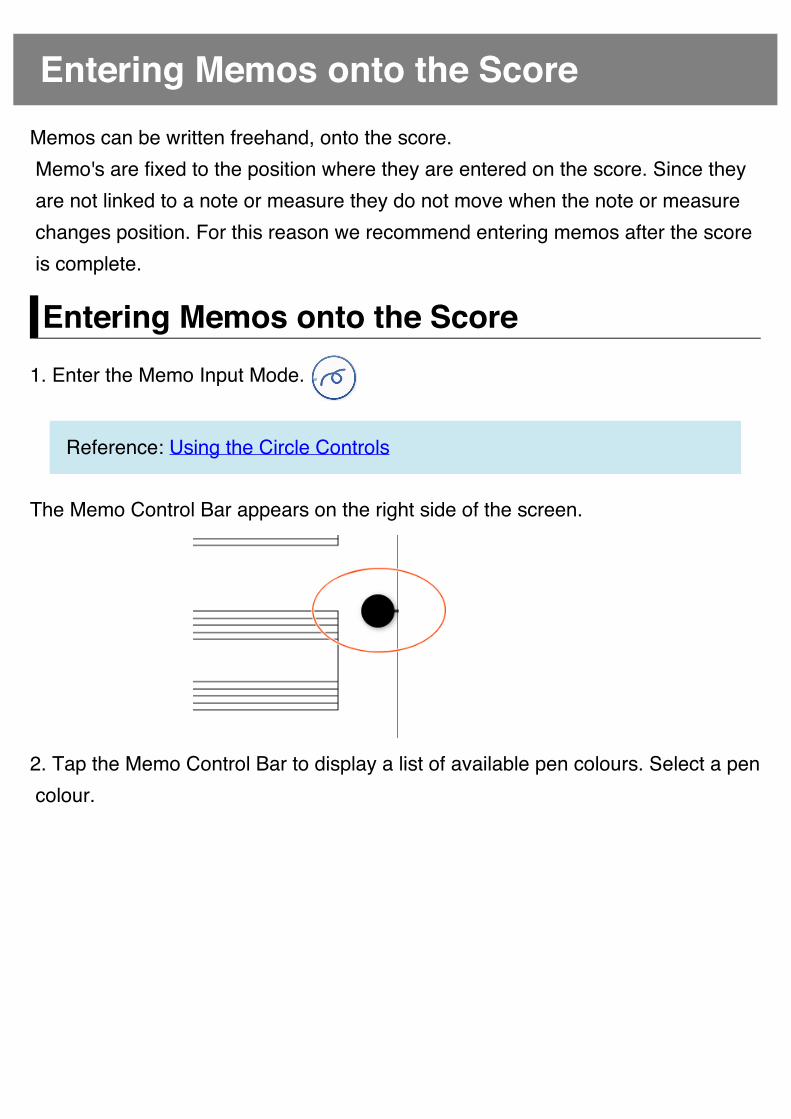
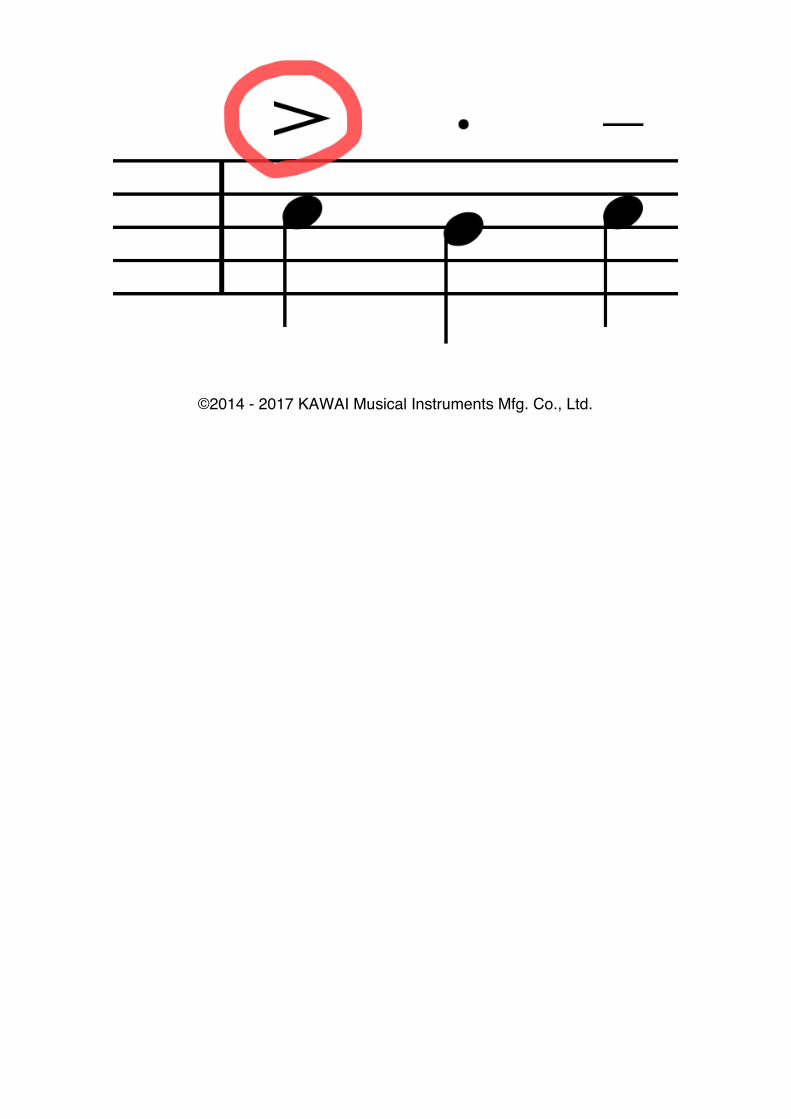
Entering Memos onto the ScoreMemos can be written freehand, onto the score. Memo's are fixed to the position where they are entered on the score. Since they are not linked to a note or measure they do not move when the note or measure changes position. For this reason we recommend entering memos after the score is complete.
Entering Memos onto the Score1. Enter the Memo Input Mode.
Reference: Using the Circle Controls
The Memo Control Bar appears on the right side of the screen.
2. Tap the Memo Control Bar to display a list of available pen colours. Select a pen colour.
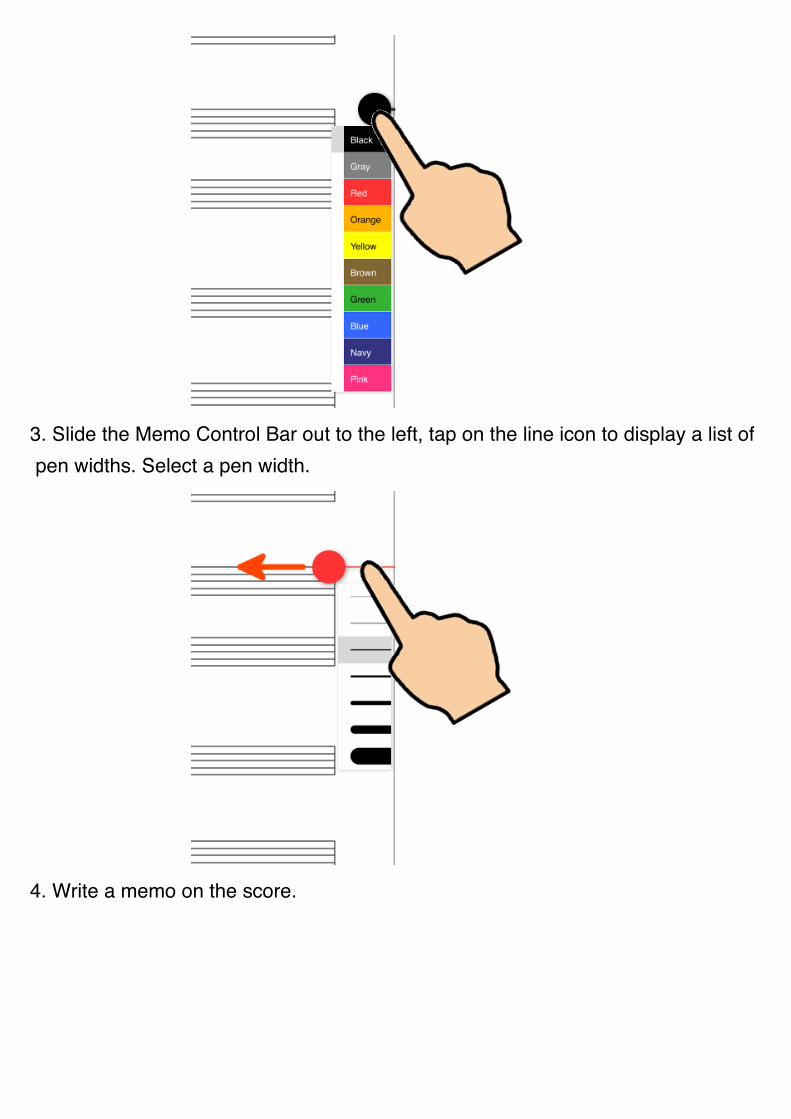
3. Slide the Memo Control Bar out to the left, tap on the line icon to display a list of pen widths. Select a pen width.
4. Write a memo on the score.
©2014 - 2017 KAWAI Musical Instruments Mfg. Co., Ltd.
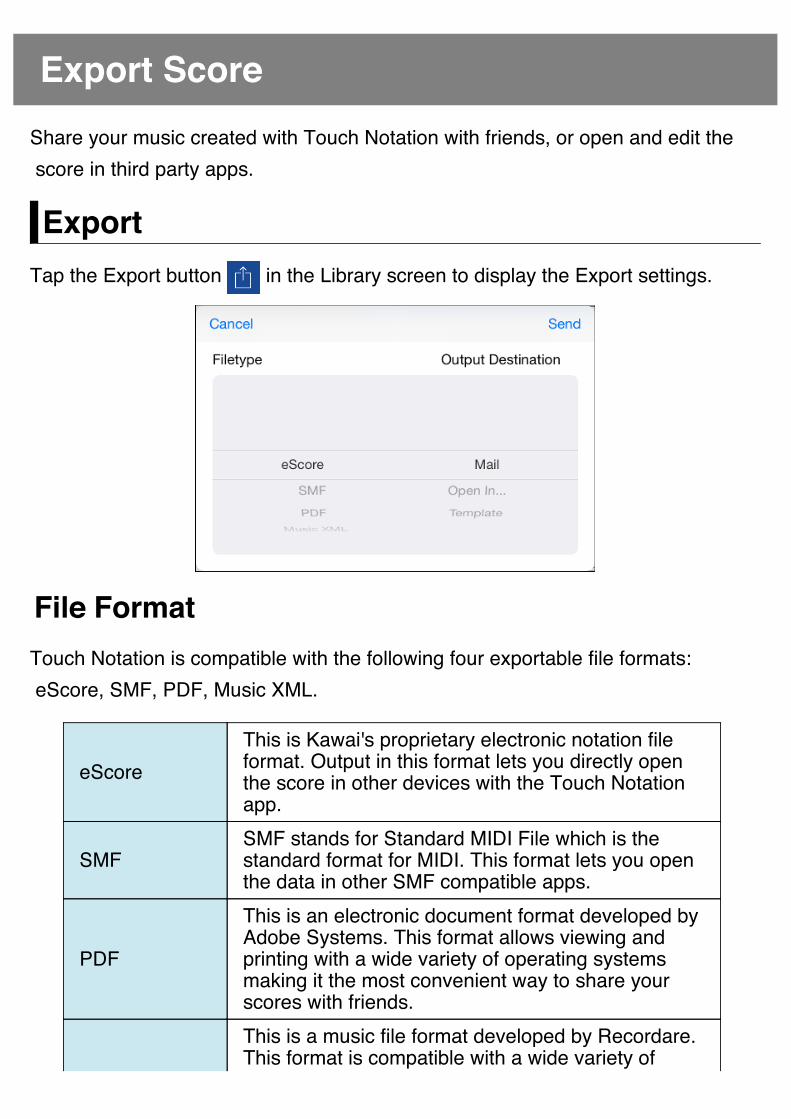
Export ScoreShare your music created with Touch Notation with friends, or open and edit the score in third party apps.
ExportTap the Export button in the Library screen to display the Export settings.
File FormatTouch Notation is compatible with the following four exportable file formats: eScore, SMF, PDF, Music XML.
eScore This is Kawai's proprietary electronic notation file format. Output in this format lets you directly open the score in other devices with the Touch Notation app.
SMF SMF stands for Standard MIDI File which is the standard format for MIDI. This format lets you open the data in other SMF compatible apps.
This is an electronic document format developed by Adobe Systems. This format allows viewing and printing with a wide variety of operating systems making it the most convenient way to share your scores with friends. This is a music file format developed by Recordare. This format is compatible with a wide variety of

Music XML application and the best choice for migrating data to other apps while maintaining information as a music score.
Destination
Email Tap on the "Mail" button then tap on the "Send" button to send your score in the selected file format as an attachment with an email.
Other App
Select "Other App" then tap the "Open" button to display a list of apps that can open the format. Tap the app you want to open the file in. You can also use this to save the file to Dropbox. It is also possible to send the file to other users close by using AirDrop.
Template Add the Score to the User Templates. This makes the same score style available for later use.
Air Printer Print the sheet music on an AirPrint compatible printer.
©2014 - 2017 KAWAI Musical Instruments Mfg. Co., Ltd.
App Settings
Tap the Settings button to adjust general settings for the Touch Notation
app. The following items can be set.
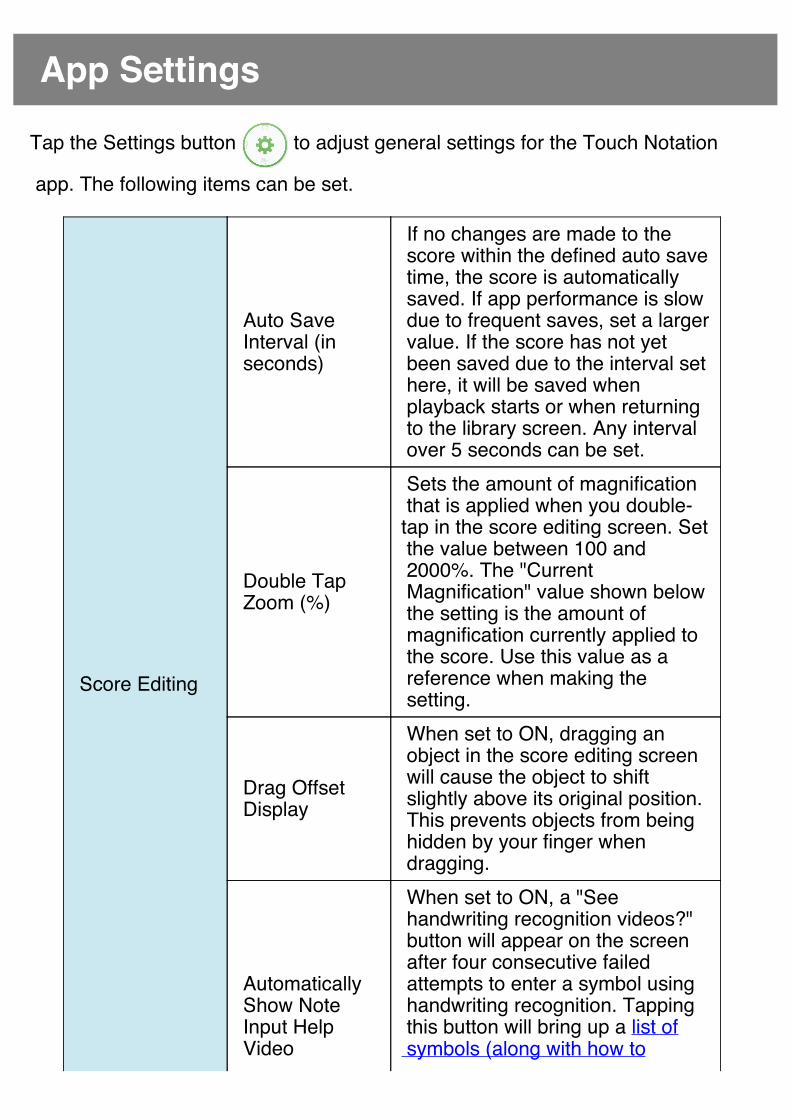
Score Editing
Auto Save Interval (in seconds)
If no changes are made to the score within the defined auto save time, the score is automatically saved. If app performance is slow due to frequent saves, set a larger value. If the score has not yet been saved due to the interval set here, it will be saved when playback starts or when returning to the library screen. Any interval over 5 seconds can be set.
Double Tap Zoom (%)
Sets the amount of magnification that is applied when you double-tap in the score editing screen. Set the value between 100 and 2000%. The "Current Magnification" value shown below the setting is the amount of magnification currently applied to the score. Use this value as a reference when making the setting.
Drag Offset Display
When set to ON, dragging an object in the score editing screen will cause the object to shift slightly above its original position. This prevents objects from being hidden by your finger when dragging.
Automatically Show Note Input Help Video
When set to ON, a "See handwriting recognition videos?" button will appear on the screen after four consecutive failed attempts to enter a symbol using handwriting recognition. Tapping this button will bring up a list of symbols (along with how to
videos) that can be entered using handwriting recognition. If you do not want to see this button, set to OFF.
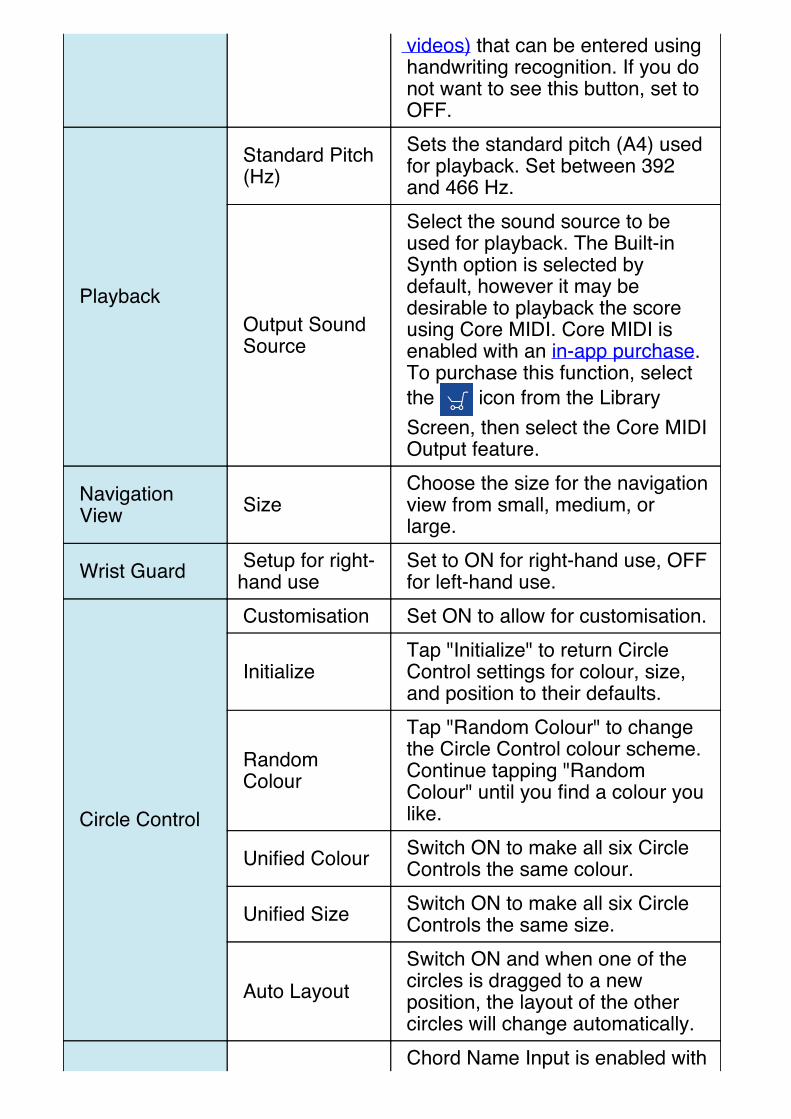
Playback
Standard Pitch (Hz)
Sets the standard pitch (A4) used for playback. Set between 392 and 466 Hz.
Output Sound Source
Select the sound source to be used for playback. The Built-in Synth option is selected by default, however it may be desirable to playback the score using Core MIDI. Core MIDI is enabled with an in-app purchase. To purchase this function, select the icon from the Library Screen, then select the Core MIDI Output feature.
Navigation View Size
Choose the size for the navigation view from small, medium, or large.
Wrist Guard Setup for right-hand use
Set to ON for right-hand use, OFF for left-hand use.
Circle Control
Customisation Set ON to allow for customisation.
Initialize Tap "Initialize" to return Circle Control settings for colour, size, and position to their defaults.
Random Colour
Tap "Random Colour" to change the Circle Control colour scheme. Continue tapping "Random Colour" until you find a colour you like.
Unified Colour Switch ON to make all six Circle Controls the same colour.
Unified Size Switch ON to make all six Circle Controls the same size.
Auto Layout Switch ON and when one of the circles is dragged to a new position, the layout of the other circles will change automatically. Chord Name Input is enabled with

Chord Name Automatic Formatting
an in-app purchase. To purchase this input method, select the icon from the Library Screen, then select the Chord Name & Automatic Accompaniment feature. Set to OFF in order to allow inputting special chord names.
©2014 - 2017 KAWAI Musical Instruments Mfg. Co., Ltd.
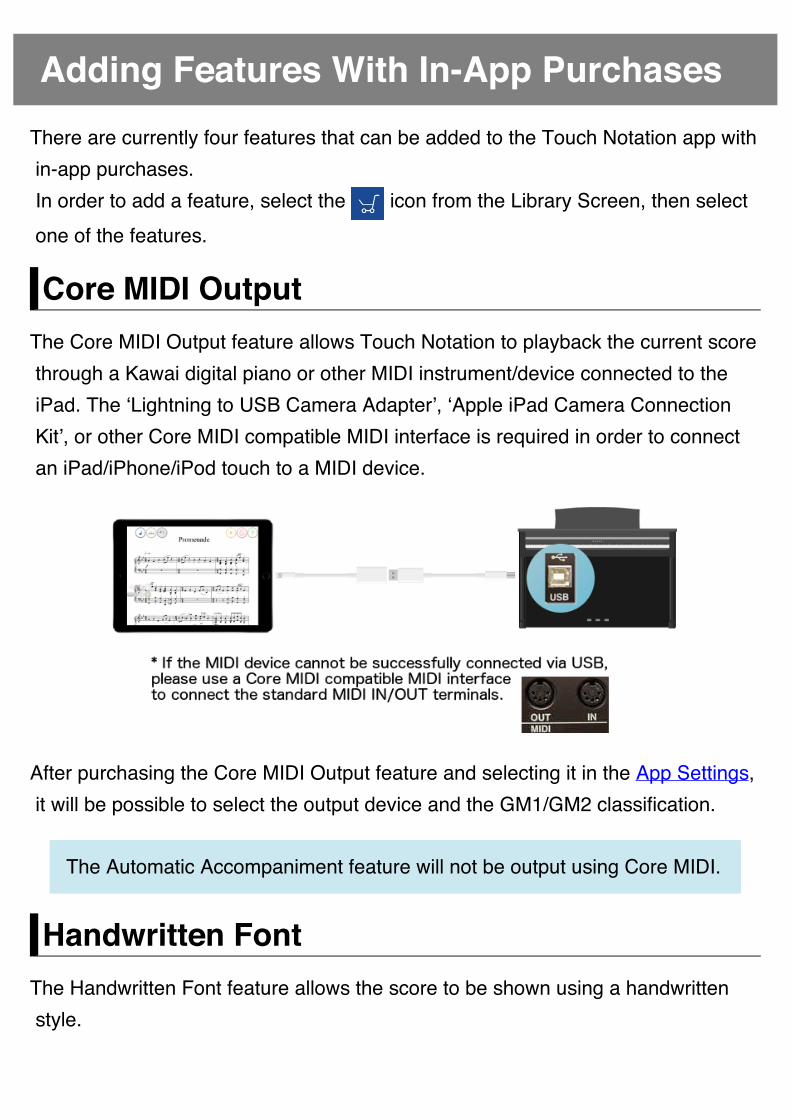
Adding Features With In-App PurchasesThere are currently four features that can be added to the Touch Notation app with in-app purchases. In order to add a feature, select the icon from the Library Screen, then select one of the features.
Core MIDI OutputThe Core MIDI Output feature allows Touch Notation to playback the current score through a Kawai digital piano or other MIDI instrument/device connected to the iPad. The ‘Lightning to USB Camera Adapter’, ‘Apple iPad Camera Connection Kit’, or other Core MIDI compatible MIDI interface is required in order to connect an iPad/iPhone/iPod touch to a MIDI device.
After purchasing the Core MIDI Output feature and selecting it in the App Settings, it will be possible to select the output device and the GM1/GM2 classification.
The Automatic Accompaniment feature will not be output using Core MIDI.
Handwritten FontThe Handwritten Font feature allows the score to be shown using a handwritten style.
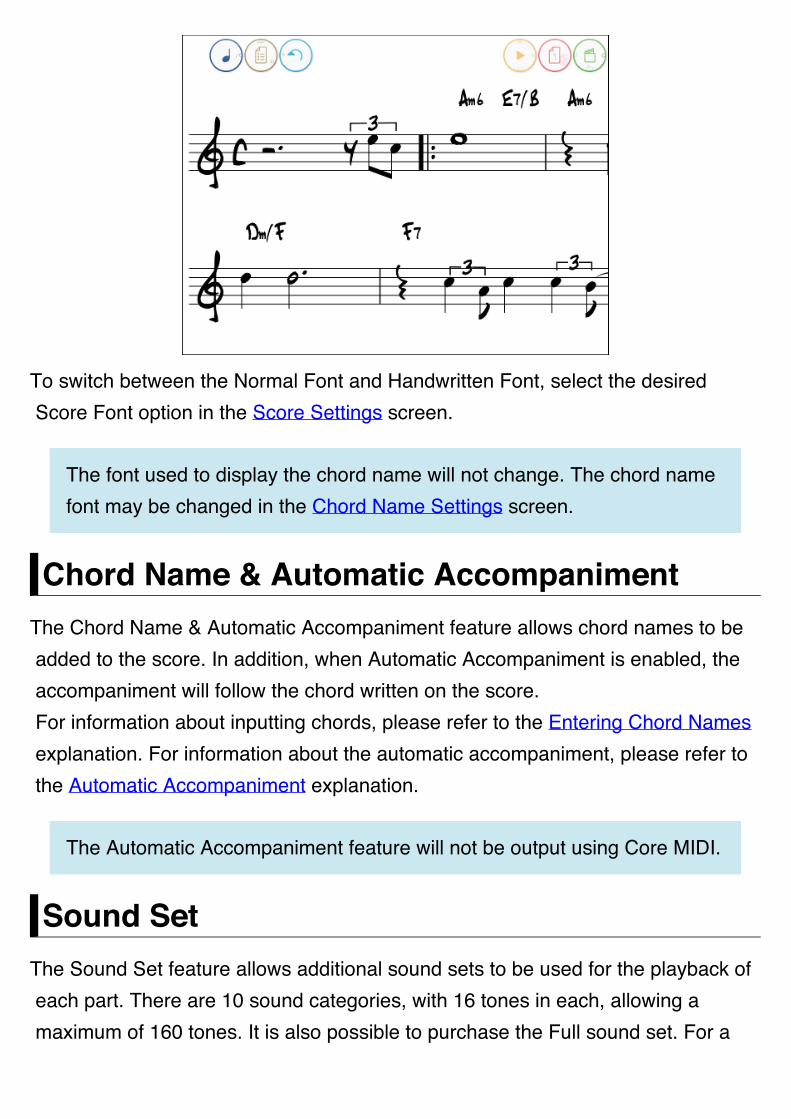
To switch between the Normal Font and Handwritten Font, select the desired Score Font option in the Score Settings screen.
The font used to display the chord name will not change. The chord name font may be changed in the Chord Name Settings screen.
Chord Name & Automatic AccompanimentThe Chord Name & Automatic Accompaniment feature allows chord names to be added to the score. In addition, when Automatic Accompaniment is enabled, the accompaniment will follow the chord written on the score. For information about inputting chords, please refer to the Entering Chord Names explanation. For information about the automatic accompaniment, please refer to the Automatic Accompaniment explanation.
The Automatic Accompaniment feature will not be output using Core MIDI.
Sound SetThe Sound Set feature allows additional sound sets to be used for the playback of each part. There are 10 sound categories, with 16 tones in each, allowing a maximum of 160 tones. It is also possible to purchase the Full sound set. For a

full list of available tones, please refer to the List of Tones. It is also possible to listen to each tone prior to purchasing.
©2014 - 2017 KAWAI Musical Instruments Mfg. Co., Ltd.
FAQThis page answers a number of frequently asked questions.
Score Editing
Q. Handwriting note input is not recognised. A. Please refer to the List of Items That Can Be Input Using Handwriting Recognition for information about entering notes/symbols by hand. Please follow the input method shown in the explanation video for each note/symbol. Magnifying the screen will also help with handwritten note input accuracy. If a handwritten note/symbol is not recognised after four consecutive input attempts, a [See input video?] button will appear. Tap this button to view the List of Items That Can Be Input Using Handwriting Recognition page. If the [See input video?] button does not appear, check that the Automatically Show Note Input Help Video option is enabled in the App Settings.
Q. Notes/symbols cannot be selected. A. For notes, long tap (tap and hold) the note head. Other symbols can be selected by long tapping the centre part of the symbol. In addition, the following symbols can also be selected by drawing a circle around the symbol, or long tapping the score and dragging a selection box over the symbol.
Beam
Tuplet
Tie
Slur
Crescendo/Decrescendo
Trill
Octave
Repeat brackets
Abbreviated musical expressions (dim., cresc., decresc., etc.)
Reference: Selecting Music Symbols/Memo
Q. Key signature at the beginning of score cannot be removed. A. If the key signature at the beginning of the score cannot be removed (or does not highlight when selected), write a 0 (zero) in the key signature area.
Score Playback
Q. Noise is heard, or no sound is produced. A. If strange noises or stuttering are heard when playing the score using the app's internal sound, please try [disabling reverb], [muting parts], or reducing the number of notes played simultaneously. If no sound is produced by the iPad/iPhone/iPod touch, check that the Output Sound Source is set to Built-in Synth. If Core MIDI is selected, Touch Notation's built-in synth will not be used.
Q. Playback is strange when using great staves. A. When using great staves, even if the correct score is written in the top and bottom staves, the note timing may not fully synchronised, resulting in an incorrect
performance when the score is played. In this case, please tap the button to
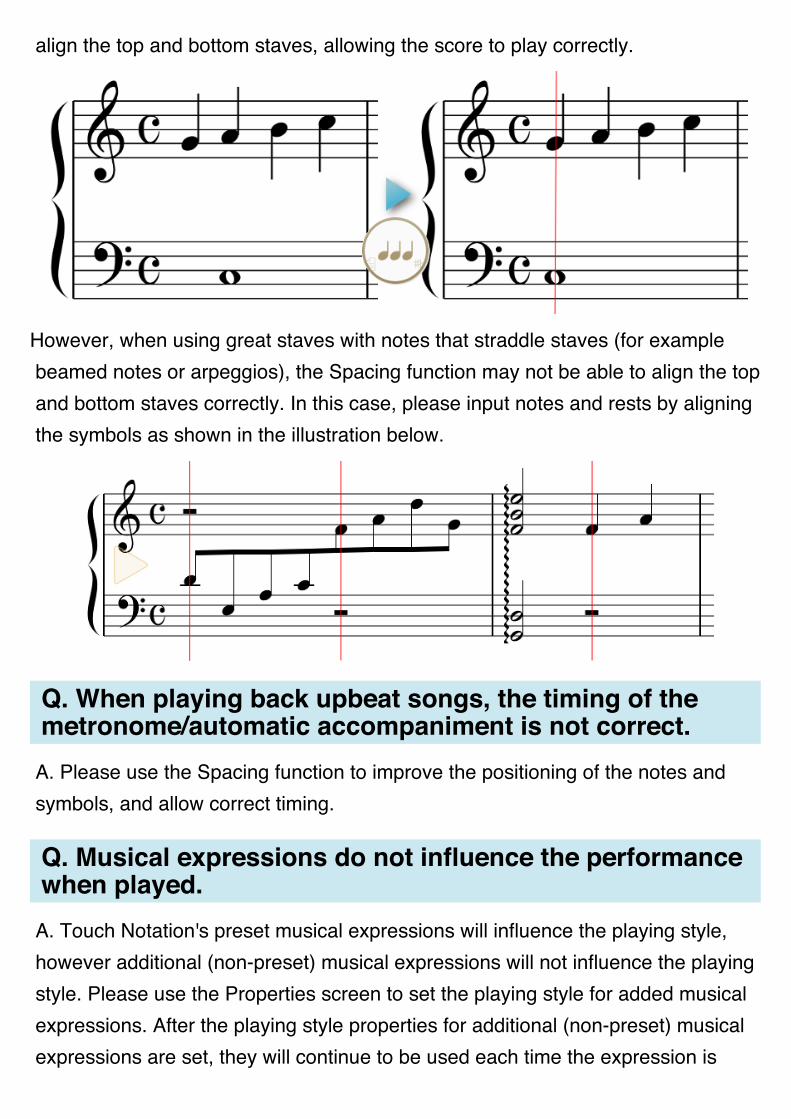
align the top and bottom staves, allowing the score to play correctly.
However, when using great staves with notes that straddle staves (for example beamed notes or arpeggios), the Spacing function may not be able to align the top and bottom staves correctly. In this case, please input notes and rests by aligning the symbols as shown in the illustration below.
Q. When playing back upbeat songs, the timing of the metronome/automatic accompaniment is not correct. A. Please use the Spacing function to improve the positioning of the notes and symbols, and allow correct timing.
Q. Musical expressions do not influence the performance when played. A. Touch Notation's preset musical expressions will influence the playing style, however additional (non-preset) musical expressions will not influence the playing style. Please use the Properties screen to set the playing style for added musical expressions. After the playing style properties for additional (non-preset) musical expressions are set, they will continue to be used each time the expression is
entered.
Reference: Entering Musical Expressions, Musical Expression Properties
©2014 - 2017 KAWAI Musical Instruments Mfg. Co., Ltd.