Embed Size (px)
Citation preview

How toPlot from Adobe Acrobat
2 June 2017

CED plotters
• A HP DesignJet T1300 Postscript ePrinter wide-format inkjet printer (top)
• A Canon imagePROGRAF iPF825 wide-format inkjet printer (bottom)
• Each hold two 36 inch wide x 100 foot length rolls of “plain paper”
• For best results leave a ¼ inch border around images
• Do not plot >126” length for Canon
• You can use any software application to design your document
• When design is complete, convert your document into Adobe PDF using instructions in this manual
• Misprints are user mistakes and are noted in these instructions; do not expect a print refund for these mistakes

OPEN PLOT in Adobe Acrobat 1) Bring your file into Adobe
FILE -> PROPERTIES
• Create your file in another application
• Save as an Adobe PDF file
• Open the file in Adobe Acrobat • Do not print from other Acrobat-type applications, may
cause misprints
• CED Computers may open files in Microsoft EDGE and will make an Edge PDF; not good. Only use the ADOBE PDF application and files.
• Immediately look at the PDF Document Properties -Page Size
• 46.59 in x 35.34 in = width x length in inches
• This is too wide and will cause misprints
• If it does not match what you expected, return to the original program used to create your plot, and redo
• Plotter paper is 36” wide but you need to allow a ¼” border around the print
• If your document is exactly 36” wide it may misprint
• If it is larger than 36” wide it will misprint

PDF PLOTTER SELECTION & SIZE VERIFICATION2) Initial print setup
FILE -> PRINT
• Identify the correct plotter• Choosing the wrong printer is a user mistake
• Verify the imported document size• By default, all print jobs tend to start out in letter-sized
portrait orientation• There is a mismatch between the original size (35.3x46.6)
and what the application shows (8.5x11), which means a print fail if you print at this point (correction instructions will be given in Step 8)
• Clipping misprints normally indicate a discrepancy between the actual printable area on the loaded paper and the printable area as understood by the software
• Make sure “paper source by PDF page size” is not checked
• Do not select “print in gray scale” if you are printing color
• Side note: “BLACK” on color printers tend to have a mixture of colors
• Black may show up as blue-black, red-black and so on; test your print by printing on a smaller size
• (Only using a B&W printer, or making all the graphics yourself, will guarantee that all the black images look the same color of black)
X

Portrait or Landscape
3) Options: choosing orientation
PRINT - PORTRAIT or LANDSCAPE
• The file usually comes in as “Auto portrait/landscape” and it is good to leave it as is (although you can change it if required)
• For some people this option has caused misprints, so test first
• Design your document with the proper orientation in mind and skip this process if you are able
Wider
Longer

DISCONNECTED SIZES = MISPRINTS
4) Options: verifying size again
• Click on ACTUAL SIZE (which is usually checked as default)
• Notice a size mismatch - the top poster will print as 8.5”x11”
• If you click on [Poster] you will see how the whole poster is laid out on letter-sized paper and why it misprints
• This will record in PaperCut as printing the proper size - it just does it in 24 letter-sized tiles so there will be no refund given
• The bottom poster matches and is most likely to print properly
X
X

PDF PAGE SIZE & HANDLING OPTIONS
5) Page size & Handling options
FILE-PRINTFIT
• Reduces/enlarges each page to fit the printable area of the selected paper size
• Depending on the file this may misprint with fuzzy images or some images resized and others not
ACTUAL SIZE
• Prints the pages without scaling
• Pages or selections that are larger than the paper size will be cut off, resulting in a misprint
SHRINK OVERSIZED PAGES
• Shrinks large pages to fit the selected paper size
• Does not enlarge small pages, potential misprint
• If an area is selected and is larger than the printable area of the currently selected paper, it’s scaled to fit the printable area
CUSTOM SCALE
• Resizes the page by the percentage you specify
• Can cause issues, It is better to redo document in original software
X
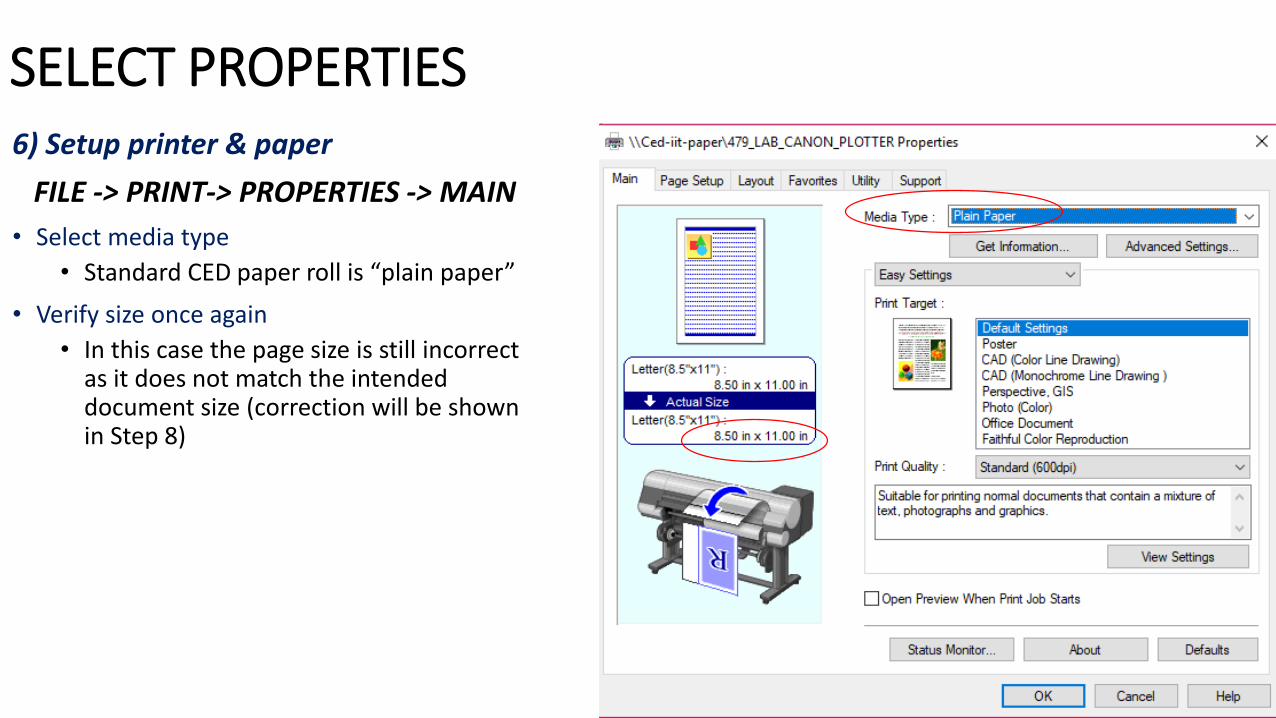
SELECT PROPERTIES6) Setup printer & paper
FILE -> PRINT-> PROPERTIES -> MAIN
• Select media type
• Standard CED paper roll is “plain paper”
• Verify size once again
• In this case the page size is still incorrect as it does not match the intended document size (correction will be shown in Step 8)

SELECT PROPERTIES - PAGE SETUP7) Rotation, print roll & custom size
FILE-PRINT- PROPERTIES - PAGE SETUP
• Borderless printing is not recommended for the Canon or HP plotters as it may cause misprints
• Regular paper is not made for full bleed
• If you “rotate” the print job, it will change as shown in the graphic
• The “Roll Paper Width” should be 36” otherwise it will misprint by cutting off the document at the edge of the page or looking like your print job is “shifted”
• Generally the Page Size you will plot will be Custom
X
YES
NO

CUSTOM SIZE8) Custom Sizes
FILE -> PRINT -> PROPERTIES• Page size can default to 8.5” x 11” even if your document
is sized correctly in original software
• To correct: select Print-Properties, click on the “Page Setup” tab, click on “Page Size” drop down box and select “Custom Paper Size” (top graphics)
• Put in proper size: in this case 35.3 x 46.3 in the “Custom Size Settings” dialog box to match original file dimensions (middle graphic). Note: max of 125.98 inches in length.
• Click [OK] and go back to the PRINT window
• Check and see both sizes now match (bottom graphic)
• Before printing, physically check the plotter to ensure that paper is loaded and it is Online and Ready
• Click the [PRINT] button and see what happens• Check the first few rows of your plot to make sure that everything
looks good.
• If you spot a problem cancel the job and you might be eligible for a partial refund

CUSTOM SIZE alternativeIf you need to print longer than 125.98 inches then use this process.
Page setupSize optionsCan print up to 708.66 inches
Thanks to student Julian Chan who provided this update.

PLOT TIPS
• Do not use MS Edge PDF, use ADOBE PDF
• Do not rely on the Adobe PDF application to fix all original file mistakes
• Get your original master file correct in the first place and plotting is easier
• Do test prints (print as a smaller size)
• Check on color, line and image quality
• Do not procrastinate on plotting
• Plotting is hard & mistakes are easy to make
• Even the best plotters make mistakes
• Even the most perfect poster will have issues
• Give your self enough time to work through the problems
• Plotters have memory issues when length of image is >=126” for Canon, no known limit to HP
• Contact the Lab Manager for instructions
• Avoid full page graphics
• Keep DPI between 150-250 max
• Saturate the paper too much & it will tear
• Better to plot heavy image posters in 477 using the Photo Quality plotter on Glossy paper
• Or get better quality on the Epson photo printers in 214, just bring your own paper
• If you want a full-bleed image use 477 Photo Quality plotter

PLOTTING OUTPUT PROBLEMS• Banding problems
• Check correct paper type, check print-quality settings (try something a bit higher, switch “speed” to “quality”)
• Line problems (too thick, thin or missing)• Check correct paper type
• Check print-quality settings (use “maximum detail” if available)
• Depending on the file, consider vector printing rather than raster
• If the resolution of your image is > the printing resolution there will be loss of line quality
• Jagged Lines• Check correct paper type
• Check print-quality settings (use “maximum detail” if available)
• This may be inherent in the image so improve the image within the original software
• Colored shading appears on images• Original image may have been cut-copied and the shade
came from original source that is interpreted as a color
• Could be a light gray that shows up as blue for example
• This would be a misprint
• Objects are missing • Try a smaller page size & scale to the final size in the front panel
• Try saving file in a TIFF or EPS format and open with another app
• Try reducing the resolution of bitmap images
• Resending print jobs• Do not resend a job if it doesn't print right away
• Check if your job was sent via the print queue
• No refund for multiple prints of the same image
• Print job is cut off (almost always due to…)• Incorrect or inconsistent size settings
• Incorrect margin settings
• Incorrect orientation
• Printing from a non-Adobe pdf• May result in sizing, orientation issues
• May result in lines, colors, missing image issues
• Using Bristol or other non-approved specialty paper• Not approved for Canon or HP plotters
• No refunds for print jobs on your own paper

PLOTTING – COLOR ISSUES
• For many reasons, it is difficult to impossible to make your plotted output match the colors you see on the screen
• Monitors and scanners are based on an "additive" color system, using the RGB (red, green, blue) color space, while the plotters are based on a "subtractive" system and use CMYK (cyan, magenta, yellow, black)
• Different monitors can vary in many ways, including calibration, variances in the phosphors and bit depths
• Also the range of colors is widely different, with monitors displaying many more colors than any printing device
• BLACK comes in many colors (blue-black, red-black, etc) so test your prints to verify color
• Remember colors will also look different on different types of paper
• If precise color rendition is important to you, consider doing a small test print, print on the Epson color photo inkjet in 214, or the color photo color plotter in 477

End
• If there are any issues missing in this presentation please let us know by going to the CED helpdesk and putting in a ticket with enough detail we can contact you to find out the details we missed
• http://Ced.Berkeley.edu/cedhelp