Embed Size (px)
Citation preview
©2016 Check Point Software Technologies Ltd. All rights reserved
[Internal Use] for Check Point employees
POC Guide
Version 9.1

©2016 Check Point Software Technologies Ltd. All rights reserved | Page 2 / 102
[Internal Use] for Check Point employees
Contents 1. Change Log..................................................................................................................... 5 2. How to use this document .............................................................................................. 7 3. Licensing and Appliances ............................................................................................... 8 3.1 Public Cloud and Appliance quota and licensing ........................................................... 8 3.2 Supported Private Cloud emulation devices .................................................................. 9 3.3 NGTX licensing ............................................................................................................. 10 4. PoC Implementation Examples .................................................................................... 11 4.1 General considerations ................................................................................................. 11 4.2 Mirror (SPAN) mode ..................................................................................................... 13 4.3 SMTP/TLS Prevent (MTA) and HTTP (SPAN)............................................................. 14 4.4 Production CP Gateway HTTP/S (Inline) and SMTP/TLS (MTA) ................................ 16 4.5 SandBlast – Ports needed between GUI/GW/SB ........................................................ 17 5. Sizing PoC and Production environment...................................................................... 18 6. Installing a Sandblast appliance ................................................................................... 19 6.1 Stand-alone vs. multiple private cloud .......................................................................... 19 6.2 TE-X Appliance ISO ...................................................................................................... 19 6.3 R77.30 Management AddOn ........................................................................................ 20 6.4 Enable Hyper-Threading ............................................................................................... 20 6.5 Recommended Jumbo Hotfix – R77.30/R80.10(EA) ................................................... 20 6.6 Updating TE images and engine .................................................................................. 21 6.6.1 General info and configuration ................................................................................. 21 6.6.2 Online Update ........................................................................................................... 22 6.6.3 Offline Update ........................................................................................................... 23 6.7 CPU-Level Threat Detection ......................................................................................... 24 7. Configuration ................................................................................................................. 25 7.1 General Considerations ................................................................................................ 25 7.2 Anti-Virus and Anti-Bot configuration ........................................................................... 26 7.3 IPS ................................................................................................................................. 29 7.4 Threat Emulation ........................................................................................................... 30 7.4.1 TE Images ................................................................................................................. 30 7.4.2 Minimum recommended images .............................................................................. 31 7.4.3 Hybrid mode .............................................................................................................. 31 7.4.4 Multiple Private Cloud appliances ............................................................................ 31 7.4.5 TE filetypes ............................................................................................................... 32 7.4.6 Different “Links inside mails/documents” features ................................................... 33 7.5 MTA ............................................................................................................................... 34 7.5.1 Show currently installed Postfix version .................................................................. 34 7.5.2 General MTA settings ............................................................................................... 34 7.5.3 BCC mode ................................................................................................................. 35 7.5.4 How-to block file extensions in Postfix ..................................................................... 37 7.5.5 Recommended MTA Best-Practises ........................................................................ 38 7.5.5.1 Raising the MTA header length limit .................................................................... 38 7.5.5.2 Setting a Postfix hostname ................................................................................... 39 7.5.5.3 Upstream MTA delivery issues (tcp_timestamp) ................................................. 40 7.5.5.4 Implementing cleanup script ................................................................................. 41 7.5.5.5 Next hop redundancy / failover ............................................................................. 41 7.5.5.6 Outgoing TLS ........................................................................................................ 41 7.5.5.7 Special considerations when using MTA on a gateway cluster ........................... 42 7.5.5.8 Feed MTA logs into SmartView Tracker / SmartLog ............................................ 44 7.5.5.9 /var/log/maillog size for PoC ................................................................................. 46
©2016 Check Point Software Technologies Ltd. All rights reserved | Page 3 / 102
[Internal Use] for Check Point employees
7.5.5.10 Debugging and Performance Troubleshooting Kit ............................................... 47 7.6 SmartEvent ................................................................................................................... 48 7.6.1 How to configure e-mail alerts for High and Critical TE events ............................... 48 7.6.2 Bugfix for TE events with more than 3 malicious images ........................................ 52 8. ICAP .............................................................................................................................. 53 8.1 ICAP Server .................................................................................................................. 54 8.2 Configuration ................................................................................................................. 54 8.2.1 Configuration files ..................................................................................................... 54 8.2.2 Configure emulation images ..................................................................................... 55 8.2.2.1 All or recommended images ................................................................................. 55 8.2.2.2 Configure specific emulation images .................................................................... 55 8.2.2.3 Adding Windows 10 image for ICAP emulation ................................................... 56 8.2.3 Attaching an ICAP Client .......................................................................................... 56 8.3 Logging ......................................................................................................................... 57 8.3.1 General logging ......................................................................................................... 57 8.3.2 Enable logging of benign files ................................................................................... 57 8.3.3 Debug logging ........................................................................................................... 57 8.4 ICAP daemon troubleshooting ...................................................................................... 58 8.4.1 Start manually and get errors on startup .................................................................. 58 8.4.2 Verify ICAP daemon is running ................................................................................ 58 8.5 Sample configurations .................................................................................................. 59 8.5.1 SQUID proxy ............................................................................................................. 59 8.5.1.1 SQUID compilation flags and version ................................................................... 59 8.5.1.2 SQUID sample configuration ................................................................................ 59 8.5.2 McAfee Web Gateway 7.6 ........................................................................................ 61 8.5.2.1 Configuring the Check Point ICAP Server ........................................................... 61 8.5.2.2 Configuration McAfee ICAP client ........................................................................ 62 8.6 ICAP Miscellaneous ...................................................................................................... 71 8.6.1 Add “Protection Type: ICAP emulation” to SmartLog/Event searches .................... 71 8.6.2 Access.log – available log variables ......................................................................... 72 8.6.3 ICAP Server response codes ................................................................................... 73 9. Threat Extraction ........................................................................................................... 74 9.1 Out-of-the box ............................................................................................................... 74 9.2 Parallel/Serial mode ...................................................................................................... 74 9.3 Add option to “send original email” ............................................................................... 74 9.4 Demo via Web Browser Plugin ..................................................................................... 75 9.5 Demo with MTA environment ....................................................................................... 75 10. TE/TX API ..................................................................................................................... 76 10.1 TE API documentation .............................................................................................. 76 10.2 Enabling API ports .................................................................................................... 76 10.3 Enabling API logging ................................................................................................ 77 11. Testing & Troubleshooting ............................................................................................ 78 11.1 I have a problem - where is the log ? ....................................................................... 78 11.2 Test emulation .......................................................................................................... 79 11.3 Image/Engine Update ............................................................................................... 79 10.3.1 Check image and detection rule versions ................................................................ 79 10.3.2 Check TE engine version .......................................................................................... 80 10.3.3 Check ThreatCloud Update server connectivity ....................................................... 80 10.3.4 Remove all images and start again .......................................................................... 81 10.3.5 Force update from CLI .............................................................................................. 82 10.4 Useful TECLI commands .......................................................................................... 83 10.5 Useful MTA/Postfix commands ................................................................................ 84 10.6 How-to send an email with attachment from CLI ..................................................... 85 10.7 SNMP Monitoring ...................................................................................................... 86
©2016 Check Point Software Technologies Ltd. All rights reserved | Page 4 / 102
[Internal Use] for Check Point employees
10.7.1 TE SNMP OIDs ......................................................................................................... 86 10.7.2 Extend SNMP Monitoring ......................................................................................... 89 10.7.2.1 Enable SNMP........................................................................................................ 89 10.7.2.2 Extend available SNMP OIDs ............................................................................... 89 10.7.2.3 Postfix mailqueue monitoring script ...................................................................... 90 10.7.2.4 Emaild queue monitoring script ............................................................................ 90 10.7.2.5 Running VM instances monitoring script .............................................................. 90 10.7.2.6 Test extended SNMP values ................................................................................ 91 10.8 How-to handle False-positives/False-negatives during a PoC ................................ 92 10.8.1 False-negatives ......................................................................................................... 92 10.8.2 False-positives .......................................................................................................... 92 10.9 How-to issue a license via User Center ................................................................... 93 10.9.1 Cloud emulation ........................................................................................................ 93 10.9.2 Local emulation ......................................................................................................... 95 10.10 Miscellaneous ........................................................................................................... 96 10.10.1 Getting data behind empty TE forensic reports.................................................... 96 10.10.2 Set TED.ELG logsize and logrotate ..................................................................... 99 10.10.3 Blocking filetypes inside archives ....................................................................... 101 11. Important SKs and hotfixes......................................................................................... 102

©2016 Check Point Software Technologies Ltd. All rights reserved | Page 5 / 102
[Internal Use] for Check Point employees
1. Change Log
Editor Date Version Comments
Igor Freidin June 1st 2015 V1 Initial document
Thomas Werner Sept 23rd
2015 V2/3 Restructure
Thomas Werner Sept 28th 2015 V4 Added content
Thomas Werner Oct 2nd
2015 V5 Added content
Thomas Werner Oct 21th 2015 V6 Added Hyper-Threading
AV setting for MTA inspection
Tom Kendrick V6.1 Fixed typos
Thomas Werner Nov 2nd
2015 V6.2 Added important notes to 6.5 CPU-Level Threat Detection; added redundant MTA
next hop info
Thomas Werner Nov 3rd
2015 V6.3 Added Stand-alone info and tecli for “save all sample” option; restrict concurrent VMs running
Thomas Werner Nov 06th 2015 V6.4 Restructured MTA section
Added MTA logging to SmartView Tracker / SmartLog
Thomas Werner Nov 11th 2015 V6.5 Added information on stand-alone
Sandblast PoC (section 6.1)
Thomas Werner Jan 08th 2016 V6.6 Added MTA infos for cluster deployment
(section 7.4.2) Updated TX infos (section 8) Added FP/FN handling (section 9.5)
Thomas Werner Jan 11th 2016 V6.7 Errata
Thomas Werner Jan 29th 2016 V6.8 Added flow diagram
Thomas Werner Feb 03rd
2016 V6.9 Added SmartEvent bug info and email alerting
Thomas Werner Feb 04th 2016 V7.0 Added 9.1) I have a problem – where is the
log ? and 10) Important hotfixes and SKs
Tom Kendrick Feb 22nd
2016 V7.1 Update to redundant MTA next hop info
Thomas Werner May 04th 2016 V7.2 Updated redundant MTA next hop
mechanism Added outgoing TLS configuration
Thomas Werner June 20th 2016 V7.3 Added AV URL reputation setting (p. 29);
added “Blocking filetypes inside archives” (9.7.3); added workaround for emails getting queued in Postfix (7.4.2)
Thomas Werner July 4th 2016 V7.4 Corrected typo in 7.4.3
Thomas Werner July 25th 2016 V7.5 Added section 7.4.2 Recommended MTA
fixes
Thomas Werner July 26th 2016 V7.6 Fixed page numbering and typos
Thomas Werner Sept 26th 2016 V8.0 Added SNMP monitoring and ICAP section;
Thomas Werner Oct 05th 2016 V8.1 Removed obsolete “Threat Cloud
information sharing” section
Thomas Werner Nov 24th 2016 V8.2 Corrected misleading information in MTA
section
Thomas Werner Dec 13th 2016 V8.3 Added
- NGTX licensing (3.3) - Ports needed (4.5) - IPS (7.3) - Minimum recommended images
(7.4.2) - Different link functionalities (7.4.5) - TX serial mode info (9.3)
Thomas Werner Dec 28th 2016 V8.4 Errata
©2016 Check Point Software Technologies Ltd. All rights reserved | Page 6 / 102
[Internal Use] for Check Point employees
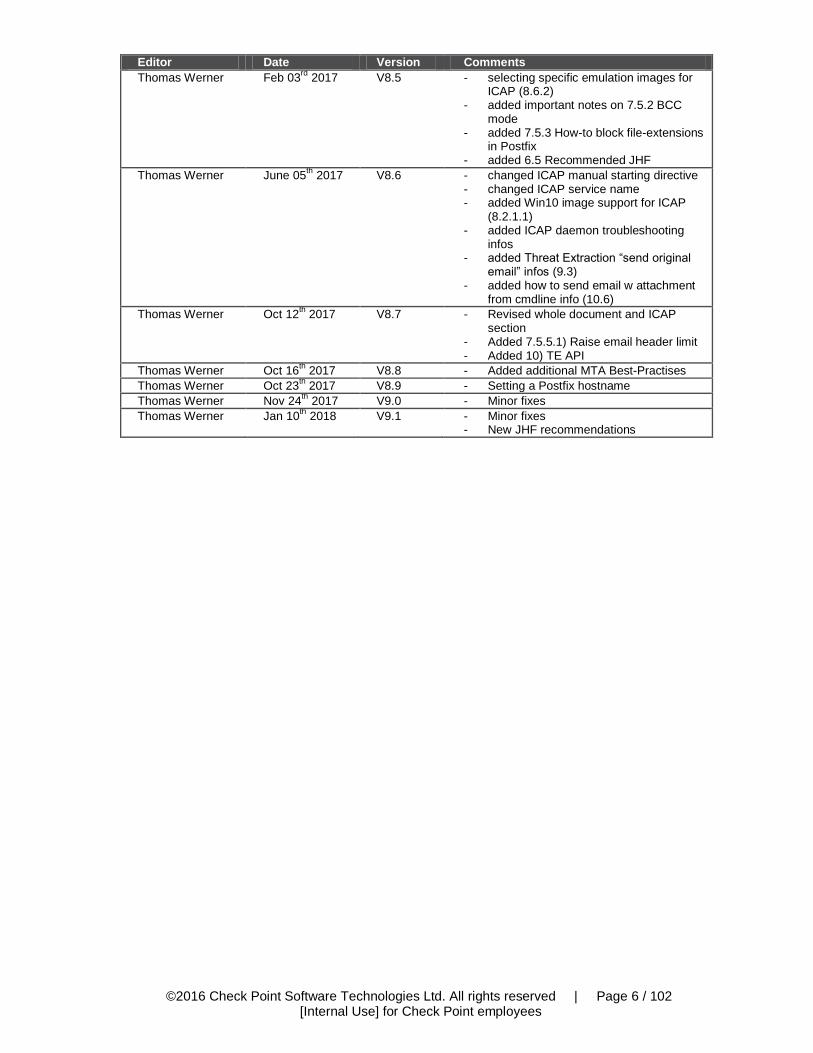
Editor Date Version Comments
Thomas Werner Feb 03rd
2017 V8.5 - selecting specific emulation images for ICAP (8.6.2)
- added important notes on 7.5.2 BCC mode
- added 7.5.3 How-to block file-extensions in Postfix
- added 6.5 Recommended JHF
Thomas Werner June 05th 2017 V8.6 - changed ICAP manual starting directive
- changed ICAP service name - added Win10 image support for ICAP
(8.2.1.1) - added ICAP daemon troubleshooting
infos - added Threat Extraction “send original
email” infos (9.3) - added how to send email w attachment
from cmdline info (10.6)
Thomas Werner Oct 12th 2017 V8.7 - Revised whole document and ICAP
section - Added 7.5.5.1) Raise email header limit - Added 10) TE API
Thomas Werner Oct 16th 2017 V8.8 - Added additional MTA Best-Practises
Thomas Werner Oct 23th 2017 V8.9 - Setting a Postfix hostname
Thomas Werner Nov 24th 2017 V9.0 - Minor fixes
Thomas Werner Jan 10th 2018 V9.1 - Minor fixes
- New JHF recommendations
©2016 Check Point Software Technologies Ltd. All rights reserved | Page 7 / 102
[Internal Use] for Check Point employees
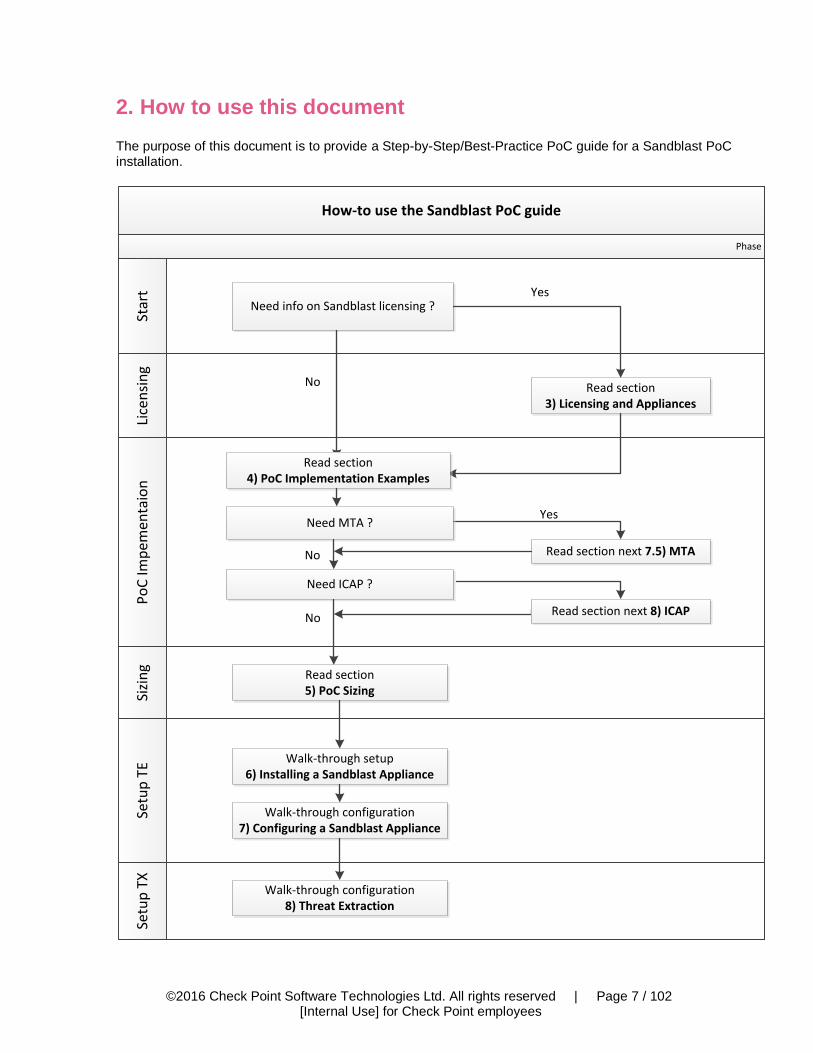
2. How to use this document The purpose of this document is to provide a Step-by-Step/Best-Practice PoC guide for a Sandblast PoC installation.
How-to use the Sandblast PoC guide
Lice
nsi
ng
Star
tP
oC
Imp
emen
taio
nSi
zin
gSe
tup
TE
Setu
p T
X
Phase
Need ICAP ?
Need info on Sandblast licensing ?
Read section3) Licensing and Appliances
No
Yes
Read section4) PoC Implementation Examples
Need MTA ?
No
Yes
Read section next 7.5) MTA
Read section5) PoC Sizing
Walk-through setup6) Installing a Sandblast Appliance
Walk-through configuration7) Configuring a Sandblast Appliance
Walk-through configuration8) Threat Extraction
NoRead section next 8) ICAP
©2016 Check Point Software Technologies Ltd. All rights reserved | Page 8 / 102
[Internal Use] for Check Point employees
3. Licensing and Appliances
3.1 Public Cloud and Appliance quota and licensing
For a POC including Public Cloud (ThreatCloud) emulation you’ll need a cloud quota license.
1. Cloud Quota Defines the maximal number of emulations allowed per month. A cloud quota, can be automatically created via User Center Quick Evaluation option.
You can use:
CPSB-NGTX-EVAL to be generated for:
This is the recommended eval license for TE cloud (public) emulation
Existing (already licensed) production gateways where you want to enable TE/TX blade with emulation in Public Cloud
In Hybrid mode (e.g EXE files configured for Public Cloud emulation and other files for local emulation) on a existing gateway where TE blade is enabled and forwarding traffic is configured for another dedicated local emulation GW and ThreatCloud
CPSG-CPSM-EVAL
o All-In-One license that includes a Public Cloud (TE/TX) license for 75.000 files/month
If you need bigger Public Cloud license per month you must approach Solution Center to get an appropriate license. We found out that also assigning multiple CPSB-NGTX-EVALs is adding the included quotas cumulative (but that´s not the official way ).
To check the current cloud license status use:
# cpstat threat-emulation -f contract
©2016 Check Point Software Technologies Ltd. All rights reserved | Page 9 / 102
[Internal Use] for Check Point employees
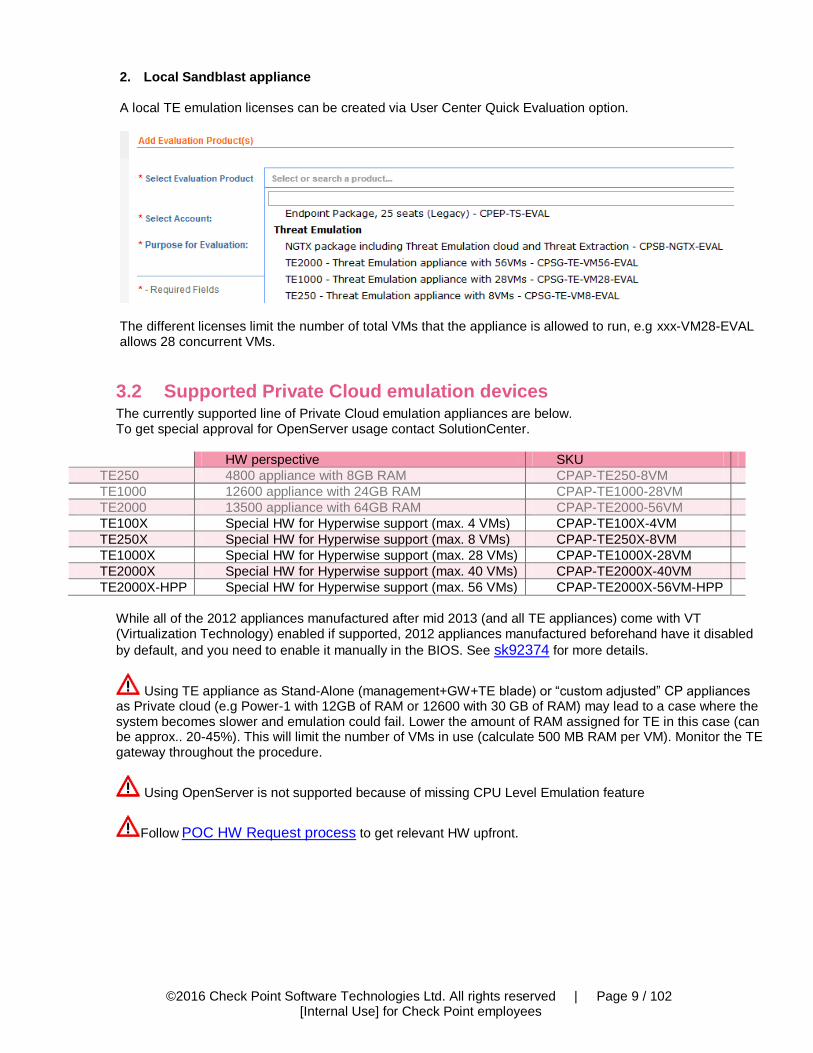
2. Local Sandblast appliance
A local TE emulation licenses can be created via User Center Quick Evaluation option.
The different licenses limit the number of total VMs that the appliance is allowed to run, e.g xxx-VM28-EVAL allows 28 concurrent VMs.
3.2 Supported Private Cloud emulation devices The currently supported line of Private Cloud emulation appliances are below. To get special approval for OpenServer usage contact SolutionCenter.
HW perspective SKU
TE250 4800 appliance with 8GB RAM CPAP-TE250-8VM
TE1000 12600 appliance with 24GB RAM CPAP-TE1000-28VM
TE2000 13500 appliance with 64GB RAM CPAP-TE2000-56VM
TE100X Special HW for Hyperwise support (max. 4 VMs) CPAP-TE100X-4VM
TE250X Special HW for Hyperwise support (max. 8 VMs) CPAP-TE250X-8VM
TE1000X Special HW for Hyperwise support (max. 28 VMs) CPAP-TE1000X-28VM
TE2000X Special HW for Hyperwise support (max. 40 VMs) CPAP-TE2000X-40VM
TE2000X-HPP Special HW for Hyperwise support (max. 56 VMs) CPAP-TE2000X-56VM-HPP
While all of the 2012 appliances manufactured after mid 2013 (and all TE appliances) come with VT (Virtualization Technology) enabled if supported, 2012 appliances manufactured beforehand have it disabled
by default, and you need to enable it manually in the BIOS. See sk92374 for more details.
Using TE appliance as Stand-Alone (management+GW+TE blade) or “custom adjusted” CP appliances as Private cloud (e.g Power-1 with 12GB of RAM or 12600 with 30 GB of RAM) may lead to a case where the system becomes slower and emulation could fail. Lower the amount of RAM assigned for TE in this case (can be approx.. 20-45%). This will limit the number of VMs in use (calculate 500 MB RAM per VM). Monitor the TE gateway throughout the procedure.
Using OpenServer is not supported because of missing CPU Level Emulation feature
Follow POC HW Request process to get relevant HW upfront.
©2016 Check Point Software Technologies Ltd. All rights reserved | Page 10 / 102
[Internal Use] for Check Point employees
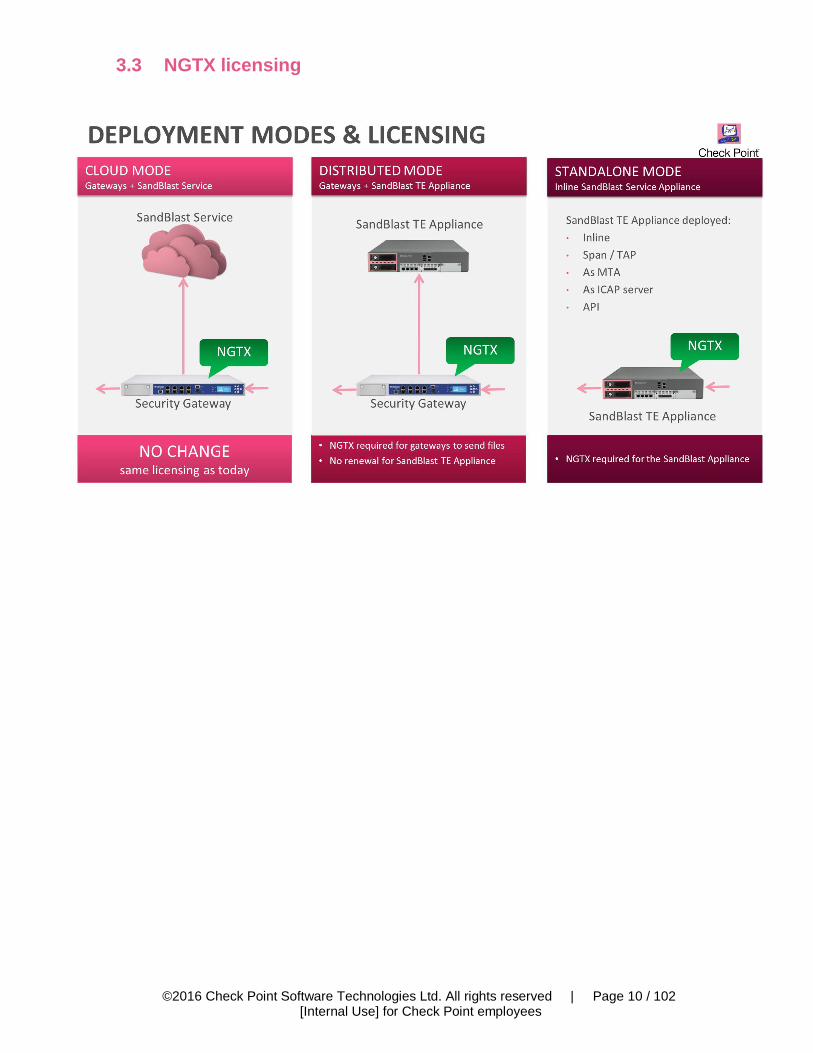
3.3 NGTX licensing
©2016 Check Point Software Technologies Ltd. All rights reserved | Page 11 / 102
[Internal Use] for Check Point employees
4. PoC Implementation Examples
4.1 General considerations As a rule of thumb – the device should see file downloads (HTTP/S), and the incoming e-mail traffic (SMTP/TLS)
SMTP/S is where we currently see most of the threats so inspecting/seeing this is very important. As some of the incoming mail might be in SMTP/TLS – enabling MTA is mandatory. You need MTA if
A. You want to inspect SMTPS/TLS traffic B. You want to use Prevent mode for SMTP/TLS C. You want to do Threat Extraction on SMTP traffic
Using a Mirror (SPAN) port
o Span ports tend to lose packets, according to the switch capabilities and the actual network throughput. This can cause Threat Emulation (and the rest of the blades) not to inspect some traffic. Take this into consideration – if some files are not shown in logs in span port, make sure (e.g. using tcpdump) that all of the packets indeed arrived correctly.
o The span port must be configured to support the combined overall throughput of the uplink and
downlink seen. For example – 100Mbps span port cannot span a 60Mbps sync connection – as it needs to pass 120Mbps to the device. Such mistakes are pretty common, and can easily
cause the PoC to be ruined. Make sure the span port can handle the traffic load. Prefer TAP deployment if possible.
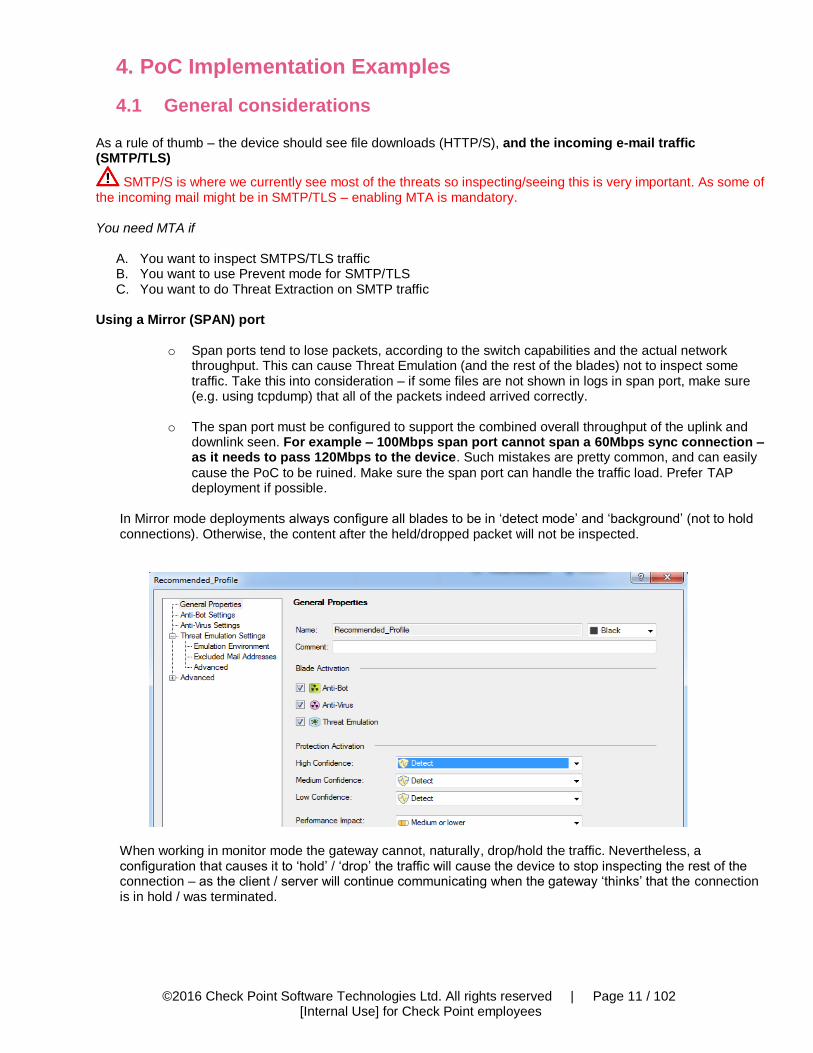
In Mirror mode deployments always configure all blades to be in ‘detect mode’ and ‘background’ (not to hold connections). Otherwise, the content after the held/dropped packet will not be inspected.
When working in monitor mode the gateway cannot, naturally, drop/hold the traffic. Nevertheless, a configuration that causes it to ‘hold’ / ‘drop’ the traffic will cause the device to stop inspecting the rest of the connection – as the client / server will continue communicating when the gateway ‘thinks’ that the connection is in hold / was terminated.
©2016 Check Point Software Technologies Ltd. All rights reserved | Page 12 / 102
[Internal Use] for Check Point employees
If traffic from the Management of the gateway is seen on the monitor port of the same gateway follow the below steps to avoid anti-spoofing issues and unstable traffic:
Edit -> $FWDIR/boot/modules/fwkern.conf
Add the appropriate line to the file:
For IPv4 traffic – fwx_bridge_reroute_ipv4=<management_ip>
For IPv6 traffic – fwx_bridge_reroute_ipv6=<management_ip>
<management_ip> is the IP address of the management interface. Afterwards reboot the Security Gateway.
©2016 Check Point Software Technologies Ltd. All rights reserved | Page 13 / 102
[Internal Use] for Check Point employees
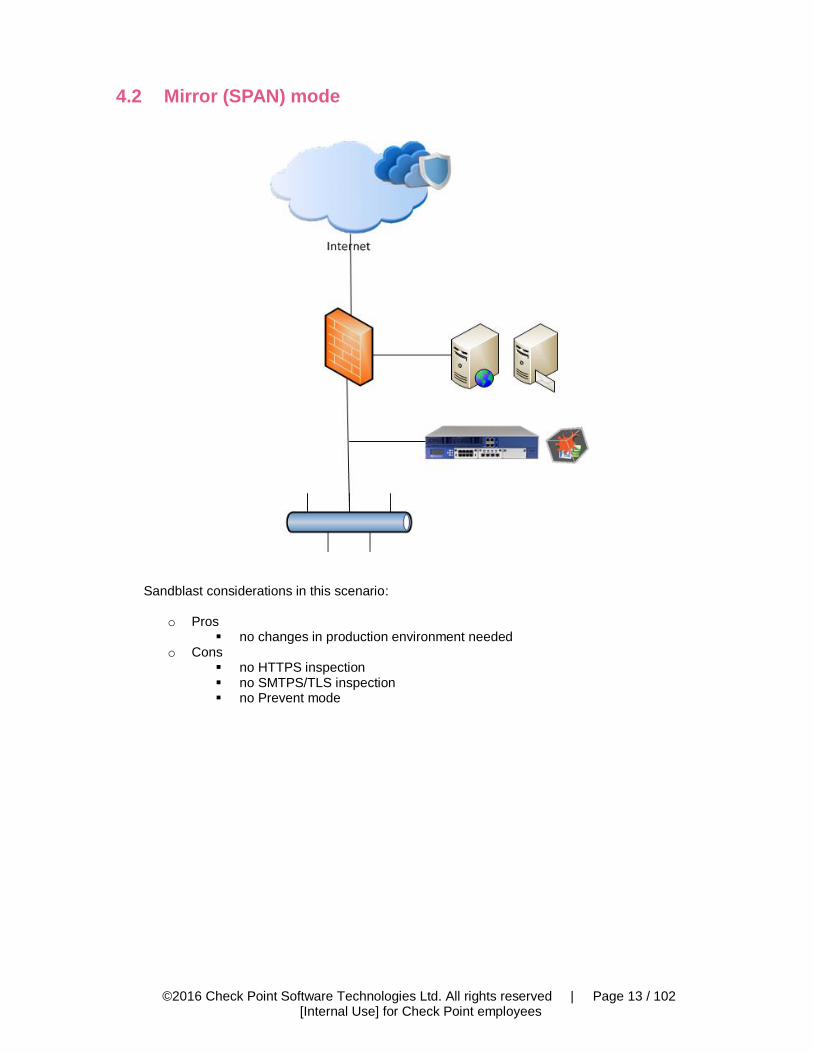
4.2 Mirror (SPAN) mode
Sandblast considerations in this scenario:
o Pros no changes in production environment needed
o Cons no HTTPS inspection no SMTPS/TLS inspection no Prevent mode
©2016 Check Point Software Technologies Ltd. All rights reserved | Page 14 / 102
[Internal Use] for Check Point employees
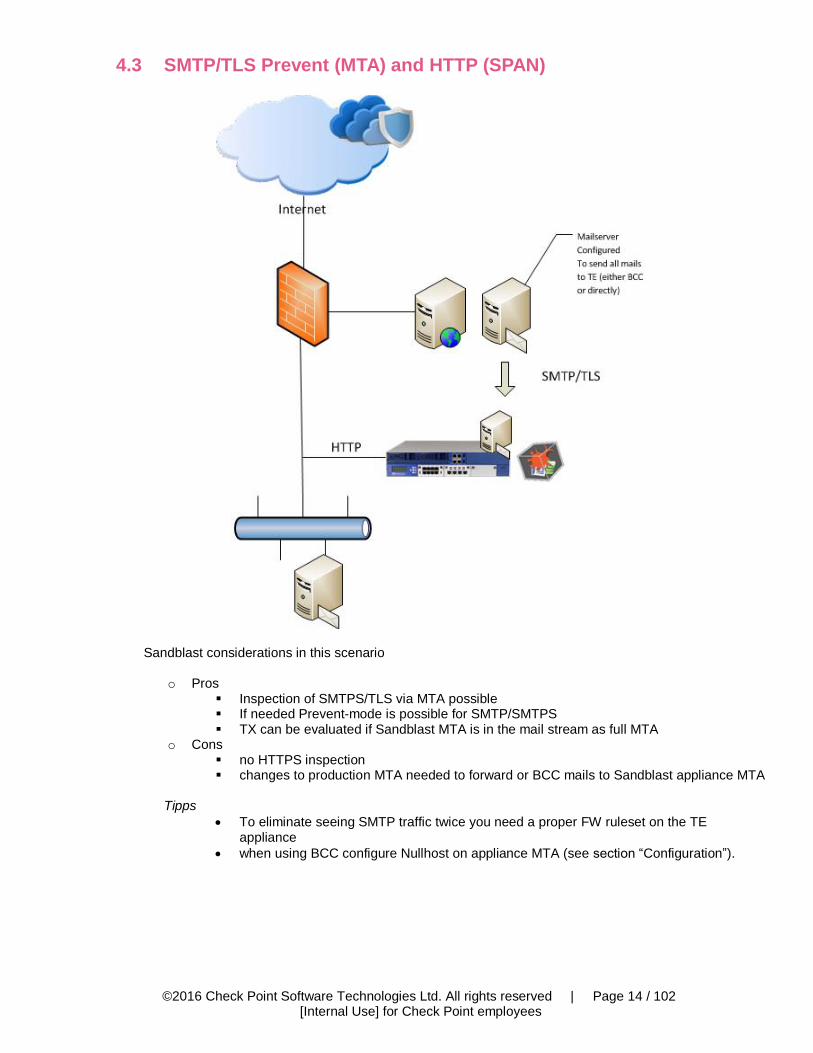
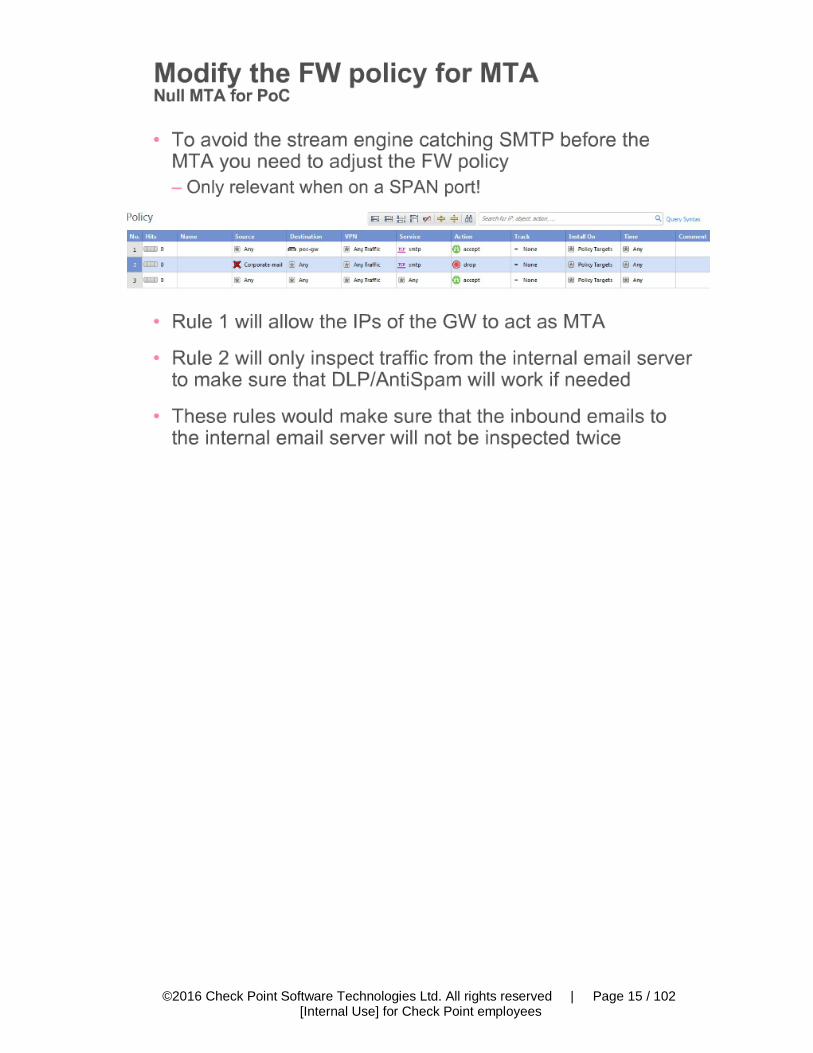
4.3 SMTP/TLS Prevent (MTA) and HTTP (SPAN)
Sandblast considerations in this scenario
o Pros Inspection of SMTPS/TLS via MTA possible If needed Prevent-mode is possible for SMTP/SMTPS TX can be evaluated if Sandblast MTA is in the mail stream as full MTA
o Cons no HTTPS inspection changes to production MTA needed to forward or BCC mails to Sandblast appliance MTA
Tipps
To eliminate seeing SMTP traffic twice you need a proper FW ruleset on the TE appliance
when using BCC configure Nullhost on appliance MTA (see section “Configuration”).
©2016 Check Point Software Technologies Ltd. All rights reserved | Page 15 / 102
[Internal Use] for Check Point employees

©2016 Check Point Software Technologies Ltd. All rights reserved | Page 16 / 102
[Internal Use] for Check Point employees
4.4 Production CP Gateway HTTP/S (Inline) and SMTP/TLS (MTA)
Sandblast considerations in this scenario
o Pros Inspection of SMTPS/TLS via MTA possible Inspection of HTTPS possible if activated on the CP gateway If needed full Prevent-mode is possible TX can be evaluated if Sandblast MTA is in the mail stream as full MTA
o Cons changes to production CP gateway configuration performance impact on CP gateway
Tipps • be sure to do sizing estimation for TE blade on productive CP gateway (see Section “Sizing”) • when using BCC configure Nullhost • when activating the TE blade on the gateway to configure the hand-off, a Threat Emulation
engine will also be installed on this CP gateway. So engine updates are also relevant if available/needed
©2016 Check Point Software Technologies Ltd. All rights reserved | Page 17 / 102
[Internal Use] for Check Point employees
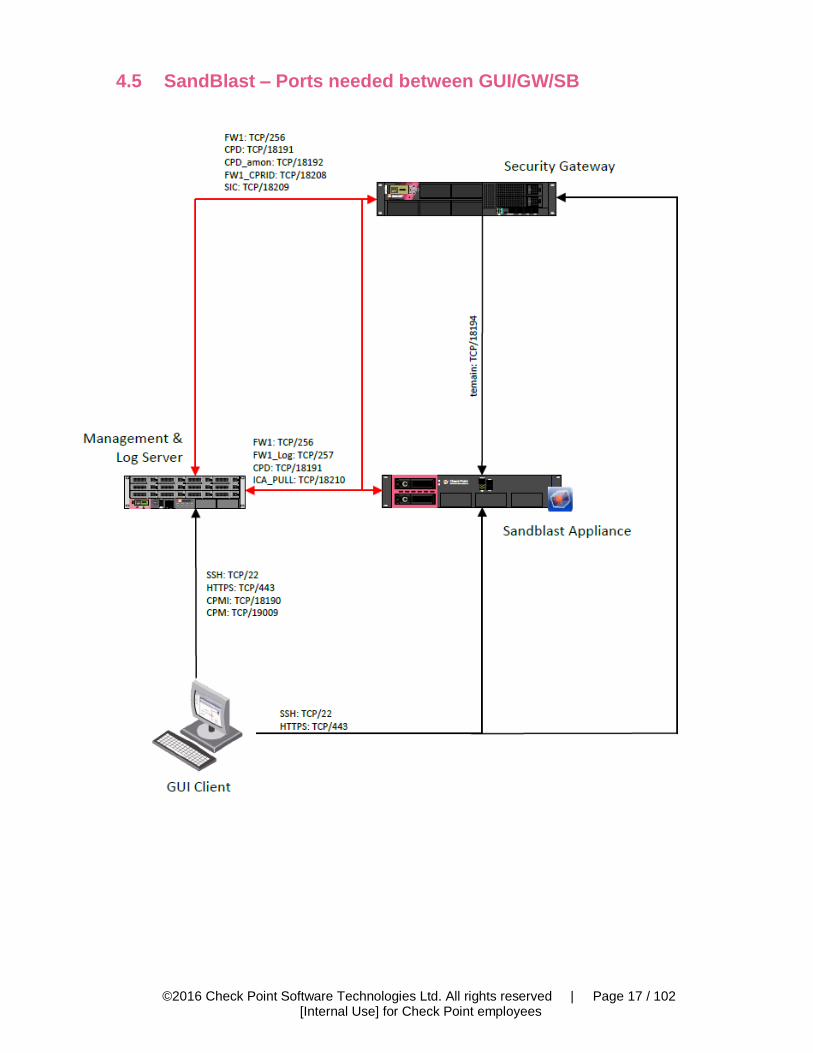
4.5 SandBlast – Ports needed between GUI/GW/SB
©2016 Check Point Software Technologies Ltd. All rights reserved | Page 18 / 102
[Internal Use] for Check Point employees
5. Sizing PoC and Production environment
The following options are available to do a proper sizing for a Sandblast PoC (order is with decreasing sizing accuracy): 1) Do a Security Checkup or a TE Poc
a. “tecli show statistics“ will give you all needed sizing information b. additionally you can take a CPSIZEME and use the Appliance Sizing Tool
(https://supportcenter.checkpoint.com/supportcenter/portal?eventSubmit_doGoviewsolutiondetails=&solutionid=sk88160)
2) Activate TE Sizing mode on an existing Check Point Gateway:
https://supportcenter.checkpoint.com/supportcenter/portal?eventSubmit_doGoviewsolutiondetails=&solutionid=sk93598
a. Performance Impact is almost the same as when running TE live. So do a proper sizing for the production gateway in advance -> use CPSIZEME and Appliance Sizing Tool (https://supportcenter.checkpoint.com/supportcenter/portal?eventSubmit_doGoviewsolutiondetails=&solutionid=sk88160) to get an estimation how activating TE Sizing Mode will affect the gateway
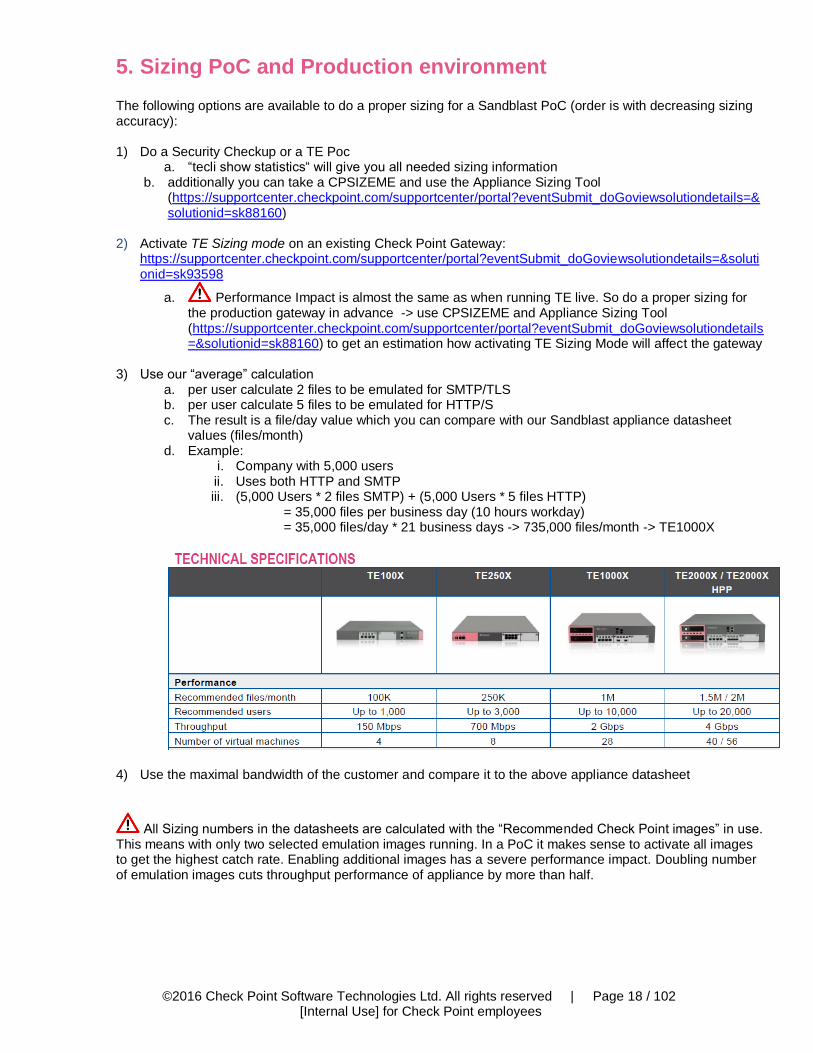
3) Use our “average” calculation
a. per user calculate 2 files to be emulated for SMTP/TLS b. per user calculate 5 files to be emulated for HTTP/S c. The result is a file/day value which you can compare with our Sandblast appliance datasheet
values (files/month) d. Example:
i. Company with 5,000 users ii. Uses both HTTP and SMTP iii. (5,000 Users * 2 files SMTP) + (5,000 Users * 5 files HTTP)
= 35,000 files per business day (10 hours workday) = 35,000 files/day * 21 business days -> 735,000 files/month -> TE1000X
4) Use the maximal bandwidth of the customer and compare it to the above appliance datasheet
All Sizing numbers in the datasheets are calculated with the “Recommended Check Point images” in use. This means with only two selected emulation images running. In a PoC it makes sense to activate all images to get the highest catch rate. Enabling additional images has a severe performance impact. Doubling number of emulation images cuts throughput performance of appliance by more than half.

©2016 Check Point Software Technologies Ltd. All rights reserved | Page 19 / 102
[Internal Use] for Check Point employees
6. Installing a Sandblast appliance
6.1 Stand-alone vs. multiple private cloud One Stand-alone Sandblast appliance If from a load perspective one Sandblast appliance is sufficient you can use the following deployment options:
1) Without attaching to the customer´s CP environment
You do the Sandblast PoC with only one self-sustaining Sandblast appliance. Therefore install the appliance as an all-in-one deployment with gateway AND management on one box. Afterwards you activate the relevant inspection blades AV/AB/TE and also the management blades like SmartLog, SmartEvent and the SmartEvent Correlation Unit. This setup will run only on a Mirror Port / MTA deployment as you cannot integrate this setup into a customer´s existing Check Point infrastructure. The deployment methods are covered in section 4.2) Mirror (SPAN) mode and 4.3) SMTP/TLS Prevent (MTA) and HTTP (SPAN).
2) With attaching to the customer´s CP environment If you want to attach one Sandblast appliance to an existing customer Check Point Gateway/Cluster - like mentioned in section 4.4) Production CP gateway HTTP/S (Inline) and SMTP/TLS (MTA) - you will have to install the sandblast appliance without the management component during the initial GAiA setup.
Multiple Private Cloud appliances
If one Sandblast appliance is not able to take all the traffic load and you need multiple once there are two options: 1) Without attaching to the customer´s CP environment
In this scenario you will need one or more Check Point gateways acting as “harvesters” attached to a Mirror Port. These gateways will be configured to use multiple Sandblast appliances for emulation like described in 7.4.4) Multiple Private Cloud appliances.
2) With attaching to the customer´s CP environment If a Check Point Gateway/Cluster is already in production at the customer you can also attach multiple Sandblast appliances directly to these gateways. See section 7.3.3) Multiple Private Cloud appliances.
6.2 TE-X Appliance ISO
Be sure to use the correct ISO for a TE-X-appliance (do not use an old TE appliance ISO) Download link R77.30 ISO image for SandBlast appliances (TE-X Appliances): https://supportcenter.checkpoint.com/supportcenter/portal/role/supportcenterUser/page/default.psml/media-type/html?action=portlets.DCFileAction&eventSubmit_doGetdcdetails=&fileid=53306

©2016 Check Point Software Technologies Ltd. All rights reserved | Page 20 / 102
[Internal Use] for Check Point employees
6.3 R77.30 Management AddOn The Management Add-on package is needed for using Threat Extraction and also for some TE/AV functionalities (like “Scan links inside emails” option).
There is no need to run a dedicated Management or SmartEvent Server within a Sandblast PoC. You can run Management, SmartLog, SmartEvent, AV, AB, TE on one Sandblast Appliance. The performance impact for Management , SmartLog, SmartEvent is almost negligible because of the much smaller event count in opposite to a full Security Checkup.
If you integrate a TE appliance with an existing CP gateway of a customer the Add-on must be installed on the management server of the customer. Take this into consideration when planning/designing a PoC. Download link R77.30 Management Add-on package: https://supportcenter.checkpoint.com/supportcenter/portal?eventSubmit_doGoviewsolutiondetails=&solutionid=sk105412
6.4 Enable Hyper-Threading Enabling Hyper-Threading will improve emulation performance on the appliances – in short activate it via
1. Run cpconfig command.
2. Choose 'Configure Hyper-Threading' option.
3. Select 'yes' to enable SMT.
4. The wizard enables SMT and updates the number of CoreXL FW instances automatically. If the wizard cannot update CoreXL automatically, then configure the CoreXL manually as described above (this is relevant in cases where CoreXL configuration was modified manually before enabling SMT).
5. Press Enter to continue.
More information can be found here: https://supportcenter.checkpoint.com/supportcenter/portal?eventSubmit_doGoviewsolutiondetails=&solutionid=sk93000
6.5 Recommended Jumbo Hotfix – R77.30/R80.10(EA)
We strongly recommend installing at least JHF 292 – currently available as GA Jumbo Hotfix.
This will include important MTA enhancements, Threat Extraction enhancements and the ICAP hotfix: https://supportcenter.checkpoint.com/supportcenter/portal?eventSubmit_doGoviewsolutiondetails=&solutionid=sk114613
If you decided to install the SandBlast Appliance with R80.10 (currently EA for SB Appliances) make sure to install at least Take 70.
225
©2016 Check Point Software Technologies Ltd. All rights reserved | Page 21 / 102
[Internal Use] for Check Point employees
6.6 Updating TE images and engine
6.6.1 General info and configuration
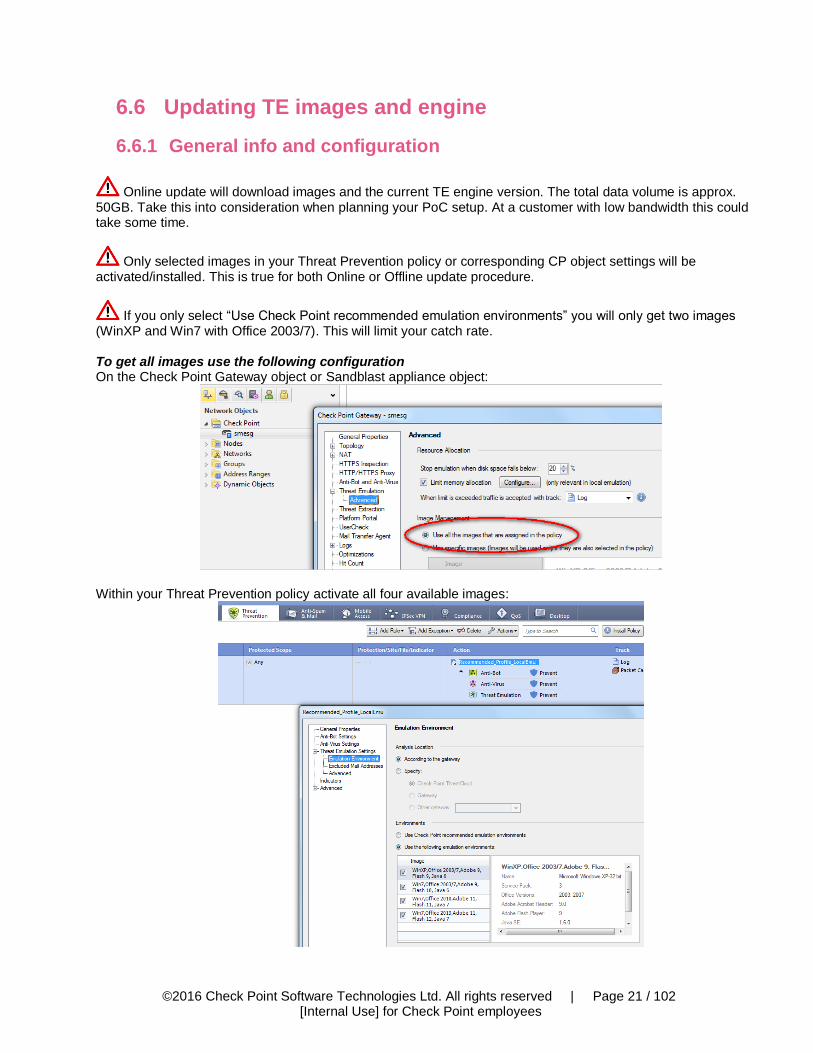
Online update will download images and the current TE engine version. The total data volume is approx. 50GB. Take this into consideration when planning your PoC setup. At a customer with low bandwidth this could take some time.
Only selected images in your Threat Prevention policy or corresponding CP object settings will be activated/installed. This is true for both Online or Offline update procedure.
If you only select “Use Check Point recommended emulation environments” you will only get two images (WinXP and Win7 with Office 2003/7). This will limit your catch rate. To get all images use the following configuration On the Check Point Gateway object or Sandblast appliance object:
Within your Threat Prevention policy activate all four available images:
©2016 Check Point Software Technologies Ltd. All rights reserved | Page 22 / 102
[Internal Use] for Check Point employees
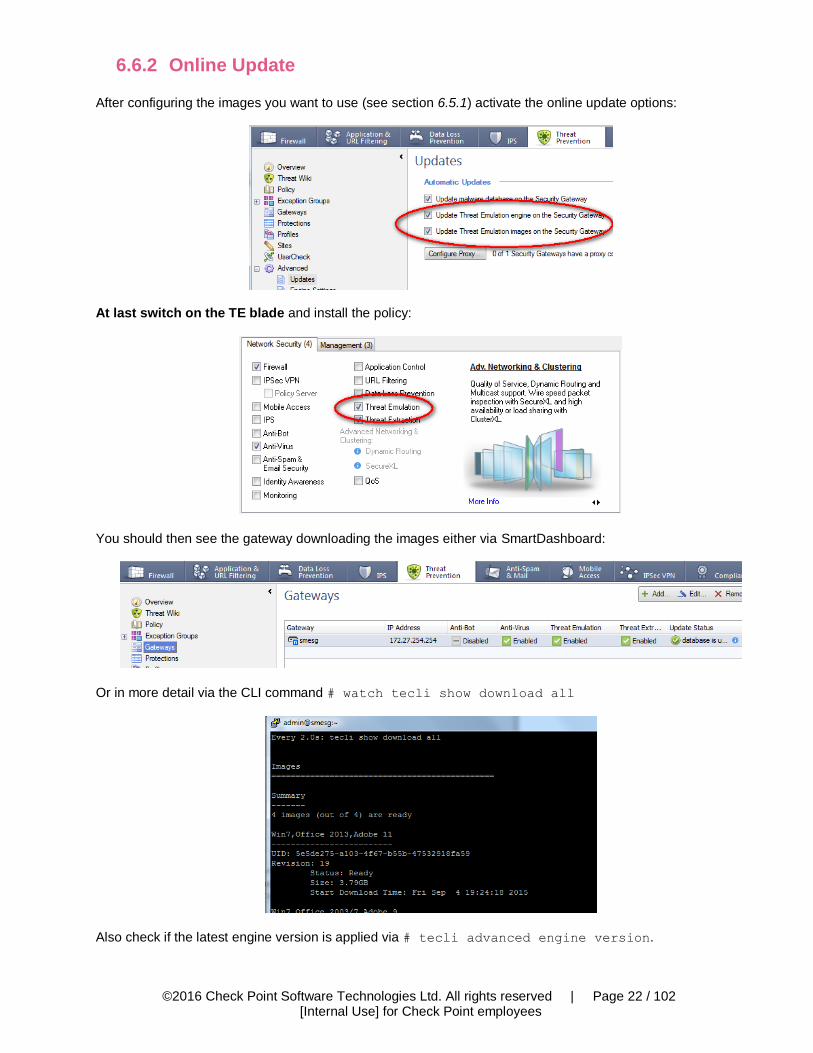
6.6.2 Online Update After configuring the images you want to use (see section 6.5.1) activate the online update options:
At last switch on the TE blade and install the policy:
You should then see the gateway downloading the images either via SmartDashboard:
Or in more detail via the CLI command # watch tecli show download all
Also check if the latest engine version is applied via # tecli advanced engine version.

©2016 Check Point Software Technologies Ltd. All rights reserved | Page 23 / 102
[Internal Use] for Check Point employees
6.6.3 Offline Update Deactivate the online update option if needed:
Download the latest Offline Update package from: https://supportcenter.checkpoint.com/supportcenter/portal?eventSubmit_doGoviewsolutiondetails=&solutionid=sk92509 The Offline Update procedure is also described in the above SK. You could see the proper initialization of the images via the CLI command # tecli show download all
Also check if the latest engine version is applied via # tecli advanced engine version
©2016 Check Point Software Technologies Ltd. All rights reserved | Page 24 / 102
[Internal Use] for Check Point employees
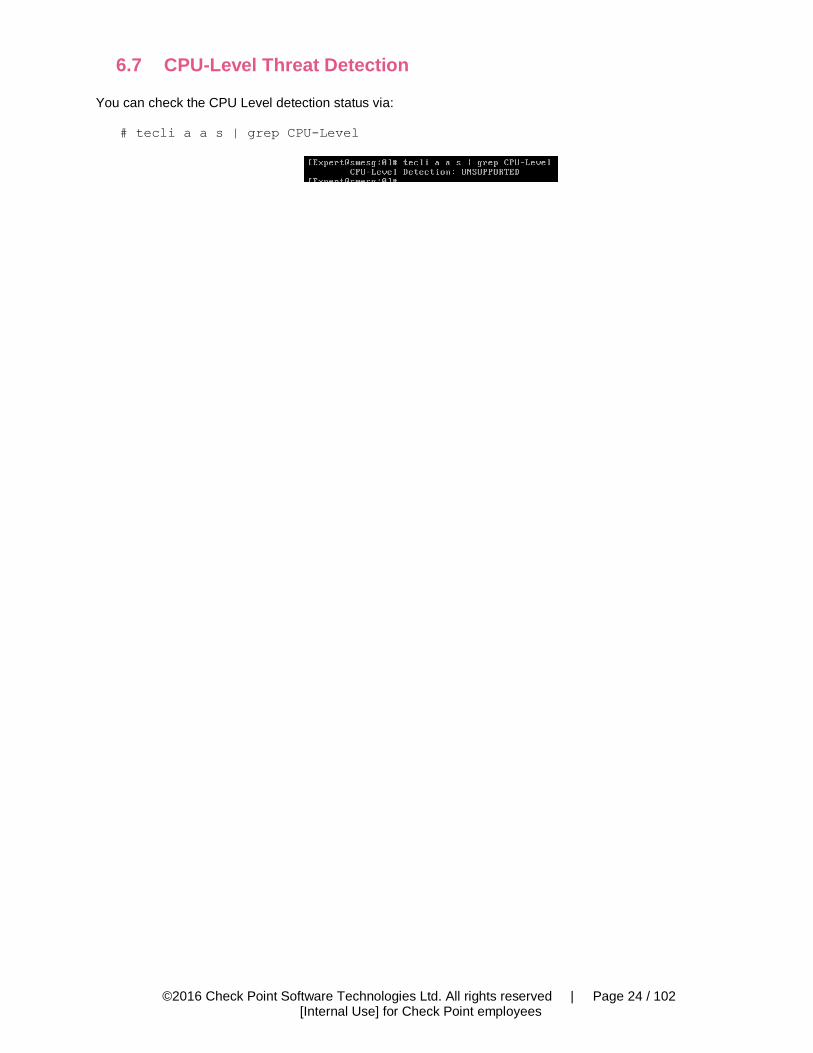
6.7 CPU-Level Threat Detection You can check the CPU Level detection status via:
# tecli a a s | grep CPU-Level

©2016 Check Point Software Technologies Ltd. All rights reserved | Page 25 / 102
[Internal Use] for Check Point employees
7. Configuration
7.1 General Considerations
Always strive to enable all Threat Prevention blades Anti-Virus, Anti-Bot in addition to Threat
Emulation. This will provide you the best catch rate in a PoC. Other vendors like FireEye devices have a built in Anti-Virus and Anti-Bot functionalities (they tend not to talk about the built in Anti-Virus, but it exists and viewable in CLI and other tools) – so a fair comparison must include these capabilities as well.
AV and AB blade activation makes sense only if you see this traffic as a stream, e.g. if a TE appliance is on a Mirror Port. If the TE appliance only works as an emulation device getting traffic from a CP gateway AV and AB will be of limited use.
In addition also activate all detection signatures with Performance Impact “High or lower”:
©2016 Check Point Software Technologies Ltd. All rights reserved | Page 26 / 102
[Internal Use] for Check Point employees
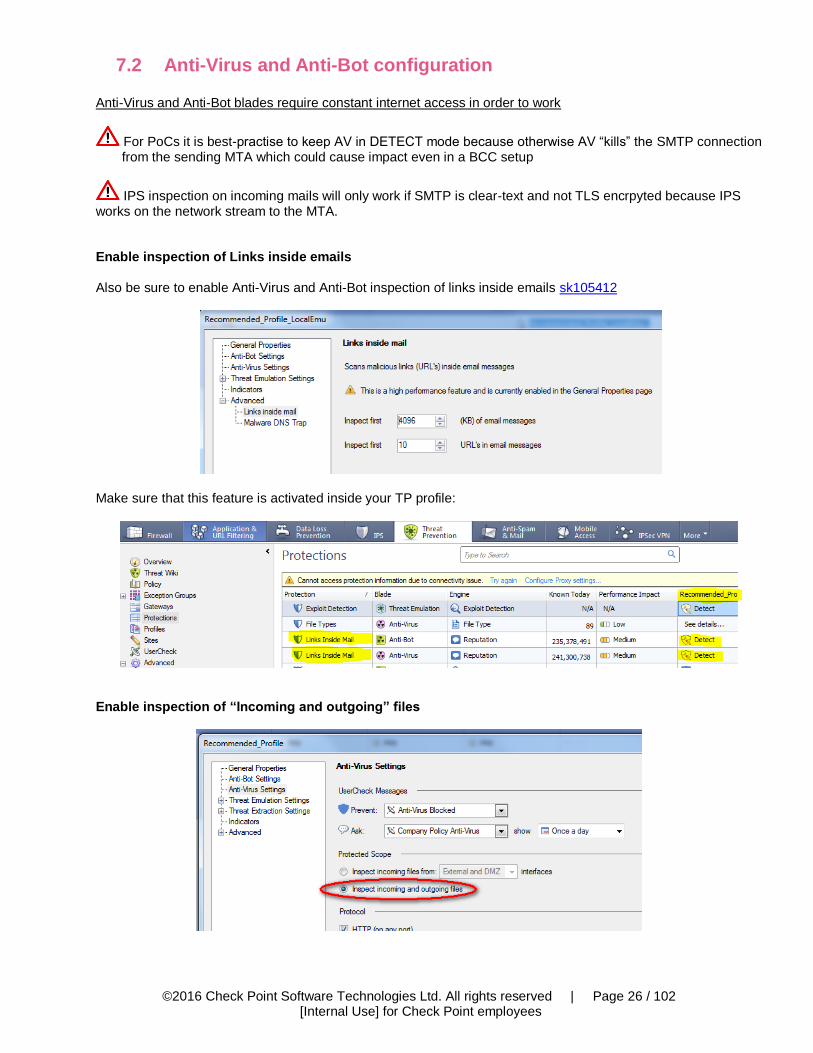
7.2 Anti-Virus and Anti-Bot configuration Anti-Virus and Anti-Bot blades require constant internet access in order to work
For PoCs it is best-practise to keep AV in DETECT mode because otherwise AV “kills” the SMTP connection from the sending MTA which could cause impact even in a BCC setup
IPS inspection on incoming mails will only work if SMTP is clear-text and not TLS encrpyted because IPS works on the network stream to the MTA. Enable inspection of Links inside emails
Also be sure to enable Anti-Virus and Anti-Bot inspection of links inside emails sk105412
Make sure that this feature is activated inside your TP profile:
Enable inspection of “Incoming and outgoing” files
©2016 Check Point Software Technologies Ltd. All rights reserved | Page 27 / 102
[Internal Use] for Check Point employees
This will enable AV stream scanning on incoming MTA traffic. If you have an incorrect topology or a one-leg interface implementation (e.g. MTA with one interface) you also need to reconfigure an additional configuration file to enable AV URL reputation on clear-text email network stream to the MTA: https://supportcenter.checkpoint.com/supportcenter/portal?eventSubmit_doGoviewsolutiondetails=&solutionid=sk109573
Follow these steps:
1. Backup the file $FWDIR/conf/malware_config on the Security Gateway. 2. Edit the file $FWDIR/conf/malware_config in Vi editor. 3. Under [email_links_classification] section, set the value of the parameter "scan_all_traffic" to true:
[email_links_classification]
...
scan_all_traffic=true
...
4. Save changes in the file and exit from Vi editor. 5. Install the Threat Prevention policy.

©2016 Check Point Software Technologies Ltd. All rights reserved | Page 28 / 102
[Internal Use] for Check Point employees
Enable ‘AV Deep Scanning’
Do not enable "Deep Scan" on all files because then DLPU has to reassemble every file passing (on
top of streaming inspection; this will cause massive CPU usage)
Deep Scan only for Msi, pif, cmd, sw, wsc, wsf, chm, hlp, lnk, swf, bat, pdf, com, class exe (all different types) dll, reg vb, vbs, vbe All Microsoft Office file types
©2016 Check Point Software Technologies Ltd. All rights reserved | Page 29 / 102
[Internal Use] for Check Point employees
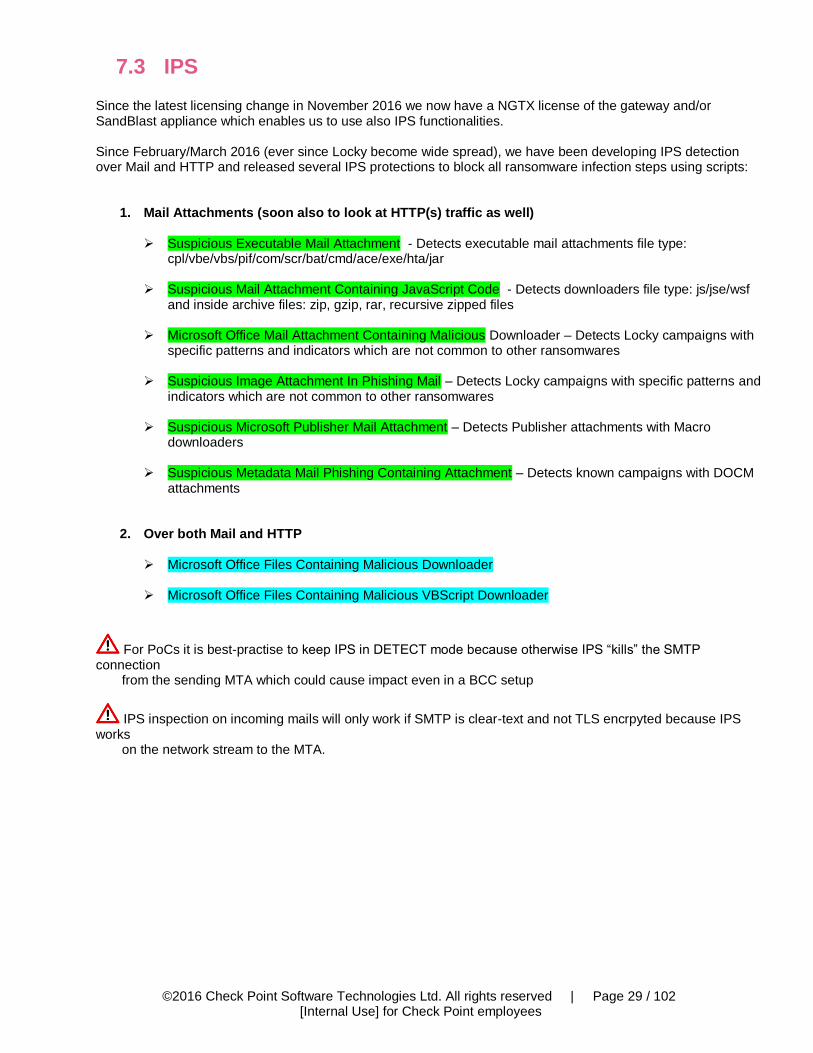
7.3 IPS Since the latest licensing change in November 2016 we now have a NGTX license of the gateway and/or SandBlast appliance which enables us to use also IPS functionalities. Since February/March 2016 (ever since Locky become wide spread), we have been developing IPS detection over Mail and HTTP and released several IPS protections to block all ransomware infection steps using scripts:
1. Mail Attachments (soon also to look at HTTP(s) traffic as well)
Suspicious Executable Mail Attachment - Detects executable mail attachments file type: cpl/vbe/vbs/pif/com/scr/bat/cmd/ace/exe/hta/jar
Suspicious Mail Attachment Containing JavaScript Code - Detects downloaders file type: js/jse/wsf and inside archive files: zip, gzip, rar, recursive zipped files
Microsoft Office Mail Attachment Containing Malicious Downloader – Detects Locky campaigns with
specific patterns and indicators which are not common to other ransomwares
Suspicious Image Attachment In Phishing Mail – Detects Locky campaigns with specific patterns and indicators which are not common to other ransomwares
Suspicious Microsoft Publisher Mail Attachment – Detects Publisher attachments with Macro
downloaders
Suspicious Metadata Mail Phishing Containing Attachment – Detects known campaigns with DOCM attachments
2. Over both Mail and HTTP
Microsoft Office Files Containing Malicious Downloader
Microsoft Office Files Containing Malicious VBScript Downloader
For PoCs it is best-practise to keep IPS in DETECT mode because otherwise IPS “kills” the SMTP connection from the sending MTA which could cause impact even in a BCC setup
IPS inspection on incoming mails will only work if SMTP is clear-text and not TLS encrpyted because IPS works on the network stream to the MTA.
©2016 Check Point Software Technologies Ltd. All rights reserved | Page 30 / 102
[Internal Use] for Check Point employees
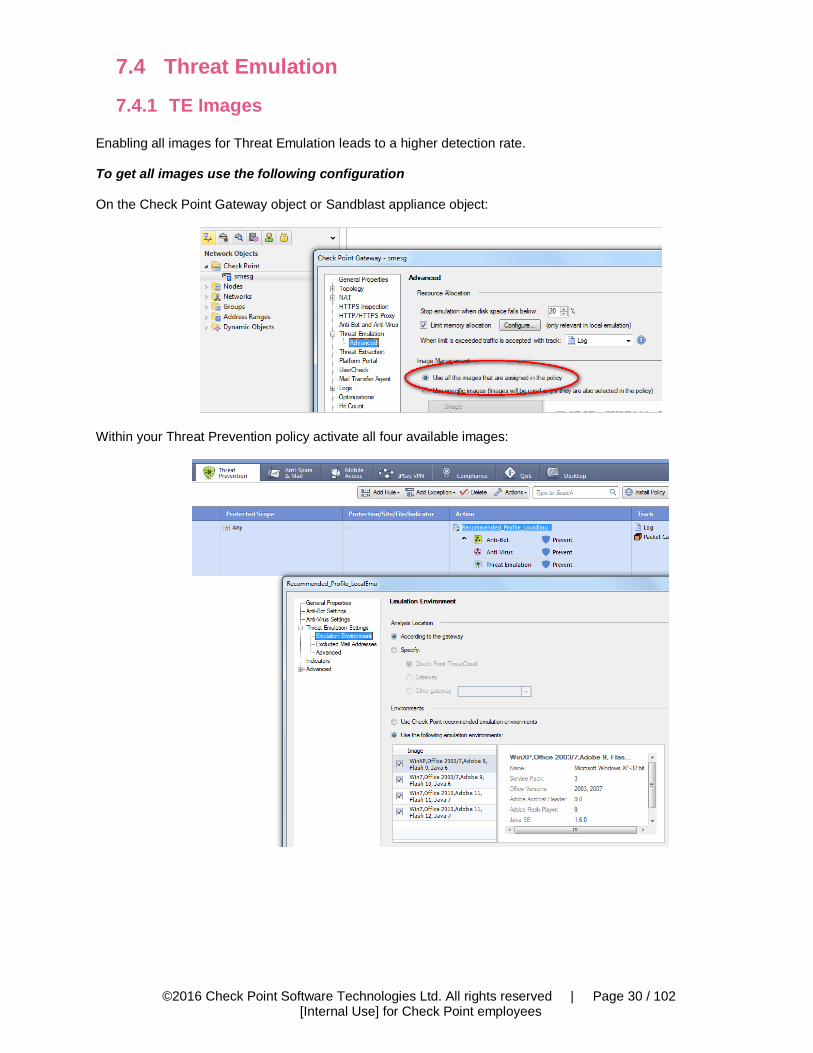
7.4 Threat Emulation
7.4.1 TE Images Enabling all images for Threat Emulation leads to a higher detection rate. To get all images use the following configuration On the Check Point Gateway object or Sandblast appliance object:
Within your Threat Prevention policy activate all four available images:
©2016 Check Point Software Technologies Ltd. All rights reserved | Page 31 / 102
[Internal Use] for Check Point employees
7.4.2 Minimum recommended images We recommend that you start at least with the following image combinations:
WinXP, Office 2003/7 + Win7 64-bit, Office 2010 + Win7, Office 2013 or
WinXP, Office 2003/7 + Win7, Office 2010 + Win8.1, Office 2013 You should have at least every Office version and in addition one 64-bit image. But remember that adding additional images has a severe performance impact as EVERY file must be openend on an additional VM instance.
7.4.3 Hybrid mode
Enabling all images for Threat Emulation on a Sandblast appliance for higher detection rate may have high performance impact. You can consider emulating specific (non-personal) files like EXE in Threat Cloud. Therefore the gateway or Sandblast appliance needs an additional TE Cloud license/subscription.
7.4.4 Multiple Private Cloud appliances
Regarding performance for local emulation PoCs you can also consider enabling emulation “load sharing” for further TE scaling, follow sk102309. With this configuration an existing GW will be the “traffic collector” forwarding files for emulation to multiple Private Cloud Appliances.
The steps mentioned in the SK must be issued on the traffic collector(s).

©2016 Check Point Software Technologies Ltd. All rights reserved | Page 32 / 102
[Internal Use] for Check Point employees
7.4.5 TE filetypes
Be sure to switch on all TE supported filetypes:
The filetype list is pulled from Threat Cloud through the Management Server. So be sure the Management Server has Internet connectivity. This is also true for the selectable images in the TP profile and CP object settings.
©2016 Check Point Software Technologies Ltd. All rights reserved | Page 33 / 102
[Internal Use] for Check Point employees
7.4.6 Different “Links inside mails/documents” features Currently we have the following functionalities:
1. Links inside emails a. See Section 7.2 b. This is an AV blade functionality c. It only works on links inside the email body d. It checks link reputation against our Threat Intelligence
2. Check links inside email attached documents
a. This is a TE blade functionality b. Available since TE engine 47.990000102 or later c. Can be controlled via “tecli advanced analyzer …” d. Check links inside documents e. It checks link reputation against our Threat Intelligence
3. Emulate links from email body
a. This is available with JHF 226 or higher b. This is a TE blade functionality c. It will try to download a file from a link DIRECTLY pointing to that file and after successful download
emulate it
©2016 Check Point Software Technologies Ltd. All rights reserved | Page 34 / 102
[Internal Use] for Check Point employees
7.5 MTA
7.5.1 Show currently installed Postfix version # /opt/postfix/usr/sbin/postconf -d | grep mail_version
Latest version since JHF225 should show: mail_version = 3.1.0
7.5.2 General MTA settings
MTA can work alongside ‘normal’ file reassembly (stream mode). It is highly recommended when prevent capabilities are needed for SMTP traffic as the device functioning as MTA completes the transaction with the sending server, inspects the file and only then opens the connection to a destination mail server. This removes the risk of timeouts when the connection is hold and the file is inspected in streaming mode. Even when running a ‘detect only’ PoC MTA has two major advantages:
It can handle encrypted mail traffic passing via SMTP/TLS
It doesn’t suffer from possible packet loss issues in SPAN/Tap mode deployments. In both cases, configuring the device as MTA is likely to increase the detection rate.
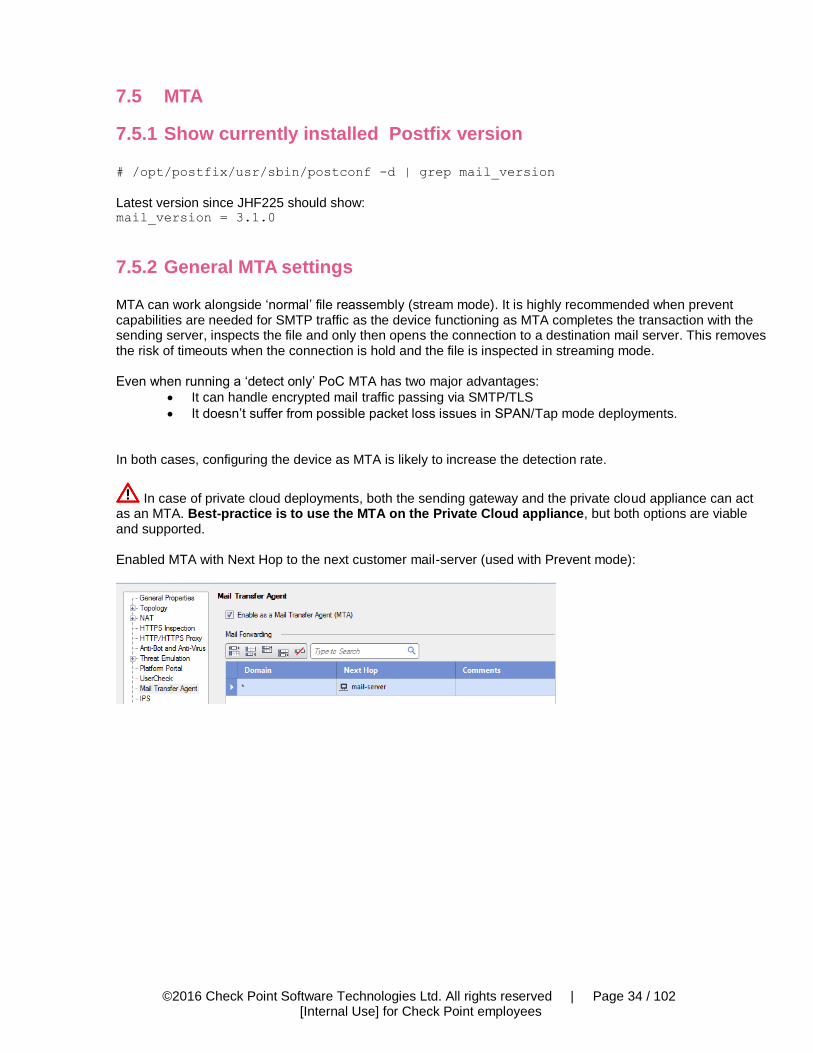
In case of private cloud deployments, both the sending gateway and the private cloud appliance can act as an MTA. Best-practice is to use the MTA on the Private Cloud appliance, but both options are viable and supported. Enabled MTA with Next Hop to the next customer mail-server (used with Prevent mode):
©2016 Check Point Software Technologies Ltd. All rights reserved | Page 35 / 102
[Internal Use] for Check Point employees
7.5.3 BCC mode
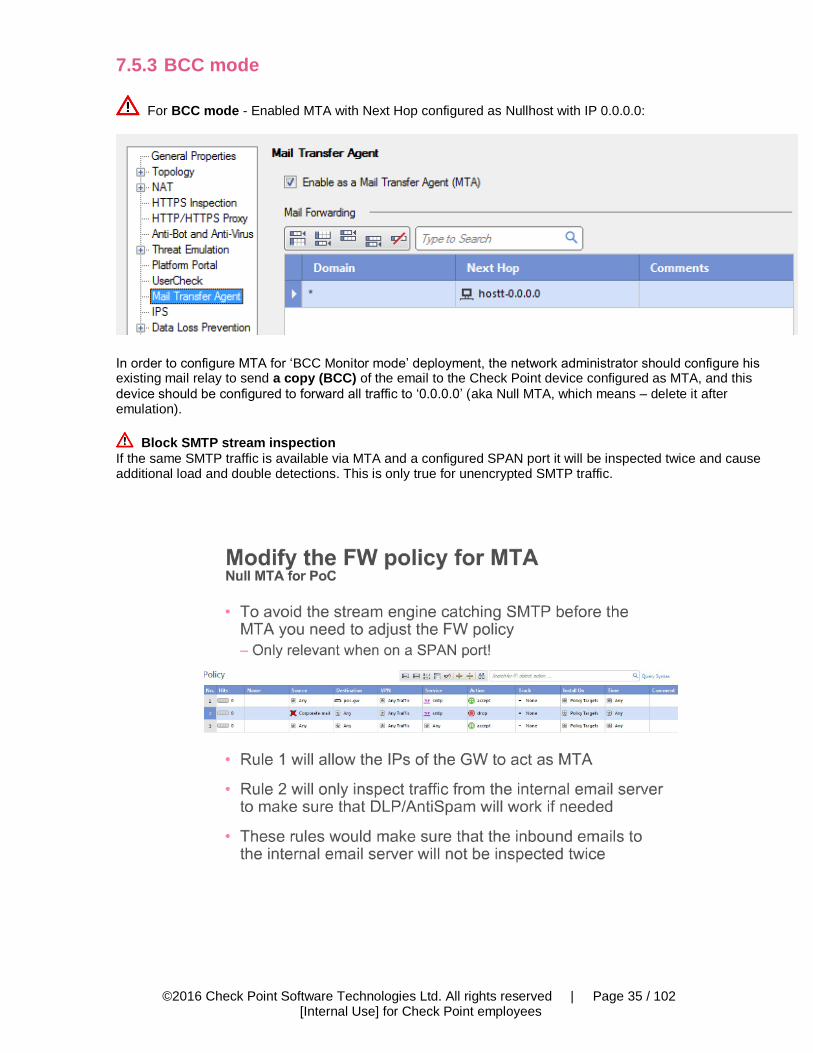
For BCC mode - Enabled MTA with Next Hop configured as Nullhost with IP 0.0.0.0:
In order to configure MTA for ‘BCC Monitor mode’ deployment, the network administrator should configure his existing mail relay to send a copy (BCC) of the email to the Check Point device configured as MTA, and this
device should be configured to forward all traffic to ‘0.0.0.0’ (aka Null MTA, which means – delete it after emulation).
Block SMTP stream inspection
If the same SMTP traffic is available via MTA and a configured SPAN port it will be inspected twice and cause additional load and double detections. This is only true for unencrypted SMTP traffic.

©2016 Check Point Software Technologies Ltd. All rights reserved | Page 36 / 102
[Internal Use] for Check Point employees
These MTA settings are only available when you install the R77.30 Management AddOn package:
Deactivate maximum MIME nesting level blocking
Be sure to change the MIME nesting level protection from “Block” to “Allow”. Otherwise E-Mails can get blocked even in BCC leading to NDRs:
©2016 Check Point Software Technologies Ltd. All rights reserved | Page 37 / 102
[Internal Use] for Check Point employees
7.5.4 How-to block file extensions in Postfix
Follow SK101870 to add your own Postfix configurations.
If not already down create your Postfix options file which will be merged with main.cf on Threat Prevention policy install via SmartDashboard: # touch $FWDIR/conf/mta_postfix_options.cf
How-to block certain file extensions
Add the following line to mta_postfix_options.cf:
mime_header_checks = regexp:/opt/postfix/etc/postfix/blocked_attachments
Add a similar line to /opt/postfix/etc/postfix/blocked_attachments:
/name=[^>]*\.(js|mht|html)/ REJECT
Install Threat Prevention Policy via SmartDashboard
Check if Postfix option is merged to main.cf:
# cat /opt/postfix/etc/postfix/main.cf | grep block
Should display: mime_header_checks = regexp:/opt/postfix/etc/postfix/blocked_attachments
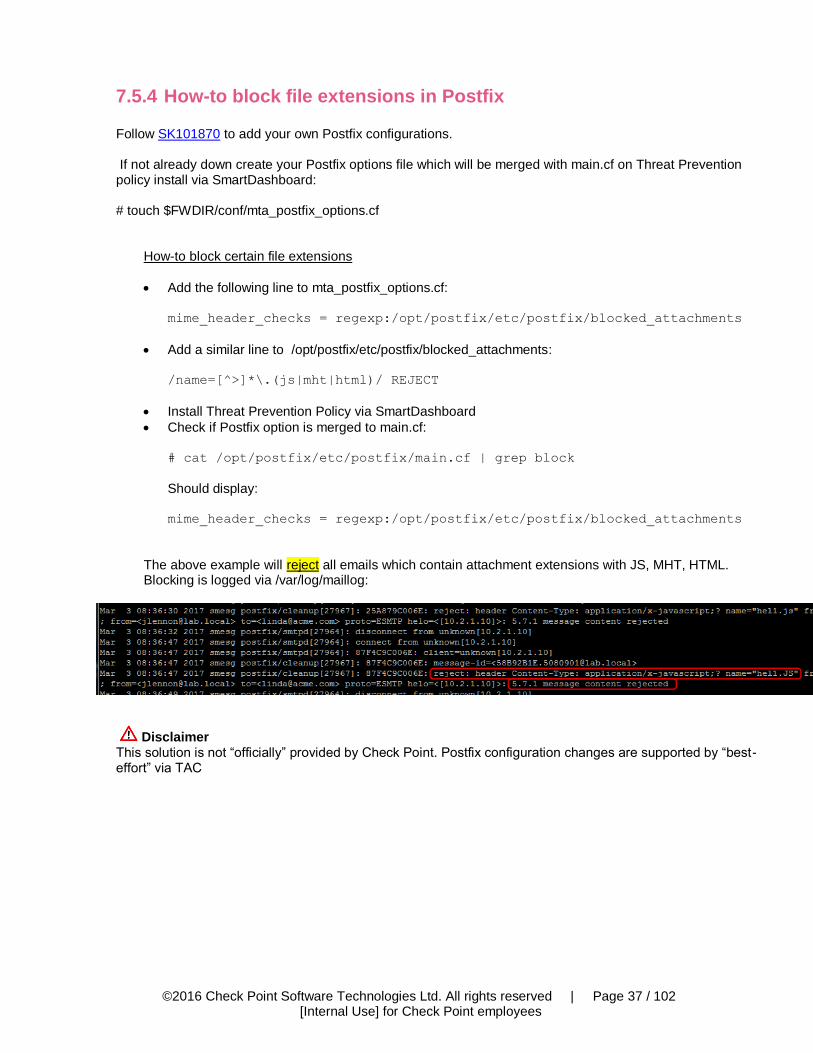
The above example will reject all emails which contain attachment extensions with JS, MHT, HTML. Blocking is logged via /var/log/maillog:
Disclaimer This solution is not “officially” provided by Check Point. Postfix configuration changes are supported by “best-effort” via TAC
©2016 Check Point Software Technologies Ltd. All rights reserved | Page 38 / 102
[Internal Use] for Check Point employees
7.5.5 Recommended MTA Best-Practises
Install at least JHF version 226 on the appliance running the MTA.
7.5.5.1 Raising the MTA header length limit
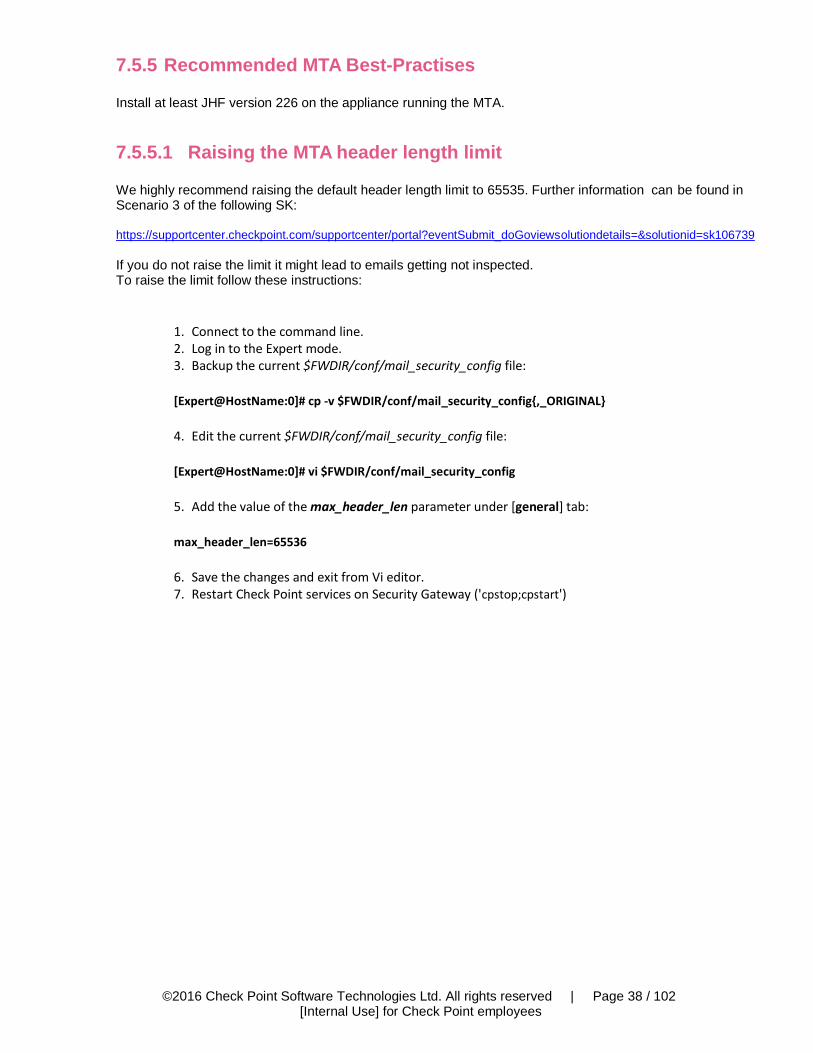
We highly recommend raising the default header length limit to 65535. Further information can be found in Scenario 3 of the following SK: https://supportcenter.checkpoint.com/supportcenter/portal?eventSubmit_doGoviewsolutiondetails=&solutionid=sk106739 If you do not raise the limit it might lead to emails getting not inspected. To raise the limit follow these instructions:
1. Connect to the command line. 2. Log in to the Expert mode. 3. Backup the current $FWDIR/conf/mail_security_config file:
[Expert@HostName:0]# cp -v $FWDIR/conf/mail_security_config{,_ORIGINAL}
4. Edit the current $FWDIR/conf/mail_security_config file:
[Expert@HostName:0]# vi $FWDIR/conf/mail_security_config
5. Add the value of the max_header_len parameter under [general] tab:
max_header_len=65536
6. Save the changes and exit from Vi editor. 7. Restart Check Point services on Security Gateway ('cpstop;cpstart')

©2016 Check Point Software Technologies Ltd. All rights reserved | Page 39 / 102
[Internal Use] for Check Point employees
7.5.5.2 Setting a Postfix hostname
In some environments the next-hop MTA will only accept emails from the Check Point MTA when our MTA has a proper FQDN set. This is NOT achieved by setting host- and domainname in the GAiA WebUI.
To set a Postfix FQDN hostname follow: https://supportcenter.checkpoint.com/supportcenter/portal?eventSubmit_doGoviewsolutiondetails=&solutionid=sk101870
Summary:
Security Gateway's hostname
The default Security Gateway's hostname, as it appears in mail headers and SMTP protocol connections, is the name of the Security Gateway's object in the SmartDashboard.
To change the Security Gateway's hostname in mail headers and SMTP protocol connections, add the following line to the '$FWDIR/conf/mta_postfix_options.cf' file:
myhostname=DESIRED_NAME
©2016 Check Point Software Technologies Ltd. All rights reserved | Page 40 / 102
[Internal Use] for Check Point employees
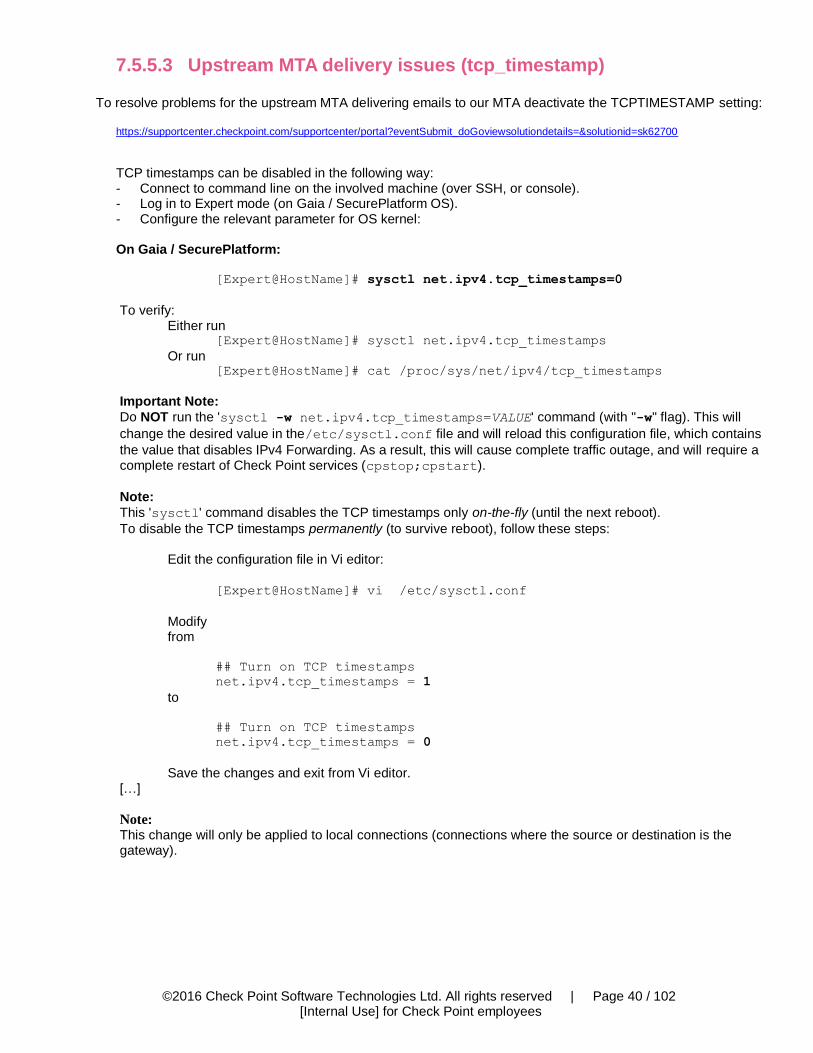
7.5.5.3 Upstream MTA delivery issues (tcp_timestamp) To resolve problems for the upstream MTA delivering emails to our MTA deactivate the TCPTIMESTAMP setting:
https://supportcenter.checkpoint.com/supportcenter/portal?eventSubmit_doGoviewsolutiondetails=&solutionid=sk62700
TCP timestamps can be disabled in the following way: - Connect to command line on the involved machine (over SSH, or console). - Log in to Expert mode (on Gaia / SecurePlatform OS). - Configure the relevant parameter for OS kernel:
On Gaia / SecurePlatform:
[Expert@HostName]# sysctl net.ipv4.tcp_timestamps=0
To verify:
Either run [Expert@HostName]# sysctl net.ipv4.tcp_timestamps
Or run [Expert@HostName]# cat /proc/sys/net/ipv4/tcp_timestamps
Important Note:
Do NOT run the 'sysctl -w net.ipv4.tcp_timestamps=VALUE' command (with "-w" flag). This will
change the desired value in the/etc/sysctl.conf file and will reload this configuration file, which contains
the value that disables IPv4 Forwarding. As a result, this will cause complete traffic outage, and will require a complete restart of Check Point services (cpstop;cpstart).
Note:
This 'sysctl' command disables the TCP timestamps only on-the-fly (until the next reboot).
To disable the TCP timestamps permanently (to survive reboot), follow these steps:
Edit the configuration file in Vi editor:
[Expert@HostName]# vi /etc/sysctl.conf
Modify from
## Turn on TCP timestamps
net.ipv4.tcp_timestamps = 1
to
## Turn on TCP timestamps
net.ipv4.tcp_timestamps = 0
Save the changes and exit from Vi editor.
[…]
Note: This change will only be applied to local connections (connections where the source or destination is the gateway).

©2016 Check Point Software Technologies Ltd. All rights reserved | Page 41 / 102
[Internal Use] for Check Point employees
7.5.5.4 Implementing cleanup script
Implement the following cleanup scripts: https://supportcenter.checkpoint.com/supportcenter/portal?eventSubmit_doGoviewsolutiondetails=&solutionid=sk117634
7.5.5.5 Next hop redundancy / failover
If you need next-hop redundancy please follow this SK: https://supportcenter.checkpoint.com/supportcenter/portal?action=portlets.SearchResultMainAction&eventSubmit_doGoviewsolutiondetails=&solutionid=sk110369
7.5.5.6 Outgoing TLS
If you need outgoing email encryption add the following line to $FWDIR/conf/mta_postfix_options.cf
and reinstall the TP policy on the gateway:
smtp_use_tls=yes
Don´t use other Postfix TLS parameters like smtp_tls_security_level=may because they may
cause serious issues e.g. bypassing TE

©2016 Check Point Software Technologies Ltd. All rights reserved | Page 42 / 102
[Internal Use] for Check Point employees
7.5.5.7 Special considerations when using MTA on a gateway cluster When activating the MTA on a gateway cluster (to use TE hand-off to a local Sandblast appliance or TE Cloud) you currently must activate the MTA to listen on ALL interfaces (see https://supportcenter.checkpoint.com/supportcenter/portal?eventSubmit_doGoviewsolutiondetails=&solutionid=sk107093):
WARNING
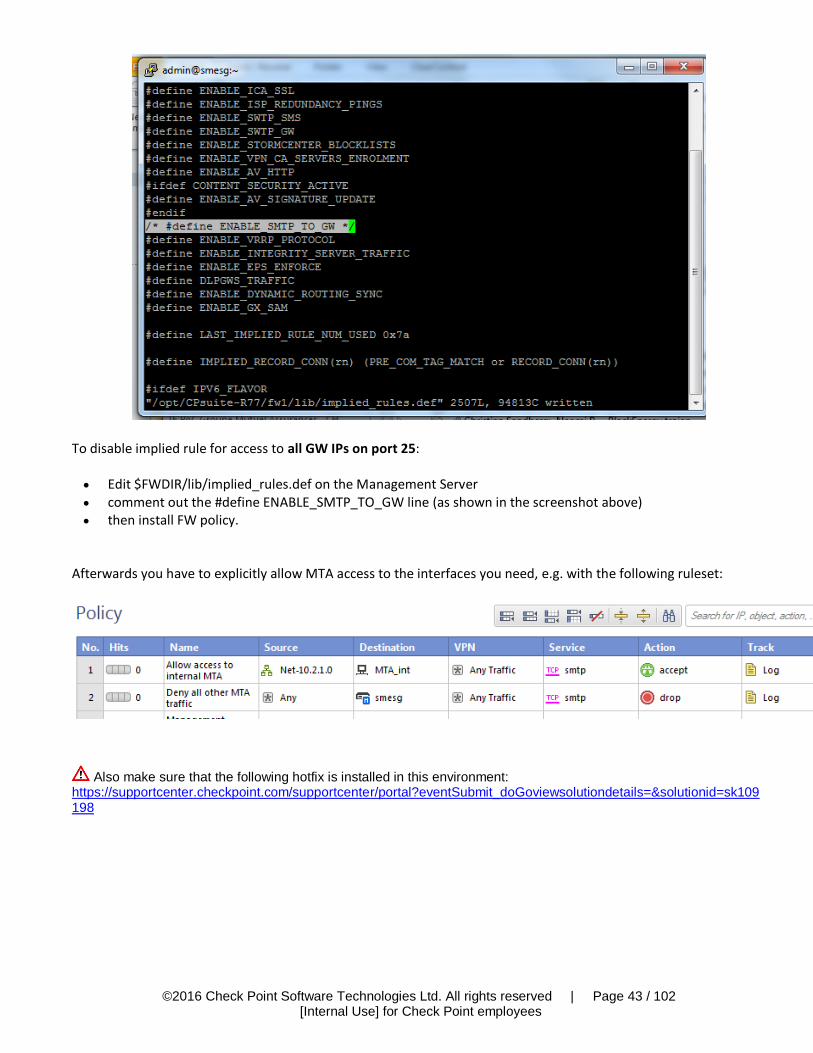
By default an implied rule is created allowing traffic to ALL interfaces on port 25 (SMTP). This will also leave the external interface on a cluster with a listening MTA. If the Check Point MTA is not the first MTA in the customers mail flow receiving emails from external we strongly recommend the following procedure to switch from this implied rule to FW rulebase MTA access.
©2016 Check Point Software Technologies Ltd. All rights reserved | Page 43 / 102
[Internal Use] for Check Point employees
To disable implied rule for access to all GW IPs on port 25: Edit $FWDIR/lib/implied_rules.def on the Management Server comment out the #define ENABLE_SMTP_TO_GW line (as shown in the screenshot above) then install FW policy.
Afterwards you have to explicitly allow MTA access to the interfaces you need, e.g. with the following ruleset:
Also make sure that the following hotfix is installed in this environment: https://supportcenter.checkpoint.com/supportcenter/portal?eventSubmit_doGoviewsolutiondetails=&solutionid=sk109198
©2016 Check Point Software Technologies Ltd. All rights reserved | Page 44 / 102
[Internal Use] for Check Point employees
7.5.5.8 Feed MTA logs into SmartView Tracker / SmartLog
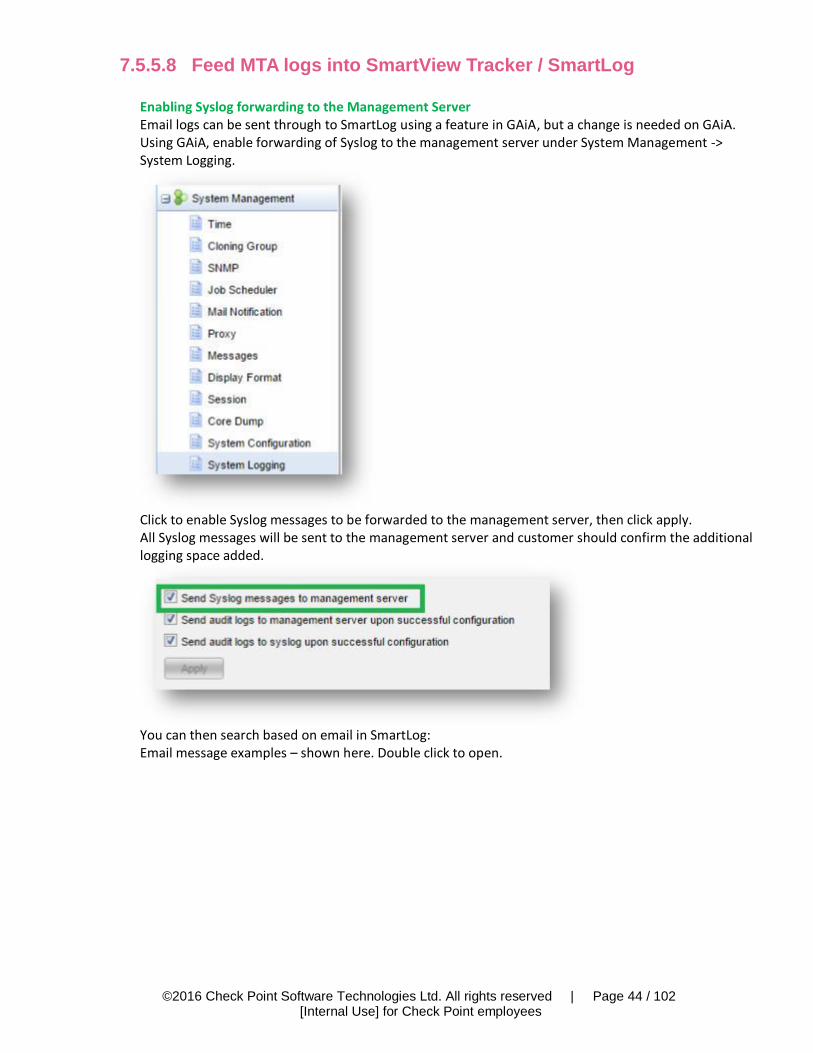
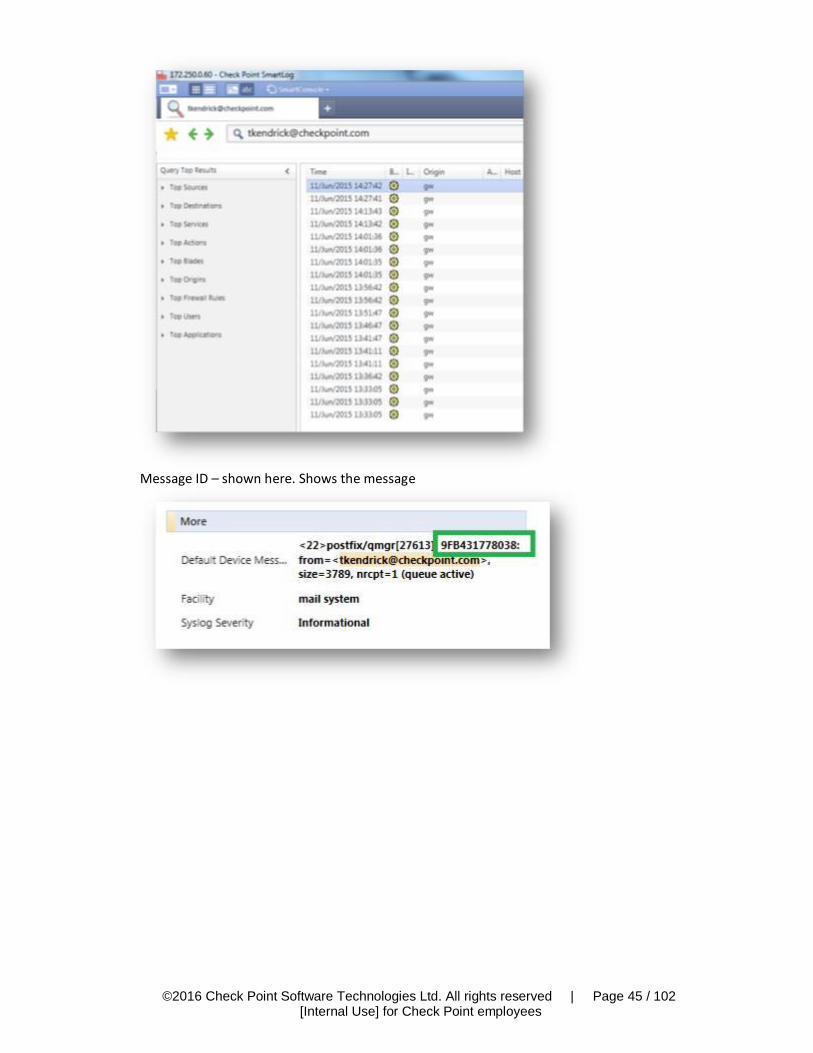
Enabling Syslog forwarding to the Management Server Email logs can be sent through to SmartLog using a feature in GAiA, but a change is needed on GAiA. Using GAiA, enable forwarding of Syslog to the management server under System Management -> System Logging.
Click to enable Syslog messages to be forwarded to the management server, then click apply. All Syslog messages will be sent to the management server and customer should confirm the additional logging space added.
You can then search based on email in SmartLog: Email message examples – shown here. Double click to open.
©2016 Check Point Software Technologies Ltd. All rights reserved | Page 45 / 102
[Internal Use] for Check Point employees
Message ID – shown here. Shows the message
©2016 Check Point Software Technologies Ltd. All rights reserved | Page 46 / 102
[Internal Use] for Check Point employees
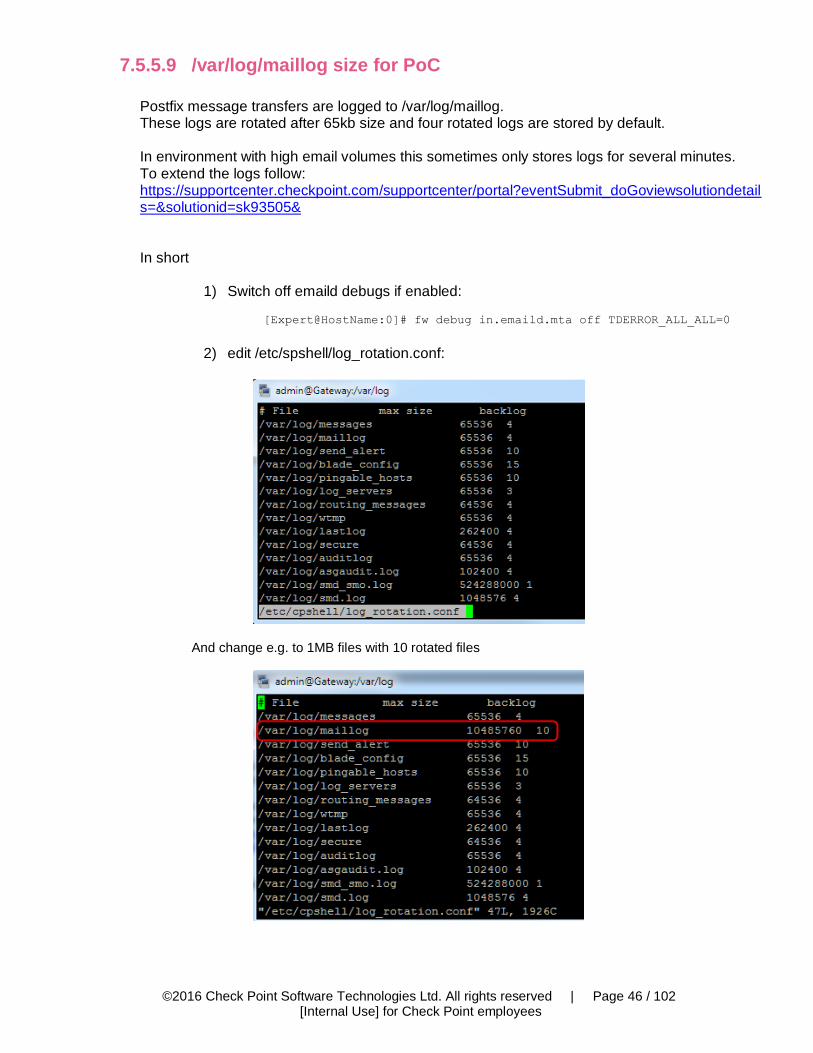
7.5.5.9 /var/log/maillog size for PoC
Postfix message transfers are logged to /var/log/maillog. These logs are rotated after 65kb size and four rotated logs are stored by default. In environment with high email volumes this sometimes only stores logs for several minutes. To extend the logs follow: https://supportcenter.checkpoint.com/supportcenter/portal?eventSubmit_doGoviewsolutiondetails=&solutionid=sk93505& In short
1) Switch off emaild debugs if enabled:
[Expert@HostName:0]# fw debug in.emaild.mta off TDERROR_ALL_ALL=0
2) edit /etc/spshell/log_rotation.conf:
And change e.g. to 1MB files with 10 rotated files

©2016 Check Point Software Technologies Ltd. All rights reserved | Page 47 / 102
[Internal Use] for Check Point employees
7.5.5.10 Debugging and Performance Troubleshooting Kit
Further troubleshooting and performance tuning kit can be found here: https://supportcenter.checkpoint.com/supportcenter/portal?eventSubmit_doGoviewsolutiondetails=&solutionid=sk120260

©2016 Check Point Software Technologies Ltd. All rights reserved | Page 48 / 102
[Internal Use] for Check Point employees
7.6 SmartEvent
7.6.1 How to configure e-mail alerts for High and Critical TE events 1) Goto the SE policy:
2) In the Event policy expand the Threat Prevention section and disable the default Threat Emulation rule
3) Afterwards save the rule with the name “Threat Emulation High-Critical”
A new folder User Defined Events appears:
©2016 Check Point Software Technologies Ltd. All rights reserved | Page 49 / 102
[Internal Use] for Check Point employees
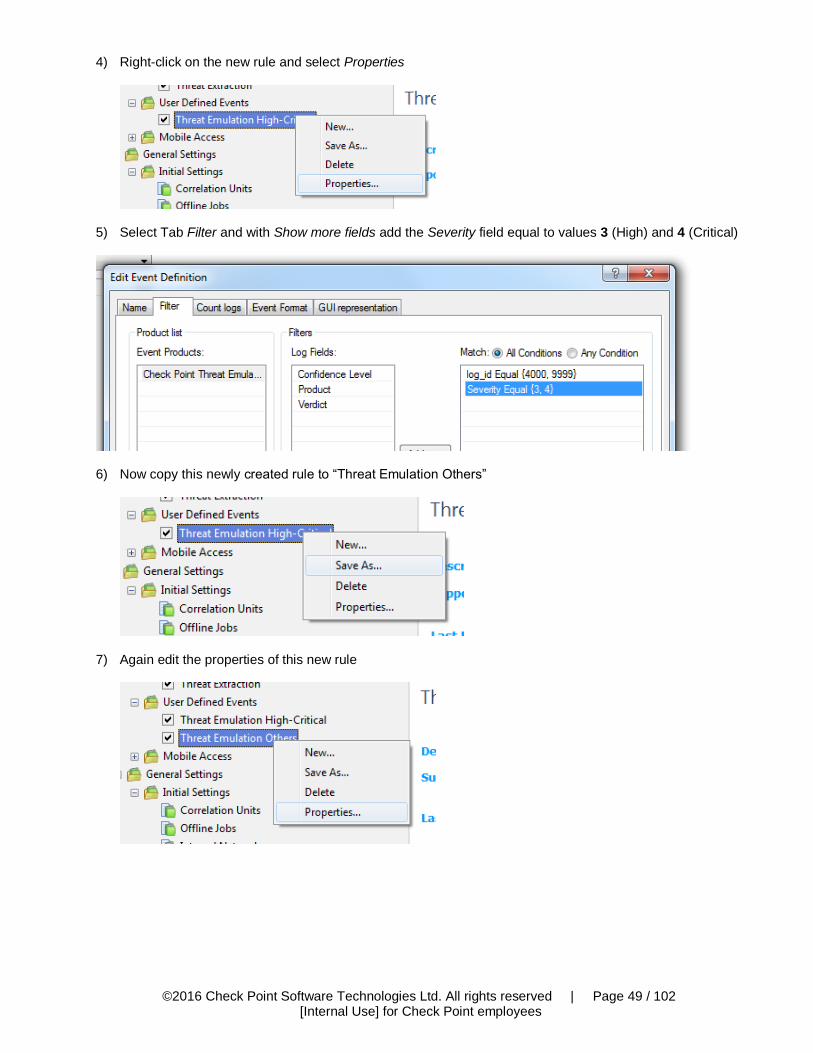
4) Right-click on the new rule and select Properties
5) Select Tab Filter and with Show more fields add the Severity field equal to values 3 (High) and 4 (Critical)
6) Now copy this newly created rule to “Threat Emulation Others”
7) Again edit the properties of this new rule
©2016 Check Point Software Technologies Ltd. All rights reserved | Page 50 / 102
[Internal Use] for Check Point employees
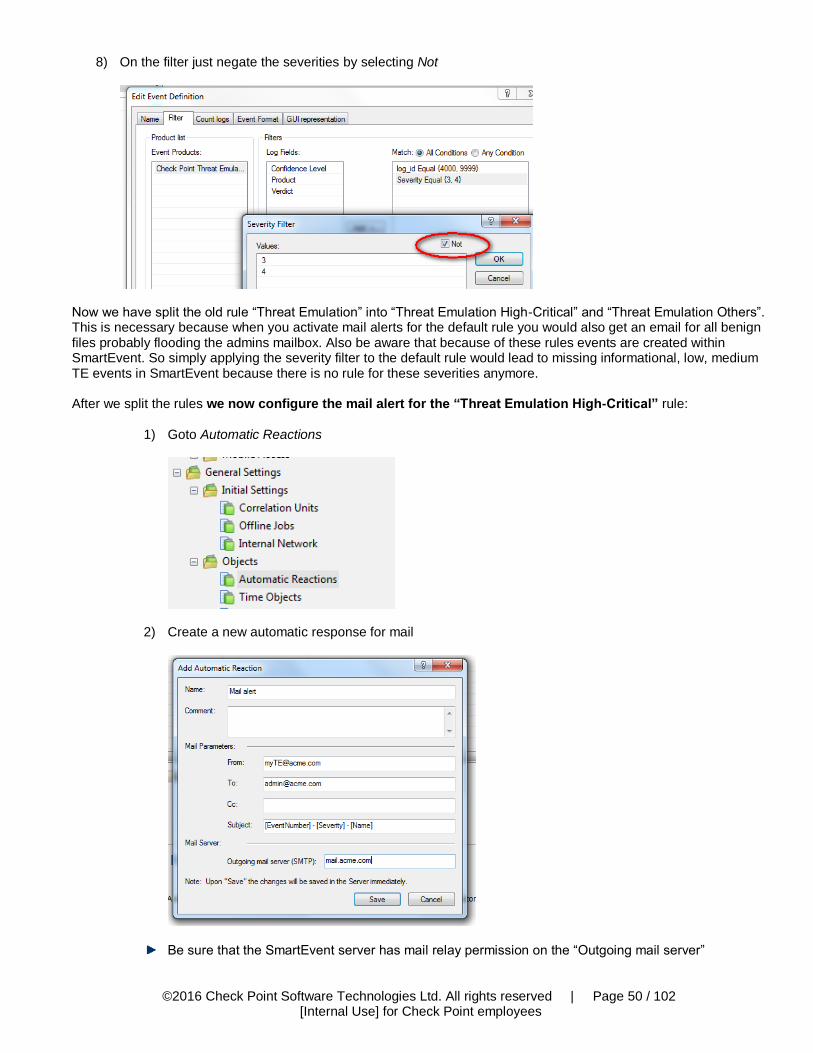
8) On the filter just negate the severities by selecting Not
Now we have split the old rule “Threat Emulation” into “Threat Emulation High-Critical” and “Threat Emulation Others”. This is necessary because when you activate mail alerts for the default rule you would also get an email for all benign files probably flooding the admins mailbox. Also be aware that because of these rules events are created within SmartEvent. So simply applying the severity filter to the default rule would lead to missing informational, low, medium TE events in SmartEvent because there is no rule for these severities anymore. After we split the rules we now configure the mail alert for the “Threat Emulation High-Critical” rule:
1) Goto Automatic Reactions
2) Create a new automatic response for mail
Be sure that the SmartEvent server has mail relay permission on the “Outgoing mail server”

©2016 Check Point Software Technologies Ltd. All rights reserved | Page 51 / 102
[Internal Use] for Check Point employees
3) Now add the newly created automatic response to the rule
4) Do not forget to install the SmartEvent policy once you are done with the changes
When using this be aware of the following limitation: https://supportcenter.checkpoint.com/supportcenter/portal?eventSubmit_doGoviewsolutiondetails=&solutionid=sk106392
©2016 Check Point Software Technologies Ltd. All rights reserved | Page 52 / 102
[Internal Use] for Check Point employees
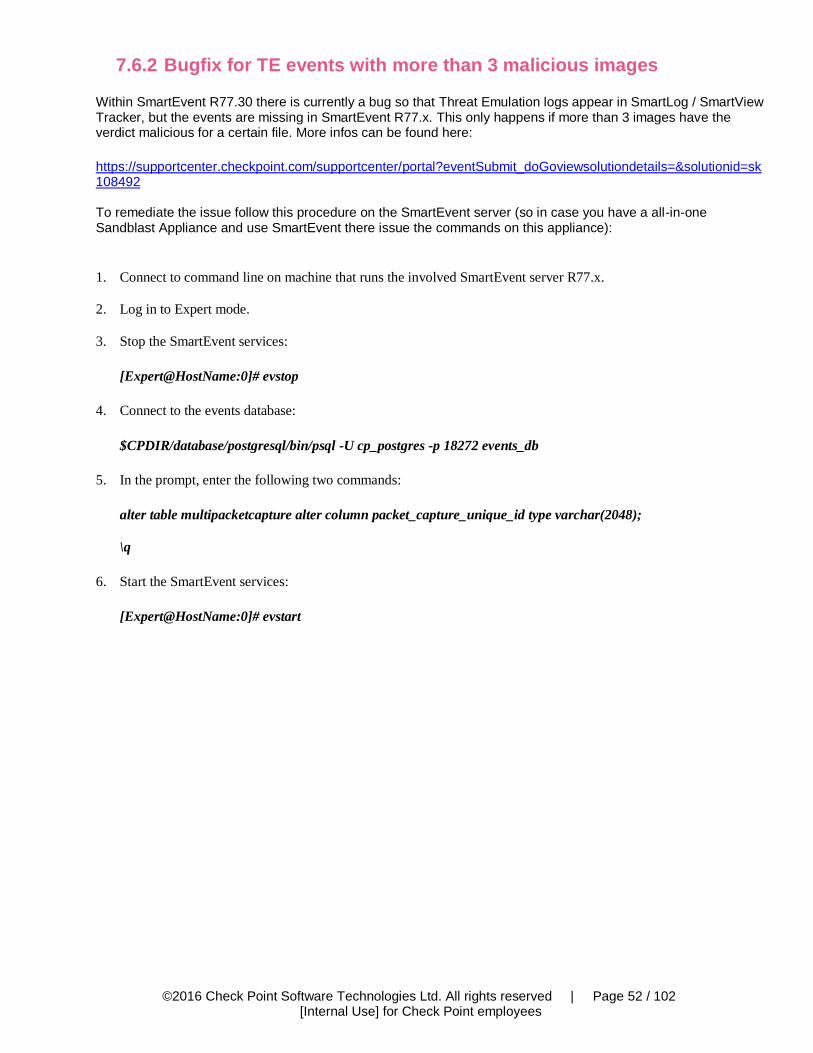
7.6.2 Bugfix for TE events with more than 3 malicious images
Within SmartEvent R77.30 there is currently a bug so that Threat Emulation logs appear in SmartLog / SmartView Tracker, but the events are missing in SmartEvent R77.x. This only happens if more than 3 images have the verdict malicious for a certain file. More infos can be found here:
https://supportcenter.checkpoint.com/supportcenter/portal?eventSubmit_doGoviewsolutiondetails=&solutionid=sk108492 To remediate the issue follow this procedure on the SmartEvent server (so in case you have a all-in-one Sandblast Appliance and use SmartEvent there issue the commands on this appliance):
1. Connect to command line on machine that runs the involved SmartEvent server R77.x.
2. Log in to Expert mode.
3. Stop the SmartEvent services:
[Expert@HostName:0]# evstop
4. Connect to the events database:
$CPDIR/database/postgresql/bin/psql -U cp_postgres -p 18272 events_db
5. In the prompt, enter the following two commands:
alter table multipacketcapture alter column packet_capture_unique_id type varchar(2048);
\q
6. Start the SmartEvent services:
[Expert@HostName:0]# evstart
©2016 Check Point Software Technologies Ltd. All rights reserved | Page 53 / 102
[Internal Use] for Check Point employees
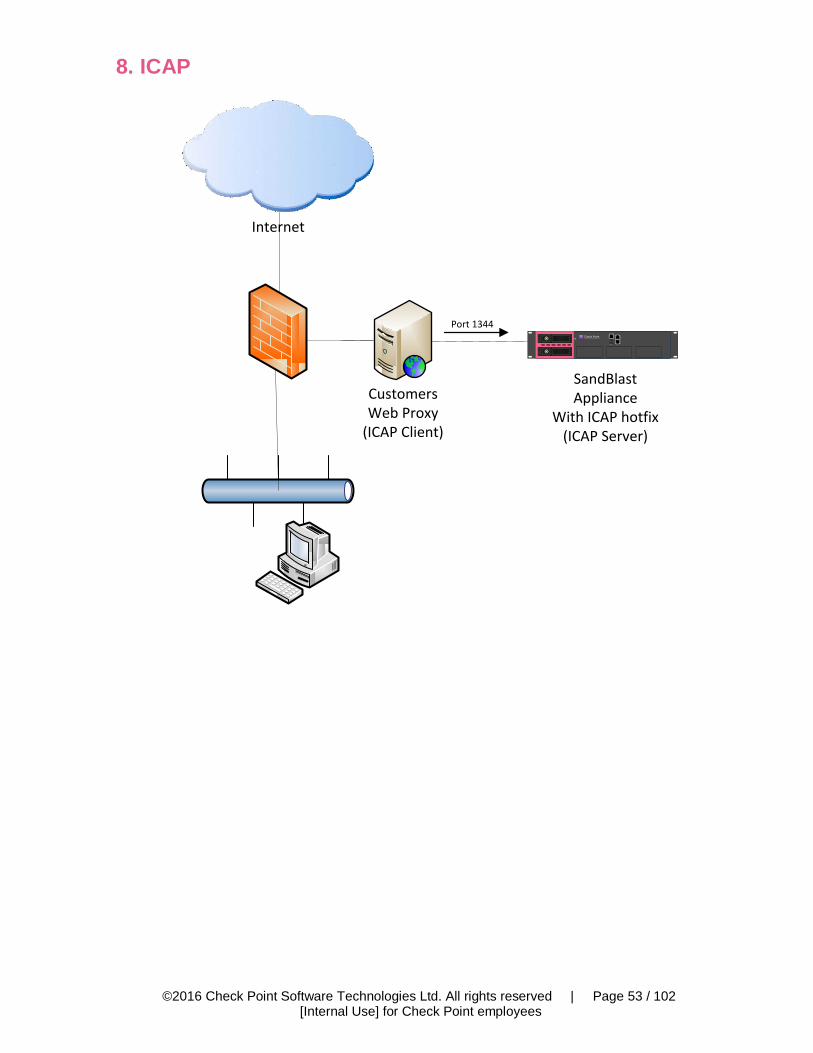
8. ICAP
Internet
SandBlast Appliance
With ICAP hotfix(ICAP Server)
CustomersWeb Proxy
(ICAP Client)
SOFT WARE T ECHNOLOGIES LT D.
Check Point
SYNC
CONSO LE
MGMT
Port 1344
©2016 Check Point Software Technologies Ltd. All rights reserved | Page 54 / 102
[Internal Use] for Check Point employees
8.1 ICAP Server The official ICAP Server SK mentions requirements, release notes and general information regarding the new ICAP server functionality. Check Point support for Internet Content Adaptation Protocol (ICAP) server https://supportcenter.checkpoint.com/supportcenter/portal?eventSubmit_doGoviewsolutiondetails=&solutionid=sk111306 ICAP Server is included since JHF 272.
Start: # icap_server start
Stop: # icap_server stop
Reconfiguration: # icap_server reconf
Note: (1) ICAP does not choose emulation images based on any of your TP profiles
(2) Choosing to emulate on all images will result in an attempt to emulate the files on all known images, even if some of them aren’t available. (3) “Recommended Images” means two images (Win7/Office2013, WinXP/Office2003-7)
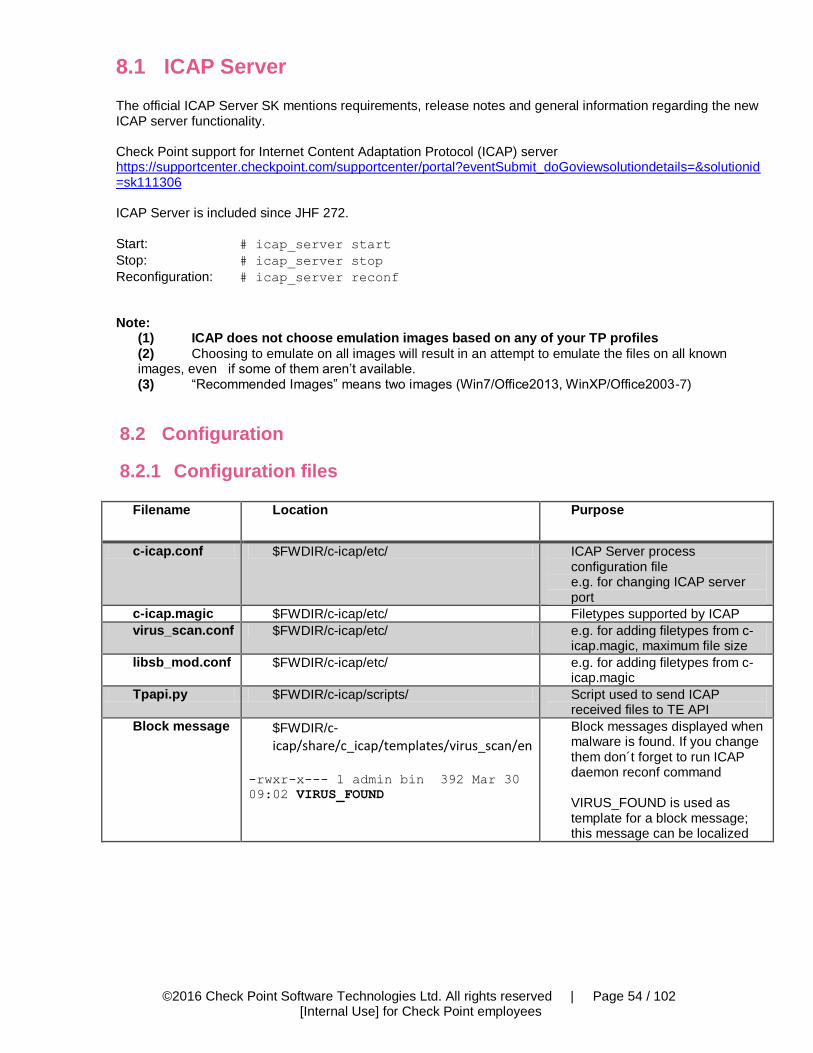
8.2 Configuration
8.2.1 Configuration files
Filename Location Purpose
c-icap.conf $FWDIR/c-icap/etc/ ICAP Server process configuration file e.g. for changing ICAP server port
c-icap.magic $FWDIR/c-icap/etc/ Filetypes supported by ICAP
virus_scan.conf $FWDIR/c-icap/etc/ e.g. for adding filetypes from c-icap.magic, maximum file size
libsb_mod.conf $FWDIR/c-icap/etc/ e.g. for adding filetypes from c-icap.magic
Tpapi.py $FWDIR/c-icap/scripts/ Script used to send ICAP received files to TE API
Block message $FWDIR/c-icap/share/c_icap/templates/virus_scan/en
-rwxr-x--- 1 admin bin 392 Mar 30
09:02 VIRUS_FOUND
Block messages displayed when malware is found. If you change them don´t forget to run ICAP daemon reconf command VIRUS_FOUND is used as template for a block message; this message can be localized

©2016 Check Point Software Technologies Ltd. All rights reserved | Page 55 / 102
[Internal Use] for Check Point employees
8.2.2 Configure emulation images
8.2.2.1 All or recommended images
Choose emulation on all images or only on recommended images:
1. Open for editing: $FWDIR/c-icap/etc/libsb_mod.conf
2. Change the field sb_mod.AllImages to off (for recommended) or on (for all)
8.2.2.2 Configure specific emulation images
Not officially supported but there is a way of selecting only specific images to emulate on:
Edit $FWDIR/c-icap/etc/libsb_mod.conf Change the field sb_mod.AllImages to on Edit $FWDIR/c-icap/scripts/TPAPI.py Add "#" in front of images you do not want to emulate on:
image_to_name = { # 'e50e99f3-5963-4573-af9e-e3f4750b55e2': 'WinXP,Office 2003/7,Adobe 9', '7e6fe36e-889e-4c25-8704-56378f0830df': 'Win7,Office 2003/7,Adobe 9', '8d188031-1010-4466-828b-0cd13d4303ff': 'Win7,Office 2010,Adobe 9.4', '5e5de275-a103-4f67-b55b-47532918fa59': 'Win7,Office 2013,Adobe 11', # '3ff3ddae-e7fd-4969-818c-d5f1a2be336d': 'Win7 64b,Office 2013,Adobe 11', # '6c453c9b-20f7-471a-956c-3198a868dc92': 'Win8.1 64b,Office 2013,Adobe 11', } te_images = [ # {'id': 'e50e99f3-5963-4573-af9e-e3f4750b55e2', 'revision': 1}, {'id': '7e6fe36e-889e-4c25-8704-56378f0830df', 'revision': 1}, {'id': '8d188031-1010-4466-828b-0cd13d4303ff', 'revision': 1}, {'id': '5e5de275-a103-4f67-b55b-47532918fa59', 'revision': 1}, # {'id': '3ff3ddae-e7fd-4969-818c-d5f1a2be336d', 'revision': 1}, # {'id': '6c453c9b-20f7-471a-956c-3198a868dc92', 'revision': 1}, ]
©2016 Check Point Software Technologies Ltd. All rights reserved | Page 56 / 102
[Internal Use] for Check Point employees
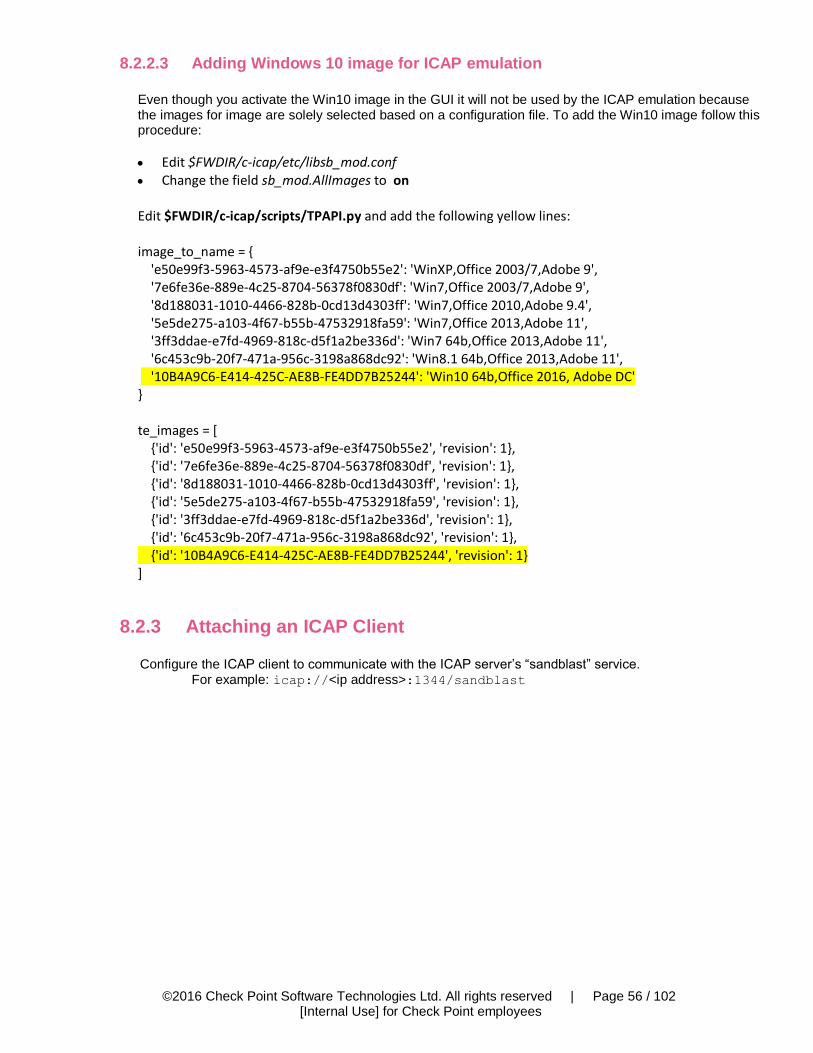
8.2.2.3 Adding Windows 10 image for ICAP emulation
Even though you activate the Win10 image in the GUI it will not be used by the ICAP emulation because the images for image are solely selected based on a configuration file. To add the Win10 image follow this procedure:
Edit $FWDIR/c-icap/etc/libsb_mod.conf Change the field sb_mod.AllImages to on Edit $FWDIR/c-icap/scripts/TPAPI.py and add the following yellow lines: image_to_name = { 'e50e99f3-5963-4573-af9e-e3f4750b55e2': 'WinXP,Office 2003/7,Adobe 9', '7e6fe36e-889e-4c25-8704-56378f0830df': 'Win7,Office 2003/7,Adobe 9', '8d188031-1010-4466-828b-0cd13d4303ff': 'Win7,Office 2010,Adobe 9.4', '5e5de275-a103-4f67-b55b-47532918fa59': 'Win7,Office 2013,Adobe 11', '3ff3ddae-e7fd-4969-818c-d5f1a2be336d': 'Win7 64b,Office 2013,Adobe 11', '6c453c9b-20f7-471a-956c-3198a868dc92': 'Win8.1 64b,Office 2013,Adobe 11', '10B4A9C6-E414-425C-AE8B-FE4DD7B25244': 'Win10 64b,Office 2016, Adobe DC' } te_images = [ {'id': 'e50e99f3-5963-4573-af9e-e3f4750b55e2', 'revision': 1}, {'id': '7e6fe36e-889e-4c25-8704-56378f0830df', 'revision': 1}, {'id': '8d188031-1010-4466-828b-0cd13d4303ff', 'revision': 1}, {'id': '5e5de275-a103-4f67-b55b-47532918fa59', 'revision': 1}, {'id': '3ff3ddae-e7fd-4969-818c-d5f1a2be336d', 'revision': 1}, {'id': '6c453c9b-20f7-471a-956c-3198a868dc92', 'revision': 1}, {'id': '10B4A9C6-E414-425C-AE8B-FE4DD7B25244', 'revision': 1} ]
8.2.3 Attaching an ICAP Client
Configure the ICAP client to communicate with the ICAP server’s “sandblast” service. For example: icap://<ip address>:1344/sandblast

©2016 Check Point Software Technologies Ltd. All rights reserved | Page 57 / 102
[Internal Use] for Check Point employees
8.3 Logging
8.3.1 General logging
Logging is limited to the following log files – so no ICAP daemon logs in the GUI/SmartLog: $FWDIR/log/c-icap/server.log
$FWDIR/log/c-icap/access.log
Highly Recommended To extend the by default limited access log follow these steps:
2) vi /opt/CPsuite-R77/fw1/c-icap/etc/c-icap.conf 3) Search for “AccessLog /opt/CPsuite-R77/fw1/log/c-icap/access.log” 4) Add this line before the abaove finding:
LogFormat accessFormat "%tl, %la %a %im %iu %is %huo '%<ho' '%{X-Infection-Found}<ih'" 5) Change the AccessLog line to:
AccessLog /opt/CPsuite-R77/fw1/log/c-icap/access.log accessFormat
So the section in c-icap.conf should now look like this:
LogFormat accessFormat "%tl, %la %a %im %iu %is %huo '%<ho' '%{X-Infection-Found}<ih'"
AccessLog /opt/CPsuite-R77/fw1/log/c-icap/access.log accessFormat
8.3.2 Enable logging of benign files Enable/Disable logs on benign files: 1. Open for editing: $FWDIR/c-icap/etc/libsb_mod.conf
2. Change the field sb_mod.LogBenign to on
8.3.3 Debug logging
To enable debug logging:
1. Open for editing: $FWDIR/c-icap/etc/c-icap.conf
2. Change DebugLevel value to: 7
3. Restart the c-icap service.
Note ! Enabling debug logs can affect performance.
©2016 Check Point Software Technologies Ltd. All rights reserved | Page 58 / 102
[Internal Use] for Check Point employees
8.4 ICAP daemon troubleshooting
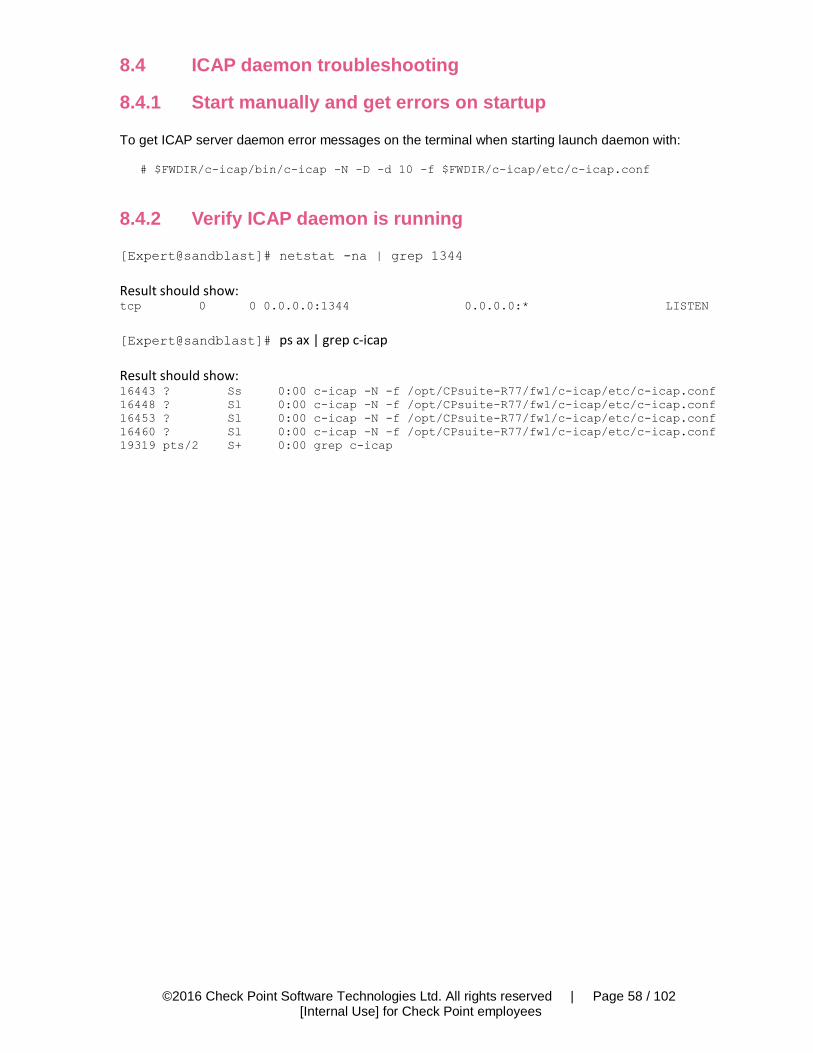
8.4.1 Start manually and get errors on startup
To get ICAP server daemon error messages on the terminal when starting launch daemon with:
# $FWDIR/c-icap/bin/c-icap -N -D -d 10 -f $FWDIR/c-icap/etc/c-icap.conf
8.4.2 Verify ICAP daemon is running
[Expert@sandblast]# netstat -na | grep 1344
Result should show: tcp 0 0 0.0.0.0:1344 0.0.0.0:* LISTEN
[Expert@sandblast]# ps ax | grep c-icap Result should show: 16443 ? Ss 0:00 c-icap -N -f /opt/CPsuite-R77/fw1/c-icap/etc/c-icap.conf
16448 ? Sl 0:00 c-icap -N -f /opt/CPsuite-R77/fw1/c-icap/etc/c-icap.conf
16453 ? Sl 0:00 c-icap -N -f /opt/CPsuite-R77/fw1/c-icap/etc/c-icap.conf
16460 ? Sl 0:00 c-icap -N -f /opt/CPsuite-R77/fw1/c-icap/etc/c-icap.conf
19319 pts/2 S+ 0:00 grep c-icap
©2016 Check Point Software Technologies Ltd. All rights reserved | Page 59 / 102
[Internal Use] for Check Point employees
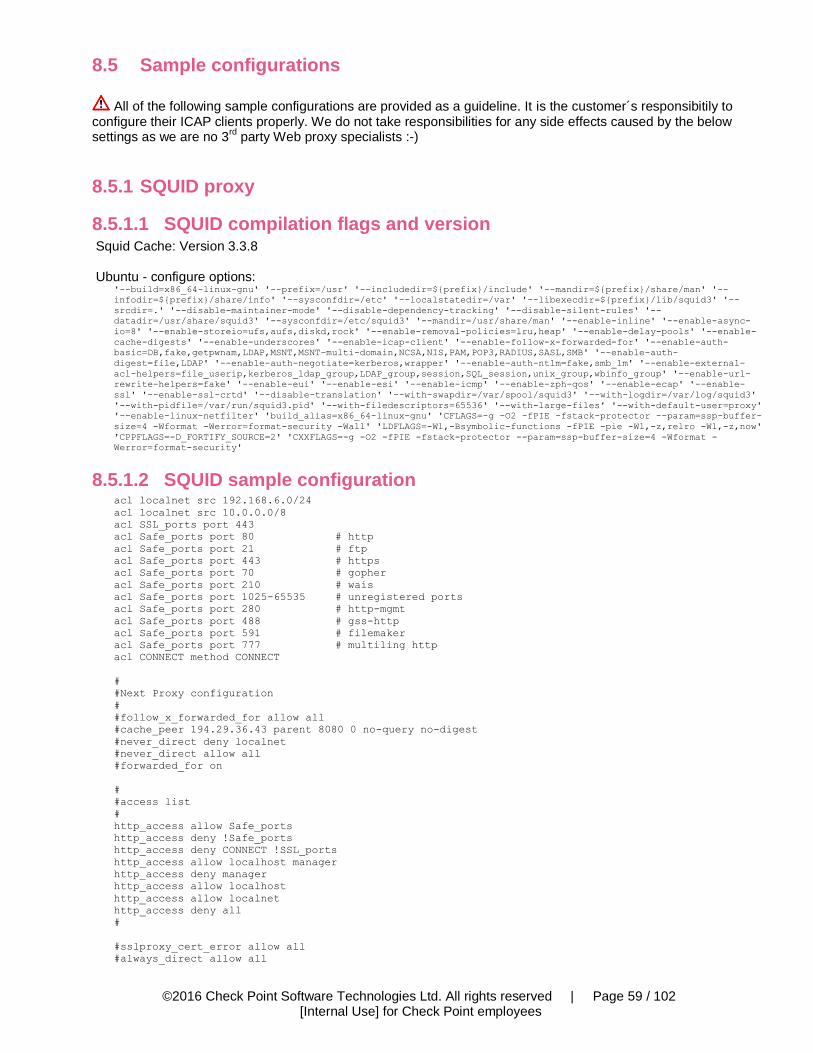
8.5 Sample configurations
All of the following sample configurations are provided as a guideline. It is the customer´s responsibitily to configure their ICAP clients properly. We do not take responsibilities for any side effects caused by the below settings as we are no 3
rd party Web proxy specialists :-)
8.5.1 SQUID proxy
8.5.1.1 SQUID compilation flags and version Squid Cache: Version 3.3.8 Ubuntu - configure options:
'--build=x86_64-linux-gnu' '--prefix=/usr' '--includedir=${prefix}/include' '--mandir=${prefix}/share/man' '--
infodir=${prefix}/share/info' '--sysconfdir=/etc' '--localstatedir=/var' '--libexecdir=${prefix}/lib/squid3' '--
srcdir=.' '--disable-maintainer-mode' '--disable-dependency-tracking' '--disable-silent-rules' '--
datadir=/usr/share/squid3' '--sysconfdir=/etc/squid3' '--mandir=/usr/share/man' '--enable-inline' '--enable-async-
io=8' '--enable-storeio=ufs,aufs,diskd,rock' '--enable-removal-policies=lru,heap' '--enable-delay-pools' '--enable-
cache-digests' '--enable-underscores' '--enable-icap-client' '--enable-follow-x-forwarded-for' '--enable-auth-
basic=DB,fake,getpwnam,LDAP,MSNT,MSNT-multi-domain,NCSA,NIS,PAM,POP3,RADIUS,SASL,SMB' '--enable-auth-
digest=file,LDAP' '--enable-auth-negotiate=kerberos,wrapper' '--enable-auth-ntlm=fake,smb_lm' '--enable-external-
acl-helpers=file_userip,kerberos_ldap_group,LDAP_group,session,SQL_session,unix_group,wbinfo_group' '--enable-url-
rewrite-helpers=fake' '--enable-eui' '--enable-esi' '--enable-icmp' '--enable-zph-qos' '--enable-ecap' '--enable-
ssl' '--enable-ssl-crtd' '--disable-translation' '--with-swapdir=/var/spool/squid3' '--with-logdir=/var/log/squid3'
'--with-pidfile=/var/run/squid3.pid' '--with-filedescriptors=65536' '--with-large-files' '--with-default-user=proxy'
'--enable-linux-netfilter' 'build_alias=x86_64-linux-gnu' 'CFLAGS=-g -O2 -fPIE -fstack-protector --param=ssp-buffer-
size=4 -Wformat -Werror=format-security -Wall' 'LDFLAGS=-Wl,-Bsymbolic-functions -fPIE -pie -Wl,-z,relro -Wl,-z,now'
'CPPFLAGS=-D_FORTIFY_SOURCE=2' 'CXXFLAGS=-g -O2 -fPIE -fstack-protector --param=ssp-buffer-size=4 -Wformat -
Werror=format-security'
8.5.1.2 SQUID sample configuration acl localnet src 192.168.6.0/24
acl localnet src 10.0.0.0/8
acl SSL_ports port 443
acl Safe_ports port 80 # http
acl Safe_ports port 21 # ftp
acl Safe_ports port 443 # https
acl Safe_ports port 70 # gopher
acl Safe_ports port 210 # wais
acl Safe_ports port 1025-65535 # unregistered ports
acl Safe_ports port 280 # http-mgmt
acl Safe_ports port 488 # gss-http
acl Safe_ports port 591 # filemaker
acl Safe_ports port 777 # multiling http
acl CONNECT method CONNECT
#
#Next Proxy configuration
#
#follow_x_forwarded_for allow all
#cache_peer 194.29.36.43 parent 8080 0 no-query no-digest
#never_direct deny localnet
#never_direct allow all
#forwarded_for on
#
#access list
#
http_access allow Safe_ports
http_access deny !Safe_ports
http_access deny CONNECT !SSL_ports
http_access allow localhost manager
http_access deny manager
http_access allow localhost
http_access allow localnet
http_access deny all
#
#sslproxy_cert_error allow all
#always_direct allow all
©2016 Check Point Software Technologies Ltd. All rights reserved | Page 60 / 102
[Internal Use] for Check Point employees
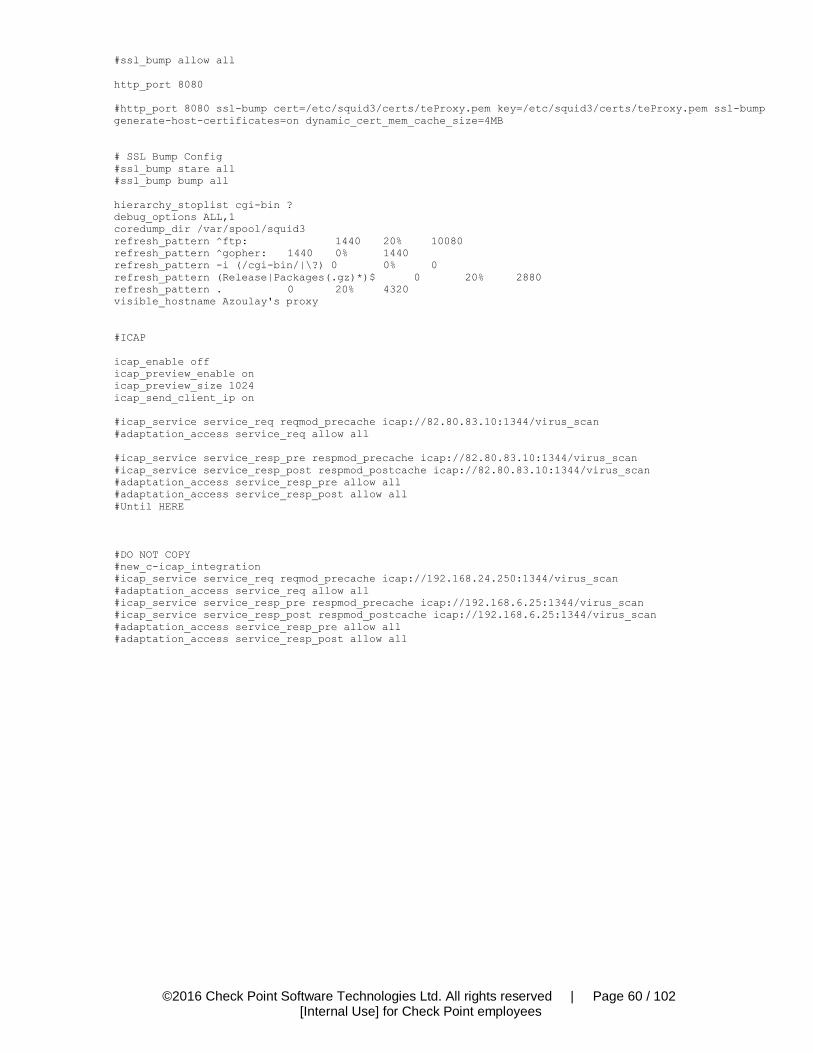
#ssl_bump allow all
http_port 8080
#http_port 8080 ssl-bump cert=/etc/squid3/certs/teProxy.pem key=/etc/squid3/certs/teProxy.pem ssl-bump
generate-host-certificates=on dynamic_cert_mem_cache_size=4MB
# SSL Bump Config
#ssl_bump stare all
#ssl_bump bump all
hierarchy_stoplist cgi-bin ?
debug_options ALL,1
coredump_dir /var/spool/squid3
refresh_pattern ^ftp: 1440 20% 10080
refresh_pattern ^gopher: 1440 0% 1440
refresh_pattern -i (/cgi-bin/|\?) 0 0% 0
refresh_pattern (Release|Packages(.gz)*)$ 0 20% 2880
refresh_pattern . 0 20% 4320
visible_hostname Azoulay's proxy
#ICAP
icap_enable off
icap_preview_enable on
icap_preview_size 1024
icap_send_client_ip on
#icap_service service_req reqmod_precache icap://82.80.83.10:1344/virus_scan
#adaptation_access service_req allow all
#icap_service service_resp_pre respmod_precache icap://82.80.83.10:1344/virus_scan
#icap_service service_resp_post respmod_postcache icap://82.80.83.10:1344/virus_scan
#adaptation_access service_resp_pre allow all
#adaptation_access service_resp_post allow all
#Until HERE
#DO NOT COPY
#new_c-icap_integration
#icap_service service_req reqmod_precache icap://192.168.24.250:1344/virus_scan
#adaptation_access service_req allow all
#icap_service service_resp_pre respmod_precache icap://192.168.6.25:1344/virus_scan
#icap_service service_resp_post respmod_postcache icap://192.168.6.25:1344/virus_scan
#adaptation_access service_resp_pre allow all
#adaptation_access service_resp_post allow all

©2016 Check Point Software Technologies Ltd. All rights reserved | Page 61 / 102
[Internal Use] for Check Point employees
8.5.2 McAfee Web Gateway 7.6 Below settings will be enorced by the McAfee Web Gateway in PREVENT mode meaning it will wait for the TE´s answer until emulation is completed. If you need a “background” scanning configuration for McAfee Web Gateway and the customer does not know how to implement this please contact us via our mailing list.
8.5.2.1 Configuring the Check Point ICAP Server Use our default settings as described in the ICAP release notes.
©2016 Check Point Software Technologies Ltd. All rights reserved | Page 62 / 102
[Internal Use] for Check Point employees
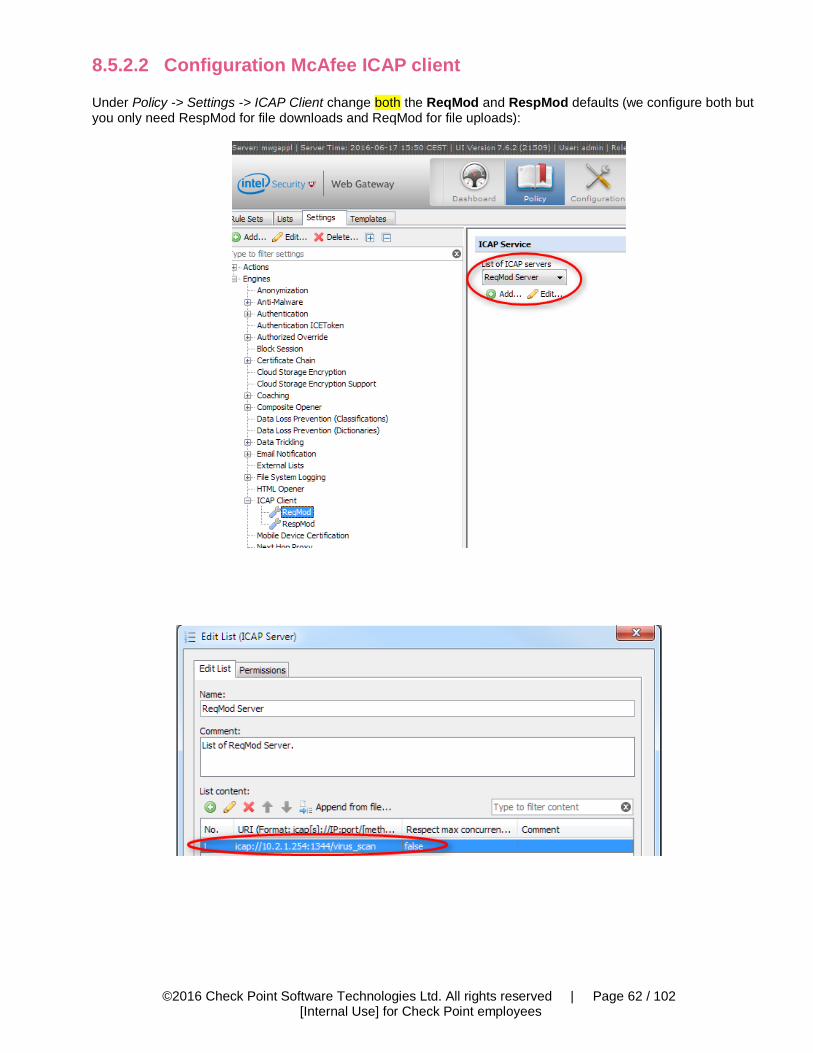
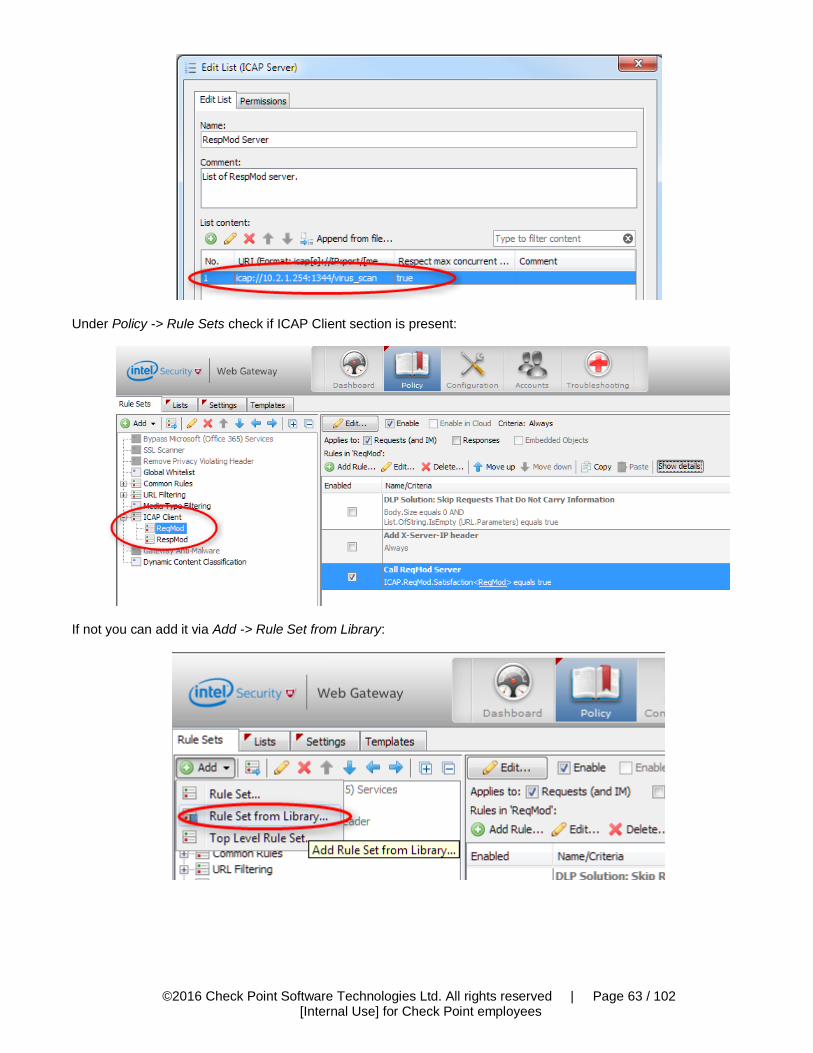
8.5.2.2 Configuration McAfee ICAP client Under Policy -> Settings -> ICAP Client change both the ReqMod and RespMod defaults (we configure both but you only need RespMod for file downloads and ReqMod for file uploads):
©2016 Check Point Software Technologies Ltd. All rights reserved | Page 63 / 102
[Internal Use] for Check Point employees
Under Policy -> Rule Sets check if ICAP Client section is present:
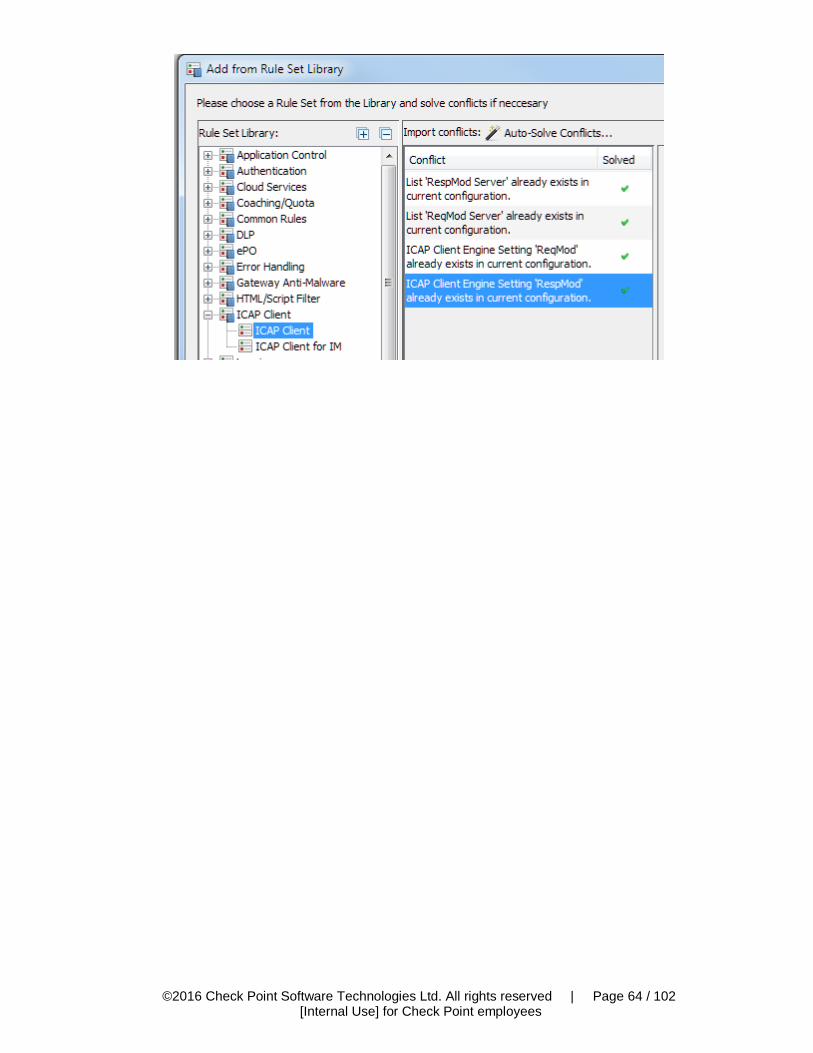
If not you can add it via Add -> Rule Set from Library:
©2016 Check Point Software Technologies Ltd. All rights reserved | Page 64 / 102
[Internal Use] for Check Point employees

©2016 Check Point Software Technologies Ltd. All rights reserved | Page 65 / 102
[Internal Use] for Check Point employees
To edit the imported rule set “Unlock View”:
You can disable “ReqMod” is it is not needed to pass downloaded files (only for file uploads):
©2016 Check Point Software Technologies Ltd. All rights reserved | Page 66 / 102
[Internal Use] for Check Point employees
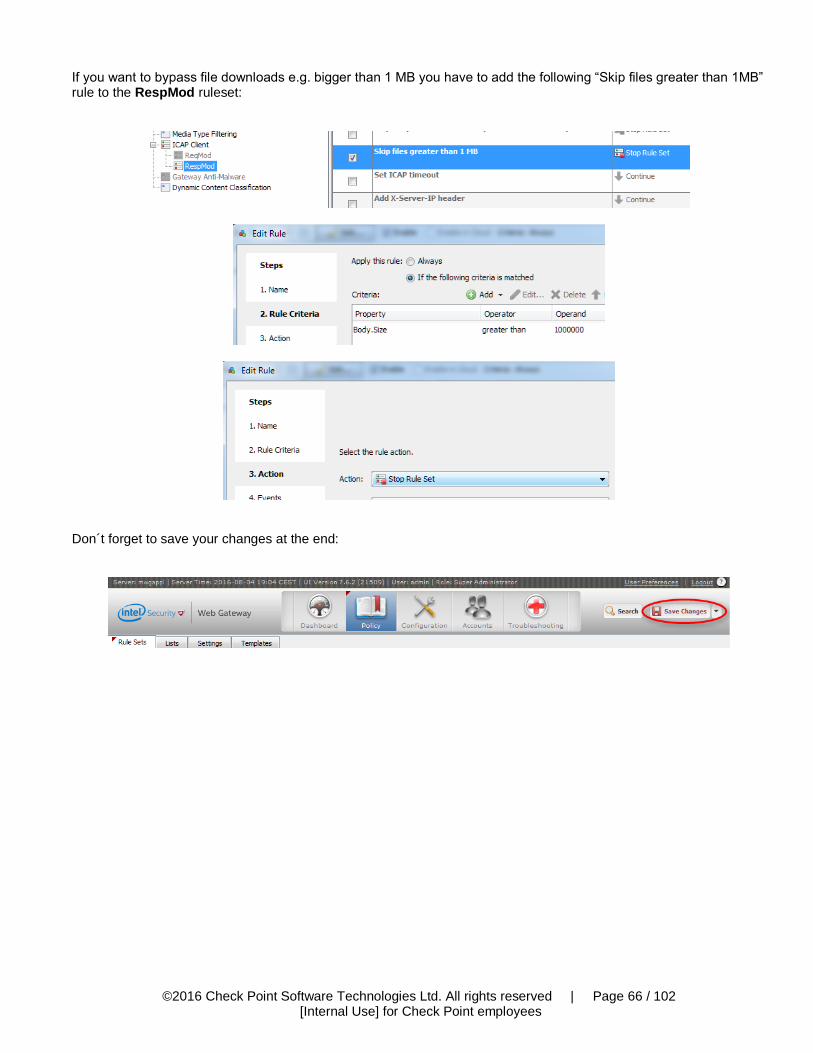
If you want to bypass file downloads e.g. bigger than 1 MB you have to add the following “Skip files greater than 1MB” rule to the RespMod ruleset:
Don´t forget to save your changes at the end:
©2016 Check Point Software Technologies Ltd. All rights reserved | Page 67 / 102
[Internal Use] for Check Point employees
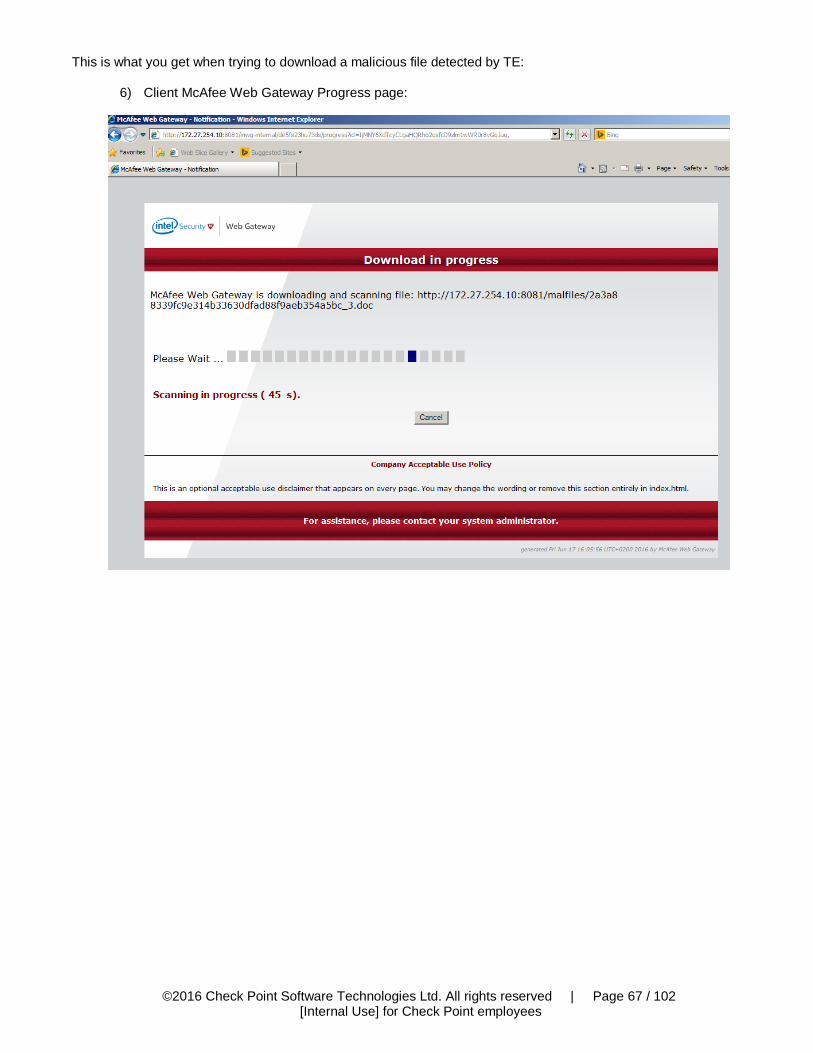
This is what you get when trying to download a malicious file detected by TE:
6) Client McAfee Web Gateway Progress page:
©2016 Check Point Software Technologies Ltd. All rights reserved | Page 68 / 102
[Internal Use] for Check Point employees
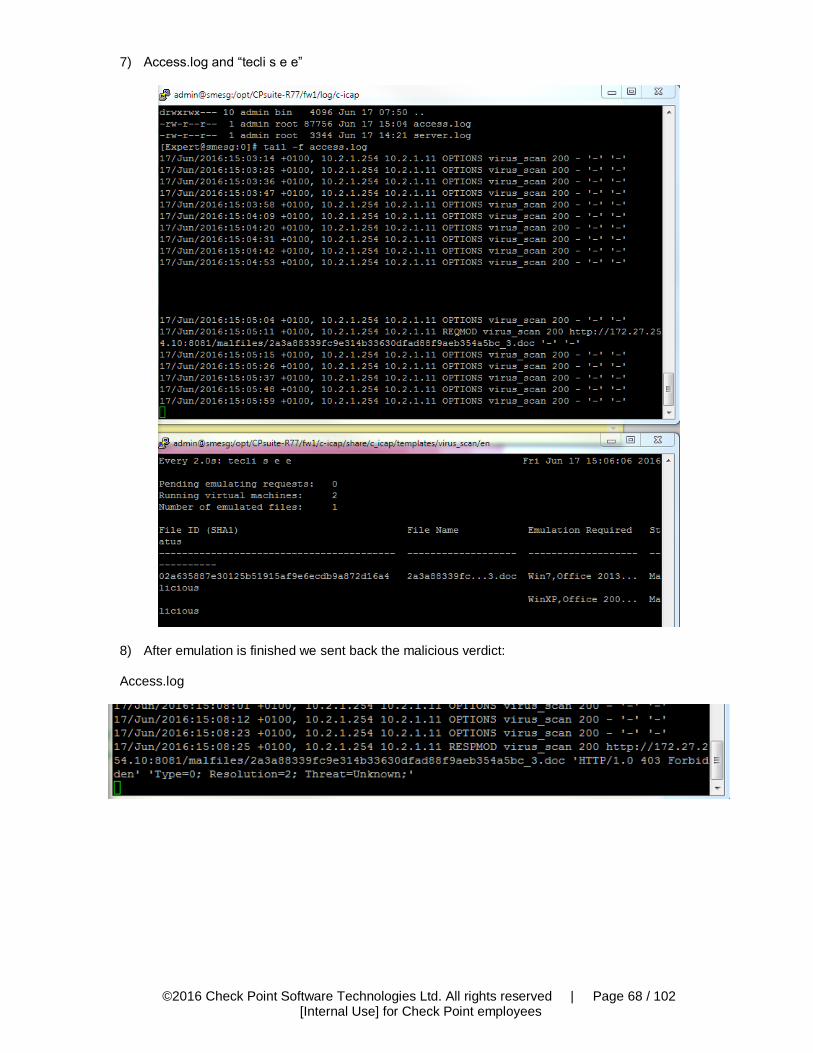
7) Access.log and “tecli s e e”
8) After emulation is finished we sent back the malicious verdict:
Access.log
©2016 Check Point Software Technologies Ltd. All rights reserved | Page 69 / 102
[Internal Use] for Check Point employees
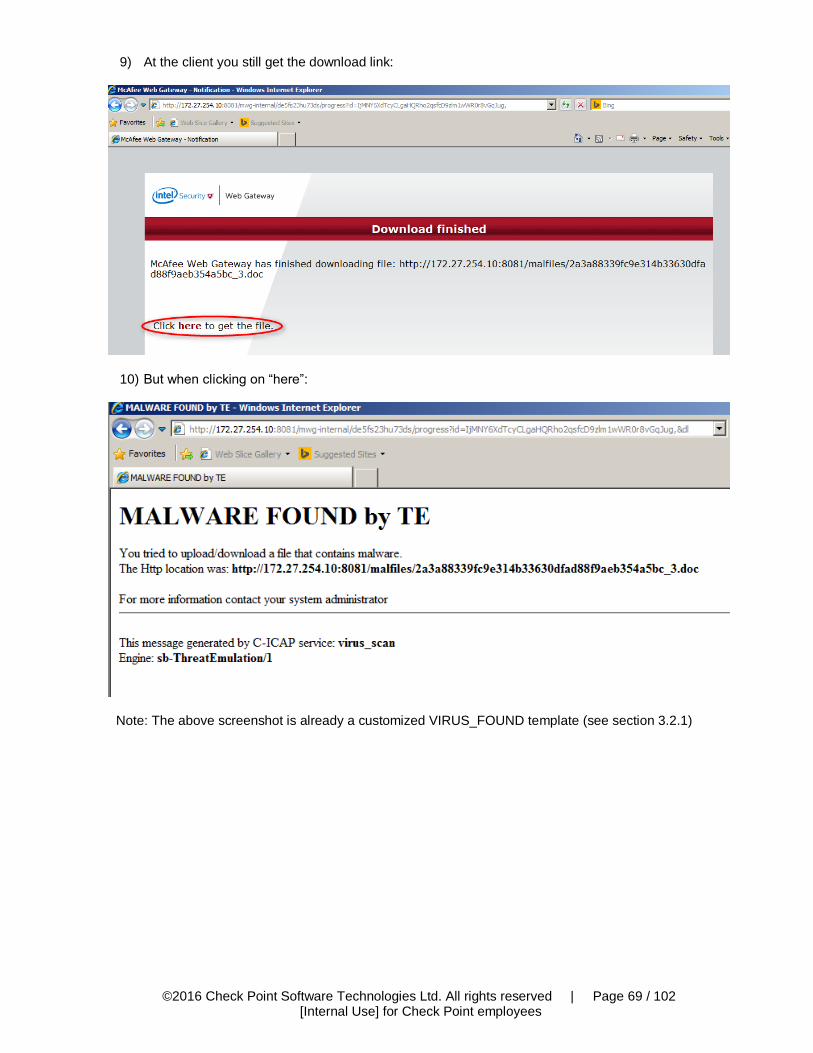
9) At the client you still get the download link:
10) But when clicking on “here”:
Note: The above screenshot is already a customized VIRUS_FOUND template (see section 3.2.1)
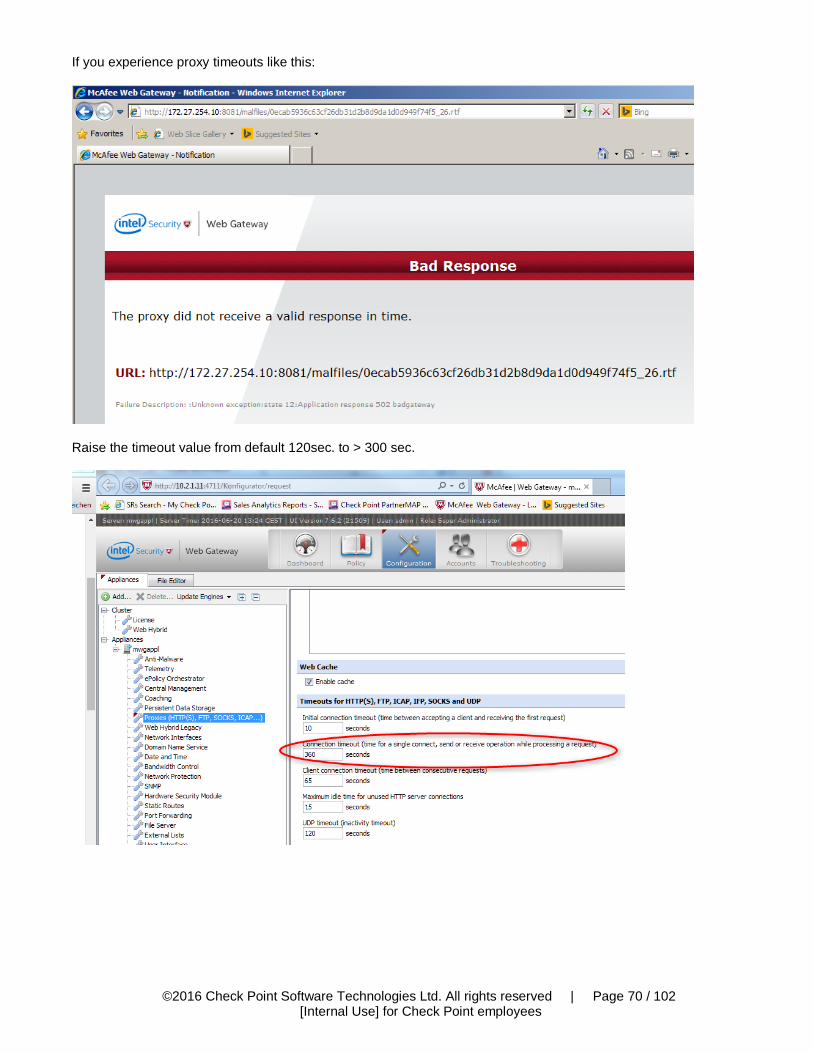
©2016 Check Point Software Technologies Ltd. All rights reserved | Page 70 / 102
[Internal Use] for Check Point employees
If you experience proxy timeouts like this:
Raise the timeout value from default 120sec. to > 300 sec.
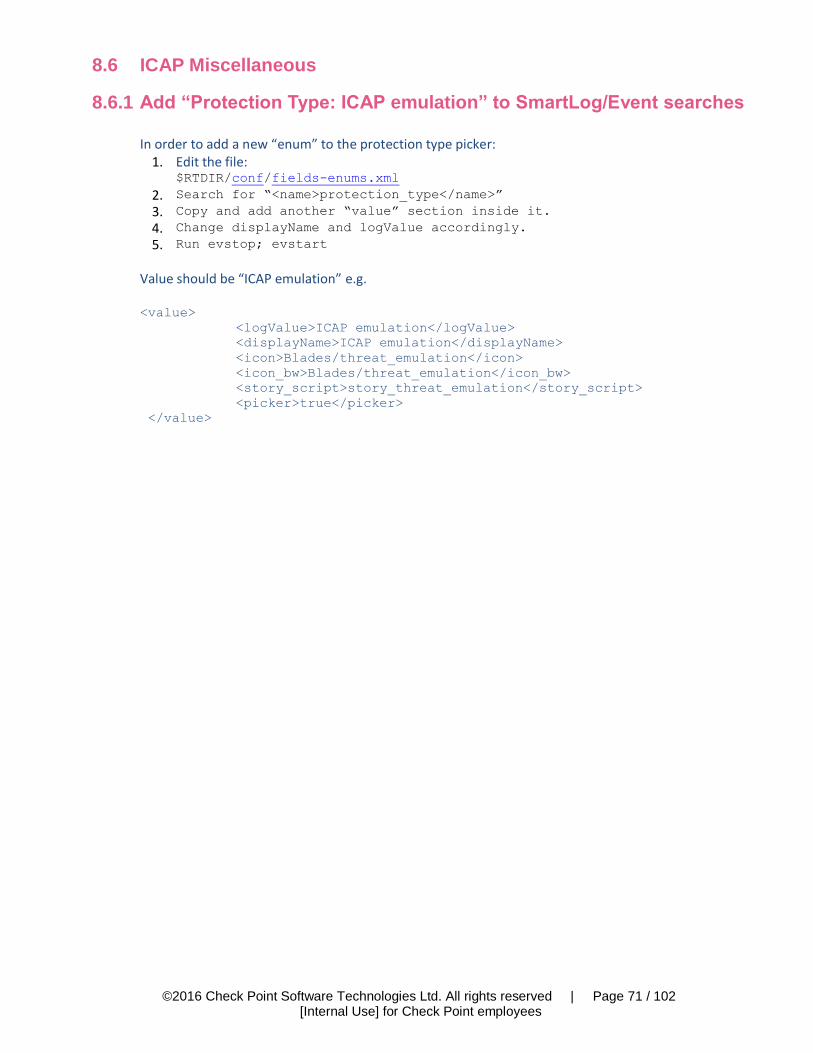
©2016 Check Point Software Technologies Ltd. All rights reserved | Page 71 / 102
[Internal Use] for Check Point employees
8.6 ICAP Miscellaneous
8.6.1 Add “Protection Type: ICAP emulation” to SmartLog/Event searches
In order to add a new “enum” to the protection type picker:
1. Edit the file: $RTDIR/conf/fields-enums.xml
2. Search for “<name>protection_type</name>” 3. Copy and add another “value” section inside it. 4. Change displayName and logValue accordingly. 5. Run evstop; evstart
Value should be “ICAP emulation” e.g. <value>
<logValue>ICAP emulation</logValue>
<displayName>ICAP emulation</displayName>
<icon>Blades/threat_emulation</icon>
<icon_bw>Blades/threat_emulation</icon_bw>
<story_script>story_threat_emulation</story_script>
<picker>true</picker>
</value>

©2016 Check Point Software Technologies Ltd. All rights reserved | Page 72 / 102
[Internal Use] for Check Point employees
8.6.2 Access.log – available log variables
Source http://c-icap.sourceforge.net/c-icap.conf-0.4.x.html#tag_LogFormat_ LogFormat
Format: LogFormat Name Format
Description: Name is a name for this log format. Format is a string with embedded % format codes. % format codes has the following form: % [-] [width] [{argument}] formatcode if - is specified then the output is left aligned if width specified then the field is exactly width size some formatcodes support arguments given as {argument} Format codes: %a: Remote IP-Address %la: Local IP Address %lp: Local port %>a: Http Client IP Address. Only supported if the proxy client supports the "X-Client-IP" header %<A: Http Server IP Address. Only supported if the proxy client supports the "X-Server-IP" header %ts: Seconds since epoch %tl: Local time. Supports optional strftime format argument %tg: GMT time. Supports optional strftime format argument %>ho: Modified Http request header. Supports header name as argument. If no argument given the first line returned %huo: Modified Http request url %<ho: Modified Http reply header. Supports header name as argument. If no argument given the first line returned %iu: Icap request url %im: Icap method %is: Icap status code %>ih: Icap request header. Supports header name as argument. If no argument given the first line returned %<ih: Icap response header. Supports header name as argument. If no argument given the first line returned %Ih: Http bytes received %Oh: Http bytes sent %Ib: Http body bytes received %Ob: Http body bytes sent %I: Bytes received %O: Bytes sent %bph: The first 5 bytes of the body preview data. Non printable characters printed in hex form. Supports the number of bytes to output as argument. %un: Username %Sl: Service log string %Sa: Attribute value set by service. The attribute name must given as argument.
Default: None set
Example: LogFormat myFormat "%tl, %a %im %iu %is %I %O %Ib %Ob %{10}bph"
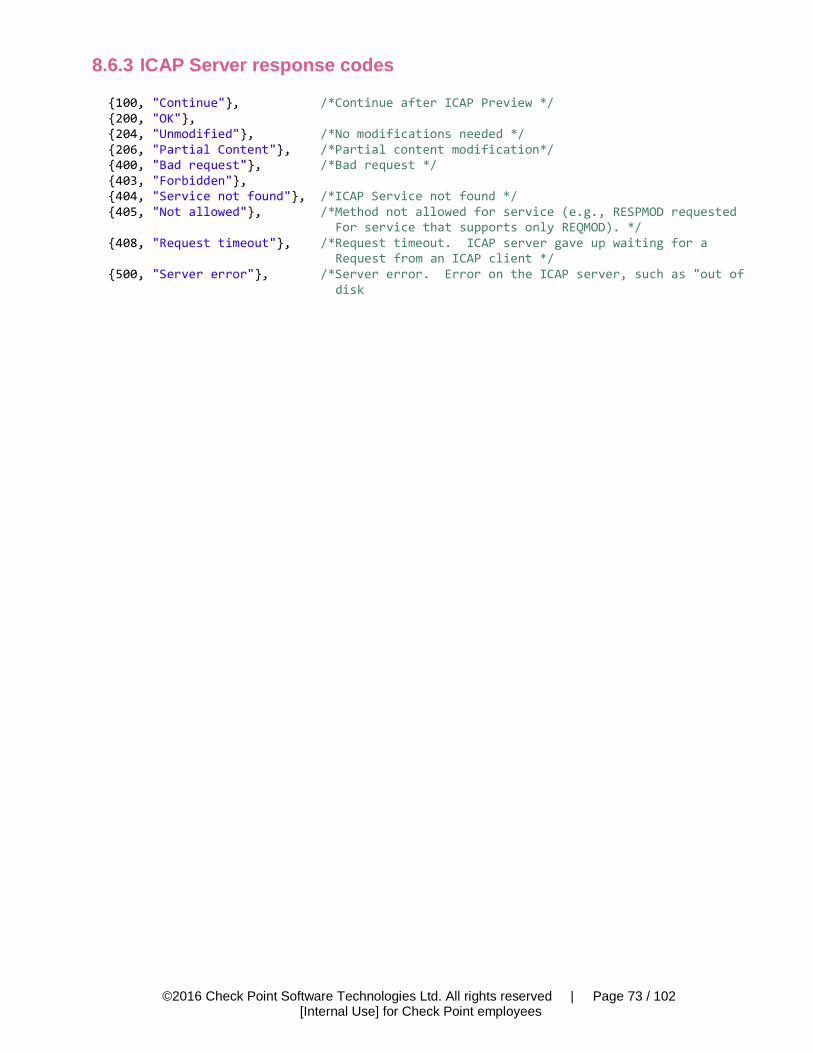
©2016 Check Point Software Technologies Ltd. All rights reserved | Page 73 / 102
[Internal Use] for Check Point employees
8.6.3 ICAP Server response codes
{100, "Continue"}, /*Continue after ICAP Preview */ {200, "OK"}, {204, "Unmodified"}, /*No modifications needed */ {206, "Partial Content"}, /*Partial content modification*/ {400, "Bad request"}, /*Bad request */ {403, "Forbidden"}, {404, "Service not found"}, /*ICAP Service not found */ {405, "Not allowed"}, /*Method not allowed for service (e.g., RESPMOD requested
For service that supports only REQMOD). */ {408, "Request timeout"}, /*Request timeout. ICAP server gave up waiting for a
Request from an ICAP client */ {500, "Server error"}, /*Server error. Error on the ICAP server, such as "out of
disk
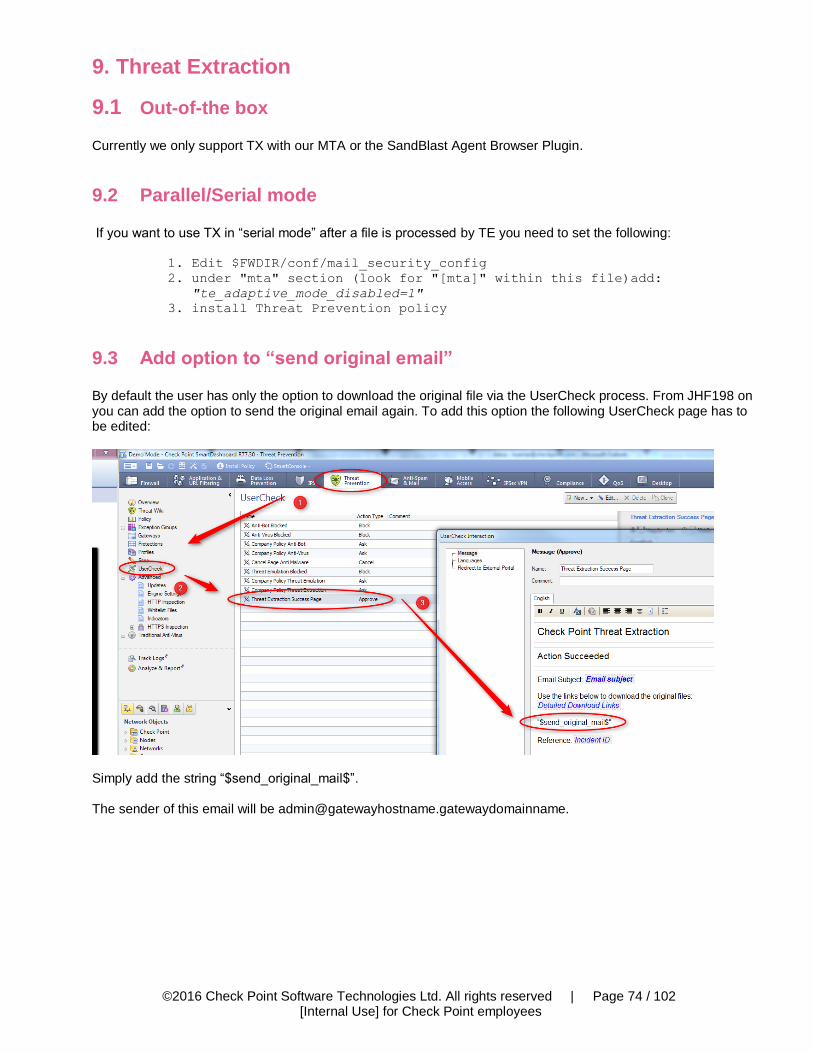
©2016 Check Point Software Technologies Ltd. All rights reserved | Page 74 / 102
[Internal Use] for Check Point employees
9. Threat Extraction
9.1 Out-of-the box
Currently we only support TX with our MTA or the SandBlast Agent Browser Plugin.
9.2 Parallel/Serial mode If you want to use TX in “serial mode” after a file is processed by TE you need to set the following:
1. Edit $FWDIR/conf/mail_security_config 2. under "mta" section (look for "[mta]" within this file)add:
"te_adaptive_mode_disabled=1"
3. install Threat Prevention policy
9.3 Add option to “send original email”
By default the user has only the option to download the original file via the UserCheck process. From JHF198 on you can add the option to send the original email again. To add this option the following UserCheck page has to be edited:
Simply add the string “$send_original_mail$”. The sender of this email will be [email protected].

©2016 Check Point Software Technologies Ltd. All rights reserved | Page 75 / 102
[Internal Use] for Check Point employees
9.4 Demo via Web Browser Plugin
Another way to demo Threat Extraction is to activate the TX Browser Plugin. The Plugin currently also supports uploading files to TE. To use the TX browser plug-in with a local Sandblast appliance you need to follow this SK: https://supportcenter.checkpoint.com/supportcenter/portal?eventSubmit_doGoviewsolutiondetails=&solutionid=sk108695
You can also use the available SandBlast Partner Training Kit for demoing the web browser extension.
9.5 Demo with MTA environment
For demoing TEX with MTA we recommend using the available SandBlast Partner Training Kit.

©2016 Check Point Software Technologies Ltd. All rights reserved | Page 76 / 102
[Internal Use] for Check Point employees
10. TE/TX API
10.1 TE API documentation
API reference guide can be found here: https://community.checkpoint.com/community/threat-prevention/sandblast-api
10.2 Enabling API ports TE API port is enabled by default to listen on port 18194 when enabling the TE blade on an appliance. TX API port must be manually enabled one:
Enabling SCRUBD (responsible to provide Threat Extraction) to listen on port 18195 To enable SCRUBD API port search for “enable_scrub_web_service” in GUIDBEDIT and set the value to “true”
Also look for further entries with "enable_scrub_service"
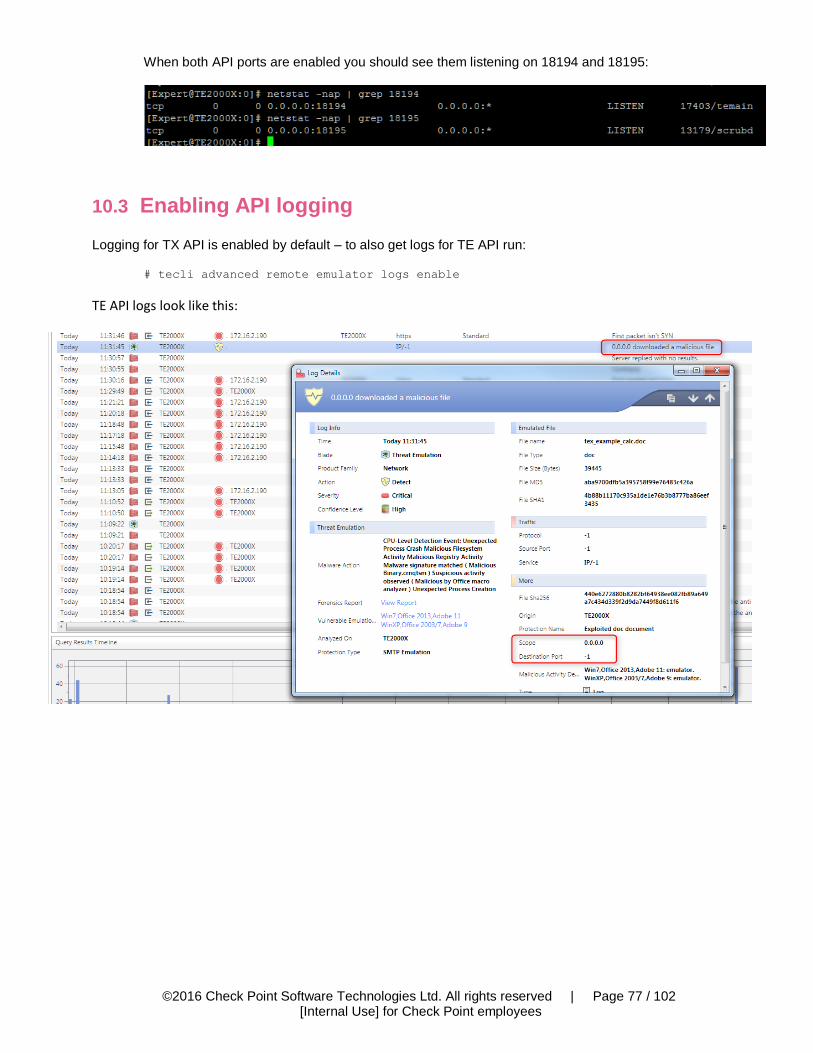
©2016 Check Point Software Technologies Ltd. All rights reserved | Page 77 / 102
[Internal Use] for Check Point employees
When both API ports are enabled you should see them listening on 18194 and 18195:
10.3 Enabling API logging Logging for TX API is enabled by default – to also get logs for TE API run:
# tecli advanced remote emulator logs enable
TE API logs look like this:
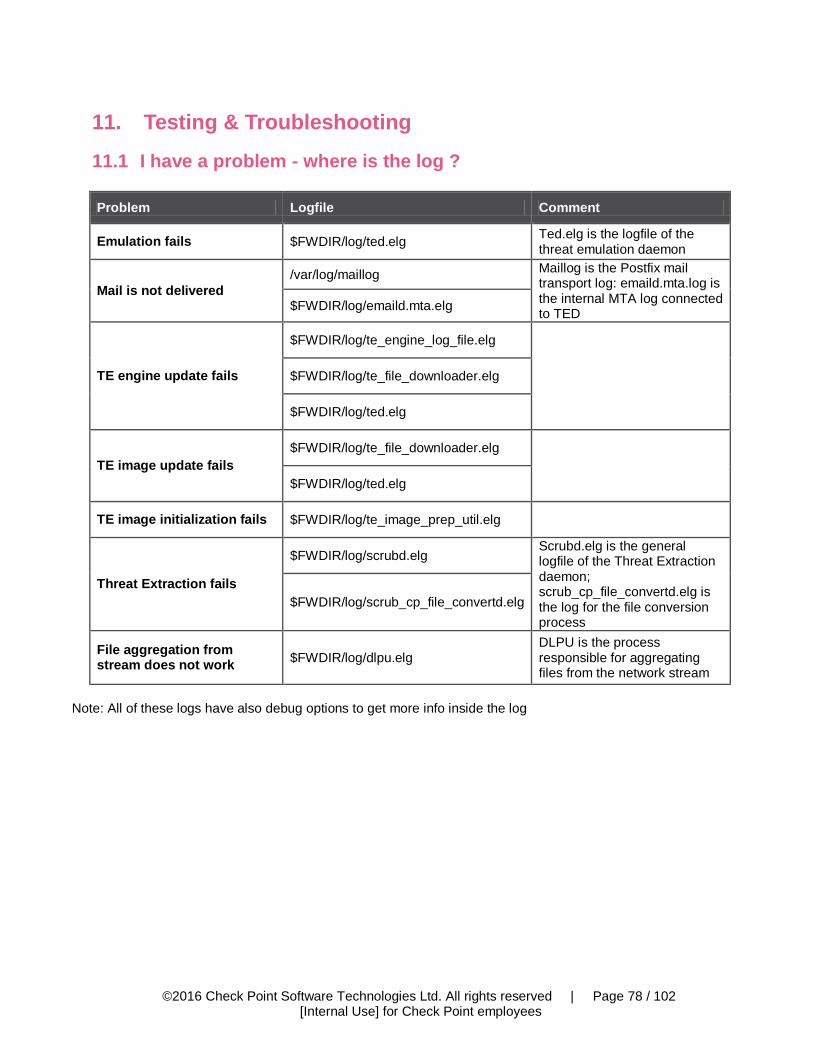
©2016 Check Point Software Technologies Ltd. All rights reserved | Page 78 / 102
[Internal Use] for Check Point employees
11. Testing & Troubleshooting
11.1 I have a problem - where is the log ?
Problem Logfile Comment
Emulation fails $FWDIR/log/ted.elg Ted.elg is the logfile of the threat emulation daemon
Mail is not delivered
/var/log/maillog Maillog is the Postfix mail transport log: emaild.mta.log is the internal MTA log connected to TED
$FWDIR/log/emaild.mta.elg
TE engine update fails
$FWDIR/log/te_engine_log_file.elg
$FWDIR/log/te_file_downloader.elg
$FWDIR/log/ted.elg
TE image update fails
$FWDIR/log/te_file_downloader.elg
$FWDIR/log/ted.elg
TE image initialization fails $FWDIR/log/te_image_prep_util.elg
Threat Extraction fails
$FWDIR/log/scrubd.elg Scrubd.elg is the general logfile of the Threat Extraction daemon; scrub_cp_file_convertd.elg is the log for the file conversion process
$FWDIR/log/scrub_cp_file_convertd.elg
File aggregation from stream does not work
$FWDIR/log/dlpu.elg DLPU is the process responsible for aggregating files from the network stream
Note: All of these logs have also debug options to get more info inside the log

©2016 Check Point Software Technologies Ltd. All rights reserved | Page 79 / 102
[Internal Use] for Check Point employees
11.2 Test emulation
If you like to manually add a file to emulation you can do this via CLI: # te_add_file –f=/tmp/test.pdf
This file will be shown in the logs as SMTP emulation
11.3 Image/Engine Update
10.3.1 Check image and detection rule versions
# tecli show download all
This will show you the revision number of the downloaded images:
And also the available detection rule revisions:
Compare latest image versions to: https://supportcenter.checkpoint.com/supportcenter/portal?eventSubmit_doGoviewsolutiondetails=&solutionid=sk92509

©2016 Check Point Software Technologies Ltd. All rights reserved | Page 80 / 102
[Internal Use] for Check Point employees
10.3.2 Check TE engine version
You can check the current TE engine version: # tecli advanced engine version
Compare latest engine versions to: https://supportcenter.checkpoint.com/supportcenter/portal?eventSubmit_doGoviewsolutiondetails=&solutionid=sk95235
10.3.3 Check ThreatCloud Update server connectivity
Check for general connection to Threat Cloud Update servers: # ping te.checkpoint.com
See if you get feedback from update servers: # curl –vk https://te.checkpoint.com

©2016 Check Point Software Technologies Ltd. All rights reserved | Page 81 / 102
[Internal Use] for Check Point employees
10.3.4 Remove all images and start again To delete all existing images and start again:
- delete old images # rm –rf /var/log/files_repository/images
- Kill Threat Emulation daemon and rerun update # fw kill ted
# tecli a d u a

©2016 Check Point Software Technologies Ltd. All rights reserved | Page 82 / 102
[Internal Use] for Check Point employees
10.3.5 Force update from CLI You can force an update: # tecli advanced download update all
This command will not give you any feedback. Feedback regarding the update process can be obtained via: $FWDIR/log/ted.elg
$FWDIR/log/te_file_downloader.elg
$FWDIR/log/te_engine_log
If update still does not initialize kill TED: # fw kill ted
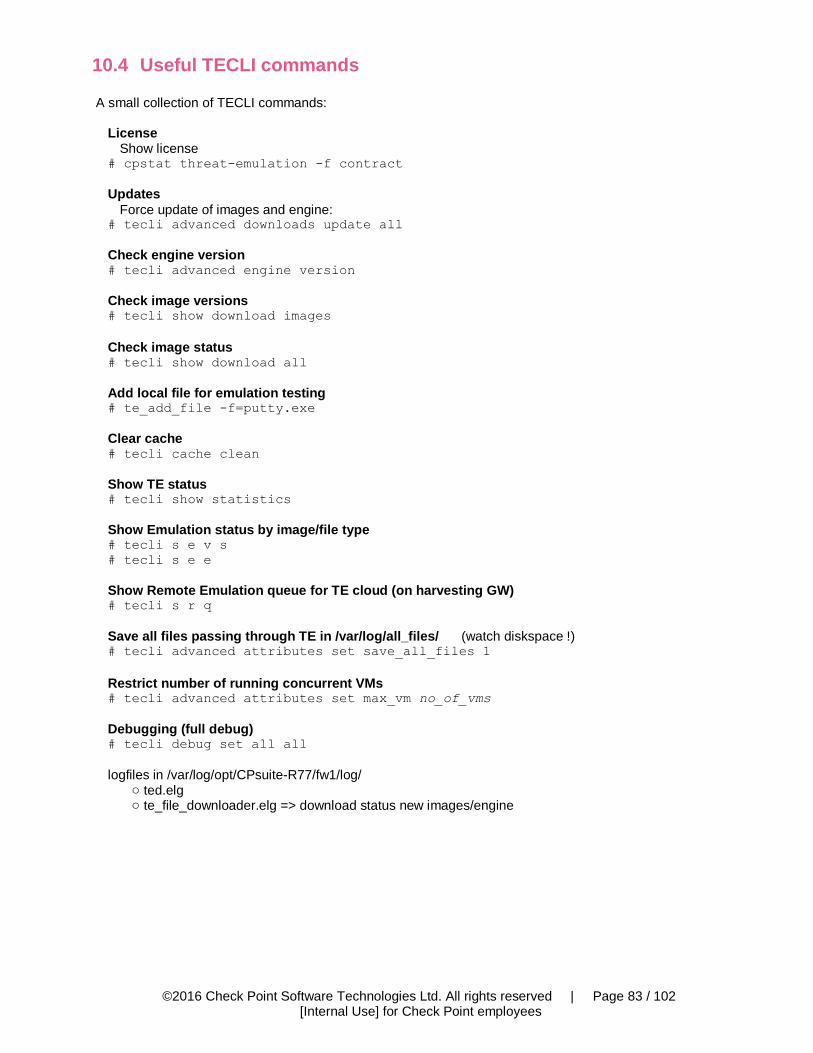
©2016 Check Point Software Technologies Ltd. All rights reserved | Page 83 / 102
[Internal Use] for Check Point employees
10.4 Useful TECLI commands
A small collection of TECLI commands:
License Show license
# cpstat threat-emulation -f contract
Updates
Force update of images and engine: # tecli advanced downloads update all
Check engine version # tecli advanced engine version
Check image versions # tecli show download images
Check image status # tecli show download all
Add local file for emulation testing # te_add_file -f=putty.exe
Clear cache # tecli cache clean
Show TE status # tecli show statistics
Show Emulation status by image/file type # tecli s e v s
# tecli s e e
Show Remote Emulation queue for TE cloud (on harvesting GW) # tecli s r q
Save all files passing through TE in /var/log/all_files/ (watch diskspace !) # tecli advanced attributes set save_all_files 1
Restrict number of running concurrent VMs # tecli advanced attributes set max_vm no_of_vms
Debugging (full debug) # tecli debug set all all
logfiles in /var/log/opt/CPsuite-R77/fw1/log/
o ted.elg o te_file_downloader.elg => download status new images/engine
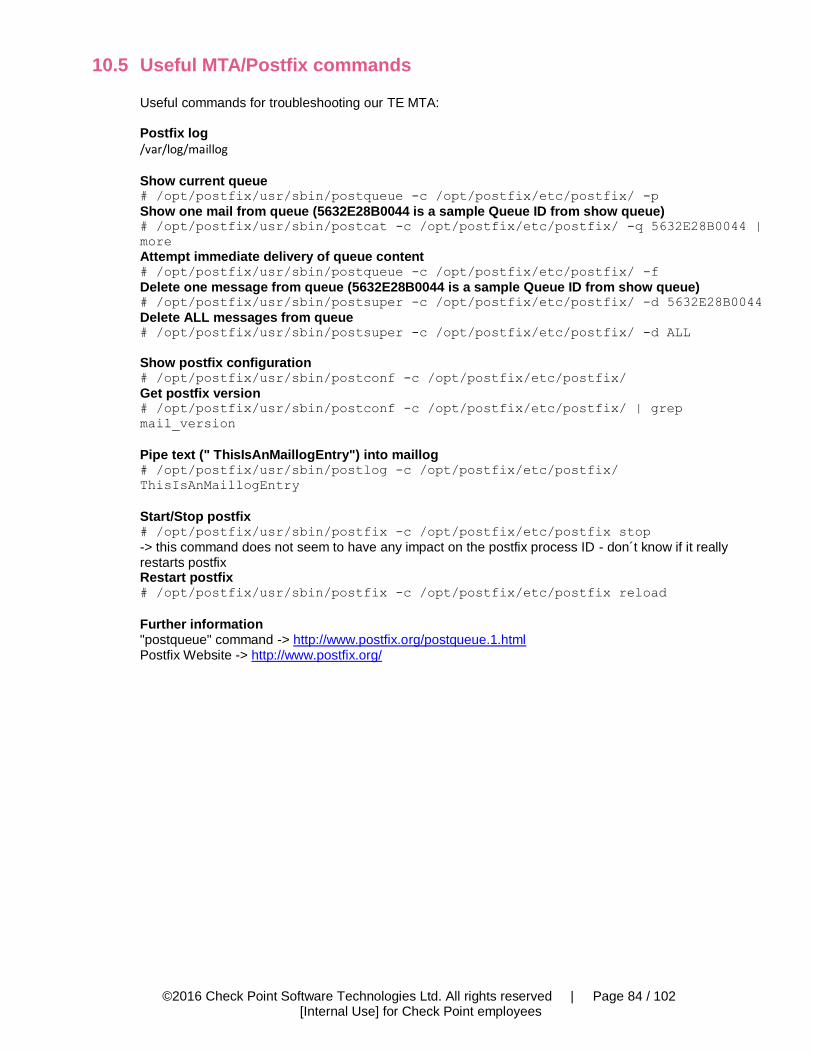
©2016 Check Point Software Technologies Ltd. All rights reserved | Page 84 / 102
[Internal Use] for Check Point employees
10.5 Useful MTA/Postfix commands Useful commands for troubleshooting our TE MTA: Postfix log
/var/log/maillog Show current queue # /opt/postfix/usr/sbin/postqueue -c /opt/postfix/etc/postfix/ -p
Show one mail from queue (5632E28B0044 is a sample Queue ID from show queue) # /opt/postfix/usr/sbin/postcat -c /opt/postfix/etc/postfix/ -q 5632E28B0044 |
more
Attempt immediate delivery of queue content # /opt/postfix/usr/sbin/postqueue -c /opt/postfix/etc/postfix/ -f
Delete one message from queue (5632E28B0044 is a sample Queue ID from show queue) # /opt/postfix/usr/sbin/postsuper -c /opt/postfix/etc/postfix/ -d 5632E28B0044
Delete ALL messages from queue # /opt/postfix/usr/sbin/postsuper -c /opt/postfix/etc/postfix/ -d ALL
Show postfix configuration # /opt/postfix/usr/sbin/postconf -c /opt/postfix/etc/postfix/
Get postfix version # /opt/postfix/usr/sbin/postconf -c /opt/postfix/etc/postfix/ | grep
mail_version
Pipe text (" ThisIsAnMaillogEntry") into maillog # /opt/postfix/usr/sbin/postlog -c /opt/postfix/etc/postfix/
ThisIsAnMaillogEntry
Start/Stop postfix # /opt/postfix/usr/sbin/postfix -c /opt/postfix/etc/postfix stop
-> this command does not seem to have any impact on the postfix process ID - don´t know if it really restarts postfix Restart postfix # /opt/postfix/usr/sbin/postfix -c /opt/postfix/etc/postfix reload
Further information "postqueue" command -> http://www.postfix.org/postqueue.1.html Postfix Website -> http://www.postfix.org/

©2016 Check Point Software Technologies Ltd. All rights reserved | Page 85 / 102
[Internal Use] for Check Point employees
10.6 How-to send an email with attachment from CLI How to send mail with attachment from Gaia OS? E.g. to reinject a previously caught malicious file to TE MTA locally:
[Expert@gw]# cd /var/log/mal_files/
[Expert@gw]# ls
4bddeb07094936013a660ac7dc263261eea2e1dc.pdf
8ee725923c3a29c59ea16083e02cc3f1409dd49d.doc
ba7809dd229b8256ce36428e5ccf514de4ea8177.doc
[Expert@gw]# uuencode 4bddeb07094936013a660ac7dc263261eea2e1dc.pdf
4bddeb07094936013a660ac7dc263261eea2e1dc.pdf | $FWDIR/bin/sendmail -t localhost -s
"inspect file" -f "[email protected] <mailto:[email protected]> " "[email protected] <mailto:[email protected]> "
First mail address is sender, second one is recipient.
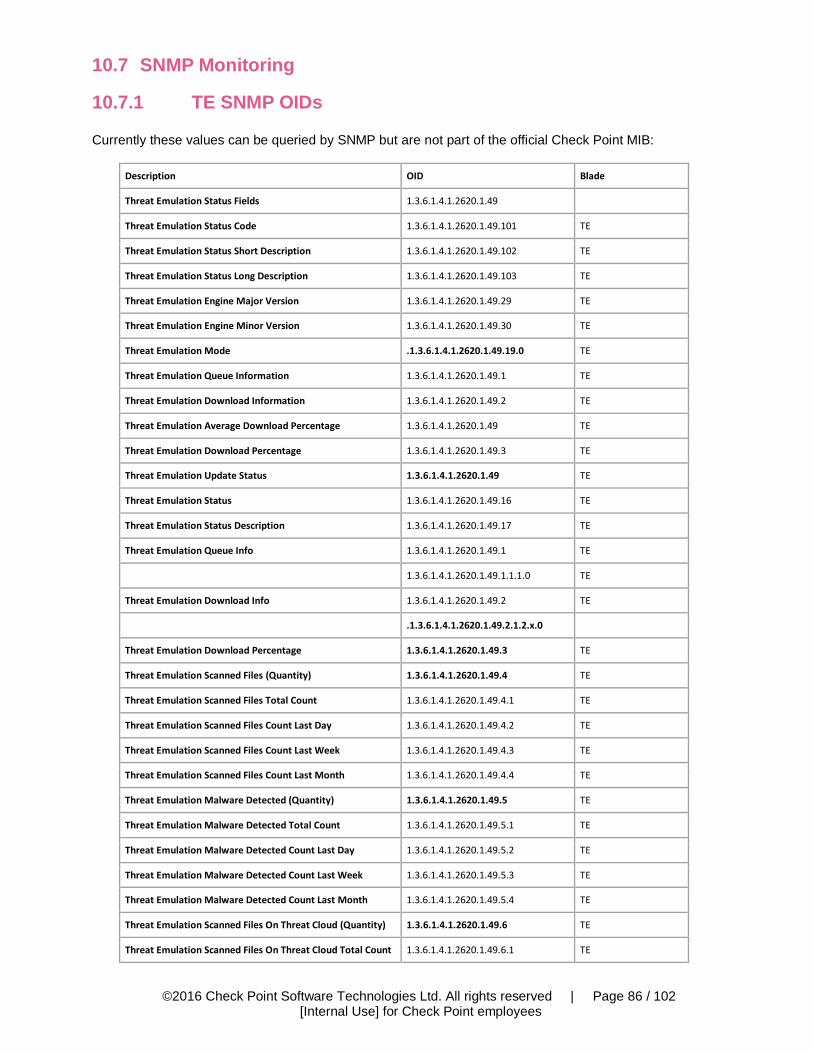
©2016 Check Point Software Technologies Ltd. All rights reserved | Page 86 / 102
[Internal Use] for Check Point employees
10.7 SNMP Monitoring
10.7.1 TE SNMP OIDs
Currently these values can be queried by SNMP but are not part of the official Check Point MIB:
Description OID Blade
Threat Emulation Status Fields 1.3.6.1.4.1.2620.1.49
Threat Emulation Status Code 1.3.6.1.4.1.2620.1.49.101 TE
Threat Emulation Status Short Description 1.3.6.1.4.1.2620.1.49.102 TE
Threat Emulation Status Long Description 1.3.6.1.4.1.2620.1.49.103 TE
Threat Emulation Engine Major Version 1.3.6.1.4.1.2620.1.49.29 TE
Threat Emulation Engine Minor Version 1.3.6.1.4.1.2620.1.49.30 TE
Threat Emulation Mode .1.3.6.1.4.1.2620.1.49.19.0 TE
Threat Emulation Queue Information 1.3.6.1.4.1.2620.1.49.1 TE
Threat Emulation Download Information 1.3.6.1.4.1.2620.1.49.2 TE
Threat Emulation Average Download Percentage 1.3.6.1.4.1.2620.1.49 TE
Threat Emulation Download Percentage 1.3.6.1.4.1.2620.1.49.3 TE
Threat Emulation Update Status 1.3.6.1.4.1.2620.1.49 TE
Threat Emulation Status 1.3.6.1.4.1.2620.1.49.16 TE
Threat Emulation Status Description 1.3.6.1.4.1.2620.1.49.17 TE
Threat Emulation Queue Info 1.3.6.1.4.1.2620.1.49.1 TE
1.3.6.1.4.1.2620.1.49.1.1.1.0 TE
Threat Emulation Download Info 1.3.6.1.4.1.2620.1.49.2 TE
.1.3.6.1.4.1.2620.1.49.2.1.2.x.0
Threat Emulation Download Percentage 1.3.6.1.4.1.2620.1.49.3 TE
Threat Emulation Scanned Files (Quantity) 1.3.6.1.4.1.2620.1.49.4 TE
Threat Emulation Scanned Files Total Count 1.3.6.1.4.1.2620.1.49.4.1 TE
Threat Emulation Scanned Files Count Last Day 1.3.6.1.4.1.2620.1.49.4.2 TE
Threat Emulation Scanned Files Count Last Week 1.3.6.1.4.1.2620.1.49.4.3 TE
Threat Emulation Scanned Files Count Last Month 1.3.6.1.4.1.2620.1.49.4.4 TE
Threat Emulation Malware Detected (Quantity) 1.3.6.1.4.1.2620.1.49.5 TE
Threat Emulation Malware Detected Total Count 1.3.6.1.4.1.2620.1.49.5.1 TE
Threat Emulation Malware Detected Count Last Day 1.3.6.1.4.1.2620.1.49.5.2 TE
Threat Emulation Malware Detected Count Last Week 1.3.6.1.4.1.2620.1.49.5.3 TE
Threat Emulation Malware Detected Count Last Month 1.3.6.1.4.1.2620.1.49.5.4 TE
Threat Emulation Scanned Files On Threat Cloud (Quantity) 1.3.6.1.4.1.2620.1.49.6 TE
Threat Emulation Scanned Files On Threat Cloud Total Count 1.3.6.1.4.1.2620.1.49.6.1 TE
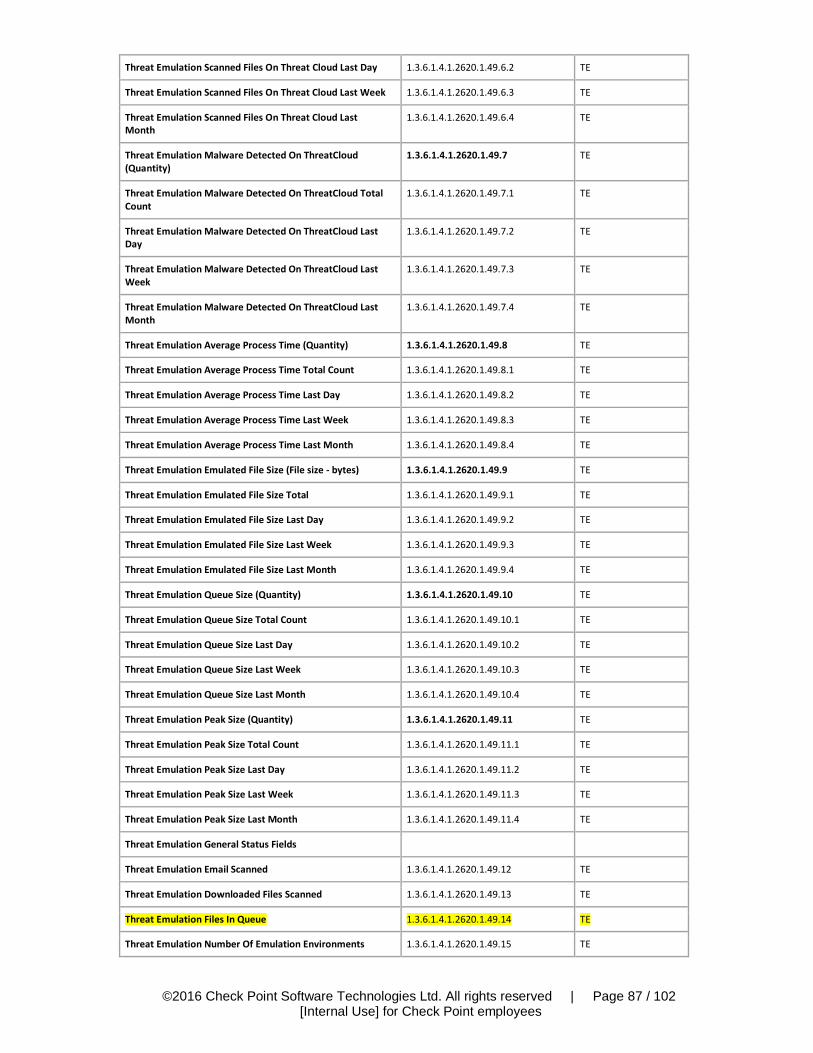
©2016 Check Point Software Technologies Ltd. All rights reserved | Page 87 / 102
[Internal Use] for Check Point employees
Threat Emulation Scanned Files On Threat Cloud Last Day 1.3.6.1.4.1.2620.1.49.6.2 TE
Threat Emulation Scanned Files On Threat Cloud Last Week 1.3.6.1.4.1.2620.1.49.6.3 TE
Threat Emulation Scanned Files On Threat Cloud Last Month
1.3.6.1.4.1.2620.1.49.6.4 TE
Threat Emulation Malware Detected On ThreatCloud (Quantity)
1.3.6.1.4.1.2620.1.49.7 TE
Threat Emulation Malware Detected On ThreatCloud Total Count
1.3.6.1.4.1.2620.1.49.7.1 TE
Threat Emulation Malware Detected On ThreatCloud Last Day
1.3.6.1.4.1.2620.1.49.7.2 TE
Threat Emulation Malware Detected On ThreatCloud Last Week
1.3.6.1.4.1.2620.1.49.7.3 TE
Threat Emulation Malware Detected On ThreatCloud Last Month
1.3.6.1.4.1.2620.1.49.7.4 TE
Threat Emulation Average Process Time (Quantity) 1.3.6.1.4.1.2620.1.49.8 TE
Threat Emulation Average Process Time Total Count 1.3.6.1.4.1.2620.1.49.8.1 TE
Threat Emulation Average Process Time Last Day 1.3.6.1.4.1.2620.1.49.8.2 TE
Threat Emulation Average Process Time Last Week 1.3.6.1.4.1.2620.1.49.8.3 TE
Threat Emulation Average Process Time Last Month 1.3.6.1.4.1.2620.1.49.8.4 TE
Threat Emulation Emulated File Size (File size - bytes) 1.3.6.1.4.1.2620.1.49.9 TE
Threat Emulation Emulated File Size Total 1.3.6.1.4.1.2620.1.49.9.1 TE
Threat Emulation Emulated File Size Last Day 1.3.6.1.4.1.2620.1.49.9.2 TE
Threat Emulation Emulated File Size Last Week 1.3.6.1.4.1.2620.1.49.9.3 TE
Threat Emulation Emulated File Size Last Month 1.3.6.1.4.1.2620.1.49.9.4 TE
Threat Emulation Queue Size (Quantity) 1.3.6.1.4.1.2620.1.49.10 TE
Threat Emulation Queue Size Total Count 1.3.6.1.4.1.2620.1.49.10.1 TE
Threat Emulation Queue Size Last Day 1.3.6.1.4.1.2620.1.49.10.2 TE
Threat Emulation Queue Size Last Week 1.3.6.1.4.1.2620.1.49.10.3 TE
Threat Emulation Queue Size Last Month 1.3.6.1.4.1.2620.1.49.10.4 TE
Threat Emulation Peak Size (Quantity) 1.3.6.1.4.1.2620.1.49.11 TE
Threat Emulation Peak Size Total Count 1.3.6.1.4.1.2620.1.49.11.1 TE
Threat Emulation Peak Size Last Day 1.3.6.1.4.1.2620.1.49.11.2 TE
Threat Emulation Peak Size Last Week 1.3.6.1.4.1.2620.1.49.11.3 TE
Threat Emulation Peak Size Last Month 1.3.6.1.4.1.2620.1.49.11.4 TE
Threat Emulation General Status Fields
Threat Emulation Email Scanned 1.3.6.1.4.1.2620.1.49.12 TE
Threat Emulation Downloaded Files Scanned 1.3.6.1.4.1.2620.1.49.13 TE
Threat Emulation Files In Queue 1.3.6.1.4.1.2620.1.49.14 TE
Threat Emulation Number Of Emulation Environments 1.3.6.1.4.1.2620.1.49.15 TE
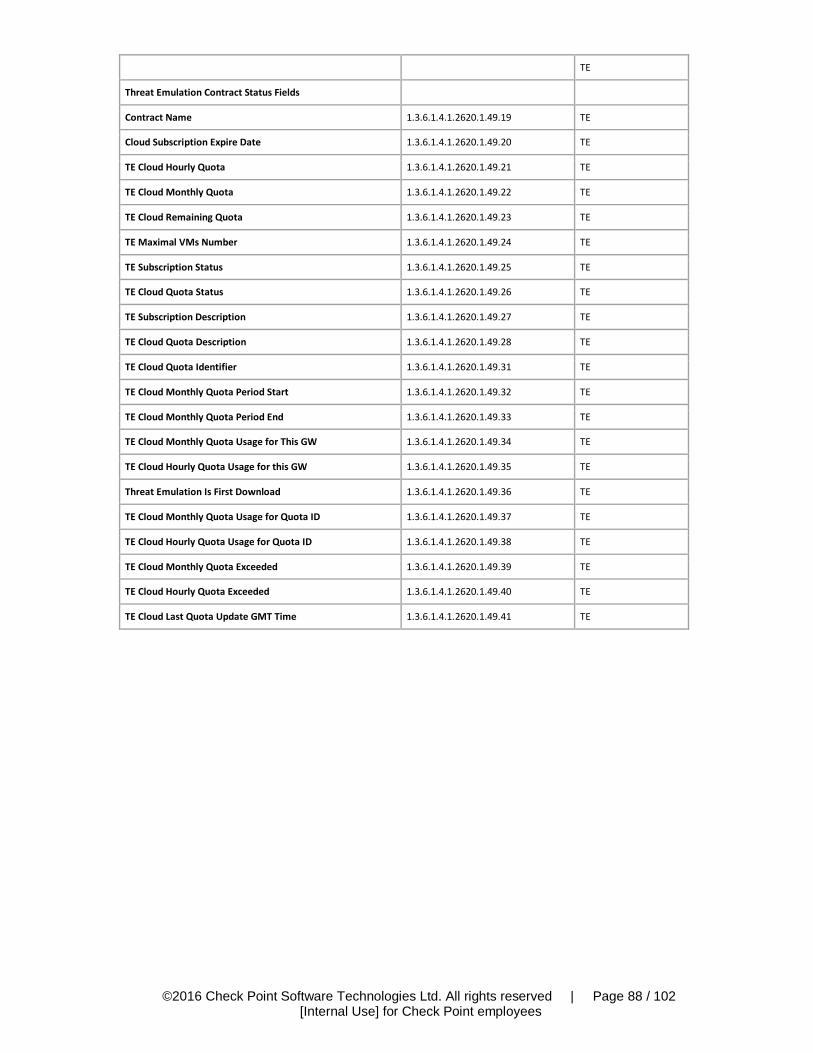
©2016 Check Point Software Technologies Ltd. All rights reserved | Page 88 / 102
[Internal Use] for Check Point employees
TE
Threat Emulation Contract Status Fields
Contract Name 1.3.6.1.4.1.2620.1.49.19 TE
Cloud Subscription Expire Date 1.3.6.1.4.1.2620.1.49.20 TE
TE Cloud Hourly Quota 1.3.6.1.4.1.2620.1.49.21 TE
TE Cloud Monthly Quota 1.3.6.1.4.1.2620.1.49.22 TE
TE Cloud Remaining Quota 1.3.6.1.4.1.2620.1.49.23 TE
TE Maximal VMs Number 1.3.6.1.4.1.2620.1.49.24 TE
TE Subscription Status 1.3.6.1.4.1.2620.1.49.25 TE
TE Cloud Quota Status 1.3.6.1.4.1.2620.1.49.26 TE
TE Subscription Description 1.3.6.1.4.1.2620.1.49.27 TE
TE Cloud Quota Description 1.3.6.1.4.1.2620.1.49.28 TE
TE Cloud Quota Identifier 1.3.6.1.4.1.2620.1.49.31 TE
TE Cloud Monthly Quota Period Start 1.3.6.1.4.1.2620.1.49.32 TE
TE Cloud Monthly Quota Period End 1.3.6.1.4.1.2620.1.49.33 TE
TE Cloud Monthly Quota Usage for This GW 1.3.6.1.4.1.2620.1.49.34 TE
TE Cloud Hourly Quota Usage for this GW 1.3.6.1.4.1.2620.1.49.35 TE
Threat Emulation Is First Download 1.3.6.1.4.1.2620.1.49.36 TE
TE Cloud Monthly Quota Usage for Quota ID 1.3.6.1.4.1.2620.1.49.37 TE
TE Cloud Hourly Quota Usage for Quota ID 1.3.6.1.4.1.2620.1.49.38 TE
TE Cloud Monthly Quota Exceeded 1.3.6.1.4.1.2620.1.49.39 TE
TE Cloud Hourly Quota Exceeded 1.3.6.1.4.1.2620.1.49.40 TE
TE Cloud Last Quota Update GMT Time 1.3.6.1.4.1.2620.1.49.41 TE
©2016 Check Point Software Technologies Ltd. All rights reserved | Page 89 / 102
[Internal Use] for Check Point employees
10.7.2 Extend SNMP Monitoring
10.7.2.1 Enable SNMP
1. # cpconfig a. enable "SNMP Extension"
2. Clish
set snmp community <community-name> read-only
save config Check OIDs for TE TE OIDs => .1.3.6.1.4.1.2620.1.49 Show all TE related OIDs
# snmpwalk -v 2c -c <community-name> localhost .1.3.6.1.4.1.2620.1.49
Enable SNMP Agent
1. Clish set snmp agent on
save config
10.7.2.2 Extend available SNMP OIDs
Select free OID for Postfix queue value Free OID => .1.3.6.1.4.1.2620.1.250.1 Extend available SNMP values
https://supportcenter.checkpoint.com/supportcenter/portal?eventSubmit_doGoviewsolutiondetails=&solutionid=sk78360 Add the following lines to /etc/snmp/userDefinedSettings.conf file:
extend .1.3.6.1.4.1.2620.1.250.1 postfix_queue /bin/sh
/home/admin/mailqueue.sh
extend .1.3.6.1.4.1.2620.1.250.2 emaild_queue /bin/sh
/home/admin/emaild_tmpdir.sh
extend .1.3.6.1.4.1.2620.1.252 vm /bin/sh /home/admin/running_vm.sh

©2016 Check Point Software Technologies Ltd. All rights reserved | Page 90 / 102
[Internal Use] for Check Point employees
10.7.2.3 Postfix mailqueue monitoring script
/home/admin/mailqueue.sh
# Extract Postfix queue size value
#!/bin/bash
MAILQ=$(/opt/postfix/usr/sbin/postqueue -c /opt/postfix/etc/postfix/ -p |
egrep '^--.*Request|^Mail.*empty')
if [[ $MAILQ =~ "empty" ]] ; then
RESPONSE=0
echo $RESPONSE
elif [[ $MAILQ =~ "Request" ]] ; then
RESPONSE=$(echo $MAILQ|awk '{print $5}')
echo $RESPONSE
else
RESPONSE=error
fi
10.7.2.4 Emaild queue monitoring script
/home/admin/emaild_tmpdir.sh
# Extract emaild temp file queue amount
#!/bin/bash
. /opt/CPshared/5.0/tmp/.CPprofile.sh
ls -l $FWDIR/tmp/email_tmp/ |grep emailtemp |wc -l
10.7.2.5 Running VM instances monitoring script
/home/admin/running_vm.sh # Extract amount of running VM Instances
#!/bin/bash
. /opt/CPshared/5.0/tmp/.CPprofile.sh
tecli s e e | grep "Running virtual machines"|awk '{print $4}'
©2016 Check Point Software Technologies Ltd. All rights reserved | Page 91 / 102
[Internal Use] for Check Point employees
10.7.2.6 Test extended SNMP values
Test new values MAILQUEUE snmpwalk -v 2c -c public localhost .1.3.6.1.4.1.2620.1.250.4.1.2.2.109.113.1 EMAILD_TEMPDIR snmpwalk -v 2c -c public localhost .1.3.6.1.4.1.2620.1.251.4.1.2.3.101.109.102.1
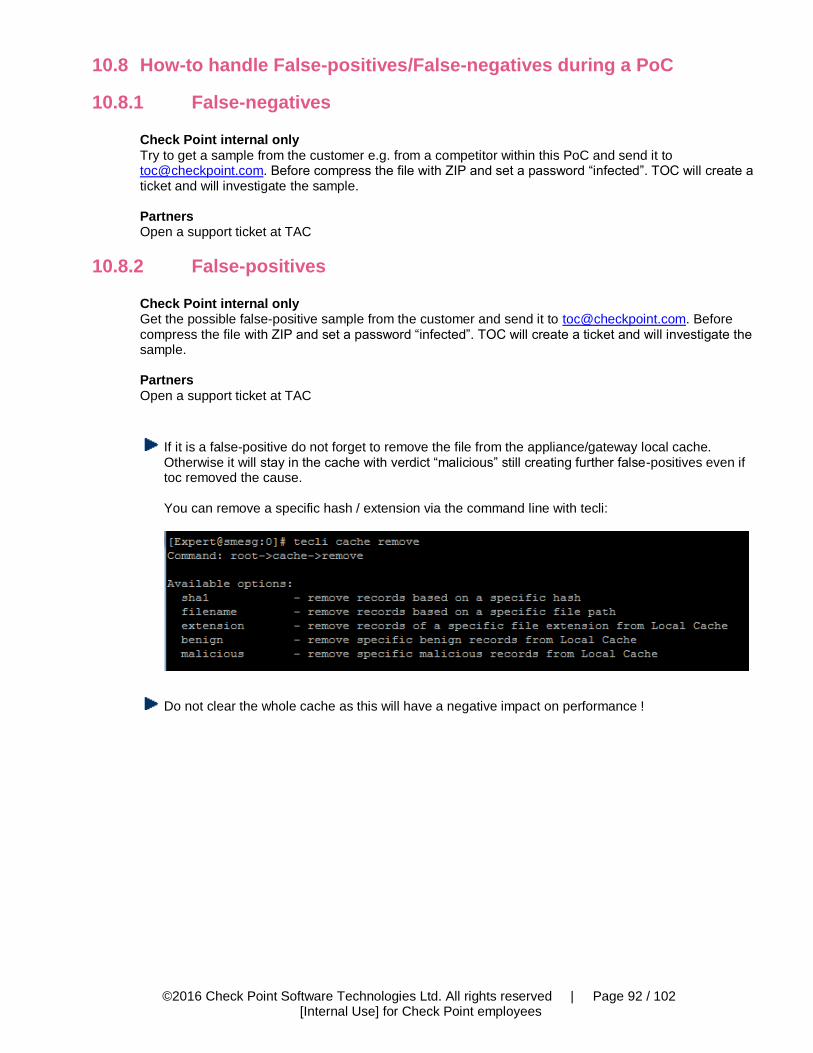
©2016 Check Point Software Technologies Ltd. All rights reserved | Page 92 / 102
[Internal Use] for Check Point employees
10.8 How-to handle False-positives/False-negatives during a PoC
10.8.1 False-negatives
Check Point internal only
Try to get a sample from the customer e.g. from a competitor within this PoC and send it to [email protected]. Before compress the file with ZIP and set a password “infected”. TOC will create a ticket and will investigate the sample. Partners Open a support ticket at TAC
10.8.2 False-positives
Check Point internal only Get the possible false-positive sample from the customer and send it to [email protected]. Before compress the file with ZIP and set a password “infected”. TOC will create a ticket and will investigate the sample. Partners
Open a support ticket at TAC
If it is a false-positive do not forget to remove the file from the appliance/gateway local cache. Otherwise it will stay in the cache with verdict “malicious” still creating further false-positives even if toc removed the cause. You can remove a specific hash / extension via the command line with tecli:
Do not clear the whole cache as this will have a negative impact on performance !
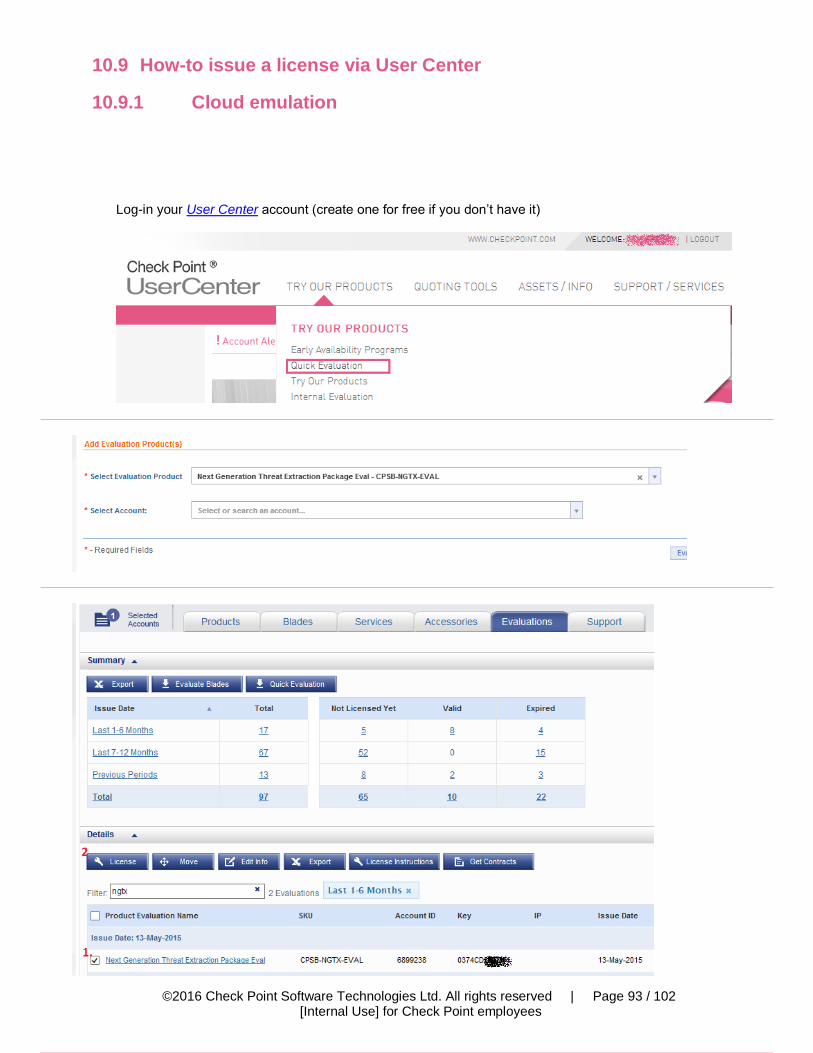
©2016 Check Point Software Technologies Ltd. All rights reserved | Page 93 / 102
[Internal Use] for Check Point employees
10.9 How-to issue a license via User Center
10.9.1 Cloud emulation
Log-in your User Center account (create one for free if you don’t have it)
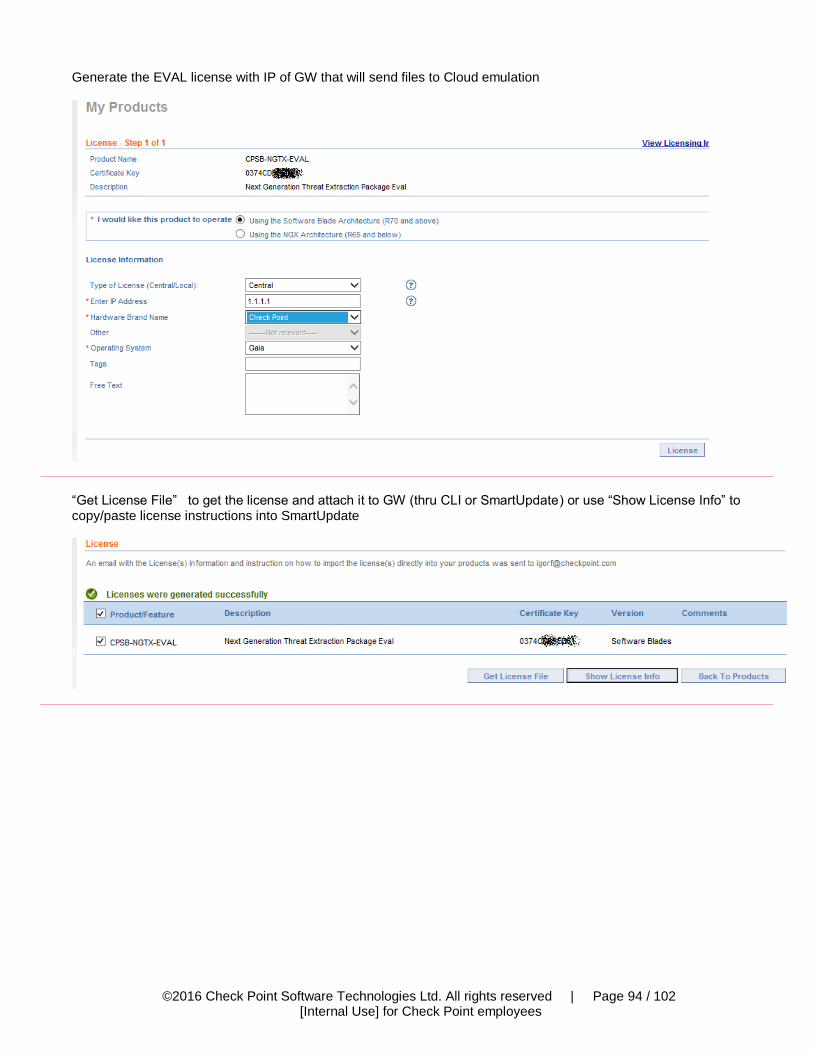
©2016 Check Point Software Technologies Ltd. All rights reserved | Page 94 / 102
[Internal Use] for Check Point employees
Generate the EVAL license with IP of GW that will send files to Cloud emulation
“Get License File” to get the license and attach it to GW (thru CLI or SmartUpdate) or use “Show License Info” to copy/paste license instructions into SmartUpdate
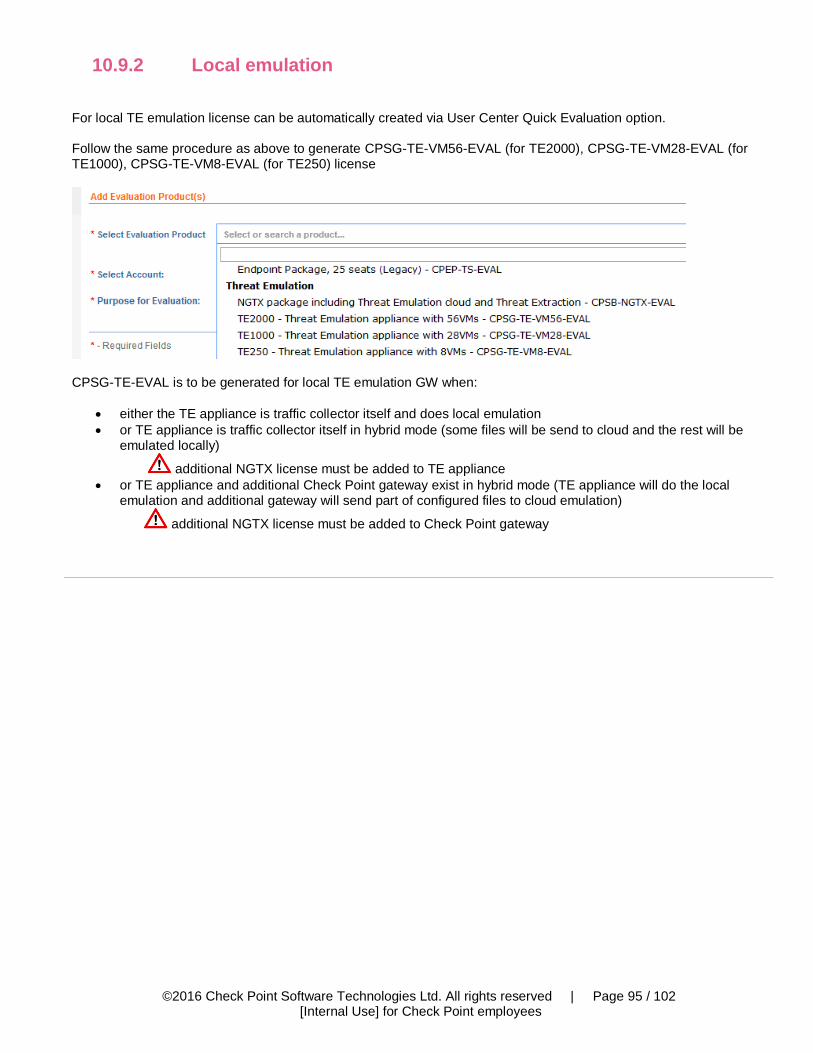
©2016 Check Point Software Technologies Ltd. All rights reserved | Page 95 / 102
[Internal Use] for Check Point employees
10.9.2 Local emulation For local TE emulation license can be automatically created via User Center Quick Evaluation option. Follow the same procedure as above to generate CPSG-TE-VM56-EVAL (for TE2000), CPSG-TE-VM28-EVAL (for TE1000), CPSG-TE-VM8-EVAL (for TE250) license
CPSG-TE-EVAL is to be generated for local TE emulation GW when:
either the TE appliance is traffic collector itself and does local emulation
or TE appliance is traffic collector itself in hybrid mode (some files will be send to cloud and the rest will be emulated locally)
additional NGTX license must be added to TE appliance
or TE appliance and additional Check Point gateway exist in hybrid mode (TE appliance will do the local emulation and additional gateway will send part of configured files to cloud emulation)
additional NGTX license must be added to Check Point gateway
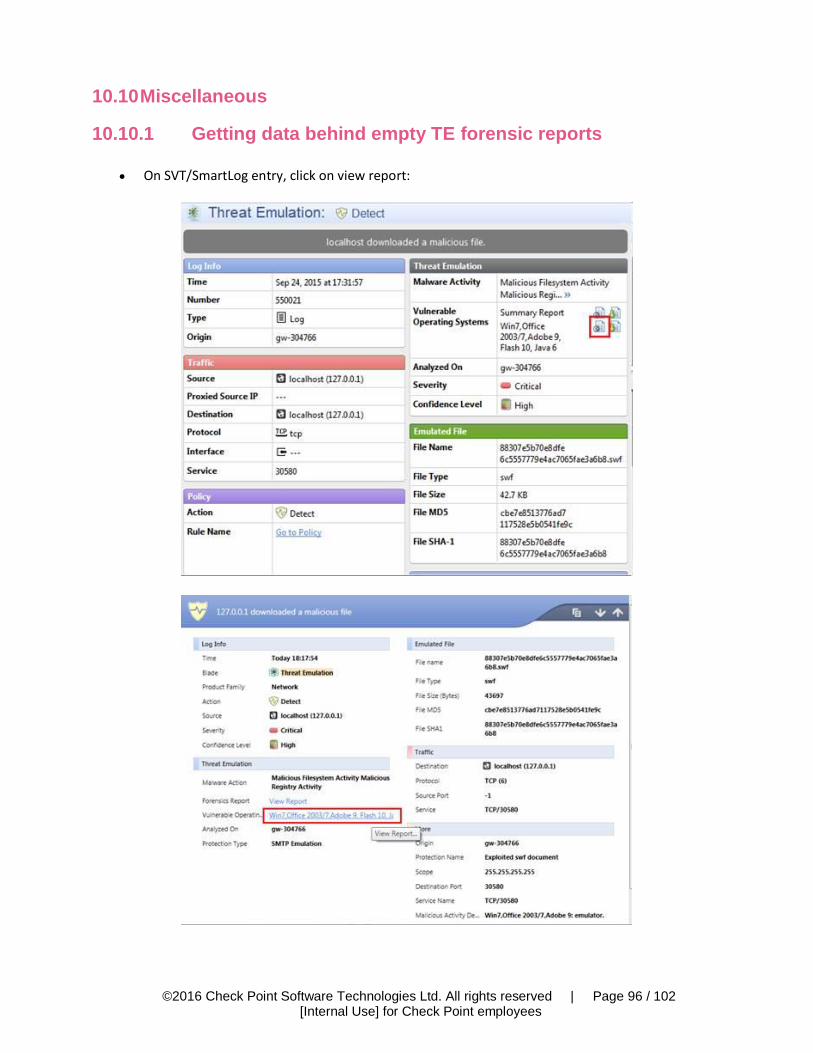
©2016 Check Point Software Technologies Ltd. All rights reserved | Page 96 / 102
[Internal Use] for Check Point employees
10.10 Miscellaneous
10.10.1 Getting data behind empty TE forensic reports
On SVT/SmartLog entry, click on view report:
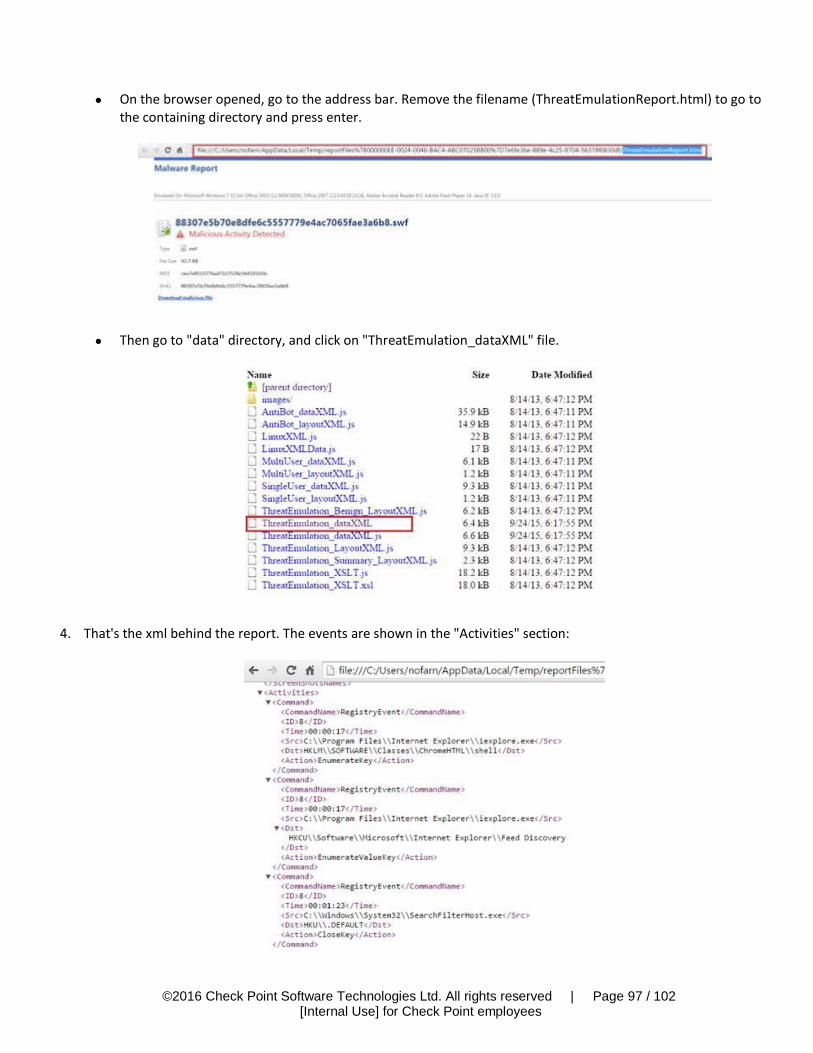
©2016 Check Point Software Technologies Ltd. All rights reserved | Page 97 / 102
[Internal Use] for Check Point employees
On the browser opened, go to the address bar. Remove the filename (ThreatEmulationReport.html) to go to the containing directory and press enter.
Then go to "data" directory, and click on "ThreatEmulation_dataXML" file.
4. That's the xml behind the report. The events are shown in the "Activities" section:

©2016 Check Point Software Technologies Ltd. All rights reserved | Page 98 / 102
[Internal Use] for Check Point employees
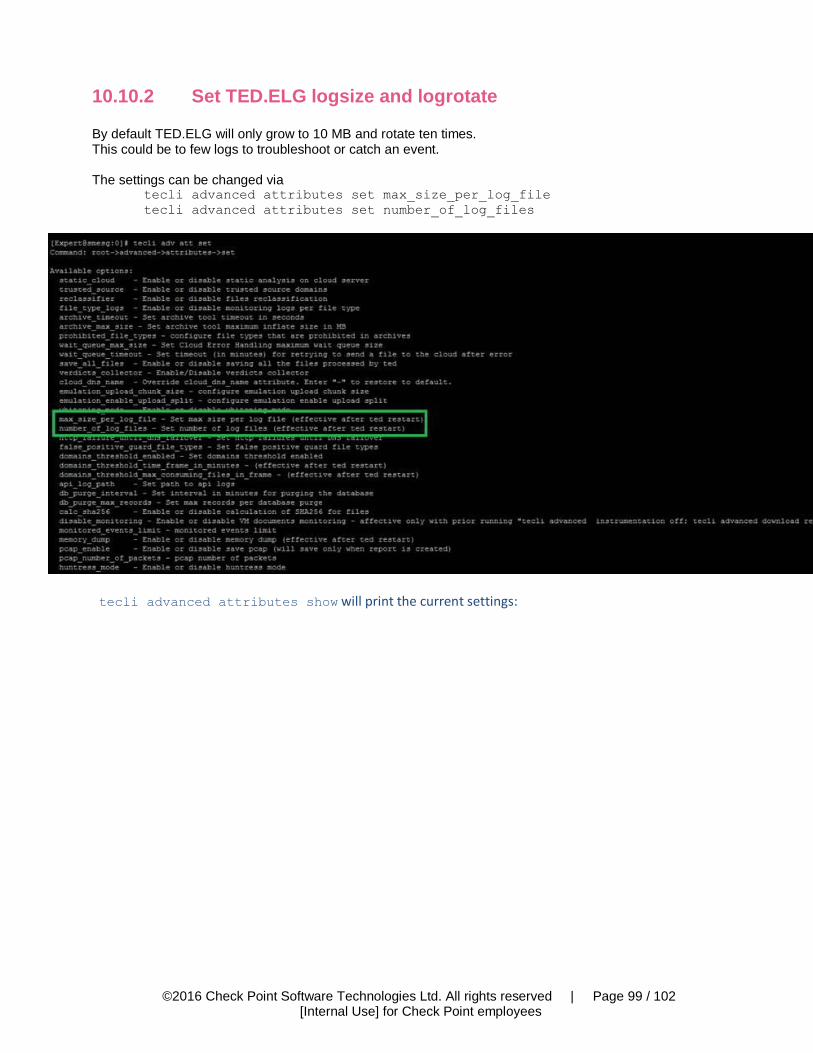
©2016 Check Point Software Technologies Ltd. All rights reserved | Page 99 / 102
[Internal Use] for Check Point employees
10.10.2 Set TED.ELG logsize and logrotate
By default TED.ELG will only grow to 10 MB and rotate ten times. This could be to few logs to troubleshoot or catch an event. The settings can be changed via
tecli advanced attributes set max_size_per_log_file
tecli advanced attributes set number_of_log_files
tecli advanced attributes show will print the current settings:
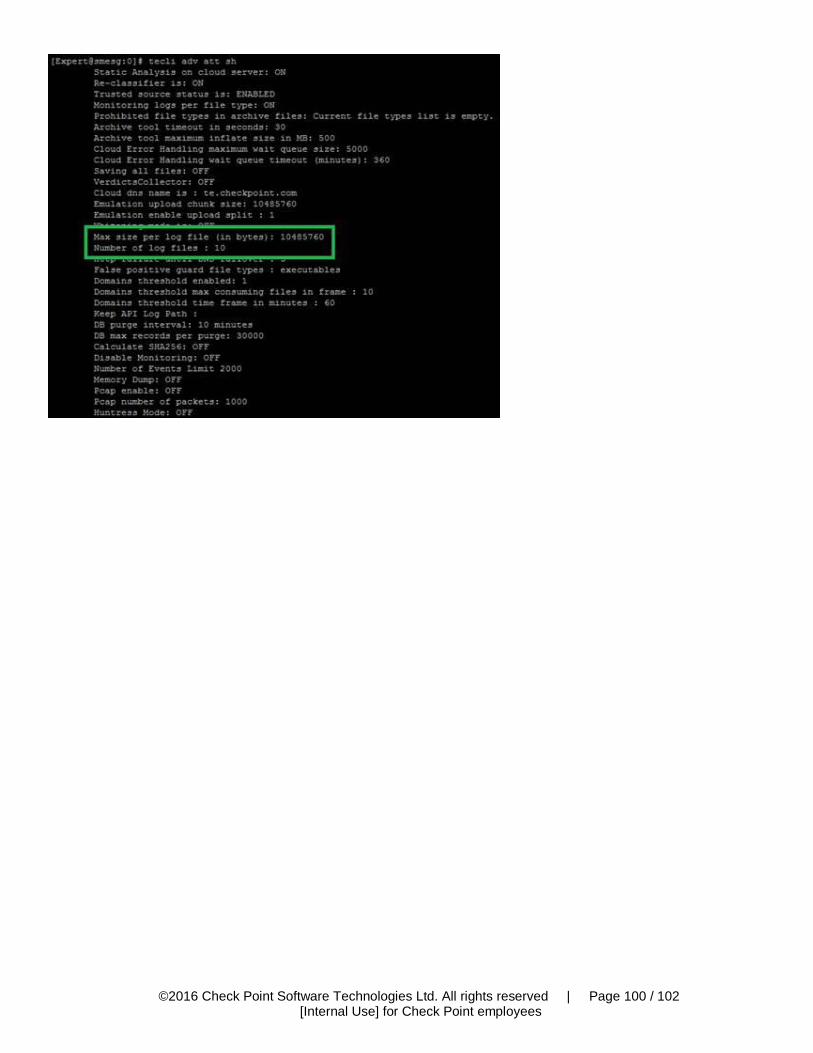
©2016 Check Point Software Technologies Ltd. All rights reserved | Page 100 / 102
[Internal Use] for Check Point employees
©2016 Check Point Software Technologies Ltd. All rights reserved | Page 101 / 102
[Internal Use] for Check Point employees
10.10.3 Blocking filetypes inside archives To block certain filetypes inside archives (which is currently not possible with AV filetype blocking) use the following TECLI command:
Enabling prohibited file types in archives
On the gateway, run the command:
tecli advanced attribute set prohibited_file_types <file_type1>,<file_type2>
For example to block every archive that contains an exe file run:
tecli advanced attribute set prohibited_file_types exe
Disabling prohibited file types in archives
To reset the list of prohibited file types and disable the feature, run:
tecli advanced attribute set prohibited_file_types -
Prohibited file types in archives status
To see the list of file types currently configured as prohibited run:
tecli advanced attribute show prohibited_file_types
https://supportcenter.checkpoint.com/supportcenter/portal?eventSubmit_doGoviewsolutiondetails=&solutionid=sk101057

©2016 Check Point Software Technologies Ltd. All rights reserved | Page 102 / 102
[Internal Use] for Check Point employees
11. Important SKs and hotfixes This table is based on R77.30 without an jumbo hotfix applied. If you already installed a jumbo check if the needed fixes are included.
Scenario Description Relevant SK
Comment
Sandblast Appliance TE100X, TE250X, TE1000X, TE2000X
Sandblast Appliances and install images
SK106210 Includes download link for X-Appliance install image
CPU Level Hotfix SK107333 Only needed if CPU Level hotfix is not included in current ISO (ISOs before October 2015); can be checked with # tecli advanced attributes show | grep CPU
Multiple Private Cloud Support
SK102309
TE General Supported file-types for emulation
SK106123
TE on-premise TE Engine Update – What´s new
SK95235 Feature list of new TE engine releases
TE Offline Update SK92509 How-to do offline image and engine updates; with download links in SK
Create forensic report for benign
SK105737
Blocking archive files according to contained file types
SK101057 If you want to block file extensions in archive (currently not supported with AV) use this feature in TE
TE cloud Cloud geo-restriction SK97877
MTA General Issues with non-ASCII characters in email subject
SK105164 Hotfix available
E-Mails are delayed for several hours in MTA
SK108878
MTA on a CP cluster Unable to configure VIP for MTA
SK107093 No fix currently available; restrict access to not used MTA interfaces by deactivating implied rule for port 25 and use firewall rules (see SandBlast PoC guide)
Double inspection when running MTA on a cluster
SK109198 Hotfix needs to be installed on the Management Server; contact Support to get fix
SmartEvent TE events missing SK108492 Fix available in SK
TE event action differs between SmartEvent and SmartLog
SK106392
SK only
SK and hotfix/download