Embed Size (px)
Citation preview
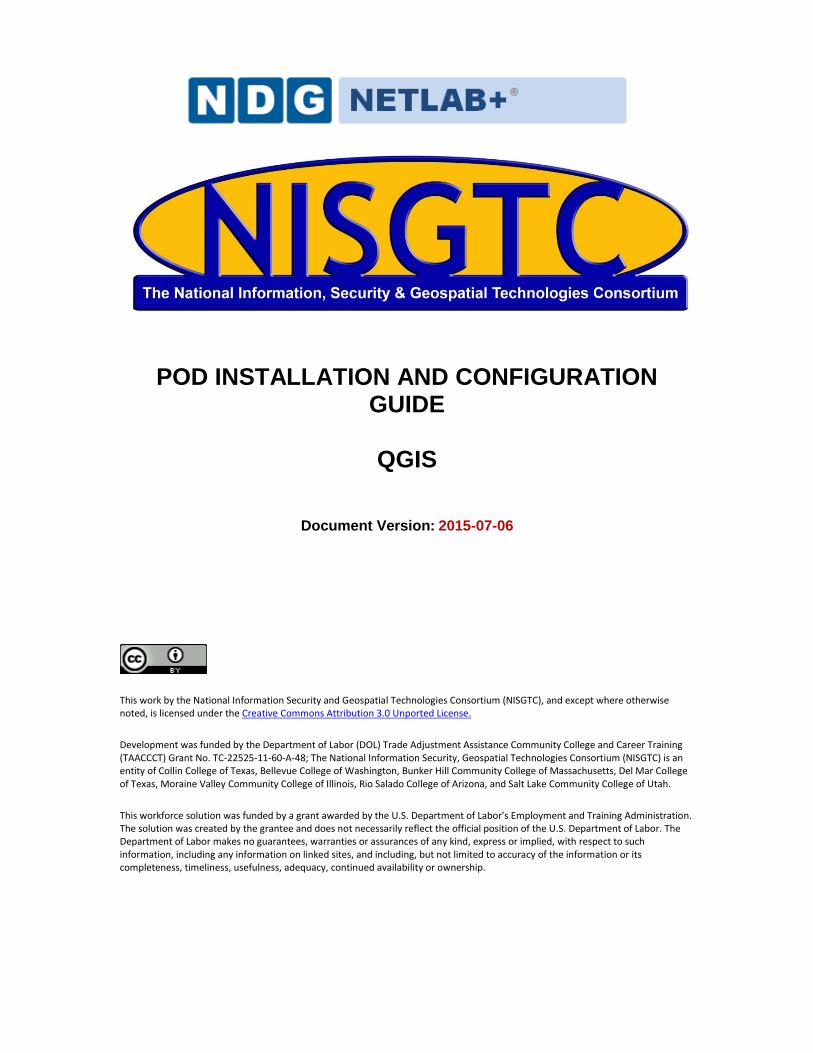
POD INSTALLATION AND CONFIGURATION GUIDE
QGIS
Document Version: 2015-07-06
This work by the National Information Security and Geospatial Technologies Consortium (NISGTC), and except where otherwise noted, is licensed under the Creative Commons Attribution 3.0 Unported License.
Development was funded by the Department of Labor (DOL) Trade Adjustment Assistance Community College and Career Training (TAACCCT) Grant No. TC-22525-11-60-A-48; The National Information Security, Geospatial Technologies Consortium (NISGTC) is an entity of Collin College of Texas, Bellevue College of Washington, Bunker Hill Community College of Massachusetts, Del Mar College of Texas, Moraine Valley Community College of Illinois, Rio Salado College of Arizona, and Salt Lake Community College of Utah.
This workforce solution was funded by a grant awarded by the U.S. Department of Labor's Employment and Training Administration. The solution was created by the grantee and does not necessarily reflect the official position of the U.S. Department of Labor. The Department of Labor makes no guarantees, warranties or assurances of any kind, express or implied, with respect to such information, including any information on linked sites, and including, but not limited to accuracy of the information or its completeness, timeliness, usefulness, adequacy, continued availability or ownership.
QGIS Pod Installation and Configuration Guide
2
This work by the National Information Security and Geospatial Technologies Consortium (NISGTC), and except where otherwise noted, is licensed under the Creative Commons Attribution 3.0 Unported License.
Contents 1 Introduction ................................................................................................................ 3
1.1 Introducing the QGIS Pod ..................................................................................... 3
2 Planning....................................................................................................................... 4
2.1 Pod Creation Workflow ........................................................................................ 4
2.2 Pod Resource Requirements ................................................................................ 5
2.3 ESXi Host Server Requirements ............................................................................ 5
2.4 NETLAB+ Requirements....................................................................................... 6
2.5 Software Requirements ....................................................................................... 6
2.6 Networking Requirements ................................................................................... 6
3 Obtaining Software and Licenses ................................................................................ 7
3.1 Downloading OVF Files ......................................................................................... 7
4 Master Pod Configuration ........................................................................................... 8
4.1 Deploying Virtual Machine OVF/OVA Files .......................................................... 8
4.2 Modify and Activate the Virtual Machine .......................................................... 10
4.2.1 Modify Network Interface Cards ................................................................ 10
4.2.2 Activate the Virtual Machine ...................................................................... 11
4.3 Create a Snapshot for the Master Virtual Machine ........................................... 12
4.4 NETLAB+ Virtual Machine Infrastructure Setup ................................................. 12
4.5 NETLAB+ Virtual Machine Inventory Setup........................................................ 13
4.6 Create the Master QGIS Pod .............................................................................. 14
4.7 Update Master Pod ............................................................................................ 15
5 Pod Cloning ............................................................................................................... 17
5.1 Linked Clones and Full Clones ............................................................................ 17
5.2 Creating User Pods on the First Host ................................................................. 17
5.3 Copying Your Master Pod to the Second Host ................................................... 19
5.4 Creating User Pods on the Second Host ............................................................ 20
6 Assigning Pods to Students, Teams , or Classes........................................................ 21
QGIS Pod Installation and Configuration Guide
3
This work by the National Information Security and Geospatial Technologies Consortium (NISGTC), and except where otherwise noted, is licensed under the Creative Commons Attribution 3.0 Unported License.
1 Introduction
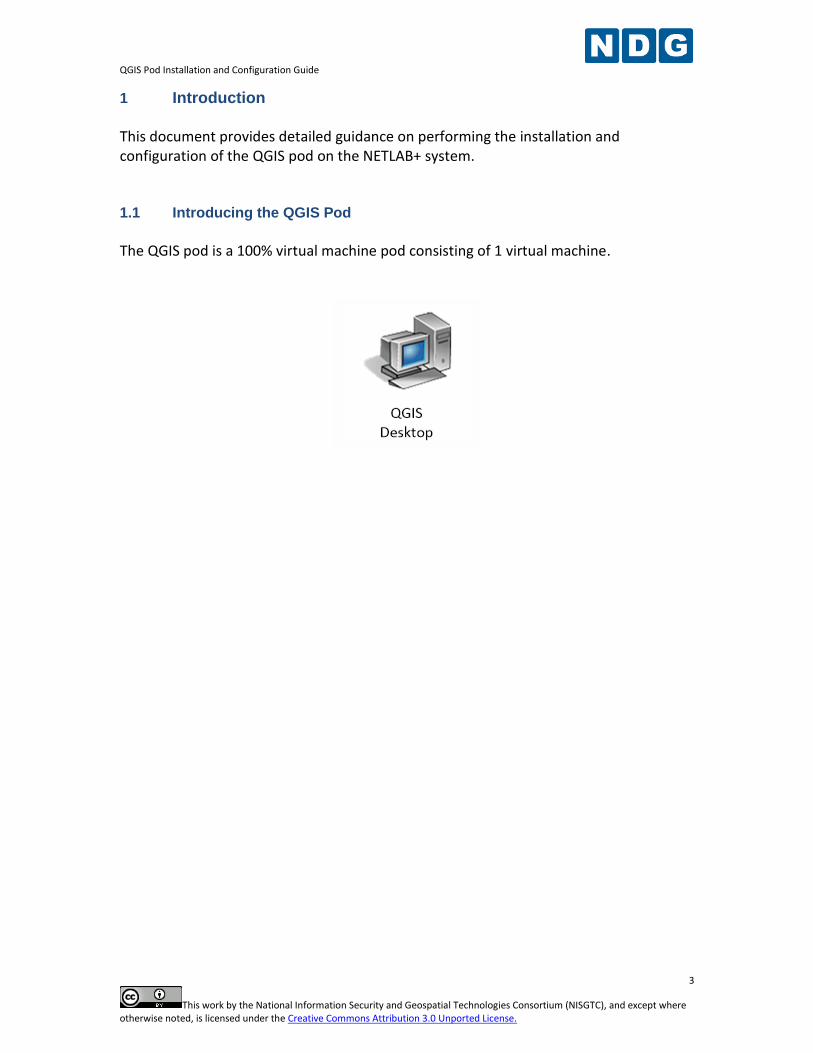
This document provides detailed guidance on performing the installation and configuration of the QGIS pod on the NETLAB+ system. 1.1 Introducing the QGIS Pod
The QGIS pod is a 100% virtual machine pod consisting of 1 virtual machine.
QGIS Pod Installation and Configuration Guide
4
This work by the National Information Security and Geospatial Technologies Consortium (NISGTC), and except where otherwise noted, is licensed under the Creative Commons Attribution 3.0 Unported License.
2 Planning
This guide provides specific information pertinent to delivering the QGIS course. The NETLAB+ Remote PC Guide Series provides the prerequisite guidance for setting up your VMware infrastructure, including:
An introduction to virtualization using NETLAB+
Detailed setup instructions for standing up VMware vCenter and VMware ESXi
Virtual machine and virtual pod management concepts using NETLAB+ This document assumes that you have set up virtual machine infrastructure in accordance with the NETLAB+ Remote PC Guide Series. The planning information below refers to specific sections in the Remote PC Guide when applicable.
2.1 Pod Creation Workflow
The following list is an overview of the pod setup process.
1. Obtain the master virtual machine image required for the pod.
2. Deploy the master virtual machine image to a master pod. a. Deploy the virtual machine using Thin Provisioning to reduce storage
consumption. b. Make necessary adjustments to the virtual machine in the environment.
i. Insert manual MAC address. ii. Change default network to SAFETY NET.
3. Import the virtual machine deployed to the NETLAB+ Virtual Machine Inventory. 4. Activate or license the required software on the virtual machine. 5. Take a snapshot of the virtual machine in the master pod labeled
GOLDEN_MASTER. The GOLDEN_MASTER snapshot is used to clone virtual machine images for the user pods.
6. Create copies of the virtual machine in the master pod on VMware host using the NETLAB+ Pod Cloning feature.
7. If multiple hosts are used in the NETLAB+ environment, make a full clone of the master pod on the initial host (Host A) to the subsequent host (Host B), using the NETLAB+ Pod Cloning Feature.

QGIS Pod Installation and Configuration Guide
5
This work by the National Information Security and Geospatial Technologies Consortium (NISGTC), and except where otherwise noted, is licensed under the Creative Commons Attribution 3.0 Unported License.
2.2 Pod Resource Requirements
The QGIS course will consume 6.5 GB of storage per each user pod instance.
The following table provides details of the storage requirements for the virtual machine in the pod.
Virtual Machine Initial Master Pod (Thin Provisioning)
Desktop 6.5 Total Recommended 6.5
2.3 ESXi Host Server Requirements
Please refer to the NDG website for specific ESXi host requirements to support virtual machine delivery: http://www.netdevgroup.com/content/vmita/requirements/
The number of active pods that can be used simultaneously depends on the NETLAB+ product edition, appliance version and the number of VMware ESXi host servers meeting the hardware requirements specifications below.
For current ESXi server requirements and active pod count, refer to the following URL:
http://www.netdevgroup.com/support/remote_pc.html#vm_host_server_specifications.

QGIS Pod Installation and Configuration Guide
6
This work by the National Information Security and Geospatial Technologies Consortium (NISGTC), and except where otherwise noted, is licensed under the Creative Commons Attribution 3.0 Unported License.
2.4 NETLAB+ Requirements
Installation of QGIS pods, as described in this guide, requires that your NETLAB+ system is equipped with NETLAB+ version 2011.R5 or later.
Previous versions of NETLAB+ do not support the use of VMware ESXi 5.1 on the physical host servers, which is required to support the installation and use of QGIS Pods on NETLAB+.
Please verify that your NETLAB+ system is running NETLAB+ version 2011.R5 or later, prior to upgrading your VMware ESXi servers to version 5.1. 2.5 Software Requirements
For the purpose of software licensing, each virtual machine is treated as an individual machine, PC or server. Please refer to the specific vendor license agreements (and educational discount programs, if applicable) to determine licensing requirements for your virtual machines’ software, operating system and applications. The following tables list the software that is required for the virtual machine inside the QGIS pod.
Pod Software Requirements
Software Version Source
Windows 7 Professional Dreamspark
2.6 Networking Requirements
To accommodate the movement of large VMs, OVF/OVAs and ISO disk images from one host to another, Gigabit Ethernet or better connectivity is recommended to interconnect your NETLAB+, vCenter Server system and ESXi host systems. Two standard networking models recommended to interconnect your servers are described in detail in the Networking Models section of the Remote PC Guide Series – Volume 1.
QGIS Pod Installation and Configuration Guide
7
This work by the National Information Security and Geospatial Technologies Consortium (NISGTC), and except where otherwise noted, is licensed under the Creative Commons Attribution 3.0 Unported License.
3 Obtaining Software and Licenses
3.1 Downloading OVF Files
The virtual machine is available as an Open Virtualization Format (OVF) or Open Virtualization Archive (OVA) file. The file is available for download from CSSIA.
To request access to the preconfigured virtual machine templates from CSSIA:
1. Go to the CSSIA Resources page: http://www.cssia.org/cssia-resources.cfm. 2. Select VM Image Sharing Agreement – Image Sharing Agreement. 3. Select VM Image Sharing Agreement to open the request form. 4. Complete and submit your access request by following the instructions on the
request form. 5. CSSIA will email a link, along with a username and password to access the
download server. Access to the download server is provided only to customers who are current with their NETLAB+ support contract and are participants in the appropriate partner programs (i.e. Cisco Networking Academy, VMware IT Academy, and/or EMC Academic Alliance).
6. Once access to the download server has been established, the virtual machine can be deployed directly to the vCenter Server by clicking on File > Deploy OVF Template in the vClient window and copying the link into the location field.
7. The deployment will start after the username and password are entered.

QGIS Pod Installation and Configuration Guide
8
This work by the National Information Security and Geospatial Technologies Consortium (NISGTC), and except where otherwise noted, is licensed under the Creative Commons Attribution 3.0 Unported License.
4 Master Pod Configuration
4.1 Deploying Virtual Machine OVF/OVA Files
Deploy on your host server the pod virtual machine OVF/OVA files you have downloaded.
1. Open the vClient on your administration machine where you downloaded the files from NDG. Connect to your vCenter Server.
2. Select Hosts and Clusters in the address bar.
3. Click on the first ESXi Host Server. 4. Click on File -> Deploy OVF Template.
5. Click on Browse and locate the OVF/OVA file you downloaded. Click Next to
continue. 6. On the OVF Template Details window, click Next. 7. On the Name and Location window, change the name of the virtual machine to
something that is easy to manage. You can use the name provided in the list below if you do not have a set naming convention. Click Next.
Virtual Machine Topology Name Virtual Machine Deployment Name
Desktop QGIS_Master_Desktop
8. On the Datastore window, select the appropriate datastore and click Next. 9. On the Disk Format window, select Thin provisioned format and click Next. 10. On the Network Mapping window, leave the default networks. Click Next.

QGIS Pod Installation and Configuration Guide
9
This work by the National Information Security and Geospatial Technologies Consortium (NISGTC), and except where otherwise noted, is licensed under the Creative Commons Attribution 3.0 Unported License.
Network mapping is handled automatically by the NETLAB+ system during pod creation.
11. On the Ready to Complete window, confirm the information and click Finish. 12. vCenter will begin deploying the virtual machine. This may take some time
depending on the speed of your connection, HDDs, etc. 13. When completed, click on Close.

QGIS Pod Installation and Configuration Guide
10
This work by the National Information Security and Geospatial Technologies Consortium (NISGTC), and except where otherwise noted, is licensed under the Creative Commons Attribution 3.0 Unported License.
4.2 Modify and Activate the Virtual Machine
The following tasks must be performed prior to taking snapshots or assigning the virtual machine to a pod. 4.2.1 Modify Network Interface Cards
Once the virtual machine is imported onto the host, change the Network Interface Cards (NIC’s) MAC address via the VMware vSphere Client interface. The following steps will guide you through the process.
1. In the vSphere Web Client interface, right-click on the imported virtual machine and select Edit Settings.
2. Right-click on the virtual machine and change the MAC address from automatic to manual then set the corresponding MAC address to the address listed in the table below.
Virtual Machine NIC MAC
Desktop 1 00:50:56:9c:73:b7
QGIS Pod Installation and Configuration Guide
11
This work by the National Information Security and Geospatial Technologies Consortium (NISGTC), and except where otherwise noted, is licensed under the Creative Commons Attribution 3.0 Unported License.
4.2.2 Activate the Virtual Machine
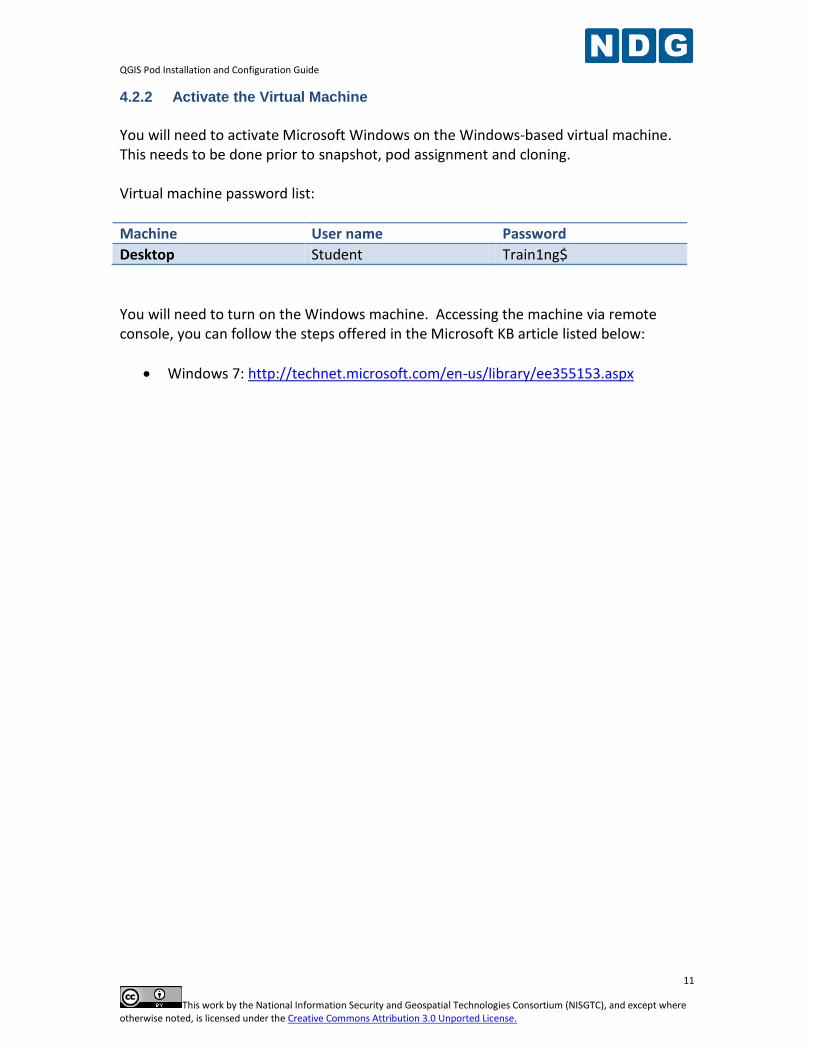
You will need to activate Microsoft Windows on the Windows-based virtual machine. This needs to be done prior to snapshot, pod assignment and cloning. Virtual machine password list:
Machine User name Password
Desktop Student Train1ng$
You will need to turn on the Windows machine. Accessing the machine via remote console, you can follow the steps offered in the Microsoft KB article listed below:
Windows 7: http://technet.microsoft.com/en-us/library/ee355153.aspx

QGIS Pod Installation and Configuration Guide
12
This work by the National Information Security and Geospatial Technologies Consortium (NISGTC), and except where otherwise noted, is licensed under the Creative Commons Attribution 3.0 Unported License.
4.3 Create a Snapshot for the Master Virtual Machine
In order to proceed with pod cloning, a snapshot must be created of the virtual machine.
Verify the VM is powered off before taking a snapshot.
1. Open the vClient on your management workstation. Connect to your vCenter
Server. 2. Select Hosts and Clusters in the address bar.
3. Right-click on the virtual machine and select Snapshot -> Take Snapshot. 4. Enter GOLDEN_MASTER as the Snapshot Name. 5. Enter a description. It is a good idea to include the date in the description for
later reference. 6. Click OK.
4.4 NETLAB+ Virtual Machine Infrastructure Setup
The NETLAB+ Virtual Machine Infrastructure setup is described in the following sections of the Remote PC Guides for NETLAB+:
Registering a Virtual Datacenter in NETLAB+
Adding ESXi hosts in NETLAB+
Proactive Resource Awareness
It is important to configure Proactive Resource Awareness to maximize the number of active pods per physical ESXi host.
QGIS Pod Installation and Configuration Guide
13
This work by the National Information Security and Geospatial Technologies Consortium (NISGTC), and except where otherwise noted, is licensed under the Creative Commons Attribution 3.0 Unported License.
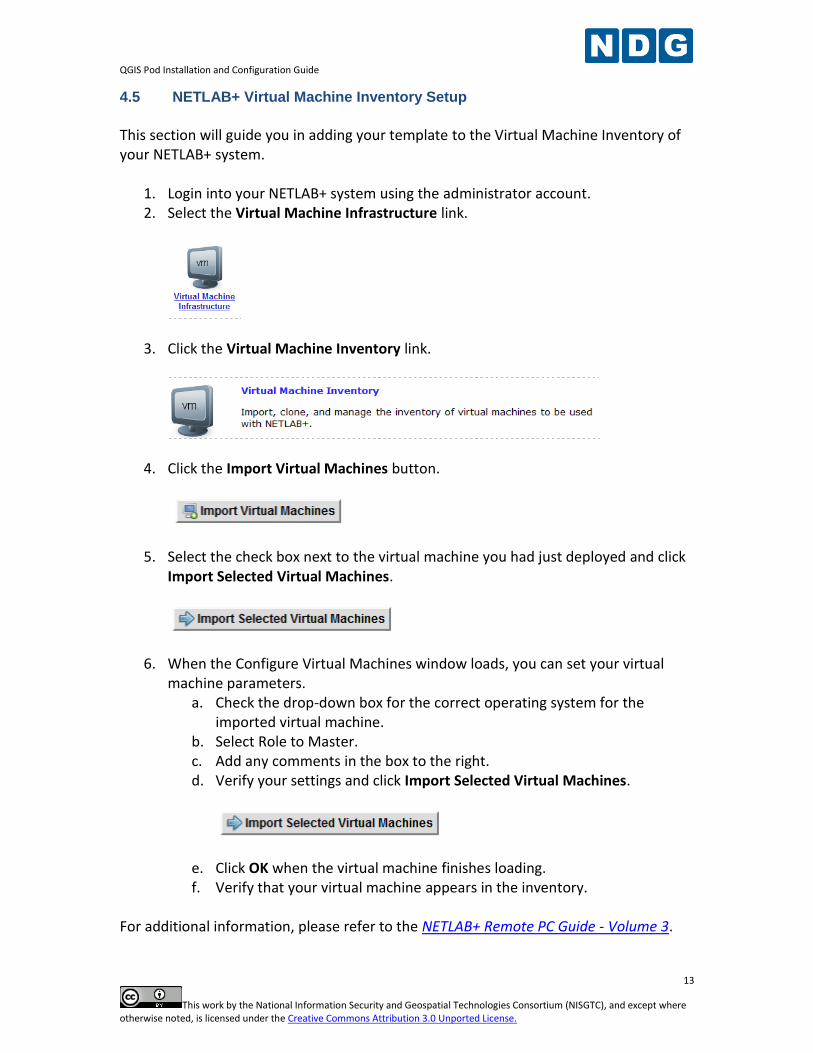
4.5 NETLAB+ Virtual Machine Inventory Setup
This section will guide you in adding your template to the Virtual Machine Inventory of your NETLAB+ system.
1. Login into your NETLAB+ system using the administrator account. 2. Select the Virtual Machine Infrastructure link.
3. Click the Virtual Machine Inventory link.
4. Click the Import Virtual Machines button.
5. Select the check box next to the virtual machine you had just deployed and click Import Selected Virtual Machines.
6. When the Configure Virtual Machines window loads, you can set your virtual machine parameters.
a. Check the drop-down box for the correct operating system for the imported virtual machine.
b. Select Role to Master. c. Add any comments in the box to the right. d. Verify your settings and click Import Selected Virtual Machines.
e. Click OK when the virtual machine finishes loading. f. Verify that your virtual machine appears in the inventory.
For additional information, please refer to the NETLAB+ Remote PC Guide - Volume 3.
QGIS Pod Installation and Configuration Guide
14
This work by the National Information Security and Geospatial Technologies Consortium (NISGTC), and except where otherwise noted, is licensed under the Creative Commons Attribution 3.0 Unported License.
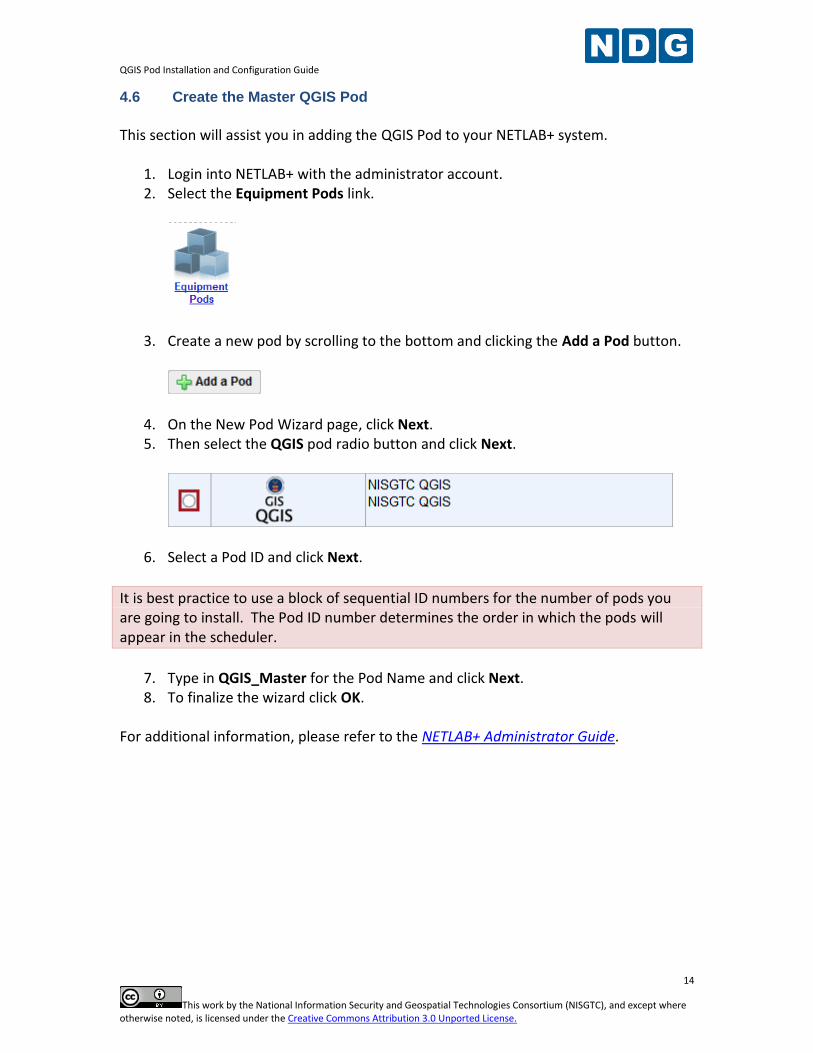
4.6 Create the Master QGIS Pod
This section will assist you in adding the QGIS Pod to your NETLAB+ system.
1. Login into NETLAB+ with the administrator account. 2. Select the Equipment Pods link.
3. Create a new pod by scrolling to the bottom and clicking the Add a Pod button.
4. On the New Pod Wizard page, click Next. 5. Then select the QGIS pod radio button and click Next.
6. Select a Pod ID and click Next.
It is best practice to use a block of sequential ID numbers for the number of pods you are going to install. The Pod ID number determines the order in which the pods will appear in the scheduler.
7. Type in QGIS_Master for the Pod Name and click Next. 8. To finalize the wizard click OK.
For additional information, please refer to the NETLAB+ Administrator Guide.

QGIS Pod Installation and Configuration Guide
15
This work by the National Information Security and Geospatial Technologies Consortium (NISGTC), and except where otherwise noted, is licensed under the Creative Commons Attribution 3.0 Unported License.
4.7 Update Master Pod
We need to update the master pod to associate the virtual machine that we deployed on the host with the pod we created.
1. Update the master pod on your NETLAB+ system. a. Login into NETLAB+ with the administrator account. b. Select the Equipment Pods link.
2. Select the QGIS master pod.
3. Click on the Magnifying Glass icon next to the VM. Please note that your PC IDs will not match the graphic below.
4. Click on Modify PC Settings.
5. Change the PC Type drop-down box to Use Virtual Machine Inventory.

QGIS Pod Installation and Configuration Guide
16
This work by the National Information Security and Geospatial Technologies Consortium (NISGTC), and except where otherwise noted, is licensed under the Creative Commons Attribution 3.0 Unported License.
6. In the Base Virtual Machine window, select your virtual machine to associate with the spot held for it in the pod.
7. Update Base Snapshot to your GOLDEN_MASTER snapshot. 8. Review the information on the screen and click Update PC Settings.
9. Click on Show Pod.
Make sure the pod status is Offline prior to continuing. The cloning process requires the pod be offline. Since this is our master pod, which will be used for cloning other pods, we will keep it offline so that it may be used to create the instructor and student pods.
QGIS Pod Installation and Configuration Guide
17
This work by the National Information Security and Geospatial Technologies Consortium (NISGTC), and except where otherwise noted, is licensed under the Creative Commons Attribution 3.0 Unported License.
5 Pod Cloning
This section will help you create multiple student pods. The following sections describe the NETLAB+ pod-cloning feature used to create student pods on one or two host systems. 5.1 Linked Clones and Full Clones
NETLAB+ can create linked clones or full clones. A linked clone (or linked virtual machine) is a virtual machine that shares virtual disks with the parent (or master) virtual machine in an ongoing manner. This conserves disk space, and allows multiple virtual machines to use the same software installation. Linked clones can be created very quickly because most of the disk is shared with the parent VM. A full clone is an independent copy of a virtual machine that shares nothing with the parent virtual machine after the cloning operation. Ongoing operation of a full clone is entirely separate from the parent virtual machine. 5.2 Creating User Pods on the First Host
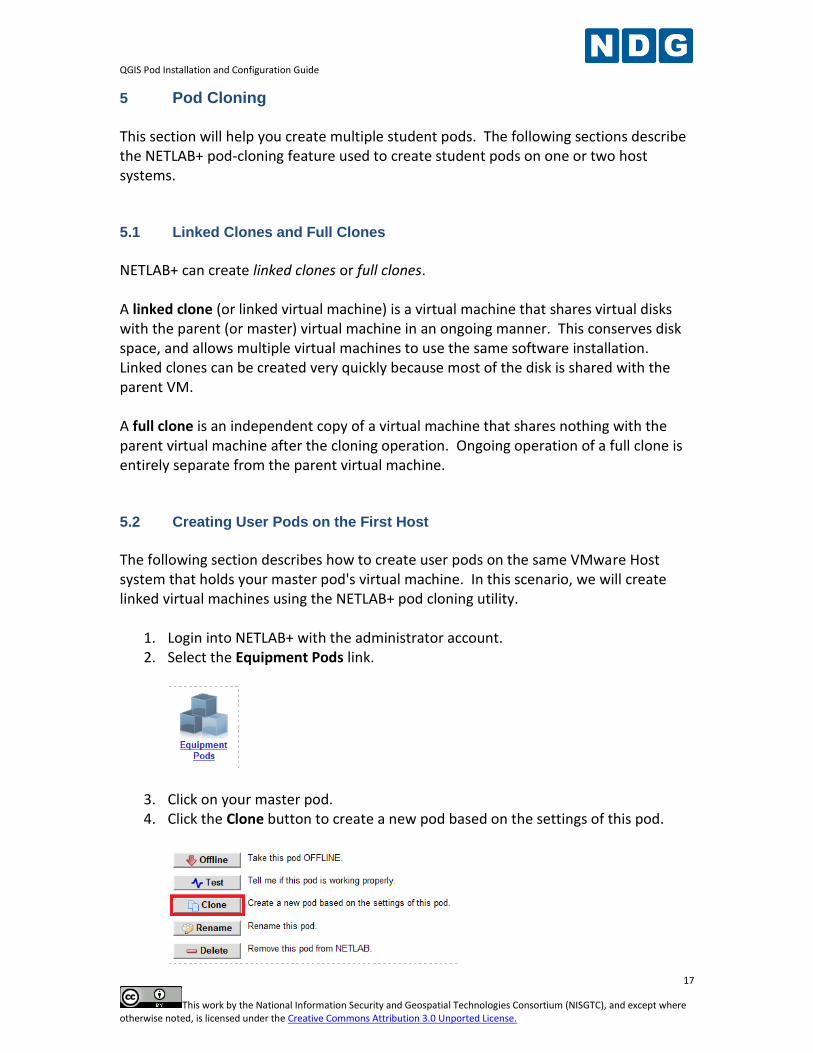
The following section describes how to create user pods on the same VMware Host system that holds your master pod's virtual machine. In this scenario, we will create linked virtual machines using the NETLAB+ pod cloning utility.
1. Login into NETLAB+ with the administrator account. 2. Select the Equipment Pods link.
3. Click on your master pod. 4. Click the Clone button to create a new pod based on the settings of this pod.
QGIS Pod Installation and Configuration Guide
18
This work by the National Information Security and Geospatial Technologies Consortium (NISGTC), and except where otherwise noted, is licensed under the Creative Commons Attribution 3.0 Unported License.
5. Select the New Pod ID. It is advised to keep the pods in numerical order. If the pod IDs are not in numerical order, they will not show up in the scheduler in numerical order.
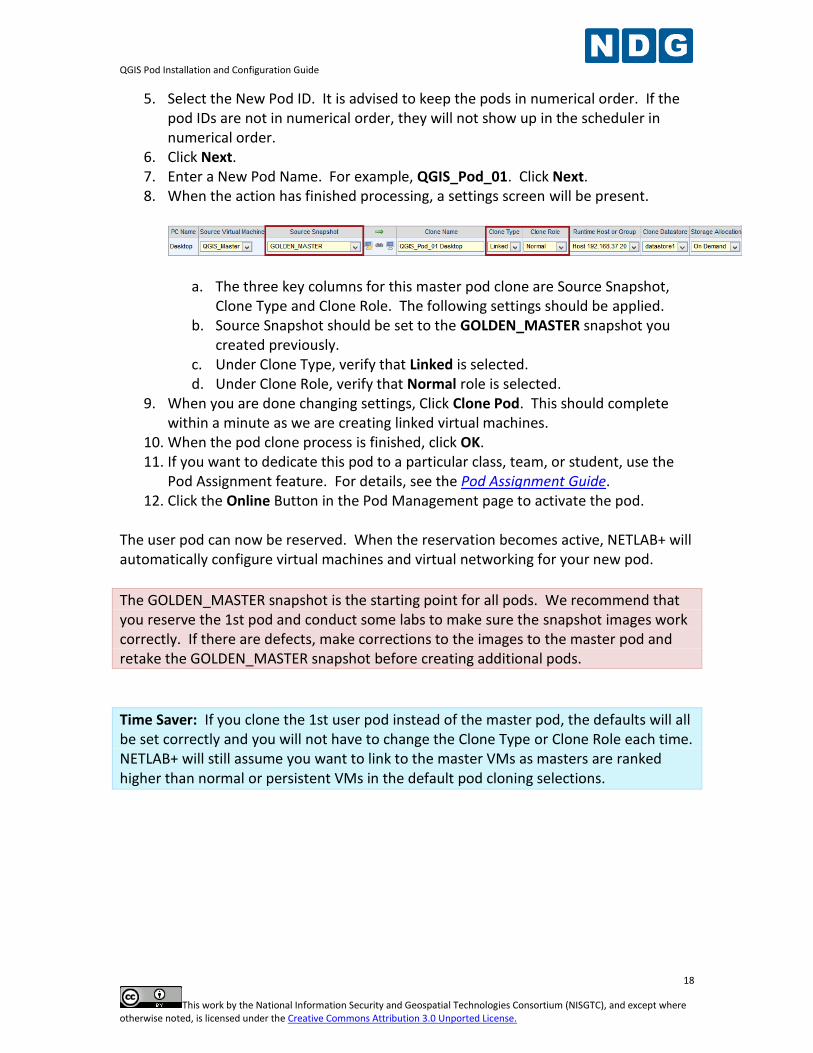
6. Click Next. 7. Enter a New Pod Name. For example, QGIS_Pod_01. Click Next. 8. When the action has finished processing, a settings screen will be present.
a. The three key columns for this master pod clone are Source Snapshot, Clone Type and Clone Role. The following settings should be applied.
b. Source Snapshot should be set to the GOLDEN_MASTER snapshot you created previously.
c. Under Clone Type, verify that Linked is selected. d. Under Clone Role, verify that Normal role is selected.
9. When you are done changing settings, Click Clone Pod. This should complete within a minute as we are creating linked virtual machines.
10. When the pod clone process is finished, click OK. 11. If you want to dedicate this pod to a particular class, team, or student, use the
Pod Assignment feature. For details, see the Pod Assignment Guide. 12. Click the Online Button in the Pod Management page to activate the pod.
The user pod can now be reserved. When the reservation becomes active, NETLAB+ will automatically configure virtual machines and virtual networking for your new pod.
The GOLDEN_MASTER snapshot is the starting point for all pods. We recommend that you reserve the 1st pod and conduct some labs to make sure the snapshot images work correctly. If there are defects, make corrections to the images to the master pod and retake the GOLDEN_MASTER snapshot before creating additional pods.
Time Saver: If you clone the 1st user pod instead of the master pod, the defaults will all be set correctly and you will not have to change the Clone Type or Clone Role each time. NETLAB+ will still assume you want to link to the master VMs as masters are ranked higher than normal or persistent VMs in the default pod cloning selections.

QGIS Pod Installation and Configuration Guide
19
This work by the National Information Security and Geospatial Technologies Consortium (NISGTC), and except where otherwise noted, is licensed under the Creative Commons Attribution 3.0 Unported License.
5.3 Copying Your Master Pod to the Second Host
For this task, we will use the pod cloning utility to copy our master pod to the 2nd host.
1. Login into NETLAB+ with the administrator account. 2. Select the Equipment Pods link.
3. Click on the master pod that was created on the 1st VMware host server. 4. Click the Clone button to create a new pod based on the settings of this pod.
5. Select the New Pod ID.
It is advised to keep the pods in numerical order. If the pod IDs are not in numerical order, they will not show up in the scheduler in numerical order.
6. Click Next. 7. Enter a New Pod Name. For example, CourseName_Master_Pod_2 then Click
Next. 8. When the action has finished processing, a settings screen will be present.
QGIS Pod Installation and Configuration Guide
20
This work by the National Information Security and Geospatial Technologies Consortium (NISGTC), and except where otherwise noted, is licensed under the Creative Commons Attribution 3.0 Unported License.
9. The four key columns for this master pod clone are Source Snapshot, Clone Type and Clone Role, and Runtime Host.
a. Source Snapshot should be set to the GOLDEN_MASTER snapshot you created previously.
b. Under Clone Type, click the dropdown menu and verify that Full is selected.
c. Under Clone Role, click the dropdown menu and select Master. d. Under Runtime Host, select the 2nd host system (which should be
different from the system you are cloning from). 10. When you are done changing settings, Click Clone Pod. This may take up to 30
minutes as full copies are being made. You may navigate away from the cloning progress screen, and then later return to the pod to check progress.
The NETLAB+ software does not automatically create the snapshots on the virtual machines. It is necessary to create the snapshots manually as you did in a previous section.
11. When the cloning process is complete, you should create a GOLDEN_SNAPSHOT
on the virtual machine in the 2nd master pod. 5.4 Creating User Pods on the Second Host
To create user pods on the second host, repeat the steps to create User pods on the first host (Section 5.2), substituting the 2nd master pod (created in the previous section) as the cloning source.

QGIS Pod Installation and Configuration Guide
21
This work by the National Information Security and Geospatial Technologies Consortium (NISGTC), and except where otherwise noted, is licensed under the Creative Commons Attribution 3.0 Unported License.
6 Assigning Pods to Students, Teams , or Classes
Please refer to the Pod Assignment Guide for details on using the Pod Assignment feature.