Embed Size (px)
Citation preview
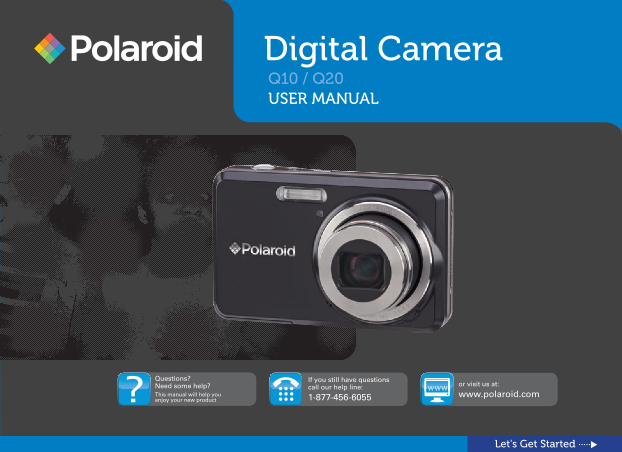
Q10 / Q20
Let's Get Started ‧‧‧‧‧
USER MANUAL
Digital Camera
�
Polaro�d Q10 / Q20WARNING
Do not expose the camera's battery pack or other accessor�es to ra�n or hum�d�ty to prevent a f�re hazard or electr�c shock.
For customers in the U.S.A.
Tested To Comply With FCC StandardsFOR HOME OR OFFICE USE
FCC StatementTh�s dev�ce compl�es w�th part 15 of the FCC Rules. Operat�on �s subject to the follow�ng two cond�t�ons: (1) Th�s dev�ce may not cause harmful �nterference, and (2) th�s dev�ce must accept any �nterference rece�ved, �nclud�ng �nterference that may cause undes�red operat�on.
For customers in Europe"CE" mark �nd�cates that th�s product compl�es w�th the European requ�rements for safety,
health, env�ronment and customer protect�on. "CE" marked cameras are �ntended for sales �n Europe.
Supplier’s declaration of conformity
For compl�ance levels 1, 2 and 3 �n Austral�a and Levels of Conform�ty 1, 2 and 3 �n New Zealand.
As requ�red by not�ces under: Sect�on 182 of the Austral�an Rad�ocommun�cat�ons
Act 1992; Sect�on 407 of the Austral�a Telecommun�cat�ons Act
1989; and Sect�on 134 of the New Zealand
Rad�ocommun�cat�ons Act 1989.
Th�s symbol [crossed-out wheeled b�n WEEE Annex IV] �nd�cates separate collect�on of electr�cal and electron�c waste �n the European
countr�es. Please do not throw the equ�pment �nto the waste. Please recycle and d�spose of properly.
Declaration of Conformity Model Name: Q10 / Q20
Trade Name: Polaro�d
Respons�ble Party: plawa-fe�nwerktechn�k GmbH & Co. KG
Address: Ble�chere�strasse 18, 73066 Uh�ngen, Germany
Conforms to the follow�ng Standards:
EMC: EN 55022:2006/A1:2007 Class B EN 55024:1998/A1:2001/A2:2003 EN 61000-3-2:2006/A1:2009/A2:2009 EN 61000-3-3:2008
follow�ng the prov�s�on of the EMC D�rect�ve (89/336/EEC, 2004/108/EEC)N13001

��
Polaro�d Q10 / Q20 SAFETY PRECAUTIONS
Camera notes:Do not store or use the camera �n the follow�ng types of locat�ons:• In the ra�n or �n, very hum�d and dusty places.• In a place where the camera may be exposed d�rectly
to sunl�ght or subject to h�gh temperature, e.g. Ins�de a closed car �n summer.
• In a place where the camera �s subject to a h�gh magnet�c f�eld, e.g. near motors, transformers or magnets.
Do not place the camera on a wet surface or places where dr�pp�ng water or sand may come �n contact w�th the camera, wh�ch may cause �rrepa�rable damage.If the camera w�ll not be used for a long per�od of t�me, we suggest you remove the batter�es and the memory card from the camera and keep them �n a dry env�ronment. If you carry the camera suddenly from a cold locat�on to a warm place, mo�sture may condense �ns�de the camera. We suggest you wa�t for a wh�le before tur�ng on the camera. No compensat�on for loss of record�ngs. Loss of record-�ngs cannot be compensated for �f a malfunct�on of your camera or record�ng med�a, makes the playback of record�ngs not poss�ble.
Battery notes:Incorrect use of the battery may cause them to leak, become hot, �gn�te or burst. Always observe the precaut�ons g�ven below.
• Do not expose the battery to water, and take part�cular care to keep the term�nals dry.
• Do not heat the battery or throw them �nto a f�re.
• Do not attempt to deform, d�sassemble or mod�fy the battery .
Keep the battery out of reach of small ch�ldren.
In cold locat�ons, battery performance deter�orates and the t�me for wh�ch they can be used shortens markedly.
Memory card notes:When us�ng a new memory card, or a memory card that has been used �n a PC, be sure to format the card w�th your d�g�tal camera before us�ng �t.
To ed�t �mage data, copy the �mage data to the PC’s hard d�sk f�rst.Do not change or delete the folder names or f�le names �n the memory card from your PC, as th�s may make �t �mposs�ble for your camera to recogn�ze the or�g�nal folder or f�le �n the memory card.The photos taken by th�s camera are stored �n the auto-generated folder �n the SD card. Please do not store photos that are not taken by th�s model of camera, as th�s may make �t �mposs�ble to recogn�ze the p�cture when the camera �s �n playback mode. Please do not expose the camera to harsh env�ronments such as mo�sture or extreme temperatures, wh�ch may shorten the l�fe of your camera or damage the batter�es.
1
Polaro�d Q10 / Q20BEFORE YOU START
Preface Safety �nformat�on
Please read the follow�ng �mportant �nformat�on care-fully before us�ng the product.
• Do not take apart or attempt to serv�ce the camera yourself.
• Do not drop or knock the camera. Improper handl�ng may damage the product.
• Turn off the camera before �nsert�ng or remov�ng the battery and (or) memory card.
• Do not touch the camera's lens.
• Please do not expose the camera to harsh env�ronments such as mo�sture, or extreme temperatures, wh�ch may shorten the l�fe of your camera or damage the batter�es.
• Do not use or store the camera �n dusty, d�rty, or sandy areas, as �ts components may be damaged.
Thank you for purchas�ng th�s d�g�tal camera. Please read th�s manual carefully and keep �t �n a safe place for future reference.
CopyrightCopyr�ght © 2011 All r�ghts reserved Th�s product �s manufactured, d�str�buted, and sold by plawa-fe�nwerktechn�k GmbH & Co. KG, Ble�chere�strasse 18, 73066 Uh�ngen, Germany.
No part of th�s publ�cat�on may be reproduced, transm�t-ted, transcr�bed, stored �n a retr�eval system, or trans-lated �nto any language or computer language, �n any form, by any means, w�thout the pr�or wr�tten perm�s-s�on of plawa-fe�nwerktechn�k GmbH & Co. KG.
TrademarksAll trademarks ment�oned �n th�s manual are used for �dent�f�cat�on purposes only and are propert�es of the�r respect�ve owners.
2
Polaro�d Q10 / Q20
• Do not expose the lens to d�rect sunl�ght for extended per�ods.
• Download all p�ctures and remove the batter�es from the camera �f you are go�ng to store the camera for long per�ods of t�me.
• Do not use abras�ve cleansers, alcohol-based, or sol-vent-based cleaners to clean the camera. To clean, w�pe the camera w�th a sl�ghtly damp soft cloth.
About th�s manual
Th�s manual prov�des you w�th �nstruct�ons on how to use your d�g�tal camera. Every effort has been made to ensure that the contents of th�s manual are accurate, however plawa-fe�nwerktechn�k GmbH & Co. KG re-serves the r�ght to make changes w�thout not�ce.
Symbols used in this manualThroughout th�s manual, the follow�ng symbols are used to help you locate �nformat�on qu�ckly and eas�ly:
Ind�cates the useful �nformat�on to know.
Ind�cates precaut�ons to be taken wh�le operat�ng the camera.
3
Polaro�d Q10 / Q20
WARNING ................................................ �
SAFETY PRECAUTIONS .......................... ��
BEFORE YOU START ..............................1
Preface ...............................................................1
Copyr�ght .....................................................1
Trademarks ..................................................1
Safety �nformat�on ..............................................1
About th�s manual ..............................................2
Symbols used �n th�s manual .......................2
CONTENTS ..............................................3
GETTING READY .....................................7
Unpack�ng ..........................................................7
Camera V�ews ....................................................8
Insert the Battery and SD/SDHC Card ............. 10
Charg�ng the Battery ........................................ 12
Turn�ng On and Off .......................................... 13
Use Mode button ............................................. 14
Set T�me, date/t�me .......................................... 15
Sett�ng the Language ................................. 15
Sett�ng the Date and T�me ......................... 16
About the LCD Screen ..................................... 17
BASIC OPERATION ...............................18
Shoot�ng �n Auto Mode .................................... 18
Us�ng the Zoom Funct�on ................................. 18
Flash ................................................................. 19
Self-t�mer .......................................................... 19
Macro Mode .....................................................20
Us�ng qu�ck record�ng ........................................20
Advanced Funct�ons Menu ..............................21
S�ze ............................................................22
Qual�ty ........................................................22
WB (Wh�te Balance) ...................................23
Color ..........................................................23
ISO .............................................................24
Exposure Compensat�on ............................24
CONTENTS
4
Polaro�d Q10 / Q20
USING THE MODES ..............................25
LCD Screen D�splay .........................................25
St�ll P�cture Mode D�splay ..........................25
V�deo Shoot�ng Mode D�splay ....................27
Playback Mode D�splay ..............................28
ASCN mode .....................................................29Landscape Mode ........................................29
Portra�t Mode ..............................................29
N�ght Portra�t ..............................................30
Backl�t Portra�t ............................................30
N�ght Landscape Mode ...............................30
Macro Mode ...............................................30
Auto Mode ..................................................30
Panorama Mode ................................................31
Manual Scene Mode (SCN) ..............................32
Landscape ..................................................33
Sport ..........................................................33
Beach .........................................................33
Sunset ........................................................33
F�reworks ...................................................33
N�ght Landscape ........................................33
N�ght Portra�t ..............................................33
Gather�ng ...................................................33
Ch�ldren ......................................................33
Indoor .........................................................33
Snow ..........................................................33
ID ...............................................................33
Museum ....................................................33
Photo frame ...............................................33
Travel shoot�ng ...........................................34
Text ............................................................34
Leaf ............................................................34
Glass ..........................................................34
F�sh eye ......................................................34
Sketch ........................................................34
Stab�l�zat�on Mode ............................................35
Face Detect�on .................................................36
Bl�nk Detect�on .................................................36
5
Polaro�d Q10 / Q20
PLAYBACK ............................................37
V�ew�ng Photos and V�deos ..............................37
Thumbna�l V�ew ................................................39
Us�ng Zoom on Playback ..................................40
Us�ng the Delete Button ..................................41
USING THE MENUS ..............................42
St�ll Menu .........................................................42
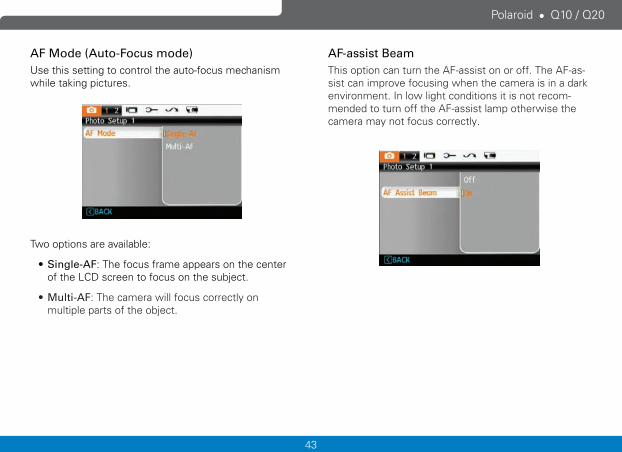
AF Mode (Auto-Focus Mode ) ...................43
AF-ass�st Beam ..........................................43
Cont�nuous AF .. .........................................44
Expo Meter�ng (Exposure Meter�ng) .. ........44
Cont�nuous Shot ........................................45
Sm�le Shutter .............................................45
D�g�tal Zoom ...............................................46
Slow shutter ..............................................46
Qu�ck Rev�ew .............................................47
Date Impr�nt ...............................................47
Mov�e Menu .....................................................48
Expo Meter�ng (Exposure Meter�ng) .. ........49
Cont�nuous AF ...........................................49
DIS .............................................................50
Playback Menu .................................................51
Protect .......................................................51
Delete ........................................................52
DPOF (D�g�tal Pr�nt Order Format) .............53
Res�ze ........................................................54
Rotate ........................................................54
Red-eye Reduct�on .....................................55
Tr�m ............................................................55
HDR-H�gh Dynam�c Range ..........................56
D�splay Setup ...................................................57
Sl�deshow ..................................................57
Wallpaper Sett�ngs .....................................58
Menu Wallpaper ........................................58
Setup Menu .....................................................60
Beep ..........................................................60
LCD Br�ghtness ..........................................64
Power Saver ..............................................62
Date/T�me ..................................................62
6
Polaro�d Q10 / Q20
Zone ...........................................................62
Language ...................................................63
F�le and Software .............................................63
Format Memory .........................................63
Copy to Card (Copy �nternal memory to memory card) .............................................64
F�le Number�ng ..........................................64
Reset Sett�ngs ...........................................65
FW Vers�on (F�rmware vers�on) .................65
Transm�ss�on ...........................................66V�deo System ...................................................66
Connect�ng to a PC ..........................................67
Sett�ng the USB Mode ...............................67
Transferr�ng F�les to your PC .....................67
APPENDICES .........................................69Spec�f�cat�ons ...................................................69
Error Messages ................................................73
Troubleshoot�ng ...............................................75
Customer Care ..................................................77
�
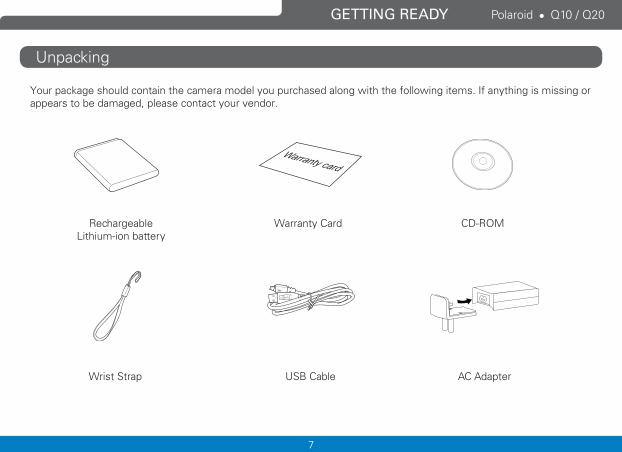
Polaroid Q10 / Q20GETTING READY
Your package should contain the camera model you purchased along with the following items. If anything is missing or appears to be damaged, please contact your vendor.
Unpacking
USB Cable
Warranty Card CD-ROM
Wrist Strap AC Adapter
Rechargeable Lithium-ion battery
8
Polaro�d Q10 / Q20
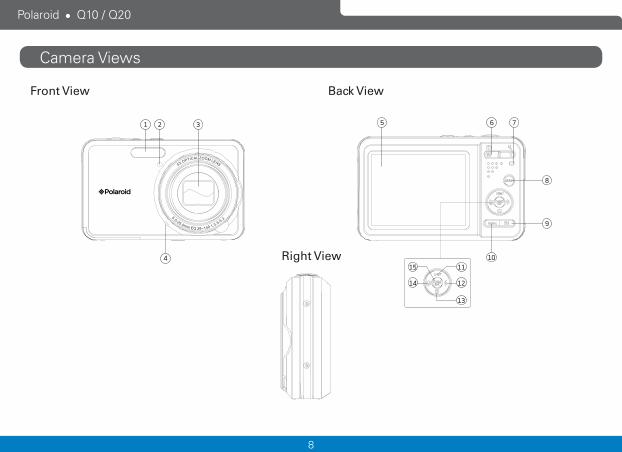
Camera V�ews
Front View Back View
Right View
1 2 3
4
5 6 7
8
9
10
11
12
15
14
13
9
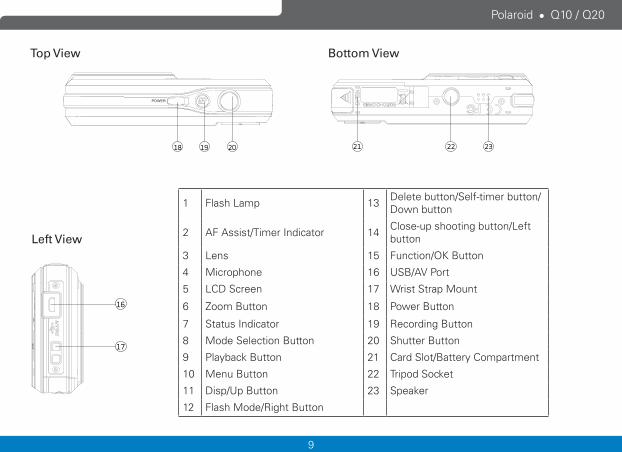
Polaro�d Q10 / Q20
Top View
Left View
Bottom View
1 Flash Lamp 13 Delete button/Self-t�mer button/Down button
2 AF Ass�st/T�mer Ind�cator 14 Close-up shoot�ng button/Left button
3 Lens 15 Funct�on/OK Button
4 M�crophone 16 USB/AV Port
5 LCD Screen 17 Wr�st Strap Mount
6 Zoom Button 18 Power Button
7 Status Ind�cator 19 Record�ng Button
8 Mode Select�on Button 20 Shutter Button
9 Playback Button 21 Card Slot/Battery Compartment
10 Menu Button 22 Tr�pod Socket
11 D�sp/Up Button 23 Speaker
12 Flash Mode/R�ght Button
18 19 20 21 22 23
17
16
10
Polaro�d Q10 / Q20
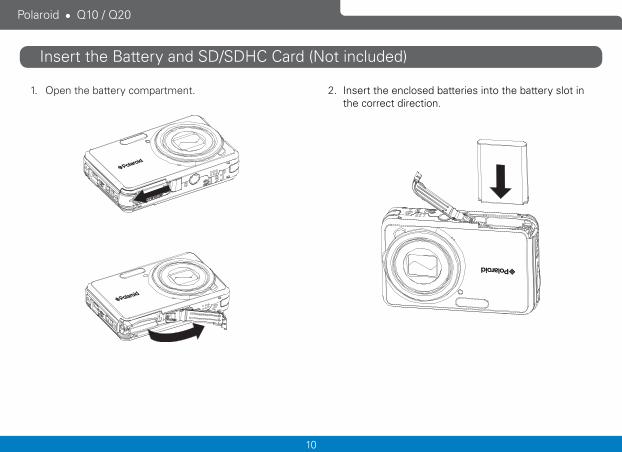
Insert the Battery and SD/SDHC Card (Not �ncluded)
2. Insert the enclosed batter�es �nto the battery slot �n the correct d�rect�on.
1. Open the battery compartment.
11
Polaro�d Q10 / Q20
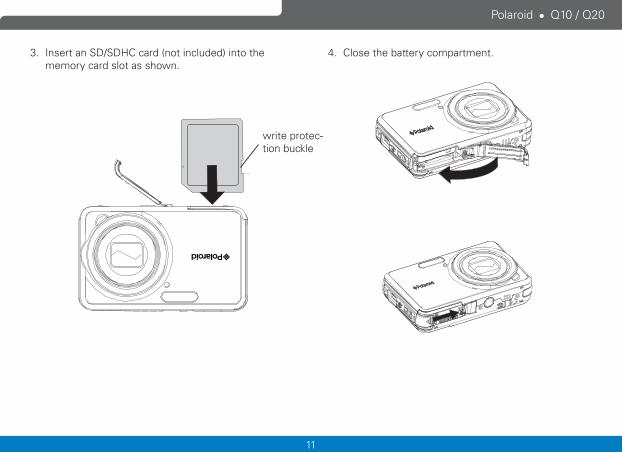
4. Close the battery compartment.3. Insert an SD/SDHC card (not �ncluded) �nto the memory card slot as shown.
wr�te protec-t�on buckle
12
Polaro�d Q10 / Q20
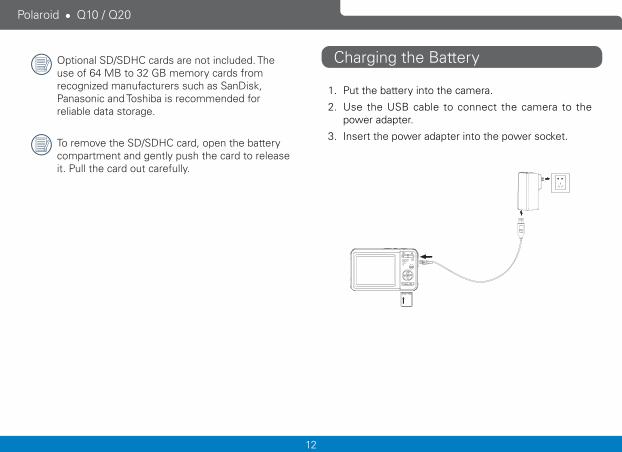
Opt�onal SD/SDHC cards are not �ncluded. The use of 64 MB to 32 GB memory cards from recogn�zed manufacturers such as SanD�sk, Panason�c and Tosh�ba �s recommended for rel�able data storage.
To remove the SD/SDHC card, open the battery compartment and gently push the card to release �t. Pull the card out carefully.
1. Put the battery �nto the camera.
2. Use the USB cable to connect the camera to the power adapter.
3. Insert the power adapter �nto the power socket.
Charg�ng the Battery
13
Polaro�d Q10 / Q20
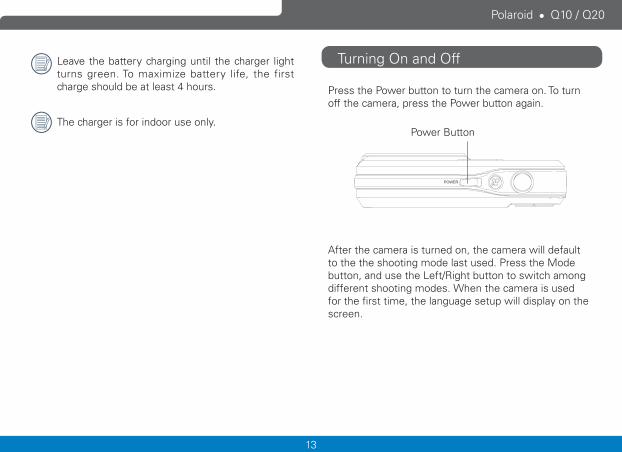
Turn�ng On and Off
Press the Power button to turn the camera on. To turn off the camera, press the Power button aga�n.
After the camera �s turned on, the camera w�ll default to the the shoot�ng mode last used. Press the Mode button, and use the Left/R�ght button to sw�tch among d�fferent shoot�ng modes. When the camera �s used for the f�rst t�me, the language setup w�ll d�splay on the screen.
Power Button
Leave the battery charg�ng unt�l the charger l�ght turns green. To max�m�ze battery l�fe, the f�rst charge should be at least 4 hours.
The charger �s for �ndoor use only.
14
Polaro�d Q10 / Q20
Use Mode button
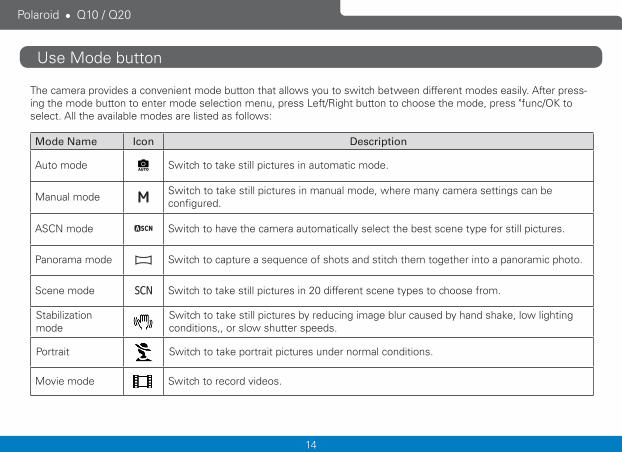
The camera prov�des a conven�ent mode button that allows you to sw�tch between d�fferent modes eas�ly. After press-�ng the mode button to enter mode select�on menu, press Left/R�ght button to choose the mode, press "func/OK to select. All the ava�lable modes are l�sted as follows:
Mode Name Icon Description
Auto mode AUTO Sw�tch to take st�ll p�ctures �n automat�c mode.
Manual mode Sw�tch to take st�ll p�ctures �n manual mode, where many camera sett�ngs can be conf�gured.
ASCN mode Sw�tch to have the camera automat�cally select the best scene type for st�ll p�ctures.
Panorama mode Sw�tch to capture a sequence of shots and st�tch them together �nto a panoram�c photo.
Scene mode Sw�tch to take st�ll p�ctures �n 20 d�fferent scene types to choose from.
Stab�l�zat�on mode
Sw�tch to take st�ll p�ctures by reduc�ng �mage blur caused by hand shake, low l�ght�ng cond�t�ons,, or slow shutter speeds.
Portra�t Sw�tch to take portra�t p�ctures under normal cond�t�ons.
Mov�e mode Sw�tch to record v�deos.
15
Polaro�d Q10 / Q20
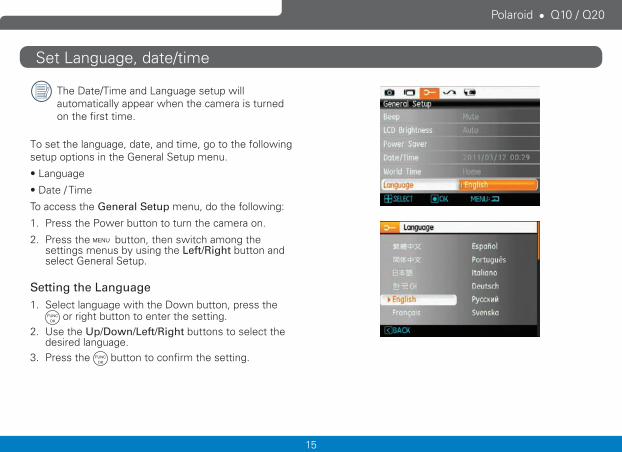
Set Language, date/t�me
The Date/T�me and Language setup w�ll automat�cally appear when the camera �s turned on the f�rst t�me.
To set the language, date, and t�me, go to the follow�ng setup opt�ons �n the General Setup menu.
• Language
• Date / T�me
To access the General Setup menu, do the follow�ng:
1. Press the Power button to turn the camera on.
2. Press the button, then sw�tch among the sett�ngs menus by us�ng the Left/Right button and select General Setup.
Setting the Language1. Select language w�th the Down button, press the
or r�ght button to enter the sett�ng.2. Use the Up/Down/Left/Right buttons to select the
des�red language.3. Press the button to conf�rm the sett�ng.
16
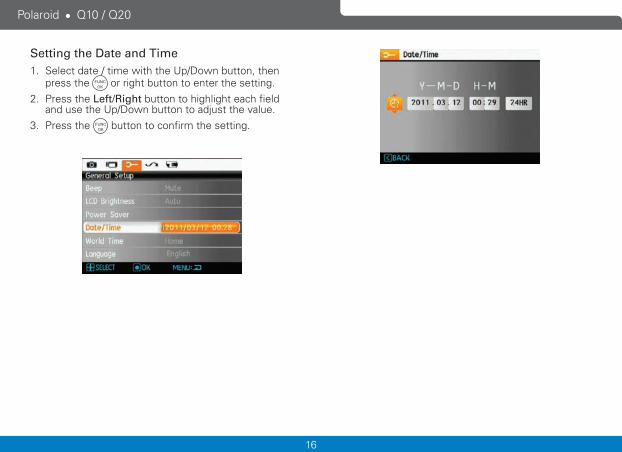
Polaro�d Q10 / Q20
Setting the Date and Time1. Select date / t�me w�th the Up/Down button, then
press the or r�ght button to enter the sett�ng.2. Press the Left/Right button to h�ghl�ght each f�eld
and use the Up/Down button to adjust the value.3. Press the button to conf�rm the sett�ng.
17
Polaro�d Q10 / Q20
If the LCD mon�tor �s damaged, take part�cular care w�th the l�qu�d �n the mon�tor. If any of the follow�ng s�tuat�ons ar�se, take the recommended �mmed�ate act�on �nd�cated below:
• If l�qu�d from the LCD comes �n contact w�th your sk�n, w�pe the area w�th a cloth and then wash thoroughly w�th soap and runn�ng water.
• If l�qu�d from the LCD flows �nto the eyes �nadvertently, please r�nse w�th water �mmed�ately and seek med�cal ass�stance.
• If l�qu�d from the LCD �s swallowed, flush your mouth thoroughly w�th water. Dr�nk large quant�t�es of water and �nduce vom�t�ng. Then seek med�cal ass�stance �mmed�ately.
About the LCD Screen
When you turn the camera on, var�ous �cons w�ll appear on the LCD screen to �nd�cate the current camera sett�ngs and status. To learn more about the d�splayed �cons, see “LCD Screen display” on page 25.
LCD Screen notes:Extremely h�gh-prec�s�on technology has been used to manufacture the LCD screen so that most of the p�xels are operat�onal for use. However, there may be some m�nute po�nts (black, wh�te, red, blue or green) that constantly appear on the LCD screen. These po�nts are normal �n the manufactur�ng process and the record�ng �s not affected �n any way.
Avo�d expos�ng the LCD screen to water; remove any mo�sture on the LCD screen w�th a soft and dry clean�ng cloth.
18
Polaro�d Q10 / Q20
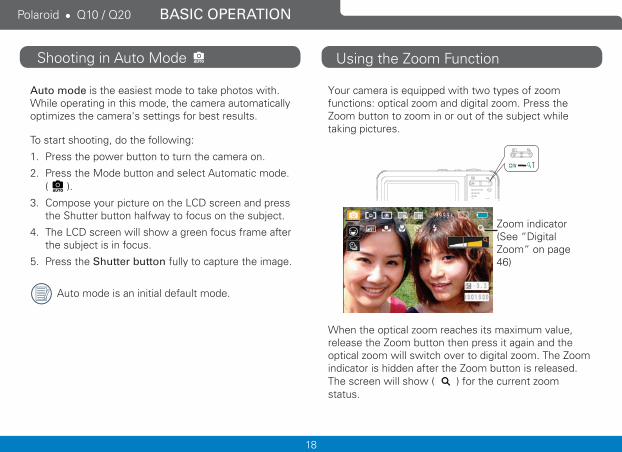
Your camera �s equ�pped w�th two types of zoom funct�ons: opt�cal zoom and d�g�tal zoom. Press the Zoom button to zoom �n or out of the subject wh�le tak�ng p�ctures.
When the opt�cal zoom reaches �ts max�mum value, release the Zoom button then press �t aga�n and the opt�cal zoom w�ll sw�tch over to d�g�tal zoom. The Zoom �nd�cator �s h�dden after the Zoom button �s released. The screen w�ll show ( ) for the current zoom status.
Shoot�ng �n Auto Mode AUTO
Auto mode �s the eas�est mode to take photos w�th. Wh�le operat�ng �n th�s mode, the camera automat�cally opt�m�zes the camera's sett�ngs for best results.
To start shoot�ng, do the follow�ng:
1. Press the power button to turn the camera on.
2. Press the Mode button and select Automat�c mode. ( AUTO ).
3. Compose your p�cture on the LCD screen and press the Shutter button halfway to focus on the subject.
4. The LCD screen w�ll show a green focus frame after the subject �s �n focus.
5. Press the Shutter button fully to capture the �mage.
Auto mode �s an �n�t�al default mode.
Us�ng the Zoom Funct�on
BASIC OPERATION
Zoom �nd�cator (See “D�g�tal Zoom“ on page 46)
19
Polaro�d Q10 / Q20
Flash
Press the R�ght/Flash button to enter the flash �nterface, then press the Left/R�ght button to sw�tch among s�x d�fferent flash modes:
• Flash: Forced off Flash �s turned off.
• Flash: Forced flash The flash w�ll f�re w�th every shot.
• Flash: Red-Eye+Slow Synchro Us�ng th�s mode for slow synchro shots w�th red-eye reduct�on.
• Flash: Slow Synchro Th�s allows you to take p�ctures of people at n�ght that clearly show both your subject and the n�ght scenery.
• Flash: Red-eye reduct�on The camera em�ts a br�ef flash before the p�cture �s taken to reduce red-eye effects.
• Flash: Auto
Camera flash f�res automat�cally based on ex�st�ng l�ght cond�t�ons.
To enable the self-t�mer funct�on, press the Down/Self-t�mer button to enter the self-t�mer select�on �nterface, press the Left/R�ght button to sw�tch among three self-t�mer modes:
• Self-t�mer : Off
The self t�mer �s d�sabled.
• Self-t�mer : 2 Sec A s�ngle p�cture �s shot 2 seconds after the Shutter button �s pressed.
• Self-t�mer : 10 Sec A s�ngle p�cture �s shot 10 seconds after the Shutter button �s pressed.
Self-t�mer
20
Polaro�d Q10 / Q20
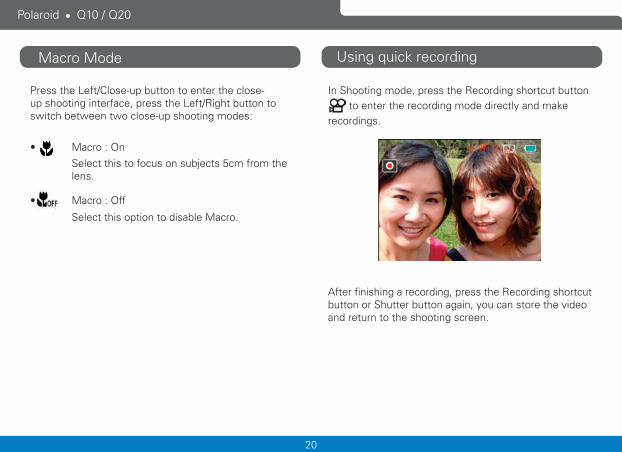
Press the Left/Close-up button to enter the close-up shoot�ng �nterface, press the Left/R�ght button to sw�tch between two close-up shoot�ng modes:
• Macro : On
Select th�s to focus on subjects 5cm from the lens.
• Macro : Off
Select th�s opt�on to d�sable Macro.
Macro Mode Us�ng qu�ck record�ng
In Shoot�ng mode, press the Record�ng shortcut button to enter the record�ng mode d�rectly and make
record�ngs.
After f�n�sh�ng a record�ng, press the Record�ng shortcut button or Shutter button aga�n, you can store the v�deo and return to the shoot�ng screen.
21
Polaro�d Q10 / Q20
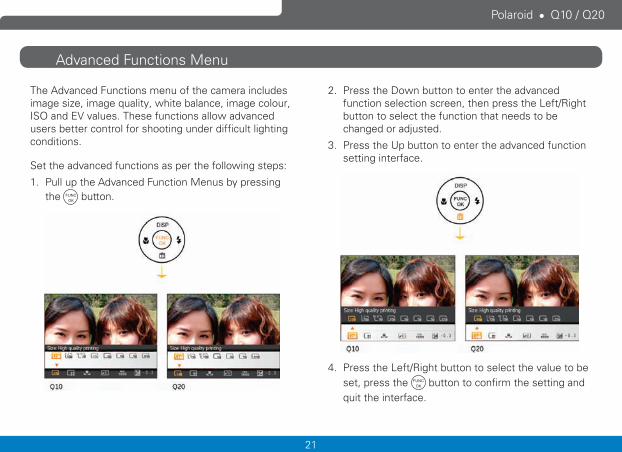
Advanced Funct�ons Menu
The Advanced Funct�ons menu of the camera �ncludes �mage s�ze, �mage qual�ty, wh�te balance, �mage colour, ISO and EV values. These funct�ons allow advanced users better control for shoot�ng under d�ff�cult l�ght�ng cond�t�ons.
Set the advanced funct�ons as per the follow�ng steps:
1. Pull up the Advanced Funct�on Menus by press�ng the button.
2. Press the Down button to enter the advanced funct�on select�on screen, then press the Left/R�ght button to select the funct�on that needs to be changed or adjusted.
3. Press the Up button to enter the advanced funct�on sett�ng �nterface.
4. Press the Left/R�ght button to select the value to be set, press the button to conf�rm the sett�ng and qu�t the �nterface.
22
Polaro�d Q10 / Q20
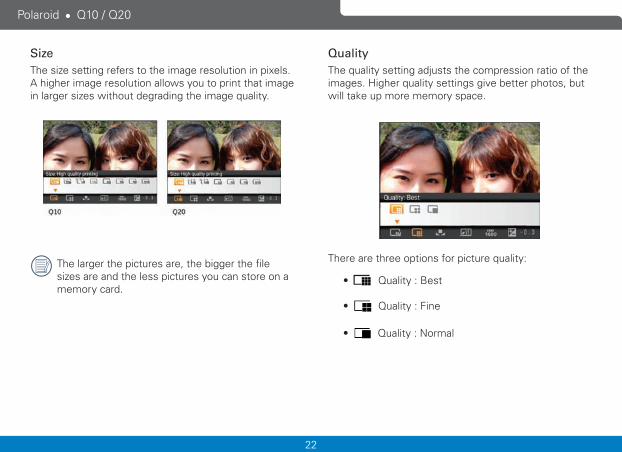
SizeThe s�ze sett�ng refers to the �mage resolut�on �n p�xels. A h�gher �mage resolut�on allows you to pr�nt that �mage �n larger s�zes w�thout degrad�ng the �mage qual�ty.
The larger the p�ctures are, the b�gger the f�le s�zes are and the less p�ctures you can store on a memory card.
QualityThe qual�ty sett�ng adjusts the compress�on rat�o of the �mages. H�gher qual�ty sett�ngs g�ve better photos, but w�ll take up more memory space.
There are three opt�ons for p�cture qual�ty:
• Qual�ty : Best
• Qual�ty : F�ne
• Qual�ty : Normal
23
Polaro�d Q10 / Q20
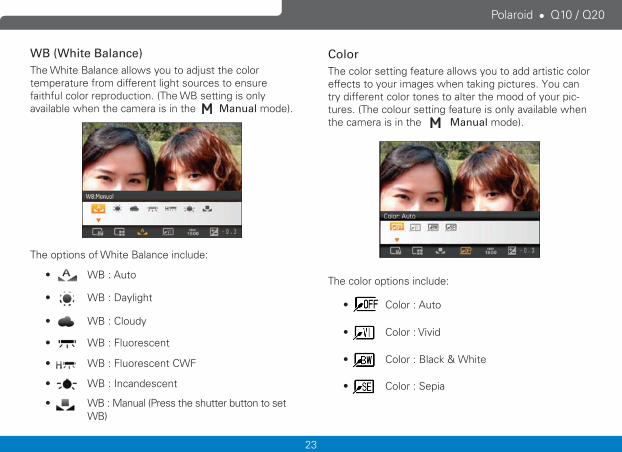
ColorThe color sett�ng feature allows you to add art�st�c color effects to your �mages when tak�ng p�ctures. You can try d�fferent color tones to alter the mood of your p�c-tures. (The colour sett�ng feature �s only ava�lable when the camera �s �n the Manual mode).
The color opt�ons �nclude:
• Color : Auto
• Color : V�v�d
• Color : Black & Wh�te
• Color : Sep�a
WB (White Balance)The Wh�te Balance allows you to adjust the color temperature from d�fferent l�ght sources to ensure fa�thful color reproduct�on. (The WB sett�ng �s only ava�lable when the camera �s �n the Manual mode).
The opt�ons of Wh�te Balance �nclude:
• WB : Auto
• WB : Dayl�ght
• WB : Cloudy
• WB : Fluorescent
• WB : Fluorescent CWF
• WB : Incandescent
• WB : Manual (Press the shutter button to set WB)
24
Polaro�d Q10 / Q20
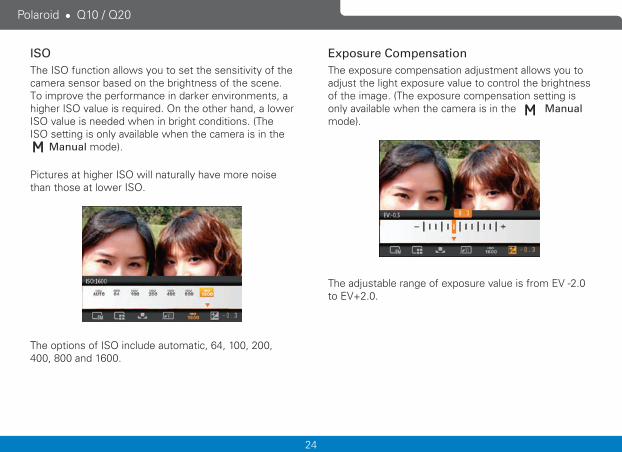
Exposure CompensationThe exposure compensat�on adjustment allows you to adjust the l�ght exposure value to control the br�ghtness of the �mage. (The exposure compensat�on sett�ng �s only ava�lable when the camera �s �n the Manual mode).
The adjustable range of exposure value �s from EV -2.0 to EV+2.0.
ISOThe ISO funct�on allows you to set the sens�t�v�ty of the camera sensor based on the br�ghtness of the scene. To �mprove the performance �n darker env�ronments, a h�gher ISO value �s requ�red. On the other hand, a lower ISO value �s needed when �n br�ght cond�t�ons. (The ISO sett�ng �s only ava�lable when the camera �s �n the
Manual mode).
P�ctures at h�gher ISO w�ll naturally have more no�se than those at lower ISO.
The opt�ons of ISO �nclude automat�c, 64, 100, 200, 400, 800 and 1600.
25
Polaro�d Q10 / Q20
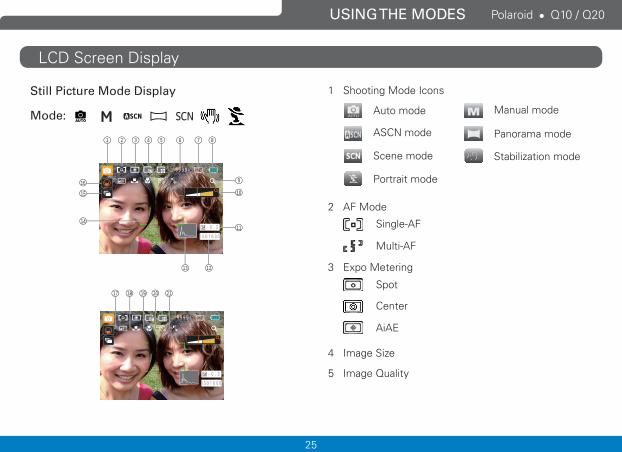
LCD Screen D�splay
USING THE MODES
Still Picture Mode Display
Mode: AUTO
1 2 3 4 5 6 7 8
9
10
11
1213
14
8
15
16
17 18 19 20 21
8
1 Shoot�ng Mode Icons
Auto mode Manual mode
ASCN mode Panorama mode
Scene mode Stab�l�zat�on mode
Portra�t mode
2 AF Mode
S�ngle-AF
Mult�-AF
3 Expo Meter�ng
Spot
Center
A�AE
4 Image S�ze
5 Image Qual�ty
26
Polaro�d Q10 / Q20
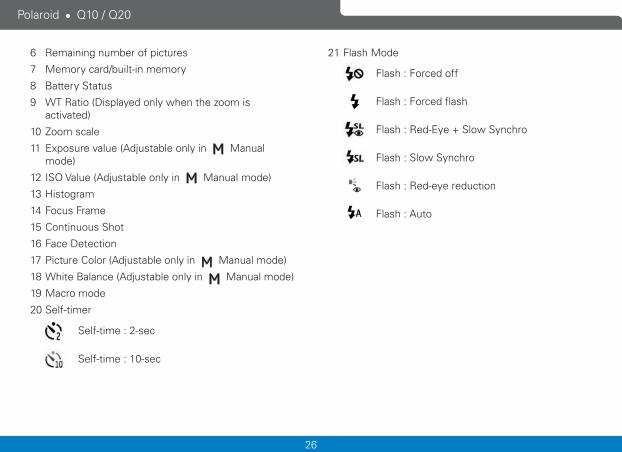
6 Rema�n�ng number of p�ctures
7 Memory card/bu�lt-�n memory
8 Battery Status
9 WT Rat�o (D�splayed only when the zoom �s act�vated)
10 Zoom scale
11 Exposure value (Adjustable only �n Manual mode)
12 ISO Value (Adjustable only �n Manual mode)
13 H�stogram
14 Focus Frame
15 Cont�nuous Shot
16 Face Detect�on
17 P�cture Color (Adjustable only �n Manual mode)
18 Wh�te Balance (Adjustable only �n Manual mode)
19 Macro mode
20 Self-t�mer
Self-t�me : 2-sec
Self-t�me : 10-sec
21 Flash Mode
Flash : Forced off
Flash : Forced flash
Flash : Red-Eye + Slow Synchro
Flash : Slow Synchro
Flash : Red-eye reduct�on
Flash : Auto
27
Polaro�d Q10 / Q20
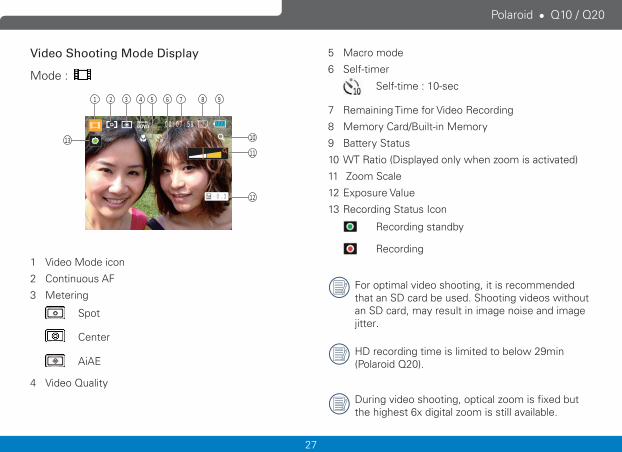
Video Shooting Mode Display
Mode :
1
13
2 3 4 5 6 7 8 9
10
11
12
1 V�deo Mode �con
2 Cont�nuous AF
3 Meter�ng
Spot
Center
A�AE
4 V�deo Qual�ty
5 Macro mode
6 Self-t�mer
Self-t�me : 10-sec
7 Rema�n�ng T�me for V�deo Record�ng
8 Memory Card/Bu�lt-�n Memory
9 Battery Status
10 WT Rat�o (D�splayed only when zoom �s act�vated)
11 Zoom Scale
12 Exposure Value
13 Record�ng Status Icon
Record�ng standby
Record�ng
For opt�mal v�deo shoot�ng, �t �s recommended that an SD card be used. Shoot�ng v�deos w�thout an SD card, may result �n �mage no�se and �mage j�tter.
HD record�ng t�me �s l�m�ted to below 29m�n (Polaro�d Q20).
Dur�ng v�deo shoot�ng, opt�cal zoom �s f�xed but the h�ghest 6x d�g�tal zoom �s st�ll ava�lable.
28
Polaro�d Q10 / Q20
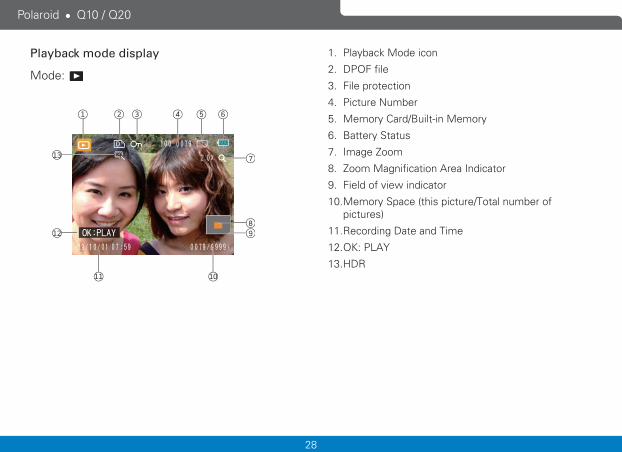
Playback mode display
Mode:
1 2 3 4 5 6
7
9
1011
13
128
1. Playback Mode �con
2. DPOF f�le
3. F�le protect�on
4. P�cture Number
5. Memory Card/Bu�lt-�n Memory
6. Battery Status
7. Image Zoom
8. Zoom Magn�f�cat�on Area Ind�cator
9. F�eld of v�ew �nd�cator
10. Memory Space (th�s p�cture/Total number of p�ctures)
11. Record�ng Date and T�me
12. OK: PLAY
13. HDR
29
Polaro�d Q10 / Q20
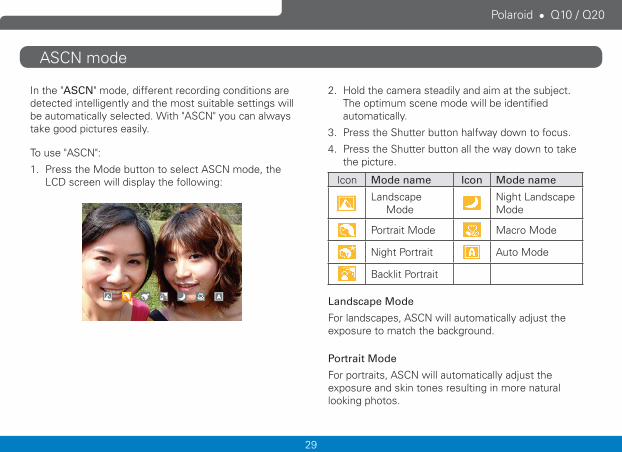
In the "ASCN" mode, d�fferent record�ng cond�t�ons are detected �ntell�gently and the most su�table sett�ngs w�ll be automat�cally selected. W�th "ASCN" you can always take good p�ctures eas�ly.
To use "ASCN":
1. Press the Mode button to select ASCN mode, the LCD screen w�ll d�splay the follow�ng:
2. Hold the camera stead�ly and a�m at the subject. The opt�mum scene mode w�ll be �dent�f�ed automat�cally.
3. Press the Shutter button halfway down to focus.
4. Press the Shutter button all the way down to take the p�cture.
Icon Mode name Icon Mode name
Landscape Mode
N�ght Landscape Mode
Portra�t Mode Macro Mode
N�ght Portra�t Auto Mode
Backl�t Portra�t
Landscape Mode
For landscapes, ASCN w�ll automat�cally adjust the exposure to match the background.
Portrait Mode
For portra�ts, ASCN w�ll automat�cally adjust the exposure and sk�n tones result�ng �n more natural look�ng photos.
ASCN mode
30
Polaro�d Q10 / Q20
Night Portrait
When you shoot portra�ts at n�ght, or �n low l�ght cond�t�ons, ASCN w�ll automat�cally adjust the exposure for people and n�ght scenes.
Backlit Portrait
When the sun or any other l�ght source �s beh�nd you, ASCN w�ll automat�cally adjust the foreground exposure to produce good p�ctures.
Night Landscape Mode
For n�ght scenes, ASCN w�ll automat�cally �ncrease the ISO value to compensate for low l�ght.
Macro Mode
To capture f�ne deta�l for close-ups, ASCN w�ll automat�cally adjust the focus.
Auto Mode
The camera w�ll automat�cally adjusts the exposure and focus to ensure good p�ctures.
31
Polaro�d Q10 / Q20
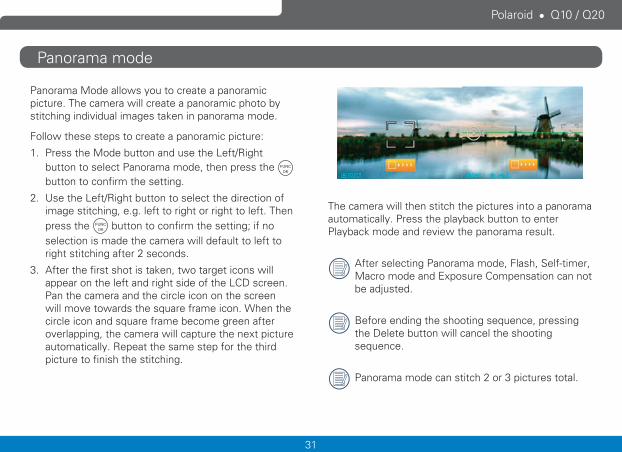
Panorama mode
Panorama Mode allows you to create a panoram�c p�cture. The camera w�ll create a panoram�c photo by st�tch�ng �nd�v�dual �mages taken �n panorama mode.
Follow these steps to create a panoram�c p�cture:
1. Press the Mode button and use the Left/R�ght button to select Panorama mode, then press the button to conf�rm the sett�ng.
2. Use the Left/R�ght button to select the d�rect�on of �mage st�tch�ng, e.g. left to r�ght or r�ght to left. Then press the button to conf�rm the sett�ng; �f no select�on �s made the camera w�ll default to left to r�ght st�tch�ng after 2 seconds.
3. After the f�rst shot �s taken, two target �cons w�ll appear on the left and r�ght s�de of the LCD screen. Pan the camera and the c�rcle �con on the screen w�ll move towards the square frame �con. When the c�rcle �con and square frame become green after overlapp�ng, the camera w�ll capture the next p�cture automat�cally. Repeat the same step for the th�rd p�cture to f�n�sh the st�tch�ng.
The camera w�ll then st�tch the p�ctures �nto a panorama automat�cally. Press the playback button to enter Playback mode and rev�ew the panorama result.
After select�ng Panorama mode, Flash, Self-t�mer, Macro mode and Exposure Compensat�on can not be adjusted.
Before end�ng the shoot�ng sequence, press�ng the Delete button w�ll cancel the shoot�ng sequence.
Panorama mode can st�tch 2 or 3 p�ctures total.
32
Polaro�d Q10 / Q20
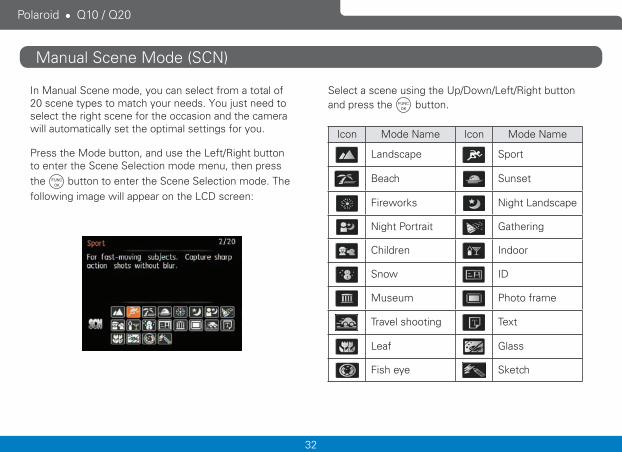
In Manual Scene mode, you can select from a total of 20 scene types to match your needs. You just need to select the r�ght scene for the occas�on and the camera w�ll automat�cally set the opt�mal sett�ngs for you.
Press the Mode button, and use the Left/R�ght button to enter the Scene Select�on mode menu, then press the button to enter the Scene Select�on mode. The follow�ng �mage w�ll appear on the LCD screen:
Manual Scene Mode (SCN)
Select a scene us�ng the Up/Down/Left/R�ght button and press the button.
Icon Mode Name Icon Mode Name
Landscape Sport
Beach Sunset
F�reworks N�ght Landscape
N�ght Portra�t Gather�ng
Ch�ldren Indoor
Snow ID
Museum Photo frame
Travel shoot�ng Text
Leaf Glass
F�sh eye Sketch
33
Polaro�d Q10 / Q20
Landscape
For landscapes. V�v�d reproduct�on of green and blue.
Sport
For fast-mov�ng subjects. Capture sharp act�on shots w�thout blur.
Beach
For captur�ng �mages �n scenes w�th strong sunl�ght.
Sunset
For sunsets. Capture subjects �n strong sunl�ght.
Fireworks
For f�reworks at n�ght. Shutter speed �s adjusted to capture spectacular �mages. The use of a tr�pod �s recommended.
Night landscape
For n�ght scenes. The use of tr�pod �s recommended.
Night portrait
For portra�ts aga�nst n�ght scenery.
Gathering
For tak�ng p�ctures of large groups or �n areas w�th uneven l�ght�ng.
ChildrenFor ch�ldren and pets. Flash �s d�sabled for eye protect�on.
Indoor
For �ndoors. Reduce blur and �mprove color accuracy.
Snow
For snow scenes. Reproduce natural look�ng snow scenery.
ID
For shoot�ng ID s�ze photos.
Museum
For museum or flash-free areas. Reta�n color and reduce blur.
Photo frame
For add�ng �nterest�ng frame effects to the photo.
34
Polaro�d Q10 / Q20
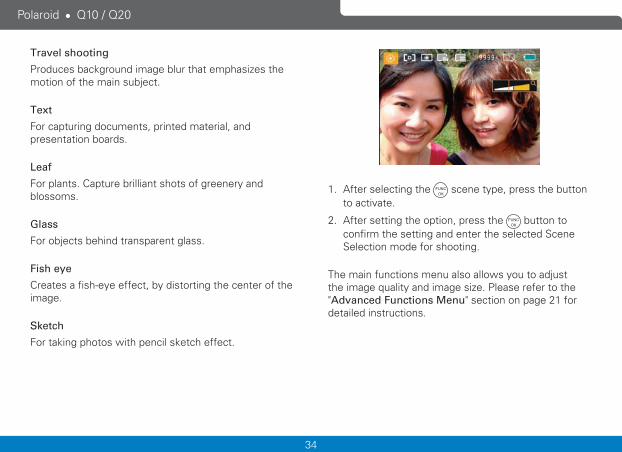
1. After select�ng the scene type, press the button to act�vate.
2. After sett�ng the opt�on, press the button to conf�rm the sett�ng and enter the selected Scene Select�on mode for shoot�ng.
The ma�n funct�ons menu also allows you to adjust the �mage qual�ty and �mage s�ze. Please refer to the "Advanced Functions Menu" sect�on on page 21 for deta�led �nstruct�ons.
Travel shooting
Produces background �mage blur that emphas�zes the mot�on of the ma�n subject.
Text
For captur�ng documents, pr�nted mater�al, and presentat�on boards.
Leaf
For plants. Capture br�ll�ant shots of greenery and blossoms.
Glass
For objects beh�nd transparent glass.
Fish eye
Creates a f�sh-eye effect, by d�stort�ng the center of the �mage.
Sketch
For tak�ng photos w�th penc�l sketch effect.
35
Polaro�d Q10 / Q20
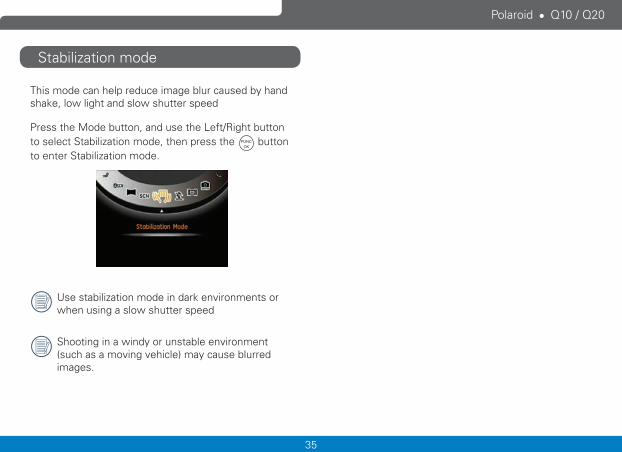
Th�s mode can help reduce �mage blur caused by hand shake, low l�ght and slow shutter speed
Press the Mode button, and use the Left/R�ght button to select Stab�l�zat�on mode, then press the button to enter Stab�l�zat�on mode.
Use stab�l�zat�on mode �n dark env�ronments or when us�ng a slow shutter speed
Shoot�ng �n a w�ndy or unstable env�ronment (such as a mov�ng veh�cle) may cause blurred �mages.
Stab�l�zat�on mode
36
Polaro�d Q10 / Q20
Face Detect�on Bl�nk Detect�on
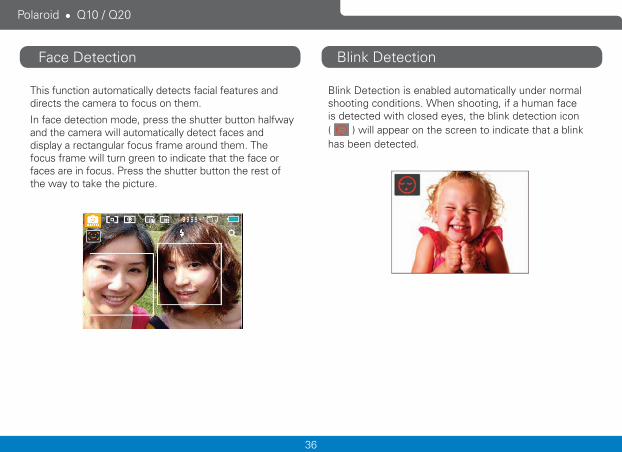
Th�s funct�on automat�cally detects fac�al features and d�rects the camera to focus on them.
In face detect�on mode, press the shutter button halfway and the camera w�ll automat�cally detect faces and d�splay a rectangular focus frame around them. The focus frame w�ll turn green to �nd�cate that the face or faces are �n focus. Press the shutter button the rest of the way to take the p�cture.
Bl�nk Detect�on �s enabled automat�cally under normal shoot�ng cond�t�ons. When shoot�ng, �f a human face �s detected w�th closed eyes, the bl�nk detect�on �con ( ) w�ll appear on the screen to �nd�cate that a bl�nk has been detected.
37
Polaro�d Q10 / Q20
V�ew�ng Photos and V�deos
PLAYBACK
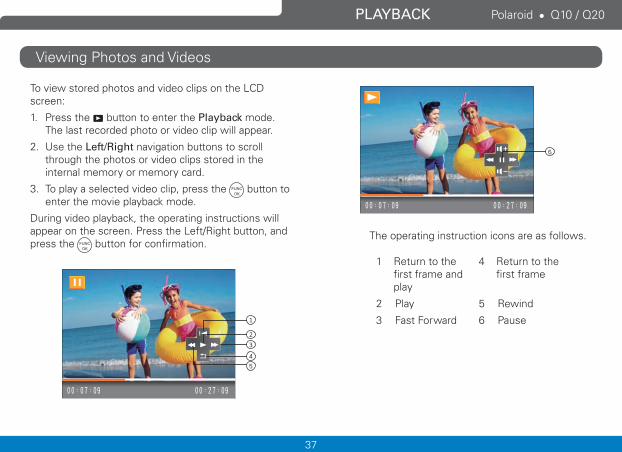
To v�ew stored photos and v�deo cl�ps on the LCD screen:
1. Press the button to enter the Playback mode. The last recorded photo or v�deo cl�p w�ll appear.
2. Use the Left/Right nav�gat�on buttons to scroll through the photos or v�deo cl�ps stored �n the �nternal memory or memory card.
3. To play a selected v�deo cl�p, press the button to enter the mov�e playback mode.
Dur�ng v�deo playback, the operat�ng �nstruct�ons w�ll appear on the screen. Press the Left/R�ght button, and press the button for conf�rmat�on.
1
2
3
4
5
6
The operat�ng �nstruct�on �cons are as follows.
1 Return to the f�rst frame and play
4 Return to the f�rst frame
2 Play 5 Rew�nd
3 Fast Forward 6 Pause
38
Polaro�d Q10 / Q20
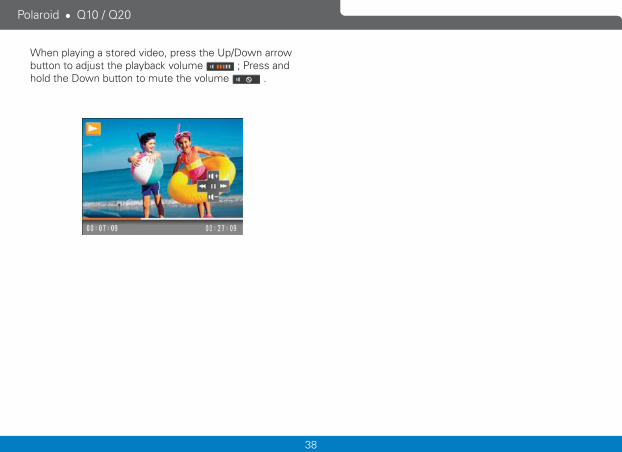
When play�ng a stored v�deo, press the Up/Down arrow button to adjust the playback volume ; Press and hold the Down button to mute the volume .
39
Polaro�d Q10 / Q20
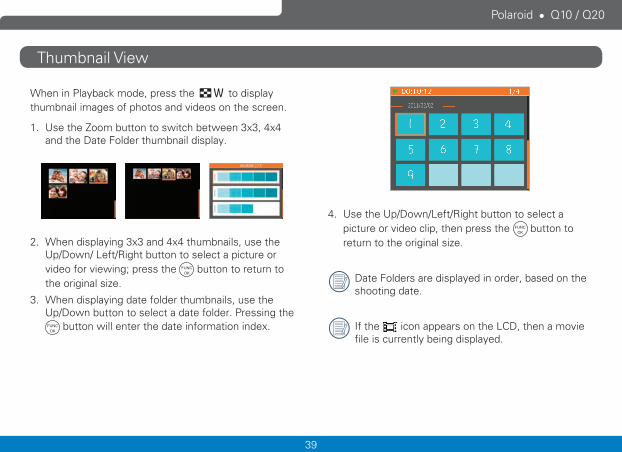
Thumbna�l V�ew
4. Use the Up/Down/Left/R�ght button to select a p�cture or v�deo cl�p, then press the button to return to the or�g�nal s�ze.
Date Folders are d�splayed �n order, based on the shoot�ng date.
If the �con appears on the LCD, then a mov�e f�le �s currently be�ng d�splayed.
When �n Playback mode, press the to d�splay thumbna�l �mages of photos and v�deos on the screen.
1. Use the Zoom button to sw�tch between 3x3, 4x4 and the Date Folder thumbna�l d�splay.
2. When d�splay�ng 3x3 and 4x4 thumbna�ls, use the Up/Down/ Left/R�ght button to select a p�cture or v�deo for v�ew�ng; press the button to return to the or�g�nal s�ze.
3. When d�splay�ng date folder thumbna�ls, use the Up/Down button to select a date folder. Press�ng the
button w�ll enter the date �nformat�on �ndex.
40
Polaro�d Q10 / Q20
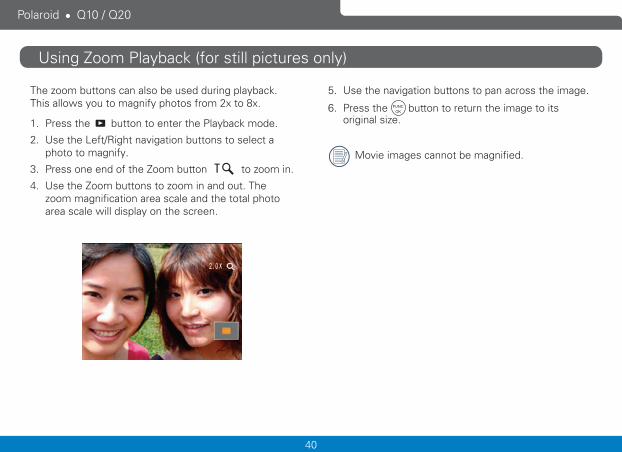
Us�ng Zoom Playback (for st�ll p�ctures only)
The zoom buttons can also be used dur�ng playback. Th�s allows you to magn�fy photos from 2x to 8x.
1. Press the button to enter the Playback mode.
2. Use the Left/R�ght nav�gat�on buttons to select a photo to magn�fy.
3. Press one end of the Zoom button to zoom �n.
4. Use the Zoom buttons to zoom �n and out. The zoom magn�f�cat�on area scale and the total photo area scale w�ll d�splay on the screen.
5. Use the nav�gat�on buttons to pan across the �mage.
6. Press the button to return the �mage to �ts or�g�nal s�ze.
Mov�e �mages cannot be magn�f�ed.
41
Polaro�d Q10 / Q20
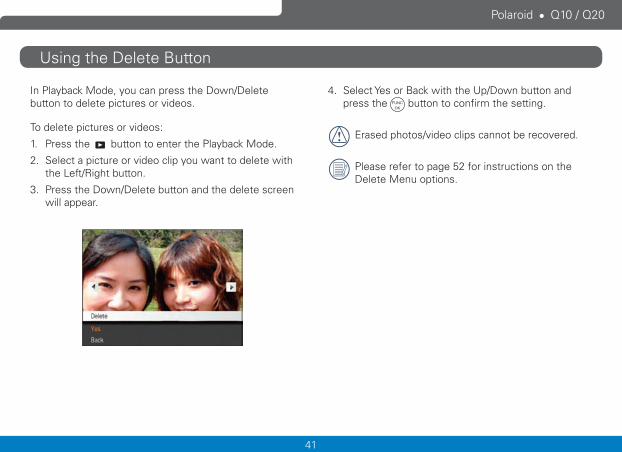
Us�ng the Delete Button
In Playback Mode, you can press the Down/Delete button to delete p�ctures or v�deos.
To delete p�ctures or v�deos:
1. Press the button to enter the Playback Mode.
2. Select a p�cture or v�deo cl�p you want to delete w�th the Left/R�ght button.
3. Press the Down/Delete button and the delete screen w�ll appear.
4. Select Yes or Back w�th the Up/Down button and press the button to conf�rm the sett�ng.
Erased photos/v�deo cl�ps cannot be recovered.
Please refer to page 52 for �nstruct�ons on the Delete Menu opt�ons.
42
Polaro�d Q10 / Q20
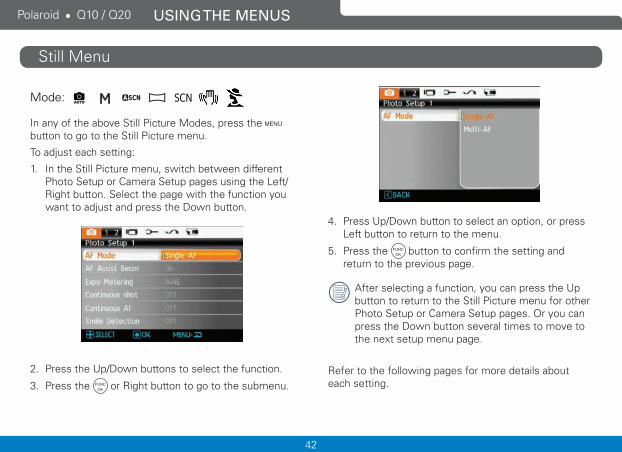
St�ll Menu
USING THE MENUS
Mode: AUTO
In any of the above St�ll P�cture Modes, press the button to go to the St�ll P�cture menu.
To adjust each sett�ng:
1. In the St�ll P�cture menu, sw�tch between d�fferent Photo Setup or Camera Setup pages us�ng the Left/R�ght button. Select the page w�th the funct�on you want to adjust and press the Down button.
2. Press the Up/Down buttons to select the funct�on.
3. Press the or R�ght button to go to the submenu.
4. Press Up/Down button to select an opt�on, or press Left button to return to the menu.
5. Press the button to conf�rm the sett�ng and return to the prev�ous page.
After select�ng a funct�on, you can press the Up button to return to the St�ll P�cture menu for other Photo Setup or Camera Setup pages. Or you can press the Down button several t�mes to move to the next setup menu page.
Refer to the follow�ng pages for more deta�ls about each sett�ng.
43
Polaro�d Q10 / Q20
AF Mode (Auto-Focus mode)Use th�s sett�ng to control the auto-focus mechan�sm wh�le tak�ng p�ctures.
Two opt�ons are ava�lable:
• Single-AF: The focus frame appears on the center of the LCD screen to focus on the subject.
• Multi-AF: The camera w�ll focus correctly on mult�ple parts of the object.
AF-assist BeamTh�s opt�on can turn the AF-ass�st on or off. The AF-as-s�st can �mprove focus�ng when the camera �s �n a dark env�ronment. In low l�ght cond�t�ons �t �s not recom-mended to turn off the AF-ass�st lamp otherw�se the camera may not focus correctly.
44
Polaro�d Q10 / Q20
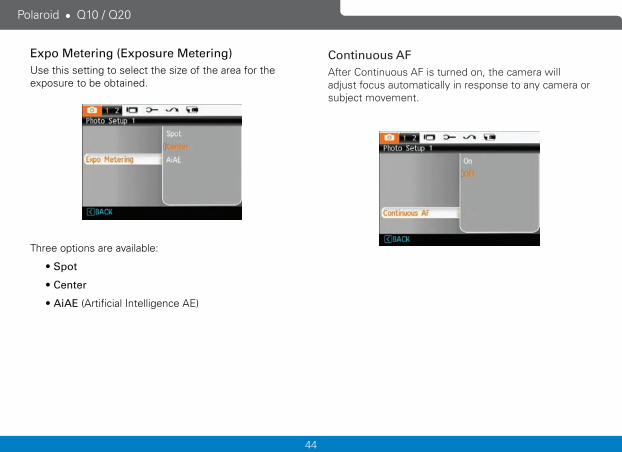
Expo Metering (Exposure Metering) Use th�s sett�ng to select the s�ze of the area for the exposure to be obta�ned.
Three opt�ons are ava�lable:
• Spot
• Center
• AiAE (Art�f�c�al Intell�gence AE)
Continuous AFAfter Cont�nuous AF �s turned on, the camera w�ll adjust focus automat�cally �n response to any camera or subject movement.
45
Polaro�d Q10 / Q20
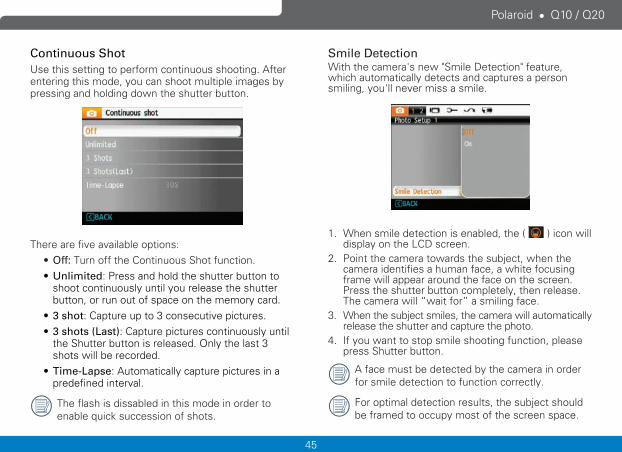
Continuous ShotUse th�s sett�ng to perform cont�nuous shoot�ng. After enter�ng th�s mode, you can shoot mult�ple �mages by press�ng and hold�ng down the shutter button.
There are f�ve ava�lable opt�ons:• Off: Turn off the Cont�nuous Shot funct�on.• Unlimited: Press and hold the shutter button to
shoot cont�nuously unt�l you release the shutter button, or run out of space on the memory card.
• 3 shot: Capture up to 3 consecut�ve p�ctures.• 3 shots (Last): Capture p�ctures cont�nuously unt�l
the Shutter button �s released. Only the last 3 shots w�ll be recorded.
• Time-Lapse: Automat�cally capture p�ctures �n a predef�ned �nterval.
The flash �s d�ssabled �n th�s mode �n order to enable qu�ck success�on of shots.
Smile DetectionW�th the camera's new "Sm�le Detect�on" feature, wh�ch automat�cally detects and captures a person sm�l�ng, you'll never m�ss a sm�le.
1. When sm�le detect�on �s enabled, the ( ) �con w�ll d�splay on the LCD screen.
2. Po�nt the camera towards the subject, when the camera �dent�f�es a human face, a wh�te focus�ng frame w�ll appear around the face on the screen. Press the shutter button completely, then release. The camera w�ll “wa�t for” a sm�l�ng face.
3. When the subject sm�les, the camera w�ll automat�cally release the shutter and capture the photo.
4. If you want to stop sm�le shoot�ng funct�on, please press Shutter button.
A face must be detected by the camera �n order for sm�le detect�on to funct�on correctly.
For opt�mal detect�on results, the subject should be framed to occupy most of the screen space.
46
Polaro�d Q10 / Q20
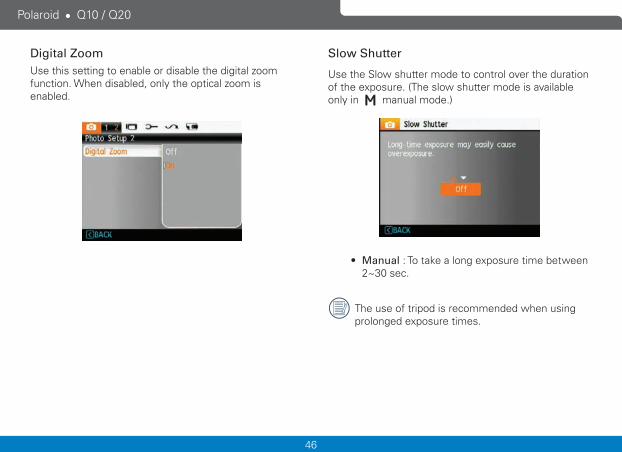
Digital ZoomUse th�s sett�ng to enable or d�sable the d�g�tal zoom funct�on. When d�sabled, only the opt�cal zoom �s enabled.
Slow Shutter
Use the Slow shutter mode to control over the durat�on of the exposure. (The slow shutter mode �s ava�lable only �n manual mode.)
• Manual : To take a long exposure t�me between 2~30 sec.
The use of tr�pod �s recommended when us�ng prolonged exposure t�mes.
47
Polaro�d Q10 / Q20
Date ImprintInclude a Date/T�me stamp �n the photo �mage.
• Off
• Date
• Date / Time
Quick ReviewTh�s sett�ng refers to the br�ef photo rev�ew �mmed�ately after tak�ng a p�cture. The p�cture stays on the LCD screen for an adjustable per�od of t�me.
Four opt�ons are ava�lable:
• Off
• 1 sec
• 2 sec
• 3 sec
48
Polaro�d Q10 / Q20
Mov�e Menu
Mode:
In Mov�e Mode, press the button to go to the cor-respond�ng Mov�e menu.
To conf�gure each sett�ng:
1. In the Mov�e menu, sw�tch between the Mov�e Setup or d�fferent Camera Setup pages us�ng the Left/R�ght button, select the page w�th the funct�on you want to adjust and press the Down button.
2. Press the Up/Down arrow button to select the funct�on to be set, and press the or R�ght button to enter the submenu.
3. Press Up/Down button to select an opt�on, or press Left button to return to the menu.
4. Press the button to conf�rm the sett�ng and return to the prev�ous page.
Refer to the follow�ng pages for more deta�ls about each sett�ng.
49
Polaro�d Q10 / Q20
Continuous AF When Cont�nuous AF �s turned on, the camera w�ll adjust focus automat�cally �n response to any camera or subject movement.
Expo Metering (Exposure Metering)Set the meter�ng mode for var�ous l�ght�ng cond�t�ons.
Three opt�ons are ava�lable:
• Spot
• Center
• AiAE (Art�f�c�al Intell�gence AE)
50
Polaro�d Q10 / Q20
DIS Us�ng th�s funct�on w�ll ensure max�mum stab�l�ty of the screen when record�ng
51
Polaro�d Q10 / Q20
Playback Menu
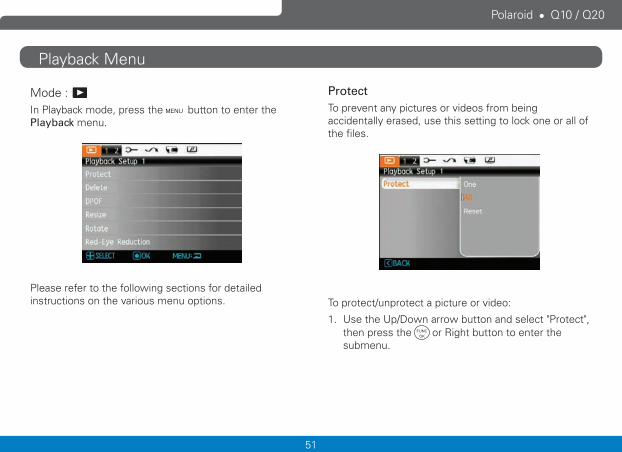
Mode : In Playback mode, press the button to enter the Playback menu.
Please refer to the follow�ng sect�ons for deta�led �nstruct�ons on the var�ous menu opt�ons.
ProtectTo prevent any p�ctures or v�deos from be�ng acc�dentally erased, use th�s sett�ng to lock one or all of the f�les.
To protect/unprotect a p�cture or v�deo:
1. Use the Up/Down arrow button and select "Protect", then press the or R�ght button to enter the submenu.
52
Polaro�d Q10 / Q20
2. Use the Up/Down button and select "One" to protect �nd�v�dual photos or mov�es; or select "All" to protect all photos and mov�es stored �n the memory card. Press the button to conf�rm and enter the photo/mov�e protect�on �nterface.
3. Press the button then select Yes to lock d�splayed photos or v�deos, or select Unprotect to unlock them, then press the Up/Down button and select Back to return to the playback menu.
4. A key �con ( ) w�ll appear on the top of the screen to �nd�cate that the p�cture/v�deo �s protected.
Select�ng "reset" w�ll unprotect all prev�ously protected photos and v�deos.
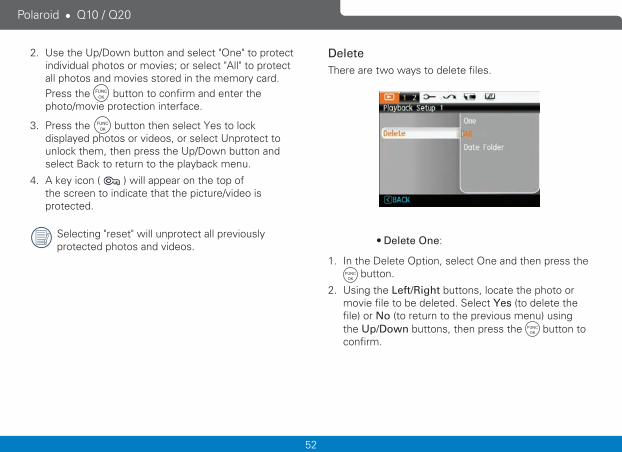
DeleteThere are two ways to delete f�les.
• Delete One:
1. In the Delete Opt�on, select One and then press the button.
2. Us�ng the Left/Right buttons, locate the photo or mov�e f�le to be deleted. Select Yes (to delete the f�le) or No (to return to the prev�ous menu) us�ng the Up/Down buttons, then press the button to conf�rm.
53
Polaro�d Q10 / Q20
• Delete All:
1. In the Delete opt�on, select All and then press the button.
2. Use the Up/Down button and select Yes to delete all f�les, or select Back to return to the menu.
• Delete Date Folder:
1. In the Delete opt�on, press the button after select�ng Date Folder.
2. Use the Up/Down button to select a Date Folder to be deleted, and press to conf�rm, then press the Up/Down button to select �tem (Yes: to delete the f�le, or Cancel: to return to the menu) and then press
to conf�rm.
The “ ” �nd�cator means a f�le �s protected. F�le protect�on must be removed f�rst before a f�le can be deleted.
Delet�ng f�les w�ll cause the DPOF sett�ngs to be reset.
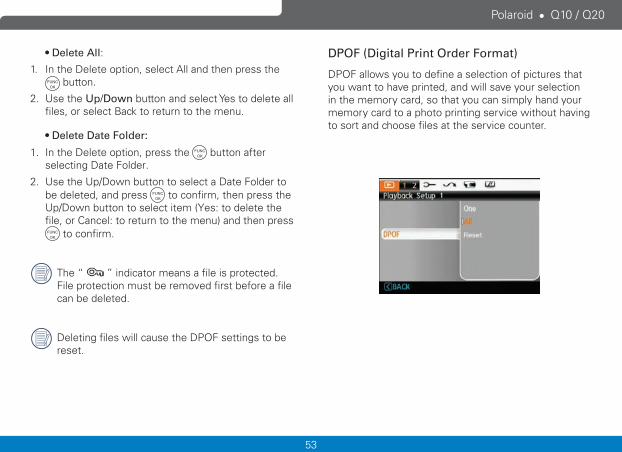
DPOF (Digital Print Order Format)
DPOF allows you to def�ne a select�on of p�ctures that you want to have pr�nted, and w�ll save your select�on �n the memory card, so that you can s�mply hand your memory card to a photo pr�nt�ng serv�ce w�thout hav�ng to sort and choose f�les at the serv�ce counter.
54
Polaro�d Q10 / Q20
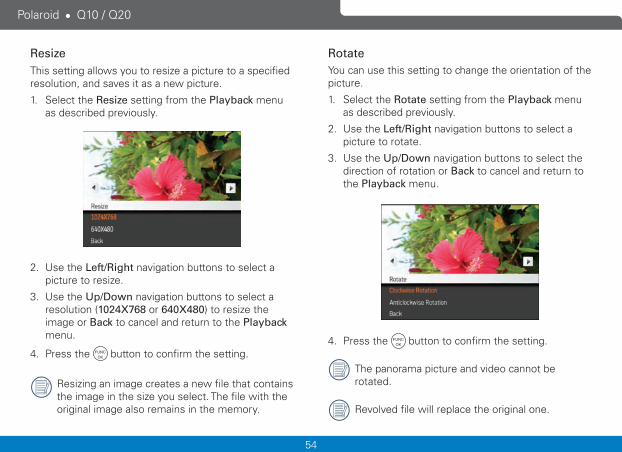
RotateYou can use th�s sett�ng to change the or�entat�on of the p�cture.
1. Select the Rotate sett�ng from the Playback menu as descr�bed prev�ously.
2. Use the Left/Right nav�gat�on buttons to select a p�cture to rotate.
3. Use the Up/Down nav�gat�on buttons to select the d�rect�on of rotat�on or Back to cancel and return to the Playback menu.
4. Press the button to conf�rm the sett�ng.
The panorama p�cture and v�deo cannot be rotated.
Revolved f�le w�ll replace the or�g�nal one.
ResizeTh�s sett�ng allows you to res�ze a p�cture to a spec�f�ed resolut�on, and saves �t as a new p�cture.
1. Select the Resize sett�ng from the Playback menu as descr�bed prev�ously.
2. Use the Left/Right nav�gat�on buttons to select a p�cture to res�ze.
3. Use the Up/Down nav�gat�on buttons to select a resolut�on (1024X768 or 640X480) to res�ze the �mage or Back to cancel and return to the Playback menu.
4. Press the button to conf�rm the sett�ng.
Res�z�ng an �mage creates a new f�le that conta�ns the �mage �n the s�ze you select. The f�le w�th the or�g�nal �mage also rema�ns �n the memory.
55
Polaro�d Q10 / Q20
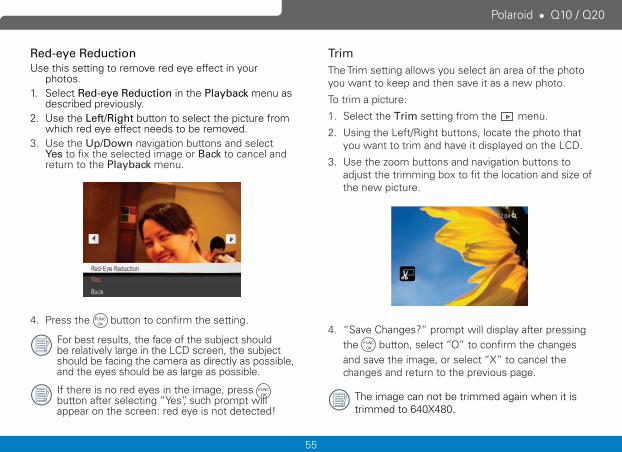
Red-eye ReductionUse th�s sett�ng to remove red eye effect �n your
photos.1. Select Red-eye Reduction �n the Playback menu as
descr�bed prev�ously.2. Use the Left/Right button to select the p�cture from
wh�ch red eye effect needs to be removed.3. Use the Up/Down nav�gat�on buttons and select
Yes to f�x the selected �mage or Back to cancel and return to the Playback menu.
4. Press the button to conf�rm the sett�ng.
For best results, the face of the subject should be relat�vely large �n the LCD screen, the subject should be fac�ng the camera as d�rectly as poss�ble, and the eyes should be as large as poss�ble.
If there �s no red eyes �n the �mage, press button after select�ng “Yes”, such prompt w�ll appear on the screen: red eye �s not detected!
TrimThe Tr�m sett�ng allows you select an area of the photo you want to keep and then save �t as a new photo.
To tr�m a p�cture:
1. Select the Trim sett�ng from the menu.
2. Us�ng the Left/R�ght buttons, locate the photo that you want to tr�m and have �t d�splayed on the LCD.
3. Use the zoom buttons and nav�gat�on buttons to adjust the tr�mm�ng box to f�t the locat�on and s�ze of the new p�cture.
4. “Save Changes?” prompt w�ll d�splay after press�ng the button, select “O” to conf�rm the changes and save the �mage, or select “X” to cancel the changes and return to the prev�ous page.
The �mage can not be tr�mmed aga�n when �t �s tr�mmed to 640X480.
56
Polaro�d Q10 / Q20
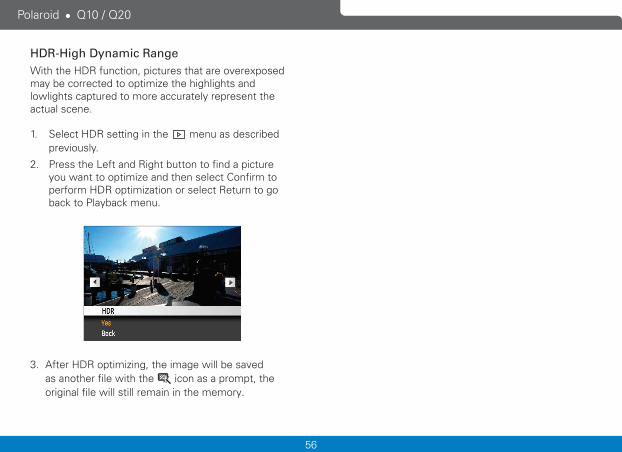
HDR-High Dynamic RangeW�th the HDR funct�on, p�ctures that are overexposed may be corrected to opt�m�ze the h�ghl�ghts and lowl�ghts captured to more accurately represent the actual scene.
1. Select HDR sett�ng �n the menu as descr�bed prev�ously.
2. Press the Left and R�ght button to f�nd a p�cture you want to opt�m�ze and then select Conf�rm to perform HDR opt�m�zat�on or select Return to go back to Playback menu.
3. After HDR opt�m�z�ng, the �mage w�ll be saved as another f�le w�th the �con as a prompt, the or�g�nal f�le w�ll st�ll rema�n �n the memory.
57
Polaro�d Q10 / Q20
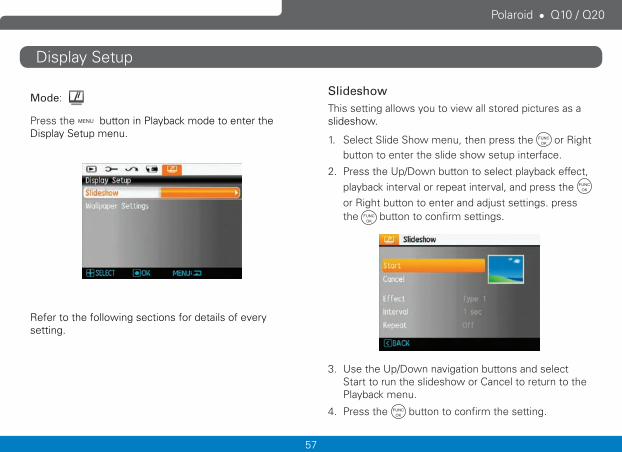
D�splay Setup
Mode:
Press the button �n Playback mode to enter the D�splay Setup menu.
Refer to the follow�ng sect�ons for deta�ls of every sett�ng.
SlideshowTh�s sett�ng allows you to v�ew all stored p�ctures as a sl�deshow.
1. Select Sl�de Show menu, then press the or R�ght button to enter the sl�de show setup �nterface.
2. Press the Up/Down button to select playback effect, playback �nterval or repeat �nterval, and press the or R�ght button to enter and adjust sett�ngs. press the button to conf�rm sett�ngs.
3. Use the Up/Down nav�gat�on buttons and select Start to run the sl�deshow or Cancel to return to the Playback menu.
4. Press the button to conf�rm the sett�ng.
58
Polaro�d Q10 / Q20
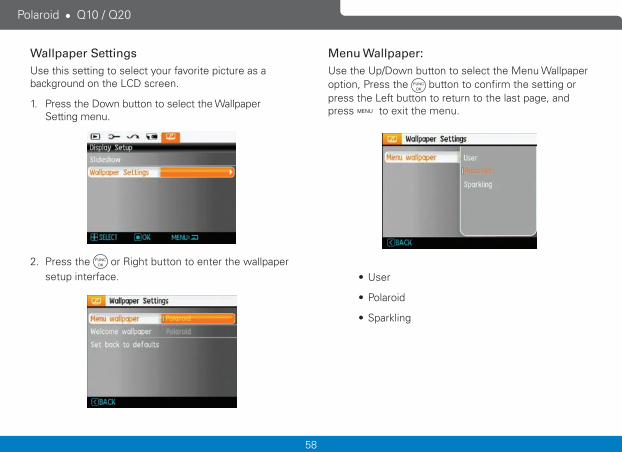
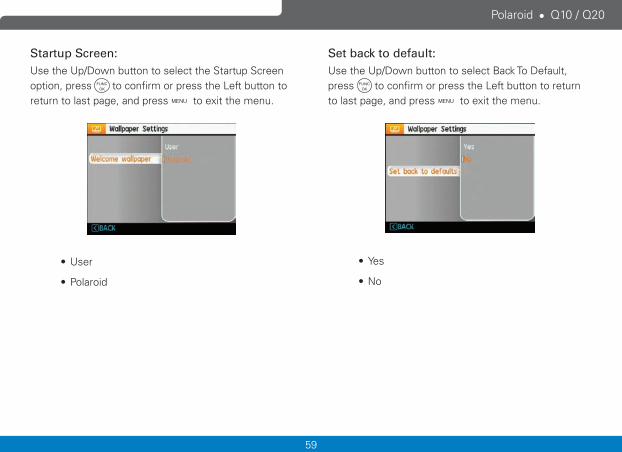
Wallpaper SettingsUse th�s sett�ng to select your favor�te p�cture as a background on the LCD screen.
1. Press the Down button to select the Wallpaper Sett�ng menu.
2. Press the or R�ght button to enter the wallpaper setup �nterface.
Menu Wallpaper:Use the Up/Down button to select the Menu Wallpaper opt�on, Press the button to conf�rm the sett�ng or press the Left button to return to the last page, and press to ex�t the menu.
• User
• Polaro�d
• Sparkl�ng
59
Polaro�d Q10 / Q20
Startup Screen: Use the Up/Down button to select the Startup Screen opt�on, press to conf�rm or press the Left button to return to last page, and press to ex�t the menu.
• User
• Polaro�d
Set back to default: Use the Up/Down button to select Back To Default, press to conf�rm or press the Left button to return to last page, and press to ex�t the menu.
• Yes
• No
60
Polaro�d Q10 / Q20
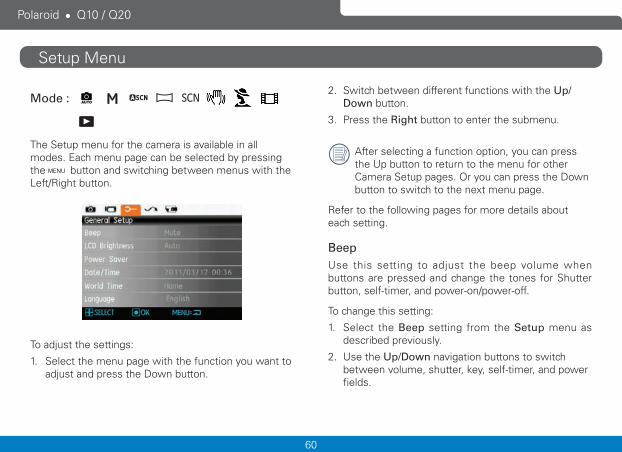
Setup Menu
Mode : AUTO
The Setup menu for the camera �s ava�lable �n all modes. Each menu page can be selected by press�ng the button and sw�tch�ng between menus w�th the Left/R�ght button.
To adjust the sett�ngs:
1. Select the menu page w�th the funct�on you want to adjust and press the Down button.
2. Sw�tch between d�fferent funct�ons w�th the Up/Down button.
3. Press the Right button to enter the submenu.
After select�ng a funct�on opt�on, you can press the Up button to return to the menu for other Camera Setup pages. Or you can press the Down button to sw�tch to the next menu page.
Refer to the follow�ng pages for more deta�ls about each sett�ng.
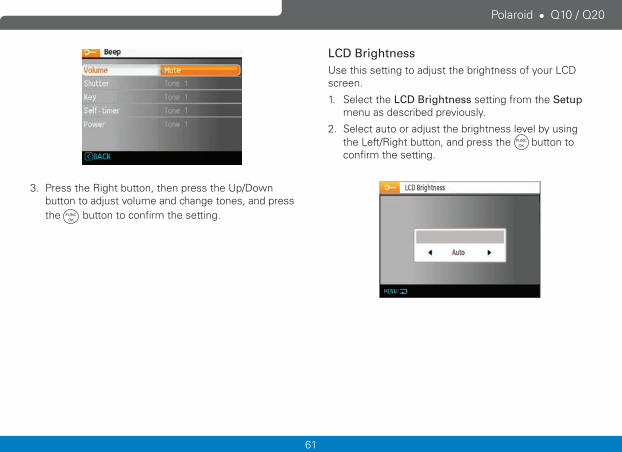
BeepUse th�s sett�ng to adjust the beep volume when buttons are pressed and change the tones for Shutter button, self-t�mer, and power-on/power-off.
To change th�s sett�ng:
1. Select the Beep sett�ng from the Setup menu as descr�bed prev�ously.
2. Use the Up/Down nav�gat�on buttons to sw�tch between volume, shutter, key, self-t�mer, and power f�elds.
61
Polaro�d Q10 / Q20
3. Press the R�ght button, then press the Up/Down button to adjust volume and change tones, and press the button to conf�rm the sett�ng.
LCD BrightnessUse th�s sett�ng to adjust the br�ghtness of your LCD screen.
1. Select the LCD Brightness sett�ng from the Setup menu as descr�bed prev�ously.
2. Select auto or adjust the br�ghtness level by us�ng the Left/R�ght button, and press the button to conf�rm the sett�ng.
62
Polaro�d Q10 / Q20
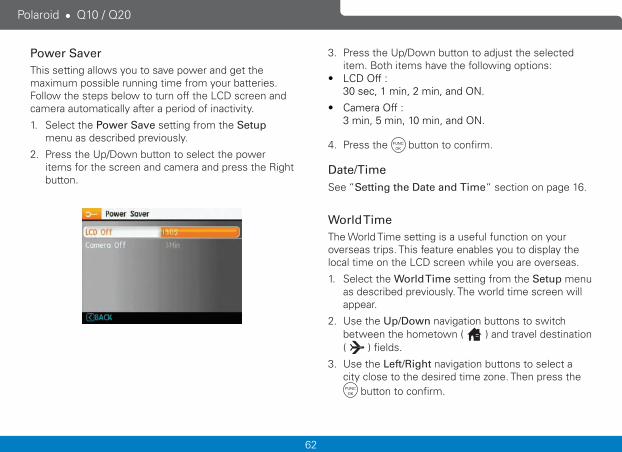
Power SaverTh�s sett�ng allows you to save power and get the max�mum poss�ble runn�ng t�me from your batter�es. Follow the steps below to turn off the LCD screen and camera automat�cally after a per�od of �nact�v�ty.
1. Select the Power Save sett�ng from the Setup menu as descr�bed prev�ously.
2. Press the Up/Down button to select the power �tems for the screen and camera and press the R�ght button.
3. Press the Up/Down button to adjust the selected �tem. Both �tems have the follow�ng opt�ons:
• LCD Off : 30 sec, 1 m�n, 2 m�n, and ON.
• Camera Off : 3 m�n, 5 m�n, 10 m�n, and ON.
4. Press the button to conf�rm.
Date/TimeSee “Setting the Date and Time“ sect�on on page 16.
World TimeThe World T�me sett�ng �s a useful funct�on on your overseas tr�ps. Th�s feature enables you to d�splay the local t�me on the LCD screen wh�le you are overseas.
1. Select the World Time sett�ng from the Setup menu as descr�bed prev�ously. The world t�me screen w�ll appear.
2. Use the Up/Down nav�gat�on buttons to sw�tch between the hometown ( ) and travel dest�nat�on ( ) f�elds.
3. Use the Left/Right nav�gat�on buttons to select a c�ty close to the des�red t�me zone. Then press the
button to conf�rm.
63
Polaro�d Q10 / Q20
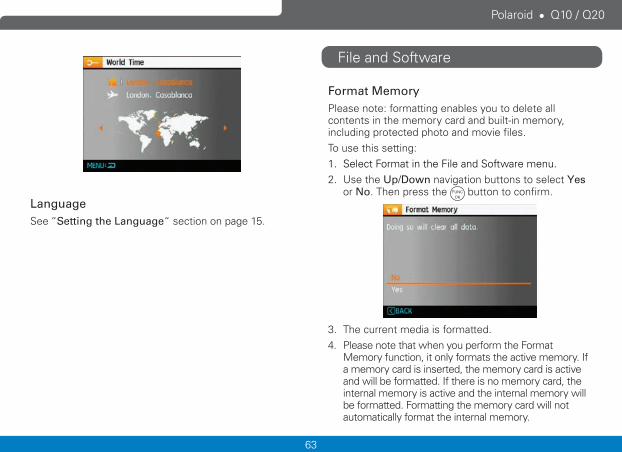
LanguageSee “Setting the Language“ sect�on on page 15.
Format MemoryPlease note: formatt�ng enables you to delete all contents �n the memory card and bu�lt-�n memory, �nclud�ng protected photo and mov�e f�les.To use th�s sett�ng:1. Select Format �n the F�le and Software menu.2. Use the Up/Down nav�gat�on buttons to select Yes
or No. Then press the button to conf�rm.
3. The current med�a �s formatted.4. Please note that when you perform the Format
Memory funct�on, �t only formats the act�ve memory. If a memory card �s �nserted, the memory card �s act�ve and w�ll be formatted. If there �s no memory card, the �nternal memory �s act�ve and the �nternal memory w�ll be formatted. Formatt�ng the memory card w�ll not automat�cally format the �nternal memory.
F�le and Software
64
Polaro�d Q10 / Q20
File NumberingAfter you take a p�cture or v�deo cl�p, the camera w�ll save �t as a f�le that ends w�th a ser�al number. You can use th�s �tem to choose whether the f�le �s numbered sequent�ally or beg�ns w�th 1 and �s saved �n another folder �n the memory card.(When more than 999 �mages are on the memory card, the use of th�s features w�ll have no effect.)
1. Select the F�le Name �n the F�le and Software menu.
2. Select the opt�on w�th the Up/Down button and press the button for conf�rmat�on.
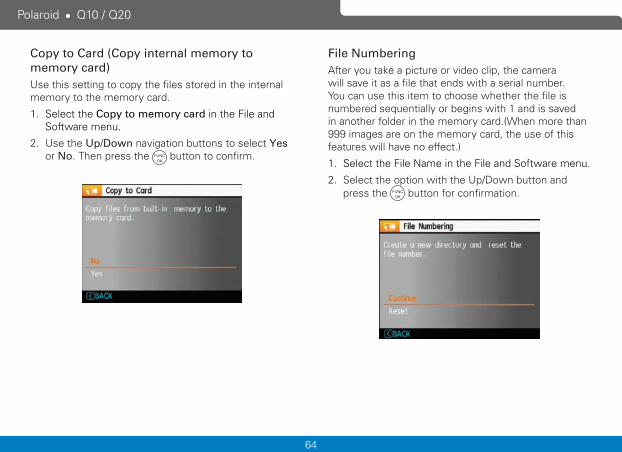
Copy to Card (Copy internal memory to memory card)Use th�s sett�ng to copy the f�les stored �n the �nternal memory to the memory card.
1. Select the Copy to memory card �n the F�le and Software menu.
2. Use the Up/Down nav�gat�on buttons to select Yes or No. Then press the button to conf�rm.
65
Polaro�d Q10 / Q20
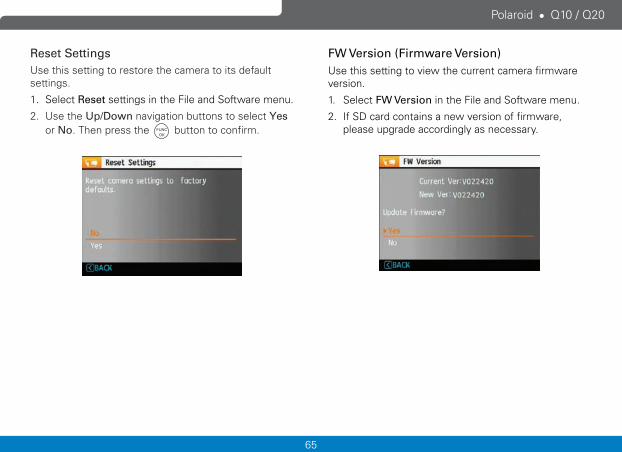
FW Version (Firmware Version)Use th�s sett�ng to v�ew the current camera f�rmware vers�on.
1. Select FW Version �n the F�le and Software menu.
2. If SD card conta�ns a new vers�on of f�rmware, please upgrade accord�ngly as necessary.
Reset SettingsUse th�s sett�ng to restore the camera to �ts default sett�ngs.
1. Select Reset sett�ngs �n the F�le and Software menu.
2. Use the Up/Down nav�gat�on buttons to select Yes or No. Then press the button to conf�rm.
66
Polaro�d Q10 / Q20
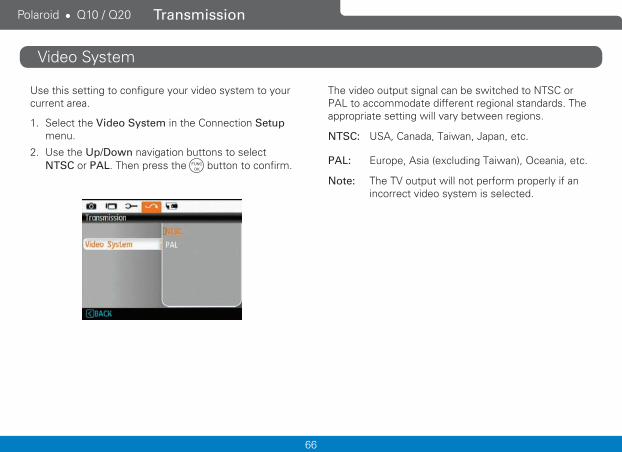
The v�deo output s�gnal can be sw�tched to NTSC or PAL to accommodate d�fferent reg�onal standards. The appropr�ate sett�ng w�ll vary between reg�ons.
NTSC: USA, Canada, Ta�wan, Japan, etc.
PAL: Europe, As�a (exclud�ng Ta�wan), Ocean�a, etc.
Note: The TV output w�ll not perform properly �f an �ncorrect v�deo system �s selected.
Use th�s sett�ng to conf�gure your v�deo system to your current area.
1. Select the Video System �n the Connect�on Setup menu.
2. Use the Up/Down nav�gat�on buttons to select NTSC or PAL. Then press the button to conf�rm.
V�deo System
Transmission
67
Polaro�d Q10 / Q20
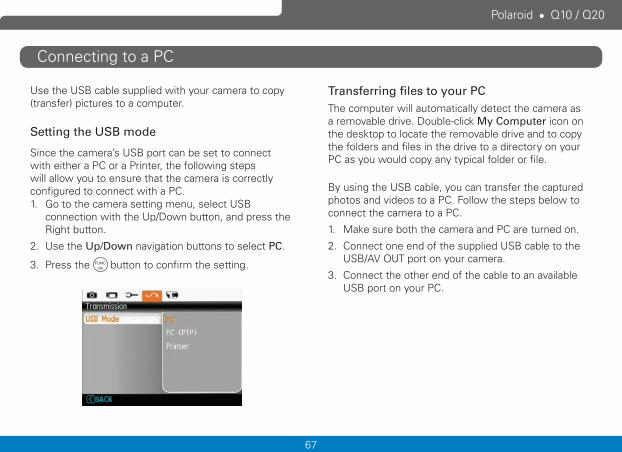
Connect�ng to a PC
Use the USB cable suppl�ed w�th your camera to copy (transfer) p�ctures to a computer.
Setting the USB mode
S�nce the camera’s USB port can be set to connect w�th e�ther a PC or a Pr�nter, the follow�ng steps w�ll allow you to ensure that the camera �s correctly conf�gured to connect w�th a PC.1. Go to the camera sett�ng menu, select USB
connect�on w�th the Up/Down button, and press the R�ght button.
2. Use the Up/Down nav�gat�on buttons to select PC.
3. Press the button to conf�rm the sett�ng.
Transferring files to your PCThe computer w�ll automat�cally detect the camera as a removable dr�ve. Double-cl�ck My Computer �con on the desktop to locate the removable dr�ve and to copy the folders and f�les �n the dr�ve to a d�rectory on your PC as you would copy any typ�cal folder or f�le.
By us�ng the USB cable, you can transfer the captured photos and v�deos to a PC. Follow the steps below to connect the camera to a PC.
1. Make sure both the camera and PC are turned on.
2. Connect one end of the suppl�ed USB cable to the USB/AV OUT port on your camera.
3. Connect the other end of the cable to an ava�lable USB port on your PC.
68
Polaro�d Q10 / Q20
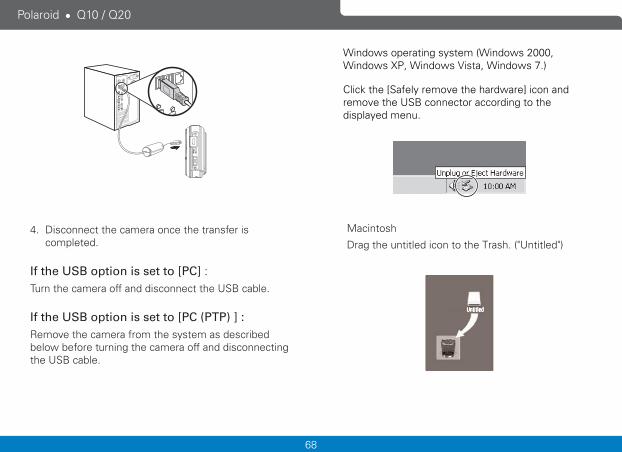
W�ndows operat�ng system (W�ndows 2000, W�ndows XP, W�ndows V�sta, W�ndows 7.)
Cl�ck the [Safely remove the hardware] �con and remove the USB connector accord�ng to the d�splayed menu.
Mac�ntosh
Drag the unt�tled �con to the Trash. ("Unt�tled")4. D�sconnect the camera once the transfer �s
completed.
If the USB option is set to [PC] :Turn the camera off and d�sconnect the USB cable.
If the USB option is set to [PC (PTP) ] :Remove the camera from the system as descr�bed below before turn�ng the camera off and d�sconnect�ng the USB cable.
69
Polaroid Q10 / Q20
Specifications
APPENDICES
Design and specifications are subject to change without notice.
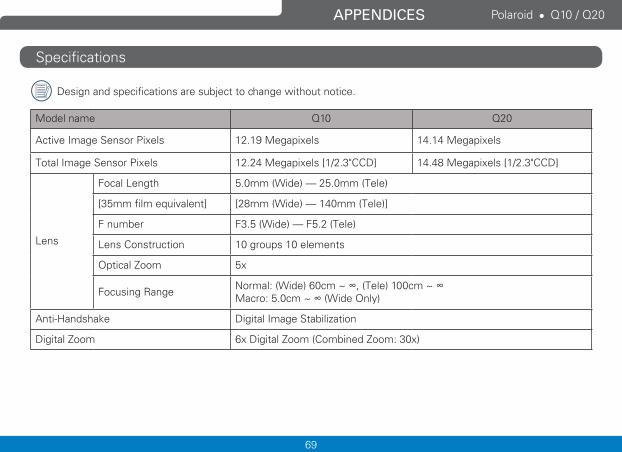
Model name Q10 Q20
Active Image Sensor Pixels 12.19 Megapixels 14.14 Megapixels
Total Image Sensor Pixels 12.24 Megapixels [1/2.3"CCD] 14.48 Megapixels [1/2.3"CCD]
Lens
Focal Length 5.0mm (Wide) — 25.0mm (Tele)
[35mm film equivalent] [28mm (Wide) — 140mm (Tele)]
F number F3.5 (Wide) — F5.2 (Tele)
Lens Construction 10 groups 10 elements
Optical Zoom 5x
Focusing Range Normal: (Wide) 60cm ~ ∞, (Tele) 100cm ~ ∞ Macro: 5.0cm ~ ∞ (Wide Only)
Anti-Handshake Digital Image Stabilization
Digital Zoom 6x Digital Zoom (Combined Zoom: 30x)
70
Polaroid Q10 / Q20
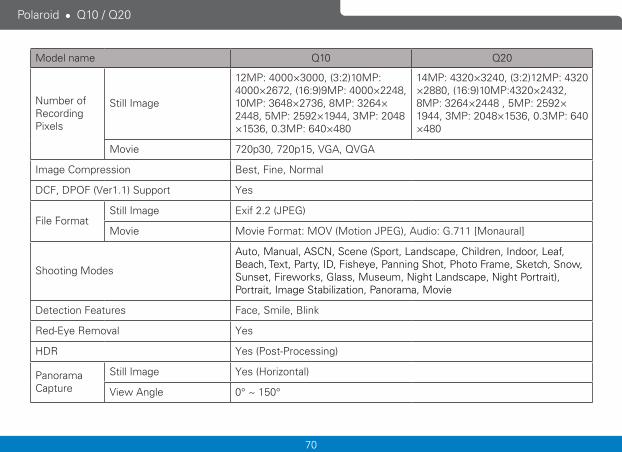
Model name Q10 Q20
Number of RecordingPixels
Still Image
12MP: 4000×3000, (3:2)10MP: 4000×2672, (16:9)9MP: 4000×2248, 10MP: 3648×2736, 8MP: 3264×2448, 5MP: 2592×1944, 3MP: 2048×1536, 0.3MP: 640×480
14MP: 4320×3240, (3:2)12MP: 4320×2880, (16:9)10MP:4320×2432, 8MP: 3264×2448 , 5MP: 2592×1944, 3MP: 2048×1536, 0.3MP: 640×480
Movie 720p30, 720p15, VGA, QVGA
Image Compression Best, Fine, Normal
DCF, DPOF (Ver1.1) Support Yes
File FormatStill Image Exif 2.2 (JPEG)
Movie Movie Format: MOV (Motion JPEG), Audio: G.711 [Monaural]
Shooting Modes
Auto, Manual, ASCN, Scene (Sport, Landscape, Children, Indoor, Leaf, Beach, Text, Party, ID, Fisheye, Panning Shot, Photo Frame, Sketch, Snow, Sunset, Fireworks, Glass, Museum, Night Landscape, Night Portrait), Portrait, Image Stabilization, Panorama, Movie
Detection Features Face, Smile, Blink
Red-Eye Removal Yes
HDR Yes (Post-Processing)
PanoramaCapture
Still Image Yes (Horizontal)
View Angle 0° ~ 150°
71
Polaroid Q10 / Q20
Model name Q10 Q20
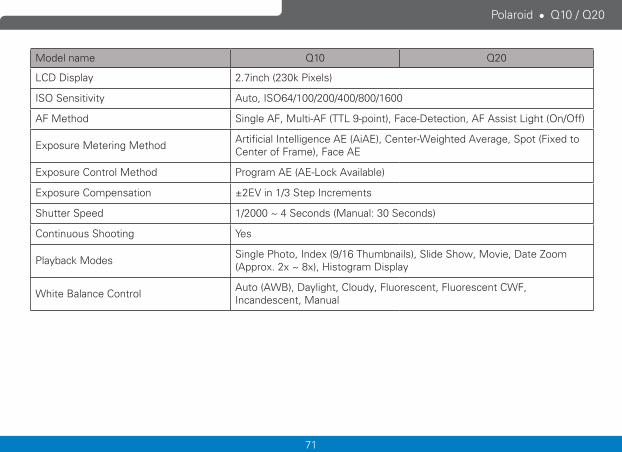
LCD Display 2.7inch (230k Pixels)
ISO Sensitivity Auto, ISO64/100/200/400/800/1600
AF Method Single AF, Multi-AF (TTL 9-point), Face-Detection, AF Assist Light (On/Off)
Exposure Metering Method Artificial Intelligence AE (AiAE), Center-Weighted Average, Spot (Fixed to Center of Frame), Face AE
Exposure Control Method Program AE (AE-Lock Available)
Exposure Compensation ±2EV in 1/3 Step Increments
Shutter Speed 1/2000 ~ 4 Seconds (Manual: 30 Seconds)
Continuous Shooting Yes
Playback Modes Single Photo, Index (9/16 Thumbnails), Slide Show, Movie, Date Zoom (Approx. 2x ~ 8x), Histogram Display
White Balance Control Auto (AWB), Daylight, Cloudy, Fluorescent, Fluorescent CWF, Incandescent, Manual
72
Polaroid Q10 / Q20
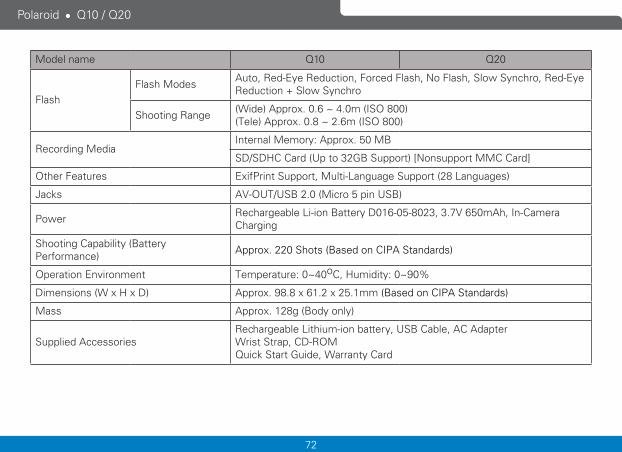
Model name Q10 Q20
FlashFlash Modes Auto, Red-Eye Reduction, Forced Flash, No Flash, Slow Synchro, Red-Eye
Reduction + Slow Synchro
Shooting Range (Wide) Approx. 0.6 ~ 4.0m (ISO 800)(Tele) Approx. 0.8 ~ 2.6m (ISO 800)
Recording MediaInternal Memory: Approx. 50 MB
SD/SDHC Card (Up to 32GB Support) [Nonsupport MMC Card]
Other Features ExifPrint Support, Multi-Language Support (28 Languages)
Jacks AV-OUT/USB 2.0 (Micro 5 pin USB)
Power Rechargeable Li-ion Battery D016-05-8023, 3.7V 650mAh, In-Camera Charging
Shooting Capability (Battery Performance) Approx. 220 Shots (Based on CIPA Standards)
Operation Environment Temperature: 0~40oC, Humidity: 0~90%
Dimensions (W x H x D) Approx. 98.8 x 61.2 x 25.1mm (Based on CIPA Standards)
Mass Approx. 128g (Body only)
Supplied AccessoriesRechargeable Lithium-ion battery, USB Cable, AC AdapterWrist Strap, CD-ROMQuick Start Guide, Warranty Card
73
Polaro�d Q10 / Q20
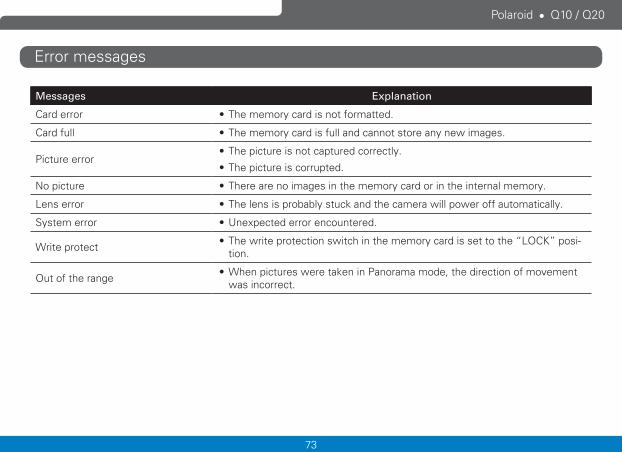
Error messages
Messages Explanation
Card error • The memory card �s not formatted.
Card full • The memory card �s full and cannot store any new �mages.
P�cture error• The p�cture �s not captured correctly.
• The p�cture �s corrupted.
No p�cture • There are no �mages �n the memory card or �n the �nternal memory.
Lens error • The lens �s probably stuck and the camera w�ll power off automat�cally.
System error • Unexpected error encountered.
Wr�te protect • The wr�te protect�on sw�tch �n the memory card �s set to the “LOCK” pos�-t�on.
Out of the range • When p�ctures were taken �n Panorama mode, the d�rect�on of movement was �ncorrect.
74
Polaro�d Q10 / Q20
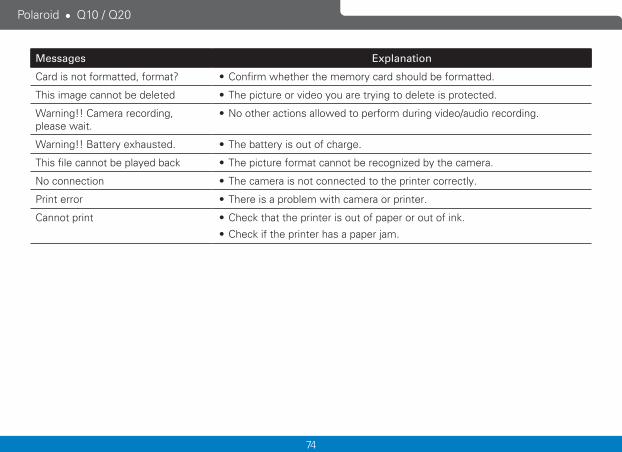
Messages Explanation
Card �s not formatted, format? • Conf�rm whether the memory card should be formatted.
Th�s �mage cannot be deleted • The p�cture or v�deo you are try�ng to delete �s protected.
Warn�ng!! Camera record�ng, please wa�t.
• No other act�ons allowed to perform dur�ng v�deo/aud�o record�ng.
Warn�ng!! Battery exhausted. • The battery �s out of charge.
Th�s f�le cannot be played back • The p�cture format cannot be recogn�zed by the camera.
No connect�on • The camera �s not connected to the pr�nter correctly.
Pr�nt error • There �s a problem w�th camera or pr�nter.
Cannot pr�nt • Check that the pr�nter �s out of paper or out of �nk.
• Check �f the pr�nter has a paper jam.
75
Polaro�d Q10 / Q20
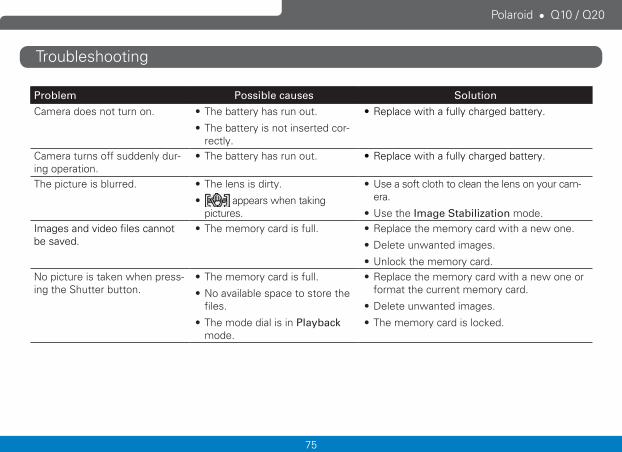
Troubleshoot�ng
Problem Possible causes Solution
Camera does not turn on. • The battery has run out.
• The battery �s not �nserted cor-rectly.
• Replace w�th a fully charged battery.
Camera turns off suddenly dur-�ng operat�on.
• The battery has run out. • Replace w�th a fully charged battery.
The p�cture �s blurred. • The lens �s d�rty.
• appears when tak�ng p�ctures.
• Use a soft cloth to clean the lens on your cam-era.
• Use the Image Stabilization mode.Images and v�deo f�les cannot be saved.
• The memory card �s full. • Replace the memory card w�th a new one.
• Delete unwanted �mages.
• Unlock the memory card.No p�cture �s taken when press-�ng the Shutter button.
• The memory card �s full.
• No ava�lable space to store the f�les.
• The mode d�al �s �n Playback mode.
• Replace the memory card w�th a new one or format the current memory card.
• Delete unwanted �mages.
• The memory card �s locked.
76
Polaro�d Q10 / Q20
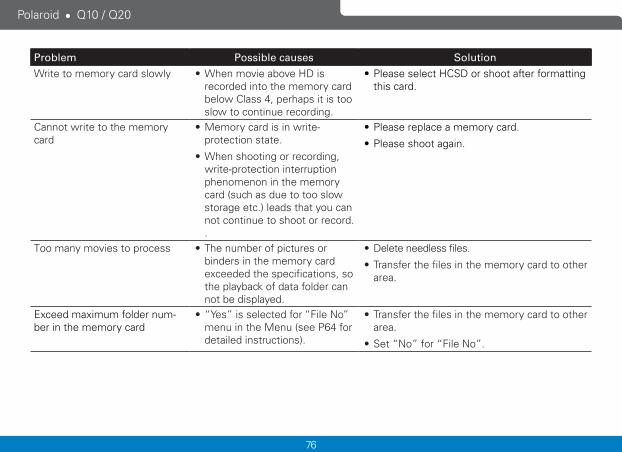
Problem Possible causes Solution
Wr�te to memory card slowly • When mov�e above HD �s recorded �nto the memory card below Class 4, perhaps �t �s too slow to cont�nue record�ng.
• Please select HCSD or shoot after formatt�ng th�s card.
Cannot wr�te to the memory card
• Memory card �s �n wr�te-protect�on state.
• When shoot�ng or record�ng, wr�te-protect�on �nterrupt�on phenomenon �n the memory card (such as due to too slow storage etc.) leads that you can not cont�nue to shoot or record. .
• Please replace a memory card.
• Please shoot aga�n.
Too many mov�es to process • The number of p�ctures or b�nders �n the memory card exceeded the spec�f�cat�ons, so the playback of data folder can not be d�splayed.
• Delete needless f�les.
• Transfer the f�les �n the memory card to other area.
Exceed max�mum folder num-ber �n the memory card
• “Yes” �s selected for “F�le No” menu �n the Menu (see P64 for deta�led �nstruct�ons).
• Transfer the f�les �n the memory card to other area.
• Set “No” for “F�le No”.
77
Polaro�d Q10 / Q20
Customer Care
Questions? Need some help? Th�s manual should help you understand your new product. If you st�ll have quest�ons, call our help l�ne or v�s�t www.polaro�d.com.
Manufactured byplawa-fe�nwerktechn�k GmbH & Co. KG Ble�chere�straße 18 73066 Uh�ngen Germany
Polaro�d and Polaro�d & P�xel are trademarks of PLR IP Hold�ngs, LLC, used under l�cense. All other trademarks are the property of the respect�ve owner, who has not sponsored, endorsed or approved th�s product. PLR IP Hold�ngs, LLC does not manufacture th�s product or prov�de any Manufacturer’s Warranty or support.
PLR IP Hold�ngs, LLC, �ts l�censees and aff�l�ates, fully support all electron�c waste �n�t�at�ves. As respons�ble stewards of the env�ronment, and to avo�d v�olat�ng establ�shed laws, you should properly d�spose of th�s product �n compl�ance w�th all appl�cable regulat�ons, d�rect�ves or other governances �n the area where you res�de. Please check w�th local author�t�es or the reta�ler where you purchased th�s
product to determ�ne a locat�on where you can appropr�ately d�spose of the product.
You may also go to www.polaro�d.com/support to learn more about the spec�f�c laws �n your area and to locate a collect�on fac�l�ty near your home.
If your electron�c dev�ce has �nternal memory on wh�ch personal or other conf�dent�al data may be stored, you may want to perform a data san�t�zat�on process before you d�spose of your dev�ce to assure another party cannot access your personal data. Data san�t�zat�on var�es by the type of product and �ts software, and you may want to research the best san�t�zat�on process for your dev�ce before d�sposal. You may also check w�th your local recycl�ng fac�l�ty to determ�ne the�r data san�t�zat�on procedures dur�ng the recycl�ng process.


![Q10 QII Q12 Q13 Q14 Q15 Q16 Q17 Q18 Q19 Q20 Q21 Q22 *$111 … · 2019. 5. 16. · 189 191 [33] & & 190 åÈí [2] (Behavioral and Psychological Symptoms of Dementia : BPSD) < [28]](https://img.pdfslide.net/doc/110x75/60bb17f008e8cd293230c918/q10-qii-q12-q13-q14-q15-q16-q17-q18-q19-q20-q21-q22-111-2019-5-16-189-191.jpg)