Embed Size (px)
Citation preview

Poltys
Call Recording
Administrator's Guide
Version 1.3

Poltys, Inc.
3300 N. Main Street, Suite D, Anderson, SC 29621-4128
+1 (864) 642-6103, [email protected]
www.poltys.com
©2016 Poltys, Inc. All rights reserved.
The information contained in this manual is based on information available at the time of publication and is subject to change without notice. Accuracy and completeness are not warranted or guaranteed.
No part of this manual may be reproduced or transmitted in any form or by any means, including electronic medium or machine-readable form, without the express written permission of Poltys, Inc. Brand or product names are trademarks of their respective owners.
April 2016

Contents
OVERVIEW ..................................................................................................................................5
INTRODUCTION .............................................................................................................................5 TARGET CUSTOMERS.......................................................................................................................5 CONFIGURATION............................................................................................................................5
IP Call Recording....................................................................................................................6 Legacy Call Recording .............................................................................................................6
KEY FEATURES..............................................................................................................................7 BENEFITS ....................................................................................................................................7
INSTALLING AND CONFIGURING CALL RECORDING...................................................................9 INSTALLING SERVER SOFTWARE .........................................................................................................9
Recommended Host Computer .................................................................................................9 Installation Procedure .............................................................................................................9
INSTALLING SUPERVISOR SOFTWARE ................................................................................................. 12 Recommended Host Computer ............................................................................................... 12 Installation Procedure ........................................................................................................... 13
CONFIGURING CALL RECORDING....................................................................................................... 15 Starting Supervisor .............................................................................................................. 15 Licensing Product ................................................................................................................. 17 Configuring Server Settings ................................................................................................... 20 Configuring Dialed Numbers .................................................................................................. 28 Configuring Users................................................................................................................. 30 Configuring Customer Data.................................................................................................... 32
USING CALL RECORDING ..........................................................................................................33 INTRODUCTION ........................................................................................................................... 33 STARTING CALL RECORDING SUPERVISOR ........................................................................................... 33 EXPLORING THE MAIN MENU ........................................................................................................... 35
File Menu ............................................................................................................................ 35 Skins Menu.......................................................................................................................... 35 About Menu ......................................................................................................................... 36
USING QUICK ACCESS TOOLBAR ...................................................................................................... 36 MANAGING CALL HISTORY INFORMATION ............................................................................................ 36
Handling the Recorded Audio Conversations ............................................................................ 38 Sorting Call Records ............................................................................................................. 41 Grouping Call Records........................................................................................................... 43 Filtering Call Records ............................................................................................................ 44 Building Advanced Filters ...................................................................................................... 48 Viewing Preferred Record Fields ............................................................................................. 50
REVIEWING CALL HISTORY ............................................................................................................. 52 PRODUCT SUPPORT...................................................................................................................57

Contents
4
- Blank Page -

Overview
Introduction
Poltys Call Recording is a standalone client-server voice solution that provides:
Non-intrusive voice recording on ISDN PRI/ Analog trunks, SIP/ MGCP/ ISDN BRI/ Analog extensions
Multiple users access
Historical voice streams management and playback
Call reviewing by notes, risk level, tags and more
Call signaling and voice archiving
Automatically send emails with conversation attachments
Playback via default Windows Media Player
The recorded conversations are useful in improving call quality, Customer relationship management,
Agent training, and evaluation or to preserve important information & questions from Customers.
The recorded call conversations are saved in a .wav format and playable by your computer's default
Windows Media Player.
Target Customers
Call Centers and Customer Services
Insurance and financial services
Attorney Offices
Government Institutions
Medical Centers
Configuration
Poltys Call Recording is a client-server solution consisting of two software components: Call Recording
Server and Supervisor.

6 Overview
The diagrams below presents two of Poltys Call Recording typical functional configurations.
IP Call Recording
NOTES:
No recording boards are necessary.
IP-PBX internal port traffic shall be mirrored to Poltys Call Recording.
Poltys Call Recording Server requires the second NIC to receive the mirrored traffic.
Legacy Call Recording
NOTE: Call recording boards are connected non-intrusively to the PBX trunks.

Overview 7
Key Features
Automatic real-time conversations recording using non-intrusive packet sniffing/ tapping boards
Record ISDN PRI/ Analog trunks, SIP/ MGCP/ ISDN BRI/ Analog extensions
Support for up to 5 concurrent Supervisor users
Configurable restriction lists per user using Dialed/ DID numbers
Restrict call tapping
Restrict call conversation playback
Compatible with any type of PBX/ IP-PBX systems
Stamp recording with caller Trunk Number, Caller ID, DID, and Dialed number information
Playback/ Export/ Email call records
Review conversations by Agent Names, Notes, Risk levels and other specific tags entered by
Supervisor
Automatic backup based on predefined schedule
No time limit for call recording
Expandable anytime by license for IP recording or by adding extra recording boards for legacy
telephony lines
Benefits
Increase Customer confidence, maximizing productivity and dramatically improving employee
performance
Improve call quality control through Agent answering time, customer hold time and lost calls number
Help evaluate and analyze agent-customer interactions
Accurate record of what was said, by whom and when, avoiding the need for repetition or speaking
slowly
Helpful aid for Agent training

8 Overview
- Blank Page -

Installing and Configuring
Call Recording
Installing Server Software
Recommended Host Computer Processor - Intel® Core™ i5-750 at 2.66 GHz or faster
RAM - 4 GB
HDD - 10 GB free space for installation
Network - 100BaseT NIC
Operating Systems - Microsoft Windows Server 2008 R2 SP1 (UAC disabled), Microsoft Windows
Server 2012 (UAC disabled), Microsoft Windows 7 Professional (UAC disabled), Microsoft Windows 8
(UAC disabled)
NOTE: 1 TB of HDD space can store up to 34.000 hours of call recordings.
Installation Procedure To install the Poltys Call Recording Server software
1. Double-click on IndependentRecordingServer.exe to start the installer application.
2. The installation process starts over.

10 Installing and Configuring Call Recording
3. Click the Next > button to continue.
4. Select the installation folder and click on Next > button.

Installing and Configuring Call Recording 11
5. Click on Install button.
6. You may need to install the WinPcap packet sniffing driver. If it is already installed on the host
computer, a confirmation message displays. Click on Cancel button to skip the driver installation.

12 Installing and Configuring Call Recording
7. The installation of Poltys Call Recording Server is now complete. Click the Finish button.
Installing Supervisor Software
Recommended Host Computer Processor - Intel® Core™ i3-530 2.93 GHz or faster
RAM - 2 GB
HDD - 10 GB free space for installation
Network - 100BaseT NIC
Operating Systems - Microsoft Windows XP Professional SP3, Microsoft Windows Vista Business (UAC
disabled), Microsoft Windows 7 Professional (UAC disabled), Microsoft Windows 8 (UAC disabled)
NOTE: Poltys Call Recording Supervisor can be installed on the same host computer with Call Recording Server.

Installing and Configuring Call Recording 13
Installation Procedure To install the Poltys Call Recording Supervisor software
1. Double-click on IndependentRecordingClient.exe to start the installer application.
2. The installation process starts over.
3. Click the Next > button to continue.

14 Installing and Configuring Call Recording
4. License Agreement window displays. Select I Accept the terms of the license agreement and click on
Next > button.
5. Select the installation folder and click on Next > button.

Installing and Configuring Call Recording 15
6. The installation of Poltys Call Recording Supervisor is now complete. Click the Finish button.
Configuring Call Recording
Starting Supervisor 1. Double-click the Poltys Call Recording icon from the desktop or run it from Start | All Programs |
Poltys | Poltys Call Recording.
2. Poltys Call Recording Login window displays.

16 Installing and Configuring Call Recording
By default, there are two types of user access levels defined:
Administrator
User
To login with Administrator rights, use the following information:
Username: Administrator
Password: administrator
TCR Server: localhost if both Call Recording Server and Supervisor applications are installed on the
same host computer, or IP Address of Call Recording Server.
To login with User rights, use the following information:
Username: user
Password: user
TCR Server: localhost if both Call Recording Server and Supervisor applications are installed on
the same host computer, or IP Address of Call Recording Server.
NOTE: By default, the User access rights grant the following operations only:
View information
Delete call history records, if enabled

Installing and Configuring Call Recording 17
3. Click on OK button. The Poltys Call Recording main window displays.
Licensing Product 1. Select the About menu tab and click on the About button.
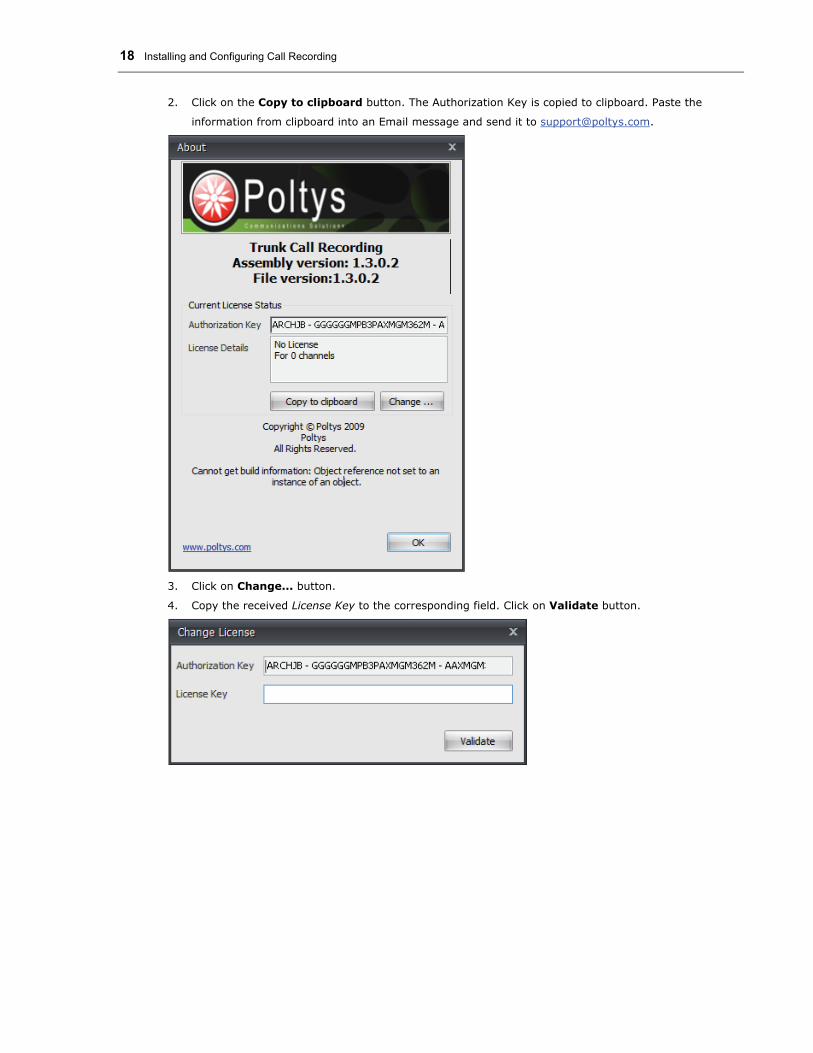
18 Installing and Configuring Call Recording
2. Click on the Copy to clipboard button. The Authorization Key is copied to clipboard. Paste the
information from clipboard into an Email message and send it to [email protected].
3. Click on Change... button.
4. Copy the received License Key to the corresponding field. Click on Validate button.

Installing and Configuring Call Recording 19
5. Verify that the number of licensed channels correspond to the license purchased.
6. Click the OK button to finish the product licensing.

20 Installing and Configuring Call Recording
Configuring Server Settings To configure the Poltys Call Recording Server click on the Settings tab from the main window and then
select the Server Settings pane like presented below.

Installing and Configuring Call Recording 21
Configure Boards
Poltys Call Recording allows you to select the type of wave PCM encoding and the file folder used for voice
recordings.
To configure boards:
1. The wave files stored to the disk have the following audio format: PCM, 8KHz, 8bits/sample, Mono.
You can select one of the following wave encoding options:
Alaw
Mulaw
2. By default, the Poltys Call Recording Server saves the voice recordings to the file folder of current
logged in Windows User. You can select any other file folder if necessary.
3. Click on Apply button for the changes to take effect.

22 Installing and Configuring Call Recording
Recorded Dialed Numbers Exclusion List
You can instruct Poltys Call Recording to skip the voice recording call stage by defining the exclusion list
based on call-dialed numbers.
To define the exclusion list:
1. Add new item to the exclusion list by clicking on Append button located on the bottom of the list.
2. Fill in the Dialed number of the calls not to be recorded. The description field is also available in order
to properly identify the scope of the excluded phone number in the list.
3. Repeat step#2 until all the intended dialed phone numbers are added.
4. Click on Apply Settings on Server button for changes to take effect.

Installing and Configuring Call Recording 23
E-mail Settings
Poltys Call Recording can automatically send the voice recordings filtered by either Caller ID or Dialed
Numbers to the predefined email recipients as file attachments.
To configure the email settings:
1. Fill in the following fields:
Server address – the FQDN server reference or the IP address of the SMTP server
Server port – the port number used by the e-mail server to send mails (by default, 25)
From Address – the e-mail address used by the e-mail server to send e-mails
Account user – the name of the email account
Account password – the password of the email account
2. Enable the Server requires authentication option if this option is required by your SMTP server.

24 Installing and Configuring Call Recording
3. Click on the Apply button for changes to take effect.
4. To test the Email settings, click on the Send Test E-mail button.
5. In the To: field, fill in the email address where you want the test email to be sent and click on the
Send button.
6. Check that the test Email is properly received.

Installing and Configuring Call Recording 25
7. Add new item to the exclusion list by clicking on the Append button located on the bottom of the
list. Fill in the phone number (Caller ID or Dialed Number) the calls are filtered by and the Email
address(es) the voice recordings are sent to.
NOTE: Multiple Email addresses are supported for each item in the list and they must be comma-delimited.
8. Repeat step#7 until all intended phone number triggers and related email recipients are added to the
list.
9. Click on Apply Settings on Server button for changes to take effect.

26 Installing and Configuring Call Recording
Database Maintenance Backup
Poltys Call Recording allows you to create backups of the call information stored in the database and the
related voice recordings using pre-defined schedules. The backups are useful to recover the call history
after a database corruption event.
NOTES:
It is strongly recommended to enable the Database Backup process in order to recover the Call Recording history information after an unexpected corruption event.
The database recovery service is provided by Poltys tech support engineers on demand.
To define the database backup schedule:
1. Select one of the following available schedule variants and pick up the appropriate sub-options:
Daily

Installing and Configuring Call Recording 27
Weekly
Monthly
2. Select the time on which the database schedule process shall start on.
3. By default, the database backup path is C:\Program Files\Poltys\Poltys Trunk Call Recording\
DBBackup on the Poltys Call Recording Server machine. If required, you can change the location for
the database backup.
4. Click on Apply button for changes to take effect.
To delete the existing call history records from the database:
1. Click on Purge button.
2. Confirm the records deletion by clicking on Yes button.

28 Installing and Configuring Call Recording
Configuring Dialed Numbers Poltys Call Recording allows you to record specific dialed numbers of both incoming and outgoing calls.
Dialed numbers stand for either telephone or extension numbers (e.g. 8052770719 or 301). A call is
recorded if its dialed number match one of the Dialed Numbers configured, no matter of Dialed Numbers
List it belongs to.
To define the lists of Dialed Numbers to be used as filter during call recording:
1. Click on the Settings tab from the main window and then select the Dialed Numbers configuration
pane.
2. Add a new item in the Dialed Number List by clicking on Append button that is located at the
bottom of the list, and rename it accordingly.

Installing and Configuring Call Recording 29
3. Add a new item in Number List by clicking on Append button that is located at the bottom of the
list. Enter the phone number and its description in the respective fields.
4. Repeat step#3 until all intended dialed numbers are added to the current list.
5. Repeat step#2-4 until all intended lists are created.

30 Installing and Configuring Call Recording
Configuring Users By default, Poltys Call Recording comes with two predefined users of the system, as presented below.
User Type Login Name Login Password Permissions
Administrator poltys poltys Full rights granted, including deletion of call history records
User user user Only allowed to view the information
To add a new Poltys Call Recording User:
1. Click on the Settings tab from the main window and then select the Users configuration pane.
2. Add a new item in the users list by clicking on the Append button located at the bottom of the
list.
3. Fill in the Name and Password of the new user.
4. Select the Type of the user and enable Can Delete option, if required.

Installing and Configuring Call Recording 31
5. Poltys Call Recording allows you to block the access to the call history records based on user-dialed
phone number filter schema.
To select one of the already defined lists, click on the Browse button located at the end of the
Dialed Numbers Disabled List field. Select the intended item in the list:
6. Click on OK button.
7. Adding new user procedure is completed.

32 Installing and Configuring Call Recording
Configuring Customer Data You can add your Customer contacts to Poltys Call Recording database in order to track the call
conversations.
When a the Caller ID match one of the Customer phone number defined in the database, the related
Customer information is presented in Active Calls and Call History panels.
To add a new Poltys Call Recording Customer:
1. Click on the Settings tab from the main window and then select the Customer Data configuration
pane.
2. Add a new item in the customers list by clicking on the Append button located at the bottom of
the list.
3. Fill in the following fields:
Phone
Name
Address
Company
Client Code
4. Adding new customer procedure is completed.

Using Call Recording
Introduction
This section is intended as a guide for end-users that describes the usability of the Poltys Call Recording
solution. The following topics are covered:
Starting Call Recording Supervisor
Exploring the Main Menu
Using Quick Access Toolbar
Managing Call History Information
Reviewing Call History
Starting Call Recording Supervisor
To start the Poltys Call Recording Supervisor application
1. Double-click on the Call Recording shortcut on the desktop, or run it from Start | All Programs | Poltys
| Poltys Call Recording.
2. Login with the credentials granted to you by the Poltys Call Recording administrator.

34 Using Poltys Call Recording
3. Click on OK button. The Poltys Call Recording main window is displayed.
Inside the main window, you can navigate between the two following sections:
Call History – allows you to manage the call recordings, review the information and evaluate the
quality of the call conversations with your customers
Settings – allows you to configure the server settings regarding the call recording filters, email
preferences, database backup schedules and the users allowed in the system. For more information,
refer to Configuring the System section in this document.
NOTE: You must login with the Administrator credentials in order to be allowed to modify the information in the Settings Poltys Call Recording section.
To exit Poltys Call Recording
1. Press Alt+F4 or click button and select Exit.

Using Poltys Call Recording 35
Exploring the Main Menu
The options available within the Poltys Call Recording Main Menu are:
File
Skins
About
File Menu
Option Description
Shutdown Supervisor application.
Allow you to export the Call History records to CSV or PDF files.
Allow you to print the Call History records to the selected printer.
While browsing the Call History list, you can filter out the information displayed using the options:
Skins Menu
Option Description
Allow you to select GUI theme out of the 23 predefined skins available. The default skin is Black.

36 Using Poltys Call Recording
About Menu
Options Description
Opens the About window, which presents the licensing information of the Poltys Call Recording and contains additional information like product version and copyright details.
Using Quick Access Toolbar
Find the Quick Access Toolbar in the left upper part of the Poltys Call Recording main window.
The available menu tabs are the following:
Change Skin – choose the skin for the Poltys Call Recording GUI. The default skin is Black.
Show Quick Access Toolbar Below the Ribbon – change the position of the Quick Access Toolbar below
the ribbon and above the Poltys Call Recording Main Menu.
Managing Call History Information
To view the call recording history section click on Call History tab. In this section you will find information
about all incoming and outgoing calls recorded by Poltys Call Recording.
The Poltys Call Recording call history records consist of the following database fields:

Using Poltys Call Recording 37
Field Type Description
Start Date Read-only The call starting date stamped by Poltys Call Recording. Read-only field.
Start Time Read-only The call starting time stamped by Poltys Call Recording. Read-only field.
Duration Read-only The total call duration including both the call control and the voice conversations. Read-only field.
End Date Read-only The call ending date stamped by Poltys Call Recording. Read-only field.
Caller ID Read-only The Caller ID phone number as tapped by Poltys Call Recording from the call control information exchanged on the PRI lines. Read-only field.
Dialed Number
Read-only The dialed phone number as tapped by Poltys Call Recording from the call control information exchanged on the PRI lines. Read-only field.
Trunk Number
Read-only The PRI timeslot number the call was encountered on. Read-only field.
File Path Read-only The file path on the Poltys Call Recording Server disk that stores the recorded audio conversation. Read-only field.
Call Notes User-editable
Text field that allows you to store additional information about the call recorded for further references. Refer to the Reviewing Call History section for more information. User-editable field.
Call Grades User-editable
Numeric field that allows you to rank the quality of the call with regards to the topics discussed. Refer to the Reviewing Call History section for more information. User-editable field.
Agent Name User-editable
Text field that allows you to set the Agent Name that handled the call for further references. Refer to the Reviewing Call History section for more information.
Follow-up User-editable
Flag that indicates that the call requires further actions to be performed. User-editable field.
Category User-editable
The following options are available in order to classify the call risk for further references: None - Default value
Low risk
Medium risk
High risk
Refer to the Reviewing Call History section for more information.
Tag User-editable
By default, the Tag field indicates if either the audio conversation corresponding to the call was successfully recorded or was skipped due to the recoding filter configured. The field can be subsequently used to mark the call with additional text information (e.g. the name of the department the Agent that handled the call belongs to). Refer to the Reviewing Call History section for more information.
Customer Name
Read-only The predefined Customer name.

38 Using Poltys Call Recording
Field Type Description
Customer Phone
Read-only The predefined Customer phone number that must match the Caller ID above.
Customer Company
Read-only The predefined Customer company.
Customer Address
Read-only The predefined Customer address.
Customer Code
Read-only The predefined Customer code that may help grouping the customers by category codes.
Handling the Recorded Audio Conversations By right clicking on a Call History record, you have access to the following options:

Using Poltys Call Recording 39
To save the recorded audio conversation to the disk:
1. Select Save to disk option:
2. Click on OK button.
To send the recorded audio conversation via email
1. Select Send to mail recipient option:
2. A new message is opened by your default email client having the audio file attached. Fill in the
recipient address and click on Send button.

40 Using Poltys Call Recording
To listen to the recorded audio conversation
1. Select Play option:
2. Your default Windows Media Player is started and the audio conversation is played back. Close the
media player when you are done.
To delete a record
NOTE: You can delete Call History records only if the Poltys Call Recording Administrator granted you with delete permission.
1. Select Delete records option or click on the Delete button located at the bottom of the Call
History list.

Using Poltys Call Recording 41
2. Click on Yes button. Please note that you can handle multiple Call History records at a time.
Sorting Call Records By clicking on a column header, the Call History information is automatically sorted descendant by that
field. Click again on the column header and the call history is sorted ascendant by that field.

42 Using Poltys Call Recording
Example
1. Click on the Start Time column header to get the Call History information sorted ascending by this
field.
2. Click again on the same column header to get the information sorted descending.

Using Poltys Call Recording 43
Grouping Call Records By dragging a column header above the Call History list you create a grouping rule. To disable the
grouping rule, drag the column header back to its original position.
Example
1. Click on the Category header and drag it above the list. Category field now groups the Call History
information.
2. Expand the groups by clicking to the button.
3. To disable the grouping rule simply drag back the column header.

44 Using Poltys Call Recording
Filtering Call Records
Quick Filter
You can easily filter the Call History list by any record field.
Example
1. Drag the mouse pointer to the Category header and click on the arrow icon. A popup window is
displayed containing all available filter options:
2. To filter the Call History list, select the desired value to be applied in the corresponding record field.

Using Poltys Call Recording 45
3. The Call History list presents all records in the database that have the selected value in the
corresponding field.
The filter rule is displayed at the bottom of the Call History list.
4. To disable the filter, click again on the arrow button from the corresponding field and select (All) or
click on button.
NOTE: All record fields in the Call History list offer the filtering feature; just drag the mouse pointer on the field header of your choice.

46 Using Poltys Call Recording
Custom Filter
You can define custom filters using multiple criteria for any record field.
Example
1. By placing the mouse cursor on the Category field header you will see an arrow button. A popup
window is displayed containing all available filter options:
2. Click on (Custom) option.

Using Poltys Call Recording 47
3. The Custom AutoFilter window is displayed. Specify the filter criteria for the Category field.
4. You can add additional condition the filter.
5. The Call History list presents all records in the database that correspond to the selected filter criteria.

48 Using Poltys Call Recording
The filter rule is displayed at the bottom of the Call History list.
6. To disable the filter, click again on the arrow button from the corresponding field and select (All) or
click on button.
NOTE: All record fields in the Call History list provide the filtering feature; just drag the mouse pointer on the field header of your choice.
Building Advanced Filters Poltys Call Recording allows you to define advanced filters based on combined conditions applied to the
record fields.
Example
1. Right-click on a field header in the Call History list and select Filter Editor option. The corresponding
window is displayed. Select Category field.
2. Click on <enter a value> option.

Using Poltys Call Recording 49
3. Select High Risk.
4. Click on Add button to append a new condition to the filter.
5. Click on [Category] and select Trunk Number option.
50 Using Poltys Call Recording
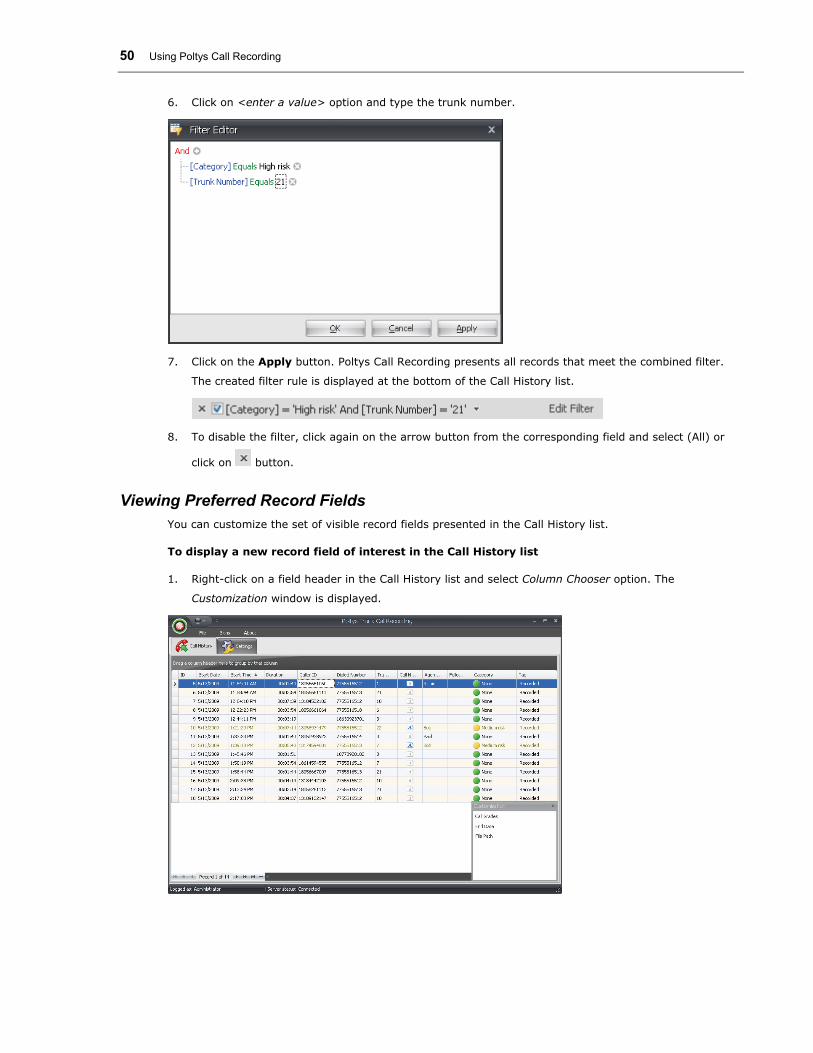
6. Click on <enter a value> option and type the trunk number.
7. Click on the Apply button. Poltys Call Recording presents all records that meet the combined filter.
The created filter rule is displayed at the bottom of the Call History list.
8. To disable the filter, click again on the arrow button from the corresponding field and select (All) or
click on button.
Viewing Preferred Record Fields You can customize the set of visible record fields presented in the Call History list.
To display a new record field of interest in the Call History list
1. Right-click on a field header in the Call History list and select Column Chooser option. The
Customization window is displayed.

Using Poltys Call Recording 51
2. Click on the preferred field in the Customization window and drag it to the Call History list.
3. Click on the Close button in the Customization window.
To remove a record field from the Call History list:
1. Right-click on a field header in the Call History list and select Column Chooser option. The
Customization window displays.
2. Click on the header of the field you want to remove from the Call History list and drag it to the
Customization window.
3. Click on the Close button in the Customization window.

52 Using Poltys Call Recording
Reviewing Call History
Poltys Call Recording allows you to review the Call History records any time by adding useful information
in the specific fields helping you to organize the call records for further.
The following user-editable fields are provided for reviewing purposes:
Field Description
Agent Name Agent Name that handled the call.
Follow-up Flag that indicates that the call requires further actions to be performed.
Category The following options are available in order to classify the call risk: None - Default value
Low risk
Medium risk
High risk
Call Notes Memo information about the call.
Tag By default, the Tag field indicates if either the audio conversation corresponding to the call was successfully recorded or was skipped due to the recoding filter configured. The field can be subsequently used to mark the call with additional text information (e.g. the name of the department the Agent that handled the call belongs to).
Call Grades Ranking field for call quality qualification with regards to the topics discussed. The Agent performance can be classified using this field.
NOTE: All sorting, grouping and filtering operations presented in the section Managing Call History Information are also available for the Call History fields meant for reviewing purposes.

Using Poltys Call Recording 53
To review the Agent Name field
1. Click on the Agent Name field of the Call History record you want to modify.
2. Enter the new information. The record is automatically updated in the Call History database.
To review the Follow-Up field
1. Click on the Follow-Up field of the Call History record you want to modify.
2. Select the preferred option from the list. The record is automatically updated in the Call History
database.

54 Using Poltys Call Recording
To review the Category field
1. Click on the Category field of the Call History record you want to modify.
2. Select the preferred option from the list. The record is automatically updated in the Call History
database.
To review the Call Notes field:
1. Click on the Call Notes field of the Call History record you want to modify. The specific text window
displays.
2. Enter the new information. The record is automatically updated in the Call History database.
3. Click on OK button. The record is automatically updated in the Call History database.

Using Poltys Call Recording 55
To review the Tag field
1. By default, the Tag field indicates if either the audio conversation corresponding to the call was
successfully recorded or was skipped due to the recoding filter configured. Click on the Tag field of the
Call History record you want to modify.
2. Enter the new information. The record is automatically updated in the Call History database.
To review the Call Grades field
1. Click on the Call Grades field of the Call History record you want to modify.
2. Enter the new call grade value. The record is automatically updated in the Call History database.

56 Using Poltys Call Recording
- Blank Page -

Product Support
Poltys tech support engineers are always available to answer your questions at:
Phone: +1 (864) 642-6103
Support: [email protected]