Embed Size (px)
Citation preview
Polycom® VBP™
and VVX® 1500 D Configuration Guide for Premise SIP Voice and H.323 Video Installations
9.1.5.1 | May 2010 | 3725-78301-002A
VBP and VVX 1500 D Configuration Guide
1
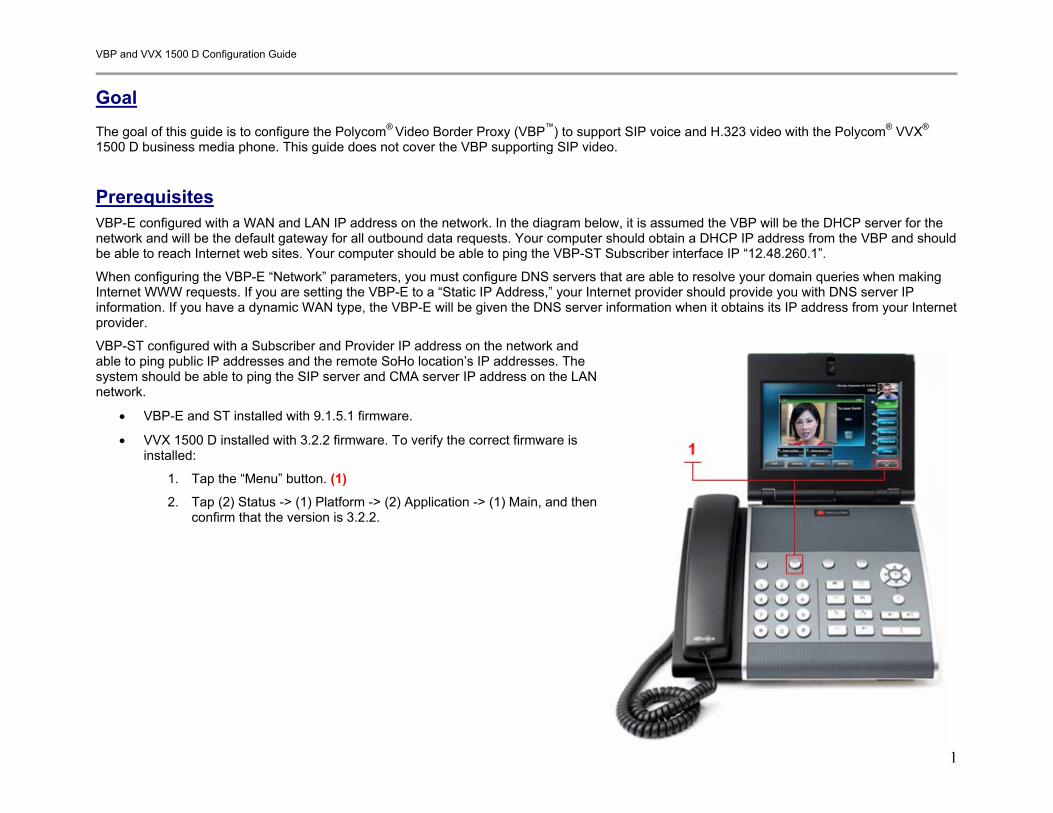
Goal
The goal of this guide is to configure the Polycom® Video Border Proxy (VBP™) to support SIP voice and H.323 video with the Polycom® VVX® 1500 D business media phone. This guide does not cover the VBP supporting SIP video.
Prerequisites VBP-E configured with a WAN and LAN IP address on the network. In the diagram below, it is assumed the VBP will be the DHCP server for the network and will be the default gateway for all outbound data requests. Your computer should obtain a DHCP IP address from the VBP and should be able to reach Internet web sites. Your computer should be able to ping the VBP-ST Subscriber interface IP “12.48.260.1”.
When configuring the VBP-E “Network” parameters, you must configure DNS servers that are able to resolve your domain queries when making Internet WWW requests. If you are setting the VBP-E to a “Static IP Address,” your Internet provider should provide you with DNS server IP information. If you have a dynamic WAN type, the VBP-E will be given the DNS server information when it obtains its IP address from your Internet provider.
VBP-ST configured with a Subscriber and Provider IP address on the network and able to ping public IP addresses and the remote SoHo location’s IP addresses. The system should be able to ping the SIP server and CMA server IP address on the LAN network.
• VBP-E and ST installed with 9.1.5.1 firmware.
• VVX 1500 D installed with 3.2.2 firmware. To verify the correct firmware is installed:
1. Tap the “Menu” button. (1)
2. Tap (2) Status -> (1) Platform -> (2) Application -> (1) Main, and then confirm that the version is 3.2.2.
VBP and VVX 1500 D Configuration Guide
2
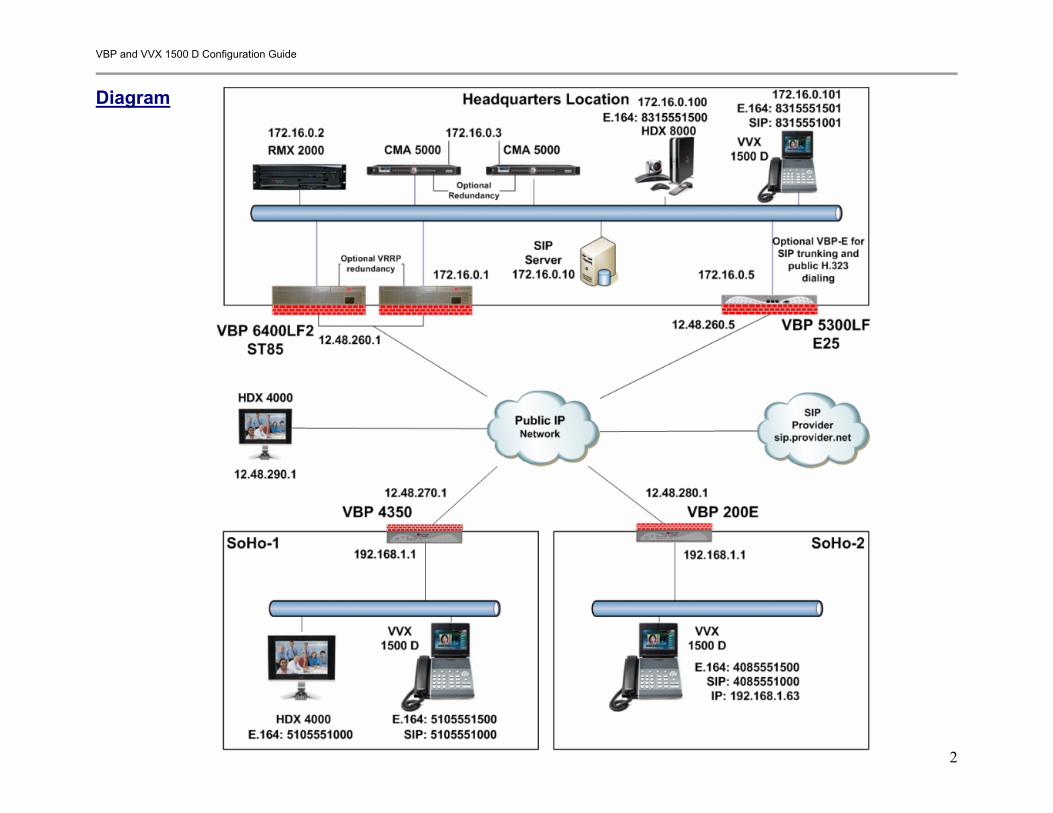
Diagram
VBP and VVX 1500 D Configuration Guide
3
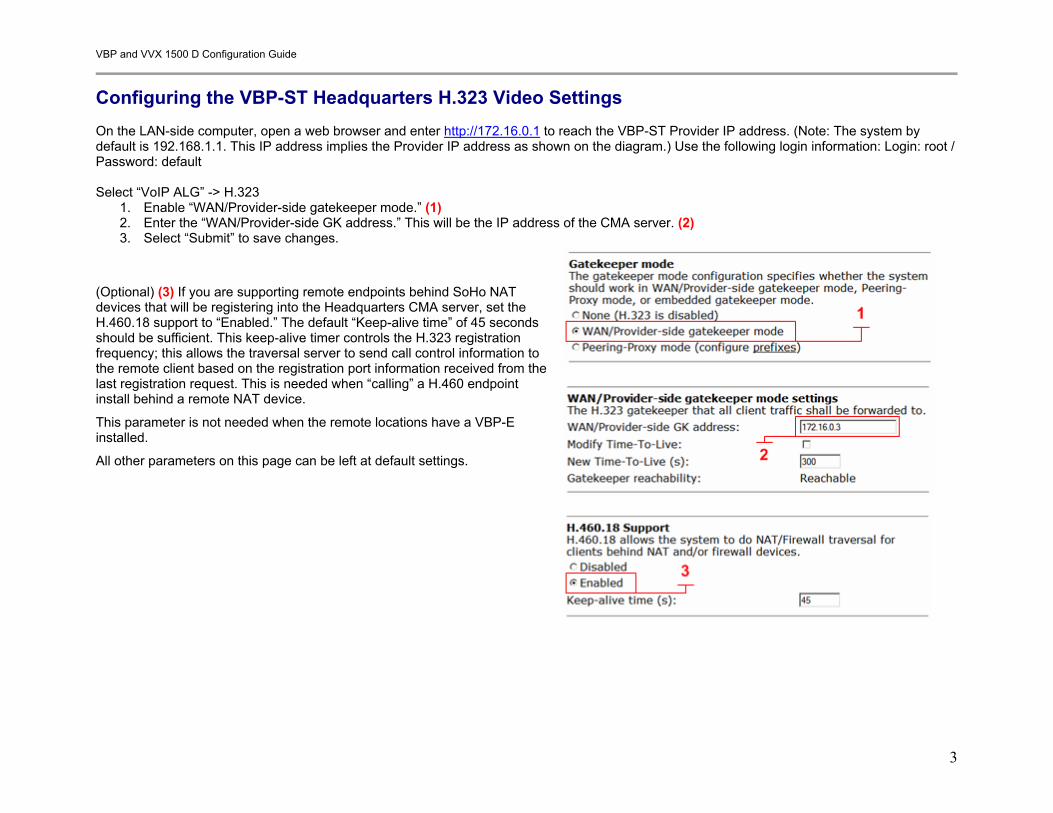
Configuring the VBP-ST Headquarters H.323 Video Settings On the LAN-side computer, open a web browser and enter http://172.16.0.1 to reach the VBP-ST Provider IP address. (Note: The system by default is 192.168.1.1. This IP address implies the Provider IP address as shown on the diagram.) Use the following login information: Login: root / Password: default Select “VoIP ALG” -> H.323
1. Enable “WAN/Provider-side gatekeeper mode.” (1) 2. Enter the “WAN/Provider-side GK address.” This will be the IP address of the CMA server. (2) 3. Select “Submit” to save changes.
(Optional) (3) If you are supporting remote endpoints behind SoHo NAT devices that will be registering into the Headquarters CMA server, set the H.460.18 support to “Enabled.” The default “Keep-alive time” of 45 seconds should be sufficient. This keep-alive timer controls the H.323 registration frequency; this allows the traversal server to send call control information to the remote client based on the registration port information received from the last registration request. This is needed when “calling” a H.460 endpoint install behind a remote NAT device.
This parameter is not needed when the remote locations have a VBP-E installed.
All other parameters on this page can be left at default settings.
VBP and VVX 1500 D Configuration Guide
4
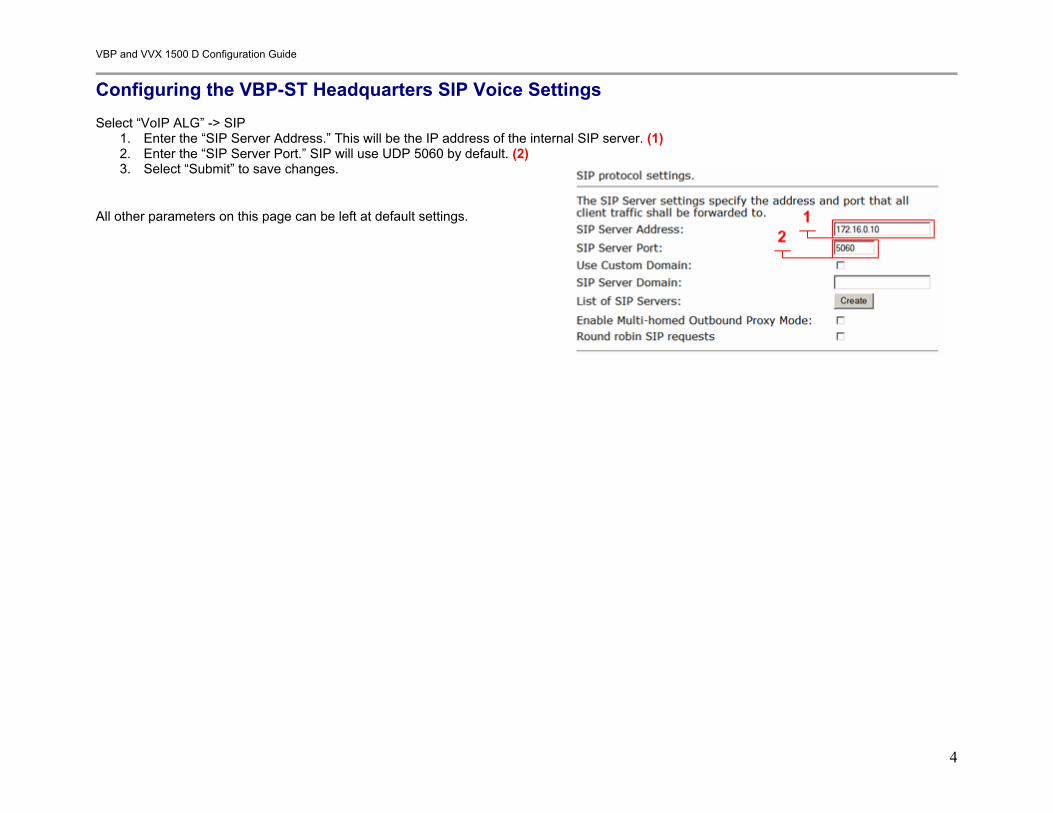
Configuring the VBP-ST Headquarters SIP Voice Settings Select “VoIP ALG” -> SIP
1. Enter the “SIP Server Address.” This will be the IP address of the internal SIP server. (1) 2. Enter the “SIP Server Port.” SIP will use UDP 5060 by default. (2) 3. Select “Submit” to save changes.
All other parameters on this page can be left at default settings.
VBP and VVX 1500 D Configuration Guide
5
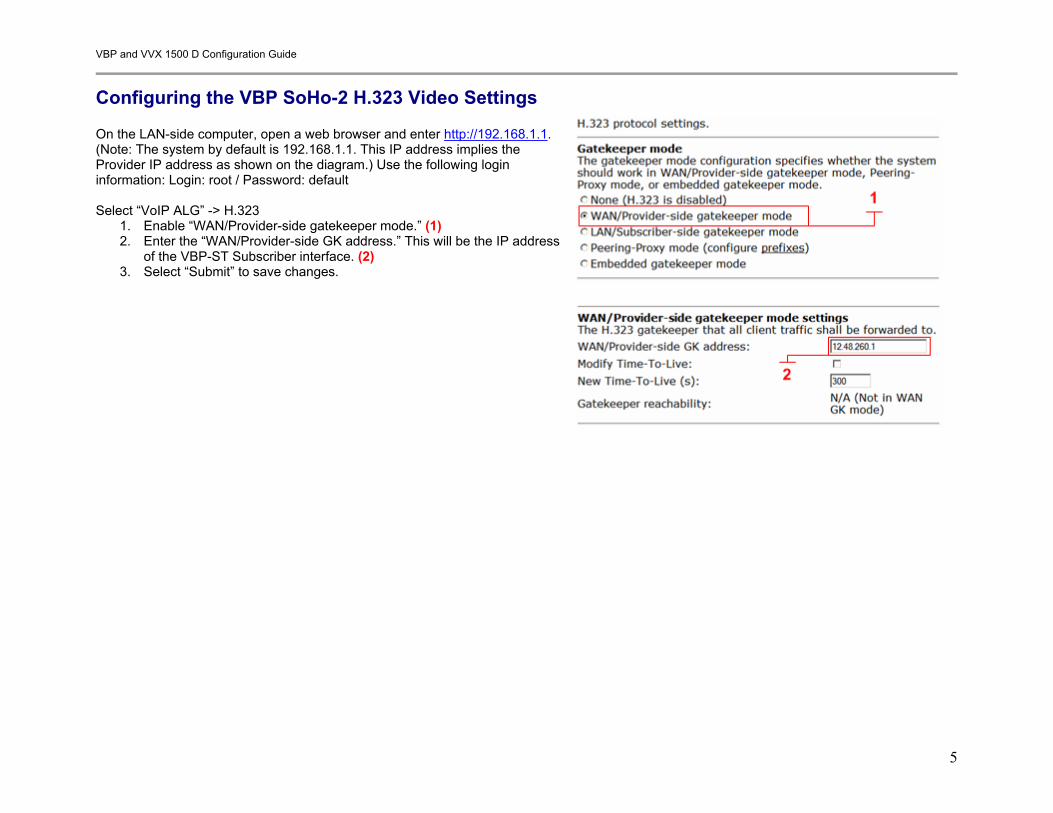
Configuring the VBP SoHo-2 H.323 Video Settings On the LAN-side computer, open a web browser and enter http://192.168.1.1. (Note: The system by default is 192.168.1.1. This IP address implies the Provider IP address as shown on the diagram.) Use the following login information: Login: root / Password: default Select “VoIP ALG” -> H.323
1. Enable “WAN/Provider-side gatekeeper mode.” (1) 2. Enter the “WAN/Provider-side GK address.” This will be the IP address
of the VBP-ST Subscriber interface. (2) 3. Select “Submit” to save changes.
VBP and VVX 1500 D Configuration Guide
6
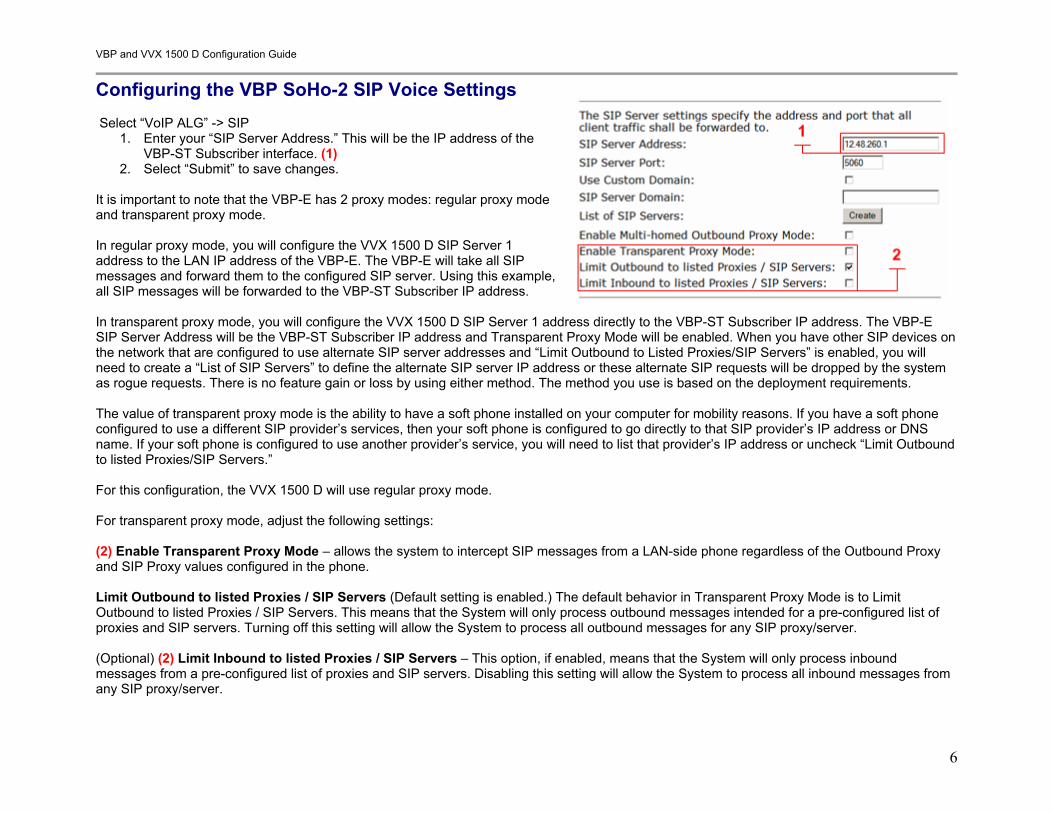
Configuring the VBP SoHo-2 SIP Voice Settings Select “VoIP ALG” -> SIP
1. Enter your “SIP Server Address.” This will be the IP address of the VBP-ST Subscriber interface. (1)
2. Select “Submit” to save changes. It is important to note that the VBP-E has 2 proxy modes: regular proxy mode and transparent proxy mode. In regular proxy mode, you will configure the VVX 1500 D SIP Server 1 address to the LAN IP address of the VBP-E. The VBP-E will take all SIP messages and forward them to the configured SIP server. Using this example, all SIP messages will be forwarded to the VBP-ST Subscriber IP address. In transparent proxy mode, you will configure the VVX 1500 D SIP Server 1 address directly to the VBP-ST Subscriber IP address. The VBP-E SIP Server Address will be the VBP-ST Subscriber IP address and Transparent Proxy Mode will be enabled. When you have other SIP devices on the network that are configured to use alternate SIP server addresses and “Limit Outbound to Listed Proxies/SIP Servers” is enabled, you will need to create a “List of SIP Servers” to define the alternate SIP server IP address or these alternate SIP requests will be dropped by the system as rogue requests. There is no feature gain or loss by using either method. The method you use is based on the deployment requirements. The value of transparent proxy mode is the ability to have a soft phone installed on your computer for mobility reasons. If you have a soft phone configured to use a different SIP provider’s services, then your soft phone is configured to go directly to that SIP provider’s IP address or DNS name. If your soft phone is configured to use another provider’s service, you will need to list that provider’s IP address or uncheck “Limit Outbound to listed Proxies/SIP Servers.” For this configuration, the VVX 1500 D will use regular proxy mode. For transparent proxy mode, adjust the following settings: (2) Enable Transparent Proxy Mode – allows the system to intercept SIP messages from a LAN-side phone regardless of the Outbound Proxy and SIP Proxy values configured in the phone. Limit Outbound to listed Proxies / SIP Servers (Default setting is enabled.) The default behavior in Transparent Proxy Mode is to Limit Outbound to listed Proxies / SIP Servers. This means that the System will only process outbound messages intended for a pre-configured list of proxies and SIP servers. Turning off this setting will allow the System to process all outbound messages for any SIP proxy/server. (Optional) (2) Limit Inbound to listed Proxies / SIP Servers – This option, if enabled, means that the System will only process inbound messages from a pre-configured list of proxies and SIP servers. Disabling this setting will allow the System to process all inbound messages from any SIP proxy/server.
VBP and VVX 1500 D Configuration Guide
7
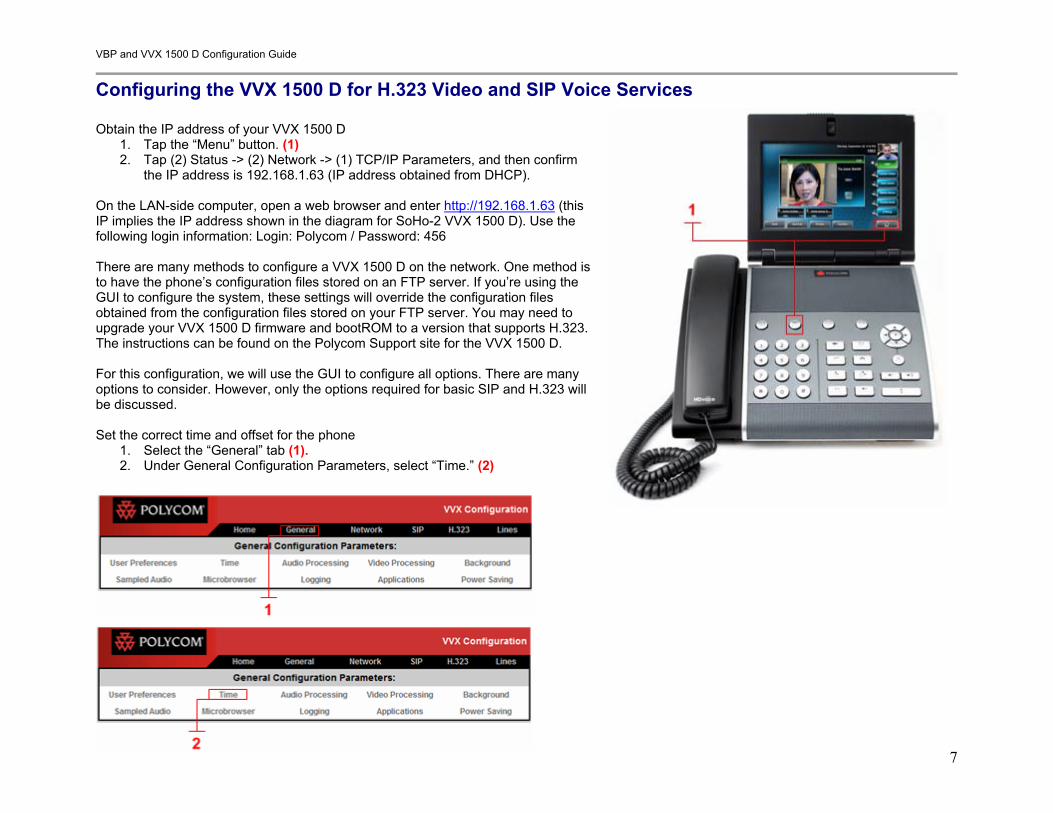
Configuring the VVX 1500 D for H.323 Video and SIP Voice Services Obtain the IP address of your VVX 1500 D
1. Tap the “Menu” button. (1) 2. Tap (2) Status -> (2) Network -> (1) TCP/IP Parameters, and then confirm
the IP address is 192.168.1.63 (IP address obtained from DHCP). On the LAN-side computer, open a web browser and enter http://192.168.1.63 (this IP implies the IP address shown in the diagram for SoHo-2 VVX 1500 D). Use the following login information: Login: Polycom / Password: 456 There are many methods to configure a VVX 1500 D on the network. One method is to have the phone’s configuration files stored on an FTP server. If you’re using the GUI to configure the system, these settings will override the configuration files obtained from the configuration files stored on your FTP server. You may need to upgrade your VVX 1500 D firmware and bootROM to a version that supports H.323. The instructions can be found on the Polycom Support site for the VVX 1500 D. For this configuration, we will use the GUI to configure all options. There are many options to consider. However, only the options required for basic SIP and H.323 will be discussed. Set the correct time and offset for the phone
1. Select the “General” tab (1). 2. Under General Configuration Parameters, select “Time.” (2)
VBP and VVX 1500 D Configuration Guide
8
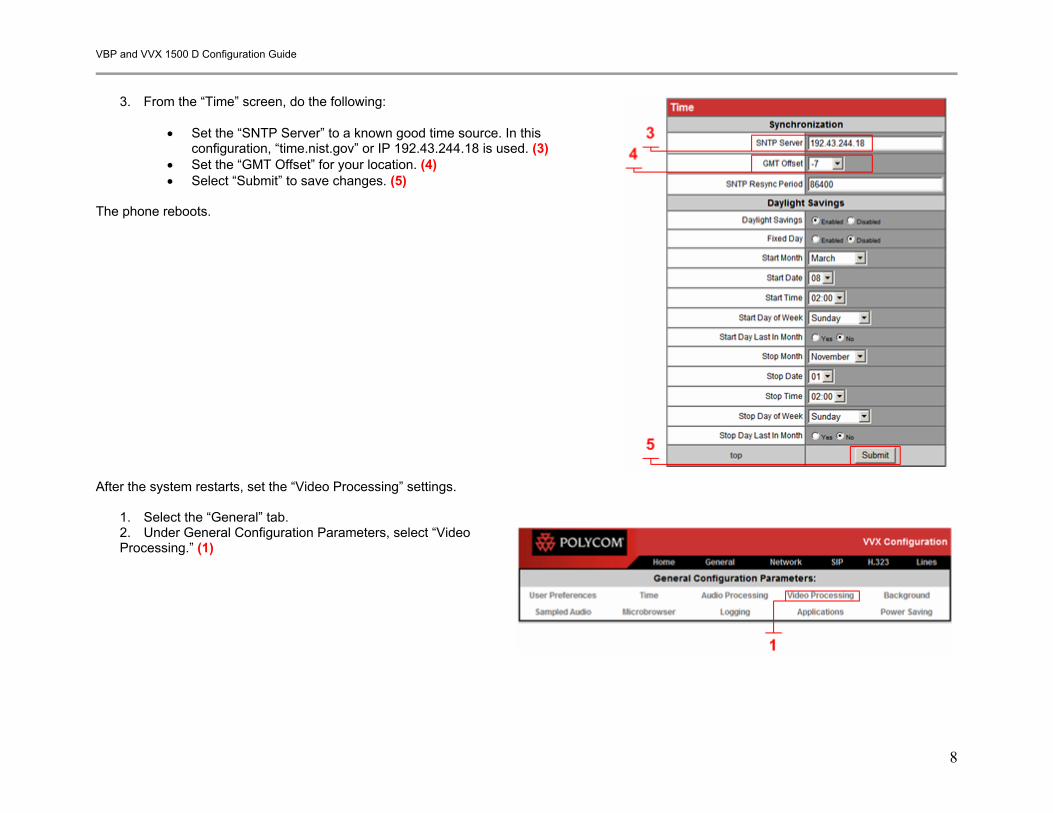
3. From the “Time” screen, do the following:
• Set the “SNTP Server” to a known good time source. In this
configuration, “time.nist.gov” or IP 192.43.244.18 is used. (3) • Set the “GMT Offset” for your location. (4) • Select “Submit” to save changes. (5)
The phone reboots. After the system restarts, set the “Video Processing” settings.
1. Select the “General” tab. 2. Under General Configuration Parameters, select “Video Processing.” (1)
VBP and VVX 1500 D Configuration Guide
9
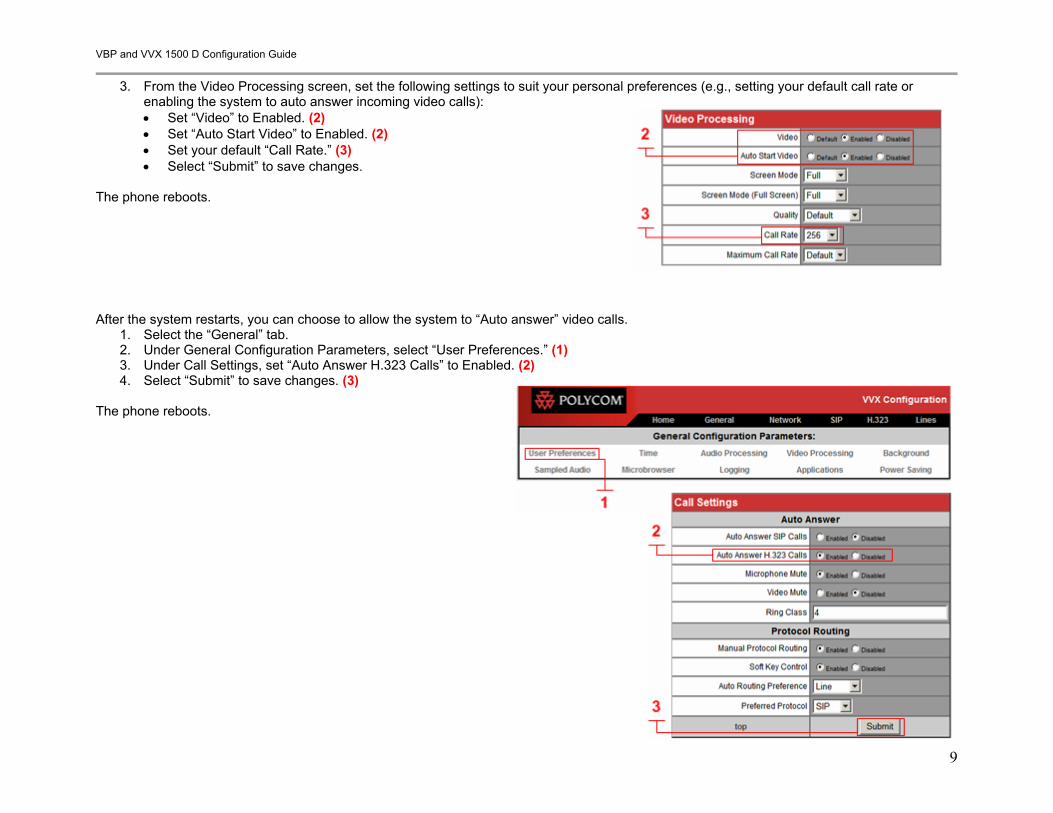
3. From the Video Processing screen, set the following settings to suit your personal preferences (e.g., setting your default call rate or enabling the system to auto answer incoming video calls):
• Set “Video” to Enabled. (2) • Set “Auto Start Video” to Enabled. (2) • Set your default “Call Rate.” (3) • Select “Submit” to save changes.
The phone reboots. After the system restarts, you can choose to allow the system to “Auto answer” video calls.
1. Select the “General” tab. 2. Under General Configuration Parameters, select “User Preferences.” (1) 3. Under Call Settings, set “Auto Answer H.323 Calls” to Enabled. (2) 4. Select “Submit” to save changes. (3)
The phone reboots.
VBP and VVX 1500 D Configuration Guide
10
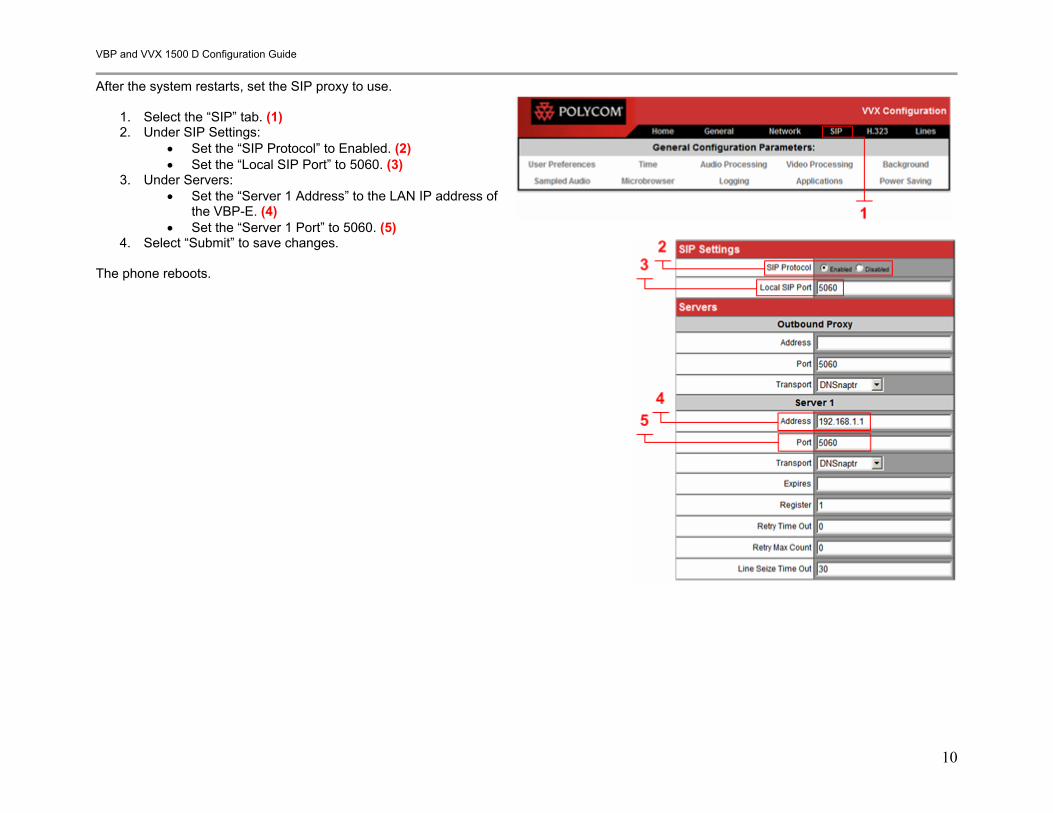
After the system restarts, set the SIP proxy to use.
1. Select the “SIP” tab. (1) 2. Under SIP Settings:
• Set the “SIP Protocol” to Enabled. (2) • Set the “Local SIP Port” to 5060. (3)
3. Under Servers: • Set the “Server 1 Address” to the LAN IP address of
the VBP-E. (4) • Set the “Server 1 Port” to 5060. (5)
4. Select “Submit” to save changes. The phone reboots.
VBP and VVX 1500 D Configuration Guide
11
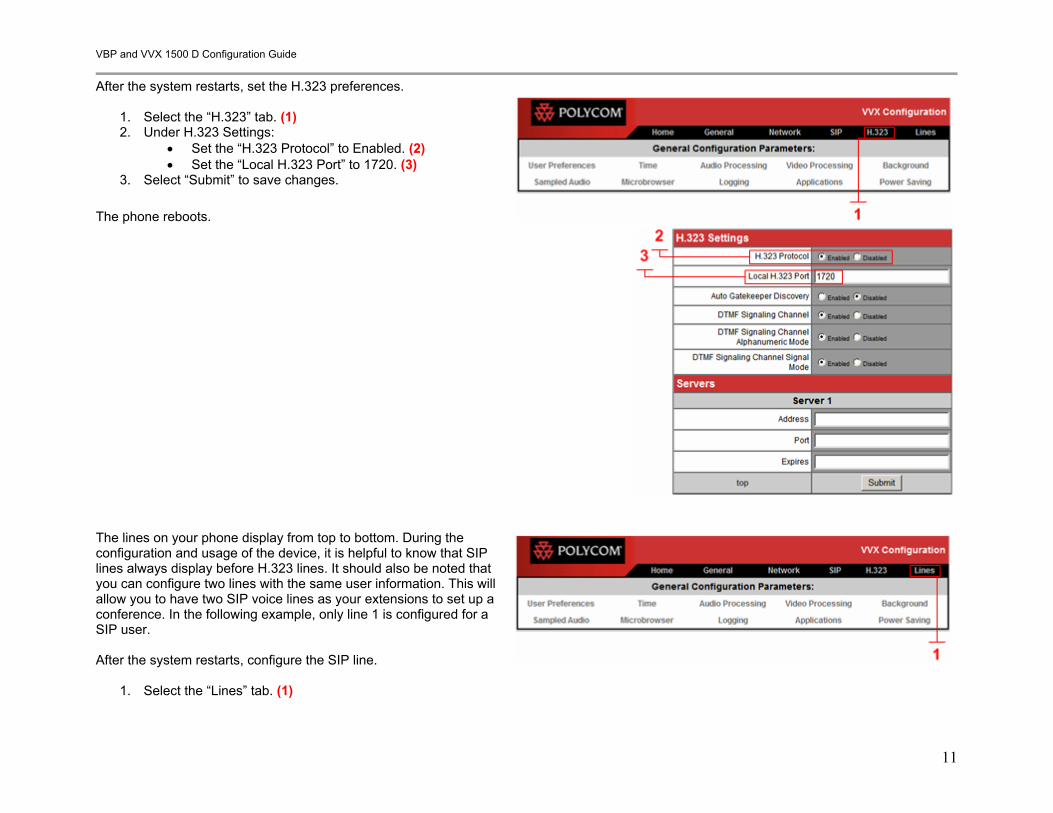
After the system restarts, set the H.323 preferences.
1. Select the “H.323” tab. (1) 2. Under H.323 Settings:
• Set the “H.323 Protocol” to Enabled. (2) • Set the “Local H.323 Port” to 1720. (3)
3. Select “Submit” to save changes. The phone reboots. The lines on your phone display from top to bottom. During the configuration and usage of the device, it is helpful to know that SIP lines always display before H.323 lines. It should also be noted that you can configure two lines with the same user information. This will allow you to have two SIP voice lines as your extensions to set up a conference. In the following example, only line 1 is configured for a SIP user. After the system restarts, configure the SIP line.
1. Select the “Lines” tab. (1)
VBP and VVX 1500 D Configuration Guide
12
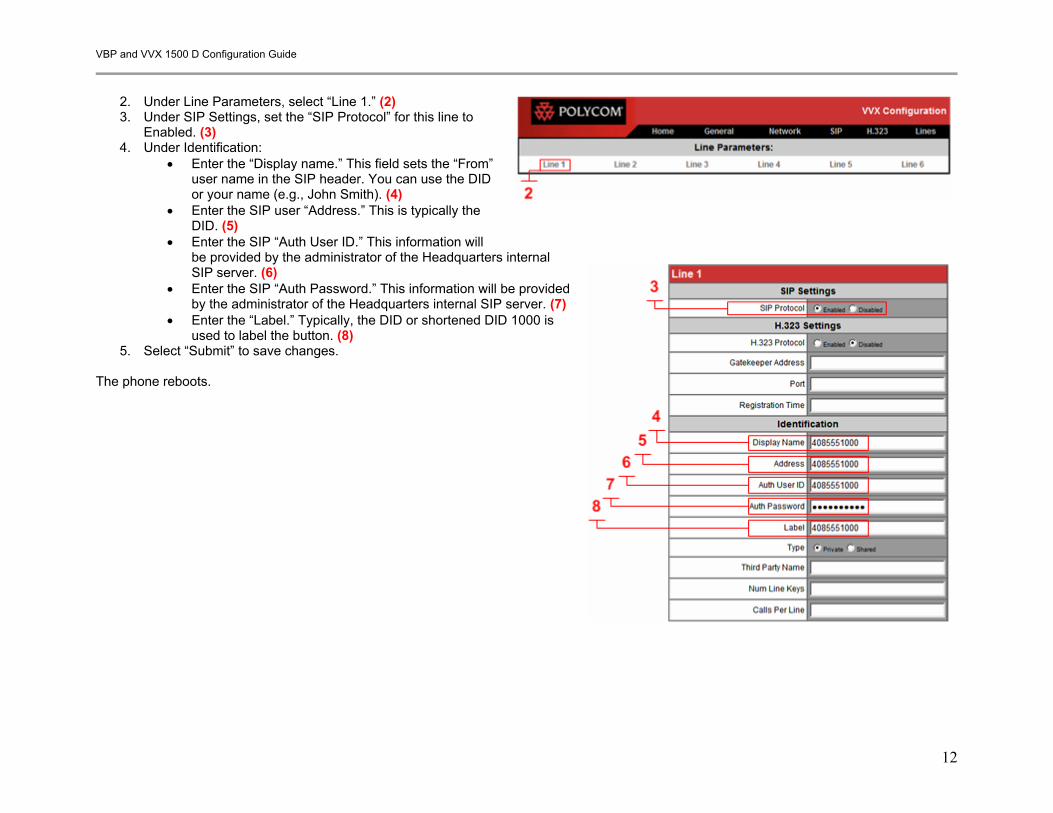
2. Under Line Parameters, select “Line 1.” (2) 3. Under SIP Settings, set the “SIP Protocol” for this line to
Enabled. (3) 4. Under Identification:
• Enter the “Display name.” This field sets the “From” user name in the SIP header. You can use the DID or your name (e.g., John Smith). (4)
• Enter the SIP user “Address.” This is typically the DID. (5)
• Enter the SIP “Auth User ID.” This information will be provided by the administrator of the Headquarters internal SIP server. (6)
• Enter the SIP “Auth Password.” This information will be provided by the administrator of the Headquarters internal SIP server. (7)
• Enter the “Label.” Typically, the DID or shortened DID 1000 is used to label the button. (8)
5. Select “Submit” to save changes. The phone reboots.
VBP and VVX 1500 D Configuration Guide
13
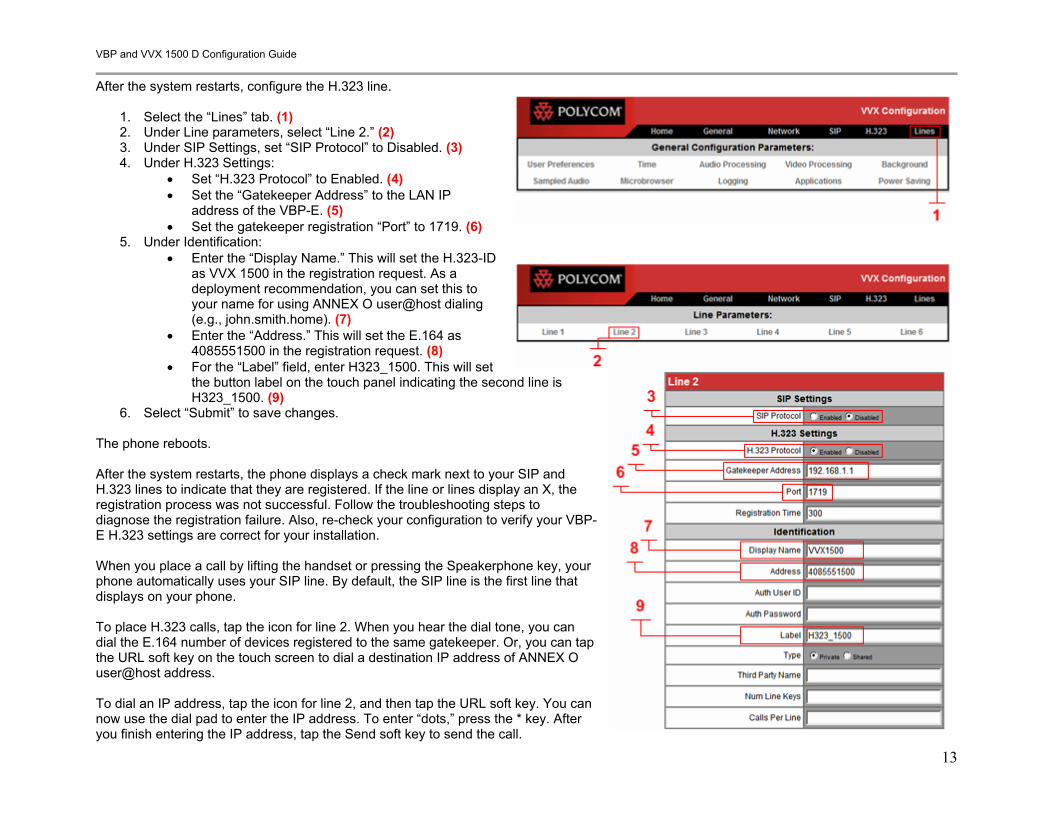
After the system restarts, configure the H.323 line.
1. Select the “Lines” tab. (1) 2. Under Line parameters, select “Line 2.” (2) 3. Under SIP Settings, set “SIP Protocol” to Disabled. (3) 4. Under H.323 Settings:
• Set “H.323 Protocol” to Enabled. (4) • Set the “Gatekeeper Address” to the LAN IP
address of the VBP-E. (5) • Set the gatekeeper registration “Port” to 1719. (6)
5. Under Identification: • Enter the “Display Name.” This will set the H.323-ID
as VVX 1500 in the registration request. As a deployment recommendation, you can set this to your name for using ANNEX O user@host dialing (e.g., john.smith.home). (7)
• Enter the “Address.” This will set the E.164 as 4085551500 in the registration request. (8)
• For the “Label” field, enter H323_1500. This will set the button label on the touch panel indicating the second line is H323_1500. (9)
6. Select “Submit” to save changes. The phone reboots. After the system restarts, the phone displays a check mark next to your SIP and H.323 lines to indicate that they are registered. If the line or lines display an X, the registration process was not successful. Follow the troubleshooting steps to diagnose the registration failure. Also, re-check your configuration to verify your VBP-E H.323 settings are correct for your installation. When you place a call by lifting the handset or pressing the Speakerphone key, your phone automatically uses your SIP line. By default, the SIP line is the first line that displays on your phone. To place H.323 calls, tap the icon for line 2. When you hear the dial tone, you can dial the E.164 number of devices registered to the same gatekeeper. Or, you can tap the URL soft key on the touch screen to dial a destination IP address of ANNEX O user@host address. To dial an IP address, tap the icon for line 2, and then tap the URL soft key. You can now use the dial pad to enter the IP address. To enter “dots,” press the * key. After you finish entering the IP address, tap the Send soft key to send the call.
VBP and VVX 1500 D Configuration Guide
14
Note: If you set the “Display Name” to your email address on your VVX 1500 D device, and you also have an H.323 device in the Headquarters location, make sure these aliases are different (e.g., john.smith.home and, for the office, john.smith.office). If these aliases are the same, the gatekeeper will reject the registrations as “duplicate aliases.”
VBP and VVX 1500 D Configuration Guide
15
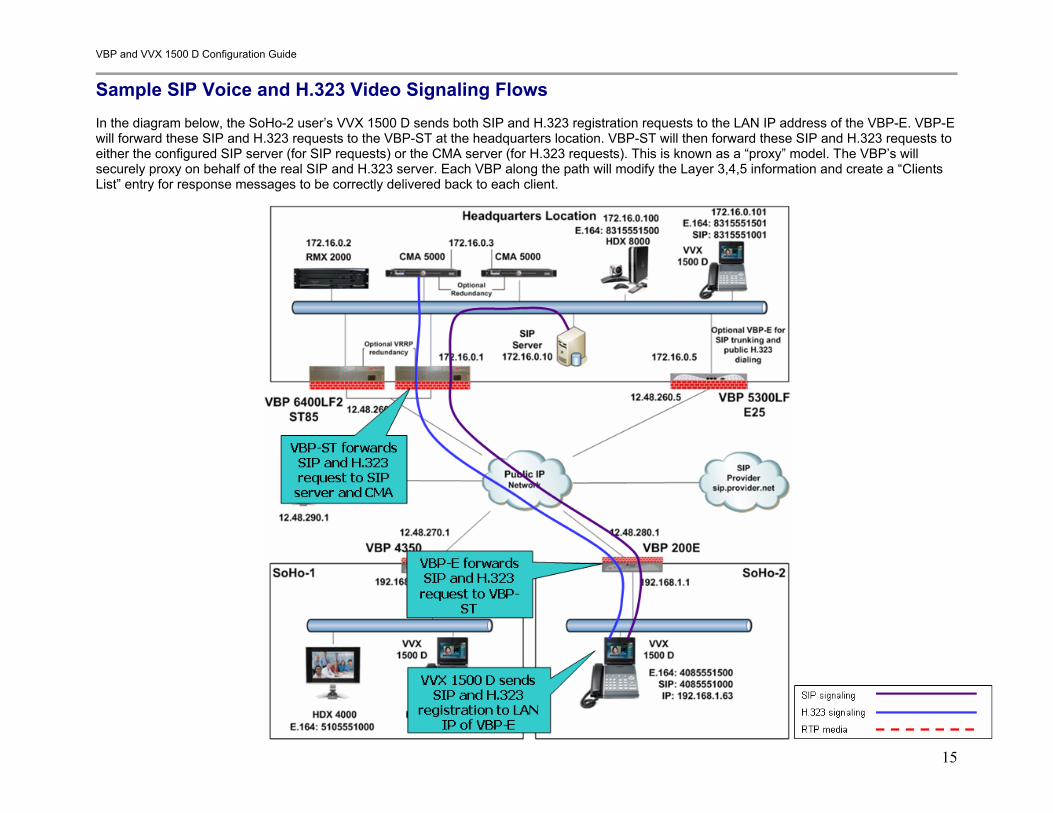
Sample SIP Voice and H.323 Video Signaling Flows In the diagram below, the SoHo-2 user’s VVX 1500 D sends both SIP and H.323 registration requests to the LAN IP address of the VBP-E. VBP-E will forward these SIP and H.323 requests to the VBP-ST at the headquarters location. VBP-ST will then forward these SIP and H.323 requests to either the configured SIP server (for SIP requests) or the CMA server (for H.323 requests). This is known as a “proxy” model. The VBP’s will securely proxy on behalf of the real SIP and H.323 server. Each VBP along the path will modify the Layer 3,4,5 information and create a “Clients List” entry for response messages to be correctly delivered back to each client.
VBP and VVX 1500 D Configuration Guide
16
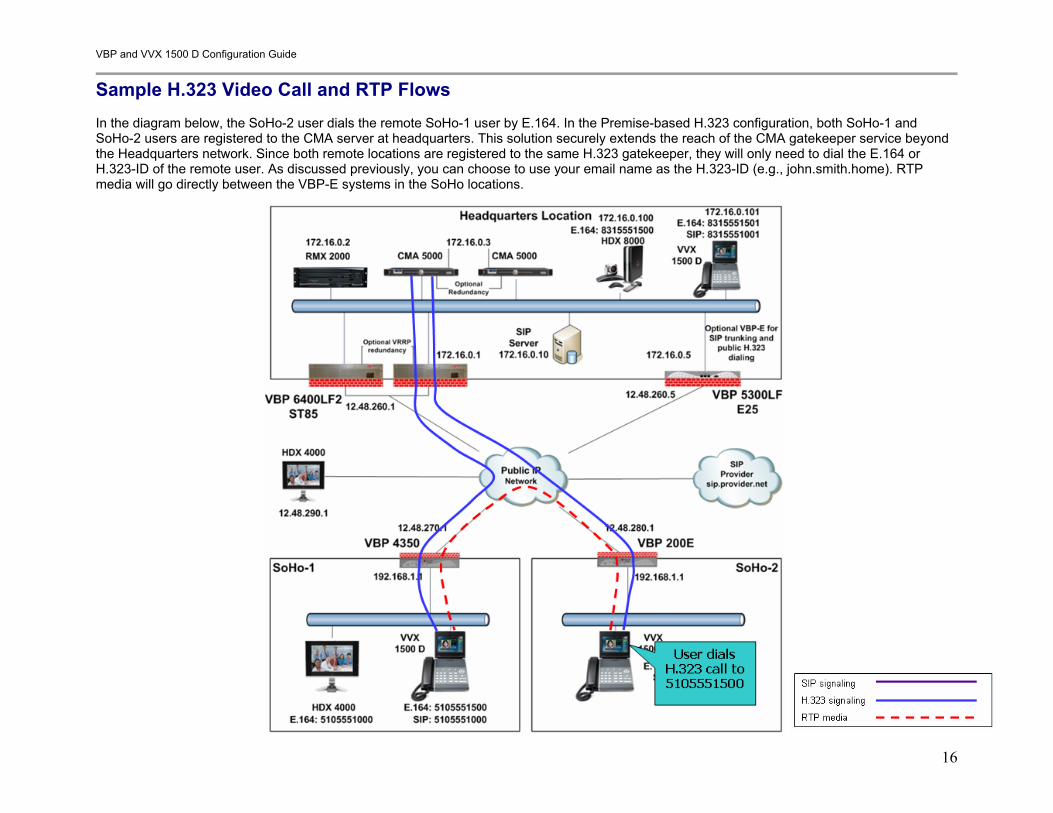
Sample H.323 Video Call and RTP Flows In the diagram below, the SoHo-2 user dials the remote SoHo-1 user by E.164. In the Premise-based H.323 configuration, both SoHo-1 and SoHo-2 users are registered to the CMA server at headquarters. This solution securely extends the reach of the CMA gatekeeper service beyond the Headquarters network. Since both remote locations are registered to the same H.323 gatekeeper, they will only need to dial the E.164 or H.323-ID of the remote user. As discussed previously, you can choose to use your email name as the H.323-ID (e.g., john.smith.home). RTP media will go directly between the VBP-E systems in the SoHo locations.
VBP and VVX 1500 D Configuration Guide
17
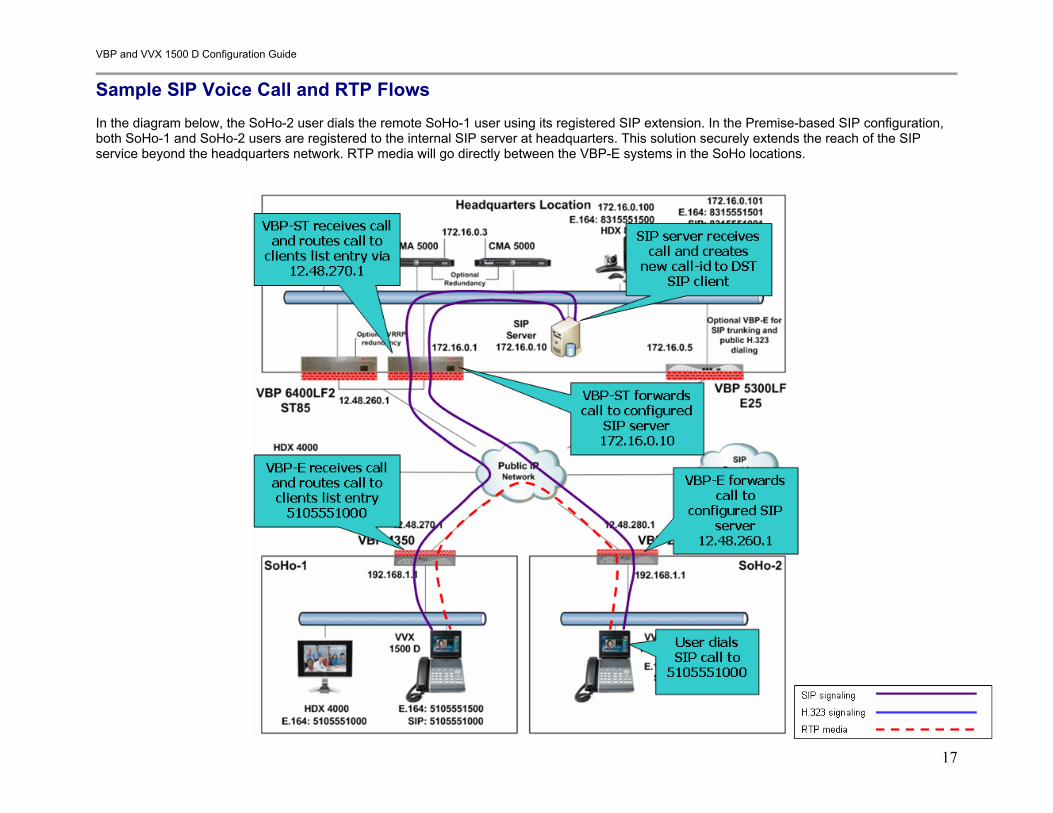
Sample SIP Voice Call and RTP Flows In the diagram below, the SoHo-2 user dials the remote SoHo-1 user using its registered SIP extension. In the Premise-based SIP configuration, both SoHo-1 and SoHo-2 users are registered to the internal SIP server at headquarters. This solution securely extends the reach of the SIP service beyond the headquarters network. RTP media will go directly between the VBP-E systems in the SoHo locations.
VBP and VVX 1500 D Configuration Guide
18
Optional VBP-E at the Headquarters Location As shown in the diagram above, you can choose to install a VBP-E to allow your enterprise users to call or be called by any “publicly” reachable H.323 system. This VBP-E system can also be secured to allow only certain endpoints to call your enterprise by deploying a “whitelist/blacklist” (see the VBP configuration guide on the Polycom Support web site for details). This VBP-E can also provide a secure SIP trunking service from your SIP provider for local and long distance calling. Some Internal SIP servers or IP-PBX systems installed on the enterprise LAN can accept direct ISDN or POTS service for offnet dialing, or you can use a separate ISDN gateway for local and long distance calling. For this example, the internal SIP server uses a SIP trunking service for local and long distance calling.
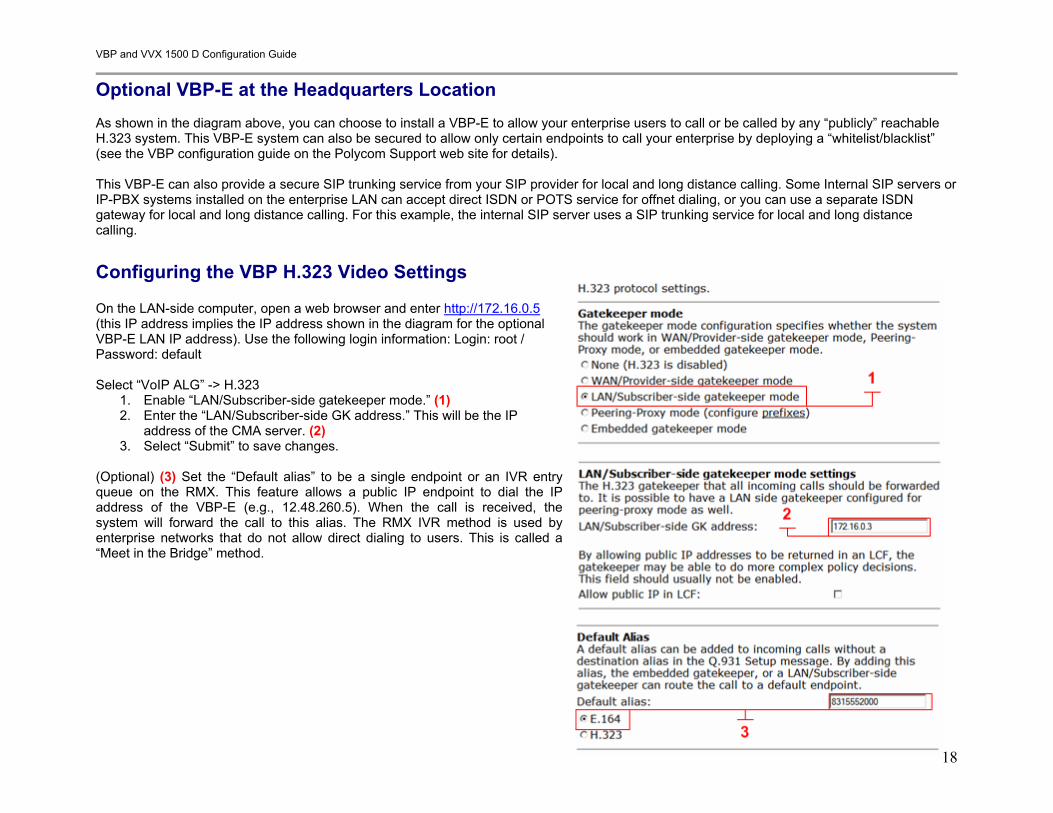
Configuring the VBP H.323 Video Settings On the LAN-side computer, open a web browser and enter http://172.16.0.5 (this IP address implies the IP address shown in the diagram for the optional VBP-E LAN IP address). Use the following login information: Login: root / Password: default Select “VoIP ALG” -> H.323
1. Enable “LAN/Subscriber-side gatekeeper mode.” (1) 2. Enter the “LAN/Subscriber-side GK address.” This will be the IP
address of the CMA server. (2) 3. Select “Submit” to save changes.
(Optional) (3) Set the “Default alias” to be a single endpoint or an IVR entry queue on the RMX. This feature allows a public IP endpoint to dial the IP address of the VBP-E (e.g., 12.48.260.5). When the call is received, the system will forward the call to this alias. The RMX IVR method is used by enterprise networks that do not allow direct dialing to users. This is called a “Meet in the Bridge” method.

VBP and VVX 1500 D Configuration Guide
19
Configuring the VBP SIP Voice Settings Select “VoIP ALG” -> SIP
1. Set the “SIP Server Address” to your SIP provider’s IP address or FQDN. (1)
2. Enter the “SIP Server Port.” The default port is UDP 5060. (2) 3. (Recommended setting) Select the “Limit Inbound to listed Proxies /
SIP Servers” setting. By limiting inbound SIP requests from the defined SIP server, you limit your chances of rogue users trying to send INVITES to your SIP server to make international long distance calls on your system. (3)
4. Select “Submit” to save changes. The above settings are for outbound SIP requests. You will need to configure your internal SIP server with a SIP trunk to the LAN-side IP address of the VBP-E (e.g., 172.16.0.5). The VBP-E will then proxy SIP requests from your internal SIP server to your provider. Select “VoIP ALG” -> SIP -> Trunking Device
1. From the “Action” list, select Add new trunking device. (1) 2. Enter the SIP device “Name.” This setting can be anything you want to
call it. When you configure the SIP dial rules, you will apply the rules you want to the trunking device name. You can have more than one trunking device for routing different dial patterns. (2)
3. Enter the IP “Address” for this trunking device. This will be the IP address of the internal SIP server (e.g., 172.16.0.10). (3)
4. Enter the SIP signaling “Port.” By default, most SIP servers will use UDP 5060. (4)
5. Select “Commit” to save changes. The above Trunking settings are for inbound SIP requests. When an inbound SIP message is received by the system and it matches the “Dial Rules” for this device, the SIP message will be forwarded to the defined IP address.
VBP and VVX 1500 D Configuration Guide
20
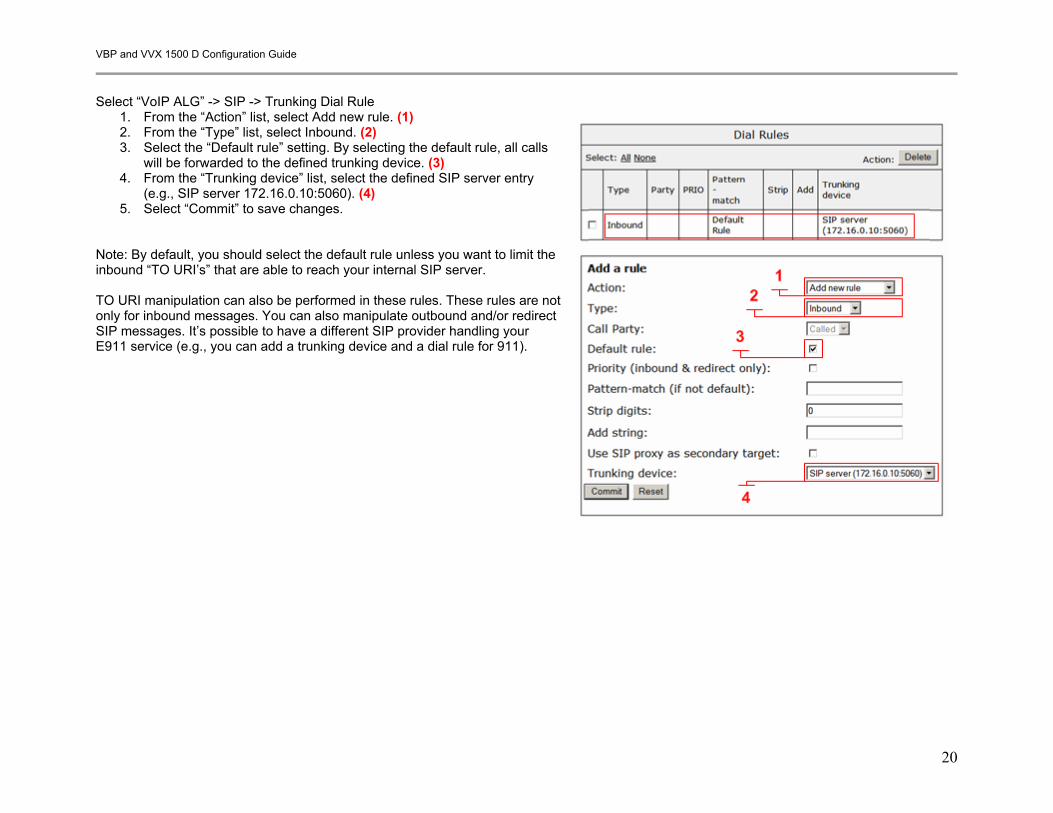
Select “VoIP ALG” -> SIP -> Trunking Dial Rule
1. From the “Action” list, select Add new rule. (1) 2. From the “Type” list, select Inbound. (2) 3. Select the “Default rule” setting. By selecting the default rule, all calls
will be forwarded to the defined trunking device. (3) 4. From the “Trunking device” list, select the defined SIP server entry
(e.g., SIP server 172.16.0.10:5060). (4) 5. Select “Commit” to save changes.
Note: By default, you should select the default rule unless you want to limit the inbound “TO URI’s” that are able to reach your internal SIP server. TO URI manipulation can also be performed in these rules. These rules are not only for inbound messages. You can also manipulate outbound and/or redirect SIP messages. It’s possible to have a different SIP provider handling your E911 service (e.g., you can add a trunking device and a dial rule for 911).
VBP and VVX 1500 D Configuration Guide
21
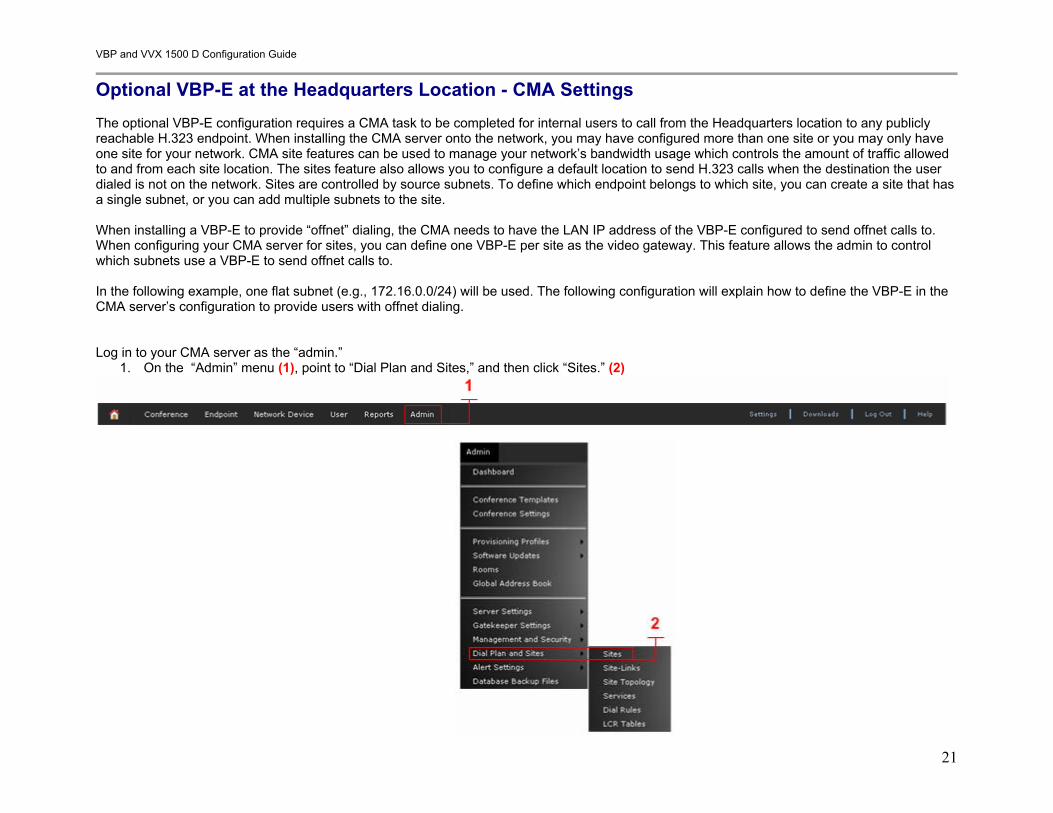
Optional VBP-E at the Headquarters Location - CMA Settings The optional VBP-E configuration requires a CMA task to be completed for internal users to call from the Headquarters location to any publicly reachable H.323 endpoint. When installing the CMA server onto the network, you may have configured more than one site or you may only have one site for your network. CMA site features can be used to manage your network’s bandwidth usage which controls the amount of traffic allowed to and from each site location. The sites feature also allows you to configure a default location to send H.323 calls when the destination the user dialed is not on the network. Sites are controlled by source subnets. To define which endpoint belongs to which site, you can create a site that has a single subnet, or you can add multiple subnets to the site. When installing a VBP-E to provide “offnet” dialing, the CMA needs to have the LAN IP address of the VBP-E configured to send offnet calls to. When configuring your CMA server for sites, you can define one VBP-E per site as the video gateway. This feature allows the admin to control which subnets use a VBP-E to send offnet calls to. In the following example, one flat subnet (e.g., 172.16.0.0/24) will be used. The following configuration will explain how to define the VBP-E in the CMA server’s configuration to provide users with offnet dialing. Log in to your CMA server as the “admin.”
1. On the “Admin” menu (1), point to “Dial Plan and Sites,” and then click “Sites.” (2)
VBP and VVX 1500 D Configuration Guide
22
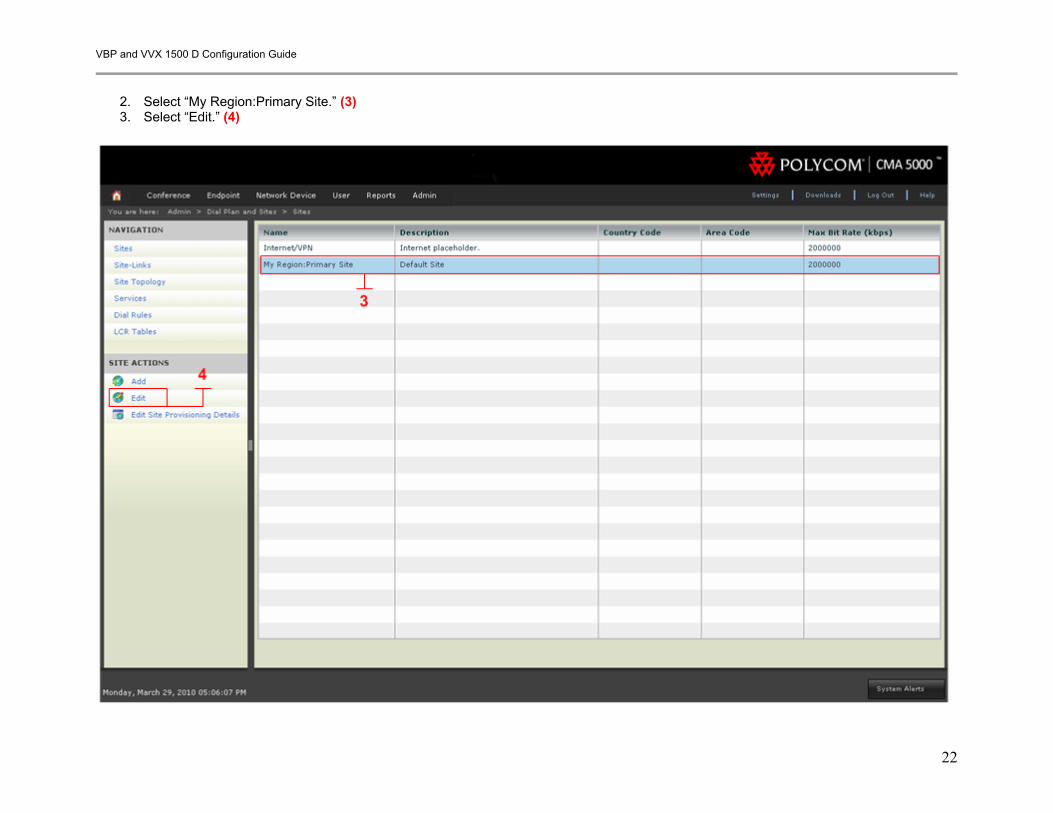
2. Select “My Region:Primary Site.” (3) 3. Select “Edit.” (4)
VBP and VVX 1500 D Configuration Guide
23
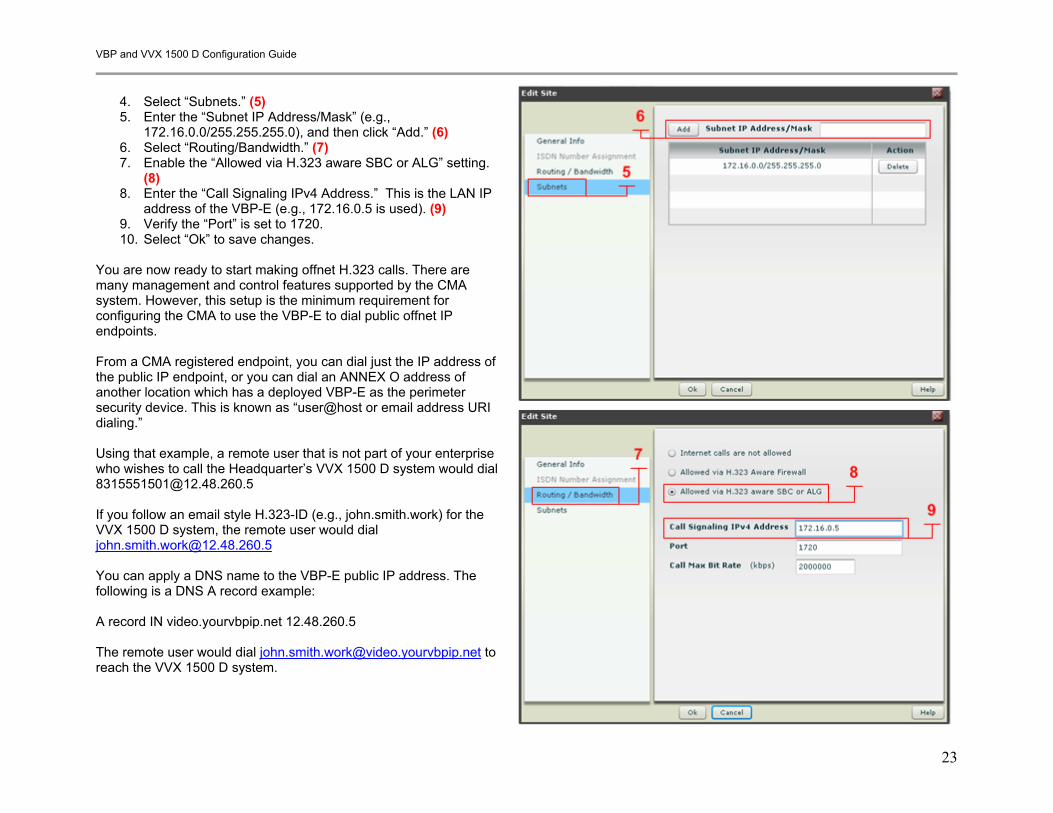
4. Select “Subnets.” (5) 5. Enter the “Subnet IP Address/Mask” (e.g.,
172.16.0.0/255.255.255.0), and then click “Add.” (6) 6. Select “Routing/Bandwidth.” (7) 7. Enable the “Allowed via H.323 aware SBC or ALG” setting.
(8) 8. Enter the “Call Signaling IPv4 Address.” This is the LAN IP
address of the VBP-E (e.g., 172.16.0.5 is used). (9) 9. Verify the “Port” is set to 1720. 10. Select “Ok” to save changes.
You are now ready to start making offnet H.323 calls. There are many management and control features supported by the CMA system. However, this setup is the minimum requirement for configuring the CMA to use the VBP-E to dial public offnet IP endpoints. From a CMA registered endpoint, you can dial just the IP address of the public IP endpoint, or you can dial an ANNEX O address of another location which has a deployed VBP-E as the perimeter security device. This is known as “user@host or email address URI dialing.” Using that example, a remote user that is not part of your enterprise who wishes to call the Headquarter’s VVX 1500 D system would dial [email protected] If you follow an email style H.323-ID (e.g., john.smith.work) for the VVX 1500 D system, the remote user would dial [email protected] You can apply a DNS name to the VBP-E public IP address. The following is a DNS A record example: A record IN video.yourvbpip.net 12.48.260.5 The remote user would dial [email protected] to reach the VVX 1500 D system.
VBP and VVX 1500 D Configuration Guide
24
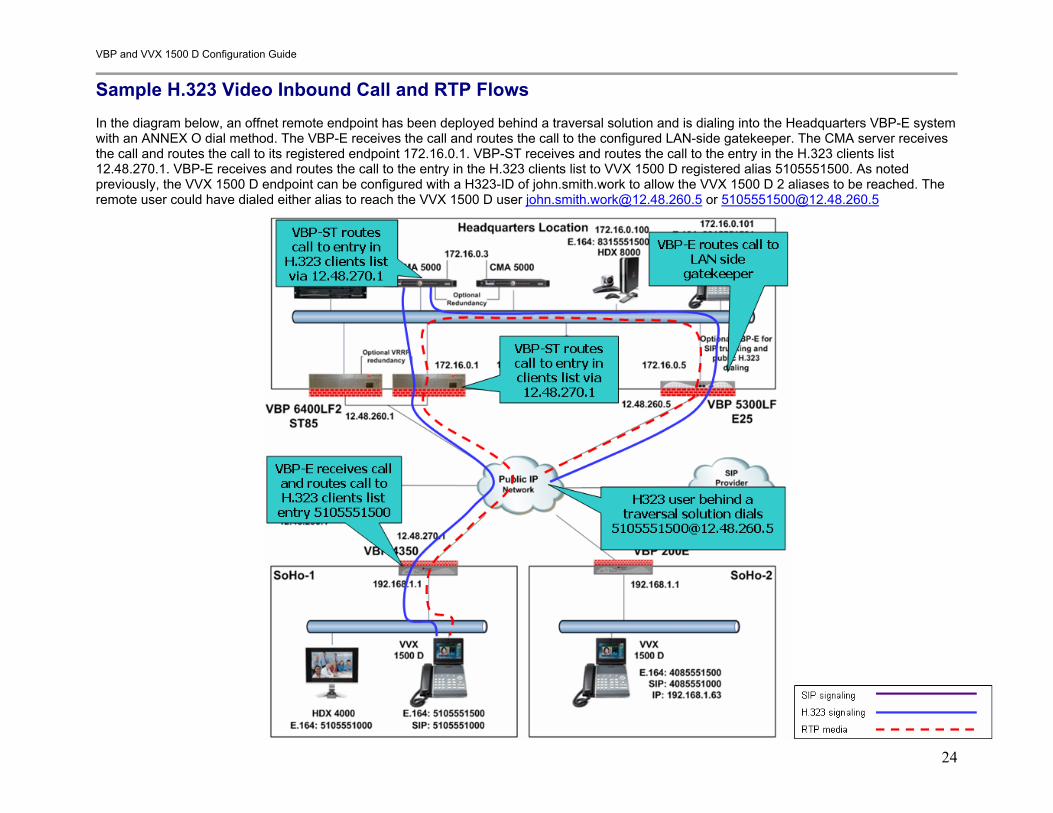
Sample H.323 Video Inbound Call and RTP Flows In the diagram below, an offnet remote endpoint has been deployed behind a traversal solution and is dialing into the Headquarters VBP-E system with an ANNEX O dial method. The VBP-E receives the call and routes the call to the configured LAN-side gatekeeper. The CMA server receives the call and routes the call to its registered endpoint 172.16.0.1. VBP-ST receives and routes the call to the entry in the H.323 clients list 12.48.270.1. VBP-E receives and routes the call to the entry in the H.323 clients list to VVX 1500 D registered alias 5105551500. As noted previously, the VVX 1500 D endpoint can be configured with a H323-ID of john.smith.work to allow the VVX 1500 D 2 aliases to be reached. The remote user could have dialed either alias to reach the VVX 1500 D user [email protected] or [email protected]
VBP and VVX 1500 D Configuration Guide
25
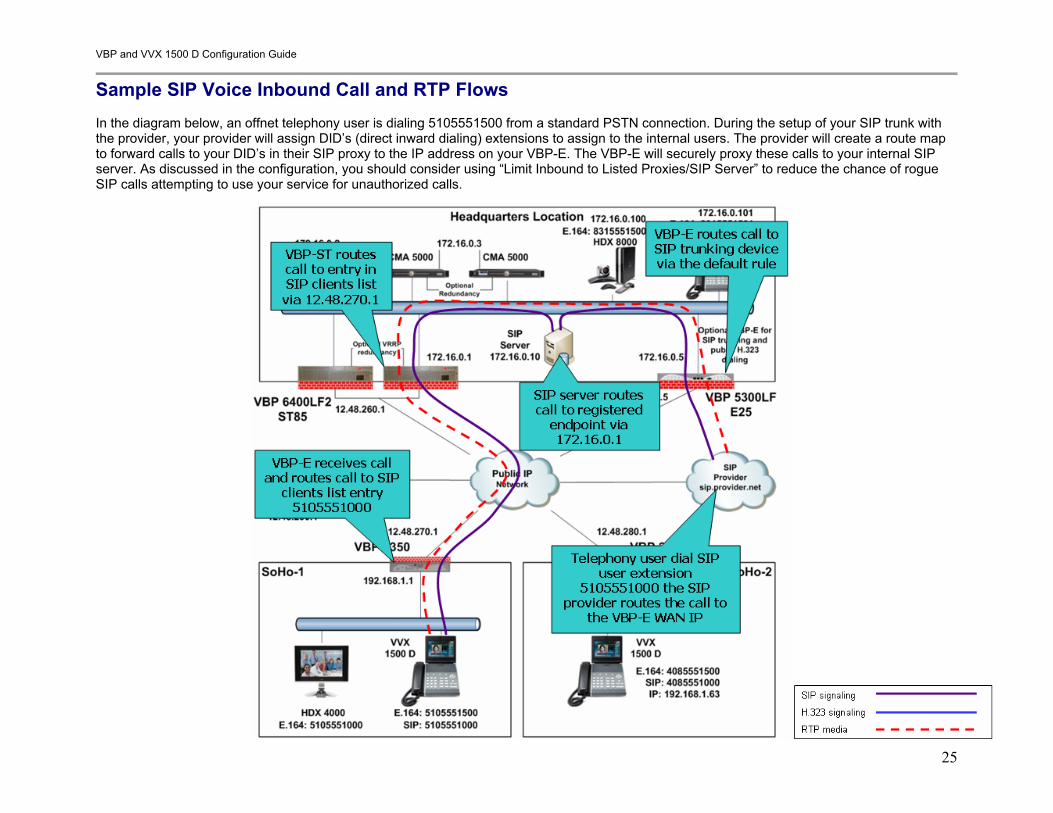
Sample SIP Voice Inbound Call and RTP Flows In the diagram below, an offnet telephony user is dialing 5105551500 from a standard PSTN connection. During the setup of your SIP trunk with the provider, your provider will assign DID’s (direct inward dialing) extensions to assign to the internal users. The provider will create a route map to forward calls to your DID’s in their SIP proxy to the IP address on your VBP-E. The VBP-E will securely proxy these calls to your internal SIP server. As discussed in the configuration, you should consider using “Limit Inbound to Listed Proxies/SIP Server” to reduce the chance of rogue SIP calls attempting to use your service for unauthorized calls.
VBP and VVX 1500 D Configuration Guide
26
Using the VBP to Diagnose Issues The best method to connect to the VBP for troubleshooting is the CLI interface. The VBP supports SSH and telnet to give you CLI access. SSH is the recommended method to connect to the CLI. To troubleshoot, you need the CLI login/password. This login/password is not documented for security reasons. Please call Polycom Support at 800.POLYCOM (800.765.9266). If you are not familiar with SSH, you can do an Internet search for “putty” and download this freeware client. Putty is a “secure shell” client and encrypts the session to ensure no one listening on port 22 can intercept your session and see clear text commands. For diagnosing SIP or H.323 issues, you will want to take a trace. Using the VBP to capture traces will tell you or Support what’s happening with either protocol. The proof will be in the trace. To set up a trace, follow the instructions below. The VBP uses a linux kernel and supports the “tcpdump” command. This command tells the sub-system to capture a full decode of the packets that are coming in on the wire on the interface defined. This capture is then FTP’ed off the VBP system to a FTP server and then opened with the “WireShark” application to assist in troubleshooting many issues associated with connection problems. For the first step, create a temporary space on the VBP’s flash drive to capture these packets. (Note: This temporary space will not survive a reboot and should be un-mounted after the traces are taken, as this space is taking available memory the system “could” need at a later date. Therefore, it is very important to un-mount the space.) On the CLI, type: Type - > mount –t tmpfs tmpfs /etc/images –o size=8m Note: you can cut&paste the above command. However, the “-t” may be converted to “.t”, so make sure you correct the syntax if it does not paste correctly. Now, type “df” and you will see file system /etc/images/ mounted with 8MB of space: # df Filesystem 1k-blocks Used Available Use% Mounted on rootfs 23208 23208 0 100% / /dev/ram0 23208 23208 0 100% / /dev/hdc5 4939 85 4599 2% /etc/config /dev/ram1 15856 1636 14220 10% /var tmpfs 128000 0 128000 0% /var/spool/asterisk/voicemail/default tmpfs 8192 0 8192 0% /etc/images
VBP and VVX 1500 D Configuration Guide
27
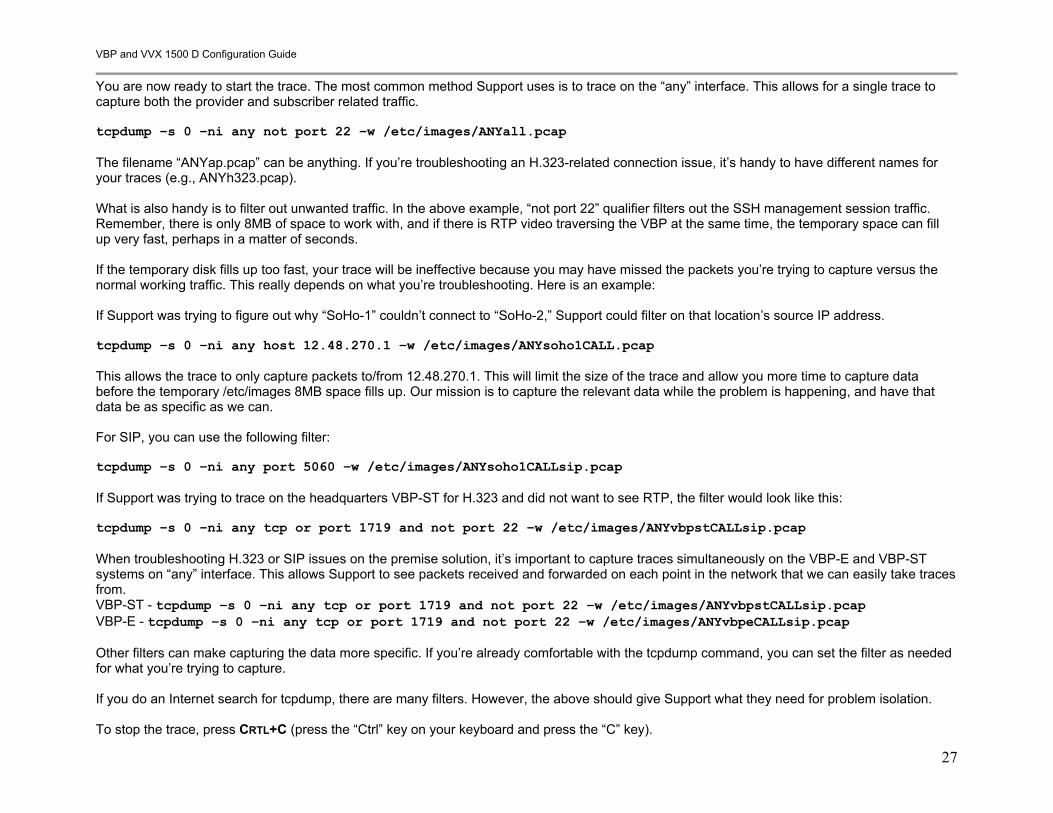
You are now ready to start the trace. The most common method Support uses is to trace on the “any” interface. This allows for a single trace to capture both the provider and subscriber related traffic. tcpdump –s 0 –ni any not port 22 –w /etc/images/ANYall.pcap The filename “ANYap.pcap” can be anything. If you’re troubleshooting an H.323-related connection issue, it’s handy to have different names for your traces (e.g., ANYh323.pcap). What is also handy is to filter out unwanted traffic. In the above example, “not port 22” qualifier filters out the SSH management session traffic. Remember, there is only 8MB of space to work with, and if there is RTP video traversing the VBP at the same time, the temporary space can fill up very fast, perhaps in a matter of seconds. If the temporary disk fills up too fast, your trace will be ineffective because you may have missed the packets you’re trying to capture versus the normal working traffic. This really depends on what you’re troubleshooting. Here is an example: If Support was trying to figure out why “SoHo-1” couldn’t connect to “SoHo-2,” Support could filter on that location’s source IP address. tcpdump –s 0 –ni any host 12.48.270.1 –w /etc/images/ANYsoho1CALL.pcap This allows the trace to only capture packets to/from 12.48.270.1. This will limit the size of the trace and allow you more time to capture data before the temporary /etc/images 8MB space fills up. Our mission is to capture the relevant data while the problem is happening, and have that data be as specific as we can. For SIP, you can use the following filter: tcpdump –s 0 –ni any port 5060 –w /etc/images/ANYsoho1CALLsip.pcap If Support was trying to trace on the headquarters VBP-ST for H.323 and did not want to see RTP, the filter would look like this: tcpdump –s 0 –ni any tcp or port 1719 and not port 22 –w /etc/images/ANYvbpstCALLsip.pcap When troubleshooting H.323 or SIP issues on the premise solution, it’s important to capture traces simultaneously on the VBP-E and VBP-ST systems on “any” interface. This allows Support to see packets received and forwarded on each point in the network that we can easily take traces from. VBP-ST - tcpdump –s 0 –ni any tcp or port 1719 and not port 22 –w /etc/images/ANYvbpstCALLsip.pcap VBP-E - tcpdump –s 0 –ni any tcp or port 1719 and not port 22 –w /etc/images/ANYvbpeCALLsip.pcap Other filters can make capturing the data more specific. If you’re already comfortable with the tcpdump command, you can set the filter as needed for what you’re trying to capture. If you do an Internet search for tcpdump, there are many filters. However, the above should give Support what they need for problem isolation. To stop the trace, press CRTL+C (press the “Ctrl” key on your keyboard and press the “C” key).
VBP and VVX 1500 D Configuration Guide
28
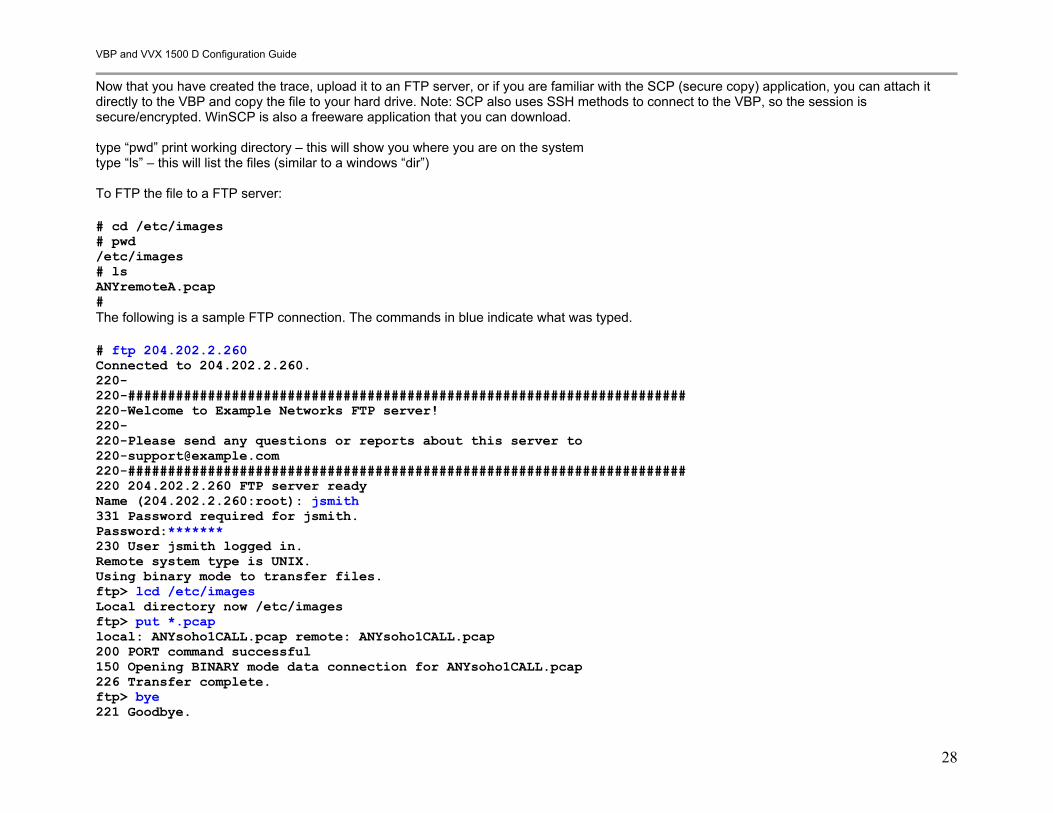
Now that you have created the trace, upload it to an FTP server, or if you are familiar with the SCP (secure copy) application, you can attach it directly to the VBP and copy the file to your hard drive. Note: SCP also uses SSH methods to connect to the VBP, so the session is secure/encrypted. WinSCP is also a freeware application that you can download. type “pwd” print working directory – this will show you where you are on the system type “ls” – this will list the files (similar to a windows “dir”) To FTP the file to a FTP server: # cd /etc/images # pwd /etc/images # ls ANYremoteA.pcap # The following is a sample FTP connection. The commands in blue indicate what was typed. # ftp 204.202.2.260 Connected to 204.202.2.260. 220- 220-###################################################################### 220-Welcome to Example Networks FTP server! 220- 220-Please send any questions or reports about this server to [email protected] 220-###################################################################### 220 204.202.2.260 FTP server ready Name (204.202.2.260:root): jsmith 331 Password required for jsmith. Password:******* 230 User jsmith logged in. Remote system type is UNIX. Using binary mode to transfer files. ftp> lcd /etc/images Local directory now /etc/images ftp> put *.pcap local: ANYsoho1CALL.pcap remote: ANYsoho1CALL.pcap 200 PORT command successful 150 Opening BINARY mode data connection for ANYsoho1CALL.pcap 226 Transfer complete. ftp> bye 221 Goodbye.
VBP and VVX 1500 D Configuration Guide
29
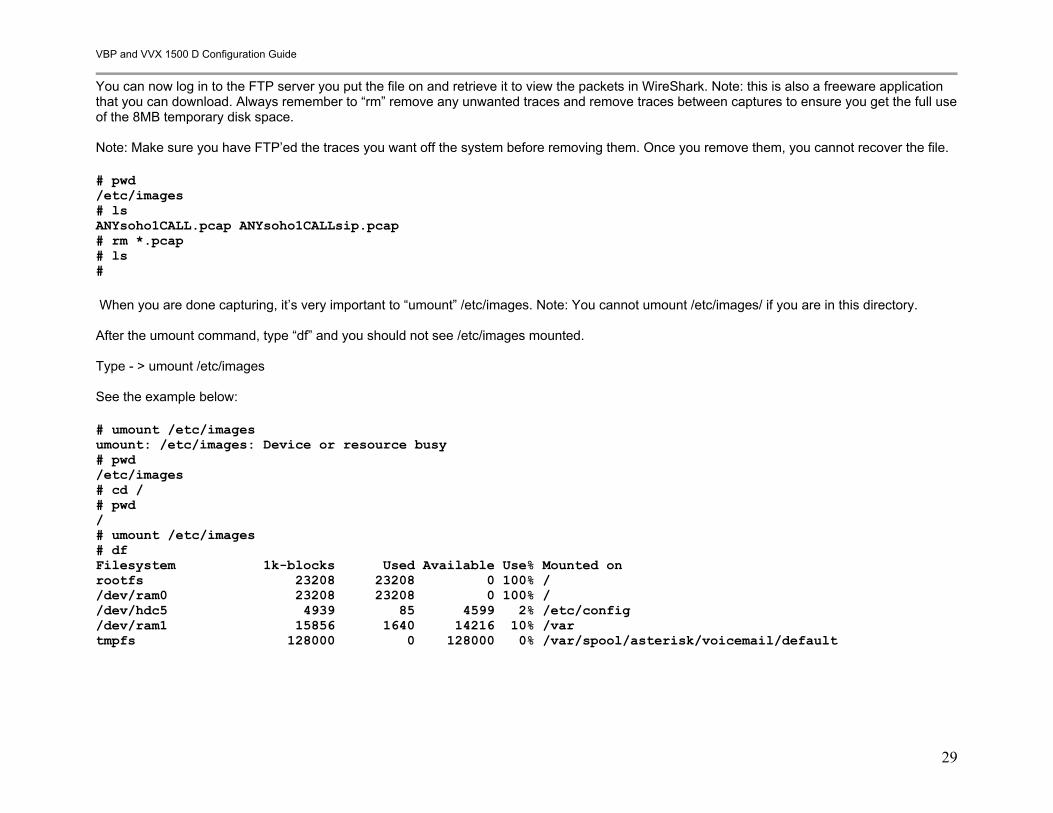
You can now log in to the FTP server you put the file on and retrieve it to view the packets in WireShark. Note: this is also a freeware application that you can download. Always remember to “rm” remove any unwanted traces and remove traces between captures to ensure you get the full use of the 8MB temporary disk space. Note: Make sure you have FTP’ed the traces you want off the system before removing them. Once you remove them, you cannot recover the file. # pwd /etc/images # ls ANYsoho1CALL.pcap ANYsoho1CALLsip.pcap # rm *.pcap # ls # When you are done capturing, it’s very important to “umount” /etc/images. Note: You cannot umount /etc/images/ if you are in this directory. After the umount command, type “df” and you should not see /etc/images mounted. Type - > umount /etc/images See the example below: # umount /etc/images umount: /etc/images: Device or resource busy # pwd /etc/images # cd / # pwd / # umount /etc/images # df Filesystem 1k-blocks Used Available Use% Mounted on rootfs 23208 23208 0 100% / /dev/ram0 23208 23208 0 100% / /dev/hdc5 4939 85 4599 2% /etc/config /dev/ram1 15856 1640 14216 10% /var tmpfs 128000 0 128000 0% /var/spool/asterisk/voicemail/default

VBP and VVX 1500 D Configuration Guide
30
Data collection Now that we’ve covered some troubleshooting techniques for the VBP running SIP voice and H.323 video, the more data you can capture before contacting Support, the greater the chance Support will solve the issue quickly. If, with the above steps, you cannot uncover the issue, then capture the data discussed and contact Polycom Support, and we can assist you in isolating the issue.
• Tcpdump of the problem happening • cat /var/log/messages • cat /var/log/messages.old • mandctl dbg replay • cat /var/replay.cfg • ps • netstat –ap • vmstat 3