Embed Size (px)
Citation preview
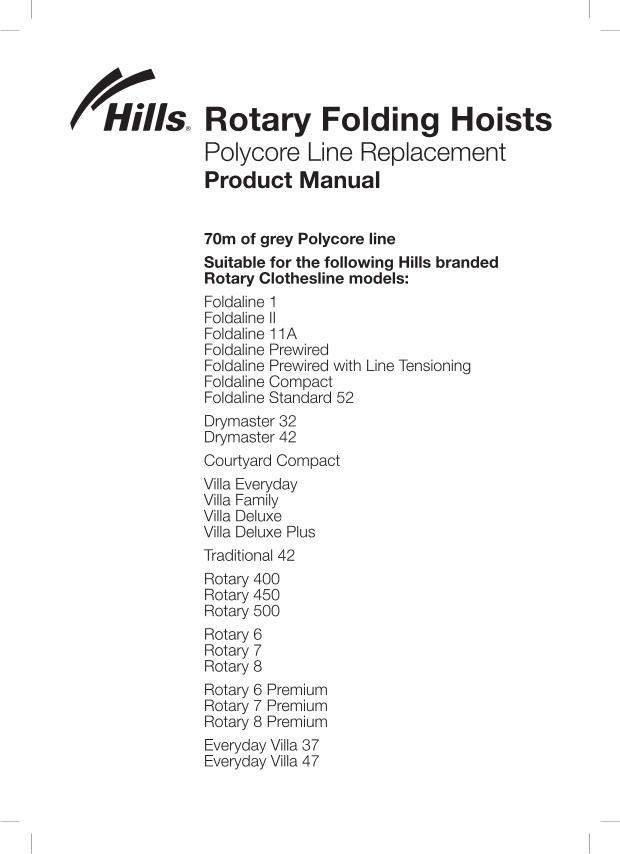
Rotary Folding Hoists Polycore Line Replacement Product Manual
70m of grey Polycore lineSuitable for the following Hills branded Rotary Clothesline models:Foldaline 1 Foldaline II Foldaline 11A Foldaline Prewired Foldaline Prewired with Line Tensioning Foldaline Compact Foldaline Standard 52Drymaster 32 Drymaster 42Courtyard CompactVilla Everyday Villa Family Villa Deluxe Villa Deluxe PlusTraditional 42Rotary 400 Rotary 450 Rotary 500Rotary 6 Rotary 7 Rotary 8Rotary 6 Premium Rotary 7 Premium Rotary 8 PremiumEveryday Villa 37 Everyday Villa 47
2
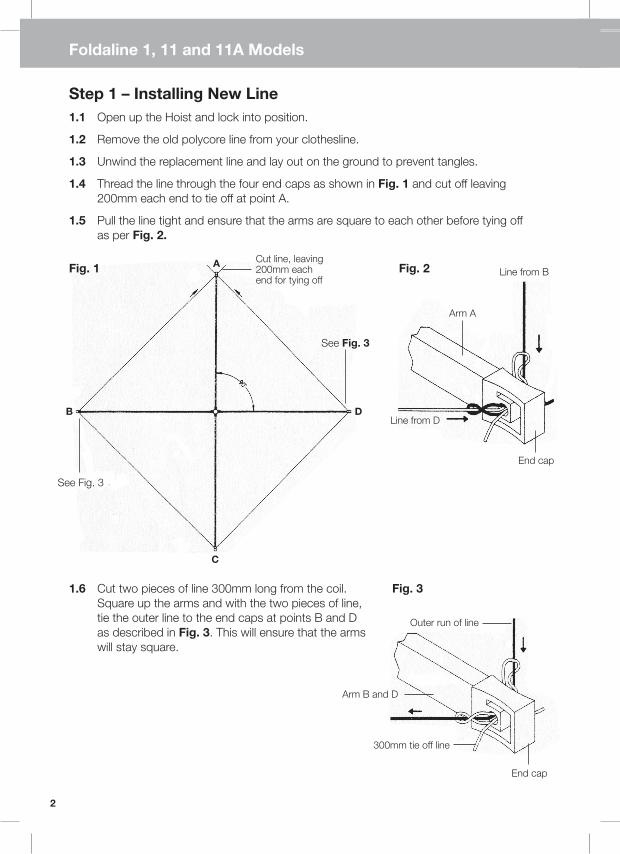
Foldaline 1, 11 and 11A Models
Step 1 – Installing New Line1.1 Open up the Hoist and lock into position.
1.2 Remove the old polycore line from your clothesline.
1.3 Unwind the replacement line and lay out on the ground to prevent tangles.
1.4 Thread the line through the four end caps as shown in Fig. 1 and cut off leaving 200mm each end to tie off at point A.
1.5 Pull the line tight and ensure that the arms are square to each other before tying off as per Fig. 2.
See Fig. 3
See Fig. 3
Cut line, leaving 200mm each end for tying off
300mm tie off line
Outer run of line
Arm B and D
End cap
A
B D
C
Fig. 1
Fig. 3
Line from D
Arm A
End cap
Line from BFig. 2
1.6 Cut two pieces of line 300mm long from the coil. Square up the arms and with the two pieces of line, tie the outer line to the end caps at points B and D as described in Fig. 3. This will ensure that the arms will stay square.

3
Foldaline 1, 11 and 11A Models
Step 1 – Installing New Line continued1.7 Take the end of the main coil of line and tie it off at point C as shown in Fig. 4
and Fig. 5. This is the start point.
1.8 Run the line along the am towards the centre of the hoist to the first line grommet. See Fig. 5. Thread the free end of the line through each corresponding grommets on arms B, A and D and back through the first grommet.
1.9 Pull the line tight and run the free end of the line down the arm to the second grommet and repeat as in Fig. 4 and 5.
Pull the line carefully through the line grommets to avoid damage
1.10 Repeat this process until you have reached the finish point as shown in Fig. 4 with the end of the line.
1.11 Do not tie off the line at this time. First the line must be tensioned.
Finish See Fig. 6
Outer line
See Fig. 5
D
C
Fig. 4
First line grommet
Arm C
Outer line
Start
Knot
Fig. 5

4
Foldaline 1, 11 and 11A Models
Step 2 – Tensioning the line2.1 Start at the first line grommet. See Fig. 5. Pull the line tight to remove any slackness.
Work your way around the hoist in the same direction as you wired it until you reach the last grommet. See Fig. 4.
Step 3 – Tying the line off3.1 Pull the line tight through the last grommet and tie off as shown in Fig. 6. Do not cut
the line off at this point.
3.2 Fold up the hoist. Open it again and lock into position to check for over-tightness. Adjust line tension if necessary.
Step 4 – Arm tie off lineThe arm tie off line is used to secure the hoist arms for storage.
4.1 Cut the line 1 metre from the tie off knot. Thread the end between the arm and the line at the point shown in Fig. 6.
4.2 Fit the cover onto the line. Tie the line tie off clip to the end of the line and slip the cover over the knot to secure.
4.3 Your hoist is now ready for use.
Cover
Finish
Figure 8 knot
Line tie off clip with 1m of line
Fig. 6

5
Foldaline Prewired, Foldaline Line Tensioning, Compact, Standard, Villa, Drymaster, Traditional Models
Step 1 – Removing Old Line1.1 Open up the hoist and lock into position.
Take notice as to how your hoist is wired before removing the old polycore line.
1.2 Remove the wedges from the end caps by inserting a 5mm pin through the hole in the underside of the end cap and tapping up with a hammer. See Fig. 7.
1.3 Untie/cut the knots at the start and finish points. See Fig. 10.
1.4 Untie/cut the knots and remove the line tie off clip. See Fig. 11.
1.5 Cut the line approximately 300mm each side of the line tensioners (where fitted). See Fig. 8.
1.6 Remove the line from the line tensioners (where fitted) by pulling it between the tensioner base and the spool a half turn at a time. See Fig. 8.
1.7 Use the tensioner key to line up the slots in the spool (where fitted) with those in the tensioner body.
1.8 Remove the remaining line by pulling it through the line clips. See Fig. 9.
Wedge
End cap
Pin
Spool
Tensioner base
Line clip
Line clip
Line
Start point Figure 8 knot
Arm
Fig. 7
Fig. 9 Fig. 10
Fig. 8

6
Foldaline Prewired, Foldaline Line Tensioning, Compact, Standard, Villa, Drymaster, Traditional Models
Step 2 – Installing New LineUnwind the replacement line and lay out on the ground to prevent tangles.
2.1 Tie a figure 8 knot 1m from the end of the new line and snap it through the first line clip opposite the line tensioning arm (if fitted). See Fig. 10.
2.2 Attach the line to the next line clips and tensioners in succession until you return to the start point. Follow the directions in Fig. 11.
At this point check that the hoist arms are square to each other and not pulled out of shape.
2.3 Snap the line through the start line clip and pull tight. Thread the line out along the arm to the next line clip. Repeat as previous until you reach the end, which is on the end of the arm from which you started.
2.4 Pull the lines tight by hand starting from the inside and working outward. Make sure that the arms are square to each other. Tie off the line as per instructions in Fig. 11 and replace the locking wedges.
2.5 Insert the tensioner key into the line tensioners (if fitted) and rotate one quarter turn clockwise to lock the line in position.
2.6 Allow the line to settle before tensioning using the line tensioners.
2.7 Replace the line tie off clip on the end of the 1m long tie off line.

7
Foldaline Prewired, Foldaline Line Tensioning, Compact, Standard, Villa, Drymaster, Traditional Models
Fig. 11
StartLine clip
1m long tie off cord
Line clip
Line clip
Line tie off clip
End cap
Tensioner end cap (if fitted)
Line Tensioner (if fitted)
Figure 8 knot to finish
Detail A
Detail ADetail D
Detail B
Detail C
Detail E
Detail E
Detail B
Start
Detail C
Detail F
Finish
Finish
Detail F
Detail D

8
Rotary 400, 450 and 500 Models
Fold hoist up and down to ensure hoist in not over tensioned and the lower cross engages with the locking collar
Step 1 – Removing Old Line Take notice as to how your hoist is wired before removing the old polycore line.
Protect your eyes when removing and replacing plastic components.
The line replacement pack can be used to replace all lines on your Rotary Hoist. Replace one section at a time beginning with the four outside lines first. Make sure that the arms of the hoist remain square to each other.
1.1 Open hoist and lock into position.
1.2 Rotate the line cover anti-clockwise until it is off of the line tensioner on one end. Repeat for the other end, which needs replacing.
1.3 Untie the polycore line from the tensioners and discard. Do not discard the line covers.
1.4 Repeat for the remaining line segments.
Step 2 – Replacing New Line2.2
Feed the line up and through the front slot of the tensioner and pull tight.
2.3
Using scissors carefully trim off excess line, leaving approximately 12mm (1/2”).
2.1
Pull line through tensioner. Loop line around back groove of the tensioner and pull tight to prevent line from slipping.
2.4
Re-attach the line cover by rotating clockwise. This will obscure the small piece of excess line remaining. Repeat on the other end. Ensure line is tensioned.
12mm (1/2”)
9
Rotary 6, 7 and 8 Models
Step 1 – Removing Old Line Take notice as to how your hoist is wired before removing the old polycore line.
Protect your eyes when removing and replacing plastic components.
The line replacement pack can be used to replace all lines on your Rotary Hoist. Replace one section at a time beginning with the four outside lines first. Make sure that the arms of the hoist remain square to each other.
1.1 Open hoist and lock into position.
1.2 Remove the line covers off the tensioners. Covers are simply clipped in place and can be levered off to remove.
1.3 Untie the polycore line from the tensioners and discard. Do not discard the line covers.
1.4 Repeat for the remaining line segments.
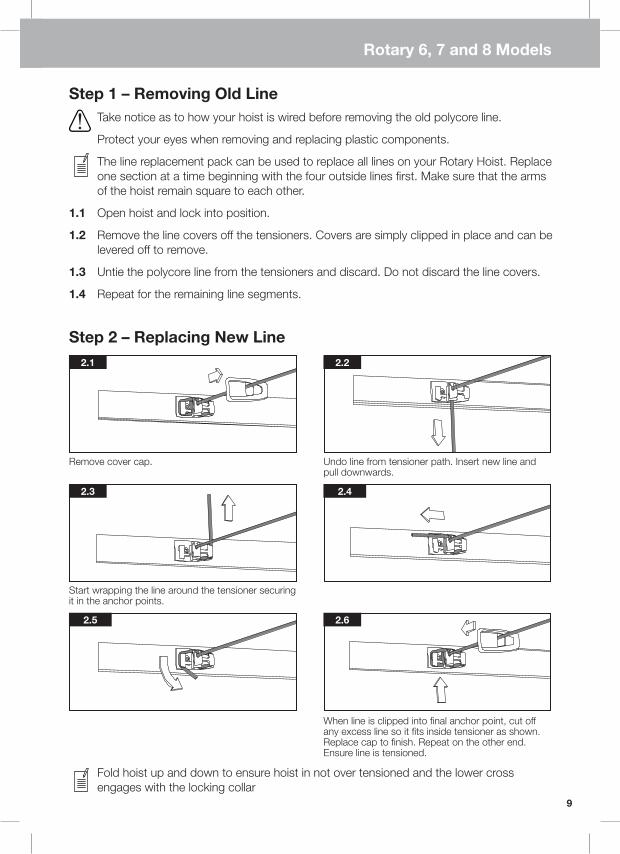
Step 2 – Replacing New Line
Fold hoist up and down to ensure hoist in not over tensioned and the lower cross engages with the locking collar
2.1
Remove cover cap.
2.4
2.2
Undo line from tensioner path. Insert new line and pull downwards.
2.5
2.3
Start wrapping the line around the tensioner securing it in the anchor points.
2.6
When line is clipped into final anchor point, cut off any excess line so it fits inside tensioner as shown. Replace cap to finish. Repeat on the other end. Ensure line is tensioned.

10
Rotary Premium 6, 7 and 8 Models
Step 1 – Removing Old Line Take notice as to how your hoist is wired before removing the old polycore line.
Protect your eyes when removing and replacing plastic components.
The line replacement pack can be used to replace all lines on your Rotary Hoist. Replace one section at a time beginning with the outside line first. Make sure that the arms of the hoist remain square to each other.
1.1 Open hoist and lock into position.
1.2 Locate the tensioner arm. This is highlighted by an arrow on the bottom of the arm cross. Remove the line covers off the tensioners. Covers are simply clipped in place and can be levered off to remove.
1.3 Untie the polycore line from the tensioners and discard. Do not discard the line covers.
1.4 Repeat for the remaining line segments.

11
Rotary Premium 6, 7 and 8 Models
2.1
Locate the tensioner arm. This is highlighted by an arrow on the bottom of the arm cross. Remove cover cap.
2.3
Undo line from tensioner path. Insert new line.
2.2
Pull line out from tensioner.
2.4
Swing the line back under the tensioner lip to secure. TIP: Keep pressure on bottom left edge to stop tension loss.
Step 2 – Replacing New Line
Fold hoist up and down to ensure hoist in not over tensioned and the lower cross engages with the locking collar
2.5
Feed line back into arm through central hole. Cut off excessive line if required prior to putting into arm.
2.6
Push line firmly into arm to give a flush result.
2.7
Replace cover when finished. Thread line through other arms until you return to the tensioner arm. Fit line into tensioners as previously done. Ensure line is tensioned. Replace cover cap.

12
Everyday Villa 37 and 47
Step 1 – Removing Old Line Take notice as to how your hoist is wired before removing the old polycore line.
Protect your eyes when removing and replacing plastic components.
The line replacement pack can be used to replace all lines on your Rotary Hoist. Replace one section at a time beginning with the outside line first. Make sure that the arms of the hoist remain square to each other.
1.1 Open hoist and lock into position.
1.2 Untie the polycore line from the tensioners and discard.
1.3 Repeat for the remaining line segments.
Step 2 – Replacing New Line
Undo line from tensioner path. Insert new line.
Feed line back into arm through central hole. Cut off excessive line if required prior to putting into arm.
Swing the line back under the tensioner lip to secure. TIP: Keep pressure on bottom left edge to stop tension loss.
2.2
2.42.3
Pull line out from tensioner.
2.1

13
Everyday Villa 37 and 47
Step 2 – Replacing New Line
Fold hoist up and down to ensure hoist in not over tensioned and the lower cross engages with the locking collar
2.5
2.7
Push line firmly into arm to give a flush result.
Refit line into tensioner as done previously. Ensure line is tensioned.
Feed line through clip on top of arm until you return to the tensioner arm.
2.6

14
Hills Warranty1. Hills provides consumers with the following warranty in relation to this Product,
in addition to complying with the requirements of any relevant legislation, including the Competition and Consumer Act 2010 (Cth) in Australia and the Consumer Guarantees Act 1993 in New Zealand (the Acts), except where a New Zealand consumer acquires the relevant Product for the purposes of a business.
2. In this warranty, we have used the following definitions:
(a) Hills, our or we means Hills Holdings Limited (ABN 35 007 573 417) of 159 Port Road Hindmarsh South Australia 5007;
(b) Products means the following goods manufactured by Hills (including products manufactured for Hills by its contract manufacturers): Hills Rotary Folding Hoist Polycore Replacement Line;
(c) Material means a material or component used by Hills in the manufacture of the Products;
(d) Warranty Period means 1 year from the date of purchase of the relevant Product. If the Product or part (as the case may be) is repaired or replaced, there will be no extension to the original warranty period; and
(e) Workmanship means the handling, assembly and manufacturing processes performed by or on behalf of Hills in order to manufacture the Products.
3. Hills warrants that for the duration of the Warranty Period, all Products will be free of faults arising from defects in Workmanship or Materials, on the terms and conditions set out in this warranty.
4. Hills undertakes that if during the Warranty Period any Product, or any part of a Product, has failed to operate correctly due to faulty Workmanship or defective Material, it will repair or replace the Product or part (as the case may be) free of charge provided that the following procedure is met:
(a) The consumer must contact Hills upon becoming aware of any defect to a Product. The contact details for Hills are set out in this warranty and under the heading “Hills Contacts”.
(b) Following consultation with Hills, Hills will determine whether there is a defect, and if so Hills agrees to (at Hills’ option):
i. in the case of goods – repair, replace or supply equivalent goods, or pay the cost of any of those remedies to the consumer; or
ii. in the case of services – supply the services again or pay the cost of having the services supplied again.
(c) If Hills requests the return of the applicable Product or part, Hills will be responsible for the collection and freight costs of returning that Product or part. The consumer agrees to assist Hills with any reasonable request to enable Hills to collect such Product or part.
(d) Hills also agrees to be responsible for the freight costs to deliver any new Product or replacement part to the consumer.
Warranty

15
Warranty
5. This warranty is in addition to any non-excludable legal rights or remedies conferred on the consumer under any applicable Act and any similar laws. To the extent permitted by law, Hills' liability for any non-excludable condition or warranty is limited to rectifying any defect at its option, as set out in paragraph 4(b).
6. Subject to the requirements of any applicable Act or legislation and to the extent permitted by law, no liability (whether expressed or implied) of any nature whatsoever, is accepted by Hills for any consequential loss, damage or injury arising as a result of any fault in the Products.
7. This warranty does not extend to damage to Products which occurs during transit or transportation, or which is caused by any abuse, accident or improper installation, connection, use, adjustment or repair or use of goods otherwise than in accordance with instructions issued by Hills.
8. The warranty on Products is waived if any addition or attachment to the Products do not have Hills' specific approval or are not sold as Hills products. The Products are designed to perform specific tasks under established test loads and unauthorised attachments may produce stresses for which the design is not appropriate.
9. The following applies to consumers who purchased a relevant Product in Australia:
Our goods come with guarantees that cannot be excluded under the Australian Consumer Law. You are entitled to a replacement or refund for a major failure and compensation for any other reasonably foreseeable loss or damage. You are also entitled to have the goods repaired or replaced if the goods fail to be of acceptable quality and the failure does not amount to a major failure.
Hills ContactsWe are committed to providing you with complete customer satisfaction. If you have any questions or comments about our products or services please contact your nearest customer service centre during their local business hours:
Australia 1300 300 564 [email protected]
New Zealand 09 262 3052 [email protected]
United States 877 534 1371 (Eastern) [email protected]
Europe +44 (0) 118 973 8971 (UK) [email protected]
South Africa 021 442 1540 [email protected]
Hills Websites
www.hills.com.au Hills Branded Products
www.hillsholdings.com.au Hills Holdings Limited

Hills Holdings Limited A.B.N. 35 007 573 417
Issue October 2011 PD1043c
Please retain this Product Manual. Record the following information for future reference.
Product Number (printed on header card): FD
Date of purchase:
Name and location of store:
Made in China
Designed and tested under a Quality System that meets Hills demanding quality specifications.
®