Embed Size (px)
Citation preview

For Help– Call MISS DIG at 248.370.6430 Polygon Maintenance User Guide 3/2015
MISS DIG User Guide
Polygon Maintenance
STEP 1 HOW TO START
Complete a mapping account (RMAM) application using the following link: http://newtin.missdig.org/newtinweb/rma_signup.html
Choose “RMAM” access type in the down drop menu of the application.
Upon receiving email confirmation from MISS DIG that the account has been activated, complete the mapping pro-gram download (Member Poly Maintenance) to have access to your code database.
See “MISS DIG Newtin Program Install Guide” for instructions to complete the download of MEMBER Polygon Maintenance onto your computer.
Once the download is complete, you can view your database at any time.
To add or delete shapes, phone MISS DIG mapping department at 800.482.7161 for “full” access to your code database.
Double CLICK the downloaded file in
your computers C: drive or the
RMAM menu to start the program.
Input the member code you wish
to maintain
Select the county where you have
underground facilities.
Select “VIEW” to review the mapped database.
Select “EDIT” function to add or delete polygon shapes.
Select the
correct
PLACE, street or
address range
from the
list. It will then
highlight on the
map.
Fill-in “Place” and “Street” fields,
then CLICK “STREET” -or-
Fill-in “Place”, “Street” and “Cross”
fields, then CLICK “CROSS” -or-
Fill-in “Street” and “Cross” fields,
then CLICK “FIND” in the “Inter”
TAB -or-
Use the “Jump” TAB to jump to:
Lat/Long
Grid #
Polygon Name
Use the navigation tool bar menu:
Left CLICK and hold while dragging your cursor to
zoom to any area on the map.
Use “MOVE” map feature to navigate the map
Then use the “IN” or “OUT” buttons.
or use buttons “1” through “5” to zoom in and out
in the map
CLICK “County” to see the entire county map
CLICK “Show Names” and “County Grids”
to display grid names/numbers
Notice the Poly count display
CLICK “Hide Grids” to work on a clear screen.
CLICK “Legend” for color code guide.
CLICK “Place” or “Near”, then click the screen to highlight PLACES and STREETS, respectively. See the lower, left-hand corner of the screen.
MORE
TOOLS
STEP 2 HOW TO NAVIGATE Use these tools to navigate to an area on the map:
For Help– Call MISS DIG at 248.370.6430 Polygon Maintenance User Guide 3/2015
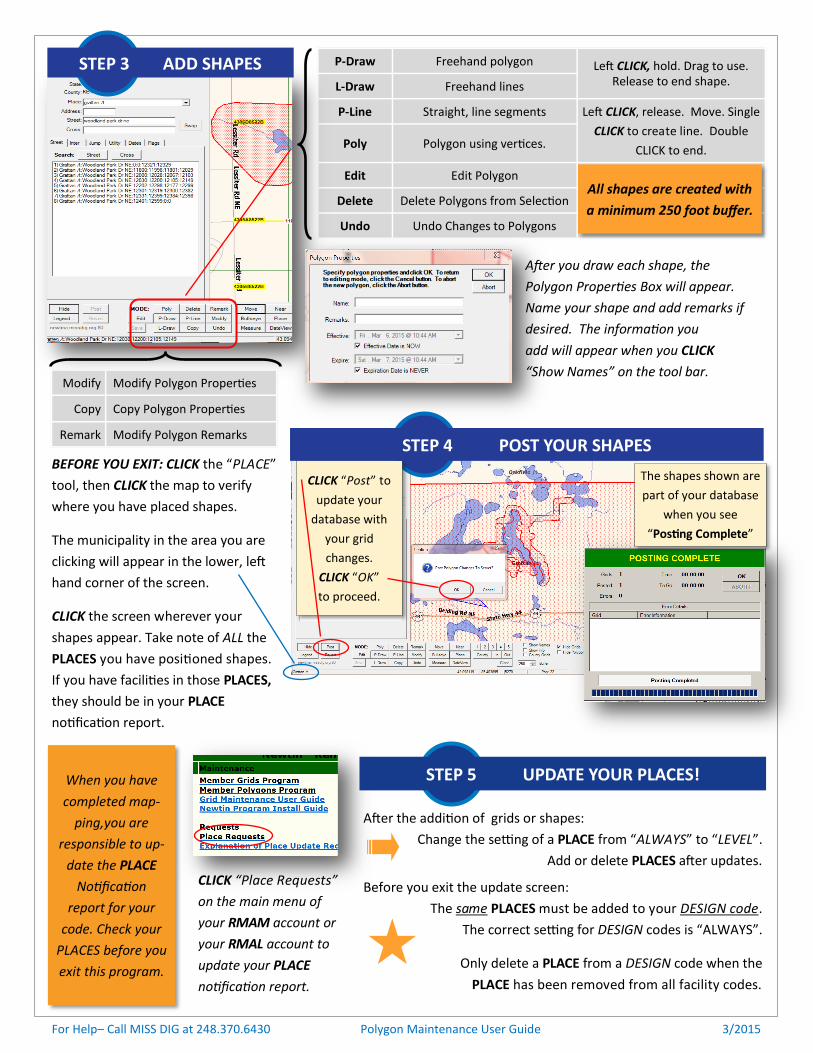
P-Draw Freehand polygon Left CLICK, hold. Drag to use. Release to end shape. L-Draw Freehand lines
P-Line Straight, line segments Left CLICK, release. Move. Single
CLICK to create line. Double
CLICK to end. Poly Polygon using vertices.
Edit Edit Polygon
Delete Delete Polygons from Selection
Undo Undo Changes to Polygons
When you have
completed map-
ping,you are
responsible to up-
date the PLACE
Notification
report for your
code. Check your
PLACES before you
exit this program.
BEFORE YOU EXIT: CLICK the “PLACE”
tool, then CLICK the map to verify
where you have placed shapes. The municipality in the area you are
clicking will appear in the lower, left
hand corner of the screen. CLICK the screen wherever your
shapes appear. Take note of ALL the
PLACES you have positioned shapes.
If you have facilities in those PLACES,
they should be in your PLACE
notification report.
The shapes shown are
part of your database
when you see
“Posting Complete”
CLICK “Post” to
update your
database with
your grid
changes.
CLICK “OK”
to proceed.
STEP 4 POST YOUR SHAPES
STEP 3 ADD SHAPES
CLICK “Place Requests”
on the main menu of
your RMAM account or
your RMAL account to
update your PLACE
notification report.
After the addition of grids or shapes:
Change the setting of a PLACE from “ALWAYS” to “LEVEL”.
Add or delete PLACES after updates.
Before you exit the update screen:
The same PLACES must be added to your DESIGN code.
The correct setting for DESIGN codes is “ALWAYS”.
Only delete a PLACE from a DESIGN code when the
PLACE has been removed from all facility codes.
All shapes are created with
a minimum 250 foot buffer.
Modify Modify Polygon Properties
Copy Copy Polygon Properties
Remark Modify Polygon Remarks
After you draw each shape, the
Polygon Properties Box will appear.
Name your shape and add remarks if
desired. The information you
add will appear when you CLICK
“Show Names” on the tool bar.
STEP 5 UPDATE YOUR PLACES!