Embed Size (px)
Citation preview

Porch Fitting Guidelines For the “Grosvenor” design
Many thanks for purchasing one of our Oak/Redwood porches. The following guidelines are for the “GROSVENOR” porch but the same principals apply to our bespoke porches.
The porch is delivered via a pallet courier on a tail lift wagon. The Front truss is the most critical part of the construction, so we assemble this on the bench before delivery. The remainder of the porch comes in kit form. Unwrap the pallet, but try and keep it dry, particularly if you have purchased the Oak boards.
The Oak comes sanded but untreated. We Recommend “Osmo” oil to use as a finish. The picture shows the bare wood in the centre and the Osmo treated wood on the left. It is not essential to treat the timber with anything and if left, it will turn a
silvery/grey colour in time. The piece on the right shows this.

It is not recommended that the posts go down in to the ground. In some cases people build a small dwarf wall for the posts to sit on or a brick pillar. We can supply “staddle” stones for the post to sit on. They come with a stainless steel dowel inserted into them to accept the post. They can be concreted into the ground leaving around 150mm – 200mm protruding from the ground. There are 2 different sizes 145mm x 145mm or 200mm x 200mm.
Once the stones are set (or the walls are built), 2 holes are knocked in to the house wall to accept the other end of the wall plate. The left picture shows the rear stubs that can be ordered at the same time as the porch to save knocking a hole into the house. They are fixed to the house wall with rawbolts. They need to be the same distance apart as the front posts (i.e. 1500mm)
NB. They do NOT come as standard.

You can then take an exact measurement for the length of the post. Use a level to transfer a line from the top of the stone to the house wall and then measure up to the stub/hole. We supply the posts slightly over length so that they can be trimmed exactly to length on site. We can cut them to the exact length in the workshop if you can provide us with a measurement when ordering. A 19mm hole is then drilled in to the centre of the post to accept the stainless steel dowel.
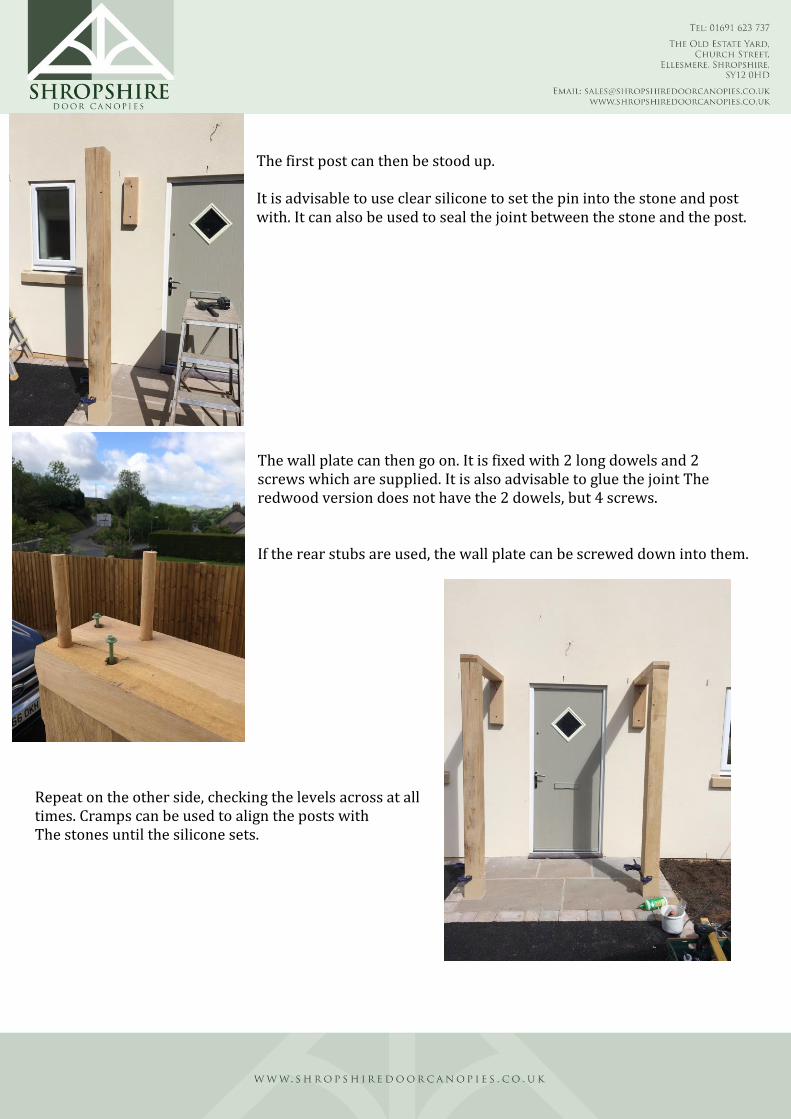
The first post can then be stood up. It is advisable to use clear silicone to set the pin into the stone and post with. It can also be used to seal the joint between the stone and the post. The wall plate can then go on. It is fixed with 2 long dowels and 2 screws which are supplied. It is also advisable to glue the joint The redwood version does not have the 2 dowels, but 4 screws. If the rear stubs are used, the wall plate can be screwed down into them.
Repeat on the other side, checking the levels across at all times. Cramps can be used to align the posts with The stones until the silicone sets.

The front truss is lifted and secured with screws into position.
The rear rafters are then fixed into position and into the house. I recommend 100mm x 6mm screws and plugs (not supplied)
The centre rafter can be fixed into the wall plate and to each other at the top.

The mortice slots are pre-cut for the corner braces. They are the only part that does take a little patience to fit. They are universally handed and the tenons are cut on them, but they will need a little adjustment. The brace on the right is how we dispatch them and the one on the left has been trimmed ready for fitting.
Once fitted, they are drilled with a 19mm bit and the short dowels tapped in.
The Oak frame is now complete and ready for the roof covering.

If you have purchased the T&G boarding we cut a rebate to accept it in the front truss. This makes a neater finish from the front. Start at the top and fix the boards down with 50mm screws. It is vital that the boards aren’t fitted to tightly. An expansion gap at the top and bottom is critical. As in the picture the boards aren’t tight to each other. Once boarded, it can be felted and the roof covering applied.
The porch is now all complete and ready for a coat of Osmo UV oil.