Embed Size (px)
Citation preview

Portable Air Conditioner
User’s Manual
It is important that you read these instructions before using your new purchase and we strongly recommend that
you keep them in a safe place for future reference.

2
Table of Contents
Safety
Information …………………………………………………………………………………………………………………….3
Specifications ………………………………………………………………………………………………………………….4
Parts List ……………………………………………………………………………………………….………………………5
Control Panel…………………………………………………………………………………………………………………..6
Remote Control& Safety Protections..………………………………………………………………………………………8
Installation Instructions …….……………………………………………………………………………………………….10
Drainage …………………………………………………………….………………………………………………………..12
Maintenance……………………………………………………………………………………………………………….…12
Troubleshooting ……………………………………………………………………………………………………………..14

3
Safety Information
Please read and understand this entire manual before attempting to assemble, operate, or install the product. This
unit is intended for residential use only.
IMPORTANT SAFETY INSTRUCTIONS
WARNING: POTENTIAL ELECTRICAL HAZARD IF NOT FOLLOWED. When using electrical appliances, basic
precautions should always be followed to reduce the risk of fire, electric shock, and injury to persons, including the
following:
Extreme caution is necessary when the unit is used by or near children, invalids, pets, or when the unit is left
operating unattended.
Always unplug the unit when not in use.
Do not operate the unit with a damaged cord or plug or after the fan malfunctions, has been dropped, or
damaged in any manner. Contact the manufacturer for resolution options.
Do not use outdoors. Exposure to outdoor elements such as rain, snow, sun, wind, or extreme temperatures
may cause the unit to become a safety hazard.
This unit is not intended for use in bathrooms, laundry areas, and similar indoor locations, nor any locations
that use GFCI outlets.
Never place the unit where it may fall into a bathtub or other water receptacles.
Do not run the cord under carpet. Do not cover the cord with throw rugs, runners, or similar coverings. Arrange
the cord away from traffic areas and where it will not be tripped over.
To disconnect the unit, first turn the power button to the OFF position and then remove the plug from the wall
outlet.
Do not allow foreign objects to enter or block any ventilation or exhaust opening as this may cause electric
shock, fire, or damage the unit.
This unit has hot and arcing or sparking parts inside. Do not use it in areas where gasoline, paint, or flammable
liquids are used or stored, nor use flammable solvents to clean it. Keep the unit dry at all times.
Use this unit only as described in this manual. Any other use not recommended by the manu facturer may
cause fire, electric shock, or injury to persons.
Do not use abrasive solvents to clean the unit as it may cause damage to the finish or casing.
The use of an extension cable is not recommended.
Should the unit stop working, first check the fuse/circuit breaker located in the power cord before contacting
the manufacturer or a certified service agent.
Keep the unit upright while transporting and storing.
When moving the air-conditioner, always turn off and disconnect the power supply, and move i t slowly.
Notes:
If any parts are received damaged please call your retailer.
The power cord must be firmly grounded.
If power cord is damaged, please turn off the unit and disconnect the power supply. It must be replaced from

4
the dealer or a designated repair shop.
WARNING: It is normal from the power cord to feel warm to the touch. However, a loose fit between the outlet and
the plug may cause over heating of the plug. If this is occurs, try inserting the plug into a different outlet. Contact a
qualified electrician to inspect the original outlet for damage.
Specifications
Model Number NPC1-14C
BTU/hour: 14000 BTU/h-COOLING
Voltage Rating: 115V/60Hz
Power Consumption / Current 1350W
Refrigerant R410A
Fan Speed 3 Speeds
Unit Size: 17.1" W x 32.5" H x I3.7" D
Unit Weight: 76.1 lbs
Moisture Removal: 50.7 pints/day
Maximum Cooling Temp: 60℉ /16℃
Minimum Cooling Temp: 86℉ /30℃
Timer: 1-24 hours
Compressor: Rotary
Note: The coolingcapacity of the unit may be affected by the height of your ceiling, quality of your
insulation, or number of windows in your room, yet we have made every effort to design and engineer a
superior quality portable air conditioning unit that effectively and efficiently cools selected areas of the
home or office.
These portable air conditioner units are designed and engineered to provide supplemental air conditioning.
To gain a better understanding of the performance capabilities of your new portable AC unit, you can
contact your retailer in advance.
LCDI Plug Instruction
If you plug in the Air Conditioner, and there is no green light on the plug. Press
the reset button on the LCDI plug. The green light should be on, indicating that
the air conditioner is getting power from the electrical outlet.
If the plug continues to trip (which is a USA national safety standard feature) and
the green light goes off, the cord may be damaged preventing you from resetting
the unit. For your safety, contact a licensed electrician.

5
Parts List
Front Side Back Side
1. Top Panel 7. Handle
2. Control Panel 8. Back Panel
3. Air Outlet 9. Power Cord
4. Remote control receiving window 10. Upper Filter
5. Front Panel 11. Exhaust Connector
6. Casters 12. Lower Filter
13. Water Plug
Accessories
Slide Bar Exhaust Hose Adjustable Slide Screws Remote Control Batteries
After unpacking the unit, please check whether all the above-mentioned accessories were included, and check
their purposes in the installation in this manual.

6
Control Panel
Control Panel as below:
Power
When Power is pressed, the unit goes directly into Cool Mode (Default set temperature at 72°F (22℃) and Fan
runs on medium speed). Press again and the unit will shut off after the shut of music .
Mode
1) Press MODE to select required working mode, all modes turn as below for your confirmation.
Cool Dehumidify Fan Energy Conversation
Operating
Modes
COOL
Temperature
Setting Range
60℉--86℉(16℃--30℃)
DEHUMIDIFY ----- 60℉--86℉(16℃--30℃)
FAN
Temperature
Setting Range
-----
Energy
Conservation
Temperature
Setting Range
60℉--86℉(16℃--30℃)
Attention: When using COOL and DEHUMIDIFY functions, let the unit run for at least 3 minutes before
shutting it off or switching between functions
Power Button
Mode Button
Down Button Up Button
Fan Speed Button
Timer Button

7
Fan
Press FAN button to select a desired fan speed, fan running speed can be adjust by below order,
Low Speed Medium Speed High Speed
Timer
Pressing the Timer button can get timer function and set the unit to auto on and off.
Auto-On setting:
When the air conditioner is OFF, press them to select a desired “auto-on” timer using UP and Down button.
Timer will display on the LCD panel
Timer can be changed at any time in 1-24 hours
Auto-Off setting:
When the air conditioner is ON, press to select a desired “auto-off” timer using UP and Down button.
Timer will display on the LCD panel
Timer can be changed from 1-24 hours.
Note:
For example, if you press the Timer to ‘2’, the unit will turn on or shut off automatically after 2 hours
Timer interval is 1 hour.
Once set, the timer icon will flash 5 times for confirmation.
Up / Down
To control the set temperature and timer setting:
1. Press the “UP” or “DOWN” button to select a desired temperature (60 -86℉)
2. Timer instructions: auto-on setting and auto-off setting.
3. Press the “UP” and “DOWN” buttons simultaneously to make Celsius and Fahrenheit degrees interchange.
Auto Swing
Press the “TIMER” and “SPEED” buttons simultaneously to start or close auto oscillation function.
Sleep
Press the “TIMER” and “UP” buttons simultaneously to start or close the sleep function.
Energy Conservation
Press “MODE” to get Energy Conservation, low energy consumption under this mode.
Auto-clean:
Press “MODE” to get Auto Clean, keep three minutes before off under COOL, DEHUMIDIFYING modes
8
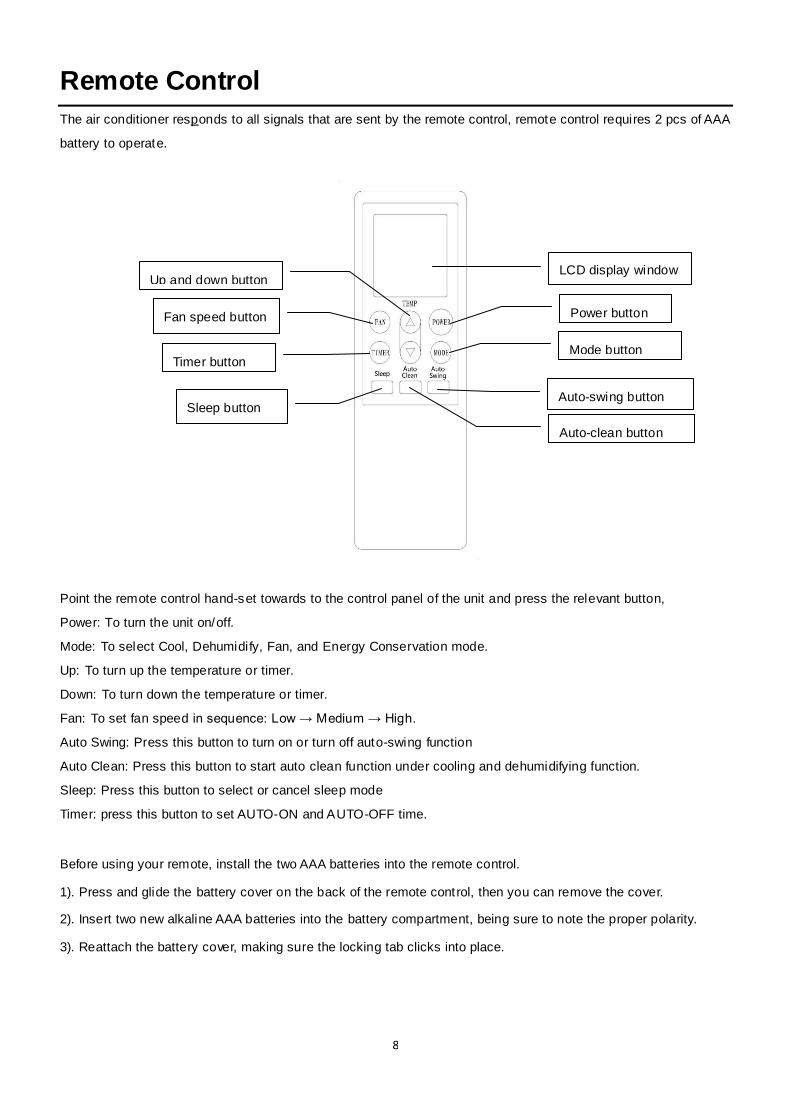
Remote Control
The air conditioner responds to all signals that are sent by the remote control, remote control requires 2 pcs of AAA
battery to operate.
Point the remote control hand-set towards to the control panel of the unit and press the relevant button,
Power: To turn the unit on/off.
Mode: To select Cool, Dehumidify, Fan, and Energy Conservation mode.
Up: To turn up the temperature or timer.
Down: To turn down the temperature or timer.
Fan: To set fan speed in sequence: Low → Medium → High.
Auto Swing: Press this button to turn on or turn off auto-swing function
Auto Clean: Press this button to start auto clean function under cooling and dehumidifying function.
Sleep: Press this button to select or cancel sleep mode
Timer: press this button to set AUTO-ON and AUTO-OFF time.
Before using your remote, install the two AAA batteries into the remote control.
1). Press and glide the battery cover on the back of the remote control, then you can remove the cover.
2). Insert two new alkaline AAA batteries into the battery compartment, being sure to note the proper polarity.
3). Reattach the battery cover, making sure the locking tab clicks into place.
Up and down button
Fan speed button
Timer button
Sleep button
LCD display window
Power button
Mode button
Auto-swing button
Auto-clean button

9
Notes:
Use alkaline batteries only. Do not use rechargeable batteries.
When replacing batteries, always replace both batteries with new batteries, do not mix old and new batteries.
If the air conditioner will not be used for an extended period of time, remove the batteries from the remote
control.
4. Remote Control Storage
1) Insert remote controller into the bracket in back of unit,
2) In order to avoid losing the remote control, please keep it stored when you do not use it.
Important:
The compressor will start approximately 3 minutes after the unit is turned on (this will help prolong the li fe of
the compressor). After switching the unit off, please wait at least 3 minutes before turning the unit back on.
The compressor will switch off when the room temperature is lower than the set temperature. The fan will
however, continue to work. When the ambient temperature rises above the set temperature, the cooling will
resume.
ATTENTION: This portable air conditioner has a number of key safety protection features:
1. Anti-frozen protection function
Under COOL mode, when the compressor continuously runs over 10 minutes, if tube temperature is ≦2℃/36℉
for 20 seconds, the anti-frozen protection function will be on, E4 will be shown on LCD display, compressor and
water wheel motor will stop working, but upper fan remains running; If tube temperature is ≧8℃/46℉, the unit will
stop anti-frozen protection and recover to original working condition. Compressor will re-start with 3 minutes delay
for protection.
2. Auto Defrosting Operation
When the coil temperature is too low and the humidity is too high, frost may form on the coils. The air conditioner
will then stop operation for 8-10 minutes for an auto defrosting to take place, until the coils have achieved a
Be sure to note proper
polarity of batteries

10
temperature that will no longer result in frost. This is not a malfunction, but rather a protection for your unit. After
the defrosting process has finished, the operation will recover automatically. Turn on your machine and wait for
three minutes.
3. Water-Full Water Level Protection
Water-level protection is mainly performed by the water-level switch. The water-level switch is always closed and
will only open when an abnormal situation occurs in the water reservoir. When there is too much water in the
reservoir, the switch moves and unit will stop working, please drain the water.
Installation Instructions
ATTENTION:
a) Before you start, place the unit on a firm, level surface where there is a
grounded 115V/60Hz power outlet nearby. Only operate in an upright position.
b) We recommend that you keep the hose as short as possible to minimize
possible loss back in the room.
c) Ensure you have space for air to flow around the unit, at least 50cm/19.7”
from wall, curtains, draperies, or heat sources to insure adequate air circulation.
Any blockage can lead to overheating of the air conditioner.
d) The flexible exhaust hose can be extended from 10.63” to 59” for mounting.
We recommend that you keep the hose as short as possible to minimize
possible loss back in the room.
e) This length has been designed especially according to the specifications of
the air conditioner. Do not use an extension or exchange for a different hose
as that may lead to malfunctioning.
f) Handle with care to prevent any kink or bend in the exhaust hose.
The unit is a portable air conditioner that may be moved from room to room.
Note: The window kit is only designed to be installed with sliding windows or doors. The window kit is not designed
or to be used with casement style windows.

11
Installation Instructions
Assemble the Outdoor Adaptor
Align the two halves of the outer adaptor and gently snap together
Note: To prevent damage, do not use excessive pressure.
Install the Outward Adaptor and window slide Bar
1. Measure and verify if your window
kit fits the dimensions of your sliding
window.
If the kit is larger than your window
dimensions, it can be cut with a
saw or power tool.
If the kit is too short for your
window, you may order an
additional window kit from our online store to extend it.
2. Screw the slide bar connector into the exhaust hose.
3. Spin the exhaust hose into the air outlet located at the rear of the unit (counter-clockwise).
4. Insert the slide bar connector
into the adjustable slide bar.
5. Extend its length to match the
width of the window (vertically or
horizontally), and then tighten the
screw to hold the length of the slide
bar.
6. Make sure the adjustable slide bar fits your window and stays
in place.
7. Proceed to close and lock your window on the slide Bar.
Or Install directly through a wall/window
Cut a 150mm diameter hole in the wall or window, and then feed
exhaust hose through the window or wall.

12
Drainage
1. Manual drain:
This unit is designed with high efficient self-evaporative system, all condensate will recycle in the unit, however
under extreme humidity the unit may need to be drained manually.
This Portable Air Conditioner has an inner water
reservoir, inside the reservoir is a safety micro switch.
When the reservoir is full, the safety switch is activated
and the alert icon will turn on, indicating that the unit
needs to be drained manually through the water hole on
the back of the unit.
To manually drain the unit, turn off the unit and get a pan or tray.
Place it under the water hole.
Remove the plug and the cap. Let the water drain into the pan or tray.
When the unit has fully drained, replace the plug and turn your unit back on.
2. Continuous drainage
Screw off the drain-cover & unplug the water stopper.
Connect drain-hole with φ12mm drain hose, as deep as
possible to avoid leakage
Pull the drain hose to bathroom or outdoor.
Please note-
The drain must be at or below the outlet level.
.
Maintenance
ATTENTION:
1) Before cleaning, be sure to turn the unit off and disconnect it with the electrical outlet.
2) Do not use gasoline or other chemical to clean the unit.
3) Do not submerge the unit to clean it.
4) Dry thoroughly before replacing.
5) Never operate the unit without the filter.

13
To maximize the efficiency of the air conditioners, please clean regularly.
Cleaning the housing
To clean the surface of the unit use a gentle detergent and damp cloth, and then wipe it dry with a soft clean cloth.
Never use strong chemicals, oil-based products, detergents, chemically treated cloths or other cleaning solutions;
this could possibly damage the housing.
Cleaning the filter
The air filter should be cleaned at least once every 2 weeks, to prevent it from becoming clogged with dust/dirt.
Open the air inlet grille on the back of the unit and take out the air filters. Clean the filters with gentle detergent in
lukewarm water. The filter should be left to dry, out in direct sunlight. Put the air filters into the inlet grill on the back
of the unit as they were.
Additional Maintenance and tasks prior to storage
a. For seasonal storage purposes, turn the unit on Fan Mode for a couple of hours to ensure that the inside can
dry not completely.
b. We also recommend allowing the unit to air dry for a period of 24 hours without the drain plug and cap in place
c. Clean or change the filter
d. Store the power cord and protect the unit again dust by putting it back into its original box.
e. Store in a dry place and not accessible to children or pets.
To return this unit for warranty or repair
It is important that you package it correctly. Please re-use all Styrofoam and cardboard
that the unit was delivered in. Repackaging is done the opposite to how you opened the
packaging upon delivery.
Seal the top flaps of the cardboard box with packing tape and flip the box upside
down. (Opening pointing towards the ground).
Place the Styrofoam and upside down box on top of the unit.
Flip the unit and box over, place the bottom Styrofoam and cardboard “cap” on the
unit.
Securely tape the bottom of the box with packing tape.
Please put the return sticker on the top flap. You are ready to ship!
Reminder:
Unit contains R410A. Waste Electrical products must not be disposed of with household waste. This
product should be taken to your local recycling center for safe treatment.
14
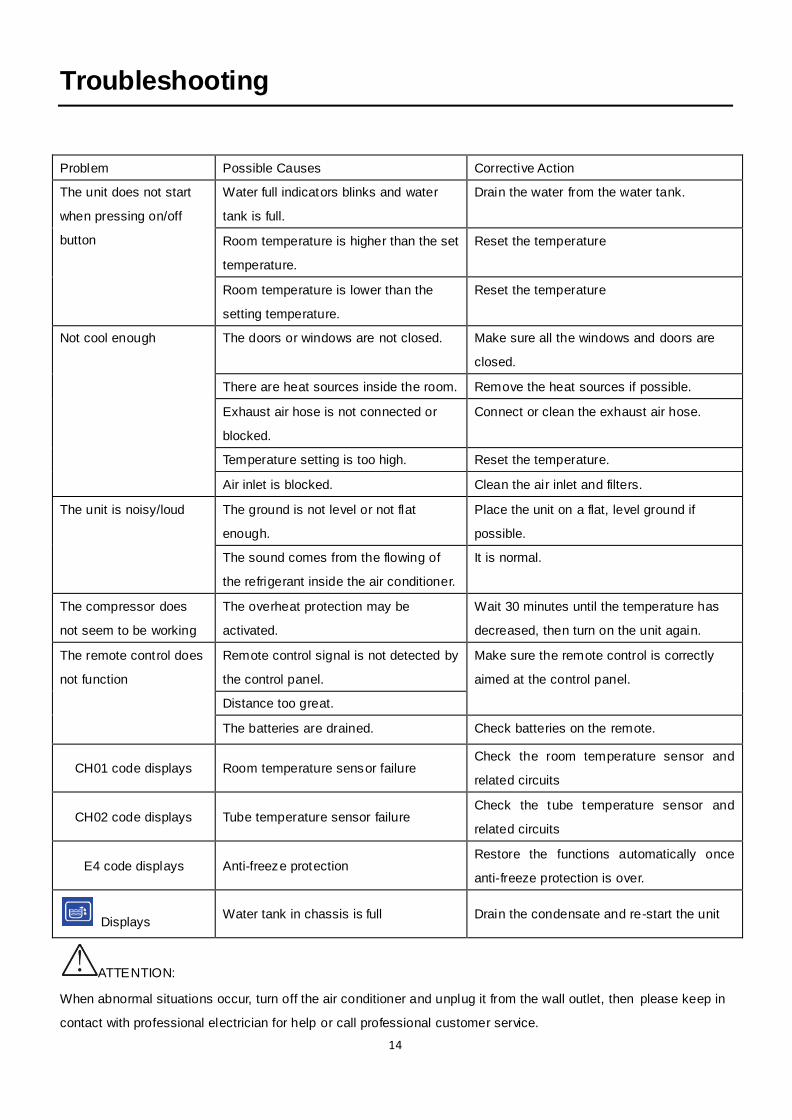
Troubleshooting
Problem Possible Causes Corrective Action
The unit does not start
when pressing on/off
button
Water full indicators blinks and water
tank is full.
Drain the water from the water tank.
Room temperature is higher than the set
temperature.
Reset the temperature
Room temperature is lower than the
setting temperature.
Reset the temperature
Not cool enough The doors or windows are not closed. Make sure all the windows and doors are
closed.
There are heat sources inside the room. Remove the heat sources if possible.
Exhaust air hose is not connected or
blocked.
Connect or clean the exhaust air hose.
Temperature setting is too high. Reset the temperature.
Air inlet is blocked. Clean the air inlet and filters.
The unit is noisy/loud The ground is not level or not flat
enough.
Place the unit on a flat, level ground if
possible.
The sound comes from the flowing of
the refrigerant inside the air conditioner.
It is normal.
The compressor does
not seem to be working
The overheat protection may be
activated.
Wait 30 minutes until the temperature has
decreased, then turn on the unit again.
The remote control does
not function
Remote control signal is not detected by
the control panel.
Make sure the remote control is correctly
aimed at the control panel.
Distance too great.
The batteries are drained. Check batteries on the remote.
CH01 code displays Room temperature sensor failure Check the room temperature sensor and
related circuits
CH02 code displays Tube temperature sensor failure Check the tube temperature sensor and
related circuits
E4 code displays Anti-freeze protection Restore the functions automatically once
anti-freeze protection is over.
Displays Water tank in chassis is full Drain the condensate and re-start the unit
ATTENTION:
When abnormal situations occur, turn off the air conditioner and unplug it from the wall outlet, then please keep in
contact with professional electrician for help or call professional customer service.

15
Aire Acondicionado Portátil
Manual del Usuario
Es importante que usted lea estas instrucciones antes de usar su nueva compra y le recomendamos que usted la
guarde en un lugar seguro para consultas futuras

16
Tabla de Contedidos
Instrucciones de Seguridad ………………………………………………………………………………………………..17
Especificaciones …………………………………………………………………………………………………………….18
Lista de Partes ……...………………………………………………………………………….…………………………… 19
Panel de Control……………………………………………..………………………………………………………………20
Control Remoto &Protecciones de seguridad..……….…………………………………………………………………..22
Instrucciones de Instalación …….……………………………………………………………………………….…………24
Drenaje…………………………………………………………….………………………………………………………….26
Mantenimiento…………………………………………………………………………………………..……………………27
Solución de Problemas ……………………………………………………………………………….……..…….………..28

17
Información de Seguridad
Lea y comprenda todo el manual antes de intentar ensamblar, operar o instalar el producto. Esta unidad está
diseñada sólo para uso residencial.
INSTRUCCIONES DE SEGURIDAD IMPORTANTES
ADVERTENCIA : POTENCIAL PELIGRO ELÉCTRICO SI NO CUMPLE. Cuando se utilizan aparatos eléctricos,
las precauciones básicas siempre se deben seguir para reducir el riesgo de incendio, descarga eléctrica y
lesiones a personas, incluyendo lo siguiente:
Extrema precaución es necesaria cuando la unidad se utiliza por o cerca de niños, inválidos, mascotas, u
operar cuando la unidad se deja desatendido.
Siempre desenchufe la unidad cuando no esté en uso.
No utilice la unidad con un cable o enchufe dañado, o después de un mal funcionamiento del ventilador, se ha
caído o dañado de alguna manera. Póngase en contacto con el fabricante para las opciones de resolución.
No utilice al aire libre. La exposición a elementos como la lluvia, la nieve, el sol , el viento o las temperaturas
extremas pueden hacer que la unidad se convierta en un peligro para la seguridad.
Esta unidad no está diseñado para su uso en baños, lavaderos y otros locales similares, ni ningúna
ubicacione que se utilizan salidas GFCI.
Nunca coloque la unidad donde pueda caer en una bañera o otros recipientes.
No pase el cable por debajo de la alfombra. No cubra el cable con tapetes, alfombras o cubiertas similares.
Disponga el cable alejado de las áreas de tráfico y donde no pueda provocar tropezones.
Para desconectar la unidad, primero oprima el botón de encendido en la posición OFF y luego retire el
enchufe de la toma de corriente.
No permita que entren objetos extraños o bloquear en la ventilación o salida de aire, ya que esto puede
causar una descarga eléctrica , un incendio o dañar la unidad.
Esta unidad tiene partes caliente y arcos eléctricos que pueden producir chispas en el interior. No lo utilice en
áreas donde la gasolina, pintura o líquidos inflamables se use o almacene ni utilice solventes inflamables para
limpiarlo. Mantenga la unidad seca en todo momento.
Utilice esta unidad sólo como se describe en este manual. Cualquier otro uso no recomendado por el
fabricante puede provocar incendios, descargas eléctricas o lesiones a las personas.
No utilice solventes abrasivos para limpiar la unidad ya que puede causar daños en el acabado o la caja
No se recomienda el uso de una extensión de cable.
En caso de que la unidad deje de funcionar , primero revise el fusible / circuito situado en el cable de
alimentación antes de contactar con el fabricante o con un técnico de servicio certificado
Mantenga la unidad en posición vertical mientras el transporte y almacenamiento.
Cuando se mueve el aire acondicionado, siempre apague y desconecte la fuente de alimentación, y moverlo
lentamente.
Notas:
Si recibe alguna pieza dañada por favor llame a su tienda.

18
El cable de alimentación debe estar sólidamente a tierra.
Si el cable de alimentación está dañado, por favor apague la unidad y desconecte la fuente de alimentación .
Debe ser reemplazado en el concesionario o un taller de reparación designado.
ADVERTENCIA: Es normal del cable de alimentación se caliente al tacto. Sin embargo, una mala conexión entre
la salida y el enchufe puede provocar un sobrecalentamiento. Si esto ocurre, trate de introducir el enchufe en una
toma diferente. Póngase en contacto con un electricista calificado para que inspeccione la salida original por
daños.
Especificaciones
Numro de Modelo NPC1-14C
BTU/hora: 14000 BTU/h-Enfriamiento
Clasificación de Voltaje: 115V/60Hz
Consumo de Energía / Corriente 1350W
Refrigerante R410A
Velocidad del Ventilador 3 Velocidades
Tamaño de la Unidad: 17.1" W x 32.5" H x I3.7" D
Peso de la Unidad: 76.1 libras
Eliminación de Humedad: 50.7 pintas/dia
Máxima temperatura de refrigeración: 60℉ /16℃
Temperatura mínima de refrigeración: 86℉ /30℃
Temporizador: 1-24 horas
Compresor: Giratorio
Nota: La capacidad de refrigeración de la unidad puede verse afectado por la altura de su techo, la calidad
de su aislamiento, o el número de ventanas de su habitación, sin embargo, hemos hecho todos los
esfuerzos para diseñar y ingenear una unidad de aire acondicionado portátil de calidad superior que se
enfría con eficiencia las áreas seleccionadas de la casa o oficina.
Estas unidades de aire acondicionado portátiles están diseñados y fabricados para proporcionar
suplementos de aire acondicionado. Para obtener una mejor comprensión de las capacidades de
rendimiento de su nueva unidad de aire acondicionado portátil, puede ponerse en contacto con su
distribuidor por adelantado.
Instrucción de plug LCDI
Si conecta el aire acondicionado, y no hay luz verde en el enchufe. Oprima el
botón de reinicio en el enchufe LCDI. La luz verde debe estar encendido, lo que
indica que el aire acondicionado está recibiendo alimentación de la toma
eléctrica.

19
Si el enchufe continúa disparándose ( Que es una característica estándar de seguridad nacional EE.UU. ) y la luz
verde se apaga , el cable puede dañarse le impide reiniciar la unidad . Para su seguridad, llame a un electricista
con licencia.
Lista de Partes
Parte Frontal Parte Posterior
1. Panel Superior 7. Manija
2. Panel de Control 8. Panel Posterior
3. Salida de Aire 9. Cable de Energía
4. Ventana de Recepción del Conrol Remoto 10. Filtro Superior
5. Panel Frontal 11. Conector de Escape
6. Ruedas 12. Filtro Inferior
13. Tapón de Agua
Accessorios
Barra de Manguera de Deslice Ajustable Tornillos Control Remoto Baterías
Desplazamiento Escape

20
Después de desembalar la unidad, compruebe si se incluyen todos los accesorios mencionados anteriormente , y
comprobar sus propósitos en la instalación de este manual.
Panel de Control
Panel de Control de la Siguiente Manera:
Encendido
Cuando se pulsa la energía, la unidad entra directamente en el modo Cool ( Temperatura establecida por defecto
a 72 ° F ( 22 ℃) y ventilador funciona a velocidad media ). Presione de nuevo y la unidad se apagará después de
que el cierre de la música.
Modo
2) Oprima MODE para seleccionar el modo de trabajo requerida, todos los modos vuelven como abajo para su
confirmación.
Fresco Deshumidificar Ventilador Conservación de Energía
Modos de
Funcionami-
ento
Fresco
Rango de Ajuste
de
Temperatura
60℉--86℉(16℃--30℃)
Deshumidificar ----- 60℉--86℉(16℃--30℃)
VENTILADOR
Rango de Ajuste
de
Temperatura
-----
Energia de
Conversación
Rango de Ajuste
de
Temperatura
60℉--86℉(16℃--30℃)
Botón de Encendido
Botón de Modo
Abajo Arriba
Botón de Velocidad del Ventilador
botón del temporizador

21
Atención: Cuando se utiliza en funcion de FRESCO y en DESHUMIDIFICACION, deje que la unidad
funcione durante al menos 3 minutos antes de apagarlo o cambio entre las funciones .
Ventilador
Pulse el botón FAN para seleccionar la velocidad deseada del ventilador, velocidad de circulación puede ser
ajustado por el orden siguiente,
Baja Velocidad Velocidad Media Alta Velocidad
Temporizador
Al presionar el botón del temporizador puede conseguir la función del temporizador y ponga la unidad de auto
encendido y apagado.
Ajuste Auto-On (Encendido Automático):
Cuando el aire acondicionado está apagado, presione para seleccionar un deseado "encendido automático"
temporizador utilizando botón arriba y abajo.
Temporizador mostrará en el panel LCD
Temporizador se puede cambiar en cualquier momento a 1-24 horas
Ajuste Auto-Off(Apagado Automático):
Cuando el aire acondicionado está encendido, presione para seleccionar un deseado temporizador "apagado
automático " con botón arriba y abajo.
Temporizador mostrará en el panel LCD
Temporizador se puede cambiar en cualquier momento a 1-24 horas
Nota:
Por ejemplo, si pulsa el temporizador en '2', la unidad se encenderá o apagará automáticamente después de
2 horas
Intervalo del temporizador es de 1 hora.
Una vez ajustado, el icono del temporizador parpadeará 5 veces para la confirmación.
Arriba / Abajo
Para controlar la temperatura de ajuste y ajuste del temporizador:
5. Oprima el botón "UP" o "DOWN" para seleccionar la temperatura deseada (60-86℉)
6. Instrucciones de temporizador: automático sobre la configuración y el ajuste de apagado automático.
7. Oprima el botón "UP" y "DOWN" simultáneamente para hacer intercambio Celsius y grados Fahrenheit .
Auto Oscilación
Oprima los botones "TIMER" y "SPEED" de forma simultánea para iniciar o cerrar la función de oscilación automática.
Dormir
Oprima los botones "UP" "TIMER" y al mismo tiempo para iniciar o cierre de función de dormir.

22
Conversación de Energía
Oprima el botón "MODE" para obtener Conversación de Energía, bajo consumo de energía en este modo.
Limpieza -Automática:
Oprima el botón "MODE" para obtener autolimpieza, mantenga tres minutos antes de apagae bajo fresco, modos
de deshumidificación
Control Remoto
El acondicionador de aire responde a todas las señales que se envían por el control remoto, control remoto
requiere 2 baterías AAA para funcionar.
Apunte el control remoto ajustado a mano hacia el panel de control de la unidad y oprima el botón
correspondiente,
Poder: Para encender la unidad y apagado.
Modo: Para seleccionar deshumidificación, Ventilador, y el modo de enfriamiento y conservación de la energía.
Arriba: Para subir la temperatura o el temporizador.
Abajo: Para bajar la temperatura o el temporizador.
Ventilador: Para ajustar la velocidad del ventilador en secuencia: Bajo → Medio → Alto.
Auto-oscilación: Oprima este botón para encender o apagar la función de auto-oscilación
Auto Limpieza: Oprima este botón para iniciar la función de limpieza automática bajo la función de refrigeración y
deshumidificación.
Dormir: Oprima este botón para seleccionar o cancelar modo de reposo
Botón arriba y abajo
UP and Down button Botón de velocidad del ventilador
Fan speed button
Botón del temporizador
Timer button
Botón de Dormir
Ventana de la LCD
Display window
Botón de Poder
Power button
Botón de Modo
Botón Oscilación Automática
Botón de Auto Limpieza

23
Temporizador: oprima este botón para ajustar la hora de Encendido Automático y Apagado Automático.
Antes de utilizar el control remoto, instale las baterías AAA en el control remoto.
1). Oprima y deslizarse la cubierta de la batería en la parte posterior del control remoto, entonces usted puede quitar la
tapa.
2).Inserte dos baterías nuevas alcalinas AAA en el compartimiento de la batería, prestando atención a la polaridad
correcta.
3). Vuelva a colocar la tapa de la batería, asegurándose de que la pestaña de bloqueo encaje en su lugar.
Notas:
Utilice sólo pilas alcalinas. No utilice pilas recargables.
Al cambiar las baterías, siempre cambie ambas baterías con baterías nuevas, no mezcle baterías viejas y nuevas.
Si el aire acondicionado no va a utilizar durante un período prolongado de tiempo, retire las pilas del control
remoto.
4. Almecenamiento del control remoto
1) Inserte control remoto en el soporte en la parte trasera de la unidad,
2) Con el fin de evitar la pérdida del control remoto, por favor manténgalo bien cuando no lo utiliza.
Importante:
El compresor comenzará a funcionar aproximadamente 3 minutos después de que la unidad se enciende
(esto ayudará a prolongar la vida útil del compresor). Después de encender la unidad, espere por lo menos 3
minutos antes de encender de nuevo la unidad.
El compresor se apaga cuando la temperatura ambiente es inferior a la temperatura establecida. El ventilador
sin embargo, seguirá trabajando. Cuando la temperatura ambiente sube por encima de la temperatura de
consigna, el enfriamiento se reanudará.
ATENCIÓN: Este acondicionado portátil de aire acondicionado tiene una serie de características clave de
protección de la seguridad:
Asegúrese de anotar la
polaridad correcta de las
baterías

24
1. Función de protección de anti-congelado
Bajo el modo COOL, cuando el compresor funciona de forma continua durante 10 minutos, si la temperatura del
tubo es ≦ 2 ℃ / 36 ℉ durante 20 segundos, la función de protección anti-congelado se encenderá, E4 se
mostrará en la pantalla LCD, compresor y motor de la rueda de agua dejará de funcionar, pero el ventilador
superior sigue siendo en funcionamiento; Si la temperatura del tubo ≧ 8 ℃ / 46 ℉, la unidad dejará de protecci
ón anti-congelado y recuperar a la condición original de trabajo. Compresor volverá a empezar a trabajar con 3
minutos de retraso para protección.
2. Operación Automática de descongelación
Cuando la temperatura de la bobina es demasiado baja y la humedad es demasiado alta, puede formarse
escarcha en las bobinas. El acondicionador de aire y luego se detiene el funcionamiento durante 8 -10 minutos
para un auto descongelación tenga lugar, hasta que las bobinas han alcanzado una temperatura que ya no dará
lugar a heladas. Esto no es un fallo, sino más bien una protección para su unidad. Después de que el proceso de
descongelación ha terminado, la operación se recuperará automáticamente. Encienda la máquina y espere tres
minutos.
3. Agua-Completa Nivel de Protección deAgua
Protección a nivel de agua se lleva a cabo principalmente por el interruptor de nivel de agua. El interruptor de nivel
de agua está siempre cerrada y sólo se abrirá cuando se produce una situación anormal en el depósito de agua.
Cuando hay demasiada agua en el depósito, se mueve el interruptor y la unidad dejará de funcionar, por favor
descargar el agua.
Instrucciones de instalación
ATENCIÓN:
a) Antes de comenzar, coloque la unidad sobre una superficie
firme y plana, donde hay una toma de corriente de 115V / 60Hz con
conexión a tierra cerca. Sólo operar en una posición vertical.
b) Le recomendamos que mantenga la manguera lo más corto posible para
minimizar la posible pérdida de vuelta en la habitación.
c) Asegúrese de que tiene espacio para que el aire fluya alrededor de la
unidad, por lo menos 50 cm / 19,7 "de pared, cortinas, o fuentes de calor para
asegurar la circulación de aire adecuada. Cualquier obstrucción puede
provocar un sobrecalentamiento del aire acondicionado.
25
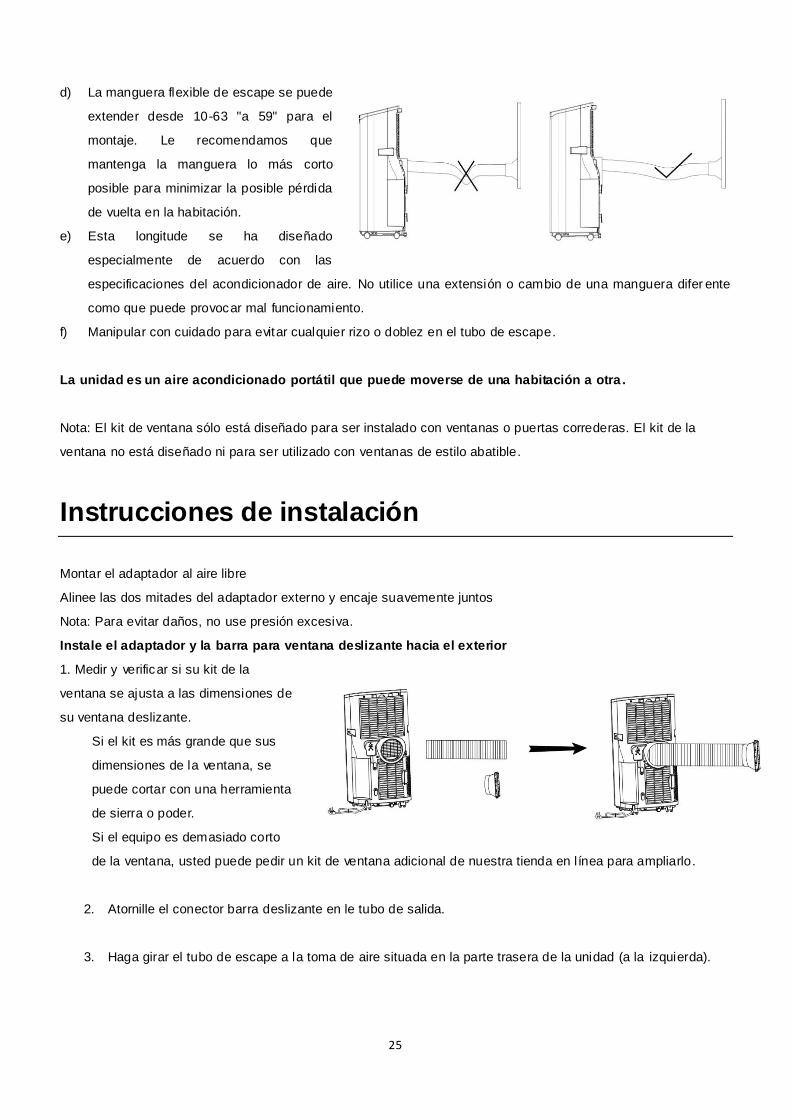
d) La manguera flexible de escape se puede
extender desde 10-63 "a 59" para el
montaje. Le recomendamos que
mantenga la manguera lo más corto
posible para minimizar la posible pérdida
de vuelta en la habitación.
e) Esta longitude se ha diseñado
especialmente de acuerdo con las
especificaciones del acondicionador de aire. No utilice una extensión o cambio de una manguera difer ente
como que puede provocar mal funcionamiento.
f) Manipular con cuidado para evitar cualquier rizo o doblez en el tubo de escape.
La unidad es un aire acondicionado portátil que puede moverse de una habitación a otra .
Nota: El kit de ventana sólo está diseñado para ser instalado con ventanas o puertas correderas. El kit de la
ventana no está diseñado ni para ser utilizado con ventanas de estilo abatible.
Instrucciones de instalación
Montar el adaptador al aire libre
Alinee las dos mitades del adaptador externo y encaje suavemente juntos
Nota: Para evitar daños, no use presión excesiva.
Instale el adaptador y la barra para ventana deslizante hacia el exterior
1. Medir y verificar si su kit de la
ventana se ajusta a las dimensiones de
su ventana deslizante.
Si el kit es más grande que sus
dimensiones de la ventana, se
puede cortar con una herramienta
de sierra o poder.
Si el equipo es demasiado corto
de la ventana, usted puede pedir un kit de ventana adicional de nuestra tienda en línea para ampliarlo.
2. Atornille el conector barra deslizante en le tubo de salida.
3. Haga girar el tubo de escape a la toma de aire situada en la parte trasera de la unidad (a la izquierda).

26
4. Inserte el conector barra
de deslizamiento en la barra
deslizante ajustable.
5. Amplíe su longitud a la
anchura de la ventana (vertical u
horizontal), y luego apretar el
tornillo para mantener la longitud
de la barra de desplazamiento.
6. Asegúrese de que la barra de deslizamiento ajustable se
adapta a su ventana y se queda en su lugar.
7. Proceda a cerrar y bloquear la ventana en la barra de
deslizamiento.
O instalar directamente a través de una pared / ventana
Corte un agujero de 150 mm de diámetro en la pared o ventana, y
luego alimentar a la manguera de escape a través de la ventana o
pared.
Drenaje
1. Drenaje manual:
Esta unidad está diseñada con un alto sistema de auto-evaporación eficiente, todo condensado reciclará en la
unidad, sin embargo, bajo la humedad extrema puede necesitar la unidad para drenar manualmente.
Este acondicionador de aire portátil tiene un depósito de
agua interior, el interior del depósito es un micro
interruptor de seguridad.
Cuando el depósito está lleno, el interruptor de
seguridad se activa y el icono de alerta se enciende,
indicando que la unidad necesita ser drenado
manualmente a través del agujero de agua en la parte
posterior de la unidad.
Para drenar manualmente la unidad, apague la unidad y obtener una cacerola o bandeja.
Colóquelo bajo el ojo de agua.
Quite el tapón y la tapa. Dejar escurrir el agua en la bandeja.

27
Cuando la unidad se haya drenado completamente, vuelva a colocar el tapón y encienda la unidad de nuevo.
2. Drenaje continuo
Desenroscar el desagüe de la cubierta y desconecte el tapón
de agua.
Conecte orificio de drenaje con tubo de desagüe φ12mm, tan
profundo como sea posible para evitar fugas
Tire de la manguera de desagüe para baño o exterior.
Tenga en cuenta-
El drenaje debe estar en o por debajo del nivel de salida.
.
Mantenimiento
ATENCIÓN:
1) Antes de limpiar, asegúrese de apagar la unidad y desconectar el enchufe eléctrico.
2) No utilice gasolina u otros productos químicos para limpiar la unidad.
3) No sumerja la unidad para limpiarla.
4) Seque completamente antes de reemplazar.
5) Nunca haga funcionar la unidad sin el filtro.
Para maximizar la eficiencia de el aparato de aire acondicionado, por favor limpie regularmente.
Limpiar la caja
Para limpiar la superficie de la unidad con un detergente suave y un paño húmedo y seque frotando con un paño
suave y limpio. Nunca utilice productos químicos fuertes, productos a base de aceite, detergentes, paños tratados
químicamente u otros productos de limpieza; esto podría dañar la caja.
Limpiar el filtro
El filtro de aire debe limpiarse al menos una vez cada 2 semanas, para evitar que se obstruya con polvo / suciedad.
Abra la rejilla de entrada de aire en la parte posterior de la unidad y sacar los filtros de aire. Limpie los filtros con
detergente suave en agua tibia. El filtro debe dejarse secar, a la luz solar directa. Poner los filtros de aire en la
parrilla de entrada en la parte posterior de la unidad como estaba n.
Adicional Mantenimiento y tareas previas al almacenamiento
a. Para fines de almacenamiento de temporada, encender la unidad Modo de ventilador durante un par de
horas para que el interior se seque por completo.
b. También recomendamos permitiendo que la uni dad se seque al aire seco durante un período de 24 horas
sin el tapón de drenaje y la tapa en su lugar
c. Limpie o cambie el filtro
d. Almacenar el cable eléctrico y proteger la unidad contra el polvo al ponerlo de nuevo en su caja original .

28
e. Almacenar en un lugar seco y no accesible para niños o las mascotas.
Para devolver esta unidad por garantía o reparación
Es importante que empaquetar correctamente. Por favor, reutilizar todo la espuma de
poliestireno y cartón que la unidad fue entregada. Reempaque se hace a lo contrario a
la forma en que se abrió el paquete al recibirlo.
Selle aletas superiores de la caja de cartón con cinta de empaque y voltear la caja
al revés. (Apertura apuntando hacia el suelo).
Coloque la espuma de poliestireno y caja al revés en la parte superior de la
unidad.
Voltear la unidad y la caja encima, colocar la espuma de poliestireno de fondo y
cartón "tope" de la unidad.
Asegure con cinta adhesiva la parte inferior de la caja con cinta de empaque.
Por favor, ponga la etiqueta de retorno sobre la aleta superior. Usted está listo para el envío !
Recuerdo:
Unidad contiene R410A. Residuos de productos eléctricos no deben desecharse con la basura
doméstica. Este producto debe tomarse al centro de reciclaje local para recibir tratamiento seguro.
Solución De Problemas
Problema Posibles Causas Acción Correctiva
La unidad no se inicia
al presionar el botón
on / off
Indicadores de agua completa parpadea y el
tanque de agua está lleno.
Drenar el agua del depósito de agua.
La temperatura del ambiente es superior a
la temperatura establecida.
Restablecer la temperatura
La temperatura de ambiente es inferior a la
temperatura del ambiente.
Restablecer la temperatura
No fría suficientemente Las puertas o ventanas no están cerradas. Asegúrese de que todas las ventanas y
puertas están cerradas.
Hay fuentes de calor dentro de la
habitación.
Retire las fuentes de calor, si es posible.
Manguera de aire de escape no está
conectado o bloqueado.
Conecte o limpie la manguera de aire de
escape.
Ajuste de la temperatura es demasiado alta. Restablecer la temperatura.
La entrada de aire está bloqueada. Limpie la entrada de aire y filtros.

29
La unidad tiene ruido /
fuerte
El suelo no está nivelado o no lo
suficientemente plana.
Coloque la unidad sobre una base
nivelada y plana si es posible.
El sonido viene del fluir del refrigerante
interior del aire acondicionado.
Es normal.
El compresor no
parece estar
funcionando
La protección contra el sobrecalentamiento
puede ser activado.
Espere 30 minutos hasta que la
temperatura ha disminuido, a
continuación, encienda de nuevo la
unidad.
El control remoto no
funciona
Señal de control remoto no es detectado por
el panel de control.
Asegúrese de que el control remoto está
apuntado correctamente en el panel de
control. Distancia demasiado grande.
Las baterías están agotadas. Revise las baterías del control remoto.
CH01 muestra código Fallo de sala en el sensor de temperatura Revise el sensor de la temperatura de
ambiente y circuitos relacionados
CH02 muestracódigo Fallo en el sensor de tubo de temperatura Revise el sensor de temperatura del tubo
y circuitos relacionados
E4 muestra código Protección de anticongelamiento
Restaurar las funciones de forma
automática una vez que la prot ección
anticongelante ha terminado.
muestra El tanque de agua en el chasis está llena
Vacíe el condensado y volver a encender
la unidad
ATENCIÓN:
Cuando se producen situaciones anormales, apague el acondicionador de aire y desenchúfelo de la toma de
corriente, por favor, mantenerse en contacto con un electricista profesional para obtener ayuda o llamar a servicio
al cliente profesional.

30
WARRANTY PERIOD:
Labor: 1 Year from the Date of Purchase.
Parts: 1 Year from the Date of Purchase.
Compressor: 3 Years from the Date of Purchase.
GLOBAL AIR
SERVICE CENTER
1941 S.Vineyard Ave.Ste.6
Ontario.CA 91761
Tel: 909-974-2859
Fax: 909-974-2865
Hours: 8:30AM-5:00PM PST
TO OBTAIN WARRANTY SERVICE
Contact Global air Technical Support
Email:[email protected]
Phone: 888.470.7342
From 8:30AM to 5:00PM Monday through Friday Pacific Time.