Embed Size (px)
Citation preview
LT260/LT240/LT220Portable Projector
Important Information
Safety Cautions .................................................... E-1What's in the Box? ............................................... E-4Replacing the Lamp ............................................. E-5Specifications ....................................................... E-6
CONTENTS [English]
Sicherheitshinweise ............................................. G-1Inhalt des Verpackungskartons ............................ G-4Austausch der Projektionslampe .......................... G-5Technische Daten ................................................ G-6
INHALT [Deutsch]
Consignes de sécurité ......................................... F-1Que contient la boîte? .......................................... F-4Remplacement de la lampe ................................. F-5Caractéristiques ................................................... F-6
CONTENU [Français]
Precauzioni di sicurezza ........................................ I-1Che cosa contiene la scatola? ............................... I-4Sostituzione della lampada .................................... I-5Specifiche .............................................................. I-6
INDICE [Italiano]
Precauciónes ....................................................... S-1¿Qué hay en la caja? ........................................... S-4Reemplazo de la lámpara .................................... S-5Especificaciones .................................................. S-6
ÍNDICE [Español]
Säkerhetsforeskrifter ........................................... W-1Vad innehåller kartongen? .................................. W-4Lampbyte ............................................................ W-5Specifikationer .................................................... W-6
INNEHÅLL [Svenska]
E-1
LT260/LT240/LT220Portable Projector
Important Information
Safety Cautions
PrecautionsPlease read this manual carefully before using your NEC LT260/LT240/LT220 Projector and keep themanual handy for future reference. Your serial number is located on the bottom of your projector. Recordit here:
CAUTIONTo turn off main power, be sure to remove the plug from power outlet.The power outlet socket should be installed as near to the equipment as possible, andshould be easily accessible.
CAUTIONTO PREVENT SHOCK, DO NOT OPEN THE CABINET.NO USER-SERVICEABLE PARTS INSIDE.REFER SERVICING TO QUALIFIED NEC SERVICE PERSONNEL.
This symbol warns the user that uninsulated voltage within the unit may be sufficient tocause electrical shock. Therefore, it is dangerous to make any kind of contact with anypart inside of the unit.
This symbol alerts the user that important information concerning the operation andmaintenance of this unit has been provided.The information should be read carefully to avoid problems.
WARNINGTO PREVENT FIRE OR SHOCK, DO NOT EXPOSE THIS UNIT TO RAIN OR MOISTURE.DO NOT USE THIS UNIT’S GROUNDED PLUG WITH AN EXTENSION CORD OR IN AN OUTLETUNLESS ALL THREE PRONGS CAN BE FULLY INSERTED.DO NOT OPEN THE CABINET. THERE ARE HIGH-VOLTAGE COMPONENTS INSIDE. ALL SER-VICING MUST BE DONE BY QUALIFIED NEC SERVICE PERSONNEL.
DOC Compliance NoticeThis Class B digital apparatus meets all requirements of the Canadian Interference-CausingEquipment Regulations.
3. GSGV Acoustic Noise Information Ordinance:The sound pressure level is less than 70 dB (A) accord-ingto ISO 3744 or ISO 7779.

E-2
This label is on the side of the remote control.
RF Interference
WARNINGThe Federal Communications Commission does not allow any modifications or changes tothe unit EXCEPT those specified by NEC Soluctions (America), Inc. in this manual. Failure tocomply with this government regulation could void your right to operate this equipment. Thisequipment has been tested and found to comply with the limits for a Class B digital device,pursuant to Part 15 of the FCC Rules. These limits are designed to provide reasonable protec-tion against harmful interference in a residential installation. This equipment generates, uses,and can radiate radio frequency energy and, if not installed and used in accordance with theinstructions, may cause harmful interference to radio communications. However, there is noguarantee that interference will not occur in a particular installation. If this equipment doescause harmful interference to radio or television reception, which can be determined by turn-ing the equipment off and on, the user is encouraged to try to correct the interference by oneor more of the following measures:• Reorient or relocate the receiving antenna.• Increase the separation between the equipment and receiver.• Connect the equipment into an outlet on a circuit different from that to which the receiver is con-
nected.• Consult the dealer or an experienced radio / TV technician for help.
In UK, a BS approved power cable with moulded plug has a Black (five Amps) fuse installed for use withthis equipment. If a power cable is not supplied with this equipment please contact your supplier.
Important SafeguardsThese safety instructions are to ensure the long life of your projector and to prevent fire and shock.Please read them carefully and heed all warnings.
Installation1. For best results, use your projector in a darkened room.2. Place the projector on a flat, level surface in a dry area away from dust and moisture.3. Do not place your projector in direct sunlight, near heaters or heat radiating appliances.4. Exposure to direct sunlight, smoke or steam can harm internal components.5. Handle your projector carefully. Dropping or jarring can damage internal components.6. Do not place heavy objects on top of the projector.7. If you wish to have the projector installed on the ceiling:
a. Do not attempt to install the projector yourself.b. The projector must be installed by qualified technicians in order to ensure proper operation and
reduce the risk of bodily injury.c. In addition, the ceiling must be strong enough to support the projector and the installation must be
in accordance with any local building codes.d. Please consult your dealer for more information.
CAUTIONDo not look into the laser pointer while itis on and do not point the laser beam ata person. Serious injury could result.

E-3
Fire and Shock Precautions1. Ensure that there is sufficient ventilation and that vents are unobstructed to prevent the build-up of
heat inside your projector. Allow at least 3 inches (10 cm) of space between your projector and a wall.
2. Prevent foreign objects such as paper clips and bits of paper from falling into your projector.
Do not attempt to retrieve any objects that might fall into your projector. Do not insert any metal objectssuch as a wire or screwdriver into your projector. If something should fall into your projector, discon-nect it immediately and have the object removed by a qualified NEC service personnel.
3. Do not place any liquids on top of your projector.
4 Do not look into the lens while the projector is on. Serious damage to your eyes could result.
5 Keep any items such as magnifying glass out of the light path of the projector. The light being pro-jected from the lens is extensive, therefore any kind of abnormal objects that can redirect light comingout of the lens, can cause unpredictable outcome such as fire or injury to the eyes.
6 Do not cover the lens with the supplied lens cap or equivalent while the projector is on. Doing so canlead to melting of the cap and possibly burning your hands due to the heat emitted from the lightoutput.
7. The projector is designed to operate on a power supply of 100-120 or 200-240 V 50/60 Hz AC. Ensurethat your power supply fits this requirement before attempting to use your projector.
8. Handle the power cable carefully and avoid excessive bending.
A damaged cord can cause electric shock or fire.
9. If the projector is not to be used for an extended period of time, disconnect the plug from the poweroutlet.
CAUTION1. Do not try to touch the ventilation outlet on the front as it can become heated while the projector is
turned on.
2. Do no use the tilt-foot for purposes other than originally intended. Misuses such as gripping the tilt-footor hanging on the wall can cause damage to the projector.
3. Enable Fan High-Speed mode if you continue to use the projector for consecutive days. (From theAdvanced menu, select [Projector Options] → [Setup] → [Page 4] → [Fan High Speed Mode].)
4. Do not unplug the power cable from the wall outlet under any one of the following circumstances.
Doing so can cause damage to the projector:
* While the Hour Glass icon appears.
* While the message "Please wait a moment." appears. This message will be displayed after theprojector is turned off.
* While the cooling fans are running. (The cooling fans continue to work for 90 seconds after theprojector is turned off).
5. Do not eject the PC card while its data is being accessed. Doing so can damage your PC card data.
Lamp Replacement• To replace the lamp, follow all instructions provided on page E-5.
• Be sure to replace the lamp when the message "The lamp has reached the end of its usable life.Please replace the lamp." appears. If you continue to use the lamp after the lamp has reached theend of its usable life, the lamp bulb may shatter, and pieces of glass may be scattered in the lampcase. Do not touch them as the pieces of glass may cause injury.
If this happens, contact your NEC dealer for lamp replacement.
• Allow a minimum of 90 seconds to elapse after turning off the projector. Then turn off the main powerswitch, disconnect the power cable and allow 60 minutes to cool the projector before replacing thelamp.
E-4
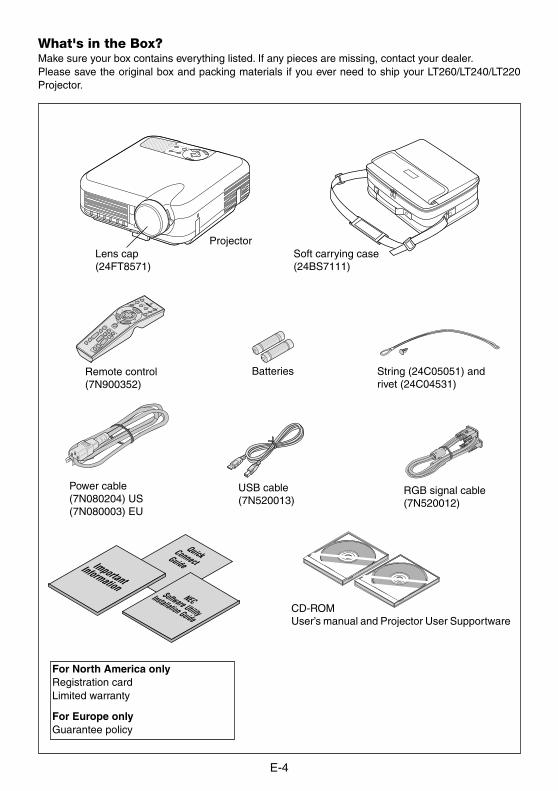
What's in the Box?Make sure your box contains everything listed. If any pieces are missing, contact your dealer.Please save the original box and packing materials if you ever need to ship your LT260/LT240/LT220Projector.
Lens cap(24FT8571)
Remote control(7N900352)
Power cable(7N080204) US(7N080003) EU
Projector
String (24C05051) andrivet (24C04531)
RGB signal cable(7N520012)
Soft carrying case(24BS7111)
CD-ROMUser’s manual and Projector User Supportware
OFFVIDEOAUTO ADJ.
S-VIDEORGB1
RGB2LASER
POWER
ON
PJASPECT
3D REFORM
HELPPOINTER
VOLUMEMAGNIFY
PICTUREPIC-MUTE
VIEWERSLIDE
FOLDERSLIDE
LIST
SELECT
FREEZE
USB cable(7N520013)
QuickConnectGuide
NECSoftware Utility
Installation Guide
ImportantInformation
Batteries
SELECT
CNACEL
TER
NE
E MNU
SOURCEAUTO ADJUST
ON STAND BYSTATUS POWER
LAMP
ALIGNMENT
PC-CARD
For North America onlyRegistration cardLimited warranty
For Europe onlyGuarantee policy
E-5
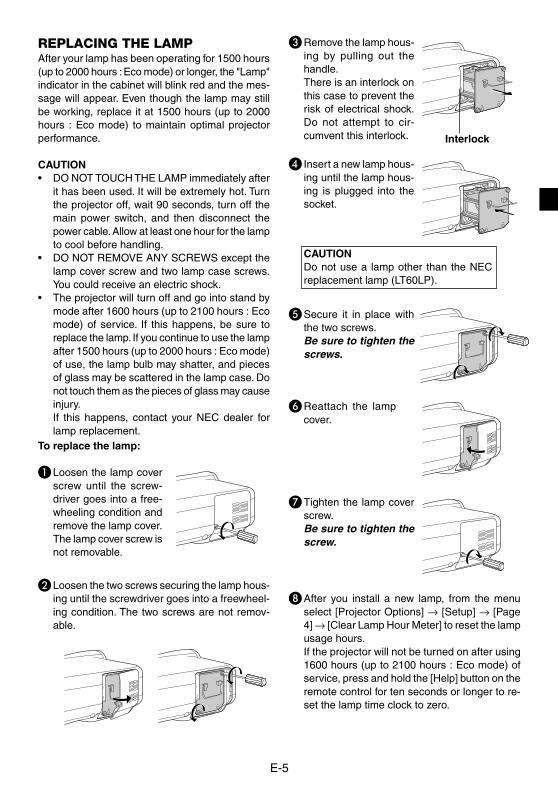
� Loosen the two screws securing the lamp hous-ing until the screwdriver goes into a freewheel-ing condition. The two screws are not remov-able.
REPLACING THE LAMPAfter your lamp has been operating for 1500 hours(up to 2000 hours : Eco mode) or longer, the "Lamp"indicator in the cabinet will blink red and the mes-sage will appear. Even though the lamp may stillbe working, replace it at 1500 hours (up to 2000hours : Eco mode) to maintain optimal projectorperformance.
CAUTION• DO NOT TOUCH THE LAMP immediately after
it has been used. It will be extremely hot. Turnthe projector off, wait 90 seconds, turn off themain power switch, and then disconnect thepower cable. Allow at least one hour for the lampto cool before handling.
• DO NOT REMOVE ANY SCREWS except thelamp cover screw and two lamp case screws.You could receive an electric shock.
• The projector will turn off and go into stand bymode after 1600 hours (up to 2100 hours : Ecomode) of service. If this happens, be sure toreplace the lamp. If you continue to use the lampafter 1500 hours (up to 2000 hours : Eco mode)of use, the lamp bulb may shatter, and piecesof glass may be scattered in the lamp case. Donot touch them as the pieces of glass may causeinjury.If this happens, contact your NEC dealer forlamp replacement.
� After you install a new lamp, from the menuselect [Projector Options] → [Setup] → [Page4] → [Clear Lamp Hour Meter] to reset the lampusage hours.If the projector will not be turned on after using1600 hours (up to 2100 hours : Eco mode) ofservice, press and hold the [Help] button on theremote control for ten seconds or longer to re-set the lamp time clock to zero.
� Tighten the lamp coverscrew.Be sure to tighten thescrew.
� Reattach the lampcover.
� Secure it in place withthe two screws.Be sure to tighten thescrews.
CAUTIONDo not use a lamp other than the NECreplacement lamp (LT60LP).
� Insert a new lamp hous-ing until the lamp hous-ing is plugged into thesocket.
� Remove the lamp hous-ing by pulling out thehandle.There is an interlock onthis case to prevent therisk of electrical shock.Do not attempt to cir-cumvent this interlock.
To replace the lamp:
� Loosen the lamp coverscrew until the screw-driver goes into a free-wheeling condition andremove the lamp cover.The lamp cover screw isnot removable.
Interlock
E-6
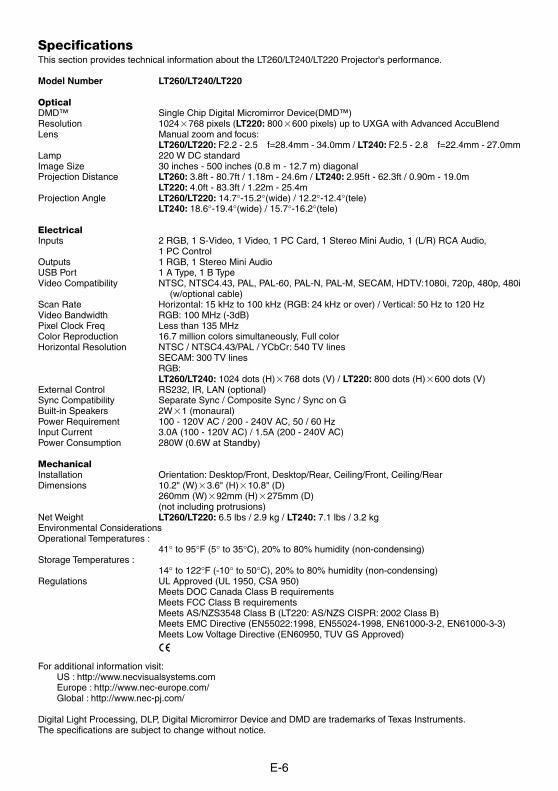
SpecificationsThis section provides technical information about the LT260/LT240/LT220 Projector's performance.
Model Number LT260/LT240/LT220
OpticalDMD™ Single Chip Digital Micromirror Device(DMD™)Resolution 1024�768 pixels (LT220: 800�600 pixels) up to UXGA with Advanced AccuBlendLens Manual zoom and focus:
LT260/LT220: F2.2 - 2.5 f=28.4mm - 34.0mm / LT240: F2.5 - 2.8 f=22.4mm - 27.0mmLamp 220 W DC standardImage Size 30 inches - 500 inches (0.8 m - 12.7 m) diagonalProjection Distance LT260: 3.8ft - 80.7ft / 1.18m - 24.6m / LT240: 2.95ft - 62.3ft / 0.90m - 19.0m
LT220: 4.0ft - 83.3ft / 1.22m - 25.4mProjection Angle LT260/LT220: 14.7°-15.2°(wide) / 12.2°-12.4°(tele)
LT240: 18.6°-19.4°(wide) / 15.7°-16.2°(tele)
ElectricalInputs 2 RGB, 1 S-Video, 1 Video, 1 PC Card, 1 Stereo Mini Audio, 1 (L/R) RCA Audio,
1 PC ControlOutputs 1 RGB, 1 Stereo Mini AudioUSB Port 1 A Type, 1 B TypeVideo Compatibility NTSC, NTSC4.43, PAL, PAL-60, PAL-N, PAL-M, SECAM, HDTV:1080i, 720p, 480p, 480i
(w/optional cable)Scan Rate Horizontal: 15 kHz to 100 kHz (RGB: 24 kHz or over) / Vertical: 50 Hz to 120 HzVideo Bandwidth RGB: 100 MHz (-3dB)Pixel Clock Freq Less than 135 MHzColor Reproduction 16.7 million colors simultaneously, Full colorHorizontal Resolution NTSC / NTSC4.43/PAL / YCbCr: 540 TV lines
SECAM: 300 TV linesRGB:LT260/LT240: 1024 dots (H)�768 dots (V) / LT220: 800 dots (H)�600 dots (V)
External Control RS232, IR, LAN (optional)Sync Compatibility Separate Sync / Composite Sync / Sync on GBuilt-in Speakers 2W�1 (monaural)Power Requirement 100 - 120V AC / 200 - 240V AC, 50 / 60 HzInput Current 3.0A (100 - 120V AC) / 1.5A (200 - 240V AC)Power Consumption 280W (0.6W at Standby)
MechanicalInstallation Orientation: Desktop/Front, Desktop/Rear, Ceiling/Front, Ceiling/RearDimensions 10.2" (W)�3.6" (H)�10.8" (D)
260mm (W)�92mm (H)�275mm (D)(not including protrusions)
Net Weight LT260/LT220: 6.5 lbs / 2.9 kg / LT240: 7.1 lbs / 3.2 kgEnvironmental ConsiderationsOperational Temperatures :
41° to 95°F (5° to 35°C), 20% to 80% humidity (non-condensing)Storage Temperatures :
14° to 122°F (-10° to 50°C), 20% to 80% humidity (non-condensing)Regulations UL Approved (UL 1950, CSA 950)
Meets DOC Canada Class B requirementsMeets FCC Class B requirementsMeets AS/NZS3548 Class B (LT220: AS/NZS CISPR: 2002 Class B)Meets EMC Directive (EN55022:1998, EN55024-1998, EN61000-3-2, EN61000-3-3)Meets Low Voltage Directive (EN60950, TUV GS Approved)
For additional information visit:US : http://www.necvisualsystems.comEurope : http://www.nec-europe.com/Global : http://www.nec-pj.com/
Digital Light Processing, DLP, Digital Micromirror Device and DMD are trademarks of Texas Instruments.The specifications are subject to change without notice.
G-1
LT260/LT240/LT220Tragbarer Projektor
Wichtige Informationen
Sicherheitshinweise
VorsichtsmaßnahmenLesen Sie sich dieses Handbuch bitte sorgfältig durch, bevor Sie den NEC LT260/LT240/LT220 Projektorbenutzen, und bewahren Sie das Bedienungshandbuch in greifbarer Nähe als spätere Referenz auf.Die Seriennummer des Gerätes befindet sich unter Ihrem Projektor. Notieren Sie hier:
VORSICHTZum Ausschalten der Hauptspannung müssen Sie unbedingt den Netzstecker von derNetzsteckdose abziehen.Die Netzsteckdose sollte so nahe wie möglich am Gerät installiert werden und jederzeitleicht zugänglich sein.
VORSICHTUM EINEN ELEKTRISCHEN SCHLAG ZU VERMEIDEN, SOLLTEN SIE DASGEHÄUSE NICHT ÖFFNEN.IM INNEREN DES GERÄTES BEFINDEN SICH KEINE BAUTEILE, DIE VOMBENUTZER SELBST GEWARTET WERDEN KÖNNTEN. ÜBERLASSEN SIESÄMTLICHE SERVICEARBEITEN QUALIFIZIERTEM NEC-SERVICEPERSONAL.
Dieses Symbol warnt den Benutzer vor unisolierter Spannung im Inneren des Gerätes,die einen elektrischen Schlag verursachen kann. Daher ist der Kontakt mit sämtlicheninneren Geräte-Bauteilen gefährlich.
Dieses Symbol macht den Benutzer darauf aufmerksam, daß dem Gerät wichtige denBetrieb und die Wartung betreffende Informationen beigefügt sind. Diese Informationensollten zur Vermeidung von Störungen unbedingt sorgfältig gelesen und beachtet werden.
WARNUNGUM EINE BRANDGEFAHR BZW. DIE GEFAHR EINES ELEKTRISCHEN SCHLAGES ZUVERMEIDEN, DARF DIESES GERÄT WEDER REGEN NOCH FEUCHTIGKEIT AUSGESETZTWERDEN. VERWENDEN SIE NICHT DEN GEERDETEN STECKER DIESER EINHEIT MIT EINEMVERLÄNGERUNGSKABEL ODER EINER STECKDOSE, IN DIE NICHT ALLE DREI STIFTEVOLLSTÄNDIG EINGESTECKT WERDEN KÖNNEN. ÖFFNEN SIE NICHT DAS GEHÄUSE. IMINNEREN BEFINDEN SICH HOCHSPANNUNGSFÜHRENDE BAUTEILE. ÜBERLASSEN SIESÄMTLICHE SERVICEARBEITEN QUALIFIZIERTEM NEC-SERVICEPERSONAL.
3. GSGV Geräuschemissionsverordnung:Der Schalldruckpegel beträgt entsprechend ISO 3744 oder ISO 7779 weniger als 70 dB (A).
G-2
Dieses Etikett ist an der Seite der Fernbedienungangebracht.
Wichtige SicherheitshinweiseDiese Sicherheitshinweise sollen eine lange Lebensdauer Ihres Projektors sicherstellen und vor Feuerund elektrischen Schlägen schützen. Lesen Sie diese Hinweise sorgfältig durch und beachten Sie alleWarnungen.
Installation1. Um beste Resultate zu erreichen, empfielt es sich, den Projektor in einem abgedunkelten Raum zu
betreiben.
2. Stellen Sie den Projektor auf eine flache, waagerechte Fläche in einer trockenen Umgebung; frei vonStaub und Feuchtigkeit.
3. Stellen Sie den Projektor weder in direktes Sonnenlicht noch in die Nähe einer Heizung oder sonstigerHitze abstrahlender Einrichtungen.
4. Wenn das Gerät direktem Sonnenlicht, Rauch oder Dampf ausgesetzt wird, können interneKomponenten beschädigt werden.
5. Behandeln Sie Ihren Projektor vorsichtig. Fallenlassen oder starkes Schütteln kann interneKomponenten beschädigen.
6. Legen Sie keine schweren Gegenstände auf den Projektor.
7. Wenn der Projektor an der Decke installiert werden soll:
a. Versuchen Sie nicht, den Projektor selbst zu installieren.
b. Der Projektor muß von qualifiziertem NEC-Servicepersonal installiert werden, um einenordnungsgemäßen Betrieb sicherzustellen und die Verletzungsgefahr zu reduzieren.
c. Die Decke muß für das Gewicht des Projektors ausreichende Festigkeit aufweisen und die Instal-lation muß entsprechend den örtlichen Bauvorschriften ausgeführt werden.
d. Weitere Informationen erhalten Sie von Ihrem Fachhändler.
VORSICHTSchauen Sie nicht in den Laser-Zeiger,solange dieser eingeschaltet ist undrichten Sie den Laserstrahl nicht aufandere Personen. Dies könnte schwereAugen-verletzungen zur Folge haben.
G-3
Vorkehrungen gegen Feuer und elektrische Schläge1. Stellen Sie ausreichende Belüftung sicher und daß die Belüftungsöffnungen frei bleiben, damit sich
innerhalb des Projektors kein Hitzestau bilden kann. Lassen Sie mindestens 10 cm Abstand zwischenIhrem Projektor und der Wand.
2. Vermeiden Sie, daß fremde Objekte wie Büroklammern und Papierstückchen in den Projektor fallen.Versuchen Sie nicht, in den Projektor gefallene Objekte zu entfernen. Stecken Sie keine metallenenGegenstände wie Schraubendreher oder Drähte in Ihren Projektor. Wenn etwas in den Projektor fiel,ziehen Sie sofort den Netzstecker heraus und lassen Sie den Gegenstand durch qualifiziertes NEC-Servicepersonal entfernen.
3. Stellen Sie keine Gefäße mit Flüssigkeiten auf Ihren Projektor ab.4. Schauen Sie nicht in die Linse, wenn der Projektor eingeschaltet ist. Dies könnte schwere
Augenverietzungen zur Folge haben.5. Lichtkegel des Projektors fern. Da das von der Linse projizierte Licht umfassend ist, können alle
abnormalen Gegenstände, die in der Lage sind, das aus der Linse austretende Licht umzulenken,unvorhersehbare Ereignisse wie z.B. einen Brand oder Augenverletzungen verursachen.
6. Bedecken Sie die Linse nicht mit der mitgelieferten Linsenkape o.ä. wärend der Projektor eingeschaltetist. Dies kann ein Schmelzen der Kappe verursachen. Darüber hinaus würden Sie sich aufgrund dervom Lichtausgang abgestrahlten Hitze wahrscheinlich die Hände verbrennen.
7. Der Projektor wurde für eine Netzspannung von 100-120 V oder 200-240 V, 50/60 Hz Wechselstromkonzipiert. Stellen Sie sicher, daß die vorhandene Spannungsversorgung diesen Vorgaben entspricht,bevor Sie versuchen, Ihren Projektor zu betreiben.
8. Behandeln Sie das Netzkabel vorsichtig und vermeiden Sie Knicke. Ein beschädigtes Netzkabel kannelektrische Schläge oder einen Brand verursachen.
9. Wenn der Projektor über eine längere Zeit nicht benutzt wird, ziehen Sie den Stecker aus der Netzsteckdose.
Vorsicht1. Berühren Sie nicht die Lüftungsöffnung auf der Vorderseite des Projektors, da sie sich während des
Projektorbetriebs erhitzt.2. Benutzen Sie den Kippfuß für keinen anderen als den beabsichtigten Zweck. Ein Missbrauch wie z.B.
das Benutzen des Kippfußes als Griff oder Aufhänger für die Wandmontage kann zu einer Beschädigungdes Projektors führen.
3. Aktivieren Sie den Hochgeschwindigkeits-Modus, wenn Sie den Projektor mehrere Tage hintereinanderbenutzen möchten. (Wählen Sie im Advanced-Menü [Projektor-Optionen] → [Einrichten] → [Seite 4]→ [Hochgeschwindigkeits-Lüfter-Modus].)
4. In folgenden Fällen das Netzkabel nicht aus der Steckdose ziehen, da dies den Projektor beschädigen könnte:* Während das Sanduhr-Symbol angezeigt wird.* Während die Mitteilung “Bitte warten Sie einen Augenblick” angezeigt wird. Diese Mitteilung wird
angezeigt, nachdem der Projektor ausgeschaltet wurde.* Während die erfrischenden Fächer laufen. (Das Kühlgebläse arbeitet noch für 90 Sekunden,
nachdem der Projektor ausgeschaltet wurde).5. Nehmen Sie die PC-Karte nicht heraus, wenn auf die Daten zugegriffen wird. Andernfalls könnten Ihre
PC-Kartendaten beschädigt werden.
Lampenaustausch• Führen Sie den Lampenaustausch entsprechend der auf Seite G-5 beschriebenen Anweisungen aus.• Tauschen Sie die Lampe aus, wenn die Meldung “Das Ende der Lampenlebensdauer ist erreicht. Bitte
ersetzen Sie die Lampe.” erscheint. Bei einer Weiterbenutzung der Lampe kann die Glühbirne platzenund Glasscherben könnten im Lampengehäuse zerstreut werden. kann die Birne platzen und die einzelnenGlasstücke werden im Lampengehäuse verstreut. Berühren Sie die Glasstücke nicht -Sie könnten sichdaran verletzen. Wenn dies passiert, wenden Sie sich an Ihren NEC-Fachhändler zum Lampenaustausch.
• Warten Sie nach dem Ausschalten des Projektors mindestens 90 Sekunden. Schalten Sie danachden Hauptnetzschalter aus, ziehen Sie das Netzkabel ab und lassen Sie den Projektor 60 Minutenabkühlen, bevor die Lampe ausgetauscht wird.
G-4
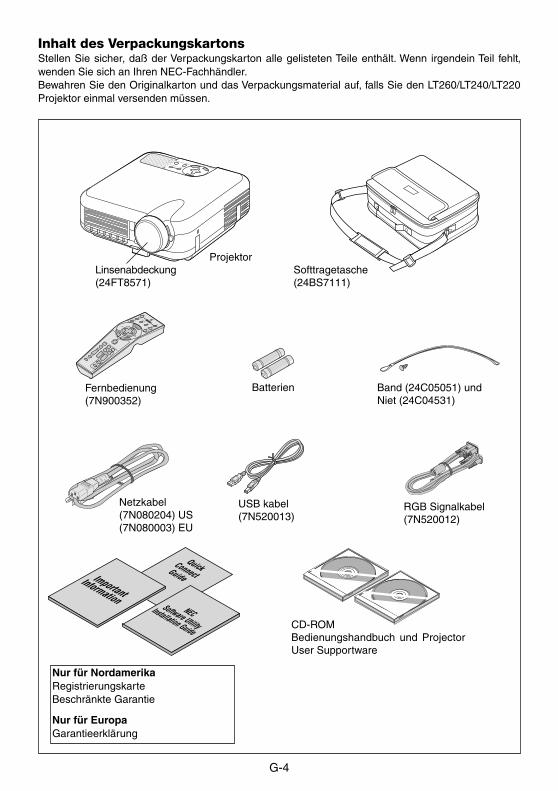
Inhalt des VerpackungskartonsStellen Sie sicher‚ daß der Verpackungskarton alle gelisteten Teile enthält. Wenn irgendein Teil fehlt‚wenden Sie sich an Ihren NEC-Fachhändler.Bewahren Sie den Originalkarton und das Verpackungsmaterial auf‚ falls Sie den LT260/LT240/LT220Projektor einmal versenden müssen.
Linsenabdeckung(24FT8571)
Fernbedienung(7N900352)
Netzkabel(7N080204) US(7N080003) EU
Projektor
Band (24C05051) undNiet (24C04531)
RGB Signalkabel(7N520012)
Softtragetasche(24BS7111)
CD-ROMBedienungshandbuch und ProjectorUser Supportware
OFFVIDEOAUTO ADJ.
S-VIDEORGB1
RGB2LASER
POWER
ON
PJASPECT
3D REFORM
HELPPOINTER
VOLUMEMAGNIFY
PICTUREPIC-MUTE
VIEWERSLIDE
FOLDERSLIDE
LIST
SELECT
FREEZE
USB kabel(7N520013)
QuickConnectGuide
NECSoftware Utility
Installation Guide
ImportantInformation
Batterien
SELECT
CNACEL
TER
NE
E MNU
SOURCEAUTO ADJUST
ON STAND BYSTATUS POWER
LAMP
ALIGNMENT
PC-CARD
Nur für NordamerikaRegistrierungskarteBeschränkte Garantie
Nur für EuropaGarantieerklärung
G-5
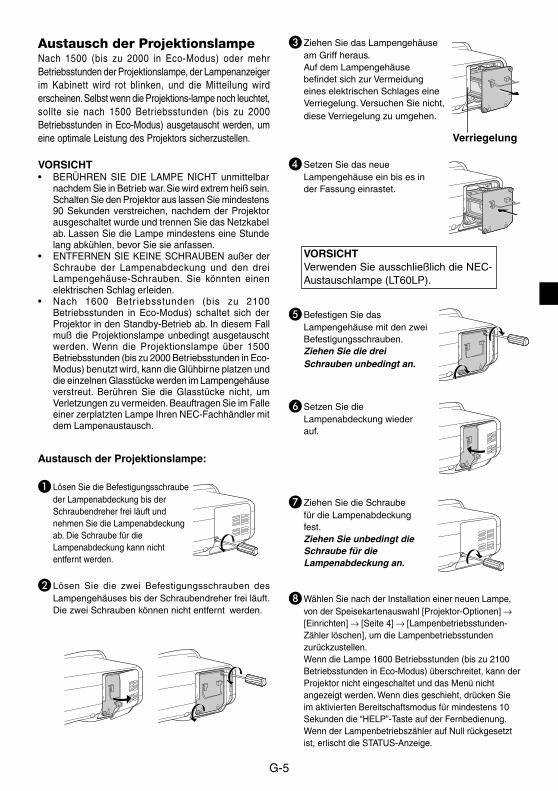
� Lösen Sie die zwei Befestigungsschrauben desLampengehäuses bis der Schraubendreher frei läuft.Die zwei Schrauben können nicht entfernt werden.
Austausch der ProjektionslampeNach 1500 (bis zu 2000 in Eco-Modus) oder mehrBetriebsstunden der Projektionslampe, der Lampenanzeigerim Kabinett wird rot blinken, und die Mitteilung wirderscheinen. Selbst wenn die Projektions-lampe noch leuchtet,sollte sie nach 1500 Betriebsstunden (bis zu 2000Betriebsstunden in Eco-Modus) ausgetauscht werden, umeine optimale Leistung des Projektors sicherzustellen.
VORSICHT• BERÜHREN SIE DIE LAMPE NICHT unmittelbar
nachdem Sie in Betrieb war. Sie wird extrem heiß sein.Schalten Sie den Projektor aus lassen Sie mindestens90 Sekunden verstreichen, nachdem der Projektorausgeschaltet wurde und trennen Sie das Netzkabelab. Lassen Sie die Lampe mindestens eine Stundelang abkühlen, bevor Sie sie anfassen.
• ENTFERNEN SIE KEINE SCHRAUBEN außer derSchraube der Lampenabdeckung und den dreiLampengehäuse-Schrauben. Sie könnten einenelektrischen Schlag erleiden.
• Nach 1600 Betr iebsstunden (bis zu 2100Betriebsstunden in Eco-Modus) schaltet sich derProjektor in den Standby-Betrieb ab. In diesem Fallmuß die Projektionslampe unbedingt ausgetauschtwerden. Wenn die Projektionslampe über 1500Betriebsstunden (bis zu 2000 Betriebsstunden in Eco-Modus) benutzt wird, kann die Glühbirne platzen unddie einzelnen Glasstücke werden im Lampengehäuseverstreut. Berühren Sie die Glasstücke nicht, umVerletzungen zu vermeiden. Beauftragen Sie im Falleeiner zerplatzten Lampe Ihren NEC-Fachhändler mitdem Lampenaustausch.
� Wählen Sie nach der Installation einer neuen Lampe,von der Speisekartenauswahl [Projektor-Optionen] →[Einrichten] → [Seite 4] → [Lampenbetriebsstunden-Zähler löschen], um die Lampenbetriebsstundenzurückzustellen.Wenn die Lampe 1600 Betriebsstunden (bis zu 2100Betriebsstunden in Eco-Modus) überschreitet, kann derProjektor nicht eingeschaltet und das Menü nichtangezeigt werden. Wenn dies geschieht, drücken Sieim aktivierten Bereitschaftsmodus für mindestens 10Sekunden die “HELP”-Taste auf der Fernbedienung.Wenn der Lampenbetriebszähler auf Null rückgesetztist, erlischt die STATUS-Anzeige.
� Ziehen Sie die Schraubefür die Lampenabdeckungfest.Ziehen Sie unbedingt dieSchraube für dieLampenabdeckung an.
� Setzen Sie dieLampenabdeckung wiederauf.
� Befestigen Sie dasLampengehäuse mit den zweiBefestigungsschrauben.Ziehen Sie die dreiSchrauben unbedingt an.
VORSICHTVerwenden Sie ausschließlich die NEC-Austauschlampe (LT60LP).
� Setzen Sie das neueLampengehäuse ein bis es inder Fassung einrastet.
� Ziehen Sie das Lampengehäuseam Griff heraus.Auf dem Lampengehäusebefindet sich zur Vermeidungeines elektrischen Schlages eineVerriegelung. Versuchen Sie nicht,diese Verriegelung zu umgehen.
� Lösen Sie die Befestigungsschraubeder Lampenabdeckung bis derSchraubendreher frei läuft undnehmen Sie die Lampenabdeckungab. Die Schraube für dieLampenabdeckung kann nichtentfernt werden.
Austausch der Projektionslampe:
Verriegelung
G-6
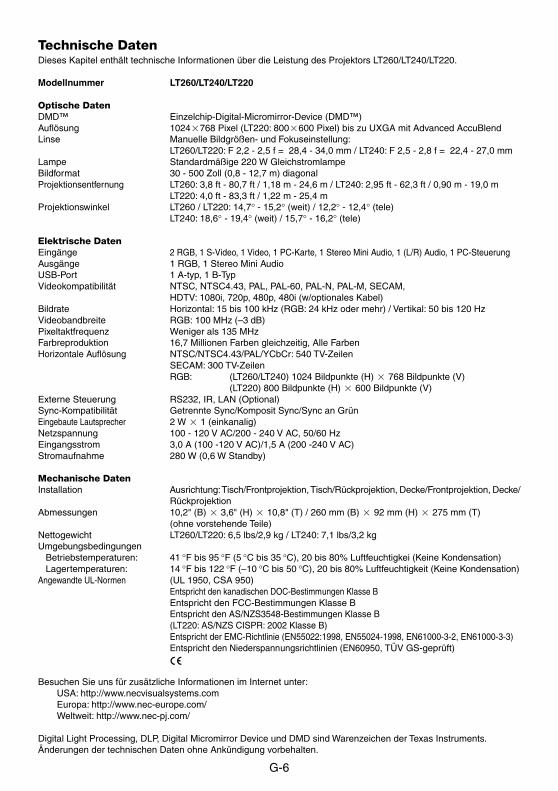
Technische DatenDieses Kapitel enthält technische Informationen über die Leistung des Projektors LT260/LT240/LT220.
Modellnummer LT260/LT240/LT220
Optische DatenDMD™ Einzelchip-Digital-Micromirror-Device (DMD™)Auflösung 1024�768 Pixel (LT220: 800�600 Pixel) bis zu UXGA mit Advanced AccuBlendLinse Manuelle Bildgrößen- und Fokuseinstellung:
LT260/LT220: F 2,2 - 2,5 f = 28,4 - 34,0 mm / LT240: F 2,5 - 2,8 f = 22,4 - 27,0 mmLampe Standardmäßige 220 W GleichstromlampeBildformat 30 - 500 Zoll (0,8 - 12,7 m) diagonalProjektionsentfernung LT260: 3,8 ft - 80,7 ft / 1,18 m - 24,6 m / LT240: 2,95 ft - 62,3 ft / 0,90 m - 19,0 m
LT220: 4,0 ft - 83,3 ft / 1,22 m - 25,4 mProjektionswinkel LT260 / LT220: 14,7° - 15,2° (weit) / 12,2° - 12,4° (tele)
LT240: 18,6° - 19,4° (weit) / 15,7° - 16,2° (tele)
Elektrische DatenEingänge 2 RGB, 1 S-Video, 1 Video, 1 PC-Karte, 1 Stereo Mini Audio, 1 (L/R) Audio, 1 PC-SteuerungAusgänge 1 RGB, 1 Stereo Mini AudioUSB-Port 1 A-typ, 1 B-TypVideokompatibilität NTSC, NTSC4.43, PAL, PAL-60, PAL-N, PAL-M, SECAM,
HDTV: 1080i, 720p, 480p, 480i (w/optionales Kabel)Bildrate Horizontal: 15 bis 100 kHz (RGB: 24 kHz oder mehr) / Vertikal: 50 bis 120 HzVideobandbreite RGB: 100 MHz (–3 dB)Pixeltaktfrequenz Weniger als 135 MHzFarbreproduktion 16,7 Millionen Farben gleichzeitig, Alle FarbenHorizontale Auflösung NTSC/NTSC4.43/PAL/YCbCr: 540 TV-Zeilen
SECAM: 300 TV-ZeilenRGB: (LT260/LT240) 1024 Bildpunkte (H) � 768 Bildpunkte (V)
(LT220) 800 Bildpunkte (H) � 600 Bildpunkte (V)Externe Steuerung RS232, IR, LAN (Optional)Sync-Kompatibilität Getrennte Sync/Komposit Sync/Sync an GrünEingebaute Lautsprecher 2 W � 1 (einkanalig)Netzspannung 100 - 120 V AC/200 - 240 V AC, 50/60 HzEingangsstrom 3,0 A (100 -120 V AC)/1,5 A (200 -240 V AC)Stromaufnahme 280 W (0,6 W Standby)
Mechanische DatenInstallation Ausrichtung: Tisch/Frontprojektion, Tisch/Rückprojektion, Decke/Frontprojektion, Decke/
RückprojektionAbmessungen 10,2" (B) � 3,6" (H) � 10,8" (T) / 260 mm (B) � 92 mm (H) � 275 mm (T)
(ohne vorstehende Teile)Nettogewicht LT260/LT220: 6,5 lbs/2,9 kg / LT240: 7,1 lbs/3,2 kgUmgebungsbedingungen Betriebstemperaturen: 41 °F bis 95 °F (5 °C bis 35 °C), 20 bis 80% Luftfeuchtigkei (Keine Kondensation) Lagertemperaturen: 14 °F bis 122 °F (–10 °C bis 50 °C), 20 bis 80% Luftfeuchtigkeit (Keine Kondensation)Angewandte UL-Normen (UL 1950, CSA 950)
Entspricht den kanadischen DOC-Bestimmungen Klasse BEntspricht den FCC-Bestimmungen Klasse BEntspricht den AS/NZS3548-Bestimmungen Klasse B(LT220: AS/NZS CISPR: 2002 Klasse B)Entspricht der EMC-Richtlinie (EN55022:1998, EN55024-1998, EN61000-3-2, EN61000-3-3)Entspricht den Niederspannungsrichtlinien (EN60950, TÜV GS-geprüft)
Besuchen Sie uns für zusätzliche Informationen im Internet unter:USA: http://www.necvisualsystems.comEuropa: http://www.nec-europe.com/Weltweit: http://www.nec-pj.com/
Digital Light Processing, DLP, Digital Micromirror Device und DMD sind Warenzeichen der Texas Instruments.Änderungen der technischen Daten ohne Ankündigung vorbehalten.

F-1
LT260/LT240/LT220Projecteur portable
Informations Importantes
Consignes de sécurité
PrécautionsVeuillez lire ce manuel avec attention avant d’utiliser votre projecteur NEC LT260/LT240/LT220 et gardezce manuel à portée de main afin de pouvoir y recourir facilement.Le numéro de série de votre appareil se trouve en dessous du projecteur. Veuillez le noter ici:
ATTENTIONPour couper complètement l’alimentation, retirez la prise du secteur.La prise du secteur doit être accessible et installée le plus près possible de l’appareil.
ATTENTIONPOUR ÉVITER TOUT CHOC ÉLECTRIQUE, N’OUVREZ PAS LE BOÎTIER.LES PIÈCES INTERNES NE SONT PAS RÉPARABLES PAR L’UTILISATEUR.POUR TOUTE RÉPARATION, ADRESSEZ-VOUS À UN RÉPARATEUR AGRÉE NEC.
Ce symbole avertit l’utilisateur que le contact avec certaines parties non isolées à l’intérieurde l’appareil risque de causer une électrocution. Il est donc dangereux de toucher quoique ce soit à l’intérieur de l’appareil.
Ce symbole avertit l’utilisateur que d’importantes informations sont fournies sur lefonctionnement ou l’entretien de cet appareil. Ces informations doivent être luesattentivement pour éviter tout problème.
AVERTISSEMENTAFIN DE PREVENIR TOUT RISQUE D’INCENDIE OU DE CHOC ÉLECTRIQUE, N’EXPOSEZ PASCET APPAREIL À LA PLUIE OU À L’HUMIDITÉ. N’UTILISEZ PAS LA PRISE AVEC TERRE DEL’APPAREIL AVEC UNE RALLONGE OU UNE AUTRE PRISE, A MOINS QUE LES TROISBROCHES PUISSENT ÊTRE COMPLETEMENT INSÉRÉES. N’OUVREZ PAS LE BOÎTIER. AL’INTÉRIEUR SE TROUVENT DES COMPOSANTS À HAUTE TENSION. TOUTE RÉPARATIONDOIT ÊTRE FAITE PAR DU PERSONNEL AGRÉE NEC.
DOC avis de conformationCet appareil numérique de la classe B respecte toutes les exigences du Règlement sur le MatérielBrouilleur du Canada.
3. Réglement sur les informations concernant les nuisances acoustiquesGSGV:Le niveau de pression sonore est inférieur à 70 dB (A) conformément à la norme ISO 3744 ou ISO 7779.
F-2
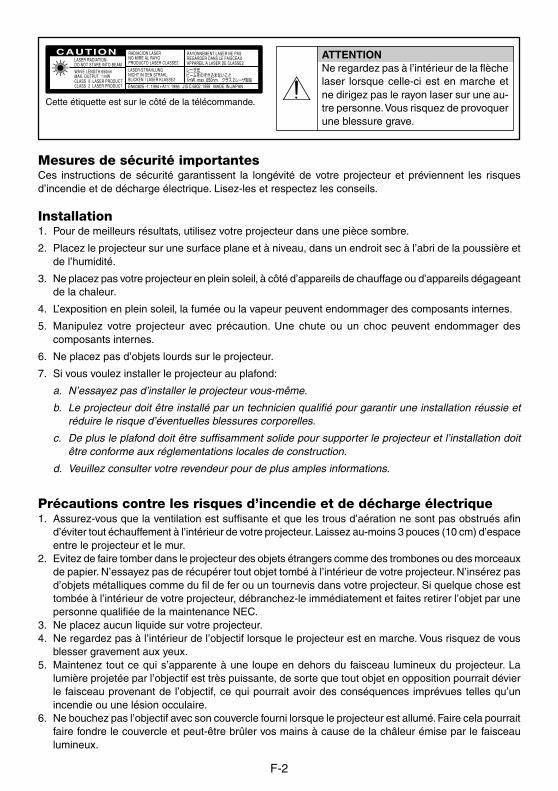
Cette étiquette est sur le côté de la télécommande.
Mesures de sécurité importantesCes instructions de sécurité garantissent la longévité de votre projecteur et préviennent les risquesd’incendie et de décharge électrique. Lisez-les et respectez les conseils.
Installation1. Pour de meilleurs résultats‚ utilisez votre projecteur dans une pièce sombre.
2. Placez le projecteur sur une surface plane et à niveau, dans un endroit sec à l’abri de la poussière etde l’humidité.
3. Ne placez pas votre projecteur en plein soleil‚ à côté d’appareils de chauffage ou d’appareils dégageantde la chaleur.
4. L’exposition en plein soleil‚ la fumée ou la vapeur peuvent endommager des composants internes.
5. Manipulez votre projecteur avec précaution. Une chute ou un choc peuvent endommager descomposants internes.
6. Ne placez pas d’objets lourds sur le projecteur.
7. Si vous voulez installer le projecteur au plafond:
a. N’essayez pas d’installer le projecteur vous-même.
b. Le projecteur doit être installé par un technicien qualifié pour garantir une installation réussie etréduire le risque d’éventuelles blessures corporelles.
c. De plus le plafond doit être suffisamment solide pour supporter le projecteur et l’installation doitêtre conforme aux réglementations locales de construction.
d. Veuillez consulter votre revendeur pour de plus amples informations.
Précautions contre les risques d’incendie et de décharge électrique1. Assurez-vous que la ventilation est suffisante et que les trous d’aération ne sont pas obstrués afin
d’éviter tout échauffement à l’intérieur de votre projecteur. Laissez au-moins 3 pouces (10 cm) d’espaceentre le projecteur et le mur.
2. Evitez de faire tomber dans le projecteur des objets étrangers comme des trombones ou des morceauxde papier. N’essayez pas de récupérer tout objet tombé à l’intérieur de votre projecteur. N’insérez pasd’objets métalliques comme du fil de fer ou un tournevis dans votre projecteur. Si quelque chose esttombée à l’intérieur de votre projecteur, débranchez-le immédiatement et faites retirer l’objet par unepersonne qualifiée de la maintenance NEC.
3. Ne placez aucun liquide sur votre projecteur.4. Ne regardez pas à l’intérieur de l’objectif lorsque le projecteur est en marche. Vous risquez de vous
blesser gravement aux yeux.5. Maintenez tout ce qui s’apparente à une loupe en dehors du faisceau lumineux du projecteur. La
lumière projetée par l’objectif est très puissante, de sorte que tout objet en opposition pourrait dévierle faisceau provenant de l’objectif, ce qui pourrait avoir des conséquences imprévues telles qu’unincendie ou une lésion occulaire.
6. Ne bouchez pas l’objectif avec son couvercle fourni lorsque le projecteur est allumé. Faire cela pourraitfaire fondre le couvercle et peut-être brûler vos mains à cause de la châleur émise par le faisceaulumineux.
ATTENTIONNe regardez pas à l’intérieur de la flèchelaser lorsque celle-ci est en marche etne dirigez pas le rayon laser sur une au-tre personne. Vous risquez de provoquerune blessure grave.
F-3
7. Ce projecteur est conçu pour fonctionner avec une alimentation électrique de 100-120 ou 200-240 V50/60 Hz. Assurez-vous que votre alimentation correspond à ces critères avant d’essayer d’utiliservotre projecteur.
8. Manipulez le câble d’alimentation avec précaution et évitez de l’entortiller. Tout câble endommagépeut provoquer une décharge électrique ou un incendie.
9. Si le projecteur ne doit pas être utilisé pendant longtemps, débranchez la prise de la sourced’alimentation.
Attention1. Ne pas toucher le trou de ventilation sur le panneau avant du projecteur, qui devient chaud lorsque le
projecteur fonctionne.2. Ne pas utiliser le pied à inclinasion réglable pour effectuer des réglages autres que ceux initialement
prévus. Des utilisations non appropriées, telles que le fait de saisir le pied à inclinaison réglable ou lesuspendre au mur peut endommager le projecteur.
3. Activer le mode grande vitesse du ventilateur si le projecteur continue à être utilisé pendant plusieursjours d'affilée. (A partir du menu Avancé, sélectionner [Options du projecteur] → [Paramétrage] →[Page 4] → [Mode ventilateur à vitesse rapide].)
4. Ne pas débrancher le câble d’alimentation de la prise du secteur dans les circonstances suivantes carcela risque d’endommager le projecteur:* Lorsque l’icone Hour Glass (vitre d’heure) apparaît.* Lorsque le message "Veuillez patientez un instant" apparaît. Ce message sera affiché après que
le projecteur soit éteint.* Pendant que les ventilateurs de refroidissement tournent. (Les ventilateurs de refroidissement
continuent à tourner pendant 90 secondes après l'extinction du projecteur).5. Ne pas éjecter la carte PC pendant l'accès à ses données. Ceci risque d'endommager les données de
la carte PC.
Remplacement de la lampe• Effectuez le remplacement de la lampe en fonction des instructions de la page F-5.• Assurez-vous de remplacer la lampe lorsque le message “La lampe a atteint sa durée de vie maxi-
mum, prière de la remplacer.” apparaît. Si vous continuer à l’utiliser au-delà de sa durée de vie,celle-ci risque d ’exploser et de répandre des fragments de verre à l’intérieur du boîtier. Ne les touchezpas car elles peuvent vous blesser.Dans ce cas, contactez votre revendeur NEC afin de procéder au remplacement de la lampe.
• Laisser s'écouler au moins 90 secondes après l'extinction du projecteur. Ensuite couper l'interrupteurprincipal, débrancher le câble d'alimentation et laisser le projecteur refroidir 60 minutes avant deremplacer la lampe.
F-4
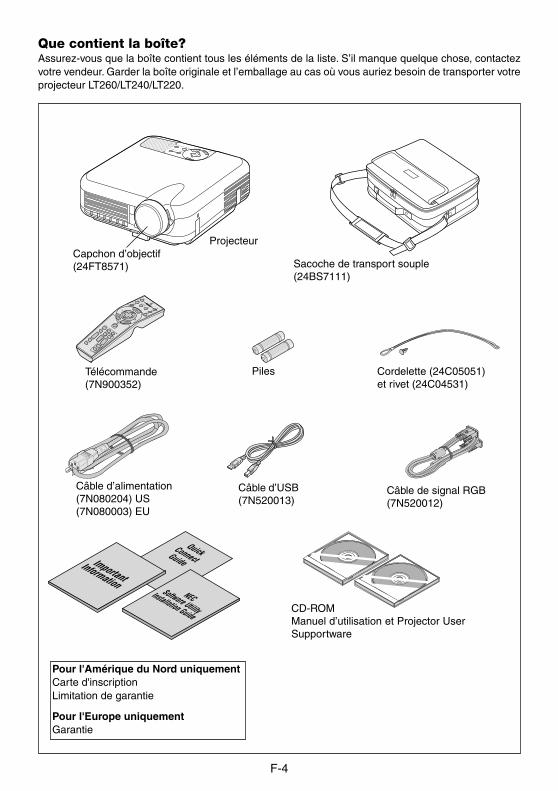
Que contient la boîte?Assurez-vous que la boîte contient tous les éléments de la liste. S’il manque quelque chose‚ contactezvotre vendeur. Garder la boîte originale et l’emballage au cas où vous auriez besoin de transporter votreprojecteur LT260/LT240/LT220.
Capchon d’objectif(24FT8571)
Télécommande(7N900352)
Câble d’alimentation(7N080204) US(7N080003) EU
Projecteur
Cordelette (24C05051)et rivet (24C04531)
Câble de signal RGB(7N520012)
Sacoche de transport souple(24BS7111)
CD-ROMManuel d’utilisation et Projector UserSupportware
OFFVIDEOAUTO ADJ.
S-VIDEORGB1
RGB2LASER
POWER
ON
PJASPECT
3D REFORM
HELPPOINTER
VOLUMEMAGNIFY
PICTUREPIC-MUTE
VIEWERSLIDE
FOLDERSLIDE
LIST
SELECT
FREEZE
Câble d’USB(7N520013)
QuickConnectGuide
NECSoftware Utility
Installation Guide
ImportantInformation
Piles
SELECT
CNACEL
TER
NE
E MNU
SOURCEAUTO ADJUST
ON STAND BYSTATUS POWER
LAMP
ALIGNMENT
PC-CARD
Pour l'Amérique du Nord uniquementCarte d'inscriptionLimitation de garantie
Pour l'Europe uniquementGarantie
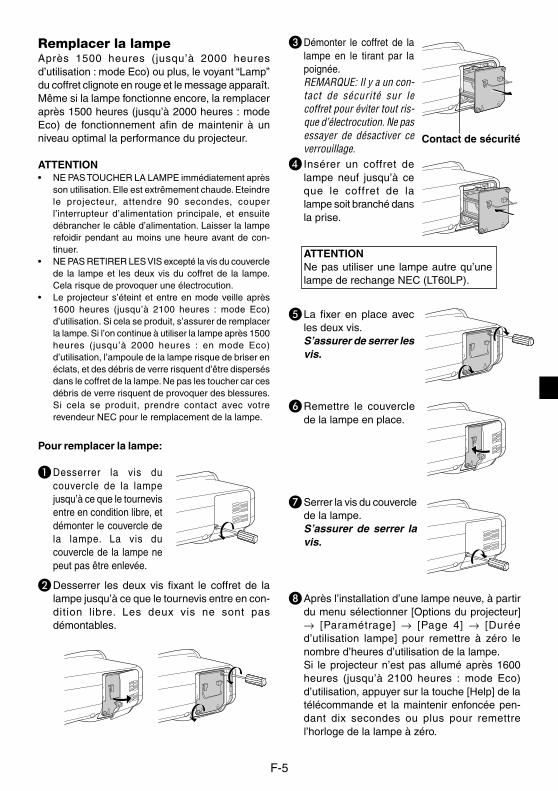
F-5
� Desserrer les deux vis fixant le coffret de lalampe jusqu’à ce que le tournevis entre en con-dition libre. Les deux vis ne sont pasdémontables.
Remplacer la lampeAprès 1500 heures (jusqu’à 2000 heuresd’utilisation : mode Eco) ou plus, le voyant “Lamp”du coffret clignote en rouge et le message apparaît.Même si la lampe fonctionne encore, la remplaceraprès 1500 heures (jusqu’à 2000 heures : modeEco) de fonctionnement afin de maintenir à unniveau optimal la performance du projecteur.
ATTENTION• NE PAS TOUCHER LA LAMPE immédiatement après
son utilisation. Elle est extrêmement chaude. Eteindrele projecteur, attendre 90 secondes, couperl’interrupteur d’alimentation principale, et ensuitedébrancher le câble d’alimentation. Laisser la lamperefoidir pendant au moins une heure avant de con-tinuer.
• NE PAS RETIRER LES VIS excepté la vis du couverclede la lampe et les deux vis du coffret de la lampe.Cela risque de provoquer une électrocution.
• Le projecteur s’éteint et entre en mode veille après1600 heures (jusqu’à 2100 heures : mode Eco)d’utilisation. Si cela se produit, s’assurer de remplacerla lampe. Si l’on continue à utiliser la lampe après 1500heures (jusqu’à 2000 heures : en mode Eco)d’utilisation, l’ampoule de la lampe risque de briser enéclats, et des débris de verre risquent d’être dispersésdans le coffret de la lampe. Ne pas les toucher car cesdébris de verre risquent de provoquer des blessures.Si cela se produit, prendre contact avec votrerevendeur NEC pour le remplacement de la lampe.
� Après l’installation d’une lampe neuve, à partirdu menu sélectionner [Options du projecteur]→ [Paramétrage] → [Page 4] → [Duréed’utilisation lampe] pour remettre à zéro lenombre d’heures d’utilisation de la lampe.Si le projecteur n’est pas allumé après 1600heures (jusqu’à 2100 heures : mode Eco)d’utilisation, appuyer sur la touche [Help] de latélécommande et la maintenir enfoncée pen-dant dix secondes ou plus pour remettrel’horloge de la lampe à zéro.
� Serrer la vis du couverclede la lampe.S’assurer de serrer lavis.
� Remettre le couverclede la lampe en place.
� La fixer en place avecles deux vis.S’assurer de serrer lesvis.
ATTENTIONNe pas utiliser une lampe autre qu’unelampe de rechange NEC (LT60LP).
� Insérer un coffret delampe neuf jusqu’à ceque le coffret de lalampe soit branché dansla prise.
� Démonter le coffret de lalampe en le tirant par lapoignée.REMARQUE: Il y a un con-tact de sécurité sur lecoffret pour éviter tout ris-que d’électrocution. Ne pasessayer de désactiver ceverrouillage.
Pour remplacer la lampe:
� Desserrer la vis ducouvercle de la lampejusqu’à ce que le tournevisentre en condition libre, etdémonter le couvercle dela lampe. La vis ducouvercle de la lampe nepeut pas être enlevée.
Contact de sécurité
F-6
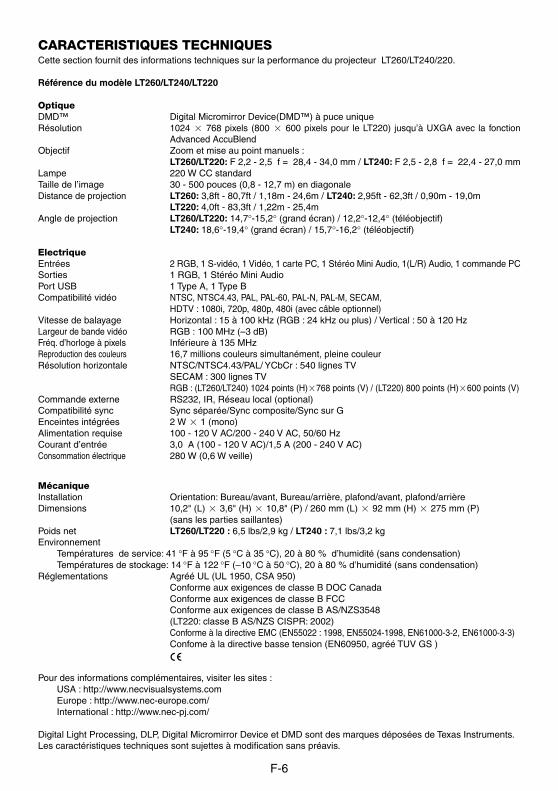
CARACTERISTIQUES TECHNIQUESCette section fournit des informations techniques sur la performance du projecteur LT260/LT240/220.
Référence du modèle LT260/LT240/LT220
OptiqueDMD™ Digital Micromirror Device(DMD™) à puce uniqueRésolution 1024 � 768 pixels (800 � 600 pixels pour le LT220) jusqu’à UXGA avec la fonction
Advanced AccuBlendObjectif Zoom et mise au point manuels :
LT260/LT220: F 2,2 - 2,5 f = 28,4 - 34,0 mm / LT240: F 2,5 - 2,8 f = 22,4 - 27,0 mmLampe 220 W CC standardTaille de l’image 30 - 500 pouces (0,8 - 12,7 m) en diagonaleDistance de projection LT260: 3,8ft - 80,7ft / 1,18m - 24,6m / LT240: 2,95ft - 62,3ft / 0,90m - 19,0m
LT220: 4,0ft - 83,3ft / 1,22m - 25,4mAngle de projection LT260/LT220: 14,7°-15,2° (grand écran) / 12,2°-12,4° (téléobjectif)
LT240: 18,6°-19,4° (grand écran) / 15,7°-16,2° (téléobjectif)
ElectriqueEntrées 2 RGB, 1 S-vidéo, 1 Vidéo, 1 carte PC, 1 Stéréo Mini Audio, 1(L/R) Audio, 1 commande PCSorties 1 RGB, 1 Stéréo Mini AudioPort USB 1 Type A, 1 Type BCompatibilité vidéo NTSC, NTSC4.43, PAL, PAL-60, PAL-N, PAL-M, SECAM,
HDTV : 1080i, 720p, 480p, 480i (avec câble optionnel)Vitesse de balayage Horizontal : 15 à 100 kHz (RGB : 24 kHz ou plus) / Vertical : 50 à 120 HzLargeur de bande vidéo RGB : 100 MHz (–3 dB)Fréq. d’horloge à pixels Inférieure à 135 MHzReproduction des couleurs 16,7 millions couleurs simultanément, pleine couleurRésolution horizontale NTSC/NTSC4.43/PAL/ YCbCr : 540 lignes TV
SECAM : 300 lignes TVRGB : (LT260/LT240) 1024 points (H)�768 points (V) / (LT220) 800 points (H)�600 points (V)
Commande externe RS232, IR, Réseau local (optional)Compatibilité sync Sync séparée/Sync composite/Sync sur GEnceintes intégrées 2 W � 1 (mono)Alimentation requise 100 - 120 V AC/200 - 240 V AC, 50/60 HzCourant d’entrée 3,0 A (100 - 120 V AC)/1,5 A (200 - 240 V AC)Consommation électrique 280 W (0,6 W veille)
MécaniqueInstallation Orientation: Bureau/avant, Bureau/arrière, plafond/avant, plafond/arrièreDimensions 10,2" (L) � 3,6" (H) � 10,8" (P) / 260 mm (L) � 92 mm (H) � 275 mm (P)
(sans les parties saillantes)Poids net LT260/LT220 : 6,5 lbs/2,9 kg / LT240 : 7,1 lbs/3,2 kgEnvironnement
Températures de service: 41 °F à 95 °F (5 °C à 35 °C), 20 à 80 % d’humidité (sans condensation)Températures de stockage: 14 °F à 122 °F (–10 °C à 50 °C), 20 à 80 % d’humidité (sans condensation)
Réglementations Agréé UL (UL 1950, CSA 950)Conforme aux exigences de classe B DOC CanadaConforme aux exigences de classe B FCCConforme aux exigences de classe B AS/NZS3548(LT220: classe B AS/NZS CISPR: 2002)Conforme à la directive EMC (EN55022 : 1998, EN55024-1998, EN61000-3-2, EN61000-3-3)Confome à la directive basse tension (EN60950, agréé TUV GS )
Pour des informations complémentaires, visiter les sites :USA : http://www.necvisualsystems.comEurope : http://www.nec-europe.com/International : http://www.nec-pj.com/
Digital Light Processing, DLP, Digital Micromirror Device et DMD sont des marques déposées de Texas Instruments.Les caractéristiques techniques sont sujettes à modification sans préavis.
I-1
LT260/LT240/LT220Proiettore portatile
Importanti Informazioni
Precauzioni di sicurezza
PrecauzioniSi prega di leggere attentamente questo manuale prima di usare il nuovo proiettore NEC LT260/LT240/LT220 e di tenerlo a portata di mano per riferimenti futuri.Il vostro numero di serie è posto in basso sul vostro proiettore. Segnatelo qui:
PRECAUZIONEPer spegnere l’alimentazione, assicurarsi di scollegare la spina dalla presa a muro.La presa a muro deve essere installata il più vicino possibile al dispositivo in posizionefacilmente accessibile.
PRECAUZIONEPER EVITARE SCOSSE ELETTRICHE, NON APRIRE L’INVOLUCRO.ALL’INTERNO SI TROVANO PARTI NON RIPARABILI DA PARTE DELL’UTENTE.PER OGNI RIPARAZIONE, RIVOLGERSI A PERSONALE QUALIFICATO.
Questo simbolo avverte l’utente che la tensione non isolata all’interno dell’unità puòessere sufficiente per causare una scossa elettrica. Perciò è pericoloso venire in contattocon le parti all’interno dell’unità.
Questo simbolo avverte l’utente di importanti informazioni che sono state fornite inrelazione al funzionamento e alla manutenzione dell’unità.Queste informazioni devono essere lette attentamente per evitare eventuali problemi.
AVVERTIMENTOPER EVITARE INCENDI O SCOSSE ELETTRICHE, NON ESPORRE L’UNITA’ ALLA PIOGGIA OALL’UMIDITA’. NON COLLEGARE MAI LA SPINA DI MASSA DI QUEST’UNITA’ AD UN CAVO DIPROLUNGA O IN UNA PRESA MURALE, A MENO CHE TUTTI E TRE I PERNI POSSANO ESSERECOMPLETAMENTE INSERITI. NON APRIRE L’INVOLUCRO. ALL’INTERNO SI TROVANO DEICOMPONENTI AD ALTA TENSIONE. TUTTI I LAVORI DI ASSISTENZA TECNICA DEVONO ESSEREESEGUITI DA PERSONALE TECNICO QUALIFICATO.
3. Nota informativa sul rumore acustico GSGV:Il livello di pressione sonora è inferiore a 70 dB (A) in conformità con le norme ISO 3744 e ISO 7779.
I-2
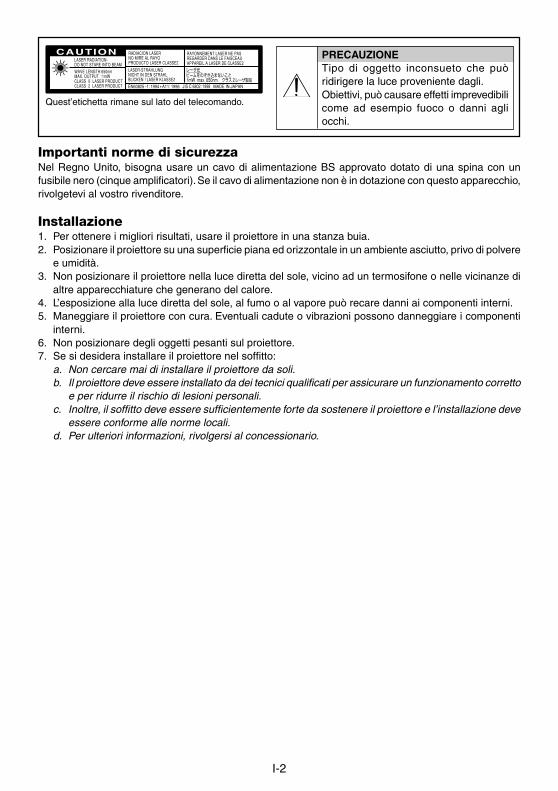
Quest’etichetta rimane sul lato del telecomando.
Importanti norme di sicurezzaNel Regno Unito, bisogna usare un cavo di alimentazione BS approvato dotato di una spina con unfusibile nero (cinque amplificatori). Se il cavo di alimentazione non è in dotazione con questo apparecchio,rivolgetevi al vostro rivenditore.
Installazione1. Per ottenere i migliori risultati, usare il proiettore in una stanza buia.2. Posizionare il proiettore su una superficie piana ed orizzontale in un ambiente asciutto, privo di polvere
e umidità.3. Non posizionare il proiettore nella luce diretta del sole, vicino ad un termosifone o nelle vicinanze di
altre apparecchiature che generano del calore.4. L’esposizione alla luce diretta del sole, al fumo o al vapore può recare danni ai componenti interni.5. Maneggiare il proiettore con cura. Eventuali cadute o vibrazioni possono danneggiare i componenti
interni.6. Non posizionare degli oggetti pesanti sul proiettore.7. Se si desidera installare il proiettore nel soffitto:
a. Non cercare mai di installare il proiettore da soli.b. Il proiettore deve essere installato da dei tecnici qualificati per assicurare un funzionamento corretto
e per ridurre il rischio di lesioni personali.c. Inoltre, il soffitto deve essere sufficientemente forte da sostenere il proiettore e l’installazione deve
essere conforme alle norme locali.d. Per ulteriori informazioni, rivolgersi al concessionario.
PRECAUZIONETipo di oggetto inconsueto che puòridirigere la luce proveniente dagli.Obiettivi, può causare effetti imprevedibilicome ad esempio fuoco o danni agliocchi.
I-3
Prevenzione contro incendi1. Assicurarsi che la ventilazione sia sufficiente e che le aperture di ventilazione non siano coperte per
prevenire l’accumularsi del calore all’interno del proiettore. Lasciare uno spazio libero di almeno 3pollici (10 cm) tra il proiettore ed il muro.
2. Prevenire l’introduzione di oggetti estranei, quali graffette e frammenti di carta, all’interno del proiettore.Non cercare di recuperare eventuali oggetti caduti all’interno del proiettore. Non inserire mai deglioggetti di metallo, ad esempio fili di ferro o un cacciavite, all’interno del proiettore. Qualora un oggettoestraneo dovesse finire all’interno del proiettore, scollegarlo immediatamente e far rimuovere l’oggettoestraneo dal personale NEC qualificato.
3. Non posizionare dei contenitori di liquidi sopra il proiettore.4. Mentre il proiettore e’ in funzione seri danni possono risoctare ai vostri occhi.5. Tenete qualsiasi oggetto tipo di lente di ingrandimento fuori dalla traiettori a del proiettore. La luce
proiettata dagli obiettivi è vasta, perciò qualsiasi.6. Non coprite gli obiettivi con copri obiettivi forniti o equivalenti mentre il proiettore è acceso. Così
facendo potete indurre lo scioglimento del copri obiettivo e possibilmente bruciarvi le mani dovuto alcalore emesso dalla luce.
7. Questo proiettore è stato disegnato per funzionare con un’alimentazione di 100-120 o 200-240V 50/60 Hz c.a. Assicurarsi che l’alimentazione corrisponda a questo requisito prima di cercare di usare ilproiettore.
8. Maneggiare il cavo di alimentazione con cura ed evitare di piegare lo stesso eccessivamente. Un cavodi alimentazione danneggiato può causare delle scosse elettriche o un incendio.
9. Se si ha intenzione di non usare il proiettore per un lungo periodo di tempo, scollegare la spina dallapresa murale.
Precauzione1. Non toccate il foro di ventilazione sulla parte anteriore del proiettore, poiché diventa bollente quando
è in uso il proiettore.2. Non usate il piedino regolabile per scopi diversi da quelli per cui è stato costruito. L’uso del proiettore
in maniera impropria, come prenderlo per il piedino regolabile o appenderlo alla parete, puòdanneggiarlo.
3. Attivate il modo dell'alta velocità del ventilatore per continuare ad usare il proiettore per alcuni giorniconsecutivi. (Dal menu Advanced, selezionate, [Opzioni Proiettore] → [Impostazione] → [Pagina 4] →[Modo Alta Velocità Ventola].)
4. Non staccate il cavo di alimentazione dalla presa a muro nelle seguenti circostanze, altrimenti si puòdanneggiare il proiettore:* Mentre appare l’icona Hour Glass.* Mentre appare il messaggio “Vi preghiamo di attendere”. Questo messaggio viene visualizzato
dopo aver spento il proiettore.* Quando girano i ventilatori di raffreddamento. (I ventilatori di raffreddamento continuano a girare
per 90 secondi dopo lo spegnimento del proiettore).5. Non espellete la PC Card durante la lettura dei dati. Altrimenti si possono danneggiare i dati della PC
Card.
Sostituzione della lampada• Per sostituire la lampada, seguire tutte le istruzioni fornite a pagina I-5.• Sostituire senz ’altro la lampada quando appare il messaggio “La lampada è arrivata a fine vita. Per
favore sostituire la lampada.”. Se continuate ad usare la lampada dopo che questa ha esaurito lasua durata, il bulbo della lampada si può frantumare e frammenti di vetro si possono disperdere nelcontenitore della lampada.Non toccare questi pezzi di vetro, altrimentiri potete fare male.Se ciò capita, rivolgetevi al rivenditore NEC per la sostituzione della lampada.
• Lasciate passare almeno 90 secondi dopo aver spento il proiettore. Poi spegnete l'interruttore principale,scollegate il cavo d'alimentazione e lasciate che il proiettore si raffreddi per 60 minuti prima di sostituirela lampada.
I-4
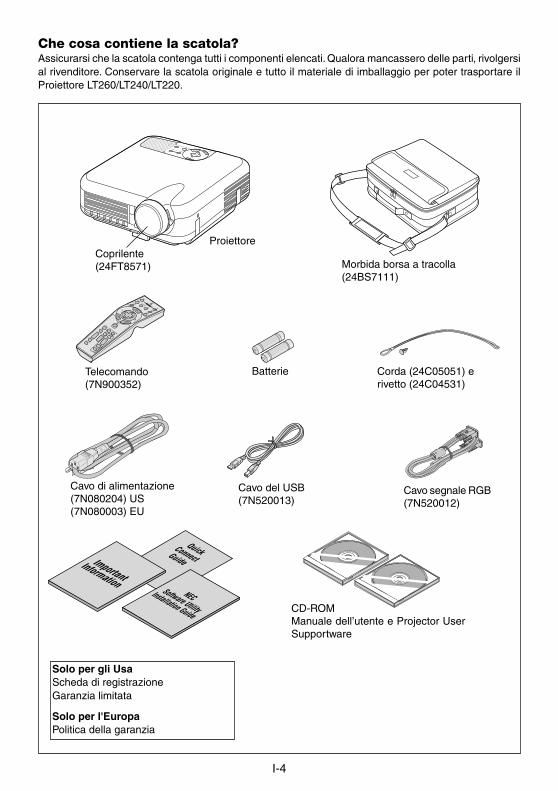
Che cosa contiene la scatola?Assicurarsi che la scatola contenga tutti i componenti elencati. Qualora mancassero delle parti‚ rivolgersial rivenditore. Conservare la scatola originale e tutto il materiale di imballaggio per poter trasportare ilProiettore LT260/LT240/LT220.
Coprilente(24FT8571)
Telecomando(7N900352)
Cavo di alimentazione(7N080204) US(7N080003) EU
Proiettore
Corda (24C05051) erivetto (24C04531)
Cavo segnale RGB(7N520012)
Morbida borsa a tracolla(24BS7111)
CD-ROMManuale dell’utente e Projector UserSupportware
OFFVIDEOAUTO ADJ.
S-VIDEORGB1
RGB2LASER
POWER
ON
PJASPECT
3D REFORM
HELPPOINTER
VOLUMEMAGNIFY
PICTUREPIC-MUTE
VIEWERSLIDE
FOLDERSLIDE
LIST
SELECT
FREEZE
Cavo del USB(7N520013)
QuickConnectGuide
NECSoftware Utility
Installation Guide
ImportantInformation
Batterie
SELECT
CNACEL
TER
NE
E MNU
SOURCEAUTO ADJUST
ON STAND BYSTATUS POWER
LAMP
ALIGNMENT
PC-CARD
Solo per gli UsaScheda di registrazioneGaranzia limitata
Solo per l'EuropaPolitica della garanzia
I-5
� Allentate le due viti che fissano l’alloggiamentodella lampada fino a quando il cacciavite nongira a vuoto. Le due viti non sono rimovibili.
Sostituzione della lampadaQuando la lampada ha funzionato per 1500 ore opiù (fino a 2000 ore: modalità Eco), l’indicatore“Lamp” sul proiettore lampeggerà in rosso edapparirà un messaggio. Anche se la lampadafunziona ancora, sostituitela a 1500 ore (fino a 2000ore: modalità Eco) per mantenere le ottimaliprestazioni del proiettore.
ATTENZIONE• NON TOCCATE LA LAMPADA immediatamente
dopo l’uso. E’ estremamente calda. Spegnete ilproiettore, aspettate per 90 secondi, spegnetel’interruttore principale e poi scollegate il cavod’alimentazione. Lasciate passare almenoun’ora affinché la lampada si raffreddi prima dimaneggiarla.
• NON RIMUOVETE LE VITI, tranne la vite delcoprilampada e le due viti sul telaio dellalampada. Potreste ricevere una scossa elettrica.
• Il proiettore si spegne ed entra in modalitàStandby dopo 1600 ore di servizio (fino a 2100ore in modalità Eco). In tal caso, sostituite lalampada. Se continuate ad usare la lampadadopo 1500 ore (fino a 2000 ore: modalità Eco),la lampadina può scoppiare e i pezzi di vetro sipossono spargere all’interno della lampada.Non toccate i frammenti di vetro, altrimenti vipotreste fare male.
� Dopo aver installato la nuova lampada,selezionate dal menu [Opzioni Proiettore] →[Impostazione] → [Pagina 4] → [AzzeraContaore Lampada] per azzerare le ored’utilizzo della lampada.Se avete l’intenzione di non accendere ilproiettore dopo averlo usato per 1600 ore (finoa 2100 ore: modalità Eco), premete e mantenetepremuto il tasto [Help] sul telecomando peralmeno dieci secondi per azzerare il contaoredella lampada.
� Serrate la vite delcoprilampada.Serrate bene la vite.
� Reinstallate ilcoprilampada.
� Fissatelo con le due viti.Serrate bene le viti.
ATTENZIONENon usate una lampada diversa dallalampada di sostituzione NEC (LT60LP).
� Inserite il nuovoalloggiamento dellalampada finché nonè inserito nelportalampada.
� Rimovete l’alloggiamentodella lampada tirando lamaniglia.NOTA: C’è un dispositivo disicurezza sul telaio perprevenire eventuali scosseelettriche. Non cercate didisabilitarlo.
Per sostituire la lampada:
� Allentate la vite delcoprilampada fino aquando il cacciavite nongira a vuoto e poi rimoveteil coprilampada. La vite delcoprilampada non èrimovibile.
Interbloccagio
I-6
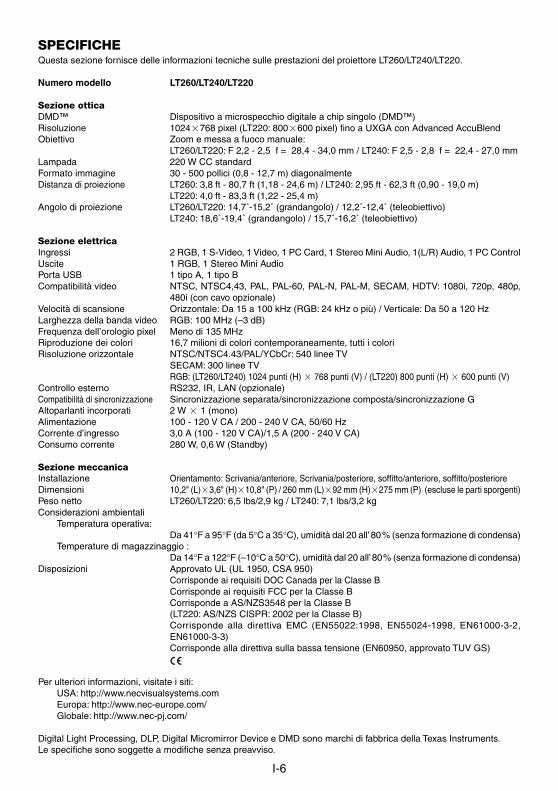
SPECIFICHEQuesta sezione fornisce delle informazioni tecniche sulle prestazioni del proiettore LT260/LT240/LT220.
Numero modello LT260/LT240/LT220
Sezione otticaDMD™ Dispositivo a microspecchio digitale a chip singolo (DMD™)Risoluzione 1024�768 pixel (LT220: 800�600 pixel) fino a UXGA con Advanced AccuBlendObiettivo Zoom e messa a fuoco manuale:
LT260/LT220: F 2,2 - 2,5 f = 28,4 - 34,0 mm / LT240: F 2,5 - 2,8 f = 22,4 - 27,0 mmLampada 220 W CC standardFormato immagine 30 - 500 pollici (0,8 - 12,7 m) diagonalmenteDistanza di proiezione LT260: 3,8 ft - 80,7 ft (1,18 - 24,6 m) / LT240: 2,95 ft - 62,3 ft (0,90 - 19,0 m)
LT220: 4,0 ft - 83,3 ft (1,22 - 25,4 m)Angolo di proiezione LT260/LT220: 14,7˚-15,2˚ (grandangolo) / 12,2˚-12,4˚ (teleobiettivo)
LT240: 18,6˚-19,4˚ (grandangolo) / 15,7˚-16,2˚ (teleobiettivo)
Sezione elettricaIngressi 2 RGB, 1 S-Video, 1 Video, 1 PC Card, 1 Stereo Mini Audio, 1(L/R) Audio, 1 PC ControlUscite 1 RGB, 1 Stereo Mini AudioPorta USB 1 tipo A, 1 tipo BCompatibilità video NTSC, NTSC4,43, PAL, PAL-60, PAL-N, PAL-M, SECAM, HDTV: 1080i, 720p, 480p,
480i (con cavo opzionale)Velocità di scansione Orizzontale: Da 15 a 100 kHz (RGB: 24 kHz o più) / Verticale: Da 50 a 120 HzLarghezza della banda video RGB: 100 MHz (–3 dB)Frequenza dell’orologio pixel Meno di 135 MHzRiproduzione dei colori 16,7 milioni di colori contemporaneamente, tutti i coloriRisoluzione orizzontale NTSC/NTSC4.43/PAL/YCbCr: 540 linee TV
SECAM: 300 linee TVRGB: (LT260/LT240) 1024 punti (H) � 768 punti (V) / (LT220) 800 punti (H) � 600 punti (V)
Controllo esterno RS232, IR, LAN (opzionale)Compatibilità di sincronizzazione Sincronizzazione separata/sincronizzazione composta/sincronizzazione GAltoparlanti incorporati 2 W � 1 (mono)Alimentazione 100 - 120 V CA / 200 - 240 V CA, 50/60 HzCorrente d’ingresso 3,0 A (100 - 120 V CA)/1,5 A (200 - 240 V CA)Consumo corrente 280 W, 0,6 W (Standby)
Sezione meccanicaInstallazione Orientamento: Scrivania/anteriore, Scrivania/posteriore, soffitto/anteriore, soffitto/posterioreDimensioni 10,2" (L)�3,6" (H)�10,8" (P) / 260 mm (L)�92 mm (H)�275 mm (P) (escluse le parti sporgenti)Peso netto LT260/LT220: 6,5 lbs/2,9 kg / LT240: 7,1 lbs/3,2 kgConsiderazioni ambientali
Temperatura operativa:Da 41 °F a 95 °F (da 5 °C a 35 °C), umidità dal 20 all’ 80 % (senza formazione di condensa)
Temperature di magazzinaggio :Da 14 °F a 122°F (–10 °C a 50 °C), umidità dal 20 all’ 80 % (senza formazione di condensa)
Disposizioni Approvato UL (UL 1950, CSA 950)Corrisponde ai requisiti DOC Canada per la Classe BCorrisponde ai requisiti FCC per la Classe BCorrisponde a AS/NZS3548 per la Classe B(LT220: AS/NZS CISPR: 2002 per la Classe B)Corrisponde alla direttiva EMC (EN55022:1998, EN55024-1998, EN61000-3-2,EN61000-3-3)Corrisponde alla direttiva sulla bassa tensione (EN60950, approvato TUV GS)
Per ulteriori informazioni, visitate i siti:USA: http://www.necvisualsystems.comEuropa: http://www.nec-europe.com/Globale: http://www.nec-pj.com/
Digital Light Processing, DLP, Digital Micromirror Device e DMD sono marchi di fabbrica della Texas Instruments.Le specifiche sono soggette a modifiche senza preavviso.
S-1
LT260/LT240/LT220Proyector portátil
Información Importante
Precauciónes
PrecauciónLea con cuidado este manual antes de utilizar el Proyector NEC LT260/LT240/LT220 y tenga el manuala mano para poder consultarlo más adelante.El número de serie está situado en la parte inferior del proyector. Regístrelo aquí:
PRECAUCIÓNPara desactivar la alimentación asegúrese de extraer el enchufe de la toma de redeléctrica.La toma de red debe estar lo más cerca posible del equipo, y además debe ser fácilmenteaccesible.
PRECAUCIÓNPARA EVITAR DESCARGAS ELÉCTRICAS, NO ABRA LA CAJA.EN EL INTERIOR NO HAY PARTES QUE PUEDA REPARAR EL USUARIO. ACUDA APERSONAL DE SERVICIO CUALIFICADO DE NEC.
Este símbolo advierte al usuario de la presencia de tensión sin aislamiento dentro de launidad suficiente como para producir sacudidas eléctricas. Por lo tanto, es peligrosorealizar cualquier tipo de contacto con cualquier pieza del interior de la unidad.
Este símbolo alerta al usuario de la presencia de importante información concernienteal funcionamiento y mantenimiento de la unidad. Debe leerse atentamente la informaciónpara evitar problemas.
ADVERTENCIAPARA EVITAR FUEGO O DESCARGAS ELÉCTRICAS, NO EXPONGA ESTA UNIDAD A LA LLUVIAO LA HUMEDAD. NO UTILICE EL ENCHUFE CON CONEXIÓN A TIERRA, CON UN CABLE DEEXTENSIÓN O EN UNA TOMA DE CORRIENTE A MENOS QUE SE PUEDAN INTRODUCIR PORCOMPLETO LAS TRES ESPIGAS. NO ABRA LA CAJA. EN EL INTERIOR HAY COMPONENTESCON ALTA TENSIÓN. EL SERVICIO DEBE SER LLEVADO A CABO POR PERSONALCUALIFICADO DE NEC.
3. Ordenanza de la información sobre ruidos acústicos GSGV:El nivel del presión del sonido es inferior a 70 dB (A) según ISO 3744 o ISO 7779.
S-2
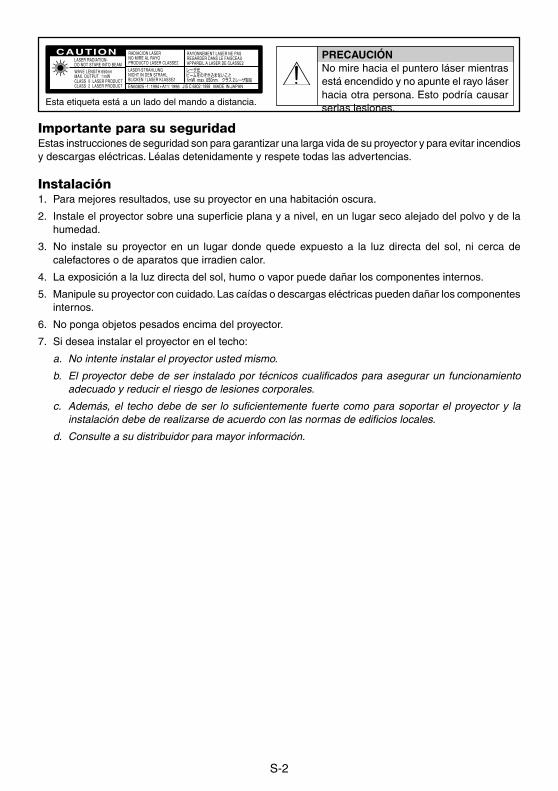
Esta etiqueta está a un lado del mando a distancia.
Importante para su seguridadEstas instrucciones de seguridad son para garantizar una larga vida de su proyector y para evitar incendiosy descargas eléctricas. Léalas detenidamente y respete todas las advertencias.
Instalación1. Para mejores resultados, use su proyector en una habitación oscura.
2. Instale el proyector sobre una superficie plana y a nivel, en un lugar seco alejado del polvo y de lahumedad.
3. No instale su proyector en un lugar donde quede expuesto a la luz directa del sol, ni cerca decalefactores o de aparatos que irradien calor.
4. La exposición a la luz directa del sol, humo o vapor puede dañar los componentes internos.
5. Manipule su proyector con cuidado. Las caídas o descargas eléctricas pueden dañar los componentesinternos.
6. No ponga objetos pesados encima del proyector.
7. Si desea instalar el proyector en el techo:
a. No intente instalar el proyector usted mismo.
b. El proyector debe de ser instalado por técnicos cualificados para asegurar un funcionamientoadecuado y reducir el riesgo de lesiones corporales.
c. Además, el techo debe de ser lo suficientemente fuerte como para soportar el proyector y lainstalación debe de realizarse de acuerdo con las normas de edificios locales.
d. Consulte a su distribuidor para mayor información.
PRECAUCIÓNNo mire hacia el puntero láser mientrasestá encendido y no apunte el rayo láserhacia otra persona. Esto podría causarserias lesiones.
S-3
Precauciones para evitar fuego y descargas eléctricas1. Para evitar la acumulación de calor en el interior del proyector, asegúrese de que haya suficiente
ventilación y que los orificios de ventilación del proyector no sean obstruidos. Deje un espacio de almenos 10 cm (3 pulgadas) entre el proyector y la pared.
2. Evite que objetos extraños tales como sujetapapeles o trozos de papel caigan dentro del proyector.No intente retirar ningún objeto que haya caído dentro del proyector. No introduzca objetos de metal,tales como alambre o destornilladores, en el proyector. Si cae algo dentro del proyector, desconécteloinmediatamente y haga que personal de servicio NEC cualificado extraiga el objeto.
3. No ponga recipientes con líquido encima del proyector.4. No mire por el objetivo mientras el proyector está encendido. Esto podría causar serios daños a la visión.5. Mantenga cualquier artículo tales como lupas fuera del paso de la luz del proyector. La luz que se
proyecta a través de la objetivo es extensa, por lo tanto cualquier tipo de objeto anormal que puedaredirigir la luz que sale de la objetivo, puede causar un resultado impredecible tal como fuego olesiones al ojo.
6. No cubra la objetivo con la tapa para la objetivo suministrada o equivalente cuando el proyector estéencendido. El hacerlo podría causar que se funda la tapa y posiblemente que se queme las manosdebido al calor de la luz.
7. El proyector está diseñado para funcionar en una fuente de alimentación de 100-120 o 200-240 V 50/60 Hz CA. Antes de usar el proyector, asegúrese de que su fuente de alimentación cumpla con estosrequisitos.
8. Manipule al cable de alimentación con cuidado y evite doblarlo excesivamente. Un cable dañadopuede causar descargas eléctricas o incendios.
9. Cuando el proyector no vaya a ser usado por un período prolongado de tiempo, desconecte la clavijadel tomacorriente.
Precaución1. No toque la abertura de ventilación en la parte delantera del proyector, que se calienta durante el
funcionamiento del proyector.2. No utilice la pata de inclinación con otro propósito que no sea el originalmente establecido. El uso
incorrecto, como la sujeción de la pata de inclinación o colgar en una pared pueden dañar el proyector.3. Habilite el modo Alta velocidad de ventilador si va a usar el proyector durante varios días seguidos.
(En el menú avanzado, seleccione [Opciones de proyector] → [Configuración] → [Página 4] → [Modode alta velocidad del ventilador].)
4. No desconecte el cable de la alimentación de la toma general bajo las siguientes circunstancias. Elhacerlo podría causar daño al proyector:* Mientras que aparezca el icono del reloj de arena.* Mientras que aparezca el mensaje “Por favor, espere un poco.” Se visualizará este mensaje después
de desconectar el proyector.* Mientras los ventiladores de refrigeración están funcionando. (Los ventiladores de refrigeración
siguen funcionando durante 90 segundos después de que se apaga el proyector.)5. No expulse la tarjeta PC mientras el sistema accede a los datos contenidos en ésta. De lo contrario,
los datos de la tarjeta PC podrán dañarse.
Reemplazo de la lámpara• Para reemplazar la lámpara, siga todas las instrucciones que suministran en la página S-5.• Sostituire senz ’altro la lampada quando appare il messaggio “La lámpara ha alcanzado el fin de su
vida util. Por favor cambiela”. Se continuate ad usare la lampada dopo che questa ha esaurito la suadurata, il bulbo della lampada si può frantumare e frammenti di vetro si possono disperdere nelcontenitore della lampada. No toque los trozos de vidrio, pues podría cortarse. Si esto sucediera,contacte a su distribuidor NEC para el reemplazo de la lámpara.
• Espere 90 segundos como mínimo después de apagar el proyector. Luego, desactive el interruptor dealimentación principal, desconecte el cable de alimentación y permita que el proyector se enfríedurante 60 minutos antes de reemplazar la lámpara.
S-4
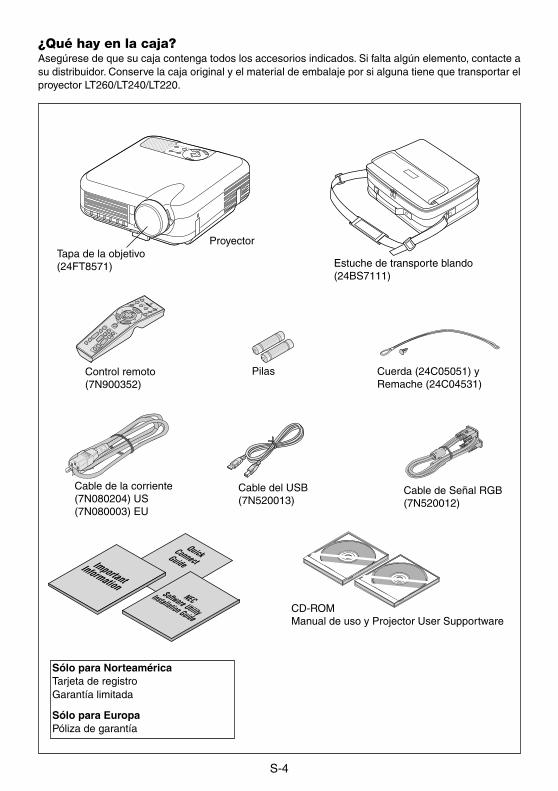
¿Qué hay en la caja?Asegúrese de que su caja contenga todos los accesorios indicados. Si falta algún elemento‚ contacte asu distribuidor. Conserve la caja original y el material de embalaje por si alguna tiene que transportar elproyector LT260/LT240/LT220.
Tapa de la objetivo(24FT8571)
Control remoto(7N900352)
Cable de la corriente(7N080204) US(7N080003) EU
Proyector
Cuerda (24C05051) yRemache (24C04531)
Cable de Señal RGB(7N520012)
Estuche de transporte blando(24BS7111)
CD-ROMManual de uso y Projector User Supportware
OFFVIDEOAUTO ADJ.
S-VIDEORGB1
RGB2LASER
POWER
ON
PJASPECT
3D REFORM
HELPPOINTER
VOLUMEMAGNIFY
PICTUREPIC-MUTE
VIEWERSLIDE
FOLDERSLIDE
LIST
SELECT
FREEZE
Cable del USB(7N520013)
QuickConnectGuide
NECSoftware Utility
Installation Guide
ImportantInformation
Pilas
SELECT
CNACEL
TER
NE
E MNU
SOURCEAUTO ADJUST
ON STAND BYSTATUS POWER
LAMP
ALIGNMENT
PC-CARD
Sólo para NorteaméricaTarjeta de registroGarantía limitada
Sólo para EuropaPóliza de garantía
S-5
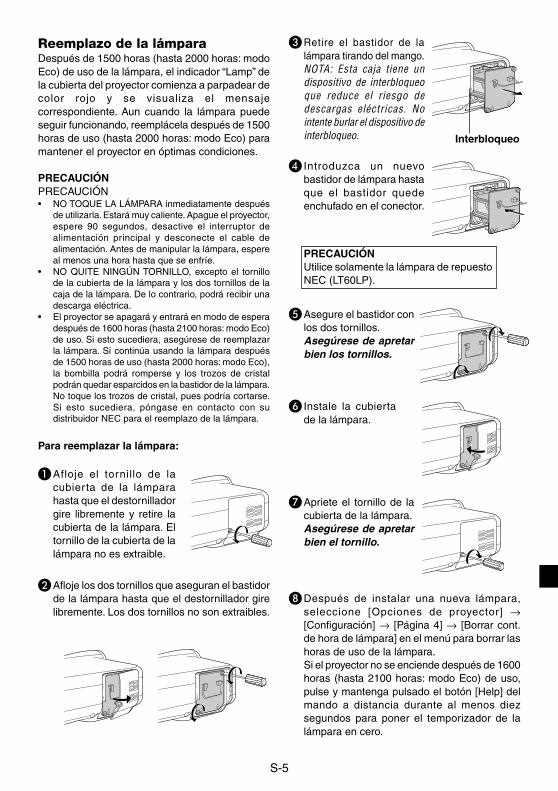
� Afloje los dos tornillos que aseguran el bastidorde la lámpara hasta que el destornillador girelibremente. Los dos tornillos no son extraibles.
Reemplazo de la lámparaDespués de 1500 horas (hasta 2000 horas: modoEco) de uso de la lámpara, el indicador “Lamp” dela cubierta del proyector comienza a parpadear decolor rojo y se visualiza el mensajecorrespondiente. Aun cuando la lámpara puedeseguir funcionando, reemplácela después de 1500horas de uso (hasta 2000 horas: modo Eco) paramantener el proyector en óptimas condiciones.
PRECAUCIÓNPRECAUCIÓN• NO TOQUE LA LÁMPARA inmediatamente después
de utilizarla. Estará muy caliente. Apague el proyector,espere 90 segundos, desactive el interruptor dealimentación principal y desconecte el cable dealimentación. Antes de manipular la lámpara, espereal menos una hora hasta que se enfríe.
• NO QUITE NINGÚN TORNILLO, excepto el tornillode la cubierta de la lámpara y los dos tornillos de lacaja de la lámpara. De lo contrario, podrá recibir unadescarga eléctrica.
• El proyector se apagará y entrará en modo de esperadespués de 1600 horas (hasta 2100 horas: modo Eco)de uso. Si esto sucediera, asegúrese de reemplazarla lámpara. Si continúa usando la lámpara despuésde 1500 horas de uso (hasta 2000 horas: modo Eco),la bombilla podrá romperse y los trozos de cristalpodrán quedar esparcidos en la bastidor de la lámpara.No toque los trozos de cristal, pues podría cortarse.Si esto sucediera, póngase en contacto con sudistribuidor NEC para el reemplazo de la lámpara.
� Después de instalar una nueva lámpara,seleccione [Opciones de proyector] →[Configuración] → [Página 4] → [Borrar cont.de hora de lámpara] en el menú para borrar lashoras de uso de la lámpara.Si el proyector no se enciende después de 1600horas (hasta 2100 horas: modo Eco) de uso,pulse y mantenga pulsado el botón [Help] delmando a distancia durante al menos diezsegundos para poner el temporizador de lalámpara en cero.
� Apriete el tornillo de lacubierta de la lámpara.Asegúrese de apretarbien el tornillo.
� Instale la cubiertade la lámpara.
� Asegure el bastidor conlos dos tornillos.Asegúrese de apretarbien los tornillos.
PRECAUCIÓNUtilice solamente la lámpara de repuestoNEC (LT60LP).
� Introduzca un nuevobastidor de lámpara hastaque el bastidor quedeenchufado en el conector.
� Retire el bastidor de lalámpara tirando del mango.NOTA: Esta caja tiene undispositivo de interbloqueoque reduce el riesgo dedescargas eléctricas. Nointente burlar el dispositivo deinterbloqueo.
Para reemplazar la lámpara:
Interbloqueo
� Afloje el tornillo de lacubier ta de la lámparahasta que el destornilladorgire libremente y retire lacubierta de la lámpara. Eltornillo de la cubierta de lalámpara no es extraible.
S-6
EspecificacionesEsta sección proporciona información técnica acerca del funcionamiento del proyector LT260/LT240/LT220.
Número de modelo LT260/LT240/LT220
Sección ópticaDMD™ Dispositivo de microespejo digital de chip único (Single Chip Digital Micromirror Device
[DMD™])Resolución 1024�768 pixeles (LT220: 800�600 pixeles) hasta UXGA con Advanced AccuBlendObjetivo Zoom y enfoque manual:
LT260/LT220: F 2,2 - 2,5 f = 28,4 - 34,0 mm / LT240: F 2,5 - 2,8 f = 22,4 - 27,0 mmLámpara 220 W CC, estándarTamaño de la imagen 30 - 500 pulgadas (0,8 - 12,7 m), diagonalDistancia de proyección LT260: 3,8 - 80,7 pies (1,18 - 24,6 m) / LT240: 2,95 - 62,3 pies (0,90 - 19,0 m)
LT220: 4,0 - 83,3 pies (1,22 - 25,4 m)Ángulo de proyección LT260/LT220: 14,7°–15,2° (gran angular) / 12,2°-12,4° (teleobjetivo)
LT240: 18,6°–19,4° (gran angular) / 15,7°–16,2° (teleobjetivo)Sección eléctricaEntradas 2 RGB, 1 S-vídeo, 1 vídeo, 1 tarjeta PC, 1 miniconectores de audio, estéreo, 1 control de PCSalidas 1 RGB, 1 miniconector de audio estéreoPuerto USB 1 tipo A, 1 tipo BCompatibilidad de vídeo NTSC, NTSC4.43, PAL, PAL-60, PAL-N, PAL-M, SECAM,
HDTV: 1080i, 720p, 480p, 480i (con cable opcional)Velocidad de exploración Horizontal: 15 a 100 kHz (RGB: 24 kHz o superior) / Vertical: 50 a 120 HzAncho de banda de vídeo RGB: 100 MHz (–3 dB)Frecuencia del reloj de pixeles Menos de 135 MHzReproducción de colores 16,7 millones de colores, color totalResolución horizontal NTSC/NTSC4.43/PAL/YCbCr: 540 líneas de TV
SECAM: 300 TV líneasRGB: (LT260/LT240)1024 puntos (H)�768 puntos (V) / (LT220)800 puntos (H)�600 puntos (V)
Control externo RS232, IR, LAN (opcional)Compatibilidad de sincronización Sincronización separada/sincronización compuesta/sincronización en verdeAltavoces incorporados 2 W�1 (monoauricular)Alimentación 100 – 120 V CA/200 – 240 V CA, 50/60 HzCorriente de entrada 3,0 A (100 –120 V CA)/1,5 A (200 – 240 V CA)Consumo 280 W (0,6 W espera)
Sección mecánicaInstalación Orientación: Escritorio/frontal, Escritorio/retroproyección, techo/frontal,
techo/retroproyecciónDimensiones 10,2" (ancho)�3,6" (alto)�10,8" (prof.) / 260 mm (ancho)�92 mm (alto)�275 mm (prof.)
(excluyendo las partes salientes)Peso neto LT260/LT220: 6,5 lbs/2,9 kg / LT240: 7,1 lbs/3,2 kgConsideraciones ambientales
Temperaturas de funcionamiento:41 °F a 95 °F (5 °C a 35 °C), 20 a 80% de humedad (sin condensación)
Temperaturas de almacenamiento:14 °F a 122 °F (–10 °C a 50 °C), 20 a 80% de humedad (sin condensación)
Normas Aprobado por UL (UL 1950, CSA 950)Cumple con los requisitos DOC de clase B de CanadáCumple con los requisitos de clase B de la FCCCumple con AS/NZS3548, clase B (LT220: AS/NZS CISPR: 2002 classe B)Cumple con las directrices de la EMC (EN55022:1998, EN55024-1998, EN61000-3-2,EN61000-3-3)Cumple con la directriz sobre baja tensión (EN60950, aprobado por TUV GS)
Para más información, visite:EE.UU.: http://www.necvisualsystems.comEuropa : http://www.nec-europe.com/Global : http://www.nec-pj.com/
Digital Light Processing, DLP, Digital Micromirror Device y DMD son marcas comerciales registradas de Texas Instru-ments.Las especificaciones están sujetas a cambios sin previo aviso.
W-1
LT260/LT240/LT220Portabel projektor
Viktig Information
Säkerhetsforeskrifter
FörsiktighetsåtgärderLäs denna bruksanvisning noggrant innan du börjar använda din NEC LT260/LT240/LT220 projektor, ochbehåll bruksanvisningen nära till hands för framtida bruk.Serienumret finns på undersidan av din Projector. Anteckna det här:
FÖRSIKTIGTFör att helt bryta strömförsörjningen till apparaten, skall stickproppen dras ur vägguttaget.Vägguttaget skall vara så nära apparaten som möjligt och måste vara lättåtkomligt.
FÖRSIKTIGTRISK FÖR ELEKTRISK STÖT. ÖPPNA INTE HÖLJET. DET FINNS INGA MANÖVER-ORGAN INNANFÖR HÖLJET. ÖVERLÅT ALL SERVICE ÅT KVALIFICERAD SERVICE-PERSONAL.
Denna symbol varnar för icke-isolerad spänning inuti apparaten, som kan vara tillräckligtstark för att ge en elektrisk stöt. Det är därför farligt att röra delar inuti apparaten.
Denna symbolen uppmärksammar användaren om viktig medföljande informationangående apparatens bruk och underhåll. Informationen skall läsas noggrant för attundvika problem.
VARNINGFÖR ATT MOTVERKA ELD ELLER ELEKTRISK STÖT, FÅR APPARATEN INTE UTSÄTTAS FÖRREGN ELLER FUKT. ANVÄND INTE APPARATENS JORDADE STICKPROPP MED ENFÖRLÄNGNINGSKABEL ELLER I ETT ELUTTAG MED MINDRE ALLA TRE BEN KAN STICKASHELT IN I KONTAKTEN. ÖPPNA INTE HÖLJET. DET FINNS HÖGSPÄNNINGSDELAR INUTIAPPARATEN. ÖVERLÅT ALL SERVICE ÅT EN KVALIFICERAD NEC SERVICETEKNIKER.
3. GSGV Acoustic Noise Information Ordinance:Ljudnivån är mindre än 70 dB (A) enligt ISO 3744 eller ISO 7779.
W-2
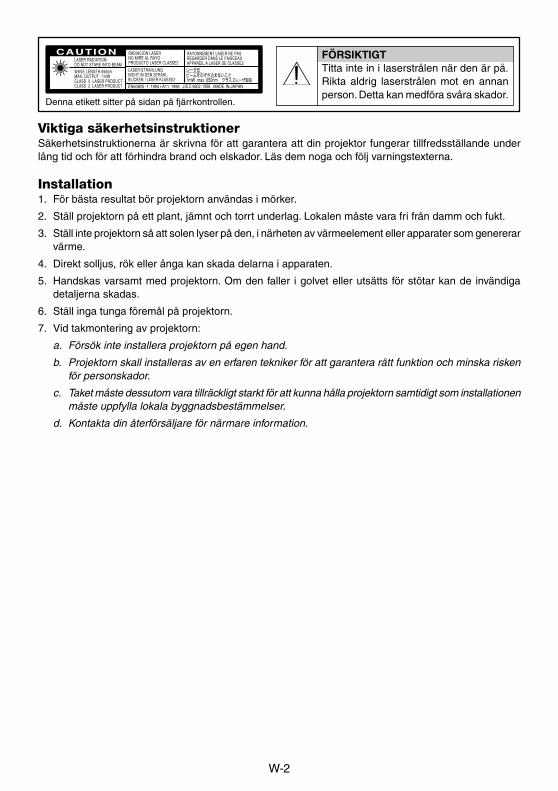
Denna etikett sitter på sidan på fjärrkontrollen.
Viktiga säkerhetsinstruktionerSäkerhetsinstruktionerna är skrivna för att garantera att din projektor fungerar tillfredsställande underlång tid och för att förhindra brand och elskador. Läs dem noga och följ varningstexterna.
Installation1. För bästa resultat bör projektorn användas i mörker.
2. Ställ projektorn på ett plant, jämnt och torrt underlag. Lokalen måste vara fri från damm och fukt.
3. Ställ inte projektorn så att solen lyser på den, i närheten av värmeelement eller apparater som genererarvärme.
4. Direkt solljus, rök eller ånga kan skada delarna i apparaten.
5. Handskas varsamt med projektorn. Om den faller i golvet eller utsätts för stötar kan de invändigadetaljerna skadas.
6. Ställ inga tunga föremål på projektorn.
7. Vid takmontering av projektorn:
a. Försök inte installera projektorn på egen hand.
b. Projektorn skall installeras av en erfaren tekniker för att garantera rätt funktion och minska riskenför personskador.
c. Taket måste dessutom vara tillräckligt starkt för att kunna hålla projektorn samtidigt som installationenmåste uppfylla lokala byggnadsbestämmelser.
d. Kontakta din återförsäljare för närmare information.
FÖRSIKTIGTTitta inte in i laserstrålen när den är på.Rikta aldrig laserstrålen mot en annanperson. Detta kan medföra svåra skador.
W-3
Förhindra brand och elskador1. Se till att ventilationen är tillräcklig och att inga ventilationsöppningar är blockerade, så att projektorn
inte blir överhettad. Håll ett avstånd på minst 10 cm mellan projektorn och en vägg.2. Se till att inga främmande föremål som gem och pappersbitar faller ner i projektorn. Försök inte peta ut
föremål som ramlar ner i projektorn. Stick inte in metallföremål, som t ex ståltråd eller en skruvmejsel,I projektorn. Om det kommer främmande föremål i projektorn, skall du omedelbart koppla den frånnätet och be en NEC-tekniker att ta bort föremålet.
3. Ställ inga vattenglas eller andra vätskefyllda behållare på projektorn.4. Titta inte in i linsen när projektorn är på. Detta kan medföra svåra ögonskador.5. Håll borta föremål som t ex förstoringsglas från ljusstrålens väg. Ljuset från projektorns lins är mycket
starkt, och om det kommer föremål i ljusstrålens väg kan ljuset från linsen omledas och resultera iolyckor så som eld eller ögonskador.
6. Täck inte till linsen med linsskyddet (medföljer) eller andra föremål när projektorn är på. Det finns i såfall risk att linsskyddet smälter och du riskerar bränna händerna om du tar i det.
7. Projektorn är avsedd att drivas med en spänning på 100-120 eller 200-240 V växelström, 50/60 Hz.Kontrollera att elnätet överensstämmer med dessa specifikationer innan du börjar använda projektorn.
8. Handskas försiktigt med nätkabeln och undvik att böja den för mycket. En skadad nätkabel kan orsakaelektriska stötar eller brand.
9. Dra ur nätkabeln ur vägguttaget om du inte räknar med att använda projektorn i en längre tid.
Försiktigt1. Rör inte ventilationsutloppet på projektorns framsida, som blir varm när projektorn används.2. Använd inte justerfoten för något annat ändamål än vad den är avsedd för. Projektorn kan ta skada om
du lyfter den eller hänger upp den på väggen i foten.3. Aktivera fläktens höghastighetsläge om du fortsätter att använda projektorn följande dagar. (Välj på
Advanced-menyn [Projektoralternativ] → [Inställning] → [Sida 4] → [Fläkten i hög hastighet].)4. Ta inte loss nätkabeln från vägguttaget i följande situationer, eftersom projektorn då kan skadas:
* När timglas-ikonen visas.* När meddelandet “Vänta ette tag.” visas. Detta meddelande visas efter det at projektorn stängts av.* När kylfläkten är igång. (Fläkten fortsätter att gå i 90 sekunder efter att projektorn har stängts av).
5. Ta inte ut PC-kortet när dess data används. Det kan skada din PC Card-data.
Lampbyte• Vid byte av lampan, skall du följa anvisningarna på sid W-5.• Byt ut lampan när meddelandet “Lampan har uppnått rekommenderad livslängd, vänligen ersätt
denna med en ny.” visas. Om du fortsätter använda lampan efter det att dess livslängd är slut, finnsdet risk att lampan splittras och att glaset flyger omkring i lamphuset.Rör inte splittret på grund av skaderisken. Vänd dig istället till din NEC-återförsäljare för lampbyte.
• Låt det gå minst 90 sekunder efter att du stängt av projektorn. Stäng sedan av huvudströmbrytaren,koppla ur nätkabeln och låt projektorn kylas av i 60 minuter innan du byter ut lampan.
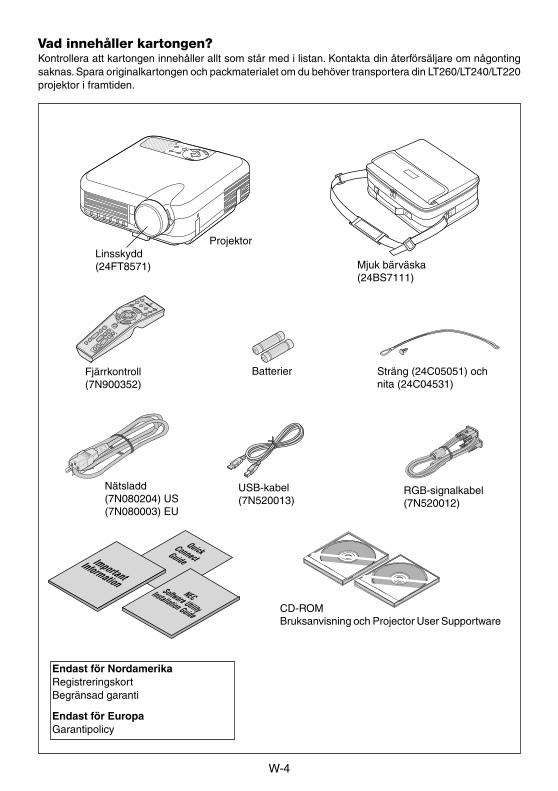
W-4
Vad innehåller kartongen?Kontrollera att kartongen innehåller allt som står med i listan. Kontakta din återförsäljare om någontingsaknas. Spara originalkartongen och packmaterialet om du behöver transportera din LT260/LT240/LT220projektor i framtiden.
Linsskydd(24FT8571)
Fjärrkontroll(7N900352)
Nätsladd(7N080204) US(7N080003) EU
Projektor
Sträng (24C05051) ochnita (24C04531)
RGB-signalkabel(7N520012)
Mjuk bärväska(24BS7111)
CD-ROMBruksanvisning och Projector User Supportware
OFFVIDEOAUTO ADJ.
S-VIDEORGB1
RGB2LASER
POWER
ON
PJASPECT
3D REFORM
HELPPOINTER
VOLUMEMAGNIFY
PICTUREPIC-MUTE
VIEWERSLIDE
FOLDERSLIDE
LIST
SELECT
FREEZE
USB-kabel(7N520013)
QuickConnectGuide
NECSoftware Utility
Installation Guide
ImportantInformation
Batterier
SELECT
CNACEL
TER
NE
E MNU
SOURCEAUTO ADJUST
ON STAND BYSTATUS POWER
LAMP
ALIGNMENT
PC-CARD
Endast för NordamerikaRegistreringskortBegränsad garanti
Endast för EuropaGarantipolicy
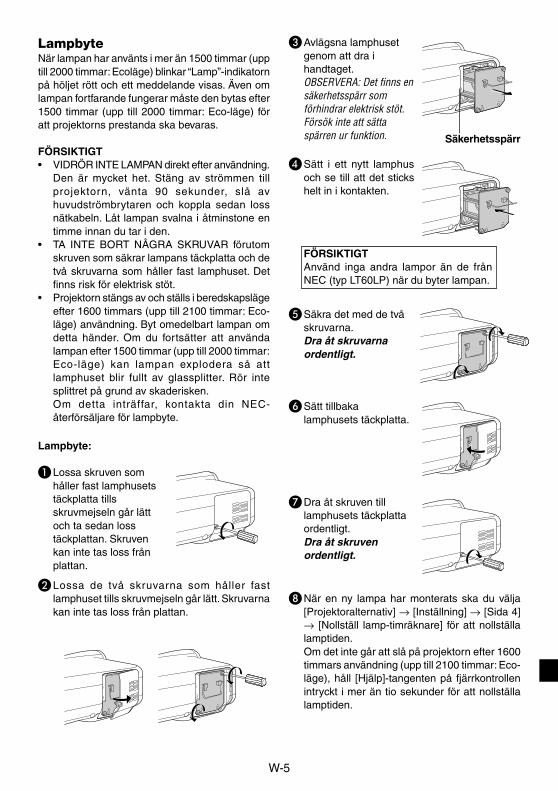
W-5
� Lossa de två skruvarna som håller fastlamphuset tills skruvmejseln går lätt. Skruvarnakan inte tas loss från plattan.
LampbyteNär lampan har använts i mer än 1500 timmar (upptill 2000 timmar: Ecoläge) blinkar “Lamp”-indikatornpå höljet rött och ett meddelande visas. Även omlampan fortfarande fungerar måste den bytas efter1500 timmar (upp till 2000 timmar: Eco-läge) föratt projektorns prestanda ska bevaras.
FÖRSIKTIGT• VIDRÖR INTE LAMPAN direkt efter användning.
Den är mycket het. Stäng av strömmen tillprojektorn, vänta 90 sekunder, slå avhuvudströmbrytaren och koppla sedan lossnätkabeln. Låt lampan svalna i åtminstone entimme innan du tar i den.
• TA INTE BORT NÅGRA SKRUVAR förutomskruven som säkrar lampans täckplatta och detvå skruvarna som håller fast lamphuset. Detfinns risk för elektrisk stöt.
• Projektorn stängs av och ställs i beredskapslägeefter 1600 timmars (upp till 2100 timmar: Eco-läge) användning. Byt omedelbart lampan omdetta händer. Om du fortsätter att användalampan efter 1500 timmar (upp till 2000 timmar:Eco-läge) kan lampan explodera så attlamphuset blir fullt av glassplitter. Rör intesplittret på grund av skaderisken.Om detta inträffar, kontakta din NEC-återförsäljare för lampbyte.
� När en ny lampa har monterats ska du välja[Projektoralternativ] → [Inställning] → [Sida 4]→ [Nollställ lamp-timräknare] för att nollställalamptiden.Om det inte går att slå på projektorn efter 1600timmars användning (upp till 2100 timmar: Eco-läge), håll [Hjälp]-tangenten på fjärrkontrollenintryckt i mer än tio sekunder för att nollställalamptiden.
� Dra åt skruven tilllamphusets täckplattaordentligt.Dra åt skruvenordentligt.
� Sätt tillbakalamphusets täckplatta.
� Säkra det med de tvåskruvarna.Dra åt skruvarnaordentligt.
FÖRSIKTIGTAnvänd inga andra lampor än de frånNEC (typ LT60LP) när du byter lampan.
� Sätt i ett nytt lamphusoch se till att det stickshelt in i kontakten.
� Avlägsna lamphusetgenom att dra ihandtaget.OBSERVERA: Det finns ensäkerhetsspärr somförhindrar elektrisk stöt.Försök inte att sättaspärren ur funktion.
Lampbyte:
� Lossa skruven somhåller fast lamphusetstäckplatta tillsskruvmejseln går lättoch ta sedan losstäckplattan. Skruvenkan inte tas loss frånplattan.
Säkerhetsspärr
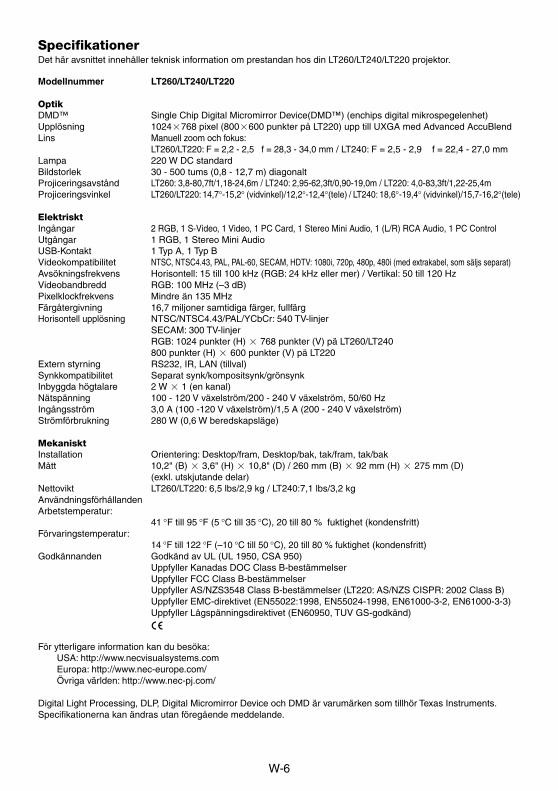
W-6
SpecifikationerDet här avsnittet innehåller teknisk information om prestandan hos din LT260/LT240/LT220 projektor.
Modellnummer LT260/LT240/LT220
OptikDMD™ Single Chip Digital Micromirror Device(DMD™) (enchips digital mikrospegelenhet)Upplösning 1024�768 pixel (800�600 punkter på LT220) upp till UXGA med Advanced AccuBlendLins Manuell zoom och fokus:
LT260/LT220: F = 2,2 - 2,5 f = 28,3 - 34,0 mm / LT240: F = 2,5 - 2,9 f = 22,4 - 27,0 mmLampa 220 W DC standardBildstorlek 30 - 500 tums (0,8 - 12,7 m) diagonaltProjiceringsavstånd LT260: 3,8-80,7ft/1,18-24,6m / LT240: 2,95-62,3ft/0,90-19,0m / LT220: 4,0-83,3ft/1,22-25,4mProjiceringsvinkel LT260/LT220: 14,7°-15,2° (vidvinkel)/12,2°-12,4°(tele) / LT240: 18,6°-19,4° (vidvinkel)/15,7-16,2°(tele)
ElektrisktIngångar 2 RGB, 1 S-Video, 1 Video, 1 PC Card, 1 Stereo Mini Audio, 1 (L/R) RCA Audio, 1 PC ControlUtgångar 1 RGB, 1 Stereo Mini AudioUSB-Kontakt 1 Typ A, 1 Typ BVideokompatibilitet NTSC, NTSC4.43, PAL, PAL-60, SECAM, HDTV: 1080i, 720p, 480p, 480i (med extrakabel, som säljs separat)Avsökningsfrekvens Horisontell: 15 till 100 kHz (RGB: 24 kHz eller mer) / Vertikal: 50 till 120 HzVideobandbredd RGB: 100 MHz (–3 dB)Pixelklockfrekvens Mindre än 135 MHzFärgåtergivning 16,7 miljoner samtidiga färger, fullfärgHorisontell upplösning NTSC/NTSC4.43/PAL/YCbCr: 540 TV-linjer
SECAM: 300 TV-linjerRGB: 1024 punkter (H) � 768 punkter (V) pä LT260/LT240800 punkter (H) � 600 punkter (V) pä LT220
Extern styrning RS232, IR, LAN (tillval)Synkkompatibilitet Separat synk/kompositsynk/grönsynkInbyggda högtalare 2 W � 1 (en kanal)Nätspänning 100 - 120 V växelström/200 - 240 V växelström, 50/60 HzIngångsström 3,0 A (100 -120 V växelström)/1,5 A (200 - 240 V växelström)Strömförbrukning 280 W (0,6 W beredskapsläge)
MekanisktInstallation Orientering: Desktop/fram, Desktop/bak, tak/fram, tak/bakMått 10,2" (B) � 3,6" (H) � 10,8" (D) / 260 mm (B) � 92 mm (H) � 275 mm (D)
(exkl. utskjutande delar)Nettovikt LT260/LT220: 6,5 lbs/2,9 kg / LT240:7,1 lbs/3,2 kgAnvändningsförhållandenArbetstemperatur:
41 °F till 95 °F (5 °C till 35 °C), 20 till 80 % fuktighet (kondensfritt)Förvaringstemperatur:
14 °F till 122 °F (–10 °C till 50 °C), 20 till 80 % fuktighet (kondensfritt)Godkännanden Godkänd av UL (UL 1950, CSA 950)
Uppfyller Kanadas DOC Class B-bestämmelserUppfyller FCC Class B-bestämmelserUppfyller AS/NZS3548 Class B-bestämmelser (LT220: AS/NZS CISPR: 2002 Class B)Uppfyller EMC-direktivet (EN55022:1998, EN55024-1998, EN61000-3-2, EN61000-3-3)Uppfyller Lågspänningsdirektivet (EN60950, TUV GS-godkänd)
För ytterligare information kan du besöka:USA: http://www.necvisualsystems.comEuropa: http://www.nec-europe.com/Övriga världen: http://www.nec-pj.com/
Digital Light Processing, DLP, Digital Micromirror Device och DMD är varumärken som tillhör Texas Instruments.Specifikationerna kan ändras utan föregående meddelande.

Printed in Japan7N8P1622