Embed Size (px)
Citation preview
User Guide Version 4.5
May 2011
®
www.portvision.com PortVision User Guide V 4.5 - 5.11 2
Table of Contents
Congratulations! ...................................................................................................................... 3
PortVision Express, PortVision Plus, and PortVision Advantage ........................................ 4
Getting Started ......................................................................................................................... 4
PortVision Search Bar ............................................................................................................. 6
PortVision Interactive Map ...................................................................................................... 8
Dashboards .............................................................................................................................11
Alerts .......................................................................................................................................12
Additional Information ............................................................................................................13
AIS Data ...............................................................................................................................13
USCG Data ...........................................................................................................................14
Q88.com Data .......................................................................................................................15
Full Screen Mode / Operations Center View..........................................................................16
Personal Lists (My Terminal, My Vessels, My Fleets) ..........................................................16
Personal Lists (My Views) ......................................................................................................18
Vessel Tracking .......................................................................................................................19
Local Weather .........................................................................................................................19
Distance Calculator.................................................................................................................20
VesselZone™ ............................................................................................................................20
Coverage .................................................................................................................................21
Ghost Vessels and Vessels Leaving the Area ......................................................................22
Preferences .............................................................................................................................22
Changing Your Password.......................................................................................................23
PortVision Advantage .............................................................................................................23
TerminalSmart™.......................................................................................................................24
Customer Support ..................................................................................................................24
PortVision Locations ..............................................................................................................24
Appendix A: Starting with a Hands-On Exercise .................................................................25
Appendix B: Icons Used on PortVision’s Interactive Map Display .....................................28
Appendix C: Standard Domains for Sending E-mails to Cell Phones ................................30
Appendix D: Definition of Events ..........................................................................................31
www.portvision.com PortVision User Guide V 4.5 - 5.11 3
Alerts
Congratulations!
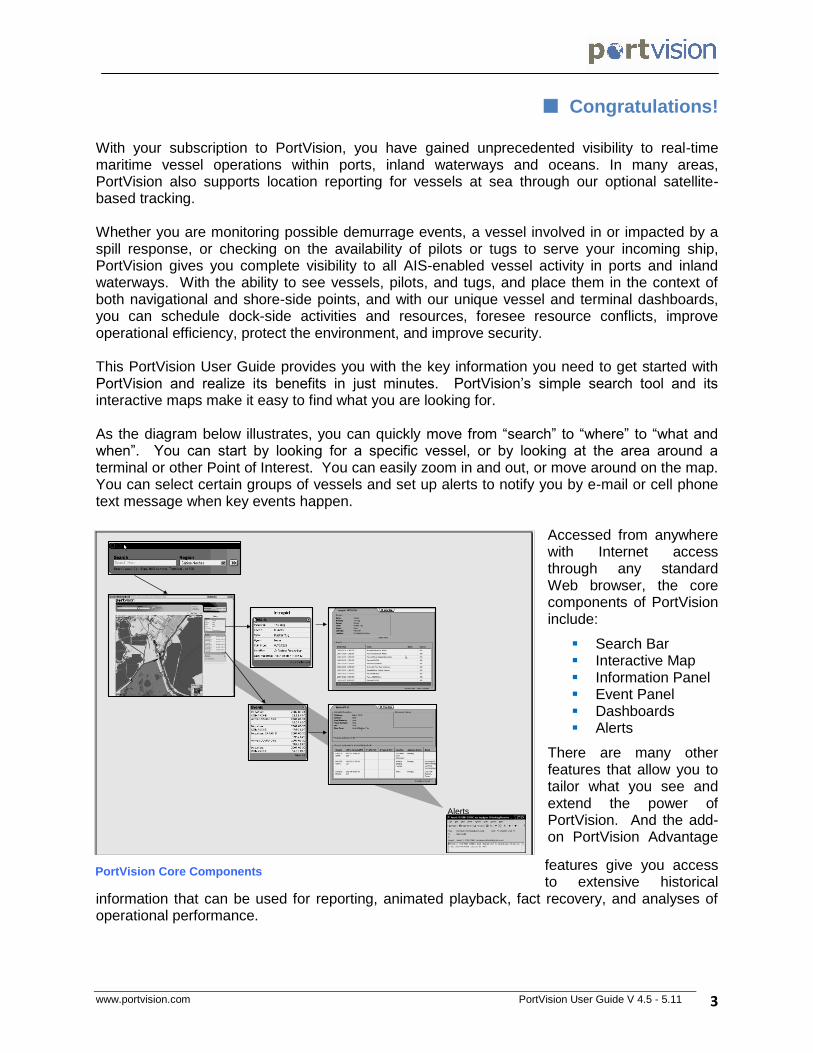
With your subscription to PortVision, you have gained unprecedented visibility to real-time maritime vessel operations within ports, inland waterways and oceans. In many areas, PortVision also supports location reporting for vessels at sea through our optional satellite-based tracking. Whether you are monitoring possible demurrage events, a vessel involved in or impacted by a spill response, or checking on the availability of pilots or tugs to serve your incoming ship, PortVision gives you complete visibility to all AIS-enabled vessel activity in ports and inland waterways. With the ability to see vessels, pilots, and tugs, and place them in the context of both navigational and shore-side points, and with our unique vessel and terminal dashboards, you can schedule dock-side activities and resources, foresee resource conflicts, improve operational efficiency, protect the environment, and improve security. This PortVision User Guide provides you with the key information you need to get started with PortVision and realize its benefits in just minutes. PortVision’s simple search tool and its interactive maps make it easy to find what you are looking for. As the diagram below illustrates, you can quickly move from “search” to “where” to “what and when”. You can start by looking for a specific vessel, or by looking at the area around a terminal or other Point of Interest. You can easily zoom in and out, or move around on the map. You can select certain groups of vessels and set up alerts to notify you by e-mail or cell phone text message when key events happen.
Accessed from anywhere with Internet access through any standard Web browser, the core components of PortVision include:
Search Bar Interactive Map Information Panel Event Panel Dashboards Alerts
There are many other features that allow you to tailor what you see and extend the power of PortVision. And the add-on PortVision Advantage
features give you access to extensive historical
information that can be used for reporting, animated playback, fact recovery, and analyses of operational performance.
PortVision Core Components
www.portvision.com PortVision User Guide V 4.5 - 5.11 4
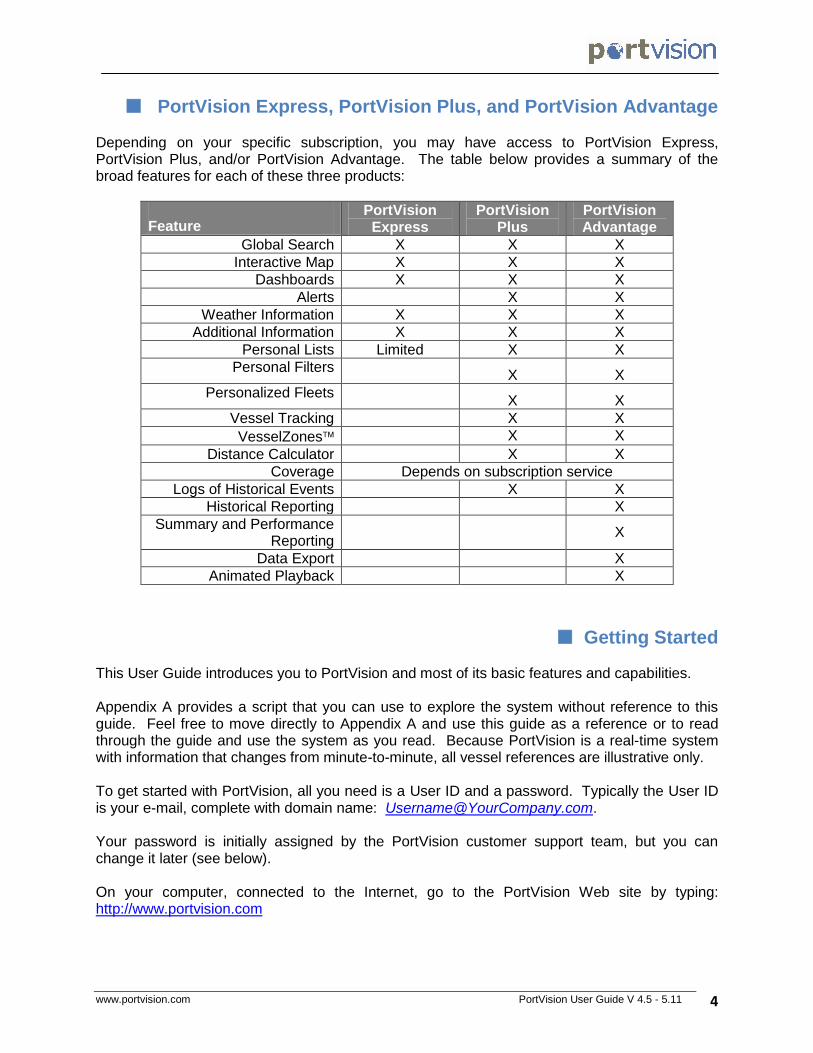
PortVision Express, PortVision Plus, and PortVision Advantage Depending on your specific subscription, you may have access to PortVision Express, PortVision Plus, and/or PortVision Advantage. The table below provides a summary of the broad features for each of these three products:
Feature PortVision Express
PortVision Plus
PortVision Advantage
Global Search X X X
Interactive Map X X X
Dashboards X X X
Alerts X X
Weather Information X X X
Additional Information X X X
Personal Lists Limited X X
Personal Filters X X
Personalized Fleets X X
Vessel Tracking X X
VesselZones X X
Distance Calculator X X
Coverage Depends on subscription service
Logs of Historical Events X X
Historical Reporting X
Summary and Performance Reporting
X
Data Export X
Animated Playback X
Getting Started This User Guide introduces you to PortVision and most of its basic features and capabilities. Appendix A provides a script that you can use to explore the system without reference to this guide. Feel free to move directly to Appendix A and use this guide as a reference or to read through the guide and use the system as you read. Because PortVision is a real-time system with information that changes from minute-to-minute, all vessel references are illustrative only. To get started with PortVision, all you need is a User ID and a password. Typically the User ID is your e-mail, complete with domain name: [email protected]. Your password is initially assigned by the PortVision customer support team, but you can change it later (see below). On your computer, connected to the Internet, go to the PortVision Web site by typing: http://www.portvision.com
www.portvision.com PortVision User Guide V 4.5 - 5.11 5
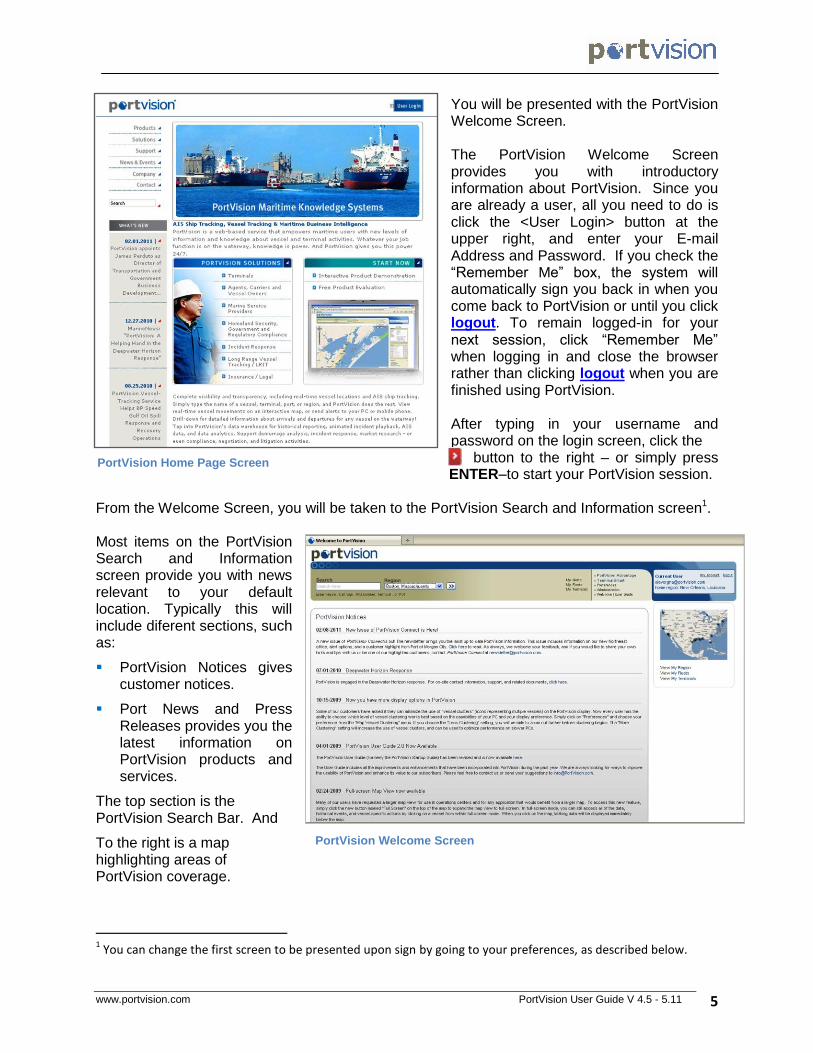
You will be presented with the PortVision Welcome Screen. The PortVision Welcome Screen provides you with introductory information about PortVision. Since you are already a user, all you need to do is click the <User Login> button at the upper right, and enter your E-mail Address and Password. If you check the “Remember Me” box, the system will automatically sign you back in when you come back to PortVision or until you click logout. To remain logged-in for your next session, click “Remember Me” when logging in and close the browser rather than clicking logout when you are finished using PortVision. After typing in your username and password on the login screen, click the button to the right – or simply press ENTER–to start your PortVision session.
From the Welcome Screen, you will be taken to the PortVision Search and Information screen1. Most items on the PortVision Search and Information screen provide you with news relevant to your default location. Typically this will include diferent sections, such as:
PortVision Notices gives customer notices.
Port News and Press Releases provides you the latest information on PortVision products and services.
The top section is the PortVision Search Bar. And
To the right is a map highlighting areas of PortVision coverage.
1 You can change the first screen to be presented upon sign by going to your preferences, as described below.
PortVision Home Page Screen
PortVision Welcome Screen
www.portvision.com PortVision User Guide V 4.5 - 5.11 6
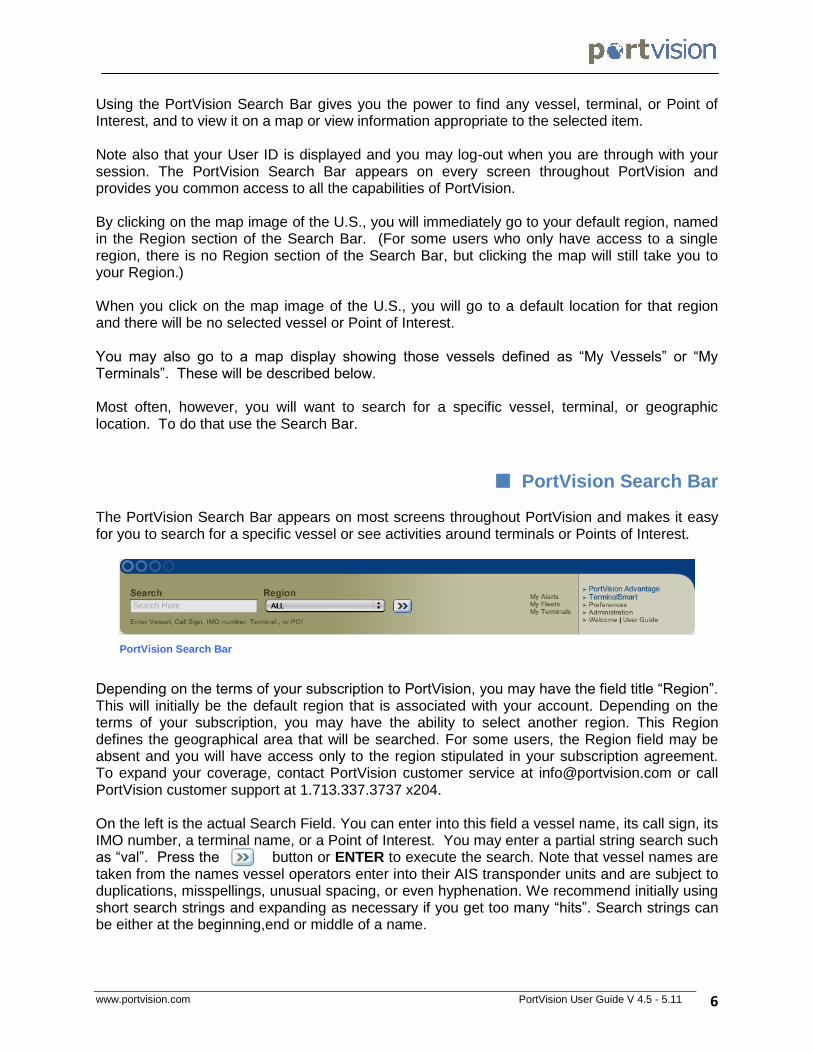
Using the PortVision Search Bar gives you the power to find any vessel, terminal, or Point of Interest, and to view it on a map or view information appropriate to the selected item. Note also that your User ID is displayed and you may log-out when you are through with your session. The PortVision Search Bar appears on every screen throughout PortVision and provides you common access to all the capabilities of PortVision. By clicking on the map image of the U.S., you will immediately go to your default region, named in the Region section of the Search Bar. (For some users who only have access to a single region, there is no Region section of the Search Bar, but clicking the map will still take you to your Region.) When you click on the map image of the U.S., you will go to a default location for that region and there will be no selected vessel or Point of Interest. You may also go to a map display showing those vessels defined as “My Vessels” or “My Terminals”. These will be described below. Most often, however, you will want to search for a specific vessel, terminal, or geographic location. To do that use the Search Bar.
PortVision Search Bar
The PortVision Search Bar appears on most screens throughout PortVision and makes it easy for you to search for a specific vessel or see activities around terminals or Points of Interest.
PortVision Search Bar
Depending on the terms of your subscription to PortVision, you may have the field title “Region”. This will initially be the default region that is associated with your account. Depending on the terms of your subscription, you may have the ability to select another region. This Region defines the geographical area that will be searched. For some users, the Region field may be absent and you will have access only to the region stipulated in your subscription agreement. To expand your coverage, contact PortVision customer service at [email protected] or call PortVision customer support at 1.713.337.3737 x204. On the left is the actual Search Field. You can enter into this field a vessel name, its call sign, its IMO number, a terminal name, or a Point of Interest. You may enter a partial string search such as “val”. Press the >> button or ENTER to execute the search. Note that vessel names are taken from the names vessel operators enter into their AIS transponder units and are subject to duplications, misspellings, unusual spacing, or even hyphenation. We recommend initially using short search strings and expanding as necessary if you get too many “hits”. Search strings can be either at the beginning,end or middle of a name.
www.portvision.com PortVision User Guide V 4.5 - 5.11 7
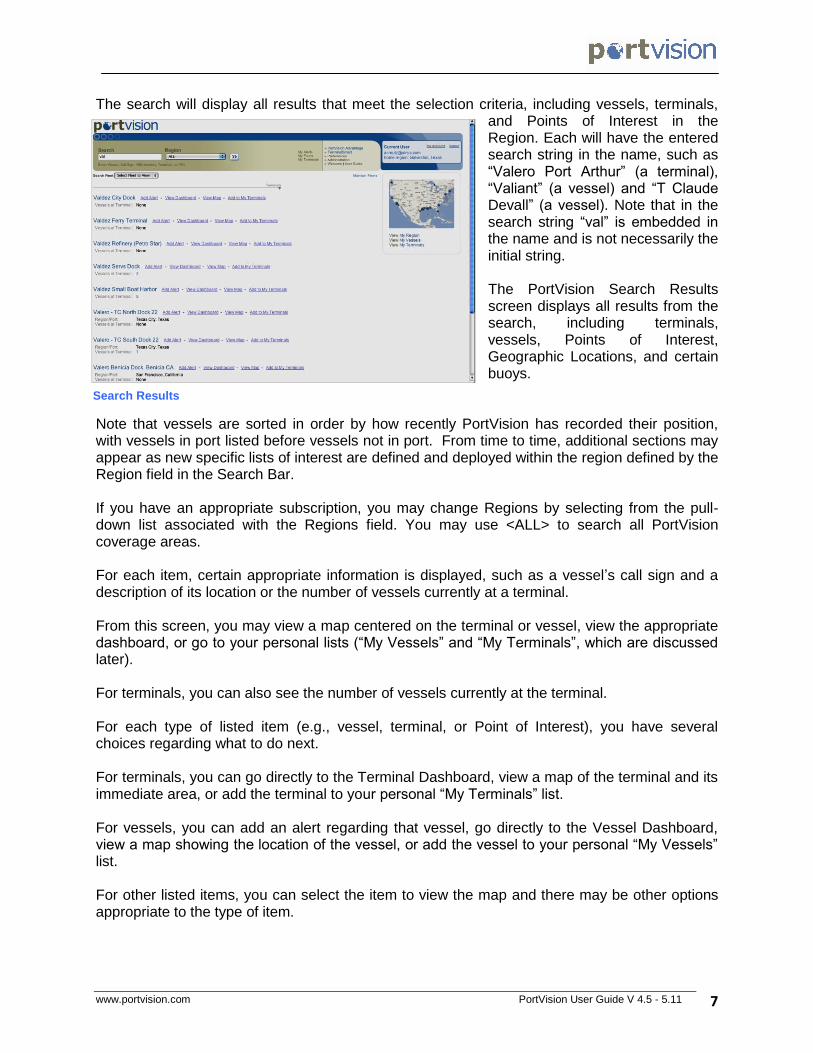
The search will display all results that meet the selection criteria, including vessels, terminals, and Points of Interest in the Region. Each will have the entered search string in the name, such as “Valero Port Arthur” (a terminal), “Valiant” (a vessel) and “T Claude Devall” (a vessel). Note that in the search string “val” is embedded in the name and is not necessarily the initial string. The PortVision Search Results screen displays all results from the search, including terminals, vessels, Points of Interest, Geographic Locations, and certain buoys.
Note that vessels are sorted in order by how recently PortVision has recorded their position, with vessels in port listed before vessels not in port. From time to time, additional sections may appear as new specific lists of interest are defined and deployed within the region defined by the Region field in the Search Bar. If you have an appropriate subscription, you may change Regions by selecting from the pull-down list associated with the Regions field. You may use <ALL> to search all PortVision coverage areas. For each item, certain appropriate information is displayed, such as a vessel’s call sign and a description of its location or the number of vessels currently at a terminal. From this screen, you may view a map centered on the terminal or vessel, view the appropriate dashboard, or go to your personal lists (“My Vessels” and “My Terminals”, which are discussed later). For terminals, you can also see the number of vessels currently at the terminal. For each type of listed item (e.g., vessel, terminal, or Point of Interest), you have several choices regarding what to do next. For terminals, you can go directly to the Terminal Dashboard, view a map of the terminal and its immediate area, or add the terminal to your personal “My Terminals” list. For vessels, you can add an alert regarding that vessel, go directly to the Vessel Dashboard, view a map showing the location of the vessel, or add the vessel to your personal “My Vessels” list. For other listed items, you can select the item to view the map and there may be other options appropriate to the type of item.
Search Results Screen Search Results
Search Results
www.portvision.com PortVision User Guide V 4.5 - 5.11 8
Note that if the list extends past one page, at the bottom you have the option to select another page, or to go to the next or previous page from the one you are viewing. If the list is excessively long, we recommend you refine the search by being more precise in the search name. You will be presented with a list of vessels, terminals, etc. matching your search criteria within the region you have designated. Select a terminal (e.g., “Valero Port Arthur”), and click on the View Map link to take you to the PortVision Interactive Map. You can also search for a geographic location, either by entering the common name (e.g., “New Orleans, La.”), or by entering a specific latitude and longitude. To enter a specific latitude and longitude, enter them with either abbreviations for directions or simply as numbers, using a minus sign to indicate South or West. For example, to locate New Orleans, La., you can enter “New Orleans, LA”, “29 57 27N 90 4 6W”, or even “29 57 27 -90 4 6”. Note that if a vessel has not reported for a significant period of time, when you click “View Map” for it, you may go to a location on the map but see no vessel icon. The map is in fact displaying the location last reported by the vessel. Rather than clutter the map display with multiple icons for vessels that have sailed out of range, PortVision suppresses showing icons that would misrepresent the vessel when the vessel is not in the vicinity.
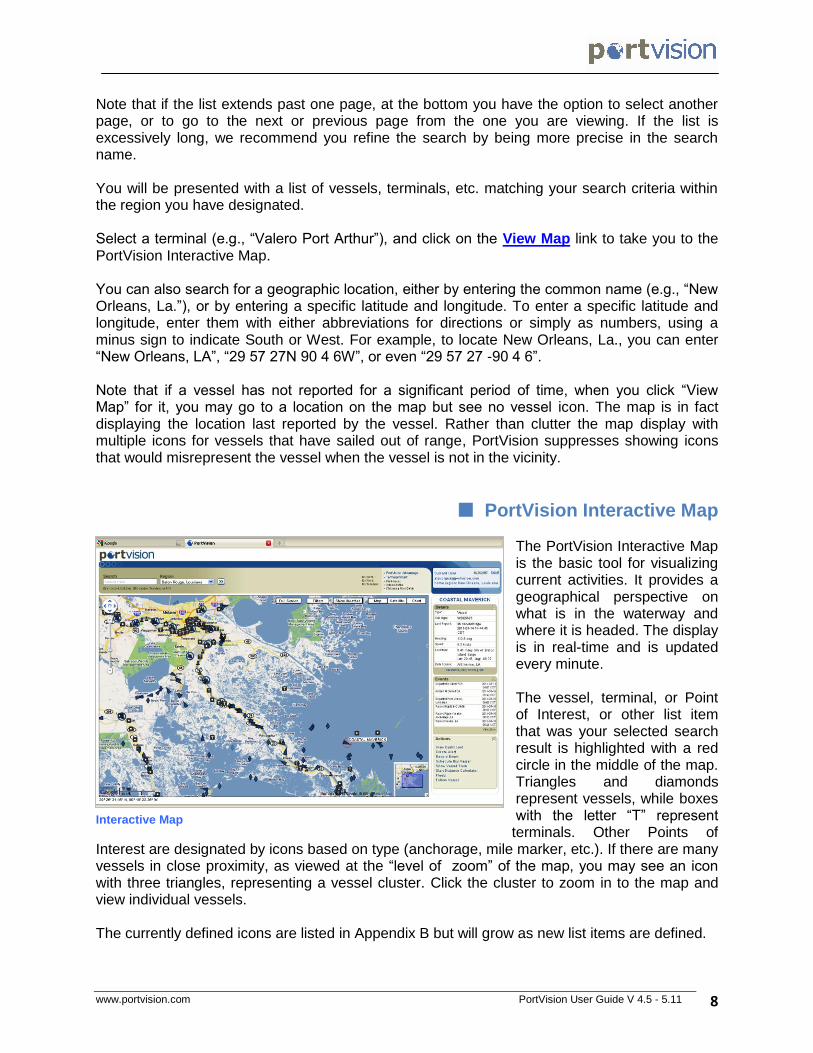
PortVision Interactive Map The PortVision Interactive Map is the basic tool for visualizing current activities. It provides a geographical perspective on what is in the waterway and where it is headed. The display is in real-time and is updated every minute. The vessel, terminal, or Point of Interest, or other list item that was your selected search result is highlighted with a red circle in the middle of the map. Triangles and diamonds represent vessels, while boxes with the letter “T” represent terminals. Other Points of
Interest are designated by icons based on type (anchorage, mile marker, etc.). If there are many vessels in close proximity, as viewed at the “level of zoom” of the map, you may see an icon with three triangles, representing a vessel cluster. Click the cluster to zoom in to the map and view individual vessels. The currently defined icons are listed in Appendix B but will grow as new list items are defined.
Interactive Map
www.portvision.com PortVision User Guide V 4.5 - 5.11 9
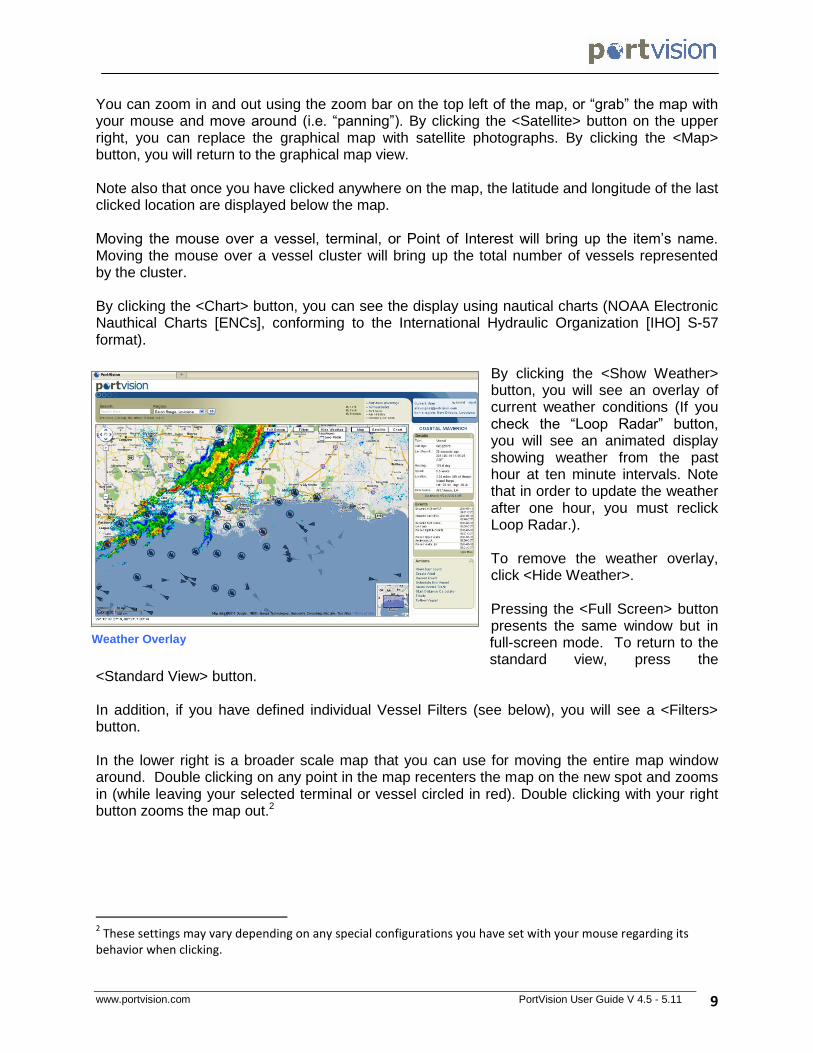
You can zoom in and out using the zoom bar on the top left of the map, or “grab” the map with your mouse and move around (i.e. “panning”). By clicking the <Satellite> button on the upper right, you can replace the graphical map with satellite photographs. By clicking the <Map> button, you will return to the graphical map view. Note also that once you have clicked anywhere on the map, the latitude and longitude of the last clicked location are displayed below the map. Moving the mouse over a vessel, terminal, or Point of Interest will bring up the item’s name. Moving the mouse over a vessel cluster will bring up the total number of vessels represented by the cluster. By clicking the <Chart> button, you can see the display using nautical charts (NOAA Electronic Nauthical Charts [ENCs], conforming to the International Hydraulic Organization [IHO] S-57 format).
By clicking the <Show Weather> button, you will see an overlay of current weather conditions (If you check the “Loop Radar” button, you will see an animated display showing weather from the past hour at ten minute intervals. Note that in order to update the weather after one hour, you must reclick Loop Radar.). To remove the weather overlay, click <Hide Weather>. Pressing the <Full Screen> button presents the same window but in full-screen mode. To return to the standard view, press the
<Standard View> button. In addition, if you have defined individual Vessel Filters (see below), you will see a <Filters> button. In the lower right is a broader scale map that you can use for moving the entire map window around. Double clicking on any point in the map recenters the map on the new spot and zooms in (while leaving your selected terminal or vessel circled in red). Double clicking with your right button zooms the map out.2
2 These settings may vary depending on any special configurations you have set with your mouse regarding its
behavior when clicking.
Weather Overlay
www.portvision.com PortVision User Guide V 4.5 - 5.11 10
Events Panel
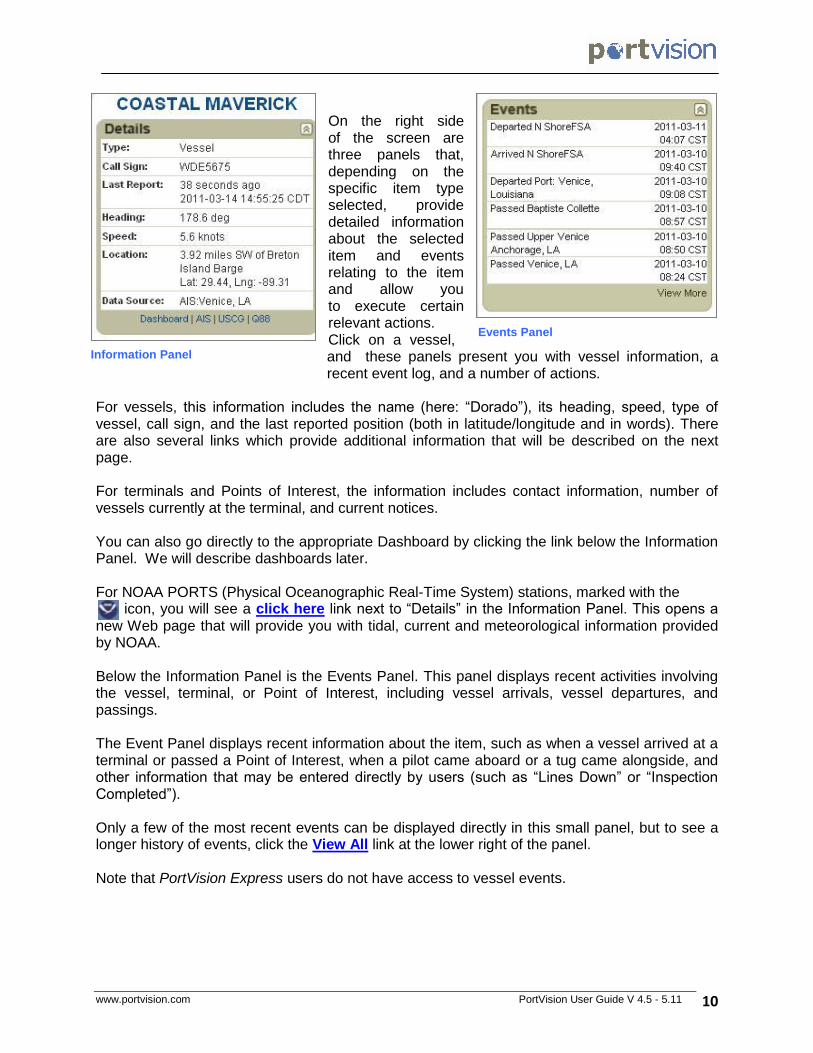
On the right side of the screen are three panels that, depending on the specific item type selected, provide detailed information about the selected item and events relating to the item and allow you to execute certain relevant actions. Click on a vessel, and these panels present you with vessel information, a recent event log, and a number of actions.
For vessels, this information includes the name (here: “Dorado”), its heading, speed, type of vessel, call sign, and the last reported position (both in latitude/longitude and in words). There are also several links which provide additional information that will be described on the next page. For terminals and Points of Interest, the information includes contact information, number of vessels currently at the terminal, and current notices. You can also go directly to the appropriate Dashboard by clicking the link below the Information Panel. We will describe dashboards later. For NOAA PORTS (Physical Oceanographic Real-Time System) stations, marked with the icon, you will see a click here link next to “Details” in the Information Panel. This opens a new Web page that will provide you with tidal, current and meteorological information provided by NOAA. Below the Information Panel is the Events Panel. This panel displays recent activities involving the vessel, terminal, or Point of Interest, including vessel arrivals, vessel departures, and passings. The Event Panel displays recent information about the item, such as when a vessel arrived at a terminal or passed a Point of Interest, when a pilot came aboard or a tug came alongside, and other information that may be entered directly by users (such as “Lines Down” or “Inspection Completed”). Only a few of the most recent events can be displayed directly in this small panel, but to see a longer history of events, click the View All link at the lower right of the panel. Note that PortVision Express users do not have access to vessel events.
Information Panel
www.portvision.com PortVision User Guide V 4.5 - 5.11 11
Vessel Dashboard
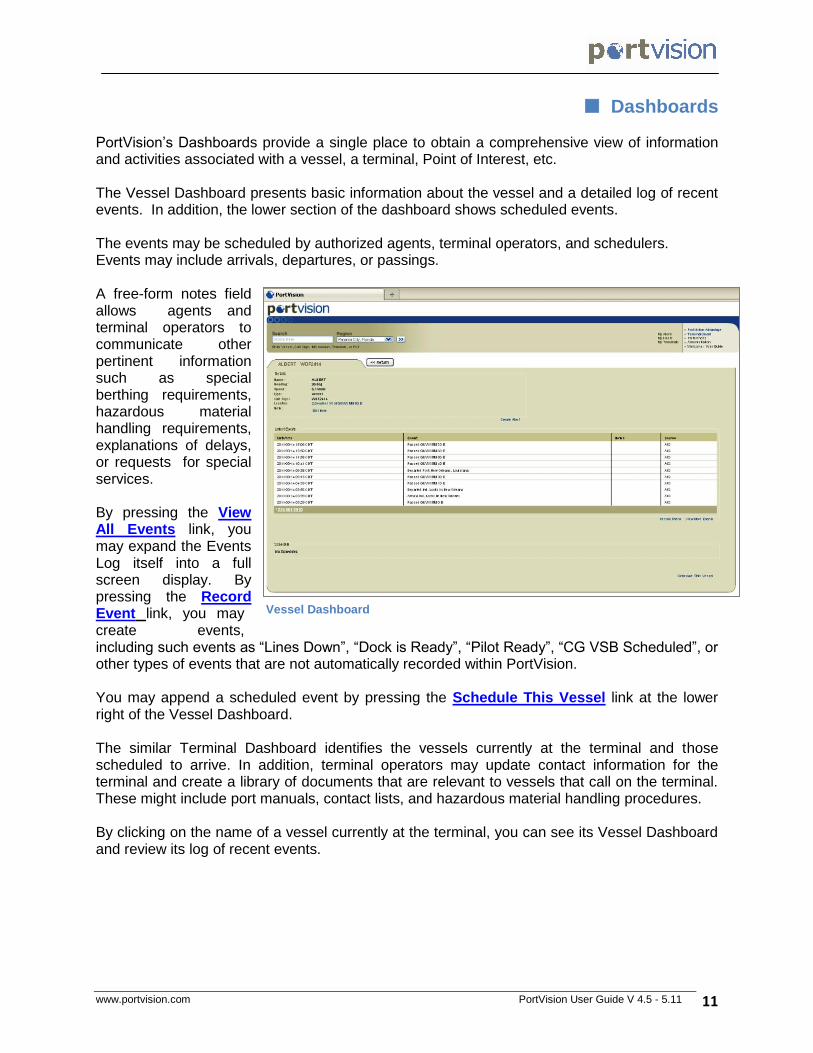
Dashboards PortVision’s Dashboards provide a single place to obtain a comprehensive view of information and activities associated with a vessel, a terminal, Point of Interest, etc. The Vessel Dashboard presents basic information about the vessel and a detailed log of recent events. In addition, the lower section of the dashboard shows scheduled events. The events may be scheduled by authorized agents, terminal operators, and schedulers. Events may include arrivals, departures, or passings. A free-form notes field allows agents and terminal operators to communicate other pertinent information such as special berthing requirements, hazardous material handling requirements, explanations of delays, or requests for special services. By pressing the View All Events link, you may expand the Events Log itself into a full screen display. By pressing the Record Event link, you may create events, including such events as “Lines Down”, “Dock is Ready”, “Pilot Ready”, “CG VSB Scheduled”, or other types of events that are not automatically recorded within PortVision. You may append a scheduled event by pressing the Schedule This Vessel link at the lower right of the Vessel Dashboard. The similar Terminal Dashboard identifies the vessels currently at the terminal and those scheduled to arrive. In addition, terminal operators may update contact information for the terminal and create a library of documents that are relevant to vessels that call on the terminal. These might include port manuals, contact lists, and hazardous material handling procedures. By clicking on the name of a vessel currently at the terminal, you can see its Vessel Dashboard and review its log of recent events.
www.portvision.com PortVision User Guide V 4.5 - 5.11 12
Alerts
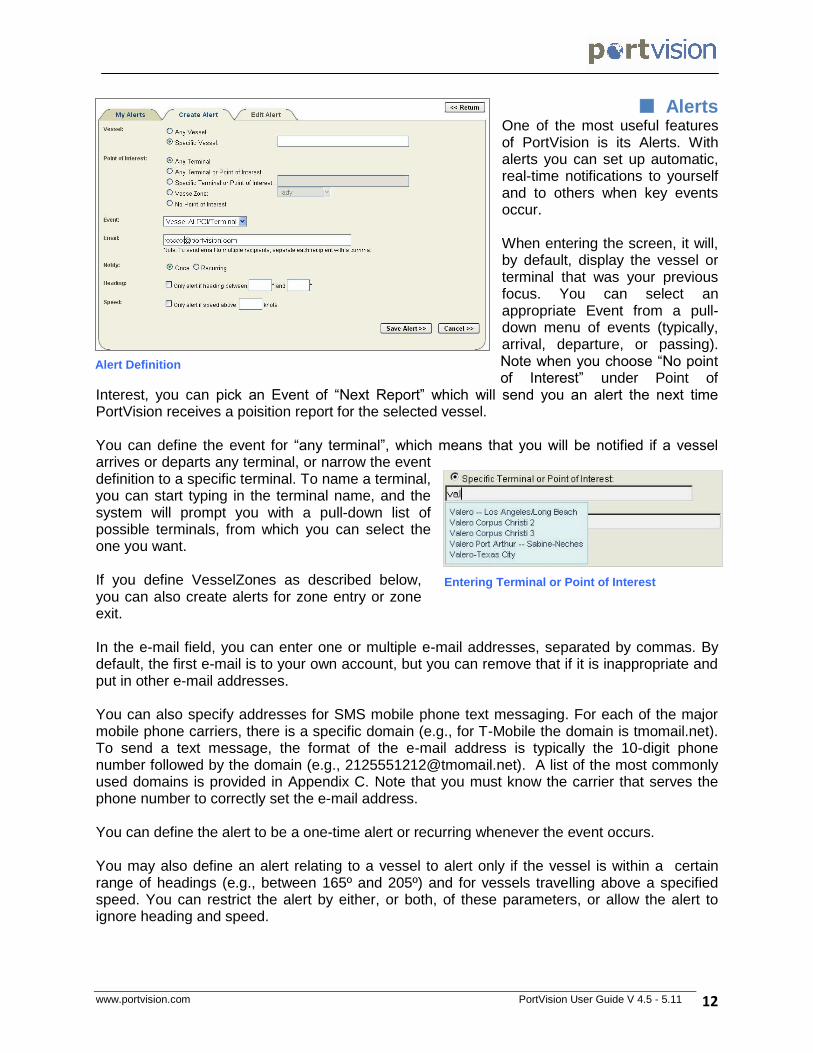
One of the most useful features of PortVision is its Alerts. With alerts you can set up automatic, real-time notifications to yourself and to others when key events occur. When entering the screen, it will, by default, display the vessel or terminal that was your previous focus. You can select an appropriate Event from a pull-down menu of events (typically, arrival, departure, or passing). Note when you choose “No point of Interest” under Point of
Interest, you can pick an Event of “Next Report” which will send you an alert the next time PortVision receives a poisition report for the selected vessel. You can define the event for “any terminal”, which means that you will be notified if a vessel arrives or departs any terminal, or narrow the event definition to a specific terminal. To name a terminal, you can start typing in the terminal name, and the system will prompt you with a pull-down list of possible terminals, from which you can select the one you want. If you define VesselZones as described below, you can also create alerts for zone entry or zone exit. In the e-mail field, you can enter one or multiple e-mail addresses, separated by commas. By default, the first e-mail is to your own account, but you can remove that if it is inappropriate and put in other e-mail addresses. You can also specify addresses for SMS mobile phone text messaging. For each of the major mobile phone carriers, there is a specific domain (e.g., for T-Mobile the domain is tmomail.net). To send a text message, the format of the e-mail address is typically the 10-digit phone number followed by the domain (e.g., [email protected]). A list of the most commonly used domains is provided in Appendix C. Note that you must know the carrier that serves the phone number to correctly set the e-mail address. You can define the alert to be a one-time alert or recurring whenever the event occurs. You may also define an alert relating to a vessel to alert only if the vessel is within a certain range of headings (e.g., between 165º and 205º) and for vessels travelling above a specified speed. You can restrict the alert by either, or both, of these parameters, or allow the alert to ignore heading and speed.
Entering Terminal or Point of Interest
Alert Definition
www.portvision.com PortVision User Guide V 4.5 - 5.11 13
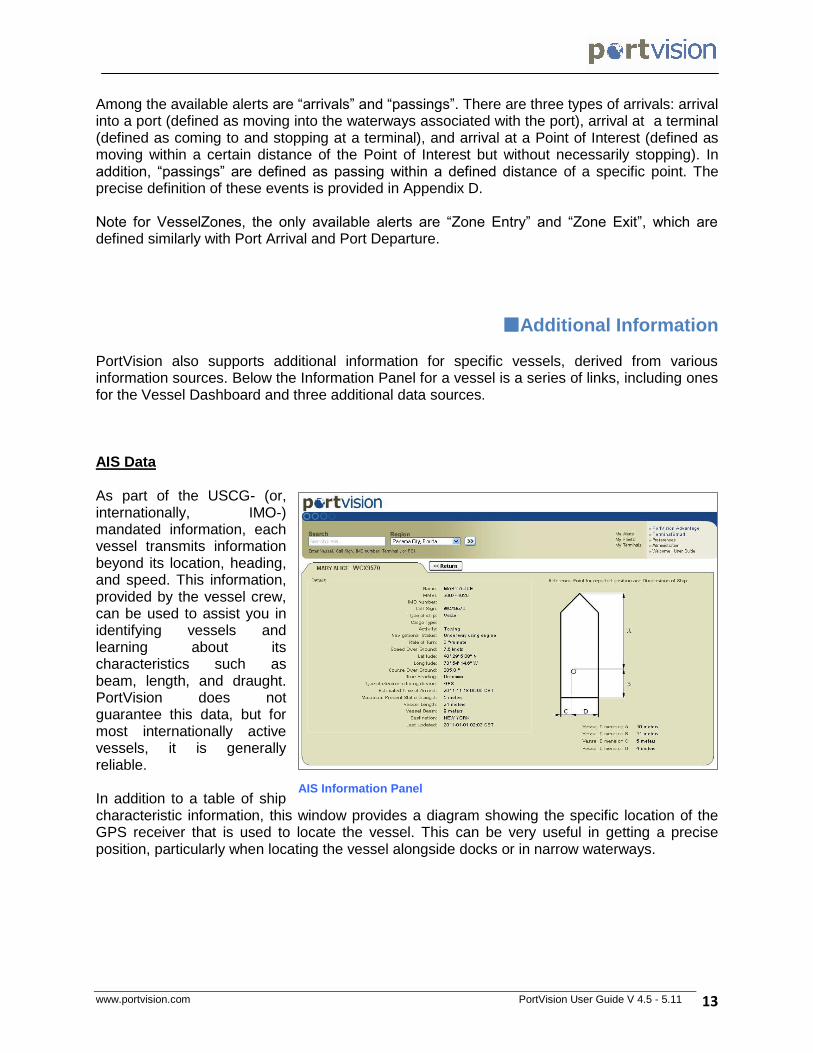
AIS Information Panel
Among the available alerts are “arrivals” and “passings”. There are three types of arrivals: arrival into a port (defined as moving into the waterways associated with the port), arrival at a terminal (defined as coming to and stopping at a terminal), and arrival at a Point of Interest (defined as moving within a certain distance of the Point of Interest but without necessarily stopping). In addition, “passings” are defined as passing within a defined distance of a specific point. The precise definition of these events is provided in Appendix D. Note for VesselZones, the only available alerts are “Zone Entry” and “Zone Exit”, which are defined similarly with Port Arrival and Port Departure.
Additional Information PortVision also supports additional information for specific vessels, derived from various information sources. Below the Information Panel for a vessel is a series of links, including ones for the Vessel Dashboard and three additional data sources. AIS Data As part of the USCG- (or, internationally, IMO-) mandated information, each vessel transmits information beyond its location, heading, and speed. This information, provided by the vessel crew, can be used to assist you in identifying vessels and learning about its characteristics such as beam, length, and draught. PortVision does not guarantee this data, but for most internationally active vessels, it is generally reliable. In addition to a table of ship characteristic information, this window provides a diagram showing the specific location of the GPS receiver that is used to locate the vessel. This can be very useful in getting a precise position, particularly when locating the vessel alongside docks or in narrow waterways.

www.portvision.com PortVision User Guide V 4.5 - 5.11 14
USCG Data In the course of managing U.S. waterways, the United States Coast Guard inspects and certifies many of the vessels that will be identified in PortVision. By clicking the USCG Data link, you will be taken to a set of panels that provide information provided by the USCG. This data, presented in four panels, identifies the vessel and presents information of interest to the United States Coast Guard.
The USCG Summary Panel presents basic information about the vessel, as recorded officially by the United States Coast Guard. The USCG Cases Panel identifies any cases or incidents that involved or referenced the vessel.
The USCG Deficiencies Panel identifies any deficiencies and the appropriate corrective action associated with the vessel.
The final panel, the USCG Documents Panel, identifies certifications, classifications, and safety documents related to the vessel.
www.portvision.com PortVision User Guide V 4.5 - 5.11 15
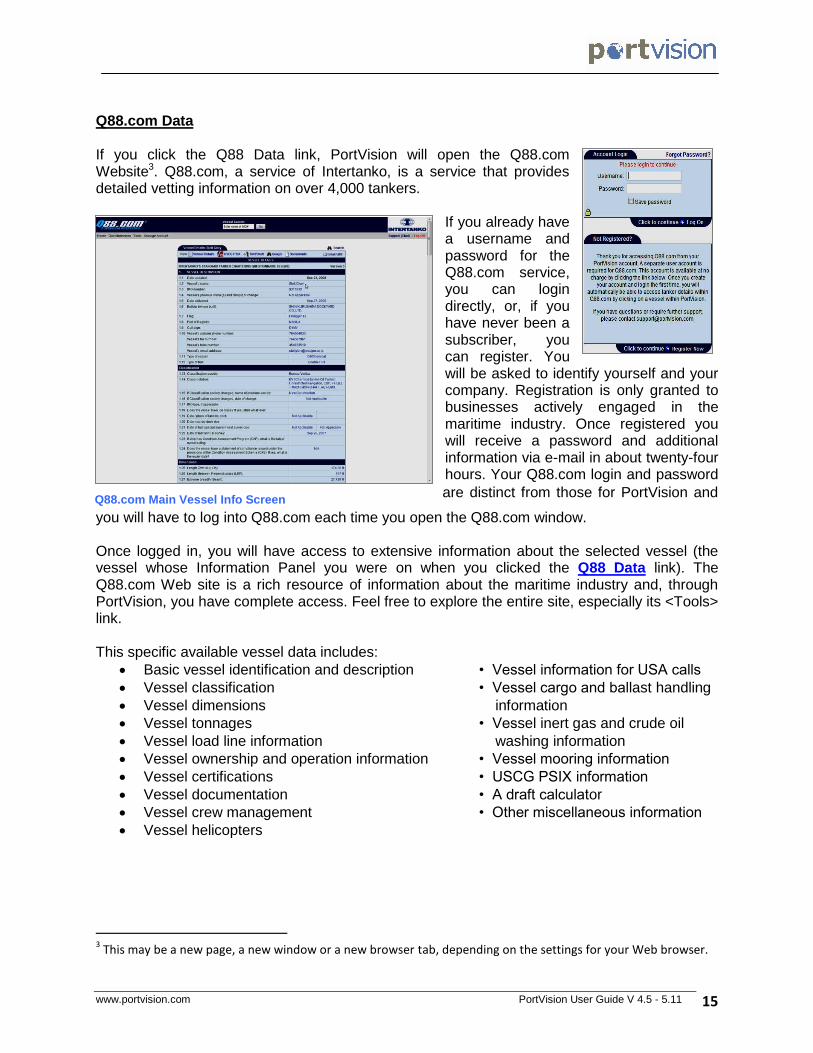
Q88.com Data If you click the Q88 Data link, PortVision will open the Q88.com Website3. Q88.com, a service of Intertanko, is a service that provides detailed vetting information on over 4,000 tankers.
If you already have a username and password for the Q88.com service, you can login directly, or, if you have never been a subscriber, you can register. You will be asked to identify yourself and your company. Registration is only granted to businesses actively engaged in the maritime industry. Once registered you will receive a password and additional information via e-mail in about twenty-four hours. Your Q88.com login and password
are distinct from those for PortVision and
you will have to log into Q88.com each time you open the Q88.com window. Once logged in, you will have access to extensive information about the selected vessel (the vessel whose Information Panel you were on when you clicked the Q88 Data link). The Q88.com Web site is a rich resource of information about the maritime industry and, through PortVision, you have complete access. Feel free to explore the entire site, especially its <Tools> link. This specific available vessel data includes:
Basic vessel identification and description • Vessel information for USA calls
Vessel classification • Vessel cargo and ballast handling
Vessel dimensions information
Vessel tonnages • Vessel inert gas and crude oil
Vessel load line information washing information
Vessel ownership and operation information • Vessel mooring information
Vessel certifications • USCG PSIX information
Vessel documentation • A draft calculator
Vessel crew management • Other miscellaneous information
Vessel helicopters
3 This may be a new page, a new window or a new browser tab, depending on the settings for your Web browser.
Q88.com Login
Q88.com Main Vessel Info Screen
www.portvision.com PortVision User Guide V 4.5 - 5.11 16
Full Screen Mode / Operations Center View
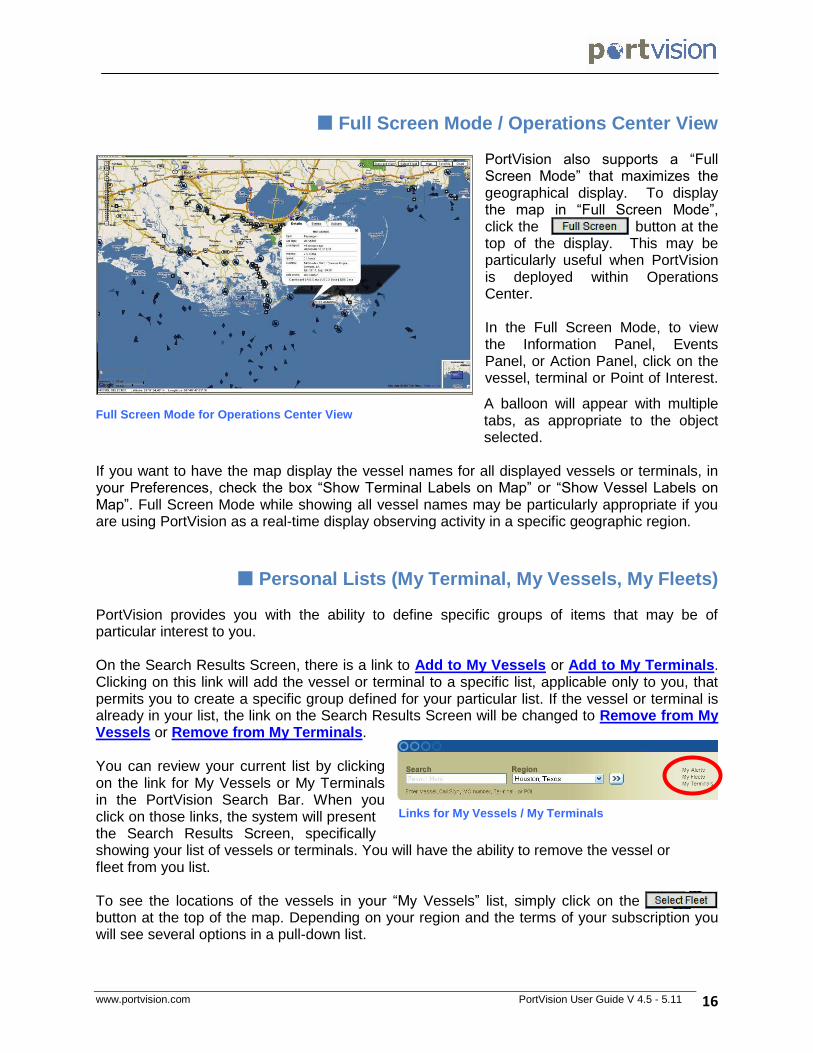
PortVision also supports a “Full Screen Mode” that maximizes the geographical display. To display the map in “Full Screen Mode”, click the button at the top of the display. This may be particularly useful when PortVision is deployed within Operations Center. In the Full Screen Mode, to view the Information Panel, Events Panel, or Action Panel, click on the vessel, terminal or Point of Interest.
A balloon will appear with multiple tabs, as appropriate to the object selected.
If you want to have the map display the vessel names for all displayed vessels or terminals, in your Preferences, check the box “Show Terminal Labels on Map” or “Show Vessel Labels on Map”. Full Screen Mode while showing all vessel names may be particularly appropriate if you are using PortVision as a real-time display observing activity in a specific geographic region.
Personal Lists (My Terminal, My Vessels, My Fleets)
PortVision provides you with the ability to define specific groups of items that may be of particular interest to you. On the Search Results Screen, there is a link to Add to My Vessels or Add to My Terminals. Clicking on this link will add the vessel or terminal to a specific list, applicable only to you, that permits you to create a specific group defined for your particular list. If the vessel or terminal is already in your list, the link on the Search Results Screen will be changed to Remove from My Vessels or Remove from My Terminals. You can review your current list by clicking on the link for My Vessels or My Terminals in the PortVision Search Bar. When you click on those links, the system will present the Search Results Screen, specifically showing your list of vessels or terminals. You will have the ability to remove the vessel or fleet from you list. To see the locations of the vessels in your “My Vessels” list, simply click on the >>>>>>> button at the top of the map. Depending on your region and the terms of your subscription you will see several options in a pull-down list.
Full Screen Mode for Operations Center View
Links for My Vessels / My Terminals
www.portvision.com PortVision User Guide V 4.5 - 5.11 17
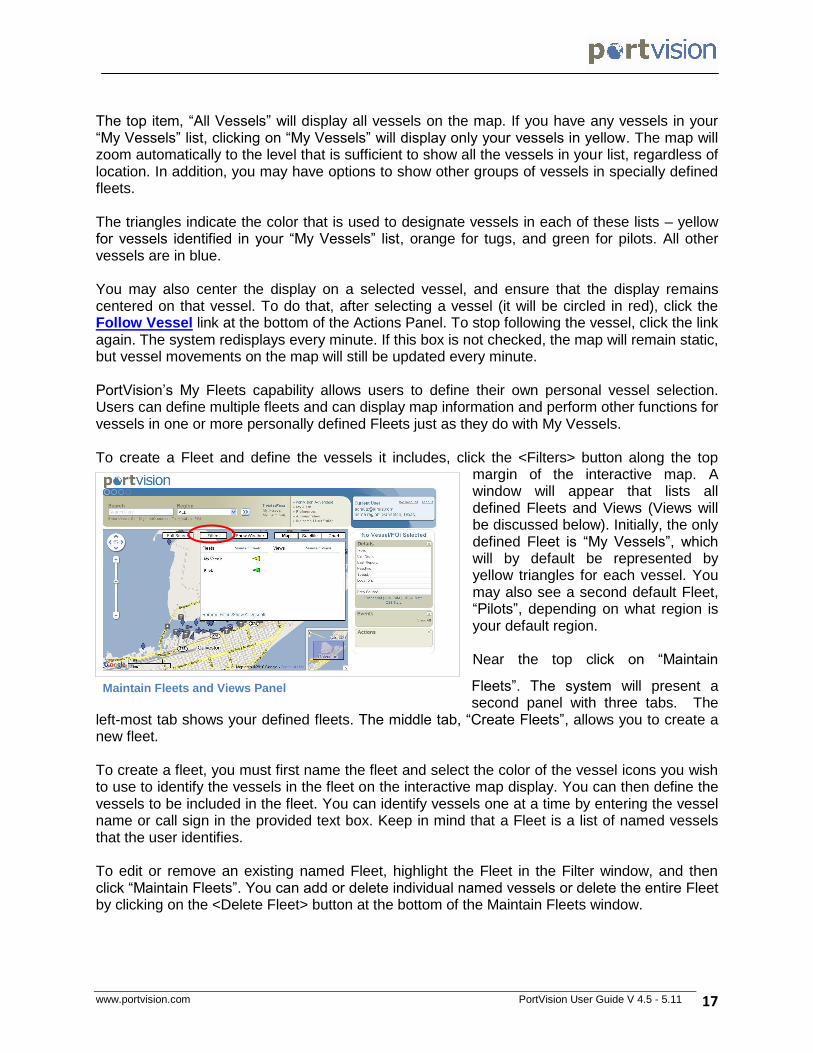
The top item, “All Vessels” will display all vessels on the map. If you have any vessels in your “My Vessels” list, clicking on “My Vessels” will display only your vessels in yellow. The map will zoom automatically to the level that is sufficient to show all the vessels in your list, regardless of location. In addition, you may have options to show other groups of vessels in specially defined fleets. The triangles indicate the color that is used to designate vessels in each of these lists – yellow for vessels identified in your “My Vessels” list, orange for tugs, and green for pilots. All other vessels are in blue. You may also center the display on a selected vessel, and ensure that the display remains centered on that vessel. To do that, after selecting a vessel (it will be circled in red), click the Follow Vessel link at the bottom of the Actions Panel. To stop following the vessel, click the link again. The system redisplays every minute. If this box is not checked, the map will remain static, but vessel movements on the map will still be updated every minute. PortVision’s My Fleets capability allows users to define their own personal vessel selection. Users can define multiple fleets and can display map information and perform other functions for vessels in one or more personally defined Fleets just as they do with My Vessels. To create a Fleet and define the vessels it includes, click the <Filters> button along the top
margin of the interactive map. A window will appear that lists all defined Fleets and Views (Views will be discussed below). Initially, the only defined Fleet is “My Vessels”, which will by default be represented by yellow triangles for each vessel. You may also see a second default Fleet, “Pilots”, depending on what region is your default region. Near the top click on “Maintain
Fleets”. The system will present a second panel with three tabs. The
left-most tab shows your defined fleets. The middle tab, “Create Fleets”, allows you to create a new fleet. To create a fleet, you must first name the fleet and select the color of the vessel icons you wish to use to identify the vessels in the fleet on the interactive map display. You can then define the vessels to be included in the fleet. You can identify vessels one at a time by entering the vessel name or call sign in the provided text box. Keep in mind that a Fleet is a list of named vessels that the user identifies. To edit or remove an existing named Fleet, highlight the Fleet in the Filter window, and then click “Maintain Fleets”. You can add or delete individual named vessels or delete the entire Fleet by clicking on the <Delete Fleet> button at the bottom of the Maintain Fleets window.
Maintain Fleets and Views Panel
www.portvision.com PortVision User Guide V 4.5 - 5.11 18
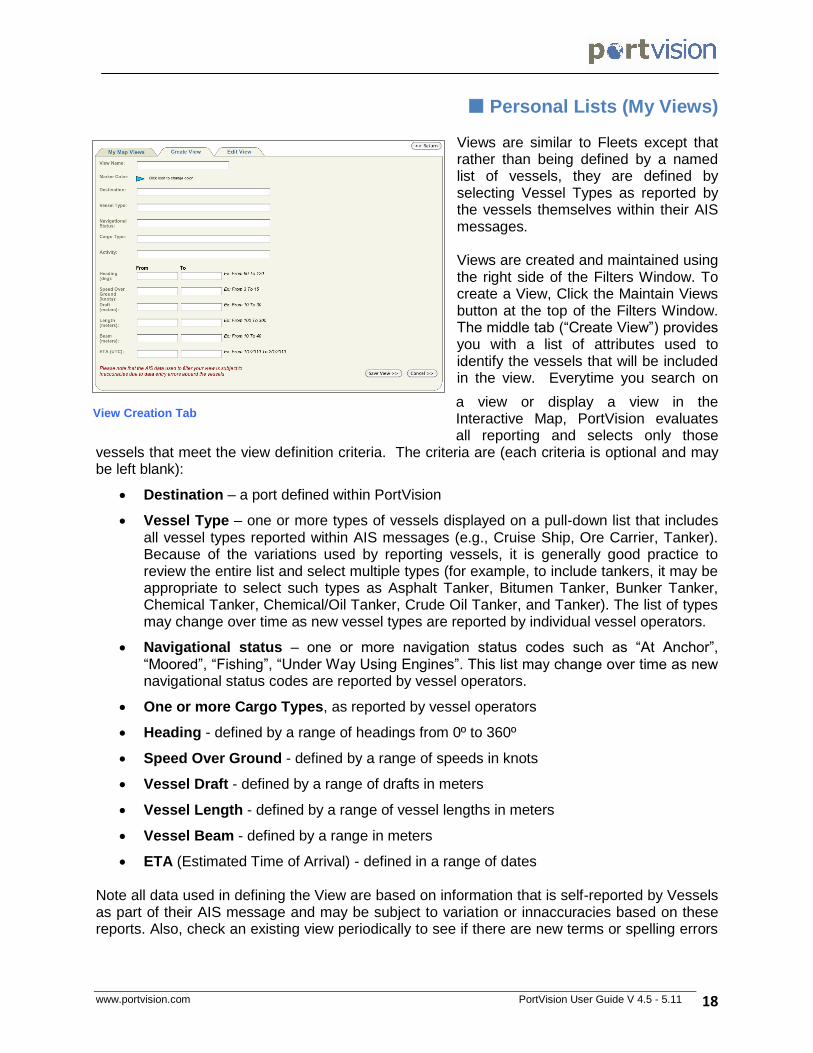
Personal Lists (My Views)
Views are similar to Fleets except that rather than being defined by a named list of vessels, they are defined by selecting Vessel Types as reported by the vessels themselves within their AIS messages. Views are created and maintained using the right side of the Filters Window. To create a View, Click the Maintain Views button at the top of the Filters Window. The middle tab (“Create View”) provides you with a list of attributes used to identify the vessels that will be included in the view. Everytime you search on
a view or display a view in the Interactive Map, PortVision evaluates all reporting and selects only those
vessels that meet the view definition criteria. The criteria are (each criteria is optional and may be left blank):
Destination – a port defined within PortVision
Vessel Type – one or more types of vessels displayed on a pull-down list that includes all vessel types reported within AIS messages (e.g., Cruise Ship, Ore Carrier, Tanker). Because of the variations used by reporting vessels, it is generally good practice to review the entire list and select multiple types (for example, to include tankers, it may be appropriate to select such types as Asphalt Tanker, Bitumen Tanker, Bunker Tanker, Chemical Tanker, Chemical/Oil Tanker, Crude Oil Tanker, and Tanker). The list of types may change over time as new vessel types are reported by individual vessel operators.
Navigational status – one or more navigation status codes such as “At Anchor”, “Moored”, “Fishing”, “Under Way Using Engines”. This list may change over time as new navigational status codes are reported by vessel operators.
One or more Cargo Types, as reported by vessel operators
Heading - defined by a range of headings from 0º to 360º
Speed Over Ground - defined by a range of speeds in knots
Vessel Draft - defined by a range of drafts in meters
Vessel Length - defined by a range of vessel lengths in meters
Vessel Beam - defined by a range in meters
ETA (Estimated Time of Arrival) - defined in a range of dates Note all data used in defining the View are based on information that is self-reported by Vessels as part of their AIS message and may be subject to variation or innaccuracies based on these reports. Also, check an existing view periodically to see if there are new terms or spelling errors
View Creation Tab

www.portvision.com PortVision User Guide V 4.5 - 5.11 19
reflected in the pull-down list of active Vessel Types, Navigational Status, and Cargo Types, etc. It may be necessary to add additional types or status codes to ensure up-to-date definitions. Each time the user searches on, or displays, a defined View, PortVision re-evaluates all reporting vessels and includes only those vessels that meet the criteria, thus allowing a dynamic perspective on vessels reflecting real-time information.
Vessel Tracking PortVision allows you to not only see where a vessel is now, but create a track of the vessel over a period of time. To see a vessel track, select a vessel on the map display and click the Show/Hide Vessel Track link in the Actions panel in the lower-right section of the screen. Depending on options set in the “Preferences” area of PortVision, you will see the current position of the vessel (the blue triangle) and then the historical position of the vessel over a period of time (white triangles). The frequency of those positions can be controlled in the Preferences area of PortVision, described below. In addition, depending on your preferences, other vessels may be removed from the display to clarify the vessel track. You can view the date/time associated with each historical location by moving the mouse pointer over the icon. To return to a normal display, with current positions of all vessels, click the Show/Hide Vessel Track link again.
Local Weather
In addition to the general weather overlay described above, PortVision includes several features to report on local weather – both current conditions and forecasts. The specific capabilities depend on geographic location, which may include current conditions reported from local buoys or forecasts prepared by the National Weather Service (NWS). To access local weather, at any location on the interactive map, click the right mouse button4. PortVision will display a short menu: clicking on “View
Weather” will display either current conditions reported by a buoy near the location or a weather forecast from the nearest weather reporting station. For actual conditions, PortVision will display a single balloon reporting weather conditions, indicating the reporting station and distance from the selected geographic location. In many locations, however, there is no nearby buoy and PortVision displays weather forecasts for both the current day and the next day, each on a separate tab. Note that these are weather forecasts, and late in the day the information for the morning represents the forecasts from the morning, and not actual weather conditions. Where neither real-time weather conditions nor weather forecasts are available, PortVision will display a message indicating no weather information is available.
4 Specific mouse operation may vary based on Web browser and configuration.
www.portvision.com PortVision User Guide V 4.5 - 5.11 20
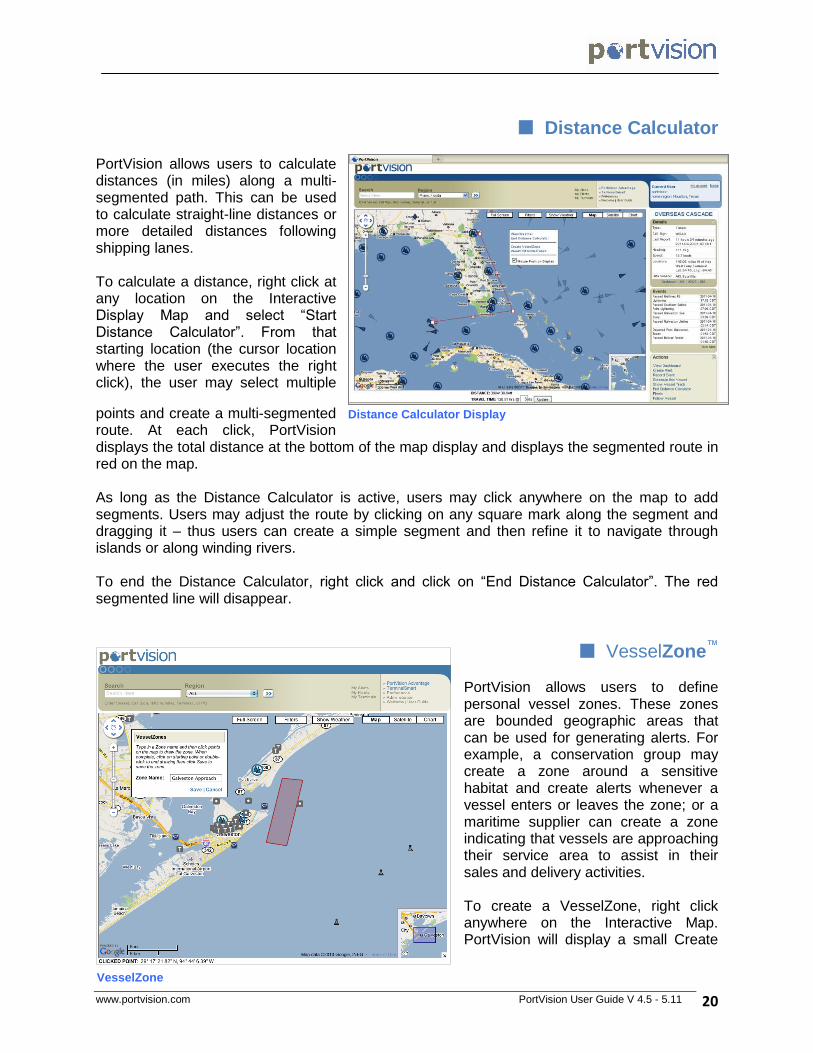
Distance Calculator
PortVision allows users to calculate distances (in miles) along a multi-segmented path. This can be used to calculate straight-line distances or more detailed distances following shipping lanes. To calculate a distance, right click at any location on the Interactive Display Map and select “Start Distance Calculator”. From that starting location (the cursor location where the user executes the right click), the user may select multiple
points and create a multi-segmented route. At each click, PortVision displays the total distance at the bottom of the map display and displays the segmented route in red on the map. As long as the Distance Calculator is active, users may click anywhere on the map to add segments. Users may adjust the route by clicking on any square mark along the segment and dragging it – thus users can create a simple segment and then refine it to navigate through islands or along winding rivers. To end the Distance Calculator, right click and click on “End Distance Calculator”. The red segmented line will disappear.
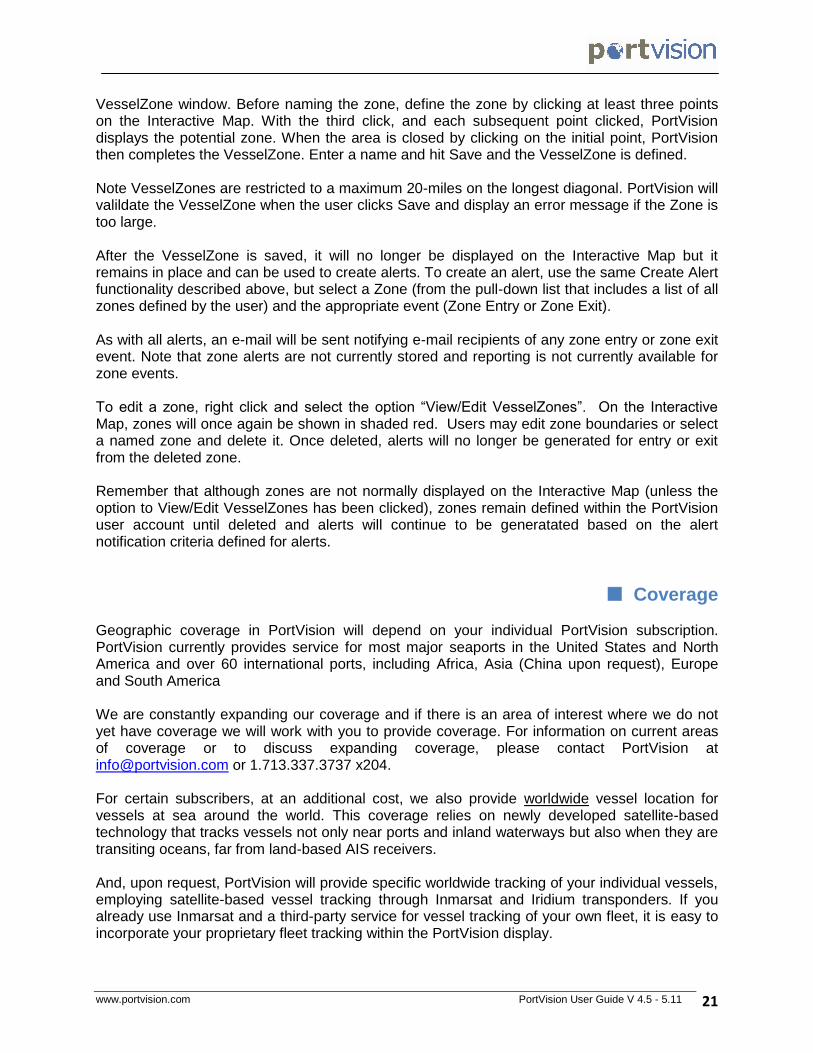
VesselZone™ PortVision allows users to define personal vessel zones. These zones are bounded geographic areas that can be used for generating alerts. For example, a conservation group may create a zone around a sensitive habitat and create alerts whenever a vessel enters or leaves the zone; or a maritime supplier can create a zone indicating that vessels are approaching their service area to assist in their sales and delivery activities. To create a VesselZone, right click anywhere on the Interactive Map. PortVision will display a small Create
Distance Calculator Display
VesselZone
www.portvision.com PortVision User Guide V 4.5 - 5.11 21
VesselZone window. Before naming the zone, define the zone by clicking at least three points on the Interactive Map. With the third click, and each subsequent point clicked, PortVision displays the potential zone. When the area is closed by clicking on the initial point, PortVision then completes the VesselZone. Enter a name and hit Save and the VesselZone is defined. Note VesselZones are restricted to a maximum 20-miles on the longest diagonal. PortVision will valildate the VesselZone when the user clicks Save and display an error message if the Zone is too large. After the VesselZone is saved, it will no longer be displayed on the Interactive Map but it remains in place and can be used to create alerts. To create an alert, use the same Create Alert functionality described above, but select a Zone (from the pull-down list that includes a list of all zones defined by the user) and the appropriate event (Zone Entry or Zone Exit). As with all alerts, an e-mail will be sent notifying e-mail recipients of any zone entry or zone exit event. Note that zone alerts are not currently stored and reporting is not currently available for zone events. To edit a zone, right click and select the option “View/Edit VesselZones”. On the Interactive Map, zones will once again be shown in shaded red. Users may edit zone boundaries or select a named zone and delete it. Once deleted, alerts will no longer be generated for entry or exit from the deleted zone. Remember that although zones are not normally displayed on the Interactive Map (unless the option to View/Edit VesselZones has been clicked), zones remain defined within the PortVision user account until deleted and alerts will continue to be generatated based on the alert notification criteria defined for alerts.
Coverage Geographic coverage in PortVision will depend on your individual PortVision subscription. PortVision currently provides service for most major seaports in the United States and North America and over 60 international ports, including Africa, Asia (China upon request), Europe and South America We are constantly expanding our coverage and if there is an area of interest where we do not yet have coverage we will work with you to provide coverage. For information on current areas of coverage or to discuss expanding coverage, please contact PortVision at [email protected] or 1.713.337.3737 x204. For certain subscribers, at an additional cost, we also provide worldwide vessel location for vessels at sea around the world. This coverage relies on newly developed satellite-based technology that tracks vessels not only near ports and inland waterways but also when they are transiting oceans, far from land-based AIS receivers. And, upon request, PortVision will provide specific worldwide tracking of your individual vessels, employing satellite-based vessel tracking through Inmarsat and Iridium transponders. If you already use Inmarsat and a third-party service for vessel tracking of your own fleet, it is easy to incorporate your proprietary fleet tracking within the PortVision display.
www.portvision.com PortVision User Guide V 4.5 - 5.11 22
For information on worldwide coverage or tracking your individual vessels throughout the world, please contact PortVision at [email protected] or call us at 1.713.337.3737 x204.
Ghost Vessels and Vessels Leaving the Area Occasionally, a vessel will be displayed more dimly than normal. Typically, this is a vessel at dockside or anchored that is not currently transmitting live information, but for which we have received information recently. PortVision assumes the vessel is still at the last reported location, but is indicating by dimming the vessel icon that it is not currently receiving information. If the vessel continues to not transmit information over a long period of time, PortVision will allow the vessel to “fade away”, presuming that either information was lost when the vessel left the area or that the vessel is in long-term maintenance. Once PortVision receives communications from the ship, the ship will reappear on the interactive map display. Since the reach of PortVision is limited to about 40 miles from our installed AIS receivers, vessels that sail out of the area may not be visible to PortVision5. Rather than continue to show an icon reporting its last position, PortVision removes such vessels from the map display. PortVision does continue to include the vessel in Search Results and if you click on the View Map link, PortVision will display a map of the last reported position for the vessel, but will not display a vessel icon.6 Note: Unless a vessel icon is painted with saturated color, the vessel icon is at the last reported position, which may be a few hours to several days old.
Preferences
By clicking the Preferences Link on the right side of the Search Bar, you can change certain user preferences that are specific to your account. Among these are your default time zone and certain options about which labels to display on the Interactive Map. You also can tailor the Vessel Tracking display, indicating the number of minutes between displayed positions (the white triangles) and whether or not to display the current position of other vessels when displaying vessel tracking. In addition, you can set a level for clustering (displaying the two-triangle cluster icon rather than a dense display of individual vessel icons), adjust the display order for personalized fleets (if you have defined them), which display your wish for your “home page” within PortVision. And if you have TerminalSmart, you have several options that configure TerminalSmart. Depending on your subscription, you may also have options about which specific sources of vessel information can be displayed.
5 Note: You may have a subscription that allows you to see worldwide AIS data, including data captured by satellites showing
vessels at sea. Because of the timing of satellite orbits, the frequency of reporting may cause vessels to fade away between reports. 6 We do not display an icon at the last reported position because the margins of the map where PortVision typically loses a ship
would quickly become cluttered with numerous icons for vessels that have left the area.
www.portvision.com PortVision User Guide V 4.5 - 5.11 23
Be sure to click the button to save your preferences. They will become active immediately. The “Account” tab allows you to change your personal identification information and change your password.
Changing Your Password On the “Account” tab within the Preferences window, you can also change your password. To do this, click the button and follow the instructions. We recommend you do this upon initial sign-in.
PortVision Advantage Up to this point, the User Guide has covered the basics for PortVision Plus and PortVision Express users. To enhance the power of PortVision, PortVision Advantage is a premium service that gives you access to the extensive history of vessel activity through PortVision’s data warehouse and data reporting engines. With PortVision Advantage, you can generate a variety of reports, including reports on historical vessel activity, such as summary and detailed reports on individual vessel activity, port and terminal activity, and transit times. You can filter the information presented in these reports in a variety of ways, and can download both summary and detailed reports and listings into a variety of electronic formats. The PortVision Advantage animated playback feature allows you to select a vessel, terminal, or Point of Interest, and see vessel activity for any period of time. The animated playback displays the same type of map seen in PortVision’s Interactive Maps but from an historical period. You can change the interval, scroll and zoom the map, and capture specific vessel activity. In addition, after playback, you can generate a detailed report of events for auditing and documenting these historical events. PortVision Advantage is ideally suited for when you need to know not only what is happening “now”, but also what happened in the past. You can reconcile or challenge demurrage reports, track a vessel over long periods of time, note who was near a specific location at a time of interest (e.g., when a dock was damaged or fuel spilled), which vessels passed through a particular area that might be restricted, note when vessels approached other vessels, etc. You can benchmark times in transit and compare individual vessels or vessels in your individualized “My Vessels” fleet against all vessels. PortVision Advantage provides you with nearly unlimited capabilities for reporting and analyzing historical activity. For more information on obtaining a subscription to PortVision Advantage, contact PortVision at [email protected] or 1.713.337.3737 x204.

www.portvision.com PortVision User Guide V 4.5 - 5.11 24
TerminalSmart™
Certain PortVision Advantage customers also have access to PortVision TerminalSmart, which permits customization of PortVision Advantage to include specific, pre-defined reports and displays, simplifying navigation and facilitating quick access to key information in one dashboard. For more information on obtaining TerminalSmart, contact PortVision at [email protected] or 1.713.337.3737 x204.
Customer Support
To contact PortVision customer support immediately, you can call our customer support line at 1.713.337.3737, x204 or e-mail [email protected].
PortVision Locations Gulf Coast 723 Main St. Suite 1004 Houston, TX 77002 USA T 1.713.337.3737 F 1.713.337.3740 West Coast 9845 Via Pasar San Diego, CA 92126 USA T 1.713.337.3737 F 1.858.586.1237 North East 114 7th Street, Suite 200 Garden City, NY 11530 T 1.917.757.4602 F 1.858.586.1237
www.portvision.com PortVision User Guide V 4.5 - 5.11 25
Appendix A: Starting with a Hands-On Exercise PortVision is highly intuitive and some users prefer to simply “start using” the system rather than read through a user guide. The following is a pseudo-script that a user can follow to explore PortVision immediately.
1. Sign into PortVision with your User ID and password.
2. In the Search Bar enter “VALERO” and press the button.
3. Select a terminal (“Valero Port Arthur” is a good choice).
4. Observe the Terminal Information, Event, and Action Panels on the right side of the screen.
5. Click a nearby vessel (blue, yellow, or orange triangle or diamond).
6. Observe the Vessel Information, Event, and Action Panels on the right side of the screen.
7. Below the Information Panel, click the AIS Data and USCG Data links.
8. If you wish, also click the Q88 Data link. You may need to register with Q88.com and may not be able to access Q88 data until the registration has been approved.
9. To return to PortVision, close Q88. Depending on the settings on your computer, this may be done by closing either a window or a new page.
10. In the Actions Panel, click Create Alert.
11. Create an Alert … to define a specific terminal, start to type a name and observe the pop-down list of terminals (“Valero” is a good starting string).
12. Return to the Map (you may use the <Go Back> feature of your Web browser or press the u button).
13. Click the button to go to Full Screen Mode.
14. Click on a vessel and observe the balloon pop-up with information about the vessel.
15. Click the button to return to the default display
16. Click the <Show Weather> button to display the weather overlay and adjust the loop frequency.
17. Click the <Hide Weather> button to remove the weather overlay.
18. Clieck the <Filters> button and explore the creation, display, and editing of both personalized Fleets and Views as described above.
19. After returning to the Interactive Map Display, right click at any point on the map and click View Weather to see weather data for cursor location.
20. Once again, right click the mouse at any location on the map and explore using the Distance Calculator.
www.portvision.com PortVision User Guide V 4.5 - 5.11 26
21. Finally, right click the mouse at any location on the map (preferably over water) and explore the creation, display, and editing of VesselZones.
22. Click the Show/Hide Vessel Track link in the Actions Panel. If you don’t see a track of white triangles showing historical positions, you can later adjust the time-interval for the position displays using the Preference Window. A good time interval is 2 or 3 minutes, although if a ship has been at dock for a significant period, you may not see any track at all.
23. Click the Show/Hide Vessel Track link a second time to return to a real-time display showing all vessels.
24. In the Actions Panel click View Dashboard (or click the Dashboard link Information Panel).
25. In the lower right, click Schedule This Vessel (any changes you save will be visible to all users of PortVision. Do not save a schedule unless you are sure!).
26. Return to the Map using your browsers <BACK> feature.
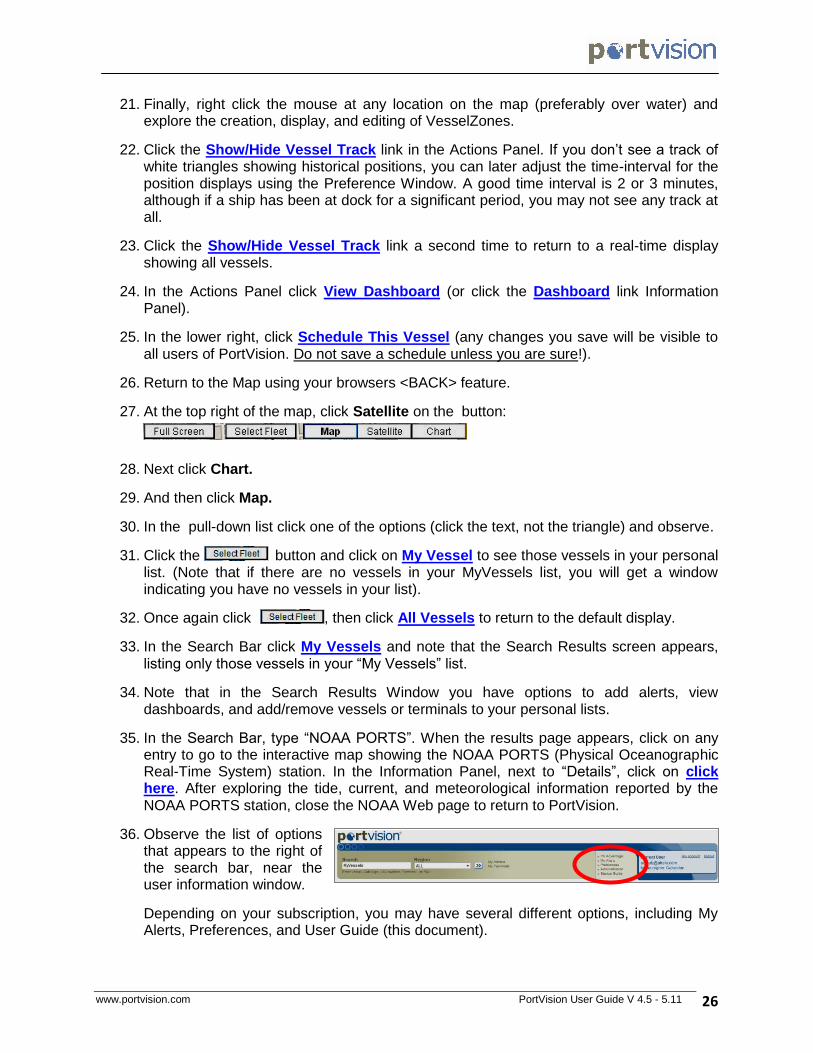
27. At the top right of the map, click Satellite on the button:
28. Next click Chart.
29. And then click Map.
30. In the pull-down list click one of the options (click the text, not the triangle) and observe.
31. Click the button and click on My Vessel to see those vessels in your personal list. (Note that if there are no vessels in your MyVessels list, you will get a window indicating you have no vessels in your list).
32. Once again click , then click All Vessels to return to the default display.
33. In the Search Bar click My Vessels and note that the Search Results screen appears, listing only those vessels in your “My Vessels” list.
34. Note that in the Search Results Window you have options to add alerts, view dashboards, and add/remove vessels or terminals to your personal lists.
35. In the Search Bar, type “NOAA PORTS”. When the results page appears, click on any entry to go to the interactive map showing the NOAA PORTS (Physical Oceanographic Real-Time System) station. In the Information Panel, next to “Details”, click on click here. After exploring the tide, current, and meteorological information reported by the NOAA PORTS station, close the NOAA Web page to return to PortVision.
36. Observe the list of options that appears to the right of the search bar, near the user information window.
Depending on your subscription, you may have several different options, including My Alerts, Preferences, and User Guide (this document).
www.portvision.com PortVision User Guide V 4.5 - 5.11 27
37. Click the Preferences link.
38. Note the two dropdown labels: “Show Terminal Labels on Map” and “Show Vessel Labels on Map”. By clicking either of these boxes, you modify the display to always show names for all terminals and vessels displayed without having to select the vessel or terminal.
39. Note the box labeled “Vessel Track” in the middle of the Preferences panel. This is where you can adjust the time interval for the historical positions shown when you Show Vessel Tracks on the interactive map. For most users, a time interval of 2 or 3 minutes is good, although if you are looking at a vessel that has been at dock for a long period or a vessel being tracked using satellite tracking, you may want a longer interval.
40. Click the “Account” tab.
41. Click the Change Password link: We highly recommend you change your password during your first session. Be sure to click Save to save your new password.
42. If you came to the Preferences Panel from the Interactive Map, you can return to the map by pressing the button; otherwise enter search criteria or press another option at the top of the screen (e.g., My Vessels or logout).
43. Finally, you may end your session by simply closing your Web browser. If you had selected the “Remember Me” option when you initially logged on, your computer will automatically log you back on when you restart PortVision. If you did not select the “Remember Me” option, you will be required to log-in once again with your User ID and password.
Feel comfortable to move about the application and explore all of its features. This User Guide provides basic information on most of the basic functions of PortVision. For complete training or questions, contact PortVision at [email protected], or call 1.713.337.3737 x204.
www.portvision.com PortVision User Guide V 4.5 - 5.11 28
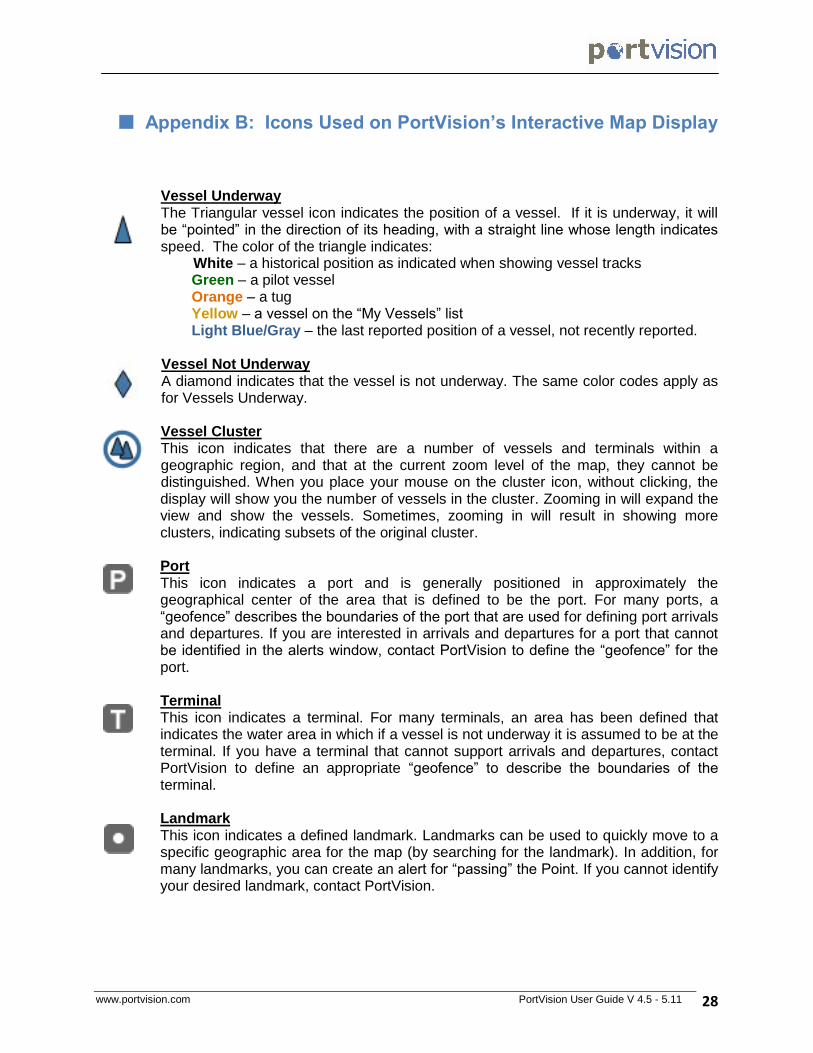
Appendix B: Icons Used on PortVision’s Interactive Map Display
Vessel Underway The Triangular vessel icon indicates the position of a vessel. If it is underway, it will be “pointed” in the direction of its heading, with a straight line whose length indicates speed. The color of the triangle indicates: White – a historical position as indicated when showing vessel tracks
Green – a pilot vessel Orange – a tug Yellow – a vessel on the “My Vessels” list Light Blue/Gray – the last reported position of a vessel, not recently reported.
Vessel Not Underway A diamond indicates that the vessel is not underway. The same color codes apply as for Vessels Underway. Vessel Cluster This icon indicates that there are a number of vessels and terminals within a geographic region, and that at the current zoom level of the map, they cannot be distinguished. When you place your mouse on the cluster icon, without clicking, the display will show you the number of vessels in the cluster. Zooming in will expand the view and show the vessels. Sometimes, zooming in will result in showing more clusters, indicating subsets of the original cluster.
Port This icon indicates a port and is generally positioned in approximately the geographical center of the area that is defined to be the port. For many ports, a “geofence” describes the boundaries of the port that are used for defining port arrivals and departures. If you are interested in arrivals and departures for a port that cannot be identified in the alerts window, contact PortVision to define the “geofence” for the port.
Terminal This icon indicates a terminal. For many terminals, an area has been defined that indicates the water area in which if a vessel is not underway it is assumed to be at the terminal. If you have a terminal that cannot support arrivals and departures, contact PortVision to define an appropriate “geofence” to describe the boundaries of the terminal. Landmark This icon indicates a defined landmark. Landmarks can be used to quickly move to a specific geographic area for the map (by searching for the landmark). In addition, for many landmarks, you can create an alert for “passing” the Point. If you cannot identify your desired landmark, contact PortVision.
www.portvision.com PortVision User Guide V 4.5 - 5.11 29
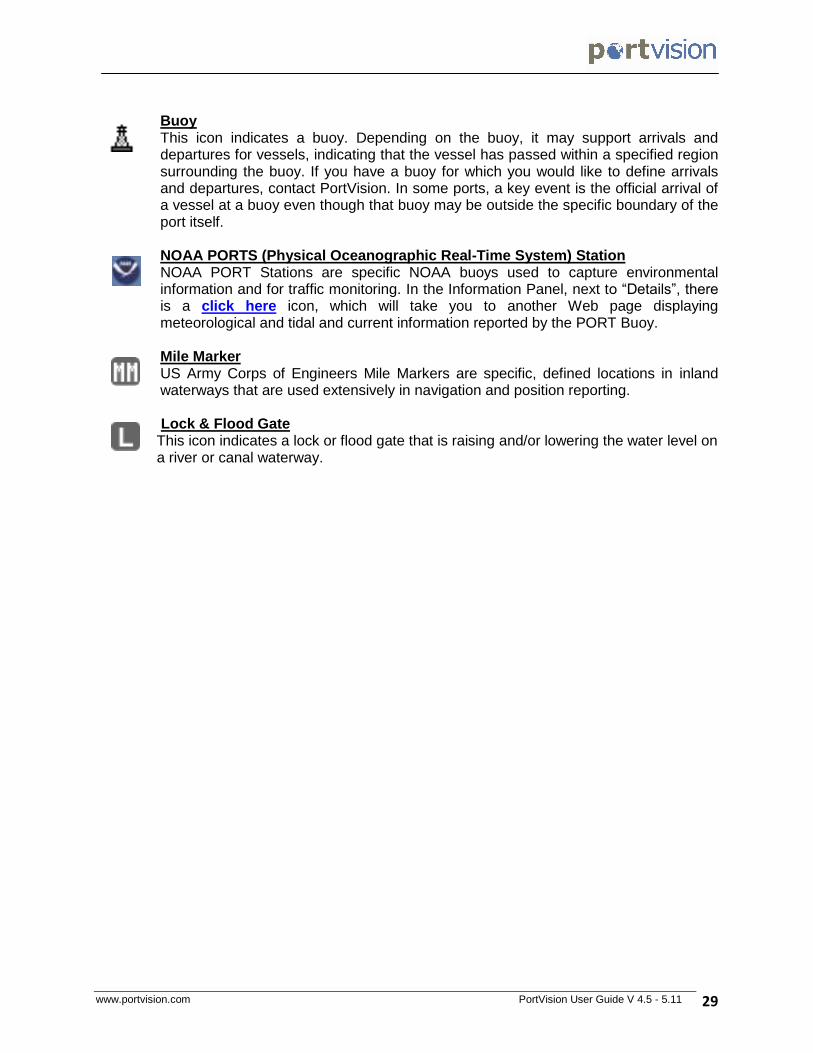
Buoy This icon indicates a buoy. Depending on the buoy, it may support arrivals and departures for vessels, indicating that the vessel has passed within a specified region surrounding the buoy. If you have a buoy for which you would like to define arrivals and departures, contact PortVision. In some ports, a key event is the official arrival of a vessel at a buoy even though that buoy may be outside the specific boundary of the port itself. NOAA PORTS (Physical Oceanographic Real-Time System) Station NOAA PORT Stations are specific NOAA buoys used to capture environmental information and for traffic monitoring. In the Information Panel, next to “Details”, there is a click here icon, which will take you to another Web page displaying meteorological and tidal and current information reported by the PORT Buoy. Mile Marker US Army Corps of Engineers Mile Markers are specific, defined locations in inland waterways that are used extensively in navigation and position reporting.
Lock & Flood Gate This icon indicates a lock or flood gate that is raising and/or lowering the water level on a river or canal waterway.
www.portvision.com PortVision User Guide V 4.5 - 5.11 30
Appendix C: Standard Domains for Sending E-mails to Cell Phones There are two effective ways to send alerts to your cell phone using PortVision. The first is to know the carrier for the cell phone. You can then enter the 10-digit number followed by the correct domain (e.g., [email protected]). Alltel [email protected]
AT&T [email protected] (includes Cingular)
Boost Mobile [email protected]
Nextel [email protected]
Sprint PCS [email protected]
T-Mobile [email protected]
US Cellular [email protected]
Verizon [email protected]
Viaero [email protected]
Virgin Mobile USA [email protected] You usually can find the domain for other carriers through their Web site. The Web site http://phonenumber.com/reversephone can be useful to identify the carrier when you only have a phone number and cannot contact its owner. Another technique to find the domain is to have the user send an e-mail from the phone to you; the return address on that e-mail will include the domain. Of course, the phone has to have the capability to send e-mails. An earlier version of this Guide had a longer list of domain names, but they cannot be validated at this time.
www.portvision.com PortVision User Guide V 4.5 - 5.11 31
Appendix D: Definition of Events PortVision provides a variety of events and alerts relating to vessel activities. This document provides an overview of the supported events and alerts. PortVision currently supports six types of events/alerts:
1. Vessel docking 2. Vessel arrival (or Vessel entry into a zone) 3. Vessel departure (or Vessel exit from a zone) 4. Vessel passing a Point of Interest (POI) 5. Vessel at Point of Interest (POI) 6. Vessel Passing a Point of Interest (POI)
A Point of Interest within PortVision is a geographical region that can be defined one of three ways:
1. A named region defined by a “geofence”, a logical closed polygon drawn, typically, around a dock, a buoy, or other real or virtual geographical location or area.
2. A specific latitude and longitude with a radius that represents a circular equivalent of a geofence.
3. A user-defined VesselZone, defined by drawing a closed polygon on the PortVision Interactive Display Map.
Note that only certain POI have defined geographical regions. A user desiring to define the geographical region associated with a POI should either create a personal VesselZone or, if they believe the POI is of broad interest in the PortVision user community, contact PortVision for more information. If there is “No Point of Interest”, an Event of “Next Report” is automatically created and will send you an alert the next time PortVision receives a position report for the selected vessel. Arrival at a Dock Event and Alert An arrival event occurs when a vessel penetrates the region defined for a POI, reports a speed less than 0.5knots, and maintains its position within the geographic region and maintains a speed below 0.5 knots for at least three minutes, as reported by at least two AIS position reports received at least three minutes apart. The time of the reported arrival is the time of the first report received that meets the geographic/speed thresholds. Note that if there is “chatter” (i.e., the position oscillates between being within the geographical region and/or the speed oscillates between being above and below the 0.5 knot speed threshold), the vessel will not be reported as arriving until the position/speed requirements are met for a continuous period of three minutes or more. An Arrival Alert is sent out when the conditions for an Arrival are met. The time of Arrival is the time of the first report meeting the geographic/speed thresholds.
www.portvision.com PortVision User Guide V 4.5 - 5.11 32
Note that in some situations when the AIS receiver stops reporting within the three minute interval, the Arrival Alert may be delayed because the three-minute requirement has not been met (no AIS report is received if the AIS receiver is turned off as soon as the vessel physically reaches a dock, and within three minutes of penetrating the geographic region and dropping its speed below 0.5 knots). When the AIS receiver is turned back on, be it hours or days later, upon receipt of the first AIS report, PortVision completes the logic for defining an ARRIVAL EVENT. At that point, the Arrival Alert is triggered. While the Alert may be delayed, it will still record the correct Arrival Date/Time since the Date/Time are defined by the initial report meeting the geographic/speed thresholds. If the Vessel should physically leave the area prior to turning the AIS receiver back on, PortVision may potentially not record the Arrival Event. This rare situation only occurs if the AIS receiver is turned off within three minutes of first satisfying the geographic/speed requirements for an arrival and not turned back on until the vessel is underway. Departure from a Dock/Zone Exit Event and Alert A departure occurs if a vessel that has previously arrived at a POI reports a position report outside the geographic region defined for the POI. Chatter Note that PortVision has logic to deal with “chatter”, the phenomenon of a vessel drifting around the boundary area of POI (or, much more rare, varying its speed around the 0.5 knot threshold). Chatter may result in a vessel appearing to depart and arrive frequently as the vessel drifts back and forth near the geographic boundary for the Point of Interest. Chatter logic requires that once a vessel has arrived a departure occurs only if the vessel remains outside the geographic region for at least ten minutes. If the vessel returns within the geographic region (and the speed has never exceeded the 0.5knot threshold), the potential departure is voided and the vessel remains “arrived”. Once a vessel has departed and stays departed for ten minutes, the Departure Event is recorded (as of the time it first left the geographical region) and the alert is triggered. Note that this logic results in a ten-minute delay in alerting a departure after the physical act of departure – this ten minutes is required in order to ensure that the apparent departure isn’t simply “chatter”. Arrival at Port/Zone Entry Event and Alert Arrivals at Port are similar to Arrivals, but lack the threshold speed requirement or chatter logic. A Vessel Arrives at Port simply by penetrating the geofence for the Port.
www.portvision.com PortVision User Guide V 4.5 - 5.11 33
Departure from Port/Zone Exit Event and Alert Departure from Port is similar to Departures, including the chatter logic that requires that a vessel remain outside the geographic region defined for the port for at least ten minutes. If the vessel should re-enter the geographic boundary within ten minutes, then there is no departure. As with Arrivals, chatter logic results in a ten minute delay between the date/time of the Departure and finalization that there really is a departure. The Alert, sent out when the ten minute threshold is reached, reports the date/time of when the vessel first left the geographic region for the Port. Passing Event and Alert A Passing is similar to an Arrival at Port but applies to any POI. As with Arrival at Port, a Passing occurs when a vessel enters the geographic region defined for the POI regardless of speed. And as with Passing, there is chatter logic that ensures that there will not be repeated Passing Events within ten minutes if a vessel drifts around the boundary (e.g., circling a buoy right at the limits of the geographic region). Unlike Arrival at Port, there is no Departure for a Passing; a Passing simply records that the vessel entered the geographical region for the POI without reference to what it may subsequently do (e.g., stop, continue on, circle at significant speed, etc.). At a Point of Interest Alert PortVision also permits an alert when a vessel arrives at a POI. The At a POI Alert actually encompasses Arrival (at a Dock), Arrival at Port, and Passing in that, upon entering the geographic region for a POI, the logic is “incomplete” to define whether it is an Arrival (at Dock), an Arrival at Port, or a Passing.7 Note that the At a Point Alert does not create an Event and will not appear in event logs. Only when all the requirements for an Arrival (at Dock), Arrival at Port, or Passing are completed will PortVision record the applicable event. Note also that which events are applicable for any particular POI are determined by the type of POI. Some Points support Passing but not Arrival (at Dock), and others support only Arrival at Port. See Attachment B for a list of Points of Interest and which types of Events and Alerts are supported.
7 Technically, the system can immediately determine if it is an Arrival at Port since there is neither time nor speed
threshold requirements for Arrival at Port, but PortVision permits interchangeable use of Arrival at Port or At a Point Alerts.
www.portvision.com PortVision User Guide V 4.5 - 5.11 34
Defining Alerts In the Create Alert screen, users may request alerts based on the above list of alerts. The user may select from several options:
Any vessel arriving at a specific Terminal (the Terminal or POI must support Arrivals/Departures)
A specific vessel arriving at any Terminal (the Terminal must support Arrivals/Departures)
A specific vessel arriving at any Terminal that supports Arrivals/Departures
A specific vessel arriving at any Terminal or POI that supports Arrivals/Departures
Any vessel departing a specific Terminal (the Terminal or POI must support Arrivals/Departures)
A specific vessel departing from any Terminal (the Terminal must support Arrivals/Departures)
A specific vessel departing from any Terminal that supports Arrivals/Departures
A specific vessel departing from any Terminal or POI that supports Arrivals/Departures
Any vessel passing a specific Terminal or POI that supports Passings
A specific vessel passing any Terminal that supports Passings
A specific vessel passing any Terminal or POI that supports Passings
A specific vessel entering a user-defined specific Zone
Any vessel entering a specific user-defined Zone
A specific vessel exiting a user-defined specific Zone
Any vessel exiting a user-defined specific Zone Note that in creating alerts, the user may place several additional constraints on the conditions that generate the alert:
The user may request the alert to occur only once (upon the next occurrence that triggers the alert) or as a recurring alert (whenever the trigger occurs, until the user cancels the alert).
The user may constrain the alert to occur only when the vessel is moving within a certain range of headings at the time the alert is triggered.
The user may constrain the alert to occur only when the vessel is traveling above a certain threshold speed when the alert is triggered (e.g., a passing at more than 3 knots). It is illogical to use a speed threshold for an Arrival at Dock.
Sending Alerts As described in this User Guide, alerts can be sent to one or more e-mail addresses or one or more cell phones as text messages. Refer to this guide for more information.
www.portvision.com PortVision User Guide V 4.5 - 5.11 35
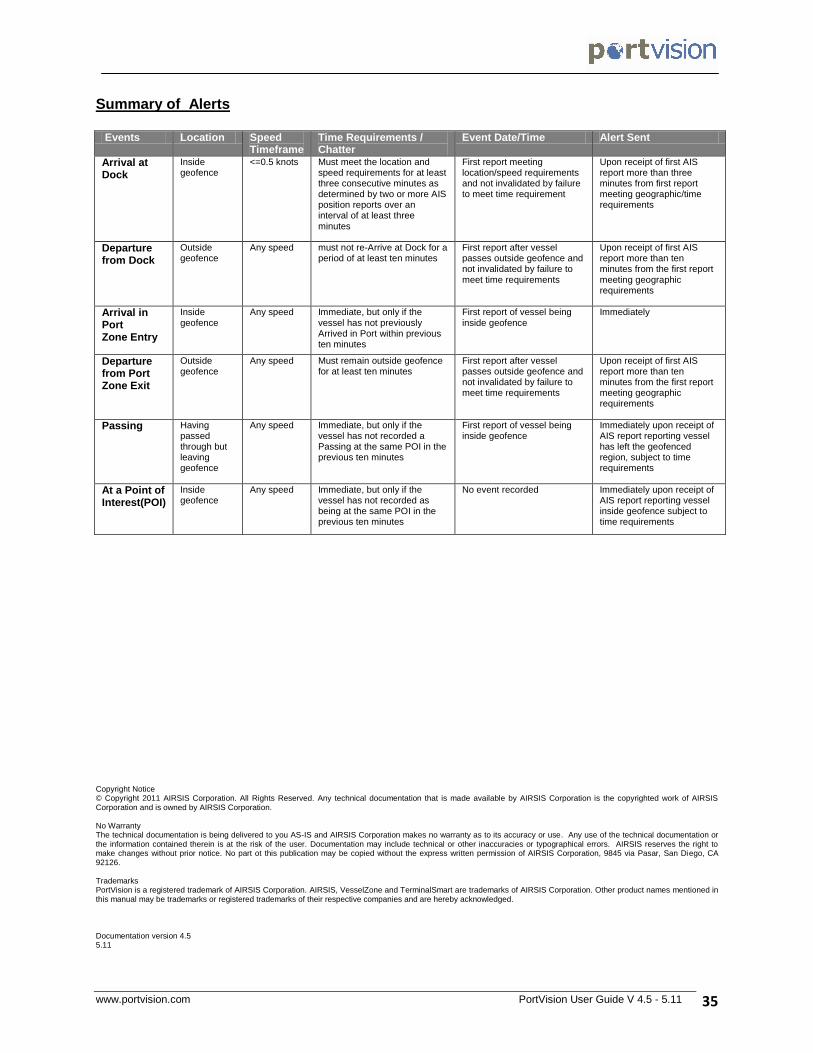
Summary of Alerts
Events Location Speed
Timeframe Time Requirements / Chatter
Event Date/Time Alert Sent
Arrival at Dock
Inside geofence
<=0.5 knots Must meet the location and speed requirements for at least three consecutive minutes as determined by two or more AIS position reports over an interval of at least three minutes
First report meeting location/speed requirements and not invalidated by failure to meet time requirement
Upon receipt of first AIS report more than three minutes from first report meeting geographic/time requirements
Departure from Dock
Outside geofence
Any speed must not re-Arrive at Dock for a period of at least ten minutes
First report after vessel passes outside geofence and not invalidated by failure to meet time requirements
Upon receipt of first AIS report more than ten minutes from the first report meeting geographic requirements
Arrival in Port Zone Entry
Inside geofence
Any speed Immediate, but only if the vessel has not previously Arrived in Port within previous ten minutes
First report of vessel being inside geofence
Immediately
Departure from Port Zone Exit
Outside geofence
Any speed Must remain outside geofence for at least ten minutes
First report after vessel passes outside geofence and not invalidated by failure to meet time requirements
Upon receipt of first AIS report more than ten minutes from the first report meeting geographic requirements
Passing Having passed through but leaving geofence
Any speed Immediate, but only if the vessel has not recorded a Passing at the same POI in the previous ten minutes
First report of vessel being inside geofence
Immediately upon receipt of AIS report reporting vessel has left the geofenced region, subject to time requirements
At a Point of Interest(POI)
Inside geofence
Any speed Immediate, but only if the vessel has not recorded as being at the same POI in the previous ten minutes
No event recorded Immediately upon receipt of AIS report reporting vessel inside geofence subject to time requirements
Copyright Notice © Copyright 2011 AIRSIS Corporation. All Rights Reserved. Any technical documentation that is made available by AIRSIS Corporation is the copyrighted work of AIRSIS Corporation and is owned by AIRSIS Corporation. No Warranty The technical documentation is being delivered to you AS-IS and AIRSIS Corporation makes no warranty as to its accuracy or use. Any use of the technical documentation or the information contained therein is at the risk of the user. Documentation may include technical or other inaccuracies or typographical errors. AIRSIS reserves the right to make changes without prior notice. No part ot this publication may be copied without the express written permission of AIRSIS Corporation, 9845 via Pasar, San Diego, CA 92126. Trademarks PortVision is a registered trademark of AIRSIS Corporation. AIRSIS, VesselZone and TerminalSmart are trademarks of AIRSIS Corporation. Other product names mentioned in this manual may be trademarks or registered trademarks of their respective companies and are hereby acknowledged. Documentation version 4.5 5.11