Embed Size (px)
Citation preview
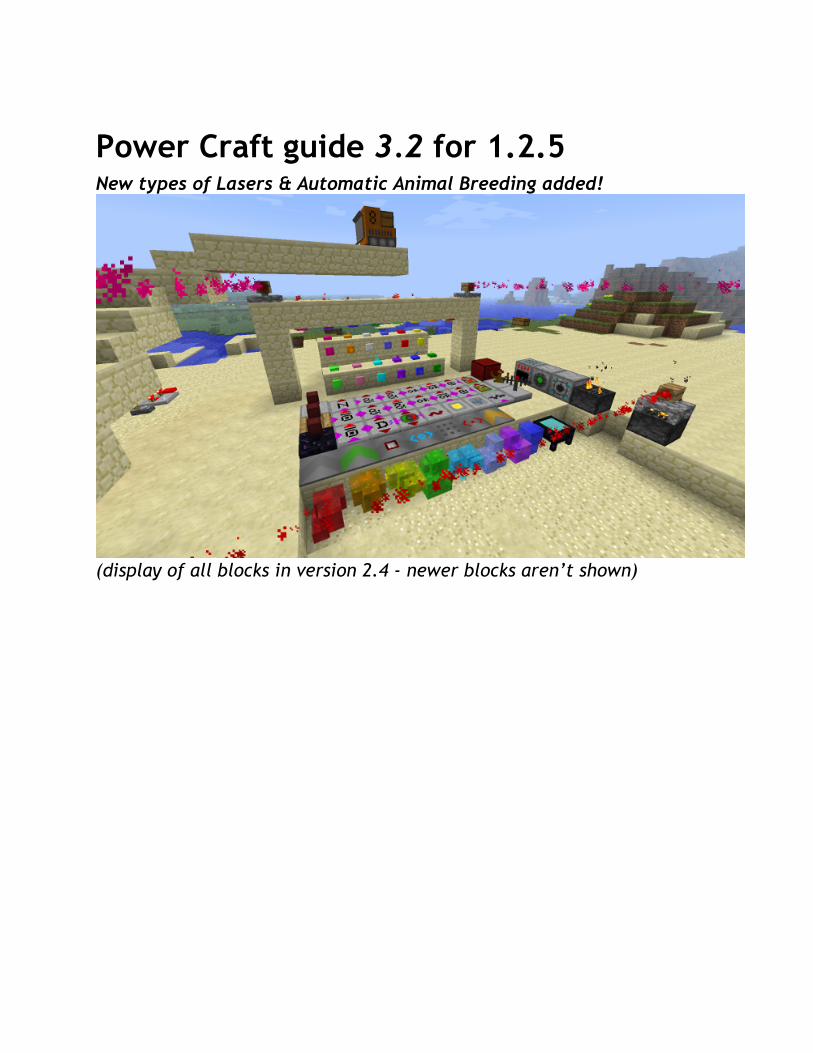
Power Craft guide 3.2 for 1.2.5New types of Lasers & Automatic Animal Breeding added!
(display of all blocks in version 2.4 - newer blocks aren’t shown)
Table of contentsPower Craft guide 3.1 for 1.2.5Table of contentsInformation overviewDownloadInstallation
If you get Black ScreenWhat is PowerCraft?Modules
General info, block placing, redstone poweringExtra recipes added
ChangelogTRANSPORT
RecipesBrewing supportIron FramesConveyor BeltSpeedy BeltRedirectorItem EjectorBrake ConveyorItem, XP & Mob Separator beltDetector BeltAutomatic WorkbenchElevatorDescenderTELEPORTER!
MACHINESRecipesBlock Dispenser (and hoe + bonemeal machine)Block Harvester [+ automatic shearing machine]
Harvesting minecartsExtending harvester’s rangeShearing sheepCustom crops support
RoasterNether field
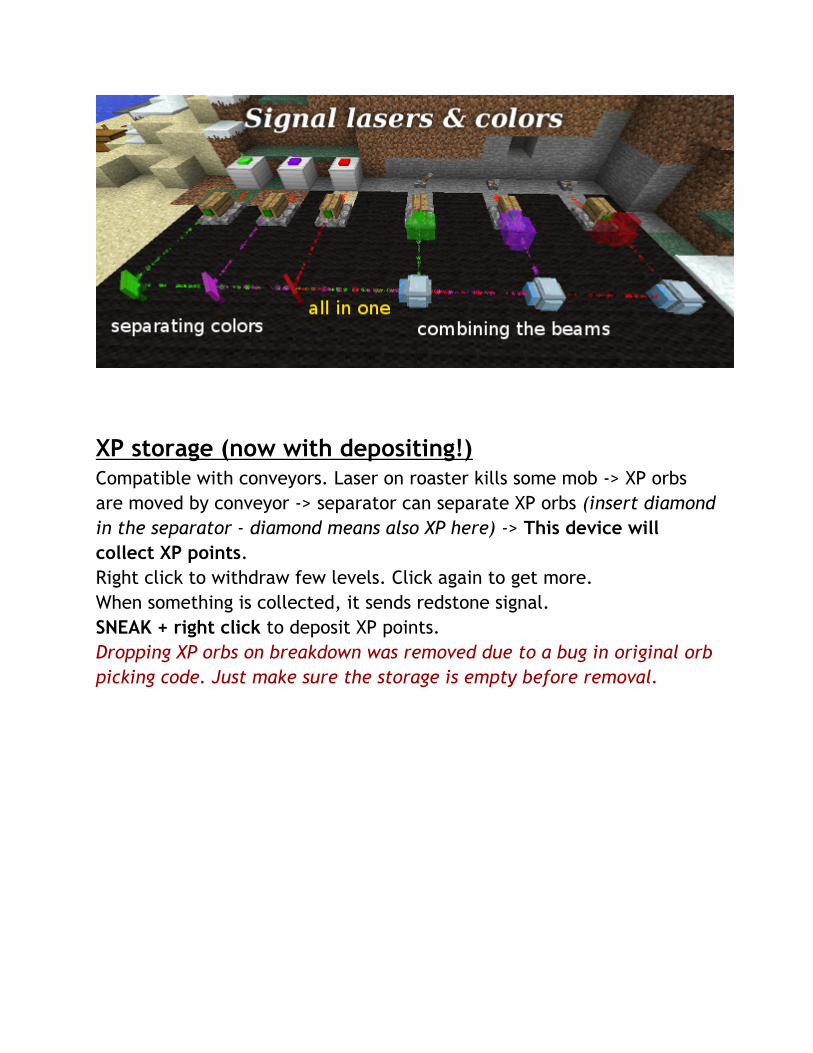
LasersKiller beamSensor beamTransmitter and receiverMirrors for lasersOptical prism - LASER SPLITTERColoured mirrors (v3.0)
XP storage (now with depositing!)MILKING MACHINE (bucket in dispenser)Automatic Animal Breeding
LOGICRecipesLogic GatesT, D and RS flip-flop gatesPowerCraft’s Crafting ToolPulsarSpecial sensors (DAY, RAIN, Empty+Full Chest)Advanced DelayerSpecial Controller
WIRELESS (radio etc.)RecipesRadioMotion SensorsSignal lights (Control Lights)
MOBILE modulePower Crystals
Power DustActivation CrystalSpawner GUI
Mining Vehicle - “Bulldozer” or “Miner”How to use MinerMiners’ Keyboard ControlMiners’ levels and special powersProgramming GUI
Programming language for MinersPLAIN COMMANDSLOOPSVARIABLESUsing variables in loops

IF-ELSE statementExample program - spiral mining
Fishing MachineHow to make it
Ore SnifferPROPERTY FILES
PC_COREPC_LOGICPC_MACHINESPC_MOBILEPC_TRANSPORTPC_WIRELESSFactory ideas
Screenshots (older features)
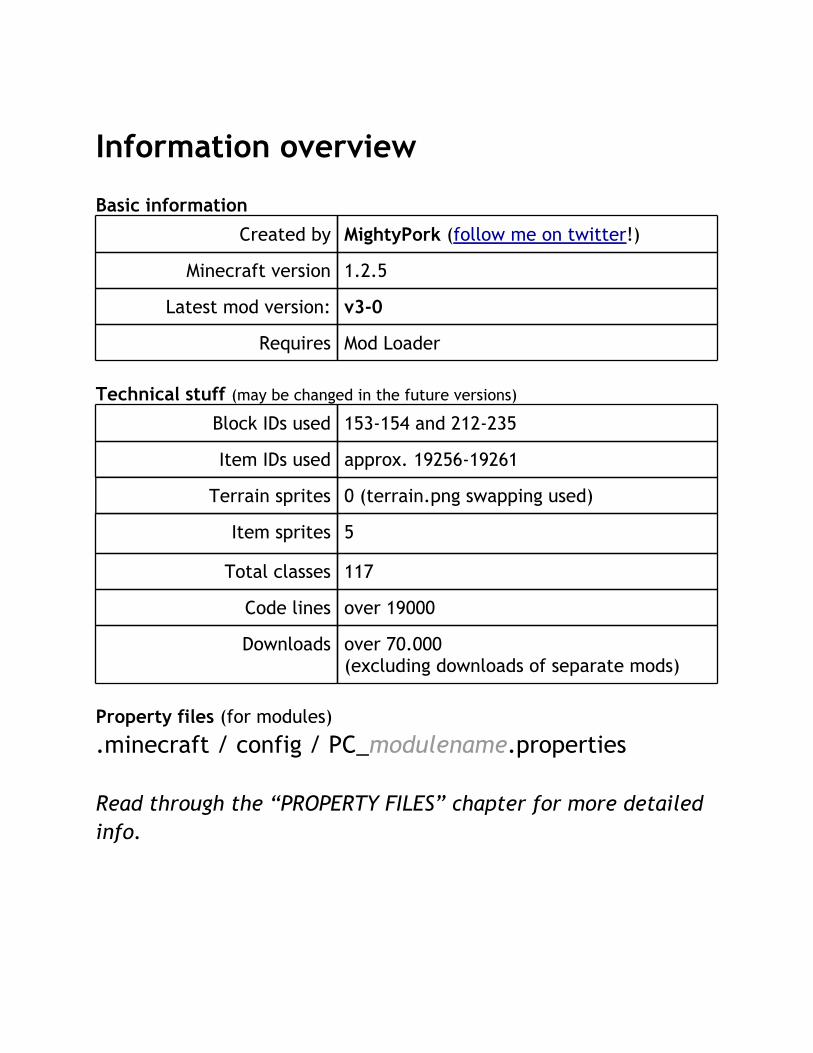
Information overview Basic information
Created by MightyPork (follow me on twitter!)
Minecraft version 1.2.5
Latest mod version: v3-0
Requires Mod Loader
Technical stuff (may be changed in the future versions)
Block IDs used 153-154 and 212-235
Item IDs used approx. 19256-19261
Terrain sprites 0 (terrain.png swapping used)
Item sprites 5
Total classes 117
Code lines over 19000
Downloads over 70.000(excluding downloads of separate mods)
Property files (for modules)
.minecraft / config / PC_modulename.properties Read through the “PROPERTY FILES” chapter for more detailed info.
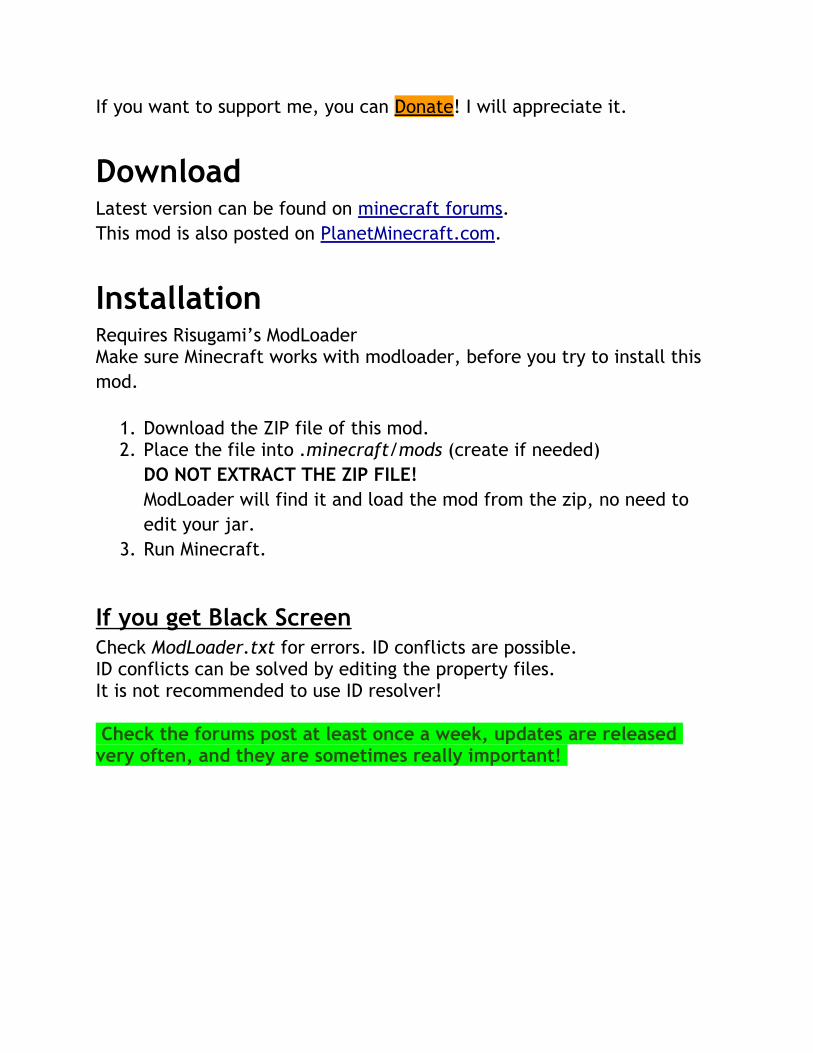
If you want to support me, you can Donate! I will appreciate it.
DownloadLatest version can be found on minecraft forums.This mod is also posted on PlanetMinecraft.com.
InstallationRequires Risugami’s ModLoaderMake sure Minecraft works with modloader, before you try to install this mod.
1. Download the ZIP file of this mod.2. Place the file into .minecraft/mods (create if needed)
DO NOT EXTRACT THE ZIP FILE!ModLoader will find it and load the mod from the zip, no need to edit your jar.
3. Run Minecraft.
If you get Black ScreenCheck ModLoader.txt for errors. ID conflicts are possible.ID conflicts can be solved by editing the property files.It is not recommended to use ID resolver! Check the forums post at least once a week, updates are released very often, and they are sometimes really important!

What is PowerCraft?● Intuitive yet powerful industrial mod● Ideal for automatic farming and mob spawners● Easier than other factory mods
Modules● PowerCraft is modular - consists of plugins, and one Core module.● Because the mod is becoming really complex, modules no longer
work separately.
General info, block placing, redstone powering● Hold CTRL while placing blocks to build in opposite direction.● I paid special attention to make it possible to build conveyors on
top of other blocks, even if they have inventories. thus: You can’t open GUI with conveyor, gate or machine in your hand.
● All blocks that react to redstone can be powered from either side, from above and even from below!
● Some blocks use Tile Entities and items with metadata to hold extra information. That’s why you can’t cheat the from TMI.
Extra recipes added● PowerCraft’s core module adds few useful recipes to the game. It
can be disabled using config file.● These let you craft wooden items back to sticks / planks, furnace
back to cobble and sandstone back to sand.● You can also craft spawner:
MSMS--SMSMM - mossy cobblestoneS - iron ingot
● Click spawner with activation crystal to set it’s mob type (pig is default).
Changelog==== 3.2 ====
* Fixed the bug with wheat and nether wart not being harvested.* You must delete default.xml from PC_CROPS for the fix to fully work. * Laser can now trigger TNT (transmitter laser and killer laser)* Placing spawner eggs by builder was fixed, no more placing 50 creepers each tick :P* Block builder's range extended to 150 blocks, use stone brick or obsidian to stop it.* Miner now makes sound when placing blocks (and believe me that digging through lava and water is now really noisy!)
==== 3.1 ====
BIGFIXES* Fixed bug with flashing grass near iron frames* Fixed bug with break particles spawned even if the block is not harvested* Fixed bug where items sometimes got stuck on conveyors, and related glitches. (Yay, this was really annoying!)* Conveyor now saves items into chests more effectively, smartly filling not-full stacks first. XML CROPS* The crops folder and file will now always appear on first Minecraft startup, instead of only when it's needed (people thought it does not work if it didn't appear instantly).* Added "priority" attribute to the xml file for crops - Each time block is harvested, the "1" items are checked first. - If nothing is dropped from priority "1", items "2" have chance. - This can be used for blocks like gravel, where if flint is droped, gravel disappears. - there can be up to 20 priorities per one crop, and more than one item with the same priority. - IMPORTANT: Priorities must be in one sequence - eg. 1,2,5 will not work (it will stop at 2).* Rarity now suports fractions, for example 2/3 (every 2 out of 3 times) GATES* Added "Advanced Delayer" gate, crafted like this:
RRR repeaters
SSS smooth stone Right click it to open config GUI. It has 3 inputs - data, reset (red) and hold (purple) HARVESTER* Harvester's beam can now be reflected by mirrors (not prisms!)* You can now use PowerCrystals instead of Lapis blocks to make the harvesting range larger.* One harvester is now able to harvest whole field. MINER* Key "Start program" was force-remapped to Numpad enter (was normal Enter before), so you will now have two "RunProgram" entries in your PC_MOBILE config file. The one with "NEW" at the end is used, you can delete the normal one. This was important, because if you closed some gui by hitting Enter, all connected miners would start moving. ==== 3.0 ====* Added support for custom (modded) crops, using XML config files* After you run Minecraft with powerCraft 3.0 installed, go to config/PC_CROPS and you will find the default config file there.* You should not edit this file, but rather create other files in the same directory.* There don't have to be only crops, you can for example add the following "crop" entry, if you want harvested sand to sometimes drop gold nugget (like in real life). That, of course, will work only if harvested by harvester, not by shovel, for example. 50% of sand will be destroyed, because sand's count is set to 0-1. <crop name='Gold in sand'> <block id='12' metaMature='-1' metaReplant='-1' /> <item id='371' meta='0' count='1-2' rarity='100' /> <item id='12' meta='0' count='0-1' rarity='1' /></crop> * Miner with bridge building enabled will now stop when it runs out of material, instead of falling down. After you insert some more blocks, it will continue. * Right click mirror with power crystal to set it's color.* Coloured mirror reflects only laser of the same color, while the other colours will simply go through.* This can be used to separate laser beams combined by prisms - good for laser communication, you can transmit up to eight different signals by single beam!

TRANSPORT● Provides Conveoyr Belts that can move items and mobs.● Many types of conveyors let you separate, filter and sort items.● Chest and other Container blocks interaction is supported.● Automatic Crafting with Automatic Workbench.
Hold SHIFT (sneak) and you won’t get moved by belts.
Recipes
The blue thing in teleporter recipe is an OPTICAL PRISM. See “machines” module for recipe.
Basic belt can be crafted also from paper, but with fewer products.Craft elevator with redstone in the middle -> DESCENDER. Goes down.
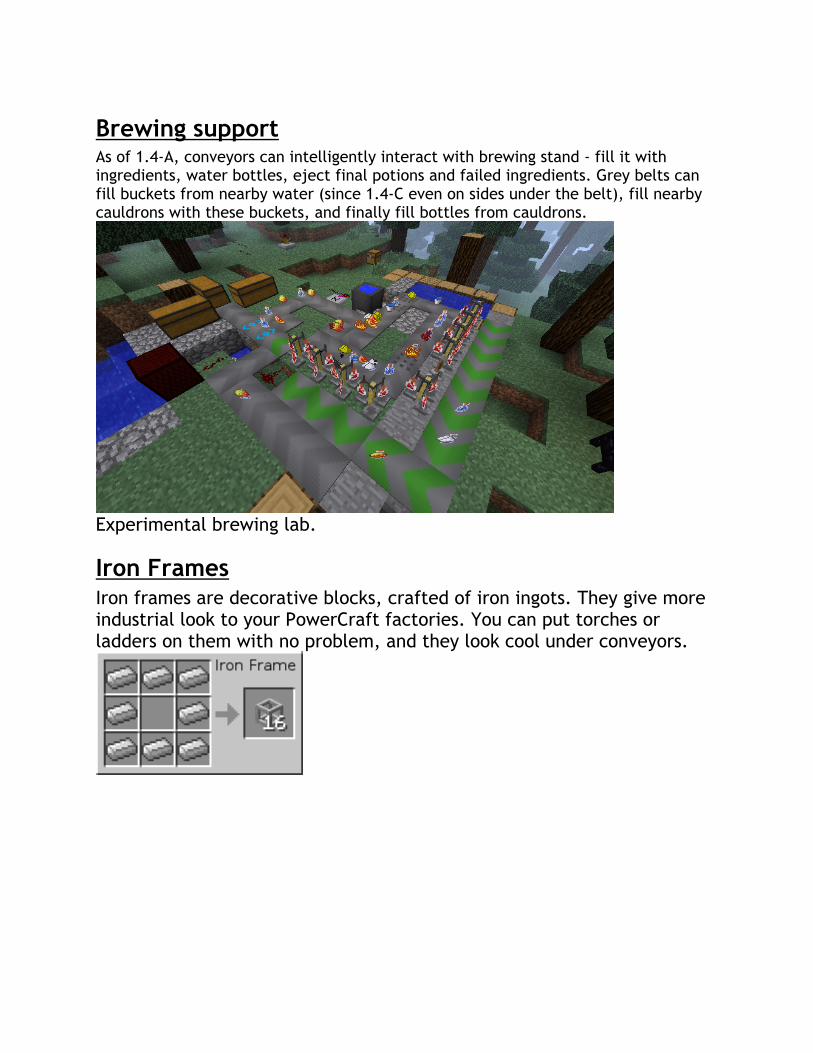
Brewing supportAs of 1.4-A, conveyors can intelligently interact with brewing stand - fill it with ingredients, water bottles, eject final potions and failed ingredients. Grey belts can fill buckets from nearby water (since 1.4-C even on sides under the belt), fill nearby cauldrons with these buckets, and finally fill bottles from cauldrons.
Experimental brewing lab.
Iron FramesIron frames are decorative blocks, crafted of iron ingots. They give more industrial look to your PowerCraft factories. You can put torches or ladders on them with no problem, and they look cool under conveyors.

Conveyor BeltMoves items and mobs. You can build corners using two conveyors, one leading from side into the other. Basic Conveyor Belt can store items into all Container blocks - on sides, above and under the belt. The only exception is Roaster, which can’t be filled from above (for a good reason). It can also fill furnaces: fuel goes into fuel slot, and all smeltable things go into the upper slot. You can eject items with Ejection Belt. Clever insertion also applies to brewing stands - ingredients to the top slot, water bottles to the bottom slot. Belt can move MINECARTS! And store items into storage minecarts. You can not pick up items from belts, except activated brakes.
Speedy BeltSpeedy belt works just like the basic belt, but is twice as faster.It can’t store items, which is sometimes required.
RedirectorRedirector is a bit harder to understand, but it isn’t that complicated.
When it is not powered, it works just like the basic belt.However, once you power it by redstone (even from below), it will try to redirect items to a side. If there is no conveyor on either side, nothing will happen. If there is one side conveyor, items will be redirected there. And finally, if there are two side conveyors, items will by default go to left, and when powered, they will go to right. Nothing will go forwards in this case.
Item EjectorWhen it’s powered by redstone, it ejects one stack from the nearby container blocks (chests, furnaces, dispensers, roasters etc.). It needs an impulse (button for example). Ejector can’t store items.In the latest update, ejector can work with brewing stand. it waits for potions to be finished, and ejects all potions (not water buckets) and failed ingredients. Since 1.4C, ejectors work also for chest minecarts!
Brake ConveyorThis conveyor is very slow, and when it gets powered, it will completely stop the moved stuff. It can be used when you have problems with too high speed (from elevator, for example).Brakes are very useful when your items keep falling off your belts.Brakes are useful for conveyor-rail interfacing. It can store items into passing by storage minecarts - these with chests, while not moving them. Active brake lets you pick up items.
Item, XP & Mob Separator beltSeparator is a selective item redirector (for filtering).Right click your separator to open its sorting GUI. It consists of two 3x3 areas: items in these areas will be redirected to the sides (left and right). Not matching items will continue forwards.

NEW: Insert the same item in both halves to split stacks. 3 to left and 1 to right = ¾ of stacks to left, ¼ to right. You can chain multiple separators to get finer fractions.Mobs can be separated using their primary loot: gunpowder, bone, slimeball, raw pork, raw beef, feathers, rotten flesh, string.Use diamond to separate XP orbs (obtained using laser on roaster).
Detector BeltWorks just like the basic belt, but it has a pressure plate on it. You can use both pressure plate types in the recipe, it makes no difference.Items and mobs are detected, and the signal goes to sides and downwards.
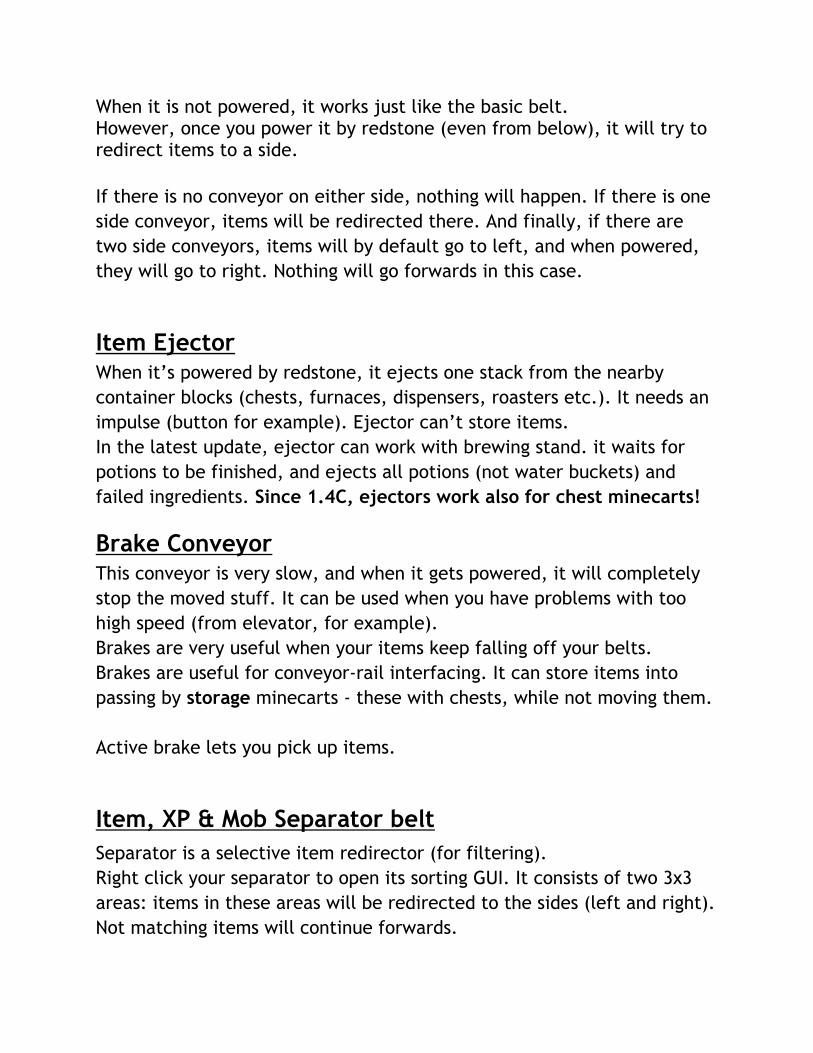
Automatic WorkbenchAW is a machine, but since it requires conveyors for effective work, it is packed in transport module.AW has a GUI, opened by right click. It is divided into two 3x3 grids. On left you can see a storage grid. What you want to edit is the right grid. you know this type of crafting interface from Workbench.The difference is that when you close AW’s GUI, the items will stay inside.You can then feed your AW by conveyor, and once the recipe you inserted is recreated in the left grid, a product will be crafted and ejected through the “door”. Your recipe grid won’t be changed. As of 1.5, if AW is built on stone bricks, it will hold crafting until a redstone signal is received (pulse). Then, one product will be ejected. This is useful for more advanced factories or shops with automatic supply.
Crafting one-by-one - workbench on stonebrick, signal from pulsar
ElevatorItem elevator is needed for vertical movement of your stuff. It can also carry mobs and players. Items can enter elevator, only if the tube continues at least one block lower, or if there is air under the lowest tube.Elevator will try to eject items if there is a conveyor attached to it’s topmost block. If you want items and players to leave in the middle, you have to power the middle blocks by redstone. This lets you build intelligent elevators for your skyscrapers. Important: Conveyor belt is needed in all stations. At least one brake conveyor.
DescenderDescender can be obtained either by crafting elevator with redstone in the middle, or by crafting elevators with redstone on top. First option is obviously cheaper.Descender is an elevator, which goes downwards. It takes care of items’ movements and forces them to stay inside while being moved down.Bottommost descender won’t let items go any lower, and it will try to

eject items to nearby conveyor. In fact, there is an invisible “conveyor belt” in the bottommost descender, which moves items to sides. Descenders reduce fall distance and remove fall damage.This applies also for elevators.
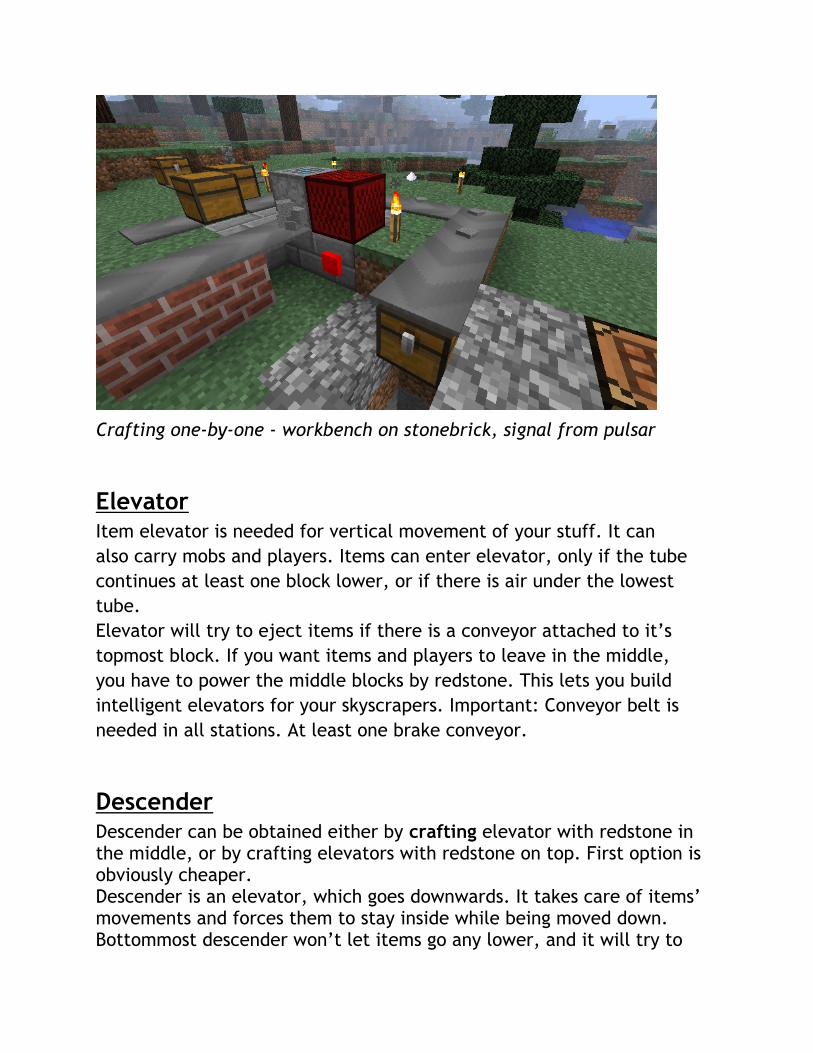
TELEPORTER!Teleporters were added in version 2.7.Crafting is as shown above. When you place a teleporter, you are asked whether you want SENDER or TARGET. Always build output first, its easier. SENDER accepts entities, items, players and other entities, and sends them to TARGET piece. Output needs some space for output, and don’t put it into a small room, mobs & players will suffocate (need 2 blocks height). You can connect more SENDERS to one TARGET.They are compatible with conveyor belts (and they work really well together, for remote processing for example). Iit is also easy to build a fast travel system of these - put one into your
home room, name it “home”, and then put “home” SENDERS to some places on the map. Teleporters look best with “fast” graphics. As of 2.8, TARGET device renders with golden metal pad, which makes it easier to distinguish them. Also since 2.8, teleporters have some checkboxes in their GUI, and because of this, old teleporters won’t work at first. Make sure the required teleportation functions are turned on in the GUI (right click them).

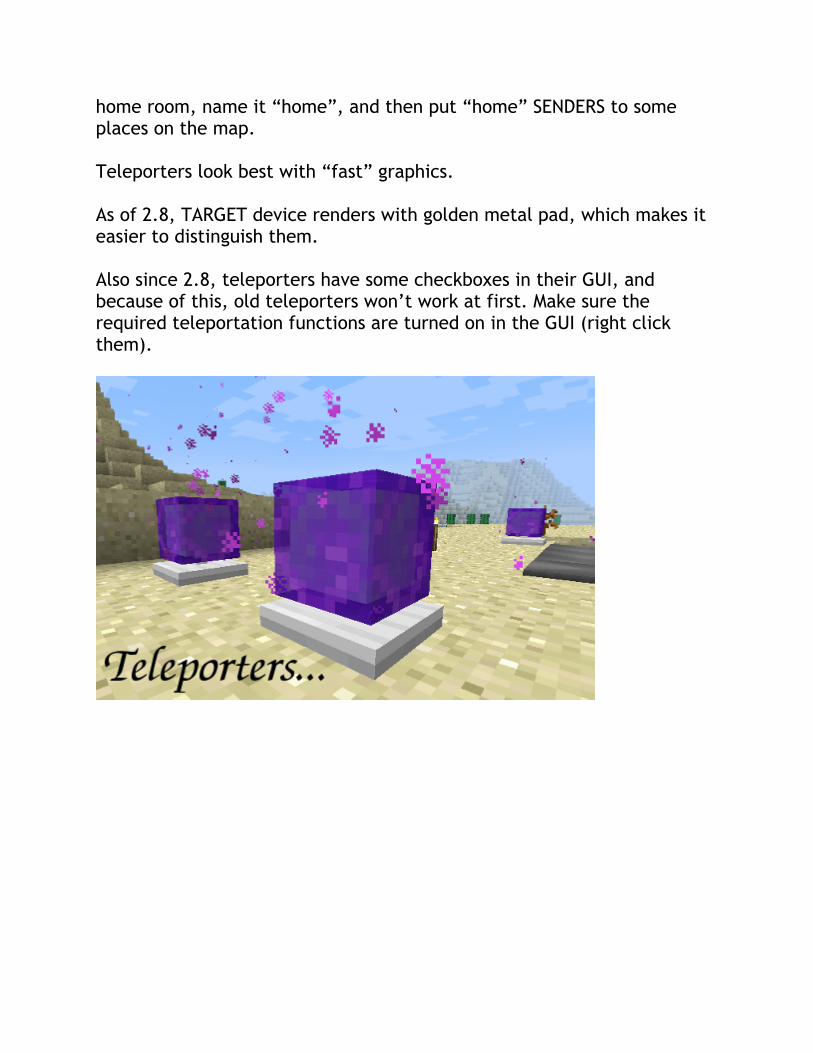
MACHINES● This module contains 3 useful machines, compatible with conveyors.● Stone Brick is used to determine the borders. (or obsidian)● Machine placed on top of stone brick has range limited to one
block.
Recipes
Roaster is not that black in the game.
Place laser onto roaster for killer beam. Its detection beam otherwise.
Block Builder(and hoe + bonemeal machine)Block Builder can build blocks. It will stop when it hits a Stone Brick or Obsidian.Builder can use hoe and bonemeal, and some other items.It can work together with harvester in a farm.
One dispenser can bonemeal a row of crops, not just one.It can also place minecarts. It’s range is 150 blocks, so you really want to stop it by the limiter block.
Block Harvester [+ automatic shearing machine]Block Harvester can break blocks and harvest crops. Harvested crops will be replaced by the seeds. Since 3.1, harvester’s beam can be reflected by laser mirrors. Trees will be harvested completely (whole tree with one harvester), and replaced by sapling. Leaves won’t be removed.Mushrooms on grass will not be harvested, so you can bonemeal them to get giant mushrooms. Giant Mushrooms will be harvested just like trees, and replaced by a small mushroom. Mushrooms on stone or other non-grass blocks will be harvested, making it possible to make a mushroom farm.
Harvesting minecartsHarvester can harvest minecarts, and it won’t break rails / conveyors.
Extending harvester’s rangeYou can extend harvester’s range by placing POWER CRYSTAL or LAPIS LAZULI in it’s way. It will then reach 20 blocks further, and it can be repeated infinitely. Or almost.
Shearing sheepSince 1.8B, harvesters can shear sheep. It is extremely useful, because wool will regrow after some time.
Custom crops supportAs of 3.0, harvester supports modded crops. The default crops config file
is generated in .minecraft/config/PC_CROPS. The config files are XML files, and I think all important is explained in the default.xml file. You can add more than one drop item to a crop block, set mature and seed metadata, and also set rarity and random count of the output items. It is really easy to configure. <?xml version=”1.1” ?><crops> <crop name='Gold in sand'> <block id='12' metaMature='-1' metaReplant='-1' /> <item id='371' meta='0' count='1-3' rarity='150' priority='1' /> <item id='12' meta='0' count='0-1' rarity='1' priority='2' /> </crop> <crop> … other crop </crop></crops> Legend: * = required attribute Block: (can be only one)id* … block IDmetaMature* … meta of mature crop, '-1' = harvest allmetaReplant* … meta after harvesting, usually the seed stage of the crop. '-1' = do not replant. Item: (can be 1 or more)id* … dropped item IDmeta … dropped item meta (damage value)count … number of items in stack. Use single number for fixed count, or range like 4-10 for random count. 0-1 works too.rarity … chance to get this item. If single number is used, the chance is 1/NUMBER, so 1 means every time, 2 means every 2nd time etc. You can also use fractions, eg. if you use '2/3', you will get this item approximately in 2 of 3 times.priority … First are dropped items with lower priority. If no items in a priority level are dropped, items with higher priority have chance. You can use priorities from 1 to 20.
After you make some config file, please post it on forums.
RoasterRoaster can be used for grilling your chickens. You shouldn't think
its unfair. Smelting items consumes twice more fuel than the normal furnace, and it consumes fuel even if it is just turned on (slowly). This is the price for smelting instantly.If you place a conveyor on top of it, it will work as an industrial furnace. It is best to use brake for this. Conveyor on top of roaster can smelt individual items, and 3 items from each stacks. Brake can smelt up to 9 items in a stack.You should get more roasters in a line, or use some loop with separator on top of them if you want to smelt whole stacks. Conveyors can’t store items into roasters from above. Right click your roaster to open it’s GUI. Stack size is limited to 16, thus one Roaster can contain up to 16*8=128 pieces of fuel (two stacks). Fuel can be inserted by a conveyor from side or from below. It can set mobs on fire, so it can be used in grinders.Roaster does not emit light, so it won’t disturb mobs spawning. Roaster with fuel inside is turned on by redstone (lever or wire for example), and it can be extinguished the same way.
Nether fieldWhen roaster burns netherrack, it emits red particles in a great range (12x12x4). This area, called Nether Field, lets Nether Wart grow in the normal world (overworld), and it also turns gravel into soulsand.This, however, takes some time and costs some netherrack. Nether wart has to be planted on soulsand.
Lasers
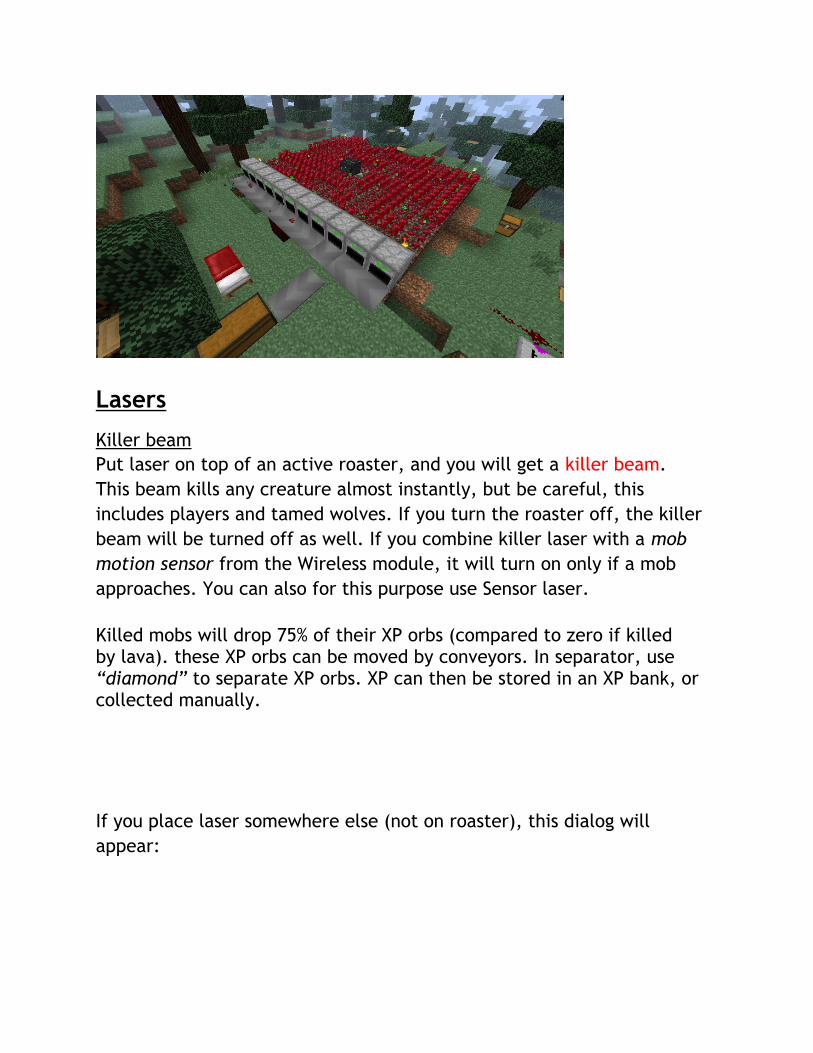
Killer beamPut laser on top of an active roaster, and you will get a killer beam.This beam kills any creature almost instantly, but be careful, this includes players and tamed wolves. If you turn the roaster off, the killer beam will be turned off as well. If you combine killer laser with a mob motion sensor from the Wireless module, it will turn on only if a mob approaches. You can also for this purpose use Sensor laser. Killed mobs will drop 75% of their XP orbs (compared to zero if killed by lava). these XP orbs can be moved by conveyors. In separator, use “diamond” to separate XP orbs. XP can then be stored in an XP bank, or collected manually. If you place laser somewhere else (not on roaster), this dialog will appear:
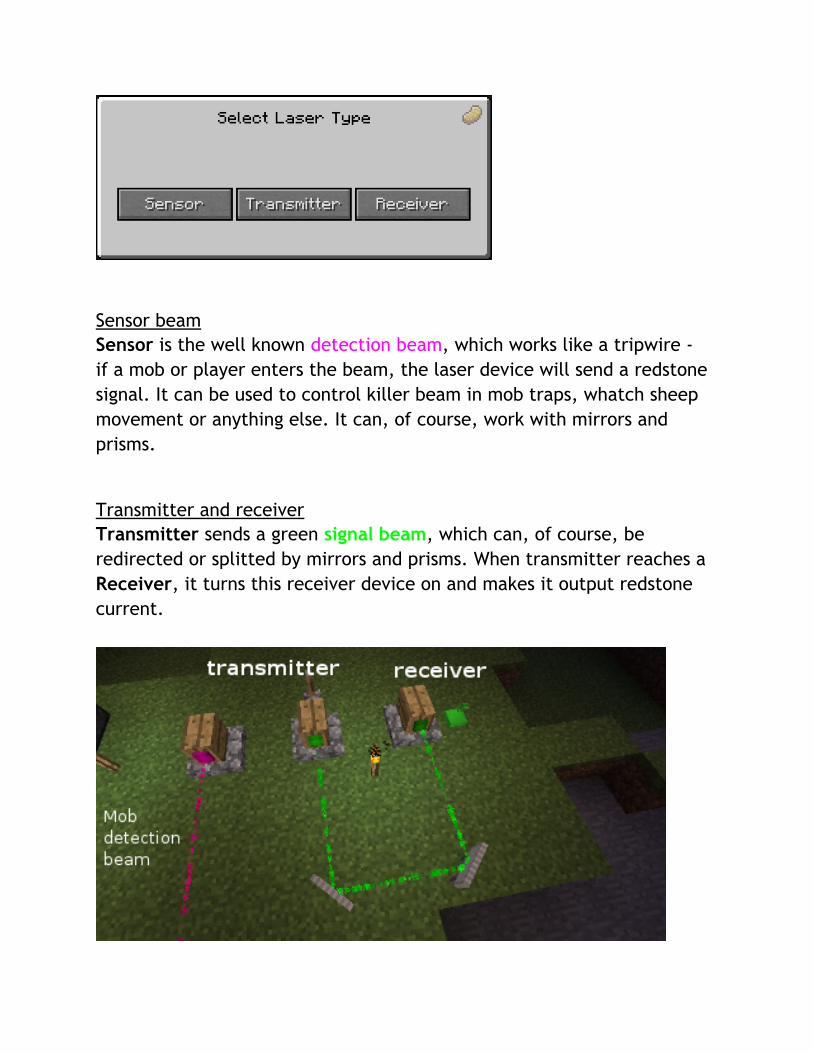
Sensor beamSensor is the well known detection beam, which works like a tripwire - if a mob or player enters the beam, the laser device will send a redstone signal. It can be used to control killer beam in mob traps, whatch sheep movement or anything else. It can, of course, work with mirrors and prisms.
Transmitter and receiverTransmitter sends a green signal beam, which can, of course, be redirected or splitted by mirrors and prisms. When transmitter reaches a Receiver, it turns this receiver device on and makes it output redstone current.
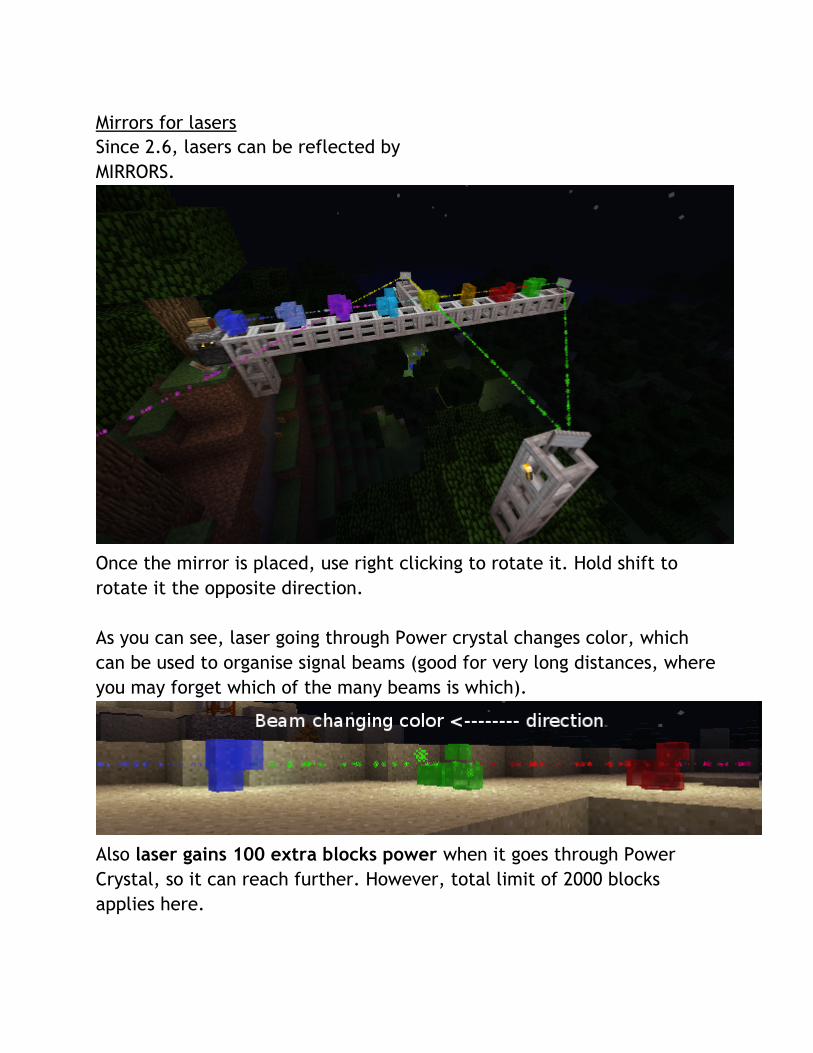
Mirrors for lasersSince 2.6, lasers can be reflected by MIRRORS.
Once the mirror is placed, use right clicking to rotate it. Hold shift to rotate it the opposite direction. As you can see, laser going through Power crystal changes color, which can be used to organise signal beams (good for very long distances, where you may forget which of the many beams is which).
Also laser gains 100 extra blocks power when it goes through Power Crystal, so it can reach further. However, total limit of 2000 blocks applies here.
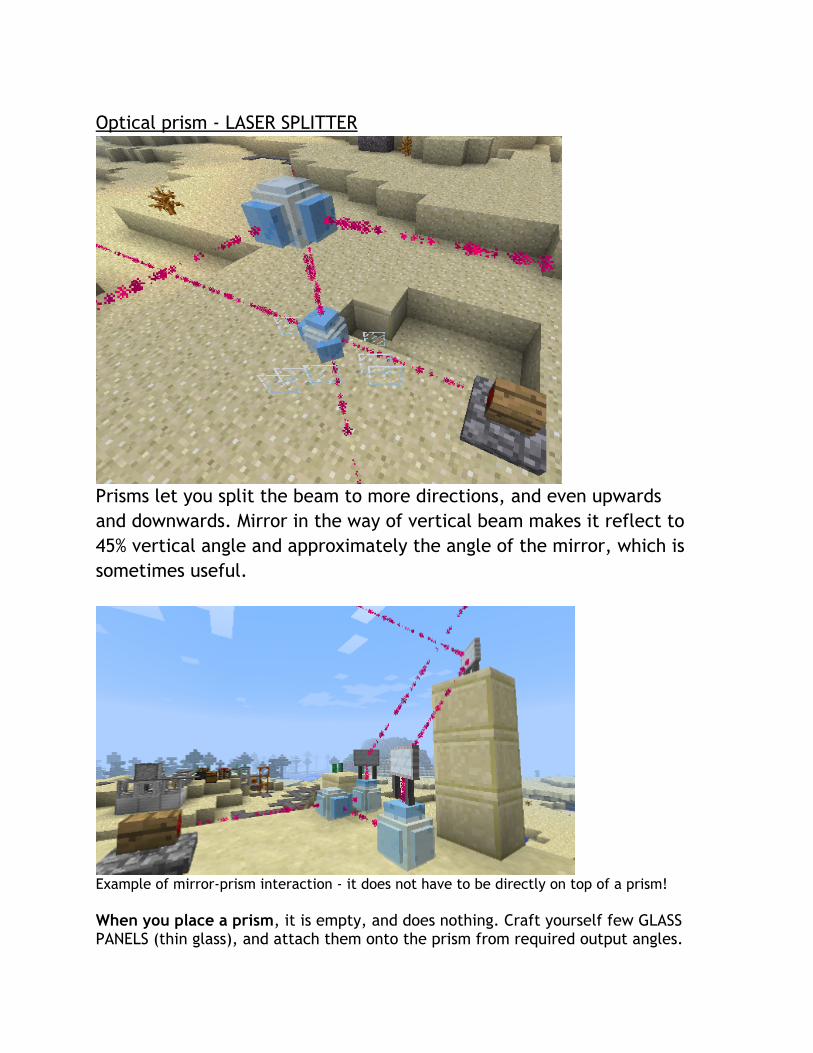
Optical prism - LASER SPLITTER
Prisms let you split the beam to more directions, and even upwards and downwards. Mirror in the way of vertical beam makes it reflect to 45% vertical angle and approximately the angle of the mirror, which is sometimes useful.
Example of mirror-prism interaction - it does not have to be directly on top of a prism! When you place a prism, it is empty, and does nothing. Craft yourself few GLASS PANELS (thin glass), and attach them onto the prism from required output angles.
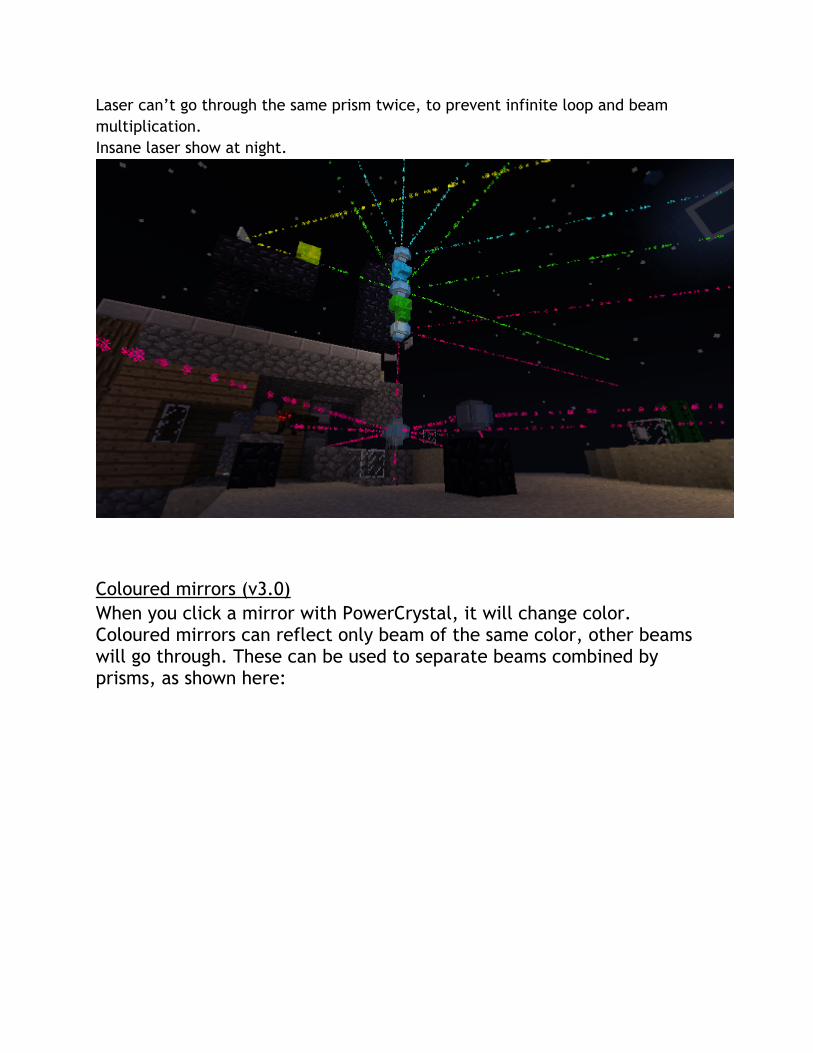
Laser can’t go through the same prism twice, to prevent infinite loop and beam multiplication.Insane laser show at night.
Coloured mirrors (v3.0)When you click a mirror with PowerCrystal, it will change color.Coloured mirrors can reflect only beam of the same color, other beams will go through. These can be used to separate beams combined by prisms, as shown here:
XP storage (now with depositing!)Compatible with conveyors. Laser on roaster kills some mob -> XP orbs are moved by conveyor -> separator can separate XP orbs (insert diamond in the separator - diamond means also XP here) -> This device will collect XP points.Right click to withdraw few levels. Click again to get more.When something is collected, it sends redstone signal.SNEAK + right click to deposit XP points.Dropping XP orbs on breakdown was removed due to a bug in original orb picking code. Just make sure the storage is empty before removal.
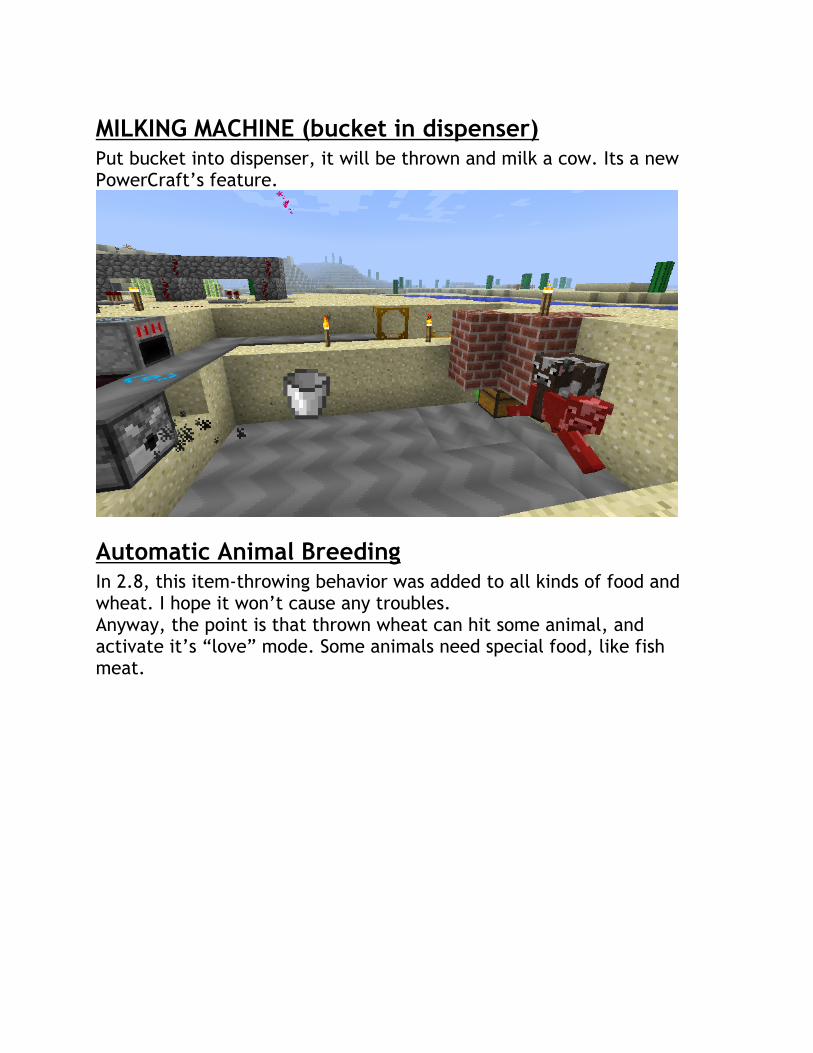
MILKING MACHINE (bucket in dispenser)Put bucket into dispenser, it will be thrown and milk a cow. Its a new PowerCraft’s feature.
Automatic Animal BreedingIn 2.8, this item-throwing behavior was added to all kinds of food and wheat. I hope it won’t cause any troubles. Anyway, the point is that thrown wheat can hit some animal, and activate it’s “love” mode. Some animals need special food, like fish meat.
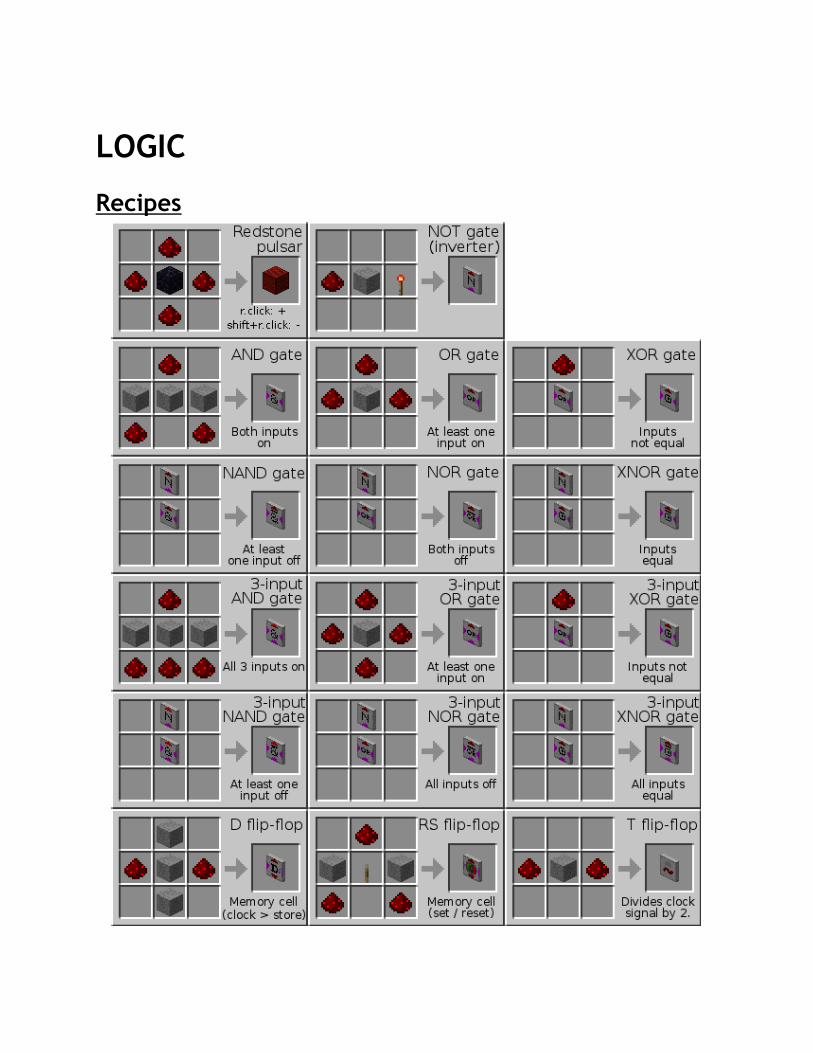
LOGIC
Recipes
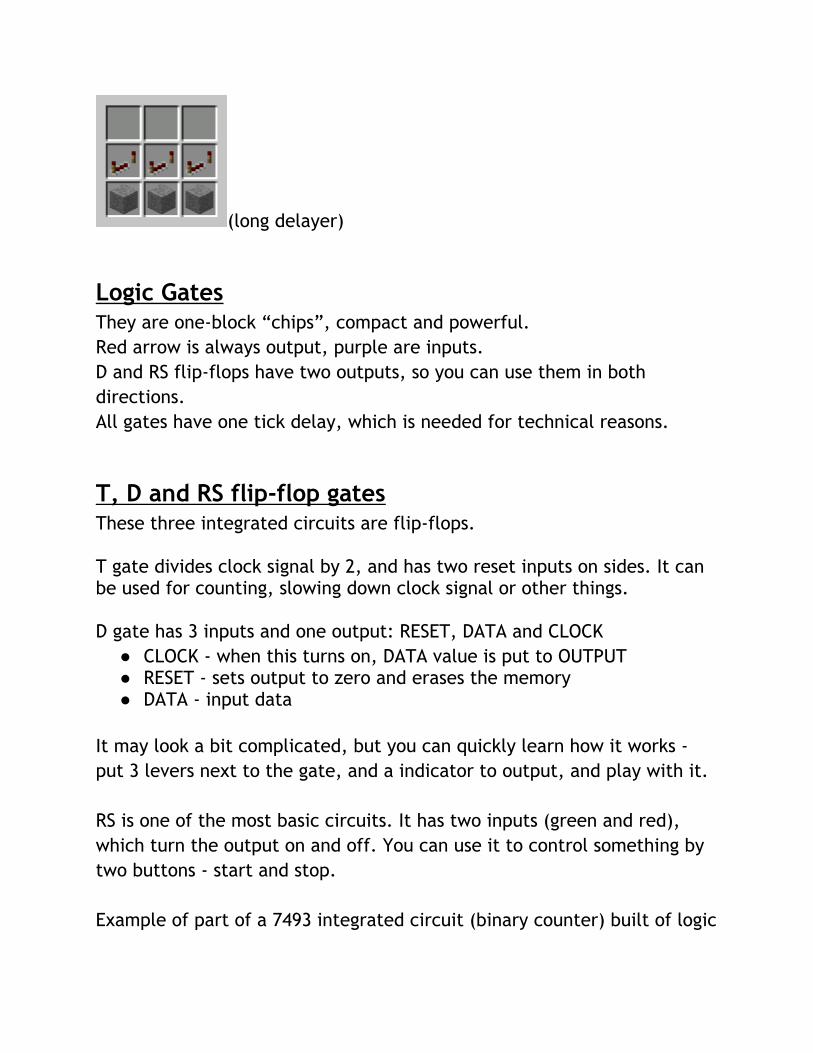
(long delayer)
Logic GatesThey are one-block “chips”, compact and powerful.Red arrow is always output, purple are inputs.D and RS flip-flops have two outputs, so you can use them in both directions.All gates have one tick delay, which is needed for technical reasons.
T, D and RS flip-flop gatesThese three integrated circuits are flip-flops. T gate divides clock signal by 2, and has two reset inputs on sides. It can be used for counting, slowing down clock signal or other things. D gate has 3 inputs and one output: RESET, DATA and CLOCK
● CLOCK - when this turns on, DATA value is put to OUTPUT● RESET - sets output to zero and erases the memory● DATA - input data
It may look a bit complicated, but you can quickly learn how it works - put 3 levers next to the gate, and a indicator to output, and play with it. RS is one of the most basic circuits. It has two inputs (green and red), which turn the output on and off. You can use it to control something by two buttons - start and stop. Example of part of a 7493 integrated circuit (binary counter) built of logic
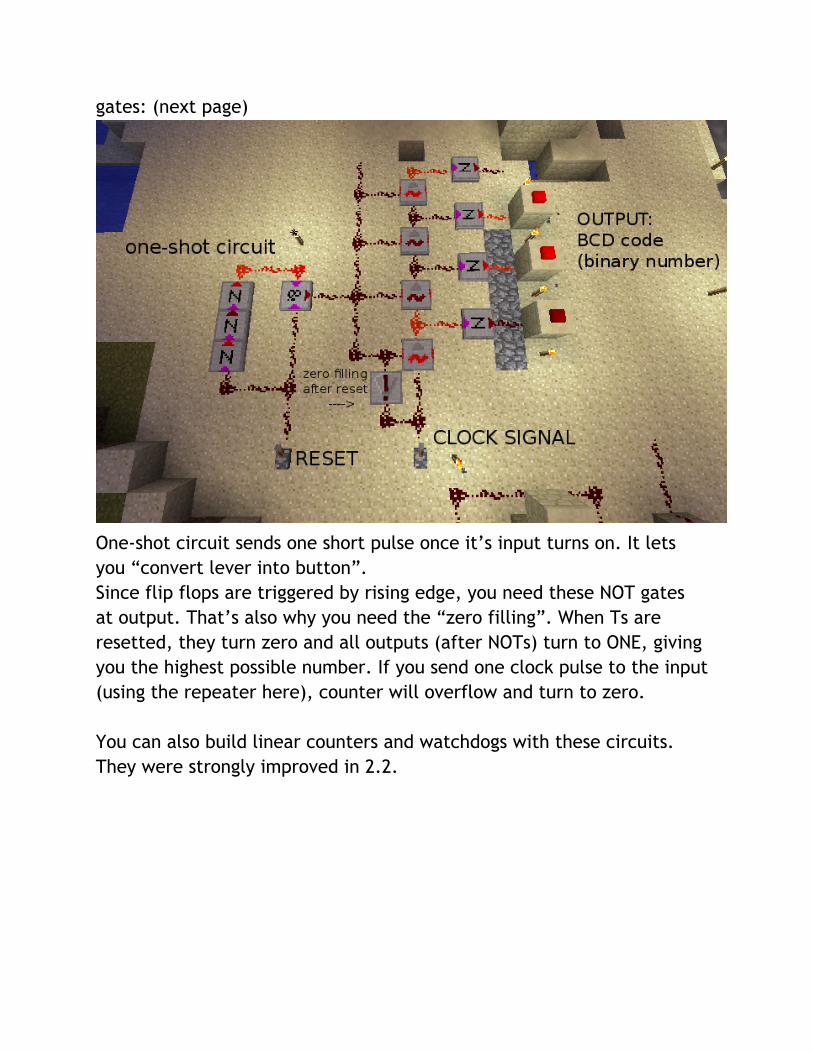
gates: (next page)
One-shot circuit sends one short pulse once it’s input turns on. It lets you “convert lever into button”.Since flip flops are triggered by rising edge, you need these NOT gates at output. That’s also why you need the “zero filling”. When Ts are resetted, they turn zero and all outputs (after NOTs) turn to ONE, giving you the highest possible number. If you send one clock pulse to the input (using the repeater here), counter will overflow and turn to zero. You can also build linear counters and watchdogs with these circuits. They were strongly improved in 2.2.
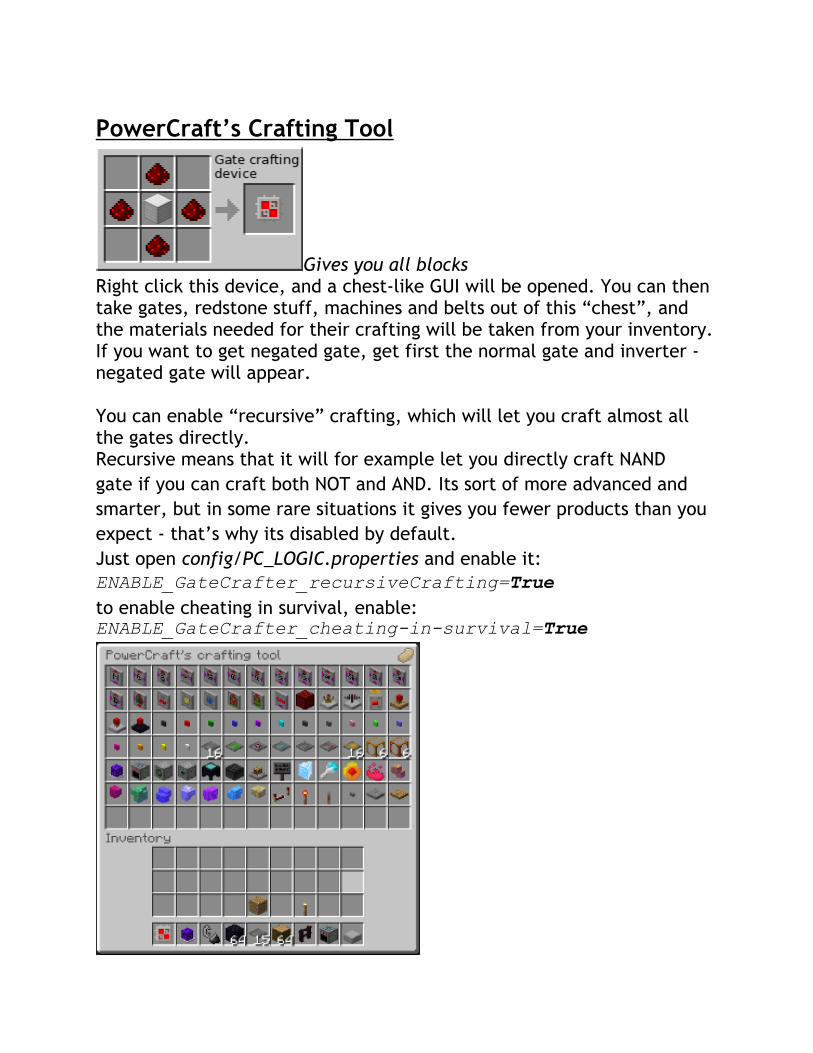
PowerCraft’s Crafting Tool
Gives you all blocksRight click this device, and a chest-like GUI will be opened. You can then take gates, redstone stuff, machines and belts out of this “chest”, and the materials needed for their crafting will be taken from your inventory. If you want to get negated gate, get first the normal gate and inverter - negated gate will appear. You can enable “recursive” crafting, which will let you craft almost all the gates directly. Recursive means that it will for example let you directly craft NAND gate if you can craft both NOT and AND. Its sort of more advanced and smarter, but in some rare situations it gives you fewer products than you expect - that’s why its disabled by default.Just open config/PC_LOGIC.properties and enable it:ENABLE_GateCrafter_recursiveCrafting=Trueto enable cheating in survival, enable:ENABLE_GateCrafter_cheating-in-survival=True
It’s in creative, that’s why everything is available.In survival, only recipes you can craft of things in your inventory are shown and ready to be take-crafted.
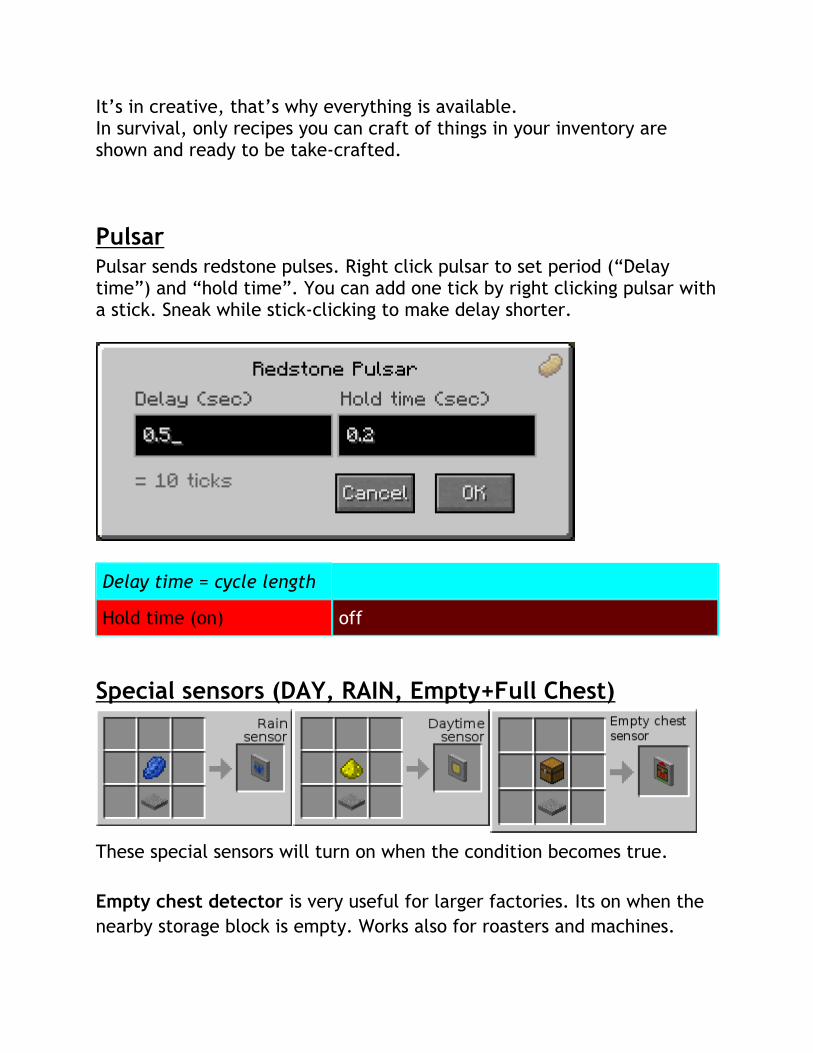
PulsarPulsar sends redstone pulses. Right click pulsar to set period (“Delay time”) and “hold time”. You can add one tick by right clicking pulsar with a stick. Sneak while stick-clicking to make delay shorter.
Delay time = cycle length
Hold time (on) off
Special sensors (DAY, RAIN, Empty+Full Chest)
These special sensors will turn on when the condition becomes true. Empty chest detector is very useful for larger factories. Its on when the nearby storage block is empty. Works also for roasters and machines.
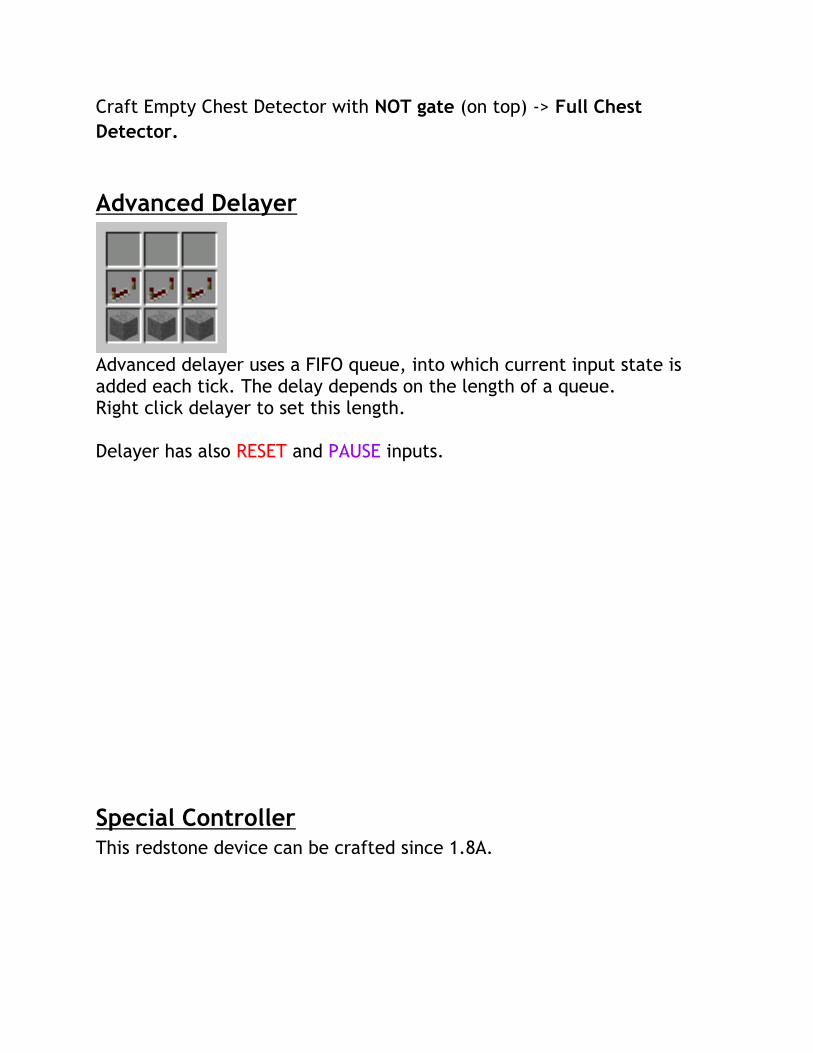
Craft Empty Chest Detector with NOT gate (on top) -> Full Chest Detector.
Advanced Delayer
Advanced delayer uses a FIFO queue, into which current input state is added each tick. The delay depends on the length of a queue.Right click delayer to set this length. Delayer has also RESET and PAUSE inputs.
Special ControllerThis redstone device can be crafted since 1.8A.
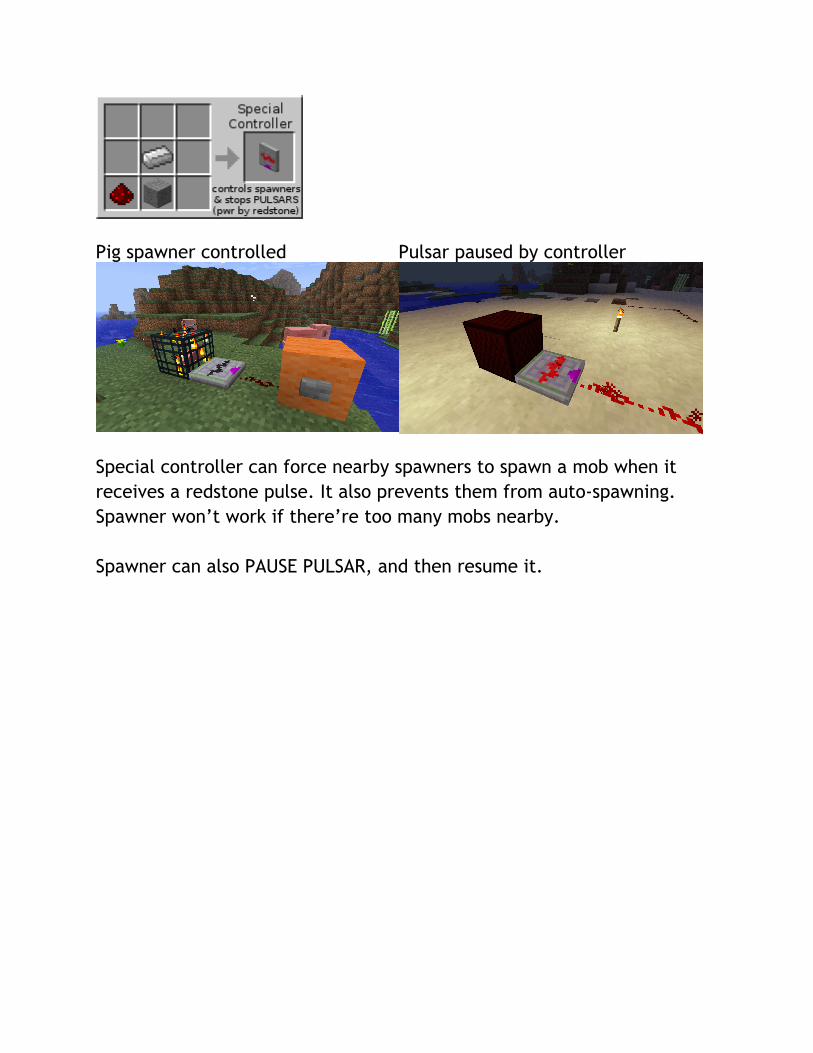
Pig spawner controlled Pulsar paused by controller
Special controller can force nearby spawners to spawn a mob when it receives a redstone pulse. It also prevents them from auto-spawning.Spawner won’t work if there’re too many mobs nearby. Spawner can also PAUSE PULSAR, and then resume it.
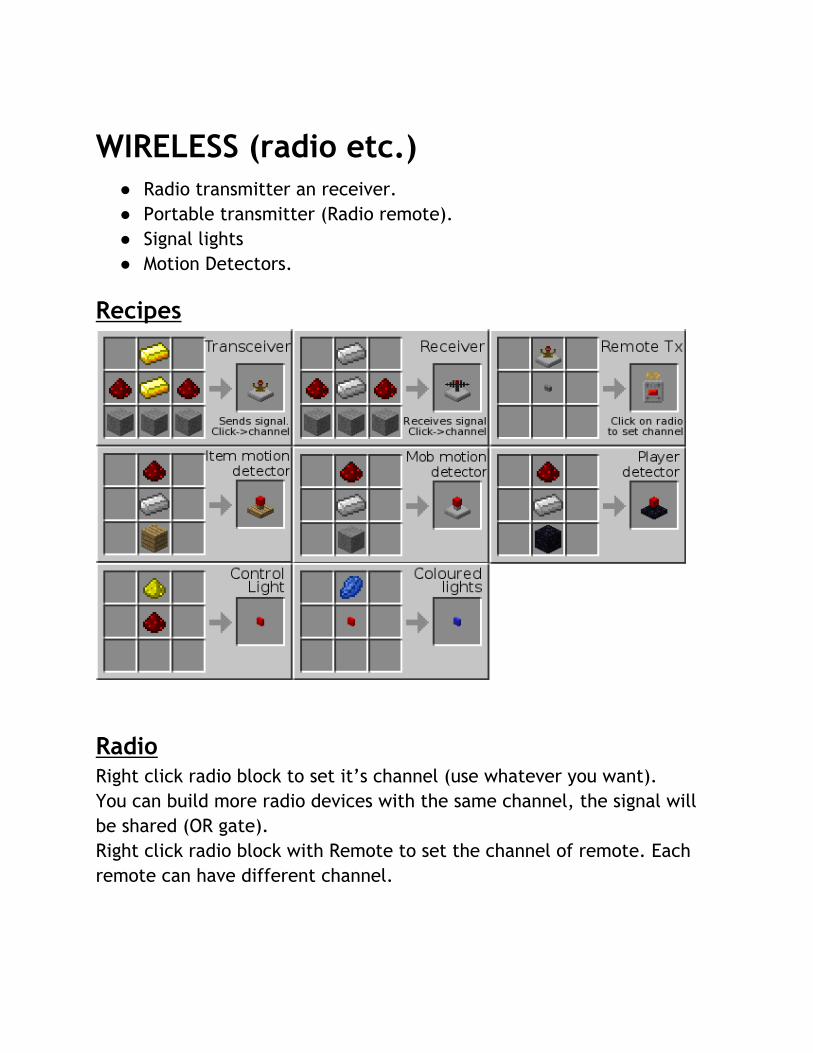
WIRELESS (radio etc.)● Radio transmitter an receiver.● Portable transmitter (Radio remote).● Signal lights● Motion Detectors.
Recipes
RadioRight click radio block to set it’s channel (use whatever you want).You can build more radio devices with the same channel, the signal will be shared (OR gate).Right click radio block with Remote to set the channel of remote. Each remote can have different channel.
Motion SensorsThere are 3 of them - for items, mobs and players. Mob detector detects all living creatures except Player - animals, monsters, NPCs. Right click sensor to make the range larger. Right click while sneaking (holding shift) to make the range smaller. Left-click to print range. Sensors send redstone signal when the entity approaches.
Signal lights (Control Lights)Crafted of one redstone and one glowstone.You can then dye them - with all dyes. Even black ;)Lights can be placed on each side: on ceiling, on floor and on sides.Light is almost as good as from torch. Since 1.8B, they should be visible in TMI.
MOBILE moduleThis is one of the most modern and most complex parts of PowerCraft.
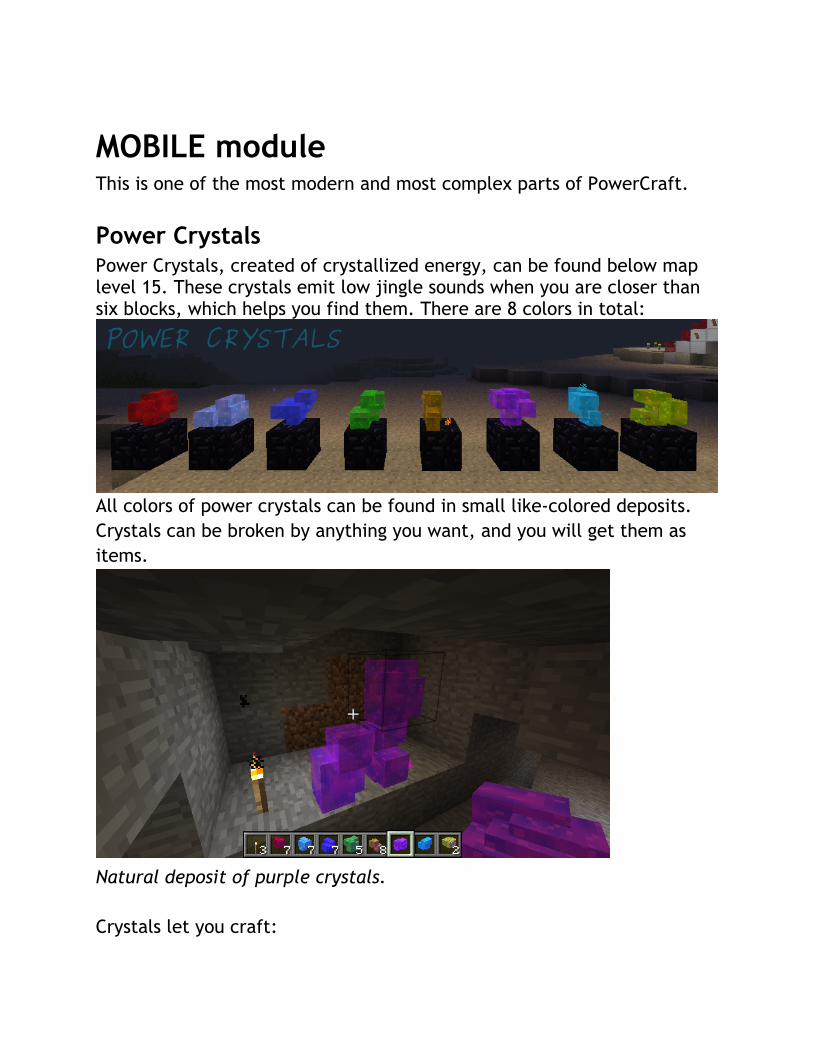
Power CrystalsPower Crystals, created of crystallized energy, can be found below map level 15. These crystals emit low jingle sounds when you are closer than six blocks, which helps you find them. There are 8 colors in total:
All colors of power crystals can be found in small like-colored deposits.Crystals can be broken by anything you want, and you will get them as items.
Natural deposit of purple crystals. Crystals let you craft:

Power DustPower Dust is a strong fuel. You get 24 pieces by crafting one Power Crystal. It lasts at least twice as long as fuel. You can’t get it if you have EasyCrystals cheat enabled.
Activation Crystal
Activation crystal can be used for these purposes:● Activating miner and fishing machine● Setting miner for keyboard control (and disconnecting from kb)● Changing spawner’s mob (see next page)

Spawner GUI Shown after clicking spawner with activation crystal.
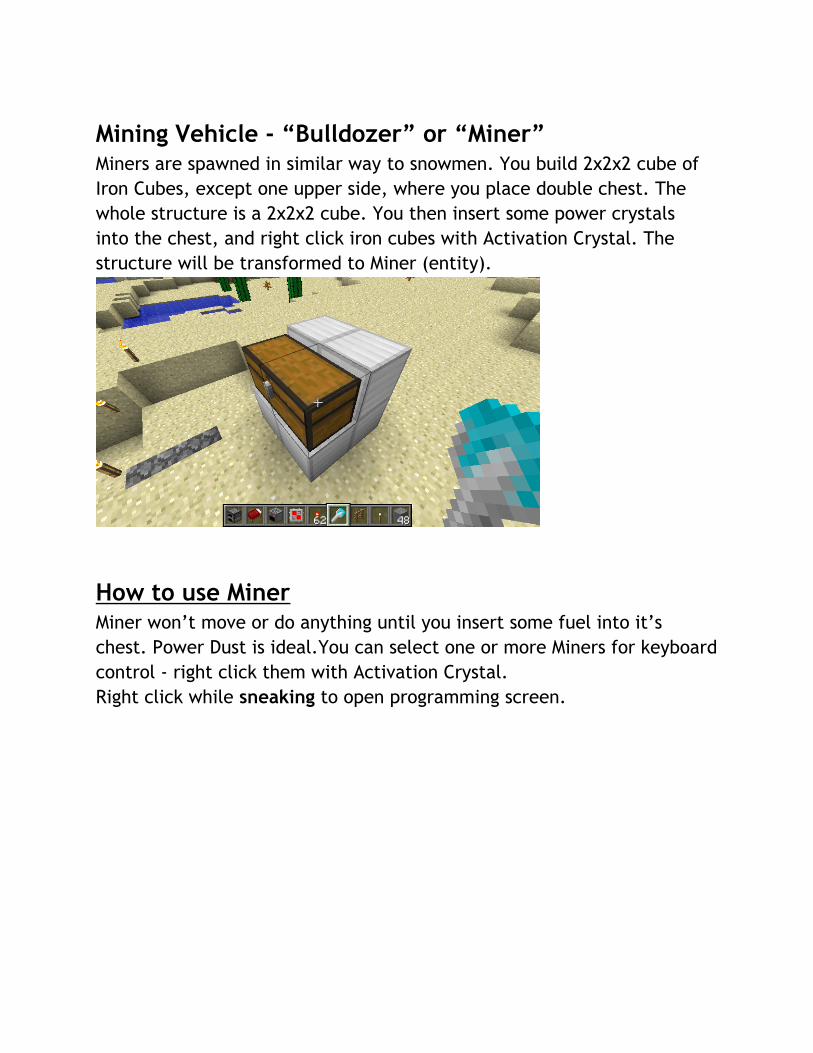
Mining Vehicle - “Bulldozer” or “Miner”Miners are spawned in similar way to snowmen. You build 2x2x2 cube of Iron Cubes, except one upper side, where you place double chest. The whole structure is a 2x2x2 cube. You then insert some power crystals into the chest, and right click iron cubes with Activation Crystal. The structure will be transformed to Miner (entity).
How to use MinerMiner won’t move or do anything until you insert some fuel into it’s chest. Power Dust is ideal.You can select one or more Miners for keyboard control - right click them with Activation Crystal.Right click while sneaking to open programming screen.

Miners’ Keyboard ControlNumpad keys:
MINUSMine down.
7 Enable mining
8Move forwards
9Disable mining
PLUSMine up. Use followed by Forward.
4Turn left
5Turn around
6Turn right
1Turn into blocks
2Move backwards
3
.DEPOSIT into chest
O - Enable Bridge P - Disable Bridge
DELETE - reset code buffer, align and fix position, free allocated fuel.
ENTER Run program and disconnect from keyboard.
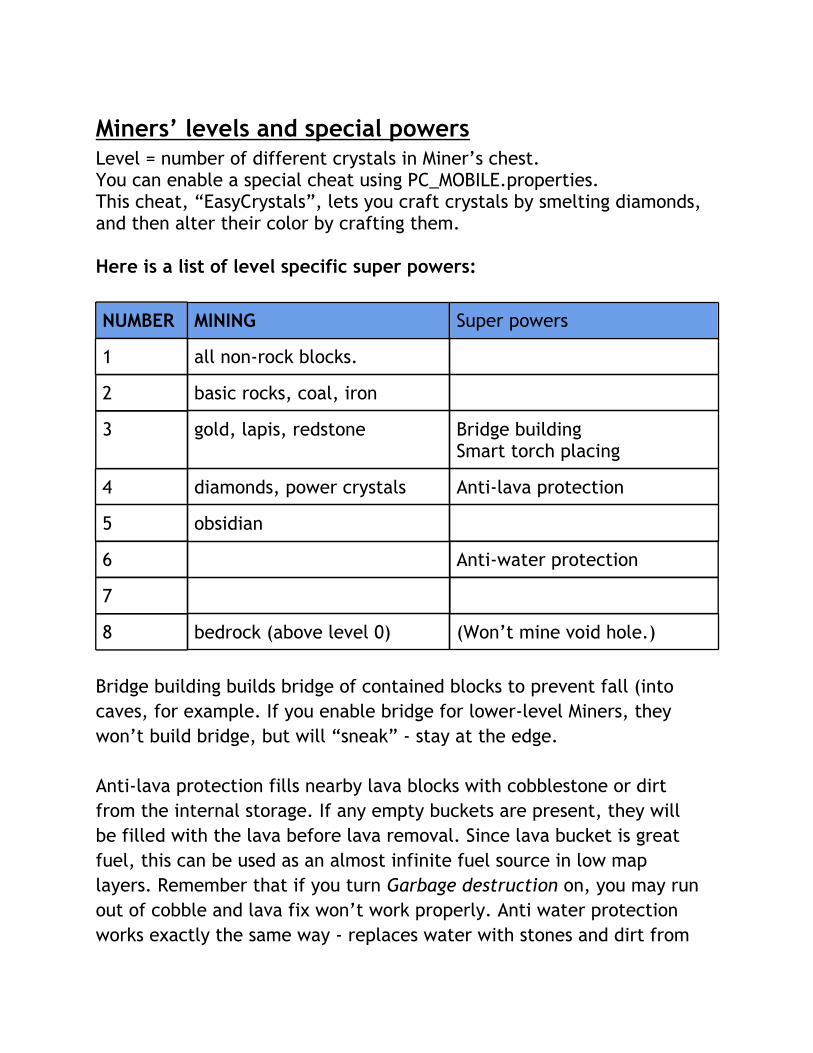
Miners’ levels and special powersLevel = number of different crystals in Miner’s chest.You can enable a special cheat using PC_MOBILE.properties.This cheat, “EasyCrystals”, lets you craft crystals by smelting diamonds, and then alter their color by crafting them. Here is a list of level specific super powers:
NUMBER MINING Super powers
1 all non-rock blocks.
2 basic rocks, coal, iron
3 gold, lapis, redstone Bridge buildingSmart torch placing
4 diamonds, power crystals Anti-lava protection
5 obsidian
6 Anti-water protection
7
8 bedrock (above level 0) (Won’t mine void hole.)
Bridge building builds bridge of contained blocks to prevent fall (into caves, for example. If you enable bridge for lower-level Miners, they won’t build bridge, but will “sneak” - stay at the edge. Anti-lava protection fills nearby lava blocks with cobblestone or dirt from the internal storage. If any empty buckets are present, they will be filled with the lava before lava removal. Since lava bucket is great fuel, this can be used as an almost infinite fuel source in low map layers. Remember that if you turn Garbage destruction on, you may run out of cobble and lava fix won’t work properly. Anti water protection works exactly the same way - replaces water with stones and dirt from
container. Torches are placed - if you insert them in the chest - with 4 or 5 blocks distance. Torches are always placed on the right-hand side of mined tunnel if possible. Fallback is left-hand side and then floor.
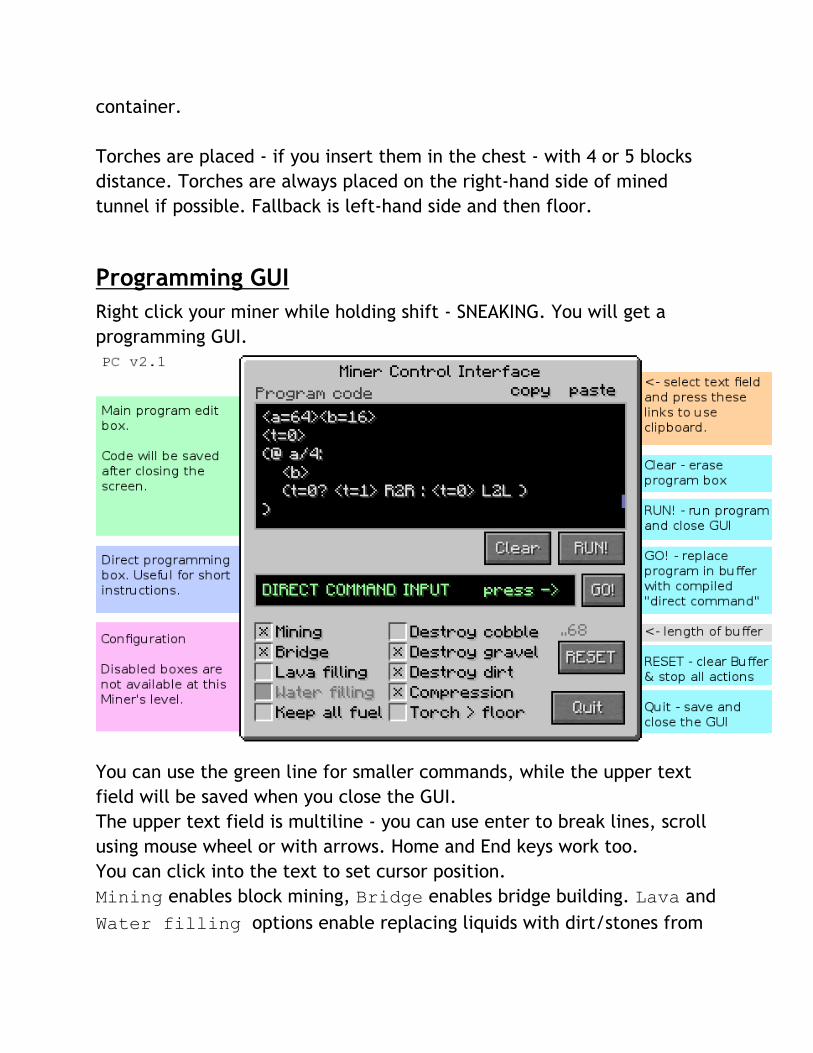
Programming GUIRight click your miner while holding shift - SNEAKING. You will get a programming GUI.
You can use the green line for smaller commands, while the upper text field will be saved when you close the GUI.The upper text field is multiline - you can use enter to break lines, scroll using mouse wheel or with arrows. Home and End keys work too.You can click into the text to set cursor position.Mining enables block mining, Bridge enables bridge building. Lava and Water filling options enable replacing liquids with dirt/stones from
the cargo storage. Enable Keep all fuel to prevent storing fuel (coal, wood) into chests. Tick Destroy checkboxes to collect and destroy specified materials. They will will be collected as usual, but not stored into the cargo chest. Compression automatically crafts sand to sandstone and diamonds and lapis to storage blocks. Torch>floor forces placing torches on floor instead of walls. This is useful for very large rooms where miner breaks already placed torches, which results in a large dark room (monsters!).
Programming language for MinersAll spaces and white characters in program code are ommited while parsing, so you can format your code with them. There is no height limit - feel free to use ENTER and spaces for better code alignment.
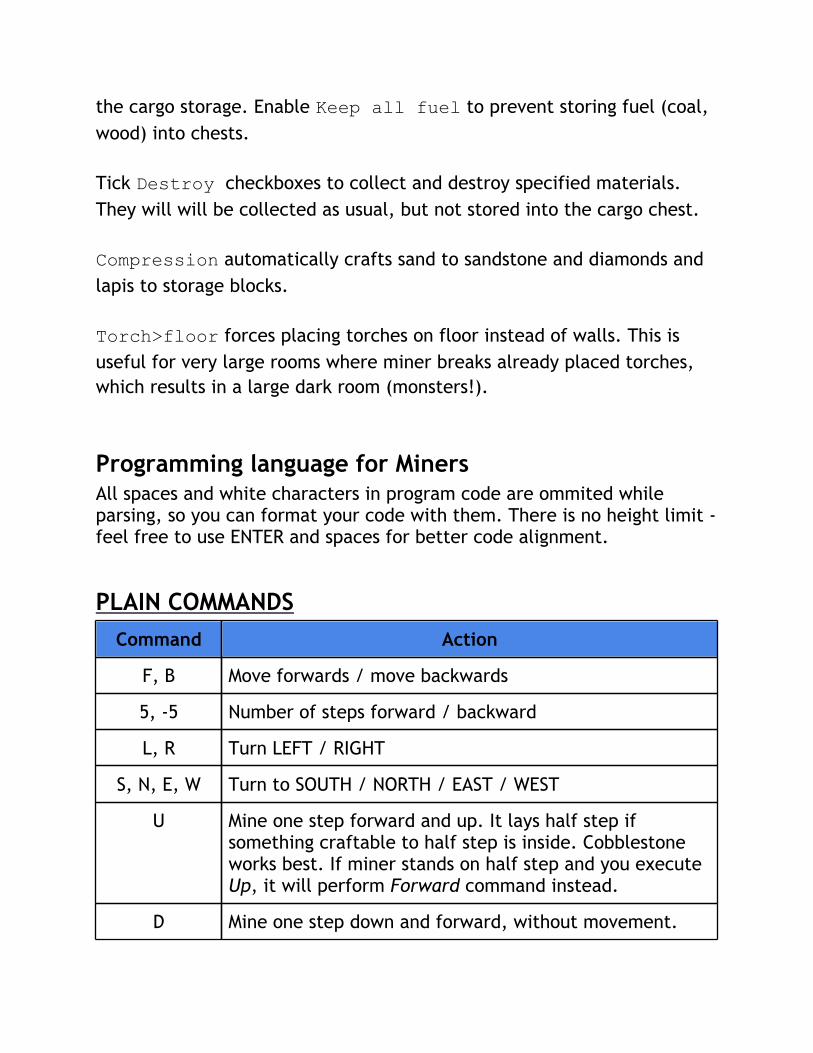
PLAIN COMMANDSCommand Action
F, B Move forwards / move backwards
5, -5 Number of steps forward / backward
L, R Turn LEFT / RIGHT
S, N, E, W Turn to SOUTH / NORTH / EAST / WEST
U Mine one step forward and up. It lays half step if something craftable to half step is inside. Cobblestone works best. If miner stands on half step and you execute Up, it will perform Forward command instead.
D Mine one step down and forward, without movement.
If you want to make a descending corridor, repeat Down and Forward commands (DF)
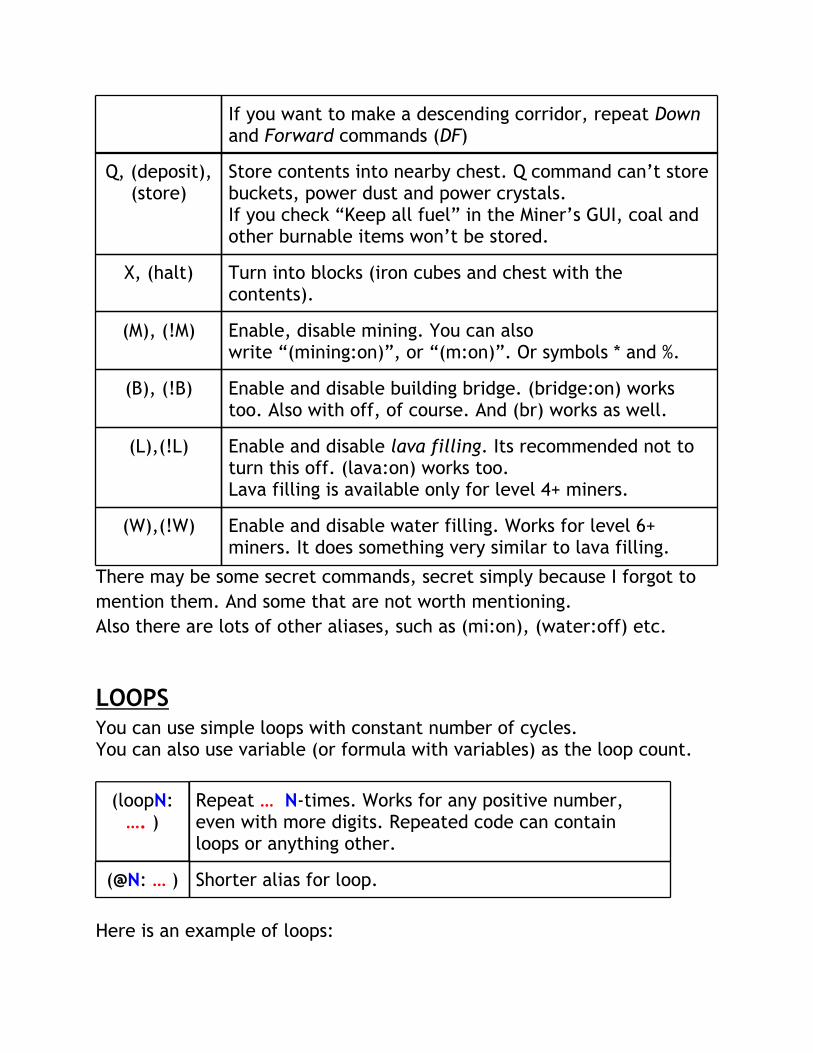
Q, (deposit), (store)
Store contents into nearby chest. Q command can’t store buckets, power dust and power crystals.If you check “Keep all fuel” in the Miner’s GUI, coal and other burnable items won’t be stored.
X, (halt) Turn into blocks (iron cubes and chest with the contents).
(M), (!M) Enable, disable mining. You can also write “(mining:on)”, or “(m:on)”. Or symbols * and %.
(B), (!B) Enable and disable building bridge. (bridge:on) works too. Also with off, of course. And (br) works as well.
(L),(!L) Enable and disable lava filling. Its recommended not to turn this off. (lava:on) works too.Lava filling is available only for level 4+ miners.
(W),(!W) Enable and disable water filling. Works for level 6+ miners. It does something very similar to lava filling.
There may be some secret commands, secret simply because I forgot to mention them. And some that are not worth mentioning.Also there are lots of other aliases, such as (mi:on), (water:off) etc.
LOOPSYou can use simple loops with constant number of cycles.You can also use variable (or formula with variables) as the loop count.
(loopN: …. )
Repeat … N-times. Works for any positive number, even with more digits. Repeated code can contain loops or anything other.
(@N: … ) Shorter alias for loop.
Here is an example of loops:

(@50: 10L10R ) Longer syntax(loop 50: 10L10R ) And with variable a:(@a: 10L10R )(@a+b: 10L10R )
(@a+15: 10L10R )
(@<a+15>: 10L10R )
< and > are optional in loop count.
VARIABLESYou can use variables in Miners’ programs. Prior to any use of your variables, you must set it’s initial value.<a=0>
Each variable operation must be enclosed in its own <> brackets.<a=6> <b=15> Supported operations:
+ add
- subtract
* multiply
/ divide and round to integer
% remainder of integer division
You can then use three different kinds of variable statements. 1) Getting a value<a> <a+15> <a+b>
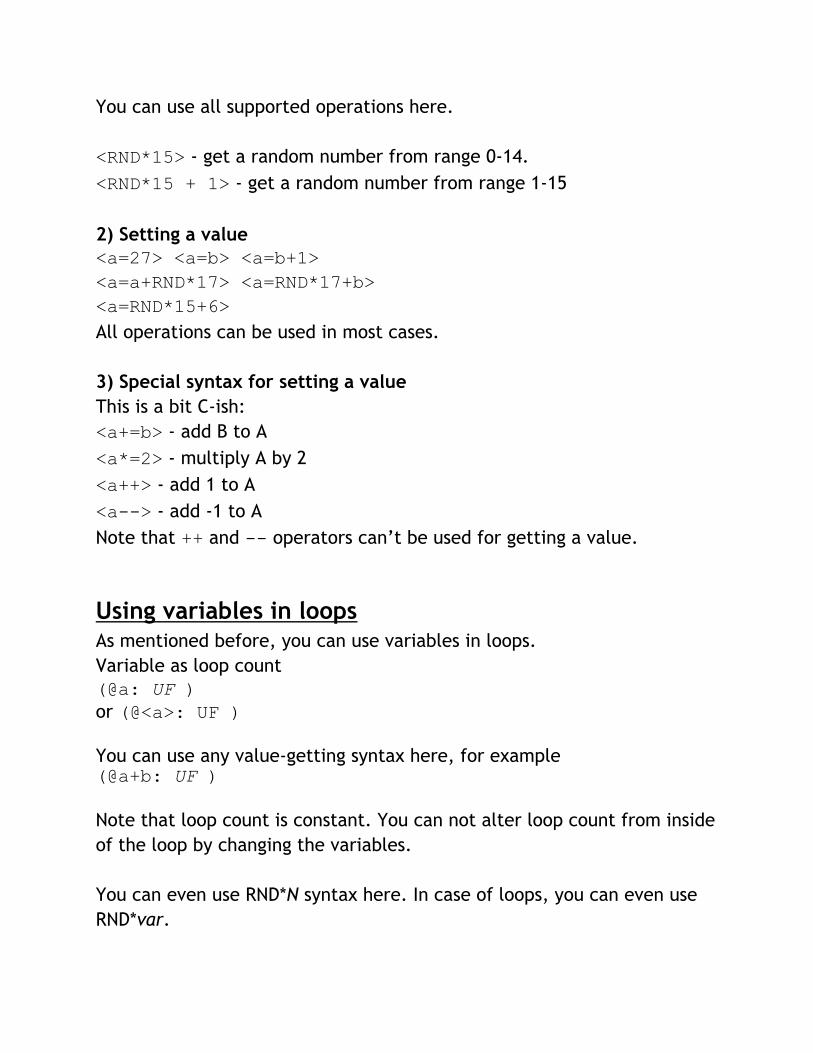
You can use all supported operations here. <RND*15> - get a random number from range 0-14.<RND*15 + 1> - get a random number from range 1-15 2) Setting a value<a=27> <a=b> <a=b+1><a=a+RND*17> <a=RND*17+b><a=RND*15+6>All operations can be used in most cases. 3) Special syntax for setting a valueThis is a bit C-ish:<a+=b> - add B to A<a*=2> - multiply A by 2<a++> - add 1 to A<a--> - add -1 to ANote that ++ and -- operators can’t be used for getting a value.
Using variables in loopsAs mentioned before, you can use variables in loops.Variable as loop count(@a: UF )or (@<a>: UF ) You can use any value-getting syntax here, for example(@a+b: UF ) Note that loop count is constant. You can not alter loop count from inside of the loop by changing the variables. You can even use RND*N syntax here. In case of loops, you can even use RND*var.
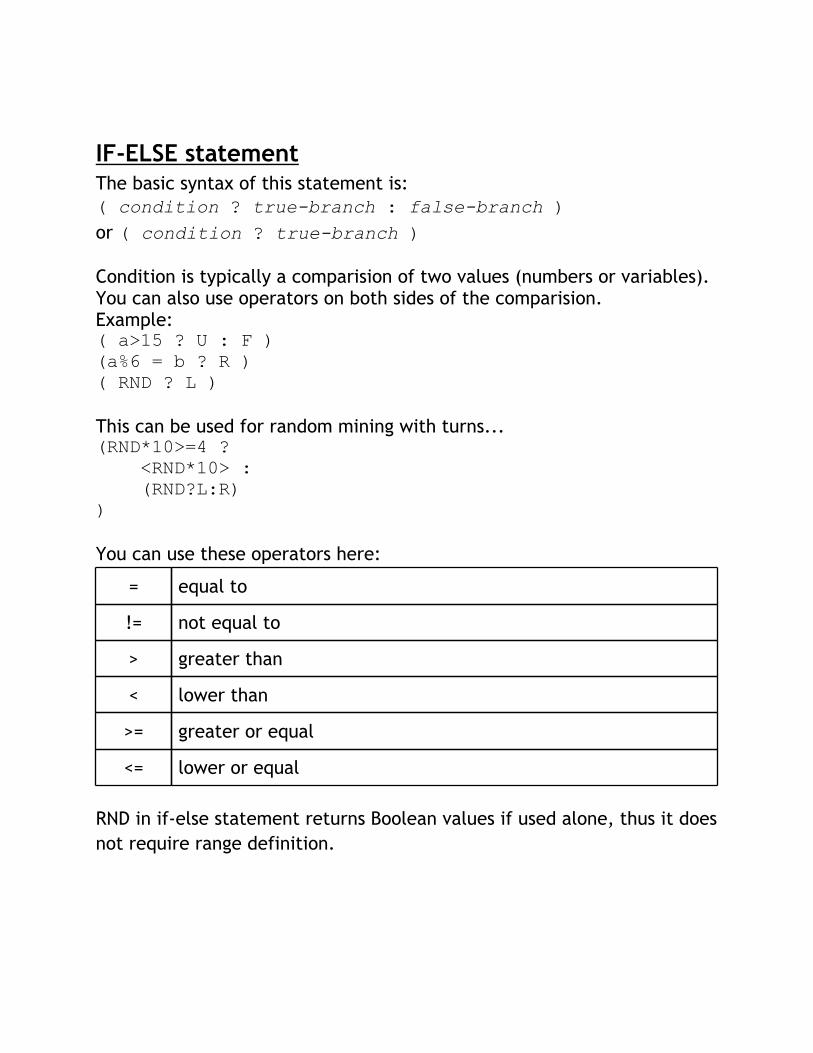
IF-ELSE statementThe basic syntax of this statement is:( condition ? true-branch : false-branch )or ( condition ? true-branch ) Condition is typically a comparision of two values (numbers or variables). You can also use operators on both sides of the comparision.Example:( a>15 ? U : F )(a%6 = b ? R )( RND ? L ) This can be used for random mining with turns...(RND*10>=4 ? <RND*10> : (RND?L:R) ) You can use these operators here:
= equal to
!= not equal to
> greater than
< lower than
>= greater or equal
<= lower or equal
RND in if-else statement returns Boolean values if used alone, thus it does not require range definition.
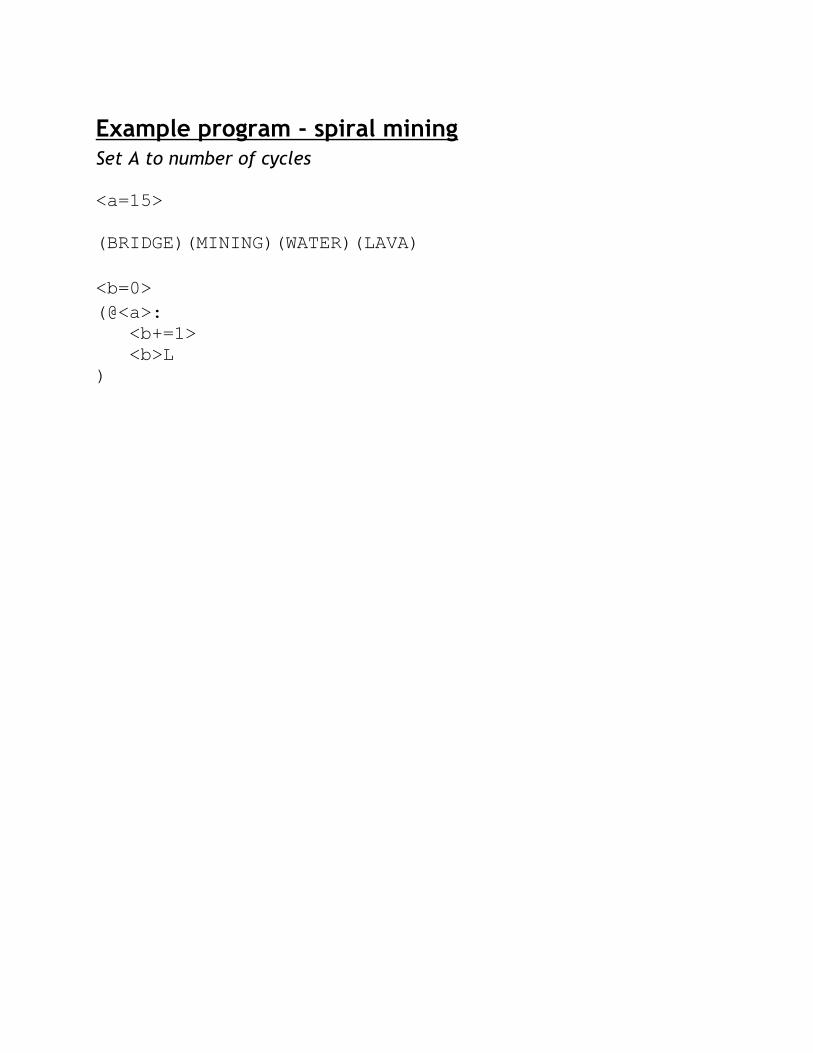
Example program - spiral miningSet A to number of cycles <a=15> (BRIDGE)(MINING)(WATER)(LAVA) <b=0>(@<a>: <b+=1> <b>L)
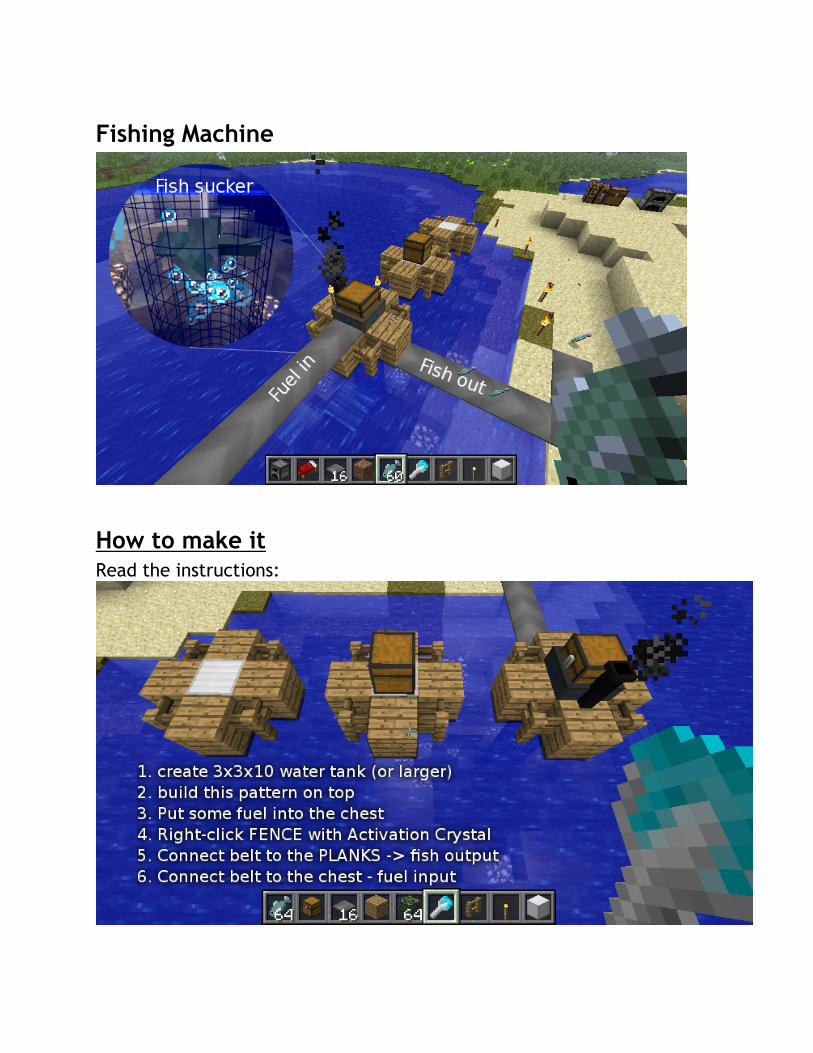
Fishing Machine
How to make itRead the instructions:
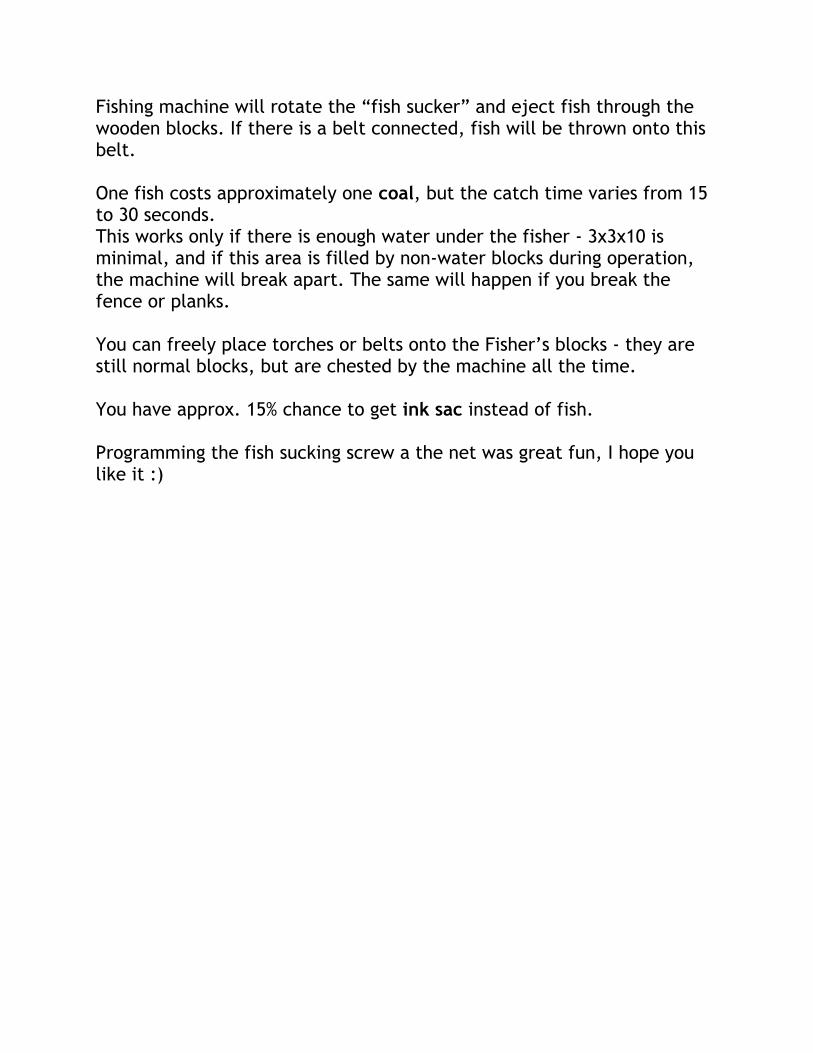
Fishing machine will rotate the “fish sucker” and eject fish through the wooden blocks. If there is a belt connected, fish will be thrown onto this belt. One fish costs approximately one coal, but the catch time varies from 15 to 30 seconds. This works only if there is enough water under the fisher - 3x3x10 is minimal, and if this area is filled by non-water blocks during operation, the machine will break apart. The same will happen if you break the fence or planks. You can freely place torches or belts onto the Fisher’s blocks - they are still normal blocks, but are chested by the machine all the time. You have approx. 15% chance to get ink sac instead of fish. Programming the fish sucking screw a the net was great fun, I hope you like it :)
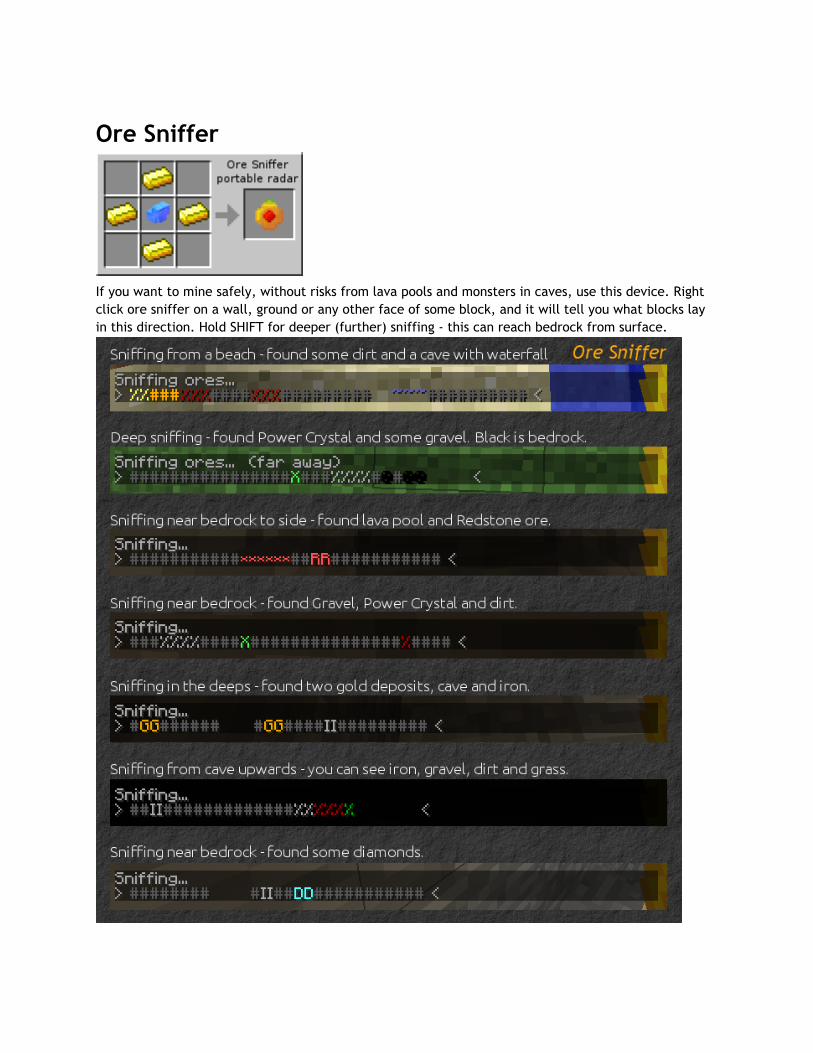
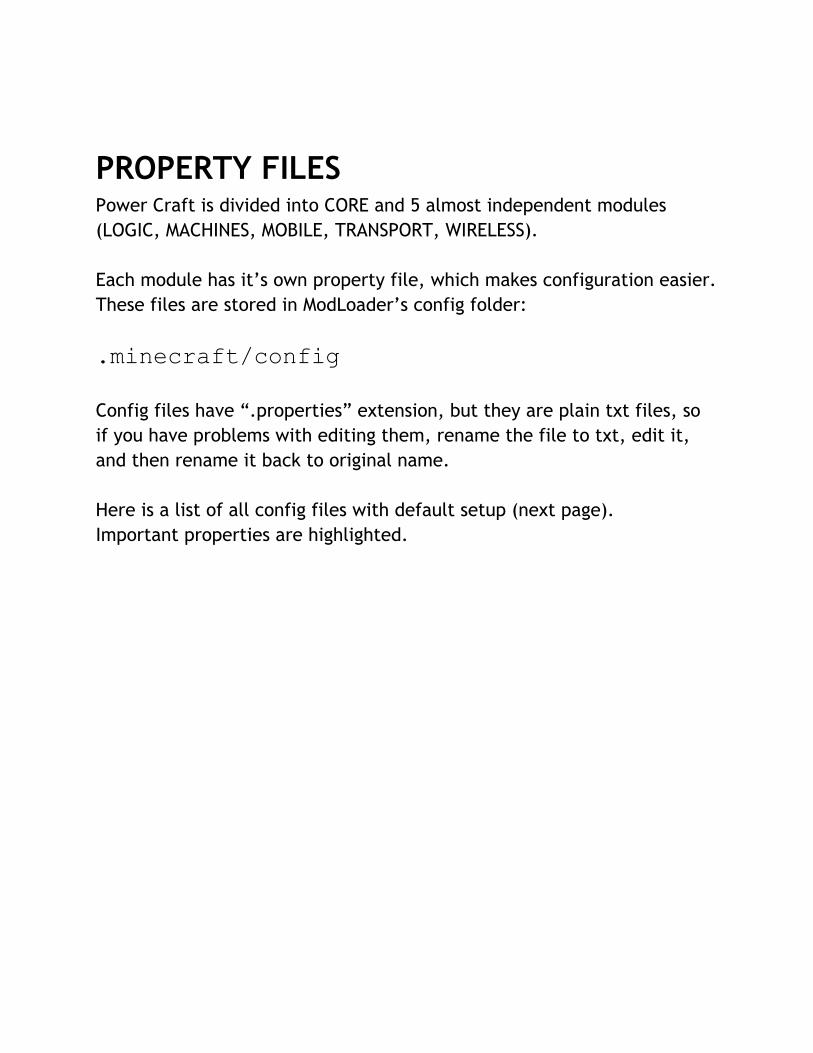
Ore Sniffer
If you want to mine safely, without risks from lava pools and monsters in caves, use this device. Right click ore sniffer on a wall, ground or any other face of some block, and it will tell you what blocks lay in this direction. Hold SHIFT for deeper (further) sniffing - this can reach bedrock from surface.
PROPERTY FILESPower Craft is divided into CORE and 5 almost independent modules (LOGIC, MACHINES, MOBILE, TRANSPORT, WIRELESS). Each module has it’s own property file, which makes configuration easier. These files are stored in ModLoader’s config folder: .minecraft/config Config files have “.properties” extension, but they are plain txt files, so if you have problems with editing them, rename the file to txt, edit it, and then rename it back to original name. Here is a list of all config files with default setup (next page).Important properties are highlighted.
PC_CORE#PowerCraft global setup fileReverseKey=LCONTROLHold this key to build gates, machines or conveyors in reverse direction.Its shared by all modules.
PC_LOGIC#PowerCraft logic plugin - setup fileENABLE_GateCrafter_recursiveCrafting=FalseEnables or disables recursive crafting. Recursive crafting is more advanced and more convenient, but sometimes it behaves strangely. See docs for Logic module for further info. ItemGateCrafter_id=19003device_LogicGate_Off=223device_LogicGate_On=224device_RedstoneClock=225Block IDs. Range is 1 - 255, but first approx. 120 IDs are used by default blocks. gate_on_BRIGHTNESS=8indicator_BRIGHTNESS=12You can set brightness of glowing blocks. Range: 0-15. This is a request feature. indicator_Off=226indicator_On=227IDs of Control Lights.

PC_MACHINES#PowerCraft machines plugin - setup filemachine_BlockDispenser=222machine_BlockHarvester=221machine_LaserGun=230machine_Roaster=228machine_XPBank=231Block IDs. Range is 1 - 255, but first approx. 120 IDs are used by default blocks.
PC_MOBILE#PowerCraft mobile [vehicles] plugin - setup fileBLOCK_PowerCrystal=232ITEM_Activator=19001ITEM_PowerDust=19002ID numbers used in Mobile module. KEY_Backward=NUMPAD2KEY_BridgeOff=PKEY_BridgeOn=OKEY_CancelOp=DELETEKEY_Deposit=DECIMALKEY_Down=SUBTRACTKEY_Forward=NUMPAD8KEY_Left=NUMPAD4KEY_MiningOff=NUMPAD9KEY_MiningOn=NUMPAD7KEY_Right=NUMPAD6KEY_RunProgram=RETURNKEY_TurnAround=NUMPAD5KEY_TurnIntoBlocks=NUMPAD1KEY_Up=ADDKeys used for Keyboard Control. Google lwjgl Keyboard for complete list of key names. RECIPES_EasyCrystals_Enabled=FalseEnables / disables easy crystal crafting.You can get Crystals by smelting diamonds, and then alter their color using crafting
grid when this option is enabled. WORLDGEN_PowerCrystal_Enabled=TrueLets you disable generation of Power Crystals. This is a request feature, but may be useful if you don’t want natural Crystal deposits. crystal_BRIGHTNESS=15You can set Crystals’ brightness here. Range is 0-15.
PC_TRANSPORT#PowerCraft transport plugin - setup fileconveyor=212conveyorBrake=216conveyorDetector=214conveyorEjector=213conveyorFilter=215conveyorItemElevator=219conveyorRedirector=218conveyorSpeedBelt=220machine_AutomaticWorkbench=217Block IDs. Automatic workbench is closely related to conveyors, that why its packed in Transport module.

PC_WIRELESS#PowerCraft wireless plugin - setup fileblock_Receiver=154block_SensorRanged=229block_Transceiver=153item_Remote=19000Block and Item IDs.
Factory ideasMost of these factories use Pulsar for timing. Wiring can be done under the machines, it works too.
● Cobblestone maker● Flint maker (dispenser and harvester, connected with belts)● All smelting and crafting recipes can be automated with belts (and
roaster, if you want).● MELON & PUMPKIN, SUGAR CANE, CACTUS, TREES, WHEAT,
FLOWERS, MUSHROOMS (giant, too), NETHER WART● XP farming is now possible with lasers and XP storage.● Automatic potion makers● Vending machine with automatic goods refill and paying by
diamonds● Storage Minecart filling stations● Automatic sheep shearing farms with coloured sheep -> you will
save your dyes!● Automatic mining with programmed miners● And, of course, fishing machine!
Screenshots (older features)Experimental alchemy lab (since 1.4A)
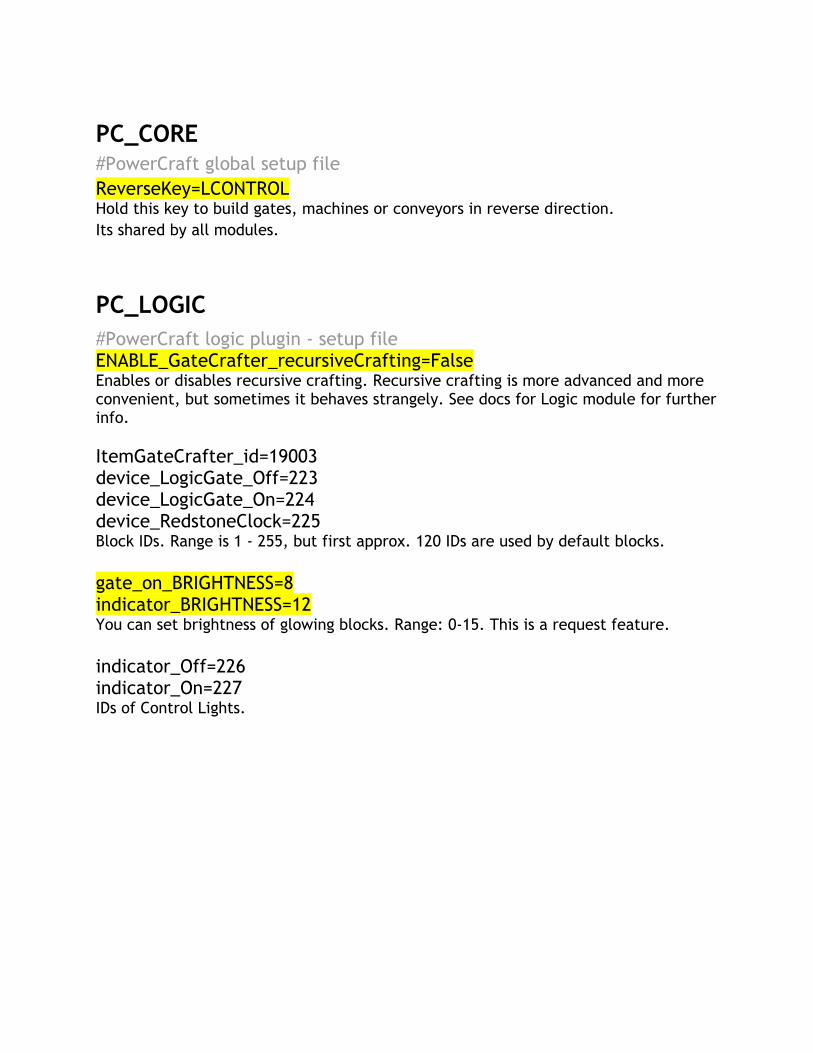
Mushroom factory Mushroom is on dirt, bonemealed and harvested.
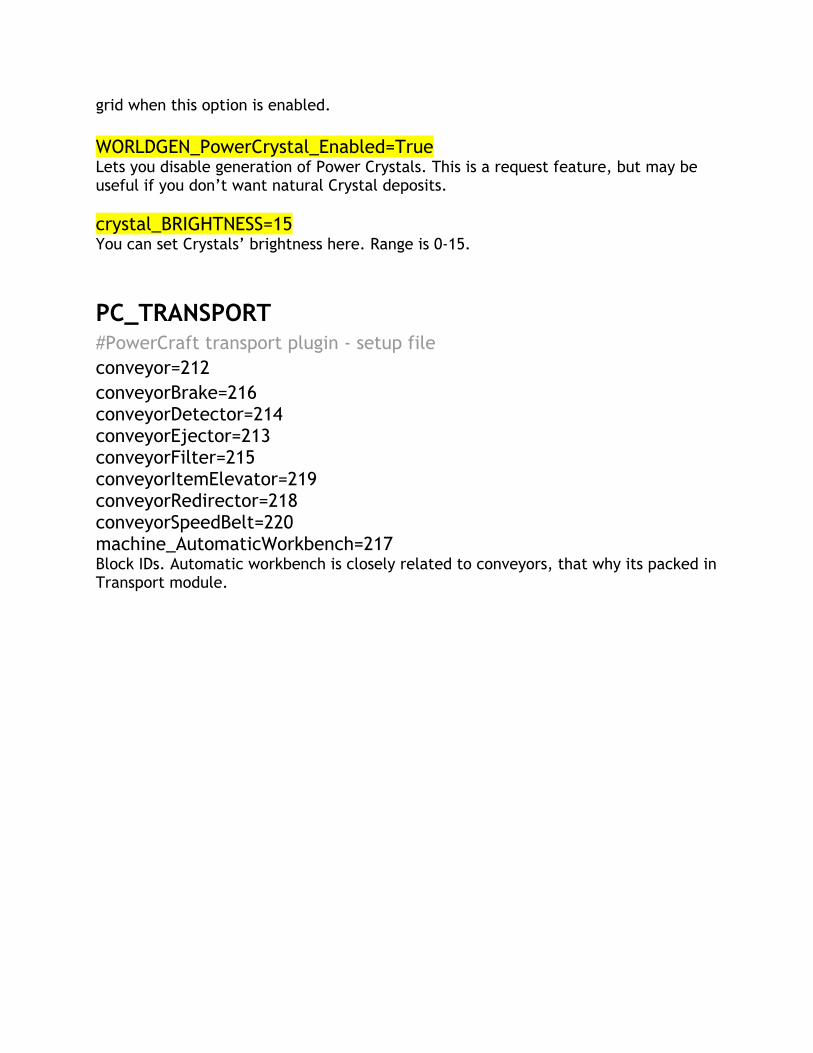
Ejection from minecart (since 1.4C).