Embed Size (px)
Citation preview
Setup Guide i
Power Management
Setup Guide
ii Power Management
Note: Before using this information and the product it supports, read the information in Notices.
© Copyright IBM Corporation 2003, 2011. US Government Users Restricted Rights – Use, duplication or disclosure restricted by GSA ADP Schedule Contract with IBM Corp.
Setup Guide iii
Contents
Part One ____________________________ 1
Introduction ________________________ 1 System requirements ___________________ 1 Subscribe to the site ____________________ 1 Use the BigFix console __________________ 1
Components _______________________ 2 Working with content _______________ 4
Part Two ___________________________ 7
Setup and configuration ______________ 7 Quick Start ___________________________ 7 Manage Power Tracking ________________ 8 Manage Assumptions __________________ 8
General Assumptions ________________ 8 Hardware Assumptions _____________ 10 Global Settings _____________________ 11
Configure Historical Reporting ___________ 12 Configure Client-side Dashboard _________ 15 Enable Wakeup _______________________ 17 Remove previous version _______________ 17
Disable previous Historical Tracking ___ 18 Unsubscribe from site ______________ 18 Remove custom analyses ___________ 19
Part Three _________________________ 21
Support ___________________________ 21 Technical support _____________________ 21
Part Four __________________________ 23
Notices ____________________________ 23

iv Power Management
Setup Guide 1
Part One
Introduction
This publication describes the initial setup, configuration, installation and activation of the BigFix Power Management components. It is intended for BigFix administrators and operators, and evaluators of the product. To learn about how to use and optimize the Power Management product in your environment, see the Power Management User’s Guide. Power Management supports many features, including: Managing computer power settings and policies Tracking and reporting on computer power usage including measuring power usage,
potential power savings, and more Tracking of computer states to create power policies that maximize power savings Advanced Wake-on-LAN capabilities including Last Man Standing, Wake-on-LAN
“Medic”, scheduled wake-up times, and more Support for PC Insomnia detection and prevention A client-side dashboard that enables you to view power usage
System requirements Windows XP, Windows Vista, Windows 2003, Windows 7 Mac OS 10.4, 10.5 and 10.6
Subscribe to the site The process for site subscription depends on your version of the BigFix Console. To get specific site subscription directions for the BigFix Knowledge Base, click here.
Use the BigFix console BigFix Power Management includes a host of new and upgraded features that provide enhanced visibility into the power settings in your deployment. The navigation tree in the BigFix Console, which is available for all BigFix products, serves as your central command for all Power Management functions. The navigation tree gives you easy access to all reports, wizards, Fixlets, analyses and tasks related to managing the power settings in your network.

2 Power Management
Components The BigFix Console organizes content into the following parts: Domain Panel – Includes a navigation tree and a list of all domains Navigation Tree – Includes a list of nodes and subnodes containing site content List Panel – Contains a list of tasks and Fixlets Work Area – Work window where Fixlet and dialogs display
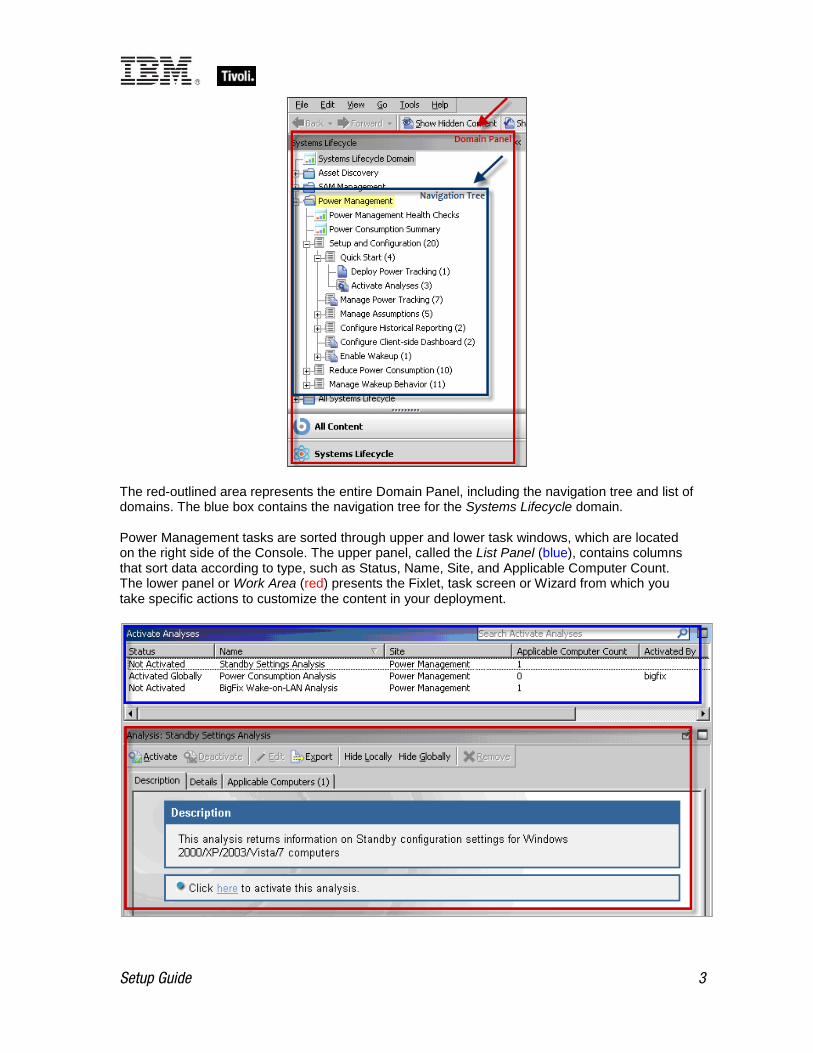
In the BigFix Console, products or sites are grouped by categories or domains. For example, Power Management is one of the sites contained within the Systems Lifecycle domain, along with SAM Management and Asset Discovery. The Domain Panel is the area on the left side of the Console that includes a navigation tree and a list of all domains. The navigation tree includes a list of nodes and sub-nodes containing site content. In the image below, you see a navigation tree at the top with expandable and collapsible nodes, and a list of domains at the bottom. By clicking the Systems Lifecycle domain at the bottom of the domain panel, a list of sites associated with that particular domain displays at the top of the navigation tree.
Setup Guide 3
The red-outlined area represents the entire Domain Panel, including the navigation tree and list of domains. The blue box contains the navigation tree for the Systems Lifecycle domain. Power Management tasks are sorted through upper and lower task windows, which are located on the right side of the Console. The upper panel, called the List Panel (blue), contains columns that sort data according to type, such as Status, Name, Site, and Applicable Computer Count. The lower panel or Work Area (red) presents the Fixlet, task screen or Wizard from which you take specific actions to customize the content in your deployment.
4 Power Management
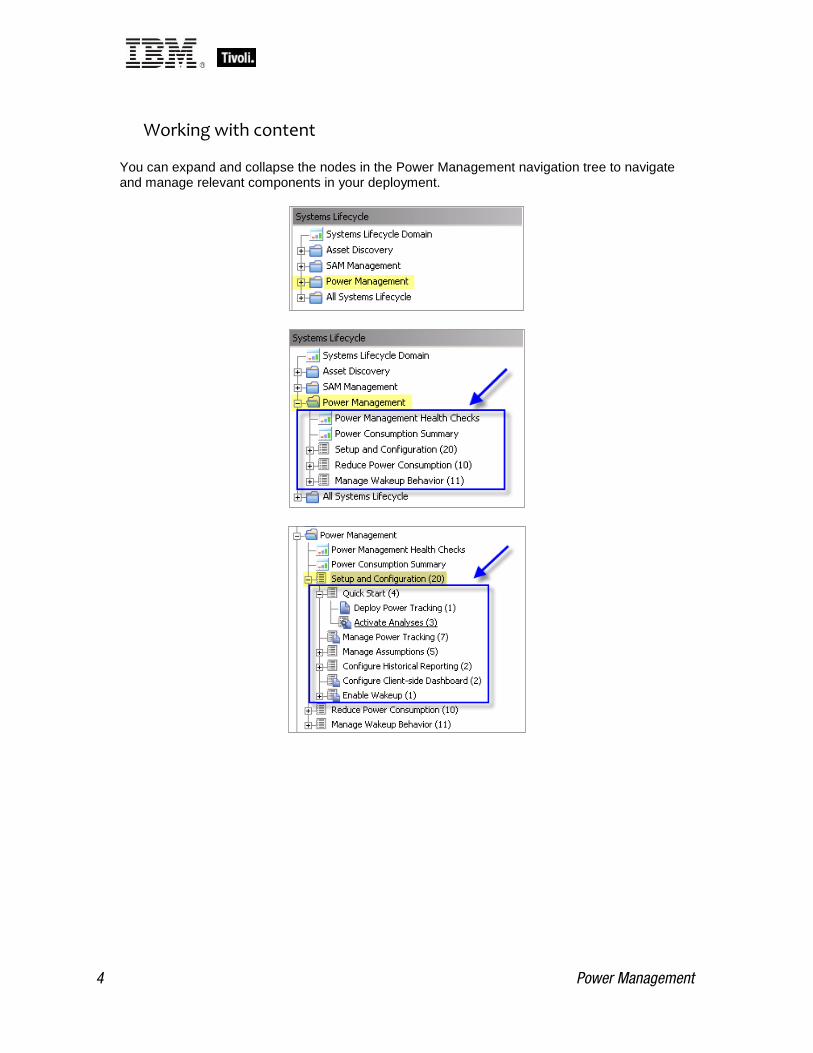
Working with content
You can expand and collapse the nodes in the Power Management navigation tree to navigate and manage relevant components in your deployment.

Setup Guide 5
You can see from the image above that BigFix Power Management content is organized into 3 primary nodes - Setup and Configuration, Reduce Power Consumption, and Manage Wakeup Behavior. Each node expands into subnodes that contain additional content. In the image below, you can see how the Manage Assumptions sub-node expands to display additional tasks and content:

6 Power Management
Composite view
For an overall view of the “type” of Power Management content, click on each node and review the List Panel on the right. Content is displayed by the following types: Analyses Dashboards Fixlets Wizards
This content represents actions that must be addressed to successfully reduce power consumption in your deployment.
Setup Guide 7
Part Two
Setup and configuration
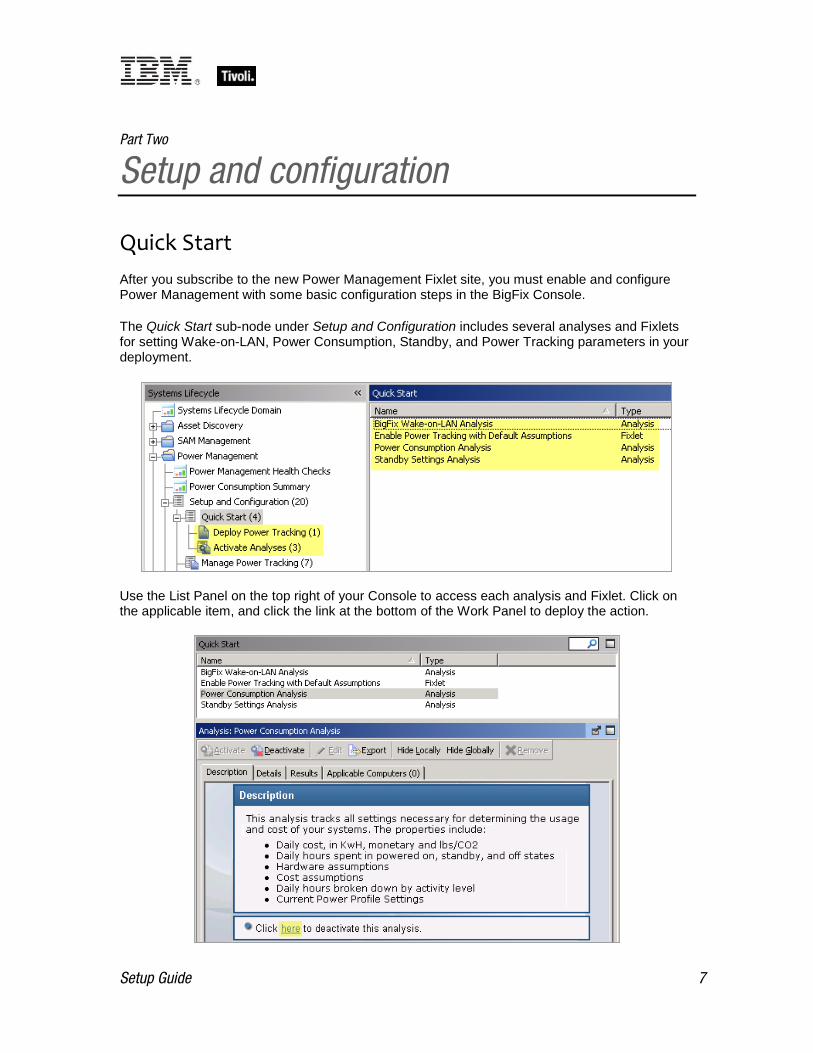
Quick Start After you subscribe to the new Power Management Fixlet site, you must enable and configure Power Management with some basic configuration steps in the BigFix Console. The Quick Start sub-node under Setup and Configuration includes several analyses and Fixlets for setting Wake-on-LAN, Power Consumption, Standby, and Power Tracking parameters in your deployment.
Use the List Panel on the top right of your Console to access each analysis and Fixlet. Click on the applicable item, and click the link at the bottom of the Work Panel to deploy the action.
8 Power Management
Manage Power Tracking
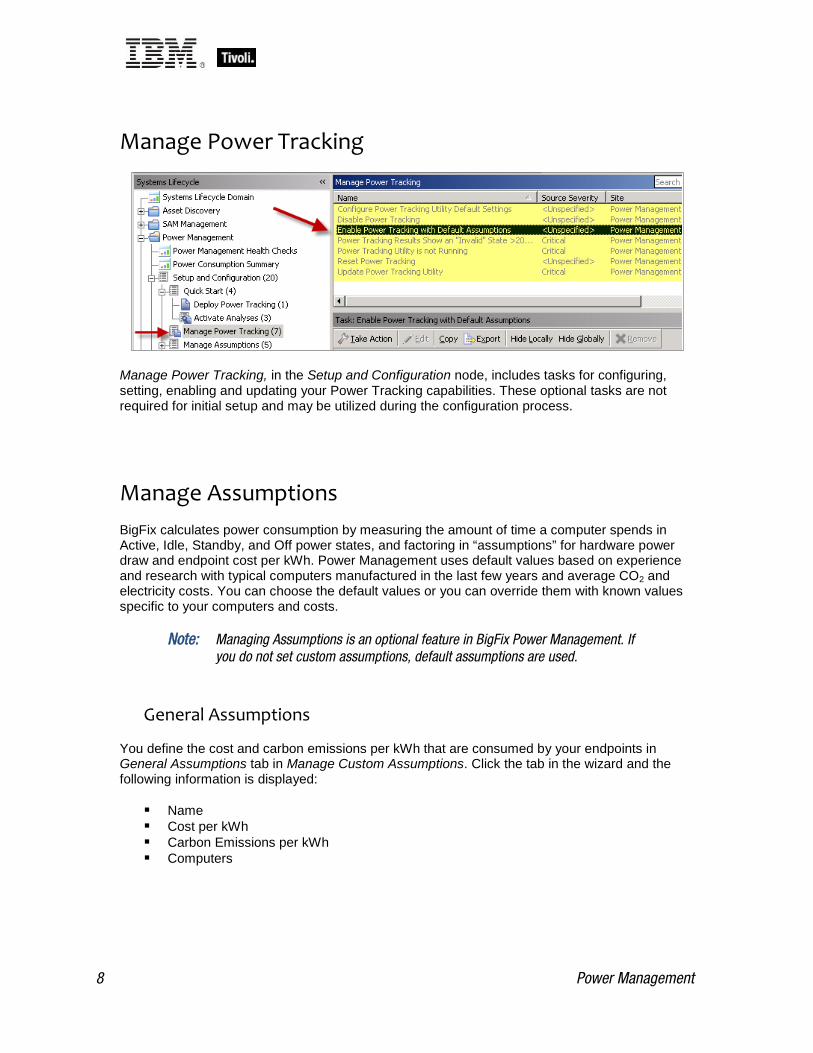
Manage Power Tracking, in the Setup and Configuration node, includes tasks for configuring, setting, enabling and updating your Power Tracking capabilities. These optional tasks are not required for initial setup and may be utilized during the configuration process.
Manage Assumptions BigFix calculates power consumption by measuring the amount of time a computer spends in Active, Idle, Standby, and Off power states, and factoring in “assumptions” for hardware power draw and endpoint cost per kWh. Power Management uses default values based on experience and research with typical computers manufactured in the last few years and average CO2 and electricity costs. You can choose the default values or you can override them with known values specific to your computers and costs.
Note: Managing Assumptions is an optional feature in BigFix Power Management. If you do not set custom assumptions, default assumptions are used.
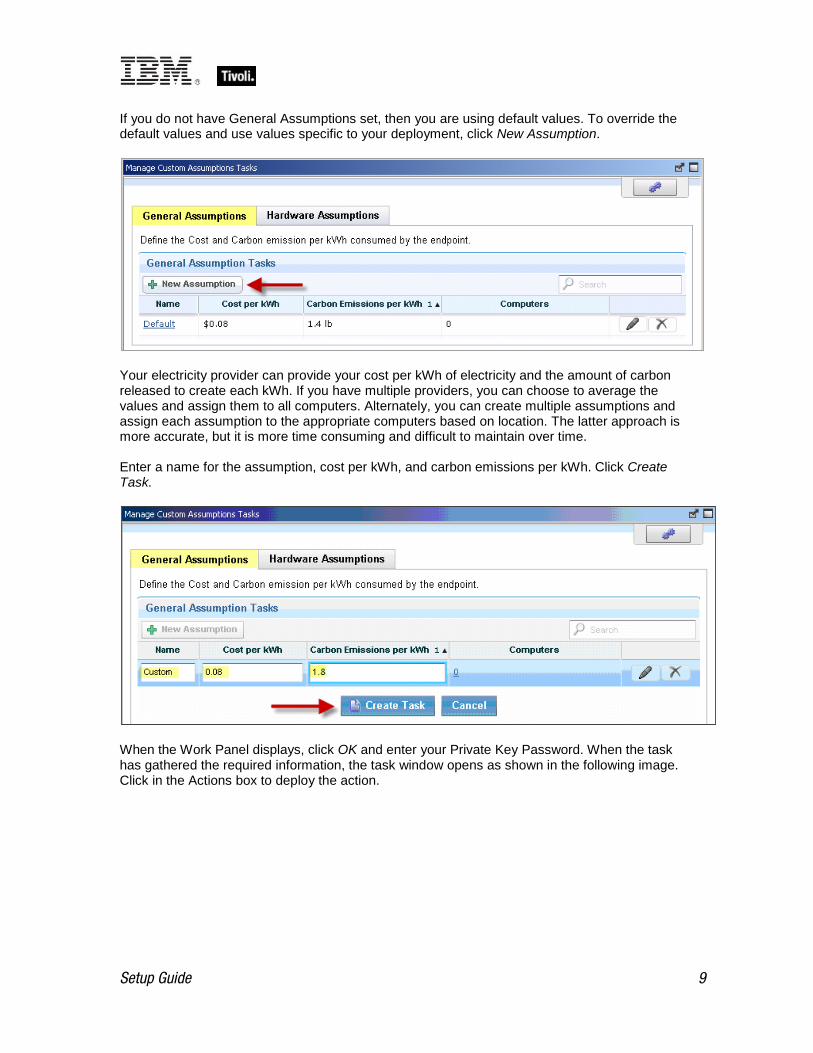
General Assumptions You define the cost and carbon emissions per kWh that are consumed by your endpoints in General Assumptions tab in Manage Custom Assumptions. Click the tab in the wizard and the following information is displayed: Name Cost per kWh Carbon Emissions per kWh Computers
Setup Guide 9
If you do not have General Assumptions set, then you are using default values. To override the default values and use values specific to your deployment, click New Assumption.
Your electricity provider can provide your cost per kWh of electricity and the amount of carbon released to create each kWh. If you have multiple providers, you can choose to average the values and assign them to all computers. Alternately, you can create multiple assumptions and assign each assumption to the appropriate computers based on location. The latter approach is more accurate, but it is more time consuming and difficult to maintain over time. Enter a name for the assumption, cost per kWh, and carbon emissions per kWh. Click Create Task.
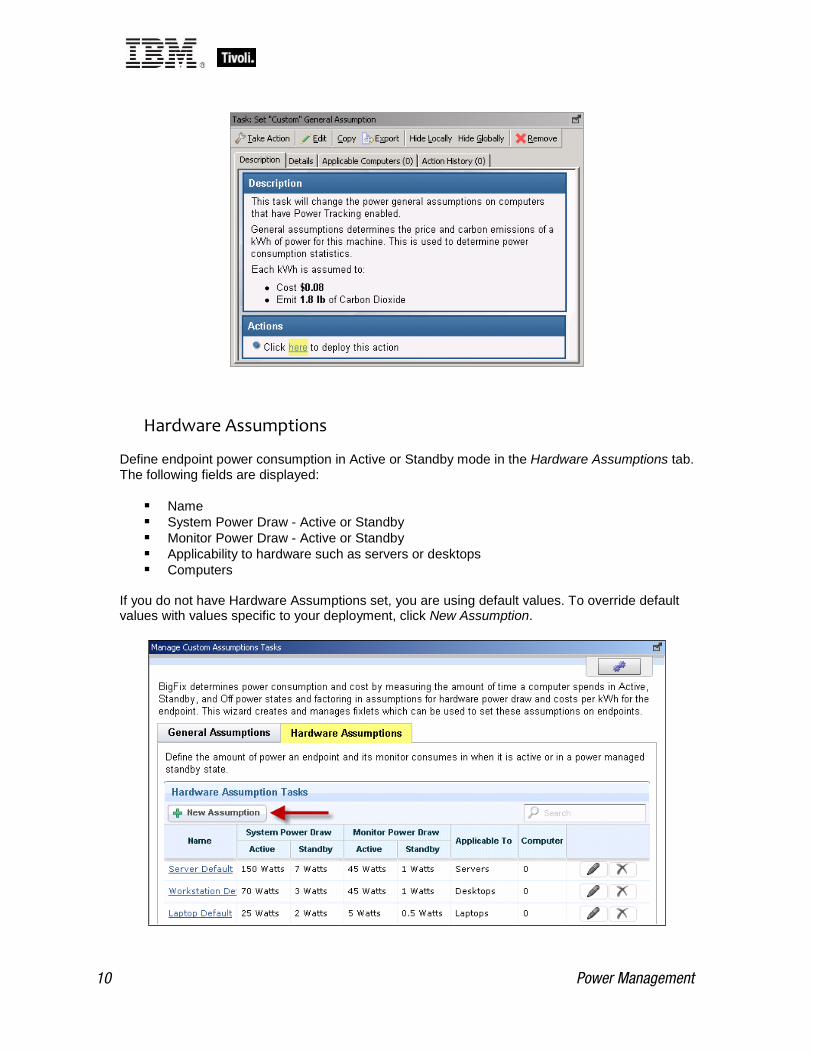
When the Work Panel displays, click OK and enter your Private Key Password. When the task has gathered the required information, the task window opens as shown in the following image. Click in the Actions box to deploy the action.
10 Power Management
Hardware Assumptions Define endpoint power consumption in Active or Standby mode in the Hardware Assumptions tab. The following fields are displayed: Name System Power Draw - Active or Standby Monitor Power Draw - Active or Standby Applicability to hardware such as servers or desktops Computers
If you do not have Hardware Assumptions set, you are using default values. To override default values with values specific to your deployment, click New Assumption.
Setup Guide 11
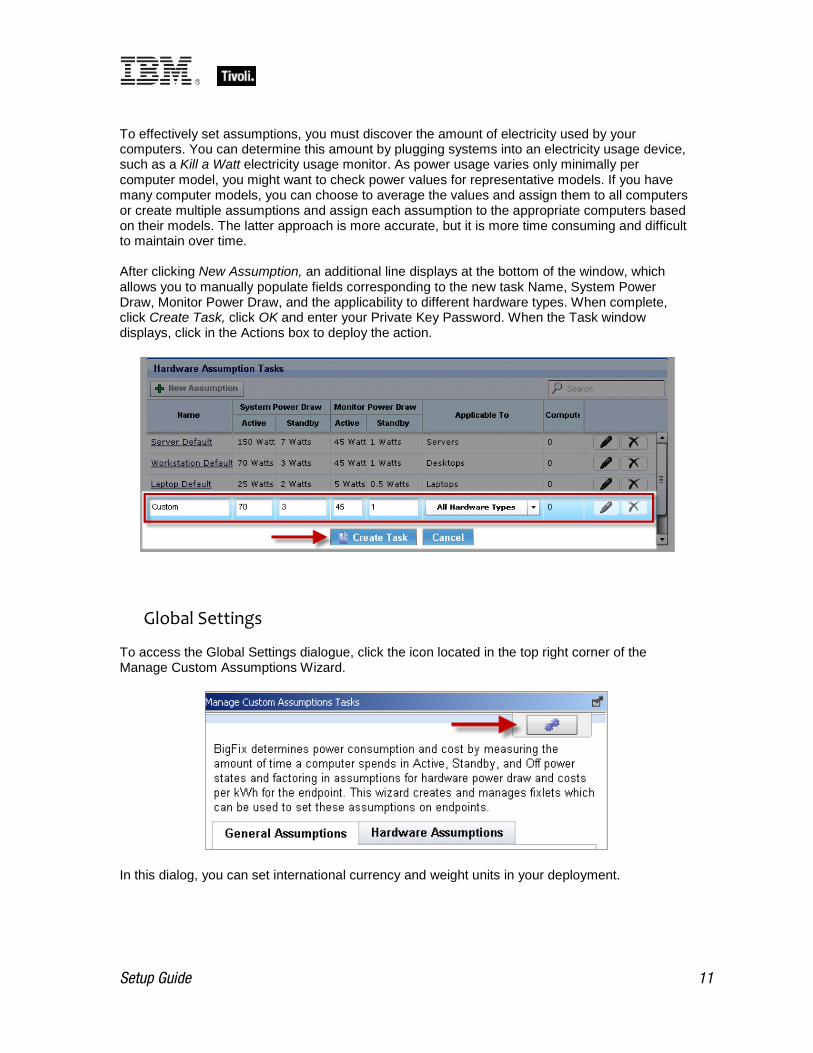
To effectively set assumptions, you must discover the amount of electricity used by your computers. You can determine this amount by plugging systems into an electricity usage device, such as a Kill a Watt electricity usage monitor. As power usage varies only minimally per computer model, you might want to check power values for representative models. If you have many computer models, you can choose to average the values and assign them to all computers or create multiple assumptions and assign each assumption to the appropriate computers based on their models. The latter approach is more accurate, but it is more time consuming and difficult to maintain over time. After clicking New Assumption, an additional line displays at the bottom of the window, which allows you to manually populate fields corresponding to the new task Name, System Power Draw, Monitor Power Draw, and the applicability to different hardware types. When complete, click Create Task, click OK and enter your Private Key Password. When the Task window displays, click in the Actions box to deploy the action.
Global Settings To access the Global Settings dialogue, click the icon located in the top right corner of the Manage Custom Assumptions Wizard.
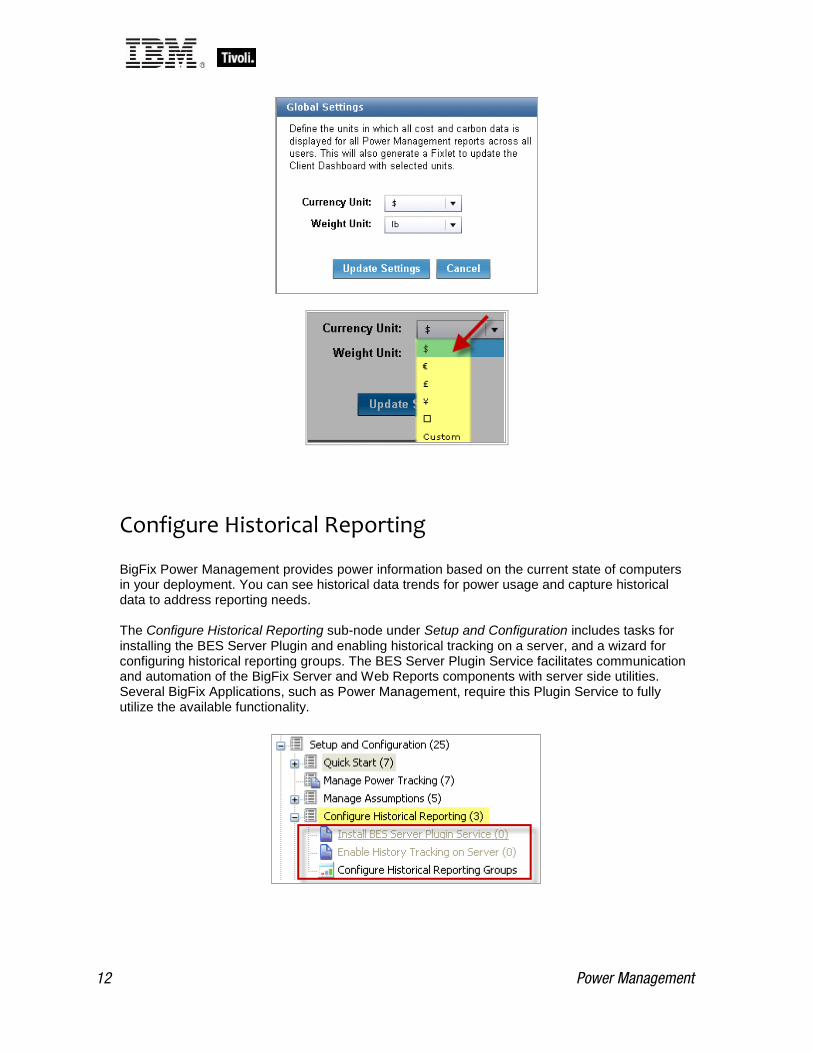
In this dialog, you can set international currency and weight units in your deployment.
12 Power Management
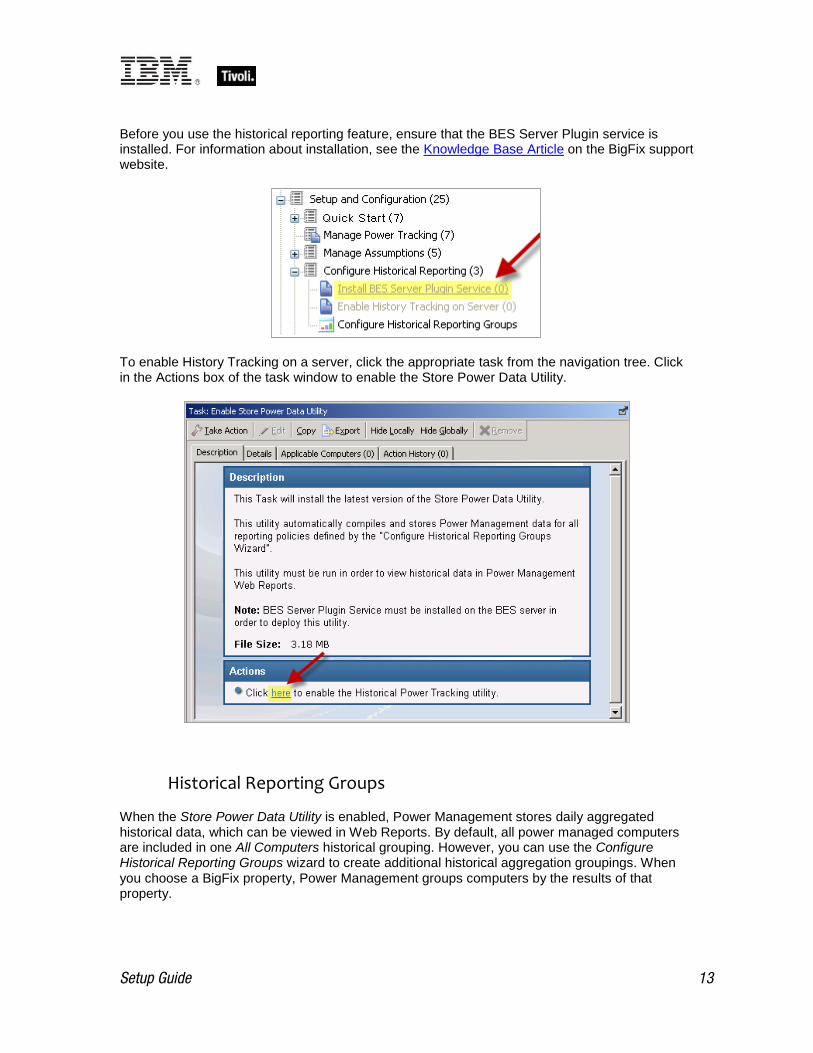
Configure Historical Reporting BigFix Power Management provides power information based on the current state of computers in your deployment. You can see historical data trends for power usage and capture historical data to address reporting needs. The Configure Historical Reporting sub-node under Setup and Configuration includes tasks for installing the BES Server Plugin and enabling historical tracking on a server, and a wizard for configuring historical reporting groups. The BES Server Plugin Service facilitates communication and automation of the BigFix Server and Web Reports components with server side utilities. Several BigFix Applications, such as Power Management, require this Plugin Service to fully utilize the available functionality.
Setup Guide 13
Before you use the historical reporting feature, ensure that the BES Server Plugin service is installed. For information about installation, see the Knowledge Base Article on the BigFix support website.
To enable History Tracking on a server, click the appropriate task from the navigation tree. Click in the Actions box of the task window to enable the Store Power Data Utility.
Historical Reporting Groups When the Store Power Data Utility is enabled, Power Management stores daily aggregated historical data, which can be viewed in Web Reports. By default, all power managed computers are included in one All Computers historical grouping. However, you can use the Configure Historical Reporting Groups wizard to create additional historical aggregation groupings. When you choose a BigFix property, Power Management groups computers by the results of that property.
14 Power Management
Note: You can add historical reporting groups at any time. However, the data is only captured going forward. As data is aggregated based on daily snapshots, there is no way to retrieve power data from points in time before the historical reporting group is created.
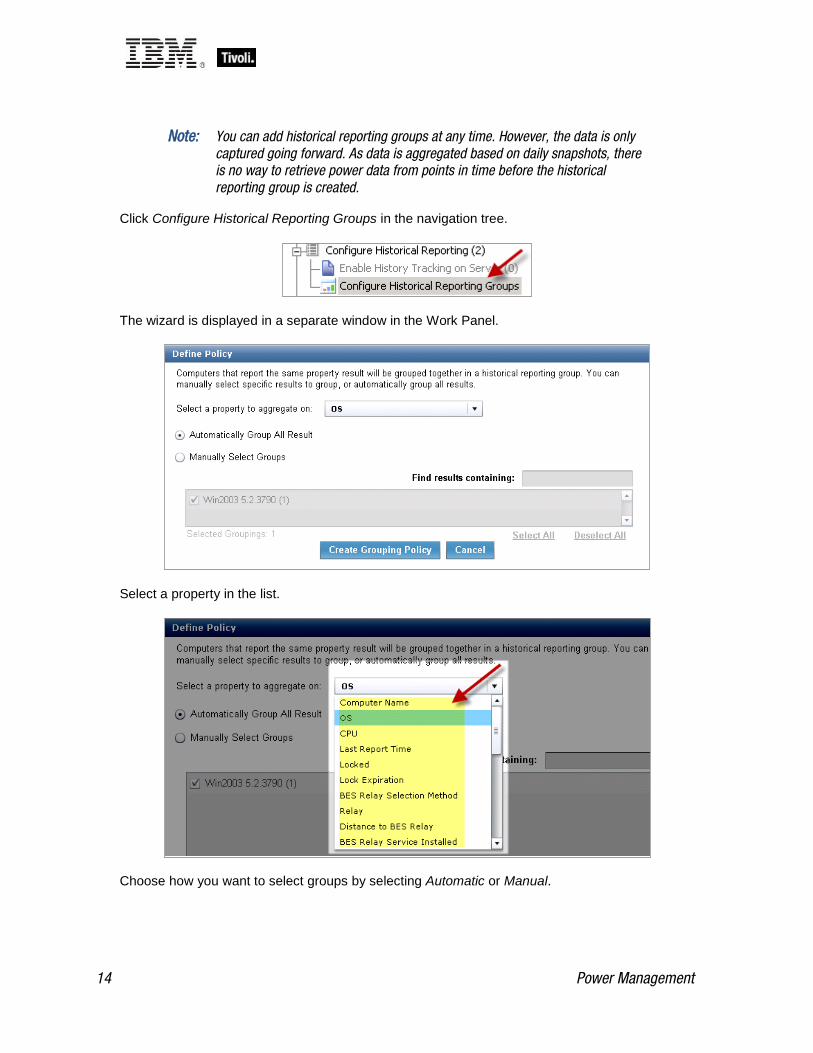
Click Configure Historical Reporting Groups in the navigation tree.
The wizard is displayed in a separate window in the Work Panel.
Select a property in the list.
Choose how you want to select groups by selecting Automatic or Manual.
Setup Guide 15
Automatic selection means that an aggregation group is created for every result that
currently exists, and new groups are created as new results are returned. Manual selection allows you to select the specific results on which to create groups. New
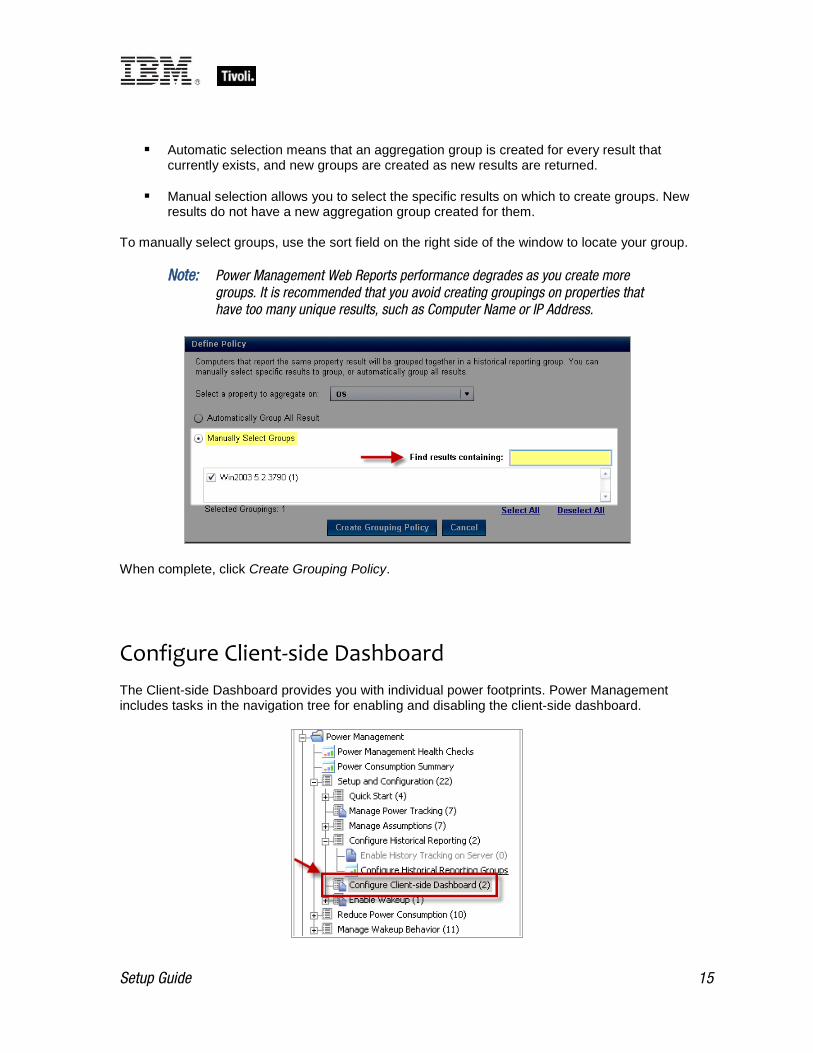
results do not have a new aggregation group created for them. To manually select groups, use the sort field on the right side of the window to locate your group.
Note: Power Management Web Reports performance degrades as you create more groups. It is recommended that you avoid creating groupings on properties that have too many unique results, such as Computer Name or IP Address.
When complete, click Create Grouping Policy.
Configure Client-side Dashboard The Client-side Dashboard provides you with individual power footprints. Power Management includes tasks in the navigation tree for enabling and disabling the client-side dashboard.
16 Power Management
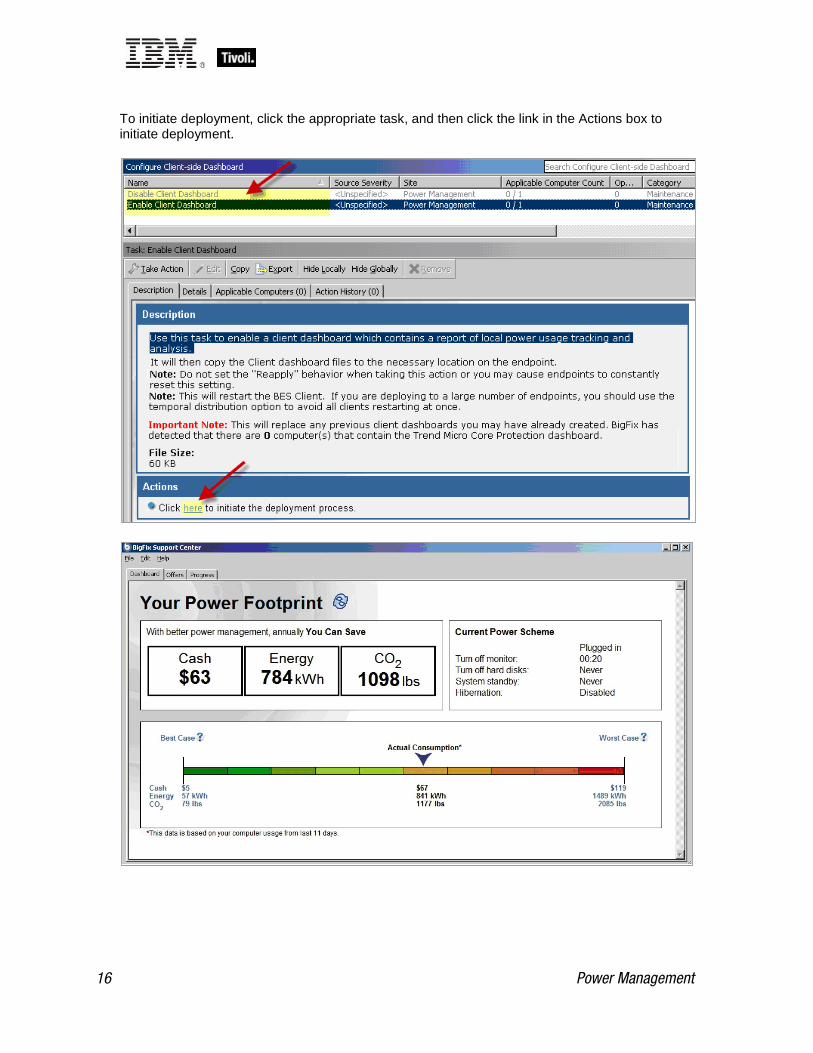
To initiate deployment, click the appropriate task, and then click the link in the Actions box to initiate deployment.
Setup Guide 17
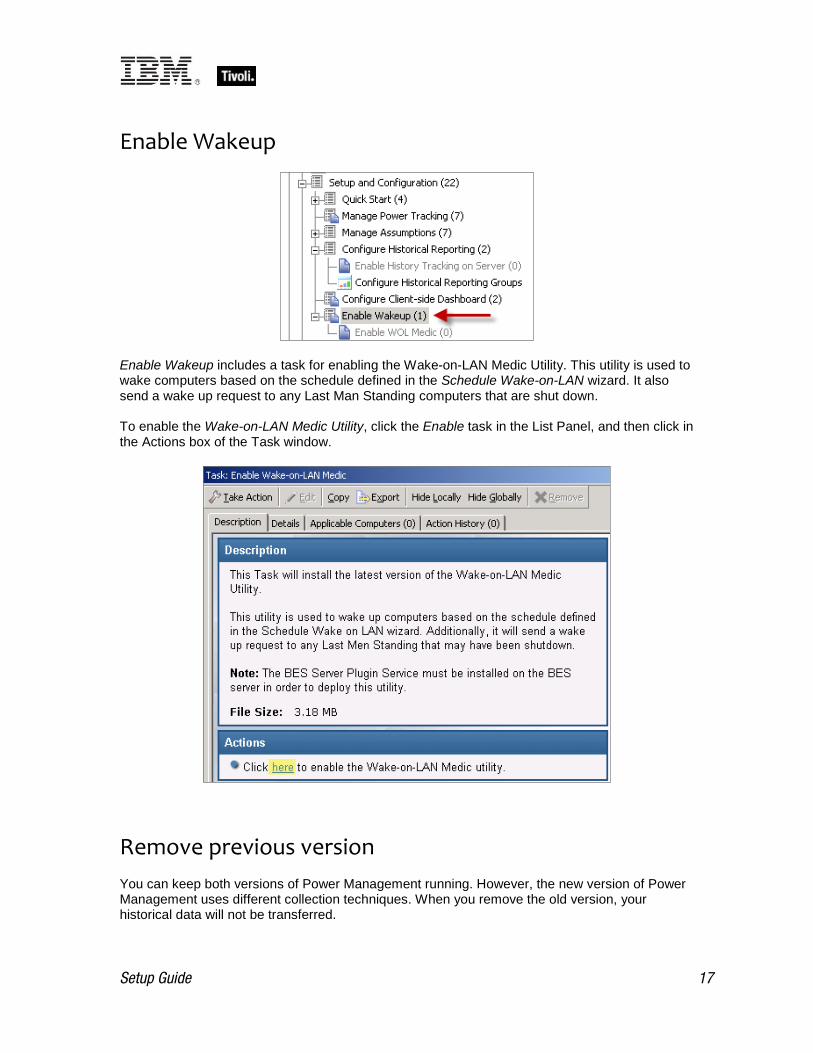
Enable Wakeup
Enable Wakeup includes a task for enabling the Wake-on-LAN Medic Utility. This utility is used to wake computers based on the schedule defined in the Schedule Wake-on-LAN wizard. It also send a wake up request to any Last Man Standing computers that are shut down. To enable the Wake-on-LAN Medic Utility, click the Enable task in the List Panel, and then click in the Actions box of the Task window.
Remove previous version You can keep both versions of Power Management running. However, the new version of Power Management uses different collection techniques. When you remove the old version, your historical data will not be transferred.

18 Power Management
Note: Remove the previous version of BigFix Power Management after the new version is installed.
Disable previous Historical Tracking The previous version of BigFix Power Management used a user-defined scheduled Task in Windows to run the Store Historical Power Data process. If you previously set up this Task, you must disable it after you remove the older Power Management Fixlet site. To disable previous historical tracking, remove the scheduled task for storing the power results utility. To do this, access the Windows Control Panel and select Scheduled Tasks. Delete the Store Historical Power Data task.
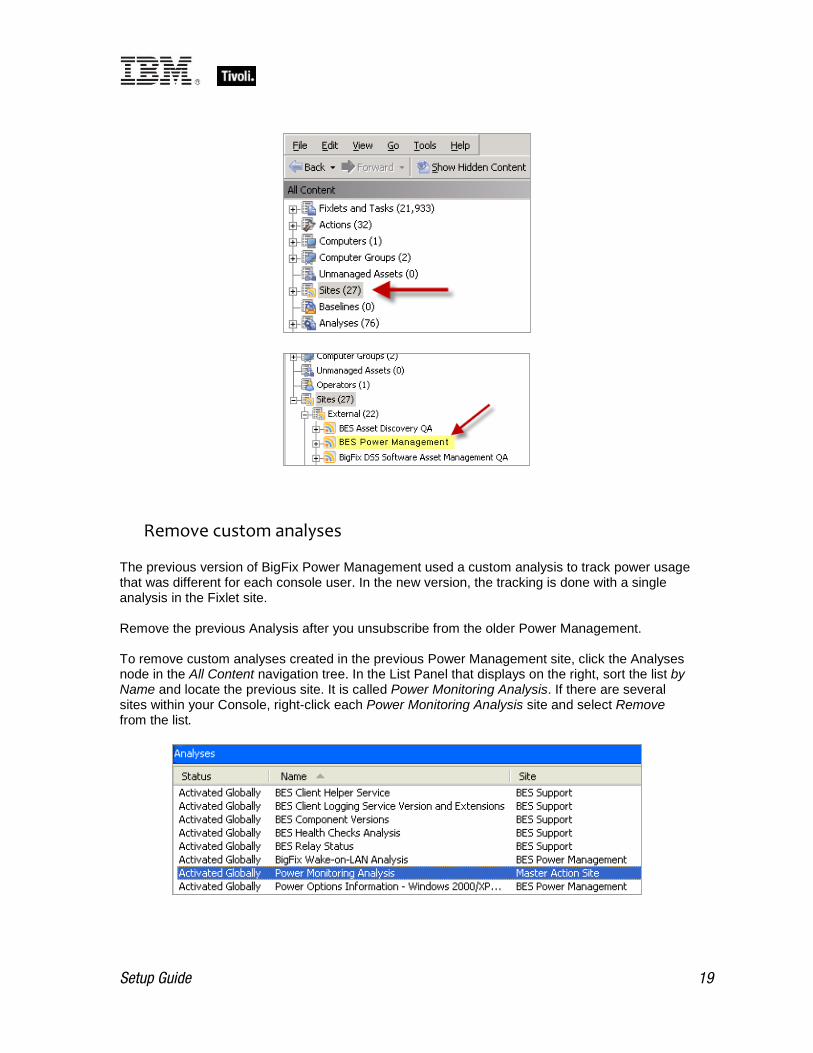
Unsubscribe from site To unsubscribe from the previous site, click the All Content domain in the domain panel. You can access this domain by clicking the domain icons at the bottom of the domain panel.
The All Content navigation tree displays in the domain panel on the left. In the All Content navigation tree, expand the Sites folder. Highlight the previous Power Management site and click Remove from the Work Panel.
Setup Guide 19
Remove custom analyses The previous version of BigFix Power Management used a custom analysis to track power usage that was different for each console user. In the new version, the tracking is done with a single analysis in the Fixlet site. Remove the previous Analysis after you unsubscribe from the older Power Management. To remove custom analyses created in the previous Power Management site, click the Analyses node in the All Content navigation tree. In the List Panel that displays on the right, sort the list by Name and locate the previous site. It is called Power Monitoring Analysis. If there are several sites within your Console, right-click each Power Monitoring Analysis site and select Remove from the list.

20 Power Management

Setup Guide 21
Part Three
Support
Technical support BigFix technical support site offers a number of specialized support options to help you learn, understand, and optimize your use of this product:
BigFix Support Site Documentation Knowledge Base Forums and Communities

22 Power Management

Setup Guide 23
Part Four
Notices IBM may not offer the products, services, or features discussed in this document in other countries. Consult your local IBM representative for information on the products and services currently available in your area. Any reference to an IBM product, program, or service is not intended to state or imply that only that IBM product, program, or service may be used. Any functionally equivalent product, program, or service that does not infringe any IBM intellectual property right may be used instead. However, it is the user's responsibility to evaluate and verify the operation of any non-IBM product, program, or service. IBM may have patents or pending patent applications covering subject matter described in this document. The furnishing of this document does not grant you any license to these patents. You can send license inquiries, in writing, to: IBM Director of Licensing IBM Corporation North Castle Drive Armonk, NY 10504-1785 U.S.A. For license inquiries regarding double-byte (DBCS) information, contact the IBM Intellectual Property Department in your country or send inquiries, in writing, to: Intellectual Property Licensing Legal and Intellectual Property Law IBM Japan Ltd. 1623-14, Shimotsuruma, Yamato-shi Kanagawa 242-8502 Japan The following paragraph does not apply to the United Kingdom or any other country where such provisions are inconsistent with local law: INTERNATIONAL BUSINESS MACHINES CORPORATION PROVIDES THIS PUBLICATION "AS IS" WITHOUT WARRANTY OF ANY KIND, EITHER EXPRESS OR IMPLIED, INCLUDING, BUT NOT LIMITED TO, THE IMPLIED WARRANTIES OF NON-INFRINGEMENT, MERCHANTABILITY OR FITNESS FOR A PARTICULAR PURPOSE. Some states do not allow disclaimer of express or implied warranties in certain transactions, therefore, this statement may not apply to you. This information could include technical inaccuracies or typographical errors. Changes are periodically made to the information herein; these changes will be incorporated in new editions of the publication. IBM may make improvements and/or changes in the product(s) and/or the program(s) described in this publication at any time without notice. Any references in this information to non-IBM Web sites are provided for convenience only and do not in any manner serve as an endorsement of those Web sites. The materials at those Web sites are not part of the materials for this IBM product and use of those Web sites is at your own risk. IBM may use or distribute any of the information you supply in any way it believes appropriate without incurring any obligation to you
24 Power Management
Licensees of this program who wish to have information about it for the purpose of enabling: (i) the exchange of information between independently created programs and other programs (including this one) and (ii) the mutual use of the information which has been exchanged, should contact: IBM Corporation 2Z4A/101 11400 Burnet Road Austin, TX 78758 U.S.A. Such information may be available, subject to appropriate terms and conditions, including in some cases payment of a fee. The licensed program described in this document and all licensed material available for it are provided by IBM under terms of the IBM Customer Agreement, IBM International Program License Agreement or any equivalent agreement between us. Information concerning non-IBM products was obtained from the suppliers of those products, their published announcements or other publicly available sources. IBM has not tested those products and cannot confirm the accuracy of performance, compatibility or any other claims related to non-IBM products. Questions on the capabilities of non-IBM products should be addressed to the suppliers of those products. COPYRIGHT LICENSE: This information contains sample application programs in source language, which illustrate programming techniques on various operating platforms. You may copy, modify, and distribute these sample programs in any form without payment to IBM, for the purposes of developing, using, marketing or distributing application programs conforming to the application programming interface for the operating platform for which the sample programs are written. These examples have not been thoroughly tested under all conditions. IBM, therefore, cannot guarantee or imply reliability, serviceability, or function of these programs. The sample programs are provided "AS IS", without warranty of any kind. IBM shall not be liable for any damages arising out of your use of the sample programs. TRADEMARKS: IBM, the IBM logo, and ibm.com are trademarks or registered trademarks of International Business Machines Corporation in the United States, other countries, or both. If these and other IBM trademarked terms are marked on their first occurrence in this information with a trademark symbol (® or ™), these symbols indicate U.S. registered or common law trademarks owned by IBM at the time this information was published. Such trademarks may also be registered or common law trademarks in other countries. A current list of IBM trademarks is available on the Web at "Copyright and trademark information" at http://www.ibm.com/legal/copytrade.shtml. Adobe, the Adobe logo, PostScript, and the PostScript logo are either registered trademarks or trademarks of Adobe Systems Incorporated in the United States, and/or other countries.

Setup Guide 25
Java and all Java-based trademarks and logos are trademarks or registered trademarks of Oracle and/or its affiliates. Microsoft, Windows, Windows NT, and the Windows logo are trademarks of Microsoft Corporation in the United States, other countries, or both. Linux is a registered trademark of Linus Torvalds in the United States, other countries, or both. UNIX is a registered trademark of The Open Group in the United States and other countries. Other company, product, and service names may be trademarks or service marks of others.