Embed Size (px)
Citation preview
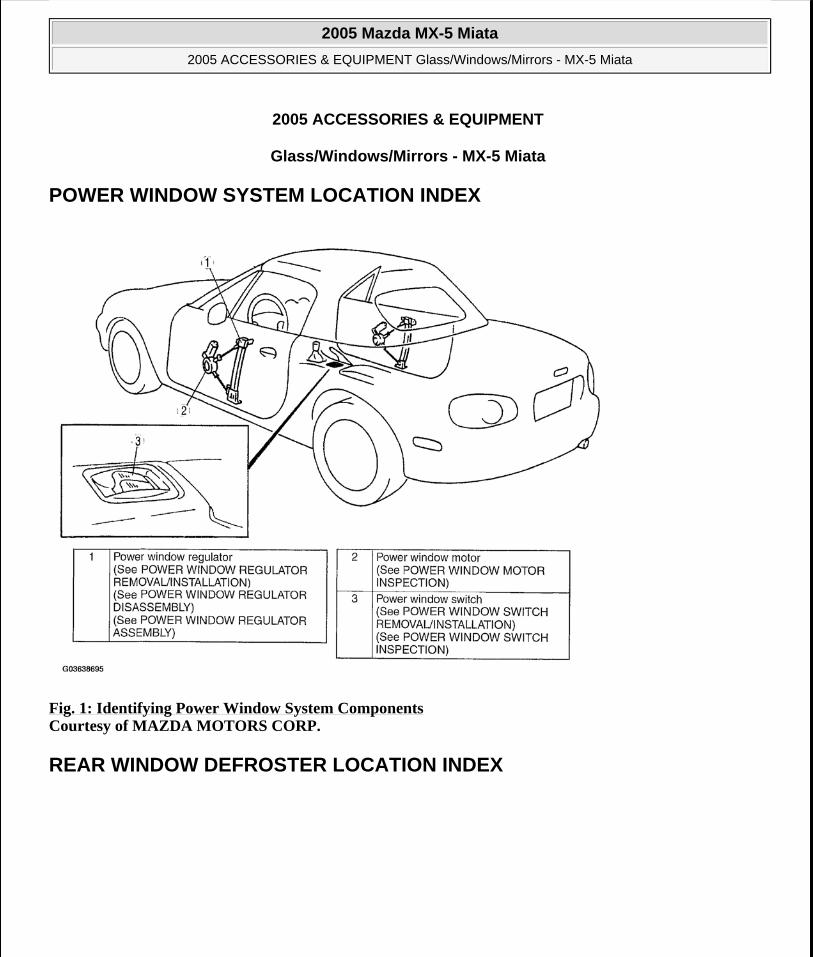
2005 ACCESSORIES & EQUIPMENT
Glass/Windows/Mirrors - MX-5 Miata
POWER WINDOW SYSTEM LOCATION INDEX
Fig. 1: Identifying Power Window System Components Courtesy of MAZDA MOTORS CORP.
REAR WINDOW DEFROSTER LOCATION INDEX
2005 Mazda MX-5 Miata
2005 ACCESSORIES & EQUIPMENT Glass/Windows/Mirrors - MX-5 Miata
2005 Mazda MX-5 Miata
2005 ACCESSORIES & EQUIPMENT Glass/Windows/Mirrors - MX-5 Miata
Microsoft
Saturday, July 04, 2009 11:59:12 AM Page 1 © 2005 Mitchell Repair Information Company, LLC.
Microsoft
Saturday, July 04, 2009 11:59:19 AM Page 1 © 2005 Mitchell Repair Information Company, LLC.
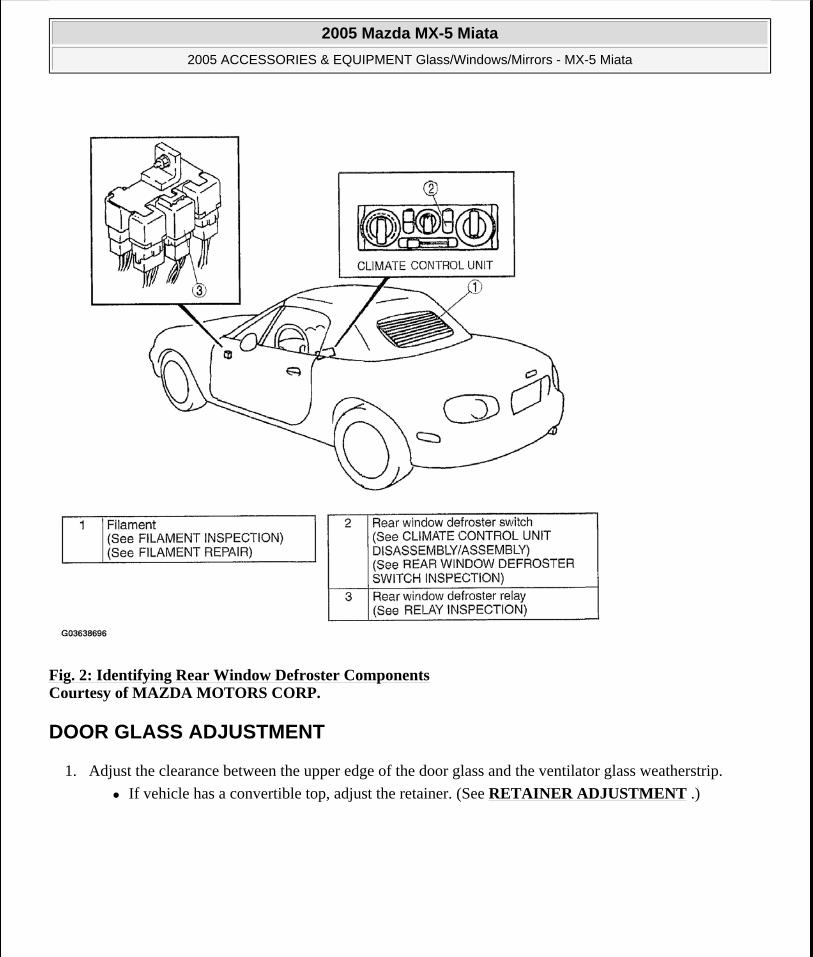
Fig. 2: Identifying Rear Window Defroster Components Courtesy of MAZDA MOTORS CORP.
DOOR GLASS ADJUSTMENT
1. Adjust the clearance between the upper edge of the door glass and the ventilator glass weatherstrip.
If vehicle has a convertible top, adjust the retainer. (See RETAINER ADJUSTMENT .)
2005 Mazda MX-5 Miata
2005 ACCESSORIES & EQUIPMENT Glass/Windows/Mirrors - MX-5 Miata
Microsoft
Saturday, July 04, 2009 11:59:12 AM Page 2 © 2005 Mitchell Repair Information Company, LLC.
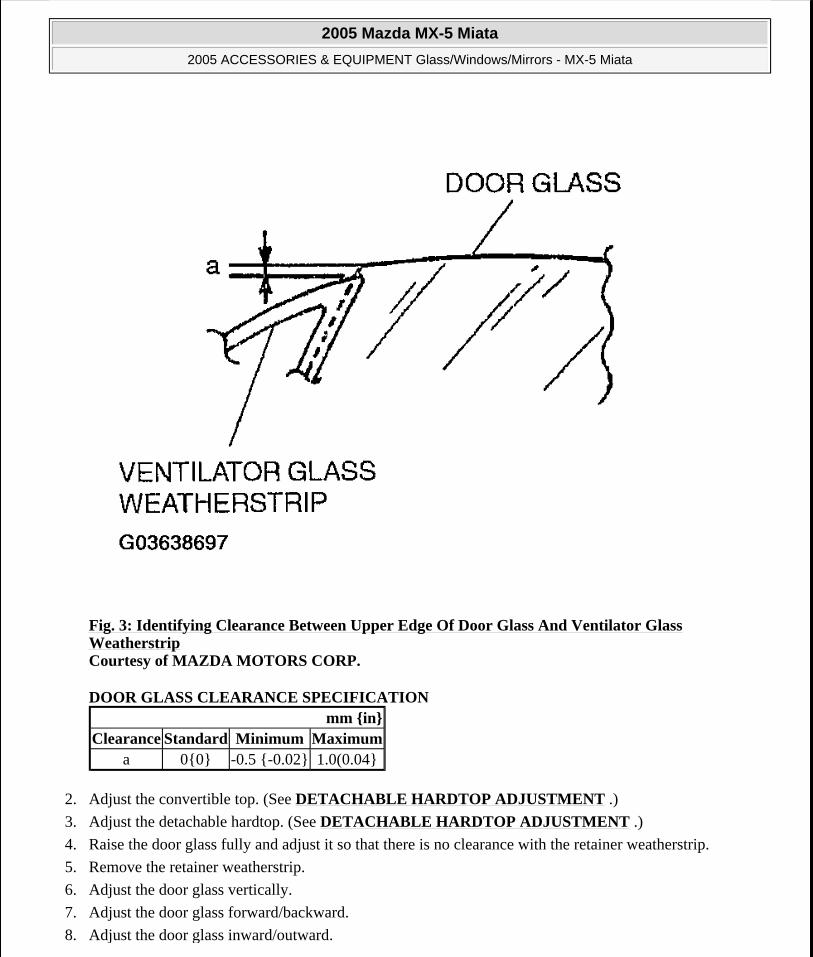
Fig. 3: Identifying Clearance Between Upper Edge Of Door Glass And Ventilator Glass Weatherstrip Courtesy of MAZDA MOTORS CORP.
DOOR GLASS CLEARANCE SPECIFICATION
2. Adjust the convertible top. (See DETACHABLE HARDTOP ADJUSTMENT .)
3. Adjust the detachable hardtop. (See DETACHABLE HARDTOP ADJUSTMENT .)
4. Raise the door glass fully and adjust it so that there is no clearance with the retainer weatherstrip.
5. Remove the retainer weatherstrip.
6. Adjust the door glass vertically.
7. Adjust the door glass forward/backward.
8. Adjust the door glass inward/outward.
mm {in}Clearance Standard Minimum Maximum
a 0{0} -0.5 {-0.02} 1.0(0.04}
2005 Mazda MX-5 Miata
2005 ACCESSORIES & EQUIPMENT Glass/Windows/Mirrors - MX-5 Miata
Microsoft
Saturday, July 04, 2009 11:59:12 AM Page 3 © 2005 Mitchell Repair Information Company, LLC.
9. Verify the door glass is in correct position when it is fully raised.
10. Install the weatherstrip.
11. Verify the door glass raises and lowers smoothly with the door closed.
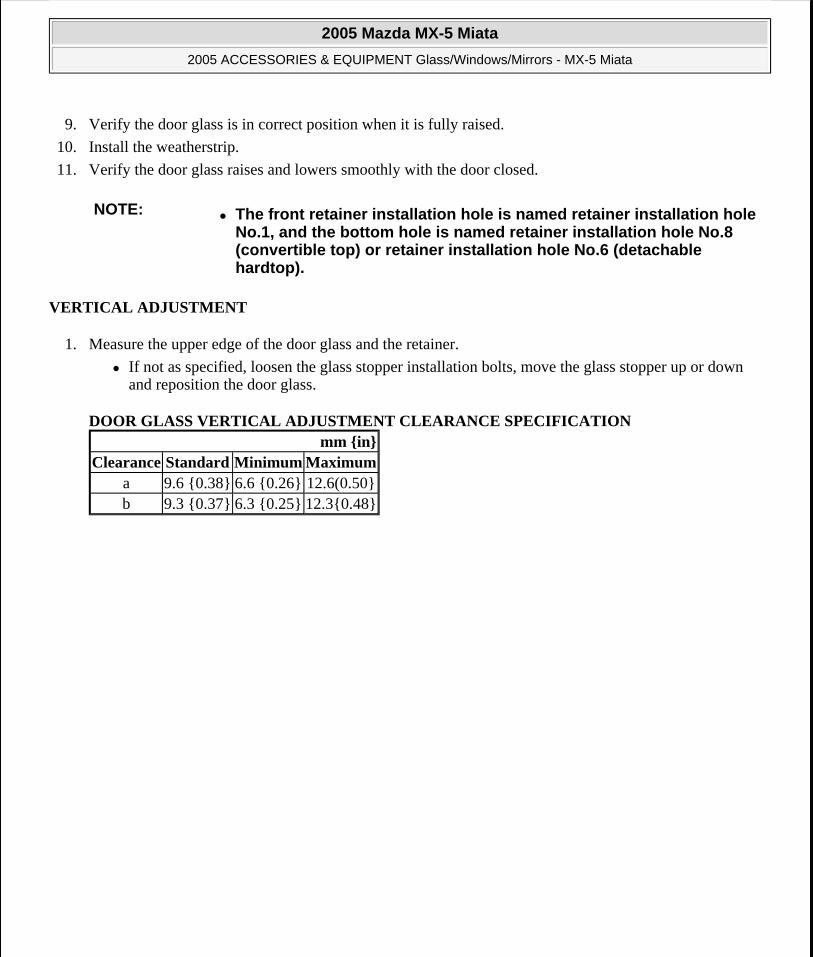
VERTICAL ADJUSTMENT
1. Measure the upper edge of the door glass and the retainer.
If not as specified, loosen the glass stopper installation bolts, move the glass stopper up or down and reposition the door glass.
DOOR GLASS VERTICAL ADJUSTMENT CLEARANCE SPECIFICATION
NOTE: The front retainer installation hole is named retainer installation hole No.1, and the bottom hole is named retainer installation hole No.8 (convertible top) or retainer installation hole No.6 (detachable hardtop).
mm {in}Clearance Standard Minimum Maximum
a 9.6 {0.38} 6.6 {0.26} 12.6(0.50}b 9.3 {0.37} 6.3 {0.25} 12.3{0.48}
2005 Mazda MX-5 Miata
2005 ACCESSORIES & EQUIPMENT Glass/Windows/Mirrors - MX-5 Miata
Microsoft
Saturday, July 04, 2009 11:59:12 AM Page 4 © 2005 Mitchell Repair Information Company, LLC.
Fig. 4: Adjusting Door Glass - Vertical Clearance Courtesy of MAZDA MOTORS CORP.
2. Tighten the bolts.
FORWARD/BACKWARD ADJUSTMENT
1. Measure the rear edge of the door glass and the retainer.
If not as specified, loosen the upper side of the window regulator installation nuts and that of the rear glass guide installation nuts, move the window regulator and the rear glass guide forward or backward and reposition the door glass.
DOOR GLASS FORWARD/BACKWARD ADJUSTMENT CLEARANCE SPECIFICATION mm {in}
Clearance Standard Minimum Maximuma 12.5(0.492} 9.5 {0.374} 15.5 {0.610}b 12.1 {0.476} 9.1 {0.358} 15.1 {0.594}
2005 Mazda MX-5 Miata
2005 ACCESSORIES & EQUIPMENT Glass/Windows/Mirrors - MX-5 Miata
Microsoft
Saturday, July 04, 2009 11:59:12 AM Page 5 © 2005 Mitchell Repair Information Company, LLC.
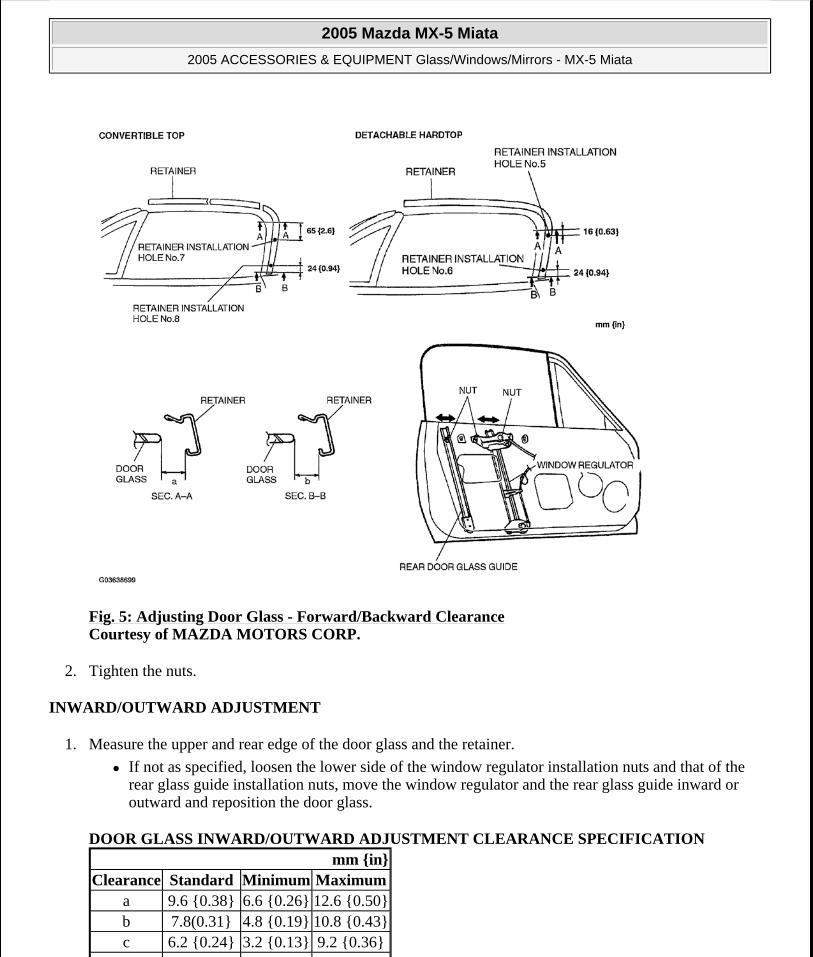
Fig. 5: Adjusting Door Glass - Forward/Backward Clearance Courtesy of MAZDA MOTORS CORP.
2. Tighten the nuts.
INWARD/OUTWARD ADJUSTMENT
1. Measure the upper and rear edge of the door glass and the retainer.
If not as specified, loosen the lower side of the window regulator installation nuts and that of the rear glass guide installation nuts, move the window regulator and the rear glass guide inward or outward and reposition the door glass.
DOOR GLASS INWARD/OUTWARD ADJUSTMENT CLEARANCE SPECIFICATION mm {in}
Clearance Standard Minimum Maximuma 9.6 {0.38} 6.6 {0.26} 12.6 {0.50}b 7.8(0.31} 4.8 {0.19} 10.8 {0.43}c 6.2 {0.24} 3.2 {0.13} 9.2 {0.36}
2005 Mazda MX-5 Miata
2005 ACCESSORIES & EQUIPMENT Glass/Windows/Mirrors - MX-5 Miata
Microsoft
Saturday, July 04, 2009 11:59:12 AM Page 6 © 2005 Mitchell Repair Information Company, LLC.
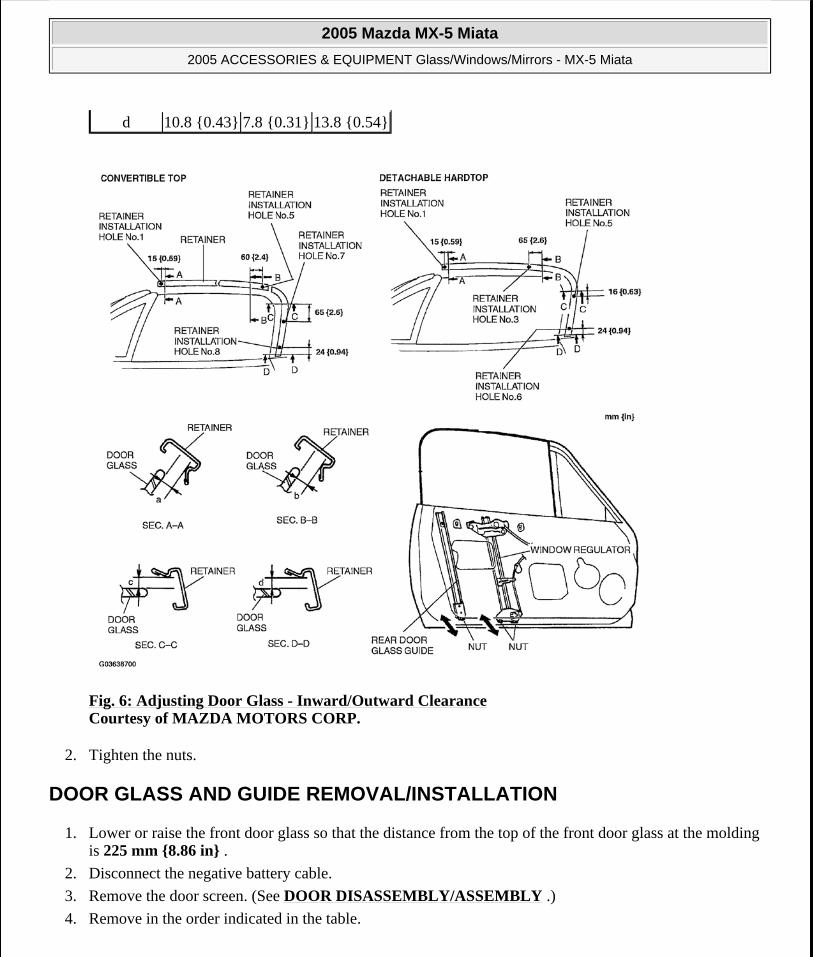
Fig. 6: Adjusting Door Glass - Inward/Outward Clearance Courtesy of MAZDA MOTORS CORP.
2. Tighten the nuts.
DOOR GLASS AND GUIDE REMOVAL/INSTALLATION
1. Lower or raise the front door glass so that the distance from the top of the front door glass at the molding is 225 mm {8.86 in} .
2. Disconnect the negative battery cable.
3. Remove the door screen. (See DOOR DISASSEMBLY/ASSEMBLY .)
4. Remove in the order indicated in the table.
d 10.8 {0.43} 7.8 {0.31} 13.8 {0.54}
2005 Mazda MX-5 Miata
2005 ACCESSORIES & EQUIPMENT Glass/Windows/Mirrors - MX-5 Miata
Microsoft
Saturday, July 04, 2009 11:59:12 AM Page 7 © 2005 Mitchell Repair Information Company, LLC.
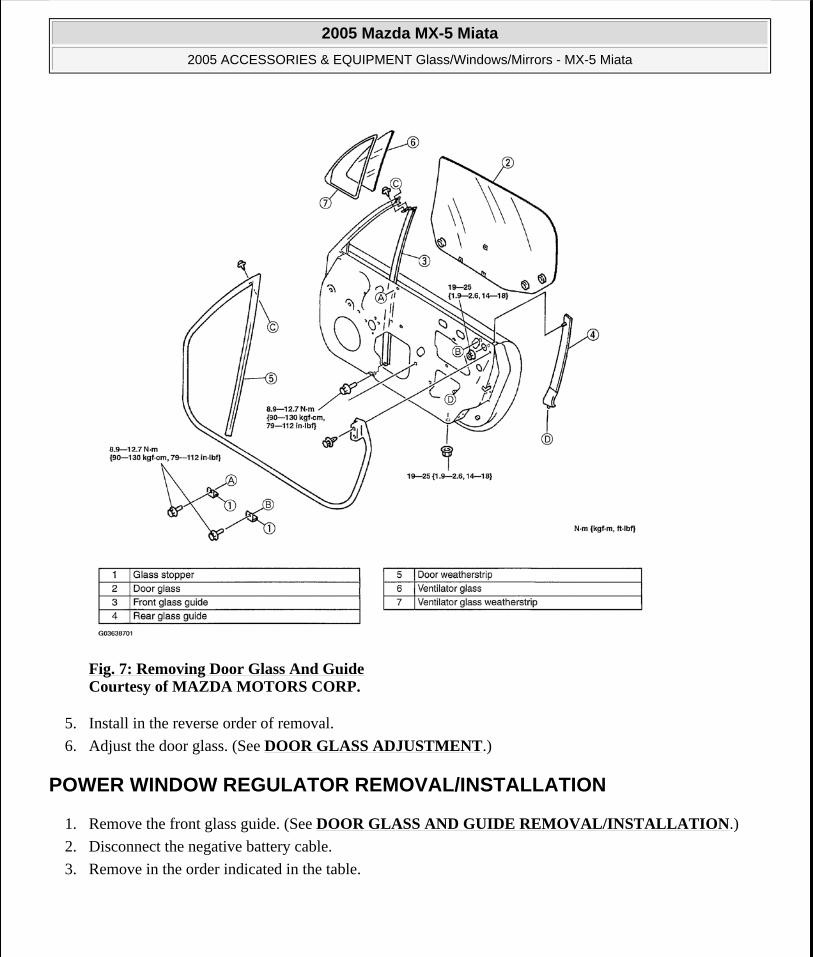
Fig. 7: Removing Door Glass And Guide Courtesy of MAZDA MOTORS CORP.
5. Install in the reverse order of removal.
6. Adjust the door glass. (See DOOR GLASS ADJUSTMENT.)
POWER WINDOW REGULATOR REMOVAL/INSTALLATION
1. Remove the front glass guide. (See DOOR GLASS AND GUIDE REMOVAL/INSTALLATION.)
2. Disconnect the negative battery cable.
3. Remove in the order indicated in the table.
2005 Mazda MX-5 Miata
2005 ACCESSORIES & EQUIPMENT Glass/Windows/Mirrors - MX-5 Miata
Microsoft
Saturday, July 04, 2009 11:59:12 AM Page 8 © 2005 Mitchell Repair Information Company, LLC.
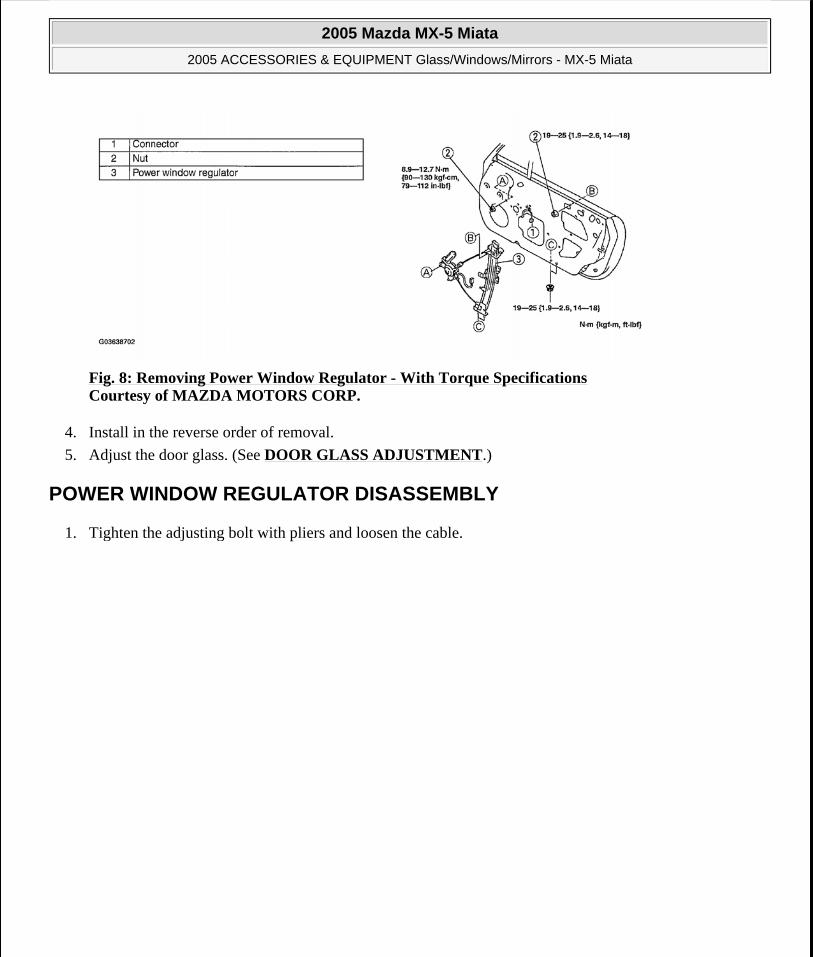
Fig. 8: Removing Power Window Regulator - With Torque Specifications Courtesy of MAZDA MOTORS CORP.
4. Install in the reverse order of removal.
5. Adjust the door glass. (See DOOR GLASS ADJUSTMENT.)
POWER WINDOW REGULATOR DISASSEMBLY
1. Tighten the adjusting bolt with pliers and loosen the cable.
2005 Mazda MX-5 Miata
2005 ACCESSORIES & EQUIPMENT Glass/Windows/Mirrors - MX-5 Miata
Microsoft
Saturday, July 04, 2009 11:59:12 AM Page 9 © 2005 Mitchell Repair Information Company, LLC.
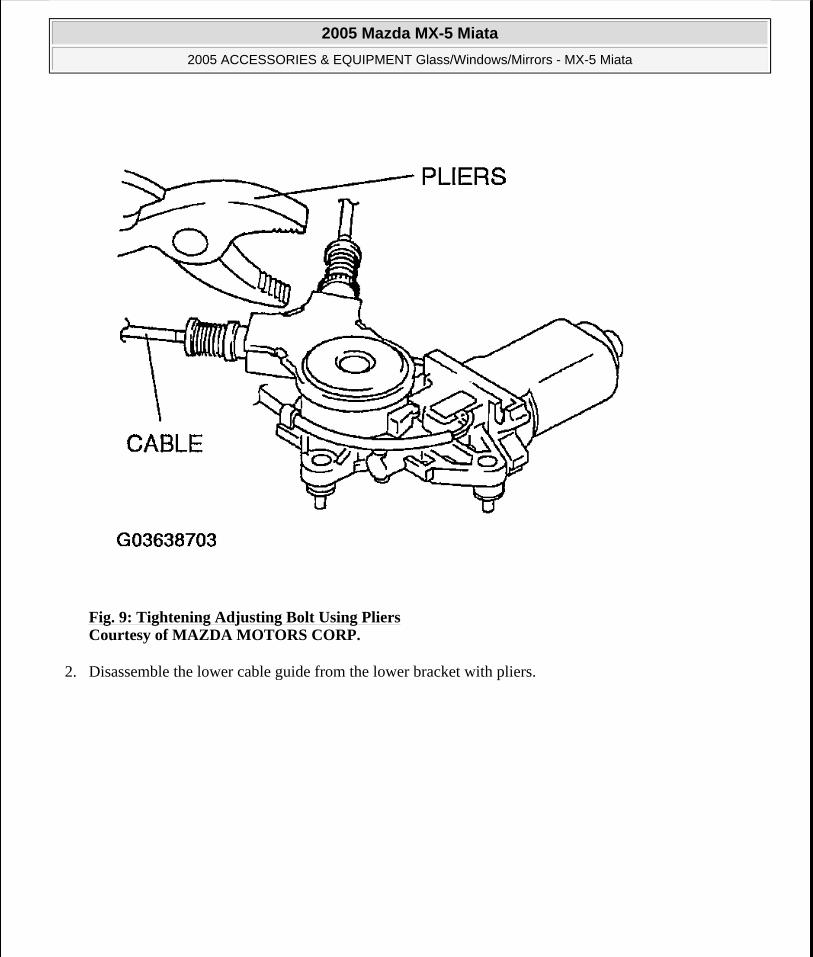
Fig. 9: Tightening Adjusting Bolt Using Pliers Courtesy of MAZDA MOTORS CORP.
2. Disassemble the lower cable guide from the lower bracket with pliers.
2005 Mazda MX-5 Miata
2005 ACCESSORIES & EQUIPMENT Glass/Windows/Mirrors - MX-5 Miata
Microsoft
Saturday, July 04, 2009 11:59:12 AM Page 10 © 2005 Mitchell Repair Information Company, LLC.
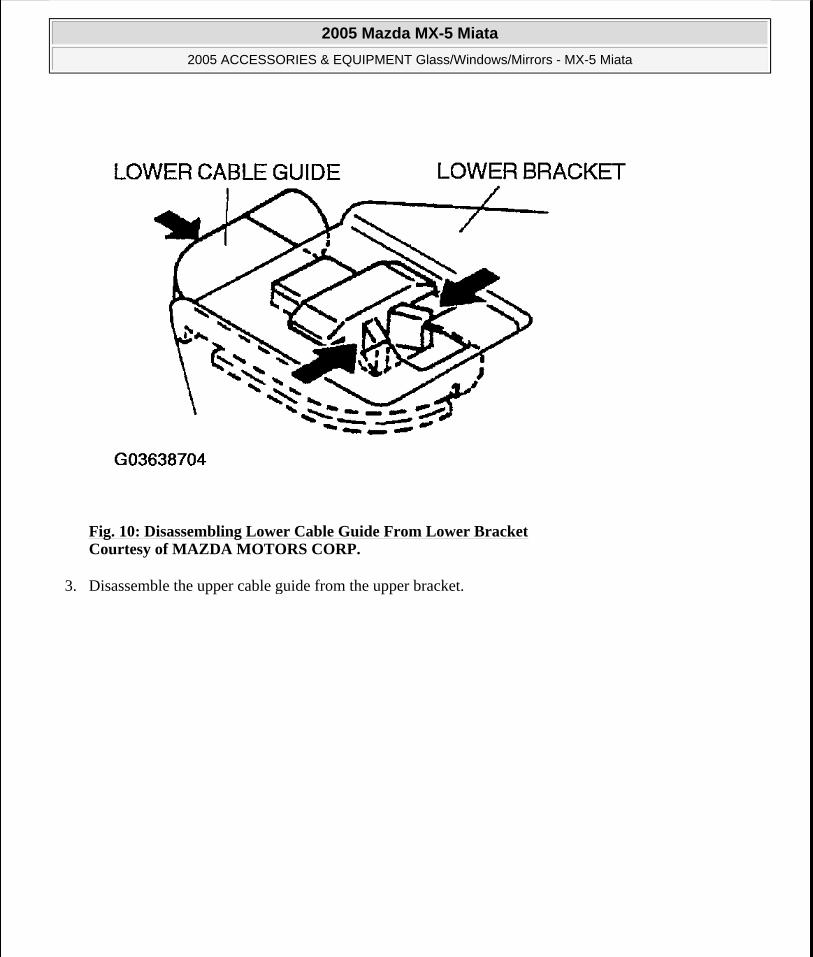
Fig. 10: Disassembling Lower Cable Guide From Lower Bracket Courtesy of MAZDA MOTORS CORP.
3. Disassemble the upper cable guide from the upper bracket.
2005 Mazda MX-5 Miata
2005 ACCESSORIES & EQUIPMENT Glass/Windows/Mirrors - MX-5 Miata
Microsoft
Saturday, July 04, 2009 11:59:12 AM Page 11 © 2005 Mitchell Repair Information Company, LLC.
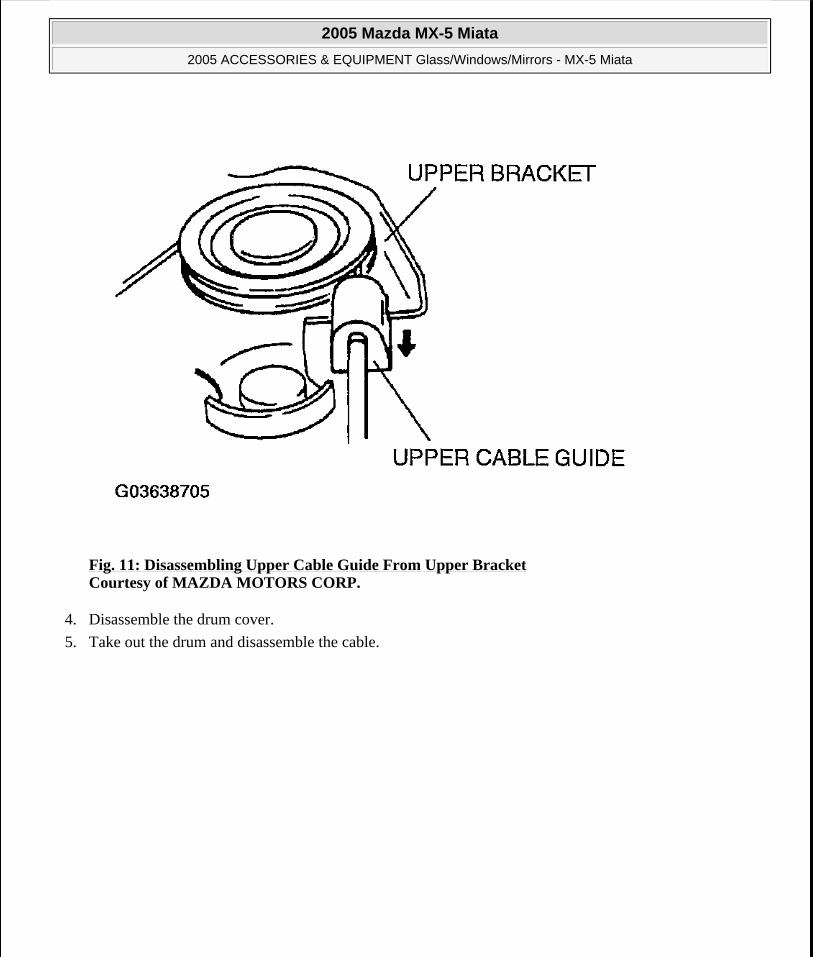
Fig. 11: Disassembling Upper Cable Guide From Upper Bracket Courtesy of MAZDA MOTORS CORP.
4. Disassemble the drum cover.
5. Take out the drum and disassemble the cable.
2005 Mazda MX-5 Miata
2005 ACCESSORIES & EQUIPMENT Glass/Windows/Mirrors - MX-5 Miata
Microsoft
Saturday, July 04, 2009 11:59:12 AM Page 12 © 2005 Mitchell Repair Information Company, LLC.
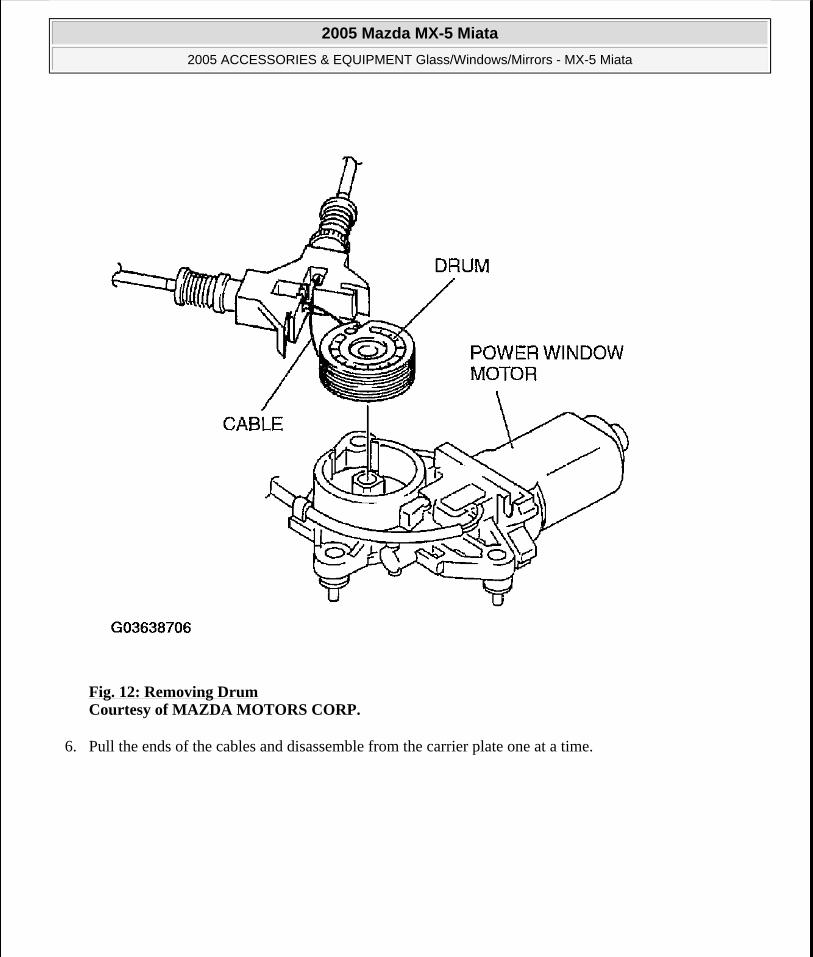
Fig. 12: Removing Drum Courtesy of MAZDA MOTORS CORP.
6. Pull the ends of the cables and disassemble from the carrier plate one at a time.
2005 Mazda MX-5 Miata
2005 ACCESSORIES & EQUIPMENT Glass/Windows/Mirrors - MX-5 Miata
Microsoft
Saturday, July 04, 2009 11:59:12 AM Page 13 © 2005 Mitchell Repair Information Company, LLC.

Fig. 13: Removing Cables From Carrier Plate Courtesy of MAZDA MOTORS CORP.
7. Disassemble the adjusting bolts.
POWER WINDOW REGULATOR ASSEMBLY
1. Tighten the adjusting bolts fully.
2. Assemble the ends of the cables to the carrier plate.
3. Insert the cables into the adjusting bolts.
4. Wind the cable around the top part of the drum three times and the bottom part twice or around the top part twice and the bottom part three times.
5. Assemble into the power window motor. Taking care to prevent the cable from getting caught between the drum and the motor and the motor housing, carefully assemble the cable onto the upper bracket pulley.
6. Verify that the ends of the cables are inserted into the adjusting bolts, shift the lower cable guide until a clicking sound is heard, and assemble to the lower bracket.
2005 Mazda MX-5 Miata
2005 ACCESSORIES & EQUIPMENT Glass/Windows/Mirrors - MX-5 Miata
Microsoft
Saturday, July 04, 2009 11:59:12 AM Page 14 © 2005 Mitchell Repair Information Company, LLC.
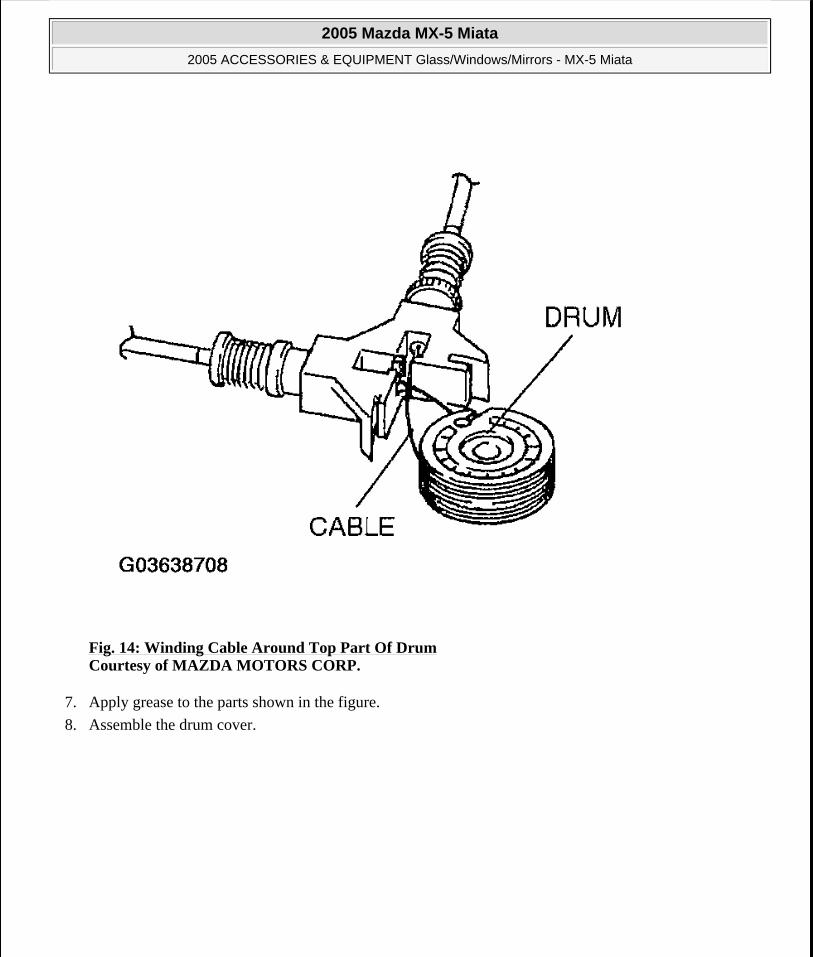
Fig. 14: Winding Cable Around Top Part Of Drum Courtesy of MAZDA MOTORS CORP.
7. Apply grease to the parts shown in the figure.
8. Assemble the drum cover.
2005 Mazda MX-5 Miata
2005 ACCESSORIES & EQUIPMENT Glass/Windows/Mirrors - MX-5 Miata
Microsoft
Saturday, July 04, 2009 11:59:12 AM Page 15 © 2005 Mitchell Repair Information Company, LLC.

Fig. 15: Applying Grease Courtesy of MAZDA MOTORS CORP.
9. For the upper part, pull the (A) part of the cable and for the lower part, pull the (B) part of the cable. Adjust the adjusting bolts, making sure the coil springs do not bend.
Adjustment range A:
0.5-7.5 mm {0.1-0.2 in}
2005 Mazda MX-5 Miata
2005 ACCESSORIES & EQUIPMENT Glass/Windows/Mirrors - MX-5 Miata
Microsoft
Saturday, July 04, 2009 11:59:12 AM Page 16 © 2005 Mitchell Repair Information Company, LLC.
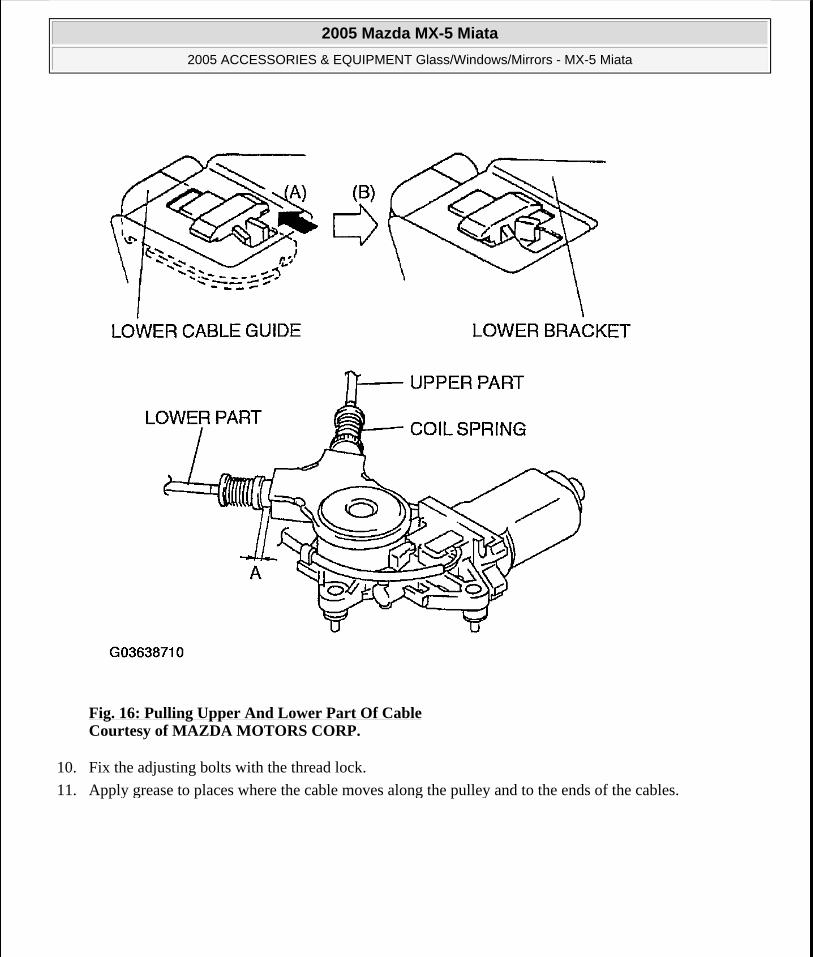
Fig. 16: Pulling Upper And Lower Part Of Cable Courtesy of MAZDA MOTORS CORP.
10. Fix the adjusting bolts with the thread lock.
11. Apply grease to places where the cable moves along the pulley and to the ends of the cables.
2005 Mazda MX-5 Miata
2005 ACCESSORIES & EQUIPMENT Glass/Windows/Mirrors - MX-5 Miata
Microsoft
Saturday, July 04, 2009 11:59:12 AM Page 17 © 2005 Mitchell Repair Information Company, LLC.
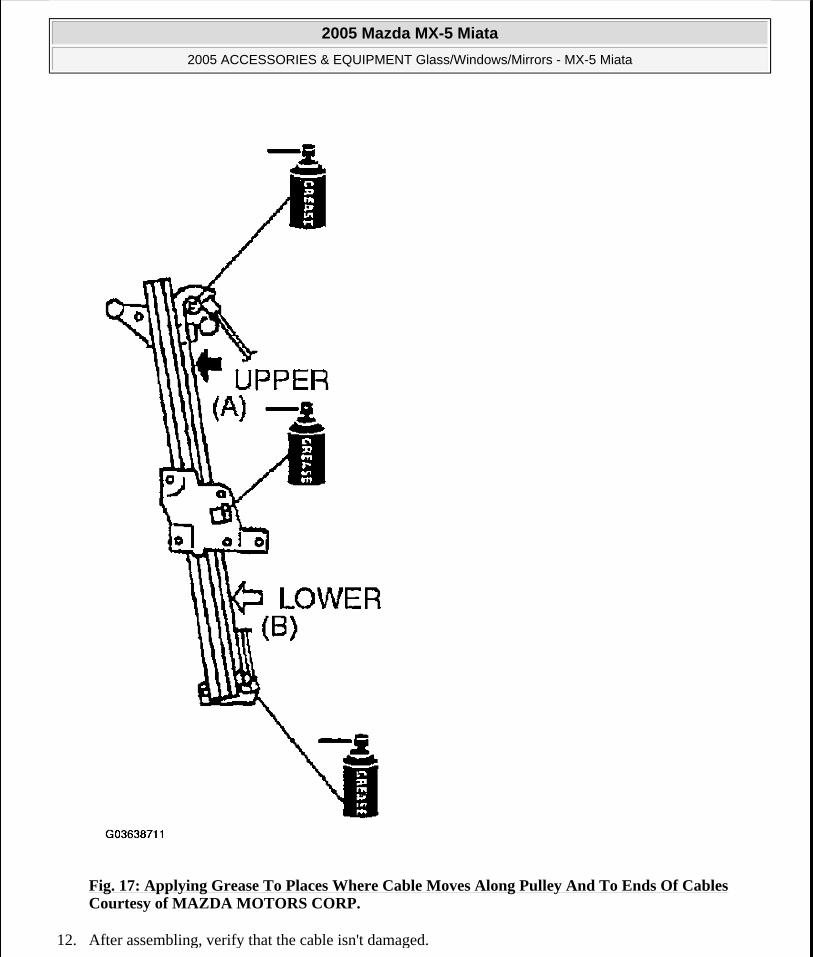
Fig. 17: Applying Grease To Places Where Cable Moves Along Pulley And To Ends Of Cables Courtesy of MAZDA MOTORS CORP.
12. After assembling, verify that the cable isn't damaged.
2005 Mazda MX-5 Miata
2005 ACCESSORIES & EQUIPMENT Glass/Windows/Mirrors - MX-5 Miata
Microsoft
Saturday, July 04, 2009 11:59:12 AM Page 18 © 2005 Mitchell Repair Information Company, LLC.
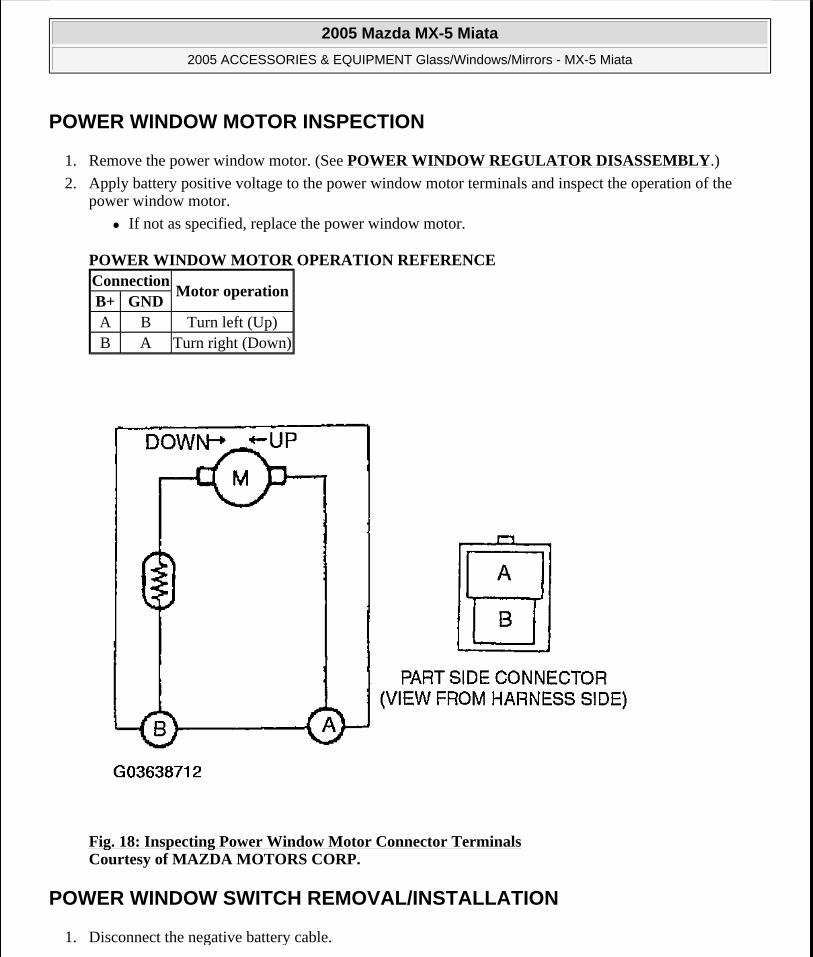
POWER WINDOW MOTOR INSPECTION
1. Remove the power window motor. (See POWER WINDOW REGULATOR DISASSEMBLY.)
2. Apply battery positive voltage to the power window motor terminals and inspect the operation of the power window motor.
If not as specified, replace the power window motor.
POWER WINDOW MOTOR OPERATION REFERENCE
Fig. 18: Inspecting Power Window Motor Connector Terminals Courtesy of MAZDA MOTORS CORP.
POWER WINDOW SWITCH REMOVAL/INSTALLATION
1. Disconnect the negative battery cable.
ConnectionMotor operation
B+ GNDA B Turn left (Up)B A Turn right (Down)
2005 Mazda MX-5 Miata
2005 ACCESSORIES & EQUIPMENT Glass/Windows/Mirrors - MX-5 Miata
Microsoft
Saturday, July 04, 2009 11:59:12 AM Page 19 © 2005 Mitchell Repair Information Company, LLC.
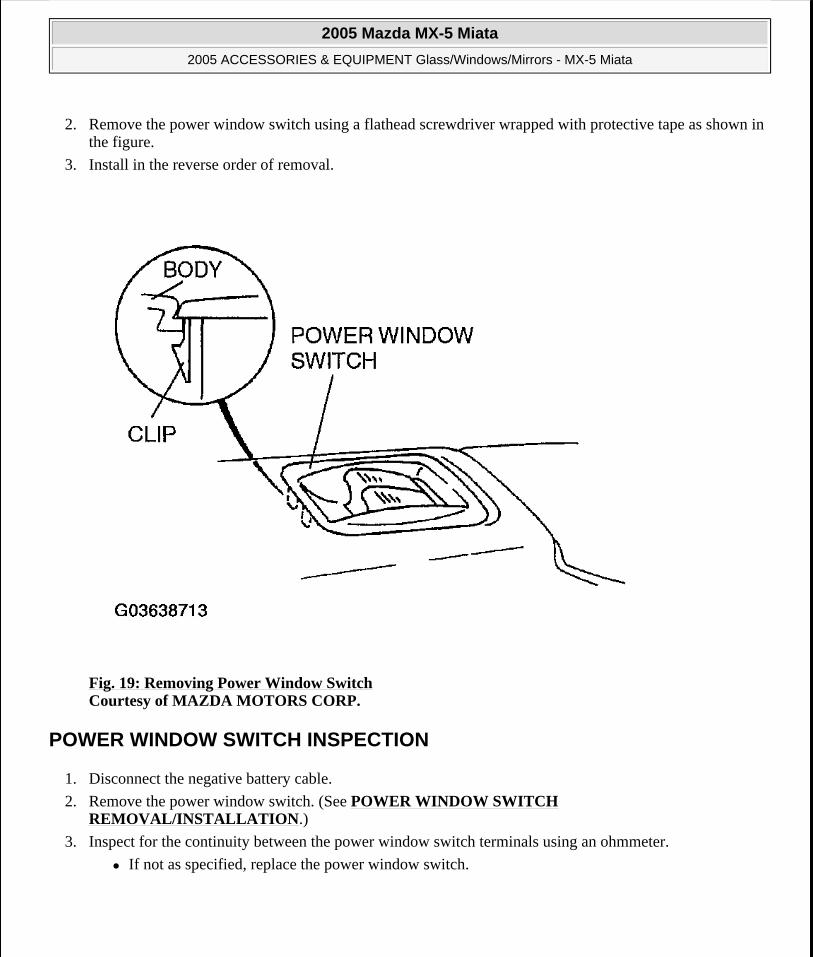
2. Remove the power window switch using a flathead screwdriver wrapped with protective tape as shown in the figure.
3. Install in the reverse order of removal.
Fig. 19: Removing Power Window Switch Courtesy of MAZDA MOTORS CORP.
POWER WINDOW SWITCH INSPECTION
1. Disconnect the negative battery cable.
2. Remove the power window switch. (See POWER WINDOW SWITCH REMOVAL/INSTALLATION.)
3. Inspect for the continuity between the power window switch terminals using an ohmmeter.
If not as specified, replace the power window switch.
2005 Mazda MX-5 Miata
2005 ACCESSORIES & EQUIPMENT Glass/Windows/Mirrors - MX-5 Miata
Microsoft
Saturday, July 04, 2009 11:59:12 AM Page 20 © 2005 Mitchell Repair Information Company, LLC.
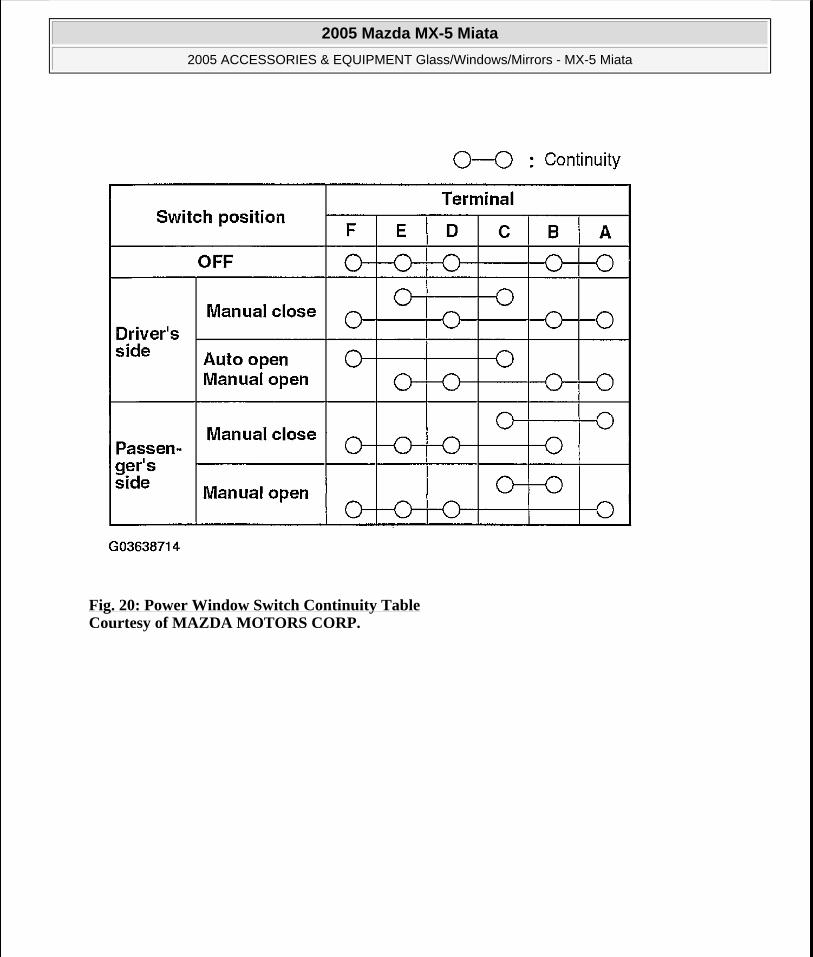
Fig. 20: Power Window Switch Continuity Table Courtesy of MAZDA MOTORS CORP.
2005 Mazda MX-5 Miata
2005 ACCESSORIES & EQUIPMENT Glass/Windows/Mirrors - MX-5 Miata
Microsoft
Saturday, July 04, 2009 11:59:12 AM Page 21 © 2005 Mitchell Repair Information Company, LLC.
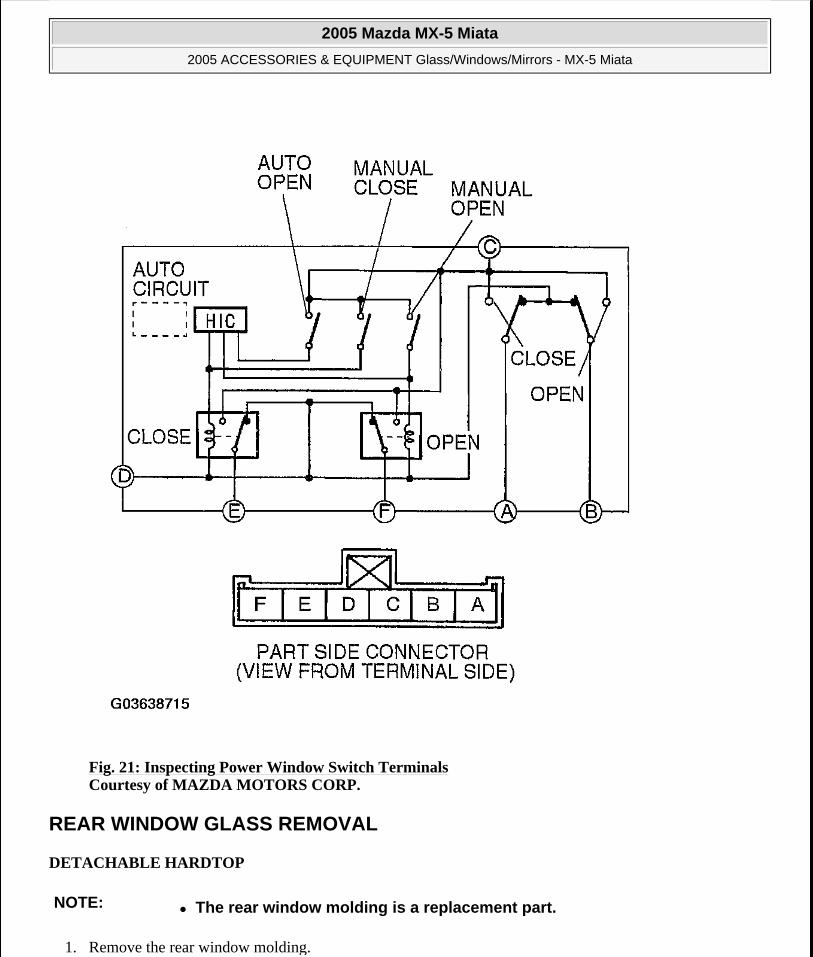
Fig. 21: Inspecting Power Window Switch Terminals Courtesy of MAZDA MOTORS CORP.
REAR WINDOW GLASS REMOVAL
DETACHABLE HARDTOP
1. Remove the rear window molding.
NOTE: The rear window molding is a replacement part.
2005 Mazda MX-5 Miata
2005 ACCESSORIES & EQUIPMENT Glass/Windows/Mirrors - MX-5 Miata
Microsoft
Saturday, July 04, 2009 11:59:13 AM Page 22 © 2005 Mitchell Repair Information Company, LLC.
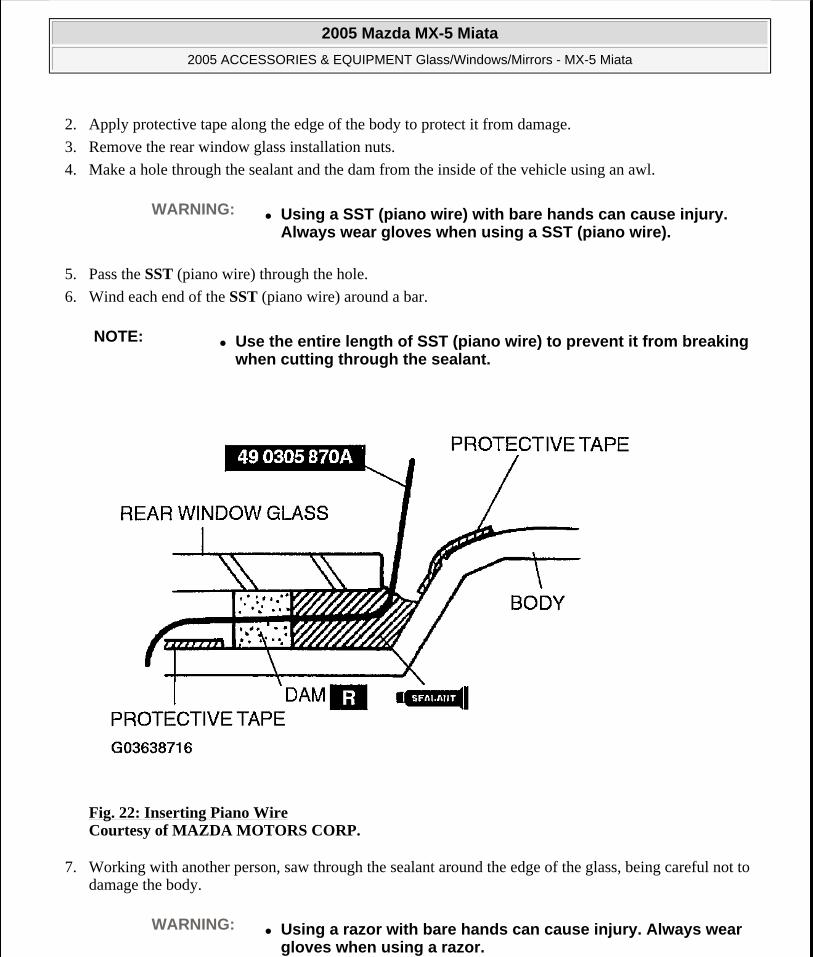
2. Apply protective tape along the edge of the body to protect it from damage.
3. Remove the rear window glass installation nuts.
4. Make a hole through the sealant and the dam from the inside of the vehicle using an awl.
5. Pass the SST (piano wire) through the hole.
6. Wind each end of the SST (piano wire) around a bar.
Fig. 22: Inserting Piano Wire Courtesy of MAZDA MOTORS CORP.
7. Working with another person, saw through the sealant around the edge of the glass, being careful not to damage the body.
WARNING: Using a SST (piano wire) with bare hands can cause injury. Always wear gloves when using a SST (piano wire).
NOTE: Use the entire length of SST (piano wire) to prevent it from breaking when cutting through the sealant.
WARNING: Using a razor with bare hands can cause injury. Always wear gloves when using a razor.
2005 Mazda MX-5 Miata
2005 ACCESSORIES & EQUIPMENT Glass/Windows/Mirrors - MX-5 Miata
Microsoft
Saturday, July 04, 2009 11:59:13 AM Page 23 © 2005 Mitchell Repair Information Company, LLC.

Fig. 23: Sawing Through Sealant Courtesy of MAZDA MOTORS CORP.
8. Use a razor to cut the places of rear window glass installation nuts where the SST (piano wire) will not cut.
2005 Mazda MX-5 Miata
2005 ACCESSORIES & EQUIPMENT Glass/Windows/Mirrors - MX-5 Miata
Microsoft
Saturday, July 04, 2009 11:59:13 AM Page 24 © 2005 Mitchell Repair Information Company, LLC.
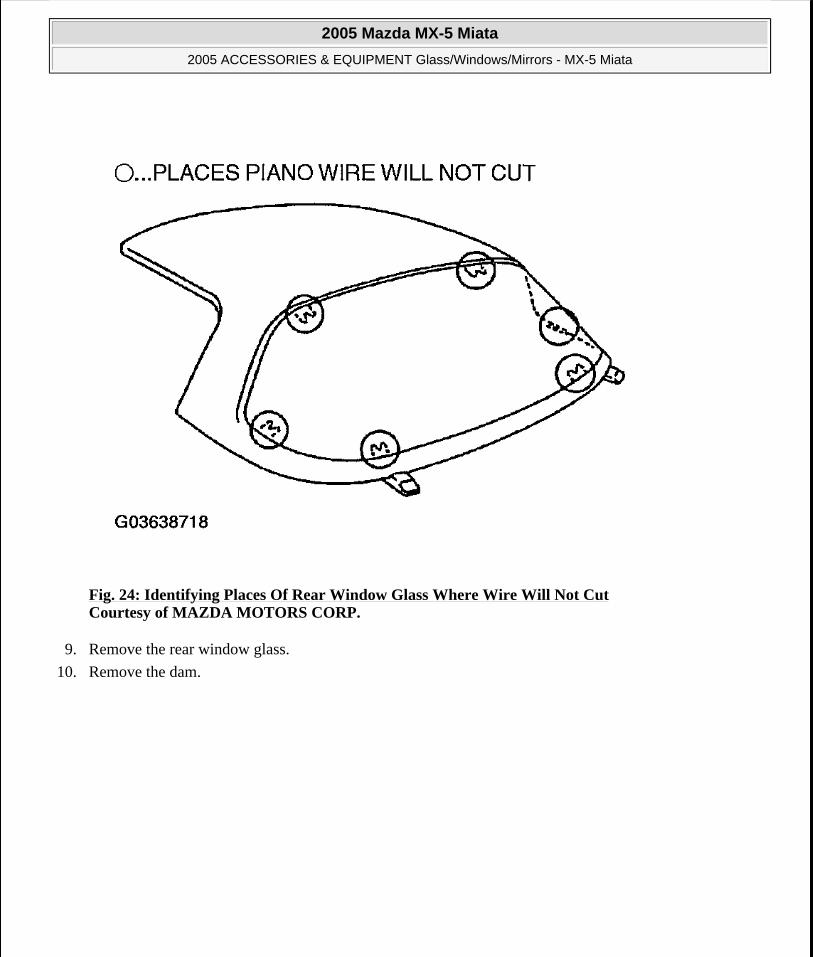
Fig. 24: Identifying Places Of Rear Window Glass Where Wire Will Not Cut Courtesy of MAZDA MOTORS CORP.
9. Remove the rear window glass.
10. Remove the dam.
2005 Mazda MX-5 Miata
2005 ACCESSORIES & EQUIPMENT Glass/Windows/Mirrors - MX-5 Miata
Microsoft
Saturday, July 04, 2009 11:59:13 AM Page 25 © 2005 Mitchell Repair Information Company, LLC.
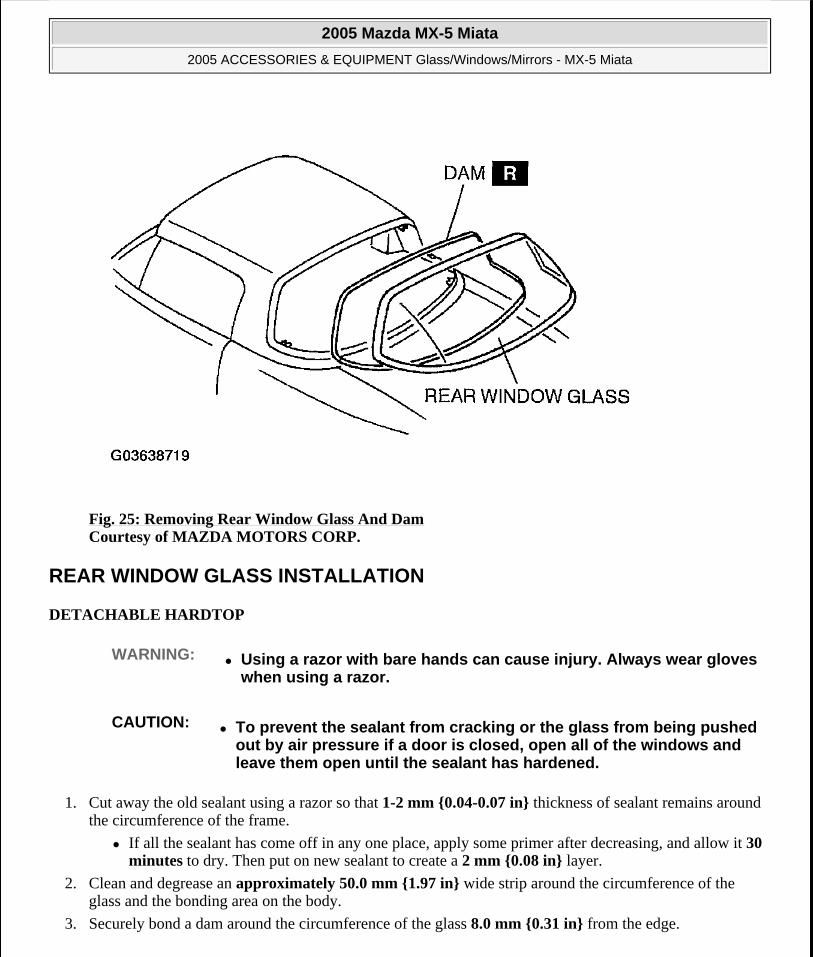
Fig. 25: Removing Rear Window Glass And Dam Courtesy of MAZDA MOTORS CORP.
REAR WINDOW GLASS INSTALLATION
DETACHABLE HARDTOP
1. Cut away the old sealant using a razor so that 1-2 mm {0.04-0.07 in} thickness of sealant remains around the circumference of the frame.
If all the sealant has come off in any one place, apply some primer after decreasing, and allow it 30 minutes to dry. Then put on new sealant to create a 2 mm {0.08 in} layer.
2. Clean and degrease an approximately 50.0 mm {1.97 in} wide strip around the circumference of the glass and the bonding area on the body.
3. Securely bond a dam around the circumference of the glass 8.0 mm {0.31 in} from the edge.
WARNING: Using a razor with bare hands can cause injury. Always wear gloves when using a razor.
CAUTION: To prevent the sealant from cracking or the glass from being pushed out by air pressure if a door is closed, open all of the windows and leave them open until the sealant has hardened.
2005 Mazda MX-5 Miata
2005 ACCESSORIES & EQUIPMENT Glass/Windows/Mirrors - MX-5 Miata
Microsoft
Saturday, July 04, 2009 11:59:13 AM Page 26 © 2005 Mitchell Repair Information Company, LLC.
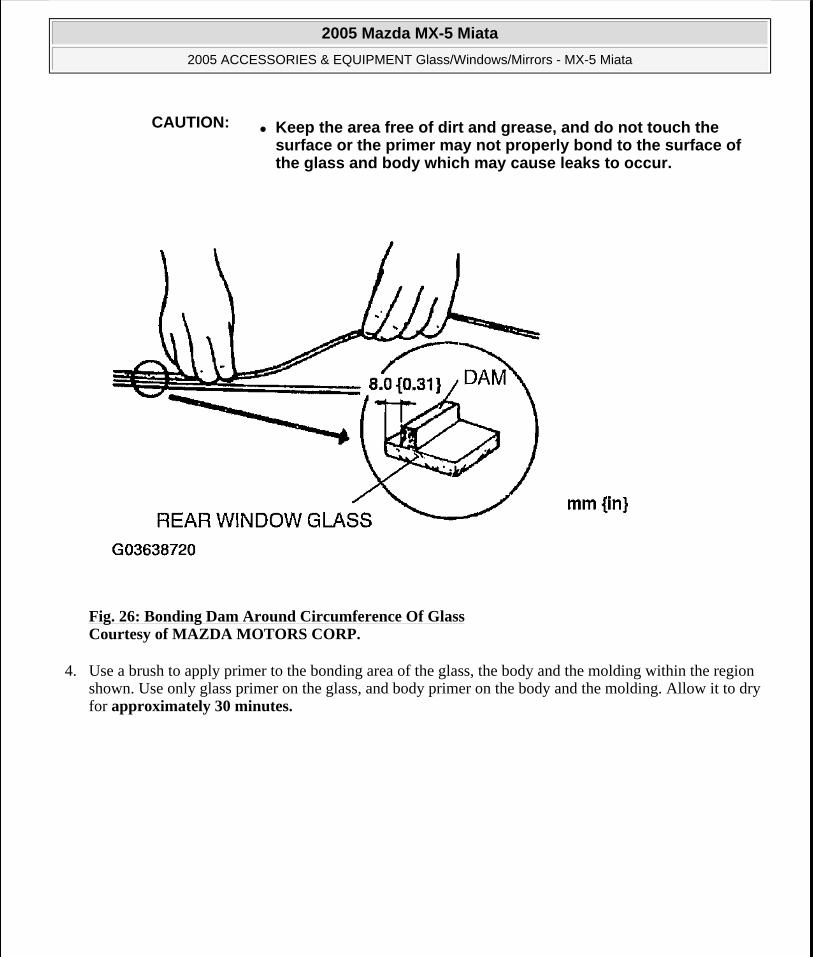
Fig. 26: Bonding Dam Around Circumference Of Glass Courtesy of MAZDA MOTORS CORP.
4. Use a brush to apply primer to the bonding area of the glass, the body and the molding within the region shown. Use only glass primer on the glass, and body primer on the body and the molding. Allow it to dry for approximately 30 minutes.
CAUTION: Keep the area free of dirt and grease, and do not touch the surface or the primer may not properly bond to the surface of the glass and body which may cause leaks to occur.
2005 Mazda MX-5 Miata
2005 ACCESSORIES & EQUIPMENT Glass/Windows/Mirrors - MX-5 Miata
Microsoft
Saturday, July 04, 2009 11:59:13 AM Page 27 © 2005 Mitchell Repair Information Company, LLC.
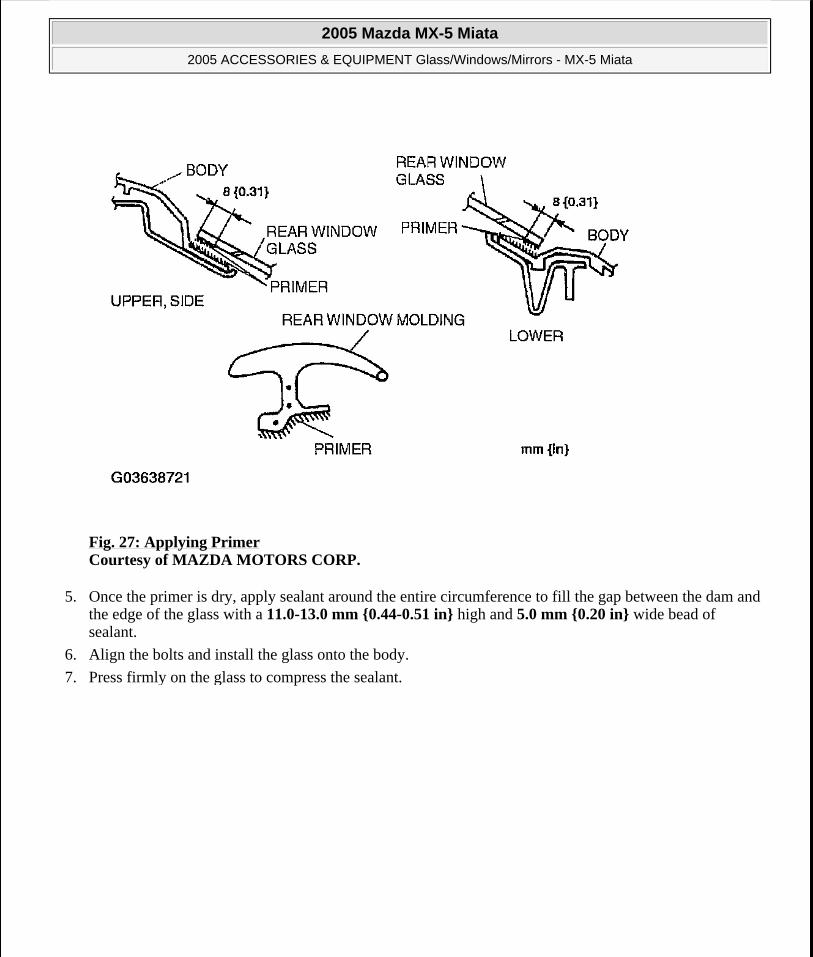
Fig. 27: Applying Primer Courtesy of MAZDA MOTORS CORP.
5. Once the primer is dry, apply sealant around the entire circumference to fill the gap between the dam and the edge of the glass with a 11.0-13.0 mm {0.44-0.51 in} high and 5.0 mm {0.20 in} wide bead of sealant.
6. Align the bolts and install the glass onto the body.
7. Press firmly on the glass to compress the sealant.
2005 Mazda MX-5 Miata
2005 ACCESSORIES & EQUIPMENT Glass/Windows/Mirrors - MX-5 Miata
Microsoft
Saturday, July 04, 2009 11:59:13 AM Page 28 © 2005 Mitchell Repair Information Company, LLC.
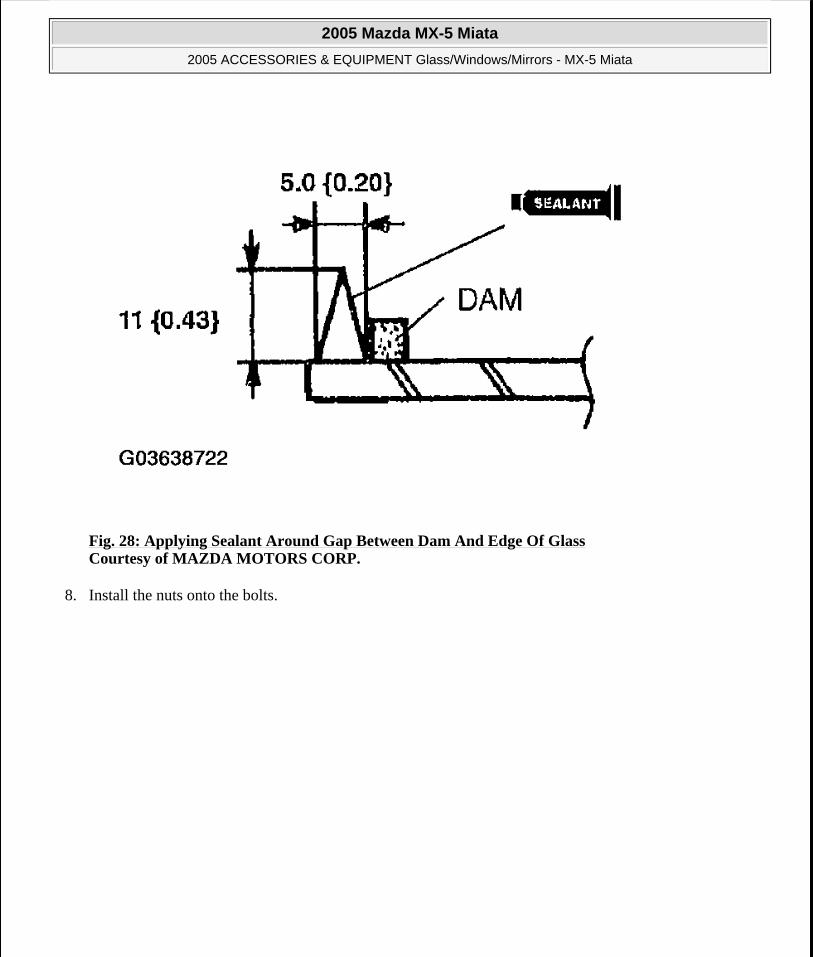
Fig. 28: Applying Sealant Around Gap Between Dam And Edge Of Glass Courtesy of MAZDA MOTORS CORP.
8. Install the nuts onto the bolts.
2005 Mazda MX-5 Miata
2005 ACCESSORIES & EQUIPMENT Glass/Windows/Mirrors - MX-5 Miata
Microsoft
Saturday, July 04, 2009 11:59:13 AM Page 29 © 2005 Mitchell Repair Information Company, LLC.
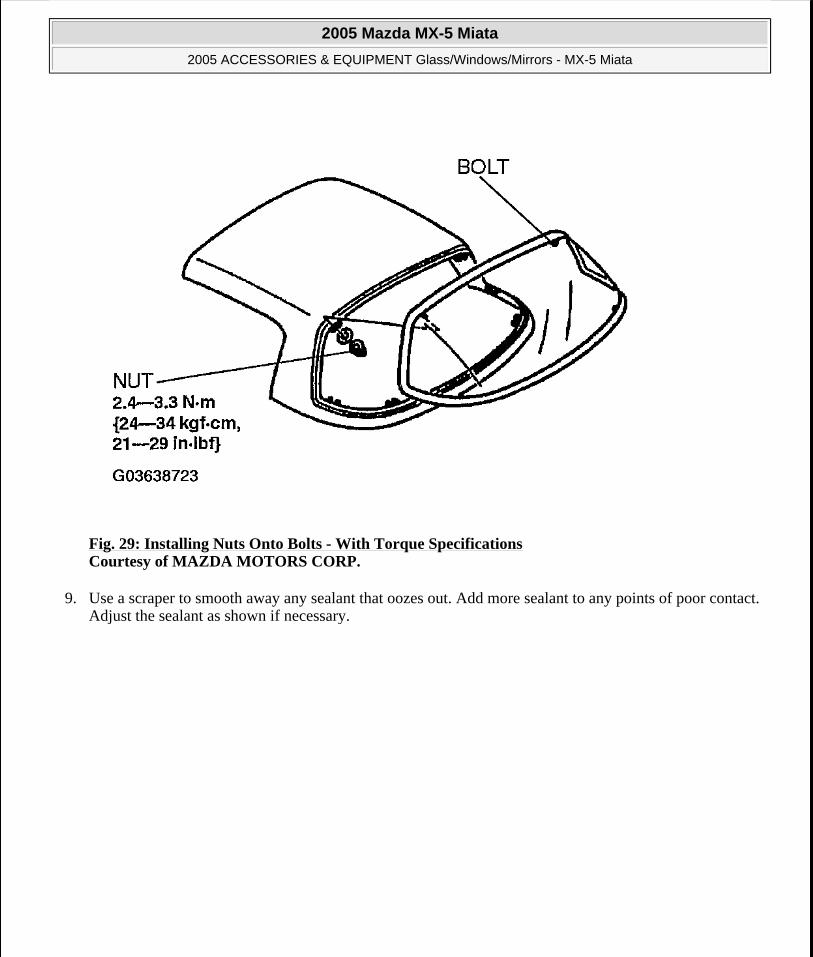
Fig. 29: Installing Nuts Onto Bolts - With Torque Specifications Courtesy of MAZDA MOTORS CORP.
9. Use a scraper to smooth away any sealant that oozes out. Add more sealant to any points of poor contact. Adjust the sealant as shown if necessary.
2005 Mazda MX-5 Miata
2005 ACCESSORIES & EQUIPMENT Glass/Windows/Mirrors - MX-5 Miata
Microsoft
Saturday, July 04, 2009 11:59:13 AM Page 30 © 2005 Mitchell Repair Information Company, LLC.
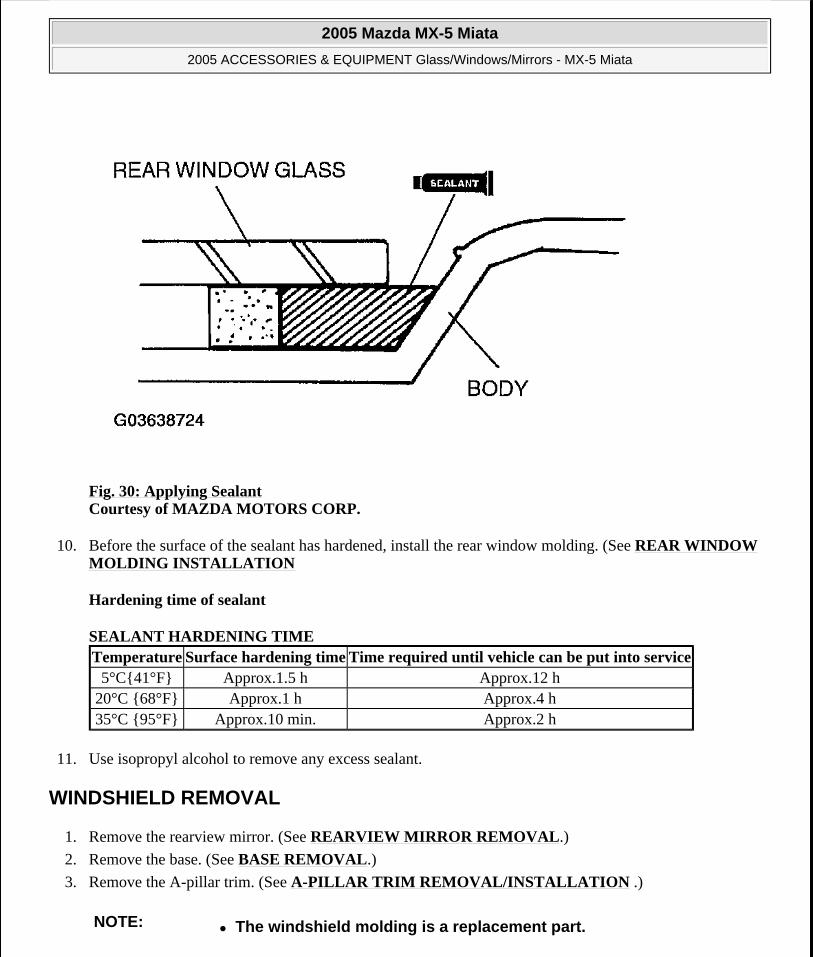
Fig. 30: Applying Sealant Courtesy of MAZDA MOTORS CORP.
10. Before the surface of the sealant has hardened, install the rear window molding. (See REAR WINDOW MOLDING INSTALLATION
Hardening time of sealant
SEALANT HARDENING TIME
11. Use isopropyl alcohol to remove any excess sealant.
WINDSHIELD REMOVAL
1. Remove the rearview mirror. (See REARVIEW MIRROR REMOVAL.)
2. Remove the base. (See BASE REMOVAL.)
3. Remove the A-pillar trim. (See A-PILLAR TRIM REMOVAL/INSTALLATION .)
Temperature Surface hardening time Time required until vehicle can be put into service5°C{41°F} Approx.1.5 h Approx.12 h
20°C {68°F} Approx.1 h Approx.4 h35°C {95°F} Approx.10 min. Approx.2 h
NOTE: The windshield molding is a replacement part.
2005 Mazda MX-5 Miata
2005 ACCESSORIES & EQUIPMENT Glass/Windows/Mirrors - MX-5 Miata
Microsoft
Saturday, July 04, 2009 11:59:13 AM Page 31 © 2005 Mitchell Repair Information Company, LLC.
4. Remove the windshield molding. (See WINDSHIELD MOLDING REMOVAL .)
5. Remove the cowl grille. (See COWL GRILLE REMOVAL/INSTALLATION .)
6. Remove the sunvisor.
7. Remove the striker. (See CONVERTIBLE TOP DISASSEMBLY/ASSEMBLY .) (See DETACHABLE HARDTOP DISASSEMBLY/ASSEMBLY .)
8. Remove the front header trim. (See FRONT HEADER TRIM REMOVAL/INSTALLATION .)
9. Apply protective tape along the edge of the body to protect it from damage.
10. Apply protective tape to the dashboard to protect it from damage.
NOT REUSING WINDSHIELD
1. Use a tool like that shown in the figure, and insert the blade into the sealant.
2. Pull through the sealant around the edge of the glass.
NOTE: For the areas of the sealant that are difficult to cut, use the SST (piano wire) and follow the procedures under "Reusing Windshield".
2005 Mazda MX-5 Miata
2005 ACCESSORIES & EQUIPMENT Glass/Windows/Mirrors - MX-5 Miata
Microsoft
Saturday, July 04, 2009 11:59:13 AM Page 32 © 2005 Mitchell Repair Information Company, LLC.
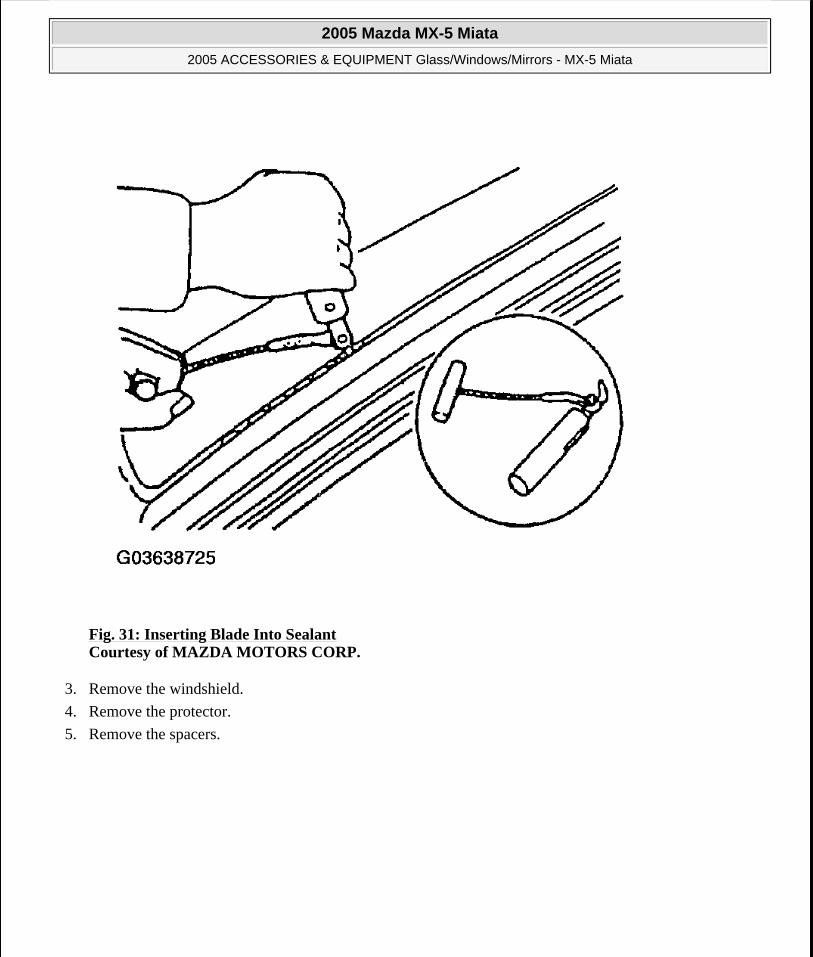
Fig. 31: Inserting Blade Into Sealant Courtesy of MAZDA MOTORS CORP.
3. Remove the windshield.
4. Remove the protector.
5. Remove the spacers.
2005 Mazda MX-5 Miata
2005 ACCESSORIES & EQUIPMENT Glass/Windows/Mirrors - MX-5 Miata
Microsoft
Saturday, July 04, 2009 11:59:13 AM Page 33 © 2005 Mitchell Repair Information Company, LLC.
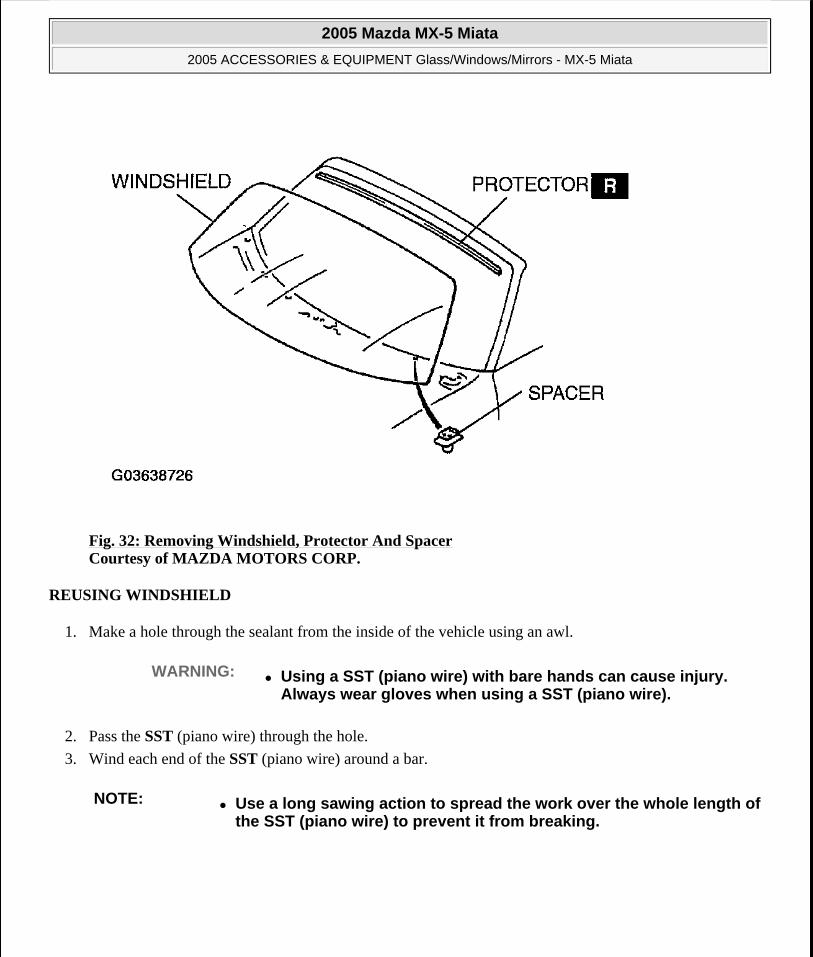
Fig. 32: Removing Windshield, Protector And Spacer Courtesy of MAZDA MOTORS CORP.
REUSING WINDSHIELD
1. Make a hole through the sealant from the inside of the vehicle using an awl.
2. Pass the SST (piano wire) through the hole.
3. Wind each end of the SST (piano wire) around a bar.
WARNING: Using a SST (piano wire) with bare hands can cause injury. Always wear gloves when using a SST (piano wire).
NOTE: Use a long sawing action to spread the work over the whole length of the SST (piano wire) to prevent it from breaking.
2005 Mazda MX-5 Miata
2005 ACCESSORIES & EQUIPMENT Glass/Windows/Mirrors - MX-5 Miata
Microsoft
Saturday, July 04, 2009 11:59:13 AM Page 34 © 2005 Mitchell Repair Information Company, LLC.
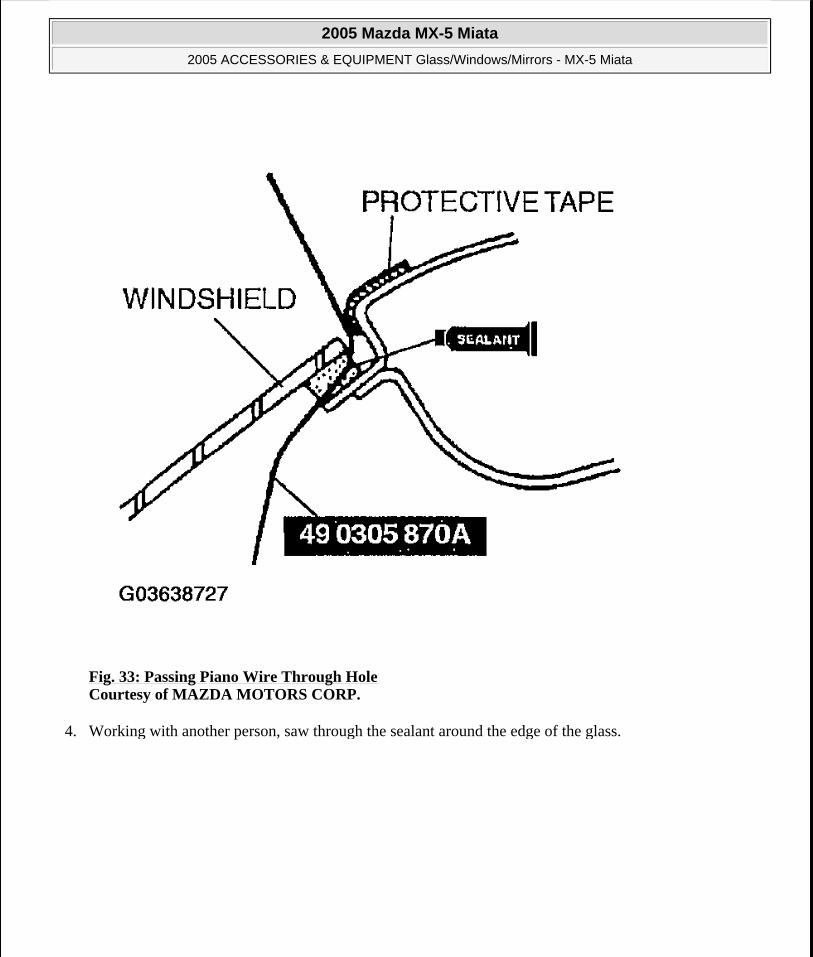
Fig. 33: Passing Piano Wire Through Hole Courtesy of MAZDA MOTORS CORP.
4. Working with another person, saw through the sealant around the edge of the glass.
2005 Mazda MX-5 Miata
2005 ACCESSORIES & EQUIPMENT Glass/Windows/Mirrors - MX-5 Miata
Microsoft
Saturday, July 04, 2009 11:59:13 AM Page 35 © 2005 Mitchell Repair Information Company, LLC.
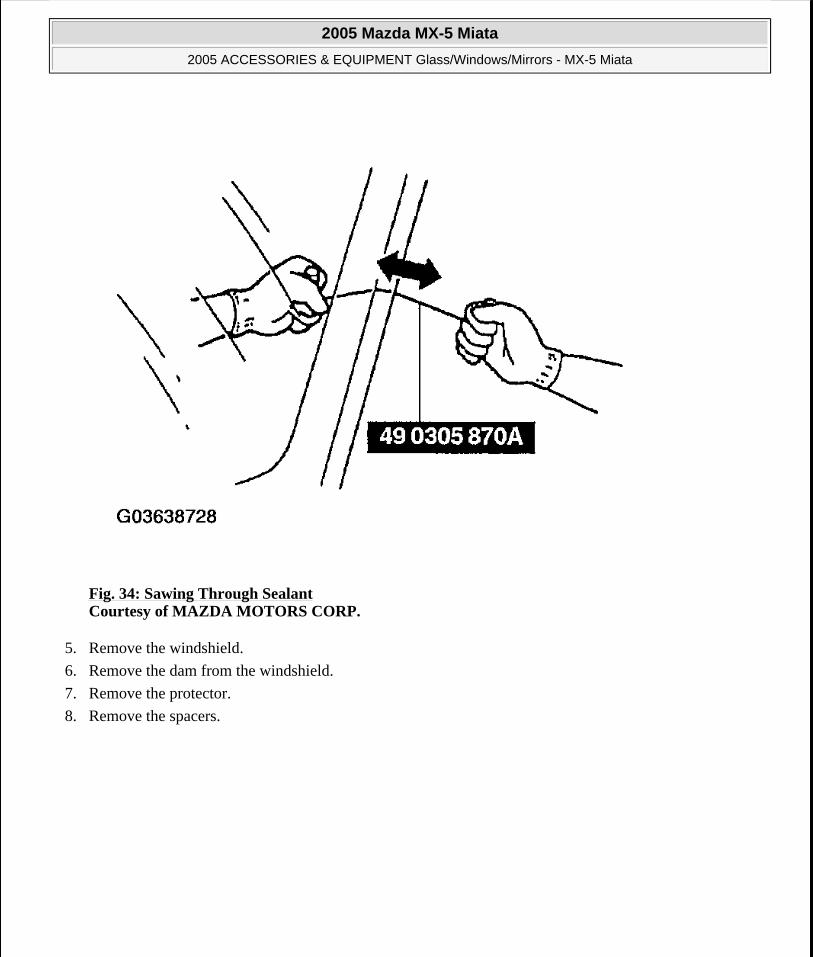
Fig. 34: Sawing Through Sealant Courtesy of MAZDA MOTORS CORP.
5. Remove the windshield.
6. Remove the dam from the windshield.
7. Remove the protector.
8. Remove the spacers.
2005 Mazda MX-5 Miata
2005 ACCESSORIES & EQUIPMENT Glass/Windows/Mirrors - MX-5 Miata
Microsoft
Saturday, July 04, 2009 11:59:13 AM Page 36 © 2005 Mitchell Repair Information Company, LLC.
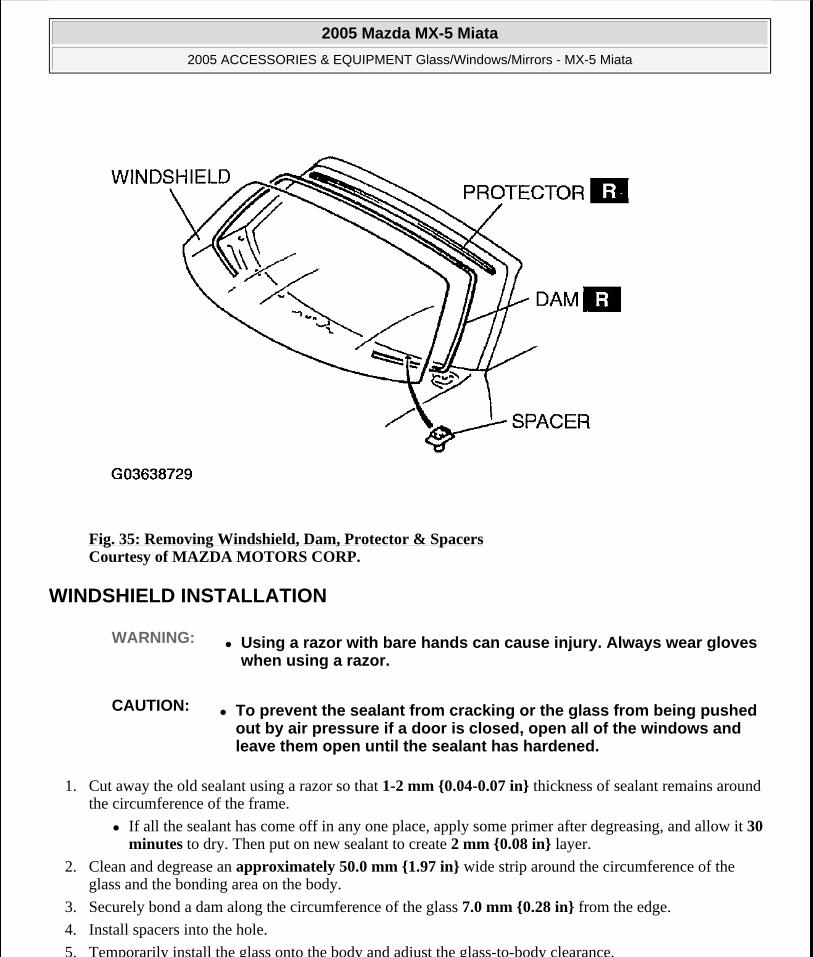
Fig. 35: Removing Windshield, Dam, Protector & Spacers Courtesy of MAZDA MOTORS CORP.
WINDSHIELD INSTALLATION
1. Cut away the old sealant using a razor so that 1-2 mm {0.04-0.07 in} thickness of sealant remains around the circumference of the frame.
If all the sealant has come off in any one place, apply some primer after degreasing, and allow it 30 minutes to dry. Then put on new sealant to create 2 mm {0.08 in} layer.
2. Clean and degrease an approximately 50.0 mm {1.97 in} wide strip around the circumference of the glass and the bonding area on the body.
3. Securely bond a dam along the circumference of the glass 7.0 mm {0.28 in} from the edge.
4. Install spacers into the hole.
5. Temporarily install the glass onto the body and adjust the glass-to-body clearance.
WARNING: Using a razor with bare hands can cause injury. Always wear gloves when using a razor.
CAUTION: To prevent the sealant from cracking or the glass from being pushed out by air pressure if a door is closed, open all of the windows and leave them open until the sealant has hardened.
2005 Mazda MX-5 Miata
2005 ACCESSORIES & EQUIPMENT Glass/Windows/Mirrors - MX-5 Miata
Microsoft
Saturday, July 04, 2009 11:59:13 AM Page 37 © 2005 Mitchell Repair Information Company, LLC.
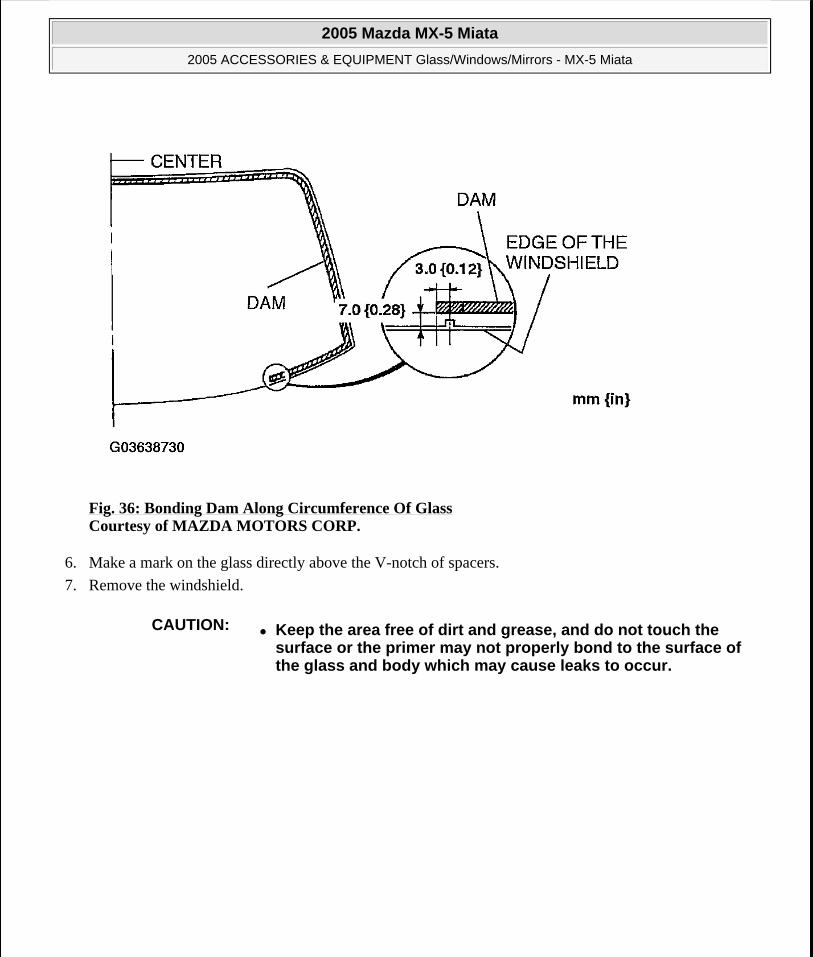
Fig. 36: Bonding Dam Along Circumference Of Glass Courtesy of MAZDA MOTORS CORP.
6. Make a mark on the glass directly above the V-notch of spacers.
7. Remove the windshield.
CAUTION: Keep the area free of dirt and grease, and do not touch the surface or the primer may not properly bond to the surface of the glass and body which may cause leaks to occur.
2005 Mazda MX-5 Miata
2005 ACCESSORIES & EQUIPMENT Glass/Windows/Mirrors - MX-5 Miata
Microsoft
Saturday, July 04, 2009 11:59:13 AM Page 38 © 2005 Mitchell Repair Information Company, LLC.
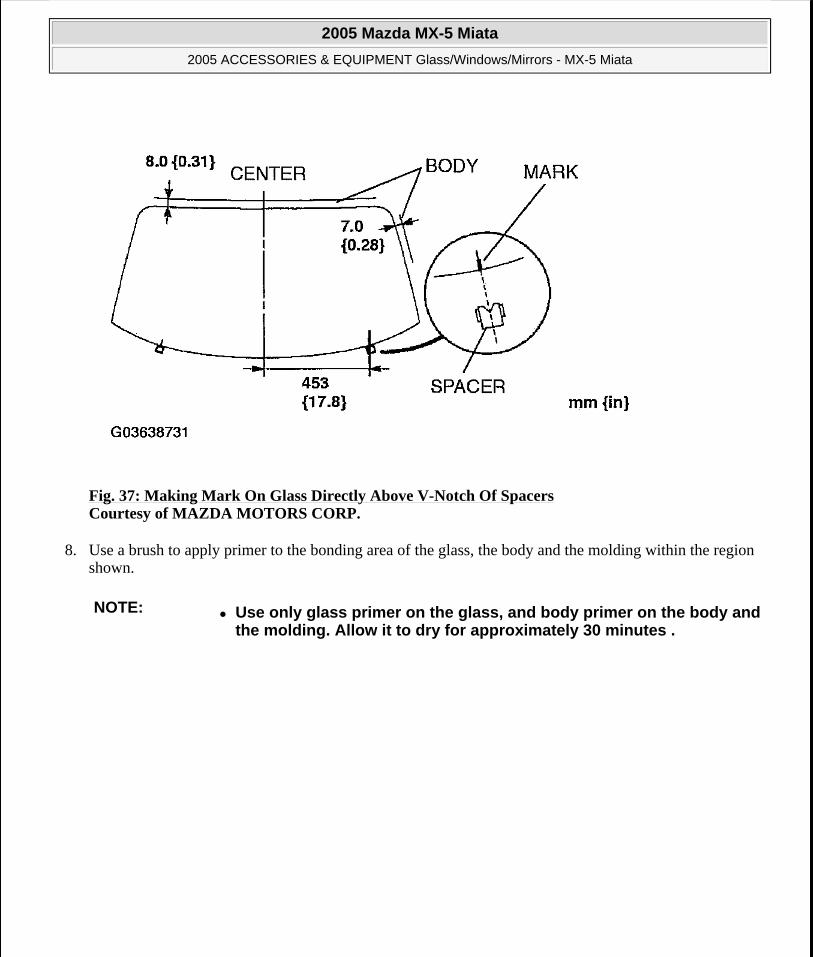
Fig. 37: Making Mark On Glass Directly Above V-Notch Of Spacers Courtesy of MAZDA MOTORS CORP.
8. Use a brush to apply primer to the bonding area of the glass, the body and the molding within the region shown.
NOTE: Use only glass primer on the glass, and body primer on the body and the molding. Allow it to dry for approximately 30 minutes .
2005 Mazda MX-5 Miata
2005 ACCESSORIES & EQUIPMENT Glass/Windows/Mirrors - MX-5 Miata
Microsoft
Saturday, July 04, 2009 11:59:13 AM Page 39 © 2005 Mitchell Repair Information Company, LLC.
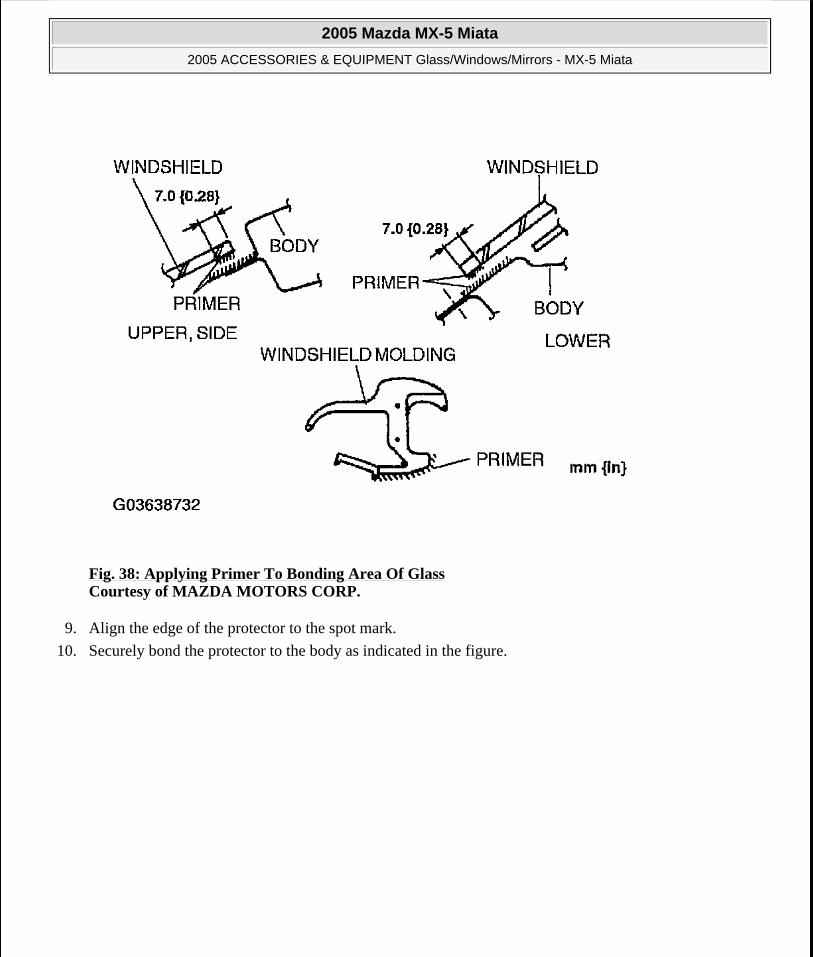
Fig. 38: Applying Primer To Bonding Area Of Glass Courtesy of MAZDA MOTORS CORP.
9. Align the edge of the protector to the spot mark.
10. Securely bond the protector to the body as indicated in the figure.
2005 Mazda MX-5 Miata
2005 ACCESSORIES & EQUIPMENT Glass/Windows/Mirrors - MX-5 Miata
Microsoft
Saturday, July 04, 2009 11:59:13 AM Page 40 © 2005 Mitchell Repair Information Company, LLC.
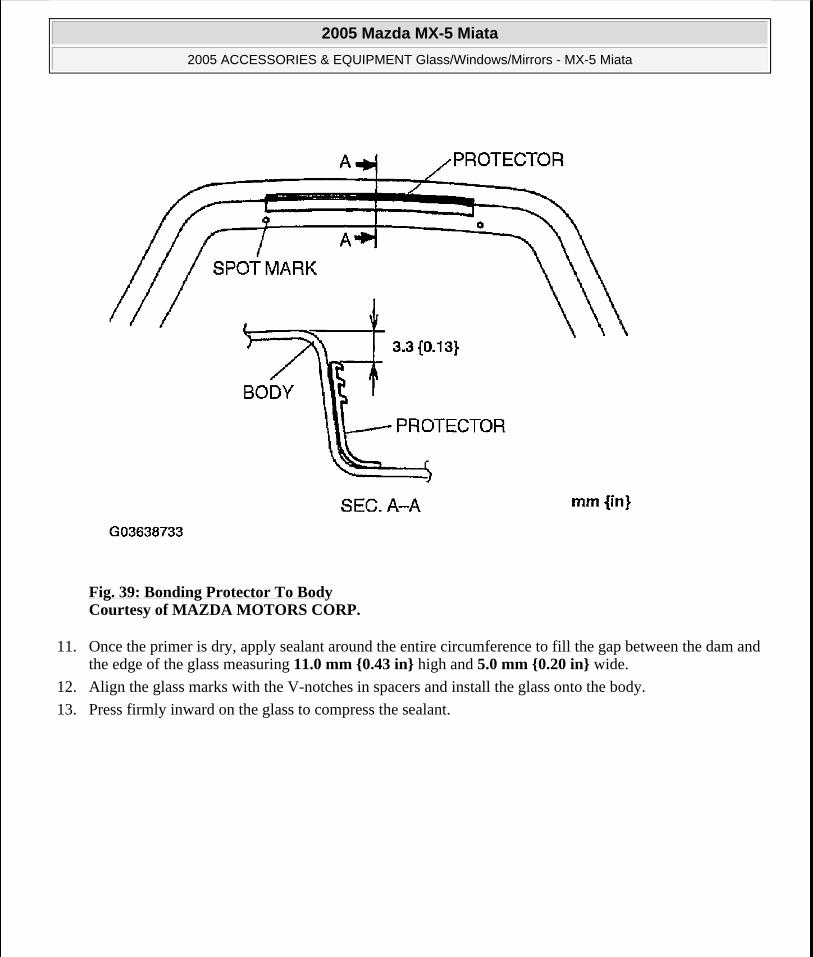
Fig. 39: Bonding Protector To Body Courtesy of MAZDA MOTORS CORP.
11. Once the primer is dry, apply sealant around the entire circumference to fill the gap between the dam and the edge of the glass measuring 11.0 mm {0.43 in} high and 5.0 mm {0.20 in} wide.
12. Align the glass marks with the V-notches in spacers and install the glass onto the body.
13. Press firmly inward on the glass to compress the sealant.
2005 Mazda MX-5 Miata
2005 ACCESSORIES & EQUIPMENT Glass/Windows/Mirrors - MX-5 Miata
Microsoft
Saturday, July 04, 2009 11:59:13 AM Page 41 © 2005 Mitchell Repair Information Company, LLC.
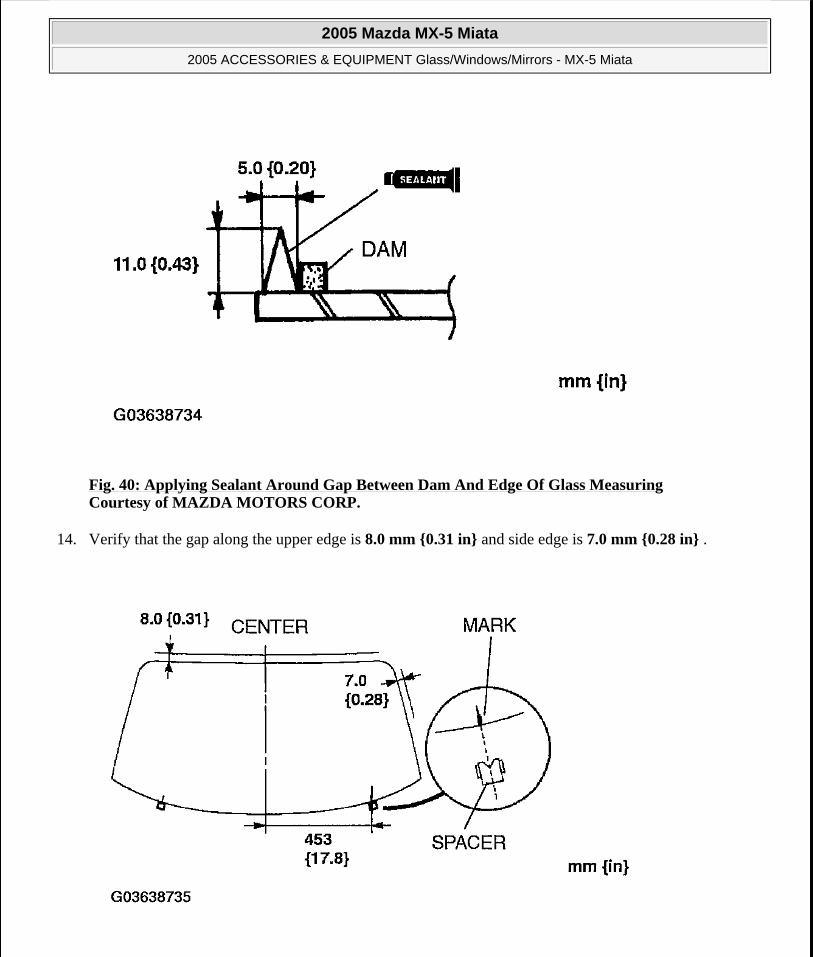
Fig. 40: Applying Sealant Around Gap Between Dam And Edge Of Glass Measuring Courtesy of MAZDA MOTORS CORP.
14. Verify that the gap along the upper edge is 8.0 mm {0.31 in} and side edge is 7.0 mm {0.28 in} .
2005 Mazda MX-5 Miata
2005 ACCESSORIES & EQUIPMENT Glass/Windows/Mirrors - MX-5 Miata
Microsoft
Saturday, July 04, 2009 11:59:13 AM Page 42 © 2005 Mitchell Repair Information Company, LLC.
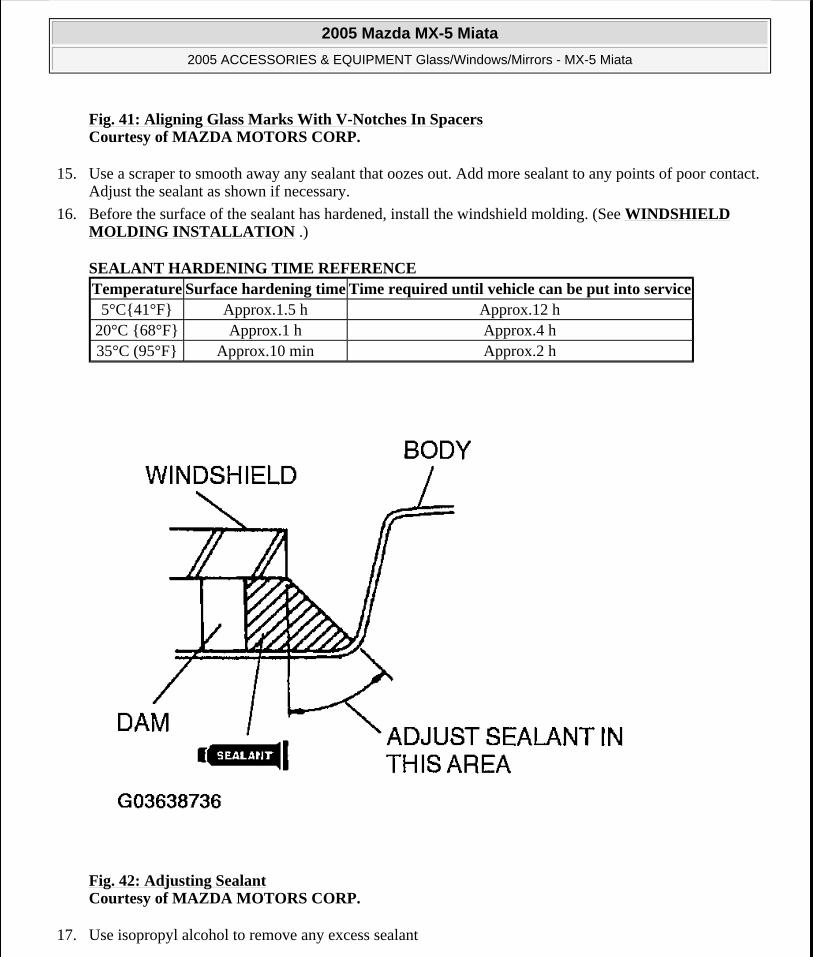
Fig. 41: Aligning Glass Marks With V-Notches In SpacersCourtesy of MAZDA MOTORS CORP.
15. Use a scraper to smooth away any sealant that oozes out. Add more sealant to any points of poor contact. Adjust the sealant as shown if necessary.
16. Before the surface of the sealant has hardened, install the windshield molding. (See WINDSHIELD MOLDING INSTALLATION .)
SEALANT HARDENING TIME REFERENCE
Fig. 42: Adjusting Sealant Courtesy of MAZDA MOTORS CORP.
17. Use isopropyl alcohol to remove any excess sealant
Temperature Surface hardening time Time required until vehicle can be put into service5°C{41°F} Approx.1.5 h Approx.12 h
20°C {68°F} Approx.1 h Approx.4 h35°C (95°F} Approx.10 min Approx.2 h
2005 Mazda MX-5 Miata
2005 ACCESSORIES & EQUIPMENT Glass/Windows/Mirrors - MX-5 Miata
Microsoft
Saturday, July 04, 2009 11:59:13 AM Page 43 © 2005 Mitchell Repair Information Company, LLC.
18. Install the front header trim. (See FRONT HEADER TRIM REMOVAL/INSTALLATION .)
19. Install the striker. (See CONVERTIBLE TOP DISASSEMBLY/ASSEMBLY .) (See DETACHABLE HARDTOP DISASSEMBLY/ASSEMBLY .)
20. Install the cowl grille. (See COWL GRILLE REMOVAL/INSTALLATION .)
21. Install the A-pillar trim. (See A-PILLAR TRIM REMOVAL/INSTALLATION )
22. Install the base. (See BASE INSTALLATION.)
23. Install the rearview mirror. (See REARVIEW MIRROR INSTALLATION.)
FILAMENT INSPECTION
1. Turn the ignition switch to ON position.
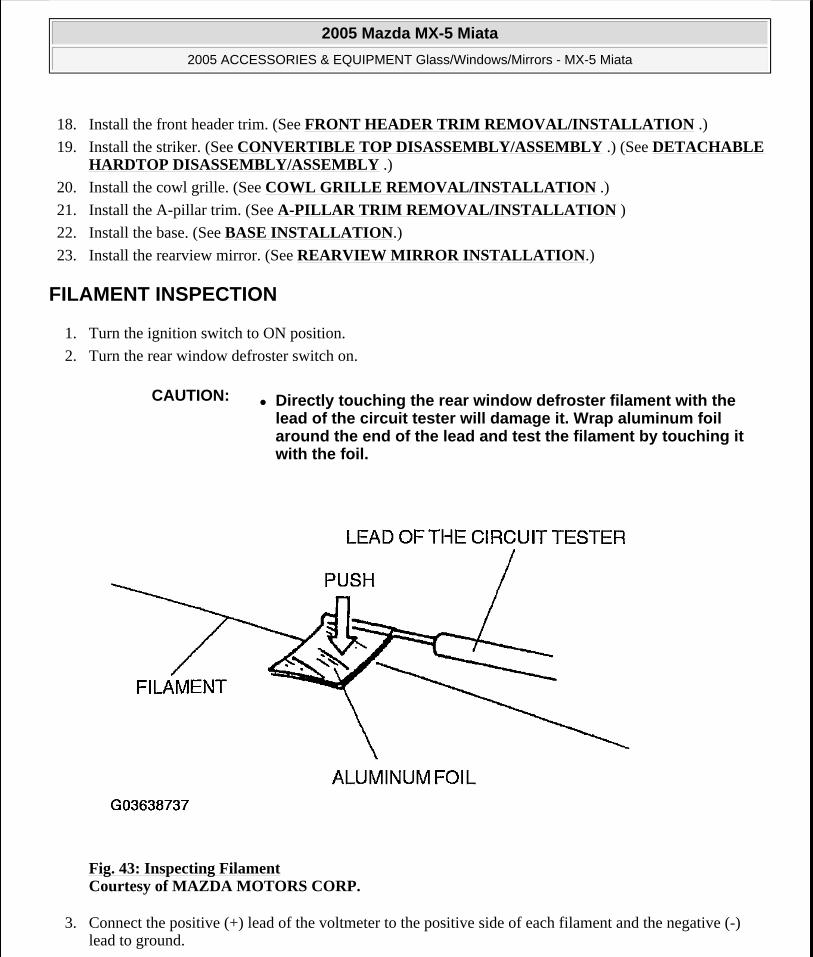
2. Turn the rear window defroster switch on.
Fig. 43: Inspecting Filament Courtesy of MAZDA MOTORS CORP.
3. Connect the positive (+) lead of the voltmeter to the positive side of each filament and the negative (-) lead to ground.
CAUTION: Directly touching the rear window defroster filament with the lead of the circuit tester will damage it. Wrap aluminum foil around the end of the lead and test the filament by touching it with the foil.
2005 Mazda MX-5 Miata
2005 ACCESSORIES & EQUIPMENT Glass/Windows/Mirrors - MX-5 Miata
Microsoft
Saturday, July 04, 2009 11:59:13 AM Page 44 © 2005 Mitchell Repair Information Company, LLC.
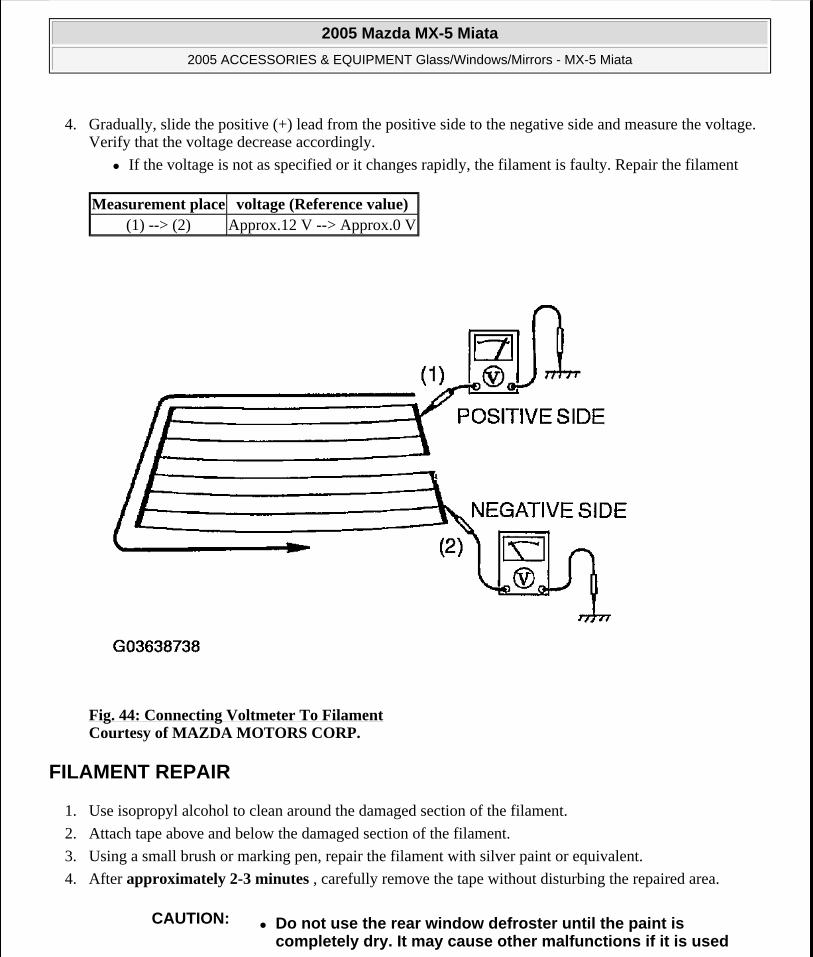
4. Gradually, slide the positive (+) lead from the positive side to the negative side and measure the voltage. Verify that the voltage decrease accordingly.
If the voltage is not as specified or it changes rapidly, the filament is faulty. Repair the filament
Fig. 44: Connecting Voltmeter To Filament Courtesy of MAZDA MOTORS CORP.
FILAMENT REPAIR
1. Use isopropyl alcohol to clean around the damaged section of the filament.
2. Attach tape above and below the damaged section of the filament.
3. Using a small brush or marking pen, repair the filament with silver paint or equivalent.
4. After approximately 2-3 minutes , carefully remove the tape without disturbing the repaired area.
Measurement place voltage (Reference value)(1) --> (2) Approx.12 V --> Approx.0 V
CAUTION: Do not use the rear window defroster until the paint is completely dry. It may cause other malfunctions if it is used
2005 Mazda MX-5 Miata
2005 ACCESSORIES & EQUIPMENT Glass/Windows/Mirrors - MX-5 Miata
Microsoft
Saturday, July 04, 2009 11:59:13 AM Page 45 © 2005 Mitchell Repair Information Company, LLC.
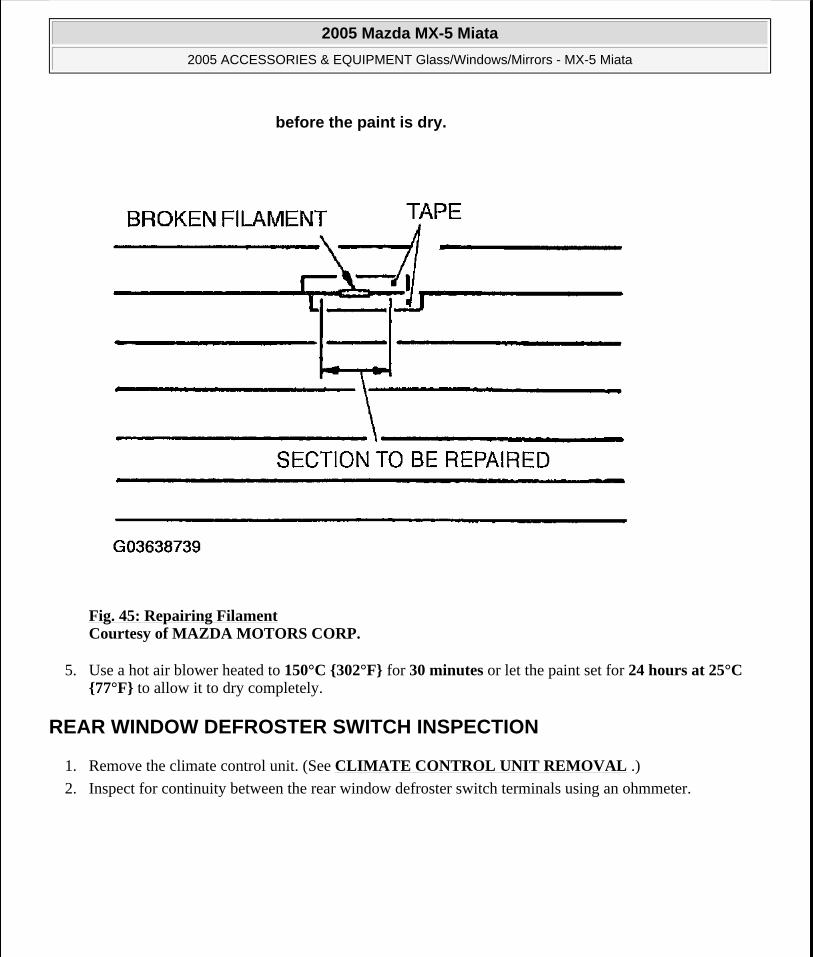
Fig. 45: Repairing Filament Courtesy of MAZDA MOTORS CORP.
5. Use a hot air blower heated to 150°C {302°F} for 30 minutes or let the paint set for 24 hours at 25°C {77°F} to allow it to dry completely.
REAR WINDOW DEFROSTER SWITCH INSPECTION
1. Remove the climate control unit. (See CLIMATE CONTROL UNIT REMOVAL .)
2. Inspect for continuity between the rear window defroster switch terminals using an ohmmeter.
before the paint is dry.
2005 Mazda MX-5 Miata
2005 ACCESSORIES & EQUIPMENT Glass/Windows/Mirrors - MX-5 Miata
Microsoft
Saturday, July 04, 2009 11:59:13 AM Page 46 © 2005 Mitchell Repair Information Company, LLC.
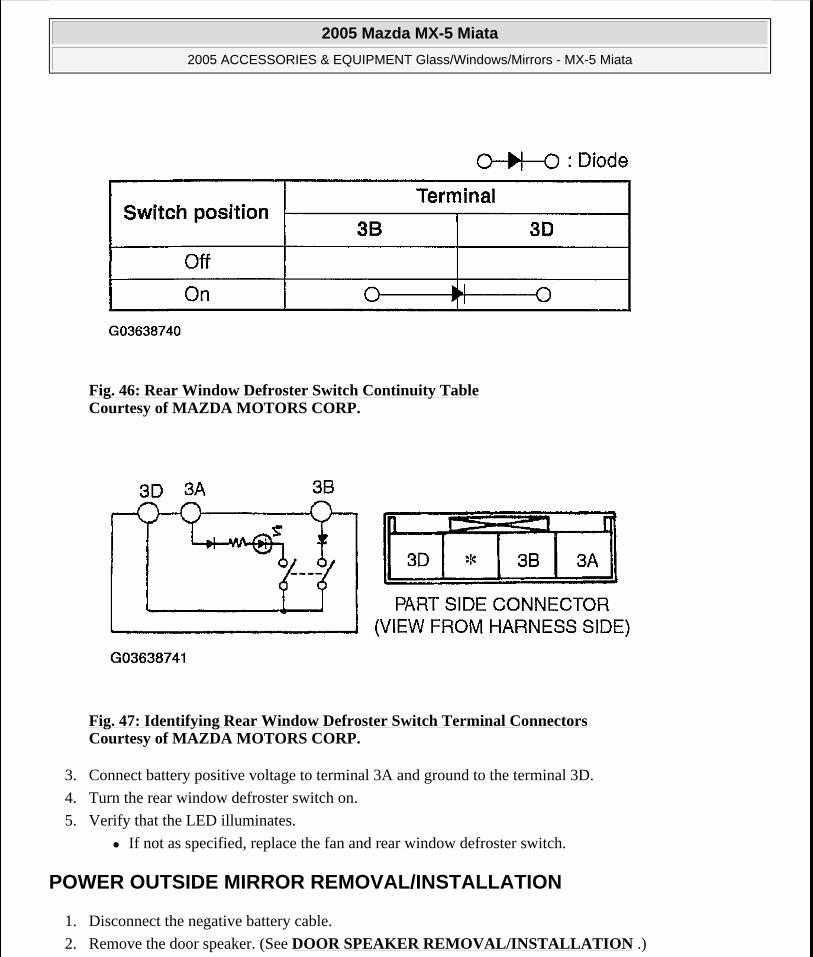
Fig. 46: Rear Window Defroster Switch Continuity Table Courtesy of MAZDA MOTORS CORP.
Fig. 47: Identifying Rear Window Defroster Switch Terminal Connectors Courtesy of MAZDA MOTORS CORP.
3. Connect battery positive voltage to terminal 3A and ground to the terminal 3D.
4. Turn the rear window defroster switch on.
5. Verify that the LED illuminates.
If not as specified, replace the fan and rear window defroster switch.
POWER OUTSIDE MIRROR REMOVAL/INSTALLATION
1. Disconnect the negative battery cable.
2. Remove the door speaker. (See DOOR SPEAKER REMOVAL/INSTALLATION .)
2005 Mazda MX-5 Miata
2005 ACCESSORIES & EQUIPMENT Glass/Windows/Mirrors - MX-5 Miata
Microsoft
Saturday, July 04, 2009 11:59:13 AM Page 47 © 2005 Mitchell Repair Information Company, LLC.
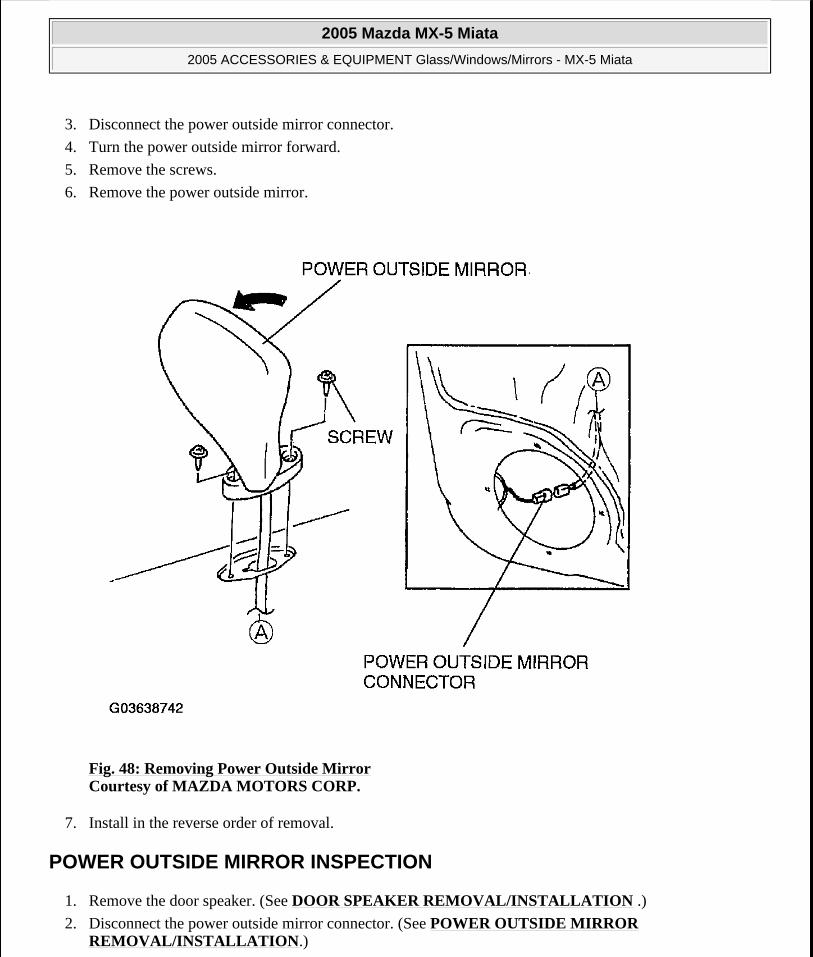
3. Disconnect the power outside mirror connector.
4. Turn the power outside mirror forward.
5. Remove the screws.
6. Remove the power outside mirror.
Fig. 48: Removing Power Outside Mirror Courtesy of MAZDA MOTORS CORP.
7. Install in the reverse order of removal.
POWER OUTSIDE MIRROR INSPECTION
1. Remove the door speaker. (See DOOR SPEAKER REMOVAL/INSTALLATION .)
2. Disconnect the power outside mirror connector. (See POWER OUTSIDE MIRROR REMOVAL/INSTALLATION.)
2005 Mazda MX-5 Miata
2005 ACCESSORIES & EQUIPMENT Glass/Windows/Mirrors - MX-5 Miata
Microsoft
Saturday, July 04, 2009 11:59:13 AM Page 48 © 2005 Mitchell Repair Information Company, LLC.
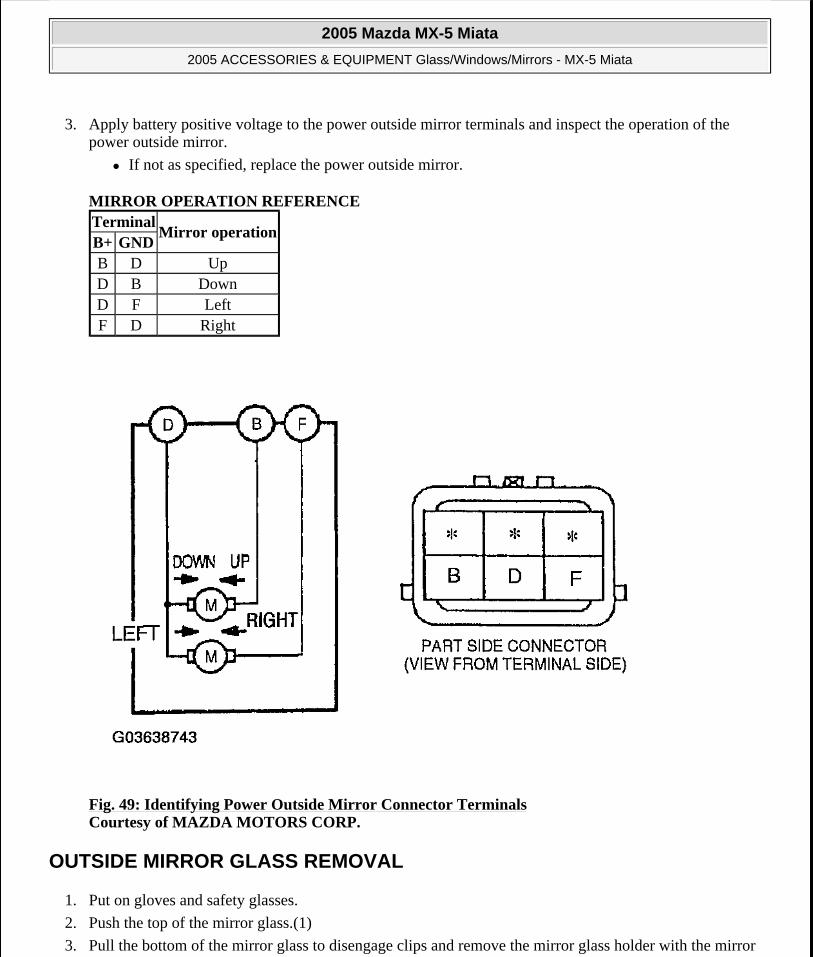
3. Apply battery positive voltage to the power outside mirror terminals and inspect the operation of the power outside mirror.
If not as specified, replace the power outside mirror.
MIRROR OPERATION REFERENCE
Fig. 49: Identifying Power Outside Mirror Connector Terminals Courtesy of MAZDA MOTORS CORP.
OUTSIDE MIRROR GLASS REMOVAL
1. Put on gloves and safety glasses.
2. Push the top of the mirror glass.(1)
3. Pull the bottom of the mirror glass to disengage clips and remove the mirror glass holder with the mirror
TerminalMirror operation
B+ GNDB D UpD B DownD F LeftF D Right
2005 Mazda MX-5 Miata
2005 ACCESSORIES & EQUIPMENT Glass/Windows/Mirrors - MX-5 Miata
Microsoft
Saturday, July 04, 2009 11:59:13 AM Page 49 © 2005 Mitchell Repair Information Company, LLC.
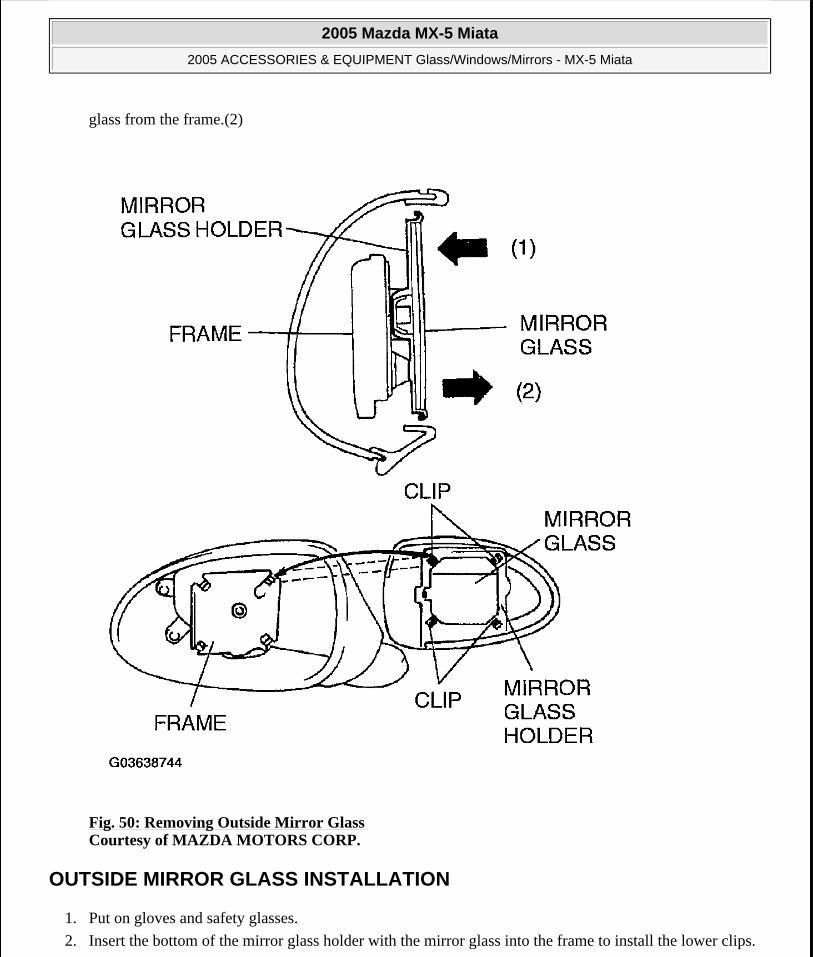
glass from the frame.(2)
Fig. 50: Removing Outside Mirror Glass Courtesy of MAZDA MOTORS CORP.
OUTSIDE MIRROR GLASS INSTALLATION
1. Put on gloves and safety glasses.
2. Insert the bottom of the mirror glass holder with the mirror glass into the frame to install the lower clips.
2005 Mazda MX-5 Miata
2005 ACCESSORIES & EQUIPMENT Glass/Windows/Mirrors - MX-5 Miata
Microsoft
Saturday, July 04, 2009 11:59:13 AM Page 50 © 2005 Mitchell Repair Information Company, LLC.

(1)
3. Press the top of the mirror glass holder with the mirror glass onto the frame to install the upper clips.(2)
Fig. 51: Installing Outside Mirror Glass Courtesy of MAZDA MOTORS CORP.
POWER OUTSIDE MIRROR SWITCH REMOVAL/INSTALLATION
1. Disconnect the negative battery cable.
2005 Mazda MX-5 Miata
2005 ACCESSORIES & EQUIPMENT Glass/Windows/Mirrors - MX-5 Miata
Microsoft
Saturday, July 04, 2009 11:59:13 AM Page 51 © 2005 Mitchell Repair Information Company, LLC.
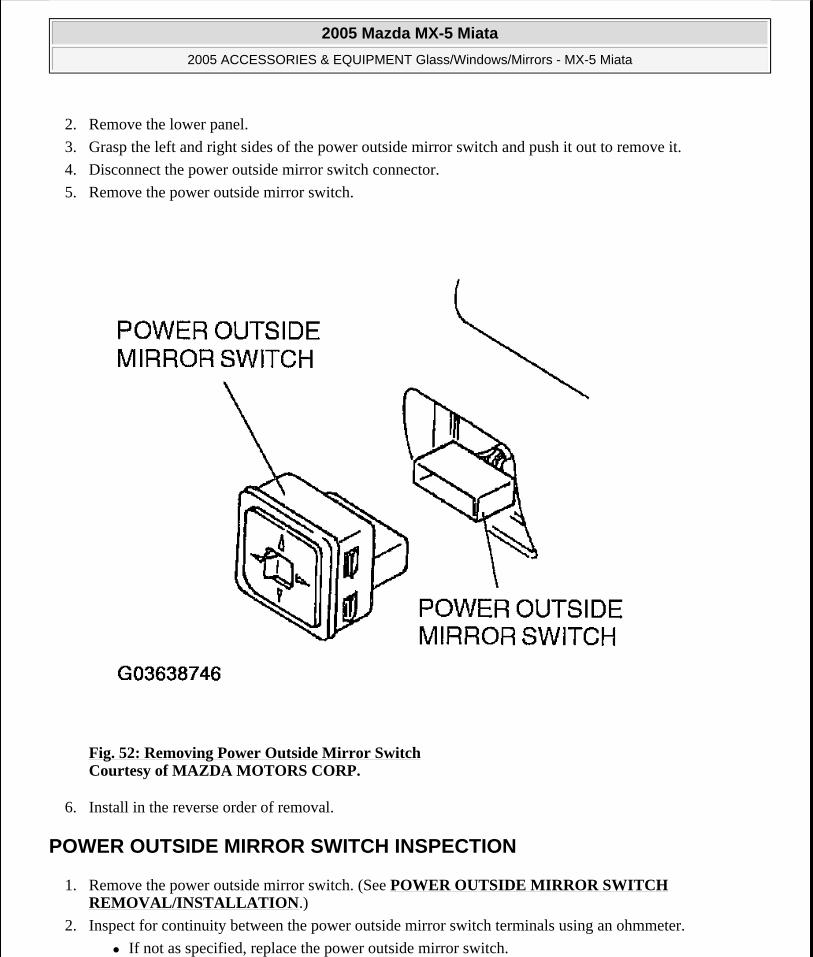
2. Remove the lower panel.
3. Grasp the left and right sides of the power outside mirror switch and push it out to remove it.
4. Disconnect the power outside mirror switch connector.
5. Remove the power outside mirror switch.
Fig. 52: Removing Power Outside Mirror Switch Courtesy of MAZDA MOTORS CORP.
6. Install in the reverse order of removal.
POWER OUTSIDE MIRROR SWITCH INSPECTION
1. Remove the power outside mirror switch. (See POWER OUTSIDE MIRROR SWITCH REMOVAL/INSTALLATION.)
2. Inspect for continuity between the power outside mirror switch terminals using an ohmmeter.
If not as specified, replace the power outside mirror switch.
2005 Mazda MX-5 Miata
2005 ACCESSORIES & EQUIPMENT Glass/Windows/Mirrors - MX-5 Miata
Microsoft
Saturday, July 04, 2009 11:59:13 AM Page 52 © 2005 Mitchell Repair Information Company, LLC.
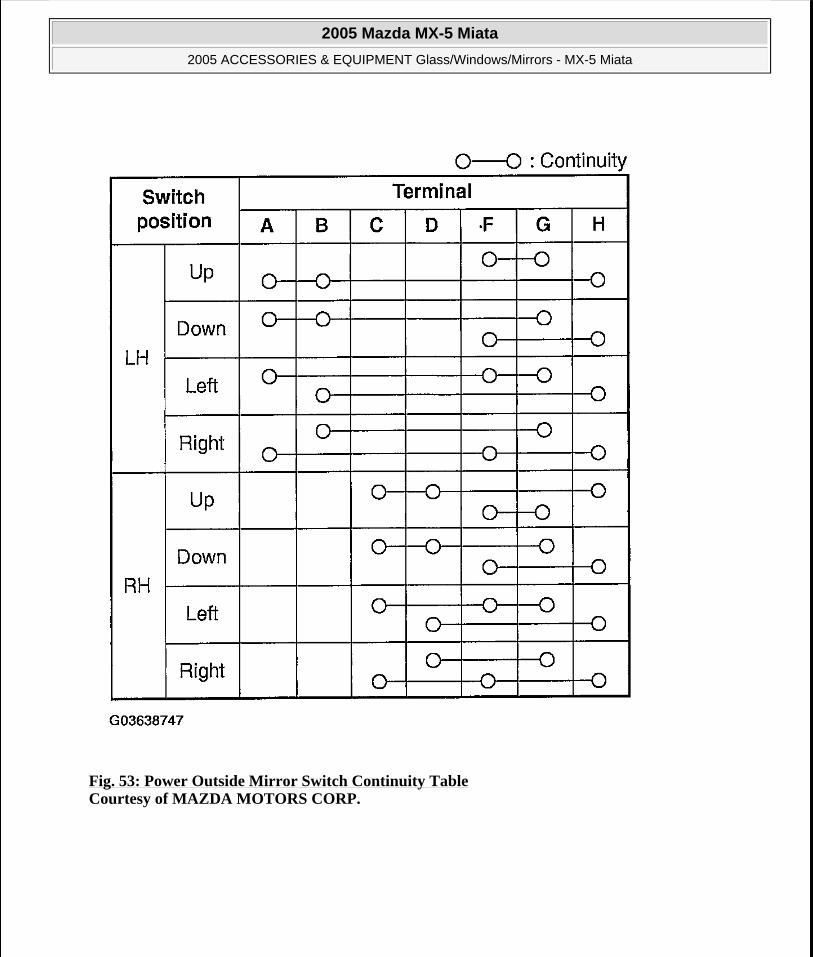
Fig. 53: Power Outside Mirror Switch Continuity Table Courtesy of MAZDA MOTORS CORP.
2005 Mazda MX-5 Miata
2005 ACCESSORIES & EQUIPMENT Glass/Windows/Mirrors - MX-5 Miata
Microsoft
Saturday, July 04, 2009 11:59:13 AM Page 53 © 2005 Mitchell Repair Information Company, LLC.
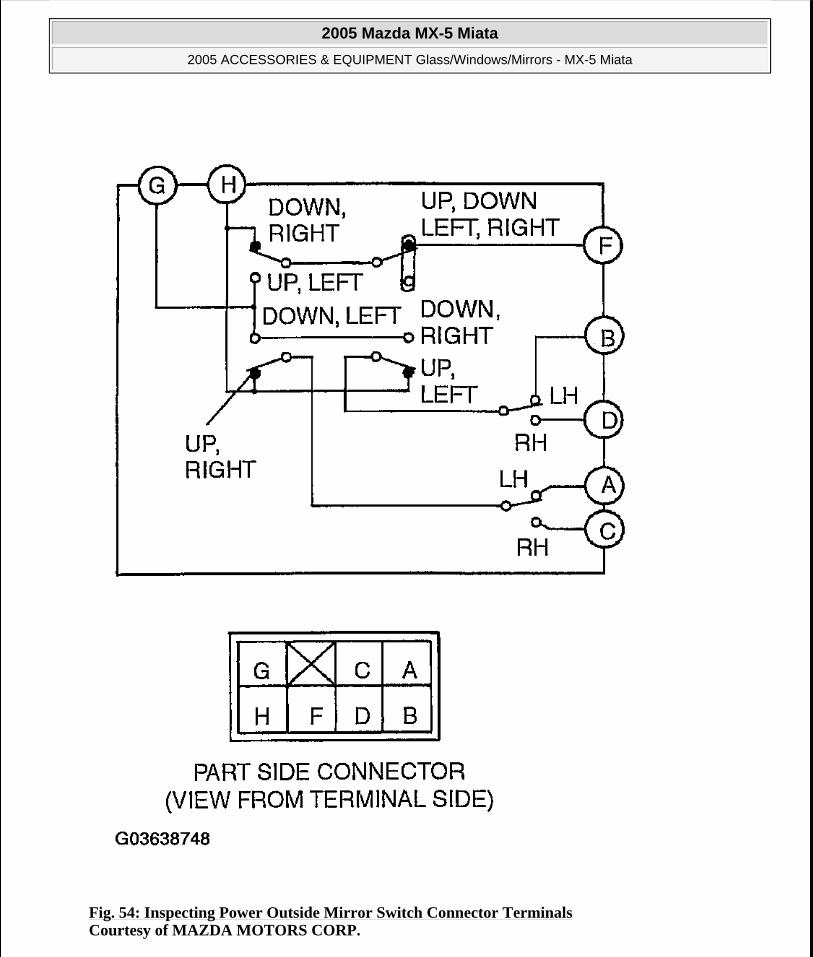
Fig. 54: Inspecting Power Outside Mirror Switch Connector Terminals Courtesy of MAZDA MOTORS CORP.
2005 Mazda MX-5 Miata
2005 ACCESSORIES & EQUIPMENT Glass/Windows/Mirrors - MX-5 Miata
Microsoft
Saturday, July 04, 2009 11:59:13 AM Page 54 © 2005 Mitchell Repair Information Company, LLC.
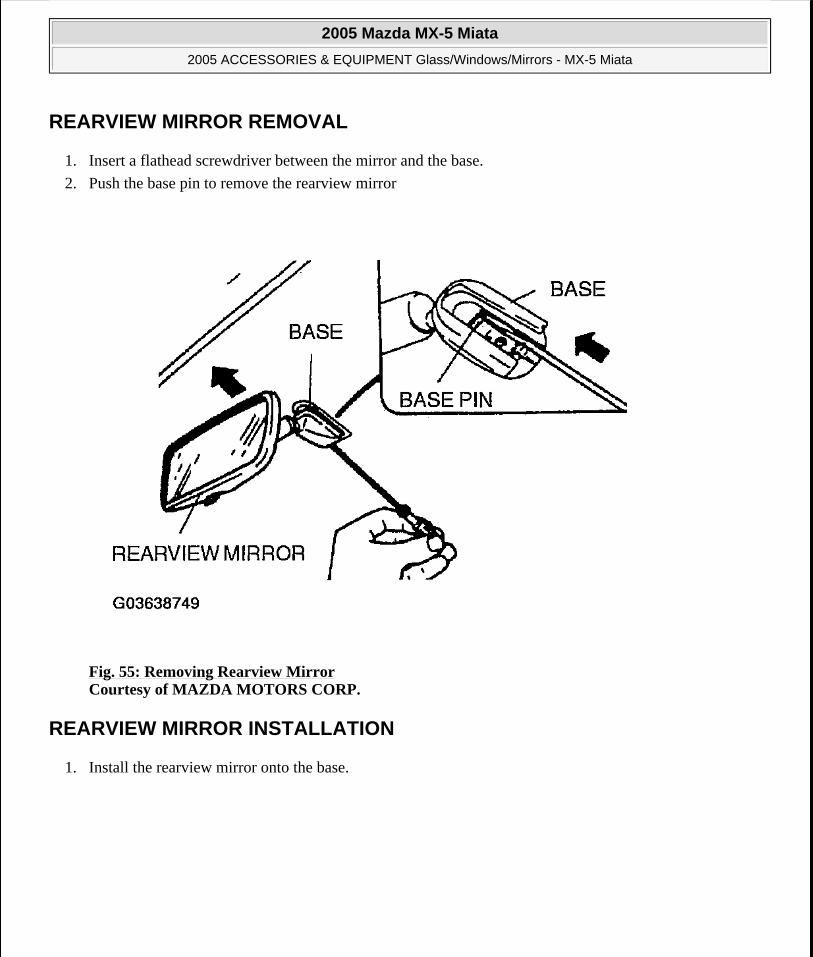
REARVIEW MIRROR REMOVAL
1. Insert a flathead screwdriver between the mirror and the base.
2. Push the base pin to remove the rearview mirror
Fig. 55: Removing Rearview Mirror Courtesy of MAZDA MOTORS CORP.
REARVIEW MIRROR INSTALLATION
1. Install the rearview mirror onto the base.
2005 Mazda MX-5 Miata
2005 ACCESSORIES & EQUIPMENT Glass/Windows/Mirrors - MX-5 Miata
Microsoft
Saturday, July 04, 2009 11:59:13 AM Page 55 © 2005 Mitchell Repair Information Company, LLC.
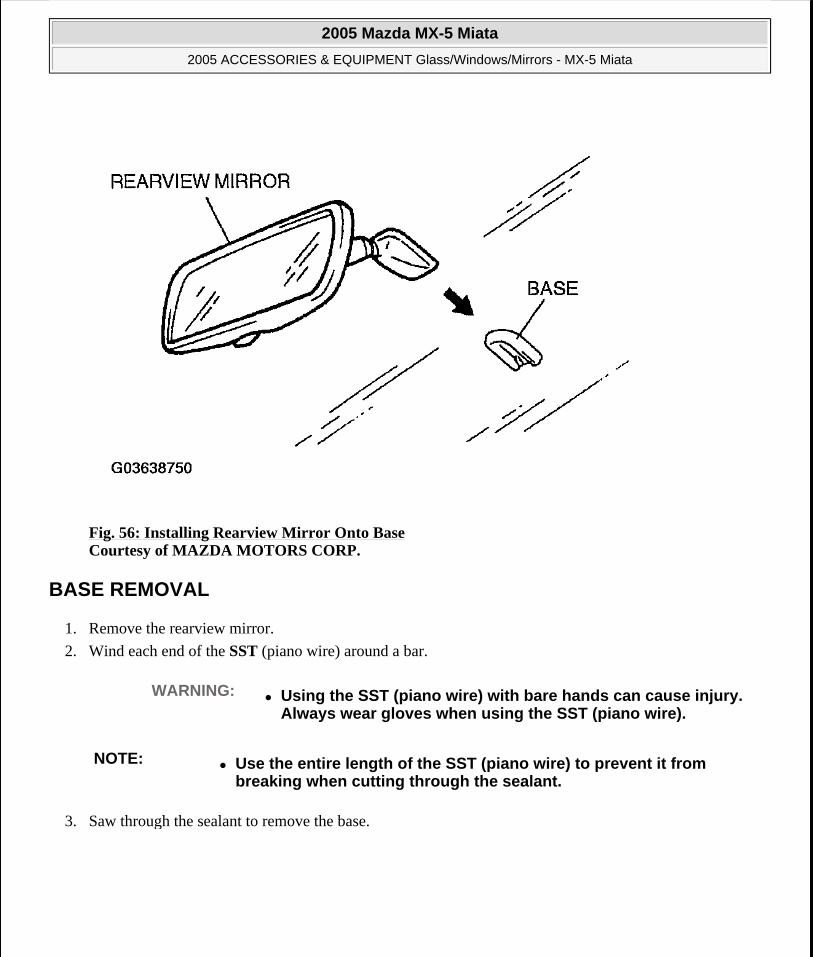
Fig. 56: Installing Rearview Mirror Onto Base Courtesy of MAZDA MOTORS CORP.
BASE REMOVAL
1. Remove the rearview mirror.
2. Wind each end of the SST (piano wire) around a bar.
3. Saw through the sealant to remove the base.
WARNING: Using the SST (piano wire) with bare hands can cause injury. Always wear gloves when using the SST (piano wire).
NOTE: Use the entire length of the SST (piano wire) to prevent it from breaking when cutting through the sealant.
2005 Mazda MX-5 Miata
2005 ACCESSORIES & EQUIPMENT Glass/Windows/Mirrors - MX-5 Miata
Microsoft
Saturday, July 04, 2009 11:59:13 AM Page 56 © 2005 Mitchell Repair Information Company, LLC.

Fig. 57: Sawing Through Sealant Of Base Courtesy of MAZDA MOTORS CORP.
BASE INSTALLATION
1. Cut away all of the original sealant using a razor.
2. Clean and degrease the ceramic coating on the glass and the base.
3. Apply primer to the bonding area of the glass and the base.
4. Apply a height of 3.0 mm {0.12 in} sealant to the base.
WARNING: Using a razor with bare hands can cause injury. Always wear gloves when using a razor.
CAUTION: Keep the area free of dirt and grease, and do not touch the surface or the primer may not properly bond to the surface of the glass.
2005 Mazda MX-5 Miata
2005 ACCESSORIES & EQUIPMENT Glass/Windows/Mirrors - MX-5 Miata
Microsoft
Saturday, July 04, 2009 11:59:13 AM Page 57 © 2005 Mitchell Repair Information Company, LLC.
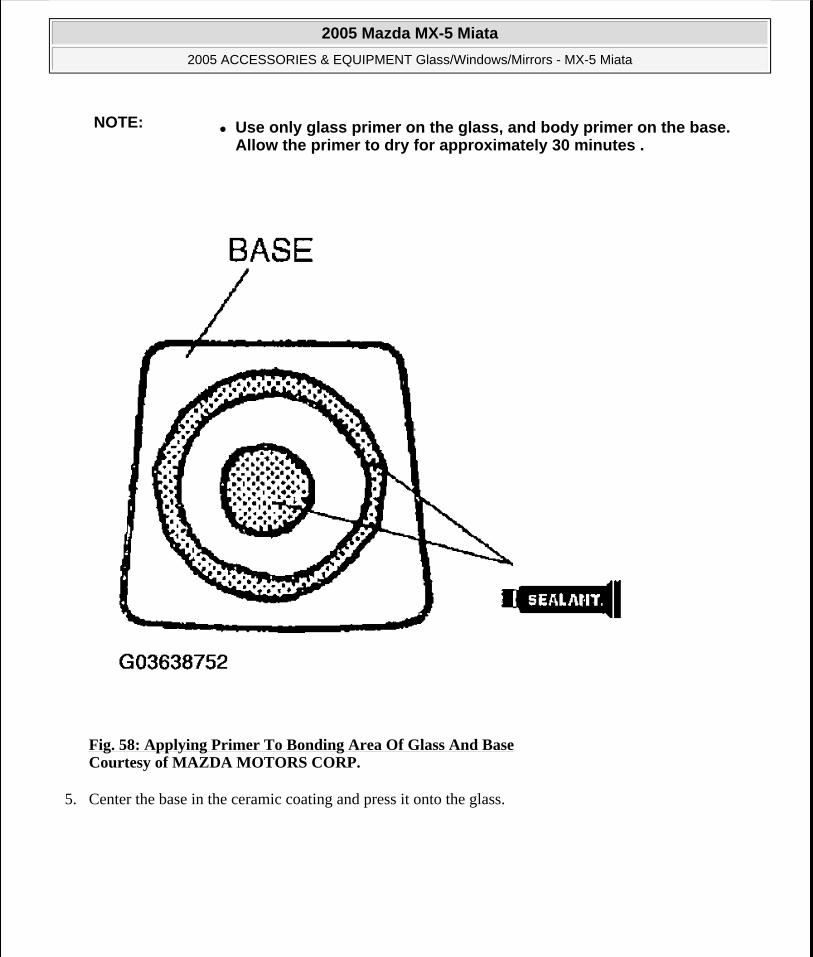
Fig. 58: Applying Primer To Bonding Area Of Glass And Base Courtesy of MAZDA MOTORS CORP.
5. Center the base in the ceramic coating and press it onto the glass.
NOTE: Use only glass primer on the glass, and body primer on the base. Allow the primer to dry for approximately 30 minutes .
2005 Mazda MX-5 Miata
2005 ACCESSORIES & EQUIPMENT Glass/Windows/Mirrors - MX-5 Miata
Microsoft
Saturday, July 04, 2009 11:59:13 AM Page 58 © 2005 Mitchell Repair Information Company, LLC.
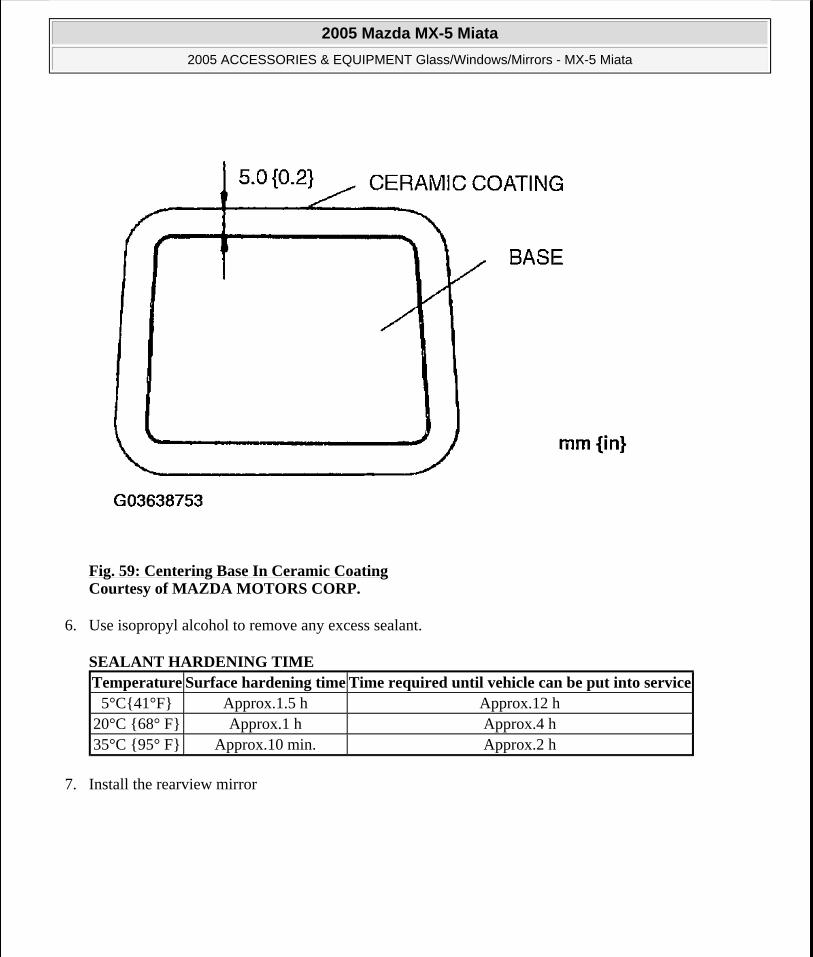
Fig. 59: Centering Base In Ceramic Coating Courtesy of MAZDA MOTORS CORP.
6. Use isopropyl alcohol to remove any excess sealant.
SEALANT HARDENING TIME
7. Install the rearview mirror
Temperature Surface hardening time Time required until vehicle can be put into service5°C{41°F} Approx.1.5 h Approx.12 h
20°C {68° F} Approx.1 h Approx.4 h35°C {95° F} Approx.10 min. Approx.2 h
2005 Mazda MX-5 Miata
2005 ACCESSORIES & EQUIPMENT Glass/Windows/Mirrors - MX-5 Miata
Microsoft
Saturday, July 04, 2009 11:59:13 AM Page 59 © 2005 Mitchell Repair Information Company, LLC.


![Lump v. Best Door & Window, Inc. - Supreme Court of Ohio · [Cite as Lump v. Best Door & Window, Inc., 2002-Ohio-1389.] COURT OF APPEALS THIRD APPELLATE DISTRICT LOGAN COUNTY MIKE](https://img.pdfslide.net/doc/110x75/5b1d3fb97f8b9acf678b6b4d/lump-v-best-door-window-inc-supreme-court-of-cite-as-lump-v-best-door.jpg)