Embed Size (px)
Citation preview
Project 2013: An introduction
Project 2013: An introduction TPAF
IT Learning Programme 2
Revision Information
Version Date Author Changes made
1.0 February 2013 Jean Glendinning Created
2.0 November 2013 Jean Glendinning Amended elements
3.0 Feb 2014 Jean Glendinning Additional tailored tasks
4.0 March 2014 Jean Glendinning Update of tasks
5.0 November 2015 Jean Glendinning Update and revision for 2013 software version
Copyright
Jean Glendinning makes this document available under a Creative Commons licence: Attribution, Non-Commercial, No Derivatives. Individual resources are subject to their own licencing conditions as listed.
Screenshots in this document are copyright of Microsoft.
The Oxford University logo and crest is copyright of Oxford University and may only be used by Oxford University members in accordance with the University’s branding guidelines.
TPAF Project 2013: An introduction
3 IT Learning Programme
Contents
Contents 1 Introduction ............................................................................. 1
1.1. What You Should Already Know ......................................................... 1
1.2. What Will You Learn? ......................................................................... 1
1.3. Using Office 2013 ............................................................................... 2
1.4. What is Project? ................................................................................. 3
1.5. Where Can I Get a Copy? ................................................................... 3
2 Preliminaries ............................................................................ 4
2.1. Concepts and Techniques .................................................................. 4
2.2. Uses of Microsoft Project ................................................................... 4
2.3. Terminology ....................................................................................... 5
2.3.1. Project Baseline .................................................................................... 5
2.3.2. Milestones ............................................................................................ 5
2.3.3. Dependencies ....................................................................................... 5
2.3.4. Critical Path ......................................................................................... 5
2.3.5. Slack ..................................................................................................... 5
2.3.6. Constraints ........................................................................................... 5
2.4. The Opening Screen ........................................................................... 6
3 Ribbons and Views ................................................................... 7
3.1.1. Ribbon Options ..................................................................................... 7
3.1.2. Displaying Different Timescales .......................................................... 8
3.2. Project Information ........................................................................... 9
3.2.1. Start/End Date ..................................................................................... 9
3.2.2. Project Calendar................................................................................... 9
4 Tasks ....................................................................................... 11
4.1. Entering Task Details ........................................................................ 11
4.2. Entering Task Durations .................................................................. 12
4.3. Linking Tasks .................................................................................... 12
4.4. Types of Task Dependencies ............................................................ 13
4.5. Amending Tasks ................................................................................ 14
4.6. Formatting the Gantt Bars ............................................................... 14
5 Resources and Fixed Costs ..................................................... 15
Project 2013: An introduction TPAF
IT Learning Programme 4
5.1. Entering Resources ........................................................................... 15
5.2. Assigning Resources ......................................................................... 15
5.3. Viewing Resource and Task Information .........................................16
5.4. Resolving Resources Conflicts .......................................................... 17
5.5. Assigning Fixed Costs ...................................................................... 18
5.6. Changing the Way Actual Costs Are Calculated .............................. 18
6 Working with Multiple Projects ............................................. 19
6.1. Creating a Multiple Project File ........................................................19
6.2. Creating a Shared Resource Pool .....................................................19
7 Monitoring and Evaluation .................................................... 20
7.1. Setting a Baseline ............................................................................. 20
7.2. Entering Constraints ........................................................................ 20
7.3. Displaying Constraints and Notes ................................................... 20
7.4. Entering Progress ............................................................................. 21
7.5. Tracking Progress ............................................................................. 21
7.6. Sorting Information .......................................................................... 21
7.7. Filtering Information ........................................................................ 21
7.8. AutoFilter .......................................................................................... 21
7.9. Changing the Project Duration ......................................................... 21
8 Presenting Information ......................................................... 23
8.1. Displaying Different Levels of Information ..................................... 23
8.2. Using the Timeline .......................................................................... 23
8.3. Displaying Different Combinations of Information ....................... 23
8.4. Previewing, Page Setup and Printing .............................................. 23
8.5. Printing Standard Reports .............................................................. 24
9 The Project Server .................................................................. 26
10 Linking tasks - Exercise ....................................................... 28
10.1. Basic Links ...................................................................................... 28
10.2. Task Group 1 .................................................................................. 28
10.3. Task Group 2 .................................................................................. 29
10.4. Task Group 3 .................................................................................. 29
10.5. Task Group 4 .................................................................................. 30
10.6. Types of links ................................................................................. 30
10.7. Task Group 5 ................................................................................... 31
10.8. Summary ........................................................................................ 32
TPAF Project 2013: An introduction
5 IT Learning Programme
11 Clinical Trials Exercise Project ............................................. 33
11.1. Entering tasks ................................................................................. 33
11.2. Using outline ................................................................................... 33
11.3. Allocating Durations ....................................................................... 34
11.4. Linking tasks ................................................................................... 35
11.5. Recurring tasks ............................................................................... 35
11.6. Format the Gantt Chart .................................................................. 36
12 Sample Exercise ................................................................... 37
12.1. Building a Plan ................................................................................ 37
12.1.1. Add the following tasks: .................................................................... 37
12.1.2. Mark as Milestones ........................................................................... 37
12.1.3. Create an outline ............................................................................... 37
12.1.4. Enter durations ................................................................................. 38
12.1.5. Add the following Resources: ........................................................... 39
13 What Next? ........................................................................... 40
13.1. More Courses .................................................................................. 40
13.2. IT Services Help Centre ................................................................. 40

Project 2013: An introduction
1 IT Learning Programme
1 Introduction Welcome to the Microsoft Project 2013 session!
This booklet accompanies the course delivered by Oxford University’s IT Learning Programme. Although the exercises are clearly explained so that you can work through them independently, you will find that it will help if you also attend the taught session where you can get advice from the teacher, demonstrator(s) and even each other!
If at any time you are not clear about any aspect of the course, please make sure you ask your teacher or demonstrator for some help. If you are away from the class, you can get help by email from your teacher or from [email protected].
1.1. What You Should Already Know
No previous knowledge of Microsoft Project is expected. We will assume that you have some knowledge of Word which may be gained via the course Word: Fundamentals and that you are familiar with entering text and simple editing, rearranging and formatting text - copy and paste, printing and previewing and managing files.
We will also assume that you are familiar with opening files from particular folders and saving them, perhaps with a different name, back to the same or a different folder.
The computer network in our teaching rooms may differ slightly from that which you are used to in your College or Department; if you are confused by the differences please ask for help from the teacher or demonstrator(s).
1.2. What Will You Learn?
This course will help you learn to use Microsoft Project 2013 it will cover how the package can be used to help plan, monitor and control a project. It will show how MS Project can be used to track project progress against a schedule and a budget. It is a single session, covering time-saving techniques and automations, and provides tasks for hands-on practice.
In this session we will cover the following topics:
Entering and linking tasks
Creating and managing calendars
Adding resources
Printing and viewing project plans
Tracking the project
These notes deal with Microsoft Project 2013 using Windows. Having worked through these notes, you should also be able to adapt to other versions including Microsoft Project for Mac, since most of the principles hold true regardless of the version of the software.
Getting to grips with a package as sophisticated and powerful as Microsoft Project can be time-consuming, so allow yourself plenty of time for practice. To increase your understanding of Microsoft Project, make use of the Help facilities available within Microsoft Project.
Project 2013: An introduction
IT Learning Programme 2
1.3. Using Office 2013
If you have previously used another version of Office, you may find Office 2013 looks rather unfamiliar. “Office 2013: What’s New” is a self-study guide covering the Ribbon, Quick Access Toolbar and so on. This can be downloaded from the ITLP Portfolio at http://portfolio.it.ox.ac.uk .
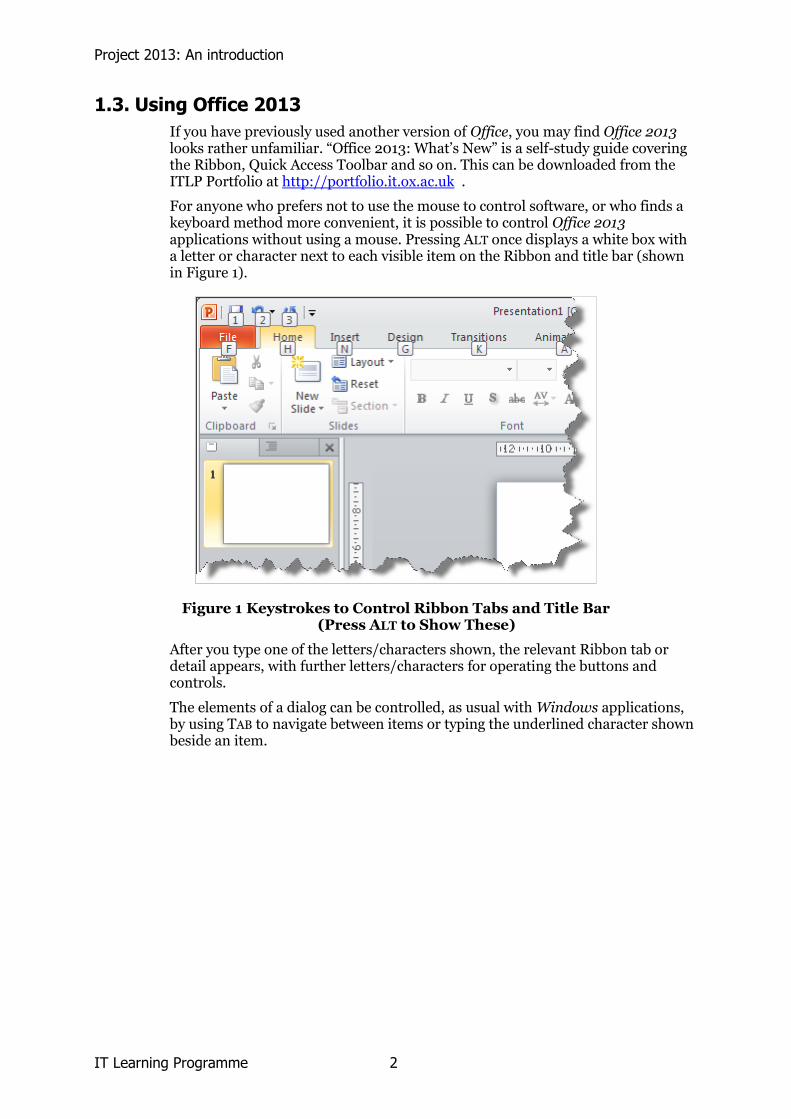
For anyone who prefers not to use the mouse to control software, or who finds a keyboard method more convenient, it is possible to control Office 2013 applications without using a mouse. Pressing ALT once displays a white box with a letter or character next to each visible item on the Ribbon and title bar (shown in Figure 1).
Figure 1 Keystrokes to Control Ribbon Tabs and Title Bar (Press ALT to Show These)
After you type one of the letters/characters shown, the relevant Ribbon tab or detail appears, with further letters/characters for operating the buttons and controls.
The elements of a dialog can be controlled, as usual with Windows applications, by using TAB to navigate between items or typing the underlined character shown beside an item.
Project 2013: An introduction
3 IT Learning Programme
1.4. What is Project?
Microsoft Project 2013 is not part of the Microsoft Office 2013 package and must be obtained separately. It enables you to create professional project plans to manage and track progress. You can create attractive Gantt charts to show progress.
You can manage resources and materials and produce reports to help track progress
1.5. Where Can I Get a Copy?
Microsoft Project 2013 is available for departments and colleges to purchase from the IT Services on-line shop. Staff and students would need to go to a Microsoft Authorised Education Reseller.
Project 2013: An introduction
IT Learning Programme 4
2 Preliminaries
2.1. Concepts and Techniques
The process of project management ensures that a project meets its objectives within a planned timescale and within budget (costs/resources). Various elements are involved:
Project planning
Client management
Quality management
Leadership and communication skills
There are many different methodologies associated with project management, for example Prince2, these give the user a planned way to develop and manage a project. Microsoft Project is a tool which can help within that methodology. It allows provision of quick and clear visual overviews of progress, as well as the facility to hone in onto specific areas of expenditure if needed.
Producing a project plan in MS Project helps to:
Communicate what you want to achieve
Demonstrate how it will be achieved
Gain approval/support
Demonstrate the need for additional resources
Provide a means of tracking and controlling progress
2.2. Uses of Microsoft Project
Microsoft Project can be used for a variety of reasons. These can be divided into:
To give an estimate with specific start dates and times (Manually Scheduled option).
Overview for project planning and funding bids
Detail view of project tracking to manage resources use and availability
Review of project for government bodies to satisfy funding requirements
The ability to produce clear and useful Gantt charts at critical moments throughout the stages annotated in various ways.
The course will attempt to identify ways in which particular templates can be created and used. The Clinical Tr ials Exercise Project will attempt to address these issues. Other exercises are shown at the back of the booklet.
Project 2013: An introduction
5 IT Learning Programme
2.3. Terminology
Before we start, here is a brief overview of some of the essential concepts and techniques which are used within MS Project.
2.3.1. Project Baseline
The baseline should be established once everything has been entered and you are satisfied that the project now represents your best expectations. You can then use the baseline to compare your original plan with actual progress during the course of the project. The options for being able to save an interim baseline has also been added. This means that you can set up and save different comparative versions of the programme.
2.3.2. Milestones
The first stage of project planning, once you have established your ultimate objective, is to identify the individual tasks. It is easier if these are grouped together into “phases”. The end of each phase can be considered as a “milestone” in the progress of the project. In the Gantt Chart view milestones are show with a different icon.
2.3.3. Dependencies
After entering the individual tasks, you need to decide how and if they affect other tasks in your list. When you have decided this you will link them together. One task then becomes dependent on another. The different types of dependencies will be explained. Considering ALL of the dependencies of a task is something that people often overlook – linking only the most obvious dependencies, however sometimes the least obvious can have an important impact on when a task happens.
2.3.4. Critical Path
The Critical Path is the “longest” route through the project. i.e. the path that cannot possibly be shortened. The critical path changes throughout the running of the project and using MS Project helps to manage the tracking of the process.
2.3.5. Slack
Critical tasks have zero “slack”: a delay in completing the task will delay the project finish date. There may be tasks which can be delayed without affecting the finish date. Slack is also referred to as “lag”. If possible when you are setting up a plan it is good if you can build in slack as it gives space for adjustments to be made without affecting the overall duration of the project.
2.3.6. Constraints
In the 2013 version you have the opportunity to manually schedule tasks or to have the programme automatically adjust the start and end dates of tasks. If you are automatically scheduling events then you should resist the temptation to allocate specific dates when first entering the details. It is best to enter a start date for the project and then think about the individual task durations. Once you have linked the tasks, Project will calculate the end date for you. Specific dates are referred to as “constraints”. If you build your project plan with specific dates from the outset it gives you much less flexibility for changing start dates etc. as you will have to redo ALL of the constrained dates in project.
Project 2013: An introduction
IT Learning Programme 6
2.4. The Opening Screen
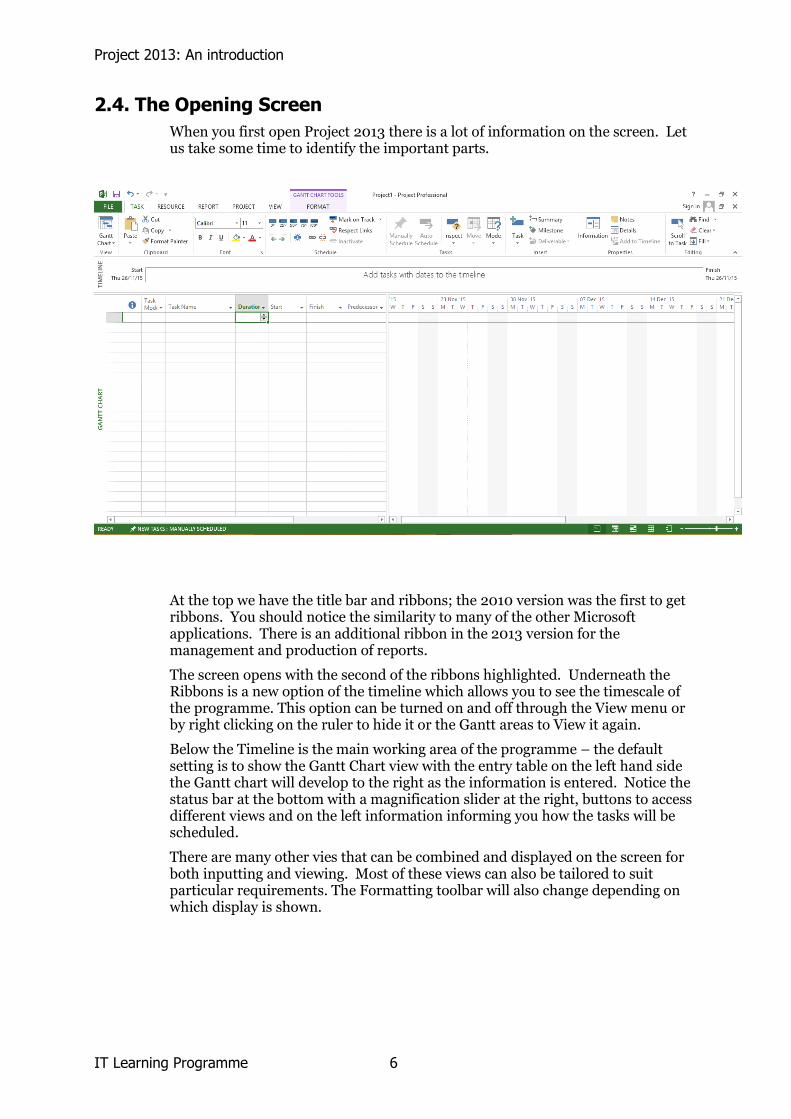
When you first open Project 2013 there is a lot of information on the screen. Let us take some time to identify the important parts.
At the top we have the title bar and ribbons; the 2010 version was the first to get ribbons. You should notice the similarity to many of the other Microsoft applications. There is an additional ribbon in the 2013 version for the management and production of reports.
The screen opens with the second of the ribbons highlighted. Underneath the Ribbons is a new option of the timeline which allows you to see the timescale of the programme. This option can be turned on and off through the View menu or by right clicking on the ruler to hide it or the Gantt areas to View it again.
Below the Timeline is the main working area of the programme – the default setting is to show the Gantt Chart view with the entry table on the left hand side the Gantt chart will develop to the right as the information is entered. Notice the status bar at the bottom with a magnification slider at the right, buttons to access different views and on the left information informing you how the tasks will be scheduled.
There are many other vies that can be combined and displayed on the screen for both inputting and viewing. Most of these views can also be tailored to suit particular requirements. The Formatting toolbar will also change depending on which display is shown.
Project 2013: An introduction
7 IT Learning Programme
3 Ribbons and Views
3.1.1. Ribbon Options
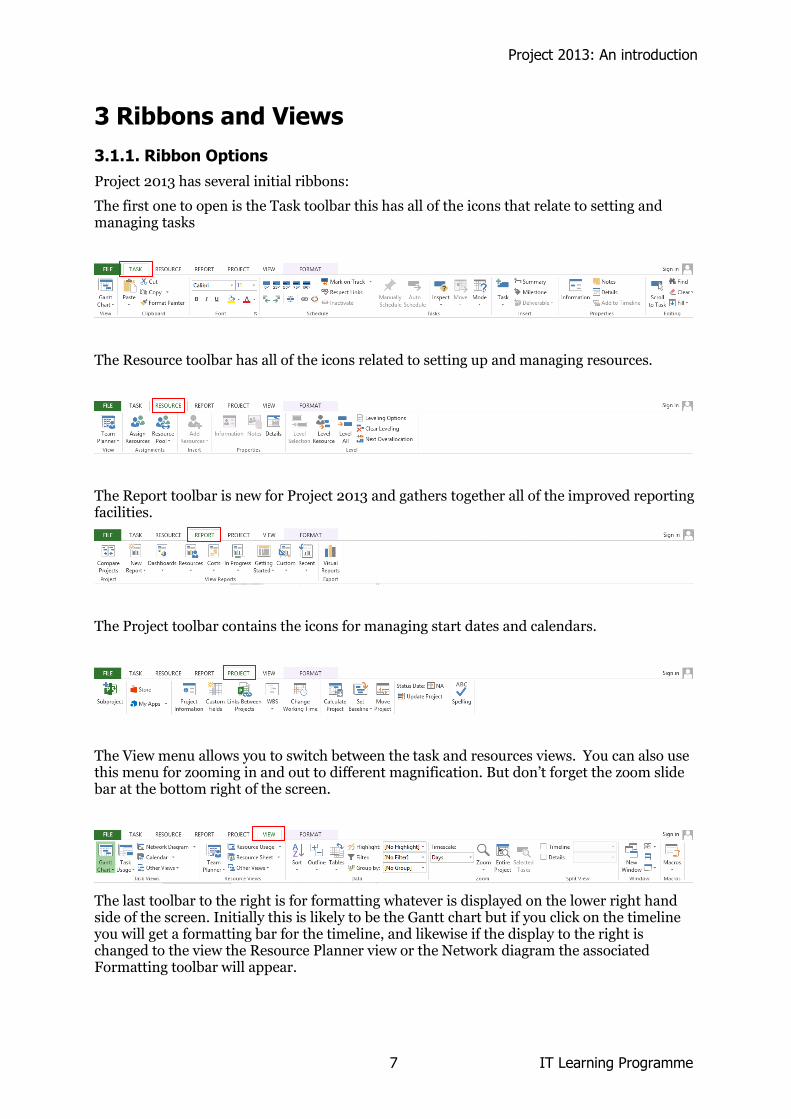
Project 2013 has several initial ribbons:
The first one to open is the Task toolbar this has all of the icons that relate to setting and managing tasks
The Resource toolbar has all of the icons related to setting up and managing resources.
The Report toolbar is new for Project 2013 and gathers together all of the improved reporting facilities.
The Project toolbar contains the icons for managing start dates and calendars.
The View menu allows you to switch between the task and resources views. You can also use this menu for zooming in and out to different magnification. But don’t forget the zoom slide bar at the bottom right of the screen.
The last toolbar to the right is for formatting whatever is displayed on the lower right hand side of the screen. Initially this is likely to be the Gantt chart but if you click on the timeline you will get a formatting bar for the timeline, and likewise if the display to the right is changed to the view the Resource Planner view or the Network diagram the associated Formatting toolbar will appear.

Project 2013: An introduction
IT Learning Programme 8
The left-most ribbon tag opens the File screen – this replaces the old File menu or Office button. In the middle recent projects are listed. Down the left are the other options.
Clicking on them will adjust the details in the central area of the page. The standard File menu options of New, Open, Save and Print are also found here.
The print menu allows you to preview the printing and change the print settings.
Document Windows
Every project file you open will open in its own window. This means you can navigate between projects using the Taskbar.
3.1.2. Displaying Different Timescales
On the View Ribbon use the Zoom buttons to change the timescale. You can also choose to display the timescale in different scales or there is a useful button to see the entire project in one screen.
Alternatively, double-click on the column headings and use the dialogue box to adjust the display scale
Project 2013: An introduction
9 IT Learning Programme
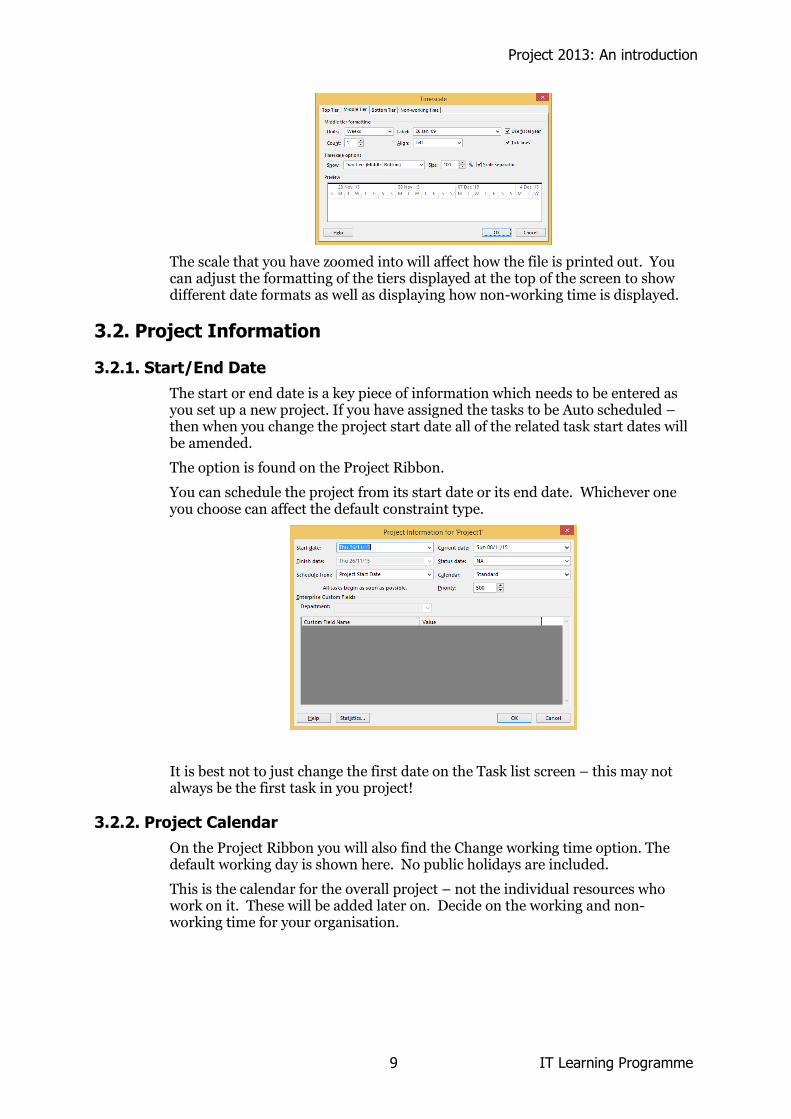
The scale that you have zoomed into will affect how the file is printed out. You can adjust the formatting of the tiers displayed at the top of the screen to show different date formats as well as displaying how non-working time is displayed.
3.2. Project Information
3.2.1. Start/End Date
The start or end date is a key piece of information which needs to be entered as you set up a new project. If you have assigned the tasks to be Auto scheduled – then when you change the project start date all of the related task start dates will be amended.
The option is found on the Project Ribbon.
You can schedule the project from its start date or its end date. Whichever one you choose can affect the default constraint type.
It is best not to just change the first date on the Task list screen – this may not always be the first task in you project!
3.2.2. Project Calendar
On the Project Ribbon you will also find the Change working time option. The default working day is shown here. No public holidays are included.
This is the calendar for the overall project – not the individual resources who work on it. These will be added later on. Decide on the working and non-working time for your organisation.

Project 2013: An introduction
IT Learning Programme 10
Enter company holiday periods and Bank Holidays. Make sure that you include these far enough ahead as if the start date of the project moves you will want to make sure that they are all included.
It is also very important that the working day length is set accurately as this will affect costings later on in the project if not done at the outset.
When you have added resources you will be able to adjust the working time for each resource as necessary, but it is vital to have the overall working day accurately.
It is a good idea to have a template version for your organisation which contains all of these factors set up, including public holidays. Then this can be reused repeatedly for new projects without having to repeat these steps.
Project 2013: An introduction
11 IT Learning Programme
4 Tasks
4.1. Entering Task Details
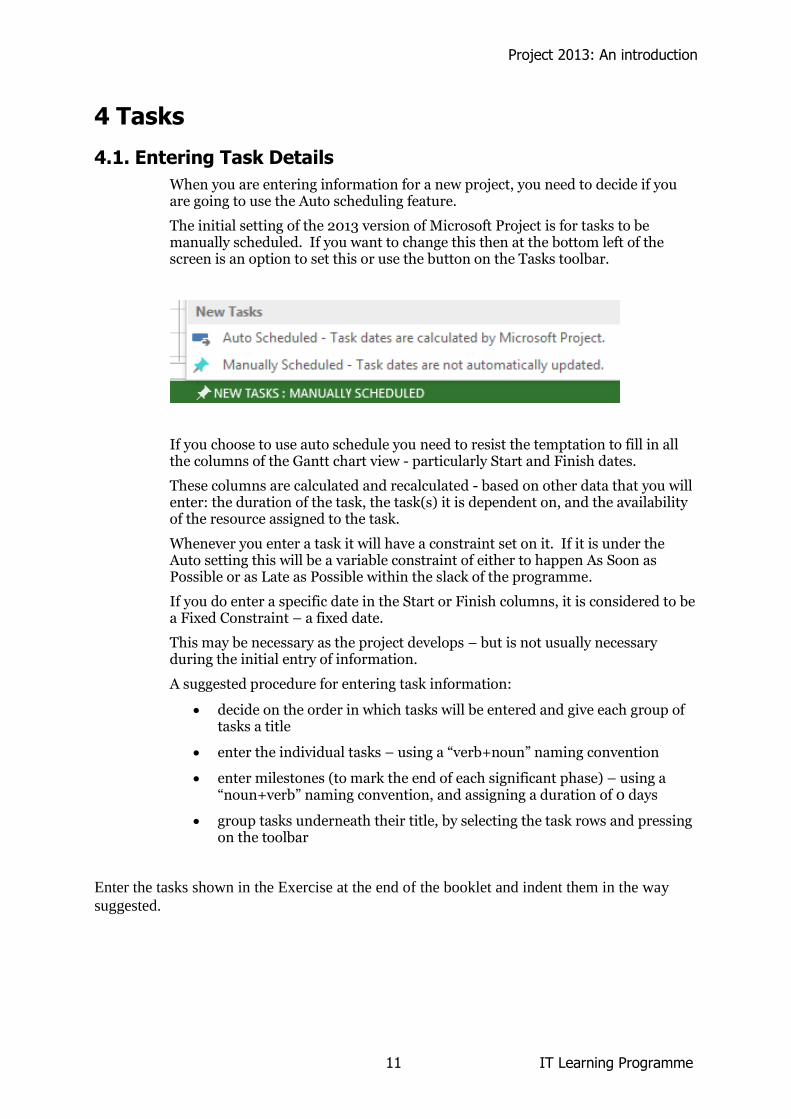
When you are entering information for a new project, you need to decide if you are going to use the Auto scheduling feature.
The initial setting of the 2013 version of Microsoft Project is for tasks to be manually scheduled. If you want to change this then at the bottom left of the screen is an option to set this or use the button on the Tasks toolbar.
If you choose to use auto schedule you need to resist the temptation to fill in all the columns of the Gantt chart view - particularly Start and Finish dates.
These columns are calculated and recalculated - based on other data that you will enter: the duration of the task, the task(s) it is dependent on, and the availability of the resource assigned to the task.
Whenever you enter a task it will have a constraint set on it. If it is under the Auto setting this will be a variable constraint of either to happen As Soon as Possible or as Late as Possible within the slack of the programme.
If you do enter a specific date in the Start or Finish columns, it is considered to be a Fixed Constraint – a fixed date.
This may be necessary as the project develops – but is not usually necessary during the initial entry of information.
A suggested procedure for entering task information:
decide on the order in which tasks will be entered and give each group of tasks a title
enter the individual tasks – using a “verb+noun” naming convention
enter milestones (to mark the end of each significant phase) – using a “noun+verb” naming convention, and assigning a duration of 0 days
group tasks underneath their title, by selecting the task rows and pressing on the toolbar
Enter the tasks shown in the Exercise at the end of the booklet and indent them in the way
suggested.
Project 2013: An introduction
IT Learning Programme 12
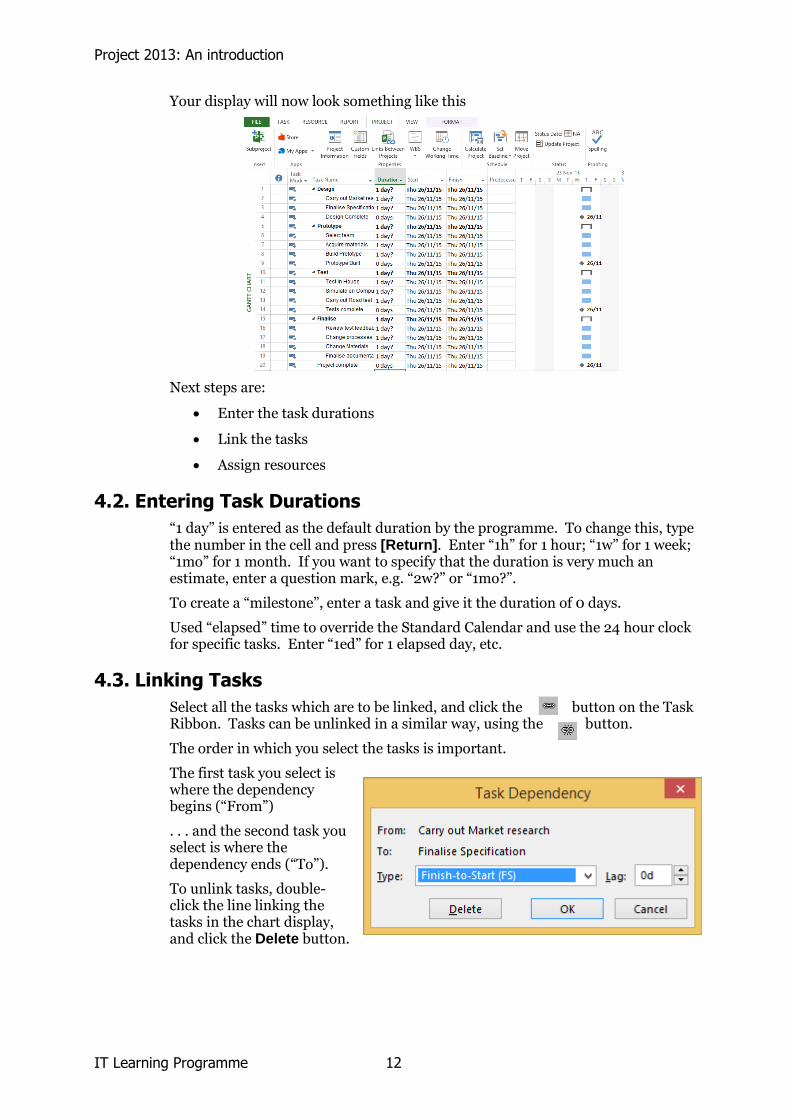
Your display will now look something like this
Next steps are:
Enter the task durations
Link the tasks
Assign resources
4.2. Entering Task Durations
“1 day” is entered as the default duration by the programme. To change this, type the number in the cell and press [Return]. Enter “1h” for 1 hour; “1w” for 1 week; “1mo” for 1 month. If you want to specify that the duration is very much an estimate, enter a question mark, e.g. “2w?” or “1mo?”.
To create a “milestone”, enter a task and give it the duration of 0 days.
Used “elapsed” time to override the Standard Calendar and use the 24 hour clock for specific tasks. Enter “1ed” for 1 elapsed day, etc.
4.3. Linking Tasks
Select all the tasks which are to be linked, and click the button on the Task Ribbon. Tasks can be unlinked in a similar way, using the button.
The order in which you select the tasks is important.
The first task you select is where the dependency begins (“From”)
. . . and the second task you select is where the dependency ends (“To”).
To unlink tasks, double-click the line linking the tasks in the chart display, and click the Delete button.
Project 2013: An introduction
13 IT Learning Programme
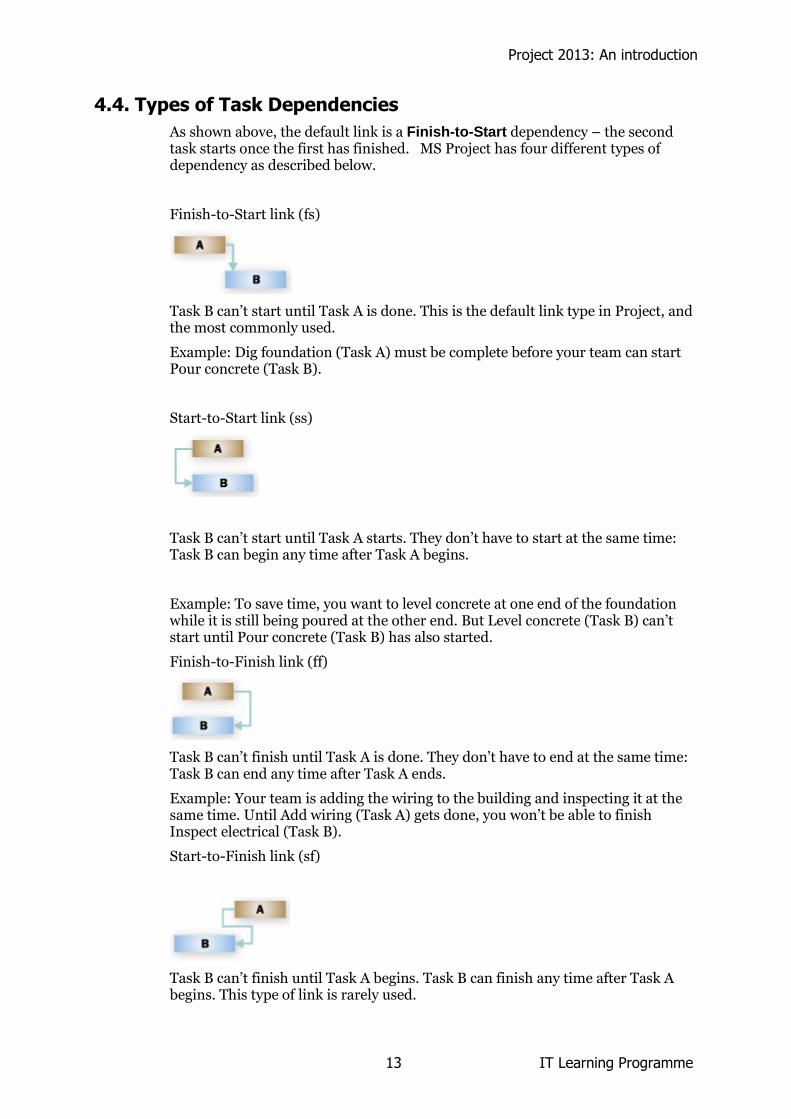
4.4. Types of Task Dependencies
As shown above, the default link is a Finish-to-Start dependency – the second task starts once the first has finished. MS Project has four different types of dependency as described below.
Finish-to-Start link (fs)
Task B can’t start until Task A is done. This is the default link type in Project, and the most commonly used.
Example: Dig foundation (Task A) must be complete before your team can start Pour concrete (Task B).
Start-to-Start link (ss)
Task B can’t start until Task A starts. They don’t have to start at the same time: Task B can begin any time after Task A begins.
Example: To save time, you want to level concrete at one end of the foundation while it is still being poured at the other end. But Level concrete (Task B) can’t start until Pour concrete (Task B) has also started.
Finish-to-Finish link (ff)
Task B can’t finish until Task A is done. They don’t have to end at the same time: Task B can end any time after Task A ends.
Example: Your team is adding the wiring to the building and inspecting it at the same time. Until Add wiring (Task A) gets done, you won’t be able to finish Inspect electrical (Task B).
Start-to-Finish link (sf)
Task B can’t finish until Task A begins. Task B can finish any time after Task A begins. This type of link is rarely used.
Project 2013: An introduction
IT Learning Programme 14
Example: The roof trusses for your building are built off-site. You can’t finish Assemble roof (Task B) until Truss delivery (Task A) begins.
It may also be necessary to enter Lag – either positive or negative. A common example of +Lag is “waiting for concrete to dry”; -Lag is used when tasks can overlap and is usually referred to as Lead.
Try the exercise on linking tasks at the end of the booklet to help to understand the difference between the types of links.
4.5. Amending Tasks
If you use [Delete] to clear a cell, it will delete the whole task. Right-click and select Clear Contents instead.
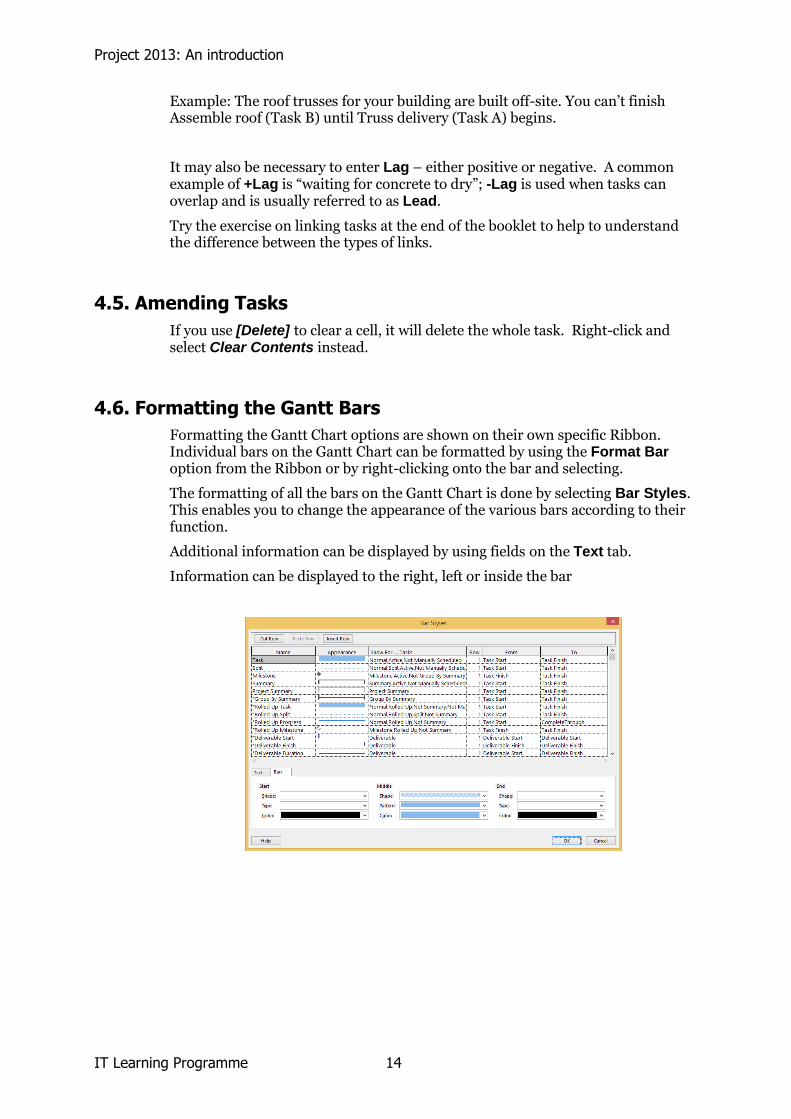
4.6. Formatting the Gantt Bars
Formatting the Gantt Chart options are shown on their own specific Ribbon. Individual bars on the Gantt Chart can be formatted by using the Format Bar option from the Ribbon or by right-clicking onto the bar and selecting.
The formatting of all the bars on the Gantt Chart is done by selecting Bar Styles. This enables you to change the appearance of the various bars according to their function.
Additional information can be displayed by using fields on the Text tab.
Information can be displayed to the right, left or inside the bar
Project 2013: An introduction
15 IT Learning Programme
5 Resources and Fixed Costs
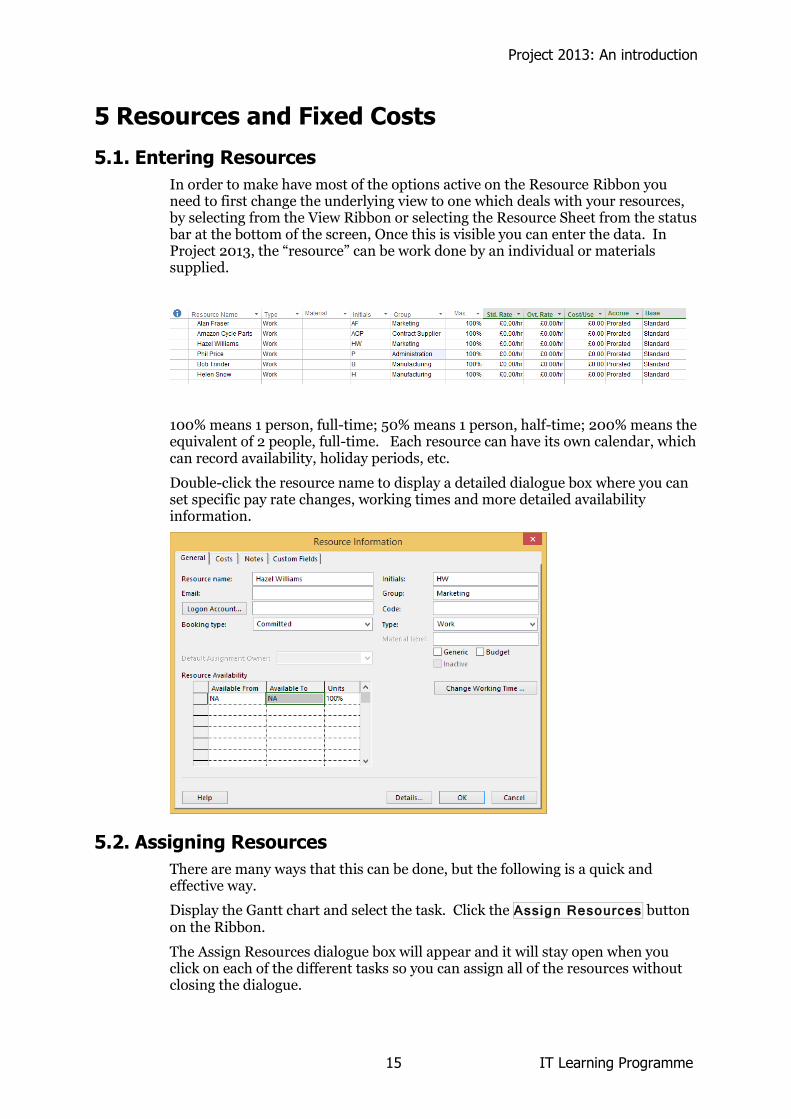
5.1. Entering Resources
In order to make have most of the options active on the Resource Ribbon you need to first change the underlying view to one which deals with your resources, by selecting from the View Ribbon or selecting the Resource Sheet from the status bar at the bottom of the screen, Once this is visible you can enter the data. In Project 2013, the “resource” can be work done by an individual or materials supplied.
100% means 1 person, full-time; 50% means 1 person, half-time; 200% means the equivalent of 2 people, full-time. Each resource can have its own calendar, which can record availability, holiday periods, etc.
Double-click the resource name to display a detailed dialogue box where you can set specific pay rate changes, working times and more detailed availability information.
5.2. Assigning Resources
There are many ways that this can be done, but the following is a quick and effective way.
Display the Gantt chart and select the task. Click the Assign Resources button on the Ribbon.
The Assign Resources dialogue box will appear and it will stay open when you click on each of the different tasks so you can assign all of the resources without closing the dialogue.
Project 2013: An introduction
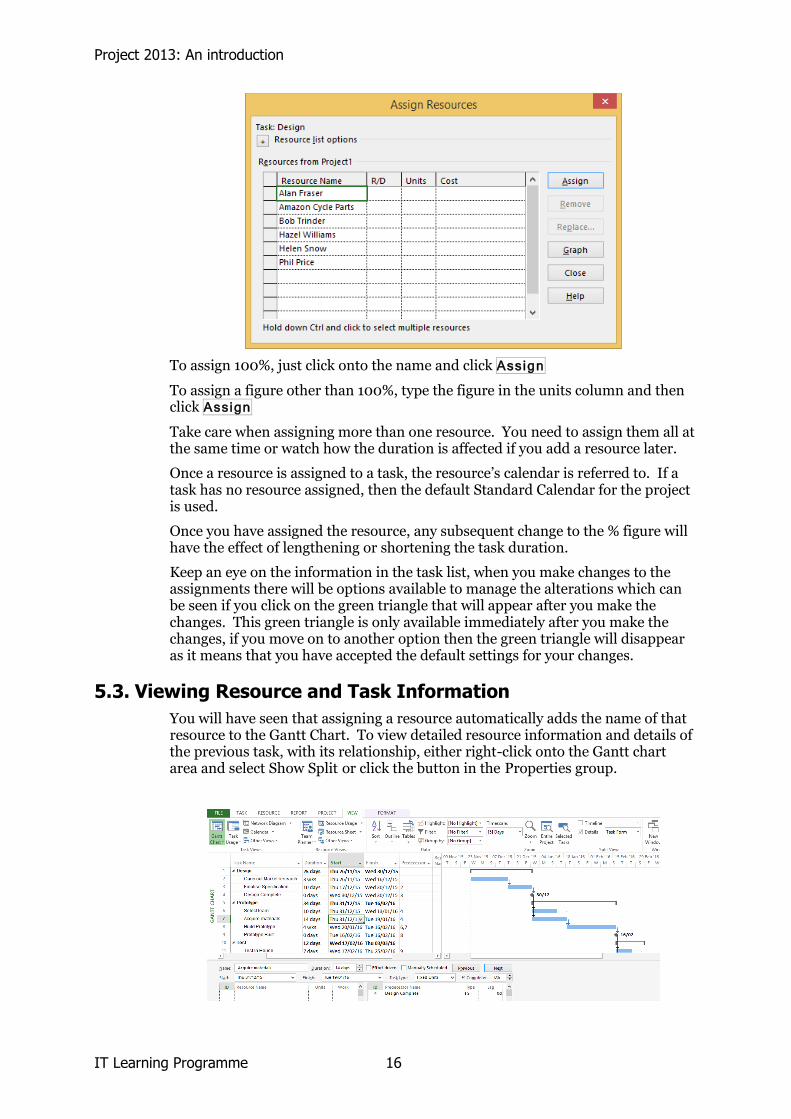
IT Learning Programme 16
To assign 100%, just click onto the name and click Assign
To assign a figure other than 100%, type the figure in the units column and then click Assign
Take care when assigning more than one resource. You need to assign them all at the same time or watch how the duration is affected if you add a resource later.
Once a resource is assigned to a task, the resource’s calendar is referred to. If a task has no resource assigned, then the default Standard Calendar for the project is used.
Once you have assigned the resource, any subsequent change to the % figure will have the effect of lengthening or shortening the task duration.
Keep an eye on the information in the task list, when you make changes to the assignments there will be options available to manage the alterations which can be seen if you click on the green triangle that will appear after you make the changes. This green triangle is only available immediately after you make the changes, if you move on to another option then the green triangle will disappear as it means that you have accepted the default settings for your changes.
5.3. Viewing Resource and Task Information
You will have seen that assigning a resource automatically adds the name of that resource to the Gantt Chart. To view detailed resource information and details of the previous task, with its relationship, either right-click onto the Gantt chart area and select Show Split or click the button in the Properties group.
Project 2013: An introduction
17 IT Learning Programme
In this view it is possible to see all of the properties attributed to the task selected. You can also amend things in this view.
To hide the split area of the screen, right click again and select, remove split.
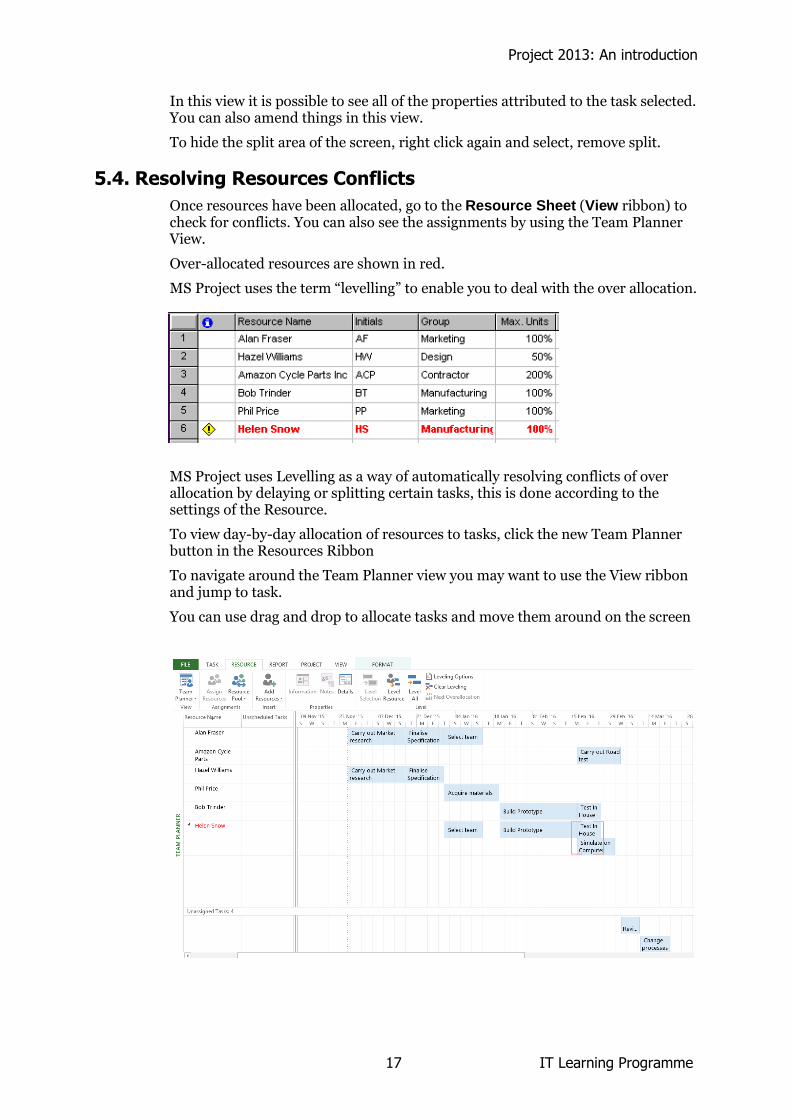
5.4. Resolving Resources Conflicts
Once resources have been allocated, go to the Resource Sheet (View ribbon) to check for conflicts. You can also see the assignments by using the Team Planner View.
Over-allocated resources are shown in red.
MS Project uses the term “levelling” to enable you to deal with the over allocation.
MS Project uses Levelling as a way of automatically resolving conflicts of over allocation by delaying or splitting certain tasks, this is done according to the settings of the Resource.
To view day-by-day allocation of resources to tasks, click the new Team Planner button in the Resources Ribbon
To navigate around the Team Planner view you may want to use the View ribbon and jump to task.
You can use drag and drop to allocate tasks and move them around on the screen
Project 2013: An introduction
IT Learning Programme 18
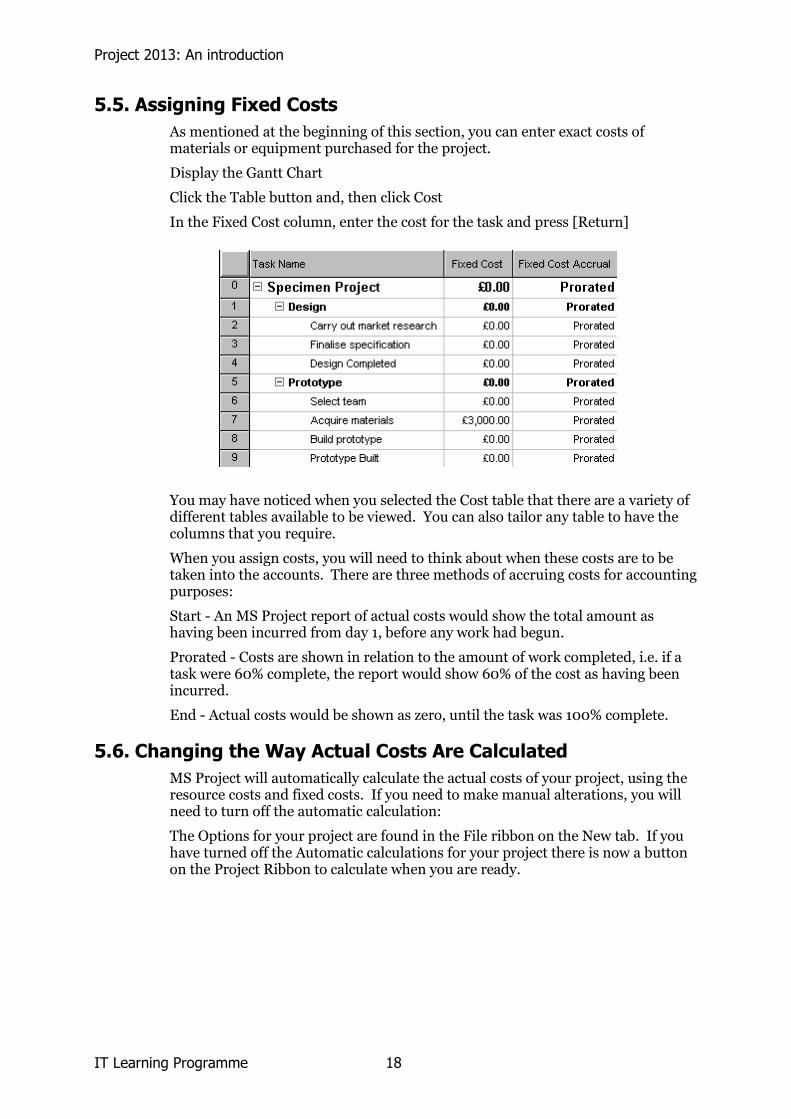
5.5. Assigning Fixed Costs
As mentioned at the beginning of this section, you can enter exact costs of materials or equipment purchased for the project.
Display the Gantt Chart
Click the Table button and, then click Cost
In the Fixed Cost column, enter the cost for the task and press [Return]
You may have noticed when you selected the Cost table that there are a variety of different tables available to be viewed. You can also tailor any table to have the columns that you require.
When you assign costs, you will need to think about when these costs are to be taken into the accounts. There are three methods of accruing costs for accounting purposes:
Start - An MS Project report of actual costs would show the total amount as having been incurred from day 1, before any work had begun.
Prorated - Costs are shown in relation to the amount of work completed, i.e. if a task were 60% complete, the report would show 60% of the cost as having been incurred.
End - Actual costs would be shown as zero, until the task was 100% complete.
5.6. Changing the Way Actual Costs Are Calculated
MS Project will automatically calculate the actual costs of your project, using the resource costs and fixed costs. If you need to make manual alterations, you will need to turn off the automatic calculation:
The Options for your project are found in the File ribbon on the New tab. If you have turned off the Automatic calculations for your project there is now a button on the Project Ribbon to calculate when you are ready.
Project 2013: An introduction
19 IT Learning Programme
6 Working with Multiple Projects
6.1. Creating a Multiple Project File
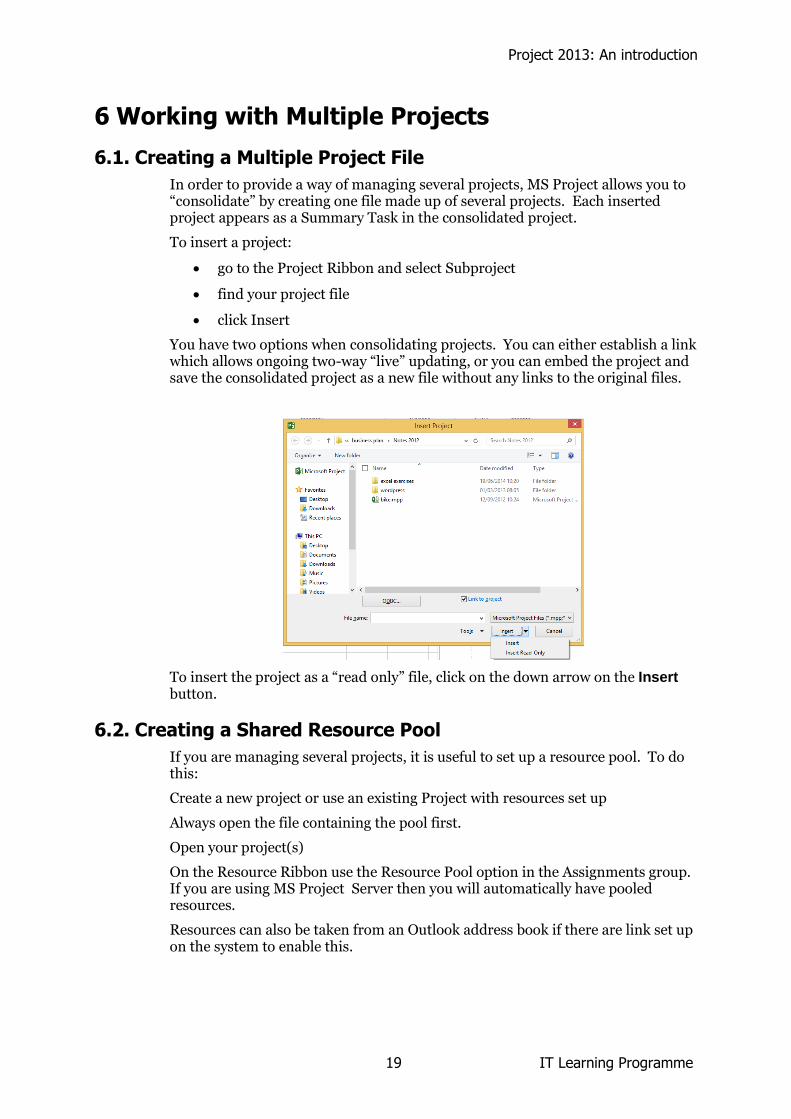
In order to provide a way of managing several projects, MS Project allows you to “consolidate” by creating one file made up of several projects. Each inserted project appears as a Summary Task in the consolidated project.
To insert a project:
go to the Project Ribbon and select Subproject
find your project file
click Insert
You have two options when consolidating projects. You can either establish a link which allows ongoing two-way “live” updating, or you can embed the project and save the consolidated project as a new file without any links to the original files.
To insert the project as a “read only” file, click on the down arrow on the Insert button.
6.2. Creating a Shared Resource Pool
If you are managing several projects, it is useful to set up a resource pool. To do this:
Create a new project or use an existing Project with resources set up
Always open the file containing the pool first.
Open your project(s)
On the Resource Ribbon use the Resource Pool option in the Assignments group. If you are using MS Project Server then you will automatically have pooled resources.
Resources can also be taken from an Outlook address book if there are link set up on the system to enable this.
Project 2013: An introduction
IT Learning Programme 20
7 Monitoring and Evaluation
7.1. Setting a Baseline
When you are satisfied that everything has been entered and the project represents a true starting-point, save a baseline.
To save a baseline select go to the Project Ribbon and select the Set Baseline button. You can set interim baselines as you manage the project allowing you to make comparisons with interim plans.
7.2. Entering Constraints
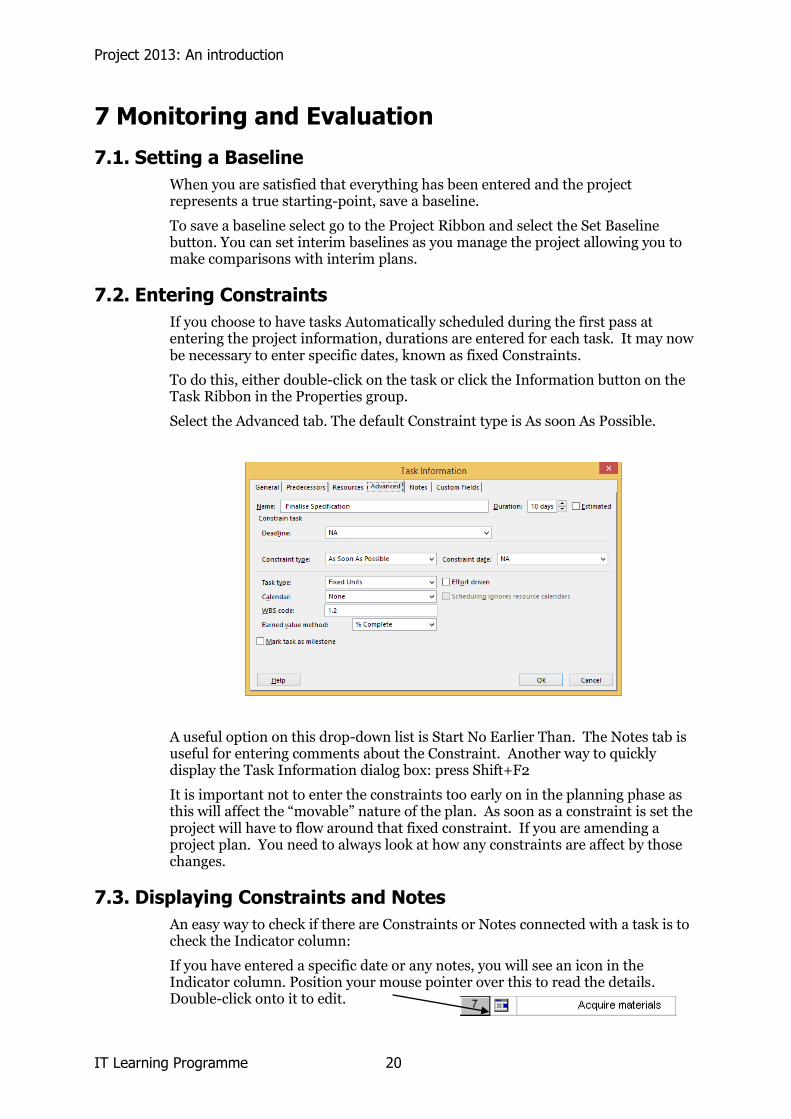
If you choose to have tasks Automatically scheduled during the first pass at entering the project information, durations are entered for each task. It may now be necessary to enter specific dates, known as fixed Constraints.
To do this, either double-click on the task or click the Information button on the Task Ribbon in the Properties group.
Select the Advanced tab. The default Constraint type is As soon As Possible.
A useful option on this drop-down list is Start No Earlier Than. The Notes tab is useful for entering comments about the Constraint. Another way to quickly display the Task Information dialog box: press Shift+F2
It is important not to enter the constraints too early on in the planning phase as this will affect the “movable” nature of the plan. As soon as a constraint is set the project will have to flow around that fixed constraint. If you are amending a project plan. You need to always look at how any constraints are affect by those changes.
7.3. Displaying Constraints and Notes
An easy way to check if there are Constraints or Notes connected with a task is to check the Indicator column:
If you have entered a specific date or any notes, you will see an icon in the Indicator column. Position your mouse pointer over this to read the details. Double-click onto it to edit.
Project 2013: An introduction
21 IT Learning Programme
7.4. Entering Progress
To enter progress, using the buttons on the Task Ribbon: Progress is shown as a black bar within the blue bar on the Gantt Chart.
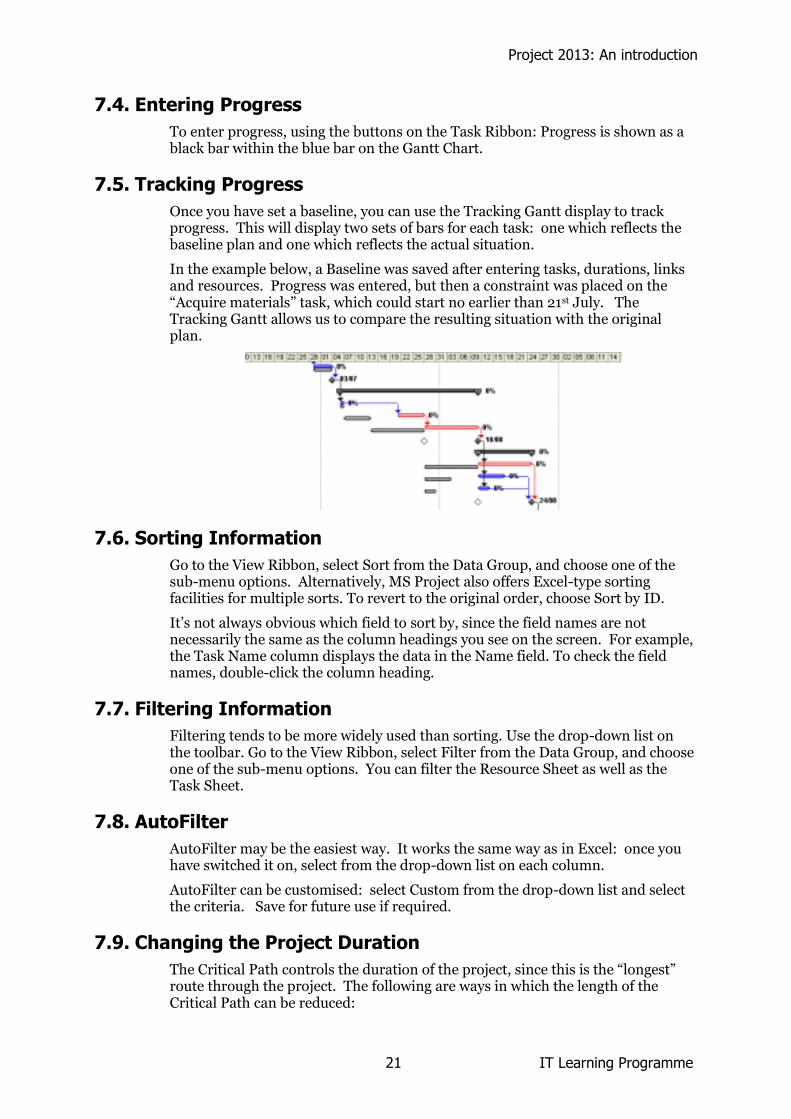
7.5. Tracking Progress
Once you have set a baseline, you can use the Tracking Gantt display to track progress. This will display two sets of bars for each task: one which reflects the baseline plan and one which reflects the actual situation.
In the example below, a Baseline was saved after entering tasks, durations, links and resources. Progress was entered, but then a constraint was placed on the “Acquire materials” task, which could start no earlier than 21st July. The Tracking Gantt allows us to compare the resulting situation with the original plan.
7.6. Sorting Information
Go to the View Ribbon, select Sort from the Data Group, and choose one of the sub-menu options. Alternatively, MS Project also offers Excel-type sorting facilities for multiple sorts. To revert to the original order, choose Sort by ID.
It’s not always obvious which field to sort by, since the field names are not necessarily the same as the column headings you see on the screen. For example, the Task Name column displays the data in the Name field. To check the field names, double-click the column heading.
7.7. Filtering Information
Filtering tends to be more widely used than sorting. Use the drop-down list on the toolbar. Go to the View Ribbon, select Filter from the Data Group, and choose one of the sub-menu options. You can filter the Resource Sheet as well as the Task Sheet.
7.8. AutoFilter
AutoFilter may be the easiest way. It works the same way as in Excel: once you have switched it on, select from the drop-down list on each column.
AutoFilter can be customised: select Custom from the drop-down list and select the criteria. Save for future use if required.
7.9. Changing the Project Duration
The Critical Path controls the duration of the project, since this is the “longest” route through the project. The following are ways in which the length of the Critical Path can be reduced:
Project 2013: An introduction
IT Learning Programme 22
Review the task durations – can you now be more precise?
Review the task links – can any work be done in parallel, or at least with some overlap?
Assign more resources to key tasks – can you second or hire additional staff?
Change the working time – can you work longer hours, or weekends?
Reduce the scope of the project – can you eliminate some of the tasks?
Project 2013: An introduction
23 IT Learning Programme
8 Presenting Information
8.1. Displaying Different Levels of Information
It’s useful to have a summary “task” at the top of the task list display, to show the entire project, it give you a quick way of being able to see the overall duration of the project. Click on the Format Gantt Ribbon and check the tick box to display the summary bar at the top of the Gantt Chart.
If an Outline has been applied to tasks use the plus and minus signs in the Task Name list to hide or display information. This controls the level of detail displayed in the Gantt Chart, and can be used to produce printed reports with appropriate amounts of information, depending on the purpose.
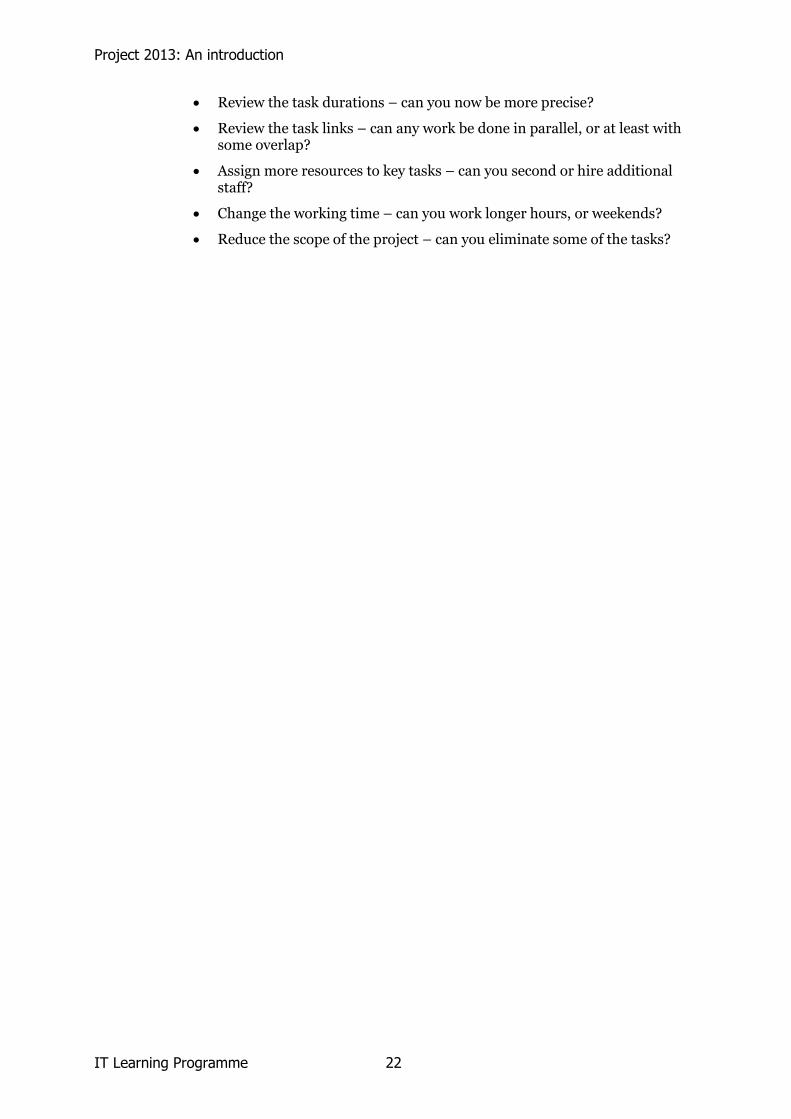
8.2. Using the Timeline
The timeline was a new feature in 2010. It is displayed at the top of the screen and shows the time line. It can be turned on or off from the View Ribbon in the split section. To start with it just shows the duration of the full project. However it can be tailored to allow specific tasks to be shown on it.
To add a task to the time line right click the task and select Add to timeline. When there are many items that are happening at the same time it may be useful to show the items as a bar. To do this Right click the task on the timeline and select display as a bar. This also causes the Format, Timeline Toolbar to be displayed.
8.3. Displaying Different Combinations of Information
MS Project stores information on two “database” sheets: the Task Sheet and the Resource Sheet. Information from these sheets is used to produce displays (“views”) such as the Gantt Chart, PERT Chart and Resource Graph. The data is also fed into Tables which enable you to view different combinations of information.
To customise/create your own table, copy an existing table and edit it according to your requirements.
8.4. Previewing, Page Setup and Printing
From either the File Ribbon, or the Preview display, use the commands in Page Setup to control margins and page borders, the display of the legend, and the scaling options.
The Print command in the Preview window takes you to the print dialogue box – it doesn’t automatically print the whole project, as in previous versions.
Project 2013: An introduction
IT Learning Programme 24
Headers and Footers make use of various fields of information. Go to the File Ribbon and select Properties in order to enter information into the Title, Manager and Company fields. If you want to use the Title, Manager and Company fields in the document Header/Footer:
8.5. Printing Standard Reports
MS Project offers a selection of pre-defined reports. In the 2013 version of Project there is a great improvement in the reporting facilities. There is now a Report ribbon with new predefined reports.
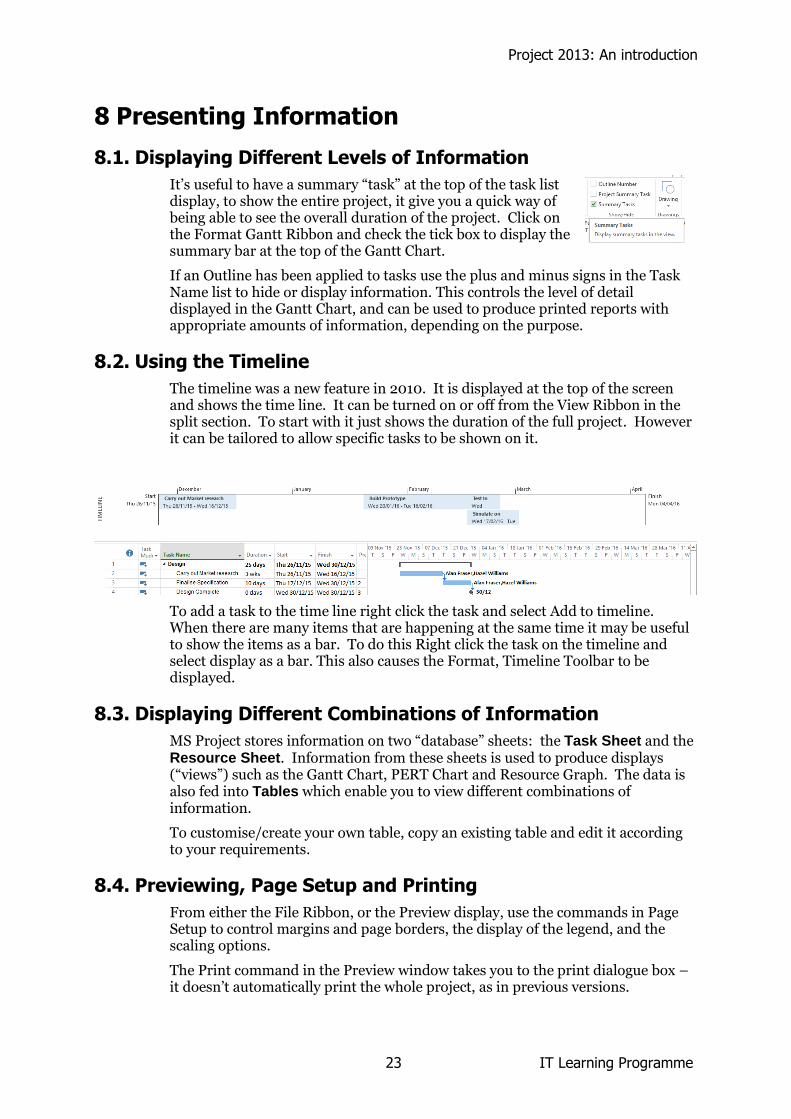
Go to the Project Ribbon and in the Report section you can see the options for Reports.
There are specialist reports under the headings Dashboards, Resources, Costs, and In Progress which display the details of your project in graphical ways. These combine the output from several different table views that are available with the application.
For example the Resource Overview report will bring up the following:
In this case the report is showing two charts and a table of data. Clicking on any of these elements will display the appropriate formatting ribbon at the top (similar to the ribbons in the base applications like Excel and Word). It will also display options associated with the application. So the charts are based on pivot reports and it allows you the opportunity to adjust the inputs and the way that they are formatted.
There are many predefined report which give a quick overview of the project. Custom reports can also be created and saved for a particular project.
There is a useful option on the Copy button which allows the users to copy the screen and save this as a picture which can then be used in a report or presentation. Click the drop down arrow alongside the Copy button on the Task

Project 2013: An introduction
25 IT Learning Programme
ribbon and select Copy Picture. You will see the dialogue below which will allow you to store an image of the plan for inclusion elsewhere. It is useful as it allows a snapshot to be taken of progress an also can be used to send to people who don’t have access to MS Project.
Project 2013 also has the Visual Reports which allow you to display the information graphically and can be created in Visio or Excel. You need to have these programmes installed on your machines in order to take advantage of these.
Project 2013: An introduction
IT Learning Programme 26
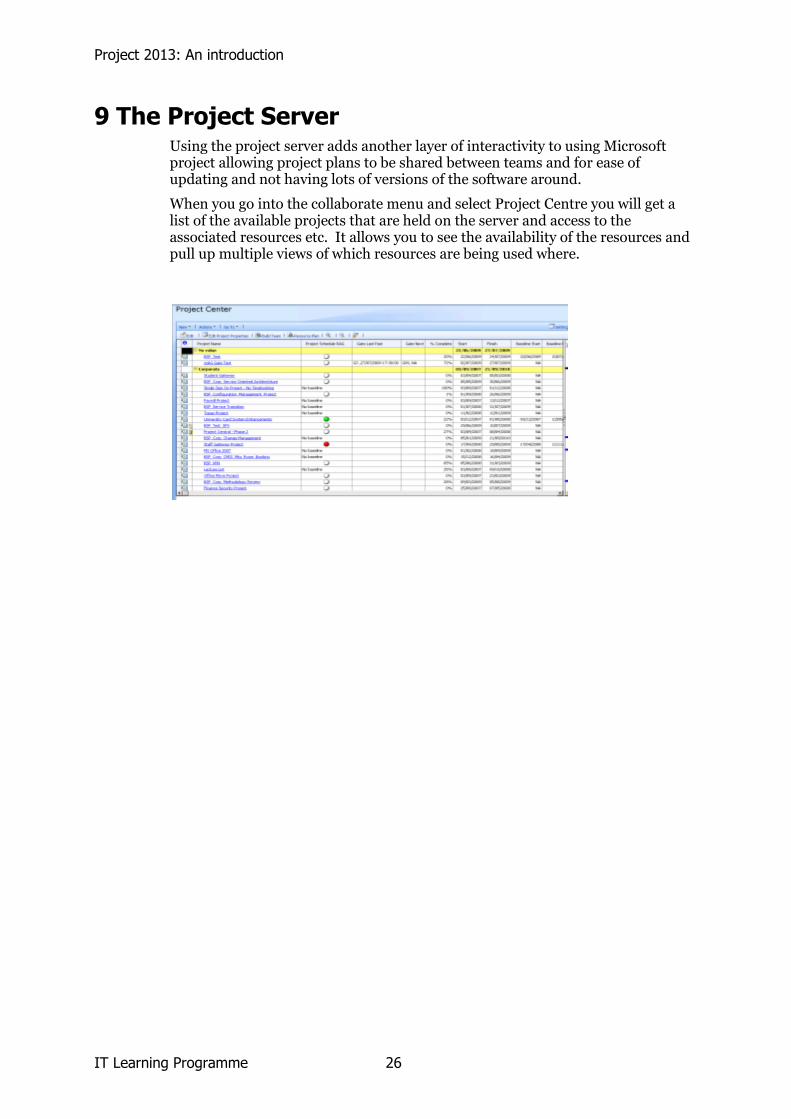
9 The Project Server Using the project server adds another layer of interactivity to using Microsoft project allowing project plans to be shared between teams and for ease of updating and not having lots of versions of the software around.
When you go into the collaborate menu and select Project Centre you will get a list of the available projects that are held on the server and access to the associated resources etc. It allows you to see the availability of the resources and pull up multiple views of which resources are being used where.
Project 2013: An introduction
27 IT Learning Programme
Exercises Section
Project 2013: An introduction
IT Learning Programme 28
10 Linking tasks - Exercise One of the most important things to get right when creating a project plan is to create the dependencies between tasks. The following exercises are to help you identify some of the issues and to explain the need for having multiple dependencies on tasks if required.
10.1. Basic Links
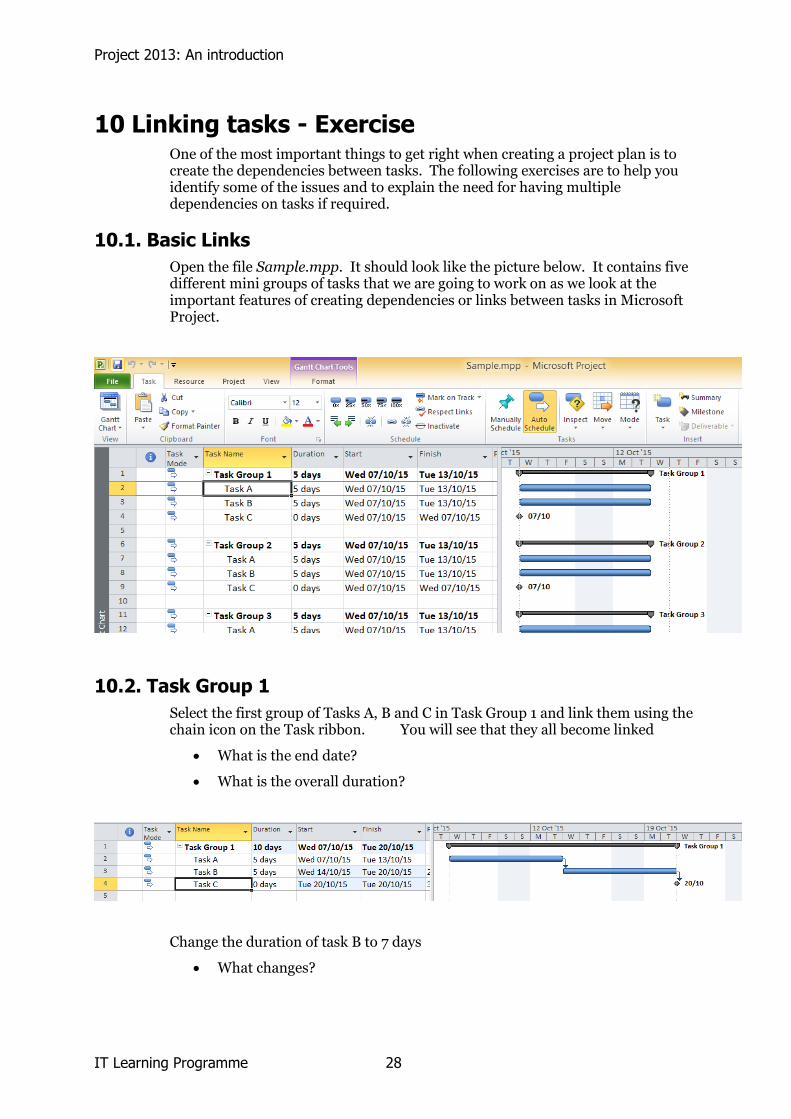
Open the file Sample.mpp. It should look like the picture below. It contains five different mini groups of tasks that we are going to work on as we look at the important features of creating dependencies or links between tasks in Microsoft Project.
10.2. Task Group 1
Select the first group of Tasks A, B and C in Task Group 1 and link them using the chain icon on the Task ribbon. You will see that they all become linked
What is the end date?
What is the overall duration?
Change the duration of task B to 7 days
What changes?

Project 2013: An introduction
29 IT Learning Programme
10.3. Task Group 2
Now in Task Group 2 link:
A to C
B to C
Look at the Gantt Chart:
What is the end date?
What is the overall duration?
Increase the duration of Task B to 10 days
What happens?
10.4. Task Group 3
A Floating task has been added to Task Group 3. Link the tasks in the following way
A to B
A to C
A to the Floating Task
B to C
It should look like the image below. Notice that the Predecessors column is now visible – showing which Task ID numbers are linked. (You can type in the ID numbers into the Predecessor column to link tasks if you wish.)
The plan should show that the Floating Task can happen at any time after Task A has finished. Now change the duration of the Floating Task to 7 days.
What happens?
You will see that the Floating Task carries on beyond Task C (the milestone), which is probably not what you wanted.
Project 2013: An introduction
IT Learning Programme 30
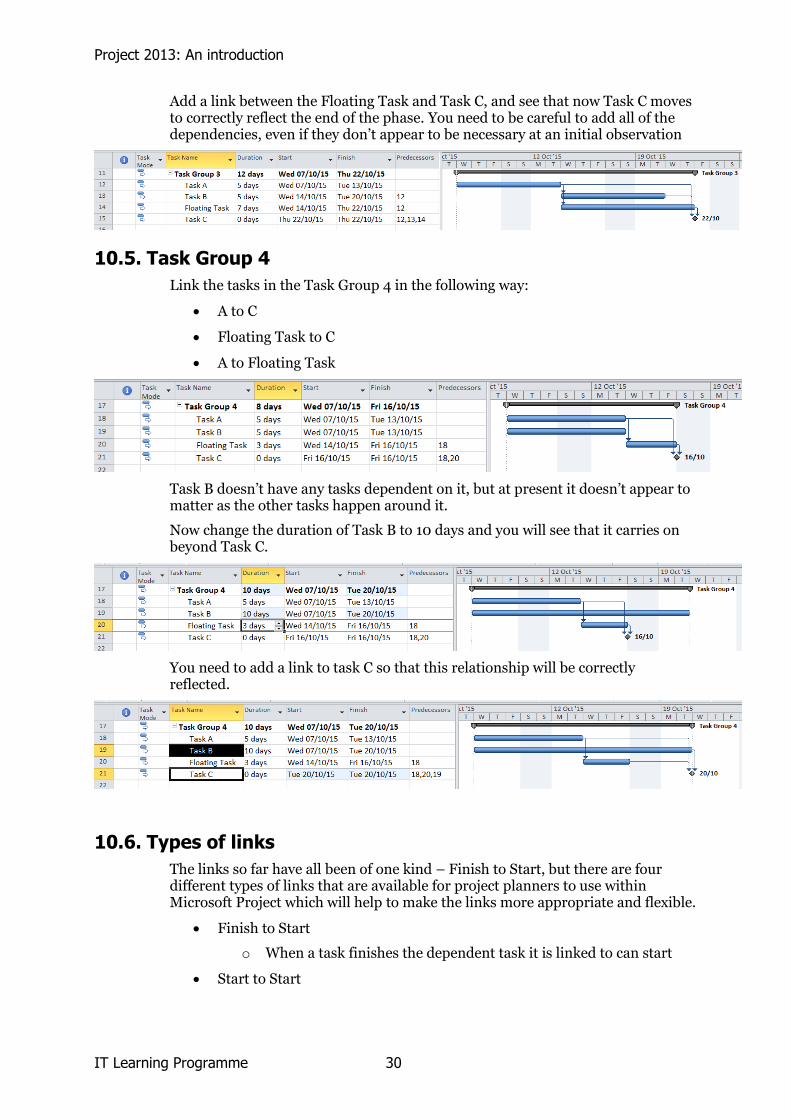
Add a link between the Floating Task and Task C, and see that now Task C moves to correctly reflect the end of the phase. You need to be careful to add all of the dependencies, even if they don’t appear to be necessary at an initial observation
10.5. Task Group 4
Link the tasks in the Task Group 4 in the following way:
A to C
Floating Task to C
A to Floating Task
Task B doesn’t have any tasks dependent on it, but at present it doesn’t appear to matter as the other tasks happen around it.
Now change the duration of Task B to 10 days and you will see that it carries on beyond Task C.
You need to add a link to task C so that this relationship will be correctly reflected.
10.6. Types of links
The links so far have all been of one kind – Finish to Start, but there are four different types of links that are available for project planners to use within Microsoft Project which will help to make the links more appropriate and flexible.
Finish to Start
o When a task finishes the dependent task it is linked to can start
Start to Start
Project 2013: An introduction
31 IT Learning Programme
o The tasks can be designated to start at the same time. The first task must have started before the dependent task can start.
Finish to finish
o The dependent task will finish at the same time as the first task or at any time after the first task has finished.
Start to finish
o The dependent task cannot finish until the first task starts (this is quite confusing but an example could be that a security guard can’t finish their shift until the next security guard comes to replace them).
In addition to the different types of links it is also possible to add a Lag or Lead time to the relationship, which gives an additional level of complexity. In the next exercises you are going to try some of these options out.
10.7. Task Group 5
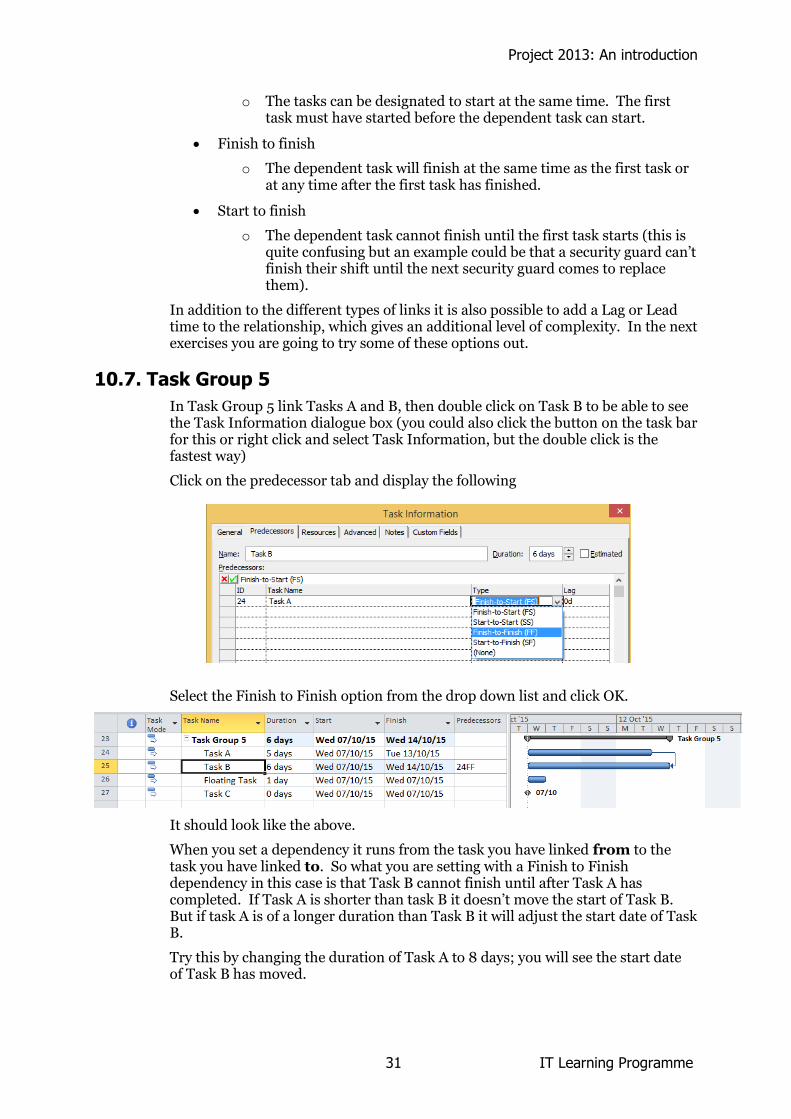
In Task Group 5 link Tasks A and B, then double click on Task B to be able to see the Task Information dialogue box (you could also click the button on the task bar for this or right click and select Task Information, but the double click is the fastest way)
Click on the predecessor tab and display the following
Select the Finish to Finish option from the drop down list and click OK.
It should look like the above.
When you set a dependency it runs from the task you have linked from to the task you have linked to. So what you are setting with a Finish to Finish dependency in this case is that Task B cannot finish until after Task A has completed. If Task A is shorter than task B it doesn’t move the start of Task B. But if task A is of a longer duration than Task B it will adjust the start date of Task B.
Try this by changing the duration of Task A to 8 days; you will see the start date of Task B has moved.
Project 2013: An introduction
IT Learning Programme 32
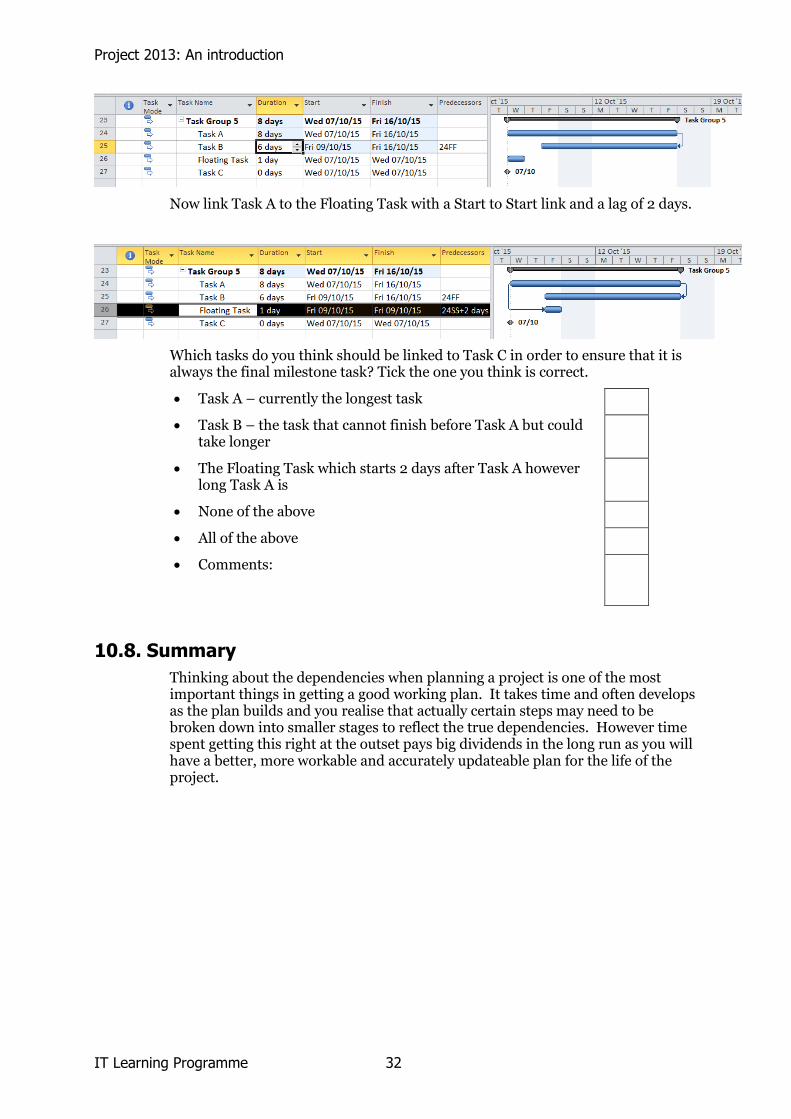
Now link Task A to the Floating Task with a Start to Start link and a lag of 2 days.
Which tasks do you think should be linked to Task C in order to ensure that it is always the final milestone task? Tick the one you think is correct.
Task A – currently the longest task
Task B – the task that cannot finish before Task A but could take longer
The Floating Task which starts 2 days after Task A however long Task A is
None of the above
All of the above
Comments:
10.8. Summary
Thinking about the dependencies when planning a project is one of the most important things in getting a good working plan. It takes time and often develops as the plan builds and you realise that actually certain steps may need to be broken down into smaller stages to reflect the true dependencies. However time spent getting this right at the outset pays big dividends in the long run as you will have a better, more workable and accurately updateable plan for the life of the project.
Project 2013: An introduction
33 IT Learning Programme
11 Clinical Trials Exercise Project Make sure that the Program is set so that tasks will be automatically scheduled. We are putting together a schedule of a single trial which can be saved as a template for reuse.
We will also look at some of the variations and additions that you may wish to add and the implications of doing so.
11.1. Entering tasks
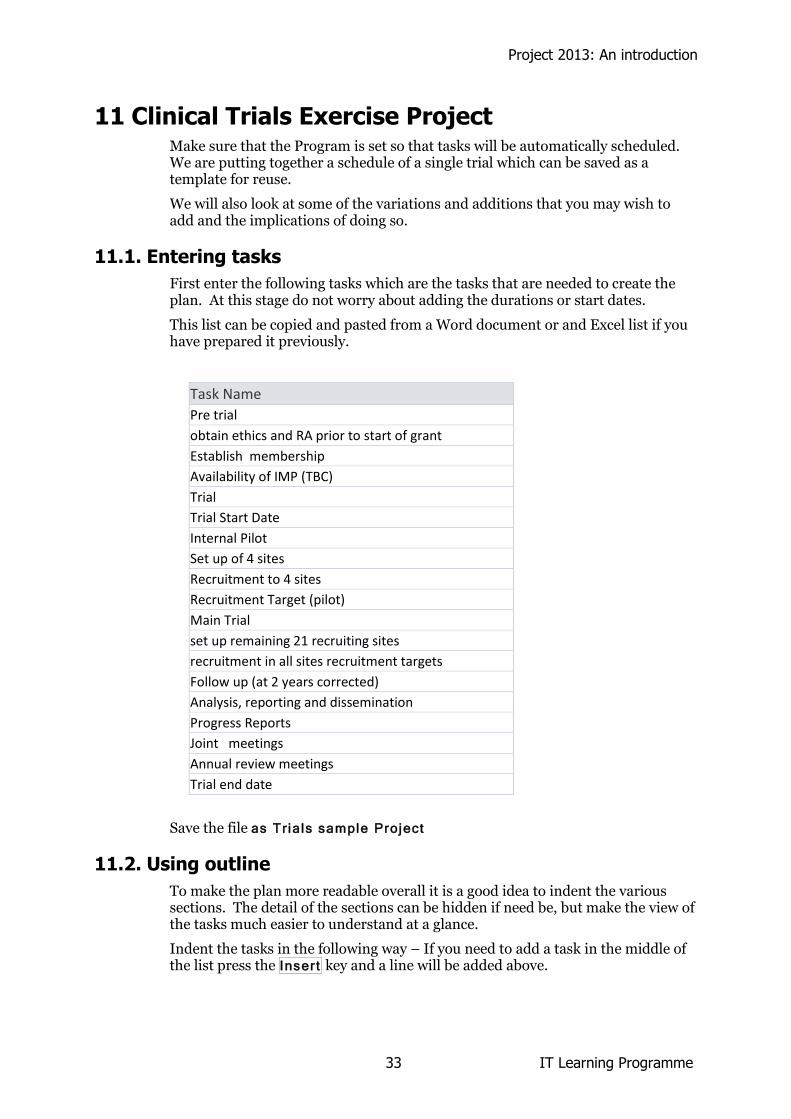
First enter the following tasks which are the tasks that are needed to create the plan. At this stage do not worry about adding the durations or start dates.
This list can be copied and pasted from a Word document or and Excel list if you have prepared it previously.
Task Name
Pre trial
obtain ethics and RA prior to start of grant
Establish membership
Availability of IMP (TBC)
Trial
Trial Start Date
Internal Pilot
Set up of 4 sites
Recruitment to 4 sites
Recruitment Target (pilot)
Main Trial
set up remaining 21 recruiting sites
recruitment in all sites recruitment targets
Follow up (at 2 years corrected)
Analysis, reporting and dissemination
Progress Reports
Joint meetings
Annual review meetings
Trial end date
Save the file as Tr ials sample Project
11.2. Using outline
To make the plan more readable overall it is a good idea to indent the various sections. The detail of the sections can be hidden if need be, but make the view of the tasks much easier to understand at a glance.
Indent the tasks in the following way – If you need to add a task in the middle of the list press the Inser t key and a line will be added above.
Project 2013: An introduction
IT Learning Programme 34
Task Name
Pre trial
obtain ethics and RA prior to start of grant
Establish membership
Availability of IMP (TBC)
Trial
Trial Start Date
Internal Pilot
Set up of 4 sites
Recruitment to 4 sites
Recruitment Target (pilot)
Main Trial
set up remaining 21 recruiting sites
recruitment in all sites recruitment targets
Follow up (at 2 years corrected)
Analysis, reporting and dissemination
Reports and Meetings
progress Reports
Joint meetings
Annual review meetings
Trial end date
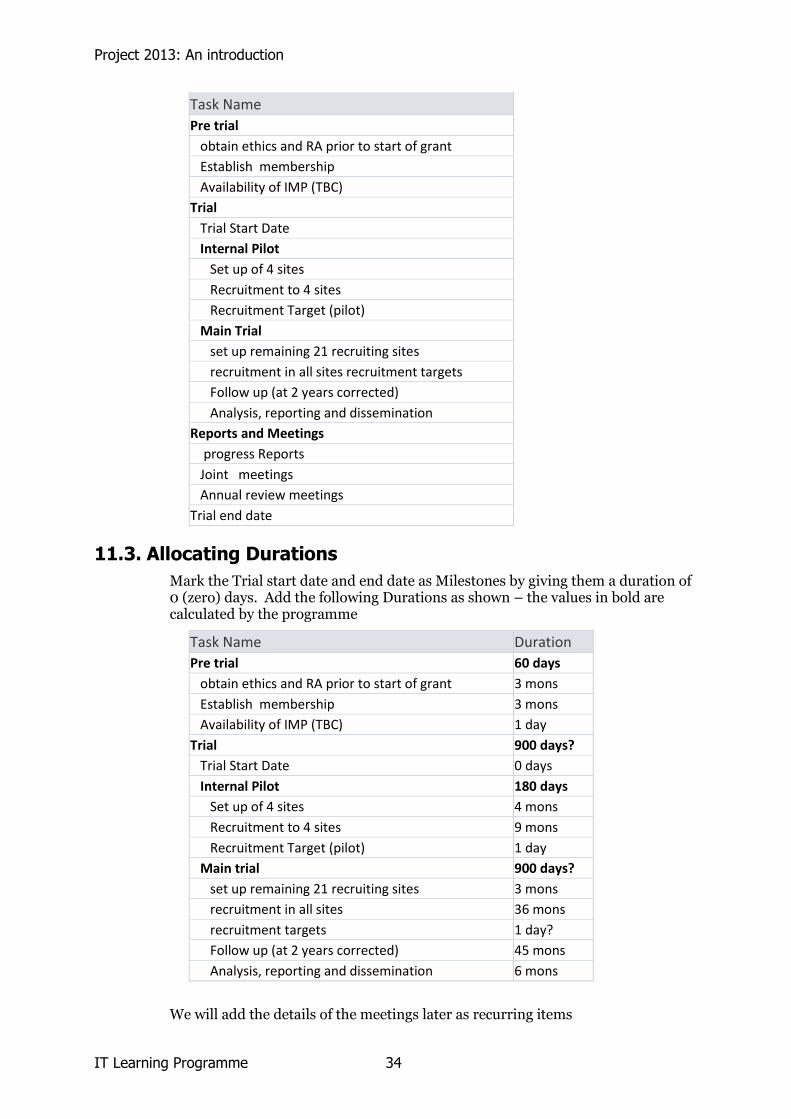
11.3. Allocating Durations
Mark the Trial start date and end date as Milestones by giving them a duration of 0 (zero) days. Add the following Durations as shown – the values in bold are calculated by the programme
Task Name Duration
Pre trial 60 days
obtain ethics and RA prior to start of grant 3 mons
Establish membership 3 mons
Availability of IMP (TBC) 1 day
Trial 900 days?
Trial Start Date 0 days
Internal Pilot 180 days
Set up of 4 sites 4 mons
Recruitment to 4 sites 9 mons
Recruitment Target (pilot) 1 day
Main trial 900 days?
set up remaining 21 recruiting sites 3 mons
recruitment in all sites 36 mons
recruitment targets 1 day?
Follow up (at 2 years corrected) 45 mons
Analysis, reporting and dissemination 6 mons
We will add the details of the meetings later as recurring items
Project 2013: An introduction
35 IT Learning Programme
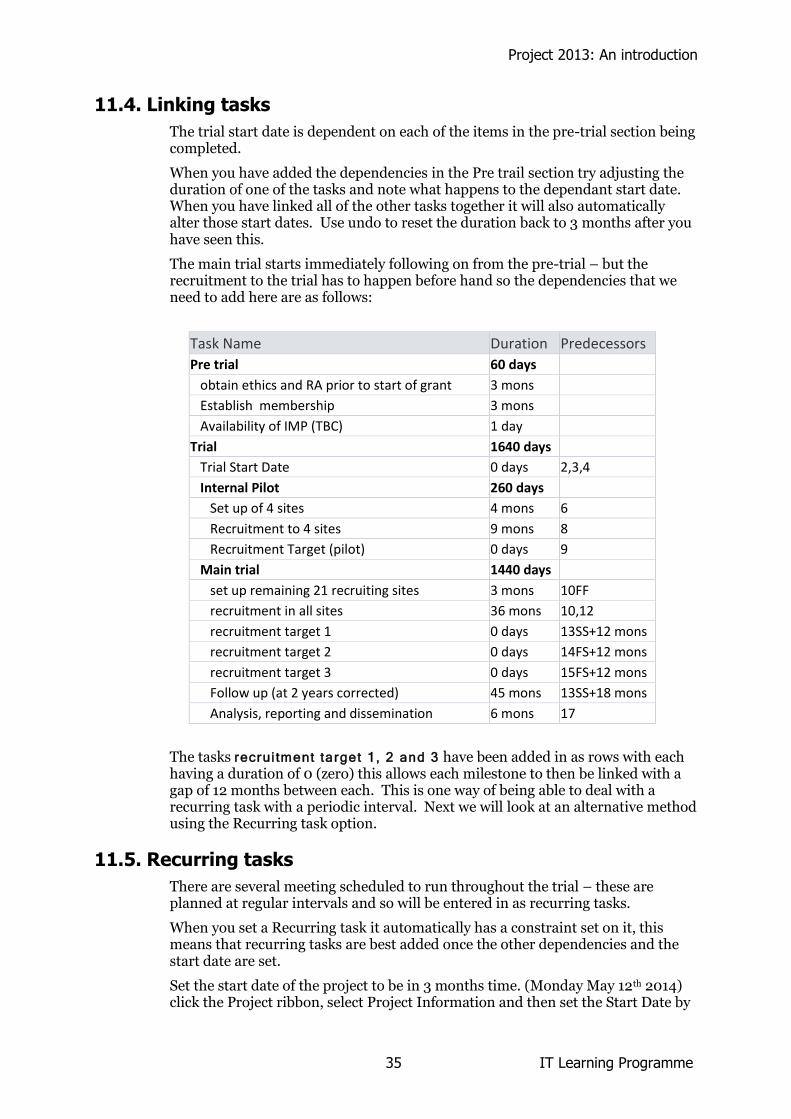
11.4. Linking tasks
The trial start date is dependent on each of the items in the pre-trial section being completed.
When you have added the dependencies in the Pre trail section try adjusting the duration of one of the tasks and note what happens to the dependant start date. When you have linked all of the other tasks together it will also automatically alter those start dates. Use undo to reset the duration back to 3 months after you have seen this.
The main trial starts immediately following on from the pre-trial – but the recruitment to the trial has to happen before hand so the dependencies that we need to add here are as follows:
Task Name Duration Predecessors
Pre trial 60 days
obtain ethics and RA prior to start of grant 3 mons
Establish membership 3 mons
Availability of IMP (TBC) 1 day
Trial 1640 days
Trial Start Date 0 days 2,3,4
Internal Pilot 260 days
Set up of 4 sites 4 mons 6
Recruitment to 4 sites 9 mons 8
Recruitment Target (pilot) 0 days 9
Main trial 1440 days
set up remaining 21 recruiting sites 3 mons 10FF
recruitment in all sites 36 mons 10,12
recruitment target 1 0 days 13SS+12 mons
recruitment target 2 0 days 14FS+12 mons
recruitment target 3 0 days 15FS+12 mons
Follow up (at 2 years corrected) 45 mons 13SS+18 mons
Analysis, reporting and dissemination 6 mons 17
The tasks recrui tment target 1, 2 and 3 have been added in as rows with each having a duration of 0 (zero) this allows each milestone to then be linked with a gap of 12 months between each. This is one way of being able to deal with a recurring task with a periodic interval. Next we will look at an alternative method using the Recurring task option.
11.5. Recurring tasks
There are several meeting scheduled to run throughout the trial – these are planned at regular intervals and so will be entered in as recurring tasks.
When you set a Recurring task it automatically has a constraint set on it, this means that recurring tasks are best added once the other dependencies and the start date are set.
Set the start date of the project to be in 3 months time. (Monday May 12th 2014) click the Project ribbon, select Project Information and then set the Start Date by
Project 2013: An introduction
IT Learning Programme 36
selecting in the calendar or typing in the date. Click OK. You will see all of the tasks have moved forwards.
Add the following as Recurring tasks with the different intervals, you may need to add additional rows to do this.
Task Name
Reports and Meetings
progress Reports (every 6 months)
Joint meetings
Annual review meetings
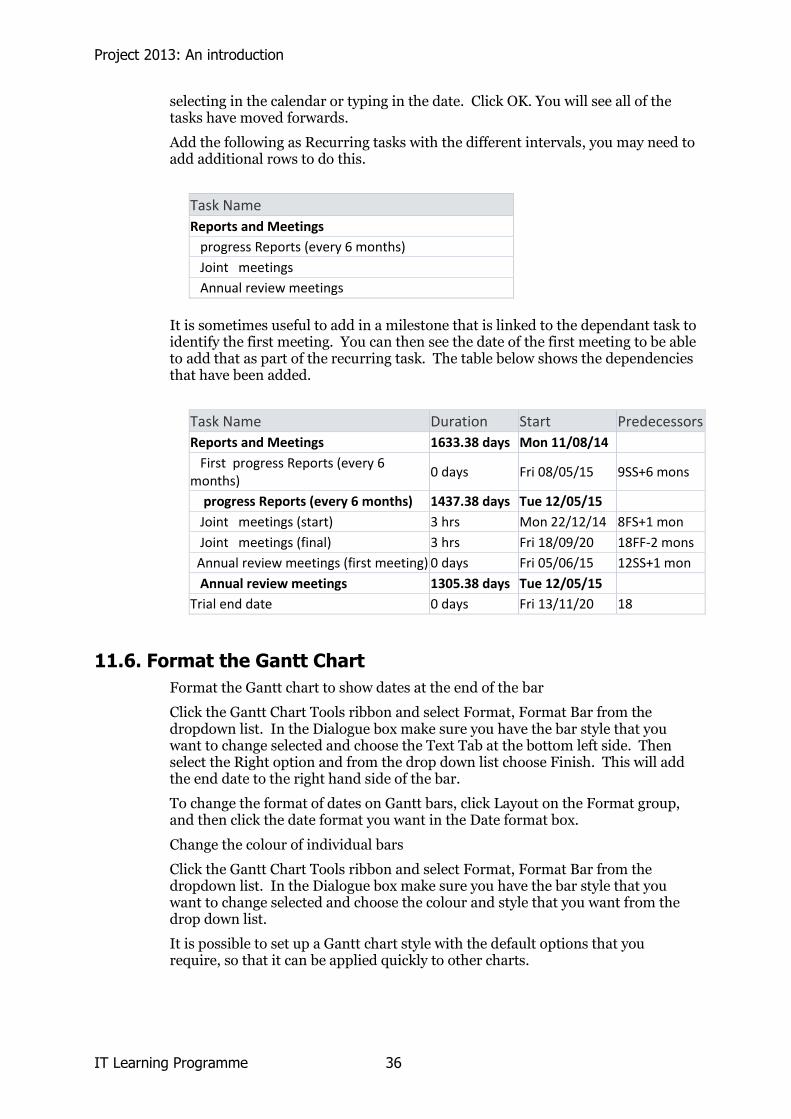
It is sometimes useful to add in a milestone that is linked to the dependant task to identify the first meeting. You can then see the date of the first meeting to be able to add that as part of the recurring task. The table below shows the dependencies that have been added.
Task Name Duration Start Predecessors
Reports and Meetings 1633.38 days Mon 11/08/14
First progress Reports (every 6 months)
0 days Fri 08/05/15 9SS+6 mons
progress Reports (every 6 months) 1437.38 days Tue 12/05/15
Joint meetings (start) 3 hrs Mon 22/12/14 8FS+1 mon
Joint meetings (final) 3 hrs Fri 18/09/20 18FF-2 mons
Annual review meetings (first meeting) 0 days Fri 05/06/15 12SS+1 mon
Annual review meetings 1305.38 days Tue 12/05/15
Trial end date 0 days Fri 13/11/20 18
11.6. Format the Gantt Chart
Format the Gantt chart to show dates at the end of the bar
Click the Gantt Chart Tools ribbon and select Format, Format Bar from the dropdown list. In the Dialogue box make sure you have the bar style that you want to change selected and choose the Text Tab at the bottom left side. Then select the Right option and from the drop down list choose Finish. This will add the end date to the right hand side of the bar.
To change the format of dates on Gantt bars, click Layout on the Format group, and then click the date format you want in the Date format box.
Change the colour of individual bars
Click the Gantt Chart Tools ribbon and select Format, Format Bar from the dropdown list. In the Dialogue box make sure you have the bar style that you want to change selected and choose the colour and style that you want from the drop down list.
It is possible to set up a Gantt chart style with the default options that you require, so that it can be applied quickly to other charts.
Project 2013: An introduction
37 IT Learning Programme
12 Sample Exercise
12.1. Building a Plan
Complete the following instructions – your tutor will be pointing out things as you go through entering the information.
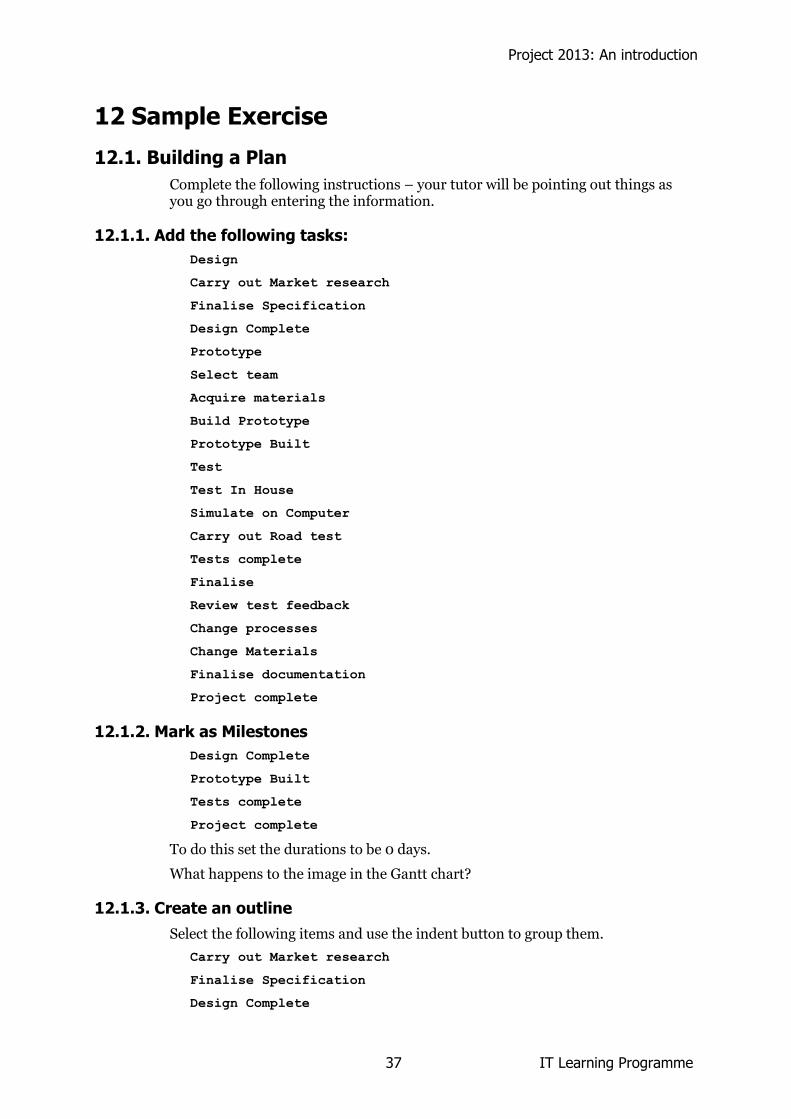
12.1.1. Add the following tasks:
Design
Carry out Market research
Finalise Specification
Design Complete
Prototype
Select team
Acquire materials
Build Prototype
Prototype Built
Test
Test In House
Simulate on Computer
Carry out Road test
Tests complete
Finalise
Review test feedback
Change processes
Change Materials
Finalise documentation
Project complete
12.1.2. Mark as Milestones
Design Complete
Prototype Built
Tests complete
Project complete
To do this set the durations to be 0 days.
What happens to the image in the Gantt chart?
12.1.3. Create an outline
Select the following items and use the indent button to group them.
Carry out Market research
Finalise Specification
Design Complete
Project 2013: An introduction
IT Learning Programme 38
Then
Select team
Acquire materials
Build Prototype
Prototype Built
Then
Test In House
Simulate on Computer
Carry out Road test
Tests complete
Then
Review test feedback
Change processes
Change Materials
Finalise documentation
What has happened to the task list?
What has happened to the Gantt Chart?
12.1.4. Enter durations
Carry out Market research 3w
Finalise Specification 10
Design Complete 0
Select team 10
Acquire materials 14
Build Prototype 4w
Prototype Built 0
Test In House 7
Simulate on Computer 10
Carry out Road test 12
Tests complete 0
Review test feedback 5
Change processes 7
Change Materials 9
Finalise documentation 8
Project complete 0
What has happened to the Summary tasks?
Link the tasks as instructed by the tutor.

Project 2013: An introduction
39 IT Learning Programme
12.1.5. Add the following Resources:
Alan Fraser Marketing
Hazel Williams Design
Amazon Cycle Parts Contractor
Bob Trinder Manufacturing
Phil Price Marketing
Helen Snow Manufacturing
Allocate the rates for as given to you by the tutor.
Project 2013: An introduction
IT Learning Programme 40
13 What Next?
13.1. More Courses
The IT Learning Programme offers courses on a range of other software. In all cases, please refer to the IT Learning Programme web page (via www.it.ox.ac.uk/courses/) for further details.
13.2. IT Services Help Centre
The IT Services Help Centre is open from 8:30 am to 8:30 pm, Monday to Friday. You can use the facilities to work through the exercises in this booklet, or use any of the applications that are available.
The Help Centre is also a good place to get advice about any aspect of using computer software or hardware. You can contact the Help Centre on (2)73200 or by email using [email protected]

![€¦ · Artistic Effects Background Adjust OF 1 DESIGN TRANS[TIONS Compress Pictures t] Change Picture Reset Picture Presentation2 - PowerPoint ANIMATIONS SLIDE SHOW REVIEW VIEW](https://img.pdfslide.net/doc/110x75/605a589ff953ea662375ad12/artistic-effects-background-adjust-of-1-design-transtions-compress-pictures-t.jpg)