Embed Size (px)
Citation preview
Matter Center for Office 365Build and deployment guide
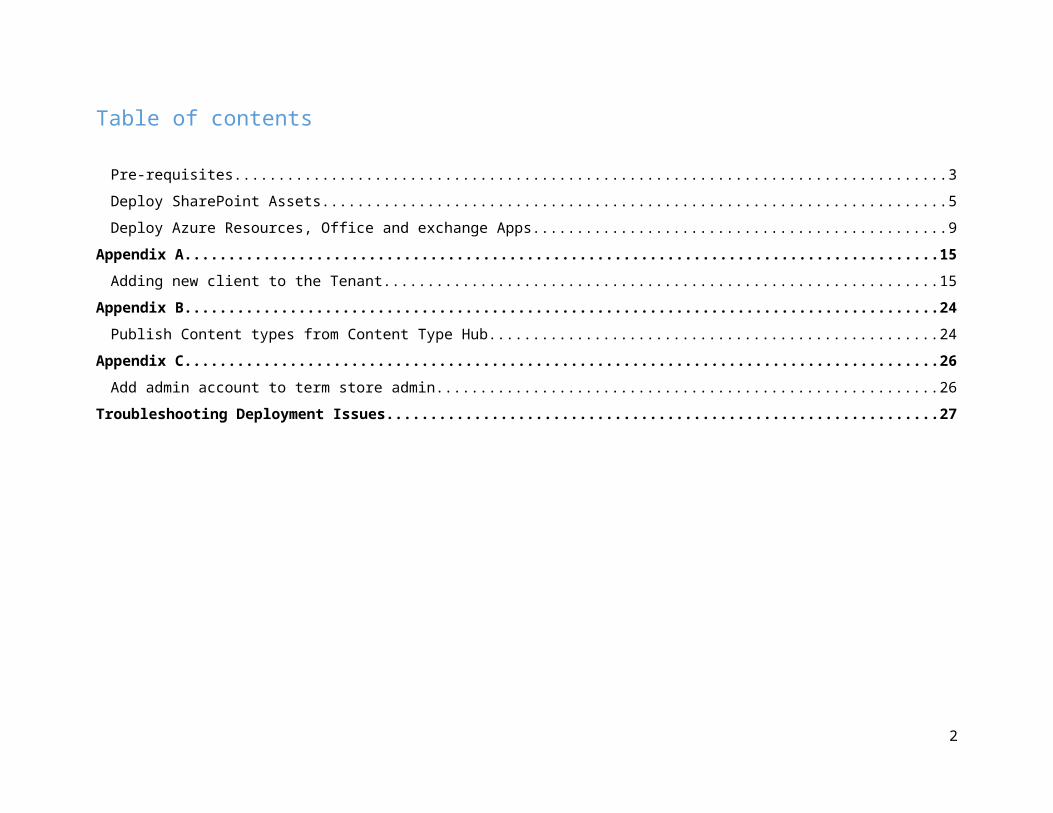
Table of contents
Pre-requisites.............................................................................................................................................................. 3Deploy SharePoint Assets........................................................................................................................................... 5Deploy Azure Resources, Office and exchange Apps..................................................................................................9
Appendix A.....................................................................................................................................15Adding new client to the Tenant............................................................................................................................... 15
Appendix B.....................................................................................................................................24Publish Content types from Content Type Hub.........................................................................................................24
Appendix C.....................................................................................................................................26Add admin account to term store admin..................................................................................................................26
Troubleshooting Deployment Issues.................................................................................................27
Pre-requisitesOffice 365 and Azure requirements
2
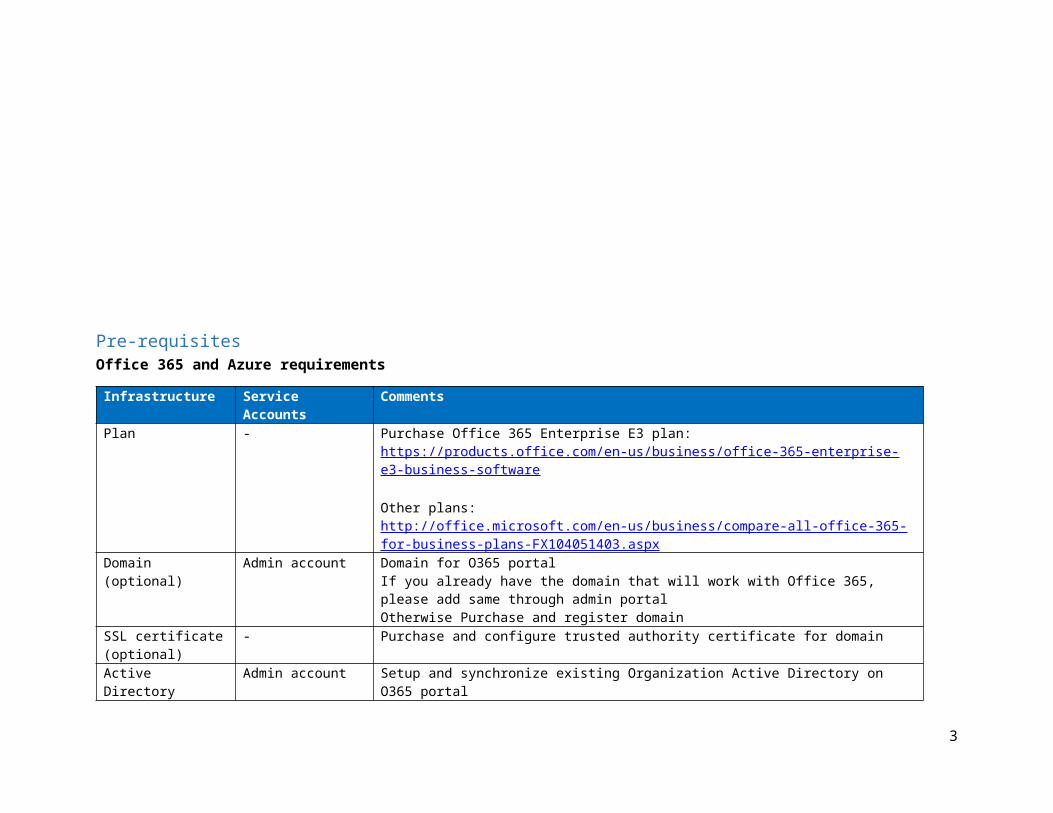
Infrastructure Service Accounts
Comments
Plan - Purchase Office 365 Enterprise E3 plan:https://products.office.com/en-us/business/office-365-enterprise-e3-business-software
Other plans:http://office.microsoft.com/en-us/business/compare-all-office-365-for-business-plans-FX104051403.aspx
Domain (optional) Admin account Domain for O365 portal If you already have the domain that will work with Office 365, please add same through admin portalOtherwise Purchase and register domain
SSL certificate (optional)
- Purchase and configure trusted authority certificate for domain
Active Directory Integration (optional)
Admin account Setup and synchronize existing Organization Active Directory on O365 portalhttp://technet.microsoft.com/en-us/library/hh967642
Azure Subscription Purchase Azure subscription which will be used to host web app, storage, web job, AppInsights, Key Vault.1. Sign in to https://portal.office.com 2. Go to Admin -> Admin centers -> Azure AD3. Sign in using office 365 credentials4. Activate Azure subscription
Domain and certificates (optional)
- Domain & certificate for UI layer (website on azure)Purchase and configure domain with website on AzurePurchase and configure trusted authority certificate for domain
Other requirements:
1. The deployment scripts are compaitable only with Windows 10 or windows server 2016 machine.2. Below are the pre-requistes for running the scripts on the user’s machine:
SharePoint Online Management Shell Windows PowerShell Run ‘Install-Module AzureRM’ from Windows PowerShell
3
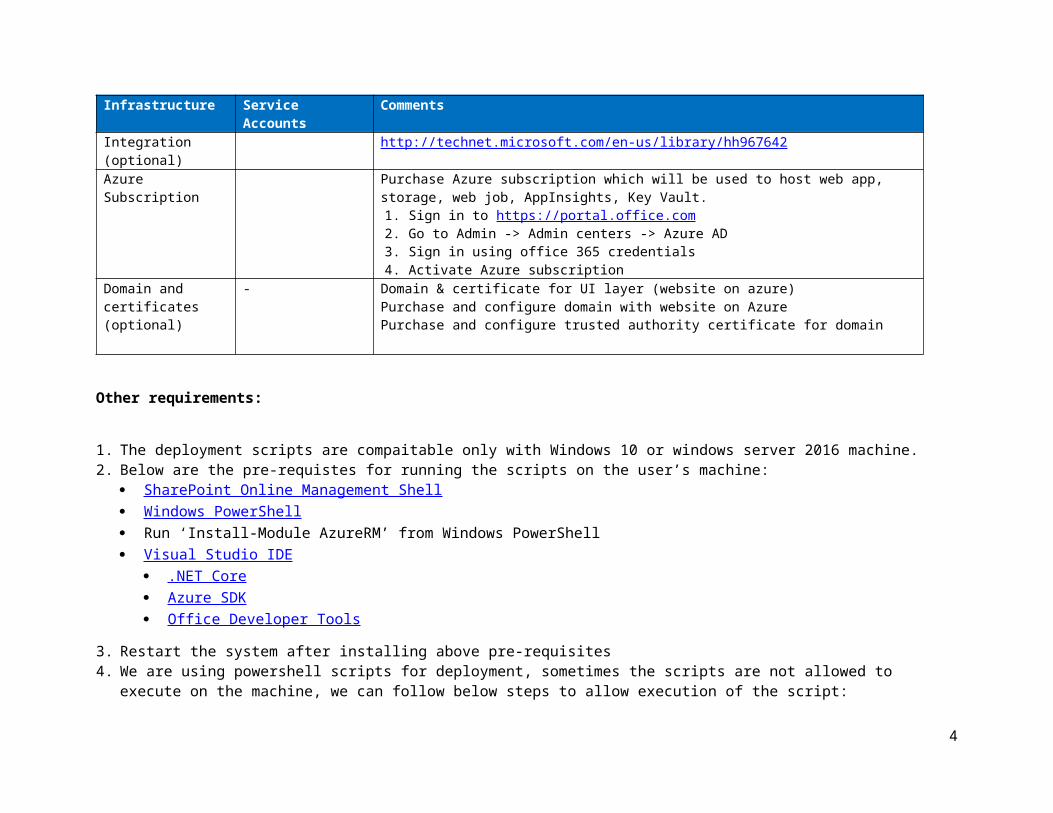
Visual Studio IDE .NET Core Azure SDK Office Developer Tools
3. Restart the system after installing above pre-requisites4. We are using powershell scripts for deployment, sometimes the scripts are not allowed to execute on the
machine, we can follow below steps to allow execution of the script: Unblock all PowerShell scripts and DLL files by unblocking mattercenter-master zip file in Windows Explorer
(right-click -> Properties -> checkmark: Unblock -> OK) Open PowerShell.exe in administrator mode Type the following command: Set-ExecutionPolicy “RemoteSigned”, it will ask for confirmation then type “Y”
for yes.
Deploy SharePoint Assets
# Deployment Steps/Description Automated/Manual
Step 1
Office 365 - Create App Catalog
Steps to create App Catalog site:
a. Sign in to https://portal.office.com with admin user name and passwordb. From left top corner, Go to Admin > SharePointc. Click Apps on the left, and then click App Catalog
4
# Deployment Steps/Description Automated/Manual
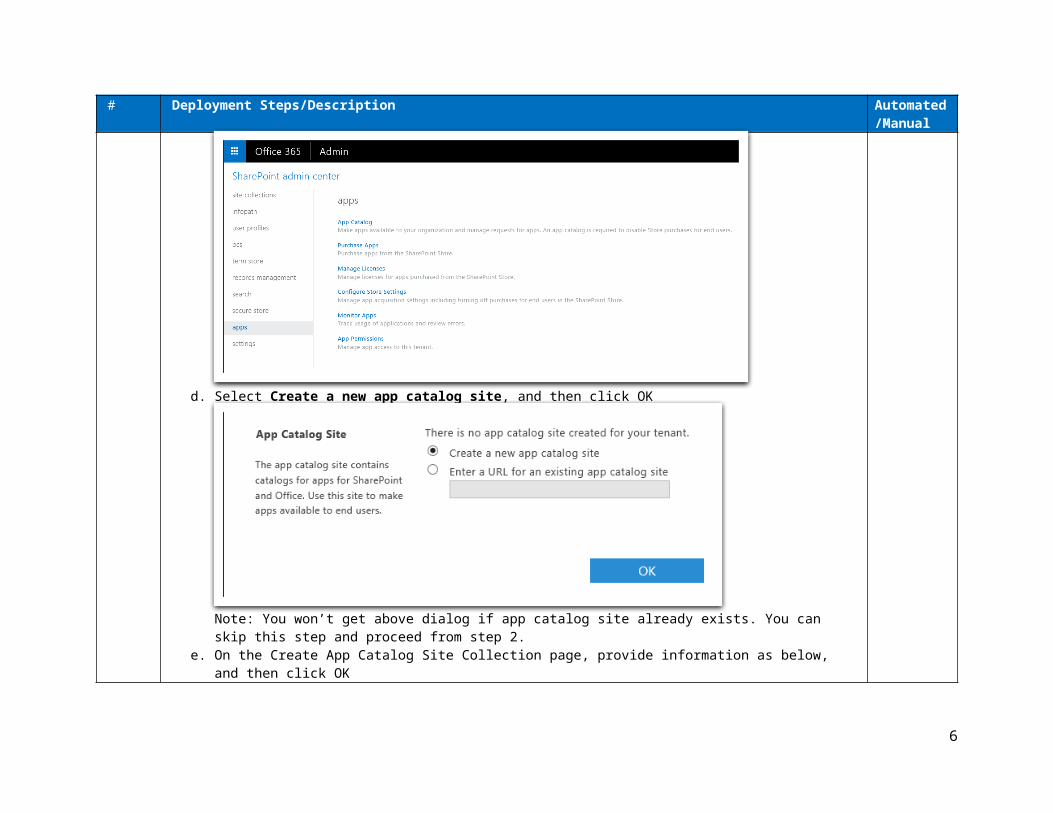
d. Select Create a new app catalog site, and then click OK
Note: You won’t get above dialog if app catalog site already exists. You can skip this step and proceed from step 2.
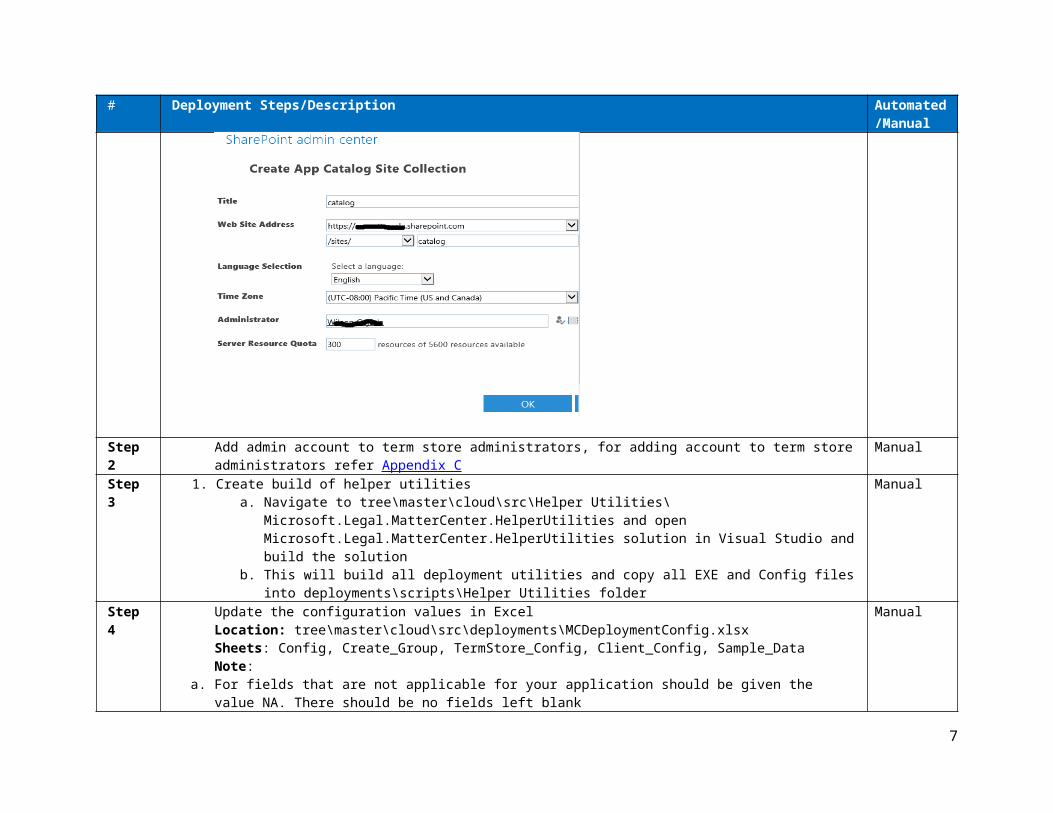
e. On the Create App Catalog Site Collection page, provide information as below, and then click OK
5
# Deployment Steps/Description Automated/Manual
Step 2
Add admin account to term store administrators, for adding account to term store administrators refer Appendix C
Manual
Step 3
1. Create build of helper utilitiesa. Navigate to tree\master\cloud\src\Helper Utilities\
Microsoft.Legal.MatterCenter.HelperUtilities and open Microsoft.Legal.MatterCenter.HelperUtilities solution in Visual Studio and build the solution
b. This will build all deployment utilities and copy all EXE and Config files into deployments\scripts\Helper Utilities folder
Manual
Step 4
Update the configuration values in ExcelLocation: tree\master\cloud\src\deployments\MCDeploymentConfig.xlsxSheets: Config, Create_Group, TermStore_Config, Client_Config, Sample_DataNote:
a. For fields that are not applicable for your application should be given the value NA. There should be no fields left blank
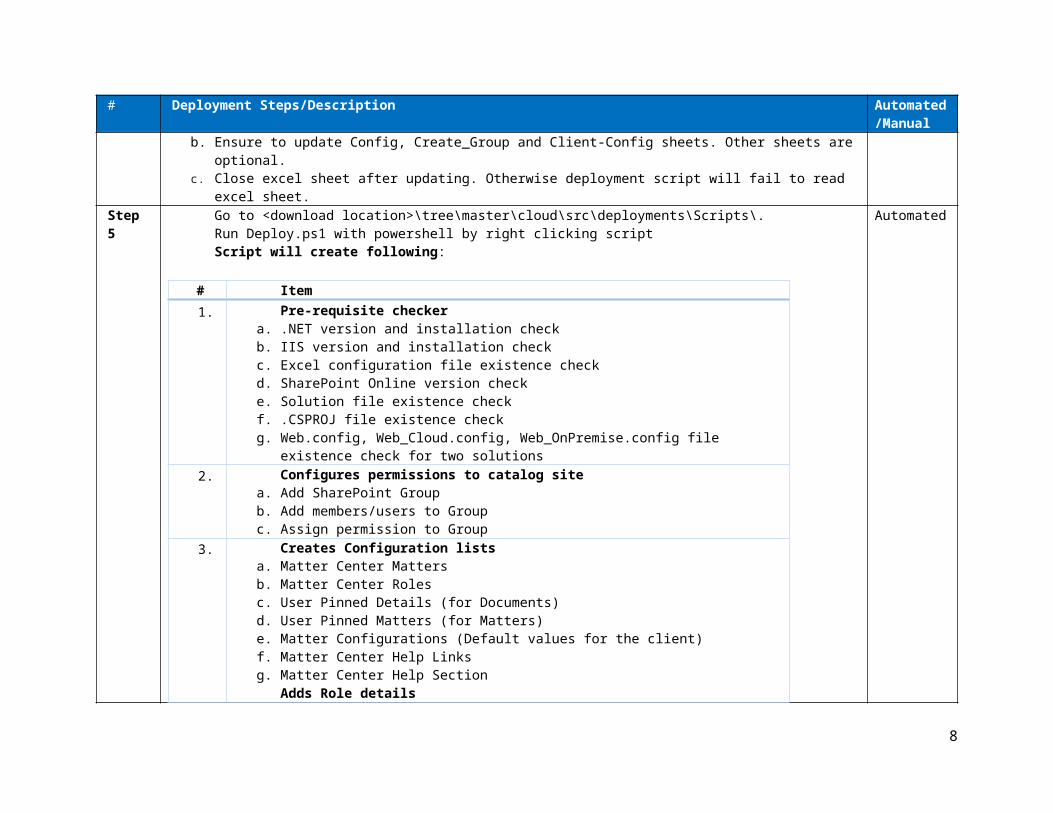
b. Ensure to update Config, Create_Group and Client-Config sheets. Other sheets are optional.c. Close excel sheet after updating. Otherwise deployment script will fail to read excel sheet.
Manual
Step Go to <download location>\tree\master\cloud\src\deployments\Scripts\. Automated
6
# Deployment Steps/Description Automated/Manual
5 Run Deploy.ps1 with powershell by right clicking scriptScript will create following:
# Item1. Pre-requisite checker
a. .NET version and installation checkb. IIS version and installation checkc. Excel configuration file existence checkd. SharePoint Online version checke. Solution file existence checkf. .CSPROJ file existence checkg. Web.config, Web_Cloud.config, Web_OnPremise.config file existence check
for two solutions2. Configures permissions to catalog site
a. Add SharePoint Group b. Add members/users to Groupc. Assign permission to Group
3. Creates Configuration listsa. Matter Center Mattersb. Matter Center Rolesc. User Pinned Details (for Documents)d. User Pinned Matters (for Matters)e. Matter Configurations (Default values for the client)f. Matter Center Help Linksg. Matter Center Help Section
Adds Role details4. Configures Term store
a. Client Idsb. Clientsc. Practice Group -> AOL -> SAOLd. Setting custom property values
i. Folder Hierarchyii. Content Type
Document Templatesiii. Is Folder Structure Present
5. Adds metadata to parent content typea. Create site columns (predefined site columns are required for apps)
7
# Deployment Steps/Description Automated/Manual
b. Add these site columns to specified parent content typec. Create additional content types based on inputs in Excel
6. Activate SharePoint Server Publishing Infrastructure feature on catalog site7. Imports search configuration for app
Updates app list permissions8. Create site collection(s) on SharePoint library based on inputs in Excel,
creates Matter Center Restricted groups in each site collection, activates Document ID service feature on each of the site collection and on the tenant root site collection
Step 6
Publish all the created content types along with parent content typeTo know how to publish content types, refer to Appendix B
Manual
Deploy Azure Resources, Office and exchange Apps
# Deployment Steps/Description Automated/Manual
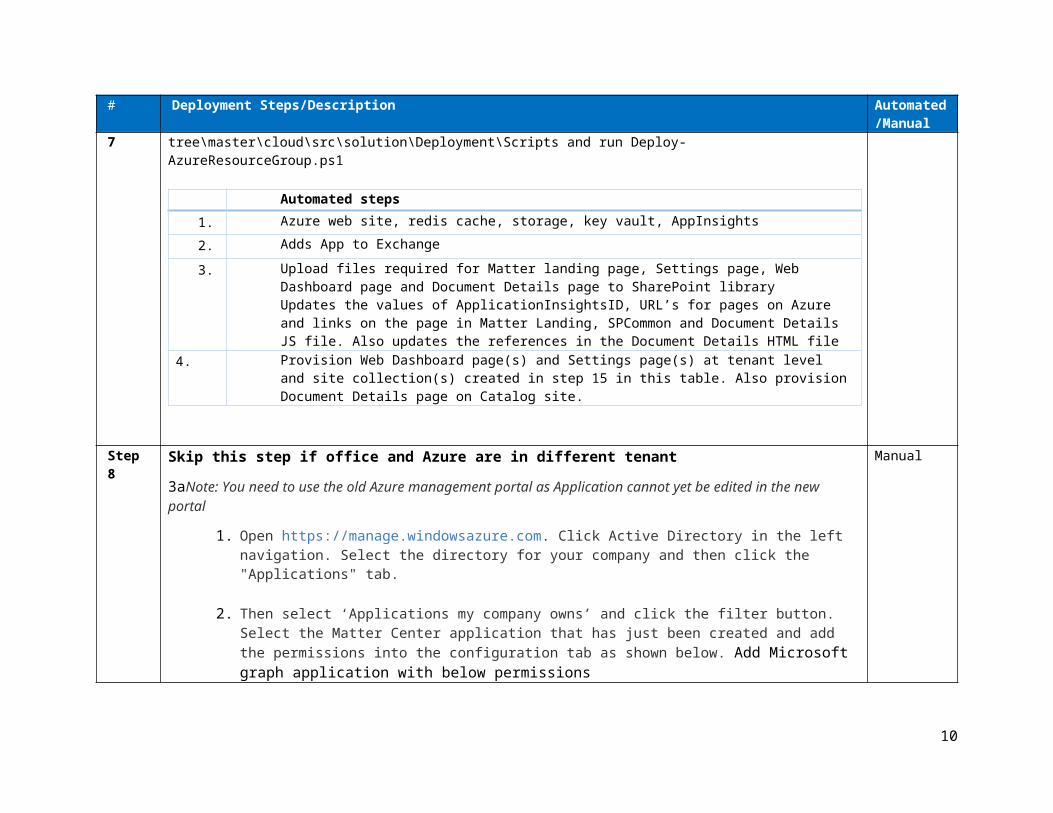
Step 7
Open Powershell as administrator and navigate to <<download location>>\tree\master\cloud\src\solution\Deployment\Scripts and run Deploy-AzureResourceGroup.ps1
Automated steps1. Azure web site, redis cache, storage, key vault, AppInsights2. Adds App to Exchange3. Upload files required for Matter landing page, Settings page, Web Dashboard page
and Document Details page to SharePoint libraryUpdates the values of ApplicationInsightsID, URL’s for pages on Azure and links on the page in Matter Landing, SPCommon and Document Details JS file. Also updates the references in the Document Details HTML file
4. Provision Web Dashboard page(s) and Settings page(s) at tenant level and site collection(s) created in step 15 in this table. Also provision Document Details page on Catalog site.
Automated
Step 8
Skip this step if office and Azure are in different tenant3aNote: You need to use the old Azure management portal as Application cannot yet be edited in
Manual
8

# Deployment Steps/Description Automated/Manual
the new portal
1. Open https://manage.windowsazure.com. Click Active Directory in the left navigation. Select the directory for your company and then click the "Applications" tab.
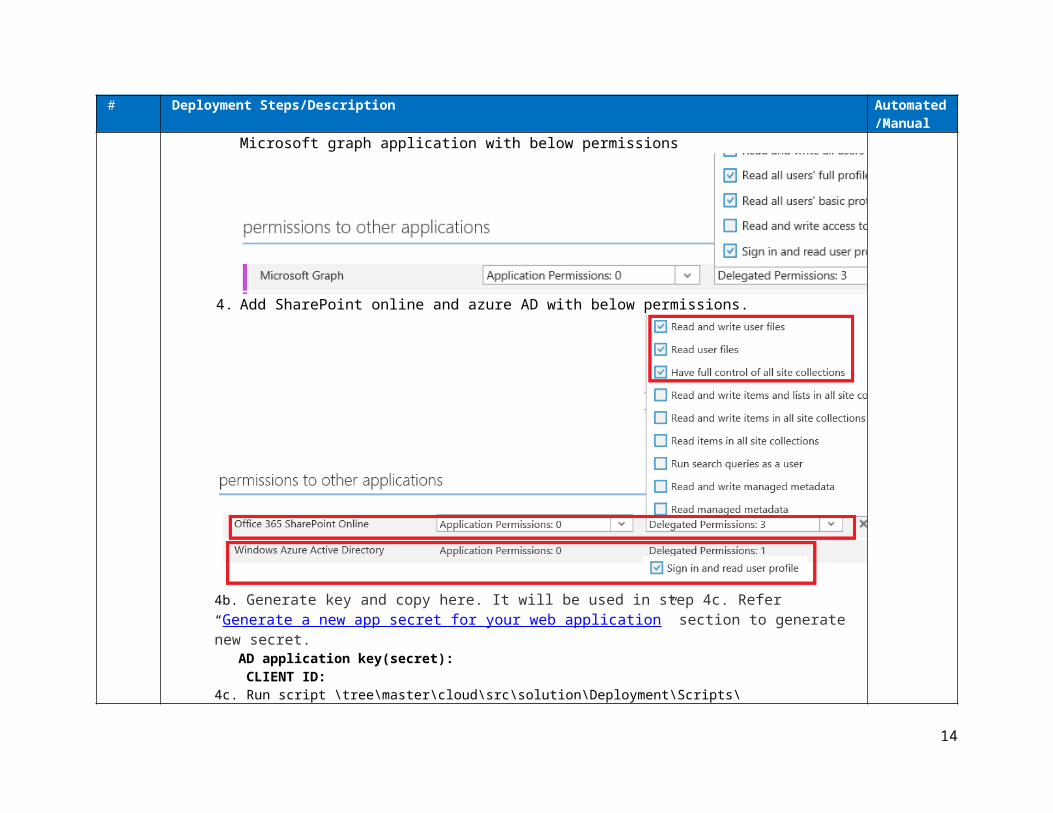
2. Then select ‘Applications my company owns’ and click the filter button. Select the Matter Center application that has just been created and add the permissions into the configuration tab as shown below. Add Microsoft graph application with below permissions
3. Add SharePoint online and azure AD with below permissions.
9
# Deployment Steps/Description Automated/Manual
3b. Generate key and copy here. It will be used in step 3c. Refer “Generate a new app secret for your web application” section to generate new secret. AD application key(secret): 3c. Run script \tree\master\cloud\src\solution\Deployment\Scripts\keyVaultSecret.ps1 to update secret in keyVault
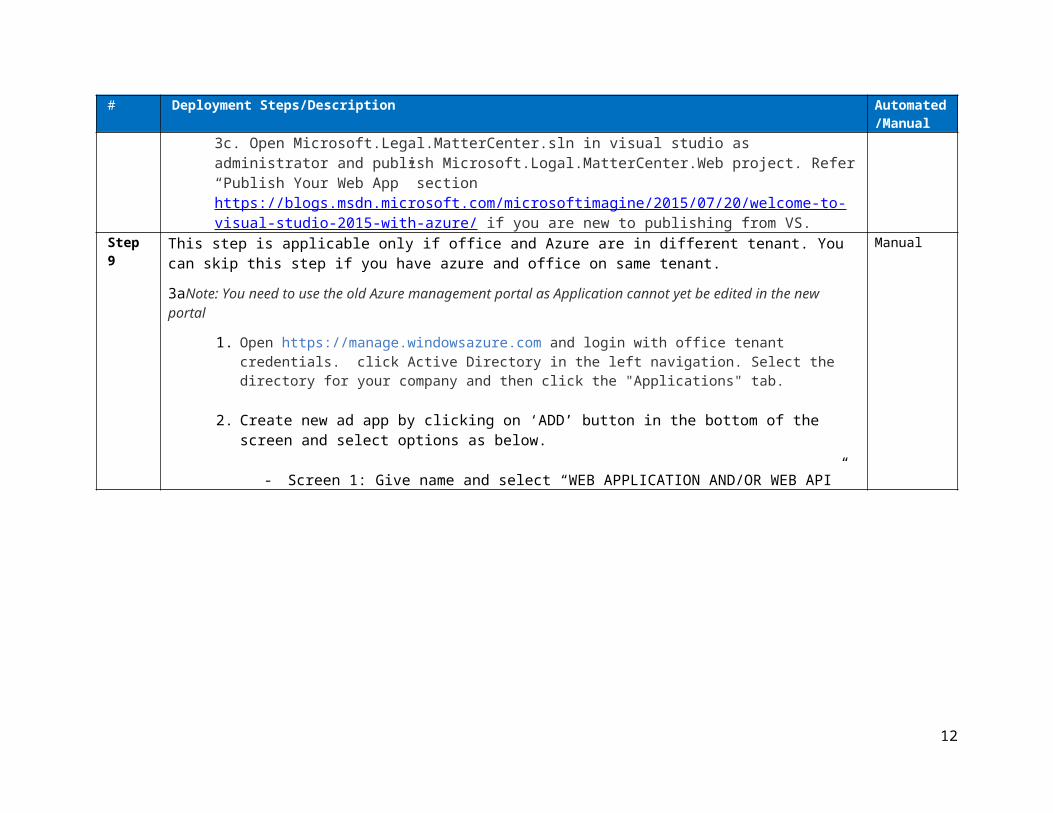
3c. Open Microsoft.Legal.MatterCenter.sln in visual studio as administrator and publish Microsoft.Logal.MatterCenter.Web project. Refer “Publish Your Web App” section https://blogs.msdn.microsoft.com/microsoftimagine/2015/07/20/welcome-to-visual-studio-2015-with-azure/ if you are new to publishing from VS.
Step 9
This step is applicable only if office and Azure are in different tenant. You can skip this step if you have azure and office on same tenant.3aNote: You need to use the old Azure management portal as Application cannot yet be edited in the new portal
1. Open https://manage.windowsazure.com and login with office tenant credentials. click Active Directory in the left navigation. Select the directory for your company and then click the "Applications" tab.
2. Create new ad app by clicking on ‘ADD’ button in the bottom of the screen and select options as below.
- Screen 1: Give name and select “WEB APPLICATION AND/OR WEB API”
Manual
10

# Deployment Steps/Description Automated/Manual
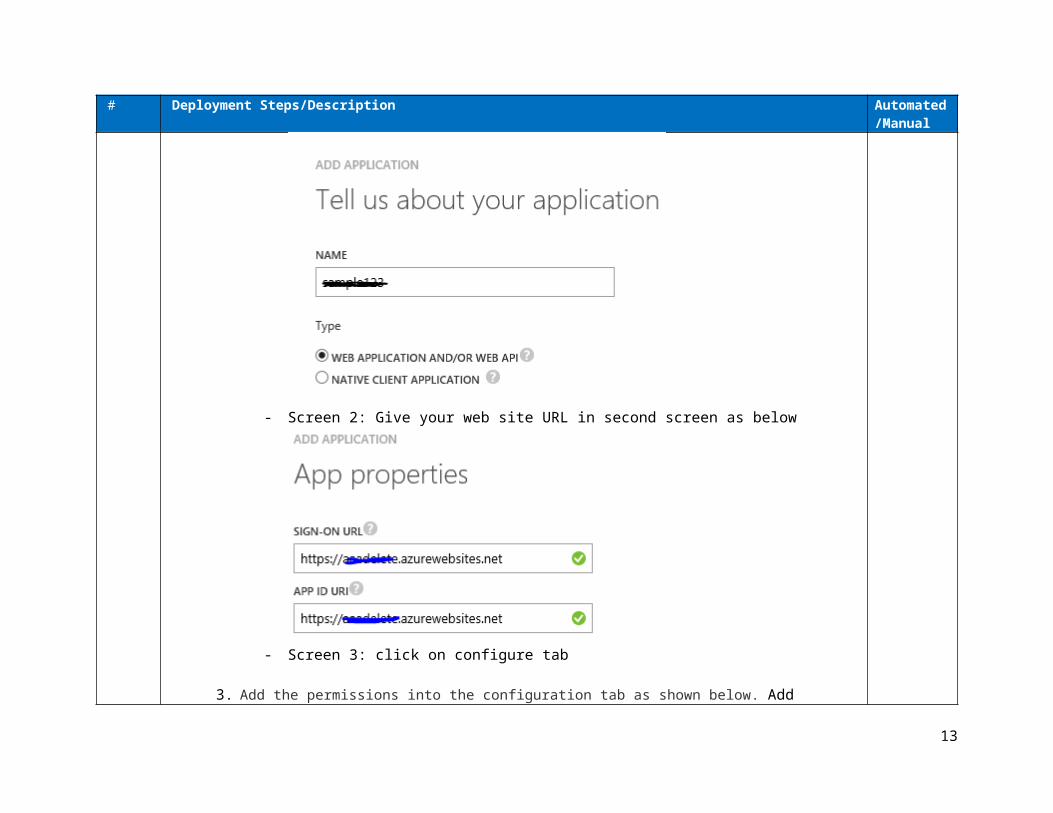
- Screen 2: Give your web site URL in second screen as below
- Screen 3: click on configure tab
3. Add the permissions into the configuration tab as shown below. Add Microsoft graph application with below permissions
11
# Deployment Steps/Description Automated/Manual
4. Add SharePoint online and azure AD with below permissions.
4b. Generate key and copy here. It will be used in step 4c. Refer “Generate a new app secret for your web application” section to generate new secret. AD application key(secret): CLIENT ID:4c. Run script \tree\master\cloud\src\solution\Deployment\Scripts\keyVaultSecret.ps1 to update secret in keyVault4c. Open script \tree\master\cloud\src\solution\Deployment\Scripts\keyVaultSecret.ps1 and replace ‘General-AppKey’ string with ‘General-ClientId’. Run the script and give client id as the value for ‘ADApplicationKey:’ parameter.
12
# Deployment Steps/Description Automated/Manual
3c. Open Microsoft.Legal.MatterCenter.sln in visual studio as administrator and publish Microsoft.Logal.MatterCenter.Web project. Refer “Publish Your Web App” section https://blogs.msdn.microsoft.com/microsoftimagine/2015/07/20/welcome-to-visual-studio-2015-with-azure/ if you are new to publishing from VS.
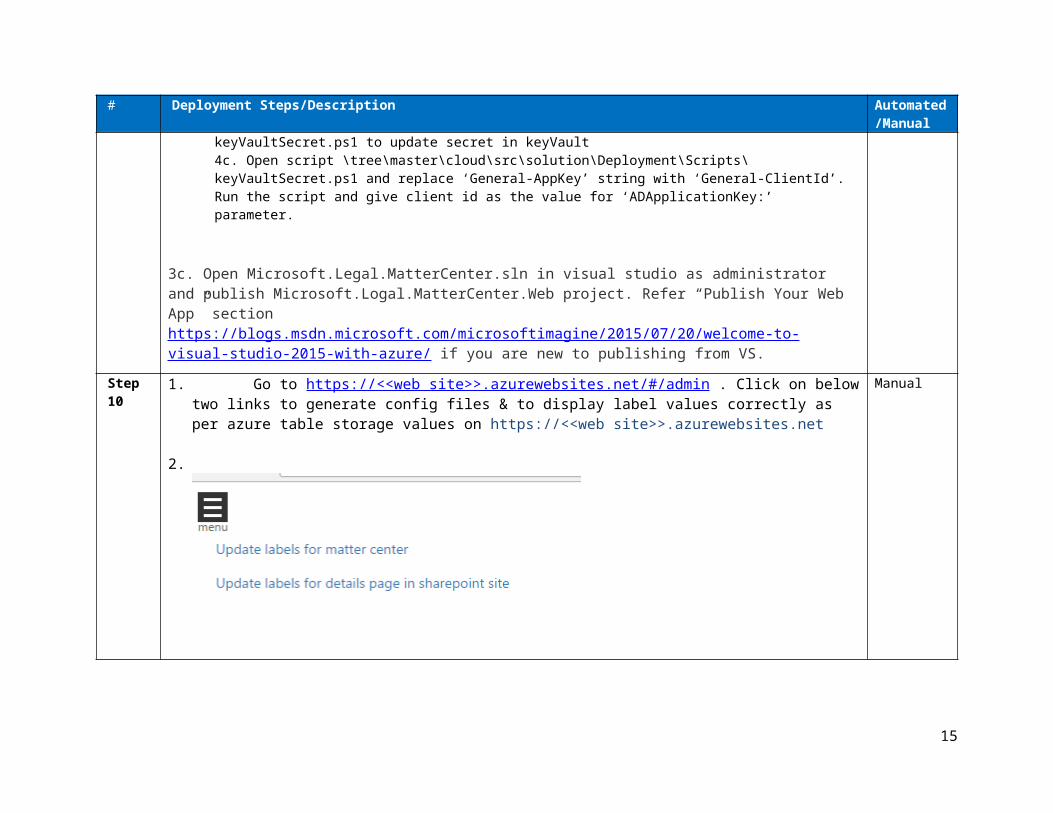
Step 10
1. Go to https://<<web site>>.azurewebsites.net/#/admin . Click on below two links to generate config files & to display label values correctly as per azure table storage values on https://<<web site>>.azurewebsites.net
2.
Manual
Appendix AAdding new client to the Tenant
Pre-requisite:Site collection should already be created.Steps:
13
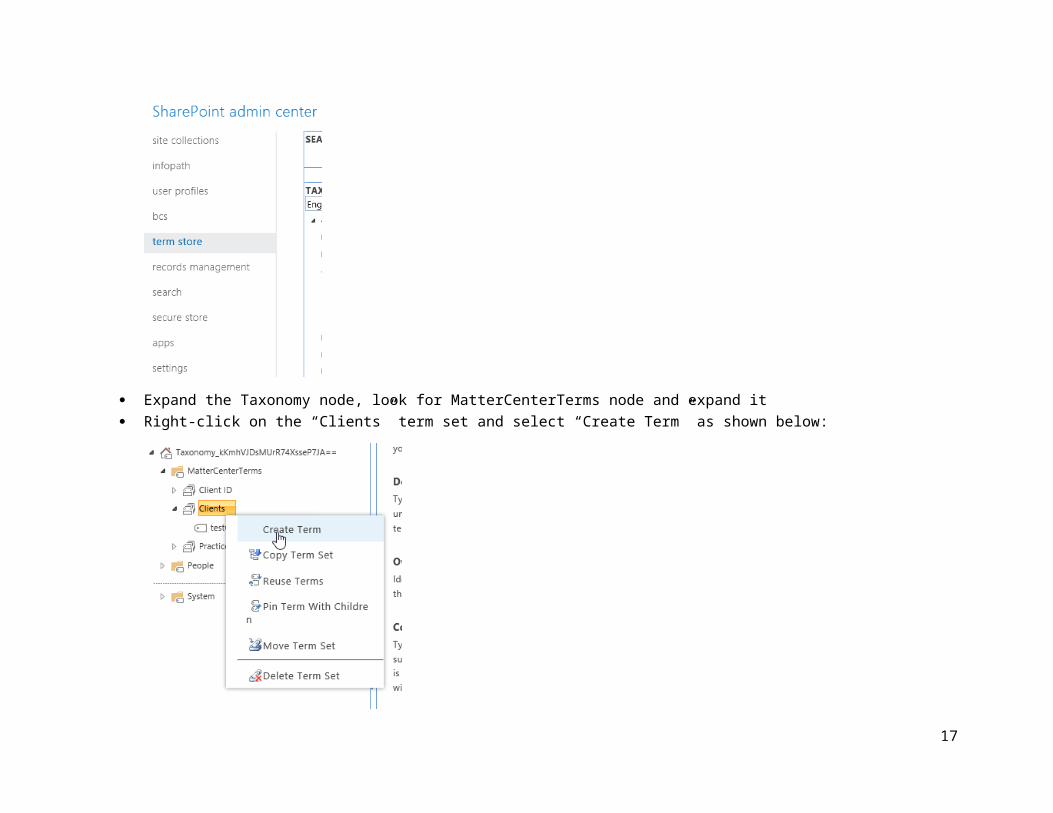
1. Term store configuration changes: Go to Admin center by typing the following URL in the browser: https://<tenant>-admin.sharepoint.com For e.g. https://mysharepointtenant-admin.sharepoint.com Select “term store” from the left navigation menu.
Expand the Taxonomy node, look for MatterCenterTerms node and expand it Right-click on the “Clients” term set and select “Create Term” as shown below:
14
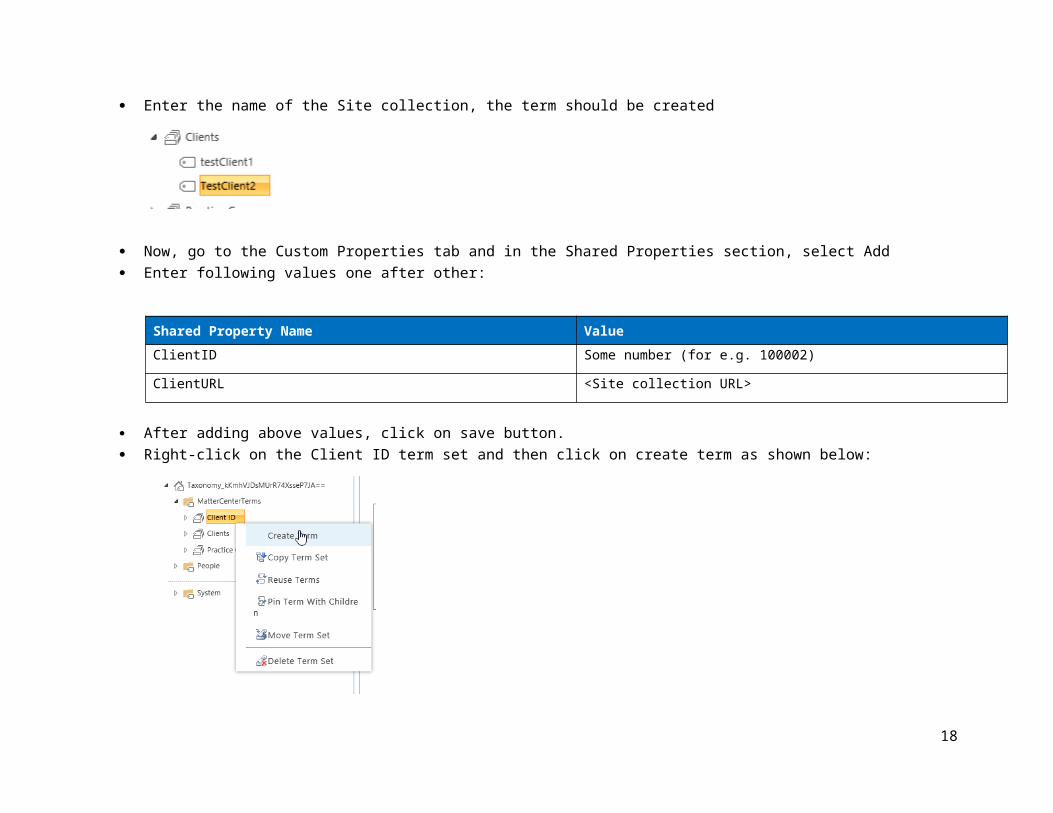
Enter the name of the Site collection, the term should be created
Now, go to the Custom Properties tab and in the Shared Properties section, select Add Enter following values one after other:
Shared Property Name ValueClientID Some number (for e.g. 100002)
ClientURL <Site collection URL>
After adding above values, click on save button. Right-click on the Client ID term set and then click on create term as shown below:
15
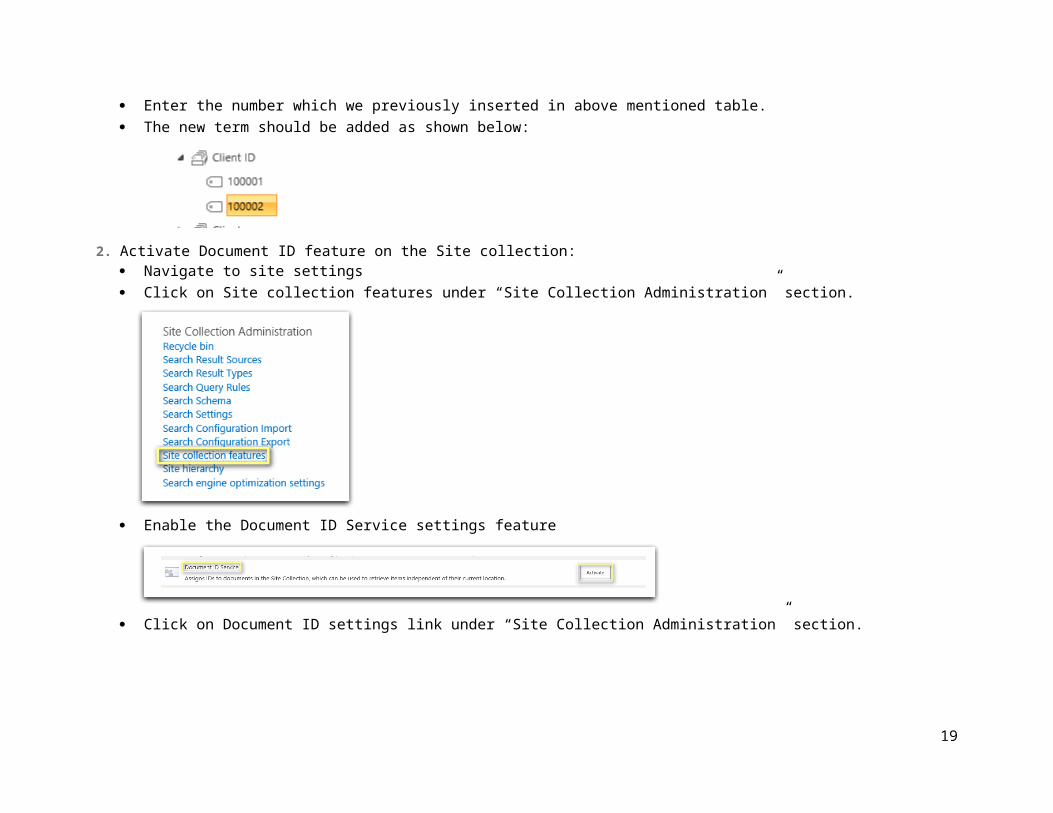
Enter the number which we previously inserted in above mentioned table. The new term should be added as shown below:
2. Activate Document ID feature on the Site collection:
Navigate to site settings Click on Site collection features under “Site Collection Administration” section.
16
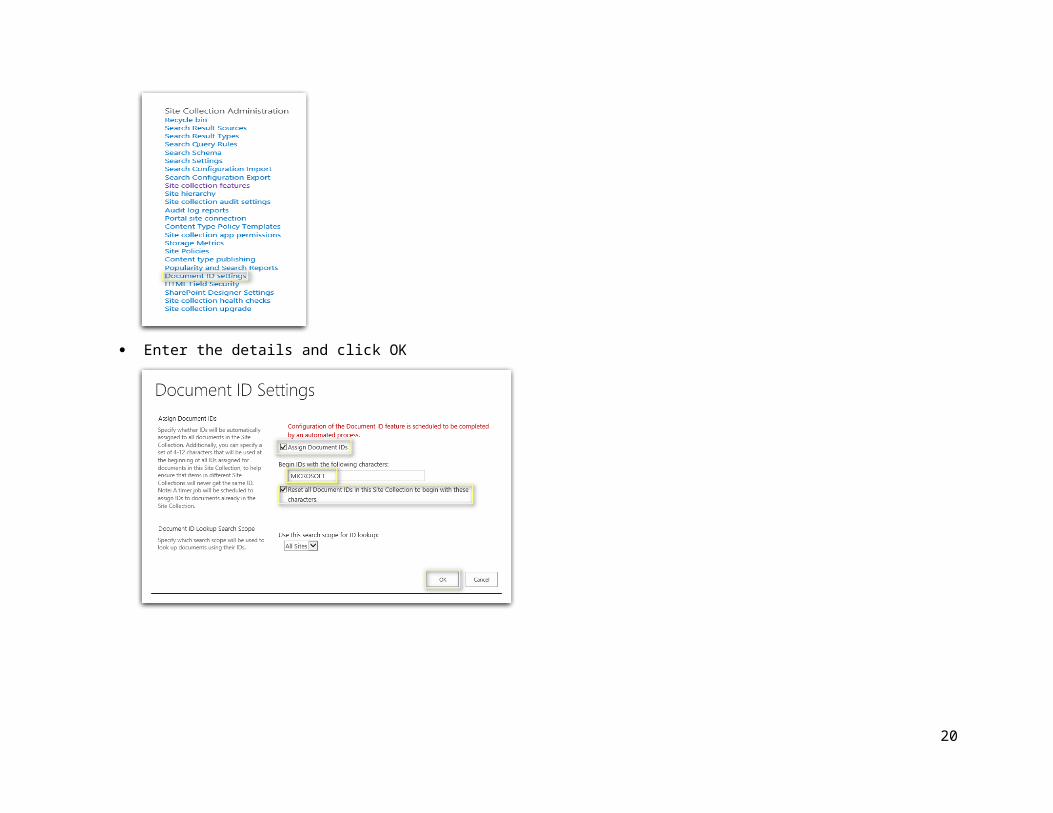
Enable the Document ID Service settings feature
Click on Document ID settings link under “Site Collection Administration” section.
17
Enter the details and click OK
Settings list configurations1. Create configurations list by following below steps:
Go to “Site Contents”:
Click on “add an app, in the page that opens up Select “Custom list” as shown below:
18
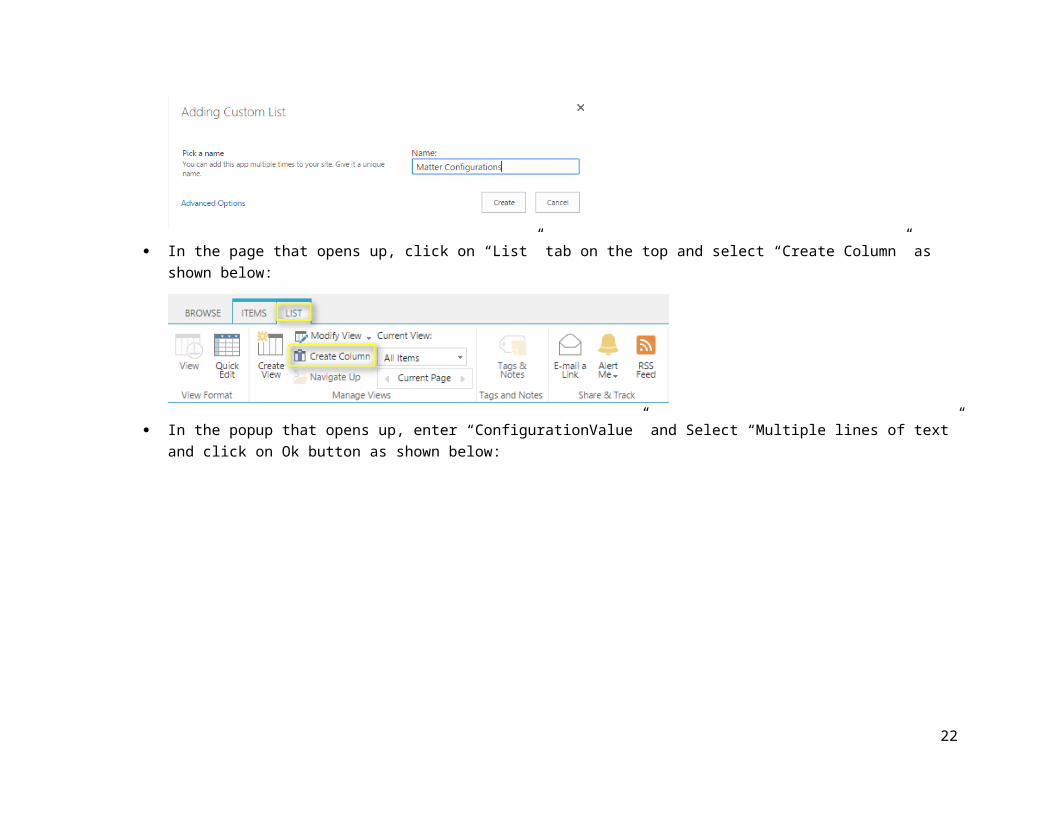
Provide the name as “Matter Configurations” as shown below:
In the page that opens up, click on “List” tab on the top and select “Create Column” as shown below:
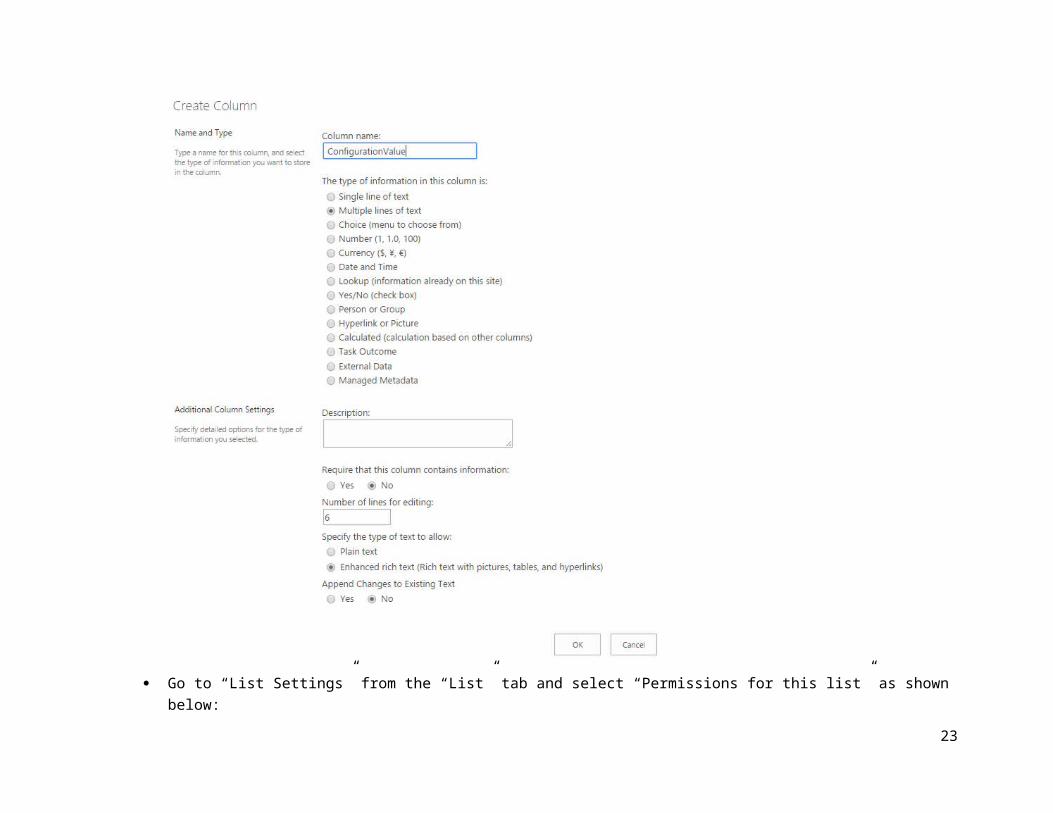
In the popup that opens up, enter “ConfigurationValue” and Select “Multiple lines of text” and click on Ok button as shown below:
19
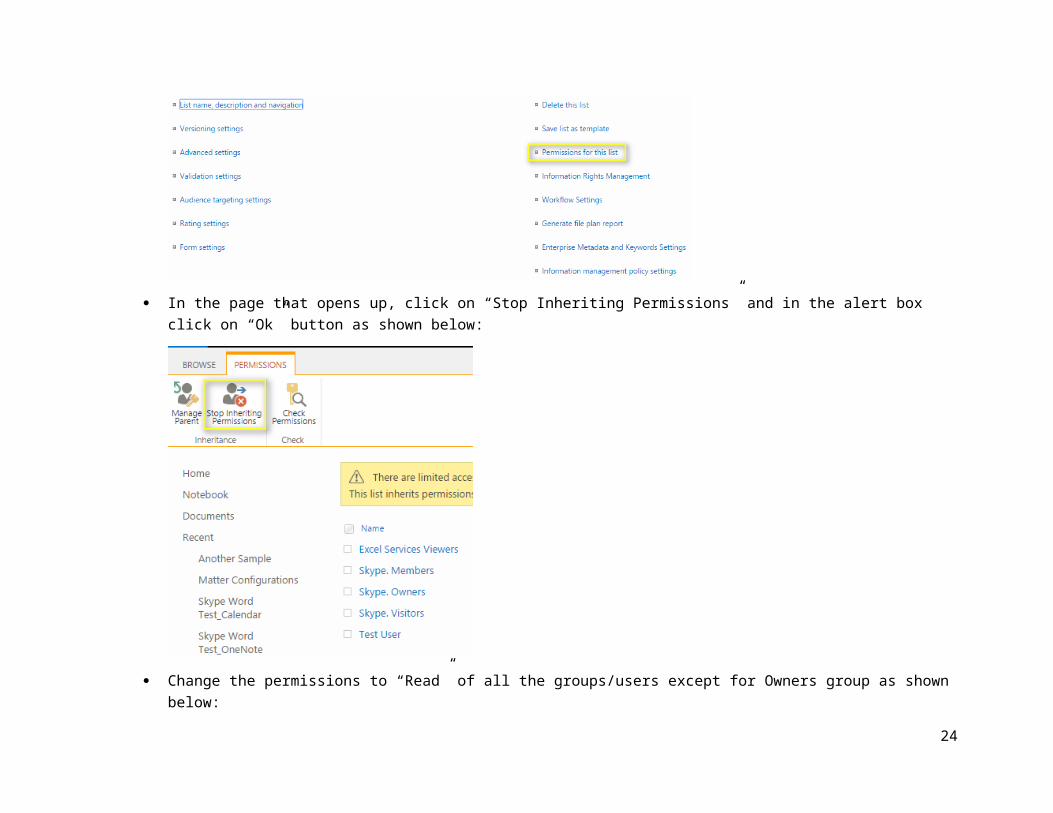
Go to “List Settings” from the “List” tab and select “Permissions for this list” as shown below:
20

In the page that opens up, click on “Stop Inheriting Permissions” and in the alert box click on “Ok” button as shown below:
Change the permissions to “Read” of all the groups/users except for Owners group as shown below:
21
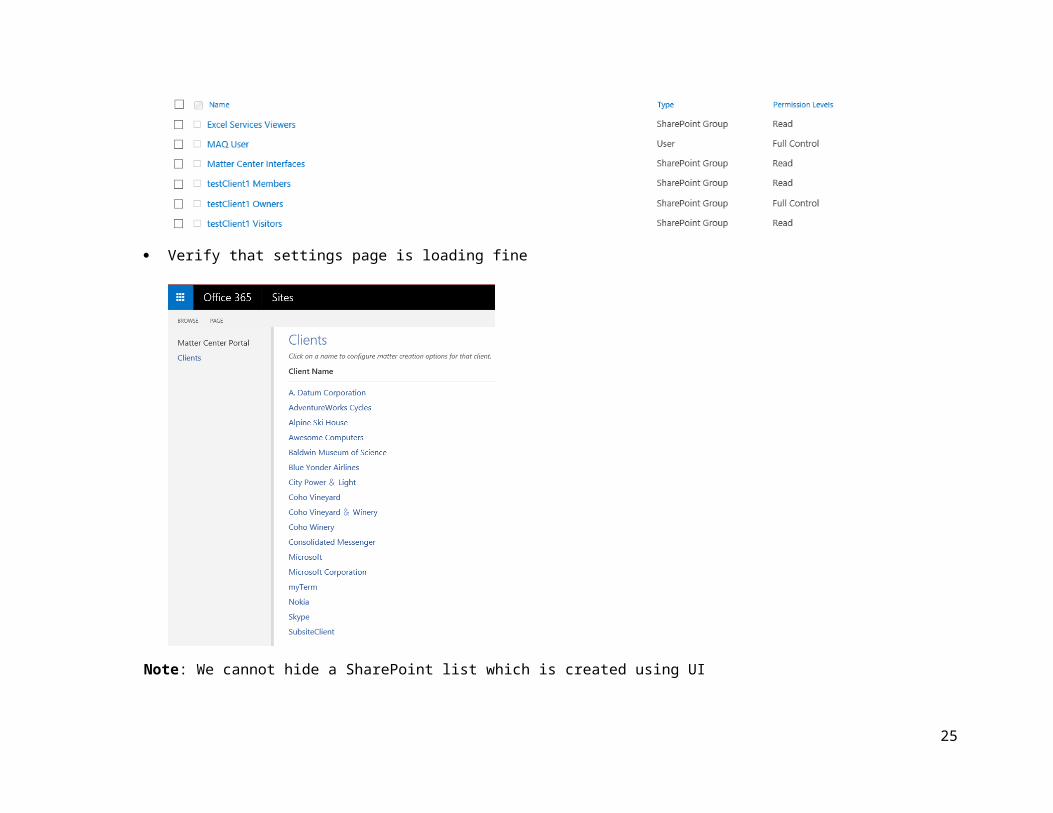
Verify that settings page is loading fine
Note: We cannot hide a SharePoint list which is created using UI
22
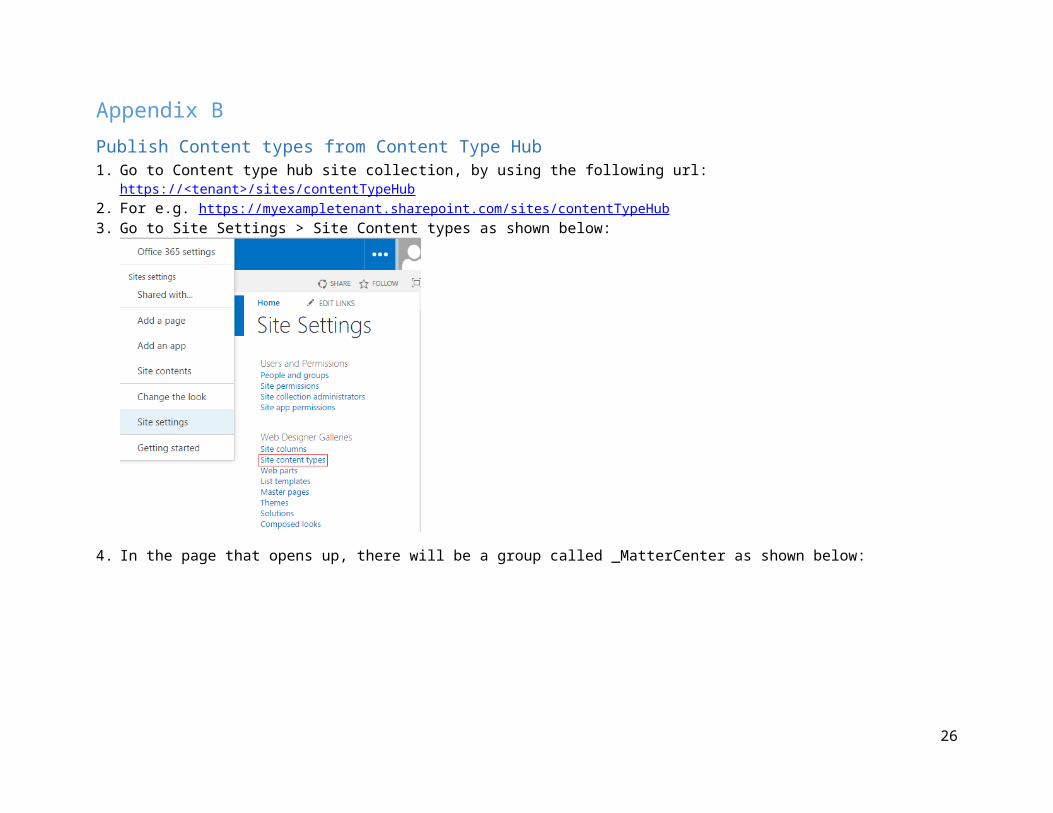
Appendix BPublish Content types from Content Type Hub1. Go to Content type hub site collection, by using the following url: https://<tenant>/sites/contentTypeHub2. For e.g. https://myexampletenant.sharepoint.com/sites/contentTypeHub3. Go to Site Settings > Site Content types as shown below:
4. In the page that opens up, there will be a group called _MatterCenter as shown below:
23
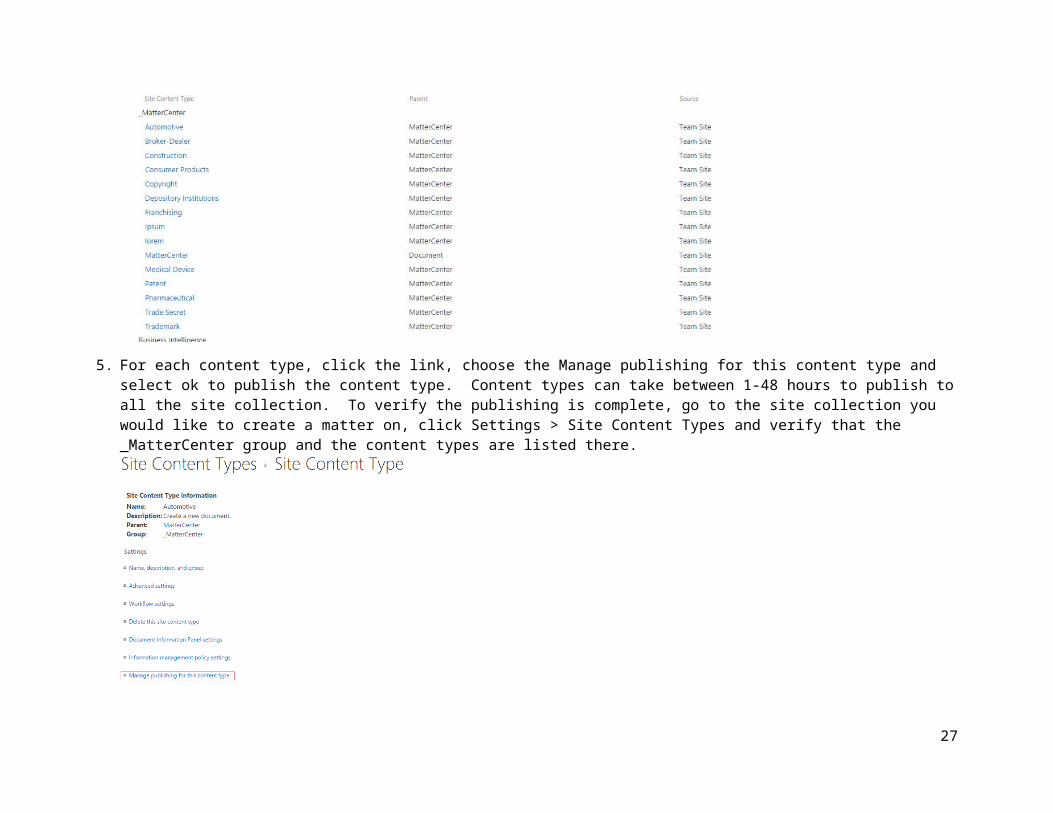
5. For each content type, click the link, choose the Manage publishing for this content type and select ok to publish
the content type. Content types can take between 1-48 hours to publish to all the site collection. To verify the publishing is complete, go to the site collection you would like to create a matter on, click Settings > Site Content Types and verify that the _MatterCenter group and the content types are listed there.
24
Appendix CAdd admin account to term store admin1. Sign in to https://portal.office.com with admin user name and password2. From left top corner, Go to Admin > SharePoint3. Select “term store” from the left navigation menu
4. Select “Taxonomy” node and in the Term Store Administrators, add the admin account as shown below:
5. Click on Save button
25
Troubleshooting Deployment Issues
1. Failed to install Exchange app
Resolution: Setup Outlook account of the user of which exchange credentials are used during deployment.2. 500 error after successfully installing all components.
If getting a 500 error on GetClientContext on SPOAuthorization for CanCreateMatter:
Verify app service plan set to BASIC(B1). Sometimes deployment failing to set app plan to BASIC which is required for loading certificate.
3. Admin-consent error occurs when application tries to connect to SharePointIf this occurs consent has to be forced to occur again. Enter the below in a Browser URL replacing the appropriate values and sign in with a Tenant Admin. This will force a prompt asking to accept permissions consent.https://login.microsoftonline.com/tenantname/adminconsent?client_id=cliientid&state=12345&redirect_uri=https%3a%2f%2flocalhost%2fportorappnumber
4. If after deployment the Documents are not loading and the page is spinning check the entry in the AppSettings in Azure for the Web App.Search:SearchResultSourceID
If this is set to System.Object[] an error has occurred in the Deployment. To fix this take the following steps.
26
a. Navigate to the Site Settings for the Site Catalogb. Open Search Result Sourcesc. Check to see if an entry exists for Matter Center exists
d. If an entry does not exist create a new onee. Set the Query Transform to the following:
{searchTerms} AND ( path: "https://siteURL/sites/Client" )f. Once created reopen and copy the sourceid from the URL
Paste this value in the Search:SearchResultSourceID value in App Settings
27