Embed Size (px)
Citation preview
“America’s leading woodworking authority”™
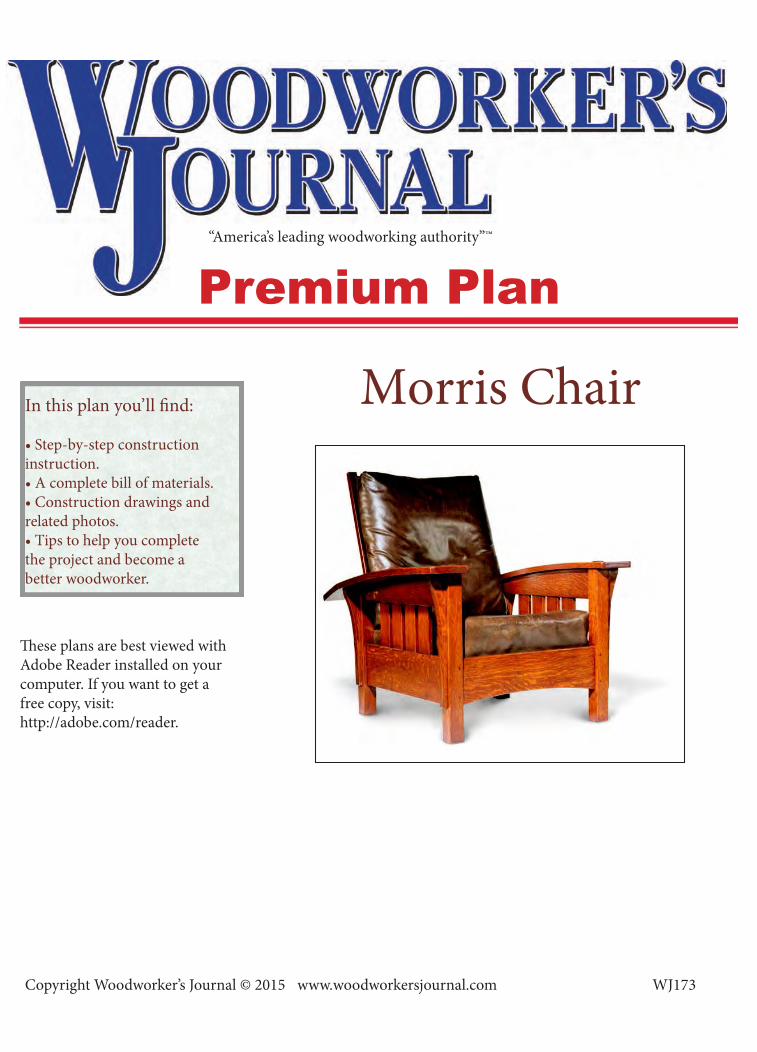
Premium Plan
In this plan you’ll find:
• Step-by-step constructioninstruction.• A complete bill of materials.• Construction drawings andrelated photos.• Tips to help you completethe project and become abetter woodworker.
Morris Chair
These plans are best viewed with Adobe Reader installed on your computer. If you want to get a free copy, visit:http://adobe.com/reader.
Copyright Woodworker’s Journal © 2015 www.woodworkersjournal.com WJ173
Woodworker’s Journal
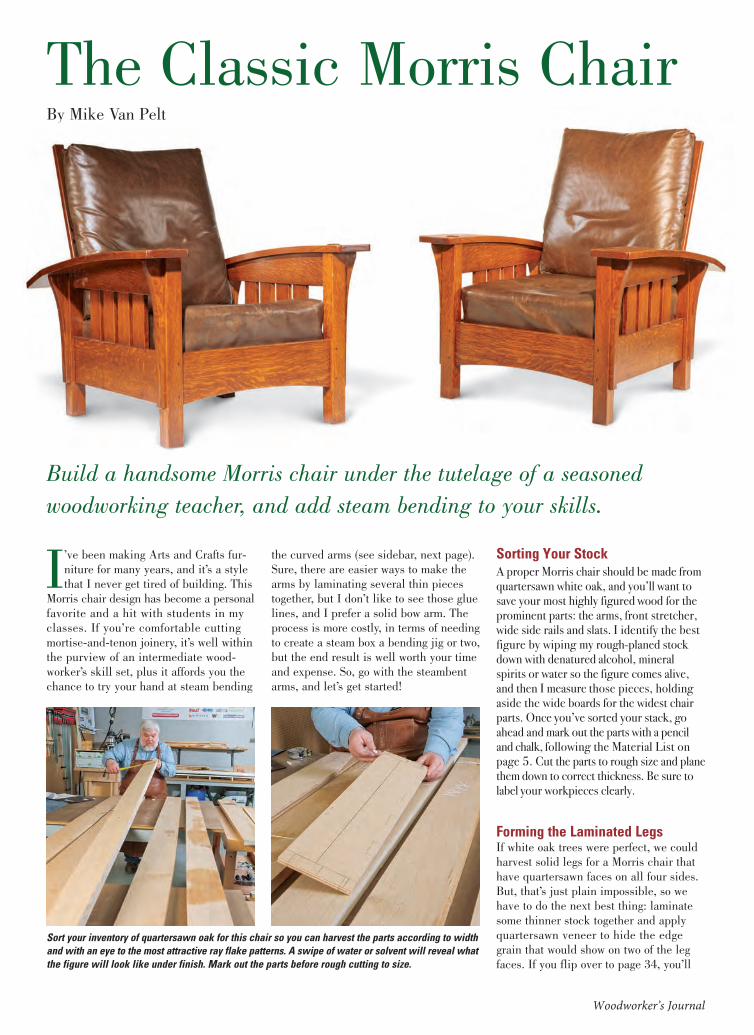
the curved arms (see sidebar, next page).Sure, there are easier ways to make thearms by laminating several thin piecestogether, but I don’t like to see those gluelines, and I prefer a solid bow arm. Theprocess is more costly, in terms of needingto create a steam box a bending jig or two,but the end result is well worth your timeand expense. So, go with the steambentarms, and let’s get started!
Sorting Your StockA proper Morris chair should be made from quartersawn white oak, and you’ll want to save your most highly figured wood for the prominent parts: the arms, front stretcher, wide side rails and slats. I identify the best figure by wiping my rough-planed stock down with denatured alcohol, mineral spirits or water so the figure comes alive, and then I measure those pieces, holding aside the wide boards for the widest chair parts. Once you’ve sorted your stack, go ahead and mark out the parts with a pencil and chalk, following the Material List on page 5. Cut the parts to rough size and plane them down to correct thickness. Be sure to label your workpieces clearly.
Forming the Laminated LegsIf white oak trees were perfect, we couldharvest solid legs for a Morris chair thathave quartersawn faces on all four sides.But, that’s just plain impossible, so wehave to do the next best thing: laminatesome thinner stock together and applyquartersawn veneer to hide the edgegrain that would show on two of the legfaces. If you flip over to page 34, you’ll
I’ve been making Arts and Crafts fur-niture for many years, and it’s a stylethat I never get tired of building. This
Morris chair design has become a personalfavorite and a hit with students in myclasses. If you’re comfortable cuttingmortise-and-tenon joinery, it’s well withinthe purview of an intermediate wood-worker’s skill set, plus it affords you thechance to try your hand at steam bending
The Classic Morris ChairBy Mike Van Pelt
Build a handsome Morris chair under the tutelage of a seasonedwoodworking teacher, and add steam bending to your skills.
Sort your inventory of quartersawn oak for this chair so you can harvest the parts according to widthand with an eye to the most attractive ray flake patterns. A swipe of water or solvent will reveal whatthe figure will look like under finish. Mark out the parts before rough cutting to size.
220.030-038 P1 Morris chair.qxp_Project 5/17/13 2:49 PM Page 30
Woodworker’s Journal
see how I address this glue-up process.First, I rip 12 strips of 26"-long stock to21⁄16" wide from 13/16"-thick material.Three of these will serve as the innerlaminations of each leg when face-gluedtogether, but that still doesn’t solve theproblem of hiding those flat-grain edgesand glue lines. So, once my glued-up“cores” are dry, I sandwich the four ofthem between five pieces of 1/2"-thick,21⁄2"-wide quartersawn oak to create aneven larger glued-up slab. Why? Becausethis way, the thinner material beside thecores will become veneer for those twofaces of each leg when I rip the big glue-up into four leg blanks again.
Now, maybe you are saying to yourself,“I don’t have a jointer as wide as Mikedoes for flattening the face of that bigslab,” and that’s OK. At CU WoodshopSchool of Woodworking, we are very well-equipped, so I can tackle this job on a12" jointer. But, you’ll get the same endresult if you just make up two narrowersets of these leg slabs instead of one soyou can flatten their faces on a 6" or 8"jointer. Note: you’ll need an extra pieceof 1/2" stock to hide the edges of one sideon the second slab.
After I jointed one face of my big legassembly smooth, I set up my table sawwith a thin-kerf blade to rip through thecenters of those thick veneer pieces. But,there’s still final sizing to do here. Yourgoal is to end up with 21⁄4" x 21⁄4" legs. Sohead to your planer and plan your strategy:you want to take the legs down in size sothe pair of veneer faces on each leg areuniformly thick. And, since the core stockwas just over 2" wide to start with, thefinal thickness of that veneer will end uppretty thin — around 3/32". You also needto plane down the two original quartersawncore faces to reach final thickness there.Work carefully!
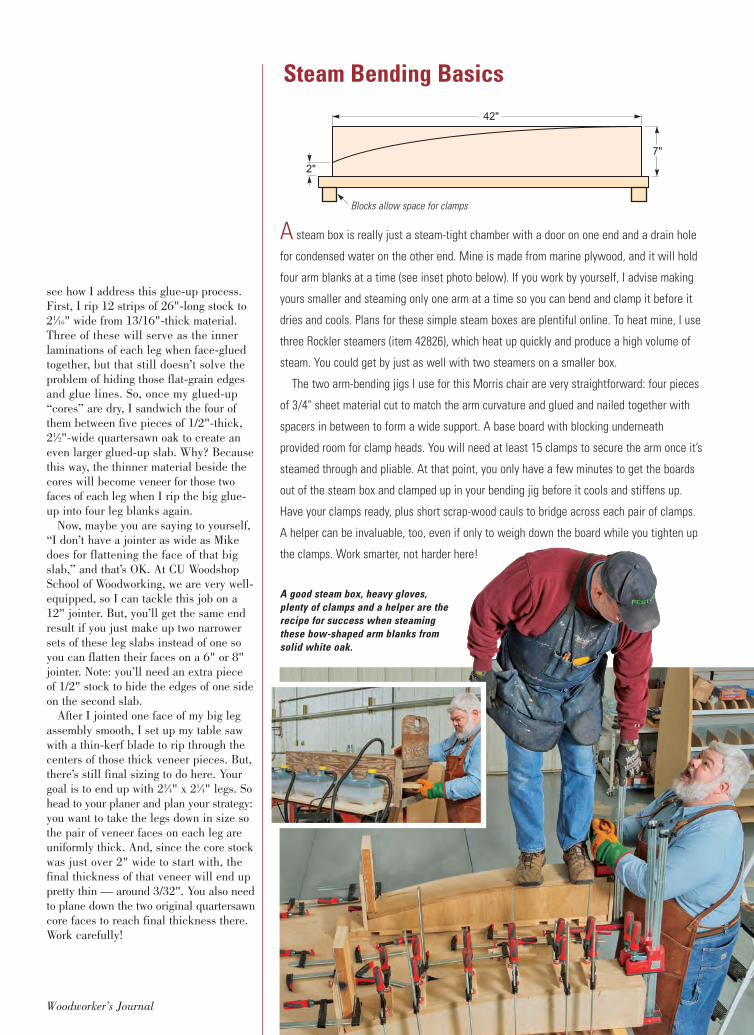
A good steam box, heavy gloves,plenty of clamps and a helper are therecipe for success when steamingthese bow-shaped arm blanks fromsolid white oak.
A steam box is really just a steam-tight chamber with a door on one end and a drain hole
for condensed water on the other end. Mine is made from marine plywood, and it will hold
four arm blanks at a time (see inset photo below). If you work by yourself, I advise making
yours smaller and steaming only one arm at a time so you can bend and clamp it before it
dries and cools. Plans for these simple steam boxes are plentiful online. To heat mine, I use
three Rockler steamers (item 42826), which heat up quickly and produce a high volume of
steam. You could get by just as well with two steamers on a smaller box.
The two arm-bending jigs I use for this Morris chair are very straightforward: four pieces
of 3/4" sheet material cut to match the arm curvature and glued and nailed together with
spacers in between to form a wide support. A base board with blocking underneath
provided room for clamp heads. You will need at least 15 clamps to secure the arm once it’s
steamed through and pliable. At that point, you only have a few minutes to get the boards
out of the steam box and clamped up in your bending jig before it cools and stiffens up.
Have your clamps ready, plus short scrap-wood cauls to bridge across each pair of clamps.
A helper can be invaluable, too, even if only to weigh down the board while you tighten up
the clamps. Work smarter, not harder here!
Steam Bending Basics
2"
42"
7"
Blocks allow space for clamps
220.030-037 P1 Morris chair_Project 5/20/13 4:18 PM Page 31
Woodworker’s Journal
33/4"
1
2 2 2 2
5
6
7 7
8 8
5/8"
1/2"
31/4"
41/2"25/8"
21/2"
23/8"
3"1"
11/2"
11/2"
6"
12"
21/4"
1/2"
1/2"
3/4"2"
2"25/8" 2"
3/8"
5/8" Dia.
3/4"
1"
1/2"
3/4"
1/2"
1/2" 1/2"
1/2"1/2"
3/4" 3/4"
27/8"
21/2"
33/4"
33/4"
11/2"11/4" 11/4"
11/4"
13/8"
11/2"
11/4"
63/8"
4"
241/4"
6"
5"
10"
21/2"
6"
5"
10"
21/2"
53/4"
135/16"
5/8" Dia.
5"
1"
1/2"
1/2"
3/4"
1/2"
1/2"
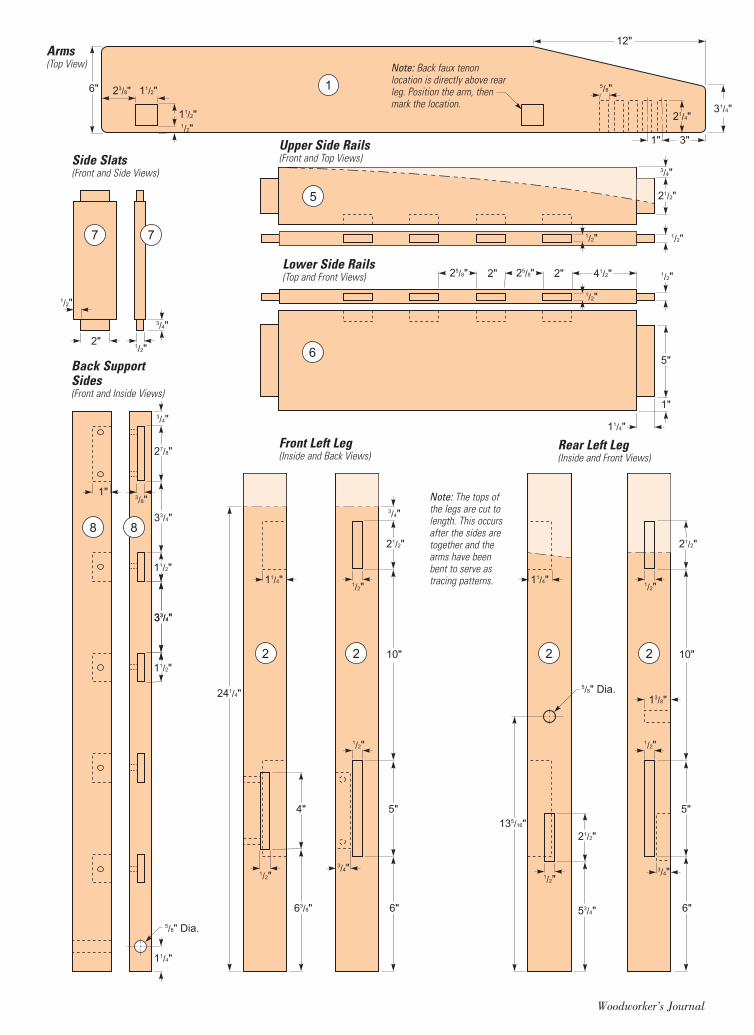
Front Left Leg(Inside and Back Views)
Upper Side Rails(Front and Top Views)Side Slats
(Front and Side Views)
Arms(Top View)
Back SupportSides(Front and Inside Views)
Lower Side Rails(Top and Front Views)
Rear Left Leg(Inside and Front Views)
Note: Back faux tenonlocation is directly above rearleg. Position the arm, thenmark the location.
Note: The tops ofthe legs are cut tolength. This occursafter the sides aretogether and thearms have beenbent to serve astracing patterns.
220.030-037 P1 Morris chair_Project 5/20/13 4:19 PM Page 32
3
3
4
43/4"
21/2"
51/2"
13/8"
4"
12"
1/2"
1/2"
3/4"
3/4"
16
16
Woodworker’s Journal
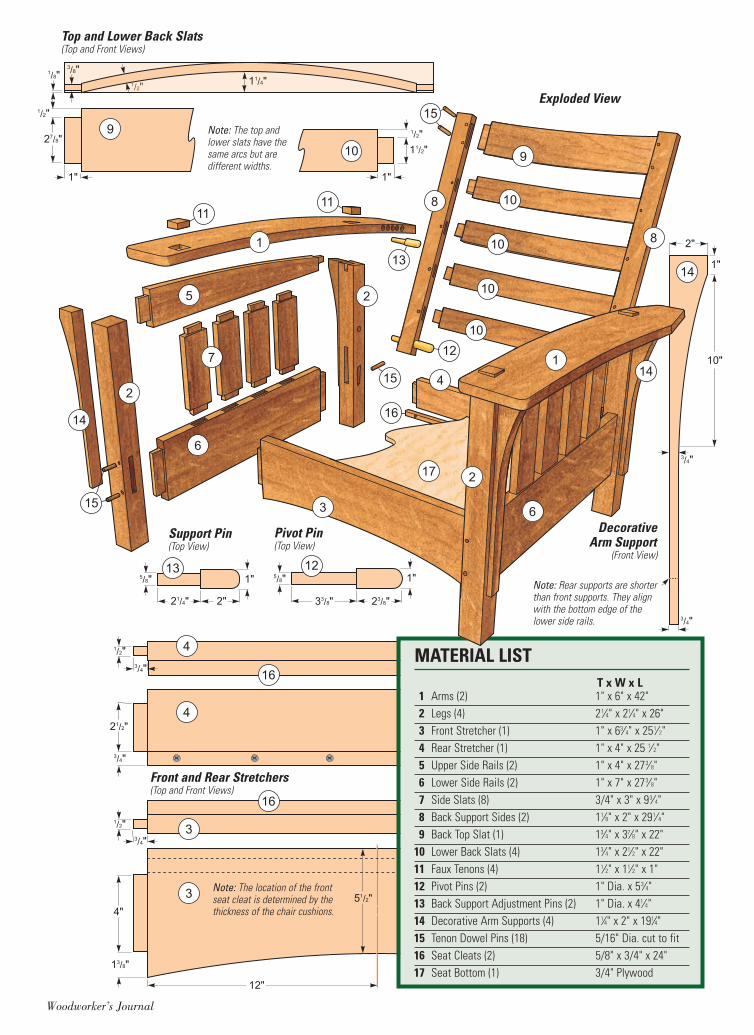
T x W x L1 Arms (2) 1" x 6" x 42"2 Legs (4) 21⁄4" x 21⁄4" x 26"3 Front Stretcher (1) 1" x 63⁄4" x 251⁄2"4 Rear Stretcher (1) 1" x 4" x 25 1⁄ 2"5 Upper Side Rails (2) 1" x 4" x 273⁄8"6 Lower Side Rails (2) 1" x 7" x 273⁄8"7 Side Slats (8) 3/4" x 3" x 93⁄4"8 Back Support Sides (2) 11⁄8" x 2" x 291⁄4"9 Back Top Slat (1) 13⁄4" x 37⁄8" x 22"
10 Lower Back Slats (4) 13⁄4" x 21⁄2" x 22"11 Faux Tenons (4) 11⁄2" x 11⁄2" x 1"12 Pivot Pins (2) 1" Dia. x 53⁄4"13 Back Support Adjustment Pins (2) 1" Dia. x 41⁄4"14 Decorative Arm Supports (4) 11⁄4" x 2" x 191⁄4"15 Tenon Dowel Pins (18) 5/16" Dia. cut to fit16 Seat Cleats (2) 5/8" x 3/4" x 24"17 Seat Bottom (1) 3/4" Plywood
MATERIAL LIST
Exploded View
12
33/8" 23/8"
1"5/8"13
21/4" 2"
1"5/8"
10
927/8"
1"
1/2"
1/2"
1/8"3/8"
1"
11/2"
11/4"
1/2"
14
3/4"
3/4"
1"
10"
2"
Top and Lower Back Slats(Top and Front Views)
Pivot Pin(Top View)
Front and Rear Stretchers(Top and Front Views)
DecorativeArm Support
(Front View)
1
1
10
10
10
10
2
2
2
3
4
5
6
6
7
8
8
9
1111
12
13
14
14
15
15
16
17
15
Note: The top andlower slats have thesame arcs but aredifferent widths.
Note: The location of the frontseat cleat is determined by thethickness of the chair cushions.
Note: Rear supports are shorterthan front supports. They alignwith the bottom edge of thelower side rails.
Support Pin(Top View)
220.030-037 P1 Morris chair_Project 5/21/13 2:37 PM Page 33
Woodworker’s Journal
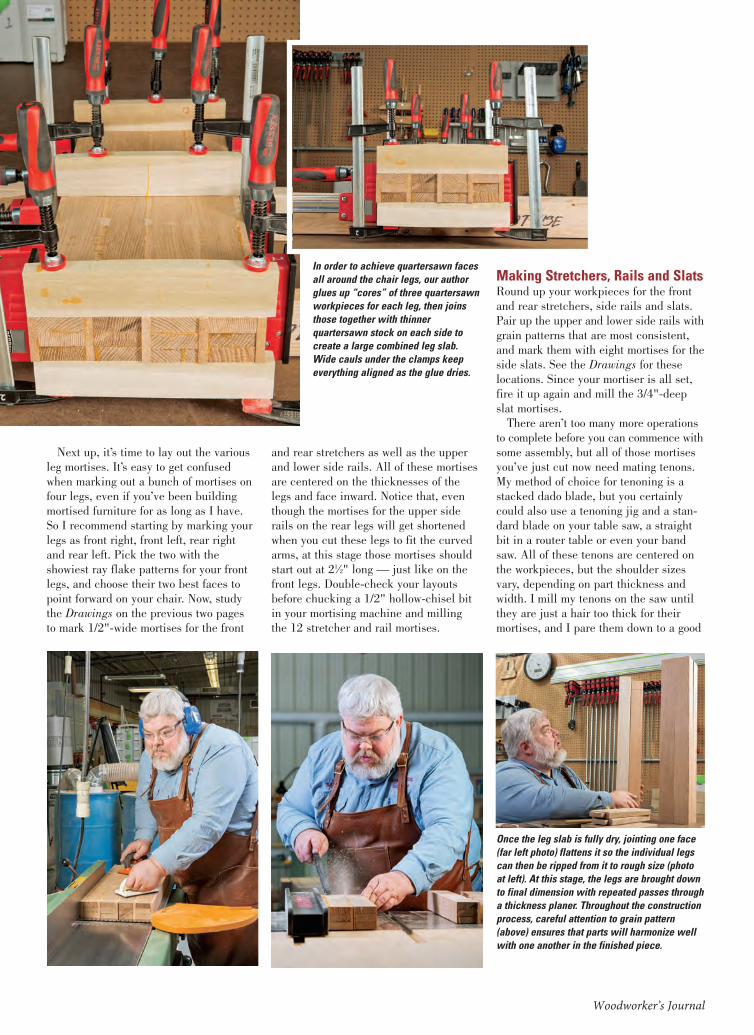
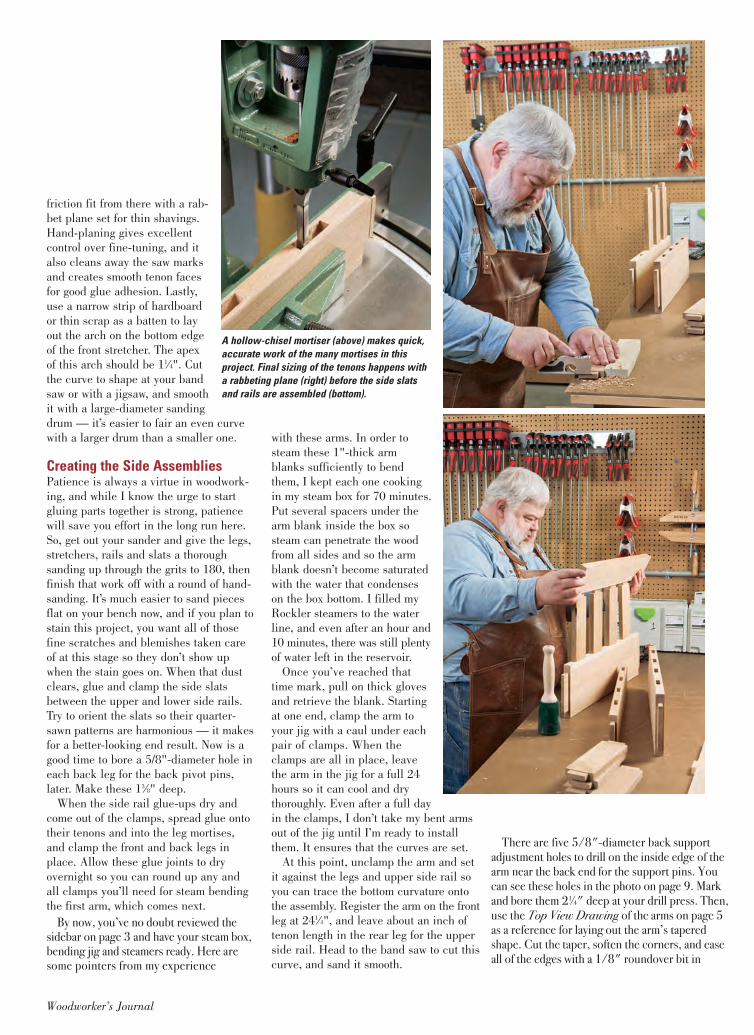
Next up, it’s time to lay out the variousleg mortises. It’s easy to get confusedwhen marking out a bunch of mortises onfour legs, even if you’ve been buildingmortised furniture for as long as I have.So I recommend starting by marking yourlegs as front right, front left, rear rightand rear left. Pick the two with theshowiest ray flake patterns for your frontlegs, and choose their two best faces topoint forward on your chair. Now, studythe Drawings on the previous two pagesto mark 1/2"-wide mortises for the front
and rear stretchers as well as the upperand lower side rails. All of these mortisesare centered on the thicknesses of thelegs and face inward. Notice that, eventhough the mortises for the upper siderails on the rear legs will get shortenedwhen you cut these legs to fit the curvedarms, at this stage those mortises shouldstart out at 21⁄2" long — just like on thefront legs. Double-check your layoutsbefore chucking a 1/2" hollow-chisel bitin your mortising machine and millingthe 12 stretcher and rail mortises.
Making Stretchers, Rails and SlatsRound up your workpieces for the frontand rear stretchers, side rails and slats.Pair up the upper and lower side rails withgrain patterns that are most consistent,and mark them with eight mortises for theside slats. See the Drawings for theselocations. Since your mortiser is all set,fire it up again and mill the 3/4"-deepslat mortises.
There aren’t too many more operationsto complete before you can commence withsome assembly, but all of those mortisesyou’ve just cut now need mating tenons.My method of choice for tenoning is astacked dado blade, but you certainlycould also use a tenoning jig and a stan-dard blade on your table saw, a straightbit in a router table or even your bandsaw. All of these tenons are centered onthe workpieces, but the shoulder sizesvary, depending on part thickness andwidth. I mill my tenons on the saw untilthey are just a hair too thick for theirmortises, and I pare them down to a good
Once the leg slab is fully dry, jointing one face(far left photo) flattens it so the individual legscan then be ripped from it to rough size (photoat left). At this stage, the legs are brought downto final dimension with repeated passes througha thickness planer. Throughout the constructionprocess, careful attention to grain pattern(above) ensures that parts will harmonize wellwith one another in the finished piece.
In order to achieve quartersawn facesall around the chair legs, our authorglues up “cores” of three quartersawnworkpieces for each leg, then joinsthose together with thinnerquartersawn stock on each side tocreate a large combined leg slab.Wide cauls under the clamps keepeverything aligned as the glue dries.
220.030-038 P1 Morris chair.qxp_Project 5/17/13 2:50 PM Page 34
Woodworker’s Journal
friction fit from there with a rab-bet plane set for thin shavings.Hand-planing gives excellentcontrol over fine-tuning, and italso cleans away the saw marksand creates smooth tenon facesfor good glue adhesion. Lastly,use a narrow strip of hardboardor thin scrap as a batten to layout the arch on the bottom edgeof the front stretcher. The apexof this arch should be 11⁄4". Cutthe curve to shape at your bandsaw or with a jigsaw, and smoothit with a large-diameter sandingdrum — it’s easier to fair an even curvewith a larger drum than a smaller one.
Creating the Side AssembliesPatience is always a virtue in woodwork-ing, and while I know the urge to startgluing parts together is strong, patiencewill save you effort in the long run here.So, get out your sander and give the legs,stretchers, rails and slats a thoroughsanding up through the grits to 180, thenfinish that work off with a round of hand-sanding. It’s much easier to sand piecesflat on your bench now, and if you plan tostain this project, you want all of thosefine scratches and blemishes taken careof at this stage so they don’t show upwhen the stain goes on. When that dustclears, glue and clamp the side slatsbetween the upper and lower side rails.Try to orient the slats so their quarter-sawn patterns are harmonious — it makesfor a better-looking end result. Now is agood time to bore a 5/8"-diameter hole ineach back leg for the back pivot pins,later. Make these 13⁄8" deep.
When the side rail glue-ups dry andcome out of the clamps, spread glue ontotheir tenons and into the leg mortises,and clamp the front and back legs inplace. Allow these glue joints to dryovernight so you can round up any andall clamps you’ll need for steam bendingthe first arm, which comes next.
By now, you’ve no doubt reviewed the sidebar on page 3 and have your steam box, bending jig and steamers ready. Here are some pointers from my experience
with these arms. In order tosteam these 1"-thick armblanks sufficiently to bendthem, I kept each one cookingin my steam box for 70 minutes.Put several spacers under thearm blank inside the box sosteam can penetrate the woodfrom all sides and so the armblank doesn’t become saturatedwith the water that condenseson the box bottom. I filled myRockler steamers to the waterline, and even after an hour and10 minutes, there was still plentyof water left in the reservoir.
Once you’ve reached thattime mark, pull on thick glovesand retrieve the blank. Startingat one end, clamp the arm toyour jig with a caul under eachpair of clamps. When theclamps are all in place, leavethe arm in the jig for a full 24hours so it can cool and drythoroughly. Even after a full dayin the clamps, I don’t take my bent armsout of the jig until I’m ready to installthem. It ensures that the curves are set.
At this point, unclamp the arm and setit against the legs and upper side rail soyou can trace the bottom curvature ontothe assembly. Register the arm on the frontleg at 241⁄4", and leave about an inch oftenon length in the rear leg for the upperside rail. Head to the band saw to cut thiscurve, and sand it smooth.
There are five 5/8"-diameter back support adjustment holes to drill on the inside edge of the arm near the back end for the support pins. You can see these holes in the photo on page 9. Mark and bore them 21⁄4" deep at your drill press. Then, use the Top View Drawing of the arms on page 5 as a reference for laying out the arm’s tapered shape. Cut the taper, soften the corners, and ease all of the edges with a 1/8" roundover bit in
A hollow-chisel mortiser (above) makes quick,accurate work of the many mortises in thisproject. Final sizing of the tenons happens witha rabbeting plane (right) before the side slatsand rails are assembled (bottom).
220.030-038 P1 Morris chair.qxp_Project 5/17/13 2:50 PM Page 35
Woodworker’s Journal
your router. Final-sand the edges andfaces. At this point, I glue and clamp thearm to the top of the side assembly, over-hanging its inside edge 1/8" past the insideleg faces. The arm should overhang thefront of the front leg by 2".
Give the glue overnight to dry, thenrepeat the whole process to bend andinstall the other arm on the second sideassembly. It’s best to tackle one arm/sideassembly at a time, because each armwill probably produce a different amountof “springback” when you release it fromthe jig, and thus a different curvature.
Building the Back SupportWhile the glue dried on my second sideassembly, I went back to my project partsand retrieved the two back support sides,wide top slat and four narrower back slatblanks. Don’t surface the long back sup-ports down to final dimensions just yet: Ileave these a little wider than necessaryso I can joint and fit the backrest snuglybetween the arms of the chair after it’sassembled. But, go ahead and cut the fiveback slat mortises into each of the sidesupports now. They all are 3/8" wide.When those are done, mark and bore the5/8" through holes for the pivot pins.
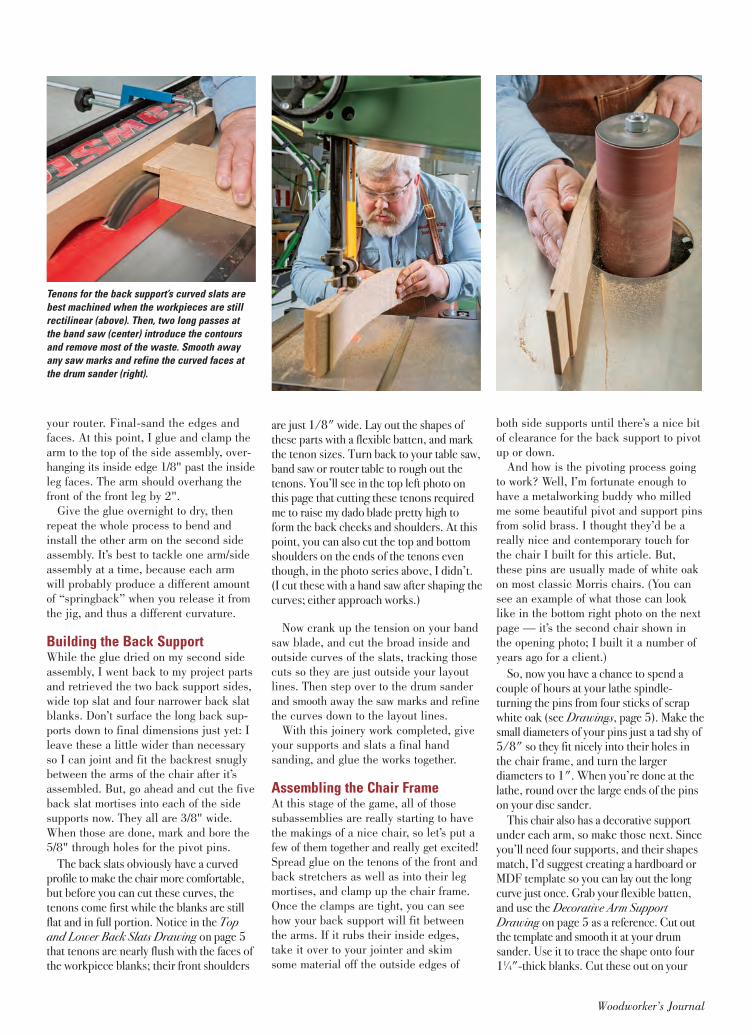
The back slats obviously have a curved profile to make the chair more comfortable, but before you can cut these curves, the tenons come first while the blanks are still flat and in full portion. Notice in the Top and Lower Back Slats Drawing on page 5 that tenons are nearly flush with the faces of the workpiece blanks; their front shoulders
are just 1/8" wide. Lay out the shapes of these parts with a flexible batten, and mark the tenon sizes. Turn back to your table saw, band saw or router table to rough out the tenons. You’ll see in the top left photo on this page that cutting these tenons required me to raise my dado blade pretty high to form the back cheeks and shoulders. At this point, you can also cut the top and bottom shoulders on the ends of the tenons even though, in the photo series above, I didn’t. (I cut these with a hand saw after shaping the curves; either approach works.)
Now crank up the tension on your bandsaw blade, and cut the broad inside andoutside curves of the slats, tracking thosecuts so they are just outside your layoutlines. Then step over to the drum sanderand smooth away the saw marks and refinethe curves down to the layout lines.
With this joinery work completed, giveyour supports and slats a final handsanding, and glue the works together.
Assembling the Chair FrameAt this stage of the game, all of thosesubassemblies are really starting to havethe makings of a nice chair, so let’s put afew of them together and really get excited!Spread glue on the tenons of the front andback stretchers as well as into their legmortises, and clamp up the chair frame.Once the clamps are tight, you can seehow your back support will fit betweenthe arms. If it rubs their inside edges,take it over to your jointer and skimsome material off the outside edges of
both side supports until there’s a nice bitof clearance for the back support to pivotup or down.
And how is the pivoting process goingto work? Well, I’m fortunate enough tohave a metalworking buddy who milledme some beautiful pivot and support pinsfrom solid brass. I thought they’d be areally nice and contemporary touch forthe chair I built for this article. But,these pins are usually made of white oakon most classic Morris chairs. (You cansee an example of what those can looklike in the bottom right photo on the nextpage — it’s the second chair shown inthe opening photo; I built it a number ofyears ago for a client.)
So, now you have a chance to spend a couple of hours at your lathe spindle-turning the pins from four sticks of scrap white oak (see Drawings, page 5). Make the small diameters of your pins just a tad shy of 5/8" so they fit nicely into their holes in the chair frame, and turn the larger diameters to 1". When you’re done at the lathe, round over the large ends of the pins on your disc sander.
This chair also has a decorative support under each arm, so make those next. Since you’ll need four supports, and their shapes match, I’d suggest creating a hardboard or MDF template so you can lay out the long curve just once. Grab your flexible batten, and use the Decorative Arm Support Drawing on page 5 as a reference. Cut out the template and smooth it at your drum sander. Use it to trace the shape onto four 11⁄4"-thick blanks. Cut these out on your
Tenons for the back support’s curved slats arebest machined when the workpieces are stillrectilinear (above). Then, two long passes atthe band saw (center) introduce the contoursand remove most of the waste. Smooth awayany saw marks and refine the curved faces atthe drum sander (right).
220.030-038 P1 Morris chair.qxp_Project 5/17/13 2:50 PM Page 36
Woodworker’s Journal
band saw, and leave about 1/16" of waste all around. Then mount the template to a blank with double-sided tape, and chuck a piloted flush-trim bit in the router table to shave the support to an exact match. Repeat for the other three supports. Switch to a1/8" roundover bit and soften the long curves.
Adding Faux Arm TenonsYou just wouldn’t have a real Morrischair without some leg tenons poking upthrough the bowed arms. But, faux is justfine here. Their 11⁄2" x 11⁄2" mortises areeasy to make with a template, a routerand a rub collar guiding a 1/4" straight orspiral bit. My template has two adjustablesections so I can use it for routing a varietyof mortise sizes, but you can just make asquare cutout for this “one-off” jig if youlike. Lay out the mortise locations on thearms so they’re centered over the legs,and clamp the template in place. Routeach mortise in a series of deepeningpasses down to a depth of 3/4". Chiselthe corners square.
The tops of these faux tenons stand justproud of the tops of the arms. It’s a nicedetail. To make them, start with a long11⁄2" x 11⁄2" blank, and ease both ends atyour disc sander to create a gentle curvedprofile. Or, if you prefer, you could justcarry the roundover theme from otheraspects of the chair and knock off thesharp edges and corners of these tenonsat the router table. Slice a pair of tenonsoff the ends of your blank, and repeat theshaping process to make two more. Whenall four are done, hand sand them so theends are smooth and scratch-free. Brushsome glue into their mortises, and pressthe tenons down into place on the arms.
On to the FinishWith the arm tenons now secured, it’stime to add the decorative supports.Depending on your arm curvatures, you’llprobably need to shape the top ends ofthe back leg supports so they snug up
nicely under the arms. This is easy to doat a disc sander without a lot of fuss.Sand a little, check the fit and sand alittle more until you reach a satisfactoryintersection. Now cut the rear supports totheir final length (all four supports shouldline up with the bottom of the lower siderails when installed). Then glue and clampthe supports beneath the arms so they’recentered on the widths of the legs.
Glue alone forms a strong mortise-and-tenon joint, but a dowel pin driventhrough the parts will lock them forever.So, I drilled and installed a pair of 5/16"dowel pins into the joints of the frontstretcher and upper back support slats,and a single pin for the rest of the backslats and the rear stretcher.
Wrap up construction byscrewing a pair ofcleats inside thestretchers to sup-port a plywood seatboard. You’ll needto determine thefinal position of thesecleats based on thethickness of the seatcushion you use.
There are all sorts ofrecipes for “authentic”Arts & Crafts finishes,
Mike Van Pelt is an instructor at CUWoodshop School of Woodworking inChampaign, Illinois.
but choose a color you like. I applied adye stain to pop the figure, followed bya dark pigment stain to accentuate thegrain and then topcoated with lacquer.Now find some leather cushions, andyour new Morris chair is ready forthe den!
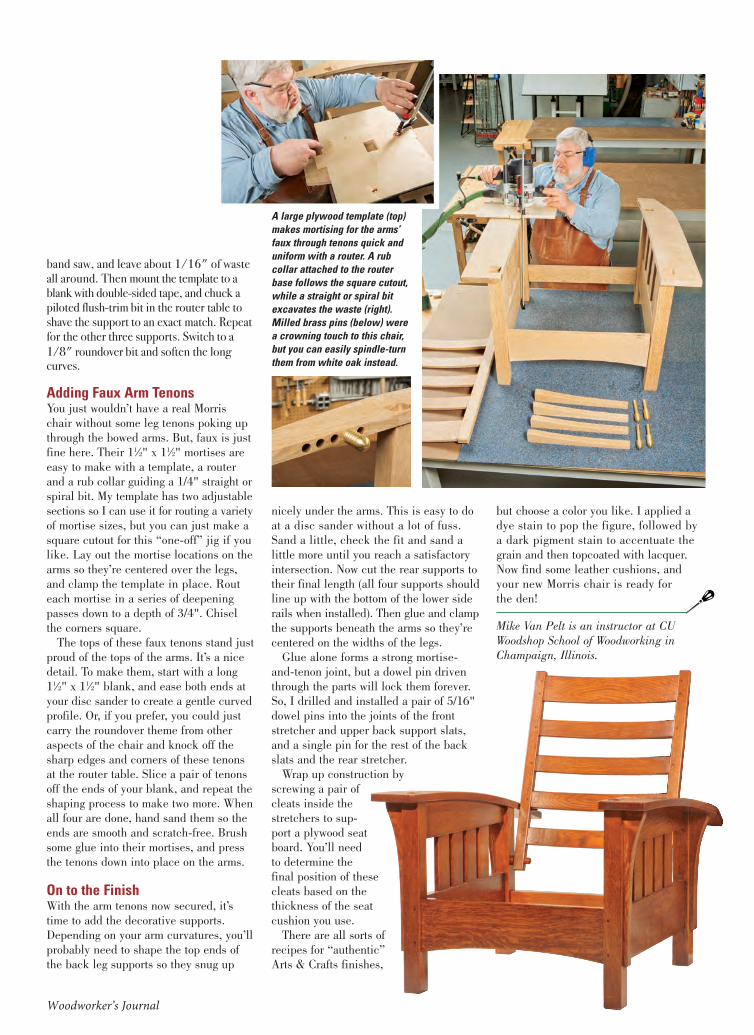
A large plywood template (top)makes mortising for the arms’faux through tenons quick anduniform with a router. A rubcollar attached to the routerbase follows the square cutout,while a straight or spiral bitexcavates the waste (right).Milled brass pins (below) werea crowning touch to this chair,but you can easily spindle-turnthem from white oak instead.
220.030-038 P1 Morris chair.qxp_Project 5/17/13 2:50 PM Page 37