Embed Size (px)
Citation preview
1
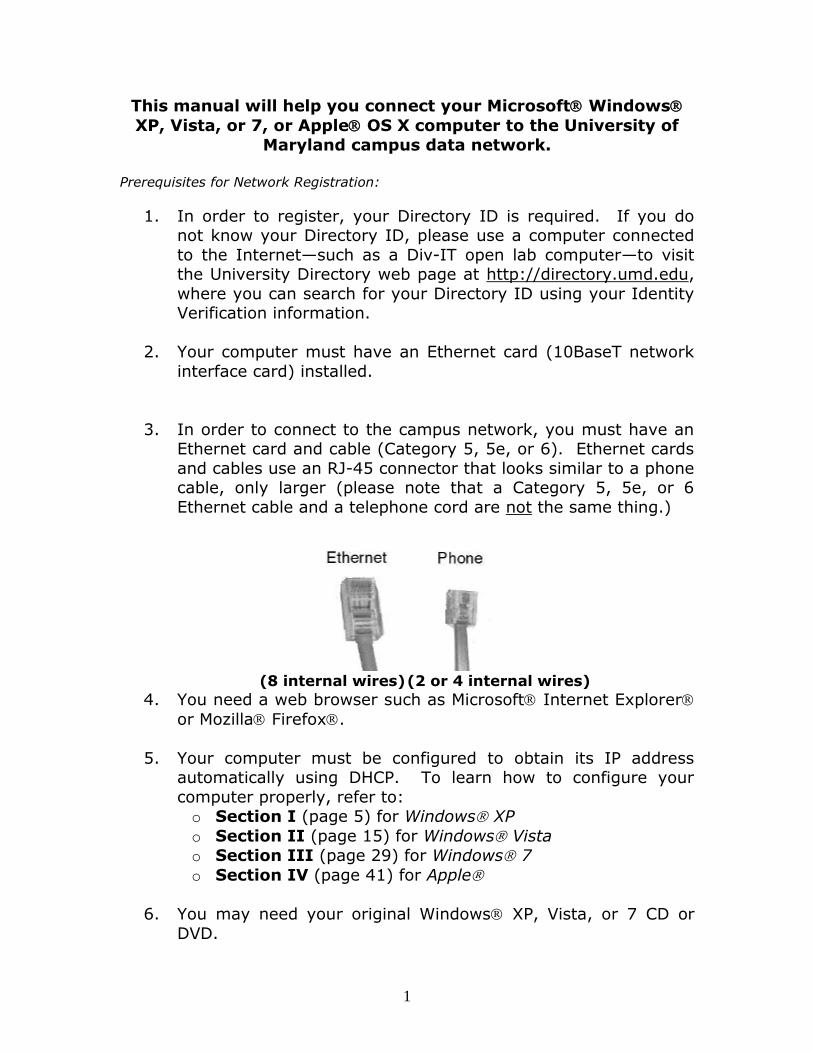
This manual will help you connect your Microsoft Windows
XP, Vista, or 7, or Apple OS X computer to the University of
Maryland campus data network.
Prerequisites for Network Registration:
1. In order to register, your Directory ID is required. If you do not know your Directory ID, please use a computer connected
to the Internet—such as a Div-IT open lab computer—to visit the University Directory web page at http://directory.umd.edu,
where you can search for your Directory ID using your Identity Verification information.
2. Your computer must have an Ethernet card (10BaseT network
interface card) installed.
3. In order to connect to the campus network, you must have an Ethernet card and cable (Category 5, 5e, or 6). Ethernet cards
and cables use an RJ-45 connector that looks similar to a phone cable, only larger (please note that a Category 5, 5e, or 6
Ethernet cable and a telephone cord are not the same thing.)
(8 internal wires) (2 or 4 internal wires)
4. You need a web browser such as Microsoft Internet Explorer
or Mozilla Firefox.
5. Your computer must be configured to obtain its IP address automatically using DHCP. To learn how to configure your
computer properly, refer to: o Section I (page 5) for Windows XP
o Section II (page 15) for Windows Vista
o Section III (page 29) for Windows 7
o Section IV (page 41) for Apple
6. You may need your original Windows XP, Vista, or 7 CD or
DVD.
2
Please, do not continue with Section V: Registering Your Data Jack (page 30) until you have met all of the prerequisites listed above.
Meeting these prerequisites is essential for a successful installation.
Campus Wireless Networks
In addition to a wired internet connection, the University of Maryland also provides two main wireless networks, “umd” and “umd-secure”.
“Umd-secure” is the recommend means of establishing a wireless internet connection. The “umd” network is meant for guests and
students, faculty, and staff who have not (or are unable to) set up WPA2/WPA on your device. Instructions for connecting to the “umd”
network are below, and for instructions on connecting to “umd-secure” refer to:
o Section I (page 14) for Windows XP
o Section II (page 23) for Windows Vista
o Section III (page 37) for Windows 7
o Section IV (page 43) for Apple
Additional information on the wireless networks provided can be found
at http://www.oit.umd.edu/nts/noc/wireless/connect.html.
3
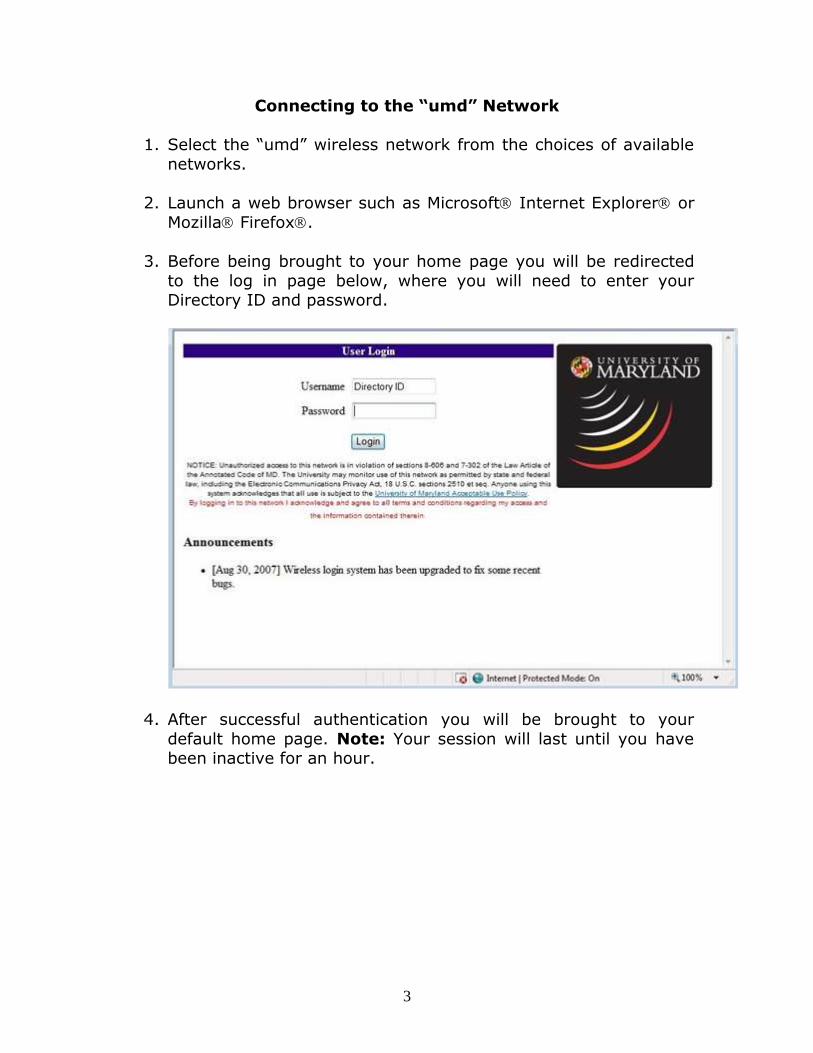
Connecting to the “umd” Network
1. Select the “umd” wireless network from the choices of available
networks.
2. Launch a web browser such as Microsoft Internet Explorer or
Mozilla Firefox.
3. Before being brought to your home page you will be redirected
to the log in page below, where you will need to enter your Directory ID and password.
4. After successful authentication you will be brought to your
default home page. Note: Your session will last until you have been inactive for an hour.
4
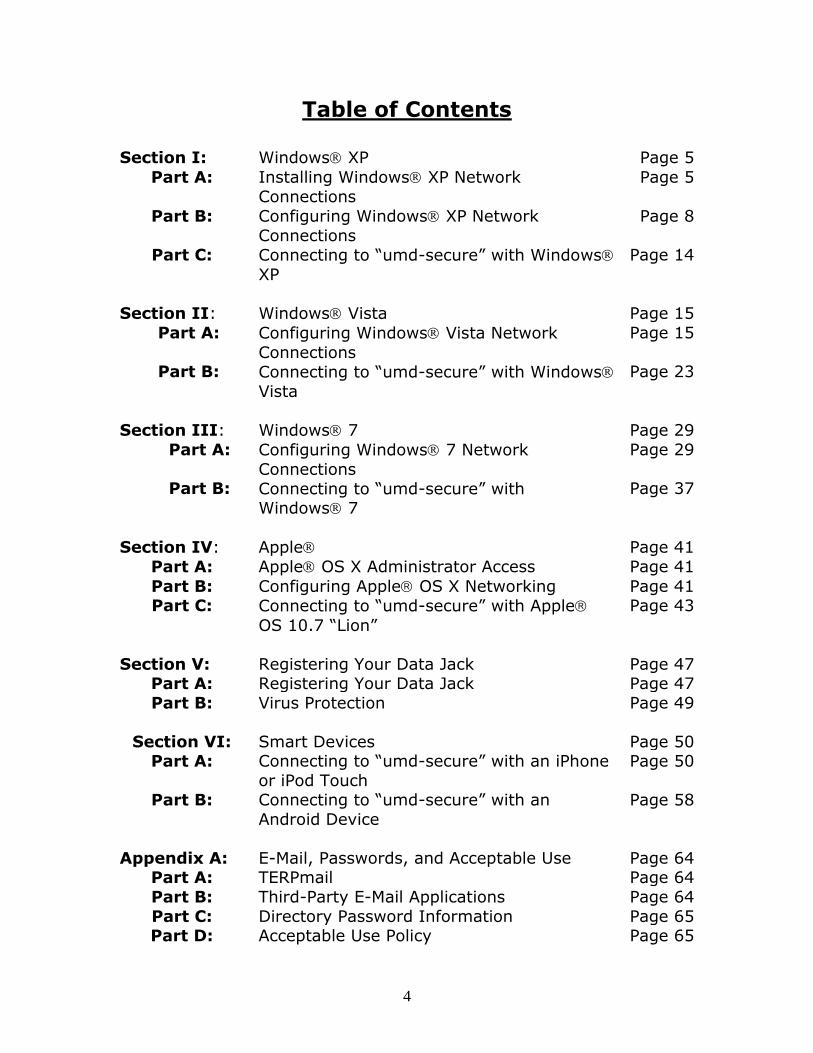
Table of Contents
Section I: Windows XP Page 5
Part A: Installing Windows XP Network
Connections
Page 5
Part B:
Part C:
Configuring Windows XP Network
Connections
Connecting to “umd-secure” with Windows
XP
Page 8
Page 14
Section II:
Part A:
Part B:
Windows Vista
Configuring Windows Vista Network
Connections
Connecting to “umd-secure” with Windows
Vista
Page 15
Page 15
Page 23
Section III:
Part A:
Part B:
Windows 7
Configuring Windows 7 Network
Connections
Connecting to “umd-secure” with Windows 7
Page 29
Page 29
Page 37
Section IV: Apple Page 41
Part A: Apple OS X Administrator Access Page 41
Part B: Part C:
Configuring Apple OS X Networking
Connecting to “umd-secure” with Apple
OS 10.7 “Lion”
Page 41 Page 43
Section V: Registering Your Data Jack Page 47 Part A: Registering Your Data Jack Page 47
Part B: Virus Protection Page 49
Section VI:
Smart Devices
Page 50 Part A: Connecting to “umd-secure” with an iPhone
or iPod Touch
Page 50
Part B: Connecting to “umd-secure” with an
Android Device
Page 58
Appendix A: E-Mail, Passwords, and Acceptable Use Page 64 Part A: TERPmail Page 64
Part B: Third-Party E-Mail Applications Page 64
Part C: Directory Password Information Page 65 Part D: Acceptable Use Policy Page 65
5
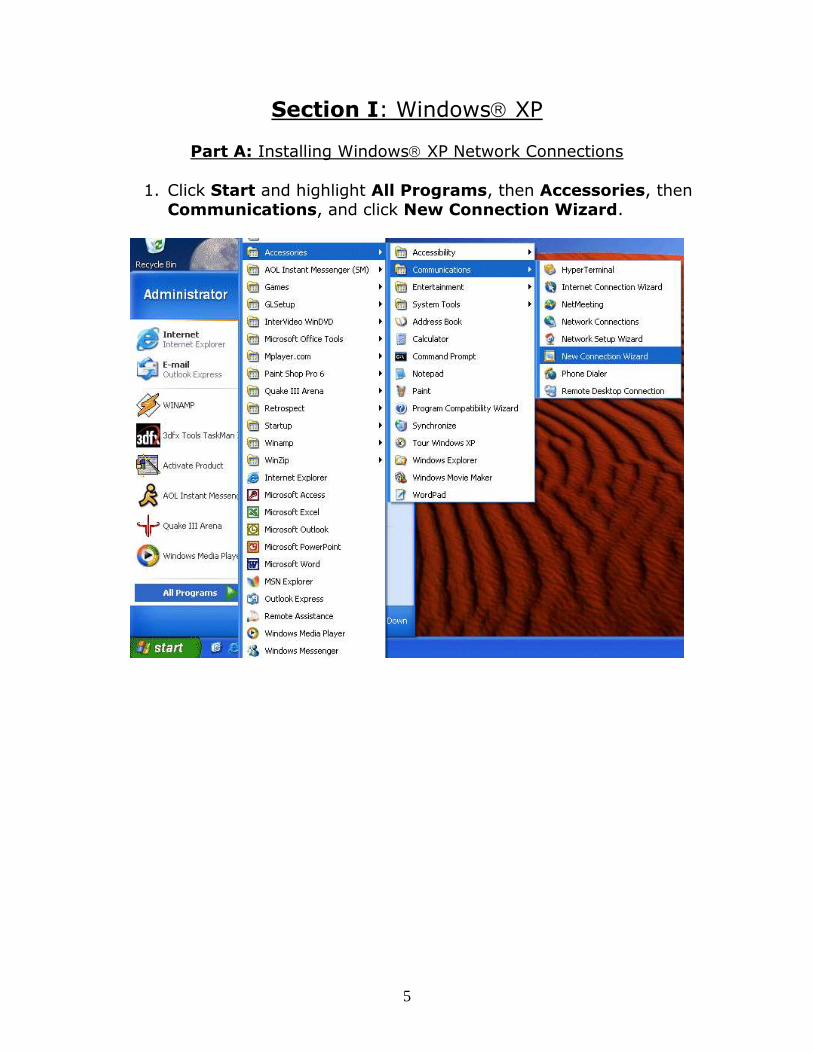
Section I: Windows XP
Part A: Installing Windows XP Network Connections
1. Click Start and highlight All Programs, then Accessories, then Communications, and click New Connection Wizard.
6
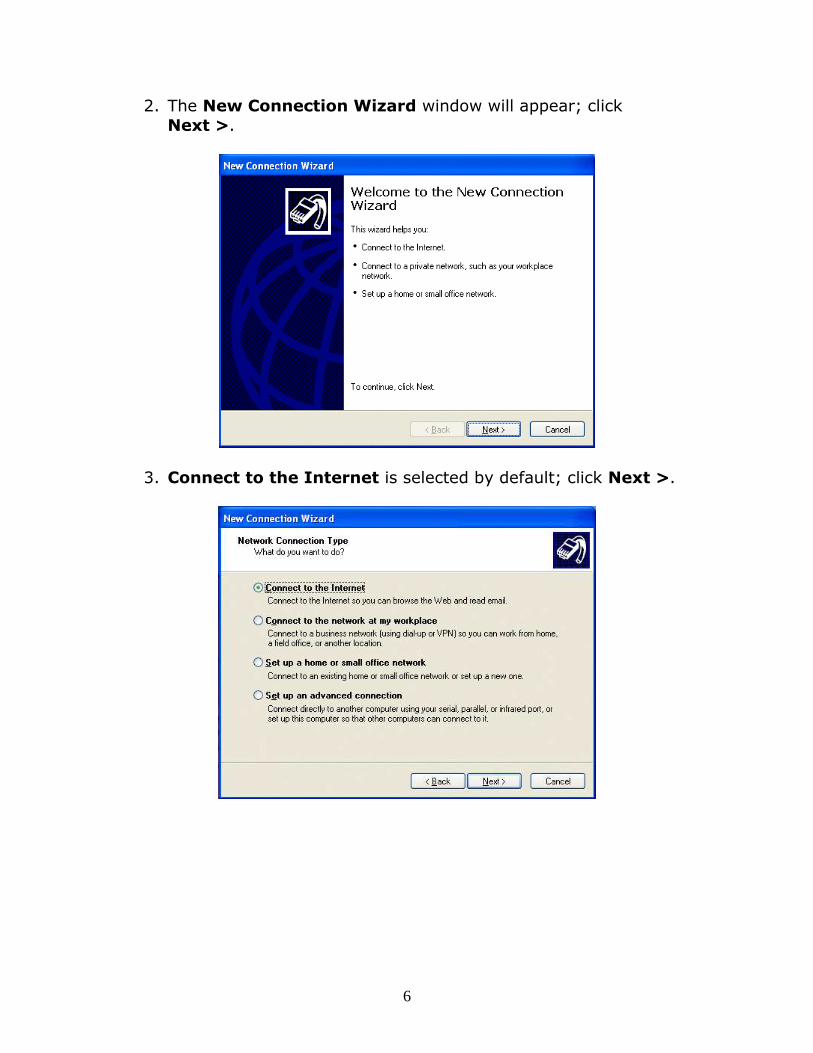
2. The New Connection Wizard window will appear; click
Next >.
3. Connect to the Internet is selected by default; click Next >.
7
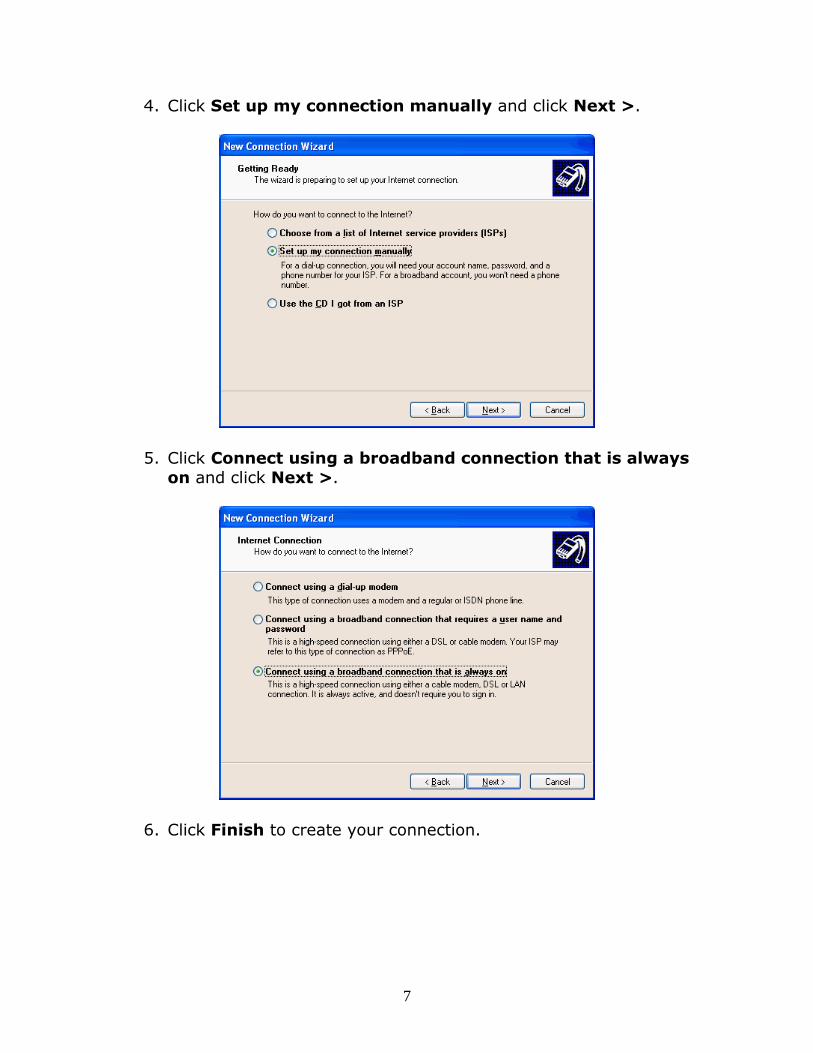
4. Click Set up my connection manually and click Next >.
5. Click Connect using a broadband connection that is always
on and click Next >.
6. Click Finish to create your connection.
8
Part B: Configuring Windows XP Network Connections
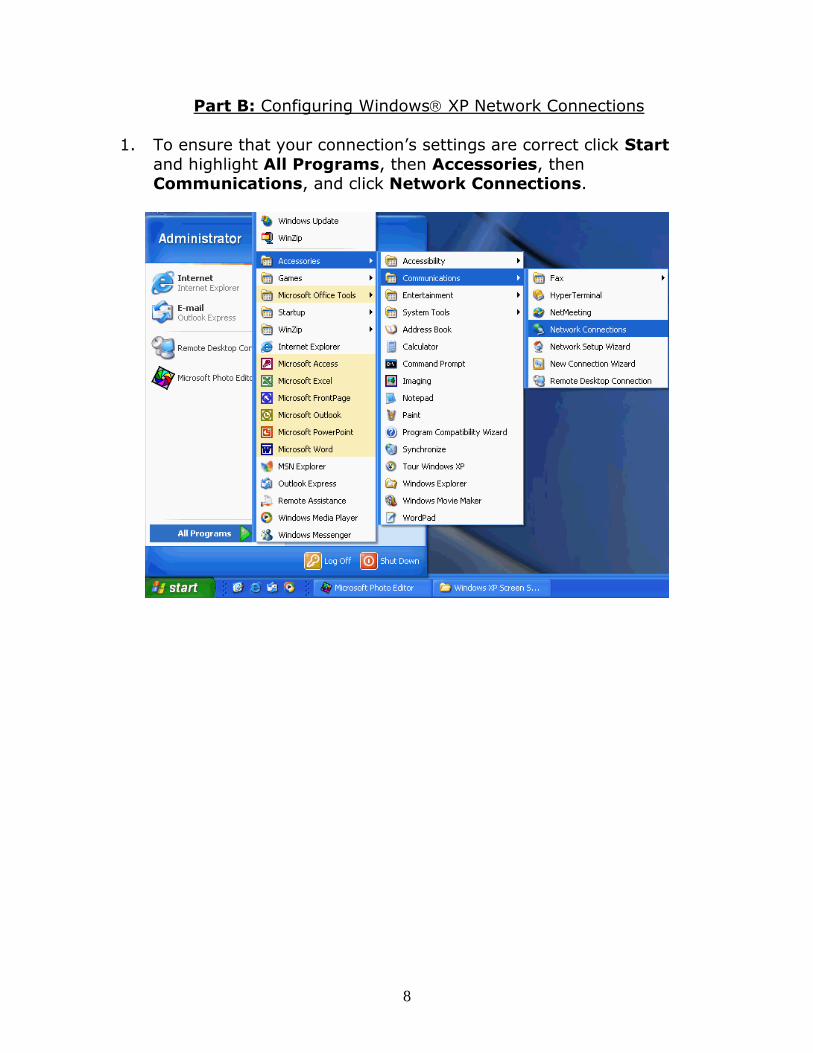
1. To ensure that your connection’s settings are correct click Start
and highlight All Programs, then Accessories, then Communications, and click Network Connections.
9
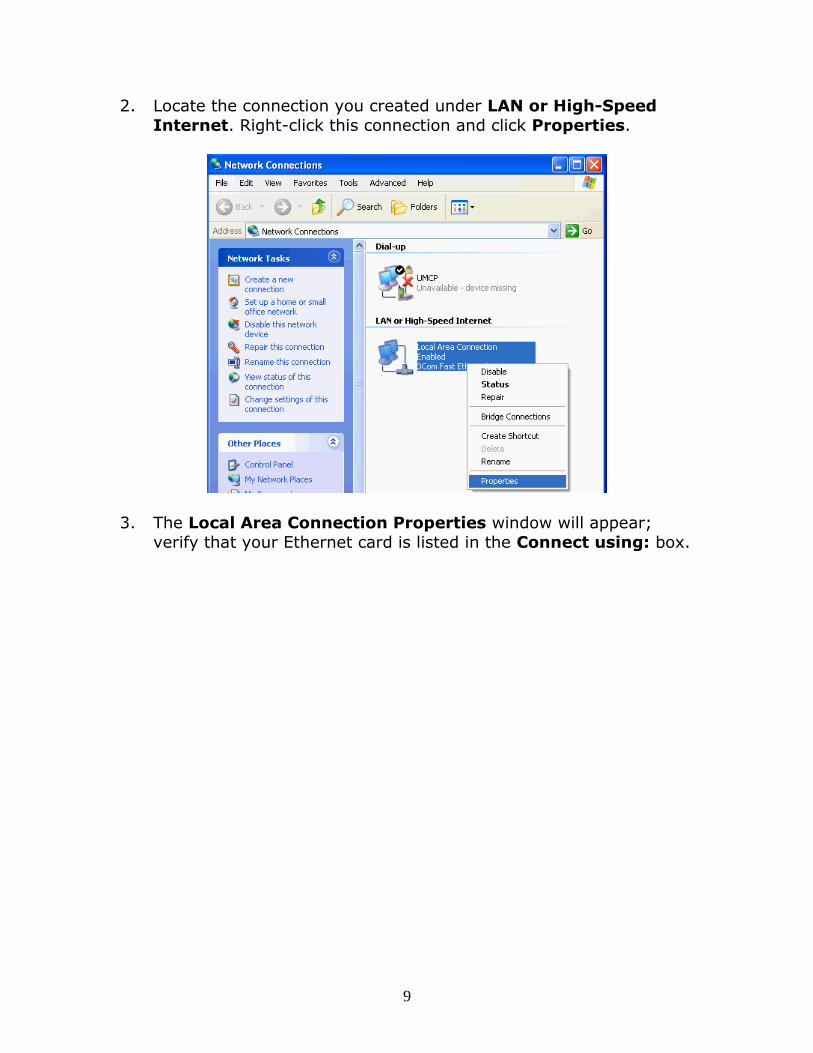
2. Locate the connection you created under LAN or High-Speed
Internet. Right-click this connection and click Properties.
3. The Local Area Connection Properties window will appear;
verify that your Ethernet card is listed in the Connect using: box.
10
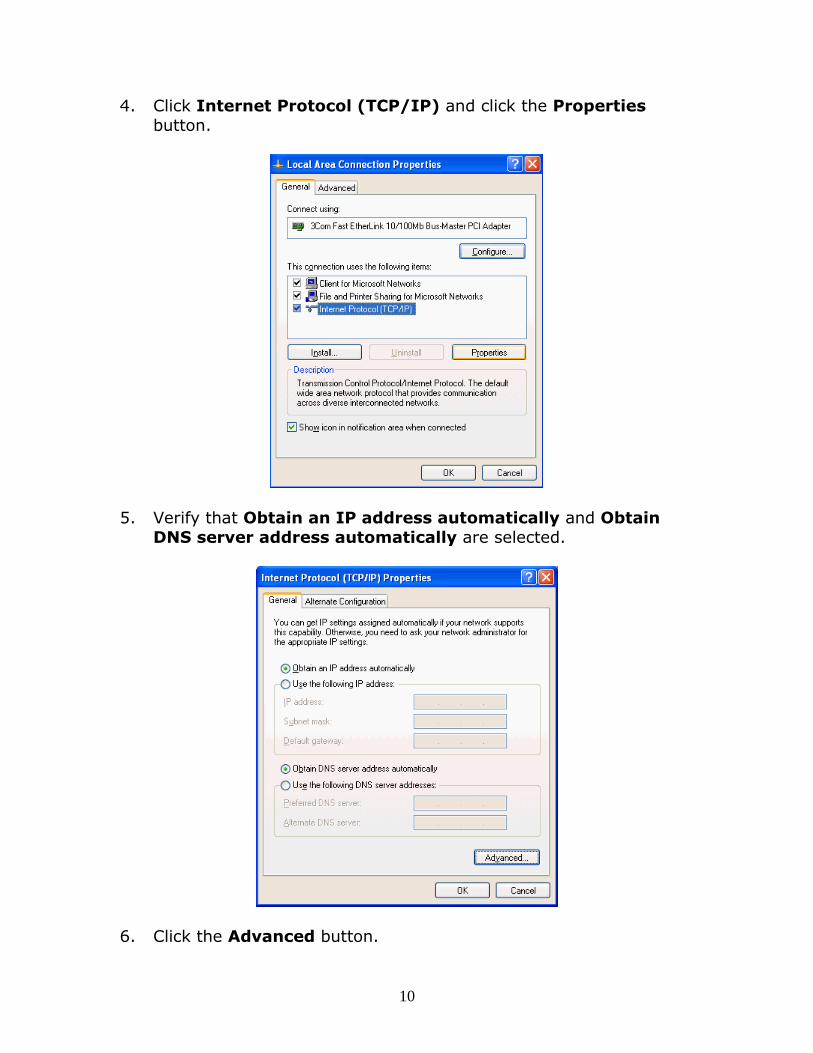
4. Click Internet Protocol (TCP/IP) and click the Properties
button.
5. Verify that Obtain an IP address automatically and Obtain
DNS server address automatically are selected.
6. Click the Advanced button.
11
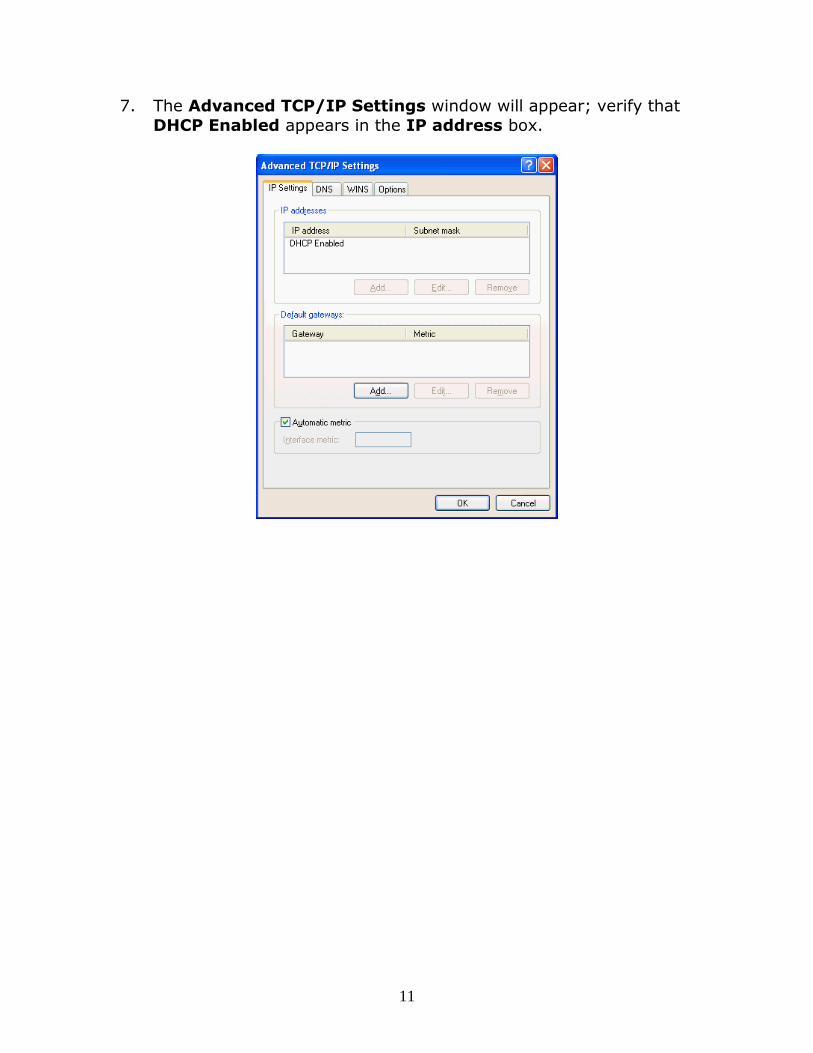
7. The Advanced TCP/IP Settings window will appear; verify that
DHCP Enabled appears in the IP address box.
12
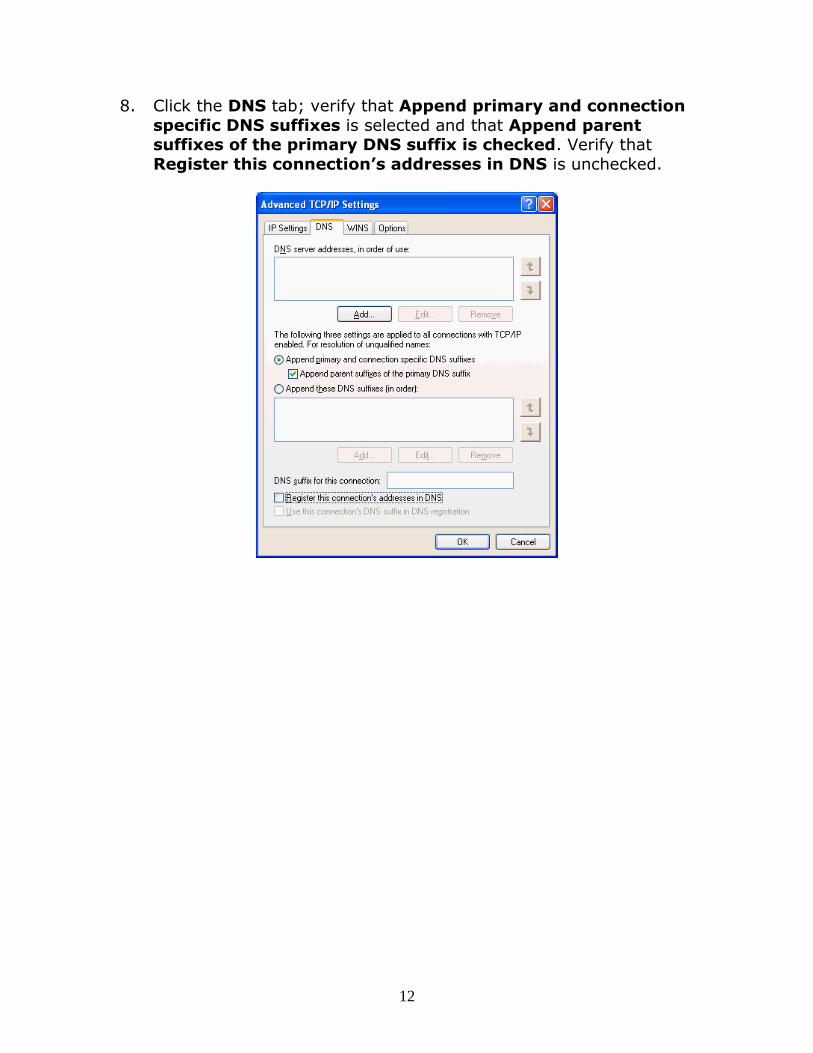
8. Click the DNS tab; verify that Append primary and connection
specific DNS suffixes is selected and that Append parent suffixes of the primary DNS suffix is checked. Verify that
Register this connection’s addresses in DNS is unchecked.
13
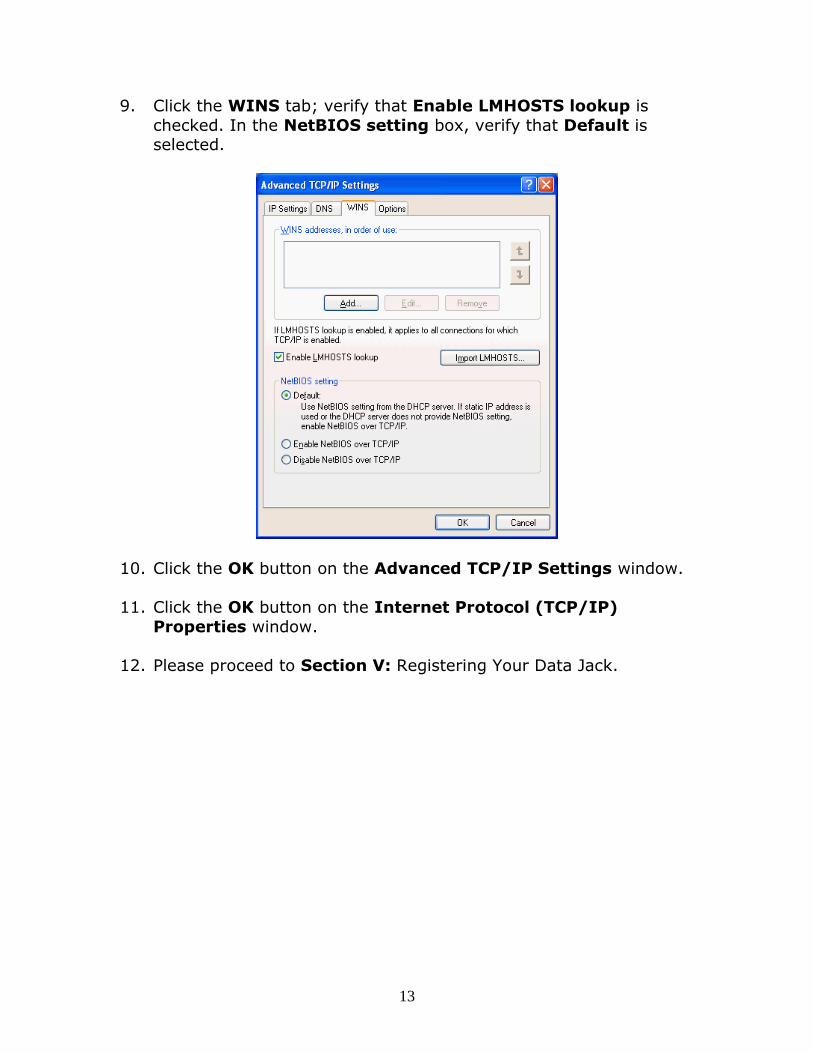
9. Click the WINS tab; verify that Enable LMHOSTS lookup is
checked. In the NetBIOS setting box, verify that Default is selected.
10. Click the OK button on the Advanced TCP/IP Settings window.
11. Click the OK button on the Internet Protocol (TCP/IP)
Properties window.
12. Please proceed to Section V: Registering Your Data Jack.
14
Part C: Connecting to “umd-secure” with Windows XP
Step-by-step instructions are provided by OIT for configuring
computers using the following wireless adapters to use the “umd-secure” wireless network. These represent the most popular adapters
used by current manufacturers. If you know which wireless adapter is installed in your laptop, use the links below to go to the appropriate
instructions. If you do not know what wireless adapter model is in your computer, you can find out by following the steps here:
http://www.oit.umd.edu/nts/noc/wireless/windows_preconfig.html.
Wireless Adapters
Intel PROSet/Wireless 2100
Intel PROSet/Wireless 2200BG Intel PROSet/Wireless 2915ABG
Intel PROSet/Wireless 3945ABG Dell Wireless 1350 WLAN MiniPCI Card
Dell Wireless 1350 WLAN PC Card Dell Wireless 1370 WLAN MiniPCI Card
Dell Wireless 1390 WLAN ExpressCard Dell Wireless 1390 WLAN MiniCard
Dell Wireless 1450 WLAN MiniPCI Card Dell Wireless 1450 Dual-Band WLAN MiniPCI Card
Dell Wireless 1470 Dual-Band WLAN MiniPCI Card Dell Wireless 1490 Dual-Band WLAN MiniPCI Card
Dell Wireless 1500 Draft 802.11n WLAN Mini Card
Instructions for Dell Wireless cards can be found here:
http://www.oit.umd.edu/nts/noc/wireless/installing_dell.html
Instructions for Intel PROSet cards can be found here: http://www.oit.umd.edu/nts/noc/wireless/version_proset.html
If your wireless adapter is not on the list, you will have to locate the updated software for the network adapter installed in your computer.
You can accomplish this by visiting the manufacturer’s Web site and searching for updated software and drivers for the network card
installed in the computer. Once you have downloaded and installed the latest software, please visit the following site to view the settings you
will need to input for a successful configuration:
http://www.oit.umd.edu/nts/noc/wireless/generic_config_chart.html

15
Section II: Windows Vista
Part A: Configuring Windows Vista Network Connections
1. To ensure that your connection’s settings are correct click Start
and click Control Panel.
16
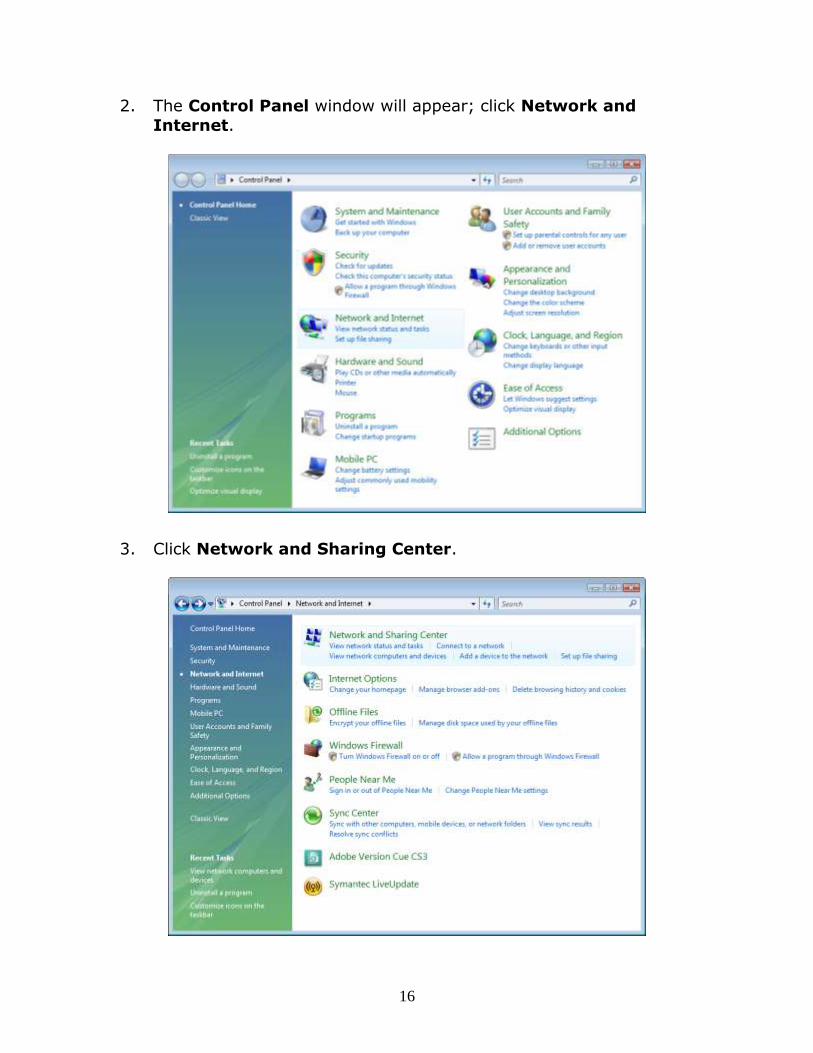
2. The Control Panel window will appear; click Network and
Internet.
3. Click Network and Sharing Center.
17
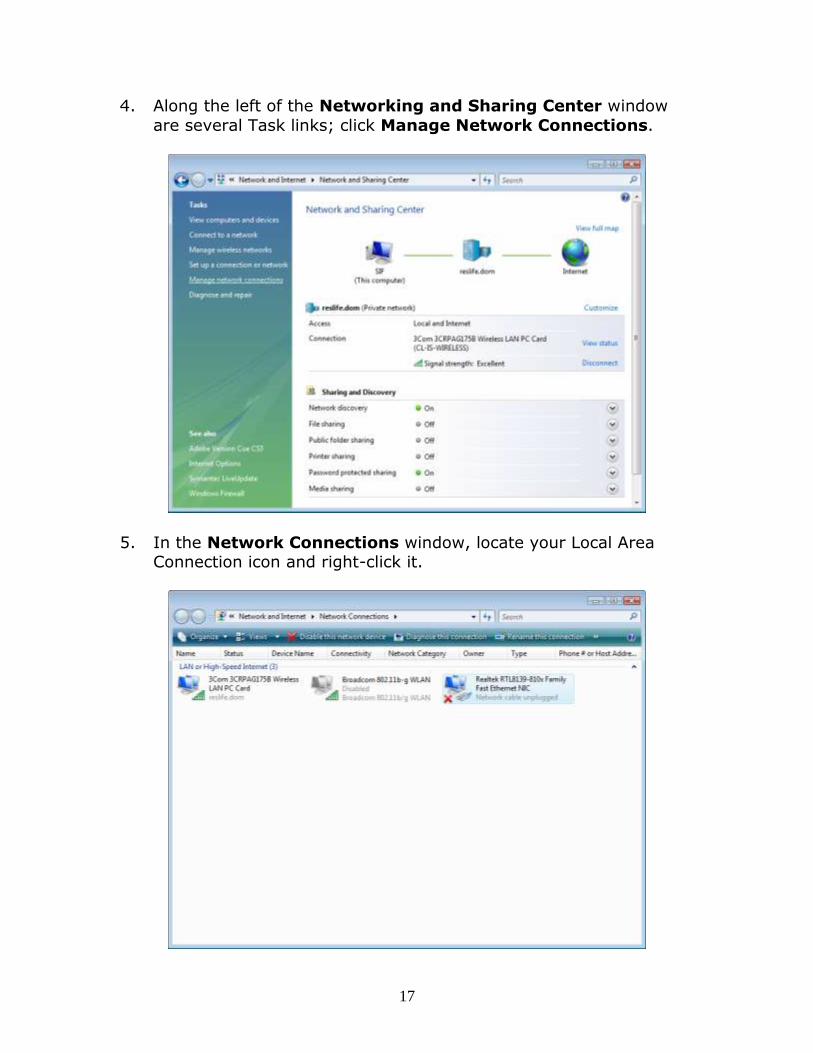
4. Along the left of the Networking and Sharing Center window
are several Task links; click Manage Network Connections.
5. In the Network Connections window, locate your Local Area Connection icon and right-click it.
18
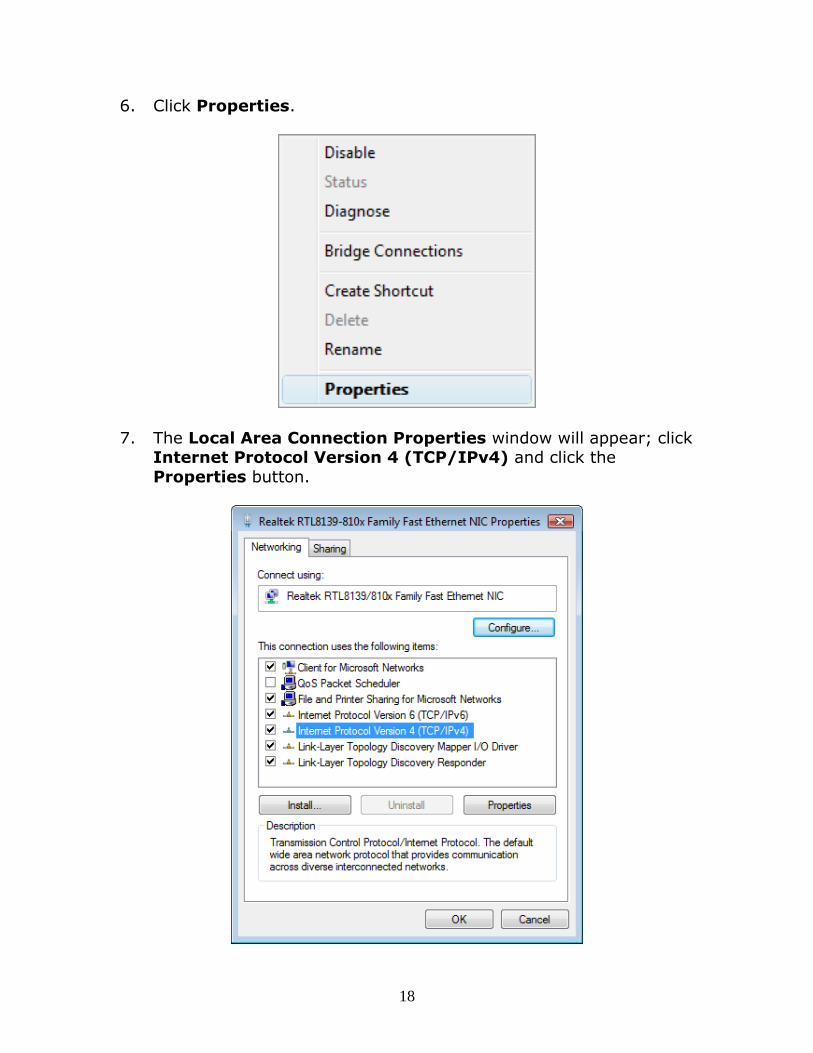
6. Click Properties.
7. The Local Area Connection Properties window will appear; click Internet Protocol Version 4 (TCP/IPv4) and click the
Properties button.
19
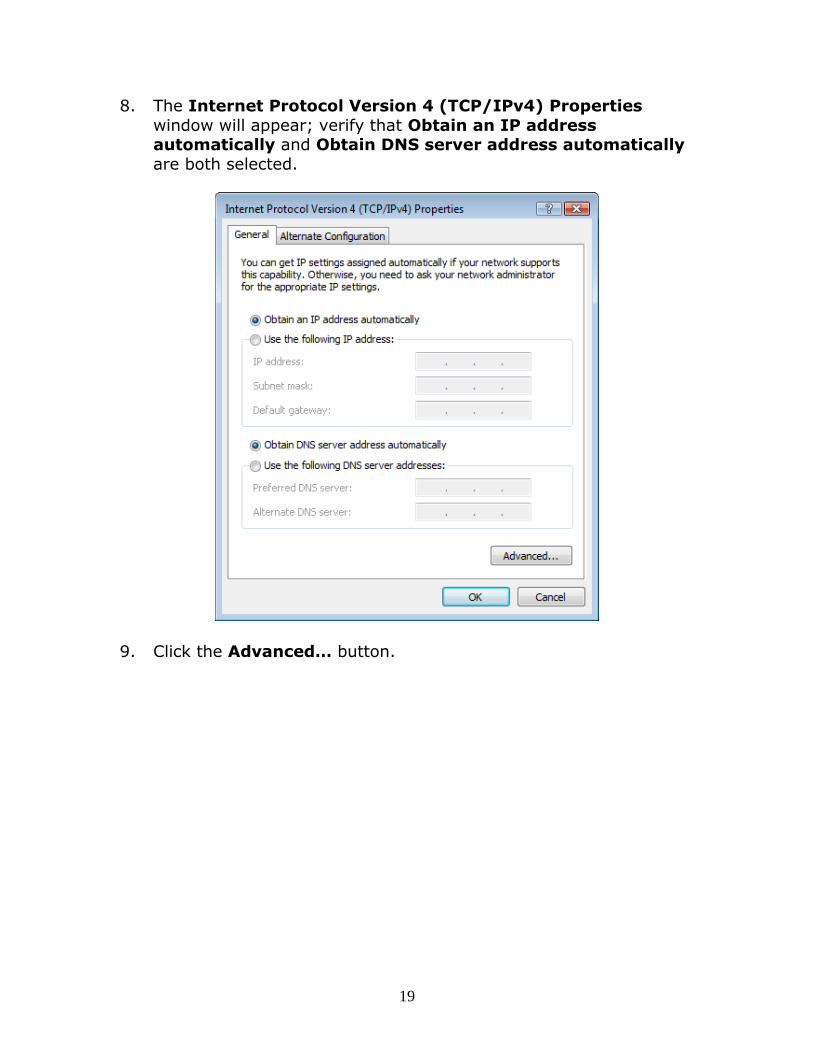
8. The Internet Protocol Version 4 (TCP/IPv4) Properties
window will appear; verify that Obtain an IP address automatically and Obtain DNS server address automatically
are both selected.
9. Click the Advanced… button.
20
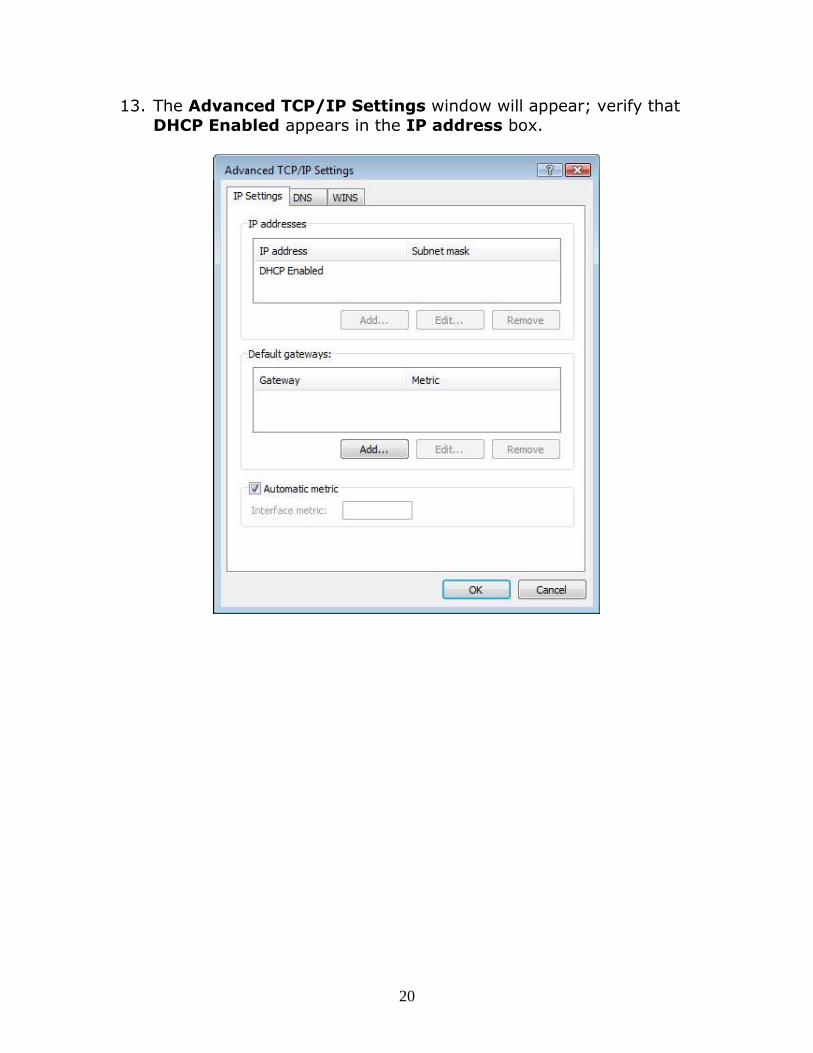
13. The Advanced TCP/IP Settings window will appear; verify that
DHCP Enabled appears in the IP address box.
21
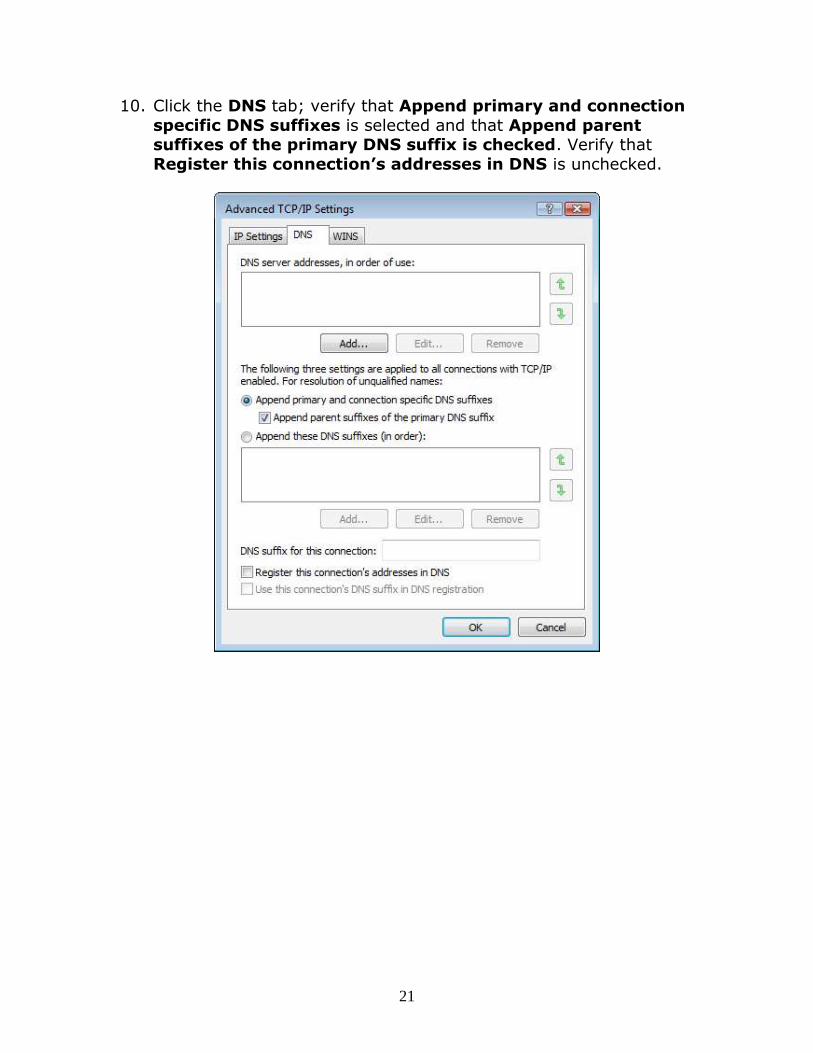
10. Click the DNS tab; verify that Append primary and connection
specific DNS suffixes is selected and that Append parent suffixes of the primary DNS suffix is checked. Verify that
Register this connection’s addresses in DNS is unchecked.
22
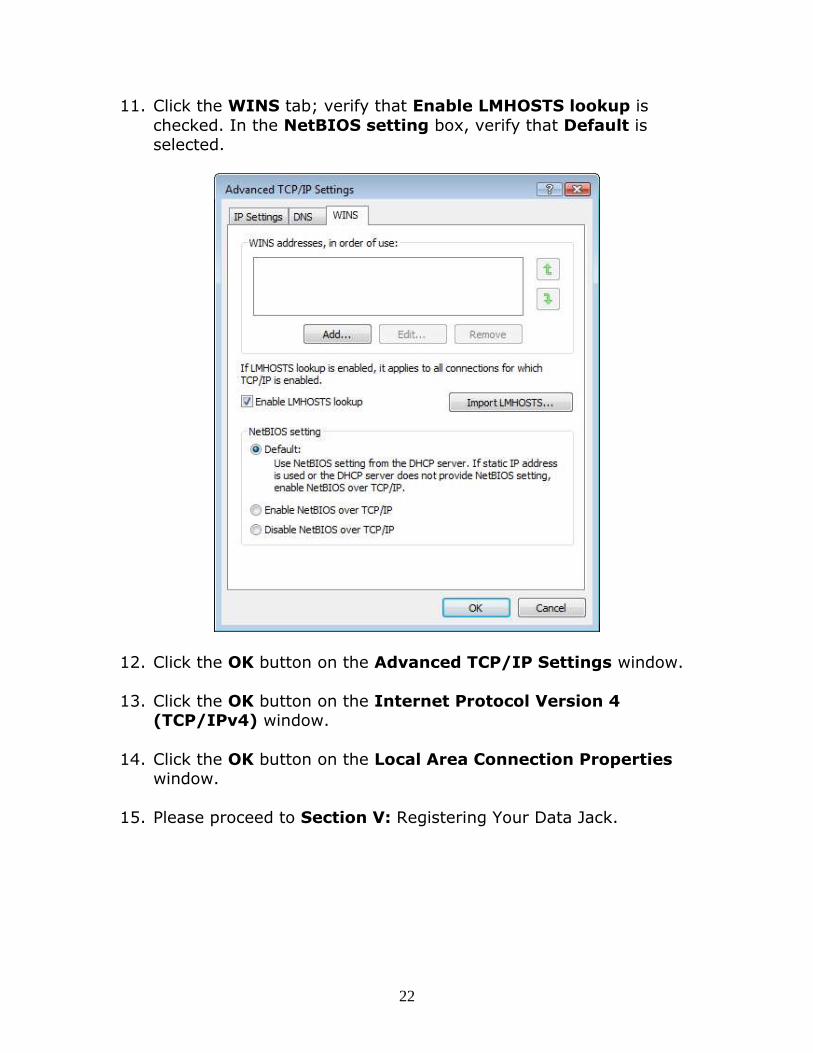
11. Click the WINS tab; verify that Enable LMHOSTS lookup is
checked. In the NetBIOS setting box, verify that Default is selected.
12. Click the OK button on the Advanced TCP/IP Settings window.
13. Click the OK button on the Internet Protocol Version 4 (TCP/IPv4) window.
14. Click the OK button on the Local Area Connection Properties window.
15. Please proceed to Section V: Registering Your Data Jack.
23
Part B: Connecting to “umd-secure” with Windows Vista
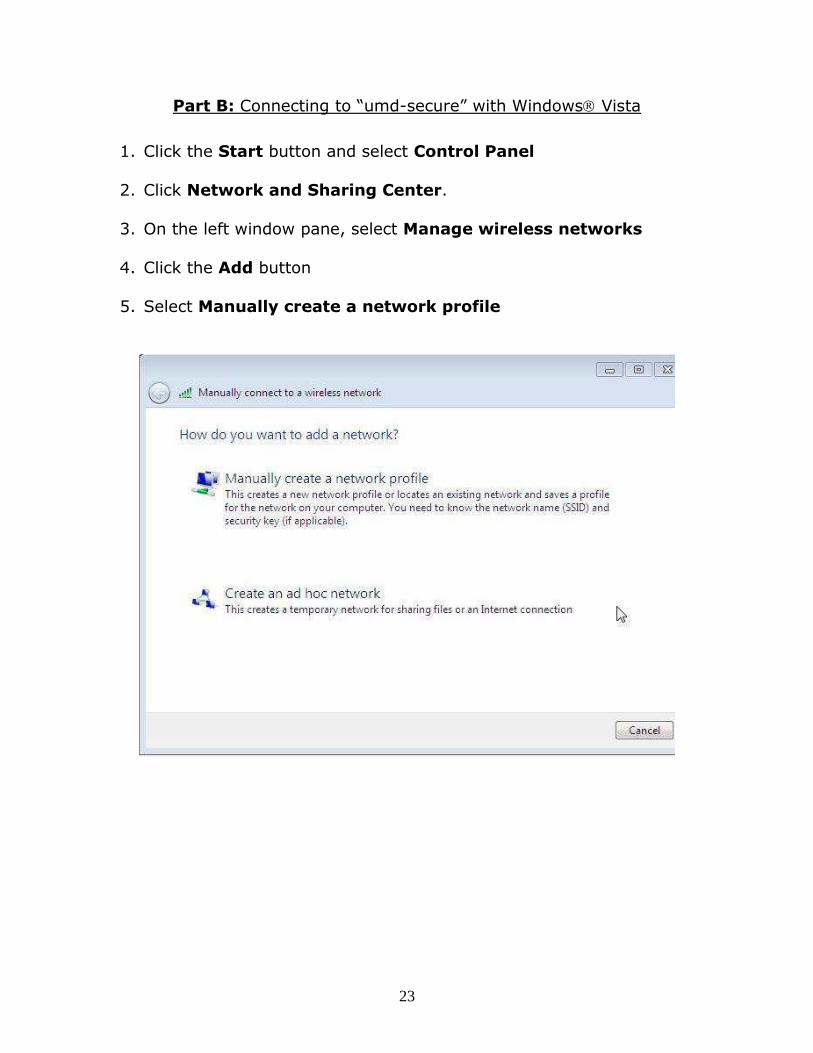
1. Click the Start button and select Control Panel
2. Click Network and Sharing Center.
3. On the left window pane, select Manage wireless networks
4. Click the Add button
5. Select Manually create a network profile

24
6. Enter in the following information:
a. Network name for type “a/g/n” network: umd-secure b. Security type: WPA2-Enterprise
c. Encryption type: AES d. Check the box for Start this connection automatically.
e. Click the Next button.
7. Click Change connection settings.
8. Click the Security tab.
9. Click the Settings button.
25
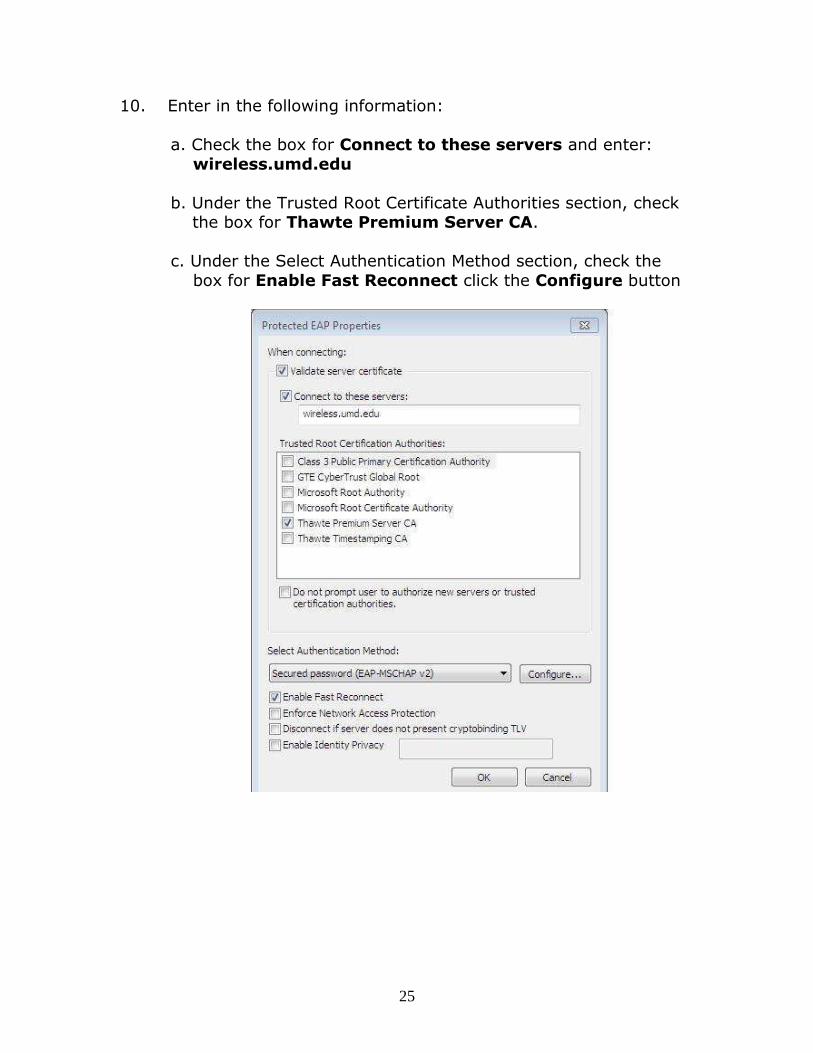
10. Enter in the following information:
a. Check the box for Connect to these servers and enter:
wireless.umd.edu
b. Under the Trusted Root Certificate Authorities section, check the box for Thawte Premium Server CA.
c. Under the Select Authentication Method section, check the
box for Enable Fast Reconnect click the Configure button
26
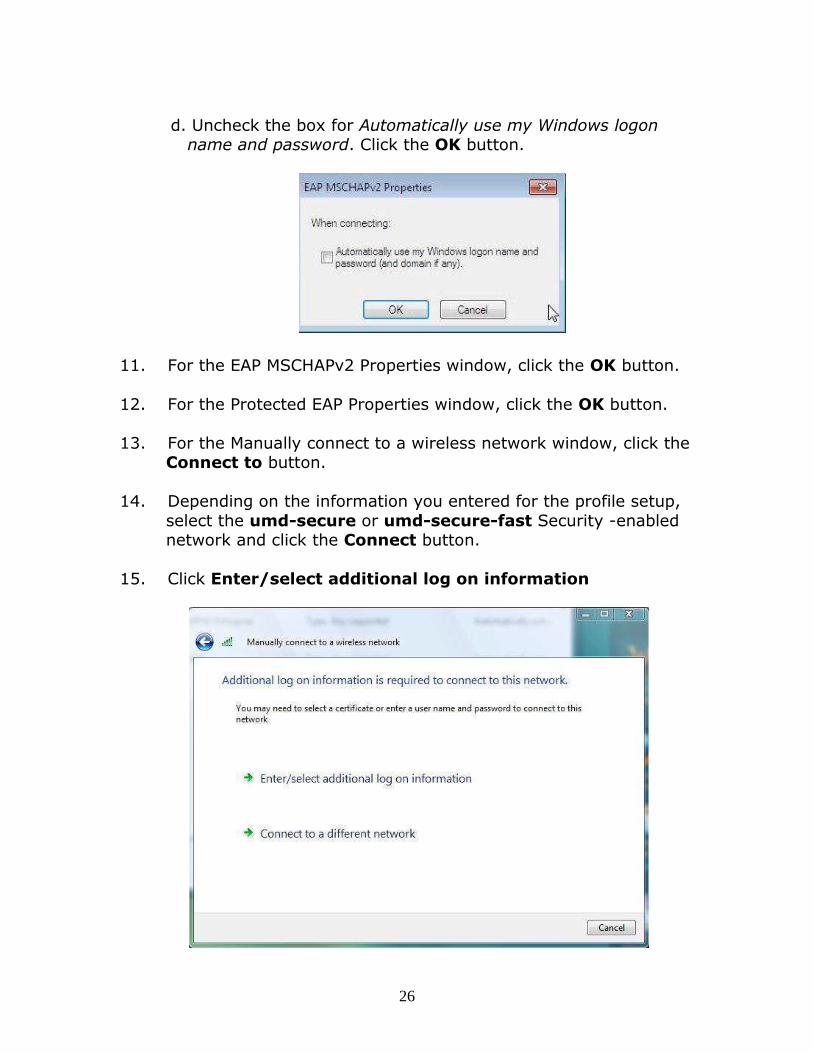
d. Uncheck the box for Automatically use my Windows logon name and password. Click the OK button.
11. For the EAP MSCHAPv2 Properties window, click the OK button.
12. For the Protected EAP Properties window, click the OK button.
13. For the Manually connect to a wireless network window, click the Connect to button.
14. Depending on the information you entered for the profile setup,
select the umd-secure or umd-secure-fast Security -enabled network and click the Connect button.
15. Click Enter/select additional log on information
27
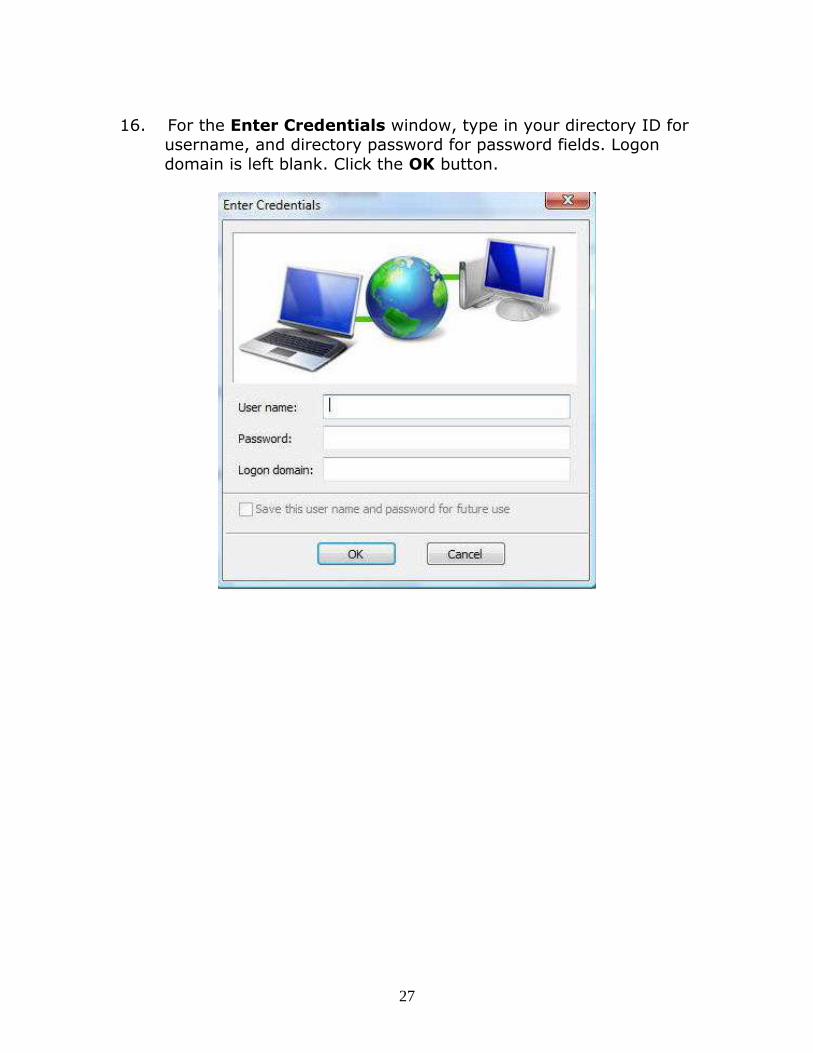
16. For the Enter Credentials window, type in your directory ID for username, and directory password for password fields. Logon
domain is left blank. Click the OK button.
28
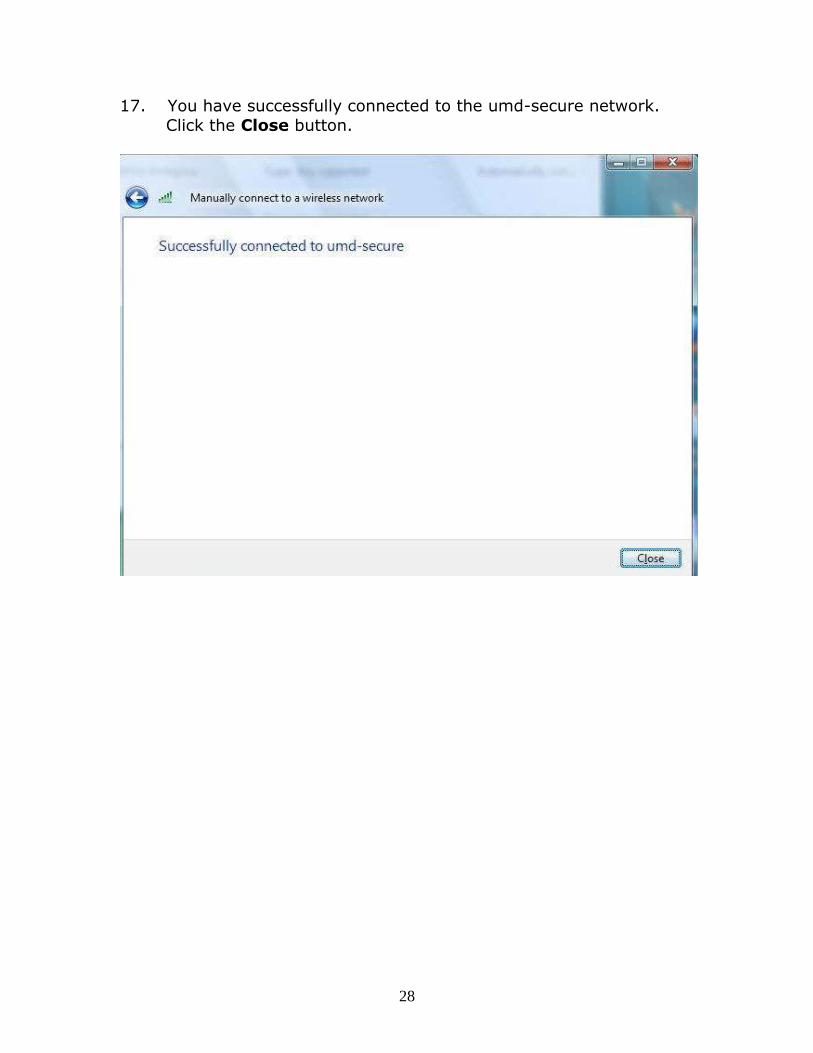
17. You have successfully connected to the umd-secure network.
Click the Close button.
29
Section III: Windows 7
Part A: Configuring Windows 7 Network Connections
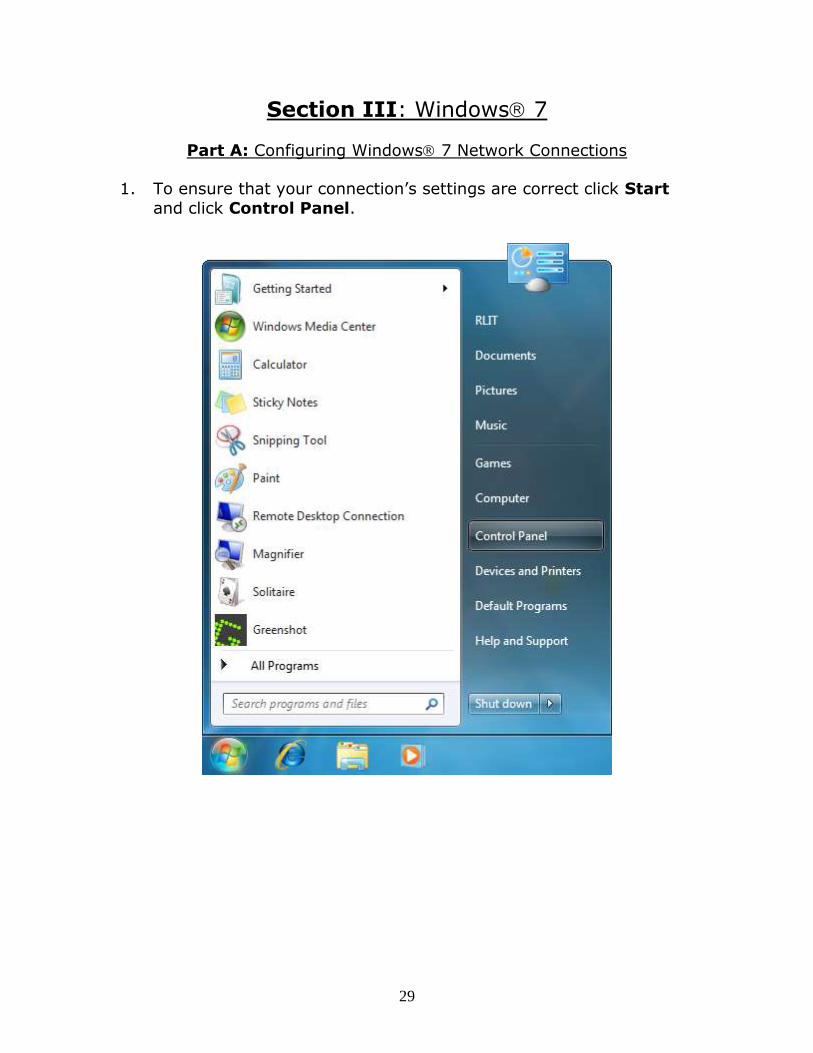
1. To ensure that your connection’s settings are correct click Start
and click Control Panel.
30
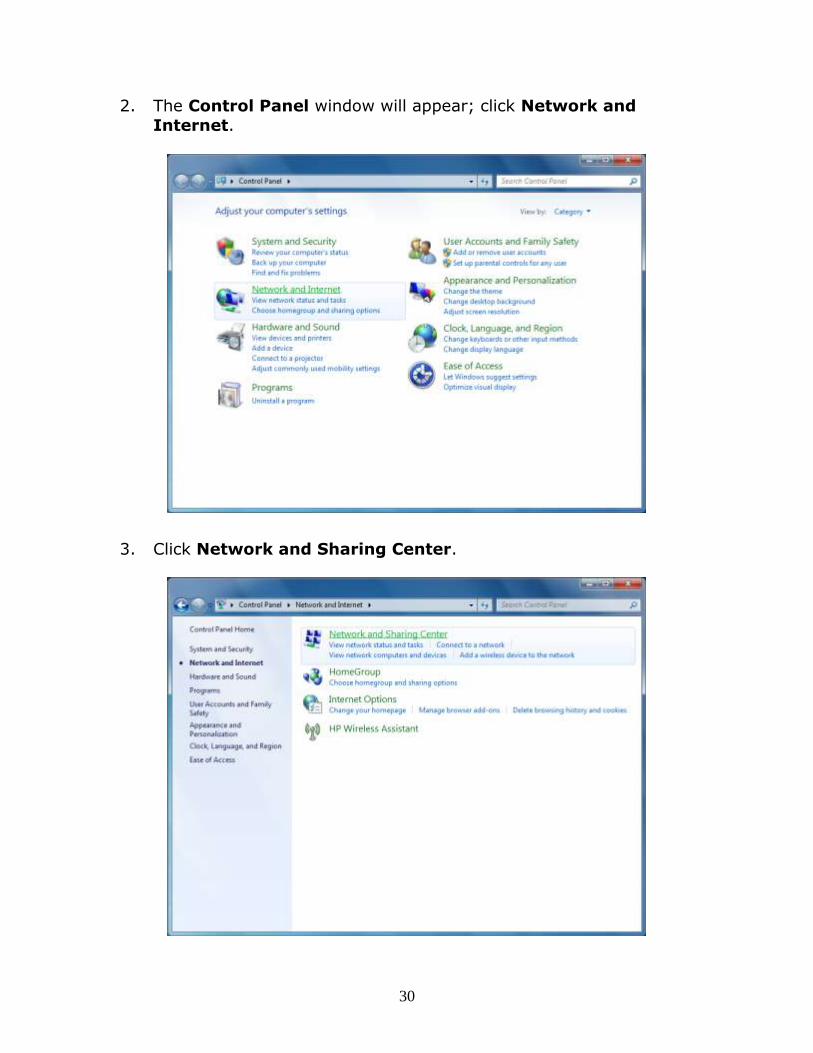
2. The Control Panel window will appear; click Network and
Internet.
3. Click Network and Sharing Center.
31
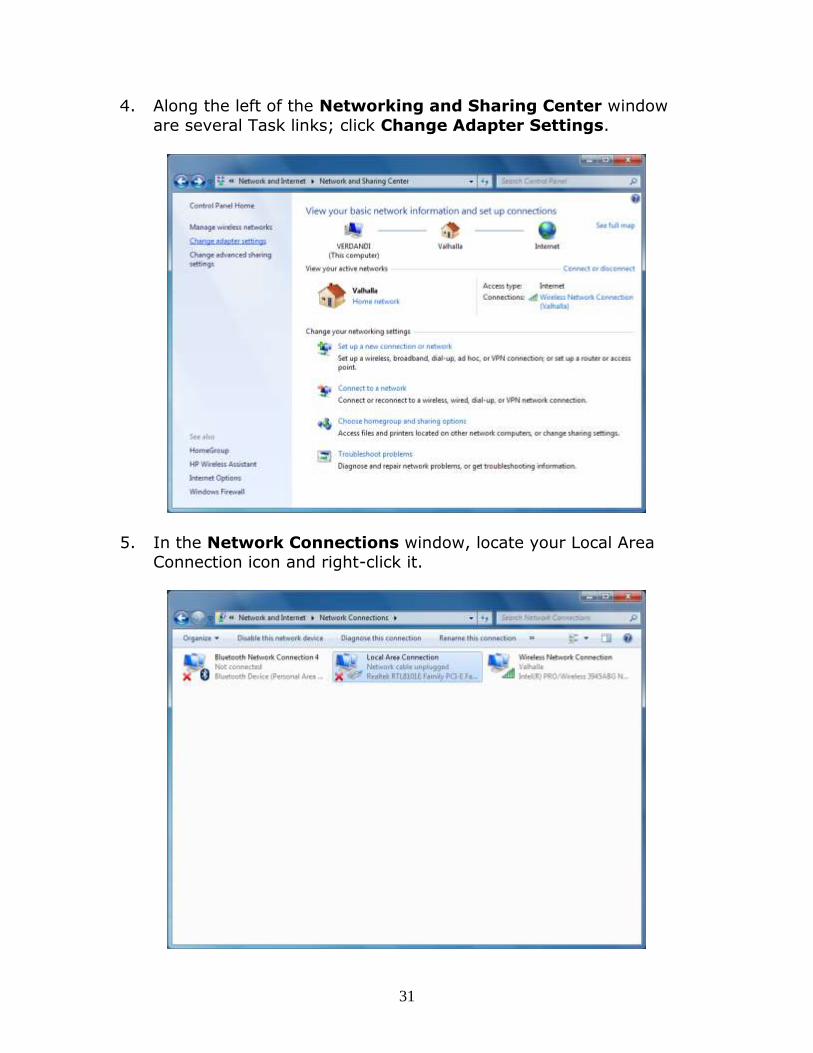
4. Along the left of the Networking and Sharing Center window
are several Task links; click Change Adapter Settings.
5. In the Network Connections window, locate your Local Area
Connection icon and right-click it.
32
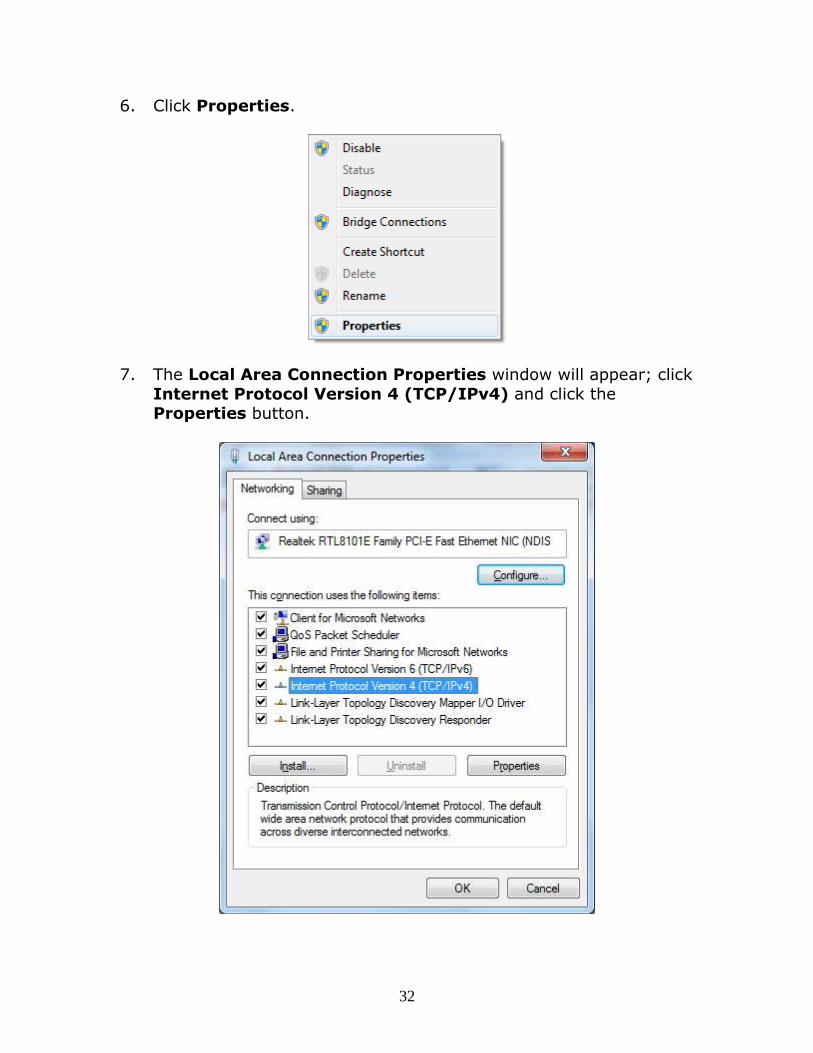
6. Click Properties.
7. The Local Area Connection Properties window will appear; click
Internet Protocol Version 4 (TCP/IPv4) and click the Properties button.
33
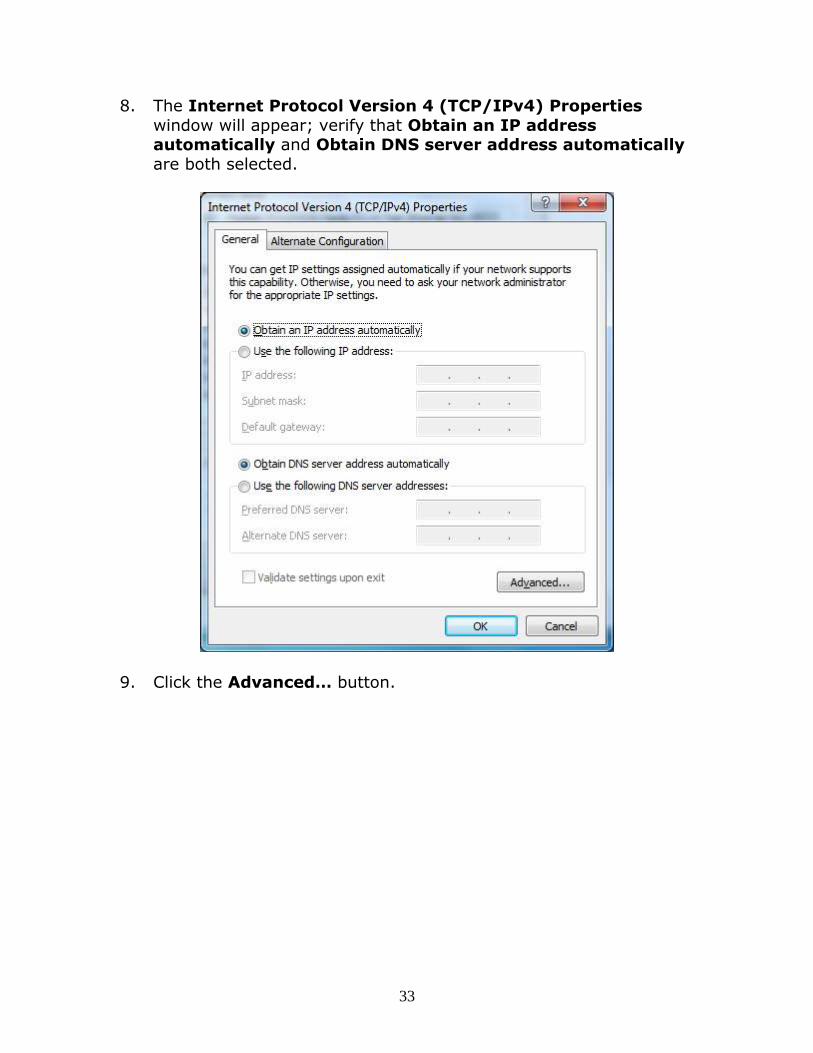
8. The Internet Protocol Version 4 (TCP/IPv4) Properties
window will appear; verify that Obtain an IP address automatically and Obtain DNS server address automatically
are both selected.
9. Click the Advanced… button.
34
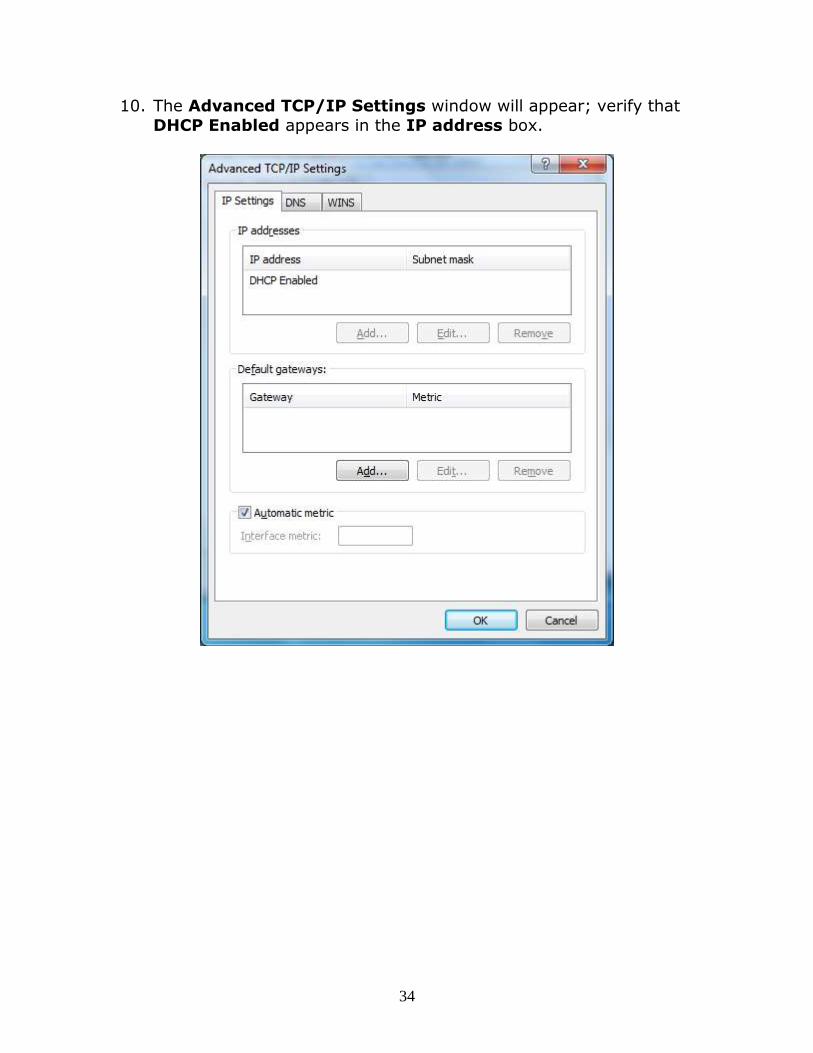
10. The Advanced TCP/IP Settings window will appear; verify that
DHCP Enabled appears in the IP address box.
35
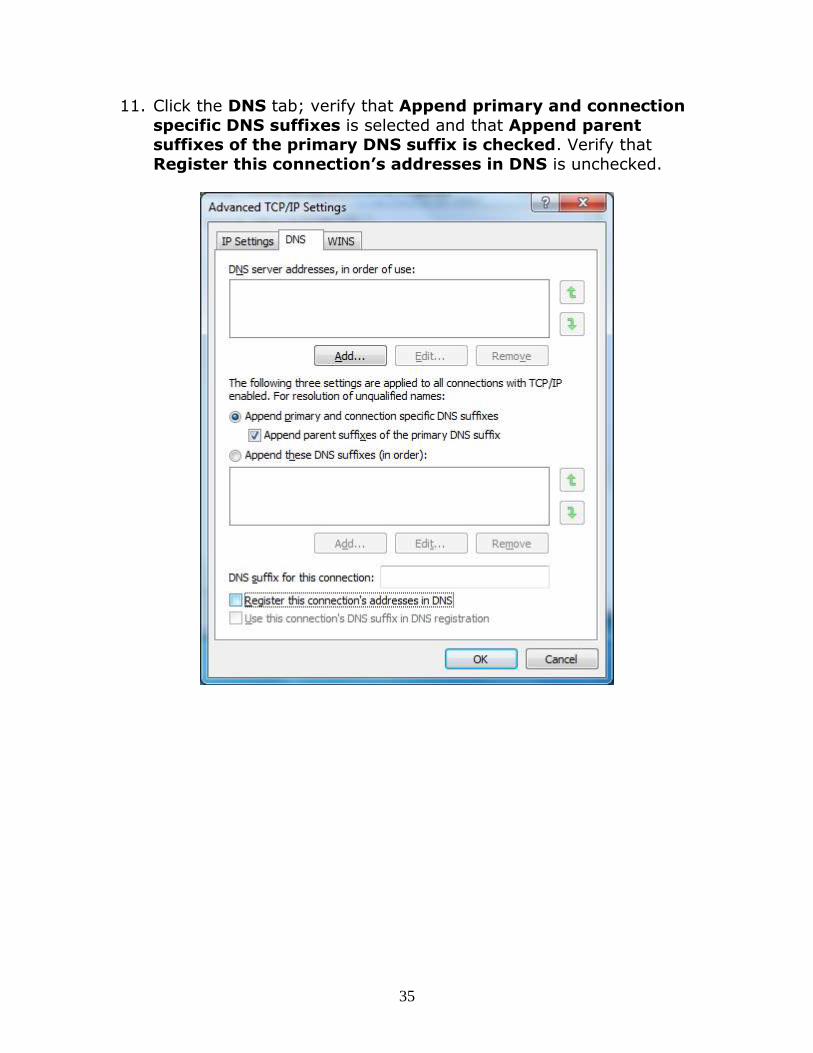
11. Click the DNS tab; verify that Append primary and connection
specific DNS suffixes is selected and that Append parent suffixes of the primary DNS suffix is checked. Verify that
Register this connection’s addresses in DNS is unchecked.
36
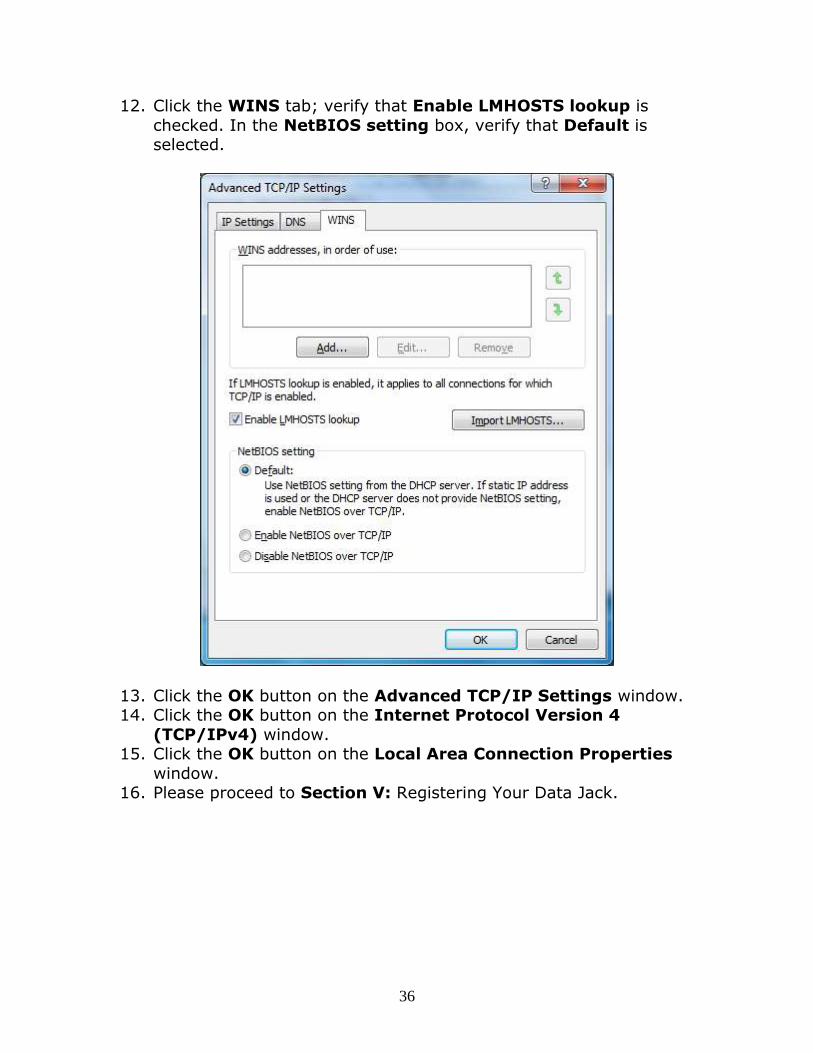
12. Click the WINS tab; verify that Enable LMHOSTS lookup is
checked. In the NetBIOS setting box, verify that Default is selected.
13. Click the OK button on the Advanced TCP/IP Settings window. 14. Click the OK button on the Internet Protocol Version 4
(TCP/IPv4) window. 15. Click the OK button on the Local Area Connection Properties
window. 16. Please proceed to Section V: Registering Your Data Jack.

37
Part B: Connecting to “umd-secure” with Windows 7
1. Click the Start button and select Control Panel.
2. Click Network and Sharing Center.
3. On the left window pane, select Manage wireless networks.
4. Click the Add button.
5. Select Manually create a network profile.

38
6. Enter in the following information:
a. Network name for type “a/g/n” network: umd-secure b. Security type: WPA2-Enterprise
c. Encryption type: AES d. Check the box for Start this connection automatically.
e. Click the Next button.
7. Click Change connection settings.
8. Click the Security tab.
9. Click the Settings button.
39
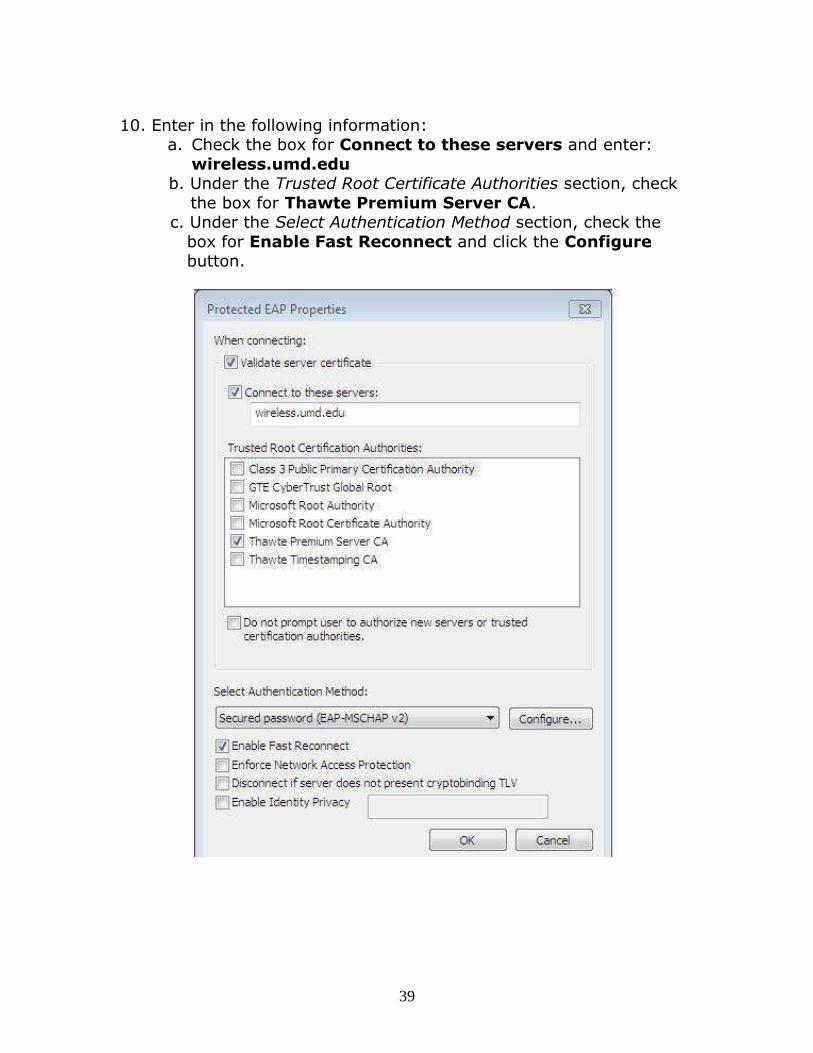
10. Enter in the following information: a. Check the box for Connect to these servers and enter:
wireless.umd.edu b. Under the Trusted Root Certificate Authorities section, check
the box for Thawte Premium Server CA. c. Under the Select Authentication Method section, check the
box for Enable Fast Reconnect and click the Configure button.
40
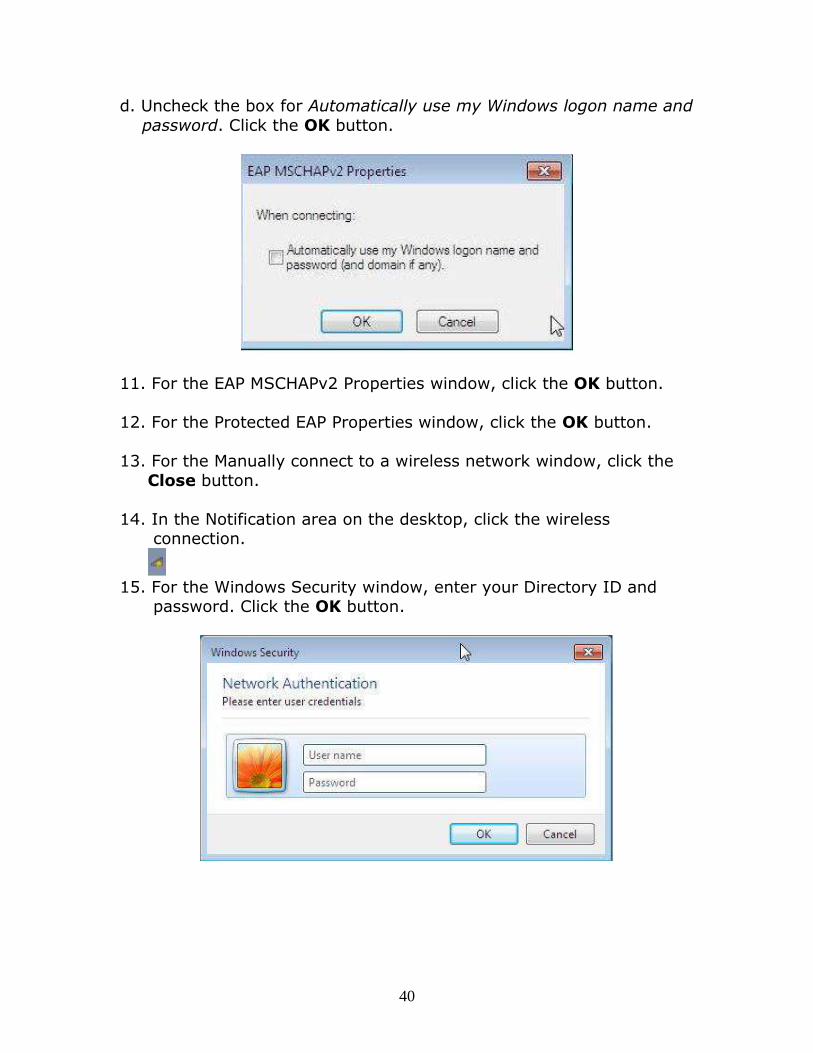
d. Uncheck the box for Automatically use my Windows logon name and
password. Click the OK button.
11. For the EAP MSCHAPv2 Properties window, click the OK button.
12. For the Protected EAP Properties window, click the OK button.
13. For the Manually connect to a wireless network window, click the
Close button.
14. In the Notification area on the desktop, click the wireless connection.
15. For the Windows Security window, enter your Directory ID and password. Click the OK button.
41
Section IV: Apple
Part A: Apple OS X Administrator Access
To make the following changes you will need to have administrator
access on your Apple OS X computer.
When you first install and configure Apple OS X you set up a user.
This user is an administrator. As an administrator you can create other
users, as well as other administrators, install software in the Applications and Library folders, and change your computer’s settings.
If you set up your computer for other users or turn on logging in, you
need to enter the username and password of an administrator to administer your computer. If you know the username and password of
an administrator, you can change settings in System Preferences… panes that are locked when you’re not logged in as an administrator.
Part B: Configuring Apple OS X Networking
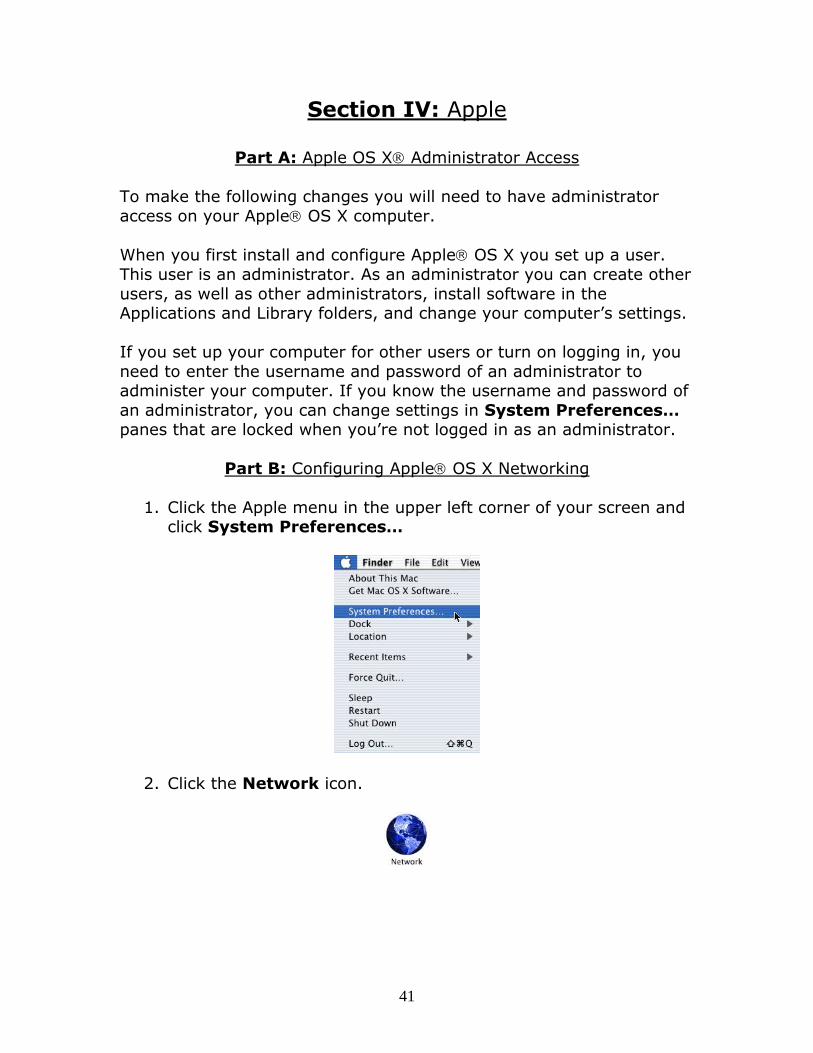
1. Click the Apple menu in the upper left corner of your screen and click System Preferences…
2. Click the Network icon.
42
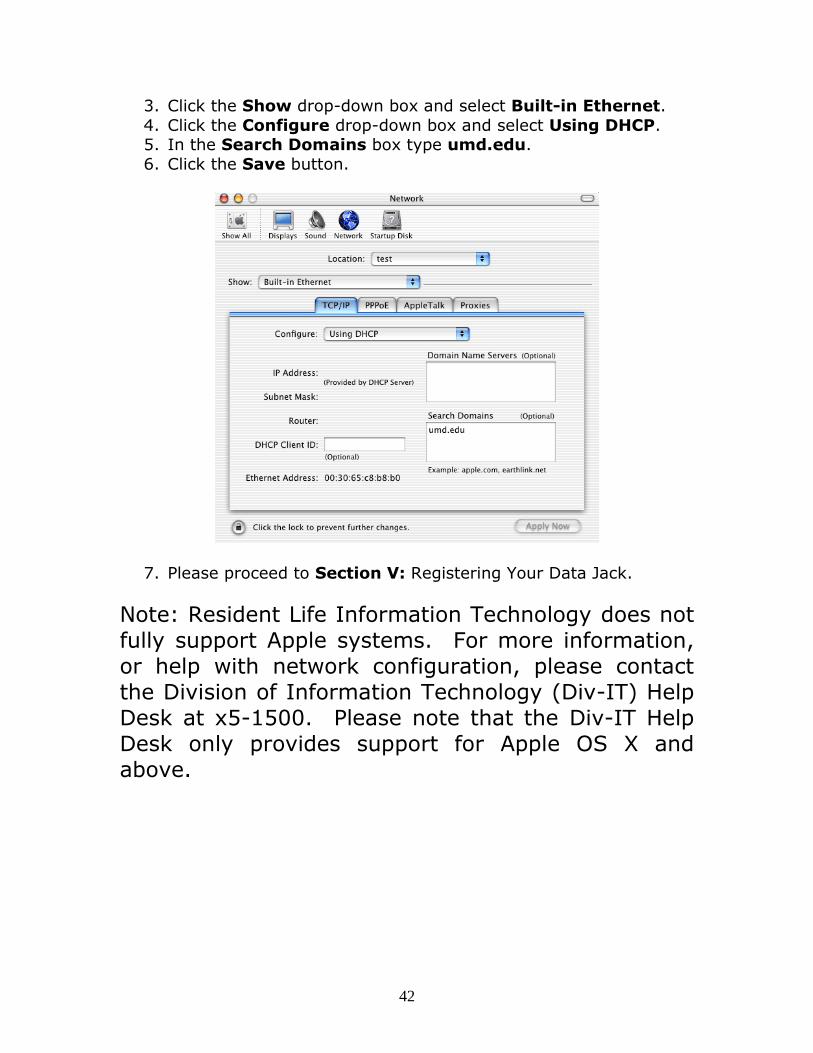
3. Click the Show drop-down box and select Built-in Ethernet.
4. Click the Configure drop-down box and select Using DHCP. 5. In the Search Domains box type umd.edu.
6. Click the Save button.
7. Please proceed to Section V: Registering Your Data Jack.
Note: Resident Life Information Technology does not
fully support Apple systems. For more information,
or help with network configuration, please contact
the Division of Information Technology (Div-IT) Help
Desk at x5-1500. Please note that the Div-IT Help
Desk only provides support for Apple OS X and
above.
43
Part C: Connecting to “umd-secure” with Apple OS 10.7 “Lion”
The following are instructions on how to connect to the “umd-secure”
network using Apple OS 10.7 “Lion”. Instructions on connecting to
“umd-secure” using other Apple operating systems can be found
here: http://www.oit.umd.edu/nts/noc/wireless/connect.html
NOTE: For the umd-secure.mobileconfig file to download and work properly, you need to access your email and the file with a configured
mail client (ex.: Macintosh Mail, Microsoft Outlook 2011) on the
computer you want to connect to umd-secure. There are instructions for configuring clients with your University of Maryland (UMD) email
available in the Division of Information Technology site: https://www.itsc.umd.edu/
1. To obtain the umd-secure Configuration file use your web
browser and go to mobility.umd.edu/emails. Enter your @umd.edu email address. Click Send Me Email Please.
2. Once you get the email, click on and open the attached file called
umd-secure.mobileconfig.
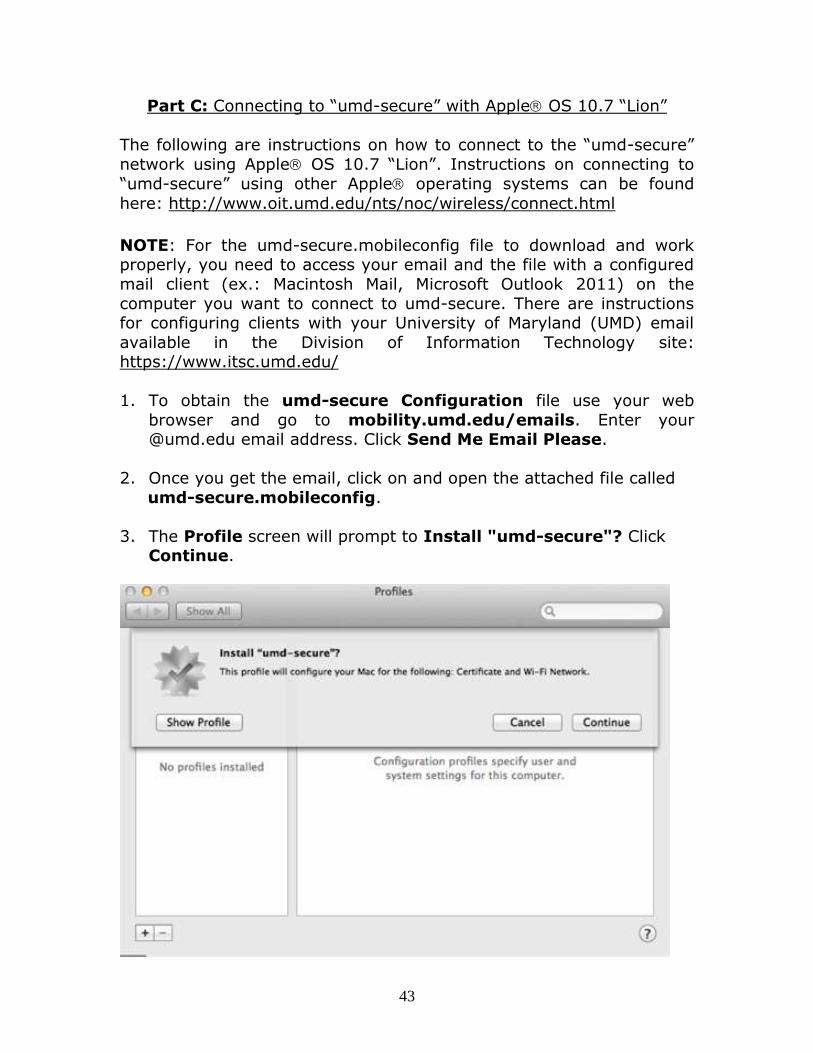
3. The Profile screen will prompt to Install "umd-secure"? Click Continue.
44
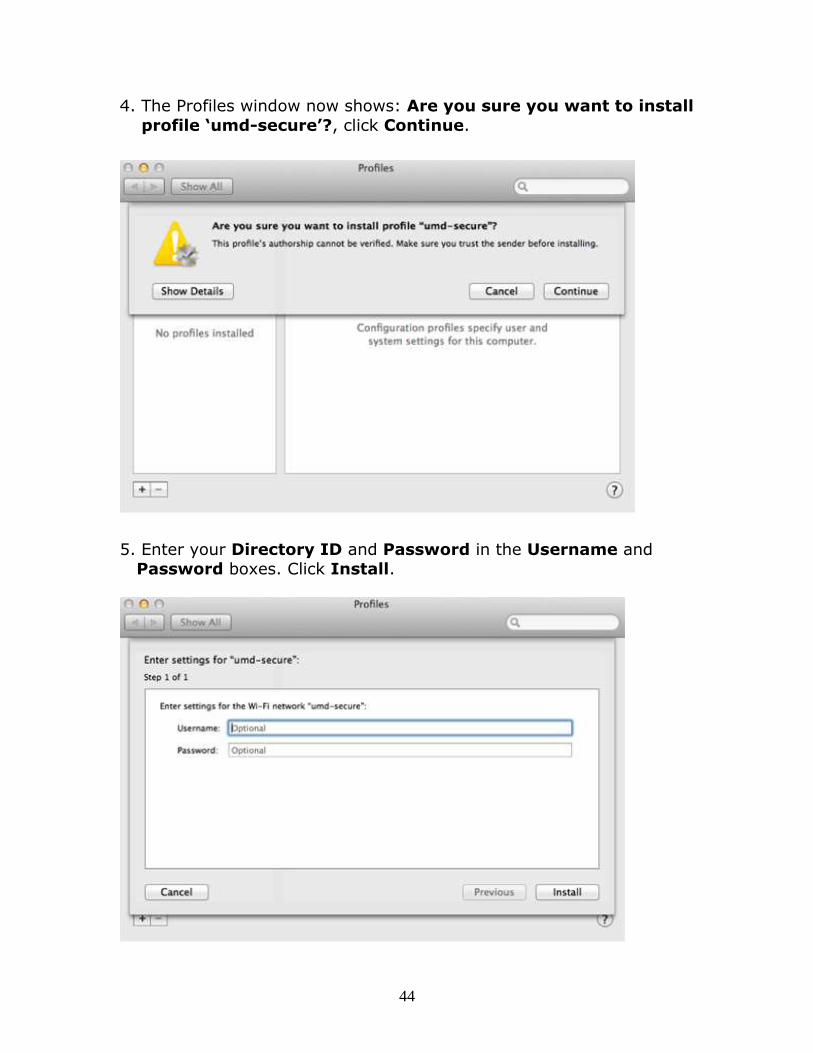
4. The Profiles window now shows: Are you sure you want to install
profile ‘umd-secure’?, click Continue.
5. Enter your Directory ID and Password in the Username and
Password boxes. Click Install.
45
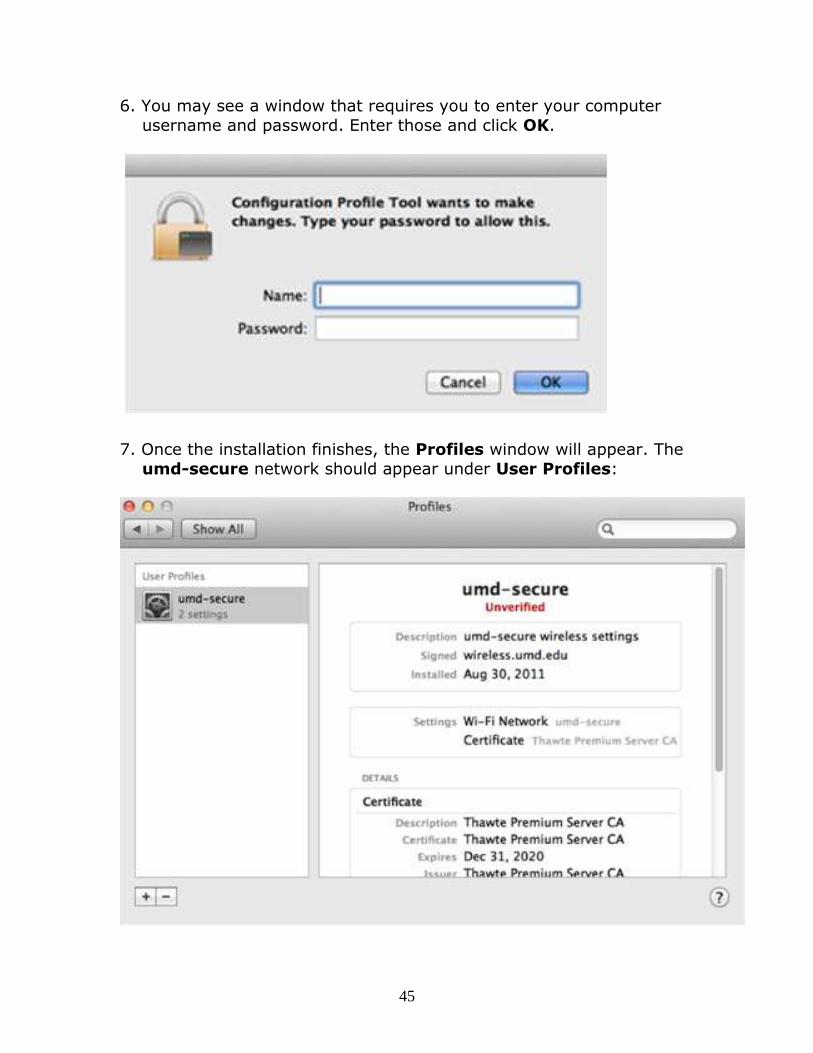
6. You may see a window that requires you to enter your computer
username and password. Enter those and click OK.
7. Once the installation finishes, the Profiles window will appear. The
umd-secure network should appear under User Profiles:
46
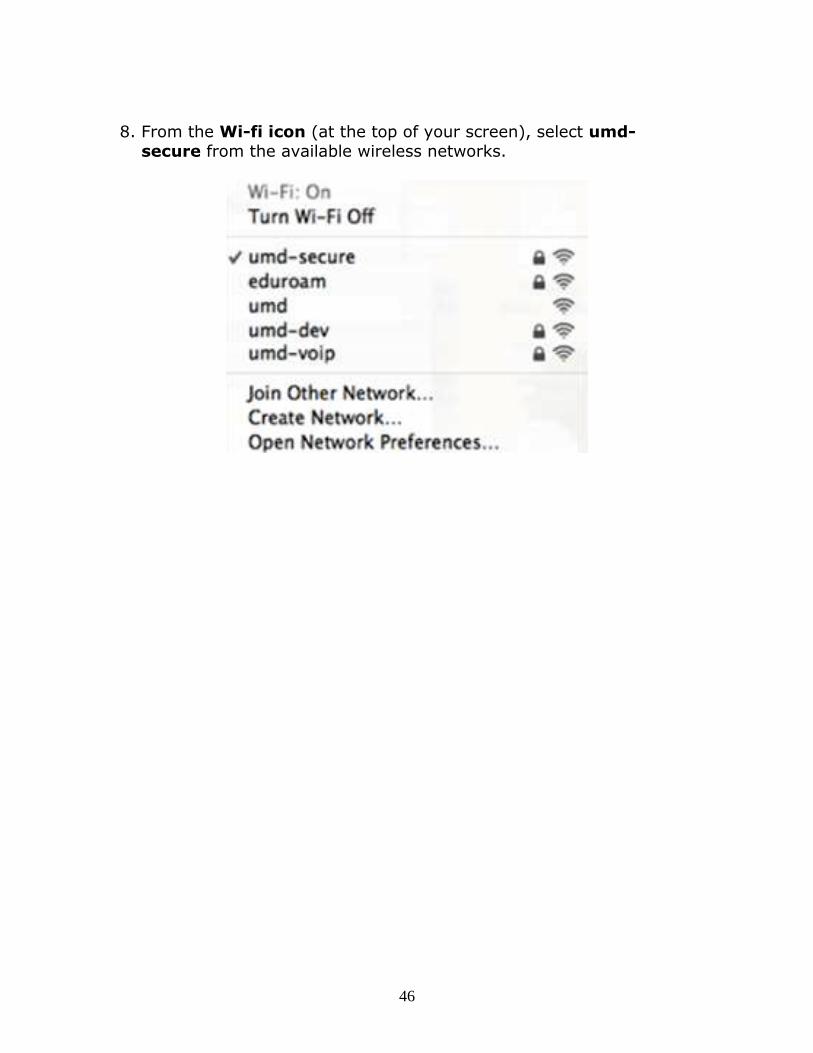
8. From the Wi-fi icon (at the top of your screen), select umd-
secure from the available wireless networks.
47
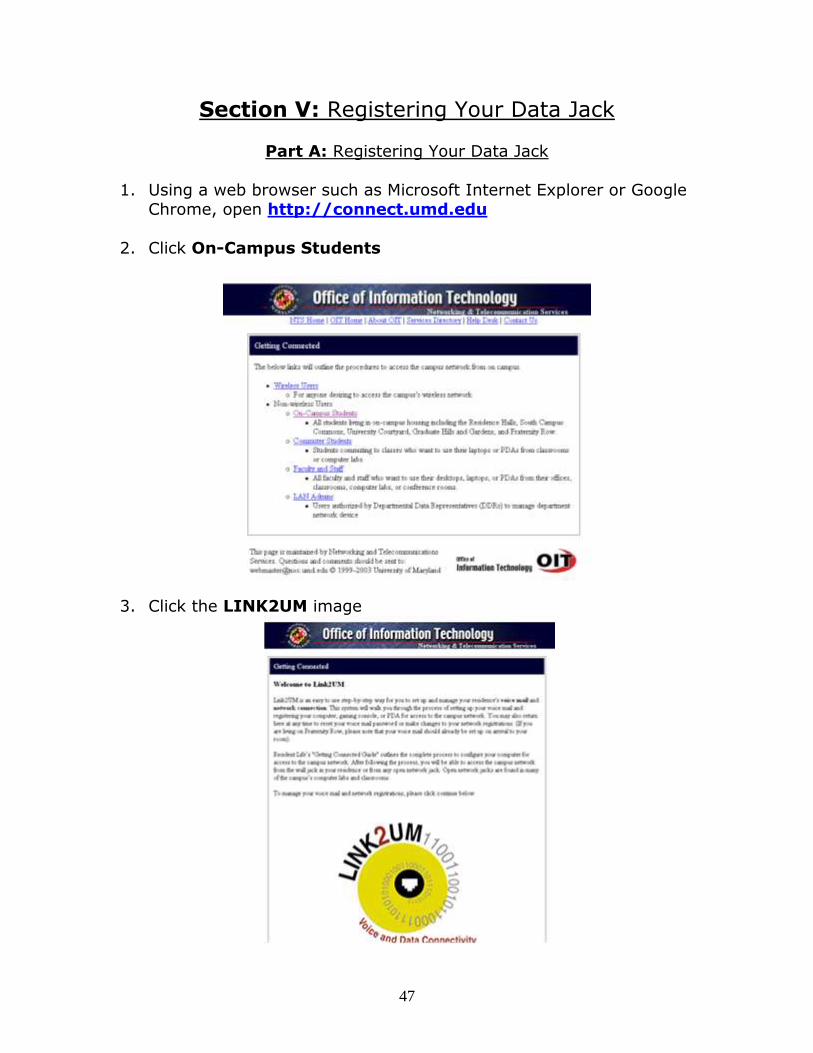
Section V: Registering Your Data Jack
Part A: Registering Your Data Jack
1. Using a web browser such as Microsoft Internet Explorer or Google Chrome, open http://connect.umd.edu
2. Click On-Campus Students
3. Click the LINK2UM image
48
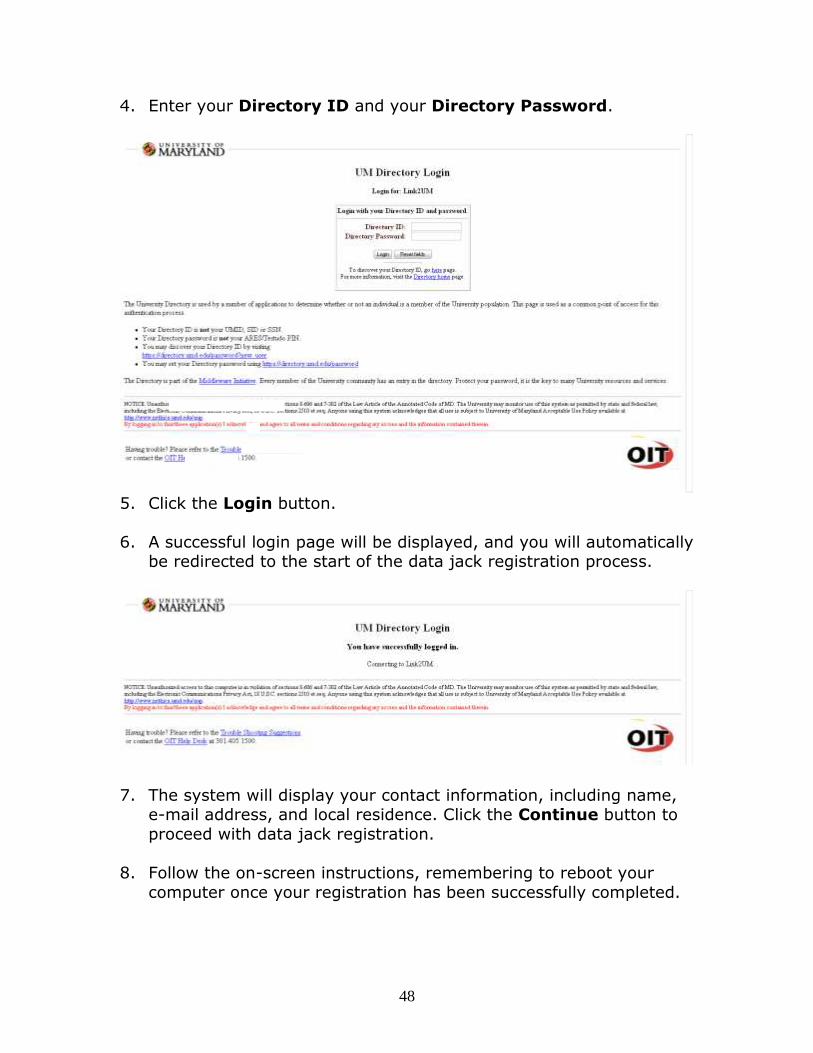
4. Enter your Directory ID and your Directory Password.
5. Click the Login button.
6. A successful login page will be displayed, and you will automatically be redirected to the start of the data jack registration process.
7. The system will display your contact information, including name, e-mail address, and local residence. Click the Continue button to
proceed with data jack registration.
8. Follow the on-screen instructions, remembering to reboot your
computer once your registration has been successfully completed.
49
Part B: Virus Protection
The University of Maryland provides high-quality anti-virus software
for PC and Apple computers to members of the UMCP community for free. Computer viruses can spread rapidly through the campus
network via e-mail, file sharing, or IRC, and are capable of deleting data files (like term papers or MP3 files), causing system crashes, and
completely erasing hard drives. If your computer does not have anti-virus software installed or only has a trial version of anti-virus
software (which is common on new computers), you are strongly encouraged to download and install one of the anti-virus software
options provided by the university. You can download the software and read the brief installation instructions at the Division of
Information Technology’s web page or as part of the Getting Started CD available from the Div-IT Helpdesk in 1400 Computer and Space
Sciences..
Anti-Virus Download & Instructions
Go to: www.itsc.umd.edu and search “University of Maryland
Supported Antivirus Software”
If any of the above steps do not complete correctly please call Resident Life Information Technology at x4-DATA (x4-3282) for
assistance.
50
Section VI: Smart Devices
Part A: Connecting to “umd-secure” with an iPhone or iPod Touch
* Be sure you have downloaded and installed the latest version of iTunes on your PC or Mac.
* Your iPhone / iPod touch software has to be version 2.0 or greater to connect to umd-secure.
The files you will need to connect to “umd-secure” must be installed on
the device via an e-mail attachment. Please use this documentation: http://www.oit.umd.edu/nts/noc/wireless/images/iPhone/Configuring_
mailatumd.pdf to create your umd.edu e-mail account on your device before proceeding with the “umd-secure” directions.
1. Visit http://mobility.umd.edu/emails and enter your @umd.edu e-mail address to have the iPhone/iPod touch configuration file and
PDF instructions for connecting to the umd-secure wireless network e-mailed to you.
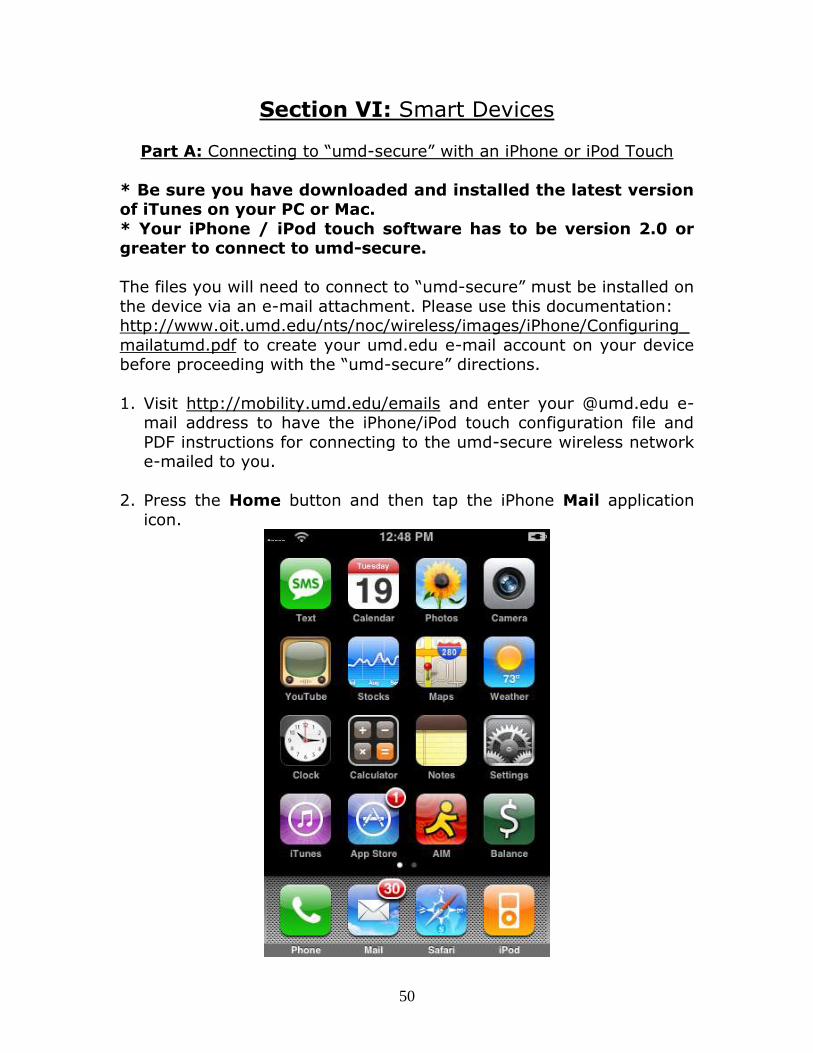
2. Press the Home button and then tap the iPhone Mail application
icon.
51
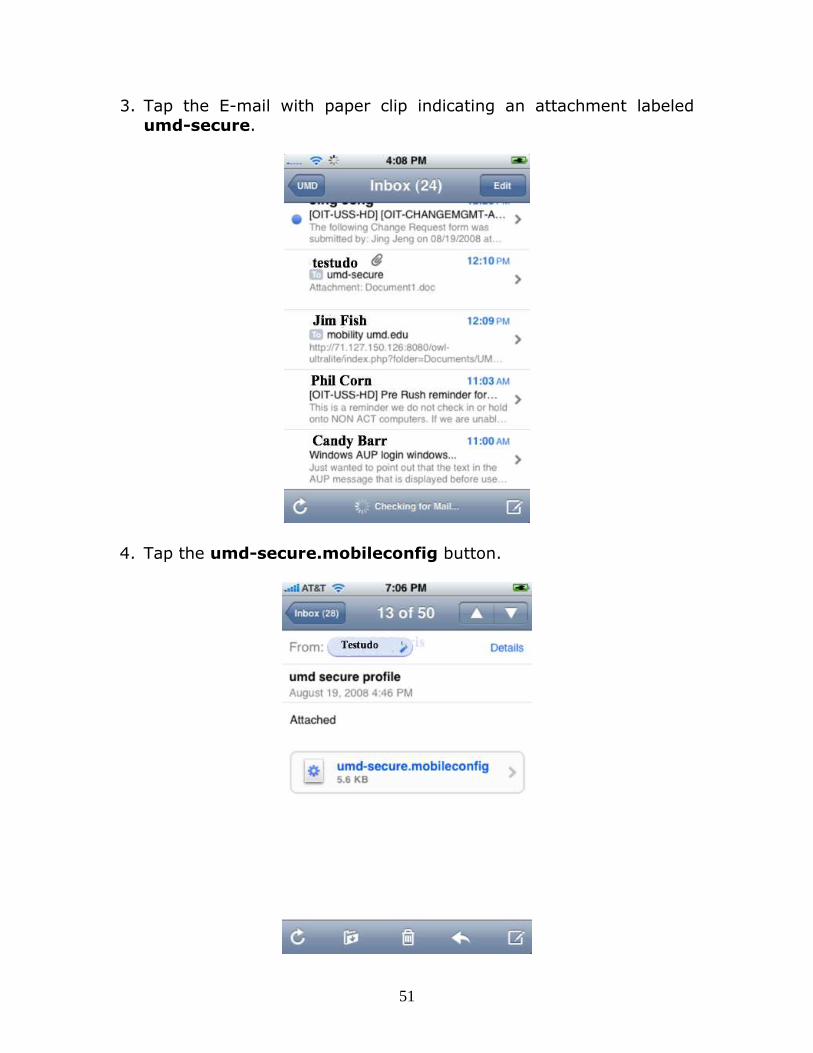
3. Tap the E-mail with paper clip indicating an attachment labeled
umd-secure.
4. Tap the umd-secure.mobileconfig button.
52
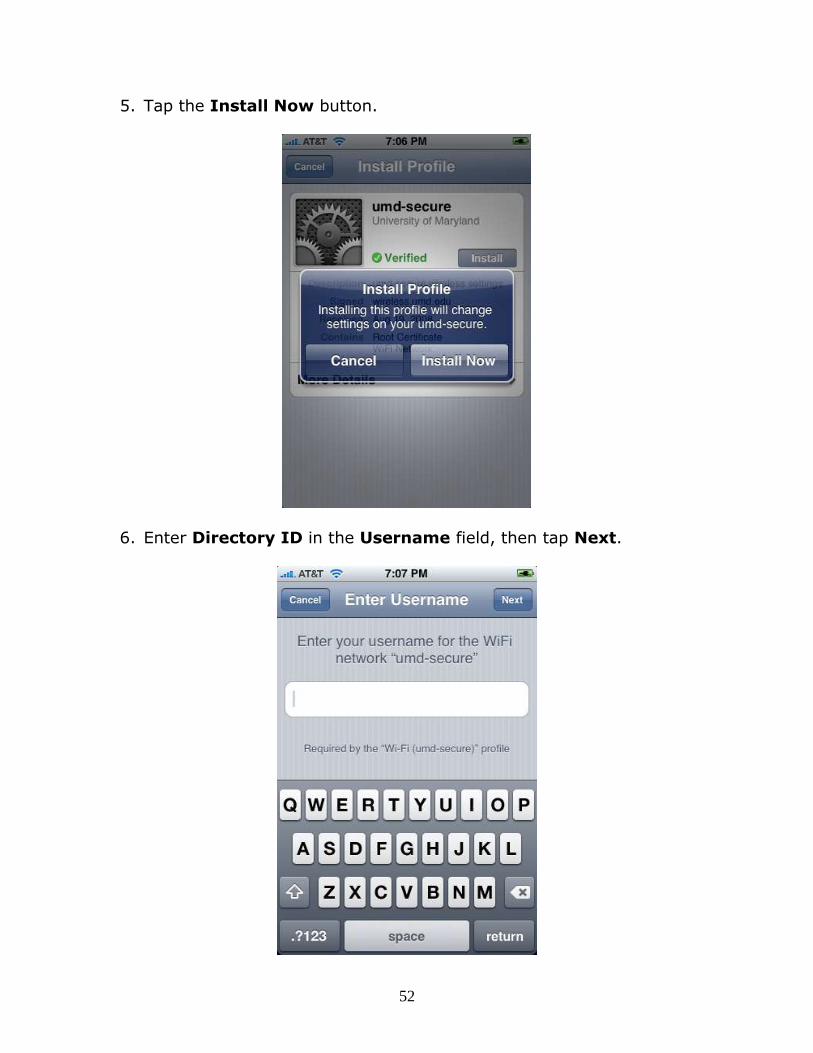
5. Tap the Install Now button.
6. Enter Directory ID in the Username field, then tap Next.

53
7. Enter your Directory password in the Password field; then, tap
Next.
8. Tap Done and you will be returned to your original e-mail message.
54
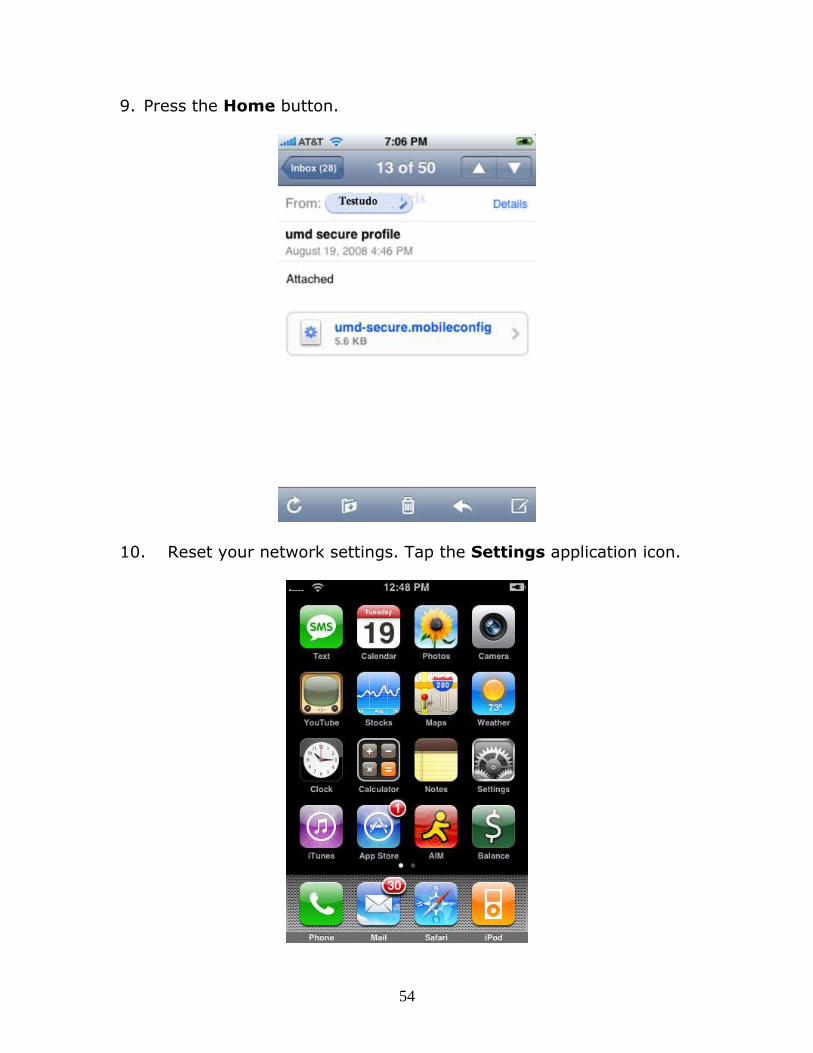
9. Press the Home button.
10. Reset your network settings. Tap the Settings application icon.
55
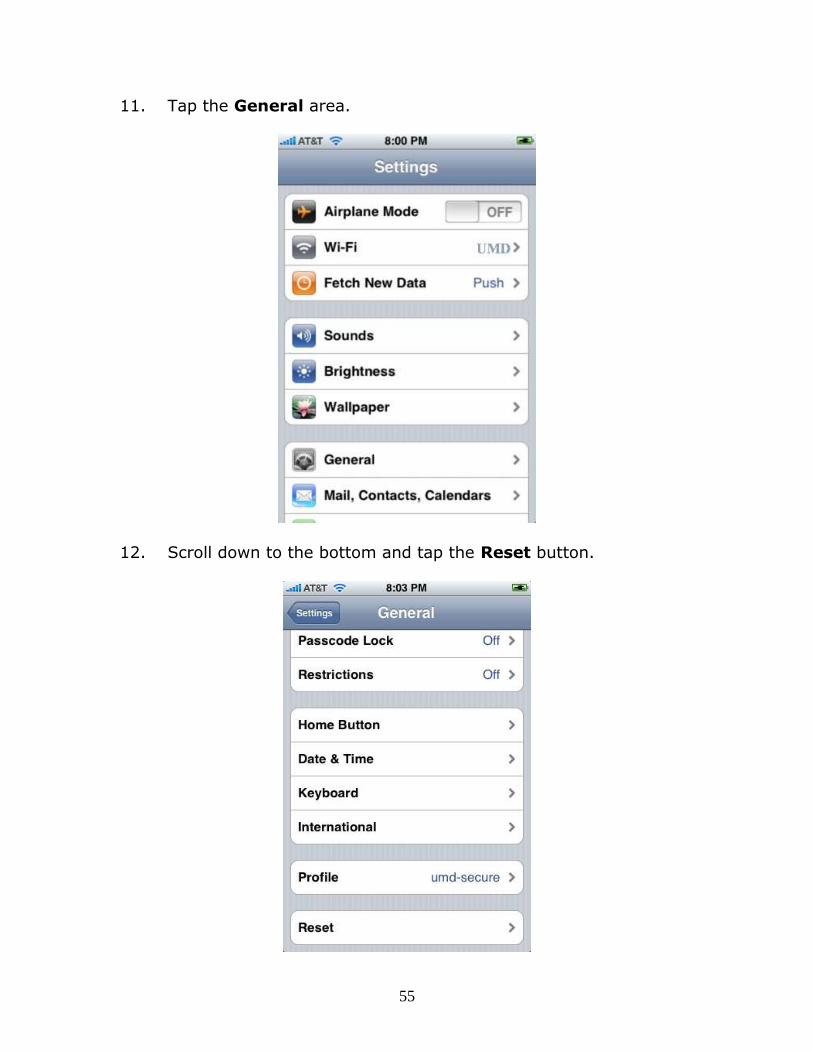
11. Tap the General area.
12. Scroll down to the bottom and tap the Reset button.
56
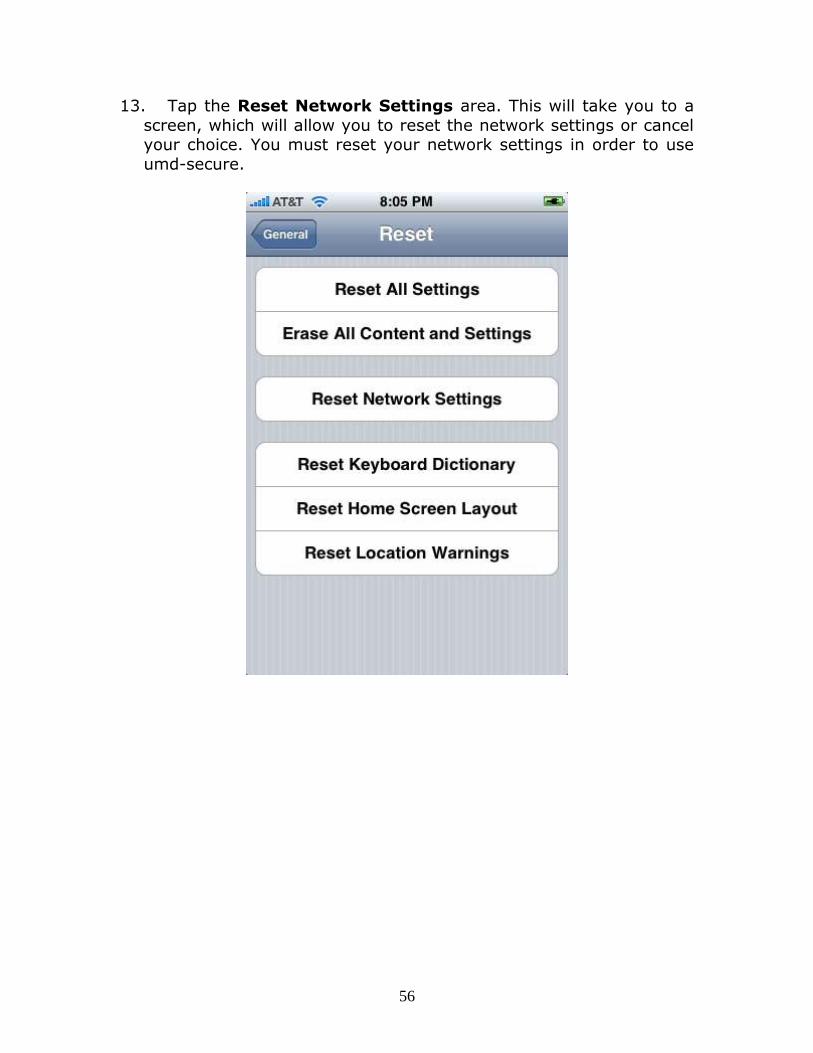
13. Tap the Reset Network Settings area. This will take you to a
screen, which will allow you to reset the network settings or cancel your choice. You must reset your network settings in order to use
umd-secure.
57
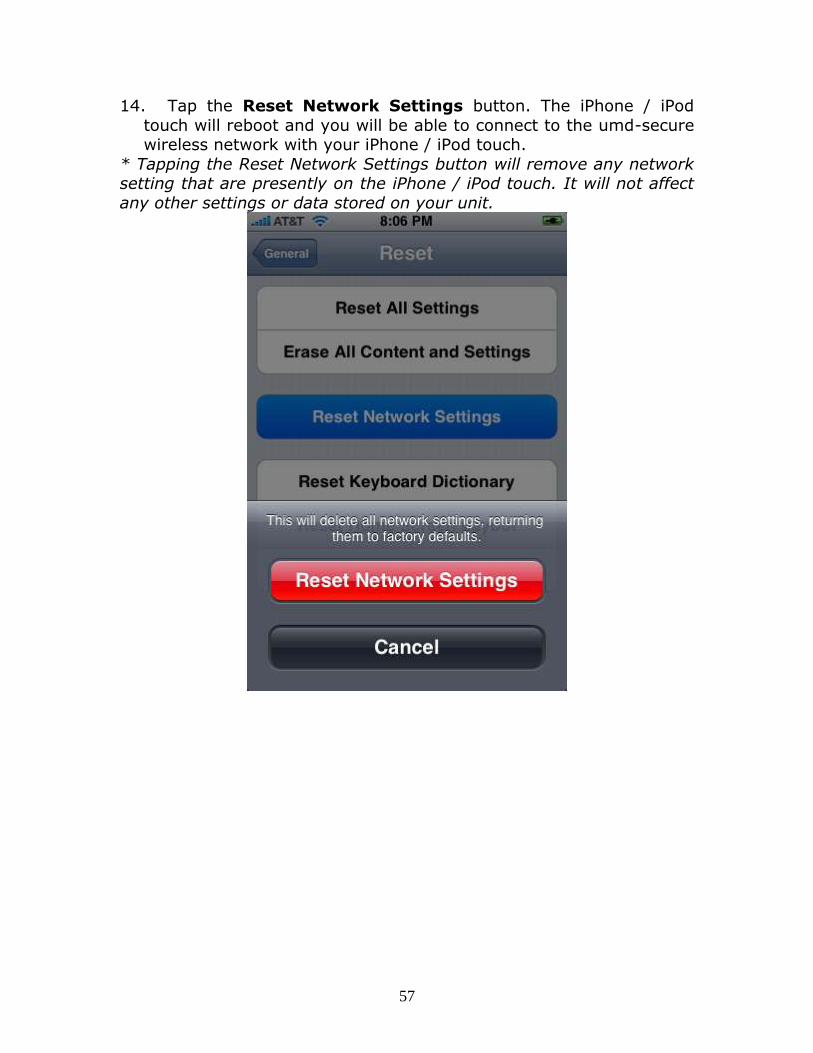
14. Tap the Reset Network Settings button. The iPhone / iPod
touch will reboot and you will be able to connect to the umd-secure wireless network with your iPhone / iPod touch.
* Tapping the Reset Network Settings button will remove any network setting that are presently on the iPhone / iPod touch. It will not affect
any other settings or data stored on your unit.
58
Part B: Connecting to “umd-secure” with an Android Device
Important: It is good practice to be sure your mobile device is
running the most recent Operating System (OS) available. The mobile operating system of your smartphone, personal digital assistant (PDA),
or tablet computer is the software platform that controls everything on that device. Check your Manufacturer's website for instructions on how
to update your system.
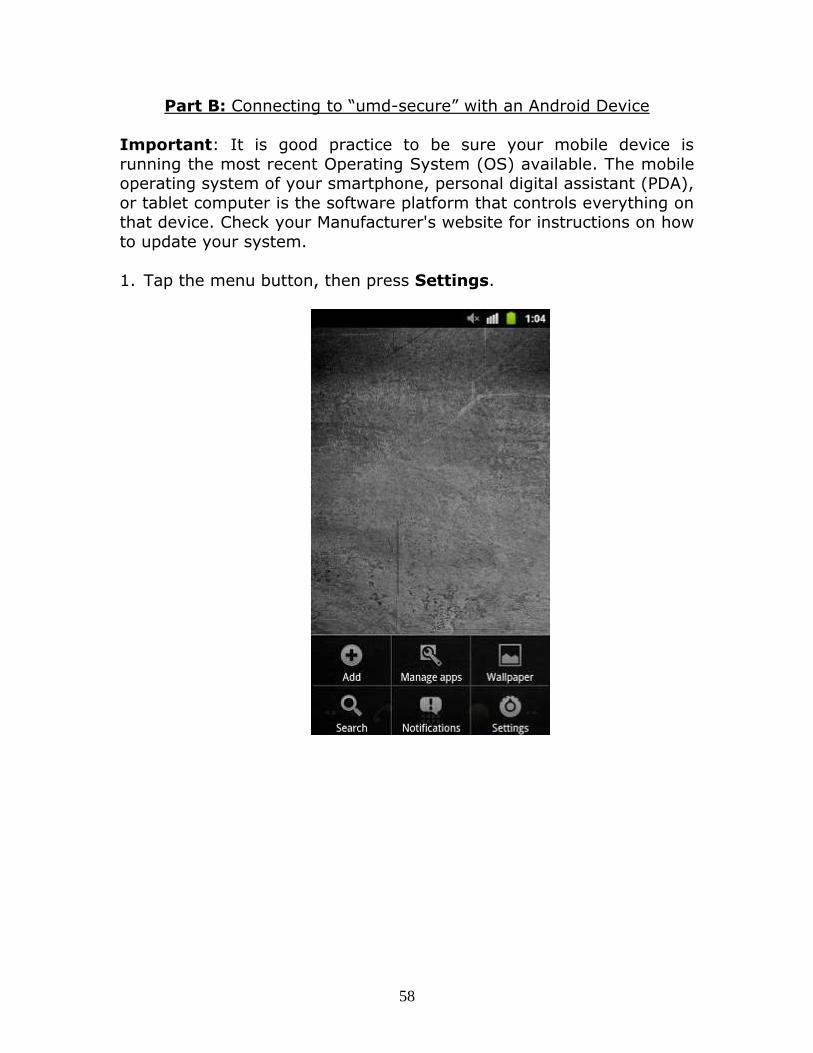
1. Tap the menu button, then press Settings.
59
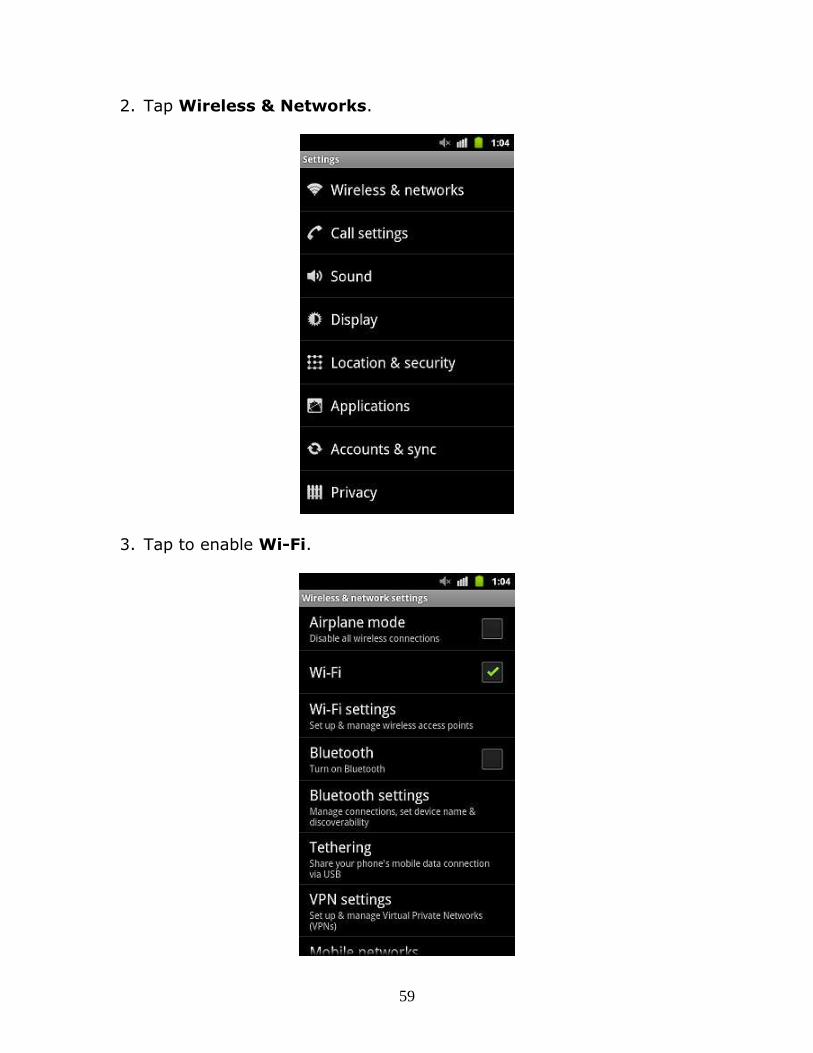
2. Tap Wireless & Networks.
3. Tap to enable Wi-Fi.
60
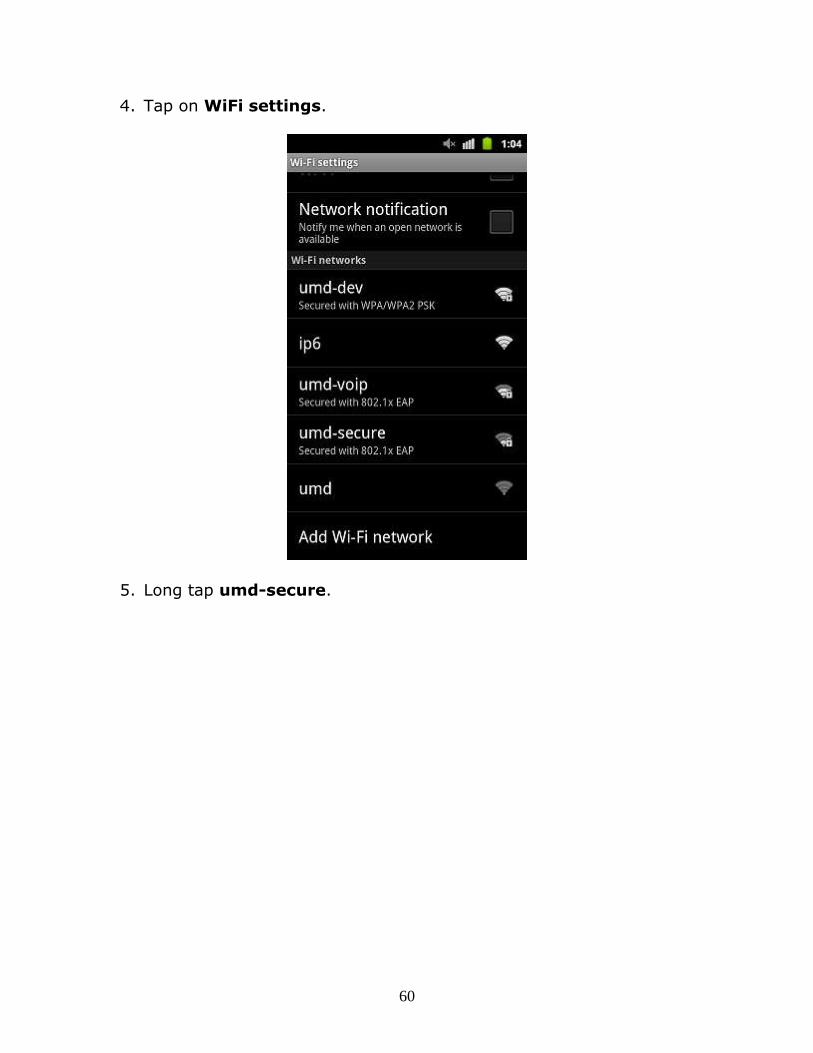
4. Tap on WiFi settings.
5. Long tap umd-secure.
61
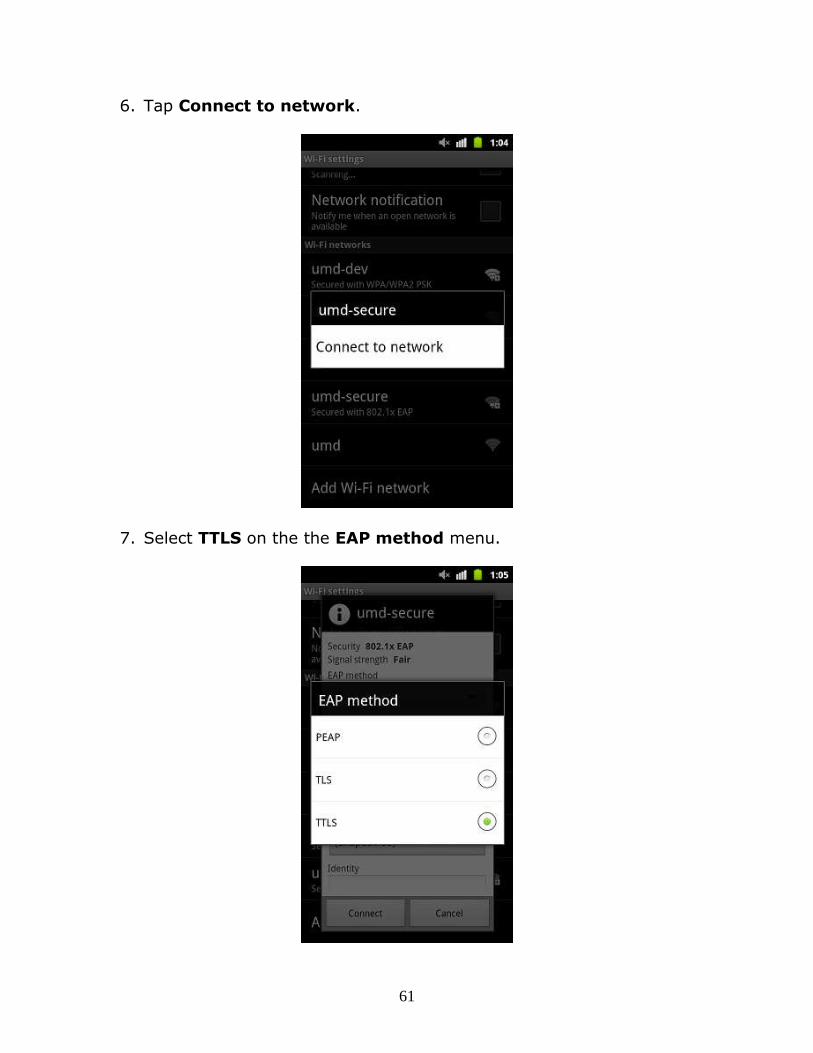
6. Tap Connect to network.
7. Select TTLS on the the EAP method menu.

62
8. Select PAP on the Phase 2 authentication menu.
9. Enter your directory ID in the Identity box.
63
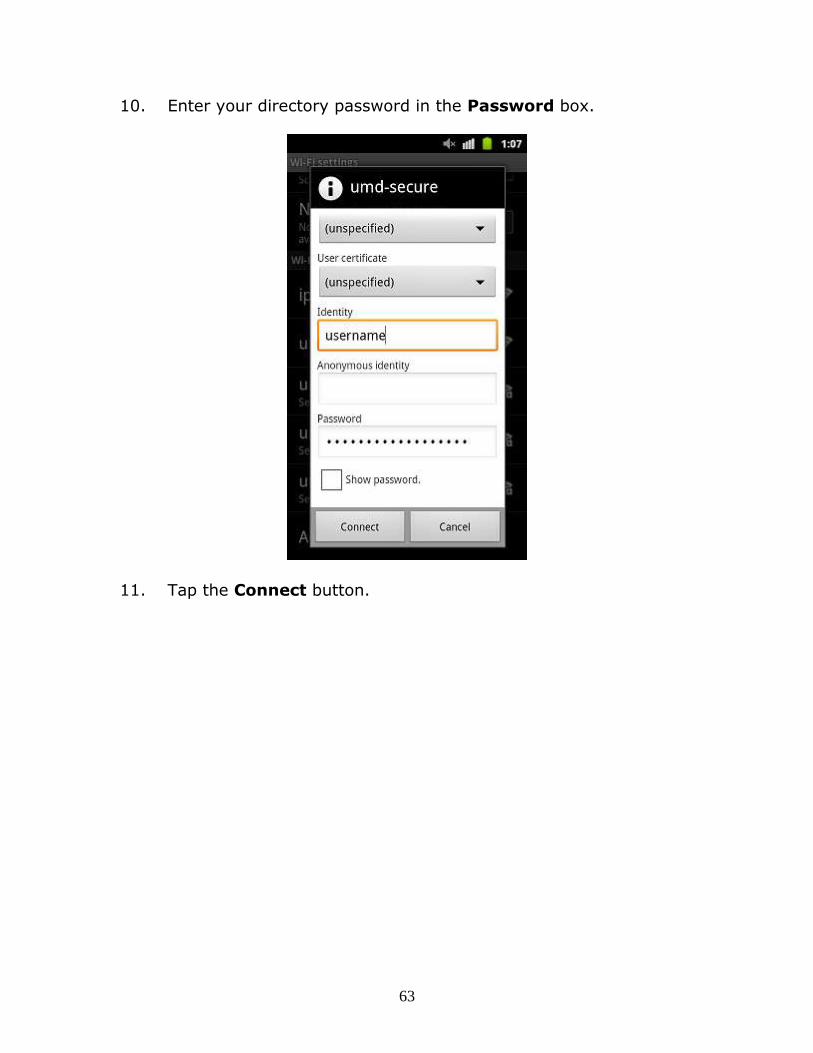
10. Enter your directory password in the Password box.
11. Tap the Connect button.
64
Appendix A: E-Mail, Passwords, and Acceptable Use
Part A: TERPmail
Using a web browser such as Microsoft Internet Explorer or
Google Chrome, visit http://terpmail.umd.edu/ and enter your
Directory ID and password to access your TERPmail account via the web.
Part B: Third-Party E-Mail Applications
If you wish to use third-party software such as Microsoft Outlook or
Mozilla Thunderbird to access your e-mail, you will need to enter
the following mail server information into your e-mail client:
Incoming (IMAP) Server: imap.googlemail.com
Outgoing (SMTP) Server: smtp.googlemail.com
The TERPmail incoming and outgoing e-mail servers require Secure Socket Layer (SSL) connections. Most popular e-mail clients will allow
you to connect to both incoming and outgoing servers in this manner, lessening the risk of malicious users stealing your account information.
For more information on enabling SSL connections, please refer to you e-mail client’s help files or to the e-mail client configuration pages
listed at the IT Service Center by going to itsc.umd.edu and using the search phrase “How to Configure TERPmail”.
Note: Resident Life Information Technology does not
support third-party software, and is only providing
this information as a service to those that prefer
third-party mail readers. For more information
regarding on-campus mail servers, please contact
the Division of Information Technology (Div-IT)
Computer Help Desk at x5-1500.
65
Part C: Directory Password Information
The Division of Information Technology (Div-IT) requires strong
passwords in order to protect any information linked with your Directory ID. For more information on strong passwords, and how to
select one, please visit the link below.
http://www.helpdesk.umd.edu/videos/passwords/
Note: Resident Life Information Technology does not
administer the Directory ID system, and can not
provide help with lost passwords. For more
information regarding the Directory ID system,
please contact the Division of Information
Technology (Div-IT) Computer Help Desk at x5-
1500.
Part D: Acceptable Use Policy
The University of Maryland Policy on Acceptable Use of Information Technology Resources can be found at
http://www.nethics.umd.edu/aup/.
Note: by registering your residence hall data jack
you agree to abide by these policies.